Pioneer T104 Digital wireless speaker transmitter User Manual En XW HT1
Pioneer Corporation Digital wireless speaker transmitter En XW HT1
Pioneer >
Users Manual
Operating Instructions
Mode d'emploi
Di
g
ital Wireless S
p
eaker S
y
ste
m
Enceinte sans fil pour
transmission numérique
XW-HT1
Register your product at
www.pioneerelectronics.com
• Protect your new investment
The details of your purchase will be on file for reference in the event of an
insurance claim such as loss or theft.
• Improve product development
Your input helps us continue to design products that meet your needs.
• Receive a free Pioneer newsletter
Registered customers can opt in to receive a monthly newsletter.
• Receive free tips, updates and service bulletins on
your new product
En_XW-HT1.book 1 ページ 2004年6月21日 月曜日 午前10時49分
The exclamation point within an equilateral
triangle is intended to alert the user to the
presence of important operating and
maintenance (servicing) instructions in the
literature accompanying the appliance.
The lightning flash with arrowhead, within
an equilateral triangle, is intended to alert
the user to the presence of uninsulated
"dangerous voltage" within the product's
enclosure that may be of sufficient
magnitude to constitute a risk of electric
shock to persons.
CAUTION:
TO PREVENT THE RISK OF ELECTRIC
SHOCK, DO NOT REMOVE COVER (OR
BACK). NO USER-SERVICEABLE PARTS
INSIDE. REFER SERVICING TO QUALIFIED
SERVICE PERSONNEL.
CAUTION
RISK OF ELECTRIC SHOCK
DO NOT OPEN
D1-4-2-3_En
IMPORTANT NOTICE – THE SERIAL NUMBER FOR THIS EQUIPMENT IS LOCATED IN THE REAR.
PLEASE WRITE THIS SERIAL NUMBER ON YOUR ENCLOSED WARRANTY CARD AND
KEEP IN A SECURE AREA. THIS IS FOR YOUR SECURITY. D1-4-2-6-1_En
This Class B digital apparatus complies with Canadian ICES-003.
Cet appareil numérique de la Classe B est conforme à la norme NMB-003 du Canada.
D8-10-1-3_EF
NOTE: This equipment has been tested and found to comply with the limits for a Class B digital device, pursuant to
Part 15 of the FCC Rules. These limits are designed to provide reasonable protection against harmful interference in
a residential installation. This equipment generates, uses, and can radiate radio frequency energy and, if not
installed and used in accordance with the instructions, may cause harmful interference to radio communications.
However, there is no guarantee that interference will not occur in a particular installation. If this equipment does
cause harmful interference to radio or television reception, which can be determined by turning the equipment off
and on, the user is encouraged to try to correct the interference by one or more of the following measures:
– Reorient or relocate the receiving antenna.
– Increase the separation between the equipment and receiver.
– Connect the equipment into an outlet on a circuit different from that to which the receiver is connected.
– Consult the dealer or an experienced radio/TV technician for help.
D8-10-1-2_En
Information to User
Alteration or modifications carried out without appropriate authorization may invalidate the user’s right to operate
the equipment.
D8-10-2_En
CAUTION: This product satisfies FCC regulations when shielded cables and connectors are used to connect the
unit to other equipment. To prevent electromagnetic interference with electric appliances such as radios and
televisions, use shielded cables and connectors for connections.
D8-10-3a_En
WARNING: Handling the cord on this product or
cords associated with accessories sold with the
product will expose you to lead, a chemical known to
the State of California and other governmental
entities to cause cancer and birth defects or other
reproductive harm.
Wash hands after handling. D36-P4_En
Thank you for buying this Pioneer product.
Please read through these operating
instructions so you will know how to
operate your model properly. After you have
finished reading the instructions, put them
away in a safe place for future reference.
CAUTION – TO PREVENT ELECTRIC SHOCK DO
NOT USE THIS (POLARIZED) PLUG
WITH AN EXTENSION CORD.
RECEPTACLE OR OTHER OUTLET
UNLESS THE BLADES CAN BE
FULLY INSERTED TO PREVENT
BLADE EXPOSURE.
ATTENTION –
POUR PREVENIR LES CHOCS
ELECTRIQUES, NE PAS UTILISER
CETTE FICHE POLARISEE AVEC UN
PROLONGATEUR, UNE PRISE DE
COURANT, OU UNE AUTRE SORTIE
DE COURANT, SAUF SI LES LAMES
PEUVENT ETRE INSEREES A FOND
SANS EN LAISSER AUCUNE PARTIE
A DECOUVERT.
D2-4-4-1_EF
WARNING:
This equipment is not waterproof. To
prevent a fire or shock hazard, do not place any
container filed with liquid near this equipment (such
as a vase or flower pot) or expose it to dripping,
splashing, rain or moisture.
D3-4-2-1-3_A_En
En_XW-HT1.book 2 ページ 2004年6月21日 月曜日 午前10時49分
READ INSTRUCTIONS — All the safety and
operating instructions should be read before the
product is operated.
RETAIN INSTRUCTIONS — The safety and
operating instructions should be retained for
future reference.
HEED WARNINGS — All warnings on the product
and in the operating instructions should be
adhered to.
FOLLOW INSTRUCTIONS — All operating and use
instructions should be followed.
CLEANING — The product should be cleaned only
with a polishing cloth or a soft dry cloth. Never
clean with furniture wax, benzine, insecticides
or other volatile liquids since they may corrode
the cabinet.
ATTACHMENTS — Do not use attachments not
recommended by the product manufacturer as
they may cause hazards.
WATER AND MOISTURE — Do not use this
product near water — for example, near a
bathtub, wash bowl, kitchen sink, or laundry
tub; in a wet basement; or near a swimming
pool; and the like.
ACCESSORIES — Do not place this product on an
unstable cart, stand, tripod, bracket, or table.
The product may fall, causing serious injury to a
child or adult, and serious damage to the
product. Use only with a cart, stand, tripod,
bracket, or table recommended by the
manufacturer, or sold with the product. Any
mounting of the product should follow the
manufacturer’s instructions, and should use a
mounting accessory recommended by the
manufacturer.
CART — A product and cart combination should be
moved with care. Quick stops, excessive force,
and uneven surfaces may cause the product
and cart combination to overturn.
VENTILATION — Slots and openings in the cabinet
are provided for ventilation and to ensure
reliable operation of the product and to protect
it from overheating, and these openings must
not be blocked or covered. The openings should
never be blocked by placing the product on a
bed, sofa, rug, or other similar surface. This
product should not be placed in a built-in
installation such as a bookcase or rack unless
proper ventilation is provided or the
manufacturer’s instructions have been adhered
to.
POWER SOURCES — This product should be
operated only from the type of power source
indicated on the marking label. If you are not
sure of the type of power supply to your home,
consult your product dealer or local power
company.
LOCATION – The appliance should be installed in a
stable location.
NONUSE PERIODS – The power cord of the
appliance should be unplugged from the outlet
when left un-used for a long period of time.
GROUNDING OR POLARIZATION
• If this product is equipped with a polarized
alternating current line plug (a plug having one
blade wider than the other), it will fit into the
outlet only one way. This is a safety feature. If
you are unable to insert the plug fully into the
outlet, try reversing the plug. If the plug should
still fail to fit, contact your electrician to replace
your obsolete outlet. Do not defeat the safety
purpose of the polarized plug.
• If this product is equipped with a three-wire
grounding type plug, a plug having a third
(grounding) pin, it will only fit into a grounding
type power outlet. This is a safety feature. If you
are unable to insert the plug into the outlet,
contact your electrician to replace your obsolete
outlet. Do not defeat the safety purpose of the
grounding type plug.
POWER-CORD PROTECTION — Power-supply
cords should be routed so that they are not likely
to be walked on or pinched by items placed
upon or against them, paying particular
attention to cords at plugs, convenience
receptacles, and the point where they exit from
the product.
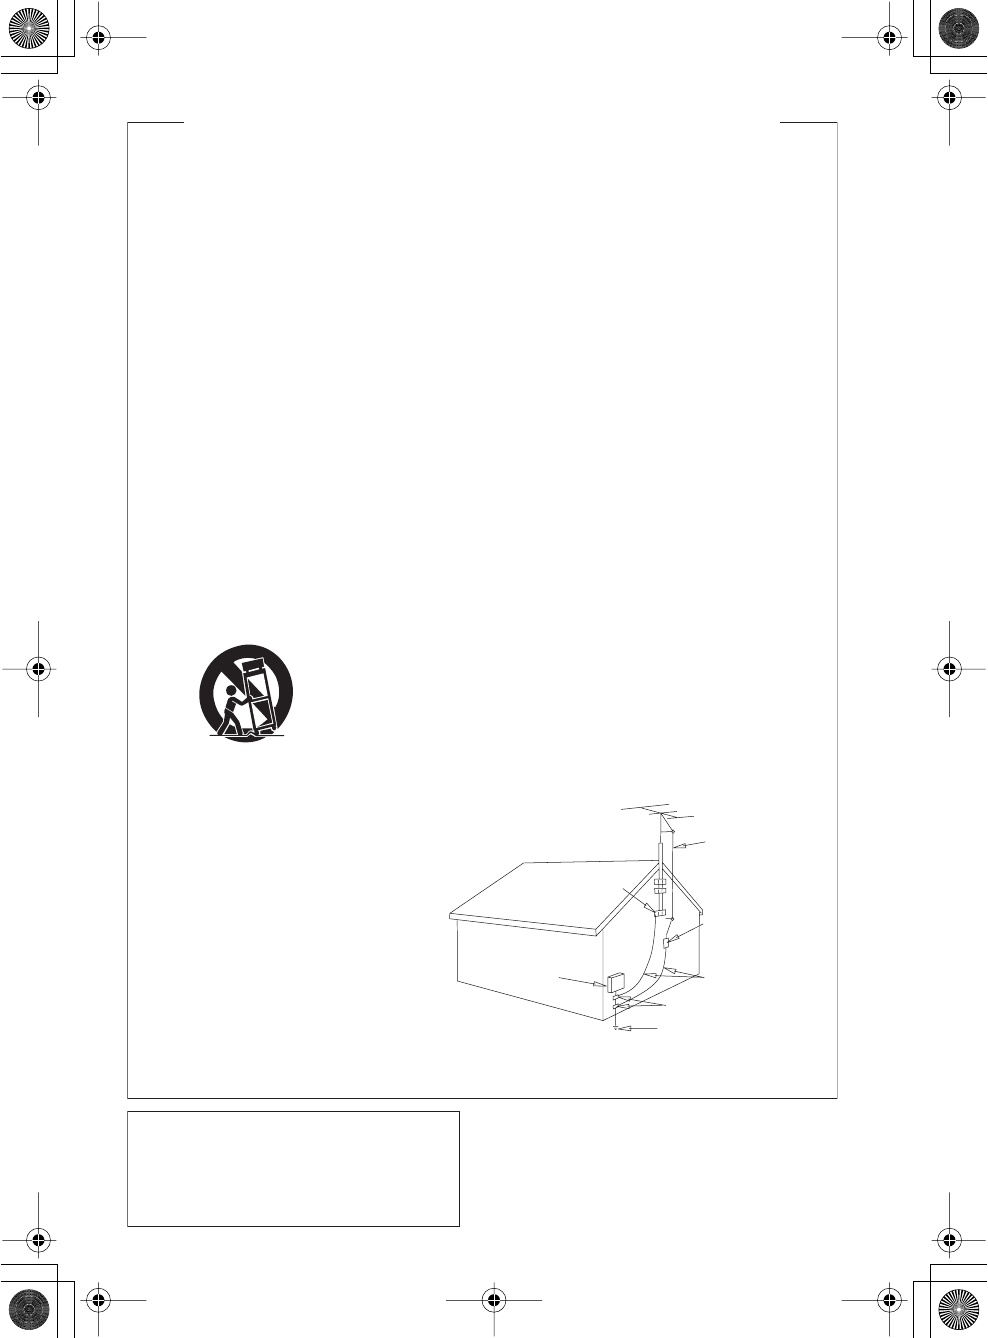
OUTDOOR ANTENNA GROUNDING — If an
outside antenna or cable system is connected to
the product, be sure the antenna or cable
system is grounded so as to provide some
protection against voltage surges and built-up
static charges. Article 810 of the National
Electrical Code, ANSI/NFPA 70, provides
information with regard to proper grounding of
the mast and supporting structure, grounding of
the lead-in wire to an antenna discharge unit,
size of grounding conductors, location of
antenna-discharge unit, connection to
grounding electrodes, and requirements for the
grounding electrode. See Figure A.
LIGHTNING — For added protection for this
product during a lightning storm, or when it is
left unattended and unused for long periods of
time, unplug it from the wall outlet and
disconnect the antenna or cable system. This
will prevent damage to the product due to
lightning and power-line surges.
POWER LINES — An outside antenna system
should not be located in the vicinity of overhead
power lines or other electric light or power
circuits, or where it can fall into such power
lines or circuits. When installing an outside
antenna system, extreme care should be taken
to keep from touching such power lines or
circuits as contact with them might be fatal.
OVERLOADING — Do not overload wall outlets,
extension cords, or integral convenience
receptacles as this can result in a risk of fire or
electric shock.
OBJECT AND LIQUID ENTRY — Never push
objects of any kind into this product through
openings as they may touch dangerous voltage
points or short-out parts that could result in a
fire or electric shock. Never spill liquid of any
kind on the product.
SERVICING — Do not attempt to service this
product yourself as opening or removing covers
may expose you to dangerous voltage or other
hazards. Refer all servicing to qualified service
personnel.
DAMAGE REQUIRING SERVICE — Unplug this
product from the wall outlet and refer servicing
to qualified service personnel under the
following conditions:
• When the power-supply cord or plug is
damaged.
• If liquid has been spilled, or objects have fallen
into the product.
• If the product has been exposed to rain or water.
• If the product does not operate normally by
following the operating instructions. Adjust only
those controls that are covered by the operating
instructions as an improper adjustment of other
controls may result in damage and will often
require extensive work by a qualified technician
to restore the product to its normal operation.
• If the product has been dropped or damaged in
any way.
• When the product exhibits a distinct change in
performance — this indicates a need for service.
REPLACEMENT PARTS — When replacement parts
are required, be sure the service technician has
used replacement parts specified by the
manufacturer or have the same characteristics
as the original part. Unauthorized substitutions
may result in fire, electric shock, or other
hazards.
SAFETY CHECK — Upon completion of any service
or repairs to this product, ask the service
technician to perform safety checks to
determine that the product is in proper
operating condition.
WALL OR CEILING MOUNTING — The product
should not be mounted to a wall or ceiling.
HEAT — The product should be situated away from
heat sources such as radiators, heat registers,
stoves, or other products (including amplifiers)
that produce heat.
GROUND
CLAMP
ELECTRIC
SERVICE
EQUIPMENT
ANTENNA
LEAD IN
WIRE
ANTENNA
DISCHARGE UNIT
(NEC SECTION 810-20)
GROUNDING CONDUCTORS
(NEC SECTION 810-21)
GROUND CLAMPS
POWER SERVICE GROUNDING
ELECTRODE SYSTEM
(NEC ART 250, PART H)
NEC — NATIONAL ELECTRICAL CODE
Fig. A
IMPORTANT SAFETY INSTRUCTIONS
D1-4-2-2_En
This product is for general household purposes. Any
failure due to use for other than household purposes
(such as long-term use for business purposes in a
restaurant or use in a car or ship) and which
requires repair will be charged for even during the
warranty period.
K041_En
En_XW-HT1.book 3 ページ 2004年6月21日 月曜日 午前10時49分

[For U.S. model]
Changes or modifications not expressly
approved by the manufacturer (party
responsible) for compliance could not void
the user's authority to operate the equipment.
[For Canadian model]
Operation is subject to the following two
conditions: (1) this device may not cause
interference, and (2) this device must accept
any interference, including interference that
may cause undesired operation of the device.
[Pour le modele Canadien]
L'utilisation de l'appareil est soumise aux
deux conditions suivantes: (1) il ne provoque
pas de brouillage, et (2) il peut supporter tous
les brouillages, y compris ceux qui sont en
mesure de provoquer une anomalie de
fonctionnement de l'appareil.
[For Canadian model]
To prevent radio interference to the licensed
service, this device is intended to be operated
indoors and away from windows to provide
maximum shielding. Equipment (or its
transmit antenna) that is installed outdoors is
subject to licensing.
[Pour le modèle Canadien]
Pour éviter le brouillage radioélectrique des
emetteurs ayant une licence, cet appareil doit
etre utilisé à l'intérieur des habitations et loin
des fenêtres de manière à assurer la
protection maximale. Un équipement (ou son
antenne d'emission) lorsqu'il est installé à
l'extérieur ne peut être utilisé qu'après
obtention d'une licence.
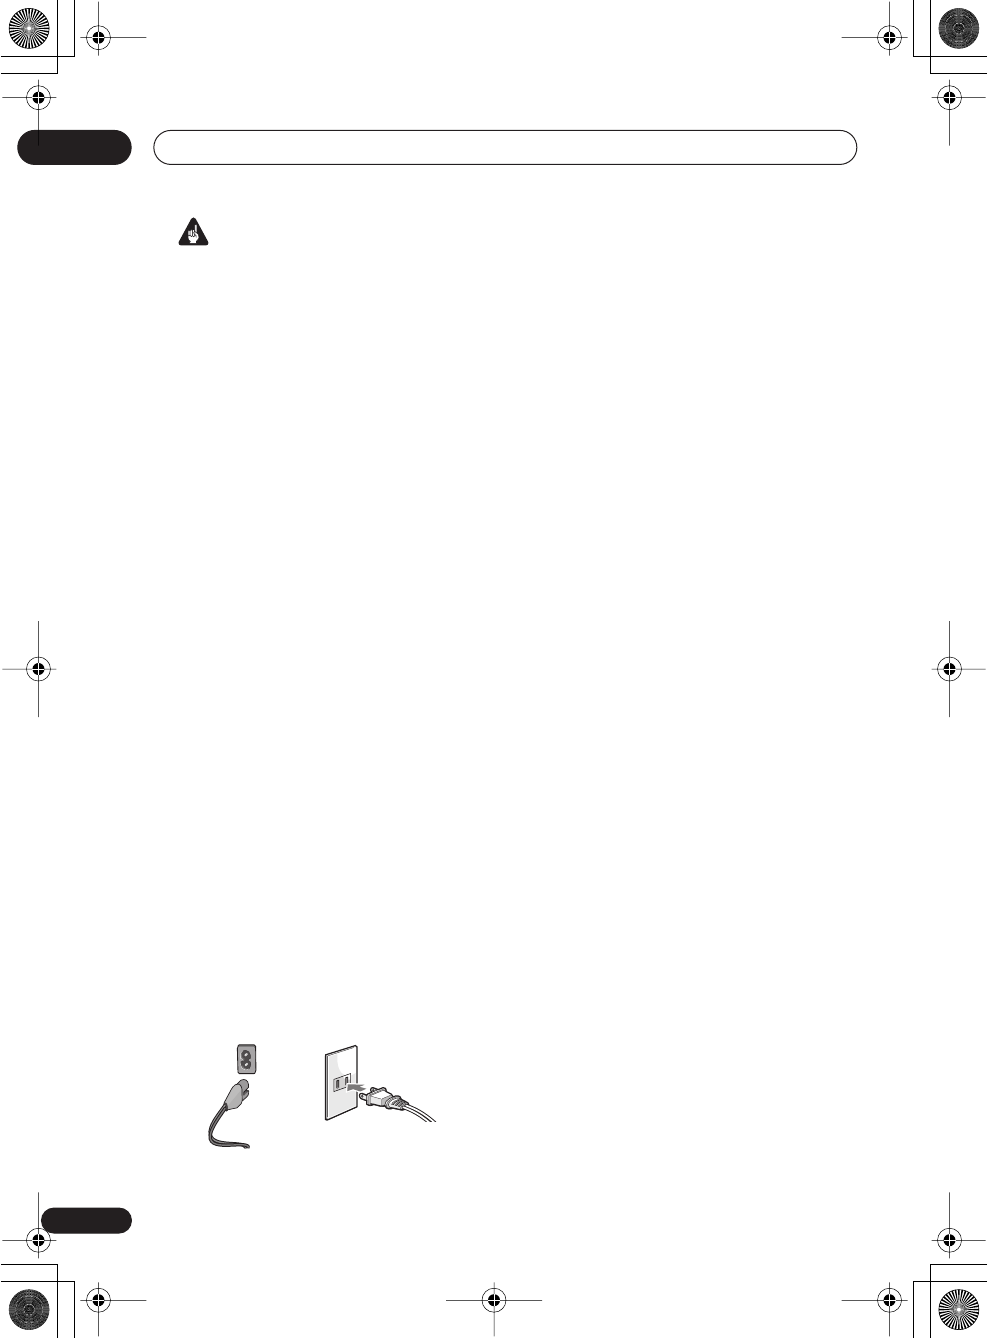
Power cord caution
Handle the power cord by the plug part. Do
not pull out the plug by tugging the cord, and
never touch the power cord when your hands
are wet, as this could cause a short circuit or
electric shock. Do not place the unit, a piece
of furniture, or other object on the power cord
or pinch the cord in any other way. Never
make a knot in the cord or tie it with other
cords. The power cord should be routed so
that they are not likely to be stepped on. A
damaged power cord can cause a fire or give
you an electric shock. Check the power cord
once in a while. If you find it damaged, ask
your nearest Pioneer authorized service
center or your dealer for a replacement.
For safety in operation
Do not use the system in the proximity of
electronic equipment that requires high-
accuracy control or handling of very low-level
signals.
• The system may affect the electronic
equipment, causing malfunction or
accident. Examples of such electronic
equipment:
Hearing aid, cardiac pacemaker, other
electrical medical equipment, fire alarm,
automatic door, and other automated
control equipment.
If you use a pacemaker or other electrical
medical equipment, consult the
manufacturer or dealer to check the
effects of radio waves on it.
Do not use the system in places where its use
is prohibited, for example near aircraft
equipment and in hospitals.
• The system may affect electronic
equipment or electrical medical
equipment, causing an accident. Follow
the instructions given by the aircraft
company or medical institution.
Note
• We do not assume any liability for the
damages incurred due to improper use of
the product by the user or third party,
malfunction during use, other troubles or
use of the product, unless indemnity for
damages is admitted by the law.
En_XW-HT1.book 4 ページ 2004年6月21日 月曜日 午前10時49分
S001_En
Selecting fine audio equipment such as the unit
you’ve just purchased is only the start of your
musical enjoyment. Now it’s time to consider how
you can maximize the fun and excitement your
equipment offers. This manufacturer and the
Electronic Industries Association’s Consumer
Electronics Group want you to get the most out of
your equipment by playing it at a safe level. One that
lets the sound come through loud and clear without
annoying blaring or distortion-and, most importantly,
without affecting your sensitive hearing.
Sound can be deceiving. Over time your hearing
“comfort level” adapts to higher volumes of sound.
So what sounds “normal” can actually be loud and
harmful to your hearing. Guard against this by
setting your equipment at a safe level BEFORE your
hearing adapts.
To establish a safe level:
• Start your volume control at a low setting.
• Slowly increase the sound until you can hear it
comfortably and clearly, and without distortion.
Once you have established a comfortable sound
level:
• Set the dial and leave it there.
Taking a minute to do this now will help to prevent
hearing damage or loss in the future. After all, we
want you listening for a lifetime.
We Want You Listening For A Lifetime
Used wisely, your new sound equipment will
provide a lifetime of fun and enjoyment. Since
hearing damage from loud noise is often
undetectable until it is too late, this manufacturer
and the Electronic Industries Association’s
Consumer Electronics Group recommend you avoid
prolonged exposure to excessive noise. This list of
sound levels is included for your protection.
Decibel
Level Example
30 Quiet library, soft whispers
40
Living room, refrigerator, bedroom away from traffic
50 Light traffic, normal conversation, quiet office
60 Air conditioner at 20 feet, sewing machine
70 Vacuum cleaner, hair dryer, noisy restaurant
80
Average city traffic, garbage disposals, alarm clock
at two feet.
THE FOLLOWING NOISES CAN BE DANGEROUS
UNDER CONSTANT EXPOSURE
90
Subway, motorcycle, truck traffic, lawn mower
100 Garbage truck, chain saw, pneumatic drill
120 Rock band concert in front of speakers,
thunderclap
140 Gunshot blast, jet plane
180 Rocket launching pad
Information courtesy of the Deafness Research Foundation.
En_XW-HT1.book 5 ページ 2004年6月21日 月曜日 午前10時49分
6
En
Contents
Contents . . . . . . . . . . . . . . . . . . . . . 6
Checking the supplied accessories . . . . . . . 6
Before you start . . . . . . . . . . . . . . . 7
Features . . . . . . . . . . . . . . . . . . . . . . . . . . . . . 7
Using the remote control . . . . . . . . . . . . . . . 8
Controls and displays. . . . . . . . . . . 9
Transmitter . . . . . . . . . . . . . . . . . . . . . . . . . . . 9
Wireless speaker . . . . . . . . . . . . . . . . . . . . . 11
Remote control . . . . . . . . . . . . . . . . . . . . . . 12
Connecting up . . . . . . . . . . . . . . . 13
Connecting a DVD player . . . . . . . . . . . . . . 13
Connecting a TV or mini component
system. . . . . . . . . . . . . . . . . . . . . . . . . . . . . . 15
Listening in surround sound . . . . 17
Using the surround modes . . . . . . . . . . . . . 17
Placing the wireless speaker system . . . . . 20
Additional information . . . . . . . . 21
Troubleshooting . . . . . . . . . . . . . . . . . . . . . . 21
Taking care of the unit. . . . . . . . . . . . . . . . . 22
Radio wave reflections . . . . . . . . . . . . . . . . 23
Scope of operation. . . . . . . . . . . . . . . . . . . . 24
Specifications. . . . . . . . . . . . . . . . . . . . . . . . 24
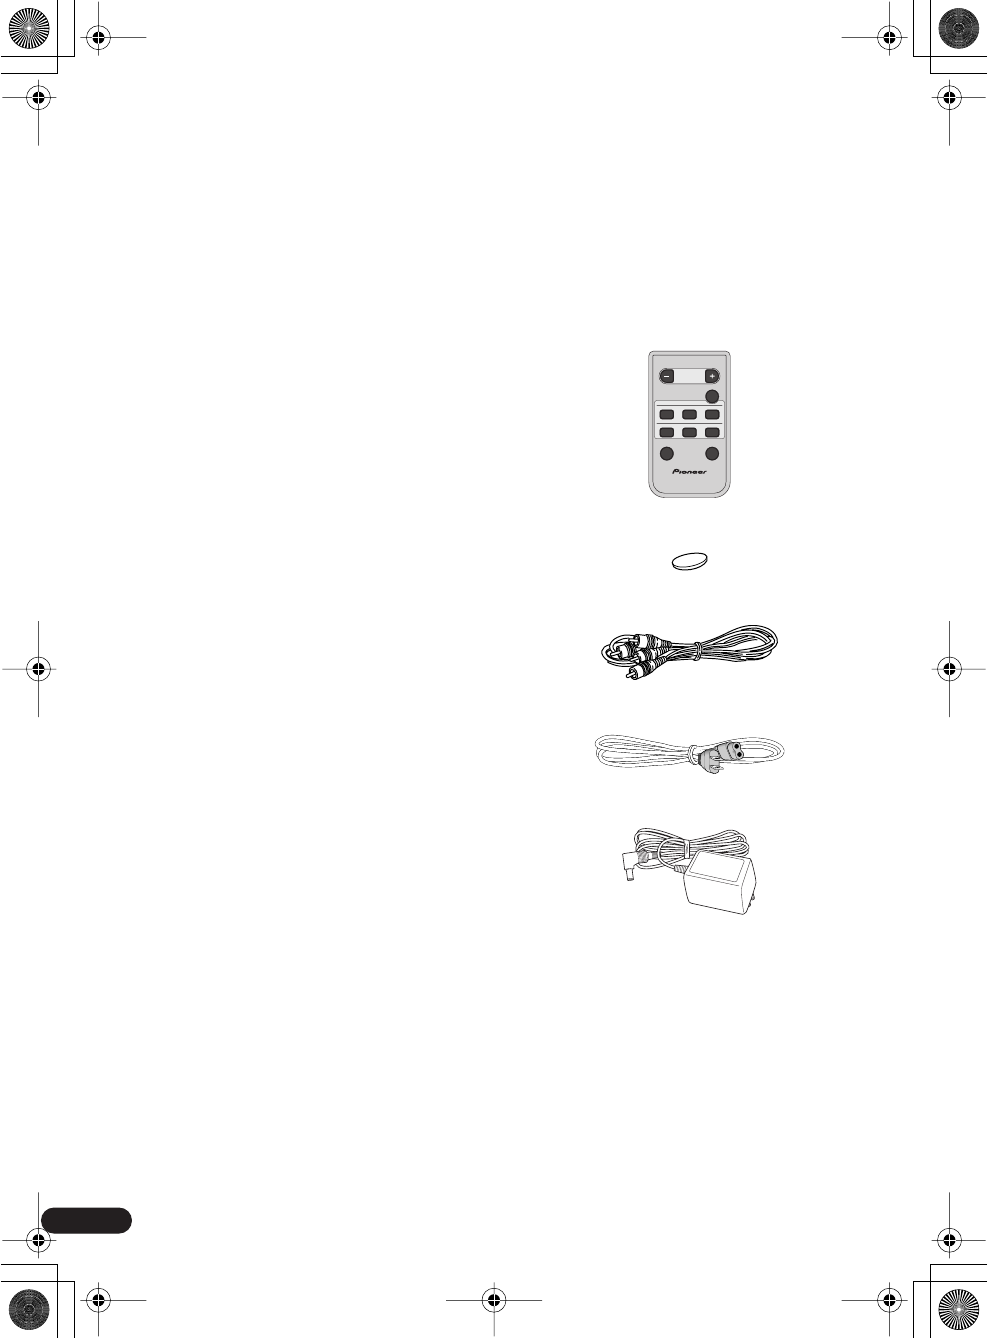
Checking the supplied
accessories
Please check that you've received the
following supplied accessories:
• Remote control unit
• Lithium battery (CR2025)
• RCA/phono stereo audio cable
• Power cord
• AC adapter
• These operating instructions
• Radio wave caution sheet
• Warranty card
CSCINEMA CSMUSIC W.STEREO
W.STEREO
TV
MUSICCINEMA
VOLUME
SURROUND MODE
MUTE
DVD
INPUT ATTWIRELESS OFF
En_XW-HT1.book 6 ページ 2004年6月21日 月曜日 午前10時49分
Before you start 01
7
En
English
Chapter 1
Before you start
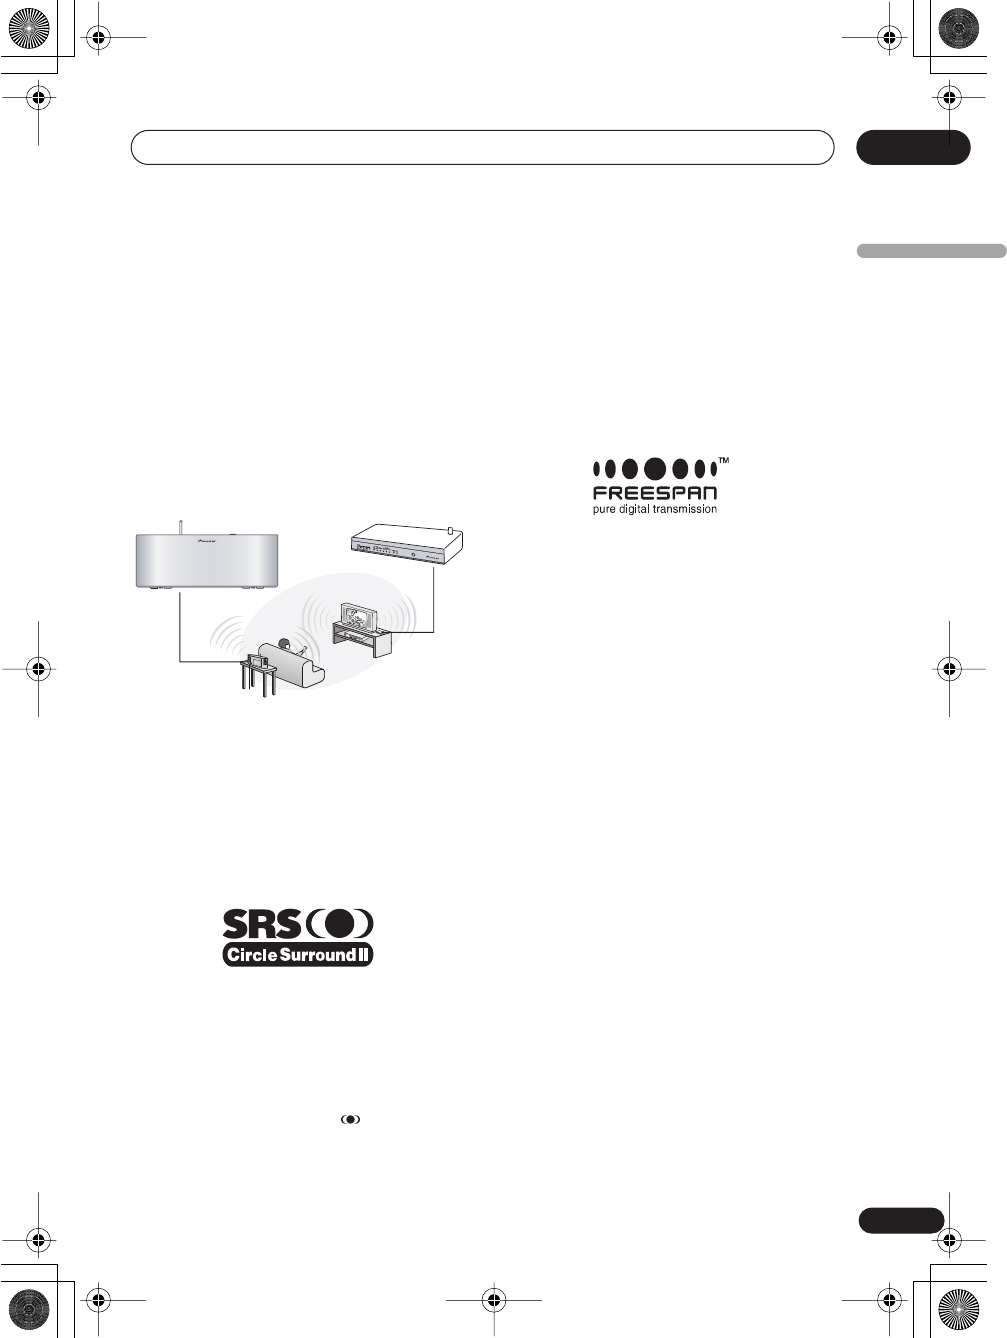
Features
• Realistic surround sound using only
this unit and your TV
You can achieve realistic surround sound by
using your TV for front sound along with this
wireless speaker behind the listening position
for a true surround experience.
•SRS Labs patented SRS Circle Surround
II technology
This system uses SRS Labs’ patented SRS
Circle Surround II technology, capable of
providing 5.1 channels of high quality
surround sound from all content (excluding
DVDs) including mono, typical stereo sources
(such as MP3 files), and other matrix
surround-encoded material.
Other benefits include the SRS Dialog Clarity
feature, which allows the listener to easily
discern actors' dialog from the rest of the
soundtrack and TruBass technology, which
creates the sensation of rich, cinema-like
bass from the front channels.
Circle Surround II, SRS and symbol are
trademarks of SRS Labs, Inc.
Circle Surround II technology is incorporated
under license from SRS Labs, Inc.
• 2.4GHz wireless high-quality
uncompressed audio delivery
You can enjoy CD quality sound from this
system thanks to the incorporation of
Freespan digital technology for pure,
uncompressed audio delivery.
•Three surround sound listening modes
For each input source (
DVD
or
TV
), you can
select one of three surround listening modes
for a truly versatile home theater system,
flexible enough to deal with all types
of
material; movies, live broadcasts and music.
•Easy connection and setup with other
components in your system
Using the TV input on this system, you can
connect stereo components easily for
realistic surround sound from the wireless
speaker. Using a TV is one possibility, but
mini-component systems can also be
connected to create a concert hall or movie
theater experience when using the wireless
speaker.
As well, a subwoofer jack is provided with this
system to complete your home theater sound
setup. Deep and rich bass tones will give true
dimension to the sound, allowing you to
experience the feeling of 5.1 channel listening
from your speaker system.
Wireless s
p
eake
r
Tr
a
n
s
mi
tter
En_XW-HT1.book 7 ページ 2004年6月21日 月曜日 午前10時49分
Before you start
01
8
En
Using the remote control
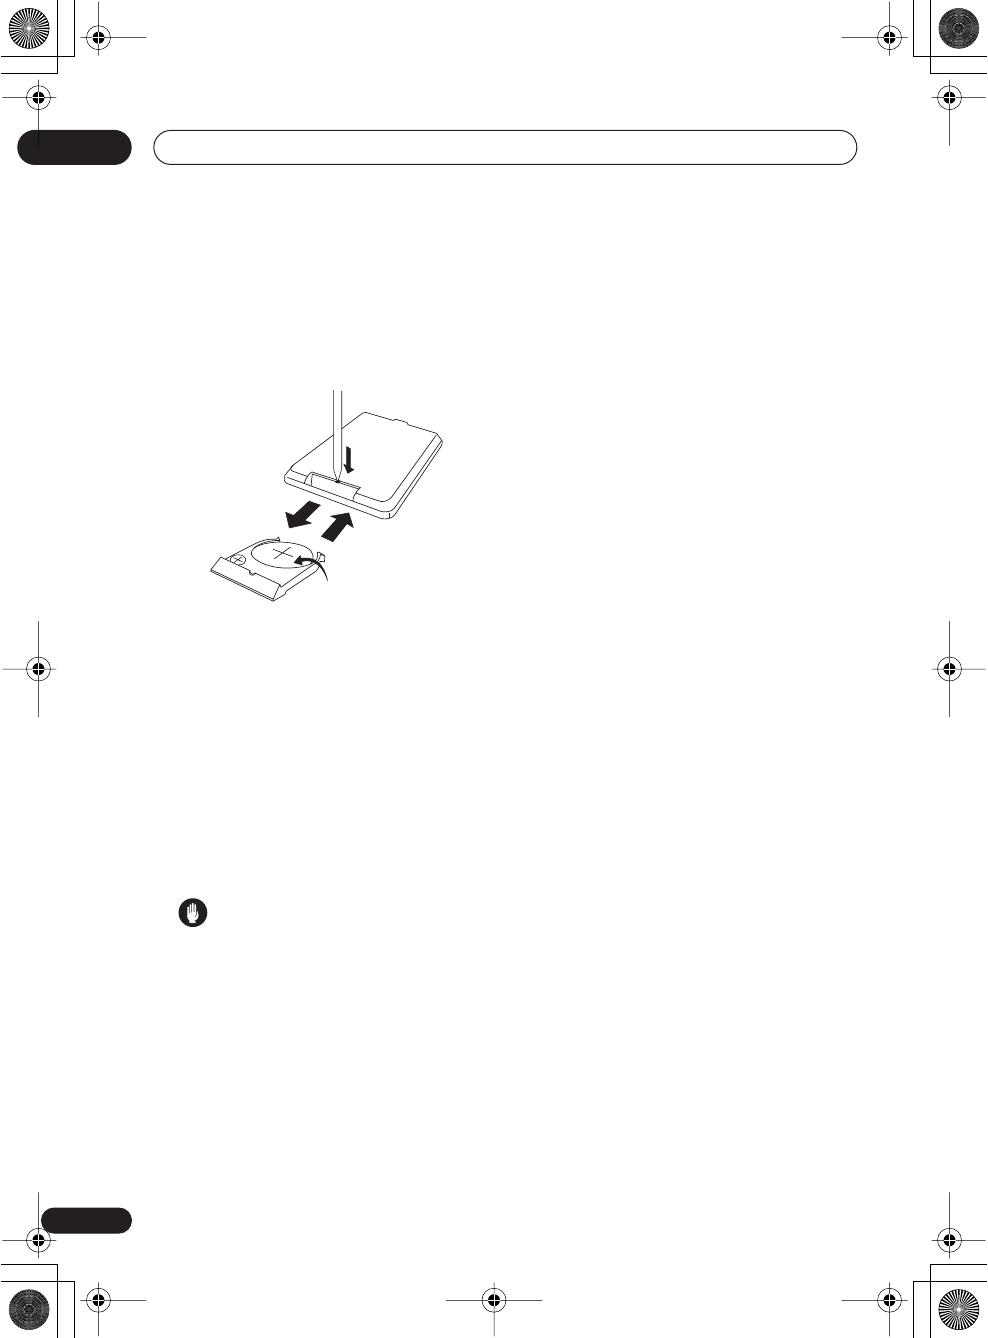
Inserting the battery
Insert the lithium battery (CR2025) into the
remote control as shown below. When you
notice a decrease in the operating range,
replace the battery in the same manner.
1 Insert a screwdriver (or other sharp
object) where shown to loosen the
battery casing.
2 Pull out the battery casing.
3 Place the battery in the casing.
Make sure the
side of the battery is facing
up when you place it in the space provided.
4 Push the battery casing back into
place.
Make sure the battery casing is inserted
properly before pushing it in.
Caution
When using lithium batteries, please
observe the following:
• Danger of explosion if the battery is
incorrectly replaced. Replaced only with
the same or equivalent type
recommended by the manufacturer.
•Dispose of used battery cells immediately
after replacement. Keep away from
children.
• If swallowed, please contact a doctor
immediately.
• Lithium batteries may present a fire or
chemical burn hazard if misused. Do not
disassemble, heat above 100˚C (212˚F),
or incinerate.
•Make sure that the plus and minus end of
the battery match the indications in the
battery compartment.
• Remove the battery if the unit isn’t going
to be used for a month or more.
•When disposing of used batteries, please
comply with governmental regulations or
environmental public instruction’s rules
that apply in your country or area.
1
2
4
3
En_XW-HT1.book 8 ページ 2004年6月21日 月曜日 午前10時49分
Controls and displays 02
9
En
English
Chapter 2
Controls and displays
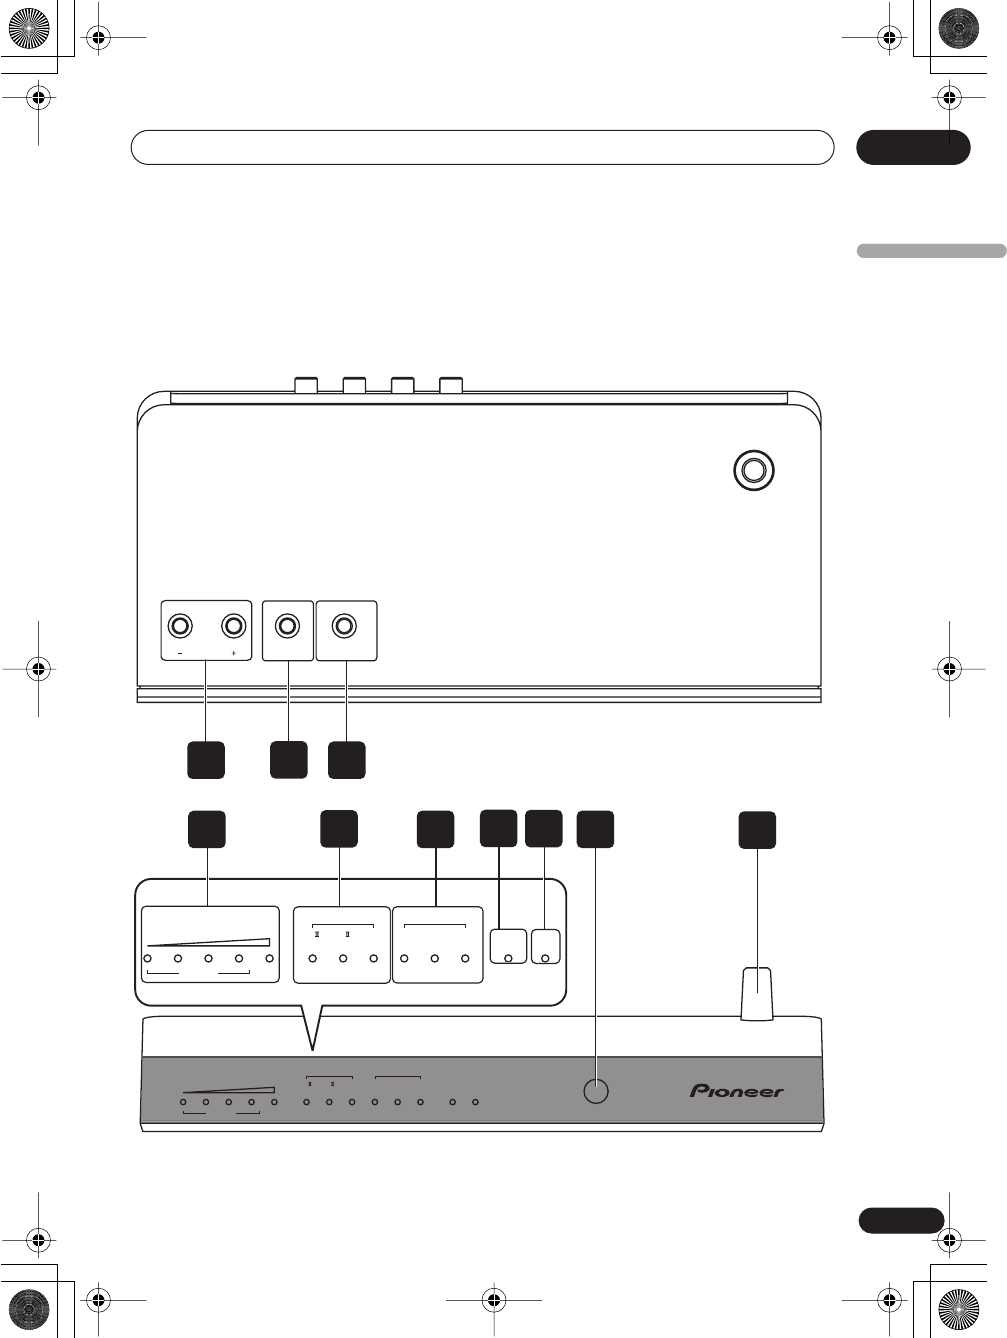
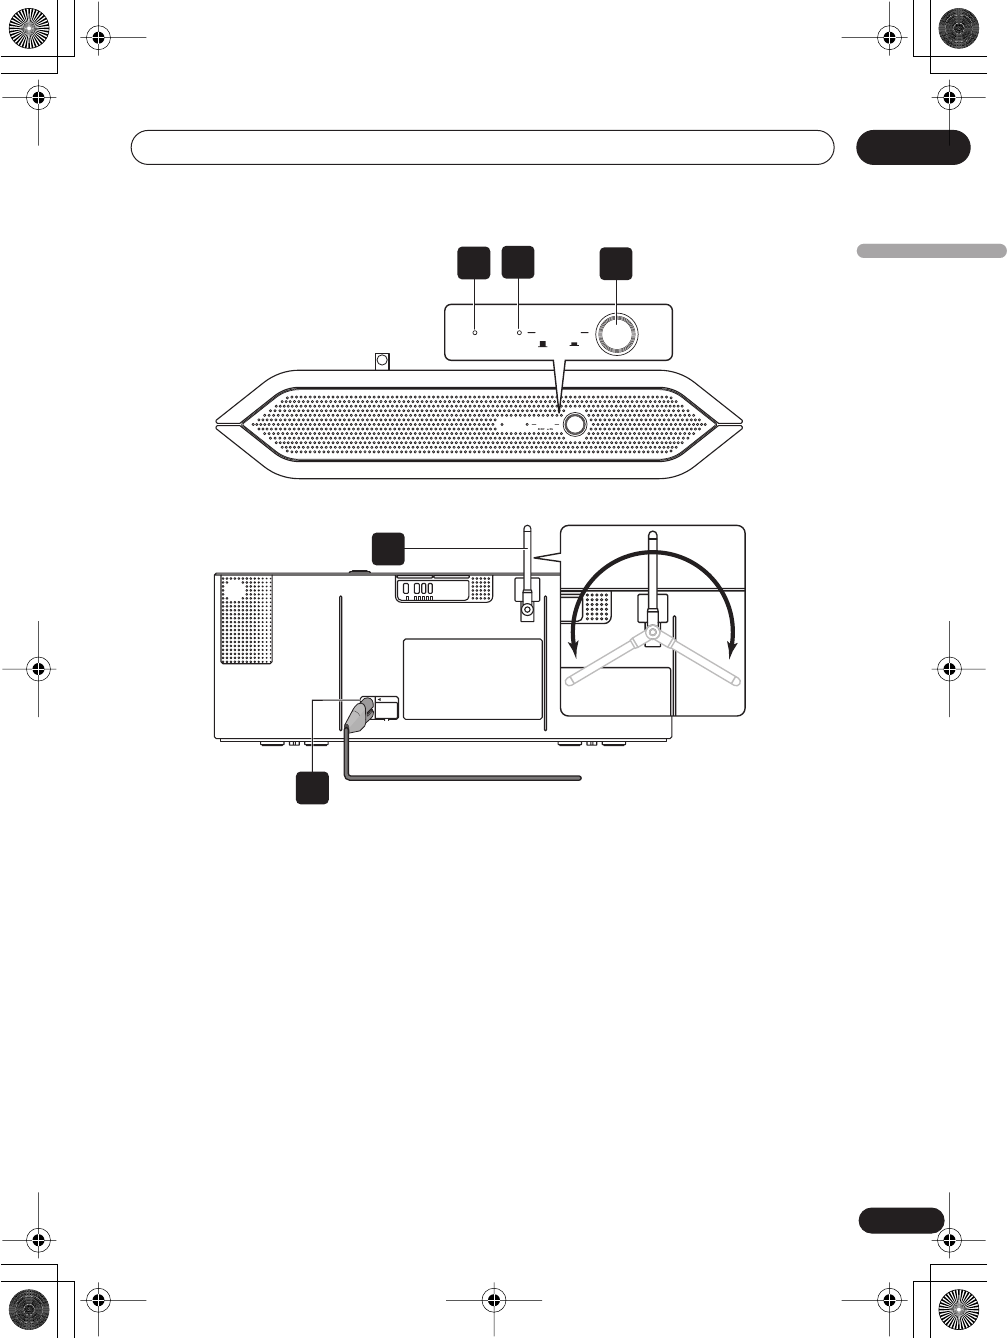
Transmitter
VOLUME CHANNEL SURROUND MODE
123
VOLUME
DVD
CS
CINEMA MUSIC
CINEMA MUSIC
W.S TEREO W.STEREO
WIRELESS
OFF
ATT/
MUTE
CHANNEL
1234
TV
CS
VOLUME
DVD
CS
CINEMA MUSIC
CINEMA MUSIC
W.STEREO W.STEREO
WIRELESS
OFF
ATT/
MUTE
CHANNEL
1234
TV
CS
9
10
78
6
5
4
En_XW-HT1.book 9 ページ 2004年6月21日 月曜日 午前10時49分

Controls and displays
02
10
En
1 VOLUME +/–
Press to adjust the volume of the wireless
speaker (and subwoofer, if connected).
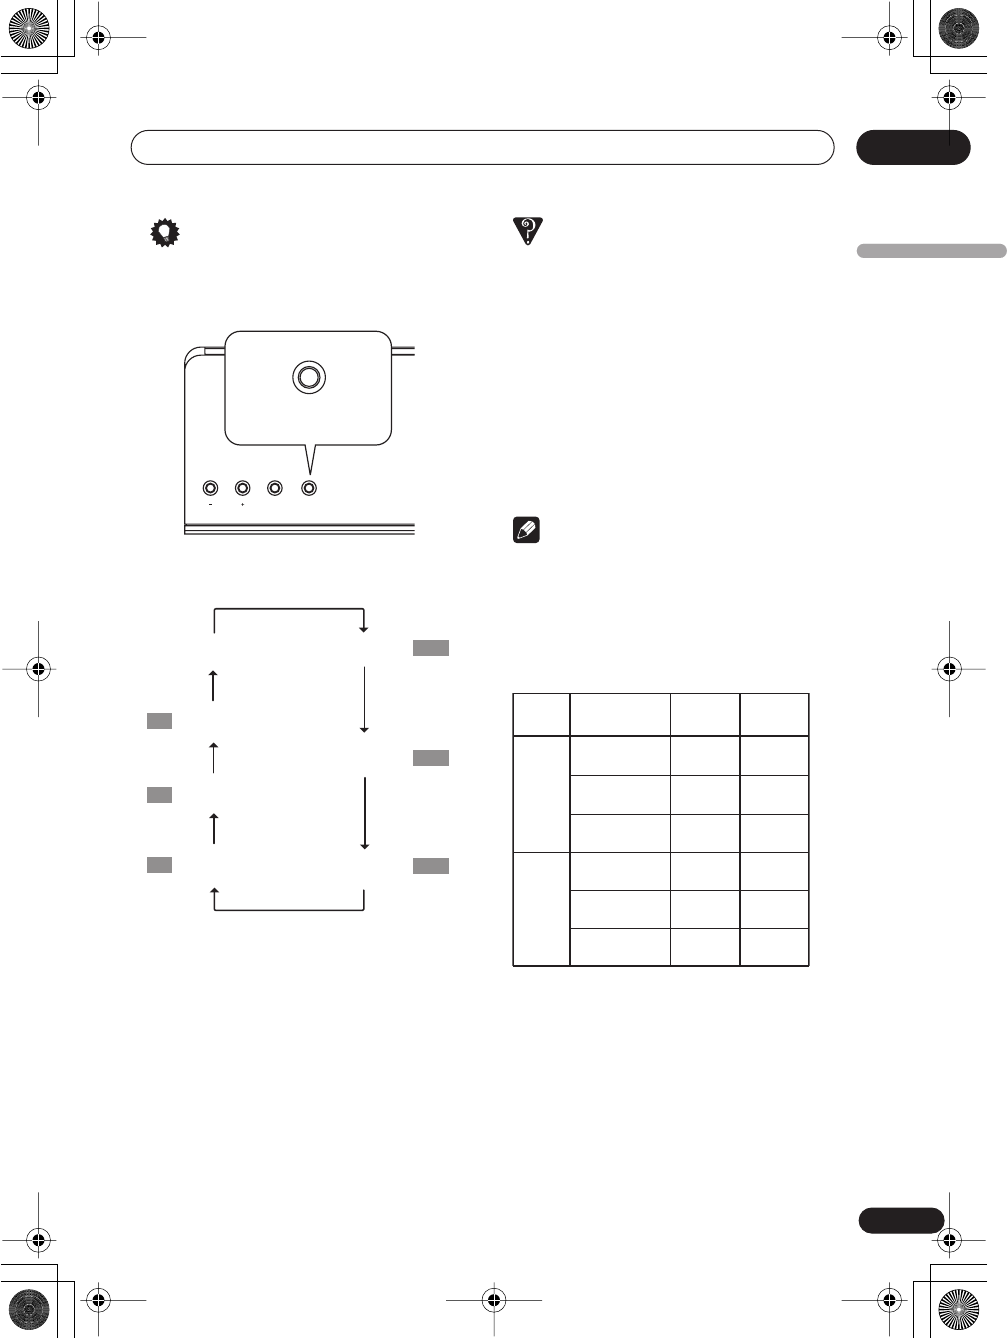
2 CHANNEL
In case of poor reception due to interference
from other electrical devices, you can improve
reception by selecting another channel. Each
time you press the button, the channel
changes sequentially:
Note
•Poor reception may cause the audio to be
interrupted or stopped. This is not a
malfunction. Try changing the location or
orientation of the transmitter and/or the
wireless speaker to improve reception.
• See also
Placing the wireless speaker
system
on page 20,
Radio wave reflections
on page 23 and
Scope of operation
on
page 24 for more on reception
troubleshooting.
3 SURROUND MODE
Press to switch the surround mode. See the
tip on page 19.
Note
• Since the surround modes work in
conjunction with the corresponding input
(
DVD
or
TV
), make sure the mode you’ve
selected corresponds with the input
source.
4VOLUME / CHANNEL indicators
Shows the volume level of the wireless
speaker (does not light when
WIRELESS
OFF
is selected). Also, after selecting a
channel, the corresponding channel
indicator blinks briefly.
Note
• The decibel level for each LED in the
volume indicator is shown below.
5 DVD input mode indicators
Light to indicate the surround mode set for
the DVD input (
CS II CINEMA
,
CS II MUSIC
or
W.STEREO
). See
DVD input surround
modes
on page 17.
6 TV input mode indicators
Light to indicate the surround mode set for
the TV input (
CINEMA
,
MUSIC
or
W.STEREO
). See
TV input surround modes
on
page 18.
7 WIRELESS OFF indicator
Lights when sound from the wireless speaker
is switched off.
8 ATT/MUTE indicator
Lights when output to the wireless speaker is
being attenuated. Blinks when output is
muted.
9 Remote sensor
Receives the signals from the remote control.
• Make sure that there are no obstacles
between the remote and the remote
sensor on the unit.
•The remote has a range of about 7 meters,
within 30º of the remote sensor.
•Remote operation may become unreliable
if strong sunlight or fluorescent light is
shining on the unit's remote sensor.
10 Transmitter antenna
Transmits signals to the wireless speaker.
CH 2 CH 3 CH 4
CH 1
VOLUME
(1–10) (11–20) (21–30) (31–40) (41–50)
En_XW-HT1.book 10 ページ 2004年6月21日 月曜日 午前10時49分
Controls and displays 02
11
En
English
Wireless speaker
1 TUNED indicator
Lights when the signal from the transmitter is
properly received.
2 POWER indicator
Lights when the wireless speaker is switched
on.
3 POWER
Press to switch the unit on or off.
4 AC IN cord inlet
5 Wireless speaker antenna
Receives signals from the transmitter.
• Note that if you choose to adjust the
antenna, turning it too far to the left or
right (shown above) may damage the unit.
POWER
OFF ON
TUNED
POWER
OFF ON
TUNED
123
AC IN
150°150°
Adjustable antenna
4
5
En_XW-HT1.book 11 ページ 2004年6月21日 月曜日 午前10時49分
Controls and displays
02
12
En
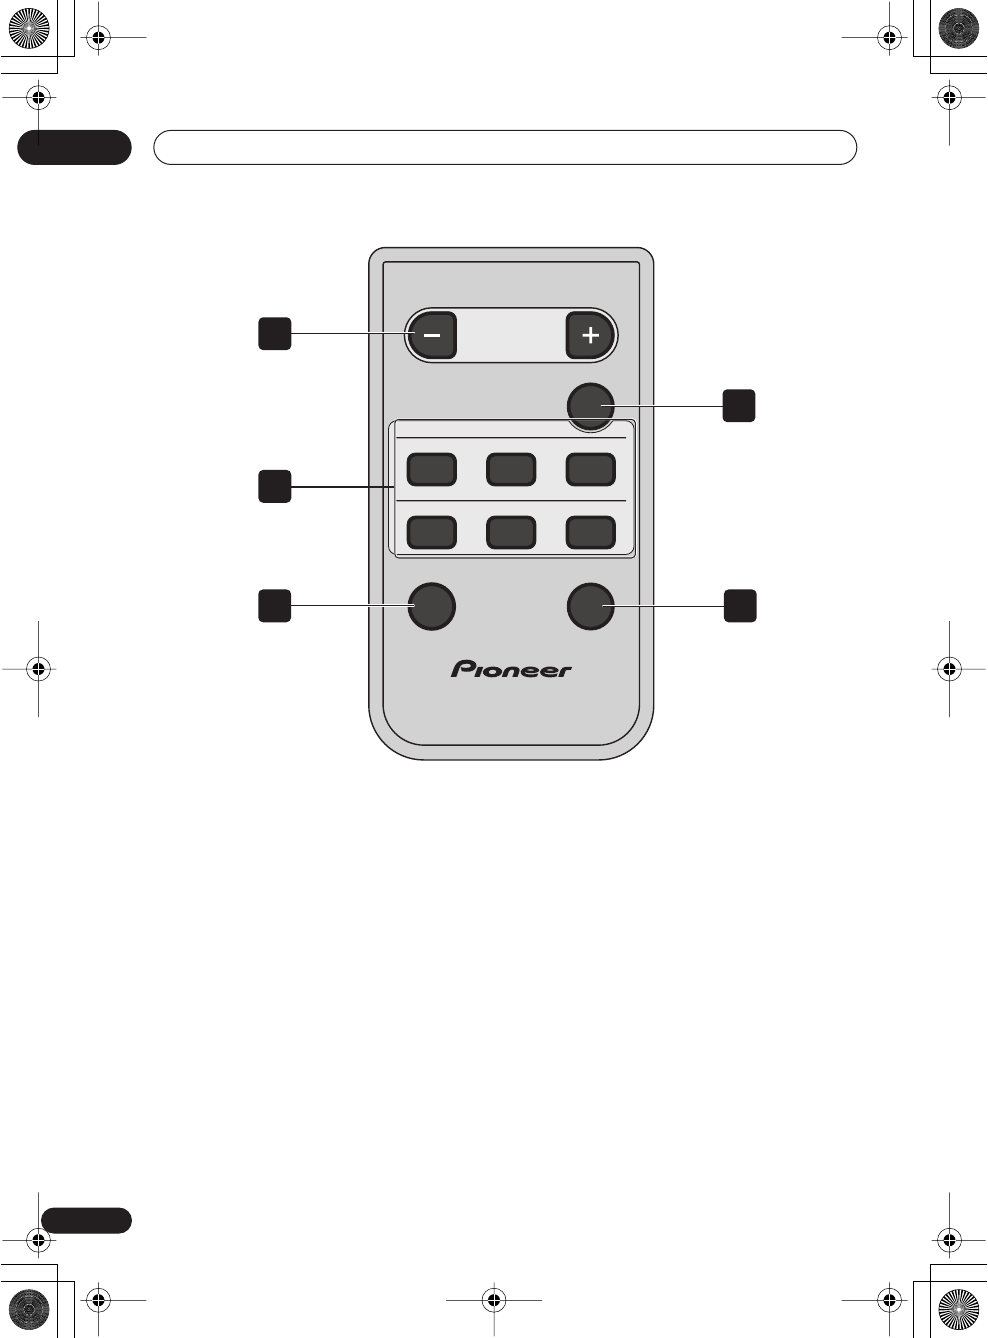
Remote control
1 VOLUME +/–
Press to adjust the wireless speaker volume.
2 SURROUND MODE buttons
Press to switch the surround mode. See
Using the surround modes
on page 17.
3 WIRELESS OFF
Press to switch off sound from the wireless
speaker (the TV or mini component outputs
sound in stereo). See
Using the surround
modes
on page 17.
4 MUTE
Press to mute/restore sound from the
wireless speaker.
5 INPUT ATT
Press to attenuate high level signals to
prevent distortion from the wireless speaker
(press again to switch the attenuator off).
CSCINEMA CSMUSIC W.STEREO
W.S T EREO
TV
MUSICCINEMA
VOLUME
SURROUND MODE
MUTE
DVD
INPUT ATTWIRELESS OFF
1
2
4
35
En_XW-HT1.book 12 ページ 2004年6月21日 月曜日 午前10時49分
Connecting up 03
13
En
English
Chapter 3
Connecting up
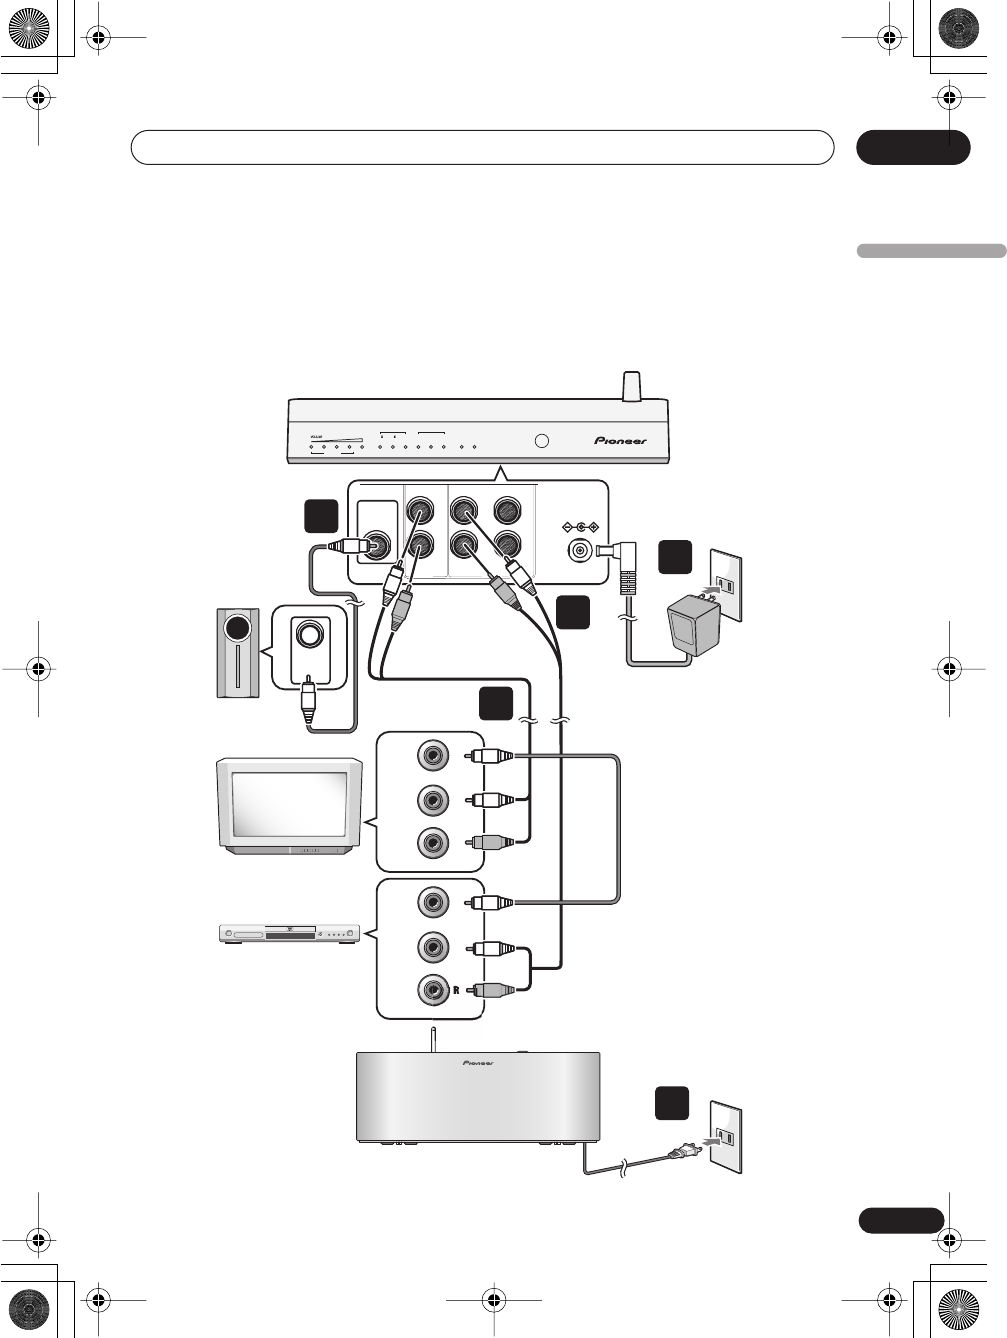
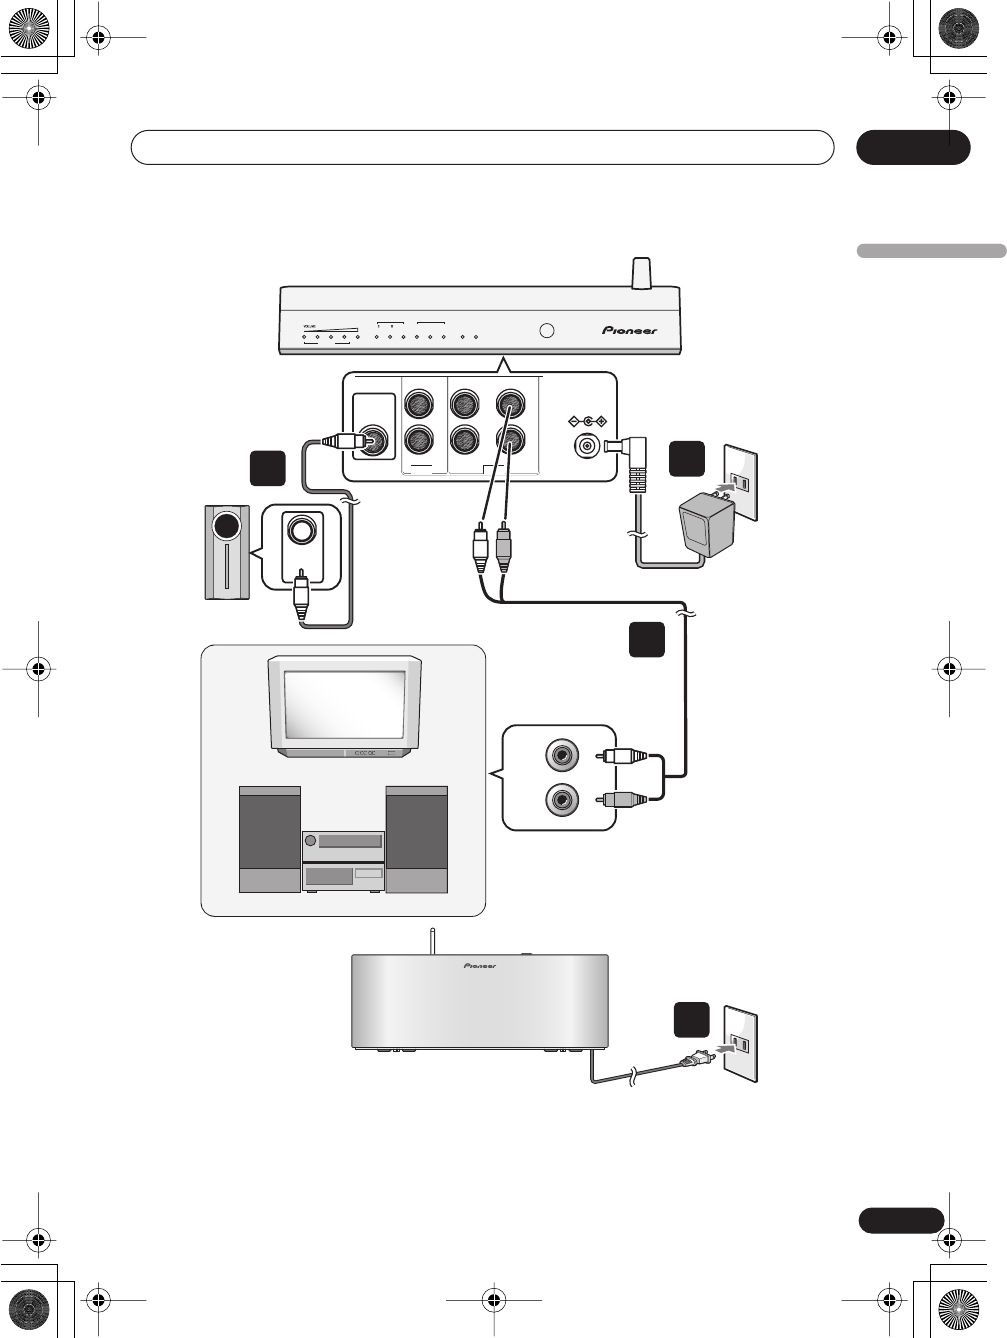
Connecting a DVD player
DC IN 12 V
TVTV DVD
LLL
RRR
SUB
WOOFER
OUT
IN
OUT
SUB
WOOFER
IN
VOLUME
DVD
CS
CINEMA MUSIC
CINEMA MUSIC
W.STEREO W.STEREO
WIRELESS
OFF
ATT /
MUTE
CHANNEL
1234
TV
CS
4
5
3
2
1
TV
DVD player
Wireless
speaker
RCA/phono
audio cable
RCA/phono
audio cable
Video
cable
RCA/phono
audio cable
AC power
outlet
AC
p
owe
r
outlet
AC power cord
AC
adapter
Transmitter
Subwoofer
AUDIO
IN
AUDIO
OUT
(2CH)
L
R
L
VIDEO
OUT
VIDEO
IN
En_XW-HT1.book 13 ページ 2004年6月21日 月曜日 午前10時49分
Connecting up
03
14
En
Important
• When connecting, make sure that all
components are switched off and
unplugged.
• Do not use the supplied cords or AC
adapter for any other purpose than that
described here.
1 Connect the DVD IN jacks on the
transmitter to a set of stereo output jacks
on your DVD player.
Use a commercially available RCA/phono
stereo audio cable to do this.
2 Connect the TV OUT jacks on the
transmitter to the stereo audio input jacks
on your TV.
Use the supplied RCA/phono stereo audio
cable to do this.
3 If you have a subwoofer, connect the
SUBWOOFER OUT jack on the transmitter
to the input jack on your subwoofer.
Use a commercially available RCA/phono
mono audio cable to do this.
• If you don’t own a subwoofer, you can
omit this step and still achieve convincing
surround sound from your system.
•Please refer to the operating instructions
supplied with your subwoofer when
connecting.
4 Connect the supplied AC adapter to
the DC IN inlet on the rear panel of the
transmitter, then plug into a power
outlet.
5 Connect the wireless speaker AC
power cord to the AC IN inlet on the rear
panel of the wireless speaker, then plug
into a power outlet.
En_XW-HT1.book 14 ページ 2004年6月21日 月曜日 午前10時49分
Connecting up 03
15
En
English
Connecting a TV or mini component system
DC IN 12 V
TVTV DVD
L
LL
RRR
SUB
WOOFER
OUT
IN
OUT
VOLUME
DVD
CS
CINEMA MUSIC
CINEMA MUSIC
W.S TEREO W.STEREO
WIRELESS
OFF
ATT /
MUTE
CHANNEL
1234
TV
CS
SUB
WOOFER
IN
4
3
2
1
or
Wireless
speaker
AC power
outlet
AC power
outlet
AC power cord
AC
adapter
Transmitter
Subwoofer
AUDIO
OUT
L
R
Mini-component
TV
RCA/phono
audio cable
RCA/phono
audio cable
En_XW-HT1.book 15 ページ 2004年6月21日 月曜日 午前10時49分
Connecting up
03
16
En
Important
• When connecting, make sure that all
components are switched off and
unplugged.
• Do not use the supplied cords or AC
adapter for any other purpose than that
described here.
1 Connect the TV IN jacks on the
transmitter to the stereo audio output
jacks on your TV or mini-component
system.
Use the supplied RCA/phono stereo audio
cable to do this.
2Connect the SUBWOOFER OUT jack on
the transmitter to the input jack on your
subwoofer.
Use a commercially available RCA/phono
mono audio cable to do this.
• If you don’t own a subwoofer, you can
omit this step and still achieve convincing
surround sound from your system.
•Please refer to the operating instructions
supplied with your subwoofer when
connecting.
3 Connect the supplied AC adapter to
the DC IN inlet on the rear panel of the
transmitter, then plug into a power
outlet.
4 Connect the wireless speaker AC
power cord to the AC IN inlet on the rear
panel of the wireless speaker, then plug
into a power outlet.
En_XW-HT1.book 16 ページ 2004年6月21日 月曜日 午前10時49分
Listening in surround sound 04
17
En
English
Chapter 4
Listening in surround sound
Using the surround modes
You can listen to any source using the
different surround modes, but the modes
available depend on which input source you
are listening to (
DVD
or
TV
).
Important
• Since the surround modes work in
conjunction with the corresponding input
(
DVD
or
TV
), if the mode you’ve selected
doesn’t correspond with the input source,
you won’t hear any sound from the unit.
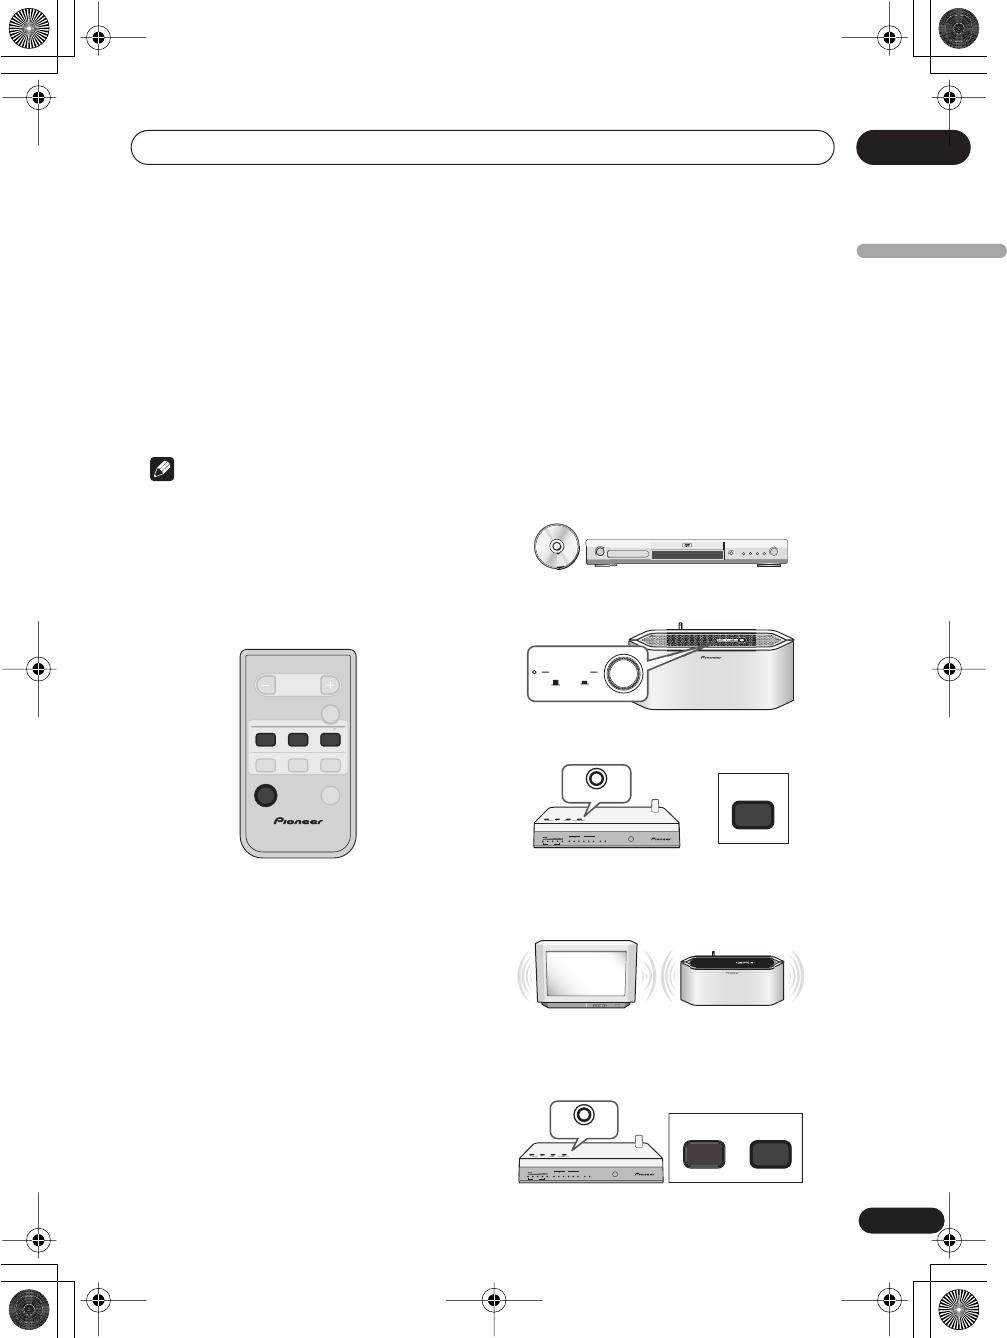
DVD input surround modes
• While listening to a source from the
DVD input, select one of the following
surround modes.
•
CS II CINEMA
– Especially designed for
movies, this mode uses SRS Circle
Surround II technology to clearly place
the dialogue up front, while providing
realistic surround sound from the rear.
•
CS II MUSIC
– Especially designed for
music, this mode uses SRS Circle
Surround II technology to give a live
concert hall feeling.
•
W.STEREO
– Use this mode for regular
stereo sound through the wireless
speaker.
•
WIRELESS OFF
– Switches off sound from
the wireless speaker.
Using the DVD input surround setup
For best results, follow the steps below when
using the DVD input for surround sound.
1 Load a disc into your DVD player and
start playback.
2 Switch on the wireless speaker.
3 Select the W.STEREO surround mode.
4Adjust the volume level of your TV and
your wireless speaker so they are about
the same level.
5Depending on the source, select either
the CS II CINEMA or CS II MUSIC surround
mode.
CSII CINEMA CSII MUSIC W.STEREO
W.STEREO
TV
MUSICCINEMA
SURROUND MODE
DVD
WIRELESS OFF
POWER
OFF ON
W.STEREO
VOLUME
DVD
CS
CINEMA MUSIC
CINEMA MUSIC
W.STEREO W.STEREO
WIRELESS
OFF
ATT/
MUTE
CHANNEL
1234
TV
CS
SURROUND MODE
CS
CINEMA CSMUSIC
VOLUME
DVD
CS
CINEMA MUSIC
CINEMA MUSIC
W.STEREO W.STEREO
WIRELESS
OFF
ATT/
MUTE
CHANNEL
1234
TV
CS
SURROUND MODE
En_XW-HT1.book 17 ページ 2004年6月21日 月曜日 午前10時49分
Listening in surround sound
04
18
En
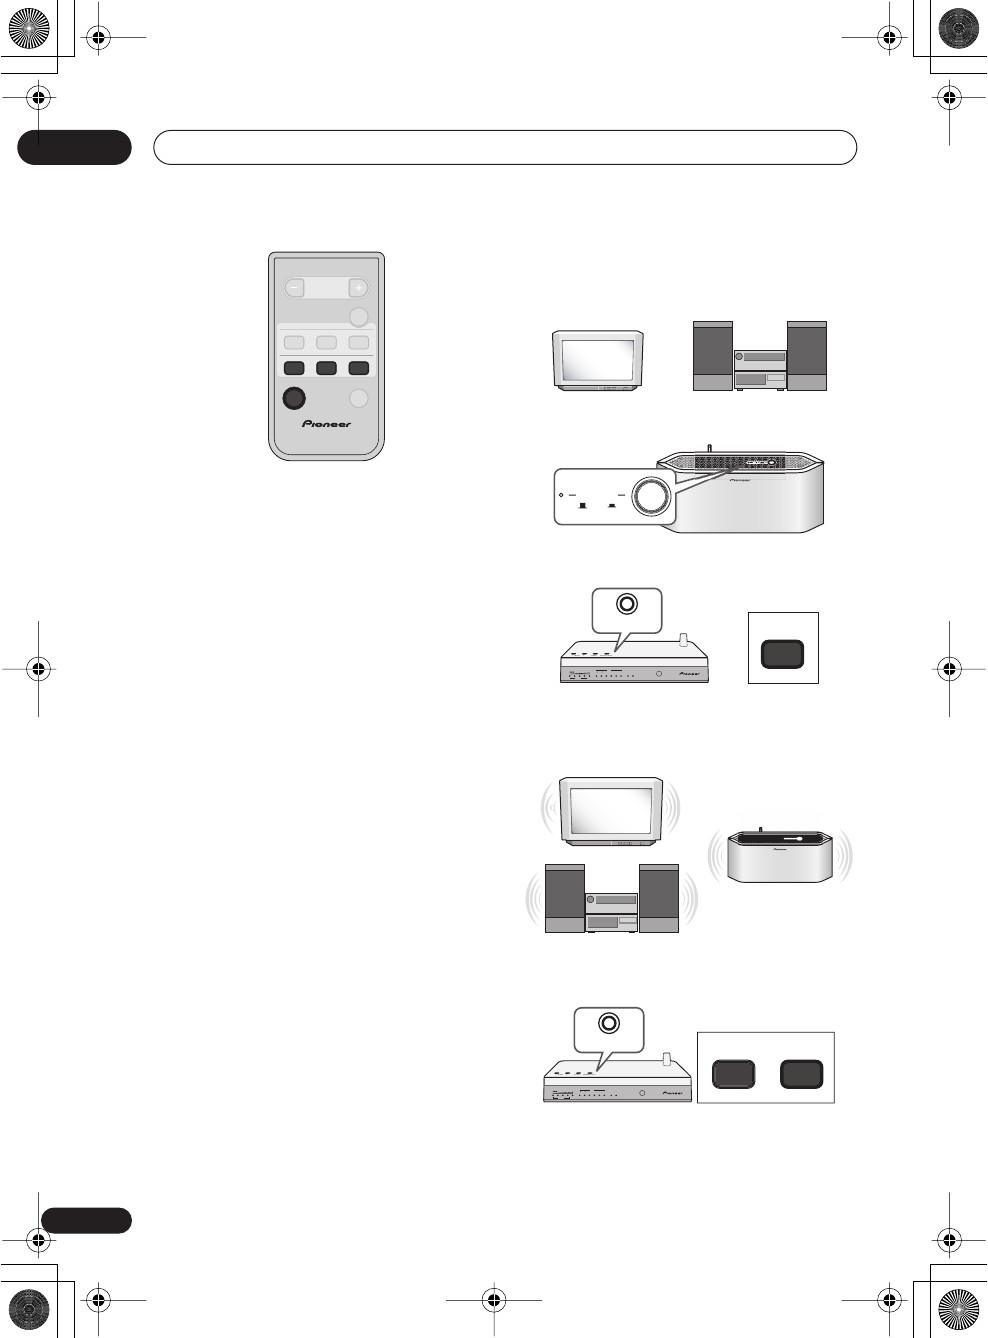
TV input surround modes
•While listening to a source from the TV
input, select one of the following
surround modes.
•
CINEMA
– Suitable for movies, the sound
from your TV will be output from the
wireless speaker, providing a movie
theater-like experience.
•
MUSIC
– Suitable for music, the sound
from your TV will be output from the
wireless speaker, providing a concert hall-
like experience.
•
W.STEREO
– Use this mode for regular
stereo sound through the wireless
speaker.
•
WIRELESS OFF
– Switches off sound from
the wireless speaker.
Using the TV input surround setup
For best results, follow the steps below when
using the TV input for surround sound.
1Switch on your TV or mini component.
2 Switch on the wireless speaker.
3 Select the W.STEREO surround mode.
4Adjust the volume level of your TV (or
mini component) and your wireless
speaker so they are about the same level.
5Depending on the source, select either
the CINEMA or MUSIC surround mode.
CSII CINEMA CSII MUSIC W.STEREO
W.STEREO
TV
MUSICCINEMA
SURROUND MODE
DVD
WIRELESS OFF
or
POWER
OFF ON
W.STEREO
VOLUME
DVD
CS
CINEMA MUSIC
CINEMA MUSIC
W.STEREO W.STEREO
WIRELESS
OFF
ATT/
MUTE
CHANNEL
1234
TV
CS
SURROUND MODE
or
CINEMA MUSIC
VOLUME
DVD
CS
CINEMA MUSIC
CINEMA MUSIC
W.STEREO W.STEREO
WIRELESS
OFF
ATT/
MUTE
CHANNEL
1234
TV
CS
SURROUND MODE
En_XW-HT1.book 18 ページ 2004年6月21日 月曜日 午前10時49分
Listening in surround sound 04
19
En
English
Tip
•You can also use the
SURROUND MODE
button on the transmitter to switch
between surround modes.
Press repeatedly to select the surround
mode you want:
*
Automatically switches to DVD input
when selected.
FAQ
• The wireless speaker is switched on and
connected, but there is still no sound!
Make sure the surround mode you’ve
selected corresponds with the input
you’re using (
DVD
or
TV
).
•The wireless speaker doesn’t seem to have
a particularly strong surround effect.
You may have to adjust the level of the
wireless speaker. Experiment by
increasing the level slightly for a more
pronounced surround effect.
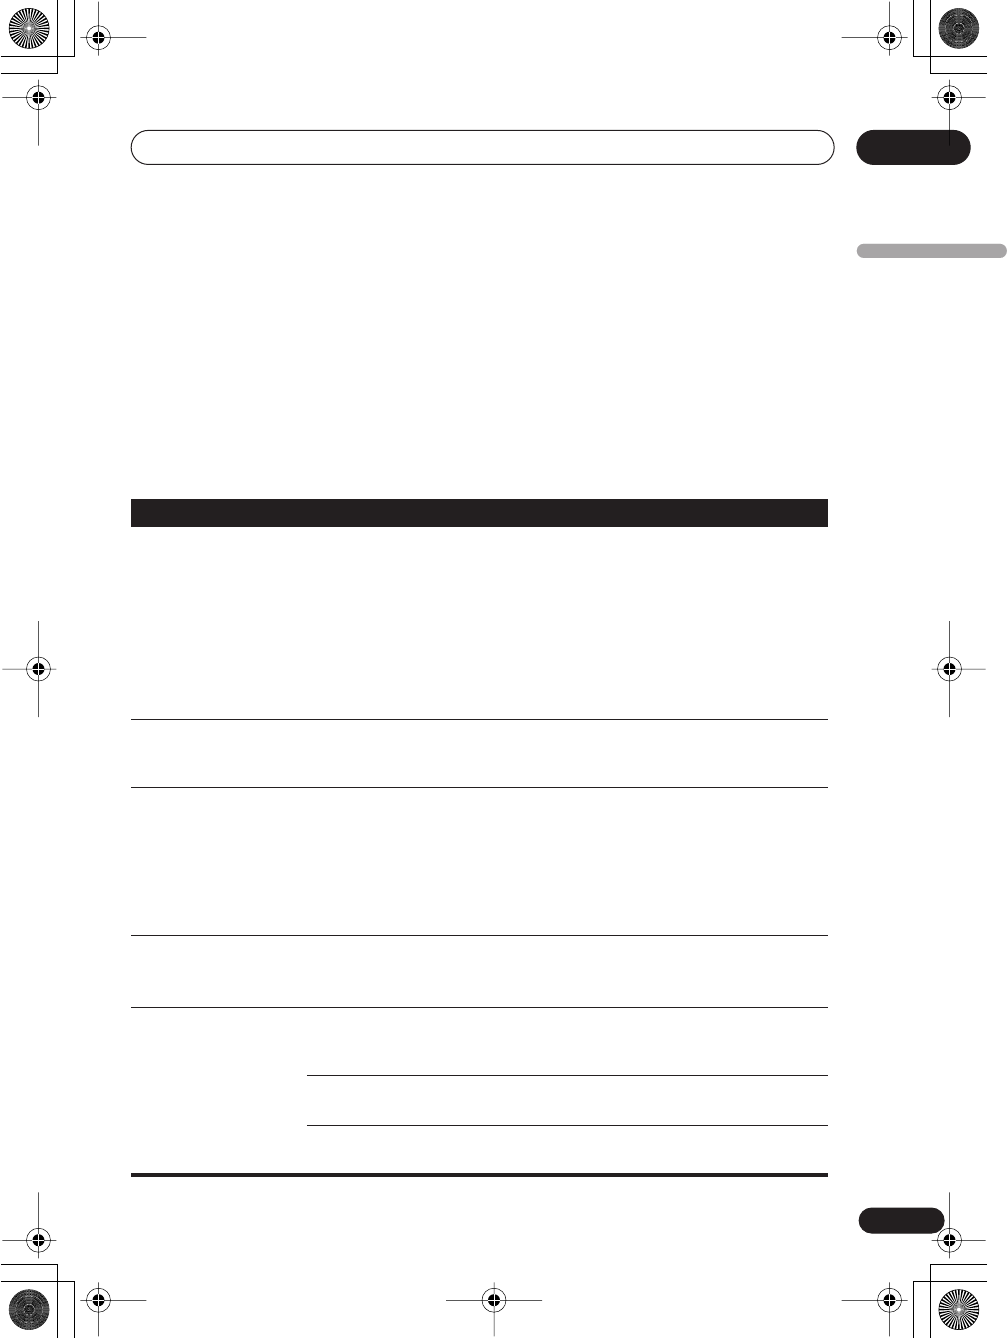
Note
•When connected to the
TV
input, there is
no sound from the
TV
output.
• Depending on the input, and the source
you’re listening to (stereo or mono), the
available surround modes change
according to the table below:
VOLUME CH ANNEL SURROUND MODE
SURROUND MODE
CS II CINEMA
CS II MUSIC
W.STEREO
WIRELESS OFF*
W.STEREO
CINEMA
MUSIC
DVD
DVD
DVD
TV
TV
TV
Surround
mode
CS CINEMA
CS MUSIC
W.STEREO
CINEMA
MUSIC
W.STEREO
Stereo
signal
Mono
signal
DVD
input
TV
input
En_XW-HT1.book 19 ページ 2004年6月21日 月曜日 午前10時49分
Listening in surround sound
04
20
En
Placing the wireless speaker
system
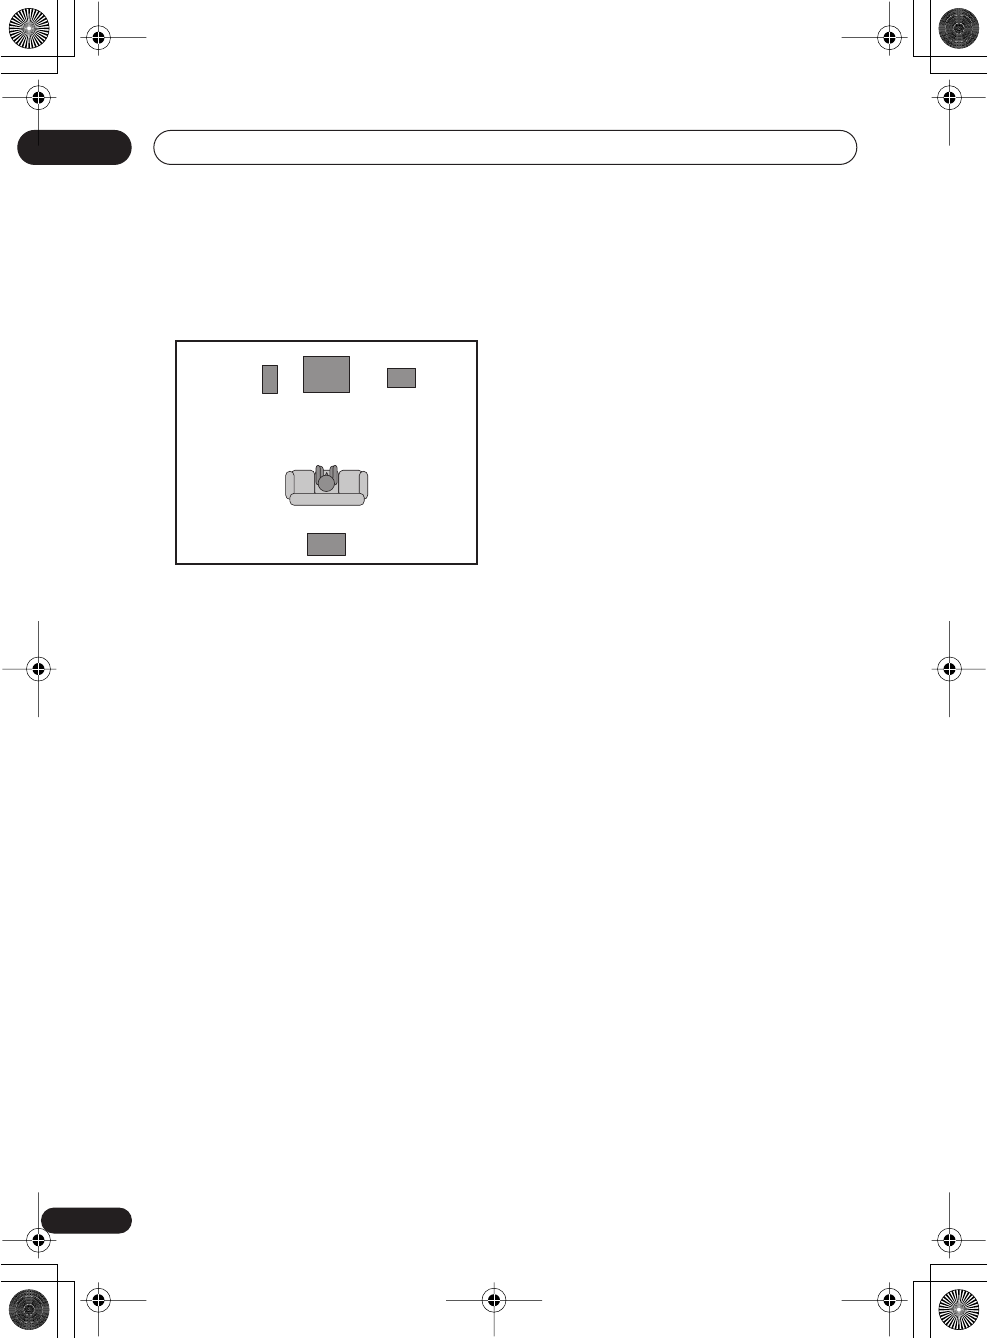
The illustration below shows a typical speaker
setup using the wireless speaker for
multichannel sound.
Where you put the wireless speaker has a big
effect on the quality of the sound. The
following guidelines should help you to get
the best sound from your system. See also
Radio wave reflections
on page 23 and
Scope
of operation
on page 24 for more on reception
troubleshooting.
• For best surround sound, make sure to
place the wireless speaker directly behind
the center of the listening position and no
higher than ear level.
• Placing the wireless speaker too far
behind the listening position will result in
little surround sound effect.
• Make sure that the wireless speaker is
securely installed. This not only improves
sound quality, but also reduces the risk of
damage or injury resulting from the
speaker being knocked over or falling in
the event of external shocks such as
earthquakes. The subwoofer can be
placed on the floor.
• The wireless speaker can be used at
distances of up to 10m from the
transmitter. This range may change
depending on the environment.
•Poor reception may cause the audio to be
interrupted or stopped. This is not a
malfunction. Try changing the location or
orientation of the transmitter and/or the
wireless speaker to improve reception.
• Placing the wireless speaker and
transmitter too close together may result
in poor reception. Keep a distance of least
1m for best sound quality.
TV/DVD player
(or mini-component)
Listening
position
Wireless
speaker
Transmitter
Subwoofer
En_XW-HT1.book 20 ページ 2004年6月21日 月曜日 午前10時49分
Additional information 05
21
En
English
Chapter 5
Additional information
Troubleshooting
•Incorrect operations are often mistaken for trouble and malfunctions. If you think that there
is something wrong with this component, check the points below. If the trouble cannot be
rectified even after exercising the checks listed below, ask your nearest Pioneer authorized
service center or your dealer to carry out repair work.
•If you are experiencing problems with the wireless speaker system, make sure to bring both
the transmitter and the wireless speaker in for repair so that they can be tested properly.
Symptom Cause & Remedy
Audio is interrupted. • This system uses high frequency radio waves that have properties
similar to light, such as linearity, reflection, refraction, diffraction, and
interference. Therefore, placement of the system can result in weak
radio waves and/or interruption.
• The distance between the transmitter and wireless speaker may be too
large. Use the wireless speaker within the reach of radio wave from the
transmitter.
•The system may be close to a location generating electrical noise. If this
is the case, find a location that does not affect the sound adversely.
Audio is suddenly
interrupted.
• There may be radio communication equipment using the same
frequency band (2.4 GHz) as this system, such as a Bluetooth device,
radio LAN device or microwave oven, operating nearby.
Audio cannot be
received.
• The radio wave reception is variable depending on locations due to the
effects of obstacles and reflecting objects. Try changing the location of
the wireless speaker a little.
• The transmitter and wireless speaker are designed and sold as a pair,
and they identify each other in communication. This means that
communication is not available between separately purchased
transmitter and wireless speaker.
Horizontal stripe noise
interference on a TV set
near the transmitter.
•Is there a piece of A/V equipment with an antenna near the transmitter?
If so, move the transmitter away from the antenna input terminal of the
AV equipment.
No sound from the
wireless speaker.
•Make sure the surround mode you’ve selected matches the input you’re
using (
DVD
or
TV
). See
Using the surround modes
on page 17 for more
on this.
•If the source you’re listening to is in mono, surround sound may not be
possible. See the note on page 19 for more on this.
•Make sure the wireless speaker is connected correctly (see
Connecting
up
on page 13).
En_XW-HT1.book 21 ページ 2004年6月21日 月曜日 午前10時49分
Additional information
05
22
En
Taking care of the unit
Cleaning the unit’s exterior
• Use a polishing cloth or dry cloth to wipe
off dust and dirt. If the surfaces are very
dirty, wipe with a soft cloth dipped in
some neutral cleanser diluted five or six
times with water and wrung out well, then
wipe again with a dry cloth.
• Do not use furniture wax or cleaners.
Never use thinners, benzine or insecticide
sprays or other chemicals on or near this
unit since they will corrode the surfaces.
• If you use a chemical-impregnated
cleaning cloth, read the instructions
carefully before use. These cloths may
leave smear marks on half-mirror finish
surfaces; if this happens, finish with a dry
cloth.
• Unplug the unit when cleaning.
Problems with condensation
Condensation may form inside the unit if it is
brought into a warm room from outside, or if
the temperature of the room rises quickly.
Although the condensation won’t damage the
unit, it may temporarily impair its
performance. For this reason you should
leave it to adjust to the warmer temperature
for about an hour before switching on and
using.
Hints on installation
We want you to enjoy using this unit for years
to come, so please bear in mind the following
points when choosing a suitable location for
it:
Do...
• Use in a well-ventilated room.
• Place on a solid, flat, level surface, such
as a table, shelf or stereo rack.
•Be sure to switch the wireless speaker off
when not in use.
Don’t...
• Use in a place exposed to high
temperatures or humidity, including near
radiators and other heat-generating
appliances.
• Place on a window sill or other place
where the unit will be exposed to direct
sunlight.
• Use in an excessively dusty or damp
environment.
• Place directly on top of an amplifier, or
other component in your stereo system
that becomes hot in use.
• Use near a television or monitor as you
may experience interference—especially
if the television uses an indoor antenna.
•Use in a kitchen or other room where the
unit may be exposed to smoke or steam.
The
POWER
indicator
goes out when the
switch is on or the
system is in operation.
• It is likely that the system is malfunctioning. Ask your nearest Pioneer
authorized service center or your dealer to carry out repair work.
Symptom Cause & Remedy
Caution
Static electricity or other external influences may cause malfunctioning of this unit. In this case,
unplugging the power cord and then re-plugging it in will usually reset the unit for proper
operation. If this does not correct the problem, please consult your nearest Pioneer service center.
En_XW-HT1.book 22 ページ 2004年6月21日 月曜日 午前10時49分

Additional information 05
23
En
English
•Use on a thick rug or carpet, or cover with
cloth—this may prevent proper cooling of
the unit.
•Place on an unstable surface, or one that
is not large enough to support all four of
the unit’s feet.
Moving the wireless speaker
If you need to move the wireless speaker, first
press
POWER
on the top panel to turn the unit
off. Unplug the power cord.
AC adapter and power cord caution
•Do not leave the power cord near heating
equipment. The coating of the cord may
melt, which could lead to fire and/or
electrocution.
• Make sure to grasp the body of the AC
adapter when removing it from the power
outlet. If you pull the power cord, it may
become damaged which could lead to fire
and/or electrocution.
• Do not attempt to plug in or remove the
AC adapter with wet hands. This may
result in electrocution.
•Insert the prongs of the AC adapter all the
way into the power outlet. If the
connection is incomplete, heat may be
generated which could lead to fire.
Furthermore, contact with the connected
prongs of the adapter may result in
electrocution.
•Do not insert the AC adapter into a power
outlet where the connection remains
loose despite inserting the prongs all the
way into the outlet. Heat may be
generated which could lead to fire.
Consult with the retailer or an electrician
regarding replacement of the power
outlet.
Radio wave reflections
The radio waves received by the wireless
speaker include the radio wave coming
directly from the transmitter (direct wave) and
waves coming from various directions due to
reflections by walls, furniture and building
(reflected waves). The reflected waves (due to
obstacles and reflecting objects) further
produce a variety of reflected waves as well as
variation in reception condition depending on
locations. If the audio cannot be received
properly due to this phenomenon, try moving
the location of the wireless speaker a little.
Also note that audio may be interrupted due
to the reflected waves when a person crosses
or approaches the space between the
transmitter and wireless speaker.
Radio wave caution
This wireless speaker system uses a 2.4GHz
radio wave frequency, which is a band used
by other wireless systems (see list below). To
prevent noise or interrupted communication,
do not use this system nearby such devices,
or make sure these devices are switched off
during use. You can also try switching the
channel on the transmitter (see
Transmitter
on page 9) for better reception.
• Cordless phones
• Wireless broadband routers
• Wireless AV equipment
• Microwave-based health aids
• Microwave ovens
• Wireless controllers for game systems
• Bluetooth equipment
• Some baby monitors
Other, less common, equipment that may
operate on the same frequency:
• Anti-theft systems
• Warehouse logistic management
systems
• Amateur radio stations (HAM)
• Discrimination systems for train or
emergency vehicles
En_XW-HT1.book 23 ページ 2004年6月21日 月曜日 午前10時49分
Additional information
05
24
En
Note
• If the transmitter is used near A/V
equipment with an antenna input
terminal, such as a TV, VCR, BS tuner or
CS tuner, you may experience noise
interference on a TV near the transmitter.
In such cases, place the transmitter at a
larger distance from the antenna input
terminal of the A/V equipment.
•If there is something obstructing the path
between the transmitter and the wireless
speaker (such as a metal door, concrete
wall, or insulation containing tinfoil), you
may need to change the location of your
system to prevent signal noise and
interruptions.
Scope of operation
Use of this equipment is limited to home use.
(Transmission distances may be reduced
depending on communication environment).
In the following locations, poor condition or
inability to receive radio waves may cause the
audio to be interrupted or stopped:
• In reinforced concrete buildings or steel-
framed or iron-framed buildings.
• Near large metallic furniture.
•In a crowd of people or near a building or
obstacle.
• In a location exposed to the magnetic
field, static electricity or radio wave
interference from radio communication
equipment using the same frequency
band (2.4 GHz) as this system, such as a
Bluetooth device, radio LAN device or
microwave oven.
• If you live in a heavily populated
residential area (apartment, townhouse,
etc.) and if your neighbor’s microwave is
placed near your system, you may
experience radio wave interference or no
sound from the speaker. If this occurs,
move your unit to a different place. When
the microwave is not in use, there will be
no radio wave interference.
Specifications
General
Digital Wireless Speaker System
(Transmitter/Wireless speaker)
Transmitter
AC adapter
Power requirements . . . . . . AC 120V, 50/60Hz
Power consumption . . . . . . . . . . . . . . . . . .9VA
Rated output . . . . . . . . . . . . . . . . . 12V/500mA
Power consumption (without AC
adapter) . . . . . . . . . . . . . . . . . . . . . . . . . . . . . . 2W
Input . . . . . . . . . . . . . . . . . . . . . . . . . . . . RCA jack
Weight . . . . . . . . . . . . . . . . . . . . 0.6 kg / 1 lb 5 oz.
Dimensions . . . . 255(W) x 58.5(H) x 121(D) mm
10(W) x 2
5
/
16
(H) x 4
3
/
4
(D)in.
Wireless speaker
Power requirements . . . . . . . . . . AC 120V, 60Hz
Power consumption . . . . . . . . . . . . . . . . . . . 26W
Amplifier characteristics
Maximum power output . . . . . . . . . . . . . 10W/ch
RMS (1kHz, THD10%, 4
Ω
)
Speaker unit . . . . . . . . . . . . . . .7cm cone type x 2
Weight . . . . . . . . . . . . . . . . . . . 2.9 kg / 6 lbs 6 oz
Dimensions (without
antenna) . . . . . . 461.5(W) x 106.5(H) x 95(D) mm
18
3
/
16
(W) x 6
15
/
16
(H) x 3
3
/
4
(D)in.
Height with antenna . . . . . . . .110 mm / 4
5
/
16
in.
Accessories
Remote control . . . . . . . . . . . . . . . . . . . . . . . . . . 1
Lithium battery (CR2025) . . . . . . . . . . . . . . . . . . 1
AC adapter . . . . . . . . . . . . . . . . . . . . . . . . . . . . . . 1
RCA/phono stereo audio cable . . . . . . . . . . . . . 1
Power cord . . . . . . . . . . . . . . . . . . . . . . . . . . . . . . 1
Radio wave caution sheet. . . . . . . . . . . . . . . . . . 1
Warranty card . . . . . . . . . . . . . . . . . . . . . . . . . . . 1
These operating instructions
Note
• The specifications and design of this
product are subject to change without
notice, due to improvement.
En_XW-HT1.book 24 ページ 2004年6月21日 月曜日 午前10時49分
Additional information 05
25
En
English
En_XW-HT1.book 25 ページ 2004年6月21日 月曜日 午前10時49分
Published by Pioneer Corporation.
Copyright © 2004 Pioneer Corporation.
All rights reserved.
PIONEER CORPORATION
4-1, Meguro 1-Chome, Meguro-ku, Tokyo 153-8654, Japan
PIONEER ELECTRONICS (USA) INC.
P.O. BOX 1540, Long Beach, California 90810-1540, U.S.A. TEL: (800) 421-1404
PIONEER ELECTRONICS OF CANADA, INC.
300 Allstate Parkway, Markham, Ontario L3R OP2, Canada TEL: 1-877-283-5901
PIONEER EUROPE NV
Haven 1087, Keetberglaan 1, B-9120 Melsele, Belgium TEL: 03/570.05.11
PIONEER ELECTRONICS ASIACENTRE PTE. LTD.
253 Alexandra Road, #04-01, Singapore 159936 TEL: 65-6472-7555
PIONEER ELECTRONICS AUSTRALIA PTY. LTD.
178-184 Boundary Road, Braeside, Victoria 3195, Australia, TEL: (03) 9586-6300
PIONEER ELECTRONICS DE MEXICO S.A. DE C.V.
Blvd.Manuel Avila Camacho 138 10 piso Col.Lomas de Chapultepec, Mexico,D.F. 11000 TEL: 55-9178-4270
K002_A_En
<04E00001> <ARE7351-A>Printed in / Imprimé au
En_XW-HT1.book 26 ページ 2004年6月21日 月曜日 午前10時49分