Pioneer VSX D711 S XRE3055 A User Manual To The 9d58a41e 3ce9 43be 99ad Aa427a5ca5e2
User Manual: Pioneer VSX-D711-S to the manual
Open the PDF directly: View PDF ![]() .
.
Page Count: 108 [warning: Documents this large are best viewed by clicking the View PDF Link!]
2
En/Sp/ChH
El triángulo equilátero con el símbolo de un relámpago
en su interior tiene por objeto alertar al usuario de la
presencia de “voltaje peligroso” sin aislar en el interior
del producto, el cual podría alcanzar la suficiente
magnitud como para constituir un riesgo de descarga
eléctrica para las personas.
PRECAUCIÓN:
PARA EVITAR EL RIESGO DE DESCARGA ELÉCTRICA,
NO RETIRAR LA TAPA (NI LA CUBIERTA POSTERIOR).
EL INTERIOR NO CONTIENE PIEZAS UTILIZABLES POR
EL USUARIO. TODA REPARACIÓN DEBERÁ SER
EFECTUADA POR PERSONAL TÉCNICO CUALIFICADO.
El triángulo equilátero con un signo de admiración en su
interior tiene por objeto alertar al usuario de la existencia
de importantes instrucciones de funcionamiento y
mantenimiento (asistencia) en el manual que acompaña
al aparato.
3
En/Sp/ChH
English Español
H017BChH
TWO VOLTAGE SELECTOR
SWITCHES (multi-
voltage model only)
Only multi-voltage model is
provided with these switches.
Mains voltages in Saudi Arabia are
127 V and 220 V only. Never use
this model with the 110 V setting
in Saudi Arabia.
The line voltage selector switches are
on the rear panel. Check that they are
set properly before plugging the
power cord into the household wall
socket. If the voltage is not properly
set or if you move to an area where
the voltage requirements differ, adjust
the selector switches as follows.
1. Use a medium-size screwdriver.
2. First, insert the screwdriver in the
groove of the voltage selector at the
right, and adjust so that the tip of the
groove points to the voltage value of
your area.
3. Next, insert the screwdriver in the
groove of the voltage selector at the
left and adjust until the voltage is the
same as at the right.
兩種電壓選擇開關(僅適
用於多電壓機型)
僅多電壓機型備有這個開關。沙烏
地阿拉伯的主要電壓為127伏及220
伏。因此,在沙烏地阿拉伯使用
時,千萬不可將此開關設定在110
伏的位置上。
線路電壓選擇開關設置在本機的背
面。在將電源線插頭插入交流電源
插座之前,請先檢查此開關的設定
位置是否正確。如果電壓位置設定
不正確,或是您將本機搬運至電源
電壓不同的地區使用時,請按下列
方法調整選擇開關。
1. 使用中型旋鑿。
2. 首先,將旋鑿的頭部插入右方選
擇開關的槽內並加以轉動,使其箭
頭指向您所在區域的電壓值位置。
3. 然後,將旋鑿的頭部插入左方選
擇開關的槽內,調節到與右方選擇
開關相同的電壓值。
220V 240V
110V 120V-127V
TWO VOLTAGE SELECTORS
110V
120-127V 220V
240V
Medium-size screwdriver
中型旋鑿
“DTS”, “DTS-ES Extended Surround” and “Neo:6” are
trademarks of Digital Theater Systems, Inc.
Manufactured under license from Dolby Laboratories.
“Dolby”, “Pro Logic” and the double D symbol are
trademarks of Dolby Laboratories.
"DTS" , “DTS-ES Extended Surround” y "Neo:6" son
marcas comerciales de Digital Theater Systems Inc.
Fabricado bajo licencia de Digital Theater Systems Inc.
Fabricado bajo licencia de Dolby Laboratories. “Dolby”,
“Pro Logic” y el símbolo con una doble D son marcas
comerciales de Dolby Laboratories.
“DTS”,“DTS-ES Extended Surround”和“Neo:6”為Digital
Theater Systems,Inc(數字影院系統公司)的商標,本機獲
Digital Theater Systems,Inc公司的許可證。
經杜比實驗室授權生產。“Dolby”,“Pro Logic” 和雙D標誌
是杜比實驗室的商標。
Destornillador de tamaño medio
DOS CONMUTADORES
SELECTORES DE TENSIÓN
(sólo el modelo
multivoltaje)
La tensión de la red en Arabia
Saudita es de 127 V y 220 V. Nunca
utilice este modelo en Arabia
Saudita con el ajuste para 110 V.
Los conmutadores selectores de la
tensión de línea se encuentran en el
panel trasero. Compruebe que éstos
se encuentren en las posiciones
correctas antes de conectar el cable de
alimentación a una toma de corriente.
Si la tensión está mal ajustada o usted
se desplaza a un área donde los
requerimientos de tensión son
diferentes, ajuste los conmutadores
selectores como se indica a
continuación.
1. Utilice un destornillador de
tamaño medio.
2. Inserte primero el destornillador
en la ranura del selector de tensión de
la derecha y ajústelo de forma que la
punta de la ranura indique hacia el
valor de la tensión utilizada en su
área.
3. A continuación, inserte el
destornillador en la ranura del
selector de tensión de la izquierda y
ajústelo hasta que la tensión sea la
misma que la del selector de tensión
de la derecha.

01
4
En/Sp/ChH
1 Before you start
Checking what’s in the box ............................................. 7
Installing the receiver....................................................... 7
Making cable connections .............................................. 7
Loading the batteries ....................................................... 8
Operating range of remote control unit ......................... 8
2 5 minute guide
Introduction to home theater .......................................... 9
Listening to Surround Sound ........................................ 10
Using the Quick Setup ................................................... 16
3 Connecting up
Audio/Video cords .......................................................... 18
S-video cables ................................................................. 18
Component video cords ................................................. 19
Digital audio coaxial cords/
Optical cables ................................................................. 19
Connecting digital components ................................... 20
Connecting audio components .................................... 22
Connecting DVD 5.1/7.1 channel components ........... 23
Connecting video components ..................................... 24
Connecting to the front panel
video terminal ........................................................... 25
Connecting antennas..................................................... 26
FM wire antenna ....................................................... 26
AM loop antenna ...................................................... 26
Antenna snap connectors ....................................... 26
Using external antennas ................................................ 27
To improve FM reception .......................................... 27
To improve AM reception ......................................... 27
Connecting the speakers (VSX-D711) ........................... 28
Speaker terminals .................................................... 28
Connecting the speakers (VSX-D811S) ........................ 30
A and B speaker systems ........................................ 32
Hints on speaker placement ................................... 32
Connecting additional amplifiers
(VSX-D811S only) ............................................................ 35
POWER-CORD CAUTION ........................................ 36
Operating other Pioneer components .......................... 36
4 Controls and displays
Front panel ...................................................................... 37
Display ............................................................................. 40
Remote control ............................................................... 43
5 Playing sources
Introduction to Sound Modes ....................................... 48
Stereo/Direct ............................................................. 48
Standard mode ......................................................... 48
Advanced Surround modes ..................................... 49
Choosing the input signal ............................................. 52
Listening to multi-channel playback ............................ 54
Using Stereo/Direct ....................................................... 55
Using Advanced Surround ............................................ 55
Using Loudness and Midnight listening ...................... 56
Using the tone controls ................................................. 57
Playing other sources .................................................... 57
Selecting the multi-channel analog inputs .................. 58
6 Setting up your receiver
Choosing your receiver setup ........................................ 59
Speaker setting ......................................................... 62
Surround back speaker
setting (VSX-D811S only) ......................................... 63
6.1 channel setting (VSX-D811S only) .................... 63
Subwoofer setting .................................................... 64
Crossover frequency setting .................................... 64
LFE attenuator setting .............................................. 65
Front speaker distance setting ................................ 65
Center speaker distance setting ............................. 66
Surround speaker distance setting......................... 66
Surround back speaker distance
setting (VSX-D811S only) ......................................... 67
Dynamic range control setting ................................ 67
Dual mono setting .................................................... 68
Component video input settings ............................. 68
Surround back channel input
setting (VSX-D811S only) ......................................... 69
Coaxial digital input settings ................................... 69
Optical digital input settings ................................... 69
Setting the relative volume level
of each channel ........................................................ 70
7 Using the tuner
Listening to the radio ..................................................... 72
Improving FM stereo sound..................................... 73
Tuning directly to a station....................................... 73
Saving station presets.................................................... 74
Naming station presets ................................................. 75
Listening to station presets ........................................... 76
Changing the frequency step ........................................ 76
8 Making a recording
Making an audio or a video recording .......................... 77
Monitoring your recording............................................. 78
9 Controlling the rest of your system
Setting the remote to control
other components .......................................................... 79
Selecting preset codes directly ..................................... 80
Searching for preset codes ........................................... 81
Programming signals from other
remote controls (VSX-D811S only) ................................ 83
Erasing one of the remote control
button settings (VSX-D811S only) ................................. 85
Clearing all the remote control settings ....................... 85
Direct function ................................................................ 86
Confirming preset codes ............................................... 87
Controls for TVs .............................................................. 88
Controls for other components ..................................... 89
Preset Code List .............................................................. 94
10 Additional information
Troubleshooting ............................................................ 101
Specifications ............................................................... 104
Cleaning the unit .......................................................... 107
Contents

01
5
En/Sp/ChH
English Español
1 Antes de empezar
Instalación del receptor ................................................... 7
Comprobación de los accesorios suministrados .......... 7
Conexión de los cables .................................................... 7
Cómo cargar las pilas ...................................................... 8
Campo operativo del mando a distancia ....................... 8
2 Guía en 5 minutos
Introducción al home theater.......................................... 9
Cómo escuchar sonido surround ................................. 10
Cómo utilizar la configuración rápida .......................... 16
3 Conexiones
Cables de audio/vídeo .................................................... 18
Cables S-Video ................................................................ 18
Cables ópticos/cables de audio digital ........................ 19
Cables ópticos/cables de audio digital ........................ 19
Conexión de componentes digitales ............................ 20
Conexión de componentes de audio ............................ 22
Conexión de componentes DVD 5.1/7.1 canales. ....... 23
Conexión de componentes de vídeo ............................. 24
Conexión al terminal de vídeo del panel frontal .... 25
Conexión de antenas ..................................................... 26
Antena de cable FM ................................................. 26
Antena de cuadro AM .............................................. 26
Conectores instantáneos de antena ....................... 26
Cómo utilizar antenas externas .................................... 27
Para mejorar la recepción de FM ............................ 27
Para mejorar la recepción de AM ........................... 27
Conexión de los altavoces (VSX-D711) ......................... 28
Terminales de los altavoces ..................................... 28
Conexión de los altavoces (VSX-D811S) ....................... 30
Sistemas de los altavoces A y B.............................. 32
Consejos sobre la ubicación de los altavoces ....... 32
Conexión de amplificadores adicionales
(sólo VSX-D811S) ............................................................ 35
PRECAUCIÓN CON EL CABLE DE
ALIMENTACIÓN ....................................................... 36
Funcionamiento de otros componentes Pioneer ........ 36
4 Controles y pantallas
Panel frontal .................................................................... 37
Pantalla ........................................................................... 40
Mando a distancia .......................................................... 43
5 Reproducción de fuentes
Introducción a los modos de sonido ............................ 48
Estéreo/Directo ......................................................... 48
Modo Estándard ....................................................... 48
Modos Surround avanzados .................................... 49
Elección de la señal de entrada .................................... 52
Cómo escuchar una reproducción
multicanal ....................................................................... 54
Utilización del Estéreo/Directo...................................... 55
Utilización de los modos Surround
avanzados ....................................................................... 55
Utilización del modo de audición Loudness
y Midnight ....................................................................... 56
Utilización de los controles del tono ............................ 57
Reproducción de otras fuentes ..................................... 57
Selección de entradas analógicas
multicanal ....................................................................... 58
6 Confuguración del receptor
Elección de la configuración de su receptor ............... 59
Ajuste de los altavoces ............................................ 62
Ajuste del altavoz posterior surround
(sólo VSX-D811S) ...................................................... 63
Ajuste 6.1 canales (sólo VSX-D811S) ...................... 63
Ajuste del realzador de graves ................................ 64
Ajuste de la frecuencia de corte ............................. 64
Ajuste del atenuador LFE ......................................... 65
Ajuste de la distancia del altavoz
frontal ........................................................................ 65
Ajuste de la distancia del altavoz
central ........................................................................ 66
Ajuste de la distancia del altavoz
surround .................................................................... 66
Ajuste de la distancia del altavoz posterior surround
(sólo VSX-D811S) ...................................................... 67
Ajuste del control de la gama
dinámica.................................................................... 67
Ajuste del monoaural dual ...................................... 68
Ajustes de la entrada de vídeo del componente .... 68
Ajuste de la entrada del canal posterior surround
(sólo VSX-D811S) ...................................................... 69
Ajustes de la entrada digital coaxial ....................... 69
Ajustes de la entrada digital óptica ........................ 69
Cómo ajustar el nivel de volumen adecuado de cada
canal .............................................................................
70
7 Utilización del sintonizador
Cómo escuchar la radio ................................................ 72
Cómo mejorar el sonido estéreo FM ....................... 73
Sintonización directa de una emisora .................... 73
Cómo guardar presintonías .......................................... 74
Cómo nombrar presintonías ......................................... 75
Cómo escuchar presintonías ........................................ 76
Cómo cambiar el intervalo de la frecuencia ................ 76
8 Cómo realizar grabaciones
Cómo realizar una grabación de audio o de vídeo ...... 77
Monitorización de la grabación............................... 78
9 Cómo controlar el resto del sistema
Cómo ajustar el mando a distancia para controlar otros
componentes .................................................................. 79
Cómo seleccionar directamente códigos predefinidos ...
80
Búsqueda de códigos predefinidos .............................. 81
Programación de señales desde otros mandos a
distancia (sólo VSX-D811S) ........................................... 83
Cómo eliminar uno de los ajustes de botón
del mando a distancia (sólo VSX-D811S) ..................... 85
Borrado de todos los ajustes del mando a distancia .......
85
Función directa ............................................................... 86
Confirmación de los códigos
predefinidos .................................................................... 87
Controles del televisor ................................................... 90
Controles de otros componentes .................................. 91
Lista de códigos predefinidos ....................................... 94
10 Información adicional
Resolución de problemas ............................................ 102
Especificaciones .......................................................... 105
Limpieza de la unidad .................................................. 107
Índice

01
6
En/Sp/ChH
6設置接收機
選擇接收機設置 ............................... 59
揚聲器設定 ................................... 62
後置環繞聲揚聲器設定(僅適於VSX-D811S) ...... 63
6.1聲道設定(僅適於VSX﹣D811S) .............. 63
超低音揚聲器設定 ............................. 64
分隔頻率設定 ................................. 64
LFE衰減器設定 ................................ 65
前置揚聲器距離設定 ........................... 65
中置揚聲器距離設定 ........................... 66
環繞聲揚聲器距離設定 ......................... 66
後置環繞聲聲道輸入設定(僅適於VSX﹣D811S) ... 67
動態范圍控制設定 ............................. 67
雙重單聲道設定 ............................... 68
分量視頻輸入設定 ............................. 68
後置環繞聲聲道輸入設定(僅適於VSX-D811S) ... 69
同軸數碼輸入設定 ............................. 69
光學數碼輸入設定 ............................. 69
設置各聲道相關的音量級 ....................... 70
7使用調諧器
收聽無線電廣播 ............................... 72
改善FM立體聲聲音 .......................... 73
直接調諧到電臺 ............................ 73
保存預設電臺 ................................. 74
命名預設電臺 ................................. 75
收聽預設電臺 ................................. 76
改變頻率間隔 ................................. 76
8進行錄製
進行音頻或視頻錄製 ........................... 77
監測錄製 ..................................... 78
9控制系統中的其他設備
設定遙控器以控制其他設備 ..................... 79
直接選擇預設代碼 ............................. 80
搜索預設代碼 ................................. 81
使用其他遙控器編製信號
(僅適於VSX-D811S) ....
83
刪除遙控按鈕設定
(僅適於VSX-D811S)
.......... 85
清除所有遙控器設定 ........................... 85
直接功能 ..................................... 86
確認預設代碼 ................................. 87
電視機的控制 ................................. 92
其他設備的控制 ............................... 93
預設代碼列表 ................................. 94
10 附加資訊
故障排除 .................................... 103
規格 ........................................ 106
清潔本機 .................................... 107
目錄
1開始使用之前
檢查附件 ...................................... 7
安裝接收機 .................................... 7
連接電纜 ...................................... 7
安裝電池 ...................................... 8
遙控器操作范圍 ................................ 8
2五分鐘快捷指南
家庭影院簡介 .................................. 9
欣賞環繞聲 ................................... 10
使用快速設置 ................................. 16
3連接
音頻/視頻電纜 ................................ 18
S視頻電纜 ................................... 18
分量視頻電纜 ................................. 19
數碼音頻同軸電纜/光纜 ........................ 19
連接數碼設備 ................................. 20
連接音頻設備 ................................. 22
連接DVD 5.1/7.1聲道設備 ...................... 23
連接視頻設備 ................................. 24
連接到前面板視頻端子 ...................... 25
連接天線 ..................................... 26
FM線型天線 ................................ 26
AM環型天線 ................................ 26
天線彈簧連接器 ............................ 26
使用外部天線 ................................. 27
改善FM接收質量 ............................ 27
改善AM接收質量 ............................ 27
連接揚聲器(VSX-D711) ...................... 28
揚聲器端子 ................................ 28
連接揚聲器(VSX-D811S) ..................... 30
A和B揚聲器系統 ............................ 32
揚聲器安置提示 ............................ 32
連接附加放大器(僅適於VSX-D811S) ........... 35
電源線注意事項 ............................ 36
操作其他先鋒設備 ............................. 36
4控制按鈕和顯示屏
前面板 ....................................... 37
顯示屏 ....................................... 40
遙控器 ....................................... 43
5播放音源
聲音模式介紹 ................................. 48
立體聲/直接 ............................... 48
標準模式 .................................. 48
高級環繞聲模式 ............................ 49
選擇輸入信號 ................................. 52
收聽多聲道播放 ............................... 54
使用立體聲/直接模式 .......................... 55
使用高級環繞聲模式 ........................... 55
使用響度和午夜收聽模式 ....................... 56
使用音調控制模式 ............................. 57
播放其他音源 ................................. 57
選擇多聲道模擬輸入 ........................... 58
01
7
En/Sp/ChH
English Español
Comprobación de los
accesorios
suministrados
Le rogamos que compruebe que
ha recibido los siguientes
accesorios que suministramos:
• Antena de cuadro AM
• Antena de cable FM
• Pilas de célula seca x 2 (tipo
AA/ IEC R6P)
• Mando a distancia
• Manual de instrucciones
Instalación del
receptor
Tenga presente los siguientes
puntos:
• No coloque objetos
directamente sobre la unidad;
ya que esto obstaculizaría una
dispersión del calor adecuada.
• Si lo instala sobre una estante,
estantería, etc., procure dejar
un espacio de más de 20 cm
por encima de la unidad.
Conexión de los
cables
Tenga cuidado con los cables para
que no queden doblados por
encima del aparato (tal y como se
muestra en la ilustración) En caso
de que esto ocurra, el campo
magnético producido por los
transformadores de este aparato
puede provocar que los altavoces
emitan un ruido de fondo.
Checking what’s in
the box
Please check that you’ve received
the following supplied accessories:
• AM loop antenna
• FM wire antenna
• Dry cell batteries x 2 (AA size
IEC R6P)
• Remote control
• These operating instructions
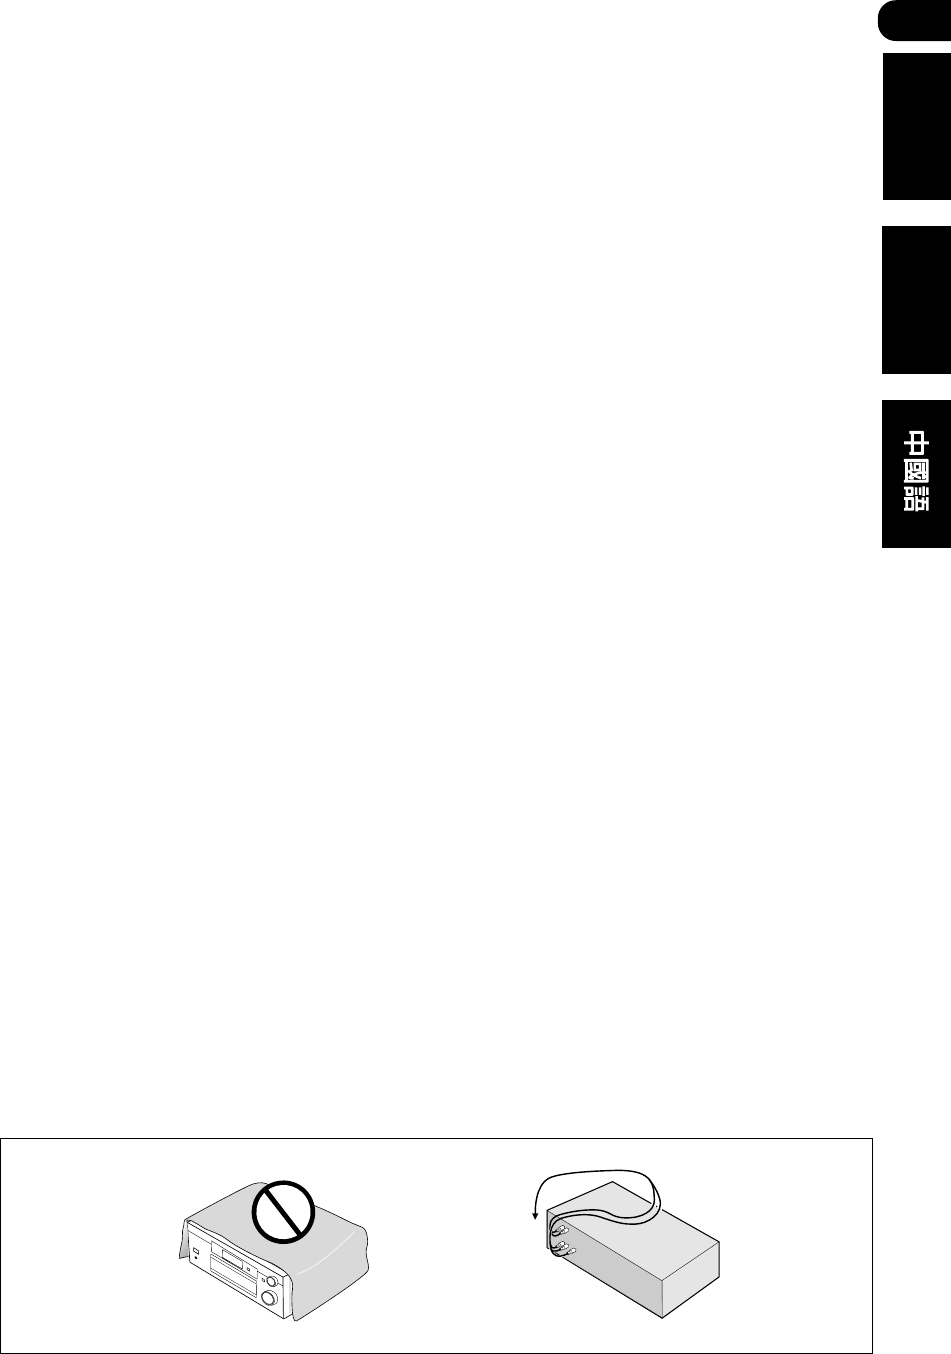
Installing the
receiver
Please note the following points:
• Do not place objects directly
on top of this unit. This
prevents proper heat
dispersal.
• When installing on a rack,
shelf, etc., be sure to leave
more than 20 cm of space
above the receiver.
Making cable con-
nections
Make sure not to bend the cables
over the top of this unit (as shown
in the illustration). If this happens,
the magnetic field produced by the
transformers in this unit may
cause a humming noise from the
speakers.
Before you start Antes de empezar
檢查附件
請檢查以下附件是否齊全︰
•AM環型天線
•FM線型天線
•干電池×2(AA尺寸IEC R6P)
•遙控器
•上述附件的操作說明書
安裝接收機
請注意下列事項︰
•請勿將物品置於該機器頂部,
以保証適當的散熱。
•如欲安裝於機架之上,務必在
接收機上方留出20厘米以上的
空間。
連接電纜
請不要將電纜從機器頂部繞過(如
圖所示),否則,機器內部的變壓
器所產生的磁場可能使揚聲器發出
“嗡嗡”的噪音。
開始使用之前
01
8
En/Sp/ChH
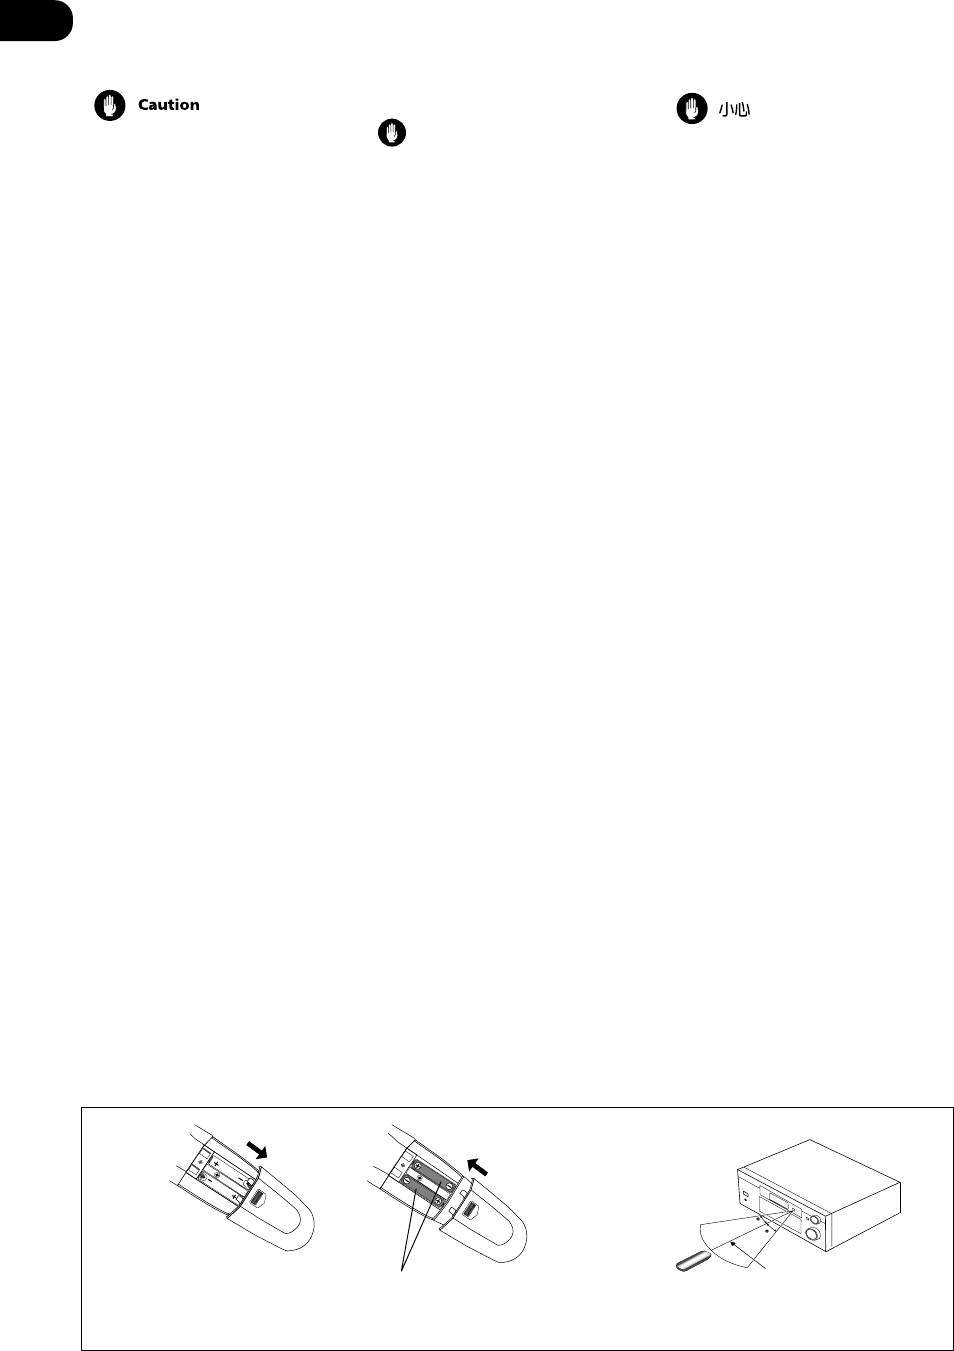
Loading the batteries
Incorrect use of batteries may
result in such hazards as
leakage and bursting. Observe
the following precautions:
•Never use new and old
batteries together.
•Insert the plus and minus
sides of the batteries properly
according to the marks in the
battery case.
•Batteries with the same shape
may have different voltages.
Do not use different batteries
together.
•When disposing of used
batteries, please comply with
governmental regulations or
environmental public instruc-
tion’s rules that apply in your
country or area.
Operating range of
remote control unit
The remote control may not work
properly if:
•There are obstacles between
the remote control and the
receiver's remote sensor.
•Direct sunlight or fluorescent
light is shining onto the
remote sensor.
•The receiver is located near a
device that is emitting infrared
rays.
•The receiver is operated
simultaneously with another
infrared remote control unit.
30
30
7m
Dry cell batteries x 2 (AA size IEC R6P)
Pilas de célula seca x 2 (tipo AA IEC RP6)
干電池×2 (AA尺寸 IEC R6P)
Cómo cargar las
pilas
Precaución
Un uso incorrecto de las pilas
puede provocar situaciones
peligrosas tales como fugas y
explosión. Tenga en cuenta las
siguientes precauciones:
•No mezcle nunca pilas nuevas
y viejas.
•Coloque correctamente los
lados positivo y negativo de las
pilas de acuerdo con las
marcas de la caja de las pilas.
•Hay pilas con la misma forma
que pueden tener distintos
voltajes. No utilice
conjuntamente pilas
diferentes.
•Cuando se deshaga de las
pilas viejas, respete la
legislación oficial o las
regulaciones públicas
medioambientales que rigen
su país o región.
Campo operativo del
mando a distancia
El mando a distancia puede no
funcionar correctamente si:
•Hay obstáculos entre el
mando a distancia y el sensor
remoto del receptor.
•La luz solar directa o luz
fluorescente se refleja en el
sensor remoto.
•El receptor está instalado
cerca de un aparato que emite
rayos infrarrojos.
•Se intenta hacer funcionar
simultáneamente con otro
mando a distancia que utiliza
rayos infrarrojos.
安裝電池
電池使用不當可能引起漏液和爆
裂。請注意下列事項︰
•切勿將新舊電池混用。
•按照電池室內的正負極標記,
將電池正確裝入電池室內。
•同一形狀的電池其電壓亦有不
同,請不要將不同電壓的電池
混用。
•處置廢棄電池時請務必遵守貴
地國家或地區的政府法規或環
境保護條約。
遙控器操作范圍
遇到下列情況,遙控器可能無法正
常工作︰
•在遙控器和接收機遙感窗之間
有障礙物。
•太陽光或熒光燈直接照射在遙
感窗上。
•接收機附近有某設備正在放射
紅外線。
•接受器同時在用另外一個紅外
遙控器進行操作。

02
9
En/Sp/ChH
English Español
Introduction to
home theater
You are probably used to using
stereo equipment to listen to
music, but may not be used to
home theater systems that give
you many more options (such as
surround sound) when listening to
soundtracks.
Home theater refers to the use of
multiple audio tracks to create a
surround sound effect, making you
feel like you're in the middle of the
action or concert. The surround
sound you get from a home
theater system depends not only
on the speakers you have set up in
your room, but also on the source
and the sound settings of the
receiver.
DVD-Video has become the basic
source material for home theater
due to its size, quality, and ease of
use. Depending on the DVD, you
can have up to seven different
audio tracks coming from one
disc, all of them being sent to
different speakers in your system.
This is what creates a surround
sound effect and gives you the
feeling of ‘being there’.
This receiver will automatically
decode Dolby Digital, DTS or Dolby
Surround DVD-Video discs,
according to your speaker setup.
In most cases, you won’t have to
make changes for realistic
surround sound, but other possi-
bilities (like listening to a CD with
multi-channel surround sound) are
explained in Playing sources,
starting on page 48.
5 minute guide Guía en 5 minutos
Introducción al
home theater
Probablemente esté acostumbrado
a utilizar un equipo estéreo para
escuchar música, pero tal vez no
esté acostumbrado a los sistemas
home theater que le proporcionan
muchas más ventajas (como el
sonido surround) cuando se
escuchan bandas sonoras.
Home theater consiste en el uso
de múltiples pistas de audio que
crean un efecto de sonido
surround, dando la sensación de
encontrarse en medio de la acción
o el concierto. El sonido surround
que se consigue de un sistema
home theater depende no sólo de
los altavoces que ha configurado
en la sala, sino también de la
fuente y de los ajustes del sonido
del receptor.
El DVD-Vídeo se ha convertido en
el material fuente básico para el
home theater debido a su tamaño,
calidad y fácil uso. Dependiendo
del DVD, puede disponer de hasta
siete pistas de audio diferentes
procedentes de un mismo disco,
que se envían a diferentes
altavoces del sistema. De este
modo se crea un efecto de sonido
surround dándole la sensación de
“encontrarse allí”.
Este receptor decodificará
automáticamente discos Dolby
Digital, DTS o DVD-Vídeo de Dolby
Surround, dependiendo de la
configuración de los altavoces. En
la mayoría de los casos no será
necesario que haga cambios para
conseguir un sonido surround real,
pero dispone de otras
posibilidades (como escuhar un
CD con sonido surround
multicanal) que se describen en
Reproducción de fuentes a partir de
la página 48.
家庭影院簡介
也許您經常使用立體聲設備來欣賞
音樂,但是可能還不熟悉家庭影院
系統;它能讓您在欣賞音樂時擁有
更多選擇(如環繞聲)。
家庭影院系統即指使用多聲道來創
造一種環繞聲效果,使您如同置身
於場景或音樂會之中。您從家庭影
院系統獲得的環繞聲效果不僅取決
於室內的揚聲器配置,而且取決於
播放源和接收機的聲音設定。
DVD影碟以其尺寸小、質量好、使
用方便等特點已成為家庭影院中較
為普及的播放素材。DVD影碟能使
您從同一張碟片中獲得多達七個聲
道的聲音,這些聲道的聲音被傳至
家庭影院系統中不同的揚聲器。這
就是使您享受到“身臨其境”的環
繞聲效果。
本接收機將根據您揚聲器的設置對
杜比數碼、DTS或杜比環繞聲DVD影
碟進行自動解碼。在大多數情況
下,您不必作任何改變以求真實的
環繞聲效果;但有些情況,如用多
聲道環繞聲欣賞CD唱碟,您可以參
見第48頁起播放音源的有關內容。
五分鐘快捷指南
02
10
En/Sp/ChH
Listening to
Surround Sound
This receiver was designed with
the easiest possible setup in mind,
so with the following quick setup
guide, you should have your
system hooked up for surround
sound in no time at all. In most
cases, you can simply leave the
receiver in the default settings.
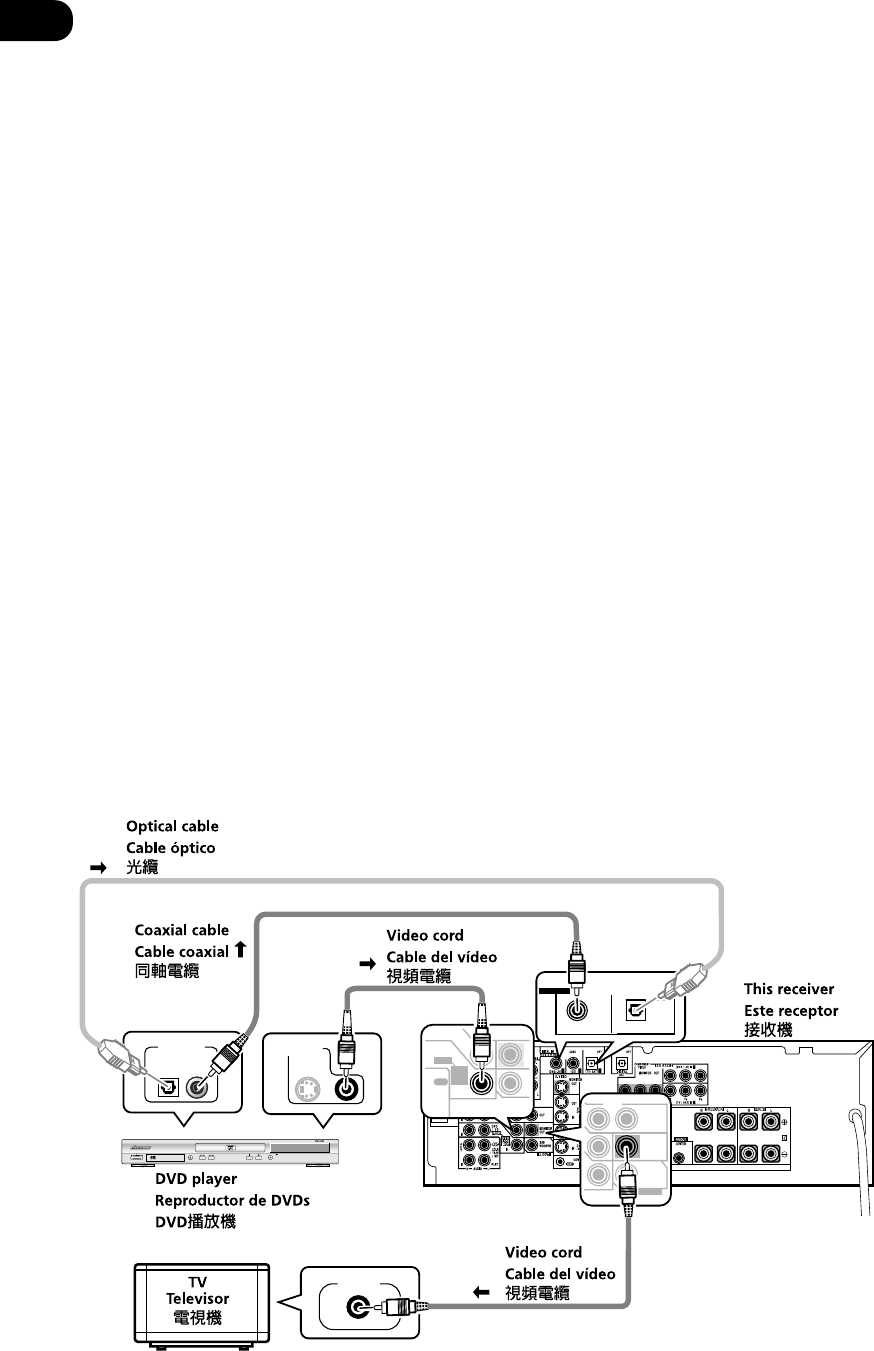
1 Hook up your DVD player.
For surround sound, you’ll want to
hook up using a digital connection
from the DVD player to the
receiver. You can do this with
either a coaxial, or an optical
connection (you don’t need to do
both). If you hook up using an
optical cable, you should refer to
Optical digital input setting on page
70 to assign the optical input to
DVD.
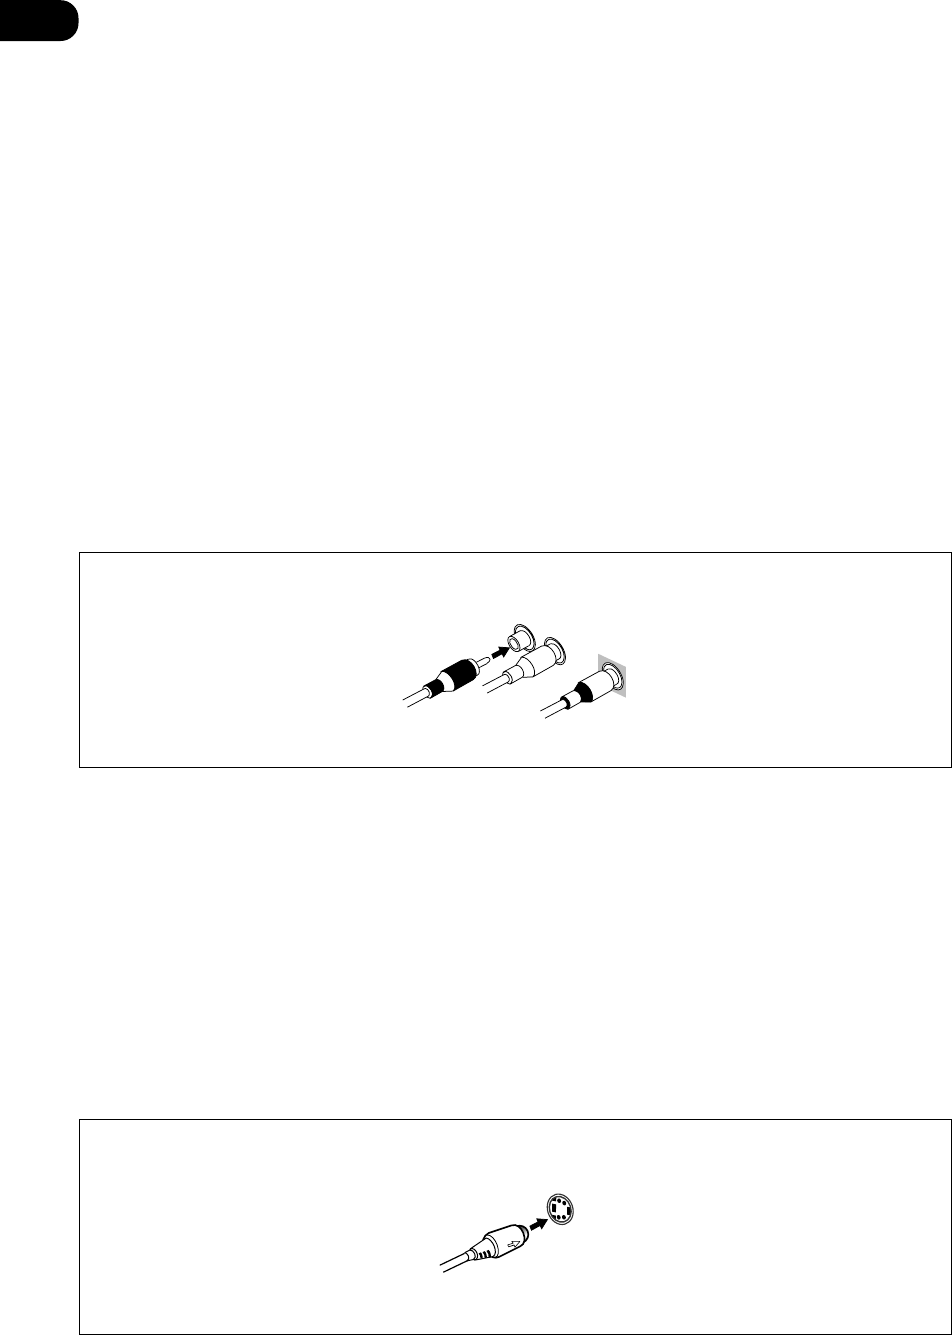
Use a video cord to connect the
video output on your DVD player to
the receiver using the jacks shown
below.
2 Hook up your TV.
Use a video cord to connect your
receiver to the TV using the jacks
as shown below.
Cómo escuchar
sonido surround
Este receptor se diseñó para una
configuración lo más sencilla
posible, así que con la siguiente
guía de configuración rápida,
podrá tener su sistema conectado
para un sonido surround
rápidamente. En la mayoría de los
casos puede dejar simplemente el
receptor con los valores de ajuste
por defecto.
1 Conecte el reproductor de
DVDs.
Para un sonido surround deberá
realizar una conexión digital del
reproductor de DVDs al receptor.
Podrá hacerlo mediante una
conexión coaxial u óptica (no es
necesario que haga ambas). Si
realiza la conexión utilizando un
cable óptico, deberá consultar
Ajuste de la entrada digital óptica
en la página 70 para asignar la
entrada óptica al DVD.
Utilice un cable de vídeo para
conectar la salida de vídeo en el
DVD al receptor utilizando las
tomas que se muestran en la
página siguiente.
2 Conecte el televisor.
Utilice un cable de vídeo para
conectar el receptor al televisor
utilizando las tomas que se
muestran en la página siguiente.
欣賞環繞聲
本接收機設計有最易於記憶的設置
方式,因此遵照下列快速設置指南
進行操作後,您很快即能將您的系
統連接好以獲得環繞聲效果。在大
多數情況下,您可以使用接收機的
默認設定。
1連接DVD播放機。
為獲得環繞聲,您需要用數碼連接
方式將DVD播放機與接收機連接。
您可以用同軸電纜或光纜實現連接
(兩者取其一即可)。如果使用光
纜,請參見第70頁上的
光學數碼輸
入設定
,以便為DVD分配一光學輸
入口。
請用視頻電纜按下圖所示的插口將
DVD播放機上的視頻輸出端與接收
機相連接。
2連接電視機。
請用視頻電纜按下圖所示的插口將
接收機與電視機相連接。
S
IN
OUT
MONITOR
OUT
SUB
WOOFER
PREOUT
COAX OPT
(DVD/LD)(TV/SAT)
¥¥
ASSIGNABLE
DIGITAL IN
VIDEO
DIGITAL OUT VIDEO OUT
VIDEO IN
IN
IN
FRONT
DVD
/ LD
CD-R
REC
/ TAPE
/ MD
D V D
5.1CH
INPUT
02
11
En/Sp/ChH
English Español
** Note: If you hook up using a
optical cable, see Optical input
setting on page 70 to assign the
optical input to DVD.
* The illustration shows the VSX-
D711, but DVD connections for
the VSX-D811S are the same.
3 Conecte los altavoces.
Se muestra una configuración de
los altavoces completa en las
páginas 14–15 (seis altavoces,
incluido el realzador de graves,
para el VSXD711, y ocho, incluido
el realzador de graves, para el VSX-
D811S) pero la configuración
home de cada uno variará.
Simplemente conecte los
altavoces de los que dispone tal y
como en siguiente la páginación.
El receptor funcionará con sólo
dos altavoces estéreo (los
altavoces frontales en el
diagrama), pero se recomienda
que se utilicen al menos tres
altavoces, siendo una
configuración completa la mejor
opción.
Asegúrese de que conecta el
altavoz derecho al terminal
derecho y el altavoz izquierdo al
terminal izquierdo. Asegúrese
también de que los terminales (+/–
) del receptor coinciden con los de
los altavoces.
Nota
•Utilice altavoces con una
impedancia nominal de 8 Ω a
16 Ω.
•En caso de que no utilice un
realzador de graves, cambie el
valor de ajuste del altavoz
frontal (véase la sección
Ajuste de los altavoces en la
página 62) a grande.
•Cuando utilice el altavoz del
televisor como el altavoz
central (C), conecte la toma
CENTER PREOUT de este
aparato a la toma de entrada
de audio del televisor En este
caso el altavoz central que se
muestra es inncesario.
** Si realiza la conexión utilizando
un cable óptico, véase la
sección “Ajuste de la entrada
digital óptica” en la página 70
para asignar la entrada óptica
al DVD.
* La ilustración muestra el VSX-
D711, pero las conexiones de
DVD para el VSX-D811S son las
mismas.
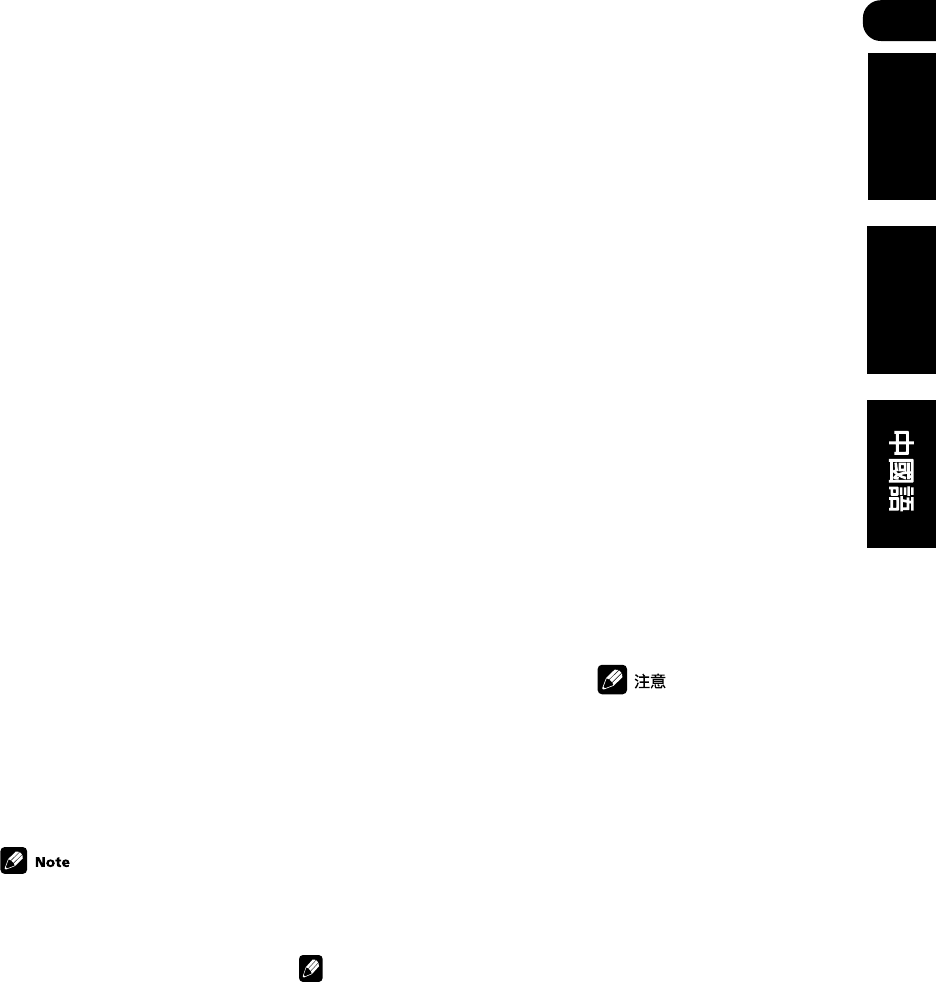
3 Connect your speakers.
A complete setup of speakers is
shown here (six speakers (includ-
ing the subwoofer) for the VSX-
D711, and eight (also including the
subwoofer) for the VSX-D811S),
but everyone’s home setup will
vary. Simply connect the speakers
you have in the manner shown on
the next page. The receiver will
work with just two stereo speakers
(the front speakers in the diagram)
but using at least three speakers is
recommended, and a complete
setup is best.
Make sure you connect the
speaker on the right to the right
terminal and the speaker on the
left to the left terminal. Also make
sure the positive and negative (+/–)
terminals on the receiver match
those on the speakers.
•Use speakers with a nominal
impedance of 8 Ω to 16 Ω.
•If you’re not using a
subwoofer, change the front
speaker setting (see Speaker
setting on page 62) to large
•When using the speaker on
your TV as the center speaker
(C), connect the CENTER
PREOUT jack on this unit to
the audio input jack on your
TV. In this case the center
speaker shown is
unnecessary.
** 注意︰如果使用光纜連接,請
參閱第70頁上的光學輸入設
定,以便為DVD分配一個光學輸
入端。
* 本圖示以VSX-D711為例,但
VSX-D811S和DVD的連接與之相
同。
3連接揚聲器。
下文介紹的是完整的揚聲器設置
(VSX-D711帶六個揚聲器(包括
超低音揚聲器);VSX-D811S帶八
個揚聲器(包括超低音揚聲
器)),但是每個家庭影院系統的
設置將各不相同。按下頁方法即可
輕鬆自如地連接您的揚聲器。本接
收機祇需連接兩個立體聲揚聲器
(圖中為前置揚聲器)即可正常工
作,但我們建議至少使用三個揚聲
器,如能完整配置則更佳。
請確保右側的揚聲器連接至右端
子,左側的揚聲器連接至左端子。
另外還請確保接收機上的正負極
(+/–)端子與揚聲器上的正負極
端子匹配。
•請使用標稱阻值為8Ω-16Ω的
揚聲器。
•如果不使用超低音揚聲器,請
將前置揚聲器設定設為大(參
見第62頁揚聲器設定)。
•如將電視機上的揚聲器用作中
置揚聲器(C),則將接收機
上的CENTER PREOUT插口連
接到電視機的音頻輸入插口。
此種情況下,所示的中置揚聲
器並非必須。
02
12
En/Sp/ChH
ASSIGNABLE
AB
MONITOR
OUT
MONITOR OUT
FRONT
RL R LRL
FRONTCENTER SURROUND
S
P
E
A
K
E
R
S
YP
B
P
R
YP
B
P
R
OUT
IN
IN
IN
S - VIDEO
VCR /
DVR
TV/
SAT
DVD/
LD
CONTROL
PREOUT
CENTER
OUT
ANTENNA
AM
LOOP
R
AUDIO
L
DVD 5.1CH INPUT
IN
IN
IN
IN
IN
IN
IN
IN
IN
RL
CENTER
SURROUND
SUB W.
CD
AUX
VCR /
DVR
TV /
SAT
DVD
/LD
PLAY
CD-R
/TAPE
/MD
FRONT
PREOUT
COAX OPT OPT
COMPONENT
VIDEO
(DVD/ LD)(
CD)(TV/ SAT)
OUT
MONITOR
OUT
SUB
WOOFER
VIDEO
REC
¥¥ø
ø
ASSIGNABLE
DIGITAL IN
DIGITAL
OUT
(T V / SAT)IN
D V D
5.1CH
INPUT
(DVD/ LD)IN ¥
FM
UNBAL
75
Ω
INPUT
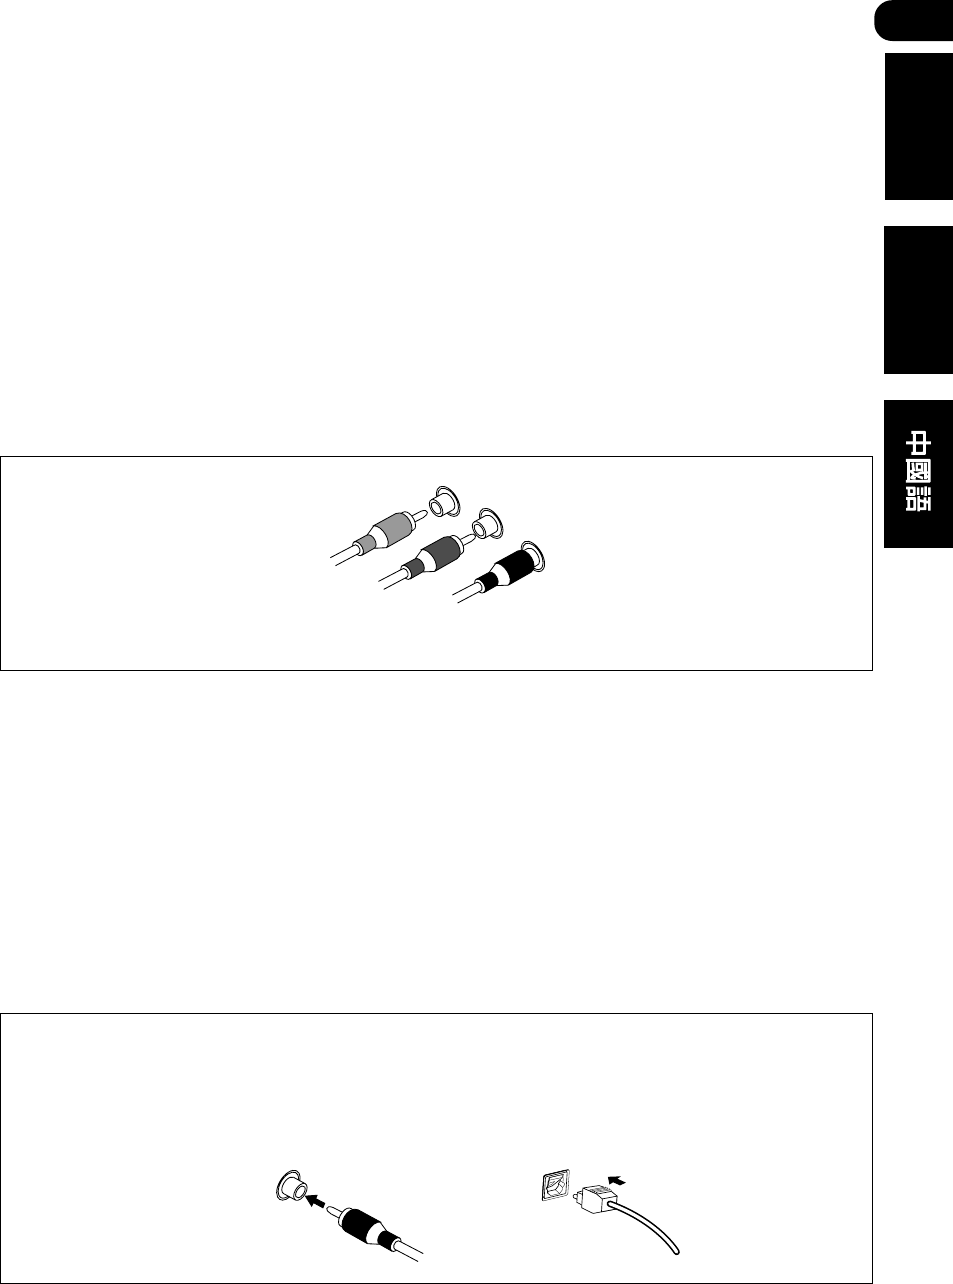
Powered subwoofer
Be sure to complete all connec-
tions before connecting this unit
to the AC power source.
Center Speaker
C
Surround Speakers
SRSL
Front Speakers
FL FR
TV
SW
Altavoces frontales
前置揚聲器
Altavoz central
中置揚聲器
Altavoces surround
環繞聲揚聲器
Realzador de graves
alimentado
有源超低音揚聲器
Televisor
電視機
Nota
Asegúrese de realizar todas las
conexiones antes de conectar
este aparato a la fuente de
alimentación de CA.
在將接收機連接到交流電源之
前,請確保所有連接都已完成。
02
13
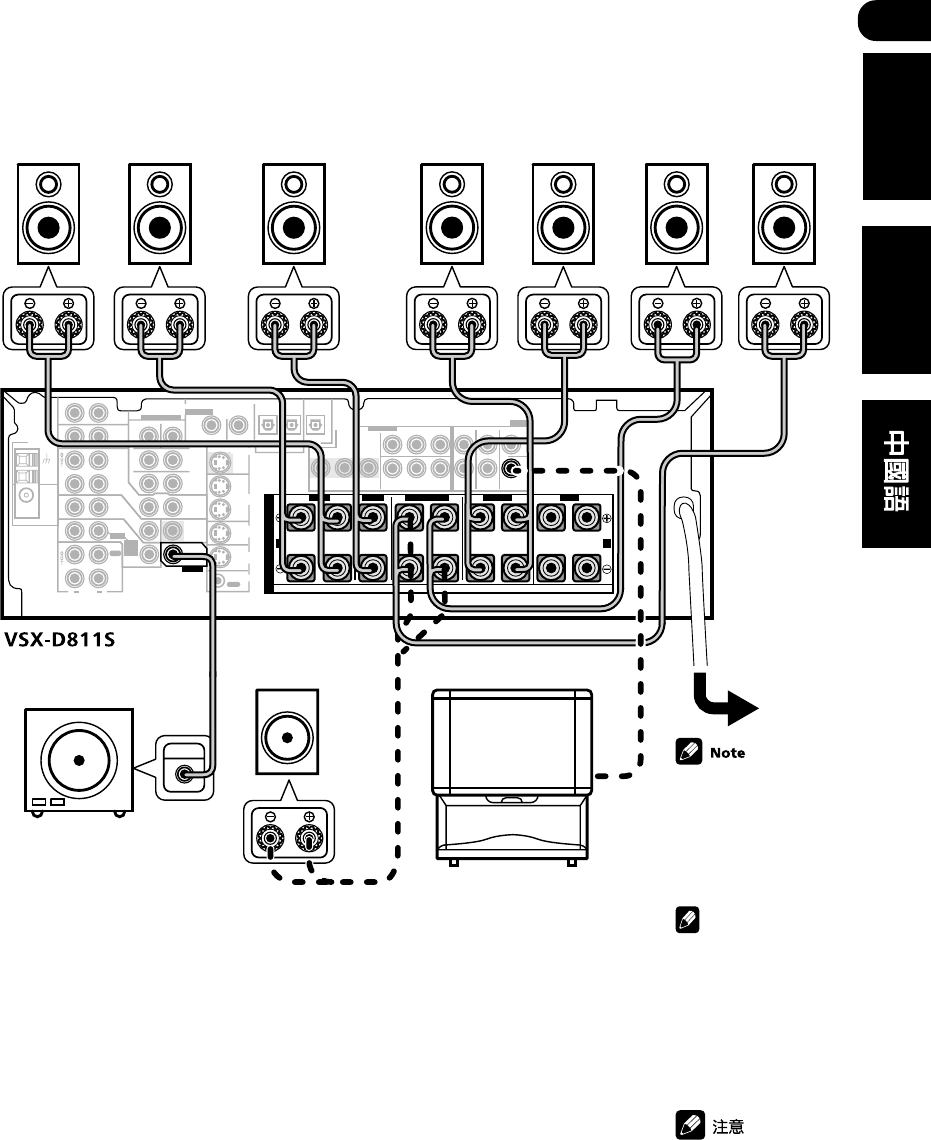
En/Sp/ChH
English Español
ASSIGNABLE
PREOUT
AB
MONITOR
OUT
MONITOR OUT
FRONT
RL R
RR
LR L
FRONTCENTER SURROUND
RL
LL
SURROUND BACK
S
P
E
A
K
E
R
S
YP
B
P
R
YP
B
P
R
OUT
IN
IN
IN
S-VIDEO
VCR /
DVR
TV/
SAT
DVD/
LD
CONTROL
OUT
ANTENNA
AM
LOOP
R
AUDIO
L
DVD 7.1CH INPUT
IN
IN
IN
IN
IN
IN
IN
IN
IN
RL
CENTER
SURROUND
RL
SURROUND
BACK
SUB W.
CD
AUX
VCR /
DVR
TV /
SAT
DVD
/ LD
PLAY
CD-R
/ TAPE
/ MD
FRONT
D V D
5.1CH
INPUT
PREOUT
COAX OPT OPT
COMPONENT
VIDEO
(DVD/ LD)(
CD)(TV/
SAT)(CD-R/
/ TAPE
/ MD)
OUT
MONITOR
OUT
SUB
WOOFER
VIDEO
REC
¥¥
øø
ø
ASSIGNABLE
DIGITAL IN
DIGITAL
OUT
(TV / SAT
)FRONT CENTER
SURROUND
BACK
SURROUND
IN
(DVD/ LD)IN
¥
FM
UNBAL
75
Ω
INPUT
Surround back speakersCenter Speaker
C
Surround Speakers
SRSL
Front Speakers
FL FR SBRSBL
SW
Surround back speaker or
Subwoofer (passive)
TV
Powered Subwoofer
Be sure to complete
all connections before
connecting this unit
to the AC power
source.
Altavoces frontales Altavoz central Altavoces surround
Realzador de graves
alimentado
Altavoz surround posterior
o realzador de graves
(pasivo)
Altavoces posteriores surround
Televisor
Nota
Asegúrese de realizar
todas las conexiones
antes de conectar
este aparato a la
fuente de
alimentación de CA.
在將接收機連接到交
流電源之前,請確保
所有連接都已完成。
中置揚聲器 環繞聲揚聲器 後置環繞聲揚聲器
有源超低音揚聲器
後置環繞聲揚聲器或超低音揚聲器(無源)
電視機
前置揚聲器
02
14
En/Sp/ChH
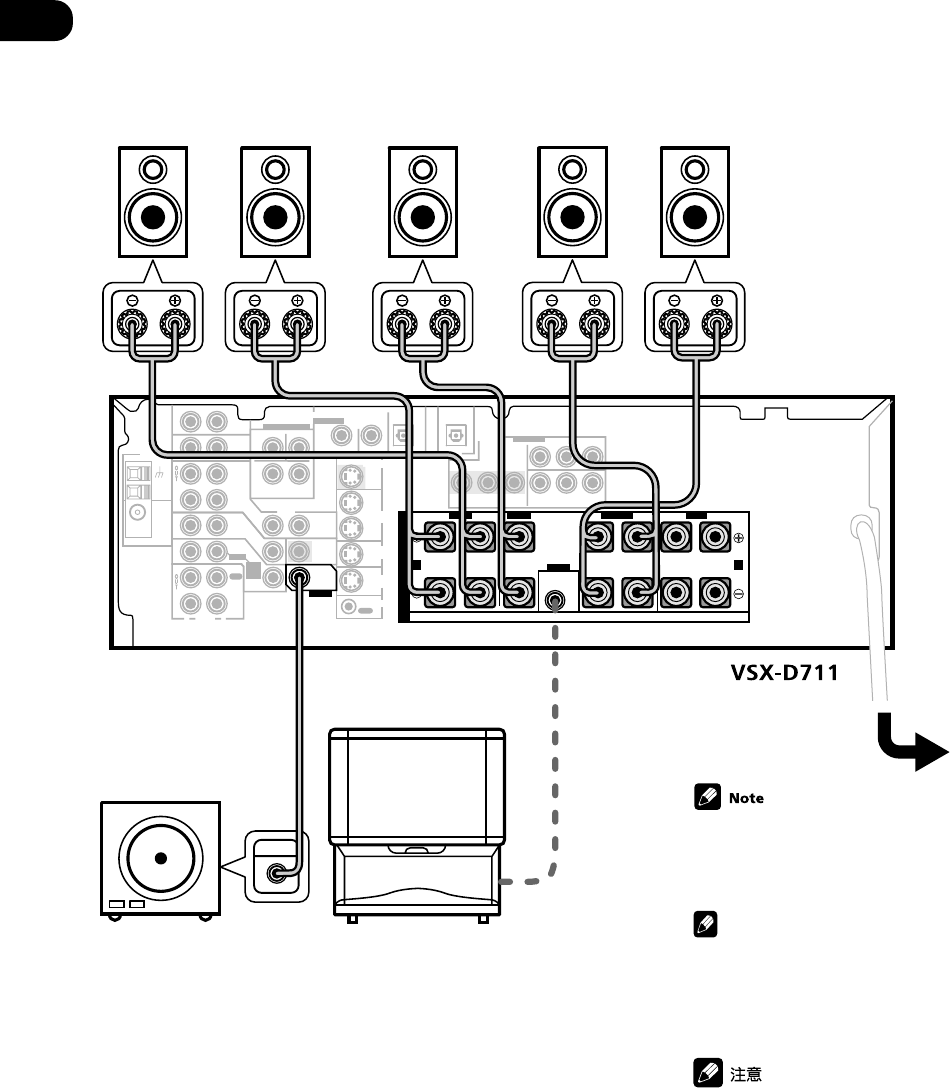
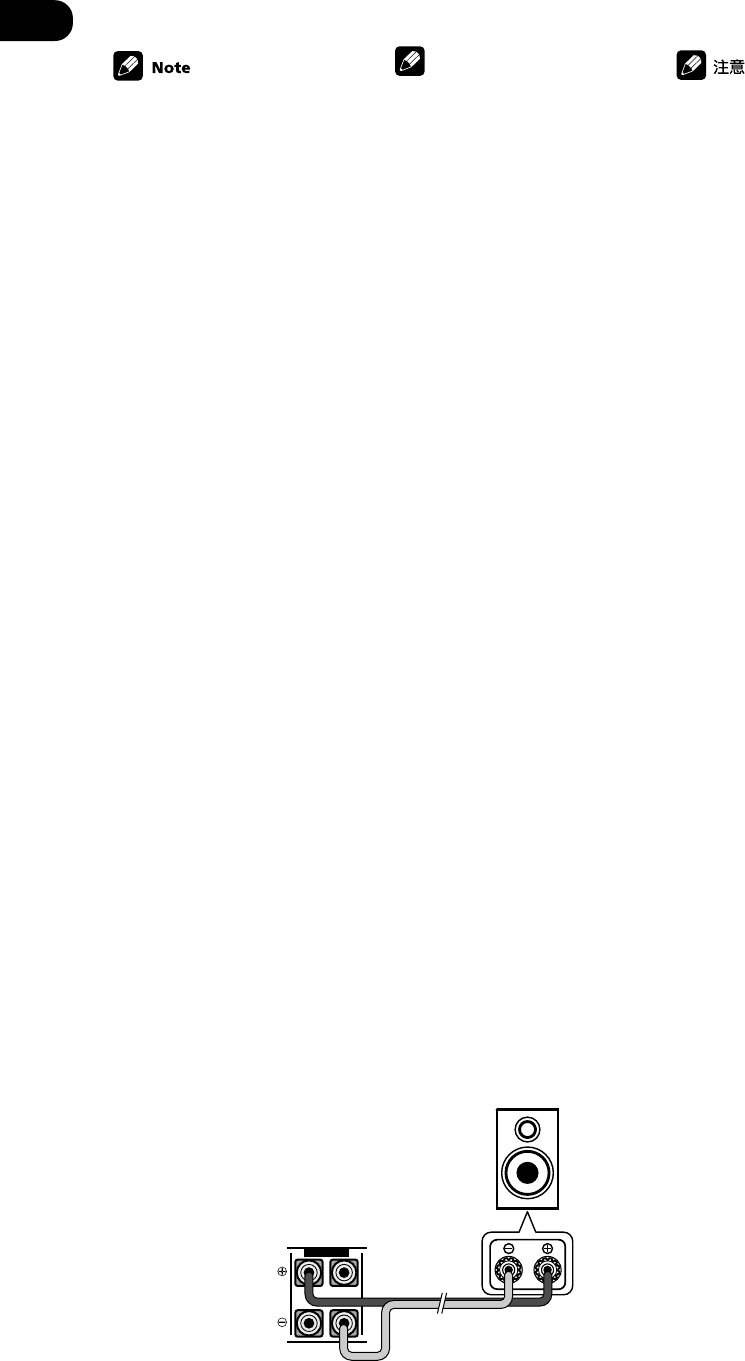
VSX-D811S only
•If you are using only one
surround back speaker,
connect the positive wire to
the right channel (+) terminal,
and the negative wire to the
left channel (–) terminal
(shown below).
•If you select subwoofer (SB
SUBWF) in the Surround back
speaker setting (see page 63)
you can hook up a subwoofer
instead of speakers to the
surround back speaker
terminals. Connect the wires
just as above (and as shown
below), connecting the
positive wire to the right
channel (+) terminal, and the
negative wire to the left
channel (–) terminal.
4 Plug in the receiver and
switch it on, followed by your
DVD player, your subwoofer
and the TV.
Make sure you’ve set the video
input on your TV to this receiver.
Check the manual that came with
the TV if you don’t know how to do
this.
Also make sure that DVD/LD is
showing in the receiver’s display,
indicating that the DVD input is
selected. If it isn’t, press DVD on
the remote control to set the
receiver to the DVD input.
RL
SURROUND BACK
VSX-D811S
Surround back speaker (or subwoofer)
4 Enchufe el receptor y
enciéndalo, y, a continuación
haga lo mismo con el
reproductor de DVDs, el
realzador de graves y el
televisor.
Asegúrese de que ha ajustado la
entrada de vídeo del televisor a
este receptor. Compruebe el
manual que se adjuntó con el
televisor en caso de que no sepa
hacerlo.
Asegúrese también de que en la
pantalla del receptor aparece
DVD/LD, indicando que se ha
seleccionado la entrada de DVD.
En caso contrario, pulse DVD en el
mando a distancia para ajustar el
receptor a la entrada de DVD.
Nota
Sólo VSX-D811S
•En caso de que utilice
únicamente un altavoz
posterior surround, conecte el
cable positivo al terminal del
canal derecho (+), y el cable
negativo al terminal del canal
izquierdo (–) (tal y como se
muestra a continuación).
•Si selecciona realzador de
graves (SB SUBWF) en el
Ajuste del altavoz posterior
surround (véase página 63)
puede conectar un realzador
de graves en lugar de
altavoces a los terminales de
los altavoces posteriores
surround. Conecte los cables
como se muestra en la página
anterior (tal y como se
muestra a continuación),
conecte el cable positivo al
terminal del canal derecho (+),
y el cable negativo al terminal
del canal izquierdo (–).
Altavoz posterior surround (o realzador)
僅適於VSX-D811S︰
•如果僅使用一個後置環繞聲揚
聲器,則將正極引線連接到右
聲道(+)端子,將負極引線
連接到左聲道(-)端子。
(如下圖所示)
•如果在
後置環繞聲揚聲器設定
中選擇超低音揚聲器(SB
SUBWF)(參見第63頁),則
可將超低音揚聲器取代連接後
置環繞聲揚聲器端子的揚聲
器。接線方法同上(如下圖所
示),將正極引線連接到右聲
道(+)端子,將負極引線連
接到左聲道(-)端子。
4插上電源插頭,打開接收機,
然後打開DVD播放機、超低音揚聲
器和電視機。
請確保電視機的視頻輸入已與接收
機相連。如有疑問,可以查閱電視
機附帶的使用說明書。
同時還請確保接收機顯示屏顯示
DVD/LD,表示DVD輸入已選擇。如
沒有顯示,則在遙控器上按DVD,
以使接收機設置為DVD輸入模式。
後置環繞聲揚聲器(或者超低音揚聲器)

02
15
En/Sp/ChH
English Español
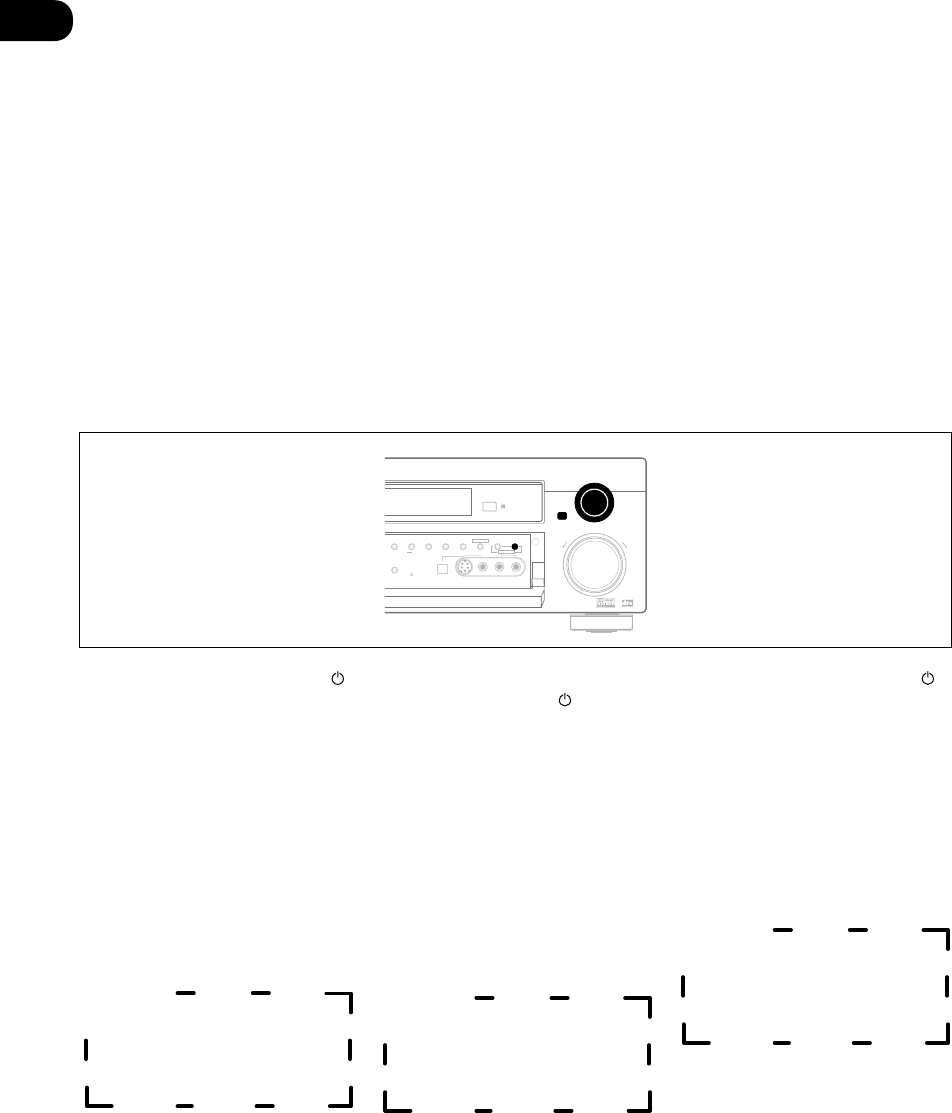
5 Press QUICK SETUP on the
front panel to specify your
speaker setup and your room
size.
Use the MULTI JOG/INPUT
SELECTOR dial to select and
ENTER to confirm your selection.
See Using the Quick Setup on page
16 if you’re unsure about the
settings.
6 Play a DVD, and adjust the
volume to your liking.
There are several other sound
options you can select. See pages
48–52 for more on this. See also
Choosing your receiver setup on
page 59–71 for more setup options.
Depending on your DVD player
or source discs, you may only
get digital 2 channel stereo and
analog sound. In this case, the
listening mode must be set to
Standard (it should already be
set—see page 48 if you need to
do this) if you want multi-
channel surround sound.
Nota
Dependiendo del reproductor de
DVDs o discos fuente, puede
que obtenga sólo sonido
analógico y estéreo digital de 2
canales. En ese caso, el modo
de audicón deberá ajustarse a
Estándar (ya debería estar
ajustado, véase página 48 en
caso de que tenga que hacerlo)
si desea un sonido surround
multicanal.
5 Pulse QUICK SETUP en el
panel frontal para especificar la
configuración del altavoz y el
tamaño de la sala.
Utilice el selector MULTI JOG/
INPUT SELECTOR para
seleccionar, y ENTER para
confirmar la selección. Véase la
sección Cómo utilizar la
configuración rápida en las páginas
16 si no está seguro de los ajustes.
6 Reproduzca un DVD, y ajuste
el volumen a su gusto.
Dispone de diversas opciones de
sonido para seleccionar. Véase la
página 48–52 para más
información. Véase también la
sección Elección de la
configuración de su receptor en las
páginas 59–71 para más opciones
de configuración.
5按前面板上的QUICK SETUP
(快速設置),指定您的揚聲器設
置和您的房間大小。
使用MULTI JOG/INPUT SELECTOR
旋鈕進行選擇,並按ENTER確認。
若您對此尚有疑問,請參閱第16頁
使用
快速設置
的有關內容。
6播放DVD,根據您的喜好調節
音量。
您可選擇其他聲音選項。詳情請參
閱第48-52頁。也可參閱第59-71
頁
選擇接收機設置
的有關內容,以
獲取更多的設置選項。
某些DVD播放機或播放碟片可能
僅錄有雙聲道數碼立體聲和模擬
聲音。在這種情況下,若想實現
多聲道環繞聲,收聽模式必須設
置為標準模式(應已設定 ──
若您要進行此設置請參閱第48
頁)。
02
16
En/Sp/ChH
DOWN
UP
ENTER
INPUT
SELECTOR
MASTER VOLUME
MULTI JOG
AUDIO/VID EO MULTI-CHANNEL RECEIVER
R
N∫m-Û≥,,
SPEAKERS
S-VIDEO VIDEO L AUDIO R
ADVANCED
SURROUND STEREO/
DIRECT SIGNAL
SELECT MIDNIGHT/
LOUDNESS MONITOR TONE QUICK SETUP
VIDEO INPUT
L
ISTENING MODE
FL DIMMER
MULTI JOG
DIGITAL IN
Using the Quick
Setup
You can use the Quick Setup to get
your system up and running with
just a few button presses. The
receiver automatically makes the
necessary settings after you have
selected your speaker setup and
room size. If you want to make
more specific settings, refer to
Choosing your receiver setup on
pages 59–71. Use the front panel
controls for the steps below.
Cómo utilizar la
configuración rápida
Puede utilizar la configuración
rápida para preparar el sistema y
hacer que funcione con sólo
pulsar unos botones. El receptor
realiza automáticamente los
ajustes necesarios una vez haya
seleccionado la configuración de
los altavoces y el tamaño de la
sala. En caso de que desee hacer
más ajustes específicos, consulte
Elección de la configuración de su
receptor en las páginas 65–76.
Utilice los controles del panel
frontal para los siguientes pasos.
1 En caso de que el receptor
esté apaga-do, pulse
STANDBY/ON para encenderlo.
El indicador STANDBY
desaparece.
2 Pulse QUICK SETUP.
La pantalla le pide que seleccione
la configura-ción de los altavoces.
3 Utilice el selector MULTI JOG/
INPUT SELECTOR para elegir la
configuración de los altavoces.
Haga una selección de entre las
siguientes opciones:
7.1ch* 4.1ch
7.0ch* 5.0ch
6.0ch*
6.1ch* 5.1ch
3.1ch3.0ch 4.0ch
* Sólo VSX-D811S
1 If the receiver is off, press
STANDBY/ON to turn the power
on.
The STANDBY indicator goes out.
2 Press QUICK SETUP.
The display prompts you to select
your speaker setup.
3 Use the MULTI JOG/INPUT
SELECTOR dial to choose your
speaker setup.
Cycle between the following
choices:
7.1ch* 4.1ch
7.0ch* 5.0ch
6.0ch*
6.1ch* 5.1ch
3.1ch3.0ch 4.0ch
* VSX-D811S only
使用快速設置
使用快速設置,您祇需按幾個按鈕
就能使系統正常運行。在對揚聲器
設置和房間大小進行選定後,接收
機將自動作必要設定。若需進行更
多特殊設定,請參閱第59-71頁
選
擇接收機設置
的有關內容。請使用
前面板控制按鈕執行以下步驟。
1如接收機處於關閉狀態,按
STANDBY/ON打開電源。
STANDBY指示標誌熄滅。
2按QUICK SETUP。
顯示屏提示您選擇揚聲器設置。
3用MULTI JOG/INPUT
SELECTOR旋鈕來選擇揚聲器設
置。
選項循環如下︰
7.1ch* 4.1ch
7.0ch* 5.0ch
6.0ch*
6.1ch* 5.1ch
3.1ch3.0ch 4.0ch
﹡ 僅適於VSX-D811S
02
17
En/Sp/ChH
English Español
* VSX-D811S only
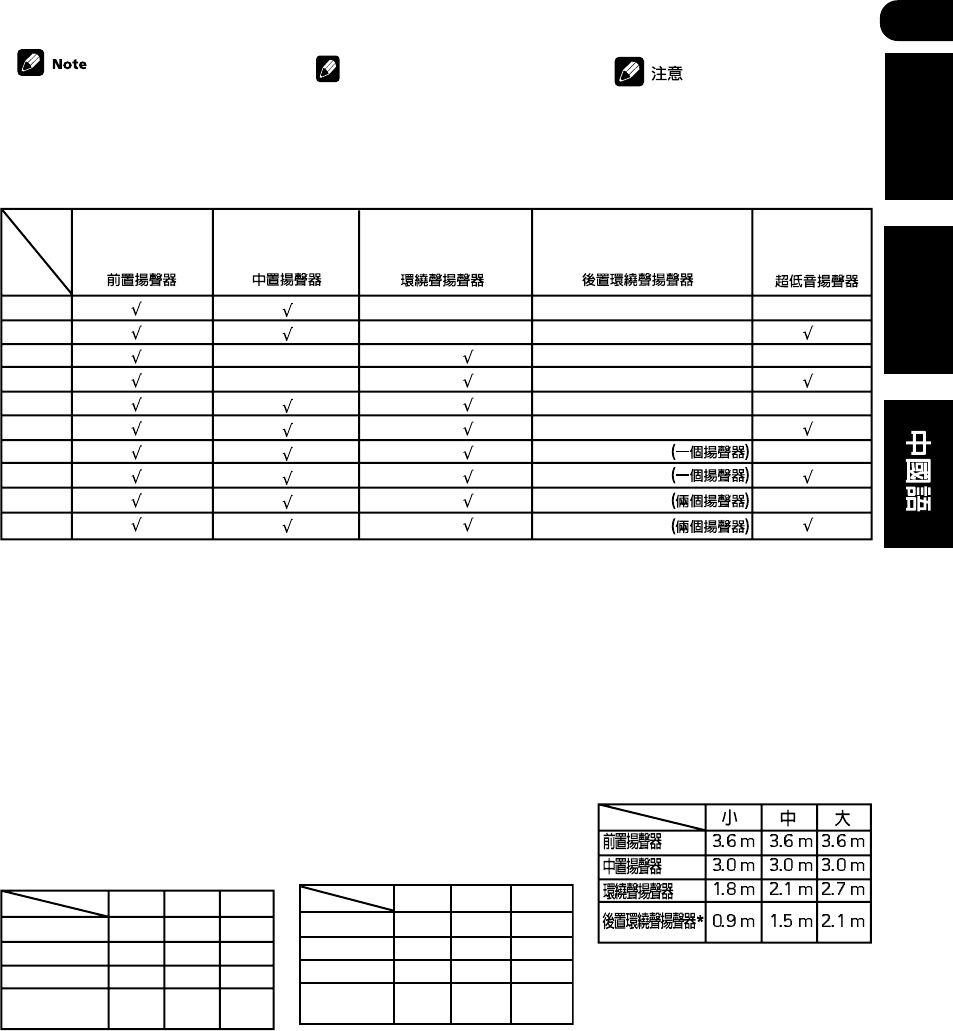
Check the table below to find
the speaker setup that corre-
sponds with your system.
4 Press ENTER.
The display prompts you to select
your room size.
5 Use the MULTI JOG/INPUT
SELECTOR dial to choose your
room size.
Depending on the distance of your
speakers from the listening
position, choose between Small,
Medium, or Large (see table
below).
S
3.6 m
3.0 m
1.8 m
0.9 m
M
3.6 m
3.0 m
2.1 m
1.5 m
L
3.6 m
3.0 m
2.7 m
2.1 m
Front
Center
Surround
Surround
Back*
* VSX-D811S only
6 Press ENTER to confirm your
setup.
The display shows the speaker
setup and room size that you have
selected.
Nota
Compruebe la siguiente tabla
para buscar la configuración de
los altavoces que corresponde a
su sistema.
* Sólo VSX-D811S
* Sólo VSX-D811S
4 Pulse ENTER.
La pantalla le pide que seleccione
el tamaño de la sala.
5 Utilice el selector MULTI JOG/
INPUT SELECTOR para elegir el
tamaño de la sala.
Dependiendo de la distancia de los
altavoces surround de la posición
de audición, elija entre Small,
Medium o Large (véase la
siguiente tabla).
S
3,6
m
3,0 m
1,8 m
0,9 m
Frontal
Central
Surround
Posterior
surr.*
M
3,6
m
3,0 m
2,1 m
1,5
m
L
3,6
m
3,0 m
2,7 m
2,1 m
6 Pulse ENTER para confirmar
la configuración.
La pantalla muestra la
configuración de los altavoces y el
tamaño de la sala que ha
seleccionado.
查閱下表,找到與您的系統匹配
的揚聲器設置。
*
僅適於VSX-D811S
Front Speakers Center Speakers Surround Speakers Surround Back Sp. Sub Woofer
3.0 ch
3.1 ch
4.0 ch
4.1 ch
5.0 ch
5.1 ch
6.0 ch*
6.1 ch*
7.0 ch*
7.1 ch*
(1 Speaker)
(1 Speaker)
(2 Speakers)
(2 Speakers)
Realz. graves
(1 altavoz)
(1 altavoz)
(2 altavoces)
(2 altavoces)
Altavoces frontales
Altavoz central Altavoces surround Altavoces post. surr.
4按ENTER。
顯示屏提示您選擇房間大小。
5使用MULTI JOG/INPUT
SELECTOR旋鈕選擇房間大小。。
根據揚聲器離開聽音位置的距離,
選擇S(小),M(中)或者L
(大)(見下表)。
*
僅適於VSX-D811S
6按ENTER,確認設置。
顯示屏顯示您所選擇的揚聲器設置
和房間大小。
03
18
En/Sp/ChH
Connecting up
L
R
VIDEO
S-VIDEO
Before making or changing any
connections, switch off the power
and disconnect the power cord from
the AC wall outlet.
Audio/Video cords
Use audio/video cords (not
supplied) to connect the audio/
video components and a video
cord to connect the monitor TV.
Connect red plugs to R (right),
white plugs to L (left), and the
yellow plugs to VIDEO.
Be sure to insert completely.
S-video cables
Use S-video cables (not supplied)
to get clearer picture reproduction
than regular video cords.
Connect from an S-video jack on
the rear of the receiver to an S-
video jack on the video component
you are hooking up.
Be sure to insert completely.
Antes de efectuar o modificar las
conexiones, apague y desconecte el
cable de alimentación de la toma de
CA.
Cables de audio/
vídeo
Utilice cables de audio/vídeo (no
suministra-dos) para conectar los
componentes de audio/vídeo y un
cable de vídeo para conector el
monitor del televisor.
Conecte los enchufes rojos a la
toma R (derecha), los enchufes
blancos a la toma L (izquierda) y
los enchufes amarillos a la toma
VIDEO.
Asegúrese de insertarlos
completamente.
Cables S-vídeo
Utilice cables S-vídeo (no
suministrado) para conseguir un
reproducción de las imágenes más
clara que con los cables de vídeo.
Conéctelo de una toma S-vídeo en
la parte posterior del receptor a
una toma S-vídeo en el
componente de vídeo que está
conectando
Asegúrese de insertarlo
completamente.
Conexiones
在進行連接或改變連接之前,關閉
電源,並將電源線從交流電插座拔
下。
音頻/視頻電纜
使用音頻/視頻電纜(不附帶)連
接音頻/視頻設備,視頻電纜連接
電視機顯示器。
將紅色插頭插入 R (右)插口,白
色插頭插入L(左)插口,黃色插
頭插入VIDEO(視頻)插口。
請確保完全插入。
連接
S視頻電纜
使用S視頻電纜(不附帶)較之使
用普通視頻電纜能得到更清晰的畫
面。
請將接收機後面的S視頻插口連接
至所要連接的視頻設備的S視頻插
口。
請確保完全插入。
03
19
En/Sp/ChH
English Español
Cables de vídeo del
componente
Utilice los cables de vídeo del
componente para obtener la mejor
reproducción del color posible de
su fuente de vídeo. La señal de
color del televisor se divide en la
señal de luminancia (Y) y las
señales de color (PB y PR), y en la
salida. De este modo, se evitan las
interferencias entre las señales.
Conecte las tomas de vídeo del
componente de la parte posterior
del receptor a las tomas de vídeo
del componente de vídeo que está
conectando.
Component video
cords
Use component video cords to get
the best possible color reproduc-
tion of your video source. The color
signal of the TV is divided into the
luminance (Y) signal and the color
(PB and PR) signals and then
output. In this way, interference
between the signals is avoided.
Connect from the component
video jacks on the rear of the
receiver to the component video
jacks on the video component you
are hooking up.
Digital audio coaxial cord
(or standard video cord)
Optical cable
Y
PBPR
Digital audio coaxial
cords/Optical cables
Commercially available digital
audio coaxial cords (standard
video cords can also be used) or
optical cables (not supplied) are
used to connect digital compo-
nents to this receiver.
Be sure to insert completely.
Cables ópticos/ca-
bles de audio digital
Los cables coaxiales de audio de
venta en el comercio (pueden
utilizarse también cables de vídeo
estándar) o cables ópticos (no
suministrados) se usan para
conectar los componentes
digitales a este receptor.
Asegúrese de insertarlos
completamente.
Cable coaxial de audio digital
(o cable de vídeo estándar) Cable óptico
Green
Verde
綠Blue
Azul
藍
Red
Rojo
紅
分量視頻電纜
使用分量視頻電纜可使視頻源獲得
最佳的色彩再現。電視機的色彩信
號被分成亮度(Y)信號和色彩
(PB和PR)信號,然後輸出,這樣
避免了信號之間的干擾。請將接收
機後面的分量視頻插口連接視頻設
備上的分量視頻插口。
數碼音頻同軸電纜/光纜
可使用市售的數碼音頻同軸電纜
(標準視頻電纜亦可)或光纜(不
附帶)將數碼設備連接到接收機。
請確保完全插入。
數碼音頻同軸電纜(或者標準視頻電纜) 光纜

03
20
En/Sp/ChH
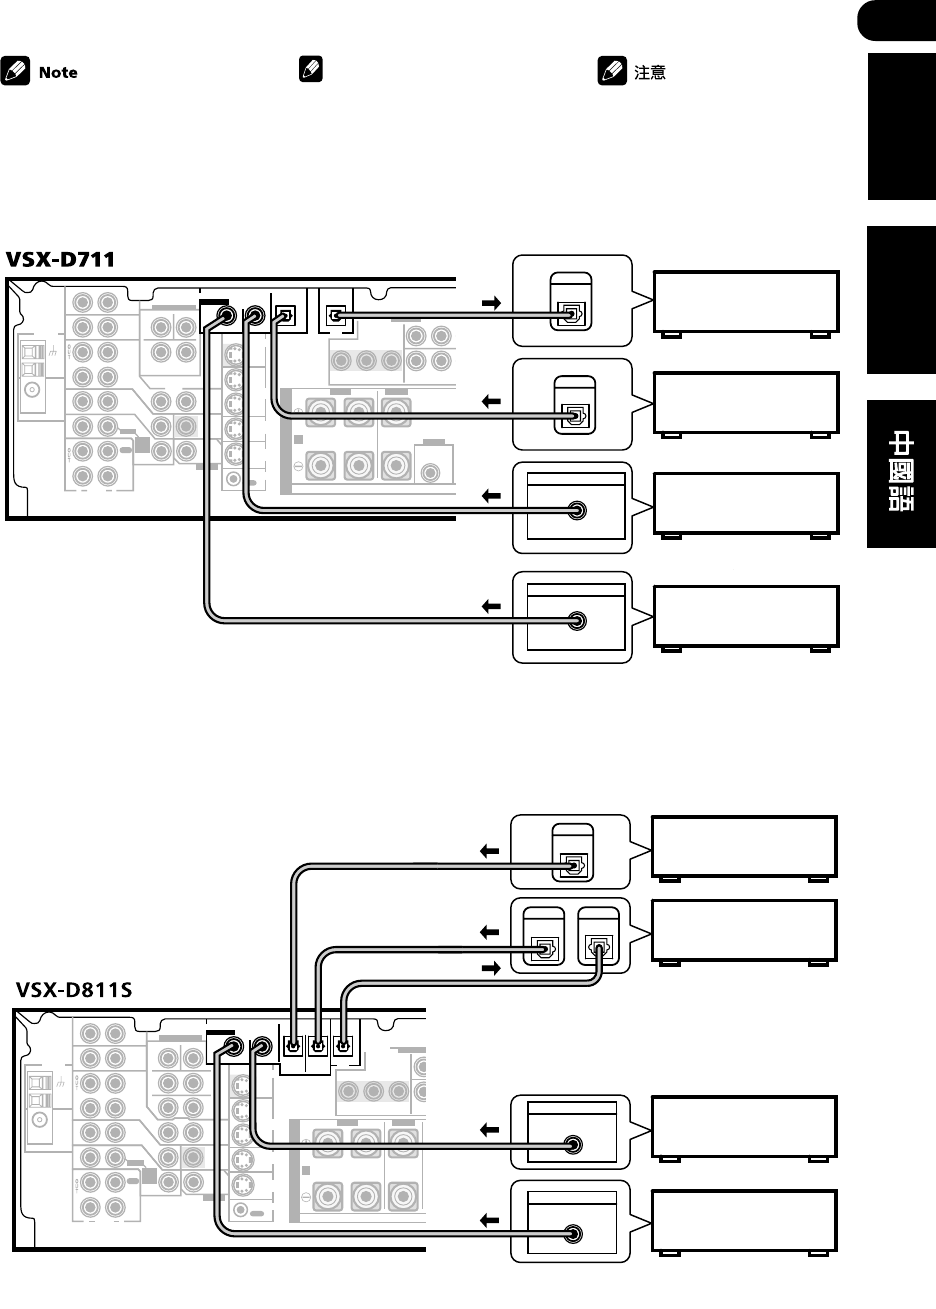
Connecting digital
components
The easiest way to hook up this
receiver for surround sound is to
use a digital input. You can do this
by either coaxial or optical connec-
tions (you do not need to do both).
The quality of these two types of
connections is the same but since
some digital components only
have one type of digital terminal, it
is a matter of matching like with
like (for example, the coaxial
output from the
component to coaxial input on the
receiver). The VSX-D711 has three
digital inputs on the rear panel
(two coaxial inputs and a optical
input) and the VSX-D811S has four
(two coaxial inputs and two optical
inputs). Connect your digital
components to the rear panel as
shown right page. See page 25 to
connect the front panel optical
input on the VSX-D811S.
There is one digital output jack
which is marked DIGITAL OUT. If
you connect this to the optical
input on a digital recorder (cur-
rently these include MD, DAT and
CD-R) you can make direct digital
recordings with this unit.
When connecting your equipment,
always make sure the power is
turned off and the power cord is
disconnected from the AC wall
outlet.
If you have an LD player, you
need to make special connec-
tions to ensure you can play
2 RF format LDs on your
system. If this is the case,
hook up your DVD or LD player
directly to an RF demodulator
using both the 2RF output
and either a coaxial or optical
digital connection. VHalso
recommend hooking up your
digital components to analog
audio jacks as well. Make sure
the RF demodulator digital in
switch is set correctly (optical
or coaxial depending on the
connection). See the compo-
nent's instruction manual if
you are unsure about its input
and output jacks.
Conexión de
componentes digitales
La mejor manera de conectar este
receptor para un sonido surround es
utilizar una entrada digital. Podrá
hacerlo mediante una conexión
coaxial u óptica (no es necesario que
haga ambas). La calidad de estos
dos tipos de conexiones es la misma,
pero debido a que algunos
componentes digitales sólo disponen
de un tipo de terminal digital, es
necesario hacerlos corresponder (por
ejemplo, la salida coaxial del
componente a la entrada coaxial del
receptor).
El VSX-D711 dispone de tres
entradas digitales en la parte
posterior del panel (dos entradas
coaxiales y una entrada óptica),
mientras que el VSX-D811S dispone
de cuatro (dos entradas coaxiales y
dos entradas ópticas). Conecte los
componentes digitales al panel
posterior tal y como se muestra en la
derecha págine. Véase la página 25
para conectar la entrada óptica del
panel en el VSX-D811S.
Hay una toma de salida digital
marcada como DIGITAL OUT. Si la
conecta a la toma óptica de una
grabadora digital (normalmente
incluyen MD, DAT y CD-R) puede
hacer grabaciones digitales directas
con este aparato.
Cuando conecte el equipo, asegúrese
siempre de que está apagado y el
cable de alimentación desconectado
de la toma de CA.
Nota
Si dispone de un reproductor de
LDs, será necesario que haga
conexiones especiales para
asegurarse de que puede
reproducir LDs con formato 2
RF en su sistema. Si este es el
caso, conecte el reproductor de
DVDs o LDs directamente a un
demodulador RF utilizando la
salida 2 RF y una conexión
digital coaxial u óptica. También
le recomendamos conectar los
componentes digitales a tomas
de audio analógicas. Asegúrese
de que el interruptor DIGITAL IN
del demodulador RF está
ajustado correctamente (óptica
o coaxial, dependiendo de la
conexión). Consulte el manual
de instrucciones del
componente en caso de que
tenga dudas acerca de las
tomas de entrada y salida.
連接數碼設備
連接本接收機來獲得環繞聲效果最
容易的方法是使用數碼輸入。您可
以使用同軸電纜或光纜進行連接
(兩者取其一即可)。此兩種連接
方式效果相同,但是由於某些數碼
設備祇有一種數碼端子,因此連接
類型需匹配(例如,將設備的同軸
輸出端連接至接收機的同軸輸入
端)。VSX-D711在後面板上有三
個數碼輸入端口(兩個同軸輸入和
一個光學輸入),而VSX-D811S有
四個(兩個同軸輸入和兩個光學輸
入)。如右頁所示,將數碼設備連
接到後面板。請參見第25頁,連接
VSX-D811S前面板上的光學輸入。
有一個數碼輸出插口,標記為
DIGITAL OUT。如果將該插口與一
個數碼錄製設備(目前此類設備有
MD、DAT和CD-R)連接,則可以進
行數碼錄製。
在連接設備時,請務必關閉電源,
並將電源線從交流電插座拔下。
如果您有LD播放機,則需要作特
殊的連接設置,以確保能播放
2RF格式的LD。此種情況下,
同時使用2RF輸出以及同軸或
光學數碼連接將DVD或者LC播
放機直接與一個RF解調器連
接。對於VH,最好也將數碼設
備與模擬音頻插口連接。請確
保RF解調器的數碼連接設置正
確(依據連接類型,使用光纜
或者同軸連接)。如果對其輸
入和輸出插口不確定,請查閱
該設備的使用說明書。
03
21
En/Sp/ChH
English Español
箭頭表示音頻信號的傳輸方向。
AC OUTLET
ASSIGNABLE
PREOUT
AB
MONITOR
OUT
MONITOR OUT
FRONT
RL R
RR
LR L
FRONTCENTER SURROUND
RL
LL
SURROUND BACK
S
P
E
A
K
E
R
S
YP
B
P
R
YP
B
P
R
OUT
IN
IN
IN
S - VI DEO
VCR /
DVR
TV/
SAT
DVD/
LD
CONTROL
OUT
ANTENNA
AM
LOOP
RAUDIO L
DVD 7.1CH INPUT
IN
IN
IN
IN
IN
IN
IN
IN
IN
RL
CENTER
SURROUND
RL
SURROUND
BACK
SUB W.
CD
AUX
VCR /
DVR
TV /
SAT
DVD
/LD
PLAY
CD-R
/TAPE
/MD
FRONT
D V D
5.1CH
INPUT
PREOUT
COAX OPT OPT
COMPONENT
VIDEO
(DVD/ LD)(
CD)(TV/
SAT)(CD-R/
/TAPE
/MD
)
OUT
MONITOR
OUT
SUB
WOOFER
VIDEO
REC
¥¥
øø
ø
ASSIGNABLE
DIGITAL IN
DIGITAL
OUT
(TV/ SAT
)FRONT CENTER
SURROUND
BACK
SURROUND
IN
(DVD/ LD)IN
¥
AC OUTLET
PREOUT
B
R
RR
LR L
FRONTSURROUND
L
LL
B
P
R
ø
FRONT CENTER
SURROUND
BACK
SURROUND
IN
IN
¥
FM
UNBAL
75
Ω
DIGITAL
IN
DIGITAL
OUT
DIGITAL
OUT
DIGITAL OUT
COAX
DIGITAL OUT
COAX
Satellite tuner
CD recorder
CD player
DVD player
The arrows indicate the direction
of the audio signal.
AC OUTLET
ASSIGNABLE
AB
MONITOR
OUT
MONITOR OUT
FRONT
RL R LRL
FRONTCENTER SURROUND
S
P
E
A
K
E
R
S
YPBPRYPBPR
OUT
IN
IN
IN
S - VI DEO
VCR /
DVR
TV/
SAT
DVD/
LD
CONTROL
PREOUT
CENTER
OUT
ANTENNA
AM
LOOP
R
AUDIO
L
DVD 5.1CH INPUT
IN
IN
IN
IN
IN
IN
IN
IN
IN
RL
CENTER
SURROUND
SUB W.
CD
AUX
VCR /
DVR
TV /
SAT
DVD
/LD
PLAY
CD-R
/TAPE
/MD
FRONT
PREOUT
COAX OPT OPT
COMPONENT
VIDEO
(DVD/ LD)(
CD)(TV/ SAT)
OUT
MONITOR
OUT
SUB
WOOFER
VIDEO
REC
¥¥ø
ø
ASSIGNABLE
DIGITAL IN
DIGITAL
OUT
(T V / SAT)IN
D V D
5.1CH
INPUT
FM
UNBAL
75
Ω
DIGITAL OUT
COAX
DIGITAL
IN
OUT
DIGITAL
DIGITAL OUT
COAX
CD recorder
Satellite tuner
CD player
DVD player
Nota
Las flechas indican la dirección
de la señal de audio.
Grabadora de CDs
Sint. del sátélite
Lector de CDs
Reproductor de DVDs
Grabadora de CDs
Reproductor de DVDs
Lector de CDs
Sint. del sátélite
CD刻錄機
衛星調諧器
CD播放機
DVD播放機
衛星調諧器
CD刻錄機
CD播放機
DVD播放機

03
22
En/Sp/ChH
Connecting audio
components
To begin set up, connect your
analog audio components (such as
a cassette deck) to the jacks. For
components you want to record
with, you need to hook up four
plugs to the receiver (a set of
stereo inputs and a set of stereo
outputs), but for components that
only play, you only need to hook up
one set of stereo plugs. You must
also hook up your digital compo-
nents to analog audio jacks if you
want to record to/from digital
components (like an MD) to/from
analog components. See page 20
for more on digital connections.
When connecting your equipment,
always make sure the power is
turned off and the power cord is
disconnected from the AC wall
outlet.
ANTENNA
AM
LOOP
R
AUDIO
L
DVD 5.1CH INPUT
IN
IN
IN
IN
IN
IN
IN
IN
IN
RL
CENTER
SURROUND
SUB W.
CD
AUX
VCR /
DVR
TV /
SAT
DVD
/LD
PLAY
CD-R
/TAPE
/MD
FRONT
PREO
U
OUT
MON
I
OUT
SUB
WOO
VIDEO
REC
ASSI
DIGI
T
D V D
5.1CH
INPUT
FM
UNBAL
75
Ω
REC PLAY
L
R
L
R
OUTPUT
CD player
CD-R/Tape/MD Deck
The arrows indicate the direction
of the audio signal.
Conexión de
componentes de
audio
Para empezar la configuración,
conecte los componentes de audio
analógicos (tales como una platina
de cintas) a las tomas. Para
componentes con los que quiera
grabar, es necesario conectar
cuatro enchufes al receptor (un
juego de entradas estéreo y un
juego de salidas estéreo), pero
para los componentes que son
sólo para reproducción, sólo
necesita conectar un juego de
enchufes estéreo. También será
necesario conectar los
componentes digitales a tomas de
audio analógicas, en caso de que
quiera grabar a/desde
componentes digitales (como un
MD) a/desde componentes
analógicos. Véase página 20 para
más información sobre conexiones
digitales.
Cuando conecte el equipo,
asegúrese siempre de que está
apagado y el cable de
alimentación desconectado de la
toma de CA.
Nota
Las flechas indican la dirección
de la señal de audio.
Lector de CDs
Platina de CD-R/cinta/MD
連接音頻設備
將模擬音頻設備(如卡式磁帶機)
與插口連接,開始設置。連接錄音
設備時,需要將四個插頭連接到接
收機(一組立體聲輸入和一組立體
聲輸出);連接僅可播放的設備
時,祇需連接一組立體聲插頭便
可。如果要在數碼設備(如MD)和
模擬設備之間實現相互錄製,則必
須將數碼設備連接到模擬音頻插
口。更多有關數碼連接的內容,請
參見第20頁。
在連接設備時,請務必關閉電源,
並將電源線從交流電插座拔下。
箭頭表示音頻信號的傳輸方向。
CD播放機
CD-R/磁帶機/MD機
03
23
En/Sp/ChH
English Español
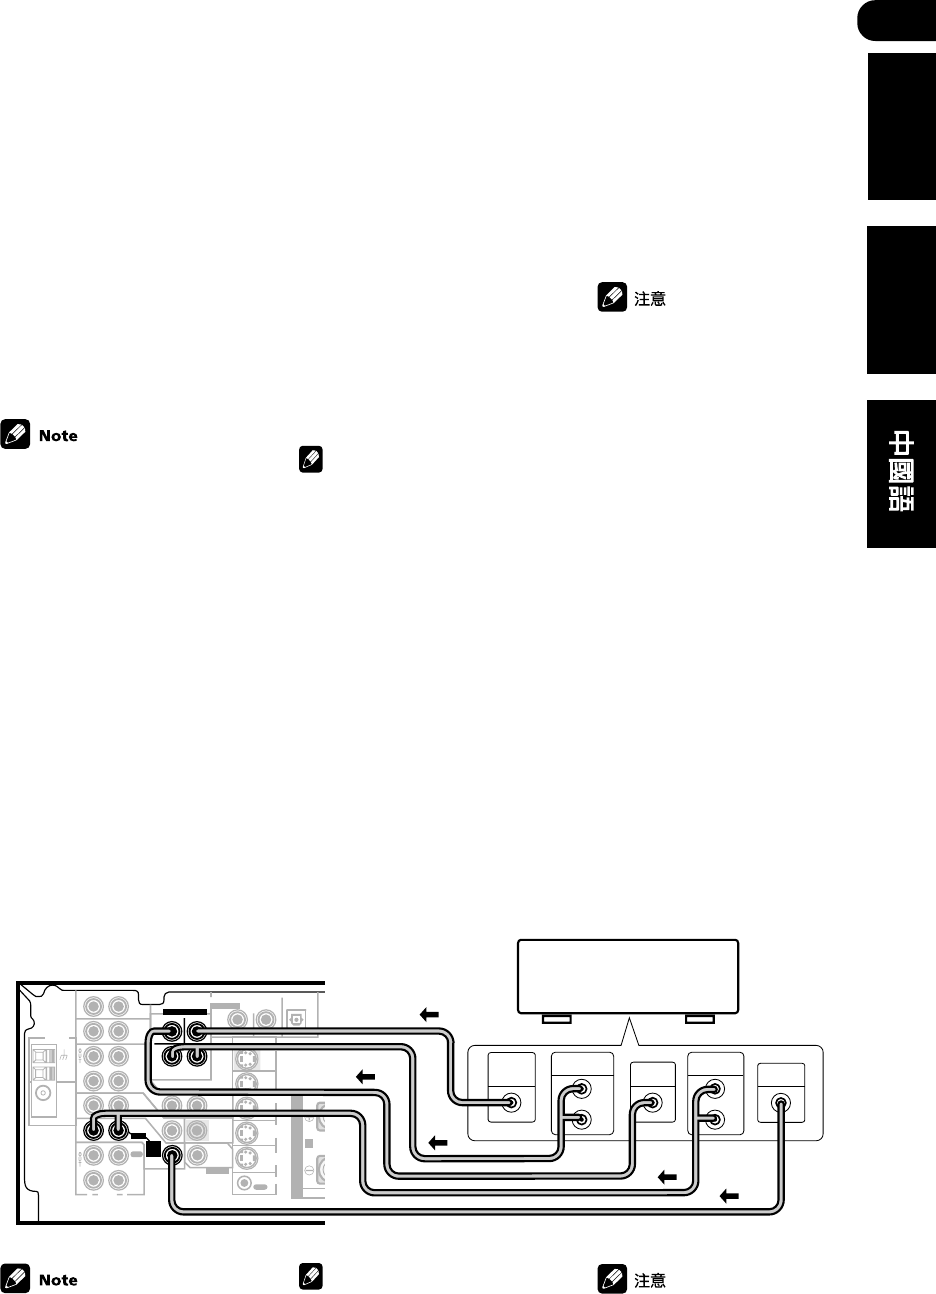
Connecting DVD 5.1/
7.1 channel compo-
nents
If you prefer to use a seperate
component for decoding DVDs,
you can connect a decoder or a
DVD player with multi-channel
analog outputs to the multi-
channel inputs of this receiver.
When connecting your equipment,
always make sure the power is
turned off and the power cord is
disconnected from the AC wall
outlet.
•The multi-channel input can
only be used when DVD 5.1
ch (or DVD 7.1 ch) is selected
(see page 52).
•If the component you are
connecting (to the VSX-D811S)
only has one surround back
channel output, change the
Surround back channel input
setting (page 69) to SB 1ch IN.
AC OUTLET
ASSIGNABLE
AB
MONITOR
OUT
MONITOR OUT
FRONT
RL R LRL
FRONTCENTER SURROUND
S
P
E
A
K
E
R
S
YPBPRYPBPR
OUT
IN
IN
IN
S - VI DEO
VCR /
DVR
TV/
SAT
DVD/
LD
CONTROL
PREOUT
CENTER
OUT
ANTENNA
AM
LOOP
R
AUDIO
L
DVD 5.1CH INPUT
IN
IN
IN
IN
IN
IN
IN
IN
IN
RL
CENTER
SURROUND
SUB W.
CD
AUX
VCR /
DVR
TV /
SAT
DVD
/LD
PLAY
CD-R
/TAPE
/MD
FRONT
PREOUT
COAX OPT OPT
COMPONENT
VIDEO
(DVD/ LD)(
CD)(TV/ SAT)
OUT
MONITOR
OUT
SUB
WOOFER
VIDEO
REC
¥¥ø
ø
ASSIGNABLE
DIGITAL IN
DIGITAL
OUT
(T V / SAT)IN
D V D
5.1CH
INPUT
(DVD/ LD)IN
¥
FM
UNBAL
75
Ω
CENTER
OUTPUT
FRONT
OUTPUT
L
R
SUB
WOOFER
OUTPUT VIDEO
OUTPUT
SURROUND
OUTPUT
L
R
VSX-D711
DVD/multi-channel decoder
with 5.1 channel analog
output jacks
The arrows indicate the direction
of the signal.
Conexión de
componentes DVD 5.
1/7.1 canales
En caso de que prefiera utilizar un
componente separado para
decodificar DVDs, puede conectar
un decodificador o un reproductor
de DVDs con entradas analógicas
multicanal a las entradas
multicanal de este receptor.
Cuando conecte el equipo,
asegúrese siempre de que está
apagado y el cable de
alimentación desconectado del
enchufe de la toma de CA.
Decodificador de DVD/
multicanal con tomas de
salida analógicas de 5.1
canales
Nota
Las flechas indican la dirección
de la señal.
Nota
•La entrada multicanal
únicamente puede utilizarse
cuando está seleccionado
DVD 5.1 Ch (o DVD 7.1 Ch)
(véase página 52).
•En caso de que el componente
que esté conectando (al VSX-
D811S) disponga únicamente
de una salida de canal
posterior surround, modifique
el Ajuste de la entrada del canal
posterior surround (página 69) a
SB 1ch IN.
連接DVD 5.1/7.1聲道設
備
如果想使用一個單獨DVD碟片解碼
設備,可以將帶多聲道模擬輸出的
解碼器或DVD播放機連接到接收機
的多聲道輸入口。
在連接設備時,請務必關閉電源,
並將電源線從交流電插座拔下。
•僅當選擇使用DVD 5.1Ch(或
者DVD 7.1Ch)時,方可使用
多聲道輸入。(參見第52頁)
•如果您連接的設備(至VSX-
D811S)僅有一個後置環繞聲
聲道輸出,則將
後置環繞聲聲
道輸入設定
(參見第69頁)改
為SB 1ch IN。
帶5.1聲道模擬輸出插口的DVD/多聲道解碼器
箭頭表示音頻信號的傳輸方向。

03
24
En/Sp/ChH
Connecting video
components
Connect your video components to
the jacks as shown below. With
digital video components (like a
DVD player), you must use the
connections shown on this page
for the video signal, but in order to
hear a digital source (like a DVD)
you should hook up the audio to a
digital input (see page 20). It is
also a good idea to hook up your
digital components with analog
audio connections (see page 22).
For better quality video, you can
hook up using the component
video jacks or the S-video jacks
(quality descends in this order) on
the rear of the receiver instead of
the regular video jacks. Make sure
they are connected to the video
component using the same kind of
connection.
When connecting your equipment,
always make sure the power is
turned off and the power cord is
disconnected from the AC wall
outlet.
AC OUTLET
ASSIGNABLE
PREOUT
AB
MONITOR
OUT
MONITOR OUT
FRONT
RL R
RR
LR L
FRONTCENTER SURROUND
RL
LL
SURROUND BACK
S
P
E
A
K
E
R
S
YPBPRYPBPR
OUT
IN
IN
IN
S - VI DEO
VCR /
DVR
TV/
SAT
DVD/
LD
CONTROL
OUT
ANTENNA
AM
LOOP
RAUDIO L
IN
IN
IN
IN
IN
IN
IN
IN
IN
CD
AUX
VCR /
DVR
TV /
SAT
DVD
/LD
PLAY
CD-R
/TAPE
/MD
FRONT
D V D
5.1CH
INPUT
PREOUT
COAX OPT OPT
COMPONENT
VIDEO
(DVD/ LD)(
CD)(TV/
SAT)(CD-R/
/ TAPE
/MD
)
OUT
MONITOR
OUT
SUB
WOOFER
VIDEO
REC
¥¥
øø
ø
ASSIGNABLE
DIGITAL IN
DIGITAL
OUT
(T V / SAT)FRONT CENTER
SURROUND
BACK
SURROUND
IN
(DVD/ LD)IN
¥
AC OUTLET
PREOUT
B
R
RR
LR L
FRONTSURROUND
RL
LL
SURROUND BACK
YPBPR
ø
(T V / SAT)FRONT CENTER
SURROUND
BACK
SURROUND
IN
(DVD/ LD)IN
¥
DVD 7.1CH INPUT
RL
CENTER
SURROUND
RL
SURROUND
BACK
SUB W.
FM
UNBAL
75
Ω
CENTER
OUTPUT
SUB
WOOFER
OUTPUT
VIDEO
OUTPUT
SURROUND
OUTPUT
L
R
SURROUND
BACK OUTPUT
L
R
FRONT
OUTPUT
L
R
VSX-D811S
DVD/multi-channel decoder with 7.1
channel analog output jacks
The arrows indicate the direction
of the signal.
Decodificador de DVD/multicanal con
tomas de salida analógicas de 7.1
canales
Conexión de
componentes de
vídeo
Conecte los componentes de vídeo
a las tomas tal y como se muestra
en la página siguiente. Con
componentes de vídeo digital
(como un reproductor de DVDs),
será necesario que utilice las
conexiones que se muestran para
una señal de vídeo, pero para que
se pueda escuchar una fuente
digital (como un DVD) será
necesario que conecte el audio a
una entrada digital (véase página
20). También es buena idea que
conecte los componentes digitales
con conexiones de audio
analógicas (véase página 22).
Para conseguir una señal de vídeo
de mejor calidad, puede realizar la
conexión utilizando las tomas de
vídeo del componente o las tomas
de S-Video (la calidad descenderá
en ese orden) en la parte posterior
del receptor en lugar de las tomas
de vídeo habituales. Asegúrese de
que están conectadas al
componente de vídeo utilizando el
mismo tipo de conexión.
Cuando conecte el equipo,
asegúrese siempre de que está
apagado y el cable de alimentación
desconectado de la toma de CA.
Nota
Las flechas indican la dirección
de la señal.
連接視頻設備
如下圖所示,將視頻設備與插口連
接。連接數碼視頻設備(如DVD播
放機)時,必須使用本頁所示的連
接方法以獲得視頻信號;但是為了
能收聽數碼音源(如DVD),您必
須將音頻端連接到數碼輸入端(參
見第20頁)。使用模擬音頻連接方
法來連接數碼設備,也不失為一種
好方法(參見第22頁)。
如欲獲得更好的視頻質量,請使用
接收機後面的分量視頻插口或者S
視頻插口進行連接(其質量依次下
降),而不是使用一般的視頻插
口。請務必確保它們以同種連接方
法連接至視頻設備。
在連接設備時,請務必關閉電源,
並將電源線從交流電插座拔下。
箭頭表示音頻信號的傳輸方向。
帶7.1聲道模擬輸出插口的DVD/多聲道解碼器
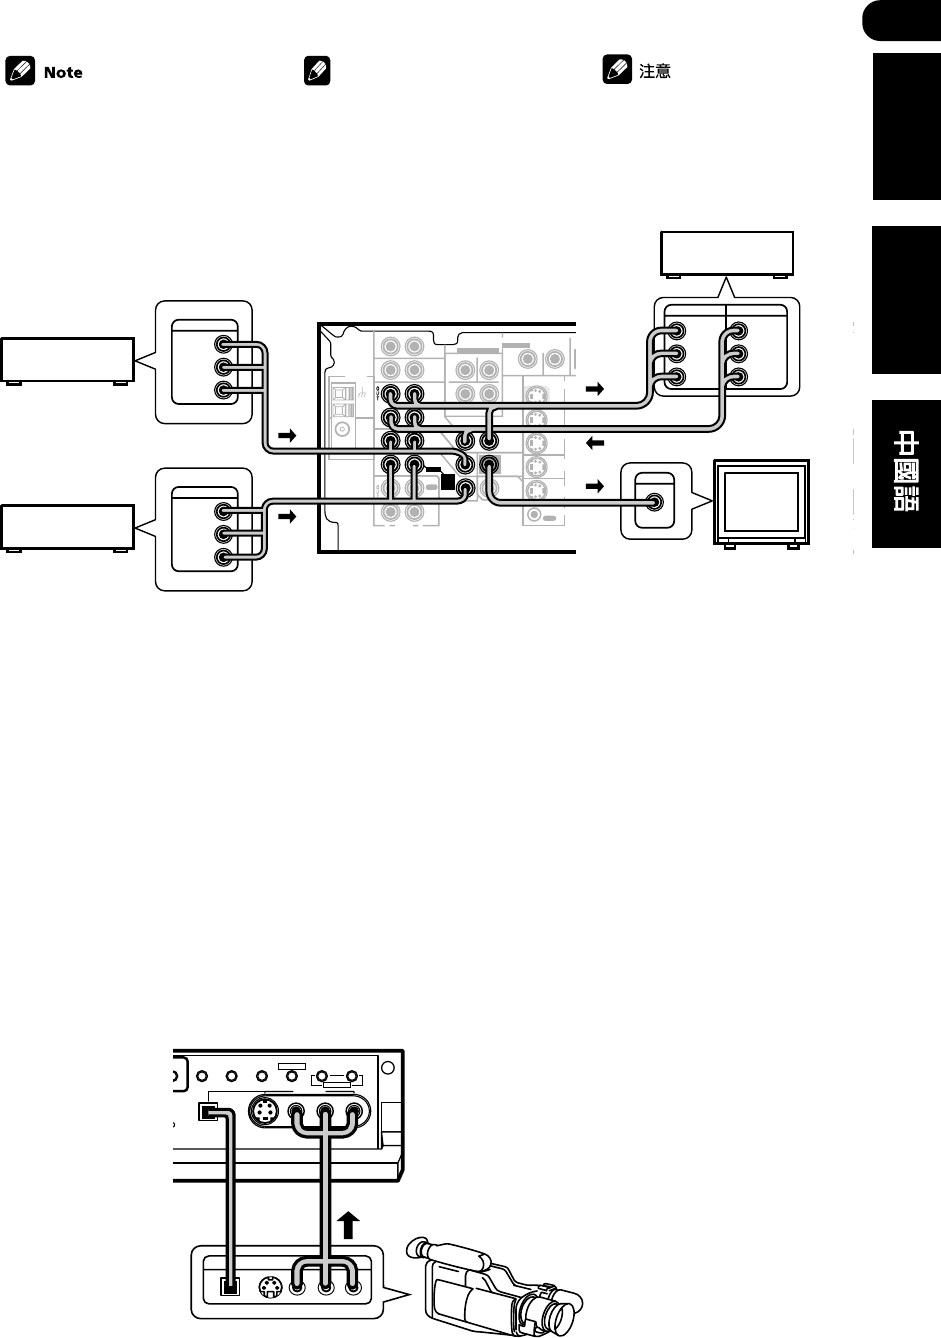
03
25
En/Sp/ChH
English Español
ASSIGNABLE
A
MONITOR
OUT
MONITOR OUT
FRONT
RL R LR
FRO
N
CENTER SURROUND
S
P
E
A
K
E
R
S
YPBPRYPBPR
OUT
IN
IN
IN
S - VI DEO
VCR /
DVR
TV/
SAT
DVD/
LD
CONTROL
PREOUT
CENTER
OUT
ANTENNA
AM
LOOP
R
AUDIO
L
DVD 5.1CH INPUT
IN
IN
IN
IN
IN
IN
IN
IN
IN
RL
CENTER
SURROUND
SUB W.
CD
AUX
VCR /
DVR
TV /
SAT
DVD
/LD
PLAY
CD-R
/TAPE
/MD
FRONT
PREOUT
COAX OPT OPT
COMPONENT
VIDEO
(DVD/ LD)(
CD)(TV/ SAT)
OUT
MONITOR
OUT
SUB
WOOFER
VIDEO
REC
¥¥ø
ø
ASSIGNABLE
DIGITAL IN
DIGITAL
OUT
(T V / SAT)IN
D V D
5.1CH
INPUT
(DVD/ LD)IN
¥
FM
UNBAL
75
Ω
OUTPUT
VIDEO
L
R
OUTPUT
INPUT
VIDEO
L
R
VIDEO
L
R
OUTPUT
VIDEO
L
R
INPUT
VIDEO
Video deck
TV tuner (or
Satellite tuner)
DVD or LD player TV (monitor)
The arrows indicate the direction
of the signal.
SPEAKERS
S-VIDEO VIDEO L AUDIO R
R
EO/
E
CT SIGNAL
SELECT MIDNIGHT/
LOUDNESS MONITOR TONE QUICK SETUP
VIDEO INPUT
MULTI JOG
DIGITAL IN
DIGITAL OUT
LV R
VIDEO INPUT
Connecting to the front
panel video terminal
Front video connections are
accessed via the front panel input
selector as VIDEO. There are
standard audio/video jacks as well
as an S-video jack (the VSX-D811S
also has an optical input jack).
Hook them up the same way you
made the rear panel connections.
Video camera (etc.)
Platina de vídeo
Sintonizador del
televisor (o de la
antena parabólica)
Reproductor de
DVDs o de LDs
(Monitor) del
televisor
Nota
Las flechas indican la dirección
de la señal.
Conexión al terminal de
vídeo del panel frontal
Se accede a las conexiones de
vídeo a través del selector de
entrada del panel frontal como
VIDEO. Hay tomas de audio/vídeo
estándar, así como una toma de S-
Video (el VSX-D811S también
dispone de una toma de entrada
óptica). Conéctelas del mismo
modo que en las conexiones del
panel posterior.
Cámara de vídeo (etc.)
箭頭表示音頻信號的傳輸方向。
電視調諧器(或者衛星調諧器)
DVD或LD播放機
影碟機
電視機(顯示器)
連接到前面板視頻端子
前置視頻連接通過前面板輸入選擇
器實現,如VIDEO。本機有標準音
頻/視頻插口以及S視頻插口(VSX
-D811S還有一個光學輸入插
口)。請對其使用與後面板連接同
樣的方法進行連接。
攝影機(等)
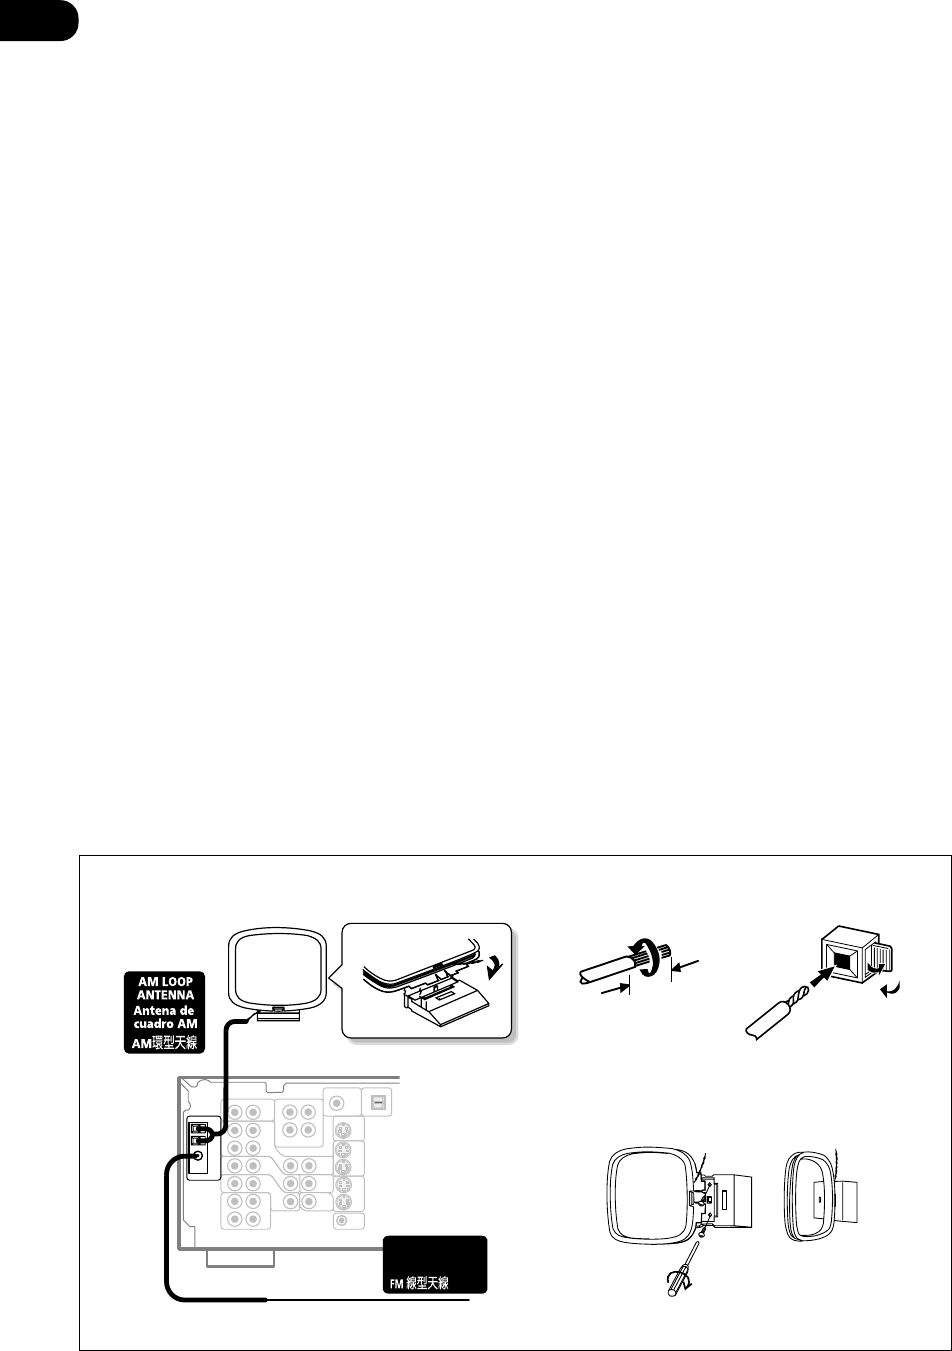
03
26
En/Sp/ChH
10mm
Connecting antennas
Connect the AM loop antenna and
the FM wire antenna as shown
below. To improve reception and
sound quality, connect external
antennas (see Using external
antennas next page). Always make
sure that the receiver is switched
off and unplugged from the wall
outlet before making or changing
any connections.
FM wire antenna
Connect the FM wire antenna and
fully extend vertically along a
window frame or other suitable
area, etc.
AM loop antenna
Assemble the antenna and
connect to the receiver. Attach to a
wall, etc. (if desired) and face in
the direction that gives the best
reception.
Antenna snap connectors
Twist the exposed wire strands
together and insert into the hole,
then snap the connector shut.
Antena de cable FM
Conecte la antena de cable de FM
y extiéndala totalmente en
dirección vertical a lo largo de un
marco de una ventana u otra área
adecuada, etc.
Conexión de antenas
Conecte la antena de cuadro AM y
la antena de cable FM tal y como
se muestra en la página siguiente.
Para mejorar la calidad de la
recepción y el sonido, conecte
antenas externas (véase la sección
Cómo utilizar antenas externas, en la
página siguiente). Asegúrese
siempre de que el receptor está
apagado y desconectado de la
toma de la pared antes de efectuar
o modificar cualquier conexión.
Antena de cuadro AM
Monte la antena y conéctela al
receptor. Acóplela a la pared, etc.
(si lo cree conveniente) y diríjala
hacia la dirección en la que
obtenga una mejor recepción.
Conectores instantáneos de
antena
Trence los filos expuestos del cable
e insértelos por el orificio, a
continuación, encaje a presión el
conector para cerrarlo.
連接天線
按圖示方法連接AM環型天線和FM線
型天線。為提高接收質量和音質,
請連接外部天線(參見下頁
使用外
部天線
)。在進行連接或改變連接
時,請確保接收機已關閉,且插頭
已從牆面插座拔下。
FM線型天線
連接FM線型天線,並沿窗框或者其
他合適的地方完全垂直伸展。
AM環型天線
組裝天線,並將其連接到接收機。
使天線附著於牆或其他地方(如有
需要),並朝向接收最佳的方位。
天線彈簧連接器
將裸露的接線頭絞在一起,插入孔
中,然後將連接器關閉。
FM WIRE ANTENNA
Antena de cable FM
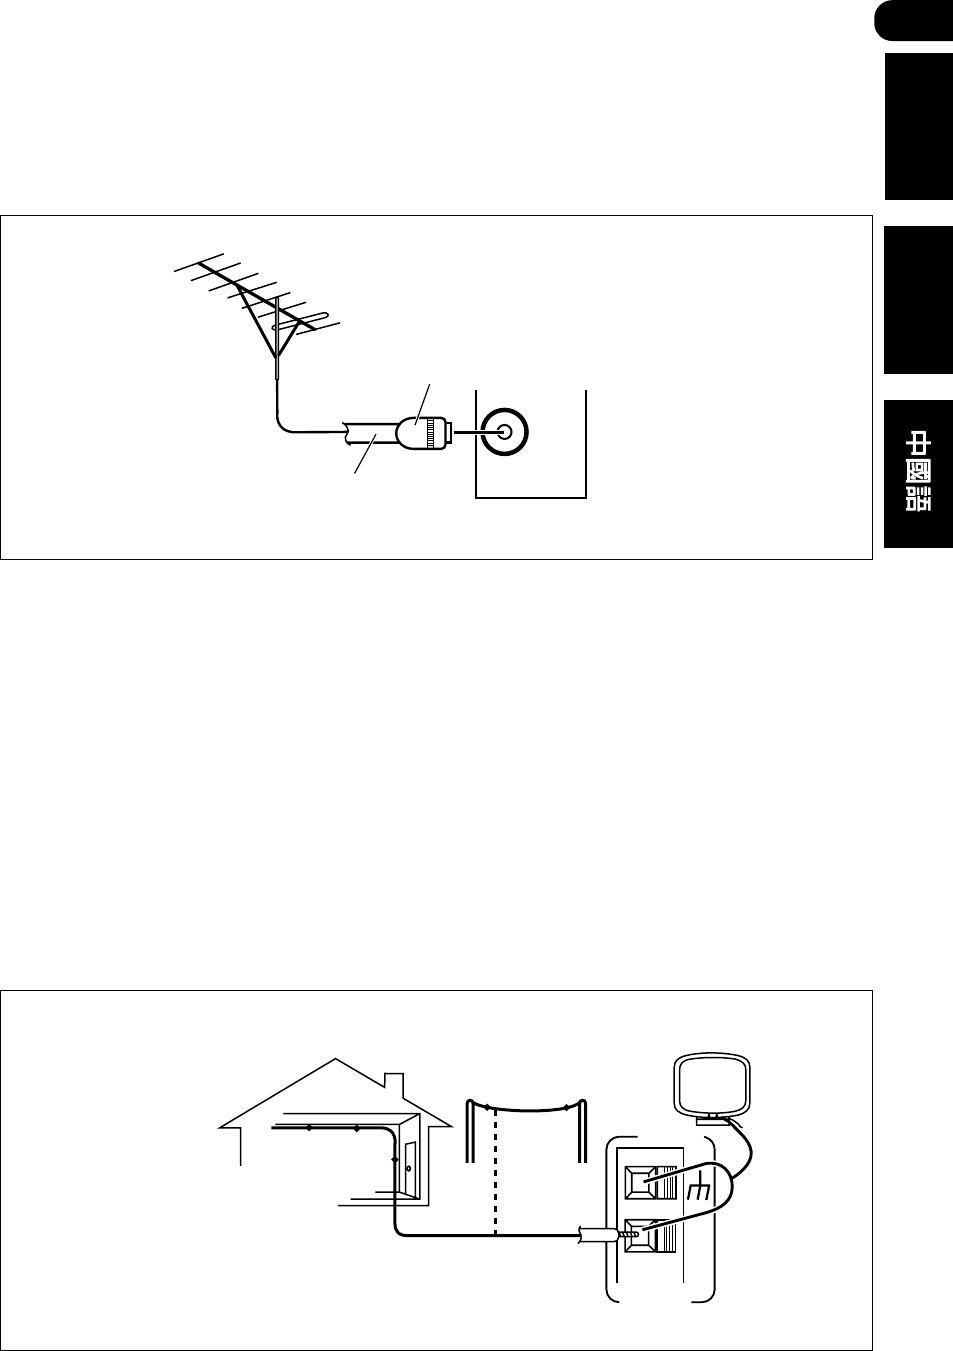
03
27
En/Sp/ChH
English Español
AM LOOP
ANTENNA
To improve AM reception
Connect a 5-6 m length of vinyl-
coated wire to the AM antenna
terminal without disconnecting the
supplied AM loop antenna.
For the best possible reception,
suspend horizontally outdoors.
Outdoor antenna
Using external
antennas
To improve FM reception
Connect an external FM antenna.
5–6 m
Indoor antenna
(Vinyl-coated wire)
FM
UNBAL
75Ω
75 Ω coaxial cable
One touch PAL connector
Para mejorar la
recepción de AM
Conecte un cable de 5-6 m.
con revestimiento de vinilo al
terminal de la antena AM sin
desconectar la antena de
cuadro AM suministrada.
Para conseguir la mejor
recepción posible,
suspéndala horizontalmente
Antena exterior
Cómo utilizar
antenas externas
Para mejorar la recepción de
FM
Conecte una antena de FM
externa.
Antena interior (cable con
revestimiento de vinilo)
Cable coaxial de 75 Ω
Conector PAL táctil
使用外部天線
改善FM接收質量
連接一個外部FM天線。
改善AM接收質量
在不拔下所附帶的AM環型天線的情
況下,將一根5-6米長的乙烯線套
電線連接至AM天線端子。
為獲得最佳接收效果,請將天線水
平懸掛在室外。
單觸式PAL連接器
75 Ω 同軸電纜
室內天線(乙烯線套電線)
室外天線
AM環型天線
5-6米
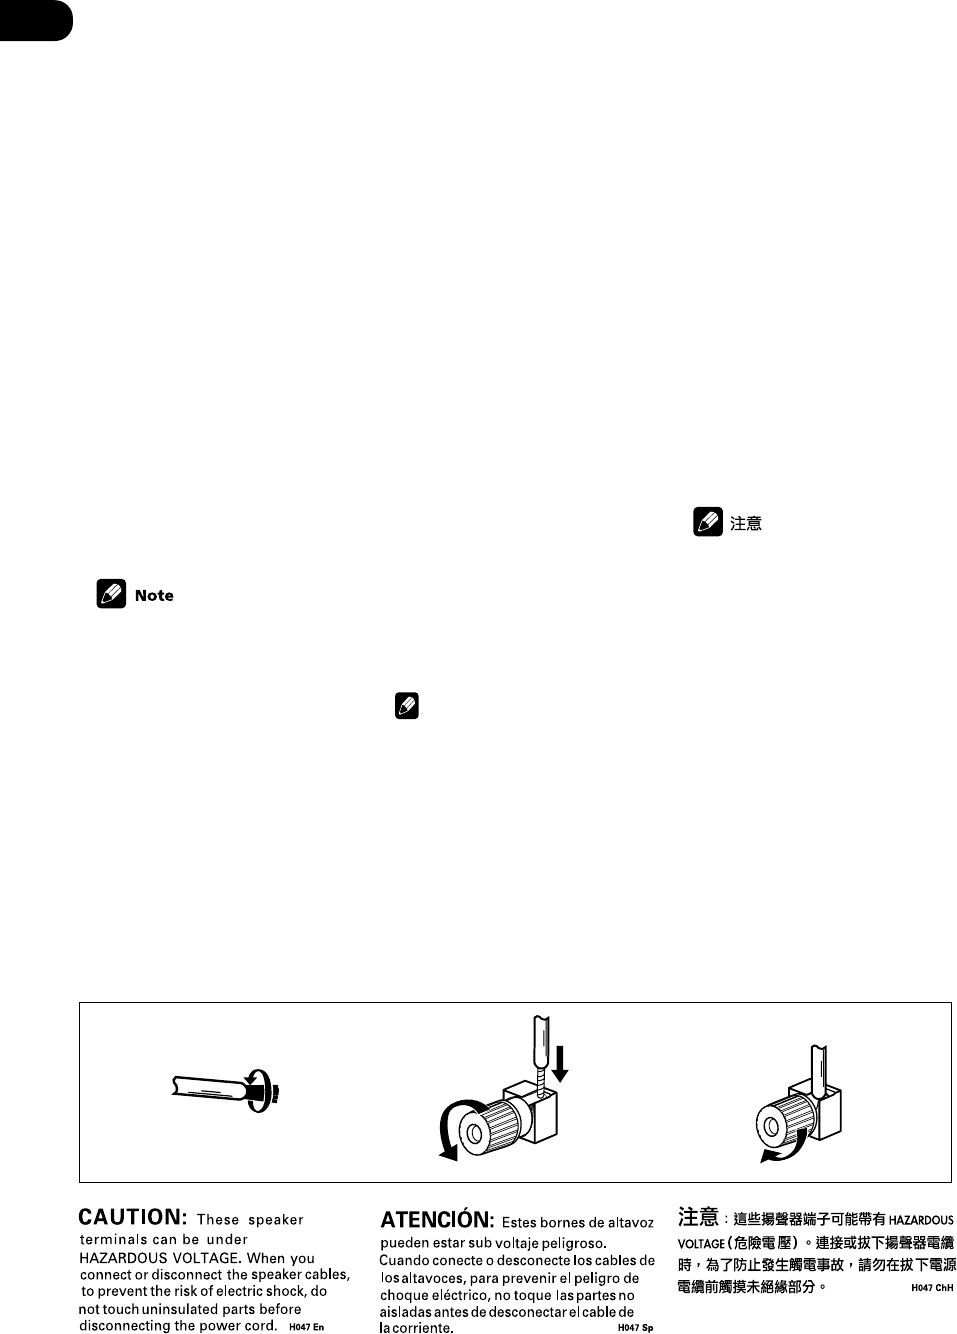
03
28
En/Sp/ChH
Connecting the
speakers (VSX-D711)
A complete setup of six speakers
(including the subwoofer) is shown
below, but everyone’s home setup
will vary. Simply connect the
speakers you have in the manner
shown below. The receiver will
work with just two stereo speakers
(the front speakers in the diagram)
but using at least three speakers is
recommended, and a complete
setup is best. If you’re not using a
subwoofer, change the front
speaker setting (see Speaker
setting on page 62) to large.
Make sure you connect the
speaker on the right to the right
terminal and the speaker on the
left to the left terminal. Also make
sure the positive and negative (+/–)
terminals on the receiver match
those on the speakers.
Use speakers with a nominal
impedance of 8 Ω to 16 Ω.
Speaker terminals
1 Twist exposed wire strands
together.
2 Loosen speaker terminal and
insert exposed wire.
3 Tighten terminal.
10 m
Conexión de los
altavoces (VSX-D711)
En la página siguiente, se muestra
una configuración completa de seis
altavoces (incluido el realzador de
graves), pero la configuración en
casa de cada uno variará.
Simplemente conecte los altavoces
de los que dispone tal y como se
muestra a continuación. El receptor
funcionará con sólo dos altavoces
estéreo (los altavoces frontales en el
diagrama), pero se recomienda que
se utilicen al menos tres altavoces,
y una configuración completa para
conseguir el mejor sonido
surround. En caso de que no utilice
un realzador de graves, cambie el
valor de ajuste del altavoz frontal
(véase la sección Ajuste de los
altavoces en la página 62) a grande.
Asegúrese de conectar el altavoz
derecho al terminal derecho y el
altavoz izquierdo al terminal
izquierdo. Asegúrese también de
que los terminales (+/–) en el
receptor coinciden con los de los
altavoces.
Nota
Utilice altavoces con una
impedancia nominal de 8 Ω a
16 Ω.
Terminales de los altavoces
1 Trence los filos expuestos del
cable.
2 Afloje el terminal del altavoz
e inserte el cable expuesto.
3 Ajuste el terminal.
連接揚聲器(VSX-
D711)
下文介紹的是六個揚聲器的完整設
置(包括超低音揚聲器),但是每
個家庭影院系統的設置將各不相
同。按圖示方法即可輕鬆自如地連
接您的揚聲器。本接收機祇需連接
兩個立體聲揚聲器(圖中為前置揚
聲器)即可正常工作,但我們建議
至少使用三個揚聲器,而使用完整
配置則更佳。若不使用超低音揚聲
器,請改變前置揚聲器設為大(請
參閱第62頁
揚聲器設定
的有關內
容)。
請務必將右側的揚聲器連接至右端
子,左側的揚聲器連接至左端子。
另外還請確保接收機上的正負極
(+/-)端子與揚聲器上的正負
極端子匹配。
請使用標稱阻值為8Ω-16Ω的揚
聲器。
揚聲器端子
1將裸線線芯擰成一股。
2擰松揚聲器端子並插入電線。
3擰緊揚聲器端子以緊固電線。
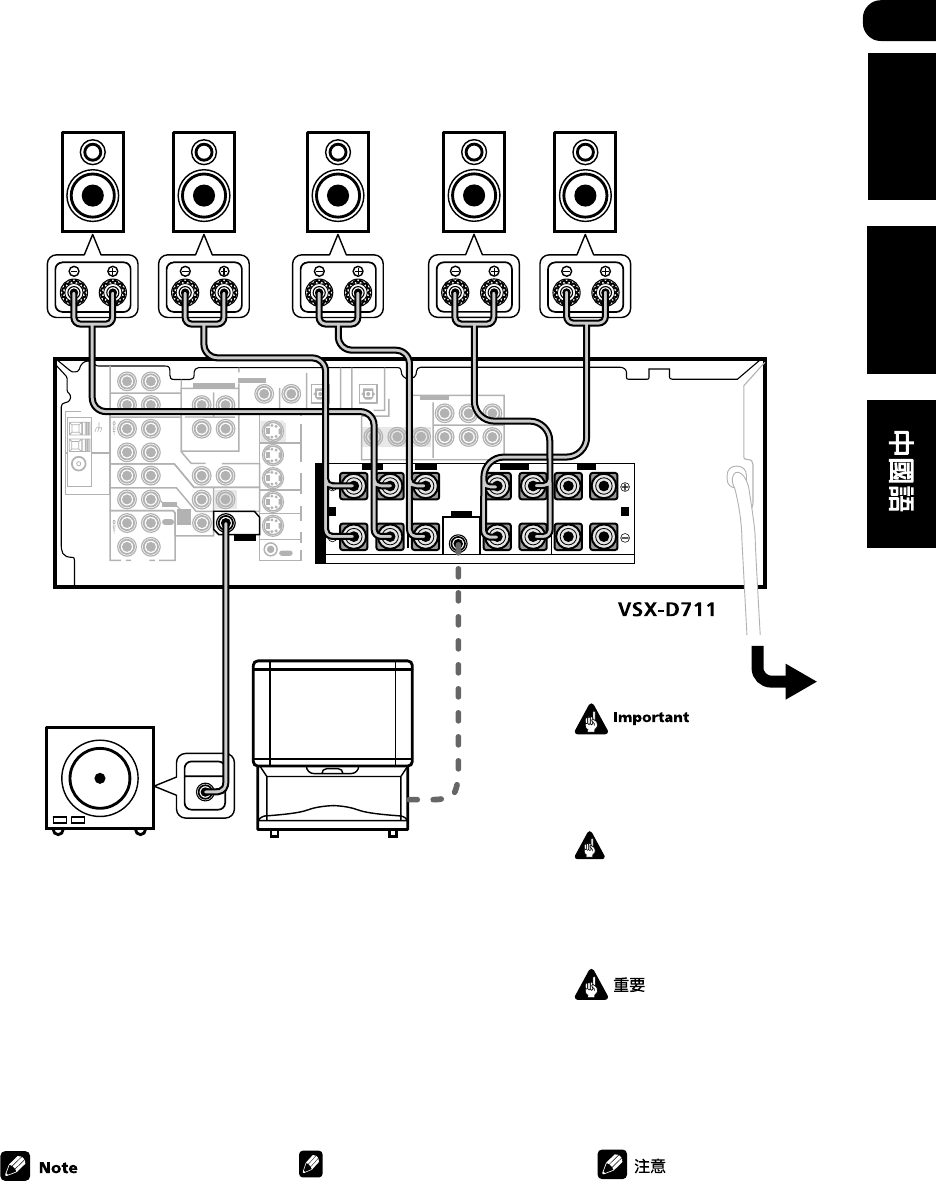
03
29
En/Sp/ChH
English Español
ASSIGNABLE
AB
MONITOR
OUT
MONITOR OUT
FRONT
RL R LRL
FRONTCENTER SURROUND
S
P
E
A
K
E
R
S
YP
B
P
R
YP
B
P
R
OUT
IN
IN
IN
S - VI DEO
VCR /
DVR
TV/
SAT
DVD/
LD
CONTROL
PREOUT
CENTER
OUT
ANTENNA
AM
LOOP
R
AUDIO
L
DVD 5.1CH INPUT
IN
IN
IN
IN
IN
IN
IN
IN
IN
RL
CENTER
SURROUND
SUB W.
CD
AUX
VCR /
DVR
TV /
SAT
DVD
/LD
PLAY
CD-R
/TAPE
/MD
FRONT
PREOUT
COAX OPT OPT
COMPONENT
VIDEO
(DVD/ LD)(
CD)(TV / SAT)
OUT
MONITOR
OUT
SUB
WOOFER
VIDEO
REC
¥¥ø
ø
ASSIGNABLE
DIGITAL IN
DIGITAL
OUT
(T V / SAT)IN
D V D
5.1CH
INPUT
(DVD/ LD)IN
¥
FM
UNBAL
75
Ω
INPUT
When using the speaker on your
TV as the center speaker (C),
connect the CENTER PREOUT
jack on this unit to the audio
input jack on your TV. In this
case the center speaker
shown is unnecessary.
FL FR CSRSL
Front Speakers Center Speaker Surround Speakers
Powered subwoofer
TV
Be sure to complete all connec-
tions before connecting this unit
to the AC power source.
SW
Nota
Cuando utilice el altavoz del
televisor como el altavoz
central (C), conecte la toma
CENTER PREOUT de este
aparato a la toma de entrada
de audio del televisor. En este
caso el altavoz central que se
muestra es innecesario.
Importante
Asegúrese de realizar todas las
conexiones antes de conectar
este aparato a la fuente de
alimentación de CA.
Altavoces frontales Altavoz central Altavoces surround
Realzador de graves
alimentado
Televisor
請務必確保在將該設備連接到交流
電源之前已完成所有連接。
前置揚聲器 中置揚聲器 環繞聲揚聲器
有源超低音揚聲器
電視機
若將電視機上的揚聲器作為中置
揚聲器(C),則將接收機的
CENTER PREOUT插口連接到
電視機上的音頻輸入插口。此
種情況下,圖中所示的中置揚
聲器並非必須。

03
30
En/Sp/ChH
Connecting the
speakers (VSX-
D811S)
A complete setup of eight speak-
ers (including the subwoofer) is
shown on the next page, but
everyone’s home setup will vary.
Simply connect the speakers you
have in the manner shown below.
The receiver will work with just two
stereo speakers (the front speakers
in the diagram) but using at least
three speakers is recommended,
and a complete setup is best for
surround sound. If you’re not using
a subwoofer, change the front
speaker setting (see Speaker
setting on page 62) to large.
Make sure you connect the
speaker on the right to the right
terminal and the speaker on the
left to the left terminal. Also make
sure the positive and negative (+/–
) terminals on the receiver match
those on the speakers.
•Use speakers with a nominal
impedance of 8 Ω to 16 Ω.
•When using the speaker on
your TV as the center speaker
(C), connect the CENTER
PREOUT jack on this unit to
the audio input jack on your
TV. In this case the center
speaker shown is unnecessary.
•If you are using only one
surround back speaker,
connect the positive wire to
the right channel (+) terminal,
and the negative wire to the
left channel (–) terminal (see
illustration on page 14).
•If you select subwoofer (SB
SUBWF) in the Surround back
speaker setting (see page 63)
you can hook up a subwoofer
instead of speakers to the
surround back speaker
terminals. Connect the
positive wire to the right
channel (+) terminal, and the
negative wire to the left
channel (–) terminal (see
illustration on page 14).
Conexión de los
altavoces (VSX-
D811S)
En la siguiente la páginación, se
muestra una configuración
completa de ocho altavoces
(incluido el realzador de graves),
pero la configuración en casa de
cada uno variará. Simplemente
conecte los altavoces de los que
dispone tal y como se muestra a
continuación. El receptor
funcionará con sólo dos altavoces
estéreo (los altavoces frontales en
el diagrama), pero se recomienda
que se utilicen al menos tres
altavoces, siendo seis la mejor
opción. En caso de que no utilice
un realzador de graves, cambie el
ajuste del altavoz frontal (véase la
sección Ajuste de los altavoces en
la página 62) a grande.
Asegúrese de que conecta el
altavoz derecho al terminal
derecho y el altavoz izquierdo al
terminal izquierdo. Asegúrese
también de que los terminales (+/–
) del receptor coinciden con los de
los altavoces.
Nota
•Utilice altavoces con una
impedancia nominal de 8 Ω a
16 Ω.
•Cuando utilice el altavoz del
televisor como el altavoz
central (C), conecte la toma
CENTER PREOUT de este
aparato a la toma de entrada
de audio del televisor. En este
caso el altavoz central que se
muestra es innecesario.
•En caso de que utilice
únicamente un altavoz
posterior surround, conecte el
cable positivo al terminal del
canal derecho (+), y el cable
negativo al terminal del canal
izquierdo (–) (véase la
ilustración en la página 14).
•Si selecciona realzador de
graves (SB SUBWF) en el
“Ajuste del altavoz posterior
surround” (véase página 63)
puede conectar un realzador
de graves en lugar de
altavoces a los terminales de
los altavoces posteriores
surround. Conecte los cables
como se indica anteriormente
(tal y como se muestra a la
derecha), conecte el cable
positivo al terminal del canal
derecho (+), y el cable
negativo al terminal del canal
izquierdo (–) (véase la
ilustración en la página 14).
連接揚聲器(VSX-
D811S)
下文介紹的是八個揚聲器的完整設
置(包括超低音揚聲器),但是每
個家庭影院系統的設置將各不相
同。按圖示方法即可輕鬆自如地連
接您的揚聲器。本接收機祇需連接
兩個立體聲揚聲器(圖中為前置揚
聲器)即可正常工作,但我們建議
至少使用三個揚聲器,而使用完整
配置則更佳。若不使用超低音揚聲
器,請改變前置揚聲器設為大(請
參閱第62頁
揚聲器設定
的有關內
容)。
請務必將右側的揚聲器連接至右端
子,左側的揚聲器連接至左端子。
另外還請確保接收機上的正負極
(+/-)端子與揚聲器上的正負
極端子匹配。
•請使用標稱阻值為8Ω-16Ω的
揚聲器。
•如將電視機上的揚聲器作為中
置揚聲器(C),則將接收機
的CENTER PREOUT插口連接
到電視機上的音頻輸入插口。
此種情況下,圖中所示的中置
揚聲器並非必須。
•如果僅使用一個後置環繞聲揚
聲器,則將正極引線連接到右
聲道(+)端子,將負極引線
連接到左聲道(-)端子(參
見第14頁示意圖)。
•如果在
後置環繞聲揚聲器設置
中選擇使用超低音揚聲器(SB
SUBWF)(參見第63頁),可
以連接超低音揚聲器,取代連
接到後置環繞聲揚聲器端子的
揚聲器。請將正極引線連接到
右聲道(+)端子,將負極引
線連接到左聲道(-)端子
(參見第14頁示意圖)。

03
31
En/Sp/ChH
English Español
請務必將所有裸露的揚聲器引線絞
成一股,並完全插入揚聲器端子。
如果裸露的揚聲器引線接觸到後面
板,電源將實行安全措施,予以關
閉。請使用優質引線將揚聲器連接
到接收機。
ASSIGNABLE
PREOUT
AB
MONITOR
OUT
MONITOR OUT
FRONT
RL R
RR
LR L
FRONTCENTER SURROUND
RL
LL
SURROUND BACK
S
P
E
A
K
E
R
S
YPBPRYPBPR
OUT
IN
IN
IN
S-VIDEO
VCR /
DVR
TV/
SAT
DVD/
LD
CONTROL
OUT
ANTENNA
AM
LOOP
R
AUDIO
L
DVD 7.1CH INPUT
IN
IN
IN
IN
IN
IN
IN
IN
IN
RL
CENTER
SURROUND
RL
SURROUND
BACK
SUB W.
CD
AUX
VCR /
DVR
TV /
SAT
DVD
/ LD
PLAY
CD-R
/ TAPE
/ MD
FRONT
D V D
5.1CH
INPUT
PREOUT
COAX OPT OPT
COMPONENT
VIDEO
(DVD/ LD)(
CD)(TV/
SAT)(CD-R/
/ TAPE
/ MD)
OUT
MONITOR
OUT
SUB
WOOFER
VIDEO
REC
¥¥
øø
ø
ASSIGNABLE
DIGITAL IN
DIGITAL
OUT
(TV / SAT
)FRONT CENTER
SURROUND
BACK
SURROUND
IN
(DVD/ LD)IN
¥
FM
UNBAL
75
Ω
INPUT
Front Speakers Center Speaker Surround Speakers
Powered subwoofer
FL FR C SRSL
Surround Back Speakers
SBR
SBL
Surround back speaker or Subwoofer (passive)
TV
Be sure to complete all connec-
tions before connecting this
unit to the AC power source.
SW
Make sure that all the bare
speaker wire is twisted together
and inserted fully into the
speaker terminal. If any of the
bare speaker wire touches the
back panel it may cause the
power to cut off as a safety
measure. Use good quality
speaker wire to connect the
speakers to the receiver.
Altavoces frontales Altavoz central Altavoces surround
Realzador de graves
alimentado
Altavoces post. surround
Altavoz surround posterior o realzador de graves
(pasivo)
Televisor
Importante
Asegúrese de realizar todas las
conexiones antes de conectar
este aparato a la fuente de
alimentación de CA.
Precaución
Asegúrese de que todo el cable
del altavoz sobrante se dobla y se
inserta totalmente en el terminal
del altavoz. Si alguno de los
cables del altavoz sobrantes
tocara el panel posterior podría
provocar un apagón como
medida de seguridad. Utilice
cables de altavoces de buena
calidad para conectar los
altavoces al receptor.
中置揚聲器 環繞聲揚聲器
前置揚聲器 後置環繞聲揚聲器
請確保在將該設備連接到交流電
源之前已完成所有連接。
有源超低音揚聲器
後置環繞聲揚聲器或超低音揚聲器(無源)
電視機

03
32
En/Sp/ChH
A and B speaker systems
The receiver has two speaker
systems: A and B. A is the main
system supporting the full speaker
setup. If you switch on both A and
B speaker systems, only the front
speakers and the subwoofer will be
audible. No sound will come from
the center, surround, or surround
back speakers, but multi-channel
sources will be down-mixed to the
active speakers so no sound will be
lost. Similarly, if you choose just
the B system you‘ll only hear the
front speakers connected to the B
system and multi channel sources
will be down-mixed to these two
speakers.
Hints on speaker placement
Speakers are usually designed with
a particular placement in mind.
Some are designed to be
floorstanding, while others should
be placed on stands to sound their
best. Some should be placed near
a wall; others should be placed
away from walls. We have provided
a few tips on getting the best
sound from your speakers (below),
but you should also follow the
guidelines on placement that the
speaker manufacturer provided
with your particular speakers to get
the most out of them.
•Place the front left and right
speakers at equal distances
from the TV.
•When placing speakers near
the TV, we recommend using
magnetically shielded speak-
ers to prevent possible
interference, such as discol-
oration of the picture when
the TV is switched on. If you do
not have magnetically
shielded speakers and notice
discoloration of the TV picture,
move the speakers farther
away from the TV.
•Place the center speaker
above or below the TV so that
the sound of the center
channel is localized at the TV
screen.
Sistemas de los altavoces A y B
El receptor dispone de dos
sistemas de altavoces A y B. A es
el sistema principal, el cual
soporta toda la configuración de
los altavoces. Si cambia a ambos
sistemas de altavoces A y B, sólo
se podrá escuchar a través de los
altavoces frontales y el realzador
de graves. Los altavoces
posteriores surround, centrales o
surround no emitirán ningún
sonido, pero las fuentes multicanal
se mezclarán a los altavoces
activos de tal manera que no se
perderá sonido. Igualmente, si
escoge sólo el sistema B, sólo
escuchará los altavoces frontales
conectados al sistema B y la
fuentes multicanal se mezclarán a
estos dos altavoces.
Consejos sobre la ubicación
de los altavoces
Normalmente los altavoces están
diseñados para ocupar una
ubicación concreta. Algunos están
diseñados para estar apoyados
sobre el suelo, mientras que otros
tendrán que descansar sobre una
base para conseguir el mejor
sonido. Algunos deberán
colocarse cerca de una pared,
mientras que otros tendrán que
estar alejados. Le facilitamos
algunos consejos para conseguir
el mejor sonido de sus altavoces
(véase a continuación), pero para
sacar el máximo provecho
también deberá seguir las
instrucciones relativas a la
ubicación que el fabricante de los
altavoces le adjunta con los
altavoces en concreto.
•Sitúe los altavoces frontales
derecho e izquierdo a
distancias equitativas con
respecto al televisor.
•Cuando coloque los altavoces
cerca del televisor,
recomendamos utilizar
altavoces con protección
magnética para evitar
posibles interferencias, como
la pérdida de color en la
imagen cuando el televisor
está encendido. En caso de
que no disponga de altavoces
con protección magnética y
perciba una pérdida de color
en la imagen del televisor,
aleje los altavoces del
televisor.
•Coloque el altavoz central
encima o debajo de televisor de
tal manera que el sonido del
canal central quede localizado
como la pantalla del televisor.
A和B揚聲器系統
接收機有兩個揚聲器系統︰A和B系
統。A系統為主系統,支持完整的
揚聲器設置。如果同時開啟A和B揚
聲器系統,祇有前置揚聲器和超低
音揚聲器輸出聲音。而中置、環繞
聲或後置環繞聲揚聲器均不輸出聲
音。但是由於多聲道音源會加以混
合,傳至工作狀態的揚聲器,所以
聲音信號並不會丟失。同樣,如果
僅選擇B系統,祇有連接到B系統的
前置揚聲器輸出聲音,而多聲道音
源會加以混合,傳至該揚聲器。
揚聲器安置提示
請留意揚聲器通常已設計好的特定
擺放方式。有些設計為落地式,而
有些則應放置在支架上以獲得最佳
的音效。有些應放置在牆壁附近,
而有些則應放置在遠離牆壁之處。
我們已提供了一些提示(見下頁
圖),以使您的揚聲器發出最佳音
質,不過,對於一些特定的揚聲
器,請遵照揚聲器製造商所提供的
安置指南進行擺放,這樣才能獲得
最佳效果。
•將左側和右側前置揚聲器放置
於離電視機等距離的地方。
•當將揚聲器置於電視機附近
時,我們建議您使用防磁式揚
聲器以防止干擾,比如電視機
打開時圖像失真等。如果您沒
有防磁式揚聲器,且注意到電
視機圖像失真,請將揚聲器放
置於遠離電視機的位置。
•將中置揚聲器放置於電視機之
上或者之下,這樣,中央聲道
的聲音被定位在電視機屏幕
上。
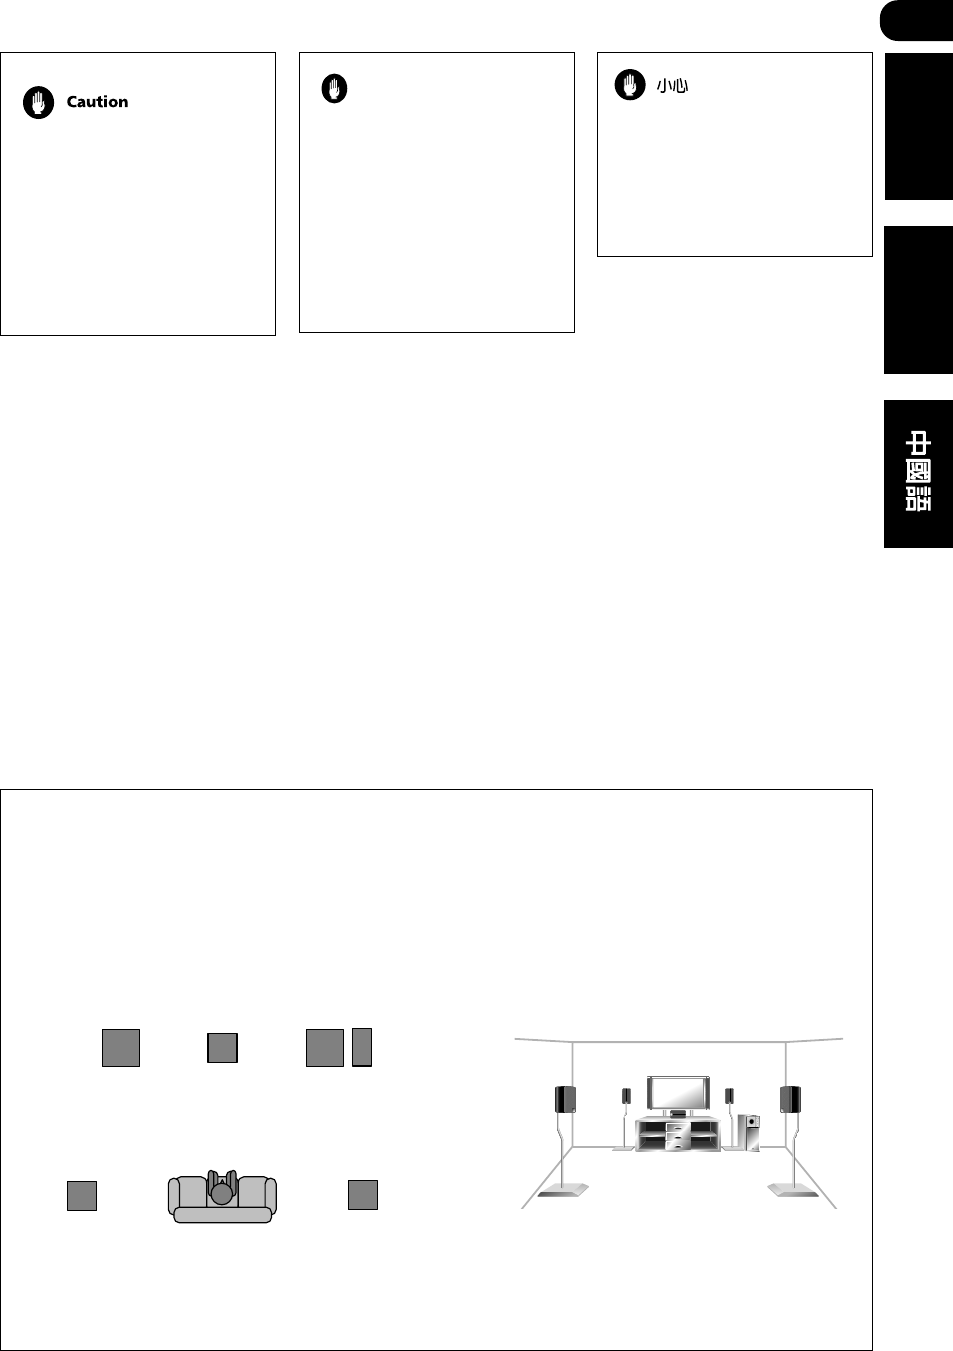
03
33
En/Sp/ChH
English Español
If you choose to install the
center speaker on top of the
TV, be sure to secure it with
putty, or by other suitable
means, to reduce the risk of
damage or injury resulting
from the speaker falling from
the TV in the event of external
shocks such as earthquakes.
•If possible, place the surround
speakers slightly above ear
level.
•Try not to place the surround
speakers further away from
the listening position than the
front and center speakers.
Doing so can weaken the
surround sound effect.
•To achieve the best possible
surround sound, install your
speakers as shown below. Be
sure all speakers are installed
securely to prevent accidents
and improve sound quality.
Overhead view of speaker set up (VSX-D711)
Plano superior de la instalación de los
altavoces (VSX-D711)
Surround Left (SL) Surround Right (SR)
Listening Position
Front Left (FL) Front Right (FL)
Center (C) Subwoofer (SW)
3-D view of speaker set up (VSX-D711)
Plano tridimensional de la instalación de
los altavoces (VSX-D711)
Precaución
Si decide instalar el
altavoz central encima del
televisor, asegúrelo con
plastelina adherente u
otro medio apropiado,
para reducir el riesgo de
accidente o daño al caer
el altavoz del televisor,
debido a causas externas
como terremotos.
•Si es posible, coloque los
altavoces surround ligeramente
por encima del nivel de los
oídos.
•Trate de no instalar los
altavoces surround más lejos
de la posición de audición que
los altavoces frontal y central.
Si lo hiciera, podría debilitar el
efecto del sonido surround.
•Para lograr el mejor sonido
surround posible, instale los
altavoces según se muestra a
continuación. Asegúrese de
que los altavoces están
instalados de forma segura
para evitar accidentes y
mejorar la calidad de sonido.
Izquierdo surround
(SL)
Derecho surround (SR)
Izquierdo frontal (FL) Derecho frontal (FR)
Central (C) Realzador de graves (SW)
Posición de
audición
如果您選擇將中置揚聲器安裝在
電視機頂端,請確保使用油灰或
者其他適當方法將其固定住,以
減小因地震等外部沖擊致使揚聲
器從電視機上跌落而造成的損坏
或損傷事故。
•如有可能,請將環繞聲揚聲器
放置於稍稍高出您雙耳的水平
位置。
•盡量使環繞聲揚聲器離開聽音
位置的距離小於中置揚聲器和
前置揚聲器的距離。否則,可
能會削弱環繞聲的效果。
•為獲得最佳環繞聲效果,請如
下圖所示安置您的揚聲器。請
確保所有揚聲器都已固定住,
以防止出現意外事故並改善音
質。
揚聲器設置俯視圖(VSX – D711) 揚聲器設置三維圖(VSX – D711)
前置左揚聲器
中置揚聲器
前置右揚聲器
超低音揚聲器
環繞聲左揚聲器 聽音位置
環繞聲右揚聲器
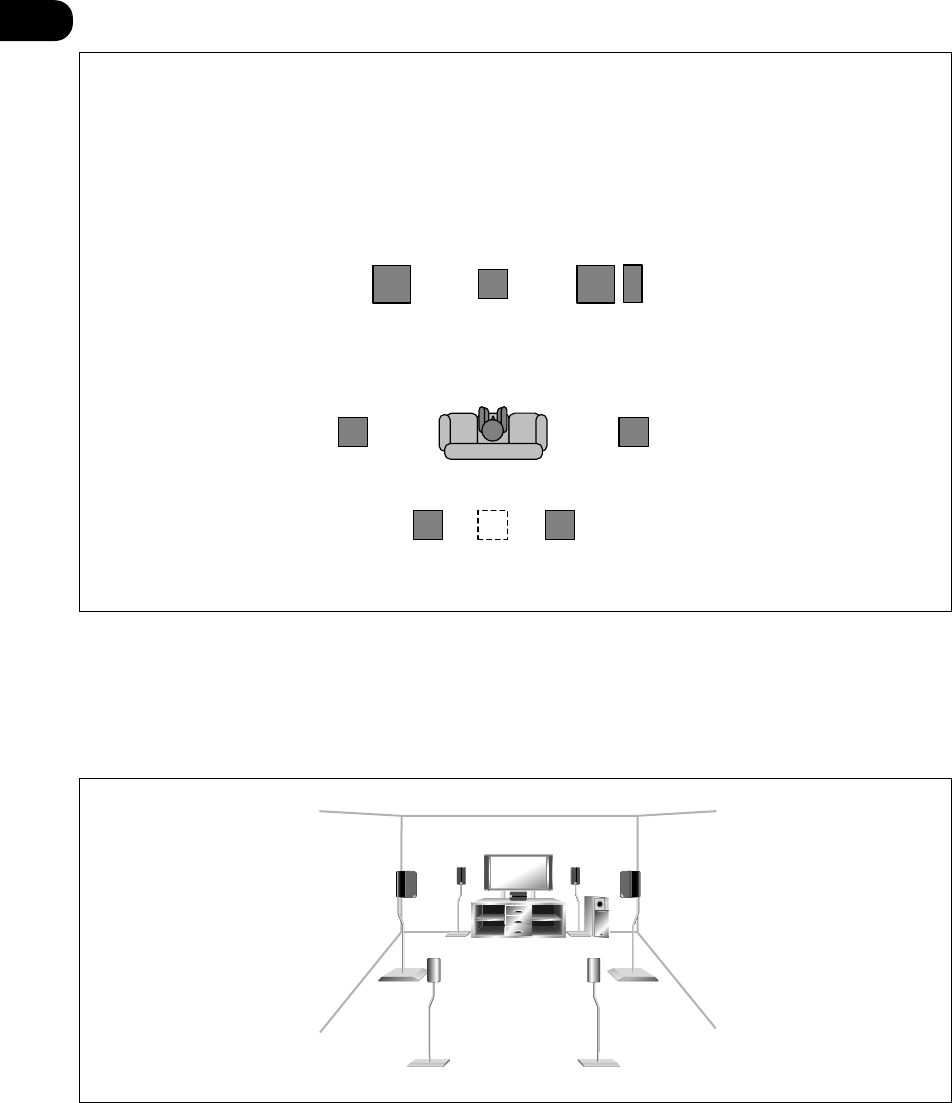
03
34
En/Sp/ChH
3-D view of speaker set up (VSX-D811S)
Overhead view of speaker set up (VSX-D811S)
Plano superior de la instalación de los altavoces
(VSX-D811S)
Surround Left (SL) Surround Right (SR)
Listening Position
Front Left (FL)
Front Right (FR)
Center (C)
Subwoofer (SW)
Surround Back Left (SBL) Surround Back Right (SBR)
Plano tridimensional de la instalación de los altavoces (VSX-D811S)
Realzador de graves (SW)
Derecho surround (SR)
Derecho frontal (FR)
Derecho posterior surround (SBR)
Izquierdo surround (SL)
Posición de audición
Izquierdo
frontal (FL)
Central (C)
Izquierdo posterior surround (SBL)
揚聲器設置俯視圖(VSX – D811S)
前置左揚聲器
中置揚聲器 前置右揚聲器
超低音揚聲器
環繞聲左揚聲器
聽音位置
環繞聲右揚聲器
後置環繞聲右揚聲器
後置環繞聲左揚聲器
揚聲器設置三維圖(VSX – D811S)
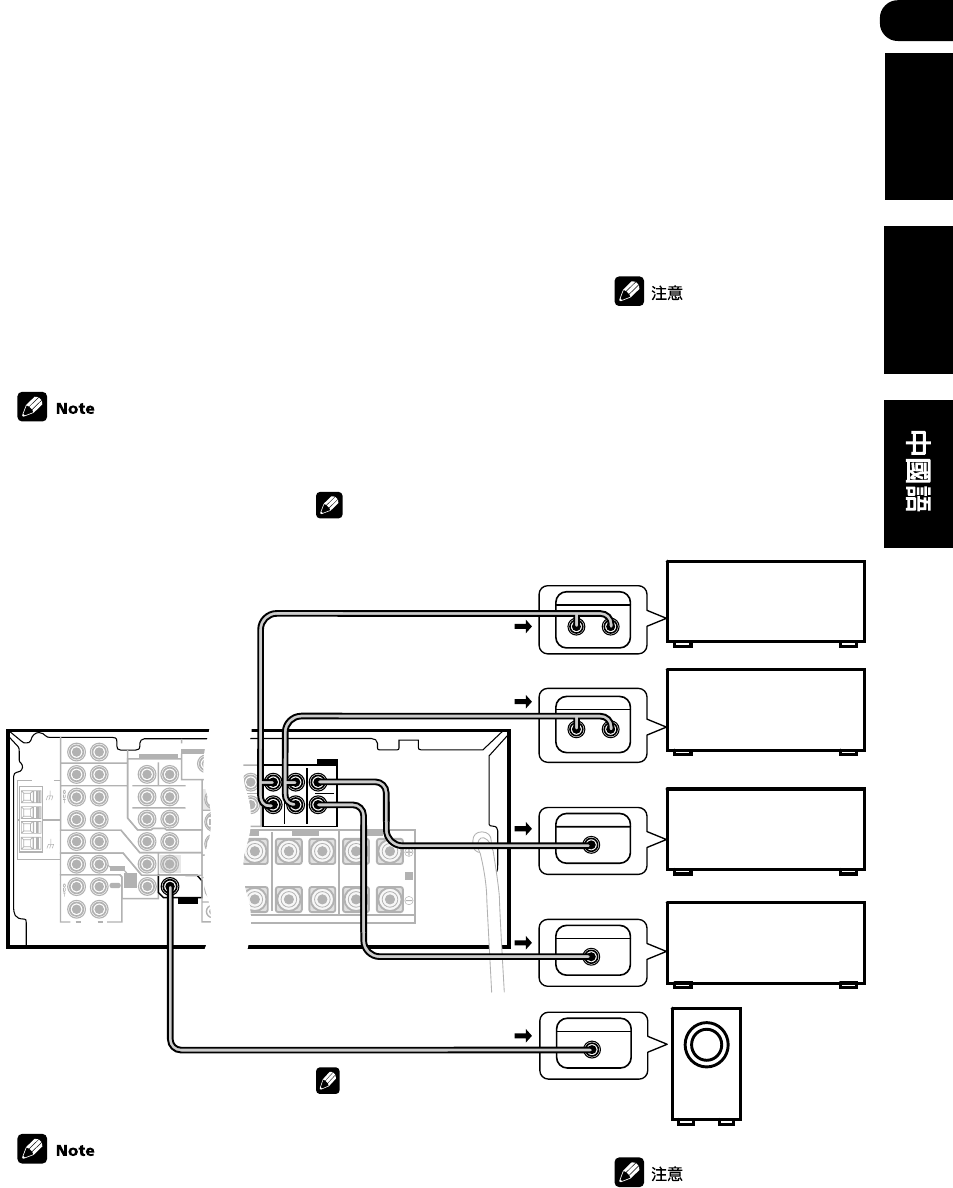
03
35
En/Sp/ChH
English Español
ASSIGNABLE
PREOUT
AB
MONITOR OUT
FRONT
RL R
RR
LR L
FRONTCENTER SURROUND
RL
LL
SURROUND BACK
S
P
E
A
K
E
R
S
YP
B
P
R
YP
B
P
R
OPT OPT
COMPONENT
VIDEO
(TV/
SAT)(CD-R/
/ TAPE
/ MD)
¥
12
ø
ø
DIGITAL OUT
(TV / SAT
)FRONT CENTER
SURROUND
BACK
SURROUND
IN
(DVD/ LD)IN
¥
S-VIDEO
ANTENNA
AM
LOOP
FM
UNBAL
75
Ω
R
AUDIO
L
DVD 7.1CH INPUT
IN
IN
IN
IN
IN
IN
IN
IN
IN
RL
CENTER
SURROUND
RL
SURROUND
BACK
SUB W.
CD
AUX
VCR /
DVR
TV /
SAT
DVD
/ LD
PLAY
CD-R
/ TAPE
/ MD
FRONT
D V D
5.1CH
INPUT
PREOUT
(DVD/ LD)
OUT
MONITOR
OUT
SUB
WOOFER
VIDEO
REC
¥
ASSIGNABLE
DIGITAL IN
VSX-D811S
ANALOG IN
ANALOG IN
ANALOG IN
INPUT
ANALOG IN
L R
LR
Connecting addi-
tional amplifiers
(VSX-D811S only)
This receiver has more than
sufficient power for any home use,
however it is possible to add
additional amplifiers to every
channel. Make the connections
shown below to add amplifiers to
power your speakers. Always make
sure that the receiver is switched
off and unplugged from the wall
outlet before making or changing
any connections.
The arrows indicate the direction
of the audio signal.
•To hear sound only from the
pre-outs, disconnect any
speakers that are connected
directly to the receiver.
•If you’re not using a
subwoofer, change the front
speaker setting (see Speaker
setting on page 62) to large.
Front channel amplifier
Surround channel amplifier
Surround back channel
amplifier
Center channel amplifier
Powered subwoofer
Conexión de
amplificadores
adicionales
(Sólo VSX-D811S)
Este receptor tiene potencia más
que suficiente para un uso en
casa, sin embargo, es posible
añadir amplificadores adicionales
a todos los canales. Efectúe las
conexiones que se muestran a
continuación para añadir
amplificadores y así dar más
potencia a los altavoces.
Asegúrese siempre de que el
receptor está apagado y
desconectado de la toma de la
pared antes de efectuar o
modificar cualquier conexión.
Nota
•Para escuchar el sonido sólo
por las salidas
preseleccionadas, desconec-
te todos los altavoces que
están conectados directa-
mente al receptor.
•En caso de que no utilice un
realzador de graves, cambie el
ajuste del altavoz frontal
(véase la sección Ajuste de los
altavoces en la página 62) a
grande.
Nota
Las flechas indican la dirección
de la señal de audio.
Realzador
de graves alimentado
Ampli. ch surround
Ampli. ch post. surr.
Ampli. ch frontal
Ampli. ch central
連接附加放大器
(僅適於VSX-D811S)
接收機功率對於任何家庭應用已足
夠,但是也可以對每個聲道添加附
加放大器。如下圖所示將放大器接
至揚聲器以增加其功率。在進行連
接或者改變連接時,請確保接收機
已關閉,且插頭從牆面插座拔下。
箭頭表示音頻信號的傳輸方向。
•要聽見僅從前置輸出輸出的聲
音,請斷開所有與接收機直接
相連的揚聲器。
•如果不使用超低音揚聲器,則
將前置揚聲器設定設為大(參
見第62頁
揚聲器設定
的有關內
容)。
前置聲道放大器
環繞聲道放大器
後置環繞聲聲道放大器
中央聲道放大器
有源超低音揚聲器
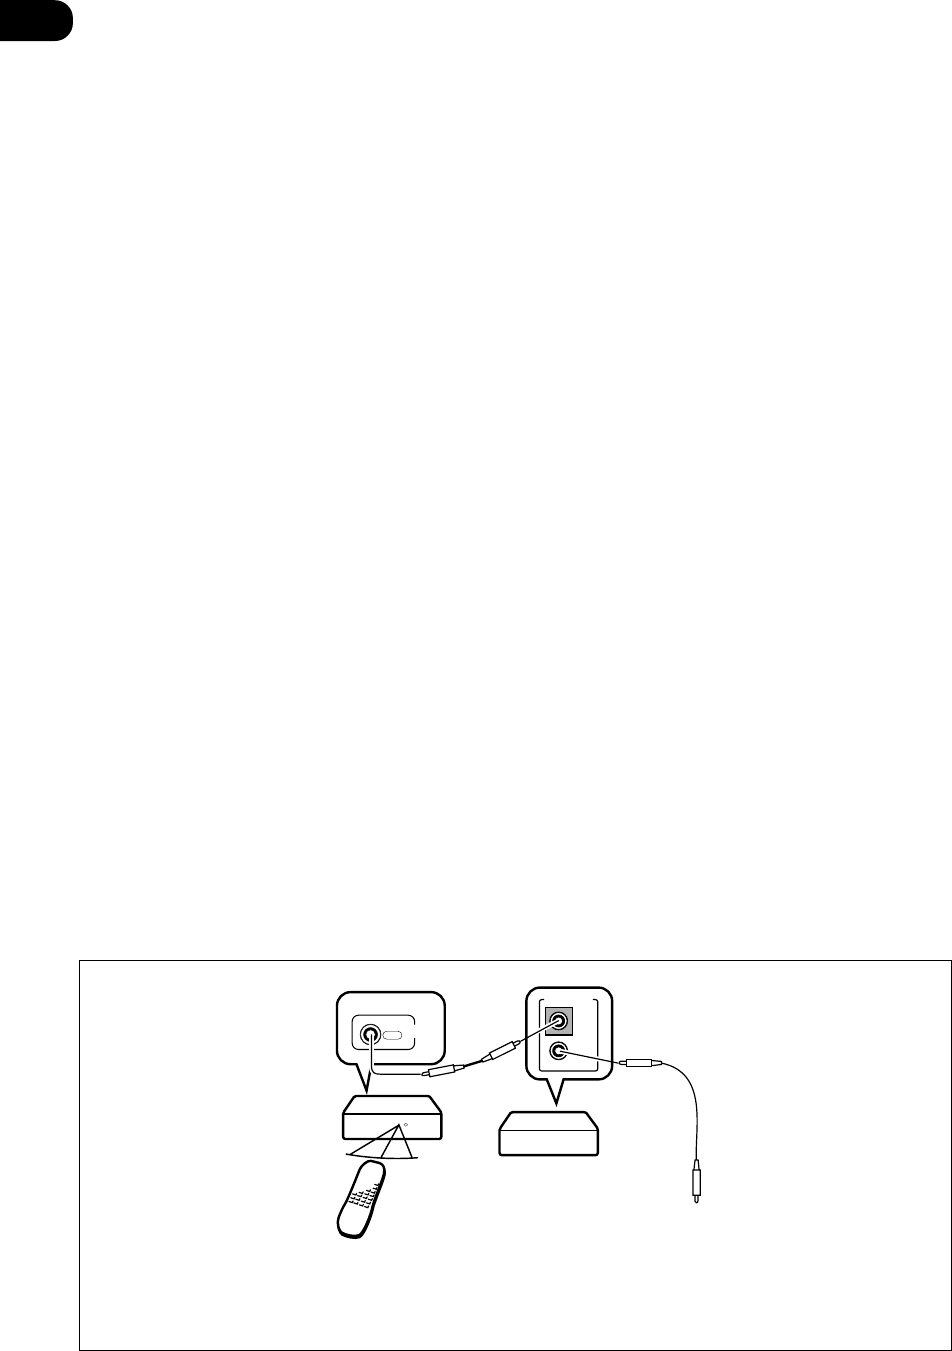
03
36
En/Sp/ChH
CONTROL
OUT
OUT
IN
CONTROL
Receiver
Other Pioneer products
with a CONTROL terminal
Operating other
Pioneer components
By connecting a control cord
(optional), you can point the
remote controls of other Pioneer
components at the receiver’s
remote sensor. The remote control
signals are received by the remote
sensor of this unit, and sent to the
other devices via the CONTROL
OUT terminal.
POWER-CORD CAUTION
Handle the power cord by the plug.
Do not pull out the plug by tugging
the cord and never touch the
power cord when your hands are
wet as this could cause a short
circuit or an electric shock. Do not
place the unit, a piece of furniture,
etc., on the power cord, or pinch
the cord. Never make a knot in the
cord or tie it with other cords. The
power cords should be routed such
that they are not likely to be
stepped on. A damaged power
cord can cause a fire or give you
an electrical shock. Check the
power cord once in a while. When
you find it damaged, ask your
nearest Pioneer authorized service
center or your dealer for a
replacement.
Connect to the CONTROL IN
terminal of other Pioneer
products with a CONTROL
terminal
Remote control unit
Receptor
Otros productos Pioneer
con terminales CONTROL
Funcionamiento de
otros componentes
Pioneer
Al conectar un cable de control
(opcional) puede apuntar con los
controles remotos de otros
componentes Pioneer el sensor
remoto del receptor. También
puede utilizar el mando a distancia
de este aparato para controlar un
reproductor de DVDs Pioneer. Las
señales del mando a distancia las
recibe el sensor remoto de este
aparato, y se envían a otros
dispositivos a través del terminal
CONTROL OUT.
PRECAUCIÓN CON EL CABLE
DE ALIMENTACIÓN
Manipule el cable de alimentación
tomándolo por el enchufe. No tire
del enchufe estirando del cable y
no lo toque nunca con las manos
mojadas, ya que podría provocar
un cortocir-cuito o descarga
eléctrica. No coloque el apa-rato,
muebles, etc., sobre el cable de
alimenta-ción, ni permita que
quede atrapado. No anude el
cable ni lo ate a otros cables. Los
cables de alimentación deberían ir
entroncados para evitar pisarlos.
Un cable alimentación dañado
puede provocar un incendio o
provocar una descarga eléctrica.
Compruebe de vez en cuan-do que
el cable está en buenas condicio-
nes. Si lo encontrase dañado,
solicite un cable de repuesto en su
centro de servicio autorizado o
distribuidor de productos Pioneer
más próximo.
Conexión al terminal
CONTROL IN de otros
productos Pioneer con el
terminal CONTROL
電源線注意事項
插拔電源線時請握住插頭,切勿拉
扯電源線來拔出插頭。禁止用濕手
接觸電源線,以防引起短路或觸
電。請勿將本設備或其他家具壓在
電源線上。請勿將電源線打結或與
其他電線綁在一起。電源線應置於
不易踩到的地方。損壞的電源線可
能引起火災或觸電事故,故請經常
檢查電源線,一旦發現損壞,請即
就近聯繫先鋒授權服務中心或者經
銷商進行更換。
操作其他先鋒設備
通過連接一條控制線(可選擇),
您可將其他先鋒設備的遙控器對準
本接收機的遙感窗,遙控信號由接
收機的遙感窗接收,然後再通過
CONTROL OUT端子傳送至其他設
備。
接收機
遙控器
其他帶CONTROL端子的先鋒產品
連接到其他帶CONTROL端子的先鋒
產品的CONTROL IN端子
Mando a distancia
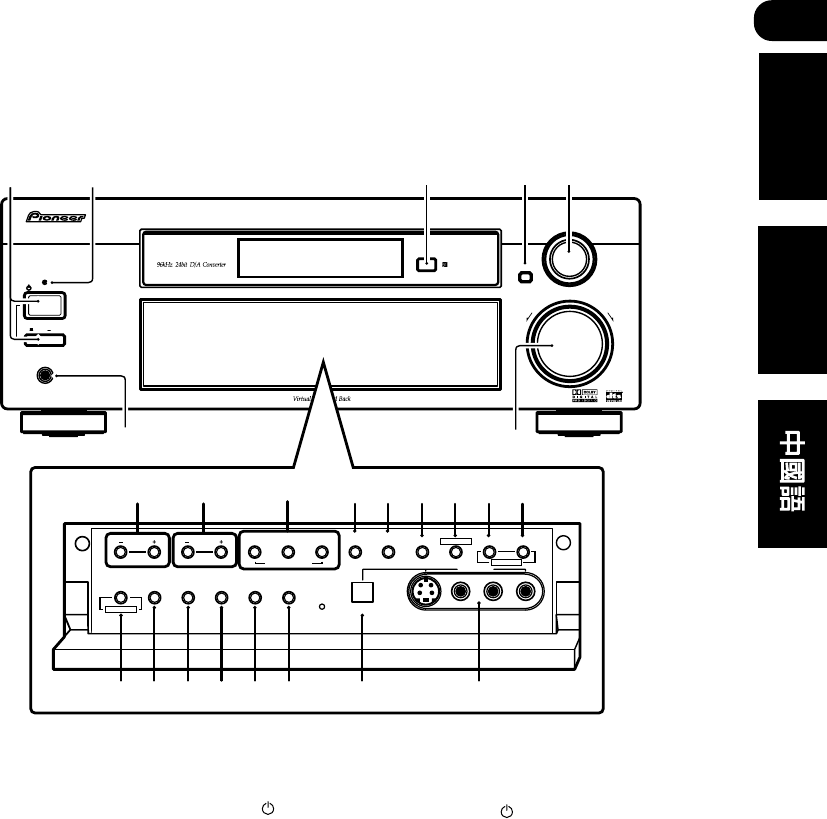
04
37
En/Sp/ChH
English Español
1 STANDBY/ON-power — OFF
_ ON button
STANDBY/ON switches the
receiver between on and standby.
The power button switches the
receiver off.
2 STANDBY indicator
Lights when the receiver is in
standby mode.
3 Remote sensor
Receives the signals from the
remote control.
4 ENTER
5 MULTI JOG/INPUT SELECTOR
dial
The MULTI JOG/INPUT SELECTOR
dial performs a number of tasks.
Use it to select options after
pressing TONE CONTROL, QUICK
SETUP or TUNER EDIT.
6 MASTER VOLUME
DOWN
UP
ENTER
INPUT
SELECTOR
MASTER VOLUME
MULTI JOG
AUDIO/VIDEO MULTI-CHANNEL RECEIVER
R
STANDBY
PHONES
N∫m-Û˘,,∫
STATION STANDARD SPEAKERS
S-VIDEO VIDEO L AUDIO R
ADVANCED
SURROUND STEREO/
DIRECT SIGNAL
SELECT MIDNIGHT/
LOUDNESS
TUNING MONITOR TONE QUICK SETUP
VIDEO INPUT
TUNER EDIT CLASS BAND MPX
MULTI JOG
LISTENING MODE
INPUT ATT FL DIMMER
MULTI JOG
DIGITAL IN
12
7
4 5
3
6
8
24 23 22 21 20 19 18*17
9
10 11 12 13 14 15 16
STANDBY
/
ON
OFF ON
Front panel
Controls and dis-
plays
1 Botón STANDBY/ON de
alimenta-ción — OFF _ ON
STANDBY/ON cambia el receptor
de encendido a modo en espera. El
botón de encendido cambia el
receptor a apagado.
2 Indicador STANDBY
Se ilumina cuando el receptor está
en modo de espera.
3 Sensor remoto
Recibe las señales del mando a
distancia.
4 ENTER
5 Selector MULTI JOG/INPUT
SELECTOR
El selector MULTI JOG/INPUT
SELECTOR realiza varias tareas.
Utilícelo para seleccionar opciones
después de pulsar TONE
CONTROL, QUICK SETUP o
TUNER EDIT.
6 MASTER VOLUME
Controles y
pantallas
Panel frontal
1 待機/電源開關—關_開按鈕
STANDBY/ON按鈕使接收機在打
開和待機狀態進行切換。電源按鈕
關閉接收機。
2 STANDBY指示標誌
如果接收機處於等待狀態,燈亮。
3遙感窗
接收遙控器信號。
4 ENTER(確認)
5 MULTI JOG/INPUT SELECTOR
(多功能慢進/輸入選擇)旋鈕
MULTI JOG/INPUT SELECTOR旋鈕
可執行多種任務。在按TONE
CONTROL(音調控制)、QUICK
SETUP(快速設置)或者TUNER
EDIT(調諧器編輯)之後,用該旋
鈕選擇選項。
6主音量
控制按鈕和顯示屏
前面板
* VSX-D811S

04
38
En/Sp/ChH
7 PHONES jack
Use to connect headphones. When
the headphones are connected,
there is no sound output from the
speakers.
8 STATION (+/–) buttons (page
76)
Selects station presets when using
the tuner.
9 TUNING buttons (pages 72-73)
Selects the frequency when using
the tuner.
10 LISTENING MODE buttons
STANDARD (pages 48, 54)
Press for Standard decoding
and to switch between the
various Pro Logic II options.
ADVANCED SURROUND
(pages 49, 55)
Use to switch between the
various surround modes.
STEREO/DIRECT (pags 48, 55)
Switches direct playback on or
off. Direct playback bypasses
the tone controls and channel
levels for the most accurate
reproduction of a source.
11 SIGNAL SELECT
(pages 53, 58, 77)
Use to select between input
signals.
12 MIDNIGHT/LOUDNESS
(page 56)
Use Midnight when listening to
movie soundtracks at low volume.
Use Loudness to boost the bass
and treble at low volume.
13 SPEAKERS
Use to cycle through the speaker
system: A = B = A+B
14 MONITOR
Press to switch tape monitoring
on/off.
15 TONE
Press this button to access the
bass and treble controls, which
you can then adjust with the
MULTI JOG/INPUT SELECTOR
dial.
7 Toma PHONES
Utilícela para conectar los
auriculares. Cuando los auricu-
lares están conectados, los
altavoces no emiten sonido.
8 Botones STATION (+/–)
(página 76)
Selecciona presintonías al utilizar
el sintonizador.
9 Botones TUNING (páginas 72-
73)
Selecciona la frecuencia al utilizar
el sintonizador.
10 Botones LISTENING MODE
STANDARD (páginas 48, 54)
Púlselo para una
decodificación Estándar y para
cambiar entre las diferentes
opciones de Pro Logic II.
ADVANCED SURROUND
(páginas 49, 55)
Utilícelo para cambiar entre los
diferentes modos surround.
STEREO/DIRECT
(páginas 48, 55)
Activa o desactivada la
reproducción directa. La
reproducción directa ignora los
controles del tono y los niveles
de canal para reproducir la
fuente de la manera más
precisa.
11 SIGNAL SELECT
(páginas 53, 58, 77)
Utilícelo para seleccionar señales
de entrada.
12 MIDNIGHT/LOUDNESS
(página 56)
Utilícelo para escuchar bandas
sonoras de vídeos a un volumen
bajo. Utilícelo para realzar los
graves y agudos a un volumen
bajo.
13 SPEAKERS
Utilícelo para avanzar por el
sistema de los altavoces: A = B =
A+B
14 MONITOR
Púlselo para activar/desactivar la
supervisión de la cinta.
7耳機插口
用來連接頭戴式耳機。當插接頭戴
式耳機時,揚聲器不發聲。
8 STATION(+/–) (電臺增/減)
按鈕(第76頁)
使用調諧器時選擇預設電臺。
9 TUNING(調諧)按鈕(第72-
73頁)
使用調諧器時選擇頻率。
10 LISTENING MODE(收聽模
式)按鈕
STANDARD(標準)(第48
頁、第54頁)
按該鈕則進行標準解碼,在不
同PRO LOGIC II選項之間進行
切換。
ADVANCED SURROUND(高
級環繞)(第49頁、第55頁)
在不同環繞模式之間切換
STERO/DIRECT(立體聲/直
接)(第48頁、第55頁)
開啟或關閉直接播放。直接播
放旁路音調控制和聲道音壓,
獲取最精確的聲音再現。
11 SIGNAL(信號)選擇(第53
頁、第58頁、第77頁)
在輸入信號之間進行選擇。
12 MIDNIGHT/LOUNDNESS(午
夜/響度)(第56頁)
當低音量收聽電影伴音時用午夜模
式。用響度模式在低音量時增強低
音和高音。
13 SPEAKERS(揚聲器)
在揚聲器系統之間循環切換: A =
B = A+B
14 MONITOR(監測器)
按該鈕打開/關閉音帶監測功能。
15 TONE(音調)
按該鈕調出低音和高音控制功能,
然後可用MULTI JOG/INPUT
SELECTOR旋鈕進行調節。

04
39
En/Sp/ChH
English Español
15 TONE
Pulse este botón para acceder a
los controles de graves y agudos,
que puede seleccionar con MULTI
JOG/INPUT SELECTOR dial.
16 QUICK SETUP
17 VIDEO INPUT (página 25)
18 DIGITAL IN (sólo VSX-D811S)
(página 25)
19 FL DIMMER
Utilícelo para que la pantalla
fluorescente (FL) se haga más
tenue o más brillante.
20 INPUT ATT
Utilícelo para atenuar (reducir) el
nivel de una señal de entrada
analógica y de este modo modo
evitar las dis
21 MPX (página 73)
Púlselo para recibir una
transmisión radiofóni-ca en
monoaural.
22 BAND (páginas 72–73)
Cambia entre bandas de radio AM
y FM.
23 CLASS (páginas 74–76)
Utilícelo para cambiar entre las
tres categorías (clases) de
presintonías.
24 TUNER EDIT (páginas 74–75)
Utilícelo para memorizar y dar un
nombre a las emisoras.
16 QUICK SETUP
17 VIDEO INPUT (page 25)
18 DIGITAL IN (VSX-D811S only)
(page 25)
19 FL DIMMER
Use this button to make the
fluorescent display (FL) dimmer or
brighter.
20 INPUT ATT
Use to attenuate (lower) the level
of an analog input signal to
prevent distortion.
21 MPX (page 73)
Press to receive a radio broadcast
in mono.
22 BAND (pages 72–73)
Switches between AM and FM
radio bands.
23 CLASS (pages 74–76)
Switches between the three banks
(classes) of station presets.
24 TUNER EDIT (pages 74–75)
Use for memorizing and naming
stations.
16 QUICK SETUP(快速設置)
17 VIDEO INPUT(視頻輸入)
(第25頁)
18 DIGITAL IN(數碼輸入)
(僅
適於
VSX – D811S
)
(第25頁)
19 FL DIMMER(FL調光器)
該鈕用來調節熒光顯示屏亮度。
20 INPUT ATT(輸入衰減)
用來衰減(降低)模擬輸入信號的
電平以防止失真。
21 MPX(第73頁)
按該鈕以單聲道接收無線電廣播。
22 BAND(波段)(第72-73
頁)
在AM和FM無線電波段之間進行切
換。
23 CLASS(類別)(第74-76
頁)
在三個預設電臺的組(類別)之間
進行切換。
24 TUNER EDIT(調諧器編輯)
(第74-75頁)
用來記憶或命名電臺。
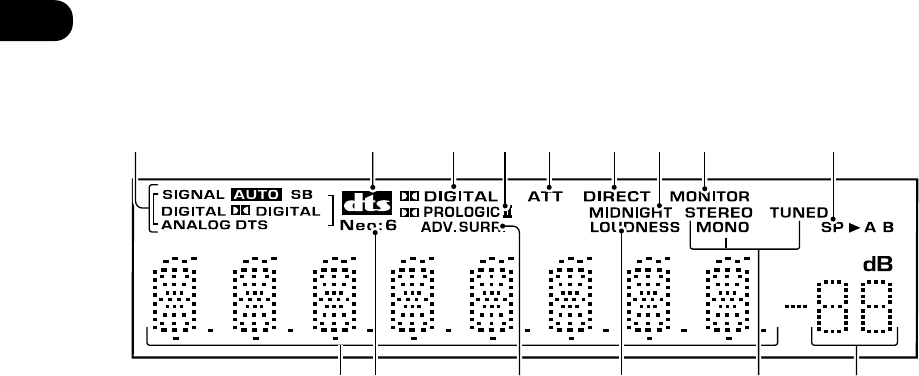
04
40
En/Sp/ChH
1 SIGNAL SELECT indicators
Lights to indicate the type of input
signal assigned for the current
component:
AUTO
Lights when AUTO signalselect
is on
SB (VSX-D811S only)
Depending on the source, this
lights when a signal with
surround back channel
encoding is detected.
DIGITAL
Lights when a digital audio
signal is detected.
2 DIGITAL
Lights when a Dolby Digital
encoded signal is detected.
ANALOG
Lights when an analog signal is
detected.
DTS
Lights when a source with DTS
encoded audio signals is
detected.
2 DTS
When the Standard mode of the
receiver is on, this lights to
indicate decoding of a DTS signal.
32 DIGITAL
When the Standard mode of the
receiver is on, this lights to
indicate decoding of a Dolby
Digital signal.
123456789
10 15131211 14
Display
1 Indicadores SIGNAL SELECT
Se ilumina para indicar el tipo de
señal de entrada asignada al
componente actual:
AUTO
Se ilumina cuando la señal de
AUTO está activada.
SB (sólo VSX-D811S)
Dependiendo de la fuente, se
ilumina cuando se detecta un
señal con codifica-ción de
canal posterior surround.
DIGITAL
Se ilumina cuando se detecta
una señal de audio digital.
2 DIGITAL
Se ilumina cuando se detecta
una señal codificada Dolby
Digital.
ANALOG
Se ilumina cuando se detecta
una señal analógica.
DTS
Se ilumina cuando se detecta
una fuente con una señal de
audio DTS.
2 DTS
Cuando el modo Estándar del
receptor está activado, se ilumina
para indicar decodificación de una
señal DTS.
Pantalla 顯示屏
1 SIGNAL SELECT(信號選擇)
指示標誌
點亮表明當前設備所分配的輸入信
號類型︰
AUTO(自動)
當AUTO信號選擇開啟時點亮。
SB
(僅適於
VSX – D811S
)
當環繞後置聲道編碼被檢測到
時燈亮,這根據播放源的類型
而定。
DIGITAL(數碼)
當數碼音頻信號被檢測到時點
亮。
2 DIGITAL(杜比數碼)
當杜比數碼編碼信號被檢測到
時點亮。
ANALOG(模擬)
當模擬信號被檢測到時點亮。
DTS
當帶DTS編碼音頻信號的播放源
被檢測到時點亮。
2 DTS
當接收機處於標準模式時點亮,表
明DTS信號正在解碼。
32 DIGITAL
當接收機處於標準模式時點亮,表
明杜比數碼信號正在解碼。

04
41
En/Sp/ChH
English Español
42 PRO LOGIC II
When the Standard mode of the
receiver is on, this lights to
indicate Pro Logic II decoding.
5ATT
Lights when INPUT ATT is used to
attenuate (reduce) the level of the
analog input signal.
6 DIRECT
Lights when source direct play-
back is in use. This function
bypasses all tone, balance,
Advanced Surround, and Dolby
Surround effects.
7 MIDNIGHT
Lights during Midnight listening.
8 MONITOR
Lights when MONITOR is selected
(page 78).
9 Speaker indicator
Shows the speaker system cur-
rently in use.
10 Character display
11 Neo:6 (VSX-D811S only)
Lights during NEO:6 processing
12 ADV. SURR (Advanced
Surround)
Lights when one of the Advanced
Surround modes has been
selected.
13 LOUDNESS
Lights when LOUDNESS has been
selected.
14 TUNER indicators
STEREO:
Lights when a stereo FM
broadcast is being received in
auto stereo mode.
MONO:
Lights when the mono mode is
set using the MPX button.
TUNED:
Lights when a broadcast is
being received.
32 DIGITAL
Cuando el modo Estándar del
receptor está activado, se ilumina
para indicar decodificación de una
señal Dolby Digital.
42 PRO LOGIC II
Cuando el modo Estándar del
receptor está activado, se ilumina
para indicar decodificación de una
señal Prologic II.
5ATT
Se ilumina cuando se utiliza
INPUT ATT para atenuar (reducir)
el nivel de la señal de entrada.
6 DIRECT
Se ilumina cuando la reproducción
directa de la fuente está en uso.
Esta función ignora todos los
efectos de tono, equilibrio, Sur-
round avanzado y Dolby Surround.
7 MIDNIGHT
Se ilumina durante el modo de
audición Midnight.
8 MONITOR
Se ilumina cuando se selecciona
MONITOR (página 78).
9 Indicador de los altavoces
Muestra el sistema de altavoces
utilizado en esos momento.
10 Pantalla de caracteres
11 Neo:6 (sólo VSX-D811S)
Se ilumina durante un proceso
NEO:6.
12 ADV. SURR (Surround
avanzado)
Se ilumina cuando se ha
seleccionado uno de los modos
Surround avanzado.
13 LOUDNESS
Se ilumina cuando se ha
seleccionado LOUDNESS.
14 Indicadores TUNER
STEREO:
Se ilumina cuando se recibe en
modo Estéreo automático una
emisión en FM en estéreo.
MONO:
Se ilumina cuando se
configura el modo monoaural
utilizando el botón MPX.
42 PRO LOGIC II
當接收機處於標準模式時點亮,表
明PRO LOGIC II信號正在解碼。
5ATT(衰減)
當用INPUT ATT來衰減(降低)模擬
輸入信號電平時點亮。
6 DIRECT(直接)
當播放源直接播放時點亮。該功能
旁路所有音調、均衡、高級環繞聲
和杜比環繞聲效果。
7 MIDNIGHT(午夜)
在午夜模式收聽時點亮。
8 MONITOR(監測器)
當選擇MONITOR時點亮。(第78
頁)
9揚聲器指示標誌
10 字符顯示
11 Neo:6
(僅適於
VSX – D811S
)
在NEO︰6處理時點亮。
12 ADV. SURR(高級環繞聲)
當高級環繞聲模式中其中一種模式
被選擇時點亮。
13 LOUDNESS(響度)
當LOUDNESS被選擇時點亮。
14 TUNER(調諧器)指示標誌
STEREO(立體聲)︰
當以自動立體聲模式接收立體
聲FM廣播時點亮。
MONO(單聲道)︰
使用MPX按鈕設為單聲道模式
時點亮。
TUNED(調諧)︰
在接收廣播時點亮。

04
42
En/Sp/ChH
15 Master volume level
Shows the overall volume level. ---
dB indicates the minimum level,
and −−
−−
−0 dB indicates the maximum
level.
Depending on your level settings
for each channel, the maximum
level can range between –10 dB
and –0 dB.
TUNED:
Se ilumina al recibirse una
emisión.
15 Nivel de volumen master
Muestra el nivel del volumen
general. ---dB indica el nivel
mínimo, y −−
−−
−0 dB indica el nivel
máximo.
Dependiendo de los ajustes del
nivel que haga para cada canal, el
máximo nivel puede oscilar entre –
10dB y –0dB.
15 主音量級
顯示總的音量級。---dB表示最小音
量級,−−
−−
−0 dB表示最大音量級。
依據您對每個聲道的音量級設定,
最高音量級應在 –10 dB和 –0 dB
之間。
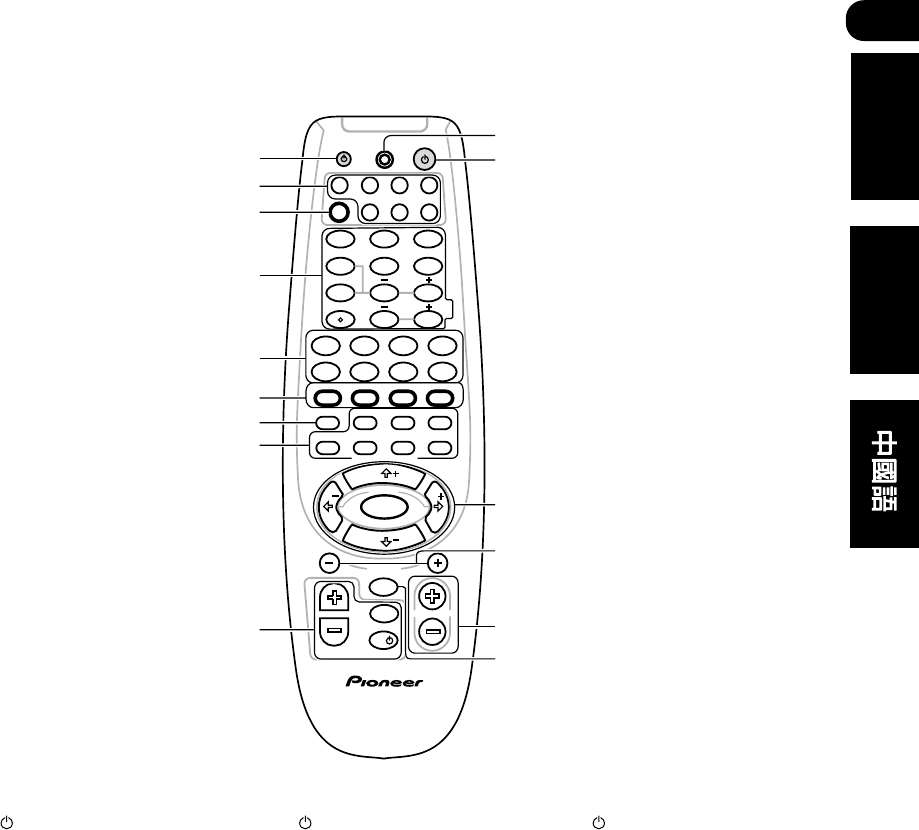
04
43
En/Sp/ChH
English Español
1 SOURCE
Press to turn on/off other compo-
nents connected to the receiver.
2 MULTI CONTROL buttons
Press to select control of other
components (see Controlling the
rest of your system on pages 79–
87).
3 RCV
Use to switch to the receiver
controls on the remote control (ex.
INPUT ATT, FL. DIMMER). Also
use this button to set up surround
sound (pages 59, 71).
4 Number buttons/Receiver
controls/ENTER
Use the number buttons to directly
select a radio frequency (page 72)
or the tracks on a CD, DVD, etc.
Remote control
TV
TV INPUT
MENU
TV VOL
MASTER VOLUME
TV CONTROL
AV PRE-PROGRAMMED
REMOTE CONTROL UNIT
CHANNEL
ENTER
ENTER
MPX/RETURNDTV INFO
DTV/DISPLAY DTV MENU
D.ACCESS T.EDIT/GUIDE
ST
TUNE
T
P
S
E
U
TUNE
ST
CLASS
FL DIMMER
BAND
TOP MENU AUDIO SUB TITLE
REMOTE SETUP
RECEIVER CONTROL
STANDARD ADV.SURR.
STEREO
ANGLE
1¡
4¢
78
3
LEVEL
DVD VCR CD-RTV
RCV TUN TVCCD
TEST TONE
CH SELECT
INPUT ATT
INPUT SEL.
MUTE
MIDNIGHT/
LOUDNESS
SIGNAL SEL
MULTI CONTROL
EFFECT DISC
+10
RECEIVER
SOURCE
123
456
789
0
3
4
5
6
8
7
9
11
10
12
13
14
15
2
1
1 SOURCE
Púlselo para enchufar/
desenchufar otros componentes
conectados al receptor.
2 Botones MULTI CONTROL
Púlselos para seleccionar el
control de otros componentes
(véase Cómo controlar el resto del
sistema en las páginas 79–87).
3 RCV
Utilícelo para cambiar los
controles del receptor en el mando
a distancia (por ejemplo, INPUT
ATT, FL. DIMMER). También utilice
este botón para configurar el
sonido surround (páginas 59, 71).
4 Botones numerados/
Controles del receptor
Utilice los botones numerados
para seleccionar directamente una
frecuencia de radio (página 72) o
las pistas de un CD, DVD, etc.
Mando a distancia 遙控器
1 SOURCE(音源)
按該鈕打開/關閉其他連接到接收
機的設備。
2 MULTI CONTROL(多功能控
制)按鈕
按該鈕選擇控制其他設備(參見第
79-87頁
控制系統中的其他設
備
)。
3 RCV
將遙控器切換至接收機控制狀態
(例如INPUT ATT, FL.
DIMMER)。還可以用該按鈕設置
環繞聲(第59頁、第71頁)。
4數字按鈕/接收機控制鈕/
ENTER(確認)鈕
用數字按鈕直接選擇無線電廣播頻
率(第72頁)或CD、DVD等碟片上
的曲目。

04
44
En/Sp/ChH
Receiver Controls
Press the RCV button first to
access the functions above the
number buttons. The display
flashes when it isn’t possible to
use a function.
TEST TONE (page 71)
Sounds the test tone when
setting up the surround sound
of the receiver.
INPUT ATT
Attenuates (lowers) the level of
an analog input signal to
prevent distortion.
FL DIMMER
Dims or brightens the display.
CH SELECT (page 71)
Selects a speaker when setting
up the surround sound of the
receiver.
LEVEL +/– (page 71)
Adjusts the levels of the
surround sound of the receiver.
EFFECT +/– buttons (page 56)
Adds or subtracts the amount
of effect with different ad-
vanced listening modes (except
5 or 6 Ch Stereo and Virtual
SB).
DISC
The button’s use depends on
the component selected (listed
on page 89).
5 Component/Tuner
controls
The main buttons (3, 7, etc.) are
used to control a component after
you have selected it using the
MULTI CONTROL buttons. The
tuner/DTV controls above these
buttons can be accessed after you
have selected the corresponding
MULTI CONTROL button (TUNER
or DVD (when connected to DTV)).
DTV INFO
Use to bring up information
screens on a digital TV.
Controles del receptor
Pulse primero el botón RCV
para acceder a las funciones
sobre los botones numerados.
La pantalla parpadea cuando
no es posible utilizar esta
función.
TEST TONE (página 71)
Hace sonar el tono de prueba
cuando configure el sonido
surround del receptor.
INPUT ATT
Atenúa (reduce) el nivel de una
señal de entrada analógica
para evitar distorsiones.
FL DIMMER
Hace que la pantalla se haga
más tenue o más brillante.
CH SELECT (página 71)
Selecciona un altavoz cuando
se configura el sonido sur-
round del receptor.
LEVEL +/– (página 71)
Ajusta los niveles del sonido
surround del receptor.
Botones EFFECT +/–
(página 56)
Añade o quita la cantidad de
efecto con diferentes modos de
audición avanzada (excepto el
canal 5 o 6 Estéreo o SB
virtual).
DISC
El uso del botón depende del
componente seleccionado (que
aparece en la lista de la página
89).
5 Controles del
Componente/
Sintonizador
Los botones principales (3, 7, etc)
se utilizan para controlar un
componente después de
seleccionarlo utilizando los
botones MULTI CONTROL. Puede
accederse a los controles del
sintonizador/DTV situados sobre
estos botones una vez haya
seleccionado el correspondiente
botón MULTI CONTROL (TUNER o
DVD, cuando se conecte a un
DTV).
接收機控制
先按RCV按鈕調出數字按鈕上
方的功能。如不能使用上方的
功能,顯示屏會閃爍。
TEST TONE(測試音)(第71
頁)
當設置接收機環繞聲時,測試
音響起。
INPUT ATT(輸入衰減)
衰減(降低)模擬輸入信號等
級,以防止失真。
FL DIMMER(FL 調光器)
調節顯示屏亮度。
CH SELECT(聲道選擇)(第
71頁)
當設置接收機的環繞聲時選擇
一個揚聲器。
LEVEL +/–(音壓增/減)(第
71頁)
調整接收機環繞聲音壓。
EFFECT +/–(音效增/減)按鈕
(第56頁)
以不同的高級收聽模式(除了5
聲道或6聲道立體聲和虛擬SB)
增加或減少音效。
DISC(碟片)
該鈕的使用依據所選擇的設備
而定(參見第89頁上的列表)
5設備/調諧器控制
用MULTI CONTROL按鈕選擇某個
設備之後,使用主按鈕(3、7
等)來控制該設備。在您選擇相應
的MULTI CONTROL按鈕(調諧器
或者DVD(當連接到DTV時))之
後,即可使用主按鈕上方的調諧
器/DTV控制按鈕。
DTV INFO(DTV資訊)
用來在數碼電視機屏幕上顯示
資訊。

04
45
En/Sp/ChH
English Español
DTV INFO
Utilícelo para que aparezcan
las pantallas de información en
un televisor digital.
MPX/RETURN (página 74)
Cambia entre recepción
monoaural y estéreo de
emisiones en FM. En caso de
que la señal sea débil, al
cambiar a monoaural la
calidad del sonido mejorará.
También actúa como un botón
de parada para CDs, cintas o
DVDs.
D. ACCESS (página 73)
Después de pulsarlo, puede
acceder directamente a una
emisora de radio utilizando los
botones numerados.
T. EDIT/GUIDE (páginas 74–75)
Utilícelo para memorizar y dar
un nombre a una emisora.
BAND (páginas 72)
Cambia entre las bandas AM y
FM del sintonizador.
CLASS (páginas 74-76)
Utilícelo para cambiar entre las
tres categorías (clases) de
presintonías.
DTV/DISPLAY
Utilícelo para cambiar entre la
pantalla del nombre y de la
frecuencia de la presintonía.
DTV MENU
Presenta los menús en un
televisor digital.
6 Controles del DVD (pulse
DVD primero para acceder)
Estos controles también
funcionarán como controles del
DTV, dependiendo del componente
que haya seleccionado.
TOP MENU
Presenta el menú “superior”
del disco de un DVD.
AUDIO
Cambia el canal o el idioma de
audio.
MPX/RETURN (page 74)
Switches between stereo and
mono reception of FM
broadcasts. If the signal is
weak then switching to mono
will improve the sound quality.
Also acts as a stop button for
CDs, tapes, or DVDs.
D. ACCESS (page 73)
After pressing, you can access
a radio station directly using
the number buttons.
T. EDIT/GUIDE (page 74–75)
Use for memorizing and
naming stations.
BAND (page 72)
Switches between the tuner
AM and FM bands.
CLASS (page 74-76)
Switches between the three
banks (classes) of radio station
presets.
DTV/DISPLAY
Use to switch the display
between the station preset
name and the frequency.
DTV MENU
Displays menus on a digital TV.
6 DVD controls (Press DVD first
to access)
These controls will also function as
DTV controls, depending on the
component you’ve selected.
TOP MENU
Displays the disc ‘top’ menu of
a DVD.
AUDIO
Changes the audio language or
channel.
SUBTITLE
Displays/changes the
subtitles included in multilin-
gual DVD-Video discs.
ANGLE
Switches camera angles on
discs with multi-angle scenes.
7 REMOTE SETUP (pages 80–87)
Press this button to set up the
remote control to control other
components.
MPX/RETURN(第74頁)
在FM廣播的立體聲和單聲道接
收之間進行切換。如信號弱則
切換至單聲道以提高音質。同
時也作為CD、音帶或者DVD碟片
的停止按鈕。
D.ACCESS(第73頁)
按該鈕便可直接用數字按鈕調
出無線電廣播電臺。
T.EDIT/GUIDE(編輯/指南)
(第74-75頁)
用來記憶和命名電臺。
BAND(波段)(第72頁)
在調諧器AM和FM波段之間進行
切換。
CLASS(類別)(第74-76
頁)
在三個預設電臺組(類別)之
間進行切換。
DTV/DISPLAY(DTV打開/關
閉)
用於在預設電臺名稱和電臺頻
率顯示之間進行切換。
DTV MENU(DTV菜單)
在數碼電視機上顯示菜單。
6 DVD控制按鈕(先按DVD以調
出該功能)
這些控制按鈕也可以作為DTV控制
按鈕使用,依據您所選擇的設備而
定。
TOP MENU(頂層菜單)
顯示DVD碟片的“頂層”菜單。
AUDIO(伴音)
改變伴音語言或聲道。
SUBTITLE(字幕)
顯示/改變多語言DVD影碟中
的字幕。
ANGLE(視角)
切換有多視角場景的碟片中的
攝影視角。
7 REMOTE SETUP(遙控器設
置)(第80-87頁)
按該鈕設置遙控器以控制其他設
備。

04
46
En/Sp/ChH
8 RECEIVER CONTROL buttons
STANDARD (page 54)
Press to switch between the
various Dolby/DTS modes
ADV. SURR. (page 55)
Use to switch between the
various surround modes.
STEREO (page 55)
Switches direct playback on or
off. Direct playback bypasses
the tone controls and channel
levels for the most accurate
reproduction of a source.
INPUT SEL
Use to select between input
signals.
SIGNAL SEL (pages 53, 58, 77)
Use to select between input
signals.
MIDNIGHT/LOUDNESS
(page 56)
Switches to Midnight or
Loudness listening.
MUTE
Mutes the sound (or restores
the sound if it has been
muted).
9 TV control buttons
These buttons are dedicated to
control the TV assigned to the TVC
button. Thus if you only have one
TV to hook up to this system assign
it to the TVC MULTI CONTROL
button. If you have two TVs, assign
the main TV to the TVC button.
TV VOL +/–
Use to adjust the volume on
your TV.
TV INPUT
Use select the TV function.
TV
Use to turn on/off the power of
the TV.
SUBTITLE
Visualiza/cambia los subtítulos
incluidos en discos de DVD-
Vídeo multilingües.
ANGLE
Cambia los ángulos de la
cámara en discos con escenas
con múltiples ángulos.
7 REMOTE SETUP
(páginas 80–87)
Pulse este botón para configurar el
mando a distancia para controlar
otros componentes.
8 Botones RECEIVER CONTROL
STANDARD (página 54)
Púlselo para cambiar entre los
diferentes modos Dolby/DTS.
ADV. SURR. (página 55)
Utilícelo para cambiar entre los
diferentes modos surround.
STEREO (página 55)
Activa o desactivada la
reproducción directa. La
reproducción directa ignora los
controles del tono y los niveles
de canal para reproducir la
fuente de la manera más
precisa.
INPUT SEL
Utilícelos para seleccionar la
fuente de entrada.
SIGNAL SEL (páginas 53, 58,
77)
Utilícelo para seleccionar
señales de entrada.
MIDNIGHT/LOUDNESS
(página 56)
Utilícelo para cambiar a modo
de audición Midnight o
Loudness.
MUTE
Silencia el sonido (o restaura el
sonido en caso de que se haya
silenciado).
8 RECEIVER CONTROL(接收機
控制)按鈕
STANDARD(標準)(第54
頁)
按該鈕在不同的杜比/DTS模式
之間進行切換。
ADV. SURR.(高級環繞聲)
(第55頁)
在不同環繞聲模式之間進行切
換。
STEREO(立體聲)(第55頁)
打開或關閉直接播放。直接播
放旁路音調控制和聲道音壓,
獲取播放源最精確的再現。
INPUT SEL(輸入選擇)
用來在輸入信號之間進行選
擇。
SIGNAL SEL(信號選擇)(第
53頁、第58頁、第77頁)
用來選擇輸入信號。
MIDNIGHT/LOUNDNESS(午
夜/響度)(第56頁)
在午夜或響度收聽模式之間進
行切換。
MUTE(靜音)
靜音(或者取消靜音)。
9電視機控制按鈕
這些按鈕用來控制分配給TVC按鈕
的電視機。因此,如果您的系統中
僅有一臺電視機,請將之分配給
TVC MULTI CONTROL按鈕,如有
兩臺電視機,則將主電視機分配給
TVC按鈕。
TV VOL +/– (電視機音量增/
減)
用來調節電視機音量。
TV INPUT(電視機輸入)
用來選擇電視機功能項。
TV (電視機電源)
用來打開/關閉電視機電源。

04
47
En/Sp/ChH
English Español
10 LED DISPLAY
This display flashes when a
command is sent from the remote
control.
11 RECEIVER
This switches between standby
and on for this receiver.
12 }]‘’ (TUNE/ST +/–) /
ENTER
Use the arrow buttons when
setting up your surround sound
system (see pages 59–71). Also
used to control DVD menus/
options and for deck 1 of a double
cassette deck player. Use the
TUNE +/– buttons to find radio
frequencies and use ST +/– to find
preset stations (page 74–76).
13 CHANNEL +/–
Select radio station presets. Also
skip tracks backward or forward on
CDs, DVDs, etc.
14 MASTER VOLUME +/–
Use to set the listening volume.
15 MENU button
Displays the disc menu of DVD-
Video discs. It also displays TV and
DTV menus.
9 Botones de control del
televisor
Estos botones están indicados
para controlar el televisor asignado
al botón TVC. Por tanto, si sólo
dispone de un televisor al que
conectar este sistema asígneselo
al botón TVC MULTI CONTROL. En
caso de que disponga de dos
televisores, asigne el televisor
principal al botón TVC.
TV VOL +/–
Utilícelo para ajustar el
volumen del televisor.
TV INPUT
Utilícelo para seleccionar la
función TV.
TV
Utilícelo para encender/
apagar el televisor.
10 LED DISPLAY
Esta pantalla parpadea cuando se
envía un comando desde el mando
a distancia.
11 RECEIVER
Cambia el receptor entre el modo
de espera y el encendido.
12 }]‘’ (TUNE/ST +/–) /
ENTER
Utilice los botones flecha cuando
configure el sistema de sonido
surround (véase las páginas 59–
71). También se utilizan para
controlar los menús/opciones del
DVD y para la platina 1 en un
reproductor de doble platina.
Utilice los botones TUNE +/– para
buscar frecuencias de radio y
utilice ST +/– para buscar
presintonías (páginas 74–76).
13 CHANNEL +/–
Selecciona presintonías de radio.
También retrocede o avanza pistas
en CDs, DVDs, etc.
14 MASTER VOLUME +/–
Utilícelos para ajustar el volumen
de escucha.
15 Botón MENU
Visualiza el menú del disco de los
discos DVD-Video. También
visualiza menús del televisor y del
DTV.
10 LED DISPLAY (LED顯示屏)
該顯示屏在遙控器發出指令之後閃
爍。
11 RECEIVE (接收機電源)
在待機和打開接收機之間進行切
換。
12 }]‘’(TUNE/ST +/– )
(調諧/電臺增/減)/ENTER(確
認)
在設置環繞聲系統時使用箭頭按鈕
(參見第59-71頁)。還用來控制
DVD菜單/選項和雙卡放音機的1 號
卡座。用TUNE +/– 按鈕來搜索無
線電頻率,用ST +/–來搜索預設電
臺(第74-76頁)。
13 CHANNEL +/–(頻道增/減)
選擇預設電臺。也可用以在CD、
DVD碟片上選擇前一個或者後一個
曲目。
14 MASTRER VOLUME +/–(主
音量增/減)
用來設置收聽音量。
15 MENU(菜單)按鈕
顯示DVD影碟的菜單。也可用以顯
示電視機或者數碼電視機的菜單。
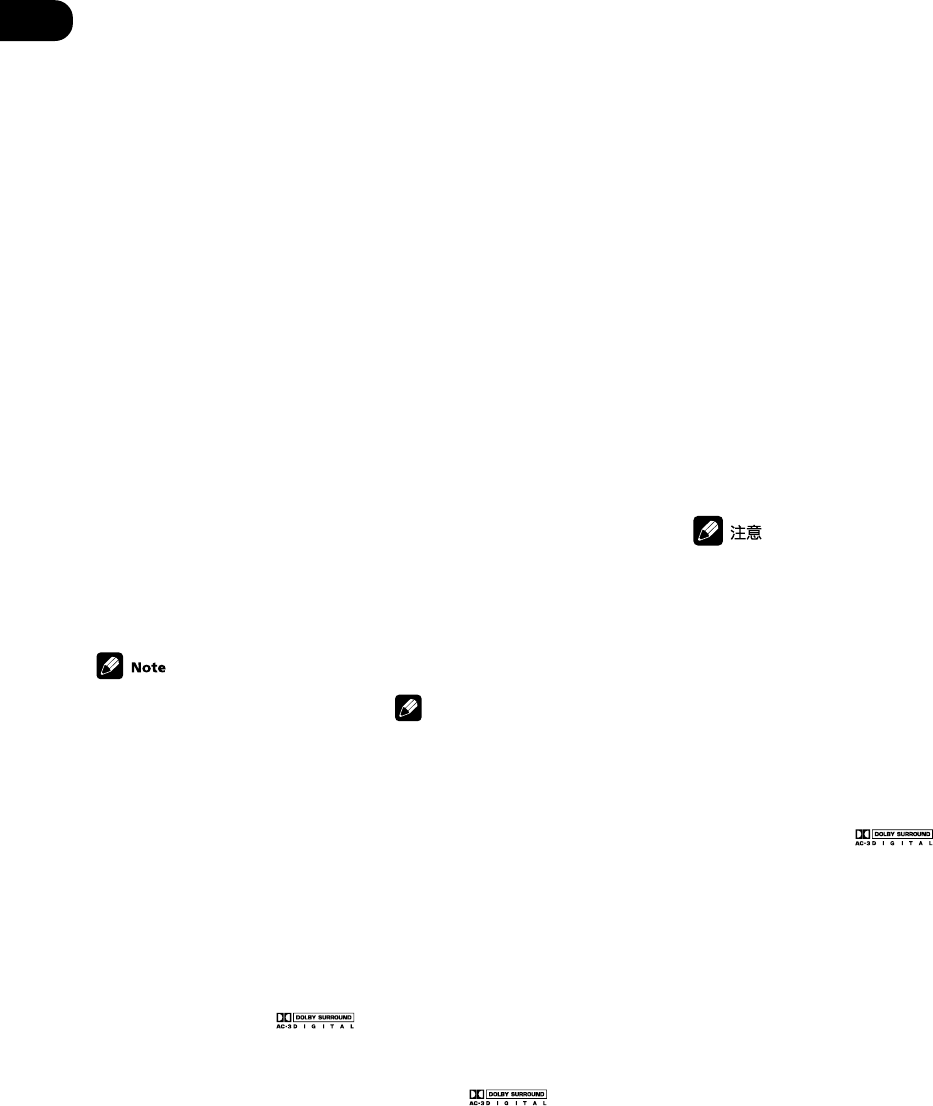
05
48
En/Sp/ChH
Playing sources
Introduction to
Sound Modes
There are three basic sound
options: Stereo/Direct, Standard or
Advanced Surround.
Stereo/Direct
When you select STEREO or
DIRECT, you will hear the source
through just the front left and right
speakers (and possibly your
subwoofer depending on your
speaker settings). Dolby Digital
and DTS multichannel sources are
downmixed to stereo.
In STEREO, you’ll hear the audio
with your surround settings and
you can still use the Midnight,
Loudness, and Tone control
functions.
With DIRECT, you will bypass all
effects and surround settings so
that the audio remains as close to
the source audio signal as
possible.
If you switch on Midnight
listening, Loudness, or the Tone
controls when DIRECT is
selected, the receiver automati-
cally switches to STEREO.
Standard mode
The standard mode will decode
Dolby Digital, DTS, or Dolby
Surround sources automatically.
The other surround sound options
(next column) can add multi-
channel sound to regular stereo
sources.
You can identify Dolby Digital
software by the 1 or
marks. Most Dolby Surround
software is marked 3, but
unmarked software may also
incorporate Dolby Surround.
Depending on the source, the 6.1
channel setting (page 63), and the
sound mode you have selected,
you may not get sound from the
surround back speakers in your
setup. For more on this, refer to the
table on page 51.
Choose one of the following to add
depth to a 2 channel source:
Reproducción de
fuentes
Introducción a los
modos de sonido
Hay tres opciones de sonido
básicas: Estéreo/Directo, Estándar
o Surround avanzado.
Estéreo/Directo
Cuando seleccione STEREO o
DIRECT, escuchará la fuente a
través de los altavoces derecho e
izquierdo frontales (y posiblemente
por el realzador de graves
dependiendo de los ajustes de los
altavoces). Las fuentes multicanal
Dolby Digital y DTS se mezclan a
estéreo.
En STEREO la señal de audio se
reproduce de acuerdo con los
ajustes de configuración del
surround y aún así puede seguir
utilizando el modo Midnight,
Loudness y las funciones de
control del tono.
En caso de que seleccione
DIRECT, la señal de audio ignora
los controles del tono y los niveles
de canal para reproducir la fuente
de la manera más precisa.
Nota
Si cambia a modo de audición
Midnight, Loudness o controles
del tono cuando está
seleccionado DIRECT, el
receptor cambia
automáticamente a STEREO.
Modo Estándard
El modo Estándar decodificará
automáticamente fuentes Dolby
Digital, DTS o Dolby Surround. Las
otras opciones de sonido surround
(siguiente columna) pueden añadir
sonido multicanal a fuentes
estéreo normales.
Se puede identificar el software
Dolby Digital por la marca 1 o
las marcas . La mayoría
del software Dolby Surround lleva
la marca 3, pero un
software sin marcas puede
también incorporar Dolby
Surround. Dependiendo de la
fuente, el Ajuste 6.1 canales
(página 63), y el modo de sonido
que ha seleccionado, es posible
que no obtenga sonido de los
altavoces posteriores surround en
su configuración. Para más
información, consulte la tabla de la
página 51.
聲音模式介紹
有三種聲音模式選項︰立體聲/直
接、標準或高級環繞聲。
立體聲/ 直接
如果選擇STEREO(立體聲)或
DIRECT(直接),您僅從左右前
置揚聲器聽到聲音(依據您的揚聲
器設置也可能從超低音揚聲器聽到
聲音)。杜比數碼和DTS多聲道源
被混至立體聲中。
在STEREO(立體聲)模式中,可
用環繞聲設定收聽聲音,而且還可
以使用午夜、響度、音調控制模式
的功能。
在DIRECT(直接)模式中,所有
音效和環繞聲設定均被旁路,所以
聽到的聲音與音源音頻信號盡可能
接近。
在DIRECT(直接)模式下,如果
打開午夜收聽、響度或者音調控
制模式,接收機將自動轉入
STEREO(立體聲)模式。
標準模式
在標準模式中,可以自動解碼杜比
數碼、DTS或者杜比環繞聲音源。
其他環繞聲選項(下一列)可以在
一般的立體聲音源上增加多聲道聲
音。
您可以通過 1 或
標記識別杜比數碼軟體。大多數杜
比環繞聲軟體標以3,但是
無標記的軟體也可能包含杜比環繞
聲信號。依據音源類型,
6.1聲道
設定
(第63頁)和您所選擇的聲音
模式,您可能不能從環繞聲後置揚
聲器中獲得聲音,有關詳情,請參
見第51頁中的表格。
選擇下列中的任一項,增加雙聲道
音源的厚度。
播放音源

05
49
En/Sp/ChH
English Español
Pro Logic
This mode gives 4.1 channel
surround sound. It is less sensitive
to the quality of the source
material, so may be useful when
Pro Logic II Movie/ Music modes
don’t give good results.
Pro Logic II Movie
This mode gives 5.1 channel
surround sound. It is suitable for
movies, especially those recorded
in Dolby Surround. The channel
separation and movement of
surround effects is comparable to
Dolby Digital 5.1.
Pro Logic II Music
This mode gives 5.1 channel
surround sound and is suitable for
music. The surround effect is more
enveloping than Pro Logic II Movie.
Neo:6 Cinema (VSX-D811S only)
This mode gives 6.1 channel
surround sound and is suitable for
movies. The Neo:6 Cinema mode
delivers good channel separation
for movie soundtracks.
Neo:6 Music (VSX-D811S only)
This mode gives 6.1 channel
surround sound and is suitable for
music. The Neo:6 Music mode
plays the stereo source as is
through the front left/right
speakers, and generates a natural,
ambient surround and center
sound.
Advanced Surround modes
These are designed to be used with
multi-channel surround sound
audio/visual sources (like DVDs
and LDs). Most Advanced Sur-
round modes are designed to be
used with film soundtracks, but
some modes are also suited for
music sources. Try different
settings with various soundtracks
to see which you like.
Elija uno de los siguientes para
añadir profundidad a una fuente
de 2 canales.
Pro Logic
Este modo proporciona un sonido
surround de 4.1 canales. Al ser
menos sensible a la calidad del
material fuente, puede ser útil
cuando los modos Pro Logic II
Movie/ Music no dan buenos
resultados.
Pro Logic II Movie
Este modo proporciona un sonido
surround de 5.1 canales. Es más
apropiado para películas, sobre
todo aquellas que se han grabado
en Dolby Surround. La separación
de canal y el movimiento de los
efectos surround son comparables
al Dolby Digital 5.1.
Pro Logic II Music
Este modo proporciona un sonido
surround de 5.1 canales y es
apropiado para música. En
comparación con Pro Logic II
Movie, el efecto surround es más
envolvente.
Neo:6 Cinema (sólo VSX-D811S)
Este modo proporciona un sonido
surround de 6.1 canales y es
apropiado para películas. El modo
Neo:6 Cinema proporciona una
separación de canales óptima para
las bandas sonoras de películas.
Neo:6 Music (sólo VSX-D811S)
Este modo proporciona un sonido
surround de 6.1 canales y es
apropiado para música. El modo
Neo:6 Music reproduce la fuente
estéreo tal y como es a través de
los altavoces izquierdo/derecho, y
crea un sonido central y surround
natural y de ambiente.
Modos Surround avanzados
Están diseñados para utilizarse
con fuentes audio/visuales de
sonido surround multicanal (tales
como los DVDs y LDs). La mayoría
de los modos Surround avanzados
están diseñados para utilizarse en
bandas sonoras de películas,
aunque algunos modos también
son apropiados para fuentes
musicales. Pruebe ajustes
diferentes con varias bandas
sonoras para que pueda escoger la
que más le gusta.
Pro Logic(專業邏輯)
此模式提供4.1聲道環繞聲。它對
於音源音質的敏感度較低,所以在
專業邏輯II電影/音樂模式效果不
佳時十分有用。
Pro Logic II Movie
此模式提供5.1聲道環繞聲,適合
播放電影,特別是以杜比環繞聲錄
製的電影。聲道分離與環繞聲效果
變動可與杜比數碼5.1相媲美。
Pro Logic II Music
此模式提供5.1聲道環繞聲,適合
播放音樂。其環繞聲效果比專業邏
輯II電影更佳。
Neo:6 Cinema(僅適於VSX –
D811S)
此模式提供6.1聲道環繞聲,適合
播放電影。Neo︰6影院模式為電影
伴音提供極佳的聲道分離。
Neo:6 Music(僅適於VSX –D811S)
此模式提供6.1聲道環繞聲,適合
播放音樂。Neo︰6 音樂模式播放
立體聲音源時,從前置左/右揚聲
器發出聲音,產生一種自然的、縈
繞四周的音效。
高級環繞聲模式
設計用於多聲道環繞聲音頻/視頻
播放源(如DVD和LD)。大多數高
級環繞聲模式設計用於電影伴音,
但某些模式也適合於音樂音源。請
嘗試對不同伴音進行各種設定,看
看自己喜歡哪一種。

05
50
En/Sp/ChH
Depending on the source, the
6.1 channel setting (page 63),
and the sound mode you have
selected, you may not get sound
from the surround back speak-
ers in your setup. For more on
this, refer to the table on page
51.
Movie
Simulates the relaxed environment
of a movie theater, and is suitable
for watching movies.
Music
Simulates the acoustic environ-
ment of a large concert hall and is
suitable for music or musical
sources.
Virtual Surround Back (VIRTL SB)
The Virtual Surround Back effect
simulates 7.1 surround channel
listening like Dolby Digital Sur-
round EX or DTS-ES, giving the
impression that there is a sur-
round back speaker in your system
when listening to a 5.1 channel
source.
Expanded
This mode is especially designed
to give sound depth to stereo
sources, and lets you hear two-
channel (stereo) signals as
simulated multi-channel surround
sound. Use with Dolby Pro Logic
for a stereo surround effect. You
can also use with Dolby Digital
sources for a wider stereo field
than the Standard modes.
5-Channel Stereo (VSX-D711)
This can be selected to give multi-
channel sound to a stereo source,
using all of the speakers in your
setup.
Nota
Dependiendo de la fuente, el
Ajuste de 6.1 canales (página 63), y
el modo de sonido que ha
seleccionado, es posible que no
obtenga sonido de los altavoces
posteriores surround en su
configuración. Para más
información, consulte la tabla de la
página 51.
Movie (Película)
Reproduce el entorno relajado de
una sala de cine y es apropiado
para ver películas.
Music (Música)
Reproduce el entorno acústico de
una sala de conciertos amplia y es
apropiado para música o fuentes
musicales.
Surround virtual posterior
(VIRTL SB)
El efecto Surround virtual posterior
reproduce una audición 7.1
surround de canal, como Dolby
Digital Surround EX o DTS-ES,
dando la impresión de que hay un
altavoz surround posterior en su
sistema cuando escucha una
fuente de 5.1 canales.
Expanded (Expandido)
Este modo está diseñado
especialmente para dar
profundidad a las fuentes en
estéreo, le permite escuchar
señales (estéreo) de dos canales
como si fuera un sonido surround
multicanal simulado. Utilícelo con
Dolby Pro Logic para conseguir un
efecto surround estéreo. También
puede utilizarla con fuentes Dolby
Digital para conseguir un campo
estéreo más amplio que con los
modos Estándar.
Estéreo de 5 canales (VSX-D711)
Puede seleccionarse para dar un
sonido multicanal a una fuente en
estéreo, utilizando todos los
altavoces en la configuración.
依據音源類型、6.1聲道設定
(第63頁)和您所選擇的聲音模
式,您可能無法從所設置的後置
環繞聲揚聲器中獲得聲音。更多
詳情,請參見第51頁的表格。
電影
模擬影院中輕松的氛圍,適合觀看
影片。
音樂
模擬大型音樂會場的音效氛圍,適
合欣賞音樂或樂曲。
虛擬環繞聲背景(VIRTL SB)
虛擬環繞聲背景模擬後置環繞7.1
聲收聽效果,如杜比數碼、環繞聲
EX或DTS-ES,當收聽5.1聲道音源
時,使人感覺系統猶如有後置環繞
聲揚聲器。
擴展
該模式經特別設計,以增加立體聲
音源的聲音厚度,使您聽到模擬多
聲道環繞聲效果的雙聲道(立體
聲)信號,與杜比專業邏輯配給使
用,產生立體環繞聲效果。也可與
杜比數碼音源配給使用,產生比標
準模式更廣闊的立體聲音場。
5聲道立體聲 (VSX-D711)
選擇此項可使立體聲音源具有多聲
道聲音,使用您所設置的所有揚聲
器。
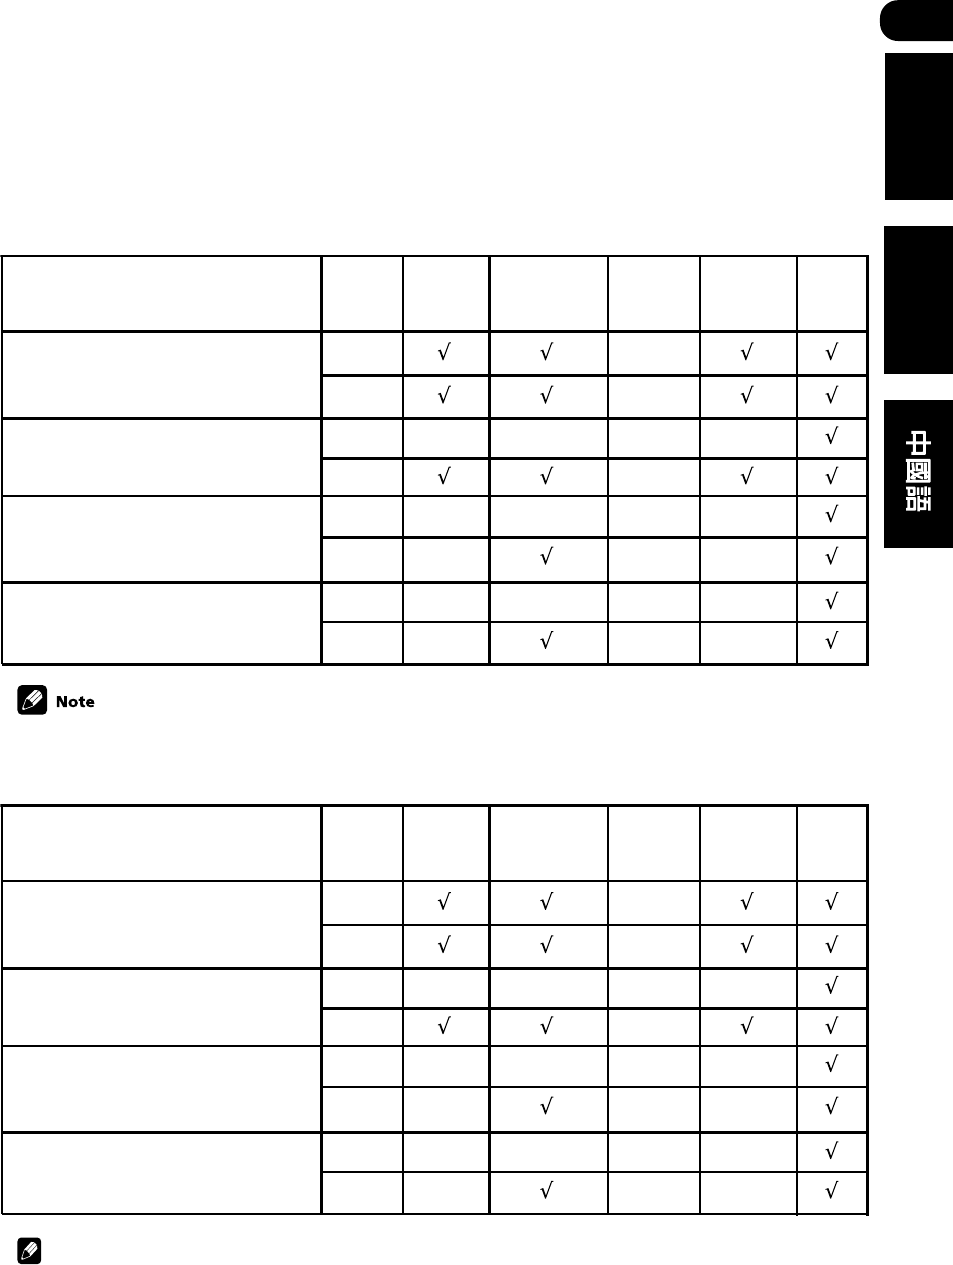
05
51
En/Sp/ChH
English Español
•The checkmark (√) indicates when sound will be output from the surround back speaker(s).
•See the 6.1 channel setting on page 63 to select between AUTO or FIX.
Auto
Fix
Fix
Fix
Fix
Auto
Auto
Auto
DTS-ES/Dolby Digital Surround EX
encoded multi-channel sources with 6.1
surround
Dolby Digital/DTS encoded multi-
channel sources with stereo surround
Dolby Digital/DTS encoded multi-channel
sources with mono surround, Stereo
sources
Analog 2-channel (stereo) source
Standard Advanced
Movie/Music Virtual SB Expanded 6 Ch.
Stereo
6.1 ch.
setting
Type of source
6-Channel Stereo (VSX-D811S)
This can be selected to give multi-
channel sound to a stereo source,
using all of the speakers in your
setup.
Estéreo de 6 canales (VSX-
D811S)
Puede seleccionarse para dar un
sonido multicanal a una fuente en
estéreo, utilizando todos los
altavoces en la configuración.
Nota
•La marca (√) indica cuando se emitirá el sonido de el/los altavoz/altavoces posterior(es) surround.
•Véase Ajuste 6.1 canales en la página 63 para seleccionar entre AUTO o FIX.
Auto
Fix
Fix
Fix
Fix
Auto
Auto
Auto
Fuentes multicanal con surround 6.1
codificadas con DTS-ES/Dolby Digital
Surround EX
Fuentes multicanal con surround estéreo
codificadas con Dolby Digital/DTS
Fuentes multicanal con surr. monoaural
codif. con Dolby Digital/DTS, fuentes
estéreo
Fuente (estéreo) de 2 canales analógicos
Estándar Pelíc./Música
avanzada
Virtual SB Expandido
Estéreo
6 can.
Ajuste de
6.1 can
Tipo de fuente
6聲道立體聲 (VSX-D811S)
選擇此項可使立體聲音源具有多聲
道聲音,使用您所設置的所有揚聲
器。
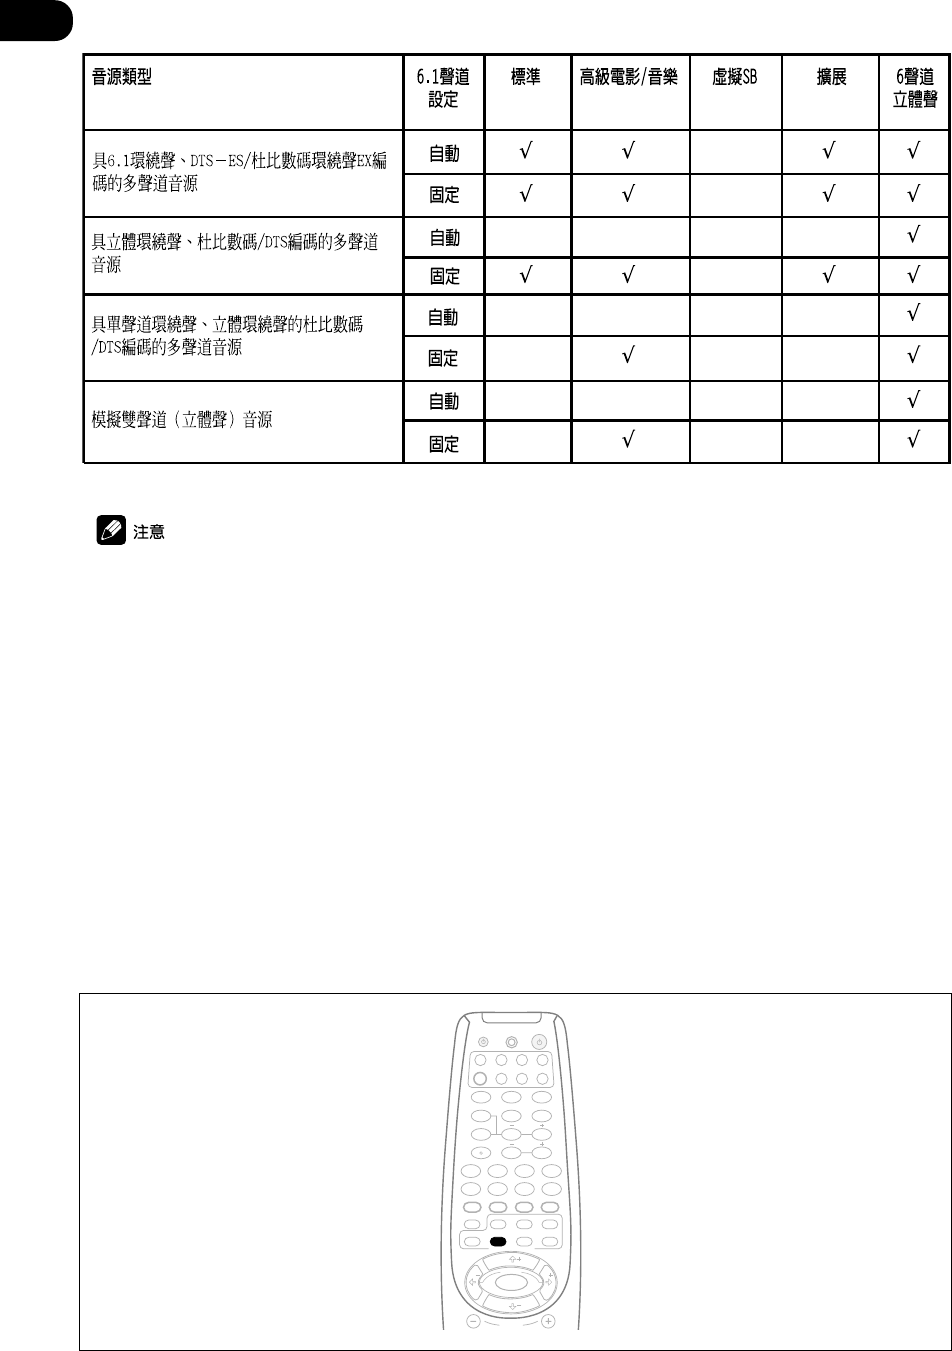
05
52
En/Sp/ChH
CHANNEL
ENTER
ENTER
MPX/RETURNDTV INFO
DTV/DISPLAY DTV MENU
D.ACCESS T.EDIT/GUIDE
ST
TUNE
T
P
S
E
U
TUNE
ST
CLASS
FL DIMMER
BAND
TOP MENU AUDIO
SUB TITLE
REMOTE SETUP
RECEIVER CONTROL
STANDARD ADV.SURR.
STEREO
ANGLE
1¡
4¢
7
8
3
LEVEL
DVD VCR CD-RTV
RCV TUN TVC
CD
TEST TONE
CH SELECT
INPUT ATT
INPUT SEL.
MUTE
MIDNIGHT/
LOUDNESS
SIGNAL SEL
MULTI CONTROL
EFFECT DISC+10
RECEIVER
SOURCE
123
456
789
0
•核選記號(√)表示後置環繞聲揚聲器輸出聲音。
•參見第63頁
6.1聲道設定
的有關內容在AUTO(自動)和 FIX(固定)之間進行選擇。
Choosing the input
signal
You need to hook up a component
to both analog and digital inputs
on the rear of the receiver to select
between input signals.
Elección de la señal
de entrada
Tendrá que conectar un
componente a ambas entradas
analógicas y digitales en la parte
posterior del receptor para
seleccionar entre las señales de
entrada.
選擇輸入信號
您需要將設備連接到接收機背部的
模擬和數碼輸入端,以便在輸入信
號之間進行選擇。

05
53
En/Sp/ChH
English Español
•Press SIGNAL SEL (SIGNAL
SELECT) to select the input signal
corresponding to the source
component.
Each press switches between
AUTO, DVD 5.1 ch/DVD 7.1ch,
ANALOG and DIGITAL. The
default is AUTO.
DVD 5.1ch (VSX-D711) and DVD
7.1ch (VSX-D811S) will only appear
when DVD/LD is selected using
the remote or the MULTI JOG/
INPUT SELECTOR dial on the front
panel.
When set to DIGITAL, 2 DIGITAL
lights when a Dolby Digital signal
is input, and DTS lights when a
DTS signal is input.
•This receiver can only play
back Dolby Digital, PCM
(32kHz, 44kHz, 48kHz, and 96
kHz) and DTS digital signal
formats. With other digital
signal formats, set to
ANALOG.
•You may get digital noise when
a LD or CD player compatible
with DTS is playing an analog
signal. To prevent noise, make
the proper digital connections
(page 20) and set the signal
input to DIGITAL.
•Some DVD players don’t
output DTS signals. For more
details, refer to the instruction
manual supplied with your
DVD player.
•Pulse SIGNAL SEL (SIGNAL
SELECT) para seleccionar la señal
de entrada correspondien-te al
componente fuente.
Cada vez que pulse cambiará entre
AUTO, DVD 5.1 ch/DVD 7.1ch,
ANALOG y DIGITAL. El ajuste por
defecto es AUTO.
DVD 5.1ch (VSX-D711) y DVD 7.
1ch (VSX-D811S) sólo aparecerán
cuando DVD/LD esté seleccionado
utilizando el mando a distancia o
el selector MULTI JOG/INPUT
SELECTOR del panel frontal.
Cuando se ajusta a DIGITAL, 2
DIGITAL se ilumina cuando se
introduce un señal Dolby Digital, y
DTS se ilumina cuando se intro-
duce una señal DTS.
Nota
•Este receptor únicamente
puede reproducir formatos de
señales digitales Dolby Digital,
PCM (32kHz, 44kHz, 48kHz y
96 kHz) y DTS. Para otros
formatos de señales digitales,
ajústelo a ANALOG.
•Puede que se produzca un
sonido digital cuando un
reproductor de CDs o LDs
compatible con DTS
reproduzca una señal
analógica. Para evitar ruidos,
efectúe las conexiones
digitales adecuadas (página
22) y ajuste la entrada de la
señal a DIGITAL.
•Algunos reproductores de
DVDs no emiten señales DTS.
Para más información,
consulte el manual de
instrucciones que se adjunta
con su reproductor de DVDs.
•按SIGNAL SEL (SIGNAL
SELECT)選擇與音源設備相應的輸
入信號。
每按一下,在AUTO(自動)、
DVD 5.1 ch/DVD 7.1ch、
ANALOG(模擬)和DIGITAL(數
碼)之間進行切換。默認設定為
AUTO(自動)。
當用遙控器或前面板上的MULTI
JOG/INPUT SELECTOR旋鈕選擇
DVD/LD時,僅顯示DVD 5.1ch
(VSX-D711)和DVD 7.1ch(VSX
-D811S)。
當設置為DIGITAL(數碼)時,
2 DIGITAL指示標誌在杜比數碼信
號輸入時點亮,而DTS指示標誌在
DTS信號輸入時點亮。
•該接收機僅能播放杜比數碼、
PCM(32千赫、44千赫、48千
赫和96千赫)和DTS數碼信號
格式。其他數碼信號格式,請
設為ANALOG(模擬)。
•當DTS兼容的LD或CD播放機在
播放模擬信號時,可能產生數
碼噪音。為避免噪音,請進行
合適的數碼連接(第20頁),
並將信號輸入設為DIGITAL
(數碼)。
•有的DVD播放機並不輸出DTS信
號。欲知更多詳情,請參閱
DVD播放機隨機提供的使用說
明書。
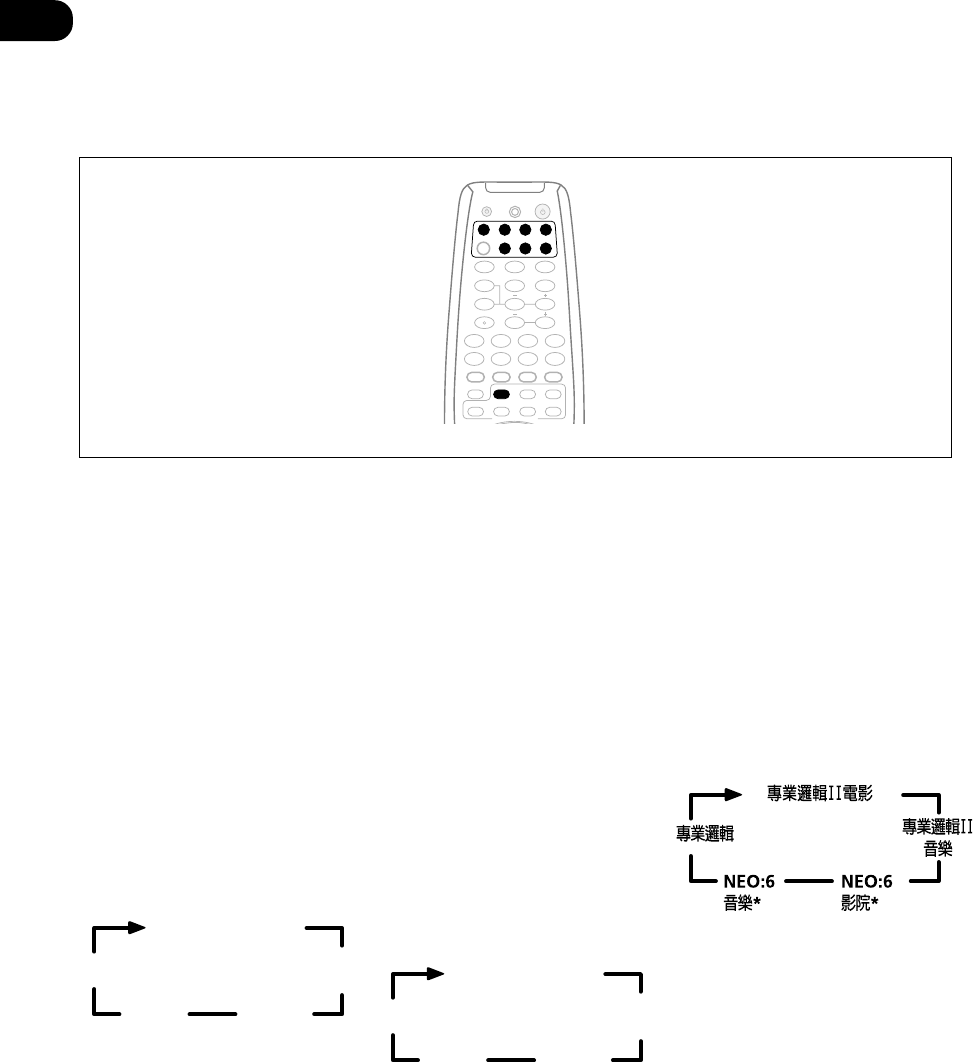
05
54
En/Sp/ChH
ENTER
MPX/RETURNDTV INFO
DTV MENU
D.ACCESS T.EDIT/GUIDE
CLASS
FL DIMMER
BAND
TOP MENU AUDIO
SUB TITLE
REMOTE SETUP
RECEIVER CONTROL
STANDARD ADV.SURR.
STEREO
ANGLE
1¡
4¢
7
8
3
LEVEL
DVD VCR CD-RTV
RCV TUN TVC
CD
TEST TONE
CH SELECT
INPUT ATT
INPUT SEL.
MUTE
MIDNIGHT/
LOUDNESS
SIGNAL SEL
MULTI CONTROL
EFFECT
+10
RECEIVER
SOURCE
123
456
789
0
DTV/DISPLAY
DISC
Listening to multi-
channel playback
1 Switch on the playback
component.
2 Select the source you want
to playback.
Use the MULTI CONTROL buttons
on the remote (or MULTI JOG/
INPUT SELECTOR dial on the front
panel).
3 Press STANDARD.
If the source is Dolby Digital, DTS,
or Dolby Surround encoded, the
proper decoding format will
automatically be selected and
shows in the display.
If you are listening to a two
channel source, each press
changes the display as follows:
Pro Logic
Pro Logic II Movie
Pro Logic
II Music
NEO:6
Music*
NEO:6
Cinema*
* VSX-D811S only
Refer to page 49 for more details
about each mode.
4 Start playback of the compo-
nent you selected in step 1.
Cómo escuchar una
reproduc-ción
multicanal
1 Encienda el componente de
reproduc-ción.
2 Seleccione la fuente que
desea repro-ducir.
Utilice los botones MULTI CON-
TROL del mando a distancia (o el
selector MULTI JOG/INPUT
SELECTOR del panel frontal).
3 Pulse STANDARD.
En caso de que la fuente esté
codificada con Dolby Digital, DTS
o Dolby Surround, se seleccionará
automáticamente el formato
adecuado de decodificación, y
aparecerá en pantalla.
Si está escuchando una fuente de
dos canales, cada vez que pulse la
pantalla cambiará de la siguiente
manera:
Pro Logic
Pro Logic II Movie
Pro Logic
II Music
NEO:6
Music*
NEO:6
Cinema*
* sólo VSX-D811S
Para más información véase las
página 49 acerca de cada modo.
4 Comienza la reproducción
del compo-nente que ha
seleccionado en el paso 1.
收聽多聲道播放
1打開播放設備。
2選擇需播放的音源。
使用遙控器上的MULTI CONTROL
按鈕(或者前面板上的MULTI
JOG/INPUT SELECTOR旋鈕)。
3按 STANDARD。
如果音源為杜比數碼、DTS或者杜
比環繞聲編碼,則自動選擇合適的
解碼格式並在顯示屏上顯示。
如果收聽雙聲道音源,每按一下該
鈕,顯示改變如下︰
*
僅適於VSX-D811S
參見第49頁,獲取各模式的詳情。
4開始播放第1步所選的設備。
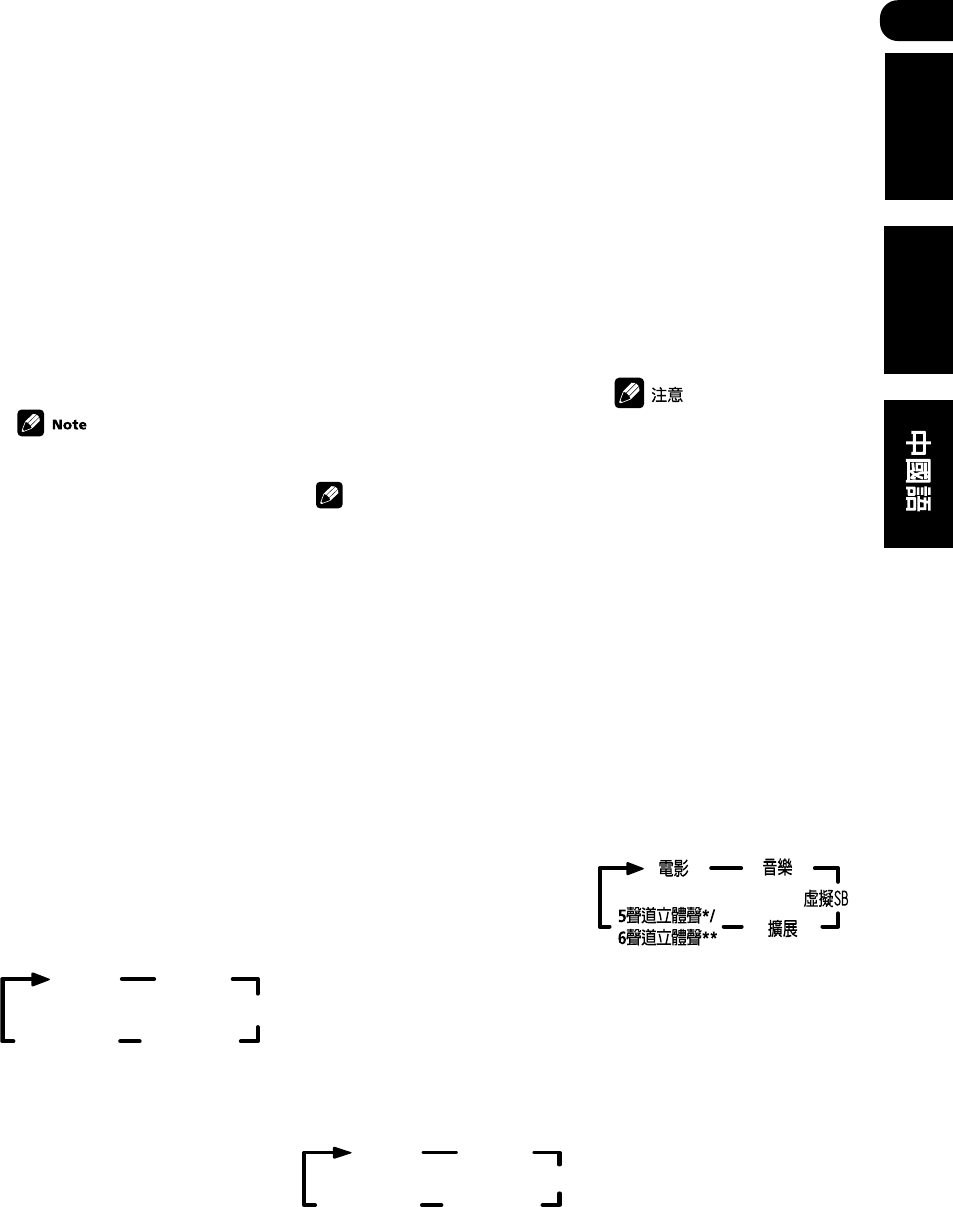
05
55
En/Sp/ChH
English Español
Using Stereo/Direct
When you select STEREO or
DIRECT, you will hear the source
through just the front left and right
speakers (and possibly your
subwoofer depending on your
speaker settings). Dolby Digital
and DTS multichannel sources are
downmixed to stereo. See page 48
for more on these modes.
•Press STEREO (STEREO/
DIRECT on the front panel)
repeatedly to switch between
the two options.
If you switch on Midnight
listening, Loudness, or the
Tone controls when DIRECT is
selected, the receiver auto-
matically switches to STEREO.
Using Advanced
Surround
When you select one of the
Advanced surround options, Dolby
Pro Logic, Dolby Digital and DTS
decoding is done automatically
corresponding to the input signal.
Use Advanced surround to add
effects to the surround sound.
•Press ADV.SURR. (AD-
VANCED SURROUND) repeatedly
to cycle the sound options.
Each press changes the display as
follows:
Movie
Virtual SB
Music
5-Stereo*/
6-Stereo** Expanded
* VSX-D711
** VSX-D811S : Refer to pages 50-
51 for more details about each
surround effect.
Utilización del
Estéreo/Directo
Cuando seleccione STEREO o
DIRECT, escuchará la fuente a
través de los altavoces derecho e
izquierdo frontales (y posiblemente
por el realzador de graves,
dependiendo de los ajustes de los
altavoces). Las fuentes multicanal
Dolby Digital y DTS se mezclan a
estéreo. Véase la página 48 para
más información sobre estos
modos.
•Pulse repetidamente STEREO
(STEREO/DIRECT en el panel
frontal) para cambiar entre las
dos opciones.
Nota
Si cambia a modo de audición
Midnight, Loudness o
controles del tono cuando
está seleccionado DIRECT, el
receptor cambia
automáticamente a STEREO.
Utilización de los
modos Surround
avanzados
Cuando selecciona una de las
opciones de Surround avanzado, la
decodificación de Dolby Pro Logic,
Dolby Digital y DTS se efectúa
automáticamente
correspondiéndose con la señal de
entrada. Utilice el Surround
avanzado para añadir efectos al
sonido surround.
•Pulse repetidamente ADV.
SURR. (ADVANCED SURROUND)
para recorrer las opciones
sonido.
Cada vez que pulse la pantalla
cambia de la siguiente manera:
Movie
Virtual SB
Music
5-Stereo*/
6-Stereo** Expanded
* VSX-D711
** VSX-D811S : Véase las páginas
50–51 para más información acerca
de cada efecto surround.
使用立體聲/直接模式
選擇STEREO(立體聲)或者
DIRECT(直接)模式時,祇有前置
左右揚聲器(以及超低音揚聲器,
依揚聲器設置而定)輸出聲音,杜
比數碼和DTS多聲道音源被混至立
體聲中。有關這些模式的詳情,請
參見第48頁。
•反覆按STEREO(前面板上的
STEREO/DIRECT),在兩種模式
間切換。
當選擇DIRECT (直接)時,如果
選擇午夜收聽、響度或者音調
控制模式,則接收機將自動切
換至STEREO (立體聲)模式。
使用高級環繞聲模式
當選擇高級環繞聲選項中的一項
時,將自動根據輸入信號進行杜比
專業邏輯、杜比數碼和DTS解碼。
使用高級環繞聲可增加環繞聲的效
果。
•反覆按ADV.SURR.(高級環繞
聲)在聲音選項中循環。
每按一下,顯示如下︰
* VSX-D711
** VSX-D811S
,有關各環繞聲效
果的詳情,請參見第50-51頁。
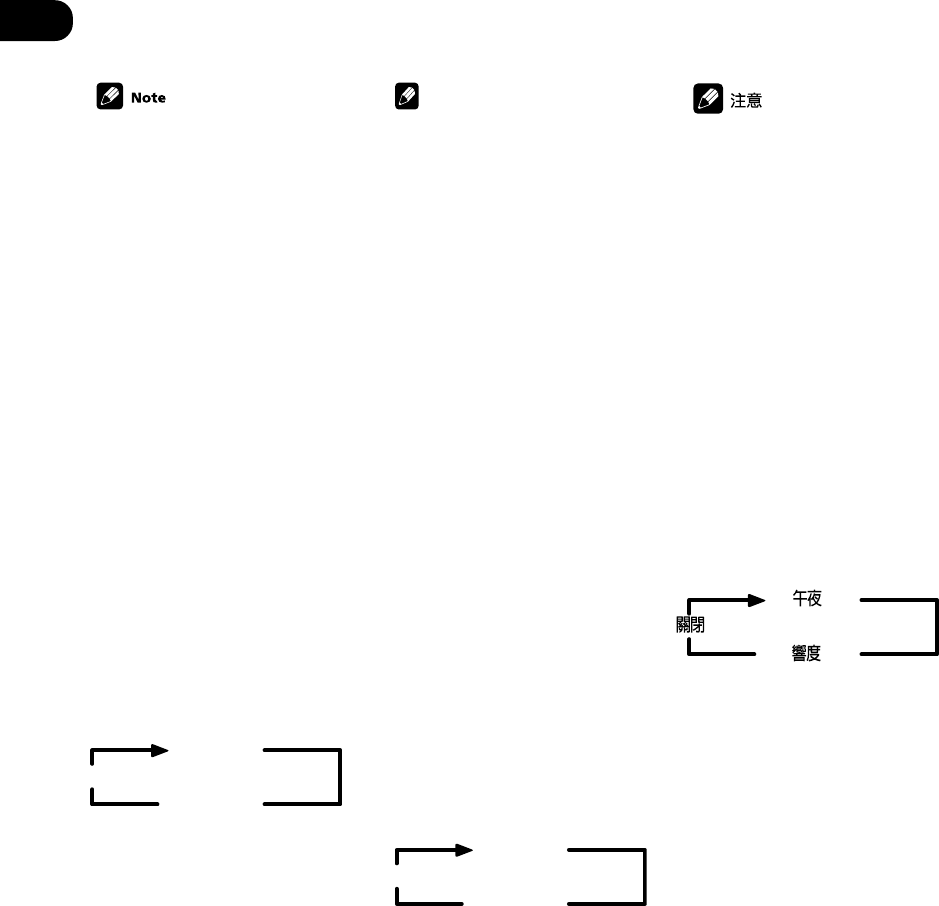
05
56
En/Sp/ChH
The Advanced surround effects
can be adjusted in the range of
10 to 90 (the default setting is
70) by pressing RCV then
pressing EFFECT +/– . The effect
level can be set for each Ad-
vanced surround mode. The
Standard mode cannot be
changed.
Using Loudness and
Midnight listening
The Loudness listening feature can
be used to get good bass and
treble from music sources at low
volume levels.
The Midnight listening feature
allows you to hear effective
surround sound of movies at low
volume levels. The effect automati-
cally adjusts according to the
volume at which you’re listening.
•Press MIDNIGHT/LOUDNESS.
Each press cycles through the
effects as follows:
Off
Midnight
Loudness
Nota
Los efectos del Surround
avanzado pueden ajustarse
entre 10 y 90 (el valor de ajuste
por defecto es 70) pulsando RCV
y, a continuación EFFECT +/– . El
nivel de efecto puede ajustarse
para cada modo Surround
avanzado. El modo Estándar no
puede modificarse.
Utilización del modo
de audi-ción Loud-
ness y Midnight
La función de audición Loudness
puede utilizarse para conseguir
graves y agudos óptimos de las
fuentes de música a un nivel de
volumen bajo.
La función de audición Midnight le
permite escuchar un sonido
surround adecuado en las
películas a un nivel de volumen
bajo. El efecto se ajusta
automáticamente de acuerdo con
el volumen al que está
escuchando.
•Pulse MIDNIGHT/LOUDNESS.
Cada vez que pulse, recorre los
efectos de la siguiente manera:
Off
Midnight
Loudness
高級環繞聲效果可以在10至90范
圍內調節(默認設定為70),調
節方法為先按RCV,然後按
EFFECT +/–。各高級環繞模式均
可設置效果等級。標準模式則不
能改變。
使用響度和午夜收聽模式
響度收聽功能可使音樂音源在低音
量級狀態下產生良好的低音和高音
效果。
午夜收聽功能使您在觀看影片收聽
低音時產生良好的環繞聲效果。效
果將根据收聽音量自動調節。
•按MIDNIGHT/LOUDNESS。
每按一下將在下述效果中循環︰
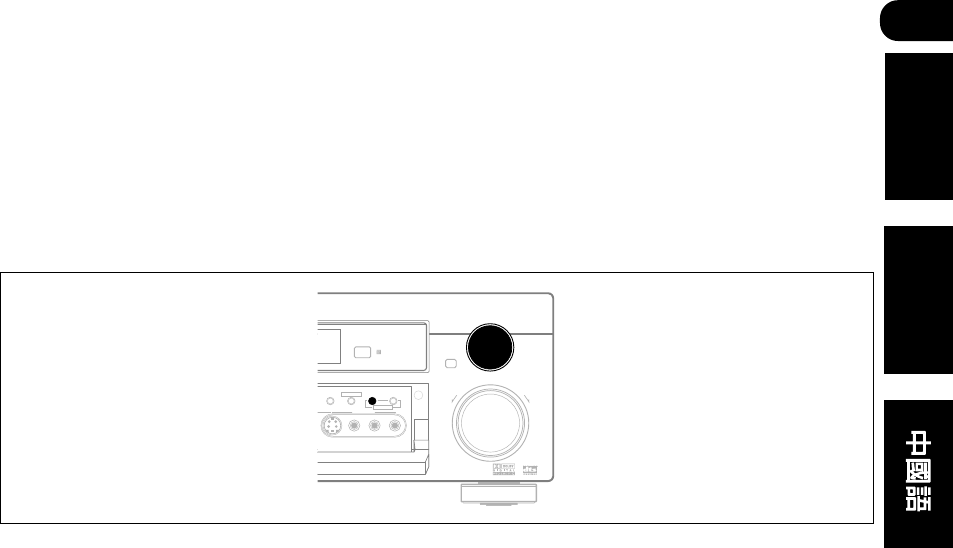
05
57
En/Sp/ChH
English Español
DOWN
UP
ENTER
INPUT
SELECTOR
MASTER VOLUME
MULTI JOG
AUDIO/VIDEO MULTI-CHANNEL RECEIVER
R
N∫m-Û≥,,
SPEAKERS
S-VIDEO VIDEO L AUDIO R
MONITOR TONE QUICK SETUP
VIDEO INPUT
MULTI JOG
Using the tone con-
trols
Depending on what you are
listening to, you may want to
adjust the bass or treble using the
front panel tone control.
1 Press TONE to select the
frequency you want to adjust.
Each press switches between
BASS and TREBLE.
2 Use the MULTI JOG/INPUT
SELECTOR dial to change the
amount of bass or treble as
necessary.
Wait about five seconds for your
changes to be input automatically.
Playing other
sources
1 Turn on the power of the
playback component.
2 Turn on the power of the
receiver.
3 Select the source you want
to playback.
Use the MULTI CONTROL buttons
on the remote (or MULTI JOG/
INPUT SELECTOR dial on the front
panel).
4 Start playback of the compo-
nent you selected in step 1.
Utilización de los
controles del tono
Dependiendo de lo que esté
escuchando, es posible que
prefiera ajustar los graves y
agudos utilizando el control del
tono del panel frontal.
1 Pulse TONE para seleccionar
la frecuen-cia que desea ajustar.
Cada vez que pulsa, se cambia
entre BASS y TREBLE.
2 Utilice el selector MULTI JOG/
INPUT SELECTOR para cambiar
la cantidad de graves y agudos,
según sea necesario.
Espere aproximadamente cinco
segundos para que sus cambios
se introduzcan automática-mente.
Reproducción de
otras fuentes
1 Encienda el componente de
reproduc-ción.
2 Encienda el receptor.
3 Seleccione la fuente que
desea repro-ducir.
Utilice los botones MULTI CON-
TROL del mando a distancia (o el
selector MULTI JOG/INPUT
SELECTOR del panel frontal).
4 Comienza la reproducción
del compo-nente que ha
seleccionado en el paso 1.
使用音調控制模式
依據您所收聽的音源,您可能想用
前面板音調控制按鈕來調整低音和
高音。
1按TONE選擇要調節的頻率。
每按一下,在BASS(低音)和
TREBLE(高音)之間切換。
2根據需要用MULTI JOG/INPUT
SELECTOR旋鈕改變低音或高音的
音量。
等待大約五秒鐘時間,所作改變即
自動輸入。
播放其他音源
1打開播放設備的音源。
2打開接收機電源。
3選擇需播放的音源。
使用遙控器上的MULTI CONTROL
按鈕(或者前面板上的MULTI
JOG/INPUT SELECTOR旋鈕)。
4開始播放在第1步所選的設備。
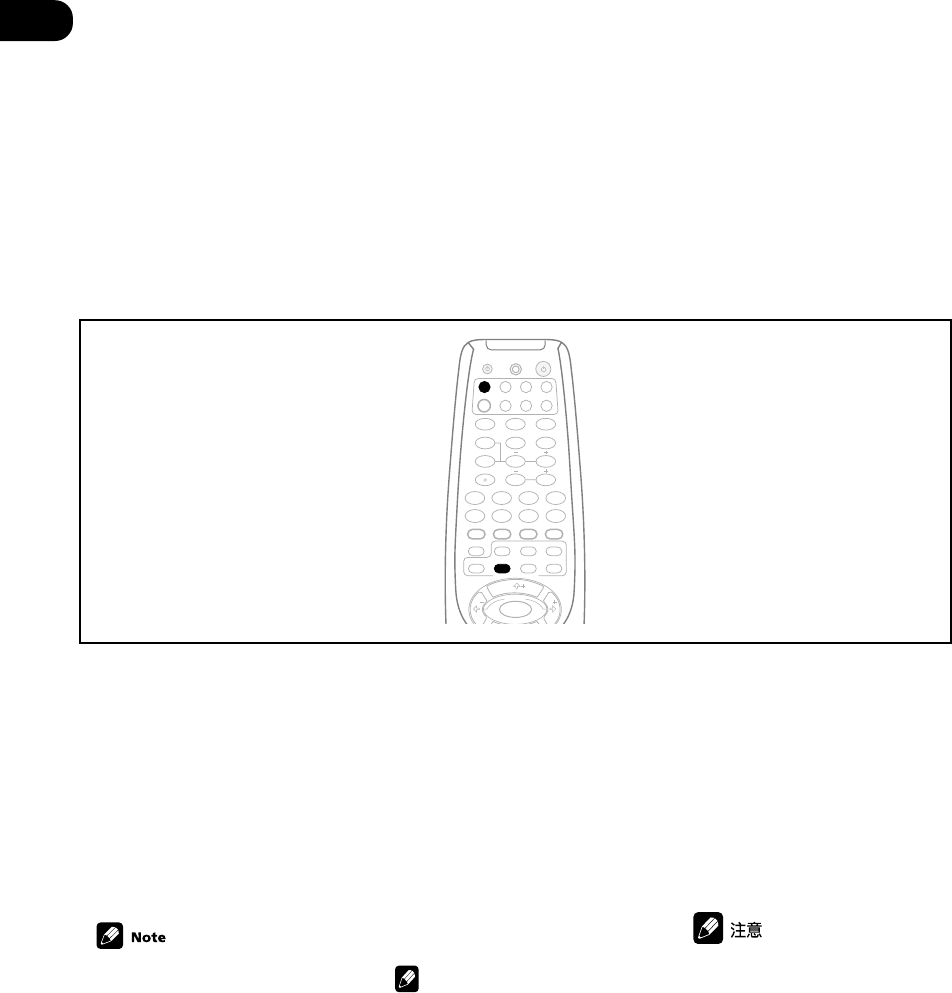
05
58
En/Sp/ChH
Selecting the multi-
channel analog
inputs
If you have connected a decoder or
a DVD player with multi-channel
analog outputs to this receiver
(page 17), you must select the
analog multi-channel inputs for
surround sound playback.
ENTER
ENTER
MPX/RETURNDTV INFO
DTV MENU
D.ACCESS T.EDIT/GUIDE
ST
TUNE
T
P
S
E
U
ST
CLASS
FL DIMMER
BAND
TOP MENU AUDIO
SUB TITLE
REMOTE SETUP
RECEIVER CONTROL
STANDARD ADV.SURR.
STEREO
ANGLE
1¡
4¢
7
8
3
LEVEL
DVD VCR CD-RTV
RCV TUN TVC
CD
TEST TONE
CH SELECT
INPUT ATT
INPUT SEL.
MUTE
MIDNIGHT/
LOUDNESS
SIGNAL SEL
MULTI CONTROL
EFFECT+10
RECEIVER
SOURCE
123
456
789
0
DTV/DISPLAY
DISC
1 Press DVD or select it with
the MULTI JOG/INPUT SELECTOR
dial (front panel).
2 Press SIGNAL SEL (SIGNAL
SELECT) repeatedly to select
DVD 5.1ch/DVD 7.1ch.
To cancel playback from the multi-
channel inputs, use the SIGNAL
SEL (SIGNAL SELECT) button to
select a different input signal.
•When playback from the multi-
channel inputs is selected, you
can’t use the INPUT ATT,
TONE, and MIDNIGHT/
LOUDNESS buttons, as well
as the Standard, Advanced
Surround, and Stereo/Direct
sound modes.
•When playback from the multi-
channel inputs is selected,
only the volume and channel
levels can be set.
Selección de
entradas analó-gicas
multicanal
En caso de que haya conectado un
decodificador o un reproductor de
DVDs con salidas analógicas
multicanal a este receptor (página
17), deberá seleccionar las
entradas multicanal analógicas
para reproducir sonido surround.
1 Pulse DVD o selecciónelo con
el selector MULTI JOG/INPUT
SELECTOR (panel frontal).
2 Pulse repetidamente SIGNAL
SEL (SIGNAL SELECT) para
seleccionar DVD 5.1 Ch/DVD 7.
1ch.
Para cancelar la reproducción
desde entradas multicanal, utilice
el botón SIGNAL SEL (SIGNAL
SELECT) para seleccionar una
señal de entrada.
Nota
•Cuando está seleccionada la
reproducción desde entradas
multicanal, no se pueden
utilizar los botones INPUT
ATT, TONE y MIDNIGHT/
LOUDNESS, así como
tampoco los modos de sonido
Estándar, Surround avanzado,
y Estéreo/Directo.
•Cuando está seleccionada la
reproducción desde entradas
multicanal, sólo pueden
ajustarse los niveles de canal y
volumen.
選擇多聲道模擬輸入
如已將解碼器或帶多聲道模擬輸出
的DVD播放機連接到本接受機上
(第17頁),則必須選擇模擬多聲
道輸入以播放環繞聲。
1按DVD或用前面板上的MULTI
JOG/INPUT SELECTOR旋鈕加以選
擇。
2反覆按SIGNAL SEL(SIGNAL
SELECT),選擇DVD 5.1 ch /
DVD 7.1 ch。
要從多聲道輸入取消播放,使用
SIGNAL SEL(SIGNAL SELECT)
按鈕選擇其他輸入信號。
•當選擇從多聲道輸入進行播放
時,則不能使用INPUT ATT、
TONE和MIDNIGHT/
LOUNDNESS按鈕,也不能使
用標準、高級環繞聲和立體
聲/直接聲音模式。
•當選擇從多聲道輸入進行播放
時,祇能設置音量級和聲道音
壓。
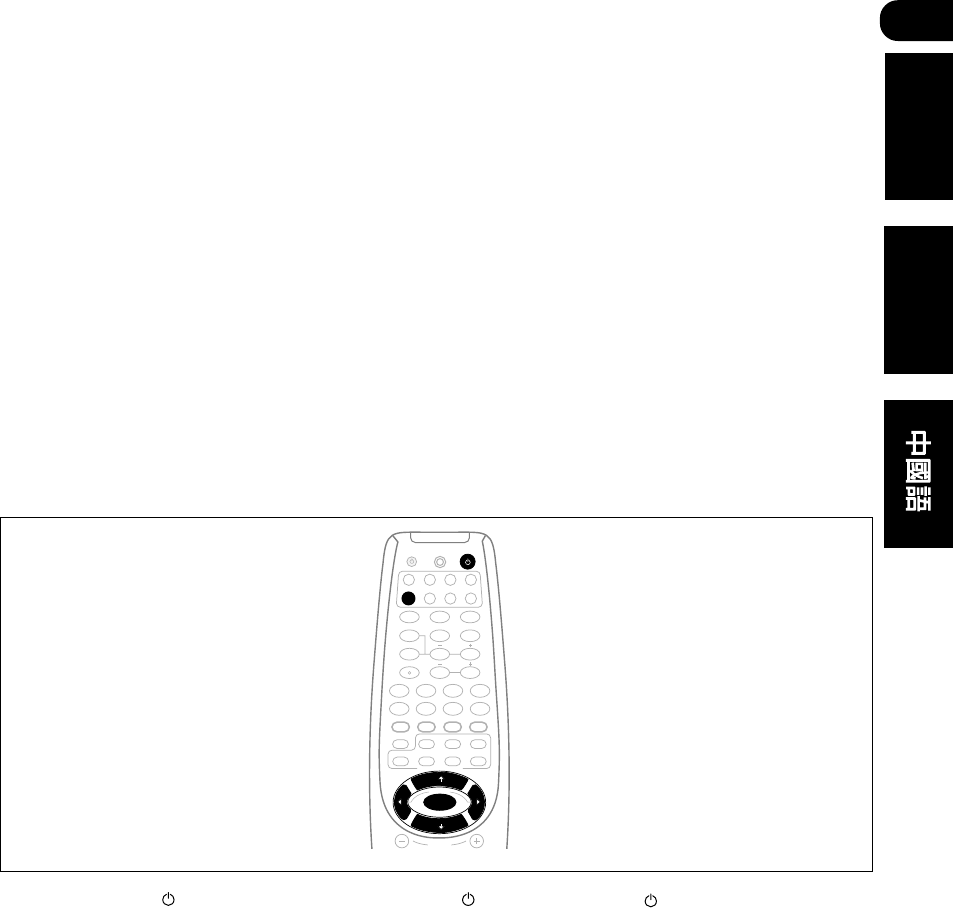
06
59
En/Sp/ChH
English Español
Setting up your
receiver
Choosing your
receiver setup
To ensure the best possible
surround sound, be sure to
complete the following set up
operations. This is particularly
important when using Dolby
surround. You only need to make
these settings once (unless you
change the placement of your
current speaker system or add new
speakers, etc.). Refer to the
following pages for details on each
of the settings.
CHANNEL
ENTER
ENTER
MPX/RETURNDTV INFO
DTV MENU
D.ACCESS T.EDIT/GUIDE
ST
TUNE
T
P
S
E
U
TUNE
ST
CLASS
FL DIMMER
BAND
TOP MENU AUDIO
SUB TITLE
REMOTE SETUP
RECEIVER CONTROL
STANDARD ADV.SURR.
STEREO
ANGLE
1¡
4¢
7
8
3
LEVEL
DVD VCR CD-RTV
RCV TUN TVC
CD
TEST TONE
CH SELECT
INPUT ATT
INPUT SEL.
MUTE
MIDNIGHT/
LOUDNESS
SIGNAL SEL
MULTI CONTROL
EFFECT
+10
RECEIVER
SOURCE
123
456
789
0
DTV/DISPLAY
DISC
1 Press RECEIVER to turn the
power on.
The STANDBY indicator goes out.
2 Press RCV.
3 Use } or ] to choose the
option you want to adjust.
It will be easiest to adjust each of
the settings in turn, following the
order below (and on the following
pages). The current setting is
shown for each option as you cycle
through the display.
Elección de la
configuración de su
receptor
Para garantizar el mejor sonido
surround asegúrese de completar
las siguientes operaciones de
configuración. Se trata de un
punto especialmente importante
cuando se utiliza surround Dolby.
Es necesario hacer estos ajustes
sólo una vez (a no ser que cambie
la ubicación de su sistema de
altavoces actual o añada nuevos
altavoces, etc.). Véanse las
páginas siguientes para más
información acerca de cada uno
de los ajustes.
1 Pulse RECEIVER para
encender el aparato.
El indicador STANDBY
desaparece.
2 Pulse RCV.
3 Utilice } o ] para elegir la
opción que desea ajustar.
Será más fácil ajustar cada uno de
los valores de ajuste por turno,
siguiendo el siguiente orden (y en
las páginas siguientes). Se
muestra el valor de ajuste actual
de cada opción a medida que
avanza por la visualización.
Configuración del
receptor
設置接收機
選擇接收機設置
為達到最佳環繞聲效果,請務必完
成下列設置操作。這在使用杜比環
繞聲時尤為重要。您祇需進行一次
這樣的設定(除非您改變了當前揚
聲器系統的位置或增加了新的揚聲
器,等)。有關各設定的詳情,請
參見後文。
1按RECEIVE打開電源。
STANDBY指示標誌熄滅。
2按RCV。
3用}或]按鈕選擇需調整的選
項
最容易的方法是按照下列順序依次
調整每個設定(參見下頁)。循環顯
示時,將顯示各選項的當前設定。

06
60
En/Sp/ChH
Speaker setting (page 62)
Specify the number and type of
speakers you have connected.
Surround back speaker
setting (VSX-D811S only)
(page 63)
Specify your surround back
speaker/surround back
subwoofer setup.
6.1 channel setting (VSX-
D811S only) (page 63)
Set when 6.1 channel decoding
is used.
Subwoofer setting (page 64)
Specify how the subwoofer is
used.
Crossover frequency setting
(page 64)
Determine which frequencies
will be sent to the subwoofer
(or large speakers).
LFE attenuator setting
(page 65)
Specify the peak level for the
LFE channel.
Front speaker distance
setting (page 65)
Specify the distance from your
listening position to your front
speakers.
Center speaker distance
setting (page 66)
Specifies the distance from
your listening position to your
center speaker.
Surround speaker distance
setting (page 66)
Specify the distance from your
listening position to your
surround speakers.
Surround back speaker
distance setting
(VSX-D811S only) (page 67)
Specifies the distance from
your listening position to your
surround back speakers.
Dynamic range control
setting (page 67)
Compress the dynamic range
of the sound track.
Ajuste de los altavoces
(página 62)
Especifique el número y el tipo
de altavoces que ha
conectado.
Ajuste del altavoz posterior
surround (sólo VSX-D811S)
(página 63)
Especifique la configuración
de los altavoces posteriores
surround/realzador de graves
posterior surround.
Ajuste 6.1 canales (sólo
VSX-D811S) (página 63)
Realice el ajuste cuando se
utilice una decodificación 6.1
canales.
Ajuste del realzador de
graves (página 64)
Especifique cómo se utiliza el
realzador de graves.
Ajuste de la frecuencia de
corte (página 64)
Determine qué frecuencias se
enviarán al realzador de
graves (o altavoces grandes).
Ajuste del atenuador LFE
(página 65)
Especifique el nivel máximo
para el canal LFE.
Ajuste de la distancia del
altavoz frontal (página 65)
Especifique la distancia desde
la posición de audición de los
altavoces frontales.
Ajuste de la distancia del
altavoz central (página 66)
Especifique la distancia desde
la posición de audición del
altavoz central.
Ajuste de la distancia del
altavoz surround (página 66)
Especifique la distancia desde
la posición de audición de los
altavoces surround.
Ajuste de la distancia del
altavoz posterior surround
(sólo VSX-D811S) (página 67)
Especifique la distancia desde
la posición de audición de los
altavoces posteriores sur-
round.
揚聲器設定(第62頁)
指定所連接的揚聲器數目和類
型。
後置環繞聲揚聲器設定(僅適
於VSX–D811S)(第63頁)
指定後置環繞聲揚聲器/後置環
繞聲超低音揚聲器設定。
6.1聲道設定(僅適於VSX籺
811S)(第63頁)
使用6.1聲道解碼時設定。
超低音揚聲器設定(第64頁)
指定如何運用超低音揚聲器。
分隔頻率設定(第64頁)
決定哪種頻率送至超低音揚聲
器(或者大型揚聲器)。
LFE衰減器設定(第65頁)
指定LFE聲道的峰值。
前置揚聲器距離設定(第65
(第65頁)
指定前置揚聲器離聽音位置的
距離。
中置揚聲器距離設定(第66頁)
指定中置揚聲器離聽音位置的
距離。
環繞聲揚聲器距離設定
(第66頁)
指定環繞聲揚聲器離聽音位置
的距離。
後置環繞聲揚聲器距離設定
(僅適於VSX–D811S)
(第67頁)
指定後置環繞聲揚聲器離聽音
位置的距離。
動態范圍控制設定(第67頁)
壓縮聲道的動態范圍。
06
61
En/Sp/ChH
English Español
Ajuste del control de la
gama dinámica (página 67)
Comprima la gama dinámica
de la banda sonora.
Ajuste del monoaural dual
(página 68)
Aísle un canal cuando
escuche discos con
codificación monoaural dual.
Ajuste de la entrada de vídeo
del componente (página 68)
Especifique los componentes
que desea asignar a las
entradas de vídeo del
componente (a continuación).
•Ajuste de la entrada de vídeo 1
del componente.
•Ajuste de la entrada de vídeo 2
del componente.
Ajuste de la entrada del
canal posterior surround
(sólo VSX-D811S) (página 69)
Especifique el número de
entradas posteriores surround
que ha conectado.
Ajustes de la entrada digital
(página 69)
Especifique los componentes
que se han de asignar a las
entradas digitales (a
continuación).
•Ajuste de la entrada 1 digital
coaxial
•Ajuste de la entrada 2 digital
coaxial
•Ajuste de la entrada 1 digital
óptica
•Ajuste de la entrada 2 digital
óptica (sólo VSX-D811S)
4 Utilice ’ o ‘ para ajustar el
valor.
El valor de ajuste se introduce
automáticamen-te.
5 Repita los pasos 3 y 4 para
ajustar otros modos surround.
6 Una vez haya acabado, pulse
ENTER para salir.
Nota
La pantalla de ajuste se cierra
automática-mente cuando
transcurren 20 segundos de
inactividad.
Dual mono setting (page 68)
Isolate one channel when
listening to discs with dual
mono encoding.
Component video input
setting (page 68)
Specify the components to be
assigned to the component
video inputs (below).
•Component video 1 input
setting
•Component video 2 input
setting
Surround back channel input
setting (VSX-D811S only)
(page 69)
Specify the number of sur-
round back inputs you have
connected.
Digital input settings
(page 69)
Specify the components to be
assigned to the digital inputs
(below).
•Coaxial digital input 1 setting
•Coaxial digital input 2 setting
•Optical digital input 1 setting
•Optical digital input 2 setting
(VSX-D811S only)
4 Use ’ or ‘ to adjust the
setting.
The setting is entered automati-
cally.
5 Repeat steps 3 and 4 to set
other surround modes.
6 When you’re done, press
ENTER to exit.
The setting display is automati-
cally exited after 20 seconds of
inactivity.
雙重單聲道設定(第68頁)
在收聽以雙重單聲道編碼的碟
片時隔離一個聲道。
分量視頻輸入設定(第68頁)
指定配於分量視頻輸入的設備
(見下)。
•分量視頻1 輸入設定
•分量視頻2 輸入設定
後置環繞聲聲道輸入設定
(僅適於VSX–D811S)
(第69頁)
指定所連接後置環繞聲輸入的
數量。
數碼輸入設定(第69頁)
指定配於數碼輸入的設備(見
下)。
•同軸數碼輸入1設定
•同軸數碼輸入2設定
•光學數碼輸入1設定
•光學數碼輸入2設定
(僅適於
VSX–D811S
)
4用’或‘按鈕調整設定。
設定自動確認。
5重複第3、4步以設定其他環繞
聲模式。
6設定完畢後,按ENTER退出。
若20秒未進行操作,設定畫面將
自動退出。
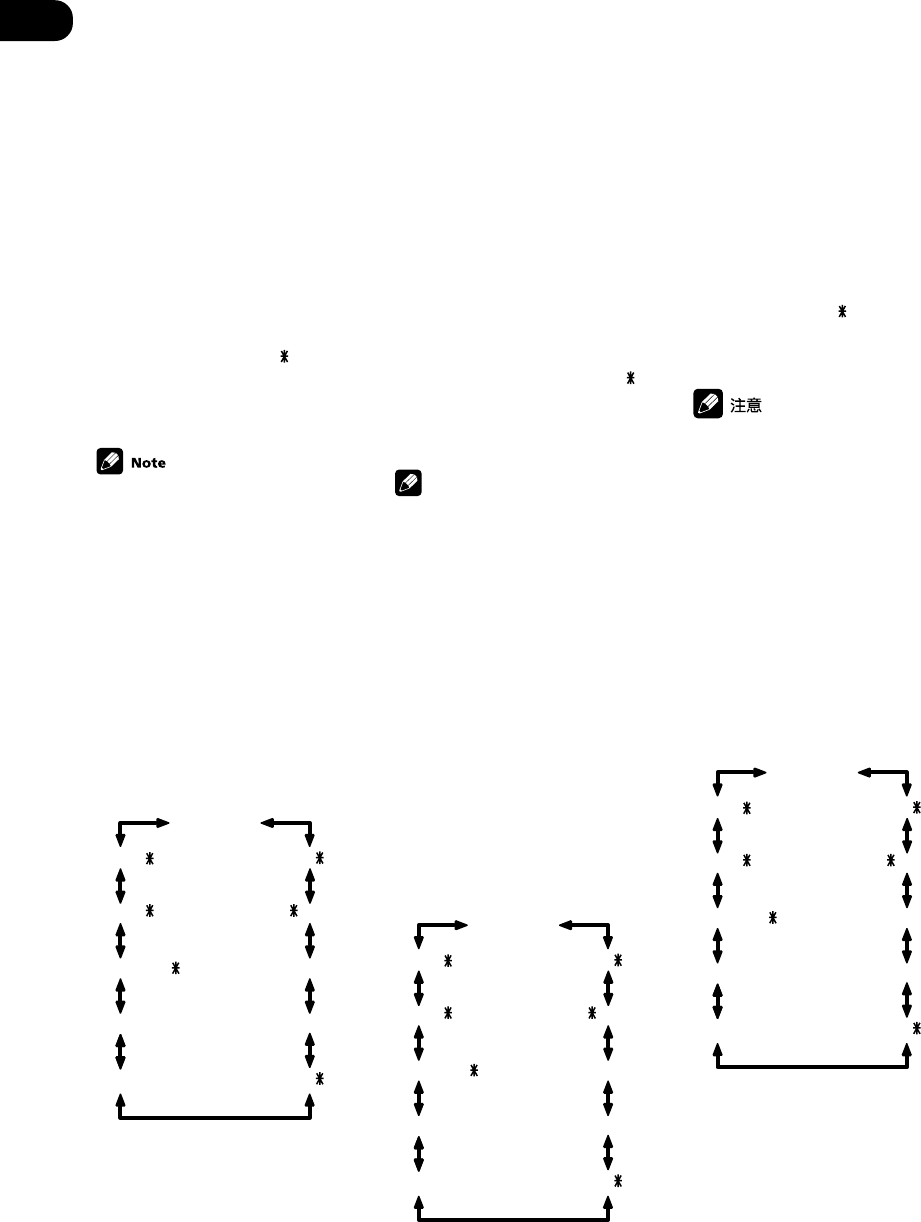
06
62
En/Sp/ChH
Speaker setting
•Default setting: S (all speak-
ers)
You must let the receiver know how
many speakers you have, and how
big they are. The size you choose
(large or small) determines how
much bass is sent from the
receiver to the speakers.
In the display, F, C, and S refer to
front, center, and surround
speakers respectively. Speaker size
is denoted as L for large speakers,
S for small speakers, and
(asterisk) if no speaker is con-
nected.
•If the cone size (diameter) of
the speaker is larger than 15
cm, set the speaker size to L.
•If you’re not using a
subwoofer, we recommend
setting the front speakers to L.
•Cycle through the available
choices using ’ or ‘ and choose
a configuration that matches
your speaker setup.
One of the following configurations
should match your setup:
FL-CL-SL
FL-CL-SS
FL-CL-S
FL-CS-SL
FL-CS-SS
FS-C -SS
FS-CS-S
FS-CS-SS
FL-C -SS
FL-C -SL
FL-CS-S
Ajuste de los altavoces
•Valor de ajuste por defecto: S
(todos los altavoces)
Deberá hacerle saber al receptor
cuántos altavoces tiene y el
tamaño. El tamaño que elija
(grande o pequeño) determina la
cantidad de graves que se envía
del receptor a los altavoces.
En la pantalla, F, C y S se refieren a
altavoces frontales, centrales y
surround respectivamente. El
tamaño del altavoz se denota
como L para los altavoces
grandes, S para los pequeños y
(asterisco) si no hay conectado
ningún altavoz.
Nota
•En caso de que el tamaño de
cono (diámetro) sea superior a
15 cm, ajuste el tamaño del
altavoz a L.
•En caso de que no utilice un
realzador de graves,
recomendamos ajustar los
altavoces frontales a L.
•Avance por las opciones
disponibles utilizando ’ o ‘ y
elija una configuración que
corresponda con la
configuración del altavoz.
Una de las siguientes
configuraciones debería
corresponder con la suya:
FL-CL-SL
FL-CL-SS
FL-CL-S
FL-CS-SL
FL-CS-SS
FS-C -SS
FS-CS-S
FS-CS-SS
FL-C -SS
FL-C -SL
FL-CS-S
揚聲器設定
•默認設定︰S (所有揚聲器)
必須使接收機知道您使用了幾個揚
聲器以及揚聲器的尺寸。尺寸(大
或小)決定了從接收機傳至揚聲器
的低音有多少。
在顯示屏中,F、C和S分別指前
置、中置和環繞聲揚聲器。揚聲器
尺寸為L表示大型揚聲器,S表示小
型揚聲器,而星號( )則表示沒
有連接揚聲器。
•如果揚聲器的錐面尺寸(直
徑)大於5英寸,則將揚聲器
尺寸應設為L。
•如果沒有使用超低音揚聲器,
我們建議將前置揚聲器設置為
L。
•按’或‘按鈕在可能的選項間循
環,選擇符合您揚聲器設置的配
置。
下列中的某一配置應與您的設置相
匹配︰
FL-CL-SL
FL-CL-SS
FL-CL-S
FL-CS-SL
FL-CS-SS
FS-C -SS
FS-CS-S
FS-CS-SS
FL-C -SS
FL-C -SL
FL-CS-S

06
63
En/Sp/ChH
English Español
Surround back speaker
setting
(VSX-D811S only)
•Default setting: S
You must let the receiver know if
surround back speaker(s) have
been connected, and how big they
are. The size you choose (large or
small) determines how much bass
is sent from the receiver to the
speakers. If you have connected a
surround back subwoofer, you
should select the surround back
subwoofer setting (SB SUBWF)
from the options. Choose
(asterisk) if no speaker is con-
nected.
•Use ’ or ‘ to select SB L, SB
S, SB or SB SUBWF.
6.1 channel setting
(VSX-D811S only)
•Default setting: 6.1 FIX
You can have the receiver auto-
matically switch to Dolby Digital
Surround EX or DTS-ES decoding
for 6.1 encoded sources (6.1
AUTO), or you can choose to listen
to other kinds of sources (for
example, 5.1 encoded material)
with 6.1 encoding (6.1 FIX). With
5.1 encoded sources, a surround
back channel will be generated,
but the material may sound better
in the 5.1 format for which it was
originally encoded.
•Use ’ or ‘ to select 6.1 FIX
or 6.1 AUTO.
•If you chose SB in Surround
back speaker setting (above),
you can’t set the 6.1 channel
setting and shows in the
display.
•Refer to the table on page 51
to see how the 6.1 channel
setting affects sound output
from the surround back
speakers.
Ajuste del altavoz posterior
surround
(sólo VSX-D811S)
•Valor de ajuste por defecto: S
Deberá hacerle saber al receptor si
se ha(n) conectado el/los altavoz/
altavoces posteriore(s), así como el
tamaño. El tamaño que elija
(grande o pequeño) determina la
cantidad de graves que se envía
del receptor a los altavoces. Si ha
conectado un realzador de graves
posterior surround, deberá
seleccionar de las opciones el
ajuste del realzador de graves
posterior surround (SB SUBWF).
Elija (asterisco) si no hay ningún
altavoz conectado.
•Utilice ’ o ‘ para
seleccionar SB L, SB S, SB o SB
SUBWF.
Ajuste 6.1 canales
(sólo VSX-D811S)
•Valor de ajuste por defecto:
6.1 FIX
Puede cambiar automáticamente
el receptor a una decodificación
Dolby Digital Surround EX o DTS-
ES para fuentes codificadas a 6.1
(6.1 AUTO), o puede elegir
escuchar otro tipo de fuentes (por
ejemplo, material codificado a 5.1)
con codificación 6.1 (6.1 FIX). Con
fuentes codificadas a 5.1, se
creará un canal posterior sur-
round, pero seguramente el
material sonará mejor en un
formato 5.1 para el cual se codificó
en un principio.
•Utilice ’ o ‘ para
seleccionar 6.1 FIX o 6.1 AUTO.
Nota
•Si escoge SB en el ajuste del
altavoz posterior surround
(véase anteriormente), no se
puede fijar el ajuste 6.1
canales y aparece en
pantalla.
•Consulte la tabla en la página
51 para ver cómo el Ajuste 6.1
canales afecta a la salida del
sonido de los altavoces
posteriores surround.
後置環繞聲揚聲器設定
(僅適於
VSX–D811S
)
•默認設定︰S
必須使接收機知道後置環繞聲揚聲
器是否已連接,並知道其尺寸。尺
寸選擇(大或小)決定了從接收機
傳至揚聲器的低音有多少。如果連
接了後置環繞聲超低音揚聲器,應
從選項中選擇後置環繞聲揚聲器設
定(SB SUBWF)。如沒有連接揚
聲器,則選擇星號( )。
•用’或‘按鈕選擇SB L,SB S,
SB 或者SB SUBWF。
6.1聲道設定
(僅適於
VSX–D811S
)
•默認設定︰6.1 FIX
可以將接收機自動切換至杜比數碼
環繞聲EX或者DTS-ES解碼以播放
6.1編碼的音源(6.1 AUTO),或
者可以選擇收聽其他帶6.1編碼
(6.1 FIX)的音源類型(例如,5.
1編碼音源)。對於5.1編碼的音
源,將產生一個後置環繞聲聲道,
但由於播放內容原本以5.1格式編
製,所以在5.1格式中效果可能會
更好。
•用’或‘按鈕選擇6.1 FIX或者
6.1 AUTO。
•如果在後置環繞聲揚聲器設定
(見上)中選擇SB ,則不能
設置為6.1聲道設定,顯示屏
上將顯示 。
•參見第51頁中的表格,獲知
6.1聲道設定
如何影響後置環
繞聲揚聲器的聲音輸出。

06
64
En/Sp/ChH
Subwoofer setting
•Default setting: ON
You can choose whether the
subwoofer is used or not. Use the
plus (PLS) setting for extra bass.
•Use ’ or ‘ to select
subwoofer ON, PLS or OFF.
•If you chose the small front
speaker setting, SUBWF ON is
automatically set and locked.
•When you select the plus
setting, you will get the bass
sounds from the subwoofer
even if the front speakers are
set to L.
Crossover frequency setting
•Default setting: 100 Hz
Crossover frequency is the point
where the receiver divides the high
and low sounds (the frequencies)
between the speakers. Since most
smaller speakers can’t handle
deep bass tones, you can send
these sounds to the subwoofer (or
if you don’t have a subwoofer, the
large (L) speakers in your system)
instead of the speakers set to
small (S) in your setup. Choose the
point at which you want the
frequency routed to the subwoofer
(or L speakers).
We recommend setting this to 200
Hz if your S speakers are smaller
bookshelf-type speakers.
•Use ’ or ‘ to specify the
crossover frequency for your
small speakers (100 Hz, 150 Hz
or 200 Hz).
100Hz 150Hz
200Hz
Ajuste del realzador de
graves
•Valor de ajus mte por
defecto: ON
Puede elegir si utilizar o no el
realzador de graves. Utilice el valor
de ajuste “plus” (PLS) para
conseguir una cantidad de graves
adicional.
•Utilice ’ o ‘ para
seleccionar el realzador de
graves en ON, PLS o OFF.
Nota
•En caso de que elija el ajuste
del altavoz frontal pequeño,
SUBWF ON se ajusta
automáticamente y se
bloquea.
•Cuando selecciona el valor de
ajuste “plus”, obtendrá los
sonidos graves del realzador
de graves incluso si los
altavoces frontales están
ajustados a L.
Ajuste de la frecuencia de
corte
•Valor de ajuste por defecto:
100 Hz
La frecuencia de corte es el punto
en el que el receptor divide los
sonidos (las frecuencias) altas y
bajas entre los altavoces. Debido a
que la mayoría de los altavoces
pequeños no pue-den manejar
tonos graves profundos, puede
enviar estos sonidos al realzador
de graves (o en caso de que no
disponga de realzador de graves,
los altavoces grandes (L) del
sistema) en lugar de enviarlos a
los altavoces ajustados a pequeño
(S) en la configuración. Escoja el
punto en el que desea dirigir la
frecuencia al realzador de graves
(o altavoces L).
Recomendamos ajustarlo a 200
Hz, en caso de que sus altavoces S
sean altavoces más pequeños del
tipo estantería.
•Utilice ’ o ‘ para especificar
la fre-cuencia de corte de los
altavoces pequeños (100 Hz, 150
Hz o 200 Hz).
100Hz 150Hz
200Hz
超低音揚聲器設定
•默認設定︰ON
可選擇是否使用超低音揚聲器,用
加強設定(PLS)獲取重低音。
•用’或‘按鈕選擇超低音揚聲器
ON,PLS或OFF。
•如選擇小型前置揚聲器,則
SUBWF ON會自動設定並鎖
定。
•當選擇PLS設定時,即使前置
揚聲器設置為L,也將從超低
音揚聲器輸出低音。
分隔頻率設定
•默認設定︰100 Hz
分隔頻率是指接收機區別揚聲器間
高音和低音(指音頻)的分界點。
由於大多數小型(S)揚聲器不能處
理厚重的低音,可將這些聲音傳至
超低音揚聲器(如沒有超低音揚聲
器,傳至大型(L)揚聲器亦
可)。選擇要導向超低音揚聲器
(或L揚聲器)的頻率分界點。
如果您的S揚聲器為較小的書架式
揚聲器,則建議將該項設為200
Hz。
•用’或‘按鈕為您的小型揚聲器
指定分隔頻率(100 Hz,150
Hz,或者200 Hz)
100Hz 150Hz
200Hz

06
65
En/Sp/ChH
English Español
100 Hz
Sends bass frequencies below
100 Hz to the subwoofer (or L
speakers).
150 Hz
Sends bass frequencies below
150 Hz to the subwoofer (or L
speakers).
200 Hz
Sends bass frequencies below
200 Hz to the subwoofer (or L
speakers).
If all speakers (front, center, and
surround) are set to L, the
crossover frequency can’t be
set because there are no S
speakers ( appears in the
display).
LFE attenuator setting
•Default setting: 0 dB
Dolby Digital and DTS audio
sources include ultra-low bass
tones. Set the LFE attenuator as
necessary to prevent the ultra-low
bass tones from distorting the
sound from the speakers.
•Use ’ or ‘ to set the attenu-
ation level (0 dB, 10 dB or
dB(
∞
)).
0 dB 10 dB
∞
(displays )
When
∞
is selected ( appears
in the display), LFE is not
available.
Front speaker distance
setting
•Default setting: 3 m
Sets the distance from the front
speakers to the listening position.
•Use ’ or ‘ to set the dis-
tance of the front speakers from
the main listening position
(within a 9 m range).
100 Hz
Envía frecuencias de graves
por debajo de los 100 Hz al
realzador de graves (o
altavoces L).
150 Hz
Envía frecuencias de graves
por debajo de los 150 Hz al
realzador de graves (o
altavoces L).
200 Hz
Envía frecuencias de graves
por debajo de los 200 Hz al
realzador de graves (o
altavoces L).
Nota
En caso de que todos los
altavoces (frontal, central y
surround) estén ajustados como
L, la frecuencia de corte no
puede ajustarse debido a que no
hay altavoces S ( aparece en
la pantalla).
Ajuste del atenuador LFE
•Valor de ajuste por defecto: 0 dB
Las fuentes de audio Dolby Digital
y DTS incluyen tonos graves
ultrabajos. Ajuste el atenuador LFE
según sea necesario para evitar
que los tonos graves ultrabajos
distorsionen el sonido de los
altavoces.
•Utilice ’ o ‘ para ajustar el
nivel de atenuación (0 dB, 10 dB
o dB(
∞
)).
0 dB 10 dB
∞
(pantallas )
Nota
Cuando se selecciona
∞
(
aparece en la pantalla), LFE no
está disponible.
Ajuste de la distancia del
altavoz frontal
•Valor de ajuste por defecto: 3 m
Ajusta la distancia desde los
altavoces frontales hasta la
posición de audición.
•Utilice ’ o ‘ para ajustar la
distancia de los altavoces
frontales de la posición de
audición principal (dentro de un
margen de 9 m).
100 Hz
將低於100 Hz的低音頻率傳至
超低音揚聲器(或L揚聲器)。
150 Hz
將低於150 Hz的低音頻率傳至
超低音揚聲器(或L揚聲器)。
200 Hz
將低於200 Hz的低音頻率傳至
超低音揚聲器(或L揚聲器)。
如所有揚聲器(前置、中置和環
繞聲)設為L,則不能設置分
隔頻率,因為沒有S揚聲器(顯
示屏上顯示 )。
LFE衰減器設定
•默認設定︰ 0 dB
杜比數碼和DTS音頻音源包含超低
音。請根據需要設置LFE衰減器以
防止超低音使揚聲器輸出的聲音失
真。
•用’或‘按鈕選擇衰減程度(0
dB,10 dB或者 dB(∞))。
0 dB 10 dB
當選擇 ∞ 時(顯示屏上顯示
),LFE無效。
前置揚聲器距離設定
•默認設定︰3 m
設置前置揚聲器離聽音位置的距
離。
•用’或‘按鈕設置前置揚聲器離
聽音位置的距離(9米范圍之
內)。
∞ (顯示 )

06
66
En/Sp/ChH
Center speaker distance
setting
•Default setting: 3 m
The center speaker is normally
placed directly in the front of the
listening room and closer to the
listening position than the front
speakers. This means that the
sound from the center speaker will
be heard before the front speakers.
To prevent this, set the center
speaker distance setting to delay
the sound from the center speaker
so that the sound from the front
and center speakers will be heard
at the same time.
•Use ’ or ‘ to set the dis-
tance of the center speaker
from the main listening position
(within a 9 m range).
When C is selected in the
speaker setting, the center
speaker distance can’t be set.
Surround speaker distance
setting
•Default setting: 3 m
Like the center speaker, you should
set the distance of the surround
speakers accurately to hear
sounds coming from both front
and surround speakers at the
same time.
•Use ’ or ‘ to set the dis-
tance of the surround speakers
from the main listening position
(within a 9 m range).
When S is selected in the
speaker setting, the surround
speaker distance can’t be set.
Ajuste de la distancia del
altavoz central
•Valor de ajuste por defecto: 3 m
El altavoz central normalmente se
coloca directamente en la parte
frontal de la sala destinada a la
audición y más próximo a la
posición de audición que los
altavoces frontales. Esto significa
que el sonido que emita el altavoz
central se escuchará antes que el
de los altavoces frontales. Para
evitarlo, ajuste el valor de la
distancia del altavoz central para
retrasar el sonido del altavoz
central, de tal manera que el
sonido de los altavoces frontal y
central se escuchará al mismo
tiempo.
•Utilice ’ o ‘ para ajustar la
distancia del altavoz central
desde la posición de audición
principal (dentro de un margen
de 9 m).
Nota
Cuando C está seleccionado en
el ajuste de los altavoces, la
distancia el altavoz central no
puede ajustarse.
Ajuste de la distancia del
altavoz surround
•Valor de ajuste por defecto: 3 m
Al igual que con el altavoz central,
deberá ajustar de manera precisa
la distancia de los altavoces
surround para poder escuchar el
sonido procedente de ambos
altavoces frontal y surround al
mismo tiempo.
•Utilice ’ o ‘ para ajustar la
distancia de los altavoces
surround desde la posición de
audición principal (dentro de un
margen de 9 m).
Nota
Cuando S está seleccionado en
el ajuste de los altavoces, la
distancia del altavoz surround
no puede ajustarse.
中置揚聲器距離設定
•默認設定︰ 3 m
通常中置揚聲器直接擺放在收聽室
的前方,比前置揚聲器更接近聽音
位置。這意味著中置揚聲器的聲音
將比前置揚聲器更早收聽到。為避
免這種情況,請設置中置揚聲器的
距離,以延遲其輸出的聲音,這樣
使前置揚聲器和中置揚聲器的聲音
能同時被收聽到。
•用’或‘按鈕設置中置揚聲器離
主聽音位置的距離。(9米范圍之
內)
當在揚聲器設定中選擇C 時,中
置揚聲器的距離不能設置。
環繞聲揚聲器距離設定
•默認設定︰3 m
與中置揚聲器一樣,您應該精確設
定環繞聲揚聲器的距離,以便能同
時聽見兩個前置揚聲器和環繞聲揚
聲器輸出的聲音。
•用’或‘按鈕設置環繞聲揚聲器
離主聽音位置的距離。(9米范圍
之內)
當在環繞聲揚聲器設定中選擇S
時,後置環繞聲揚聲器的距離
不能設置。
06
67
En/Sp/ChH
English Español
Surround back speaker
distance setting
(VSX-D811S only)
•Default setting: 3 m
Like the center speaker, you should
set the distance of the surround
speakers accurately to hear
sounds coming from both front
and surround speakers at the
same time.
•Use ’ or ‘ to set the dis-
tance of the surround speakers
from the main listening position
(within a 9 m range).
When SB is selected in the
surround speaker setting, the
surround back speaker
distance can’t be set.
Dynamic range control
setting
•Default setting: OFF
Dynamic range is the difference
between the loudest and softest
sounds in any given signal. With
this setting, you can compress the
dynamic range, so that low level
sounds can be heard more easily
(sounding relatively louder) yet
louder sounds won’t be too
overbearing.
•Press ’ or ‘ to set the
dynamic range control (OFF,
MAX, or MID).
•When the volume level is
increased, set to OFF.
•When listening at low vol-
umes, set to MAX for maxi-
mum dynamic range compres-
sion.
•Dynamic range control is
effective only when a Dolby
Digital signal is being played
back.
Ajuste de la distancia del
altavoz posterior surround
(sólo VSX-D811S)
•Valor de ajuste por defecto: 3 m
Al igual que con el altavoz central,
deberá ajustar de manera precisa
la distancia de los altavoces
surround para poder escuchar el
sonido procedente de ambos
altavoces frontal y surround al
mismo tiempo.
•Utilice ’ o ‘ para ajustar la
distancia de los altavoces
surround desde la posición de
audición principal (dentro de un
margen de 9 m).
Nota
Cuando SB está seleccionado
en el ajuste del altavoz surround,
la distancia del altavoz posterior
surround no puede ajustarse.
Ajuste del control de la gama
dinámica
•Valor de ajuste por defecto: OFF
La gama dinámica es la diferencia
entre los sonidos más altos y los
más suaves en cualquier señal
dada. Con este valor de ajuste,
puede comprimir la gama
dinámica, de tal manera que se
pueda escuchar fácilmente los
sonidos de bajo nivel (haciendo
que suenen relativamente más
altos), pero los sonidos más altos
no predominarán demasiado.
•Pulse ’ o ‘ para ajustar el
control de la gama dinámica
(OFF, MAX, o MID).
Nota
•Cuando el nivel del volumen
aumenta, ajústelo a OFF.
•Cuando se escuche a un
volumen bajo, ajuste a MAX
para una compresión de gama
dinámica máxima.
•El control de la gama
dinámica es eficaz sólo
cuando se está reproduciendo
un señal Dolby Digital.
後置環繞聲聲道輸入設定
(僅適於
VSX–D811S
)
•默認設定︰ 3 m
與中置揚聲器一樣,您應該精確設
定環繞聲揚聲器的距離,以便能同
時聽見兩個前置揚聲器和環繞聲揚
聲器輸出的聲音。
•用’或‘按鈕設定環繞聲揚聲器
離主聽音位置的距離(在9米範圍
內)。
當環繞聲揚聲器設定中選擇SB
時,無法設定後置環繞聲揚聲
器距離。
動態范圍控制設定
•默認設定︰ OFF
動態范圍是指某給定信號其最響聲
音和最輕柔聲音之間的差值。
通過該設定,可以壓縮動態范圍,
這樣低音可更容易地被聽到(聽起
來相對更響),而高音也不至於太
刺耳。
•用’或‘按鈕設置動態范圍
(OFF,MAX(最大)或MID(中
等))。
•當音量級增加時,設置為
OFF。
•在低音量下收聽時,設置為
MAX,獲得最大動態范圍壓
縮。
•僅當杜比數碼信號播放時,動
態范圍控制才有效。
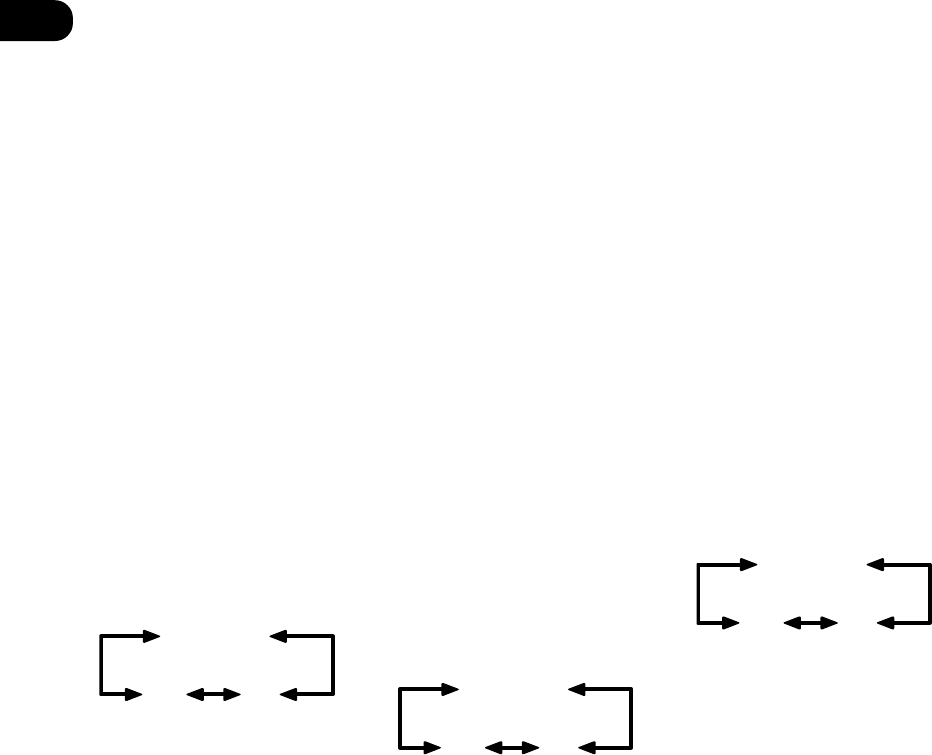
06
68
En/Sp/ChH
Ajuste del monoaural dual
•Valor de ajuste por defecto: ch1
El ajuste monoaural dual
únicamente puede utilizarse
cuando se escuchan discos Dolby
Digital con codificación monoaural
dual. Estos discos no se utilizan
con mucha frecuencia, pero en
ocasiones se utilizan cuando es
necesario tener un idioma en un
canal y un idioma diferente en el
otro. Con este valor de ajuste,
puede elegir qué canal del ajuste
monoaural dual desea escuchar.
Escuchará el canal que ha
seleccionado (ch 1 o ch 2) a través
del altavoz central. En caso de que
no disponga de un altavoz central,
escuchará el canal que ha
seleccionado a través de ambos
altavoces frontales. Durante el
ajuste del L ch 1. R ch 2, el altavoz
izquierdo frontal reproducirá el
canal 1 y el altavoz derecho frontal
reproducirá el canal 2.
•Utilice ’ o ‘ para avanzar
por los posibles ajustes
monoaural dual.
ch2
L ch 1.R ch 2
ch1
Ajustes de la entrada de
vídeo del componente
Aquí es donde le indica al receptor
qué componentes ha conectado a
las tomas de vídeo del
componente en la parte posterior
del receptor.
Vídeo 1 del componente:
•Valor de ajuste por defecto:
DVD
1 Utilice ’ o ‘ para asignar la
entrada de vídeo 1 del
componente (DVD, TV, VCR, u
OFF).
Vídeo 2 del componente:
•Valor de ajuste por defecto: TV
2 Utilice ’ o ‘ para asignar la
entrada de vídeo 2 del
componente (DVD, TV, VCR, u
OFF).
Dual mono setting
•Default setting: ch1
The dual mono setting can only be
used when listening to Dolby
Digital discs with dual mono
encoding. These discs are not
widely used, but are sometimes
used when it is necessary to have
one language on one channel and
a different language on the other.
With this setting you can choose
which channel in the dual mono
setting you want to listen to.
You will hear the channel you have
selected (either ch1 or ch2)
through your center speaker. If you
don’t have a center speaker, you
will hear the channel you have
selected through both front
speakers. In the L ch 1. R ch 2
setting, the left front speaker will
play channel 1 and the right front
speaker will play channel 2.
•Use ’ or ‘ to cycle through
the possible dual mono settings.
ch2
L ch 1.R ch 2
ch1
Component video input
settings
Here you tell the receiver what
components you have hooked up
to the component video jacks on
the back of the receiver.
Component video 1:
•Default settings: DVD
1 Use ’ or ‘ to assign the
component video 1 input (DVD,
TV, VCR or OFF).
Component video 2:
•Default setting: TV
2 Use ’ or ‘ to assign the
component video 2 input (DVD,
TV, VCR or OFF).
雙重單聲道設定
•默認設定︰ ch1
僅當收聽雙重單聲道編碼的杜比數
碼碟片時使用雙重單聲道設定。這
種碟片應用並不廣泛,但有時若需
一條聲道對應一種語言時應用。通
過該設定,可以選擇雙重單聲道設
定中想要收聽的聲道。
您將通過中置揚聲器聽到所選擇的
聲道(ch1或者ch2)。
如果沒有中置揚聲器,您可從兩個
前置揚聲器收聽所選聲道。在L ch
1.R ch 2 設定中,前置左揚聲器播
放聲道1,而前置右揚聲器則播放
聲道2。
•用’或‘按鈕在可能的雙重單聲
道設定中循環。
ch2
L ch 1.R ch 2
ch1
分量視頻輸入設定
該設定用來告知接收機其背面的分
量視頻插口上連接了何種設備。
分量視頻 1︰
•默認設定︰ DVD
1用’或‘按鈕分配分量視頻1輸
入(DVD,TV,VCR或OFF)。
分量視頻 2︰
•默認設定︰ TV
2用’或‘按鈕分配分量視頻2輸
入(DVD,TV,VCR或OFF)。

06
69
En/Sp/ChH
English Español
Surround back channel input
setting
(VSX-D811S only)
•Default setting: SB 2ch IN
You only have to make this setting
if you are using a seperate compo-
nent for decoding DVDs, and the
component has only one surround
back channel output. If this is the
case, select SB 1ch IN, otherwise
leave it set to SB 2ch IN.
•Use ’ or ‘ to select SB 2ch
IN or SB 1ch IN.
Coaxial digital input settings
Here you tell the receiver what
components you have hooked up
to the coaxial DIGITAL IN jacks 1
and 2 on the back of the receiver.
Coaxial digital 1:
•Default settings: DVD/LD
1 Use ’ or ‘ to assign the
coaxial digital 1 input (DVD, TV,
CD, CD-R, VCR or OFF).
Coaxial digital 2:
•Default setting: CD
2 Use ’ or ‘ to assign the
coaxial digital 2 input (DVD, TV,
CD, CD-R, VCR or OFF).
After you assign a component to a
digital jack, whenever you select
that component, (for example, a
DVD player) the receiver
automatically changes to the
digital input setting and DIGITAL
shows in the display.
Optical digital input settings
Here you tell the receiver what
components you have hooked up
to the optical DIGITAL IN jack(s)
on the back of the receiver.
Optical digital 1:
•Default settings: TV/SAT
1 Use ’ or ‘ to assign the
optical digital 1 input (DVD, TV,
CD, CD-R, VCR or OFF).
Ajuste de la entrada del
canal posterior surround
(sólo VSX-D811S)
•Valor de ajuste por defecto:
SB 2ch IN
Únicamente deberá realizar este
ajuste en caso de que utilice un
componente separado para
codificar DVDs, y el componente
tenga sólo una salida de canal
posterior surround. Si este es el
caso, seleccione SB 1ch IN, o si no
cambie el valor de ajuste SB 2ch IN.
•Utilice ’ o ‘ para
seleccionar SB 2ch IN o SB 1ch
IN.
Ajustes de la entrada digital
coaxial
Aquí es donde le indica al receptor
qué componentes ha conectado a
las tomas 1 y 2 coaxiales DIGITAL
IN en la parte posterior del receptor.
Digital coaxial 1:
•Valor de ajuste por defecto:
DVD/LD
1 Utilice ’ o ‘ para asignar la
entrada digital coaxial 1 (DVD,
TV, CD, CD-R, VCR u OFF).
Digital coaxial 2:
•Valor de ajuste por defecto: CD
2 Utilice ’ o ‘ para asignar la
entrada digital coaxial 2 (DVD,
TV, CD, CD-R, VCR u OFF).
Una vez haya asignado un
componente a una toma digital,
siempre que seleccione ese
componente, (por ejemplo, un
reproductor de DVDs), el receptor
cambia automáticamente a ajuste
de entrada digital y DIGITAL
aparece en la pantalla.
Ajustes de la entrada digital
óptica
Aquí es donde le indica al receptor
qué componentes ha conectado a
la(s) toma(s) 1 y 2 ópticas DIGITAL
IN en la parte posterior del receptor.
Digital óptica 1:
•Valor de ajuste por defecto:
TV/SAT
1 Utilice ’ o ‘ para asignar la
entrada digital óptica 1 (DVD,
TV, CD, CD-R, VCR u OFF).
後置環繞聲聲道輸入設定
(僅適於
VSX–D811S
)
•默認設定︰ SB 2ch IN
僅當您在使用獨立的設備來解碼
DVD且該設備有後置環繞聲聲道輸
出時設置。在這種情況下,選擇SB
1ch IN;否則則設為SB 2ch IN。
•用’或‘按鈕選擇SB 2CH IN或
者SB 1CH IN。
同軸數碼輸入設定
該設定告知接收機其背面的同軸
DIGITAL IN(數碼輸入)插口1和2
上連接了何種設備。
同軸數碼 1︰
•默認設定︰ DVD/LD
1用’或‘按鈕分配同軸數碼1輸
入(DVD,TV,CD,CD–R,VCR
或OFF)。
同軸數碼 2︰
•默認設定︰ CD
2用’或‘按鈕分配同軸數碼2輸
入(DVD,TV,CD,CD–R,VCR
或OFF)。
在對數碼插口指定一設備後,無論
何時選擇該設備(例如DVD播放
機),接收機將自動改變至數碼輸
入設定,顯示屏上顯示DIGITAL。
光學數碼輸入設定
該設定告知接收機其背面的
DIGITAL IN光學數碼輸入插口上連
接了何種設備。
光學數碼 1︰
•默認設定︰ TV/SAT
1用’或‘按鈕分配光學數碼1輸
入(DVD,TV,CD,CD–R,VCR
或OFF)。
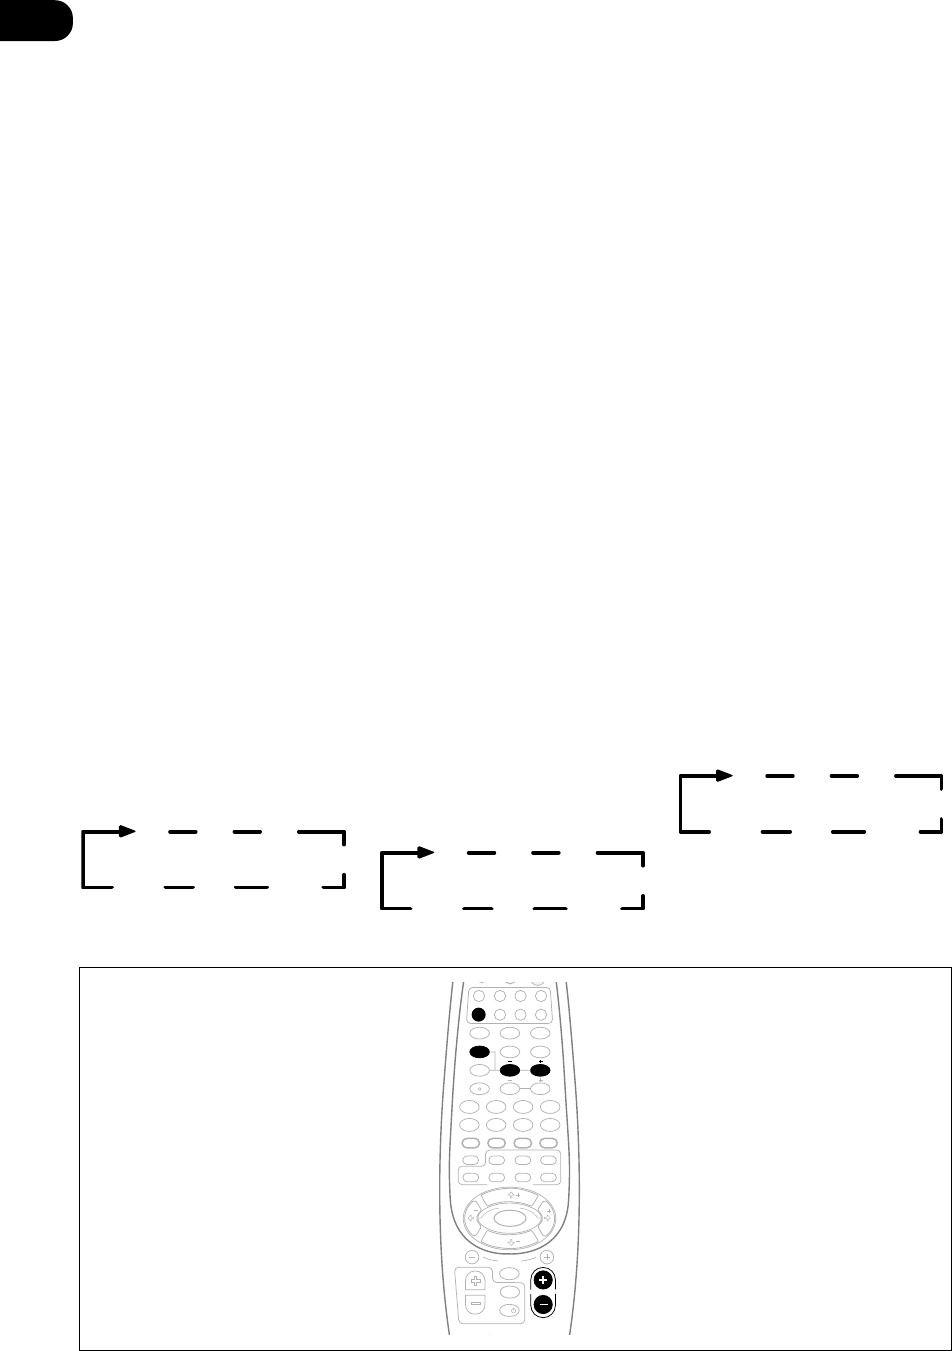
06
70
En/Sp/ChH
TV
TV INPUT
MENU
TV VOL
MASTER VOLUME
TV CONTROL
CHANNEL
ENTER
ENTER
MPX/RETURNDTV INFO
DTV MENU
D.ACCESS T.EDIT/GUIDE
ST
TUNE
T
P
S
E
U
TUNE
ST
CLASS
FL DIMMER
BAND
TOP MENU AUDIO
SUB TITLE
REMOTE SETUP
RECEIVER CONTROL
STANDARD ADV.SURR.
STEREO
ANGLE
1¡
4¢
7
8
3
LEVEL
DVD VCR CD-RTV
RCV TUN TVC
CD
TEST TONE
CH SELECT
INPUT ATT
INPUT SEL.
MUTE
MIDNIGHT/
LOUDNESS
SIGNAL SEL
MULTI CONTROL
EFFECT+10
123
456
789
0
DTV/DISPLAY
DISC
Optical digital 2
(VSX-D811S only)
•Default setting: CDR/TAPE/
MD
2 Use ’ or ‘ to assign the
optical digital 2 input (DVD, TV,
CD, CD-R, VCR or OFF).
After you assign a component to a
digital jack, whenever you select
that component, (for example, a
DVD player) the receiver
automatically changes to the
digital input setting and DIGITAL
shows in the display.
Setting the relative volume
level of each channel
•Default setting: 0 db
For best surround sound playback,
you should set the relative channel
levels from the main listening
position. You can set seperate
levels for each surround mode.
1 Press RCV.
2 Press STANDARD.
3 Press TEST TONE to output
the test tone.
The test tone is output in the
following order (depending on the
speaker setting):
FL C
SR
FR
SL
SW SB*
*VSX-D811S only
Digital óptica 2
(sólo VSX-D811S)
•Valor de ajuste por defecto:
CDR/TAPE/MD
2 Utilice ’ o ‘ para asignar la
entrada digital óptica 2 (DVD,
TV, CD, CD-R, VCR u OFF).
Una vez haya asignado un
componente a una toma digital,
siempre que seleccione ese
componente, (por ejemplo, un
reproductor de DVDs), el receptor
cambia automáticamente a ajuste
de entrada digital y DIGITAL
aparece en la pantalla.
Cómo ajustar el nivel de
volumen adecuado de cada
canal
•Valor de ajuste por defecto: 0 db
Para obtener la mejor reproducción
de sonido surround, deberá ajustar
los niveles del canal desde la
posición de audición principal.
Puede ajustar diferentes niveles
para cada modo Surround.
1 Pulse RCV.
2 Pulse STANDARD.
3 Pulse TEST TONE para que se
emita el tono de prueba.
El tono de prueba se emite
siguiendo el siguiente orden
(dependiendo del ajuste del altavoz):
FL C
SR
FR
SL
SW SB*
*sólo VSX-D811S
光學數碼 2︰
(僅適於
VSX–D811S
)
•默認設定︰ CDR/TAPE/MD
2用’或‘按鈕分配光學數碼1輸
入(DVD,TV,CD,CD-R,VCR
或OFF)。
在對指定數碼插口設備後,無論何
時選擇該設備(例如DVD播放
機),接收機將自動改變至數碼輸
入設定,顯示屏上顯示DIGITAL。
設置各聲道相關的音量級
•默認設定︰ 0 db
為獲得最佳環繞聲效果,應從主聽
音位置設置相關聲道的音量級。可
為各環繞聲模式設置各自的音量
級。
1按RCV。
2按STANDARD。
3按TEST TONE以輸出測試音。
測試音以下列順序輸出(依揚聲器
設定而定)︰
FL C
SR
FR
SL
SW SB*
*
僅適於
VSX°–D811S
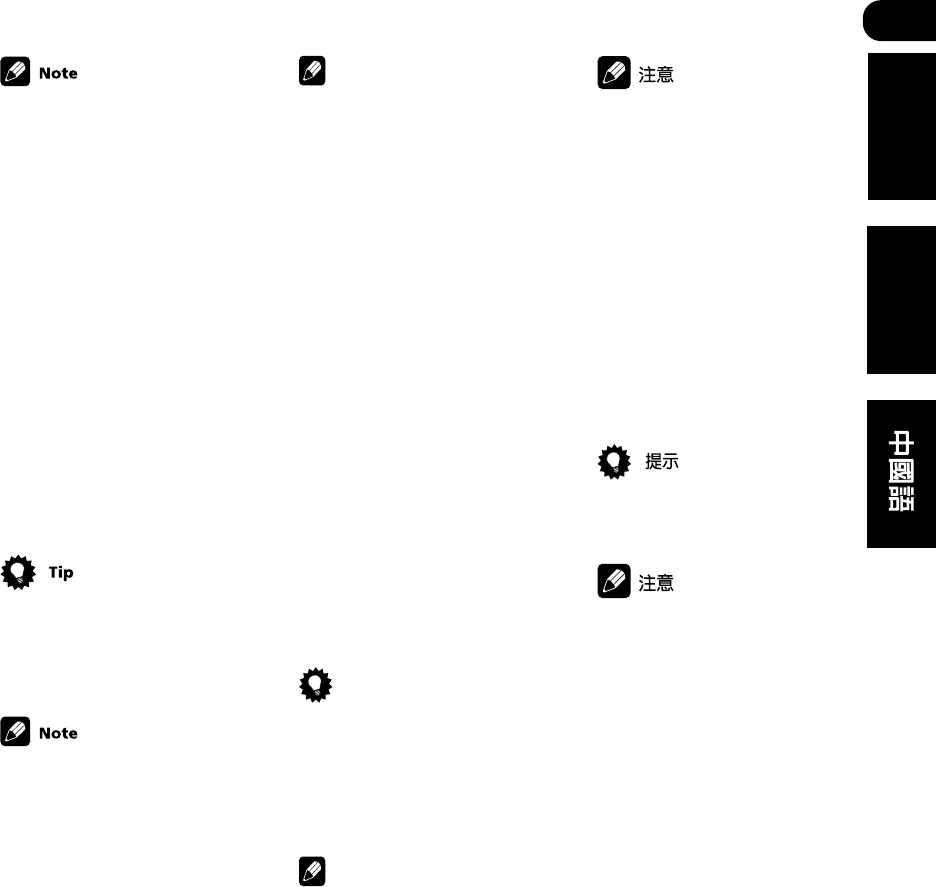
06
71
En/Sp/ChH
English Español
If you don’t hear a test tone from
one of your speakers, please
refer to Speaker setting on
page 62 to make sure you have
correctly specified your
speaker setup.
4 Press MASTER VOLUME +/–
to adjust the volume to an
appropriate level.
5 Use LEVEL +/- to adjust the
speaker levels in turn.
You should hear the test tone at
the same volume from each
speaker when seated in the main
listening position. The channel
level range is ± 10 dB.
6 When you’re done, press
TEST TONE to turn off the test
tone.
The speaker volume can be
adjusted without outputting
the test tone by pressing CH
SELECT and then using LEVEL
+/–.
•Test tone is only output in
Standard modes.
•Since the subwoofer transmits
an ultra-low frequency its
sound may seem quieter than
it actually is.
Nota
Si no escucha un tono de
prueba por uno de sus
altavoces, consulte la sección
Ajuste de los altavoces en la
página 62 para asegurarse
que ha especificado
correctamente la
configuración de los
altavoces.
4 Pulse MASTER VOLUME +/
– para ajustar el volumen a un
nivel adecuado.
5 Utilice LEVEL +/– para
ajustar los niveles de los
altavoces por turno.
Deberá escuchar el tono de
prueba al mismo volumen de
cada altavoz sentado en la
posición de audición principal.
La gama del nivel de canal es ±
10 dB.
6 Una vez hecho esto, pulse
TEST TONE para desactivar el
tono de prueba.
Consejo
El volumen del altavoz puede
ajustarse sin necesidad de
emitir el tono de prueba
pulsando CH SELECT y
utilizando después LEVEL +/–.
Nota
•El tono de prueba sólo se
emite en modos Estándar.
•Debido a que el realzador
de graves transmite un
frecuencia ultrabaja, el
sonido puede parecer más
bajo de lo que en realidad
es.
如果從某個揚聲器中聽到的測試
音有所不同,請參見第62頁揚
聲器設定的有關內容,確保指
定了正確的揚聲器設置。
4按MASTER VOLUME+/– 調整
音量至合適程度。
5用LEVEL+/–來依次調整揚聲器
音壓。
坐在主聽音位置上,您從各揚聲器
聽到的測試音應為同等音量。聲道
音壓變動范圍為±10 dB。
6設定完成後,按TEST TONE關
閉測試音。
先按CH SELECT,然後再使用
LEVEL+/–,這樣無需輸出測試
音也可調整揚聲器音量。
•測試音僅在標準模式下輸出。
•既然超低音揚聲器傳輸超低頻
率,因此聽上去可能比實際聲
音顯得安靜。
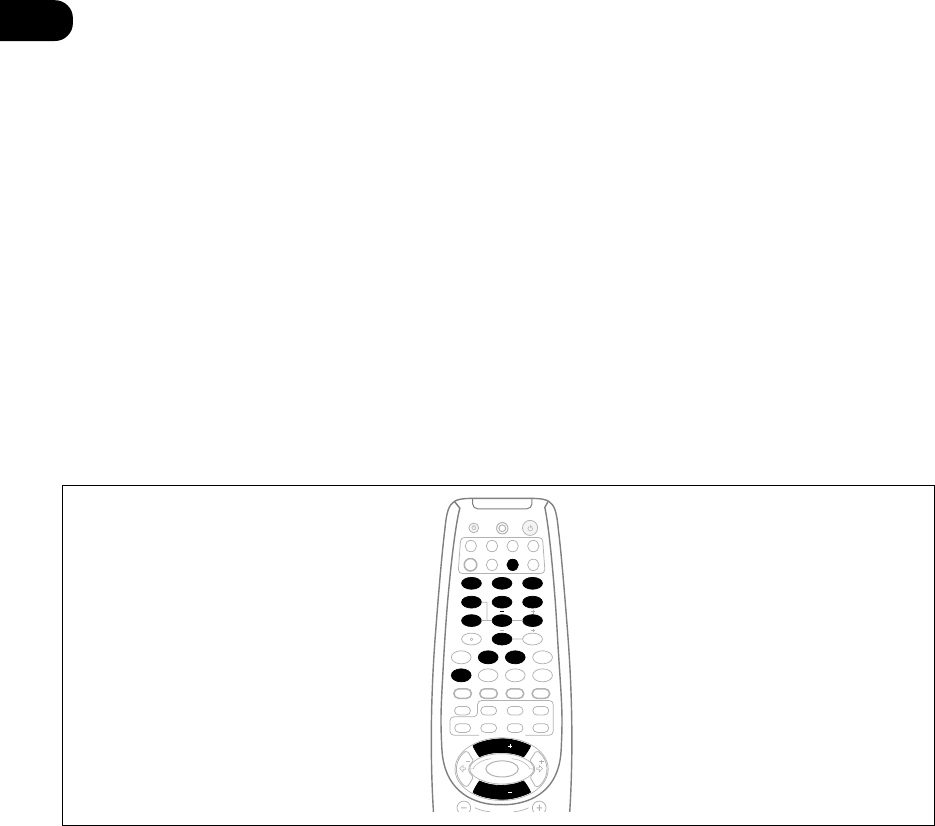
07
72
En/Sp/ChH
Using the tuner
Listening to the ra-
dio
The following steps show you how
to tune in to FM and AM radio
broadcasts using the automatic
(search) and manual (step) tuning
functions. If you already know the
frequency of the station you want,
see Tuning directly to a station on
page 73. Once you are tuned to a
station you can memorize the
frequency for recall later—see
Saving station presets on page 74
for more on how to do this.
1 Press the TUN button on the
remote control to select the
tuner.
You can also use the MULTI JOG/
INPUT SELECTOR dial on the front
panel.
2 Use the BAND button to
change the band (FM or AM), if
necessary.
Each press switches the band
between FM and AM.
3 Tune to a station.
There are three ways to do this:
Automatic tuning
To search for stations in the
currently selected band, press
and hold TUNE +/– for about a
second. The receiver will start
searching for the next station,
stopping when it has found
one. Repeat to search for other
stations.
CHANNEL
ENTER
ENTER
MPX/RETURNDTV INFO
DTV MENU
D.ACCESS T.EDIT/GUIDE
ST T
P
S
E
U
ST
CLASS
FL DIMMER
BAND
TOP MENU AUDIO
SUB TITLE
REMOTE SETUP
RECEIVER CONTROL
STANDARD ADV.SURR.
STEREO
ANGLE
1¡4¢
7
8
3
LEVEL
DVD VCR CD-RTV
RCV TUN TVC
CD
TEST TONE
CH SELECT
INPUT ATT
INPUT SEL.
MUTE
MIDNIGHT/
LOUDNESS
SIGNAL SEL
MULTI CONTROL
EFFECT+10
RECEIVER
SOURCE
123
456
789
0
TUNE
TUNE
DTV/DISPLAY
DISC
Cómo escuchar la
radio
Los pasos siguientes le muestran
cómo sintonizar transmisiones
radiofónicas de FM y AM
empleando las funciones de
sintonización automática
(búsqueda) y manual (por
intervalo). Si ya sabe la frecuencia
de la emisora que quiere, véase
Sintonización directa de una emisora
en la página 73. Una vez haya
sintonizado una emisora puede
memorizar la frecuencia para
rellamarla más tarde—véase la
sección Cómo guardar presintonías
en la página 74 para más
información sobre cómo hacer esto.
1 Pulse el botón TUN del mando
a distancia para seleccionar el
sintonizador.
También puede utilizar el selector
MULTI JOG/INPUT SELECTOR en el
panel frontal.
2 Utilice el botón BAND para
cambiar la banda (FM o AM), si es
necesario.
Cada vez que pulsa, se cambia la
banda entre FM y AM.
3 Sintonice una emisora.
Hay tres maneras de hacerlo:
Sintonización automática
Para buscar emisoras en la
banda seleccionada
actualmente, pulse y mantenga
pulsado los botones TUNE +/–
durante un segundo
aproximadamente. El receptor
comenzará a buscar la próxima
emisora, deteniéndose cuando
encuentre una. Repita este
proceso para buscar otras
emisoras.
Utilización del
sintonizador 收聽無線電廣播
下列步驟介紹如何用自動(搜索)
和手動(間隔)調諧功能來收聽FM
和AM無線電廣播。
如已知道所需收聽電臺的頻率,請
參見73頁直接調諧至電臺的有關內
容。一旦調諧到某個電臺,即可記
憶該頻率以便日後收聽之便──參
見74頁保存預設電臺的有關內容,
獲取更多資訊。
1按遙控器上的TUN按鈕選擇調
諧器。
您也可使用前面板上的MULTI
JOG/INPUT SELECTOR旋鈕。
2如有必要,用BAND按鈕改變
波段(FM或者AM)。
在FM和AM之間切換。
3調諧至某個電臺。
有三種方法可供選擇︰
自動調諧
要在當前所選的波段中搜索電
臺,按住TUNE+/– 約一秒鐘。
接收機開始搜索下一個電臺,
搜到後停止。重複以上動作,
可搜索其他電臺。
使用調諧器

07
73
En/Sp/ChH
English Español
Sintonización manual
Para cambiar la frecuencia un
intervalo cada vez, pulse los
botones TUNE +/–.
Sintonización a alta velocidad
Pulse y mantenga pulsado los
botones TUNE +/– para una
sintonización a alta velocidad.
Suelte el botón una vez haya
llegado a la frecuencia que
desea.
Cómo mejorar el sonido
estéreo FM
En caso de que los indicadores
TUNED o STEREO no se iluminen
cuando sintonice una emisora de
FM, debido a que la señal es débil,
pulse el botón MPX(/RETURN)
para cambiar el receptor a modo
de recepción monoaural. De este
modo se mejorará la calidad y le
permitirá disfrutar de la
transmisión.
Sintonización directa de una
emisora
A veces, ya sabrá la frecuencia de
la emisora que desea escuchar. En
esos casos, simplemente puede
introducir directamente la
frecuencia utilizando los botones
numerados del mando a distancia.
1 Pulse el botón TUN del
mando a distancia para
seleccionar el sintonizador.
También puede utilizar el selector
MULTI JOG/INPUT SELECTOR en el
panel frontal.
2 Utilice el botón BAND para
cambiar la banda (FM o AM), si
es necesario.
Cada vez que pulsa, se cambia la
banda entre FM y AM.
3 Press D.ACCESS (Direct
Access).
4 Utilice los botones
numerados para introducir la
frecuencia de la emisora de
radio.
Por ejemplo, para sintonizar
106.00 (FM), pulse 1, 0, 6, 0, 0.
SP A
STEREO TUNED
FM 106.00
En caso de que cometa un fallo
durante el proceso, pulse dos
veces D.ACCESS para cancelar la
frecuencia y empezar de nuevo.
Manual tuning
To change the frequency one
step at a time, press TUNE +/–.
High speed tuning
Press and hold TUNE +/– for
high speed tuning. Release the
button at the
frequency you want.
Improving FM stereo sound
If the TUNED or STEREO indica-
tors don't light when tuning to an
FM station because the signal is
weak, press the MPX(/RETURN)
button to switch the receiver into
mono reception mode. This should
improve the sound quality and
allow you to enjoy the broadcast.
Tuning directly to a station
Sometimes, you'll already know the
frequency of the station you want
to listen to. In this case, you can
simply enter the frequency directly
using the number buttons on the
remote control.
1 Press the TUN button on the
remote control to select the
tuner.
You can also use the MULTI JOG/
INPUT SELECTOR dial on the front
panel.
2 Use the BAND button to
change the band (FM or AM), if
necessary.
Each press switches the band
between FM and AM.
3 Press D.ACCESS (Direct
Access).
4 Use the number buttons to
enter the frequency of the radio
station.
For example, to tune to 106.00
(FM), press 1, 0, 6, 0, 0.
If you make a mistake halfway
through, press D.ACCESS twice to
cancel the frequency and start
over.
手動調諧
要一次改變一段間隔的頻率,
按TUNE+/–。
快速調諧
按住TUNE+/–,進行快速調
諧,並當到達所需頻率時松開
按鈕。
改善FM立體聲聲音
當調到一個FM電臺時,如果由於信
號微弱TUNED或STEREO指示標誌
未點亮,則按MPX(/RETURN)按鈕
將接收機切換至單聲道接收模式。
這樣可以提高音質,使您更好收聽
廣播節目。
直接調諧到電臺
有時您可能已經知道了電臺的頻
率,這時您祇需用遙控器上的數字
按鈕直接輸入頻率便可。
1按遙控器上的TUN按鈕,選擇
調諧器。
您也可使用前面板上的MULTI
JOG/INPUT SELECTOR旋鈕進行選
擇。
2如有必要,用BAND按鈕改變
波段(FM或AM)。
每按一次該鈕在FM和AM之間切換。
3按D.ACCESS(直接調出)。
4用數字按鈕輸入電臺頻率。
例如,欲調至106.00(FM),則按
1,0,6,0,0。
SP A
STEREO TUNED
FM 106.00
如輸入時出錯,按D.ACCESS兩次
取消輸入的頻率,然後再重新輸
入。

07
74
En/Sp/ChH
Saving station
presets
If you often listen to a particular
radio station, it's convenient to
have the receiver store the fre-
quency for easy recall whenever
you want to listen to that station.
This saves the effort of manually
tuning in each time. This unit can
memorize up to 30 stations, stored
in three banks, or classes, (A, B
and C) of 10 stations each. When
saving an FM frequency, the MPX
setting (see previous page) is also
stored. Use the front panel
controls to store station presets.
STATION STANDARD SPEAKERS
S-VIDEO VIDEO L AUDIO R
ADVANCED
SURROUND STEREO/
DIRECT SIGNAL
SELECT MIDNIGHT/
LOUDNESS
TUNING MONITOR TONE QUICK SETUP
VIDEO INPUT
TUNER EDIT CLASS BAN D MPX
MULTI JOG
LISTENING MODE
INPUT ATT FL DIMMER
MULTI JOG
DOWN
UP
ENTER
INPUT
SELECTOR
MASTER VOLUME
MULTI JOG
AUDIO/VIDEO MULTI-CHANNEL RECEIVER
R
N∫m-Û≥,,
SPEAKERS
S-VIDEO VIDEO L AUDIO R
SIGNAL
SELECT MIDNIGHT/
LOUDNESS MONITOR TONE QUICK SETUP
VIDEO INPUT
MULTI JOG
CHANNEL
ENTER
ENTER
MPX/RETURNDTV INFO
DTV MENU
D.ACCESS T.EDIT/GUIDE
TUNE
T
P
S
E
U
TUNE
CLASS
FL DIMMER
BAND
TOP MENU AUDIO SUB TITLE
REMOTE SETUP
RECEIVER CONTROL
STANDARD ADV.SURR.
STEREO
ANGLE
1¡4¢
7
8
3
LEVEL
DVD VCR CD-RTV
RCV TUN TVC
CD
TEST TONE
CH SELECT
INPUT ATT
INPUT SEL.
MUTE
MIDNIGHT/
LOUDNESS
SIGNAL SEL
MULTI CONTROL
EFFECT
+10
RECEIVER
SOURCE
123
456
789
0
ST ST
DTV/DISPLAY
DISC
1 Tune to a station you want
to memorize.
See Listening to the radio (previous
page) for more on this.
2 Press T.EDIT (TUNER EDIT).
The display shows ST. MEMORY,
then a blinking memory class.
SP A
STEREO TUNED
A - 99.50
3 Press CLASS to select one of
the three classes then use }
and ] (ST +/-) to select the
station preset you want.
You can also use the the MULTI
JOG/INPUT SELECTOR dial (front
panel) to select a station preset.
Cómo guardar
presintonías
Si escucha frecuentemente una
emisora de radio concreta, es
conveniente hacer que el receptor
memorice la frecuencia para
rellamarla fácilmente siempre que
desee escuchar esa emisora. De
esta manera se ahorrará el
esfuerzo de sintonizarla
manualmente cada vez. Este
aparato puede memorizar hasta 30
emisoras, que se guardan en tres
categorías o clases (A, B y C) de 10
emisoras cada una. Al memorizar
frecuencias de FM, también se
guarda el ajuste MPX (véase la
página 80). Utilice los controles del
panel frontal para guardar las
presintonías.
1 Sintonice una emisora que
desee memorizar.
Véase Cómo escuchar la radio (ante-
rior páginacioán) para más
información.
2 Pulse T.EDIT (TUNER EDIT).
La pantalla mostrará ST. MEMORY y
a continuación, una clase de memo-
ria parpadeando.
SP A
STEREO TUNED
A - 99.50
3 Pulse CLASS para seleccionar
una de las tres clases y, a
continuación, utilice } y ] (ST
+/-) para seleccionar la
presintonía que desea.
También puede utilizar el selector
MULTI JOG/INPUT SELECTOR (panel
frontal) para seleccionar una
presintonía.
保存預設電臺
如果經常收聽某一電臺,則可將該
頻率保存於本接收機內,以便您需
要收聽時調出該電臺。這樣省去了
每次手動調諧的工作。本機能記憶
多達30個電臺,存於三個組或類別
中(A、B和C),每組可有十個
臺。保存FM頻率時,MPX設定(參
見上頁)也被保存。請使用前面板
控制按鈕來保存預設電臺。
1調諧至需記憶的電臺。
參見
收聽廣播電臺
(上一頁)的有
關內容,獲知更多詳情。
2按T.EDIT(調諧器編輯)
顯示屏顯示ST.MEMORY(電臺記
憶),然後顯示閃爍的記憶類別。
SP A
STEREO TUNED
A - 99.50
3按CLASS選中三個類別中的一
個,然後用}和]按鈕(ST+/–)
選擇所需的預設電臺。
您也可使用前面板上的MULTI
JOG/INPUT SELECTOR旋鈕來選擇
預設電臺。
07
75
En/Sp/ChH
English Español
4 Press ENTER.
After pressing ENTER, the preset
class and number stop blinking
and the receiver stores the station.
Naming station pre-
sets
For easier identification, you can
name your station presets.
1 Choose the station preset
you want to name.
See Listening to station presets
(this page) for how to do this.
2 Press T.EDIT (TUNER EDIT).
The display shows ST. NAME, then
a blinking cursor at the first
character position.
3 Input the name you want.
Names can be up to four charac-
ters long.
•Use the MULTI JOG/INPUT
SELECTOR dial (front panel) or
the } and ] (ST +/-) buttons
(remote) to select characters.
•Press ENTER to confirm a
character. If no character is
input, a space is input.
•The name is stored when
ENTER is pressed after
choosing the fourth
character.
To erase a station name, simply
repeat steps 1-3 and input four
spaces instead of a name.
Once you have named a station
preset, you can press DISPLAY
when listening to a station to
switch the display between the
name and the frequency.
4 Pulse ENTER.
Una vez haya pulsado ENTER, el
número y clase de presintonía
dejan de parpadear y el receptor
guarda la emisora.
Cómo nombrar
presintonías
Puede dar un nombre a las
presintonías, para identificarlas
más fácilmente.
1 Elija la presintonía que desea
nombrar.
Véase Cómo escuchar presintonías
(página siguiente) para saber cómo
hacerlo.
2 Pulse T.EDIT (TUNER EDIT).
La pantalla mostrará ST. NAME y, a
continuación, un cursor parpadeará
delante del primer carácter.
3 Introduzca el nombre que
desee.
Los nombres pueden contener un
máximo de cuatro caracteres.
• Utilice el selector MULTI JOG/
INPUT SELECTOR (panel
frontal) o los botones } y ]
(ST +/−) (mando a distancia)
para seleccionar los
caracteres.
• Pulse ENTER para confirmar un
carácter. En caso de que no se
introduzca ningún carácter, se
incluirá un espacio.
• El nombre se guardará cuando
se haya pulsado ENTER
después de elegir el cuarto
carácter.
Nota
Para borrar el nombre de una
emisora, simplemente repita los
pasos 1-3 e introduzca cuatro
espacios en lugar de un nombre.
Consejo
Cuando ya haya dado nombre a
una presintonía, puede pulsar
DISPLAY mientras esté
escuchando una emisora para
hacer cambiar la pantalla y que
ésta muestre el nombre y la
frecuencia.
4按ENTER。
按ENTER以後,預設電臺類別和號
碼將停止閃爍,接收機已保存了該
電臺頻率。
命名預設電臺
為方便識別,您可以為預設電臺命
名。
1選擇要命名的預設電臺。
有關操作方法請參見本頁的
收聽預
設電臺
。
2按T.EDIT(調諧器編輯)
顯示屏顯示ST.NAME,然後光標
在第一個字符位置處閃爍。
3輸入所需名稱。
最多可輸入四個字符。
•使用MULTI JOG/INPUT
SELECTOR旋鈕(前面板),
或者}和](ST +/-)按鈕
(遙控器)來選擇字符。
•按ENTER確認字符。如沒有字
符輸入,則為空格。
•在選擇第四個字符後,按
ENTER保存名稱。
要刪除電臺名稱,祇需重複第1
-3步,然後輸入四個空格即
可。
命名電臺之後,您可在收聽時按
住DISPLAY切換名稱和頻率。

07
76
En/Sp/ChH
Cómo escuchar
presintonías
Véanse las páginas 74–75 en caso
de que no haya guardado todavía
algunas presintonías.
1 Pulse TUN (mando a
distancia) o utilice el selector
MULTI JOG/INPUT SELECTOR del
panel frontal para seleccionar el
sintonizador.
2 Pulse CLASS para seleccionar
la clase en la que está guardada
la emisora.
Pulse repetidamente para recorrer
las clase A, B y C.
3 Pulse STATION +/– (STATION
+/–) para seleccionar la
presintonía que desea.
Nota
•Si el receptor se deja
desconectado de la toma de
CA durante un periodo
prolongado, se perderán las
estaciones memorizadas y
tendrán que volver a
programarse.
Cómo cambiar el
intervalo de la
frecuencia
(únicamente para modelos con
múltiples voltajes)
Si no puede sintonizar
adecuadamente emisoras, es
posible que el intervalo de la
frecuencia no sea el adecuado
para su país/región. A
continuación le indicamos cómo
modificar el ajuste:
1 Cambie el sistema a modo de
espera.
2 En el panel frontal, pulse
STANDBY/ON, mientras
mantiene pulsado el botón
BAND.
El intervalo de sintonización del
canal cambiará entre FM 100
kHz/AM 10 kHz y FM 50 kHz/AM
9 kHz cada vez que realice este
paso.
Listening to station
presets
See pages 74–75 if you haven’t
already stored some station
presets.
1 Press TUN (remote) or use
the MULTI JOG/INPUT SELECTOR
dial on the front panel to select
the tuner.
2 Press CLASS to select the
class in which the station is
stored.
Press repeatedly to cycle through
classes A, B and C.
3 Press ST +/– (STATION +/–) to
select the station preset you
want.
•If the receiver is left discon-
nected from the AC power
outlet for an extended period,
the station memories will be
lost and will have to be
reprogrammed.
Changing the fre-
quency step
(multi-voltage model only)
If you find that you can’t tune into
stations successfully, the fre-
quency step may not be suitable
for your country/region. Here’s
how to switch the setting:
1 Switch the system into
standby.
2 On the front panel, press
STANDBY/ON while you press
and hold the BAND button.
The channel tuning step alternates
between FM 100 kHz/AM 10 kHz,
and FM 50 kHz/AM 9 kHz each
time you do this.
收聽預設電臺
如果還沒有保存預設電臺,則請參
見第74-75頁。
1按TUN(遙控器)或使用前面
板上的MULTI JOG/INPUT
SELECTOR旋鈕選擇調諧器。
2按CLASS選擇電臺所保存的類
別。
反覆按該鈕,在A、B和C類別間循
環。
3按ST +/–(STATION +/–)選擇
所需的預設電臺。
•如接收機切斷交流電源的時間
過長,電臺記憶將會丟失,需
要重新設置。
改變頻率間隔
(僅適於多電壓模式)
如發現不能順利調入電臺,可能是
頻率間隔不適合您所在國家/地
區。下面是如何切換間隔。
1將系統切換至待機狀態。
2在前面板上按住BAND按鈕的
同時按STANDBY/ON。
頻道調諧間隔在FM 100 kHz/AM
10 kHz和FM 50 kHz /AM 9 kHz之
間變換。
08
77
En/Sp/ChH
English Español
Making Record-
ings
Making an audio or
a video recording
You can make an audio or a video
recording from the built-in tuner, or
from an audio or video source
connected to the receiver (such as
a CD player or TV).
Keep in mind you can’t make a
digital recording from an analog
source or vice-versa, so make sure
the components you are recording
to/from are hooked up in the same
way (see pages 20–25 for more on
connections).
If you want to record a video
source, you also need use the
same type of connection for the
source as for the recorder. For
example, you can’t record a
component hooked up to S-video
jacks with a recorder hooked up to
the component video outputs (see
page 18 for more on video connec-
tions).
The receiver's volume, balance,
tone (bass, treble, loudness),
and surround effects have no
effect on the recorded signal.
1 Select the source you want
to record.
Use the MULTI CONTROL buttons
on the remote (or MULTI JOG/
INPUT SELECTOR dial on the front
panel).
2 Select the input signal (if
necessary).
Press SIGNAL SEL (SIGNAL
SELECT) to select the input signal
corresponding to the source
component (see page 52 for more
on this).
3 Prepare the source you want
to record.
Tune to the radio station, load the
CD, video, DVD etc.
Cómo realizar
grabaciones
Cómo realizar una
grabación de audio
o de vídeo
Puede realizar una grabación de
audio o de vídeo desde el
sintonizador incorporado o desde
una fuente de audio o vídeo
conectada a receptor (tales como
un reproductor de CDs o un
televisor).
Tenga presente que no se puede
realizar una grabación digital
desde una fuente analógica o
viceversa, así que asegúrese de
que los componentes a/desde los
que está grabando están
conectados de la misma manera
(véase las páginas 20–25 para más
información sobre conexiones),
Si desea grabar una fuente de
vídeo, necesitará también utilizar
el mismo tipo de conexión para la
fuente como para la grabadora.
Por ejemplo, no se puede grabar
un componente conectado a
tomas S-Video con una grabadora
conectada a las salidas de vídeo
del componente (véase las
páginas 18 para más información
sobre conexiones de vídeo).
Nota
El volumen, equilibrio, tono
(graves, agudos, sonoridad) y
los efectos surround no
influyen en la señal grabada.
1 Seleccione la fuente que
desea grabar.
Utilice los botones MULTI CON-
TROL del mando a distancia (o el
selector MULTI JOG/INPUT
SELECTOR del panel frontal).
2 Seleccione la señal de
entrada (en caso necesario).
Pulse SIGNAL SEL (SIGNAL
SELECT) para seleccionar la señal
de entrada correspondiente al
componente fuente (véase página
52 para más información).
3 Prepare la fuente que desea
grabar.
Sintonice la emisora de radio,
cargue el CD, vídeo, DVD etc.
進行錄製
進行音頻或視頻錄製
您可以對內置調諧器或者與接收機
相連接的音頻或視頻源(如CD播放
機或電視機)進行音頻或視頻錄
製。
請記住,您不能對模擬音源進行數
碼錄製,反之亦然。所以請確認錄
製或被錄製的設備以同樣的方法連
接(更多有關連接的詳情,請參見
第20-25頁)。
如果要錄製視頻源,錄製設備和播
放源的連接類型也需相同。例如,
您不能以連接至分量視頻輸出的錄
製設備來錄製連接到S視頻插口的
設備(有關視頻連接更多內容見第
18頁)。
接收機的音量、均衡、音調(低
音、高音、響度)和環繞聲音
效對錄製信號無影響。
1選擇需錄製的播放源。
使用遙控器上的MULTI CONTROL
按鈕(或前面板上的MULTI JOG/
INPUT SELECTOR旋鈕)。
2選擇輸入信號(如有必要)。
按SINGAL SEL(SINGAL
SELCET)按鈕選擇與播放設備相
應的輸入信號(更多詳情請參見第
52頁)。
3準備需錄製的播放源。
調諧至電臺,裝入CD、VCD、DVD
等。

08
78
En/Sp/ChH
4 Prepare the recorder.
Insert a blank tape, MD, video etc.
into the recording device and set
the recording levels.
Refer to the instructions that came
with the recorder if you are unsure
how to do this. Most video record-
ers set the audio recording level
automatically—check the compo-
nent’s instruction manual if you’re
unsure.
5 Start recording, then start
playback of the source compo-
nent.
Monitoring your
recording
You can listen to (monitor) the
recording as it's being made using
the MONITOR button on the front
panel (a cassette deck would have
to have a record monitor function).
•Press the MONITOR button
to switch between the recorded
signal and the original source
signal.
4 Prepare la grabadora.
Inserte una cinta, vídeo, MD etc.
virgen en el dispositivo de
grabación y ajuste los niveles de
grabación.
Consulte las instrucciones que
acompañan la grabadora si no
está seguro de cómo hacerlo. La
mayoría de las grabadoras de
vídeo ajustan el nivel de grabación
automáticamente. Compruebe el
manual de instrucciones del
componente si no está seguro.
5 Comience la grabación y, a
continua-ción, comience la
reproducción del componente
fuente.
Monitorización de la
grabación
Puede escuchar (supervisar) la
grabación según se va haciendo
empleando el botón MONITOR del
panel frontal (una platina de
casetes debería contar con una
función de supervisión de
grabación).
•Pulse el botón MONITOR
para cambiar entre la señal
grabada y la señal de la fuente
original.
4準備錄製設備。
插入空白磁帶、MD、碟片等,設置
錄製音壓。
如有疑問,請參閱錄製設備的使用
說明書。大多數錄影機會自動設置
音頻錄製音壓。如不確定,請查閱
設備的使用說明書。
5開始錄製,然後開始播放源設
備。
監測錄製
可使用前面板上的MONITOR按鈕
監聽(監測)錄製過程。(卡式磁
帶機應具備錄製監測功能)。
•按MONITOR按鈕在所錄信號和
源信號之間進行切換。
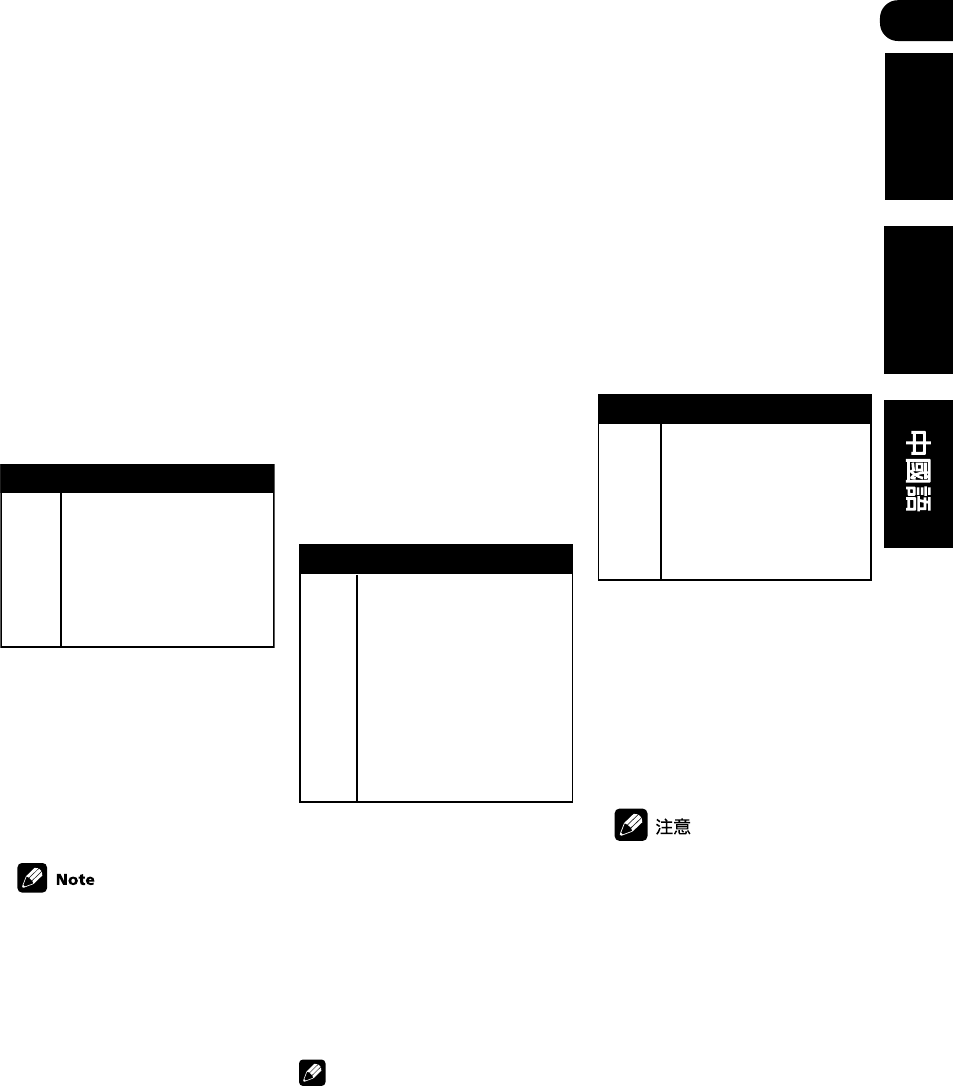
09
79
En/Sp/ChH
English Español
Controlling the
rest of your system
Setting the remote
to control other
components
There are several ways to set your
remote to control the other
components in your system. The
easiest way to do this is to assign
the component’s manufacturer
preset code (listed on pages 94–
100) to one of the MULTI CON-
TROL buttons on the remote
control.
The buttons can be set to control
the following components:
Controllable Components
DVD or LD player
TV or Satellite tuner
VCR or Digital Video Recorder
CD player
CD Recorder, Tape deck
or MD player
TV or Cable TV tuner
FM/AM tuner
Button
DVD:
TV:
VCR:
CD:
CD-R:
TVC:
TUN:
You can do this directly, or by
searching through different preset
codes until you find the right one.
If you can’t find a preset code that
matches the component you want
to control, you can still teach the
remote individual commands from
another remote control (page 83).
You can cancel or exit any of the
steps by pressing and holding
MUTE for three seconds.
Cómo controlar el resto
del sistema
Cómo ajustar el
mando a distancia
para controlar otros
componentes
Hay varias maneras de ajustar el
mando a distancia para controlar
los otros componentes del
sistema. La manera más sencilla
de hacerlo es asignar el código
predefinido del fabricante del
componente (véase la lista en las
páginas 94−100) a uno de los
botones MULTI CONTROL del
mando a distancia.
Los botones pueden ajustarse para
controlar los siguientes
componentes:
Componentes controlables
Reproductor de DVDs o de LDs
Sintonizador del televisor o del
sátélite
Grabadora de vídeo digital o
de VCR
Reproductor de CDs
Grabadora de CDs, platina de
casete o reproductor de MDs
or MD player
Sintonizador del televisor o la
TV por cable
Sintonizador de FM/AM
Botón
DVD:
TV:
VCR:
CD:
CD-R:
TVC:
TUN:
Puede hacerlo directamente, o
buscando entre los diferentes
códigos predefinidos hasta que
encuentre el correcto. Si no puede
encontrar un código predefinido
que corresponda con el
componente que desea controlar,
puede al mando a distancia
comandos individuales de otro
mando (página 83).
Nota
Puede cancelar o salir de
cualquiera de los pasos
manteniendo pulsado durante tres
segundos MUTE.
設定遙控器以控制其他
設備
有幾種方法可設定遙控器以控制系
統中的其他設備。其中最容易的方
法就是將設備的出廠預設代碼(參
見第94-100頁列表)分配給遙控
器上的MULTI CONTROL按鈕。
這些按鈕經設置可控制下列設備︰
DVD:
TV:
VCR:
CD:
CD-R:
TVC:
TUN:
您可以直接進行設置,也可通過搜
索不同預設代碼找到正確的代碼。
如果找不到與所要控制的設備相匹
配的預設代碼,您還可以用其他遙
控器將單個指令告知本遙控器(第
83頁)。
按住MUTE三秒鐘即可取消或退
出這些步驟中的任何一步。
控制系統中的其他設
備
按鈕 可控設備
DVD或LD播放機
TV或衛星調諧器
VCR或數碼錄影機
CD播放機
CD播放機,CD刻錄機
磁帶卡座或MD播放機
TV或有線電視調諧器
FM/AM調諧器
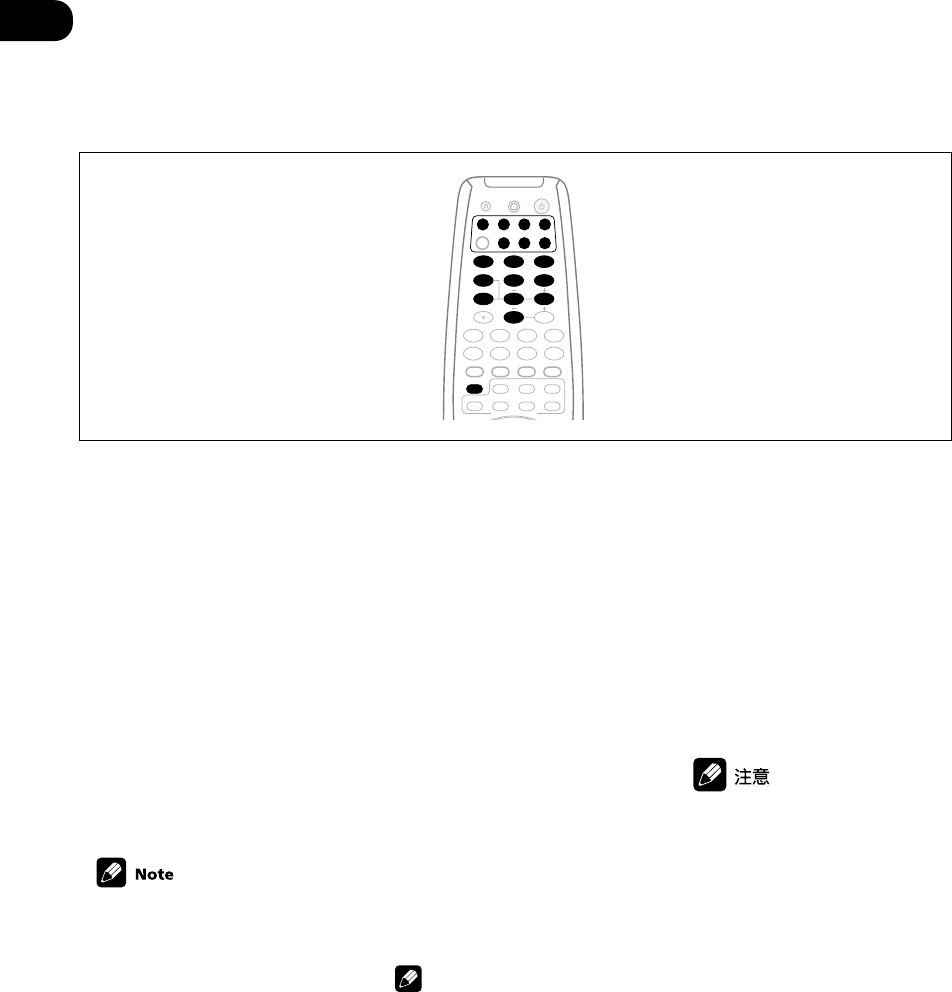
09
80
En/Sp/ChH
Selecting preset
codes
directly
1 Press and hold REMOTE
SETUP for three seconds.
The LED lights steadily for two
seconds.
2 Press the MULTI CONTROL
button for the component you
want to control.
3 Use the number buttons to
enter the 4 digit preset code
(see pages 94–100)
The LED blinks for half a second
after you input each digit and
shows a long, two second blink
once you have entered a valid
code. If the LED blinks three times
it means an invalid code has been
input or an error has occurred.
•If you assign a preset code for
the TUNER button, you won’t
be able to control the built-in
tuner of this receiver using the
remote. Reset the remote to
the built-in tuner by entering
the preset code 7008.
4 Repeat steps 1 through 3 for
the other components you want
to control.
ENTER
MPX/RETURNDTV INFO
DTV MENU
D.ACCESS T.EDIT/GUIDE
CLASS
FL DIMMER
BAND
TOP MENU AUDIO
SUB TITLE
REMOTE SETUP
RECEIVER CONTROL
STANDARD ADV.SURR.
STEREO
ANGLE
1¡
4¢
7
8
3
LEVEL
DVD VCR CD-RTV
RCV TUN TVC
CD
TEST TONE
CH SELECT
INPUT ATT
INPUT SEL.
MUTE
MIDNIGHT/
LOUDNESS
SIGNAL SEL
MULTI CONTROL
EFFECT
+10
RECEIVER
SOURCE
123
456
789
0
DTV/DISPLAY
DISC
Cómo seleccionar
directa-mente
códigos predefinidos
1 REMOTE SETUP durante tres
segundos.
El LED se iluminará
continuamente durante dos
segundos.
2 Pulse el botón MULTI CON-
TROL para el componente que
desea controlar.
3 Utilice los botones
numerados para introducir el
código predefinido de 4 dígitos
(véaselas páginas 94–100).
El LED parpadeará durante medio
segundo después de introducir
cada dígito y se muestra
parpadeando durante dos
segundos cuando se ha
introducido un código válido. Si el
LED parpadea tres veces indica
que se ha introducido un código
incorrecto o se ha producido un
error.
Nota
•Si asigna un código
predefinido para el botón TUN,
no podrá controlar el
sintonizador incorporado de
este receptor utilizando el
mando a distancia Vuelva
ajustar el mando a distancia a
sintonizador incorporado
introduciendo el código
predefinido 7008.
4 Repita los pasos 1 al 3 para
los otros componentes que
desea controlar.
1按住REMOTE SETUP三秒。
LED將持續點亮兩秒鐘。
2按與您要控制的設備相應的
MULTI CONTROL按鈕。
3用數字按鈕輸入四位預設代碼
(參見第94-100頁)。
在輸入每個數字之後,LED將閃爍
半秒鐘,並當輸入有效代碼後閃爍
兩秒鐘,如LED閃爍三次則表示所
輸代碼無效或出錯。
•如果為TUNER按鈕分配了預設
代碼,則不能用遙控器控制接
收機的內置式調諧器。輸入預
設代碼7008重新設置遙控器,
以控制內置式調諧器。
4重複第1-3步,設置您要控制
的其他設備。
直接選擇預設代碼
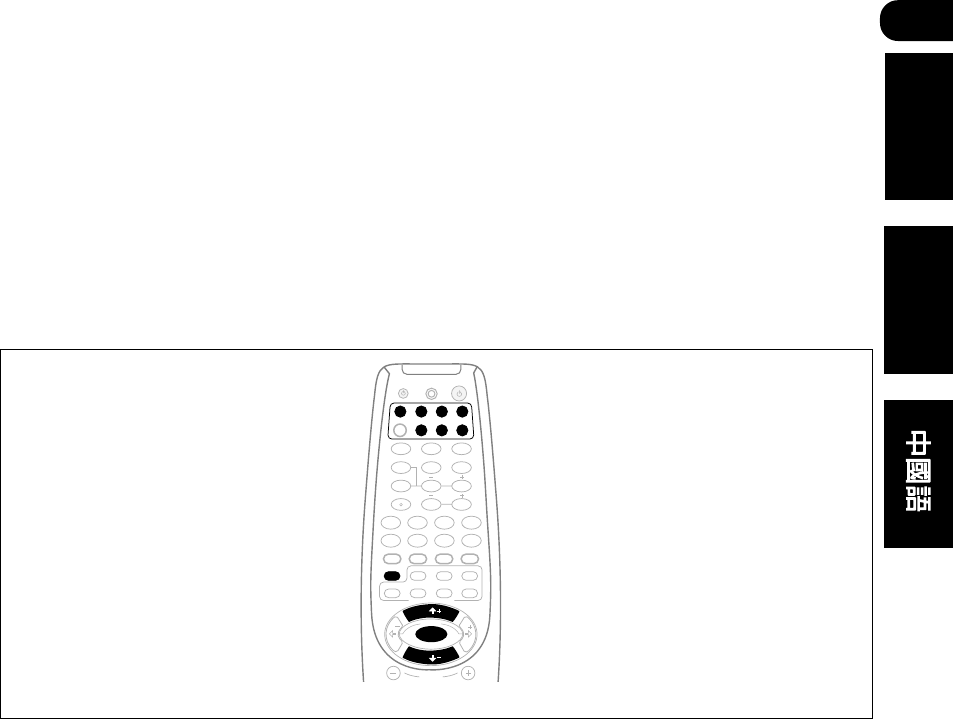
09
81
En/Sp/ChH
English Español
Searching for preset
codes
Another way of entering preset
codes is to use the search feature.
The remote transmits batches of
10 codes; when you see the
component you want to control
respond (by turning on or off), you
just scan through the last 10 codes
until you find the right one.
1 Switch on the component
you want to control.
If the component is some kind of
player (CD player, VCR, etc.), start
it playing.
2 Press and hold REMOTE
SETUP for three seconds.
The LED lights steadily for two
seconds.
3 Press the MULTI CONTROL
button for the component you
want to control.
4 Press and hold REMOTE
SETUP for three seconds.
A batch of 10 codes is transmitted
and the LED blinks during trans-
mission. If the component re-
sponds, by stopping or switching
off, go to the next step, otherwise
repeat this step.
CHANNEL
ENTER
MPX/RETURNDTV INFO
DTV MENU
D.ACCESS T.EDIT/GUIDE
ST T
P
S
E
U
ST
CLASS
FL DIMMER
BAND
TOP MENU AUDIO
SUB TITLE
REMOTE SETUP
RECEIVER CONTROL
STANDARD ADV.SURR.
STEREO
ANGLE
1¡
4¢
7
8
3
LEVEL
DVD VCR CD-RTV
RCV TUN TVC
CD
TEST TONE
CH SELECT
INPUT ATT
INPUT SEL.
MUTE
MIDNIGHT/
LOUDNESS
SIGNAL SEL
MULTI CONTROL
EFFECT
+10
RECEIVER
SOURCE
123
456
789
0
TUNE
TUNE
ENTER
DTV/DISPLAY
DISC
Búsqueda de
códigos predefinidos
Otra manera de introducir códigos
predefinidos es utilizar la función
de búsqueda. El mando a distancia
transmite lotes de 10 códigos,
cuando vea que el componente
que quiere controlar responde
(encendiéndose y apagándose),
sólo tendrá que examinar esos
últimos 10 códigos hasta ue
encuentre el correcto.
1 Encienda el componente que
desea nombrar.
Si el componente es algún tipo de
reproductor (reproductor de CDs,
VCR, etc.), haga que comience a
reproducir.
2 Mantenga pulsado REMOTE
SETUP durante tres segundos.
El LED se iluminará
continuamente durante dos
segundos.
3 Pulse el botón MULTI CON-
TROL para el componente que
desea controlar.
4 Mantenga pulsado REMOTE
SETUP durante tres segundos
Se transmitirá un lote de 10
códigos y el LED parpadeará
durante la transmisión. Si el
componente responde
deteniéndose o apagándose, vaya
al paso siguiente, de lo contrario,
repita este paso.
搜索預設代碼
另一種輸入預設代碼的方法就是使
用搜索功能。
遙控器將傳送10個一批的代碼;當
您看到要控制的設備有所反應時
(通過打開或關閉操作),則在最
後10個代碼中進行掃描,直到找到
正確的代碼。
1打開您要控制的設備。
如果該設備是播放機類型(CD播放
機、VCR,等),則讓其開始播
放。
2按住REMOTE CONTROL三秒
鐘。
LED持續點亮兩秒鐘。
3按要控制設備的MULTI
CONTROL按鈕。
4按住REMOTE SETUP三秒鐘。
一批10個代碼被傳送,其間,LED
閃爍。如果設備以停止或關閉回
應,則進行下一步;否則,重複這
一步。

09
82
En/Sp/ChH
5 Switch the component back
on or restart playback.
6 Use ’ and ‘ to scan through
the last 10 codes transmitted to
identify the correct code.
Stop when you see the component
stop or switch off.
You can also verify you have the
correct code by adjusting the
volume, pressing 3, 7, etc.
7 Press and hold ENTER for
three seconds to save the preset
code.
5 Encienda de nuevo el
componente o reanude la
reproducción.
6 Utilice ’ y ‘ para examinar
los últimos 10 códigos
transmitidos para identificar el
código correcto.
Deténgase cuando vea el
componente detenerse o
apagarse.
También puede verificar que ha
encontrado el código correcto
ajustando el volumen, pulsando
3, 7, etc.
7 Mantenga pulsado ENTER
durante tres segundos para
guardar el código predefinido.
5切回設備或重新開始播放。
6用’和‘按鈕掃描最後10個代
碼,以識別正確的代碼。
發現設備停止或關閉,則停止掃
描。
按3,7等調整音量也可確認正確
的代碼。
7按住ENTER 三秒鐘,以保存預
設代碼。
09
83
En/Sp/ChH
English Español
Programming sig-
nals from other re-
mote controls
(VSX-D811S only)
If the preset code for your compo-
nent is not available, or the
available preset codes do not
operate correctly, you can program
signals from the remote control of
another component. This can also
be used to program additional
operations (buttons not covered in
the presets) after assigning a
preset code.
1 Press REMOTE SETUP and
hold for three seconds.
The LED lights steadily for two
seconds.
2 Press the MULTI CONTROL
button for the component you
want to control.
3 Prepare the remote to learn
the remote control signal from
the component.
Press and hold the RECEIVER
button for two seconds.
The LED lights steadily to indicate
the remote is ready accept a
signal.
To exit or cancel press and hold
the REMOTE SETUP key for
three seconds.
4 Point the two remote
controls towards each other
about 2-5 cm apart then press
the button that will be doing
the learning on this receiver’s
remote control (for example 3,
7, etc.).
The LED flashes rapidly.
2 - 5 cm
Programación de
señales desde otros
mandos a distancia
(sólo VSX-D811S)
Si no dispone de códigos
predefinidos para su componente,
o si los códigos predefinidos
disponibles no funcionan
correctamente, puede programar
señales desde el mando a
distancia de otro componente.
Esta operación también podrá
utilizarse después de asignar un
código predefinido para programar
operaciones (botones no cubiertos
por los códigos predefinidos).
1 Mantenga pulsado REMOTE
SETUP durante tres segundos.
El LED se iluminará
continuamente durante dos
segundos.
2 Pulse el botón MULTI CON-
TROL para el componente que
desea controlar.
3 Prepare el mando a distancia
para que aprenda la señal del
mando a distancia desde el
componente.
Mantenga pulsado el botón
RECEIVER durante dos
segundos.
El LED se iluminará
continuamente para indicar que el
mando a distancia está preparado
para aceptar una señal.
Nota
Para salir o cancelar mantenga
pulsada la tecla REMOTE SETUP
durante tres segundos
4 Apunte los dos mandos a
distancia directamente entre sí a
unos 2-5 cm de distancia y, a
continuación, pulse el botón
que hay que aprender en el
mando a distancia de este
receptor (por ejemplo 3, 7,
etc.).
El LED parpadeará rápidamente.
2 - 5 cm
使用其他遙控器編製信
號
(僅適於VSX-D811S)
如設備的預設代碼並不存在,或者
現有的預設代碼並不能正確操作,
可以使用其他設備的遙控器來編製
信號。
這也可用於在分配預設代碼後編製
附加操作(使用預設中沒有被設置
的按鈕)。
1按住REMOTE SETUP三秒鐘。
LED持續點亮兩秒鐘。
2按需控制設備的MULTI
CONTROL按鈕。
3準備遙控器以學習其他設備的
遙控信號。
按住RECEIVER 按鈕兩秒鐘。
LED持續點亮,表明遙控器以準備
好接收信號。
要退出或取消操作,按住
REMOTE SETUP鍵三秒鐘。
4將兩個遙控器互相對準並距離2
-5厘米,然後按本接收機遙控器
上要學習的按鈕(例如3,7
等)。
LED快速閃爍。
2 - 5 cm
09
84
En/Sp/ChH
5 Press the corresponding
button on the other remote
control that is sending (teach-
ing) the signal to this receiver’s
remote control (for example 3,
7, etc.).
If the operation has been learned
successfully, the LED on this
receiver’s remote will go out and
then light steadily.
If for some reason the operation
hasn’t been learned the LED will
blink for three seconds and then
light steadily. If this happens, keep
pressing the (teaching) button as
you vary the distance between the
two remotes, until you see the the
LED light steadily.
To program additional operations
for the current component repeat
steps 4 and 5.
To program operations for another
component exit and repeat steps 1
through 5.
6 Press and hold the REMOTE
SETUP button for three seconds
to store the operation(s).
•Some commands from other
remote controls cannot be
learned, but in most cases the
remotes just need to be moved
closer together or farther
apart.
•Certain buttons represent
operations that cannot be
learned from other remote
controls. These include:
RECEIVER , REMOTE SETUP
and the MULTI
CONTROL, RECEIVER CON-
TROL and MASTER VOLUME
buttons.
•TV CONTROL buttons (TV , TV
VOL +/-, and TV INPUT) can
only be learned after selecting
TV or TVC.
5 Pulse el botón
correspondiente del otro mando
a distancia que está enviando
(enseñando) la señal al mando a
distancia del receptor (por
ejemplo 3, 7, etc.).
Si la operación se ha aprendido
con éxito, el LED del mando a
distancia del receptor se apagará y
posteriormente volverá a
iluminarse con una luz continua.
Si la operación no se ha aprendido
por alguna razón el LED
parpadeará durante tres segundos
y a continuación se iluminará
continuamente. En caso de que
esto suceda, pulse repetidamente
el botón (de aprendizaje), variando
las distancias entre los mandos
hasta que vea el LED iluminarse
continuamente.
Para programar operaciones
adicionales para el componente
que esté manejando en esos
momentos, repita los pasos 4 y 5.
Para programar operaciones para
otro componente salga y repita los
pasos 1 al 5.
6 Mantenga pulsado el botón
REMOTE SETUP durante tres
segundos para guardar la(s)
operacion(es).
Nota
•Algunos comandos de otros
mandos a distancia no
pueden aprenderse, pero en la
mayoría de los casos los
mandos sólo necesitan
acercarse o alejarse un poco.
•Ciertos botones representan
operaciones que no pueden
aprenderse desde otros
mandos a distancia. Estos
incluyen: RECEIVER ,
REMOTE SETUP y MULTI
CONTROL, y los botones
RECEIVER CONTROL y
MASTER VOLUME.
•Los botonesTV CONTROL (TV,
TV
VOL +/–, y TV INPUT) sólo
pueden aprenderse después
de seleccionar TV y TVC.
5按另一遙控器上相應的按鈕,
將信號傳送至本接收機的遙控器
(例如3,7等)。
如果操作成功,本接收機遙控器上
的LED會熄滅然後持續點亮。
如果操作不成功,LED將閃爍三秒
鐘,然後持續點亮。此時,請持續
按(傳授端)按鈕並一邊調整兩個
遙控器之間的距離,直到LED持續
點亮。
要編製當前設備的附加操作,請重
複第4步和第5步。
要編製其他設備的操作,則退出並
重複第1-5步。
6按住REMOTE SETUP按鈕三秒
鐘,以保存操作。
•可能無法學習其他遙控器的某
些指令,但大多數情況下,祇
需調整兩個遙控器之間的距離
即可解決問題。
•某些按鈕的操作無法從其他遙
控器上學到,其中包括︰
RECEIVER ,REMOTE
SETUP,MULTI CONTROL,
RECEIVER CONTROL和
MASTER VOLUME按鈕。
•TV CONTROL按鈕(TV,TV
VOL +/-和TV INPUT)祇能在
選擇TV或TVC之後才可以進行
學習。
09
85
En/Sp/ChH
English Español
Erasing one of the
remote control but-
ton settings
(VSX-D811S only)
This erases one of the buttons you
have programmed and restores the
button to the factory default.
1 Press REMOTE SETUP and
hold for three seconds.
The LED lights steadily for two
seconds.
2 Press the MULTI CONTROL
button relating to the button
setting to be erased.
3 Prepare the remote to erase
the button setting.
Press the RECEIVER button
twice quickly.
The LED blinks to indicate the
remote is ready to erase the button
setting.
4 Press and hold the button to
be erased for three seconds.
The LED lights steadily for three
seconds and then goes off.
5 Repeat step 4 to erase other
buttons.
6 Press and hold the REMOTE
SETUP button for two seconds
to exit.
Clearing all the
remote control
settings
You can clear all presets and
restore the factory default settings.
1 Press REMOTE SETUP and
hold for three seconds.
The LED lights steadily for two
seconds.
2 Press any MULTI CONTROL
button then use the number
buttons to enter 0123.
The LED lights for two seconds to
indicate that the settings have
been restored to the factory
presets. (If the LED blinks three
times, then you made a mistake
with the code—try re-entering it.)
Cómo eliminar uno
de los ajustes de
botón del mando a
distancia
(sólo VSX-D811S)
Esta acción borra uno de los
botones que ha programado y
restaura la configuración por
defecto de fábrica de ese botón.
1 Mantenga pulsado REMOTE
SETUP durante tres segundos.
El LED se iluminará continuamente
durante dos segundos.
2 Pulse el botón MULTI CON-
TROL relacionado con el valor
ajuste del botón a eliminar.
3 Prepare el mando a distancia
para eliminar el valor de ajuste
del botón.
Pulse rápidamente dos veces el
botón RECEIVER .
El LED parpadeará para indicar
que el mando a distancia está
preparado para eliminar el valor
de ajuste del botón.
4 Mantenga pulsado el botón
que ha de eliminarse durante
tres segundos.
El LED se iluminará
continuamente durante tres
segundos y a continuación, se
apagará.
5 Repita el paso 4 para
eliminar otros botones.
6 Mantenga pulsado el botón
REMOTE SETUP durante dos
segundos para salir.
Borrado de todos los
ajustes del mando a
distancia
Puede borrar todos los códigos
predefinidos y restaurar los valores
de ajuste por defecto de fábrica.
1 Mantenga pulsado REMOTE
SETUP durante tres segundos.
El LED se iluminará
continuamente durante dos
segundos.
刪除遙控按鈕設定
(僅適於VSX-D811S)
可以刪除所設置的按鈕操作,使其
恢復出廠設定。
1按住REMOTE SETUP三秒鐘。
LED持續點亮兩秒鐘。
2按與要刪除按鈕設定相關的
MULTI CONTROL按鈕。
3準備遙控器,刪除按鈕設定。
快速按動RECEIVER 按鈕兩次。
LED閃爍,表明遙控器已準備好刪
除按鈕設定。
4按住按鈕三秒鐘,刪除設定。
LED持續點亮三秒鐘,然後熄滅。
5重複第4步,刪除其他按鈕。
6按住REMOTE SETUP兩秒鐘,
退出操作。
清除所有遙控器設定
您可以清除所有預設定並恢復出廠
默認設定。
1按住REMOTE SETUP三秒鐘。
LED持續點亮兩秒鐘。
2按MULTI CONTROL按鈕,然後
用數字按鈕輸入0123。
LED點亮兩秒鐘,表示設置已恢復
至出廠預設定。(如LED閃三下,
表示代碼有誤,重新輸入即可)。

09
86
En/Sp/ChH
Direct function
•Default setting: ON
You can use the direct function
feature to control one component
using the remote control while at
the same time, using your receiver
to playback a different component.
This could let you, for example, use
the remote control to set up and
listen to a CD on the receiver and
then use the remote control to
rewind a tape in your VCR while
you continue to listen to your CD
player.
When direct function is on, any
component you select (using the
MULTI CONTROL buttons ) will be
selected by both the receiver and
the remote control. When you turn
direct function off, you can operate
the remote control without
affecting the receiver.
1 Press REMOTE SETUP and
hold for three seconds.
The LED lights steadily for two
seconds.
2 Press the MULTI CONTROL
button for the component you
want to control.
3 Use the number buttons to
enter either 9990 (direct on) or
9995 (direct off).
The LED will light for two seconds
to indicate that it’s been correctly
set. (If the LED blinks three times,
then there was a mistake with the
code—repeat steps 1-4.)
You can’t use direct function for
TV INPUT.
2 Pulse cualquier botón MULTI
CONTROL y, a continuación
utilice los botones numerados
para introducir 0123.
El LED se iluminará durante dos
segundos para indicar que se han
restaurado los valores a los
predefinidos de fábrica. (Si el LED
parpadea tres veces, significa que
ha cometido un error con el
código, intente introducirlo de
nuevo).
Función directa
•Valor de ajuste por defecto: ON
Puede utilizar la función directa
para controlar un componente
utilizando el mando a distancia, y
al mismo tiempo utilizar el
receptor para reproducir un
componente diferente. Esto le
podría permitir, por ejemplo,
utilizar el mando a distancia para
preparar y escuchar un CD en el
receptor y, a continuación, utilizar
el mando a distancia para
rebobinar una cinta de VCR
mientras continúa oyendo su
reproductor de CDs.
Cuando la función directa esté
activada cualquier componente
que seleccione (utilizando los
botones MULTI CONTROL) será
seleccionado por el receptor y el
mando a distancia. Cuando
desactive la función directa, podrá
operar el mando a distancia sin
afectar al receptor.
1 Mantenga pulsado REMOTE
SETUP durante tres segundos.
El LED se iluminará
continuamente durante dos
segundos.
2 Pulse el botón MULTI CON-
TROL para el componente que
desea controlar.
3 Utilice los botones
numerados para introducir 9990
(activación de la función directa)
o 9995 (desactivación de la
función directa).
El LED se iluminará durante dos
segundos para indicar que se ha
ajustado correctamente. (Si el LED
parpadea tres veces, significa que
ha cometido un error con el
código, repita los pasos 1
−
4).
直接功能
•默認設定︰ ON
您可用直接功能通過遙控器來控制
一個設備,而同時用接收機播放另
一個設備。例如,可以用遙控器在
接收機上收聽CD,然後用遙控器控
制VCR倒帶,而同時可繼續收聽CD
播放機。
當直接功能打開時,接收機和遙控
器均將選擇您所選的設備(使用
MULTI CONTROL按鈕)。當直接
功能關閉時,您可以操作遙控器而
不影響接收機。
1按住REMOTE SETUP三秒鐘。
LED持續點亮兩秒鐘。
2按需控制設備的MULTI
CONTROL按鈕。
3用數字按鈕輸入或者9990(直
接功能打開),或者9995(直接功
能關閉)。
LED將點亮兩秒鐘,表示設置正
確。(如LED閃三下,則表示代碼
有誤,請重複第1-4步)。
您無法將DIRECT功能用於TV
INPUT。

09
87
En/Sp/ChH
English Español
Confirming preset
codes
Use this feature to check which
preset code is assigned to a MULTI
CONTROL button.
1 Press REMOTE SETUP and
hold for three seconds.
The LED lights steadily for two
seconds.
2 Press the MULTI CONTROL
button of the component for
which you want to check the
preset code.
3 Press and hold ENTER for
two seconds.
Each preset code consists of four
digits, for example 1329. Each digit
will be represented by a series of
blinks on the remote’s LED—3
blinks to represent the digit “3”,
etc. (“0” is represented by 10
blinks.)
Nota
No puede utilizar la función
directa con TV INPUT.
Confirmación de los
códigos predefinidos
Utilice esta función para
comprobar que código predefinido
está asignado al botón MULTI
CONTROL.
1 Mantenga pulsado REMOTE
SETUP durante tres segundos
El LED se iluminará
continuamente durante dos
segundos.
2 Pulse el botón MULTI CON-
TROL del componente que
desea comprobar el código
predefinido.
3 Mantenga pulsado ENTER
durante dos segundos
Cada código predefinido consta de
cuatro dígitos, por ejemplo 1329.
Cada código estará representado
por una serie de parpadeos en el
LED del mando a distancia. 3
parpadeos representan el dígito
“3”, etc. (El “0” esta representado
por 10 parpadeos.).
確認預設代碼
使用本功能以確認分配給MULTI
CONTROL按鈕的預設代碼。
1按住REMOTE SETUP三秒鐘。
LED持續點亮兩秒鐘。
2按您所要確認預設代碼設備的
MULTI CONTROL按鈕。
3按住ENTER兩秒鐘。
每個預設代碼有四位數,如1329。
每個數字由遙控器上LED閃爍的次
數表示︰閃3次則表示數字“3”,
依次類推。(閃10次則表示
“0”)
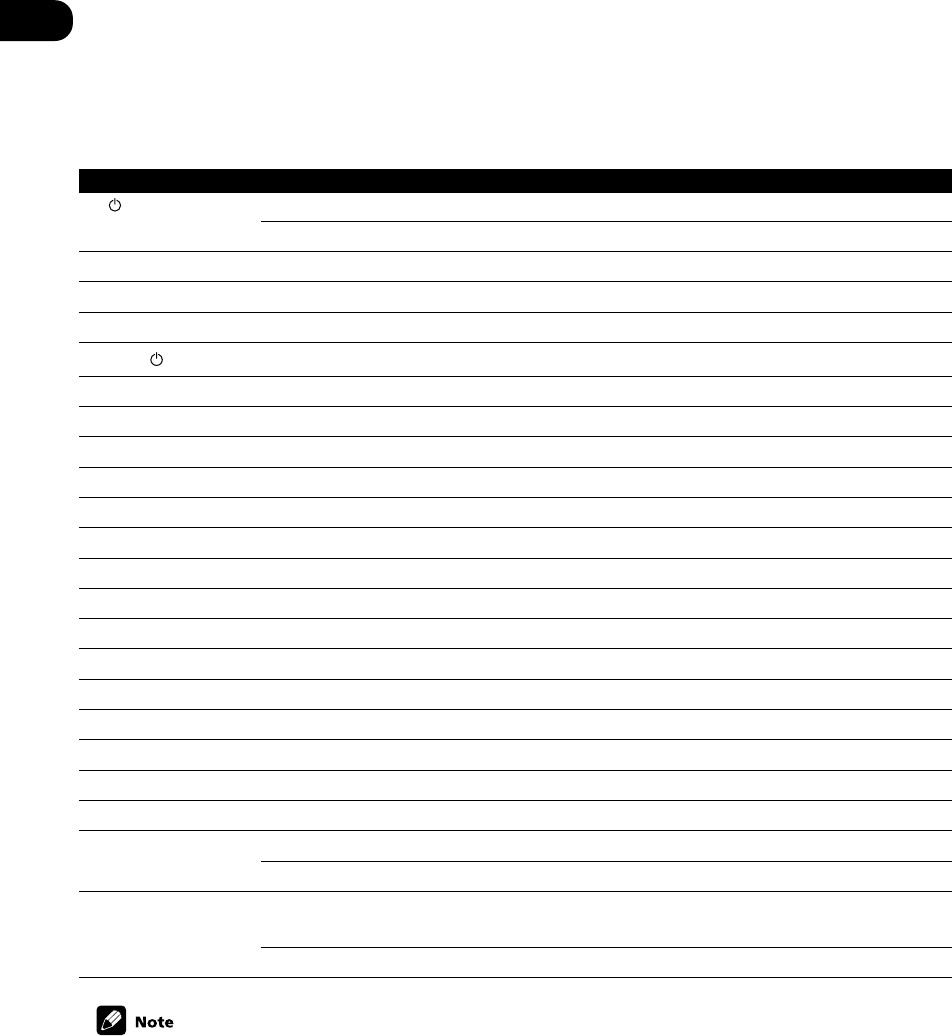
09
88
En
Controls for TVs
This remote control can control components after entering the proper codes or teaching the receiver the
commands (see pages 80–84). Use the MULTI CONTROL buttons to select the
component.
Button (s) Function Components
TV Switches the DTV on or off. DTV
Switches the TV or CATV between standby and on. Cable TV/Satellite TV/TV
TV INPUT Switches the TV input. (Not possible with all models.) TV
CHANNEL +/– Selects channels. Cable TV/Satellite TV/TV/DTV
TV VOL +/– Adjust the TV volume. Cable TV/Satellite TV/TV/DTV
SOURCE Press to switch the component assigned to the TVC button on or off. DTV
4Switches DTV on or off. DTV
¢Press to display the DTV menu. DTV
8Use as the GUIDE button for navigating DTV
¶Press to get information on DTV programs. DTV
TOP MENU Use to choose the BLUE commands on a DTV menu. DTV
AUDIO Use to choose the GREEN commands on a DTV menu. DTV
SUB TITLE Use to choose the RED commands on a DTV menu. DTV
ANGLE Use to choose the YELLOW commands on a DTV menu. DTV
¡Selects between screen formats for widescreen TVs. TV
1Use to clear a TV channel selected using the number buttons. Cable TV/TV
3Use to switch DTV audio tracks DTV
7Use to select closed captioning with DTV. DTV
Number Buttons Use to select a specific TV channel. Cable TV/Satellite TV/TV/DTV
+10 button Use to add a decimal point when selecting a specific TV channel. DTV
ENTER/DISC Use to enter a channel. Cable TV/Satellite TV/TV/DTV
MENU Select different menus from the DTV functions. DTV
Select the menu screen. Cable TV/Satellite TV/TV
}]’‘ & ENTER Select or adjust and navigate items on the menu screen. DTV
ENTER brings up the DTV menus.
Press to select or adjust and navigate items on the menu screen. Cable TV/Satellite TV/TV/DTV
The four TV CONTROL buttons on the remote control are dedicated to control the TV assigned to the TVC
button. Thus if you only have one TV to hook up to this system assign it to the TVC MULTI CONTROL button.
If you have two TVs, assign the main TV to the TVC button.

09
89
En
English
Controls for other components
This remote control can control these components after entering the proper codes or teaching the receiver the
commands (see pages 80–84). Use the MULTI CONTROL buttons to select the
component.
Button (s) Function Components
SOURCE Press to switch the component between standby and on. CD/MD/CD-R/VCR/DVD/LD/
DVR player/Cassette deck
4Press to return to the start of the current track. CD/MD/CD-R/DVD/LD player
Repeated presses skips to the start of previous tracks.
Go back channels (channel –). VCR/DVR
Play the reverse side of the tape on a reversible deck. Cassette deck
¢Press to advance to the start of the next track. CD/MD/CD-R/LD player
Repeated presses skips to the start of following tracks.
Go forward channels (channel +). VCR
Play the forward side of the tape on a reversible deck. Cassette deck
8Pause playback or recording. CD/MD/CD-R/VCR/DVD/LD/
DVR player/Cassette deck
3Start playback. CD/MD/CD-R/VCR/DVD/LD/
DVR player/Cassette deck
¡Hold down for fast forward playback. CD/MD/CD-R/VCR/DVD/LD/
DVR player/Cassette deck
1Hold down for fast reverse playback. CD/MD/CD-R/VCR/DVD/LD/
DVR player/Cassette deck
7Stops playback (on some models, pressing this when the disc is CD/MD/CD-R/VCR/DVD/LD/
already stopped will cause the disc tray to open). DVR player/Cassette deck
¶Starts recording. To prevent accidental recording, this button must VCR/DVR player
be pressed twice to take effect (the second press must be within 10
seconds of the first).
Number buttons Directly access tracks on a program source. CD/MD/CD-R/VCR/LD player
Use the number buttons to navigate the on-screen display. DVD/DVR player
+10 button Selects tracks higher than 10. (For example, press +10 then 3 to CD/MD/CD-R/VCR/LD player
select track 13.)
DISC Chooses the disc. Multiple CD player
Ejects the disc. MD player
Use as the ENTER button. VCR
Changes sides of the LD. LD player
MENU Displays menus concerning the current DVD or DVR you are using. DVD/DVR player
’Pauses the tape. CD-R/Cassette deck
‘Stops the tape. CD-R/Cassette deck
ENTER Starts playback. CD-R/Cassette deck
}/]Fast rewinds/fast forwards the tape. CD-R/Cassette deck
}]’‘ & ENTER Navigates DVD menu/options. DVD/DVR Player
CHANNEL Selects channels. VCR/DVD/DVR Player
+/–Selects tracks. CD/MD/CD-R/Cassette deck
TOP MENU /DISPLAY Displays the disc ‘top’ menu of a DVD. DVD/DVR Player
AUDIO Changes the audio language or channel. DVD/DVR Player
SUBTITLE Displays/changes the subtitles on multilingual DVDs. DVD/DVR Player
ANGLE Switches camera angles on discs with multi-angle scenes. DVD/DVR Player
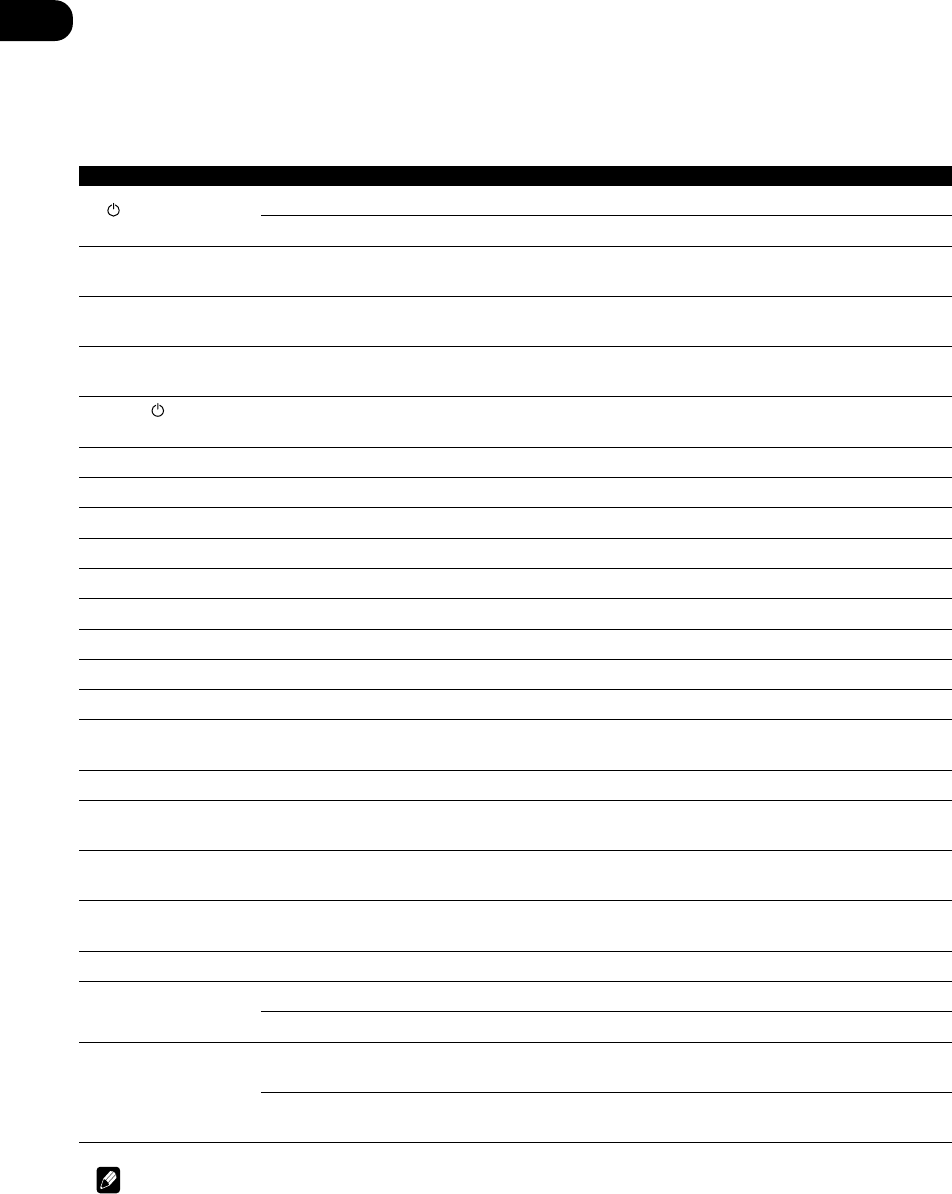
09
90
Sp
Función
Enciende o apaga el DTV.
Cambia el televisor o CATV entre el modo de espera y el encendido.
Cambia la entrada del televisor. (No es posible con todos los
modelos).
Selecciona canales.
Ajusta el volumen del televisor.
Púlselo para encender o apagar el componente asignado al botón
TVC.
Apaga o enciende la DTV.
Púlselo para visualizar el menú DTV.
Utilícelo como el botón GUIDE para navegar.
Púlselo para obtener información en programas DTV.
Utilícelo para elegir los comandos AZULES en un menú DTV.
Utilícelo para elegir los comandos VERDES en un menú DTV.
Utilícelo para elegir los comandos ROJOS en un menú DTV.
Utilícelo para elegir los comandos AMARILLOS en un menú DTV.
Selecciona formatos de pantalla para televisores de pantalla ancha.
Utilícelo para borrar un canal de TV seleccionado utilizando los
botones numerados.
Utilícelo para cambiar pistas de audio DTV.
Utilícelo para seleccionar con la DTV menús emergentes
desactivados.
Utilícelos para seleccionar un canal de TV específico.
Utilícelo para añadir un punto decimal cuando se selecciona un canal
de TV específico.
Utilícelo para introducir un canal.
Selecciona diferentes menús de las funciones de la DTV.
Selecciona la pantalla del menú.
Selecciona o ajusta y navega por los elementos de la pantalla del menú.
ENTER hace que aparezcan los menús de la DTV.
Púlselo para seleccionar o ajustar y navegar por los elementos de la pantalla
del menú.
Botón (es)
TV
TV INPUT
CHANNEL +/–
TV VOL
+/–
SOURCE
4
¢
8
TOP MENU
AUDIO
SUB TITLE
ANGLE
¡
1
3
7
Botones
numerados
+10 botón
ENTER/DISC
MENU
}]’‘ & ENTER
Controles del televisor
Este mando a distancia puede controlar componentes una vez introducidos los códigos adecuados o una vez se ha
enseñado al receptor los comandos (véase las páginas 96−103). Utilice los botones MULTI CONTROL para seleccionar el
componente.
Componentes
DTV
TV por cable/TV vía satélite/TV
TV
TV por cable/TV vía satélite/TV/
DTV
TV por cable/TV vía satélite/TV/
DTV
DTV
DTV
DTV
DTV
DTV
DTV
DTV
DTV
DTV
TV
TV por cable/ TV
DTV
DTV
TV por cable/TV vía satélite/TV/
DTV
DTV
TV por cable/TV vía satélite/TV
DTV
TV por cable/TV vía satélite/TV/
DTV
TV por cable/TV vía satélite/TV/DTV
Nota
Los cuatros botones TV CONTROL del mando a distancia están indicados para controlar el televisor asignado al botón
TVC. Por tanto, si sólo dispone de un televisor al que conectar este sistema asígneselo al botón TVC MULTI CONTROL.
En caso de que disponga de dos televisores, asigne el televisor principal al botón TVC.

09
91
Sp
Español
Controles de otros componentes
Este mando a distancia puede controlar estos componentes una vez introducidos los códigos adecuados o una
vez se ha enseñado al receptor los comandos (véase las páginas 96−103). Utilice los botones MULTI CONTROL
para seleccionar el componente.
Botón (es) Función Componentes
SOURCE Púlselo para cambiar el componente entre el modo de espera y Platina de casetes/
el encendido. reproductor de CDs/MDs/CD-R/
VCR/DVDs/LDs/DVR
4Púlselo para volver al comienzo de la pista actual. Pulsando Reproductor de CDs/MDs/CD-R/
repetidamente se salta al comienzo de pistas anteriores. DVDs/LDs
Retrocede canales (canal –). VCR/DVR
Reproduce la cara inversa de la cinta en un platina reversible. Platina de casetes
¢Púlselo para avanzar hasta el comienzo de la próxima pista. Pulsando Reproductor de CDs/MDs/CD-R/
repetidamente se salta al comienzo de las pistas siguientes. LDs
Avanza canales (canal +). VCR
Reproduce la cara delantera de la cinta en un platina reversible. Platina de casetes
8Hace un pausa en la reproducción o grabación.
Platina de casetes/reproductor de
CDs/MDs/CD-R/VCR/DVDs/LDs/ DVR
3omienza la reproducción.
Platina de casetes/reproductor de
CDs/MDs/CD-R/VCR/DVDs/LDs/ DVR
¡Manténgalo pulsado para avanzar rápidamente.
Platina de casetes/reproductor de CDs/
MDs/CD-R/VCR/DVDs/LDs/ DVR
1Manténgalo pulsado para retroceder rápidamente. P
latina de casetes/reproductor de CDs/
MDs/CD-R/VCR/DVDs/LDs/ DVR
7Detiene la reproducción (en algunos modelos si se pulsa cuando el
Platina de casetes/reproductor de
disco ya se ha detenido hará que la bandeja de discos se abra).
CDs/MDs/CD-R/VCR/DVDs/LDs/ DV
R
¶Comienza la grabación. Para evitar una grabación accidental, debe Reproductor de VCR/DVR
pulsarse el botón dos veces para que tenga efecto (la segunda
pulsación debe ser a menos de 10 segundos de la primera).
Botones Acceden directamente a las pistas en una fuente de programa. Reproductor de CD/MD/CD-R/
numerados VCR/LD
Utilice los botones numerados para navegar por la pantalla. Reproductor de DVD/DVR
Botón +10 Selecciona pistas cuyo número es superior a 10. (Por ejemplo, Reproductor de CD/MD/CD-R/
pulse +10 y, a continuación 3 para seleccionar la pista 13). VCR/LD
DISC Escoge el disco. Reproductor de Múltiple CD
Expulsa el disco. Reproductor de MD
Utilícelo como el botón ENTER. VCR
Cambia las caras del LD. Reproductor de LD
MENU Presenta menús relacionados con el DVD o DVR que está utilizando Reproductor de DVD/DVR
en esos momentos.
’Hace una pausa en la cinta. Platina de Cassette/CD-R
‘Detiene la cinta. Platina de Cassette/CD-R
ENTER Comienza la reproducción. Platina de Cassette/CD-R
}/]Retroceso rápido/Avance rápido de la cinta. Platina de Cassette/CD-R
}]’‘ & ENTER Navega por las opciones/menús del DVD. Reproductor de DVD/DVR
CHANNEL Selecciona canales. Reproductor de VCR/DVD/DVR
+/–Selecciona pistas. Platina de Ctte./CD/MD/CD-R
TOP MENU /DISPLAY Presenta el menú "superior" del disco de un DVD. Reproductor de DVD/DVR
AUDIO Cambia el canal o el idioma de audio. Reproductor de DVD/DVR
SUBTITLE Visualiza/cambia los subtítulos en DVDs multilingües. Reproductor de DVD/DVR
ANGLE Cambia los ángulos de la cámara en discos con escenas con Reproductor de DVD/DVR
múltiples ángulos.

09
92
ChH
電視機的控制
本機遙控器在輸入正確代碼或向本接收機傳授相應指令(參見第80-84頁)後便可控制相應設備。使用MULTI
CONTROL按鈕選擇設備。
按鈕 功能 設備
TV 打開或關閉DTV。 DTV
在待機或打開狀態之間切換TV或CATV。 有限電視/衛星電視/電視
TV INPUT 切換TV輸入(並非所有模式)。 TV
CHANNEL +/–選擇頻道。 有限電視/衛星電視/電視/DTV
TV VOL +/–調整TV音量。 有限電視/衛星電視/電視/DTV
SOURCE 打開或關閉分配給TVC按鈕的設備。 DTV
4打開或關閉DTV。 DTV
¢按該鈕顯示DTV菜單。 DTV
8 用作GUIDE按鈕,用於導向。
DTV
¶按該鈕獲取DTV節目資訊。 DTV
TOP MENU 選擇DTV菜單上的BLUE指令。 DTV
AUDIO 選擇DTV菜單上的GREEN指令。 DTV
SUB TITLE 選擇DTV菜單上的RED指令。 DTV
ANGLE 選擇DTV菜單上的YELLOW指令。 DTV
¡選擇寬屏TV的屏幕格式。 TV
1清除以數字按鈕選擇的TV頻道。 有限電視/電視
3用以切換DTV聲道。 DTV
7用以選擇DTV關閉的字幕。 DTV
Number Buttons 選擇特定TV頻道。 有限電視/衛星電視/電視/DTV
+10 button 用以在選擇特定TV頻道時增加一個十進製點。 DTV
ENTER/DISC 用以輸入頻道。 有限電視/衛星電視/電視/DTV
MENU 選擇DTV功能中的各種菜單。 DTV
選擇菜單畫面。 有限電視/衛星電視/電視
}]’‘ & ENTER 選擇或調整並導向菜單畫面上的項目。 DTV
ENTER調出DTV菜單。
選擇或調整並導向菜單畫面上的項目。 有限電視/衛星電視/電視/DTV
遙控器上的四個TV CONTROL按鈕用來控制分配給TVC按鈕的電視機。因此,如果祇有一臺電視機,則將其
分配給TVC MULTI CONTROL按鈕;如有兩臺電視機,則將主電視機分配給TVC按鈕。
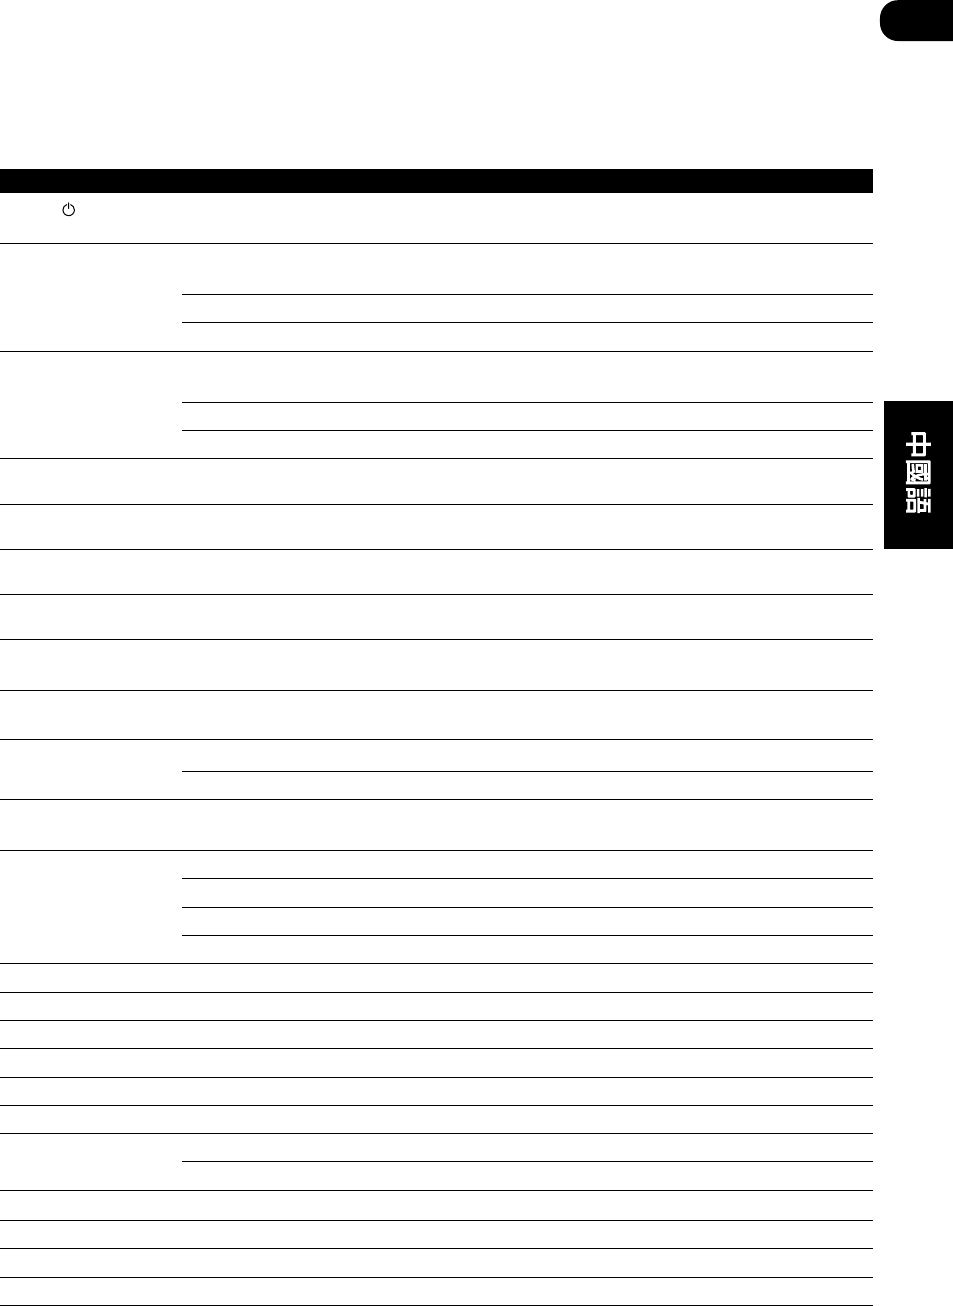
09
93
ChH
其他設備的控制
遙控器在輸入正確代碼或傳授給接收機相應指令(參見第80-84頁)後便可控制設備。使用MULTI CONTROL
按鈕選擇設備。
按鈕 功能 設備
SOURCE 按該鈕在待機和打開狀態之間切換。 CD/MD/CD-R/VCR/DVD/LD/
DVR播放機/卡式磁帶機
4按該鈕返回當前曲目的開始處。 CD/MD/CD-R/DVD/LD播放機
反覆按則跳至上一首曲目。
向後調整頻道(頻道減)。 VCR/DVR
在可倒帶設備上播放磁帶反面。 卡式磁帶機
¢按該鈕前進至下一曲目的開始處。 CD/MD/CD-R/LD播放機
反覆按則跳至下一曲目。
向前調整頻道(頻道加)。 VCR
在可倒帶設備上播放磁帶正面。 卡式磁帶機
8暫停播放或錄製。 CD/MD/CD-R/VCR/DVD/LD/
DVR播放機/卡式磁帶機
3開始播放。 CD/MD/CD-R/VCR/DVD/LD/
DVR播放機/卡式磁帶機
¡按下為快進播放。 CD/MD/CD-R/VCR/DVD/LD/
DVR播放機/卡式磁帶機
1按下為快倒播放。 CD/MD/CD-R/VCR/DVD/LD/
DVR播放機/卡式磁帶機
7停止播放(對於某些型號,在碟片停止 CD/MD/CD-R/VCR/DVD/LD/
時按該鈕則打開碟片托盤)。 DVR播放機/卡式磁帶機
¶開始錄製。為避免誤錄,該鈕 VCR/DVR播放機
必須按兩次才有效(第二次按動必須在10秒鐘內)。
Number buttons 直接獲取程式源上的曲目。 CD/MD/CD-R/VCR/LD播放機
用數字按鈕導航屏幕顯示。 DVD/DVR播放機
+10 button 選擇大於10的曲目(如,按+10再按 CD/MD/CD-R/VCR/LD播放機
3則選擇了第13個曲目)。
DISC 選擇碟片。 多碟CD播放機
退出碟片。 MD播放機
用作ENTER按鈕。 VCR
LD翻面。 LD播放機
MENU 顯示當前DVD或者DVR的菜單。 DVD/DCR播放機
’暫停磁帶。 CD-R/卡式磁帶機
‘停止磁帶。 CD-R/卡式磁帶機
ENTER 開始播放。 CD-R/卡式磁帶機
}/]快倒/快進磁帶。 CD-R/卡式磁帶機
}]’‘ & ENTER 導航DVD菜單/選項。 DVD/DVR播放機
CHANNEL 選擇聲道。 VCR/DVD/DVR播放機
+/–選擇曲目。 CD/MD/CD-R/卡式磁帶機
TOP MENU /DISPLAY 顯示DVD頂層菜單。 DVD/DVR播放機
AUDIO 改變伴音語言或聲道。 DVD/DVR播放機
SUBTITLE 顯示/改變多語言DVD字幕。 DVD/DVR播放機
ANGLE 切換多視角場景碟片的攝影視角。 DVD/DVR播放機

09
94
En/Sp/ChH
Preset Code List
You should have no problem
controlling a component if you find
the manufacturer in this list, but
you can only set these codes for
the button that is assigned to that
component. So, for example, the
TV codes can only be set to the TV
or TVC button.
Please note that there are cases
where only certain functions may
be controllable after assigning the
proper preset code, or the codes for
the manufacturer in the list will not
work for the model that you are
using.
CATHAY 1017
CENTURY 1075
CENTURION 1017
CELEBRITY 1001
CCE 1017
CGE 1034, 1036, 1038, 1086,
1097
CIMLINE 1006
CINERAL 1040, 1110
CITIZEN 1013, 1019, 1026, 1027,
1040
CLARIVOX 1017
CLATRONIC 1036, 1086, 1102
CME 1007, 1015, 1114
CONCERTO 1026
CONDOR 1098, 1102
CONTEC 1006, 1016, 1064, 1078
CONTINENTALEDISON
1069, 1070, 1072
CRAIG 1054
CROSLEY 1025, 1034, 1036, 1038,
1075
CROWN 1006, 1017, 1019, 1036,
1064, 1102, 1106
CRYSTAL 1109
CSELECTRONICS
1078
CTC 1086
CURTISMATHES 1009, 1013, 1019, 1022,
1023, 1025, 1026, 1027,
1041, 1047, 1050, 1057,
1110, 1113, 1129, 1131
CYBERTRON 1080
CXC 1064
DAINICHI 1077, 1080
DANSAI 1017
DAYTRON 1006, 1011
DECCA 1017, 1032
DEGRAAF 1074
DENON 1047
DIXI 1006, 1017
DUALTEC 1079
DUMONT 1010, 1011, 1031
DWIN 1125, 1127
ECE 1017
ELBE 1088
ELECTROBAND 1001
ELIN 1017
ELITE 1080, 1098
ELTA 1006
TV
Televisor
電視機
Manufacturer Code
Fabricante Código
生產商 代碼
PHILIPS 1008, 1017, 1020, 1025,
1104, 1115
SONY 1001, 1007, 1016
PANASONIC 1023, 1054, 1055, 1075,
1076, 1082, 1087, 1121,
1124
TOSHIBA 1015, 1016, 1027, 1031,
1050, 1051, 1085
TELEFUNKEN 1005, 1026, 1034, 1038,
1042, 1046, 1075, 1097
SHARP 1016, 1019, 1041, 1056,
1124
SAMSUNG 1006, 1011, 1013, 1017,
1026, 1027, 1039, 1062,
1079, 1089, 1092, 1102
FERGUSON 1005, 1017, 1033, 1046,
1065, 1084, 1091
MITSUBISHI 1011, 1016, 1041, 1045,
1049, 1062, 1114
GOLDSTAR 1002, 1011, 1013, 1017,
1019, 1026, 1046, 1062,
1079, 1092
BLAUPUNKT 1066, 1068, 1071, 1075,
1115
RADIOLA 1008, 1017
JVC 1016, 1024, 1030, 1053,
1065, 1067, 1103, 1122
DAEWOO 1006, 1011, 1017, 1019,
1028, 1040, 1050, 1104,
1110, 1118, 1119
ORION 1017, 1063, 1083, 1095,
1098, 1099, 1112
SIEMENS 1017, 1052, 1066, 1068,
1071, 1075, 1115
ADMIRAL 1041, 1055, 1075, 1112
ADYSON 1014, 1079
AIKO 1040
AKAI 1013, 1074
AKURA 1080, 1089
ACURA 1006
ALARON 1063, 1078
ALBA 1006, 1016, 1017, 1080,
1103
ALLORGAN 1095
ANAM 1004, 1006, 1029, 1054,
1064, 1087, 1108
ANAMNATIONAL
1054, 1087, 1108
AMBASSADOR 1061
AMERICAACTION
1064
AMPLIVISION 1079
AMPRO 1126
AMSTRAD 1006, 1017, 1103, 1105
ANITECH 1006, 1029, 1036
AOC 1011, 1013
ARCAM 1078, 1079
ASBERG 1036
ASUKA 1080
ATLANTIC 1073
AUDIOSONIC 1017, 1046
AUDIOVOX 1040, 1064, 1110, 1118
AUTOVOX 1036, 1073
BANG&OLUFSEN
1116
BASICLINE 1006, 1080
BAYSONIC 1064
BAUR 1007, 1017, 1114, 1115
BEKO 1102
BELCOR 1011
BELL&HOWELL 1009, 1050
BEON 1017
BINATONE 1079
BLUESKY 1080
BLUESTAR 1090
BONDSTEC 1086
BOOTS 1079
BPL 1090
BSR 1095
BRADFORD 1064
BRANDT 1046, 1069, 1070, 1072
BRITANNIA 1078
BROCKWOOD 1011
BROKSONIC 1083, 1112
BTC 1080
BUSH 1006, 1016, 1017, 1080,
1090, 1095, 1103, 1104
CANDLE 1013, 1026
CARNIVALE 1013
CARREFOUR 1016
CARVER 1025, 1058
CASCADE 1006
Lista de códigos
predefinidos
No deberá tener ningún problema
al controlar un componente si
encuentra el fabricante en la lista,
pero sólo puede ajustar estos
códigos para el botón que está
asignado a ese componente. Por
tanto, por ejemplo, los códigos del
televisor sólo pueden ajustarse al
botón TV o TVC. Tenga presente
que hay casillas donde sólo ciertas
funciones pueden controlarse
después de asignar el código
predefinido adecuado, o los
códigos en la lista para el
fabricante no funcionarán para el
modelo que está utilizando.
TV
TVC
預設代碼列表
如果在列表能找到設備的生產廠
商,則控制該設備應該無問題。但
是您祇能為那些分配給該設備的按
鈕設置代碼。例如,TV代碼祇能設
置給TV或TVC按鈕。
請注意,有時候在分配正確的預設
代碼之後,僅有某些功能可控,或
者列表中的生產廠商代碼對您所使
用的型號並不起作用。

09
95
En/Sp/ChH
English Español
EMERSON 1011, 1018, 1019, 1050,
1061, 1062, 1063, 1064,
1075, 1083, 1090, 1112,
1118, 1119
ENVISION 1013
ERRES 1008, 1017
ETRON 1006, 1120
EXPERT 1073
FIDELITY 1078
FINLANDIA 1074
FINLUX 1017, 1031, 1032, 1044
FISHER 1050, 1074, 1079, 1096,
1102
FLINT 1111
FORMENTI 1017, 1075, 1098
FORTRESS 1041
FRONTECH 1055, 1086, 1089, 1109
FUJITSU 1032, 1063, 1073
FUNAI 1059, 1063, 1064, 1089,
1095, 1096
FUTURETECH 1064
GE 1012, 1022, 1023, 1041,
1062, 1090, 1110, 1129,
1131
GEC 1017, 1020, 1032, 1072,
1079
GELOSO 1006, 1075
GENEXXA 1055, 1080
GIBRALTER 1010, 1011, 1013
GOODMANS 1016, 1017, 1032, 1079,
1103, 1104
GORENJE 1102
GPM 1080
GRAETZ 1055
GRANADA 1017, 1032, 1048, 1074,
1079, 1100
GRADIENTE 1024, 1026, 1058
GRANDIN 1090
GRUNDIG 1031, 1066, 1068, 1072,
1115
GRUNPY 1063, 1064
HALLMARK 1062
HANSEATIC 1017, 1098
HARLEYDAVIDSON 1063
HARVARD 1029, 1064
HARMAN/KARDON 1025
HCM 1006, 1090, 1105
HINARI 1006, 1016, 1017, 1080
HISAWA 1090, 1111
HITACHI 1014, 1016, 1018, 1020,
1021, 1026, 1044, 1046,
1047, 1055, 1069, 1070,
1079, 1081, 1097
HUANYU 1078, 1104
HYPSON 1017, 1089, 1090
ICE 1079, 1089, 1103
ICES 1080
IMPERIAL 1034, 1036, 1038, 1086,
1102, 1106
INDIANA 1017
INFINITY 1025
INGELEN 1055
INNOHIT 1032
INNOVA 1017
INTEQ 1010
INTERBUY 1029
INTERFUNK 1017, 1055, 1086, 1114
INTERVISION 1017, 1029, 1043, 1079,
1089
ISUKAI 1080
ITS 1103
ITT 1055
JBL 1025
JCB 1001
KAISUI 1006, 1078, 1079, 1080,
1090,
KAMP 1078
KAPSCH 1055, 1073
KAWASHO 1078
KEC 1064
KENDO 1017
KNEISSEL 1088
KENWOOD 1011, 1013
KINGSLEY 1078
KONIG 1114
KORPEL 1017
KOYODA 1006
KTV 1013, 1019, 1064
LEYCO 1017, 1032, 1089, 1095
LG 1026
LIESENK&TTER 1017
LLOYTRON 1014
LOEWE 1035, 1114
LOGIK 1009
LUMA 1073
LUXMAN 1026
LXI 1022, 1025, 1050, 1051,
1062
MELECTRONIC 1006, 1017, 1029, 1044,
1046, 1055, 1079, 1091,
1104
MAGNAVOX 1013, 1016, 1025, 1063
MAGNADYNE 1043, 1086
MAGNAFON 1036, 1043, 1075
MAJESTIC 1009
MANESTH 1079, 1089, 1098
MARANTZ 1013, 1017, 1025
MARK 1017
MATSUI 1006, 1015, 1016, 1017,
1032, 1074, 1079, 1095,
1103
MATSUSHITA 1087
MCMICHAEL 1020
MEDIATOR 1008, 1017
MEGATRON 1047, 1062
MEMOREX 1006, 1009, 1026, 1049,
1050, 1062, 1087, 1112
METZ 1075
MGA 1011, 1013, 1049, 1062
MIDLAND 1010, 1019, 1022, 1023
MINERVA 1031, 1115
MINOKA 1105
MINUTZ 1012
MIVAR 1078, 1092, 1093, 1094
MOTION 1036
MOTOROLA 1041
MTC 1011, 1013, 1026, 1027,
1078, 1114
MULTITECH 1006, 1036, 1043, 1064,
1078
NAD 1051, 1057, 1062
NEC 1011, 1013, 1016, 1026,
1058
NECKERMANN 1017, 1066, 1075, 1115
NEI 1017, 1109
NETSAT 1017
NICAMAGIC 1078
NIKKAI 1014, 1015, 1017, 1032,
1078, 1080, 1089
NIKKO 1013, 1040, 1062
NOBLIKO 1036, 1043
NORDMENDE 1046, 1069, 1070, 1075,
1091
NTC 1040
OCEANIC 1055, 1077
ONWA 1064
OPTIMUS 1050, 1057, 1087
OPTONICA 1041, 1056
OSAKI 1014, 1032, 1079, 1080,
1089, 1105
OSO 1080
OSUME 1014, 1032, 1052
OTTO 1007, 1114
OTTO VERSAND 1007, 1016, 1017, 1066,
1075, 1079, 1098, 1115
PALLADIUM 1102, 1106
PANAMA 1079, 1089
PATHE MARCONI
1069, 1070, 1072
PATHE CINEMA 1075, 1078, 1084, 1098
PAUSA 1006
PENNEY 1003, 1011, 1012, 1013,
1019, 1022, 1023, 1026,
1027, 1051, 1062, 1131
PERDIO 1098
PHAPSODY 1078
PHASE 1014
PHILCO 1011, 1013, 1025, 1034,
1036, 1038, 1047, 1075,
1086, 1112
PHONOLA 1008, 1017
PILOT 1011, 1013, 1019
PORTLAND 1011, 1019, 1040
PRISM 1023
PROFEX 1006, 1037
PROLINE 1099
PROSOCAN 1022
PROTECH 1006, 1017, 1043, 1079,
1086, 1089, 1106, 1109
PROTON 1062, 1113
PULSAR 1010, 1011
PYE 1008
QUASAR 1023, 1056, 1087
QUELLE 1007, 1017, 1031, 1034,
1038, 1071, 1075, 1097,
1114, 1115
QUESTA 1016
R-LINE 1017
RANK ARENA 1016
RBM 1031
RCA 1011, 1018, 1022, 1023,
1039, 1041, 1128, 1129,
1130, 1131, 1132
REALISTIC 1011, 1013, 1019, 1026,
1050, 1056, 1062, 1064
REX 1055, 1073, 1088, 1089
REVOX 1017
ROADSTAR 1006, 1080, 1089, 1106
RUNCO 1010, 1013, 1117
SABA 1035, 1046, 1055, 1069,
1070, 1072, 1075, 1091
SACCS 1084
SAISHO 1006, 1089, 1109
SALORA 1055
SAMBERS 1036, 1043, 1075
SAMPO 1013, 1019
SAMSUX 1019
SANDRA 1078
SANSEI 1110
SANSUI 1112
SANYO 1016, 1032, 1048, 1050,
1052, 1074, 1075, 1100
SBR 1008, 1017, 1020
SCHNEIDER 1017, 1080, 1086, 1096,
1103
SCIMITSU 1011
SCOTCH 1062
SCOTT 1011, 1062, 1063, 1064,
1083

09
96
En/Sp/ChH
SEARS 1022, 1025, 1026, 1050,
1051, 1059, 1062, 1063
SEG 1016, 1036, 1079, 1089
SEI 1043, 1075, 1095
SEI-SINUDYNE 1007
SELECO 1055, 1073, 1088
SEMIVOX 1064
SEMP 1051
SENTRA 1015
SHOGUN 1011
SHORAI 1095
SSS 1011, 1064
SIAREM 1043, 1075
SINDYNE 1043, 1075, 1095
SIGNATURE 1009
SILVER 1016
SKY 1017
SKY-WORTH 1017
SOLAVOX 1014, 1055
SONITRON 1074
SONOKO 1006, 1017
SONOLOR 1055, 1074, 1077
SONTEC 1017
SOUNDESIGN 1062, 1063, 1064
SOUNDWAVE 1017, 1106
SQUAREVIEW 1059
STANDARD 1006, 1079, 1080
STARLITE 1064
STERN 1055, 1073, 1088
SUNKAI 1095, 1099
SUPERTECH 1078
SUPREME 1001
SUSUMU 1080
SYLVANIA 1013, 1025
SYMPHONIC 1059
SYSLINE 1017
TANDY 1032, 1041, 1055, 1079,
1080
TASHIKO 1016, 1020, 1079
TEC 1079, 1086
TECHNEMA 1098
TECHNICS 1023, 1087, 1121
TECHNOL ACE 1063
TECHWOOD 1023, 1026
TEKNIKA 1009, 1011, 1019, 1025,
1026, 1027, 1040, 1049,
1063, 1064
TELEAVIA 1072
TELEMEISTER 1098
TELETECH 1006
TELETON 1016, 1073, 1079
TENSAI 1080, 1095, 1098
TEXET 1078, 1080
THOMSON 1046, 1069, 1070, 1072,
1091
THORN 1015, 1017, 1032, 1034,
1038, 1065, 1067, 1114
TMK 1026, 1061, 1062
TOMASHI 1090
TOTEVISION 1019
TRIUMPH 1085
TUTUNG 1017, 1032, 1079
UHER 1073, 1096, 1098
ULTRA 1067
ULTRAVOX 1043
UNIVERSUM 1017, 1044, 1089, 1102
VECTOR RESEARCH 1013
VESTEL 1017
VICTOR 1016, 1024, 1053, 1087
VIDEOSAT 1086
VIDEOTECHNIC 1079
VIDIKRON 1025
VIDTECH 1011, 1016, 1062
VISION 1098
VOXSON 1055
WALTHAM 1079
WATSON 1017, 1098
WATT RADIO 1043
WARDS 1009, 1011, 1012, 1013,
1025, 1026, 1056, 1062,
1063
WEGA 1016
WHITE WESTINGHOUSE 1017,
1078, 1098, 1112,
1118, 1119
YAMAHA 1011, 1013
YOKO 1017, 1079, 1101, 1109
ZANUSSI 1073
ZENITH 1009, 1010, 1040, 1112
PIONEER 1018, 1046, 1055, 1057,
1060, 1091, 1107, 1123,
1124
MD PLAYER
REPRODUCTOR DE MDs
MD
播放機
Manufacturer Code
Fabricante Código
生產商 代碼
SONY 5401
KENWOOD 5402,5407
SHARP 5403
ONKYO 5404
ORION 5406
DENON 5405
PIONEER 5408
LD PLAYER
REPRODUCTOR DE LDs
LD
播放機
Manufacturer Code
Fabricante Código
生產商 代碼
AKAI 5222
BBK 5224
CYRUS 5207
DENON 5202
DISCO VISION 5201
FUNAI 5217
HITACHI 5201
HONG DENG 5213
IDALL 5219
KEBAO 5215
MARANTZ 5203, 5205
MITSUBISHI 5202
NAD 5202
PANASONIC 5210
PHILIPS 5203, 5207, 5209
RADIOLA 5207
ROWA 5212
SALORA 5203
SEGA 5201
SHARP 5221
SHINCO 5211
SMC 5220
SONY 5204, 5206, 5216, 5218
SUPER 5215
TELEFUNKEN 5202
TOSHIBA 5223
PIONEER 5201, 5202, 5208 5214
CD PLAYER
REPRODUCTOR DE CDs
CD
播放機
Manufacturer Code
Fabricante Código
生產商 代碼
AIWA 5016, 5021
AKAI 5014, 5020, 5032
ANAM 5041
ARCAM 5021
AUDIOLAB 5021
AUDIOMECA 5021
AUDIO TON 5021
BESTAR 5022
BURMESTER 5045
CALIFORNIA AUDIO LABS 5004
CARVER 5021, 5025, 5046
CONDOR 5018, 5022
CURTIS MATHES 5004
CYRUS 5021
DENON 5002, 5006, 5040, 5060
DKK 5001
DUAL 5031
DYNAMIC BASS 5025
EMERSON 5038
EROICA 5053, 5054
FANTASIA 5051
FISHER 5024, 5025
GARRARD 5044, 5045
GENEXXA 5005, 5038
GOLDSTAR 5043, 5051
GRUNDIG 5021
HARMAN/KARDON 5021, 5023
HITACHI 5005
INKEL 5015, 5026, 5046
JVC 5011
KENWOOD 5003, 5008, 5029, 5056,
5057, 5062
KRELL 5021
LINN 5021
LUXMAN 5036
LXI 5038
MAGNAVOX 5021, 5038
MARANTZ 5004, 5009, 5017, 5021,
5026
MATSUI 5021
MCS 5004
MEMOREX 5022
MERIDIAN 5021
MICROMEGA 5021
MISSION 5021
MITSUBISHI 5014, 5020
MTC 5045
NAD 5001
NAIM 5021
NIKKO 5024, 5041, 5051
NSM 5021
ONKYO 5012, 5013, 5042, 5059
OPTIMUS 5001, 5005, 5008, 5019,
5025, 5038, 5045, 5046,
5048
ORION 5061
PANASONIC 5004, 5037
PARASOUND 5045
PHILIPS 5021, 5055
PMG 5022
POPPY 5022
PROTON 5021
QED 5021
QUAD 5021
QUASAR 5004,
CD-R CD
DVD
CD-R
CD
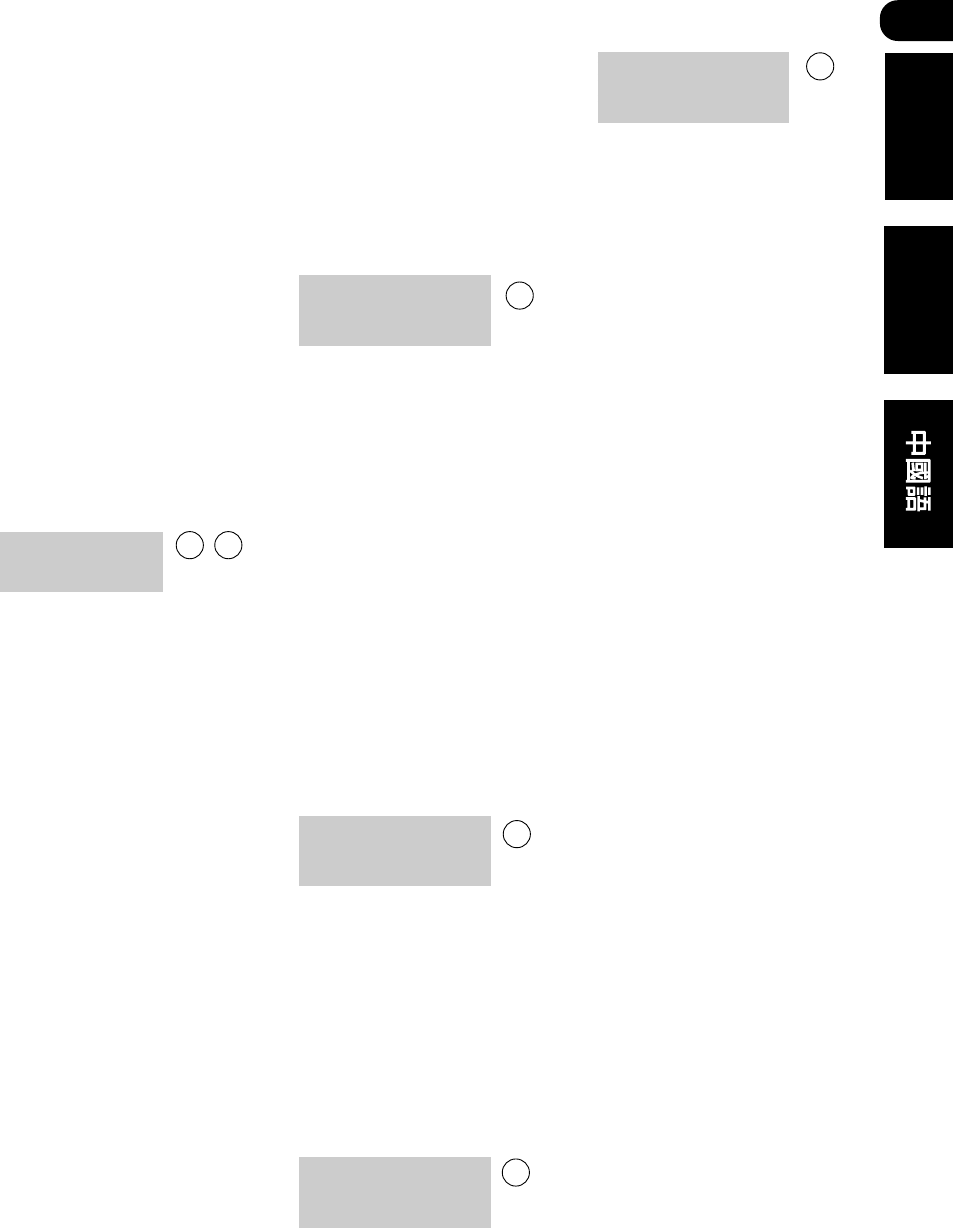
09
97
En/Sp/ChH
English Español
RCA 5010, 5025, 5038
REALISTIC 5025, 5026, 5045
REVOX 5021
ROTEL 5021, 5045
SAE 5021
SANSUI 5021, 5033, 5038
SANYO 5025, 5039
SCHNEIDER 5018
SCOTT 5038
SEARS 5038
SHARP 5008, 5026, 5058
SHERWOOD 5015, 5026, 5031
SONY 5001, 5027, 5050
SOUDESIGN 5019
TASCAM 5045
TEAC 5024, 5026, 5044, 5045
TECHNICS 5004, 5034, 5037
THORENS 5021
TOSHIBA 5049
UNIVERSUM 5021
YAMAHA 5007, 5028
YORX 5047
VICTOR 5011
WARDS 5010, 5021
PIONEER 5005, 5030, 5035, 5038,
5048, 5052, 5063
TAPE DECK
PLATINA DE CASETES
錄放音機
Manufacturer Code
Fabricante Código
生產商 代碼
ADC 6013
AIWA 6002, 6022, 6017, 6018
AKAI 6015, 6016
ANAM 6035
ARCAM 6005
CARVER 6002, 6028
DENON 6005, 6039
DUAL 6037
DYNAMIC BASS 6028
EROICA 6041
FISHER 6028
GARRARD 6036
GOLDSTAR 6036
GRUNDIG 6002
HARMON/KARDON 6002, 6014
INKEL 6003
JVC 6027, 6030, 6031
KENWOOD 6003, 6004, 6019, 6024,
6025
KYOCERA 6013
LOTTE 6034
LUXMAN 6029
MAGNAVOX 6002
MARANTZ 6002
MEMOREX 6008, 6009
MITSUBISHI 6016
NAKAMICHI 6020
NIKKO 6035
OLYMPUS 6029
ONKYO 6010, 6011, 6032
OPTIMUS 6001, 6021
PANASONIC 6023
PHILIPS 6002
RCA 6028
RENAISSANCE 6040
REVOX 6002
SAMSUNG 6038
SANSUI 6002
SANYO 6028
SHARP 6019
SONIC 6036
SONY 6012, 6026, 6033
TEAC 6038
TECHNICS 6023
THORENS 6002
VICTOR 6027, 6030
WARDS 6001
YAMAHA 6006, 6007, 6019
PIONEER 6001, 6008, 6009
6021,
DVD PLAYER
REPRODUCTOR DE DVDs
DVD
播放機
Manufacturer Code
Fabricante Código
生產商 代碼
TOSHIBA 5302
SONY 5306
PANASONIC 5301, 5322
KENWOOD 5307
JVC 5311, 5318
SAMSUNG 5313
AKAI 5316
HARMAN/KARDON 5314
MAGNAVOX 5302
MITSUBISHI 5303
ONKYO 5302, 5317, 5319
PROSCAN 5304
RCA 5304
SHARP 5320
THETA DIGITAL 5312
TECHNICS 5301
THOMSON 5310
YAMAHA 5301, 5309
PHILIPS 5302, 5308
ZENITH 5302, 5315
PIONEER 5305, 5312, 5321
5322
AMPLIFIER
AMPLIFICADOR
放大器
Manufacturer Code
Fabricante Código
生產商 代碼
AUDIOLAB 8005
DENON 8002
GRUNDIG 8005
MARANTZ 8005
MICROMEGA 8005
PHILIPS 8005
PIONEER 8004
REVOX 8005
TANDBERG 8003
THORENS 8005
YAMAHA 8001, 8006
MISC AUDIO
MISCELÁNEOS AUDIO
各種音響
Manufacturer Code
Fabricante Código
生產商 代碼
JERROLD 8201, 8203
STARCOM 8201
SCIENTIFIC ATLANTA 8202
RECEIVERS
RECEPTORES
接收機
Manufacturer Code
Fabricante Código
生產商 代碼
ADC 7042
AIWA 7012, 7023, 7031, 7055,
7064
AKAI 7011, 7027
ANAM 7010, 7046
ARCAM 7018, 7048
AUDIOLAB 7059
CAPETRONIC 7042
CARVER 7055, 7059
CURTIS 7008
DAEWOO 7032
DENON 7001, 7056, 7058
DUAL 7040
EROICA 7005
FANTASIA 7037
FERGUSON 7042
FINE ARTS 7059
FISHER 7028
GARRARD 7032, 7034, 7035
GOLDSTAR 7010
GOODMANS 7027
GP AUDIO 7033
GRUNDIG 7018, 7059
HARMAN/KARDON 7009, 7051
INKEL 7038, 7040
JBL 7009
JVC 7007, 7036, 7042
KENWOOD 7003, 7017, 7025, 7026,
7044, 7053, 7063, 7066
LOTTE 7037, 7039
LUXMAN 7021
MAGNAVOX 7030, 7042, 7055, 7059
MARANTZ 7004, 7018, 7055, 7059
MCINTOSH 7020
MCS 7004
MCSILVER 7037
MICROMEGE 7018, 7059
NIKKO 7032, 7037, 7046
OPTIMUS 7017, 7034, 7042, 7049,
7052
ONKYO 7013, 7029
PALLADIUM 7050
PANASONIC 7004, 7024, 7041
PHILIPS 7018, 7030, 7045, 7048,
7051, 7055, 7059
PHONOTREND 7038
QUASAR 7004
RCA 7006, 7042
RENAISSANCE 7043
REVOX 7018
ROADSTAR 7027
SABA 7042
SAISHO 7027
SAMSUNG 7010
SANSUI 7027, 7055
SANYO 7028
SCHNEIDER 7042
SHARP 7017
SHERWOOD 7038
SOUNDESIGN 7049
SONY 7015, 7054, 7057, 7060
TAE KWANG 7034
TEAC 7010, 7035
TECHNICS 7004, 7062, 7065
CD-R CD
DVD
TUN
TUN
TUN

09
98
En/Sp/ChH
TELEFUNKEN 7019, 7024, 7041, 7061,
7062, 7065
THORENS 7018, 7059
UHER 7027, 7042, 7050
VICTOR 7007
WARDS 7002, 7006, 7008
YAMAHA 7016, 7017
PIONEER 7002, 7008, 7014, 7022,
7042, 7047, 7050, 7052
VCR
VCR
VCR
Manufacturer Code
Fabricante Código
生產商 代碼
PHILIPS 2015, 2035, 2074, 2075
PANASONIC 2015, 2042, 2053, 2054,
2055, 2087
THOMSON 2021, 2064, 2074
SONY 2001, 2009, 2012, 2013,
2014, 2015
JVC 2008, 2021, 2033, 2049,
2050, 2074, 2080
GRUNDIG 2003, 2005, 2007, 2010,
2034, 2035, 2048, 2050,
2054, 2069, 2071, 2075
AKAI 2021, 2029, 2038, 2060,
2063
HITACHI 2001, 2004, 2021, 2022,
2043, 2056, 2057
TOSHIBA 2021, 2023, 2024, 2035,
2074
MITSUBISHI 2023, 2027, 2033, 2035,
2045
SHARP 2027, 2073
ORION 2002, 2004, 2016, 2036,
2046, 2052, 2070, 2072,
2078
SANYO 2025, 2026, 2037, 2057
FERGUSON 2021, 2039, 2064, 2065
BLAUPUNKT 2003, 2005, 2010, 2014,
2041, 2042, 2048, 2054,
2055, 2075
NOKIA 2025, 2037, 2038, 2057
ADMIRAL 2027, 2052
ADVENTURA 2001
AIKO 2059
AIWA 2001, 2017, 2062, 2070,
2072
AKIBA 2034
ALBA 2011, 2034, 2052, 2059,
2063, 2072
AMBASSADOR 2011
AMERICA ACTION 2059
AMERICAN HIGH 2015
AMSTRAD 2001, 2059, 2067, 2068
ANAM 2017, 2042, 2054, 2057,
2059, 2082, 2084
ANAM NATIONAL 2042, 2054, 2087
ANITECH 2034
ASA 2017, 2035
ASHA 2057
ASUKA 2017
AUDIOVOX 2017
BAIRD 2001, 2021, 2037, 2039
BASIC LINE 2011, 2034, 2059
BEAUMARK 2057
BELL & HOWELL 2037
BRANDT 2047, 2064, 2065
BRANDT ELECTRONIC 2021
BROKSONIC 2002, 2040, 2046, 2052,
2078
BUSH 2034, 2052, 2059, 2072
CALIX 2017
CANON 2015
CAPEHART 2011
CARVER 2035
CATRON 2011
CCE 2034, 2059
CGE 2001
CIMLINE 2034
CINERAL 2059
CITIZEN 2017, 2059
CLATRONIC 2011
COLT 2034
COMBITECH 2072
CONDOR 2011
CRAIG 2017, 2026, 2034, 2057,
2058
CROWN 2011, 2034, 2059
CURTIS MATHES
2015, 2021, 2032, 2042
CYBERNEX 2057
CYRUS 2035
DAEWOO 2011, 2024, 2025, 2059,
2083
DANSAI 2034
DAYTRON 2011
DECCA 2001, 2035
DE GRAAF 2022, 2043
DENON 2022
DUAL 2021
DUMONT 2001, 2035, 2037
DYNATECH 2001
ELBE 2018
ELCATECH 2034
ELECTROHOME 2017
ELECTROPHONIC 2017
EMEREX 2012
EMERSON 2001, 2002, 2017, 2023,
2040, 2046, 2051, 2052,
2059, 2078, 2083
ESC 2057, 2059
FIDELITY 2001
FINLANDIA 2035, 2037
FINLUX 2001, 2022, 2035, 2037
FIRSTLINE 2017, 2023, 2024, 2034,
2052
FISHER 2025, 2026, 2030, 2037
FRONTECH 2011
FUJI 2015
FUNAI 2001
GARRARD 2001
GE 2015, 2027, 2032, 2057
GEC 2035
GENERAL 2011, 2028
GOLDHAND 2034
GOLDSTAR 2017, 2018, 2053, 2079
GOODMANS 2001, 2017, 2034, 2059,
2075
GO VIDEO 2077, 2081
GRAETZ 2005, 2021, 2037, 2057
GRANADA 2025, 2035, 2037
GRADIENTE 2001, 2008
GRANDIN 2001, 2017, 2034
HANSEATIC 2017
HARMAN/KARDON 2018, 2035
HARLEY DAVIDSON 2001
HARWOOD 2034
HCM 2034
HEADQUARTER 2025
HINARI 2004, 2034, 2057, 2072
HI-Q 2026
HUGHES NETWORK SYSTEMS 2022
HYPSON 2034
IMPERIAL 2001
INGERSOL 2004
INTERFUNK 2035
ITT 2005, 2021, 2025, 2037,
2038, 2057, 2074
ITV 2017, 2059
JENSEN 2021
KAISUI 2034
KEC 2017, 2059
KENDO 2038, 2052
KENWOOD 2018, 2021, 2033
KLH 2034
KODAK 2015, 2017
KORPEL 2034
LAYCO 2034
LENCO 2059
LG 2079
LLOYD’S 2001, 2051
LOEWE 2004, 2005, 2017, 2035
LOGIK 2004, 2034, 2057
LUXOR 2023, 2025, 2027, 2037,
2038
LXI 2017
M ELECTRONIC 2001
MAGNASONIC 2059
MAGNAVOX 2001, 2015, 2019, 2035
MAGNIN 2057
MANESTH 2024, 2034
MARANTZ 2003, 2005, 2015, 2035
MARTA 2017
MATSUI 2004, 2016, 2036, 2052,
2070, 2072
MATSUSHITA 2015, 2042, 2055
MEI 2015
MELECTRONIC 2018
MEMOREX 2001, 2015, 2017, 2019,
2025, 2026, 2027, 2037,
2052, 2057, 2062, 2085,
2087, 2088
MEMPHIS 2034
METZ 2003, 2005, 2017, 2042,
2048, 2055, 2069
MGA 2023, 2057
MGN TECHNOLOGY 2057
MINCRVA 2048
MINERVA 2005, 2010, 2048
MINOLTA 2022
MOTOROLA 2015, 2027
MTC 2001, 2057
MULTITECH 2001, 2034
MURPHY 2001
NAD 2031
NATIONAL 2054
NEC 2018, 2020, 2021, 2033,
2037
NECKERMANN 2035
NESCO 2034
NIKKO 2017
NIKON 2014
NOBLEX 2057
NOKIA 2021, 2025, 2037, 2038,
2057
NORDMENDE 2021, 2061, 2064, 2065,
2074
OCEANIC 2001, 2021
OKANO 2063, 2070
OLYMPUS 2015, 2054
OPTIMUS 2017, 2027, 2031, 2037,
2042, 2077, 2086, 2087,
2088
VCR

09
99
En/Sp/ChH
English Español
OSAKI 2001, 2017, 2034
OTTO VERSAND 2035
PALLADIUM 2005, 2017, 2021, 2034
PATHE MARCONI 2021
PATHE CINEMA 2016
PENTAX 2022
PENNY 2015, 2017, 2018, 2020,
2022, 2057
PERDIO 2001
PHILCO 2015, 2018, 2052, 2078
PHONOLA 2035
PILOT 2017
PORTLAND 2011
PROFEX 2066
PROFITRONIC 2057
PROLINE 2001
PROSCAN 2032
PROTEC 2034
PULSAR 2019
PYE 2035
QUARTER 2025
QUARTZ 2025
QUASAR 2015, 2042, 2087
QUELLE 2035
RADIO SHACK 2001, 2085
RADIOLA 2035
RADIX 2017
RANDEX 2017
RCA 2015, 2022, 2027, 2032,
2038, 2057
REALISTIC 2001, 2015, 2017, 2025,
2026, 2027, 2037
REX 2021, 2074
RFT 2075
RICOH 2014
ROADSTAR 2017, 2034, 2057, 2059
RUNCO 2019
SABA 2021, 2049, 2050, 2061,
2064, 2065, 2074
SAISHO 2004, 2016, 2036, 2052
SALORA 2023, 2025, 2038
SANKY 2019, 2027
SANSUI 2001, 2021, 2033, 2052,
2058, 2078
SAMSUNG 2024, 2057, 2076, 2077
SAVILLE 2072
SBR 2035
SCHAUB LORENZ 2001, 2005, 2021,
2037
SCHNEIDER 2001, 2034, 2035
SCOTT 2023, 2024, 2040, 2046
SEARS 2001, 2015, 2017, 2022,
2025, 2026, 2037
SEG 2057, 2066
SEI 2004, 2035
SELECO 2021
SEMP 2024
SENTRA 2011
SHINTOM 2034, 2037
SHOGUN 2057
SHORAI 2004
SIEMENS 2003, 2005, 2010, 2017,
2030, 2035, 2037, 2048
SILVA 2017
SINGER 2024, 2034
SINUDYNE 2004, 2035
SOLAVOX 2011
SONOLOR 2025
SONTEC 2017
STS 2022
SUNKAI 2070
SUNSTAR 2001
SUNTRONIC 2001
SYLVANIA 2001, 2015, 2023, 2035
SYMHONIC 2001
TASHIKO 2001
TATUNG 2001, 2021, 2035
TEAC 2001, 2021
TEC 2011
TECHNICS 2015, 2042, 2054
TEKNIKA 2001, 2015, 2007, 2017,
2028
TELEAVIA 2021
TELEFUNKEN 2021, 2047, 2058, 2064,
2074
TENOSAL 2034
TENSAI 2001, 2066
THOMAS 2001
THORN 2016, 2021, 2037
TMK 2051, 2057
TOTEVISION 2017, 2057
TOWADA 2066
UHER 2057
UNITECH 2057
UNIVERSUM 2001, 2006, 2010, 2017,
2035, 2038, 2048, 2057,
2067
VECTOR 2024
VECTOR RESEARCH 2018, 2020
VICTOR 2008, 2021, 2033
VIDEO CONCEPTS 2020, 2024
VIDEOSONIC 2057
WARDS 2001, 2015, 2022, 2026,
2027, 2032, 2034, 2035,
2057
WHITE WESTINGHOUSE 2052, 2059
XR-1000 2001
XR-1001 2015
XR-1002 2034
YAMAHA 2018
YAMISHI 2034
YOKAN 2034
YOKO 2011, 2057
ZENITH 2001, 2014, 2019, 2052,
2078
PIONEER 2031, 2033, 2035, 2044,
2056
SATELLITE TUNER
SINTONIZADOR DEL
SATÉLITE
衛星調諧器
Manufacturer Code
Fabricante Código
生產商 代碼
ABSAT 4006
AST 4027
ALBA 4029, 4034, 4037, 4052
ALDES 4019
AMSTRAD 4003, 4016, 4025, 4038,
4039, 4042
ANKARO 4013, 4019, 4030, 4044
ANTTRON 4009, 4034
ARMSTRONG 4015
ASTRA 4005
ASTRO 4008, 4039, 4045
AVALON 4031
AXIS 4030, 4046
BT 4053
BEKO 4010
BEST 4030
BLAUPUNKT 4008
BOCA 4015, 4043
BRAIN WAVE 4022
BRITISH SKY BROADCASTING 4058
BUSH 4002
CNT 4045
CAMBRIDGE 4024
CANAL SATELLITE 4059
CANAL+ 4059
CHANNEL MASTER 4029
COMLINK 4019
CONNEXIONS 4031
CROWN 4015
CYRUS 4011
D-BOX 4054
DDC 4029
DNT 4011, 4031
ECHOSTAR 4031, 4036, 4061
EMANON 4034
FTE HUMAX 4060
FERGUSON 4002, 4009, 4010, 4023
FIDELITY 4016
FINLUX 4005, 4024, 4032, 4037
FRACARRO 4061
FREECOM 4034
FUBE 4030, 4031, 4034
G-SAT 4009
GALAXIS 4019, 4057, 4060
GENERAL INSTRUMENT 4012
GOLD BOX 4059
GOODING 4048
GOODMANS 4010
GRUNDIG 4008, 4010, 4048
HINARI 4009
HIRSCHMANN 4008, 4032, 4039, 4040,
4049
HITACHI 4037
HOUSTON 4053
HUTH 4013, 4015, 4019, 4026
ITT 4005
INVIDEO 4061
INTERVISION 4050
JVC 4048
JOHANSSON 4022
KATHREIN 4004, 4006, 4008, 4011,
4035, 4041
KREISELMEYER 4008
KYOSTAR 4034
LA SAT 4043, 4045
LENCO 4034
LENNOX 4050
LUPUS 4030
LUXOR 4005, 4049
MANHATTAN 4037, 4045, 4050
MARANTZ 4011
MASPRO 4004, 4023
MATSUI 4024, 4048
MEDIASAT 4059
MEDIAMARKT 4015
MINERVA 4048
MORGAN’S 4015, 4043
NAVEX 4022
NEUHAUS 4039
NEUSAT 4057
NEWHAUS 4013
NIKKO 4028
NOKIA 4005, 4032, 4037, 4049,
4054, 4063
NORDMENDE 4029
ORBITECH 4039
OXFORD 4024
PACE 4002, 4009, 4014, 4023,
4037, 4055, 4058
PALLADIUM 4048
TV
TVC

09
100
En/Sp/ChH
PALSAT 4039
PANDA 4037
PHILIPS 4007, 4011, 4020, 4037,
4048, 4059
PHONOTREND 4019, 4050
PIONEER 4021, 4059
PLANET 4061
PROMAX 4037
PROSAT 4019
QUADRAL 4029, 4044
RADIOLA 4011
RADIX 4031, 4064
RFT 4011, 4013, 4019
SAT 4027, 4038
SABA 4023, 4045
SABRE 4037
SAGEM 4056
SALORA 4005
SATCOM 4026, 4051
SATEC 4009
SATMASTER 4026
SATPARTNER 4022, 4034, 4040, 4045
SCHWAIGER 4009, 4041
SEEMANN 4031, 4046
SEG 4030, 4034
SIEMENS 4008
SKYMASTER 4019, 4044, 4051
SONY 4017, 4018
STRONG 4062
SUNSTAR 4043
TPS 4056
TANTEC 4023, 4037
TECHNISAT 4001, 4039
TECHNILAND 4026
TELEFUNKEN 4034
TELEKA 4015, 4052
TELESAT 4051
THOMSON 4037, 4059
TONNA 4026, 4053
TRIAD 4027
TRIASAT 4040
UNITOR 4022
UNIVERSUM 4008, 4049
VENTANA 4011
VORTEC 4034
VTECH 4027
WINERSAT 4022
WISI 4008, 4027, 4031, 4037
XSAT 4006, 4065
XCOM MULTIMEDIA 4065
ZEHNDER 4033, 4045, 4047
CABLE TV
TV POR CABLE
有線電視
Manufacturer Code
Fabricante Código
生產商 代碼
ABC 3002, 3003, 3004, 3006,
3008
ANDOVER 3037
BELL & HOWELL 3006
BIRGMINGHAM CABLE
COMMUNICATION 3020
BRITISH TELECOM 3002, 3012
CABLETIME 3016, 3019, 3025, 3029
CONTEC 3009
CLYDE 3011
CRYPTOVISION 3038
DAEHAN 3043
DAERYUNG 3003
DECSAT 3027
EVERQUESST 3007
FILMNET 3028
FRANCE TELECOM 3030
GEC 3011
GEMINI 3007
GENERAL INSTRUMENT 3004, 3020,
3031, 3046
GOLDSTAR 3014, 3047
GRUNDIG 3035
HITACHI 3004
JASCO 3007
JERROLD 3002, 3004, 3005, 3006,
3007, 3020, 3031, 3046
LG ALPS 3044
MEMOREX 3001
MNET 3009, 3028
NOW 3041
OAK 3009
PACIFIC 3039
PANASONIC 3001, 3013
PARAGON 3001
PULSAR 3001
PVP STEREO VISUAL
MATRIX 3002
PIONEER 3010, 3014, 3018, 3036
QUASAR 3001
RADIO SHACK 3007
REMBRANDT 3004
RUNCO 3001
SAMSUNG 3014, 3040
SATBOX 3024
SIGNAL 3007
SIGNATURE 3004
STS 3015
SALORA 3026
SCIENTIFIC 3003, 3032, 3049
SCIENTIFIC ATLANTA 3003, 3008, 3021
SEAWOO 3045
STARCOM 3002, 3007
STARGATE 3007
STARQUEST 3007
TAIHAN 3043
TELESERVICE 3022
TELE+1 3028
TUDI 3023
TUSA 3007
TOCOM 3005
TONGKOOK 3042, 3048
TOSHIBA 3001
UNITED CABLE 3002
VIDEOWAY 3017
VISICABLE+ 3033
WESTMINSTER 3012
WOLSEY GENE 3037
ZENITH 3001, 3034
TV
TVC
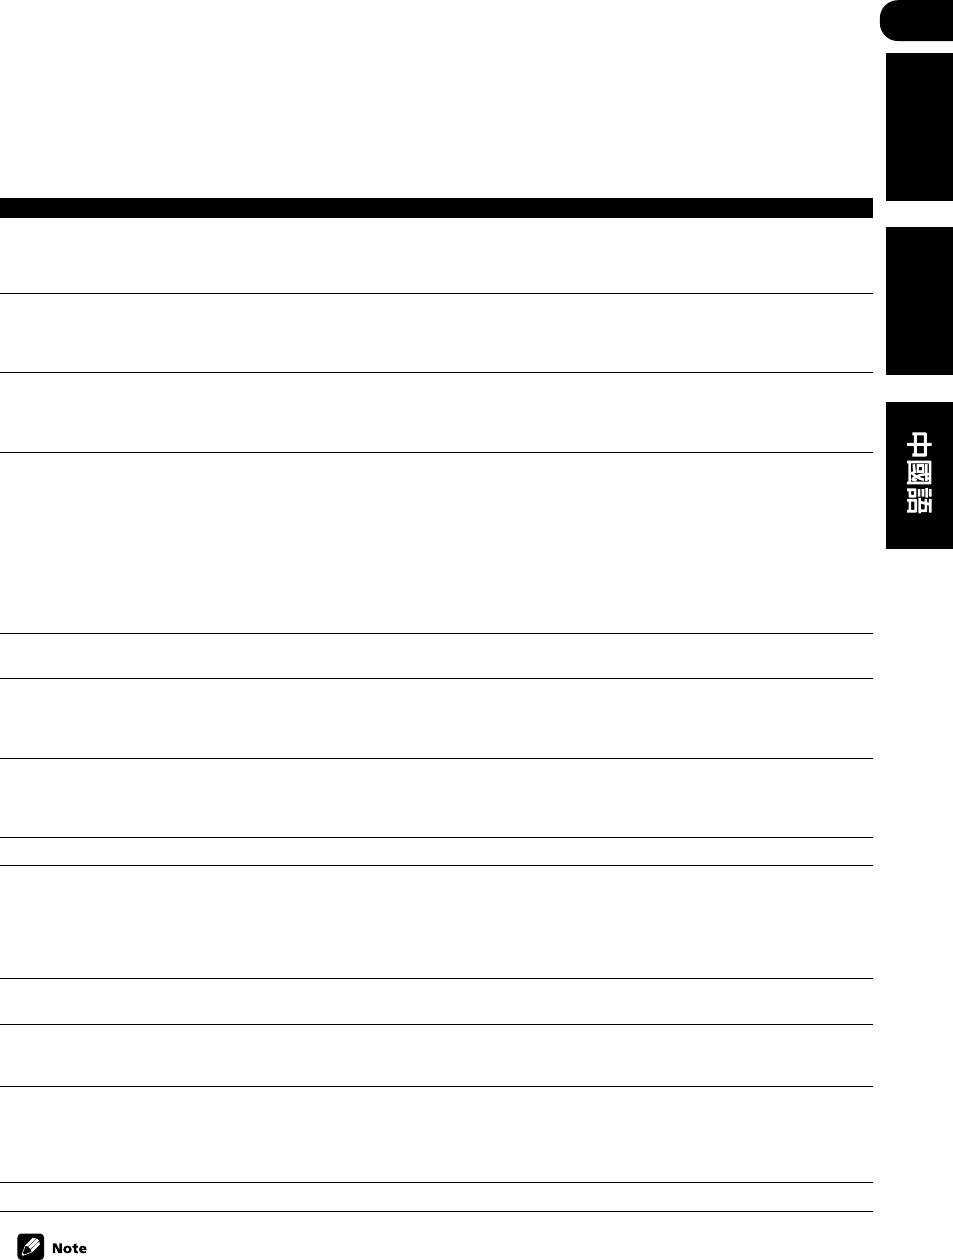
10
101
ChH
English Español
Additional information
Troubleshooting
Incorrect operations are often mistaken for trouble and malfunctions. If you think that there is something
wrong with this component, check the points below. Sometimes the trouble may lie in another component.
Investigate the other components and electrical appliances being used. If the trouble cannot be rectified even
after exercising the checks listed below, ask your nearest Pioneer authorized service center or your dealer to
carry out repair work.
Problem
The power does not turn on.
No sound is output when a function is selected.
No image is output when a function is selected.
Considerable noise in radio broadcasts.
Broadcast stations cannot be selected automati-
cally.
No sound from surround or center speakers.
No sound from surround back speakers.
Noise during playback of a cassette deck.
Sound is produced from other components, but
not from LD or DVD player.
No sound is output or a noise is output when
software with DTS is played back.
When a search is performed by a DTS compat-
ible CD player during playback, noise is output.
Can’t operate the remote control.
The display is dark or off.
Remedy
• Connect the power plug to the wall outlet.
• Disconnect the power plug from the outlet, and insert again.
• Make sure there are no loose strands of speaker wire touching the rear panel. This
could cause the receiver to shut off automatically.
• Make sure the component is connected correctly (refer to pages 18–36).
• Press MUTE on the remote control to turn muting off.
• Adjust the MASTER VOLUME.
• Press the MONITOR button to turn monitoring off.
• Make sure the component is connected correctly (refer to pages pages 18–36).
• Select the correct component (use the MULTI JOG/INPUT SELECTOR dial or
the MULTI CONTROL buttons on the remote).
• Tune in the correct frequency.
• Connect the antenna (refer to pages 26-27).
• Route all cables away from the antenna terminals and wires.
• Fully extend the FM wire antenna, position for best reception, and secure to a
wall.
• Connect an outdoor FM antenna (refer to pages 26-27).
• Adjust the direction and position for best reception.
• Connect an additional internal or external AM antenna (refer to pages 26-27).
• Turn off the equipment causing the noise or move it away from the receiver.
• Place the antenna farther away from the equipment causing the noise.
• Connect an outdoor antenna (refer to page 27).
• Refer to Speaker setting on page 62 to check the speaker settings.
• Refer to Setting the relative volume level of each channel on page 70 to check
the speaker levels.
• Connect the speakers properly (refer to page 28–36).
• Refer to Surround back speaker setting on page 66 to check the surround back
speaker settings.
• Refer to the table on page 51 to make sure the 6.1 channel setting and the
sound mode are set for surround back sound.
• Move the cassette deck further from your receiver, until the noise disappears.
• Set the SIGNAL SELECT to AUTO, DIGITAL or ANALOG according to the
type of connections made. (refer to page 52).
• Set the digital input settings correctly (refer to page 61).
• Make digital connections (refer to page 20) and set the SIGNAL SELECT to
DIGITAL (refer to page 52).
• Refer to the instruction manual supplied with the DVD player.
• Set the digital volume level of the player to full, or to the neutral position.
• This is not a malfunction, but be sure to turn the volume down to prevent the
output of loud noise from your speakers.
• Replace the batteries (refer to page 6).
• Operate within 23 feet ( 7 m), 30° of the remote sensor on the front panel (refer
to page 8).
• Remove the obstacle or operate from another position.
• Avoid exposing the remote sensor on the front panel to direct light.
• Press FL DIMMER on the remote control repeatedly to return to the default.
If the unit does not operate normally due to external effects such as static electricity disconnect the power
plug from the outlet and insert again to return to normal operating conditions.

10
102
Sp
Resolución de problemas
Un manejo incorrecto a menudo se confunde con problemas o funcionamientos defectuosos. Si cree que algo va
mal con este componente, compruebe los puntos siguientes. A veces el problema puede estar en otro
componente. Examine los demás componentes y aparatos eléctricos que se están utilizando. Si el problema no
puede rectificarse incluso después de llevar a cabo las comprobaciones listadas a continuación, diríjase a su
centro de servicio o distribuidor autorizado Pioneer más cercano para que lleve a cabo los trabajos de reparación.
Problema
El aparato no se enciende.
Cuando se selecciona una función no se emite
sonido.
Cuando se selecciona una función no se emite
imagen.
Ruido considerable en transmisiones
radiofónicas.
Las emisoras no pueden seleccionarse
automáticamente.
No se emite sonido por los altavoces surround o
central.
No se emite sonido por los altavoces posteriores
surround.
Ruido durante la reproducción de una platina de
casete.
Se emite sonido de otros componentes pero no
del reproductor de LDs o DVDs.
No se emite sonido o se emite un ruido cuando
se reproduce software con DTS.
Cuando se lleva a cabo una búsqueda con un
reproductor de CDs compatible con DTS,
durante la reproducción se emiten ruidos.
El mando a distancia no funciona.
La pantalla está oscura o apagada.
Solución
• Conecte el enchufe de alimentación a la toma de la pared.
• Desconecte el enchufe de alimentación de la toma y vuélvalo a enchufarlo.
• Compruebe que no hay hilos sueltos del cable de altavoces tocando el panel
posterior. Esto podría hacer que el receptor se desconectara automáticamente.
• Compruebe que el componente está conectado correctamente (véanse las
páginas 18–36).
• Pulse MUTE en el mando a distancia.
• Ajuste el MASTER VOLUME.
• Pulse el botón MONITOR para desactivar la supervisión.
• Compruebe que el componente está conectado correctamente (véanse las
páginas 18–36).
• Seleccione el componente correcto (utilice el selector MULTI JOG/INPUT
SELECTOR o los botones MULTI CONTROL del mando a distancia).
• Sintonice la frecuencia correcta.
• Conecte la antena (véase las páginas 26–27).
• Encamine los cables digitales y 2 RF alejados de los termina-les y cables de la
antena.
• Extienda totalmente la antena de cable de FM, posiciónela para obtener una
recepción óptima y sujétela en la pared.
• Conecte una antena de FM externa (véase la página 26–27).
• Ajuste la dirección y posiciónela para obtener una recepción óptima.
• Conecte una antena de AM interna o externa adicional (véase las páginas
26–27
).
• Apague el equipo que está causando el ruido o aléjelo del receptor.
• Aleje la antena del equipo que está causando el ruido.
• Conecte una antena externa (véase la página 27).
• Consulte Ajuste de los altavoces en la página 62 para comprobar los ajustes de
los altavoces.
• Consulte Cómo ajustar el nivel de volumen adecuado de cada canal en la página
70 para comprobar los niveles de los altavoces.
• Conecte los altavoces correctamente (véanse las páginas 28–36).
• Consulte Ajuste del altavoz posterior surround en la página 66 para comprobar
los ajustes de los altavoces posteriores surround.
• Consulte la tabla de la página 51 para asegurarse de que el ajuste 6.1 canales y el
modo de sonido están ajustados para sonido posterior surround.
• Aleje la platina de casete del receptor hasta que desaparezca el ruido.
• Ajuste SIGNAL SELECT a AUTO, DIGITAL o ANALOG de acuerdo con el tipo
de conexión realizada (véase la página 52).
• Ajuste los valores de entrada digital correctamente (véase las páginas 61).
• Realice las conexiones digitales (véase las páginas 20) y ajuste SIGNAL SELECT
a DIGITAL (véase la página 52).
• Consulte el manual de instrucciones que se adjunta con su reproductor de DVDs.
• Ajuste el nivel de volumen digital al máximo o a una posición neutra.
• Esto no es un funcionamiento defectuoso, pero reduzca el volumen para evitar la
salida de ruido a alto volumen de los altavoces.
• Cambie las pilas (véase la página 6).
• Opere a 7 metros y 30° del sensor remoto del panel frontal (véase la página 8).
• Retire el obstáculo u opere desde otra posición.
• No exponga el sensor remoto del panel frontal a la luz directa.
• Pulse repetidamente FL DIMMER en el mando a distancia para volver a la
posición por defecto.
Nota
Si la unidad no funciona normalmente debido a efectos externos tales como electricidad estática, desconecte
el enchufe de la toma e insértelo de nuevo para volver a las condiciones operativas normales.
Información adicional
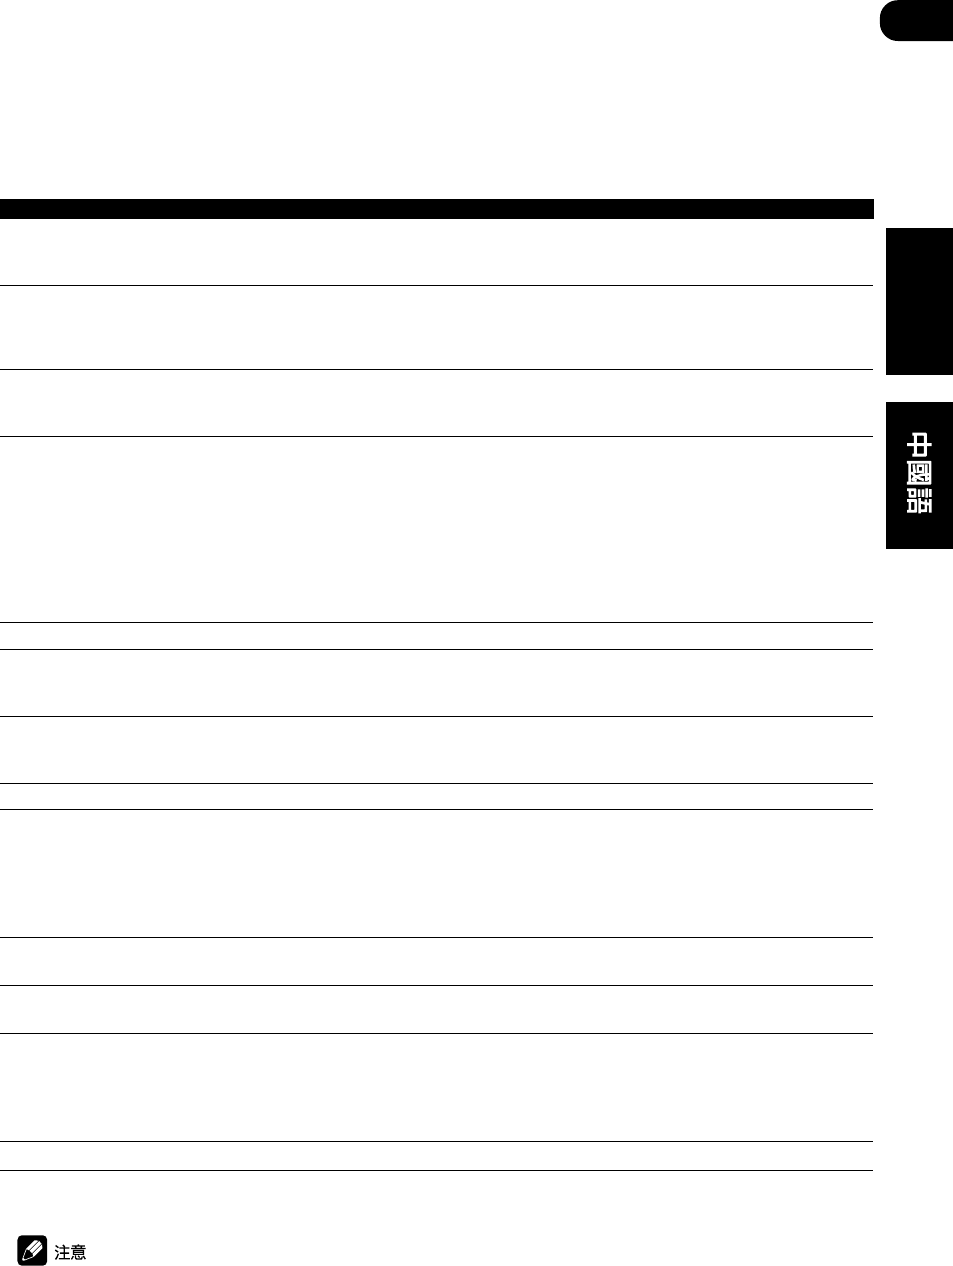
10
103
ChH
Español
附加資訊
故障排除
不正確的操作經常被誤認為是故障。如果您覺得設備出現問題,請查閱下列各項。有時為其他設備出現故障。
請檢查所使用的其他設備和電器。如果即使在進行了下列所述的檢查後故障仍然存在,請就近聯系貴地的先鋒
授權服務中心或您的經銷商進行維修事宜。
故障 對策
如果設備受外界影響(如靜電)而不能正常工作,請從插座拔下電源插頭,然後再插入,以返回正常操作狀
態。
電源不開啟。 • 將電源插頭插入牆面插座。
• 拔下電源插頭,再插入。
• 確認揚聲器引線的線芯未松脫並接碰到背面板,否則接收機會自動關閉。
選擇某功能時沒有聲音輸出。 • 確認設備連接正確(參見第18-36頁)。
• 按遙控器上的MUTE,關閉靜音功能。
• 調整MASTER VOLUME(主音量)。
• 按MONITOR按鈕,關閉監測功能。
選擇某功能時沒有影像輸出。 • 確認設備連接正確(參見第18-36頁)。
• 選擇正確的設備(用MULTI JOG/INPUT SELECTOR旋鈕或遙控器上的MULTI
CONTROL按鈕)。
無線電廣播具有相當的噪音。 • 調諧至正確的頻率。
• 連接天線(參見第26-27頁)。
• 電纜布線時遠離天線端子和引線。
• 完全展開FM線型天線,並將其置於最佳的接收位置,且固定於牆上。
• 連接一個室外FM天線(參見第26-27頁)。
• 調整方向和位置至最佳接收效果。
• 連接額外的內部或外部AM天線(參見第26-27頁)。
• 關閉引起噪音的設備或將之移離接收機。
• 使天線遠離引起噪音的設備。
廣播電臺無法自動選擇。
• 將卡式磁帶機移離接收機,直到噪音消失。
• 參見第62頁揚聲器設定,檢查揚聲器設定。
• 參見第70頁設定各聲道相關的音量級,檢查揚聲器的音量級。
• 正確連接揚聲器(參見第28-36頁)。
環繞聲或中置揚聲器無聲音輸出。
後置環繞聲揚聲器無聲音輸出。 • 參見第66頁後置環繞聲揚聲器設定,檢查後置環繞聲揚聲器的設定。
• 參見第51頁的表格,確認6.1聲道設定和聲音模式為後置環繞聲進行了設
置。
播放卡式磁帶機時發出噪音。
• 連接室外天線(參見第27頁)。
• 根據連接類型,將SIGNAL SELECT(信號選擇)設為AUTO(自動)、
DIGITAL(數碼)或ANALOG(模擬)。(參見第52頁)。
• 正確設置數碼輸入設定(參見第61頁)。
• 進行數碼連接(參見第20頁),並將SIGNAL SELECT(信號選擇)設為
DIGITAL(數碼)(參見第52頁)。
• 參閱DVD播放機的使用說明書。
聲音從其他設備而不是從LD或者DVD
播放機上產生。
播放DTS的軟體時,沒有聲音輸出或
有噪音輸出。
• 這並非故障,但請務必降低音量,以避免揚聲器中輸出較大的噪音。播放過程中,DTS兼容的CD播放機執行
搜索功能時輸出噪音。
• 將播放機的數碼音量級設為最大,或者設置為中檔。
無法操作遙控器。 • 更換電池(參見第6頁)。
• 請在離前面板遙感窗23英尺(7米)的距離、30° 之范圍內進行操作(參見
第8頁)。
• 請移走障礙物,或者從其他方位進行操作。
• 請勿使前面板的遙感窗暴露於直射光線下。
顯示屏變暗或無法顯示。 • 反覆按遙控器上的FL DIMMER,恢復默認設定。

10
104
En
Amplifier Section
Continuous Power Output (STEREO MODE)
FRONT ..... 100 W + 100 W (DIN 1 kHz, THD 1 %, 8 Ω)
Continuous Power Output (SURROUND MODE)
FRONT .....................100 W/ch (1 kHz, THD 1 %, 8 Ω)
CENTER ....................... 100 W (1 kHz, THD 1 %, 8 Ω)
SURROUND ............. 100 W/ch (1 kHz, THD 1 %, 8 Ω)
SURROUND BACK*
.............................100 W/ch (1 kHz, THD 1 %, 8 Ω)
Maximum Power (1 KHz, 10%, RMS, per channel driven)
................................................................. 120 W x 5
Input (Sensitivity/Impedance)
CD, AUX, VCR/DVR, CD-R/TAPE/MD, DVD/LD,
TV/SAT, VIDEO
.......................................................... 200 mV/47 kΩ
Frequency Response
CD, AUX, VCR/DVR, CD-R/TAPE/MD, DVD/LD,
TV/SAT, VIDEO
...........................................5 Hz to 100,000 Hz dB
Output (Level/Impedance)
VCR/DVR OUT, CD-R/TAPE/MD REC
......................................................... 200 mV/2.2 kΩ
Tone Control
BASS ................................................. ± 6 dB (100 Hz)
TREBLE .............................................± 6 dB (10 kHz)
LOUDNESS ......................... +9 dB (100 Hz/10 kHz)
Signal-to-Noise Ratio (IHF, short circuited, A network)
CD, AUX, VCR/DVR, CD-R/TAPE/MD, DVD/LD,
TV/SAT, VIDEO
.......................................................................96 dB
Signal-to-Noise Ratio [EIA, at 1 W (1 kHz)]
CD, AUX, VCR/DVR, CD-R/TAPE/MD, DVD/LD,
TV/SAT, VIDEO
.......................................................................79 dB
Signal-to-Noise Ratio
[DIN (Continuous rated power output/50 mW)]
CD, AUX, VCR/DVR, CD-R/TAPE/MD, DVD/LD,
TV/SAT, VIDEO
.............................................................. 88 dB/64 dB
VIDEO Section
Input (Sensitivity/Impedance)
VCR/DVR, DVD/LD, TV/SAT
.............................................................. 1 Vp-p/75 Ω
Output (Level/Impedance)
VCR/DVR, TO MONITOR TV OUT ....... 1 Vp-p/75 Ω
Frequency Response
VCR/DVR, DVD/LD, TV/SAT → MONITOR
.................................................. 5 Hz to 7 MHz dB
Signal-to-Noise Ratio ............................................ 55 dB
COMPONENT VIDEO Section
Input (Sensitivity/Impedance)
DVD/LD, TV/SAT ................................... 1 Vp-p/75 Ω
Specifications
+0
–3
+0
–3
Published by Pioneer Corporation.
Copyright © 2002 Pioneer Corporation.
All rights reserved.
Output (Level/Impedance)
TO MONITOR TV OUT ......................... 1 Vp-p/75 Ω
FM Tuner Section
Frequency Range ....................... 87.5 MHz to 108 MHz
Usable Sensitivity
.......................... Mono:13.2 dBf, IHF (1.3 µV/ 75 Ω)
50 dB Quieting Sensitivity ..................... Mono: 20.2 dB
Stereo: 38.6 dBf
Signal-to-Noise Ratio ............... Mono: 73 dB (at 85 dBf)
Stereo: 70 dB (at 85 dBf)
Signal-to-Noise Ratio (DIN) ...................... Mono: 62 dB
Stereo: 58 dB
Distortion .................................... Stereo: 0.5 % (1 kHz)
Alternate Channel Selectivity ...............60 dB (400 kHz)
Stereo Separation .....................................40 dB (1 kHz)
Frequency Response ................ 30 Hz to 15 kHz (±1dB)
Antenna Input (DIN) .......................... 75 Ω unbalanced
AM Tuner Section
Frequency Range
Multi voltage model
........................... 531 kHz to 1,602 kHz(9 kHz step)
......................... 530 kHz to 1,700 kHz(10 kHz step)
Singapore model .................... 531 kHz to 1,602 kHz
Sensitivity (IHF, Loop antenna) ...................... 350 µV/m
Selectivity ............................................................. 30 dB
Signal-to-Noise Ratio ............................................ 50 dB
Antenna ................................................... Loop antenna
Miscellaneous
Power Requirements
Multi voltage model
... AC 110/120-127/220/240 V (Switchable), 50/60 Hz
Singapore model ................. AC 220-230 V, 50/60 Hz
Power Consumption
VSX-D711/D711-S
Multi voltage model .................................. 900 W
Singapore model ....................................... 250 W
VSX-D811S/D811S-S
Multi voltage model .................................. 990 W
Singapore model ....................................... 280 W
In Standby .............................................................. 1 W
Dimensions ............... 420 (W) x 158 (H) x 401 (D) mm
Weight (without package) .................................. 10.0 kg
Furnished Parts
AM loop antenna ......................................................... 1
FM wire antenna .......................................................... 1
Dry cell batteries (AA size IEC R6P) ............................. 2
Remote control ............................................................ 1
Operating instructions ................................................. 1
NOTE:
• Specifications and the design are subject to possible
modifications without notice, due to improvements.
* VSX-D811S/ VSX-D811S-S only.

10
105
Sp
English Español
Sección del amplificador
Potencia continua (modo estéreo)
Frontales .... 100 W + 100 W (DIN 1 kHz, DAT 1 %, 8 Ω)
Potencia continua (modo surround)
Frontales ............... 100 W/canal (1 kHz, DAT 1 %, 8 Ω)
Centrales ........................ 100 W (1 kHz, DAT 1 %, 8 Ω)
Surround .............. 100 W/canal (1 kHz, DAT 1 %, 8 Ω)
Posteriores con surround*
......................... 100 W/canal (1 kHz, DAT 1 %, 8 Ω)
Potencia máxima (1 kHz, 10%, RMS, por canal
excitado) ....................................................... 120 W × 5
Entrada (Sensitividad/Impedancia)
CD, AUX, VCR/DVR, CD-R/TAPE/MD, DVD/LD,
TV/SAT, VIDEO
.......................................................... 200 mV/47 kΩ
Frecuencia de respuesta
CD, AUX, VCR/DVR, CD-R/TAPE/MD, DVD/LD,
TV/SAT, VIDEO
............................................ 5 Hz a 100.000 Hz dB
Salida (Nivel/Impedancia)
VCR/DVR OUT, CD-R/TAPE/MD REC
......................................................... 200 mV/2.2 kΩ
Control del tono
BASS ................................................. ± 6 dB (100 Hz)
TREBLE .............................................± 6 dB (10 kHz)
LOUDNESS ......................... +9 dB (100 Hz/10 kHz)
Relación de señal a ruido (IHF, cortocircuitado, red A)
CD, AUX, VCR/DVR, CD-R/TAPE/MD, DVD/LD,
TV/SAT, VIDEO
.......................................................................96 dB
Relación de señal a ruido [EIA, a 1 W (1 kHz)]
CD, AUX, VCR/DVR, CD-R/TAPE/MD, DVD/LD,
TV/SAT, VIDEO
.........................................................................79 dB
Relación señal/ruido
[DIN (Potencia nominal continua/50 mW)]
CD, AUX, VCR/DVR, CD-R/TAPE/MD, DVD/LD,
TV/SAT, VIDEO
.............................................................. 88 dB/64 dB
Sección vídeo
Entrada (Sensitividad/Impedancia)
VCR/DVR, DVD/LD, TV/SAT
.............................................................. 1 Vp-p/75 Ω
Salida (Nivel/Impedancia)
VCR/DVR, TO MONITOR TV OUT ....... 1 Vp-p/75 Ω
Frecuencia de respuesta
VCR/DVR, DVD/LD, TV/SAT → MONITOR
................................................... 5 Hz a 7 MHz dB
Relación señal/ruido ..............................................55 dB
Sección de los componentes de vídeo
Entrada (Sensitivity/Impedancia)
DVD/LD, TV/SAT ................................... 1 Vp-p/75 Ω
Salida (Nivel/Impedancia)
TO MONITOR TV OUT ......................... 1 Vp-p/75 Ω
Especificaciones
Sección del sintonizador de FM
Gama de frecuencias .................... 87,5 MHz a 108 MHz
Sensitividad utilizable
.......................... Mono:13,2 dBf, IHF (1.3 µV/ 75 Ω)
50 dB Sensitividad de silencio ................ Mono: 20.2 dB
Estéreo: 38.6 dBf
Relación señal/ruido .................. Mono: 73 dB (a 85 dBf)
Stereo: 70 dB (a 85 dBf)
Relación señal/ruido (DIN) ....................... Mono: 62 dB
Estéreo: 58 dB
Distorsión .................................. Estéreo: 0,5 % (1 kHz)
Selectividad de canal de substitución ... 60 dB (400 kHz)
Separación estéreo ...................................40 dB (1 kHz)
Frecuencia de respuestas ........... 30 Hz a 15 kHz (±1dB)
Entrada de antena (DIN) ....................... 75 Ω asimétrica
Sección del sintonizador de AM
Gama de frecuencias
Modelo multivoltaje
.......... 531 kHz a 1.602 kHz (incrementos de 9 kHz)
........ 530 kHz a 1.700 kHz (incrementos de 10 kHz)
Modelo para Singapur .............. 531 kHz a 1.602 kHz
Sensitividad (IHF, Antena de bucle) ............... 350 µV/m
Selectividad ...........................................................30 dB
Relación señal/ruido ..............................................50 dB
Antena ............................................... Antena de cuadro
Misceláneos
Alimentación
Modelo multivoltaje
..... CA 110/120-127/220/240 V (conmutable), 50/60 Hz
Modelo para Singapur ......... CA 220-230 V, 50/60 Hz
Consumo
VSX-D711/D711-S
Modelo multivoltaje ................................... 900 W
Modelo para Singapur ................................ 250 W
VSX-D811S/D811S-S
Modelo multivoltaje .................................. 990 W
Modelo para Singapur ............................... 280 W
En modo de espera ................................................. 1 W
Dimensiones .......... 420 (An) x 158 (Al) x 401 (Lg) mm
Peso (sin embalaje) ............................................ 10,0 kg
Accesorios suministrados
Antena de cuadro AM .................................................. 1
Antena de cable FM ..................................................... 1
Pilas de célula seca (tipo AA/IEC R6P) ......................... 2
Mando a distancia ........................................................ 1
Manual de instrucciones .............................................. 1
NOTA:
•Las especificaciones y el diseño están sujetas a
posibles modificaciones sin previo aviso debido a la
política de mejoras continuas de la empresa.
* Sólo VSX-D811S/D811S-S.
+0
–3
+0
–3
Publicado por Pioneer Corporation.
Copyright © 2002 Pioneer Corporation.
Todos los derechos reservados.

10
106
ChH
放大部分
連續功率輸出(立體聲模式)
前 ..... 100 W+100 W(DIN 1kHz,THD 1%,8 Ω)
連續功率輸出(環繞聲模式)
前 .......... 100 W/ch(1 kHz,THD 1%,8 Ω )
中 ............ 100 W( 1 kHz,THD 1%,8 Ω )
環繞聲 ...... 100 W/ch(1 kHz,THD 1%,8 Ω )
後環繞聲*
........... 100 W/ch(1 kHz,THD 1%,8 Ω)
最大功率(1 kHz,10%,RMS,每聲道驅動) .. 120 W×5
輸入(靈敏度/阻抗)
CD,AUX,VCR/DVR,CD-R/卡式磁帶/MD,DVD/
LD,TV/衛星,VIDEO
............................. 200 mV/47 kΩ
頻率響應
CD,AUX,VCR/DVR,CD-R/卡式磁帶/MD,DVD/
LD,TV/衛星,VIDEO
.................... 5 Hz to 100,000 Hz dB
輸出(電平/阻抗)
VCR/DVR OUT,CD-R/卡式磁帶/MD REC
............................ 200 mV/2.2 kΩ
音調控制
低音 ...................... ±6 dB(100 Hz)
高音 ...................... ±6 dB(10 kHz)
響度 ............... +9 dB(100 Hz/10 kHz)
信噪比(IHF,短路,A網絡)
CD,VCR/DVR,CD-R/TAPE/MD,DVD/LD,TV/SAT
........................................ 96 dB
信噪比(EIA,於1W(1kHz))
CD,VCR/DVR,CD-R/TAPE/MD,DVD/LD,TV/SAT
........................................ 79 dB
信噪比
[DIN(連續額定功率輸出/50mW)]
CD,AUX,VCR/DVR,CD-R/卡式磁帶/MD,DVD/
LD,TV/衛星,VIDEO
............................... 88 dB/64 dB
視頻部分
輸入(靈敏度/阻抗)
VCR/DVR,DVD/LD,TV/衛星
.............................. 1 Vp-p/75 Ω
輸出(電平/阻抗)
VCR/DVR,監視器/TV ............ 1 Vp-p/75 Ω
頻率響應
VCR/DVR,DVD/LD,TV/衛星→監視器
......................... 5 Hz to 7 MHz dB
信噪比 ................................. 55 dB
分量視頻部分
輸入(靈敏度/阻抗)
DVD/LD,TV/衛星 ............... 1 Vp-p/75 Ω
輸出(電平/阻抗)
監視器/TV ..................... 1 Vp-p/75 Ω
規格
FM調諧器部分
頻率範圍 ................. 87.5 MHz to 108 MHz
可用靈敏度
... 單聲道:13.2 dBf,IHF(1.3 μV/ 75 Ω)
50 dB靜止靈敏度 .............. 單聲道:20.2 dB
立體聲:38.6 dBf
信噪比 ............. 單聲道: 73 dB (at 85 dBf)
立體聲: 70 dB (at 85 dBf)
信噪比 (DIN) ................... 單聲道: 62 dB
立體聲: 58 dB
失真率 ................ 立體聲:0.5 %(1 kHz)
交變聲道選擇度 ............... 60 dB (400 kHz)
立體聲隔離 ..................... 40 dB (1 kHz)
頻率響應 ............. 30 Hz to 15 kHz (±1dB)
天線輸入(DIN) .................. 75 Ω不均衡
AM調諧器部分
頻率範圍
多電壓型號
........ 531 kHz to 1,602 kHz(9 kHz 步進)
....... 530 kHz to 1,700 kHz(10 kHz 步進)
新加坡型號 ............ 531 kHz to 1,602 kHz
靈敏度(1HF,環形天線) ............. 350μV/m
選擇度 ................................. 30 dB
信噪比 ................................. 50 dB
天線 ................................ 環型天線
其他
電源要求
多電壓型號
AC 110/120-127/220/240 V(可切換),50/60 Hz
新加坡型號 .......... AC 220-230 V,50/60 Hz
功耗
VSX-D711/D711-S
多電壓型號 ......................... 900 W
星加坡型號 ......................... 250 W
VSX-D811S/D811S-S
多電壓型號 ......................... 990 W
新加坡型號 ......................... 280 W
備用模式時的功耗 ......................... 1 W
外形尺寸 ... 420(深)x 158(高)x 401(寬)mm
重量(不帶包裝) ..................... 10.0 kg
提供的部件
AM環形天線 ................................. 1
FM線形天線 ................................. 1
乾電池(AA型IEC R6P) ...................... 2
遙控器 ..................................... 1
使用說明書 ................................. 1
說明:
•規格和設計在改進時,有可能修改,不另外通知。
* 僅用於 VSX-D811S/VSX-D811S-S。
日本先鋒公司出版
版權©2002日本先鋒公司
版權所有
+0
-3
+0
-3

10
107
Cleaning the unit
• Use a polishing cloth or dry
cloth to wipe off dust and dirt.
• When the surfaces are dirty,
wipe with a soft cloth dipped
in some neutral cleanser
diluted five or six times with
water, and wrung out well, and
then wipe again with a dry
cloth. Do not use furniture
wax or cleansers.
• Never use thinners, benzine,
insecticide sprays or other
chemicals on or near this unit,
since these will corrode the
surfaces.
Limpieza de la
unidad
• Utilice un trapo de limpiar o
un trapo seco para retirar el
polvo y la suciedad.
• Cuando las superficies estén
sucias, utilice un trapo suave
humedecido en un limpiador
neutro con cinco o seis partes
de agua y bien escurrido, y, a
continuación pase un trapo
seco. No utilice cera o
limpiadores para muebles.
• No utilice nunca diluyentes,
benzina, insecticidas u otros
productos químicos sobre o
cerca de este aparato, ya que
corroerán la superficie.
清潔本機
•請使用拋光布或乾布進行清
潔,擦拭灰塵。
•當本機表面變髒時,將軟乾布
蘸上用四至五倍的水稀釋過的
中性清潔劑,擰乾後擦拭,然
後再用乾布擦拭。請勿使用家
具蠟或清潔劑。
•切勿將稀釋劑、汽油、殺虫劑
噴霧或其他化學品用在本機上
或本機周圍,否則會使本機表
面腐蝕。

Published by Pioneer Corporation.
Copyright © 2002 Pioneer Corporation.
All rights reserved.
PIONEER CORPORATION
4-1, Meguro 1-Chome, Meguro-ku, Tokyo 153-8654, Japan
PIONEER ELECTRONICS [USA] INC.
P.O. BOX 1540, Long Beach, California 90801-1540, U.S.A.
PIONEER ELECTRONICS OF CANADA, INC.
300 Allstate Parkway, Markham, Ontario L3R OP2, Canada
PIONEER EUROPE NV
Haven 1087, Keetberglaan 1, B-9120 Melsele, Belgium TEL: 03/570.05.11
PIONEER ELECTRONICS AUSTRALIA PTY. LTD.
178-184 Boundary Road, Braeside, Victoria 3195, Australia, TEL: [03] 9586-6300
PIONEER ELECTRONICS DE MEXICO S.A. DE C.V.
San Lorenzo 1009 3er Piso Desp. 302 Col. Del Valle Mexico D.F. C.P. 03100
TEL: 55-5688-52-90
<TSWZW/02B00001> Printed in <XRE3055-A>
