Pismolabs Technology P1805 Pepwave / Peplink / Pismo Wireless Product User Manual U8G P1805
Pismo Labs Technology Limited Pepwave / Peplink / Pismo Wireless Product U8G P1805
Contents
- 1. User Manual (1 of 4).pdf
- 2. User Manual (2 of 4).pdf
- 3. User Manual (3 of 4).pdf
- 4. User Manual (4 of 4).pdf
User Manual (1 of 4).pdf

User Manual
For Model ONE/20/30/30 LTE/210/310/305/380/580/710/1350/2500
Peplink Balance Firmware 6.1
Copyright & TrademarksSpecifications are subject to change without prior notice. Copyright © Peplink International Ltd. All Rights
Reserved. Peplink and the Peplink logo are trademarks of Peplink International Ltd. Other brands or products mentioned may be
trademarks or registered trademarks of their respective owners.
Peplink Balance Multi-WAN Bonding Routers

USER MANUAL
Peplink Balance Series
http://www.peplink.com -2 / 227- Copyright © Peplink
TABLE OF CONTENTS
1 INTRODUCTION AND SCOPE ······························································································6
2 GLOSSARY ··························································································································7
3 PRODUCT COMPARISON CHART ························································································8
4 PRODUCT FEATURES ········································································································12
4.1 Supported Network Features ····················································································· 12
4.2 Other Supported Features ························································································· 13
5 PACKAGE CONTENTS········································································································15
5.1 Peplink Balance One ······························································································· 15
5.2 Peplink Balance 20 / 30 / 30 LTE ················································································ 15
5.3 Peplink Balance 210 / 310 ························································································· 15
5.4 Peplink Balance305 / 380 / 580 / 710 / 1350 / 2500 ························································ 15
6 PEPLINK BALANCE OVERVIEW ·························································································16
6.1 Peplink Balance One ······························································································· 16
6.2 Peplink Balance 20 ·································································································· 18
6.3 Peplink Balance 30 ·································································································· 20
6.4 Peplink Balance 30 LTE ··························································································· 22
6.5 Peplink Balance 210 ································································································ 24
6.6 Peplink Balance 310 ································································································ 26
6.7 Peplink Balance 305 ································································································ 28
6.8 Peplink Balance 380 ································································································ 31
6.9 Peplink Balance 580 ································································································ 34
6.10 Peplink Balance 710 ····························································································· 37
6.11 Peplink Balance 1350 ··························································································· 40
6.12 Peplink Balance 2500 ··························································································· 43
7 INSTALLATION··················································································································47
7.1 Preparation ············································································································ 47
7.2 Constructing the Network ·························································································· 47
7.3 Configuring the Network Environment ·········································································· 49
8 BASIC CONFIGURATION ···································································································55
8.1 Connecting to the Web Admin Interface ······································································· 55
8.2 Configuration with the Setup Wizard ············································································ 56
8.3 Advanced Setup ····································································································· 59
8.4 Cellular WAN ········································································································· 60
9 CONFIGURING THELAN INTERFACE ··················································································65
10 DROP-IN MODE ················································································································70
11 CONFIGURING THE WAN INTERFACE(S) ···········································································73
11.1 Connection Method(s) ··························································································· 75
11.2 Physical Interface Settings ····················································································· 82

USER MANUAL
Peplink Balance Series
http://www.peplink.com -3 / 227- Copyright © Peplink
11.3 WAN Health Check ······························································································· 83
11.4 Bandwidth Allowance Monitor ················································································· 86
11.5 Additional Public IP Settings ··················································································· 87
11.6 Dynamic DNS Settings ·························································································· 88
12 BANDWIDTH BONDING SPEEDFUSIONTM ·········································································90
12.1 SpeedFusionTMSettings ························································································· 90
12.2 The Peplink Balance Behind a NAT Router ································································ 96
12.3 SpeedFusionTM Status ··························································································· 97
13 IPSEC VPN ························································································································98
13.1 IPsec VPN Settings ······························································································ 98
13.2 IPsec Status······································································································ 101
14 OUTBOUND POLICY MANAGEMENT ·············································································· 102
14.1 Outbound Policy ································································································ 103
14.2 Custom Rules for Outbound Policy ········································································· 104
15 INBOUND ACCESS ·········································································································· 110
15.1 Definition of Port Forwarding················································································· 110
15.2 Definition of Servers on LAN ················································································· 111
15.3 Inbound Access Services ····················································································· 113
15.4 Reverse Lookup Zones ······················································································· 127
15.5 DNS Record Import Wizard ·················································································· 130
16 NAT MAPPINGS·············································································································· 134
17 CAPTIVE PORTAL ············································································································ 136
18 QOS ································································································································ 139
19 FIREWALL ······················································································································· 143
19.1 Outbound and Inbound Firewall Rules ···································································· 143
20 OSPF & RIPV2 ················································································································· 150
21 MISCELLANEOUS SETTINGS···························································································· 152
21.1 High Availability ································································································· 152
21.2 PPTP Server ····································································································· 155
21.3 Certificate Manager ···························································································· 156
21.4 Service Forwarding ····························································································· 156
21.5 Service Passthrough ··························································································· 158
22 AP ·································································································································· 160
22.1 AP Controller····································································································· 160
22.2 Wireless SSID ··································································································· 161
22.3 Profiles ············································································································ 167
22.4 Info ················································································································· 171
22.5 Usage ·············································································································· 172
22.6 AP Status ········································································································· 174
22.7 Rogue AP ········································································································· 176

USER MANUAL
Peplink Balance Series
http://www.peplink.com -4 / 227- Copyright © Peplink
22.8 Toolbox ············································································································ 176
23 SYSTEM SETTINGS ·········································································································· 177
23.1 Admin Security ·································································································· 177
23.2 Firmware ·········································································································· 181
23.3 Time ················································································································ 182
23.4 Email Notification ······························································································· 183
23.5 Event Log ········································································································· 185
23.6 SNMP ·············································································································· 186
23.7 InControl ·········································································································· 188
23.8 Configuration····································································································· 189
23.9 Feature Add-ons ································································································ 190
23.10 Reboot ············································································································· 190
24 TOOLS ···························································································································· 191
24.1 Ping ················································································································ 191
24.2 Traceroute Test ································································································· 192
24.3 PepVPN Test ···································································································· 192
24.4 PepVPN Analyzer ······························································································ 192
24.5 CLI (Command Line Interface Support) ··································································· 193
25 STATUS ·························································································································· 194
25.1 Device ············································································································· 194
25.2 Active Sessions ································································································· 196
25.3 Client List ········································································································· 198
25.4 WINS Client ······································································································ 198
25.5 SpeedFusionTMStatus ························································································· 198
25.6 Event Log ········································································································· 199
25.7 Bandwidth ········································································································ 200
APPENDIX A. RESTORATION OF FACTORY DEFAULTS ····························································· 206
APPENDIX B. ROUTING UNDER DHCP, STATIC IP, AND PPPOE ··············································· 207
B.1 Routing via Network Address Translation (NAT)··························································· 207
B.2 Routing via IP Forwarding ······················································································· 208
APPENDIX C. CASE STUDIES ···································································································· 209
C.1 Performance Optimization ······················································································· 209
C.2 Maintaining the Same IP Address throughout a Session ················································ 211
C.3 Bypassing the Firewall to Access Hosts on LAN ·························································· 212
C.4 Inbound Access Restriction ····················································································· 213
C.5 Outbound Access Restriction ··················································································· 214
APPENDIX D. TROUBLESHOOTING ·························································································· 215
APPENDIX E. PRODUCT SPECIFICATIONS ················································································ 217
E.1 Peplink Balance 20, 30 and 30 LTE··········································································· 217
E.2 Peplink Balance 210 and 310 ·················································································· 218
E.3 Peplink Balance 380 ······························································································ 219
E.4 Peplink Balance 305 ······························································································ 220

USER MANUAL
Peplink Balance Series
http://www.peplink.com -5 / 227- Copyright © Peplink
E.5 Peplink Balance 380 ······························································································ 221
E.6 Peplink Balance 580 ······························································································ 222
E.7 Peplink Balance 710 ······························································································ 223
E.8 Peplink Balance 1350 ···························································································· 224
E.9 Peplink Balance 2500 ···························································································· 225
APPENDIX F. DECLARATION ···································································································· 226

USER MANUAL
Peplink Balance Series
http://www.peplink.com -6 / 227- Copyright © Peplink
1 Introduction and Scope
The Peplink Balance series provides link aggregation and load balancing across up to thirteen WAN
connections.
The Peplink Balance 20/30/30 LTE provides a cost-effective solution suitable for power users and home
offices.
The Peplink Balance 210/310 provides advanced features for small business.
The Peplink Balance 380, 580, 710, 1350, and 2500 come with a suite of advanced enterprise-class
features. They areideal single-box solutions for medium to large-sized business environments,andthey
allow service providers to enable highly available multi-network services.
This manual applies to the following Peplink Balance products:
Peplink Balance 20/30 (firmware version v6.1.x)
Peplink Balance 30 LTE (firmware version v6.1.x)
Peplink Balance 210/310 (firmware version v6.1.x)
Peplink Balance 380 (firmware version v6.1.x)
Peplink Balance 580 (firmware version v6.1.x)
Peplink Balance 710 (firmware version v6.1.x)
Peplink Balance 1350 (firmware version v6.1.x)
Peplink Balance 2500 (firmware version v6.1.x)
The manual covers setting up your Peplink Balance and provides a collection of case studies detailing
theadvanced features of the Peplink Balance.
Important Note to Users Upgrading from Firmware 4.7 or below
If your current firmware version is 4.7 or below, please upgrade to Firmware 4.8.2 before upgrading to Firmware
6.1.
Important Note to Users of the Peplink Balance 30 (Classic Edition)
Firmware 5.0 or above is NOT applicable to the Peplink Balance 30 (Classic Edition). For more information
onidentifying the generation of your Peplink Balance 30, please visit our knowledge base at
<http://www.peplink.com/index.php?view=faq&id=231&path=16>.

USER MANUAL
Peplink Balance Series
http://www.peplink.com -7 / 227- Copyright © Peplink
2 Glossary
The following terms, acronyms, and abbreviations are frequently used in this manual:
Term
Definition
3G
3rd generation standards for wireless communications (e.g., HSDPA)
4G
4th generation standards for wireless communications (e.g., WiMAX, LTE)
DHCP
Dynamic Host Configuration Protocol
DNS
Domain Name System
EVDO
Evolution-Data Optimized
FQDN
Fully Qualified Domain Name
HSDPA
High-Speed Downlink Packet Access
HTTP
Hyper-Text Transfer Protocol
ICMP
Internet Control Message Protocol
IP
Internet Protocol
LAN
Local Area Network
MAC Address
Media Access Control Address
MTU
Maximum Transmission Unit
MSS
Maximum Segment Size
NAT
Network Address Translation
PPPoE
Point to Point Protocol over Ethernet
QoS
Quality of Service
SNMP
Simple Network Management Protocol
TCP
Transmission Control Protocol
UDP
User Datagram Protocol
VPN
Virtual Private Network
VRRP
Virtual Router Redundancy Protocol
WAN
Wide Area Network
WINS
Windows Internet Name Service
WLAN
Wireless Local Area Network
210+
Refers to Peplink Balance 210/310/380/580/710/1350/2500
380+
Refers to Peplink Balance 380/580/710/1350/2500

USER MANUAL
Peplink Balance Series
http://www.peplink.com -8 / 227 - Copyright © Peplink
3 Product Comparison Chart
Features 20
30
30 LTE
210
310
380
580
710
1350
2500
Capacity
WAN Ports (GbE) /
Internet Links
2 3 2 2 3 3 5 7 13 12
USB WAN Modem Port
1 1 1 1 1 1 1 1 1
1
Embedded LTE Modem
X X 1 X X X
X X
X
X
Recommended Users
1-25
1-25
1-25
1-50
1-50
50
-
500
300
-
1000
500-
2000+
1000-
5000+
5000-
20000+
Router Throughput
100M
100M
100M
100M
100M
200M
400M
800M
1500M
8Gbps
Core Functionality
Load Balancing & Failover
Yes
Yes
Yes
Yes
Yes
Yes
Yes
Yes
Yes
Yes
Load Balancing
Algorithms
5
5
5
7
7
7
7
7
7
7
l Weighted
Yes
Yes
Yes
Yes
Yes
Yes
Yes
Yes
Yes
Yes
l Enforced
Yes
Yes
Yes
Yes
Yes
Yes
Yes
Yes
Yes
Yes
l Persistence
Yes
Yes
Yes
Yes
Yes
Yes
Yes
Yes
Yes
Yes
l Priority
Yes
Yes
Yes
Yes
Yes
Yes
Yes
Yes
Yes
Yes
l Overflow
Yes
Yes
Yes
Yes
Yes
Yes
Yes
Yes
Yes
Yes
l Least Used
X
X
X
Yes
Yes
Yes
Yes
Yes
Yes
Yes

USER MANUAL
Peplink Balance Series
http://www.peplink.com -9 / 227 - Copyright © Peplink
l Lowest Latency
X
X
X
Yes
Yes
Yes
Yes
Yes
Yes
Yes
Drop-In Mode
X
X
X
Yes
Yes
Yes
Yes
Yes
Yes
Yes
Inbound Load Balancing
X
X
X
Yes
Yes
Yes
Yes
Yes
Yes
Yes
4G/3G Modem Support
Yes
Yes
Yes
Yes
Yes
Yes
Yes
Yes
Yes
Yes
VPN Functionality
SpeedFusionTM
X
X
X
Yes
Yes
Yes
Yes
Yes
Yes
Yes
Number of
SpeedFusionTMPeer
X
X
X
2
2
20
50
300
800
4000
Bonded VPN Throughput
X
X
X
30M
30M
60M
80M
150M
350M
2Gbps
PPTP VPN Server
Yes
Yes
Yes
Yes
Yes
Yes
Yes
Yes
Yes
Yes
Recommended PPTP
VPN Users
3
3
3
15
15
50
100
200
500
1000
RADIUS / LDAP Support
for PPTP
X X X Yes
Yes
Yes
Yes
Yes Yes
Yes
IPsec VPN
(Network-to-Network)
Yes
Yes
Yes
Yes
Yes
Yes
Yes
Yes
Yes
Yes
Number of IPsec Tunnel
2
2
2
2
2
20
50
150
400
800
WLAN Control
Functionality
Manage Pepwave AP
One
X
X
X
X
X
Yes
Yes
Yes
Yes
Yes
Access Point
Configuration
X
X
X
X
X
Yes
Yes
Yes
Yes
Yes
AP Firmware Update
X
X
X
X
X
Yes
Yes
Yes
Yes
Yes
Number of AP Support
X
X
X
X
X
50*
100*
250*
500*
Yes
Advanced QoS
Functionality
Bandwidth Usage Monitor
Yes
Yes
Yes
Yes
Yes
Yes
Yes
Yes
Yes
Yes
QoS for VoIP and E-
Commerce
Yes
Yes
Yes
Yes
Yes
Yes
Yes
Yes
Yes
Yes

USER MANUAL
Peplink Balance Series
http://www.peplink.com -10 / 227 - Copyright © Peplink
Application Prioritization
X
X
X
Yes
Yes
Yes
Yes
Yes
Yes
Yes
Application Prioritization
by User Group
X
X
X
X
X
Yes
Yes
Yes
Yes
Yes
User Group Bandwidth
Reservation
X
X
X
X
X
Yes
Yes
Yes
Yes
Yes
Individual Bandwidth Limit
X
X
X
X
X
Yes
Yes
Yes
Yes
Yes
Networking Functionality
NAT and IP Forwarding
Yes
Yes
Yes
Yes
Yes
Yes
Yes
Yes
Yes
Yes
Static Routes
Yes
Yes
Yes
Yes
Yes
Yes
Yes
Yes
Yes
Yes
Port Forwarding
Yes
Yes
Yes
Yes
Yes
Yes
Yes
Yes
Yes
Yes
Many to One, One to One
NAT
Yes
Yes
Yes
Yes
Yes
Yes
Yes
Yes
Yes
Yes
NAT Pool
Yes
Yes
Yes
Yes
Yes
Yes
Yes
Yes
Yes
Yes
SIP ALG, H.323 ALG
Yes
Yes
Yes
Yes
Yes
Yes
Yes
Yes
Yes
Yes
UPnP, NAT-PMP
Yes
Yes
Yes
Yes
Yes
Yes
Yes
Yes
Yes
Yes
WINS Server
Yes
Yes
Yes
Yes
Yes
Yes
Yes
Yes
Yes
Yes
Dynamic DNS
Yes
Yes
Yes
Yes
Yes
Yes
Yes
Yes
Yes
Yes
Web Blocking
X
X
X
X
X
Yes
Yes
Yes
Yes
Yes
Device
Management
Web Administrative
Interface
Yes
Yes
Yes
Yes
Yes
Yes
Yes
Yes
Yes
Yes
Email Notification
Yes
Yes
Yes
Yes
Yes
Yes
Yes
Yes
Yes
Yes
Active Client List
Yes
Yes
Yes
Yes
Yes
Yes
Yes
Yes
Yes
Yes
Active Session List
Yes
Yes
Yes
Yes
Yes
Yes
Yes
Yes
Yes
Yes
Bandwidth Usage
Statistics
Yes
Yes
Yes
Yes
Yes
Yes
Yes
Yes
Yes
Yes

USER MANUAL
Peplink Balance Series
http://www.peplink.com -11 / 227 - Copyright © Peplink
Web Reporting Services
Yes
Yes
Yes
Yes
Yes
Yes
Yes
Yes
Yes
Yes
Email Notification
Yes
Yes
Yes
Yes
Yes
Yes
Yes
Yes
Yes
Yes
Syslog
Yes
Yes
Yes
Yes
Yes
Yes
Yes
Yes
Yes
Yes
SNMP v1, v2c and v3
Yes
Yes
Yes
Yes
Yes
Yes
Yes
Yes
Yes
Yes
Hardware Features
LAN Ports
(GbE) 4 4
4
4 4 1 1 1 1
8/ 2(10GbE
SFP+)
Power Input
9-16V DC
9-16V DC
9-16V DC
9-16V AC
DC
9-16VDC
100V to
240V
AC
100V to
240V AC
100V to
240V AC
100V to
240V AC
100V to
240V AC
Power Consumption
15W
15W
15W
15W
15W
50W
50W
70W
70W
230W
1U Rackmount
X
X
X
Yes
Yes
Yes
Yes
Yes
Yes
Yes
High Availability
X
X
X
Yes
Yes
Yes
Yes
Yes
Yes
Yes
LAN Bypass
X
X
X
X
X
X
Yes
Yes
Yes
Yes
Dimension (H x W x D)
3.5cm x 26cm x 13.3cm 3.5cm x 26cm x 13.3cm
1U x 37.9cm
1U x
39.8cm
1U x
55cm
Weight
1.0kg
1.0kg
1.0kg
1.2kg
1.2kg
3.5kg
5.5kg
5.5kg
6.5kg
12kg

USER MANUAL
Peplink Balance Series
http://www.peplink.com -12 / 227 - Copyright © Peplink
4 Product Features
Peplink Balance series products enableall LAN users to sharebroadband Internet connectionsand provide
advanced features to enhanceInternet access. The following is alist of supported features:
4.1 Supported Network Features
4.1.1 WAN
Multiple public IP support (DHCP, PPPoE, static IP address)
Static IP support for PPPoE
10/100/1000Mbps Ethernet connection in full/half duplex
Built-in HSPA and EVDO cellular modems (Available on Peplink Balance 30 LTE)
USB mobile connection(only one USB modem can be connected at a time)
Drop-in Modeon selectable WAN portwith MAC address passthrough(available on Peplink
Balance 210+)
Network address translation (NAT) / port address translation (PAT)
Inbound and outbound NAT mapping
Multiple static IP addresses per WAN connection
MAC address clone
Customizable MTU and MSS values
WAN connection health check
Dynamic DNS (supported service providers: changeip.com, dyndns.org, no-ip.org,tzo.com, and
DNS-O-Matic)
Ping, DNS lookup,and HTTP-based health check
4.1.2 LAN
DHCP server on LAN
Extended DHCP option support
Static routing rules
Local DNS proxy server
VLAN on LAN support
4.1.3 VPN
Secure SpeedFusionTM(available on Peplink Balance 210+)
SpeedFusion performance analyzer
X.509 certificate support (feature activation required on Peplink Balance 20/30/30 LTE;
included on Peplink Balance 210+)
Bandwidth bondingand failover among selected WAN connections
Ability to route traffic to a remote VPN peer
Optional pre-shared key setting
Layer 2 bridging
SpeedFusionTMthroughput, ping, and traceroute tests
Built-in PPTP VPN server
Authenticate PPTP clients using RADIUS and LDAP servers (Available on Peplink Balance
210+)
IPsec VPN for network-to-network connections (Works with Cisco and Juniper only)
PPTP and IPsecpassthrough

USER MANUAL
Peplink Balance Series
http://www.peplink.com -13 / 227 - Copyright © Peplink
4.1.4 Inbound Traffic Management
TCP/UDP traffic redirection to dedicated LAN server(s)
Inbound link load balancing by means of DNS(available on Peplink Balance 210+)
4.1.5 Outbound Policy
Link load distribution per TCP/UDP service
Persistent routing for specified source and/or destination IP addresses per TCP/UDP service
Prioritize and route traffic to VPN tunnels with Priority and Enforced algorithms
4.1.6 AP Controller
· Configure and manage Pepwave AP devices
· Review the status of connected AP
4.1.7 QoS(Available on Peplink Balance 210+)
Quality of Service for different applications and custom protocols
User Group classification for different service levels (Available on Peplink Balance 380+)
Bandwidth usage control and monitoring on group- and user- level (Available on Peplink
Balance 380+)
Application Prioritization for custom protocols and DSL optimization
4.1.8 Firewall
Outbound (LAN to WAN) firewall rules
Inbound (WAN to LAN) firewall rules per WAN connection
Intrusion detection and prevention
Specification of NAT mappings
Web Blocking (Available on Peplink Balance 380+)
Outbound firewall rules can be defined by destination domain name
4.1.9 Captive Portal
Splash screen of open networks, login page for secure networks
Customizable built-in captive portal
Supports linking to outside page for captive portal
4.2 Other Supported Features
Easy-to-use web administration interface
HTTP and HTTPS support for Web Administration Interface
Configurable web administration port and administrator password
Read-only user for Web Admin
Shared-IP drop-in mode (Available on the Peplink Balance 20, 30 and 30 LTE upon feature
activation, available on Peplink Balance 210+)
Authentication and Accounting by RADIUS server for Web Admin(Available on Peplink Balance
210+)
Firmware upgrades, configuration backups, Ping, and Traceroute via W eb Administration
Interface
Remote web based configuration (via WAN and LAN interfaces)

USER MANUAL
Peplink Balance Series
http://www.peplink.com -14 / 227 - Copyright © Peplink
Remote reporting to Peplink Balance reporting server
Hardware High Availability via VRRP, with automatic configuration synchronization(Available on
Peplink Balance 210+)
Real-Time, Hourly, Daily and Monthly Bandwidth Usage reports and charts
Hardware backup via LAN bypass (Available on Peplink Balance 580, 710, 1350 and 2500)
Built-in WINS server
Time server synchronization
SNMP
Email notification
Syslog
SIP passthrough
PPTP packet passthrough
Active Sessions
Active Client List
WINS Client List
UPnP / NAT-PMP
Improved Active Sessions Page
Event Log is persistent across reboots
IPv6 support
Support USB tethering on Android 2.2+ phones

USER MANUAL
Peplink Balance Series
http://www.peplink.com -15 / 227 - Copyright © Peplink
5 Package Contents
The contents of Peplink Balance product packages are as follows:
5.1 Peplink Balance One
Peplink Balance 20 / 30 / 30 LTE
Power adapter
Information slip
5.2 Peplink Balance 20 / 30 / 30 LTE
Peplink Balance 20 / 30 / 30 LTE
Power adapter
Information slip
5.3 Peplink Balance 210 / 310
Peplink Balance 210 / 310
Power adapter
Information slip
Rackmount kit
5.4 Peplink Balance305 / 380 / 580 / 710 / 1350 / 2500
Peplink Balance 305/380/580/710/1350/2500
Power cord
Information slip
Rackmount kit
USER MANUAL
Peplink Balance Series
http://www.peplink.com -16 / 227 - Copyright © Peplink
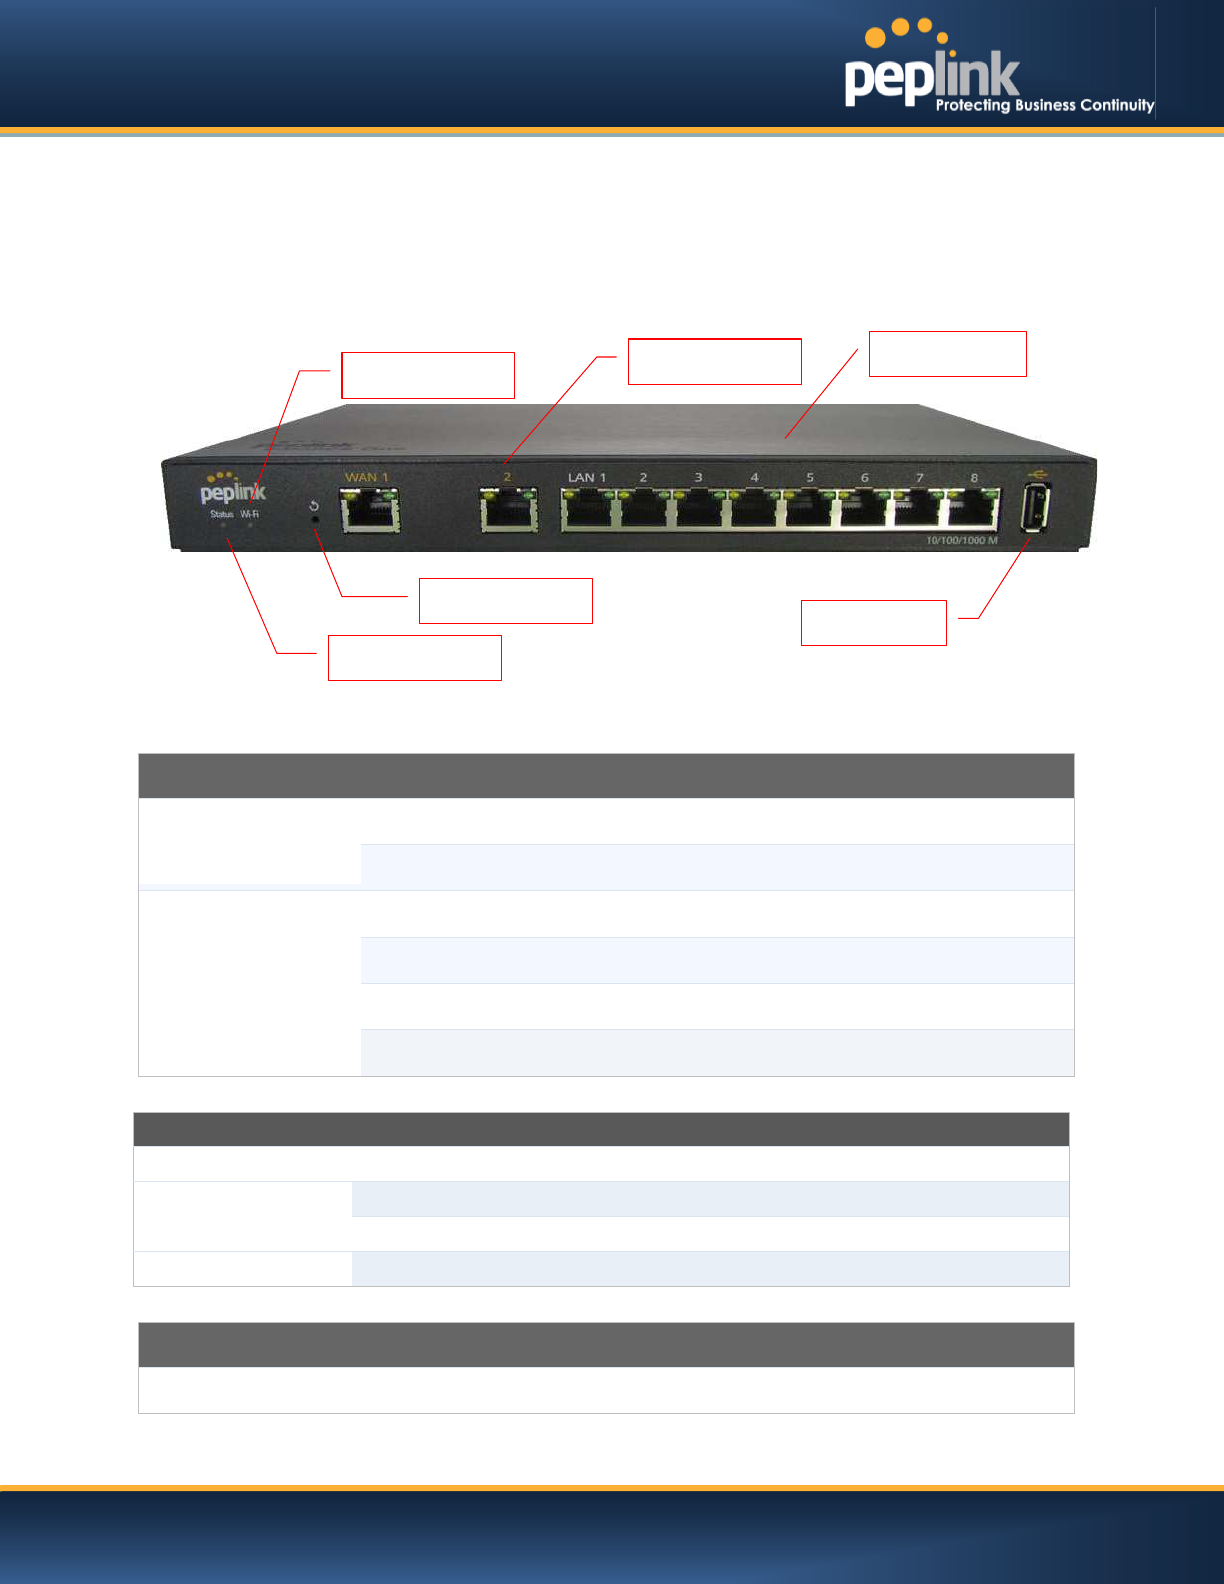
6 Peplink Balance Overview
6.1 Peplink Balance One
6.1.1 Front Panel Appearance
.
6.1.2 LED Indicators
The statuses indicated by the front panel LEDs are as follows:
Power and Status Indicators
Wi-Fi
OFF
– Wi-Fi is off
Green
– Ready
Status
OFF
– Upgrading firmware
Red
– Booting up or busy
Blinking r
ed– Boot up error
Green
– Ready
LAN and WAN Ports
Green LED
ON
– 10 / 100 / 1000 Mbps
Orange LED
Blinking
– Data is transferring
OFF
– No data is being transferred or port is not connected
Port Type
Auto MDI/MDI
-X ports
USB Port
USB Ports
For
future functionalities.
Status LED
USB Port
LAN Ports
WAN Ports
Reset Button
Wi-Fi LED

USER MANUAL
Peplink Balance Series
http://www.peplink.com -17 / 227 - Copyright © Peplink
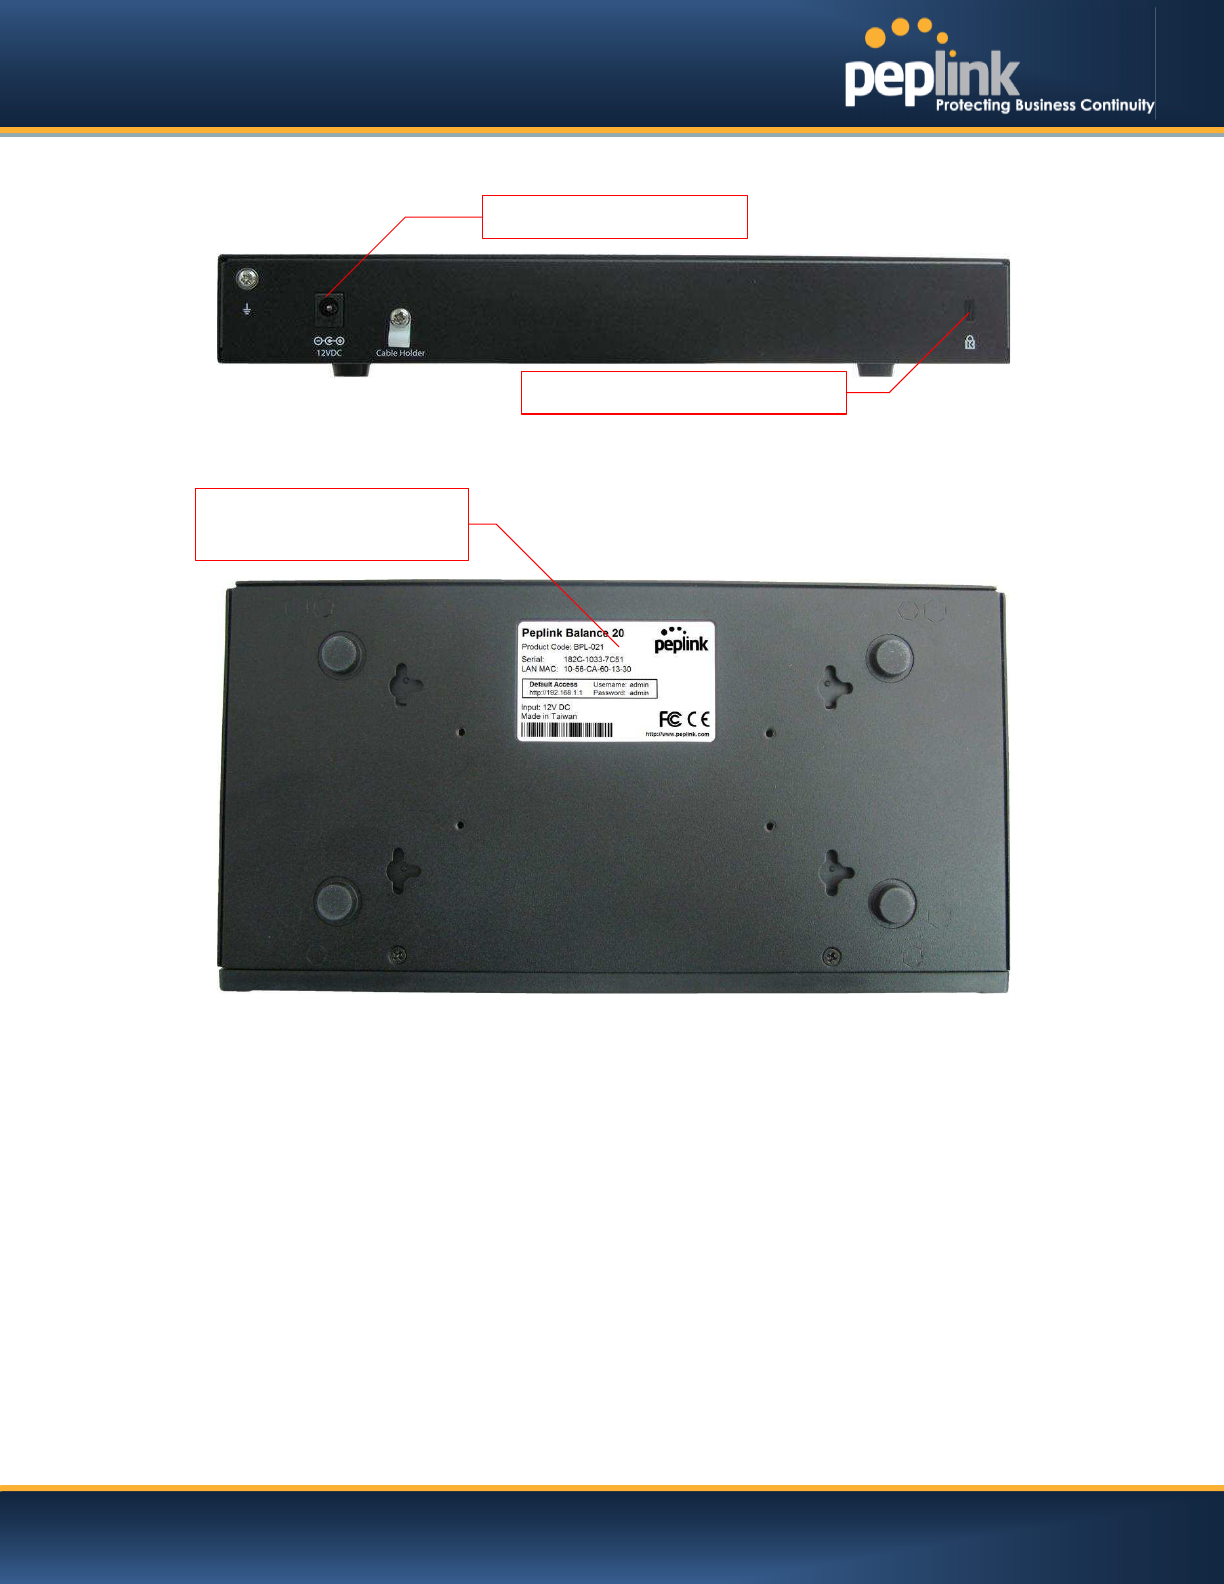
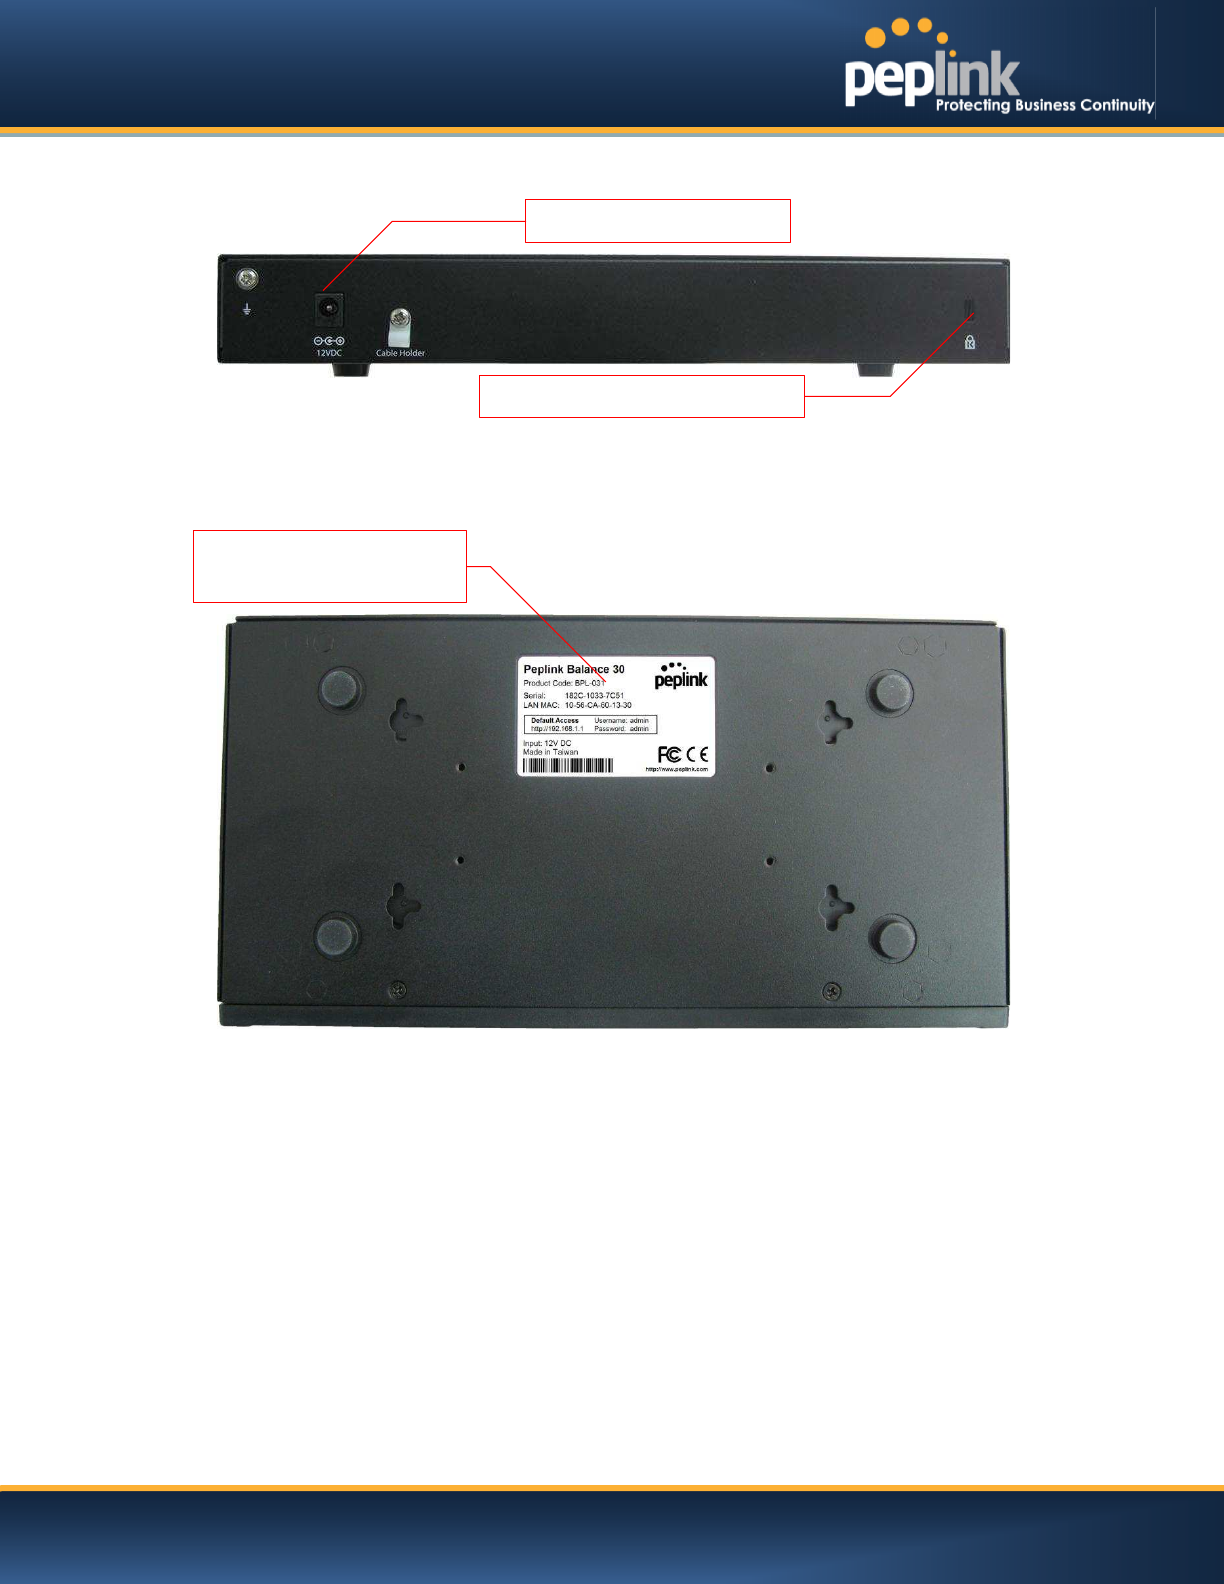
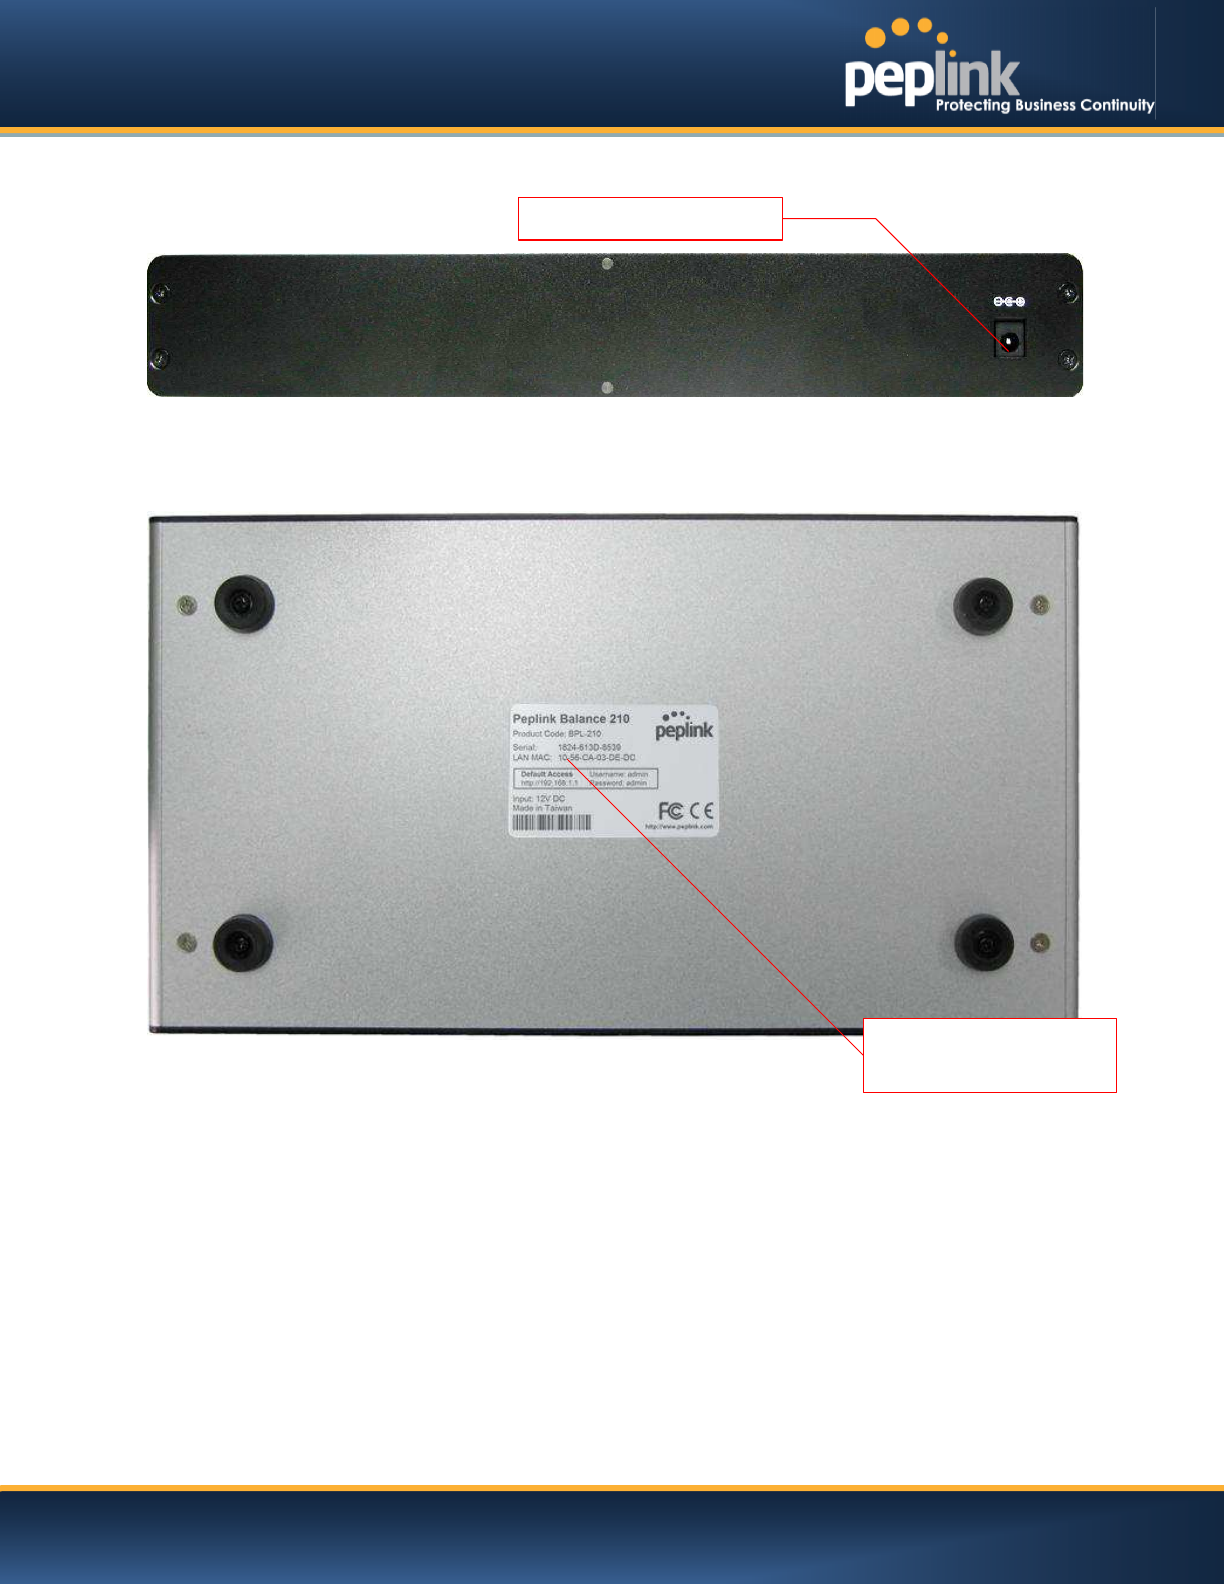
6.1.3 Rear Panel Appearance
6.1.4 Product Label
Power Connector
USER MANUAL
Peplink Balance Series
http://www.peplink.com -18 / 227 - Copyright © Peplink
6.2 Peplink Balance 20
6.2.1 Front Panel Appearance
6.2.2 LED Indicators
The statuses indicated by the front panel LEDs are as follows:
Power and Status Indicators
Power
OFF – Power off
Green
– Power on
Status
OFF
– Upgrading firmware
Red
–Booting up or busy
Blinking r
ed– Boot up error
Green
– Ready
LAN and WAN Ports
Green LED
ON – 10 / 100 / 1000 Mbps
Orange LED
Blinking
– Data is transferring
OFF
– No data is being transferred or port is not connected
Port Type
Auto MDI/MDI-X ports
USB Port
USB Ports
For connecting a
4G/3G USB modem
LAN Ports
Power LED
Reset Button
Status LED
WAN Ports
USB Port
USER MANUAL
Peplink Balance Series
http://www.peplink.com -19 / 227 - Copyright © Peplink
6.2.3 Rear Panel Appearance
6.2.4 Unit Base Appearance
Serial Number and
LAN MAC Address
Power Connector
Kensington Security Slot
USER MANUAL
Peplink Balance Series
http://www.peplink.com -20 / 227 - Copyright © Peplink
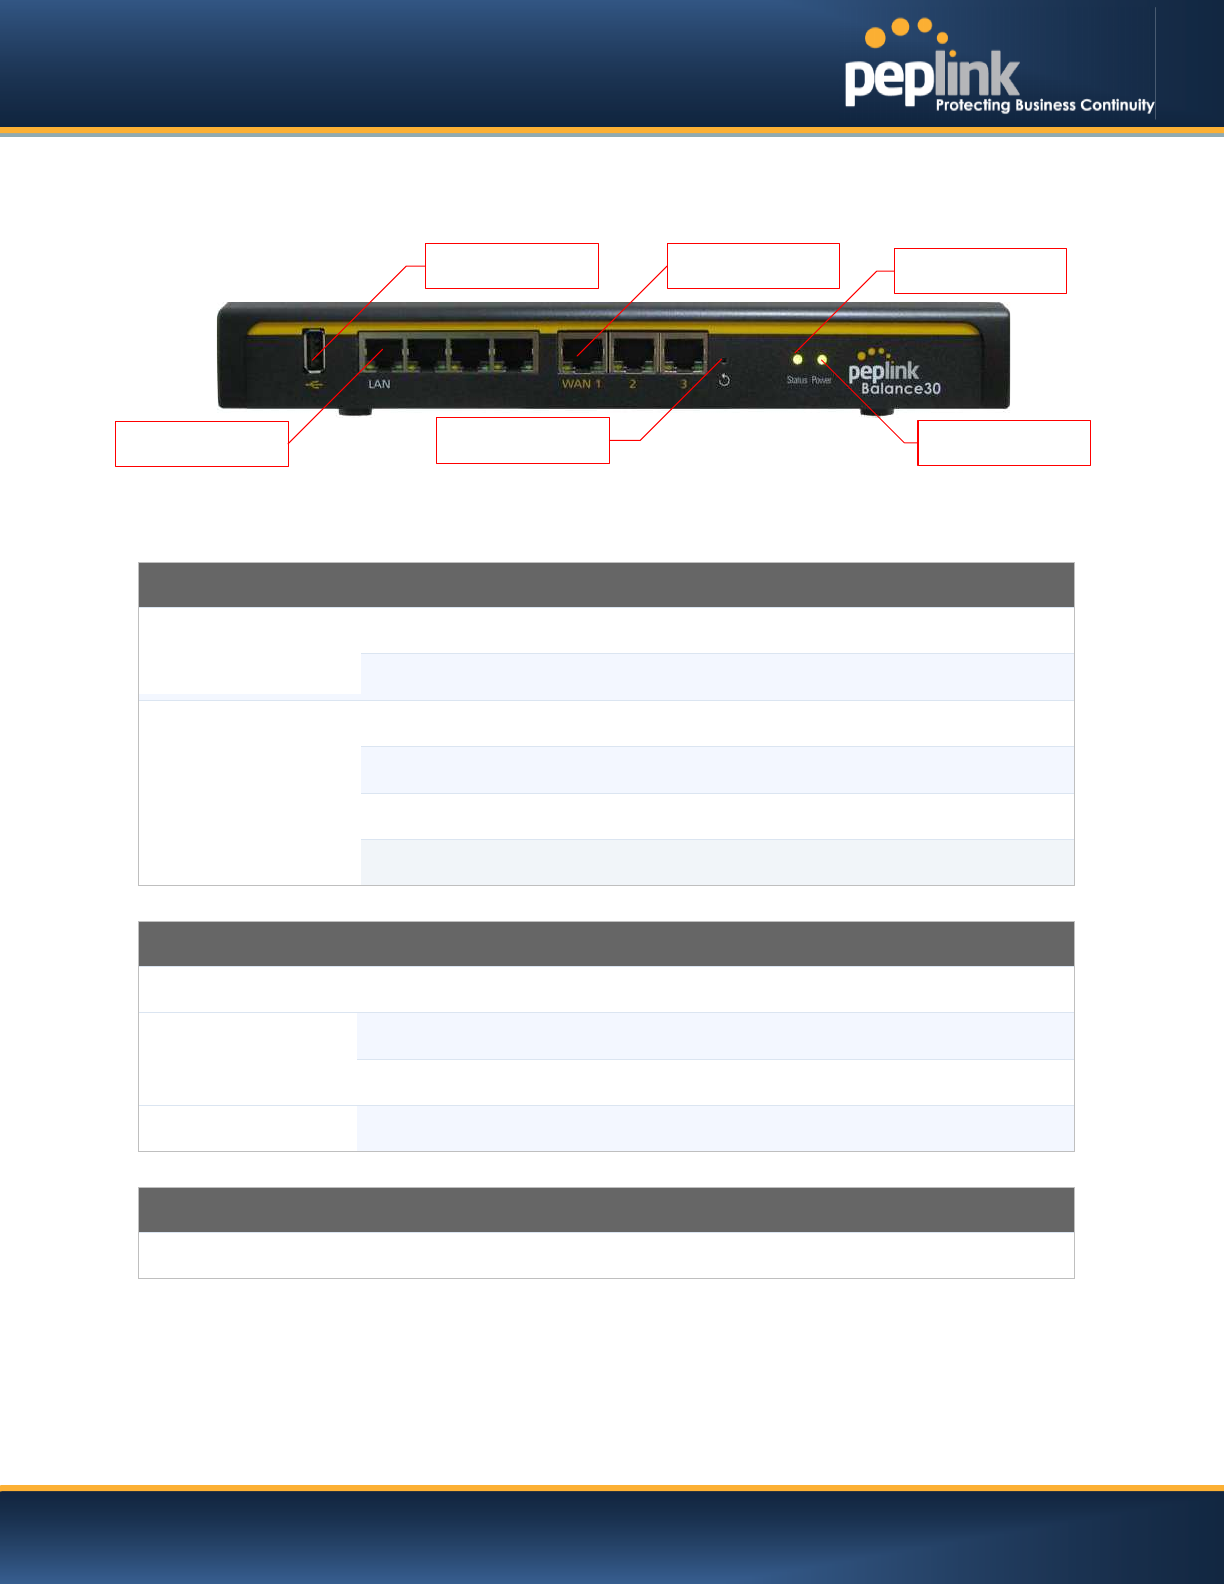
6.3 Peplink Balance 30
6.3.1 Front Panel Appearance
6.3.2 LED Indicators
The statuses indicated by the front panel LEDs are as follows:
Power and Status Indicators
Power
OFF – Power off
Green
– Power on
Status
OFF
– Upgrading firmware
Red
– Booting up or busy
Blinking r
ed– Boot up error
Green
– Ready
LAN and WAN Ports
Green LED
ON – 10 / 100 /1000 Mbps
Orange LED
Blinking
– Data is transferring
OFF
– No data is being transferred or port is not connected
Port Type
Auto MDI/MDI
-X ports
USB Port
USB Ports
For connecting a
4G/3G USB modem
Reset Button
Power LED
Status LED
LAN Ports
WAN Ports
USB Port
USER MANUAL
Peplink Balance Series
http://www.peplink.com -21 / 227 - Copyright © Peplink
6.3.3 Rear Panel Appearance
6.3.4 Unit Base Appearance
Serial Number and
LAN MAC Address
Power Connector
Kensington Security Slot
USER MANUAL
Peplink Balance Series
http://www.peplink.com -22 / 227 - Copyright © Peplink
6.4 Peplink Balance 30 LTE
6.4.1 Front Panel Appearance
6.4.2 LED Indicators
The statuses indicated by the front panel LEDs are as follows:
Power and Status Indicators
Power
OFF
– Power off
Green
– Power on
Status
OFF
– Upgrading firmware
Red –Booting up or busy
Blinking r
ed– Boot up error
Green
– Ready
LAN and WAN Ports
Green LED
ON – 10 / 100 /1000 Mbps
Orange LED
Blinking
– Data is transferring
OFF
– No data is being transferred or port is not connected
Port Type
Auto MDI/MDI
-X ports
USB Port
USB Ports
For connecting a
4G/3G USB modem
Reset Button
Power LED
Status LED
LAN Ports
WAN Ports
USB Port
USER MANUAL
Peplink Balance Series
http://www.peplink.com -23 / 227 - Copyright © Peplink
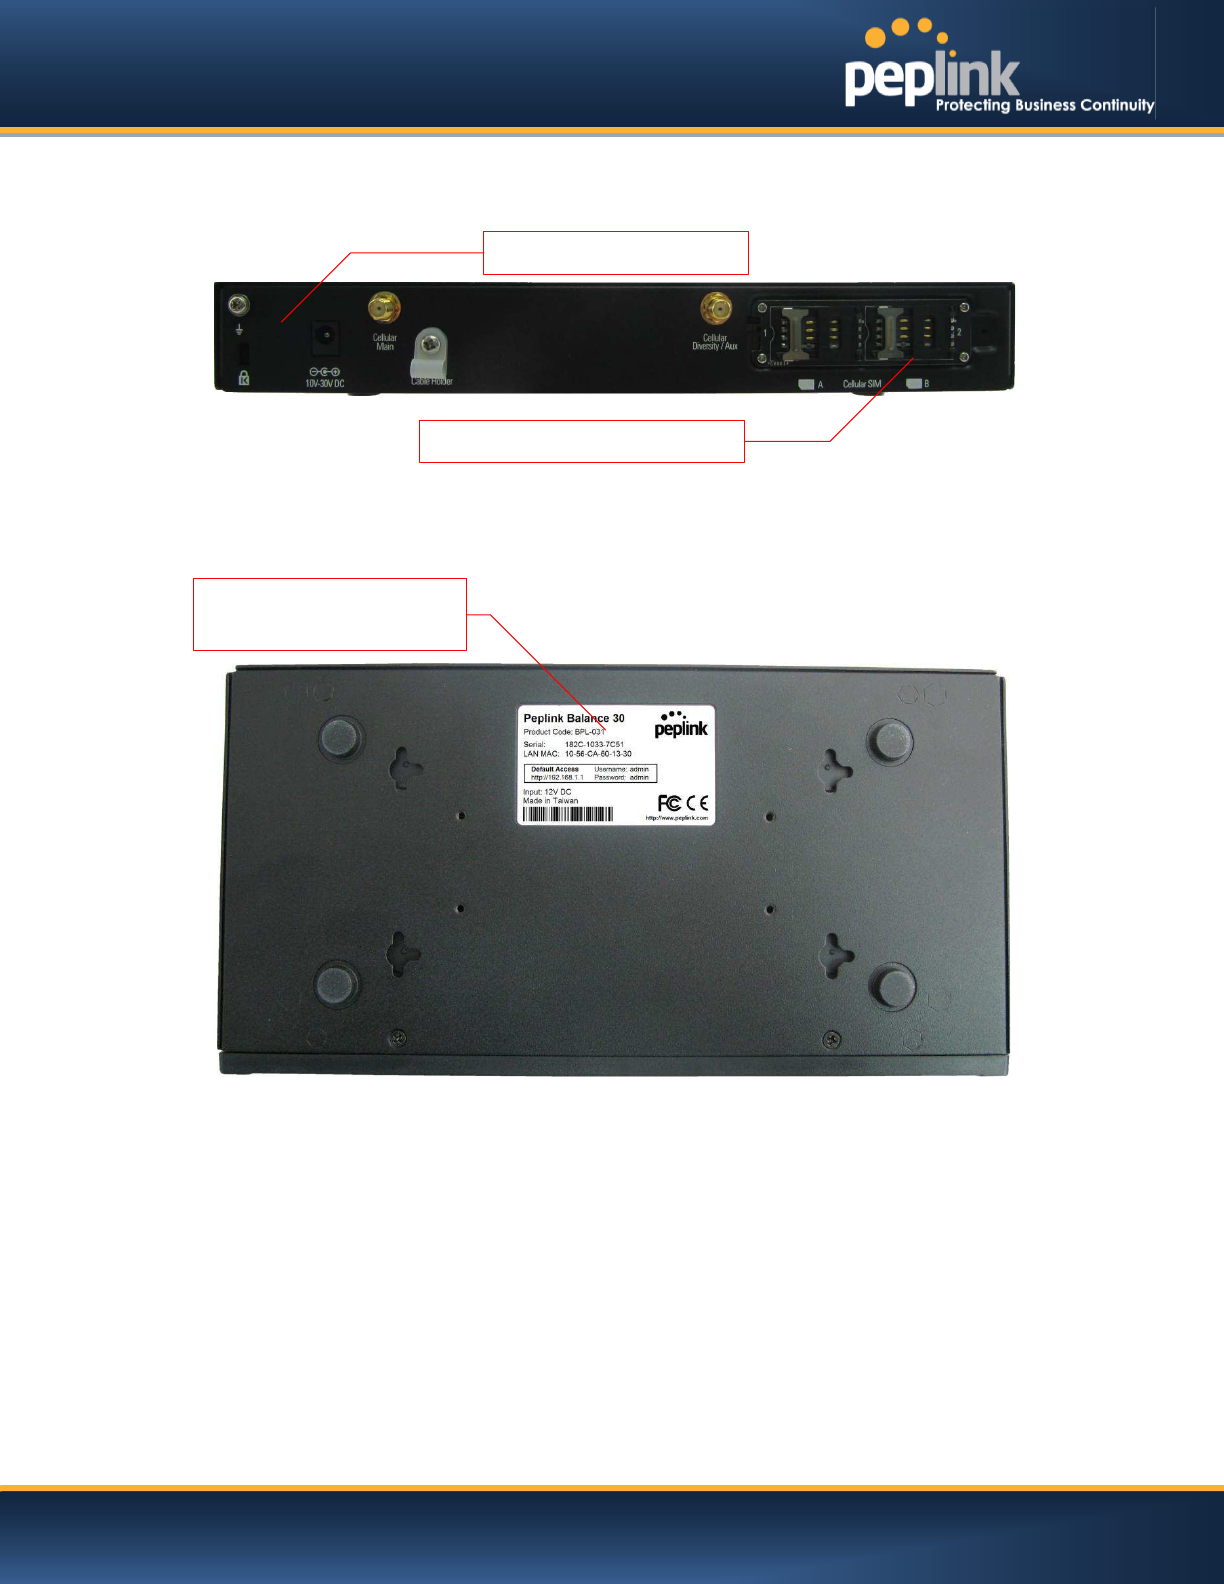
6.4.3 Rear Panel Appearance
6.4.4 Unit Base Appearance
Serial Number and
LAN MAC Address
Power Connector
Cellular SIM Slot
USER MANUAL
Peplink Balance Series
http://www.peplink.com -24 / 227 - Copyright © Peplink
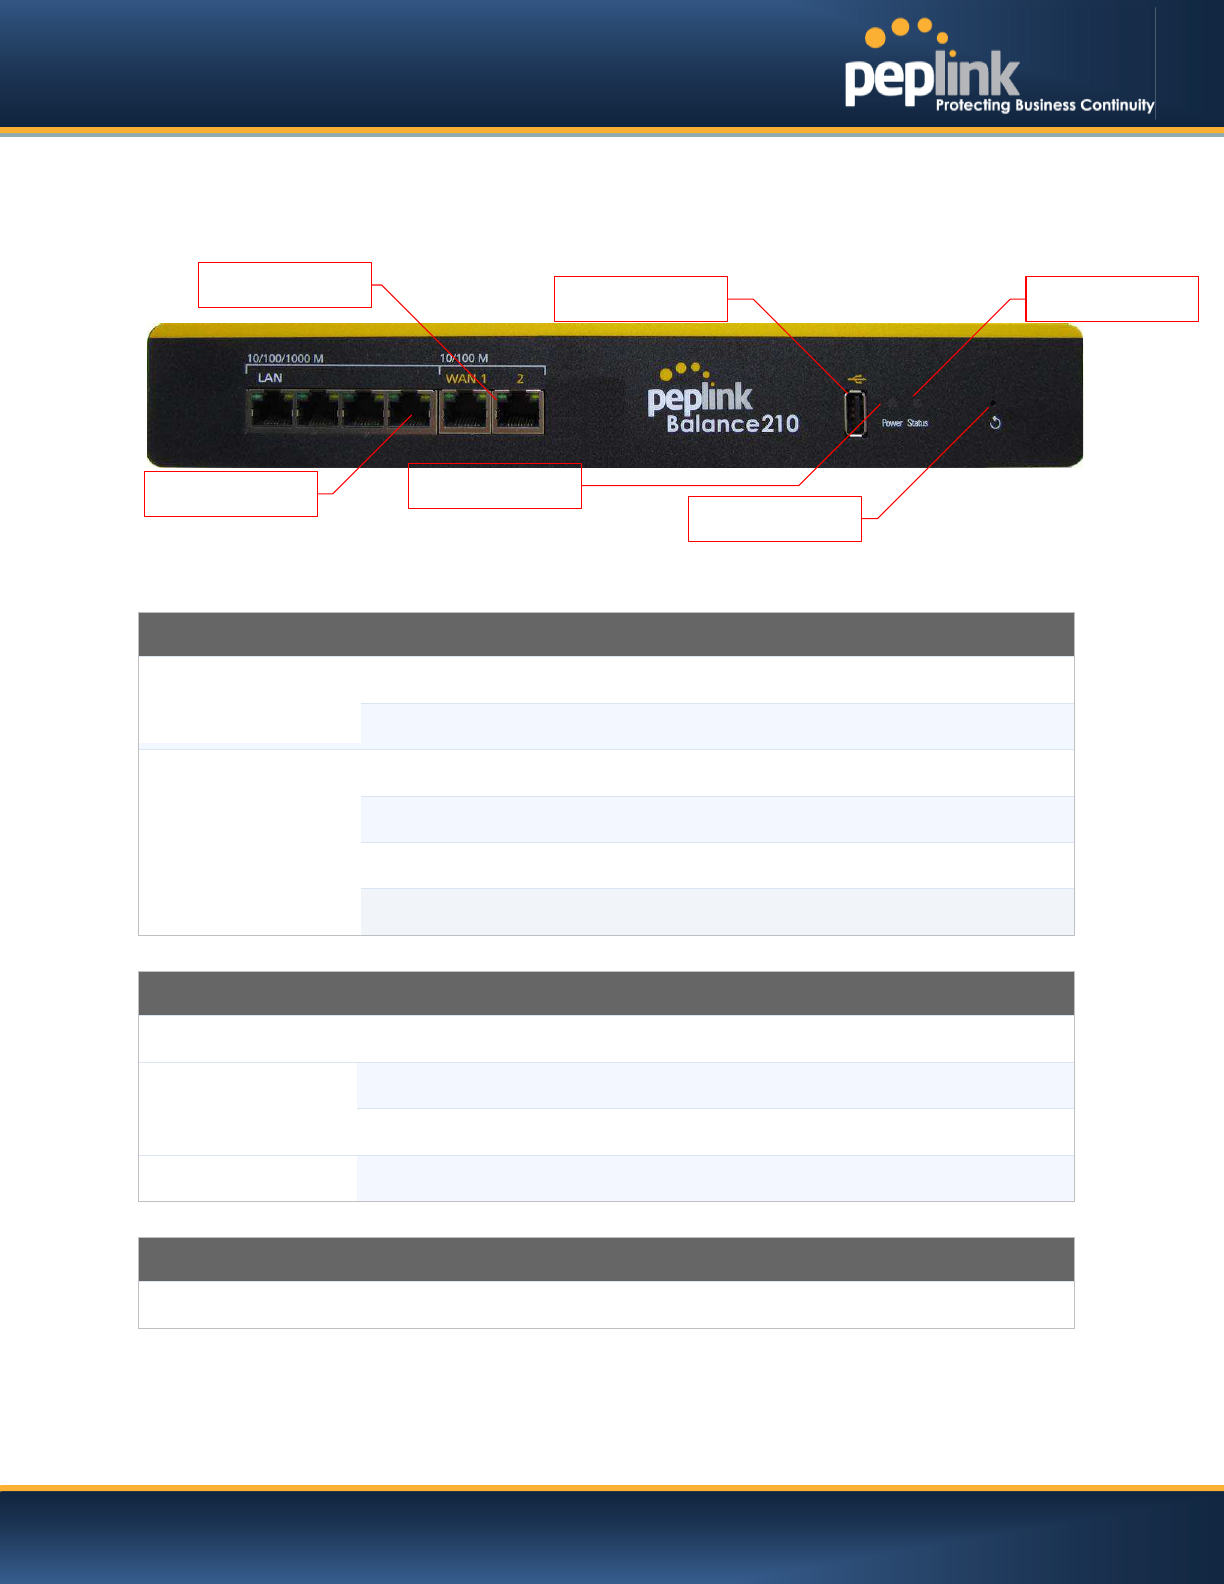
6.5 Peplink Balance 210
6.5.1 Front Panel Appearance
6.5.2 LED Indicators
The statuses indicated by the front panel LEDs are as follows:
Power and Status Indicators
Power
OFF
– Power off
Green
– Power on
Status
OFF
– Upgrading firmware
Red – Booting up or busy
Blinking r
ed– Boot up error
Green
– Ready
LAN and WAN Ports
Green LED
ON – 10 / 100 / 1000 Mbps
Orange LED
Blinking
– Data is transferring
OFF
– No data is being transferred or port is not connected
Port Type
Auto MDI/MDI
-X ports
USB Port
USB Ports
For connecting a
4G/3G USB modem
LAN Ports
Power LED
Reset Button
USB
WAN Ports
Status LED
USER MANUAL
Peplink Balance Series
http://www.peplink.com -25 / 227 - Copyright © Peplink
6.5.3 Rear Panel Appearance
6.5.4 Unit Base Appearance
Serial Number and
LAN MAC Address
Power Connector
USER MANUAL
Peplink Balance Series
http://www.peplink.com -26 / 227 - Copyright © Peplink
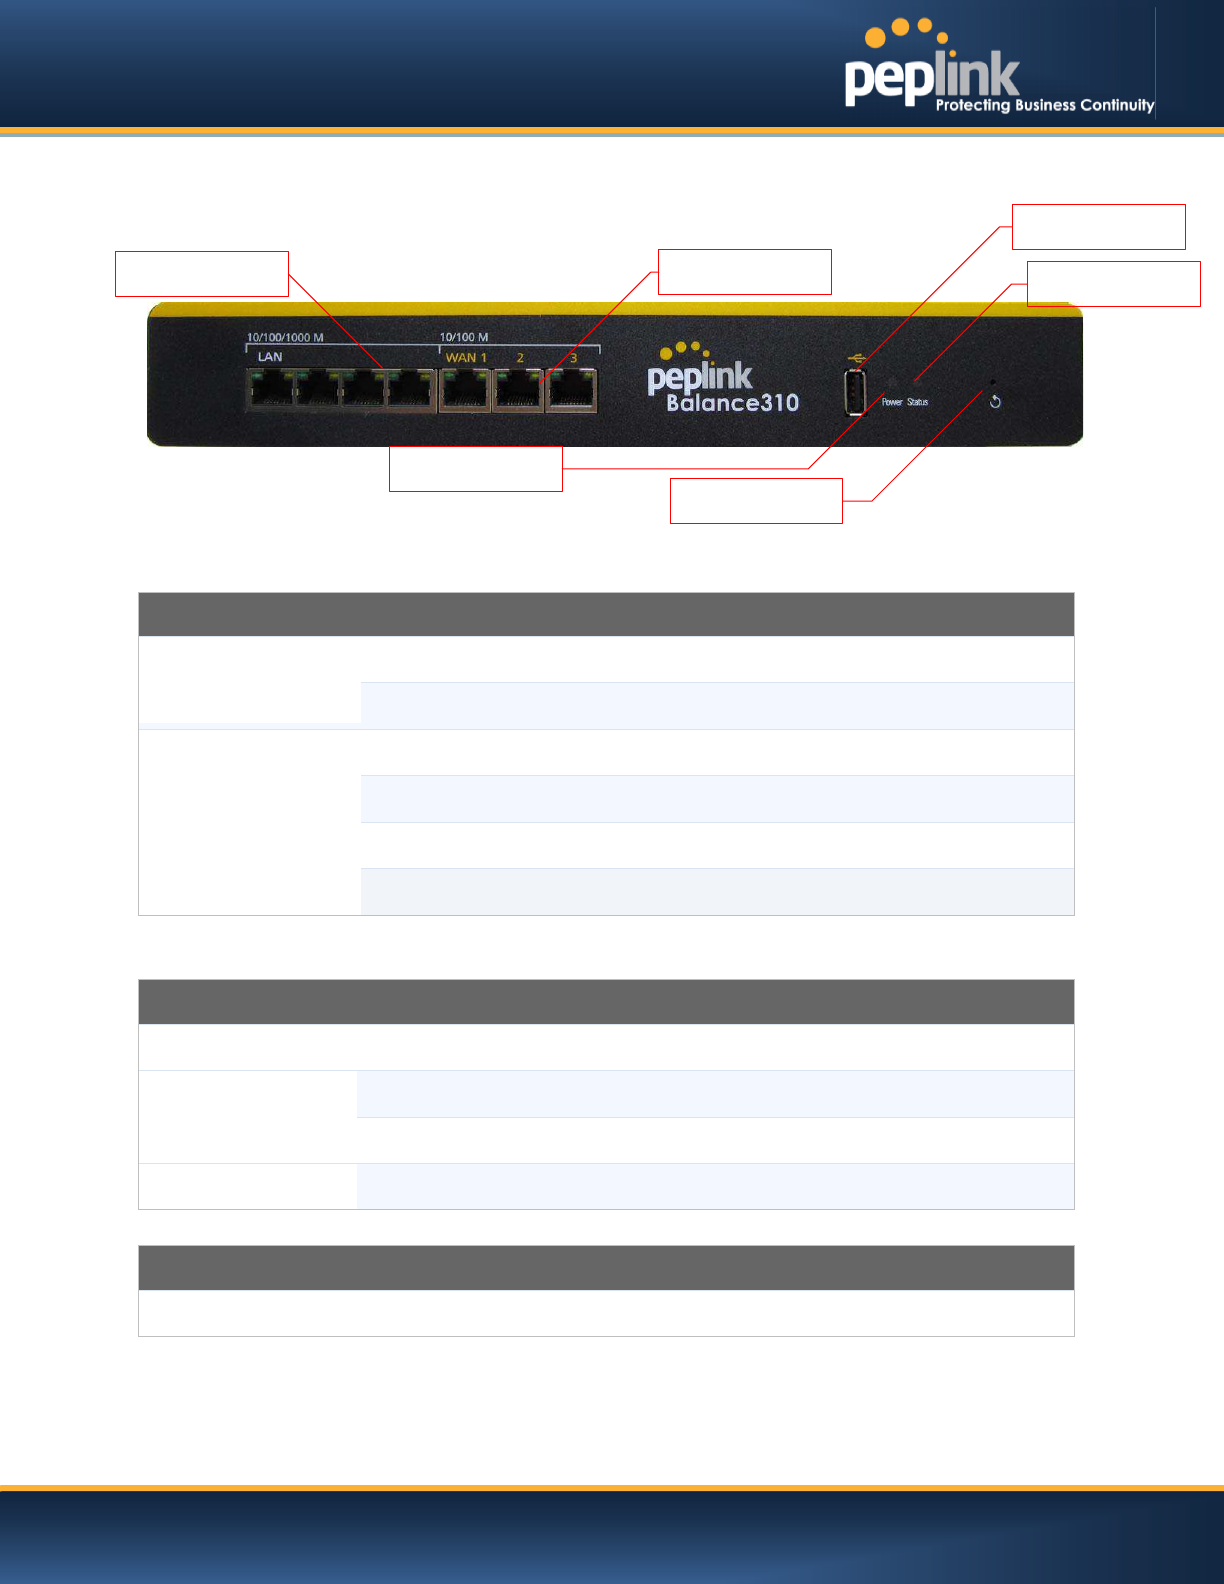
6.6 Peplink Balance 310
6.6.1 Front Panel Appearance
6.6.2 LED Indicators
The statuses indicated by the front panel LEDs are as follows:
Power and Status Indicators
Power
OFF – Power off
Green
– Power on
Status
OFF
– Upgrading firmware
Red
– Booting up or busy
Blinking r
ed– Boot up error
Green
– Ready
LAN and WAN Ports
Green LED
ON – 10 / 100 / 1000 Mbps
Orange LED
Blinking
– Data is transferring
OFF
– No data is being transferred or port is not connected
Port Type
Auto MDI/MDI-X ports
USB Port
USB Ports
For connecting a
4G/3G USB modem
Reset Button
Power LED
Status LED
LAN Ports
WAN Ports
USB
USER MANUAL
Peplink Balance Series
http://www.peplink.com -27 / 227 - Copyright © Peplink
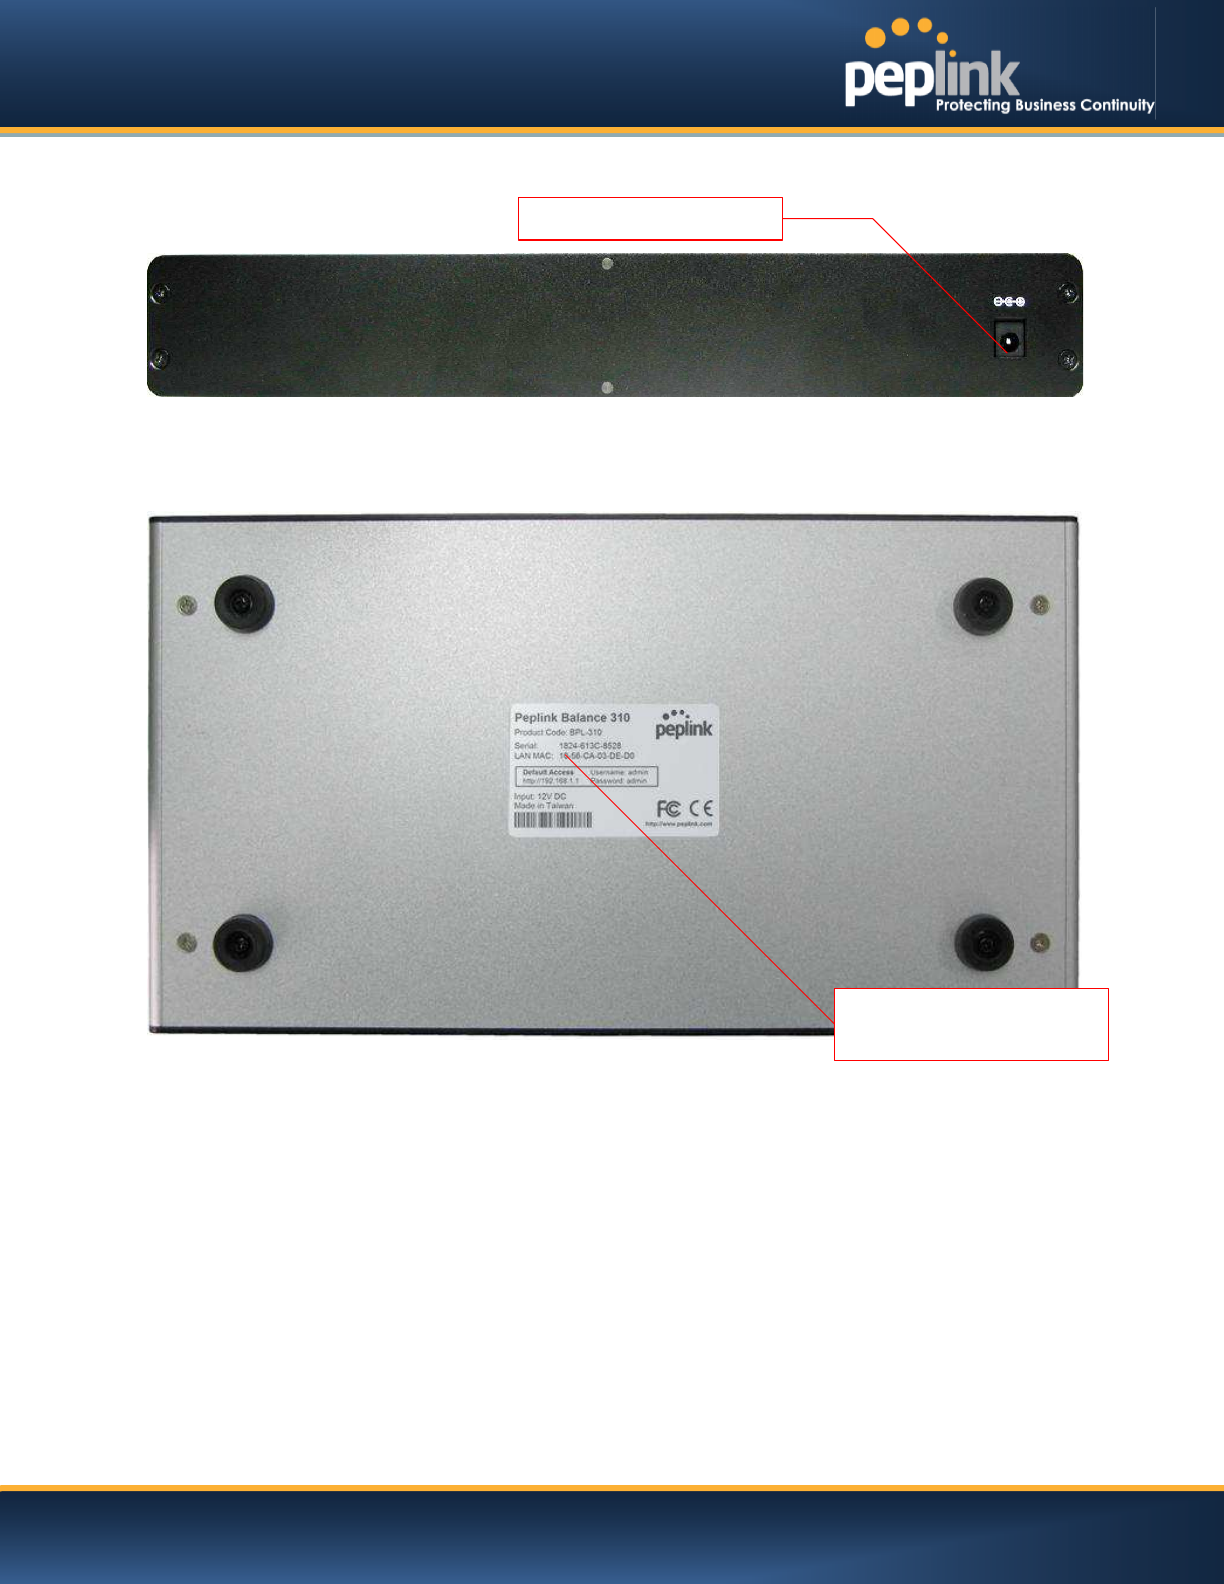
6.6.3 Rear Panel Appearance
6.6.4 Unit Base Appearance
Serial Number and
LAN MAC Address
Power Connector

USER MANUAL
Peplink Balance Series
http://www.peplink.com -28 / 227 - Copyright © Peplink
6.7 Peplink Balance 305
6.7.1 Front Panel Appearance
6.7.2 LED Indicators
The statuses indicated by the front panel LEDs are as follows:
Power and Status Indicators
Power LED
OFF – Power off
GREEN– Power on
LAN Port, WAN 1 – 3 Ports
Right LED
ORANGE– 1000 Mbps
GREEN– 100 Mbps
OFF – 10 Mbps
Left LED
Solid – Port is connected without traffic
Blinking – Data is transferring
OFF
– Port is not connected
Port Type
Auto MDI/MDI-X ports
Console and USB Ports
Console Port
Reserved for engineering
use
USB Ports
For connecting a
4G/3G USB modem
LCD Display
Console
LCD Controls
LAN Port
Power LED
WAN Ports
USB Ports

USER MANUAL
Peplink Balance Series
http://www.peplink.com -29 / 227 - Copyright © Peplink
6.7.3 LCD Display Menu
> HA State: Master/Slave
> LAN IP
> VIP
> System Status
> System
> Firmware ver. (showsfirmware version)
> Serial number (shows serial number)
> System time (shows current time)
> System up time (shows system uptime sincelast reboot)
> CPU load (shows current CPU loading, 0-100%)
> LAN
> Status (shows LAN port physical status)
> IP address (shows LAN IP address)
> Subnet mask (shows LAN subnet mask)
> Link status (shows Connected/Disconnected, IP address list)
> WAN1
> WAN2
> WAN3
> VPN status (shows Connected/Disconnected)
>VPN Profile 1
>VPN Profile 2
>…
>VPN Profile n
> Link usage
> Throughput in (shows transfer rate in Kbps)
> WAN1
> WAN2
> WAN3
> Throughput out (shows transfer rate in Kbps)
> WAN1
> WAN2
> WAN3
> Data Transfer’d (shows volume transferred since last reboot in MB)
> WAN1
> WAN2
> WAN3
> Maintenance
> Reboot > Reboot? (Yes/No) (to reboot the unit)
> Factory default > Factory default? (Yes/No) (to restore factory defaults)
> LAN config
> Port speed (shows port speed: Auto, 10baseT-FD, 10baseT-HD,
> LAN 100baseTx-FD, 100baseTx-HD, 1000baseTx-FD)
> WAN1
> WAN2
> WAN3
USER MANUAL
Peplink Balance Series
http://www.peplink.com -30 / 227 - Copyright © Peplink
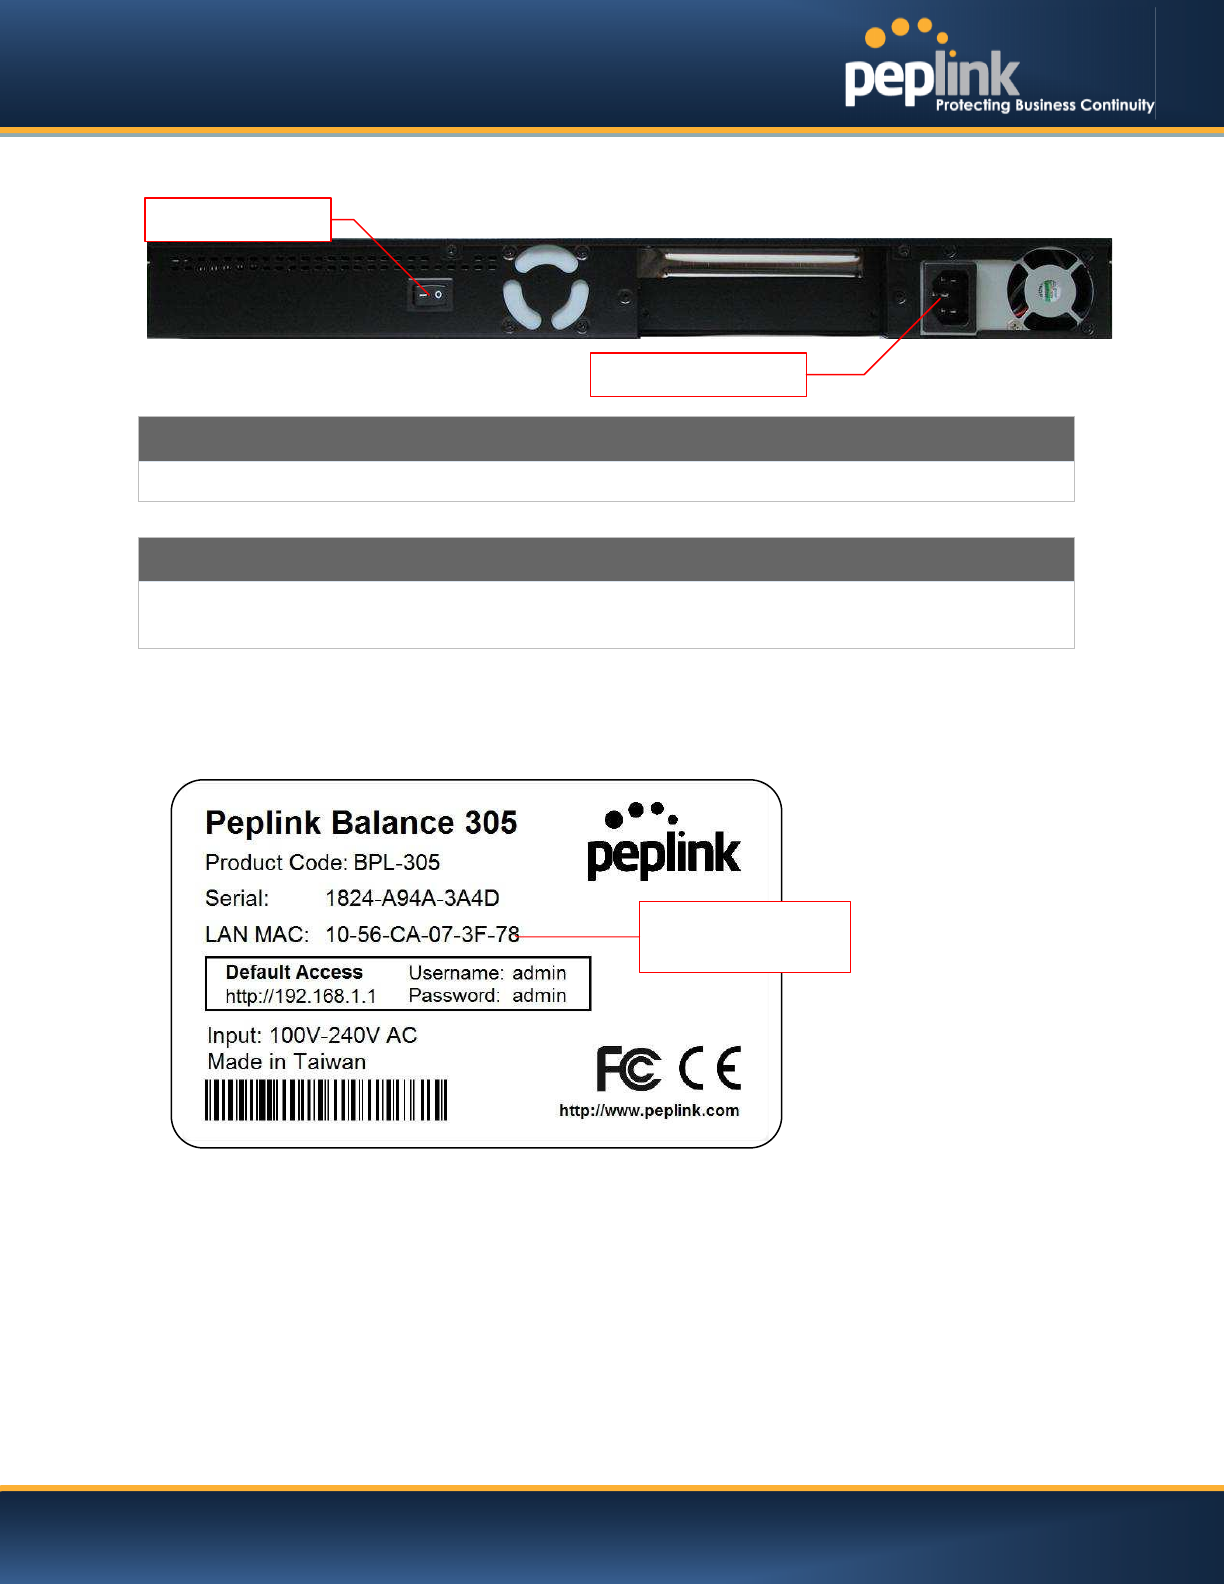
6.7.4 Rear Panel Appearance
Connector Ports
Power Connector
AC input 110/220V
Switch
Power Switch
Pressing and holding the key for 4 seconds will power down the unit.
When the unit is powered off, press it will power on the unit
6.7.5 Unit Label Appearance
Power Connector
Power Switch
Serial Number and
LAN MAC Address
USER MANUAL
Peplink Balance Series
http://www.peplink.com -31 / 227 - Copyright © Peplink
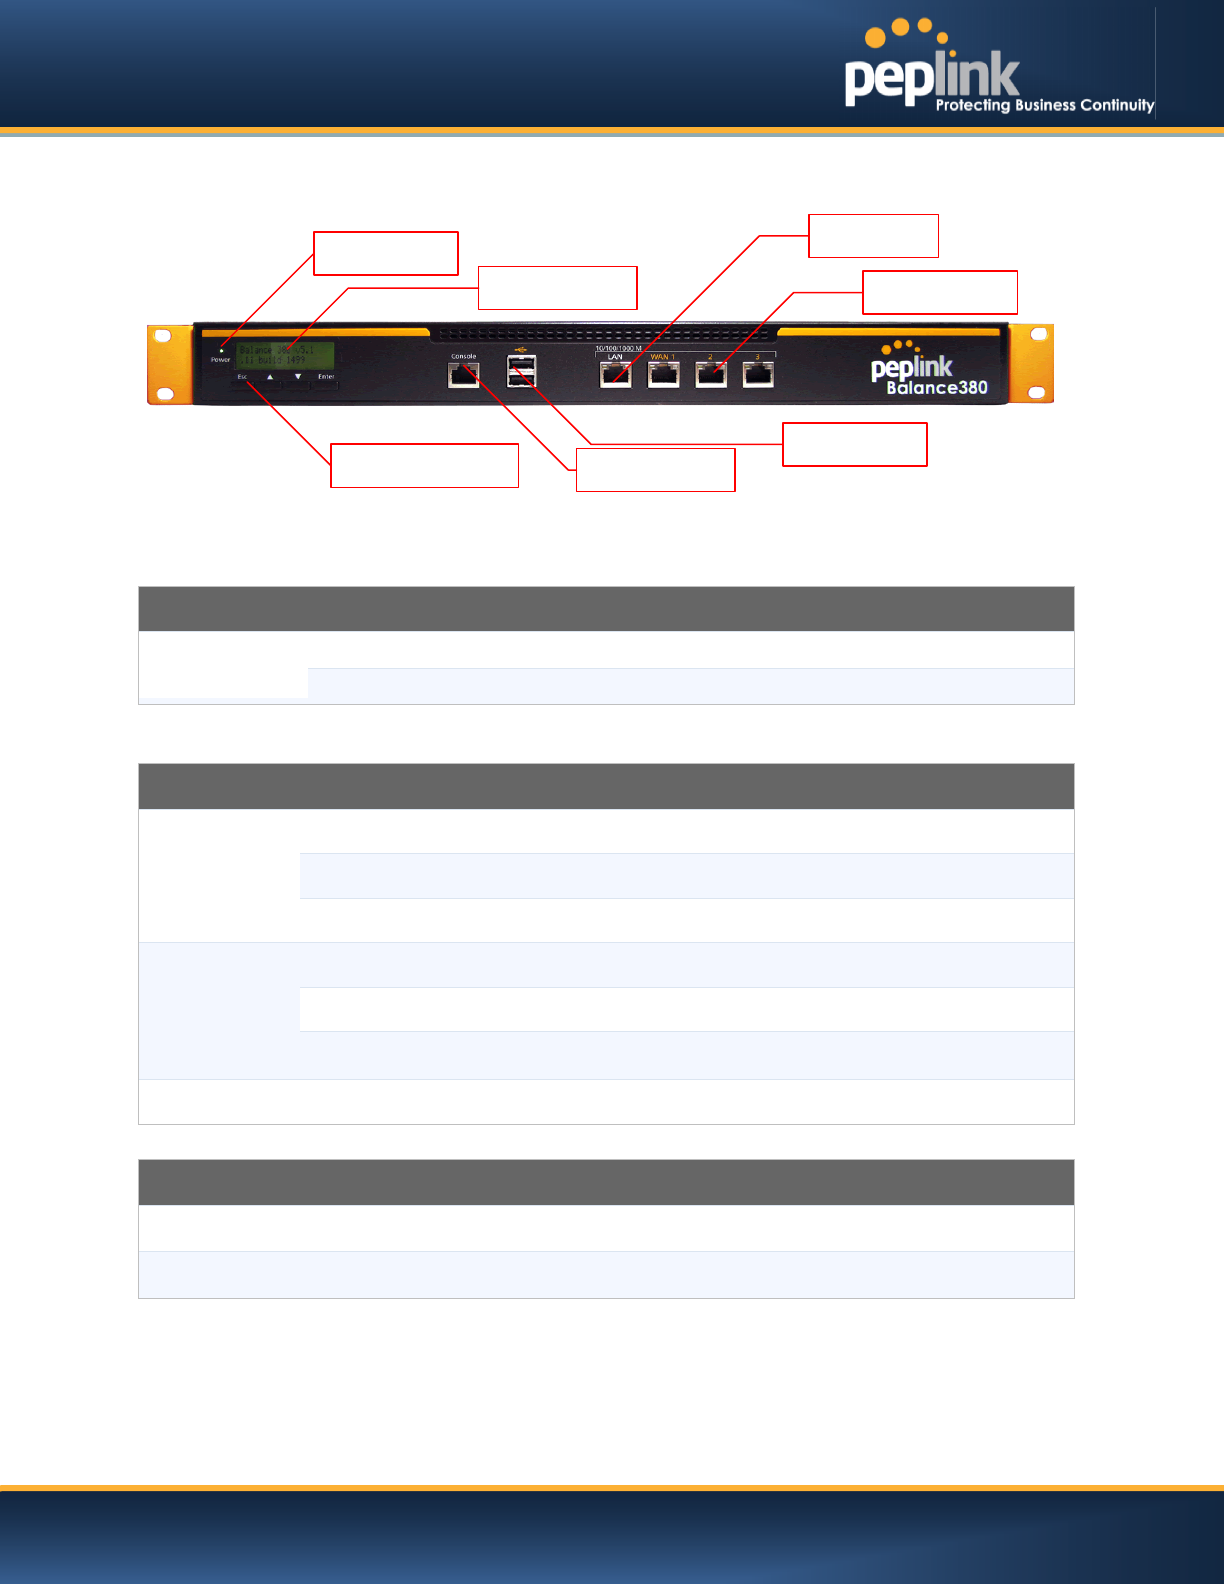
6.8 Peplink Balance 380
6.8.1 Front Panel Appearance
6.8.2 LED Indicators
The statuses indicated by the front panel LEDs are as follows:
Power and Status Indicators
Power LED
OFF – Power off
GREEN– Power on
LAN Port, WAN 1 – 3 Ports
Right LED
ORANGE– 1000 Mbps
GREEN– 100 Mbps
OFF – 10 Mbps
Left LED
Solid – Port is connected without traffic
Blinking – Data is transferring
OFF
– Port is not connected
Port Type
Auto MDI/MDI-X ports
Console and USB Ports
Console Port
Reserved for engineering
use
USB Ports
For connecting a
4G/3G USB modem
LCD Display
Console
LCD Controls
LAN Port
Power LED
WAN Ports
USB Ports

USER MANUAL
Peplink Balance Series
http://www.peplink.com -32 / 227 - Copyright © Peplink
6.8.3 LCD Display Menu
> HA State: Master/Slave
> LAN IP
> VIP
> System Status
> System
> Firmware ver. (showsfirmware version)
> Serial number (shows serial number)
> System time (shows current time)
> System up time (shows system uptime sincelast reboot)
> CPU load (shows current CPU loading, 0-100%)
> LAN
> Status (shows LAN port physical status)
> IP address (shows LAN IP address)
> Subnet mask (shows LAN subnet mask)
> Link status (shows Connected/Disconnected, IP address list)
> WAN1
> WAN2
> WAN3
> VPN status (shows Connected/Disconnected)
>VPN Profile 1
>VPN Profile 2
>…
>VPN Profile n
> Link usage
> Throughput in (shows transfer rate in Kbps)
> WAN1
> WAN2
> WAN3
> Throughput out (shows transfer rate in Kbps)
> WAN1
> WAN2
> WAN3
> Data Transfer’d (shows volume transferred since last reboot in MB)
> WAN1
> WAN2
> WAN3
> Maintenance
> Reboot > Reboot? (Yes/No) (to reboot the unit)
> Factory default > Factory default? (Yes/No) (to restore factory defaults)
> LAN config
> Port speed (shows port speed: Auto, 10baseT-FD, 10baseT-HD,
> LAN 100baseTx-FD, 100baseTx-HD, 1000baseTx-FD)
> WAN1
> WAN2
> WAN3
USER MANUAL
Peplink Balance Series
http://www.peplink.com -33 / 227 - Copyright © Peplink
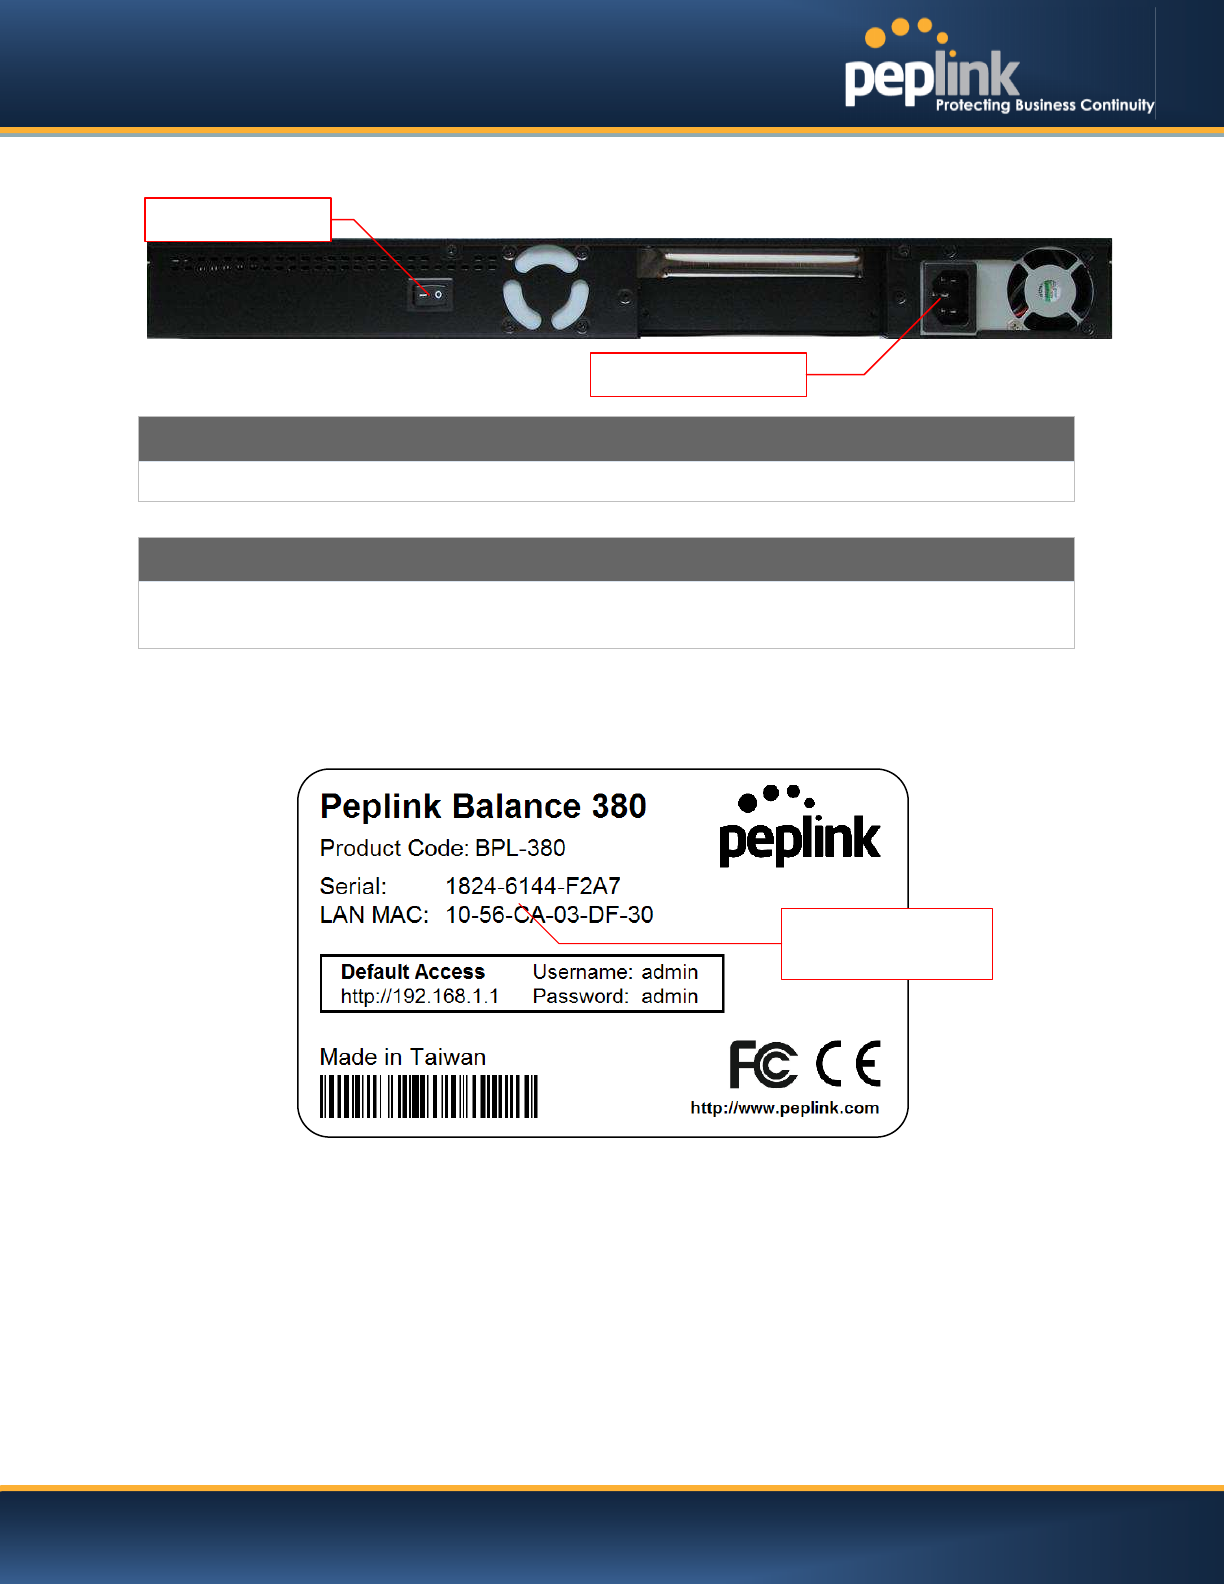
6.8.4 Rear Panel Appearance
Connector Ports
Power Connector
AC input 110/220V
Switch
Power Switch
To hold pressing the key for 4 seconds will power down the unit
When the unit is powered off, press it will power on the unit
6.8.5 Unit Label Appearance
Power Connector
Power Switch
Serial Number and
LAN MAC Address
USER MANUAL
Peplink Balance Series
http://www.peplink.com -34 / 227 - Copyright © Peplink
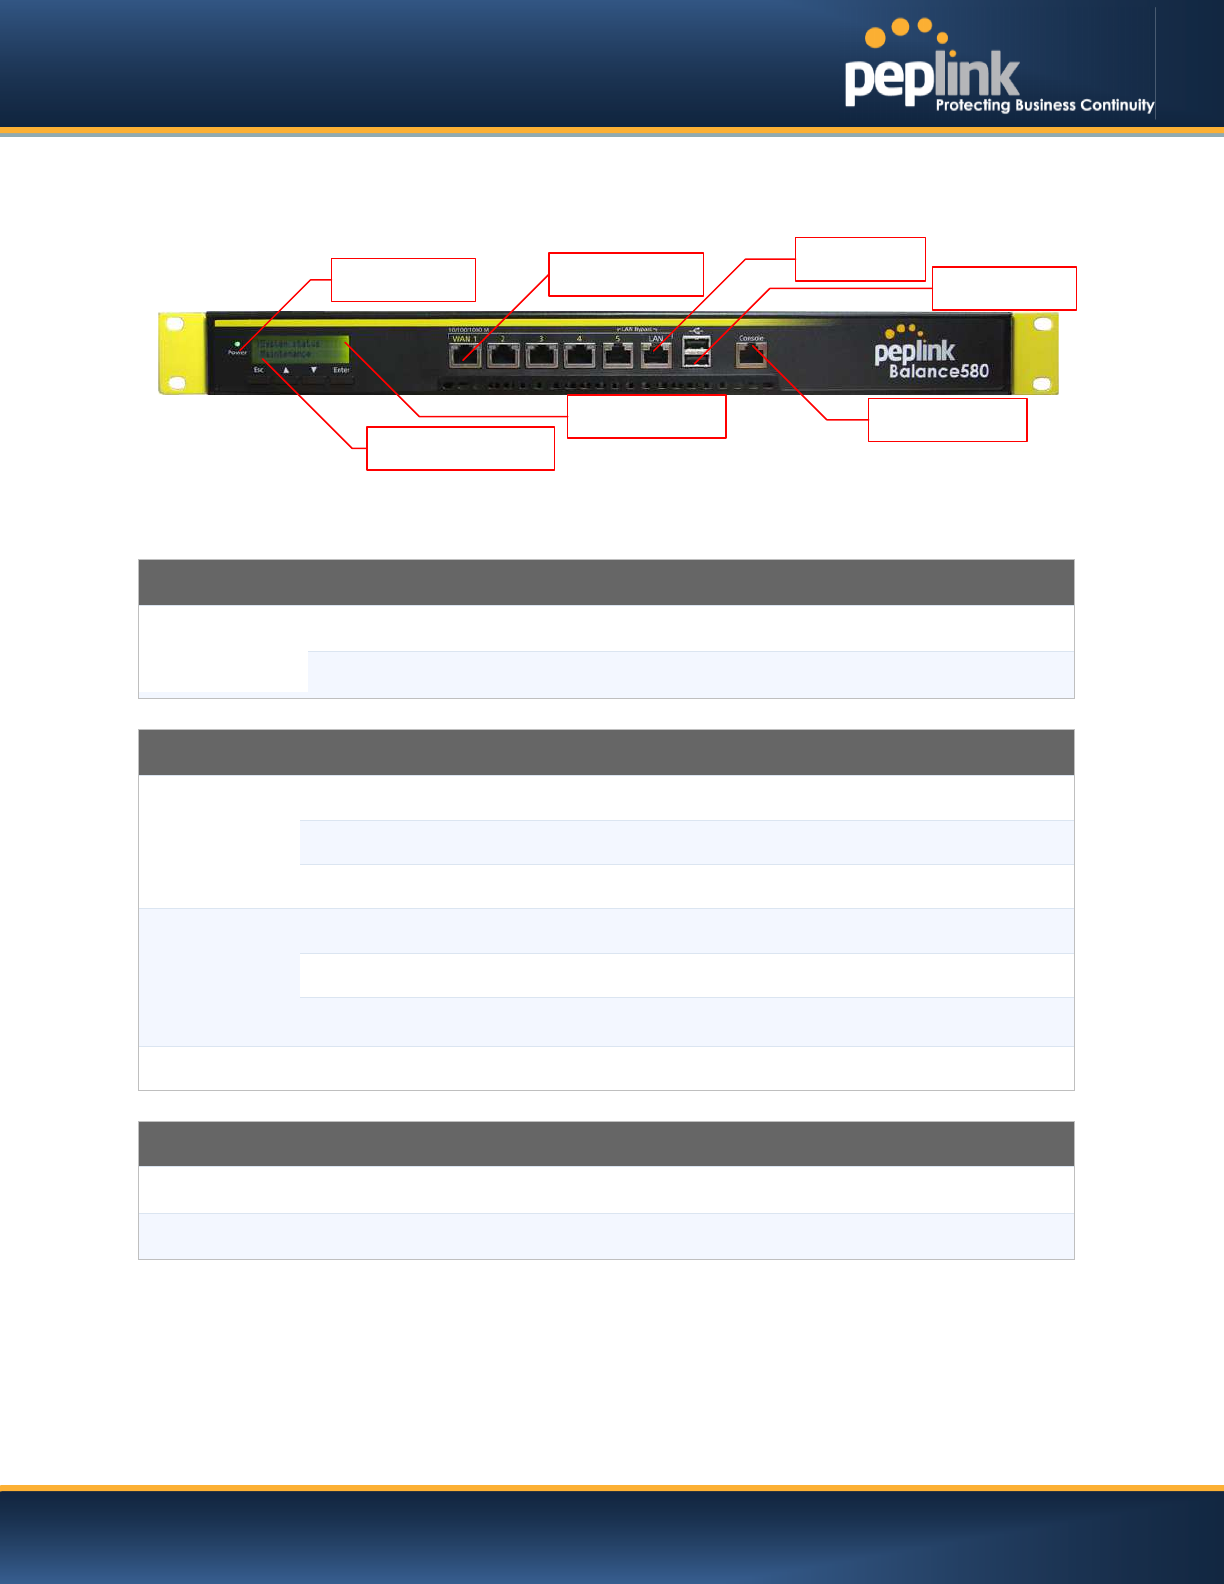
6.9 Peplink Balance 580
6.9.1 Front Panel Appearance
6.9.2 LED Indicators
The statuses indicated by the front panel LEDs are as follows:
Power and Status Indicators
Power LED
OFF
– Power off
GREEN
– Power on
LAN Port, WAN 1 – 5 Ports
Right LED
ORANGE – 1000 Mbps
GREEN– 100 Mbps
OFF – 10 Mbps
Left LED
Solid – Port is connected without traffic
Blinking – Data is transferring
OFF
– Port is not connected
Port Type
Auto MDI/MDI-X ports
Console and USB Ports
Console Port
Reserved for engineering
use
USB Ports
For connecting a
4G/3G USB modem
LCD Display
Console
LCD Controls
LAN Port
Power LED
WAN Ports
USB Ports

USER MANUAL
Peplink Balance Series
http://www.peplink.com -35 / 227 - Copyright © Peplink
6.9.3 LCD Display Menu
> HA State: Master/Slave
> LAN IP
> VIP
> System Status
> System
> Firmware ver. (shows firmware version)
> Serial number (shows serial number)
> System time (shows current time)
> System up time (shows system uptime since last reboot)
> CPU load (shows current CPU loading, 0-100%)
> LAN
> Status (shows LAN port physical status)
> IP address (shows LAN IP address)
> Subnet mask (shows LAN subnet mask)
> Link status (shows Connected/Disconnected, IP address list)
> WAN1
> WAN2
> …
>WAN5
> VPN status (shows Connected/Disconnected)
>VPN Profile 1
>VPN Profile 2
>…
>VPN Profile n
> Link usage
> Throughput in (shows transfer rate in Kbps)
> WAN1
> WAN2
> …
>WAN5
> Throughput out (shows transfer rate in Kbps)
> WAN1
> WAN2
> …
>WAN5
> Data Transfer’d (shows volume transferred since last reboot in MB)
> WAN1
> WAN2
> …
>WAN5
> Maintenance
> Reboot > Reboot? (Yes/No) (to reboot the unit)
> Factory default > Factory default? (Yes/No) (to restore factory defaults)
> LAN config
> Port speed (shows port speed: Auto, 10baseT-FD, 10baseT-HD,
> LAN 100baseTx-FD, 100baseTx-HD, 1000baseTx-FD)
> WAN1
> WAN2
> …
>WAN5
USER MANUAL
Peplink Balance Series
http://www.peplink.com -36 / 227 - Copyright © Peplink
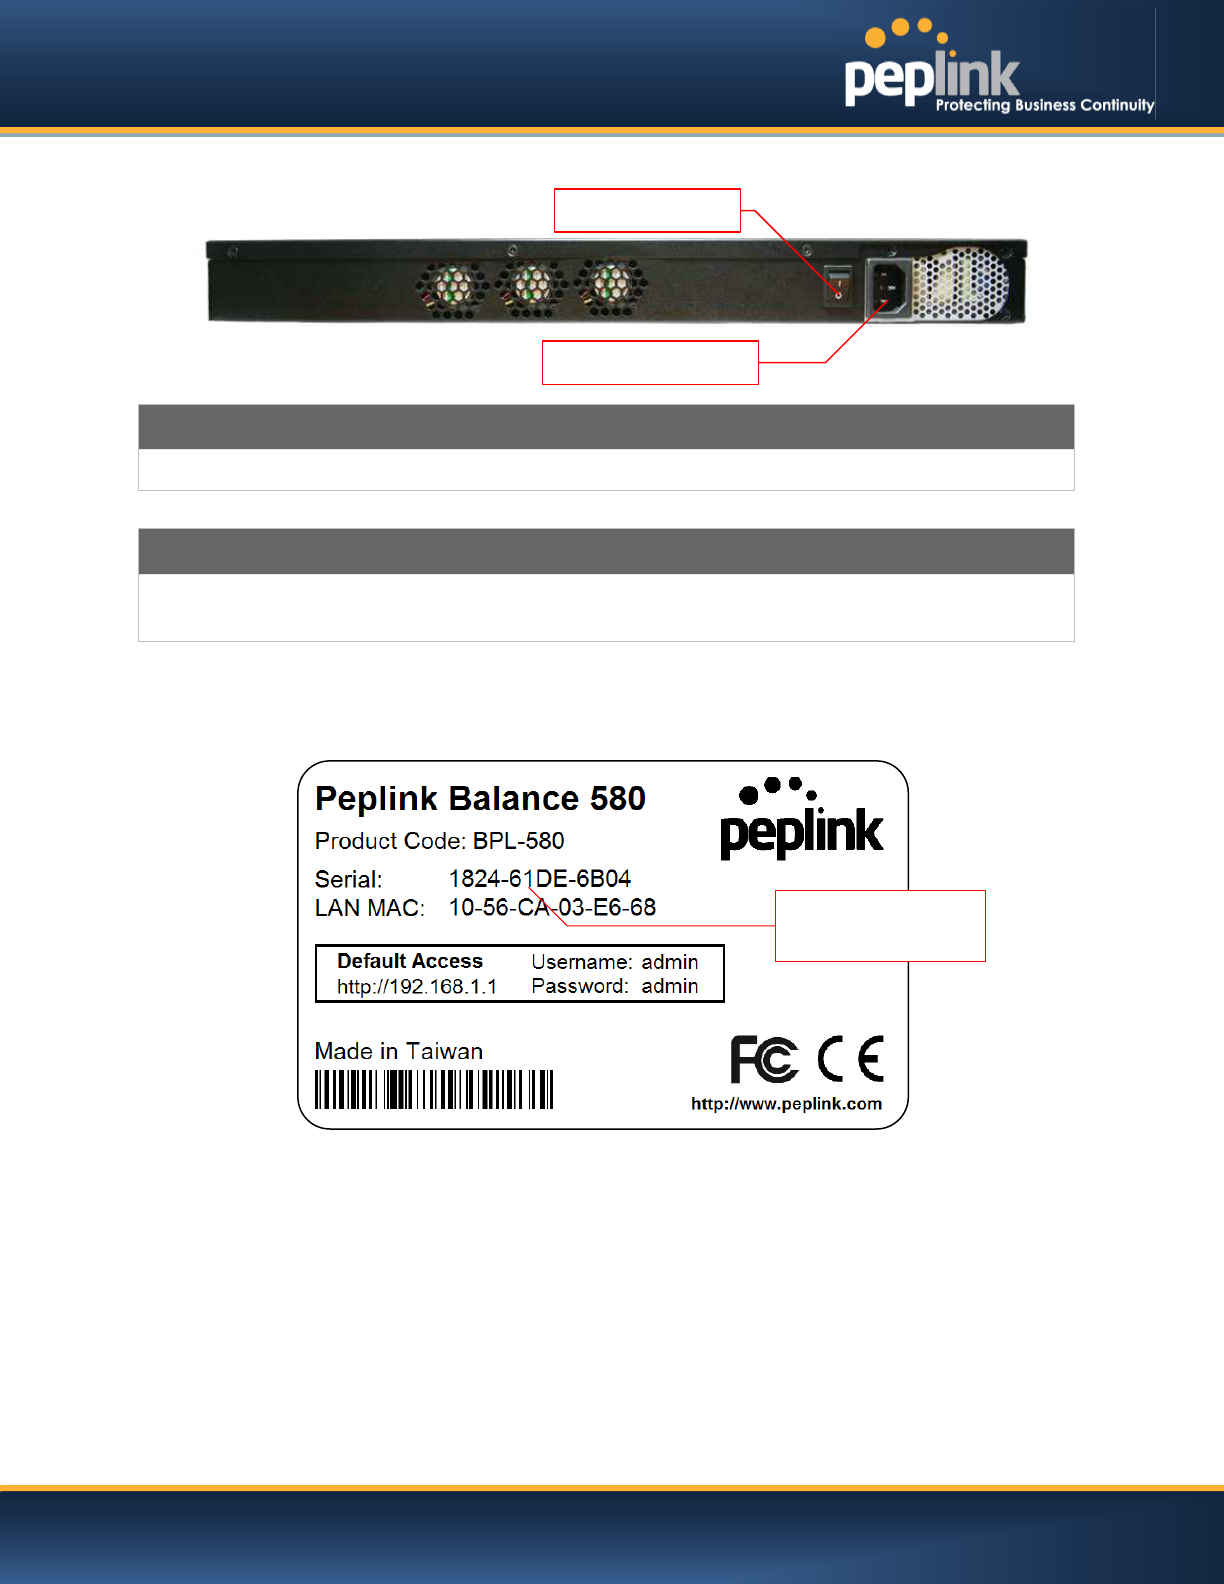
6.9.4 Rear Panel Appearance
Connector Ports
Power Connector
AC input 110/220V
Switch
Power Switch
To hold pressing the key for 4 seconds will power down the unit
When the unit is powered off, press it will power on the unit
6.9.5 Unit Label Appearance
Power Connector
Power Switch
Serial Number and
LAN MAC Address
USER MANUAL
Peplink Balance Series
http://www.peplink.com -37 / 227 - Copyright © Peplink
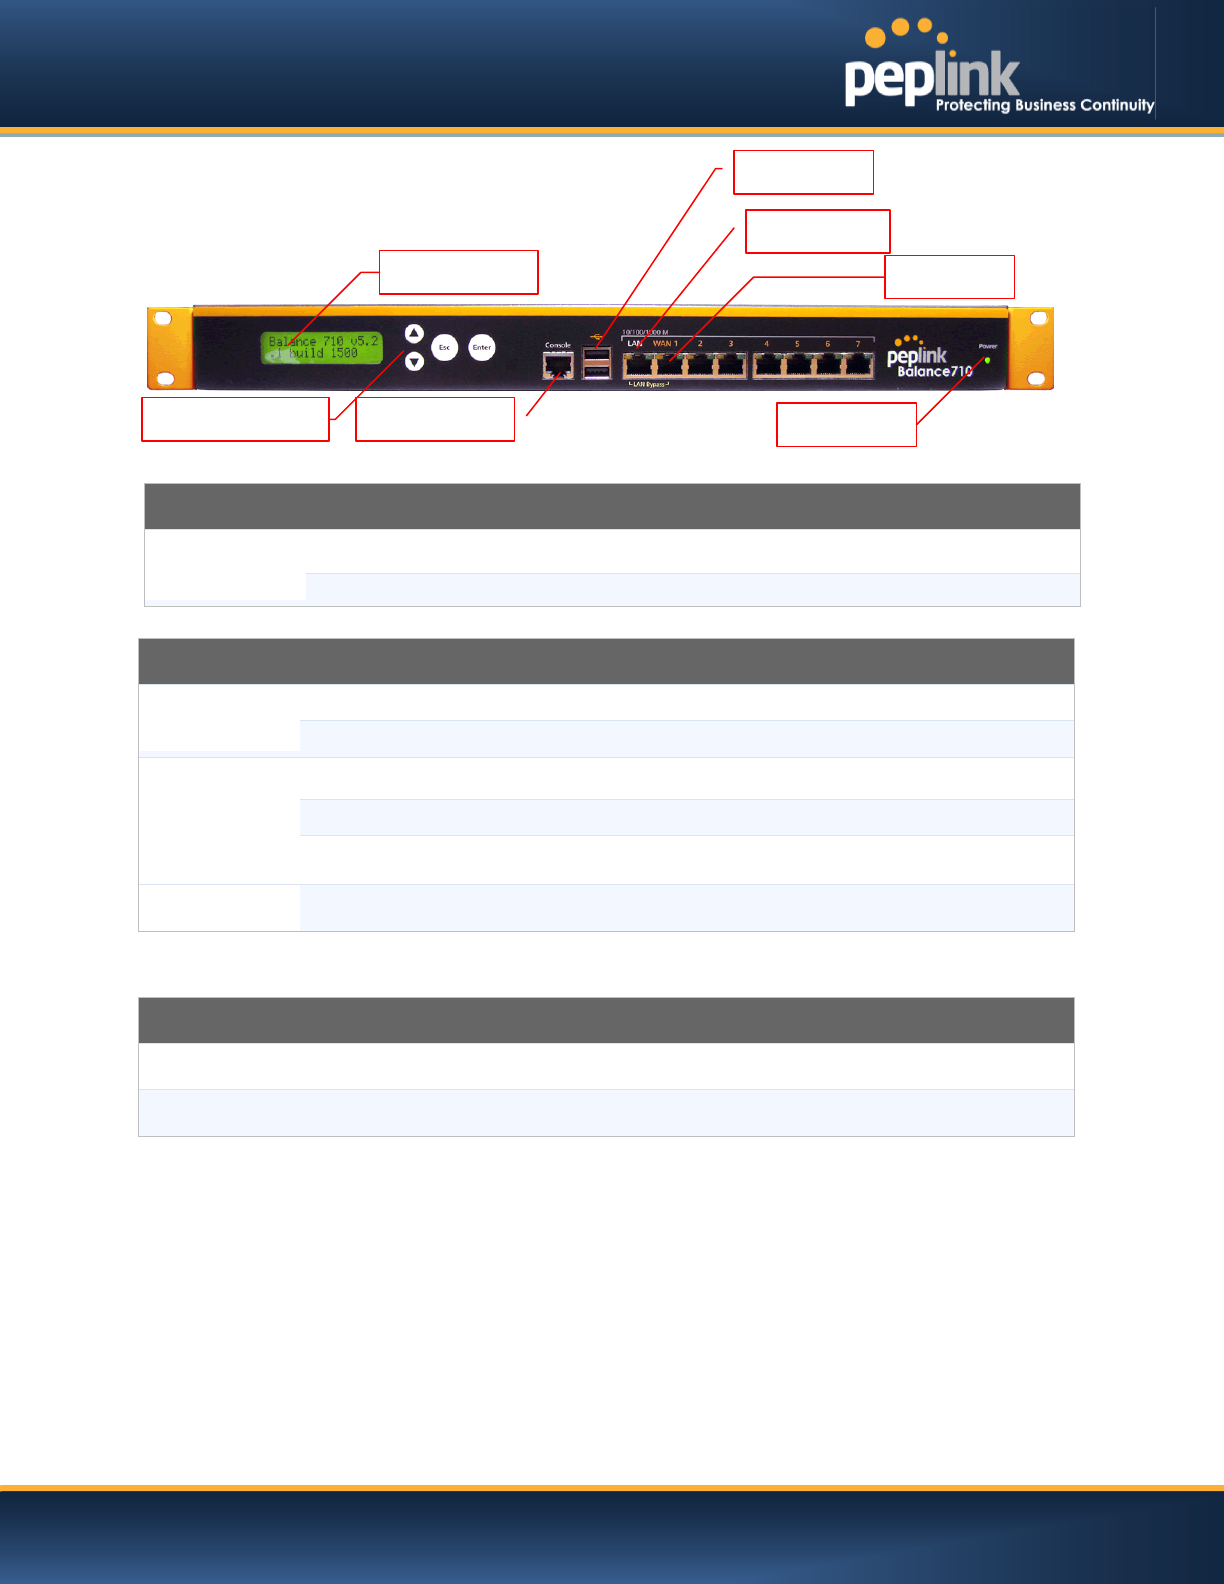
6.10 Peplink Balance 710
6.10.1 Front Panel Appearance
Status indicated in the front panel is as follows:
LAN Port, WAN 1 – 7Ports
Green LED
ON – 1000 Mbps
OFF – 100/10 Mbps
Orange LED
Solid –Port is connected without traffic
Blinking – Data is transferring
OFF
– Port is not connected
Port Type
Auto
MDI/MDI-X ports
LED Indicator
Power LED
OFF – Power off
GREEN – Power on
Console & USB Ports
Console Port
Reserved for engineering use
USB Ports
For connecting a
4G/3G USB modem
LCD Display
Console Port
LCD Controls
WAN Port
LAN Ports
Power LED
USB Ports

USER MANUAL
Peplink Balance Series
http://www.peplink.com -38 / 227 - Copyright © Peplink
6.10.2 LCD Display Menu
> HA State: Master/Slave
>LAN IP
> VIP
> System Status
> System
> Firmware ver. (shows firmware version)
> Serial number (shows serial number)
> System time (shows current time)
> System up time (shows system uptime since last reboot)
> CPU load (shows current CPU loading, 0-100%)
> LAN
> Status (shows LAN port physical status)
> IP address (shows LAN IP address)
> Subnet mask (shows LAN subnet mask)
> Link status (shows Connected/Disconnected, IP address list)
> WAN1
> WAN2
> …
> WAN7
> VPN status (shows Connected/Disconnected)
>VPN Profile 1
>VPN Profile 2
>…
>VPN Profile n
> Link usage
> Throughput in (shows transfer rate in Kbps)
> WAN1
> WAN2
> …
> WAN7
> Throughput out (shows transfer rate in Kbps)
> WAN1
> WAN2
> …
> WAN7
> Data Transfer’d (shows volume transferred since last reboot in MB)
> WAN1
> WAN2
> …
> WAN7
> Maintenance
> Reboot > Reboot? (Yes/No) (to reboot the unit)
> Factory default > Factory default? (Yes/No) (to restorefactory defaults)
> LAN config
> Port speed (shows port speed: Auto, 10baseT-FD,
> LAN 10baseT-HD, 100baseTx-FD, 100baseTx-HD,
> WAN1 1000baseTx-FD)
> WAN2
> …
> WAN7
USER MANUAL
Peplink Balance Series
http://www.peplink.com -39 / 227 - Copyright © Peplink
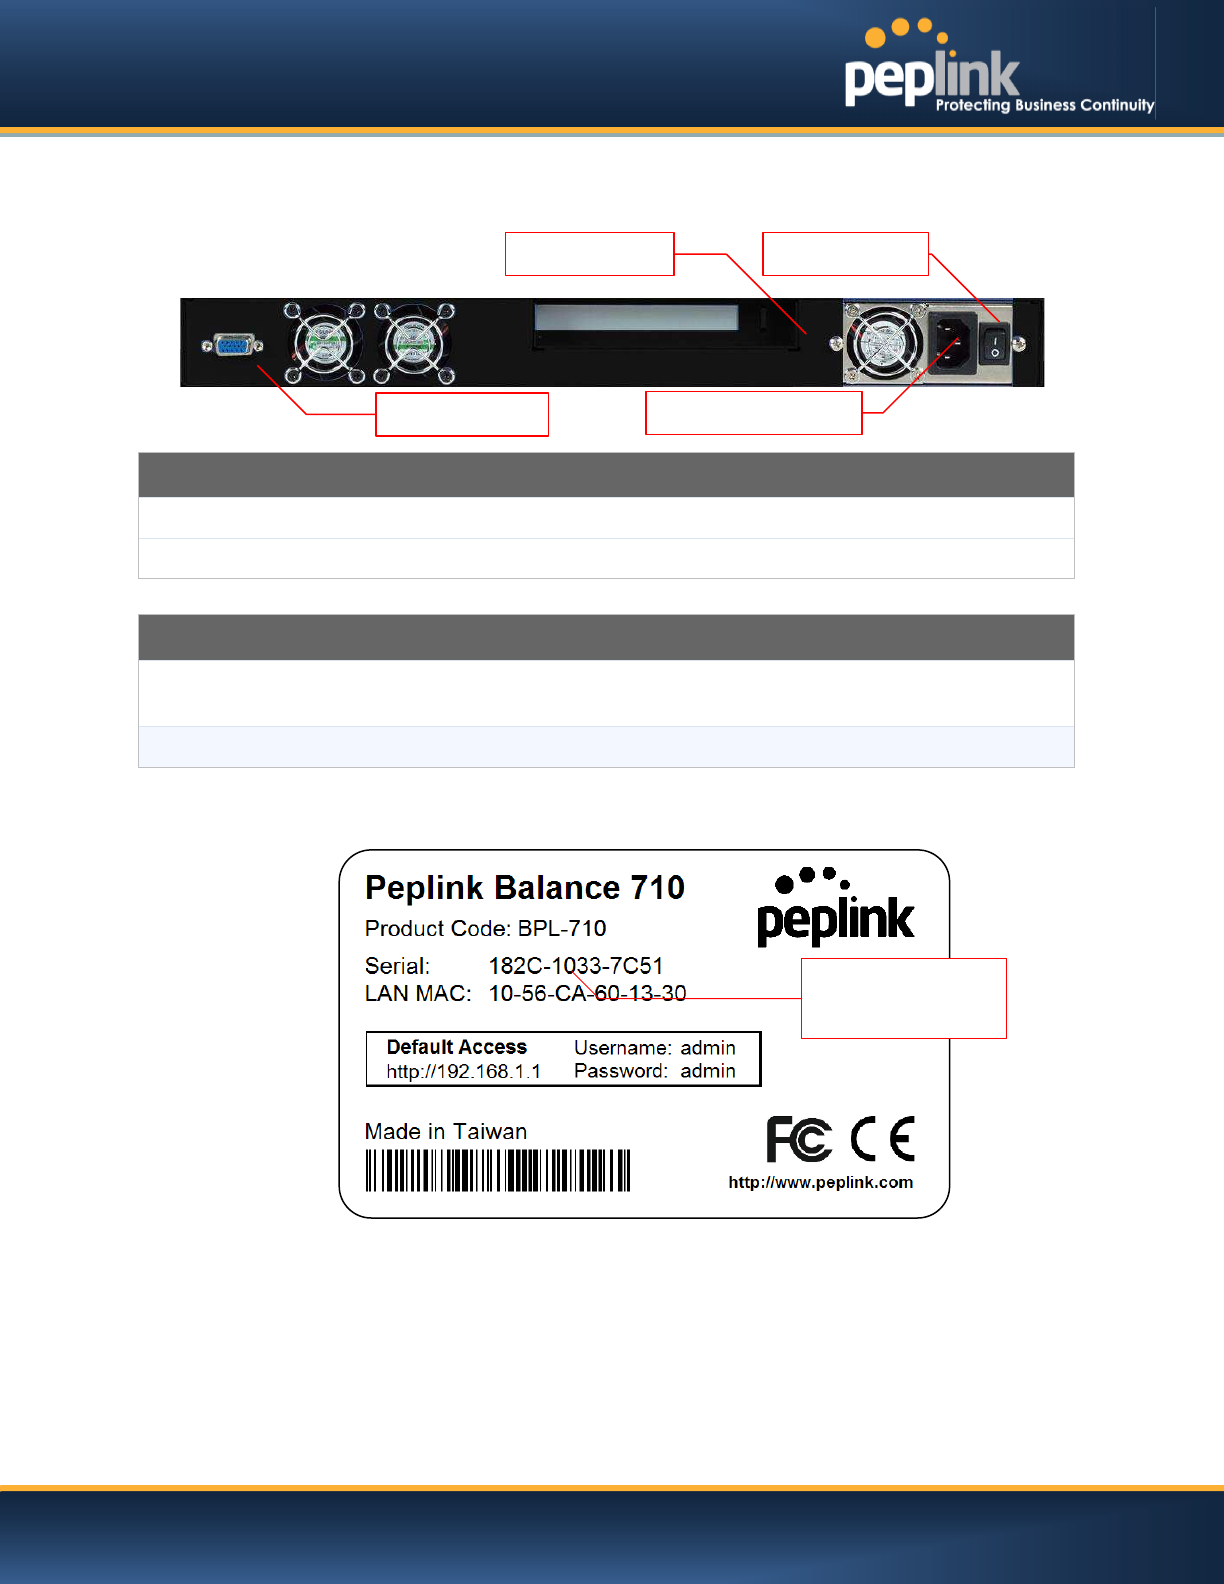
6.10.3 Rear Panel Appearance
Connector Ports
RS-232 Port
Reserved for engineering use
Power Connector
AC input 110/220V
Switches
Power Switch
To hold pressing the key for 4 seconds will power down the unit
When the unit is powered off, press it will power on the unit
Reset Switch
Press and release once to reset the system
6.10.4 Unit Label Appearance
RS-232 Port
Power Connector
Power Switch
Reset Switch
Serial Number and
LAN MAC Address
USER MANUAL
Peplink Balance Series
http://www.peplink.com -40 / 227 - Copyright © Peplink
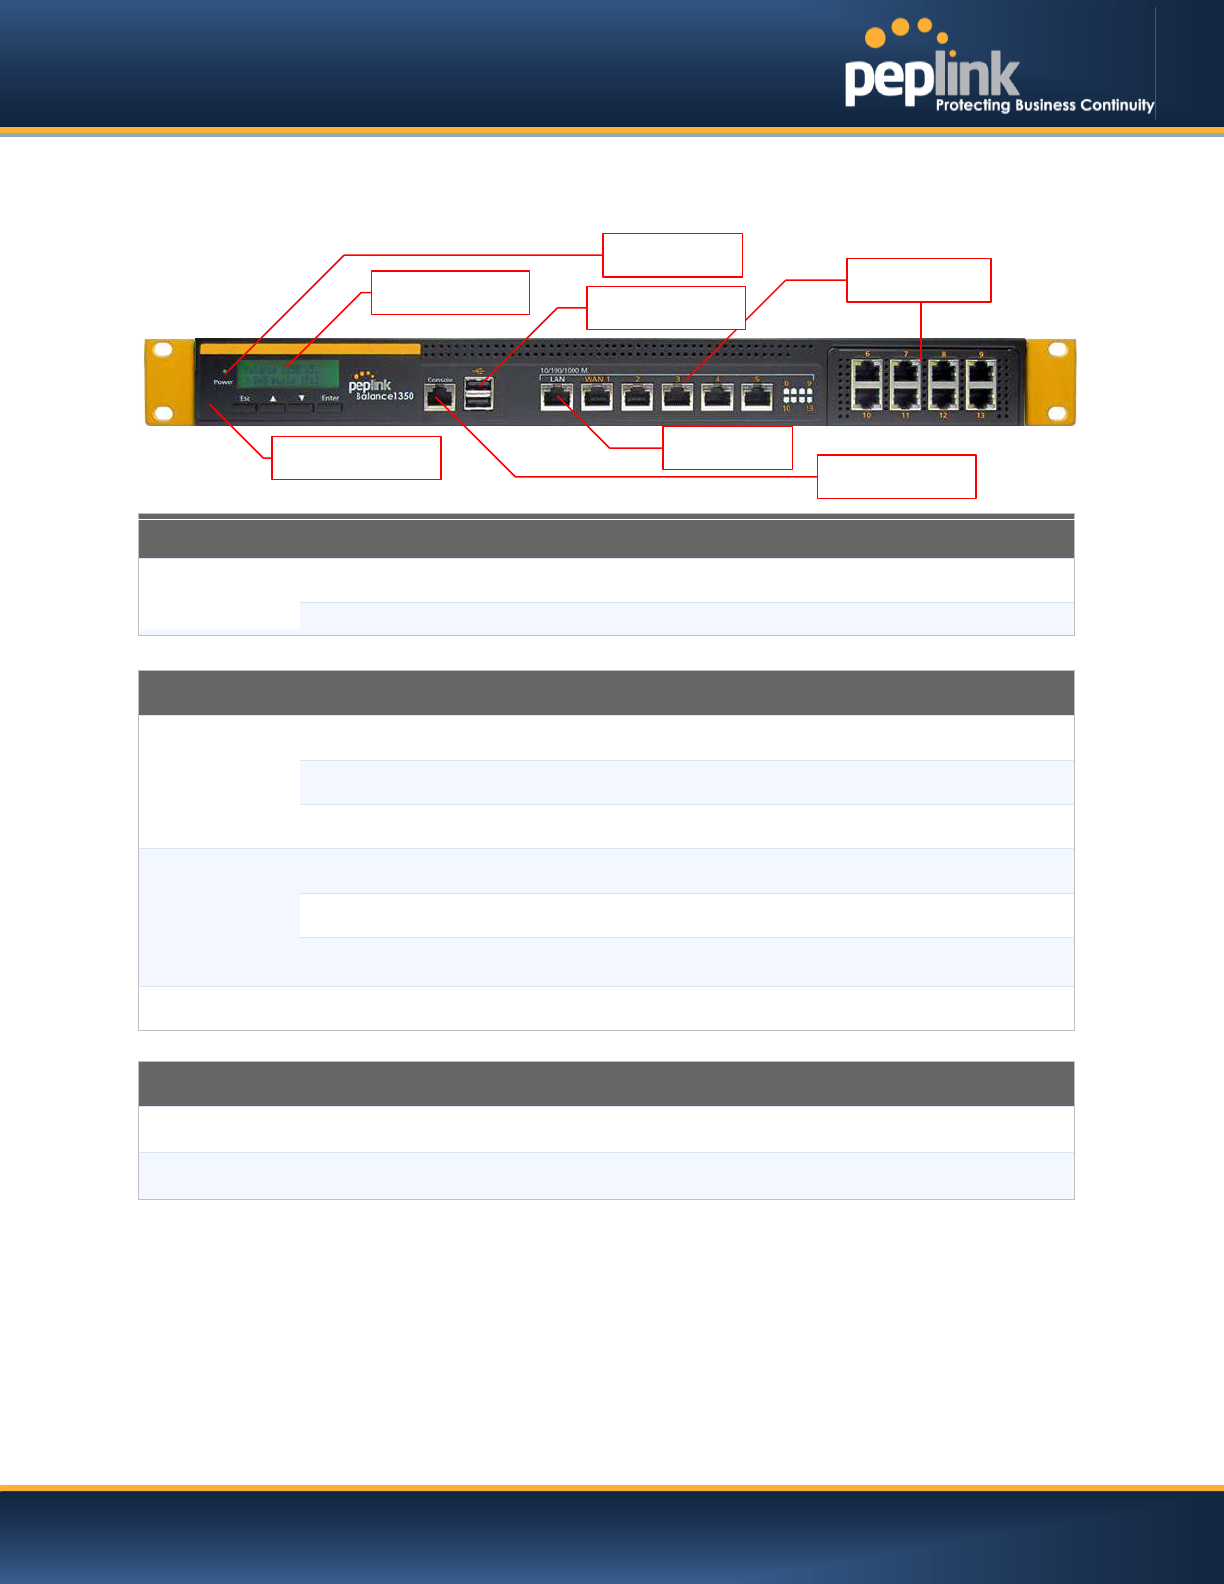
6.11 Peplink Balance 1350
6.11.1 Front Panel Appearance
Status indicated in the front panel is as follows:
LAN Port, WAN 1 – 13 Ports
Right LED
ORANGE – 1000 Mbps
GREEN– 100 Mbps
OFF – 10 Mbps
Left LED
Solid – Port is connected without traffic
Blinking – Data is transferring
OFF
– Port is not connected
Port Type
Auto MDI/MDI-X ports
LED Indicator
Power LED
OFF – Power off
GREEN– Power on
Console & USB Ports
Console Port
Reserved for engineering
use
USB Ports
For connecting a 4G/3G USB modem
Console Port
LCD Controls
LAN Port
WAN Ports
Power LED
LCD Display
USB Ports

USER MANUAL
Peplink Balance Series
http://www.peplink.com -41 / 227 - Copyright © Peplink
6.11.2 LCD Display Menu
> HA State: Master/Slave
>LAN IP
> VIP
> System Status
> System
> Firmware ver. (shows firmware version)
> Serial number (shows serial number)
> System time (shows current time)
> System up time (shows system uptime since last reboot)
> CPU load (shows current CPU loading, 0-100%)
> LAN
> Status (shows LAN port physical status)
> IP address (shows LAN IP address)
> Subnet mask (shows LAN subnet mask)
> Link status (shows Connected/Disconnected, IP address list)
> WAN1
> WAN2
> …
> WAN13
> VPN status (shows Connected/Disconnected)
>VPN Profile 1
>VPN Profile 2
>…
>VPN Profile n
> Link usage
> Throughput in (shows transfer rate in Kbps)
> WAN1
> WAN2
> …
> WAN13
> Throughput out (shows transfer rate in Kbps)
> WAN1
> WAN2
> …
> WAN13
> Data Transfer’d (shows volume transferred since last reboot in MB)
> WAN1
> WAN2
> …
> WAN13
> Maintenance
> Reboot > Reboot? (Yes/No) (to reboot the unit)
> Factory default > Factory default? (Yes/No) (to restore factory defaults)
> LAN config
> Port speed (shows port speed: Auto, 10baseT-FD, 10baseT-HD,
> LAN 100baseTx-FD, 100baseTx-HD,1000baseTx-FD)
> WAN1
> WAN2
> …
> WAN13
USER MANUAL
Peplink Balance Series
http://www.peplink.com -42 / 227 - Copyright © Peplink
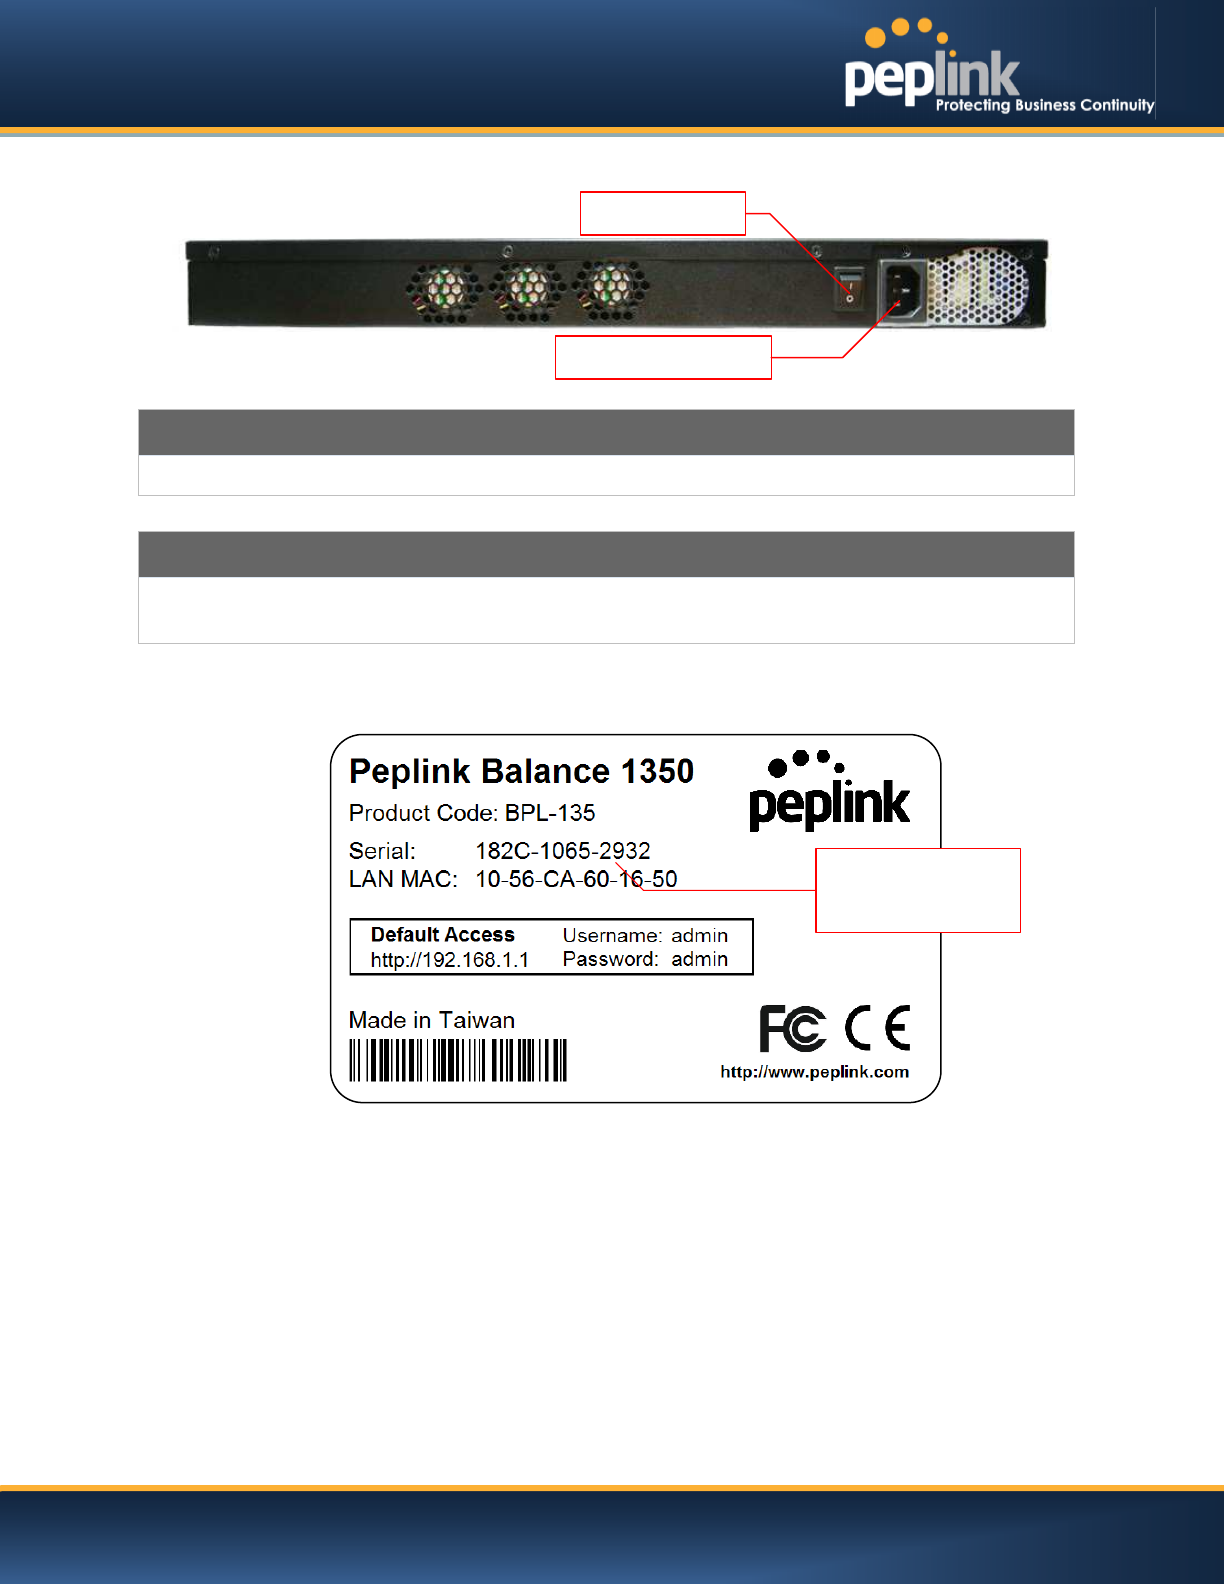
6.11.3 Rear Panel Appearance
Connector Ports
Power Connector
AC input 110/220V
Switches
Power Switch
To hold pressing the key for 4 seconds will power down the unit
When the unit is powered off, press it will power on the unit
6.11.4 Unit Label Appearance
Power Connector
Power Switch
Serial Number and
LAN MAC Address
USER MANUAL
Peplink Balance Series
http://www.peplink.com -43 / 227 - Copyright © Peplink
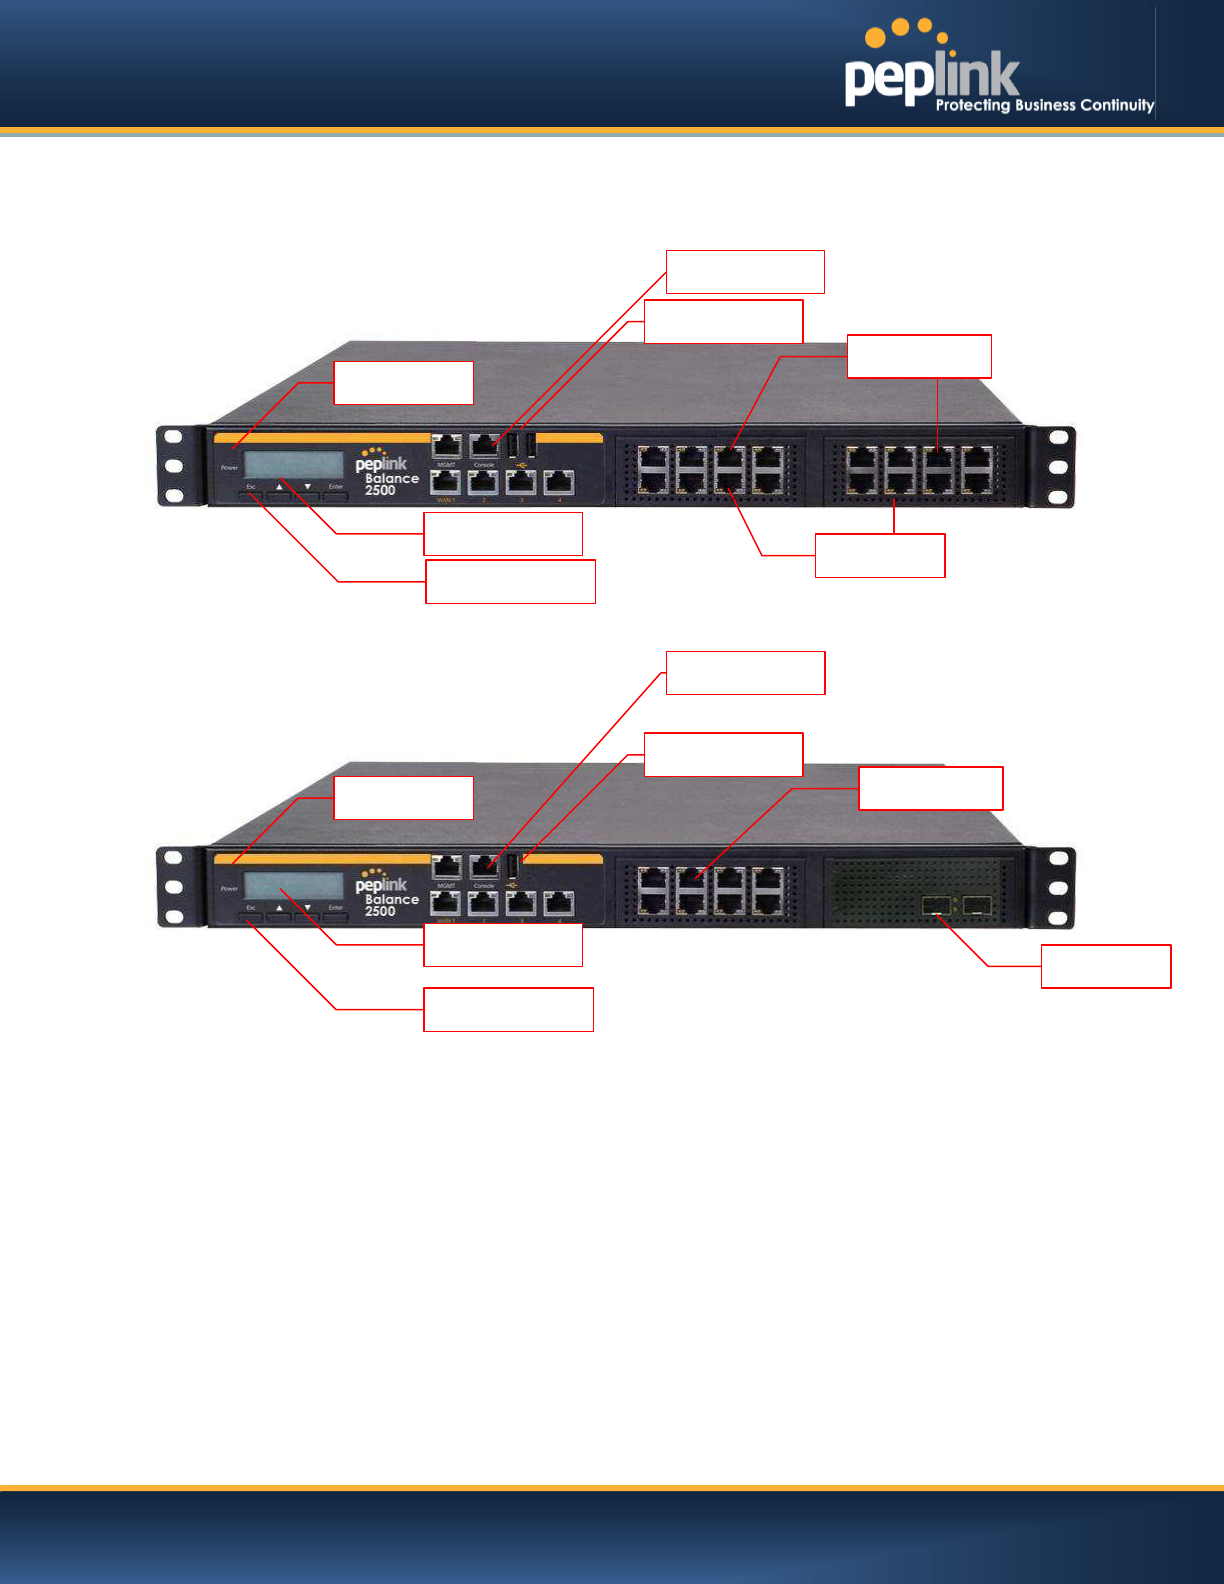
6.12 Peplink Balance 2500
6.12.1 Front Panel Appearance
BPL-2500
BPL-2500-SFP
Console Port
LCD Controls
Power LED
LCD Display
WAN Ports
LAN Port
USB Ports
Console Port
LCD Controls
Power LED
LCD Display
WAN Ports
LAN Port
USB Ports

USER MANUAL
Peplink Balance Series
http://www.peplink.com -44 / 227 - Copyright © Peplink
Status indicated in the front panel is as follows:
LAN andWAN Ports
Right
LED
ORANGE – 1000 Mbps
GREEN– 100 Mbps
OFF – 10 Mbps
Left LED
Solid – Port is connected without traffic
Blinking – Data is transferring
OFF
– Port is not connected
Port Type
Auto MDI/MDI-X ports
LED Indicator
Power LED
OFF – Power off
GREEN– Power on
Console & USB Ports
Console Port
Reserved for engineering use
USB Ports
For connecting a
4G/3G USB modem

USER MANUAL
Peplink Balance Series
http://www.peplink.com -45 / 227 - Copyright © Peplink
6.12.2 LCD Display Menu
> HA State: Master/Slave
>LAN IP
> VIP
> System Status
> System
> Firmware ver. (shows firmware version)
> Serial number (shows serial number)
> System time (shows current time)
> System up time (shows system uptime since last reboot)
> CPU load (shows current CPU loading, 0-100%)
> LAN
> Status (shows LAN port physical status)
> IP address (shows LAN IP address)
> Subnet mask (shows LAN subnet mask)
> Link status (shows Connected/Disconnected, IP address list)
> WAN1
> WAN2
>…
> WAN13
> VPN status (shows Connected/Disconnected)
>VPN Profile 1
>VPN Profile 2
>…
>VPN Profile n
> Link usage
> Throughput in (shows transfer rate in Kbps)
> WAN1
> WAN2
> …
> WAN13
> Throughput out (shows transfer rate in Kbps)
> WAN1
> WAN2
> …
> WAN13
> Data Transfer’d (shows volume transferred since last reboot in MB)
> WAN1
> WAN2
> …
> WAN13
> Maintenance
> Reboot > Reboot? (Yes/No) (to reboot the unit)
> Factory default > Factory default? (Yes/No) (to restore factory defaults)
> LAN config
> Port speed (shows port speed: Auto, 10baseT-FD, 10baseT-HD,
> LAN 100baseTx-FD, 100baseTx-HD,1000baseTx-FD)
> WAN1
> WAN2
> …
> WAN13
USER MANUAL
Peplink Balance Series
http://www.peplink.com -46 / 227 - Copyright © Peplink
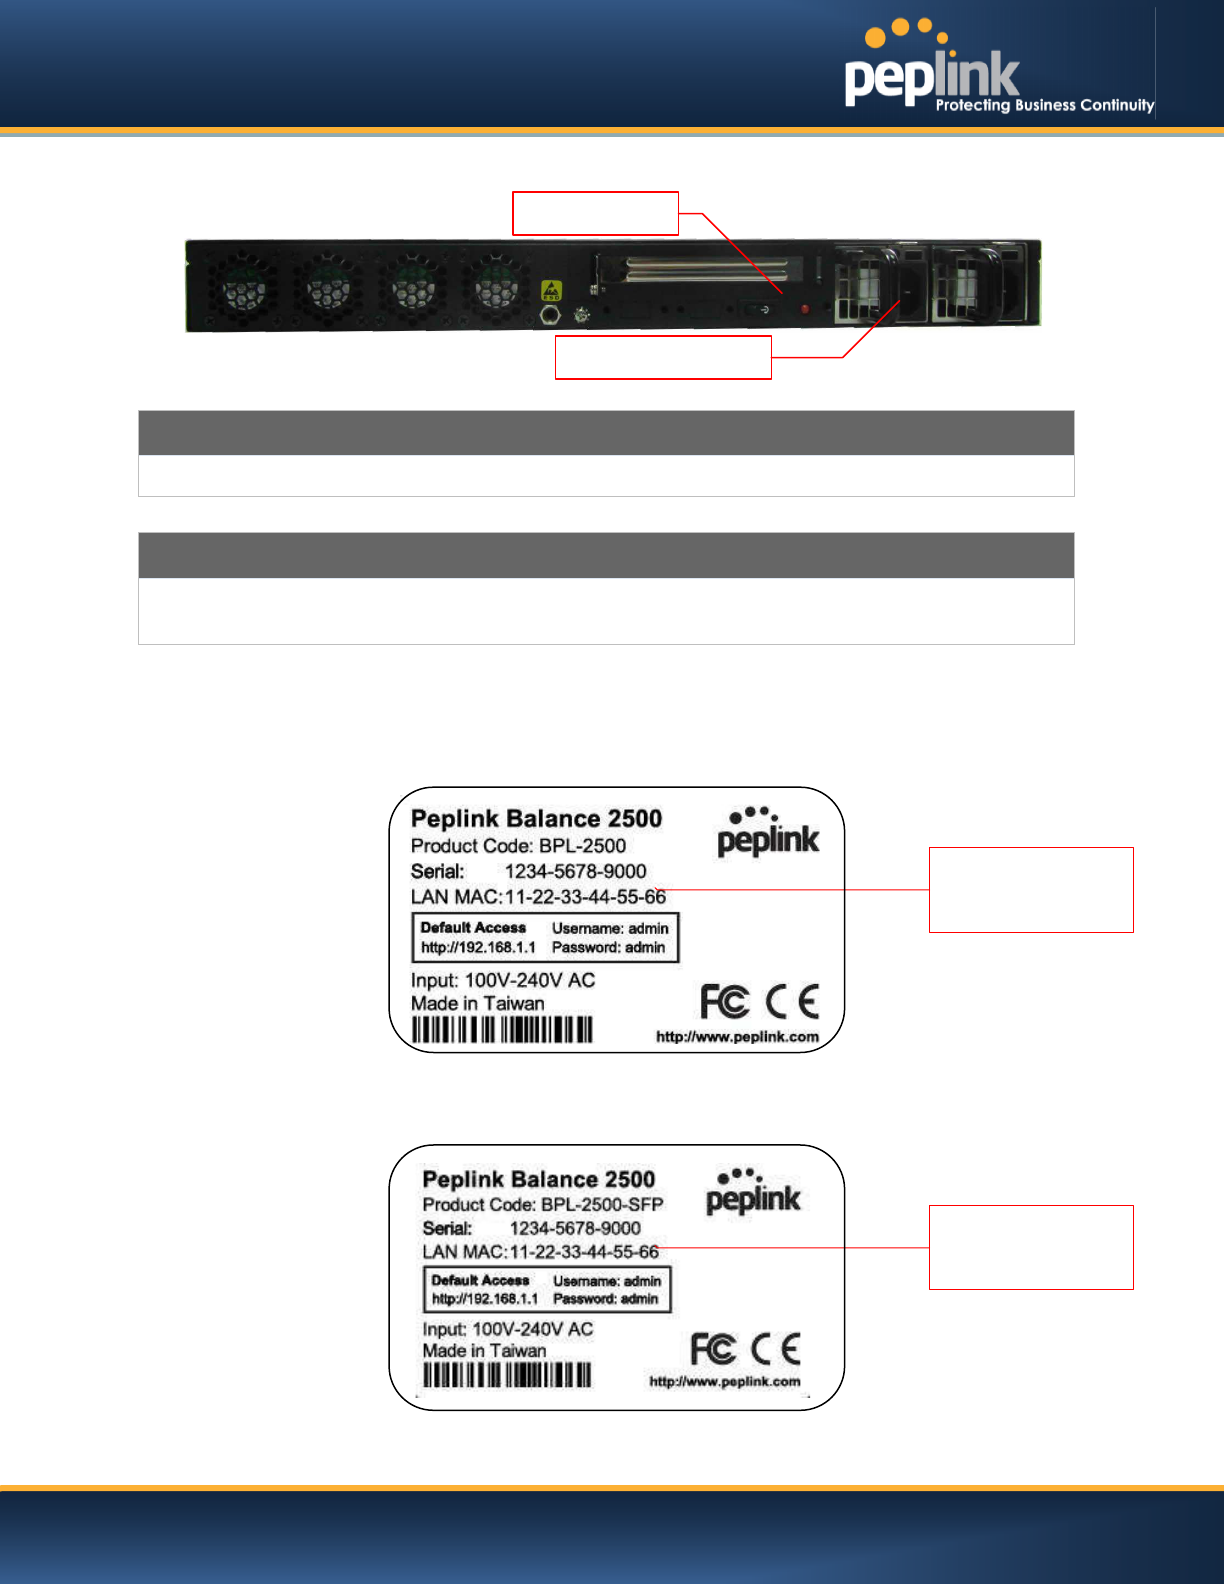
6.12.3 Rear Panel Appearance
Connector Ports
Power Connector
AC input 100-240V
Switches
Power Switch
To hold pressing the key for 4 seconds will power down the unit
When the unit is powered off, press it will power on the unit
6.12.4 Unit Label Appearance
BPL-2500
BPL-2500-SFP
Power Connector
Power Switch
Serial Number and
LAN MAC Address
Serial Number and
LAN MAC Address

USER MANUAL
Peplink Balance Series
http://www.peplink.com -47 / 227 - Copyright © Peplink
7 Installation
The following section details connecting the Peplink Balance to your network:
7.1 Preparation
Before installingyour Peplink Balance, please prepare the following:
At least one Internet/WAN access account
For each network connection, one 10/100BaseT UTP cable with RJ45 connector, or one
1000BaseT Cat5E UTP cable for the Gigabit port on the Balance 580/710/1350/2500, or one
USB modem for the USB WAN port on the Balance 305/380/580/710/1350/2500
A computer with the TCP/IP network protocol and a Web browser installed.Supported browsers
include Microsoft Internet Explorer 8.0 andabove, MozillaFirefox 10.0andabove, Apple Safari
5.1andabove, and Google Chrome 18andabove.
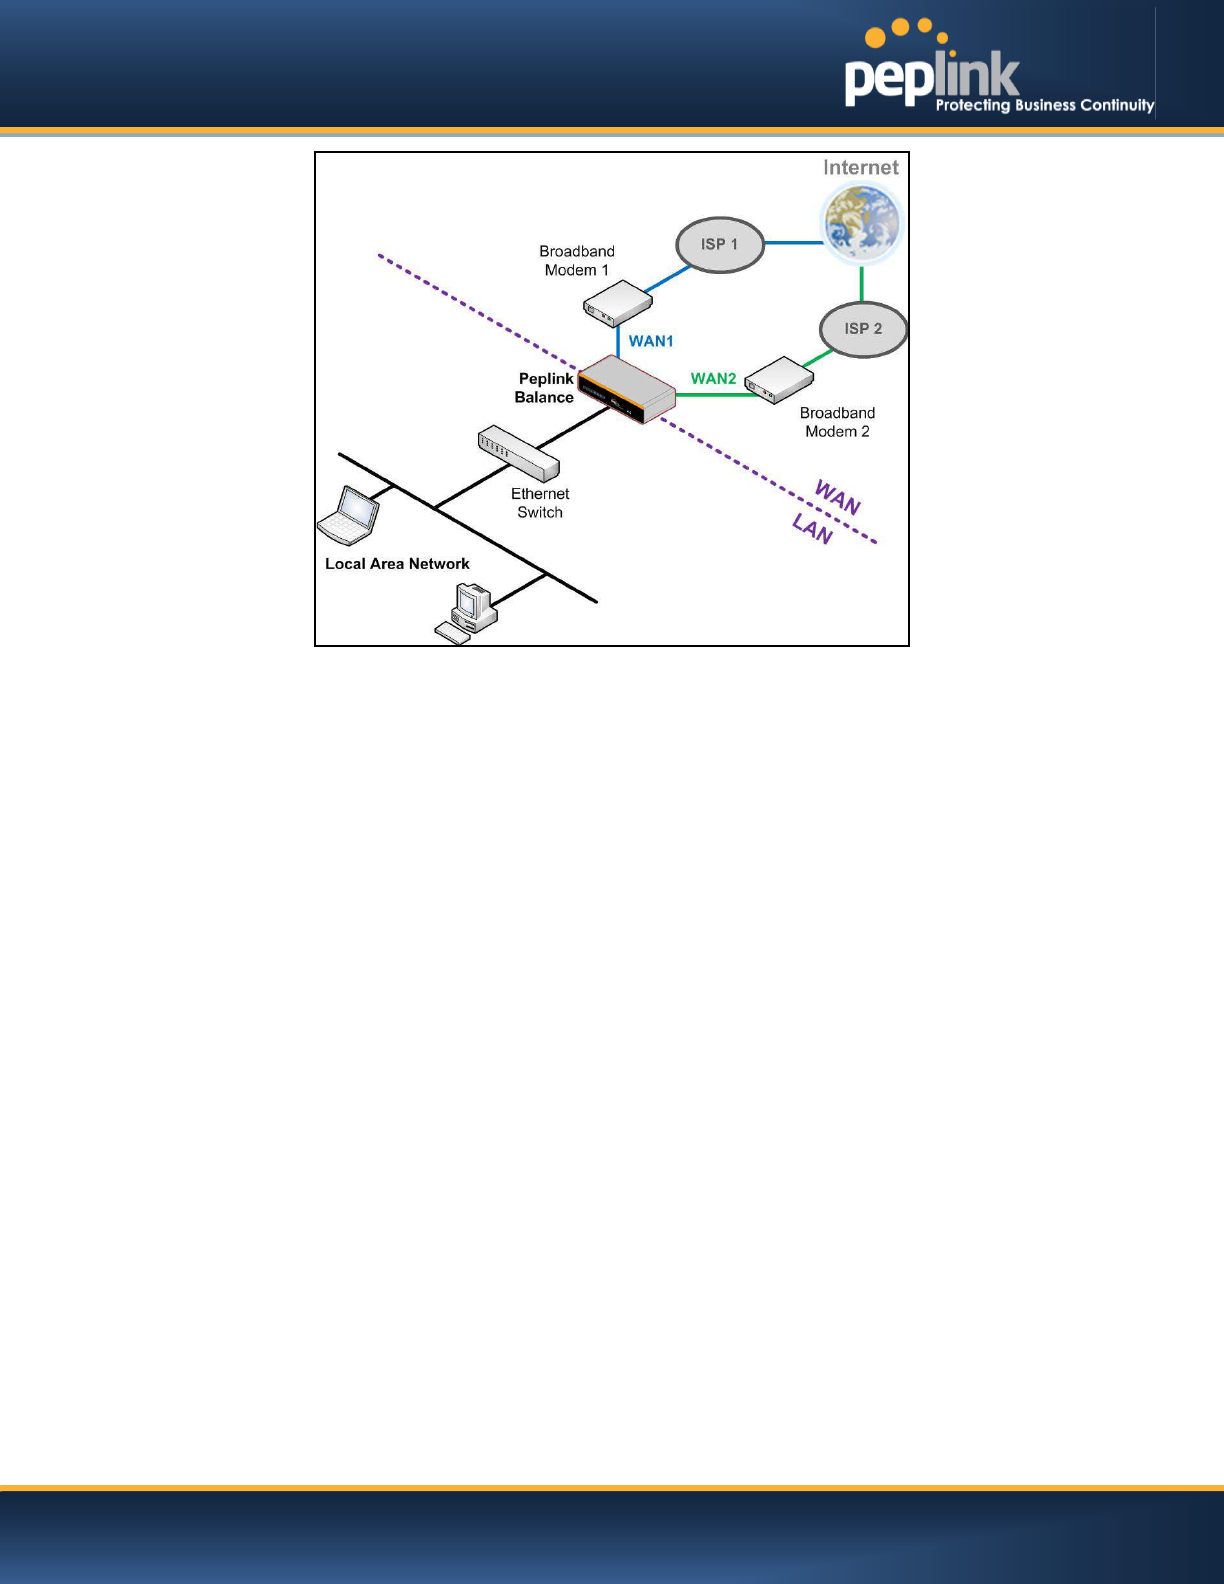
7.2 Constructing the Network
At the high level, construct the network according to the following steps:
1. With anEthernetcable, connect a computer to one of the LAN ports on the Peplink Balance. For
the Peplink Balance 20, 30, 30 LTE,210 and 310, repeat with different cables for up to
4computers to be connected.
2. With another Ethernetcable, connect the WAN/broadband modem to one of the WAN ports on
the Peplink Balance. Repeat using different cables to connect up to 2, 3, 5, 7, 13 or
12WAN/broadband connections with the Peplink Balance 20, 30, 30 LTE, 210, 310, 305,380,
580,710, 1350 and 2500, respectively, or connect a USB modem to the USB WAN port on the
Peplink Balance 20/30/30 LTE/380/580/710/1350/2500.
3. For the PeplinkBalance 20, 30, 30 LTE,210, and 310, connect the provided power adapter to the
power connector on the Peplink Balance, and thenplug the power adapter into a power outlet.
Forthe Peplink Balance 305,380, 580, 710, 1350 and 2500, connect the provided power cord to
the AC power connector on the Peplink Balance, and then plug the power cord into a power
outlet.
The following figure schematically illustrates the resulting configuration:
USER MANUAL
Peplink Balance Series
http://www.peplink.com -48 / 227 - Copyright © Peplink
USER MANUAL
Peplink Balance Series
http://www.peplink.com -49 / 227 - Copyright © Peplink
7.3 Configuring the Network Environment
To ensure that your Peplink Balance works properly in the LAN environment and can access the Internet
via the WAN connections, please refer to the following setup procedures:
LAN Configuration
For basic configuration, refer to Section , Basic Configuration.
For advanced configuration, refer to Section ,
Cellular WAN
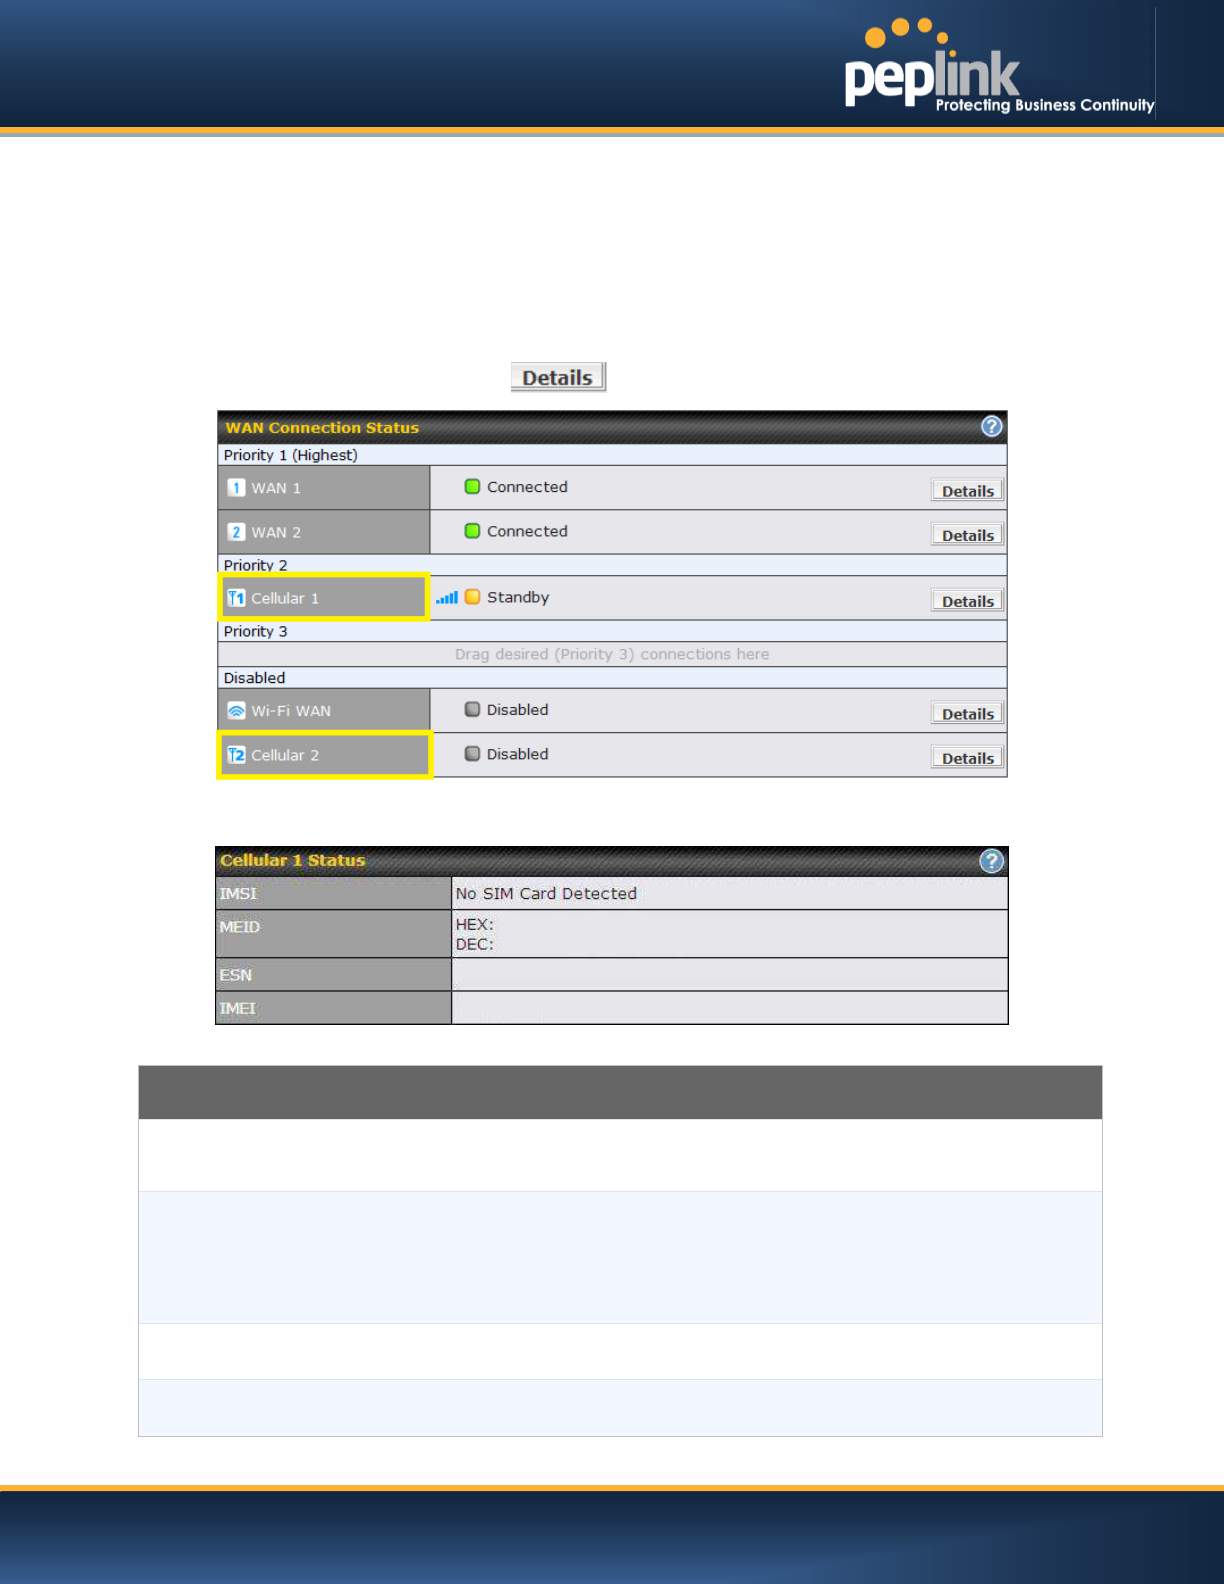
Network>WAN> Click on Detail
(Available on the Peplink 30 LTE only)
Cellular Status
IMSI
This is the International Mobile Subscriber Identity which uniquely identifies the SIM card.
This is applicable to 3G modems only.
MEID
The Pepwave MAX supports both HSPA and EV-DO.
For Sprint or Verizon Wireless EV-DO users, a unique MEID identifier code (in
hexadecimal format) is used by the carrier to associate the EV-DO device with the user.
This information is presented in hex and decimal format.
ESN This serves the same purpose as MEID HEX but uses an older format.
IMEI This is the unique ID for identifying the modem in GSM/HSPA mode.
USER MANUAL
Peplink Balance Series
http://www.peplink.com -50 / 227 - Copyright © Peplink
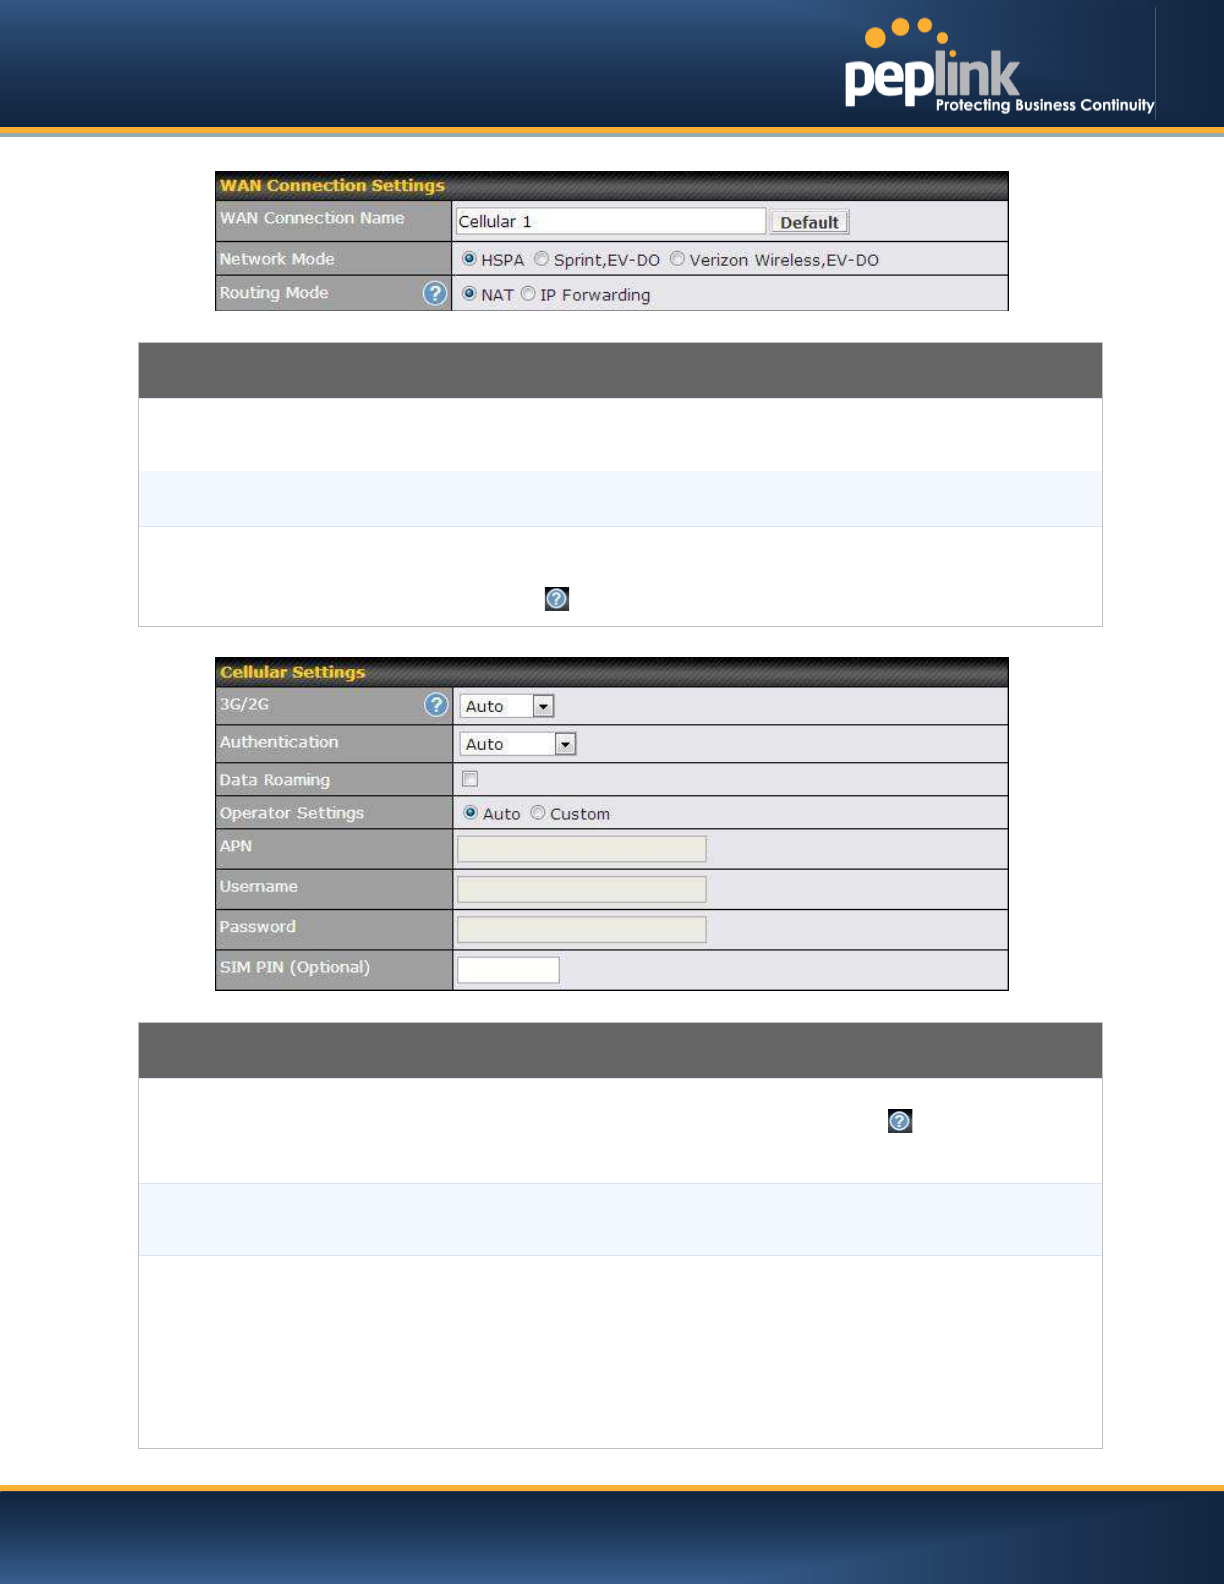
WAN Connection Settings
WAN Connection
Name
This field is for defining a name to represent this WAN connection.
Network Mode
Users have to specify the Network they are on accordingly.
Routing Mode
This option allows you to select the routing method to be used in
routing IP frames via the
WAN connection. The mode can be either NAT (Network Address Translation) or IP
Forwarding. Click the button to enable IP Forwarding.
Cellular Settings
3G/2G Band selection to restrict cellular on particular band. Click on the
button to enable the
selection of specific bands.
Data Roaming
This checkbox enables data roaming on this particular SIM card. Please check your
service provider’s data roaming policy before proceeding.
Operator Settings
This setting applies to 3G / EDGE / GPRS modem only. It does not apply to EVDO / EVDO
Rev. A modem.
This allows you to configure the APN settings of your connection. If Auto is selected, the
mobile operator should be detected automatically. The connected device will be
configured and connection will be made automatically afterwards. If there is any difficulty
in making connection, you may select Custom to enter your carrier’s APN, Login,
Password, and Dial Number settings manually. The correct values can be obtained from