Pittasoft DR650S-2CH Driving Recorder User Manual 2
Pittasoft Co., Ltd. Driving Recorder 2
Contents
- 1. User Manual 1
- 2. User Manual 2
User Manual 2
DR650S-2CH 15
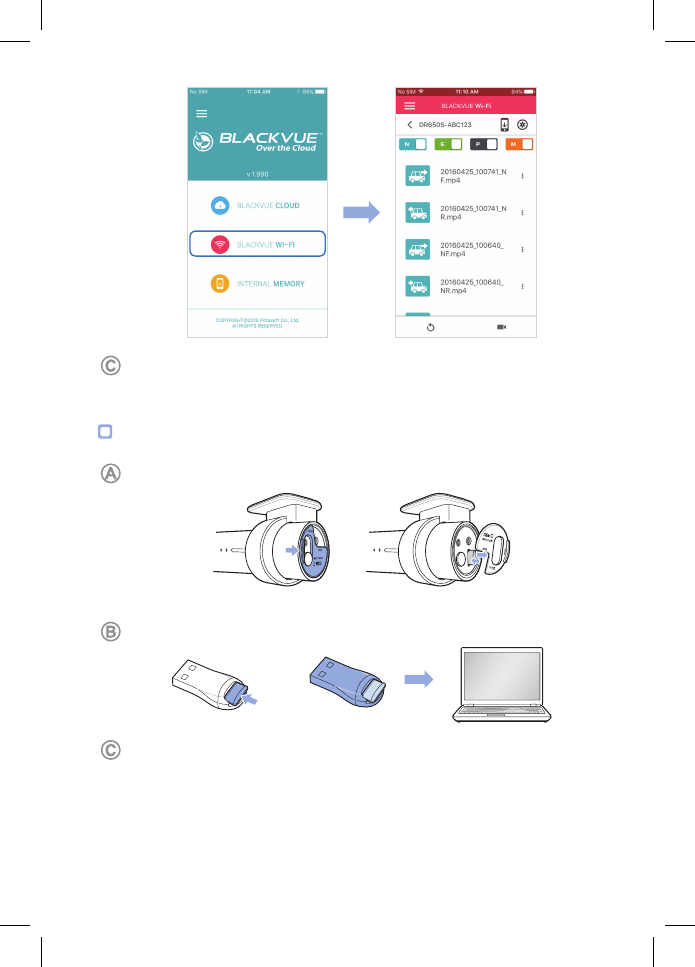
Select the video le you want to play from the video list.
Playing video les on your computer (Windows/Mac)
Remove the microSD card from the dashcam.
Open side cover To remove
Insert the card into the microSD card reader and connect it to a computer.
Find and run the BlackVue Viewer program.
For Windows users: Open Windows Explorer and click on the microSD card
(Removable Disk (F:), or the name of your card location). Go to F:\BlackVue\
Application\Viewer for Windows\ and run BlackVue.exe.
For Mac users: Open Finder and select the microSD card reader from the list in the left
frame. Go to \BlackVue\Application\Viewer for Mac\ and run BlackVue Viewer.
16 BLACKVUE
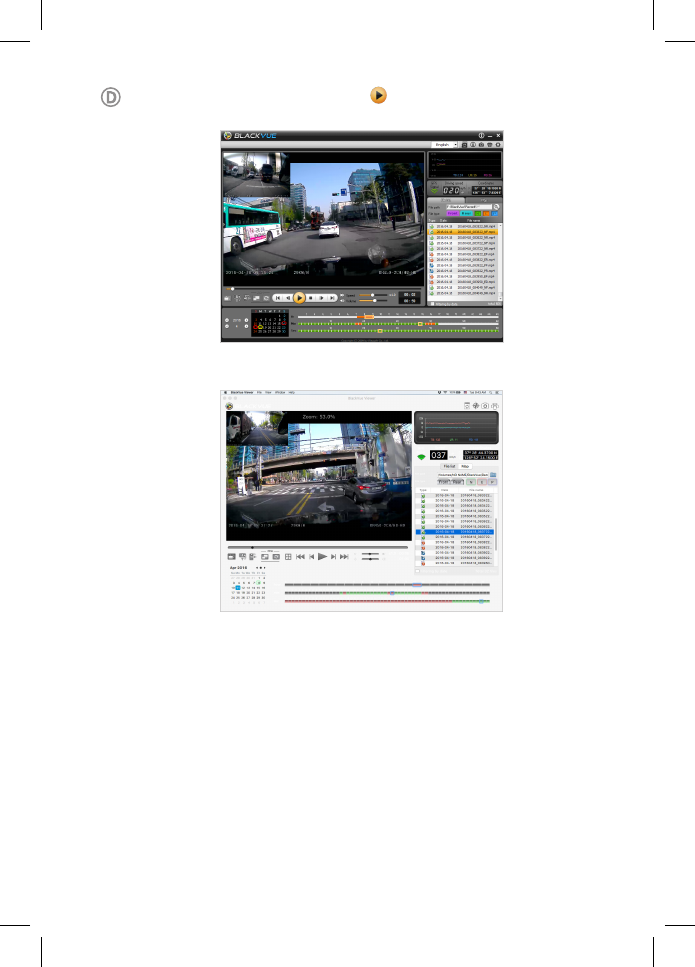
In BlackVue Viewer select a video and click or double click the selected video to
play.
Windows Viewer
Mac Viewer
DR650S-2CH 17
STEP 3 Change the time zone and Wi-Fi password
The camera’s time zone is initially set to ‘Pacic/Midway_Midway Islands’ (GMT-11). To
display the correct time please select your time zone.
The camera’s default Wi-Fi password is ‘blackvue’. For your security please change the
password.
Changing the camera’s time zone and Wi-Fi password using your
smartphone (Android/iOS)
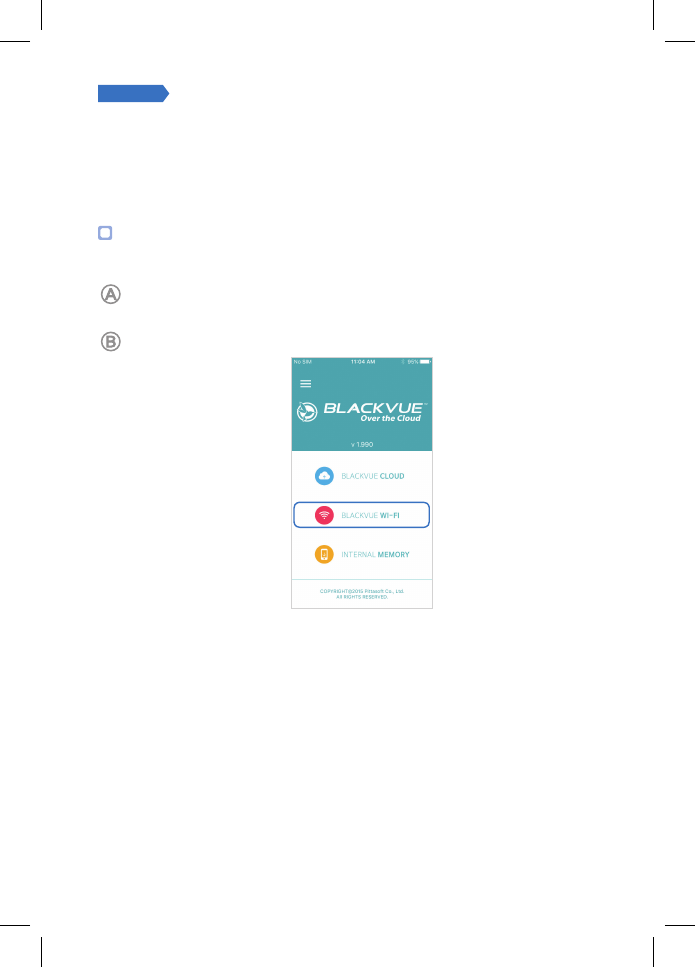
“Pair” your smartphone with the BlackVue dashcam via direct Wi-Fi (for details see
STEP 2 ‘Playing video les on your smartphone’)
Open the BlackVue C app and select BLACKVUE WI-FI.
18 BLACKVUE
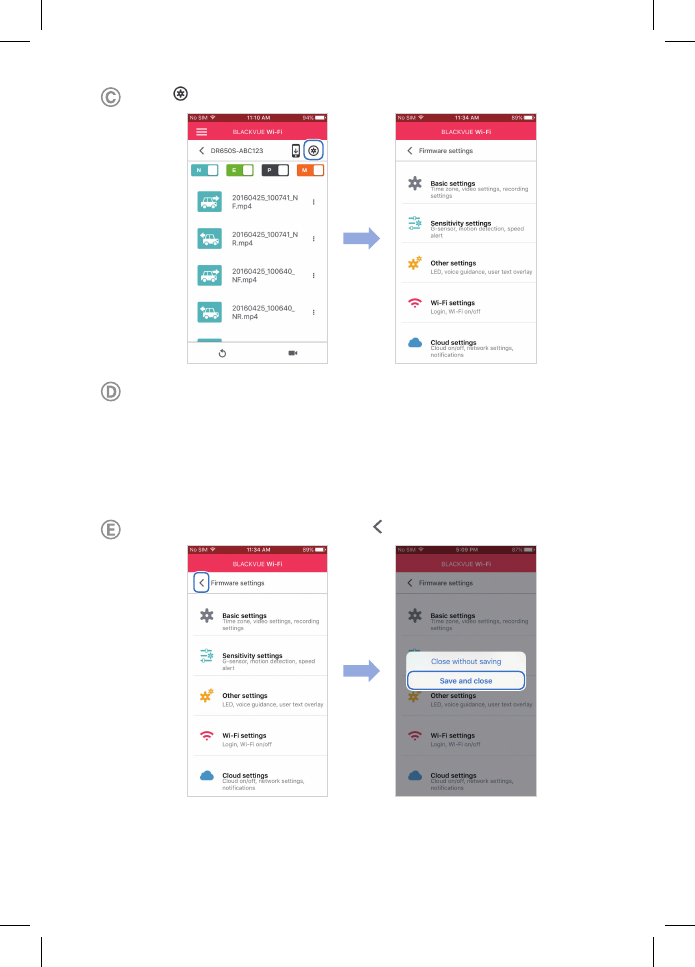
Tap the button to access the Firmware settings menu.
(i) Select Basic settings > Time zone.
(ii) Select your time zone in the drop-down list. If your city is not in the list, select
any other city within the same time zone.
(iii) Go back to the Firmware settings menu.
(iv) Select Wi-Fi settings > Login credentials.
(v) You can change the camera’s SSID and Wi-Fi login password.
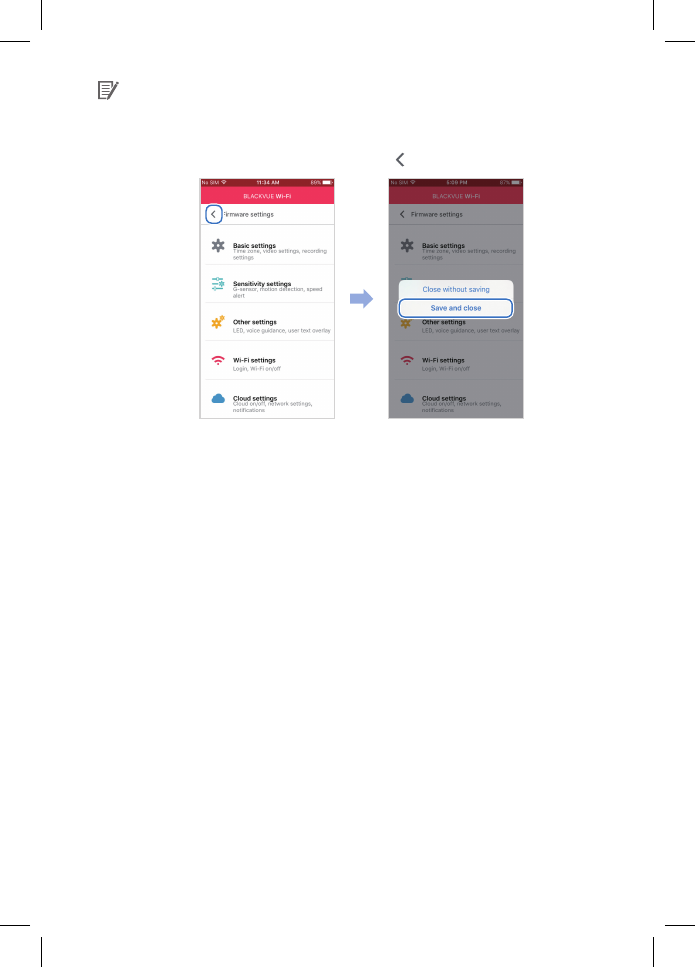
Go back to the Firmware settings menu, tap and tap Save and close.
DR650S-2CH 19
The new settings will be uploaded to your BlackVue dashcam and it will reboot. After
rebooting, the new settings will take eect.
Other settings that can be changed in the Firmware settings menu include the video
resolution, image quality, video file duration, voice recording on/off, speed unit (km/h,
MPH, o), LEDs on/o, voice guidance volume, rear camera settings, Wi-Fi settings and
Cloud settings.
Changing the camera’s time zone and Wi-Fi password on your
computer (Windows/Mac)
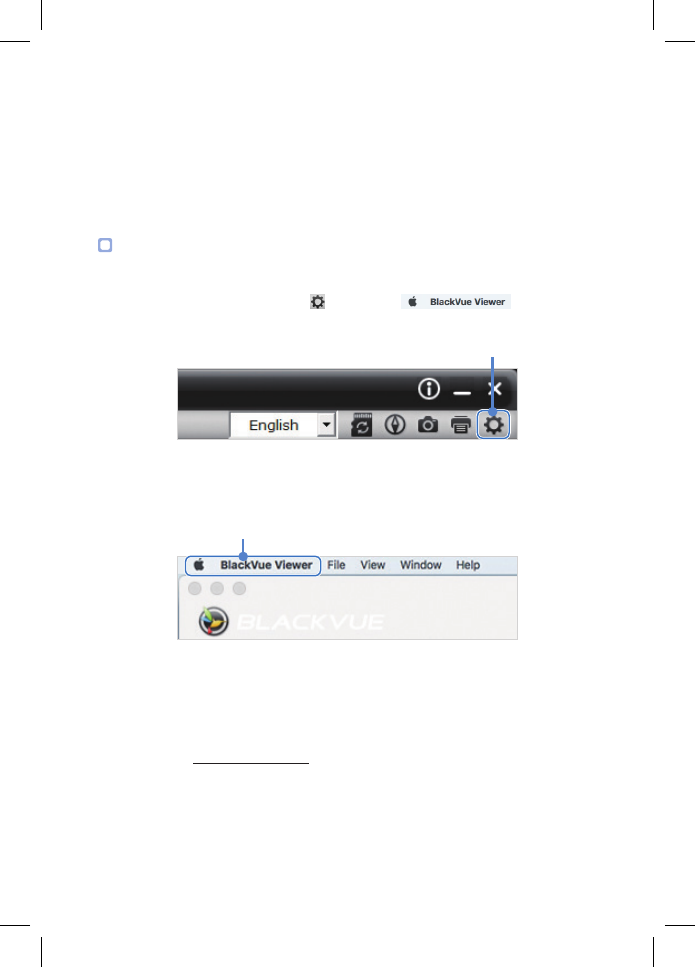
Open BlackVue Viewer and click on the button or the menu to access
the settings panel.
Windows Viewer
Settings
Mac Viewer
Settings
Settings that can be changed include the time zone, Wi-Fi password, video resolution,
image quality, video le duration, voice recording on/o, speed unit (km/h, MPH, o), LEDs
on/o, voice guidance volume, rear camera settings, Wi-Fi settings and Cloud settings.
For more information about changing the settings in BlackVue Viewer, please download
the manual from www.blackvue.com > Support > Downloads.
20 BLACKVUE
STEP 4 Connect to BLACKVUE CLOUD (optional)
If you don’t have a mobile Wi-Fi hotspot, or if you don’t want to use the BLACKVUE CLOUD
service, you can skip this step.
If you have a mobile Wi-Fi hotspot (also known as a portable Wi-Fi router), a car-embedded
wireless internet network or a Wi-Fi network near your car, you can use the BlackVue C app
to connect to BLACKVUE CLOUD and see in real-time where your car is and the dashcam’s
live video feed.
For more information about using the BlackVue C app, please download the Cloud Manual
from www.blackvue.com > Support > Downloads.
Create an account
(i) Open the BlackVue C app.
(ii) Tap the button in the top-left corner and select Create account.
(iii) Enter your email address and choose a password. Re-enter your password and
press Next.
(iv) After reading the Terms & Policies, check the boxes and press the Create
account button to continue.
(v) You will receive an e-mail. Click the link in the email to finish creating your
account.
Register your dashcam with your account
(i) In the BlackVue C app select BLACKVUE CLOUD and login to your account.
(ii) Tap Yes to enable push notications (this setting can be adjusted at any time
later).
(iii) Select Register new camera.
(iv) Register your camera using one of the following methods:
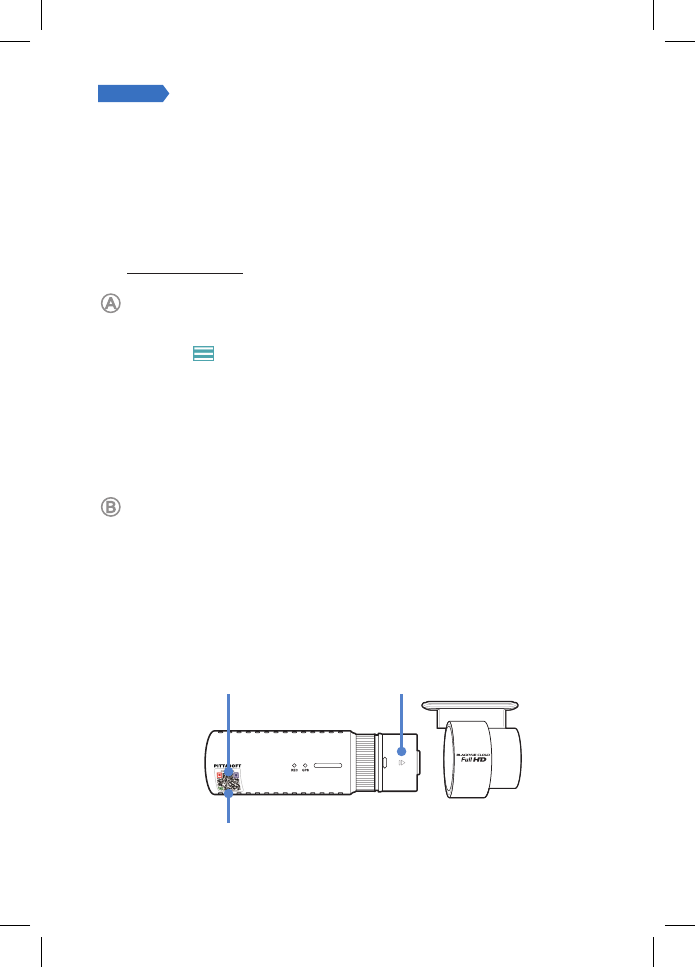
QR Code: Press Scan QR Code and line up the QR Code on your smartphone’s
screen.
Cloud code
QR Code: Serial number
DR650S-2CH 21
or
Manual registration: Enter your camera’s Serial number and Cloud code and press
Register.
Connect your BlackVue dashcam to a Wi-Fi hotspot for Cloud connectivity
(i) Make sure your BlackVue dashcam and mobile Wi-Fi hotspot are on.
(ii) “Pair” your smartphone with the BlackVue dashcam via direct Wi-Fi (for details
see STEP 2 ‘Playing video les on your smartphone’)
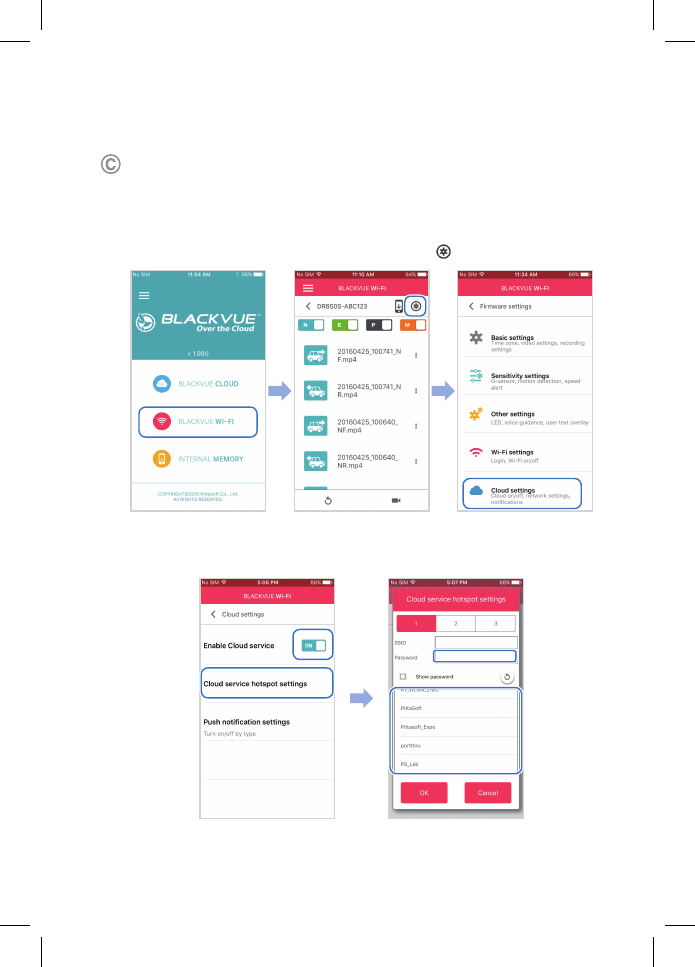
(iii) Open the BlackVue C app. Select BLACKVUE WI-FI > > Cloud settings.
(iv) Ensure Enable Cloud service is on. Select Cloud service hotspot settings.
(v) Choose your Wi-Fi hotspot from the list. Enter the password and tap OK.
22 BLACKVUE
Note
yUp to 3 Wi-Fi hotspot SSIDs can be saved (e.g. home, portable hotspot and work).
yThe BlackVue dashcam is not compatible with 5GHz wireless networks.
(vi) Go back to the Firmware settings menu, tap and tap Save and close.
After rebooting, your dashcam will automatically connect to the Wi-Fi hotspot.
Select BLACKVUE CLOUD from the main screen to access all of the Cloud features.
DR650S-2CH 23
Tips for optimal performance
Format the microSD card once a month, or when the BlackVue dashcam tells you the
card needs maintenance.
Self-format function:
To format the microSD card press the Wi-Fi/Format button on the side of the
dashcam for 10 seconds until the dashcam beeps.
Format using BlackVue Viewer (Windows):
Download BlackVue Windows Viewer from www.blackvue.com > Support
> Downloads and install it on your computer. Insert the microSD card into the
microSD card reader and connect the reader to your computer. Launch the copy
of BlackVue Viewer that is installed on your computer. Click the Format button,
select the card drive and click OK.
Format using BlackVue Viewer (Mac):
Download BlackVue Mac Viewer from www.blackvue.com > Support >
Downloads and install it on your computer. Insert the microSD card into the
microSD card reader and connect the reader to your computer. Launch the copy of
BlackVue Viewer that is installed on your computer. Click the Format button and
select the microSD card from the list of drives in the left frame. After selecting your
microSD card select the Erase tab in the main window. Select “MS-DOS (FAT)” from
the Volume Format drop-down menu and click Erase.
Only use ocial BlackVue microSD cards. Other cards may have compatibility issues.
Regularly upgrade the firmware for performance improvements and updated
features. Firmware updates will be made available for download at www.blackvue.
com > Support > Downloads.
Customer Support
For customer support, manuals and rmware updates please visit www.blackvue.com
You can also email a Customer Support expert at cs@pittasoft.com
4BLACKVUE