Pittasoft SC300 BLACKVUE SPORT User Manual
Pittasoft Co., Ltd. BLACKVUE SPORT
User Manual
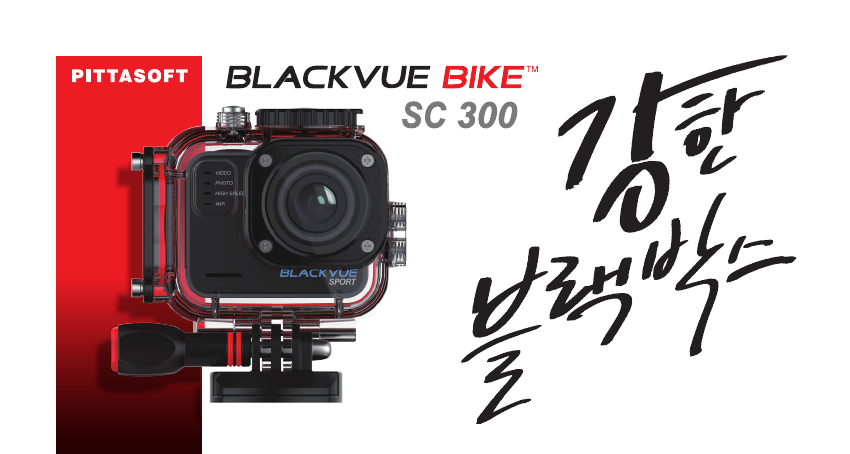
Name Ι BLACKVUE SPORT
Manufacturer Ι Pittasoft Co.,Ltd. / South Korea
Address Ι (Gasan-dong, BYC HIGHCITY), A-7th floor, 131, Gasan digital 1-ro,
Geumcheon-gu, Seoul, 153-718, Republic of Korea
E-mail Ι sales@pittasoft.com
Service Center Ι +82.2.6947.4670(ext.3)
www.blackvuesport.com

BLACKVUE SPORT
SC300
ENGLISH

BLACKVUE SPORT I SC300 3
ENGLISH
Introduction to the Manual 4
Safety Precautions 5
Getting Started Checking the Components 8
Understanding the Part Name
and Function 10
Inserting/Removing
the Memory Card 12
Inserting/Removing the Battery 13
Charging the Battery 14
Assembling the LCD
(not supplied) 15
Installing Camera Camera Installation 17
Installing the Camera inside
a Waterproof Housing 18
Connecting Power Cable 19
Shooting Turning on the Power 23
Automatic Video Recording 23
Using the BLACKVUE 24
SPORT APP Screen View 26
Changing the Setting Option 27
Playing Movies/Photos 30
Moving les 30
Managing the internal memory 31
Firmware Upgrade 32
Product Specifications 33
>Contents

>Introduction to the Manual
Thank you for purchasing BLACKVUE SPORT of PittaSoft Co., Ltd.
This instruction manual contains information on how to operate your
BLACKVUE SPORT. Before using the product, make sure to read through
this manual so as to use the product in the correct way. To enhance the
performance of the product, the contents of this instruction manual may be
changed without prior notice.
Warranty and Support
yIn accordance with Personal Information Security Law & related
legislation, Pitta Soft Co., Ltd. will not be held responsible for any
problem due to illegal use of this product.
Copyright and Trademark
yThis instruction manual is protected by Copyright Law, and all rights to it
are protected by law.
yIt is prohibited to reproduce, copy, modify, or translate this instruction
manual without permission.
y BlackVue is the registered trademark of Pitta Soft Co.,
Ltd. PittaSoft Co., Ltd. reserves the rights regarding all works related to
the BlackVue brand such as product design, trademarks, and product-
promotional videos. It is prohibited to reproduce, copy, modify, or use
related works without permission. Any violation may be penalized in
accordance with the relevant regulations.

BLACKVUE SPORT I SC300 5
ENGLISH
>Safety Precautions
The purpose of these cautions is to maintain user safety and avoid damage to property.
Please make sure to read through this manual so as to use the product in the correct way.
yDo not install it in an environment with high humidity, or combustible
gases or liquids.
It can cause explosion & re.
yDo not insert flammable materials into the camera or store these
materials near the camera.
This may cause a re or electric shock.
yDo not expose the camera to direct sunlight or high temperatures
for an extended period of time.
Prolonged exposure to sunlight or extreme temperatures can cause
permanent damage to your camera’s internal components.
DANGER Death or property damage can be caused for users if the following directions are not followed:
yDo not disassemble, repair, or modify the product yourself.
It can cause re, electric shock, or malfunction. For internal inspection
and repair, call your customer service center.
yIf any foreign matter gets inside the product, detach the power cord
straightaway.
Call the customer service center for repair.
yDo not use a damaged or altered USB cable. Use the USB cable provided
by the manufacturer.
Otherwise it can cause explosion, re, or malfunction.
yDo not operate the product with wet hands.
It can cause electric shock.

yDo not leave the product where infants, children, or pets can reach it.
They might swallow small components, or their saliva could get into it
and cause an explosion due to a short circuit.
yIf smoke or an unusual smell is emitted from the USB cable, detach it
immediately.
Call the customer service center or the dealer.
yUse only authentic, manufacturer-recommended, Lithium-ion
replacement batteries or supplied battery charger. Otherwise, Pitta
Soft Co., Ltd. will not be held responsible for any problem.
yDo not cover the product with any material.
It can cause external deformation of the product or re. Use the product
and peripherals where ventilation is ensured.
yIf the camera is not used for a long period of time, remove the
battery from the camera.
Fluid may leak out of the battery, damaging the camera signicantly.
yDo not apply excessive force to the exterior of the camera.
Doing so may result in product failure.
WARNING Death or serious injury can be caused for users if the following directions are not followed:

BLACKVUE SPORT I SC300 7
ENGLISH
yDo not spray cleaning products directly onto the outside of the product.
It can cause discoloration, cracks, or malfunction.
yMake sure that the product is installed properly.
The product can fall as a result of vibration, and may cause physical
injury.
yMicroSD cards are a consumable so replace them after prolonged
use.
They may not record video correctly after a long time in use, so check
their recording capability periodically and replace it as necessary.
yClean the lens regularly.
Foreign material attached to the lens can aect the recording quality.
yDo not remove the microSD card while it is saving or reading data.
The data may be damaged or malfunction caused.
yWhen you connect the cable or insert the battery or memory card to
the camera, be careful not to apply impact to the camera or connect
the cable or insert the battery or memory card in a wrong direction.
The insertion hole or accessory may be damaged.
The camera or cable may be damaged, and if the battery and memory
card are not inserted correctly, the connection terminal or accessory of
the camera may be damaged.
yDo not use batteries for unintended purposes.
This may cause a re or electric shock.
yUse Waterproof housing when the product is used at low temperature.
Due to the characteristics of Li-ion Polymer Battery, battery performance
may decrease when the product is used at low temperature. Waterproof
housing is recommended for use at low temperature.
CAUTION Injury or property damage can be caused for users if the following directions are not followed:
>Getting Started IChecking the Components
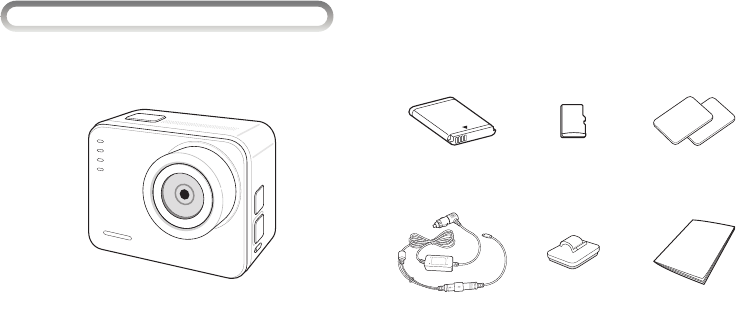
After purchasing the camera, open the box and check the following components.
Battery Memory card Tape for mount
Waterproof power cable Cable clip User Manual
Camera
BLACKVUE SPORT I SC300 9
ENGLISH
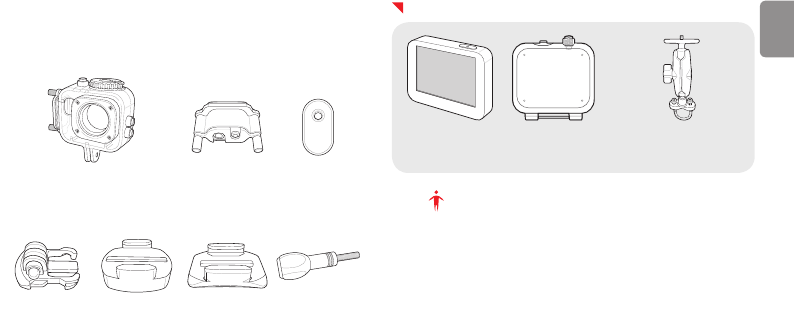
Waterproof housing Cable connector Joint rubber for
single cable
Basic connector Tripod mount Curved mount Thumb screw
Accessories (Sold separately)
LCD pack for bike
(LCD, Waterproof housing backdoor for LCD)
Handlebar mount
Note
yThe image of each component or accessory may dier from the ac-
tual component or accessory.
yTo enhance the performance of the product, the components of this
product may be changed without prior notice.
yThe components and accessories can be purchased separately from
the BLACKVUE SPORT homepage (www.blackvuesport.com).
yThe manufacturer holds no responsibility for any problem occurred
due to the use of a product which is not certied by the manufacturer.
yThere is a screw hole that can be assembled with tripod screw on the
bottom of the tripod mount.
IUnderstanding the Part Name and Function
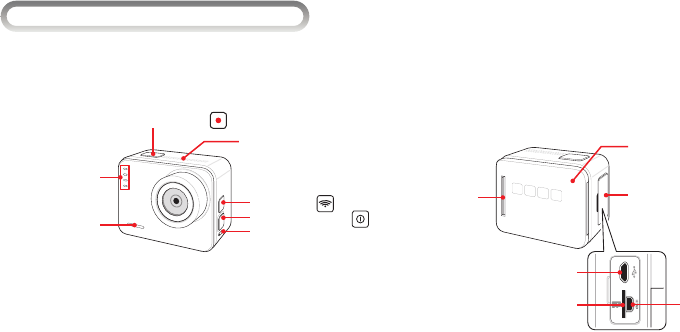
Check the name and function of each part rst before using the camera.
Shutter/Select button
Speaker
Wi-Fi button
LED indicators
• VIDEO
• PHOTO
• HIGH SPEED
• WiFi
LED Indicators
• Blinking: In shooting
• Lighting: In charging
Power/Mode button
Microphone
USB, HDMI output
terminal and
memory card slot
cover
HDMI output
port
LCD connection
terminal
USB port
microSD card slot
Battery slot cover
BLACKVUE SPORT I SC300 11
ENGLISH
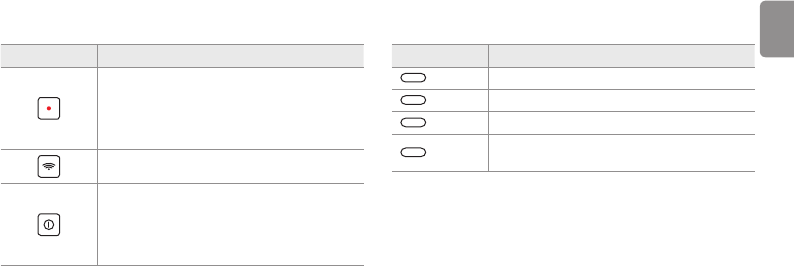
Item Description
Shooting mode: Start/End shooting
Playback mode
*
• Thumbnail view: Select a le
• Playback or Pause
*
Setting mode
*
: Select a menu or setting item
Wi-Fi On/O: Long press
Power On/O: Long press
Mode change: Press
•
*
Movie/Normal Photo/High-speed Shooting/Playback/
Setting
•
*
Switching between menus or setting items
Item Description
VIDEO Blue: Movie/Time Lapse mode
PHOTO Blue: Photo shooting mode
HIGH SPEED Blue: High speed shooting mode
Wi-Fi Blue: Wi-Fi power on
O: Wi-Fi power o
* The items marked with are the functions supported only when LCD is mounted.
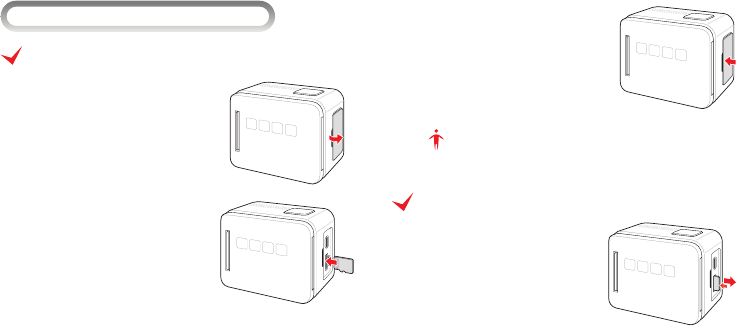
IInserting/Removing the Memory Card
Inserting the memory card
1 Open the cover of the memory
card slot.
2 Insert the memory card with the
metallic terminal to the left.
3 Close the cover of the memory
card slot.
Note
Be careful not to lose the cover for the memory card slot.
Removing the memory card
Press the memory card in lightly, and
when the top emerges part way, pull it
out completely.
BLACKVUE SPORT I SC300 13
ENGLISH
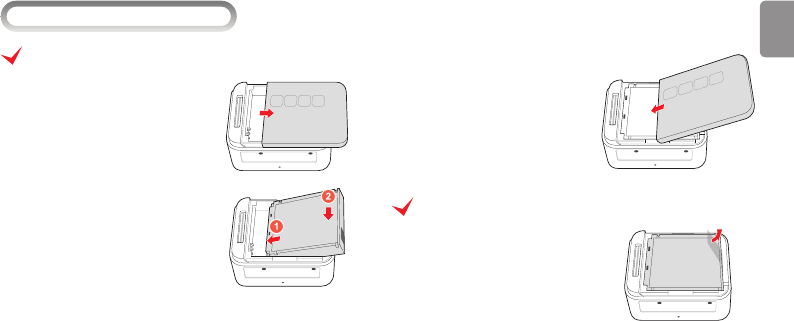
IInserting/Removing the Battery
Inserting the battery
1 Open the battery cover.
2 Insert the batteries.
3 Close the battery cover.
Removing the Battery
Remove the battery by holding and lifting
the plastic handle on the opposite side of
the metallic terminal.
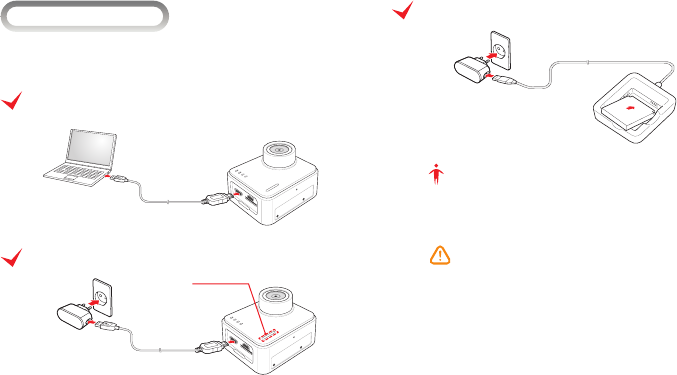
ICharging the Battery
Charge the battery completely when using the camera for the rst time after
purchasing it.
Charging by connecting the USB cable to a PC
(not supplied)
Charging by Connecting to the Power Adaptor
(Not supplied)
LED Indicators
• Charging in progress : Red
• Charging complete : O
Charging by Connecting the Battery Charger (not supplied)
(Not supplied)
Note
Use only authentic, manufacturer-recommended, Lithium-ion replacement
batteries or supplied battery charger. Otherwise, PittaSoft Co., Ltd. will not
be held responsible for any problem.
Caution
yRISK OF EXPLOSION IF BATTERY IS REPLACED BY AN INCORRECT TYPE.
USE ONLY THE BATTERY PROVIDED BY PITTA SOFT.
yDISPOSE OF USED BATTERIES ACCORDING TO THE LOCAL
REGULATIONS. BATTERY DISPOSAL INSTRUCTIONS MAY VARY
DEPENDING ON COUNTRY AND REGION.
BLACKVUE SPORT I SC300 15
ENGLISH
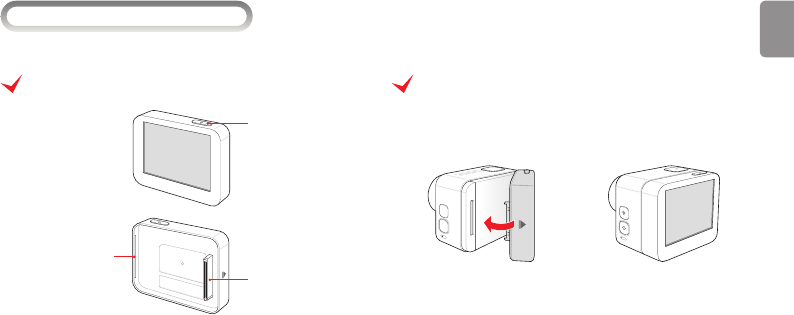
IAssembling the LCD (not supplied)
You can check the shooting scene, play back a le, or set the camera and shooting environments by mounting the LCD component to the camera.
Name of each part in the LCD
LCD power button
Camera connecting
terminal
Assembly groove
Assembling the LCD
Align the assembly groove on the LCD with the right end of the camera, and
insert the connection terminal of the LCD into the connection terminal of
the camera correctly.
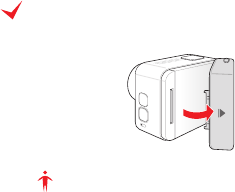
Removing the LCD
Remove the LCD by pulling the part marked with an arrow rmly upwards.
Note
After assembling the LCD, turn on the camera and check the LCD operates
normally. If the LCD screen does not turn on, turn off the camera and
assemble the LCD again using the method specied on the previous page.
BLACKVUE SPORT I SC300 17
ENGLISH
>Installing Camera ICamera Installation
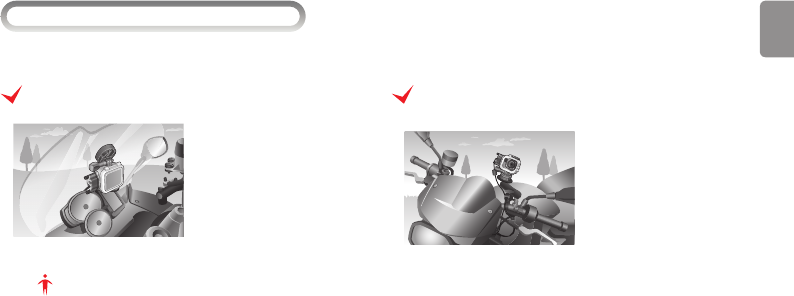
Using a mount, you can install the camera on a bike.
Installation Using an Adhesive Tape
Attach the adhesive tape to
where you want to place the
camera, and then mount or use
the curved mount for the tripod
to ax the camera onto it.
Note
If the camera is installed facing downward, reverse the view. For more
details, see Changing the Setting Option (page 27).
Camera Installation Using a Handle Bar Mount
(not supplied)
You can install the camera onto
the handle via a handle bar
mount and ax the camera using
a tripod mount.
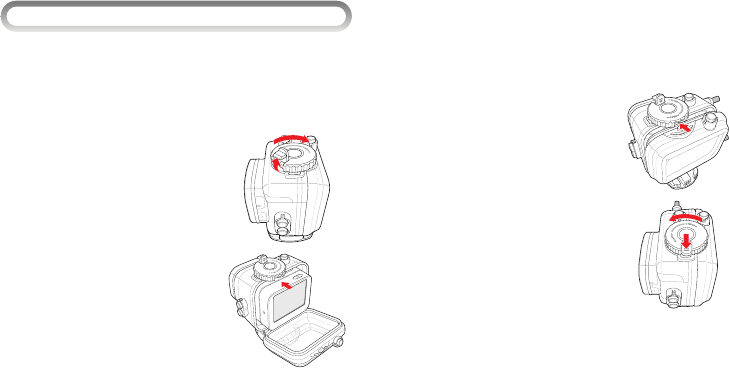
IInstalling the Camera inside a Waterproof Housing
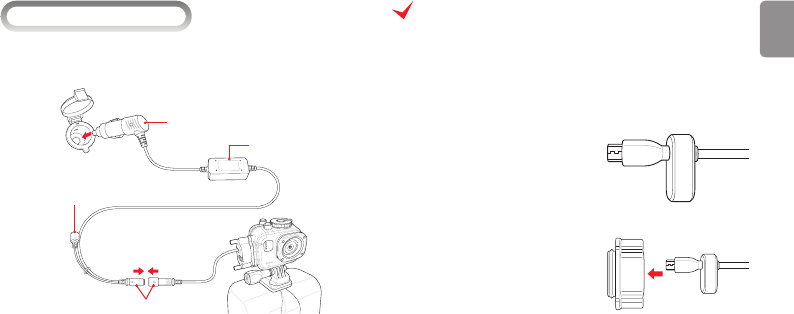
By placing the camera inside a waterproof housing, you can protect your camera from external hazards (dust and water). Camera installation method is the
same as the slim-type backdoor and backdoor for LCD.
4 Couple the groove in the lock with
the groove in the rear cover.
5 Turn the lock counter clockwise to
the fullest and lower the latch.
6 Check if all buttons in the waterproof housing work normally.
1 Before placing the camera inside the waterproof housing,
ensure that you have powered o the camera.
2 Lift up the latch of the lock and
turn it clockwise.
3 Open the cover and carefully push
the camera into the waterproof
housing.
BLACKVUE SPORT I SC300 19
ENGLISH
IConnecting Power Cable
Using the waterproof housing and waterproof power cable, you can draw power
from the bike’s cigar jack when it rains.
Connector jack
Connector jack cap
Cigar jack
Converter
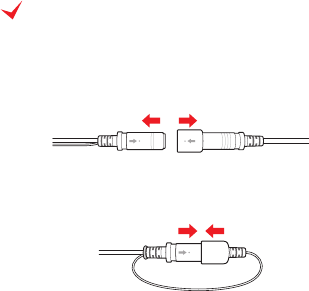
yDisconnect the connector jacks of waterproof power cable to prevent
inconvenience arising from the long cable.
Connecting Camera and Cable
1 Turn connector screw clockwise and remove the S-washer and cable
joint rubber.
2 Insert the micro USB connector of
the waterproof power cable into
the cable joint rubber for single
cable.
3 Insert the cable joint rubber,
assembled into the connector.
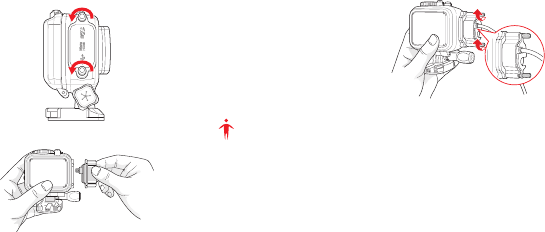
4 Turn the extension cable screw of
waterproof housing clockwise and
remove the extension cable cover.
5 Connect the cable connector you
have assembled in your camera.
6 Insert the S-washer with the narrow
side facing upwards and turn
the cable connector joint screw
clockwise.
Note
Using a joint rubber for multi cable, you can connect both the HDMI cable
(not supplied) and the power cable at the same time.
BLACKVUE SPORT I SC300 21
ENGLISH
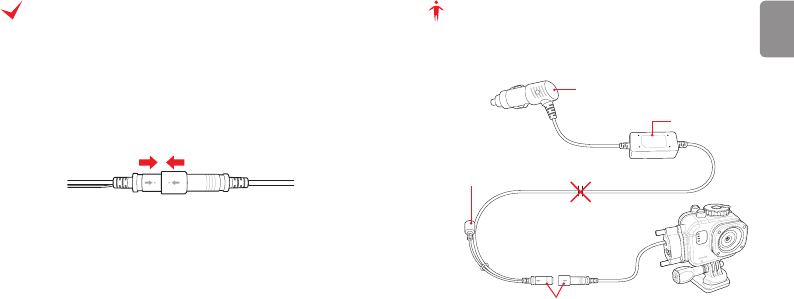
Connecting Cable with Power Supply
1 Firmly mount the waterproof housing that holds the camera onto
your bike.
yYou can use a curved mount or a handle bar mount (not supplied) for
this purpose.
2 Plug the waterproof power cable connector jack in the direction, as
indicated by the arrow.
3 Plug the cigar jack to the bike’s power supply.
4 Fasten the cable using a cable holder.
Note
When you have no cigar jack power, cut the waterproof power cable and
connect it directly to the battery, make sure that you do not cut the middle of
the converter or the connector jack.
Cigar jack
Converter
Connector jack cap
Connector jack
Removing Cable after Using the Camera
When you are done with using the camera, detach periferals, and keep the
camera, you do not need to remove all cables from you bike. Remove cables
in a place free from water, sand, or dust.
1 Disconnect the connector jacks of waterproof power cable.
2 Keep the disconnected camera and cables indoorse.
3 Keep the connector jack installed on your bike with a cap plugged.

BLACKVUE SPORT I SC300 23
ENGLISH
>Shooting ITurning on the Power
After charging the battery, press and hold down until the camera turns
on.
yPress and hold down again to turn o the camera.
Note
yFrom the BLACKVUE SPORT application, you can view and edit Resolu-
tion/Shooting Time/Rotation View settings in full detail.For more details,
see Using BLACKVUE SPORT APP (page 24).
yIf you installed an LCD, you can change the settings in Camera Settings.
For how to set and use your camera with an installed LCD, see BLACKVUE
SPORT website at www.blackvuesport.com.
IAutomatic Video Recording
If you have ther camera connected to the bike power supply, you can record
video during the entirel time you are biking. Up to full HD image resolution
with 1920 x 1080 pixels at 30fps, video images are recorded in the MP4 format.
1 Press and select the video mode.
yOn the LED of your camera, the menu VIDEO will appear in blue.
2 Press to start video recording.
3 Press once again to end video recording.
Note
yThe le name of the video recording will be recorded in MMDDHHMM
(month/date/hour/minute) format.
yVideo recordings are stored by unit of time specied, the default setting
is 1 minute.
yIf storage is insucient, the oldest les will be deleted by default.
>Using the BLACKVUE SPORT APP
You can control or manage the camera from a wireless device (smartphone
or tablet PC) where the BLACKVUE SPORT App is installed.
1 Install and execute BLACKVUE SPORT App on a wireless device.
Note
yThe BLACKVUE SPORT App can be downloaded from the Google Play
store and Apple App Store.
yThe BLACKVUE SPORT App can be used with Android 2.3 or later and
iOS 5.0 or later.
ySome functions may not be supported depending on the wireless
device.
2 Turn on the Wi-Fi function of the wireless device.
3 Turn the camera on and press and hold down button to turn on the
Wi-Fi function. It takes about 35 seconds to activate the Wi-Fi function.
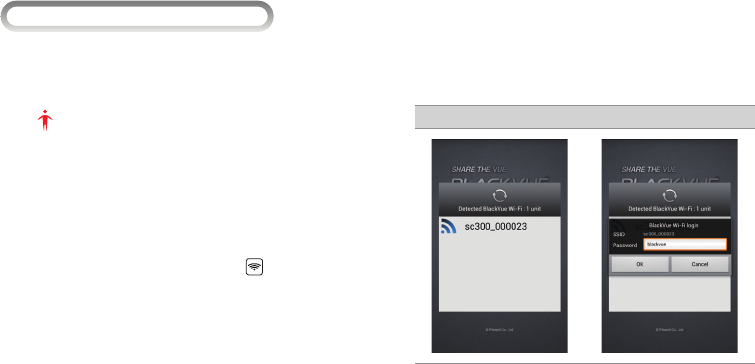
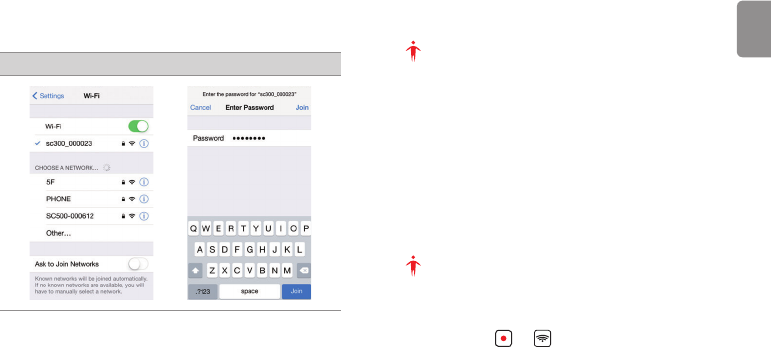
4 Touch the Wi-Fi button of BLACKVUE SPORT App. (Eg: SC300) Select
a list of devices to connect and enter blackvue as the password. Tap
the OK button to connect it to the selected device.
Android
BLACKVUE SPORT I SC300 25
ENGLISH
iOS Note
yWi-Fi SSID can be changed from the App Settings.
yIf you save the connection information when connecting using Wi-
Fi, you can tap the Wi-Fi button in the BLACKVUE SPORT App to
connect it without turning on the Wi-Fi function of the smartphone.
(only for Android)
yThe initial password is blackvue, but the user can change it.
yFor the Live View function, Wi-Fi can be used within a 10m range,
although the range may vary in some circumstances.
yFor playback of recorded videos using Wi-Fi, reception may vary
according to the data transfer rate.
5 Select the recorded video you want to play back in the video list.
Note
yTap the Live View button to play the movie in real time.
yIf you have changed Wi-Fi settings, always restart the camera.
yIf you have forgotten the password, you should reset camera settings.
Press and hold and at the same time for about 10 seconds, the
camera will power down and all camera settings will be initialized.
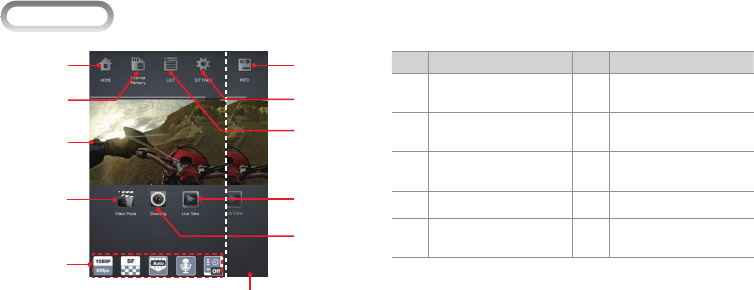
IScreen View
1
2
3
4
6
:
7
9
8
5
Drag the top bar to
display.
No. Descriptions No. Descriptions
1
Moves to the Home screen.
6
Shoots a movie or take a
picture.
2
Moves to the internal
memory.
7
Watches the shooting
screen in real time.
3
Displays the captured
screen in real time.
8
Moves to the list of movies/
pictures.
4
Changes the mode.
9
Moves to the setting screen.
5
Displays the setting options
of the camera.
:
Allows you to check the
version information.
BLACKVUE SPORT I SC300 27
ENGLISH
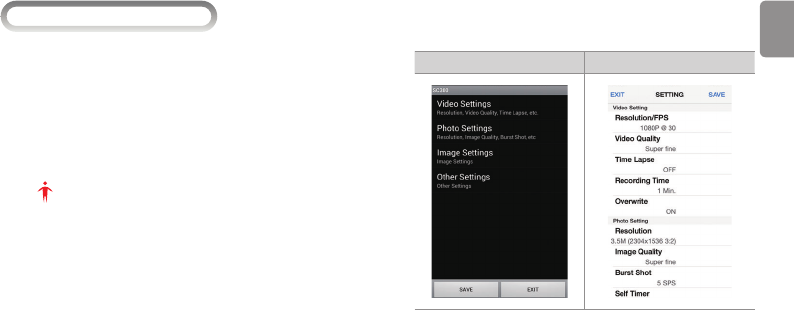
IChanging the Setting Option
1 Press
BlackVue Sport ▶ SETTINGS ▶ App Settings or Camera
Settings to access the setting screen.
2 Select a desired setting menu, and select the setting to change.
3 Press Save to save the setting.
Press EXIT to return to the previous screen without saving the
setting.
Note
yIf you have changed Wi-Fi settings, always restart the camera.
yThe date is originally set to default. You can set the date manually by
connecting with BLACKVUE SPORT APP.
(SETTINGS ▶ Camera Settings ▶ Other Settings ▶ Date/Time)
Android iOS

Note
You can reverse the LCD screen by activating Rotation in the Image
Settings.
Setting Option
Mode Menu Setting Option
App Settings
Always use BlackVue S player
On
O
Enable Wi-Fi Strength Monitor
On
O
Camera
Settings Video Settings
Resolution/FPS
Video Quality
Time Lapse
Recording Time
Overwrite
Mode Menu Setting Option
Camera
Settings
Photo Settings
Resolution
Image Quality
Burst Shot
Self Timer
Image Settings Rotation

BLACKVUE SPORT I SC300 29
ENGLISH
Mode Menu Setting Option
Camera
Settings Other Settings
Date/Time
Wi-Fi
Voice Record
Volume
Automatic Recovery
Auto Power O
Default Setting
Format
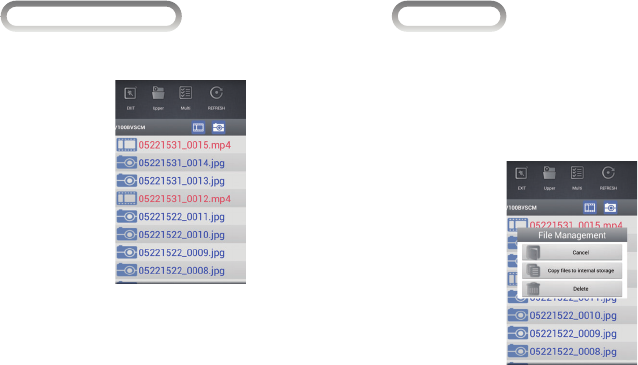
IPlaying Movies/Photos
1 Press BlackVue Sport ▶ LIST ▶ 100BVSCM.
2 Select a desired movie or photo.
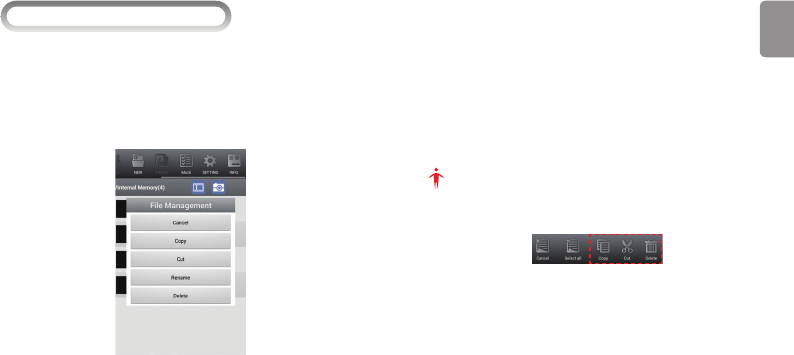
IMoving les
1 Press BlackVue Sport ▶ LIST ▶100BVSCM.
2 Select a desired le, and press and hold down the le until the menu
is displayed.
3 Press Copy les to internal storage to move the selected le to the
internal memory.
BLACKVUE SPORT I SC300 31
ENGLISH
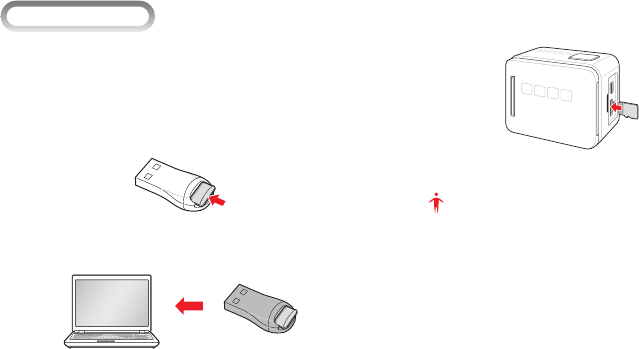
IManaging the internal memory
1 Press Internal Memory.
2 Select a desired le, and press and hold down the le until the menu
is displayed.
3 Press each menu to edit the selected le.
yCancel: Returns to the previous screen.
yCopy: Copies the selected video/photo.
yCut: Cuts the selected video/photo.
yRename: Renames the video/photo you have selected.
yDelete: Deletes the selected video/photo.
Note
You can copy, clip or delete a movie/photo file after pressing Multi by
dragging the top bar.
IFirmware Upgrade
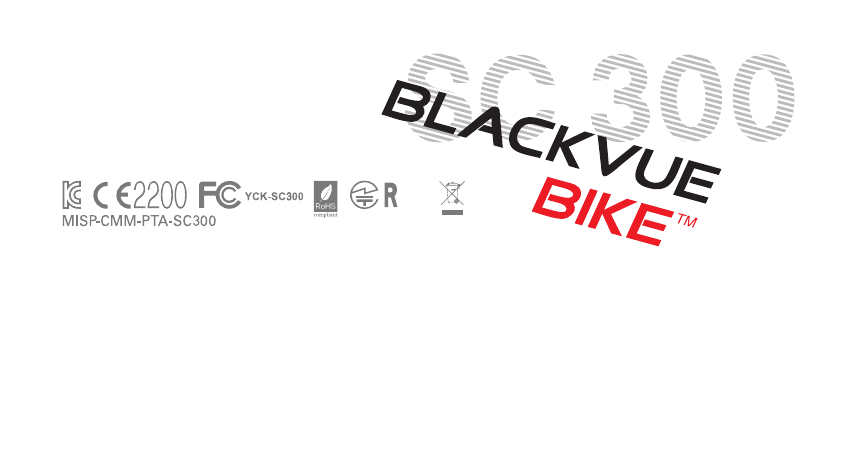
You can upgrade the rmware version by saving the rmware to a microSD
card and connecting the microSD card into the PC.
1 Access the BLACKVUE SPORT web site (www.blackvuesport.com) and
download the rmware upgrade le.
2 Insert the provided microSD card into a microSD card reader.
3 Connect the microSD card reader to the PC and copy the downloaded
rmware to the microSD card.
4 Detach the microSD card from the microSD card reader, and insert
the microSD card into the camera.
5 When the power is turned on, it is automatically upgraded.
Note
yMake sure that the power is never turned o while rmware upgrade
is in progress.
yWhen the remaining battery level is below one, you cannot upgrade
the rmware.
yDuring upgrade, you can check the upgrade status through the LED
indicators. VIDEO LED starts blinking rst, and then the other LEDs
blink additionally according to upgrade status.
yThe camera turns o automatically after updating the rmware. Press
the power button to use the camera.

BLACKVUE SPORT I SC300 33
ENGLISH
>Product Specications
To enhance the performance of the product, the product specications may be changed without prior notice.
Battery
Type Rechargeable 1050mAh
Li-ion Polymer Battery
Charging Micro USB
Video
Format MP4
Resolution/FPS 1080p 30fps
720p 60/30fps
Time Laps
Recording
1, 5, 30, 60, 300, 600 second
intervals
Photo
Format JPEG
Resolution
3.5M (2304x1536 3:2)
3M (2048x1536 4:3)
3M (2304x1286 16:9)
High Speed
Shooting Resolution/FPS 480p 120fps
Model BLACKVUE SPORT
Camera
Pixel 3.5 Mega Pixel
Angle of View Opposite Angle 138˚
Weight 77g (LCD : 22g) LCD optional
Size (WxLxH) 55mm x 36.7mm x 44.2mm
Sensor
3.5M CMOS Sensor
H/W
Interface
Storage micro SD Card
Up to 32 GB
Class10 or higher
microSD cards are
recommended
Input/Output USB 2.0 / USB 2.0, HDMI
Button Power/Mode, Wi-Fi,
Shutter/Choice
LCD 2.0 inch, 240p

Wi-Fi
13 Channel 802.11b/g/n(20)
9 Channel 802.11n(40)
PCM DSSS(CCK), OFDM(QAM)
Audio
Mic Built-in, Mono
Format 128kHz, AAC
Software Application BLACKVUE SPORT APP
Android 2.3 or
later, iOS 5.0 or
later
Waterproof
Degree IP68
Housing
Depth Rate 10m / 32ft
Frontcase (basic) Option
Frontcase (extended)
Backdoor (for LCD) Option
Backdoor (silm)
Waterproof power cable External power supply
Operation Temperature
0°C ~ 45°C
※ Due to the characteristics of Li-ion Polymer
Battery, product performance may decrease
when the product is used under 0 degree.

FCC Compliance Information (FCC ID: YCK-SC300)
THIS DEVICE COMPLIES WITH PART 15 OF THE FCC RULES.
Operation is subject to the following two conditions;
(1) This device may not cause harmful interference, and
(2) This device must accept any interference received, including interference that may cause undesired operation.
CAUTION : Changes or modications not expressly approved by the party responsible for compliance could void the user’s authority to operate the
equipment.
Note: This equipment has been tested and found to comply with the limits for a Class B digital device, pursuant to part 15 of the FCC Rules. These
limits are designed to provide reasonable protection against harmful interference in a residential installation. This equipment generates, uses and
can radiate radio frequency energy and, if not installed and used in accordance with the instructions, may cause harmful interference to radio
communications. However, there is no guarantee that interference will not occur in a particular installation. If this equipment does cause harmful
interference to radio or television reception, which can be determined by turning the equipment o and on, the user is encouraged to try to correct
the interference by one or more of the following measures:
yReorient or relocate the receiving antenna.
yIncrease the separation between the equipment and receiver.
yConnect the equipment into an outlet on a circuit dierent from that to which the receiver is connected.
yConsult the dealer or an experienced radio/TV technician for help.
Modications not expressly approved by the manufacturer could void the user's authority to operated the equipment under FCC rules.

Product Warranty
The term of this product warranty is 1 year from the purchase date. (Accessories such as Battery : 6 Months)
We, PittaSoft Co., Ltd., provide the product warranty according to Consumer Dispute Settlement Regulations (drawn up by the Fair Trade Commission).
PittaSoft or designated partners will provide the service upon request.
Product Name (Model Name) Serial No.
Purchased When Purchased Where
Customer Information Address / Call Number
Consumer Injury
Warranty
Within the Term Out of the Term
For performance
/ functional
problems under
normal use
conditions
For serious repair required within 10 days of purchase Exchange/Refund
N/A
For serious repair required within 1 month of purchase
Exchange
For serious repair required within 1 month of exchange
Exchange/Refund
When not exchangeable Refund

Consumer Injury
Warranty
Within the Term Out of the Term
For performance
/ functional
problems under
normal use
conditions
Repair If
Available
For Defect Free Repair Paid Repair/
Paid Product Exchange
Repeated problem with the same defect (up to 3 times)
Exchange/Refund
Repeated trouble with dierent parts (up to 5 times)
Repair If
Unavailable
For the loss of a product while in A/S Refund after depreciation plus an additional
10% Maximum: purchase price)
When repair is unavailable due to lack of spare parts within the component
holding period
When repair is unavailable even with spare parts Exchange/
Refund after depreciation
1) Malfunction due to customer fault
- Malfunction & damage caused by user negligence (fall, shock, damage, unreasonable operation, etc) or careless use
- Malfunction & damage occurred after a repair conducted by the consumer of the third person, not our A/S engineer.
- Malfunction & damage due to used of unauthorized components, consumables, or separately sold parts
2) Other Cases
- Malfunction due to natural disasters (re, ood, earthquake, etc)
- Expired life span of a consumable part
- Malfunction due to external reasons
Paid Repair Paid Repair
This warranty is only valid in the country where you purchased the product.
Exchange or refund is available only in the original place of purchase.

MEMO

MEMO
Name Ι BLACKVUE SPORT
Manufacturer Ι Pittasoft Co.,Ltd. / South Korea
Address Ι (Gasan-dong, BYC HIGHCITY), A-7th floor, 131, Gasan digital 1-ro,
Geumcheon-gu, Seoul, 153-718, Republic of Korea
E-mail Ι sales@pittasoft.com
Service Center Ι +82.2.6947.4670(ext.3)
www.blackvuesport.com