Planet Technology WDAPC7200AC 1200Mbps 802.11ac Dual Band Ceiling Mount Wireless Access Point User Manual part2
Planet Technology Corporation 1200Mbps 802.11ac Dual Band Ceiling Mount Wireless Access Point part2
Contents
- 1. User manual part1
- 2. User manual part2
User manual part2

User Manual of WDAP-C7200AC
-62-
Band Select the desired mode. Default is 2.4GHz (B+G+N). It is strongly
recommended that you set the Band to 2.4GHz (B+G+N), and all of
802.11b, 802.11g, and 802.11n wireless stations can connect to the
WDAP-C7200AC.
2.4 GHz (B): 802.11b mode, rate is up to 11Mbps
2.4 GHz (G): 802.11g mode, rate is up to 54Mbps
2.4 GHz (N): 802.11n mode, rate is up to 300Mbps(2T2R)
2.4 GHz (B+G): 802.11b/g mode, rate is up to 11Mbps or 54Mbps
2.4 GHz (G+N): 802.11g/n mode, rate is up to 54Mbps or 300Mbps
2.4 GHz (B+G+N): 802.11b/g/n mode, rate is up to 11Mbps,
54Mbps, or 300Mbps
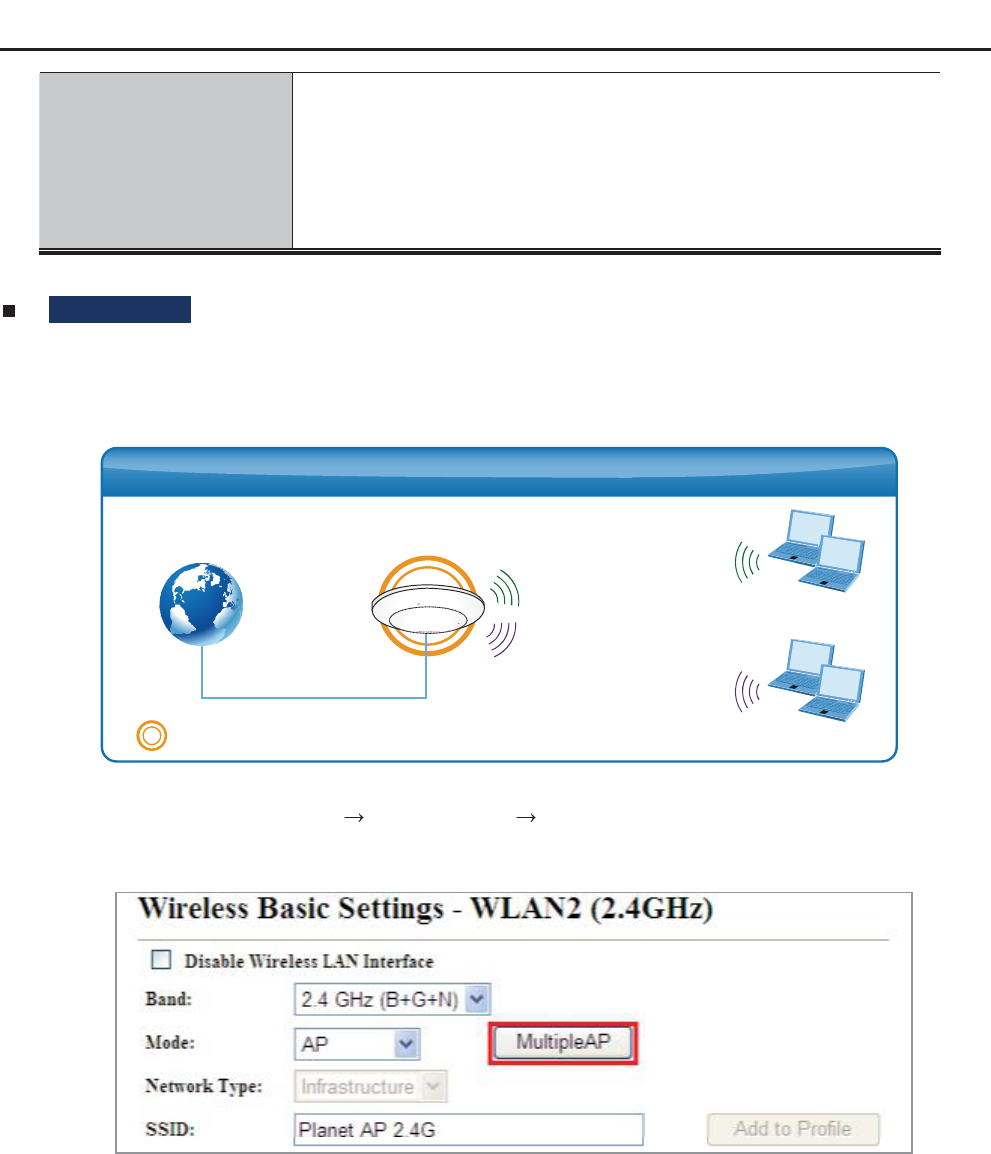
Mode There are four kinds of wireless mode selections:
AP
Client
WDS
AP+WDS
If you select WDS or AP+WDS, please click WDS Settings submenu
for the related configuration. Furthermore, click the Multiple AP
button to enable multiple SSID function.
SSID The ID of the wireless network. User can access the wireless network
via the ID only. However, if you switch to Client Mode, this field
becomes the SSID of the AP you want to connect with.
Default: Planet AP 2.4G
Channel Width You can select 20MHz, or 40MHz.
Channel Number You can select the operating frequency of wireless network.
Default: 11
Broadcast SSID If you enable Broadcast SSID, every wireless station located within
the coverage of the AP can discover its signal easily. If you are building
a public wireless network, enabling this feature is recommended. In
private network, disabling Broadcast SSID can provide better
wireless network security.
Default is Enabled.
Data Rate Set the wireless data transfer rate to a certain value. Since most of
wireless devices will negotiate with each other and pick a proper data
transfer rate automatically, its not necessary to change this value
unless you know what will happen after modification.
Default is Auto.
Associated Clients Click the Show Active Clients button to show the status table of
active wireless clients.
User Manual of WDAP-C7200AC
-63-
Enable Universal
Repeater Mode
(Acting as AP and client
simultaneously)
Universal Repeater is a technology used to extend wireless coverage.
To enable Universal Repeater mode, check the box and enter the
SSID you want to broadcast in the field below. Then please click
“Security” submenu for the related settings of the AP you want to
connect with.
Multiple-SSID
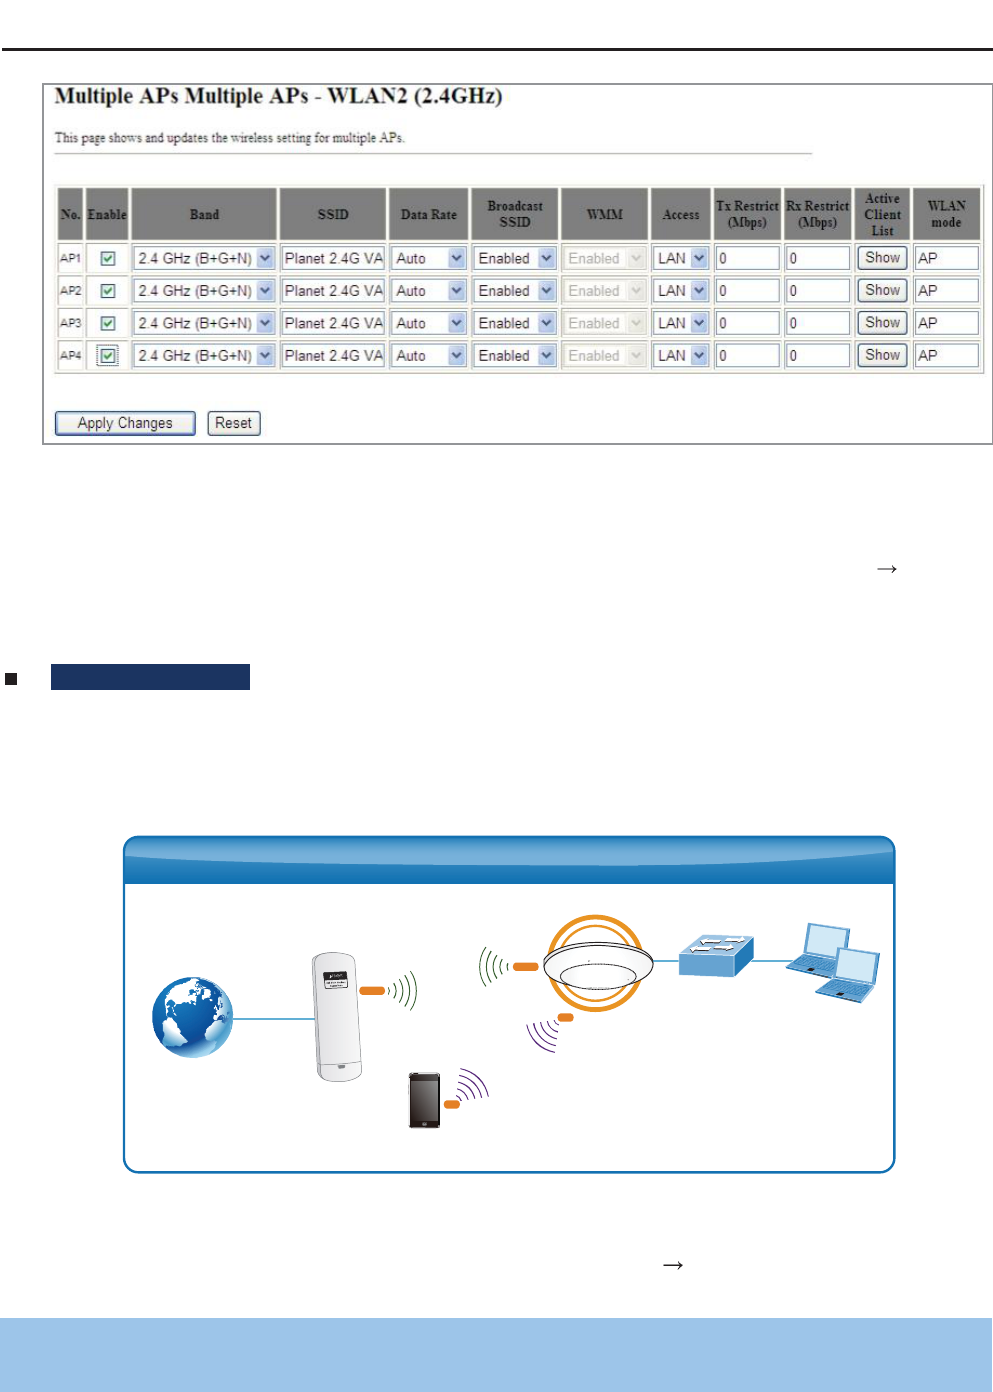
Enable multiple-SSID can broadcast multiple WLAN SSID's using virtual interfaces. You can have different
encryption settings for each WLAN and you can restrict what they have access to.
Choose menu “WLAN1 (2.4GHz) Basic Settings Multiple AP” to configure the device as a general
wireless access point with multiple SSIDs.
Figure 5-50 2.4GHz Wireless Basic Settings – Multiple AP
The device supports up to four multiple Service Set Identifiers. You can back to the Basic Settings page to
set the Primary SSID. The SSID’s factory default setting is Planet 2.4G VAP1~4 (Multiple-SSID 1~4). The
SSID can be easily changed to connect to an existing wireless network or to establish a new wireless
network. When the information for the new SSID is finished, click the Apply Changes button to let your
changes take effect.
AP(Multi-SSID) Mode
Clients
Clients
SSID-1(5G)
SSID-2(2.4G)
Internet WDAP-C7200AC
AP Mode
User Manual of WDAP-C7200AC
-64-
Figure 5-51 2.4GHz Multiple-SSID
Once you have applied and saved those settings, you can then go to the “WLAN1 (2.4GHz) Security”
page on the AP to set up security settings for each of the SSIDs.
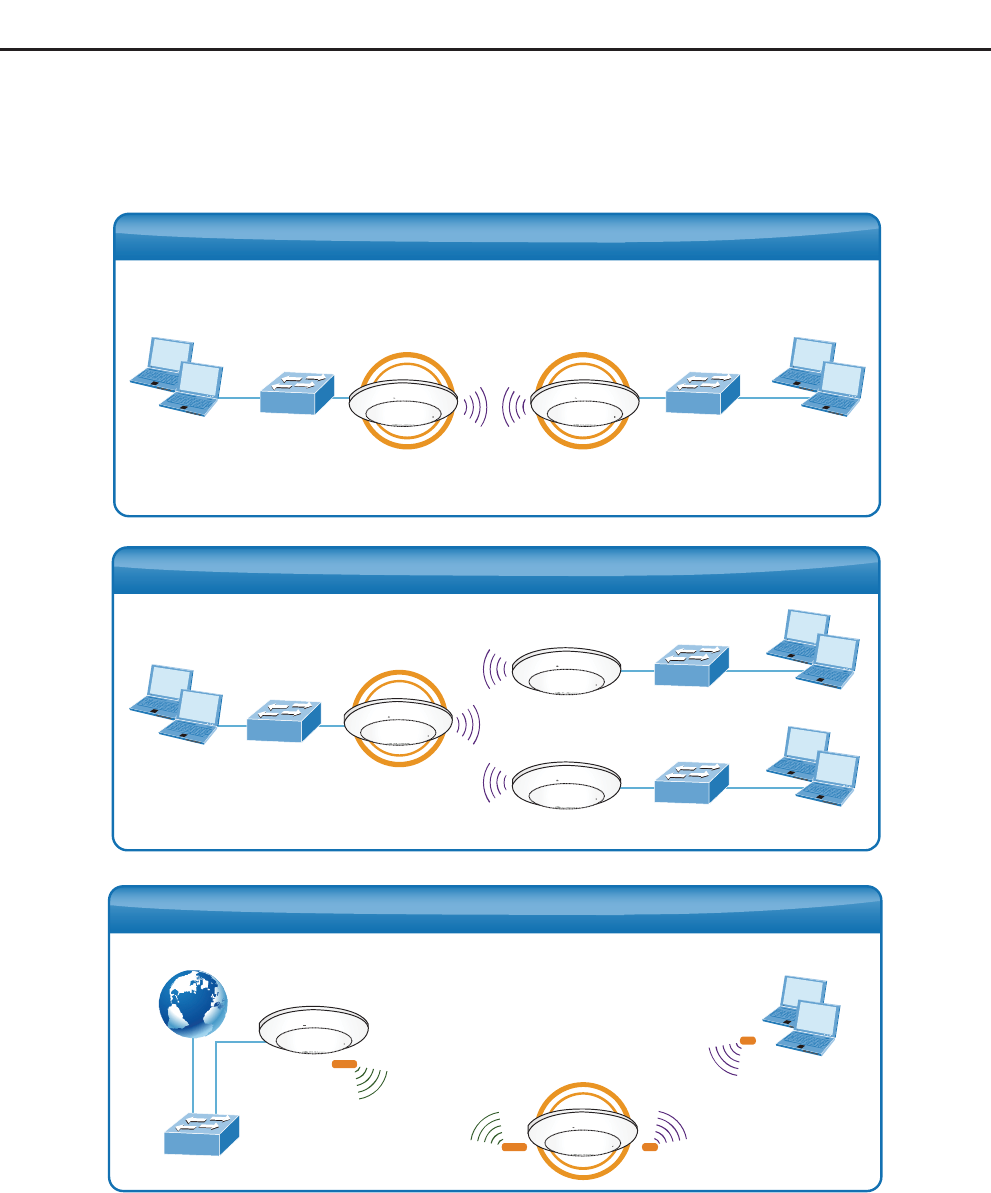
Universal Repeater
This mode allows the AP with its own BSS to relay data to a root AP to which it is associated with WDS
disabled. The wireless repeater relays signal between its stations and the root AP for greater wireless
range.
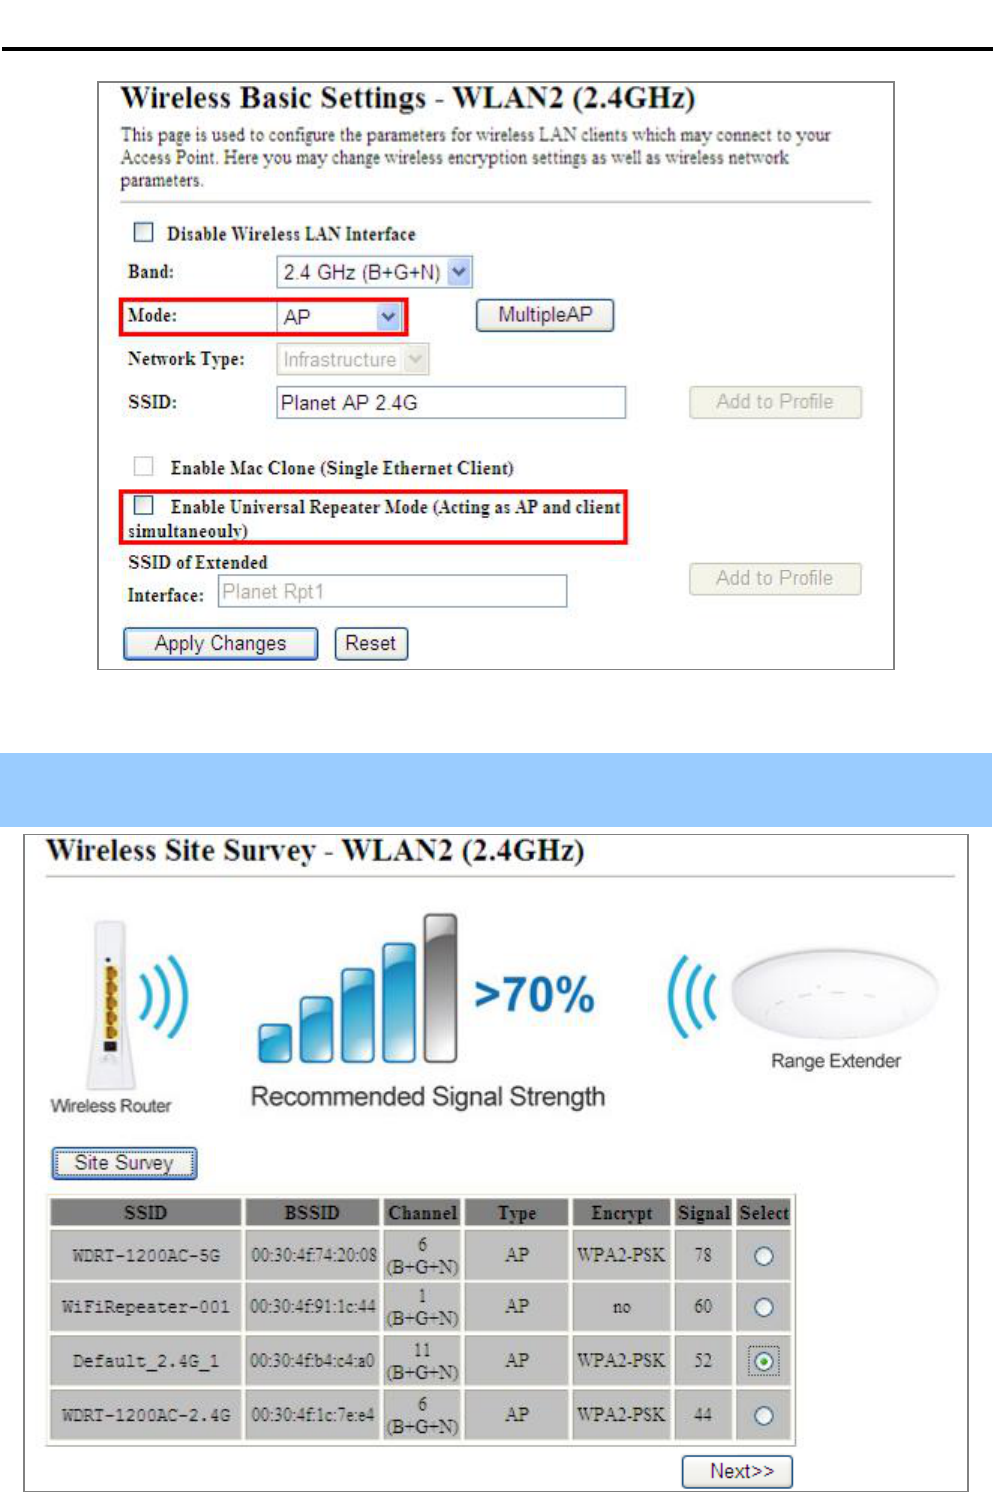
2. Example of how to configure Universal Repeater Mode. Please take the following steps:
To configure each wireless parameter, please go to the “WLAN2 (2.4GHz) Basic Settings” page.
Step 1. Configure wireless mode to “AP” and then check “Enable Universal Repeater Mode (Acting as AP
and client simultaneously)”. Click “Apply Changes” to take effect.
2.4G
5G Clients
Smart Phone
Switch
WDAP-C7200AC
AP
Universal Repeater Mode
Internet
g/n
g/n
a/n/ac
a/n/ac
User Manual of WDAP-C7200AC
-65-
Figure 5-52 2.4GHz Universal Repeater-1
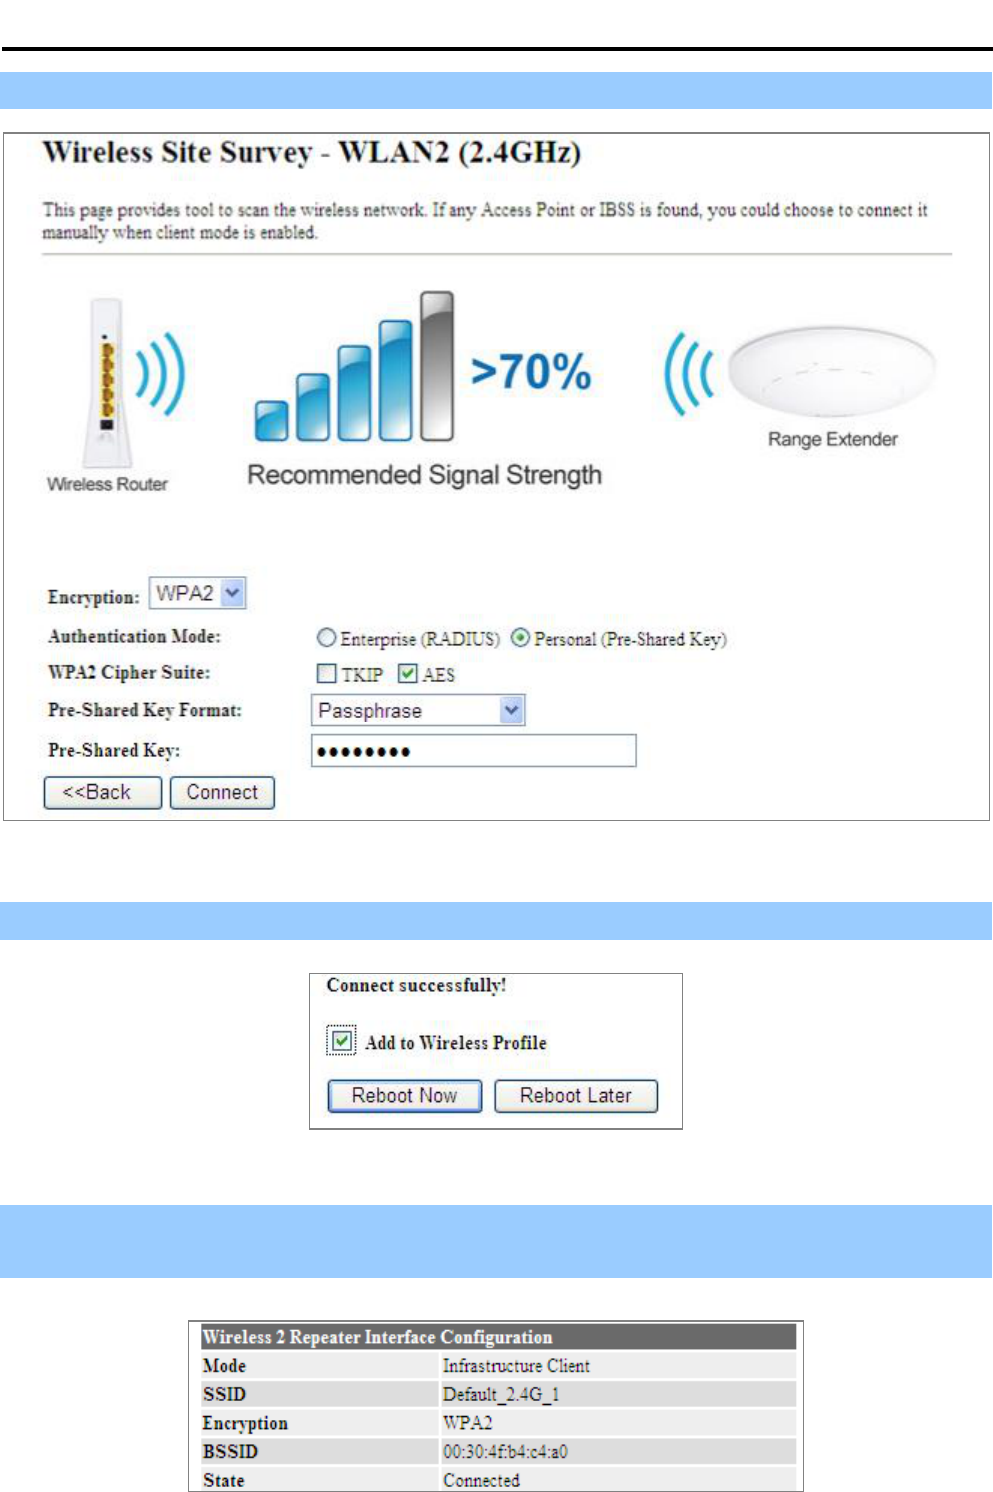
Step 2. Go to 2.4GHz Site Survey page to find the root AP. Select the root AP that you want to repeat the signal,
and then click Next.
Figure 5-53 2.4GHz Universal Repeater-2
User Manual of WDAP-C7200AC
-66-
Step 3. Select the correct encryption method and enter the security key. Then, click Connect.
Figure 5-54 2.4GHz Universal Repeater-3
Step 4. Check Add to Wireless Profile and click Reboot Now.
Figure 5-55 2.4GHz Universal Repeater-4
Step 5. Go to Management-> Status page to check whether the state of Repeater interface should be
Connected.
Figure 5-56 2.4GHz Universal Repeater-5
User Manual of WDAP-C7200AC
-67-
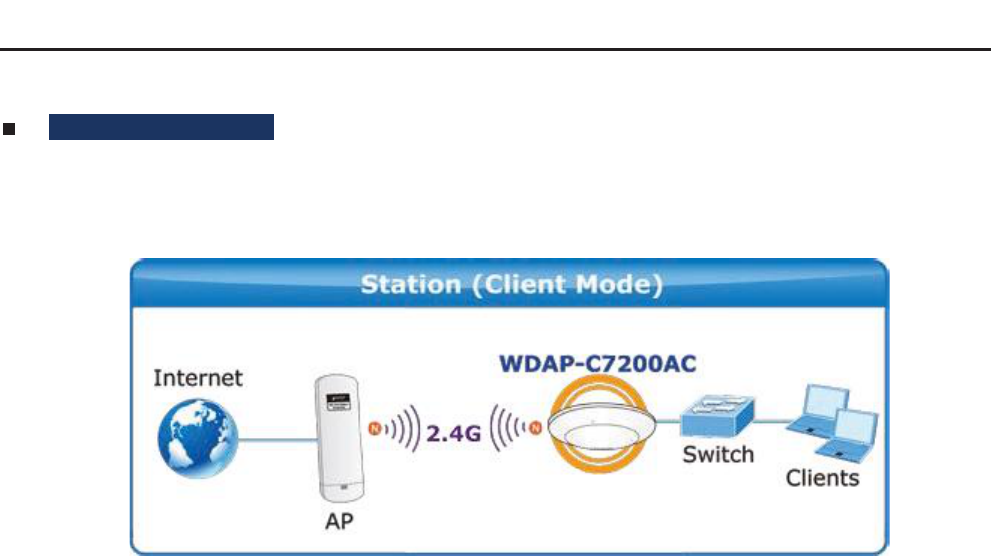
Client (Infrastructure)
Combine the Wireless Router to the Ethernet devices such as TV, Game player, or HDD and DVD, to make
them be wireless stations.
User Manual of WDAP-C7200AC
-68-
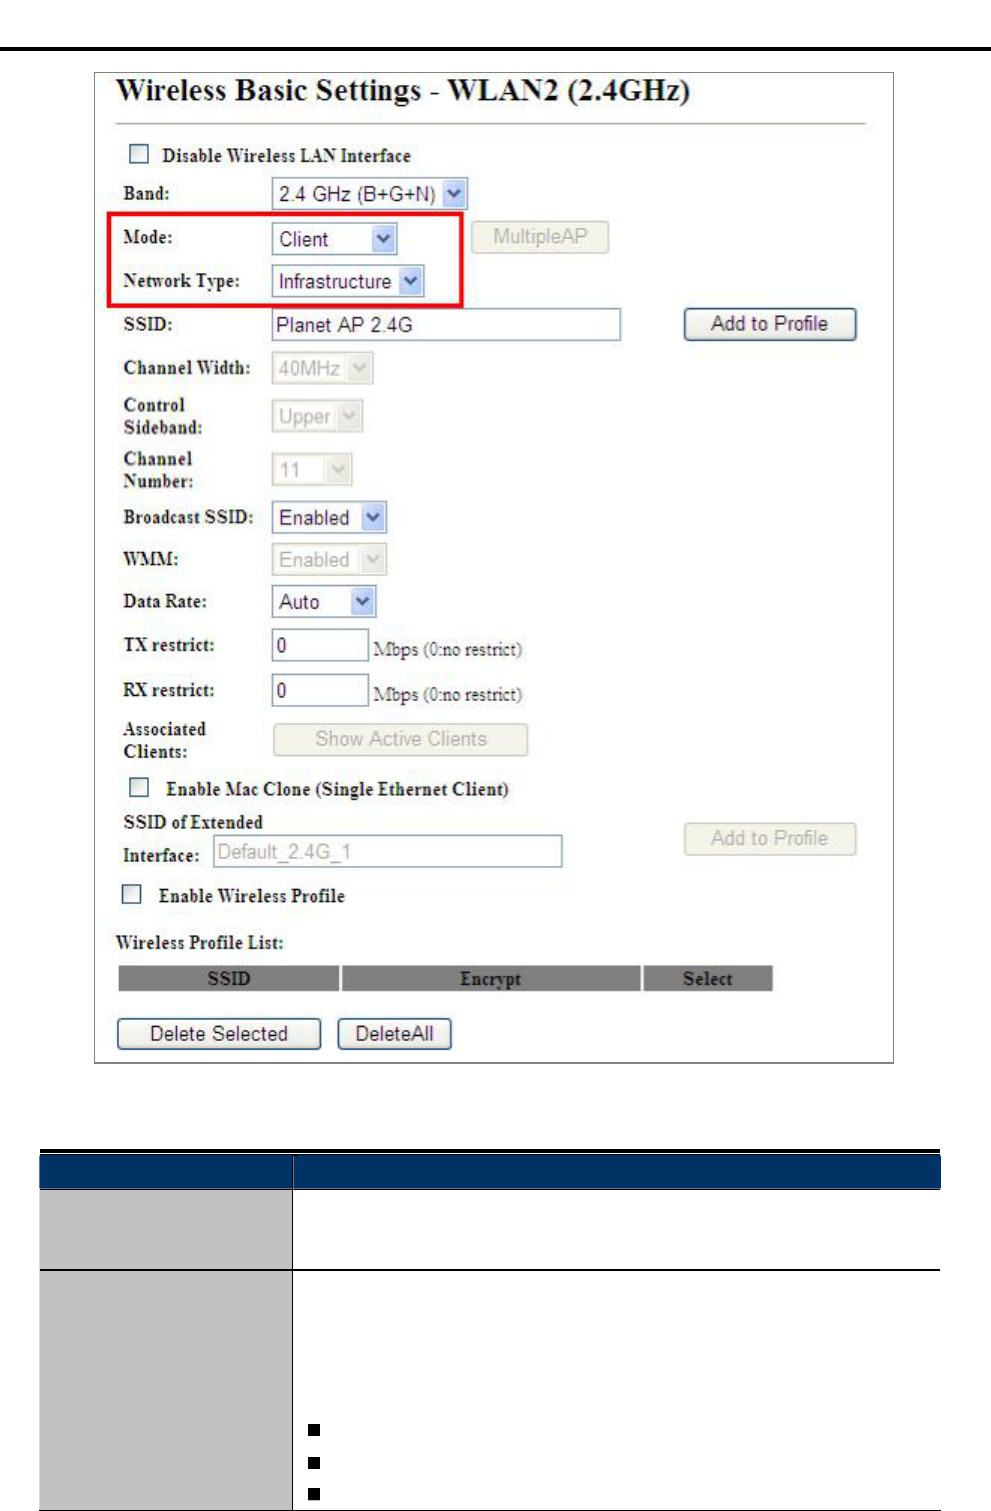
Figure 5-57 2.4GHz Wireless Basic Settings Client
The page includes the following fields:
Object Description
Disable Wireless LAN
Interface
Check the box to disable the wireless function.
Band Select the desired mode. Default is 2.4GHz (B+G+N). It is strongly
recommended that you set the Band to 2.4GHz (B+G+N), and all of
802.11b, 802.11g, and 802.11n wireless stations can connect to the
WDAP-C7200AC.
2.4 GHz (B): 802.11b mode, rate is up to 11Mbps
2.4 GHz (G): 802.11g mode, rate is up to 54Mbps
2.4 GHz (N): 802.11n mode, rate is up to 300Mbps(2T2R)

User Manual of WDAP-C7200AC
-69-
2.4 GHz (B+G): 802.11b/g mode, rate is up to 11Mbps or 54Mbps
2.4 GHz (G+N): 802.11g/n mode, rate is up to 54Mbps or 300Mbps
2.4 GHz (B+G+N): 802.11b/g/n mode, rate is up to 11Mbps,
54Mbps, or 300Mbps
Mode There are four kinds of wireless mode selections:
AP
Client
WDS
AP+WDS
If you select WDS or AP+WDS, please click WDS Settings submenu
for the related configuration. Furthermore, click the Multiple AP
button to enable multiple SSID function.
Network Type In Infrastructure, the wireless LAN serves as a wireless station. And
the user can use the PC equipped with the WDAP-C7200AC to access
the wireless network via other access points. In Ad hoc, the wireless
LAN will use the Ad-hoc mode to operate.
Default is Infrastructure.
Note: only while the wireless mode is set to Client, then the Network
Type can be configured.
SSID The ID of the wireless network. User can access the wireless network
via the ID only. However, if you switch to Client Mode, this field
becomes the SSID of the AP you want to connect with.
Default: Planet AP 2.4G
Broadcast SSID If you enable Broadcast SSID, every wireless station located within
the coverage of the WDAP-C7200AC can discover its signal easily. If
you are building a public wireless network, enabling this feature is
recommended. In private network, disabling Broadcast SSID can
provide better wireless network security.
Default is Enabled.
Data Rate Set the wireless data transfer rate to a certain value. Since most of
wireless devices will negotiate with each other and pick a proper data
transfer rate automatically, its not necessary to change this value
unless you know what will happen after modification.
Default is Auto.
Enable Mac Clone
(Single Ethernet Client)
Enable Mac Clone.
Example of how to configure Client Mode. Please take the following steps:
To configure each wireless parameter, please go to the WLAN2 (2.4GHz) Basic Settings page.
User Manual of WDAP-C7200AC
-70-
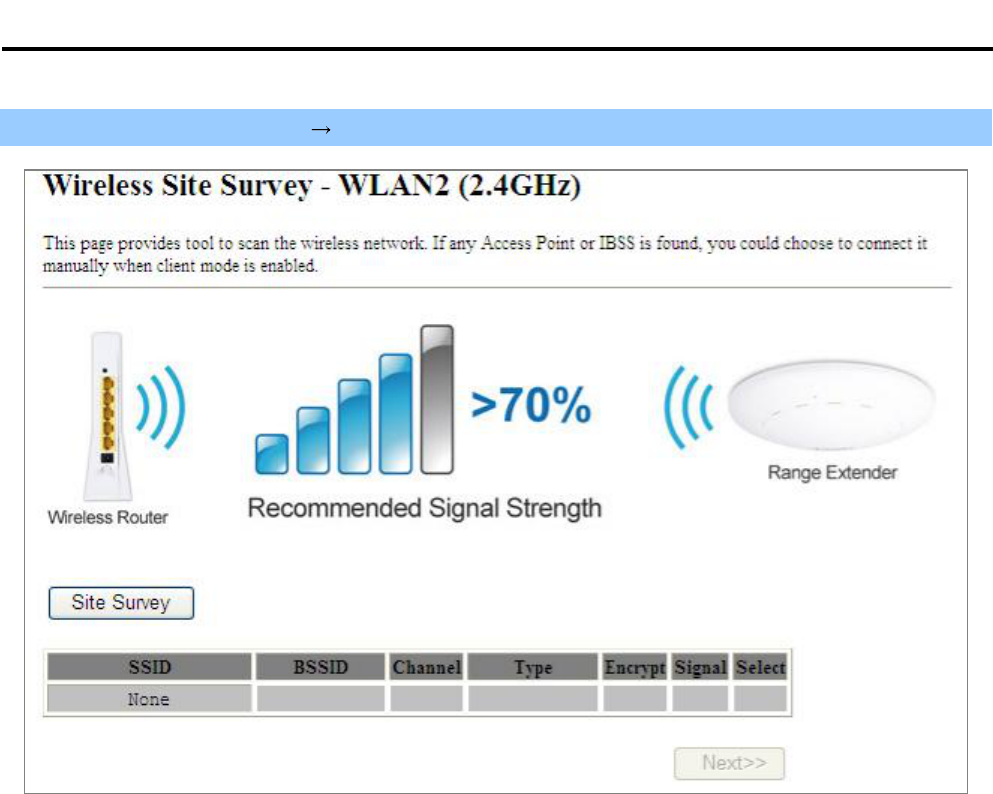
Step 1. Go to WLAN2 (2.4GHz) Site Survey page and click Site Survey button.
Figure 5-58 Client Survey
User Manual of WDAP-C7200AC
-71-
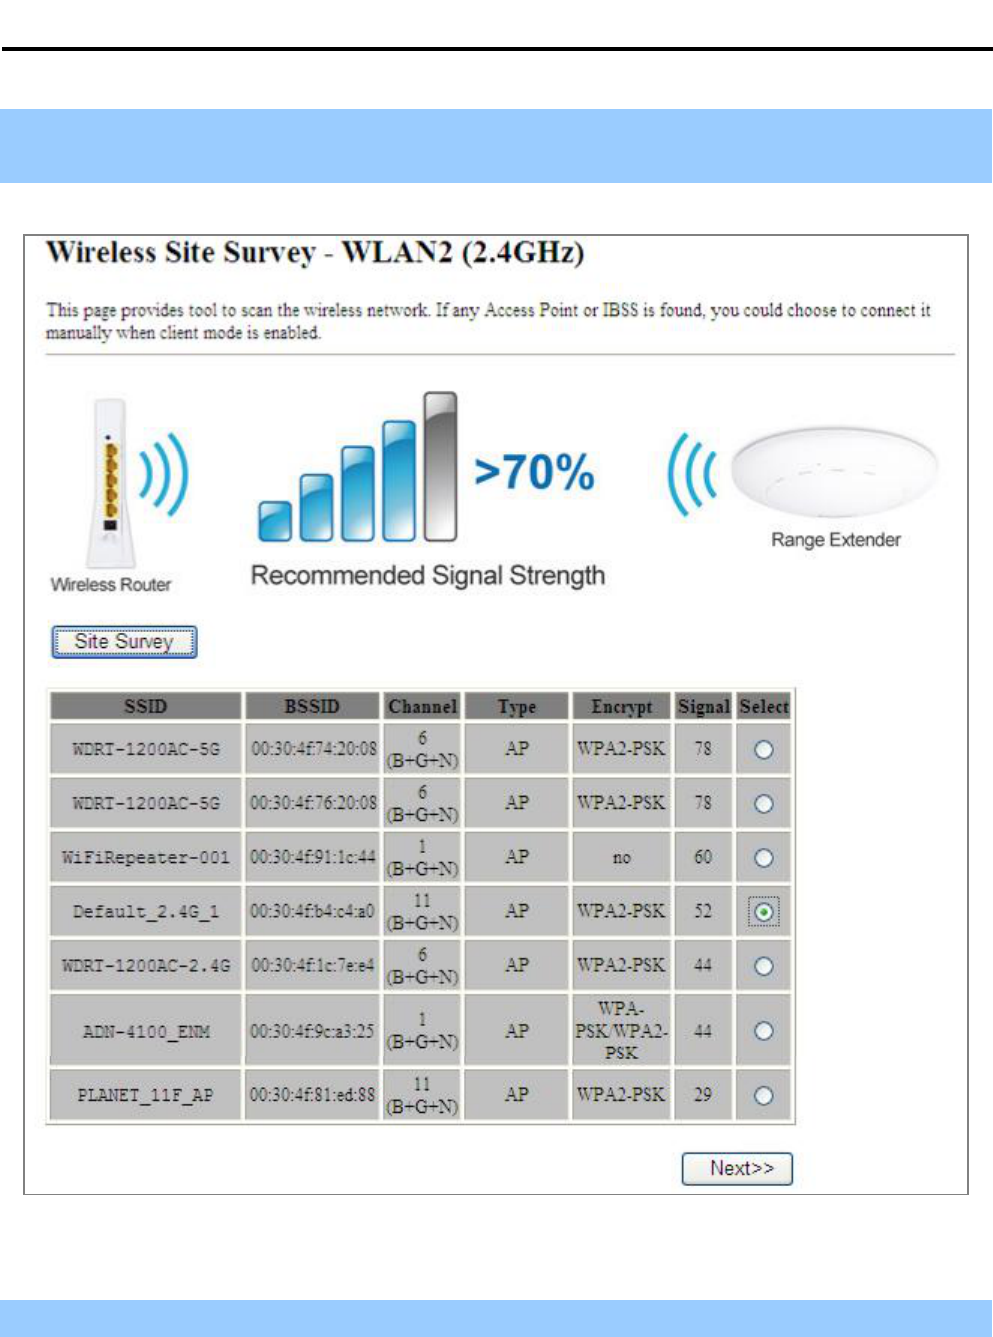
Step 2. Choose the root AP from the list. If the root AP is not listed in the table, re-click Site Survey to update
the list.
Figure 5-59 Client AP List
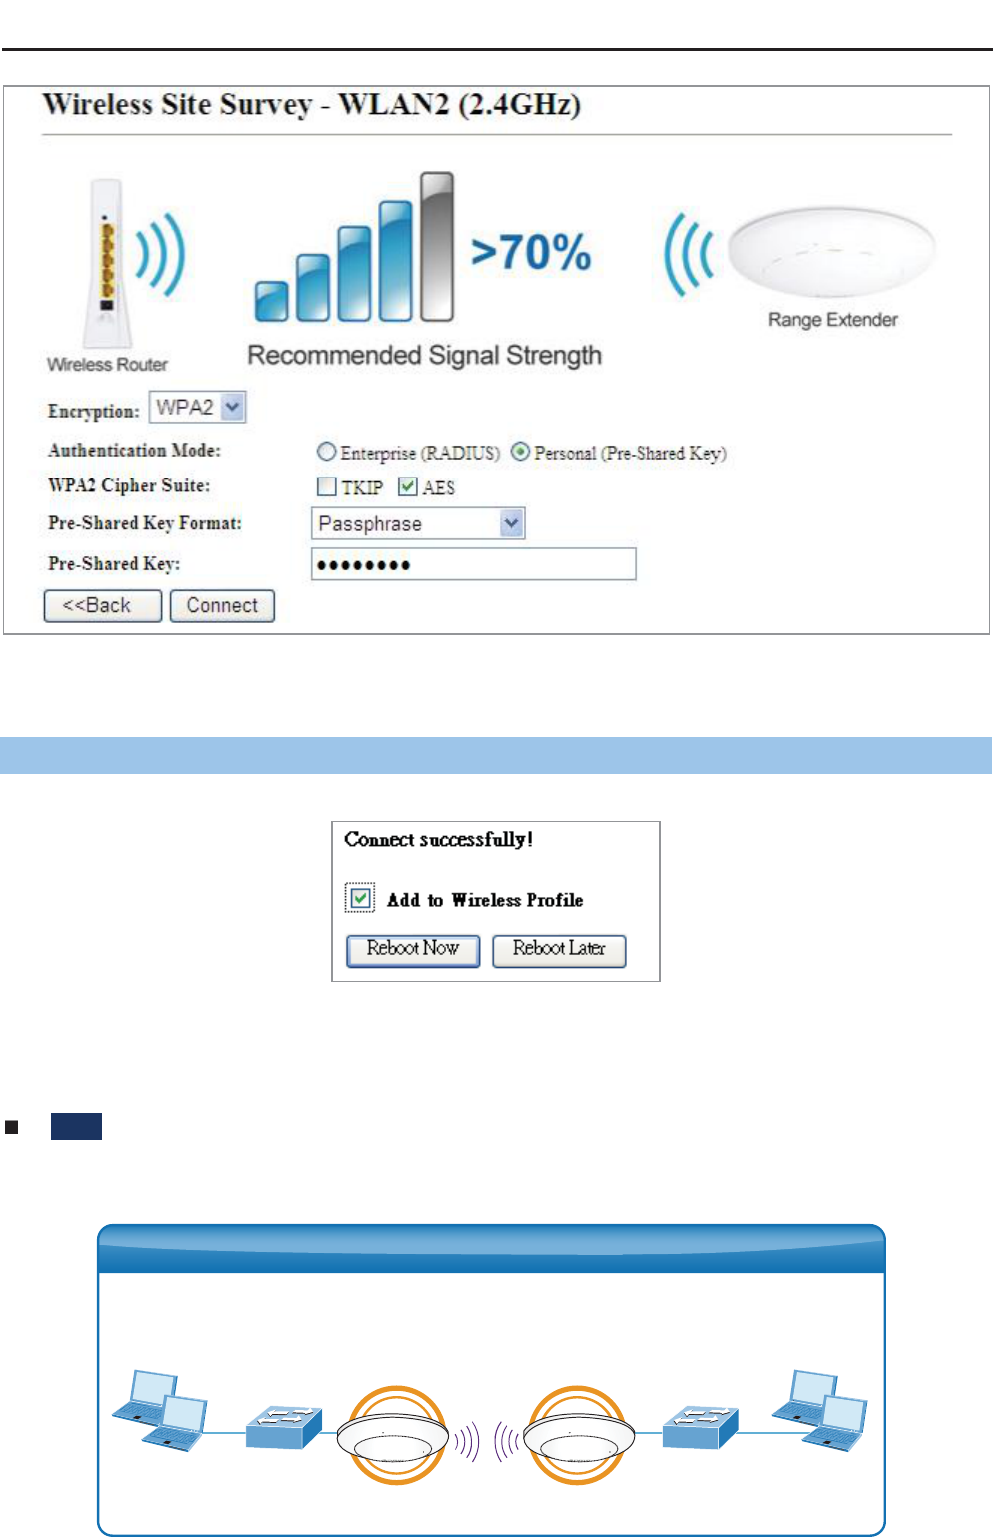
Step 3. Enter the Security Key of the root AP and then click Connect.
User Manual of WDAP-C7200AC
-72-
Figure 5-60 Client – Security
Step 4. Wait until the connection established. Check the “Add to Wireless Profile” option and then reboot it.
Figure 5-61 Client – Status
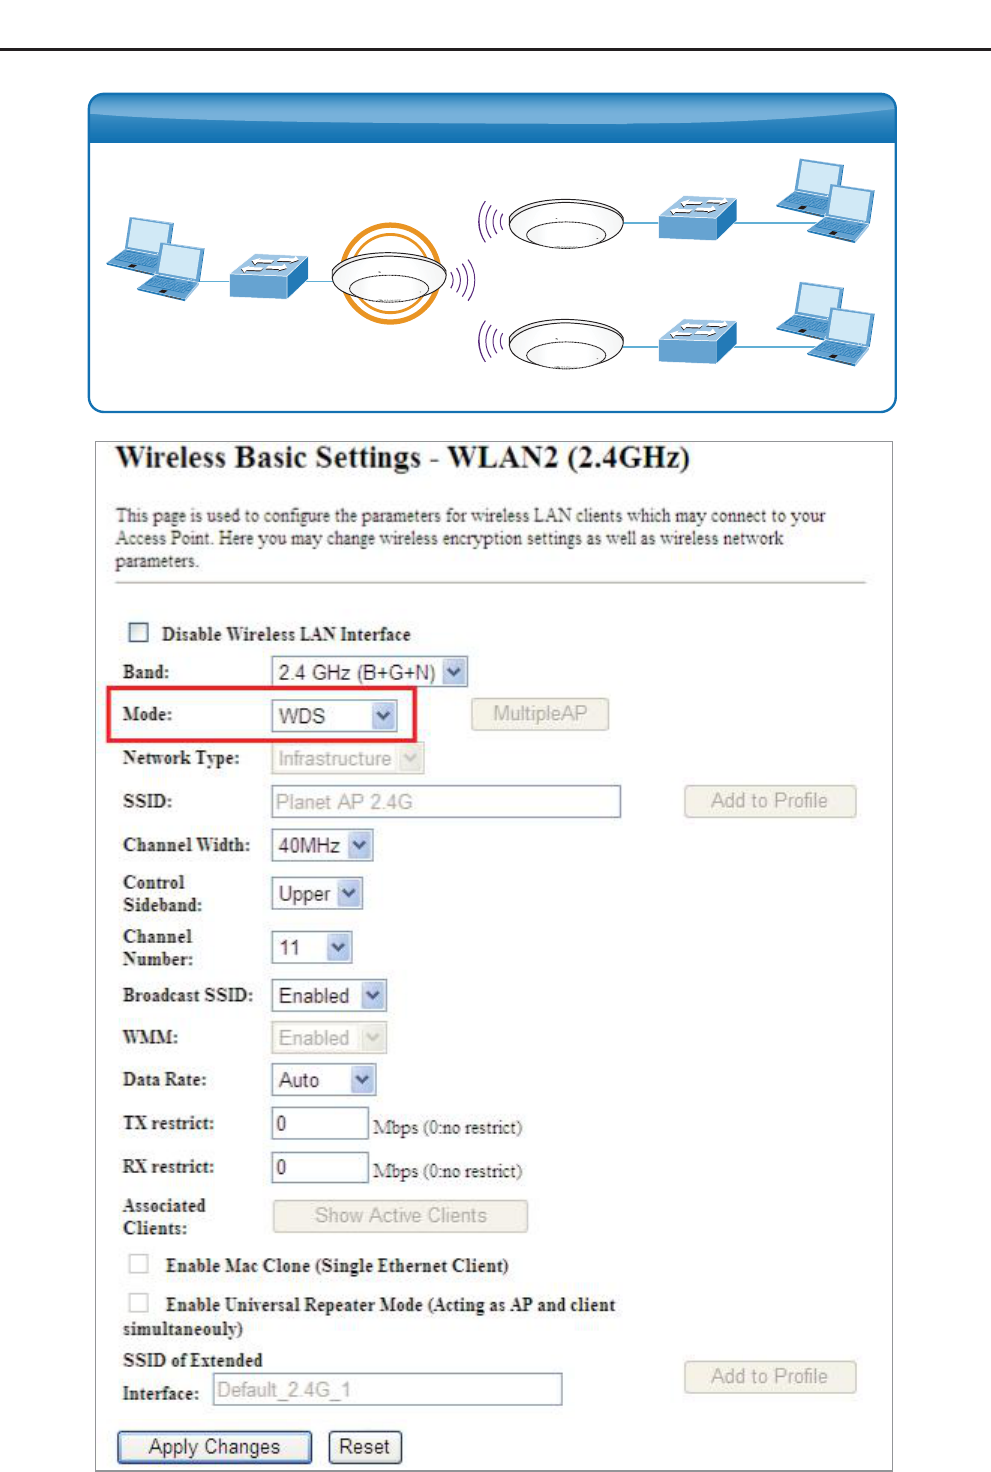
WDS
Connect this Wireless AP with up to 8 WDS-capable wireless APs to expand the scope of network.
Clients ClientsSwitch Switch
WDAP-C7200AC WDAP-C7200AC
WDS Bridge-PtP Mode
User Manual of WDAP-C7200AC
-73-
Figure 5-62 2.4GHz Wireless Basic Settings – WDS
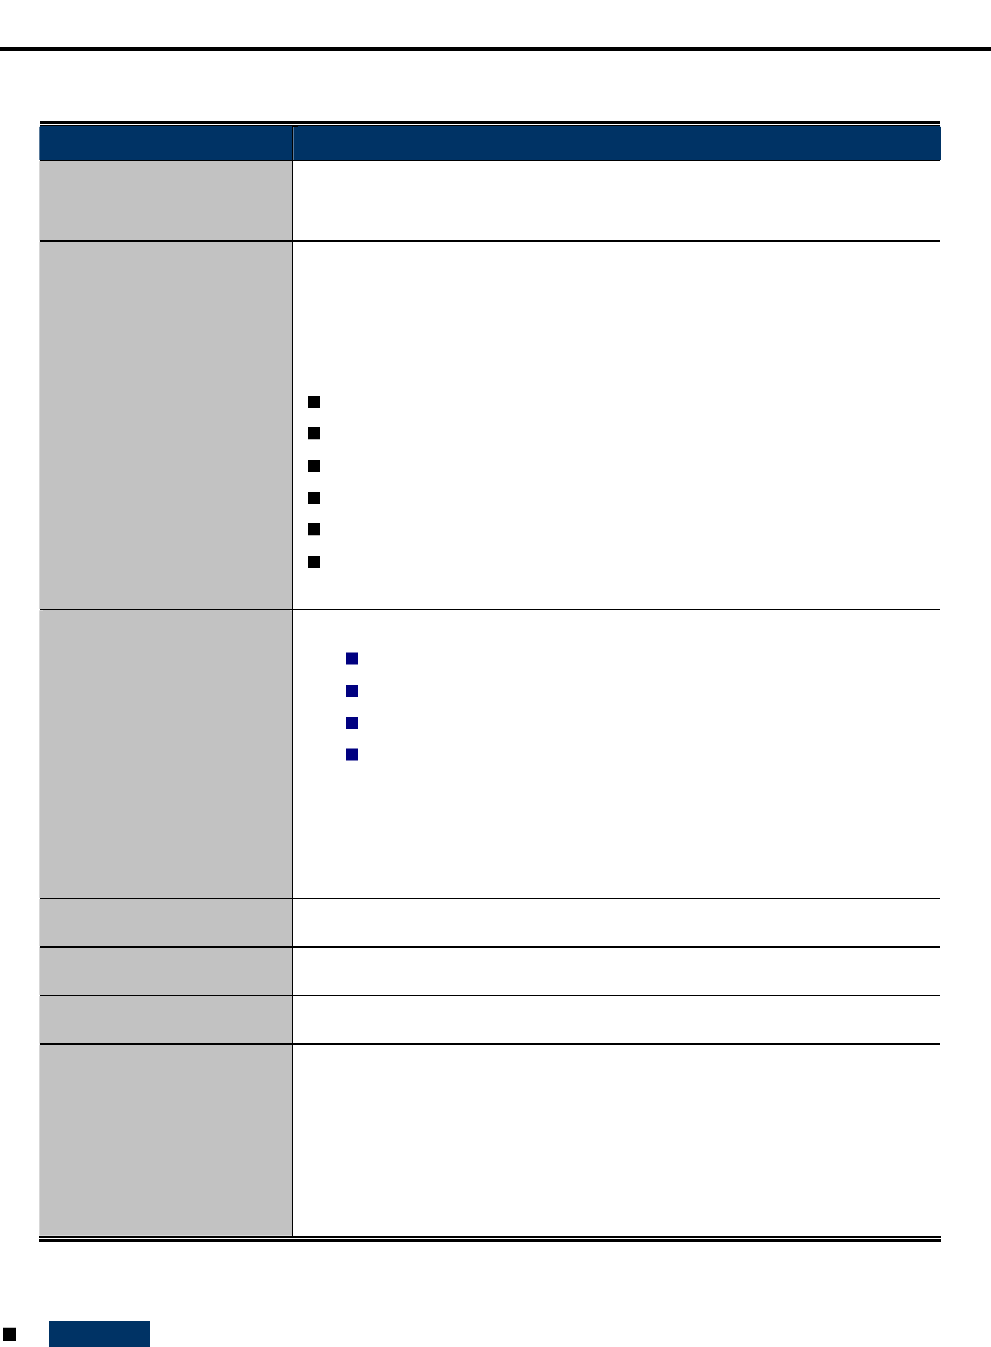
AP ClientsSwitch
ClientsSwitch
Clients Switch
WDAP-C7200AC
AP
WDS Bridge-PtMP Mode
User Manual of WDAP-C7200AC
-74-
The page includes the following fields:
Object Description
Disable Wireless LAN
Interface
Check the box to disable the wireless function.
Band Select the desired mode. Default is 2.4GHz (B+G+N). It is strongly
recommended that you set the Band to 2.4GHz (B+G+N), and all of
802.11b, 802.11g, and 802.11n wireless stations can connect to the
WDAP-C7200AC.
2.4 GHz (B): 802.11b mode, rate is up to 11Mbps
2.4 GHz (G): 802.11g mode, rate is up to 54Mbps
2.4 GHz (N): 802.11n mode, rate is up to 300Mbps(2T2R)
2.4 GHz (B+G): 802.11b/g mode, rate is up to 11Mbps or 54Mbps
2.4 GHz (G+N): 802.11g/n mode, rate is up to 54Mbps or 300Mbps
2.4 GHz (B+G+N): 802.11b/g/n mode, rate is up to 11Mbps,
54Mbps, or 300Mbps
Mode There are four kinds of wireless mode selections:
AP
Client
WDS
AP+WDS
If you select WDS or AP+WDS, please click WDS Settings submenu
for the related configuration. Furthermore, click the Multiple AP
button to enable multiple SSID function.
Channel Width You can select 20MHz, or 40MHz
Control Sideband You can select Upper or Lower.
Channel Number You can select the operating frequency of wireless network.
Data Rate Set the wireless data transfer rate to a certain value. Since most of
wireless devices will negotiate with each other and pick a proper data
transfer rate automatically, its not necessary to change this value
unless you know what will happen after modification.
Default is Auto.
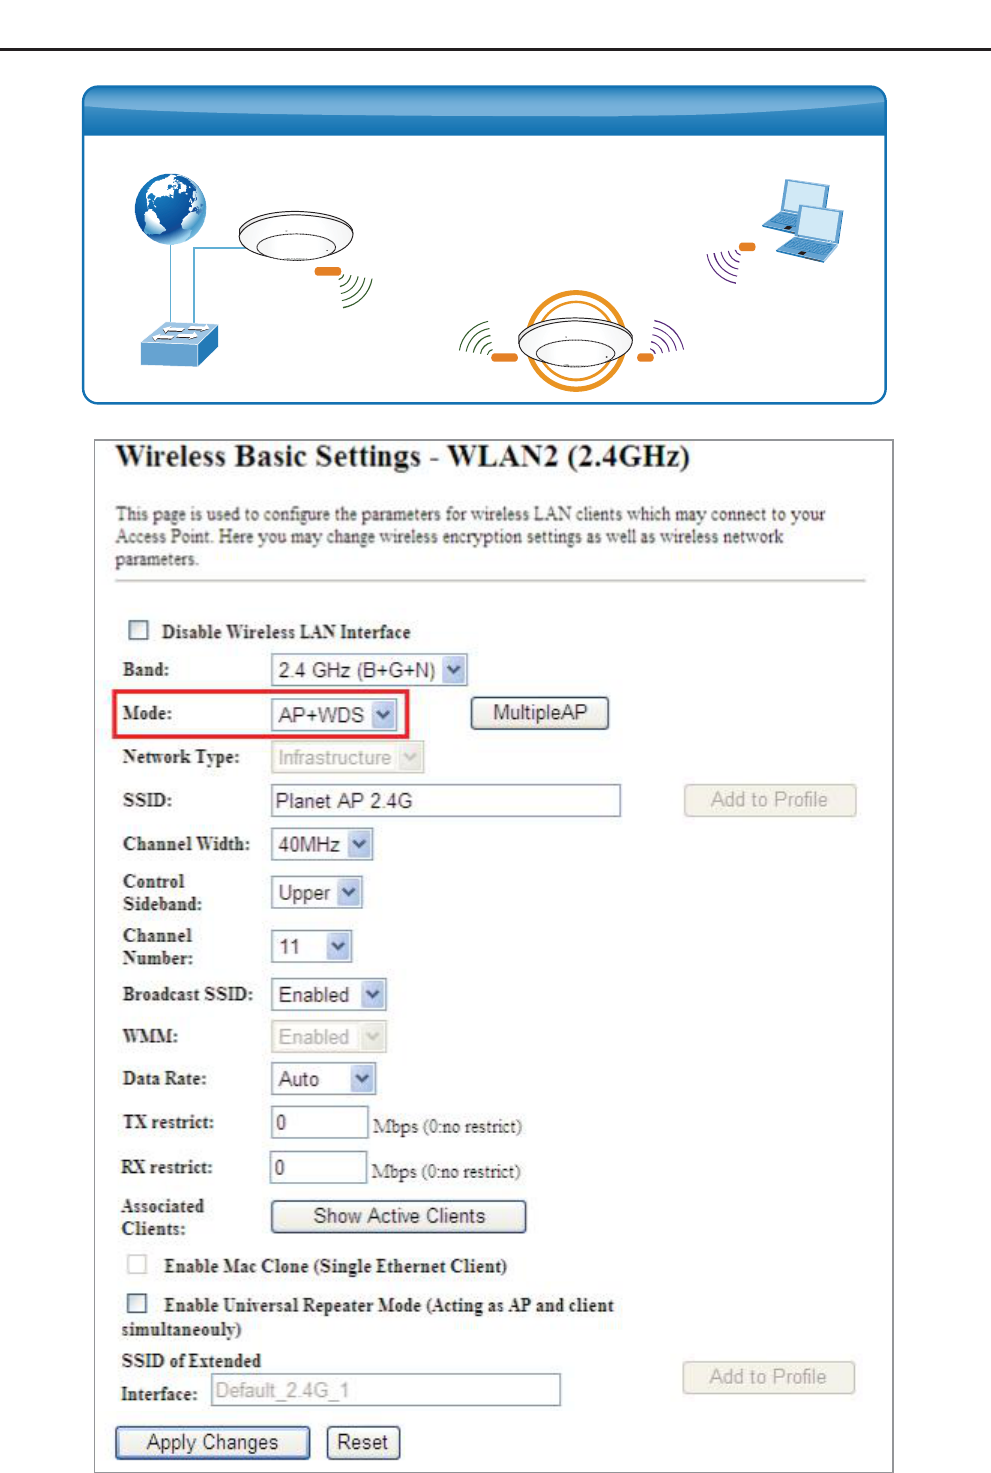
AP+ WDS
Connect this Wireless AP with up to 8 WDS-capable wireless APs, and connect another AP to provide
service for all wireless stations within its coverage.
User Manual of WDAP-C7200AC
-75-
Figure 5-63 2.4GHz Wireless Basic Settings – WDS+AP
Switch
WDS Repeater Mode
Clients
5G WDS 2.4G
AP
Internet
WDAP-C7200AC
g/n
g/n
a/ n/ ac
a/ n/ ac
User Manual of WDAP-C7200AC
-76-
The page includes the following fields:
Object Description
Disable Wireless LAN
Interface
Check the box to disable the wireless function.
Country Select your region from the pull-down list.
This field specifies the region where the wireless function of the Router
can be used. It may be illegal to use the wireless function of the Router
in a region other than one of those specified in this field. If your country
or region is not listed, please contact your local government agency for
assistance.
Band Select the desired mode. Default is 2.4GHz (B+G+N). It is strongly
recommended that you set the Band to 2.4GHz (B+G+N), and all of
802.11b, 802.11g, and 802.11n wireless stations can connect to the
WDAP-C7200AC.
2.4 GHz (B): 802.11b mode, rate is up to 11Mbps
2.4 GHz (G): 802.11g mode, rate is up to 54Mbps
2.4 GHz (N): 802.11n mode, rate is up to 300Mbps(2T2R)
2.4 GHz (B+G): 802.11b/g mode, rate is up to 11Mbps or 54Mbps
2.4 GHz (G+N): 802.11g/n mode, rate is up to 54Mbps or 300Mbps
2.4 GHz (B+G+N): 802.11b/g/n mode, rate is up to 11Mbps,
54Mbps, or 300Mbps
Mode There are four kinds of wireless mode selections:
AP
Client
WDS
AP+WDS
If you select WDS or AP+WDS, please click WDS Settings submenu
for the related configuration. Furthermore, click the Multiple AP
button to enable multiple SSID function.
SSID The ID of the wireless network. User can access the wireless network
via the ID only. However, if you switch to Client Mode, this field
becomes the SSID of the AP you want to connect with.
Default: Planet AP 2.4G
Channel Width You can select 20MHz, or 40MHz
Control Sideband You can select Upper or Lower.
Channel Number You can select the operating frequency of wireless network.
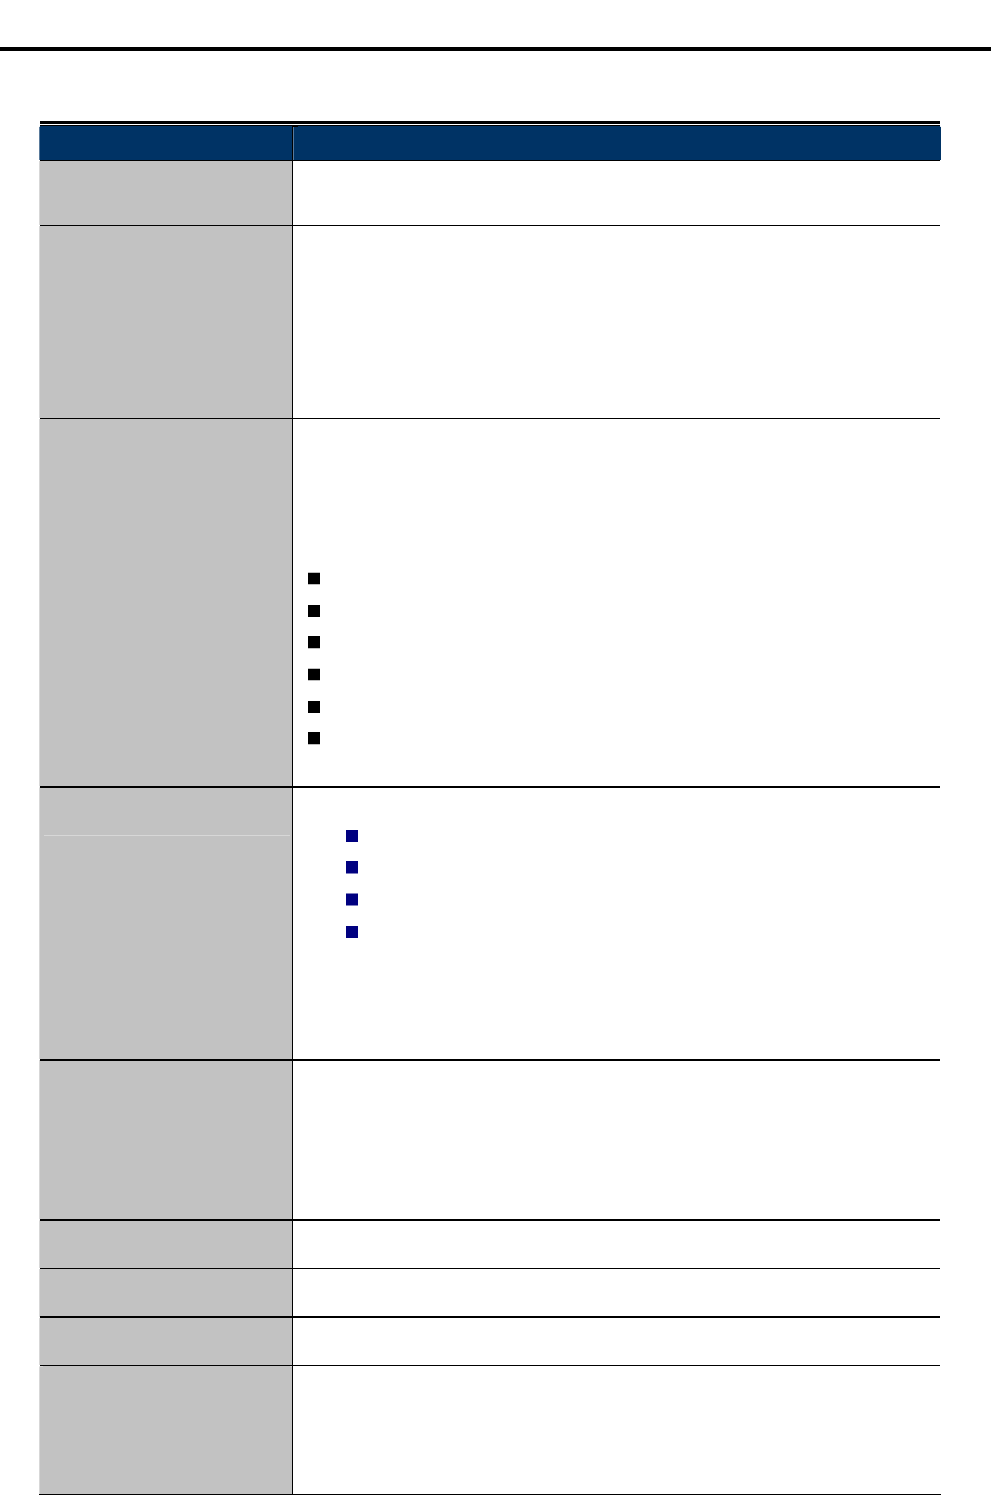
Broadcast SSID If you enable Broadcast SSID, every wireless station located within
the coverage of the WDAP-C7200AC can discover its signal easily. If
you are building a public wireless network, enabling this feature is
recommended. In private network, disabling Broadcast SSID can
User Manual of WDAP-C7200AC
-77-
provide better wireless network security.
Default is Enabled.
Data Rate Set the wireless data transfer rate to a certain value. Since most of
wireless devices will negotiate with each other and pick a proper data
transfer rate automatically, its not necessary to change this value
unless you know what will happen after modification.
Default is Auto.
Associated Clients Click the Show Active Clients button to show the status table of
active wireless clients.
Enable Universal
Repeater Mode
(Acting as AP and client
simultaneously)
Universal Repeater is a technology used to extend wireless coverage.
To enable Universal Repeater Mode, check the box and enter the
SSID you want to broadcast in the field below. Then please click
Security submenu for the related settings of the AP you want to
connect with.
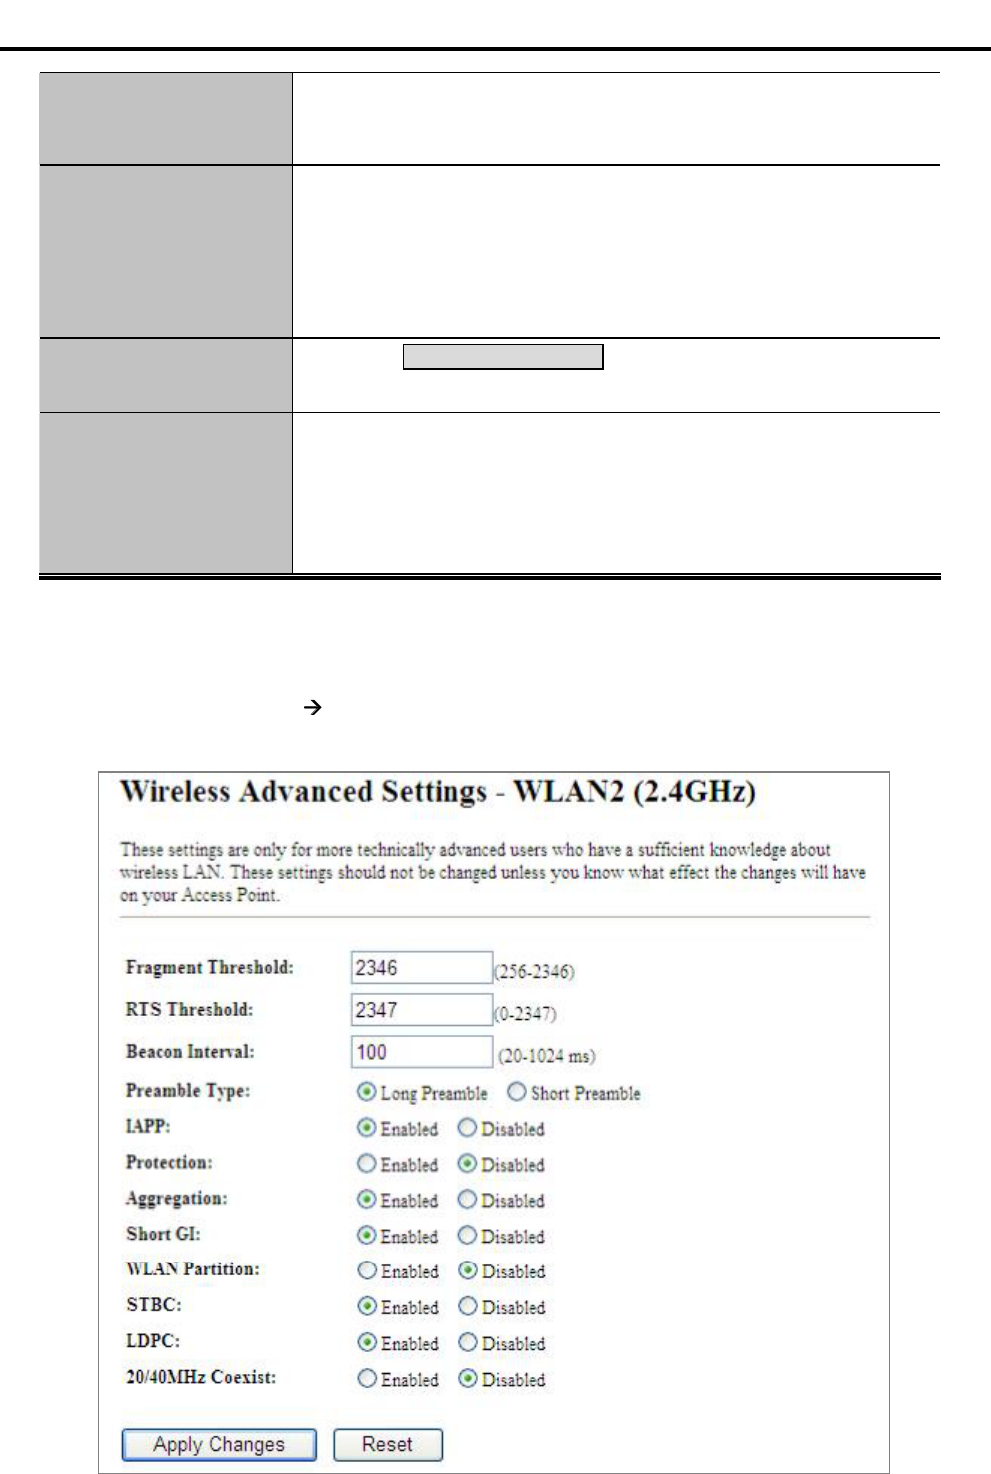
5.4.2 Advanced Settings
Choose menu WLAN2 (2.4GHz) Advanced Settings to configure the 2.4GHz advanced settings for the
wireless network on this page. After the configuration, please click the Apply button to save the settings.
Figure 5-64 Wireless Advanced Settings 2.4GHz

User Manual of WDAP-C7200AC
-78-
The page includes the following fields:
Object Description
Fragment Threshold You can specify the maximum size of packet during the fragmentation
of data to be transmitted. If you set this value too low, it will result in
bad performance.
Default is 2346.
RTS Threshold When the packet size is smaller than the RTS threshold, the access
point will not use the RTS/CTS mechanism to send this packet.
Default is 2347.
Beacon Interval The interval of time that this access point broadcasts a beacon.
Beacon is used to synchronize the wireless network. Default is 100.
IAPP IAPP (Inter-Access Point Protocol) enabled is recommended as it
describes an optional extension to IEEE 802.11 that provides wireless
access-point communications among multivendor systems.
Default is Enabled.
Protection It is recommended to enable the protection mechanism. This
mechanism can decrease the rate of data collision between 802.11b
and 802.11g wireless stations. When the protection mode is enabled,
the throughput of the AP will be a little lower due to the transmission of
heavy frame traffic.
Default is Disabled.
Aggregation It is a function where the values of multiple rows are grouped together.
Default is Enabled
Short GI It is used to set the time that the receiver waits for RF reflections to
settle out before sampling data.
Default is Enabled
WLAN Partition This feature also called WLAN isolation or Block Relay. If this is
enabled, wireless clients cannot exchange data through the
WDAP-C7200AC.
Default is Disabled.
STBC Activate Space Time Blocking Code (STBC) which does not need
channel statement information (CSI).
Default Setting: "Enabled"
LDPC Low-density Parity-check Code is wireless data transmit algorithm.
Default Setting: "Enabled"
20/40MHz Coexist Configure 20/40MHz coexisting scheme.
If you set up as "Enabled", "20MHz" and "40MHz" will coexist.
Default Setting: "Disabled"
User Manual of WDAP-C7200AC
-79-
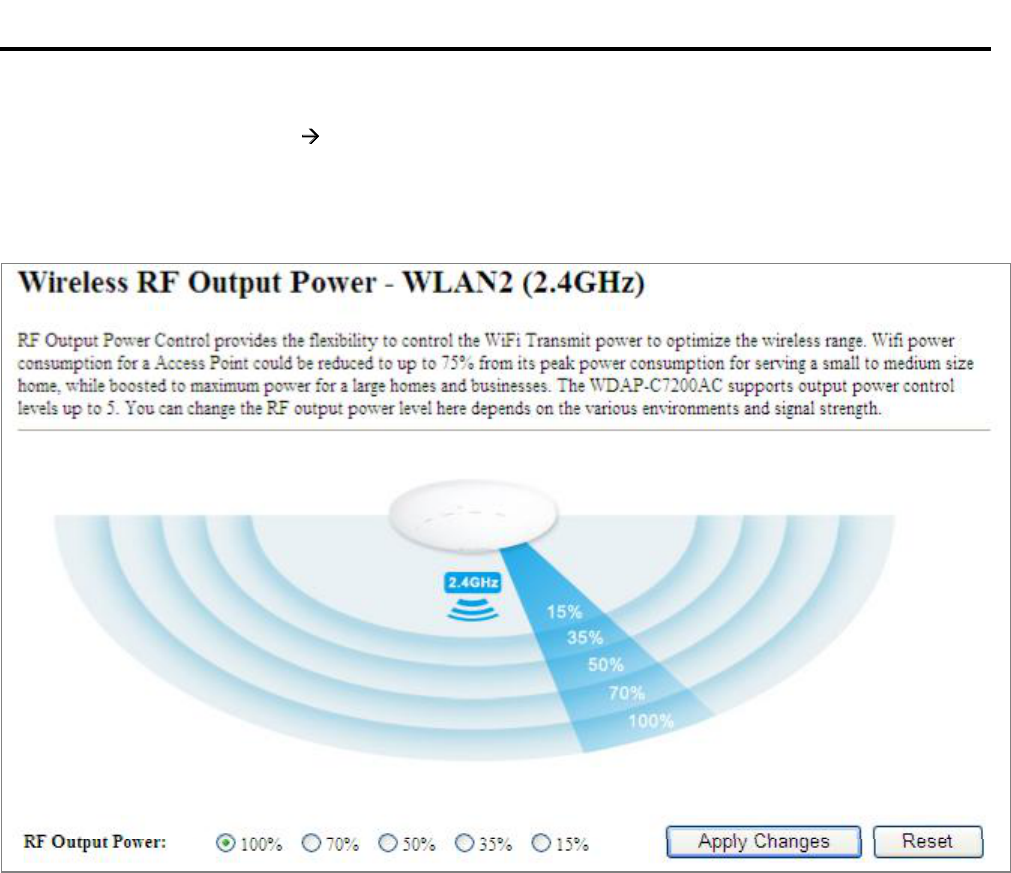
5.4.3 RF Output Power
Choose menu WLAN2 (2.4GHz) RF Output Power to adjust to different levels of transmitting power for the
wireless network according to various environment on this page. After the configuration, please click the Apply
Changes button to save the settings.
Figure 5-65 RF Output Power 2.4GHz
RF Output Power Control provides the flexibility to control the Wi-Fi Transmit power to optimize the wireless
range. Wi-Fi power consumption for an Access Point could be reduced to up to 75% from its peak power
consumption for serving small to medium size homes, while boosted to maximum power for large homes and
businesses. The WDAP-C7200AC supports output power control levels up to 5. You can change the RF output
power level here in accordance with various environments and signal strength.
User Manual of WDAP-C7200AC
-80-
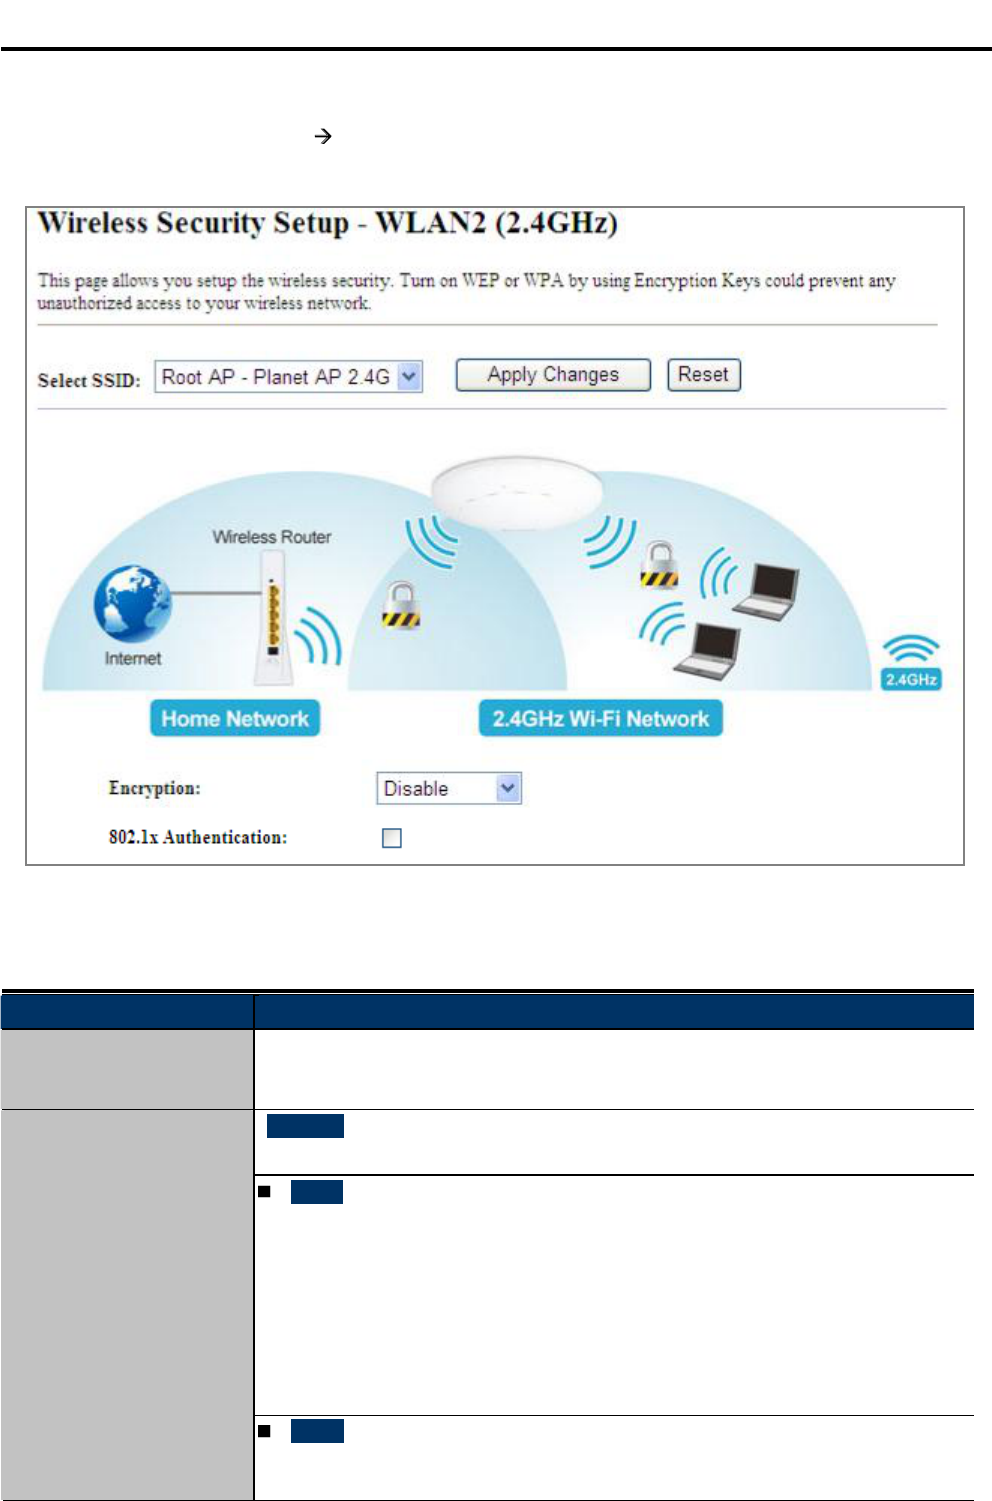
5.4.4 Security
Choose menu WLAN2 (2.4GHz) Security to configure the settings of wireless security for the wireless
network on this page. After the configuration, please click the Apply Changes button to save the settings.
Figure 5-66 Wireless Security Settings 2.4GHz
The page includes the following fields:
Object Description
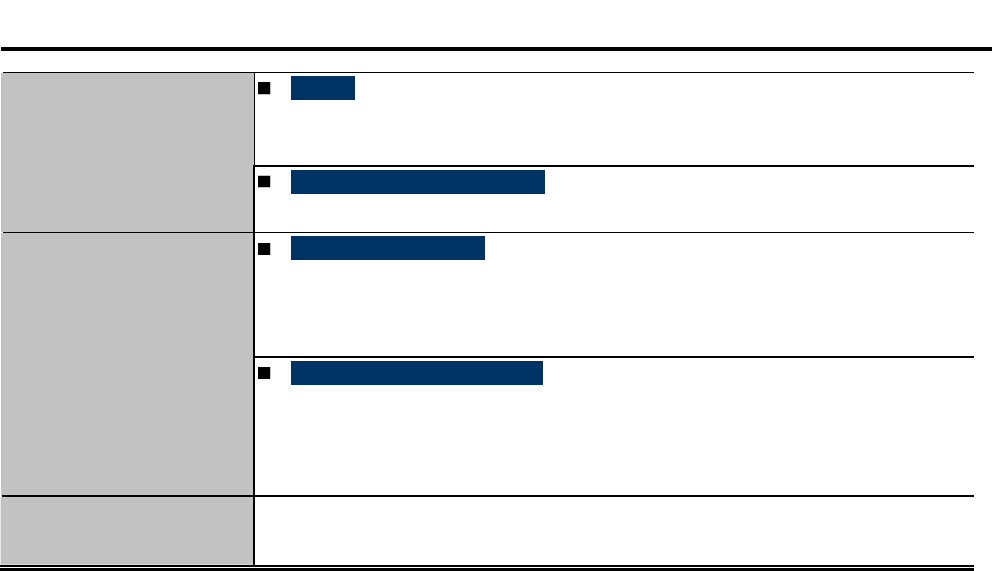
Select SSID Select the SSID you want to configure the wireless security function, which
includes the root one and the client one.
Disable:
No security setup for wireless connection.
WEP:
It is based on the IEEE 802.11 standard. And the default setting of
authentication is Automatic, which can select Open System or Shared Key
authentication type automatically based on the wireless station's capability
and request. Furthermore, you can select Key Length and enter 10 and 26
Hexadecimal digits (any combination of 0-9, a-f, A-F, zero key is not
promoted) or 5 and 13 ASCII characters in the Encryption Key field.
Encryption
WPA:
WPA is a medium level encryption and is supported by most wireless devices
and operating systems.
User Manual of WDAP-C7200AC
-81-
WPA2:
WPA2 is a high level encryption and is supported by most wireless devices
and operating systems.
WPA / WPA2 / WPA-Mixed:
WPA Mixed Mode allows the use of both WPA and WPA2 at the same time.
Enterprise (RADIUS)
When you select the authentication mode based on Enterprise (Radius
Server), please enter the IP Address,Port, and Password of the Radius
Server.
Authentication Mode
Personal (Pre-Shared Key)
When you select the other authentication mode based on Personal
(Pre-Shared Key), please enter at least 8 ASCII characters (Passphrase) or
64 Hexadecimal characters. All of the Cipher Suites support TKIP and AES.
802.1x Authentication Enable 802.1x authentication function and then enter the IP Address,Port,
and Password of the Radius Server.

User Manual of WDAP-C7200AC
-82-
5.4.5 Access Control
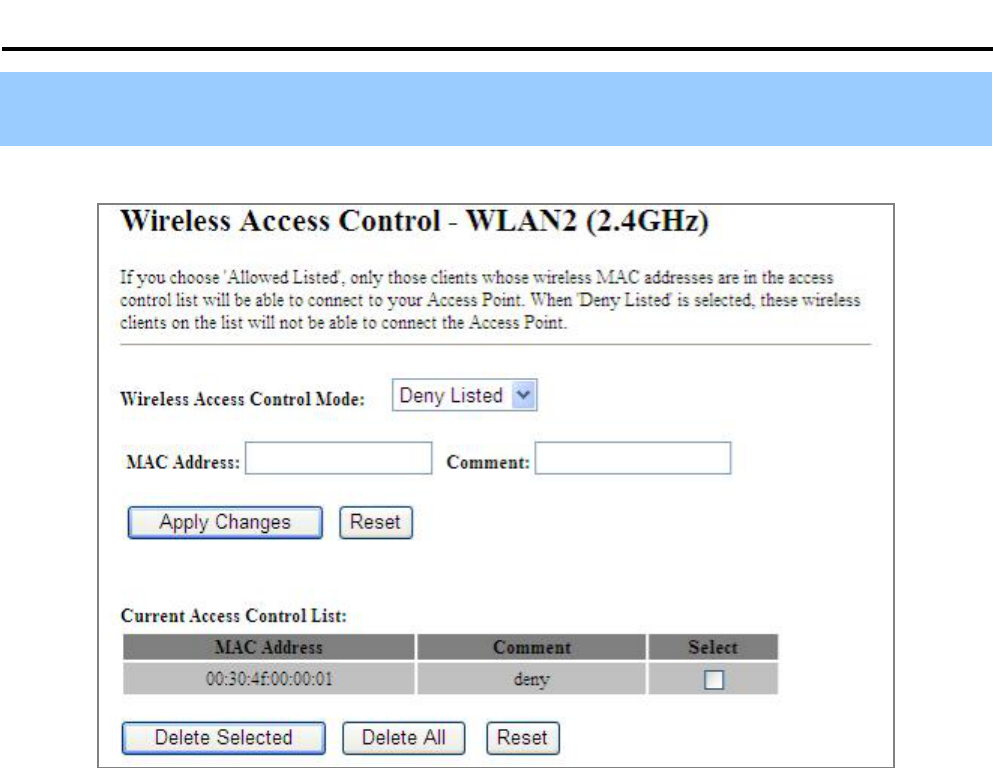
Choose menu WLAN2 (2.4GHz) Access Control to allow or deny the computer of specified MAC address
to connect with the WDAP-C7200AC on this page. After the configuration, please click the Apply Changes
button to save the settings.
Figure 5-67 Wireless Access Control 2.4GHz
The page includes the following fields:
Object Description
Wireless Access
Control Mode
You can choose to set the Allowed-List, Denied-List, or disable this function.
MAC Address Enter the MAC address you want to allow or deny connection to the
WDAP-C7200AC in the field.
Comment You can make some comment on each MAC address on the list.
Current Access Control
List
You can select some MAC addresses and click the Delete Selected button to
delete it.
Wireless Access Control example:
To deny a PC at the MAC address of 00:30:4F:00:00:01 to connect to your wireless network, do as follows:
Step 1.Select Deny from MAC Address Filter drop-down menu.
Step 2. Enter 00:30:4F:00:00:01 in the MAC address box and click Add.
User Manual of WDAP-C7200AC
-83-
Step 3. Click the OK button to save your settings and you can add more MAC addresses, if you like, simply
repeat the above steps.
Figure 5-68 Wireless Access Control Deny
User Manual of WDAP-C7200AC
-84-
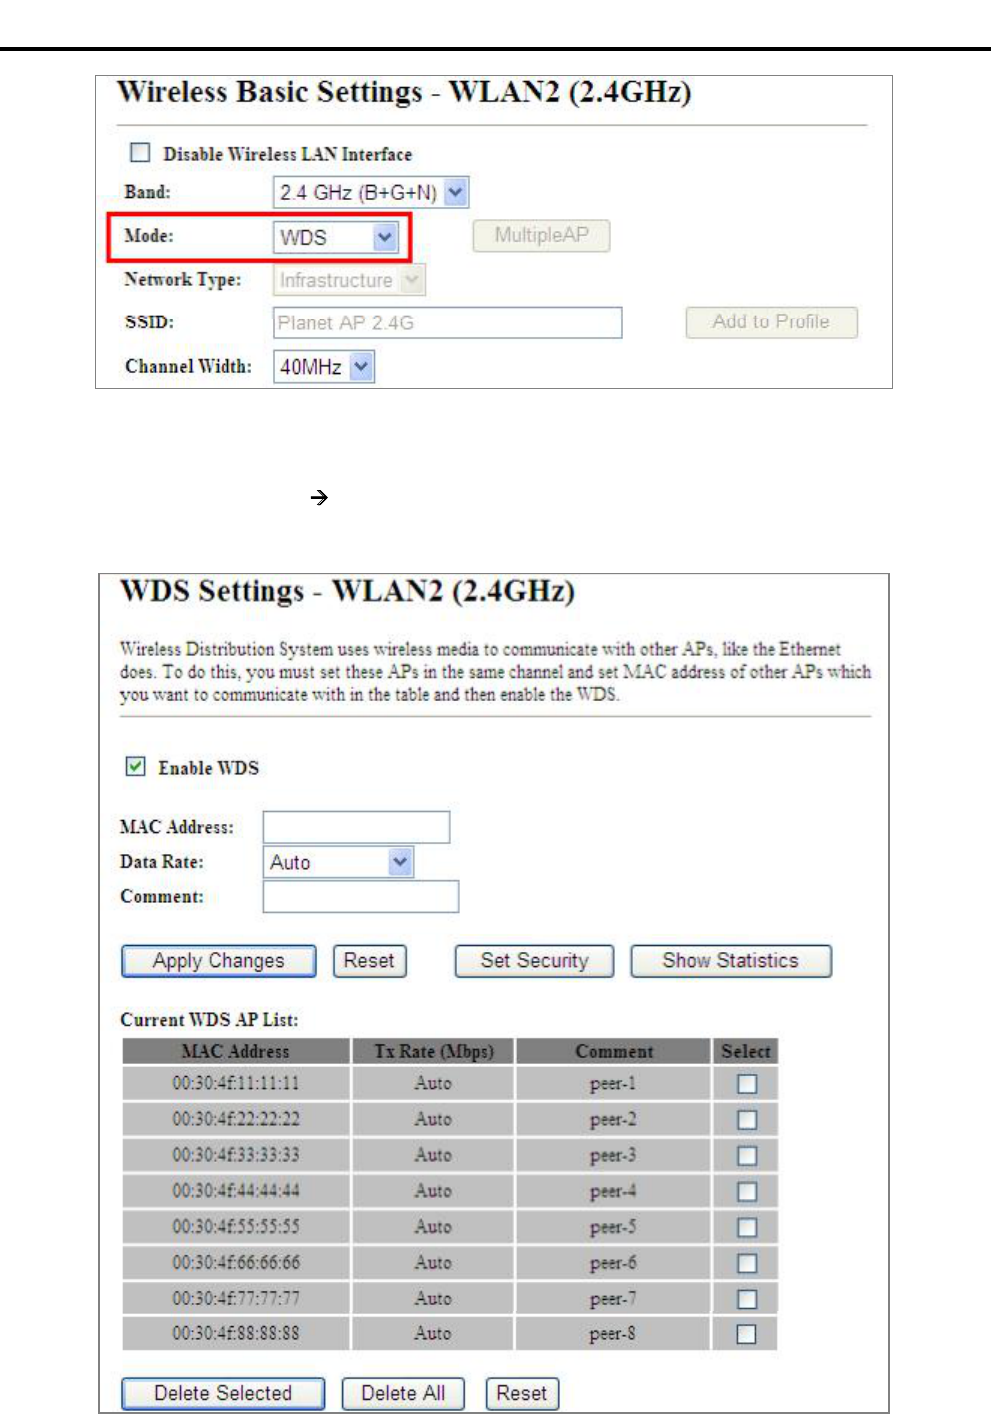
5.4.6 WDS
WDS (Wireless Distribution System) feature can be used to extend your existing 2.4G or 5G wireless network
coverage. Here we present you how to configure such feature in 2.4GHz, which also applies to 2.4GHz.
Before configuring the WDS Setting page, you have to select the wireless mode to “WDS” on the WLAN2
(2.4GHz) -> Basic Settings web page.
Clients ClientsSwitch Switch
WDAP-C7200AC WDAP-C7200AC
WDS Bridge-PtP Mode
AP ClientsSwitch
ClientsSwitch
Clients Switch
WDAP-C7200AC
AP
WDS Bridge-PtMP Mode
Switch
WDS Repeater Mode
Clients
5G WDS 2.4G
AP
Internet
WDAP-C7200AC
g/n
g/n
a/n/ac
a/n/ac
User Manual of WDAP-C7200AC
-85-
Figure 5-69 WDS Mode 2.4GHz
Choose menu WLAN2 (2.4GHz) WDS Settings to configure WDS to connect the WDAP-C7200AC with
another AP on this page. After the configuration, please click the Apply Changes button to save the settings.
Figure 5-70 WDS Settings 2.4GHz
User Manual of WDAP-C7200AC
-86-
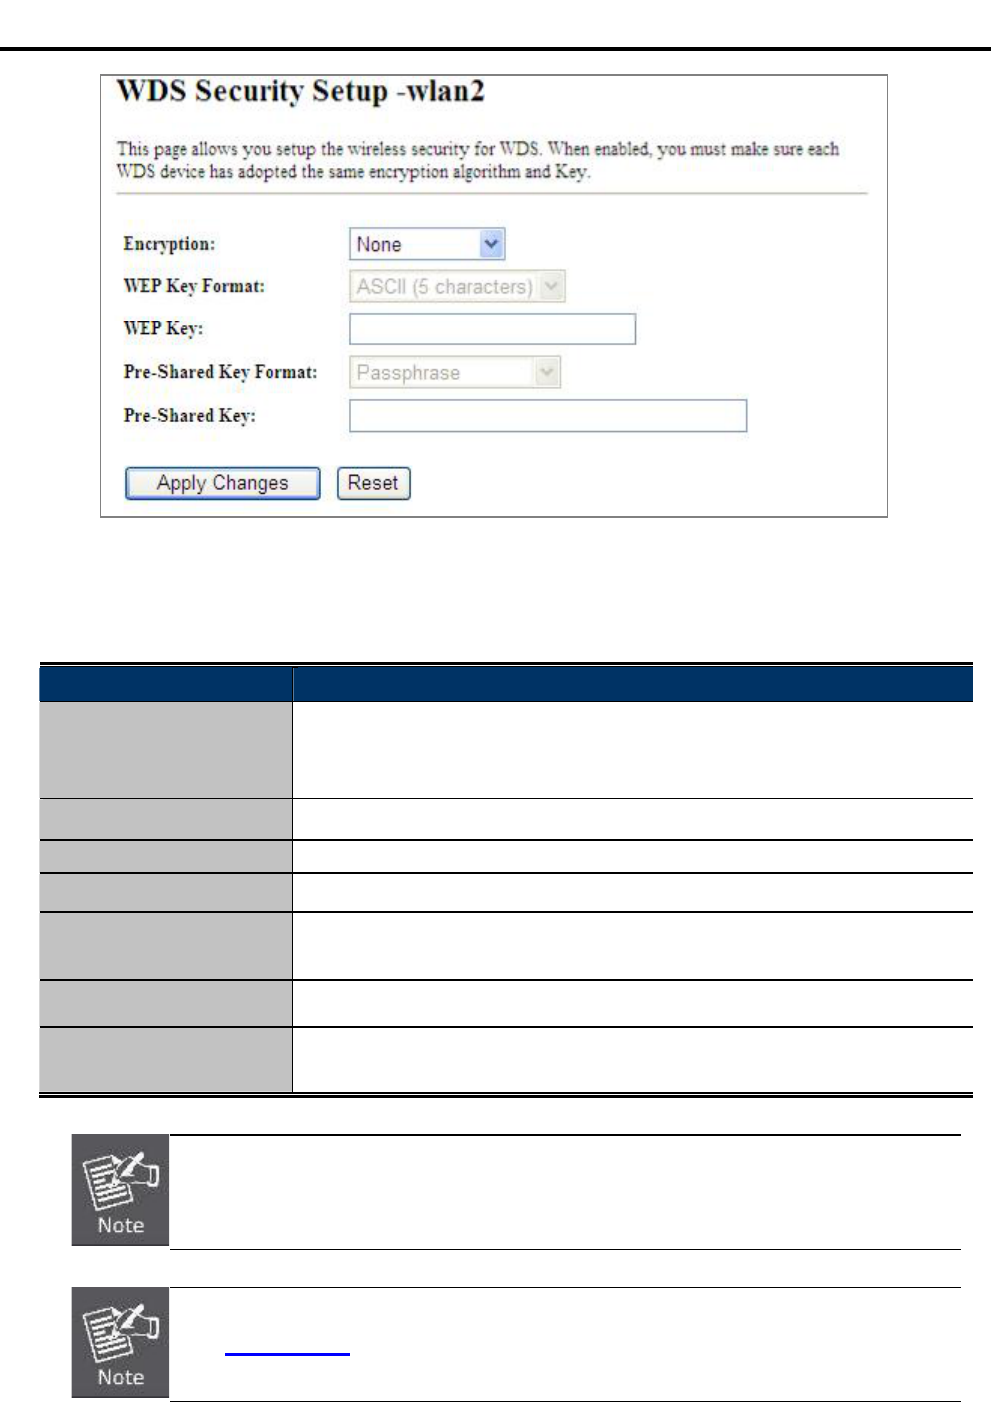
Figure 5-71 WDS Set Security
The page includes the following fields:
Object Description
Enable WDS Check the box to enable the WDS function. Please select WDS or
AP+WDS in the Mode of Wireless Basic Settings before you enable
WDS on this page.
MAC Address You can enter the MAC address of the AP you want to connect with.
Data Rate Default is Auto.
Comment You can make some comment for each MAC address on the list.
Set Security Click the Set Security button to configure the wireless security
parameters of the AP you want to connect via WDS.
Show Statics Click the Show Statics button to show the WDS AP.
Current WDS AP List You can select some MAC addresses of the AP and click the Delete
Selected button to delete it.
WDS feature can only be implemented between 2 wireless devices that both support the
WDS feature. Plus, channel,security settings and security key must be the same on
both such devices.
To encrypt your wireless network, click Set Security. For the detail of wireless security,
see section 5.5.4. Do remember to reboot the device after you save your wireless
security settings; otherwise, the WDS feature may not function.
User Manual of WDAP-C7200AC
-87-
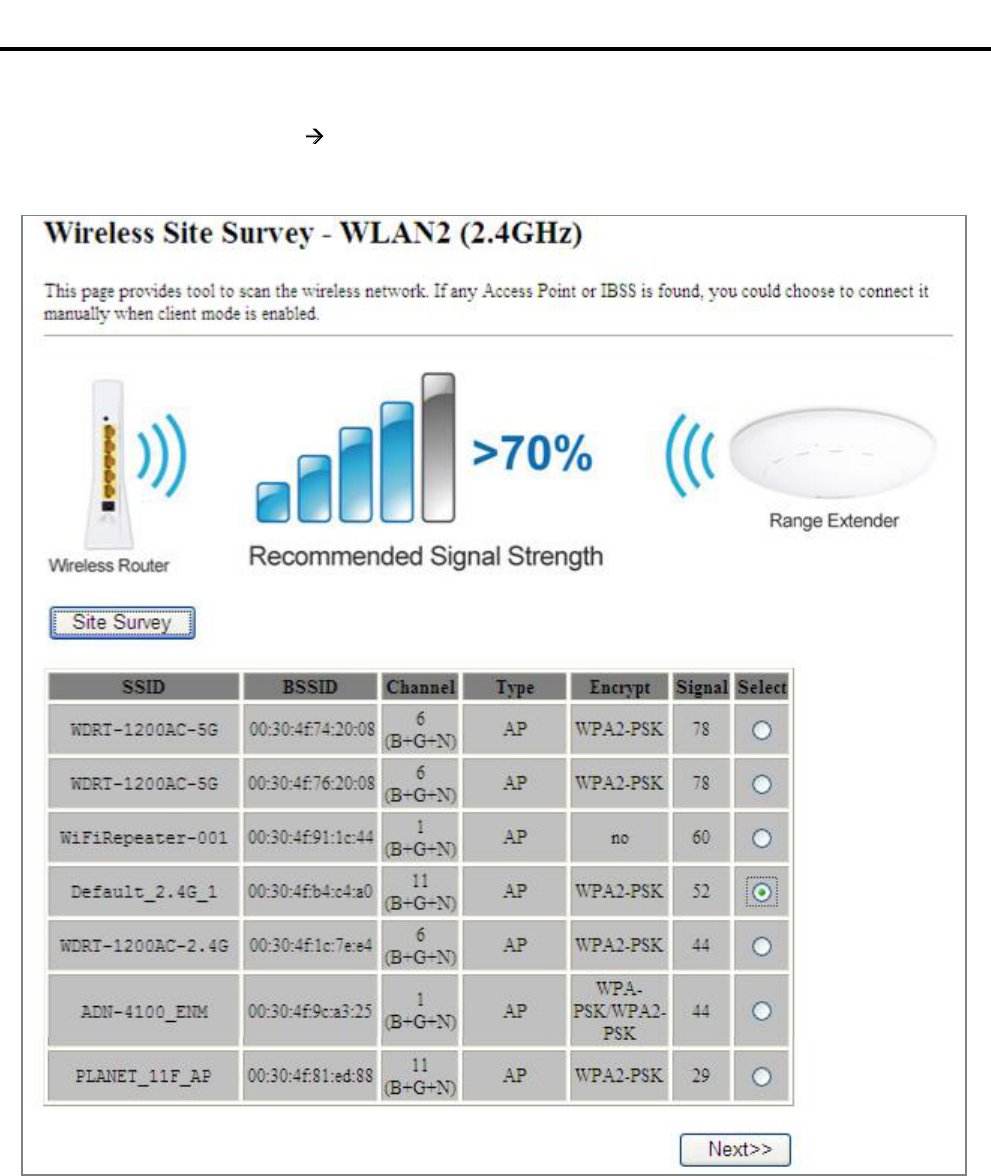
5.4.7 Site Survey
Choose menu WLAN2 (2.4GHz) Site Survey to scan the available local AP. If any Access Point is found,
you could choose any one to connect with manually when the Client Mode is enabled.
Figure 5-72 Site Survey 2.4GHz
5.4.8 WPS
WPS (Wi-Fi Protected Setup) is designed to ease setup of security Wi-Fi networks and subsequently network
management. This Wireless Router supports WPS features for AP mode,AP+WDS mode,
Infrastructure-Client mode, and the wireless root interface of Universal Repeater mode.
Simply enter a PIN code or press the software PBC button or hardware WPS button (if any) and a secure
wireless connection is established.
User Manual of WDAP-C7200AC
-88-
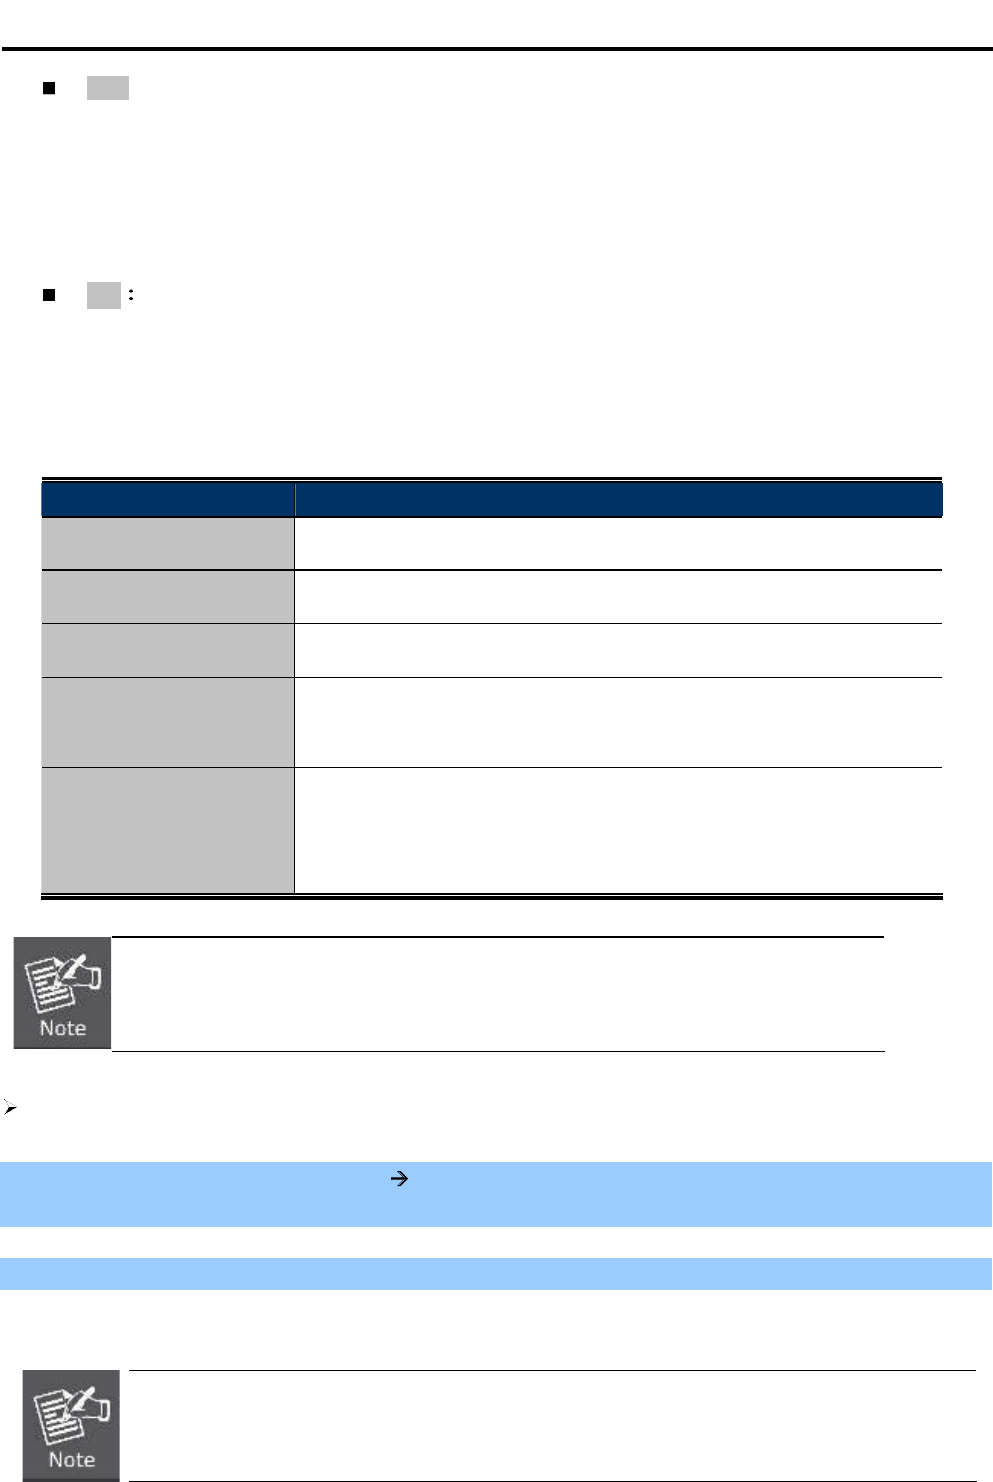
PBC: If you find the WPS LED blinking for 2 minutes after you press the hardware WPS button on the
device, it means that PBC encryption method is successfully enabled. And an authentication will
be performed between your router and the WPS/PBC-enabled wireless client device during this
time; if it succeeds, the wireless client device connects to your device, and the WPS LED turns
off. Repeat steps mentioned above if you want to connect more wireless client devices to the
device.
PIN To use this option, you must know the PIN code from the wireless client and enter it in
corresponding field on your device while using the same PIN code on client side for such
connection.
The page includes the following fields:
Object Description
Disable WPS You can check the box to disable the WPS function.
WPS Status Here you can check if the connection via WPS is established or not.
Self-PIN Number It is the PIN number of the WDAP-C7200AC here.
Push Button
Configuration
Click the Start PBC to activate WPS as well in the client device within
2 minutes.
Client PIN Number In addition to the PBC method, you can also use the PIN method to
activate the WPS. Just enter the PIN number of the client device in the
field and click the Start PIN button.
The WPS encryption can be implemented only between your Router and another
WPS-capable device.
Example of how to establish wireless connection using WPS. Please take the following steps:
Step 1. Choose menu WLAN2 (2.4GHz) WPS to configure the setting for WPS. After the configuration,
please click the Apply Changes button to save the settings.
Step 2. Add a new device.
If the wireless adapter supports Wi-Fi Protected Setup (WPS), you can establish a wireless connection between
wireless adapter and AP using either Push Button Configuration (PBC) method or PIN method.
To build a successful connection by WPS, you should also do the corresponding configuration
of the new device for WPS function.
User Manual of WDAP-C7200AC
-89-
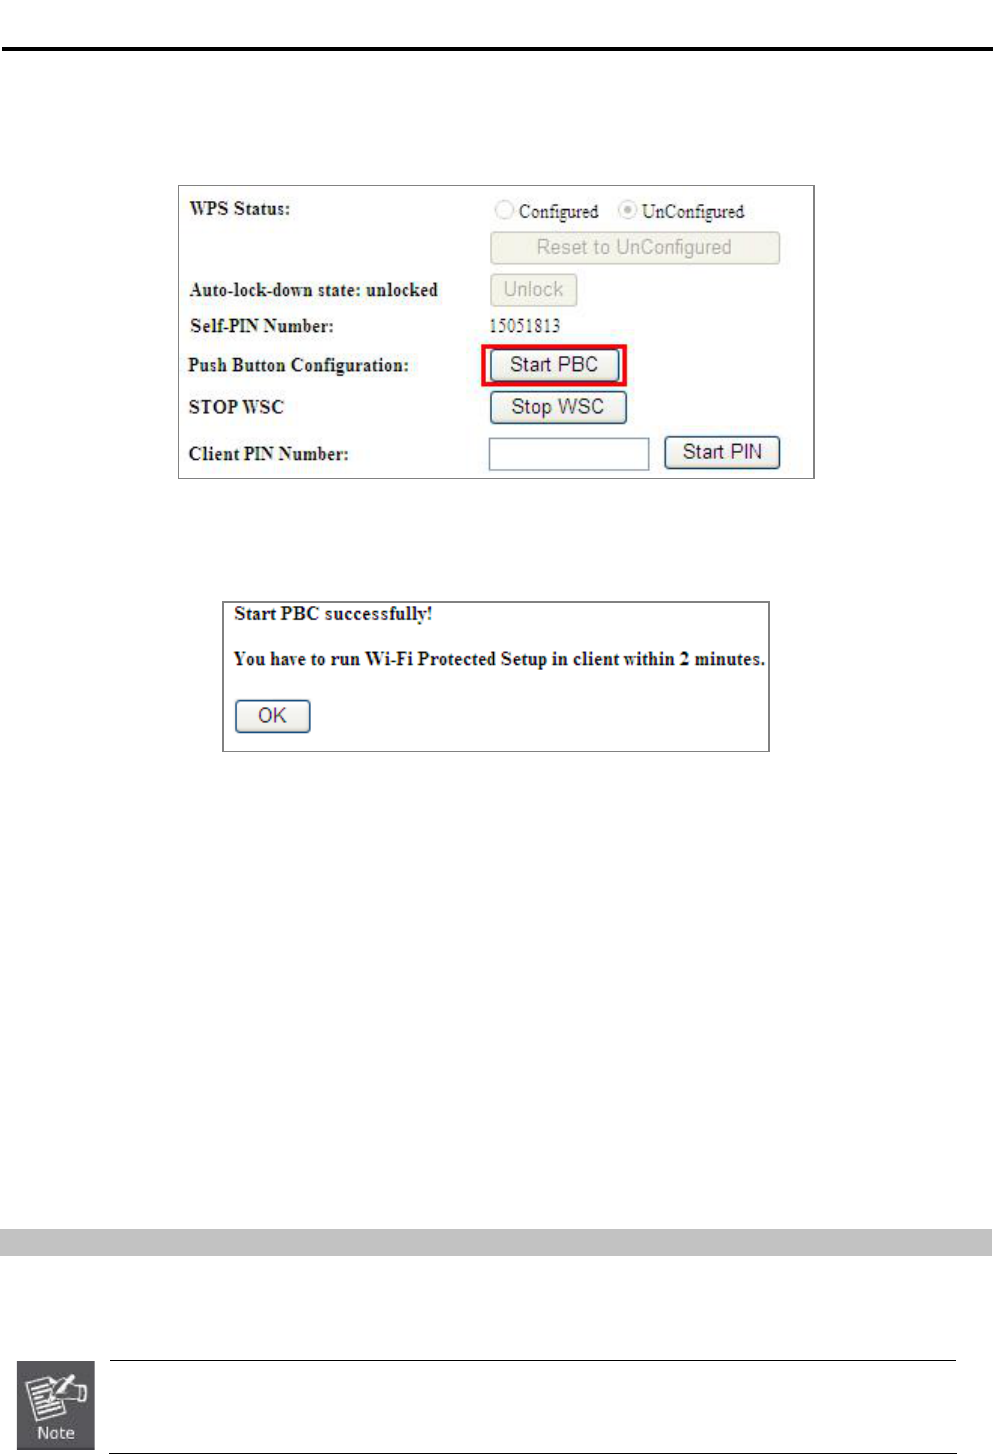
A. By Push Button Configuration (PBC)
i. Click the Start PBC Button on the WPS page of the AP.
Figure 5-73 WPS-PBC 2.4GHz-1
Figure 5-74 WPS-PBC 2.4GHz-2
ii. Press and hold the WPS Button equipped on the adapter directly for 2 or 3 seconds. Or you can click
the WPS button with the same function in the configuration utility of the adapter. The process must be
finished within 2 minutes.
iii. Wait for a while until the next screen appears. Click OK to complete the WPS configuration.
B. By PIN
If the new device supports Wi-Fi Protected Setup and the PIN method, you can add it to the network by PIN with
the following two methods.
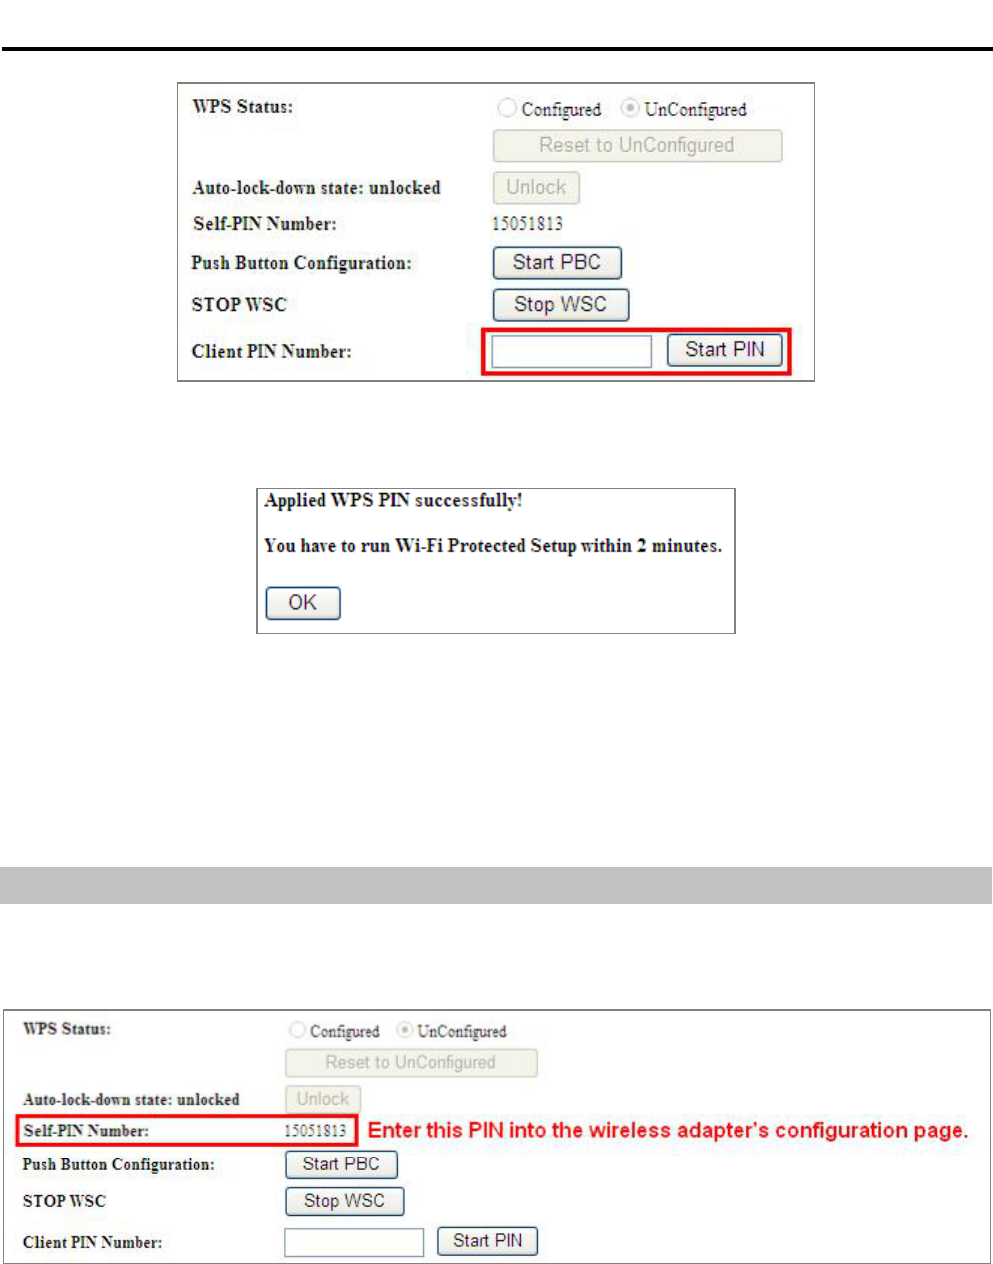
Method One: Enter the PIN of your Wireless adapter into the configuration utility of the AP
i. Enter the PIN code of the wireless adapter in the field behind Client PIN Number in the following
figure and then click Start PIN.
The PIN code of the adapter is always displayed on the WPS configuration screen.
User Manual of WDAP-C7200AC
-90-
Figure 5-75 WPS-PIN 2.4GHz-1
Figure 5-76 WPS-PIN 2.4GHz-2
ii. For the configuration of the wireless adapter, please choose the option that you want to enter PIN
into the AP (Enrollee) in the configuration utility of the WPS and click Next until the process finishes.
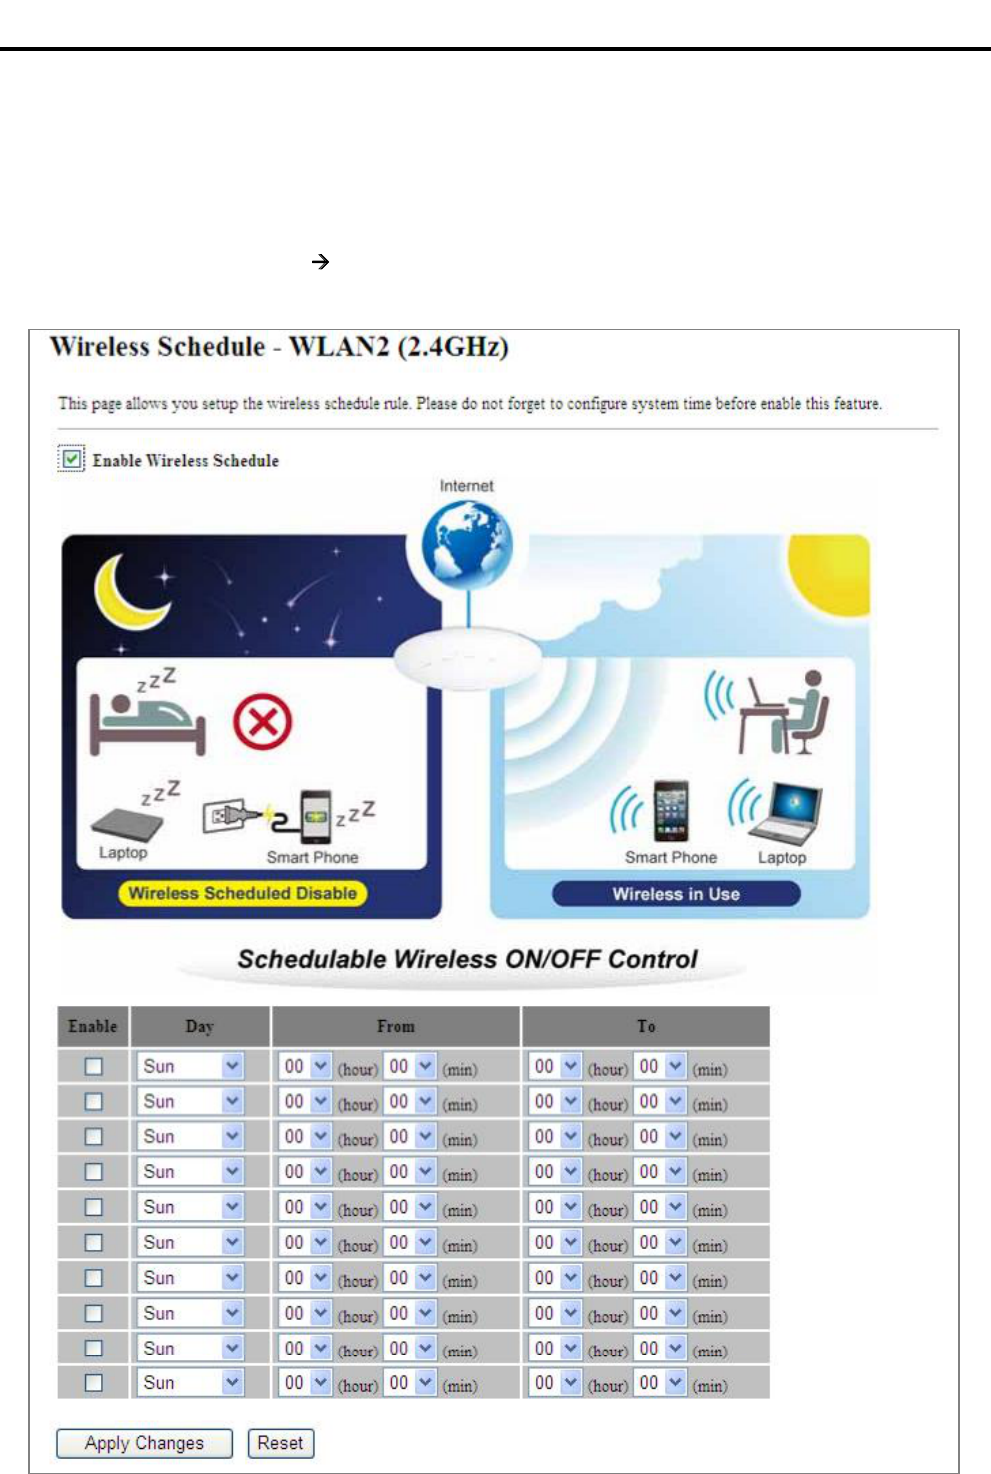
Method Two: Enter the PIN of the AP into the configuration utility of your Wireless adapter
i. Click the Start PBC Button on the WPS page of the AP. Get the Current PIN code of the AP in WPS
page (each AP has its unique PIN code).
Figure 5-77 WPS-PIN 2.4GHz-3
ii. For the configuration of the wireless adapter, please choose the option that you want to enter the PIN
of the AP (Registrar) in the configuration utility of the Wireless adapter and enter it into the field.
Then click Next until the process finishes.
User Manual of WDAP-C7200AC
-91-
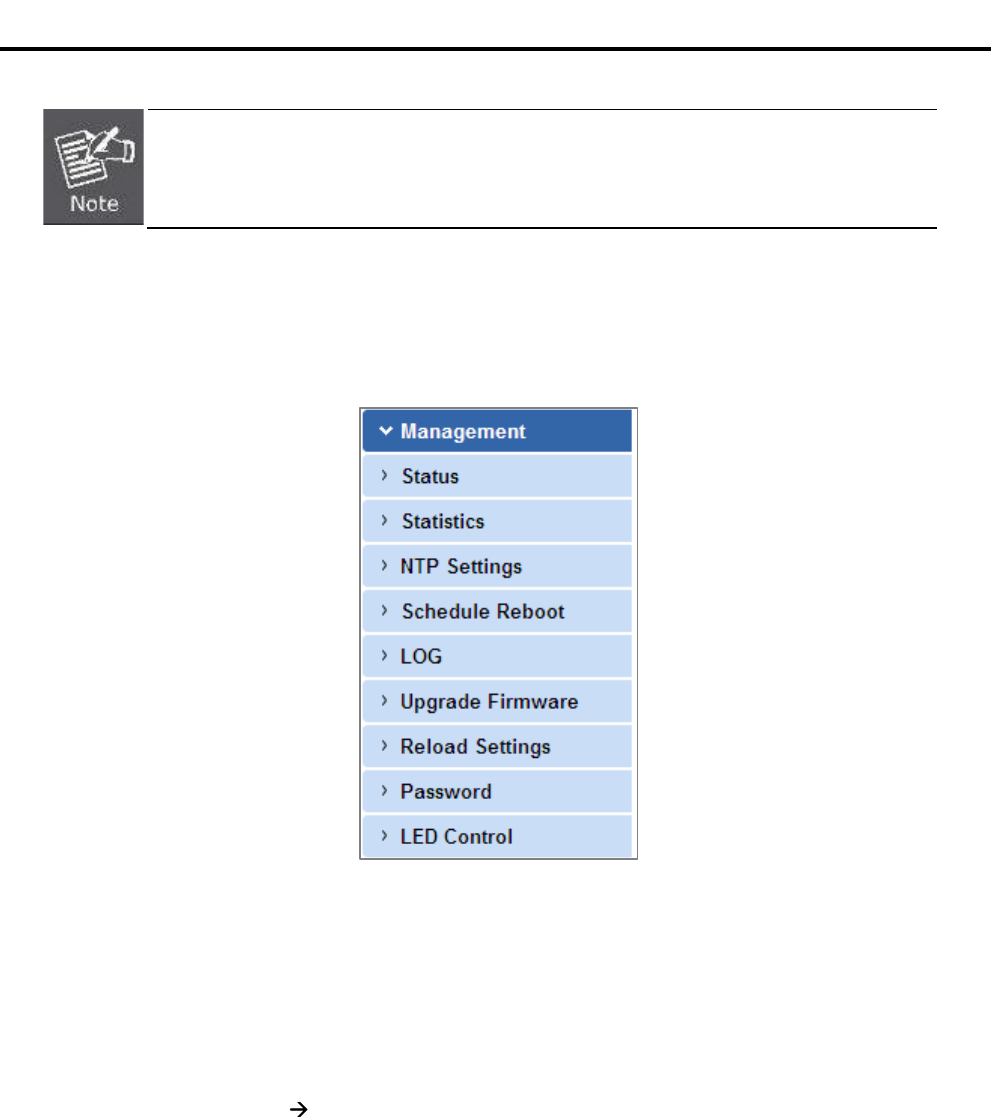
5.4.9 Schedule
Wireless Schedules will enable or disable your wireless access at a set time based on your predefined schedule.
This feature is often used for restricting access to all users (such as children, employees and guests) during
specific times of the day for parental control or security reasons.
Choose menu WLAN2 (2.4GHz) Schedule to configure the schedule rule of enabling wireless function.
After the configuration, please click the Apply Changes button to save the settings.
Figure 5-78 Schedule 2.4GHz
User Manual of WDAP-C7200AC
-92-
When setting the Wireless Schedule, it is important to ensure that your System Clock
settings have been configured. If not, your Wireless Schedule will not function correctly.
5.5 Management
This section focuses on how to maintain AP, including Restore to Factory Default Setting, Backup/Restore,
Firmware Upgrade, Reboot, Password Change and Syslog.
Figure 5-79 Management Main Menu
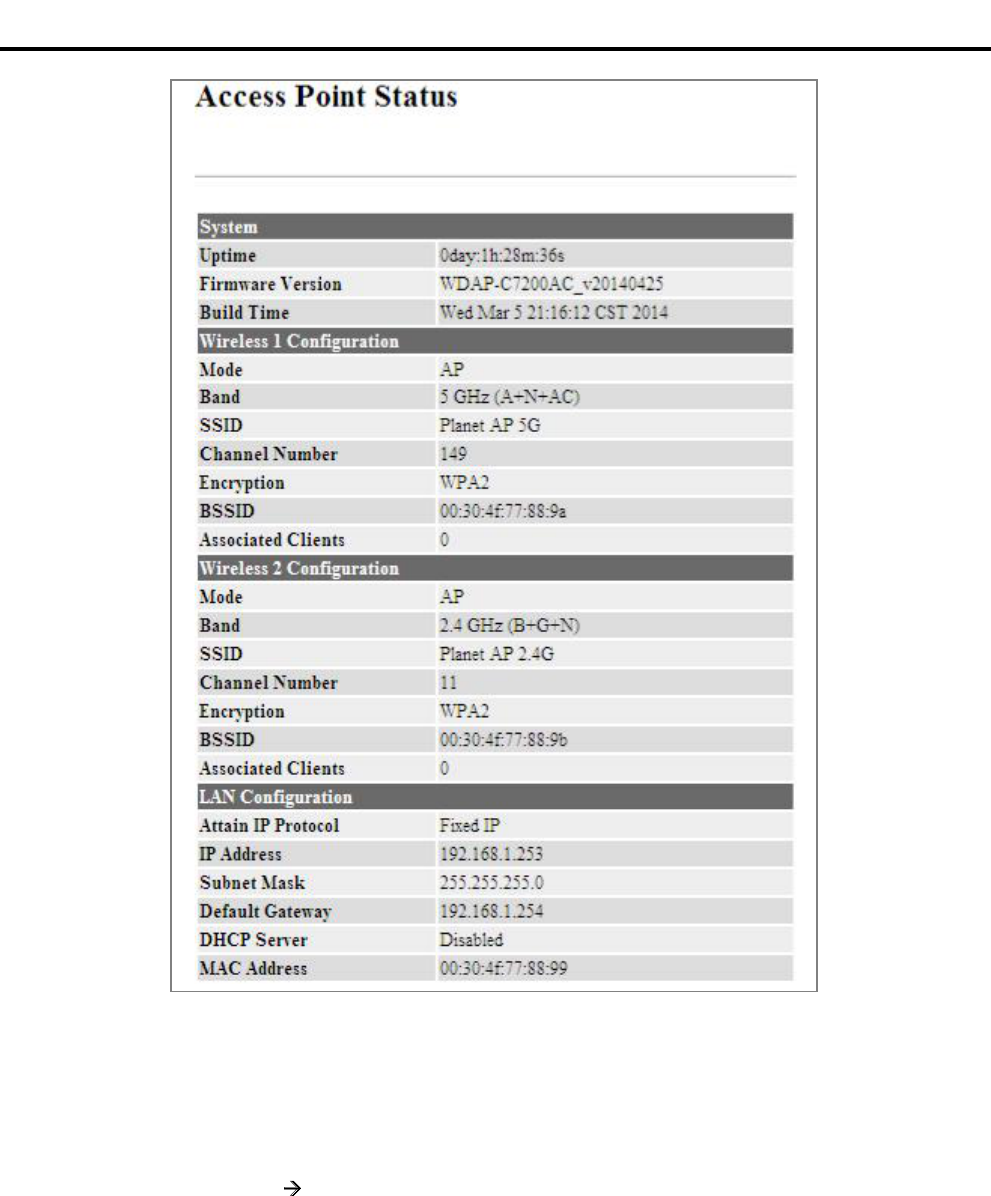
5.5.1 Status
You can use this function to realize the instantaneous information of the Wireless AP. The Information displayed
here may vary on different configurations.
Choose menu Management Status to show the current status and some basic settings of the
WDAP-C7200AC.
User Manual of WDAP-C7200AC
-93-
Figure 5-80 Status
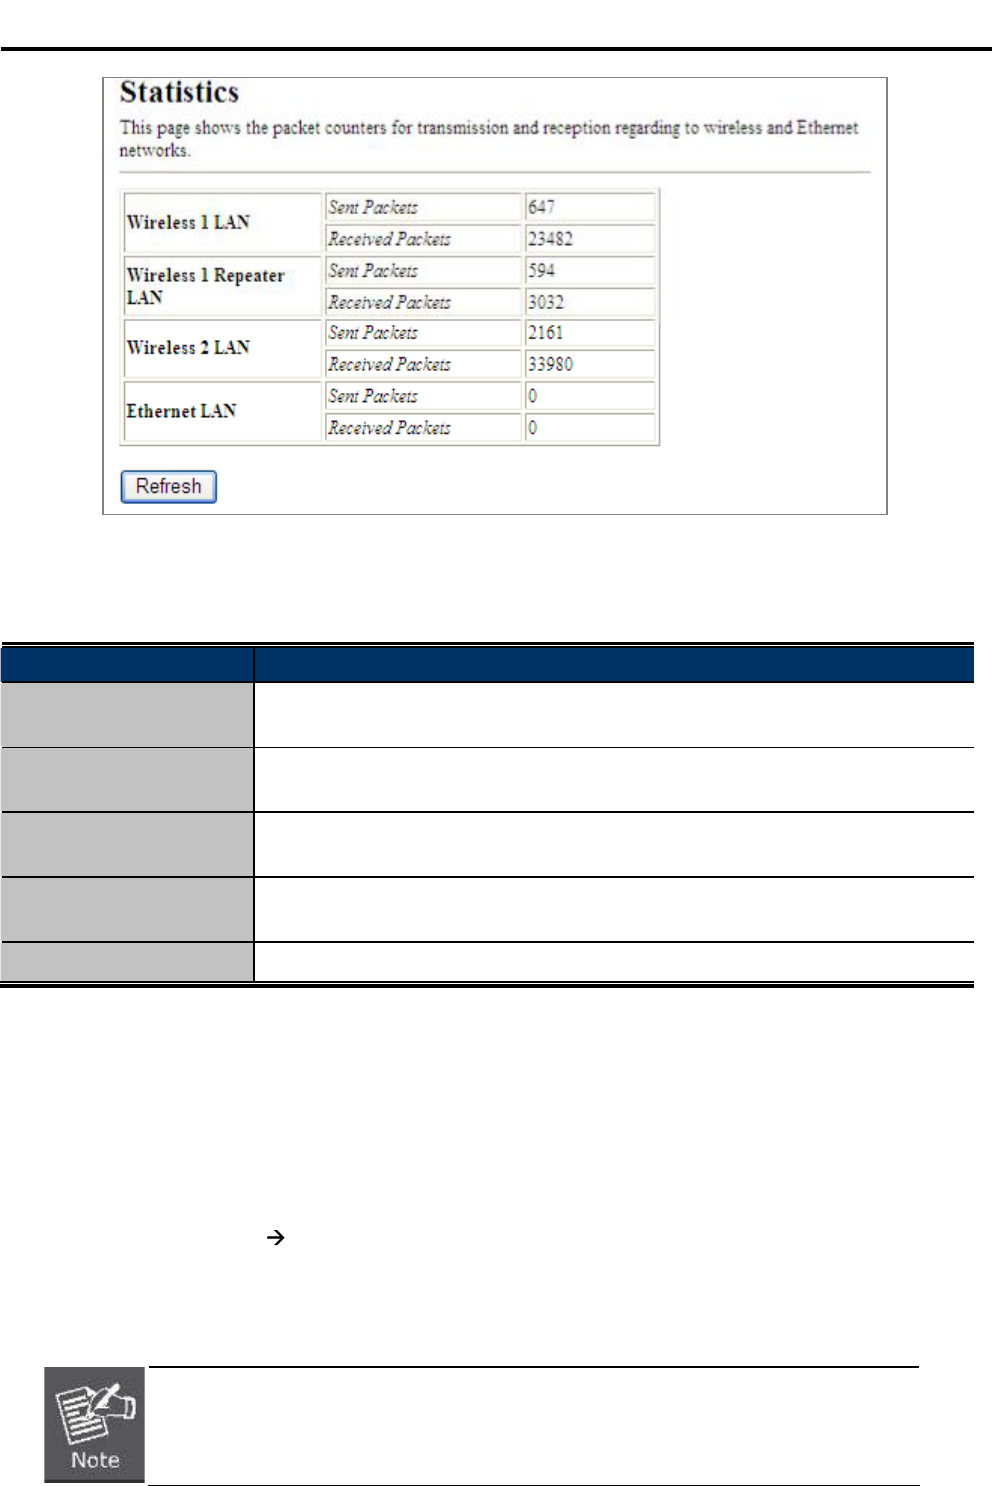
5.5.2 Statistics
Choose menu Management Statistics to show the packet counters for transmission and reception
regarding wireless and Ethernet network.
User Manual of WDAP-C7200AC
-94-
Figure 5-81 Statistics
The page includes the following fields:
Object Description
Wireless LAN
Sent Packets
It shows the statistic count of sent packets on the wireless LAN interface.
Wireless LAN
Received Packets
It shows the statistic count of received packets on the wireless LAN interface.
Ethernet WAN
Sent Packets
It shows the statistic count of sent packets on the Ethernet WAN interface.
Ethernet WAN
Received Packets
It shows the statistic count of received packets on the Ethernet WAN interface.
Refresh Click the refresh the statistic counters on the screen.
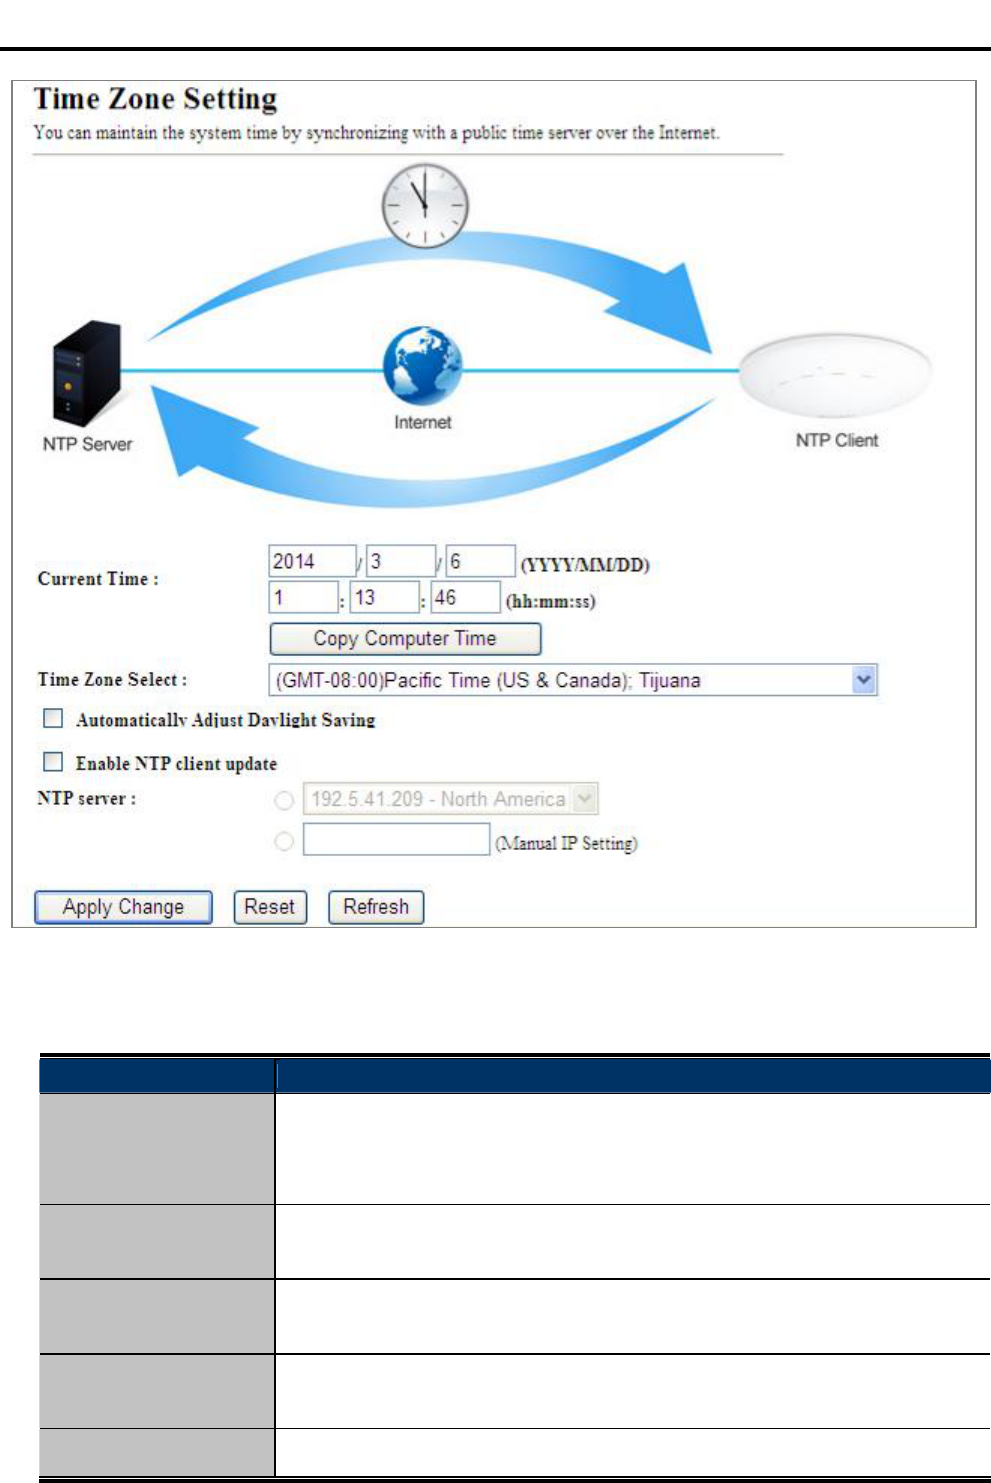
5.5.3 NTP Settings
This section assists you in setting the Wireless APs system time. You can either select to set the time and date
manually or automatically obtain the GMT time from Internet.
Choose menu Management NTP Settings to configure the system time. You can also maintain the system
time by synchronizing with a public time server over the Internet. After the configuration, please click the OK
button to save the settings.
The configured time and date settings are lost when the Wireless AP is powered off.
User Manual of WDAP-C7200AC
-95-
Figure 5-82 Time Zone Settings
The page includes the following fields:
Object Description
Current Time Input current time manually.
You can click Copy Computer Time button to copy the PCs current time to
the AP.
Time Zone Select Select the time zone of the country you are currently in. The router will set its
time based on your selection.
Automatically Adjust
Daylight Saving
Select the time offset, if your location observes daylight saving time.
Enable NTP client
update
Check to enable NTP update. Once this function is enabled, AP will
automatically update current time from NTP server.
NTP Server User may select prefer NTP sever or input address of NTP server manually.
User Manual of WDAP-C7200AC
-96-
If the AP loses power for any reason, it cannot keep its clock running, and will not have
the correct time when it is started again. To maintain correct time for schedules and logs,
either you must enter the correct time after you restart the AP, or you must enable the
NTP Server option.
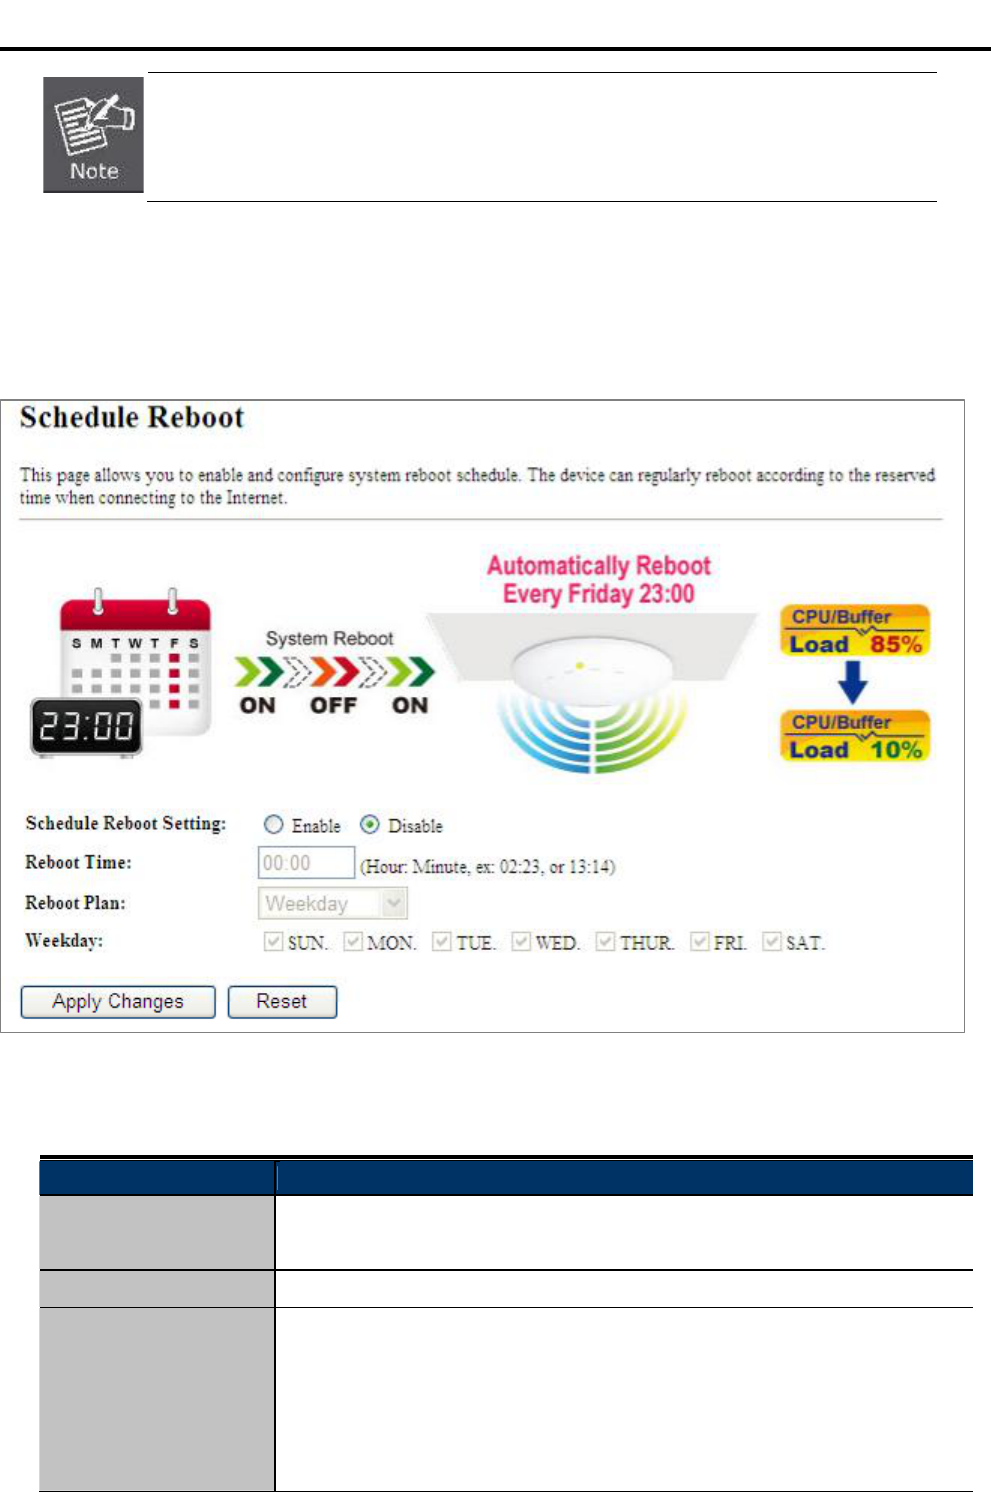
5.5.4 Schedule Reboot
This page allows you to enable and configure system reboot schedule. The device can regularly reboot
according to the reserved time when connecting to the Internet.
Figure 5-83 Schedule Reboot
The page includes the following fields:
Object Description
Schedule Reboot
Setting Enable or disable the Schedule Reboot function.
Reboot Time Enter the Reboot Time (24-hour format) to enable this function to take effect.
Reboot Plan There are two Reboot Plans supported in the AP:
Weekday: select this option to let the device reboot automatically according
to the reserved time in one or more days of a week.
Every day: select this option to let the device reboot automatically according
to the reserved time every day.
User Manual of WDAP-C7200AC
-97-
Weekday Check one or more days to let the device auto reboot on schedule.
When choosing Every day as your reboot plan, the Weekday will be
grayed out (disabled), which means Every day will auto reboot at the time
that you scheduled.
1. This setting will only take effect when the Internet connection is accessible and the GMT
time is configured correctly.
2. You must select at least one day when choosing Weekday as your reboot plan.
3. When choosing Every day as your reboot plan, the Weekday will be grayed out
(disabled), which means Every day will auto reboot at the time that you schedule.
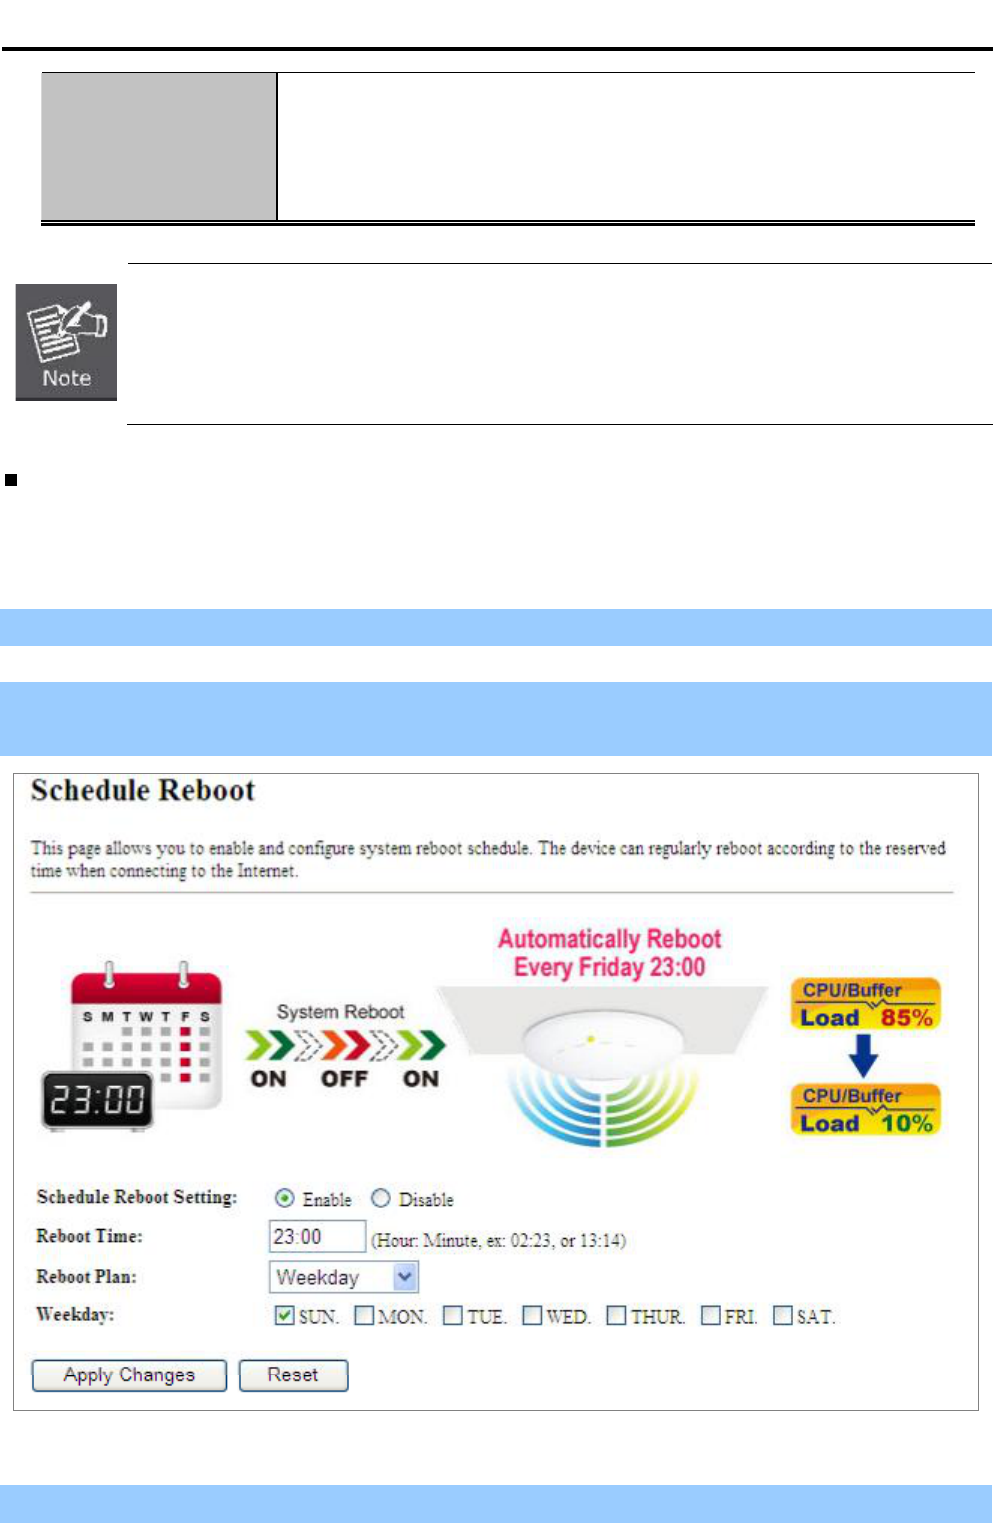
Example of how to configure Schedule Reboot. Please take the following steps:
Before configured schedule reboots, please ensure the Internet connection is accessible and the GMT time is
configured correctly according to NTP Settings page.
Step 1.Select the Schedule Reboot Setting checkbox.
Step 2. Enter the Reboot Time (24-hour format) to enable this function to take effect. For example, if you want
this function to work at 23:00 every Sunday, choose "Weekday" in the Reboot Plan field.
Figure 5-84 Schedule Reboot - Example
Step 3. Click the Apply Changes button to take this function effect.
User Manual of WDAP-C7200AC
-98-
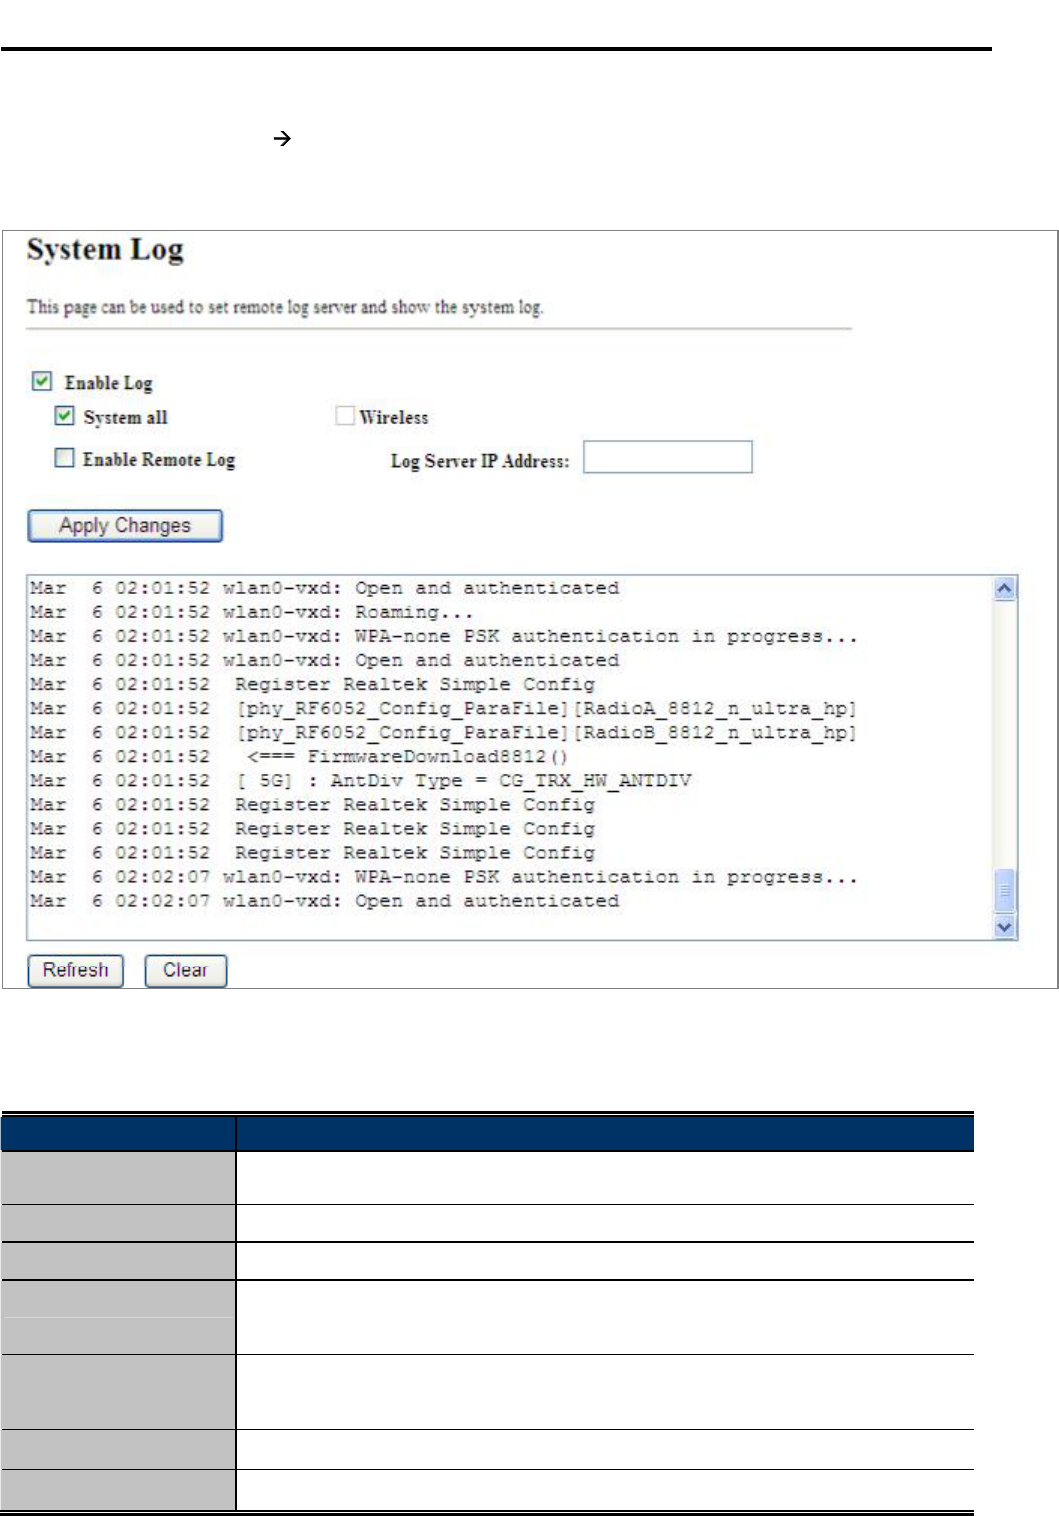
5.5.5 LOG
Choose menu Management LOG to configure the settings of system log. You can check the box of the
items you want to record it in the log. After the configuration, please click the Apply button to save the settings.
Figure 5-85 System Log
The page includes the following fields:
Object Description
Enable Log Check to enable log function.
System all Check this option to display all the system logs.
Wireless Check this option to display only the logs related to wireless module.
Enable Remote Log Enable this option if you have a syslog server currently running on the LAN and
wish to send log messages to it.
Log Server IP
Address
Enter the LAN IP address of the Syslog Server.
Refresh Click this button to update the log.
Clear Click this button to clear the current log.
User Manual of WDAP-C7200AC
-99-
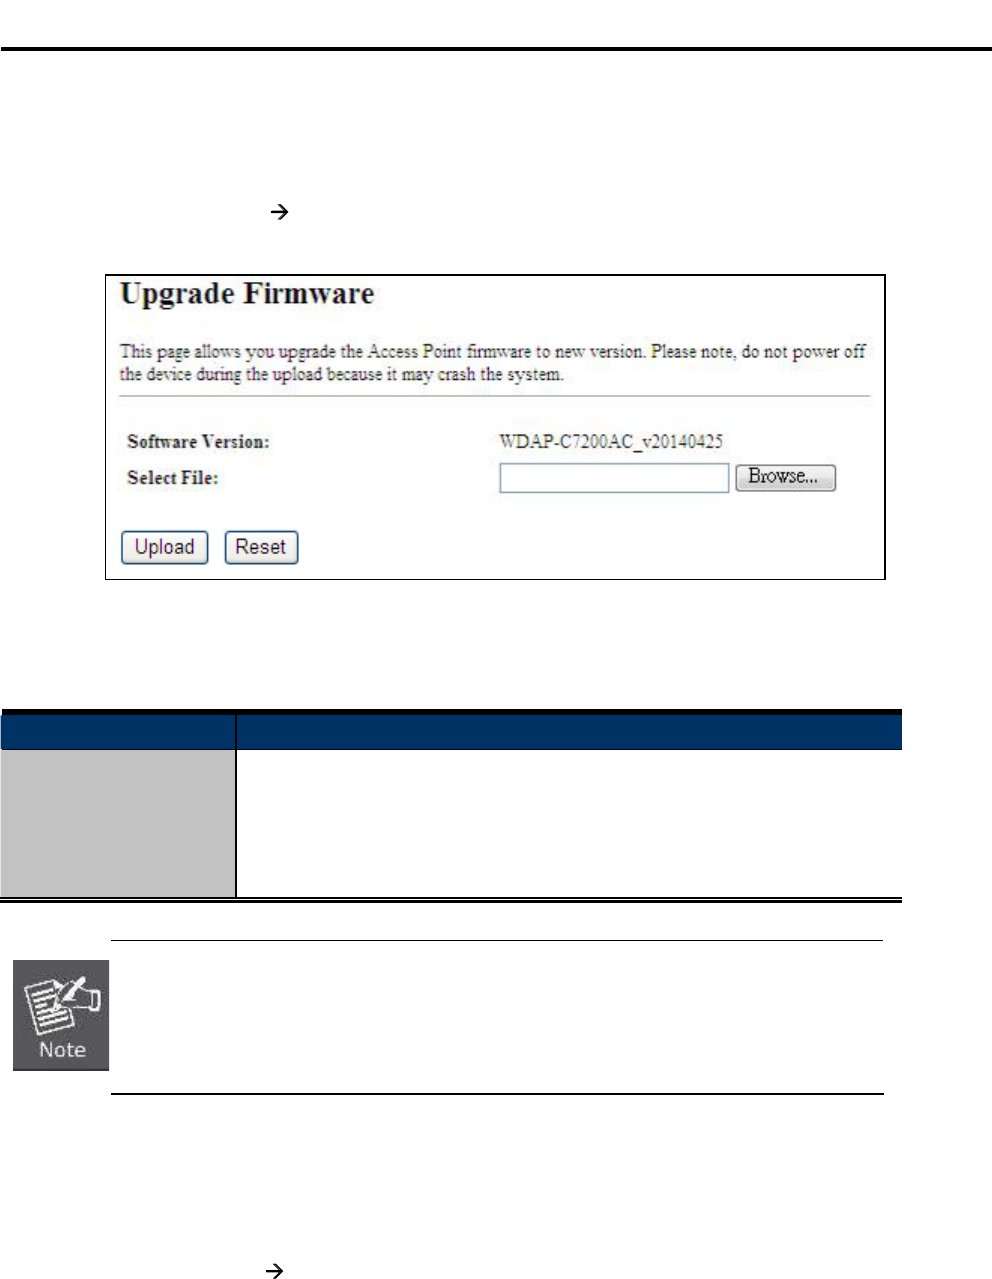
5.5.6 Upgrade Firmware
This page allows you upgrade the Access Point firmware to new version. Please note, do not power off the
device during the upload because it may crash the system.
Choose menu Management Upgrade Firmware to upgrade the firmware of the WDAP-C7200AC. Select
the new firmware file downloaded from the PLANET website and then click Upload button to upgrade it.
Figure 5-86 Upgrade Firmware
The page includes the following fields:
Object Description
Select File Browse and select file you want to upgrade and press Upload to perform
upgrade.
Please wait till the related information is shown on the screen after
upgrade is finished.
Do not disconnect the Wireless AP from your management PC (the PC you use to
configure the device) or power off it during the upgrade process; otherwise, it may be
permanently damaged. The Wireless AP will restart automatically when the upgrade
process, which takes several minutes, to complete.
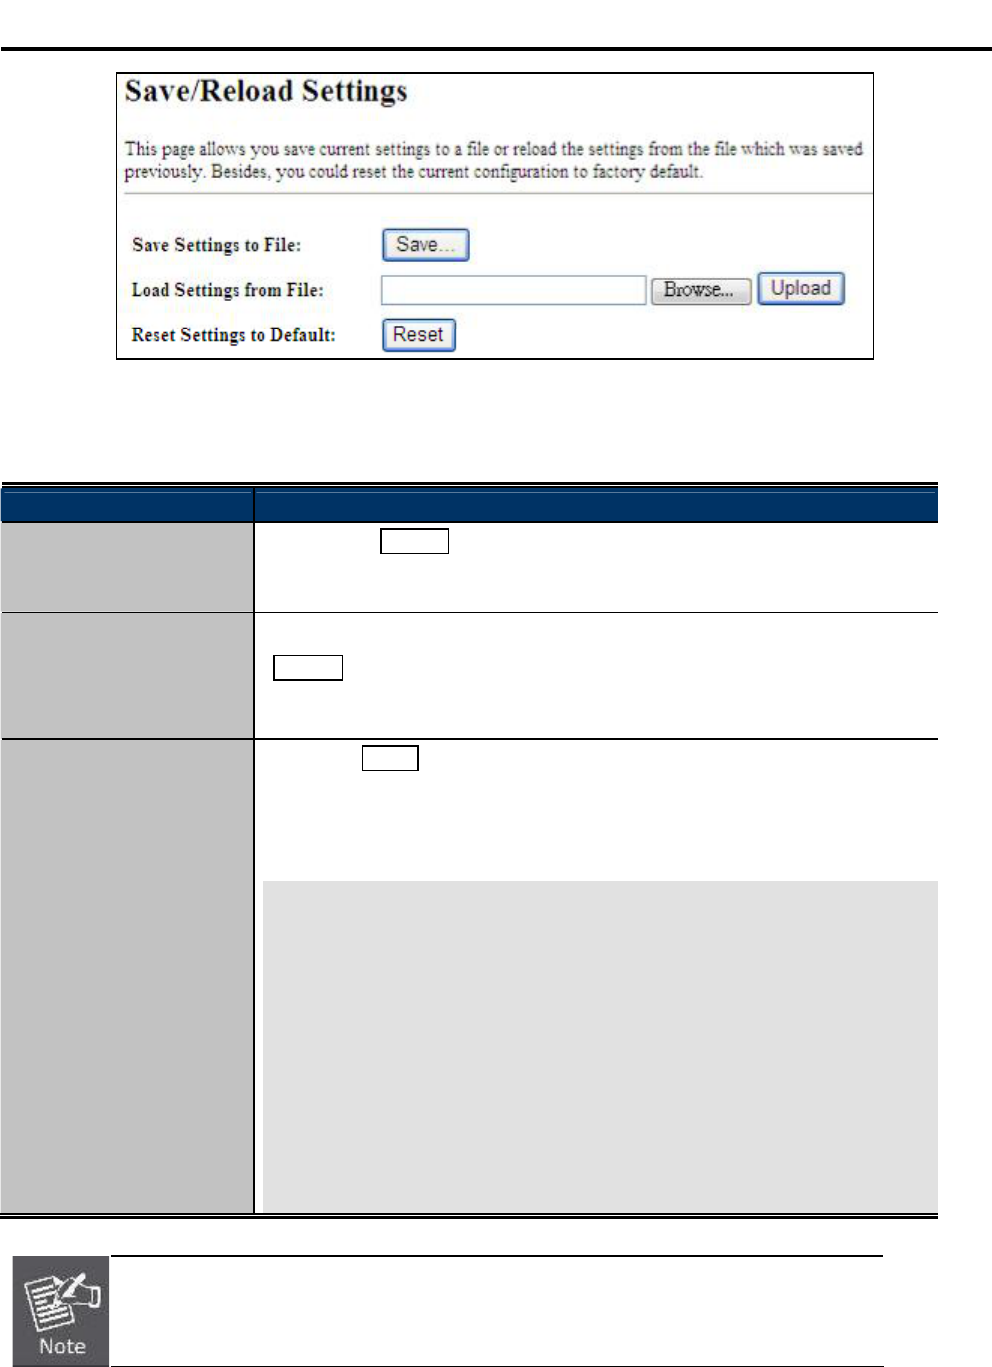
5.5.7 Reload Settings
Choose menu Management Reload Settings to back up or reset the configuration of the WDAP-C7200AC.
Once you have configured the Wireless AP the way you want it, you can save these settings to a configuration
file on your local hard drive that can later be imported to your Wireless AP in case the device is restored to
factory default settings.
User Manual of WDAP-C7200AC
-100-
Figure 5-87 Save/Reload Settings
The page includes the following fields:
Object Description
Save Settings to File Click the Save button to back up the configuration of the
WDAP-C7200AC and then save the config.dat in your computer.
Load Settings from File Select the configuration file of the WDAP-C7200AC and then click the
Upload button to reload the configuration back into the
WDAP-C7200AC.
Reset Settings to
Default
Click the Reset button to reset all settings of the WDAP-C7200AC to
factory default.
Factory Default Settings:
User Name: admin
Password: admin
IP Address: 192.168.1.253
Subnet Mask: 255.255.255.0
Default Gateway: 192.168.1.254
DHCP: Disabled
5GHz SSID: Planet AP 5G
2.4GHz SSID: Planet AP 2.4G
Wireless Security: None
To activate your settings, you need to reboot the Wireless AP after you reset it.
User Manual of WDAP-C7200AC
-101-
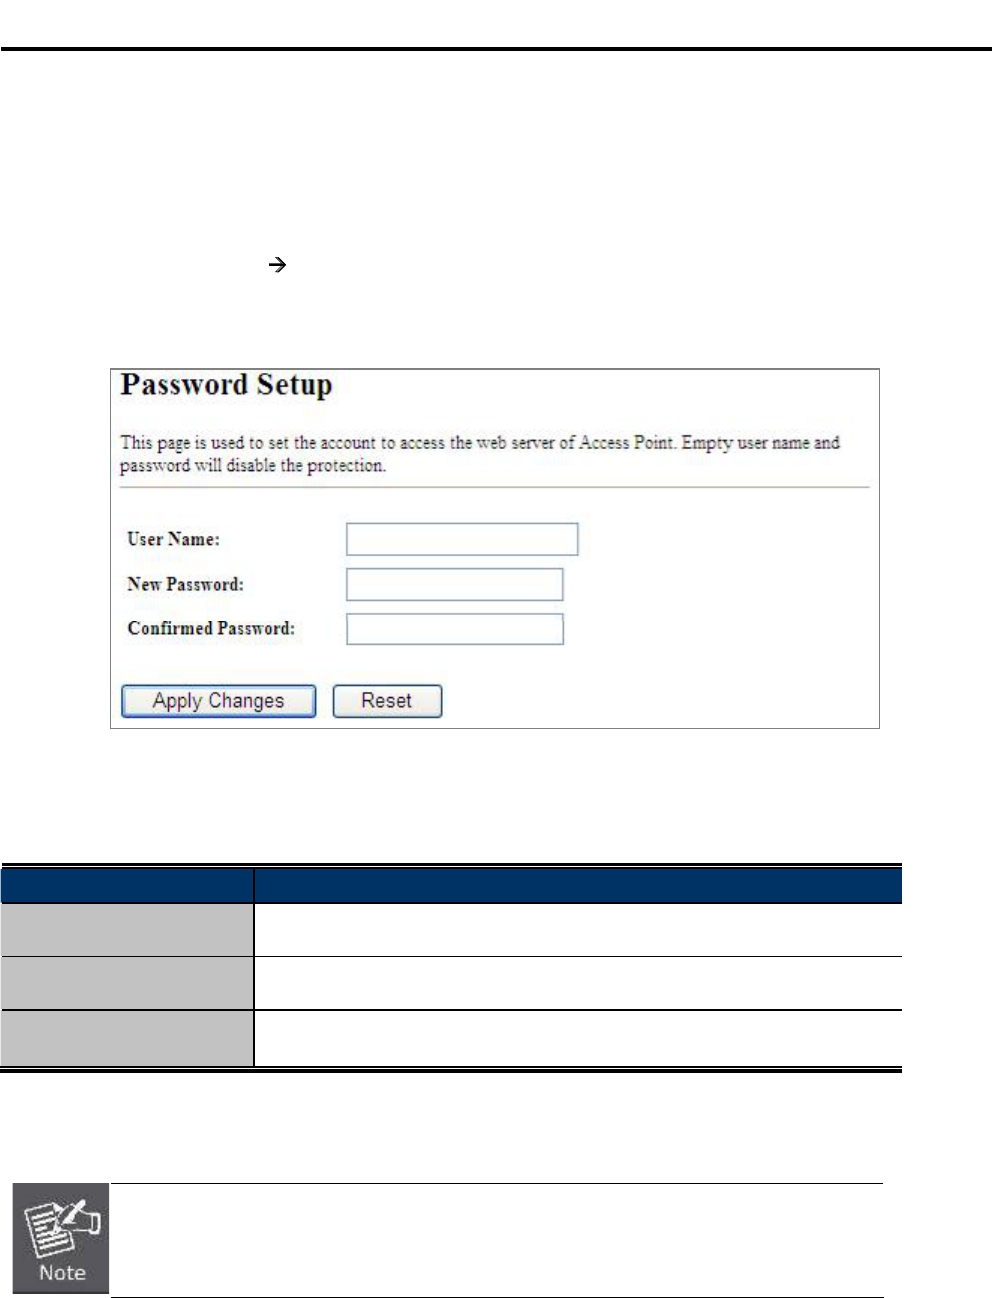
5.5.8 Password
To ensure the Wireless APs security, you will be asked for your password when you access the Wireless APs
Web-based Utility. The default user name and password are admin. This page will allow you to add or modify
the user name and password.
Choose menu Management User Management to change the user name and password which is inputted
to access the web UI of the WDAP-C7200AC.
Figure 5-88 Password Setup
The page includes the following fields:
Object Description
User Name Enter user name.
New Password Input password for this user.
Confirmed Password Confirm password again.
For the sake of security, it is highly recommended that you change default login
password and user name.
User Manual of WDAP-C7200AC
-102-
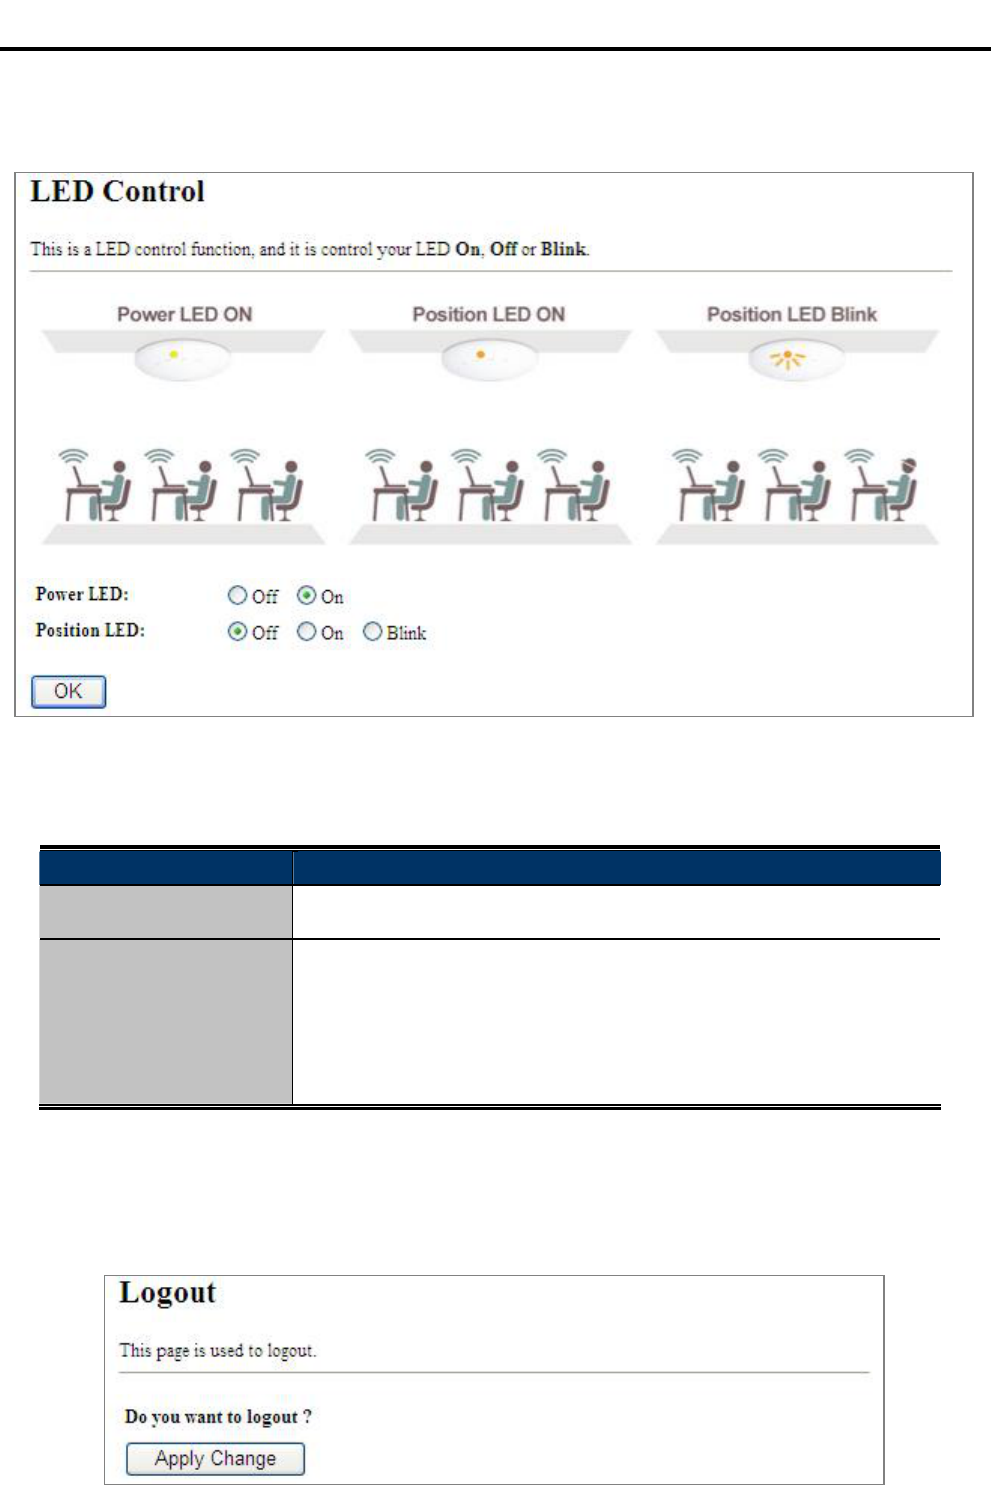
5.5.9 LED Control
This section allows the user to determine the router packets are talking to particular host.
Figure 5-89 LED Control
The page includes the following fields:
Object Description
Power LED Click On or Off to turn on/off the Power LED.
Position LED The LED to detect and identify the AP.
1) Position LED on: the position LED is on.
2) Position LED blink: the position LED blinks continuously.
2) Position LED off: the position LED is off.
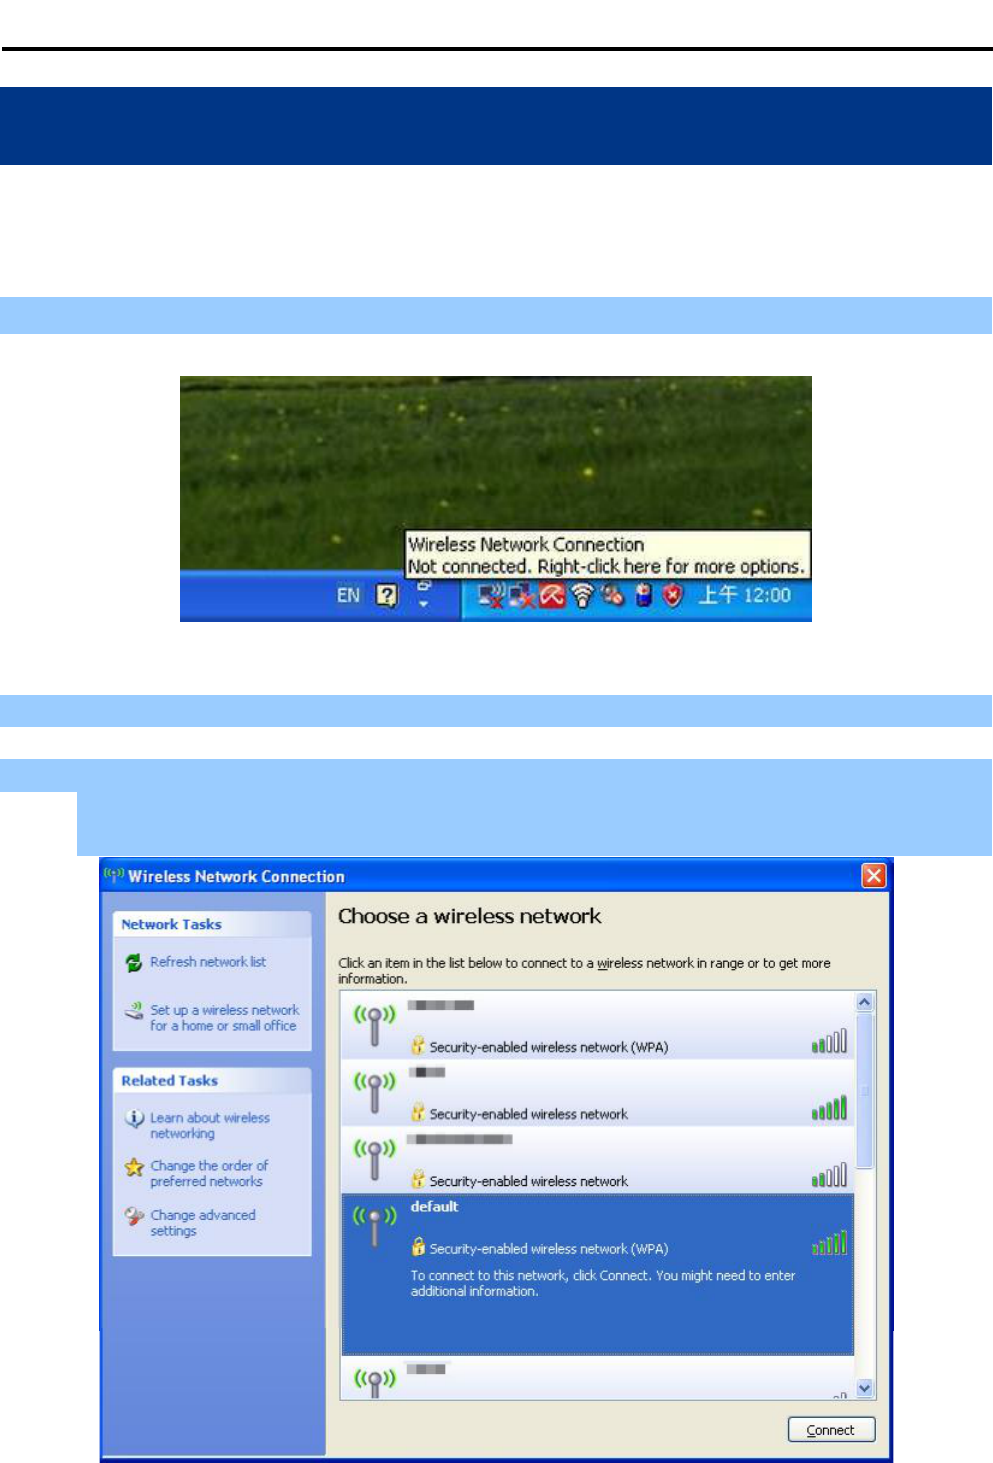
5.5.10 Logout
To logout the WDAP-C7200AC, please select Logout from the left-side menu.
Figure 5-90 Logout
User Manual of WDAP-C7200AC
-103-
Chapter 6. Quick Connection to a Wireless Network
In the following sections, the default SSID of the WDAP-C7200AC is configured to default.
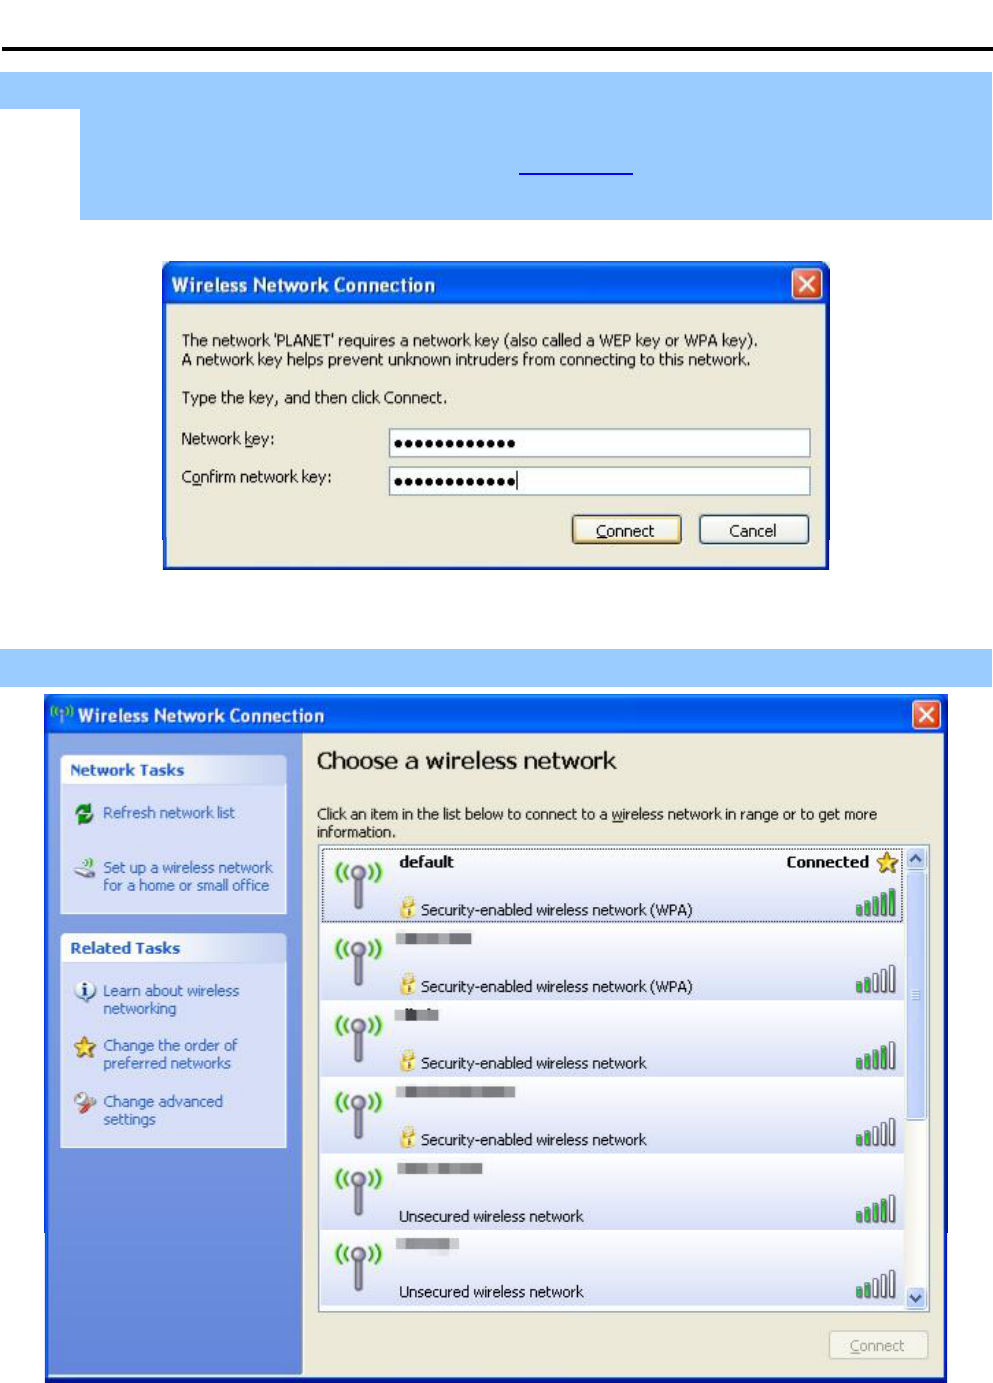
6.1 Windows XP (Wireless Zero Configuration)
Step 1: Right-click on the wireless network icon displayed in the system tray
Figure 6-1 System Tray Wireless Network Icon
Step 2: Select [View Available Wireless Networks]
Step 3: Highlight and select the wireless network (SSID) to connect
(1) Select SSID [default]
(2) Click the [Connect] button
Figure 6-2 Choose a wireless network
User Manual of WDAP-C7200AC
-104-
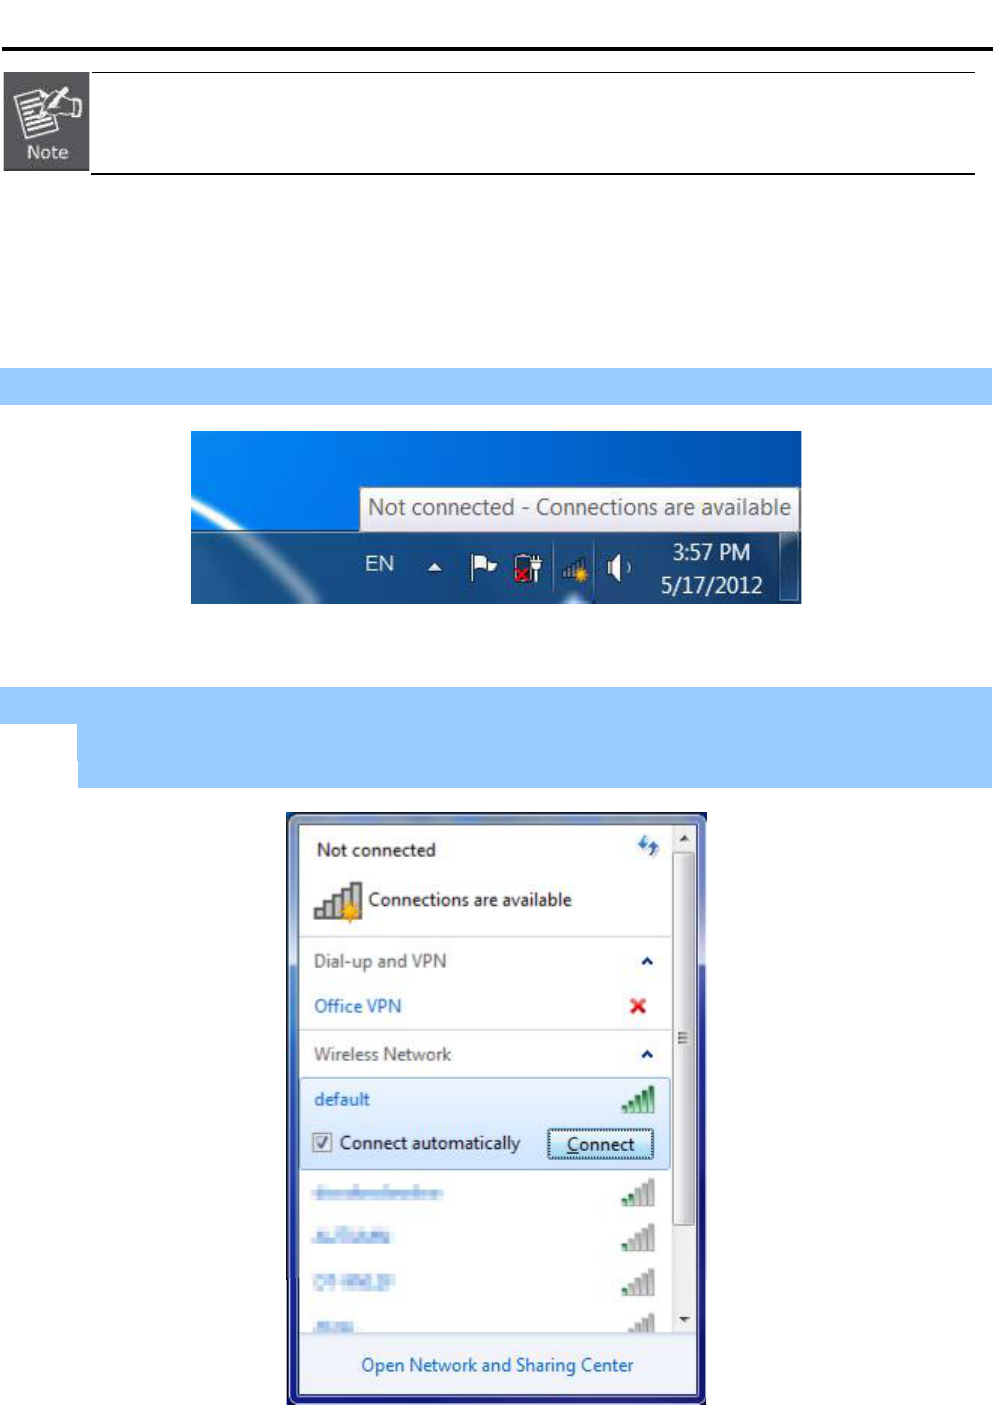
Step 4: Enter the encryption key of the Wireless AP
(1) The Wireless Network Connection box will appear
(2) Enter the encryption key that is configured in section 5.3.3
(3) Click the [Connect] button
Figure 6-3 Enter the network key
Step 5: Check if Connected is displayed
Figure 6-4 Choose a wireless network -- Connected
User Manual of WDAP-C7200AC
-105-
Some laptops are equipped with a Wireless ON/OFF switch for the internal wireless LAN. Make
sure the hardware wireless switch is switched to ON position.
6.2 Windows 7 (WLAN AutoConfig)
WLAN AutoConfig service is built-in in Windows 7 that can be used to detect and connect to wireless network.
This built-in wireless network connection tool is similar to wireless zero configuration tool in Windows XP.
Step 1: Right-click on the network icon displayed in the system tray
Figure 6-5 Network icon
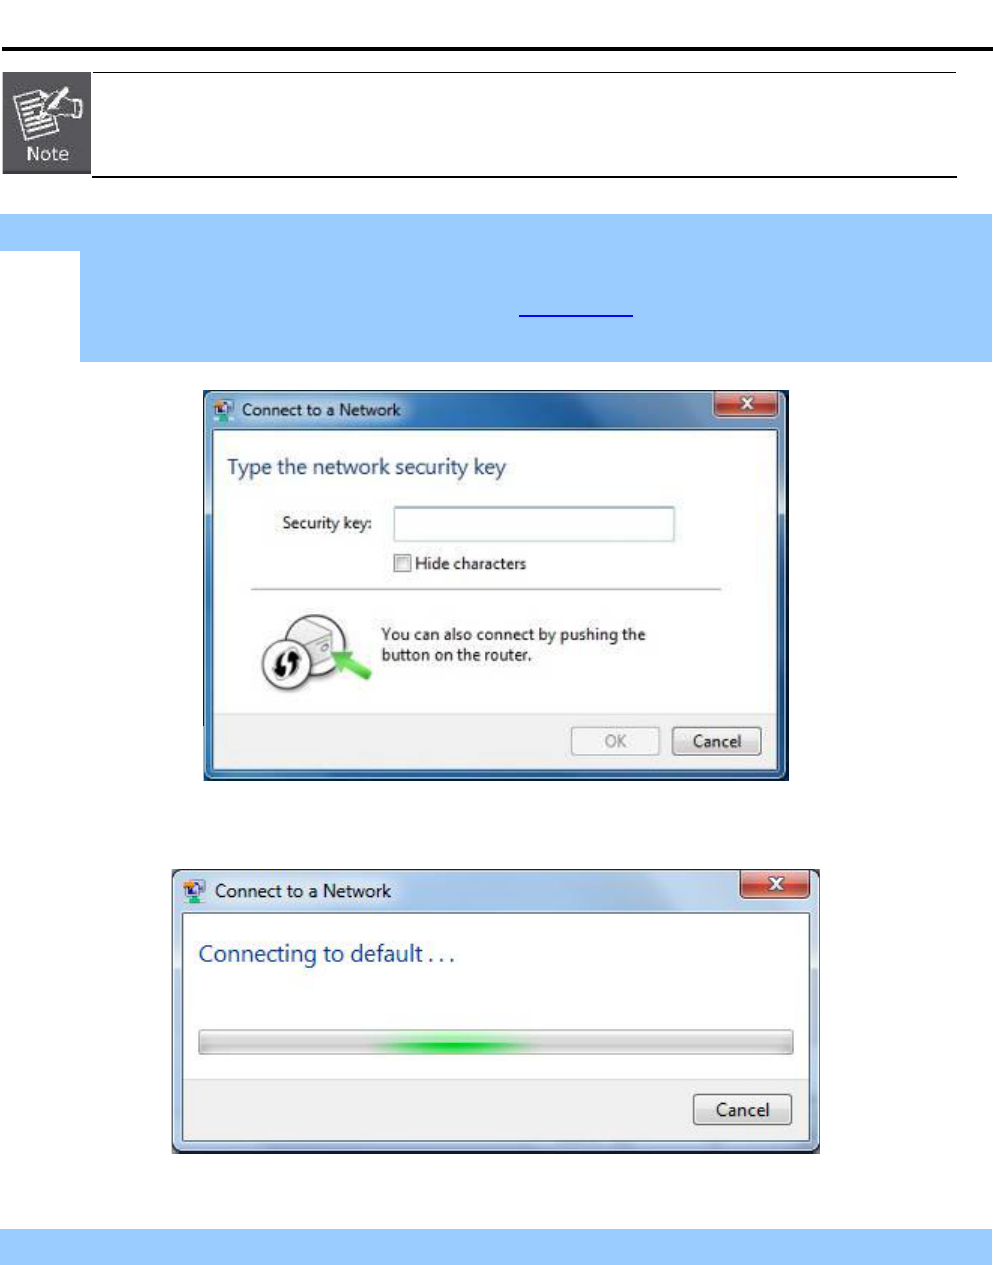
Step 2: Highlight and select the wireless network (SSID) to connect
(1) Select SSID [default]
(2) Click the [Connect] button
Figure 6-6 WLAN AutoConfig
User Manual of WDAP-C7200AC
-106-
If you will be connecting to this Wireless AP in the future, check [Connect automatically].
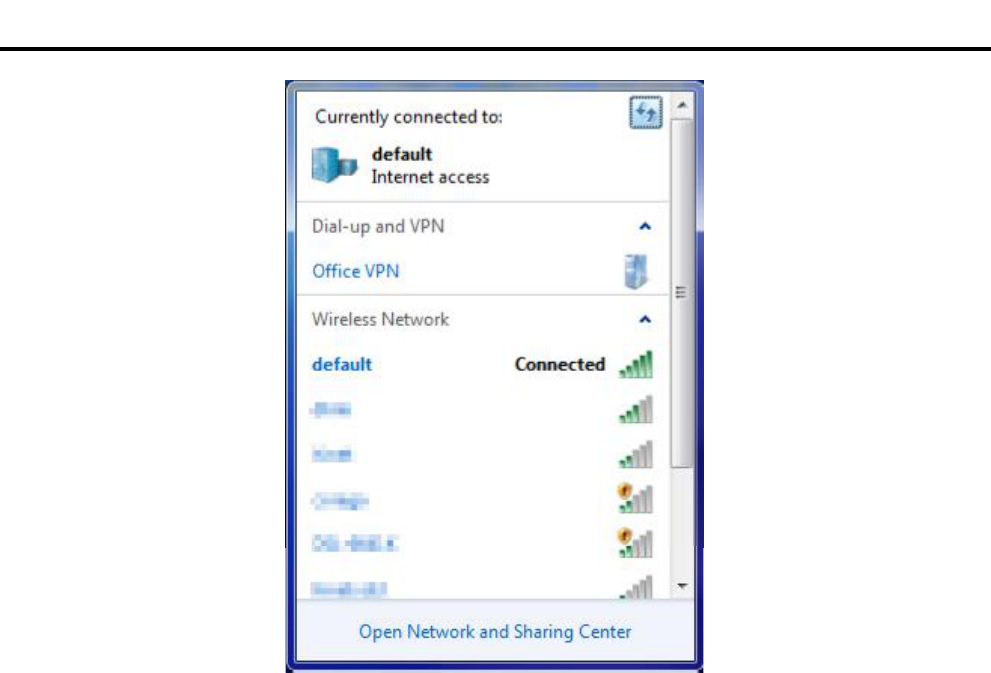
Step 4: Enter the encryption key of the Wireless AP
(1) The Connect to a Network box will appear
(2) Enter the encryption key that is configured in section 5.3.3
(3) Click the [OK] button
Figure 6-7 Type the network key
Figure 6-8 Connecting to a Network
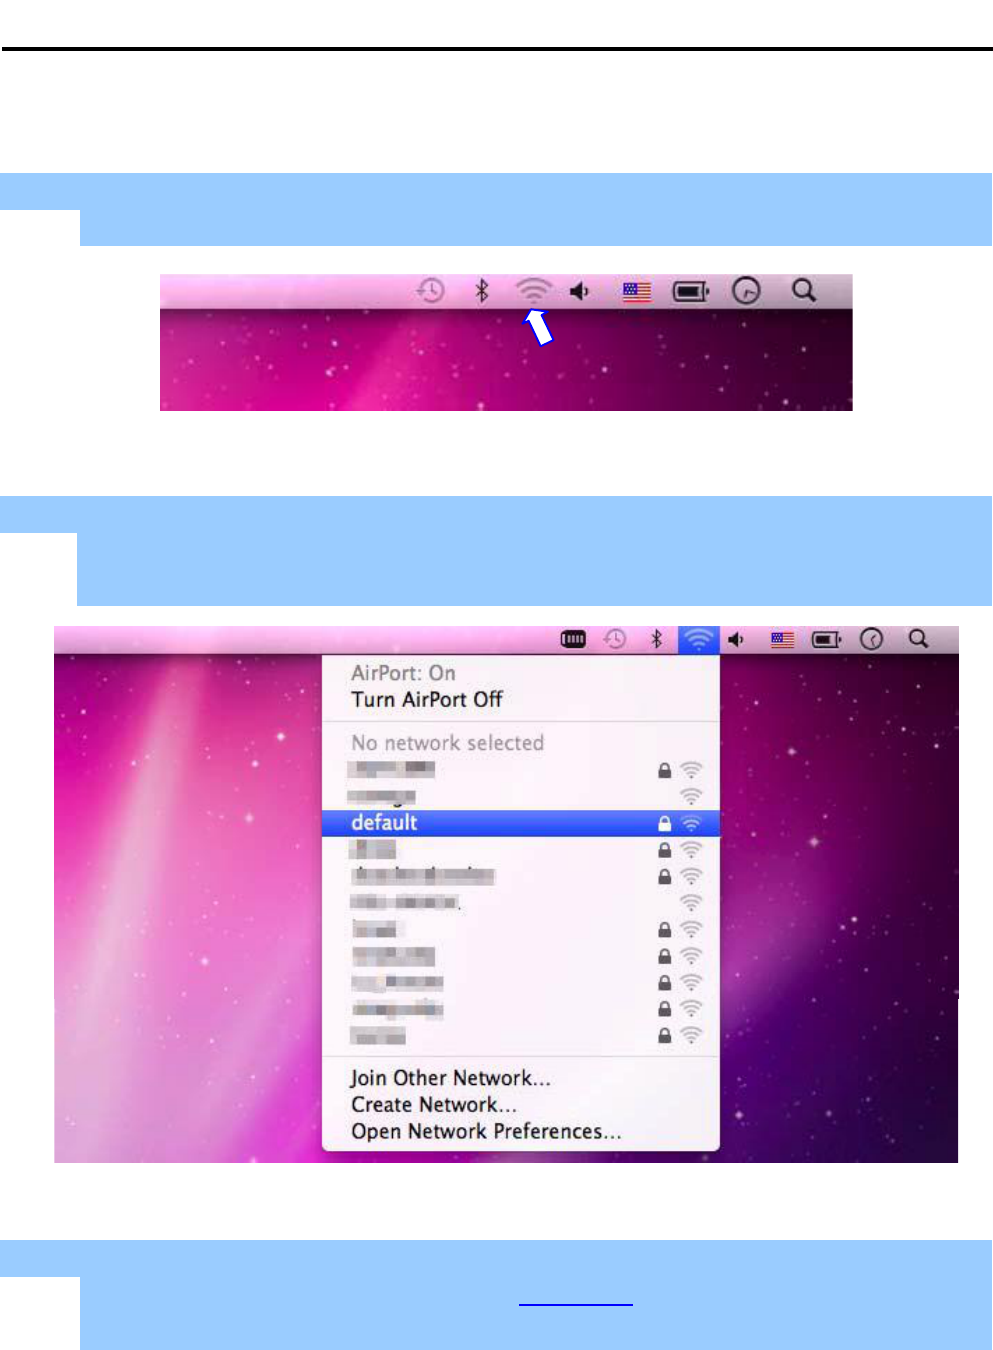
Step 5: Check if Connected is displayed
User Manual of WDAP-C7200AC
-107-
Figure 6-9 Connected to a Network
User Manual of WDAP-C7200AC
-108-
6.3 Mac OS X 10.x.3 Mac OS X 10.x
In the following sections, the default SSID of the WDAP-C7200AC is configured to default.In the following sections, the default SSID of the WDAP-C7200AC is configured to default.
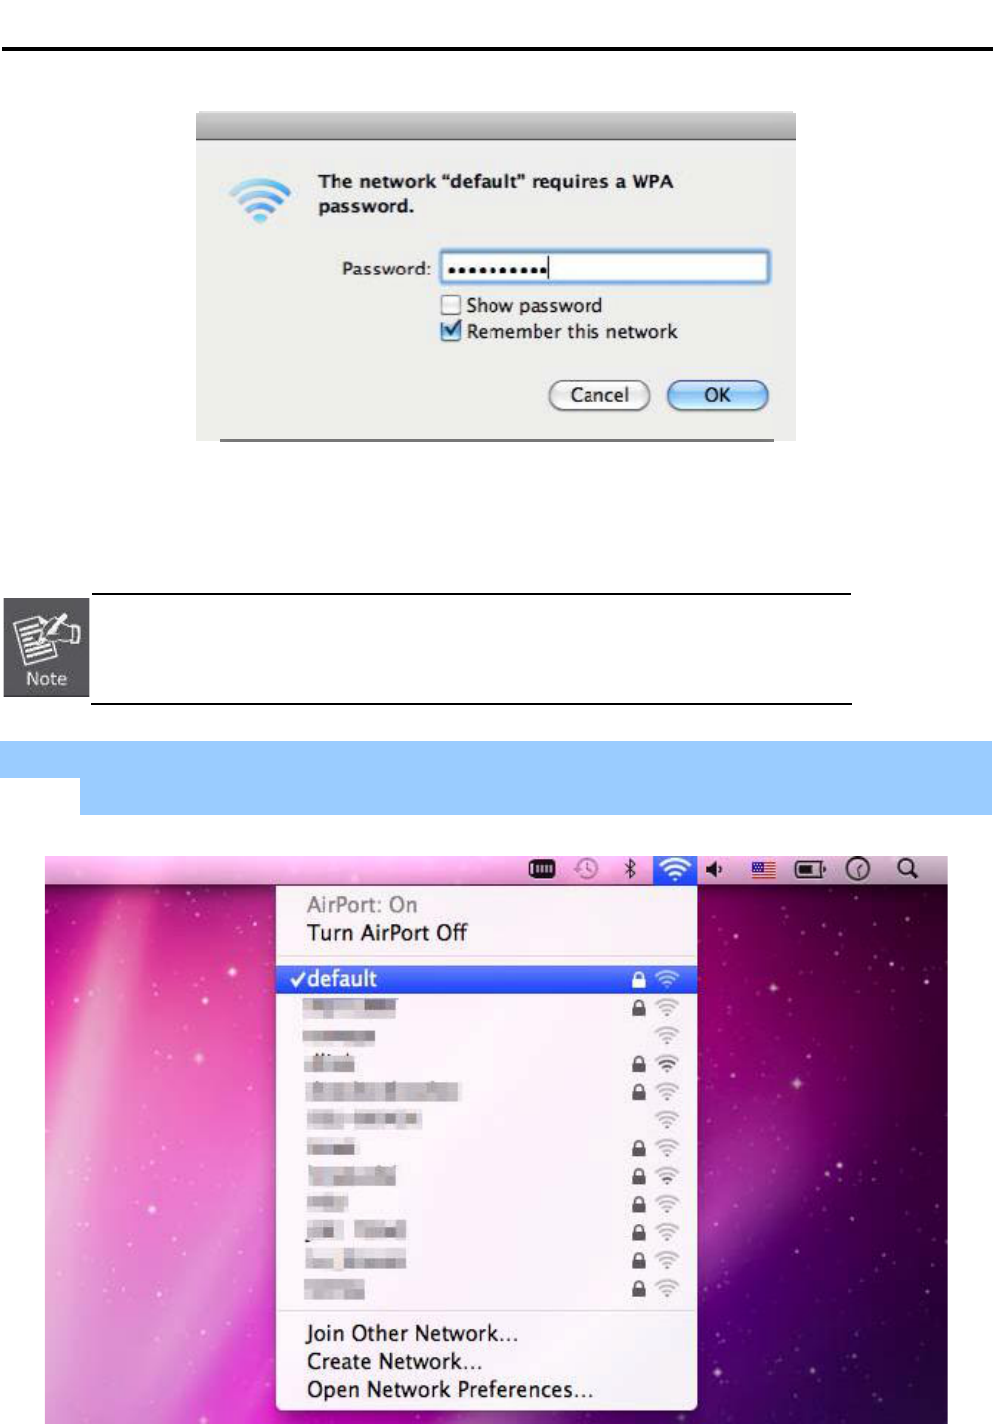
Step 1: Right-click on the network icon displayed in the system tray
The AirPort Network Connection menu will appear
Figure 6-10 Mac OS Network icon
Step 2: Highlight and select the wireless network (SSID) to connect
(1) Select and SSID [default]
(2) Double-click on the selected SSID
Figure 6-11 Highlight and select the wireless network
Step 4: Enter the encryption key of the Wireless AP
(1) Enter the encryption key that is configured in section 5.3.3
(2) Click the [OK] button
User Manual of WDAP-C7200AC
-109-
Figure 6-12 Enter the Password
If you will be connecting to this Wireless AP in the future, check [Remember this
network].
Step 5: Check if the AirPort is connected to the selected wireless network.
If Yes, then there will be a checksymbol in the front of the SSID.
Figure 6-13 Connected to the Network
User Manual of WDAP-C7200AC
-110-
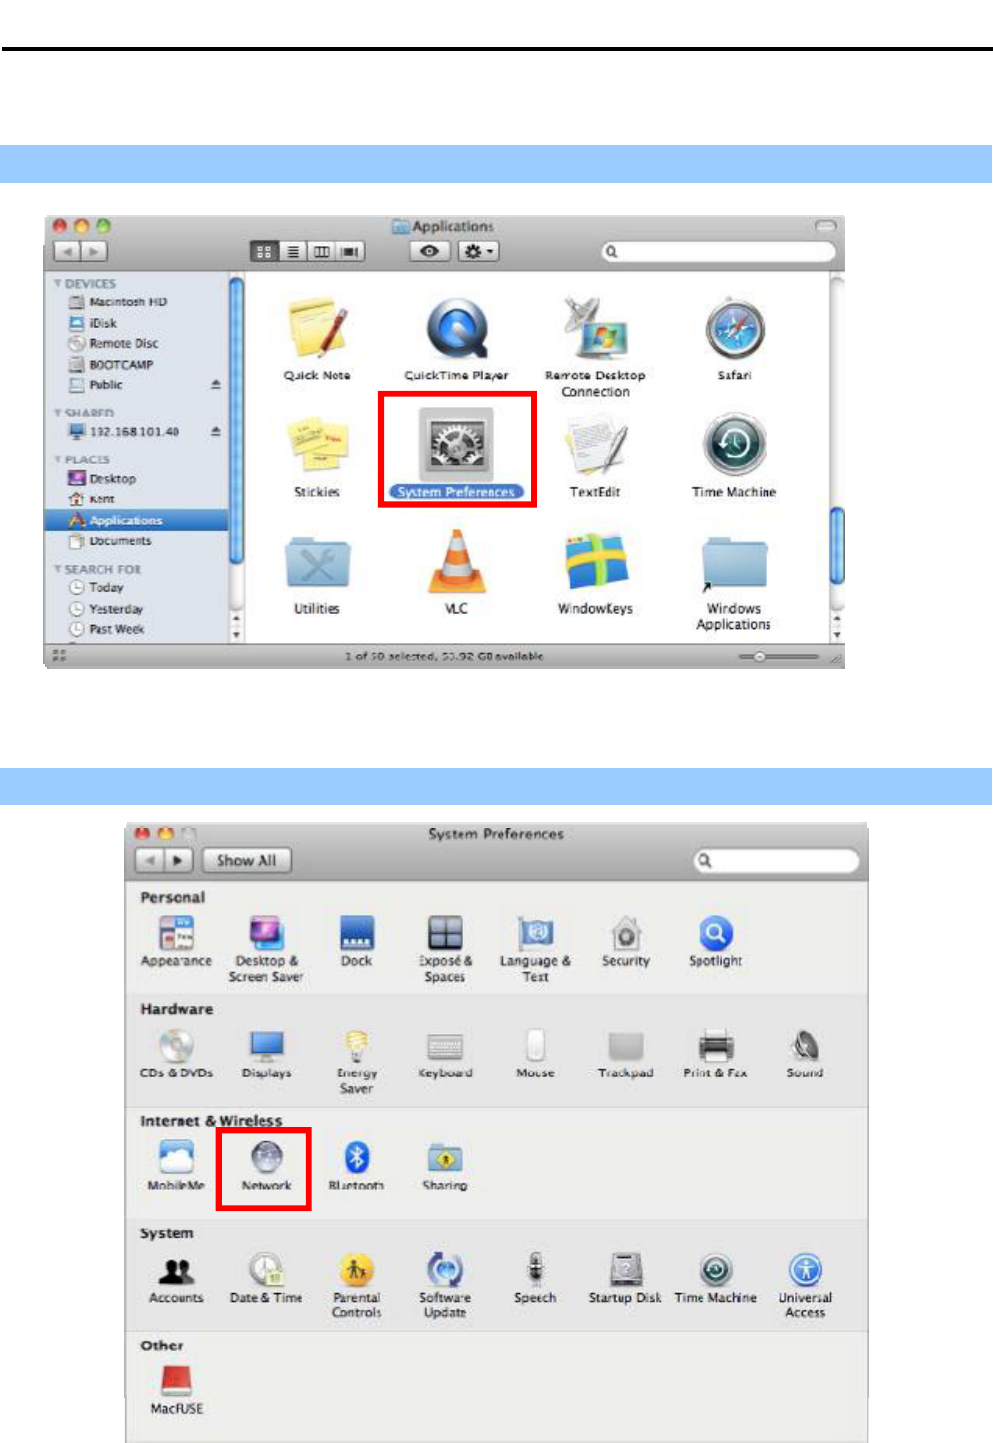
There is another way to configure the MAC OS X Wireless settings:
Step 1: Click and open the [System Preferences]by going to Apple > System Preference or Applications
Figure 6-14 System Preferences
Step 2: Open Network Preference by clicking on the [Network] icon
Figure 6-15 System Preferences -- Network
User Manual of WDAP-C7200AC
-111-
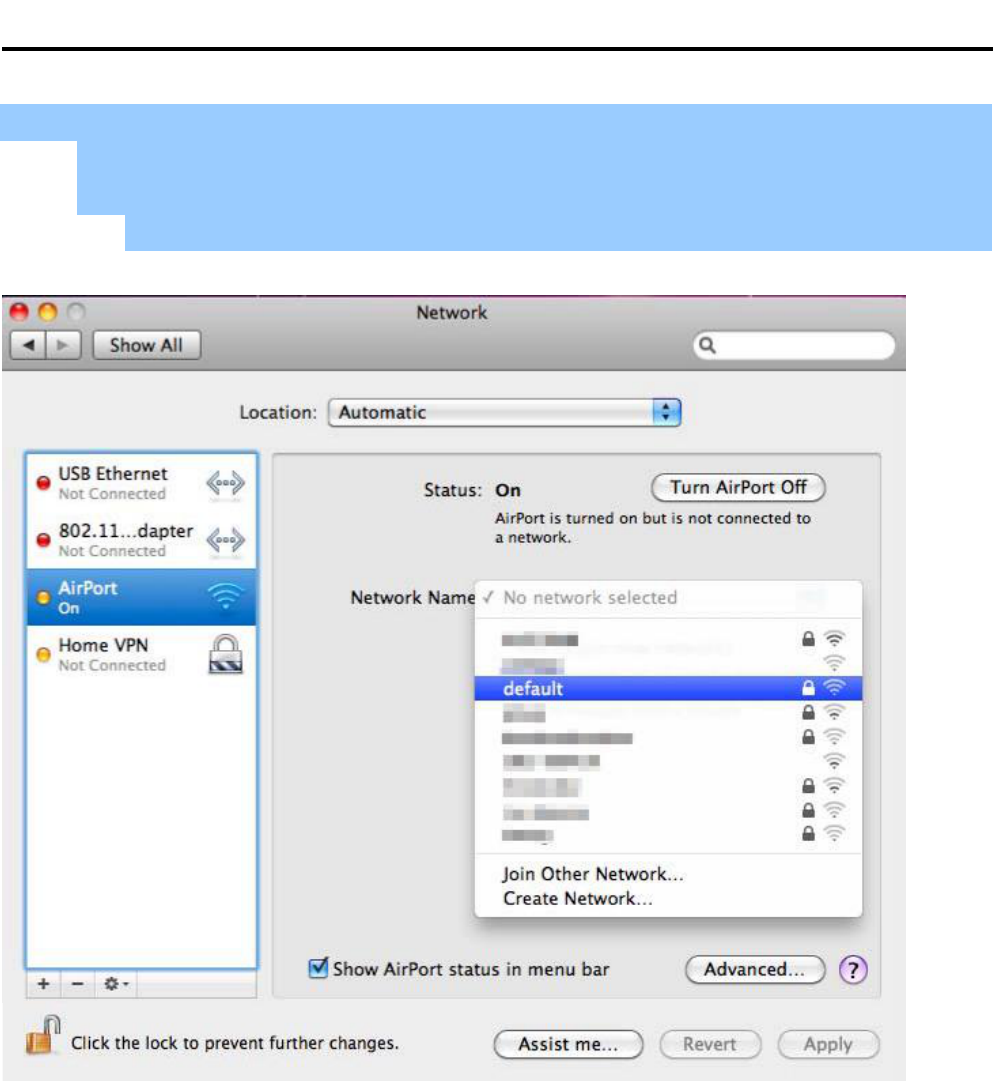
Step 3: Check Wi-Fi setting and select the available wireless network
(1) Choose the AirPort on the left-menu (make sure it is ON)
(2) Select Network Name [default] here
If this is the first time to connect to the Wireless AP, it should show Not network selected.
Figure 6-16 Select the Wireless Network
User Manual of WDAP-C7200AC
-112-
6.4 iPhone / iPod Touch / iPad.4 iPhone / iPod Touch / iPad
In the following sections, the default SSID of the WDAP-C7200AC is configured to default.In the following sections, the default SSID of the WDAP-C7200AC is configured to default.
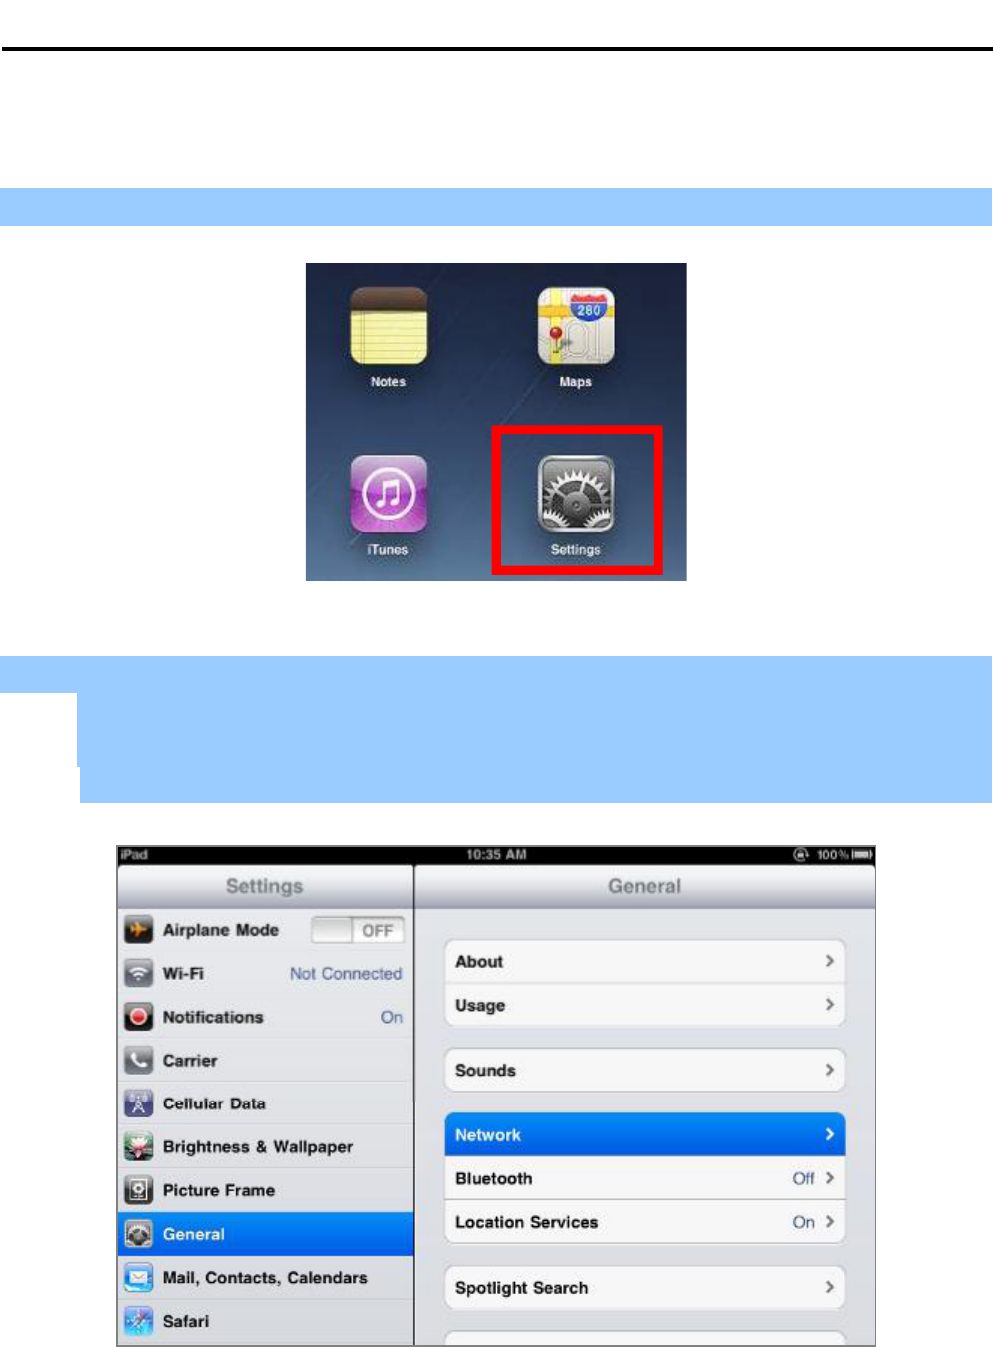
Step 1: Tap the [Settings]icon displayed in the home screen
Figure 6-17 iPhone Settings icon
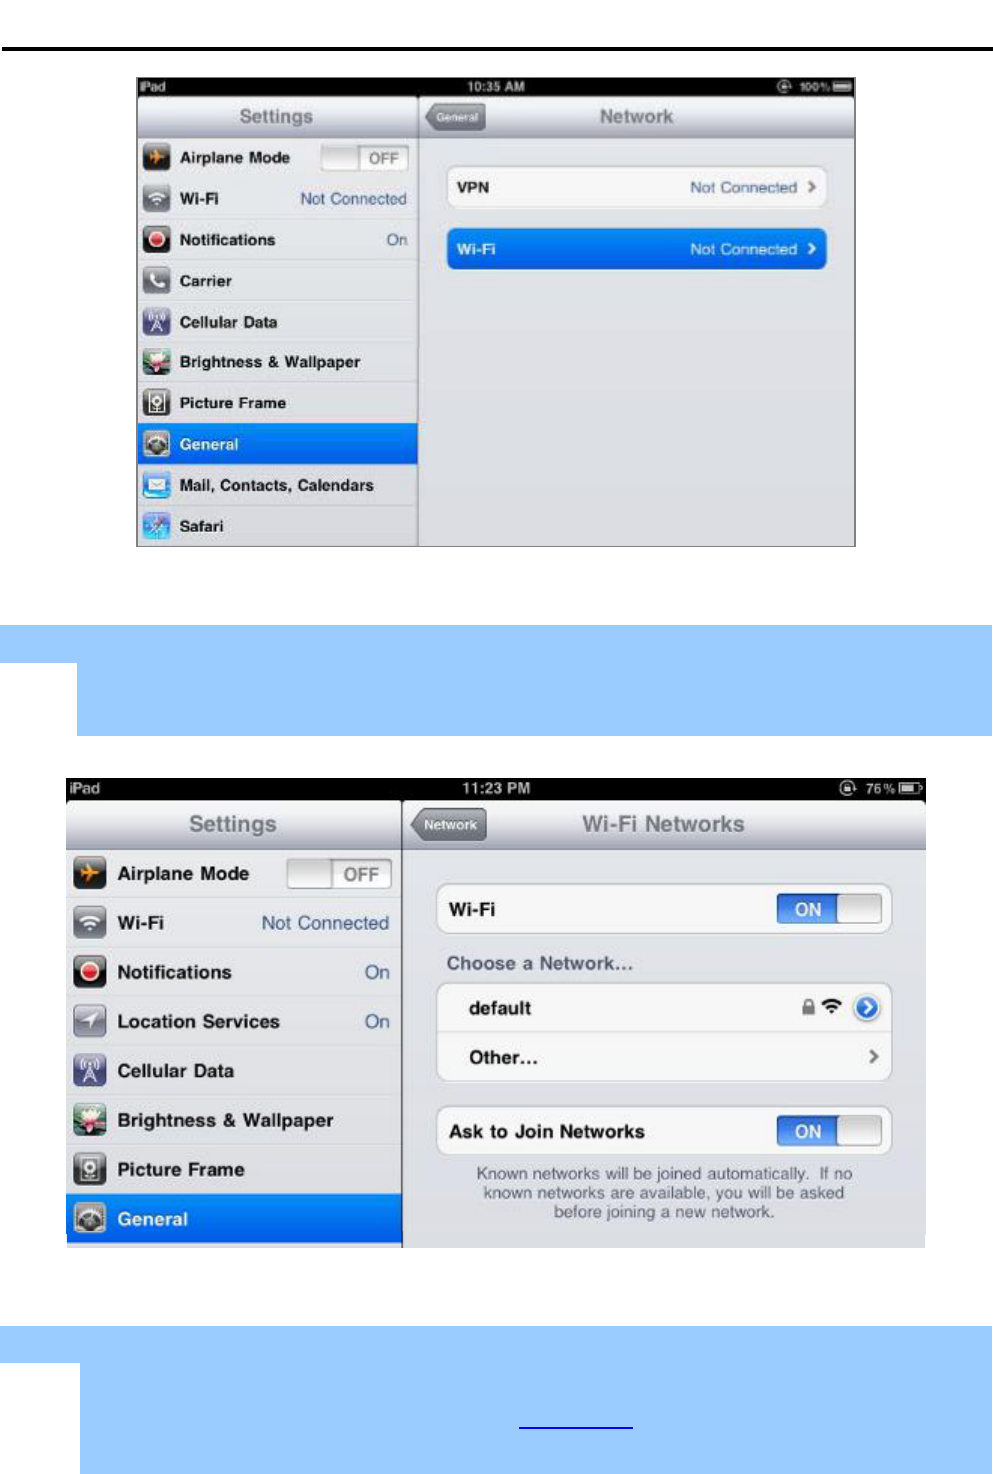
Step 2: Check Wi-Fi setting and select the available wireless network
(3) Tap [General] \ [Network]
(4) Tap [Wi-Fi]
If this is the first time to connect to the Wireless AP, it should show Not Connected.
Figure 6-18 Wi-Fi Setting
User Manual of WDAP-C7200AC
-113-
Figure 6-19 Wi-Fi Setting Not Connected
Step 3: Tap the target wireless network (SSID) in Choose a Network
(1) Turn on Wi-Fi by tapping Wi-Fi
(2) Select SSID [default]
Figure 6-20 Turn on Wi-Fi
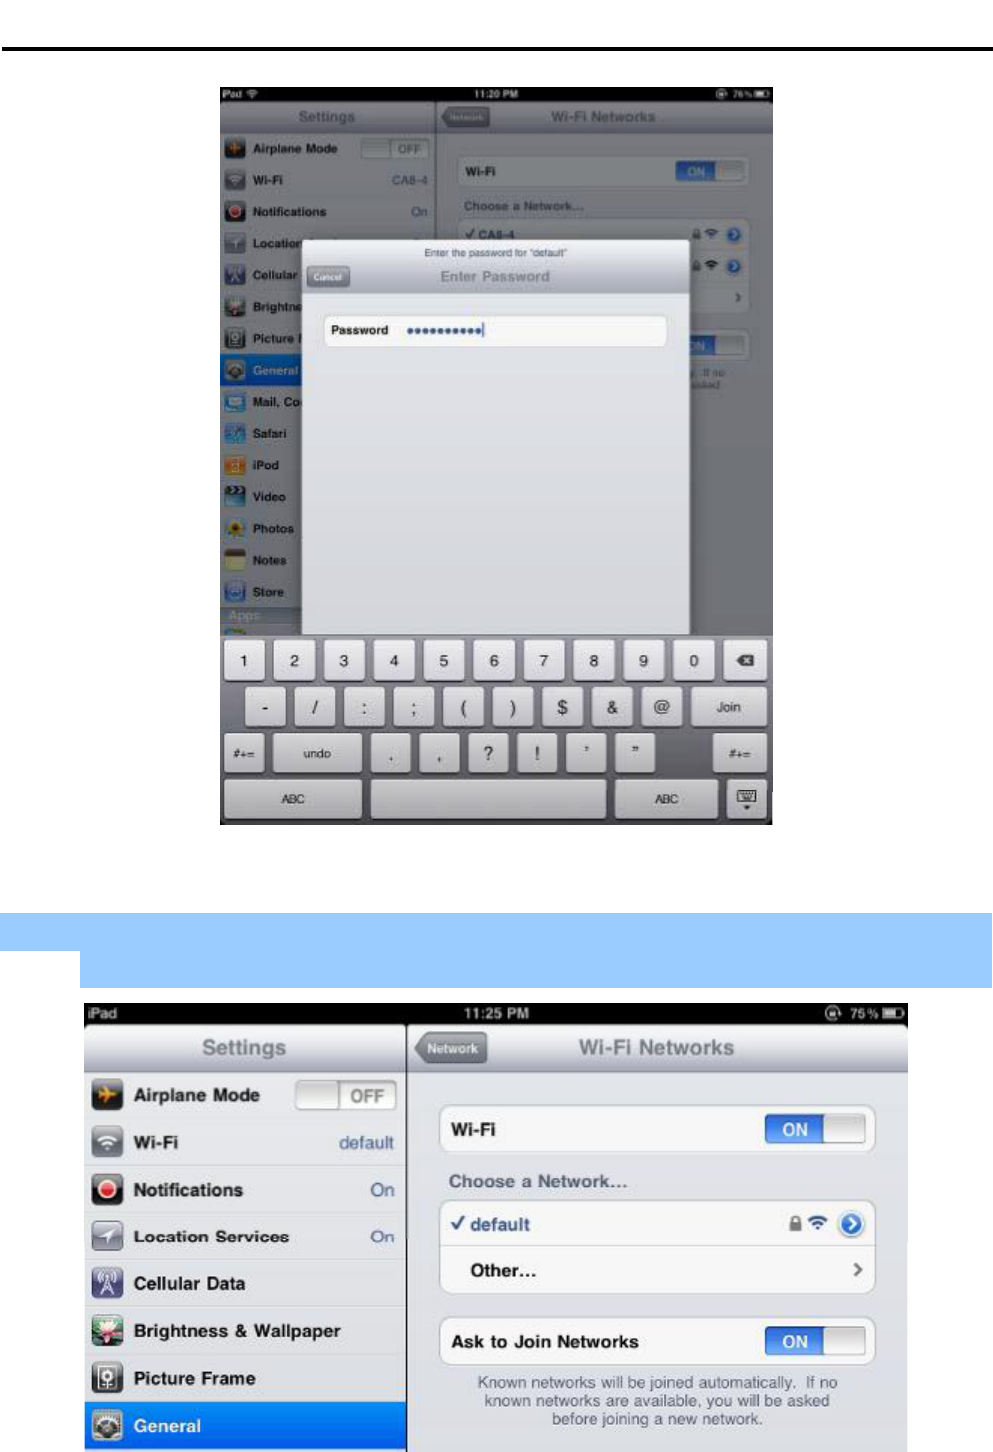
Step 4: Enter the encryption key of the Wireless AP
(1) The password input screen will be displayed
(2) Enter the encryption key that is configured in section 5.3.3
(3) Tap the [Join] button
User Manual of WDAP-C7200AC
-114-
Figure 6-21 iPhone -- Enter the Password
Step 5: Check if the device is connected to the selected wireless network.
If Yes, then there will be a checksymbol in the front of the SSID.
Figure 6-22 iPhone -- Connected to the Network
User Manual of WDAP-C7200AC
-115-
Appendix A: Planet Smart Discovery Utility
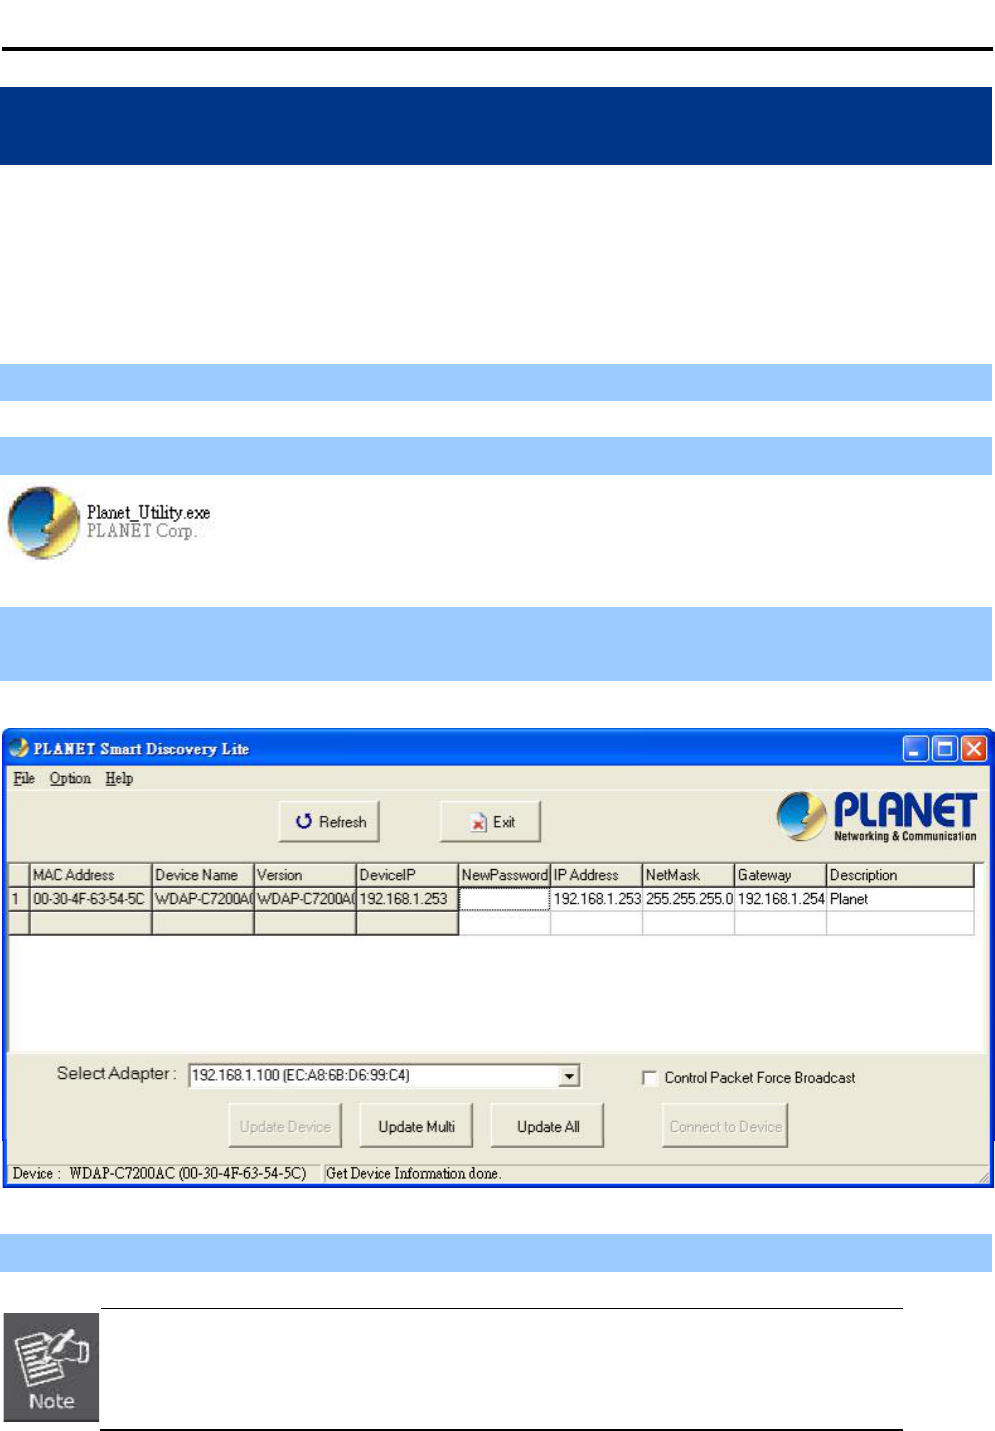
To easily list the WDAP-C7200AC in your Ethernet environment, the Planet Smart Discovery Utility from users
manual CD-ROM is an ideal solution.
The following installation instructions guide you to running the Planet Smart Discovery Utility.
Step 1: Deposit the Planet Smart Discovery Utility in administrator PC.
Step 2: Run this utility and the following screen appears.
Step 3: Press Refreshbutton for the current connected devices in the discovery list as shown in the following
screen:
Step 3: Press Connect to Device button and then the Web login screen appears.
The fields in white background can be modified directly and then you can apply the new
setting by clicking the Update Device button.

User Manual of WDAP-C7200AC
-116-
Appendix B: Troubleshooting
If you find the AP is working improperly or stop responding to you, please read this troubleshooting first before
contacting the dealer for help. Some problems can be solved by yourself within a very short time.
Scenario Solution
The AP is not responding to
me when I want to access it
by Web browser.
a. Please check the connection of the power cord and the
Ethernet cable of this AP. All cords and cables should be
correctly and firmly inserted to the AP.
b. If all LED on this AP is off, please check the status of
power adapter, and make sure it is correctly powered.
c. You must use the same IP address section which AP
uses.
d. Are you using MAC or IP address filter? Try to connect
the AP by another computer and see if it works; if not,
please reset the AP to the factory default settings
(pressing reset button for over 7 seconds).
e. Use the Smart Discovery Tool to see if you can find the
AP or not.
f. If you did a firmware upgrade and this happens, contact
your dealer of purchase for help.
g. If all the solutions above dont work, contact the dealer
for help.
I cant get connected to the
Internet.
a. Go to Status -> Internet Connection menu on the router
connected to the AP, and check Internet connection
status.
b. Please be patient, sometimes Internet is just that slow.
c. If youve connected a computer to Internet directly
before, try to do that again, and check if you can get
connected to Internet with your computer directly
attached to the device provided by your Internet service
provider.
d. Check PPPoE / L2TP / PPTP user ID and password
entered in the routers settings again.
e. Call your Internet service provider and check if theres
something wrong with their service.
f. If you just cant connect to one or more website, but you
can still use other internet services, please check
URL/Keyword filter.
g. Try to reset the AP and try again later.
h. Reset the device provided by your Internet service
provider too.

User Manual of WDAP-C7200AC
-117-
i. Try to use IP address instead of host name. If you can
use IP address to communicate with a remote server,
but cant use host name, please check DNS setting.
I cant locate my AP by my
wireless device.
a. Broadcast ESSID set to off?
b. Both two antennas are properly secured.
c. Are you too far from your AP? Try to get closer.
d. Please remember that you have to input ESSID on your
wireless client manually, if ESSID broadcast is disabled.
File downloading is very slow
or breaks frequently.
a. Are you using QoS function? Try to disable it and try
again.
b. Internet is slow sometimes. Please be patient.
c. Try to reset the AP and see if its better after that.
d. Try to know what computers do on your local network. If
someones transferring big files, other people will think
Internet is really slow.
e. If this never happens before, call you Internet service
provider to know if there is something wrong with their
network.
I cant log into the web
management interface; the
password is wrong.
a. Make sure youre connecting to the correct IP address of
the AP!
b. Password is case-sensitive. Make sure the Caps Lock
light is not illuminated.
c. If you really forget the password, do a hard reset.
The AP becomes hot a. This is not a malfunction, if you can keep your hand on
the APs case.
b. If you smell something wrong or see the smoke coming
out from AP or A/C power adapter, please disconnect
the AP and power source from utility power (make sure
its safe before youre doing this!), and call your dealer of
purchase for help.

User Manual of WDAP-C7200AC
-118-
Appendix C: Glossary
802.11ac - 802.11ac is a wireless networking standard in the 802.11 family (which is marketed under the
brand name Wi-Fi), developed in the IEEE Standards Association process, providing high-throughput
wireless local area networks (WLANs) on the 5 GHz band.
802.11n - 802.11n builds upon previous 802.11 standards by adding MIMO (multiple-input
multiple-output). MIMO uses multiple transmitter and receiver antennas to allow for increased data
throughput via spatial multiplexing and increased range by exploiting the spatial diversity, perhaps
through coding schemes like Alamouti coding. The Enhanced Wireless Consortium (EWC) [3] was
formed to help accelerate the IEEE 802.11n development process and promote a technology
specification for interoperability of next-generation wireless local area networking (WLAN) products.
802.11a - 802.11a was an amendment to the IEEE 802.11 wireless local network specifications that
defined requirements for an orthogonal frequency division multiplexing (OFDM) communication
system. It was originally designed to support wireless communication in the unlicensed national
information infrastructure (U-NII) bands (in the 56 GHz frequency range) as regulated in the United
States by the Code of Federal Regulations, Title 47, Section 15.407.
802.11b - The 802.11b standard specifies a wireless networking at 11 Mbps using direct-sequence
spread-spectrum (DSSS) technology and operating in the unlicensed radio spectrum at 2.4GHz, and
WEP encryption for security. 802.11b networks are also referred to as Wi-Fi networks.
802.11g - specification for wireless networking at 54 Mbps using direct-sequence spread-spectrum
(DSSS) technology, using OFDM modulation and operating in the unlicensed radio spectrum at
2.4GHz, and backward compatibility with IEEE 802.11b devices, and WEP encryption for security.
DDNS (Dynamic Domain Name System) - The capability of assigning a fixed host and domain name to
a dynamic Internet IP Address.
DHCP (Dynamic Host Configuration Protocol) - A protocol that automatically configure the TCP/IP
parameters for the all the PC(s) that are connected to a DHCP server.
DMZ (Demilitarized Zone) - A Demilitarized Zone allows one local host to be exposed to the Internet
for a special-purpose service such as Internet gaming or videoconferencing.
DNS (Domain Name System) - An Internet Service that translates the names of websites into IP
addresses.
Domain Name - A descriptive name for an address or group of addresses on the Internet.
DSL (Digital Subscriber Line) - A technology that allows data to be sent or received over existing
traditional phone lines.
ISP (Internet Service Provider) - A company that provides access to the Internet.

User Manual of WDAP-C7200AC
-119-
MTU (Maximum Transmission Unit)- The size in bytes of the largest packet that can be transmitted.
NAT (Network Address Translation) - NAT technology translates IP addresses of a local area network
to a different IP address for the Internet.
PPPoE (Point to Point Protocol over Ethernet) - PPPoE is a protocol for connecting remote hosts to
the Internet over an always-on connection by simulating a dial-up connection.
SSID - AService Set Identification is a thirty-two character (maximum) alphanumeric key identifying a
wireless local area network. For the wireless devices in a network to communicate with each other, all
devices must be configured with the same SSID. This is typically the configuration parameter for a
wireless PC card. It corresponds to the ESSID in the wireless Access Point and to the wireless network
name.
WEP (Wired Equivalent Privacy) - A data privacy mechanism based on a 64-bit or 128-bit or 152-bit
shared key algorithm, as described in the IEEE 802.11 standard.
Wi-Fi - A trade name for the 802.11b wireless networking standard, given by the Wireless Ethernet
Compatibility Alliance (WECA, see http://www.wi-fi.net), an industry standards group promoting
interoperability among 802.11b devices.
WLAN (Wireless Local Area Network) - A group of computers and associated devices communicate
with each other wirelessly, which network serving users are limited in a local area.
User Manual of WDAP-C7200AC
-120-
EC Declaration of Conformity
English Hereby, PLANET Technology Corporation,
declares that this 11ac Wireless AP is in
compliance with the essential requirements and
other relevant provisions of Directive 1999/5/EC.
Lietuvikai iuo PLANET Technology Corporation,, skelbia,
kad 11ac Wireless AP tenkina visus svarbiausius
1999/5/EC direktyvos reikalavimus ir kitas svarbias
nuostatas.
esky Spole nost PLANET Technology Corporation,
tímto prohlauje, e tato 11ac Wireless AP spl uje
základní poadavky a dalí p ísluná ustanovení
sm rnice 1999/5/EC.
Magyar A gyártó PLANET Technology Corporation, kijelenti,
hogy ez a 11ac Wireless AP megfelel az 1999/5/EK
irányelv alapkövetelményeinek és a kapcsolódó
rendelkezéseknek.
Dansk PLANET Technology Corporation, erklærer
herved, at følgende udstyr 11ac Wireless AP
overholder de væsentlige krav og øvrige relevante
krav i direktiv 1999/5/EF
Malti Hawnhekk, PLANET Technology Corporation,
jiddikjara li dan 11ac Wireless AP jikkonforma
mal- ti ijiet essenzjali u ma provvedimenti o rajn
relevanti li hemm fid-Dirrettiva 1999/5/EC
Deutsch Hiermit erklärt PLANET Technology Corporation,
dass sich dieses Gerät 11ac Wireless AP in
Übereinstimmung mit den grundlegenden
Anforderungen und den anderen relevanten
Vorschriften der Richtlinie 1999/5/EG befindet".
(BMWi)
Nederlands Hierbij verklaart , PLANET Technology orporation,
dat 11ac Wireless AP in overeenstemming is met de
essentiële eisen en de andere relevante bepalingen
van richtlijn 1999/5/EG
Eestikeeles Käesolevaga kinnitab PLANET Technology
Corporation, et see 11ac Wireless AP vastab
Euroopa Nõukogu direktiivi 1999/5/EC
põhinõuetele ja muudele olulistele tingimustele.
Polski Niniejszym firma PLANET Technology Corporation,
owiadcza, e 11ac Wireless AP spe nia wszystkie
istotne wymogi i klauzule zawarte w dokumencie
Directive 1999/5/EC.
,PLANET Technology
Corporation, 11ac Wireless
AP
1999/5/
Português PLANET Technology Corporation, declara que este
11ac Wireless AP está conforme com os requisitos
essenciais e outras disposições da Directiva
1999/5/CE.
Español Por medio de la presente, PLANET Technology
Corporation, declara que 11ac Wireless AP
cumple con los requisitos esenciales y
cualesquiera otras disposiciones aplicables o
exigibles de
la Directiva 1999/5/CE
Slovensky Výrobca PLANET Technology Corporation, týmto
deklaruje, e táto 11ac Wireless AP je v súlade so
základnými poiadavkami a alími relevantnými
predpismi smernice 1999/5/EC.
Français Par la présente, PLANET Technology
Corporation, déclare que les appareils du 11ac
Wireless AP sont conformes aux exigences
essentielles et aux autres dispositions pertinentes
de la directive 1999/5/CE
Slovensko
PLANET Technology Corporation,s tem potrjuje,
da je ta 11ac Wireless AP skladen/a z osnovnimi
zahtevami in ustreznimi dolo ili Direktive 1999/5/EC.
Italiano Con la presente , PLANET Technology
Corporation, dichiara che questo 11ac Wireless
AP è conforme ai requisiti essenziali ed alle altre
disposizioni pertinenti stabilite dalla direttiva
1999/5/CE.
Suomi PLANET Technology Corporation, vakuuttaa täten
että 11ac Wireless AP tyyppinen laite on direktiivin
1999/5/EY oleellisten vaatimusten ja sitä koskevien
direktiivin muiden ehtojen mukainen.
Latviski Ar oPLANET Technology Corporation,
apliecina, ka 11ac Wireless AP atbilst
Direkt vas 1999/5/EK pamatpras b m un citiem
atbilstoiem noteikumiem.
Svenska Härmed intygar, PLANET Technology Corporation,
att denna 11ac Wireless AP står i överensstämmelse
med de väsentliga egenskapskrav och övriga
relevanta bestämmelser som framgår av direktiv
1999/5/EG.