Plantronics WH210 Wireless Communications System Headset User Manual
Plantronics Inc Wireless Communications System Headset Users Manual
Users Manual

Savi™ Office WO200 Professional Wireless Headset System
(WO1™ Base + WH210™ Headset)
Quick Start Guide
Guide de démarrage rapide
Guía de inicio rápido
Guia de Início Rápido
2-1
2-2
2-3
1
Quick Start
1
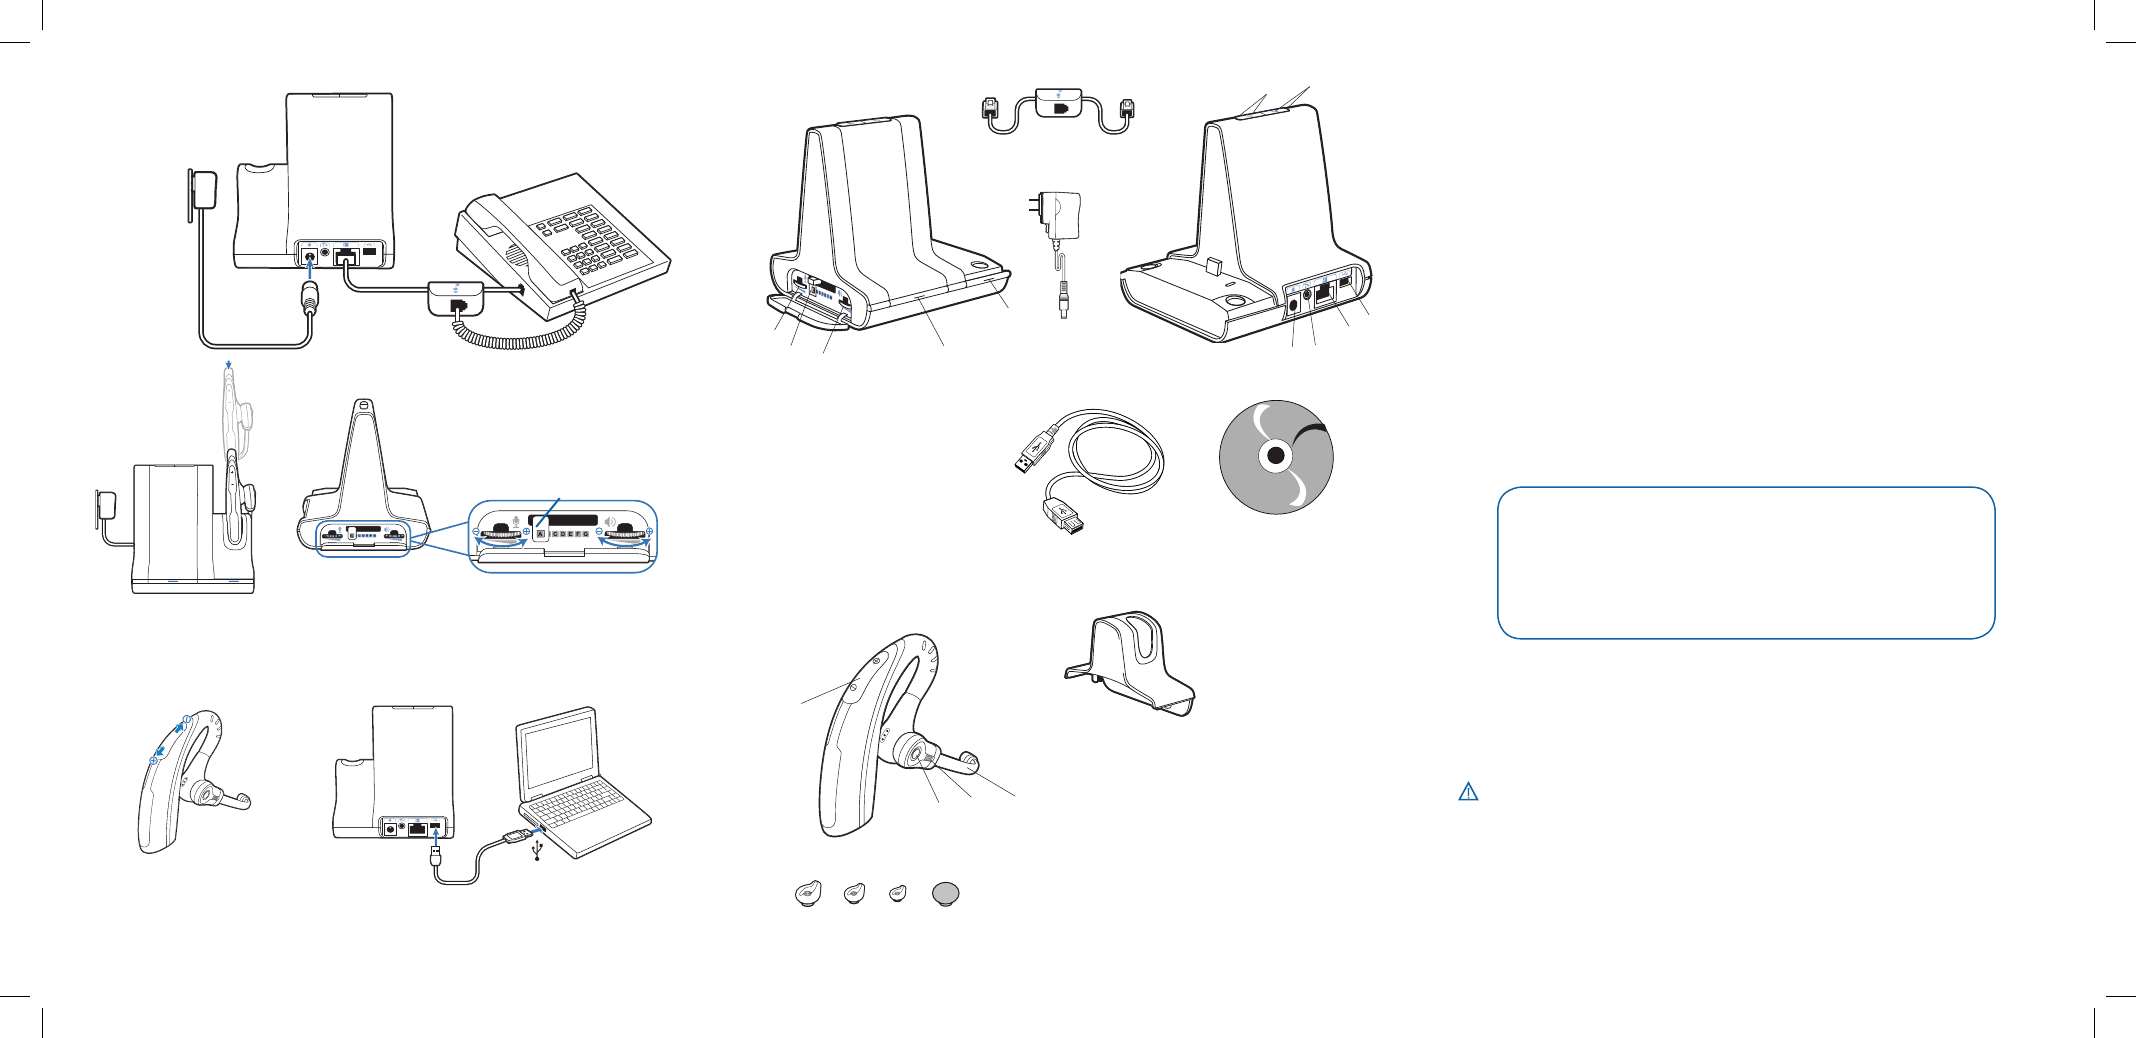
Savi WH210 Headset
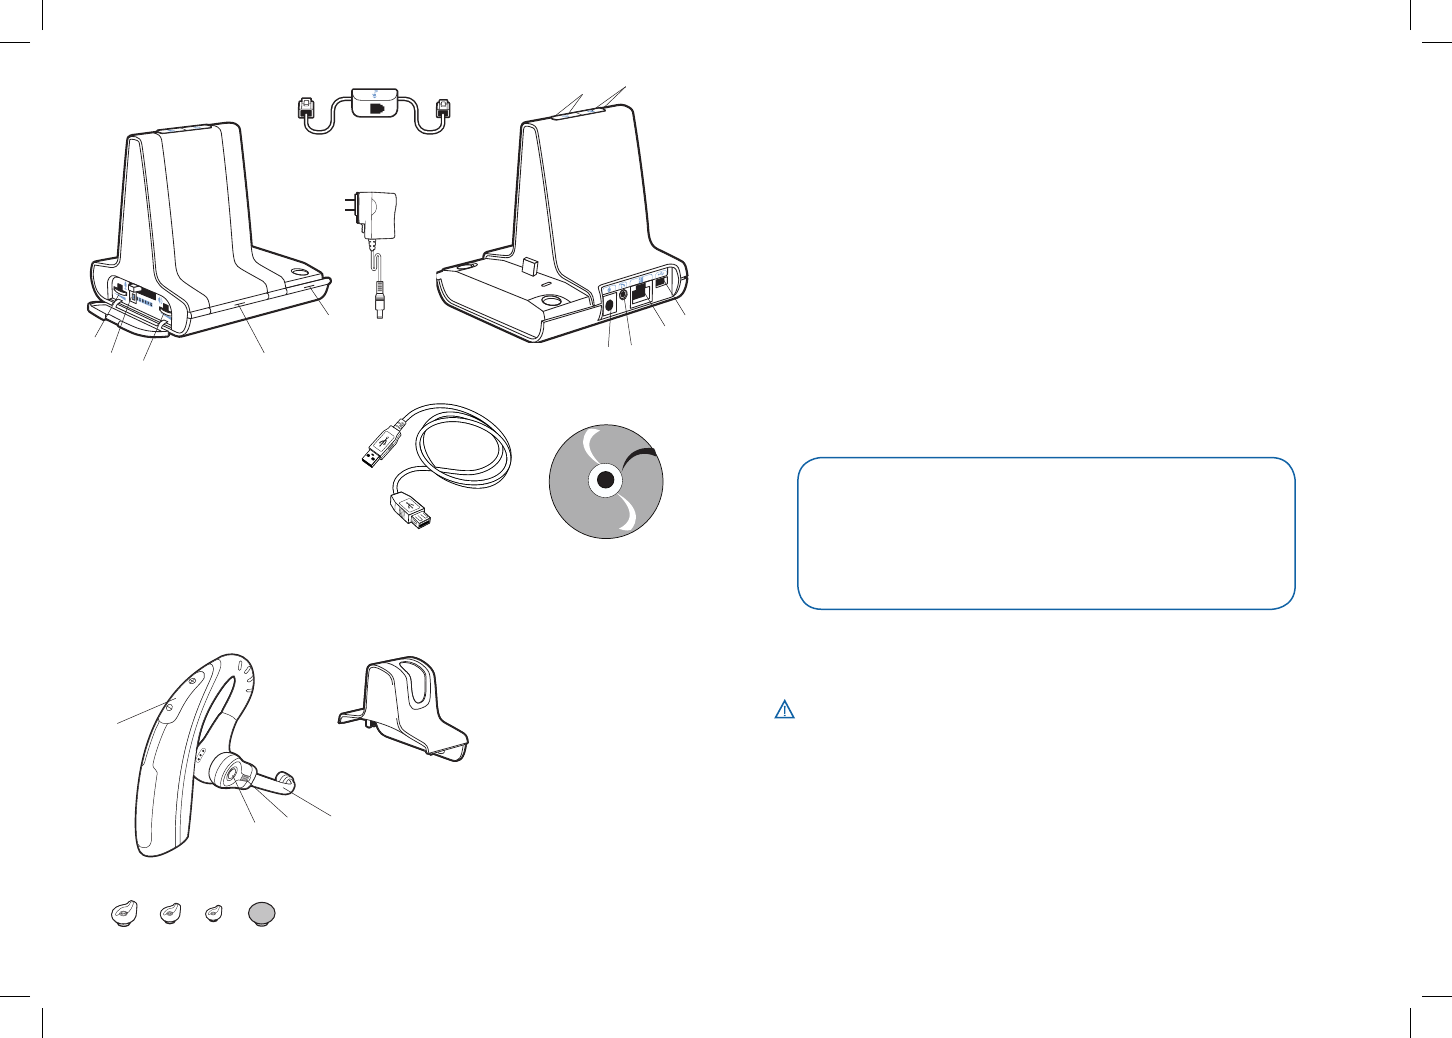
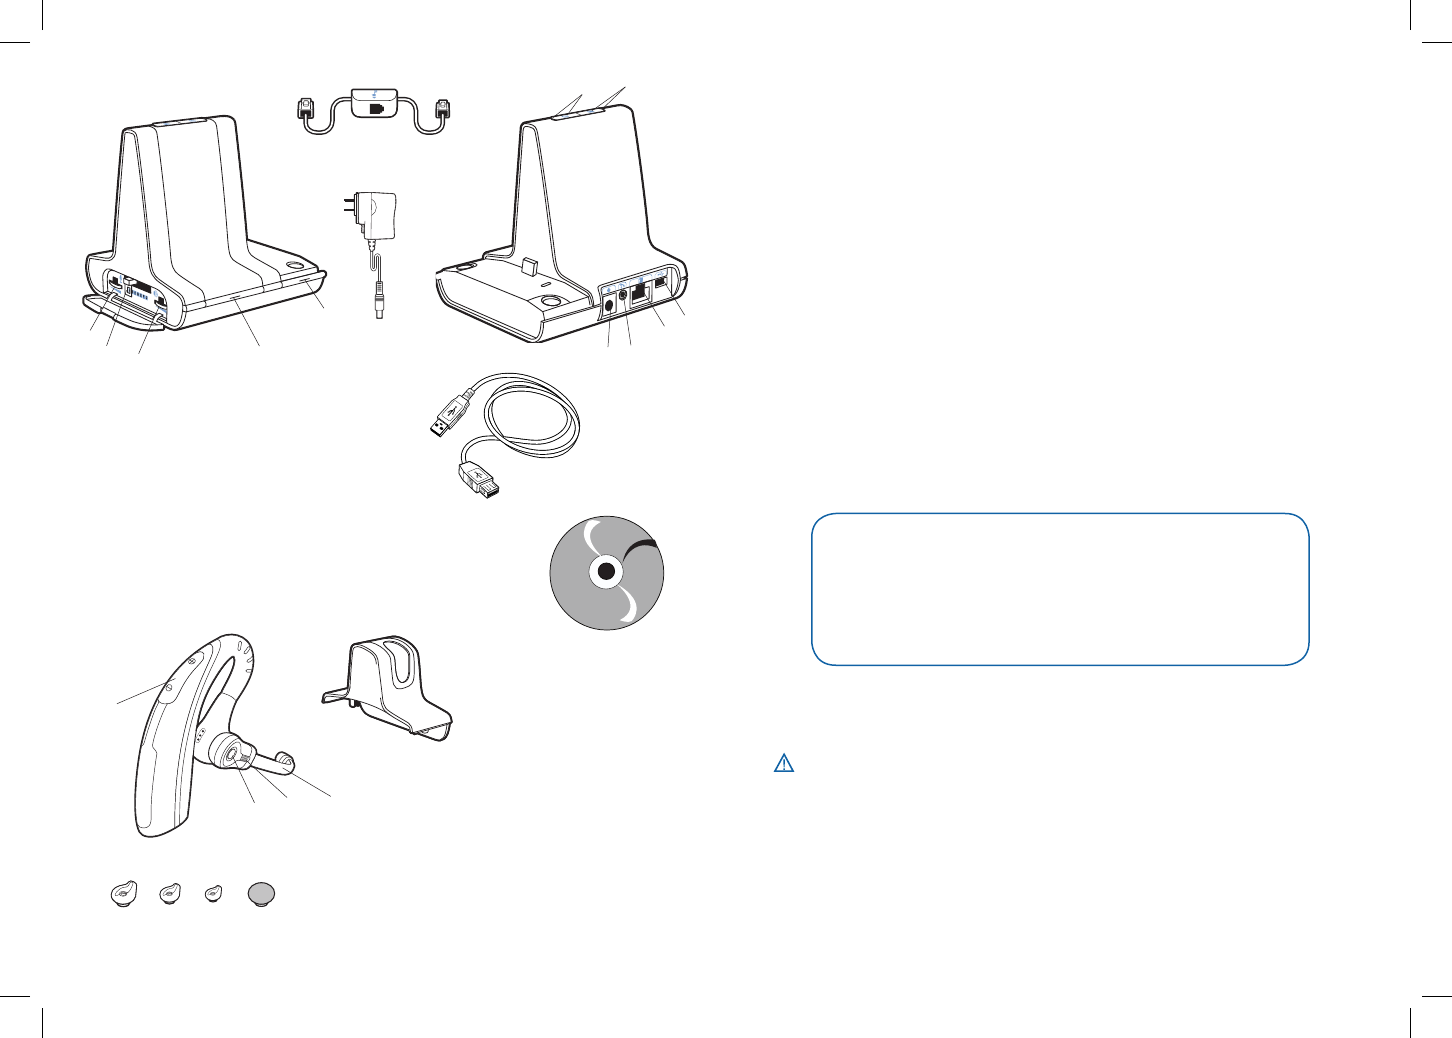
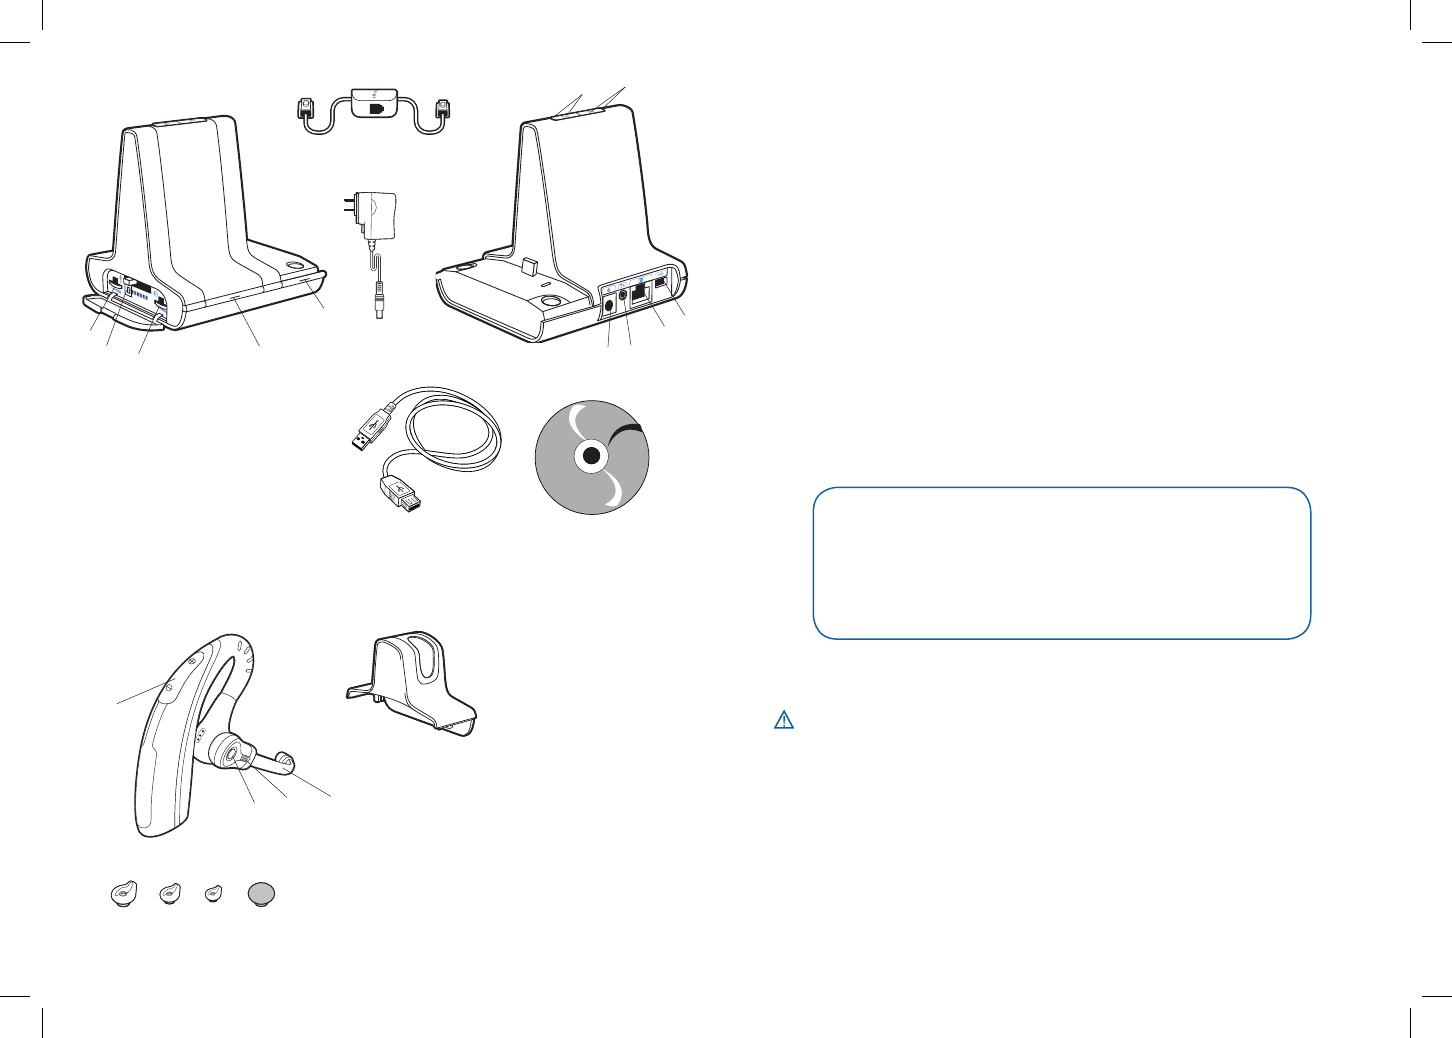
Savi WO1 Base
1. Listening Volume (also controls
mute and switching functions)
2. Call Control Button
3. Indicator Light
4. Noise-Canceling Boom
5. Ear tips
6. Charge Cradle
6
4
23
5
1. Desk Phone Speaking Volume
2. Configuration Switch
3. Desk Phone Listening Volume
4. Subscription Button and Indicator Light
5. Power/Charging Indicator Light
6. Power Jack
7. Handset Lifter Jack
8. Telephone Interface Cable Jack
9. USB Port
10. Desk Phone Talk Button and Indicator Light
11. PC Talk Button and Indicator Light
Base Power
Supply
Telephone
Interface Cable
CD includes:
• PerSono® Suite Software
• Animated Setup Guide
• Complete User Guide
USB Cable
10
67
8
11
9
3-1
3-2
4
7-1 7-2
5-7
5-2
6-6
5-2
6-5
5-2
6-4
5-6
4
23
1
5
Welcome
Congratulations on purchasing your new Plantronics product. This Quick Start Guide contains
instructions for setting up the Savi Office WO200 Professional Wireless Headset System. Please
refer to the separate safety instructions for important product safety information prior to installation
or use of the product.
System Requirements
The minimum system requirements for Savi Office are as follows:
• Supported Operating Systems: Windows XP, Windows Vista
• Processor: 400 MHz Pentium processor or equivalent (Minimum); 1GHz Pentium processor or
equivalent (Recommended)
• RAM: 96 MB (Minimum); 256 MB (Recommended)
• Hard Disk: 280 MB (Minimum); 500 MB (Recommended)
• Display: 800 x 600, 256 colours (Minimum); 1024 x 768 high colour, 32-bit (Recommended)
• Internet Explorer V6 or better must be on the user’s system (Required)
Safety Instructions
Do not use headphones / headsets at high volumes for an extended period of time.
Doing so can cause hearing loss. Always listen at moderate levels. See www.plantronics.com/
healthandsafety for more information on headsets and hearing.
We highly recommend that you refer to the CD
for Animated Set Up instructions and the complete
User Guide.

Setting Up the Savi Office WO200 System
1. Attaching Charge Cradle to Base
Connect the headset charge cradle to the base. Push firmly on the cradle until the cradle snaps
into place.
2. Connecting Base to Desk Phone
2-1. Connect the telephone interface cable to the telephone interface cable jack on the base.
2-2. After disconnecting the handset coil cord from the desk phone, connect the telephone
interface cable to the now open handset port on the desk phone.
2-3. Connect the handset coil cord to the telephone interface cable junction box.
3. Connecting Power Supply to Base
3-1. Connect the base power supply into the power jack on the base.
3-2. Connect the power supply to outlet.
4. Docking and Charging Headset
Gently push the headset into the charge cradle. Charge for at least 20 minutes prior to the rst use.
A full charge takes 3 hours.
5. Checking Configuration
5-1. Set volume on desk phone to mid-range.
5-2. On the base, ensure the conguration switch is set to “A” and the desk phone speaking
volume and desk phone listening volume are both set to 3.
NOTE For most phones, these factory default settings will sound the best.
5-3. With your headset on, press the call control button on headset.
5-4. Remove the handset from desk phone cradle.
5-5. Listen for a dial tone. If the dial tone sounds clear, press the call control button on headset
and continue with Step 6. Making a Test Call with Desk Phone.
5-6. If the dial tone is too loud or too soft, adjust the headset volume level.
5-7. If the dial tone still does not sound clear, adjust the conguration switch until the dial tone
sounds the best.
NOTE Multiple settings might work with your phone; however, only one is the optimal position.
5-8. Press the call control button on the headset and return the handset to the cradle to complete
configuration.
6. Making a Test Call with Desk Phone
6-1. With your headset on, press the call control button on headset.
6-2. Remove the handset from desk phone cradle.
6-3. Dial the number using your desk phone.
6-4. If needed, adjust the listening volume on the headset.
6-5. If the listening volume is still too loud or too soft, adjust the desk phone listening volume
on the base.
6-6. If the speaking volume is too loud or too soft for your listener, adjust the desk phone
speaking volume on the base.
6-7. Press the call control button on the headset and return the handset to the cradle to
complete the test call.
7. Connecting to the PC
7-1. Connect the USB cable to the USB port on the back of the base.
7-2. Connect the other end of the USB cable to the USB port on the PC.
7-3. Insert the CD and install the PerSono Suite software. Follow the installation instructions
shown on your PC.
8. Making a Test Call with PC
8-1. Ensure the PerSono Suite software is running on your PC.
8-2. With your headset on, press the PC talk button on the base.
8-3. Dial the number using your softphone application.
8-4. Adjust listening and speaking volume using your softphone application and/or “sound and
audio devices” in your PC control panel.
8-5. You can fine tune the listening volume on the headset.
8-6. To end the test call, press the call control button on the headset.
Please refer to the complete User Guide located on the CD for further details on how to use your
Savi Office WO200 Professional Wireless Headset System.
CHARGING TIME
20 min .....................
Minimum charge
before first use
3 hours ...................
Full charge
1
Micro-casque Savi WH210
Base Savi WO1
1. Volume (contrôle aussi les fonctions
de sourdine et de commutation)
2. Bouton de contrôle des appels
3. Voyant
4. Microphone éliminateur de bruit
5. Embouts
6. Chargeur
6
4
23
5
1. Volume d’émission du téléphone
2. Commutateur de configuration
3. Volume de réception du téléphone
4. Bouton d’association et voyant
5. Voyant d’alimentation/charge
6. Prise d’alimentation
7. Prise du décrocheur de combiné
8. Prise de câble d’interface téléphonique
9. Port USB
10. Bouton de conversation par téléphone et voyant
11. Bouton de conversation par ordinateur et voyant
Bloc d’alimentation
de la base
Câble
d’interface téléphonique
Contenu du CD :
• Logiciel PerSono®
• Guide de conguration
animé
• Guide de l’utilisateur
complet
Câble USB
10
67
8
11
9
Bienvenue
Félicitations pour votre nouveau produit Plantronics. Ce guide explique comment installer le
système de micro-casque sans fil professionnel Savi Office WO200. système de micro-casque sans
l professionnel Savi Ofce WO100. Veuillez lire les consignes de sécurité fournies séparément
avant d’installer ou d’utiliser le produit. Elles contiennent des renseignements importants relatifs à la
sécurité.
Configuration système requise
La configuration système requise pour Savi Office est la suivante :
• Systèmes d’exploitation compatibles : Windows XP et Windows Vista
• Processeur : 400 MHz (minimum); 1 GHz (recommandé)
• Mémoire : 96 Mo (minimum); 256 Mo (recommandé)
• Disque dur : 280 Mo (minimum); 500 Mo (recommandé)
• Afchage : 800 x 600, 256 couleurs (minimum); 1 024 x 768, couleurs 32 bits (recommandé)
• Internet Explorer version 6
Renseignements sur la sécurité
Attention : N’utilisez pas les casques et micro-casques à volume élevé sur de longues
périodes. Cela pourrait provoquer des problèmes d’audition. Conservez toujours un niveau
d’écoute modéré. Consultez le site www.plantronics.com/healthandsafety pour obtenir de plus
amples renseignements sur les micro-casques et l’audition.
Nous vous recommandons fortement de vous
reporter aux instructions du guide de configuration
animé et du guide de l’utilisateur complet sur le CD.
4
23
1
5

Installation du Savi Office WO200
1. Connexion du chargeur à la base
Connectez le chargeur à la base. Appuyez fermement sur le chargeur jusqu’à ce qu’il soit bien en
place.
2. Connexion de la base au téléphone
2-1. Branchez le câble d’interface dans la prise d’interface de la base.
2-2. Débranchez le câble enroulé de combiné sur le téléphone, puis branchez le câble d’interface
dans cette même prise sur le téléphone.
2-3. Branchez le câble enroulé de combiné dans la boîte de jonction du câble d’interface.
3. Branchement du bloc d’alimentation
3-1. Branchez la mini-che du bloc dans la prise d’alimentation de la base.
3-2. Branchez la che dans une prise électrique.
4. Recharge du micro-casque
Poussez doucement le micro-casque dans le chargeur. Chargez le micro-casque pendant au moins
20 minutes avant de l’utiliser pour la première fois. Une charge complète dure 3 heures.
5. Vérification de la configuration
5-1. Sur le téléphone, réglez le volume à la moitié.
5-2. Assurez-vous que le sélecteur de conguration de la base est positionné sur « A » et que les
volumes d’émission et de réception du téléphone sont réglés sur 3.
REMARQUE : sur la plupart des téléphones, ces réglages par défaut permettent d’obtenir la
meilleure qualité sonore.
5-3. Mettez le micro-casque, puis appuyez sur le bouton de contrôle des appels.
5-4. Soulevez le combiné du téléphone.
5-5. Vous devriez entendre la tonalité. Si la tonalité est claire, appuyez sur le bouton de contrôle
des appels du micro-casque, puis passez à l’étape 6. Appel de test avec le téléphone.
5-6. Si la tonalité est trop forte ou trop faible, réglez le volume du micro-casque.
5-7. Si, malgré vos réglages, la tonalité n’est toujours pas clairement audible, changez la position
du sélecteur de conguration jusqu’à ce qu’elle vous convienne.
REMARQUE : même si plusieurs réglages peuvent fonctionner avec le téléphone, un seul est
optimal.
5-8. Pour terminer la conguration, appuyez sur le bouton de contrôle des appels du micro-
casque et reposez le combiné sur le téléphone.
6. Appel de test avec le téléphone
6-1. Mettez le micro-casque, puis appuyez sur le bouton de contrôle des appels.
6-2. Soulevez le combiné du téléphone.
6-3. Composez le numéro sur le téléphone.
6-4. Au besoin, réglez le volume de réception sur le micro-casque.
6-5. S’il est encore trop fort ou trop faible, ajustez-le sur la base du téléphone.
6-6. Si le volume d’émission ne convient pas à votre interlocuteur, réglez-le sur
la base du téléphone.
6-7. Pour terminer l’appel de test, appuyez sur le bouton de contrôle des appels du micro-
casque et reposez le combiné sur le téléphone.
7. Connexion à l’ordinateur
7-1. Branchez une extrémité du câble USB dans le port USB à l’arrière de la base.
7-2. Branchez l’autre extrémité dans un port USB de l’ordinateur.
7-3. Insérez le CD dans le lecteur optique de l’ordinateur et installez le logiciel PerSono. Suivez
les instructions afchées.
8. Appel de test avec l’ordinateur
8-1. Démarrez PerSono Suite sur l’ordinateur.
8-2. Mettez le micro-casque, puis appuyez sur le bouton de conversation par PC sur la base.
8-3. Composez le numéro de téléphone avec votre application de téléphonie.
8-4. Vous pouvez régler le volume d’émission et d’écoute avec l’application de téléphonie ou
avec l’option Sons et périphériques audio du Panneau de conguration de Windows.
8-5. Vous pouvez ajuster le volume d’écoute sur le micro-casque.
8-6. Pour raccrocher, appuyez sur le bouton de contrôle des appels du micro-casque.
Pour plus de détails sur l’utilisation de votre système de micro-casque sans l professionnel Savi
Ofce WO200, consultez le guide de l’utilisateur sur le CD.
TEMPS DE CHARGE
20 min .....................
Charge minimale
avant la première
utilisation
3 heures ..................
Charge complète
1
Audífono Savi WH210
Base Savi WO1
1. Volumen de escucha (también controla
las funciones de silencio y conmutación)
2. Botón de control de llamadas
3. Luz indicadora
4. Micrófono con anulación de ruido
5. Tapones
6. Base de carga
6
4
23
5
1. Volumen de conversación del teléfono de escritorio
2. Control de configuración
3. Volumen de escucha del teléfono de escritorio
4. Botón de suscripción y luz indicadora
5. Luz indicadora de energía/carga
6. Entrada de alimentación
7. Entrada del dispositivo para descolgar el teléfono
8. Entrada del cable de interfaz del teléfono
9. Puerto USB
10. Botón de conversación por el teléfono de escritorio
y luz indicadora
11. Botón de conversación por la PC y luz indicadora
Fuente de alimentación
de la base
Cable de interfaz
del teléfono
El CD incluye:
• Software PerSono¨ Suite
• Guía animada de conguración
• Manual del usuario completo
Cable USB
10
67
8
11
9
4
23
1
5
Bienvenido
Felicidades por su compra de un nuevo producto Plantronics. Esta guía de inicio rápido contiene
instrucciones para congurar el sistema de audífonos inalámbricos profesionales Savi Ofce
WO200. Antes de instalar o utilizar el producto, consulte las instrucciones de seguridad (aparte)
para obtener información importante acerca de la seguridad del producto.
Requisitos del sistema
Los requisitos mínimos del sistema para Savi Ofce son:
• Sistemas operativos compatibles: Windows XP, Windows Vista
• Procesador: procesador Pentium a 400 MHz o equivalente (mínimo); procesador Pentium a
1GHz o equivalente (recomendado)
• RAM: 96 MB (mínimo); 256 MB (recomendado)
• Disco duro: 280 MB (mínimo); 500 MB (recomendado)
• Pantalla: 800 x 600, 256 colores (mínimo); 1024 x 768 color de alta calidad, 32 bits
(recomendado)
• Debe tener instalado Internet Explorer V6 o posterior en el sistema (necesario)
Instrucciones de seguridad
No use nunca los audífonos o auriculares a un volumen alto durante periodos prolongados.
Esto puede causar pérdida de audición. Use siempre un volumen moderado. Visite www.
plantronics.com/healthandsafety para obtener más información acerca de los auriculares y la
audición.
Le recomendamos que consulte las instrucciones
animadas de configuración y el manual del usuario
completo incluidos en el CD.

Instalación del sistema Savi Office WO200
1. Conexión de la base de carga a la base
Conecte la base de carga del audífono a la base. Presione rmemente la base de carga contra la
base hasta que encaje en su sitio.
2. Conexión de la base al teléfono de escritorio
2-1. Conecte el cable de interfaz del teléfono a la entrada correspondiente en la base.
2-2. Después de desconectar el cable espiral del auricular del teléfono de escritorio, conecte
el cable de interfaz del teléfono a la entrada de auricular (ahora desocupada) del teléfono de
escritorio.
2-3. Conecte el cable espiral del auricular a la caja de conexiones del cable de interfaz del
teléfono.
3. Conexión de la fuente de alimentación a la base
3-1. Conecte la fuente de alimentación de la base a la entrada de alimentación de la base.
3-2. Conecte la fuente de alimentación a una toma de corriente.
4. Acoplamiento y carga del audífono
Presione suavemente el audífono en la base de carga. Cárguelo durante al menos 20 minutos
antes de usarlo por primera vez. La carga completa tarda 3 horas.
5. Comprobación de la configuración
5-1. Ajuste el volumen del teléfono de escritorio en un nivel intermedio.
5-2. En la base, compruebe que el control de conguración esté ajustado en “A”, y que el
volumen de conversación y el volumen de escucha del teléfono de escritorio estén ajustados
en el nivel 3.
NOTA En la mayoría de los teléfonos, estos ajustes precongurados de fábrica producen un sonido
óptimo.
5-3. Con el audífono puesto, presione el botón de control de llamadas del audífono.
5-4. Retire el auricular de la base del teléfono de escritorio.
5-5. Espere a escuchar el tono de marcar. Si escucha claramente el tono de marcar, presione el
botón de control de llamadas del audífono y continúe con el paso 6. Realización de una
llamada de prueba con el teléfono de escritorio.
5-6. Si el tono de marcar se escucha demasiado alto o demasiado bajo, ajuste el volumen del
audífono.
5-7. Si el tono de marcar aún no suena claro, ajuste el control de conguración hasta obtener un
sonido óptimo.
NOTA Puede haber varias conguraciones que funcionen con su teléfono; sin embargo, solo una
es la posición óptima.
5-8. Presione el botón de control de llamadas del audífono y devuelva el auricular a la base para
nalizar la conguración.
6. Realización de una llamada de prueba con el
teléfono de escritorio
6-1. Con el audífono puesto, presione el botón de control de llamadas del audífono.
6-2. Retire el auricular de la base del teléfono de escritorio.
6-3. Marque el número en el teléfono de escritorio.
6-4. Si es necesario, ajuste el volumen de escucha en el audífono.
6-5. Si el volumen de escucha sigue siendo demasiado alto o demasiado bajo, ajuste el volumen
de escucha del teléfono de escritorio en la base.
6-6. Si el volumen de conversación es demasiado alto o demasiado bajo para su interlocutor,
ajuste el volumen de conversación del teléfono de escritorio en la base.
6-7. Presione el botón de control de llamadas del audífono y devuelva el auricular a la base para
nalizar la llamada de prueba.
7. Conexión a la PC
7-1. Conecte el cable USB al puerto USB de la parte posterior de la base.
7-2. Conecte el otro extremo del cable USB al puerto USB de la PC.
7-3. Inserte el CD e instale el paquete de software PerSono . Siga las instrucciones de instalación
que aparecen en la PC.
8. Realización de una llamada de prueba con la PC
8-1. Compruebe que el paquete de software PerSono se está ejecutando en su PC.
8-2. Con el audífono puesto, presione el botón de conversación por la PC de la base.
8-3. Marque el número con la aplicación de teléfono.
8-4. Ajuste el volumen de escucha y de conversación con la aplicación de teléfono o en
Dispositivos de sonido y audio, en el Panel de control de la PC.
8-5. Puede realizar un ajuste no del volumen de escucha en el auricular.
8-6. Para terminar la llamada de prueba, presione el botón de control de llamadas del audífono.
Consulte el manual del usuario completo incluido en el CD para obtener más información acerca de
cómo usar el sistema de audífonos inalámbricos profesionales Savi Ofce WO200.
TIEMPO DE CARGA
20 min .....................
Carga mínima
antes del primer uso
3 horas ....................
Carga completa
1
Headset Savi WH210
Base do Savi WO1
1. Volume de audição (controla também as
funções de mudo e alternância)
2. Botão de controle de chamadas
3. Luz indicadora
4. Cancelamento de ruídos
5. Pontas auriculares
6. Base de carga
6
4
23
5
1. Volume de fala do telefone de mesa
2. Chave de configuração
3. Volume de audição do telefone de mesa
4. Botão de vinculação e luz indicadora
5. Luz indicadora de energia/carga
6. Entrada de energia
7. Tomada do suporte de monofone
8. Entrada do cabo de interface do telefone
9. Porta USB
10. Botão de conversação e luz indicadora do telefone
de mesa
11. Botão de conversação e luz indicadora do PC
Fonte de alimentação
da base
As
Cabo de interface
O CD inclui:
• Software PerSono¨ Suite
• Guia de instalação animado
• Guia completo do usuário
Cabo USB
10
67
8
11
9
4
23
1
5
Bem-vindo
Parabéns por adquirir o seu novo produto da Plantronics. Este Guia de Início Rápido contém
instruções para configurar o sistema de headset wireless profissional do Savi Office WO200.
Consulte o folheto de instruções sobre segurança para obter informações importantes de
segurança do produto antes da instalação ou do uso do produto.
Requisitos de sistema
Os requisitos mínimos de sistema para o Savi Ofce são os seguintes:
• Sistemas operacionais suportados: Windows XP, Windows Vista
• Processador: processador Pentium de 400 MHz ou equivalente (mínimo); processador Pentium
de 1GHz ou equivalente (recomendado)
• RAM: 96 MB (mínimo); 256 MB (recomendado)
• Disco rígido: 280 MB (mínimo); 500 MB (recomendado)
• Visor: 800 x 600, 256 cores (mínimo); cores de alta resolução de 1024 x 768, 32 bits
(recomendado)
• Internet Explorer 6.0 ou superior (necessário)
Instruções de Seguranç
Não use fones de ouvido/headsets em volume muito alto por períodos prolongados de tempo.
Isso pode causar a perda de audição. Ouça sempre em níveis moderados. Visite www.plantronics.
com/healthandsafety para obter mais informações sobre headsets e assuntos de audição.
Recomendamos que você consulte o CD com
instruções interativas de configuração e o Guia do
Usuário.

Configurando o sistema Savi Office WO200
1. Conectando a base de carga à base
Conecte a base de carga do headset à base. Empurre rmemente a base até que ela se encaixe e
fique no lugar.
2. Conectando a base ao telefone de mesa
2-1. Conecte o cabo de interface do telefone à entrada do cabo de interface na base.
2-2. Após desconectar o cabo espiral do monofone do telefone de mesa, conecte o cabo de
interface do telefone para abrir a porta do monofone no telefone de mesa.
2-3. Conecte o cabo espiral do monofone à caixa de junção do cabo de interface do telefone.
3. Conectando a fonte de alimentação à base
3-1. Conecte a fonte de alimentação da base na entrada de energia da base.
3-2. Conecte a fonte de alimentação à tomada.
4. Encaixando e recarregando o headset
Empurre levemente o headset para a base de carga. Carregue por, no mínimo, 20 minutos antes
de usar pela primeira vez. Uma carga completa leva 3 horas.
5. Verificando a configuração
5-1. Ajuste o volume do telefone de mesa para um nível médio.
5-2. Na base, certique-se de que a chave de conguração esteja denida para “A” e que os
volumes de fala e de audição do telefone estejam definidos para 3.
NOTA para a maioria dos telefones, as congurações padrões de fábrica são as melhores.
5-3. Com o seu headset ligado, pressione o botão de controle de chamadas do headset.
5-4. Remova o monofone da base do telefone de mesa.
5-5. Ouça um tom de discagem. Se o tom de discagem for claro, pressione o botão de controle
de chamadas do headset e continue no Passo 6. Fazendo uma chamada teste com o
telefone de mesa.
5-6. Se o tom de chamada soar muito alto ou muito suave, ajuste o volume do headset.
5-7. Se o tom de discagem não soar claro, ajuste a chave de conguração até que ele atinja
o som ideal.
NOTA diversas congurações podem funcionar com o seu telefone; no entanto, apenas uma será
a posição ideal.
5-8. Pressione o botão de controle de chamadas do headset e retorne o monofone à base para
concluir a configuração.
6. Fazendo uma chamada teste com o telefone de
mesa
6-1. Com o seu headset ligado, pressione o botão de controle de chamadas do headset.
6-2. Remova o monofone da base do telefone de mesa.
6-3. Disque o número usando o seu telefone de mesa.
6-4. Se necessário, ajuste o volume de audição do headset.
6-5. Se o volume de audição do telefone de mesa ainda estiver muito alto ou muito suave,
ajuste-o na base.
6-6. Se o volume de fala estiver muito alto ou muito suave para o receptor, ajuste o volume de
fala do telefone na base.
6-7. Pressione o botão de controle de chamadas do headset e retorne o monofone à base para
concluir a chamada teste.
7. Conectando ao PC
7-1. Conecte o cabo USB na porta USB da parte traseira da base.
7-2. Conecte a outra extremidade do cabo USB na porta USB do PC.
7-3. Insira o CD e instale o software PerSono Suite. Siga as instruções de instalação
exibidas em seu computador.
8. Fazendo uma chamada teste com o PC
8-1. Verique se o software PerSono Suite está em execução no seu computador.
8-2. Com o headset ligado, pressione o botão de conversação do computador na base.
8-3. Disque um número usando o aplicativo do seu softphone
8-4. Ajuste os volumes de fala e audição usando o aplicativo do seu softphone e/ou na opção
“Sons e Dispositivos de Áudio” no Painel de Controle do seu computador.
8-5. Você pode ajustar da melhor forma o volume de audição no headset.
8-6. Para nalizar a chamada teste, pressione o botão de controle de chamadas no headset.
Consulte o Guia de Usuário, que está no CD, para obter mais detalhes de como usar o seu sistema
de headset wireless profissional do Savi Office WO200.
TEMPO DE
CARREGAMENTO
20 min .....................
Carga mínima antes do
primeiro uso
3 horas ....................
Recarga completa

Homologação Anatel
Este produto está homologado pela ANATEL, de acordo com os procedimentos
regulamentados pela resolução 242/2000, e atende aos requisitos técnicos aplicados.
Para maiores informações consulte o site da ANATEL.
http://www.anatel.gov.br
Distribuído por Plantronics Telecomunicações Ltda
CNPJ 05.758.913/0001-95
(01)07898401710610
0647-09-1893
“ ESTE EQUIPAMENTO OPERA EM CARÁTER SECUNDÁRIO. ISTO É, NÃO TEM DIREITO A
PROTEÇÃO CONTRA INTERFERÊNCIA PREJUDICIAL, MESMO DE ESTAÇÕES DO MESMO TIPO E
NÃO PODE CAUSAR INTERFERÊNCIA A SISTEMAS OPERANDO EM CARÁTER PRIMÁRIO. ”

Plantronics, Inc.
345 Encinal Street
Santa Cruz, CA 95060
United States
Tel: 800-544-4660
Tel: 831-426-5858
www.plantronics.com
©2008 Plantronics, Inc. All rights reserved. Plantronics, the logo design, PerSono, Savi, and Sound Innovation are trademarks or registered
trademarks of Plantronics, Inc. All other trademarks are the property of their respective owners.
Patents US 5,210,791; D539,266; D469,756; Australia 147229; France 651,857-651,865; Germany 40108524.4; GB Regd.Des.No.
2104923; Patents Pending.
82328-02 (07.09)
This device complies with Part 15 of the FCC Rules. Operation is subject to the following two conditions:
1. This device may not cause harmful interference, and
2. This device must accept any interference received, including interference that may cause undesired operation.
This equipment has been tested and found to comply with the limits for a Class B digital device, pursuant to Part 15 of the FCC Rules.
These limits are designed to provide reasonable protection against harmful interference in a residential installation. This equipment
generates, uses, and can radiate radio frequency energy and, if not installed and used in accordance with the instructions, may cause
harmful interference to radio communications. However, there is no guarantee that interference will not occur in a particular installation. If
this equipment does cause harmful interference to radio or television reception which can be determined by turning the radio or television
off and on, the user is encouraged to try to correct interference by one or more of the following measures:
1. Reorient or relocate the receiving antenna.
2. Increase the separation between the equipment and receiver.
3. Connect the equipment into an outlet on another circuit.
4. Consult the dealer or an experienced radio/TV technician for help.
FCC REGISTRATION INFORMATION — Part 68
This equipment complies with Part 68 of the FCC rules and the requirements adopted by ACTA. On the exterior of this equipment is a label
that contains a product identier in the format US:AAAEQ##TXXXX. If requested, this information must be provided to your telephone
company.
A plug and jack used to connect this equipment to the premises wiring and telephone network must comply with the applicable FCC Part
68 rules and requirements adopted by ACTA. A compliant telephone cord and modular plug is provided with this product. It is designed to
be connected to a compatible jack that is also compliant. See installation instructions for details.
The REN is useful to determine the quantity of devices you may connect to your telephone line. Excessive RENs on a telephone line may
result in the devices not ringing in response to an incoming call. In most, but not all areas, the sum of the RENs should not exceed ve (5.0).
To be certain of the number of devices you may connect to your line, as determined by the REN, contact your local telephone company. For
products approved after August 8, 2001, the REN for this product is part of the product identier that has the format US:AAAEQ##TXXXX.
The digits represented by ## are the REN without the decimal point. (For example, 03 represents a REN of 0.3.) For earlier producers, the
REN is separately shown on the label.
If this telephone equipment causes harm to the telephone network, the telephone company will notify you in advance that temporary
discontinuance of service may be required. But if advance notice isn’t practical, the telephone company will notify the customer as soon as
possible. Also, you will be advised of your right to le a complaint with the FCC if you believe it is necessary.
The telephone company may make changes in its facilities, equipment, operations, or procedures that could affect the proper functioning
of your equipment. If they do, you will be notied in advance in order for you to make necessary modications to maintain uninterrupted
service.
If trouble is experienced with this unit, for repair or warranty information, please contact customer service at (800) 544-4660. If the
equipment is causing harm to the network, the telephone company may request that you disconnect the equipment until the problem is
resolved.
DO NOT DISASSEMBLE THIS EQUIPMENT: it does not contain any user-serviceable components.
We recommend the installation of an AC surge arrester in the AC outlet to which this equipment is connected. Telephone companies report
that electrical surges, typically lighting transients, are very destructive to customer terminal equipment connected to AC power sources.
Exposure to RF Radiation
The internal wireless radio operates within the guidelines found in radio frequency safety standards and recommendations, which reect the
consensus of the scientific community. Independent studies have shown that the internal wireless radio is safe for use by consumers. Visit
www.plantronics.com for more information.
In order to comply with FCC RF Exposure requirements, the base must be installed and operated such that a minimum separation distance
of 20 cm is maintained between the base and all persons during normal operation.
NOTE: Modications not expressly approved by Plantronics, Inc. could void the user’s authority to operate the equipment.
INDUSTRY CANADA REGULATORY INFORMATION
This product meets the applicable Industry Canada technical specications/Le présent materiel est conforme aux specications techniques
applicable d’ Induristrie Canada.
This Class B digital apparatus complies with Canadian ICES-003.
Cet appareil numérique de la classe B est conforme à la norme NMB-003 du Canada.

en Safety Instructions
ar إرشادات حول السلامة
bg Инструкции за безопасност
cs Bezpečnostní pokyny
da Sikkerhedsvejledning
de Sicherheitshinweise
el Οδηγίες για την ασφάλεια
es Instrucciones de seguridad
fa دستورالعمل های ایمنی
fr Instructions de sécurité
he הוראות בטיחות
hr Sigurnosne upute
hu Biztonsági előírások
it Informazioni sulla sicurezza
mk Безбедносни упатства
nl Veiligheidsinstructies
no Sikkerhetsinstruksjoner
pl Instrukcje bezpieczeństwa
pt Instruções de Segurança
ro Instrucţiuni de siguranţă
ru Инструкции по безопасности
sl Varnostna navodila
sv Säkerhetsanvisningar
tr Instrucţiuni de siguranţă

AR
EN
إرشادات حول السلامة
يرجى قراءة إرشادات السلامة والتشغيل التالية قبل استخدام منتج Plantronics. يرجى الاحتفاظ
بهذه الإرشادات للرجوع إليها. عند استخدام هذا المنتج، يجب اتباع تدابير وتحذيرات السلامة
الأساسية هذه للتخفيف من خطر الحريق والصدمات الكهربائية والإصابات الجسدية وخطر
الأضرار المادية.
تحذيرات
استخدم فقط منتجات Plantronics المصممة للاستخدام مع نظام Plantronics هذا.
الأطفال. لا تسمح للأطفال باللعب بالمنتج على الإطلاق إذ قد تتسبب القطع الصغيرة
بالاختناق.
وصّل محوّل التيار المتناوب بالمأخذ الأقرب إلى الجهاز والذي يسهل الوصول إليه.
للتخفيف من خطر حدوث صدمة كهربائية، أو انفجار أو حريق، استخدم فقط الشاحن الموفر أو محوّل
التيار المتناوب Class 2 لشحن سماعة الرأس. تأكد من أن درجة الفولتية (مثلاً 120 فولت، 60
هرتز) تطابق مصدر الطاقة الذي تنوي استخدامه.
Safety Instructions
Please read the following safety and operational instructions before using your Plantronics product.
Please keep these instructions for your reference. When using this product, these basic safety
precautions and warnings should be followed to reduce the risk of fire, electric shock, injury to persons
and damage to property.
General
Operating, charging and storage temperature is 0ºC to 40ºC (32ºF to 104ºF).
Warnings
• Only use those Plantronics products designed for use with this Plantronics system.
• CHILDREN. Never allow children to play with the product—small parts may be a choking hazard.
• Plug the AC adapter into the outlet nearest the equipment that is easily accessible.
• To reduce the risk of electric shock, explosion or fire, use only the supplied charger or Class 2 AC
adapter to charge the headset. Ensure that the voltage rating (e.g. 120v, 60 Hz) corresponds to the
power supply you intend to use.
• Do not disassemble the product or AC adapter as this may expose you to dangerous voltages or other
risks. Incorrect reassembly can cause electric shock or fire when the product is subsequently used.
• Do not insert anything into the product because this may cause damage to the internal components or
cause injury to you.
• If this system includes a mobile phone headset, check local laws regarding use of a mobile phone and
headset while driving. If you use the headset while driving, ensure your attention and focus remain on
driving safely.
• Use of a headset that covers both ears will impair your ability to hear other sounds. Use of such a
headset while operating a motor vehicle or riding a bicycle may create a serious hazard to you and/or
others, and is illegal in most states and regions.
• If this system includes a Bluetooth headset, observe all signs or instructions that require an electrical
device or RF radio product to be switched off in designated areas, such as hospitals, blasting areas,
potentially explosive atmospheres, and aircraft.
• Avoid contact with liquids. Do not locate this product near water, for example, near a bathtub, or sink,
in a wet basement, or near a swimming pool.
• Discontinue use of product and contact Plantronics if the product overheats, has a damaged cord or
plug, if the product has been dropped or damaged, or if the product has come into contact with liquids.
• This product should never be placed over or near a heat register and should not be placed in locations
without which do not have proper ventilation.
• If you experience a skin irritation after using this product, discontinue use and contact Plantronics.
• Exposure to high volume sound levels or excessive sound pressure may cause temporary or
permanent damage to your hearing. Although there is no single volume setting that is appropriate for
everyone, you should always use your headset/headphones with the volume set at moderate levels
and avoid prolonged exposure to high volume sound levels. The louder the volume, the less time is
required before your hearing could be affected. You may experience different sound levels when using
your headset /headphones with different devices. The device you use and its settings affect the level of
sound you hear. If you experience hearing discomfort, you should stop listening to the device through
your headset/headphones and have your hearing checked by your doctor. To protect your hearing,
some hearing experts suggest that you:
1. Set the volume control in a low position before putting your headset or headphones
on your ears and use as low a volume as possible.
2. Avoid turning up the volume to block out noisy surroundings. Whenever possible,
use your headset or headphones in a quiet environment with low background noise.
3. Limit the amount of time you use headsets or headphones at high volume levels.
4. Turn the volume down if the sound from the headset/headphones prevent you from hearing people
speaking near you.
See www.plantronics.com/healthandsafety for more information on headsets/headphones and hearing.
To avoid the risk of electric shock, explosion, fire or leakage of corrosive or toxic chemicals,
please observe the following charging and battery warnings:
Charging Warnings
• Use only the charger supplied by Plantronics to charge the product. Do not use the charger for any
other purpose. Ensure that the voltage rating corresponds to the power supply you intend to use.
• Charge the headset/headphones according to the instructions supplied with the unit.
• Plug the AC adapter or charger into an outlet that is near the equipment and will be
easily accessible.
• Never charge the battery where the temperature may fall below 0ºC (32ºF) or rise above 40ºC (104ºF) -
for example in an unattended motor vehicle.
• Avoid charging the battery while it is unattended.
Headset Battery Warnings
The headset is equipped with a non-replaceable battery. To reduce the risk of fire or injury to persons,
read and follow these instructions.
Do not attempt to open the headset or remove the battery.
Do not dispose of the headset or battery in a fire. The battery may explode. Check local laws for disposal
instructions.
Do not open or mutilate the battery. There may be corrosive materials which can cause damage to eyes
or skin and may be toxic if swallowed.
Charge the headset according to the instructions supplied with the headset.
RECYCLING: The battery used in your headset must be recycled or disposed of properly. Contact your
local recycling center for proper disposal of your headset.