Plantronics WO1 Wireless Communications System Base User Manual
Plantronics Inc Wireless Communications System Base Users Manual
Users Manual
Savi™ Office WO100 Professional Wireless Headset System
(WO1 Base + WH100 Headset)
Quick Start Guide
Guide de démarrage rapide
2-1
2-2
2-3
1
Quick Start
Welcome
Congratulations on purchasing your new Plantronics product. This Quick Start Guide contains
instructions for setting up the Savi Office WO100 Professional Wireless Headset System.
System Requirements
The minimum system requirements for Savi Office are as follows:
• SupportedOperatingSystems:WindowsXP,WindowsVista
• Processor:400MHzPentiumprocessororequivalent(Minimum);1GHzPentiumprocessoror
equivalent(Recommended)
• RAM:96MB(Minimum);256MB(Recommended)
• HardDisk:280MB(Minimum);500MB(Recommended)
• Display:800x600,256colours(Minimum);1024x768highcolour,32-bit(Recommended)
• InternetExplorerV6orbettermustbeontheuser’ssystem(Required)
Safety Instructions
Donotuseheadphones/headsetsathighvolumesforanextendedperiodoftime.
Doingsocancausehearingloss.Alwayslistenatmoderatelevels.Seewww.plantronics.com/
healthandsafety for more information on headsets and hearing.
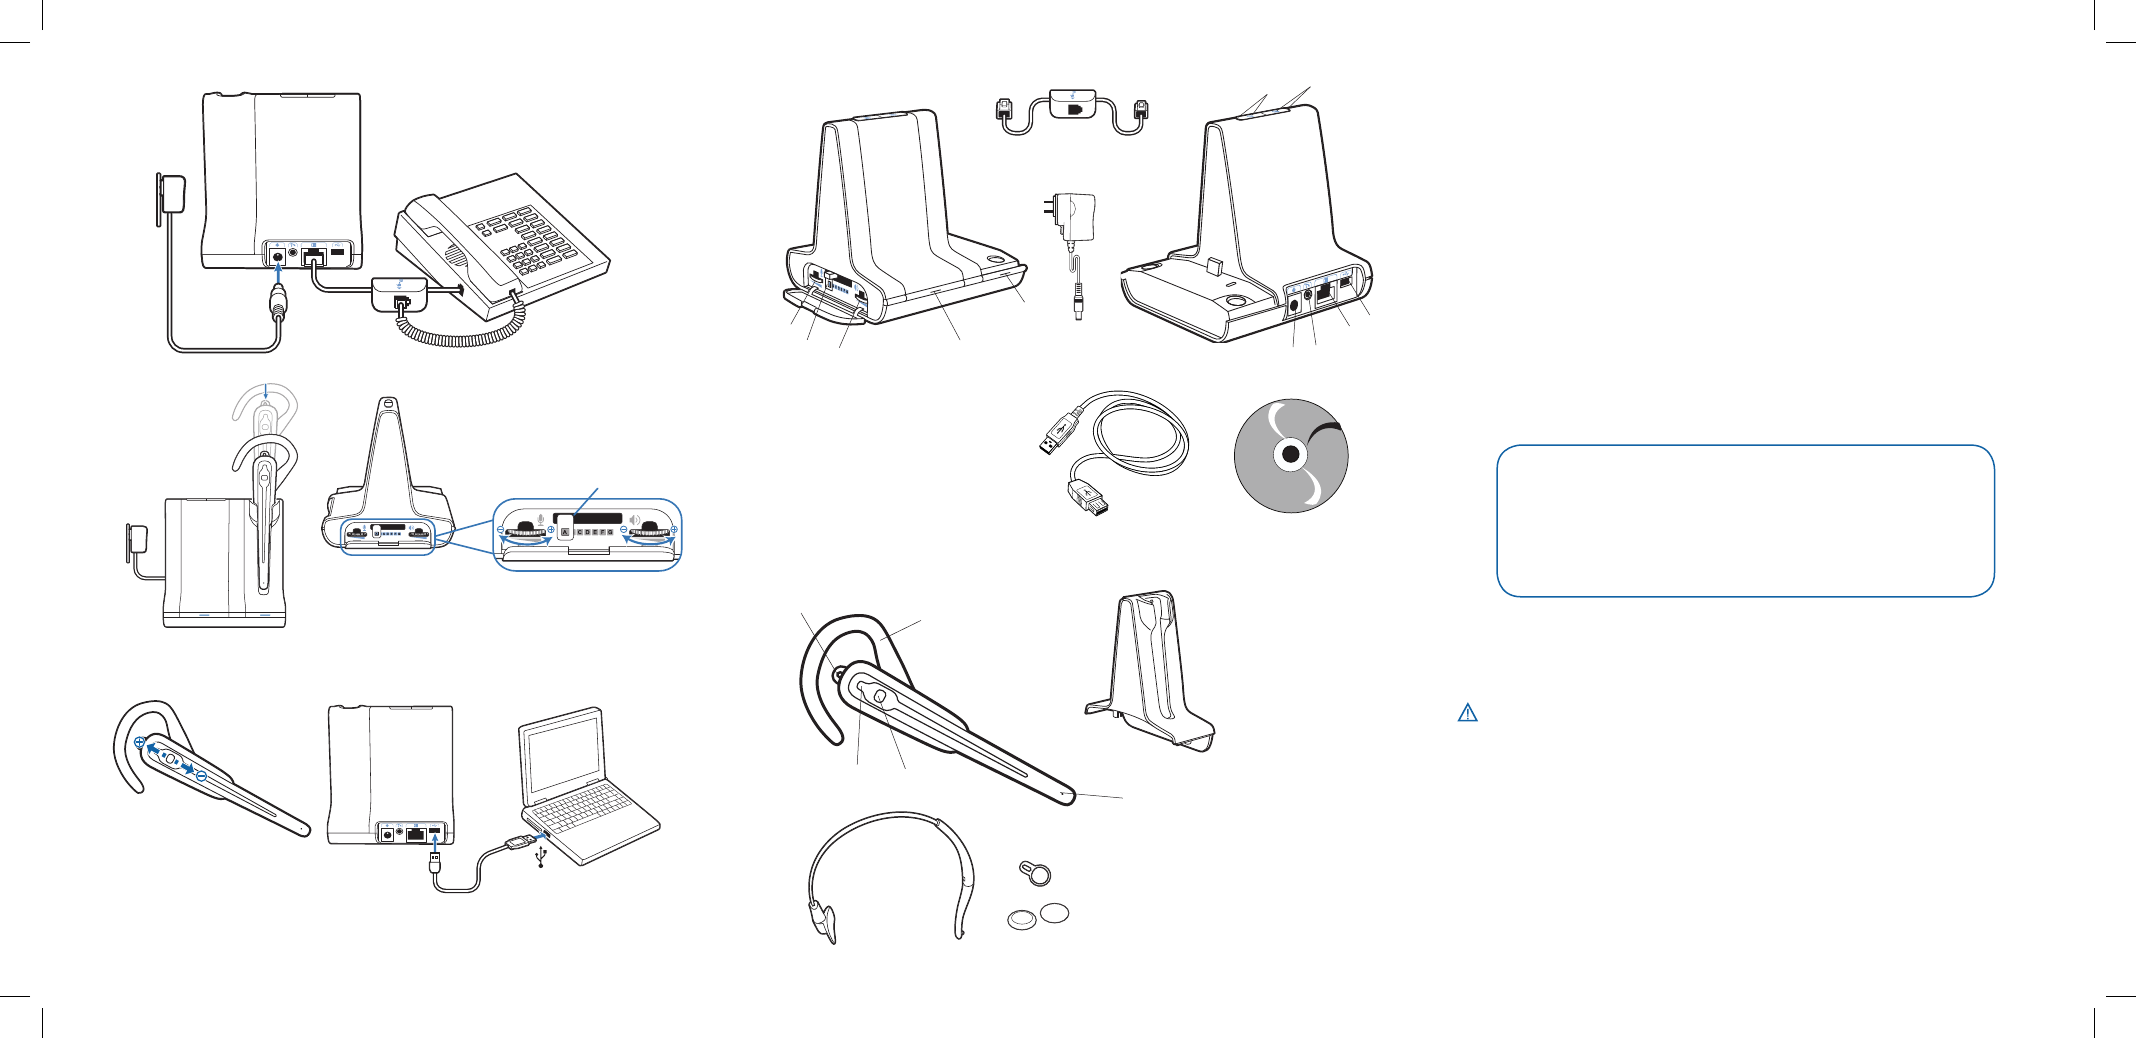
Savi WH100 Headset
Savi WO1 Base
1.DeskPhoneSpeakingVolume
2.CongurationSwitch
3.DeskPhoneListeningVolume
4.SubscriptionButtonandIndicatorLight
5.Power/ChargingIndicatorLight
6.PowerJack
7.HandsetLifterJack
8.TelephoneInterfaceCableJack
9.USBPort
10.DeskphoneTalkButtonandIndicatorLight
11.PCTalkButtonandIndicatorLight
Telephone
InterfaceCable
BasePower
Supply
CDincludes:
•PerSono® Suite Software
•AnimatedSetupGuide
•CompleteUserGuide
USBCable
10
67
8
11
9
3-1
3-2
4
5-7
7-1
7-2
We highly recommend that you refer to the CD
for Animated Set Up instructions and the complete
User Guide.
5-2
6-6
5-2
6-5
5-2
6-4
5-6
1.Earloop
2.EarTab
3.IndicatorLight
4.CallControlButton(alsocontrols
volume,muteandswitching
functions)
5.Microphone
6.Headband
7.ChargeCradle
8.ExtraEarTab
9.FoamEarCushions
6
7
21
3
5
4
9
8
4
23
1
5

Setting Up the Savi Office WO100 System
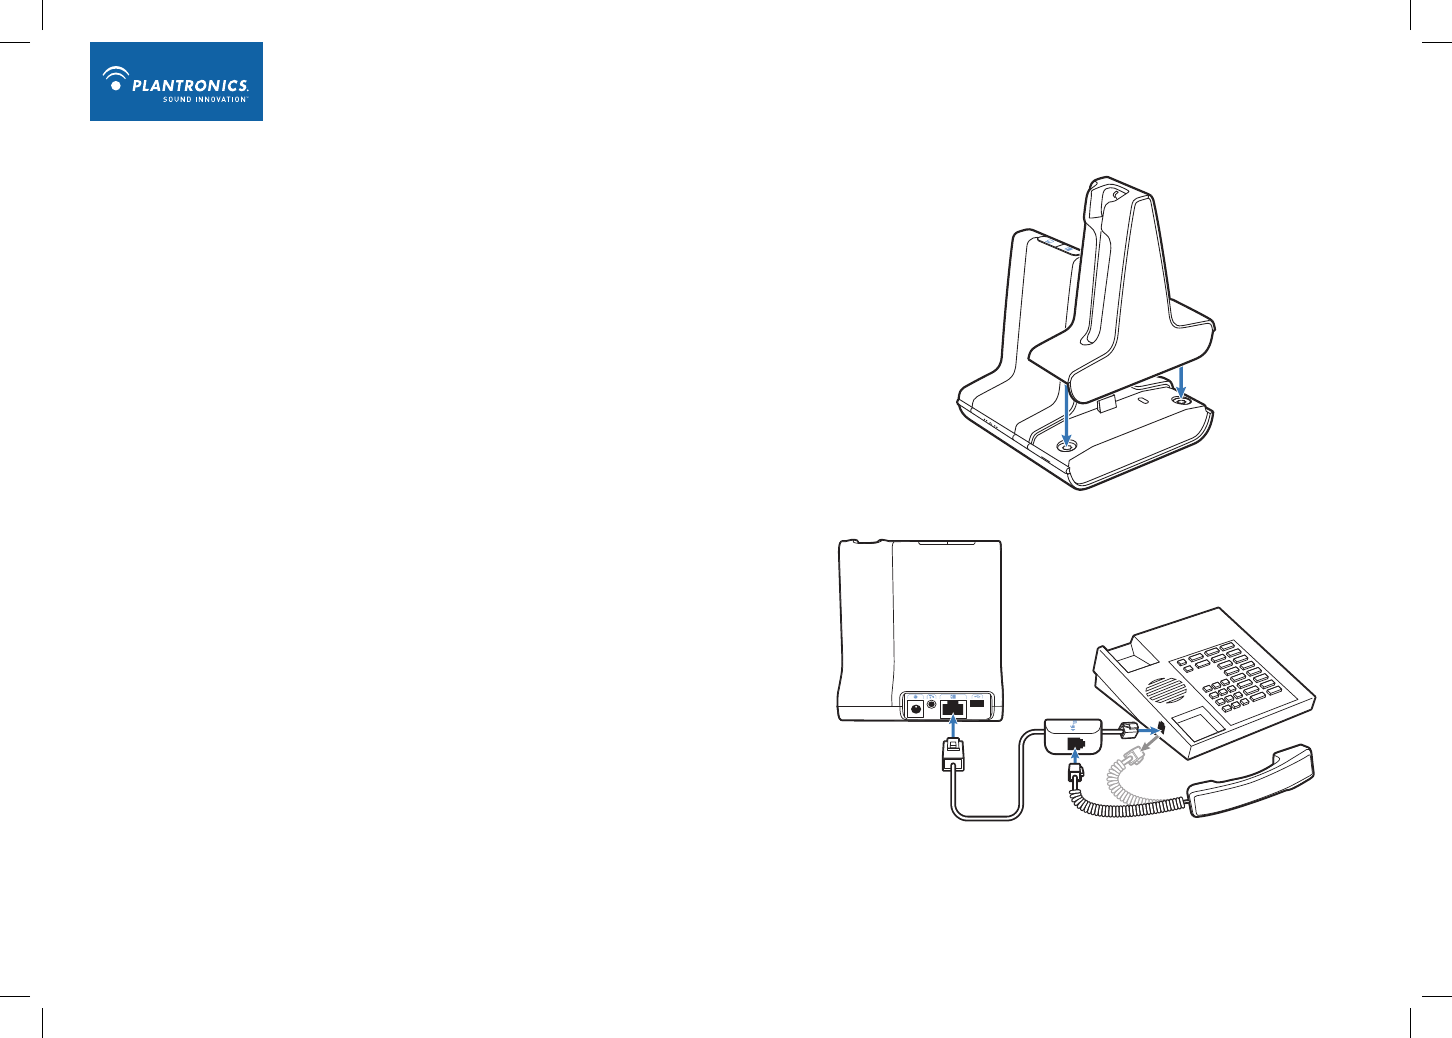
1. Attaching Charge Cradle to Base
Connecttheheadsetchargecradletothebase.Pushrmlyonthecradleuntilthecradlesnaps
into place.
2. Connecting Base to Desk Phone
2-1. Connectthetelephoneinterfacecabletothetelephoneinterfacecablejackonthebase.
2-2. Afterdisconnectingthehandsetcoilcordfromthedeskphone,connectthetelephone
interfacecabletothenowopenhandsetportonthedeskphone.
2-3. Connectthehandsetcoilcordtothetelephoneinterfacecablejunctionbox.
3. Connecting Power Supply to Base
3-1. Connectthebasepowersupplyintothepowerjackonthebase.
3-2. Connect the power supply to outlet.
4. Docking and Charging Headset
Gentlypushtheheadsetintothechargecradle.Chargeforatleast20minutespriortotherstuse.
Afullchargetakes3hours.
5. Checking Configuration
5-1. Setvolumeondeskphonetomid-range.
5-2. Onthebase,ensurethecongurationswitchissetto“A”andthedeskphonespeaking
volumeanddeskphonelisteningvolumearebothsetto3.
NOTEFormostphones,thesefactorydefaultsettingswillsoundthebest.
5-3. Withyourheadseton,pressthecallcontrolbuttononheadset.
5-4. Removethehandsetfromdeskphonecradle.
5-5. Listenforadialtone.Ifthedialtonesoundsclear,continuewithStep6.MakingaTestCall
withDeskPhone.
5-6. Ifthedialtoneistooloudortoosoft,adjusttheheadsetvolumelevel.
5-7. Ifthedialtonestilldoesnotsoundclear,adjustthecongurationswitchuntilthedialtone
soundsthebest.
NOTEMultiplesettingsmightworkwithyourphone;however,onlyoneistheoptimalposition.
5-8. Pressthecallcontrolbuttonontheheadsetandreturnthehandsettothecradletocomplete
configuration.
6. Making a Test Call with Desk Phone
6-1. Withyourheadseton,pressthecallcontrolbuttononheadset.
6-2. Removethehandsetfromdeskphonecradle.
6-3. Dialthenumberusingyourdeskphone.
6-4. Ifneeded,adjustthelisteningvolumeontheheadset.
6-5. Ifthelisteningvolumeisstilltooloudortoosoft,adjustthedeskphonelisteningvolume
onthebase.
6-6. Ifthespeakingvolumeistooloudortoosoftforyourlistener,adjustthedeskphone
speakingvolumeonthebase.
6-7. Pressthecallcontrolbuttonontheheadsetandreturnthehandsettothecradleto
complete the test call.
7. Connecting to the PC
7-1. ConnecttheUSBcabletotheUSBportonthebackofthebase.
7-2. ConnecttheotherendoftheUSBcabletotheUSBportonthePC.
7-3. InserttheCDandinstallthePerSonoSuitesoftware.Followtheinstallationinstructions
shown on your PC.
8. Making a Test Call with PC
8-1. EnsurethePerSonoSuitesoftwareisrunningonyourPC.
8-2. Withyourheadseton,pressthePCtalkbuttononthebase.
8-3. Dialthenumberusingyoursoftphoneapplication.
8-4. Adjustlisteningandspeakingvolumeusingyoursoftphoneapplicationand/or“soundand
audiodevices”inyourPCcontrolpanel.
8-5. You can fine tune the listening volume on the headset.
8-6. Toendthetestcall,pressthecallcontrolbuttonontheheadset.
PleaserefertothecompleteUserGuidelocatedontheCDforfurtherdetailsonhowtouseyour
Savi Office WO100 Professional Wireless Headset System.
CHARGING TIME
20 min .....................
Minimum charge
before first use
3 hours ...................
Full charge

Micro-casque Savi WH100
Base Savi WO1
1.Volumed’émissiondutéléphone
2.Commutateurdeconguration
3.Volumederéceptiondutéléphone
4.Boutond’associationetvoyant
5.Voyantd’alimentation/charge
6.Prised’alimentation
7.Prisedudécrocheurdecombiné
8.Prisedecâbled’interfacetéléphonique
9.PortUSB
10.Boutondeconversationpartéléphoneetvoyant
11.Boutondeconversationparordinateuretvoyant
1.Contourd’oreille
2.Embout
3.Voyant
4.Boutondecontrôledesappels
(contrôleaussilevolumeetles
fonctions de sourdine et de
commutation)
5.Microphone
6.Serre-tête
7.Chargeur
8.Emboutpouroreillesupplémentaire
9.Coussinetsenmousse
Câble
d’interfacetéléphonique
Blocd’alimentation
delabase
ContenuduCD:
•LogicielPerSono®
•Guidedecongurationanimé
•Guidedel’utilisateurcomplet
CâbleUSB
10
67
8
11
9
Bienvenue
FélicitationspourvotrenouveauproduitPlantronics.Ceguideexpliquecommentinstallerle
systèmedemicro-casquesanslprofessionnelSaviOfceWO100.
Configuration système requise
LacongurationsystèmerequisepourSaviOfceestlasuivante:
•Systèmesd’exploitationcompatibles:WindowsXPetWindowsVista
•Processeur:400MHz(minimum);1GHz(recommandé)
•Mémoire:96Mo(minimum);256Mo(recommandé)
•Disquedur:280Mo(minimum);500Mo(recommandé)
•Afchage:800x600,256couleurs(minimum);1024x768,couleurs32bits(recommandé)
•InternetExplorerversion6
Renseignements sur la sécurité
Attention:N’utilisezpaslescasquesetmicro-casquesàvolumeélevésurdelongues
périodes.Celapourraitprovoquerdesproblèmesd’audition.Conserveztoujoursunniveau
d’écoutemodéré.Consultezlesitewww.plantronics.com/healthandsafetypourobtenirdeplus
amplesrenseignementssurlesmicro-casquesetl’audition.
Nous vous recommandons fortement de vous
reporter aux instructions du guide de configuration
animé et du guide de l’utilisateur complet sur le CD.
6
7
21
3
5
4
9
8
4
23
1
5

Installation du Savi Office WO100
1. Connexion du chargeur à la base
Connectezlechargeuràlabase.Appuyezfermementsurlechargeurjusqu’àcequ’ilsoitbienen
place.
2. Connexion de la base au téléphone
2-1. Branchezlecâbled’interfacedanslaprised’interfacedelabase.
2-2. Débranchezlecâbleenroulédecombinésurletéléphone,puisbranchezlecâbled’interface
danscettemêmeprisesurletéléphone.
2-3. Branchezlecâbleenroulédecombinédanslaboîtedejonctionducâbled’interface.
3. Branchement du bloc d’alimentation
3-1. Branchezlamini-chedublocdanslaprised’alimentationdelabase.
3-2. Branchezlachedansunepriseélectrique.
4. Recharge du micro-casque
Poussezdoucementlemicro-casquedanslechargeur.Chargezlemicro-casquependantaumoins
20minutesavantdel’utiliserpourlapremièrefois.Unechargecomplètedure3heures.
5. Vérification de la configuration
5-1. Surletéléphone,réglezlevolumeàlamoitié.
5-2. Assurez-vousquelesélecteurdecongurationdelabaseestpositionnésur«A»etqueles
volumesd’émissionetderéceptiondutéléphonesontrégléssur3.
REMARQUE : surlaplupartdestéléphones,cesréglagespardéfautpermettentd’obtenirla
meilleurequalitésonore.
5-3. Mettezlemicro-casque,puisappuyezsurleboutondecontrôledesappels.
5-4. Soulevezlecombinédutéléphone.
5-5. Vousdevriezentendrelatonalité.Sielleestnette,passezàl’étape6.Appeldetestavecle
téléphone.
5-6. Silatonalitéesttropforteoutropfaible,réglezlevolumedumicro-casque.
5-7. Si,malgrévosréglages,latonalitén’esttoujourspasclairementaudible,changezlaposition
dusélecteurdecongurationjusqu’àcequ’ellevousconvienne.
REMARQUE : mêmesiplusieursréglagespeuventfonctionneravecletéléphone,unseulest
optimal.
5-8. Pourterminerlaconguration,appuyezsurleboutondecontrôledesappelsdumicro-
casqueetreposezlecombinésurletéléphone.
6. Appel de test avec le téléphone
6-1. Mettezlemicro-casque,puisappuyezsurleboutondecontrôledesappels.
6-2. Soulevezlecombinédutéléphone.
6-3. Composezlenumérosurletéléphone.
6-4. Aubesoin,réglezlevolumederéceptionsurlemicro-casque.
6-5. S’ilestencoretropfortoutropfaible,ajustez-lesurlabasedutéléphone.
6-6. Silevolumed’émissionneconvientpasàvotreinterlocuteur,réglez-lesurlabasedu
téléphone.
6-7. Pourterminerl’appeldetest,appuyezsurleboutondecontrôledesappelsdumicro-
casqueetreposezlecombinésurletéléphone.
7. Connexion à l’ordinateur
7-1. BranchezuneextrémitéducâbleUSBdansleportUSBàl’arrièredelabase.
7-2. Branchezl’autreextrémitédansunportUSBdel’ordinateur.
7-3. InsérezleCDdanslelecteuroptiquedel’ordinateuretinstallezlelogicielPerSono.Suivez
lesinstructionsafchées.
8. Appel de test avec l’ordinateur
8-1. DémarrezPerSonoSuitesurl’ordinateur.
8-2. Mettezlemicro-casque,puisappuyezsurleboutondeconversationparPCsurlabase.
8-3. Composezlenumérodetéléphoneavecvotreapplicationdetéléphonie.
8-4. Vouspouvezréglerlevolumed’émissionetd’écouteavecl’applicationdetéléphonieou
avecl’optionSonsetpériphériquesaudioduPanneaudecongurationdeWindows.
8-5. Vouspouvezajusterlevolumed’écoutesurlemicro-casque.
8-6. Pourraccrocher,appuyezsurleboutondecontrôledesappelsdumicro-casque.
Pourplusdedétailssurl’utilisationdevotresystèmedemicro-casquesanslprofessionnelSavi
OfceWO100,consultezleguidedel’utilisateursurleCD.
TEMPS DE CHARGE
20 min .....................
Charge minimale avant
la première utilisation
3 heures ..................
Charge complète

Plantronics,Inc.
345EncinalStreet
SantaCruz,CA95060
UnitedStates
Tel:800-544-4660
Tel:831-426-5858
www.plantronics.com
©2008Plantronics,Inc.Allrightsreserved.Plantronics,thelogodesign,PerSono,Savi,andSoundInnovationare
trademarksorregisteredtrademarksofPlantronics,Inc.Allothertrademarksarethepropertyoftheirrespectiveowners.
PatentsUS5,210,791;PatentsPending.
80531-02(12.08)
ThisdevicecomplieswithPart15oftheFCCRules.Operationissubjecttothefollowingtwoconditions:
1.Thisdevicemaynotcauseharmfulinterference,and
2.Thisdevicemustacceptanyinterferencereceived,includinginterferencethatmaycauseundesiredoperation.
ThisequipmenthasbeentestedandfoundtocomplywiththelimitsforaClassBdigitaldevice,pursuanttoPart15oftheFCCRules.
Theselimitsaredesignedtoprovidereasonableprotectionagainstharmfulinterferenceinaresidentialinstallation.Thisequipment
generates,uses,andcanradiateradiofrequencyenergyand,ifnotinstalledandusedinaccordancewiththeinstructions,maycause
harmfulinterferencetoradiocommunications.However,thereisnoguaranteethatinterferencewillnotoccurinaparticularinstallation.If
thisequipmentdoescauseharmfulinterferencetoradioortelevisionreceptionwhichcanbedeterminedbyturningtheradioortelevision
offandon,theuserisencouragedtotrytocorrectinterferencebyoneormoreofthefollowingmeasures:
1.Reorientorrelocatethereceivingantenna.
2.Increasetheseparationbetweentheequipmentandreceiver.
3.Connecttheequipmentintoanoutletonanothercircuit.
4.Consultthedealeroranexperiencedradio/TVtechnicianforhelp.
FCCREGISTRATIONINFORMATION—Part68
ThisequipmentcomplieswithPart68oftheFCCrulesandtherequirementsadoptedbyACTA.Ontheexteriorofthisequipmentisalabel
thatcontainsaproductidentierintheformatUS:AAAEQ##TXXXX.Ifrequested,thisinformationmustbeprovidedtoyourtelephone
company.
AplugandjackusedtoconnectthisequipmenttothepremiseswiringandtelephonenetworkmustcomplywiththeapplicableFCCPart
68rulesandrequirementsadoptedbyACTA.Acomplianttelephonecordandmodularplugisprovidedwiththisproduct.Itisdesignedto
beconnectedtoacompatiblejackthatisalsocompliant.Seeinstallationinstructionsfordetails.
TheRENisusefultodeterminethequantityofdevicesyoumayconnecttoyourtelephoneline.ExcessiveRENsonatelephonelinemay
resultinthedevicesnotringinginresponsetoanincomingcall.Inmost,butnotallareas,thesumoftheRENsshouldnotexceedve(5.0).
Tobecertainofthenumberofdevicesyoumayconnecttoyourline,asdeterminedbytheREN,contactyourlocaltelephonecompany.For
productsapprovedafterAugust8,2001,theRENforthisproductispartoftheproductidentierthathastheformatUS:AAAEQ##TXXXX.
Thedigitsrepresentedby###aretheRENwithoutthedecimalpoint.(Forexample,03representsaRENof0.3.)Forearlierproducers,the
RENisseparatelyshownonthelabel.
Ifthistelephoneequipmentcausesharmtothetelephonenetwork,thetelephonecompanywillnotifyyouinadvancethattemporary
discontinuanceofservicemayberequired.Butifadvancenoticeisn’tpractical,thetelephonecompanywillnotifythecustomerassoonas
possible.Also,youwillbeadvisedofyourrighttoleacomplaintwiththeFCCifyoubelieveitisnecessary.
Thetelephonecompanymaymakechangesinitsfacilities,equipment,operations,orproceduresthatcouldaffecttheproperfunctioning
ofyourequipment.Iftheydo,youwillbenotiedinadvanceinorderforyoutomakenecessarymodicationstomaintainuninterrupted
service.
Iftroubleisexperiencedwiththisunit,forrepairorwarrantyinformation,pleasecontactcustomerserviceat(800)544-4660.Ifthe
equipmentiscausingharmtothenetwork,thetelephonecompanymayrequestthatyoudisconnecttheequipmentuntiltheproblemis
resolved.
DONOTDISASSEMBLETHISEQUIPMENT:itdoesnotcontainanyuser-serviceablecomponents.
WerecommendtheinstallationofanACsurgearresterintheACoutlettowhichthisequipmentisconnected.Telephonecompaniesreport
thatelectricalsurges,typicallylightingtransients,areverydestructivetocustomerterminalequipmentconnectedtoACpowersources.
ExposuretoRFRadiation
Theinternalwirelessradiooperateswithintheguidelinesfoundinradiofrequencysafetystandardsandrecommendations,whichreectthe
consensusofthescienticcommunity. Independentstudieshaveshownthattheinternalwirelessradioissafeforusebyconsumers.Visit
www.plantronics.com for more information.
InordertocomplywithFCCRFExposurerequirements,thebasemustbeinstalledandoperatedsuchthataminimumseparationdistance
of20cmismaintainedbetweenthebaseandallpersonsduringnormaloperation.
NOTE: ModicationsnotexpresslyapprovedbyPlantronics,Inc.couldvoidtheuser’sauthoritytooperatetheequipment.
INDUSTRY CANADA REGULATORY INFORMATION
ThisClassBdigitalapparatuscomplieswithCanadianICES-003.
CetappareilnumériquedelaclasseBestconformeàlanormeNMB-003duCanada.