Plugwise SCAN Plugwise Network Device User Manual 15a ZB9 SCAN EN
Plugwise B.V. Plugwise Network Device 15a ZB9 SCAN EN
Plugwise >
Contents
- 1. 15_ZB9-SCAN_User Manual
- 2. 15a_ZB9-SCAN_User Manual EN
15a_ZB9-SCAN_User Manual EN
Scan
200.106.110211
Presence detecon
Manual
2 3
Scan Manual
Thank you for buying this extension to your Plugwise system.
The Scan enables you to detect people’s presence by means of
an IR sensor and to switch appliances and lighng on and o
when people are or are not present in a room. The wireless
Scan is baery operated and communicates measurement
data by means of the Plugwise ZigBee protocol. This does
not require the computer to be le on. The Scan also has a
‘daylight override’ opon to switch lights o automacally
if the ambient light intensity is above a specied value for a
certain period (the override opon is switched o as standard).
This manual describes the installaon of a single Scan, but the
same steps can be followed if you want to install mulple Scans
at the same me.
Before you start
• Werecommendthatyoufollowthismanualcarefully;itisessenal
totakethestepsinthecorrectorder.
• To be able to use the Scan, you will require a Plugwise network
consisngofatleastaSckorStretchandaCircle+.
A Plugwise network can never contain more Scans than 5 mes the number
of Circles. What this manual explains for the Circle also applies to the
Stealth and the Sng, or a combinaon thereof.
• Ensure that you use the latest version of Source and that your
moduleshavethelatestrmwareversion.Youcancheckthisbyclicking
theUpdatesbuoninSource.TheScanisonlysupportedifallother
moduleshavermwareversion2.36(asof13-05-2011)orlater.Ifthisis
notyetthecase,priortotheinstallaonoftheScan,theothermodules
mustrstbeupdated.InSource,checkwhethertheSckandallofthe
modulesareonline.
• InSource,checkwhethertheckattheboomleofthescreen
showsthattheSckisonline:
• InSource,checkinthetreeat‘Overviews’toseewhetheralldevices
areonline.Thisisindicatedbygreyandyellowlights:
• OnlyinsertthebaerywhenyoustarttousetheScan.AScanuses
agreatdealmorepowerifitisnotconnectedtoaPlugwisenetwork.
• TousetheScan,itmustbeconnectedtoaPlugwisenetwork.Finally,
theScanmustbemountedontheceiling.Thesestepsareexplainedin
moredetailbelow.
• Check whether all components are present. If a component is
missing,pleasecontactusassoonaspossible.
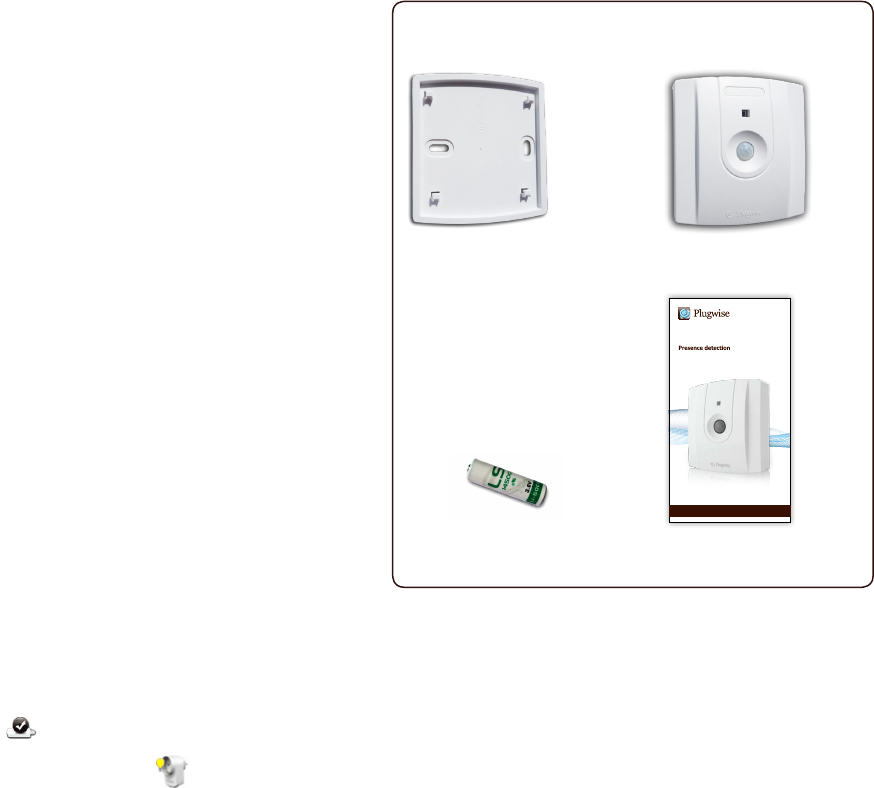
Contents of the package
• PerScan:
ScanMounng plate
Scan
200.106.110211
Manual
1 3,6V AA baery This manual
4 5
1. Adding the Scan to your
Plugwise network
ÌAddingtheScantoyourPlugwisenetwork.
When you are asked to select a network, select the network to which the
Scan must be added.
ÌFillintheIDoftheScan.ThisIDisindicatedonthesckersthatare
aachedtotheback.
ÌClickthebuonwiththegreenarrow:Next,inserttheAA
baeryintheScan,makingnoteofthe+and–marks.
ÌIfyouwanttoinstallmulpleScans,youcanaddtheIDsforallof
theScanstothelist.ThePlugwisenetworkwillthensearchforthe
ScanswiththenewIDsinthelist.WaitunlSourceindicatesthatthe
Scanisonline.Thecirclewiththequesonmarkwillthenchangeinto
thefollowingicon:
If the Scan is not found within several minutes, check whether the
Plugwise network is operang correctly (refer to ‘Before you start’). If the
Sck and the other modules are available in Source and the Scan is sll
not shown as being online, follow the instrucons to delete the network
sengs under ‘Delete network sengs’, see: ‘Advanced use’.
ÌClick‘Next’andthen‘Finish’.
TheScanisnowconnectedtoyournetwork.
2. Attaching the Scan to the ceiling
ÌTaketheScantothelocaonwhereitmustbeinstalled.TheScan
must always be in contact with its ‘parent’ (for example, a Circle),
otherwise no communicaon can take place. Addionally, to ensure
properfunconingoftheScan,itshouldbeinstalledinalocaonwhere
itisnotexposedtodirectsunlightorcarheadlightsandmustnotbe
directlyexposedtoanaircondionerorcentralheang/heater.
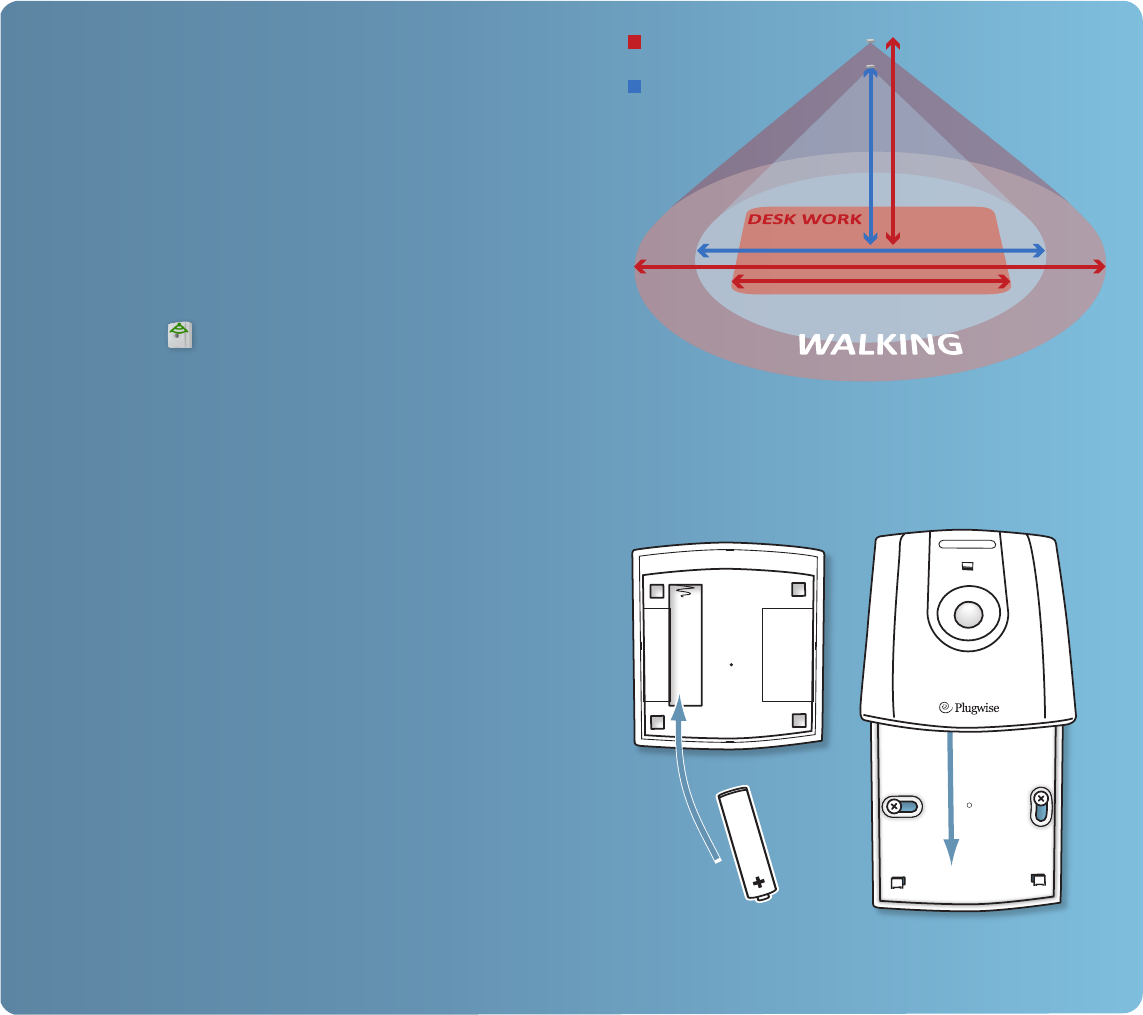
ÌThisScanhasthefollowingsensivitysengs:
ÌHighsensivity(parcularlysuitedtooceenvironments)
ÌMediumsensivity(mainlyforhomeuse)
ÌO
Thefollowinggureshowstherangeforthersttwosengsforvarious
degreesofregisteredmovements(forwalkingordeskwork)atvarious
opmalinstallaonheights.
ÌCheckwhetherSourcesllindicatesthattheScanisonline.Itcan
takeseveralminutesforthenetworktoprocessthenewlocaonofthe
Scan.
ÌAach the Scan mounng plate to the ceiling. The Up/Window
arrowontheinsideofthemounngplateindicatesthetop.Ensurethat
thePlugwiselogoonthefrontendsupinahorizontalposion:
Up/Window >
< Reset
ÌWhenthemounngplateisaachedtotheceiling,slidetheScan
fromaboveontotheplateunlyoufeeltheScanclickintoplace.
4.50 m
3.50 m
6 m
high sensivity
medium sensivity
2.40 m
2.70 m
6 7
3. Use
Communicaon in the network
The Scan contacts one of the Circles in your network. This Circle
transmits the measurement data to the other Circles. If the Circle that
the Scan tries to contact is unavailable, a connecon will be made with
another Circle. This can take several seconds. The computer does not
need to be switched on to be able to use the Scan.
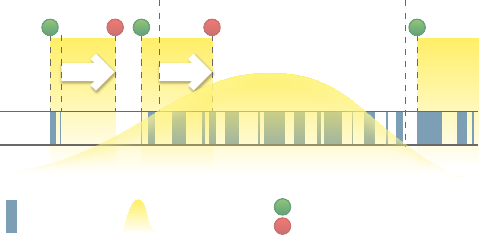
Switching and insight
The Scan can be set up, for example, to switch on lighng automacally
when human presence is registered. The Scan then sends a ‘Switch on’
command in case of a detected movement. If a ‘Switch on’ command
has already been sent, the command will not be sent again. A switching
delay can also be set up (1–255 minutes, 10 minutes is standard) to
determine that lighng is switched o aer a certain period in which
no movement is detected. In addion, ‘daylight override’ can also be
acvated. Starng at a certain level of ambient light, bearing in mind the
specied switching delay, the lighng is then switched o automacally.
Detected movements will be ignored: no addional ‘Switch on’
command will be sent unl the quanty of ambient light falls below a
certain lower-limit value.
The following gure shows how the Scan responds to detected
movements and ambient light in a given scenario.
An overview of the opons for linking switching acons to the Scan
in Source, as well as other soware funcons, is available in the latest
Source manual. The manual is available at www.plugwise.com/manuals.
The Scan does not take into account other switching acons in the
network, such as those from the Plugwise Switch or Plugwise Source.
Removing Scan
If the Scan will (temporarily) no longer be used, it can be removed from
the Plugwise network.
ÌStart Source and go to Sengs, Devices.
ÌThe list of ‘Non-assigned modules’ is displayed to the right of the
screen. Right-click the Scan and then click ‘Delete’.
ÌThe Scan will now be ignored by the network.
ÌTo also physically remove the Scan from the ceiling, follow the steps
as described in secon 2, ‘Aaching the Scan to the ceiling’, in reverse
order.
ÌNote: remove the baery. As long as the Scan is not assigned to a
network, it will consume more power and the baery will therefore
drain more quickly.
4. Advanced use
Connecng Scan to another network
Aer a Scan has been removed from a network (see the explanaon
above), it can be connected to another Plugwise system. To do this,
follow the normal installaon procedure.
Restarng Scan
In case of problems, the Scan can be restarted. For this purpose, a reset
buon can be found on the back of the module, which can be acvated
by inserng a long, thin object such as a pin or a paperclip (not a pencil
or mechanical pencil, which can break o) in the hole marked ‘Reset’.
When the LED light in the casing (on the front of the module) begins to
ash, the Scan has restarted.
Deleng network sengs
You can also delete all of the sengs saved on the Scan. As a result,
the Scan will also forget its posion in the network. To delete all of the
sengs, follow the instrucons as described in the secon ‘Restarng
Scan’, but keep the reset buon pressed unl the rapid ashing of the
LED light stops. This should take about 10 seconds.
Firmware updates
When a new rmware version is available, the update can be
downloaded and sent to the Scan. More informaon on rmware
updates is provided in the Source manual. Aer you send the rmware
update from Source, press the white wake buon on the top of the
front of the Scan. The Scan will then waken temporarily to receive and
install the rmware update.
LIGHTS ON LIGHTS ON
switching
delay
switching
delay
upper limit
ambient light
‘daylight override’
acvated
‘daylight override’
deacvated
lower limit
ambient light
LIGHTS ON
LIGHTS OFF
ON
ON
ON ONOFF
OFF
OFF
movement
detected
level of
ambient light
Switch on/off
command sent

8 9
5. Environment
Old electrical and electronic devices oen contain
valuablematerials.Therefore,neverdisposeofdiscarded
devicesasnormalhouseholdrubbish.Handthedevice
intoalocalauthoritycolleconpointforelectricaland
electronicdevices.
Neverthrowbaeriesawaywiththehouseholdrubbish;insteadhand
theminatthespecialcolleconpoints.
6. Technical details
Specicaons
Parameters Min. Nominal Max. Unit Comments
Installaon
Installaonheight 2.40 2.70 3.50 m
Environment
Operaonal 0
5
60
95
˚C
%RH Nocondensaon
Storage -40
0
85
95
˚C
%RH Nocondensaon
Power supply
Supplyvoltage 3.2 3.6 3.6 Vdc Single3.6V(2400mAh)AA
Liionbaery
Baerylife 2 year
Basedon1rmwareupdate
peryear,amaintenance
intervalof24hoursand±20
switchaconsperday.
Powerconsumpon 150 mW
Infrared detecon
Wavelengthrange 3 14 μm Opmisedforpresence
deteconofpeople
Deteconangle 170 ˚ Dependingonposionof
installaon
Deteconrange 0 6 m
Dimensions 86x80x21 mm Heightxwidthxdepth
Memory
Storagecapacity 512 kByte UsedforZigBeermware
updates
Servicelife 100,000 Cycles Programming/deleng
ZigBee communicaon
Baudrate 250 kbps O-QPSK
Frequency 2400 2483.5 MHz 6 channels of the 2.4 GHz
ISMband
Bandwidth 2.0 MHz 5MHzchannelspace
Receponsensivity -92 -97 -98 dBm @1%per20-bytepacket
Transmissionpower -32 3 5 dBm
LED
WhentheScansendsdatawirelesslyviathePlugwiseZigBeeprotocol,
aredLEDlightstartstoashinthecasing.
7. Support and contact
AdetailedPlugwiseSourcemanualisdisplayedifyouclickthe‘Help’
buonattheboom ofthe screen.Our websitecontainsapageof
frequentlyaskedquesons:
www.plugwise.com
Ifyou sllhavequesons,pleasecontactusviathecontactform on
thesupportpageonourwebsiteorviaourservicenumber.Youcan
ofcoursealsocontactusifcomponentsaremissing.Wewouldalsobe
pleasedtohearfromyouifyouarehappywiththedeliveredproduct.