Poly Habitat Soundscaping Mesh Waterfall Installation Guide
User Manual: Poly Habitat Soundscaping Support | Poly, formerly Plantronics & Polycom
Open the PDF directly: View PDF ![]() .
.
Page Count: 17
INSTALLATION + MAINTENANCE MANUAL
CUSTOM WATER PANEL
COMPONENTS & INSTALLATION
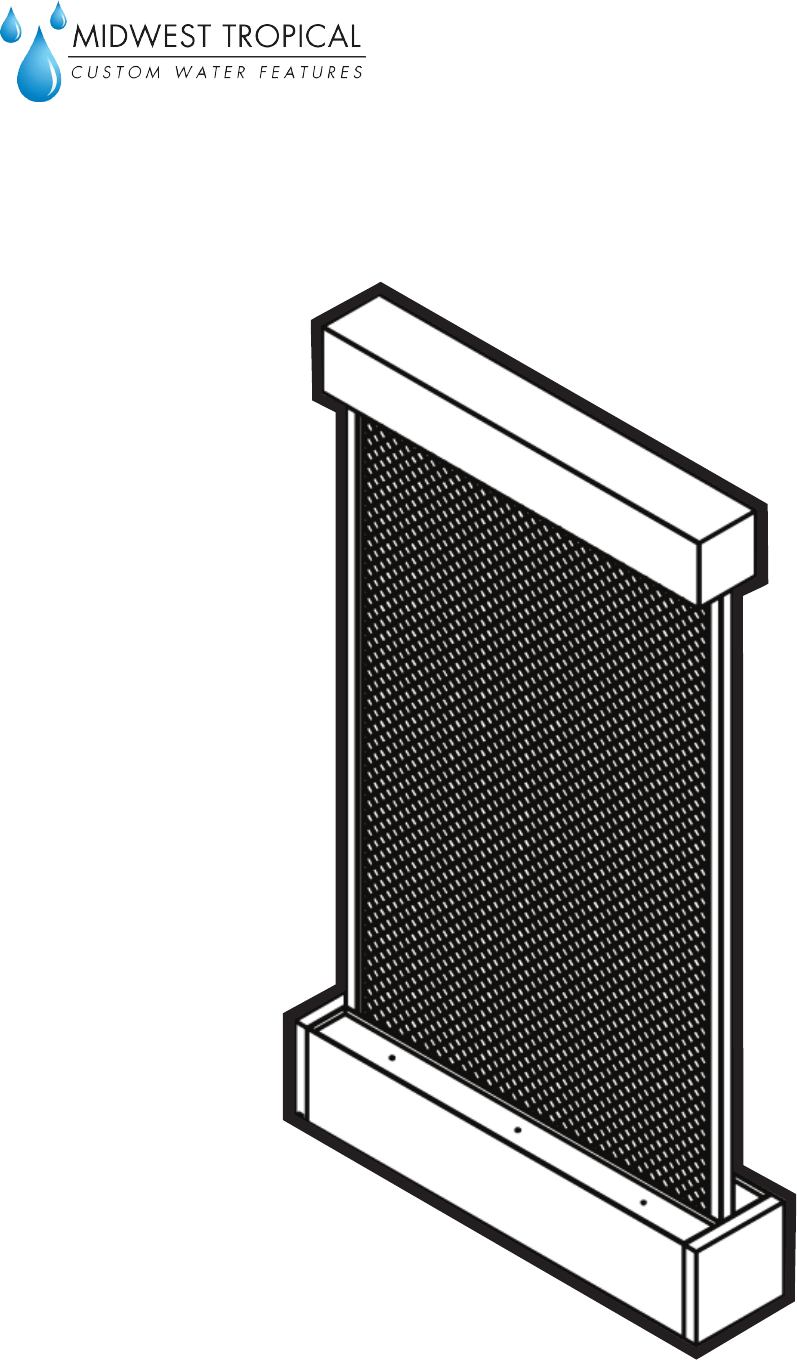
Mesh Waterfall Installation Guide

2
Mesh Waterfall
CAUTION: WHEN SERVICING YOUR WATER FEATURE MAKE SURE THAT YOU DISCONNECT ALL ELECTRICAL AND LIGHTING.
Midwest Tropical Inc • 3420 West Touhy Ave • Skokie, IL 60076 USA • Phone: (847)679-6666 • Fax: (847)679-6669
Welcome
Product features
Uncrating the unit
Tools
Instructions
Waterfall technical Information
Technical drawings
Installed components
Installation and operation
What you will need
Cleaning and maintenance
Pump and
maintaining the water
General cleaning
Troubleshooting
3
4
6
9
12

3
Mesh Waterfall
CAUTION: WHEN SERVICING YOUR WATER FEATURE MAKE SURE THAT YOU DISCONNECT ALL ELECTRICAL AND LIGHTING.
Midwest Tropical Inc • 3420 West Touhy Ave • Skokie, IL 60076 USA • Phone: (847)679-6666 • Fax: (847)679-6669
Congratulations on receiving a your new Mesh
Waterfall. This document contains the information you
need to install, operate and troubleshoot your new
water feature.
• Stainless steel wire mesh provides a slow, tranquil
ow of water.
• Mesh serves as an acoustic barrier for ambient
noise.
Welcome
Product Features

4
Mesh Waterfall
CAUTION: WHEN SERVICING YOUR WATER FEATURE MAKE SURE THAT YOU DISCONNECT ALL ELECTRICAL AND LIGHTING.
Midwest Tropical Inc • 3420 West Touhy Ave • Skokie, IL 60076 USA • Phone: (847)679-6666 • Fax: (847)679-6669
Your water feature was sent to you inside of a wooden
crate to protect the water feature from any damage.
The following documentation will walk you through
how to uncrate your waterfall.
1. Your container will be marked to indicate which
side is the front of the water feature.
2. Position the container so that the indicated front
face is facing towards the ceiling.
3. Starting from the marked front face of the panel
use the drill with the No. 2 Phillips bit to remove all of
the screws. Remove the cardboard.
4. The waterfall is wrapped in plastic and surrounded
by protective insulation foam.
5. Remove the top layer of insulation foam, but do not
throw it away. Use the insulation foam to protect
the stainless steel while you move the watr feature
to its nal position.
6. Remove the cardboard from the sides of the
shipping container. Remove the wooden frame
pieces from all sides.
7. Once all of the wood is removed, use the
assistance of a few colleagues to help pivot the
base from its current horizontal orientation to a
Uncrating the
Shipping
Container
Tools You Will
Need
Instructions
• Safety gloves
• Electric drill
• No. 2 Phillips bit
• Bit holder
• Glass holders
• Pair of at platform dollies
• Suction cup glass holders

5
Mesh Waterfall
CAUTION: WHEN SERVICING YOUR WATER FEATURE MAKE SURE THAT YOU DISCONNECT ALL ELECTRICAL AND LIGHTING.
Midwest Tropical Inc • 3420 West Touhy Ave • Skokie, IL 60076 USA • Phone: (847)679-6666 • Fax: (847)679-6669
vertical orientation.
8. Use caution when handling the water feature
because the mesh can be damaged if punctured
and things can get caught on the mesh surface.
9. Use dollies, if necessary, to move the panel to it’s
nal location or slide the panel into place.

6
Mesh Waterfall
CAUTION: WHEN SERVICING YOUR WATER FEATURE MAKE SURE THAT YOU DISCONNECT ALL ELECTRICAL AND LIGHTING.
Midwest Tropical Inc • 3420 West Touhy Ave • Skokie, IL 60076 USA • Phone: (847)679-6666 • Fax: (847)679-6669
Waterfall
Technical
Information
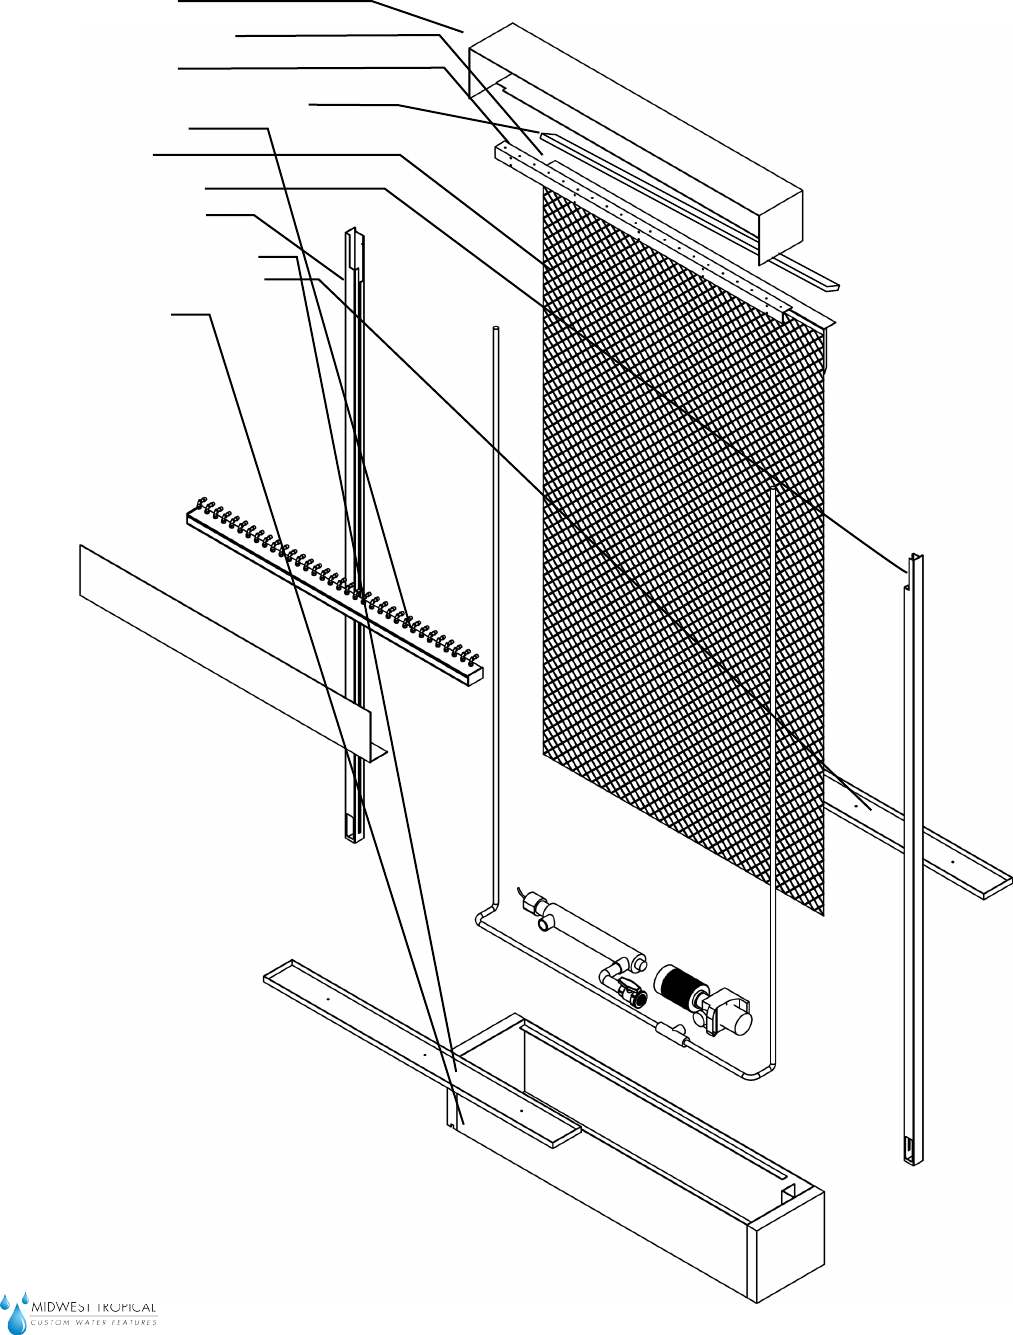
Technical
Illustrations
Your unit will ship as a standalone waterfall. The
following information describes what is included inside
of your water feature, as well as provide dimensions
and component locations.
See next page
7
Mesh Waterfall
CAUTION: WHEN SERVICING YOUR WATER FEATURE MAKE SURE THAT YOU DISCONNECT ALL ELECTRICAL AND LIGHTING.
Midwest Tropical Inc • 3420 West Touhy Ave • Skokie, IL 60076 USA • Phone: (847)679-6666 • Fax: (847)679-6669
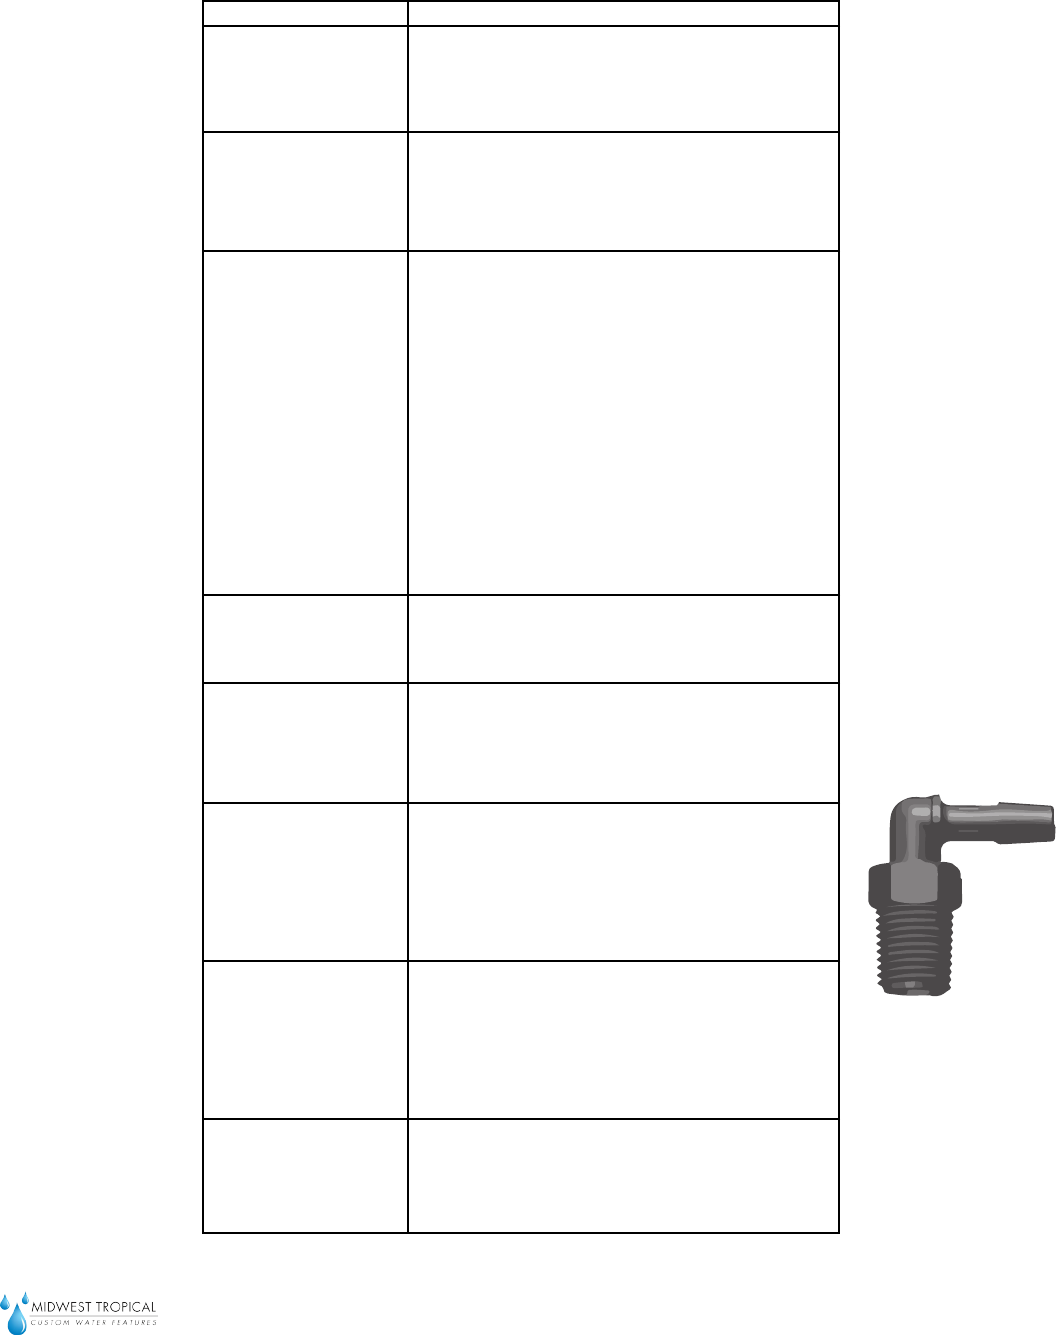
1. Header
2. Acrylic Guide
3. L-Bracket
4. Mesh clasp
5. Spray bar
6. Mesh
7. Side-post -R
8. Side post -L
9. Lid-top - front
10. Lid-top - Back
11. Base
1. 1/4 - 20 PHILLIPS
2. 10-24 PHILLIPS SCREW
(Header Door)
HARDWARE

8
Mesh Waterfall
CAUTION: WHEN SERVICING YOUR WATER FEATURE MAKE SURE THAT YOU DISCONNECT ALL ELECTRICAL AND LIGHTING.
Midwest Tropical Inc • 3420 West Touhy Ave • Skokie, IL 60076 USA • Phone: (847)679-6666 • Fax: (847)679-6669
Oase® Waterfall Pump
Max ow rate: 8000GPH
Power requirements: 120v / 60 hZ
Power consumption: 460 W
Usage: Submersed usage
Inlet: 2 inch
Pondmaster® UV Clarier
Max Flow rate: 3000GPH
Power Requirements: 120v / 60 hZ
Usage: Submersed, in-line, or external
Inlet: 1 1/2” threaded X 1 1/2” Barb
Installed
Components
• Oase® Waterfall Pump
• Pondmaster® UV Clarier

9
Mesh Waterfall
CAUTION: WHEN SERVICING YOUR WATER FEATURE MAKE SURE THAT YOU DISCONNECT ALL ELECTRICAL AND LIGHTING.
Midwest Tropical Inc • 3420 West Touhy Ave • Skokie, IL 60076 USA • Phone: (847)679-6666 • Fax: (847)679-6669
Note* An unleveled water fall will cause the water to ow
improperly.
Installation and
Operation
Step 1:
Prepare
Installation
Location
Step 2:
Position the
Water Feature
At this point your waterfall should be outside of the
shipping container; in a vertical position and near its
nal position. If not, refer to page 4 of this document.
The pump, lter, UV sterilizer, control valves will all be
accessible by removing the lid top. The plumbing
connections are completed prior to your receipt of the
unit. Please remove all packaging inside the base prior
to ling the basin with water. Run all electrical cords out
of the chase hole on the side of the tank. Do not plug in
any components until you’ve lled the base with water.
Before moving the water feature into place, you must
ensure the oor is perfectly level and at.
Remove any debris from the area surrounding the nal
placement of the water feature. Use a liquid level to
check the oor for level.
Use a dolly under each end of the water feature to
afford the ability to move the waterfall around easily.
Pivot the basin on one of the short edges. Roll one of the
dollies under the basin. Next, carefully, tilt the waterfall
so that the other dolly can be rolled underneath. Move
the waterfall as close to the nal location as possible.
To remove from dollies: Lift one side of the waterfall,
remove a dolly then rest the base onto the oor. Do the
same for the other side. Now you must slide the waterfall
into its nal location. After the waterfall is in position
check once again for level.
Tools You Will
Need
• Liquid level
• Shims
• Ladder or scissor lift
• Microber cloth
• Phillips screw driver
• Pair of low prole dollies
• Mallet
It is highly recommended that a party of 3 or more are
available to assist in installation.
The water feature requires a 120VAC 20 AMP Duplex out-
let (US Standard outlet).
Note* An unleveled water fall will cause the water to ow
improperly.

10
Mesh Waterfall
CAUTION: WHEN SERVICING YOUR WATER FEATURE MAKE SURE THAT YOU DISCONNECT ALL ELECTRICAL AND LIGHTING.
Midwest Tropical Inc • 3420 West Touhy Ave • Skokie, IL 60076 USA • Phone: (847)679-6666 • Fax: (847)679-6669
Step 2 (Cont.):
Position the
Water Feature
Step 4:
Fill with Water
Step 3:
Chase Cables
If the waterfall is not level use shims to level the
waterfall.
To use the shims:
Keep the level on the top of the basin of the waterfall.
Slightly tilt the waterfall, insert a shim starting from the
thinest end of the shim into the gap between the
oor and the bottom of the waterfall unit. Allow the
waterfall to rest on the shim. Check the level again
you may have to use the mallet to tap the shim further
into underside of the base. Repeat the process until
the base is level on all sides.
Once the base is level break off or cut the exposed
ends of the shims.
Your unit requires approximately 36 gallons of water.
(We recommend using distilled water.)
Fill the base directly, do not overll, The water surface
should be at least an inch below the electrical chase
hole.
Chase the cables for the water pump and UV sterilizer
out of the small hole on the side of the water fall base
make sure they reach the outlet.
Remove Lid tops on the base

11
Mesh Waterfall
CAUTION: WHEN SERVICING YOUR WATER FEATURE MAKE SURE THAT YOU DISCONNECT ALL ELECTRICAL AND LIGHTING.
Midwest Tropical Inc • 3420 West Touhy Ave • Skokie, IL 60076 USA • Phone: (847)679-6666 • Fax: (847)679-6669
Step 5:
Operating the
Water Fall
Step 6
First Run
Water Pump
Primary control
valve
UV sterilizer
Inside the base there is one valve to control the water
ow for the waterfall.
For more water onto the mesh turn the valve handle
towards perpendicular to the PVC piping; however,
avoid turning the valve completely perpendicular to
the piping as that will decrease the efciency of the
UV sterilizer.
Connect the cables to electrical power outlets. The
waterfall will begin to run. Adjust the primary control
valve to achieve the desired speed/ ow of waterfall.
Evaluate the waterfall to check for uneven ow, dry
spots or leaks.
If all is well close the lid tops, and replace the basin -
Lidtops.

12
Mesh Waterfall
CAUTION: WHEN SERVICING YOUR WATER FEATURE MAKE SURE THAT YOU DISCONNECT ALL ELECTRICAL AND LIGHTING.
Midwest Tropical Inc • 3420 West Touhy Ave • Skokie, IL 60076 USA • Phone: (847)679-6666 • Fax: (847)679-6669
Cleaning And
Maintenance
Pump And UV
Sterilizer
Each unit is fabricated to last for many years. To make
sure that it operates and looks as new as possible,
perform regular maintenance on the water feature.
Oase® Waterfall Pump
Cleaning the unit
● Regular cleaning of the pump may be necessary de-
pending upon the environment in which it is operated.
Clean the pump when it is visibly soiled or when a drop
in performance is detected. Clean the unit with
warm water using a soft brush.
● Never use aggressive cleaning agents or chemical
solutions. These could attack the housing surface or im-
pair the function.
● In the event of stubborn furring (calcium deposits),
a common household cleaner free from vinegar and
chlorine can be used. Subsequently, clean the pump
thoroughly using warm water.
Pondmaster® UV Clarier
The bulb has a life of 9000 hours before the UV
output drops below a useful level. It should remain on
24 hours per day throughout the season. For the best
possible performance, it is recommended that the
bulb be replaced every year. Remember, the bulb will
produce visible light long after it has stopped produc-
ing UV wavelength.
The quartz sleeve should be cleaned periodi-
cally of dirt or lime scale build-up since this will block
the UV light and reduce efciency. Clean the quartz
sleeve with vinegar and a scrub pad. Please dispose
of the used bulb in accordance with state hazardous
waste laws since it contains mercury.
13
Mesh Waterfall
CAUTION: WHEN SERVICING YOUR WATER FEATURE MAKE SURE THAT YOU DISCONNECT ALL ELECTRICAL AND LIGHTING.
Midwest Tropical Inc • 3420 West Touhy Ave • Skokie, IL 60076 USA • Phone: (847)679-6666 • Fax: (847)679-6669
Maintaining The
Water
The water inside the basin will need to be regularly
maintained to deter growth of micro-organisms, and
maintain clear, odorless water. We Recommend using
Protec® for removing and preventing white scale build
up and stains from contaminants in the water. We also
recommend using Fountec® to kill all types of algae and
prevents re growth in the water, it also clarifies the water.
Replace the water once a year or as needed.
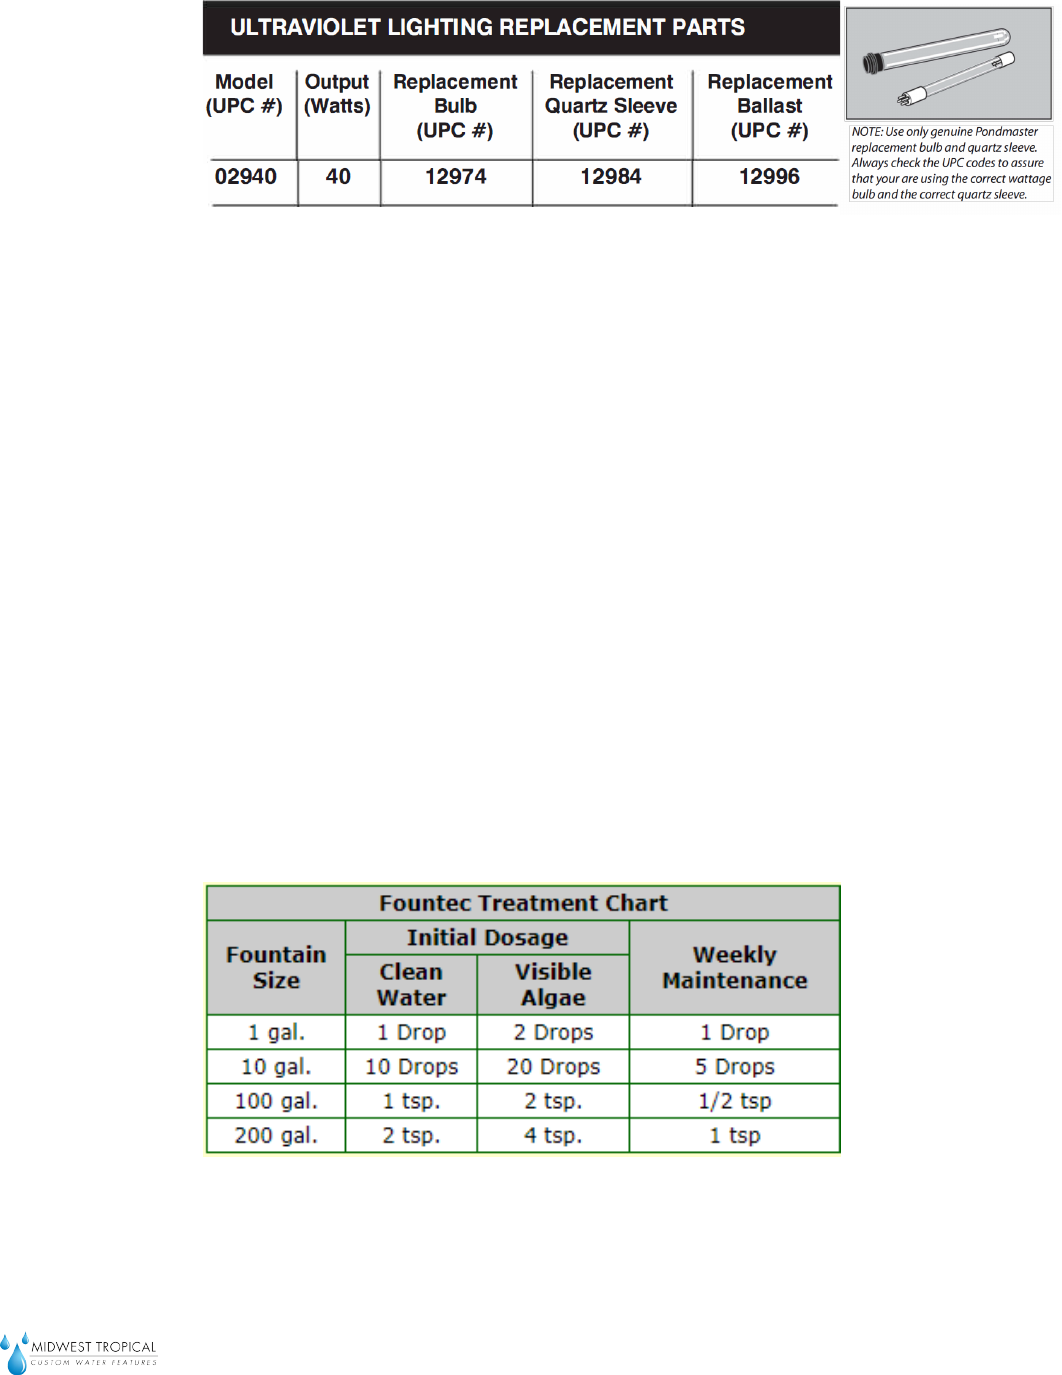
Fountec® Algaecide, Clarier
Before You Start: The most effective use of Fountec
is best achieved when fountain and water garden
equipment has been checked and is working properly.
If needed, backwash or clean the lter according to
instructions. Occasional small use of chlorine product
to non-chlorine shock helps remove organic waste
and excessive algae growths. Follow recommended
dosage for your water feature size.

14
Mesh Waterfall
CAUTION: WHEN SERVICING YOUR WATER FEATURE MAKE SURE THAT YOU DISCONNECT ALL ELECTRICAL AND LIGHTING.
Midwest Tropical Inc • 3420 West Touhy Ave • Skokie, IL 60076 USA • Phone: (847)679-6666 • Fax: (847)679-6669
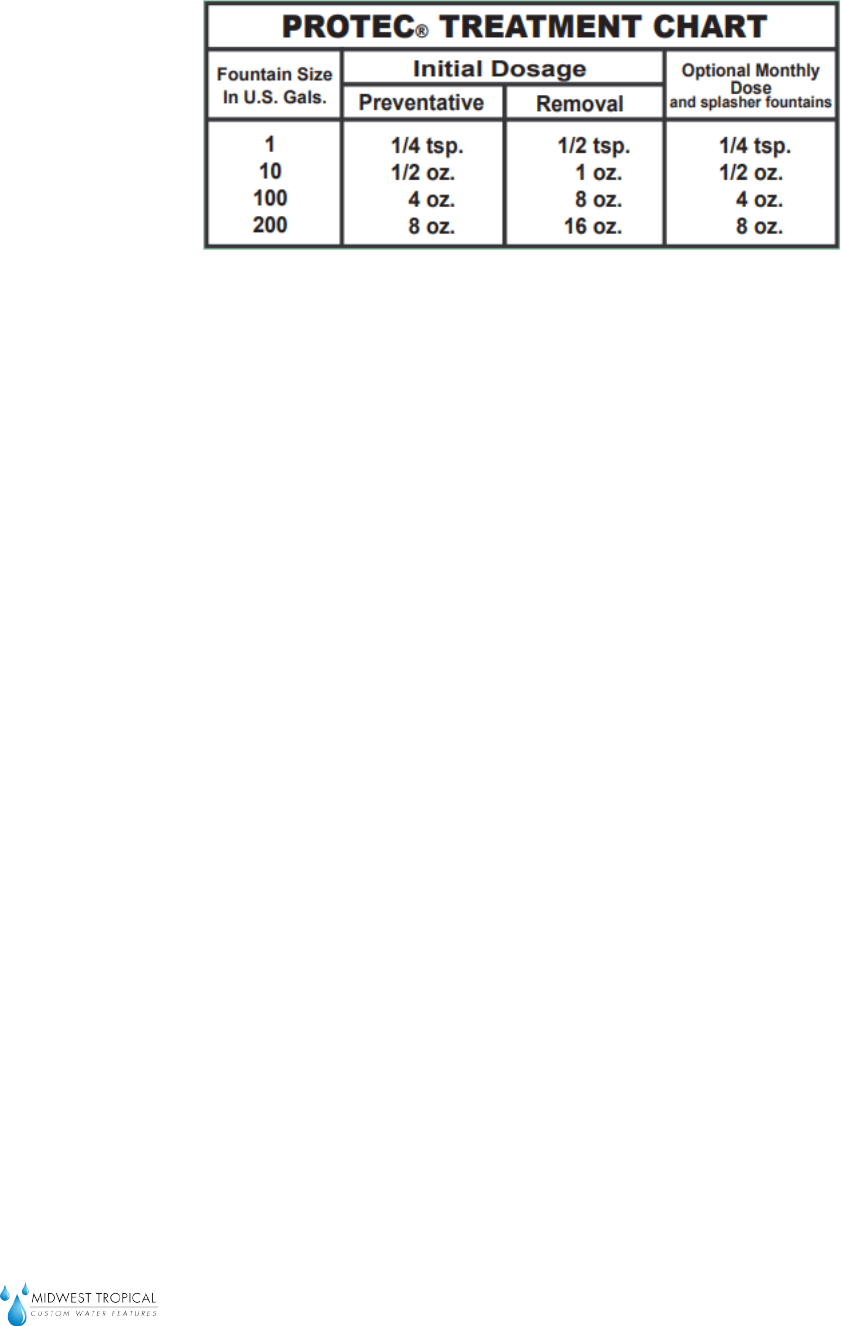
Protec® Scale & Stain Remover
Before You Start: The best use of Protec® is achieved
when the fountain is clean of debris and freshly
lled with clean water. Water fountains with normal
loss of water due to evaporation require only the
“Preventative” treatment after initial lling. Fountains
with some loss of water due to splashing (leakage)
require “Optional Monthly dose.”
Fountec® Algaecide, Clarier
Maintenance: To maintain water clear and algae-free,
add the proper Fountec initial dosage under “Clean”
for your fountain size. The addition of Fountec “Weekly
Dosage” makes for easier maintenance by keeping
water clear and algae-free.
Cleanup: For maximum effectiveness, water
containing heavy algae growth should be cleaned
of excess debris. Add and dispense proper Fountec
dosage under “Visible Algae” directly to water.
Super chlorination or shock treatments synergize with
Fountec to improve the control of algae. In fountains;
a non-chlorine shock is recommended,follow label
instructions. Operate circulation pump during algae
clean-up period to ensure through distribution and
maximum cleanup effect.
Maintaining The
Water(Cont)
15
Mesh Waterfall
CAUTION: WHEN SERVICING YOUR WATER FEATURE MAKE SURE THAT YOU DISCONNECT ALL ELECTRICAL AND LIGHTING.
Midwest Tropical Inc • 3420 West Touhy Ave • Skokie, IL 60076 USA • Phone: (847)679-6666 • Fax: (847)679-6669
General
Cleaning:
Stainless Steel
We Recommend using Weimans® Stainless Steel
Cleaner & Polish Aerosol on any exposed surfaces of
stainless steel
Weimans® Stainless Steel &Polish Aerosol
Shake well before using.
• Spray directly onto surface.
• Wipe in the direction of the natural metal grain
using a clean, soft cloth.
• Buff with a dry cloth to achieve a brilliant shine.
Maintaining The
Mesh
Check the mesh and water basin daily for paper or
plastic debris. Debris may be small enough to pass
through the plumbing, but get caught in the mesh. An
accumilation of debris could cause water to detach
from the mesh and mist.
16
Mesh Waterfall
CAUTION: WHEN SERVICING YOUR WATER FEATURE MAKE SURE THAT YOU DISCONNECT ALL ELECTRICAL AND LIGHTING.
Midwest Tropical Inc • 3420 West Touhy Ave • Skokie, IL 60076 USA • Phone: (847)679-6666 • Fax: (847)679-6669
Dry spots on
mesh
There is not
enough water
in the base
Pump not
operating at full
power
First Run your hand over the dry
area. If that doesn’t resolve the
issue. Check if base is level
Fill with more water
Water ow is too low, adjust the
control valve
Air may be trapped inside the
pump or piping.
To resolve, disconnect all cables,
disconnect pipes from the water
pump and remove pump out of
the water, allowing the air es-
cape.
Next submerge the pump back
into the base and reconnect the
plumbing from underwater
Spitting/Misting
from panel
Decrease water ow with the
Primary control valve
Mesh is dirty. Use a vaccum to
remove debris that is too stubborn
to remove with soap and water.
Spray Bar
clogged
Open door on header. Clogged
spray nozzle. Unscrew the
troubled, black nozzle by twisting
counter clockwise, and run warm
water through nozzle.
Disengage the Spray Bar from
the glass and rinse with CLR. Use
a Pipe cleaner to dislodge any
obstructions inside the nozzles
Troubleshoot Problem Solution
Uneven Water
Flow
Pump Is Loud/
Can Hear A
Sucking Sound
Black Nozzle
17
Mesh Waterfall
CAUTION: WHEN SERVICING YOUR WATER FEATURE MAKE SURE THAT YOU DISCONNECT ALL ELECTRICAL AND LIGHTING.
Midwest Tropical Inc • 3420 West Touhy Ave • Skokie, IL 60076 USA • Phone: (847)679-6666 • Fax: (847)679-6669
Leaking water
(unknown loca-
tion)
Water
wrapping
around from
mesh to side
post
DISCONNECT ALL ELECTRICAL CABLE.
Check if water level is above
electrical chase hole
Check to see if the mesh is touching
the inside channel of side post. Try to
see if the mesh can be realigned to
not touch the side post.
Problem Solution
Leaking Water
