Pro Nets Technology WA25TD2 ADSL 2 PLUS ROUTER WIRELESS User Manual WA25TC2
Pro-Nets Technology Corporation ADSL 2 PLUS ROUTER WIRELESS WA25TC2
Contents
- 1. Users Manual 1
- 2. Users Manual 2
- 3. Users Manual 3
- 4. Users Manual 4
Users Manual 3
61
8. Access Management
8.1 ACL
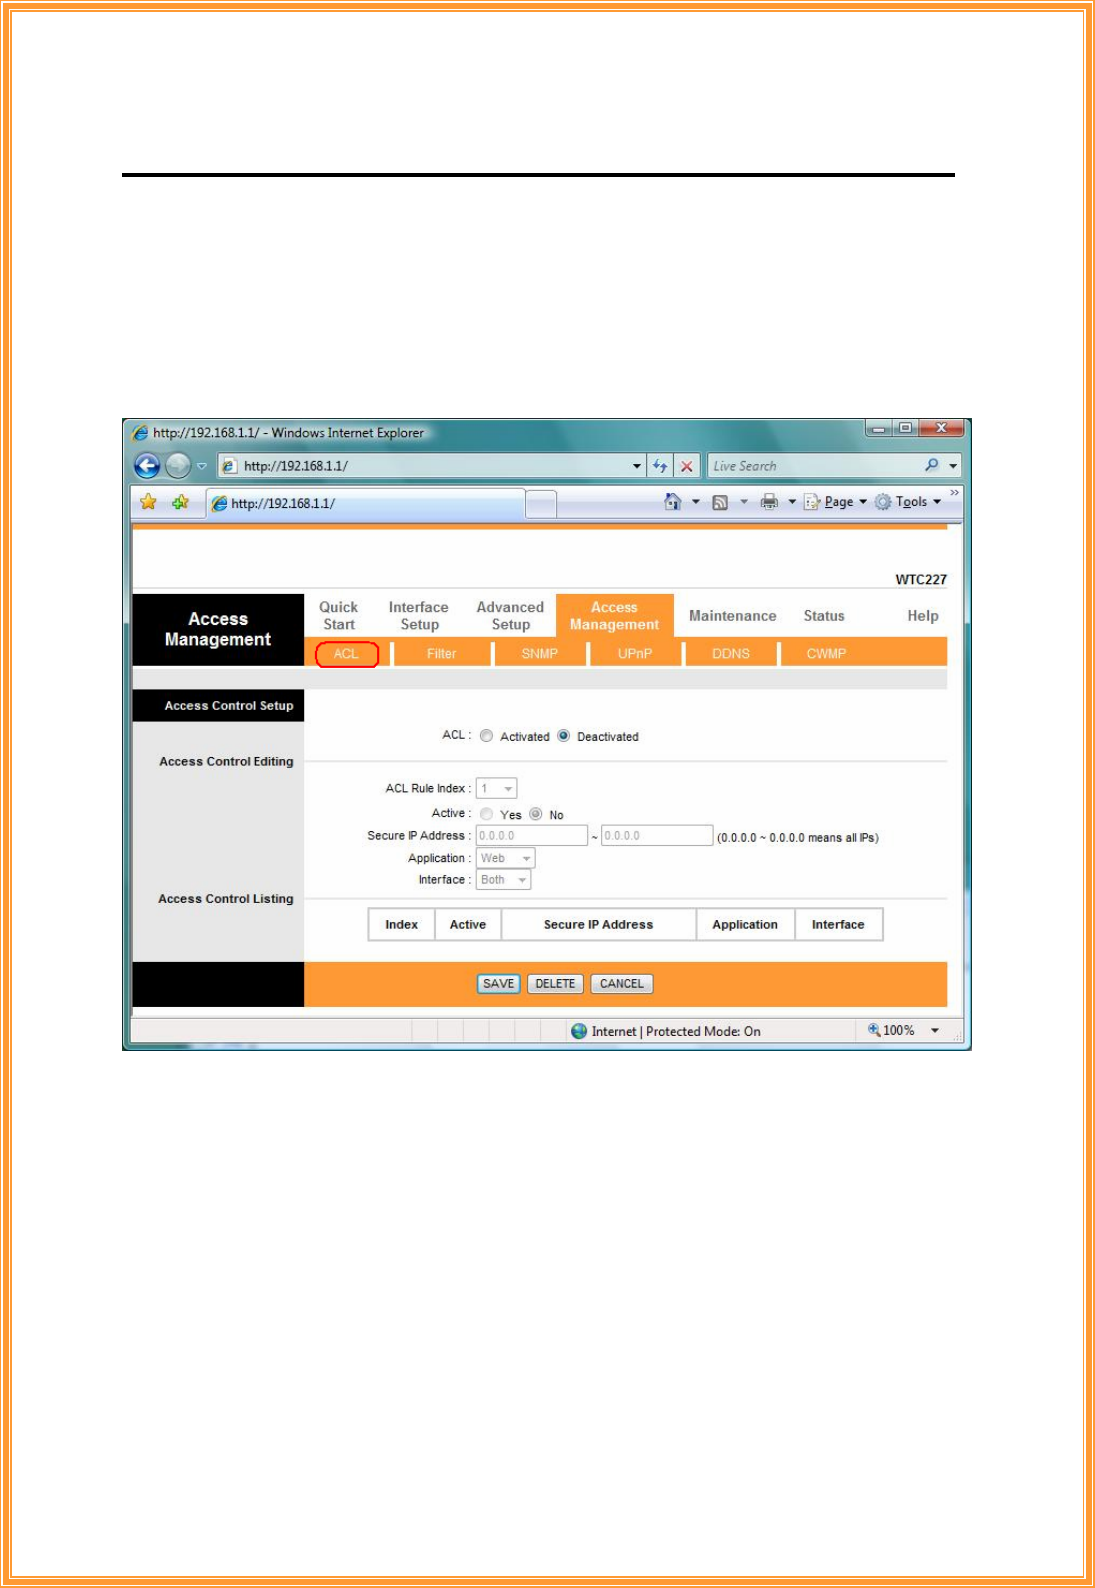
Go to Access Management Æ ACL to enable remote management. Access Control
Listing (ACL) is a management tool that acts as a filter for incoming or outgoing packets, based
on application. You may use telnet or Web to remotely manage the ADSL Router. User just
needs to enable Telnet or Web and give it an IP address that wants to access the ADSL Router.
The default IP 0.0.0.0 allows any client to use this service to remotely manage the ADSL Router.
ACL: There has Activated & Deactivated option. The default setting is Deactivated which
means all IP can access via router. If you choose Activated, you only can access via router by
listed IP addresses.
ACL Rule Index: Index number from 1 and up to 16.
Active: Once you choose Yes then you can access the IP via router.
Application: Each of these labels denotes a service that you may use to remotely manage the
Router. Choices are Web, FTP, Telnet, SNMP, Ping, ALL.
Interface: Select the access interface. Choices are WAN, LAN and Both.
62
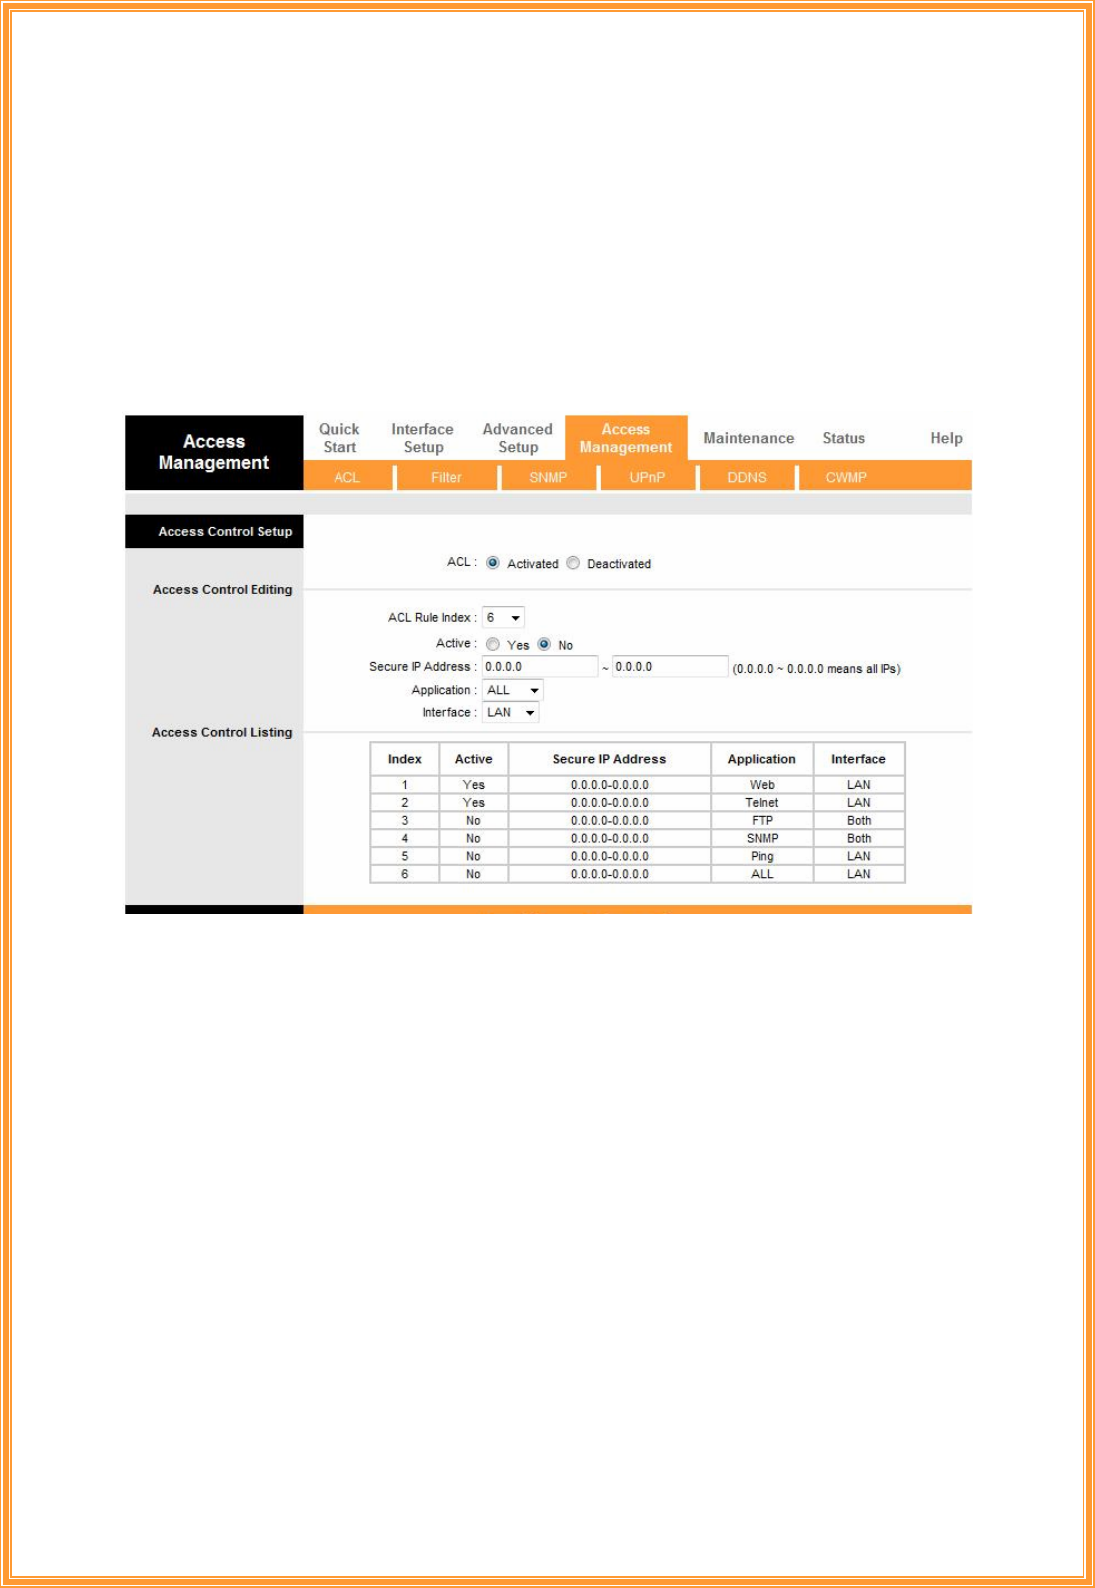
For Example:
How to set your ACL?
1. You must choose Activated to enable your ACL function.
2. Select the ACL Rule Index number (up to 16 number)
3. You can set the specific Secure IP address or set 0.0.0.0 for all IPs.
4. Choose the Application which you want to access for this ACL Rule index.
5. Select the Interface you want to access from.
6. After all settings are ready, click SAVE and continue next ACL Rule Index setting.
[Note]
1. You must set one ACL index to access your router via LAN interface. If you don’t, your
router cannot access other listed IP Address. (Refer to Index 1).
2. Remember! Once you active your ACL function, you only can access via router by listed
Secure IP Address.
8.2 Filter
The Router provides extensive firewall protection by restricting connection parameters to
limit the risk of intrusion and defending against a wide array of common hacker attackers. Go to
Access Management Æ Filter to set different IP filter rules of a given protocol (TCP, UDP, or
ICMP) and a specific direction (incoming, outgoing, or both) to filter the packets.
IP Filter is a more complex filtering tool, based more on IP and custom rules. Each of the indices
can hold six rules, and each interface can have four associated indices, allowing 24 rules per
interface. If all six rules in an index are Next rules, the data will be sent to the next index for
filtering.
63
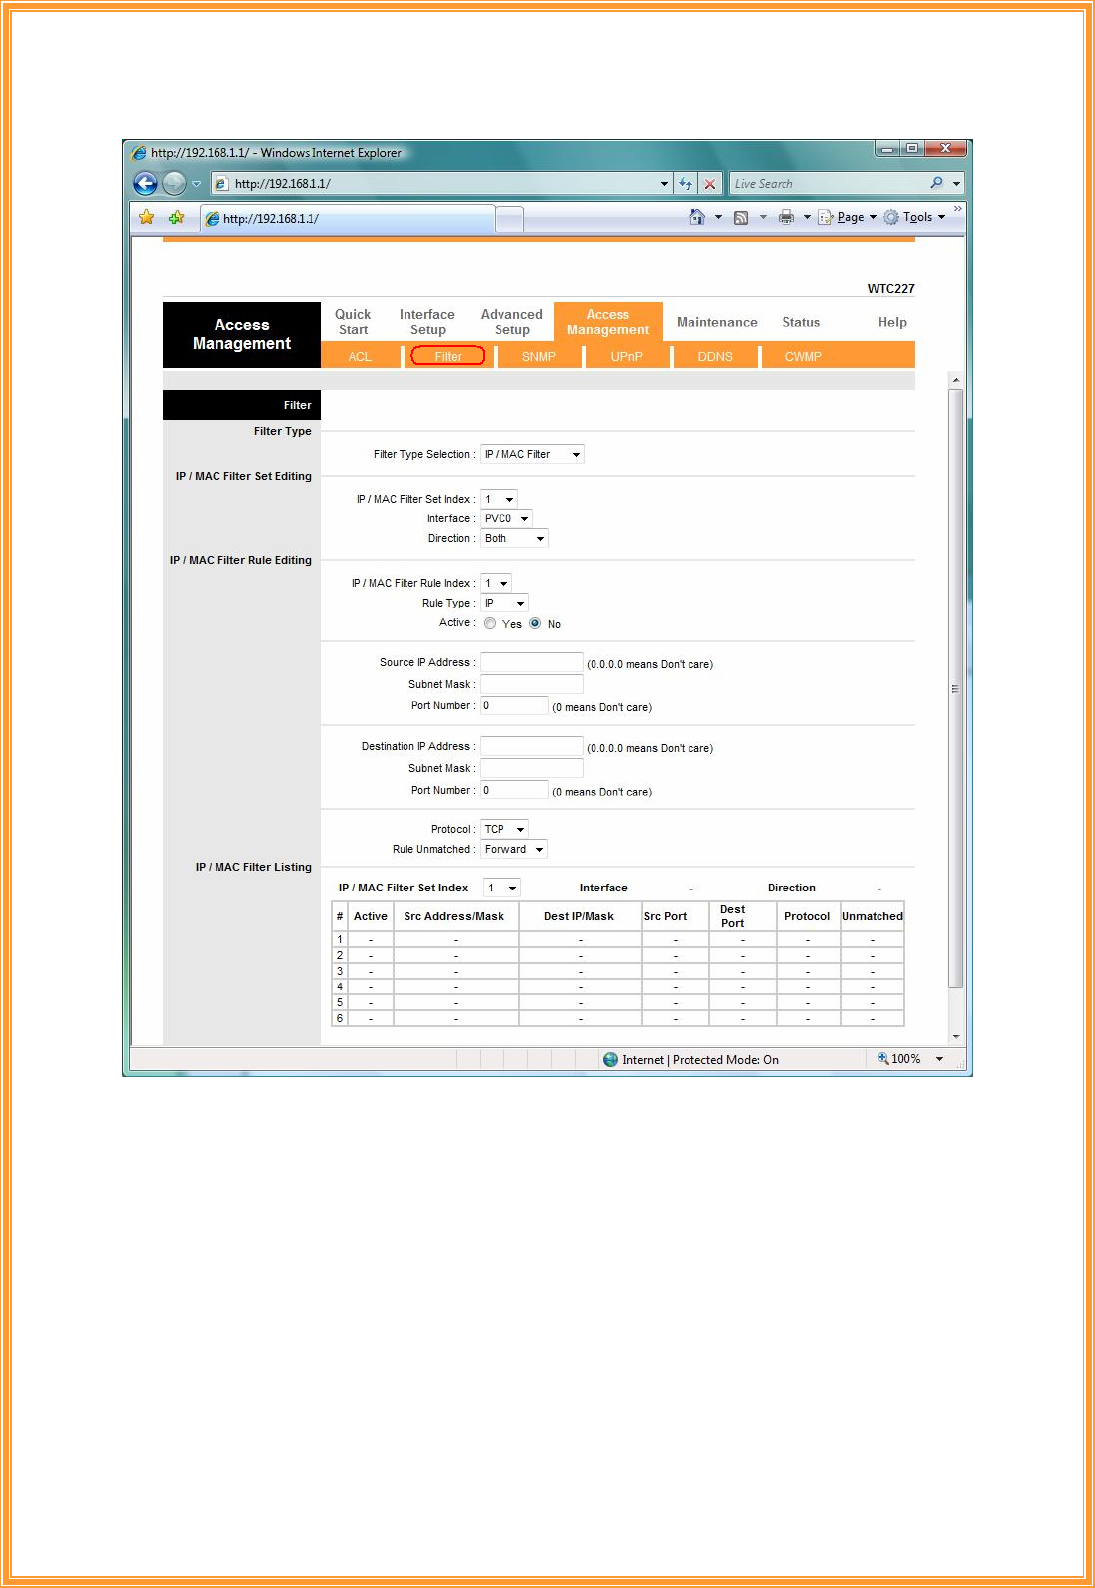
Filter Type: You can select IP/MAC Filter, Application, and URL Filter type.
IP/MAC Filter Set Index: The IP/MAC Filter Set Index from 1 to 12 and each index can set up to
6 IP Filter.
Interface: Choices from PVC0 to PVC7 and LAN.
Direction: Choices are Both, Incoming and Outgoing. Select which direction of data flow you
wish to apply the filters to. Note that Incoming and Outgoing are from the point of view of your
router, relative to the interface you select. For WAN, data coming from outside your system is
considered Incoming and data leaving your system is Outgoing. For LAN, data leaving your
system is considered Incoming and data entering your system is Outgoing.
IP/MAC Filter rule Index: The IP/MAC Filter rule Index from 1 to 6.

64
IP/MAC Filter Rule Editing: Select the IP/MAC Filter Rule Index you wish to modify.
Active: Toggle this rule index on or off with Yes or No, respectively.
Source IP Address: Enter the source IP address you wish to deny access to your system.
Subnet Mask: Enter the subnet mask of the source IP address.
Port Number: Enter the port number of the source IP address. Note that 0 means all that ports
are allowed.
Destination IP Address: Enter the destination IP address that you wish to deny access to your
system.
Subnet Mask: Enter the subnet mask of the destination IP address
Port Number: Enter the port number of the destination IP address. Note that 0 means that all
ports are allowed
Protocol: Select the protocol to filter. Choices are TCP, UDP, and ICMP.
Rule Unmatched: Choices are Forward and Next. Select what happens to the data in question
if the rule you are currently editing is unmatched. Next means that the data is then compared to
the next IP filter rule. Forward means that the data will be allowed into your system. Note that a
Forward rule should be the last rule, as no data will be compared to rules after a Forward rule.
IP/MAC Filter Set Index: Select the IP/MAC filter set you wish to view.
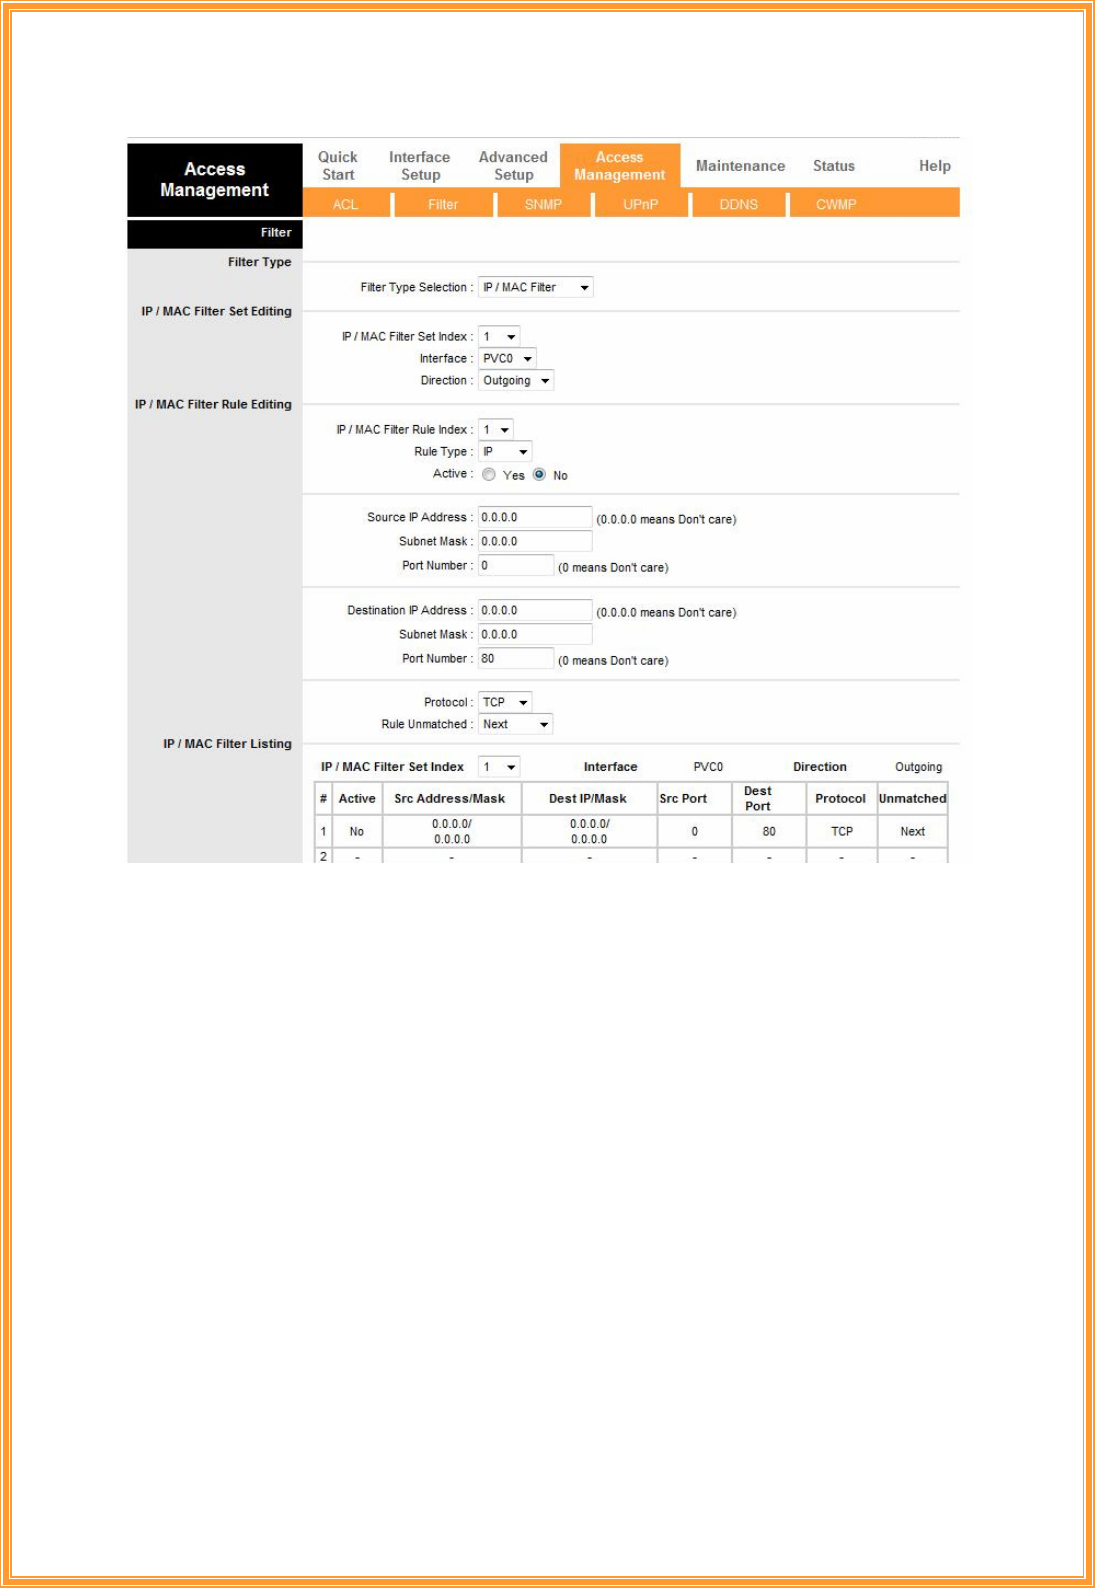
For Example
Please follow below steps to set your IP Filter:
1. IP/MAC Filter Set Editing: Choose your IP/MAC Filter Set Index, Interface and Direction
options. Remember, Interface and Direction functions are affected with IP/MAC Filter Set
Index. EX: if your 1st index set of IP filter set PVC0 as Interface and Outgoing as Direction, so
the list of 1st IP Filter will be PVC0 and Outgoing as their settings.
2. IP/MAC Filter Rule Editing: Select the IP/MAC Filter Rule Index (up to 6 numbers for each
set index) and choose Active option. As below example, Source IP Address is
192.168.1.4, Subnet Mask is 255.255.255.255, Destination IP Address & Subnet Mask is
0.0.0.0, Port Number is 80. And, Protocol sets TCP. From this setting, it filters
192.168.1.14, so it cannot access the web. Notice, each IP Filter Set Index can has up to 6
filters IP. At “Rule Unmatched” option, you must choose NEXT until the last filter IP choose
Forward.
3. After every setting is done, click SAVE to continue next IP Filter Editing.
65
66
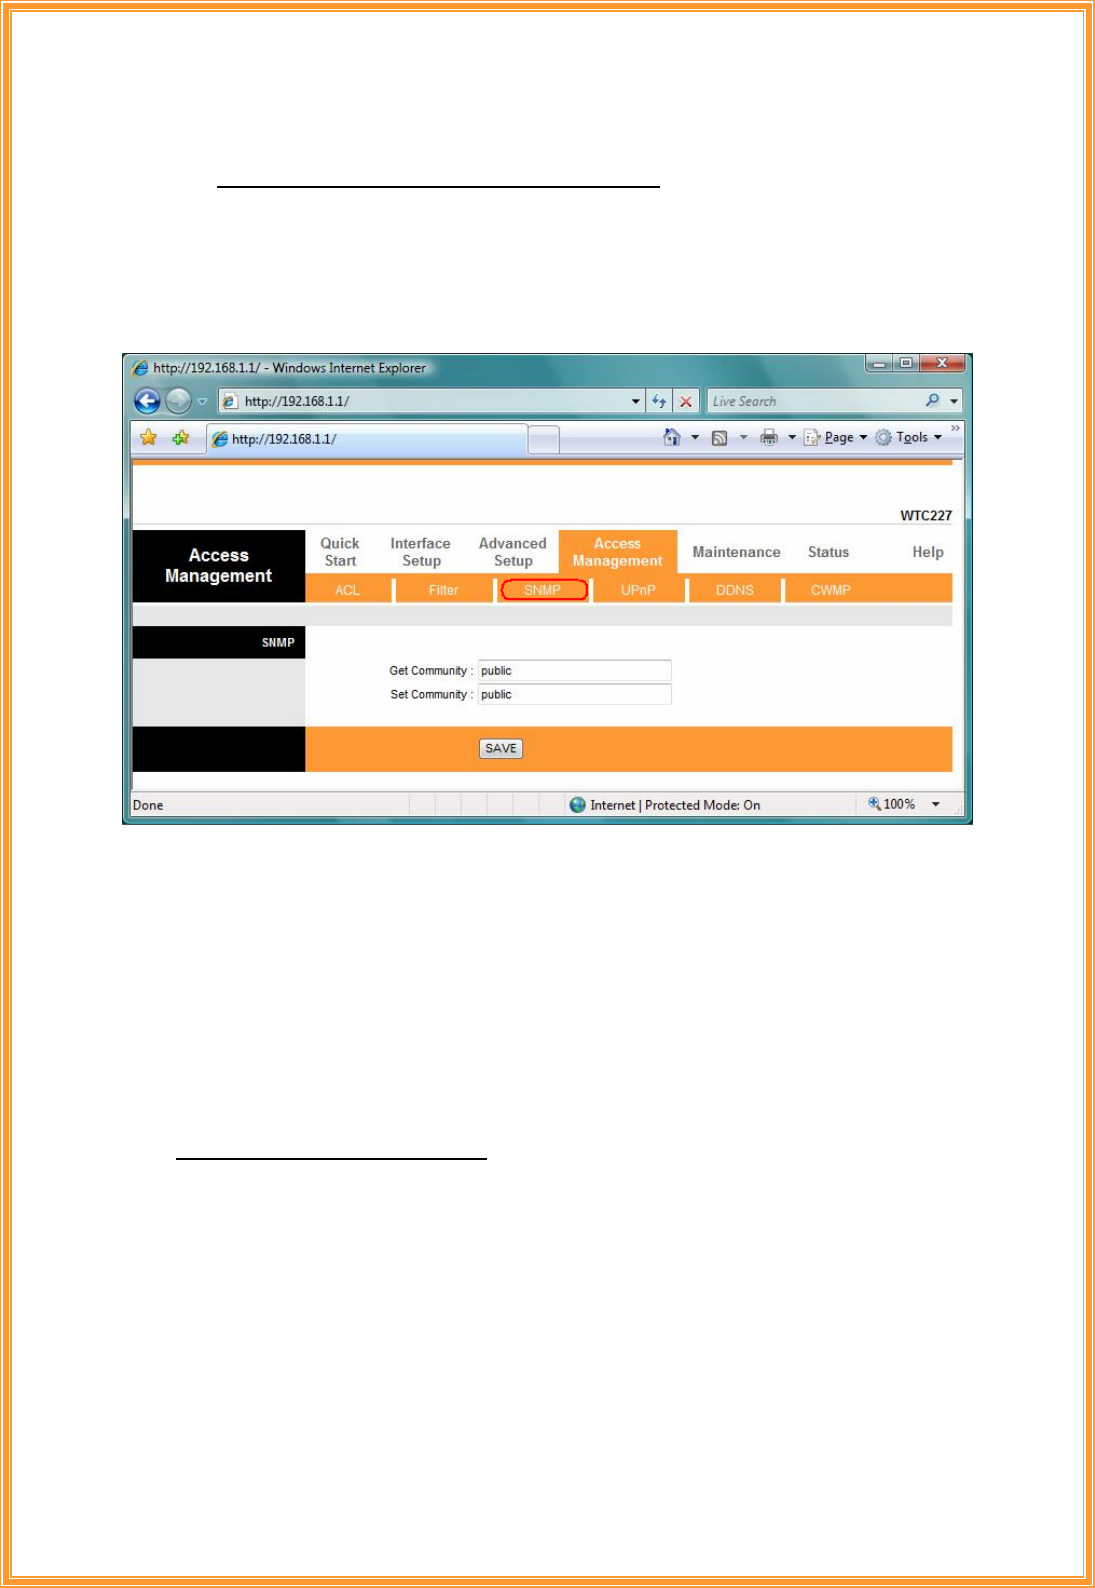
8.3 SNMP
The Simple Network Management Protocol (SNMP) is used for exchanging information
between network devices. It enables a host computer to access configuration, performance, and
other system data that resides in a database on the modem. The host computer is called a
management station and the modem is called an SNMP agent. The data that can be accessed
via SNMP is stored in a Management Information Database (MIB) on the modem.
Get Community: Select to set the password for incoming Get- and GetNext request from
management station.
Set Community: Select to set the password for incoming Set request from management station.
The default password is ‘public’. When you are done making changes, click on SAVE to save
your changes.
8.4 UPnP
UPnP (Universal Plug and Play) is a distributed, open networking standard that uses
TCP/IP for simple peer-to-peer network connectivity between devices. An UPnP device can
dynamically join a network, obtain an IP address, convey its capabilities and learn about other
devices on the network. In turn, a device can leave a network smoothly an automatically when it
is no longer in use. UPnP broadcasts are only allowed on the LAN.
How do I know if I'm using UPnP?
UPnP hardware is identified as an icon in the Network Connections folder (in Windows XP &
Windows ME). Each UPnP-compatible device that is installed on your network will appear as a
separate icon.
67
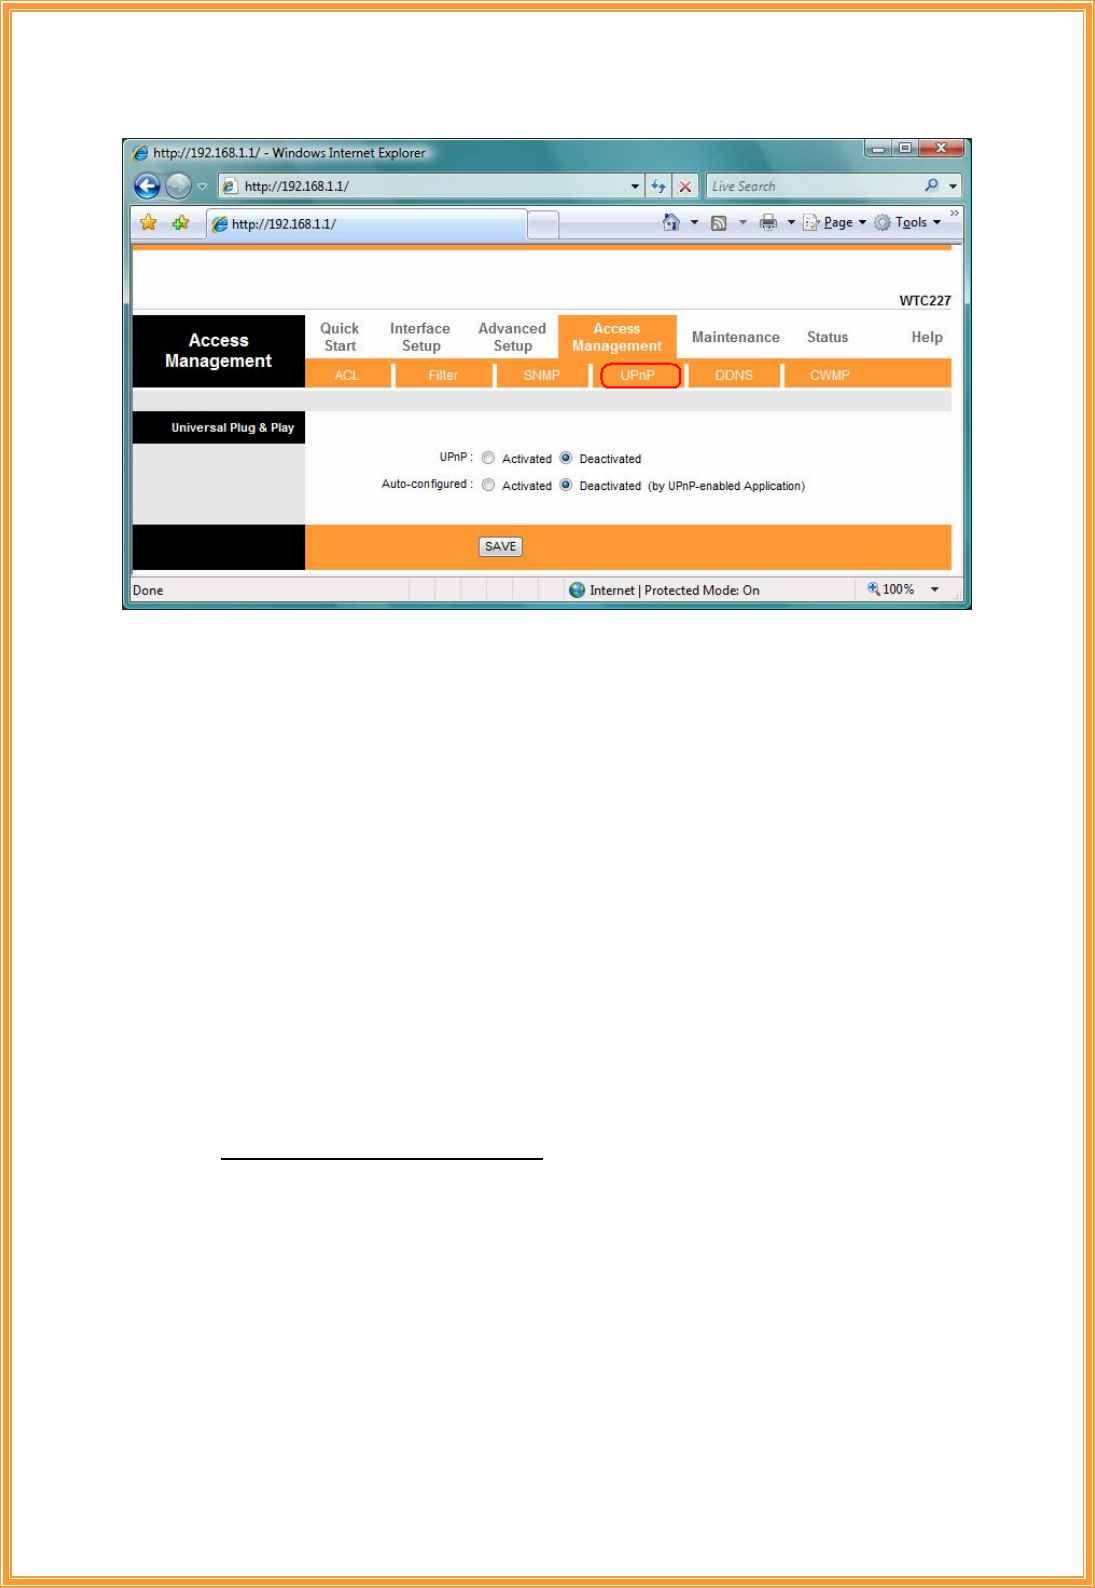
UPnP (Universal Plug and Play): You can choose “Activated” or “Deactivated” option from
this session.
Auto-Configured (by UPnP Application): UPnP network devices can automatically configure
network addressing, announce their presence in the network to other UPnP devices and enable
exchange of simple product and service descriptions. Choose “Activated” option to allow
UPnP-enabled applications to automatically configure the ADSL Router so that they can
communicate through the ADSL Router, for example by using NAT traversal, UPnP applications
automatically reserve a NAT forwarding port in order to communicate with another UPnP
enabled device; this eliminates the need to manually configure port forwarding for the UPP
enabled application. If you don’t want to make configuration changes through UPnP, just
choose “Deactivated”.
SAVE: Click SAVE to save the setting to the ADSL Router.
8.5 DDNS
The Dynamic Domain Name System allows you to update your current dynamic IP
address with one or many dynamic DNS services so that anyone can contact you (in NetMeeting,
CU-SeeMe, etc.). You can also access your FTP server or Web site on your own computer using
a DNS-like address (for instance myhost.dhs.org, where my host is a name of your choice) that
will never change instead of using an IP address that changes each time you reconnect. Your
friends or relatives will always be able to call you even if they don't know your IP address. First of
all, you need to have registered a dynamic DNS account with www.dyndns.org. This is for people
with a dynamic IP from their ISP or DHCP server that would still like to have a DNS name. The
Dynamic DNS service provider will give you a password or key.
68
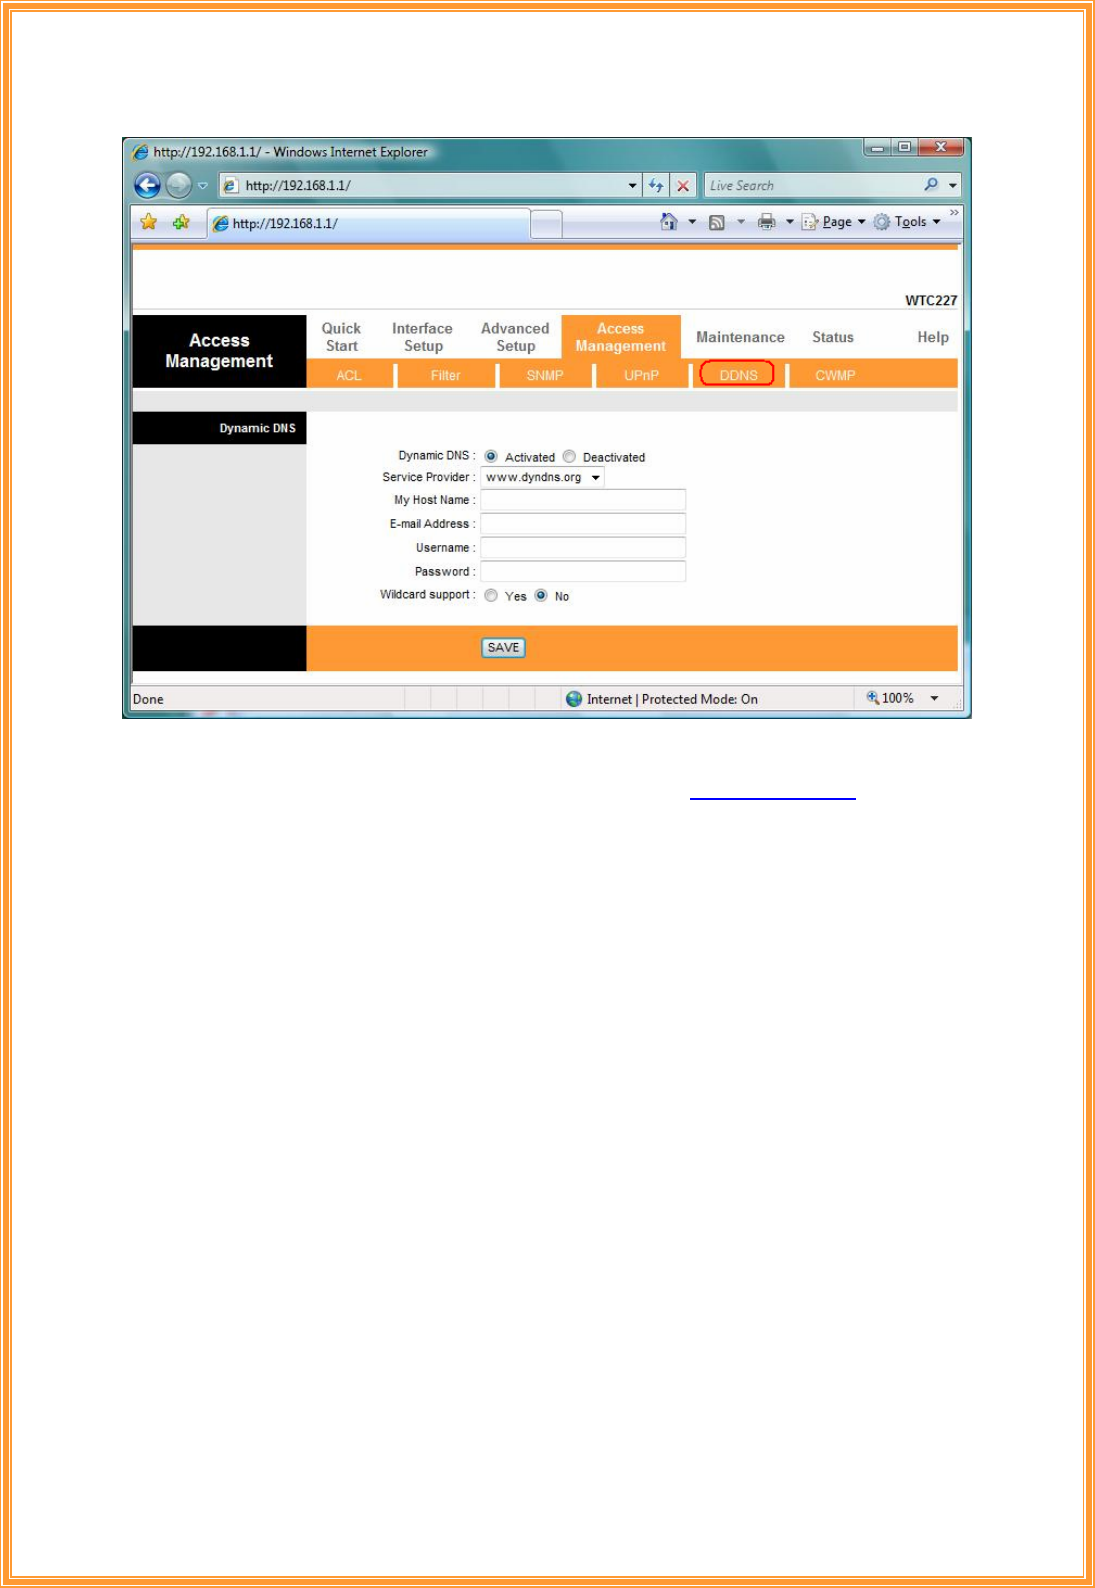
Dynamic DNS: Choose the option for Activated or Deactivated DDNS.
Service Provider: The default Dynamic DNS service provider is www.dyndns.org.
My Host Name: Type the domain name assigned to your ADSL by your Dynamic DNS provider.
E-mail Address: Type your e-mail address.
Username: Type your user name.
Password: Type the password assigned to you.
Wildcard support: Select Yes or No to turn on DYNDNS Wildcard.
DYNDNS Wildcard --> Enabling the wildcard feature for your host causes *.yourhost.dyndns.org
to be aliased to the same IP address as yourhost.dyndns.org. This feature is useful if you want to
be able to use, for example, www.yourhost.dyndns.org and still reach your hostname.
SAVE: Click SAVE to save your changes.
Note that you must enter the user name exactly as your ISP assigned it. If the assigned name is
in the form of user@domain where domain identifies a service name, enter it exactly as given.
When you are done making changes, click on SAVE to save your changes.
8.6 CWMP
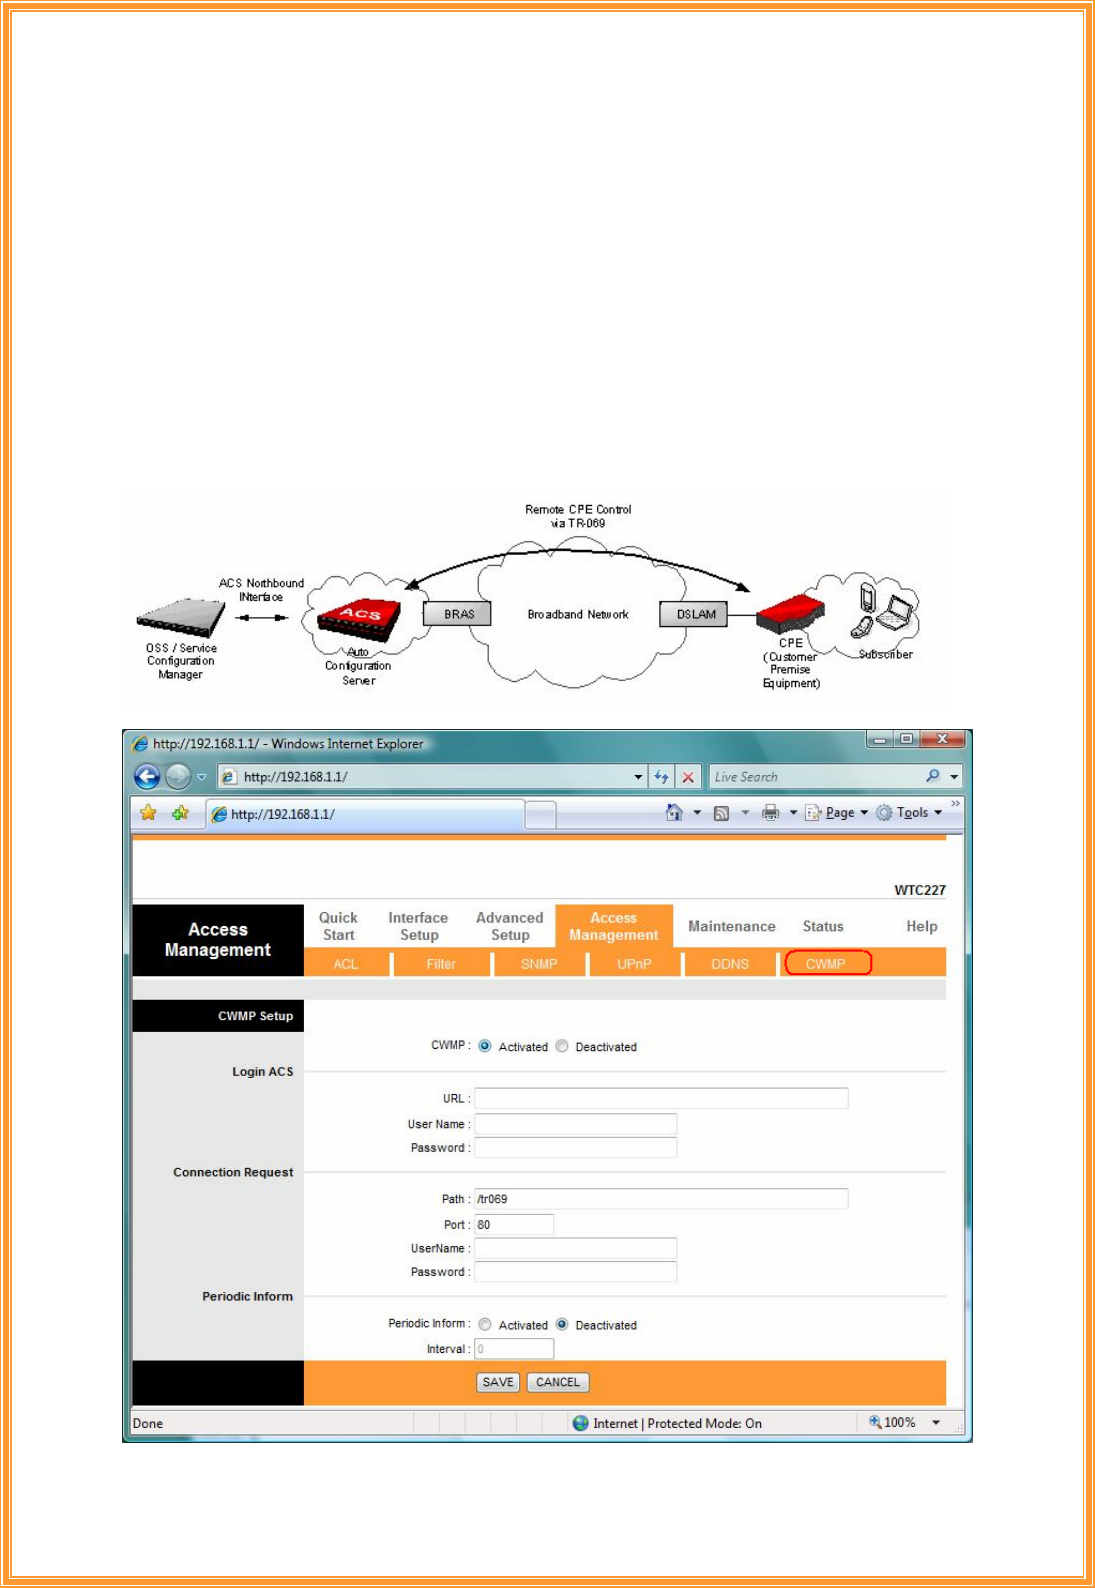
TR-069 is a CPE WAN Management Protocol (CWMP). As a bidirectional SOAP/HTTP
based protocol it provides the communication between CPE and Auto Configuration Servers
(ACS). It includes both a safe auto configuration and the control of other CPE management
69
functions within an integrated framework. In the course of the boom of the broadband market, the
number of different Internet access possibilities grew as well (e.g. modems, routers, gateways,
Set-top box, paddles, VoIP-phones). At the same time the configuration of this equipment
became more complicated -- too complicated for the end-users. For this reason the TR-069
standard was developed. It provides the possibility of auto configuration of these access types.
The technical specifications are managed and published by the DSL Forum. Using TR-069 the
terminals can get in contact with the Auto Configuration Servers (ACS) and establish the
configuration automatically. Accordingly other service functions can be provided. TR-069 is the
current standard for activation of terminals in the range of DSL broadband market.
70
9. Maintenance
9.1 Administration
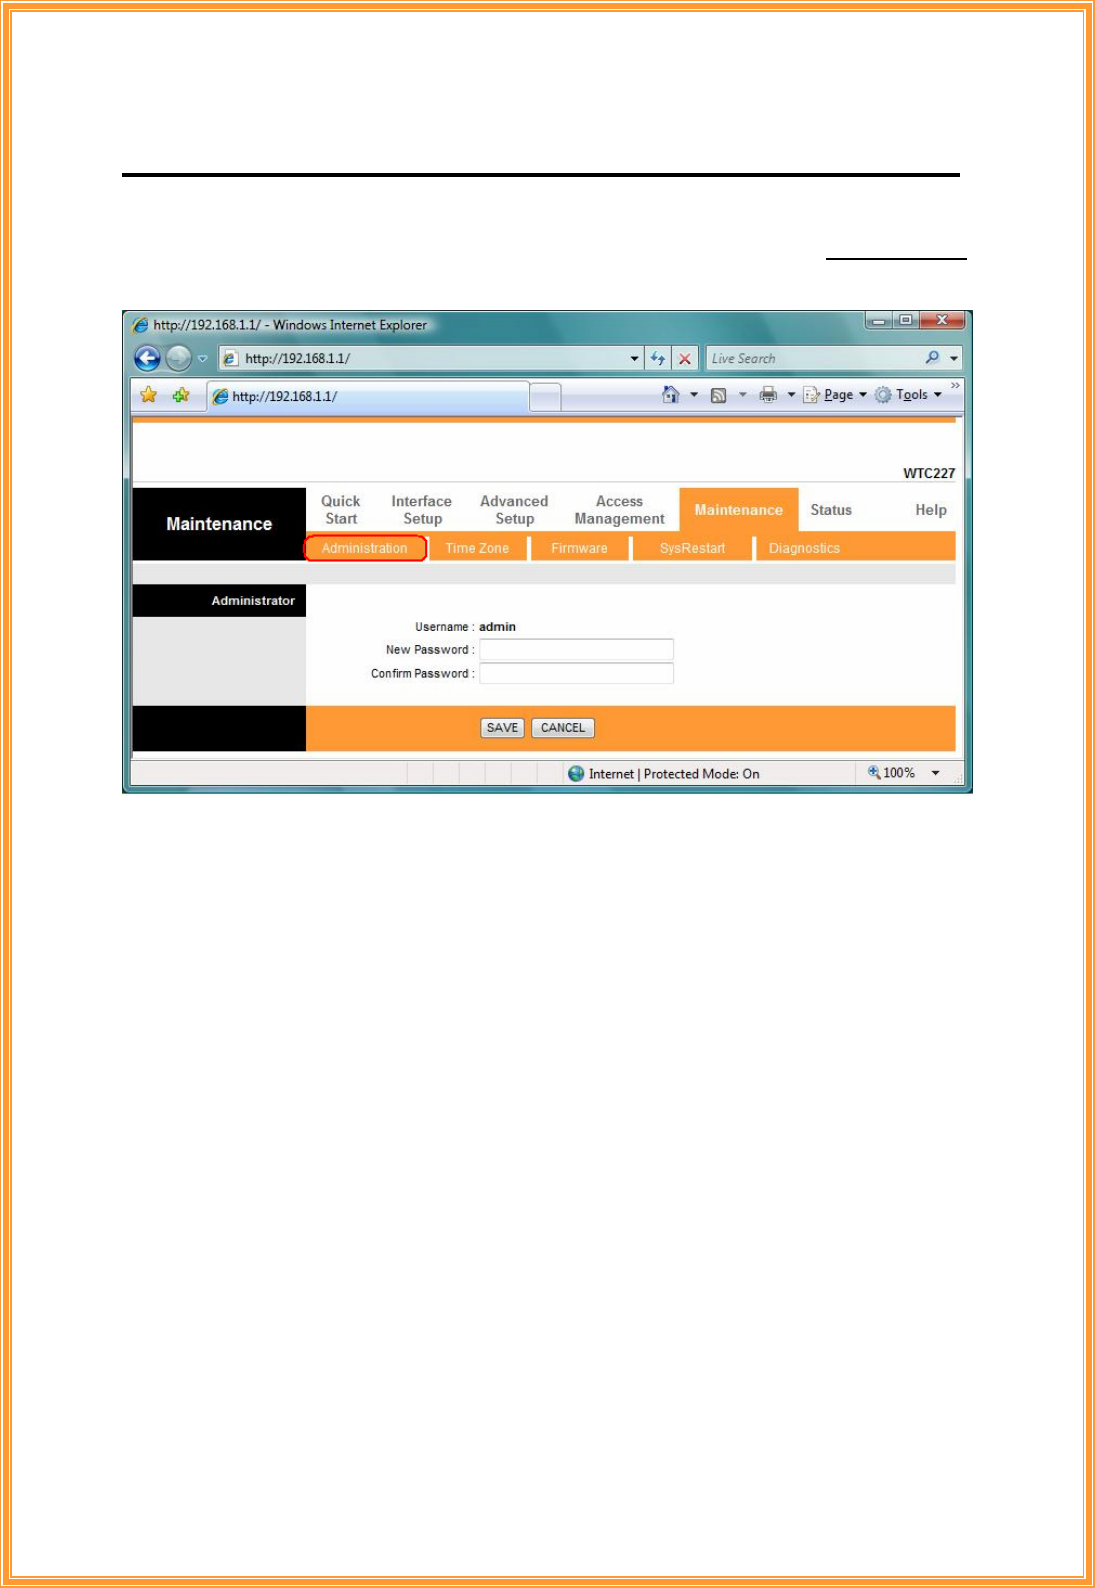
There is only one account that can access Web-Management interface-Administration.
Admin has read/write access privilege. In this web page, you can set new password for admin.
New Password: Type the new password in this field.
Confirm Password: Type the new password again in this field.
Note: If you ever forget the password to log in, you may press the RESET button up to 6
second to restore the factory default settings. The Factory Default Settings for User Name
& Password are admin & admin.
9.2 Time Zone
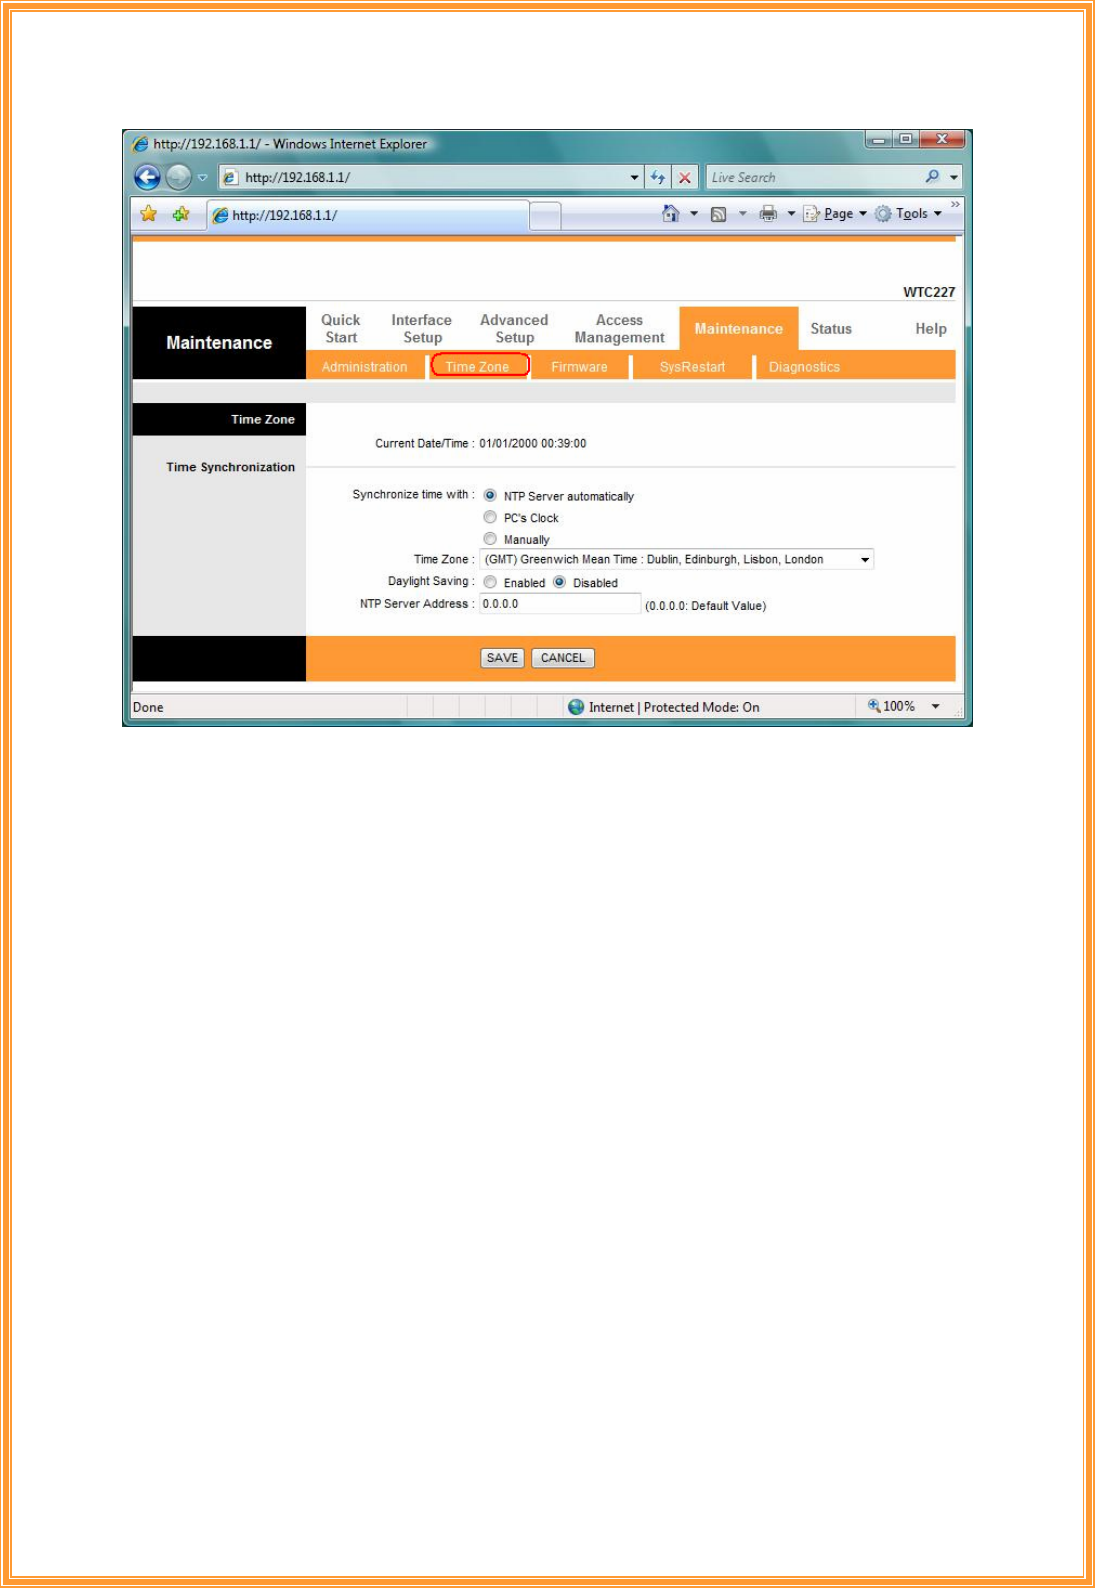
The system time is the time used by the device for scheduling services. You can manually
set the time or connect to a NTP (Network Time Protocol) server. If an NTP server is set, you will
only need to set the time zone. If you manually set the time, you may also set Daylight Saving
dates and the system time will automatically adjust on those dates.
71
Current Date/Time: This field displays an updated Date and Time when you reenter this menu.
[Time Synchronization]
Synchronize time with: You can choose “NTP Server automatically”, “PC’s Clock”, or
“Manually” to coordinate the time.
Time Zone: Choose the Time Zone of your location. This will set the time difference between
your time zone and Greenwich Mean Time (GMT).
Daylight Saving: Choose “Enabled” or “Disabled” to use daylight savings time.
NTP Server Address: Type the IP address or domain name of your timeserver. Check with your
ISP/network administrator if you are unsure of this information.
A Network Time Protocol (NTP) server can automatically set the router time for you. If you use
an NTP server, you will only need to select your time zone. If you manually set the time, you can
enable Daylight Saving. The router will automatically adjust when Daylight Saving goes into
effect.
When you are done making changes, click on SAVE to save your changes or on CANCEL to exit
without saving.
72
9.3 Firmware
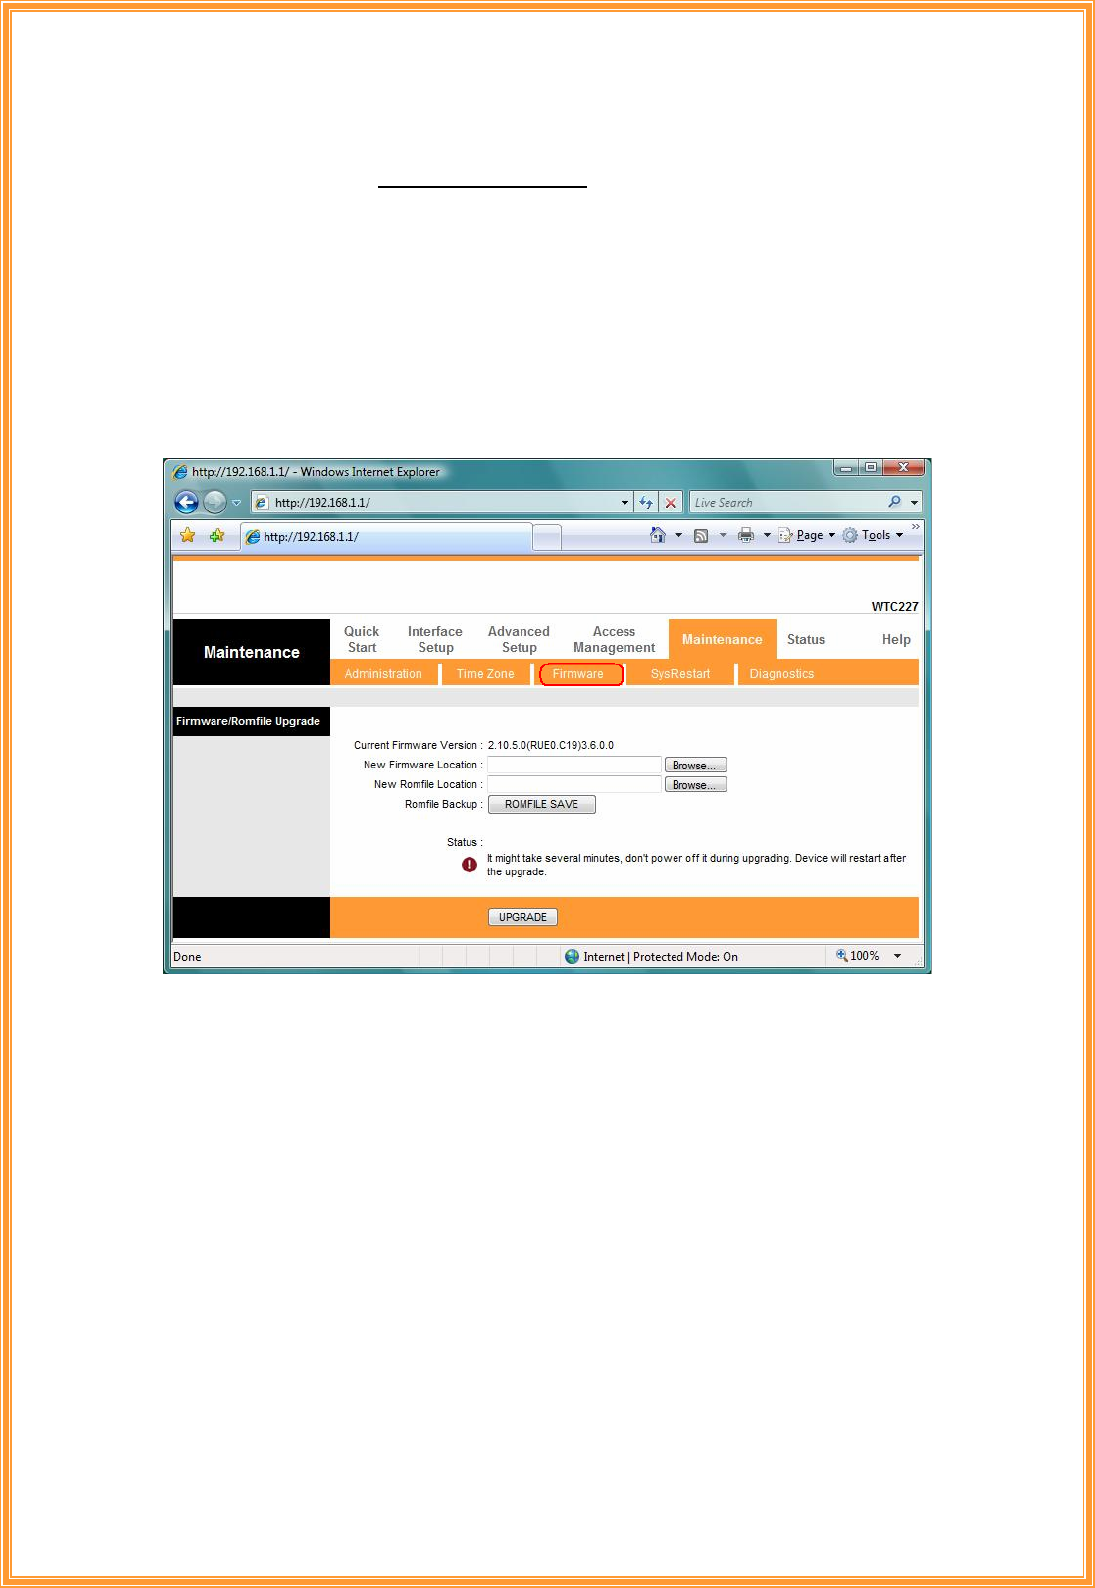
You can upgrade the firmware and Romfile of the router in this page. Make sure the
firmware you want to use is on the local hard drive of the computer. Click on Browse to browse
the local had drive and locate the firmware to be used for the update. Then press UPGRADE to
upload new Firmware. It might take several minutes, don’t power off it during upgrading.
Device will restart after the upgrade!!
After a success upload, the system automatically restarts. Please wait for the device to finish
restarting. This should take about 2 minutes or more. You need to log in again if you want to
access the device.
Current Firmware Ver.: This filed displays the current firmware version.
New Firmware Location: Type in the location of the file you want to upload in this field or click
Browse… to find it.
UPGRADE: Click UPGRADE to begin the upload process.
9.4 System Restart
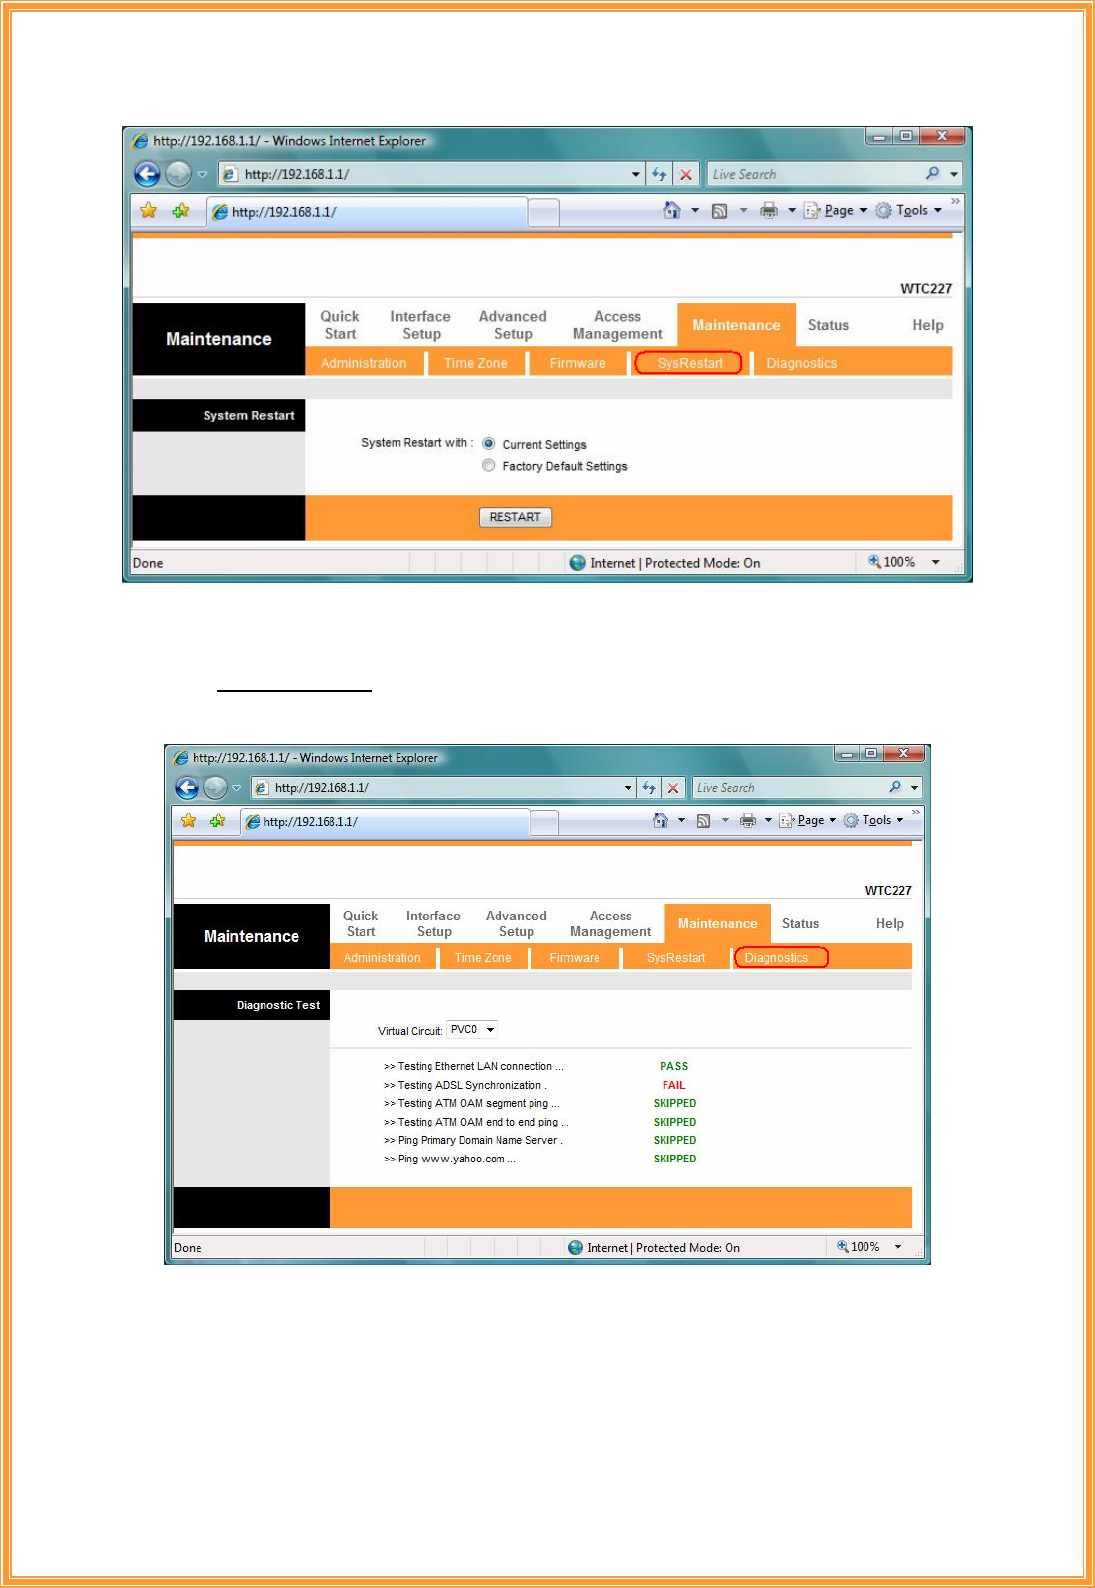
The SysRestart screen allows you to restart your router with either its current settings still
in place or the factory default settings.
If you wish to restart the router using the factory default settings (for example, after a
firmware upgrade or if you have saved an incorrect configuration), select Factory Default
Settings to reset to factory default settings. Otherwise, you can select Current Settings. You
may also reset your router to factory settings by holding the DEFAULT button on the back panel
of your router in for 10-12 second while the router is turned on.
73
9.5 Diagnostic
The Diagnostic Test page shows the test results for the connectivity of the physical layer
and protocol layer for LAN & WAN sides.
Select which PVC you wish to test from the dropdown list. The router will automatically run
diagnostic tests on that circuit. A green PASS means that the given test was passed, a red FAIL
means that the test was failed and a green SKIPPED means that the test was skipped.
Note: 1) User ONLY can view PVC0’s Diagnostic Test connection.
2) “Testing ADSL Synchronization” might take 30 sec to execute the Diagnostic Test.