Pro Nets Technology WA25TD2 ADSL 2 PLUS ROUTER WIRELESS User Manual WA25TC2
Pro-Nets Technology Corporation ADSL 2 PLUS ROUTER WIRELESS WA25TC2
Contents
- 1. Users Manual 1
- 2. Users Manual 2
- 3. Users Manual 3
- 4. Users Manual 4
Users Manual 4

74
10. Status
10.1 Device Info
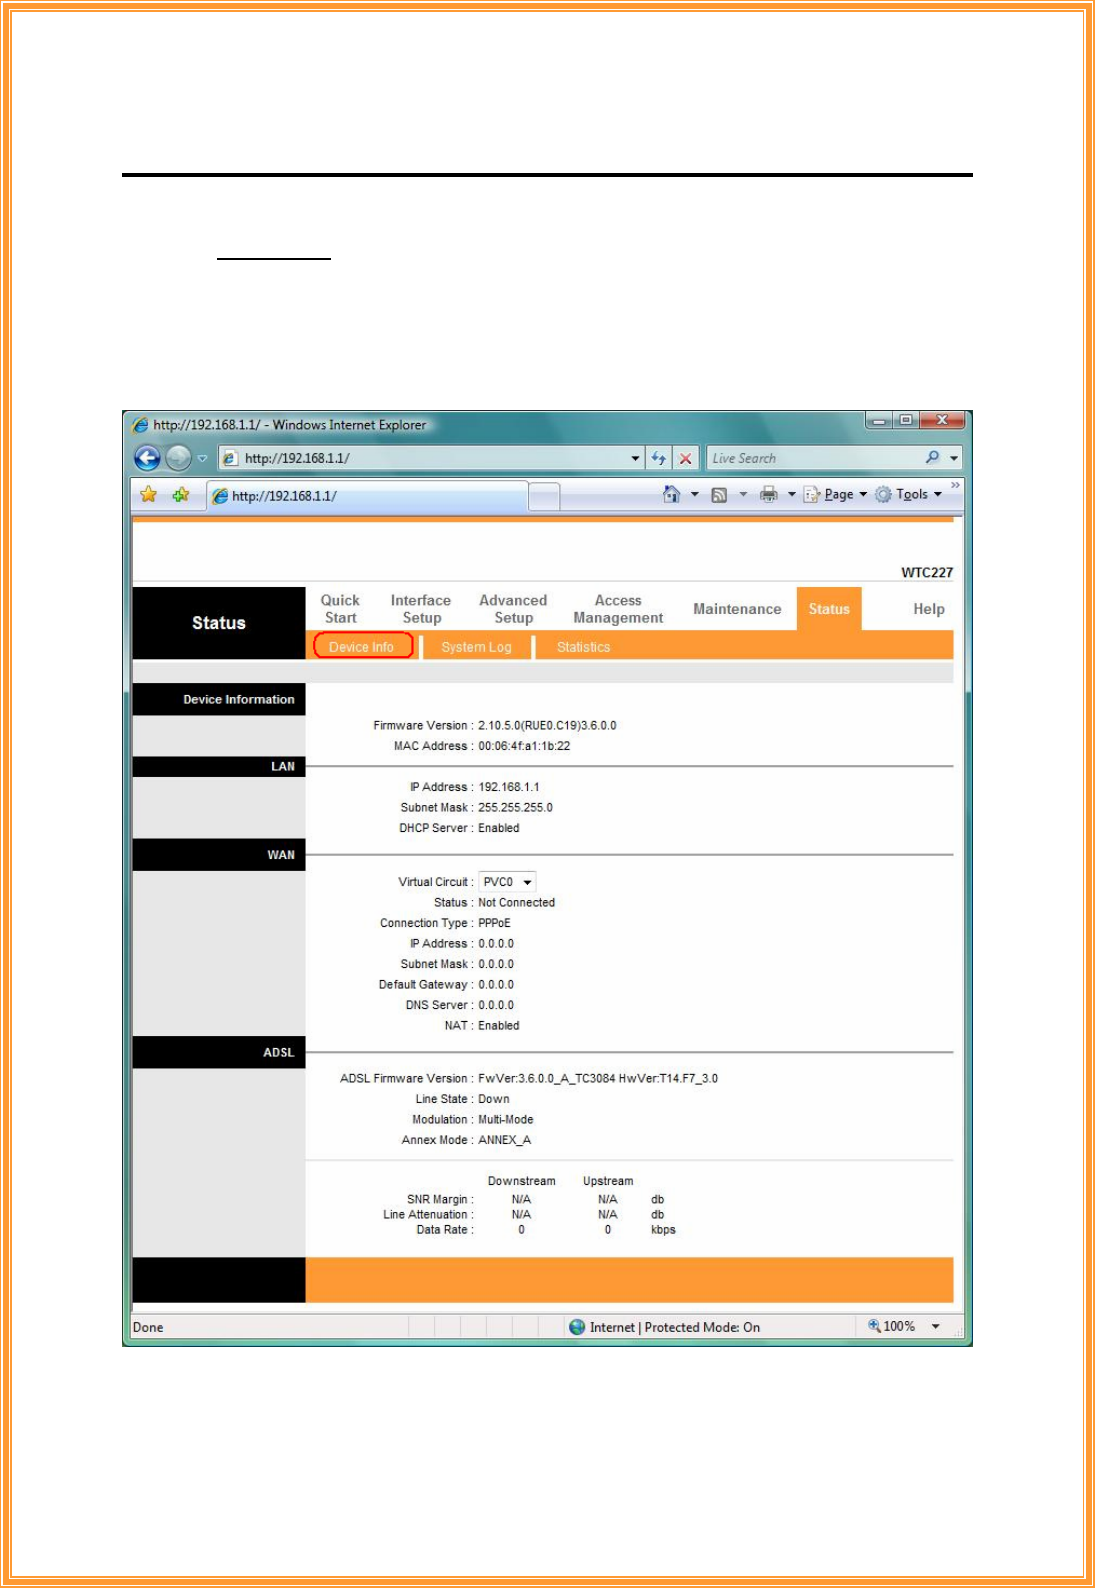
The Device Info screen is a tool that you use to monitor your ADSL Router. It shows the
Firmware Version, WAN, LAN, and MAC address information. Note that these fields are
read-only and are not meant for diagnostic purposes. Except the Virtual Circuit, click the
drop-down list and select the name of the Virtual Circuit on which the system status is to be
shown.
[Device Information]
Firmware Version: This filed displays current firmware version.
MAC Address: The MAC (Media Access Control) or Ethernet address unique to your modem.

75
[LAN]
IP Address: The LAN port IP address
Subnet Mask: The LAN port IP subnet mask.
DHCP Server: The status of DHCP Server (Enabled or Disabled)
[WAN]
Virtual Circuit: Click the drop-down list and select the name of the Virtual Circuit on which the
system status is to be shown.
Status: Connected or Not Connected
Connection Type: The WAN Connection Type.
IP Address: The WAN port IP address
Subnet Address: The WAN port IP subnet mask.
Default Gateway: The IP address of the default gateway, if applicable.
DNS Server: The IP address of the DNS Server
[ADSL]
ADSL Firmware Version: This field displays current ADSL firmware version.
Line States: This field displays the ADSL connection process and status.
Modulation: This field displays the ADSL modulation status for G.dmt or T1.413.
Annex Mode: This field displays the ADSL annex modes for Annex A or Annex B. Downstream
and Upstream: Status of SNR Margin, Line Attenuation and Data Rate
SNR Margin: Amount of increased noise that can be tolerated while maintaining the designed
BER (bit error rate). The SNR Margin is set by Central Office DSLAM. If the SNR Margin is
increased, bit error rate performance will improve, but the data rate will decrease. Conversely, if
the SNR Margin is decreased, bit error rate performance will decrease, but the data rate will
increase.
Line Attenuation: Attenuation is the decrease in magnitude of the ADSL line signal between the
transmitter (Central Office DSLAM) and the receiver (Client ADSL Modem), measured in dB. It is
measured by calculating the difference in dB between the signal power level received at the
Client ADSL Router and the reference signal power level transmitted from the Central Office
DSLAM.
Data Rate: This field displays the ADSL data rate.

76
10.2 System Log
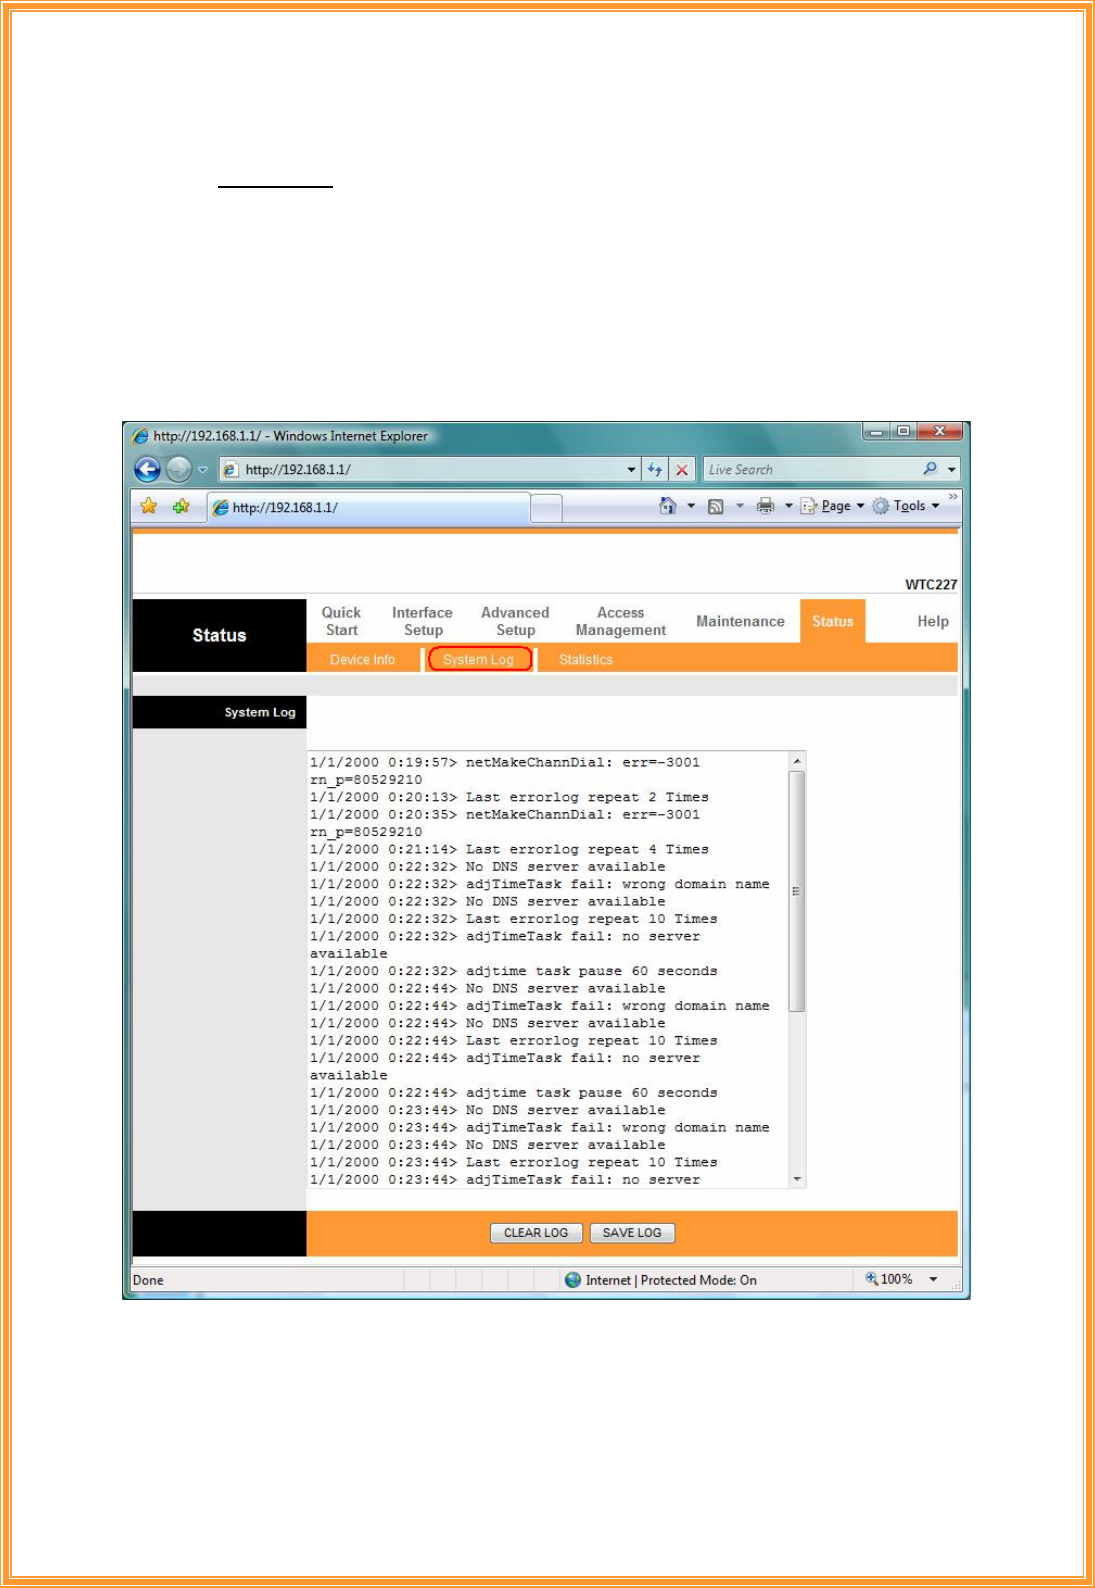
The System Log displays data generated or acquired by routine system communication
with other devices, such as the results of negotiations with the ISP's computers for DNS and
gateway IP addresses. The device keeps a running log of events and activities occurring on the
Router. You can click Save Log to display a Windows File Download dialog box that enables
opening or saving the contents of the log to your PC. To remove all entries from the list, click
Clear Log. New entries will begin accumulating. If the device is rebooted, the logs are
automatically cleared.

77
10.3 Statistics
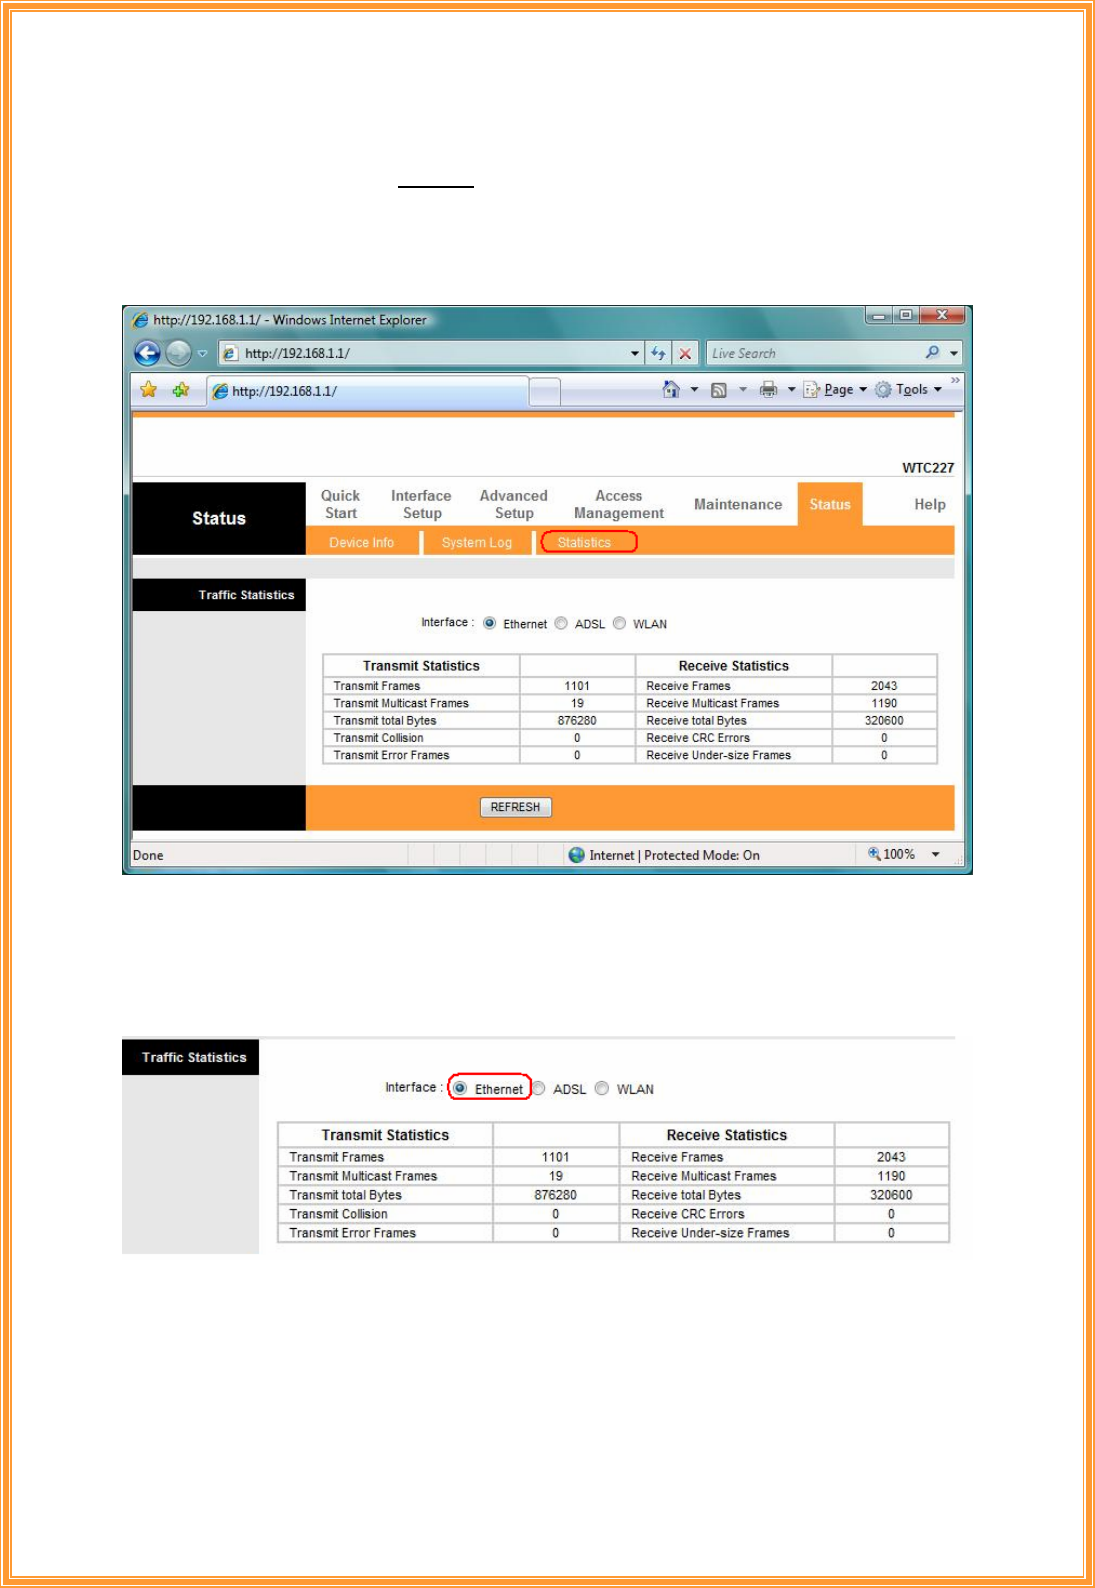
The ADSL Router keeps statistic of traffic that passes through it. You are able to view the
amount of packets that passes through the Router on both the WAN port & the LAN port. The
traffic counter will reset if the device is rebooted. You can select Ethernet/ADSL to view the
statistics report of LAN/WAN.
[Ethernet]
The Ethernet screen gives you information on how much data your router has transmitted and
received across the Ethernet connection. Click on REFRESH to update the screen.
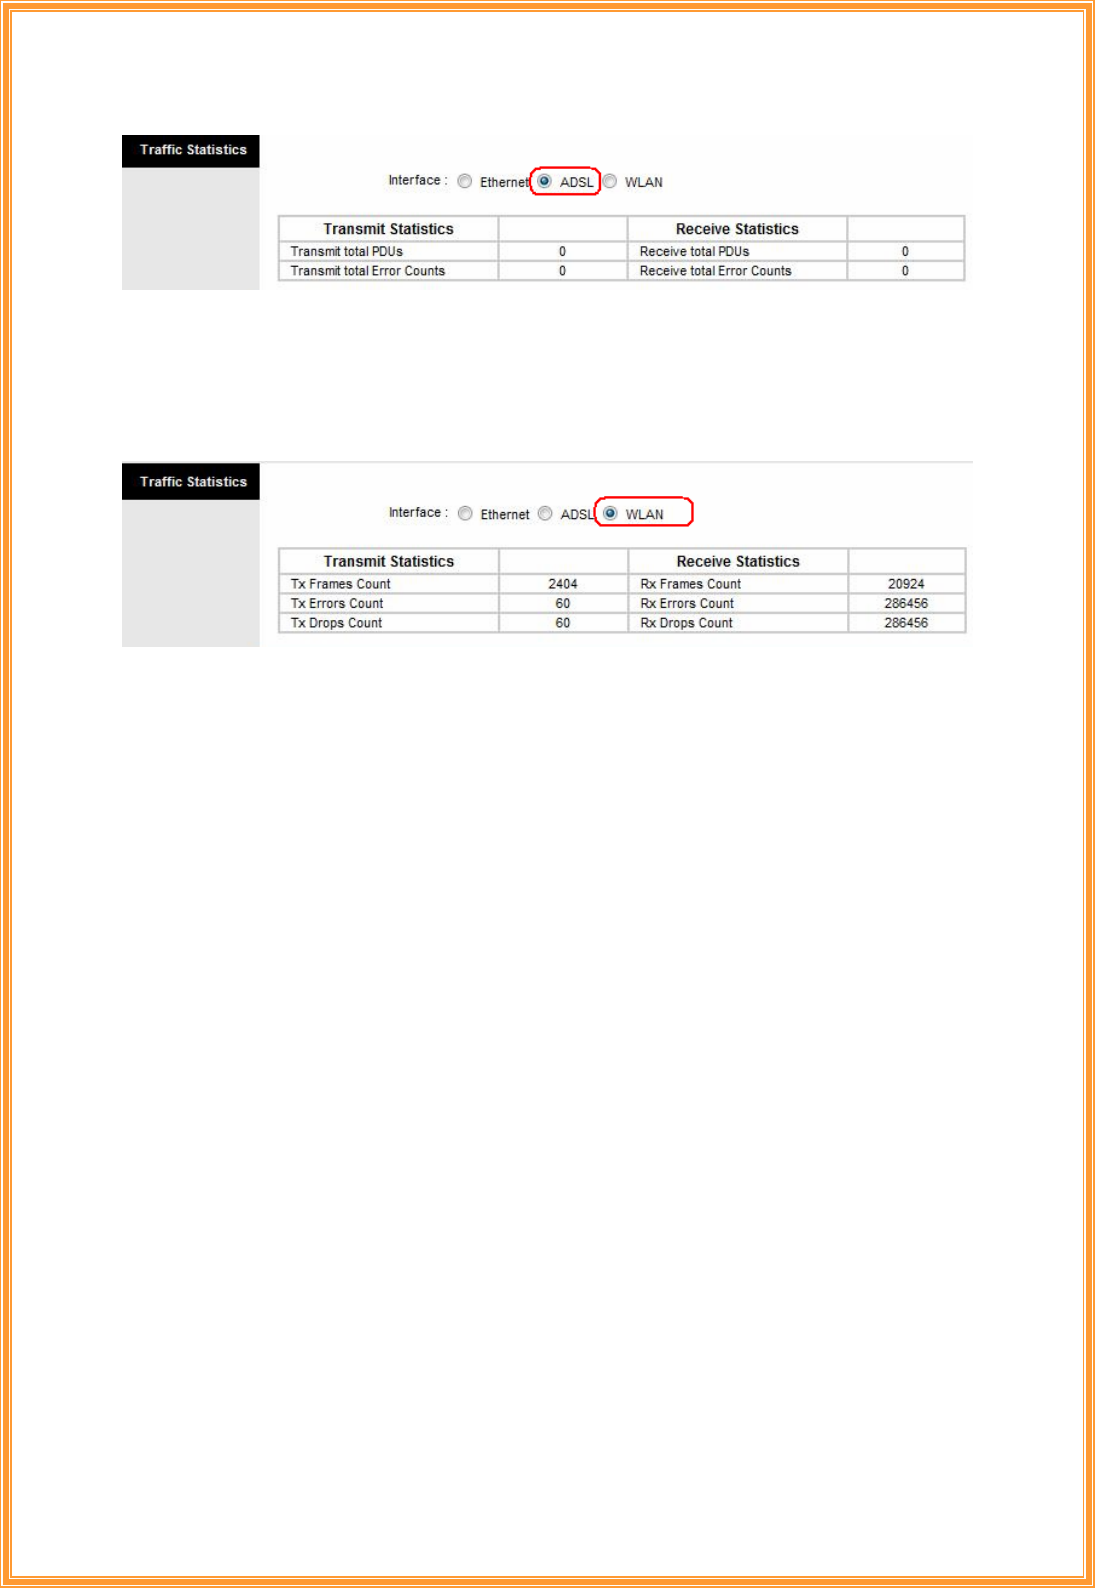
[ADSL]
The ADSL screen gives you information about how much data your router has transmitted or
received across the ADSL connection. Click on REFRESH to update the screen.

78
[WLAN]
The WLAN screen gives you information about how much data your router has transmitted or
received across the ADSL connection. Click on REFRESH to update the screen.

79
11. Troubleshooting
If the router is not function properly, first check this session for simple troubleshooting
before contacting your Internet service provider (ISP) for support.
11.1 Using LEDs to Diagnose Problems
The LEDs are useful aides for finding possible problem causes.
11.1.1 Power LED
The PWR LED on the front panel does not light up.
STEPS CORRECTIVE ACTION
1 Make sure that the power adaptor is connected to the router and plugged in to an
appropriate power source. Use only the supplied power adaptor.
2 Check that the router and the power source are both turned on and the router is
receiving sufficient power.
3 Turn the router off and on.
4 If the error persists, you may have a hardware problem. In this case, you should contact
your vendor.
11.1.2 LAN LED
The LAN LED on the front panel does not light up.
STEPS CORRECTIVE ACTION
1 Check the Ethernet cable connections between your router and the computer or hub.
2 Check for faulty Ethernet cables.
3 Make sure your computer’s Ethernet card is working properly.
4 If these steps fail to correct the problem, contact your local distributor for assistance.
11.1.3 ADSL LED
The ADSL LED on the front panel does not light up.
STEPS CORRECTIVE ACTION
1 Check the telephone wire and connections between the router ADSL port and the wall
jack.
2 Make sure that the telephone company has checked your phone line and set it up for
ADSL service.
3 Reset your ADSL line to reinitialize your link to the DSLAM.
4 If these steps fail to correct the problem, contact your local distributor for assistance.

80
11.2 Problems with the Web Interface
I cannot access the web Interface.
STEPS CORRECTIVE ACTION
1 Make sure you are using the correct IP address of the router. Check the IP address of
the router.
2 Make sure that there is not a console session running.
3 Check that you have enabled web service access. If you have configured a secured
client IP address, your computer’s IP address must match it. Refer to the chapter on
remote management for details.
4 For WAN access, you must configure remote management to allow server access from
the WAN (or all).
5 Your computer’s and the router’s IP addresses must be on the same subnet for LAN
access.
6 If you changed the router’s LAN IP address, then enter the new one as the URL.
7 Remove any filters in LAN or WAN that block web service.
The web Interface does not display properly.
STEPS CORRECTIVE ACTION
1 Make sure you are using Internet Explorer 5.0 and later versions.
2 Delete the temporary web files and log in again.
In Internet Explorer, click Tools, Internet Options and then click the Delete Files ...
button.
When a Delete Files window displays, select Delete all offline content and click OK.
(Steps may vary depending on the version of your Internet browser.)
11.3 Problems with the Login Username and Password
I forgot my login username and/or password.
STEPS CORRECTIVE ACTION
1 If you have changed the password and have now forgotten it, you will need to upload
the default configuration file. This will erase all custom configurations and restore all of
the factory defaults including the password.
2 Press the DEFAULT button for five seconds, and then release it. When the ADSL LED
begins to blink, the defaults have been restored and the router restarts.
3 The default username is “admin”. The default password is “trendchip”. The Password
and Username fields are case-sensitive. Make sure that you enter the correct password
and username using the proper casing.

81
4 It is highly recommended to change the default username and password. Make sure
you store the username and password in a save place.
11.4 Problems with LAN Interface
I cannot access the router from the LAN or ping any computer on the LAN.
STEPS CORRECTIVE ACTION
1 Check the Ethernet LEDs on the front panel. A LAN LED should be on for a port that has
a PC connected. If it is off, check the cables between your router and the PC. Make sure
you have uninstalled any software firewall for troubleshooting.
2 Make sure that the IP address and the subnet mask is consistent between the router
and the workstation.
11.5 Problems with WAN Interface
Initialization of the ADSL connection failed.
STEPS CORRECTIVE ACTION
1 Check the cable connections between the ADSL port and the wall jack. The ADSL LED
on the front panel of the router should be on.
2 Check that your VPI, VCI, type of encapsulation and type of multiplexing settings are the
same as what you collected from your telephone company and ISP.
3 Restart the router. If you still have problems, you may need to verify your VPI, VCI, type
of encapsulation and type of multiplexing settings with the telephone company and ISP.
I cannot get a WAN IP address from the ISP.
STEPS CORRECTIVE ACTION
1 Ensure that all other devices connected to the same telephone line as your router (e.g.
telephones, fax machines, analogue modems) have a line filter connected between
them and the wall socket (unless your are using a Central Splitter or Central Filter
installed by the qualified and licensed electrician), and ensure that all line filters are
correctly installed and right way around.
2 Missing line filters or line filters installed the wrong way around can cause problems with
your ADSL connection, including causing frequent disconnects.
Frequent loss of ADSL line sync (disconnections).
STEPS CORRECTIVE ACTION
1 The ISP provides the WAN IP address after authenticating you. Authentication may be
through the user name and password, the MAC address or the host name.

82
2 The username and password apply to PPPoE and PPoA encapsulation only. Make sure
that you have entered the correct Service Type, User Name and Password (be sure to
use the correct casing).
11.6 Problems with the Internet Access
I cannot access the Internet.
STEPS CORRECTIVE ACTION
1 Make sure the router is turned on and connected to the network.
2 If the ADSL LED is off, refer to Section 11.1.3 (Page 71).
3 Verify your WAN settings.
4 Make sure you entered the correct user name and password.
5 For wireless stations, check that both the router and wireless station(s) are using the
same ESSID, channel and WEP keys (if WEP encryption is activated).
Internet connection disconnects.
STEPS CORRECTIVE ACTION
1 Check the schedule rules.
2 If you use PPPoA or PPPoE encapsulation, check the idle time-out setting.
3 Contact your ISP.
If you have any troubles to configure or setup this ADSL Ethernet Router, please feel free
to contact us.
Before contacting us, make sure collect following information. Submit complete detailed
information of your problem will help us to provide you accurate answers.
Model Name:
Serial Number:
PC Settings:
Other: