Contents
- 1. User manual
- 2. Revised manual
User manual

User Guide
Pro4Tech © 2009

3
NanoPen User Guide
Table of Content
Introduction................................................................
4
PC Minimum Requirements......................................... 4
Box Contents............................................................. 5
Parts and Control....................................................... 6
Closed View................................................................ 6
Open View.................................................................. 7
Remote Control Reference........................................... 8
Function Table............................................................. 9
Getting Started.......................................................... 10
Pen.............................................................................. 11
Opening and Closing................................................... 11
Power On/Off.............................................................. 11
Charging..................................................................... 12
Memory Availability..................................................... 13
Battery Level................................................................ 13
Writing........................................................................ 14
Changing the Ink Cartridge......................................... 14
Remote Control..........................................................
15
Locking and Unlocking................................................ 15
Charging..................................................................... 16
Video and Audio Recording......................................... 17
Audio only Recording.................................................. 18
Taking a Snapshot....................................................... 19
Indications................................................................... 20
PC Functions............................................................... 21
File Management.........................................................
21
Disconnecting the NanoPen......................................... 22
NanoPen Manager..................................................... 23
Synchronizing Date and Timestamp............................. 25
Formatting the NanoPen Memory................................ 27
Updating the NanoPen Firmware................................. 28
Pairing and Un-Pairing................................................. 30
Care and Maintenance...............................................
32
Troubleshooting.........................................................
33
Technical Specification...............................................
34
Warranty.....................................................................
35
FCC Compliance..........................................................
36

4NanoPen User Guide
Introduction
NanoPen is a self-contained covert digital camcorder concealed
inside a fully functioning standard profile ballpoint pen. The pen
has a hidden camera, microphone and micro-USB socket.
The camera records events, incidents and the persons
concerned. This is supplemented by an audio recording. If
required, an audio only recording can be selected, and still
images can be taken at any time.
The pen can be either carried or concealed in worn clothing,
with due care taken not to obstruct the camera lens or
microphone. The pen can also be left unattended if required,
and will still function normally.
The Pen is operated remotely and covertly, using a remote
control, disguised as normal car key fob.
All NanoPen files are time and date stamped and stored in the
internal flash memory in the following formats:
Movie = MPEG4 (QVGA 320 x 240)
•
Audio Only = AMR
•
Snapshots = JPEG, UXGA (2M Pixels)
•
All NanoPen digital files are exported by Micro-USB and
are easily viewed, renamed, edited and transferred using
Windows© Explorer.
PC Minimum Requirements
USB 1.1 or higher
•
Windows 2000/XP/Vista
•
QuickTime Player
•

5
NanoPen User Guide
Box Contents
NanoPen
1.
Remote Control key fob
2.
Multi-Charger
3.
USB Cable
4.
Spare ink refills
5.
User Guide
6.
Reference Card
7.
Carrying Case
8.
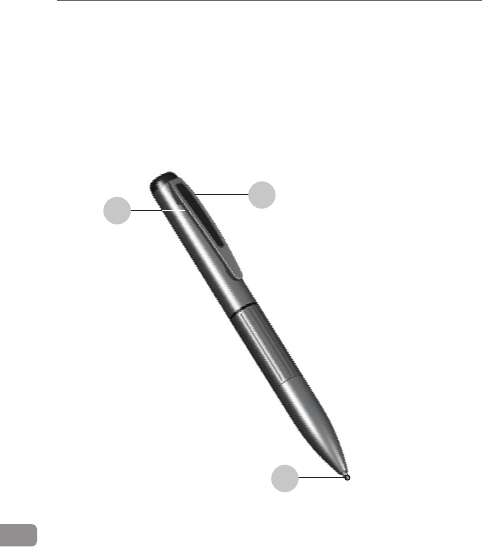
6NanoPen User Guide
Parts and Control
Closed View
This view shows the pen in its normal state.
Lens location (do not obscure)
1.
Microphone location (do not block)
2.
Nib
3.
21
3

7
NanoPen User Guide
Open View
This view shows the pen in its open state. All components
listed here, are concealed when the pen is closed.
Power on/off button
1.
LEDs indicators
2.
Micro-USB socket
3.
3
1
2
8NanoPen User Guide
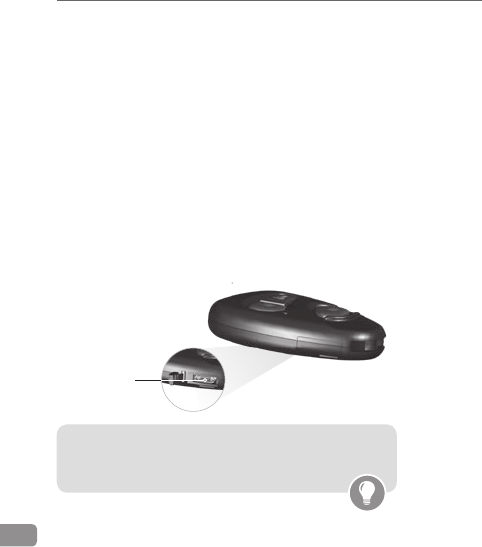
Remote Control Reference
This view shows the remote control.
Lock button (Taking snapshot) 1.
Alarm button (Audio only recording)2.
LED
3.
indicator
Unlock button (A/V recording)4.
S5.
ocket cover
Micro-USB socket
6.
4
3
2
1
6
5
9
NanoPen User Guide
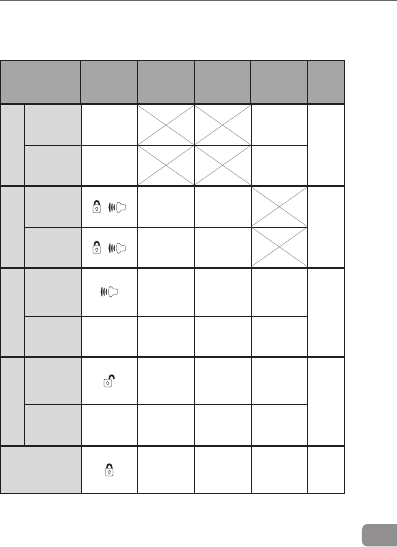
Function Table
Function Press
Vibration
(Remote)
Remote
Control
LEDs
NanoPen
LEDs
Ref.
Page
Power
On Power
Button
Five
times 11
Off Power
Button Twice
Lock
Locking +Four
times
Four
times 15
Unlocking +Twice Twice
Audio/Video
Begin Once Once
Memory
level
indication
17
End Any Twice Twice Twice
Audio Only
Begin Once Once
Battery
level
indication
18
End Any Twice Twice Twice
Take snapshots Twice Twice Twice 19

10 NanoPen User Guide
Getting Started
When you get the NanoPen, check that the box contents
are complete, and undamaged. Also take time to read the
instructions and familiarize yourself with the basic functions.
Then take the following action
Charge the NanoPen using the process described on
1.
page 13.
Charging process can take up to 3 hours.
Charge the Remote Control using the process described
2.
on page 16.
Adjust the time stamp using the process described
3.
on page 25.
WARNING: The NanoPen must only be formatted
using the procedure and software described on
page 27. Failure to do this will result in irreparable
damage.
11
NanoPen User Guide
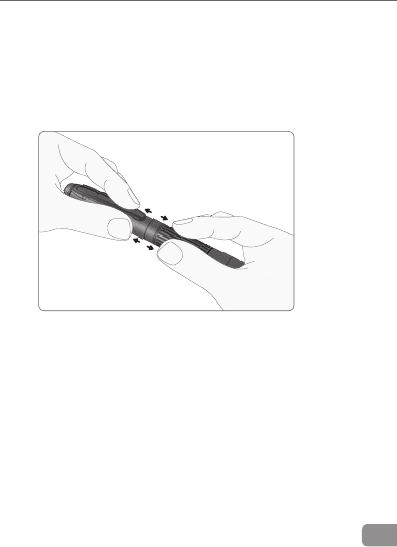
Pen
Opening and Closing
To locate the power button and the Micro-USB socket, as
shown on open view picture (page 7), take the pen in both
hands and pull gently on each end as shown.
Power On/Off
Press on the power button indicated in the open view picture
(page 7). When the LEDs flash 5 times, the pen is on. To
switch the Pen off, press the button again until the LEDs flash
2 times.
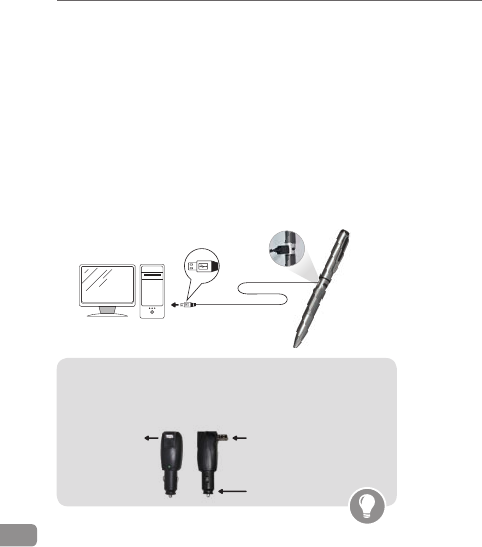
12 NanoPen User Guide
Charging the NanoPen Battery
Open the NanoPen to access the Micro-USB socket.1.
Connect the Micro-USB plug into the socket on the
2.
NanoPen,
and connect the other end of the cable to standard PC USB
port, or to a portable USB charger.
During charging, the green LED will blink once per second.
When fully charged, the green LED will remain on. This can
take up to 3 hours.
Note: The supplied charger allows charging from
main power (110V-220V AC) or from car cigarette
lighter socket (12V DC).
Do not use force or attempt to insert the USB plugs
at an angle.
12V DC input
110V-220V
AC input
USB output
13
NanoPen User Guide
Memory Availability
Open the pen and look at the LED indicators. Press button
on the Remote control. The LEDs will then indicate the
following
Red and Green = maximum recording time available
Green = ½ to ¾ recording time available
Red = ¼ to ½ recording time available
No indication = little to no memory available
Battery Level
This process is the same as checking the memory; except that
you need press button on the remote control. The LEDs will
then indicate the following
Red and Green = battery full
Green = ½ to ¾ battery available
Red = ¼ to ½ battery available
No indication = little to no battery power available
14 NanoPen User Guide
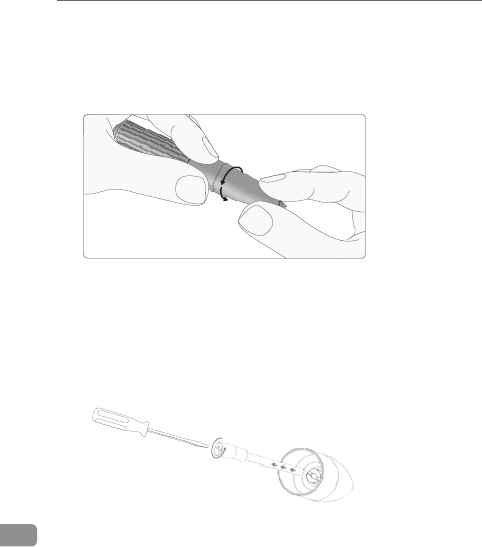
Writing
To write, twist the tip collar of the pen till the nib appears. You
can then write normally. To retract the nib, twist the collar in
the opposite direction.
Changing the Ink Cartridge
Twist and pull off the nib end of the NanoPen until it seperates.
Inside the tip, locate the slot and, using a small screwdriver, turn
the screw counter clock wise until the ink cartridge falls free.
Replace the empty cartridge and reverse the procedure.
15
NanoPen User Guide
Remote Control
Note: The pen needs to be within 1 meter of the
remote control to ensure consistent and effective
operation. Operation beyond this distance, is not
guaranteed.
Locking and Unlocking
To ensure against the accidental activation of the NanoPen the
remote control can be locked, by pressing buttons and
together. Locking is confirmed by 4 vibrations.
To unlock the NanoPen, press buttons and together.
Unlocking is confirmed by 2 vibrations.
Note: Once the NanoPen start recording, it won't
stop, even if the remote battery become empty.
16 NanoPen User Guide
Charging the Remote Control Battery
Open the connector cover to access the Micro-USB
1.
charging socket.
Connect the micro-USB plug into the socket on the Remote
2.
Control, and connect the other end of the cable to standard
PC USB port, or to a portable USB charger.
During charging, the green LED will blink once per second.
When fully charged, the green LED will remain on. This can
take up to 3 hours.
Do not use force or attempt to insert the USB plugs at
an angle.
Remote Control Side View
Note: The supplied charger allows charging from
main power (110V-220V AC) or from car cigarette
lighter socket (12V DC).
Micro-USB
socket
17
NanoPen User Guide
Video and Audio Recording
Note: Firstly, make sure that the pen is switched
on and the lens of the pen and the microphone
are not obstructed.
To begin recording press button
1.
on the remote control.
The remote control will vibrate once.
During recording the remote control will vibrate once
per 30 seconds.
To cease recording press any button on the remote
2.
control.
The remote control will then vibrate twice.
Alternatively, if the remote control has been lost
or damaged, it is possible to start A/V recording
by pressing the power button for 10 seconds.

18 NanoPen User Guide
Audio only Recording
Note: Firstly, make sure that the pen is switched
on and the lens of the pen and the microphone
are not obstructed.
To begin audio recording only, press button
1.
on the
remote control.
The remote control will vibrate once.
During recording the remote control will vibrate once
per 30 seconds.
To cease recording press any button on the
2.
remote control.
The remote control will then vibrate twice.
Note: Once the NanoPen start recording, it won't
stop, even if the remote battery become empty.
19
NanoPen User Guide
Taking a Snapshot
Note: Firstly, make sure that the pen is switched
on and the lens of the pen and the microphone
are not obstructed.
To take a snap shot, ensure the pen lens is pointed at the
subject and press button on the remote control.
The remote control will vibrate twice.

20 NanoPen User Guide
Indications
The NanoPen confirms its reception of each command via
vibrations felt in the remote control.
Green LED
Green LEDs confirm normal functions combined with vibrations.
For more information see page 9. However, if the memory of
the NanoPen is full, trying to start recording will cause the
Green LED to flash once, and then immediately twice.
Yellow LED
Any flashing of Yellow LEDs warn the user that the Remote
Control is not paired with any
NanoPen
. For more information
see page 31.
Red LED
Any flashing Red LEDs indicates problem. Generally they will
indicate that the NanoPen is out of range of the remote control
or that the memory has become full. For more information
see page 34.

21
NanoPen User Guide
PC Functions
File Management
The NanoPen files are of three format types:
3GP
•
— Audio/Video (AV) recordings
AMR
•
– Audio recordings
JPEG
•
— Snapshots
When the NanoPen is connected to your PC using the supplied
USB cable, Windows recognizes it as a mass storage device.
Both the AV and the audio files can be viewed, listened to and
otherwise managed from Windows Explorer, as follows:
Right-click on the Windows
1.
Start button, and select
Explore. Windows Explorer opens.
Navigate to the NanoPen drive, and do any of the
2.
following:
Click and drag a file to copy it from the NanoPen to another
•
location.
Right-click a file and select
•
Cut to remove it from the NanoPen,
then right-click the destination file and select Paste.
Right-click a file and select
•
Rename to change the file name.
Right-click a file and select
•
Delete to delete the file.

22 NanoPen User Guide
Disconnecting the NanoPen
To disconnect NanoPen:
Click the
1.
Safely Remove Hardware icon in the Windows
task bar. A pop-up opens that lists all removable devices
currently connected to the PC.
In the pop-up, click NanoPen. The pop
2.
-up opens
informing you that it is safe to remove the hardware.
Disconnect the NanoPen from the USB cable. 3.
23
NanoPen User Guide
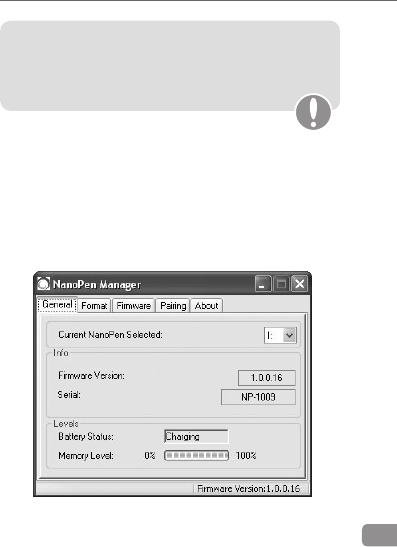
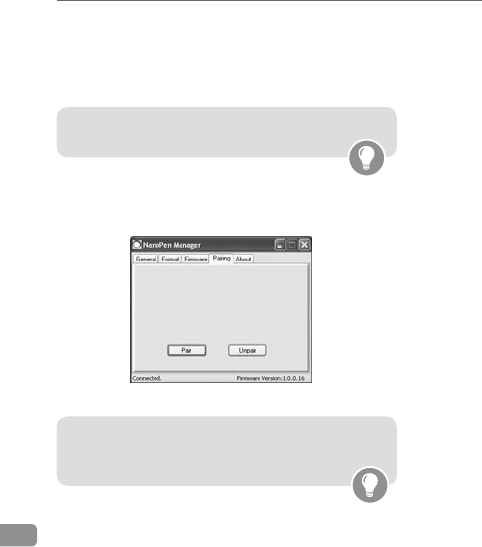
NanoPen Manager
WARNING: The NanoPen must only be formatted
using the procedure and software described on
page 27. Failure to do this will result in irreparable
damage.
The NanoPen Manager is a utility used primarily for managing
the NanoPen Memory utilization, pairing between the
NanoPen and a remote control and for updating the Firmware.
Special indicator panes display the currently installed rmware
version, the serial number of the device, the % Memory
Utilization and the status of the NanoPen battery.

24 NanoPen User Guide
The NanoPen Manager Tab consists of the following elements:
Element Description
USB
Drive
The location of the PC where the NanoPen
USB port is mapped.
Info
Read-only information, including the
Firmware version and the NanoPen unique
serial number.
Levels
Indicators for the NanoPen battery status
and the percentage of memory used.
Battery Status is either Full, Charging,
or Empty.
Available memory level is indicated on a scale
between 0-100%. 0% = memory full.
Status Bar The status bar indicates the following:
- Whether the NanoPen device is connected
to the PC.
- Whether the NanoPen clock has been
synchronized to the PC clock upon
connection to the PC USB drive.
- The current version of the Firmware.
25
NanoPen User Guide
Synchronizing the NanoPen Date and
Timestamp
The NanoPen Date and Timestamp are automatically
synchronized with the PC clock when you connect the
NanoPen device to the PC USB drive.
To Set the NanoPen Date and Timestamp:
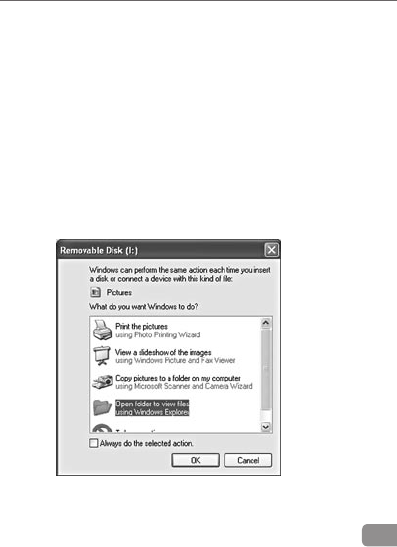
Connect the NanoPen device to a PC USB port.
1.
A New Hardware Device dialog box appears.
26 NanoPen User Guide
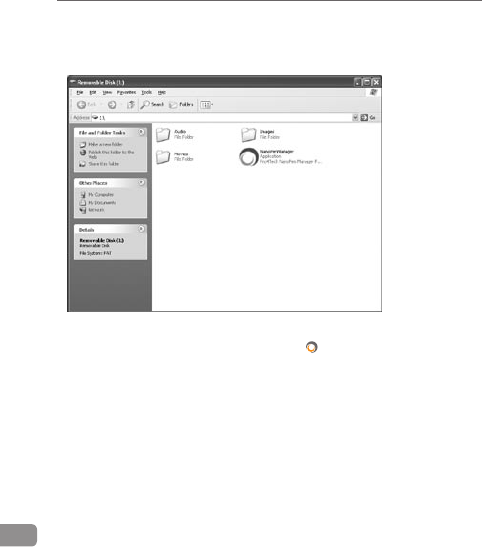
Select 2. Open Folder.
The NanoPen directory dialog is displayed.
Double-click on the NanoPen Manager Icon
3.
. The NanoPen
Manager application is opened and the Date and Timestamp
are automatically synchronized with the PC clock.
Verify that the Status bar displays
4.
Clock Updated, indicating
that the NanoPen clock and the PC clock are synchronized.
27
NanoPen User Guide
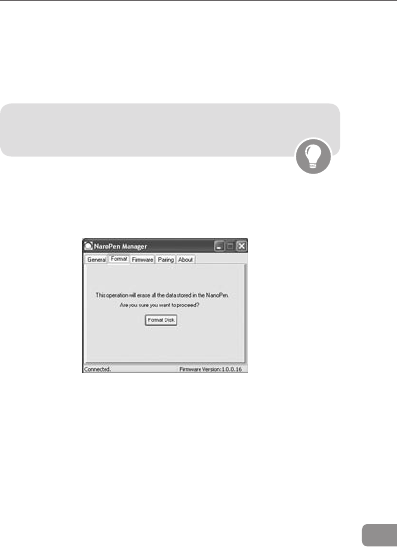
Formatting the NanoPen Memory
You have the option to format the internal memory of the
NanoPen device. This operation should only be performed
when the NanoPen file system becomes corrupted.
Note: Do not format the NanoPen using any external
application, except the NanoPen Manager.
To Format the NanoPen Memory:
In the NanoPen Manager, select the 1. Format Memory tab.
The Format Memory pane is displayed.
You are prompted whether you wish to erase all of the
2.
data stored in the NanoPen.
Select the 3. Format Disk button to confirm operation.
You are prompted to disconnect the NanoPen from the
PC USB drive.
Disconnect the NanoPen from the PC USB drive. NanoPen
4.
internal memory is formatted.
28 NanoPen User Guide
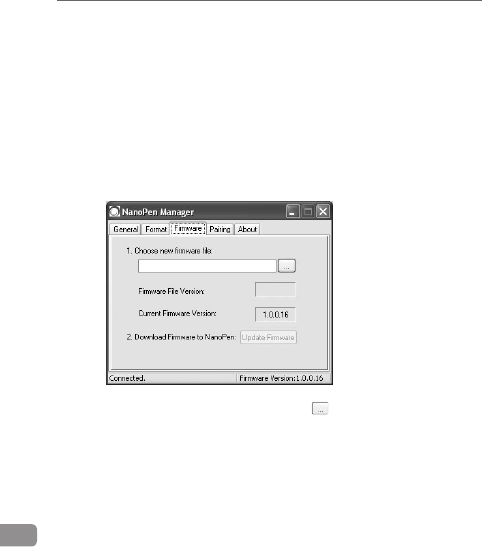
Updating the NanoPen Firmware
From time to time, new versions of the NanoPen Firmware will
be released.
To upgrade the NanoPen Firmware:
Connect the NanoPen to the PC USB port.
1.
Select the Firmware Update tab.
2.
The Firmware Update pane is displayed.
In the Choose new firmware file field, click
3.
and browse
to and select the new firmware file.
The new firmware’s version number is displayed in the
Note this version number for future reference.

29
NanoPen User Guide
Click the Update Firmware button.
4.
The new firmware version
will now be downloaded and installed in the NanoPen.
The progress bar in at the bottom of the NanoPen Manager
window (status bar indicator) will fill from left to right.
This will happen twice. You will then be instructed to push
any button on the remote control within a 30 second time
period.You should then be notified that the update has been
successful.
Disconnect the NanoPen from the PC USB port.
5.
The NanoPen has now been reset and will start with the
new firmware.
Note that the NanoPen LEDs will blink 5 times after
disconnection. In case there is no indication repeat
the firmware process.
Verifying Firmware
To verify the new firmware is installed correctly, reconnect the
6.
NanoPen to the PC USB drive.
Double-click
7.
to open the NanoPen Manager.
8. The NanoPen Manager is opened. Verify the following :
The Status bar displays Clock Updated (indicating that the
NanoPen clock and the PC clock are synchronized).
The Current NanoPen Firmware Version field displays the
current version number
30 NanoPen User Guide
Pairing and Un-Pairning
NanoPen and Remote Control must be paired in order to
operate together. Use the following process to pair between
an un-paired Remote Control and the NanoPen.
Connect the NanoPen to the PC.1.
Open the pairing tab in the NanoPen manager.2.
The Pairing pane is displayed.
Click on the 3. pair button.
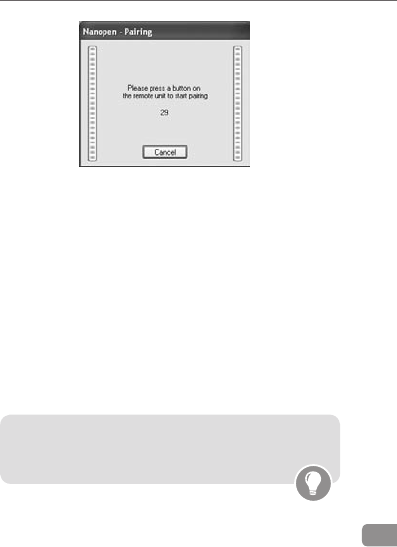
Note: During the following 30 seconds, you will
have to press on any button on the remote control,
in order to complete the pairing process.
Note: It is possible to pair several remote controls
with a single NanoPen.
31
NanoPen User Guide
Take the remote control, and press on any button.4.
You should then be notified that the update has been5.
successful.
6. Disconnect the NanoPen from the USB cable and test that
the NanoPen and the remote control are paired. If not,
then repeat the process.
Un-Pairing
Un-pairing is the same process as paring, expect:
1. Press on the Unpair button on the pairing tab
2. Repeat the process as from step 4 in pairing
Note: Before a Remote Control can be paired with
another NanoPen, it must be un-paired from any
existing NanoPens.

32 NanoPen User Guide
Care and Maintenance
The NanoPen is a precision piece of equipment, and thus
should not be subjected to sudden impacts, immersion in
water, electrical current, or sources of direct heat. The NanoPen
requires little maintenance but should be stored at normal
room temperatures in a clean dry environment.
The following outlines all maintenance recommendations and
procedures:
Recharge whenever not in use. Charging can be performed
•
either via PC or any portable USB charging unit.
Keeping the NanoPen close whenever possible will keep
•
the USB connector free of dust and moisture.
Store the NanoPen in the original box (closed) in a cool, dry
•
and dust-free place.
Basic cleaning of the NanoPen should be performed with a
•
clean, damp cloth, with the NanoPen turned off.
Great care should be taken not to scratch or damage the
•
outer surface of the clip, as this will degrade the
performance of the lens.
Never clean the NanoPen or any of its components with
•
acetone, benzene or other liquids or solvents. No abrasive
cleaning solutions should be used.

33
NanoPen User Guide
Troubleshooting
Problem Probable
Cause
Solution
Recording and/
or snapshot are of
poor quality.
Lens and/or
microphone
is obstructed
or dirty.
Verify that you are holding
the NanoPen correctly and
that clothing or position is
not obstructing the lens/
microphone. Clean the lens
with a dry cotton swab and
always store the NanoPen in
its original container.
Nothing happens
when I try to record
of take snapshots
NanoPen is
locked
Follow the unlocking
procedure described on
Page 15.
Nothing happens
when I try to record
of take snapshots.
NanoPen is
unlocked.
Battery is
discharge Charge the Battery.
Nothing happens
when I try to record
of take snapshots.
Red LEDs blink
3 times, but the
battery is charged
and there is spare
memory.
Firmware
failure contact your distributor.
Nothing happens
when I connect the
NanoPen to the
PC or Portable USB
charger.
USB
connector
is dirty or
damaged.
Replace the USB cable. If the
problem persists, contact your
distributor.

34 NanoPen User Guide
Technical Specification
Image Sensor 1/3.2" CMOS
Storage 512MB
Control Wireless Two-Way Remote control
Case Classic BallPoint Pen
Snapshot Recording
Resolution 2 Megapixels (1,600X1,200)
Compression JPEG
Capacity Over 4,000 images
Video Recording
Resolution QVGA
Compression MPEG4
Frame Rate 15-24 fps
Recording Time Over 2 hours
Audio Recording
Compression AMR, 12.2 Kbps; Digital AGC
Sample Rate 8 KHz
Recording Time Up to 9.5 hours
Internal Battery Li-ion 360 mAh
Auto Shutdown 3 Hours
Charging Via USB
Remote Control
Two-Way RF ISM Band
Indication Vibrations, LED
PC interface USB 1.1 or higher
Time Stamp Date, Time
Dimensions
Weight 35 gr.
Size 144mm X Ø13.1mm

35
NanoPen User Guide
Warranty
The device registered below is guaranteed to operate
properly according to Pro4Tech’s specifications for a period
of 12 months from date of purchase or we shall repair or
replace the same to operate properly. In the event that this
device requires any repair or service you must contact your
distributor. The device will be restored to proper operating
condition at no charge to you. This includes warranted
parts and labor for Pro4Tech defects. Such service, repair or
adjustment of the device is assured to the customer, provided
the device has not been misused, tampered with, modified
or damaged as a result of accident, liquid, sand, grit, impact,
physically broken parts or lack of proper care as indicated
in the manual of operations. This limited warranty applies
only to the device specified herein. It does not cover power
adapter, digital media, software and additional accessories or
any consequential damage or expense. If the device cannot
be repaired by Pro4Tech, replacement will be made with the
same or an equivalent model based on the warranted device
current market value at our discretion. Pro4Tech will not be
liable under any circumstances whatsoever, for any loss of
data, mission failure, loss of revenues or profits, inconvenience,
expense of substitute equipment, incidental or consequential
or indirect damages howsoever caused. Except as required
by applicable law, no warranties of any kind, either express
or implied, including but not limited to, the implied warranty
of merchantability and fitness for particular purpose, are
made in relation to the accuracy, reliability or contents of this
document. Pro4Tech reserves the right to revise this document
at any time without prior notice. This warranty applies only to
the product specified herein.

36 NanoPen User Guide
FCC Compliance
This equipment has been tested and found to comply with the
limits for a Class B digital device, pursuant to part 15 of the FCC
Rules. These limits are designed to provide reasonable protection
against harmful interference in a residential installation. This
equipment generates, uses and can radiate radio frequency energy
and, if not installed and used in accordance with the instructions,
may cause harmful interference to radio communications.
However, there is no guarantee that interference will not occur
in a particular installation. If this equipment does cause harmful
interference to radio or television reception, which can be
determined by turning the equipment off and on, the user is
encouraged to try to correct the interference by one or more of
the following measures:
Reorient or relocate the receiving antenna.•
Increase the separation between the equipment and receiver.•
Connect the equipment into an outlet on a circuit different •
from that to which the receiver is connected.
Consult the dealer or an experienced radio/TV technician for help.•
Warning: Changes or modifications to this equipment not
expressly approved by the party responsible for compliance
(Pro4Tech Ltd.) could void the user’s authority to operate
the equipment.
This device complies with Part 15 of the FCC Rules.
Operation is subject to the following two conditions:
This device may not cause harmful interference, and
1.
this device must accept any interference received,
2.
including interference that may cause undesired operation.