Proform 831159342 User Manual CROSS TRAINER Manuals And Guides 99020117
PROFORM Weight System Manual 99020117 PROFORM Weight System Owner's Manual, PROFORM Weight System installation guides
User Manual: Proform 831159342 831159342 PROFORM CROSS TRAINER - Manuals and Guides View the owners manual for your PROFORM CROSS TRAINER #831159342. Home:Fitness Equipment Parts:Proform Parts:Proform CROSS TRAINER Manual
Open the PDF directly: View PDF ![]() .
.
Page Count: 28

TABLE OF CONTENTS
eQe .**ot i i.**..*,***t ioooooe ioeoele, ioQQota_im°le_*lt t t t o_
BEFOREYOU BEGIN:. 'j._,'" -:" * " "_'_ ......"°_'" _'-'_-"- "......:" ,-'_*_-_'_ • - .: 2
o'e oe oel i leoe6 eiD* Deo e_l eeeeeeeeeeD_e i i o D eeeeiem oe le le ooe o e e ooe• • •_l •
ASSEMBLY.-. " "'- -"
D, e s o e eloe e oe ee i el e le e e i i e e t* e e_o i • •• • ee ee • i i leoeo t* • t D e=le _* eerie _l_ • ee ••••••
ADJU_rlNG THE CROSS TRAINER• .......... - - _,_..- .... 8le**ee e t* e eee e _ee _ _ e e _e| _*e _e _ e_le e e _ _* e e e e ee**e e _ • ••• ••
(_I_ERATINGTHE STEPPERCONSOLE -- . .. . ,.-: ; -.:..,o, ::-.'._'_- _ .".-. ..... ........... ".;..'... .... ;.,..,_= .............. 10
..... . .... .
OPERATING THE PERSONALTRAINERCOMPUTER . ::, ." " _:_'
..... ......................... :..ll
"-'"-Calories "°"°> "- :_ ' -'- :: -_" --- _ "-°*"'12
EXERCISEGUIDE ". -""" _ ...... " "= "_ 16
°'_ 25
TROUBLE SHOOTING AND MAINTENANCE " ."-". ..... _ "-" " ""
ORDERING REPLACEMENTPARTS _ BackCover
U_q'ED WARRANTY..-.-. ;- '-.. :_...-... ;Back-Cover
IMPORTANT SAFETY PRECAUTIONS
WARNING: To reduce the risk o| seriousinjury, read the following important safety precautionsbefore using the
CROSS TRAINER e. Before beginning any i_xerci_ program, consultyour physician. Thisis'especially im,p_.,rtant_r
F_ersansover the age o| 35 or personswilh pre-e_sting hea.lthp_oMerns.PROFORM assumesno respons,b,li_ for.
personal injury or properly damage sustainedbv o_ throuab th'_ _se of this _roduct.
i". Readth_s_wner'_manu_and_e_cc_mPany_ngRTN_E_-J_JRNA_carefu_ybaf_reusing_hecR_NERe; _
Use the CROSSTRAINER • only as described.
2.. Inspect and fiQhten'all parts each time you use the _KUbb IKAliN_:Re. Replace any wom parts |mmediatelyt
3. Do not use the transformer it it is damaged. Keep the power cord away trom walkways and healed surfoces.
4. Keep your hands away trom moving paris. Always wear athlehc shoosfor toot protection.
5. Keep small children away from the CROSSTRAINERe at all llmes.
6. To prevent damage, to. the Weight system, do IlO_ F)Lri'a_y-'pl'_ur_on the legdeveloper, an_ or cableswhil_eth?
weight setting is ch.a.nging.If thelot bar or rower b_r _'atteched ..tp'thehigh_pblley_tefion,_r_.'t"=tin_'rack_'n_the
h_ghpulley station. (SeeOPERATINGTHEPERSONA/.TRAINERcoMPUTER on page 11 o| _th,,"ownersma_aL)
7. Ahvays stand on the foot plate when I:_rformincl-anyexercise that could cause the CROSSTRAINER• to fip._:
.,....to
8. Make sure that the cables'i:ematnin'the_g-robv_ in-the pulleys a_yo_-_se the CROSS"II(_JNER_
9. The resistance cylinders bacome ve_ hot durlng use.AJIow the resistance cytindersfo €o_!_bafor_ to_ichlng_; =--:
them. Cover the floor beneath the stepper for protection;a small amount of o,I leakage _snormal fo_ hydrau|k"
cyhnders. When us,ngthe stepper,keep yo_ feet_onth_ j_Ja_ at oil limes. If you'lift y_r f_t off the p_dals,
the isedals may b_ome separak,dfrom the resistance_71!_ders, resu!ting m mlury. _.'._
lO.'lf you feel pain or dizzinessat any time while exercisincl;stoD immediately and beain coulina down. Findout _
what is wrona before contlnulno.
BEFORE YOU BEGIN
Congralulations[or purchasingtherevolutionaryPROFOP,M_CROSSTRAJ'NER4" TheCROSSTRAINERe."c_mbiri_'a":
multi-stationweightsystemwth a [ull-s_zestepperIq letyouenlaytruecrossIram0ngwork_JtsIn theconvenienceoF,
yourownhome.And tohelpyougetthemost_everyy_orkout,theCROSSTRAINERek,_lui'_"the-6dv_EceclI_EP_-'.'
SONALTP,AI,NER'r_weighttrainingcomputer.Whetheryour goalis |mprovedcordlovascu/arfitness,a sha_Jy,ton_
bodyordramatlc'musclesizeandstrength,theCROSSTRA]NEI_• v_llbelpyo_ to ,_chi_veth"_'sl_,cific'i'_sultsyou_t.
For your safelyand benefit, read this ' " " " " """ " _- "" *" ":owner's .manualand the accompanyingFITNESSJOURNALcarefelb; before using"
the CROSSTRAINERe. IFyou have additional questions, please call our CustomerServTceD.eparlmenttoll-flee at
1-800.999.3756, Monday tt_rbughFriday, 6a.m. until6p.m. Mountain Time (e_cludin_ holidays).'To help-u_ ass|_i
you quicldy,please note the model numberand serial numberof your CROSS TRAINER• befor_ c-ailing-.The model"
numberis 831.159342. The serial numbercan be found on a decal _lt_hed to the CROSSTRA/NERe. The location oF
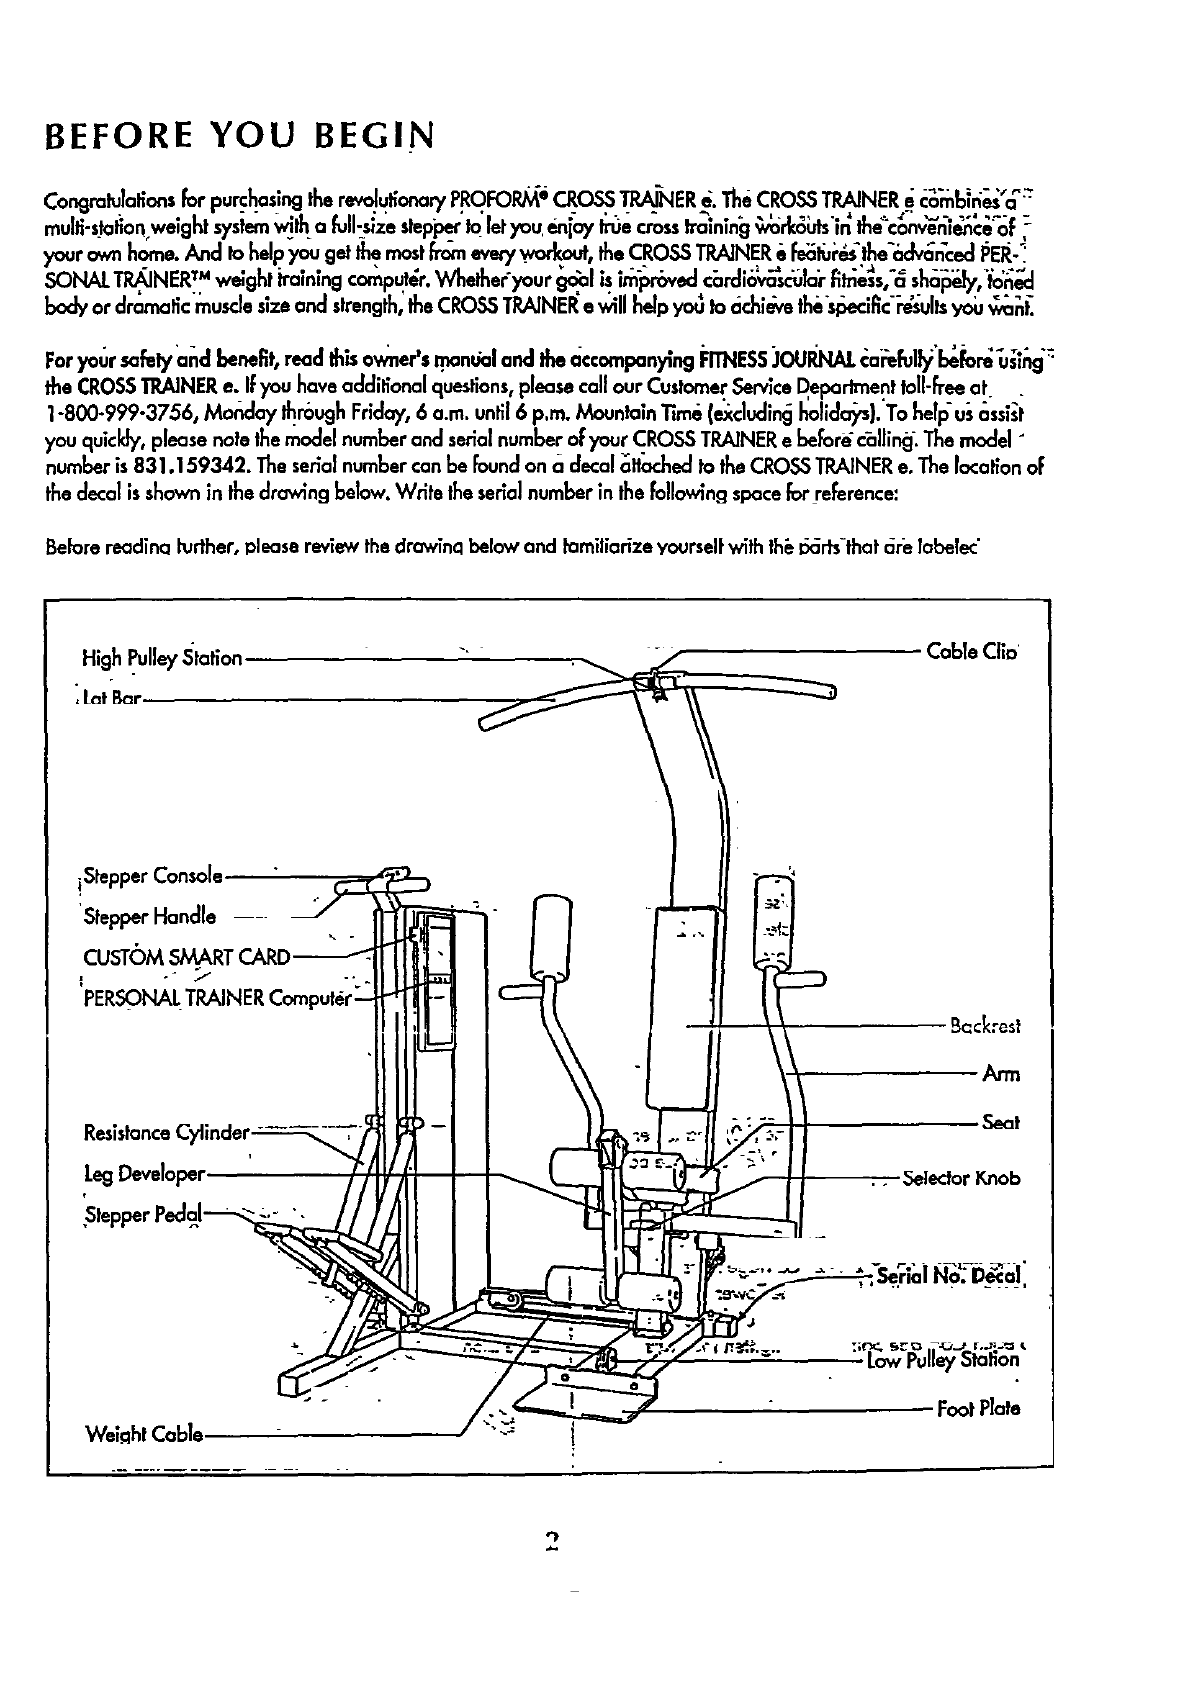
the decal is shown in the drawing below. Write the serialnumber in the following space for reference:
BeForereadina turther, please review the draw[nclbelow and familiarize yourselfwith thi_I:_ds-that a_e labelec"
High_lley Station Cobb Clio
iStepper Console
Stepper Handle
CUST6M SMARI"CARn
!o" .I .-
LegDeveloper
i
I
I
_ackrest
Arm
Seat
We_nhtCable.
'_o_ PulleyStation
- FootPlate
ASSEMBLY
Assembly requires Iwo persons.To'assembleth_ CRO_ TRAINERe, us":.1_ ind.ud_ vid.ea_:assetteor foflow the _-_
instrucffons befow. Due 1othe weTght'oFthe GROSS TRAINERe, it shouldbe assembledin the'location whof'e it will be"
used.Pta_e'attPor_inactea,_o_;_ed,'_* _ mot_a!s.Do_otd_s_seo_thePo_,_,_te_ol_unto
assembly is co_'npleted.Make'sure to lower the'r_islance cylinders and pedals before beginning assembly; if the ,._
reslstahce cyllnders foil, Ihey may damage _theslde._ielcls. Read ea.chassemblystepand examineeach drawing .-.
care[ully. Refer tothe Part IdentificationChart a_componylngthis owner'smanual, to help identi_, the h_ardware used
in assembly. Make sure that all parts a'reoriented as shown in Ihe dr_s.
The follow_ngtools "(notindude_ 9m .requ|mdfor assembly:.Iwo 8" Adjustable Wrenches _ and a
Rubber'Mailet .Asmallanent oFsoapy_vateris alsoreclulred._
-3.
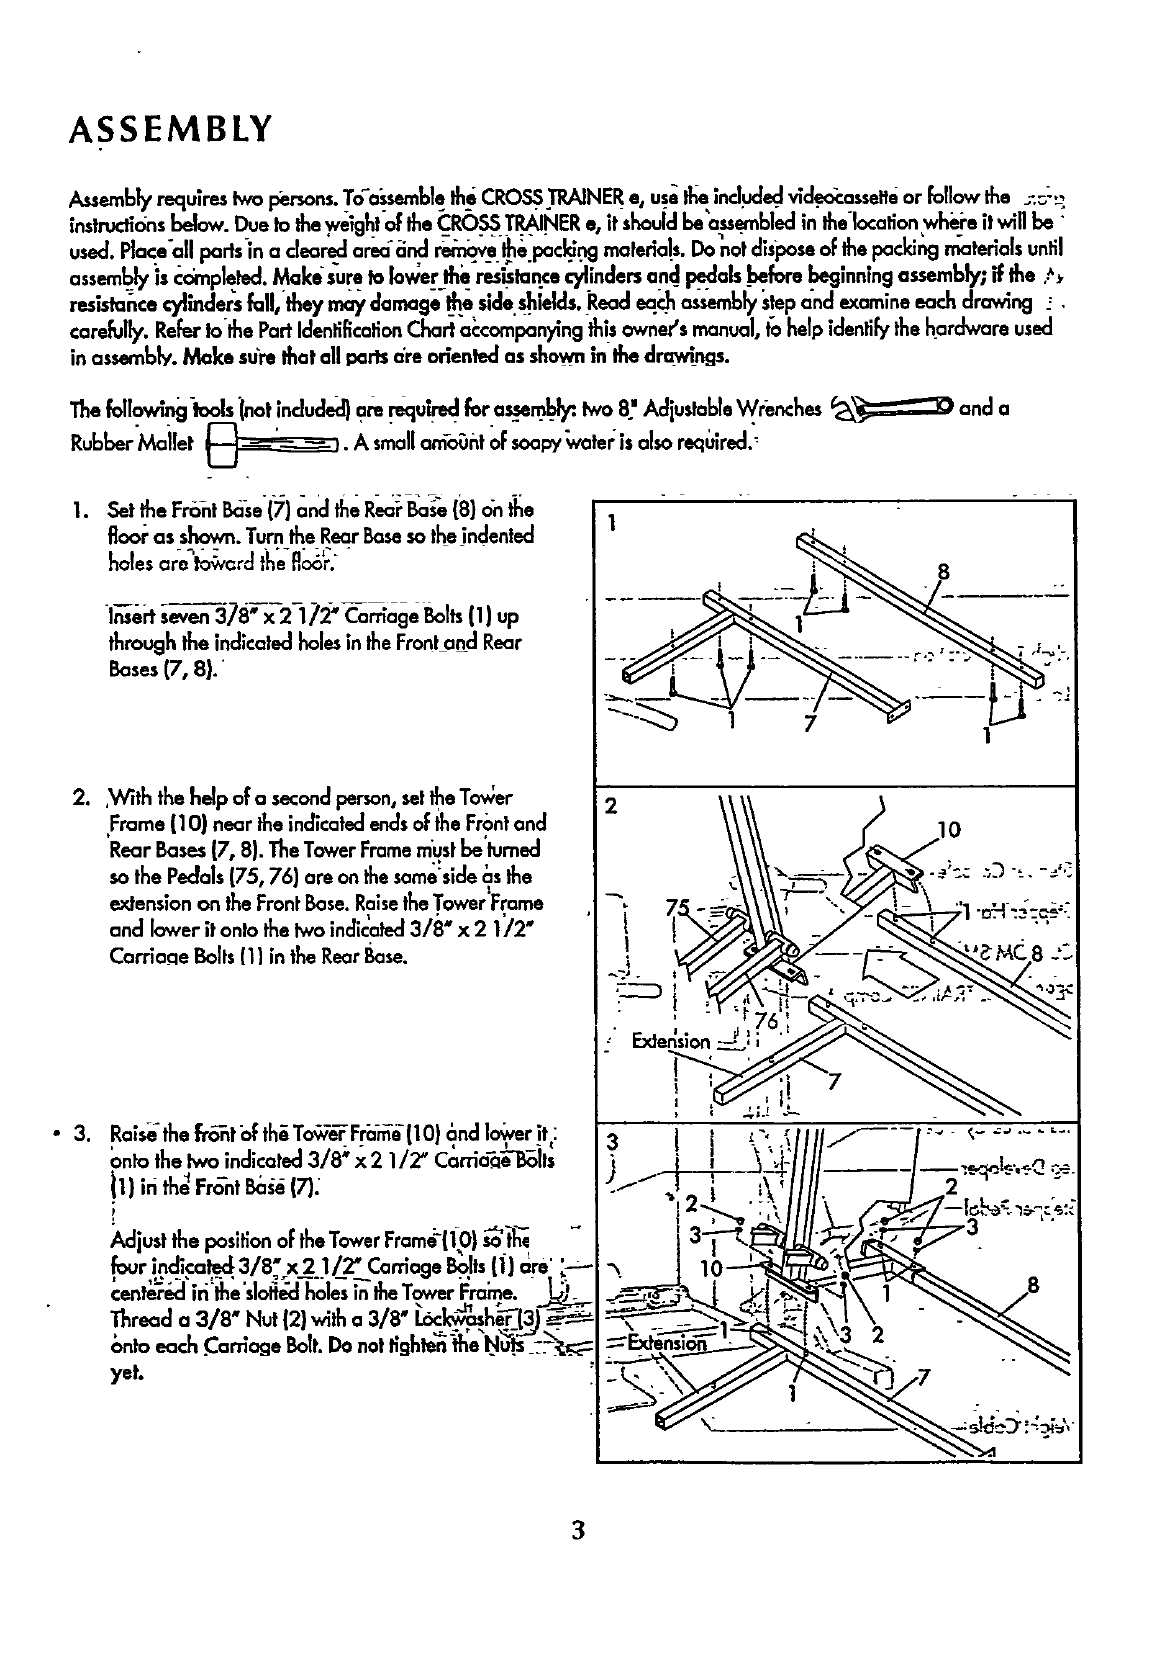
Ls_ttheF_t _se(;;)_ndth,iR_ _ (8)on_e
fioor as shown.Turn the RearBaseso the indented
holes ore toward the floor.
l_e_ s-_3_ 378_x-2-1 _2"Caarr[age Bolts(1) up
through the indicated holesin the Frontand Rear
Bases (7, 8}."
2..With the help of o secondperson,setIhe To_er
Frame (10) near the indicated endsof the Frontand
'Rear Bases(7, 8). TheTower Framemustbe'turned
so the Pedals (75, 76) are on thesame:side_.sthe
extension on the FrontBase. Raisethe Tower'Frame
and lower it onto the two indicated3/8" x 2 1/2"
Corriaae Bolts(1) in the Rear Base.
Rai.,,ethefr_t oFth_To,_v-e¥Fr;_ (1O}_ndI"o_verit:
ontothetwo indicated 3/8 '_x2 1/2' Carria_"l_its
_1) iri the_FrOnt Ba_a (7).
J_djust the positionof the Tower Frame11_O}_'t_e -
four indite .h.._..3/8" x_2._I/__ Carriage Bolts(1) are'
cent_r&l'ffithe'slol_J holes_the Tower i_ra_e. _)_
Thread a 3/8" Nut {2} with a3/8" 1.6c_h__(3)_
onto each .Carnage Bolt.Do not I_ghten_neNu'_-_:.-'_:_
yet.
1
|
1
_12"__ "'_ III1\ .,-'q_--_/--l_:_:.
"_,. _10 _,-_-_._ 8
!-_ _ _. "-"
3

.
.
Slide the Brace (29) onto the_threadedbolt proh;ud-
ing frownthe Tower Frame (I0). Thread a '3/8",
Ny_ackNut (6} onto the thr_ded bolt. Do noelI_Qht.
en the Nvlack Nut yet.
Placeyour foot on the extensionand sligh_ m.ise
the front oFthe Tower Frame (10). _ign the Imver
end of the Brace (29) with the indicated 3/8" x"
2 1/2" Carriag_ BOlt(1). Lowerthe Tower Frameso
the Braceslides onto the Carriage Bolt.Thre_cl a
3/8" Nut (2) with a 3/8" Lack'washer(3) onto the
Ca ageBolt.Do.o ,gh oNutyet.
With the help o.Fa secondperson, lift the Ul_right(9)
and lower it onto the two indicated 3/8" x 2 1/2"
Carriage Bolts (.1)in the Real Base(8). Thread a
3/8" Nut (2) and 3/8" Lac_a'sher (3) onto each
Carriafle Bolt.Do not fi_hten the Nuts yet.
Altoch !he FrontBase(7}to theeUpright(9) with
"3/8" x 3/,_" Boltsr3111s_ th;.ins_tdrm.v[n_l. _"
'.tighten Ibe 3/8" N/lack Nut (6) attached in assem-
bly s_p 4: and the .spven3/8" Nuts (2) attached in
,assembly steps 3through 5.
.Atta'ch the"Fo_t Plc_te-(102)to th_ Ul_ight" (9) _-_h
two 3/8" x 3/4__ Bolts (31) and 3/8" N_ock Nuts
(6).
i
With the help of q second l_rs_n, lift t_ FrontBase
(7). Peehhe backi_"_lf th;;ee'Rub,berPads (48)." / °
Paresstwoonto the _ndemde of the FrontBose in the
|ndlcated Io_'afions, and one onto theundersde of
the Upnght (9). Lower the FrontBose." -/
Presstwo Rubber Pads 148| onto the R_r I_e (8)
in the some manner. 102
4
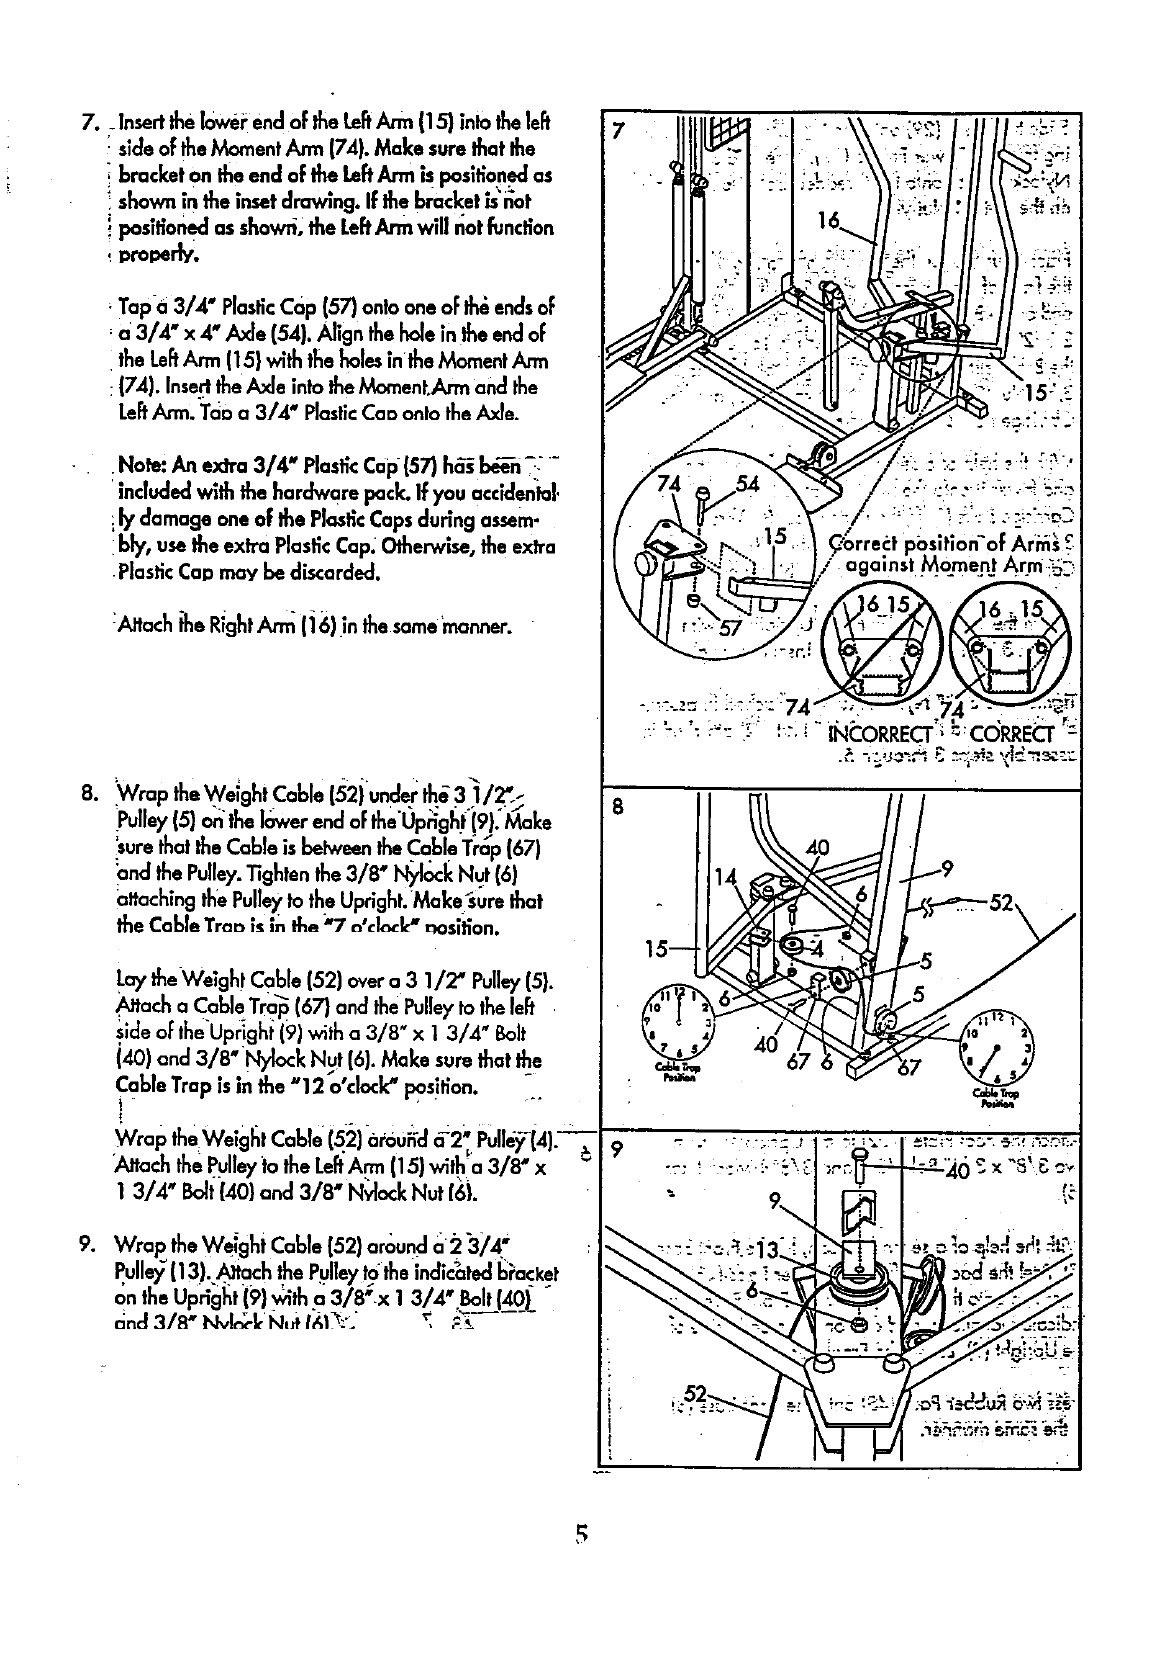
7. _Insertthe Iowei.end oFthe LeEArm (15} into the lee
: side of the h_ment Ann (74). Make sure that the
bracket on the end of the LeftArm is positioned as
!shown in the inset drawing. If the bracket is"_ot
ipositioned as shown,, the LeftArm will not f_nction
proper_y.
Tap-a 3/4" PlasticCap (57) onto one oFt_ endsoF
a3/4' x 4" J_e (54). Align the hole in the end oF
the Left_ (15} with the holesin the Moment Ann
:(74). Insert the AxJeinto the Momenb_-m and the
LeftArm. Tea a 3/4" PlasticCaa onto the Axle.
•Note: An exlTa 3/4' PlasticCap (57) hc_ibee'-h_: -
included with the hardware Pock. If you accldentol.
_ly damage one of the PlasticCapsduring assem-
bly, use the extra Plastic Cap. Othenvlse, the exh'a
•PlasticCap may be discarded.
:,_.tochtheRightArn'l(i6) inthesamemanner.
.Wrap the Weight Cable (52) under th_ 3 1/2=!
Pu ey (5) on the lower end of the Upright (9). Make
.'surethat the Cable is belween _ Cable Tr,_p(67)
_nd the Pulley.Tighten the 3/8 I_ock Nut (6)
altachlng the Pulleyto the Upright.Make_ure Ihat
the Cable Trao is in _a _'7 "
_'ck_k" ,_osltlon.
I.ay the Weight Cable (52) over a 3 1/2' Pulley(5).
_ach a Cable Tra_ (67) and thehlley to the left
_ide oEtheuprighi (9) with a 3/8 x1 3/4 Bolt
(40) and 3/8" F._k N_ (6). Make sure that the
Cable Trap is in the "12 o'clock" Position.
Wrap theWelght Cable (52)a_bUh'da-2_' PUl]_(4). :
_ttach the Pulleyto the Left'Arm (15) wit\hla 3/8" x
1 3/4" Bolt{40) and 3/8" N_4ockNut 16|.
9. Wrap the Weight Cable (52) around a _3/4"
Pulle); (13). Attach the Pulley tothe indicated b?acket
ontheup ght(g) 3/8-.x13/4" lt 4_oj.
and 318" Nvln_.k N,_ I._,1_:'_" _ "
8
40
67
_, Il'="i /='1 .
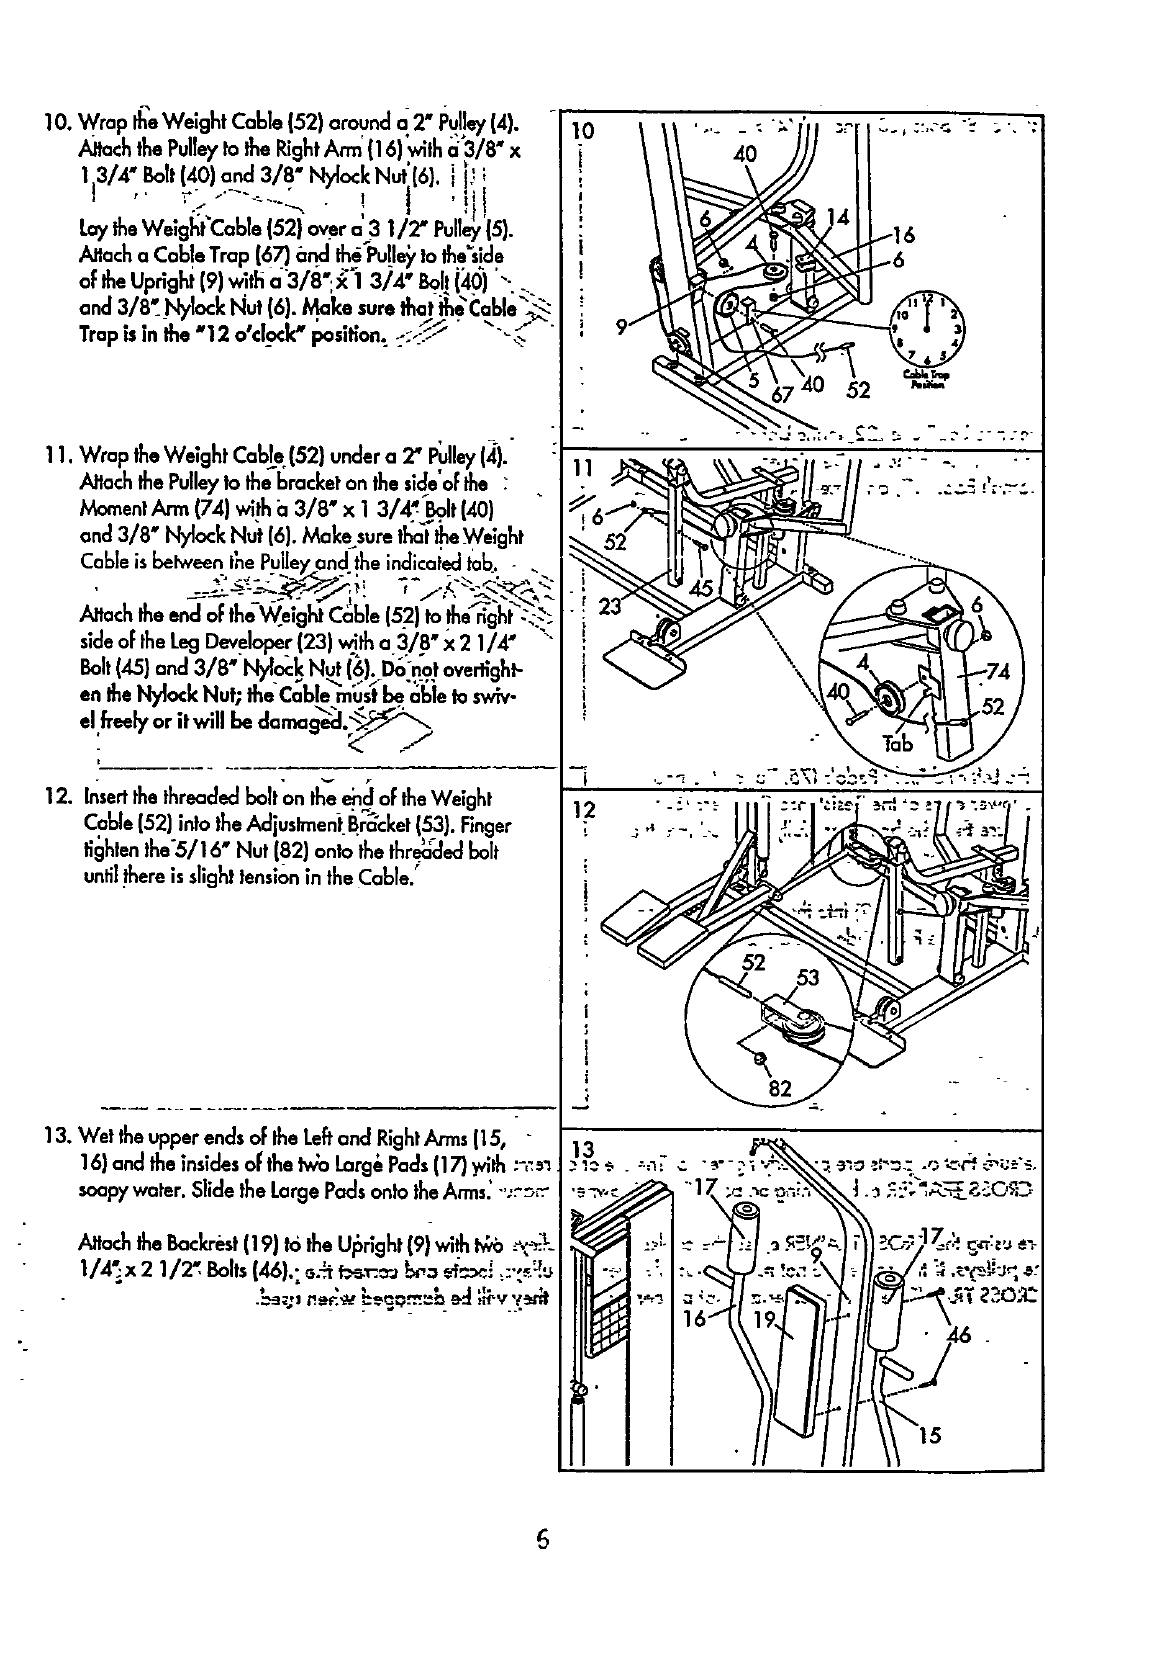
10. Wrap theeWeightCable (52) arounda_2" Pulley(4)•
AltochthePulleyto the RightArm (16) withar3/8_ X
1 3/4' Bolt(40) and 3/8" N/lock Nut'(6). i _
.... ! Jl
LaytheWelgl_t'Cable(52)over a3 1/2" Pull_'(5).
Attacha CableTrap(67) and _ _lle_, to the'slde
oftheUprlghi(9) with a'3/8,':_ 1 3)4" Bolt{46) "-.
and3/8: NylockHut(6)• Make surethat _n_i:able':_-.
Trapis in the "12 o'clock"posiffon:.:;-_-_-_" "'_
11. Wrap theWeight Cable(52} undera2" _lley (,_)." :
Altoch thePulleyto thel:_racketon thesideof the :
MomentAnn (74) witha3/8" x 1 3/4_ Bg.It(40) "
and 3/8" Nylock Nut (6). Make suretl_c_ttheWeight
CableisbelweenthePulleyandthe indicaiedtab. - .
Altoch the end oFthe Weigh/Cable (5.2)to theright-..::
sideoftheLegDeveloper(23) witha3/8" x 2 1/4" "
Bolt(45) and 3/8" I',lyl_k Nut (6). Do".n'otoverfighl-
en the Nylock Nut; the Cable must be able to sww-
elfreely or it will be dama_l._
. . v ,-
12• Insertthethreadedbolton theendof theWeight
Cable(52) ratatheAdjustmentBracket(53) Finger
tightenthe'5/16" Nut (82) ontothethr_ed bolt
until.thereisslighttensionin theCable/
13. Wet theupperendsoFtheLeftand RightArms(15,
16)andtheinsidesof thetv;oLarg&Pads(17)with :",_,5"1
soapywater.Slidethe LargePadsontotheArms_-,:.--.o_.
Attach theBackrest(19) tothe ULbrlght(9) with t_ _-z_=
1/4'_x 2 1/_ Bolts(46).; .-,._'r:_.o_ t_ _'_.._.:::':_%
6
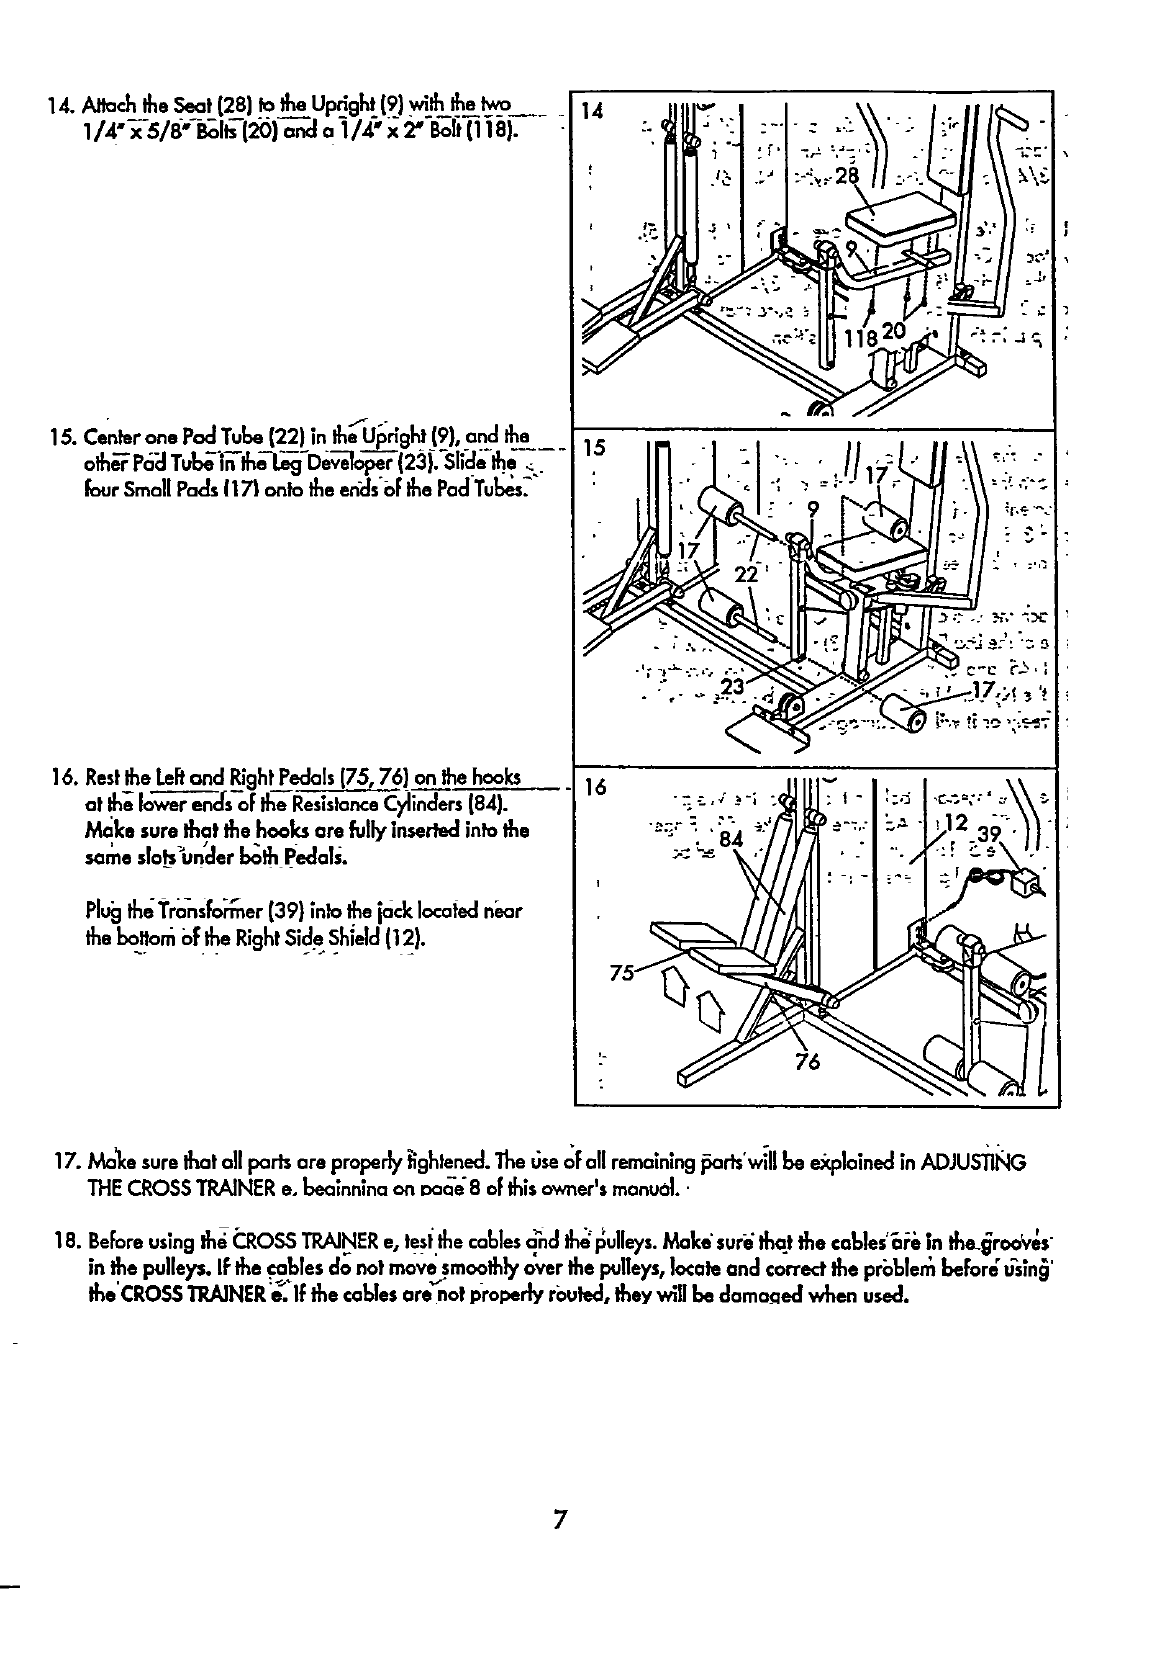
15. CenteronePodTube(22) and the
othSFF
four SmallPads|171ontotheen'ds'oFthe
16. RestI'neLeFtand RightP_) on thehooks
at the Io_-----r_en_s_Fth-eRes|stonceC_in-_'ers(84).
Make surethat the hooksare fuJJy|nserled into the
sameslo_ underbothpedals.
PI_ theTronsfo_er (39) into thejacklocatednear
the boeombfthe RightSid.eShield(12).
16
76
:\\ _\
:.,))::
;-II _-
=_z.I ,"
,."" -i q
17. Make surethatoil parisare properly tlghtened."I'VeuseoFall remaln;ng_arts'wiUbe e.,q.plolnedinADJUSI_I_IG
THECROSSTRAINERe, boolnnlnaon i_a_e"8 of this owner'smanu01.•
18. Beforeusingthei_.ROSSTRAINERe, t_l_.thecablesa_clth-_l_ulleys.Make'sur-ethat the cablesa_ m the.grooves"
m the pulleys.If the cablesdo notmovesmoothlyoverthepulleys,locale and correctthe problembeforeusing
the CROSSI_-._NER'e. If the cables are not pral_n_ rout,d, they _11 be damaged _en used.
7
ADIUSTING.THE €C.ROSS trAINER
theCROssTRAIN.ERe!sdes!gnedtobechangedfroms._ontostar;onqu!c_and.eas,ly...thamstruc,_sbelow-5
desc_beho'weach_rt of_aCROSStr_ner • canbeadjusted.Ploosareadthesemsh'Oction's'c_,rebllybeb_e Us;rig
theCROSSTRAINERe. re_;Flo'pa..,ges17 through24 of_is owner's.rnanualto_ee.h6v;Ih_CRO_ TRAINERashpuld
beset'upfor_ch individualexerci_se.
IMPORTANT: For effective exerc|se, the CROSS11_JNER• must be set up co_ect_/for each exerc|se. When ah'ach-_
ing the lot bar, rower ba r or strap, bttach them diredty 1othe CROSSTRAINER•or use thechaln to attach themF '
make surethat the lat bar, rower baJ;oi"strap is in the correct Startingpositionfor each exercise. If there is any
slack in the cable or chain as ),ou perform an exercise, the effedlveness of the exercisewill be reduced.
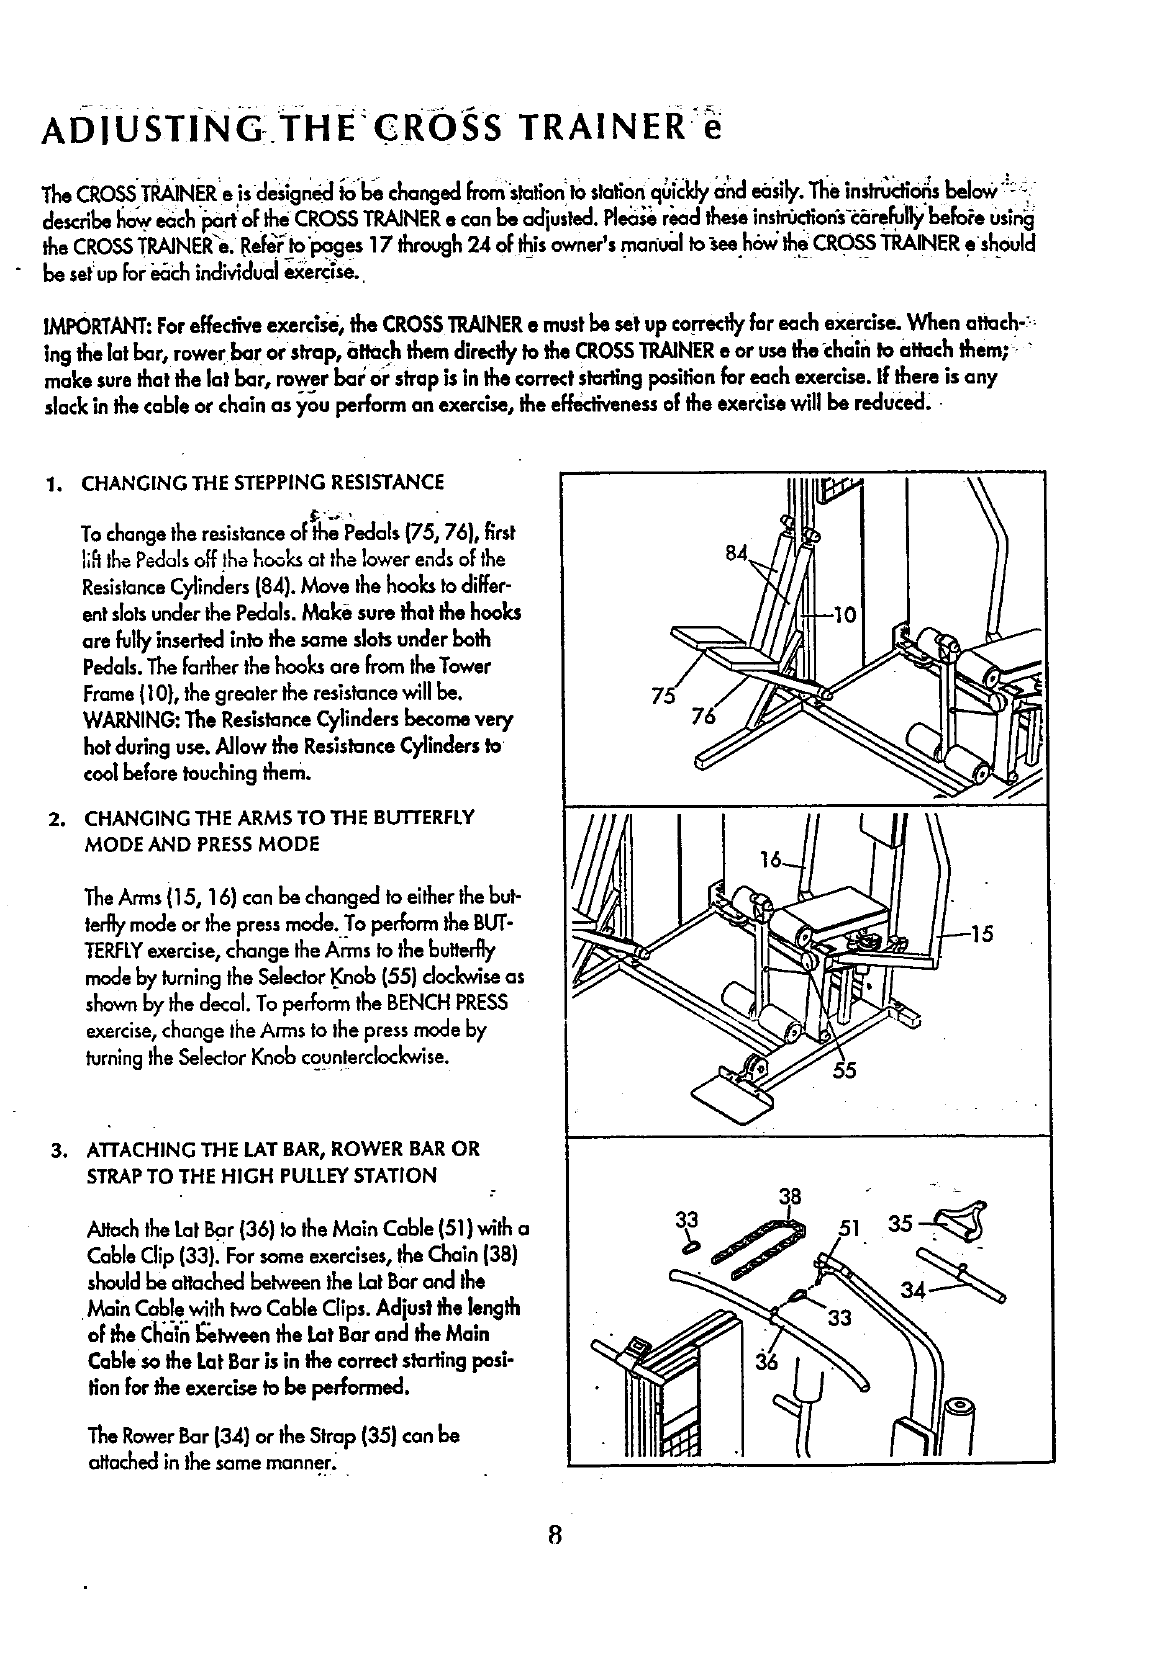
1. CHANGING THE STEPPING RESISTANCE
To changethe resistanceoF_e I_eclals(75, 76), first
I_fithe Pedals off.the hoo_ at the lower endsof the
ResistanceCylinders(84). Move the hooks to differ-
ent slotsunder the Pedats. Make sure that the hooks
are fully inserled inlo the same slotsunder both
Pedals.The farther the hooks are from the Tower
Frame (10), the greater the resistancewill be.
WARNING: The ResistanceCylinders become very
hot during use. Allow the Resistance Cylinders1o
cool before touching them.
2. CHANGING THE ARMS TO THE BUTTERFLY
MODE AND PRESSMODE
The Arms 115, 16) can be changed to either the but-
terflymodeor the pressmode..To perform the BUT-
TERFLYexercise, change the Arms to the buffer'fly
mode by turningthe SelectorI_ob (55) clockwiseas
shownby the decal. To perform the BENCH PRESS
exercise,change |heArms ta the pressmodeby
turningthe Selector Knob cour!!erdockwise.
3, ATTACHING THE/.AT BAR, ROWER BAR OR
STRAPTO THE HIGH PULLEY STATION
Attach the tat Ba.r(36) io the Main Cable (51) with a
Cable Clip (33). For some exercises,the Chain (38)
should be attached between the tat Bar and the
Main Cable with two Cable Clips. Adjust the length
of the Cha'in_tween the Lat Bar and the Main
Cable sa the I.at Bar is in the correct starting posl-
tion for the exercise to be performed.
The RowerBar (34) or the Strap (35) can be
attachedin the same mannen
o. .
B

4. ATTACHING THE LAT BAR, ROWER BAR OR
STRAPTO THE LOW PULLEYSTA'I'ION:
• Cable Clip(33). For .sg_ne_e_cl...._, lhe.Chaln (38)_
Ma_n Cable with Iwo Cable Clips. Adjust the length
of the Chain between the Eat Bar and the Ma_n
Cable so the.Eat.Bar is in the correctslatting posi-._
fion for the exercise to be performed. : ; _,: __: :_-'.
The Rower Bc_r(34) or the Slra'p(35) can 10e'
altacheclin the same manner.
9
OPERATING TH E STEPPER-CON'SOI-E
The stepper consoleis des;g.ned to give you in',font [e_fbeck as yo_ _xet:cJseon the d_open'Plea._'r_cJ the_ instruc-"_
tlonscare[uJ_ybe_oreooeralinQ_e console. Note: Removethe clear plastic fr_n the front oFthe a_n,._l_ -
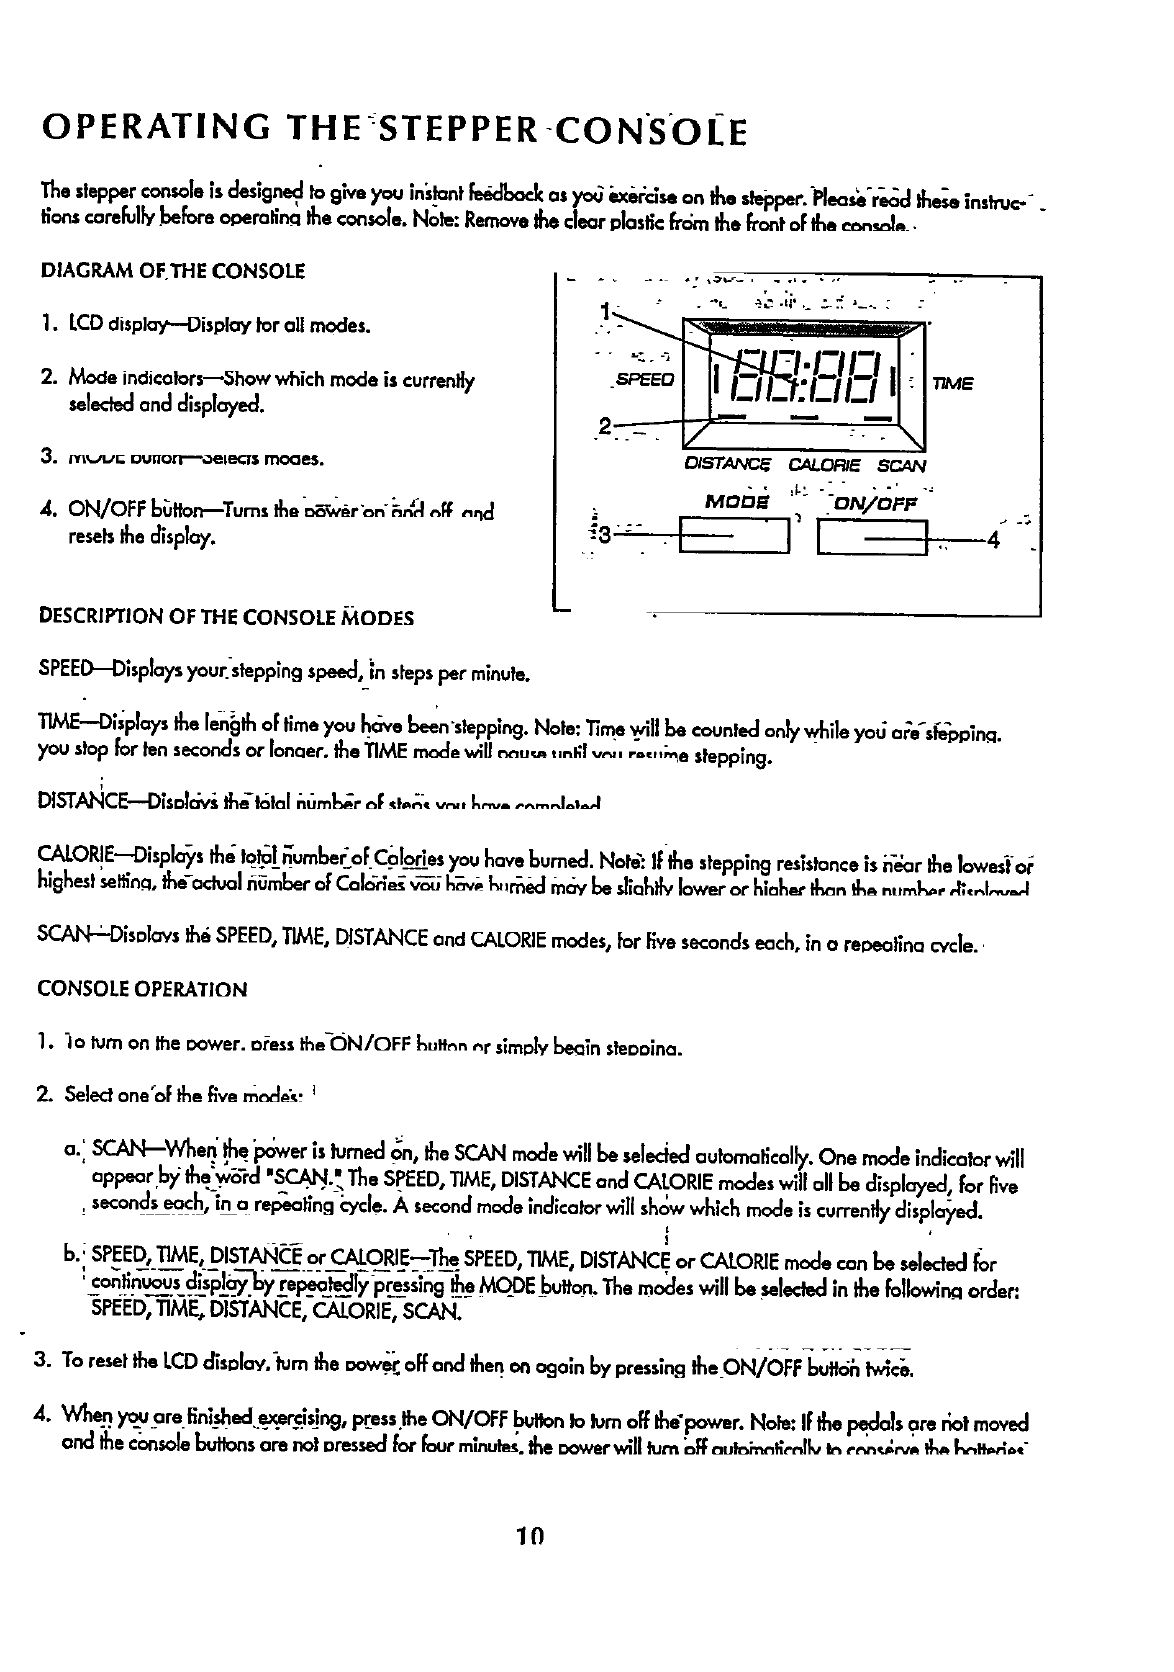
DIAGRAM OFTHE CONSOLE
1. LCDdisplay--Display for all modes.
2. Mode indicalorsuShow which mode is currently
seleded and displayed.
3. /vl_/_._'[; DUi'EOiT'OeI_CTS manes.
4. ON/OFF b_tlon.--Tums the _:_W_.r'_,'hZ,:.l,,; ,,ncl
resetsthe display.
ii
DIS'rANC_ CALORIE SCAN
MoE,e:":OWo r
:- [----i [----]. 4
DESCRIPTION OF THE CONSOLE J_ODES
SPEED--Displays your.-stepp_ngspeed, in stepsper minute.
TIME--DL,_playsthe length oFtime you hc_ve _n'stepplng. Note: .time.willbe counted on_, while yo_ aFe's_opln_l.
you stopfor ten secondsor Ionaer. _e TIME modewill nn.,._ ,,,',ill,.,,-,,...... _e stepping.
DISTAHCE--DIsokJv;-_tc;tal n6ml_;r _1:_,,;,_ v,,,, k...... I,,_,_1
CALOR!E'--DispI_s the tq.tal__umbe_o(Cglories you hoveburned. Nard: If the stepping resistanceis n-_arthe Iowes'l:o_
SCAN-LDisnlavs the SPEED,TIME, DISTANCE and CALORIFmodes,for five secondseach, in a receotina cycle.
CONSOLE OPERATION
1. "in turnon the cower, or_ssth_ON/OFF k.,',-,n _r sim_Y beain sfecoina.
2. Seled one'oFthe fiw m_l_'_ I
a. ISCAH--W_en.' thq_x;wer is lurned _n, the SCAN modewill be seleded automatically.One mode indicator will
appear .b);the.'_8?cl "SCJ._..',.1"heSPEED,TIME, DISTANCEand CA.LORIF modeswill oil be displayed, for five
:seconds each,-in a rel:_'affng-E,/cle.,_ second mode indlcolor will show which mode is currentlydispla),ed.
• I
b.; SPEED,TIME, DISTAN,CE or CALORIE--The SPEED,TIME, DISTANCEor CALOPJEmode con be seceded for
:_n--u_.s _1_. y_el_19 ___s_g_ MOOE button. The m_.s will be _I_ecl in the followln_ order:
SPEED,TIME, DISTANCE, CALORIE, SCAN.
3. To rese!the LCD disolov.'lumtheoow_offondthenon ogaln by pressingtheON/O-FF_buff_h lyre'e,
4. When. yc_uare Enbhed.ex.e.rc.i_ng,press.lheON/OFF button!o lure off the'power. Note: IFthe p_ols 9re r_otmoved
and the cc_nso_ebuflonsore cot Dressedfor Fourm|nut_s,the cowerwill turn _ aut_innl;_nllvin _-nn,._w Ik_ knl_-;_"
10
OPERATING THE PERSONAL.--TRAINER COMPUTER
Theheartof theCROSSTRAINER• is IheadvancedPERSONALTP,AJNER_m_ghth_alnln_€omputer.With IbePERSON-_
AL TRAINERcomputer,youcan chong'etheweightse!fingwlth'atouchoFa button.As you exerc;se,the compbte?_11 :
measureyourrange oFmotion,showthenumberofCaloriesyouhaveburnedand keephackof the repetitionsand
selsyouhavecompleted,in the hainer mode,yc;uconselecta-speclficmusclegroup,and the computerwillguideyou_
throughaseriesoFexercisesthatwill developthe selectedmusclegroup.Usingthe includedCUSTOMSMARTCARD,
youcan createcustom-e;xerc;se'F_Fai"hs_:!storethent°in mer_ for_ture workouts.PreprogrammedSMART:'"
CARDScan also be purcha._d to helpyouachievespec!ficexercisegoals.Seethe included brochureformoreinFor-
motion.Pleaseread these ;nslrucffonscarefullybefur'e-operafingthe €ompu_r.
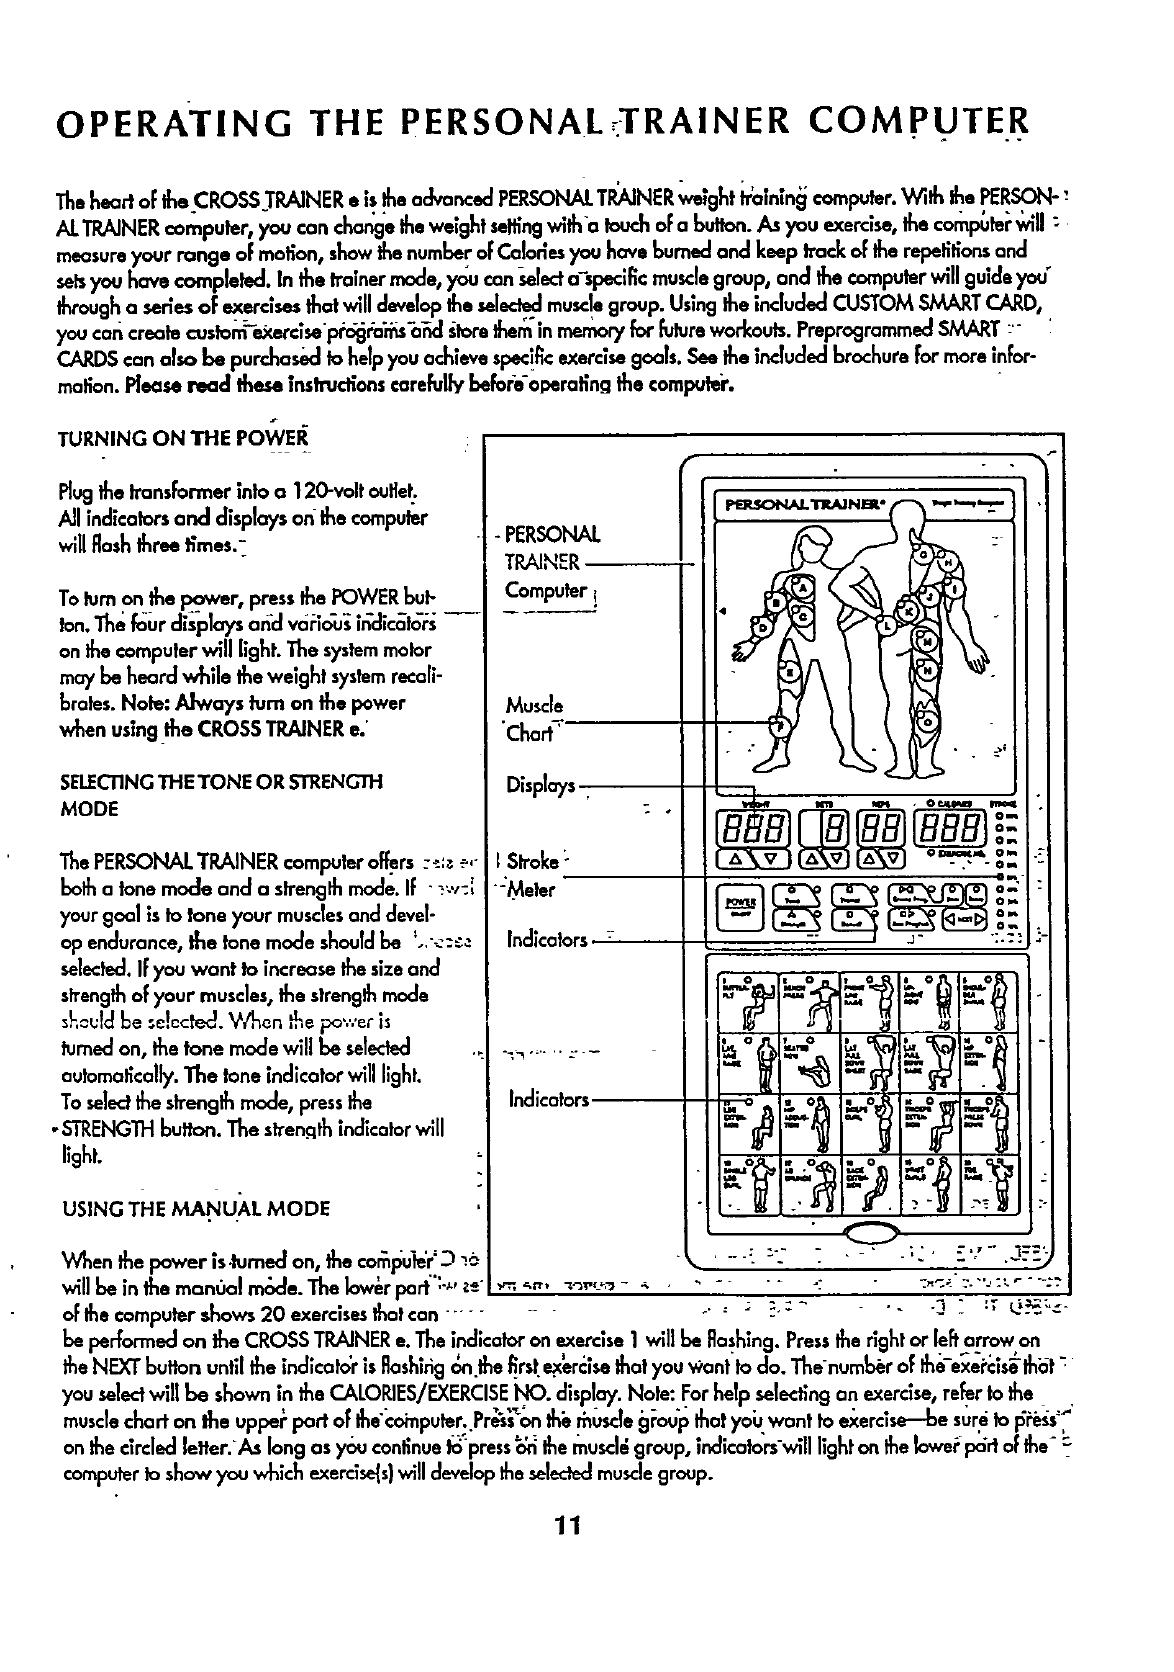
TURNING ON THE POWEI_
Plugthetranslbrmer into a 120"voltoultet.
All indicatorsand displayson thecomputer
willflashthreefimes.'_
Tolumon the powers pressthePOWERbut-
ton.Thefc;urdislolaysaEd v,_:i_'_i_ic_tc;_
onthecomputerwill light.The systemmotor
may be heardwhile theweightsystemrecali-
broles.Nole: Always tum on the power
whenusingthe CROSSTRAINERe.'
SELECTINGTHETONE OR STRENGTH
MODE
The PERSONALI'RAINER computeroff.ers.--::_._,"
both a tone mode and a strengthmode. If "_'-',::
your goal is to tone your musclesand devel-
op endurance, the tone mode shouldbe *."_::_"
selected.IFyou want to increase the size and
strength of your muscles,the strengthmode
s_,o_:ldbe se!cctod. V_en ,,'hepo',ver is
hJmed on, the tone mode will be selected
automatically.The tone indicator will light.
To selectthe strengthmode, pressthe
• STRENGTHbutton. The stren.qthindicatorwill
light.
USING THE MA.NU.AL MODE
When the power is.lamed on, the co_ldui_r'D
will be in the mon0al n'_,de.The lower part":'_ 2_
oFthe computer shows 20 exercisesthat can .....
-PERSONAL
TRAIN._R
Computer !
MUSCle
cho
Displays ,
Stroke:
"-Meter
Indicators _-
Indicators
0
beperformedon the CROSSTRAINERe.Theindicatoron exercise1 will be flashing.Pressthe right or left arrow on
theNEXTbuttonuntilthe indicator is Itashirig_,n.thefirst._r,:ise thatyou v_ant'todo. The-numberof the-exei'_iselh_t_
youselectwill be shownin theCALORIES/EXERCISE_=NO.display.Note:Forhelp selectingan exercise,rear tothe
musc• charton the uppe_"port oFthe'co_nputer..Pre'_'_onthi__fluscleg_ou'l_ thatyah wantto exerclse--besureto lihbss-"_
on thecircledletter/As longasyoucontinuet_press_'_themuscl_group,;ndico_rs'willlight on theIowe_I_rt ofthe_
computerIo show youwhichexercise(s)will developtheselectedmusclegroup.
11
Next, pressthe IUINI: or _RI: .1_K_11-1button,dependingon whelberyou want lee firstexerciseto be a lone or a strength
exercise.TheWEIGHT display will show the recommendedweight se_ng for the exercise that you hove'selected. ".....
WARNING: The recommended weight selffngmay be too high or too low for you, depending upon suchfaders as =
your body size and physical €ondiffon. If you cannotcomplete tee desired numbers of setsanti re_,fiffons th-.- "-
weight sailing should be decreased. The weight seltlng can be changed by pressinglEe inc-rea_ or decrease bultori _:
beneath the WEIGHT display.Each time one of the buttonsis p_:essed,IEe_welghtsetting_11cl_angeby I pound. The"
buttonscan be held down to change the weighticing" qulckty.[Theweight range for the BENCH PRESSexercise i_ 30 _.
to 250 pour_s; the weight range for all olEer exercisesis 15 to 125 pounds.)
IMPORTANT:While the weight seltlng is changlng, themotor wiil be heard and the SETSand REP5dlsplays-_ll sinew
a rapidly rotating indicator. To prevent damage to the weight system,do nat out any Bressure on the I,_ devele_._-
•4r . • -_4r_/_='•I
arms or cableswhile the we,ght setting ,s changing.If the lat bar or rower bar is affached to lee high pulley sta!i.on,
restit in the rack near lee hlgh pulley station,if the computersenses pressure on thewelght systemwhile the wei..ghl
sel_ng is changing, the WEIGHT display will show an e'or cede ("EEE")for Iwo seconds,and the.vtelght se_ng will
stopchanging• The WEIGHT display will then show the currentweight set_ng. Make sure that there is no pressure
on the leg developer, arms or €_bles. Pressthe increase or decr_se buffon 1_eneaththe WEIGHT dlsplayagaln ._.
change the weight se_ng as desired. Wait for'lha souredof the motor !o stop before you'€onffnue. -.
The SETSand REPSdisplayswill show the recommendednumbersoFsetsand repetitionsfor the exercise thai you hove
selected.If Desired, the number of sets or reptilians can be changed by E_ressingthe increaseor decrease button" -' ":
beneath the SETSor REPSdisplay. Each tlme one of the buttonsis pressed,the number of setsor repetitionswlJlchange
toy1.Therangeo(se !s tog.Th. ng:oF e titionsis2to20.:,
Beginthe exercisethat _,ou hove selected.(Referto pages 17 through 20 oFthis owner's manual for infor_atiBn al:_t
the proper form for the exercise.) During your firstrepetition,the computerwill measure y_ourrange oFmotion-'--_y, ta "°-
move through the fall range-of motion for the exercise. D_rlngeach following repetition, lee STROKE meter;will sho_, :
your range oFmotion -ify to reach 100% during each repetition.As you exercise, the SETSand REPSdlsplaysw-illshow"
the numbersof serf,and repetitionsremaining to be completed.One tone will soundafter each repetitionis completed, "
two tones will sound after each set is completed,and three toneswill sound after oil repetitionsand setshov_ b_eh co_-
plated. In addition, the CALORIESindicatorwill fight, and the CALORIES/EXERCISENO. displaywill showthe number_F
Calories lear you have burned.
..-
IMPORTANT: For effective exercise, rest for 1 minute after each setif you are doing a tone exercise, and 3 n'llnutes"
after each set if yo_ are doing a strength •x-•r-else.Your body will burn Calories at all times--at an increased rate
while you are _rformTng repet_l_ons,and at a decreasedran "._;le you are rasing. As soon as you _in '_e f_rst
exercise, the computer will begln counting the Caloriesyou are burning, belh wh'le you are performing repetifio_s
and while you_are resffng. In order to fin'd the number of Caloriesyou bum during your workout, note the number :
that is shownas soon as you _:omp_eteyour lastexerc]_: .
e - _ ,• . o
ryou hove completed all of tee repetitionsand setsfar lee firstexerase that you selected,pressthe right or left "-"
arrow on the NEXT button _selectthe next exerclse_not);ou wont to do. Repeat the procedure described abo_v'efor the
next exercise. (Notei If you ._,electon exercise the! involves only one arm or leg, suchas the SINGLE LEG CURLexercise,
the numbersoFrepetitionsand setsshown inlee SETSand REPSdisplaysshould be performed once using th_ rightarm
or leg, and once_using_the"left a;'m"orleg. AJter_pleting the repetitionsand setsusing one arm or leg, press'the right
arrow on lee NEXT bulton, then pressthe left arraw-ohlee NEXTbutton, and I_en repeat therepetitionsand setsuslng'£_
the olE_ arm or.leg.) Sel_ect6s many exercises as desireduntilyour workout is completed.
USING THE TRAINER MODE
Pressthe TRAINERbutton. The trainer indlcal-or_villlight. Next, refer to the muscle chart on the upi_erport of tee c6m-".:
puter. An indicatorwill be lighted on muscle group "A." If you wont _exercise a differ•n! muscle group first, l_resson
the deslr_ musclegroul0--_-besure to I_resson the clrcle_letter_ ÷
1")
Once you have selectedthe firstmusclegroup that you w.ontto _ercise , rek,r to the Icier part of the €._pu_r. One or
more indlcato3swill be lighted, showing you which exerase(s)10do to developthe selectedmusclegroup, on..eof the
indicatorswl befiashinnto_how_ouwhichekercise_todofir_i_f_uw_n_s_dp.`.`_efir_texerdse,_Press`theri_ht ."
arrow on the NEXT button until thein°dicator is floshi'ng_n _e _-'r¢!" _"t_' t y._ Wg"n| !o do fir_,i.The'fiomb:erof the" '_?,
exercisewill be shownin theCALORIES/EXERCISEHal dlipl6y.N_._,_pre_itheTONE0rSTRENGTHbu_;depend-
mgonwhetheryouwantthefirstexeraseto bea toneora s_rengthexerc!se:The WE!GHI_.d,sp1aywtllsho__ rec•-
ommendedweightse_ngforthefirstexercise. !fdeslt:ed,the _elghts_n§ re:anbe.ch_n_ecl. This can be':dgne m the _:
same manner'as when the_computer is in the manual m_cle.The s_soafid REPSd!sp!ay_,wi!lshowthe recommen_d.
numbersof setsand repetitionsfor the firstexercise. If desi_,d, the nu_nbero[ setsOr ie,_etiffons con be chonaed. This _'_
can be done in the same manner as when the computeris in the manual mode..
Beginthefirstexerclse,A_youexerdse,the"_om_a'_willprovideIhesamefeedbackaswhenitisinIhemanualmode.
After you have c0mpleted all of the repetitlohs0nd setsfor the firste_erclse_pi:essthe fight arrow on the NEXT burn
to sebct the next exerase that you want to do. Do as many Qf the indicated exercises as desired."
When you ha;,,e"c_p1eted th&desired e._ei:ci_ for the firstmu_le -gt:_,upthat you selected, pros on the nexf muscle.
group that you V.Gntto exerds_ Do'as many'of the indicated_rclses as desired. Sel_t as many muscleg'_0S'_:
desired untilyour war'out is €ompleted."
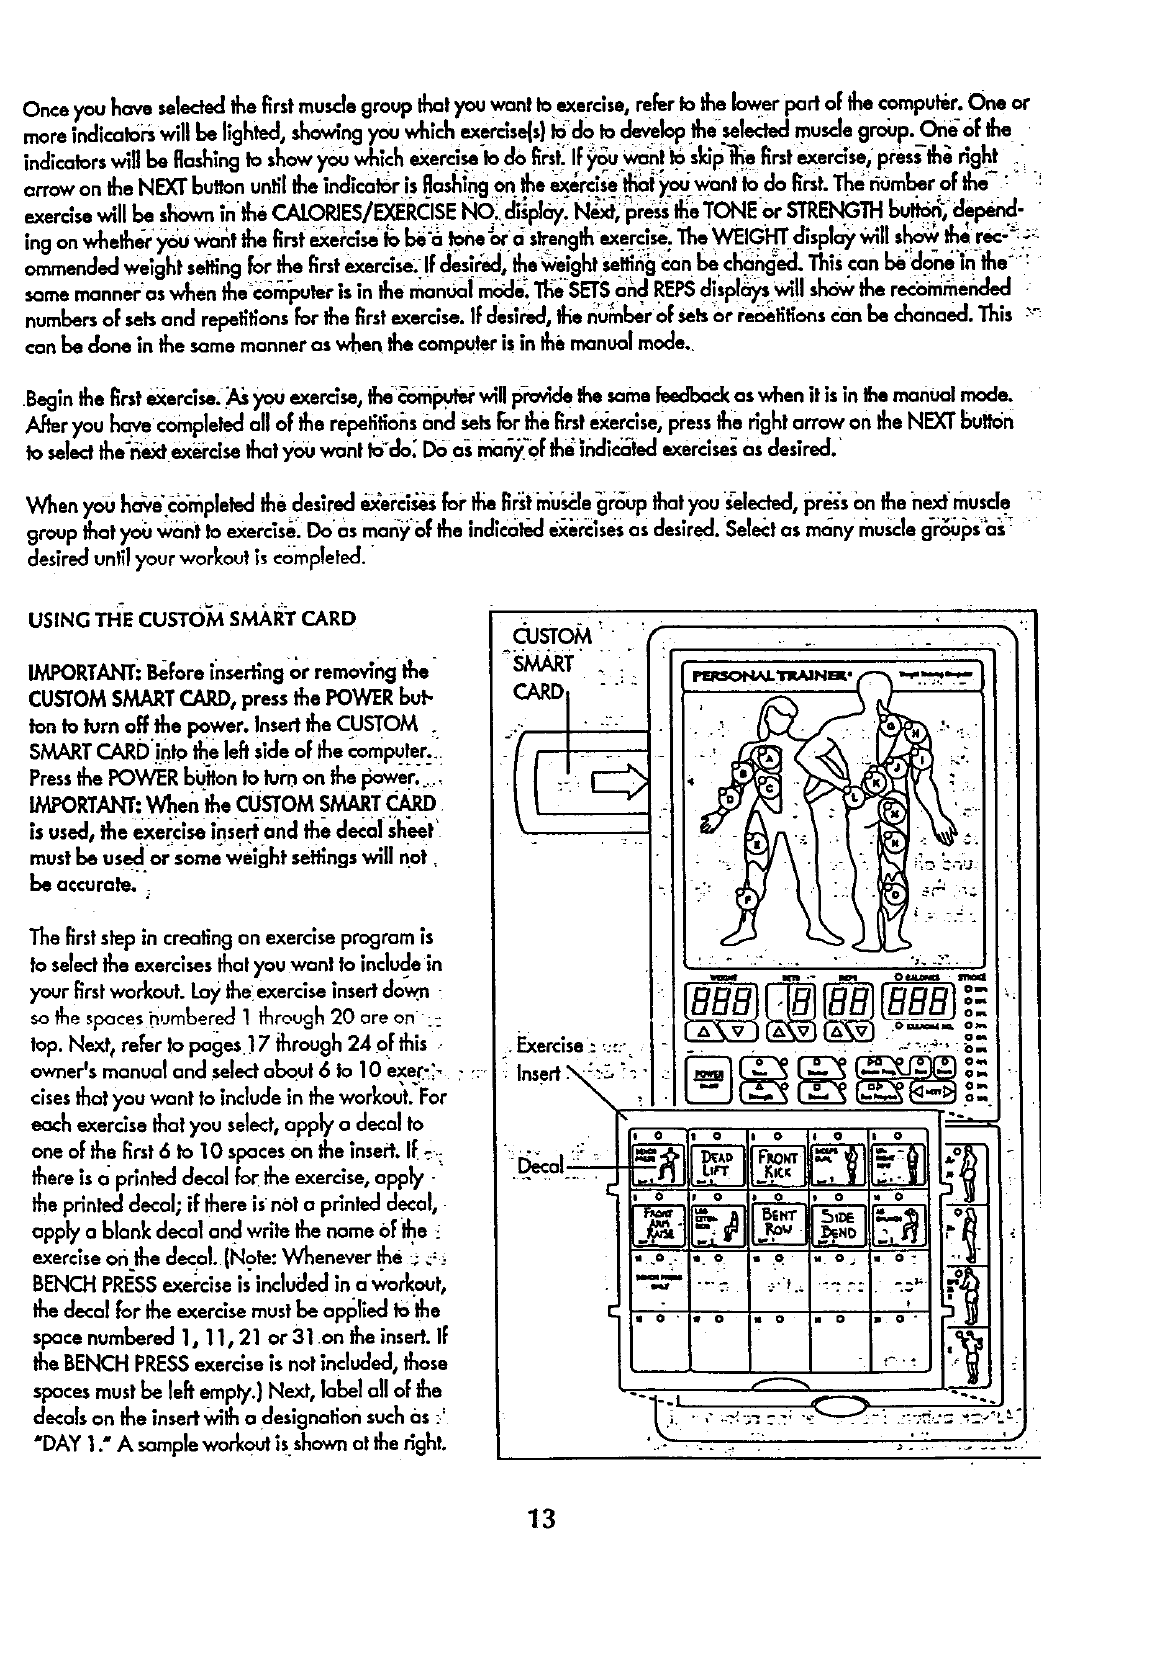
UStNGTH-ECusTO starer
IMPORTANTi Before inserting or remov|ng the-
CUSTOM SMART CARD, press the POWER but-
ton to turn off .thepower. Insert the CUSTOM .
SMART CARD'!_I.o the left s,de oFthe _-omputer._
PressthePOWERbu ontoturnonthe i
IMPORTANT: When the cUSTOM SMARTCARD
is used, the exercise insert and the decal sheet'
mustbe usecl.or some weight se_ngs will n#t,
be accurate. :
The firststep in creating on exercise program is
to selectthe exercises that you want to indu_Jein
your firstworkout. Lay the_exerciseinsert down.
so the spaces i3umbered I through 20 are on"::
lop. Nex b refer to poges ] 7 through 24 o! this ,
owner's manual and selectabout 6to 10 _e_'b
clsesthat you want to include in the warkout:For
each exercise that you select,apply a decal to
one o_the first6to 10 spaces0n the insert. IF:.:
there is a printed decal for the exercise, apply -"
the printed decal; if there is not a printed decal,
apply a blank decal and write the name 0f _e
exerciseor_.the decal.[Note:Whenever _e _;_:
BENCH PRESSexercise is included in 0 wo_out,
the decal for the exercise mustbe opt_lied to the
space numbered 1, 11, 21 or 3 ! on the insert.If
the BENCH PRESSexerciseis not included, those
spacesmust be left emply.) Next, label all of the
decals on the insert'bilh a designatior_suchas ::
"DAY 1." Asampleworkoutis.shown at the right.
13
After you have applied a decal to the exerciseinsert for each of the exerc|sesthat you want to include in your first
workout, fit the four tabs on the insertink) the slotsin the lower part of the computer.Make surethe!' I_e i_se_ iStu_med
so the decals are visible, fl_e useoFthe remalnin.qspaceson the insertwill be explained below.)
Next,a weight,s_tandrepetitionseltlngsl_._ldbepr.ogrammedfor _ch o|_a exer.ci._s,and _qwOrkout shouldbe.j:
storedon theCUSTOMSMARTCARD.
Pressthe CREATEPROGRAM button.The indlcator next to the button will light. Pressthe right or left arrow on the NEXT
bulton, if necessary,untilthe indicator is flashing on the firstspaceon the exercise insert where a decal has been
applied. The number of the exercise will be shown in the CAlORIES/EXERCISENO. display. Next, pressthe TONE or
STRENGTH button,depending onwhether you want the firstexercise to be a tone or a s_engthexercise. The indicator
next to the buttonyou presswill light. TheWEIGHT, SETSand REPSdisplayswill showthe recommendedweight selling
and numbersoFsetsand repetitionsfor the firstexercise. WARNING: The recommended weight setting may be too
high or too low far you, depending on suchfactors as your body slze and physicalcondition. If you cannot com-
plete the recommended numbers of sets and repetitions, the weight setting should be decreased. If desired, the
weight, setor repetition settingcan be changed by pressingthe increaseor decreasebutton below the WEIGHT, SETS
or REPSdisplay. The weight setting can be changed in incrementsoF1 pound;the buttonscan be held down to change
the weight settingquickly..ThenumberoFsetsor repetitionscan be changedin increments oF1. The range oFsetsis 1 to
9. The range of repetitionsis 2 to 20. After you have programmed the desired weight, setand repetitionseltingsfor the
firstexercise, pressthe STORE"button.The indicator will remain lightedon the firstexercise on the exerciseinsert, and
the indicator will begin flashingon the next exercise on the insert.Pressthe TONE or STRFNGTHbutton and program
weight, setand repetitionsettingsfor the next exercise as describedabove. Pressthe STOREbutton. Repeat for each oF
the exerciseson the insert.The workoutwill then be storedon the CUSTOM SMARTCARD. o'
When you are ready to begin theworlcout, pressthe RUN PROGRAM bulton. The indicator next to the button will light.
The indicatorswill light on all oFthe spaces on the exercise insertwhere decalshave been applied. The indicator _11 be
flashing on the firstexercise oFthe workout. Begin the firstexerclse. (ReFerto pages 17 through 24 oFthis owner's"
manual for information about Ihe proper form for the exercise.) As you exercise, the computerwill provide the same
feedback as when it is in the manual mode. After you hove completedall of the setsand repetitionsfor the firstexer-
cise, pressthe right arrow on the NEXT button. The indicator will begin flashingon the nextexercise oFthe workout.
Perform the next exercise as describedabove. Repeat untilyou have completedall oFthe exercises included in the
workout. :-
The workout can be revisedasyour fitnesslevel increasesor your goalschange. To revisethe workout, firstpress
CRE.ATEPROGRAM buffon. To revisethe settingsfor an exercise,pressthe right or left arrow an the NEXT buttonuntil
the indicator is flashing on the exercisethat you want to revise. Pressthe increaseor decreasebuttonbelow the
WEIGHT, SETSor REPSdisplay to change the setting.Pressthe STOREbutton. To delete an exercise,pressthe right or
left arrow on the NEXT buttonuntilthe indicator is flashingan the exercise that you Want to delete. Pressthe DELETE
button. Re'movethe decal for the exercise from the exercise insert.To add an exercise,attach a decal to the insertand
pressthe right or left arrow on the NEXT'button Untilthe indicator is flushingon the ne_, exercise on the insert. Program
weight, setand repetitionsettingsas described above. Pressthe STOREbutton.
..._"
Becausethere are 40 spaceson the exercise insert, a number oFdifferent workoutscan be storedon the CUSTOM
SMART CARD at the same time. For'_ample, your exercise program couldinclude three differentworkouts--one [or
Mondays, one for Wedne_lays, and one for Fridays.Or, you couldcreatetwo differentworkoutsusing the spaces
numbered 1 thrc_ugh_ on the 10sert,and a Iralnlng partner could createtwo d|fferent workoutsus'ngthe spa_:esnum-
bered 21 through'40. To do Oneof the workouis, firstpressthe RUN PROGRAM button. Pressthe right Or lefi.an'ow on
the NEXT button untilthe indicatoris flashing on the firstexerciseoFthe workoutthat you wont to do. Then, €omplete
the workout asdescribed above. The CUSTOM SMARTCARD can be programmed in a variely OFways to fit your i_:]i-_
vidualneeds. " "
14

TURNING OFFTHE POWER
To turnoff Ihe powe.r,pressfne}_)WERbulton.Note:If no buttonson thecomputerare pressedfor 30 minutes,the
power w_lllure off aut6inafically.Thetransformershouldbe unpluggedfrom the 120"voltoutletdurin__rlods of
/1onuse.
EXERCISE GUIDE
SAFETY
TheCROSS"r_NERe1_6k;ol{ondle_fng'ta-u_ it L0_:ep_'yise_n_ol_i _iy'as wellas=h,_';o'_s_f,_I__,
CROSSTRAINERe, Re_mbe& fn&mfo_otion re'this owner'smanual and in the FITNESSJOURNAL is geaeral in _ ,_
nalure.Formore reformationabout exerase,consultyourphyslaanorobtaina roputaI01ebook aboutexerase,":_::.:
WARNING: Beforebeginning any exercise program, consultyour physician.This is esoe<iaIv |monrtant for aer-_ns
over the age of 35 or personswith pre-existing health problems.
THE FOUR BASICTYPESOF EXERCISEPROGRAMS
STRENGTH
in order ta inc=:eas_the size and strengtho| your n_uscles,_mustsubject)h_r'mu=:les'_above-normal wo_ds:' _
You must also progressively increase the intensity oFyour exerciseso _at your muscleswill ;:ontinueto'at/apt a'nd'-" _'
grow. Eachindividual _xercise can be tailored to the proper intensitylevel by chonging the Weight se_ing,orfne_;_:
ber oFrepetitionsor setscompleted. The proper weight settingand numberso1:sets and repetitionsfor each exerase_._
dependsupon the individual user. Each workout should includeabout 6to 10 differentexercises.Select exercisesfor--
every major musclegroup, with empl_asls_ the areas that youwant ta develop the most•To give balance and va_ety
to your workouts,vary the exercisesfr&'h_ork_t to workout:WARNING: If y0u'are unclerage-17, W0[_ouls;=k_u|d i
consistexclusivelyof lone exercises. Unsupervised workouts €onsls_ngeXC!US_velYof strengthexerdse_re _t l'_:
ommended by exercise physiologists. • _ _=
TONING
To toneyour muscles_se!ed mc_Jerate'welght settingsand increasethe number oFrepefitlon-sin each set.Work your
musclesby completingmore repetitions rather than by usinghlghweight _.ettlngs.
LOSING WEIGHT
To loseweight, seted lowweight settings and increasethe nu.ml_rat re.petitionsin each set_Exercisin_lon the stepl::,er--_
wdl alsohelp you to burn Calories and shed extra pounds.
CROSS TRAINING '
In the pur-suitof a-(:ompleteand wel!-1:_16h_ fih_s__r_-r_n_;_ny h_n;e foGi_dth6f c_s;=training is the d_sW_. Th':_
CROSSTPJ_NERels ideOI for _r_ss trainir_'? B);€omblnlng*_;eight tro_nin_'_vithae=:oblc"_ercise, you _:on resh_"_r_J
strengthen),our body, plus develop a stronger heart and lungs.
EXERCISEFORM
n order ta obtain the greatestbenefils from exerasmg, It ,s essentialto mamtem proper form• h_mtammg proper ['c;r'm
means movingthra.ugh the [uUrange oFmotion for each exerase, and moving only the oppropnate partsof the-_._._
On pages 17 thr _ 24 oFth sowner's monua, ou wl find otagro hs showng the carted form for..eqchexerase.:
ou9 . y ph p .. , .-_- _ -._-_,--=._.=
Adescriptiono[ each exerase _solse pi'ovided, olongwttha list oFlee musclesaft•tied: ReFerto the mulleinS, m_5
occomoanv=ngFITNESSJOURNAL to find _e locationsoFthe mu_es..As you exert,s•, _ repetitions,n each _s_
shouldbePe_rmedsmoothlyandw,_t Peus,ng.Theex_.r_onphaseof_.=.hrepetition,houldlastonlyo_ h_If_
as long os the relurn phase. Rest for I minute offereach setIF)'ouore doing a to-hemce?clse,and 3 mlnu!es offer'each
set if you ore doing a strength exercise. Plan to SF_ndthe firsttwo weekslearning the proper |on'n for _ach exercise.
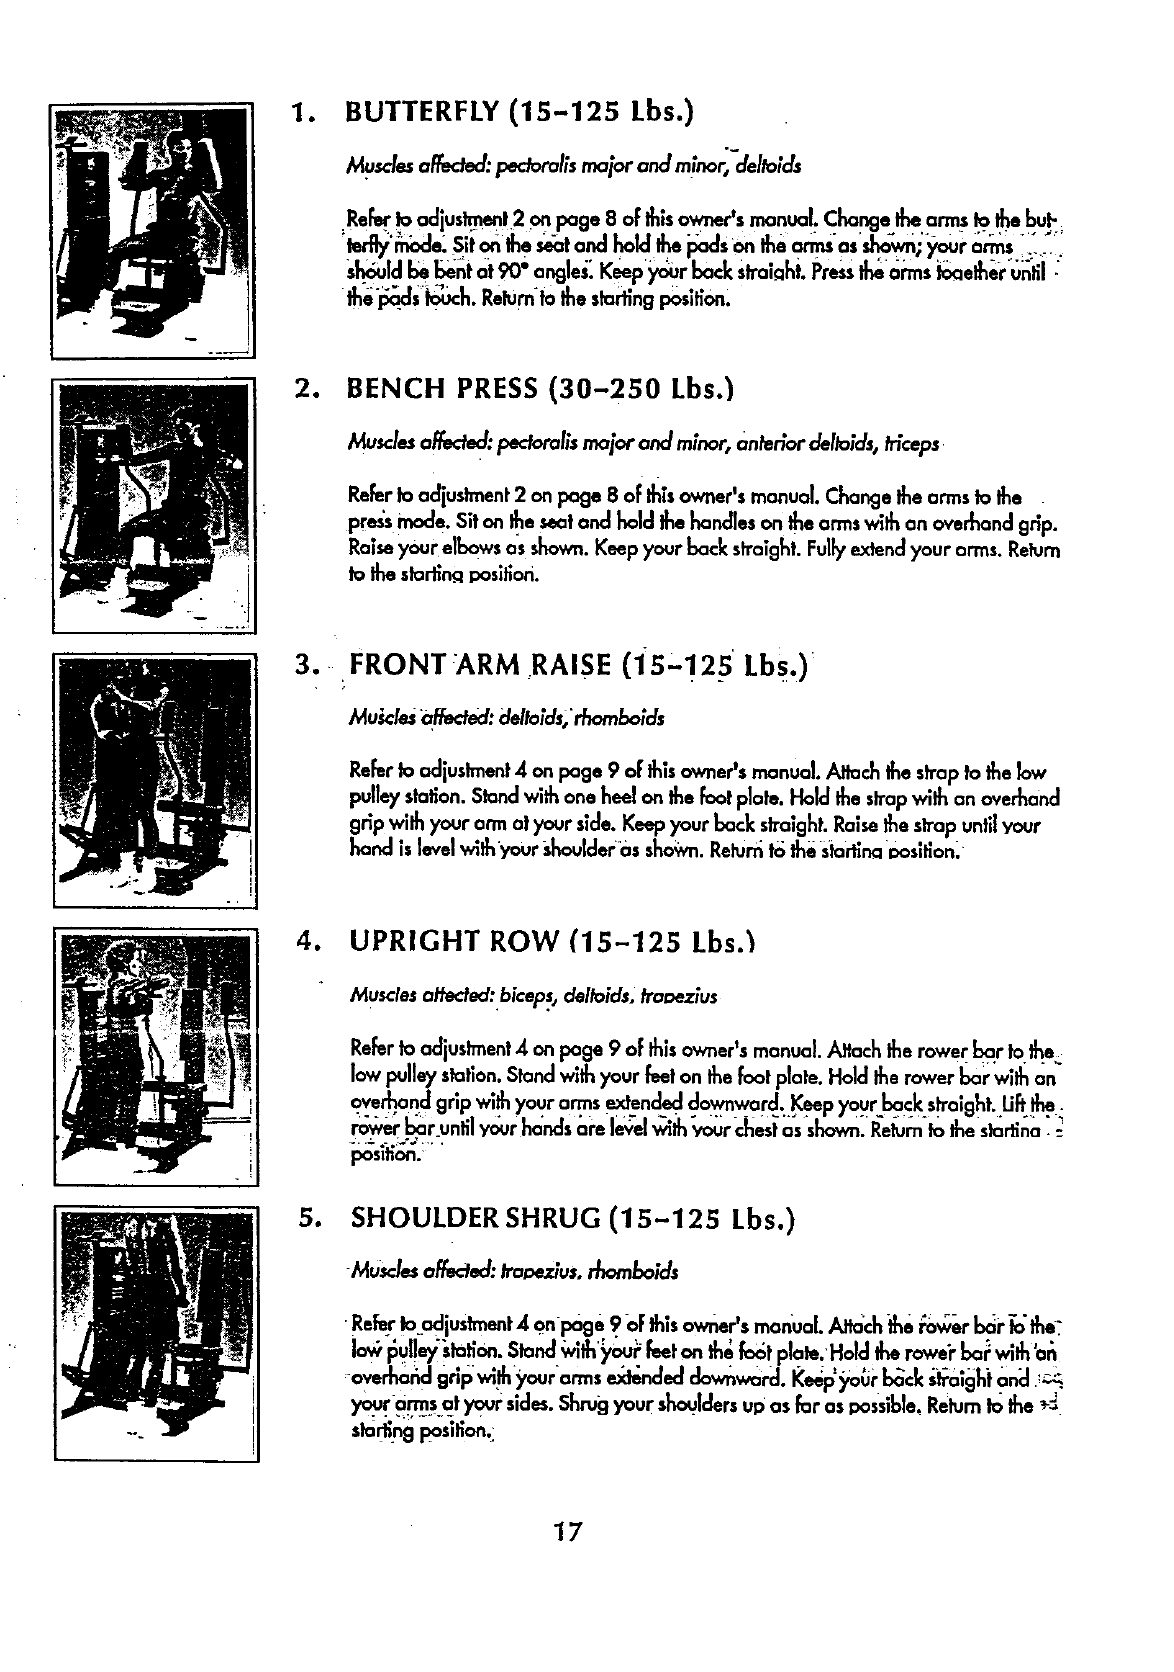
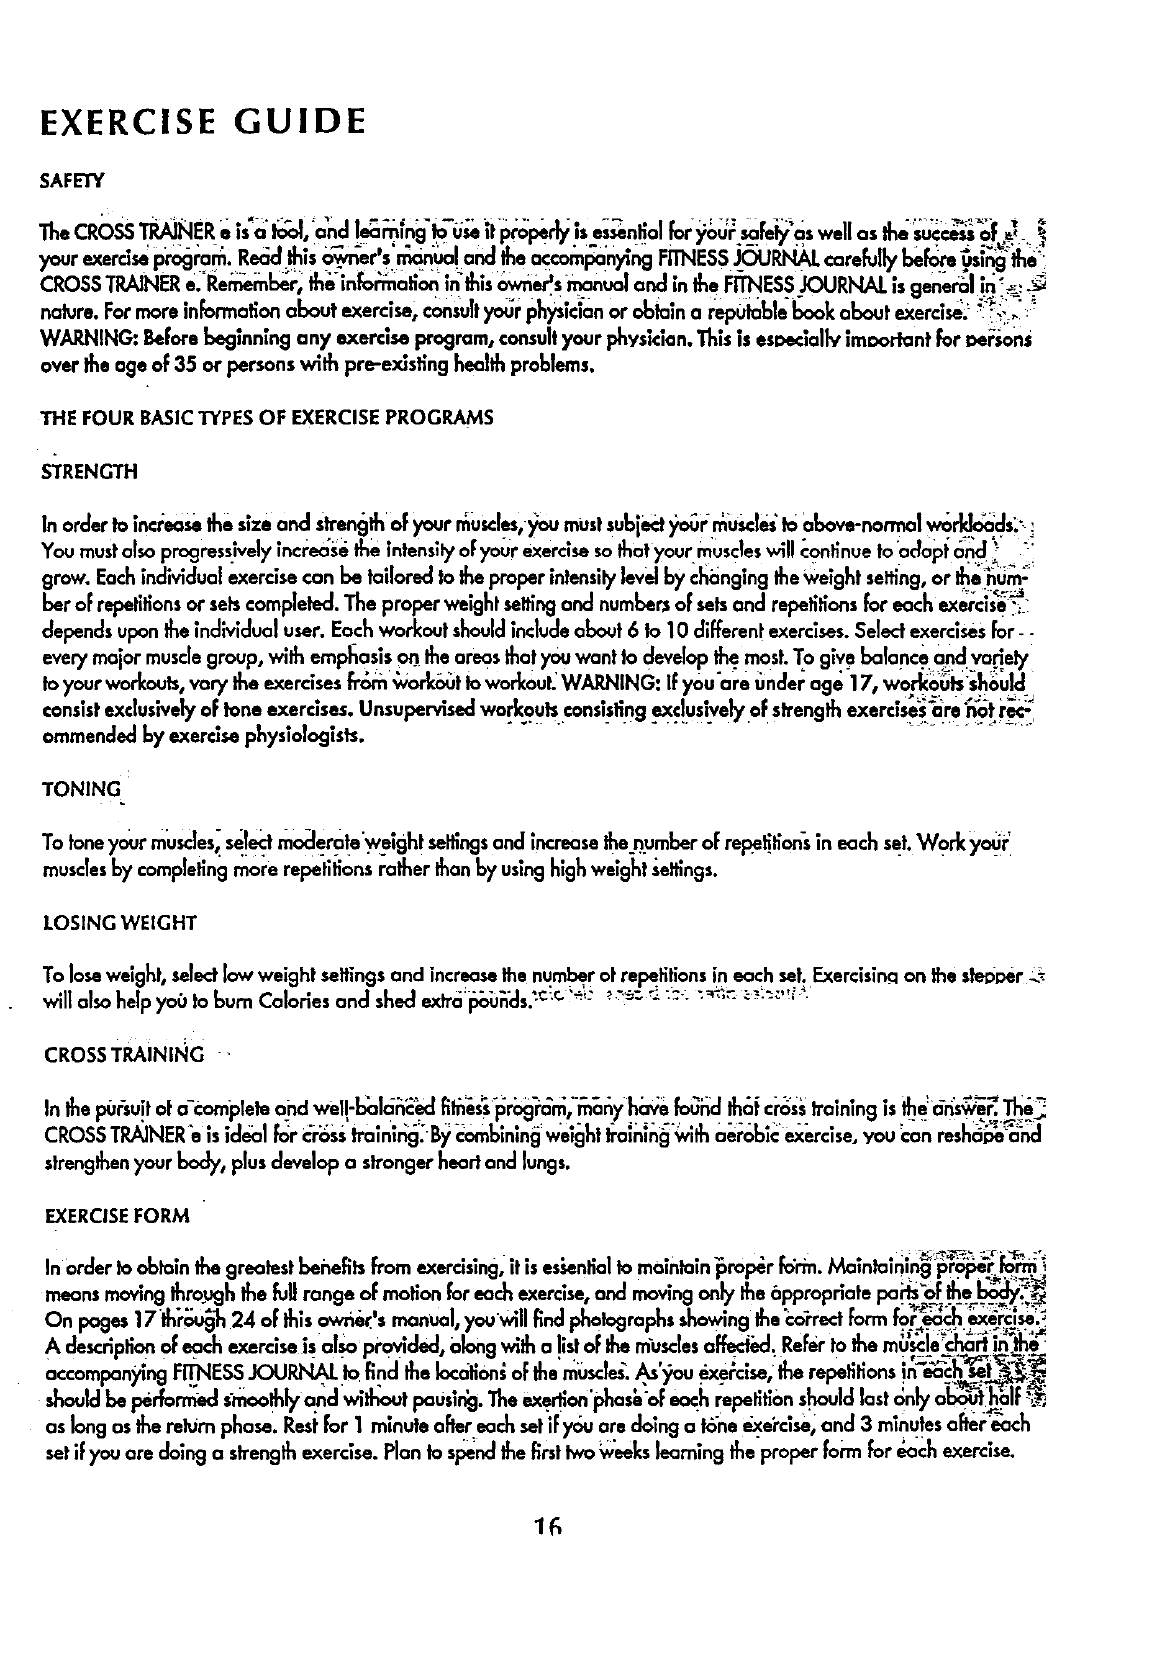
•BUTTERFLY (15-125 Lbs.)
Musclesaf6_ed:I_,orallsmaiorandmtnor_-clel_kls
Refer1oadjustment2 on page 8 oFthis owner'smanual.Changethe armsta the but-
should_ _nt at 90_angles_Keepyour back StraiQht.Pressthean-nsk_aethe?unffl;"
th__s :_h. Re_mta_os_r_ngpos_on,
2. BENCH PRESS (30-250 Lbs.')
Muscles affected:peer•rails major and minor, antedor dellolds, fflceps
ReFer1oadjustment2 on page8 of thlsowner'smanual.Changethearmsta the
pressmode.Sitonthe seatandholdthehandleson leearmswithan overhandgdp.
Raiseyourelbowsasshown.Keepyourback straight.Fullyextendyourarms.Rehsm
Io thestortin.qpostlon.
3. FRONTARM RAISE (i5"!25 Lbs.)
MuScles "qffeded:deilolds,'rhombolds
ReFertoadjustment4 on page9oFthisowner'smanual.Attach thestrap to thebw
pulleystation.Slondwithoneheelon thefootplate•Holdthe strapwith an overhand
gripwithyourarmatyourside.Keepyourbackstraight.Raisethestrapuntilyour
hand islevelwithyour_,haulder_asshown.Relurrit_ theStorfinaDosltion_
4. UPRIGHT ROW (15-125 Lbs.I
Muscles attected:.biceps,delloids, traf_-.zius
ReFerto adjustment4 on page 9 of thisowner'smanual Affach the rowei_I:_.rto.th.e.
lowpulleystation.Standwithyourfeetonthe footplate•Holdtherowerbar with an
qve_and gripwithyourarmsextendeddownward.Keepyourbackstraight.Uftthe.
_r bar until yq_urhands are levelv_th_€_r _est assha,bn_l_etum+lothestarfina_
_p_s_-_._-.
•SHOULDER SHRUG (15-125 Lbs.)
Musclesaff_ed:tm_zbs,rl_mbolds
•Rear Iojacljustmeet4onpage 9.oFlfllsowner'smanual.Affa_:hthe ibwer b0rto'the;
lowpulleys.l_ti_. standw_thyourFeeton thef_t plate.'Holdtherawerbarw_than
your_sat yoursides.Shrugyourshouldersup asfar asposslb_e,Relum_ the _-_
sta_ngposltion._
17
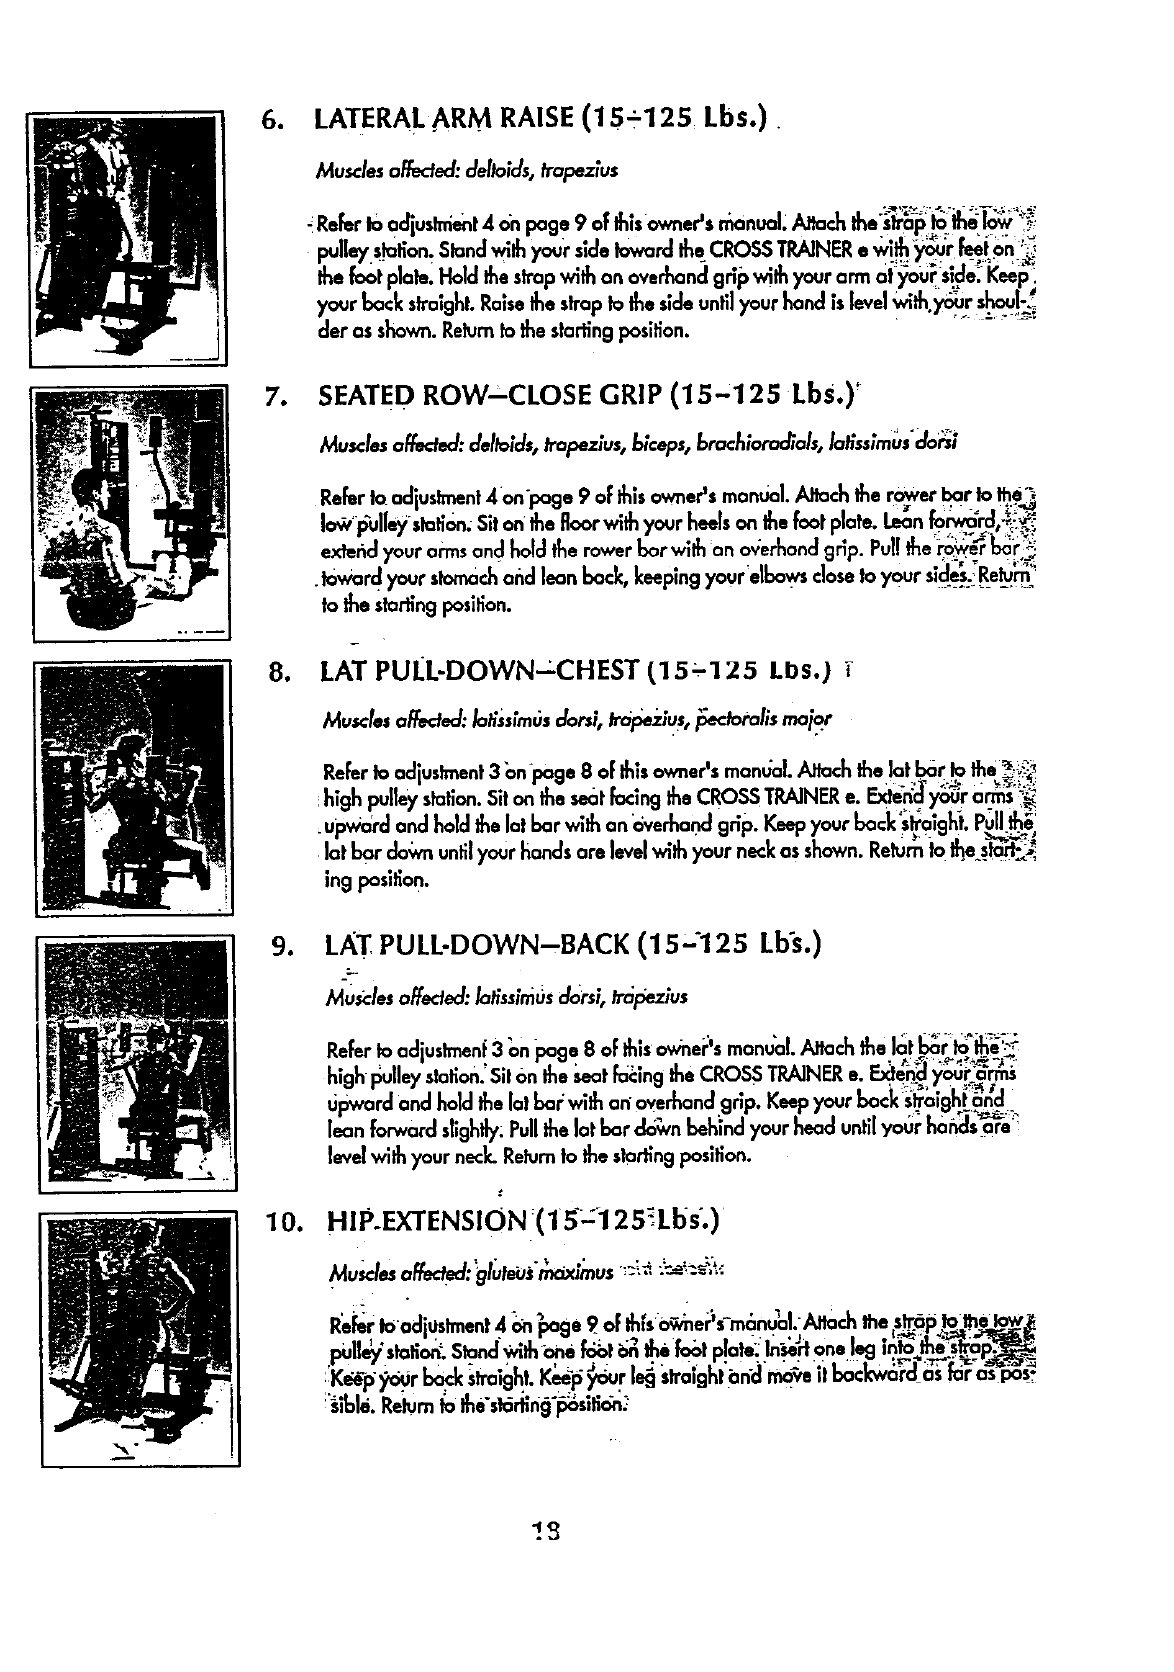
ILATERAL ARM RAISE (15-125 Lbs.)
Muscles affected:deltoids,trapez[us
Refertoodius,._l.4o.page9oFthiso_er'sm.,_l._ the_:_:__:_ _
pulley slalion_Standwith your side toward the CROSS TRAINER• w!_ _'r __.!_n:_
the foot plate. Hold the s_p with an overhand gr;i) with your arm Ot:_ouFside_Keel;_
your back straght. Ra sethe strap to the sde unti your hand ,slevel w_th.YoUrs_!-_i
dot as shown.Return to the startingposition.
7. SEATED ROW-CLOSE GRIP (15-125 Lbs.) !
Muscles affected:deltolds,trapezlus, bleeps,brachloraclials,la_sslrnbs'do_i
Refer to adjuslmenl.4 on'page 9 of this owner's manual. Attach the rower I:_arto _e_
o,_v_ullev station. S t on the floor with your heels on the fool'plate. L_n fotwo'rd,-_-_i
ex_r_d your arms and hold the rower bar with an overhand grip. Put the rower _0_r._
toward your stomach and lean back, keepingyour'elbows closeto your skle_:!Re_ '
to the starling posilion.
8. LAT PUlL-DOWN--CHEST (15-125 LOs.) T
Muscles affected:lalisslm_sdorsi, trape;,iUS,_:tomlis mai_"
Referto adjuslmenl.3 bn_poge 8 of this owner's mandol. Altach the lot bar _ _" _._.!_
high pulley station.Sit on the seatfac,ng the CROSS TRAINERe• IF.xten_Youra.rms
uDwo_rdand holdthe lal.bar with an _verhond grip Keepyour back'straighL Pullth_
lat bar down untilyour hands are levelw_thyour neck as shown.Relum to the sta_l-i_
ing position.
9_
10.
LAT PULL-DOWN-BACK (15--'125 Lb's.)
MUsclesaffecled:lalisslm_s dorsl, Irapezlus
Refer to ad ustment3 on page 8 of th_sowner smanual. Atlach the lal._ _e
high pu ey station S Ion the seal' foc ng the CROSS TRAINERe. [::.x_en_your arms
Upward and ha dthe at.bar w_thar_overhand gnp. Keepyour back stra_gh_and
lean forward slightly. Pullthe lat bar _n behind your head untilyour ho_s are
levelwith your neck. Relumto the startingposition.
HIP.EXTENSION :(1_125_Lbs.)
Musclesaffect: gluteusmax_mus ............
Referto od 0slment4 on page 9 of th sowner's manual. Agoch the .s_.ap_,_e___w_
_.y.to,on.stand,,,,thon._, onthe_, _a'.._n,.,on.I_,._,__
:K_'_p_;_r back Sh'aighhKe_l__ur le_ slra,ghl_n'd _ _tbackw6rd as _r as pos-
!_.lbla.Relum 1othe's16ri;ng'_:_sltio'n.
_S
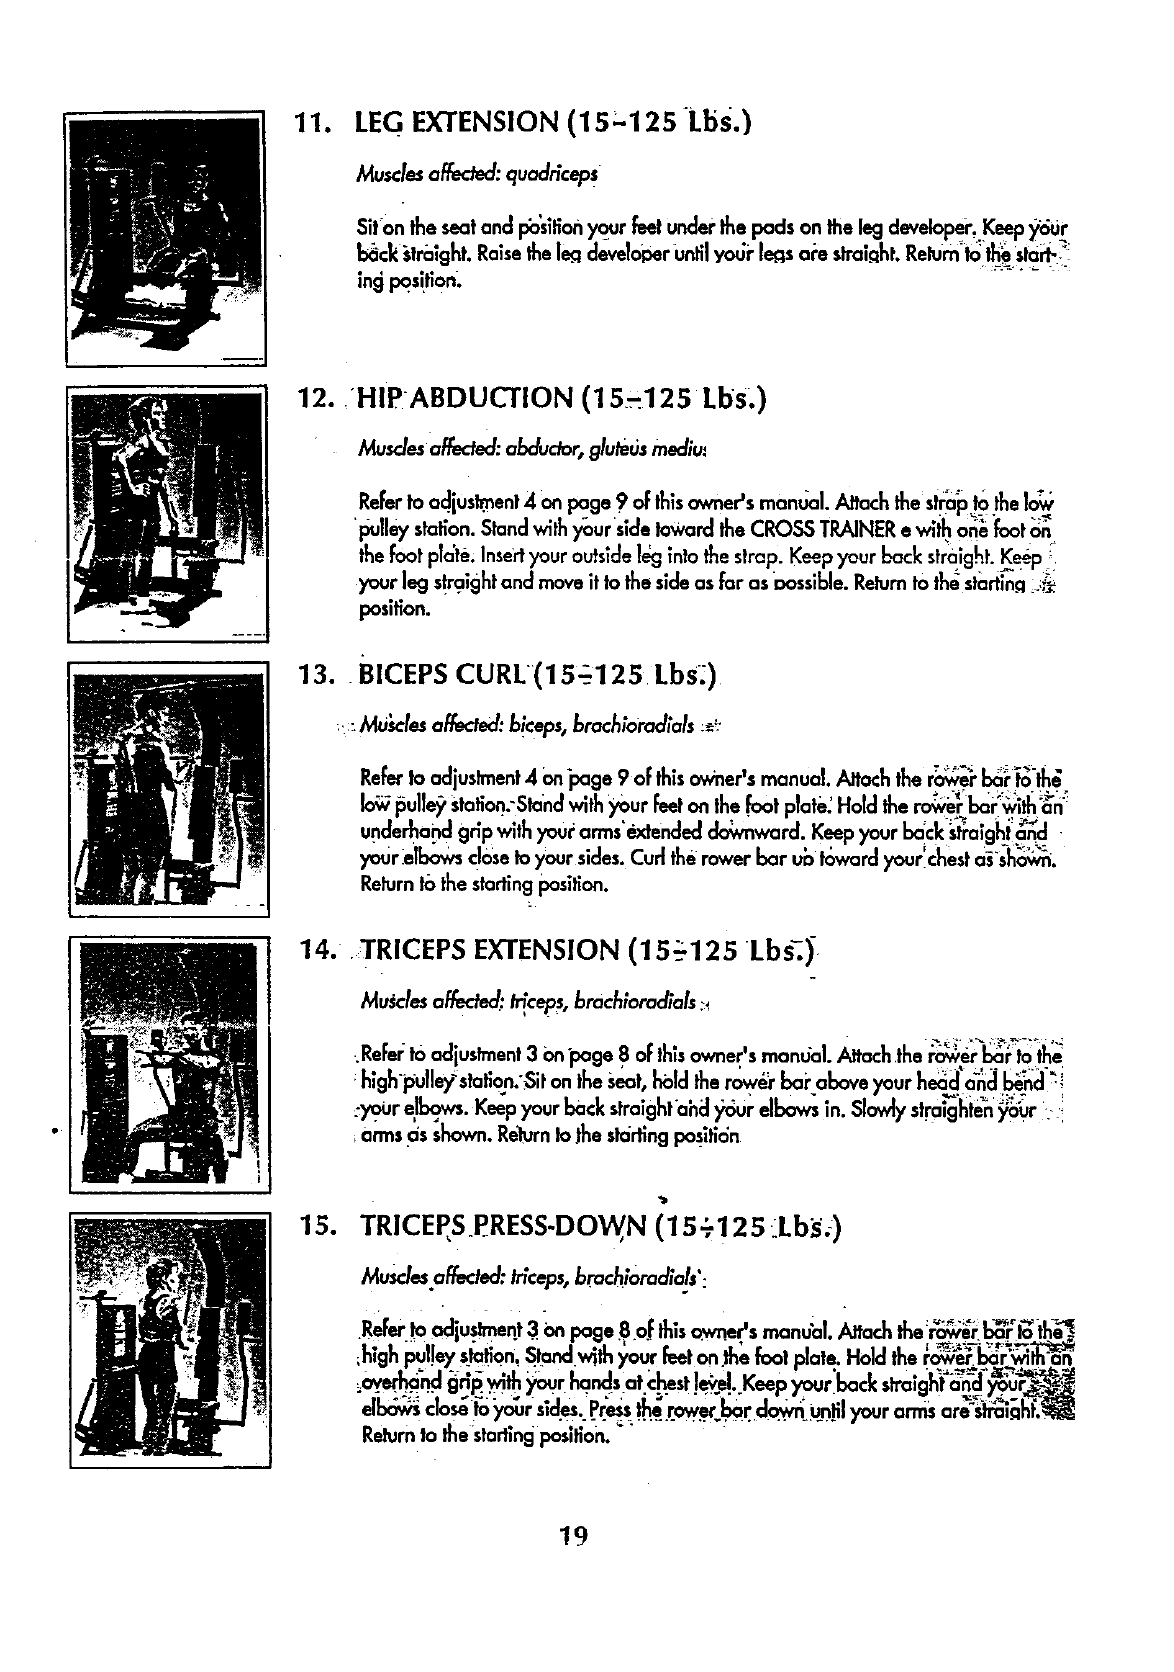
11. LEG EXTENSION (15-125 Lbs.)
Musclesaffected: quadrlceps
Sit'on the seatand F_'Silionyour feetunder the pods on the leg developer, Keepy_Ur
b_ck _',tra_ght.Ra,sethe leg developerUntilyo_Jr"lens ai'e strainht. Retum:lolt_ sta_!
ing pos!tion.
12. iHIPABDUCTION (15-125 Lbs.)
Musclesaffected: abdudor, gluteusmediu:
ReFerto ad.ius_ent 4 on page ? oFthisowner's manual. Altock the strai0to the 1o_
'pulley station.Standwith y_ourside toward the CROSS TRAINER• wiih o_ "f_t oh
the foot plote. Insertyour outsideleg into the strop. Keep your back stra)ght.K_p ;i
your leg sh'aight and move it to the sideas far as _:)ossible.Returnto th_ startin.q.:_
position.
13. BICEPS CURL(15_125 Lbs.)
:::MUsclesaffected:b!ceps,brachiomd;als :_-_"
Referto adjustment4on_0age9 oFthisowner's manual. Altoch the r_e_"/0_" t_'th_;
Io_ l_ulfe_stotion.:Standwlth_'our Feeton the foot ptate: Hold the ro_" bai"wi_ :_n"
underband gnp with your arms e.xtendeddo_vnward. Keepyour back strmghtand
your e bows dose to your sides.Curt the rower bar uo toward your chestas shown.
Returnto the startingposition.
14. .TRICEPS EXTENSION (15-125 Lbs_
Muscles affected: _ceps, brochloracliols:,.
•.ReFerto acllus/ment3 on page 8 oFthis owner's manual. Altach the rower ]:_r to the
_hlgh'pulle)rstatlon.'Siton the seat, hold the rowe_"f0akabove your he_;a-nclb_8 :i
-your elbows. Ke_pyour back straight'ahd);our elbaws in. Slowly stralghi_n_r i •:
arms as shown. Relumto )he slartlng positi(_n " '
15. TRICEPS P_RESS-DOW,N (15-125 _Lbs._)
Musdes.affeded:tn'ceps,brachloradlals':
.ReFer_oadlu.stmen.t3..on page 8 oF th,s o:wner'smanual. Attachthe rowe_b_r to the_.
h_gkpul!ey station,Standw_thyour reelon the foot p ate. Hod the rower 10_rwl_
_gnp._th your hqndsat.c_st !_el. Keep yourback stra,ghtan_lyo_
el_ closo....................toyour s|des.Pressthe rower.bar d.o_vnur)lilyour arms are str_a_f._
Returnto thestarting position._
19

16. SINGLE LEG,..C_.U.RL.(!5-1.25 L._s.)
.MusclesalTecfed:_ms_ng, gastrocnem,us._o
StandfacingtheCRO_..l"R__NEReand restthe Ix_:kofone leg a_6ins[the_ _
-onthelegcJevelopor.Ra,setheleg develops"as faras poss_bleby be_._ your :,
17_ ._ABCRUNCH (15._J 25 Lbse)
I_u_fesaffectS:rectusabdom_nus,V/_r abdomlnals;
Refer ta adjuslment3 on joage 8 oFthis _s manuq _Attach the sh'apto__e high_
:F_lteysta_on.$_tontheseatandhold.€oes_apbeh_ yourheadas_.Keep _:,_._
your baFk straight. Sbwiy bend forward atth e waist untilyour uppe_ _is at a _b'_:
.45; 9ngle. Relum _.11_.starling Posjh'oq.
18..B_ACK_EXT[NSION_(!5-.125Lb.s_)
Refer ta aclluslment4 on page 9 oFth_sowner s manual Altach the [qt b_r lathe low :;_
,pulleystation.Siton thefloorwth yourheelson the.footplate.Crossyou(armsond
:h0]d._e.bt ]_r 99a!nstyour _the.s.tassho'_...[€,_p your.backstramht. _ backat
._thewaist. Relumta the startingposition.
19. _..W.RIST .CURL (15_125_Lbs.)
Refer ta ad uslment4on page 9oFth s owner's manuo Attachtherower bc_r_ the _
lowF__]leystagon:Standwnthyourk_etonthe.foot plate:Holdther_,e'_ba_'_N_nan
!.O.ver_.M gr,p wzthy_r arms exlenclecldo_)nv_ard.Keepyour arrn?_ and €!
•.curlyou_.hd.nds bpas far as passible: Ream to the startingposition'.
20. _TOE_RAISE (15_.125: Lb_;)
• , , °
Musclesaffecfed:_astrocnemiui
,Re_ to_iiustn_nt4onpa9e? oFthis_m_.s rnono_l.'Attachthe_'_'.l_r _'_
overha_ -H-With your,_rimextendecl_rd. Ke_ your back_._algh_'a_:l.._
your arms atyours_des.R]s_u_on your Icesas far aspossnble.Relumta t_ starling.
position.
2O
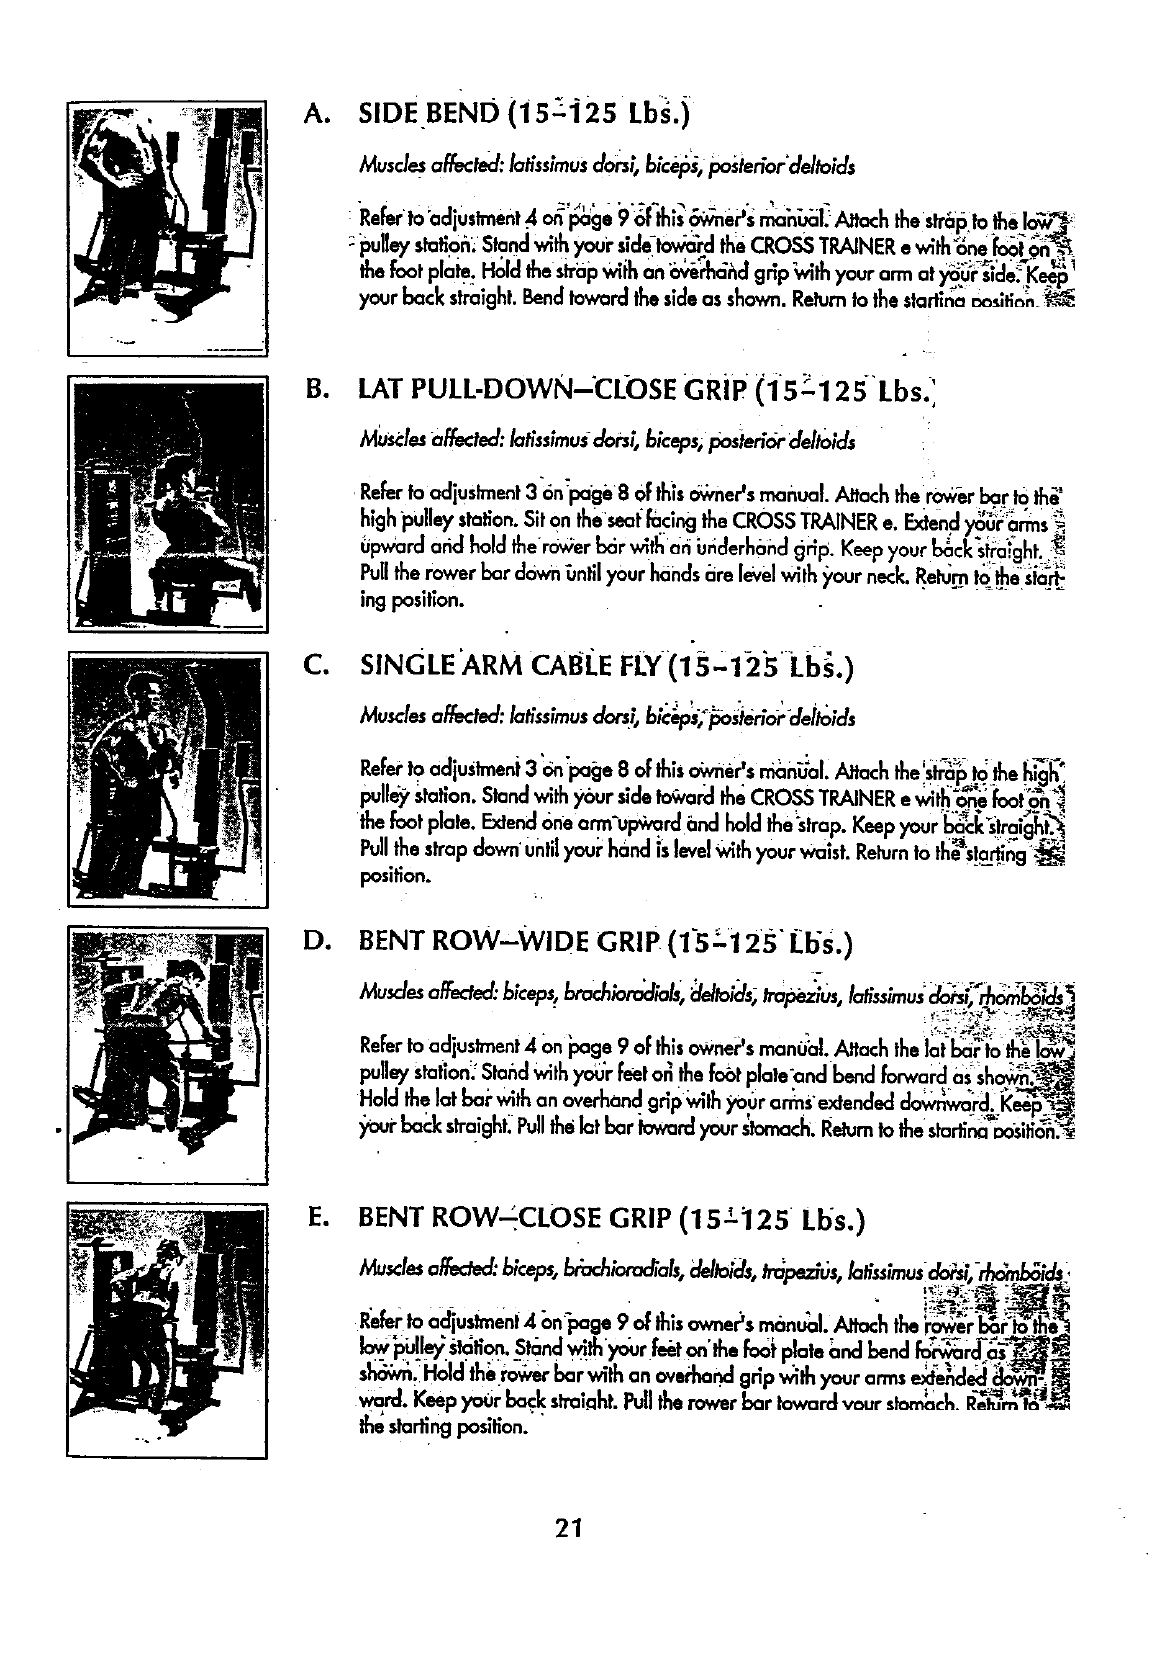
Jo SIDEBEND (i5_-i25 Lbs.)
Musclesaffect,d:latlsslmusdors;,b[¢epi,poslerloFdeltolds
Refer to acliustment4on page 9_ th,sowner_s manual. Altach the sl_p to_e/o_ _'
pulleystatloh.Standwithyourslda_ thaCROSSTRAINERawith_na_t _i_ _
thefootplata.Holdthes_'apwiJhan_i'h_hd grip_th yourarmat_r_ide_l¢_ _
yourbackstra'ght.Bendtowardthesldaasshown.Returnto thestartina_s;_on
Bo
C¢4
De
LAT PUI.L-DOWN-CL-OSE GRiP (i5_.12 S"Lbs. ',
Musclesaffectecl:/atlss,'musdorsl,biceps,pos_eddrdeltoids
Referto adjuslment3 on'page8 Ofthis0_h'nerJsmaf_ual.Attach therowerbar to Ih_°
high"pulleystotion.SitOn the'seal[acingtheCROSSTRAINERe. Extendy_'a_s _
0pward and hod therov_erb6r wlt!_ar_imclerhondgHp._Keepyour b_cksiEa:i.ght_;_.
PulltherowerbardownOntilyourhonds;_relevelWith_,ourneck.Retu_ !_el.sia_
ingposition.
SINGLE'ARM CABIE FLY(15'125Li_.)
Referto adtustment3 onpage 8 oFth_sownersmanual.Attach theslraptotheh_gh.
pulleystohon.Standw_thyour s_detoCvardtheCROSSTRAINER• w_thonefooton
thefootplate. Extendonearmupwardandholdthe strap. Keepyourb_ckstralgkt._
Pu thestrapdown"untilyourhand _slevelWithyourwalst.Returnl0 th_'startin__o,g_':"".'
position.
BENT Row-WIDE GRIP (15 _.125" Lbs.)
,_usdesoffecteo':b,'ceps,brochiorociiob,_toi'ds;trop_.zi'us,Io_'ss_mus_dois;,'_b_s
ReferIo adlustment4 on page 9 ofth_sowner'smonual. Attach thelat bar to th_
pulleystat,on_Sta?clWithyou'rf.t o!thefo_tplate'ondbondforwardassh_-_
Holdthelat bai' with an overhandgnpWith_yr arms'extendedclo¢_,_ward_J(ee_.,_
),oui"back straight_Pullthelet bar k:_rd your Stomach.Returntothesturli_ _slti_
EQ BENT ROW_CLOSE GRIP (15z:125 Ll_s.)
Musclesaffected:b_ceps,brbch_:_adia[s,deltoids,trapezes, lah'ss;musla_, _ids .
Iow_0i_Heys_tbn. Standwlth'yobrfeinton'Onefooiplata and bendfo_rd-a_'_
_Holdth'_i_;_,erbarwithanoven"_ar)dgrlp'..;ith yourarmse_€l_ _
ward. Keepyourbackstraight.Pulltherowerbartoward vaurstm-n_k R_n_'_,
thestartingpasltion.
21
F,
G+
.+
I.
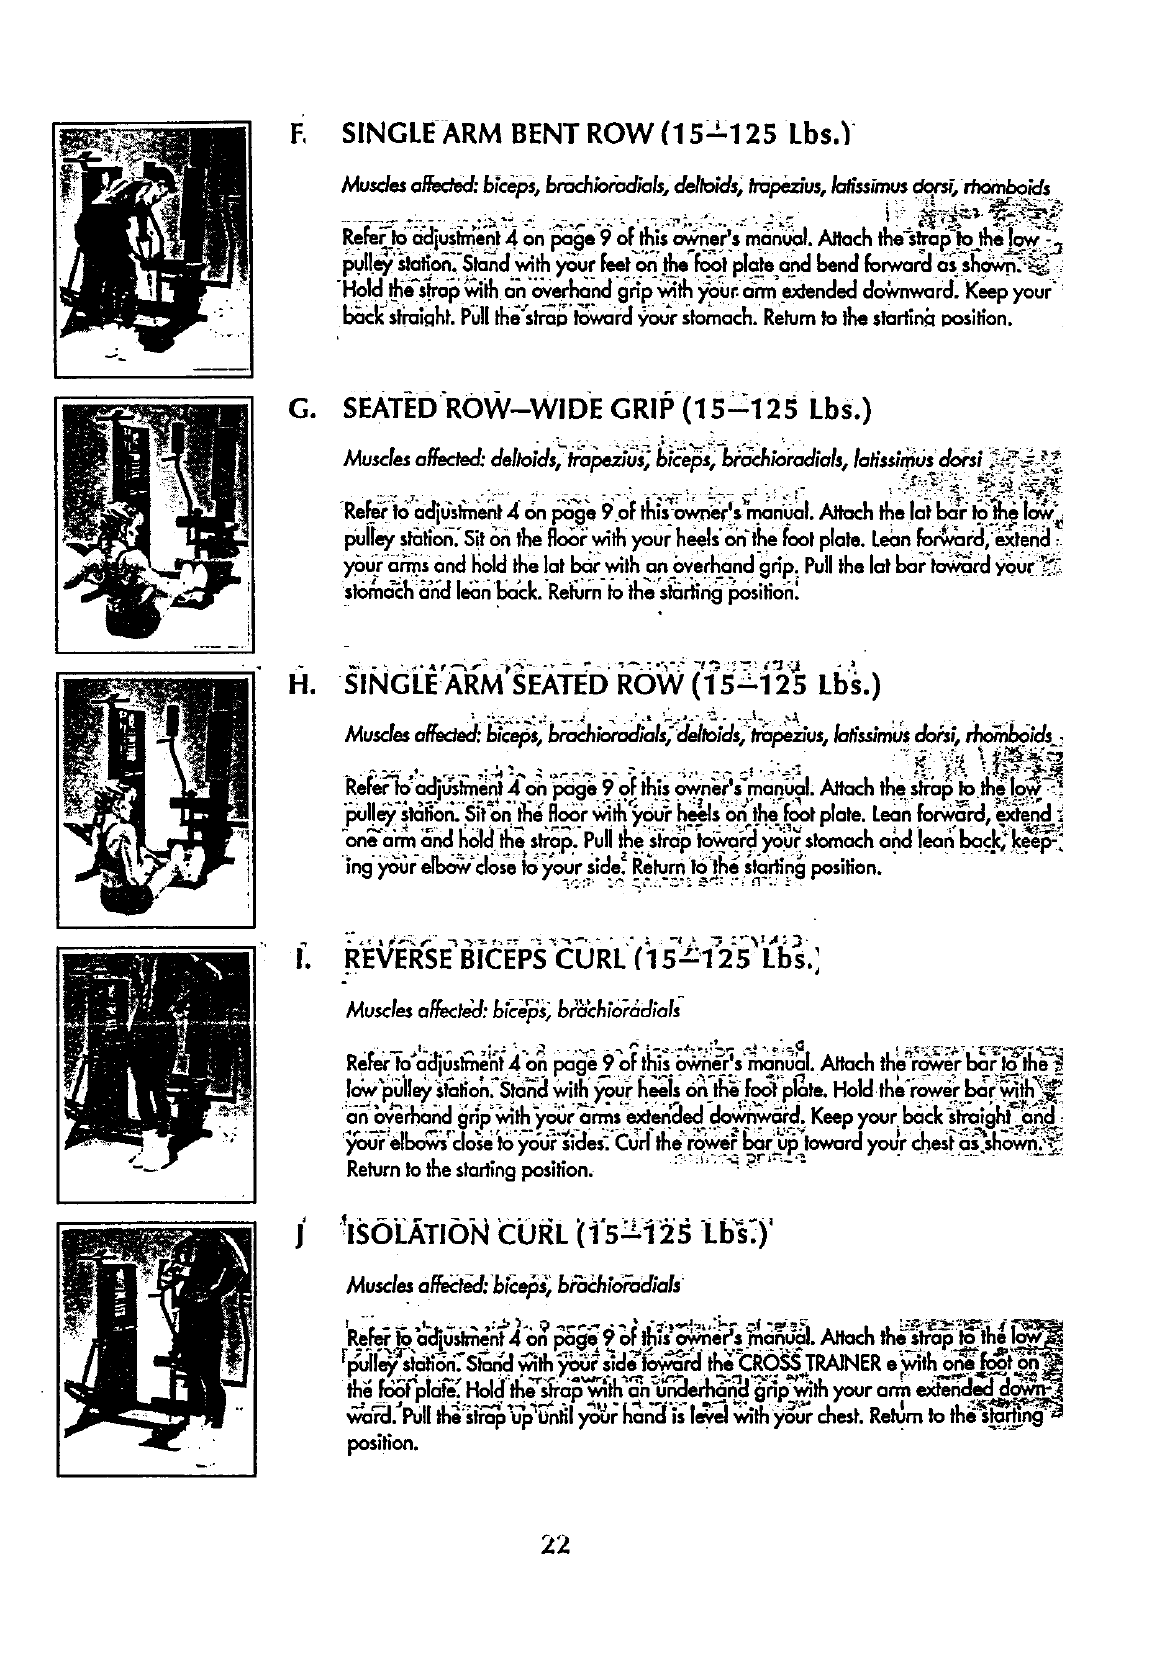
SINGLE ARM BENT ROW (15_'125 Lbs.l
MusclesaEeded:bleeps,br_.h_oiadials, deltoids;trapezius,lah'ssimus_+ -, _boMs
Re_ 1oadiuslment.4 on page 9oFth,sowner's manual. Altach the s_ap 1othe low- -
pul!_ slation_Standw_thyour ._.t on _ _ p!a_.qnd bend forwa_ as[sh_:_ :,
"Hold the_sira_9,,iPnah "overhandg _p'_th )_Our.ai_mextended do+,,nward. K_p your_
b<_ck_stml.clht.Pullthe'stra_'l_,vard _u'r stomach.Returnto the startin_tI:x_sifion.
SEATEDROViC--WIDE GRil _ (15=125 Lbs.)
MusclesaEec/ed:deltoMs, Irapezius, b_ceps,b_htoiaclials, lalisstmusdc/rs_+_ _._'_+
":_:, _ _'p_-_ ...--_.-
ReFe_to adjustment4on page 9oFth,s-owne¢'s manual. Altach the lat b_r ta PneI_
....... _. ._ • .. ,. -_-%",- ._+. + .. _ - .. _1 _,, • ++p++
_+_e_+s and l_old the lal l:_r w_th an Overhand-gnp, Pull the lot bar'_rcl +u_ +++
slomachand JeanJ:_ack.Returnto the slatting pos,tion.
SINGLE ARM gEATED ROW (15-_-125 Lb+.)
Musclesaffected:biceps,brachioradials,deltaMs;lFapezius,[atisdmdsdoai, _gs .
ReFerta adluslment4 on page 9 oFth,s owner's manual; Attach the strap 1othe 1.o.;_:__
pulley station.S,t on l]_e floor w_thyour he_s on the _t plate. Leanforward, extend_
one arm and h_Id the strap. Pull the strop toward your slomachand lean back, keel_2
,ng y_r e_ closeto your s,de_Return to the startingpos,tion.
_EVERSE BICEPS CURL (15-"125 Lbs.',
Musclesaffectdd:b+'ce_s,b_+ch;o-rddi'als
Re,era- taad uslment4on page 9 oFth_sowner's manual. Altach the rower to_r Io_th_N
on overhandgnp wdh your arms extended downwa?d. Keepyour b<_ckslra,ght a_[d+_
your ellx_ close to your redes. Cud the mw_r Ixir u_ t_rd your chest as shown...
ReturnIo the starhngpos,t_on. •"1
MusclesaFf_l_'d:'b_e_s; b_oFad_als:
r;"*-_ --,_-.-- +-, -_. -+++-_ • ++-. o- • .€-+- -_ * +--; ,,-_..+ ._p_
pulley station•Standruth your side 1o9_1 the CRO,SSTRAINERe,wflh one Fo<_+tone+
me roarp|ate, r_olame strapw_tnan unaern_anagnp w_myour arm exmnc_++eaa+ow_
waFd. Pullthe strapup until your han_ ,s level w_thyour chest.Reign ta the [_'_
position.
22
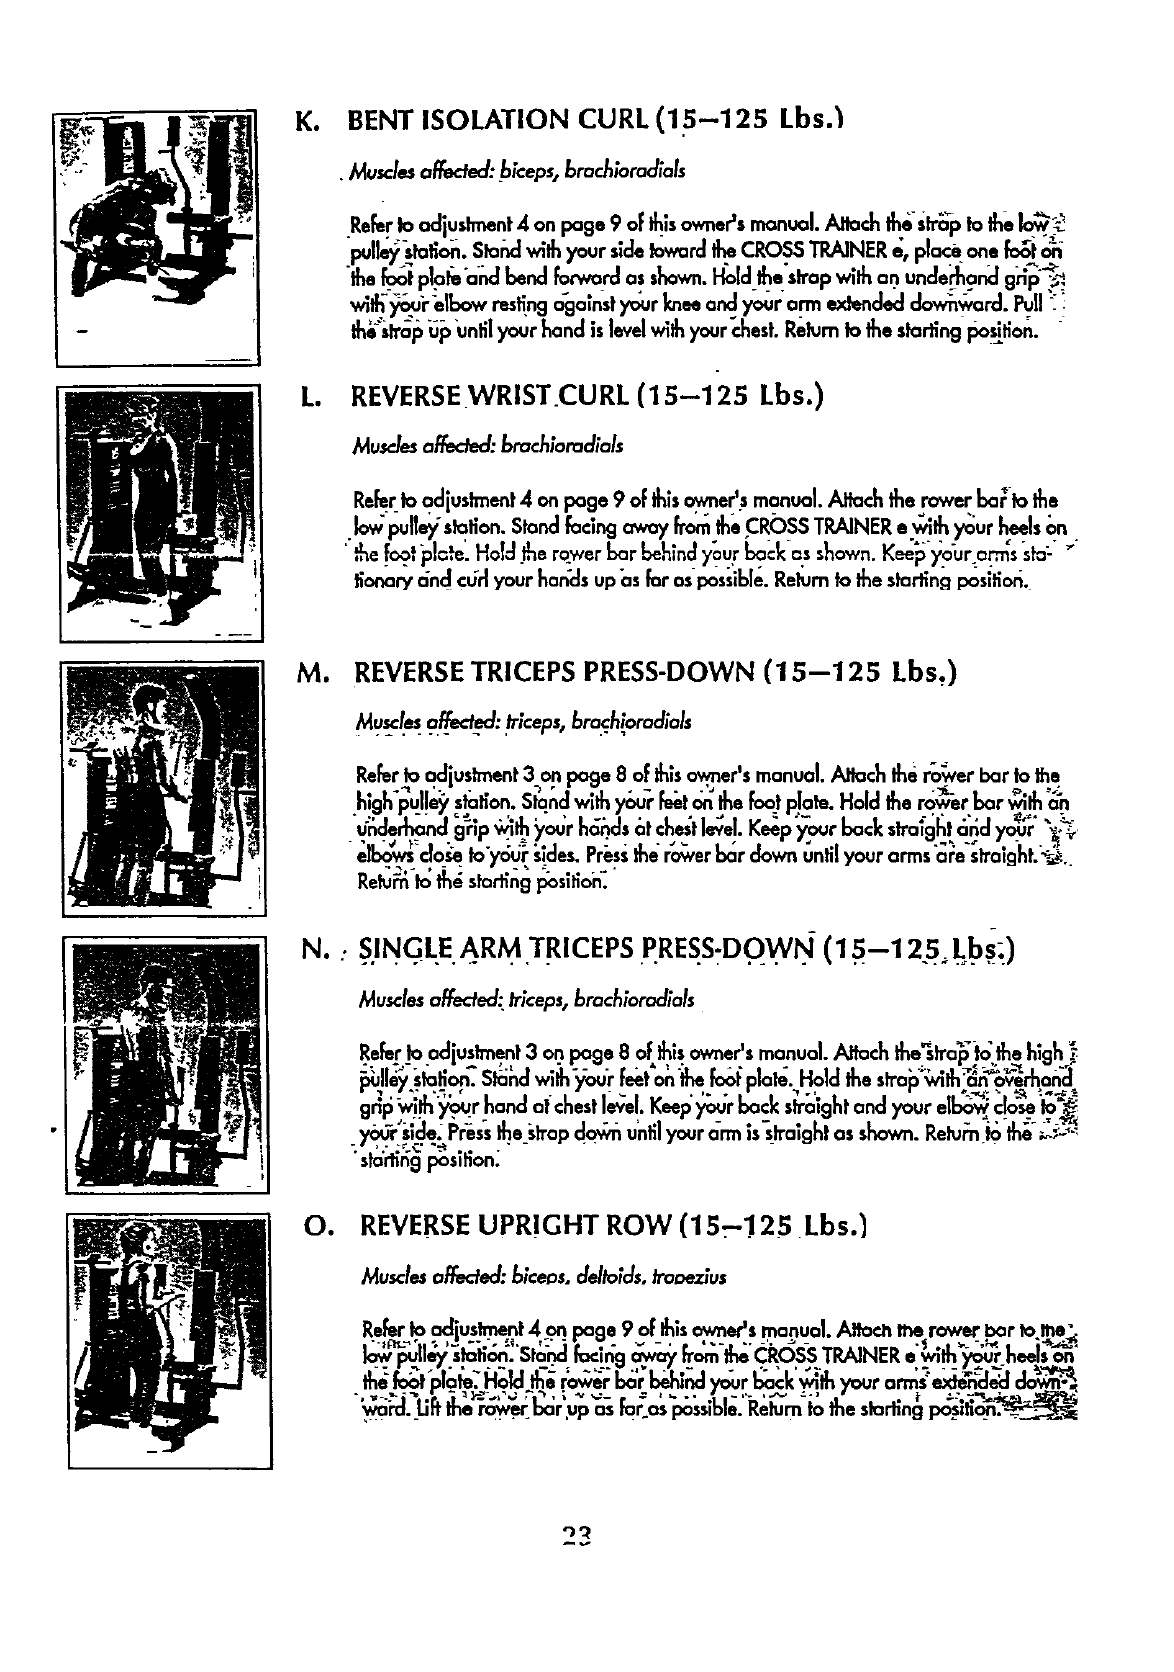
K. BENT ISOLATION CURL (15-125 Lbs.I
•MusclesatT_ecfed:biceps,brachloradlals
ReferIo adjustment4 onpage 9 oFthisownerSsmanual.Attack I_-,LIm_p!otheIo_
"pull_@atlon. Slandwithyoursldet_,ard theCROSSTRAINER_, place,onefo_i
"thefoot plal_'a_l bendfor_. rd asshown.I'_ld the'stropwithan.unde_and g_p'_.
th_",_ral_i_p"untilyourhand ,slevelwithyour_'_est.Relum1ofnedarling position.
L. REVERSEWRIST.CURL (15-125 Lbs.)
,Musclesaffeded:brachloradials
Refer1oadjustment4 on page9 ofthl=owner'smanual. Atlach the rowerhallo the
Iowl_ulte_/°slafion.StandfacingawayfromtheCRC)SSTRAINERe_th yourheelson
hef_otplo:e.Holdherov,erbarbehind7"ourbe=ka,=h_n.K_ :,;o'ura_ _b_"_
fionaryand ¢_rlyot_rhands upas far aspossible.Relumto thestarlingpositior_.
!_l M. REVERSE TRICEPS PRESS-DOWN (15--125 Lbs,)
MuFl,,o.f_: triceps,bra_h!o_lials
ReEer_adjustment3on page 8 of thlso_er's manual.Attach theroarerbar to the
highpulleyc=_tion.Standw=thyour_"etonthefootplate.Holdthe rowerbar w_than
under'hal gnpw_thyourhandsatchestlevel.Keepyourbackstraightandyour -_o_.
e_ €lo_sq1oyour sJdes.Presstherowerbar downuntilyourarmsare straight.'%<
Re_ _ fn__ng p_si_on-
N.: S.INGI.E.ARM TRICEPS PRESS:DQWN.- (15-1.... 25_ Lbs,_.,,)
Musclesaffected:triceps,brachioradials
Re&rIo adjustment3 onpage 8 of his owner'smanual.Alto_ the3tra_t; thehlgh}
pulleystation.Slandw,thyourfeeton _ fao| plate.Hold thestrap Wlh an overhancl
.,- .. . :_-;. _ =%_;:
gripwithy._r handat chestlevel.Keepyourbackstratghtand yourelto_ €_seto_
yours_de.Pressthe strap_untilyour arm=sstra=ghtasshown.Relurntothe _"
startingPasdion.
Oe REVERSE UPRIGHT ROW (15,!25 Lbs._
Musclesaffecfed:biceas,deltoids,tra=_Jus
Referto adjusLment4 on page 9ofthlsowner'smanual.Alla_ me rowerbar toma_.
Io4;l_lle 7 slotion. Standfact_ _ {TomtheCROSSTRAINER•w_thyourheelson
Ihef_ plate.Holdtherowerb_rb_=ndyourback _th yourarms"_ _ ..
wai'cl.I.iBthero_v.erb6r.upasfacos pass,hie.Relumto thedarlingpos,li_qn'___
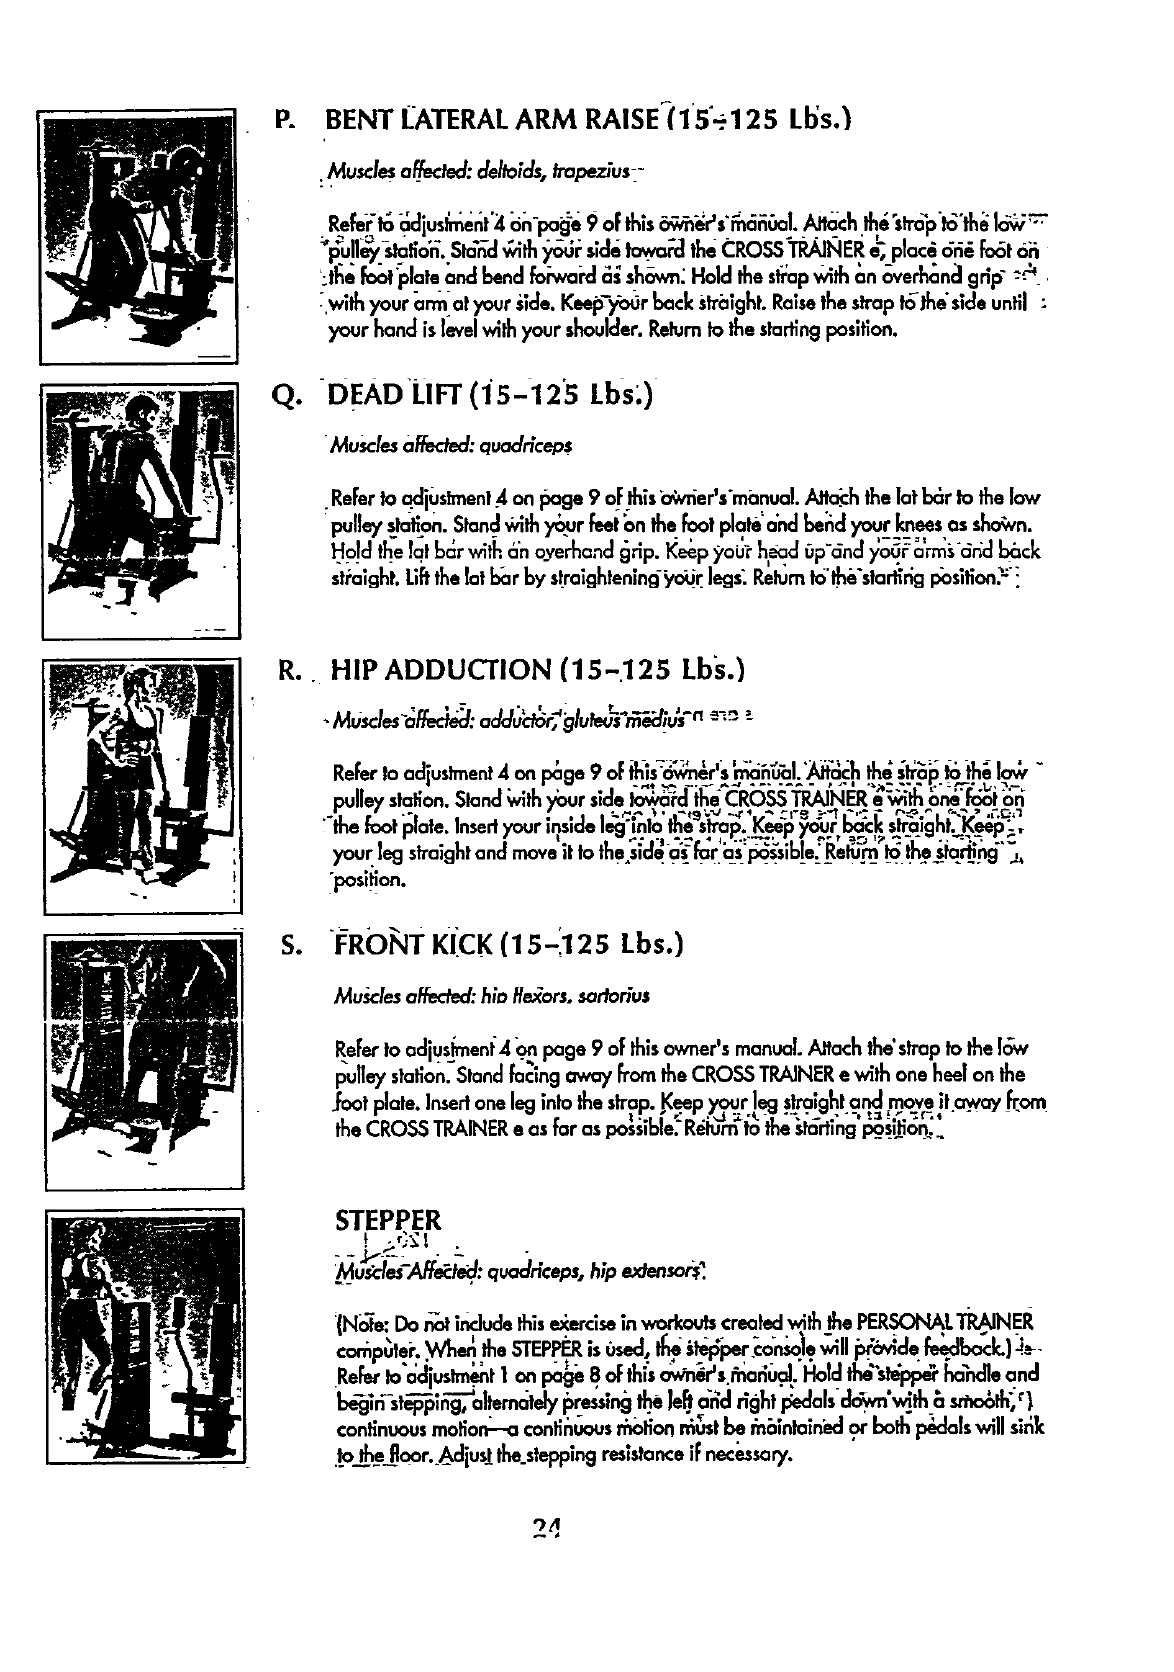
P. BENT I_ATERALARM RAISE_(15_125 Lb's.)
•MusclesoF_t=l:del_ids,_p_us:-
Re_t_ _ljusl_ent'_l _-pag_ 9 ofthis_Tv_r's'_6_0al. Attachth__tra_p't_°th_Io_1_
_p_ull_-s_:_tio'h.S_hd,;,ith_ii sldatowa_ theC:ROSS'TRAINER'_. plac__r_ fo6t oi'i
_:t_ef_t _late and bendfoh.a_ ,:,,_sh_vn"Hold the$_ap_,,ithan overhonc/grip"":-_
; withyour arm atyour slde.Keep-y_r back stralght.Ralsethe strap_the'slde until :
your hand islevelwith your shoulder.Relumto the slartlngposition.
Q. DEAD LIFT (15-12'5 Lbs:)
Muscles affected: quadrlceps
•ReFerto .acljustment4on _ge 9 oFIhis o,;vfier's'mbnual.Attokh the lot b6r to the low
pulley s_tiph. Sland _th y_u.rfeetbn the foot plata'a'ndbend your kg_ees as sho_vn.
Hold the lat bc_rwith a'noverhand _rip• Keep;;,o0_h_d Op'dndy'ou_ _'rm_,'cin'db_ck
st_alght. Lft the at bar by s!raightenlng-_,_r egs: Relum Io'lhe'starffng position:':"
Se
HIP ADDUCTION (15-125 Lbs.)
ReFerto ad'uslment4on I:_ge 9 oFthlsr=6_n_r's'r_h_._l•'_k_h th_ s_ to th_ lo_
oullev station•Sland with your side l_Td the CROSSTRAINER_w_thone_._t on
the foot plate Insertyour |ns_deleg ,nto the strap. K_p you.rb_ck straight...Ke_;.,
your leg straightand move _tto the.s_dqO_far as 1_Sss_ble:Return_ the s/qrtjng ,,
"position.
I_ROhlT KICK (15-'.125 Lbs.)
Mu_.les affected:hio tie,ors, sartorius
ReFerto adjus_ent'4"_onpage 9 of this owner's manual. Attach the'strap to the IcTw
pulley station."Standfa_ing away from the CROSS TRAINER• with one heel on the
.foot plate. Insertone leginto the strap. K.eepy_..r !eg straigh!a_l move !t._ _om
the CROSSTRAINER•as far as po_ible: ReJu_rn'_the _la_ing'p_s_n'_._
STEPPER
L__uKde_-Affe_: quaclrfceps,hip extensor:
:(Note: Do _includethis e_erclsein workouts createdwith the PERSONALI_NER
corn uter. When the STEPPER,s used,_st_per.con_).e wdl _prairie.re,back.) J.-_-
Re to aius . t on 8oFthi, Hold ho'n eand
be_in'-step-'_;ng,--'ahemate]yl_ressingthe left.o'rldright i:iedals-d_c_vn'_th asmo6th__)
conlinuousmolion-.a conlinuousmolmn mustbe mamlamL-dor both I:_-_alswdl sink
.lo_thefloor. Adjust the_steppingresistanceif necessary.
TROUBLE-SHOOTINGAND _MAINTENANCE
Inspect and tighten all ports each time you use the CRO,S,STRAINERe. Replaceany worn ports im_6te_,_CN_ide _
surfacesaf the CROSS TRAINER• can be cleanedusinga clampclath and mild detergent. Keep all hquldsaway_
th°step_"co,,aeahdth+PF.RSO_.T_NEEcom_r._s+cRO_s_ui,iER_,__o_;lem,;a,_..nd b_,_+-'%d_:
,ngleeslepsbelow,Findtheapplicablesymptomandfollowleestep(s)!lsted.If furtherassistanceisn_ed; calla_
CustomerSeP4ce Deporlment toll-flee at 1-800-999-3"756, Monday lerough Fr|day, 6 a.m. unhl6 p.m. Mountain
Time (excluclinghalidays)_
1. SYMPTOM: THE PERSONAL TRAINER COMPUTER DISPLAYSAN ERROR CODE ("EEE")
a. While the weight selling ischanging,lee motorwillbeheardandtheSETSandREPSdisplayswillsba'_-ara_01dly. :'+_+
rotating indicator. To preventdamage to the weight system, do notput any pressurean the leg deveiope'r,a_ :_
ar cableswhile the weight settingischanging•If the tat ba'ror rower bar is altachedlo the highpulley_siatiah__i ;_:i
inthe rack near the high pulley stotion.Wait for the'sound of _ motor to slap befoi'eyou contlr_Ue.If the'c_'10_ _- i
er sensespressureon the weight systemwhile the weigh( setting is changing, the WEIGHT display_ll'sl_," _'r_ _ ! ..
•error cc_e ("EEE")for Iwo seconds,and the weight settingwill stopch6nglng. The WEIGHT displ_/'_!l then°sh_ +_L'_i
• . ,. . .. • _ . -,=: +, _+,_ _i °:
the current weight selling.Make surethat there _sno pressureon the leg developer, arms or cables• Pressthe _ _._!
increase'or decrease button beneath the WEIGHT display'to change theweight se_ffingas desired. :;" _- _'= m:
i__..j
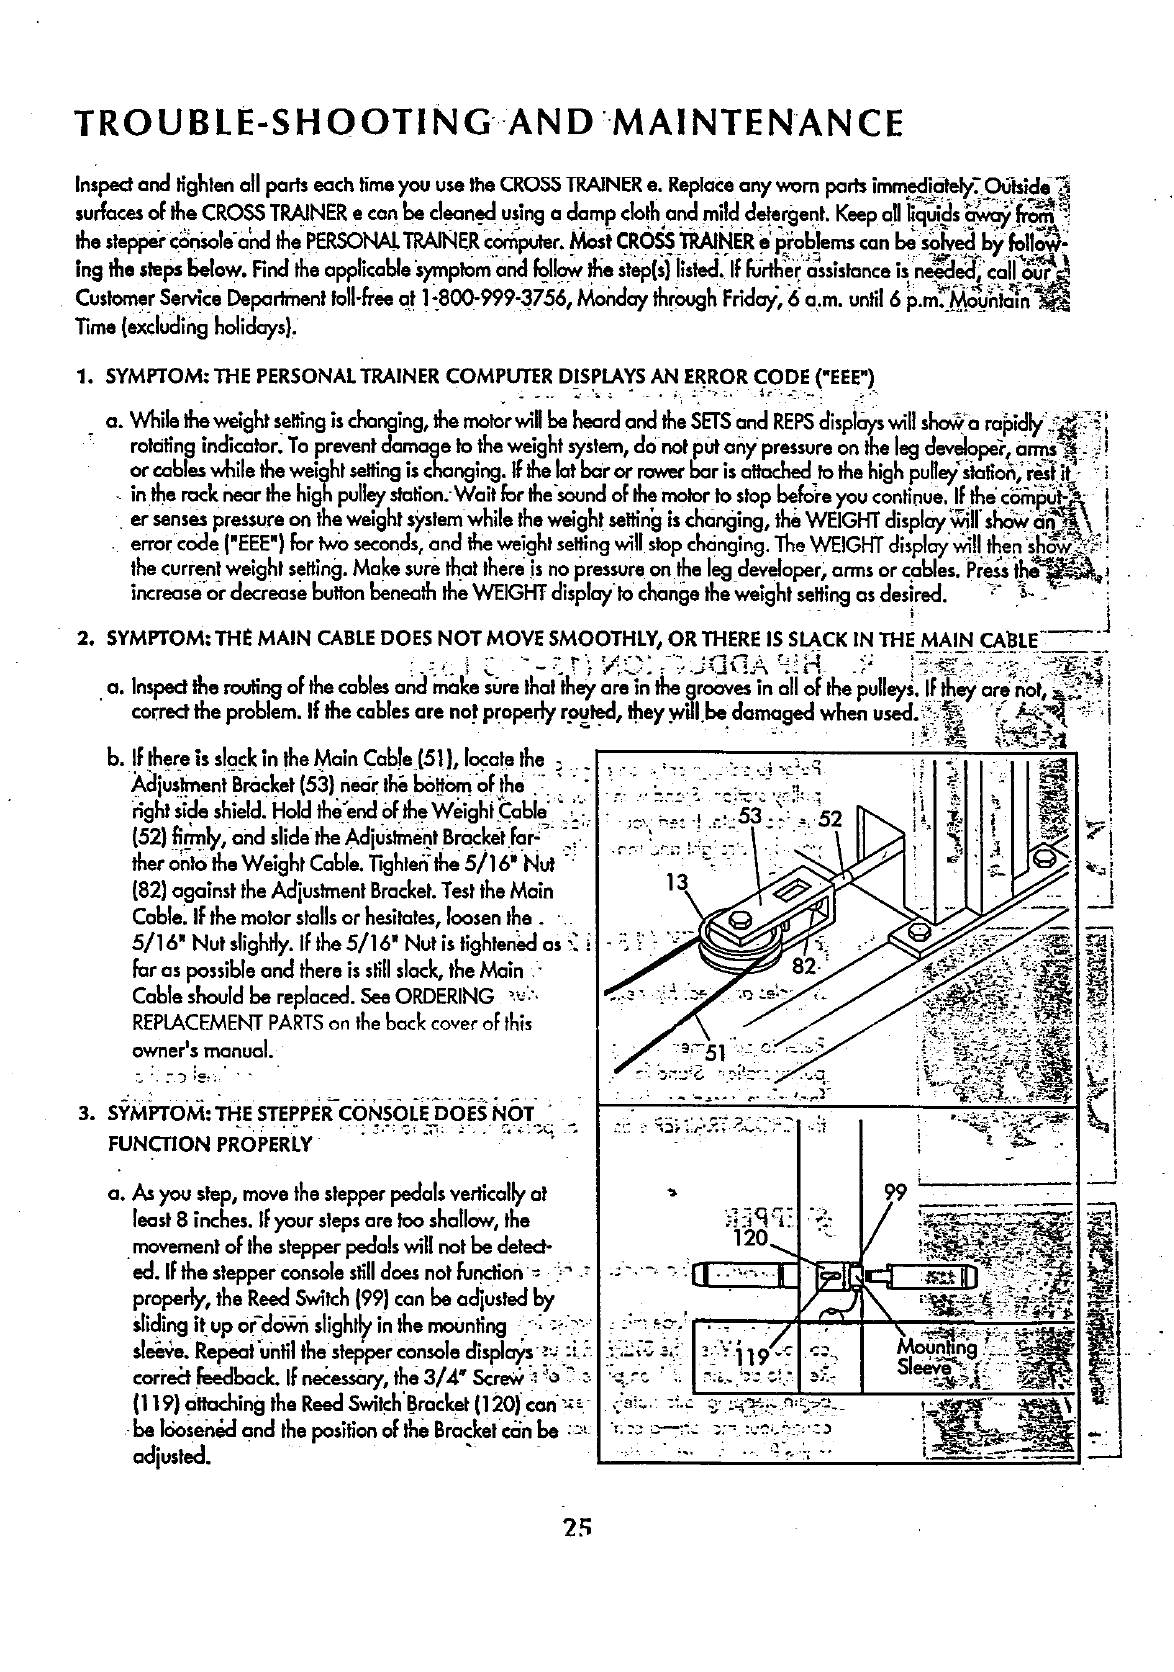
2. SYMPTOM: THE MAIN CABLEDOES NOT MOVE SMOOTHLY,, OR THERE IS SI.ACK IN THE_.MA/N+€___LE.... _+
a Inspectlee routingoFthe cables and make surethai they are In the groovesin all aFthe pulleys.IFthey are nat. _- :-+
correctlee problem. If lee cablesare not propedy routed, they w,II be damaged when used._+'_+_• " _ _:_-_t -_ +t
b. lf there |s slack m the Mam Cable (51}, lacale the ., _.- +,-_ -_ -'1 _ _ _1 !
AclustmentBr6cket(53)n_-rthi,b0.omofthe; "- : ' _ _:_:_i- :/'_' -,.,_ _._I_ I I_;_1I_1 +
rightsaeshield.Haldthe'end'_fthe_'VelgI_i_:abie;_/- = '_--_-"_ '_53:'_'+: _", rr.,. +,!1_ ? _'_
(52) firmly, and slide the Ad uslmentSrocketfar: . : :: II 1:1I _"=
leerantatheWe,ghtCable.Tightenthe5/16"Nut•_/__-...u_q_ I+-II_.ITQ_I _=+
(82) against the Ad uslmentBracket.Test the Main 1< I+I 113 /I
Cable; I_lEe mater stallsor hesitates, loosen the. • __,'_e/_g"_.,.J _ _ ]--
5/16"Nuts ghtl ftheS/16"Nut slghten_edas_, i -:_;": "_:'- "_ "; +._:'_'_::_;+:i_"
far as possible and there is stillslack, the Main ." ' _ ...... '_ ;.....
Cable should be replaced. SeeORDERING _':. __/_'
REPLACEMENTPARTSon the back cover oFth_s _ /_./ !_ :
.. ./__._ ;_+.
3. SYMPTOM: THE STEPPERCONSOLE DOES NOT ' "....... c*, _ ........ _ + o_.;_--:.:'--_'-:_..I[_.!
FUNCTION PROPERLY " " i ' :_ _" I
i
a. As you step, move the stepperpedals verticallyat "+ 99
least 8 inches. I_your stepsare too shallow, the _';:_q _" r',;_.
.movement oFthe stepperpedals will not be detect-
ed. If the stepper consolestilldoes not function = i_" ._
properly, the ReedSwitch{99) can be adjustedby
Slidingit.up O.r-'da'_ slightlyin the mounting ": :_:?_:
sle_,;e.Repeat'until the slel0perconsoledisplay
cori'e_"tfeedback. If necessary,the 3/4"
(119} a.lt_..ing the ReedSwitch'Bracket(120)'.can':_- ,_:_i=.::_.,: _* ,._,-_o;.n:_.-_=,.
be Ioosen&:land the positionof the Bracketc;,'nbe :='_- " ................ ;"....
adjusted" .+ .__.._-. .Z._I
'25
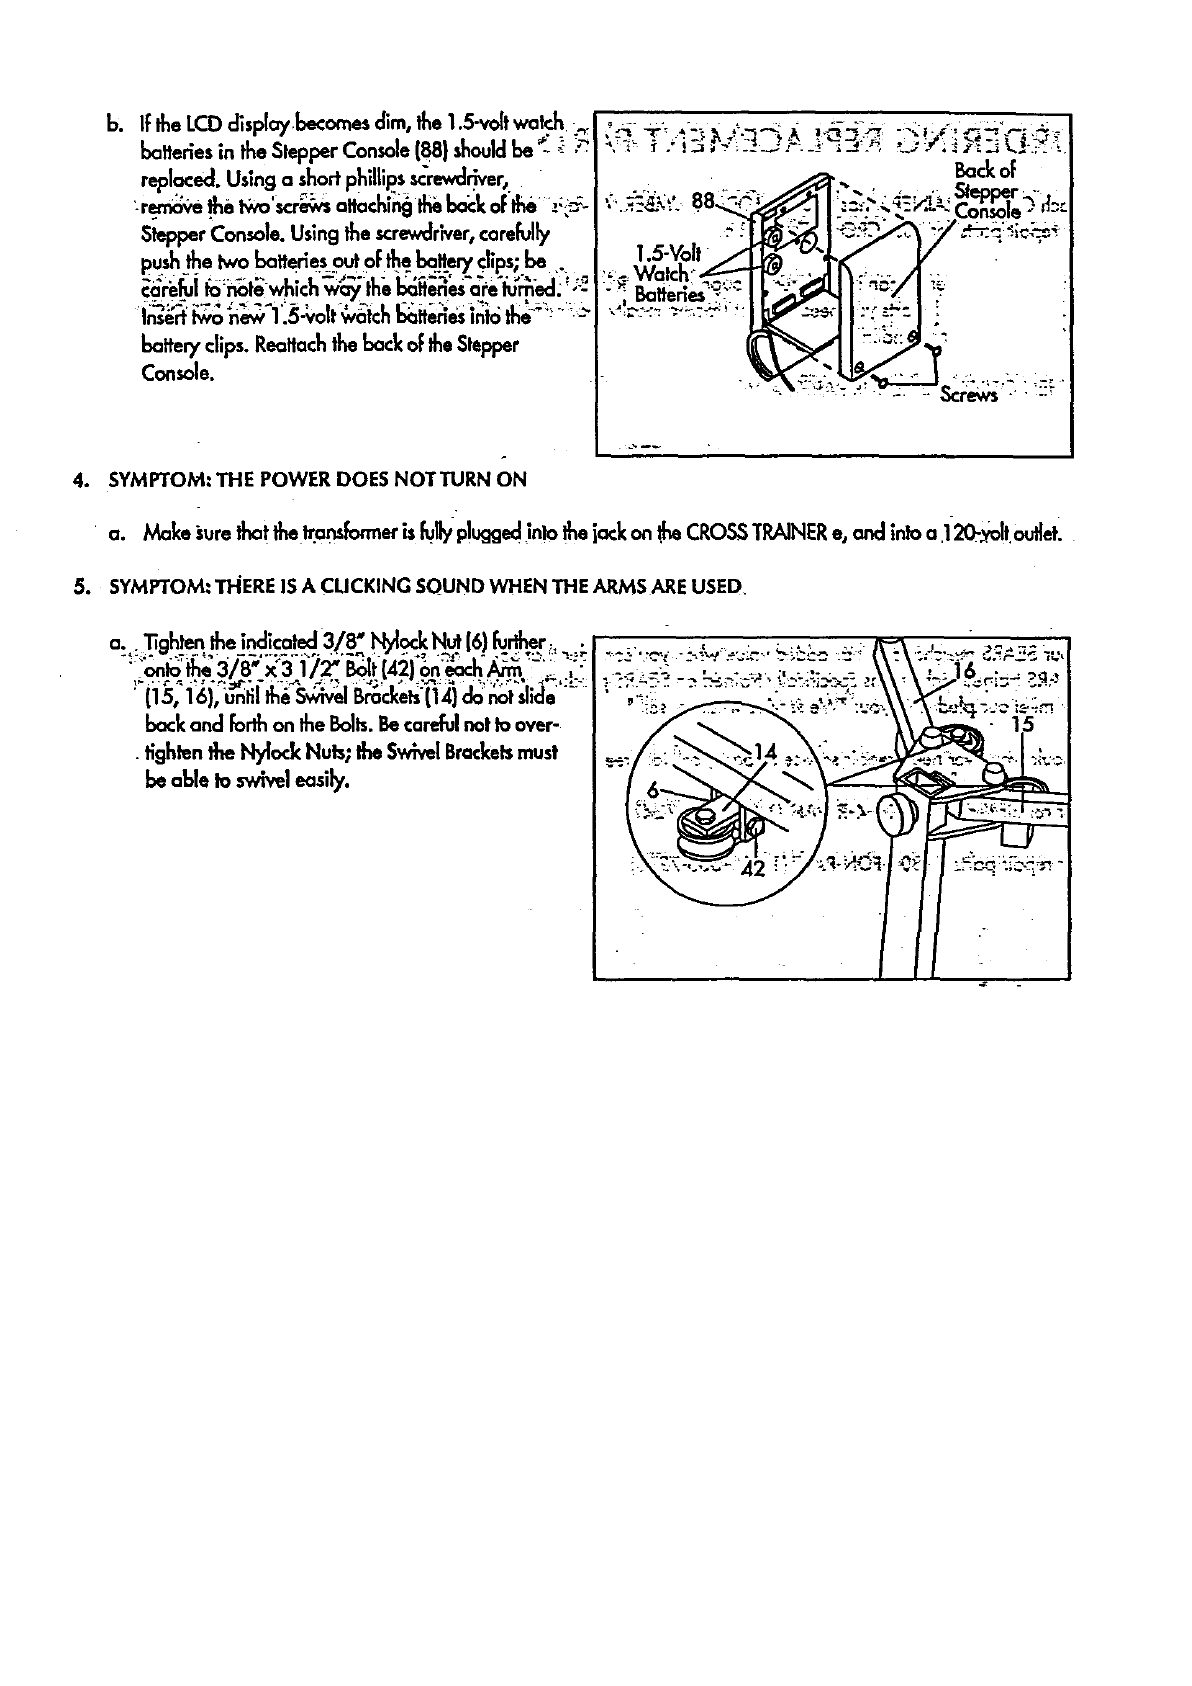
Inserttwo new 1.
batter/clips.Reattochthebeckof theStepper
Console.
4. SYMPTOM:THE POWER DOES NOTTURN ON
+
a. Make_urethatthe_mbrmer ishlly pluggedinto thejackon.theCROSSTRAINERe, and intoa 120-_o!t.oulhtl
5. SYMPTOM: TI-IEREIS ACLICKING SQUND WHEN THE ARMS ARE USED
a.+ +'l]gh.te_.+the in<_.+!cal.ed.3../._8+"!_+.o_.bl__16)_L_..,r+__+.
; i'onlo'the"318"x'3 i"/2" _tt42)+on'_h _.:'.;: ;'!
(15, 16), unli the SwivelBrackets(14)donotshde
backand _orthontheBolts.Becarefulnotto aver-
tightenthebb/{ockNuts;theSwh_ Bracketsmust
beable to swiveleasily.
• + •%-u- ++-+m
++
ORDERING REPLACEMENT PARTS
EachCR(_SS"TRAINER • has its'_ MODEL NUMBER.A],V,'aysm_6on _!s M_EL NUMBER._en requesilr_ Service
or repair parts for your CROSS TRAINER_.
A]ipartsllsteanere,n can 1oeoraerea rnrougn_r.._, KuI:BUC_AND CO. SER_iICECENTERSand mostS_S
RETAILSTORES. If paris you nee_ are not stackedlocally,your order will be Iransmilted_fo a SEARSPARTSDISTRIBU-
TION CENTERfor handling.
WHEN ORDERING REPAIRPARTS,ALWAYS GIVE THE FOLLOWING INFORMATION:
1. TheMODELNUMBERof the product[831.159342).
2. The NAME of the'product (PROFORM* CROSSTRAINERe).
3. LJ'he-PARTNUMBER of _ne_oa_l(Si _rom _e PART IIST/I'xPLo-0EDDRAWING occ0mE_anv(na th(s owner's mmnu0[
4. The DESCRIP'IlOIN at the pa_s| ITom the I"AKI U.b|/[:,Xlq.r,.)Ol-D DKA.WING accompa_nyingthisowner's manual
Your SEARSmerchand!s_ has added valuewhen you considerthat SEARS has serviceur_itsr_tlo'n_d,e_staffedwith_
SEARStrained technicians specificallytrained on SEARSproducts,having the parts; toolsand eclulpme_ta:e_s_re that
We meet our pledge to _'0u: "We servicewhat we sell.=
_13ould you ever need repair service or pal'ts,'call tail-tree:
For repalrports: 1-800-FON-PART (1-800-366-7278)
j FULL 90 DAY WARRANTY j
For 90 days from the date of purchase,when proper assemblyand maintenanceproceduresdetailed in the
owner's manual are followed, SEARSwill, free of charge, repair or replace and installa replacementpart For"
any defective part, when the PROFORM* CROSSTRAINERe is usedin a normal manner.
This warranly rices not apply when the CROSSTRAINER• is usedfor commercialo.rrental purposes.
SERVICEIS AVAILABLESIMPLYBYCONTACTING YOUR NEARESTSEARSSERVICECENTER/DEPARTMENTIN
THEUNITED STATES_
, • • . •- .
This worranly gives you specificlegal _ghls; you may also hc_'eotherr_ghtswhich vary trornstateto state.
SEARS,ROEBUCKAND CO., DEPT.817WA,
3333 BEVERLYROAD, HOFFMAN ESTATES,IL60179
PartNo_ 119804 R694A PrintedinUSA
