Proform 831297302 User Manual CROSSWALK PLUS TREADMILL Manuals And Guides L0801748
PROFORM Treadmill Manual L0801748 PROFORM Treadmill Owner's Manual, PROFORM Treadmill installation guides
831.298302 L0801748
User Manual: Proform 831297302 831297302 PROFORM PROFORM CROSSWALK PLUS TREADMILL - Manuals and Guides View the owners manual for your PROFORM PROFORM CROSSWALK PLUS TREADMILL #831297302. Home:Fitness Equipment Parts:Proform Parts:Proform PROFORM CROSSWALK PLUS TREADMILL Manual
Open the PDF directly: View PDF ![]() .
.
Page Count: 16
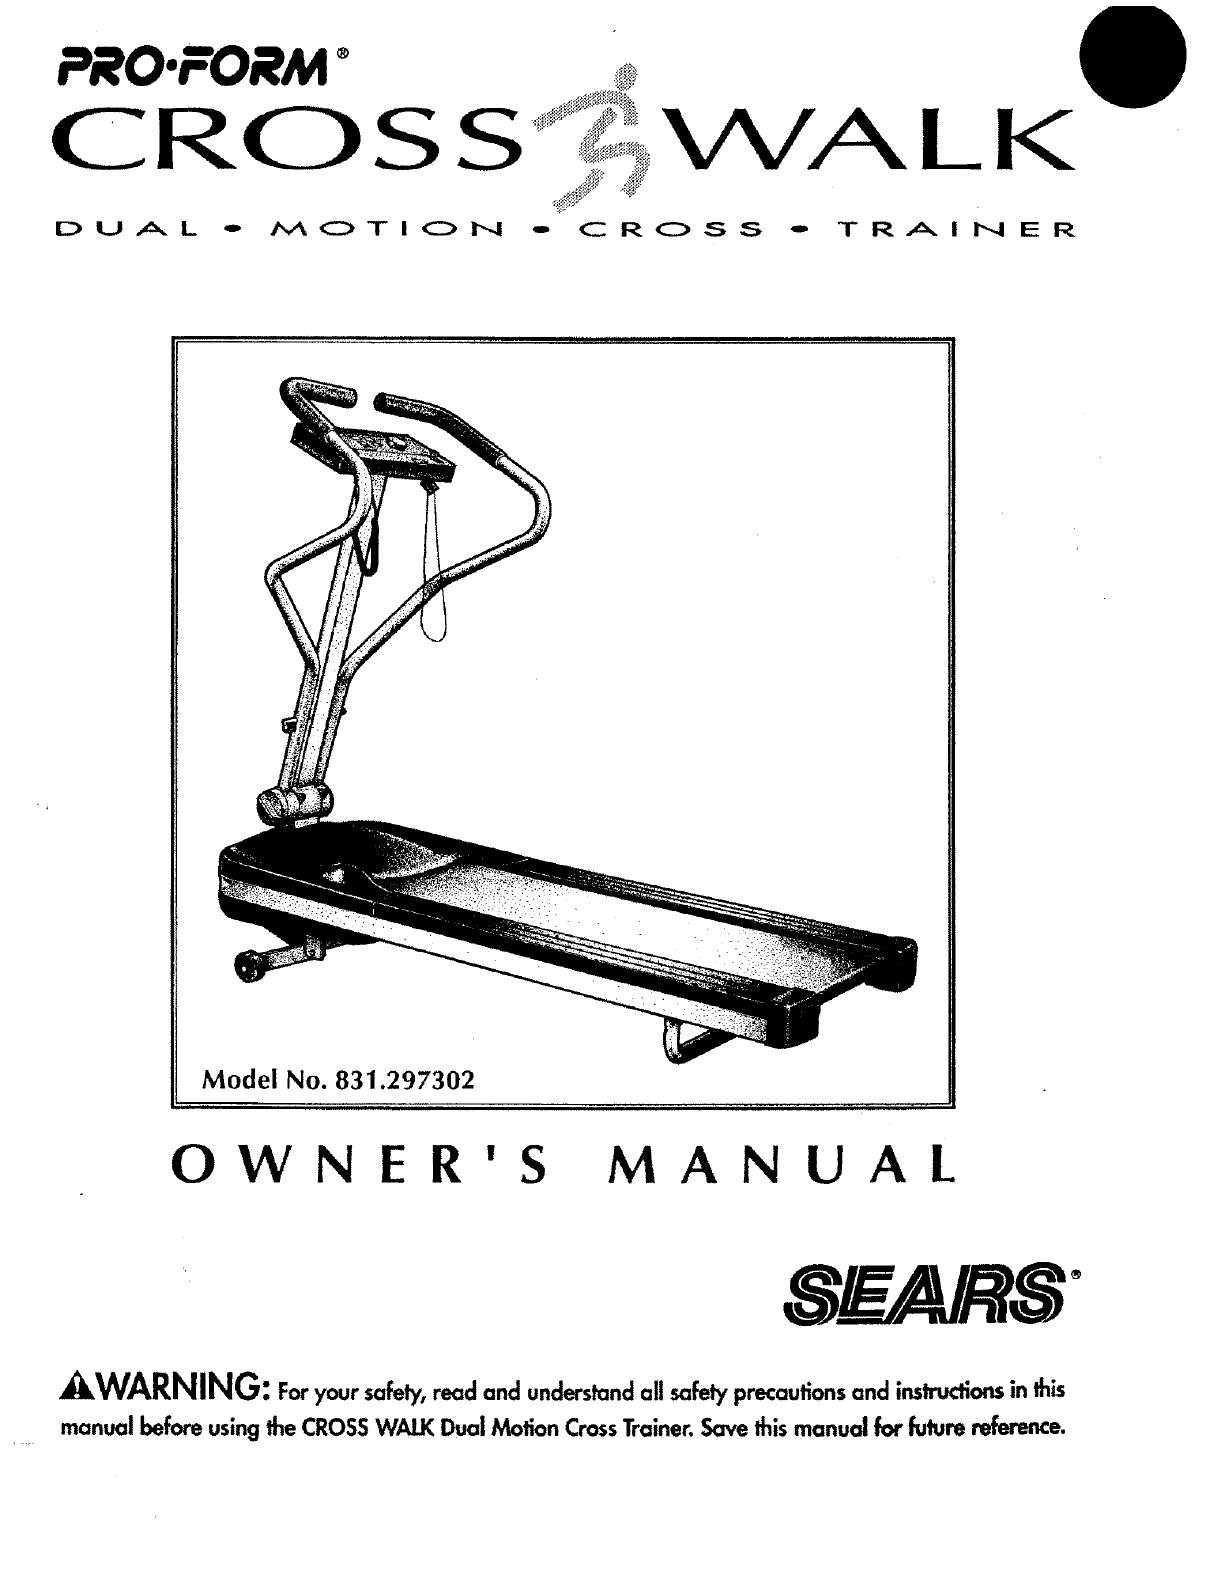
PRO.FORM _
CROSS LK
D U A L o /'.A O T I O N o C R O S S .- T R A I N E R
u,,,,,,,,,,,,,I,'i i i
Model No. 831.297302
OWNER'S MANUAL
SF-ARS"
_WARNING: Foryour safely, read and understandall safely precautions and inslrucfionsin this
manual before using the CROSSWALK Dual Motion CrossTrainer. Save this manual for future reference.

TABLE OF CONTENTS
UMITED WARRANTY ...................................................................... 3
IMPORTANT SAFETYPRECAUTIONS .......................................................... 4
BEFOREYOU BEGIN ..................................................................... 5
ASSEMBLYAND OPERATION ............................................................... 6
TROUBLE-SHOOTING AND MAINTENANCE .................................................... 9
CONDITIONING GUIDEUNES ............................................................. 11
PARTUST ............................................................................. 1_ I_
EXPLODEDDRAWING ................................................................... ,1.6,_S
ORDERING REPLACEMENTPARTS .................................................... Back Cover
i
FULL 90 DAY WARRANTY
For 90 days from the date of purchase, when proper assembly and maintenance procedures detailed in the
Owner's Manual are followed, SEARSwill, free of charge, repair or replace and install a replacement part for
any defective part, when the CROSS WALK is used in a normal manner.
Thiswarranty does not apply when the CROSS WALK is used for commercial or rentaJpurposes.
SERVICEIS AVAILABLESIMPLY BY CONTACTING YOUR NEARESTSEARSSERVICECENTER/DEPARTMENTIN
THEUNITED STATES.
This warranty gives you specific legal rights, and you may also have other rights which vary from stateto state.
SEARS,ROEBUCKAND CO., DEPT.817WA,
3333 BEVERLYROAD, HOFFMAN ESTATES,II. 60179
i iii
IMPORTANT SAFETY PRECAUTIONS
WARNING: To reduce the risk of burns, fire, elect_ shockor injury to persons, read the following
important safely precautions and information before operating the CROSSWALK.
1. Place the CROSSWALK on a levelsurface,withat least 8 feet of clearance behind it. Do not place the CROSS
WAlK near water, outdoors or on a surface that blocks any air openings. Do not operate the treadmill where
aerosol products are usedor where oxygen is being administered.
2. When connectingthe power card (seeOPERATION AND ADJUSTMENT),plug the power cord directly into a
grounded circuitcapable of carrying 12 or more amps. No other appliance should be on the same circuit. Keep
the power cord away from heated surfaces. If an extonsion cord is needed, use only a 14-gauge general-pur-
pose cord of five feet or less in length with a three-wire conductor.
3. Never move the walking belt while the power is turned off. DO notoperate the treadmill if the power cord or
plug is damaged, or if the CROSSWAlK is not working properly. (SeeBEFOREYOU BEGIN if the CROSS WALK
is not working properly.)
4. The roller guards must be 1/8 inch from the rear roller. Turn the power off and adjust the roller guards, if nec-
essary.
5. Wear appropriate dothing when exercising. Never wear loose dothing that could become caught in the CROSS
WALK. Always wear athletic shoes;never use the CROSS WALKwith bare feet, wearing only stockingsor in
sandals. Athletic support clothesare recommended for both men and women.
6. The pulse eardip is not a medical device. Various factors, includingthe user's movement while exercising, may
affect the accuracy of heart rate readings. The earclip is intended only as an exercise aid in determining heart
rate trends in general.
7. Never start the CROSSWALK while you are standing on the walking belt. Always hold the upper body arms
when exercising on the CROSSWALK.
8. To reduce the possibility of overheating, never operate the CROSSWALK continuouslyfor longer than 1 hour.
9. The CROSSWALK should be used only by personsweighing 250 pounds or less.Never allow more than one
person on the CROSSWALK at a time.
10. Use the CROSSWALK only as described in this manual.
11. Keep small children away from the CROSSWALK at all times. Never leave the CROSSWALK unattended while
the walking belt is moving. Always turn the power off when the CROSSWALK is not in use.
12. Never drop or insert any object into any opening.
13. The CROSSWALK is capable of high speeds. Adjust the speed slowly to avoid sudden jumps in speed.
14. Always unplug the power card before performing the maintenance and adjuslment procedures described in this
manual. Never remove the motor hood unless instructedto do so by an authorized service representative.
Servicing other than the procedures described in this manual should be performed by an authorized service
representative only.
WARNING: Before beginning this or any exercise program, consultyour physician. This is especially
important for persons over the age of 35 or persons with pre-existing health problems. Read all instructionsbefore
usingthe CROSSWALK. SEARSassumes no responsibility for personal injury or property damage sustained by or
through the use of the CROSSWALK.
SAVETHESEINSTRUCTIONS
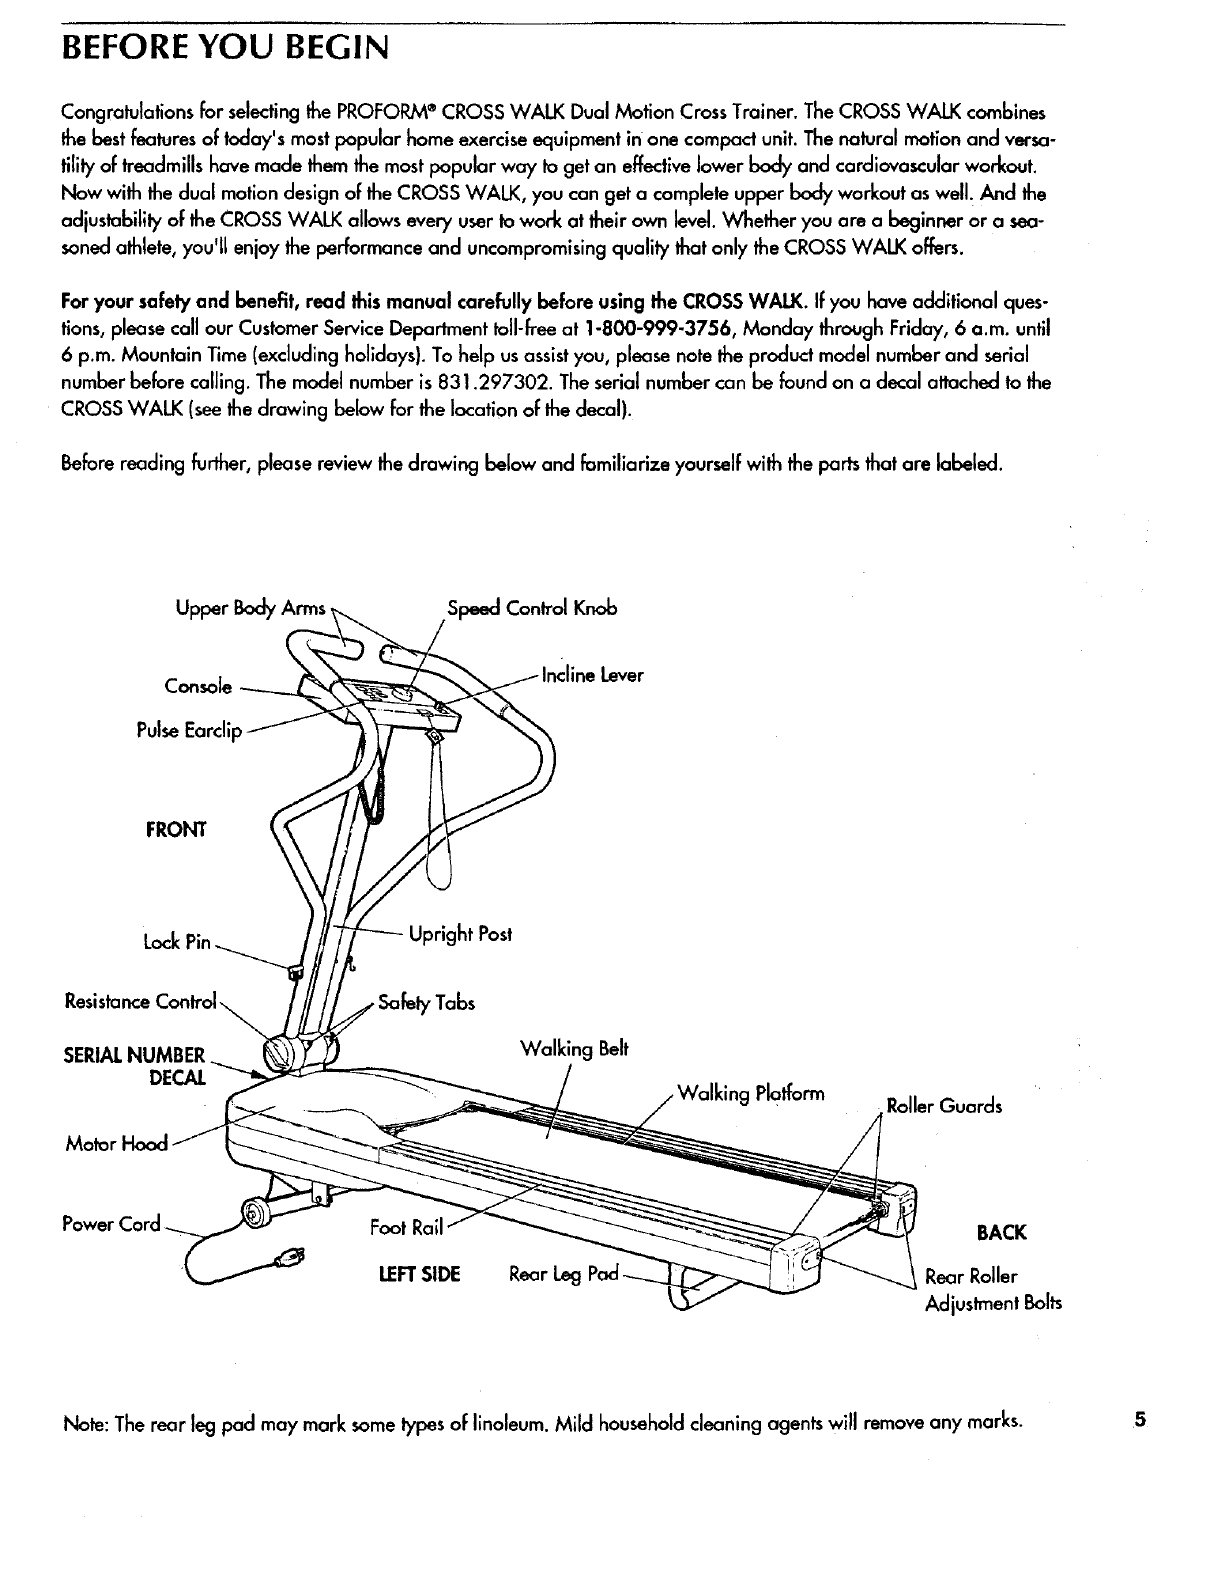
BEFORE YOU BEGIN
Congratulations for selectingthe PROFORM®CROSS WALK Dual Motion CrossTrainer. The CROSSWALK combines
the best features of today's most papular home exercise equipment in one compact unit. The natural motion and versa-
tility of treadmills have made them the most papular way to get an effective lower body and cardiovascular workout.
Now with the dual motion design of the CROSS WALK, you can get a complete upper body workout as well. And the
adjustabilily of the CROSSWALK allows every user to work at their own level. Whether you are a beginner or a sea-
sonedathlete, you'll enjoy the performance and uncompromising quality that only the CROSS WALK offers.
For your safely and benefit, read this manual carefully before using the CROSSWALK. If you hove additional ques-
tions,please call our Customer ServiceDepartment toll-freeat 1-800-999-3756, Monday through Friday, 6a.m. until
6 p.m. Mountain Time (excludingholidays). To help usassistyou, please notethe product model number and serial
number before calling. The model number is 831.297302. The serial number can be found on a decal attached to the
CROSSWALK (see the drawing below for the location of the decal).
Before reading further, please review the drawing below and familiarize yourself with the parts that are labeled.
Upper Body Speed Control Knob
Cof3sole
Pulse Earclip
Lever
FRONT
Lock
Besista
SERIALNUMBER.
DECAL
Tabs
Walking Belt
Platform RollerGuards
Foot Rall BACK
LEFTSIDE Rear Leg Rear Roller
Adjustment Belts
Note: The rear leg pad may mark some types of linoleum. Mild household cleaning agents will remove any marks. 5
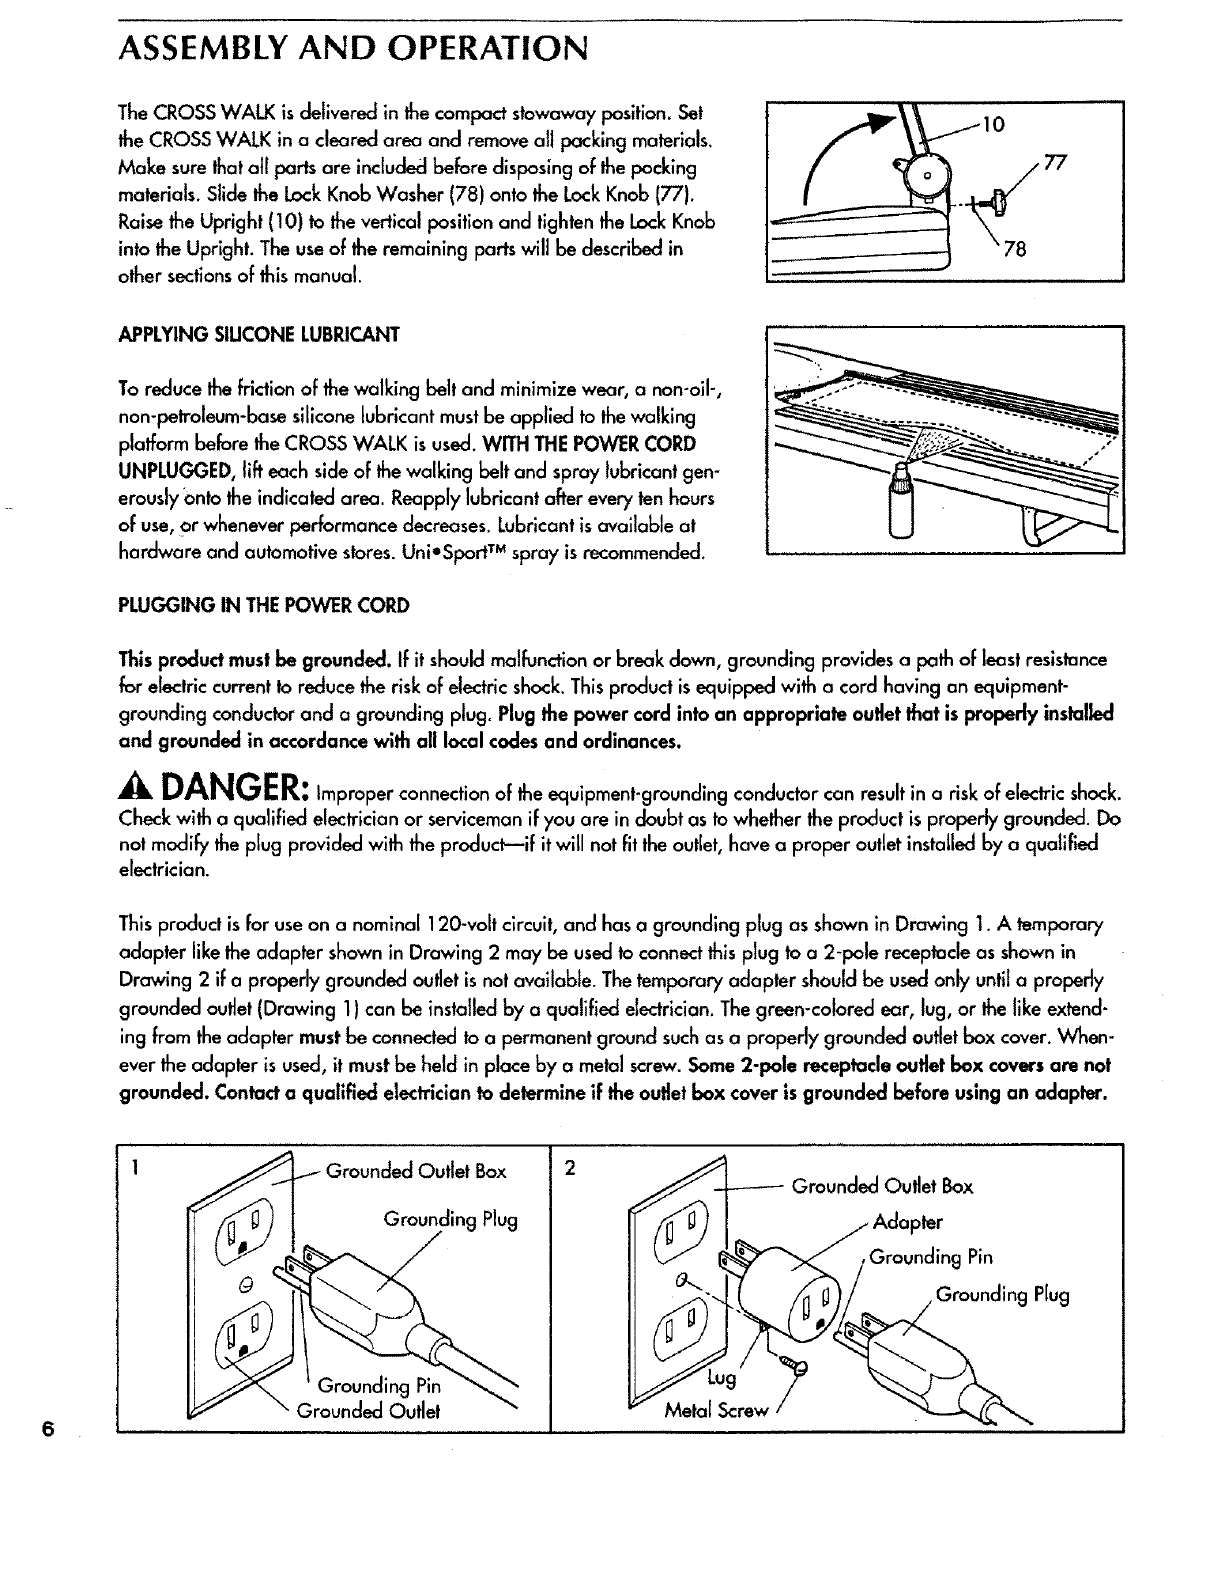
ASSEMBLY AND OPERATION
The CROSS WALK is delivered in the compact stowaway position. Set
the CROSSWALK in a cleared area and remove all packing materials.
Make sure thatall parts are includedbefore disposing of the packing
materials. Slide the Lock Knob Washer (78) onto the Lock Knob (77).
Raise the Upright (10} to the vertical position and tighten the Lock Knob
into the Upright. The use of the remaining parts will be described in
other sections of this manual.
10 77
APPLYING SIUCONE LUBRICANT
To reduce the friction of the walking belt and minimize wear, a non-oil-,
non-petroleum-bose siliconelubricant must be applied to the walking
platform before the CROSS WALK is used. WITH THE POWERCORD
UNPLUGGED, lift each sideof the walking belt and spray lubricant gen-
erously onto the indicated area. Reapply lubricant after every ten hours
of use, or whenever performance decreases. Lubricant is available at
hardware and automotive stores.Uni°Spart TM spray is recommended.
PLUGGING IN THE POWER CORD
Thisproduct must be grounded. If it should malfunctionor break down, grounding provides a path of least resistance
for electrlc currentto reduce the riskof electricshock.Thisproductis equipped with a cord having an equipment-
grounding conductor and a grounding plug. Plug the power cord into an appropriate outlet that is properly installed
and grounded in accordance with all local codesand ordinances.
DANGER: Improper connection of the equipment-grounding conductor can result in a risk of electric shock.
Check with a qualified electrician or serviceman if you are in doubt as to whether the product is properly grounded. Do
not modify the plug provided with the product--if it will not fit the outlet, have a proper outlet installed by a quallfied
electrician.
This product is for use on a nominal 120-volt circuit, and has a grounding plug as shown in Drawing 1. A temporary
adapter like the adapter shown in Drawing 2 may be used to connect this plug to a 2-pale receptacle as shown in
Drawing 2 if a properly grounded outlet is not available. The temparary adapter should be used only until a properly
grounded outlet (Drawing 1) can be installed by a qualified electrician. The green-colored ear, lug, or the like extend-
ing from the adapter must be connected to a permanent ground such as a properly grounded outlet box cover. When-
ever the adapter is used, it must be held in place by a metal screw.Some 2-pole receptacle oudet box coversare not
grounded. Contact a qualified electrician to determine if the outlet box cover is grounded before using an adapter.
Box
Grounding Plug
Grounding Pin
Grounded Outlet Metal Screw
Grounded Outlet Box
_ter
Pin
Grounding Plug
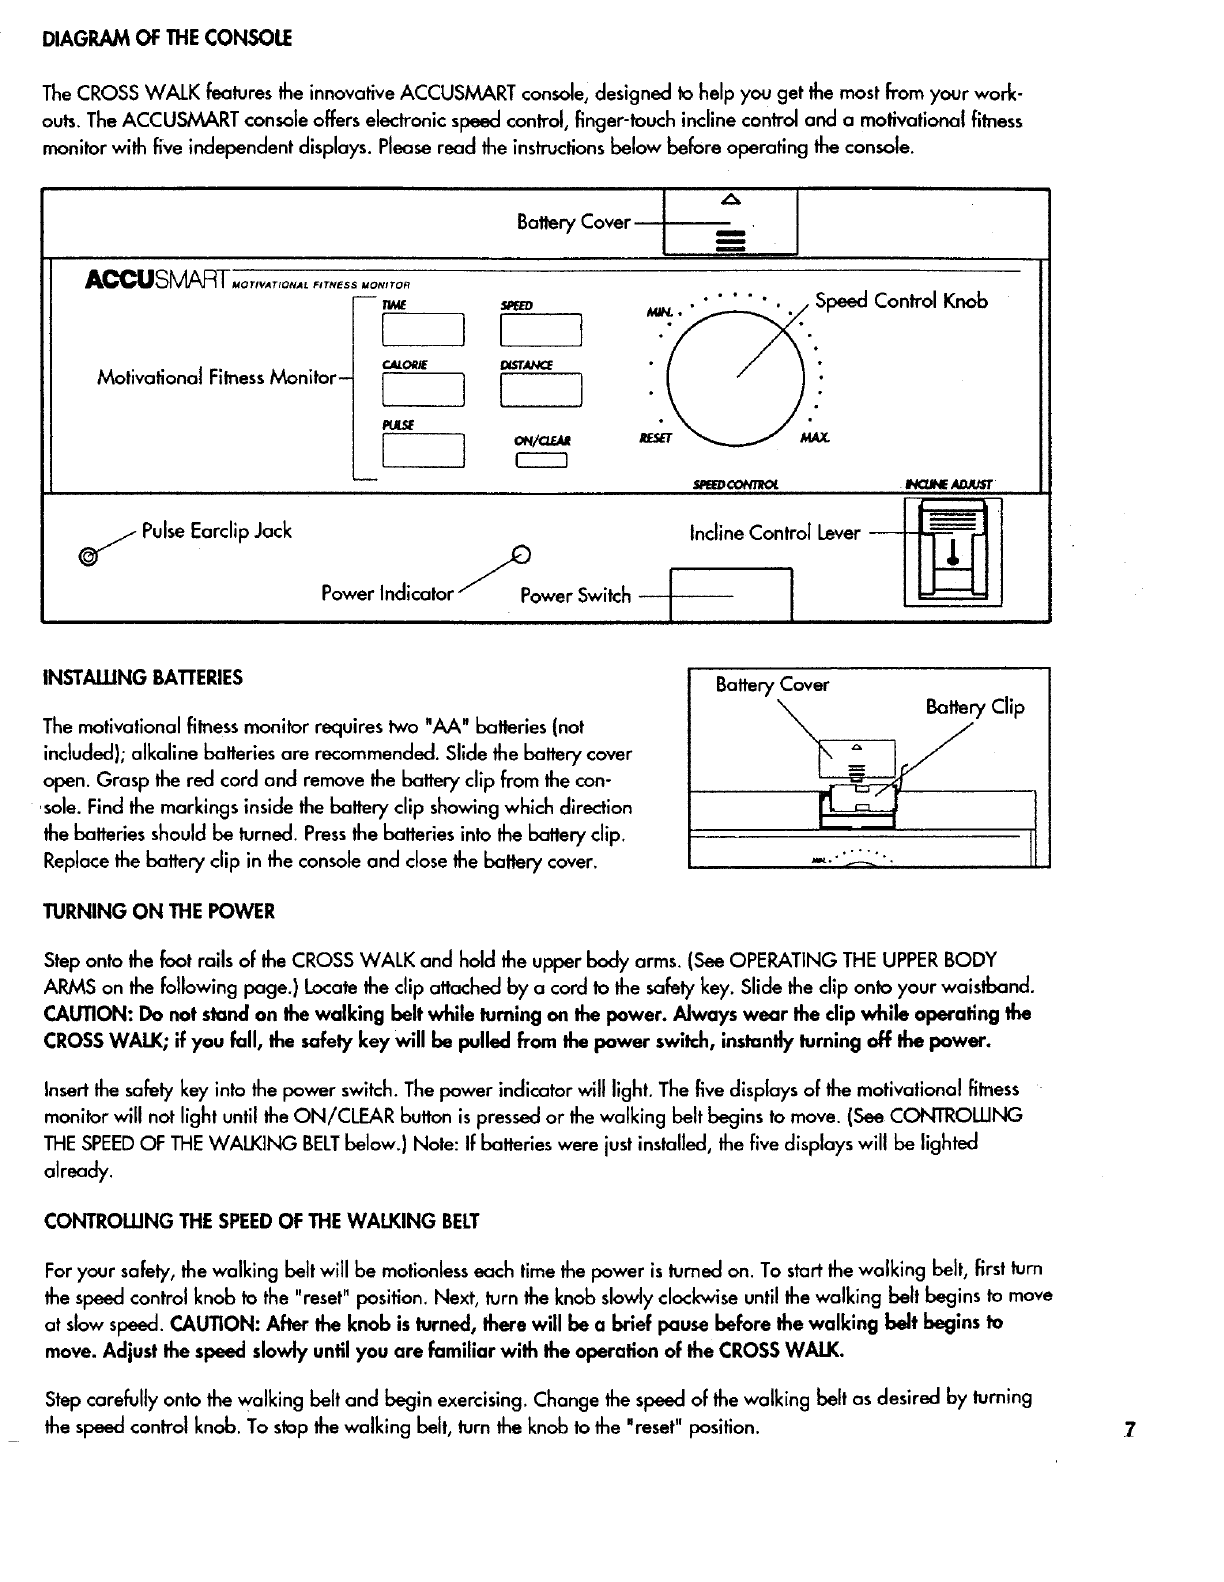
DIAGRAM OF THE CONSOLE
The CROSS WALK features the innovative ACCUSMART console, designed to help you get the most from your work-
outs. The ACCUSMART console offers electronic speed control, finger-touch incline control and a motivational fitness
monitor with five independent displays. Please read the instructions below before operating the console.
Motivational FitnessMonitor-
A
_,./Pulse Earclip Jack
Power Indicator_Power Switch
Control Knob
INSTALLINGBATI'ERIES
The motivationalfitness monitor requires two "AA" batteries(not
included);alkaline batteries are recommended.Slide the battery cover
open. Grasp the red cord and remove the battery clip from the con-
sole. Findthe markings insidethe battery clip showingwhich direction
the batteries should be turned. Pressthe batteries into the battery clip.
Replacethe battery clip in the console and close the battery cover.
Battery Cover
....-..
BatteryClip
TURNING ON THE POWER
Step onto the foot rails of the CROSSWALK and hold the upper body arms. (See OPERATING THEUPPERBODY
ARMS on the following page.) Locate the clip attached by a cord to the safety key. Slide the cllp onto your waistband.
CAUTION: Do not stand on the walking belt while luming on the power. Always wear the clip while operating the
CROSSWALK; if you fall, the safely key will be polled from the power switch, instantly turning off the power.
Insert the safety key into the power switch.The power indicator will light. The five displays of the motivational fitness
monitor will not light until the ON/CLEAR button is pressed or the walking belt begins to move. (See CONTROLLING
THESPEEDOF THEWALKING BELTbelow.) Note: If batteries were just installed, the five displays will be lighted
already.
CONTROLLINGTHE SPEEDOF THEWALKING BELT
For your safety, the walking belt will be motionless each time the power is turned on. To startthe walking belt, firstturn
the speed control knob to the "reset" position. Next, turn the knob slowly clockwise until the walking belt begins to move
at slow speed. CAUTION: After the knob is lurned, there will be abrief pause before the walking belt begins to
move. Adjust the speed slowly until you are familiar with the operation of the CROSSWALK.
Step carefully onto the walking belt and begin exercising.Change the speed of the walking belt as desired by turning
the speed control knob. To stopthe walking belt, turn the knob to the "reset" position. 7

CHANGING THEINCUNE
To vary the intensityof your exercise, the incline of the CROSS WALK can be changed using the lever on the right side
of the console. To increase the incline, stand toward the back of the foot rails and pull back the lever until the desired
incline is reached. To decrease the incline, stand toward the front of the foot rails, lean forward, and pull back the
lever. CAUTION: Do not change the incline while you are walking or running an the CROSSWALK.
OPERATING THEUPPERBODY ARMS
The upper body arms can be used in either the stationaryposition or the
dual motion position. To use the upper body arms in the stationary posi-
tion, insert the lock pin through the arms and the upright. Firmly tighten
the resistance control. Attach the spring clip to the end of the lock pin.
Make sure that the spring clip passes over the detent ball (seethe inset
drawing.) To use the upper body arms in the dual motion position, first
make surethe resistance control is tightened. Removethe lock pin from
the arms and the upright, and insertit through the safetytabs at the
base of the upright. Attach the spring clip to the lock pin. In the dual
motionposition, you can move the arms forward and back asyou walk
or run, exercisingyour arms, back and shouldersfor a total body work-
out. To tailor the intensityof your exercise, the resistance of the arms
can be changed. To increase the resistance,turn the resistancecontrol
clockwise; to decrease the resistance,turn the control counterclockwise.
Lock Pin
Control
//Spring
Spring
CAUTION: Always insert the lock pin through the safely labs when using the upper body arms in the dual motion
position. If you fall while exercising, the lock pin will limit the downward movement of the arms. When the lock pin is
insertedthrough the safely tabs, do nat lean on the upper body arms or the lock pin may be damaged. If the spring
cllp is not attached to the lock pin as instructed,the lock pin may slip out, resulting in injuring to the user.
OPERATINGTHEMOTIVATIONAL FITNESSMONITOR
The five displays of the motivational fitness monitor are designed to provide you with instant exercisefeedback. To reset
the displays, press the ON/CLEAR button. The five displays are described below:
TIME--This display showsthe elapsed time. Note: When the walking belt is stopped, the TIME display will go into a
pause mode after a few seconds.
CALORIE--This display showsthe total number of nutritional Calories that you have burned.
PULSE--This display showsyour heart rate. Plug the pulseearclip into the
console and hook the metal clothes clip onto the earclip wire. Attach the
earclip to your left ear lobe and slide the clothes clip onto your collar.
(When using the upper body arms in the dual motion position, attach the
earclip to your right ear lobe.) After a few seconds, your heart rate will
be displayed. If your heart rate is not displayed, rub your ear lobe and
reposition the earclip. It may also be helpful to stand still for a moment.
SPEED--This display shows the current speedof the walking belt.
DISTANCE--This display shows the total distance that you have walked or run.
TURNING OFFTHE POWER
To turn off the power, remove the safety key from the power switch. Keep the safetykey in a secure location. The five
displays of the motivational fitness monitor will turn off automatically a few minutes after the walking belt is stopped.
TROUBLE-SHOOTING AND MAINTENANCE
Most problems can be solved by _lowlng _ simple stepsbelow. If furtherassistance is needed, please call our
Customer Service Department toll-free at 1-800-999-3756, Monday through Friday, 6 a.m. until 6 p.m. Mounlain Time
(excluding holidays).
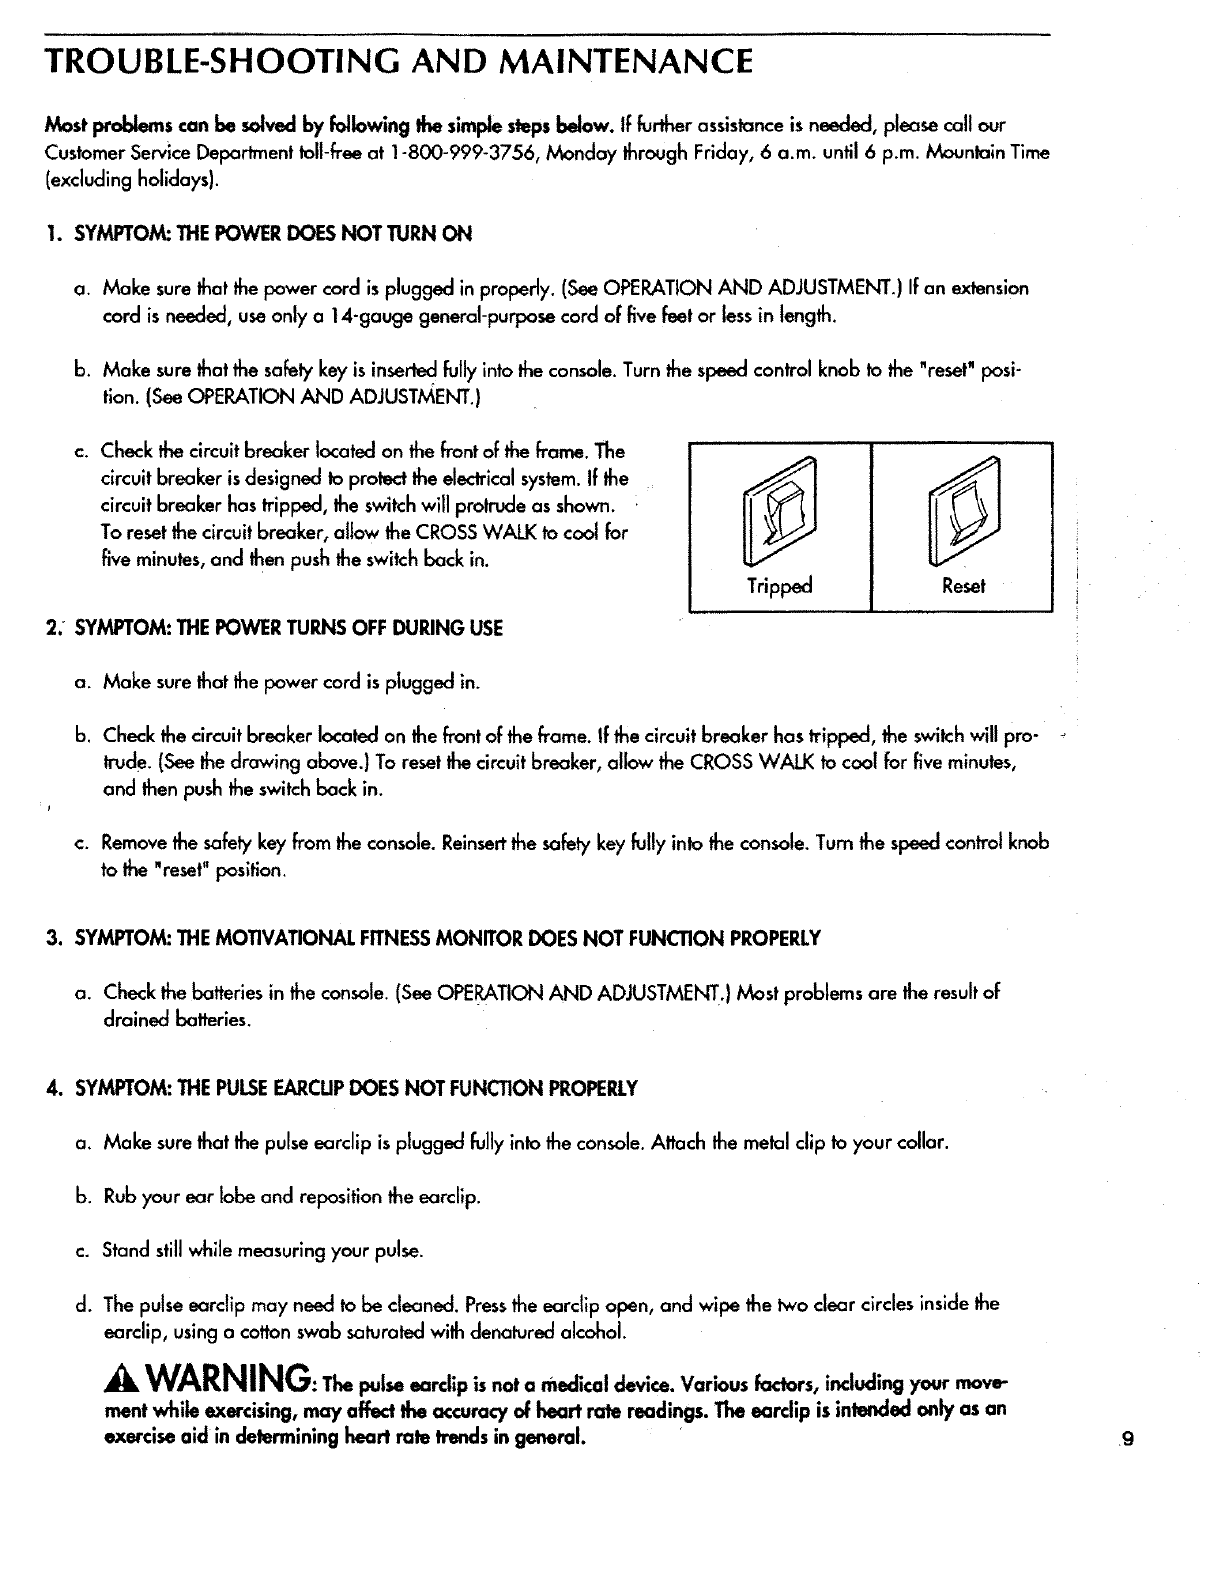
1. SYMPTOM: THEPOWER DOES NOT TURN ON
a. Make surethat the power cord is plugged in properly. (See OPERATION AND ADJUSTMENT.) If an extension
cord is needed, use only a 14-gauge general-purpose cord of five feet or less in length.
b. Make surethat the safetykey is insertedfully intothe console. Turn the speed control knob to the "reset"Posi-
tion. (SeeOPERATION AND ADJUSTMENT.)
Check the circuit breaker located on the frontof the frame. The
circuit breaker is designed to protect the electricalsystem.If the
circuit breaker has tripped, the switchwill protrucle as shown.
To resetthe circuit breaker, allow the CROSS WALK to cool for
five minutes,and then pushthe switchback in.
2." SYMPTOM: THEPOWER TURNSOFF DURING USE
Tripped Reset
a. Make surethat the power cord is plugged in.
b. Check the circuitbreaker located on the front of the frame. If the circuit breaker has tripped, the switch will pro-
trude. (Seethe drawing above.) To reset the circuit breaker, allow the CROSS WALK to cool for five minutes,
and then push the switchback in.
c. Removethe safely key from the console. Reinsertthe safetykey fully into the console. Turn the speed control knob
to the "reset"position.
3. SYMPTOM: THEMOTIVATIONAL FITNESSMONITOR DOES NOT FUNCTION PROPERLY
a. Check the batteries in the console. (See OPERATION AND ADJUSTMENT.) Most problems are the result of
drained batteries.
4. SYMPTOM: THEPULSEEARCUPDOES NOT FUNCTION PROPERLY
a. Make sure that the pulse earclip is plugged fullyinto the console. Attach the metal clip to your collar.
b. Rubyour ear lobe and repositionthe earclip.
c. Stand stillwhile measuring your pulse.
d. The pulse earclip may need to be cleaned. Pressthe earclip open, and wipe the two clear circles inside the
earclip, usinga cotton swab saturaledwith denatured alcohol.
WARNING:Tbe ,lse notom col Vor us i, iu ingyourmove-
ment while exercising, may affect the accuracy of heart rate readings. The earclip is intended only as an
exercise aid in €letermining heart rote trends in general. g
5. SYMPTOM: THECROSSWALK DOES NOT INCUNE
a. Stand at the back of the foot rails while increasingthe incline. Stand at th_ front of the foot rails and lean for-
ward while decreasing the incline. (See OPERATION AND ADJUSTMENT.)
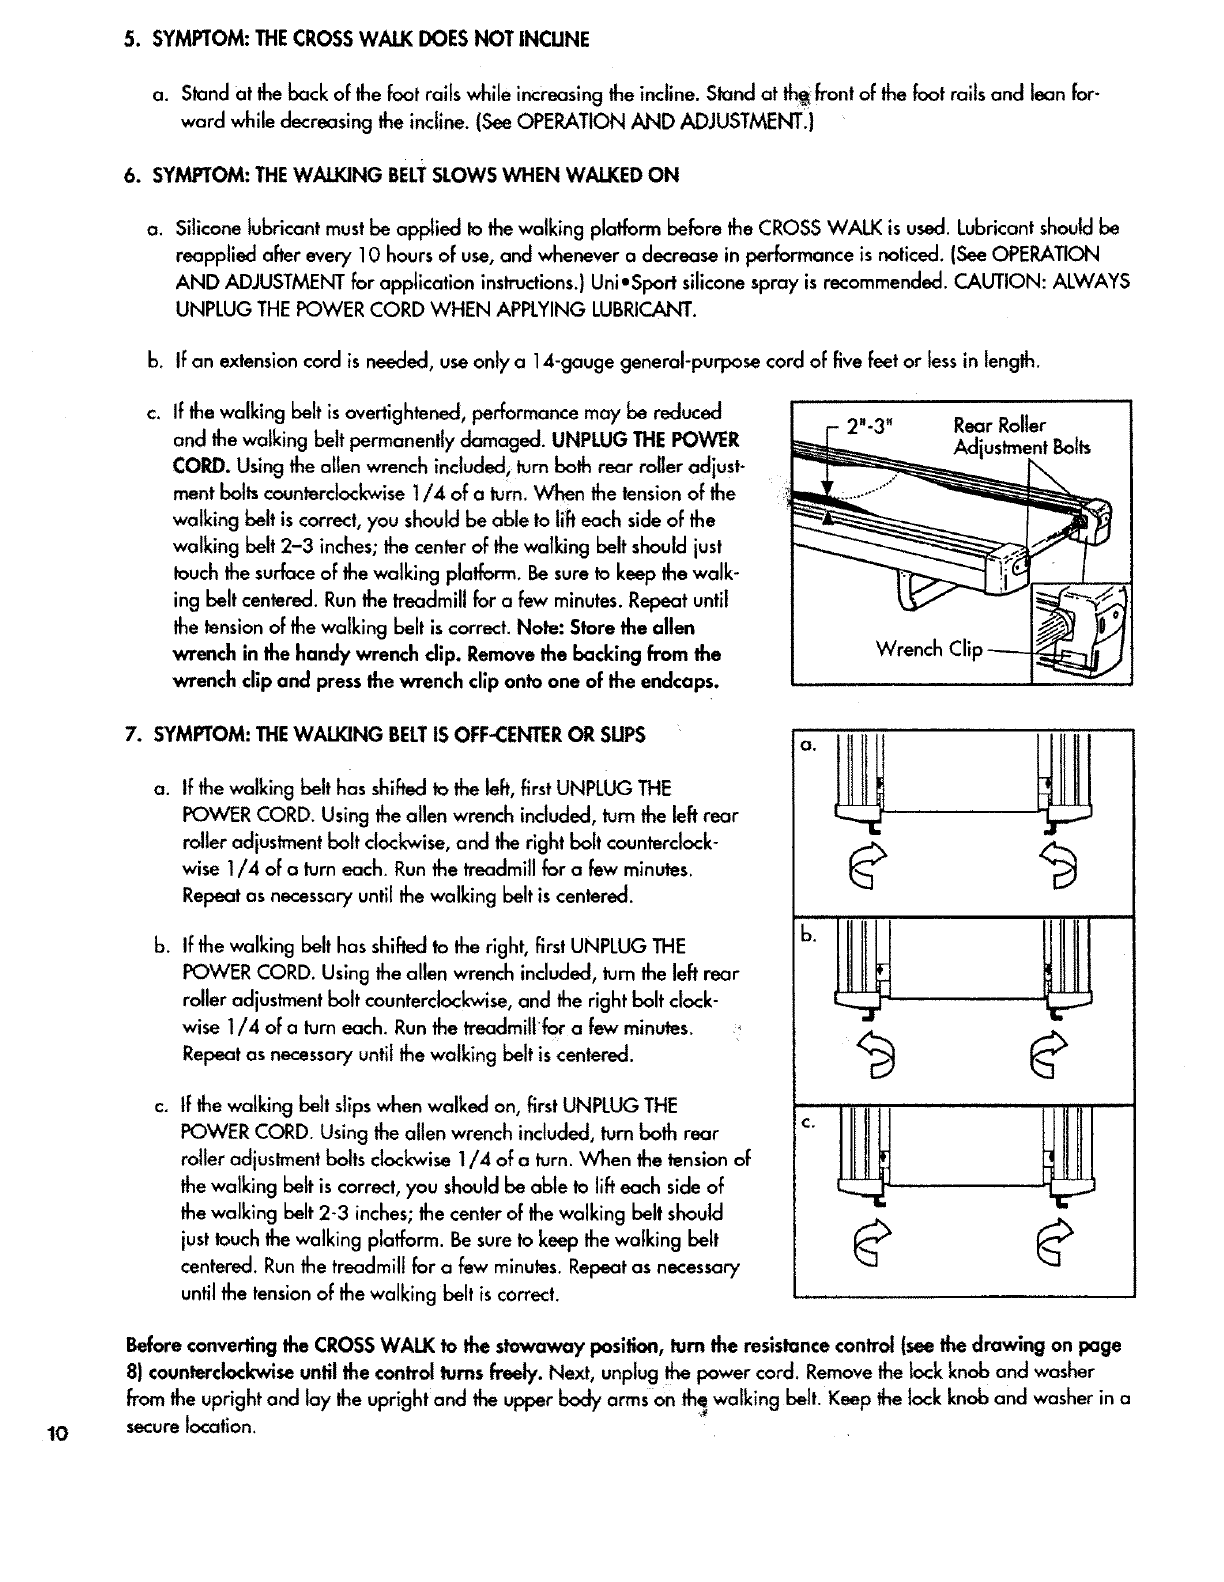
6. SYMPTOM: THEWALKING BELTSLOWS WHEN WALKED ON
a, Silicone lubricant must be applied to the walking platform before the CROSS WALK is used. Lubricant shouldbe
reapplied after every 10 hours of use, and whenever a decrease in performance is noticed. (SeeOPERATION
AND ADJUSTMENT for application instructions.)UnioSport silicone spray is recommended. CAUTION: ALWAYS
UNPLUG THE POWER CORD WHEN APPLYING LUBRICANT.
b. If an extension cord is needed, use only a 14-gauge general-purpose cord of five feet or less in length.
C. If the walking belt is overtightened, performance may be reduced
and the walking belt permanently damaged. UNPLUG THEPOWER
CORD. Using the allen wrench included; turn both rear roller adjust-
ment bolts counterclockwise 1/4 of a turn. When the tensionof the
walking belt is correct, you shouldbe able to lift each side of the
walking belt 2-3 inches;the center of the walking belt should just
touch the surfaceof the walking platform. Be sureto keep the walk-
ing belt centered Runthe treadmill for a few minutes.Repeat until
the tension of the walking belt iscorrect. Note: Store the allen
wrench in the handy wrench dip. Removethe backing from the
wrench clip and pressthe wrench clip onto one of the endcaps.
Wrench Clip
Rear Roller
Adjustment Bolts
7. SYMPTOM: THEWALKING BELTiS OFF-'CENTEROR SUPS
a. If the walking belt has shifted to the left, first UNPLUG THE
POWER CORD. Using the allen wrench included,turn the left rear
roller adjustment bolt clockwise, and the right bolt counterclock-
wise 1/4 of a turn each. Run the treadmill for a few minutes.
Repeat as necessary until the walking belt is centered.
b. If the walking belt has shifted to the right, first UNPLUG THE
POWER CORD. Using the allen wrench included, turn the left rear
roller adjustment bolt counterclockwise, and the right bolt clock-
wise 1/4 of a turn each. Run the treadmill for a few minutes.
Repeat as necessary until the walking belt is centered.
C, If the walking belt slips when walked on, first UNPLUG THE
POWER CORD. Using the allen wrench included, turn both rear
roller adjustment bolts clockwise 1/4 of a turn. When the tension of
the walking belt is correct, you should be able to lift each side of
the walking belt 2-3 inches; the center of the walking belt should
just touch the walking platform. Be sure to keep the walking belt
centered. Run the treadmill for a few minutes. Repeat as necessary
until the tension of the walking belt is correct.
10
Before converting the CROSSWALK to the stowaway position, turn the resistance control (see the drawing on page
8) counterclockwiseuntil the control turns freely. Next, unplug the power cord. Removethe lock knob and washer
from the upright and lay the upright and the upper body arms on th_ walking belt. Keep the lock knob and washer in a
securelocation.
CONDITIONING GUIDELINES
The fallowingguidelines will help you to plan your exerciseprogram. Remember that proper nutrition and adequate
rest are essentialfor successfulresults.
4LWARNING: blare beginning this or any exercise program, consultyour physician. This is especially
important Forindividuals over the age of 35 or individuals with pre-existing health problems.
WHY EXERCISE?
Exercisehas proven essentialfar good health, longevityand general well-being. Studies have shownthat staying in
good physicalcondition is beffer than any drug for helping to prevent or alleviate severaldiseases,including heart dis-
ease, diabetes and cancer. Americans are saying that the narrow fitness goals of the past have been replaced by the
desire for an overall healthier lifestyle.
Regular participation in a well-rounded exerciseprogram results in a stronger and more efficientheart, improved respi-
ratory function, increased staminaand endurance, belCerweight management and body fat control, increased ability to
deal with stress, and greater self-esteem and confidence.
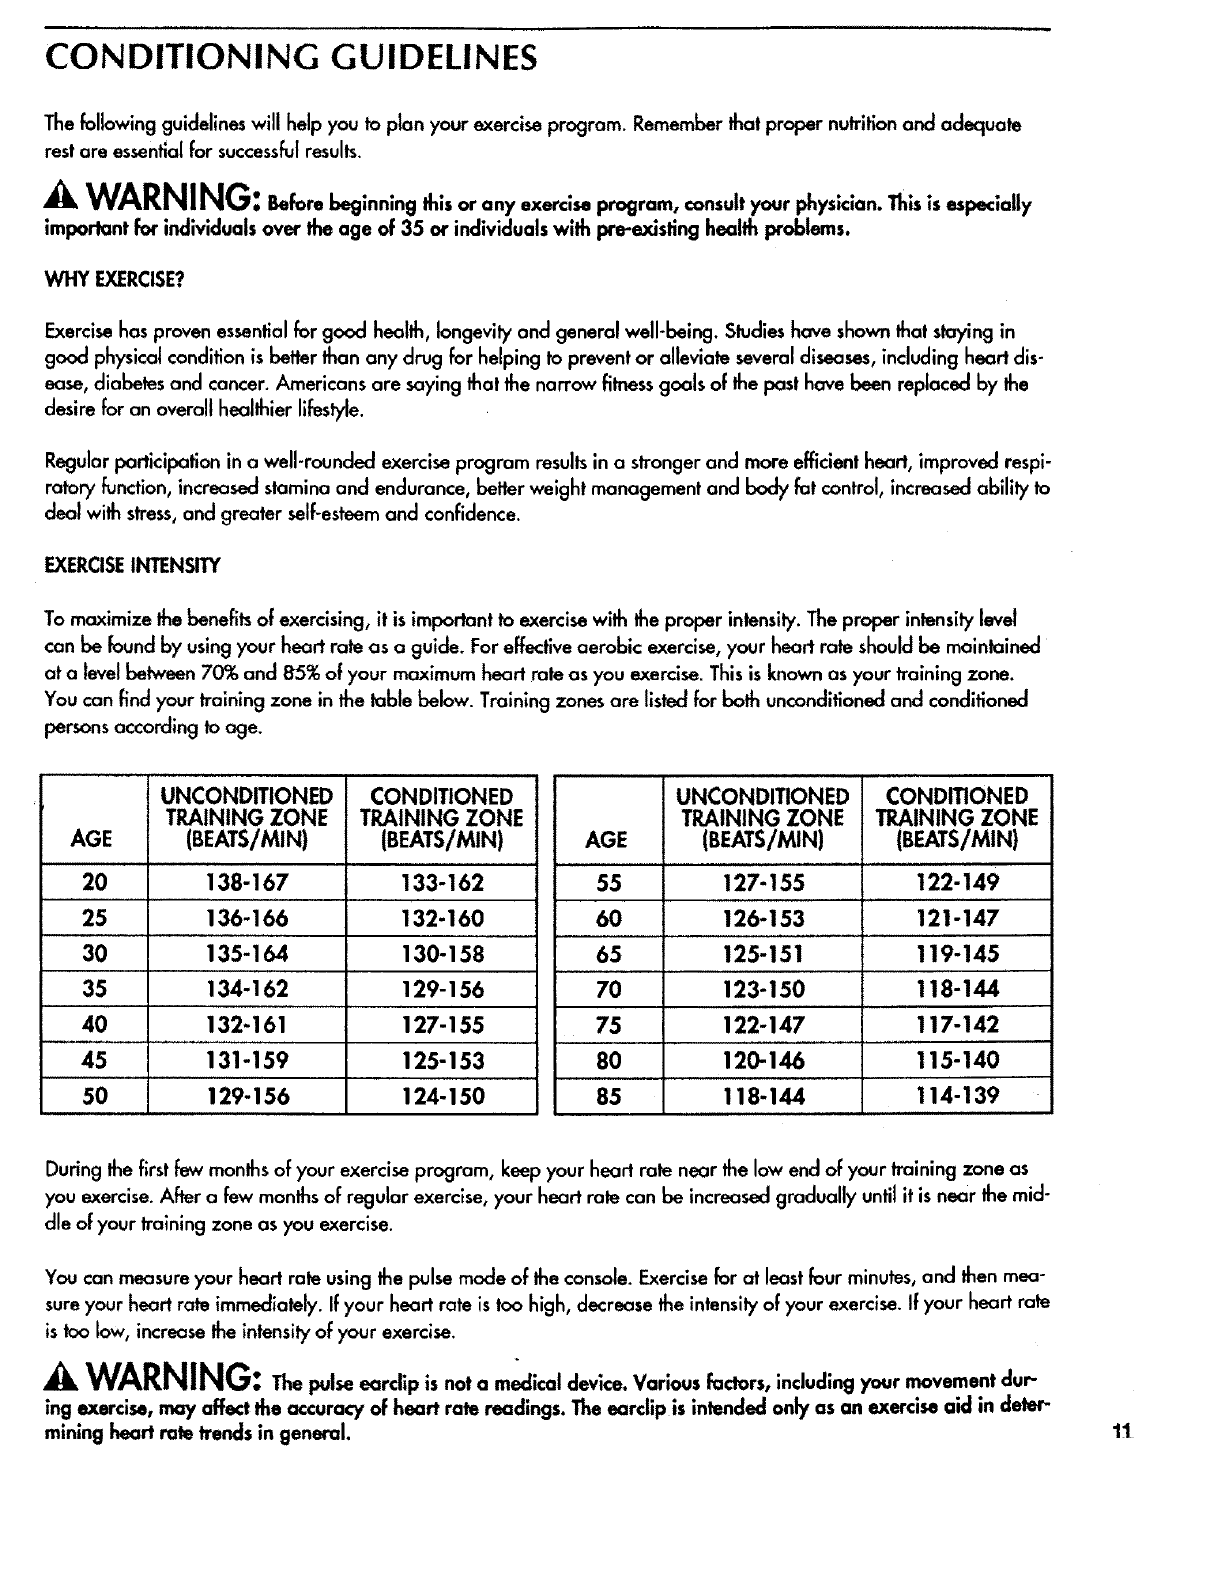
EXERCISEINTENSITY
To maximize the benefits of exercising, it is important to exercise with the proper intensity.The proper intensitylevel
can be found by usingyour heartrate as a guide. For effectiveaerobic exercise, your heartroteshouldbemaintained
at a levelbetween 70% and 85% of your maximum heart rate as you exercise. This is known as your training zone.
You can find your training zone in the table below. Training zones are listed for both unconditionedand conditioned
persons accordingto age.
UNCONDITIONED CONDITIONED
TRAINING ZONE TRAINING ZONE
AGE (BEATS/MIN) (BEATS/MIN)
20 138-167 133-162
25 136-166 132-160
30 135-164 130-158
35 134-162 129-156
40 132-161 127-155
45 131-159 125-153
50 129-156 124-150
UNCONDITIONED CONDmONED
TRAINING ZONE TRAINING ZONE
AGE (BEATS/MIN) (BEATS/MIN)
.... ,,,,.,
55 127-155 ......... 122-149
60 126-153 121-147
65 125-151 119-145
70 123-150 118-144
75 122-147 117-142
80 120-146 115-140
85 118-144 114-139
During the firstfew monthsof your exercise program, keep your heart rate near the low end of your training zone as
you exercise. After a few months of regular exercise, your heart rate can be increased gradually until it is near the mid-
die of your training zone as you exercise.
You can measure your heart rate usingthe pulse mode of the console. Exercisefar at least four minutes,and then mea-
sure your heart rate immediately. If your heart rate is too high, decrease the intensityof your exercise. If your heart rate
is too low, increasethe intensityof your exercise.
WARNING: thepulse rc,pis not a medical device. Various factors, including your movement dur-
ing exercise, may affect the accuracy of heart rate readings. The earclip is intended only as an exercise aid in deter-
mining heart rote trends in general. "11
WORKOUT GUIDEUNES
A well-rounded workout developsthe heart, musclesand body compositionby includingthe following phases:
A warm-up phase, lasting 5to 10 minutes.Beginwith slow, controlled stretches,and progressto more rhythmic
stretchesto increase the body temperature, heart rate and circulation in preparation for strenuousexercise.Stretching
also guards against muscle, tendon and ligament sprains.(See SUGGESTEDSTRETCHESon page 13.)
A cardiovascular phase, including 20-30 minutesof exercisingwith your heart rate in your training zone.
A cool-down phase, consisting of 5-I 0 minutes of activity similar to that of the warm-up phase. Thoroughstretching
offsetsmusclecontractionsand other problemscausedwhen you slopexercising suddenly.Stretchingfor increased
flexibility is often most effectiveduring this phase. This phase shouldleave you relaxed and comfortablytired.
Instead of waiting for aconvenient time to exercise, plan aspecifictime.The morning hourswork well for many, and
the self-discipline required to riseearly and exercise oftencarries through the day to help increaseproductivity in other
areas. For some, exercising before dinner initiatesa period of winding-down from the day's activities.Whatever time
you choose, be consistent and stickwith it.
To maintain or improve your condition, complete three workoutseach week, with at leastone day of rest between
workouts. After a few monthsof regular exercise, you may completeup to five workoutseach week, if desired.
Remember,the key to successis CONSISTENCY.
12
WORKOUT ATTIRE
Exerciseclothing should be loose-fitting and comfortable, allowing unrestrictedmovement. Do not wear rubberized or
plasticclothing that can interferewith the evaporation of sweatfrom your skin.Always wear athletic shoesthat are flex-
ible and provide good protectionand support.
ADDITIONALSUGGESTIONS
Creating a more active lifestyle,in addition to establishinga regular exerciseprogram, will help you to achieve your fit-
nessgoals. It'seasy lo improve your lifestyleby making a few changes in your daily routine:
Keep yourself moving throughout the day. Use the stairsinsteadof the elevator. Park a half mile away from work or get
off the bus a couple of blocks before your stopand walk the remaining distance.
Increasemidday produdivity, creativity and energy by replacing a heavy lunch with a lightmeal. Spend the extra time
in physicalactivity suchas walking.
Substitutemanually-operated devices for automatic equipmentsuchas lawn-care machinery, power toals and snow
removers.
Stop smoking;smoking nearly doubles the risk of coronary heart disease. (Framington Heart Sludy)
Reduce or eliminate alcohol consumption.Alcohol is a major cause of liver problemsand other health disorders.
(Office of Disease Prevention and Health Promotion)
Reduce your intake of fat. Lessthan 30% of the calories you consume each day shouldcome from fat. Excessive fat con-
sumptionhas been linked to numerous causes of death, including heart disease and cancer.
Know and keep a record of your cholesterol level, blood pressure and other health information. Keep your blood pres-
sure below 140/90; below 125/85 is preferable.
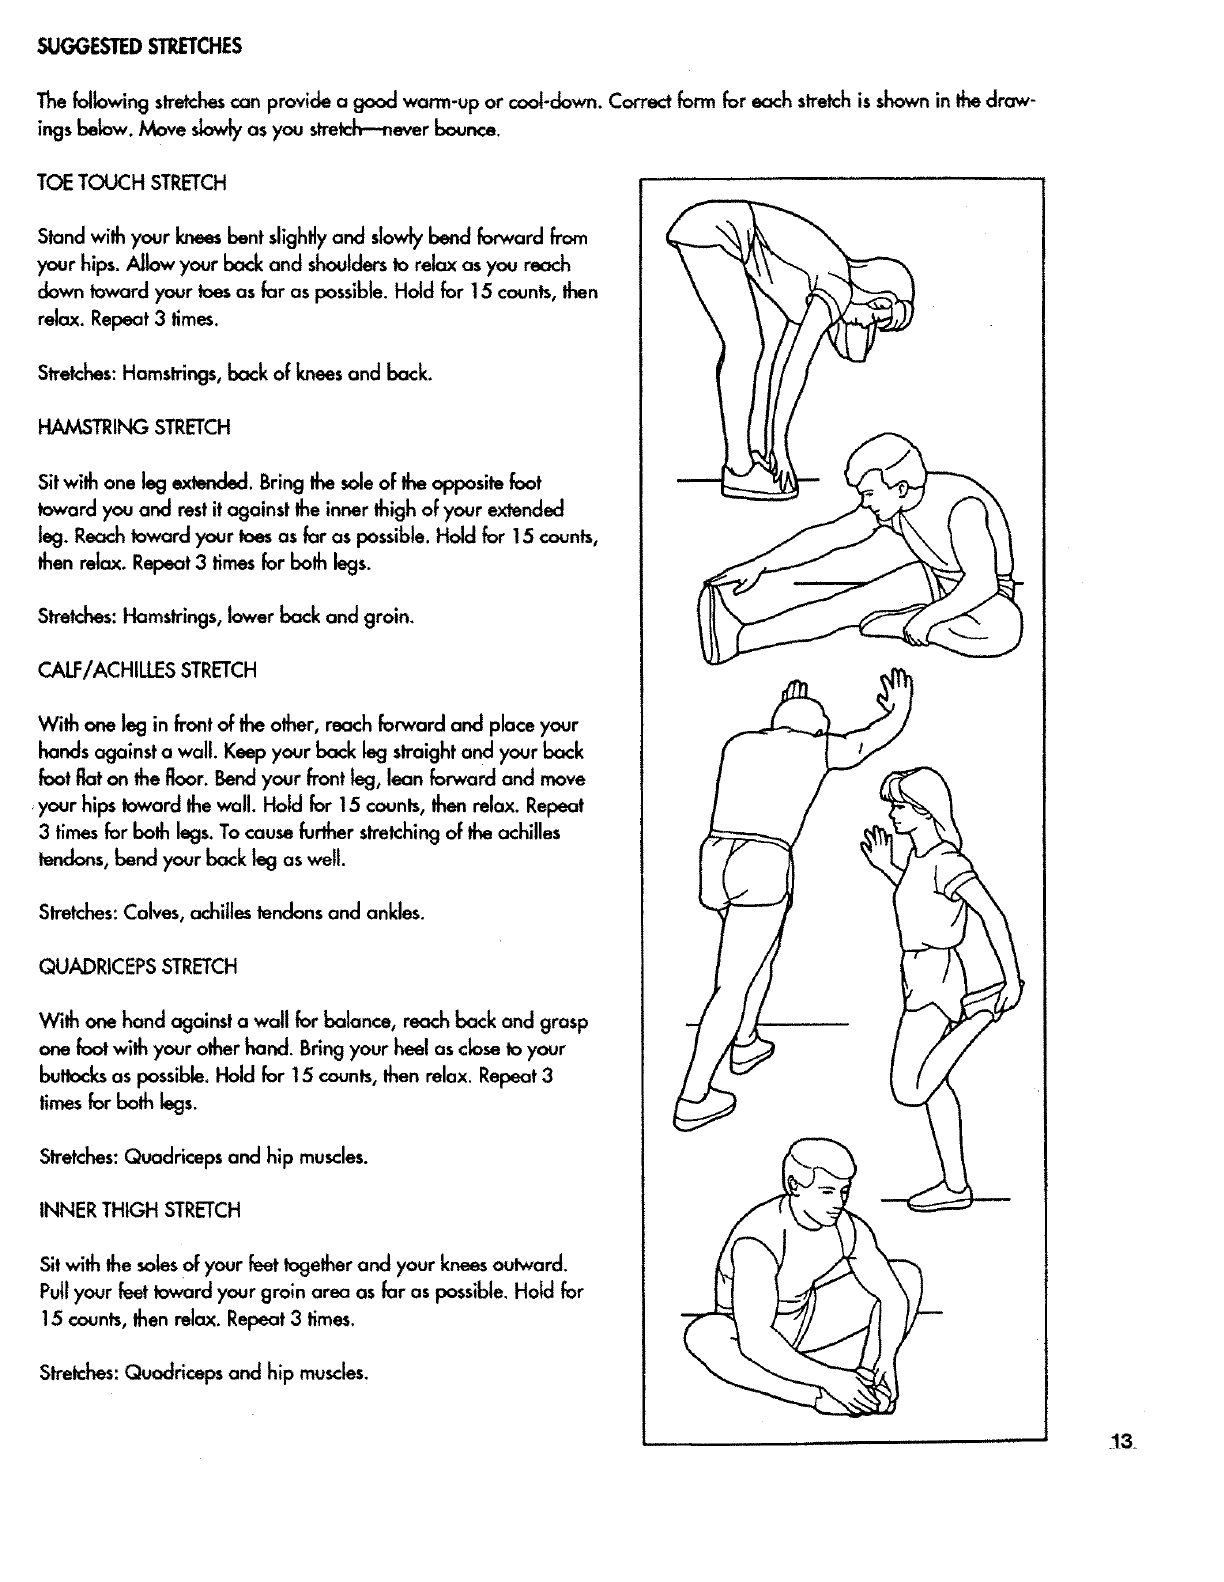
SUGGESTEDSTRETCHES
The following stretchescan provide a good warm-up or cool-down. Correct form for each stretchis shown in the draw-
ings bebw. Move slowlyas you stretch--never bounce.
TOE TOUCH STRETCH
Stand with your knees bent slighllyand slowly bend forward from
your hips. Allow your back and shouldersto relax as you reach
down toward your toes as for as possible. Hold for 15 counts, then
relax. Repeat 3 times.
Stretches: Hamstrings, back of kneesand back.
HAMSTRING STRETCH
Sitwith one leg extended. Bring the soleof the opposite foot
toward you and rest it against the innerthigh of your extended
leg. Reachtoward your Ioes as for as possible.Hold for 15 counts,
then relax. Repeat3timesfor bath legs.
Stretches: Hamstrings,lower back and groin.
CALF/ACHILLES STRETCH
With one leg in front of the other, reach forward and place your
hands against a wall. Keepyour back leg straightand your back
foot flat on the floor. Bendyour front bg, lean forward and move
your hips toward the wall. Hold for 15 counts,then relax. Repeat
3 times for both legs. To cause further stretchingof the achilles
tendons, bend your back leg as well.
Stretches: Calves, achillestendonsand ankles.
QUADRICEPS STRETCH
With one hand against a wall for balance, reach back and grasp
one foot with your other hand. Bringyour heel ascbse to your
buttocks as possible. Hold for 15 counts, then relax. Repeat 3
timesforbath_s.
Stretches:Quadriceps and hip muscles.
INNER THIGH STRETCH
Sit with the solesof your feettogetherand your kneesoutward.
Pullyour feettoward your groin area as for as possible.Hotd for
15 counts, then relax. Repeat 3times.
Stretches:Quadriceps and hip muscles.
J3_
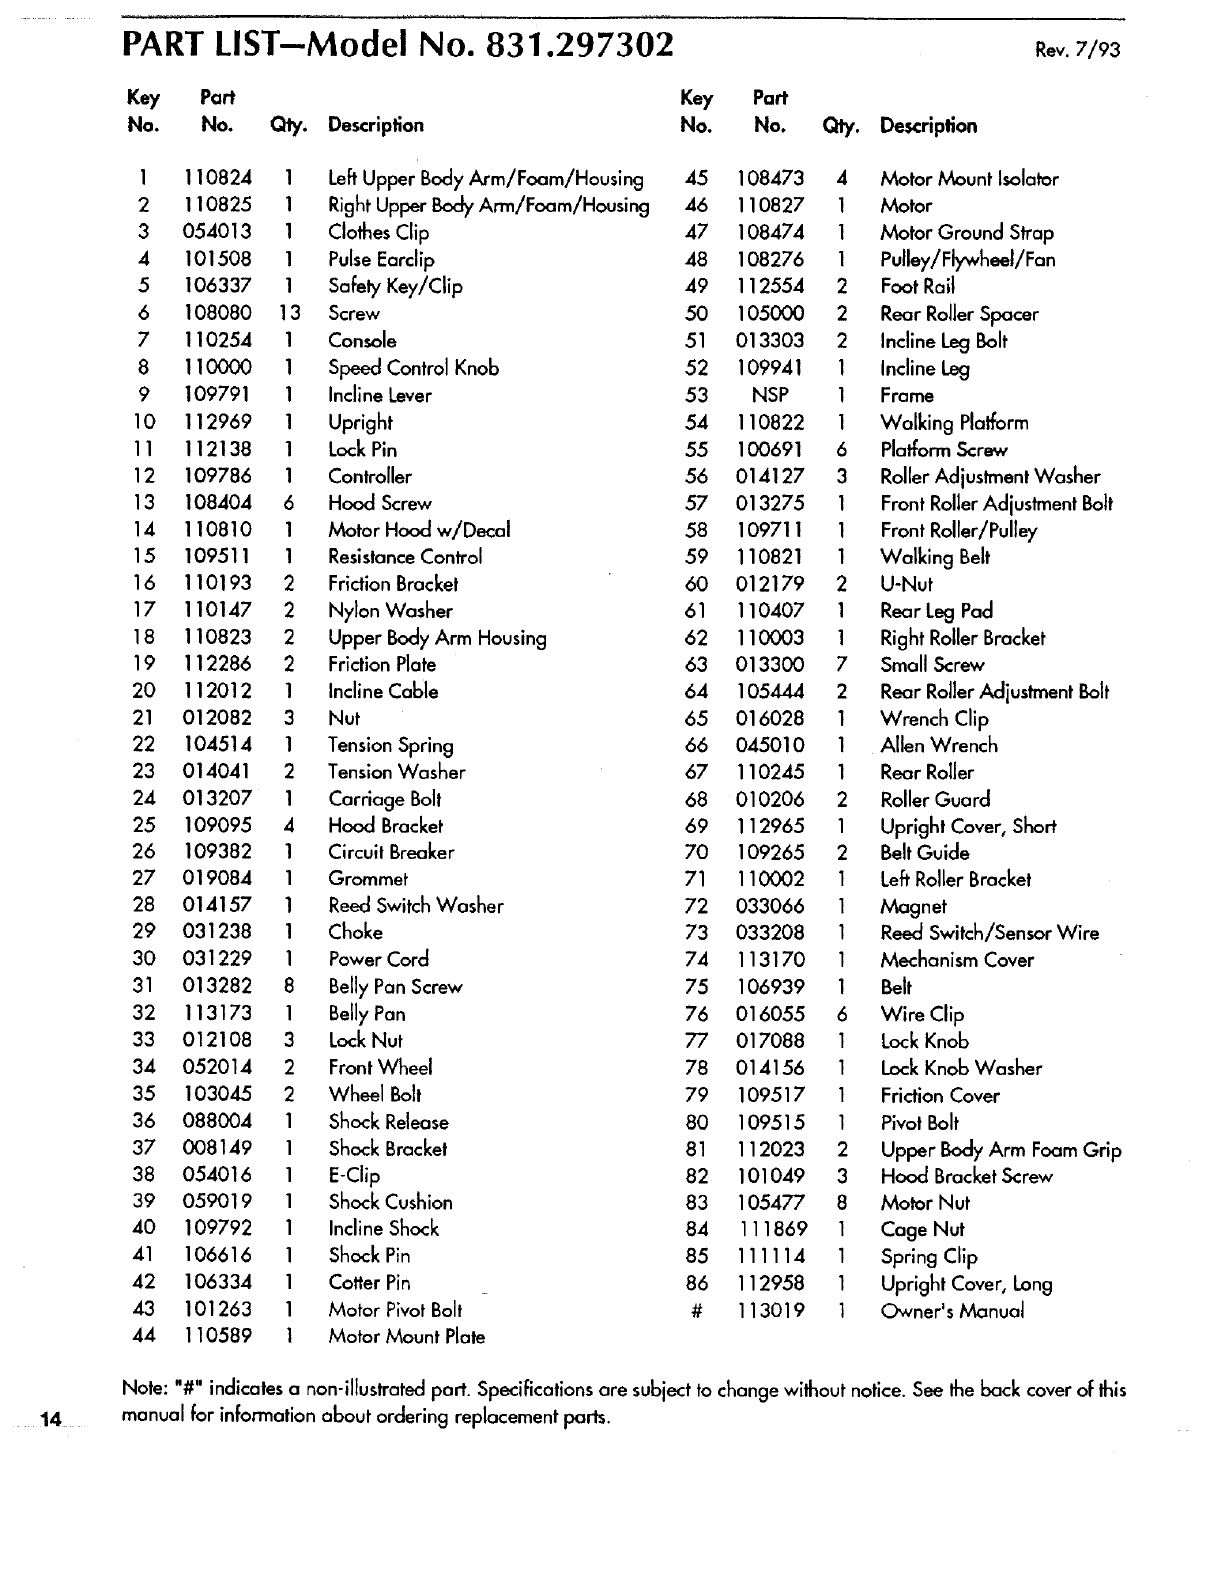
PART LIST--Model No. 831.297302 Rev.7/93
Key Part
No. No. Qty. Description
I110824
2 110825
3054013
4101508
5106337
6108080
7 110254
8 110000
9 109791
10 112969
11 112138
12 109786
13 108404
14 110810
15 109511
16 110193
17 110147
18 110823
19 112286
20 112012
21 012082
22 104514
23 014041
24 013207
25 109095
26 109382
27 019084
28 014157
29 031238
30 031229
31 013282
32 113173
33 012108
34 052014
35 103045
36 088004
37 008149
38 054016
39 059019
40 109792
41 106616
42 106334
43 101263
44 110589
6
I
I
2
2
2
2
I
3
I
2
I
4
I
I
I
I
I
8
I
3
2
2
Key
No.
Left Upper Body Arm/Foam/Housing 45
RightUpper Body Arm/Foam/Housing 46
Clothes Clip 47
Pulse Earclip 48
Safely Key/Clip 49
Screw 50
Console 51
Speed Control Knob 52
Incline Lever 53
Upright 54
Lock Pin 55
Controller 56
Hood Screw 57
Motor Hood w/Decal 58
Resistance Control 59
Friction Bracket 60
Nylon Washer 61
Upper Body Arm Housing 62
Friction Plate 63
Incline Cable 64
Nut 65
Tension Spring 66
Tension Washer 67
Carriage Bolt 68
Hood Bracket 69
Circuit Breaker 70
Grommet 71
Reed Switch Washer 72
Choke 73
Power Cord 74
Belly Pan Screw 75
Belly Pan 76
LockNut 77
Front Wheel 78
Wheel Bolt 79
Shock Release 80
Shock Bracket 81
E-Clip 82
Shock Cushion 83
Incline Shock 84
Shock Pin 85
Cotter Pin 86
Motor Pivot Bolt #
Motor Mount Plate
Part
No.
08473
10827
08474
08276
12554
O5OOO
013303
109941
NSP
110822
100691
014127
013275
109711
110821
012179
110407
110003
013300
105444
016028
045010
110245
010206
112965
109265
110002
033066
033208
113170
106939
016055
017088
014156
109517
109515
112023
101049
105477
111869
111114
112958
113019
Qty. Description
4 Motor Mount Isolator
1 Motor
1Motor Ground Strap
1 Pulley/Flywheel/Fan
2 Foot Rail
2 Rear Roller Spacer
2 Incline Leg Bolt
1 Incline Leg
1 Frame
1 Walking Platform
6 Platform Screw
3 Roller Adjustment Washer
1 Front Roller Adjustment Bolt
1 Front Roller/Pulley
1 Walking Belt
2 U-Nut
1 Rear Leg Pad
1 Right Roller Bracket
7 Small Screw
2 Rear Roller Adjustment Bolt
1 Wrench Clip
1 Allen Wrench
1 Rear Roller
2 Roller Guard
1 Upright Cover, Short
2 Belt Guide
1 Left Roller Bracket
1 Magnet
1 Reed Switch/Sensor Wire
1 Mechanism Cover
1 Belt
6 Wire Clip
1 Lock Knob
1 Lock Knob Washer
1 Friction Cover
1 Pivot Bolt
2 Upper Body Arm Foam Grip
3 Hood Bracket Screw
8 Motor Nut
1 Cage Nut
1 Spring Clip
1 Upright Cover, Long
1 Owner's Manual
Note: "#" indicatesa non-illustrated part. Specifications are subjectto change without notice. See the back cover of this
14 manual for informationabout ordering replacement parts.
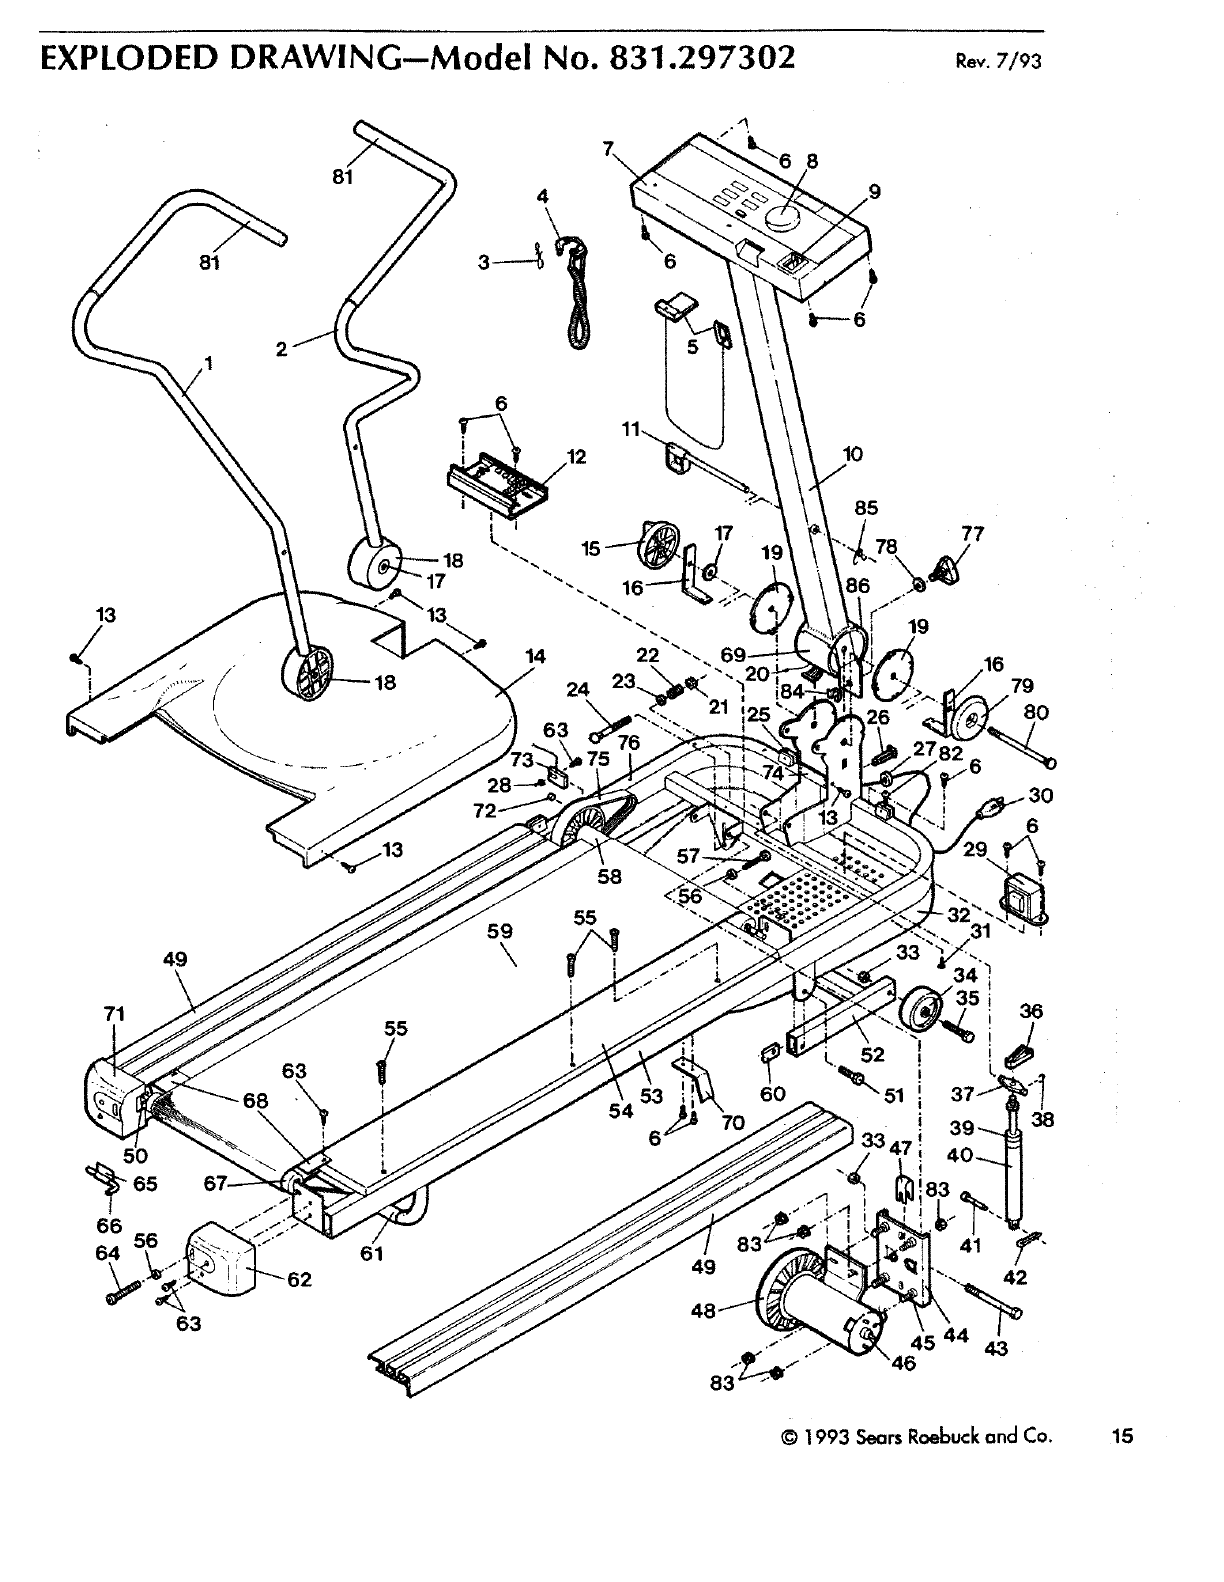
EXPLODED DRAWING--Model No. 831.297302 Rev7/93
81
13
i
49
71
14
\
61
55
63
58
55
59
17
60
10
85
77
19
16
46
79
80
6
36
38
42
43
©1993 Sears Roebuck and Co. 15
ORDERING REPLACEMENT PARTS
Each TREADMILLhas itsown MODEL NUMBER. Always mention the MODEL NUMBER when requesting serviceor
repair parts for your TREADMILL.
All parts listedmay be ordered through SEARS,ROEBUCK AND CO. SERVICECENTERSand most SEARS RETAIL
STORES.
If parts you need are not stocked locally, your order will be transmitted to a SEARS PARTSDISTRIBUTION CENTERfor
handling.
WHEN ORDERING REPAIRPARTS,ALWAYS GIVE THE FOLLOWING INFORMATION:
1. The MODEL NUMBER of the product (831.297302).
2. The NAME of the product. (PROFORM®CROSS WALK Dual Motion Cross Trainer)
3. The PARTNUMBER of the part(s), from page 14 of this manual.
4. The DESCRIPTION of the part(s), from page 14 of this manual.
Your SEARS merchandise has added value when you consider that SEARShas service units nationwide, staffed with
SEARS trained technicians specifically trained on SEARS products, having the parts, tools and equipment to ensure that
we meet our pledge to you:"We service what we sell."
SOLD BY SEARS,ROEBUCKAND CO., HOFFMAN ESTATES,IL60179
Part No. 113019 7/93 ....__'_':::"/
_:" Printed in USA ......
