Proview Electronics 998A COLOR MONITOR User Manual manual
Proview Electronics (Taiwan) Co Ltd COLOR MONITOR manual
Exhibit 7 The user manual of EUT

Proview 17”,19”,21” User’s Manual
Table of Content
IMPORTANT SAFEGUARDS … … … … … … … .. … … … … … … ..…I
1. Introduction …………………………………….. … … … … .. … … … 1
1.1 General information . … … … … … … … … ..… … … … … . … . … .1
1.2 Features … … … … … … … … … .. …………………………...1
2.Installation………………………... ……………………………... …..2
2.1 Package … … … … … … … … … … . … … … ..... ………………….. … 2
2.2 Precautions …………………………………………... … … ... …..3
2.3 Pedestal … … … .. … … … … . … … … … … .. … … … … … .. … … ... … 3
3.Connection to the computer … … … … … .. … … … … … . … … … … ....4
3.1 Connecting the signal cable and the power cable … … … … … .. … 4
3.2 Connecting the microphone and speaker cable(optional) … … . … 4
4.Front control location and functions … … … … … … . … … … … … … 5
4.1 Operation …………………………………….. … … … ...… … .. … 5
4.2 Adjusting and programming … … … … … … … … . … … . … … . … ..6
4.3 Built-in microphone(optional) … … … … … … . … … … … … ..… 9
4.4 Self test pattern … … … … … … . … … … … … … … … … … . … ...9
4.5 Safety protection … … … … . … … … … … .. … … … … … … … … 9
4.6 Timing guide …………………………………….. ………..… … 9
4.7 Power management … … … . … … … … . … … … .. … … .. … … … … 10
4.8 Plug and play …………………….. …... … … … … … … … … … 10
5. Technical information … … .. … … … … … … .. … … … … … .. …. … … 11
5.1 Products specifications … … … … … … . … … … … … … ... … … ..11
5.2 Signal connector pin assignment … … … … … . … … . … … ... … … 13
6.Troubleshooting … … … … … .. ……………….………………….. …14
F.C.C. STATEMENT … … … … . … … … … … . … … … … … … … .. …15
IMPORTANT SAFEGUARDS
Warnings:
1. Read all of these instructions. Save these instructions for later use, Please
2. Follow all warning and instructions marked on the product.
3. Unplug this monitor from the wall outlet before cleaning. Do not use liquid cleaners
or aerosol cleaners. Use a damp cloth for cleaning.
4. Do not use attachments not recommended by the monitor manufacturer as they may
cause hazards.
5. Do not use this monitor near water. For example near a bathtub, washbowl, kitchen
sink, or laundry tub, in a wet basement, or near a swimming pool, etc...
6. Do not place this monitor on an unstable cart, stand, or table. The monitor may fall,
causing serious injury to a child or adult, and serious damage to the appliance. Use
only with a cart or stand recommended by the manufacturer or sold with monitor.
Wall or shelf mounting should follow the manufacturer's instructions, and should
use a mounting kit approved by the manufacturer.
7. Slots and openings in the cabinet and the back or bottom are provided for ventilation,
and to insure reliable operation of the television receiver and to protect it from
overheating, these openings must not be blocked or covered. The openings should
never be blocked by placing the monitor on a bed, sofa, rug, or other similar surface.
This monitor should never be placed near or over a radiator or heat register. This
monitor should not be placed in built-in installation such as a bookcase unless
proper ventilation is provided.
8. This monitor should be operated only from the type of power source indicated on the
marking label. If you are not sure of the type of power supplied in your home,
consult your monitor dealer or local power company.
9. This monitor is equipped with a three-wire grounding type plug, a plug having a
third (grounding) pin. This plug will only fit into a grounding-type power outlet.
This is a safety feature. If you are unable to insert the plug into the outlet. contact
your electrician to replace your obsolete outlet. Do not defeat the safety purpose of
the grounding-type plug.
10.Do not allow anything to rest on the power cord. Do not locate this monitor where
the cord will be abused by persons working on it.
I
Important safeguards
11. For added protection for this monitor, when it is left unattended and unused for long
periods of time, unplug it from the wall outlet. This will prevent damage to the
monitor due to power-line surges.
12. Do not overload wall outlets and extension cords as this can result into fire or
electric shock.
13. Never push objects of any kind into this monitor through cabinet slots as they may
touch dangerous voltage points or short out parts that could result in a fire or
electric shock. Never spill liquid of any kind on the monitor.
14. Do not attempt to service this monitor yourself since opening or removing covers
may expose you to dangerous voltage or other hazards. Refer all servicing to
qualified service personnel.
15. Unplug this monitor from the wall outlet and refer servicing to qualified service
personnel under the following conditions:
a. When the power cord or plug is damaged or frayed.
b. If liquid has been spilled into the monitor.
c. If the monitor has been exposed to rain or water.
d. If the monitor does not operate normally by following the operating
instructions. Adjust only those controls that are covered by the operating
instructions as improper adjustment of other controls, may result in
damage and will often require extensive work by a qualified technician
to restore the monitor to normal operation.
e. If the monitor has been dropped or the cabinet has been damaged.
f. When the monitor exhibits a distinct change in performance this
indicated a need for service.
16. When replacement parts are required, be sure the service technician has used
replacement parts specified by the manufacturer that have the same characteristics
as the original parts. Unauthorized substitutions may result in fire, electric shock,
or other hazards.
17. Upon completion of any service or repairs to this monitor, ask the service technician
to perform routine safety checks to determine that the monitor is in safe operating
condition.
18. The socket outlet shall be near the equipment and shall be easily accessible.
19. The power supply cord is used as the main disconnect device.
1. Introduction
1.1. General Information
Thank you for your patronage. This Auto Scan color monitor display sharp images of
text and graphics with an optimum for resolution up to 1280x1024 pixels non-
interlaced by maximum 85Hz refresh rate. The maximum display resolution are from
1600x1200 pixels to 1920x1440 pixels non-interlaced mode.
The monitor automatically scans horizontal frequencies from:
30-95KHz 50-150Hz (17”, 19”Series)
30-115KHz 50-150Hz (21”Series)
You may use this color monitor with a computer which utilizes IBM VGA, XGA and
all VESA non-interlaced SVGA and EVGA resolutions in the above mentioned
frequencies ranges. The wide range included IBM PC, PC/XT, PC/AT, PS/2. 386, 486,
586, Pentium or other compatible systems.
1.2 Features
•
Anti-Glare, Anti-Static and Anti-reflection, high contrast screen coating eliminate
any bad effects caused by the screen surface such as reflection of the room lights
and dust attraction.
•
With Color Adjustment function you can easily choose different preset color
temperatures or set your own customized color parameters.
•
Image Tilt Adjustment function provides correction of rotated image. This
correction can minimize the distortions caused by outside environments, such as
earth magnetic field.
•
Green Design including automatic power saving function (NUTEK) and low
emission compliance shows our commitment in environmental care.
•
DDC1/DDC2B allows communication between the monitor and PC system for
optional video configuration.
•
Moire Cancellation function serves to eliminate the diffraction.
•
Universal power supply.
•
TCO 99 compliant (optional).
•
Side-mount Provision for optional speakers.
•
Built-in microphone to optimize speakerphone functionality. (optional)
Page 1
Introduction
Important safeguards
II
2. Installation
NOTE: Before installing this monitor, please refer to the user's guides of your
computer and video adapter to make sure if these equipments require
any change of setting.
2.1. Package
After unpacking the shipping carton, check if you have received the following
items:
● Your monitor. ● USB software (Only for USB model)
● This user's manual. ● USB cable (Only for USB model)
● Power cord.
If any of these item are missing, please contact your dealer for technical support
and customer service.
NOTE: Be sure to save original box and all packing material for future
transport of the monitor.
2.2 Precautions – when using this monitor
NOTE: when positioning this equipment ensure that the mains plug and socket
is easily accessible.
• To avoid eyes fatigue, do not use the color monitor in bright background
sunlight or other light sources shine directly on the screen.
• Do not place the monitor near a heat source.
• Set up in a good ventilated environment, and ensure that the ventilation
openings of the monitor are not covered. The heat from the monitor can
dissipate properly.
• Keep the monitor away from high capacity transformer, electric motor and
other strong magnetic field.
• The monitor should not be used in damp, dusty or dirty area.
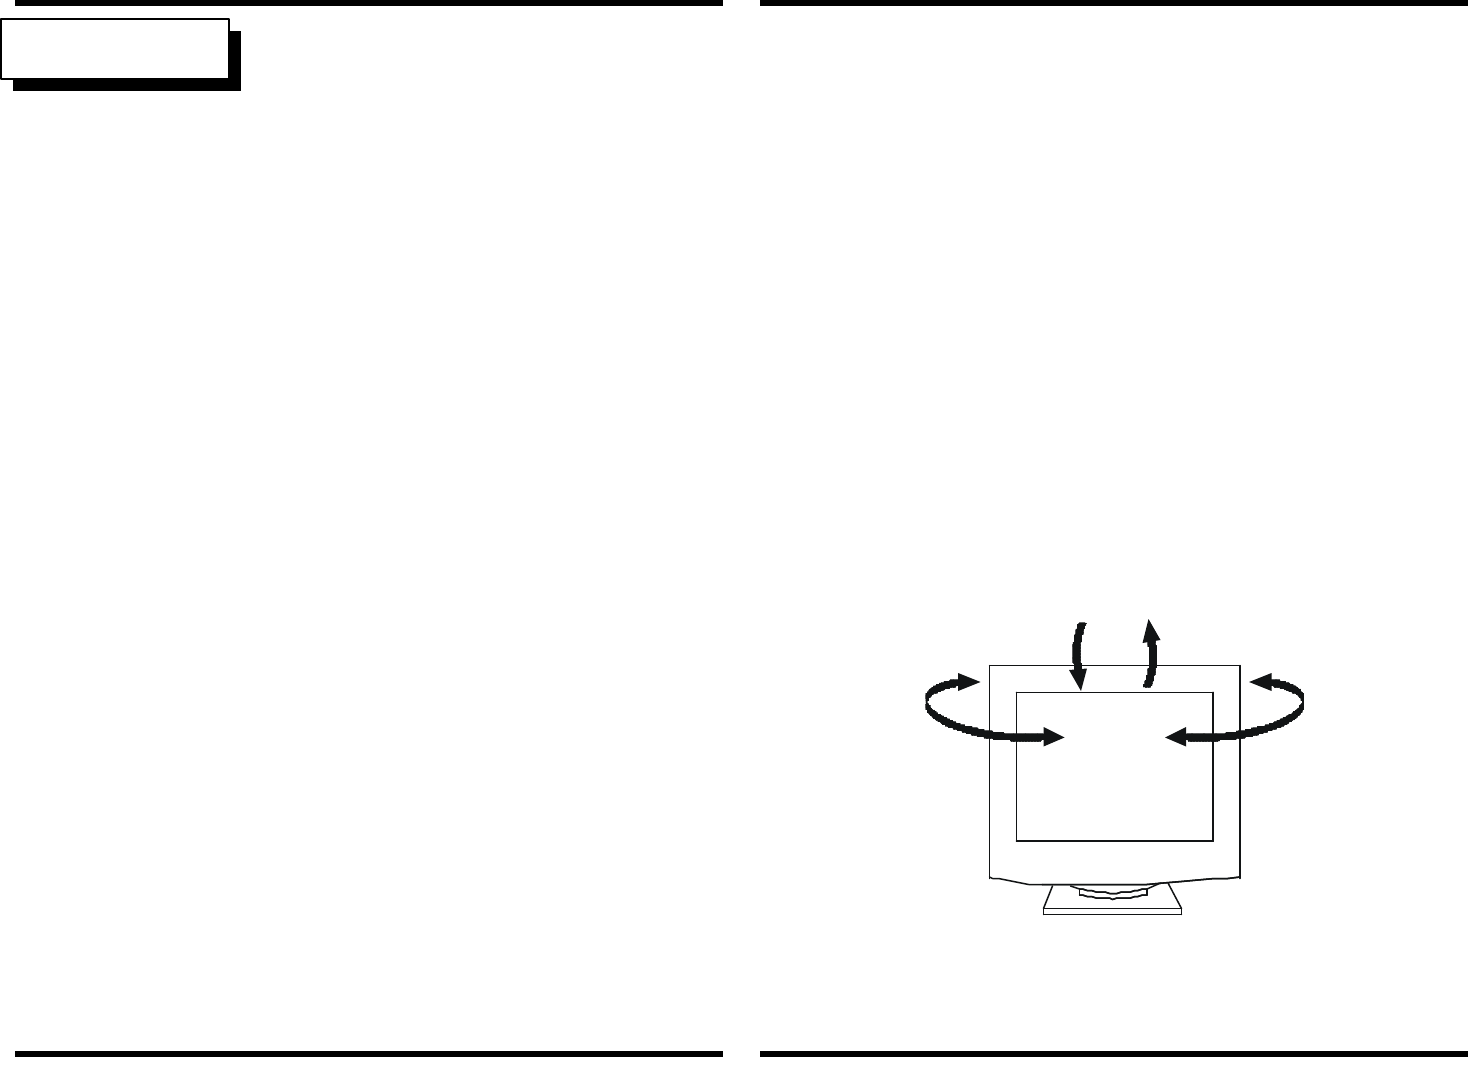
2.3. Pedestal
The pedestal enables you to place the monitor into a convenient position with best
viewing comfort by tilting and/or turning the monitor.
Page 3
Installation
Installation
Page 2
3. Connection to the computer
3.1 Connecting the signal cable and the power cable
Follow the steps below to connect these cable
a. Plug the 15-pin monitor signal cable into the video signal connector located at the
rear of the system, and lock the two screws to ensure firm grounding.
b. This monitor is equipped with a universal power supply (100-240V). Please plug
power cord into the power supply of PC or into the well outlet of the power. A three-
wire cord is provided as a safety precaution to ensure proper electrical grounding.
3.2 Connecting the microphone and speaker cable (optional)
a. Connect one end of the microphone cable to the connector on the back of the
Monitor and the other end to the sound card of computer.
b. Connect two of the speaker cable to each side of speakers connector of monitor and
the third speaker cable to the sound card of computer.
c. DC15V output: (On the back of the monitor or right side of the monitor) The DC
15V/250mA output provides power only for multimedia speaker. To connect the DC
15V output from monitor to speaker sets.
NOTE: How to attach and connect the optional speakers to your monitor. Please refer
to the user’s manual of speaker.
4. Front control locations and functions
4.1 Operation
Power ON/OFF Switch
This button is used to turn the monitor on and off.
Power (DPMS) indicator
This indicator lights up green when the monitor operates normally. If the monitor
is in DPMS (Energy saving) mode (stand-by/suspend/Power off), this indicator
color changes to orange.
Using the volume and Volume muting (Optional function)
1. When turn the knob clockwise to increase or counter clockwise to decrease the
volume up and down. (only for one key model)
2. Volume mute: This control turns the speakers and headphone terminal sound
ON or OFF.
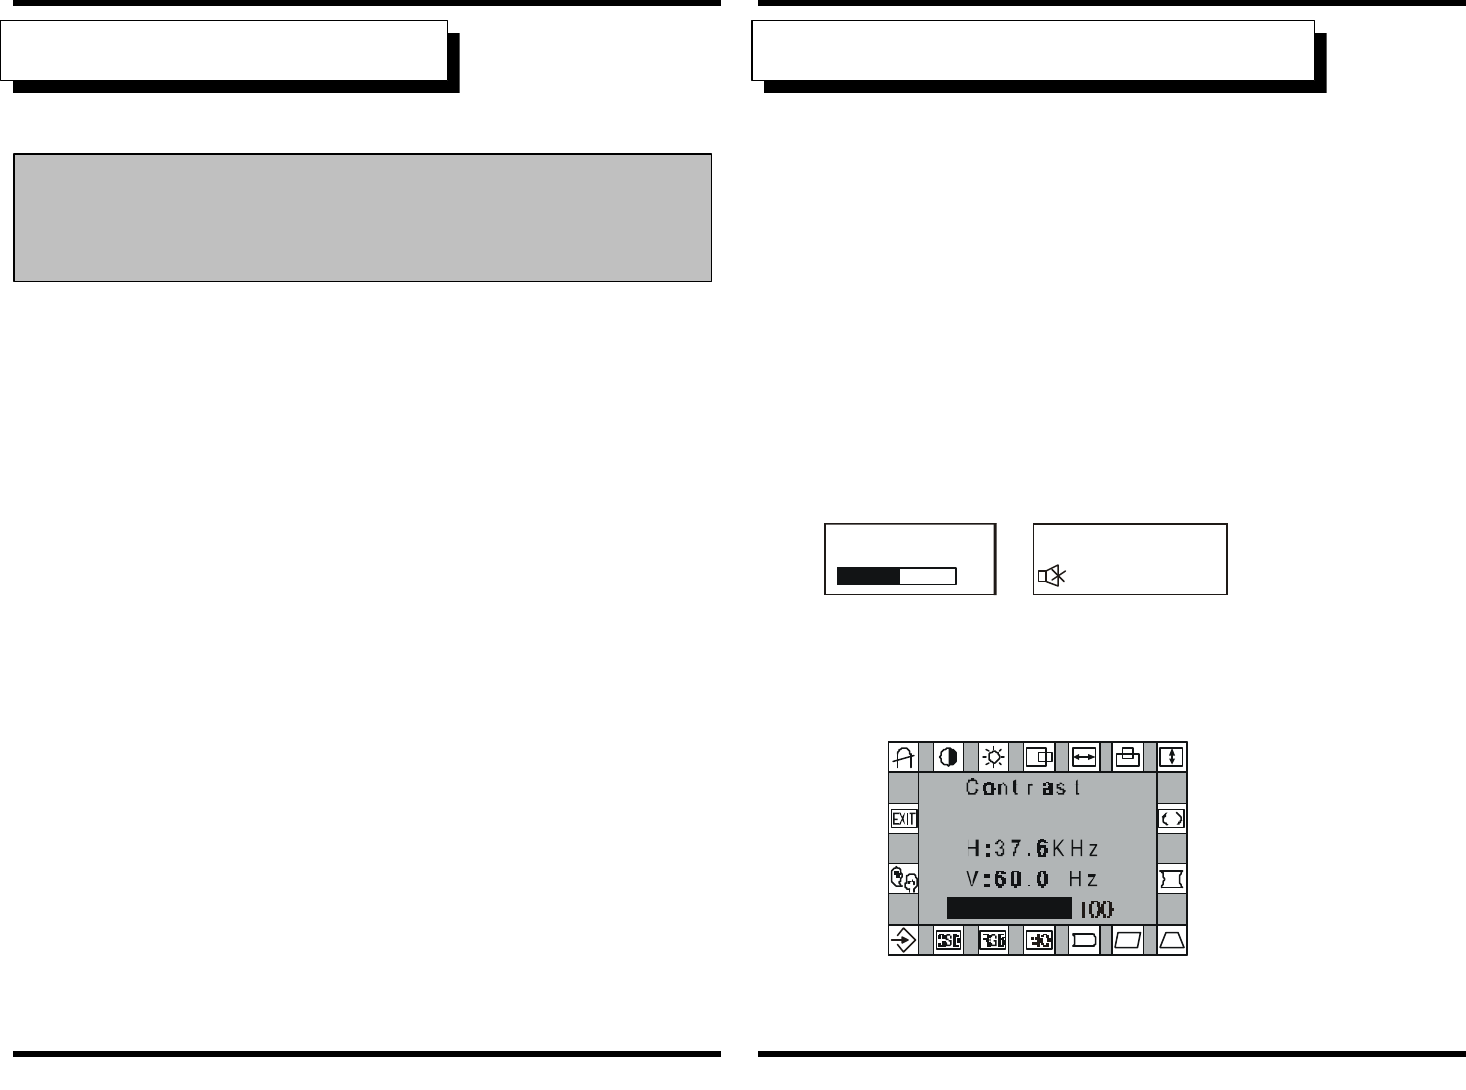
To adjust visual settings
Please following the procedure of selection and adjusting an item using the
OSD system as below steps for main functions adjustment.
Page 5Front control locations and functions
Connection to the computerPage 4
WARNING
: Please be sure the AC power to your computer is" OFF "
before connecting or disconnecting any display peripheral, Failure to do so
may cause serious personal injury as well as permanent damage to your
computer equipments.
VOLUME
50 VOLUME MUTE
1. One key model
Step 1: Press and release the OSD control knob to activate the OSD menu.
Step 2: Turn the knob to highlight the desired option of OSD icon.
Step 3: Press and release the knob again to access the option. The color of the
inner area of the OSD will changed from blue to green.
Step 4: To make your adjustments, turn the knob clockwise to increase or
Counterclockwise to decrease the setting.
Step 5: Press and release the knob again to store the changed, the color of
The inner area will go back to blue. You can select other function
To make adjustments by the knob. Also you can select EXIT icon
And press the knob the exit the OSD menu.
2. Four key model
Step 1: Press and release any digital control key to activate the OSD menu.
Step 2: Press “+” or “-“ key to highlight the desired option of OSD icon.
Step 3: Press and release “ MENU” key to access the option. The color of
The inner area of the OSD will changed from blue to green.
Step 4: To make your adjustments, press ”+” key to increase or “-“ key to
decrease the setting.
Step 5: Press and release “MENU” key to store the changed, the color of
The inner area will go back to blue. You can select other function
To make adjustments by “+” and “-“ key. Also you can select
EXIT icon or press Exit key to exit the OSD menu.
4.2 Adjust and Programming
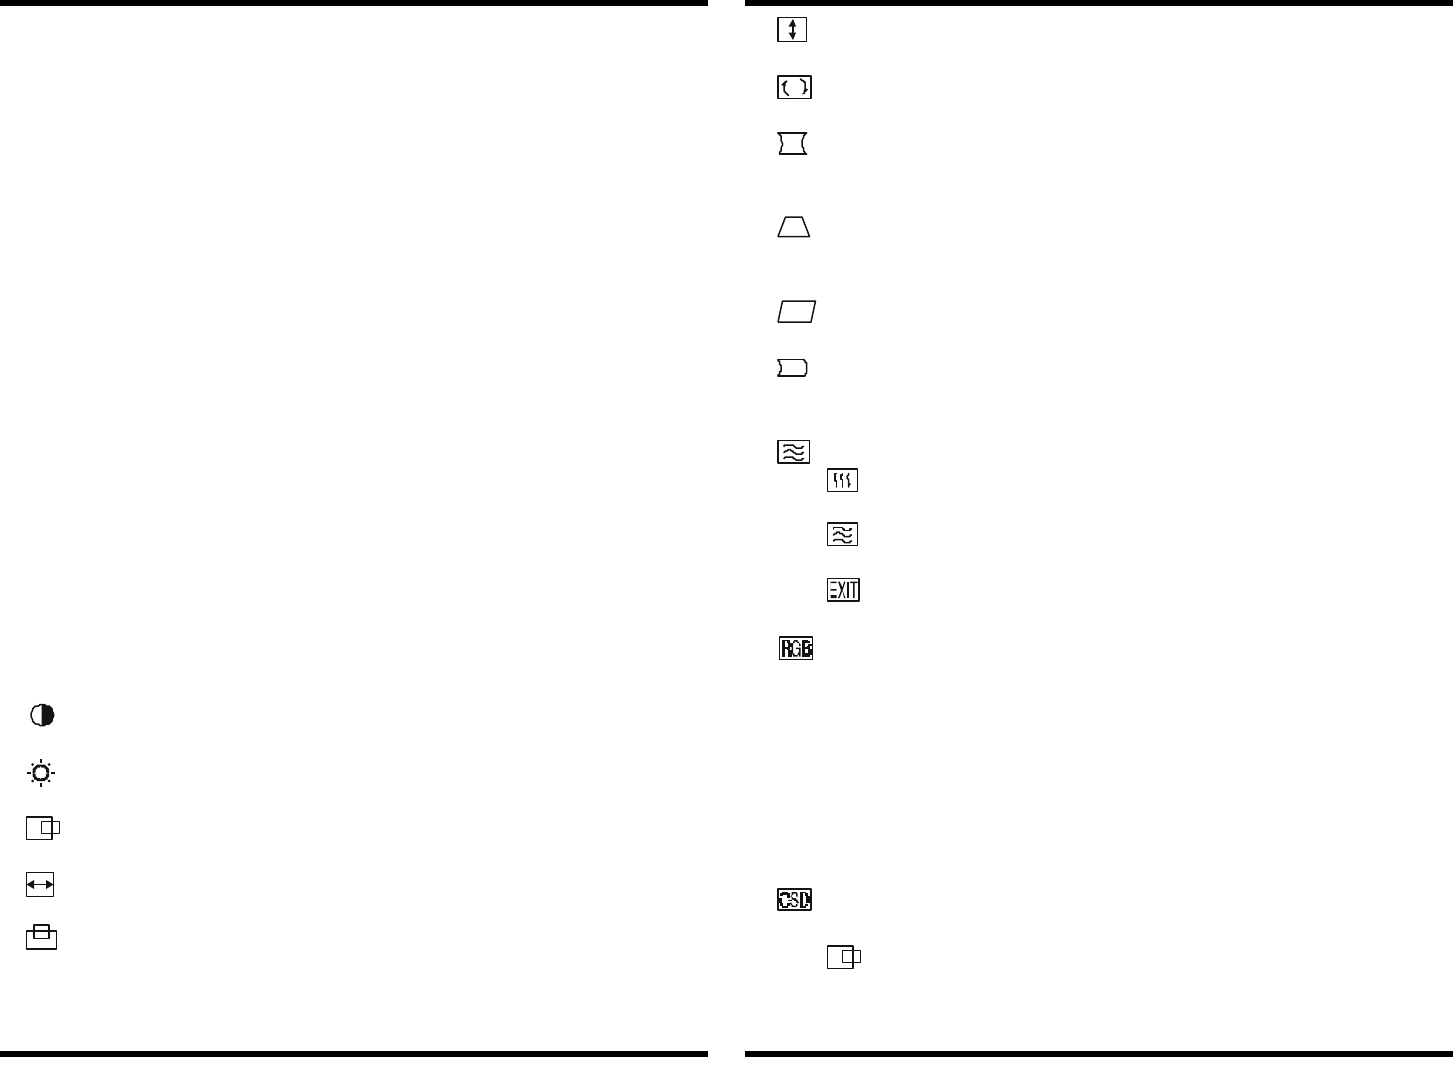
CONTRAST:
Adjusts the image brightness in relation to the background.
BRIGHTNESS:
Adjusts the overall image and background screen brightness.
H. POSITION:
To moves the picture image horizontally left or right.
H. SIZE:
To increases or decrease the horizontal size of the image.
V. POSITION:
To moves the picture image vertically left or right.
V. SIZE:
To increases or decrease the vertical size of the image.
ROTATION:
Rotates the entire display clockwise or counter clockwise.
PINCUSHION:
To increases or decreases the curvature of the sides either inward
or outward.
TRAPEZOID:
To increases or decreases the bottom of the screen to be the same
as the top.
PARALLELOGRAM:
To increase or decreases the tilt of the side either to the left or right.
PIN. BALANCE:
To increase or decreases the curvature of the side either to the left
or right.
MO ADVANCE OPTIONS:
V. MOIRE:
To increase or decrease the vertical moire of the image.
H. MOIRE:
To increase or decrease the horizontal moire of the image.
EXIT:
Exit to the main menu.
COLOR SELECT:
This control adjusts the color temperature of the screen image.
9300°K, 6500°K and 5500°K are preset by factory. You can not to adjustment.
9300
°
K: Which is bluer and brighter.
6500
°
K: Which is redder and closer to paper white.
5500
°
K: Which is slight yellower.
USER:
You can adjusts the individual color gun intensity by yourself. Increase
Or decrease red, green or blue depending upon which is selected.
OSD ADJUSTMENT:
You can choose where you would like OSD image to appear on your screen.
H. POSITION:
Moves the OSD image horizontally left or right.
Page 7
Front control locations and functions
Front control locations and functions
Page 6
V. POSITION:
Moves the OSD image vertically up or down.
TIME (SEC.):
You can select how long the monitor waits after the last adjust o
The knob to shut off the OSD menu. The time setting choices are
From 8 to 127 seconds.
RESET:
Resets the currently highlighted control to the factory setting. You must
Be using factory preset video mode to use this function.
LANGUAGE:
Activates the LANGUAGE submenu. Allow you to choose the language
for the menu screens.
EXIT:
Exits the OSD controls. (Turning off the OSD windows)
DEGAUSS:
Eliminates the build-up of stray magnetic fields which alter the correct
Scan of the electron beams and affect the purity of the screen colors,
Focus and convergence. When pressed, your image will jump and waver
A bit as the screen is demagnetized.
4.3 Built-in microphone (optional)
Built-in microphone to optimize speakerphone functionality. When used with
multimedia computers.
4.4 Self test pattern
The monitor may display a blue, green and red test pattern. This is to indicate that
the monitor is functioning properly, but the computer’s video signal is not
reaching the monitor. In this case, please make sure the video cable is properly
connected. The test pattern will disappear when the monitor is able to receive the
video signal. However, if the test pattern does not display all three colors (blue,
green and red), the monitor is not functioning properly. Please contact your local
dealer for assistance.
4.5 Safety protection
The safety protection function is protect of the monitor itself. When frequency of
video signal from computer’s was out of range, (please refer to monitor”
specifications”) The monitor will protect by itself and a warning message of OSD
will appear on the screen, warning you to resetting monitor type on your computer.
4.6 Timing guide
This multi-scanning monitor can automatically detect and display several video
modes. This monitor offers 14 to 16 factory preset modes that cover most of the
common video modes supported by popular graphics adapters. If the monitor
recognizes one of preset timing signals, it will recall that mode and any stored
display adjustments you have made.
Mode Resolution
(dots x lins)
Horizontal
Freq. (KHz)
Vertical
Freq. (Hz) Remark
IBM/VGA 720 × 400 31.47 70 Non-interlaced
IBM/VGA 640 × 480 31.47 60 Non-interlaced
VESA/75 640 × 480 37.50 75 Non-interlaced
VESA/60 800 × 600 37.88 60 Non-interlaced
VESA/SVGA 800 × 600 48.08 72 Non-interlaced
VESA/75 800 × 600 46.88 75 Non-interlaced
IBM/XGA 1024 × 768 48.39 60 Non-interlaced
VESA/85 800 × 600 53.67 85 Non-interlaced
VESA/70 1024 × 768 56.47 70 Non-interlaced
VESA/75 1024 × 768 60.02 75 Non-interlaced
VESA/60 1280 × 1024 63.98 60 Non-interlaced
VESA/85 1024 × 768 68.67 85 Non-interlaced
VESA/60 1600 × 1200 75.00 60 Non-interlaced
VESA/75 1280 × 1024 79.98 75 Non-interlaced
VESA/75 1600 × 1200 93.75 75 Non-interlaced
VESA/85 1600 × 1200 106.25 85 Non-interlaced
VESA/75 1920 ×1440 112.50 75 Non-interlaced
Page 9
Front control locations and functions
Front control locations and functions
Page 8
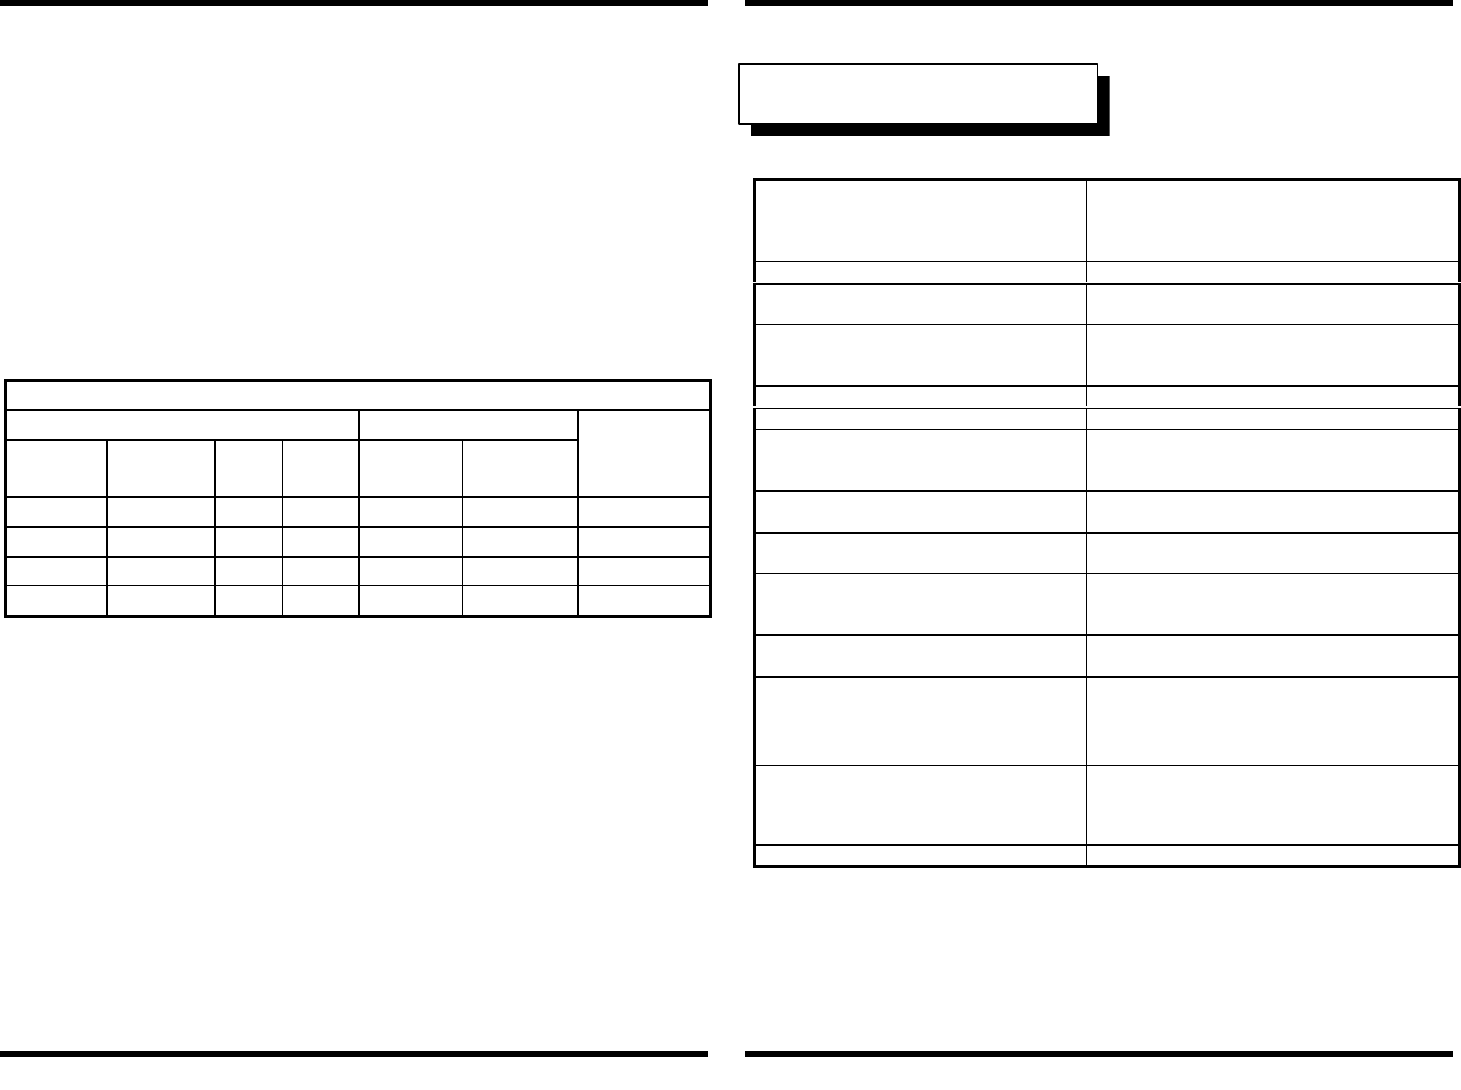
New mode
The monitor reserved for 5 new modes in case non-standard video modes
are used. If the input signal is different from our factory-preset modes, the
new timing data will automatically be stored. However, the displayed
parameters may need to be adjusted and can’t be RESET.
4.7 Power management
This monitor meets VESA DPMS (Display power management signaling)
Standards, and complies with both the EPA’S energy star requirements and
Europe’s TCO NUTEK’S power management. The following is the description of
the power indicator for the power saving modes.
Power Management Definition
VESA DPMS POWER SAVING STATES
MODE VIDEO H-SYNC V-SYNC POWER USED POWER
SAVING(%)
POWER
INDICATOR
ON ACTIVE YES YES NORMAL 0% GREEN
STAND-BY BLANKED NO YES <15 watts 86% ORANGE
SUSPEND BLANKED YES NO <15 watts 86% ORANGE
OFF BLANKED NO NO <5 watts 93% ORANGE
NOTE: 1.This monitor is Energy Star compliant when used
with a computer equipped with DPMS.
2.The monitor automatically goes through the power management
Step when it is idle. To release the monitor from the power saving
Condition, press any key on the keyboard or mouse.
4.8 Plug and Play
This monitor features the VESA DDC (Display Data Channel) standard which,
when used with a DDC compatible video card, will simplify the monitor’s set up.
With VESA DDC1/2B, when the monitor is powered up, it will automatically
notify a windows 95/98 host computer of its scanning frequencies, capabilities and
characteristics. Windows 95/98 will automatically recognize the connection of the
monitor and select the appropriate display resolution.
5. Technical information
5.1 Products specifications
Picture tube
Size:
Dot pitch:
Surface/transmission:
17-inch (43.18cm) diagonal
0.25mm
Tinted screen glass non-glare, black matrix
Maximum viewable area 15.70 (39.88cm) diagonal
Display size(factory setting) 310mm(H)x235mm(V)(Adjustable)
12.20 inch(H)x9.25 inch(V)( Adjustable)
Synchronization range
Horizontal frequency:
Vertical frequency: 30-95KHz
50-150Hz
Max. Resolution 1600x1200
Max. Video Bandwidth 150MHz
Power supply (universal)
Input Voltage:
Consumption: AC100-240V/50-60Hz
110 watts maximum
Input signal Video : Analog 0.7Vp-p/75 Ohms
Sync : Separate sync. TTL level
Display Analog Input Unlimited Number of colors
(depends upon video card)
Weight
Net :
Gross : 16.5kg (36.3Lb)
19.0kg (41.8Lb)
Unit dimension (L x W x H) 420 x 410 x 410 (mm)
16.54 x 16.14 x 16.14 (inch)
Operating condition
Temperature:
Humidity: 0°C-40°C (32°F to 104°F)
20%-80%
Storage condition
Temperature:
Humidity: -20°~55°C (-4°F al 131°F)
10%~90%
DDC1/DDC2B VESA standard
NOTE:All technical specifications are subject to change without notice.
Page 11
Technical information
Front control locations and functions
Page 10
19-inch (48.26 cm) diagonal
0.25 mm
Tinted screen glass non-glare, black matrix
21-inch (53.34 cm) diagonal
0.25 mm
Tinted screen glass non-glare, black matrix
17.90-inch (45.47 cm) diagonal 19.7-inch (50.04 cm) diagonal
360 mm(Al) x 270 mm (V) (Adjustable)
14.17 inch x10.63 inch (V) (Adjustable)
400 mm(Al) x300 mm (V) (Adjustable)
15.75 inch(Al) x 11.81 inch (V) (Adjustable)
30-95 KHz
50-150 Hz
30-115 KHz
50-150 Hz
1600 x 1200 1600 x 1200
150 MHz 150 MHz
AC 100 240V/50-60 Hz
130 watts maximum (998 Series)
AC 100 240V/50-60 Hz
150 watts maximum
Video : Analog 0.7Vp-p/75 Ohms
Sync. : Separate sync. TTL level
Video : Analog 0.7Vp-p/75 Ohms
Sync. : Separate sync. TTL level
Unlimited Number of colors
(depends upon video card)
Unlimited Number of colors
(depends upon video card)
19.6 kg (43.1 Lb)
23.0 kg (50.6 Lb)
23.0 kg (50.6 Lb)
28.0 kg(61.6 Lb)
455 x 446 x 452 (mm)
17.91 x 17.56 x 17.80 (inch)
480 x 496 x 491 (mm)
18.90 x 19.53 x 19.33 (Inch)
0°C-40°C (32°F to 104°F)
20%~80%
0°C-40°C (32°F to 104°F)
20%~80%
-20°C~55°C (-4°F to 131°F)
10%~90%
-20°C~60°C (-4°F to 131°F)
10%~90%
VESA standard VESA standard
NOTE: All technical specifications are subject to change without notice.
5.2 Signal connector pin assignment
Pin Assignment
1Red Video
2Green Video
3Blue Video
4Ground
5Ground
6Red Ground
7Green Ground
8Blue Ground
9No connection
10 Ground
11 Ground
12 SDA (For DDC)
13 H. Sync.
14 V. Sync.
15 SCL (For DDC)
Page 13
Technical information
Technical information
Page 12

6. Troubleshooting
If your monitor is not performing properly, use the following
Troubleshooting for quick solutions to common problems, If the problem
Persists, call the dealer. Where you purchased the monitor.
No Picture:
Please check these items
l Power cord and signal cable are securely connected.
l Monitor in power save mode?
l Adjust the brightness and contrast controls.
Display image is too large or small:
l Use the function keys to adjust the image.
Picture is scrolling or unstable:
l Signal cable should be completely attached to the computer.
l Check the signal cable pin assignments incorrect?
Color is abnormal:
l Magnetic object nearby?
l Signal cable pin assignments incorrect?
l Signal cable properly connected?
The built – in microphone does not operate:
l Please connect the microphone cable correctly.
l Speak distance is too far. Speak into the microphone is a normal voice from a
distance of 30-50 cm (12”-20”)
Image is not correctly shaped:
l A now video mode is selected
l User control has not yet been adjusted. Use the function keys to adjust
image.
FEDERAL COMMUNICATIONS
COMMISSION(F.C.C)STATEMENT
This equipment has been tested and found to comply with the limits of a Class
B digital device. Pursuant to Part 15 of the FCC Rules. These limits are
designed to provide reasonable protection against harmful interference in a
residential installation. This equipment generates, uses and can radiate radio
frequency energy and, if not installed and used in accordance with the
instructions, may cause harmful interference to radio communications.
However, there is no guarantee that interference will not occur in a particular
installation. If this equipment does cause harmful interference to radio or
television reception, which can be determined by turning the equipment off and
on, the user is encouraged to try to correct the interference by one or more of
the following measures:
1. Reorient/Relocate the receiving antenna.
2. Increase the separation between the equipment and receiver.
3. Connect the equipment into an outlet on a circuit different from that to which
the receiver is connected.
4. Consult the dealer or an experienced radio/TV technician for help.
CAUTION: Changes or modifications not expressly approved by the
manufacturer responsible for compliance could void the user's
authority to operate the equipment.
NOTE: The use of a non-shielded interface cable with this equipment is
prohibited.
Page 15FCC STATEMENTTroubleshooting informationPage 14