Proxim Wireless S58-GX1 Unlicensed DTS User Manual Lynx
Proxim Wireless Corporation Unlicensed DTS Lynx
Contents
Manual Part 1

Part Number 64352v1r2
Lynx.GX
Installation and Management
Models 4T, 4E-BNC, 4E, 8T, 8E, 16T

Lynx.GX Installation and Management
First Edition, January 2004
Copyright and Service Marks
Copyright © 2004 by Proxim Corp. All rights reserved. No part of this book may be reproduced without prior
written permission from Proxim Corp.
The information contained in this book is subject to change without notice. Proxim shall not be liable for errors
contained herein or for incidental or consequential damages in connection with the furnishing, performance, or
use of this book or equipment supplied with this book. Proxim makes no warranty of any kind with regard to this
book or any equipment supplied with this book, including, but not limited to, the implied warranties of
merchantability and fitness for a particular purpose.
Tsunami™ and Tsunami.GX are trademarks of Proxim Corporation.
Lynx™ and Lynx.GX™ are trademarks of Proxim Corporation.
OpenView® is a registered trademark of Hewlett Packard Corporation.
Windows® is a registered trademark of Microsoft Corporation.
Other names are trademarks of their respective owners.
Y2K (Year 2000 Issue): All software supplied by and for Proxim products adhere to the 4-digit year
nomenclature as required for Year 2000 compliance.
Regulatory Notice
This equipment has been tested and found to comply with the limits for a Class A digital device, pursuant to part
15 of the FCC Rules. These limits are designed to provide reasonable protection against harmful interference
when the equipment is operated in a commercial environment. This equipment generates, uses, and can radiate
radio frequency energy and, if not installed and used in accordance with the instruction manual, may cause
harmful interference to radio communications. Operation of this equipment in a residential area is likely to cause
harmful interference in which case the user will be required to correct the interference at his own expense.
Shielded cables and I/O cords must be used for this equipment to comply wit the relevant FCC regulations.
Changes or modifications not expressly approved in writing by Proxim may void the user’s authority to operate
this equipment.
This device complies with Part 15 of FCC rules and RSS-210 of Industry Canada. Operation is subject to the
following two conditions: (1) this device may not cause interference, and (2) this device must accept any
interference, including interference that may cause undesired operation of the device.
WARNING!
This device must be professionally installed. Instructions for setting the transmitter RF output power are
referenced in “Adjust Output Power” on page 27. This device is to be used exclusively for fixed point-
to-point operation that employs directional antennas. Be sure to read “Product Safety Instructions”
above before installing this product.
Notices 2

Lynx.GX Installation and Management
Product Safety Instructions
This product must be installed, used, and maintained by experienced telecommunications personnel only.
When installed, this equipment is to be connected to a lightning/surge protection device that meets all applicable
national safety requirements.
WARNING!
To avoid injury, risk of fire, and damage, do not connect this product directly to an antenna. Ensure that
proper lightning isolation also is provided between this unit and other equipment.
Equipment is to be used and powered by the type of power source indicated on the marking label only.
Lynx.GX radios are intended to be connected to a ± 24 VDC or ± 48 VDC power source, which must be
electrically isolated from any AC sources and reliably earthed.
Only a DC power source that complies with the Safety Extra Low Voltage (SELV) requirements in the Standard
for the Safety of Information Technology Equipment, including Electrical Business Equipment, CAN/CSA C22.2,
No. 950-95 * UL 1950, Third Edition, can be used with this product.
A 5-Amp circuit breaker or fuse is required at the DC power source. If using the Proxim optional power supply
(P/N 201-31075-1), use a 15-Amp circuit breaker or fuse on the AC input. In addition, an easily an easily
accessible disconnect device should be incorporated into the facility wiring.
Always use copper conductors only for all power connections.
Do not connect or disconnect the power cable to the equipment when the other end of the cable is connected to
the DC power supply.
WARNING! This product must be serviced by trained personnel only.
Do not:
▪ Disassemble this product. Opening or removing any covers voids the warranty for this product.
Furthermore, by opening or removing any covers, you could expose yourself to hazardous energy parts.
Incorrect reassembly of this product can cause a malfunction or electrical shock when the unit subsequently
is used.
▪ Insert any objects of any shape or size inside this product while powered. Objects could contact hazardous
energy parts, resulting in a risk of fire or personal injury.
▪ Spill any liquids of any kind on or inside this product.
▪ Cover or block any of the openings (to protect this product from overheating). Side and top cover openings
on the IDU are provided for ventilation.
Always ensure the following:
▪ That sufficient space is provided surrounding this product.
This product can be installed in a standard 19-inch rack. Check the size and clearance requirements for this
product and ensure that enough clearance is provided for installation. Consideration should be given to the
mechanical loading of the rack and the equipment to avoid potential hazards.
▪ If this product is to be powered from the same source as other units, ensure that the power supply circuit is
not overloaded.
▪ When installed in a rack, always ensure that proper air flow is provided for this product. Mount as shown in
this manual.
▪ If you are using a standard telephone (for orderwire function) not provided by Proxim with this product,
ensure that the telephone has a ringing equivalency specification of 1.0 Baud and is a UL-Listed (ITE)
device that has been evaluated to the Standard for the Safety of Information Technology Equipment,
including Electrical Business Equipment, CAN/CSA C22.2, No. 950-85 * UL 1950, Third Edition.
The maximum room ambient temperature for the IDU is 50° C. When installed in a closed or multi-unit rack,
consideration should be given to installing this equipment in an environment compatible with the maximum room
ambient temperature.
Equipment is suitable for mounting on concrete or other noncombustible surfaces only.
Notices 3

Lynx.GX Installation and Management
Contents
PRODUCT SAFETY INSTRUCTIONS ............................................................................................................. 3
CONTENTS....................................................................................................................................................... 4
Figures........................................................................................................................................................ 5
CHAPTER 1. INTRODUCTION ....................................................................................................................... 6
Intended Audience...................................................................................................................................... 6
Equipment Features ................................................................................................................................... 6
Planning for Installation .............................................................................................................................. 7
Troubleshooting Hints................................................................................................................................. 7
CHAPTER 2. INSTALLING THE IDU AND RFU ............................................................................................ 8
Step 1. Gather Required Tools.................................................................................................................. 8
Step 2. Unpack Shipping Box Contents .................................................................................................... 9
Step 3. Test Radios Back-to-Back........................................................................................................... 11
Step 4. Install the Radio Units ................................................................................................................. 14
Step 5. Install and Adjust the Antenna .................................................................................................... 18
Step 6. Establish Connections................................................................................................................. 22
Step 7. Adjust Output Power ................................................................................................................... 27
Step 8. Establish a Link Between the Radios.......................................................................................... 28
Step 9. Establish Near-End to Far-End Communications using Orderwire (optional) ............................ 31
CHAPTER 3. MANAGING THE LYNX.GX.................................................................................................... 32
Managing with the Web Interface ............................................................................................................. 33
Managing with SNMP ............................................................................................................................... 44
Managing with Telnet................................................................................................................................ 44
Maintaining the Radio............................................................................................................................... 45
APPENDIX A. INSTALLATION PLANNING................................................................................................. 46
Site Selection............................................................................................................................................ 46
Availability................................................................................................................................................. 47
Fade Margin.............................................................................................................................................. 47
Useful Path Calculations........................................................................................................................... 48
Equipment Co-Location ............................................................................................................................ 52
Planning for and Selecting IF Cable ......................................................................................................... 53
Planning for Antenna and RF Transmission Line Installation................................................................... 54
APPENDIX B. WEB INTERFACE WINDOWS AND FIELD DESCRIPTIONS ............................................. 56
Device Tab—Accessing Radio Information.............................................................................................. 56
Interface Configuration Tab—Modifying T1/E1 Interface Configurations................................................ 57
System Configuration Tab—Configuring Tx Power, Security Link ID, and Tx Channel Plan .................. 58
Status Tab—Viewing Current Status........................................................................................................ 59
Alarms Tab—Monitoring Link Status ........................................................................................................ 61
Log Tab—Viewing Status and Alarms...................................................................................................... 62
Contact Tab—Viewing Support Information ............................................................................................. 64
Administration Tab—Changing System Passwords, Date, and Time ...................................................... 64
APPENDIX C. LYNX.GX FRONT PANEL AND CONNECTIONS ................................................................ 69
Models ...................................................................................................................................................... 69
Basic Specifications.................................................................................................................................. 69
Channel Plans .......................................................................................................................................... 70
Lynx.GX Front Panel ................................................................................................................................ 71
Front Panel Common Connectors, Indicators and Controls..................................................................... 72
APPENDIX D. CONNECTORS AND PIN ASSIGNMENTS .......................................................................... 75
IDU Main Traffic T1/E1 Connectors.......................................................................................................... 75
IDU VF Port .............................................................................................................................................. 76
IDU Aux Data Port Connector (DCE port) ................................................................................................ 77
IDU NMS Port Connectors........................................................................................................................ 78
IDU Alarm Port Connector........................................................................................................................ 79
IDU Configuration Port Connector (DTE port).......................................................................................... 80
IDU Orderwire Port Connector ................................................................................................................. 81
Contents 4

Lynx.GX Installation and Management
IDU/RFU Cable Connector and Pin Assignment......................................................................................81
RSL and GND Connectors on IDU ........................................................................................................... 82
RFU/Antenna Connector and Pin Assignment ......................................................................................... 82
RFU RSL/Tone and Pin Assignment ........................................................................................................ 83
APPENDIX E. SPARES AND ACCESSORIES ............................................................................................84
APPENDIX F. LYNX.GX SPECIFICATIONS ................................................................................................ 85
Lynx.GX 4T/4E (5.8 GHz) Specifications ................................................................................................. 85
Lynx.GX 8T (ISM) Specifications.............................................................................................................. 86
Lynx.GX 8E (ISM) Specifications ............................................................................................................. 87
Lynx.GX 16T Specifications ..................................................................................................................... 88
Detailed Lynx.GX Specifications .............................................................................................................. 89
APPENDIX G. TROUBLESHOOTING .......................................................................................................... 93
Changing Frequency Plans ...................................................................................................................... 93
Counteracting and Evaluating Interference .............................................................................................. 93
Troubleshooting Alarms............................................................................................................................ 95
Troubleshooting the Web Interface Management Tool ............................................................................ 98
Repair Policy............................................................................................................................................. 99
TECHNICAL SUPPORT ...............................................................................................................................100
Enhanced Warranty Packages ...............................................................................................................100
WARRANTY .................................................................................................................................................101
ACRONYMS / GLOSSARY ..........................................................................................................................103
FIGURES
Figure 1. Back-to-Back Test Configuration .................................................................................................... 12
Figure 2. Link Testing..................................................................................................................................... 13
Figure 3. Loopback Mode .............................................................................................................................. 13
Figure 4. Daisy Chaining NMS Connections at a Hub Location ....................................................................34
Figure 5. Port Connector Layout for 16 T1 Ports ........................................................................................... 75
Figure 6. VF Plug Pin Assignments ............................................................................................................... 76
Figure 7. Aux Plug Pin Assignments.............................................................................................................. 77
Figure 8. NMS Plug Pin Assignment.............................................................................................................. 78
Figure 9. Alarm Plug Pin Assignment ............................................................................................................ 79
Figure 10. Configuration Plug Pin Assignments ............................................................................................ 80
Figure 11. Orderwire RJ-11 Modular Plug (typical termination).................................................................... 81
Figure 12. IDU/RFU Cable Connector ........................................................................................................... 81
Figure 13. RSL and GND Connectors on IDU ............................................................................................... 82
Figure 14. Antenna Type N Female Front Panel Connector .........................................................................82
Figure 15. Antenna Type N Male Connector ................................................................................................. 82
Figure 16. RSL/Tone BNC Female Panel Connector .................................................................................... 83
Figure 17. RSL/Tone BNC Male Connector to DVM or Headphone.............................................................. 83
Contents 5

Lynx.GX Installation and Management
Chapter 1. Introduction
Proxim Corporation introduces the GX platform of wireless T1 or E1 radio products—Lynx.GX. The split-box
design lets you install both units indoors, or one unit indoors (the IDU, or Indoor Unit) and one unit outdoors (the
RF Unit, or RFU).
The units can be mounted in a 19-inch or 23-inch rack; each unit is 1.75” high, occupying one rack unit (RU).
Two pieces fit in two RU spaces for indoor installation, or you can mount the RFU outdoors on a tower or pole.
The IDU and RFU are connected with a single coaxial cable that carries power, telemetry, TX IF and RX IF
signals; the antenna is connected to the RF unit with a coaxial cable. Outdoor placement of the RFU can
directly contribute to significant cost savings of cable and antennas, improved system availability, and enhanced
path performance.
A standardized and easy-to-use interface is provided, with a full network management system (NMS) for remote
equipment management.
INTENDED AUDIENCE
This book is designed for network engineers and field service personnel responsible for installing, maintaining,
and troubleshooting the Lynx.GX radios. It is assumed you have an understanding of networks in general and a
basic understanding of the following subjects:
▪ Microwave fundamentals
▪ Antenna systems
▪ Transmission line systems
▪ Electrical grounding
▪ Microwave test equipment
▪ T1, E1, DS-3
▪ Ethernet, Fast Ethernet
▪ IP networking
EQUIPMENT FEATURES
The following features apply to the Lynx.GX product series:
▪ Split-box design with IDU and RFU for addressing budget, maintenance, and performance requirements
▪ User-selectable frequency plans (for those models that support more than one frequency plan)
▪ Full-featured Fault and Configuration Management through Web browser, SNMP, Telnet, or serial
connection
▪ Advanced diagnostics (such as RSL time-strip charting and alarm logging) for troubleshooting the
equipment and the microwave path, including a spectrum analyzer to check remote transmitter function and
possible interference
▪ Auxiliary interfaces include a serial data port and orderwire connection (VF bridge)
▪ Link ID authentication algorithm to ensure highly secure link transmission.
Chapter 1. Introduction 6

Lynx.GX Installation and Management
PLANNING FOR INSTALLATION
There are several planning factors to be considered prior to installing the radio system. In addition to selecting
the installation site, you must:
Calculate:
º Required RSL and fade margin to achieve availability objectives
º Required path availability
º Anticipated Multi-Path Reflection Points
Determine:
º System Frequency Plan
º Required Antenna Size and Type
º Required Antenna Mounting Height to obtain proper Path Clearance
º Required Transmission Line Types and Lengths
Plan for:
º The unit’s continuous power consumption needs
º Antenna installation
º Lightning protection and system grounding
º Radio hardware mounting
º Cable installation including egress
º Pre-testing Radio Equipment (back-to-back test procedure)
For detailed information regarding these planning items, see “Installation Planning” on page 46.
TROUBLESHOOTING HINTS
▪ Most common problems are poor transmission line connector terminations.
º Best way to test is a return loss measurement (VSWR).
º Basic function can be tested using a continuity and short test with DMM.
º The transmission line can be evaluated with a network analyzer connected to both ends of cable
through the cable and comparing when spectrum analyzer is connected directly to the radio without the
cable.
º Transmission line loss can be evaluated with a back-to-back Receive Signal Level (RSL) test.
º “Tap and wiggle” testing of all terminations while monitoring RSL and alarms can expose poor
terminations.
▪ Could be a faulty antenna.
º Very hard to tell without swapping.
º VSWR test on antenna feed can identify antenna problems.
º “Tap” test can expose a faulty feed for moisture or connector problems.
▪ Could be a faulty radio.
º Back-to-back RSL testing normally exposes a faulty radio.
▪ Could be a path obstruction or multipath reflection
º Re-evaluate path clearance including Fresnel zone criteria.
º Driving or walking the path may be required to identify potential obstructions.
º Re-check path calculations for multipath reflection points along the paths
Chapter 1. Introduction 7

Lynx.GX Installation and Management
Chapter 2. Installing the IDU and RFU
The following sections describe how to install the GX radios.
▪ Step 1. Gather Required Tools (below)
▪ Step 2. Unpack the Remaining Contents of Shipping Box (on page 9)
▪ Step 3. Test the Radios Back-to-Back (on page 11)
▪ Step 4. Install the Radio Units (on page 14)
▪ Step 5. Install and Adjust the Antenna (on page 18)
▪ Step 6. Establish Connections (on page 22)
▪ Step 7. Adjust Output Power (on page 27)
▪ Step 8. Establish a Link Between the Radios (on page 28)
▪ Step 9. Establish near-end to far-end Communications Using Orderwire (optional) (on page 31)
STEP 1. GATHER REQUIRED TOOLS
The following sections list the tools required when installing the radios.
IDU Installation Tools (Indoor)
You must obtain the following tools before installing the IDU:
▪ Phillips (cross-tip) screwdrivers (for 19-inch rack-mounting and attachment of brackets)
▪ Small blade (1/8”) standard screwdriver (for power supply connector)
▪ Wire crimpers (if using any 8-pin modular 2-wire or 4-wire connectors that are not pre-made)
▪ Soldering iron (if using any D-type connector)
▪ Adjustable 6” wrench to attach the chassis ground wire (7/16” for RFU and ¼” for IDU)
No additional tools are required from the above list if the RFU is mounted indoors.
RF Unit Installation Tools (Outdoor)
You must obtain the following before installing the RF Unit outdoors:
▪ RFU outdoor mounting kit (NOT INCLUDED WITH SHIPMENT; order separately)
▪ Adjustable 6-inch wrench (for installing the mounting bolts)
▪ Large blade standard screwdriver (for pole mounting clamps)
▪ Additional weatherproofing material for sealing the IDU and antenna connectors. (Butyl tape supplied with
RFU mounting kit.)
Test and Configuration Tools
The following tools, which are necessary and useful to have available for testing and configuring the radios:
Digital Multi Meter.....................................................To measure RSL, DC power, and for antenna alignment
RF power meter........................................................To measure transmitter output power.
Cellular telephone or 2-way radio............................. For talking with far-end crew and tower crew.
Bit Error Rate test set ...............................................To test link after installation.
Computer* ............................................................... For NMS access.
Pair of touch-tone telephones 1.4 B or less REN ..... To test Orderwire circuits and for communication with far-end.
*with 10/100 Ethernet Network Interface Card, CAT5 cross-over cable, and Internet browser
Chapter 2. Installing the IDU and RFU 8
Lynx.GX Installation and Management
Additional tools may be needed for antenna and transmission line installation and antenna alignment as well as
the lightning arrestor mounting and grounding. Consult the antenna manufacturer documentation and review
“Installing and Adjusting the Antenna” on page 18.
STEP 2. UNPACK SHIPPING BOX CONTENTS
The boxes should be left intact and sheltered until arrival at the installation site.
If the shipping container shows signs of damage, notify the transportation company immediately. Upon receipt,
inspect contents to make sure no parts are missing or damaged.
You should retain all the packaging materials (including all internal boxes). In the unlikely event that you must
return the equipment to the factory, use the original packing materials for return shipment. The packaging
materials also are recommended for transporting the equipment from location to location.
Shipment Contents
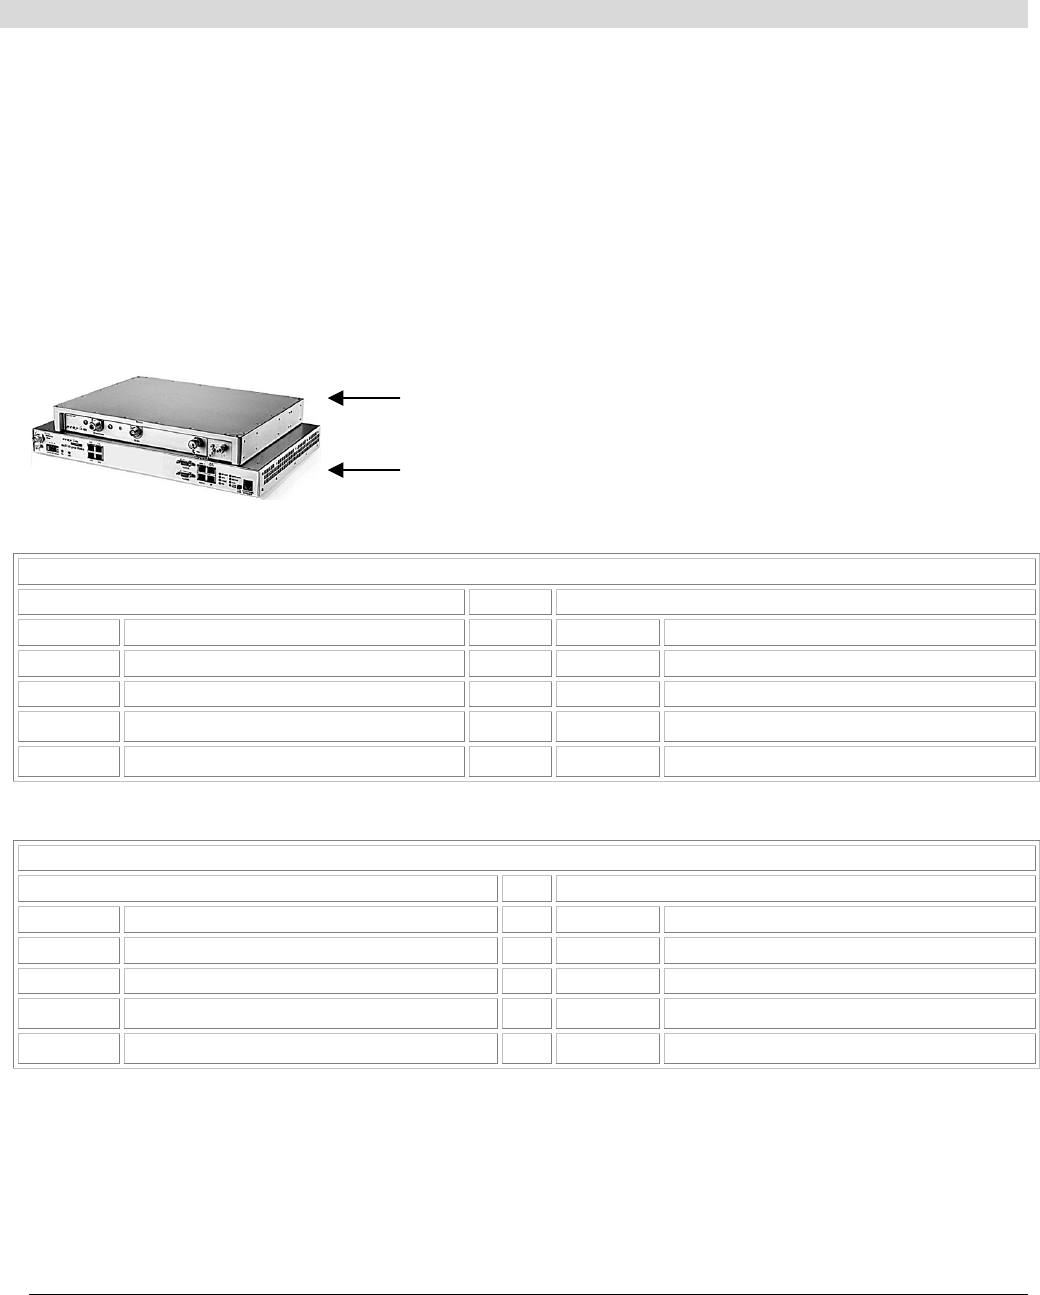
Each Lynx.GX shipment includes one GX Indoor Unit (IDU), one GX RF Unit (RFU), and an installation
accessory kit, as shown in the tables below.
RF Unit
Indoor Unit
Lynx.GX 4xT1
Lynx.GX 4T 5.8 GHz ISM System
Hi, Model 51850-10H0 (Item 62292) Low, Model 51850-10L0 (Item 62291)
Item # Description Item # Description
62290 Lynx.GX 4T1 Indoor Unit 62290 Lynx.GX 4T1 Indoor Unit
62138 Lynx.GX 5.8 GHz Hi RF Unit 62137 Lynx.GX 5.8 GHz Low RF Unit
67262 GX RFU Indoor Installation Kit 67262 GX RFU Indoor Installation Kit
67263 GX IDU Installation Kit 67263 GX IDU Installation Kit
Lynx.GX 4xE1 Balanced (RJ48C)
Lynx.GX 4E 5.8 GHz ISM System
Hi, Model 301-51850-20H0 (Item 62295) Low, Model 301-51850-20L0 (Item 62294)
Item # Description Item # Description
62293 Lynx.GX 4E Indoor Unit, Balanced, RJ48C 62293 Lynx.GX 4E Indoor Unit, Balanced, RJ48C
62138 Lynx.GX 5.8 GHz Hi RF Unit 62137 Lynx.GX 5.8 GHz Low RF Unit
67262 GX RFU Indoor Installation Kit 67262 GX RFU Indoor Installation Kit
67263 GX IDU Installation Kit 67263 GX IDU Installation Kit
Chapter 2. Installing the IDU and RFU 9

Lynx.GX Installation and Management
Lynx.GX 4xE1 Unbalanced (BNC)
Lynx.GX 4E 5.8 GHz ISM System
Hi, Model 301-51850-30H0 (Item #64751) Low, Model 301-51850-30L0 (Item #64749)
Item # Description Item # Description
64750 Lynx.GX 4E1 Indoor Unit, Unbal., BNC 64750 Lynx.GX 4E1 Indoor Unit, Unbal., BNC
62138 Lynx.GX 5.8 GHz Hi RF Unit 62137 Lynx.GX 5.8 GHz Low RF Unit
67262 GX RFU Indoor Installation Kit 67262 GX RFU Indoor Installation Kit
67263 GX IDU Installation Kit 67263 GX IDU Installation Kit
Lynx.GX 8xT1
Lynx.GX 8T1 5.8 GHz ISM System
Hi (Model 301-51145-10H0—Item #62142) Low (Model 301-51145-10L0—Item #62139)
Item # Description Item # Description
62135 Lynx.GX 8T Indoor Unit 62135 Lynx.GX 8T Indoor Unit
62138 Lynx.GX 5.8 GHz ISM, Hi RF Unit 62137 Lynx.GX 5.8 GHz Low RF Unit
67262 GX RFU Indoor Installation Kit 67262 GX RFU Indoor Installation Kit
67263 GX IDU Installation Kit 67263 GX IDU Installation Kit
Lynx.GX 8xE1 Balanced (RJ48C)
Lynx.GX 8E1 5.8 GHz ISM System
Hi (Model 301-51145-20H0—Item #62145) Low (Model 301-51145-20L0—Item #62144)
Item # Description Item # Description
62143 Lynx.GX 8E Indoor Unit, Balanced, RJ48C 62143 Lynx.GX 8E Indoor Unit, Balanced, RJ48C
62138 Lynx.GX 5.8 GHz Hi RF Unit 62137 Lynx.GX 5.8 GHz Low RF Unit
67262 GX RFU Indoor Installation Kit 67262 GX RFU Indoor Installation Kit
67263 GX IDU Installation Kit 67263 GX IDU Installation Kit
Lynx.GX 16xT1
Lynx.GX 16T1 5.8 GHz ISM System
Hi, (Model 301-52290-10H0, Item 62286) Low, (Model 301-52290-10L0, Item 62284)
Item # Description Item # Description
62285 Lynx.GX 16T1 Indoor Unit 62285 Lynx.GX 16T1 Indoor Unit
62138 Lynx.GX 5.8 GHz ISM, Hi RF Unit 62137 Lynx.GX 5.8 GHz ISM, Low RF Unit
67262 GX RFU Indoor Installation Kit 67262 GX RFU Indoor Installation Kit
67263 GX IDU Installation Kit 67263 GX IDU Installation Kit
Chapter 2. Installing the IDU and RFU 10

Lynx.GX Installation and Management
GX Installation Kits
Item Contents Qty.
GX RFU Installation Kit GX RFU Rack Mount Kit (see “Sub-Contents” below)(19” or 23”)
RFU Grounding Cable
1
1
GX IDU Installation Kit GX IDU Rack Mount Kit (see “Sub-Contents” below)(19” or 23”)
IDU Grounding Cable
IDU-to-RFU Interface Cable 12”
IDU DC Power Cord with CD 3-Pin Terminal Block
Custom Cable Kit RJ-45 (see “Sub-Contents” below)
Custom Cable Kit DB9 (see “Sub-Contents” below)
Rubber Table Mount Feet
1
1
1
1
1
1
4
Documentation and
Software CD-ROM
Release Notes, Installation and Maintenance Manual, Quick Install Guide, MIBs 1
GX Quick Install Guide printed 1
Sub-Contents
Item Contents Qty.
GX IDU Rack Mount Kit (19” or 23”) “L” IDU Rack Mount Brackets
2-inch Extender Brackets
GX Rack Mount Screw Pack (see below)
2
2
1
GX RFU Rack Mount Kit (19” or 23”) L” RFU Rack Mount Brackets
2-inch Extender Brackets
GX Rack Mount Screw Pack (see below)
2
2
1
GX Rack Mount Screw Pack Rack Mount Screws
Small Extender Bracket Screws
4
8
Custom Cable Kit RJ-45 RJ-45 Connectors 2
Custom Cable Kit DB9 Metal DB9 Connectors
DB9 Cable Sheaths
1
1
STEP 3. TEST RADIOS BACK-TO-BACK
Before installing the radios, Proxim recommends a back-to-back test of the radio pair. Back-to-back testing is a
simple way to verify that the radios are fully operational before they are installed. The process of installation
adds several variables that can lead to system turn-up delays during troubleshooting (such as antenna
alignment, cabling, and path dynamics). By pre-testing the radios, you reduce the chance of the radios being
the cause of system turn-up problems, and you can focus on other factors, such as the transmission line,
antenna alignment, and path clearance.
Note: Back-to-back testing must be performed to verify a radio problem before returning any radio to the
factory for repair.
Chapter 2. Installing the IDU and RFU 11
Lynx.GX Installation and Management
Required Equipment for Test
Back-to-back testing must be performed with both radios at the same location. The following test equipment is
required:
▪ DC power source capable of supplying approximately 200 Watts (total) to the radios (or two radio AC
adapters)
▪ One low-loss coaxial cable, N-to-N male
▪ One (or more) coaxial in-line fixed attenuators, 50 to 100 dB total attenuation
The following test equipment may also be useful for further testing of the radio:
▪ Bit Error Rate (BER) tester
▪ Variable RF attenuator (60 dB range or more, rated for the proper frequency, 5.8 GHz) or several fixed
attenuators totaling 100 dB.
▪ RF power meter
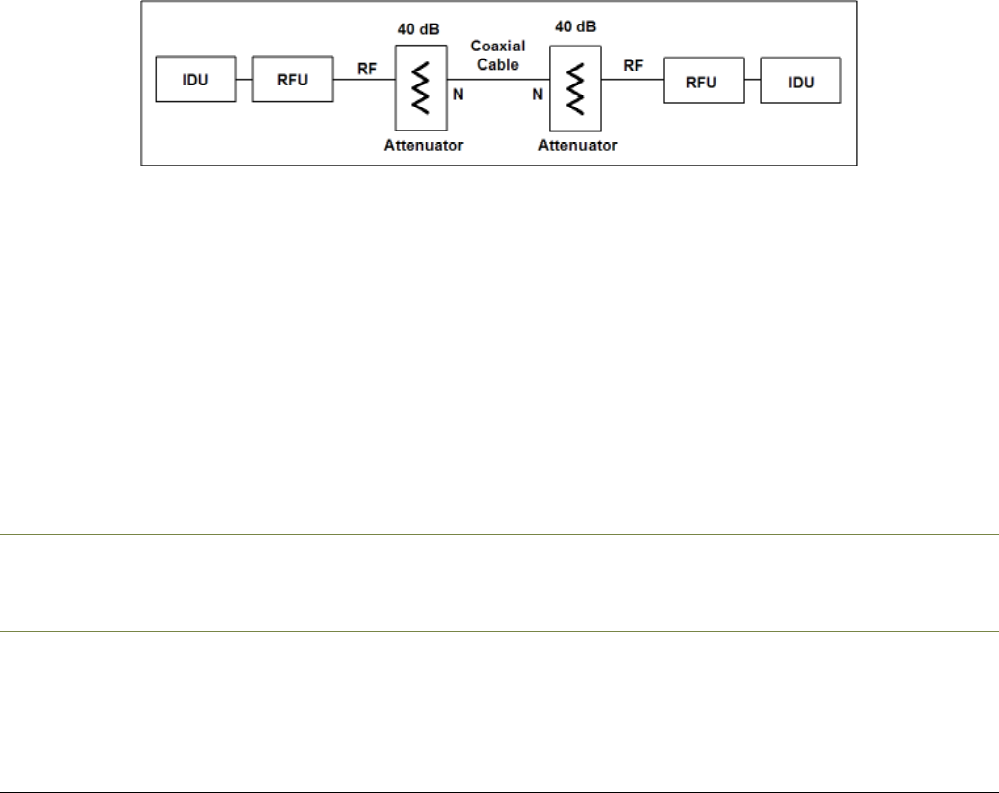
Back-to-Back Test Configuration
When the equipment is connected as shown in the following figure, both radios should have no alarm
conditions. (Data Input and AIS OUT are exceptions, if any of the T1/E1 channels are not connected.) If these
conditions have been met, it is likely that the radio is operating in accordance to specifications. If errors or
alarms occur during this test, verify alarm status. If alarms or errors are still present, one or both of the radio
terminals is likely to be faulty.
Figure 1. Back-to-Back Test Configuration
It can be helpful to insert a variable RF attenuator between the radios to fade down the path to determine that
the threshold specification is being met. You can run the threshold tests in both directions to isolate the radio
problem (if any). See “Link Testing” on page 13 for more information.
You can use an RF power meter to individually test each radio’s output power to test the transmitter functions.
You can also use the radio’s output transmitter attenuation to help precisely lower the link to threshold level after
inserting attenuation.
If the transmitter output power has been verified (by the mathematics of the back-to-back test or by a power
meter) and the threshold is not meeting specification, the side whose threshold is diminished is the likely radio at
fault. Swapping IDUs from one end to the other can help determine whether the problem is with the IDU or the
RF Unit.
WARNING!
The radios will be damaged if appropriate attenuation is not supplied between radios. You must provide
a minimum of 50 dB between the two radios. At 50 dB attenuation, output power can be left at maximum
output power.
Chapter 2. Installing the IDU and RFU 12
Lynx.GX Installation and Management
Link Testing
Link testing is the preferred way to evaluate a radio link's performance. It can be performed from end-to-end or
in link test mode (which tests both directions of the radio path). The following figure illustrates a typical test
configuration (which may include the radio’s path instead of in-line attenuators).
Figure 2. Link Testing
When performing testing, verify all configuration settings.
Note: If link testing indicates an unacceptable level of errors, see the instructions in “RF Link Alarms” on page
95.
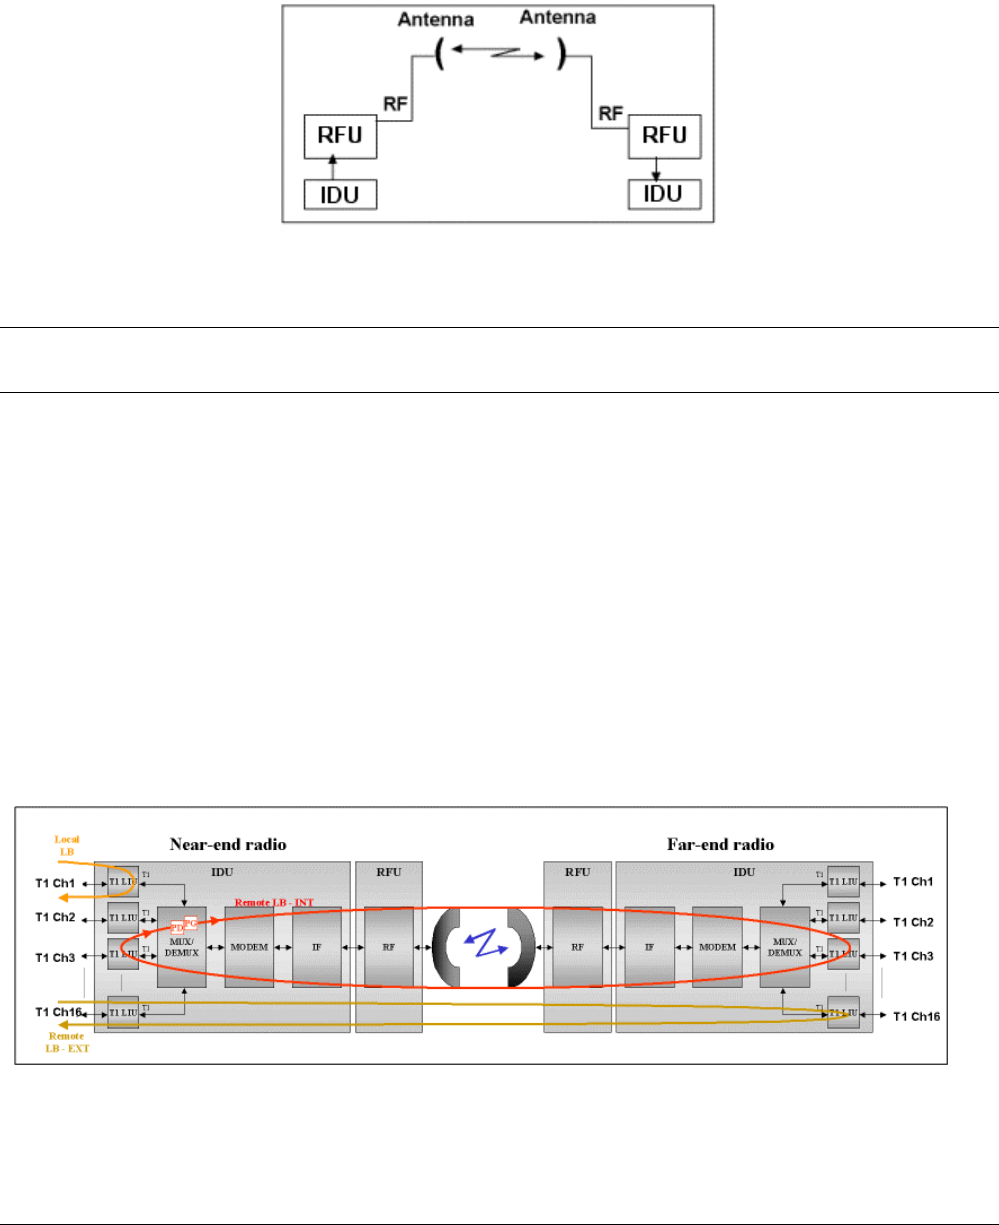
Several built-in loopback functions are implemented in the radio. They are:
Local LB
Local radio line interface is in loopback to the line connector (does not test the wireless link). This is useful
for external equipment or circuit testing, including an external BER tester.
Remote LB-int
The far end or remote radio is set to loopback data. The radio uses an internally generated signal and
external signals are ignored. This is useful for testing the entire radio link without using external test
equipment.
Remote LB-ext
Similar to Remote LB-int, but an external T1/E1 signal is required locally. This is useful for testing the entire
radio link and includes testing the physical connector to which the external test equipment is connected.
Running this test on every interface from both ends of the radio link would completely test every interface
connector and the complete radio link.
Figure 3. Loopback Mode
Chapter 2. Installing the IDU and RFU 13

Lynx.GX Installation and Management
Only one loopback can be enabled per link at a time; that is, only one channel can be tested at a time and
configuring a channel in loopback disables the current loopback. The front panel and Web interface loopback
LED on the near-end and far-end radios informs the operator that the radio is configured in loopback mode.
STEP 4. INSTALL THE RADIO UNITS
There are two primary ways to install the radio system.
IDU and RFU Indoor Mounting
Both units (the IDU and the RF Unit) are mounted indoors or in a suitable enclosure, stacked on top of one
another, in a rack.
IDU Indoor Mounting / RFU Outdoor Mounting
The IDU is mounted indoors and the RF Unit is mounted outdoors, either near the antenna or simply at a
location somewhere between the enclosure/structure egress point and the antenna.
Complete the installation of all cables and the antenna system prior to connecting power; refer to “Installing and
Adjusting the Antenna” on page 18 for important information.
Installing Both the IDU and RFU Indoors
Although rack-mounting of the IDU is the ideal configuration; the radio can be placed on a tabletop or a cabinet
shelf. To prevent movement, apply the rubber table mount feet, found in the GX IDU Installation Kit, under the
bottom of the radio at each corner.
For rack mounting, to optimize cabling and to avoid interference with the RFU or antenna cables, mount the IDU
high in a standard 19-inch rack. Empty rack-mounting spaces above and below the unit are recommended,
especially if the surrounding equipment dissipates a considerable amount of heat (over 40W).
When mounting both the IDU and the RFU indoors, mount the IDU immediately below the RFU with no gap
between the units. (The IDU provides required forced-air cooling of a rack-mounted RFU). Leave the equivalent
of one rack space above the total 2-unit space for the radio if any equipment is mounted above the radio
system.
Set up the radio for mounting (using the rack mounting brackets enclosed with the screws in the shipping
container) with the front edge projecting from the front face of a standard 19-inch rack. Alternatively, you can
reverse the rack-mounting brackets to install the unit at a flush position. Additional extension brackets are
provided for 23-inch rack mounting and are attached to the standard 19-inch rack flanges with screws provided.
The radio has internal fans that intake on the left side and exhaust on the right side of the chassis. When rack
mounting, leave a small gap between the outer edges of the radio and the inside edge of the rack.
A short 12” IDU-to-RFU interface cable (TNC to TNC) is included in the GX IDU Installation Kit. Use this cable
to connect the IDU to the RFU when both are installed indoors.
Chapter 2. Installing the IDU and RFU 14
Lynx.GX Installation and Management
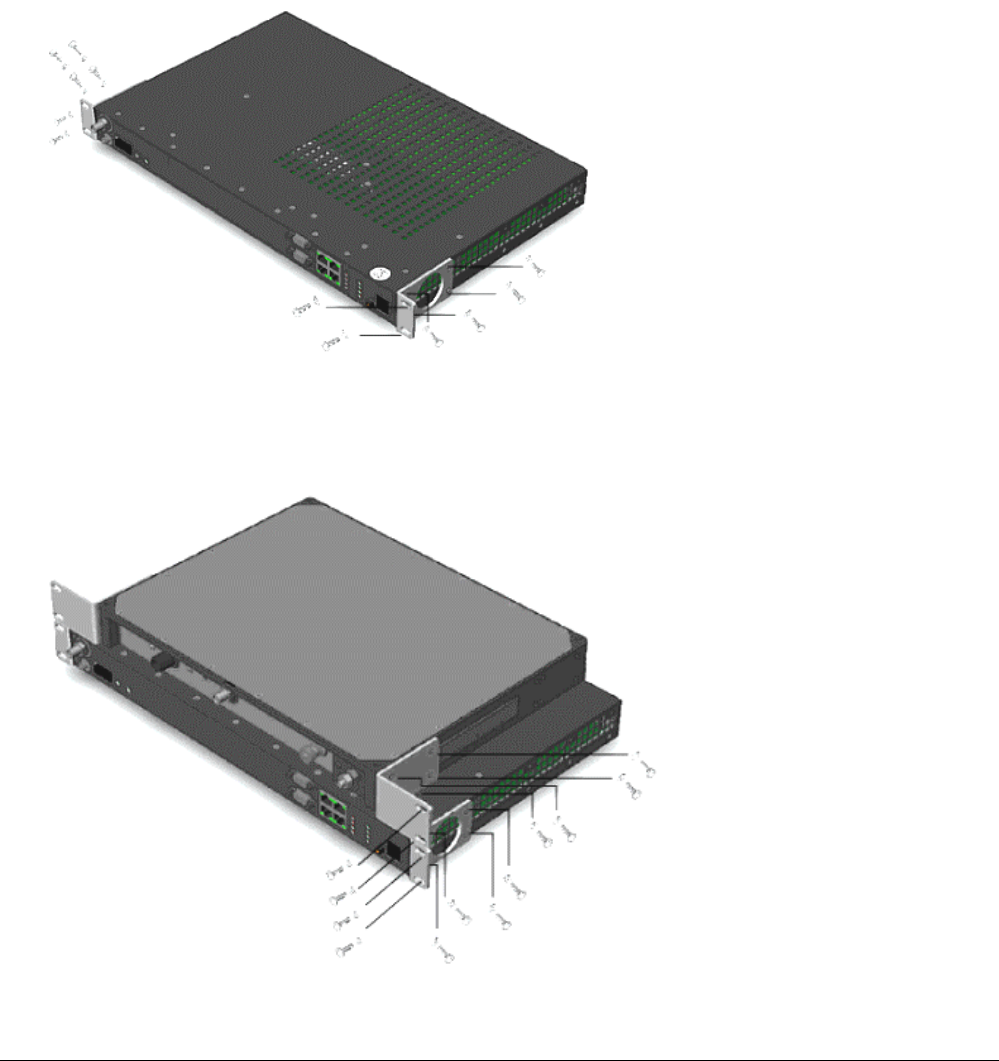
To rack-mount the IDU and RFU:
1. Gather all the parts contained in the GX IDU Installation Kit.
2. Set the unit on a flat surface and, using a screwdriver, remove the front screws on each side of the unit that
match up to the holes of the rack mounting flange. You must remove these screws to prepare the unit for
bracket attachment.
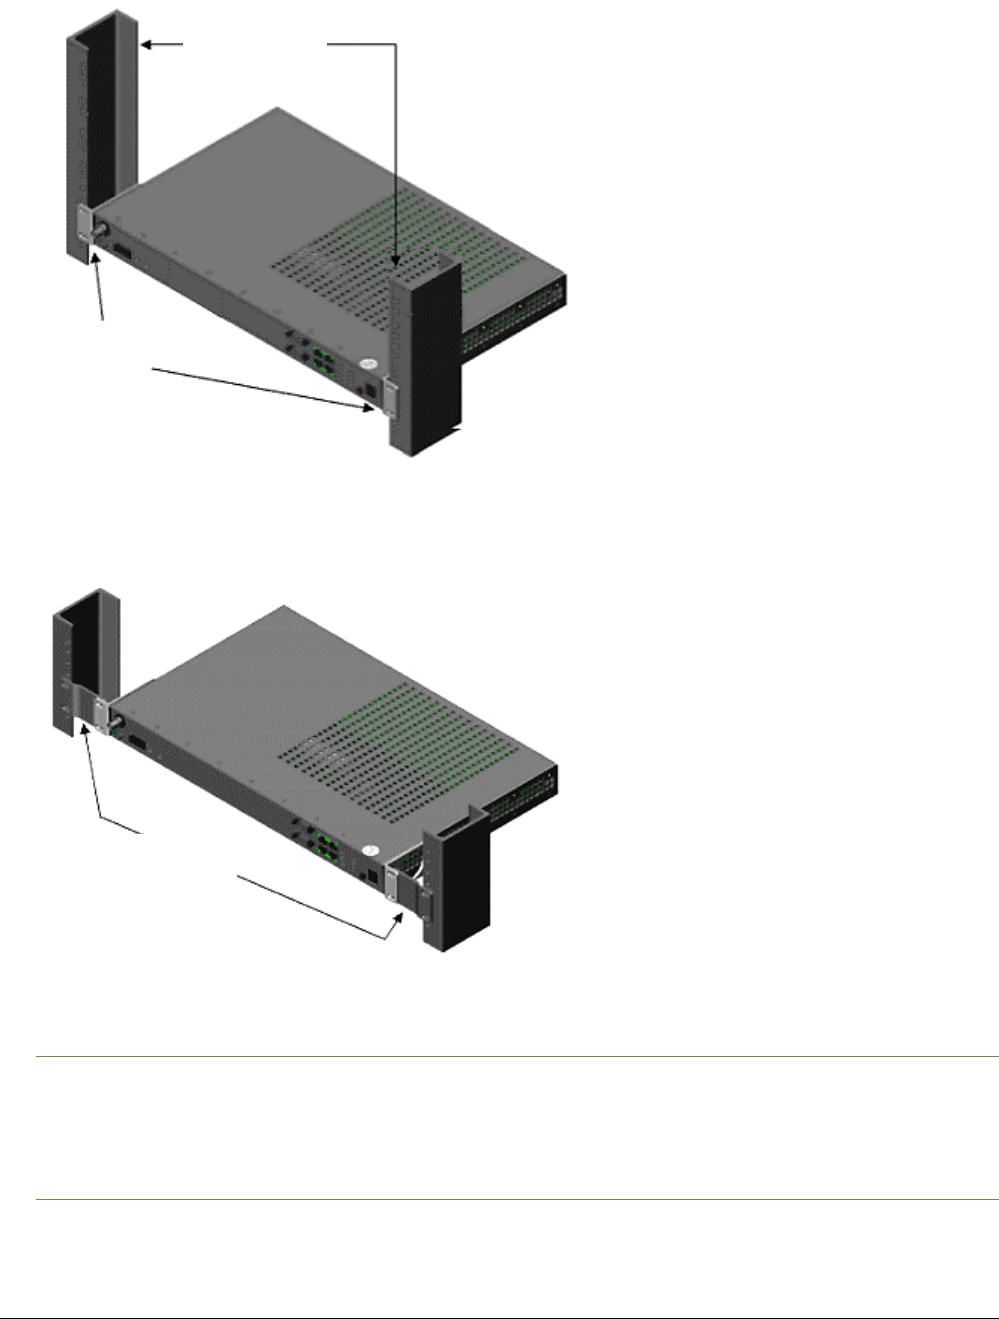
3. Attach the “L” IDU Rack Mount Brackets to each side of the IDU using the long mounting screws that are
contained in the GX Rack Mount Screw Pack.
The following figure illustrates mounting bracket attachment for the IDU only (occupying one space in a 19-
inch rack).
1. Attach brackets to unit.
2. Attach brackets to 19” rack
Attach the “L” RFU Rack Mount Brackets to each side of the RFU using the long mounting screws that are
contained in the GX Rack Mount Screw Pack. The following figure illustrates mounting bracket attachment
for the combined IDU and RFU (occupying two spaces in a 19-inch rack).
1. Attach brackets to units.
2. Attach brackets to 19” rack.
Chapter 2. Installing the IDU and RFU 15
Lynx.GX Installation and Management
4. Position the radio in the rack and align the holes in the mounting bracket with the holes in the rack. Two
screws for each bracket should be used into the rack (these screws are not included).
If you are installing the IDU in a 23-inch rack, you must use the 2-inch extender brackets and attach them to
the rack mounting brackets (with the screws provided in the GX Rack Mount Screw Pack), as shown in the
following figure:
5. Insert two screws and lock washers, appropriate for your rack, into each of the mounting brackets and
tighten.
IMPORTANT!
When the RFU is rack mounted, it must be mounted directly above the IDU and facing with the
connectors forward in the same direction as the connector panel of the IDU (as shown).
The IDU fan exhaust is used to cool the RFU in a rack mount configuration. Also, if one unit is
projection mounted, both units should be projection mounted. In either configuration, an empty rack
mount space is required above and below the configuration.
Bracket
Extenders
Rack
Mounting
Brackets
19-inch rack
Chapter 2. Installing the IDU and RFU 16
Lynx.GX Installation and Management
Installing the RFU Outdoors
The outdoor RFU installation consists of these tasks:
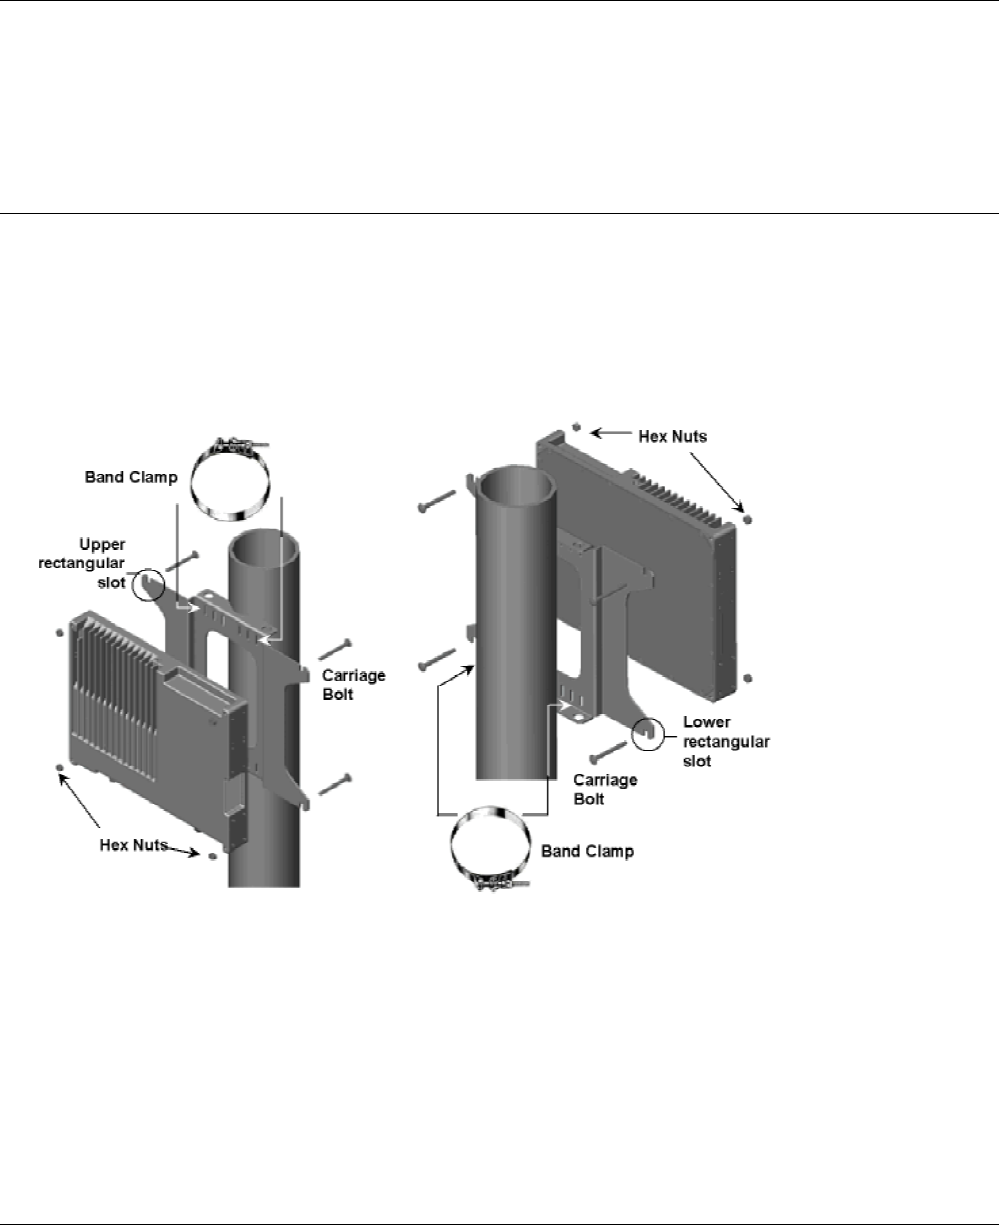
▪ Installing the mounting brackets and mounting plate onto the pole (using two band clamps).
▪ Mounting and securing the RFU on the mounting plate.
Notes:
(1) Installing the RFU outdoors requires the use of the optional GX RF UNIT Outdoor Mounting Kit (Proxim part
ACC-GX-RF-2, item number 61688), sold separately. The GX RF UNIT Outdoor Mounting Kit contains the
items necessary for secure pole mounting of the RFU. See “Lynx.GX Spares and Accessories” for part
numbers and ordering information. If the RFU is mounted outdoors on both ends of the link, you must order
two outdoor mounting kits.
(2) To facilitate assembly, installing the carriage bolts to the top holes of the RFU can be partially completed on
the ground before being raised to the pole assembly.
Installing the Mounting Plate
1. Obtain the optional GX RF UNIT Outdoor Mounting Kit (Proxim part ACC-GX-RF-2, item number 61688).
2. Hold the mounting plate with the upper and lower V-cut tabs in contact with the pole.
3. Wrap a band clamp around pole/mast and through the vertical slots near the top of the mounting plate.
Repeat for lower slots.
4. Tighten both band clamps sufficiently to prevent the mounting plate from rotating on the pole/mast; you can
now mount the RFU onto the bracket assembly.
Chapter 2. Installing the IDU and RFU 17

Lynx.GX Installation and Management
Mounting the RFU
1. Orient the RFU for mounting onto the mounting plate so that the connectors are pointed down and the
heatsink fins are facing away from the bracket.
2. Insert carriage bolts into the upper holes of the RFU with the head of the bolt facing the flat side (back) of
the RFU.
When facing the unit, place both thumbs over the hex nuts to hold the bolt in place; place the RFU onto the
mounting plate by setting the square portion of the carriage bolts into the upper, rectangular slots on the
mounting plate. Loosely attach the self-locking hex nuts without tightening.
3. Insert carriage bolts into the lower holes. Loosely attach the self-locking hex nuts.
4. Tighten all hex nuts sufficiently to prevent the RFU from any movement. Ensure the heads of the carriage
bolts are properly aligned with the notches in the mounting plate and placed firmly against the mounting
plate prior to tightening the self-locking hex nuts.
5. Install an RF lightning arrestor that connects to the antenna cable to the RFU Type-N connector labeled To
Antenna and seal the connectors using weatherproofing material (butyl and electrical tape, butyl tape or
self-vulcanizing adhesive). A short jumper cable can be used to connect the RF lightning arrestor, if
necessary. The lightning arrestor must be properly grounded.
6. Install the IF/DC-passing lightning arrestor that connects to the IDU cable to the RFU TNC connector
labeled To IDU and seal the connectors using weatherproofing material. A short jumper cable can be used
to connect the IF/DC lightning arrestor, if necessary. The lightning arrestor must be properly grounded.
7. Attach a grounding wire to the ground post of the RUF and route to a proper low impedance ground point.
Wire of at least 10 AWG should be used; a braid or strap conductor is the preferred choice.
STEP 5. INSTALL AND ADJUST THE ANTENNA
The installation information discussed in this section is generic. For installation procedures specific to the
antenna you are installing, refer to the antenna manufacturer’s documentation.
WARNING (FCC requirement for implementation in the USA):
Any antenna used for the transmitter must be fix-mounted on outdoor permanent structures with a
separation distance of at least 1.5 meters from all persons during normal operation. Antennas must be
professionally installed. Installers must be provided with antenna installation instructions and
transmitter operating conditions, including antenna co-location requirements of CFR47 Part
1.1307(b)(3), for satisfying RF exposure compliance.
Helpful Hints—Mounting Antennas
▪ Proper system and path engineering is required to determine antenna mounting location.
▪ Antenna height is critical for achieving path clearance, ensuring line of sight, and addressing potential path
reflections.
▪ Ensure that the antennas will not be blocked by people during normal operation.
▪ Antenna structure must be secure for wind load and whatever climbing may be necessary.
▪ When mounting the antenna, sufficient clearance must be allocated to swing the antenna at least ±20° from
the desired bearing.
Chapter 2. Installing the IDU and RFU 18

Lynx.GX Installation and Management
Mounting the Antenna
This section describes how to permanently mount the antenna to the mast, pole, or tower, and how to attach the
antenna to the RFU.
The antenna must be mounted outdoors on a tower, building roof, or other location that provides line-of-sight
path clearance to the far-end location. In general, antennas smaller than two feet in diameter, or one-foot
panels, are not recommended for use with these radios.
Antennas should be:
▪ Ordered with the suitable mounting kit specific to the site requirements.
▪ Very rigidly mounted, with adequate room for azimuth and elevation adjustment from the rear.
The antenna polarization must be the same at both ends of the link, either vertical or horizontal.
In general, antenna mountings require a support pipe to which upper and lower support brackets are attached
with U-bolts. The antenna and optional elevation and azimuth adjustment rods then are mounted onto the
support brackets. The entire structure must be adequately grounded for lightning protection (see “Grounding”
on page 27). The antenna system must always be installed according to the manufacturer's instructions.
Unless special test equipment is available, two operating radios are required to align the antennas.
Alternatively, you can use a CW generator to transmit a signal toward the end being aligned.
The antenna is coarse-aligned using visual sighting and then fine-aligned using the receive signal level (RSL)
voltage provided by the radio.
The RSL voltage reading still can be used to peak antennas even if the wireless units have not synchronized;
however, you cannot measure far-end RSL from the near-end terminal until the units are synchronized.
Aligning the Antenna
The larger the antenna, the more critical alignment becomes. For example, with a 2-foot dish at 5.8 GHz, the
antenna can be moved ±3 degrees off the correct heading before the receive signal level drops by 3 dB. This
compares with a 6-foot dish, which can be moved only ±1 degree for the same degradation.
▪ You must perform antenna alignment on one end of the link at a time, one plane at a time.
▪ Keep one antenna stationary at all times.
▪ Fine-align each end several times, until the planned RSL is reached.
In some cases, you may need to perform coarse alignment using a wide arc in both azimuth and elevation while
reading the RSL to find the main beam of the opposite end antenna.
Note: The RSL voltage is slightly delayed, so make small incremental adjustments during the fine alignment
phase and wait a few seconds for the RSL voltage to settle after each adjustment. When aligned to
maximum RSL, ensure that all antenna mechanics are tightened without impacting the alignment.
Coarse Alignment
To coarse-align the antenna, set the antenna mount for flat elevation (no up-tilt or down-tilt) using a spirit level.
Point the antenna at a heading marker obtained using a compass/GPS (magnetic corrected) back-bearing from
an adjacent location (ideally, 100 feet or more away from the antenna).
If the path has substantial change to elevation from one end to the other, this may not be an advisable method
for starting the alignment activities. In such cases, compare antenna elevations at each end of the link and set
the initial elevation of the antenna to roughly match the anticipated up-tilt or down-tilt.
Chapter 2. Installing the IDU and RFU 19

Lynx.GX Installation and Management
If you cannot set a heading marker sufficiently far away (for example when on a city building roof), obtain a
rough azimuth setting by sighting along the antenna feed or based upon compass measurements made during
the path planning stage.
Note: Use the instructions provided by the antenna manufacturer to verify that both antennas are on the same
polarization; otherwise, the RSL will be approximately 25 to 30 dB below the calculated level.
Because maximizing the receive RF signal level at each end of the radio link is critical, most antennas also
require fine alignment using an operating link.
Once the coarse alignment is completed at both ends, the link can be powered and some level of reliable
communication established. The voltage at the radio test point can be measured with a DVM to determine the
relative receive RF signal level.
Note: Be sure to read “Power Connections” on page 27 prior to powering up the radios.
Fine Alignment
When fine-aligning the antenna:
▪ Adjust the azimuth and then the elevation of the local antenna to maximize the RSL voltage.
▪ Align the far-end antenna in the same manner, using the RSL voltage of its local RFU.
Helpful Hints—Antenna Alignment
▪ Rough align antenna azimuth and elevation based upon path planning (using compass bearing or milestone
sighting, telescopic sight, binoculars, and so on).
▪ Apply power to both ends of the radio system
▪ Use a Digital Volt Meter (DVM) to read the radio’s RSL voltage provided on the RFU to peak antennas. Or,
use the RSL reading from the IDU’s front panel test point. (See “RSL / GND” in “Front Panel LED
Descriptions” on page 73.)
▪ When aligning antennas, if the RFU is located indoors or distant from the antenna location, you may want to
run wires or a cable from the RSL test point on the RFU to the antenna location so that the voltmeter
reading or audio device is directly visible and audible to the technicians aligning the antenna. Alternatively:
º The RSL value can be provided by a ‘verbal relay’ or by two-way radio (or similar communications
device) from the radio location to antenna alignment personnel.
º The RFU (and IDU, if necessary) can be taken to the antenna location temporarily for the purposes of
antenna alignment. An additional short transmission line jumper may be required for this approach,
along with TNC-to-N adaptors at each end of the primary transmission line. If this approach is used, the
actual RSL when alignment is completed is higher than that planned (due to the shorter transmission
line). Verify the desired RSL once the radio system is mounted as originally planned.
º Coaxial couplers can be placed temporarily at each end of the primary transmission line so the RSL
voltage is sent to the antenna location.
▪ A cellular telephone or two-way radio can be useful for coordinating alignment activities between both ends
of the link. You can use an orderwire telephone for end-to-end voice communications once the units are
synchronized. Synchronization usually can be accomplished by coarse alignment alone. After
synchronization, you can use the orderwire phones to communicate between radio sites for antenna fine
alignment.
▪ Make sure antenna polarization is the same at both ends.
º Adjust alignment of one antenna at a time, one plane (azimuth vs. elevation) at a time.
º Adjust each end multiple times until predicted RSL is achieved.
Chapter 2. Installing the IDU and RFU 20

Lynx.GX Installation and Management
Checking RSL Against Predicted Results
There are two RSL voltages that can be read off the radio.
▪ The IDU front panel has an RSL Test Point for a voltmeter probe.
▪ The RFU also has a voltage test point at the BNC connector.
Both the IDU RSL voltage and the RFU RSL voltage readings are identical: They can range from 0.9 volts for
–90 dBm to 0.05 volts for –5 dBm. The RSL voltage is -Volts RSL (mV)/10 or -10mV per dBm, so that the
readings can range from 0.9 volts for –90 dBm to 0.1 volt for –10 dBm. This unique approach for measurement
voltage makes it possible to read the RSL value directly off the DVM; for example: -60 dBm = 0.6V.
Keep in mind that a higher RSL results in a lower absolute voltage. Therefore, when you are ‘peaking’ an
antenna, you actually are attempting to achieve the lowest voltage. For example, a desired RSL of –50 dBm is
equivalent to 0.5 Volts RSL and, if you were reading 0.7 Volts of RSL (a higher voltage), this would be a lower
(worse) RSL of –70dBm.
Because the maximum error-free receive signal level is –20 dBm, the receiver can produce errors above this
level; however, this level will rarely, if ever, be exceeded in an actual system implementation. See “Calculating
Received Signal Level and Link Budget” on page 51 to calculate the anticipated RSL. However, if cabling the
system back-to-back with inadequate attenuation, permanent damage can occur. Also, extremely short paths
can result in excess RSL.
During anomalous propagation conditions, the RSL can fade up but does not typically increase by more than 10
dB (except in unusual, very long paths, which may increase by 15 dB). This is not something that typically must
be planned, but can cause error conditions if the normal (unfaded) RSL is close to the maximum error-free
specification.
Antenna alignment should let RSL achieve the level calculated in the link budget. If the RSL is optimized but is
approximately 20 dB below the calculated level, it is likely the antennas are aligned on a sidelobe of the
antenna's radiated signal. In such case, you must adjust the antennas in a wide arc in both azimuth and
elevation (at both sides) until the main lobe is located.
See also “Confirm Receive Signal Level (RSL) “ on page 29.
Chapter 2. Installing the IDU and RFU 21

Lynx.GX Installation and Management
STEP 6. ESTABLISH CONNECTIONS
This section discusses antenna connection, RF coaxial cable connection, IF transmission line connection,
grounding, and power connections.
Helpful Hints—Lines and Connections
▪ Use proper transmission line.
▪ Proper termination is critical, especially at 5.8 GHz. Follow manufacturer’s instructions and use proper tools
and connectors.
▪ Be careful with the bend radius and never kink the transmission line.
▪ Secure the transmission line to structures; be careful not to crush.
▪ A direct connection to the antenna feed is ideal (if required, you can use a flexible jumper at the antenna).
▪ Weatherproof all outdoor connections when completed with installation.
▪ When the RF Unit is placed indoors, the RF lightning arrestor is best located at the building egress point.
▪ When the RF Unit is placed outdoors, the IF lightning arrestor is best located at the building egress point. In
addition, Proxim recommends that an additional lightning arrestor be placed at the RF input (from the
antenna) and one at the junction between IF cable interface to the RFU
NOTE: IF cable lightning arrestors must be specified to pass DC and rated to 1 GHz operation.
▪ IDU cable lightning arrestors must be specified to pass DC and rated to 1 GHz operation.
▪ All lightning arrestors and transmission line must be properly grounded.
▪ Do not use 90-degree adapters unless rated at operating frequency.
▪ Test power voltages and pinouts at the power connector before connecting power to IDU.
Connecting an Antenna
The radios are equipped with an N-type female connector on the RFU at the antenna port. You can use a short
length jumper cable (such as 1/4-inch to 1/2-inch coax or pigtail of approximately 6 feet in length) fitted with two
N-type male connectors to connect the RFU antenna port to the antenna (if the RFU is located near the
antenna) or to the primary transmission line (if the RFU is mounted remotely from the antenna).
A low-loss 50-ohm cable is recommended for the antenna transmission line between the RFU and the antenna
(such as Andrew LDF4-50 or Times LMR-600 1/2-inch coaxial cable, Andrew LDF4.5-50 or Times LMR-900 5/8-
inch coaxial cable, or EW-52 wave guide).
The return loss presented by the transmission line at the RFU interface should be as high as possible (20 dB
minimum recommended). The length of the antenna transmission line should be kept as short as possible to
minimize losses.
To minimize feeder losses, use an elliptical wave guide (typical loss is 1.25 dB/100 ft. at 5.8 GHz) for
implementations with longer transmission line lengths (such as >200 feet) or long paths (such as >20 miles).
Depending upon path length and transmission line feeder length, ½-inch or 5/8-inch coaxial cables are often
sufficient. The lower the transmission loss the better, so if your installation can accommodate the larger cable
(5/8-inch), this is highly desirable.
Chapter 2. Installing the IDU and RFU 22

Lynx.GX Installation and Management
Antenna Cabling Guidelines for 5.8 GHz Units
▪ Coaxial cables of 7/8-inch or larger diameter can exhibit moding at 5.8 GHz and are never recommended.
Also, some small diameter cable types, such as RG-8 or LMR-400, will have high loss or poor VSWR at
these frequencies. If small diameter cables are required, be certain to keep the lengths of these cables as
short as possible and always properly terminate these cables.
▪ For wave guide transmission at 5.8 GHz, EW-52 wave guide is recommended. EW-63 will also work, but
may exhibit more loss.
▪ Do not use right angle N-type connectors with the radios operating at 5.8 GHz.
▪ Do not use low quality jumper cables with the radios.
▪ Always precisely follow the antenna manufacturer’s recommended procedures and tools for termination.
Connecting RF Coaxial Cables
Prior to installation, determine the specific antenna location and mounting. The transmission line should be kept
as short as possible, so when line-of-sight placement of antennas allow flexibility, it is always desirable for the
equipment to be located closer to the antenna. See “Planning for Antenna and RF Transmission Line
Installation” on page 54 for further planning information.
If the RFU is mounted near the antenna, the RF transmission line can be pre-terminated at both ends and
simply attached from the antenna feed to the RFU without any special consideration to securing the
transmission line to the antenna structure (as the length is likely to be very short).
In this configuration, Proxim recommends you place an RF lightning suppression device specified for use at 5.8
GHz (such as Polyphaser LSX) between the RF transmission line and the RFU’s RF port, as close as possible
to the RFU. Always properly ground any lightning suppression device.
When the RFU is mounted near the antenna, generally follow the instructions in this section for the cable used
to connect the RFU to the IDU. This cable is likely to be longer and also egresses the structure in which the IDU
is located. It may require more care for installation, including grounding, lightning protection, and securing the
cable.
Lightning suppression is required at the interconnection cable junction as close as possible to the RFU, as well
as at the building egress point. For this cable, the lightning suppressors must be specified to pass DC and
support the intermediate frequencies (approximately 800 MHz) and the digital signals carried by this cable. A
NexTek PTC series Gas Tube surge protector (http://www.nexteklightning.com), rated at 90 Volts or greater, is
an appropriate device for this application. These devices are available in various connector and mounting
configurations, and provide the flexibility required for different installation configurations.
For example, a PTC-TNM-TNF-09S would be a unit with a TNC-Male connector on one end, and TNC-Female
connector on the other end. A PTC-TNF-TNF-09S specifies the same part, but with TNC-Female connectors on
both ends.
Chapter 2. Installing the IDU and RFU 23

Lynx.GX Installation and Management
To prepare the RF transmission line or the RFU-to-IDU cable (experienced or skilled technician only):
1. Cut a cable to the proper length (allowing some excess for service loops) that will connect the RFU to the
building egress point. Terminate both ends with TNC-Male connectors.
2. Repeat this process for the cable that will connect to the lightning surge protector outside the building
egress point and the equipment. Do not install the equipment end connector at this time, to facilitate pulling
the cable through ducts, trays, or conduit (as required) between the egress point and the IDU location.
3. Install the building egress lightning surge protector between the two RFU/IDU cable ends outside of the
building egress point, and ground the lightning surge protector to a proper broadband earth ground. The
proper installation and grounding of this lightning/surge protector is critical, since it is the “firewall” protecting
equipment and personnel inside the building from potentially lethal electrical storm power surges.
º Pay close attention to the transmission line specifications for bend radius when installing.
º Be careful not to kink, damage, or deform the transmission line in any way.
º Support the transmission line in a tray on horizontal runs and by hangers on vertical runs. Space
hangers according to the manufacturer instructions.
4. Ground the transmission line using the appropriate cable/waveguide grounding kits per the cable/waveguide
manufacturer’s instructions. A minimum of three grounding points is recommendedat the antenna end of
the cable/waveguide, at the base of the tower, and at the equipment building egress point. In addition, long
transmission line runs should be grounded at least every 100 feet.
5. Install lightning protection devices, including proper grounding and termination to cables. There should
always be a lightning protection device at the egress point for whatever cables egress the building or
enclosure. For an all-indoor implementation, the in-line lightning protection device must be rated for the
operating frequency of the radio (5.8 GHz).
Lightning protection for the RFU-to-IDU connection portion of an outdoor implementation of the RFU must
be rated to 800 MHz and must be non-blocking to DC. Proxim recommends placing lightning arrestors near
the RFU and outside of the equipment building egress point for 2-piece systems. Lightning arrestors must
be grounded to a proper broadband earth ground in order to be effective. This means use of a low-
inductance ground strap or very short ground cable between the lightning protector and earth (not power
company) ground.
6. After installation, terminate the RF transmission line with an N-type (or appropriate) male connector or low-
loss adapter attached at the equipment end. For waveguide, this typically requires a CPR-to-N adapter.
Be sure to use manufacturer-specified connectors and termination tools, and follow termination instructions
precisely. Improper transmission line terminations can cause excess losses and reflections that can lead to
many problems with the system.
7. Prior to operation, check the electrical integrity of the transmission line, including all connectors, with a
simple DC check between the center conductor and outer conductor (this is not possible for waveguide,
which should be swept to assure transmission performance).
The transmission line ideally should be connected directly to the antenna at one end and to the radio antenna
port at the other end; however, short pigtail jumper cables may be required in order to avoid sharp bends in the
primary transmission line, or to limit stress on either connection.
Chapter 2. Installing the IDU and RFU 24

Lynx.GX Installation and Management
Connecting IF Coax Cable
The radio can be installed with the RFU mounted indoors above the IDU in a 19-inch or 23-inch rack, or
mounted outdoors onto the pole-mounted bracket (included).
▪ For indoor mounting, a short IF coaxial cable is included in the accessory kit to connect the IDU to the RFU.
▪ For indoor/outdoor mounting, a long IF coaxial cable is required to connect the IDU to the RFU outdoors. In
such a case, the same cable installation, grounding, surge-protection (except using NexTek PTC series
surge protectors and the appropriate cable type) as described above applies. In addition, a low-loss RF
transmission line is required to run the RF signal from the RFU to the antenna (located outdoors atop a
tower, monopole, rooftop pole, or cell site).
For indoor/outdoor mounting configurations, the connectors on both ends should be TNC (male) to TNC (male).
Multiple cables can be used to accomplish IDU-to-egress and egress-to-RFU connections. Be sure that a
proper lightning protection device is installed at the building cable egress point.
See “Planning For and Selecting IF Cable” on page 53 for cable recommendations.
Connecting Power
The radios do not have a power on/off switch. When you connect the DC power, the unit powers up and is
operational in about one minute.
Note: When first powered up, the second LED from the left column lights up red, then the bottom one flashes
red. If these conditions continue after one minute, there is a problem powering up the radio and the unit
should be returned.
There can be up to 200mW of RF power present at the RFU antenna port.
Before power is applied:
▪ Terminate the antenna port (either by connecting the RFU to an antenna or to an appropriate 50-ohm load,
such as provided by a fixed RF attenuator).
▪ Connect the cable between the IDU and the RFU.
The IDU can be powered separately (with no cable or RFU present), but do not connect the RFU without
removing power first; then connect the IDU-to-RFU cable and re-apply power.
WARNING!
Connect all cables between the IDU and the RFU before applying power to the IDU— Do not apply DC power to the
IDU if the RFU antenna connect is not terminated. Likewise, remove power from the IDU before removing any
cables between the two units.
DC voltage is conducted on the IF coaxial cable; improper installation of the cable while power is applied could
result in damage to the equipment. Be sure to read “Product Safety Instructions” in Chapter 2 before installing this
product.
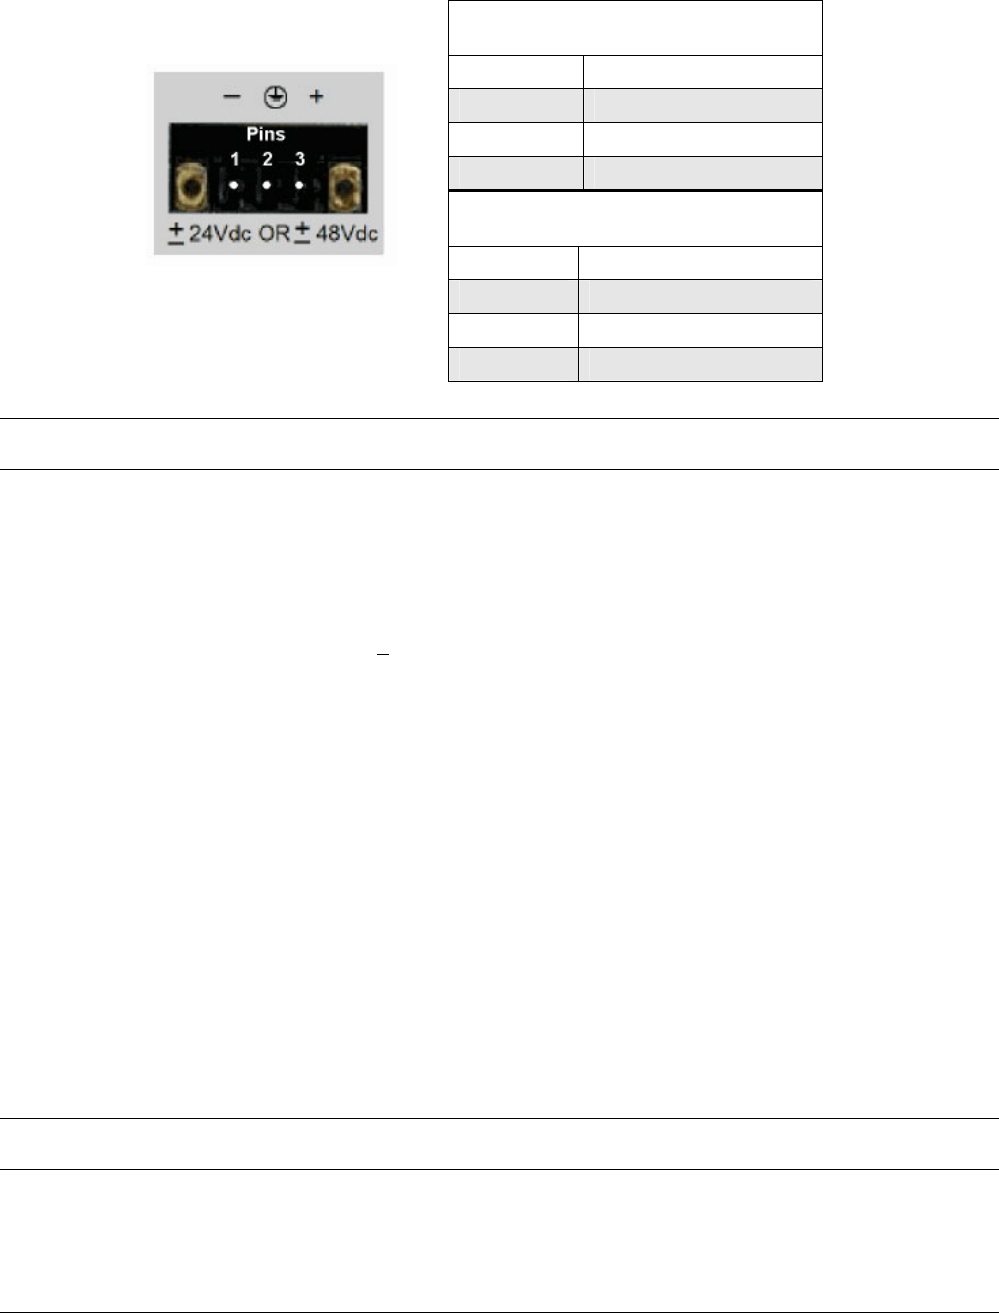
Power is connected using the terminal block connector contained in the accessory kit. The terminal connector is
a 3-pin mating connector.
Use the pin information listed in following tables, along with the associated figures, to wire the terminal and
connect the DC power supply properly. For DC power return connection, connect to the opposite voltage (either
the -DC or the +DC Pin).
Chapter 2. Installing the IDU and RFU 25
Lynx.GX Installation and Management
Be sure to connect the return to ground at the DC power plug and make sure that all equipment is grounded to
proper station earth ground.
Negative DC Power Input Pin Assignment (-
20 to -63 VDC)
Pin Number Function
1 Power (–DC)
2 Ground
3 Return (+DC)
Positive DC Power Input Pin Assignment
(+20 to +63 VDC)
Pin Number Function
1 Return (–DC)
2 Ground
3 Power (+DC)
Note: Each radio terminal block must be fused externally with an 5-Amp maximum fuse. The DC power cable
must be shorter than 3 meters (9.75 feet).
To wire the DC power, wire the power cable with an adequate current rating into the terminal block connector
using the screw connections on the terminal block.
Suggested rating of external fuses and cables is 5 to 8 Amps (-120W to –240W) for 24V and 3 to 5 Amps (-144
W to –240 W) for 48V in order to accommodate inrush current at equipment power-up.
The radios consume less than 1.5 Amp at + 48V, less than 3.0 Amp at + 24V under steady-state conditions.
▪ If using negative power, connect the negative voltage to pin 1. Connect the return connection to pin 3 and
use an optional jumper to pin 2 for ground reference.
▪ If using positive power, connect the positive voltage to pin 3. Connect the return connection to pin 1 and
use an optional jumper to pin 2 for ground reference.
The ground connection is available using pin 2. Do not ground both sides of the power supply.
Proxim recommends you leave the ground connection floating if the power supply also is floating. This
configuration can help avoid ground loops and provide the best lightning protection; however, if the power
source is referenced to ground, this configuration may not provide adequate grounding for lightning protection.
This configuration is more susceptible to lightning damage no matter what grounding scheme for the radio
power supply is chosen.
A grounding screw and nut is provided on the left front panel of the IDU. Be sure to use the local electrical code
to determine wire size and proper connection to the grounding screw, and do not depend on rack mounting
screws for a ground connection.
Note: Proper grounding, either through the chassis or the power supply, is important for protecting the unit
against lightning. A grounding screw post is provided on the front panel.
Use a digital voltmeter (DVM) to verify the voltage and polarity of the plug after wiring the terminal block for
power and before inserting the plug into the IDU.
Chapter 2. Installing the IDU and RFU 26
Lynx.GX Installation and Management
Grounding
WARNING!
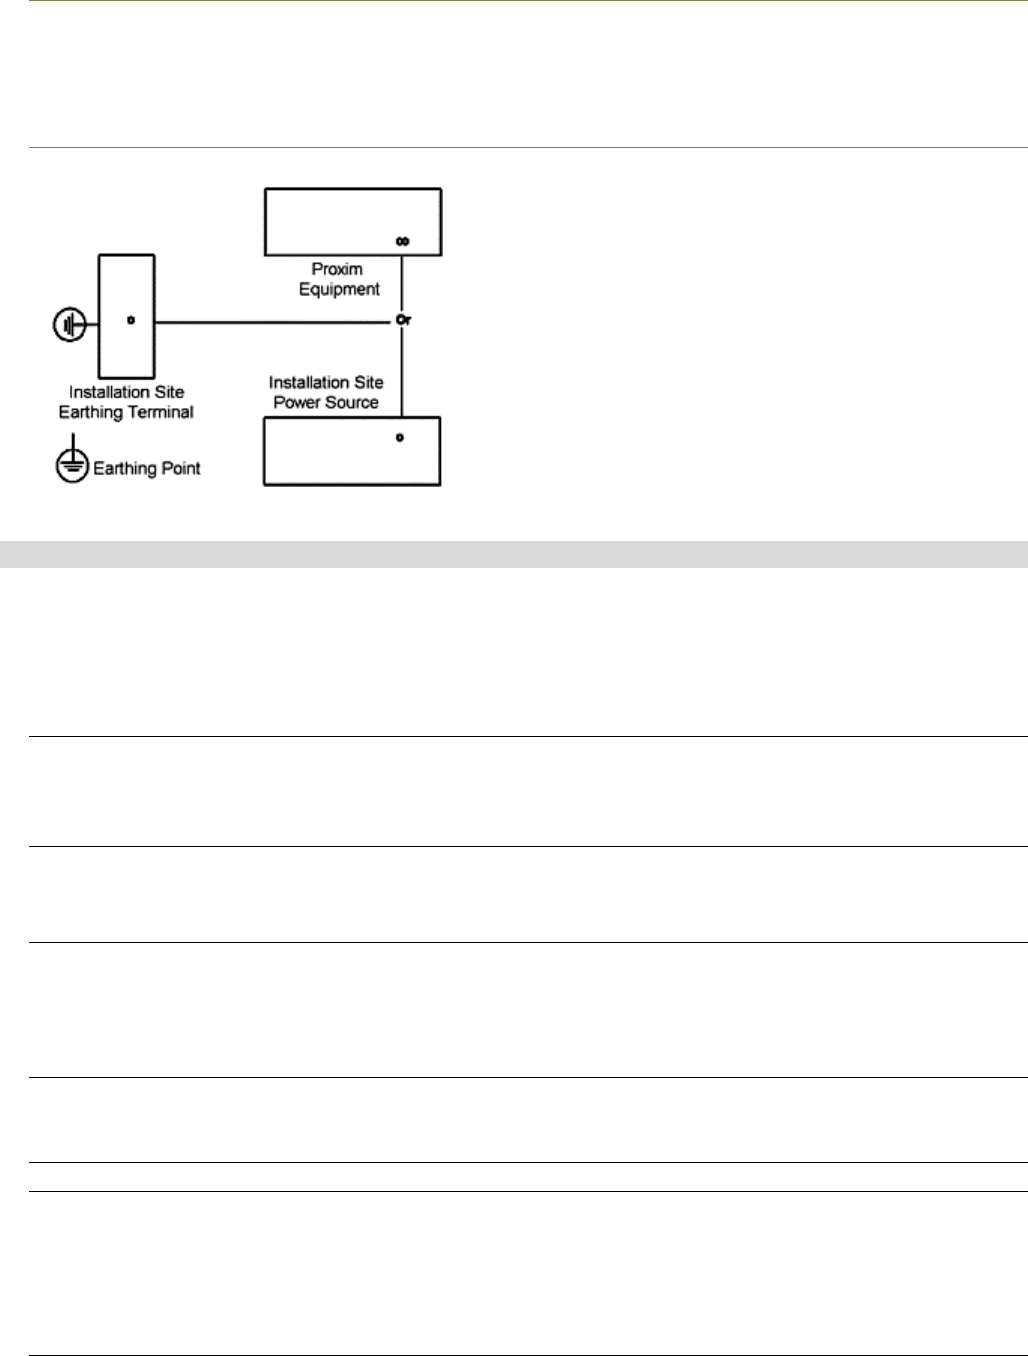
This equipment is intended to be grounded. If you are not using the power supply provided by Proxim
Corporation, you must connect the grounding conductor of your power source to the grounding
terminal located on the units; or, connect an grounding conductor between the unit's grounding
terminals and your grounding point. For safe operation, always ensure that the units are grounded
properly per the following figure.
Be sure to:
▪ Use a common station ground for all equipment
▪ Ground the radio to the rack
▪ Ground the tower or mast properly
▪ Ground the transmission line properly.
STEP 7. ADJUST OUTPUT POWER
In certain cases, you may need to adjust the output power lower from the factory setting; for example, to:
▪ Meet any required EIRP (Effective Isotropic Radiated Power) limits
▪ Avoid exceeding the maximum far-end RSL of -20 dBm
▪ Meet in-bound RSL requirements for a hub site location
Note: In certain countries, Effective Isotropic Radiated Power (EIRP) limits dictate the maximum output power
the radio can transmit, given transmission line loss and antenna gain. Consult with appropriate
government agencies or Proxim Corporation if there is any question regarding maximum output power
allowed.
Using the Web browser interface through the NMS1 or NMS2 port, you can adjust the output power from factory
settings. Select the Sys Cfg tab and choose from +5 to +25 dBm, in 1 dB steps, in the Tx Power (dBm) field.
Note: For precise measurement of transmitter power, a calibrated RF power meter is recommended. This
power sensor can be connected directly to the output of the radio without exceeding the power rating.
With some power meters, it may be necessary to place a calibrated in-line fixed attenuator between the
radio antenna port and the power meter so as to not exceed the power meter's maximum input level.
Thruline power meters do not operate at Proxim radio RF frequencies and are not recommended.
If adjusting the output power to meet an EIRP limit, you must calculate the overall RF system gains and losses,
including feeder losses for the type of transmission line installed and the antenna gain.
Note: For the US and Canada, there is no EIRP limit for fixed point-to-point applications of this product.
You can determine the radio transmit power for EIRP-limited installations using the following equation:
Tx Power (dBm) = EIRP Limit (dBm) + Transmission System Losses (dB) - Antenna Gain (dB)
Chapter 2. Installing the IDU and RFU 27

Lynx.GX Installation and Management
STEP 8. ESTABLISH A LINK BETWEEN THE RADIOS
Follow these steps to establish a link between the radios:
1) Connect the transmission line to the antenna and feed it to the RFU location.
Connect the opposite end of the transmission line to the N-type female connector located on the RFU through a
lightning arrestor. If the RFU is mounted indoors or in a shelter, the lightning protection should be located at the
cable egress point. If the RFU is mounted outdoors, it can be mounted at the RF input port of the RFU. The
lightning arrestor must be properly grounded. The transmission line connection must be terminated into an
antenna or a load before DC power is applied to the radio.
2) Connect the RFU to the IDU.
Connect the cable the runs from the RFU to the IDU. If the RFU is mounted outdoors, ensure that proper
lightning protection is used at the shelter or building egress point as well as at the RFU connector. The lightning
arrestor must be properly grounded. If the RFU is mounted indoors, use the supplied TNC jumper cable. No
grounding or lightning arrestor is needed.
3) Confirm DC power connection.
With the DC power source active but not plugged into the radio, confirm with a voltmeter that the DC mating
connector has the proper power connections as discussed in “Power Connections” on page 27.
▪ Verify the polarity and the absolute voltage on all pins.
▪ Verify ground connection for power (if applicable).
▪ Ensure that the RF Antenna port connection is properly terminated before applying power.
▪ Ensure that the IDU-to-RFU cable is connected.
4) Connect power to the radio.
When the radio is initially powered-on, some alarm conditions may be present. This is normal and alarms can be
ignored at this time.
5) Ensure that the antennas at both ends are aligned.
Perform a general alignment of the antennas on both ends of the path using binoculars, compass, or other
related tools. You must have the antennas aligned as accurately as possible before putting radio traffic over the
link. This helps in getting the system running more rapidly. Assure that both antennas are set for the same
polarization (vertical or horizontal at both ends).
6) Adjust RF power (if necessary).
Using the NMS port, verify the RF output power setting and, if necessary, adjust the output power of the local
transmitter in accordance with the path analysis calculations.
In cases of no EIRP limits, the radio transmitter output power should be left at the factory setting, except for very
short paths using very high gain antennas, where excessive power may not be advised (in which case power
should be reduced), or in cases where lower RSL is desired into a hub site (multi-link) location.
Be sure the RF output port is terminated at all times when power is applied to the radio. Therefore, disconnect
power to the unit before connecting a power meter; reapply power once connected.
Chapter 2. Installing the IDU and RFU 28

Lynx.GX Installation and Management
Often, an RF power meter has a limit to the input power it can measure without damage. Proxim advises you
place a calibrated fixed value RF attenuator (typically 20 dB or more) between the radio and the power meter to
ensure proper operation and safety for the RF power meter. The value of this fixed attenuation then can be
added to the value of the RF power meter reading to obtain the actual transmitter output power.
Other typical causes of inadequate RSL are:
▪ Path obstructions
▪ Excess loss in connectors/cables (poor terminations, improper bend radius, kinked, crushed, …)
▪ Poor quality or unaccounted for adapters and pigtail jumper cables
▪ Different antenna polarization at each end of the link
▪ Improper configuration of the radio’s transmit power output adjustment
▪ Insufficient RF output power (faulty radio transmitter)
▪ Faulty antenna
7) Confirm Received Signal Level (RSL).
Connect a voltmeter to the RSL measurement port on the RF Unit. This voltage reading corresponds to the
Received Signal Level (RSL) of the near-end radio. RSL is the amount of signal the near-end radio is receiving
from the far-end radio. Because the antennas have not been finely aligned, the RSL value at this time will not
be the desired value. However, you can verify that some communication is taking place between the two units.
Use the RSL voltage reading to align the antennas. Align one antenna at a time as discussed in “Alignment
Guidelines” on page 19. Align both ends of the link before proceeding.
The RSL voltage output on the radio’s front panel supplies a voltage over the usable range of the radio. (You
can also use the RSL port on the RFU, which has both DC and Tone available.)
The RSL of both sides of the link can also be measured using the NMS port. See “Management with the Web
Interface” on page 33 for details about connecting to the NMS port and viewing performance parameters.
If the RSL is not at the expected level, re-check the path clearance and transmission line, as these are the
typical causes of insufficient RSL.
You can verify radio operations by connecting units back-to-back with attenuators (60-80 dB), as described in
“Step 3. Test Radios Back-to-Back” on page 11. If the problem persists, see “6.0 Troubleshooting” on page 93.
The transmitter output power adjustment on the radio affects the RSL. Depending upon EIRP limits (if any),
path distance, and antenna gain, you may need to adjust the output transmit power to the proper level before
putting the units in service.
Chapter 2. Installing the IDU and RFU 29

Lynx.GX Installation and Management
Helpful Hints—Checking RSL Against Predicted Results
▪ Is the RF Link LED red?
º If so, keep aligning the antennas.
º If not (or green), the radios are talking!
▪ Does the measured RSL at both ends closely match the predicted value?
º If too strong, this is probably OK; the transmitter power may be higher than originally planned.
º If not strong enough, keep aligning.
º If still not strong enough, double-check the prediction and compare to the actual installation (verify
antenna gains, lengths/type of transmission line, path length, and so on).
º Are you sure you have line of sight?
º Did you test the radios in advance?
º You could have a bad cable, connector termination, or antenna
▪ Do you need to adjust the output power down?
º Check path calculations and regulations.
º Re-verify RSL after power is adjusted.
Several factors can contribute to low RSL:
▪ Incorrect antenna alignment (aligned on a side lobe and not on the main signal)
▪ Improper polarization orientation of antennas (horizontal versus vertical)
▪ Transmission line problems (loose connections, kinked or damaged cables, “loss-y” adapters, improper
termination)
▪ Path obstructions (trees, buildings, hills, and so on)
▪ Improper path clearance (line-of-sight, earth curvature, Fresnel zone, diffraction, and partial obstruction)
▪ Weather (inversion layers, ducting, and multipath)
▪ Antenna feed (coaxial/connector) problem
▪ Highly reflective surfaces of the path terrain
8) Verify the channel plans.
Verify that the units follow the same channel plan, and that the opposite Tx and Rx frequencies complete a
matched pair of radios (for example, A1 and A2 make up a matched pair). The RFU pair is made up of a “Hi”
and “Low” pair of the same root model number. Also, if co-locating equipment for multiple paths, make sure that
you do not deploy the same transmitter frequency as any of the receive frequencies at the same site.
9) Connect unit to telecommunications equipment to pass the T1/E1 traffic.
Connect to the T1 circuits using properly shielded 8-pin modular (RJ-48C) connectors. Connect to the E1
circuits using properly shielded 8-pin modular (RJ-45) connectors.
All front panel LEDs should either be off or green. (You may need to set Data Input parameters on the HTTP
IntfCfg page to make the Data Input LED green.) If any LEDs are red, see “Front Panel LED Definition” on
page 73 or “Troubleshooting Alarms” on page 95 for more information.
Chapter 2. Installing the IDU and RFU 30

Lynx.GX Installation and Management
STEP 9. ESTABLISH NEAR-END TO FAR-END COMMUNICATIONS USING ORDERWIRE (OPTIONAL)
To establish near-end to far-end communications using orderwire:
1. Connect telephones to the near-end and far-end radios.
Using a standard RJ-11 telephone cable, connect a standard electronic telephone (a touch tone phone,
complete with dialer, or DTMF phones) to the Orderwire connector on the radio front panel. This connector
is wired identically to a standard two-wire telephone jack. For connector pin assignment, see “Connectors
and Pin Assignments” on page 46.
Note: If you are using a standard telephone (for orderwire function) not provided by Proxim with this
product, ensure that the telephone has a ringing equivalency specification of 1.0 B or less and is a
UL-Listed (ITE) device that has been evaluated to the Standard for the Safety of Information
Technology Equipment, including Electrical Business Equipment, CAN/CSA C22.2, No. 950-85 * UL
1950, Third Edition.
2. Call the far-end radio.
With a telephone connected to each radio on opposite ends of the link, either telephone can be used to dial-
up the far-end location. The far-end radio internal ringer and the connected telephone ring, and if answered,
two-way full-duplex voice communication is established.
If the radios are connected in a repeater configuration, you can establish orderwire services in the network by
connecting the radios (by cabling their front-panel VF connectors). The orderwire operates on radios at each
end of the repeater and at the repeater site. You can extend this function through several repeater sites. For
hub connections of three or more radios, an external 4-wire VF bridge (600 is required to connect all devices for
orderwire operations.
Dialing an * (asterisk/star key) on the orderwire telephone implements an “all call” feature that rings all
connected radios. All telephones provide communication to all other telephones in the connected network.
Even if a particular telephone does not ring, it can still be used to talk and listen to any ongoing orderwire activity
if the orderwire is in use at other terminal locations.
Also, if a phone anywhere in the connected network has accidentally been left off-hook, the # [pound] key can
be used to mute all off-hook phones until they are placed on and off hook again.
Chapter 2. Installing the IDU and RFU 31

Lynx.GX Installation and Management
Chapter 3. Managing the Lynx.GX
You can configure and manage the radios using any of the following methods:
Web Interface
Using a Netscape® or Windows® Internet Explorer browser, you can configure and manage the unit using a
Web-based management interface. This management method includes all configuration parameters and
monitoring information. The Web browser interface is the most versatile tool to use for the most complete
set of information and access to configuration of the radio equipment. Of any of the tools to be used for
configuration and troubleshooting, this tool is highly recommended. For more information, see “Management
with the Web Interface” on page 33.
SNMP
Using an SNMP management program (such as HP OpenView or Castle Rock SNMPc), you can use MIB
information to receive alarm traps, set configuration parameters, and get alarm and status information about
the unit. This method provides the majority of configuration and monitoring tools available on the radio, and
is a preferred method among those users already familiar with an installed SNMP Manager, or those who
have a proprietary network element manager that uses SNMP protocol for communication. The MIB is
available from Proxim Technical Services or the Proxim Internet site (http://www.proxim.com/support). For
more information see “Management with SNMP” on page 44.
Telnet Command Line Interface (CLI) through IP
If a terminal is not available or you are a distance from the radio, you can use Telnet. See “Management
with Telnet” on page 44.
Each radio’s IP address is used to identify it for the Web browser interface, SNMP interface, or Telnet session.
For any extensive management, use the Web browser interface or the SNMP interface. The CLI is limited to
initially configure the IP address, mask, gateway, and password.
Each radio communicates to its far end mate using a low-speed link, thereby creating a proprietary management
channel for managing, configuring, and monitoring any link of radios. This communications channel is not
accessible for use by end users; it is designated for use by the radios exclusively.
Radios are identified by IP addresses that are assigned by the end user. Default IP addresses are assigned at
the factory for the radios.
This link also implements a RIPv2 router to more efficiently manage remote radios that may be connected in a
ring or mesh topology. The router is enabled as long as opposite radios in a link are in different IP subnets.
See “Setting Up Static Route for Remote Access to Far End Radio” on page 36 for more details.
Chapter 3. Managing the Lynx.GX 32

Lynx.GX Installation and Management
MANAGING WITH THE WEB INTERFACE
Minimum Computer Requirements for NMS
The client PC should satisfy the following minimum requirements:
▪ CPU Processor speed greater than 1 GHz
▪ Web Browser: Internet Explorer, version later than 5.0; Netscape 7.0 and later
▪ 10/100 Ethernet Interface
▪ Windows® Operating System: Windows® 98 or later (including XP Home and Professional)
Accessing the Radio
Use Windows Internet Explorer® or Netscape® to access the radio by entering its IP address in the browser
address bar. The radios are configured at the factory with the default IP address of 10.0.0.1. Once you have
successfully logged in to the radio, you can change the IP address from the Admin tab of the Web interface.
You can configure your computer to this subnet by setting its address to 10.0.0.x (where x is from 2 to 254 and
not already used in the network) or use the command line interface through Telnet to change the IP addresses
of the radios.
Note: The PC connected to the near-end radio’s NMS port must be on the same subnet as the near-end radio
to communicate with each other.
Change both the near-end and the far-end radio to the desired IP addresses. You may need to change the
subnet of your PC many times to accomplish this as you change from the default IP address to your desired
address scheme. Always save the new IP address configurations of the radios.
After changing the IP addresses, you must reconfigure the IP address of your computer to again match the
subnet of the radio (following your Operating System guidelines for changing IP addresses).
Providing a Contiguous Management Link
The second NMS port (NMS2) is switched with NMS1 on the front panel of the radio; it is used to daisy-chain a
CAT5 cable between co-located radios to provide a contiguous management link between radios at a hub
location.
Because the 10/100 Base-T ports are auto-MDI/MDI+X, the link can be established with either a straight CAT5
cable or a cross-over cable.
Factory Default Values:
Default IP Address (set at the factory).....................................10.0.0.1
Default Subnet Mask ...............................................................255.0.0.0
Default Gateway ......................................................................0.0.0.0
Chapter 3. Managing the Lynx.GX 33
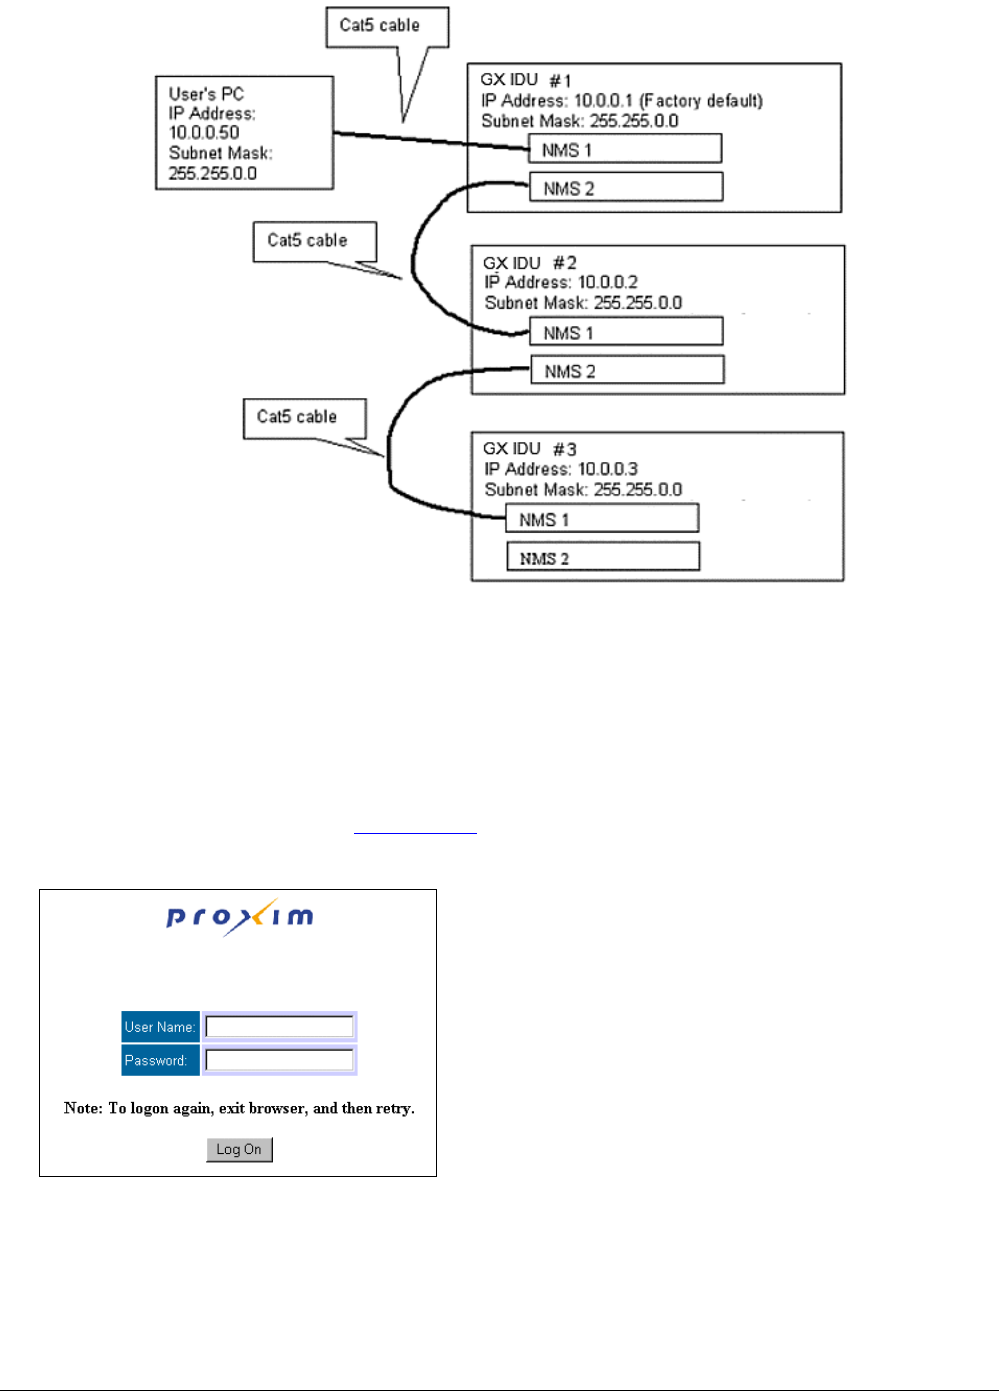
Lynx.GX Installation and Management
Figure 4. Daisy Chaining NMS Connections at a Hub Location
The next few pages describe how to access the Web Interface and the configuration and management
available.
Initial Log-On
To access the Web Interface:
1. At your browser address field enter http://10.0.0.1 (or your previously set IP address) to open the Logon
window.
Chapter 3. Managing the Lynx.GX 34
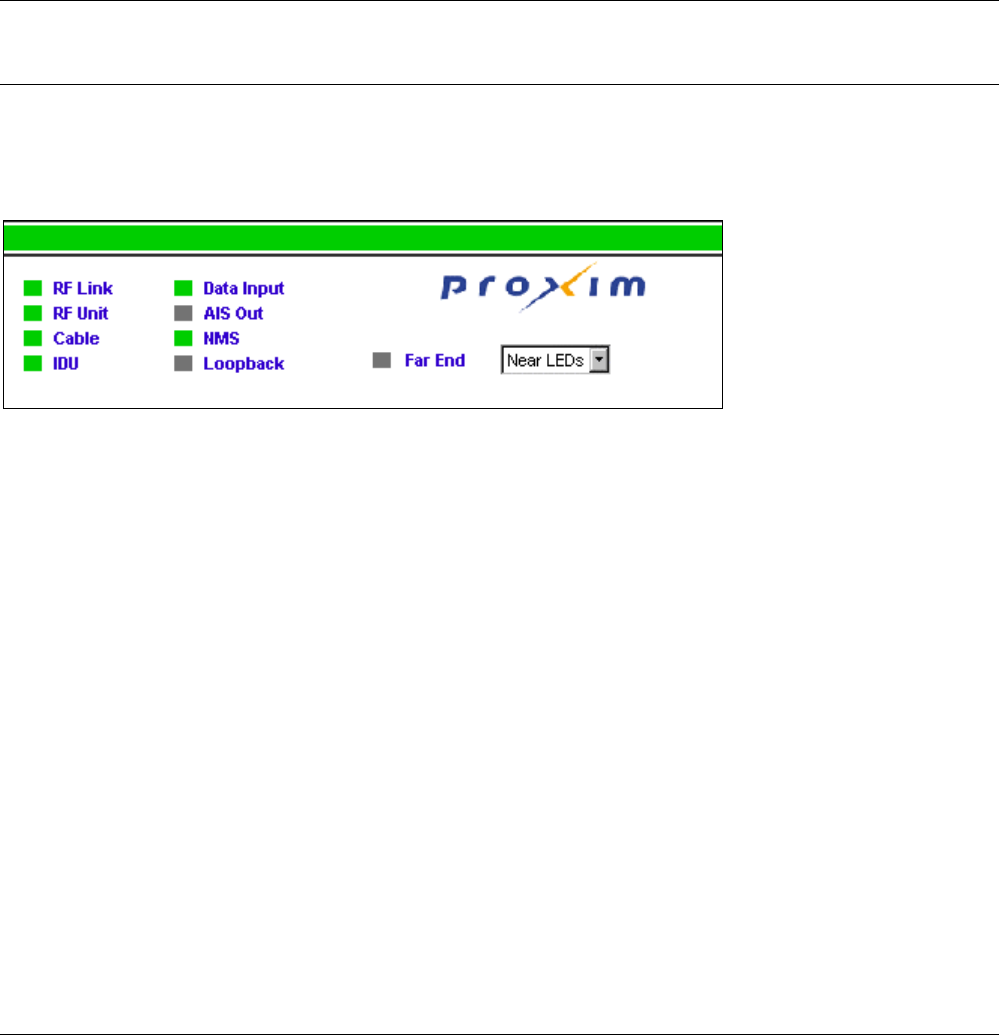
Lynx.GX Installation and Management
2. Enter the following administrative logon username and default password (or your previously set password)
in the corresponding fields on the logon page:
Username: managers
Password: managers
The monitoring logon username and default password are:
Username: operator
Password: operator
The radios ship from the factory with the default user name and password, as shown above. You should change
the password to another value and practice proper security management for limiting access to the
Configuration and Control menu tabs through the browser.
Note: If you forget the IP addresses or password, you can reset the radio to factory settings by powering the
radio up while depressing the FAR END button for 10 seconds. The default IP address, subnet mask,
passwords, and other default settings are installed in the radio.
Web Interface Front Panel LEDs
The radio’s front panel LEDs are displayed at the top of each window in the Web interface; they provide the
same color and flashing alarm and status information as the actual LEDs on the front panel.
You can choose to view LED information for the near-end radio (the unit to which you are connected) or the far-
end radio. The default option when you open a tab or refresh a page is to display the near-end LEDs. If the far-
end radio is not available when you choose to view far-end LEDs, these LEDs flash red. See “Front Panel LED
Descriptions” on page 73 for more information.
In addition, the large green bar at the very top of the display represents the summary LED (on the back of the
IDU) that indicates the health of the radio by summarizing all the eight LEDs on the front panel:
▪ If all the LEDs are green or off, the bar is green
▪ If any LED is red, the bar turns red
▪ If any LED is yellow and none are red, the bar turns yellow
The bar also indicates the state of the Form C relays: Red indicates that the Major or “Out of Service” relay is
energized; Yellow indicates that the Minor or “Summary” relay is energized. (A yellow AIS OUT LED will make
the summary bar yellow, but will not energize the Minor Relay.) This feature also allows the user to view the
summary status of multiple radios concurrently on a single computer display.
The rear panel LED is a single indicator that reflects the summary state of the radio, exactly copying the state of
the status bar on the GUI.
Chapter 3. Managing the Lynx.GX 35
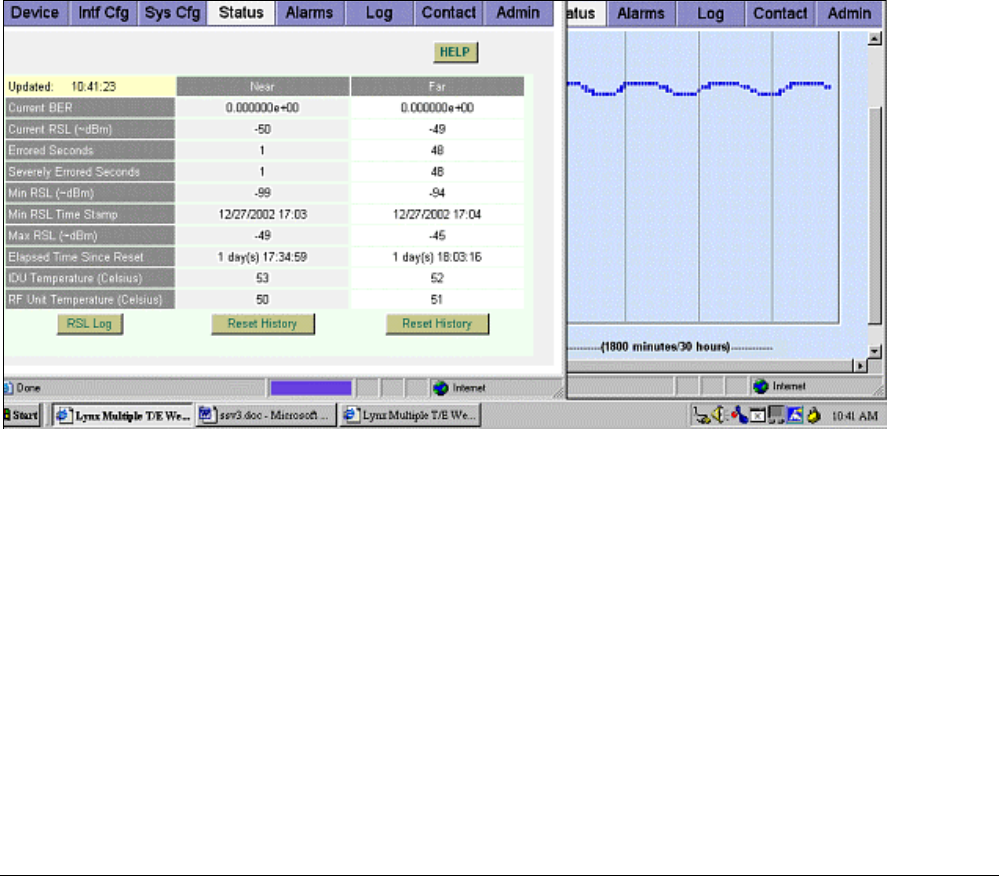
Lynx.GX Installation and Management
Initial Configuration
The default settings of all Lynx.GX radios are:
IP Address: 10.0.0.1
Subnet Mask: 255.0.0.0
Gateway Address: 0.0.0.0
The next three steps should be accomplished while both radios are on a test bench. Additional details follow.
Step 1: Change the PCs IP address to the same subnet as 10.0.0.x. This allows you to address the local radio.
Step 2: Using the CLI, change the IP address, subnet mask, and default gateway of the two radios.
Step 3: Using the Web browser, review and configure any additional settings (such as changing T1/E1
parameters) as necessary.
In-Band Management
If it is desired to have in-band management, each side of a radio link must be in a different IP subnet. Using in-
band management lets you enable two browsers to be viewed on a PC at the same time.
The following is an example of two browsers enabled for two different radios.
The browser for each radio is opened using the IP address of that radio.
Setting Up Static Route for Remote Access to Far End Radio
To access the far radio from a near-side computer, set that computer’s default gateway to 10.0.0.1, or configure
a permanent static route on your computer to access the 10.10.0.0 network through 10.0.0.1. This is more
useful if you are using the Internet and do not want to change the default gateway of your computer. Having the
two ends of a hop on different subnets lets the end user enable two browsers to be presented on a PC screen at
the same time. The browser for the near-end radio is opened using the IP address of the near-end radio. A
second browser is opened using the IP address of the far-end radio. It finds the far-end radio using the near-
end radio as a gateway.
Using the MS-DOS Prompt under Windows, enter the command
route add 10.10.0.0 mask 255.255.0.0 10.0.0.1.
Chapter 3. Managing the Lynx.GX 36
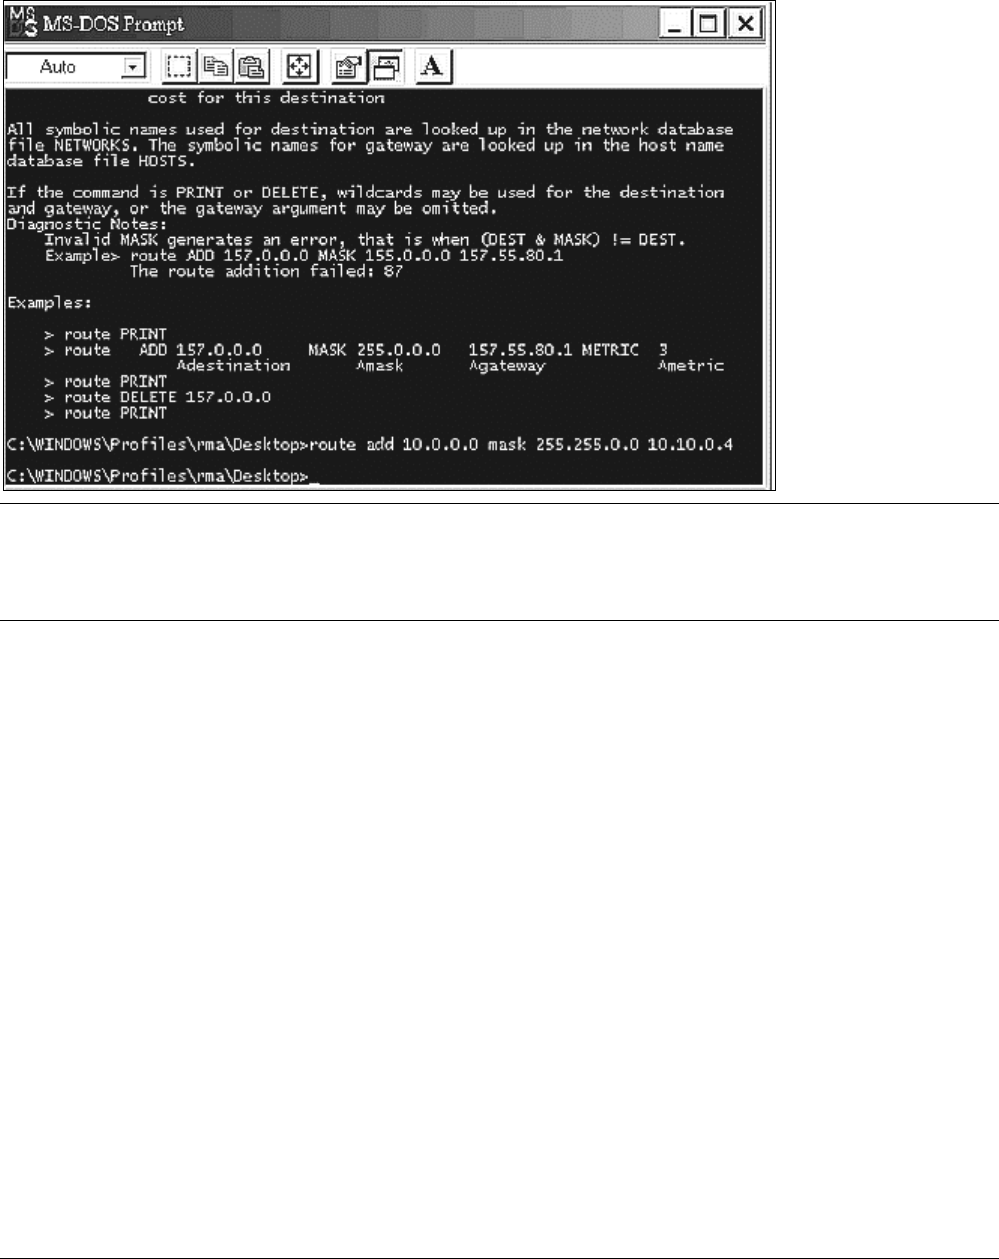
Lynx.GX Installation and Management
This example uses the default addresses of 10.0.0.1 for the near end radio, and 10.10.0.x for the far end radio.
This is a temporary static route. To make it permanent, add this as a batch file to run at system startup. The
GX radios use RIP to learn routes automatically in your network. Remember, this extended NMS network is
available only while the wireless link is up.
Note: If both radios are set to the same IP subnet, no NMS data passes across the wireless link and
management of both units at the same time requires another network path. In this setup, the end user
has the near-end and the far-end status through the near-end browser, but cannot change configuration
of the far-end radio from the near-end radio. This is not a recommended means to manage the radios.
Helpful Configuration Hints
▪ You must set Tx Power to meet required EIRP limits or RSL requirements.
▪ You must set IP Address and Subnet Mask to conform to your network. You also must set the Default
Gateway Address if your monitoring stations will be on a different IP subnet from the GX radio.
▪ If you have a T1 radio, you must set the appropriate Line Code and Line Buildout setting.
▪ To aid in troubleshooting possible problems, Proxim recommends you set System Date and Time to provide
correct timestamps for Log Messages.
▪ For greater security, Proxim recommends changing the Configuration Password. Also, use a unique Link
Security Code for each link of radios.
▪ To avoid alarms on unused channels, Proxim recommends disabling the Input Alarm on all unused
channels.
Chapter 3. Managing the Lynx.GX 37

Lynx.GX Installation and Management
Basic Tasks with the Web Interface
The following sections introduce you to the Web Interface and the tasks that can be accomplished with each
window. For more in-depth information about the Web Interface windows, see “Web Interface Windows and
Field Descriptions” on page 56.
Task Quick Reference
To view or monitor: Click this tab: To view or monitor: Click this tab:
All or selected status alarms LOG Radio sync alarm ALARMS
Application software version DEVICE RF receive frequency DEVICE
BER (current) STATUS RF software version DEVICE
Bit error alarm ALARMS RF transmit frequency DEVICE
Boot software version DEVICE RFU serial number DEVICE
Data rate DEVICE RSL reading of radio over time STATUS/RSL button
Elapsed time since reset STATUS RSL (current) STATUS
Errored seconds STATUS RSL (max) STATUS
External Input Alarm ALARMS RSL (min) STATUS
Fan summary alarm ALARMS RSL (min) timestamp STATUS
IDU serial number DEVICE Severely errored seconds STATUS
IDU temperature STATUS Spectrum Analyzer ADMIN
Interface type DEVICE Status alarms, all or selected LOG
Major relay alarm ALARMS T-1/E-1 AIS ALARMS
Minor relay alarm ALARMS T-1/E-1 Input ALARMS
Model number DEVICE
To configure: Click this tab: To configure: Click this tab:
Alarm external inputs SYS CFG IP address ADMIN
Auxiliary port speed SYS CFG Link Security code SYS CFG
Date and time, system ADMIN Orderwire address SYS CFG
Default gateway address ADMIN System passwords ADMIN
SNMP Community Strings ADMIN T1/E1 settings INTF CFG
Tx Power SYS CFG
Chapter 3. Managing the Lynx.GX 38
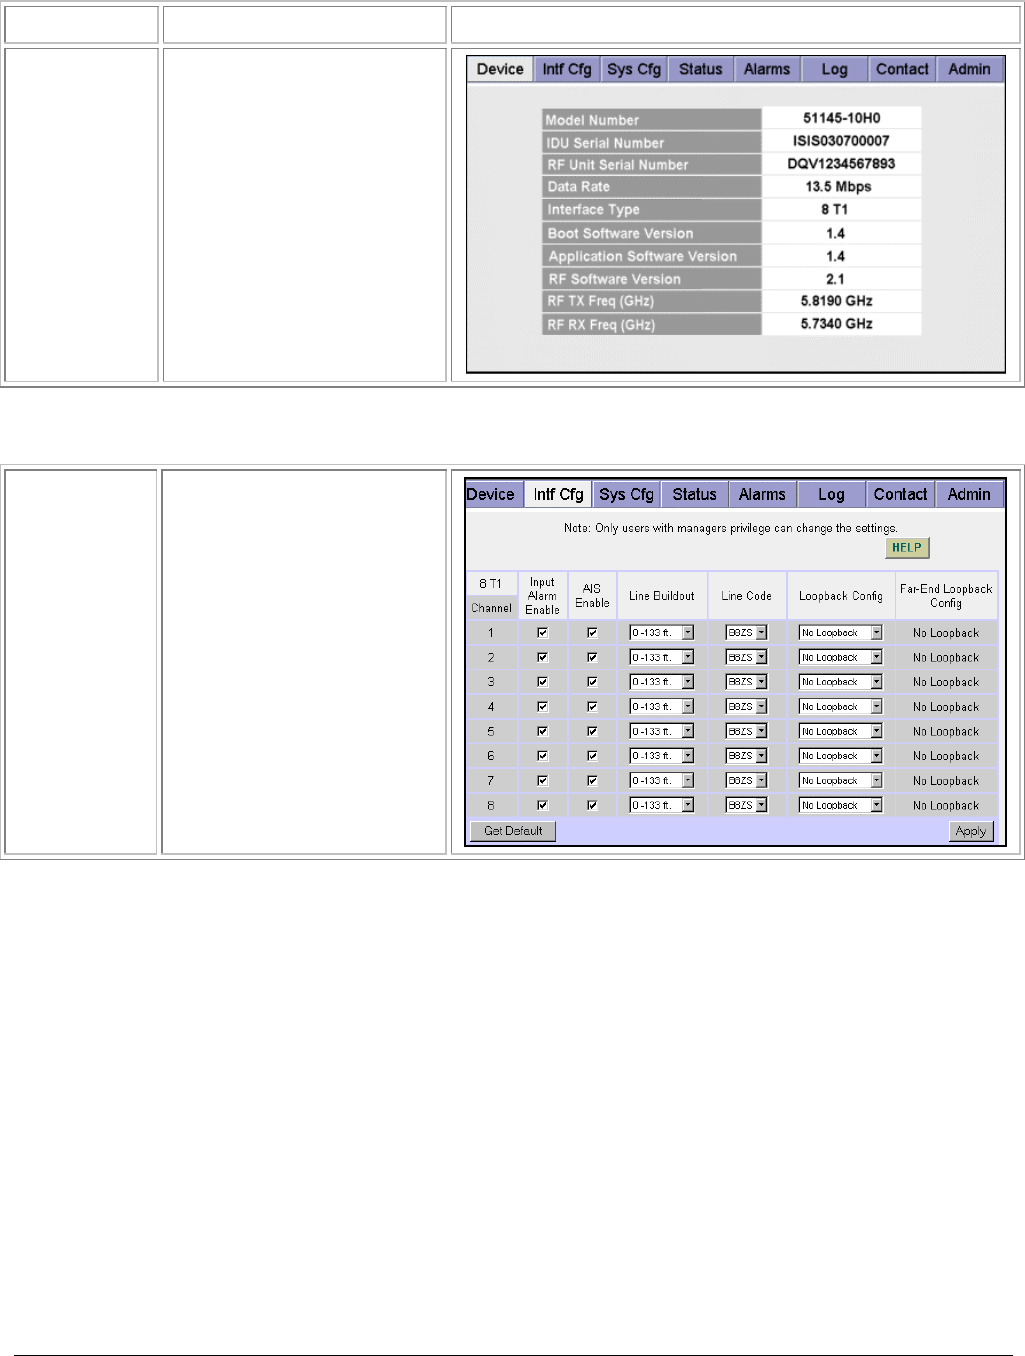
Lynx.GX Installation and Management
Viewing Radio Information
Use this tab: To do this: Window
Device Tab
on page 56
Access radio information,
such as model and serial
numbers, data rate and
frequency, interface type,
and software version levels.
The fields in this window are
not configurable.
Modifying T1 / E1 Channel Interface Configurations
Intf Cfg Tab
on page 57
Modify the T1 or E1
channel interface
configurations, including
line build-out, line code, and
loopback configuration.
Chapter 3. Managing the Lynx.GX 39
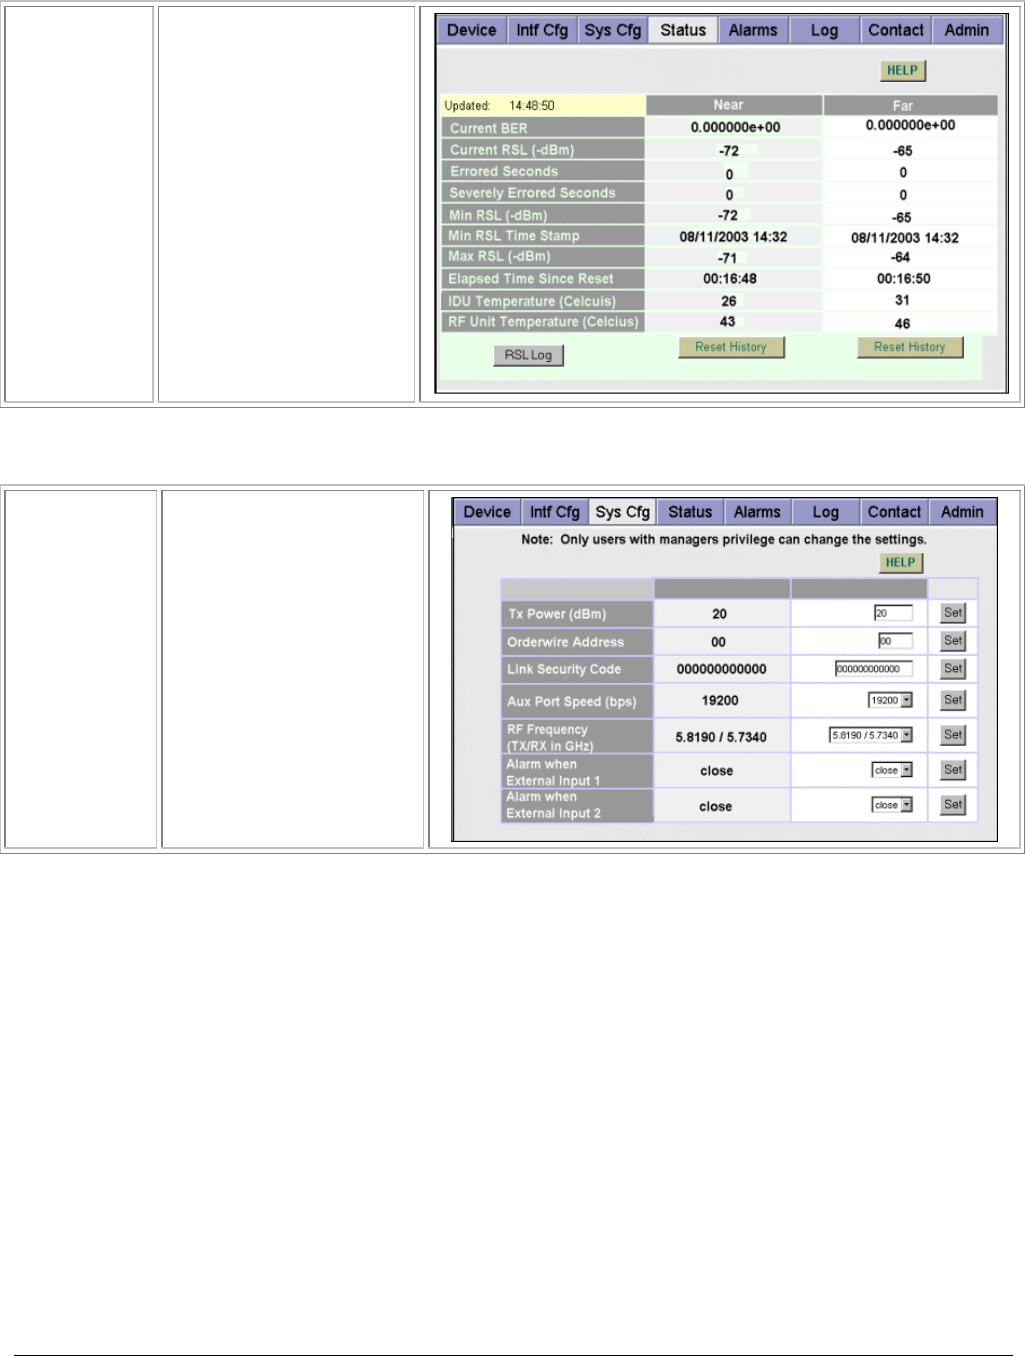
Lynx.GX Installation and Management
Viewing the Current Near and Far Status
Status Tab
on page 59
View the current Near
and Far status for the
selected unit, including
BER, errored seconds,
RSL, elapsed time since
reset, and temperature.
You also can track the
RSL reading of the radio
over time by clicking the
RSL Log button on the
Status window.
The fields on this window
are not configurable.
See “RSL Log” on page
60 for more information.
Configuring System Parameters
Sys Cfg Tab
on page 58
Configure Tx power,
orderwire address,
security link ID, aux port
speed, RF frequency
settings, and External
Alarms
Chapter 3. Managing the Lynx.GX 40
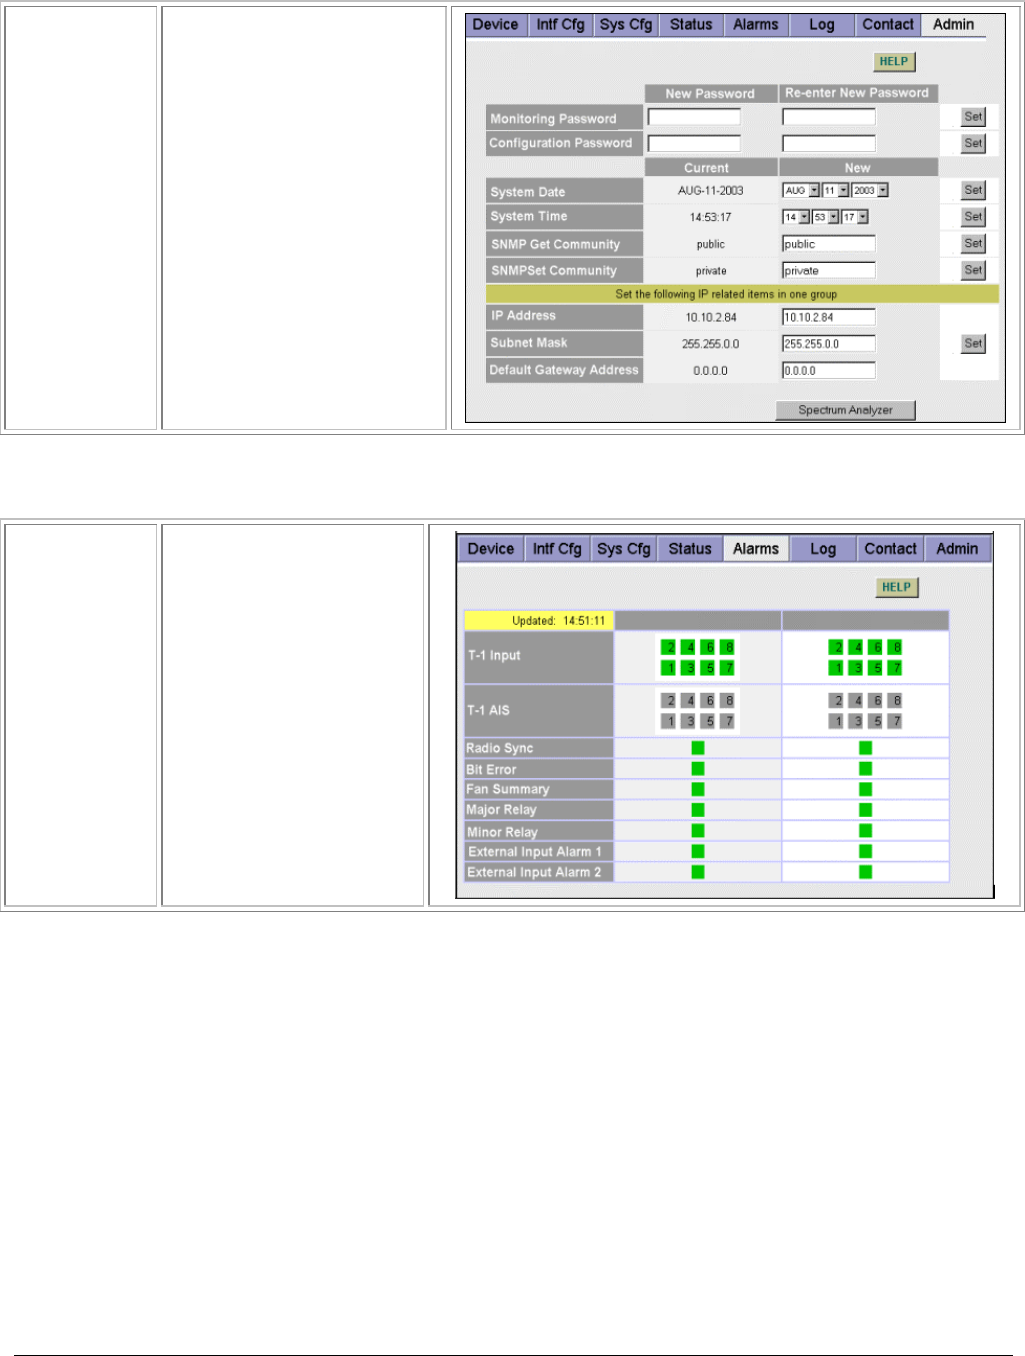
Lynx.GX Installation and Management
Changing Passwords, System Date and Time, SNMP Community Strings, and IP Address
Admin Tab
on page 64
Change the system
passwords, system date
and time, SNMP
community strings, and
radio IP address
information.
You can also enable the
built-in Spectrum Analyzer to
check for transmission
sources that the radio can
receive and to determine
whether these emitters could
be a source of possible
interference (click the
Spectrum Analyzer button
on the Admin window).
Monitoring Link Alarms
Alarms Tab
on page 61
Monitor link status —
both near-end and far-end
link alarm status. The
orientation of the alarms
matches the position of
the connectors on the front
panel.
Chapter 3. Managing the Lynx.GX 41
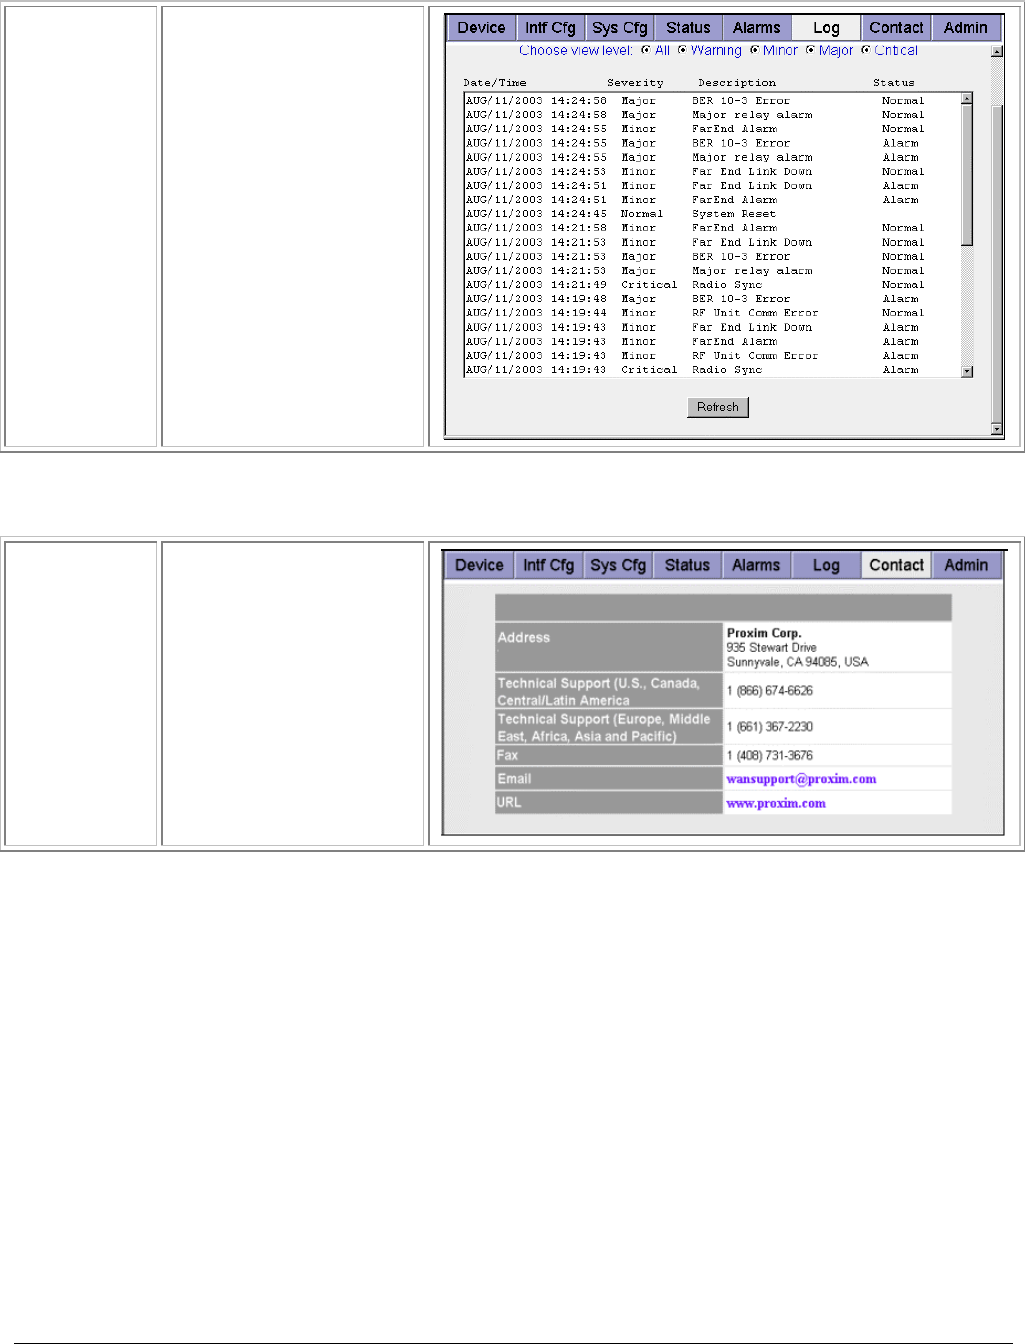
Lynx.GX Installation and Management
Viewing All or Selected Status and Alarms
Log Tab
on page 62
View all or selected
status and alarms for the
radio. You can view
alarms of all levels or
selected levels and
greater.
Viewing Proxim Support Information
Contact Tab
on page 64
View Proxim Support
information (see
“Technical Support” on
page 100)
Chapter 3. Managing the Lynx.GX 42
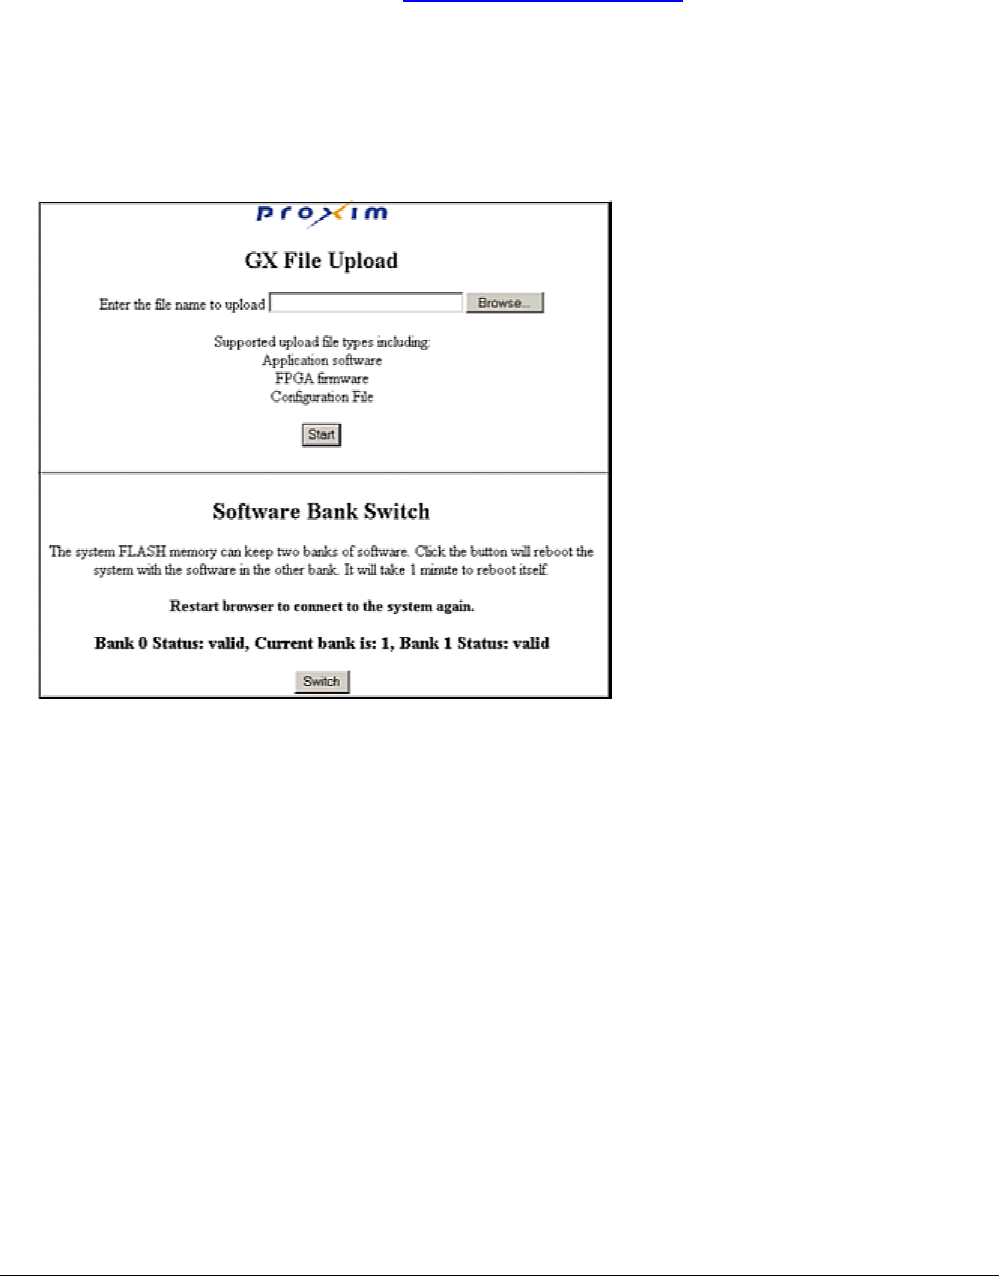
Lynx.GX Installation and Management
Uploading Software
You can upload the most recent version of the application software. To upload a file:
1. Download the most recent software from http://www.proxim.com/support/.
2. Connect the PC with the new software to the radio terminal through the NMS.
3. At your browser’s address field, enter http://<IP address>/upload.htm, or select File Upload from the
Admin tab. (For factory default, use 10.0.0.1 for the IP address.)
4. If not already logged in, enter the default “managers” username and the appropriate password; the
following Web page is displayed.
5. Enter the name and location of the file you want to upload, or click Browse and select the file location.
6. Click Start. For software or firmware, the file is uploaded to the unused Bank. Make note of the Current
bank number for reference. (The radio has two banks of flash memory available: Bank 0 and Bank 1. Only
one bank is in use at a time. After uploading, the radio automatically switches to the bank holding the newly
uploaded software. )
Once software upload is complete, the following message is displayed:
File upload finished and system will reboot! Restart browser to logon again.
You will need to wait one minute for the radio to restart. Close both browser windows and restart your browser.
You may complete steps 1 through 3 to ensure the newly uploaded Bank is valid and is the current Bank in use.
To use the previous software version, you can manually switch between banks by clicking the Switch button;
after switching between Banks, you must close and restart the browser after waiting for the radio to reboot. If a
Bank is marked invalid, you cannot switch to that Bank and should upload the latest software to that bank. A
Bank may become invalid if a software upload was interrupted.
Chapter 3. Managing the Lynx.GX 43
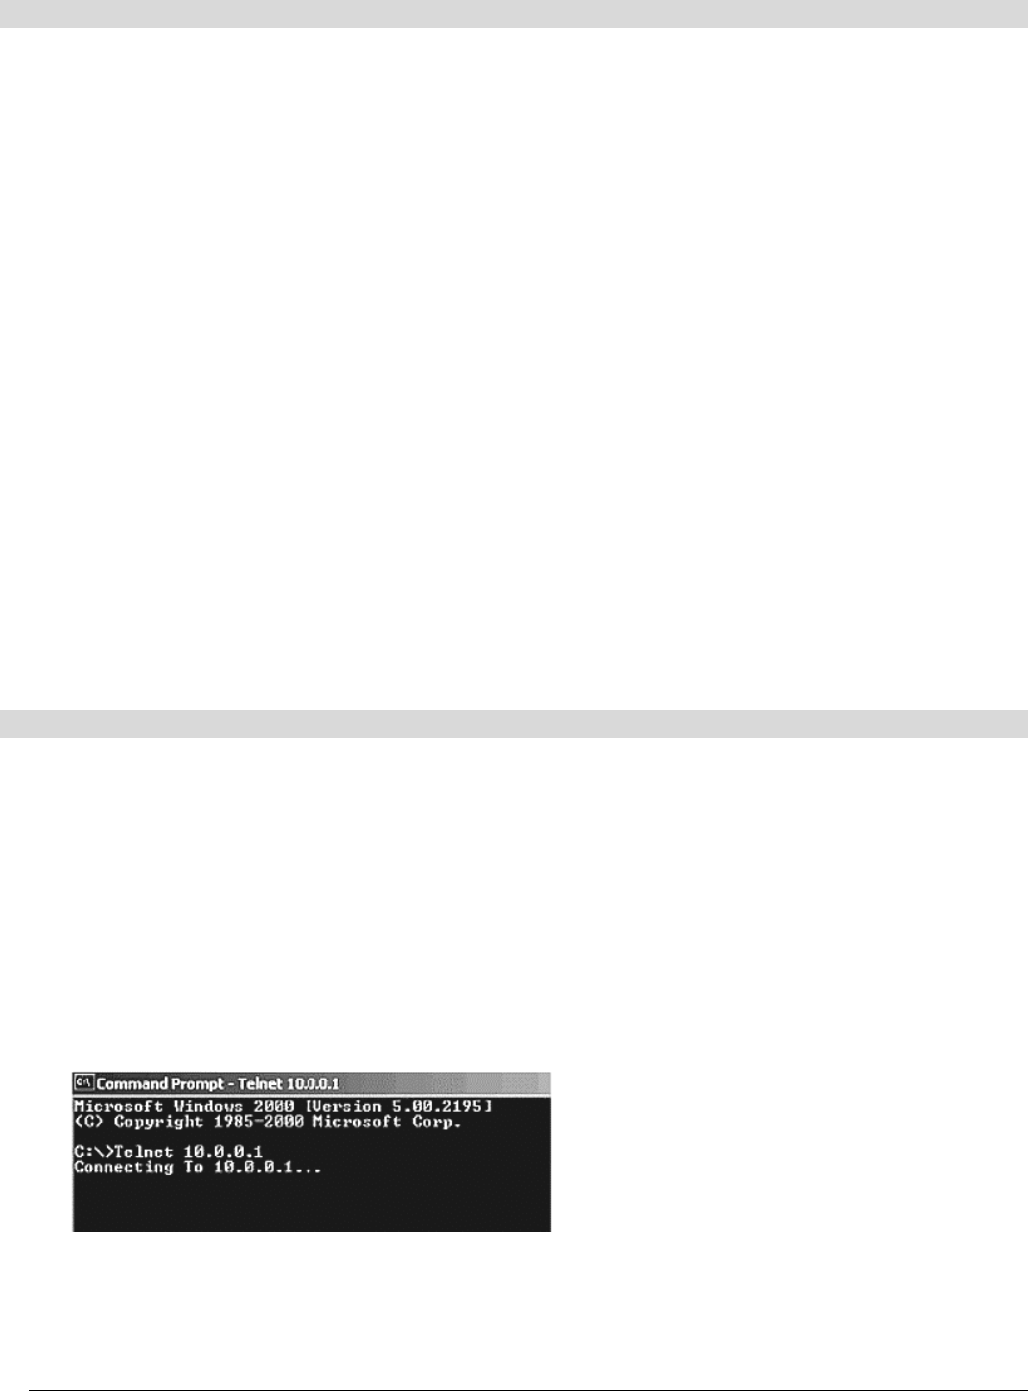
Lynx.GX Installation and Management
MANAGING WITH SNMP
The radios support SNMP version 2C and earlier. All SNMP traffic, including traps, SET commands, and GET
commands, are sent and received through the NMS whether locally or through the in-band PPP link. See
“Planning NMS Configuration” on page 33 to configure the NMS network.
Requirements
▪ A copy of the Proxim MIB files are required to configure and manage the radios using SNMP. There is a
generic MIB for all GX radios (g4_generic.mib) and a more interface-specific MIB file per the specific radio
and its interfaces (for example, the file if_t1e1.mib is used for the Lynx.GX model radios).
▪ A workstation running an SNMP manager such as HP OpenView, Castle Rock SNMPc, or Ipswitch
WhatsUp Gold.
Install the MIB in the SNMP Manager
Follow the instructions provided with the SNMP Management software to load and compile the generic MIB and
the specific interface MIB for the radio onto the SNMP Network Manager. The MIBs contain all the traps and
configuration variables for the radio SNMP agent. These MIBs are included in the CD that ships with the unit.
Network Connections
Use a ping utility to make sure your SNMP Manager can communicate with the radios. Configure the radio’s
SNMP Community strings using the Web interface Admin page or through the CLI interface.
These radios support many of the RFC1213 functions, and the enterprise MIBs allow monitoring and configuring
of boot, clock, trap, authentication, log, device, status, performance, and configuration information.
MANAGING WITH TELNET
You can use the command line interface (CLI) through Telnet to assign the radio new IP information, change the
password, change SNMP community strings, and view some radio status information.
Starting a Session
To start a Telnet session through the NMS port:
1. From Windows, open a Command Prompt, or MS-DOS Prompt (Start Î Run…).
2. Enter the following at the command line of the command prompt window:
c:\>Telnet <IP address>
3. Telnet issues a connection message;
4. When prompted, enter managers as the username and managers as the password (or your assigned
password).
Chapter 3. Managing the Lynx.GX 44
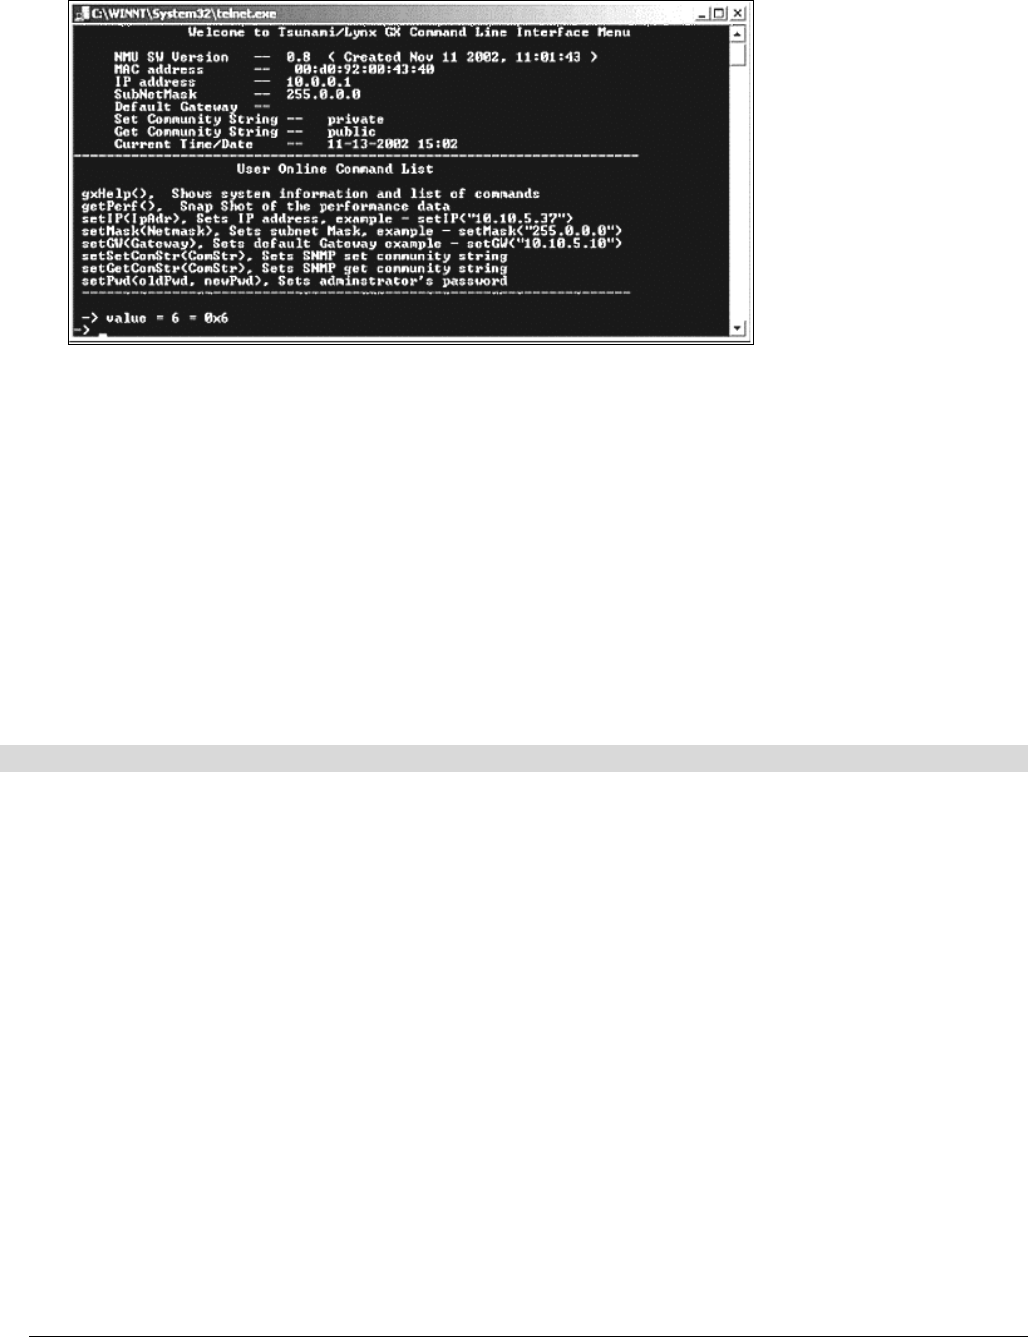
Lynx.GX Installation and Management
5. Enter gxHelp to view available commands, as shown in the following figure:
To end a Telnet session use the logout command. A config port session is unavailable until any telnet session
has ended.
CLI Commands
These are the CLI commands you can use:
gxHelp ............................................... Shows system information and list of commands.
getPerf ............................................. Snapshot of the performance data.
setIP(“IpAdr”) .............................. Sets IP address; example: setIP (“10.10.5.37”)
setMask (“Netmask”) ................... Sets subnet mask; example: setMask (”255.0.0.0”)
setGW (“Gateway”)........................ Set to default gateway; example: setGW(”10.10.5.10”)
setSetComStr (“ComStr”)........... Sets SNMP set community string
setGetComStr (“ComStr”)........... Sets SNMP get community string
SetPwd (“oldPwd”, “newPwd”).. Sets administrator’s password
MAINTAINING THE RADIO
The radio does not require any regular maintenance. However, it is prudent to monitor the radio link at regular
intervals to ensure that the link conditions are not changing. When visiting a radio site for maintenance, you
should check the following items and record the results:
▪ RSL voltage
▪ Power setting (NMS)
▪ Far-end RSL voltage
▪ Alarm conditions
Be sure to verify that the unit has adequate ventilation.
If any alarm conditions exist, record them. See “Troubleshooting Alarms” on page 95.
Proxim recommends you review the radio’s Log and Status pages to view whatever alarms and changes in
performance have occurred since the last maintenance interval. Download the log or perform a ‘print screen’
with your computer to keep a record of the performance for your maintenance records.
Proxim also recommends that the antenna system be inspected annually. This inspection should include
inspection of mounting hardware for tightness and corrosion, condition of the weatherseal on all RF
connections, and integrity of ground connections on cable and surge suppressor.
Chapter 3. Managing the Lynx.GX 45