Psion 7525RA2025 HAND HELD COMPUTER WITH WLAN User Manual 8000024 Book
Psion Inc HAND HELD COMPUTER WITH WLAN 8000024 Book
Psion >
Contents
- 1. USERS MANUAL 1
- 2. USERS MANUAL 2
- 3. USERS MANUAL 3
- 4. USERS MANUAL 4
USERS MANUAL 1
I
SO 9001 Certified
Quality Management System
WORKABOUT PRO M/C
Hand-Held Computer
User Manual
August 6, 2004 Part No. 8000024.B
© Copyright 2004 by Psion Teklogix Inc., Mississauga, Ontario
This document and the information it contains is the property of Psion Teklogix Inc.,
is issued in strict confidence, and is not to be reproduced or copied, in whole or in
part, except for the sole purpose of promoting the sale of Teklogix manufactured
goods and services. Furthermore, this document is not to be used as a basis for
design, manufacture, or sub-contract, or in any manner detrimental to the interests
of Psion Teklogix Inc.
All trademarks are the property of their respective holders.
Return-To-Factory Warranty
Psion Teklogix warrants a return-to-factory warranty for a period of one year. In
some regions, the warranty exceeds this period. Please contact your local Psion Tek-
logix office for details. For a list of offices, see
Appendix A: Support Services And
Worldwide Offices
. The warranty on Psion Teklogix manufactured equipment does
not extend to any product that has been tampered with, altered, or repaired by any
person other than an employee of an authorized Psion Teklogix service organization.
See Psion Teklogix terms and conditions of sale for full details.
Service
When requesting service, please provide information concerning the nature of the
failure and the manner in which the equipment was used when the failure occurred.
Type, model, and serial number should also be provided. Before returning any prod-
ucts to Psion Teklogix, please call the Customer Services Group for a Return Autho-
rization number.
Support Services
Psion Teklogix provides a complete range of product support services to its custom-
ers. For detailed information, please refer to
Appendix A: Support Services And
Worldwide Offices
. This section also provides information about accessing support
services through the Psion Teklogix web site.
Disclaimer
Every effort has been made to make this material complete, accurate, and up-to-date.
Psion Teklogix Inc. reserves the right to make changes without notice and shall not
be responsible for any damages, including but not limited to consequential damages,
caused by reliance on the material presented, including but not limited to typograph-
ical errors.

Psion Teklogix WORKABOUT PRO Hand-Held Computer User Manual
i
T
ABLE
OF
C
ONTENTS
Program License Agreements
..............................I
Approvals And Safety Summary
...........................IX
Chapter 1: Introduction
1.1 About This Manual ............................3
1.2 Text Conventions .............................4
1.3 About The WORKABOUT PRO Hand-Held Computer .........4
1.3.1 Features...............................4
1.3.2 The WORKABOUT PRO Hand-Held Computer .........9
1.3.3 Regulatory Labels .........................10
Chapter 2: Basic Checkout
2.1 Preparing The WORKABOUT PRO For Operation ...........15
2.1.1 The Main Battery..........................15
2.1.2 Charging The Battery .......................15
2.1.3 The Internal Battery ........................15
2.2 Turning The WORKABOUT PRO On and Off..............15
2.2.1 Installing The Battery And Switching The Unit On ........15
2.2.2 Switching The Unit Off (Suspend).................16
2.3 Connecting The WORKABOUT PRO To A PC .............16
2.3.1 Using Microsoft® ActiveSync® To Work With Files.......16
2.4 Calibrating The Touchscreen .......................17
2.5 Resetting The WORKABOUT PRO Hand-Held .............17
Chapter 3: Getting To Know The WORKABOUT PRO
3.1 Features Of The WORKABOUT PRO ..................21
3.2 The Batteries ...............................22
3.2.1 Battery Safety ...........................23
Contents
ii
Psion Teklogix WORKABOUT PRO Hand-Held Computer User Manual
3.2.2 Removing And Installing The Battery Pack ...........23
3.2.3 Charging The Battery .......................24
3.3 Switching The Hand-Held On And Off .................25
3.4 The Keyboard ..............................26
3.4.1 Modifier Keys...........................27
3.4.1.1 Activating Modifier Keys................27
3.4.1.2 Locking Modifier Keys.................27
3.4.2 The Keys .............................27
3.4.3 The Keypad Backlight ......................29
3.5 The Display ...............................29
3.5.1 Colour Display ..........................29
3.5.2 Monochrome Display.......................30
3.5.3 Calibrating The Touchscreen ...................30
3.6 Indicators.................................31
3.6.1 The LED .............................31
3.6.2 Onscreen Indicators........................32
3.6.3 Audio Indicators .........................34
3.6.3.1 Adjusting The Speaker Volume ............35
3.7 Monitoring The Battery And Maximizing Run Time ..........35
3.7.1 Storing Batteries .........................36
3.8 Uploading Data In A Docking Station..................36
3.9 Bluetooth Radio .............................37
3.10 The SD/MMC Card – Adding Memory .................37
3.10.1 Inserting The Card ........................37
3.11 General Maintenance ..........................39
3.11.1 Caring For The Touchscreen ...................39
3.11.2 Cleaning The WORKABOUT PRO ...............39
Chapter 4: Working With Windows CE .NET
4.1 Navigating In Windows CE .NET And Applications ..........43
4.1.1 Navigating Using A Touchscreen And Stylus ..........43
4.1.2 Navigating Using The Keyboard .................43
4.2 Working With Files, Folders And Programs ...............44
4.3 The Startup Desktop ...........................44
4.3.1 The Desktop Icons ........................45
4.3.2 The Taskbar............................46
Psion Teklogix WORKABOUT PRO Hand-Held Computer User Manual
iii
Contents
4.3.2.1 Using The Taskbar ....................46
4.3.2.2 Customizing The Taskbar ................46
4.4 The Start Menu ..............................47
4.4.1 The Desktop ............................48
4.4.2 Security Settings ..........................48
4.4.3 The System Tray ..........................49
4.4.4 The Task Manager .........................50
4.4.5 Cycle Tasks.............................50
4.4.6 Power Info .............................50
4.4.7 Programs ..............................51
4.4.8 Settings ...............................52
4.4.9 Run .................................53
4.4.10 Shutdown..............................54
4.5 Using A Dialogue Box ..........................55
Chapter 5: Configuration
5.1 Remote Desktop Connection .......................59
5.2 Pocket PC Compatibility .........................59
5.3 The Control Panel .............................59
5.4 Control Panel Icons ............................60
5.5 Basic Setup ................................64
5.5.1 Display Properties .........................64
5.5.1.1 Display Contrast .....................64
5.5.1.2 Display Backlight ....................65
5.5.1.3 Display Appearance ...................66
5.5.2 Keyboard Properties ........................67
5.5.2.1 Key Repeat........................67
5.5.2.2 Keyboard Backlight ...................68
5.5.2.3 Keyboard One Shot Modes ...............69
5.5.2.4 Keyboard Macro Keys ..................70
5.5.2.5 Unicode Mapping ....................71
5.5.3 Volume And Sound Properties...................73
5.5.3.1 Volume Adjustments...................73
5.5.4 Power Management Properties...................74
5.5.4.1 Battery Capacity .....................74
5.5.4.2 Power Saving Schemes .................75
5.5.5 Stylus Properties ..........................76
5.5.5.1 Setting Double-Tap Sensitivity .............76
Contents
iv
Psion Teklogix WORKABOUT PRO Hand-Held Computer User Manual
5.5.5.2 Touchscreen Calibration ................77
5.5.5.3 Touchscreen Options ..................77
5.5.6 Certificate Assignment ......................77
5.6 Bluetooth Setup .............................78
5.6.1 The Devices Tab .........................79
5.6.2 The Server Tab ..........................82
5.6.3 The Property Tab .........................83
5.6.4 The Bluetooth GPRS Phone ...................84
5.7 SNMP (Simple Network Management Protocol) Setup.........90
5.7.1 Contact Tab ............................91
5.7.2 Communities Tab .........................92
5.7.2.1 Adding A Community .................93
5.7.2.2 Modifying A Community Setting ...........94
5.7.2.3 Removing An Existing Community ..........94
5.7.3 Trap Destination Tab .......................95
5.7.3.1 Enabling Authentication TRAPS............95
5.7.3.2 Adding A Destination .................95
5.7.3.3 Changing A Destination ................96
5.7.3.4 Removing A Trap Destination .............96
5.7.4 Permitted Hosts Tab .......................97
5.7.4.1 Adding A Host .....................97
5.7.4.2 Changing A Host ....................98
5.8 Total Recall ...............................98
5.8.1 Creating A Backup Profile ....................99
5.8.2 Restoring A Profile ........................102
5.9 APN Manager Settings .........................102
5.9.1 Automatic GSM Setup – Connecting To The Network .....102
5.9.2 Manual GSM Setup – APN Settings Manager ..........103
5.9.3 PIN Settings............................105
Chapter 6: Connecting To A LAN With 802.11b
6.1 Installing The 802.11b Radio ......................109
6.2 Connecting To A LAN Using An 802.11b Radio ............111
6.2.1 Configuring An IEEE 802.11b Radio ..............111
6.2.2 Assigning An IP Address .....................117
6.2.3 Name Servers Tab ........................118
6.2.4 Advanced Features ........................118
Psion Teklogix WORKABOUT PRO Hand-Held Computer User Manual
v
Contents
6.2.4.1 Rearranging Preferred Networks ...........119
6.2.4.2 Deleting A Preferred Network.............119
6.2.4.3 Changing Network Properties .............119
Chapter 7: Expansion Modules
7.1 Expansion Modules ...........................123
7.1.1 Removing The End-Cap And Back Plate ............123
7.1.2 What’s Inside...........................124
7.1.3 Shutting Off Power........................125
7.1.4 Installing The PCMCIA Module.................125
7.1.5 Installing A GSM/GPRS Module ................127
7.1.6 Installing An SE 1223HP Scanner ................128
Chapter 8: Peripheral Devices & Accessories
8.1 Carrying Accessories ..........................133
8.1.1 Attaching The Hand Strap ....................133
8.1.2 Attaching The Pistol Grip ....................135
8.1.3 Protective Carrying Case.....................136
8.1.3.1 Using The Swivel Belt Loop With The Carrying Case 137
8.1.4 Soft Shell Holster.........................139
8.2 The Batteries ..............................140
8.2.1 Lithium Ion Battery Safety Precautions .............140
8.3 Chargers And Docking Stations.....................141
8.3.1 Installation – Chargers And Docking Stations ..........142
8.3.2 Power Consumption Considerations ...............142
8.3.3 Operator Controls ........................142
8.3.4 Important Charger Safety Instructions ..............142
8.4 Desktop Docking Station – Model #WA4002 .............144
8.4.1 Charging A Battery Installed In The WORKABOUT PRO. . . 145
8.4.2 Charging A Spare Battery ....................145
8.4.3 Battery Charge Duration .....................145
8.4.4 Charger LED Indicators .....................145
8.4.5 Troubleshooting The Charging Operation Of The Dock ....146
8.4.6 Desktop Docking Station Ports .................146
8.4.7 Linking A WORKABOUT PRO To A PC ...........146
8.4.7.1 Using Microsoft® ActiveSync® To Work With Files . 147
Contents
vi
Psion Teklogix WORKABOUT PRO Hand-Held Computer User Manual
8.4.8 Linking A WORKABOUT PRO To An Ethernet Network . . .147
8.4.8.1 Network Access ....................148
8.4.9 Troubleshooting The Docking Station Operations ........148
8.5 Single Battery Charger – Model #WA3001 ...............148
8.5.1 Inserting A Battery In The Single Battery Charger........149
8.5.2 Battery Charge Duration .....................149
8.5.3 Charge Indicators – The LED...................149
8.6 Quad Battery Charger – Model #WA3004................150
8.6.1 Charging Batteries ........................150
8.6.2 Battery Charge Duration .....................150
8.6.3 Charge Indicators – The LEDs ..................150
8.6.4 Troubleshooting..........................151
8.6.4.1 Excessive Charge Duration...............151
8.6.4.2 Indicator Flashing Red .................151
8.6.4.3 Power LED Does Not Light Up ............151
8.6.4.4 Indicator Does Not Light When Battery Installed . . .152
8.7 Quad Docking Station – Model #WA4004 ...............152
8.7.1 Quad Docking Station Setup ...................153
8.7.2 Quad Indicators ..........................153
8.7.3 Inserting A WORKABOUT In The Quad Docking Station . . .153
8.7.4 Network Access..........................153
8.7.4.1 Network Addressing ..................154
8.7.5 Battery Charging – LED Behaviour ...............154
8.7.6 Troubleshooting..........................154
8.7.6.1 Network Link Unsuccessful ..............154
8.7.6.2 Hand-Held LED Does Not Light When Docked....154
8.8 AC Wall Adaptor And Tether Cable ...................155
8.9 Automotive Adaptor ...........................156
8.10 The Vehicle Cradle............................157
8.10.1 Vehicle Cradle Mounting Recommendations ..........157
8.10.1.1 Mounting Template...................158
8.10.2 Wiring Guidelines ........................158
8.10.3 Using The Vehicle Cradle ....................158
8.10.4 Maintaining The Vehicle Cradle .................159
8.10.5 Powered Cradle Installation In High Voltage Vehicles .....159
8.10.6 Powered Vehicle Cradle Installation ...............160
8.10.6.1 Wiring Vehicle Power To The Cradle .........160
Psion Teklogix WORKABOUT PRO Hand-Held Computer User Manual
vii
Contents
8.10.7 The Port Replicator........................161
8.11 Bluetooth Peripherals ..........................162
Chapter 9: Specifications
9.1 Hand-Held Computer Specifications ..................165
9.2 Radio Specifications...........................167
9.3 SE 1223HP Scanner Specifications ...................167
9.4 Battery Specifications ..........................168
9.4.1 Standard Battery Pack ......................168
9.4.2 High-Capacity Battery Pack ...................169
9.4.3 Maxell ML2032 Rechargeable Coin Battery ..........171
Appendix A: Support Services And Worldwide Offices
A.1 Technical Support ............................A-1
A.2 Product Repairs .............................A-1
A.3 Worldwide Offices............................A-2
Appendix B: Port Pinouts
B.1 Standard Battery Contact Pin Definition ................B-1
B.2 High-Capacity Battery Contact Pin Definition .............B-1
B.3 LIF (Low Insertion Force) Port Pinout .................B-2
B.4 Tether Port Pinout ............................B-2
B.5 Audio Mini-Plug ............................B-3
Appendix C: USB Setup Application
C.1 USB Setup................................C-1
C.1.1 Launching The Application ...................C-1
C.1.2 Pre-Installation: Updating usbstor.inf And wceusbsh.inf ....C-2
C.1.3 Installation: WORKABOUT PRO As A Device On Your PC . C-4
C.1.4 Post Installation .........................C-5

Psion Teklogix WORKABOUT PRO Hand-Held Computer User Manual
I
P
ROGRAM
L
ICENSE
A
GREEMENTS
Microsoft's End User License Agreement
You have acquired a device (“DEVICE”) that includes software licensed by Psion
Teklogix Inc. from Microsoft Licensing Inc. or its affiliates (‘MS”). Those installed
software products of MS origin, as well as associated media, printed materials, and
“online” or electronic documentation (“SOFTWARE”) are protected by interna-
tional intellectual property laws and treaties. The SOFTWARE is licensed, not sold.
All rights reserved.
IF YOU DO NOT AGREE TO THIS END USER LICENSE AGREEMENT
(“EULA”), DO NOT USE THE DEVICE OR COPY THE SOFTWARE.
INSTEAD, PROMPTLY CONTACT PSION TEKLOGIX INC. FOR INSTRUC-
TIONS ON RETURN OF THE UNUSED DEVICE(S) FOR A REFUND.
ANY
USE
OF THE SOFTWARE, INCLUDING BUT NOT LIMITED TO USE ON
THE DEVICE, WILL CONSTITUTE YOUR AGREEMENT TO THIS EULA
(OR RATIFICATION OF ANY
PREVIOUS CONSENT).
GRANT OF SOFTWARE LICENSE.
This EULA grants you the following
license:
• You may use the SOFTWARE only on the DEVICE.
•
NOT FAULT TOLERANT
. THE SOFTWARE IS NOT FAULT TOLER-
ANT. PSION TEKLOGIX INC. HAS INDEPENDENTLY DETER-
MINED HOW TO USE THE SOFTWARE IN THE DEVICE, AND MS
HAS RELIED UPON PSION TEKLOGIX INC. TO CONDUCT SUFFI-
CIENT TESTING TO DETERMINE THAT THE SOFTWARE IS SUIT-
ABLE FOR SUCH USE.
• NO WARRANTIES FOR THE SOFTWARE.
THE SOFTWARE is pro-
vided “AS IS” and
with all faults. THE ENTIRE RISK AS TO SATIS-
FACTORY QUALITY, PERFORMANCE, ACCURACY, AND
EFFORT (INCLUDING LACK OF NEGLIGENCE) IS WITH YOU.
ALSO, THERE IS NO WARRANTY AGAINST INTERFERENCE
WITH YOUR ENJOYMENT OF THE SOFTWARE OR AGAINST
License Agreement
II
Psion Teklogix WORKABOUT PRO Hand-Held Computer User Manual
INFRINGEMENT.
IF YOU HAVE RECEIVED ANY WARRANTIES
REGARDING THE DEVICE OR THE SOFTWARE, THOSE WARRAN-
TIES DO NOT ORIGINATE FROM, AND ARE NOT BINDING ON, MS.
•
Note on Java Support
. The SOFTWARE may contain support for pro-
grams written in Java. Java technology is not fault tolerant and is not
designed, manufactured, or intended for use or resale as online control
equipment in hazardous environments requiring fail-safe performance, such
as in the operation of nuclear facilities, aircraft navigation or communica-
tion systems, air traffic control, direct life support machines, or weapons
systems, in which the failure of Java technology could lead directly to
death, personal injury, or severe physical or environmental damage. Sun
Microsystems, Inc. has contractually obligated MS to make this disclaimer.
• No Liability for Certain Damages.
EXCEPT AS PROHIBITED BY
LAW, MS SHALL HAVE NO LIABILITY FOR ANY INDIRECT,
SPECIAL, CONSEQUENTIAL OR INCIDENTAL DAMAGES
ARISING FROM OR IN CONNECTION WITH THE USE OR PER-
FORMANCE OF THE SOFTWARE. THIS LIMITATION SHALL
APPLY EVEN IF ANY REMEDY FAILS OF ITS ESSENTIAL PUR-
POSE. IN NO EVENT SHALL MS BE LIABLE FOR ANY AMOUNT
IN EXCESS OF U.S. TWO HUNDRED FIFTY DOLLARS
(U.S.$250.OO).
•
Limitations on Reverse Engineering, Decompilation, and Disassembly.
You
may not reverse engineer, decompile, or disassemble the SOFTWARE,
except and only to the extent that such activity is expressly permitted by
applicable law notwithstanding this limitation.
•
SOFTWARE TRANSFER ALLOWED BUT WITH RESTRICTIONS.
You
may permanently transfer rights under this EULA only as part of a per-
manent sale or transfer of the Device, and only if the recipient agrees to this
EULA. If the SOFTWARE is an upgrade, any transfer must also include all
prior versions of the SOFTWARE.
•
EXPORT RESTRICTIONS.
You acknowledge that SOFTWARE is
subject to U.S. export jurisdiction. You agree to comply with all applicable
international and national laws that apply to the SOFTWARE, including the
U.S. Export Administration Regulations, as well as end-user, end-use and
destination restrictions issued by U.S. and other governments. For addi-
tional information see http://www.microsoft.com/exporting/.
Psion Teklogix WORKABOUT PRO Hand-Held Computer User Manual
III
License Agreement
Meetinghouse Data Communications, Inc. End User License Agreement
End User License Agreement:
ATTENTION: PLEASE READ THIS SOFTWARE LICENSE AGREEMENT
("LICENSE") CAREFULLY BEFORE INSTALLATION. USE OF THE SOFT-
WARE IS SUBJECT TO THE SOFTWARE LICENSE TERMS SET FORTH
BELOW. USING THE SOFTWARE INDICATES YOUR ACCEPTANCE OF
THESE LICENSE TERMS. IF YOU DO NOT ACCEPT THESE LICENSE
TERMS, YOU MUST RETURN THE SOFTWARE FOR A FULL REFUND. IF
THE SOFTWARE IS SUPPLIED WITH ANOTHER PRODUCT, YOU MAY
RETURN THE ENTIRE UNUSED PRODUCT FOR A FULL REFUND.
Software License Terms:
The following terms govern your use of the enclosed Software unless you have a
separate written agreement with Meetinghouse Data Communications, Inc. herein
also known as “MDC”.
License Grant:
MDC grants you a non-exclusive and non-transferable license to Use one copy of
the Software. "Use" means storing, loading, installing, executing or displaying the
Software. “Software” means software, documentation and any fonts accompanying
this License whether on disk, in read only memory, on any other media or in any
other form. You may not modify the Software or disable any licensing or control
features of the Software. If the Software is licensed for "concurrent use", you may
not allow more than the maximum number of authorized users to Use the Software
concurrently.
The Software is licensed as a "Shareware" version, on one computer only. You may
use the Software distributed and licensed as Shareware on a trial basis only. The
shareware version of the Software may be distributed freely without any associated
fees to other parties who wish to try the software as long as the Software is distrib-
uted within an exact copy of the original MDC self-extracting installation file. In
other words, nothing may be left out of the Shareware as distributed on MDC's web
site at http://www.mtghouse.com.
License Agreement
IV
Psion Teklogix WORKABOUT PRO Hand-Held Computer User Manual
All permanent licenses are prepaid and the Software is licensed to you by MDC.
You own the media on which the Software is recorded but MDC and/or MDC’s
licensor(s) retain title to the Software. The Software and any copies which this
License authorizes you to make are subject to this License.
Permitted Uses and Restrictions:
This License allows you to install and use the Software on a single computer at a
time. This License does not allow the Software to exist on more than one computer
at a time. You may make one copy of the Software in machine-readable form for
backup purposes only. The backup copy must include all copyright information con-
tained on the original. Except as expressly permitted in this License, you may not, in
whole or part, decompile, reverse engineer, disassemble, modify, rent, lease, loan,
sublicense, distribute or create derivative works based upon the Software, or trans-
mit the Software over a network. You may not copy the Software onto any bulletin
board or similar system. You agree that you will not utilize any information obtained
from MDC or obtained or learned in the course of using the Software, to develop or
improve technology with similar functionality to the Software, nor will you directly
or indirectly assist any other party in doing so. You further agree that you will not
separate the various modules of the software for their different purposes, if any.
High Risk Activities:
The Software is not fault-tolerant and is not designed, manufactured or intended for
use or resale as on-line control equipment in hazardous environments requiring fail-
safe performance, such as in the operation of nuclear facilities, aircraft navigation or
communication systems, air traffic control, direct life support machines, or weapons
systems, in which the failure of the Software could lead directly to death, personal
injury, or severe physical or environmental damage ("High Risk Activities").
Accordingly, MDC and its suppliers specifically disclaim any express or implied
warranty of fitness for High Risk Activities. You agree that MDC and its suppliers
will not be liable for any claims or damages arising from the use of the Software in
such applications.
Ownership:
The Software is licensed, not sold. The Software is owned and copyrighted by MDC
or its third party suppliers. Your license confers no title or ownership in the Software
and is not a sale of any rights in the Software. You acknowledge such ownership and
intellectual property rights and will not take any action to jeopardize, limit or inter-
fere in any manner with MDC's or its suppliers' ownership of or rights with respect
Psion Teklogix WORKABOUT PRO Hand-Held Computer User Manual
V
License Agreement
to the Software. The Software is protected by copyright and other intellectual prop-
erty laws and by international treaties. MDC's third party suppliers may protect their
rights in the event of any violation of these License Terms.
Termination:
Your rights under this License will terminate automatically without notice from
MDC if you fail to comply with any term(s) of this License. Upon termination, you
must immediately destroy the Software, together with all copies, adaptations and
merged portions in any form.
U.S. Government Restricted Rights:
The Software and documentation have been developed entirely at private expense
and are provided as "Commercial Computer Software" or "restricted computer soft-
ware". They are delivered and licensed as "commercial computer software" as
defined in DFARS 252.227-7013 (Oct 1988), DFARS 252.211-7015 (May 1991) or
DFARS 252.227-7014 (Jun 1995), as a "commercial item" as defined in FAR 2.101
(a), or as "Restricted computer software" as defined in FAR 52.227-19 (Jun 1987)
(or any equivalent agency regulation or contract clause), whichever is applicable.
You have only those rights provided for such Software and Documentation by the
applicable FAR or DFARS clause or the MDC standard software agreement for the
product.
Export Law Assurances:
You may not use or otherwise export or reexport the Software except as authorized
by United States law and the laws of the jurisdiction in which the Software was
obtained. In particular, but without limitation, the Software may not be exported or
reexported (i) into (or to a national or resident of) any U.S. embargoed country or
(ii) to anyone on the U.S. Treasury Department's list of Specially Designated
Nationals or the U.S. Department of Commerce's Table of Denial Orders. By using
the Software, you represent and warrant that you are not located in, under control of,
or a national or resident of any such country or on any such list.
Limited Warranty on Media: (if applicable)
MDC warrants the media on which the Software is recorded to be free from defects
in materials and workmanship under normal use for a period of ninety (90) days
from the date of original retail purchase. Your exclusive remedy under this para-
graph shall be, at MDC's option, a refund of the purchase price of the product con-
taining the Software or replacement of the Software which is returned to MDC or a
License Agreement
VI
Psion Teklogix WORKABOUT PRO Hand-Held Computer User Manual
MDC authorized representative with a copy of the receipt. THIS LIMITED WAR-
RANTY AND ANY IMPLIED WARRANTIES ON THE MEDIA INCLUDING
THE IMPLIED WARRANTIES OF MERCHANTABILITY AND FITNESS FOR
A PARTICULAR PURPOSE ARE LIMITED IN DURATION TO NINETY (90)
DAYS FROM THE DATE OF ORIGINAL RETAIL PURCHASE. SOME JURIS-
DICTIONS DO NOT ALLOW LIMITATIONS ON HOW LONG AN IMPLIED
WARRANTY LASTS, SO THIS LIMITATION MAY NOT APPLY TO YOU. THE
LIMITED WARRANTY SET FORTH HEREIN IS EXCLUSIVE AND IN LIEU
OF ALL OTHERS, WHETHER ORAL OR WRITTEN, EXPRESS OR IMPLIED.
LICENSOR SPECIFICALLY DISCLAIMS ALL OTHER WARRANTIES. THIS
LIMITED WARRANTY GIVES YOU SPECIFIC LEGAL RIGHTS, AND YOU
MAY ALSO HAVE OTHER RIGHTS WHICH VARY BY JURISDICTION.
Disclaimer of Warranty on Software:
You expressly acknowledge and agree that use of the Software is at your sole risk.
The Software is provided "AS IS" and without warranty of any kind and MDC and
MDC’s licensor(s) (for the purposes of warranty and liability, MDC and MDC's
licensor(s) shall be collectively referred to as "MDC") EXPRESSLY DISCLAIM
ALL WARRANTIES AND/OR CONDITIONS, EXPRESS OR IMPLIED,
INCLUDING, BUT NOT LIMITED TO, THE IMPLIED WARRANTIES
AND/OR CONDITIONS OF MERCHANTABILITY OR SATISFACTORY
QUALITY AND FITNESS FOR A PARTICULAR PURPOSE AND NONIN-
FRINGEMENT OF THIRD PARTY RIGHTS. LICENSOR DOES NOT WAR-
RANT THAT THE FUNCTIONS CONTAINED IN THE SOFTWARE WILL
MEET YOUR REQUIREMENTS, OR THAT THE OPERATION OF THE SOFT-
WARE WILL BE UNINTERRUPTED OR ERROR-FREE, OR THAT DEFECTS
IN THE SOFTWARE WILL BE CORRECTED. FURTHERMORE, LICENSOR
DOES NOT WARRANT OR MAKE ANY REPRESENTATIONS REGARDING
THE USE OR THE RESULTS OF THE USE OF THE SOFTWARE OR
RELATED DOCUMENTATION IN TERMS OF THEIR CORRECTNESS,
ACCURACY, RELIABILITY, OR OTHERWISE. NO ORAL OR WRITTEN
INFORMATION OR ADVICE GIVEN BY LICENSOR OR AN LICENSOR
AUTHORIZED REPRESENTATIVE SHALL CREATE A WARRANTY OR IN
ANY WAY INCREASE THE SCOPE OF THIS WARRANTY. SHOULD THE
SOFTWARE PROVE DEFECTIVE, YOU (AND NOT LICENSOR OR AN
LICENSOR AUTHORIZED REPRESENTATIVE) ASSUME THE ENTIRE
COST OF ALL NECESSARY SERVICING, REPAIR OR CORRECTION. SOME
JURISDICTIONS DO NOT ALLOW THE EXCLUSION OF IMPLIED WAR-
Psion Teklogix WORKABOUT PRO Hand-Held Computer User Manual
VII
License Agreement
RANTIES, SO THE ABOVE EXCLUSION MAY NOT APPLY TO YOU. THE
TERMS OF THIS DISCLAIMER DO NOT AFFECT OR PREJUDICE THE
STATUTORY RIGHTS OF A CONSUMER ACQUIRING LICENSOR PROD-
UCTS OTHERWISE THAN IN THE COURSE OF A BUSINESS, NEITHER DO
THEY LIMIT OR EXCLUDE ANY LIABILITY FOR DEATH OR PERSONAL
INJURY CAUSED BY LICENSOR’S NEGLIGENCE.
Limitation of Liability:
UNDER NO CIRCUMSTANCES, EXCEPT TO THE EXTENT PROHIBITED
BY LOCAL LAW, INCLUDING NEGLIGENCE, SHALL LICENSOR, ITS SUB-
SIDIARIES, AFFILIATES, OR SUPPLIERS BE LIABLE FOR ANY DIRECT,
INCIDENTAL, SPECIAL, INDIRECT OR CONSEQUENTIAL DAMAGES
(INCLUDING LOST PROFIT, LOST DATA, OR DOWNTIME COSTS) ARIS-
ING OUT OF OR RELATING TO THIS LICENSE, THE USE, INABILITY TO
USE, OR THE RESULTS OF USE OF THE SOFTWARE, WHETHER BASED IN
WARRANTY, CONTRACT, TORT OR OTHER LEGAL THEORY, AND
WHETHER OR NOT ADVISED OF THE POSSIBILITY OF SUCH DAMAGES.
In no event shall MDC's total liability to you for all damages exceed the price paid
for the license to use the Software, regardless of the form of the claim.
Government End Users:
If the Software is supplied to the United States Government, the Software is classi-
fied as "restricted computer software" as defined in clause 52.227-19 of the FAR.
The United States Government's rights to the Software are as provided in clause
52.227-19 of the FAR.
Controlling Law and Severability:
This License shall be governed by the laws of the United States and the State of
New Hampshire. As to any dispute relating to this License or the Software, you fur-
ther agree to jurisdiction and venue in the Federal and State Courts located in the
State of New Hampshire. If for any reason a court of competent jurisdiction finds
any provision, or portion thereof, to be unenforceable, the remainder of this License
shall continue in full force and effect.
Acknowledgement:
Your use of any software produced by MDC is based only on your acknowledge-
ment that you have read this License, understand it, and agree to be bound by its
terms and conditions.
License Agreement
VIII
Psion Teklogix WORKABOUT PRO Hand-Held Computer User Manual
MDC Acknowledgments:
This product includes software developed by MDC and its licensors. This product
includes software developed by the OpenSSL Project for use in the OpenSSL Tool-
kit (http://www.openssl.org/)". This product includes cryptographic software written
by Eric Young (eay@cryptsoft.com). This product includes software written by Tim
Hudson (tjh@cryptsoft.com).
Complete Agreement:
This License constitutes the entire agreement between the parties with respect to the
use of the Software and supersedes all prior or contemporaneous understandings
regarding such subject matter. No amendment to or modification of this License will
be binding unless in writing and signed by MDC.
NOTE: EXCEPT TO THE EXTENT ALLOWED BY LOCAL LAW, THESE
WARRANTY TERMS DO NOT EXCLUDE, RESTRICT, OR MODIFY, AND
ARE IN ADDITION TO, THE MANDATORY STATUTORY RIGHTS APPLICA-
BLE TO THE LICENSE OF THE SOFTWARE TO YOU.
Meetinghouse Data Communications, Inc.
150 Greenleaf Avenue, Unit F
Portsmouth, NH 03801
Revised 8/12/2002

Psion Teklogix WORKABOUT PRO Hand-Held Computer User Manual
IX
A
PPROVALS AND SAFETY SUMMARY
Declaration Of Conformity
Product: 7525 WORKABOUT PRO
Application of Council EMC Directive: 89/336/EEC
Directive(s): Low Voltage Directive: 73/23/EEC
Conformity Declared EN 55022: 1998 Class B;
to Standards: EN 61000-3-2; EN 61000-3-3
EN 55024:1998;
EN 61000-4-2; ±4kV CD; ±8kV AD
EN 61000-4-3; 3V/m, 80-1000 MHz
EN 61000-4-4; ±1kV Power lines
EN 61000-4-5; ±1kV Differential mode
EN 61000-4-6; 3VRMS, 150kHz-80MHz
EN 61000-4-11; AC Mains Ports
EN 60950: 2000
IEC 60825-1:1993+A1:1997+A2:2001
Manufacturer: ASKEY COMPUTER CORP.
10F, NO. 119, ChienKang Rd., Chung-Ho,
Taipei, Taiwan, R.O.C.
Year of Manufacture: 2004
Manufacturer’s Address PSION TEKLOGIX S.A.
in the European La Duranne; 135 Rue Rene Descartes; BP 421000
Community: 13591 Aix-En-Provence
Cedex 3; France
Type of Equipment: Information Technology Equipment
Equipment Class: Commercial and Light Industrial
I the undersigned hereby declare that the equipment specified above conforms to
the above directives and standards.
Manufacturer: Legal Representative in Europe:
Signature Signature
John Chiou Dominique Binckly
Position Position
Product Certification Manager Vice President International Sales
Place Place
ASKEY COMPUTER, TAIPEI PSION TEKLOGIX S.A. France

Approvals And Safety Summary
XPsion Teklogix WORKABOUT PRO Hand-Held Computer User Manual
FCC DECLARATION OF CONFORMITY (DoC)
Applicant’s Name & Address: ASKEY COMPUTER CORP.
10F, NO. 119, ChienKang Rd., Chung-Ho,
Taipei, Taiwan, R.O.C.
Contact Person: Piyang Chiang
Telephone No.: (510) 440-8694
47849 FREMONT BLVD. FREMONT,
CA, 94538, USA
US Representative’s Name & Address: PSION TEKLOGIX
1810 Airport Exchange Blvd., Suite 500
Erlanger, KY, 41018, USA
Contact Person: Kyle Day
Telephone No.: (859) 372-4329
Equipment Type/Environment: Computing Devices
Trade Name / Model No.: WORKABOUT PRO, Model 7525
Year of Manufacture: 2004
Standard(s) to which Conformity is Declared:
The WORKABOUT PRO, model 7525, supplied by Askey Computer Corp., has been
tested and found to comply with FCC PART 15, SUBPART B - UNINTENTIONAL
RADIATORS, CLASS B COMPUTING DEVICES FOR HOME & OFFICE USE.
I, the undersigned, hereby declare that the equipment as tested is representative within
manufacturing tolerance to units.
Applicant Legal Representative in U.S.
Signature Signature
Piyang Chiang Kyle Day
Full Name Full Name
General Manager V.P. Channel Sales
Position Position
Askey International Corp Erlanger, KY 41018, USA
Place Place
Feb. 4, 2004 Feb. 4, 2004
Date Date

Psion Teklogix WORKABOUT PRO Hand-Held Computer User Manual XI
Approvals And Safety Summary
This equipment complies with Class B Part 15 of the FCC rules.
Operation is subject to the following two conditions:
1. This device may not cause harmful interference, and
2. This device must accept any interference received, including interfer-
ence that may cause undesired operation.
Changes or modifications not expressly approved by Psion Teklogix, the party
responsible for compliance, may void the user's authority to operate the equipment.
1. FCC Information to Users
For Class B Unintentional Radiators:
This equipment has been tested and found to comply with the limits for a Class B
digital device, pursuant to Part 15 of the FCC Rules. These limits are designed to
provide reasonable protection against harmful interference in a residential instal-
lation. This equipment generates, uses, and can radiate radio frequency energy
and, if not installed and used in accordance with the instruction manual, may
cause harmful interference to radio communications. However, there is no guaran-
tee that interference will not occur in a particular installation. If this equipment
does cause harmful interference to radio or television reception, which can be
determined by turning the equipment off and on, the user is encouraged to try to
correct the interference by one of more of the following measures:
• Reorient or relocate the receiving antenna
• Increase the separation between the equipment and receiver
• Connect the equipment into an outlet on a circuit different from that to
which the receiver is connected.
• Consult the dealer or an experienced radio/TV technician for help.
2. Warning to Users
Warning: Changes or modifications not expressly approved by Psion
Teklogix Inc. could void the user's authority to operate the
equipment.

Approvals And Safety Summary
XII Psion Teklogix WORKABOUT PRO Hand-Held Computer User Manual
This product complies with CDRH 21 CFR 1040 Class II and IEC 60825-
1:1993+A1:1997+A2:2001 laser product.
LASER WARNINGS
For your own safety, it is critical that you comply with the following warn-
ings:
CAUTION
The laser aperture is located in the front of termnial. Do not look into the
laser beam or point the beam at people or animals.
CAUTION
Using controls or adjustments, or performing procedures other than those
specified herein may result in hazardous radiation exposure.
CAUTION
The use of optical instruments with this product will increase eye hazard.
This product contains a laser scanner that emits less than 1.2 mW maximum
radiant power at a wavelength of 650nm to 680nm. This product complies
with CDRH 21 CFR 1040 Class II and IEC 60825-
1:1993+A1:1997+A2:2001 Class 2 laser product.
DO NOT OPERATE IN AN EXPLOSIVE ATMOSPHERE
Operating Psion Teklogix equipment where explosive gas is present may
result in an explosion.
DO NOT REMOVE COVERS OR OPEN ENCLOSURES
To avoid injury, the equipment covers and enclosures should only be
removed by qualified service personnel. Do not operate the equipment
without the covers and enclosures properly installed.
Before removing the cover and enclosures, remove the battery pack at first

Psion Teklogix WORKABOUT PRO Hand-Held Computer User Manual XIII
Approvals And Safety Summary
CAUTION!
Danger of explosion if a battery is incorrectly handled, charged, disposed of
or replaced. Replace only with the same or equivalent type
recommended by the manufacturer. Dispose of used batteries according to
the instructions described in “Lithium Ion Battery Safety Precautions” on
page 140. Carefully review all battery safety issues.
VORSICHT!
Explosiongefahr bei unsachgemäßem Austausch der Batterie Ersatz nur
durch denselben oder einen vom Hersteller empfohlenen gleichwertigen
Typ. Entsorgung gebrauchter Batterien nach Angaben des Herstellers.

Psion Teklogix WORKABOUT PRO Hand-Held Computer User Manual 1
INTRODUCTION 1
1
1.1 About This Manual ..............................3
1.2 Text Conventions ...............................4
1.3 About The WORKABOUT PRO Hand-Held Computer ...........4
1.3.1 Features .................................4
1.3.2 The WORKABOUT PRO Hand-Held Computer ............9
1.3.3 Regulatory Labels ............................10
Psion Teklogix WORKABOUT PRO Hand-Held Computer User Manual 3
Chapter 1: Introduction
About This Manual
1.1 About This Manual
This manual describes how to configure, operate and maintain the WORKABOUT
PRO hand-held computer.
Chapter 1: Introduction
provides a basic overview of the WORKABOUT PRO hand-held.
Chapter 2: Basic Checkout
describes the steps required to get the unit ready for operation.
Chapter 3: Getting To Know The WORKABOUT PRO
describes the features and outlines how to charge and maintain the battery. This
chapter also provides indicators, installing a SD/MMC card and general maintenance.
Chapter 4: Working With Windows CE .NET
describes the Microsoft® Windows CE .NET desktop and how to use it. This
chapter also outlines the basics of moving around a Windows CE .NET window,
selecting and opening icons, files, folders and working with a dialogue box.
Chapter 5: Configuration
provides a description of the Windows CE .NET Control Panel and how to use it
to configure the WORKABOUT PRO, along with the scanners attached to the
hand-held, and so on.
Chapter 6: Connecting To A LAN With 802.11b
describes how to insert and configure an 802.11b radio.
Chapter 7: Expansion Modules
provides instructions about installing expansion modules – the PCMCIA
module, the GSM/GPRS module and the scanner module.
Chapter 8: Peripheral Devices & Accessories
describes the peripherals and accessories available for your hand-held.
Chapter 9: Specifications
details radio, hand-held computer, scanner and battery specifications.
Appendix A: Support Services And Worldwide Offices
provides the helpdesk phone number at the Mississauga, Ontario, Canada office
and details the support services available. This appendix also lists the world-
wide office addresses and phone numbers.
Appendix B: Port Pinouts
includes port pinouts.
Appendix C: USB Setup Application
details how to use the USB Setup application.

Chapter 1: Introduction
Text Conventions
4Psion Teklogix WORKABOUT PRO Hand-Held Computer User Manual
1.2 Text Conventions
Note: Notes highlight additional helpful information.
Important: These statements provide particularly important instructions
or additional information that is critical to the operation of
the equipment.
Warning: These statements provide critical information that may prevent
physical injury, equipment damage or data loss.
1.3 About The WORKABOUT PRO Hand-Held Computer
The WORKABOUT PRO is a ruggedized hand-held personal computer, running the
Microsoft® Windows CE .NET operating system. It is intended for use in
commercial and light industrial applications with a focus on real time wireless data
transactions. This hand-held is optimized for mobile computing applications and
third party expansion. It is available with a monochrome or colour touchscreen.
1.3.1 Features
• Rugged design:
- sealed from water and dust to IP54 (light rain) rating.
- withstands multiple drops of up to 1.2m (4 ft.) drop to concrete.
• WORKABOUT PRO Model Variants
- WORKABOUT PRO M:
- Monochrome touchscreen display
- 32 MB Flash
- 64 MB RAM
- WORKABOUT PRO C:
- 32 MB Flash
- 128 MB RAM
Psion Teklogix WORKABOUT PRO Hand-Held Computer User Manual 5
Chapter 1: Introduction
Features
- Integrated Bluetooth
• Processor:
- 400 MHz Intel Xscale PXA255
• Operating System:
- Microsoft Windows CE .NET 4.2
• Programming Environment:
- HTML, XML
- Psion Teklogix Mobile Devices SDK
- HDK - Hardware Development Kit for third-party developed
expansion modules.
- Compact Framework
-java
- Standard protocol APIs
Windows sockets (Windows CE .NET)
- Psion Teklogix Mobile SDK
• Wireless Communications:
- Optional expansion modules for:
- 802.11b (via expansion interface)
GSM/GPRS (via expansion interface)
CDMA/lxRTT (via expansion interface) (future project)
- Internet Bluetooth class II, version 1.1 standard on WORKABOUT
PRO C
Note: WAN, 802.11b and Bluetooth are available simultaneously on
WORKABOUT PRO C units.
• Application Software:
- Internet Explorer 6.0 for CE
- Open TekTerm (optional)
- ANSI, TESS terminal emulations IBM 3270, IBM 5250, HP 2392
(optional)
Chapter 1: Introduction
Features
6Psion Teklogix WORKABOUT PRO Hand-Held Computer User Manual
• User Interface:
- Monochrome Touchscreen Display
- 3.5 in. (8.9 cm) diagonal, 1/4 VGA 240 x 320 transflective portrait
mode LCD
Backlight on/off control, adjustable contrast
Sunlight readable for outdoor use
High reliability EL backlight
- Colour Touchscreen Display
- 3.5 in. (8.9 cm) diagonal 1/4 VGA, 240 x 320 transflective portrait
mode TFT
16-bit colour
Adjustable backlight
Sunlight readable for outdoor use
High reliability LED backlight
- Touchscreen
- Passive stylus or finger operation
Signature capture
Stylus held on main unit
- Keyboards
- Alphanumeric
Ergonomic ambidextrous one-hand operation
Backlit, high durability hard-capped keys
- Indicators and Controls
- Internal speaker with volume control
LED indicating battery charge status
• Bar Code Applications:
- Optional 2D Imager expansion module*
- Optional 1D SE 1223HP laser scanner expansion module*
- Optional field-upgradeable/replaceable pistol grip*
* Note: All are field upgradeable
• Expansion Slots:
- One SD/MMC memory card slot – user accessible
Psion Teklogix WORKABOUT PRO Hand-Held Computer User Manual 7
Chapter 1: Introduction
Features
- 100 Pin High-Speed Expansion connector, accessible through end-cap
or back cover
Supports serial, USB, PCMCIA
- Type II Compact Flash slot accessible through end-cap
• Other Expansion Modules:
- Type II PCMCIA slot – field upgradeable
- Third Party accessories
• External Ports:
- USB Host port on base of tethered USB devices (printers, etc.)
- Low Insertion Force Docking Station Port with:
USB device port
USB Host port
Power
• Power Management:
- Lithium Ion 3.7V Standard Battery
- Long life Lithium Ion 3.7V High-Capacity Battery
- Quick swap pack
- Advanced Smart Battery with gas gauge
- 3 power source options:
Battery
Wall adaptor
Cigarette light adaptor
- Built-in charger
- Also accepts standard consumer available AA Alkaline batteries
- Rechargeable, user replaceable coin-cell backup battery
• Environmental (Standard):
- Operating temperature: 14˚ F to 122˚ F (-10˚ C to 50˚ C)
- Storage temperature: -13˚ F to 140˚ F (-25˚ C to 60˚ C)
- Humidity: 5-95% RH non-condensing
- Rain/Dust: IEC 529, classification IP54
- Shock: Multiple 4 ft. (1.2m) drops to polished concrete
• Power Accessories
- AC Wall adaptor (charge and operate hand-held)
Chapter 1: Introduction
Features
8Psion Teklogix WORKABOUT PRO Hand-Held Computer User Manual
- Single battery charger
- Quad battery charger
- Charger/Docking Station (charges hand-held and spare battery)
- Vehicle cradle with optional charge capability
- Automotive adaptor
• Communication Accessories:
- Quad Dock (4-site) with 10/100BaseT Ethernet and charge functions
- Desktop Charger/Docking Station supports USB host and device ports
and optional 10/100Base T Ethernet module.
- Powered/non-powered cradle for vehicle applications
- Port Replicator for vehicle cradles (field installable option) includes 3
RS232 ports plus USB device port.
• Carrying Accessories:
- handstrap, pistol grip w/ trigger, shoulder strap.
- holster, belt loop, protective vinyl carrying case with belt clip.
Psion Teklogix WORKABOUT PRO Hand-Held Computer User Manual 9
Chapter 1: Introduction
The WORKABOUT PRO Hand-Held Computer
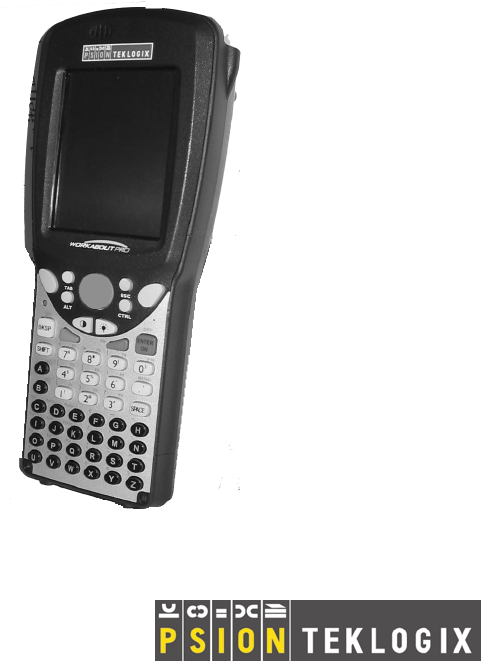
1.3.2 The WORKABOUT PRO Hand-Held Computer
Figure 1.1 WORKABOUT PRO
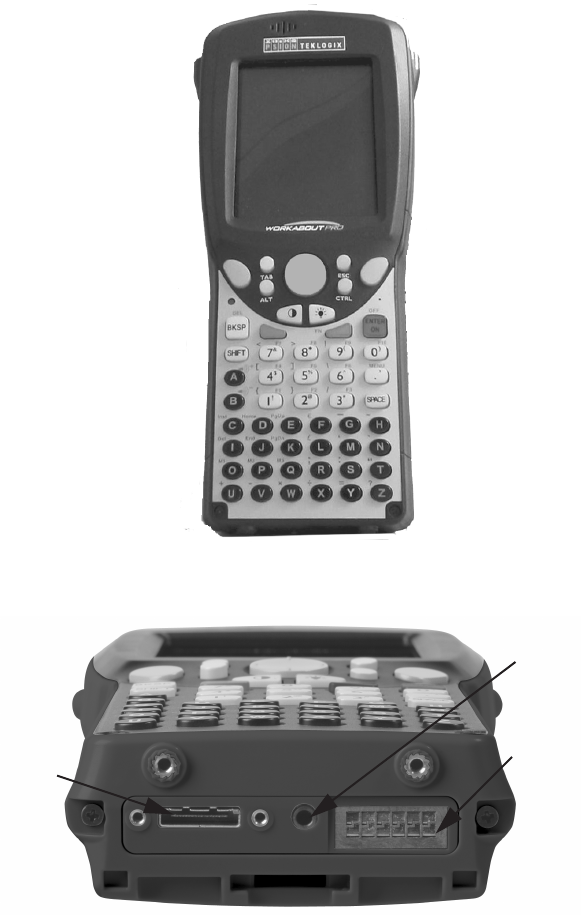
Figure 1.2 Tether Port, Low Insertion Force (LIF) Port And Audio Jack
Tether Port
Audio Jack
Low Insertion
Force Port (LIF)
Chapter 1: Introduction
Regulatory Labels
10 Psion Teklogix WORKABOUT PRO Hand-Held Computer User Manual
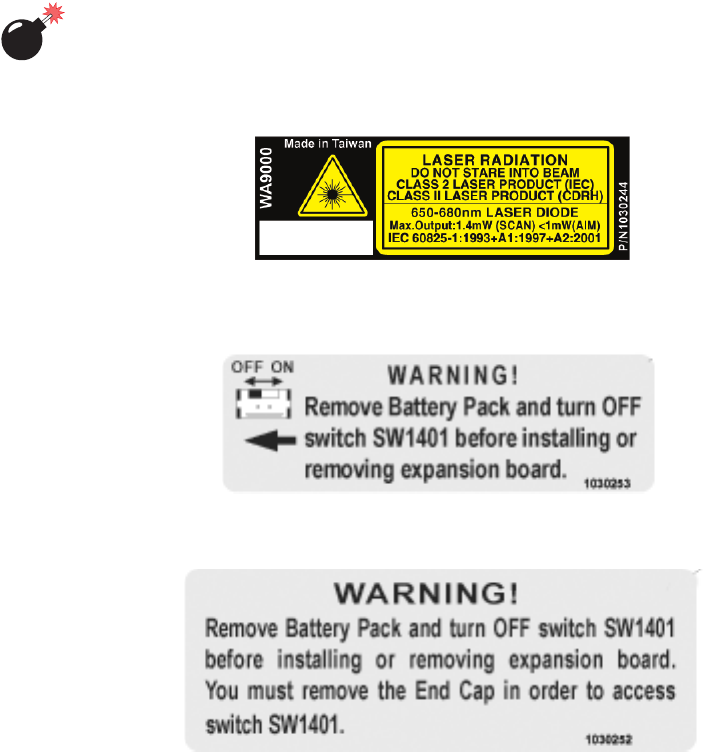
1.3.3 Regulatory Labels
Warning: Using controls or adjustments or performing procedures other than
those specified herein may result in hazardous radiation exposure.
Figure 1.3 Scanner Module–Laser Warning Label
Figure 1.4 End- Cap–Expansion Module Warning
Figure 1.5 Back Plate–Expansion Module Warning Label

Psion Teklogix WORKABOUT PRO Hand-Held Computer User Manual 11
Chapter 1: Introduction
Regulatory Labels
Figure 1.6 Manufacturer Label – WORKABOUT PRO C Unit
Figure 1.7 Manufacturer Label – WORKABOUT PRO M Unit
Figure 1.8 FCC Compliance Label

Chapter 1: Introduction
Regulatory Labels
12 Psion Teklogix WORKABOUT PRO Hand-Held Computer User Manual
Figure 1.9 Standard Capacity Battery Label
Figure 1.10 High-Capacity Battery Label

Psion Teklogix WORKABOUT PRO Hand-Held Computer User Manual 13
BASIC CHECKOUT 2
2
2.1 Preparing The WORKABOUT PRO For Operation ............15
2.1.1 The Main Battery ...........................15
2.1.2 Charging The Battery .........................15
2.1.3 The Internal Battery..........................15
2.2 Turning The WORKABOUT PRO On and Off...............15
2.2.1 Installing The Battery And Switching The Unit On .........15
2.3 Connecting The WORKABOUT PRO To A PC ..............16
2.3.1 Using Microsoft® ActiveSync® To Work With Files ........16
2.4 Calibrating The Touchscreen ........................17
2.5 Resetting The WORKABOUT PRO Hand-Held ..............17

Psion Teklogix WORKABOUT PRO Hand-Held Computer User Manual 15
Chapter 2: Basic Checkout
Preparing The WORKABOUT PRO For Operation
2.1 Preparing The WORKABOUT PRO For Operation
2.1.1 The Main Battery
The WORKABOUT PRO can be powered with one of the following battery packs:
• Standard Battery
• High-Capacity Battery, or
• 3 AA alkaline batteries.
2.1.2 Charging The Battery
Important: It is critical that you review the battery safety guidelines in “Lith-
ium Ion Battery Safety Precautions” on page 140 before charging
the battery.
Battery packs shipped from the factory are not charged. They must be fully charged
prior to use. Full capacity may not be reached until at least 5 full charge/discharge
cycles have been performed.
Batteries can be charged using a variety of chargers and docking stations along with
a Workabout internal charger. When using the internal charger, a suitable power
source is required. All chargers and docking stations are described in Chapter 8:
Peripheral Devices & Accessories beginning on page 150.
2.1.3 The Internal Battery
To preserve data stored in your WORKABOUT PRO while you swap the main
battery, the unit is equipped with an internal battery – a standard Lithium Alloy
Manganese Dioxide coin battery – a Maxell ML2032. This battery is easily
accessible by removing the back cover of the unit.
2.2 Turning The WORKABOUT PRO On and Off
2.2.1 Installing The Battery And Switching The Unit On
• Turn the fasteners at the base of the battery cover counter-clockwise to
unlock the cover and remove it. The top of the stylus is shaped to help you
loosen the fasteners.
• Slide the charged battery into the unit. Replace the battery cover, and turn the
fasteners at the base of the battery cover clockwise to lock the battery in place.

Chapter 2: Basic Checkout
Switching The Unit Off (Suspend)
16 Psion Teklogix WORKABOUT PRO Hand-Held Computer User Manual
Note: If you are using a docking station or an external power supply, you can
insert an uncharged battery, dock the unit and switch it on.
To switch on the WORKABOUT PRO:
• Press and hold down the <ENTER/ON> key for at least one second.
• When the LED flashes green, release the <ENTER/ON> button.
A splash screen displaying the Psion Teklogix logo and the Microsoft®
Windows CE .NET logo appears followed by the startup desktop.
Note: If the unit was already in use – the unit may be off (suspend state) – press-
ing <ENTER/ON> ‘wakes’ the unit from this state. The screen in which
you were working prior to the suspend state is displayed.
2.2.2 Switching The Unit Off (Suspend)
• Press the <BLUE> key, and then press <ENTER/ON> to switch off the
WORKABOUT PRO.
2.3 Connecting The WORKABOUT PRO To A PC
Note: Refer to “Linking A WORKABOUT PRO To A PC” on page 146 for more
details about the desktop docking station and how to link to a PC.
The WORKABOUT PRO can be connected to a PC using the desktop docking
station.
• Insert the unit in the desktop docking station,
• Use the Client USB connector to complete the communication link between
the hand-held and the PC.
2.3.1 Using Microsoft® ActiveSync® To Work With Files
ActiveSync® – Microsoft PC connectivity software – can be used to connect the
WORKABOUT PRO to PCs running this software. By connecting the hand-held to a
PC through your desktop docking station and running ActiveSync on the PC, you can
view WORKABOUT PRO files, drag and drop files between the WORKABOUT
PRO and the PC, back up WORKABOUT PRO files to the PC, and so on.
Note: You’ll need the USB setup utility to configure the .ini file. For information
about this USB application, refer to Appendix C: USB Setup Application.

Psion Teklogix WORKABOUT PRO Hand-Held Computer User Manual 17
Chapter 2: Basic Checkout
Calibrating The Touchscreen
To install ActiveSync, follow the step-by-step instructions provided with the
program’s setup wizard. Refer to the following website for details:
http://www.microsoft.com/windowsmobile/resources/downloads/pocketpc/activesync35.mspx
2.4 Calibrating The Touchscreen
Refer to “Calibrating The Touchscreen” on page 30 for details.
2.5 Resetting The WORKABOUT PRO Hand-Held
Important: Because Psion Teklogix cannot guarantee what has been saved
(registry) after a reset, this should be considered as a last resort.
To reset the unit:
• Press and hold down the <BLUE> key and the <ENTER/ON> key simulta-
neously for a minimum of six seconds.
A reset results in a complete reboot of the unit. All RAM memory contents are lost.
The contents of the flash memory and memory card may be preserved, but Psion
Teklogix cannot guarantee this.
Note: You do not need to reset your WORKABOUT PRO after configuring the
radio.

Psion Teklogix WORKABOUT PRO Hand-Held Computer User Manual 19
GETTING TO KNOW THE WORKABOUT PRO 3
3
3.1 Features Of The WORKABOUT PRO ...................21
3.2 The Batteries ................................22
3.2.1 Battery Safety.............................23
3.2.2 Removing And Installing The Battery Pack .............23
3.2.3 Charging The Battery .........................24
3.3 Switching The Hand-Held On And Off ...................25
3.4 The Keyboard ................................26
3.4.1 Modifier Keys.............................27
3.4.1.1 Activating Modifier Keys ..................27
3.4.1.2 Locking Modifier Keys ...................27
3.4.2 The Keys ...............................27
3.4.3 The Keypad Backlight ........................29
3.5 The Display .................................29
3.5.1 Colour Display ............................29
3.5.2 Monochrome Display.........................30
3.5.3 Calibrating The Touchscreen .....................30
3.6 Indicators ..................................31
3.6.1 The LED ...............................31
3.6.2 Onscreen Indicators..........................32
3.6.3 Audio Indicators ...........................34
3.6.3.1 Adjusting The Speaker Volume ...............35
3.7 Monitoring The Battery And Maximizing Run Time ............35
3.7.1 Storing Batteries ...........................36
3.8 Uploading Data In A Docking Station ...................36
3.9 Bluetooth Radio ...............................37
3.10 The SD/MMC Card – Adding Memory ..................37
3.10.1 Inserting The Card..........................37
3.11 General Maintenance ...........................39
3.11.1 Caring For The Touchscreen ....................39
3.11.2 Cleaning The WORKABOUT PRO.................39
Psion Teklogix WORKABOUT PRO Hand-Held Computer User Manual 21
Chapter 3: Getting To Know The WORKABOUT PRO
Features Of The WORKABOUT PRO
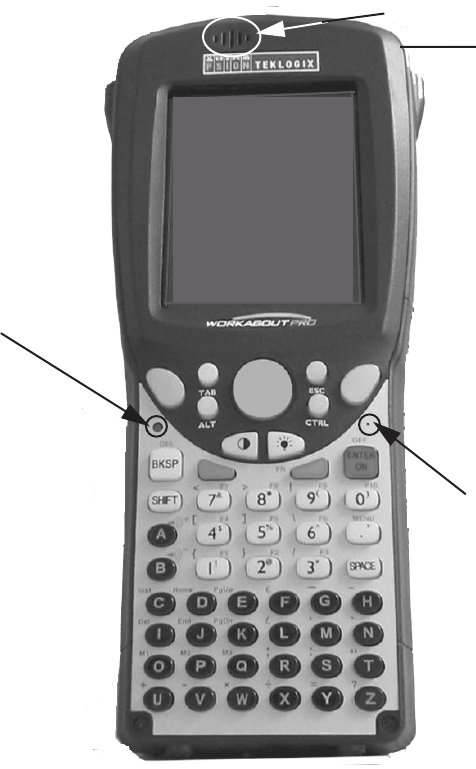
3.1 Features Of The WORKABOUT PRO
Figure 3.1 Front Of WORKABOUT PRO M Or C
Sound Port
Stylus
(pointing tool)
LED
(Light Emitting Diode)
Microphone
Chapter 3: Getting To Know The WORKABOUT PRO
The Batteries
22 Psion Teklogix WORKABOUT PRO Hand-Held Computer User Manual
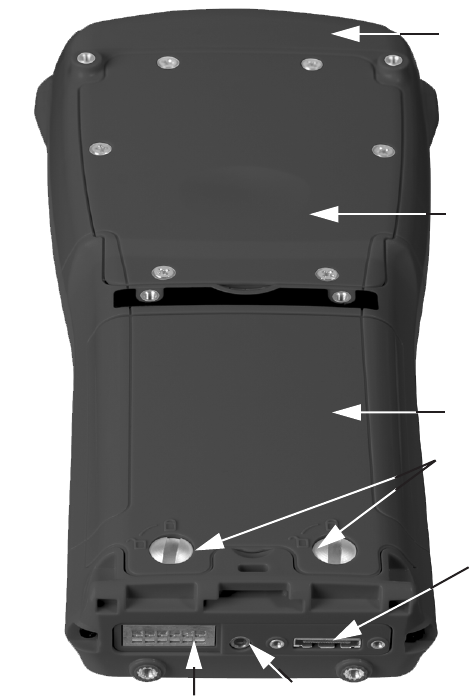
Figure 3.2 Back Of WORKABOUT PRO
3.2 The Batteries
The WORKABOUT PRO hand-held can operate with a Standard Lithium Ion
battery pack, a High Capacity Lithium Ion battery pack or three AA alkaline
batteries. If you are using a Lithium Ion battery pack, preparing the hand-held unit
for operation requires that the battery pack be charged before it is installed in the
unit.
Battery Cover
Tether Port
Low Insertion
Battery Cover
Fasteners
Force (LIF) Port
Audio Jack
End Cap
Back Cover
Psion Teklogix WORKABOUT PRO Hand-Held Computer User Manual 23
Chapter 3: Getting To Know The WORKABOUT PRO
Battery Safety
To maintain data during a battery swap, the WORKABOUT PRO is also equipped
with an easily accessible coin backup battery.
3.2.1 Battery Safety
Important: Before attempting to install, use or charge the battery pack, it is
critical that you review and follow the important safety guidelines
in the section entitled “Lithium Ion Battery Safety Precautions”
beginning on page 140.
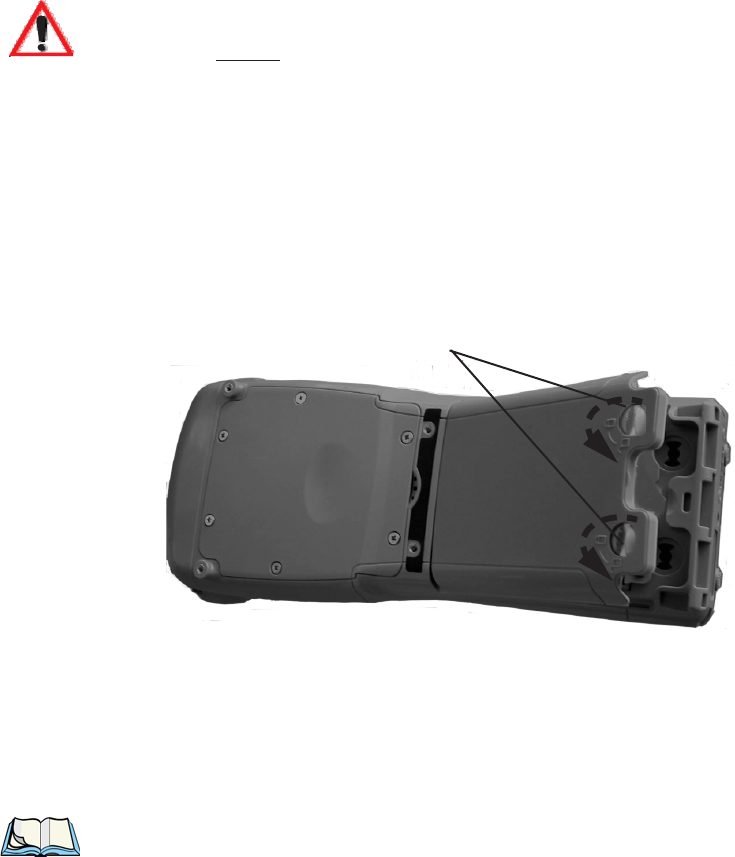
3.2.2 Removing And Installing The Battery Pack
Removing The Battery Cover
• Turn the fasteners at the base of the battery cover counter-clockwise to
unlock the cover. The top of the stylus has a screwdriver shaped end to help
you loosen the fasteners.
• Lift and remove the cover.
Figure 3.3 The Battery Cover
Installing The Battery
• Insert the charged battery in the unit.
• Replace the battery cover, and turn the fasteners at the base of the battery
cover clockwise to lock the battery in place.
Note: If you are using a docking station or other external power source, you can
insert an uncharged battery, dock the unit and switch it on.
Battery Cover Fasteners

Chapter 3: Getting To Know The WORKABOUT PRO
Charging The Battery
24 Psion Teklogix WORKABOUT PRO Hand-Held Computer User Manual
3.2.3 Charging The Battery
Important: FOR DETAILED INFORMATION about chargers and docking
stations, refer to Chapter 8: Peripheral Devices & Accessories
beginning on page 131.
For battery safety, refer to “Lithium Ion Battery Safety Precau-
tions” beginning on page 140.
Lithium Ion battery packs must be charged before use. These batteries can be
charged with a variety of chargers and docking stations. These include:
• Desktop Docking Station (Model #WA4002) – operates as both a charger
and a docking station. Operating as a charger, both the battery installed in
the hand-held and a spare battery can be charged simultaneously.
• Quad Docking Station (Model #WA4004) – can charge the battery of up to
four WORKABOUT PROs inserted in the docking station.
• Single Battery Charger (Model #WA3001) – charges a single battery.
• Quad Battery Charger (Model #WA3004) – charges up to four spare Stan-
dard or High-Capacity WORKABOUT PRO battery packs.
It can take up to 5 hours to charge a battery. The WORKABOUT PRO’s intelligent
charging system protects the battery from over-charging by terminating the charge
process when the battery is at maximum capacity.
Note: Refer to “Monitoring The Battery And Maximizing Run Time” on page 35
for additional information about the battery.
Important: To avoid damaging the battery, chargers will not begin the charge
process until the battery temperature is between 0˚ C to 45 ˚C
(32˚ F to 113˚ F).

Psion Teklogix WORKABOUT PRO Hand-Held Computer User Manual 25
Chapter 3: Getting To Know The WORKABOUT PRO
Switching The Hand-Held On And Off
3.3 Switching The Hand-Held On And Off
Switching On The WORKABOUT PRO
• Press and hold down the <ENTER/ON> key for at least one second.
• When the LED flashes green, release the <ENTER/ON> button.
A splash screen displaying the Psion Teklogix logo and the Windows CE .NET logo
appears followed by the startup desktop.
Note: If the WORKABOUT PRO is in suspend state, pressing <ENTER/ON>
key ‘wakes’ the unit from this state. The screen in which you were working
before the computer entered suspend state is displayed.
Switching Off The WORKABOUT PRO (Suspend)
Important: Keep in mind that turning off the WORKABOUT PRO does not
result in a complete reboot; rather, the unit enters a power-saving,
“suspend” state. When the unit is turned on from suspend state,
operation resumes within a few seconds.
To switch off the WORKABOUT PRO:
• Press the <BLUE> key, and then press the <ENTER/ON> key.
Chapter 3: Getting To Know The WORKABOUT PRO
The Keyboard
26 Psion Teklogix WORKABOUT PRO Hand-Held Computer User Manual
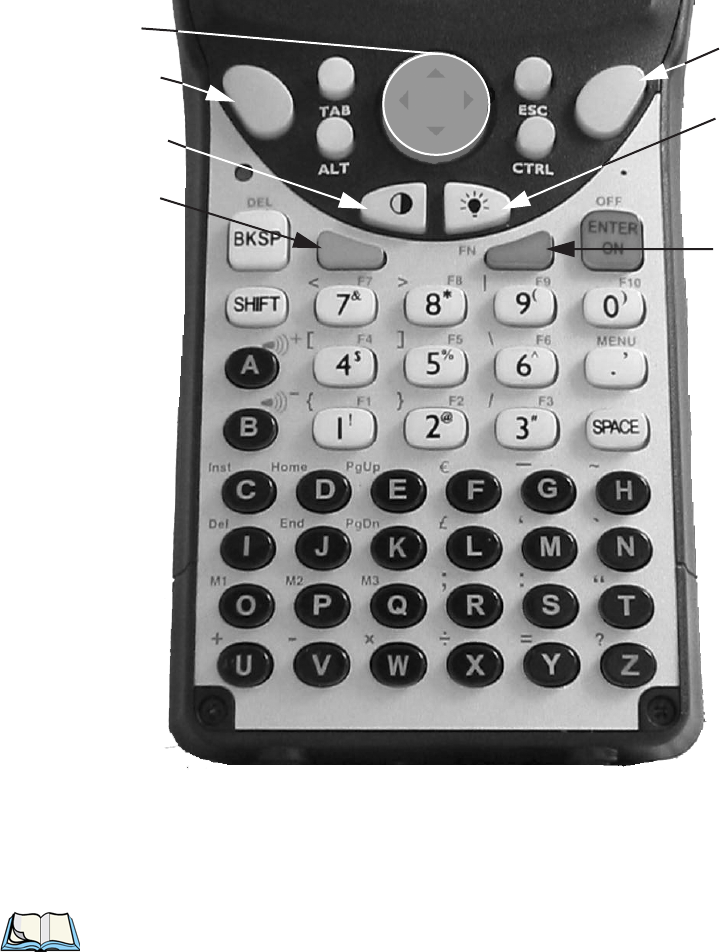
3.4 The Keyboard
Figure 3.4 The Keys
The WORKABOUT PRO is equipped with a 55-key alphanumeric keyboard. Along
with the standard keyboard keys, the <ORANGE> and <BLUE> modifier keys
provide access to additional keys and system functions. These functions are colour
coded in orange and blue print above the keyboard keys.
Note: Almost all keys can be reprogrammed to suit your requirements.
Arrow
Keys Scan
Key
Scan
Key
Contrast
Key
Display
Backlight Key
Orange
Key
Blue
Key

Psion Teklogix WORKABOUT PRO Hand-Held Computer User Manual 27
Chapter 3: Getting To Know The WORKABOUT PRO
Modifier Keys
3.4.1 Modifier Keys
The <SHIFT>, <CTRL>, <ALT>, <ORANGE> and <BLUE> keys are modifier
keys. Pressing a modifier key changes the function of the next key pressed. For
example, a square bracket is printed in orange print above the <4> key. Pressing the
<ORANGE> key followed by the <4> key displays a square bracket rather than the
number 4.
The <SHIFT>, <CTRL> and <ALT> keys operate like a desktop keyboard except
that they are not chorded (two keys held down simultaneously). The modifier key
must be pressed first followed by the key whose function you want modified.
3.4.1.1 Activating Modifier Keys
When a modifier key is pressed once, it is displayed in lowercase letters in the
taskbar at the bottom of the screen. For example, if the <CTRL> key is pressed
once, ctrl key is displayed in the taskbar. Once the next key is pressed, the modifier key
becomes inactive and disappears from the taskbar.
3.4.1.2 Locking Modifier Keys
When a modifier key is pressed twice, it is ‘locked’ on. A ‘locked’ modifier key is
displayed in uppercase letters in the taskbar. For example, pressing the <BLUE> key
twice locks it on – it is displayed as BLUE KEY in the taskbar at the bottom of the
computer screen.
The locked modifier key will remain active until it is pressed a third time to unlock
or turn it off. Once a modifier key is unlocked (pressed a third time), the uppercase
representation in the taskbar is no longer displayed.
Note: The locking function of the <ORANGE> and <BLUE> keys can be dis-
abled so that pressing either of these keys once will lock the keys ‘on’.
Refer to “Keyboard One Shot Modes” on page 69 for details.
3.4.2 The Keys
The <SHIFT> Key
The <SHIFT> key is used to display uppercase alpha characters and provide access
to the symbols above the numeric keys. Pressing this key twice locks it ‘on’ so that
when you press an alpha key, an upper case character is displayed. When you press
a numeric key, the associated symbol on the numeric key is displayed
Chapter 3: Getting To Know The WORKABOUT PRO
The Keys
28 Psion Teklogix WORKABOUT PRO Hand-Held Computer User Manual
The Arrow Keys
The Arrow keys are located on the grey circular key at the top of the keyboard,
directly below the display. The arrow keys move the cursor around the screen – up,
down, left and right. The cursor is the flashing box or underline character that
indicates where the next character you type will appear.
The <BKSP/DEL> Key
The <BKSP> key (sometimes referred to as destructive backspace) moves the
cursor one character to the left, erasing the incorrectly entered key stroke.
The <DEL> key (<BLUE> <BKSP>) erases the character at the cursor position.
The <CTRL> And <ALT> Keys
The <CTRL> and <ALT> keys modify the function of the next key pressed and are
application dependent.
The <TAB> Key
Typically, the <TAB> key moves the cursor to the next field to the right or
downward.
The <ESC> Key
Generally, this key is used as a keyboard shortcut to close the current menu,
dialogue box or activity and return to the previous one.
The <SPACE> Key
Pressing this key inserts a blank space between characters. In a Windows dialogue
box, pressing the <SPACE> key enables (√) or disables a checkbox.
The <SCAN> Keys
Pressing either of the <SCAN> keys – the two yellow keys situated in upper-left and
upper-right corner of the keyboard – activates the scanner beam. For units that do
not have internal scanners, these keys are inoperable.
The Function Keys – <F1> to <F10>
Function keys <F1> to <F10> perform special, custom-defined functions. These
keys are accessed by pressing <BLUE> followed by numeric keys <1> to <10>.
They can be used with the Windows CE .NET operating system or another
application.

Psion Teklogix WORKABOUT PRO Hand-Held Computer User Manual 29
Chapter 3: Getting To Know The WORKABOUT PRO
The Keypad Backlight
The Macro Keys – <M1> to <M3>
Macro keys <M1> to <M3> contain up to 20 programmable characters (“positions”)
and executable keys. These keys are accessed by pressing <ORANGE> followed by
alpha keys <O>, <P> or <Q>. When pressed, the macro key executes a
custom-defined string of characters, including executable keys.
3.4.3 The Keypad Backlight
The intensity of the keypad backlight and the conditions under which this backlight
is activated can be configured using the Keyboard icon in the Control Panel. The behaviour
of the keypad backlight is tailored in the Keyboard Properties dialogue box. Refer to
“Keyboard Backlight” on page 68 for details about this option.
Note: Keep in mind that this option may be restricted to supervisory use only.
3.5 The Display
Depending on the type of display – colour or monochrome – you can adjust the
backlight behaviour or the contrast of the display to improve character visibility.
Note: Display backlight and contrast adjustments may be restricted to supervi-
sory use only.
3.5.1 Colour Display
Adjusting The Backlight
Note: For units equipped with monochrome screens, the Backlight key < >
turns the backlight on or off. Backlight intensity cannot be adjusted.
On colour screens, the display backlight can be adjusted using the keyboard.
• Press the Backlight key < > to cycle from the lightest to darkest settings,
and then back to lightest. Press <ORANGE> < > to cycle backward from
darker to lighter.
To set the range of the backlight intensity and the duration of time that the backlight
will remain on, you’ll need to choose the Display icon in the Control Panel. Refer to
“Display Backlight” on page 65 for details about the Display Properties Backlight tab.
Chapter 3: Getting To Know The WORKABOUT PRO
Monochrome Display
30 Psion Teklogix WORKABOUT PRO Hand-Held Computer User Manual
3.5.2 Monochrome Display
Adjusting The Contrast
Note: Contrast adjustment is only available on hand-helds equipped with mono-
chrome screens. Contrast has no effect on units with colour screens.
The display contrast can be adjusted from the keyboard using the Contrast key < >
just below the arrow keys.
• Press this key until you are satisfied with the contrast adjustment. Press
<ORANGE> < > to shift contrast backward.
To set the maximum range of the contrast on a monochrome screen, you’ll need to
choose the Display icon in the Control Panel. Refer to “Display Contrast” on page 64
for details about the Display Properties Contrast tab.
Keep in mind that this option may be restricted to supervisory use only
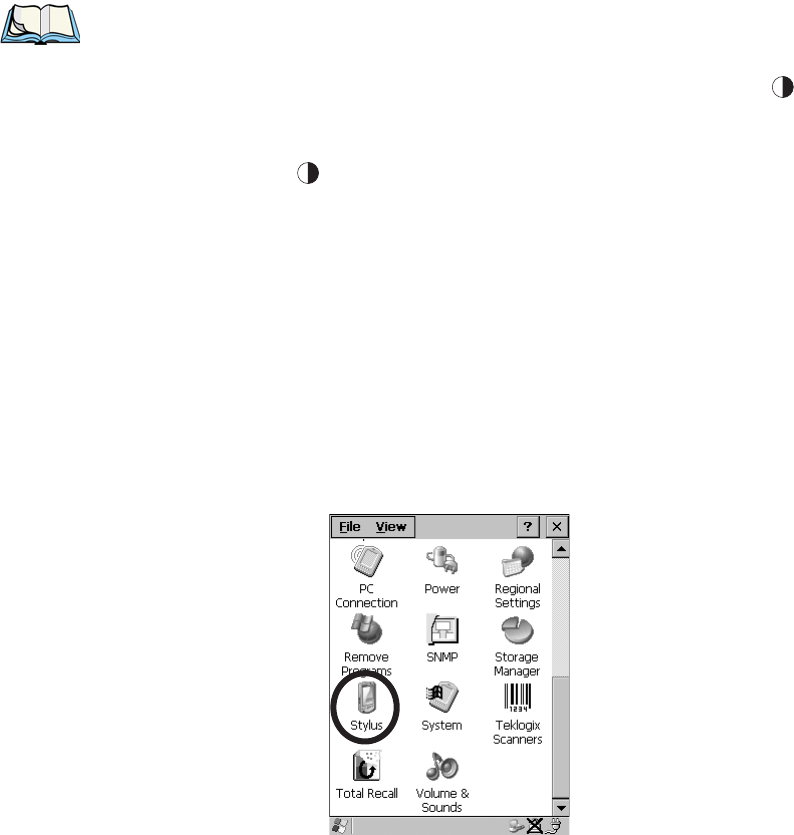
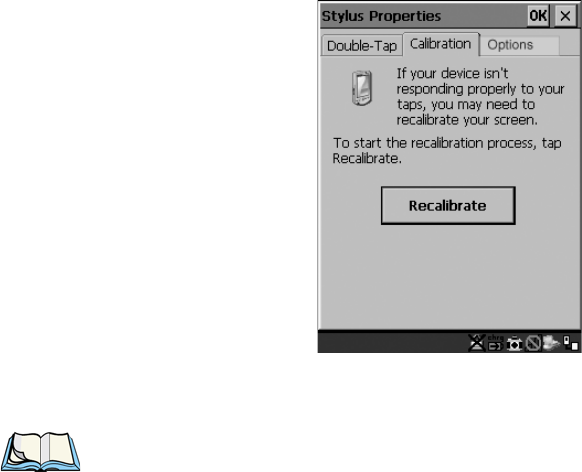
3.5.3 Calibrating The Touchscreen
If your touchscreen has never been calibrated or if you find that the stylus pointer is
not accurate when you tap on an item, use the Stylus Properties dialogue box in the Control
Panel to recalibrate the screen.
• In the Control Panel, choose the Stylus icon to display the Stylus Properties window.
Figure 3.5 Stylus Icon
Psion Teklogix WORKABOUT PRO Hand-Held Computer User Manual 31
Chapter 3: Getting To Know The WORKABOUT PRO
Indicators
• Select the Calibration tab, and then tap on the ‘Recalibrate’ button.
Figure 3.6 Calibration Screen
• Follow the directions on the calibration screen to calibrate the screen.
Note: The Stylus Properties dialogue box provides two additional tabs: Double-tap and
Options. The Double-Tap tab allows you to adjust the sensitivity of the dou-
ble-tap and the physical distance between taps. The Options tab allows you
to disable the touchscreen.
3.6 Indicators
The WORKABOUT PRO uses an LED (Light Emitting Diode), onscreen messages
and audio tones to indicate the various conditions of the hand-held, the batteries, the
scans and so on.
3.6.1 The LED
The WORKABOUT PRO is equipped with a single, dual-coloured LED. When the
<ENTER/ON> key is pressed, the LED flashes green to indicate that the unit has
been powered up.
Chapter 3: Getting To Know The WORKABOUT PRO
Onscreen Indicators
32 Psion Teklogix WORKABOUT PRO Hand-Held Computer User Manual
If the unit is attached to an external power supply, the hand-held LED reflects the
battery charge status.
Table 3.1 WORKABOUT PRO LED BEHAVIOUR
Note: The application installed on your WORKABOUT may alter the behaviour
of the LED on your unit. Refer to your application manual for details.
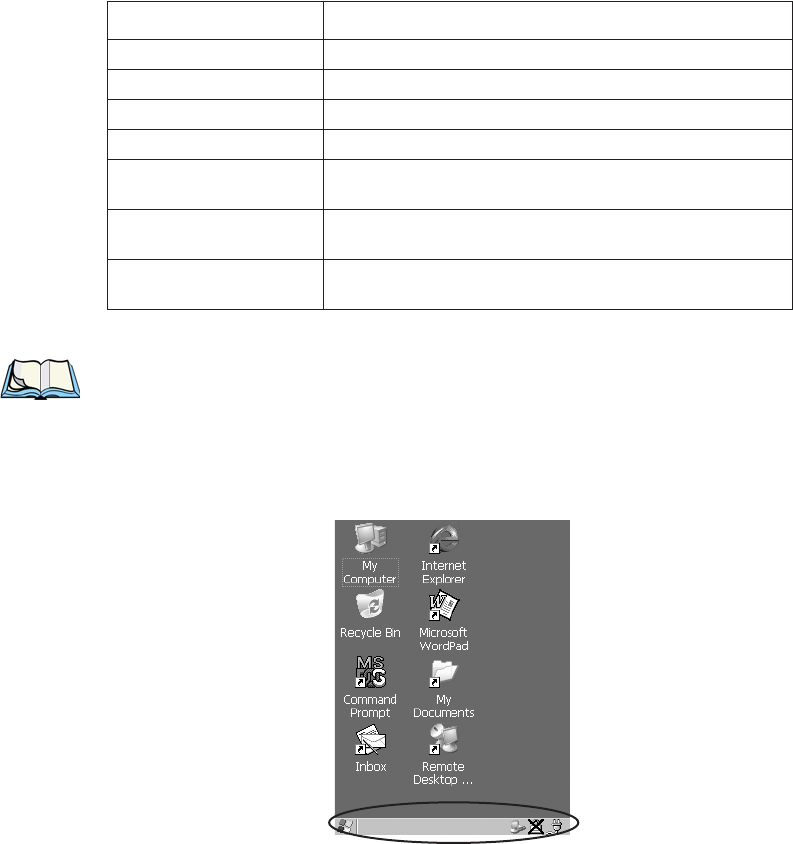
3.6.2 Onscreen Indicators
The taskbar at the bottom of the screen displays a variety of system status indicators.
Figure 3.7 Taskbar
LED Behaviour Charge Status
Off No battery detected in the charge well.
Solid green Battery is fully charged.
Fast flashing green Battery is charged to 75% capacity.
Slow flashing green Charge in progress.
Solid red Battery is outside ambient temperature range of
0˚ C to 45 ˚C (32˚ F to 113˚ F).
Flashing red Charge alarm indicating a charging circuit problem.
Refer to “Troubleshooting” on page 151 for details.
Flashing red then green
in a 3 second cycle Power up test sequence.
Psion Teklogix WORKABOUT PRO Hand-Held Computer User Manual 33
Chapter 3: Getting To Know The WORKABOUT PRO
Onscreen Indicators
Taskbar icons change dynamically, and only those icons that are applicable are
displayed. For example, if a Bluetooth radio is not installed in your hand-held, the
Bluetooth radio icon is not displayed in the taskbar.
Note: To access these icons and display the associated menu and dialogue
boxes, refer to “Using The Taskbar” on page 46.
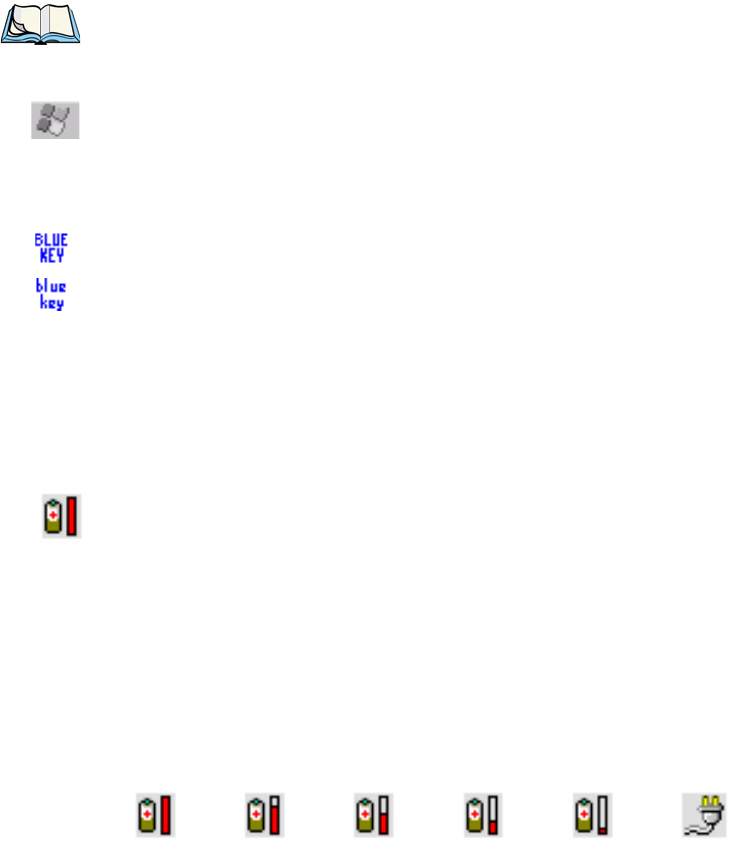
Windows® Start Button
This icon provides access to the Start Menu. Tapping on the Windows® Start button
displays the menu.
Modifier Key Indicators
<SHIFT>, <CTRL>, <ALT>, <BLUE> and <ORANGE> are modifier keys that
have associated onscreen indicators to show when a key is active or locked. If a
modifier key is pressed once to activate it, the key is displayed in the taskbar in
lowercase characters – for example, pressing the <BLUE> key once displays ‘blue
key’ in the taskbar. If a modifier key is pressed twice, it is ‘locked on’ and the
onscreen indicator is displayed in uppercase letters in the taskbar – for example,
pressing <BLUE> twice displays ‘BLUE KEY’ in the taskbar.
Battery Gauge
The battery shaped icon displayed in the taskbar provides a visual indication of the
remaining battery power. The icon acts as a meter that is either full, at three-quarter
level, half, quarter level or empty.
When the battery level is low – approximately 15 minutes from empty – a warning
window pops up. When the battery power is completely depleted, a final warning
window indicates that the WORKABOUT PRO will be powered down.
If the unit is being powered externally, an external power icon is displayed in the
taskbar.
External PowerFull
75%
50% 25% Empty
Chapter 3: Getting To Know The WORKABOUT PRO
Audio Indicators
34 Psion Teklogix WORKABOUT PRO Hand-Held Computer User Manual
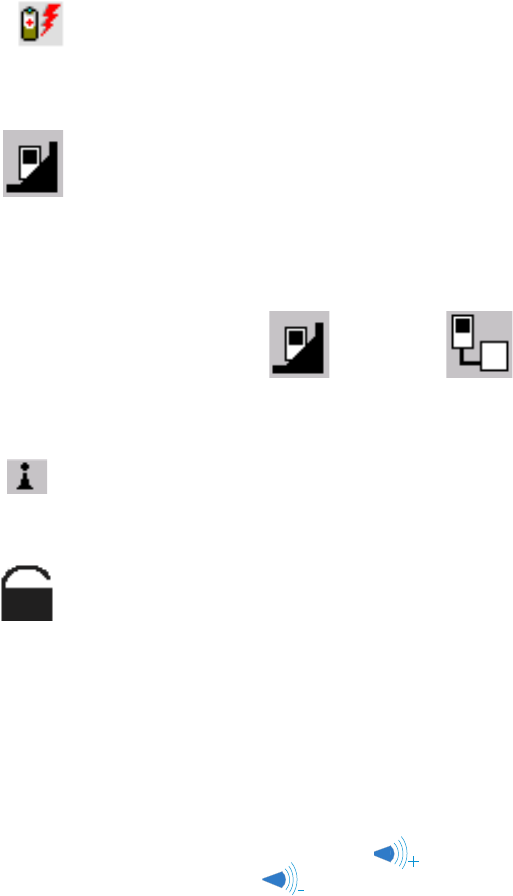
Battery Charge
The battery charge icon is displayed in the taskbar when the battery is being
charged.
LIF and USB Devices
When a device such as a docking station or a charger is connected to the USB
(tether) port or the LIF (Low Insertion Force) port and is activated, an associated
icon appears in the taskbar. A message also appears on the screen recognizing that a
new device has been connected through either the USB or the LIF port.
Bluetooth Radio
If a Bluetooth radio is installed in your unit, this icon is displayed in the taskbar.
Security Level
Security levels can be set to limit user access to the settings. In addition, applications
can be restricted to prevent inadvertent changes.
3.6.3 Audio Indicators
The audio speaker provides a variety of sounds and can be configured to emit a
sound when a key is pressed, a keyboard character is rejected, scan input is accepted
or rejected, an operator’s entry does not match in a match field or the battery is low.
The volume keys are located above the <A> and <B> keys. The increase volume
key is labelled with a plus symbol and the decrease volume key is labelled
with a minus symbol .
New device connected: New device connected:
USB PortLIF Port

Psion Teklogix WORKABOUT PRO Hand-Held Computer User Manual 35
Chapter 3: Getting To Know The WORKABOUT PRO
Adjusting The Speaker Volume
3.6.3.1 Adjusting The Speaker Volume
To adjust the speaker volume:
• Press the <BLUE> key twice to lock the key ‘on’ and then, press the
increase volume key or the decrease volume key until the
volume meets your requirements.
• Remember to press the <BLUE> key again to turn it ‘off’.
3.7 Monitoring The Battery And Maximizing Run Time
Under normal operating conditions, fully charged Standard Batteries hold a charge
for up to 8 hours. High-Capacity batteries can hold a charge for up to 12 hours.
As Lithium Ion batteries age, their capacity decreases gradually, and they are
generally considered depleted after approximately 2 years of use (less than 60% of
original capacity remaining). Keep in mind however that heavy usage or operating
the unit at temperature extremes will shorten the battery life.
Lithium Ion batteries do not require conditioning cycles and the WORKABOUT
PRO battery system (including chargers) requires no user interaction to maintain
peak performance.
To maximize the run time of your batteries, consider the following:
• The display backlight is the largest drain on the battery. Try to keep its
brightness as low as possible.
• The hand-held is ‘event’ driven – that is, when the unit is not in use, it
reverts to sleep mode (even when it appears to be running), saving battery
power. Events include a key press, touchscreen taps and scan triggers.
Power consumption is reduced if you avoid unnecessary events, and allow
the unit to sleep as much as possible.
• The battery is a ‘smart battery’ with built-in intelligence. The taskbar
battery icon is a linear gauge used to estimate the remaining run time of the
battery. It is important to note that the battery capacity icon displays quarter
percentages of nominal capacity (the capacity of a new battery). An aged
battery, even when fully charged, shows somewhat less capacity than
nominal.
Double-tapping on the battery icon displays a dialogue box that provides
detailed information about the battery status and performance.

Chapter 3: Getting To Know The WORKABOUT PRO
Storing Batteries
36 Psion Teklogix WORKABOUT PRO Hand-Held Computer User Manual
• When the hand-held is switched off, it goes into a low-power, suspend state
but continues to draw a small amount of power from the battery. This
should not be an issue unless the unit is left in suspend state for more than a
week – in this case, the battery should be removed.
3.7.1 Storing Batteries
Long term battery storage is not recommended. If storage is necessary:
• Always try to use a ‘first-in first-out’ approach to minimize storage time.
• Lithium Ion batteries age much faster at elevated temperatures. Store batter-
ies at temperatures between 0˚ C and 20˚C.
• Always charge batteries to at least 40 to 60% before storing them. Batteries
can be damaged by an over-discharge phenomenon that occurs when an
empty battery is stored for a long period of time such that the cell voltage
drops below a lower limit.
• To minimize storage degradation, recharge stored batteries to 40 to 60%
every 4 or 6 months to prevent over-discharge damage.
• A ‘never used’ Li-Ion battery that has been stored for 3 years may have
limited or no useful life remaining once put into service. Think of batteries
as perishable goods.
3.8 Uploading Data In A Docking Station
Important: Review the documentation provided with the user application
installed in your WORKABOUT PRO before performing data
uploads.
The desktop docking station and quad docking station allows the WORKABOUT
PRO to link to an Ethernet network. They are typically used to upload transaction
data to a server computer when a radio link in not available.
Note: Refer to “Chargers And Docking Stations” on page 141 for more details.

Psion Teklogix WORKABOUT PRO Hand-Held Computer User Manual 37
Chapter 3: Getting To Know The WORKABOUT PRO
Bluetooth Radio
The desktop docking station can complete batch uploads to a Client USB connected
PC or server. An optional10/100baseT Ethernet module is also available.
Unlike the desktop docking station, the quad docking station supports only TCP/IP
connections to a PC or server through a 10/100baseT Ethernet connection.
When a WORKABOUT PRO is properly inserted in a docking station, a dock icon
is displayed in the taskbar at the bottom of the screen. The unit also detects the
presence of the Ethernet network.
3.9 Bluetooth Radio
Note: Integrated Bluetooth class II radios are standard on WORKABOUT
PRO C units. Keep in mind also that Bluetooth is available simulta-
neously with WAN and 802.11b on a single unit.
A WORKABOUT PRO C is equipped with an on-board Bluetooth radio. This type
of radio enables short range data communication between devices. The Bluetooth
also provides the capability to use a Bluetooth-enabled cellular phone as a data
modem, exchanging information with other Bluetooth devices and providing
network access. Keep in mind too that a Bluetooth and an 802.11b radio card can
operate simultaneously in your unit. Refer to “The Bluetooth GPRS Phone” on
page 84 for setup details.
3.10 The SD/MMC Card – Adding Memory
To add additional non-volatile memory to your hand-held, you can insert a Secure
Digital/Multi-Media Card (SD/MMC) through the battery compartment.
3.10.1 Inserting The Card
• Remove the battery cover and the battery.

Chapter 3: Getting To Know The WORKABOUT PRO
Inserting The Card
38 Psion Teklogix WORKABOUT PRO Hand-Held Computer User Manual
A hinged door at the top of the battery compartment protects the connectors.
Figure 3.8 Inserting the SD.MMC Card
• Lift the hinged SD door by gently pulling upward on the metal tab.
• Orient the SD/MMC card according to the legend stamped into the battery
well plastic.
• Place the card in the slot with the card contacts down, and slide it inward
until it latches into place.
• Swing hinged door back into place.
To remove the card:
• Gently press it inward slightly until the detent unlatches, and the card is
expelled from the slot.
Hinged SD door
SD/MMC
Card

Psion Teklogix WORKABOUT PRO Hand-Held Computer User Manual 39
Chapter 3: Getting To Know The WORKABOUT PRO
General Maintenance
3.11 General Maintenance
3.11.1 Caring For The Touchscreen
The top of the touchscreen is a thin, flexible polyester plastic sheet with a
conductive coating on the inside. The polyester can be permanently damaged by
harsh chemicals and is susceptible to abrasions and scratches. Using sharp objects
on the touchscreen can scratch or cut the plastic, or crack the internal conductive
coating.
The chemicals listed below must not come into contact with the touchscreen:
• mustard,
• sodium hydroxide,
• concentrated caustic solutions,
• benzyl alcohol, and
• concentrated miner acids.
If the touchscreen is used in harsh environments, consider applying a disposable
screen protector (WA6110). These covers reduce the clarity of the display slightly
but will dramatically extend the useful life of the touchscreen. When they become
scratched and abraded, they are easily removed and replaced.
3.11.2 Cleaning The WORKABOUT PRO
Important: Do not immerse the unit in water. Dampen a soft cloth with mild
detergent to wipe the unit clean.
• Use only mild detergent or soapy water to clean the hand-held unit.
• Avoid abrasive cleaners, solvents or strong chemicals for cleaning. The
plastic case is susceptible to harsh chemicals. The plastic is partially soluble
in oils, mineral spirits and gasoline. The plastic slowly decomposes in
strong alkaline solutions.
• To clean ink marks from the keypad and touchscreen, use isopropyl
alcohol.

Psion Teklogix WORKABOUT PRO Hand-Held Computer User Manual 41
WORKING W ITH W INDOWS CE .NET4
4
4.1 Navigating In Windows CE .NET And Applications ............43
4.1.1 Navigating Using A Touchscreen And Stylus ............43
4.1.2 Navigating Using The Keyboard ...................43
4.2 Working With Files, Folders And Programs ................44
4.3 The Startup Desktop ............................44
4.3.1 The Desktop Icons ..........................45
4.3.2 The Taskbar ..............................46
4.4 The Start Menu ...............................47
4.4.1 The Desktop .............................48
4.4.2 Security Settings ...........................48
4.4.3 The System Tray ...........................49
4.4.4 The Task Manager ..........................50
4.4.5 Cycle Tasks ..............................50
4.4.6 Power Info ..............................50
4.4.7 Programs ...............................51
4.4.8 Settings ................................52
4.4.9 Run ..................................53
4.4.10 Shutdown ..............................54
4.5 Using A Dialogue Box ...........................55

Psion Teklogix WORKABOUT PRO Hand-Held Computer User Manual 43
Chapter 4: Working With Windows CE .NET
Navigating In Windows CE .NET And Applications
4.1 Navigating In Windows CE .NET And Applications
Graphic user interfaces like Windows CE .NET for portable devices or desktop
Windows (2000, XP, etc.) utilize ‘point and click’ navigation. On the WORK-
ABOUT PRO, this is accomplished using a touchscreen and stylus rather than
a mouse. An equivalent keyboard shortcut is also available for every ‘point and
click’ action.
4.1.1 Navigating Using A Touchscreen And Stylus
Note: If the touchscreen is not registering your screen taps accurately, it may
need recalibration. Refer to “Calibrating The Touchscreen” on page 30.
A touchscreen is a standard feature on all WORKABOUT PROs. Each is equipped
with a stylus – a pointing tool that looks like a pen – stored in a slot at the top of the
unit. The stylus is used to select objects on the touchscreen.
• Tap the stylus on the appropriate icon to open a file or launch an applet.
4.1.2 Navigating Using The Keyboard
If the touchscreen on your unit is disabled, choosing icons and navigating dialogue
boxes, displaying the desktop, and so on will require keyboard input.
Table 4.1 Keyboard Navigation
Keep in mind that unlike a desktop computer, the WORKABOUT PRO does not
support key chording (pressing two keys at the same time). You must press one key
followed by the next in sequence.
Operation Key or Key Combination
Switch between active applications <ALT> <TAB>
Open task manager <ALT> <ESC>
Move the cursor Arrow keys
Open file, folder or icon <ENTER>
Exit & Save <ENTER>
Close/Exit & Do Not Save <ESC>
Navigate Dialogue Boxes <TAB>
To move cursor up <SHIFT> <TAB>
To display contents of the next ‘tab’ <CTRL><TAB>
Select Radio Button/Press Button <SPACE>
Go to Start Menu <BLUE><.>
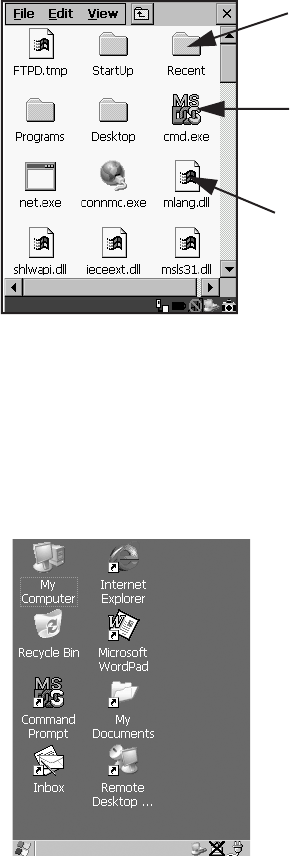
Chapter 4: Working With Windows CE .NET
Working With Files, Folders And Programs
44 Psion Teklogix WORKABOUT PRO Hand-Held Computer User Manual
4.2 Working With Files, Folders And Programs
Figure 4.1 Working With Windows Icons
• Double-tap on the appropriate icon – a folder icon, a program icon or a file
icon – to open or launch your selection.
4.3 The Startup Desktop
When the WORKABOUT PRO boots up, the startup desktop (shell) is displayed.
Any applications stored in the Startup folder start up immediately.
Figure 4.2 The WORKABOUT PRO Startup Desktop
Folder
File
Program Icon

Psion Teklogix WORKABOUT PRO Hand-Held Computer User Manual 45
Chapter 4: Working With Windows CE .NET
The Desktop Icons
Note: The startup folder is in: \Windows\StartUp and \Flash Disk\Start Up.
• Tap on an icon to open a window or, in the case of an application icon,
launch an application.
4.3.1 The Desktop Icons
The icons displayed in the startup desktop operate in much the same way as those
displayed on any standard PC desktop that is running Windows®.
My Computer
Choosing this icon displays the contents of your WORKABOUT PRO. If you’re not
sure how to work with the files, folders and programs displayed, refer to “Working
With Files, Folders And Programs” on page 44.
Recycle Bin
This option temporarily contains items that were deleted, allowing you to either
permanently delete or restore the items.
Command Prompt
Command Prompt is used to access the DOS command prompt. At the prompt, you
can type DOS commands such as dir to display all the directories in the drive.
Inbox
Inbox is used to access and view your email.
Internet Explorer
Choosing this icon launches Internet Explorer – a standard Windows CE .NET
version. Keep in mind that your supervisor will need to set up access using the
Internet Options and the Network and Dial-up Connections icons in the Control Panel.
Microsoft Wordpad
This application, an abbreviated version of Microsoft Word, allows you to create
documents on the WORKABOUT PRO.
Remote Desktop Connection
This option allows your WORKABOUT PRO to communicate with a remote
desktop PC. “Remote Desktop Connection” on page 59 provides a website address
with step-by-step instructions.
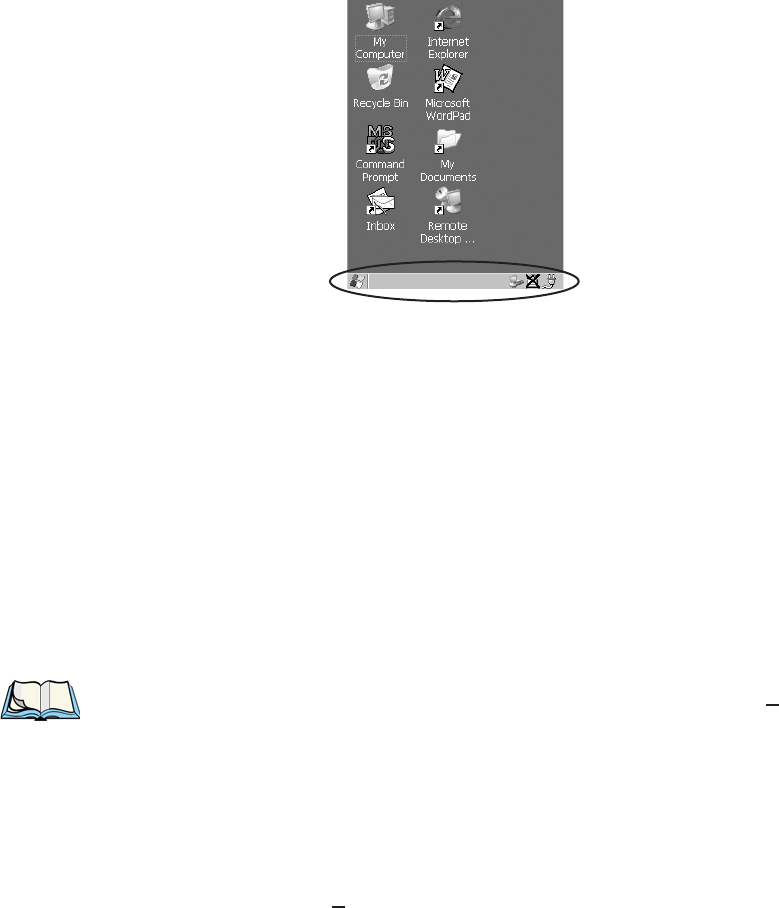
Chapter 4: Working With Windows CE .NET
The Taskbar
46 Psion Teklogix WORKABOUT PRO Hand-Held Computer User Manual
4.3.2 The Taskbar
Figure 4.3 The Taskbar
The WORKABOUT PRO is equipped with a taskbar at the bottom of the screen. It
displays icons through which you can view the battery capacity and identify any
active modifier keys – <SHIFT>, <ALT>, <CTRL>, <ORANGE> and <BLUE>.
Keys that have been locked “on” are displayed in uppercase letters. When a
peripheral is attached to the tether or LIF port, the associated icon is displayed. In
addition, the taskbar displays the application(s) currently running on your unit and
the security level assigned to it.
4.3.2.1 Using The Taskbar
• Using the stylus, tap on an icon to display the associated dialogue box. For
example, tap on the battery icon to display a Power Properties dialogue box that
indicates the current battery capacity.
Note: If your touchscreen is disabled, type <BLUE> <.> <Y> to choose Sys-
tem Tray from the Start Menu. Press the <LEFT> or <RIGHT> arrow
keys to choose a taskbar icon and press <ENTER> to display the associ-
ated dialogue box.
4.3.2.2 Customizing The Taskbar
To customize the taskbar so that it displays only those icons you require:
• Tap on the Settings option, and then tap on Taskbar... in the sub-menu,
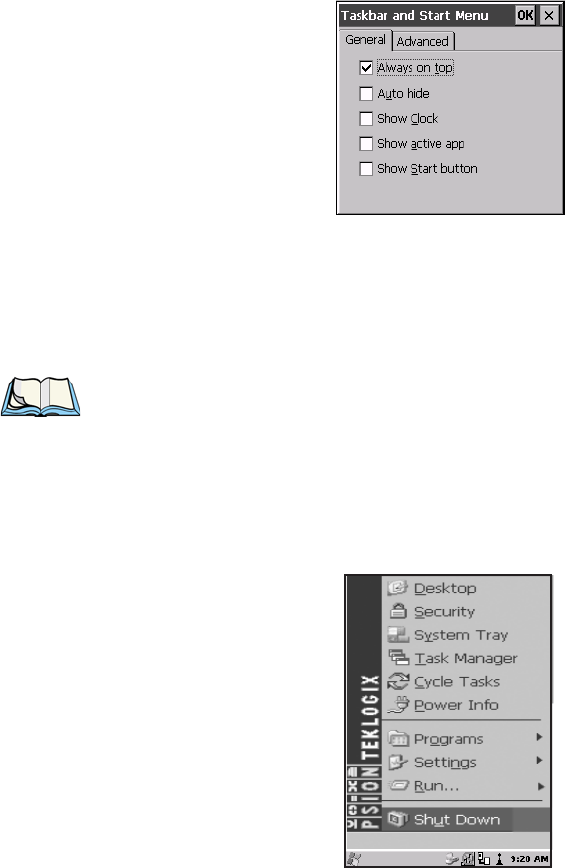
Psion Teklogix WORKABOUT PRO Hand-Held Computer User Manual 47
Chapter 4: Working With Windows CE .NET
The Start Menu
The Taskbar and Start Menu dialogue box is displayed.
Figure 4.4 Taskbar And Start Menu Settings
• Tap the stylus on the items you want to activate or deactivate. A check mark
indicates an active item.
4.4 The Start Menu
Note: Some of the Start Menu items may be disabled based on the WORK-
ABOUT PRO’s current security settings.
The Start Menu lists the operations you can access and work with. It is available from
the startup desktop or from within any application.
To display the menu:
• Tap on the Windows® Start button in the left-most corner of the taskbar.
Figure 4.5 Start Menu
• Tap on the item in the menu with which you want to work.
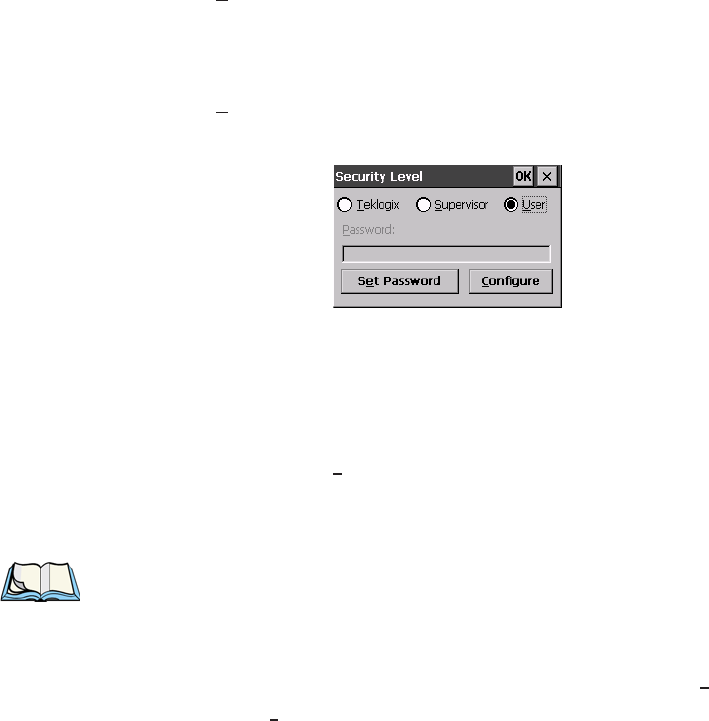
Chapter 4: Working With Windows CE .NET
The Desktop
48 Psion Teklogix WORKABOUT PRO Hand-Held Computer User Manual
4.4.1 The Desktop
Choosing the Desktop option from the Start Menu displays the WORKABOUT
PRO desktop.
4.4.2 Security Settings
Choosing the Security option from the Start Menu displays a dialogue box in
which you can define the WORKABOUT PRO access level – Teklogix, Supervisor or User.
Figure 4.6 Security Levels
Security Level
These security levels define the options accessible to the operator in the Start Menu
and the taskbar. When you change security levels, you’ll need to enter the
appropriate password in the Password textbox. The security level is represented by an
icon in the shape of a lock in the taskbar.
Changing A Password
Note: Keep in mind that this is the same password as that assigned through the
Password control panel applet. Refer to “Control Panel Icons” on page 60.
To assign a password:
• Choose a security level, and enter the existing password in the Password field
• Choose the Set Password button.
A dialogue box labelled Password Properties is displayed.
• Type the new password in the Password: text box
• In the Confirm Password: text box, retype the new password.
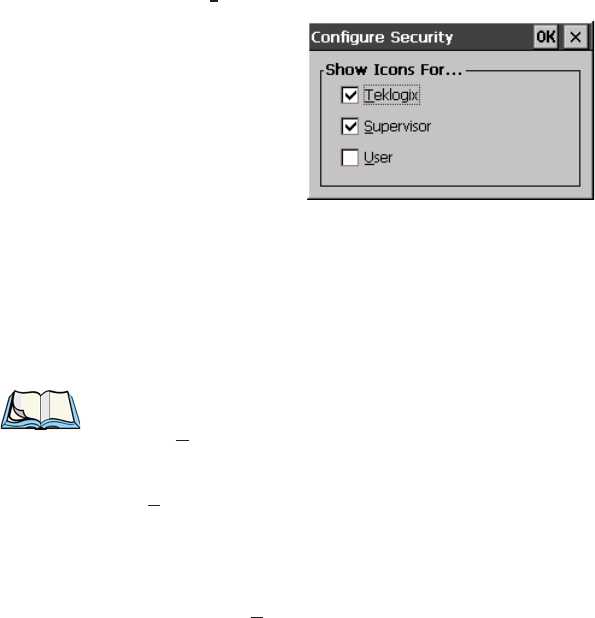
Psion Teklogix WORKABOUT PRO Hand-Held Computer User Manual 49
Chapter 4: Working With Windows CE .NET
The System Tray
Configuring Security
Choosing the Configure button displays the Configure Security dialogue box.
Figure 4.7 Configuring Security
This dialogue box allows you to determine which security levels will have an
associated icon displayed in the taskbar. By default, a security icon is not displayed
for user-level security.
4.4.3 The System Tray
Note: This option is useful if your touchscreen has been disabled. Activating
System Tray allows you to access taskbar icons using keyboard keys
in place of the stylus.
The System Tray option allows access to the icons in the taskbar using your
keyboard. The taskbar displays indicators such as a battery capacity gauge and the
security level. These indicators are attached to dialogue boxes that provide
additional information.
• Choose System Tray from the Start Menu.
To display the dialogue box attached to an icon:
• Press the <LEFT> or <RIGHT> arrow keys to choose a taskbar icon and
press <ENTER> to display the associated dialogue box.
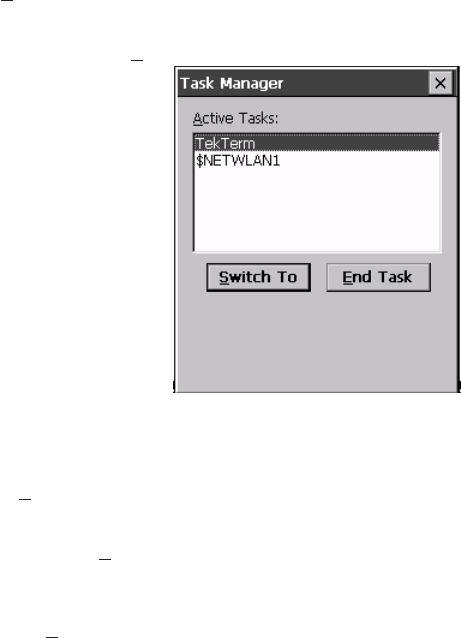
Chapter 4: Working With Windows CE .NET
The Task Manager
50 Psion Teklogix WORKABOUT PRO Hand-Held Computer User Manual
4.4.4 The Task Manager
The Task Manager option allows you to switch to another task or to end an
active task. To display the task manager window:
• Tap on the Task Manager in the Start Menu.
Figure 4.8 Task Manager
4.4.5 Cycle Tasks
When Cycle Tasks is selected (and the Task Manager is not open), you can
cycle through active applications. To choose this option:
• Tap on Cycle Tasks in the Start Menu.
4.4.6 Power Info
Selecting Power Info from the Start Menu displays the Power Properties dialogue box.
This dialogue box indicates the remaining charge capacity of the battery.

Psion Teklogix WORKABOUT PRO Hand-Held Computer User Manual 51
Chapter 4: Working With Windows CE .NET
Programs
4.4.7 Programs
• Tap on Programs to display a sub-menu of options.
Figure 4.9 Program Sub-Menu
This sub-menu allows you to access to the following options:
ActiveSync®
This option allows you to connect to another device using ActiveSync.
Command Prompt
Command Prompt is used to access the DOS command prompt. At the prompt, you can
type DOS commands such as dir to display all the directories in the drive.
Inbox
Inbox is used to access and view your email.
Internet Explorer
The WORKABOUT PRO is equipped with Microsoft® Internet Explorer consistent
with all Windows CE .NET devices on the market. You can access the Internet Options
icon through the Start Menu under Settings>Control Panel or by
double-tapping on the desktop icon labelled My Computer and then, double-tapping on
the Control Panel icon.
Microsoft Wordpad
This application, an abbreviated version of Microsoft Word, allows you to create
documents using the WORKABOUT PRO.
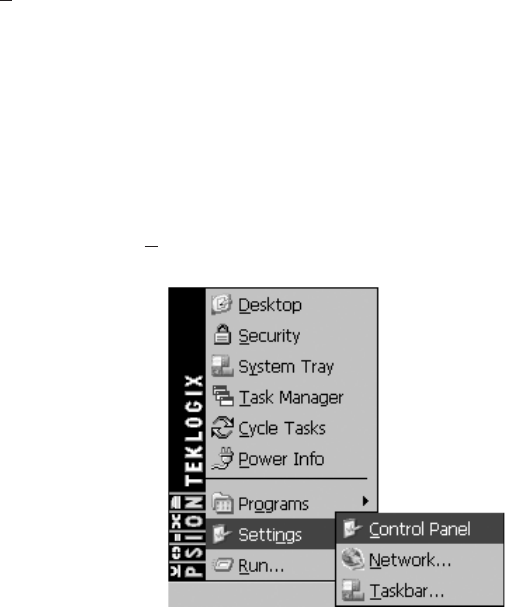
Chapter 4: Working With Windows CE .NET
Settings
52 Psion Teklogix WORKABOUT PRO Hand-Held Computer User Manual
Windows Explorer
Windows Explorer installed on your unit is consistent with all Windows CE .NET
devices. You can access this option either from the Start Menu under
Programs>Windows Explorer.
Remote Desktop Connection
Remote Desktop Connection is an application used to connect to a Windows Terminal
Server so that you can run a “session” on the Server machine using the
WORKABOUT PRO (Windows CE .NET device). “Remote Desktop Connection”
on page 59 provides a website with details about this option.
4.4.8 Settings
Tapping on Settings displays a sub-menu of options, including Control Panel,
Network and Dial-up Connections and Taskbar and Start Menu settings.
Figure 4.10 Settings Sub-Menu
Control Panel
The Control Panel contains applets used to configure hardware, the operating system
and the shell. If your unit is running with the Psion Teklogix Open Tekterm
application or another application, additional configuration applets may appear in
the Control Panel.
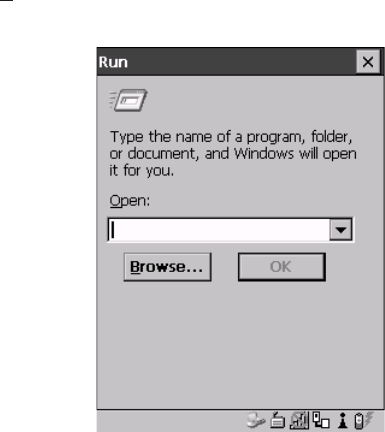
Psion Teklogix WORKABOUT PRO Hand-Held Computer User Manual 53
Chapter 4: Working With Windows CE .NET
Run
Network And Dial-Up Connections
The Network and Dial-up Connections window allows you to configure the radio or execute
an existing configuration. Refer to “Configuring An IEEE 802.11b Radio” on
page 111 for radio setup details.
Taskbar And Start Menu
The Taskbar and Start Menu option displays a dialogue box in which you can
customize the taskbar, choosing which options will be displayed. Refer to
“Customizing The Taskbar” on page 46 for additional details about this option.
4.4.9 Run
Choosing the Run option from the Start Menu displays a dialogue box in which you
can enter the name of the program, folder or document you want to open or launch.
Figure 4.11 Run Dialogue Box
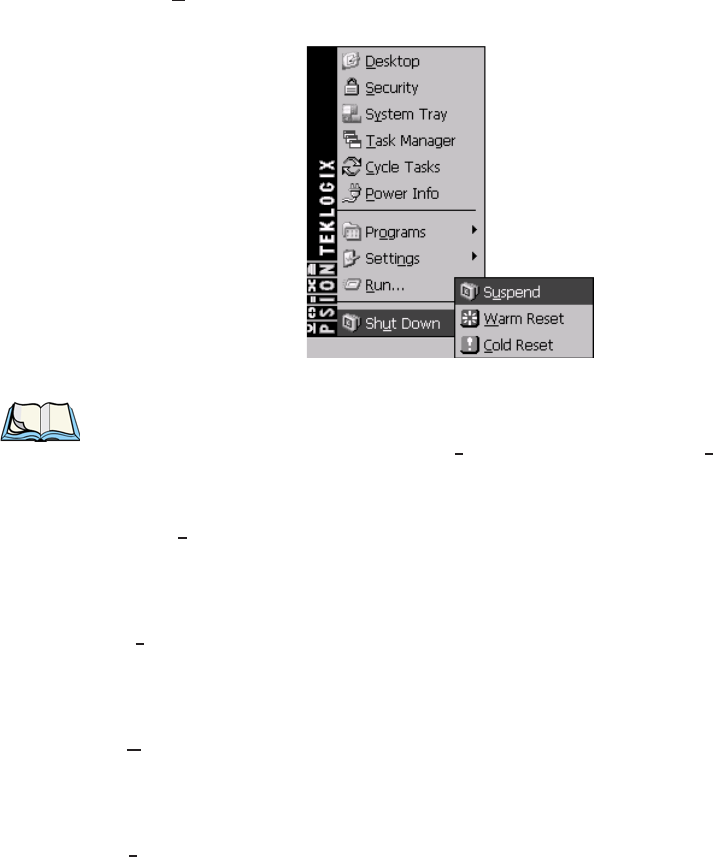
Chapter 4: Working With Windows CE .NET
Shutdown
54 Psion Teklogix WORKABOUT PRO Hand-Held Computer User Manual
4.4.10 Shutdown
With Shutdown highlighted, pressing the <RIGHT> arrow key displays a
sub-menu of options, including Suspend, Warm Reset and Cold Reset.
Figure 4.12 Shutdown Sub-Menu
Note: This menu varies slightly depending on the security level chosen. When
the unit is set to User level, the Shutdown option is replaced by Suspend.
A sub-menu is not available.
At Teklogix security level, an additional option is available in the sub-menu
– Bootloader. This option behaves like cold-reset, except that the WORK-
ABOUT PRO starts Bootloader rather than Windows CE .NET
Suspend
The Suspend option suspends the WORKABOUT PRO immediately – this is
equivalent to turning the hand-held off.
Warm Reset
The Warm Reset option resets the WORKABOUT PRO, leaving all saved files and
(registry) settings intact. Any unsaved data is lost.
Cold Reset
The Cold Reset option resets the WORKABOUT PRO. Any files not stored in
permanent memory are lost. However, the registry settings are saved.
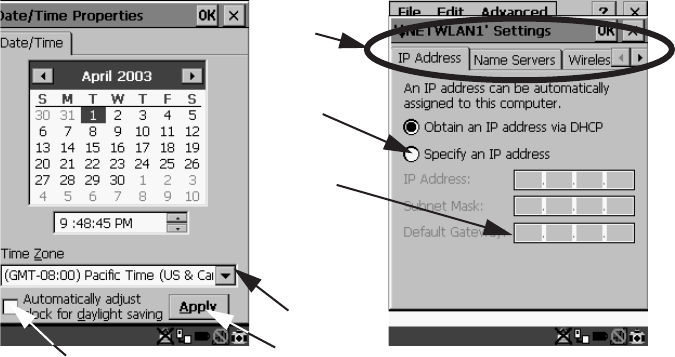
Psion Teklogix WORKABOUT PRO Hand-Held Computer User Manual 55
Chapter 4: Working With Windows CE .NET
Using A Dialogue Box
4.5 Using A Dialogue Box
A dialogue box (like the samples in Figure 4.13) appears when you need to make
selections and enter further information.
You can move between dialogue items by tapping on them, or by pressing the arrow
keys and the <TAB> key. (<SHIFT> <TAB> moves the cursor backwards.)
Figure 4.13 Dialogue Boxes
Dialogue boxes contain one or more of the following elements:
Tab: A tab separates different elements of a dialogue box. Tapping on a tab displays
its contents.
Textbox: A textbox requires that you type information. Use the stylus to highlight
the textbox and then type the appropriate information.
Dropdown: This type of menu is identified by up and down arrows next to the
dropdown menu to indicate that additional options are available. Tap on the menu to
highlight it, and use the arrows to cycle through the options.
Checkbox: This box allows you to select or deselect an option. To select or deselect
a checkbox, tap the stylus in the checkbox to select (√) or deselect it.
Checkbox
Dropdown Menu
Button
Textbox
Radio
Button
Tabs

Chapter 4: Working With Windows CE .NET
Using A Dialogue Box
56 Psion Teklogix WORKABOUT PRO Hand-Held Computer User Manual
Radio buttons: These buttons allow you to choose from a number of options. For
example, in the sample screen in Figure 4.13 on page 55 you can choose to ‘Obtain an
IP address via DHCP’ or ‘Specify an IP address’. Tap on a radio button to activate the option
next to it.
Buttons: This type of button allows you to ‘Save’, ‘Delete’ and so on the options
you’ve chosen in a dialogue box. Tap the stylus on the button you want to activate it.
Saving Your Choices: Once you’ve made all your changes, tap on the OK button or
press the <ENTER> to save your changes and exit the dialogue box.
Note: A dialogue box item that is displayed in grey text indicates that it is not
currently available.

Psion Teklogix WORKABOUT PRO Hand-Held Computer User Manual 57
CONFIGURATION 5
5
5.1 Remote Desktop Connection ........................59
5.2 Pocket PC Compatibility ..........................59
5.3 The Control Panel ..............................59
5.4 Control Panel Icons .............................60
5.5 Basic Setup .................................64
5.5.1 Display Properties ..........................64
5.5.1.1 Display Contrast .......................64
5.5.1.2 Display Backlight ......................65
5.5.1.3 Display Appearance .....................66
5.5.2 Keyboard Properties .........................67
5.5.2.1 Key Repeat..........................67
5.5.2.2 Keyboard Backlight .....................68
5.5.2.3 Keyboard One Shot Modes .................69
5.5.2.4 Keyboard Macro Keys ....................70
5.5.2.5 Unicode Mapping ......................71
5.5.3 Volume And Sound Properties ....................73
5.5.3.1 Volume Adjustments .....................73
5.5.4 Power Management Properties ....................74
5.5.4.1 Battery Capacity .......................74
5.5.4.2 Power Saving Schemes ...................75
5.5.5 Stylus Properties ...........................76
5.5.5.1 Setting Double-Tap Sensitivity ...............76
5.5.5.2 Touchscreen Calibration ...................77
5.5.5.3 Touchscreen Options.....................77
5.5.6 Certificate Assignment ........................77
5.6 Bluetooth Setup ...............................78
5.6.1 The Devices Tab ...........................79
5.6.2 The Server Tab ............................82
5.6.3 The Property Tab ...........................83
5.6.4 The Bluetooth GPRS Phone .....................84
5.7 SNMP (Simple Network Management Protocol) Setup ..........90
Chapter 5: Configuration
58 Psion Teklogix WORKABOUT PRO Hand-Held Computer User Manual
5.7.1 Contact Tab ..............................91
5.7.2 Communities Tab ...........................92
5.7.2.1 Adding A Community ....................93
5.7.2.2 Modifying A Community Setting ..............94
5.7.2.3 Removing An Existing Community .............94
5.7.3 Trap Destination Tab .........................95
5.7.3.1 Enabling Authentication TRAPS...............95
5.7.3.2 Adding A Destination ....................95
5.7.3.3 Changing A Destination ...................96
5.7.3.4 Removing A Trap Destination ................96
5.7.4 Permitted Hosts Tab..........................97
5.7.4.1 Adding A Host ........................97
5.7.4.2 Changing A Host .......................98
5.8 Total Recall .................................98
5.8.1 Creating A Backup Profile ......................99
5.8.2 Restoring A Profile .........................102
5.9 APN Manager Settings ..........................102
5.9.1 Automatic GSM Setup – Connecting To The Network .......102
5.9.2 Manual GSM Setup – APN Settings Manager ...........103
5.9.3 PIN Settings .............................105

Psion Teklogix WORKABOUT PRO Hand-Held Computer User Manual 59
Chapter 5: Configuration
Remote Desktop Connection
5.1 Remote Desktop Connection
Remote Desktop Connection is a WORKABOUT PRO application used to connect to a
Windows Terminal Server so that you can run a “session” on the Server machine,
using the hand-held (Windows CE .NET device).
Refer to the following website for step-by-step information about setting up this
connection:
http://www.microsoft.com/WindowsXP/pro/using/howto/gomobile/remotedesktop/default.asp
5.2 Pocket PC Compatibility
The WORKABOUT PRO supports the AYGShell API set that allows
PocketPC-compatible applications to run on the hand-held. Microsoft® Windows
CE .NET 4.2 is designed to include application programming interface (API)
compatibility support for the Microsoft Windows Powered Pocket PC 2002 shell in
units running Windows CE .NET 4.2.
The website below describes the APIs exposed through AYGShell and the
application compatibility between Windows Powered Pocket PC 2002-based
applications and Windows CE .NET 4.2-based devices:
http://msdn.microsoft.com/library/default.asp?url=/library/en-us/dncenet /html/WINCENET_CEPCC_App.asp
5.3 The Control Panel
The Control Panel provides a group of icons through which you can set a variety of
system-wide properties, such as mouse sensitivity, network configuration and the
desktop color scheme.
Note: If you are uncertain how to move around a dialogue box and make selec-
tions, review “Using A Dialogue Box” on page 55.
When the WORKABOUT PRO boots up, the startup desktop (shell) is displayed,
and any applications stored in the Startup folder start up immediately.
To access the Control Panel:
• Use the stylus to tap on the Start button in the taskbar to display the Start Menu.
Tap on Settings>Control Panel.
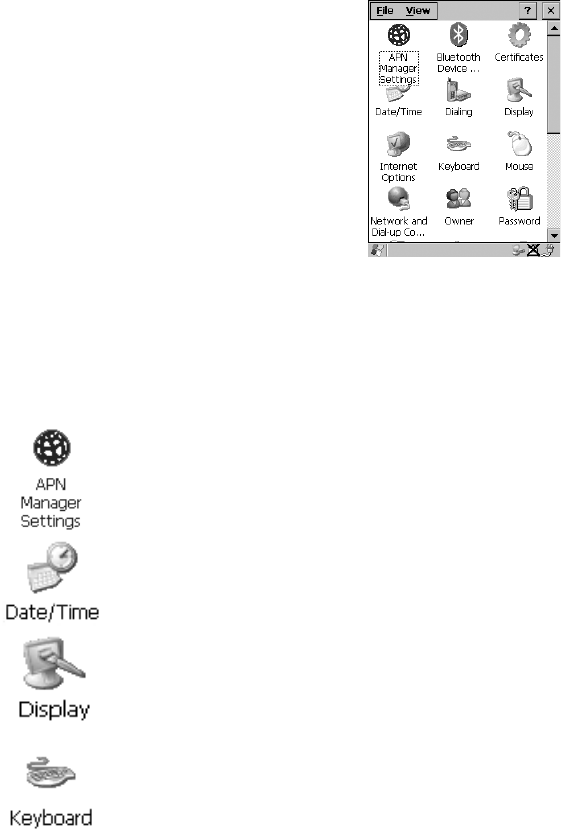
Chapter 5: Configuration
Control Panel Icons
60 Psion Teklogix WORKABOUT PRO Hand-Held Computer User Manual
The Control Panel folder contains icons used in the setup of your WORKABOUT PRO.
Figure 5.1 Control Panel
5.4 Control Panel Icons
The Control Panel provides a group of icons that allow you to customize and adjust
settings on your WORKABOUT PRO.
APN Manager Settings
Allows you to specify the APN (access point name) settings for units
equipped with a GSM/GPRS card.
Date/Time
Allows you to set the current Month, Date, Time and Time Zone on the unit.
Display
Changes the appearance (window colour scheme) on the unit desktop.
Keyboard
Toggles character repeat on and off and specifies delay and rate for repeated
characters. It also allows you to adjust the keyboard backlight.

Psion Teklogix WORKABOUT PRO Hand-Held Computer User Manual 61
Chapter 5: Configuration
Control Panel Icons
Volume & Sound
Allows you to adjust the volume of the sound emitted to indicate events like
warnings, key clicks and screen taps. This option also allows you to tailor
sounds (wave files) emitted from your WORKABOUT PRO.
Mouse Properties
This icon allows you to customize the sensitivity and speed of the stylus
double-tap.
Owner
Provides fields in which you can specify owner information. A ‘Notes’ tab
allows additional information to be entered and displayed when the unit is
powered up. ‘Network ID’ tab information is used to access network resources.
(This information should be provided by your System Administrator.)
Password
Allows you to assign a password to restrict access to elements of the unit.
Once assigned, password access cannot be circumvented so it is important
that you write down your password and keep it in a safe place. Refer to
“Security Settings” on page 48 for details.
Power
Displays battery pack power status. (Alternately, battery status can be
accessed through the taskbar.) The ‘Power Scheme’ tab allows you to deter-
mine a suspend states, and the ‘Charger’ tab determines whether or not a
battery that requires it, can be recalibrated. (Refer to “Power Saving
Schemes” on page 75 for details.)
Regional Settings
Allows you to specify the local language the display text will use along
with the format of numbers, currency, time and date for your region.

Chapter 5: Configuration
Control Panel Icons
62 Psion Teklogix WORKABOUT PRO Hand-Held Computer User Manual
Remove Programs
Lists the programs that can be removed from your unit. To remove a pro-
gram, select it and then click on the Remove button.
Stylus
Adjusts how Windows CE .NET recognizes your double-tap (as slow or
rapid successive taps).
Under the ‘Calibration’ tab, you can recalibrate your touchscreen by tapping
on the ‘Recalibrate’ button and following the directions on the calibration
screen.
System
Displays system and memory properties. Under the Memory tab, you can
allocate memory between storage memory and program memory.
Dialing
Specifies dialing settings, including area code, country code, dial type and
the code to disable call waiting. You can store multiple patterns – for exam-
ple, ‘Work’, ‘Home’, and so on using this dialogue box.
Certificates
A public key is transmitted as part of a certificate. The certificate assigned
through this icon is used to ensure that the submitted public key is, in fact,
the public key that belongs to the submitter. The client checks that the cer-
tificate has been digitally signed by a certification authority that the client
explicitly trusts. “Certificate Assignment” on page 77 directs you to the
appropriate setup information.
PC Connection
Enables direct connections to a desktop computer. Selecting the ‘Change Con-
nection’ button allows you to change the type of direct connect to your PC.

Psion Teklogix WORKABOUT PRO Hand-Held Computer User Manual 63
Chapter 5: Configuration
Control Panel Icons
Teklogix Scanners
If your WORKABOUT PRO is equipped with a scanner, this option pro-
vides the set up parameters and choose the bar code symbologies that the
unit will successfully read.
Network And Dial-up Connections
Displays a network window from which the radio can be configured and an
existing configuration can be executed.
Internet Options
Used to configure your Internet browser including options such as identify-
ing the default and search page that the browser applies when connecting to
the Internet, setting the cache size, specifying the Internet connection
options, and defining the security level that is applied when browsing.
SNMP
SNMP (Simple Network Management Protocol) is the protocol used to
monitor and manage devices attached to a TCP/IP network.
Bluetooth
A short-range wireless technology that enables data communication
between devices. It also provides the capability to use a Bluetooth-enabled
cellular phone as a data modem, exchanging information with other Blue-
tooth devices and providing network access.
Total Recall
Total Recall is a Psion Teklogix utility developed to maintain the persis-
tence of installed applications and settings over cold boots. This is based on
a backup and restore concept and is extended to incorporate many advanced
features.
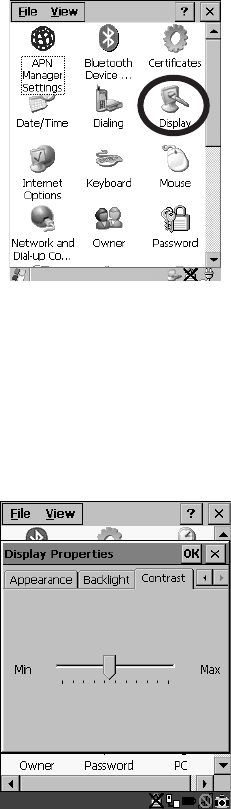
Chapter 5: Configuration
Basic Setup
64 Psion Teklogix WORKABOUT PRO Hand-Held Computer User Manual
5.5 Basic Setup
5.5.1 Display Properties
• In the Control Panel, choose the Display icon.
Figure 5.2 Choosing The Display Icon
5.5.1.1 Display Contrast
The Contrast tab allows you to adjust the display contrast to suit the environment in
which you are using the hand-held. Keep in mind that contrast adjustments only an
affect monochrome displays.
• In the Display Properties dialogue box, open the Contrast tab.
Figure 5.3 Display Contrast Properties
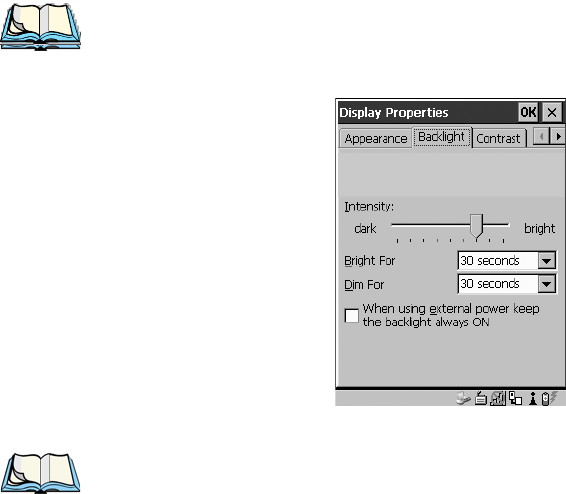
Psion Teklogix WORKABOUT PRO Hand-Held Computer User Manual 65
Chapter 5: Configuration
Display Backlight
Sliding bar in the Contrast tab to the left decreases or darkens the display contrast.
Sliding the bar to the right to increases or lightens the display contrast.
5.5.1.2 Display Backlight
The Display Properties dialogue box in the Control Panel allows you to specify the intensity
of the backlight along with the duration of time it stays on after an event like a key
press or scanner trigger.
Note: Keep in mind that this option may be restricted to supervisory use only.
• In the Display Properties dialogue box, open the Backlight tab.
Figure 5.4 Display Backlight Properties
Note: Backlight changes take affect immediately. You do not need to reset
the WORKABOUT PRO.
Intensity
This parameter is used to adjust the light intensity of the backlight. Sliding the bar to
the left lowers the light intensity, and sliding it to the right raises the intensity.
Bright For
The value chosen from this dropdown menu determines the duration of time that the
backlight stays on at the configured intensity when a unit is not in use.
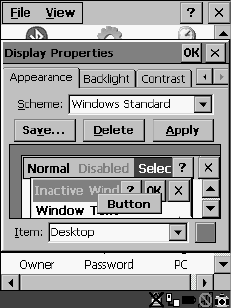
Chapter 5: Configuration
Display Appearance
66 Psion Teklogix WORKABOUT PRO Hand-Held Computer User Manual
Dim For
The value chosen from this dropdown menu determines the duration of time that
the backlight stays on at half the configured intensity (dimmed backlight) when a
unit is not in use.
External Power Checkbox
When you select (√) the checkbox next to ‘When using external power keep the backlight
always ON.’, the backlight remains ON at the configured intensity when the
WORKABOUT PRO is operating with external power (not battery power). If
power is being drawn from the battery, this option is ignored and the other
parameters defined in Display Properties dialogue box take affect.
5.5.1.3 Display Appearance
• In the Display Properties dialogue box, open the Appearance tab.
Figure 5.5 Display Appearance Properties
This dialogue box allows you to customize the display colour scheme.
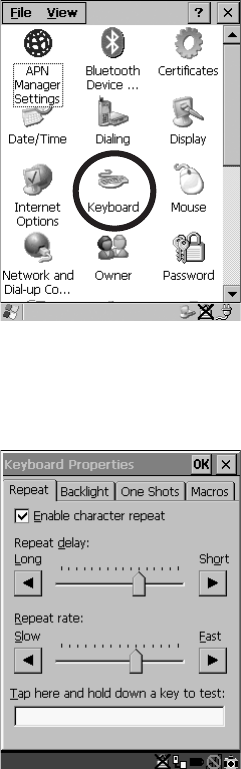
Psion Teklogix WORKABOUT PRO Hand-Held Computer User Manual 67
Chapter 5: Configuration
Keyboard Properties
5.5.2 Keyboard Properties
This icon displays the Keyboard Properties dialogue box in which you can adjust the
repeat rate of the keys, the intensity of the keyboard backlight and the behaviour of
the <BLUE> and <ORANGE> modifier keys. This dialogue box also allows you to
define macro keys and Unicode characters.
• In the Control Panel, choose the Keyboard icon.
Figure 5.6 Choosing The Keyboard Icon
5.5.2.1 Key Repeat
• In the Keyboard Properties dialogue box, open the Repeat tab.
Figure 5.7 Key Repeat Properties
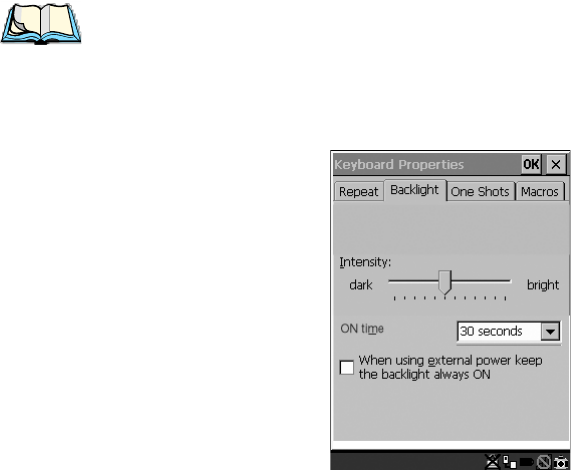
Chapter 5: Configuration
Keyboard Backlight
68 Psion Teklogix WORKABOUT PRO Hand-Held Computer User Manual
Repeat Delay
The value assigned for this parameter determines the delay in milliseconds between
repeat characters. Sliding the Repeat Delay bar to the left increases the delay between
key repeats while sliding the bar to the right shortens the repeat delay time.
Repeat Rate
The value assigned for the Repeat Rate parameter determines how quickly the key you
press repeats and is measured in characters per second (cps). Sliding the bar to the
left slows the repeat rate, and sliding the bar to the right increases the repeat rate.
Note: Use the field at the bottom of this dialogue box to test the repeat delay and
rate settings you’ve chosen.
5.5.2.2 Keyboard Backlight
• In the Keyboard Properties dialogue box, open the Backlight tab.
Figure 5.8 Keyboard Backlight Properties
Intensity
This parameter is used to adjust the light intensity of the keyboard backlight. Sliding
the bar to the left darkens the keyboard backlight intensity, and sliding it to the right
lightens the intensity.
ON Time
The value chosen from this dropdown menu determines the duration of time that the
keyboard backlight stays on when a unit is not in use.
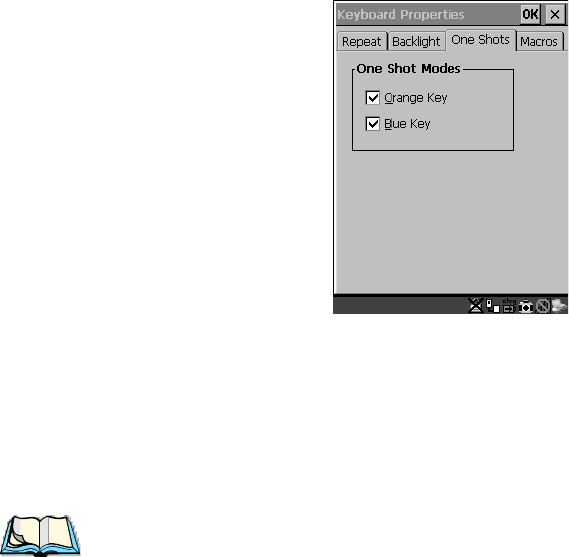
Psion Teklogix WORKABOUT PRO Hand-Held Computer User Manual 69
Chapter 5: Configuration
Keyboard One Shot Modes
5.5.2.3 Keyboard One Shot Modes
• In the Keyboard Properties dialogue box, open the One Shots tab.
Figure 5.9 Keyboard One Shot Properties
When these options are enabled (√), the <ORANGE> and <BLUE> keys only
remain active until the next key is pressed. If the ‘One Shots’ options are disabled
(the checkbox is left blank), the <ORANGE> and <BLUE> keys are locked ‘on’
when pressed only once; they remain ‘on’ until they are pressed a second time to
unlock them.
Note: Keep in mind that checking the taskbar lets you know whether or not
these keys are locked on. When the <ORANGE> and <BLUE> keys
are locked ‘on’, the taskbar at the bottom of the screen displays them
in uppercase characters – ORANGE KEY and BLUE KEY. If these keys are
displayed in lowercase characters in the taskbar, you’ll know that the
orange key and the blue key are not locked. They will become inactive
following a key press.
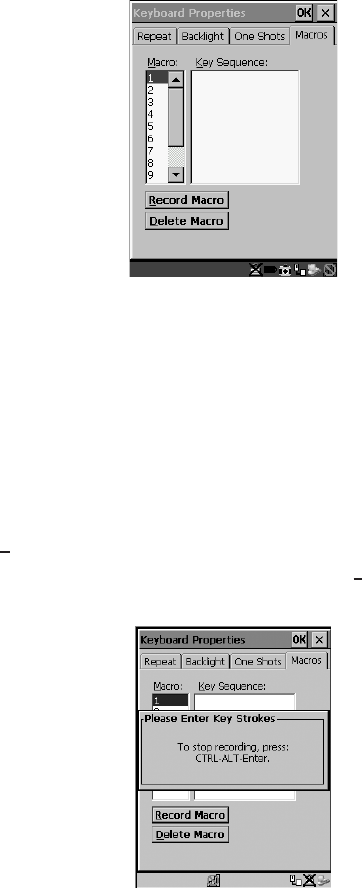
Chapter 5: Configuration
Keyboard Macro Keys
70 Psion Teklogix WORKABOUT PRO Hand-Held Computer User Manual
5.5.2.4 Keyboard Macro Keys
• In the Keyboard Properties dialogue box, open the Macros tab.
Figure 5.10 Macro Dialogue Box
A macro has 20 programmable characters (or “positions”). The macro keys can be
programmed to replace frequently used keystrokes, along with the function of
executable keys including <ENTER>, <BKSP> and <DEL> (<BLUE>-<BKSP>),
function keys and arrow keys.
Recording And Saving A Macro
You can program up to 3 macro keys.
• In the Macro: menu, highlight a macro key number – for example, macro 1 to
assign a macro to macro key <M1>. Tap on the Record Macro button.
A message screen is displayed instructing you to ‘Please Enter Key Strokes’.
Figure 5.11 Recording A Macro
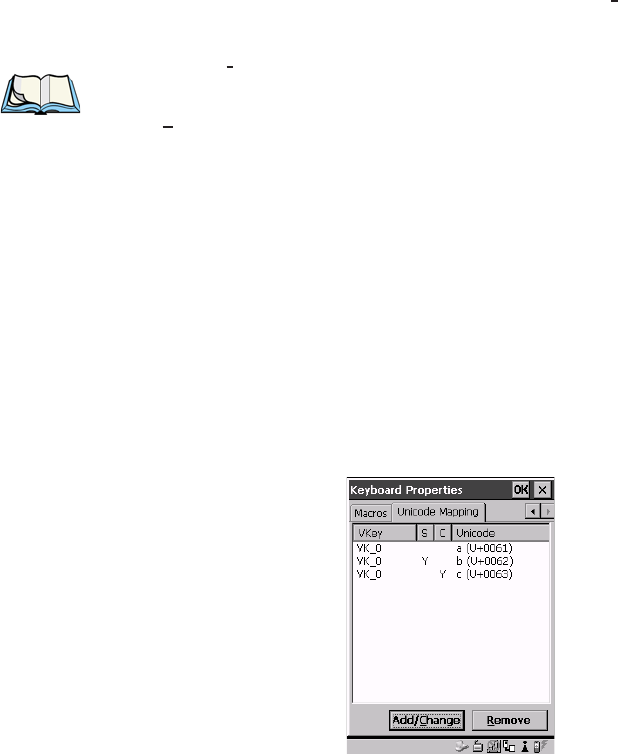
Psion Teklogix WORKABOUT PRO Hand-Held Computer User Manual 71
Chapter 5: Configuration
Unicode Mapping
• Type the macro sequence you want to assign to the Macro key. You can type
text and numbers, and you can program the function of special keys into a
macro.
• When you’ve finished recording your macro sequence, press the key
sequence – <CTRL> <ALT> <ENTER>.
A new screen displays the macro sequence you created. The Save Macro button is
highlighted.
• Tap on Save Macro to save your macro.
Note: If you want to discard the macro you’ve just created, tap on the
Discard Macro button.
Executing A Macro
• Press the macro key to which you’ve assigned the macro. For example, if
you created a macro for macro key ‘1’, press <M1> to execute the macro.
Deleting A Macro
• In the Macros tab, use the stylus to highlight the macro number you want to
delete.
• Tap on the Delete Macro button, and press <ENTER>.
5.5.2.5 Unicode Mapping
• In the Keyboard Properties dialogue box, open the Unicode Mapping tab.
Figure 5.12 Unicode Mapping
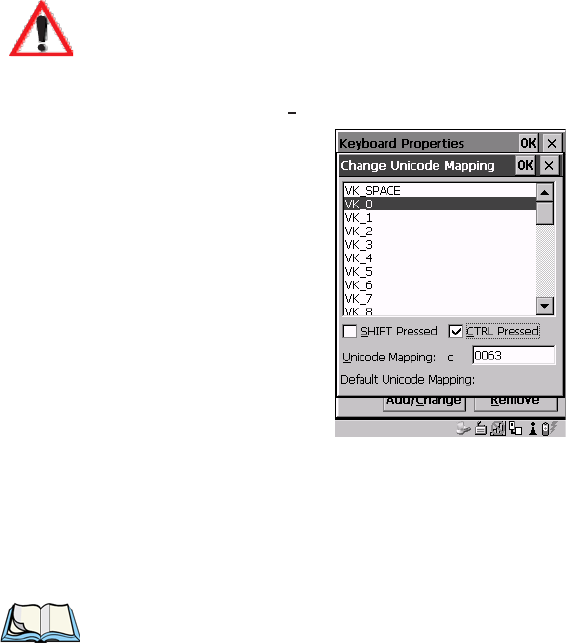
Chapter 5: Configuration
Unicode Mapping
72 Psion Teklogix WORKABOUT PRO Hand-Held Computer User Manual
The Unicode Mapping tab is used to map combinations of virtual key values and
<CTRL> and <SHIFT> states to Unicode™ values. This tab shows the configured
Unicode character along with the Unicode value. For example, the sample screen
above shows “a (U+0061)” indicating that the character “a” is represented by the
Unicode value “0061”, and so on. Keep in mind that Unicode configurations are
represented as hexidecimal rather than decimal values.
All user-defined Unicode mappings are listed in the Unicode Mapping tab in order of
virtual key value, and then by order of the shift state. If a Unicode mapping is not
listed, the Unicode mapping is mapped to the default Unicode value.
Adding And Changing Unicode Values
Important: Changes to Unicode mappings are not saved until you exit the
Keyboard Properties dialogue box.
• Tap on the Add/Change button.
Figure 5.13 Adding And Change Unicode Values
• Highlight a value in the Unicode mapping list – in the sample screen above,
a value will be assigned to virtual key 0 (VK 0).
• Position the cursor in the ‘Unicode Mapping’ field and type a Unicode
value for the highlighted key.
Note: To add a shifted state – <SHIFT> and/or <CTRL>, tap the stylus on the
checkbox next to ‘SHIFT Pressed’ and/or ‘CTRL Pressed’.
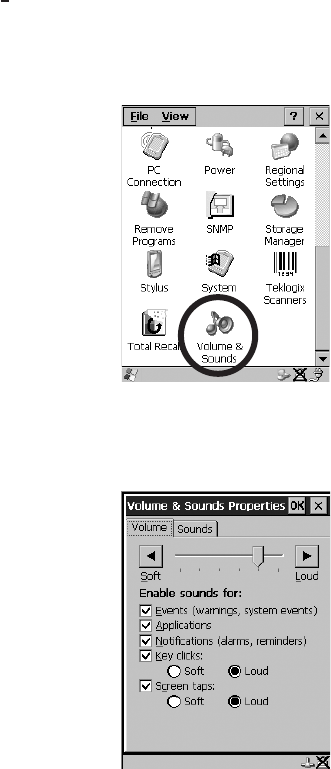
Psion Teklogix WORKABOUT PRO Hand-Held Computer User Manual 73
Chapter 5: Configuration
Volume And Sound Properties
Removing Unicode Values
• In the ‘Unicode Mapping’ tab, highlight the item you want to delete, and
tap the Remove button.
5.5.3 Volume And Sound Properties
• In the Control Panel, choose the Volume & Sounds icon.
Figure 5.14 Choosing The Volume Icon
5.5.3.1 Volume Adjustments
Figure 5.15 Volume Settings
• Slide the volume button to the left to lower the beeper volume or to the right
to increase the beeper volume.
• Under the heading ‘Enable sounds for:’, enable (√) the conditions under which
you want the WORKABOUT PRO to emit a beep.
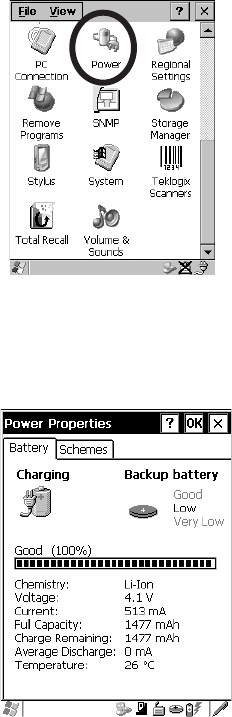
Chapter 5: Configuration
Power Management Properties
74 Psion Teklogix WORKABOUT PRO Hand-Held Computer User Manual
5.5.4 Power Management Properties
This icon displays a Power Properties dialogue box that indicates the unit’s battery
capacity and allows you to manage battery use.
• In the Control Panel, choose the Power icon.
Figure 5.16 Choosing The Power Icon
5.5.4.1 Battery Capacity
• In the Power Properties dialogue box, open the Battery tab.
Figure 5.17 Power Battery Properties
The Battery tab details information about the battery installed in your WORKABOUT
PRO.
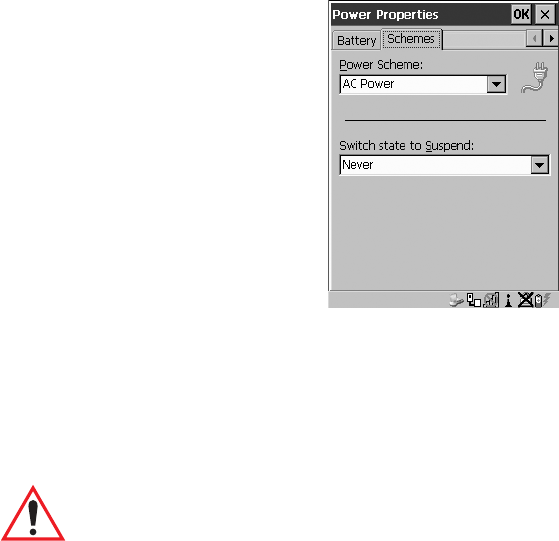
Psion Teklogix WORKABOUT PRO Hand-Held Computer User Manual 75
Chapter 5: Configuration
Power Saving Schemes
5.5.4.2 Power Saving Schemes
• In the Power Properties dialogue box, open the Schemes tab.
Figure 5.18 Power Scheme Properties
Power Scheme
This dropdown menu allows you to specify whether the unit is using AC Power or
Battery Power.
Switch State To Suspend
Important: If a WORKABOUT PRO is using battery power, Psion Teklogix
recommends setting the Suspend value to 10 minutes. Setting
‘Switch State To Suspend’ to values greater than 10 or setting the
suspend state to ‘Never’ will adversely affect the battery run time.
To further reduce power consumption, carefully consider the
duration of time that the display backlight is ‘on’ (see “Display
Backlight” on page 65).
When the WORKABOUT PRO is idle – not receiving any user input (a key touch, a
scan, and so on) or system activity (serial data, an activity initiated by an
application, and so on), the hand-held uses the value assigned in the Switch State To
Suspend field to determine when the unit will go to sleep (appear to be off).
When the time in the Suspend field elapses without any activity, the unit enters Suspend
state. In Suspend state, the WORKABOUT PRO CPU enters a sleep state, and any
radios are shut off. The state of the device (RAM contents) is preserved. Pressing
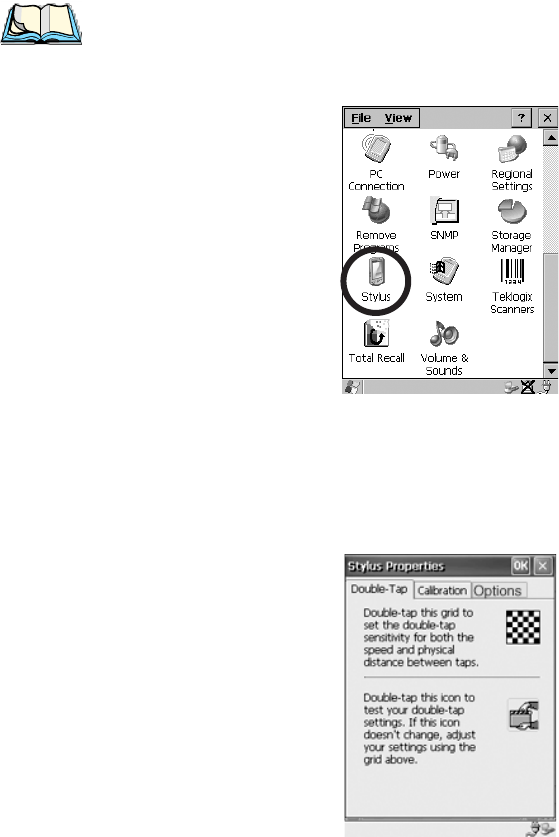
Chapter 5: Configuration
Stylus Properties
76 Psion Teklogix WORKABOUT PRO Hand-Held Computer User Manual
<ENTER> wakes the system from suspend state. When the unit is in suspend state,
the network connection will not be broken immediately. If the connection is
dropped, you must re-establish the network connection.
5.5.5 Stylus Properties
Note: Touchscreen calibration may not be enabled on your unit. If your screen
appears to require recalibration, contact your supervisor.
• In the Control Panel, choose the Stylus icon.
Figure 5.19 Stylus Icon
5.5.5.1 Setting Double-Tap Sensitivity
• In the Double-Tap tab, follow the directions to tailor the sensitivity of the stylus
when you tap on the touchscreen.
Figure 5.20 Setting Stylus Sensitivity
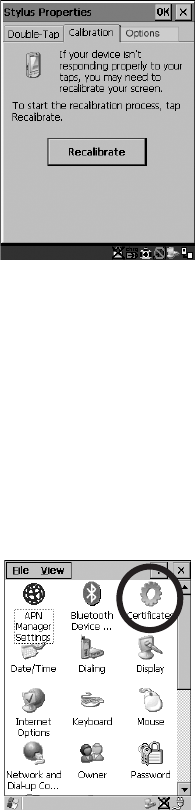
Psion Teklogix WORKABOUT PRO Hand-Held Computer User Manual 77
Chapter 5: Configuration
Touchscreen Calibration
5.5.5.2 Touchscreen Calibration
Touchscreens rarely require recalibration. However, if your touchscreen has never
been calibrated or if you find that the stylus pointer is not accurate when you tap on
an item, follow the directions below.
• Choose the Calibration tab and then tap on the Recalibrate button.
Figure 5.21 Calibrating The Touchscreen
• Follow the directions in the Calibration tab to recalibrate the screen.
5.5.5.3 Touchscreen Options
This tab allows you to disable the touchscreen.
• Choose the Options tab and then tap on the ‘Disable the touch panel’ checkbox.
5.5.6 Certificate Assignment
• In the Control Panel, choose the Certificate icon.
Figure 5.22 Certificate Icon
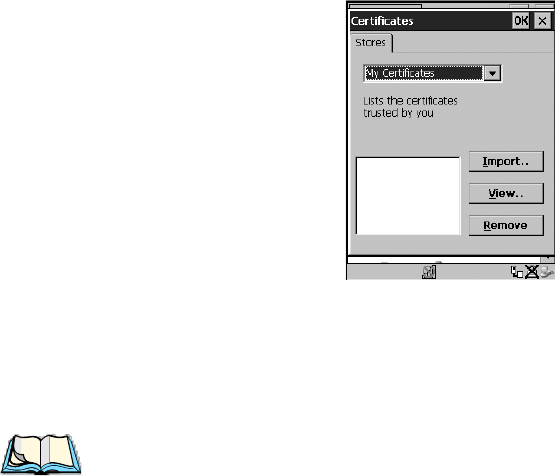
Chapter 5: Configuration
Bluetooth Setup
78 Psion Teklogix WORKABOUT PRO Hand-Held Computer User Manual
The dialogue box is used in conjunction with 802.1x authentication to enhance
security.
Figure 5.23 Certificates Dialogue Box
For a detailed description about Certificate setup for both the server and client-side
devices (WORKABOUT PROs), refer to the following website:
www.microsoft.com/windows2000/techinfo/planning/walkthroughs/default.asp - "Security Services"
Note: When importing certificates, the unit only recognizes .cer files.
5.6 Bluetooth Setup
Bluetooth is a global standard for wireless connectivity for digital devices and is
intended for Personal Area Networks (PAN). The technology is based on a
short-range radio link that operates in the ISM band at 2.4 GHz. When two
Bluetooth-equipped devices come within a 5 meter range of each other, they can
establish a connection. Because Bluetooth utilizes a radio-based link, it does not
require a line-of-sight connection in order to communicate.
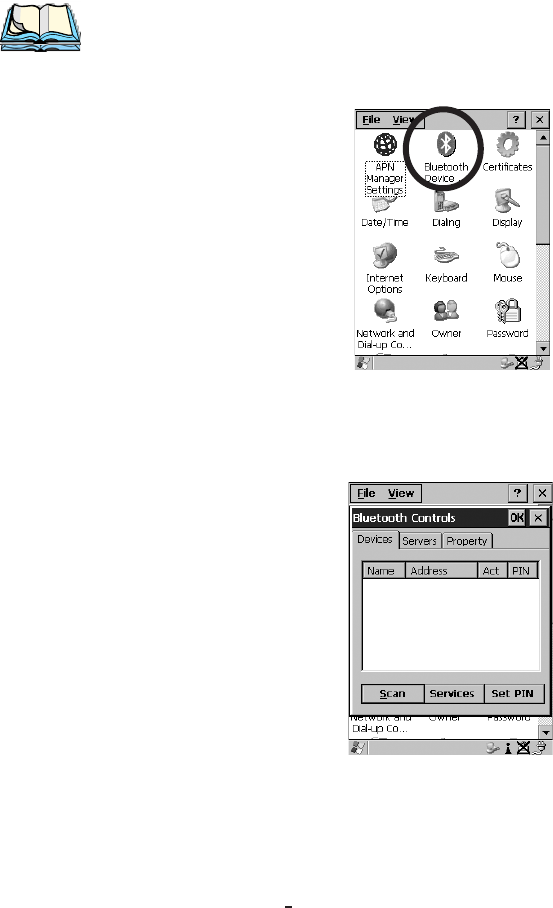
Psion Teklogix WORKABOUT PRO Hand-Held Computer User Manual 79
Chapter 5: Configuration
The Devices Tab
Note: The Bluetooth radio card uses an internal antenna.
• In the Control Panel, choose the Bluetooth Device Properties icon to display the
Bluetooth Manager screen.
Figure 5.24 Bluetooth Icon
The Bluetooth Controls dialogue box is used to display the other Bluetooth devices with
which you can communicate.
Figure 5.25 Bluetooth Devices Tab
5.6.1 The Devices Tab
Scan• Click on the <Scan> button to list available devices.

Chapter 5: Configuration
The Devices Tab
80 Psion Teklogix WORKABOUT PRO Hand-Held Computer User Manual
Wait for the WORKABOUT PRO to complete its scan (approximately 20 seconds).
When scanning starts, the <Scan> button will change to <Stop> – if necessary, you
can tap on this button to stop the process. Once scanning is complete, all discovered
devices will be displayed in the list box, with Name, Address, Active status, and
PIN information.
Note: During the scanning process, addresses are located first, followed by
names. Therefore, only the names of devices that are within the Bluetooth
radio coverage range will be retrieved.
The Active column indicates whether any service is activated for that device. When
a service is activated, the device is displayed in the list even when it is not detected
during the scan.
The PIN column indicates whether you have a PIN (password) set for the device.
At this point you can either query for services or set the PIN for each device. Once
you highlight a device in the list box, both the <Services> and <Set PIN> buttons
become available.
Services
A discovered device may display several service profiles that it can use to
communicate, and you will want to activate the type you need. Supported profiles
that can be activated include: DUN (Dial-Up Networking service), Printer (serial
service), and LANPPP (LANAccessUsingPPP service). ASync (ActiveSync) is
another available profile.
• To start the service scan, highlight a device in the Devices tab list, and then
click on the <Services> button or double-click on the device entry.
Note: If the remote device is out of reach or turned off, it can take a consider-
able amount of time for the Services dialogue box to appear – it may
appear to be frozen.
Once the device’s service profiles are displayed in the Services list box:
• Highlight the desired service, and then click on <Activate> or <Deactivate>, as
required.
Once the service is successfully activated, the assigned port (if applicable) will
appear in the Port column of the Services list box. You can choose to use BSP or
COM as the port name. BSP is the latest Microsoft Bluetooth stack standard, but

Psion Teklogix WORKABOUT PRO Hand-Held Computer User Manual 81
Chapter 5: Configuration
The Devices Tab
older applications assume serial ports are COM. When using COM as the port name,
the Bluetooth manager will try to find and use a free port between COM7 and
COM9. When using BSP as the port name, BSP2 to BSP9 are available for use. The
port is available as soon as it is activated.
Note: The CH column shows the RFCOMM channel of the service IF the
service is RFCOMM-based. This information is not generally needed
except for debugging purposes.
The Authentication and Encryption options can be changed only before activation.
To change those after activation, deactivate the service first, then change the options.
Once a service is activated, all the information regarding the service, including the
RFCOMM channel number, is saved in the registry. (Some remote devices may
change their RFCOMM channel numbers when they reboot, so your saved setting
may not work when the remote device is rebooted. In that case, you must deactivate
the service and reactivate it to detect the current RFCOMM channel.)
Set PIN
PINs can be set for each device by pressing the <Set PIN> button in the Devices tab, or
you can skip this step and try to connect to the device first.
Important: The remote device must have authentication enabled, otherwise
the PIN authentication will fail.
• Highlight a device, click on the <Set Pin> button, and type the PIN.
You will receive a message, either that the PIN has been successfully validated or
that it has been rejected.
If the PIN has been validated, an asterisk (*) appears in the PIN column in the
Devices list box, indicating that this device has a PIN set. Once a PIN is entered, it is
saved in the registry.
To remove the PIN:
• Click on <Set PIN> and press <ENTER>.
If the WORKABOUT PRO attempts to connect to a remote device that has
Authentication enabled and does not have a required PIN set, an Authentication
Request dialogue box appears.
• Enter the PIN, and click on <OK> to connect the devices.
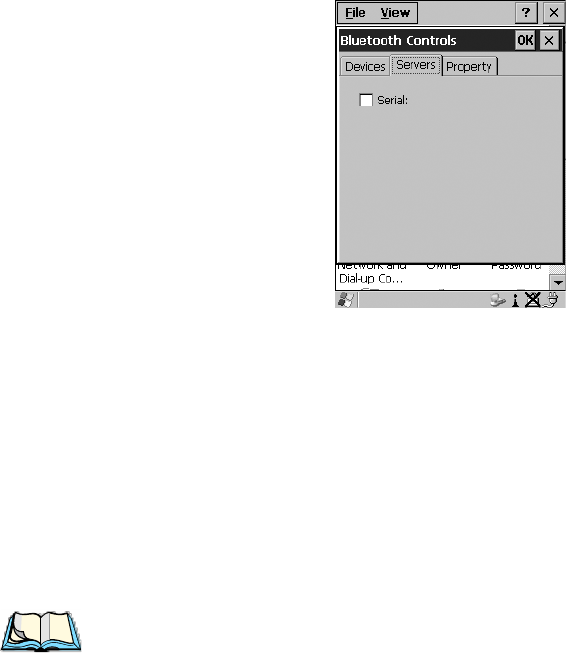
Chapter 5: Configuration
The Server Tab
82 Psion Teklogix WORKABOUT PRO Hand-Held Computer User Manual
5.6.2 The Server Tab
Figure 5.26 Bluetooth Servers Tab
The Bluetooth connection is initiated from your WORKABOUT PRO to the remote
device – therefore the WORKABOUT PRO is called the ‘client’ and the remote is
called the ‘server’. The Servers tab displays the server profiles that can be activated in
your WORKABOUT PRO. There is currently one server profile available: Serial.
• Tap on the checkbox to activate (√) the server, and it will display the
associated port name beside the server name.
Once you activate a server profile, it is recommended that the WORKABOUT PRO
be rebooted before you try to bond from a server.
Note: You do not need to reboot if you are deactivating a server.

Psion Teklogix WORKABOUT PRO Hand-Held Computer User Manual 83
Chapter 5: Configuration
The Property Tab
5.6.3 The Property Tab
Figure 5.27 Bluetooth Servers Tab
The Property tab displays information about your WORKABOUT PRO, and provides
some port options.
The Device Name field shows the device name of your WORKABOUT PRO. This
name can be changed (see the Note in this section for details).
Device Class shows the Class of Device (e.g. desktop, hand-held), which is always
set to Handheld.
Local Bluetooth Address shows the address of your WORKABOUT PRO radio.
Port Prefix is used to set the port name to either BSP or COM. When the name is
set to BSP, BSP2 to BSP9 are available for activated services (including the server).
When COM is chosen, COM7 to COM9 are available.
The Connection list table shows the Name, Address, and Type of the currently
active connections. The table is periodically updated while on display, but it can take
a few seconds before it reflects the actual list of connections. The Type column of
the table shows ‘ACL’ or ‘SCO’. The Connection list table shows the connections
for scanning as well as the service connections.
Note: You can change the device-name and description of your radio by clicking
on the System icon in Control Panel, which will open the System Properties dia-
logue box. Click on the Device Name tab to access the menu and change your
settings. Then click on OK.
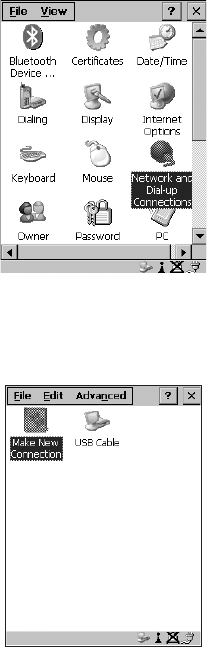
Chapter 5: Configuration
The Bluetooth GPRS Phone
84 Psion Teklogix WORKABOUT PRO Hand-Held Computer User Manual
Although the name will have changed in the Property menu in Bluetooth
Controls, the radio only reads it on boot-up. For the changes to take effect,
you must reset the WORKABOUT PRO.
5.6.4 The Bluetooth GPRS Phone
Once you’ve completed the Bluetooth settings described beginning on page 78, you
can go ahead and set up communication through your GPRS phone.
1. To set up the internet parameters, select the Network And Dial-up Connections
icon from the Control Panel.
Figure 5.28 Network And Dial-up Connection Icon
2. Select the Make New Connection icon.
Figure 5.29 Creating A GPRS Connection
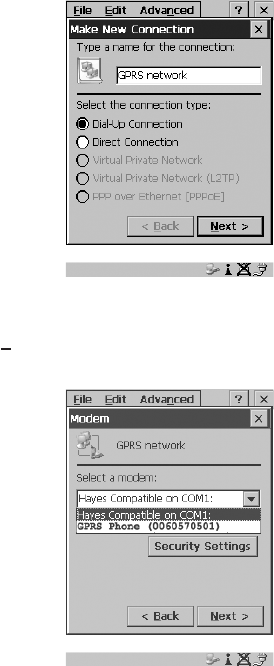
Psion Teklogix WORKABOUT PRO Hand-Held Computer User Manual 85
Chapter 5: Configuration
The Bluetooth GPRS Phone
3. In the Make New Connection dialogue box, choose Dial-Up Connection.
Enter a name for your GPRS network connection.
Figure 5.30 Setting Up The Connection
4. Highlight the Next> button, and press <ENTER> to display the Modem
dialogue box.
Figure 5.31 Setting Up The Modem
5. In the dropdown menu labelled Select a modem:, choose the name of the
modem with which you want to connect, and then choose the Configure
button to display the Device Properties dialogue box.

Chapter 5: Configuration
The Bluetooth GPRS Phone
86 Psion Teklogix WORKABOUT PRO Hand-Held Computer User Manual
The WORKABOUT PRO communicates with your phone and retrieves the
parameters for the Device Properties dialogue box. The unit then disconnects.
Figure 5.32 Port Settings
6. Under the Call Options tab, turn off Cancel the call if not connected within...
and press <ENTER> to save your changes.
Figure 5.33 Call Options
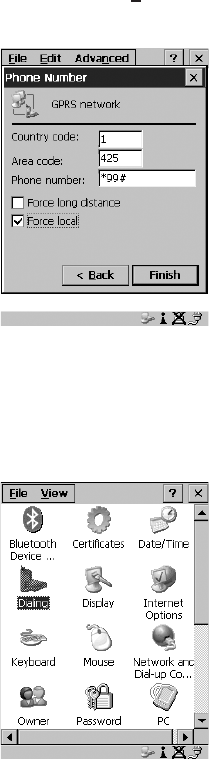
Psion Teklogix WORKABOUT PRO Hand-Held Computer User Manual 87
Chapter 5: Configuration
The Bluetooth GPRS Phone
7. In the Modem dialogue box, select the Next> button to display the Phone
Number dialogue box.
Figure 5.34 Setting The Phone Number
The phone number you enter is network carrier dependent. Once you’ve
specified all the necessary information, choose the Finish button.
8. In the Control Panel, choose the Dialing icon.
Figure 5.35 Dialing Icon
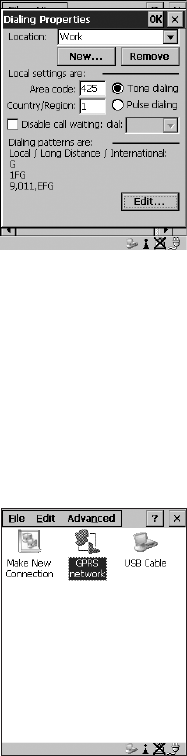
Chapter 5: Configuration
The Bluetooth GPRS Phone
88 Psion Teklogix WORKABOUT PRO Hand-Held Computer User Manual
9. The values in the Dialing Properties dialogue box need to be edited accord-
ing to your network carrier specifications.
Figure 5.36 Setting Up Dialing Properties
Once you’ve edited this dialogue box to reflect your network carrier
requirements, press <ENTER> to save your changes.
10. At this point, you’ll need to return to the Control Panel and select the
Network and Dial-up Connections icon.
11. In the network connection window, the new network configuration – in
this case – GPRS Network – is displayed. Choose the new icon.
Figure 5.37 GPRS Network Connection
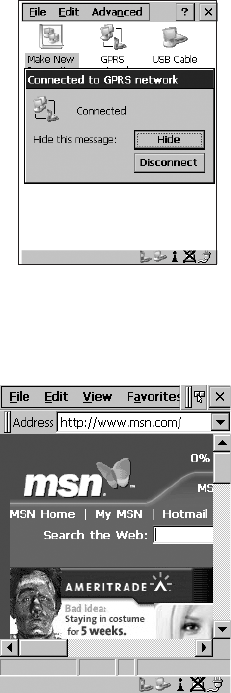
Psion Teklogix WORKABOUT PRO Hand-Held Computer User Manual 89
Chapter 5: Configuration
The Bluetooth GPRS Phone
This onscreen message indicates the status of your connection – connected,
disconnected, error messages, and so on.
Figure 5.38 Successful Connection
• Select the Hide button to move this message to the background.
You can now access the internet.
Figure 5.39 Accessing The Internet
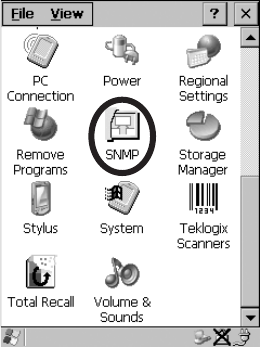
Chapter 5: Configuration
SNMP (Simple Network Management Protocol) Setup
90 Psion Teklogix WORKABOUT PRO Hand-Held Computer User Manual
5.7 SNMP (Simple Network Management Protocol) Setup
Simple Network Management Protocol (SNMP) is the protocol used to monitor and
manage devices attached to a TCP/IP network (providing they support SNMP).
SNMP uses Management Information Bases (MIBs) that define the variables an
SNMP Network Management Station can access. Each product has a defined set of
MIBs that determine how SNMP operates, the type of access allowed and so on.
All Teklogix products support the TEKLOGIX-GENERIC-MIB – a MIB that
defines some common features across Teklogix products. All devices also support
MIB-II, a management information base that defines the common features of
TCP/IP networks. The SNMP Agent software embedded in the WORKABOUT
PRO supports SNMPv1 (RFC 1157).
• In the Control Panel, choose the SNMP icon.
Figure 5.40 SNMP Icon
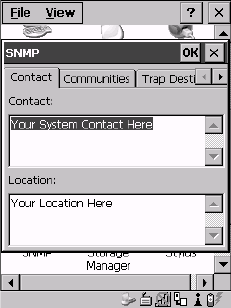
Psion Teklogix WORKABOUT PRO Hand-Held Computer User Manual 91
Chapter 5: Configuration
Contact Tab
5.7.1 Contact Tab
The SNMP dialogue box is displayed.
Figure 5.41 Contact Tab
Contact
This field identifies the contact person for this managed node along with
information about how to get in touch with this person. The content of this
parameter is accessible through MIB-II’s sysContact object.
Location
This parameter is used to identify the physical location of this node (e.g., Warehouse
A: Pillar 32B). The content of this parameter is accessible through MIB-II’s
sysLocation object.
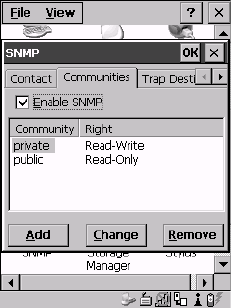
Chapter 5: Configuration
Communities Tab
92 Psion Teklogix WORKABOUT PRO Hand-Held Computer User Manual
5.7.2 Communities Tab
Figure 5.42 Community Settings
The “Communities” tab provides a means of limiting access to SNMP managed
devices to those SNMP Managers with matching “community names”, as specified
by RFC 1157.
Enable SNMP
Enabling (√) ‘Enable SNMP’ allows the device to respond to SNMP queries and to send
Traps. After enabling this option and rebooting the device, the SNMP Agent will
automatically start up. To disable this feature, remove the check mark from the
check box.
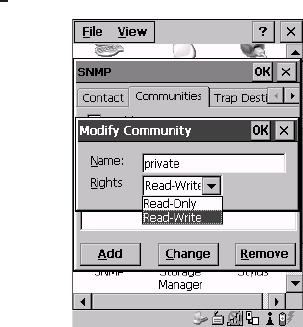
Psion Teklogix WORKABOUT PRO Hand-Held Computer User Manual 93
Chapter 5: Configuration
Adding A Community
5.7.2.1 Adding A Community
• Choose the Add button to add a new ‘community’.
Figure 5.43 Adding A Community
Name
The value assigned here is the name assigned by the network administrator to the set
of devices to which this managed node belongs.
Rights
This menu allows you to specify access – that is, ‘Read-Only’ or Read-Write’
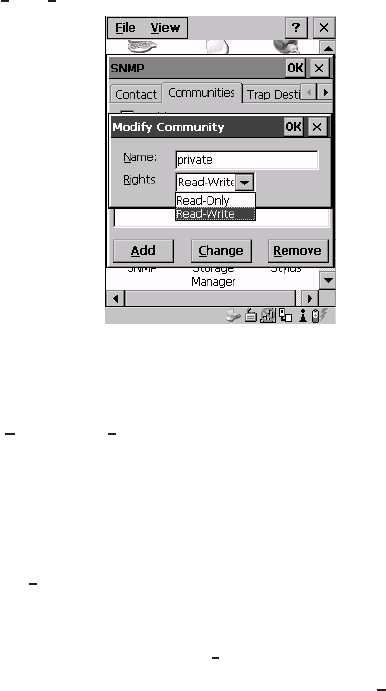
Chapter 5: Configuration
Modifying A Community Setting
94 Psion Teklogix WORKABOUT PRO Hand-Held Computer User Manual
5.7.2.2 Modifying A Community Setting
To modify an existing community:
• Highlight the community you want to alter.
• Tap the Change button.
Figure 5.44 Changing Or Removing A Community
A Modify Community dialogue box is displayed, listing the community you highlighted.
• Edit the Name and/or Rights, and press <ENTER> to save your changes.
5.7.2.3 Removing An Existing Community
To remove an item:
• Highlight the community you want to remove in the Communities tab and then
choose the Remove button.
A Delete Confirmation screen is displayed.
• To remove a community, tap the Yes button.
• If you decide not to remove the community, tap the No button.
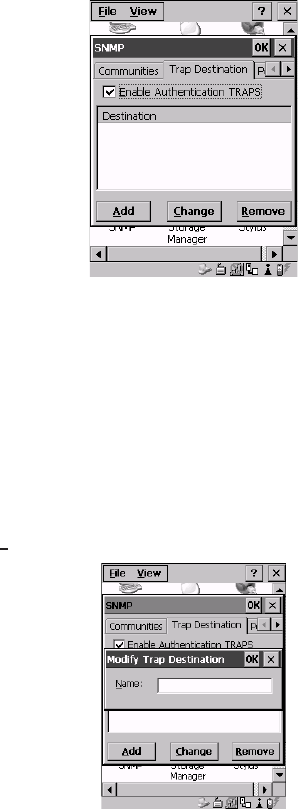
Psion Teklogix WORKABOUT PRO Hand-Held Computer User Manual 95
Chapter 5: Configuration
Trap Destination Tab
5.7.3 Trap Destination Tab
A trap is an unsolicited report sent to SNMP Managers by the SNMP Agent running
on the managed node. This option allows you to define where the report will be sent.
Figure 5.45 Trap Destination Tab
5.7.3.1 Enabling Authentication TRAPS
Enabling (√) ‘Enable Authentication TRAPS’ allows authorization traps to be sent when a
failure is detected (e.g., an SNMP message received with a bad community name).
5.7.3.2 Adding A Destination
To add a new destination:
• Tap on the Add button.
Figure 5.46 Adding A Trap Destination
• Type a destination in the text box provided, and press <ENTER>.
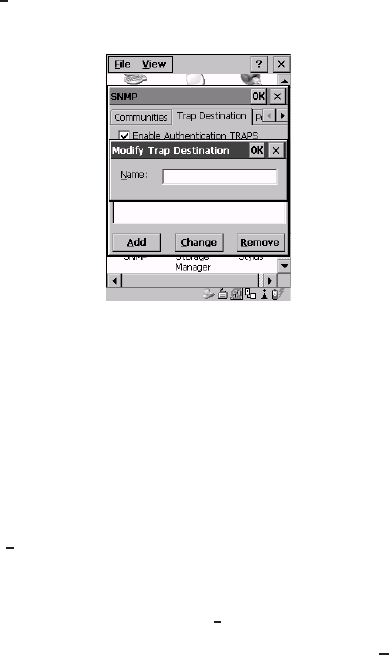
Chapter 5: Configuration
Changing A Destination
96 Psion Teklogix WORKABOUT PRO Hand-Held Computer User Manual
5.7.3.3 Changing A Destination
To change an existing trap destination:
• Highlight the destination you want to alter in the Trap Destination tab, and then
tap on the Change button.
A dialogue box like the one displayed when you add a destination is displayed.
Figure 5.47 Changing A Destination
• Make the changes to the destination, and press <ENTER> to save the
changes.
5.7.3.4 Removing A Trap Destination
To remove a trap destination:
• In the Trap Destination tab, highlight the destination you want to delete.
• Tap on the Remove button.
A Delete Confirmation screen is displayed.
• To remove a destination, tap on the Yes button.
• If you decide not to remove the destination, tap on the No button.
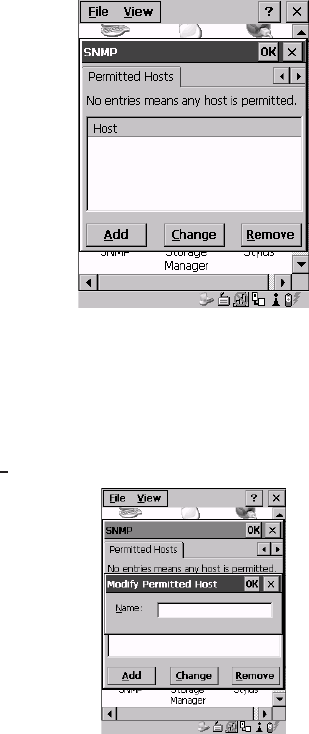
Psion Teklogix WORKABOUT PRO Hand-Held Computer User Manual 97
Chapter 5: Configuration
Permitted Hosts Tab
5.7.4 Permitted Hosts Tab
For security reasons, the Network Administrator may want to restrict SNMP-node
access to a known sub-set of SNMP Managers. This tab lists the IP addresses of all
the SNMP Managers which are allowed to monitor and manage this device. If no
entries are listed, the device will accept SNMP queries from any host.
Figure 5.48 Permitted Hosts Tab
5.7.4.1 Adding A Host
To add a new host:
• Tap on the Add button.
Figure 5.49 Adding A Host
• Type a new host IP address in the text box provided, and press <ENTER>.

Chapter 5: Configuration
Changing A Host
98 Psion Teklogix WORKABOUT PRO Hand-Held Computer User Manual
5.7.4.2 Changing A Host
To change an existing host IP address:
• Highlight the IP address you want to alter in the Permitted Hosts tab, and then
tap on the Change button.
A dialogue box like the one displayed when you add a host is displayed.
• Make the necessary changes, and press <ENTER>.
5.8 Total Recall
Total Recall is a Psion Teklogix utility developed to maintain applications and setting
over cold boots. This utility is based on a backup and restore concept and is
extended to incorporate power advanced features.
• In the Control Panel, choose the Total Recall icon.
Figure 5.50 Total Recall Icon

Psion Teklogix WORKABOUT PRO Hand-Held Computer User Manual 99
Chapter 5: Configuration
Creating A Backup Profile
5.8.1 Creating A Backup Profile
Figure 5.51 Backup Profile
In the dropdown menu, you can choose from four options: Create Backup Profile, View
Selected Profile, Restore Selected Profile and Delete Selected Profile. Keep in mind however that
until a profile is created, the only available option is Create Backup Profile.
• Tap on the <Next> button to begin the process.
Figure 5.52 Profile Details
Profile Information
This dialogue box lists the possible storage destinations for the profile file.
• To begin, type a name for the profile in the field labelled Profile Name.
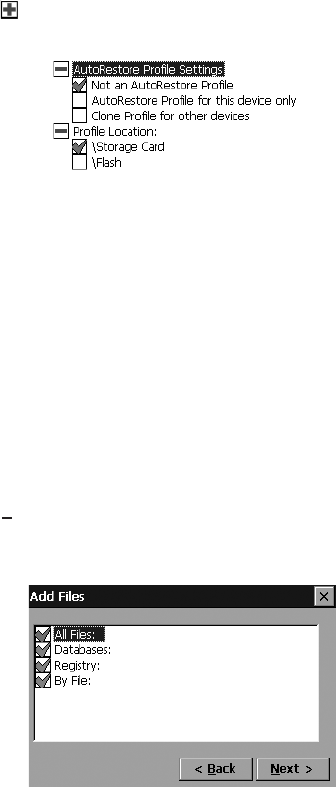
Chapter 5: Configuration
Creating A Backup Profile
100 Psion Teklogix WORKABOUT PRO Hand-Held Computer User Manual
This dialogue box also lists the image type – OS Version and Registry Type for the
WORKABOUT PRO.
• Tap on the icon to expand your settings for AutoRetore Profile and Profile
Location.
Figure 5.53 Profile Options
-Not an AutoRestore Profile – creates a backup that is manually restored
by the operator.
-AutoRestore Profile for this device only – creates a profile that automati-
cally restores itself following a cold boot.
-Clone Profile for other devices – creates a profile that automatically
restores after resuming from a cold boot, but it will not contain the
touch screen calibration coordinates or the Wireless radio settings.
-Profile Location – allows the operator to specify where the profile is to
be saved. The location for the profile will typically be Flash or a
Storage card.
• Tap on the <Next> button to display the next dialogue box – Add Files.
Add Files
Figure 5.54 Adding Files
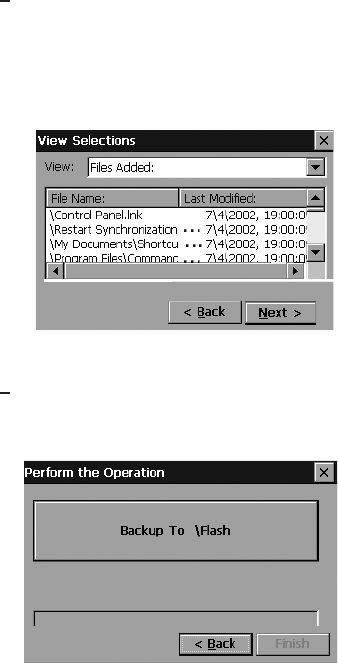
Psion Teklogix WORKABOUT PRO Hand-Held Computer User Manual 101
Chapter 5: Configuration
Creating A Backup Profile
By default, All Files: is selected so that all installed or copied files, database entries,
and the Registry will be saved. You can, however, limit the backup to database,
and/or the registry only.
• Tap on the <Next> button to view your selections.
View Selections
Depending on what you have selected for inclusion in your profile, you can view a
list of the selected files, databases, and/or registry.
Figure 5.55 Viewing Selections
• Tap on the <Next> button to perform the operation.
Performing The Backup
Figure 5.56 Performing The Backup
• Tap on Select the <Backup To \Flash> or <\Storage Card> button to start the
process and create a profile.
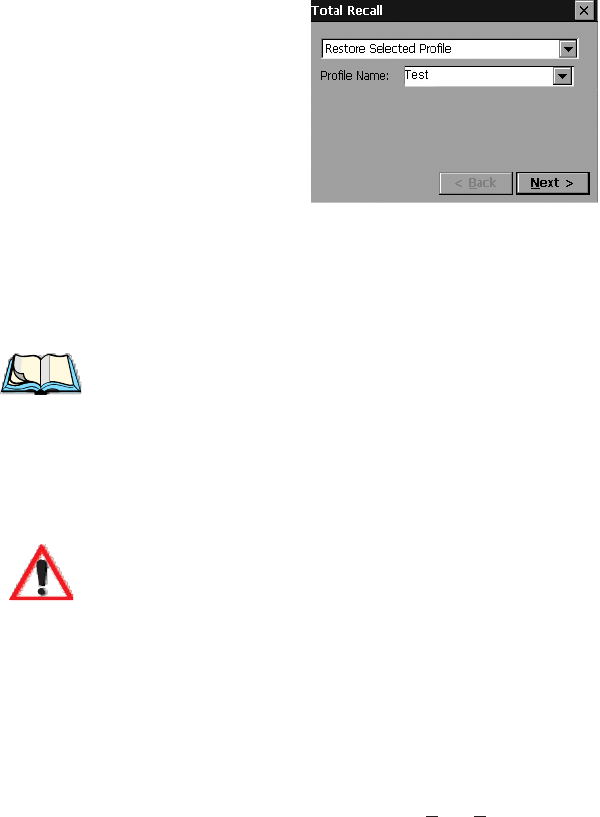
Chapter 5: Configuration
Restoring A Profile
102 Psion Teklogix WORKABOUT PRO Hand-Held Computer User Manual
5.8.2 Restoring A Profile
Figure 5.57 File Restoration
To manually restore a profile:
• Choose Restore Selected Profile from the dropdown menu, and select the Profile
Name displayed in the drop down box.
Note: You can also manually restore an auto restore profile located in flash or a
storage device.
5.9 APN Manager Settings
The APN Settings Manager icon in the Control Panel is used to set up APN (Access Point
Name) settings for units equipped with GSM/GPRS radios.
Important: Typically, APN setup information is automatically configured for
you. The APN Manager Settings icon is only necessary if automatic
setup fails.
5.9.1 Automatic GSM Setup – Connecting To The Network
When you initially attempt to connect to a network using a GSM radio, a dialogue
box is displayed asking if you would like your GSM automatically configured.
1. Choose Yes to initiate automatic configuration.
2. In the Start Menu, choose Settings>Network... and in the connec-
tion window, double-tap on the GPRS icon that has been set up for you.
3. In the Dial-Up dialogue box, tap on the <Connect> button.
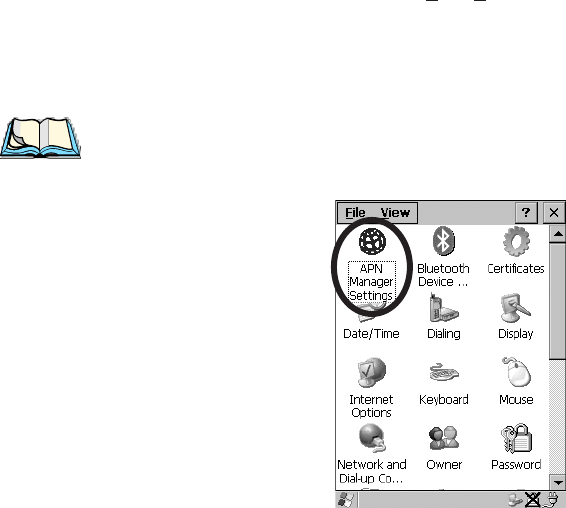
Psion Teklogix WORKABOUT PRO Hand-Held Computer User Manual 103
Chapter 5: Configuration
Manual GSM Setup – APN Settings Manager
PIN (Personal Identification Number) Request
The SIM (Subscriber Identity Module) card in your unit may be password protected.
In this case, a dialogue box will appear, requesting that you enter your PIN
(Personal Identification Number).
1. Type the PIN assigned to your unit SIM.
2. In the Start Menu, choose Settings>Network... and in the connec-
tion window, double-tap on the GPRS icon that has been set up for you.
3. In the Dial-Up dialogue box, tap on the <Connect> button.
5.9.2 Manual GSM Setup – APN Settings Manager
Note: Before using the APN Manager, close any active connections.
• In the Control Panel, choose the APN Manager Settings icon.
Figure 5.58 APN Manager Settings Icon
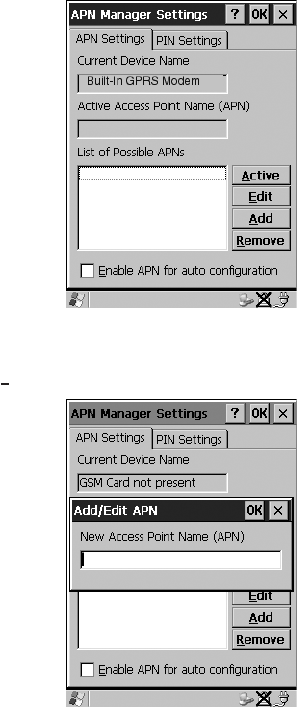
Chapter 5: Configuration
Manual GSM Setup – APN Settings Manager
104 Psion Teklogix WORKABOUT PRO Hand-Held Computer User Manual
If automatic configuration has failed, you’ll need to set up your details manually,
using the APN (Access Point Name) settings tab.
Figure 5.59 APN Settings Tab
• Tap on the <Add> button.
Figure 5.60 Adding A New APN
• In the Add/Edit APN dialogue box, type a new APN, and tap on <OK>.
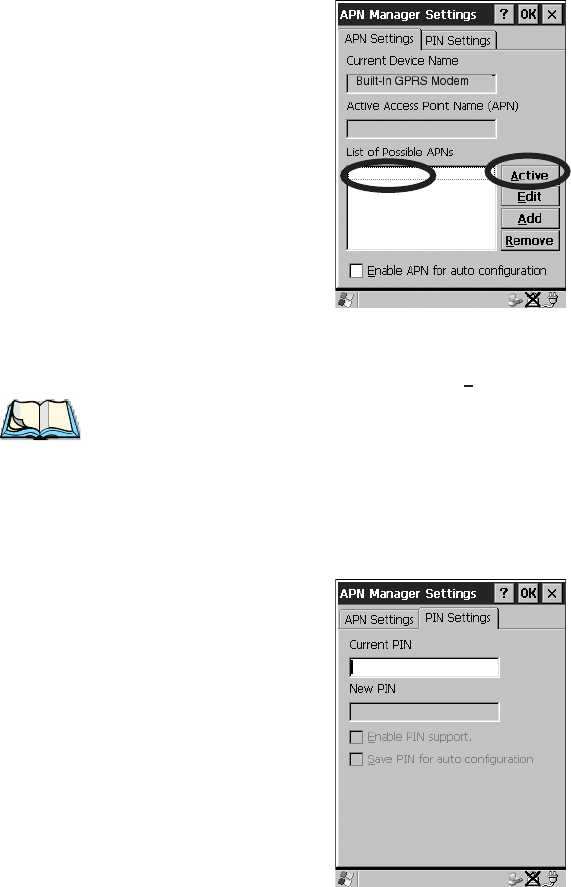
Psion Teklogix WORKABOUT PRO Hand-Held Computer User Manual 105
Chapter 5: Configuration
PIN Settings
Your new APN is added to the ‘List of Possible APNs’ under the APN Settings tab.
Figure 5.61 Adding A New APN
• To use your new APN, tap on the <Active> button.
Note: To avoid overwriting your newly created APN, disable the checkbox next
to ‘Enable APN for auto configuration’.
5.9.3 PIN Settings
The Pin Settings tab is used to change, enable or disable the PIN (Personal
Identification Number) assigned to your SIM card.
Figure 5.62 PIN Settings Tab
New APN

Chapter 5: Configuration
PIN Settings
106 Psion Teklogix WORKABOUT PRO Hand-Held Computer User Manual
To change your PIN:
• Type your existing PIN in the text box labelled Current PIN.
• Type the new PIN in the text box labelled New PIN.
Enabling (√) Enable PIN Support. activates the PIN entry requirement – each time you
connect to a network, your PIN will be requested. Leaving this checkbox unchecked
disables PIN requirement.
Note: Some SIM cards do not allow the PIN support to be disabled.
Enabling (√) Save PIN for auto configuration. causes the PIN to be stored in the hand-held.
At power up, the PIN is automatically submitted to the modem.
Important: Keep in mind that if the WORKABOUT PRO is starting from a
‘cold reboot’, the PIN is deleted. If unauthorized use of the
hand-held is a serious issue at your site, Save PIN for auto configuration
should be disabled.