Psion 7525RA2025 HAND HELD COMPUTER WITH WLAN User Manual 8000024 Book
Psion Inc HAND HELD COMPUTER WITH WLAN 8000024 Book
Psion >
Contents
- 1. USERS MANUAL 1
- 2. USERS MANUAL 2
- 3. USERS MANUAL 3
- 4. USERS MANUAL 4
USERS MANUAL 2

Psion Teklogix WORKABOUT PRO Hand-Held Computer User Manual 107
CONNECTING TO A LAN WITH 802.11b6
6
6.1 Installing The 802.11b Radio.........................109
6.2 Connecting To A LAN Using An 802.11b Radio ..............111
6.2.1 Configuring An IEEE 802.11b Radio .................111
6.2.2 Assigning An IP Address........................117
6.2.3 Name Servers Tab ...........................118
6.2.4 Advanced Features ...........................118
Psion Teklogix WORKABOUT PRO Hand-Held Computer User Manual 109
Chapter 6: Connecting To A LAN With 802.11b
Installing The 802.11b Radio
6.1 Installing The 802.11b Radio
The WORKABOUT PRO operates with an 802.11b Direct Sequence Spread
Spectrum radio. The CF (Compact Flash) card is easily installed in the unit.
• To begin, remove the battery pack. If your unit is using AC power,
disconnect it.
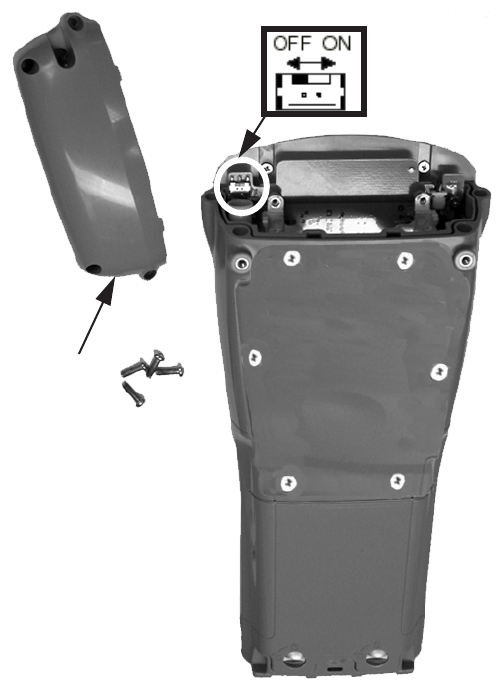
• Remove the stylus from the end-cap before removing the end-cap itself.
• Remove the end-cap at the top of the WORKABOUT PRO – unscrew the
four Philips head screws from the cap.
Figure 6.1 The End-Cap And The SW1401 Power Switch
SW1401 Power Switch
End-Cap

Chapter 6: Connecting To A LAN With 802.11b
Installing The 802.11b Radio
110 Psion Teklogix WORKABOUT PRO Hand-Held Computer User Manual
• Slide the SW1401 switch to the left to shut off internal battery power.
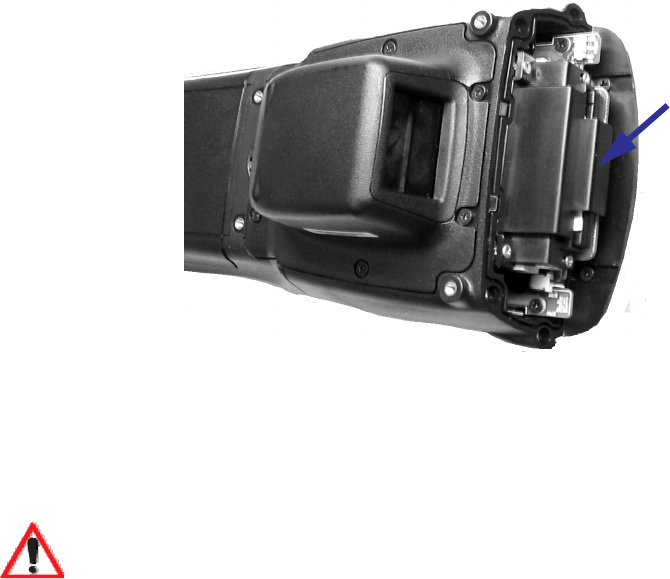
• With the back of the hand-held facing you, slide the radio (label up) into the
CF slot at the top of the unit until it clicks into place.
Figure 6.2 Inserting A CF Card
Once the radio is installed, you’ll need to attach a CF card stopper to hold the radio
in place.
Figure 6.3 CF Stopper
Psion Teklogix WORKABOUT PRO Hand-Held Computer User Manual 111
Chapter 6: Connecting To A LAN With 802.11b
Connecting To A LAN Using An 802.11b Radio
• Fit the CF stopper over the card, and use the four screws provided to secure
the stopper in place.
Figure 6.4 CF Stopper Installed
• Install the battery, and replace the backplate.
• Slide the SW1401 switch to the right to turn power back on.
• Replace the end-cap, and tighten the four Philips screws to secure
the end-cap.
Important: The WORKABOUT PRO does not support hot swapping cards.
All power sources must be switched off before inserting a card
in the unit.
6.2 Connecting To A LAN Using An 802.11b Radio
Once the 802.11b radio is installed in the WORKABOUT PRO, you’ll need to take
a few steps to configure the radio.
6.2.1 Configuring An IEEE 802.11b Radio
While most common 802.11b settings are configured as defaults, there are some
fields that must be completed, including the SSID of your access point and the
security methods implemented in the network (including access keys).
CF Card Stopper
Installed
Chapter 6: Connecting To A LAN With 802.11b
Configuring An IEEE 802.11b Radio
112 Psion Teklogix WORKABOUT PRO Hand-Held Computer User Manual
Important: If the WORKABOUT PRO radio has never been configured, the
radio settings dialogue box will open automatically when the unit
is powered on. In this case, skip to Step 4 on page 113.
To configure the 802.11b radio:
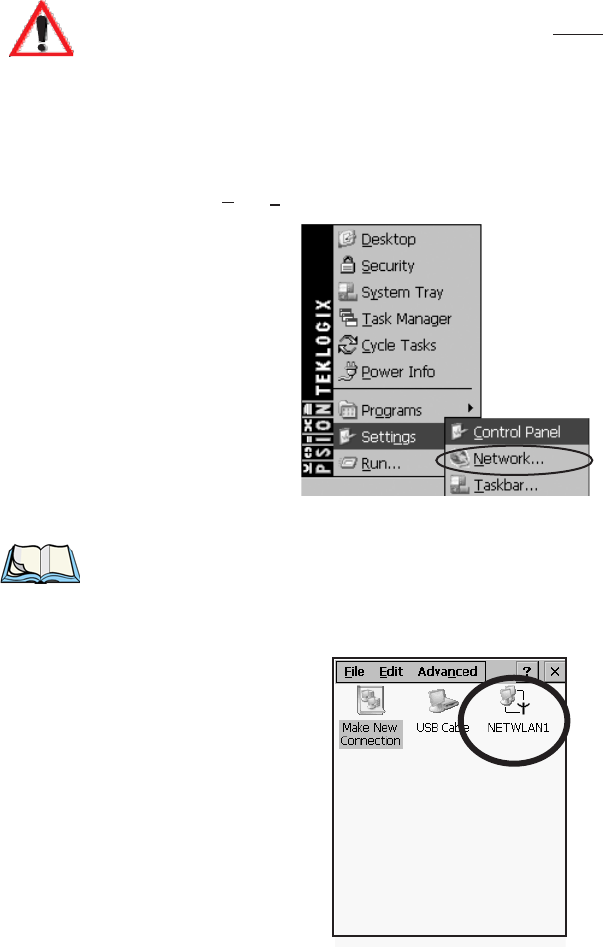
1. Tap on the Start button in the taskbar, and tap on
Settings>Network....
Figure 6.5 Network And Dial-Up Connections
Note: You can also press <CTRL> <ESC> to display the Start Menu.
2. Tap on the radio icon to open the 802.11b Wireless LAN Settings window – in
the sample screen this is labelled NETWLAN1.
Figure 6.6 802.11b Wireless LAN Settings Window
Psion Teklogix WORKABOUT PRO Hand-Held Computer User Manual 113
Chapter 6: Connecting To A LAN With 802.11b
Configuring An IEEE 802.11b Radio
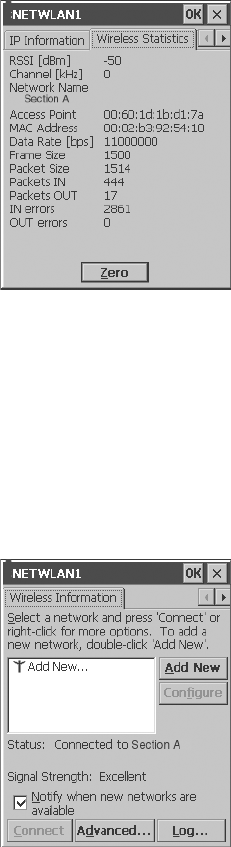
3. Wireless Statistics Tab
When you choose the Wireless LAN icon, an 802.11b Wireless LAN Settings
window (NETWLAN1 in the sample below) is displayed.
Figure 6.7 Wireless Statistics
This tab lists your radio statistics. Tapping on the <Zero> button resets the
statistics of the last four items – Packets IN, Packets OUT, IN errors and OUT errors.
• Tap on the Wireless Information tab.
4. Wireless Information Tab
The options under this tab list existing networks to which you can
connect, and it allows you to add a new network or modify the settings
for an existing network.
Figure 6.8 Wireless Information Tab
Chapter 6: Connecting To A LAN With 802.11b
Configuring An IEEE 802.11b Radio
114 Psion Teklogix WORKABOUT PRO Hand-Held Computer User Manual
Note: <Configure> button – To change the settings in an existing network,
highlight the network you want to modify, and tap the <Configure> button
to display the Wireless Properties dialogue box.
<Connect> button – To force connection to a specific, existing network,
highlight the network to which you want your unit to connect, and tap
the <Connect> button.
This tab lists available networks – any access points that are broadcasting
an SSID, and it lists preferred networks – networks that you have config-
ured. Since access points are generally secure, they will most likely not
be listed here. By default, the unit attempts to connect to preferred net-
works. This behaviour can be changed by enabling (√) ‘Automatically connect to
non-preferred networks’ in the Advanced dialogue box (page 118).
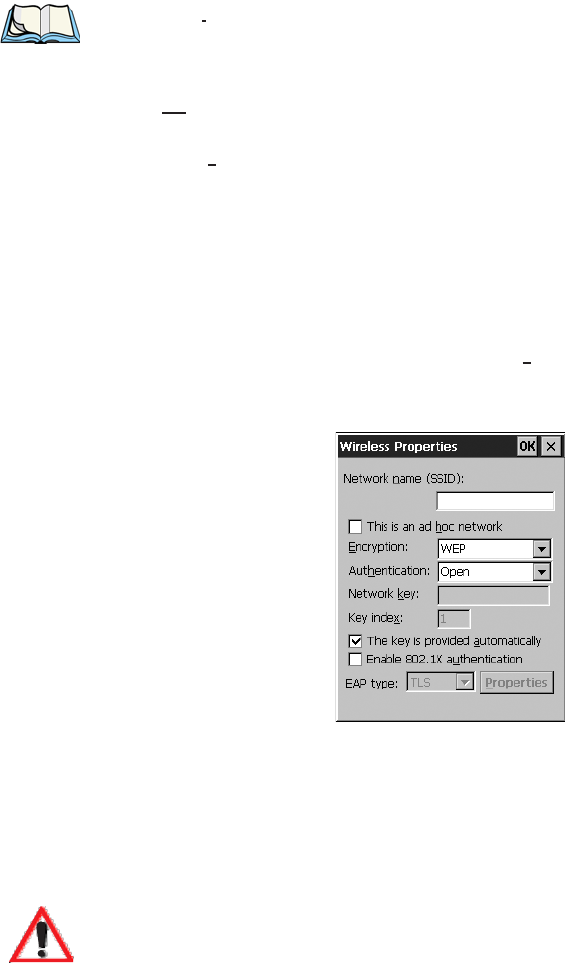
•To add a new configuration, tap the <Add New> button. A blank Wireless
Properties dialogue box is displayed.
5. Wireless Properties
Figure 6.9 Wireless Properties Dialogue Box
Network name (SSID):
• Type the appropriate SSID (Service Set Identifier) in the ‘Network name
(SSID):’ text entry field at the top of this dialogue box.
The Network name field can contain a maximum of 32 characters. The name
assigned here is listed as a preferred network.
Important: Keep in mind that the WORKABOUT PRO will only communicate
with access points that are configured with the same SSID.

Psion Teklogix WORKABOUT PRO Hand-Held Computer User Manual 115
Chapter 6: Connecting To A LAN With 802.11b
Configuring An IEEE 802.11b Radio
Ad Hoc And Infrastructure
If you are using an “Infrastructure” network – one in which WORK-
ABOUT PROs must pass data through an access point – leave the checkbox
next to ‘This is an ad hoc network’ blank.
If you are using an “Ad Hoc” network – a network in which hand-held com-
puters pass data directly to other hand-helds without an access point – tap
on the checkbox next to ‘This is an ad hoc network’ to enable (√) Ad Hoc.
Encryption
WEP (Wired-Equivalent Privacy) encryption prevents others from acciden-
tally accessing your network. If you are not using encryption, you can
choose ‘Disabled’ from the dropdown encryption menu. Otherwise, leave
this field as is.
Authentication
802.11b supports two subtypes of network authentication services: Open
and Shared. Under Open authentication, any wireless station can request
authentication. The station that needs to authenticate with another wireless
station sends an authentication management frame that contains the identity
of the sending station. The receiving station then sends back a frame that
indicates whether it recognizes the identity of the sending station.
Under Shared authentication, each wireless station is assumed to have
received a secret shared key over a secure channel that is independent from
the 802.11b wireless network communications channel.
Network Key:
This text box is used to specify a 5 or 13 ASCII character sequence or an
equivalent 10 or 26 Hexadecimal digit sequence that matches the active
WEP key on the access point.
Chapter 6: Connecting To A LAN With 802.11b
Configuring An IEEE 802.11b Radio
116 Psion Teklogix WORKABOUT PRO Hand-Held Computer User Manual
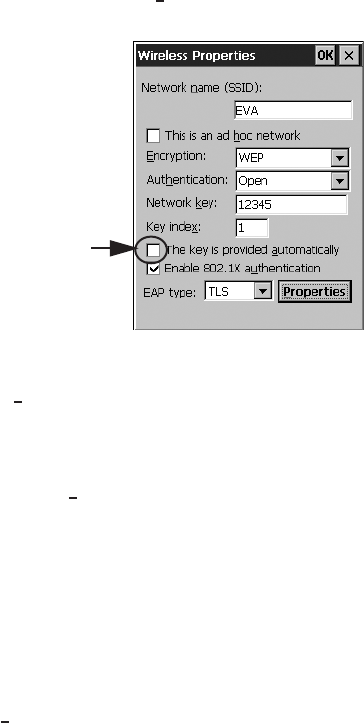
• To assign a Network key, tap the stylus in the checkbox next to ‘The key is
provided automatically’ to remove the √ and disable this option.
Figure 6.10 Accessing Network Key And Key Index
Key Index:
This field is used to identify the WEP key.
• Enter a value from 1 to 4.
Enable 802.1x authentication
“802.1X” is the IEEE standard that offers additional security for local area
networks. It provides authentication for user devices attached to an Ethernet
network, whether wired or wireless. A security protocol packet such as TLS
or MD5 encapsulated in an “EAP” is used in conjunction with the “802.1x”
standard to authenticate users at the MAC layer. Available EAPs are listed
in the dropdown menu next to the ‘EAP’ option.
• To activate “802.1X”, tap the stylus in the checkbox next to ‘Enable 802.1x
authentication’ to enable (√) it.
EAP Type (Extensible Authentication Protocol):
This dropdown menu lists the EAP types available on your system. The
items in this dropdown menu will vary depending on your network setup.
Keep in mind also that some authentication protocols require that you select
a ‘Certificate’. By selecting the Properties button, you will be able to select a
Certificate. “Certificate Assignment” on page 77 provides a website that
outlines how to create certificates for your network.
6. Saving and exiting the radio setup.
Once you have completed your configuration, tap on <OK>.
Disable this option to
access
Network Key
&
Key Index
fields.
Psion Teklogix WORKABOUT PRO Hand-Held Computer User Manual 117
Chapter 6: Connecting To A LAN With 802.11b
Assigning An IP Address
The connection you created will be listed in the Wireless Information tab as a preferred
network. The radio will search for the SSID and will compare the WEP and
authentication information you specified. If there is a match between your
WORKABOUT PRO settings and the access point settings, the WORKABOUT
PRO will communicate on the network through the access point.
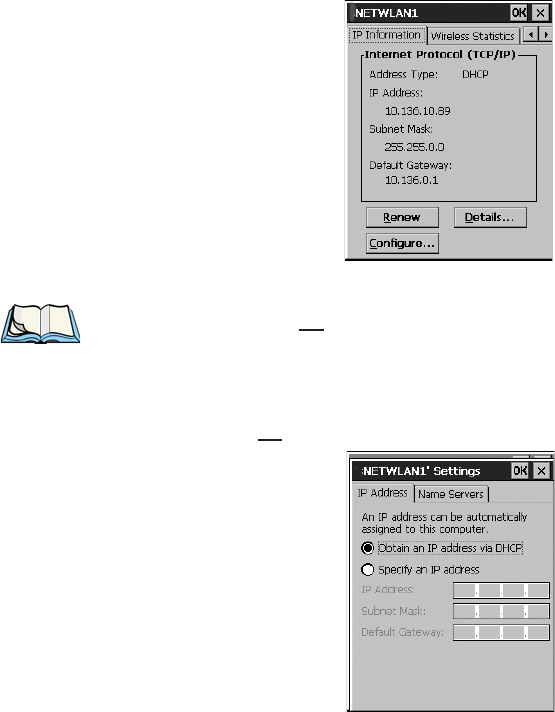
6.2.2 Assigning An IP Address
If your network is not using a DHCP server, you will need to assign an IP address.
• In the NETWLAN1 Settings window, display the IP Information tab.
Figure 6.11 IP Information
Note: Tapping on the <Renew> button forces the WORKABOUT PRO to renew
or find a new IP address. This is useful if, for example, you are out of com-
munication range for a longer period of time and your hand-held is
dropped from the network.
• Tap on the <Configure...> button to define a static IP address.
Figure 6.12 Defining An IP Address
Chapter 6: Connecting To A LAN With 802.11b
Name Servers Tab
118 Psion Teklogix WORKABOUT PRO Hand-Held Computer User Manual
• Tap on the radio button next to ‘Specify an IP address’ to select it.
• Type the appropriate address in each of the fields – IP Address, Subnet Mask and
Default Gateway. Tap on <OK> to save your information.
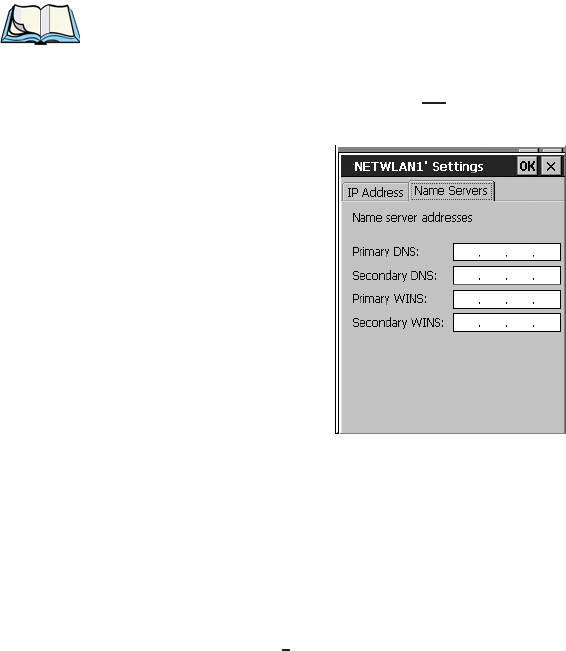
6.2.3 Name Servers Tab
Note: If DHCP is enabled, name server addresses are assigned automatically.
• In the NETWLAN1 Settings window, display the IP Information tab.
• In the IP Information tab, tap the <Configure...> button.
• Display the Name Servers tab.
Figure 6.13 Name Servers Tab
The DNS and WINS fields in the Name Servers tab allow you to specify additional
WINS and DNS resolvers. The format for these fields is ###.###.###.###.
6.2.4 Advanced Features
To display the Advanced Wireless Settings dialogue box:
• Tap on the <Advanced...> button in the Wireless Information tab.
Psion Teklogix WORKABOUT PRO Hand-Held Computer User Manual 119
Chapter 6: Connecting To A LAN With 802.11b
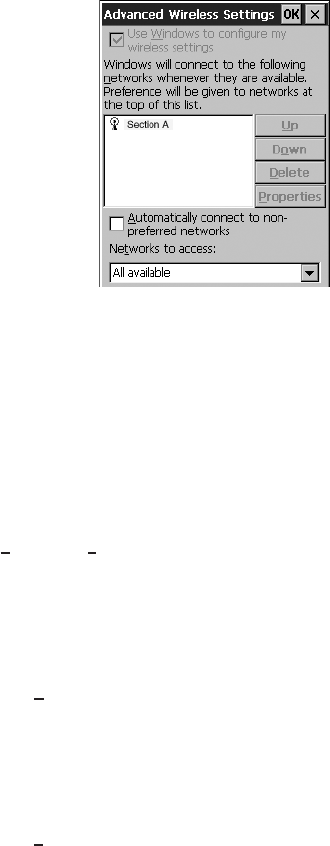
Rearranging Preferred Networks
This window lists the available preferred networks.
Figure 6.14 Advanced Settings
6.2.4.1 Rearranging Preferred Networks
The WORKABOUT PRO attempts to connect with the networks listed in this
dialogue box in sequence, beginning at the top of the list. If you need to rearrange
this list of networks – move networks up and down in the list:
• Highlight the network that you want to move up or down in the list.
• To move the highlighted item in the list upward or downward, tap the stylus
on the <Up> or <Down> button.
6.2.4.2 Deleting A Preferred Network
To delete a network from this list:
• Highlight the network that you want to remove in the network list.
• Tap on the <Delete> button.
6.2.4.3 Changing Network Properties
To change the properties of an existing preferred network:
• Highlight the network that you want to modify.
• Tap on the <Properties> button.
• Make any necessary changes in the Wireless Properties dialogue box, and press
<ENTER> to save the changes.

Psion Teklogix WORKABOUT PRO Hand-Held Computer User Manual 121
EXPANSION MODULES 7
7
7.1 Expansion Modules..............................123
7.1.2 What’s Inside..............................124
7.1.4 Installing The PCMCIA Module....................125
7.1.5 Installing A GSM/GPRS Module ...................127
7.1.6 Installing An SE 1223HP Scanner ...................128
Psion Teklogix WORKABOUT PRO Hand-Held Computer User Manual 123
Chapter 7: Expansion Modules
Expansion Modules
7.1 Expansion Modules
Easily installable expansion modules available for the WORKABOUT PRO allow
you to customise this hand-held to meet your specific mobile computing
requirements. This chapter outlines how to install the following expansion modules:
PCMCIA, GSM/GPRS and SE 1223HP scanner.
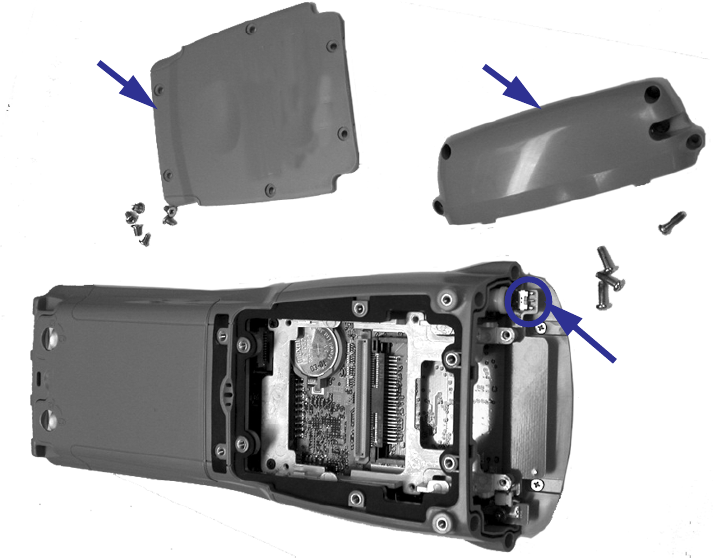
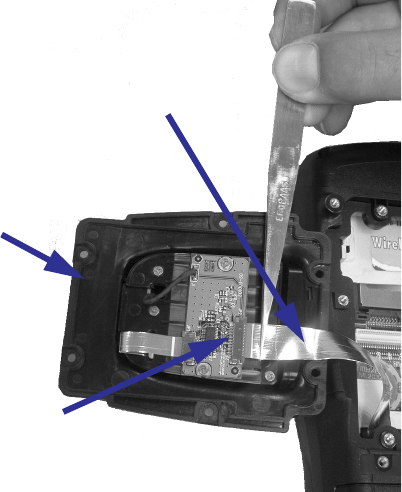
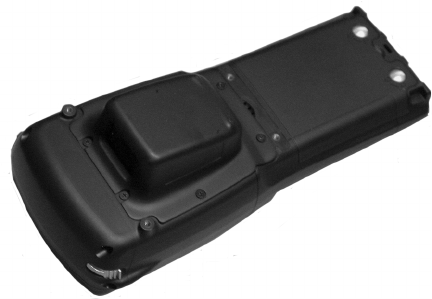
7.1.1 Removing The End-Cap And Back Plate
To install a module, you’ll need to remove the end-cap and back plate on the
WORKABOUT PRO. This is a simple process of unfastening four screws on the
end-cap and six screws on the back plate.
Figure 7.1 Removing The End-Cap And Back Plate
Back plate End-cap
SW1401
Power Switch
Chapter 7: Expansion Modules
What’s Inside
124 Psion Teklogix WORKABOUT PRO Hand-Held Computer User Manual
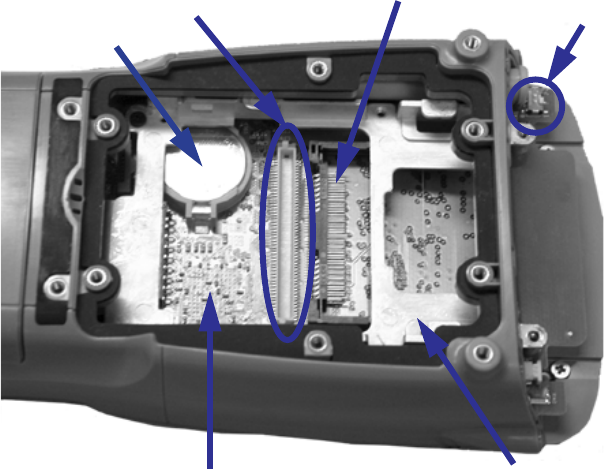
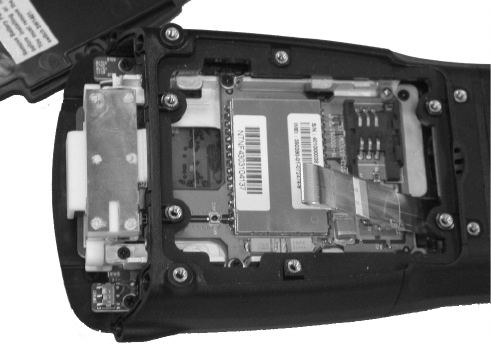
7.1.2 What’s Inside
Figure 7.2 Standard Features
Internal Battery
Expansion Connector Compact Flash (CF) Connector
Metal Frame
Main Logic Board
SW1401 Power Switch
Psion Teklogix WORKABOUT PRO Hand-Held Computer User Manual 125
Chapter 7: Expansion Modules
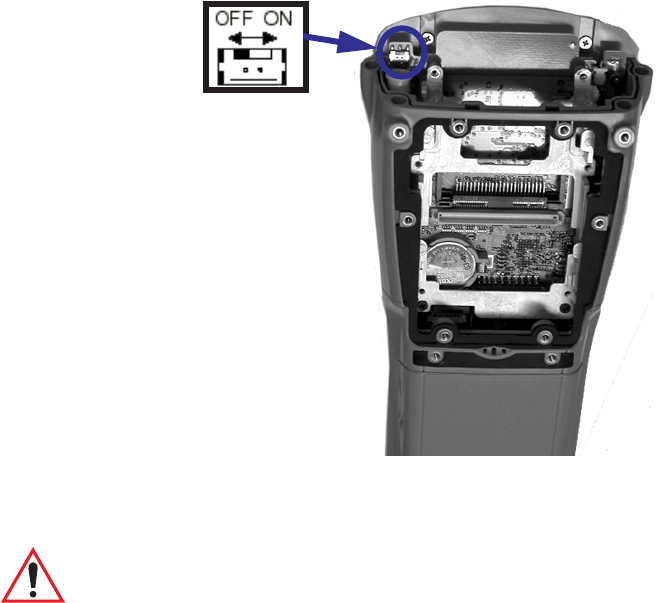
Shutting Off Power
7.1.3 Shutting Off Power
Before installing a module or card in the WORKABOUT PRO, all power sources
must be turned off.
• Remove the batteries. If your unit is using AC power, disconnect it.
• Remove the stylus from the top of the unit.
• Remove the end-cap, and slide the SW1401 switch to the left to shut off
internal battery power.
Figure 7.3 SW1401 Power Switch
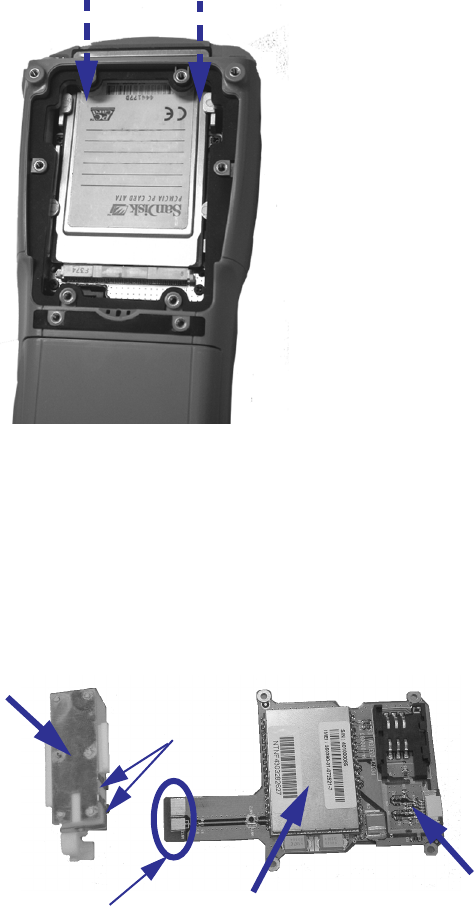
7.1.4 Installing The PCMCIA Module
Important: The WORKABOUT PRO does not support hot swapping. All
power sources must be turned off before inserting any card or
module in the unit.
To insert a PCMCIA PC card in your WORKABOUT, you will need to install a
PCMCIA module equipped with a 100-pin connector. This module snaps onto the
expansion connector on your WORKABOUT PRO.
SW1401 Power Switch
Chapter 7: Expansion Modules
Installing The PCMCIA Module
126 Psion Teklogix WORKABOUT PRO Hand-Held Computer User Manual
Figure 7.4 PCMCIA Module
• Remove the batteries. If your unit is using AC power, disconnect it.
• Remove the end-cap and back plate.
• Slide the SW1401 switch to the left to shut off internal battery power.
• Remove the two screws at the top of the metal frame.
• Align the connector on the PCMCIA module with the expansion connector
on the hand-held, and gently snap the PCMCIA module connector into the
expansion connector.
• Using six screws, fasten the module into place on the main logic board.
Remember to replace the two metal frame screws to secure the module and
frame in place.
Important: Once the PCMCIA module is installed in the unit, you do not
need to remove the back plate to insert a PCMCIA PC card. Just
remove the end-cap and slide the card into the unit.
Psion Teklogix WORKABOUT PRO Hand-Held Computer User Manual 127
Chapter 7: Expansion Modules
Installing A GSM/GPRS Module
• Apply gentle downward pressure to securely seat the card in the connector.
Figure 7.5 Inserting A PCMCIA Card
• Slide the SW1401 switch to the right to turn power back on.
• Replace the end-cap, back plate and batteries.
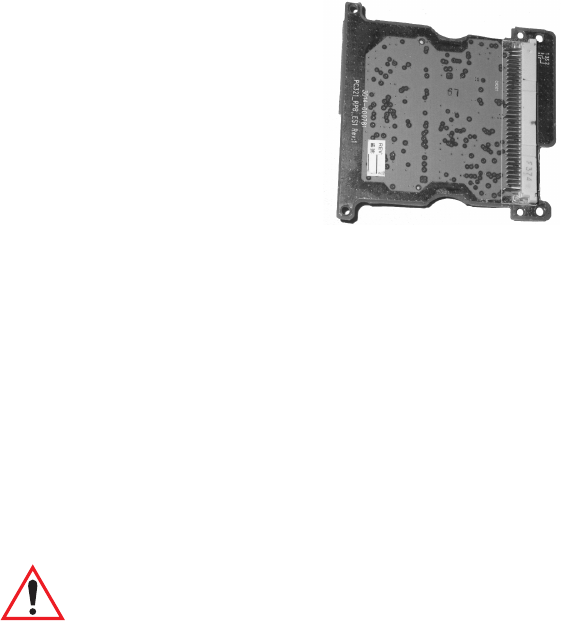
7.1.5 Installing A GSM/GPRS Module
The GSM/GPRS module accommodates a GSM radio and a SIM card and is
equipped with a built-in antenna. The module snaps onto the expansion connector
on your WORKABOUT PRO.
Figure 7.6 GSM/GPRS Module
Insert the PCMCIA card as
shown here, with the label
facing you.
Antenna
GSM/GPRS Radio SIM Card Slot
Antenna
Contacts
Antenna
Contacts
Chapter 7: Expansion Modules
Installing An SE 1223HP Scanner
128 Psion Teklogix WORKABOUT PRO Hand-Held Computer User Manual
• Remove the batteries. If your unit is using AC power, disconnect it.
• Remove the end-cap at the top of the WORKABOUT PRO.
• Slide the SW1401 switch to the left to shut off internal battery power.
With the power shut down, you can install the GSM/GPRS module and the antenna.
• Slide the GSM/GPRS radio under the metal frame, and align the
GSM/GPRS connector with the expansion connector on the WORK-
ABOUT PRO. Apply slight pressure to snap the module into place on the
hand-held.
• Use the screws provided to secure the module in place.
• Fit the antenna at the top of the unit making certain that the antenna
contacts are aligned with the contacts on the GSM/GPRS module.
• Use the screws provided to secure the antenna on the metal frame.
Figure 7.7 An Installed GSM/GPRS Module
• Slide the SW1401 switch to the right to turn power back on.
• Replace the end-cap, back plate and batteries.
7.1.6 Installing An SE 1223HP Scanner
The SE 1223HP scanner is the internal scanner module available with the
WORKABOUT PRO. To install it:
• Remove the batteries. If your unit is using AC power, disconnect it.
Psion Teklogix WORKABOUT PRO Hand-Held Computer User Manual 129
Chapter 7: Expansion Modules
Installing An SE 1223HP Scanner
• Remove the stylus and then, remove the end-cap at the top of the
WORKABOUT PRO.
• Slide the SW1401 switch to the left to shut off internal battery power.
• Remove the back plate from the unit.
A scanner flex cable is already attached to the WORKABOUT PRO. You need to
connect the flex cable to the internal scanner module.
• On the scanner module, pull the tabs on either side of the connector up.
• Using pincers, insert the flex cable into the connector on the scanner
module.
• Push the connector tabs down to secure the flex cable in place.
Figure 7.8 Attaching The Flex Cable To The Scanner Module
• Fit the scanner module over the back of the WORKABOUT PRO – it
replaces the back plate of the unit.
• Fasten the module in place with the screws provided.
Scanner
Connector
Module
Flex
Cable
Chapter 7: Expansion Modules
Installing An SE 1223HP Scanner
130 Psion Teklogix WORKABOUT PRO Hand-Held Computer User Manual
• Slide the SW1401 power switch to the right to turn power back on, and
replace the end-cap, backplate and batteries.
Figure 7.9 Scanner Module Installed In WORKABOUT PRO