Psion 7530RA1001 HANDHELD COMPUTER User Manual 8000007 Book
Psion Inc HANDHELD COMPUTER 8000007 Book
Psion >
Contents
- 1. USERS MANUAL 1
- 2. USERS MANUAL 2
- 3. USERS MANUAL 3
USERS MANUAL 2

Psion Teklogix 7530 Hand-Held Computer User Manual55
Chapter3:Getting To Know Your 7530
Storing Batteries
3.9.1 Storing Batteries
Long term battery storage is not recommended. If storage is necessary:
• Always try to use a ‘first-in first-out’ approach to minimize storage time.
• Lithium-Ion batteries age much faster at elevated temperatures. Store bat-
teries at temperatures between 0˚ C and 20˚C.
• Always charge batteries to 40 to 60% before storing them. Batteries can be
damaged by an over-discharge phenomenon that occurs when an empty
battery is stored for a long period of time such that the cell voltage drops
below a lower limit.
• To minimize storage degradation, recharge stored batteries to 40 to 60%
every 4 or 6 months to prevent over-discharge damage.
• A ‘never used’ Li-Ion battery that has been stored for 3 years may have
limited or no useful life remaining once put into service. Think of batteries
as perishable goods.
3.10 Monitoring The Network Connection
If your hand-held is equipped with a wireless LAN radio, it will typically associate
with the nearest access point. The radio signal quality meter in the taskbar indicates
the relative strength of the communication link.
To access the radio signal icon from the keyboard:
• Press <BLUE> <0> to display the Start Menu.
• Choose System Tray from the menu.
• Use the <LEFT> and <RIGHT> arrow keys to highlight the radio signal
icon in the taskbar.
• Press <ENTER> to display the wireless statistics box dialogue box.
If you have a touchscreen:
• Tap on the radio icon in the taskbar to display the wireless statistics
dialogue box.
Note: Moving in and out of the radio coverage area can have varying effects on
a network session. At times, you may need to renew your connection by
logging in again.
Chapter3:Getting To Know Your 7530
Uploading Data In A Docking Station
56Psion Teklogix 7530 Hand-Held Computer User Manual
3.11 Uploading Data In A Docking Station
The Combo Docking and Quad Docking peripherals allow the 7535 to link to an
Ethernet network. They are typically used to upload transaction data to a server
computer when a radio link in not available. When a 7530 is properly inserted in a
docking station, a dock icon is displayed in the taskbar at the bottom of the 7530
screen. The 7530 also detects the presence of the Ethernet network. Review the
documentation provided with the user application installed in your 7530 before
preforming data uploads.
3.12 General Maintenance
3.12.1 Caring For The Touchscreen
The top of the touchscreen is a thin, flexible polyester plastic sheet with a
conductive coating on the inside. The polyester can be permanently damaged by
harsh chemicals and is susceptible to abrasions and scratches. Using sharp objects
on the touchscreen can scratch or cut the plastic, or crack the internal conductive
coating.
The chemicals listed below must not come into contact with the touchscreen:
• mustard,
• sodium hydroxide,
• concentrated caustic solutions,
• benzyl alcohol, and
• concentrated miner acids.
If the touchscreen is used in harsh environments, consider applying a disposable
screen protector (PN HU6110). These covers reduce the clarity of the display
slightly but will dramatically extend the useful life of the touchscreen. When they
become scratched and abraded, they are easily removed and replaced.

Psion Teklogix 7530 Hand-Held Computer User Manual57
Chapter3:Getting To Know Your 7530
Cleaning The 7530
3.12.2 Cleaning The 7530
Important: Do not immerse the unit in water. Dampen a soft cloth with mild
detergent to wipe the unit clean.
• Use only mild detergent or soapy water to clean the hand-held unit.
• Avoid abrasive cleaners, solvents or strong chemicals for cleaning. The
7535 has a plastic case that is susceptible to harsh chemicals. The plastic is
partially soluble in oils, mineral spirits and gasoline. The plastic slowly
decomposes in strong alkaline solutions.
• To clean ink marks from the keypad and touchscreen, use isopropyl
alcohol.

Psion Teklogix 7530 Hand-Held Computer User Manual59
WORKING WITH WINDOWS CE 4
4
4.1 Navigating In Windows CE And Applications ...............61
4.1.1 Navigating Using A Touchscreen And Stylus ............61
4.1.2 Navigating Using The Keyboard ...................62
4.2 Working With Files, Folders And Programs ................63
4.3 The Startup Desktop ............................64
4.3.1 The Desktop Icons ..........................65
4.3.2 The Taskbar ..............................66
4.3.2.1 Using The Taskbar ......................66
4.3.2.2 Customizing The Taskbar ..................67
4.4 The Start Menu ...............................68
4.4.1 The Desktop .............................68
4.4.2 Security Settings ...........................69
4.4.3 The System Tray ...........................70
4.4.4 The Task Manager ..........................71
4.4.5 Cycle Tasks ..............................71
4.4.6 Power Info ..............................71
4.4.7 Programs ...............................72
4.4.8 Settings ................................73
4.4.9 Run ..................................74
4.4.10 Shutdown ..............................75
4.5 Using A Dialogue Box ...........................76

Psion Teklogix 7530 Hand-Held Computer User Manual61
Chapter 4: Working With Windows CE
Navigating In Windows CE And Applications
4.1 Navigating In Windows CE And Applications
Graphic user interfaces like Windows CE for portable devices and desktop Windows
(2000, XP, etc.) utilize ‘point and click’ navigation. An equivalent keyboard shortcut
is also available for every ‘point and click’ action.
Windows CE supports the same ‘point and click’ user interface and keyboard
shortcuts as desktop Windows with one difference – the ‘point and click’ action is
accomplished using a touchscreen rather than a mouse. Actions can be performed
using any combination of keyboard shortcuts or touchscreen tapping (provided your
7530 is equipped with a touchscreen).
4.1.1 Navigating Using A Touchscreen And Stylus
Note: If the touch screen is not registering your screen taps accurately, the
touchscreen may need recalibration. Refer to “Calibrating The Touch-
screen” on page 41.
A touchscreen is an optional feature. A 7530 equipped with a touchscreen has a
stylus – a pointing tool that looks like a pen – stored in a slot at the top of the 7530.
The stylus is used to select objects on the touchscreen.
Note: To prevent damage to the touchscreen, use only the stylus (pen)
supplied with your 7530.
To open a file, launch an applet or open a folder:
• Double-tap the stylus on the appropriate icon.

Chapter 4: Working With Windows CE
Navigating Using The Keyboard
62Psion Teklogix 7530 Hand-Held Computer User Manual
4.1.2 Navigating Using The Keyboard
If your 7530 has a standard screen (rather than a touchscreen), choosing icons and
navigating dialogue boxes, displaying the desktop, and so on requires keyboard
input. If your unit has already been fully configured and your application is
launched at startup, you’ll have little need for keyboard navigation.
Table 4.1 Keyboard Navigation
Keep in mind that unlike a desktop computer, the 7530 does not support key
chording (pressing two keys at the same time). You must press one key followed by
the next in sequence.
Refer to “Working With Files, Folders And Programs” on page 63 for additional
details about keyboard navigation.
Operation Key or Key Combination
Switch between active applications <ALT> <TAB>
Open task manager <ALT> <ESC>
Move the cursor Arrow keys
Open file, folder or icon <ENTER>
Exit & Save <ENTER>
Close/Exit & Do Not Save <ESC>
Navigate Dialogue Boxes
<TAB>
To move cursor up <SHIFT> <TAB>
To display the contents of the next ‘tab’ in
a dialogue box <CTRL> <TAB>
Select Radio Button/Press Button <SPACE>
Go to Start Menu <BLUE><0>
Psion Teklogix 7530 Hand-Held Computer User Manual63
Chapter 4: Working With Windows CE
Working With Files, Folders And Programs
4.2 Working With Files, Folders And Programs
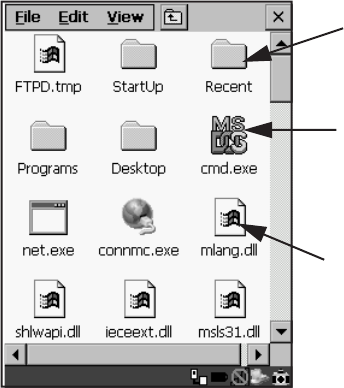
Figure 4.1 Working With Windows Icons
• Use the arrow keys to highlight the icon you want to open or launch.
• Press <ENTER>.
If you have a touchscreen:
• Double-tap on the appropriate icon – either a folder icon, a program icon or
a file icon – to open or launch your selection.
Folder
File
Program Icon
Chapter 4: Working With Windows CE
The Startup Desktop
64Psion Teklogix 7530 Hand-Held Computer User Manual
4.3 The Startup Desktop
When the 7530 boots up, the startup desktop (shell) is displayed. Any applications
stored in the Startup folder start up immediately.
Note: The startup folder is located in \Windows\StartUp and
\Flash Disk\StartUp.
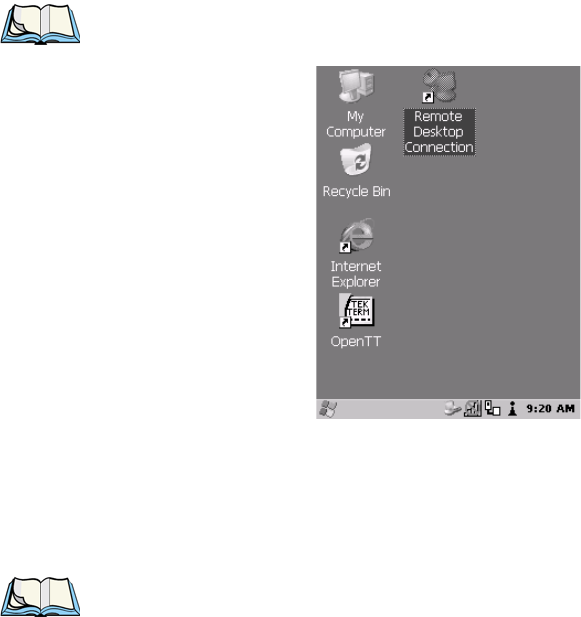
Figure 4.2 The 7530 Startup Desktop
To access desktop icons:
• Use the arrow keys to highlight the icon, and press <ENTER> to launch the
highlighted icon.
Note: If the arrow keys do not highlight the desktop icons, the desktop may not
be selected. Press <BLUE> 0 (zero) to display the Start Menu, and select
Desktop. Now the desktop will be “in focus” and the arrow keys will high-
light the icons.
If you have a touchscreen:
• Tap on the icon to open a window or, in the case of an application icon,
launch an application.
Psion Teklogix 7530 Hand-Held Computer User Manual65
Chapter 4: Working With Windows CE
The Desktop Icons
4.3.1 The Desktop Icons
The icons displayed in the startup desktop operate in much the same way as those
displayed on any standard PC desktop that is running Windows®.
My Computer
Choosing this icon displays the contents of your 7530 computer. If you’re not sure
how to work with the files, folders and programs displayed, refer to “Working With
Files, Folders And Programs” on page 63.
Recycle Bin
This option temporarily contains items that were deleted, allowing you to either
permanently delete or restore these items.
Internet Explorer
Choosing this icon launches Internet Explorer – a standard Windows CE version.
Keep in mind that your supervisor will need to set up access using the Internet Options
and the Network and Dial-up Connections icons in the Control Panel.
Remote Desktop Connection
This option allows your 7530 to communicate with a remote desktop PC. “Remote
Desktop Connection” on page 83 provides a website with step-by-step instructions.
Chapter 4: Working With Windows CE
The Taskbar
66Psion Teklogix 7530 Hand-Held Computer User Manual
4.3.2 The Taskbar
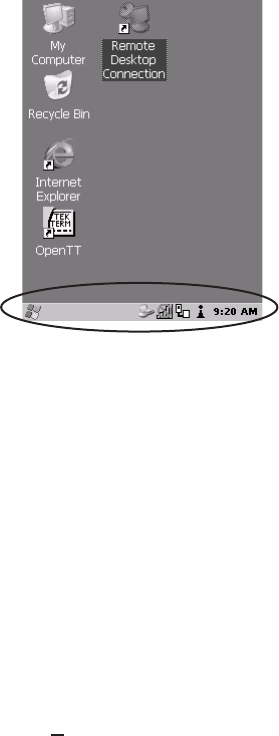
Figure 4.3 The Taskbar
The 7530 is equipped with a taskbar at the bottom of the screen. It displays icons
through which you can view the battery capacity and radio signal quality of your
unit. If the hand-held is attached to a charger, cradle, docking station or PDM, an
associated icon is displayed. In addition, the taskbar displays the application(s)
currently running on your unit and the security level assigned to your 7530.
The taskbar also displays active modifier keys – <SHIFT>, <ALT>, <CTRL>,
<BLUE> and <ORANGE>. Keys that have been locked “on” are displayed in
uppercase letters. For example, if you press the <CTRL> key twice to lock it “on”, it
is displayed as CTRL KEY in the taskbar.
4.3.2.1 Using The Taskbar
• Press <BLUE> <0> to display the Start Menu.
• Type <Y> to choose System Tray from the menu.
• Use the arrow keys to highlight the icon in the taskbar about which you’d
like more information.
• Press <ENTER> to display the appropriate dialogue box.
If you have a touchscreen:
• Using the stylus, tap on the indicator you want to view – the battery icon for
example – to display a dialogue box listing the current battery capacity
information.
Psion Teklogix 7530 Hand-Held Computer User Manual67
Chapter 4: Working With Windows CE
Customizing The Taskbar
4.3.2.2 Customizing The Taskbar
To customize the taskbar so that it displays only those icons you require:
• Press <BLUE> <0> (zero) to display the Start Menu.
• Highlight the Settings option, highlight Taskbar... in the sub-menu, and
press <ENTER>.
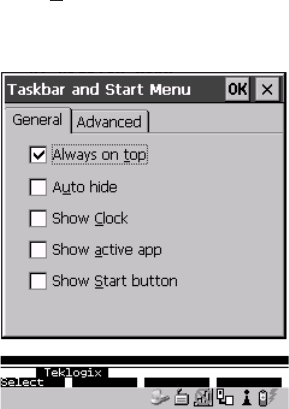
The Taskbar and Start Menu dialogue box is displayed.
Figure 4.4 Taskbar And Start Menu Settings
• Under the General tab, highlight the options you want to activate, and press
the <SPACE> key to select them. A check mark indicates active items.
If you have a touchscreen:
• Tap the stylus on the items you want to activate or deactivate. The check
mark indicates active items.
Chapter 4: Working With Windows CE
The Start Menu
68Psion Teklogix 7530 Hand-Held Computer User Manual
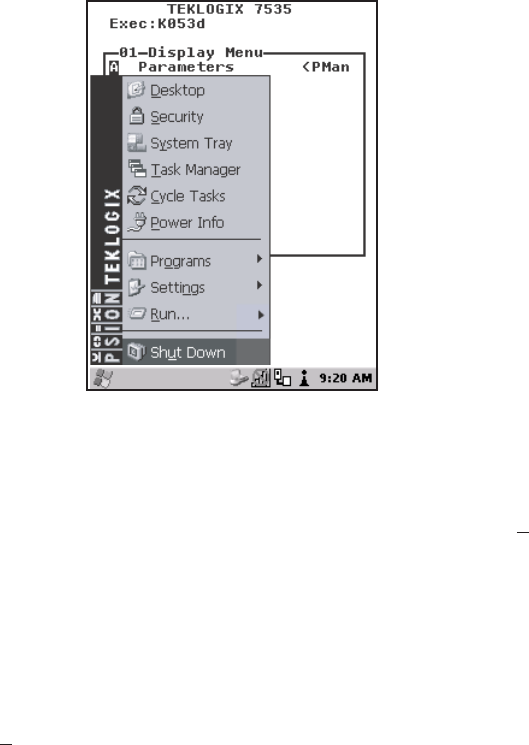
4.4 The Start Menu
Note: Some of the Start Menu items may be disabled based on the 7530’s
current security settings.
The Start Menu lists the operations you can access and work with. It is available from
the startup desktop or from within any application.
To display the menu:
• Press <BLUE> <0> (zero).
Figure 4.5 Start Menu
• Use the arrow keys to highlight a menu item, and press <ENTER>, or
If the menu item has an underlined character:
• Type the underlined alpha character – for example, to display the Power
Info dialogue box, type the letter p.
If you have a touchscreen:
• Tap on the Windows® Start button in the taskbar. Tap on the item in the
menu with which you want to work.
4.4.1 The Desktop
Choosing the Desktop option from the Start Menu displays the 7530 desktop.
Psion Teklogix 7530 Hand-Held Computer User Manual69
Chapter 4: Working With Windows CE
Security Settings
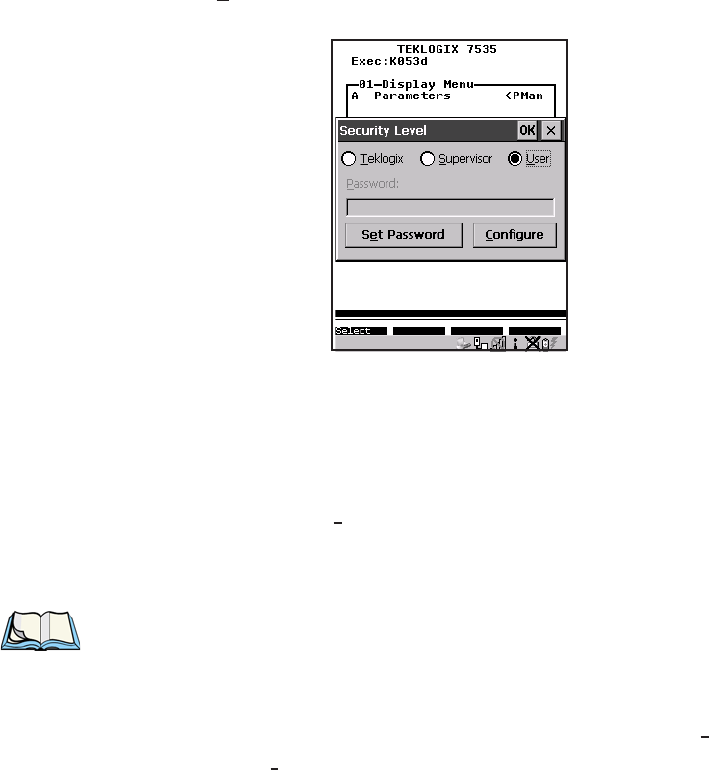
4.4.2 Security Settings
Choosing the Security option from the Start Menu displays a dialogue box in
which you can define the access level for the 7530 – Teklogix, Supervisor or User.
Figure 4.6 Security Levels
Security Level
These security levels define the options accessible to the operator in the Start Menu
and the taskbar. When you change security levels, you’ll need to enter the
appropriate password in the Password textbox. The security level is represented by an
icon in the shape of a lock in the taskbar.
Changing A Password
Note: Keep in mind that this is the same password as that assigned through the
Password control panel applet. Refer to “Control Panel Icons” on page 84.
To assign a password:
• Choose a security level, and enter the existing password in the Password field
• Choose the Set Password button.
A dialogue box labelled Password Properties is displayed.
• Type the new password in the Password: text box
• In the Confirm Password: text box, retype the new password.
Chapter 4: Working With Windows CE
The System Tray
70Psion Teklogix 7530 Hand-Held Computer User Manual
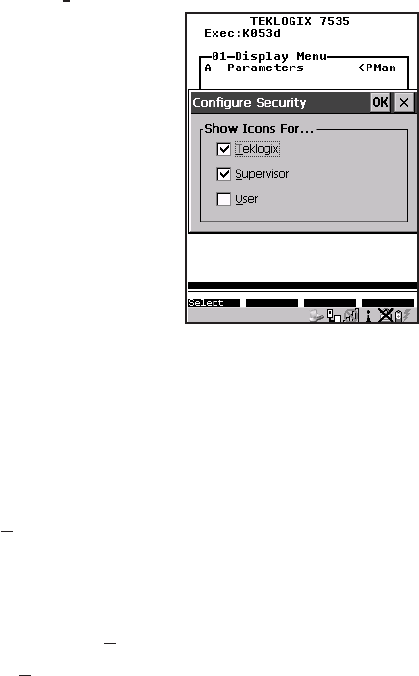
Configuring Security
Choosing the Configure button displays the Configure Security dialogue box.
Figure 4.7 Configuring Security
This dialogue box allows you to determine which security levels will have an
associated icon displayed in the taskbar. By default, a security icon is not displayed
for user-level security.
4.4.3 The System Tray
The System Tray option allows access to the icons in the taskbar at the bottom
of the screen. The taskbar displays indicators such as a battery capacity gauge and
the security level. These indicators are attached to dialogue boxes that provide
additional information.
• Choose System Tray from the Start Menu.
When System Tray is chosen, the taskbar icons become accessible. To display
the dialogue box attached to an icon:
• Use the arrow keys to highlight an icon – for example – the security icon.
• Press <ENTER> to display the security level dialogue box.
If you have a touchscreen:
• Tap on the icon with which you want to work. The associated dialogue box
is displayed.
Psion Teklogix 7530 Hand-Held Computer User Manual71
Chapter 4: Working With Windows CE
The Task Manager
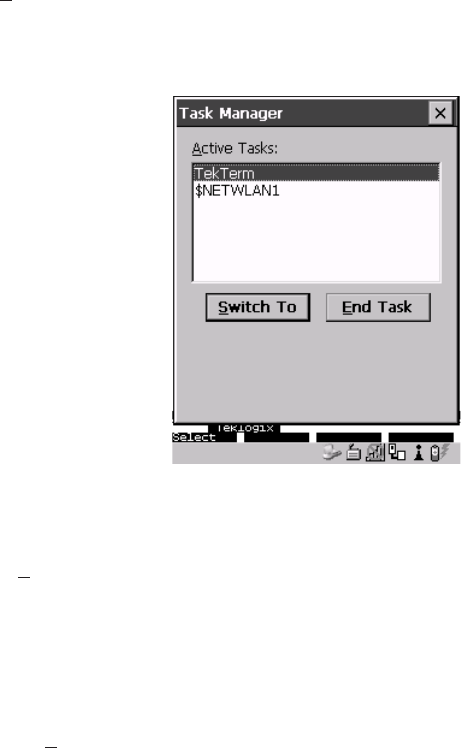
4.4.4 The Task Manager
The Task Manager option allows you to switch to another task or to end an
active task. To display the task manager window:
• Press <BLUE><0><T>, or
• Press <ALT> <ESC>.
Figure 4.8 Task Manager
4.4.5 Cycle Tasks
When Cycle Tasks is selected (and the Task Manager is not open), you can
cycle through active applications. To choose this option:
• Press <BLUE><0>, and type <C>, or
• Press <ALT> <TAB>.
4.4.6 Power Info
Selecting Power Info from the Start Menu displays the Power Properties dialogue box.
This dialogue box indicates the remaining charge capacity of the battery.
Chapter 4: Working With Windows CE
Programs
72Psion Teklogix 7530 Hand-Held Computer User Manual
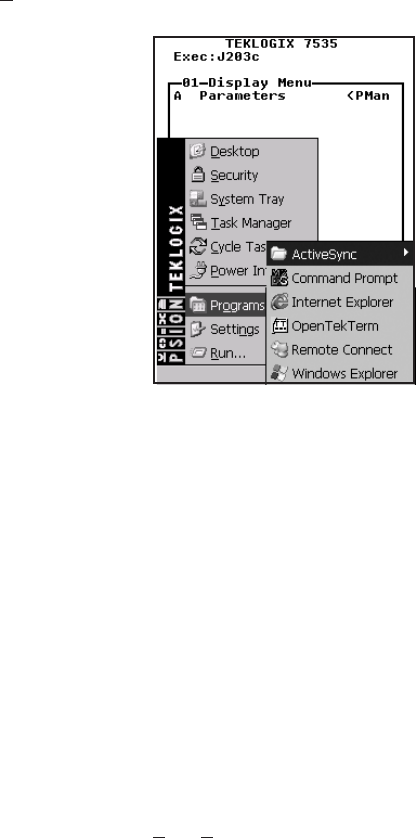
4.4.7 Programs
With Programs highlighted, press the <RIGHT> arrow key to display a
sub-menu of options.
Figure 4.9 Program Sub-Menu
This sub-menu allows you to choose ActiveSync and Command Prompt, and you can access
the Internet Explorer, installed applications (e.g., Open Tekterm), Remote Desktop Connection or
Windows Explorer.
ActiveSync®
This option allows you to connect to another device using ActiveSync.
Command Prompt
Command Prompt is used to access the DOS command prompt. At the prompt, you can
type DOS commands such as dir to display all the directories in the drive.
Internet Explorer
The 7530 is equipped with Microsoft® Internet Explorer consistent with all
Windows CE devices on the market. You can access the Internet Options icon through
the Start Menu under Settings>Control Panel or by double-tapping on the
desktop icon labelled My Computer and then, double-tapping on the Control Panel icon.
Psion Teklogix 7530 Hand-Held Computer User Manual73
Chapter 4: Working With Windows CE
Settings
Windows Explorer
Windows Explorer installed on your 7530 is consistent with all Windows CE.NET 4.2
devices. You can access this option either from the Start Menu under
Programs>Windows Explorer.
Remote Desktop Connection
Remote Desktop Connection is a 7530 application used to connect to a Windows Terminal
Server so that you can run a “session” on the Server machine using the 7530
(Windows CE device). “Remote Desktop Connection” on page 83 provides a
website with details about this option.
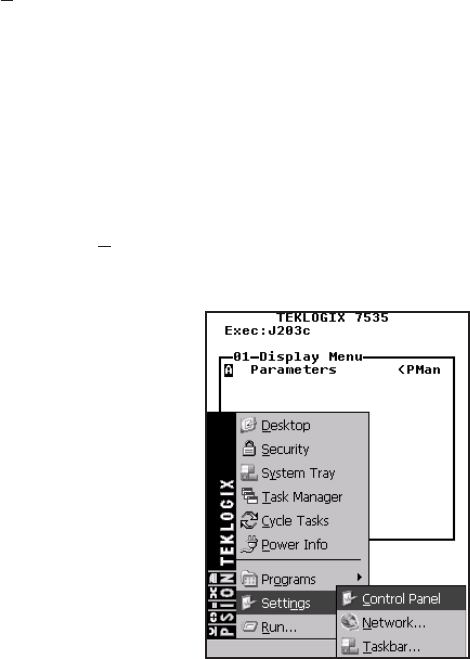
4.4.8 Settings
With Settings highlighted, pressing the <RIGHT> arrow key displays a
sub-menu of options, including Control Panel, Network and Dial-up Connections and Taskbar and
Start Menu settings.
Figure 4.10 Settings Sub-Menu
Control Panel
The Control Panel contains applets used to configure hardware, the operating system
and the shell. If your 7530 is running with the Psion Teklogix Tekterm application or
another application, additional configuration applets may appear in the Control Panel.
Chapter 4: Working With Windows CE
Run
74Psion Teklogix 7530 Hand-Held Computer User Manual
Network And Dial-Up Connections
The Network and Dial-up Connections window allows you to configure the 7530 radio or
execute an existing configuration. Refer to “Configuring An IEEE 802.11 Radio
Installed In The 7530” on page 18 for radio setup details.
Taskbar And Start Menu
The Taskbar and Start Menu option displays a dialogue box in which you can
customize the taskbar, choosing which options will be displayed. Refer to
“Customizing The Taskbar” on page 67 for additional details about this option.
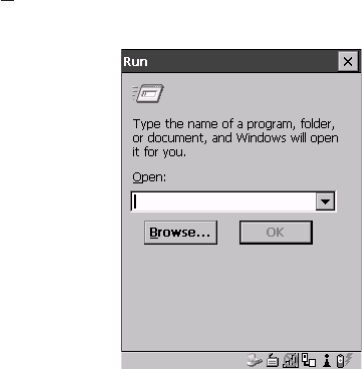
4.4.9 Run
Choosing the Run option from the Start Menu displays a dialogue box in which you
can enter the name of the program, folder or document you want to open or launch.
Figure 4.11 Run Dialogue Box
Psion Teklogix 7530 Hand-Held Computer User Manual75
Chapter 4: Working With Windows CE
Shutdown
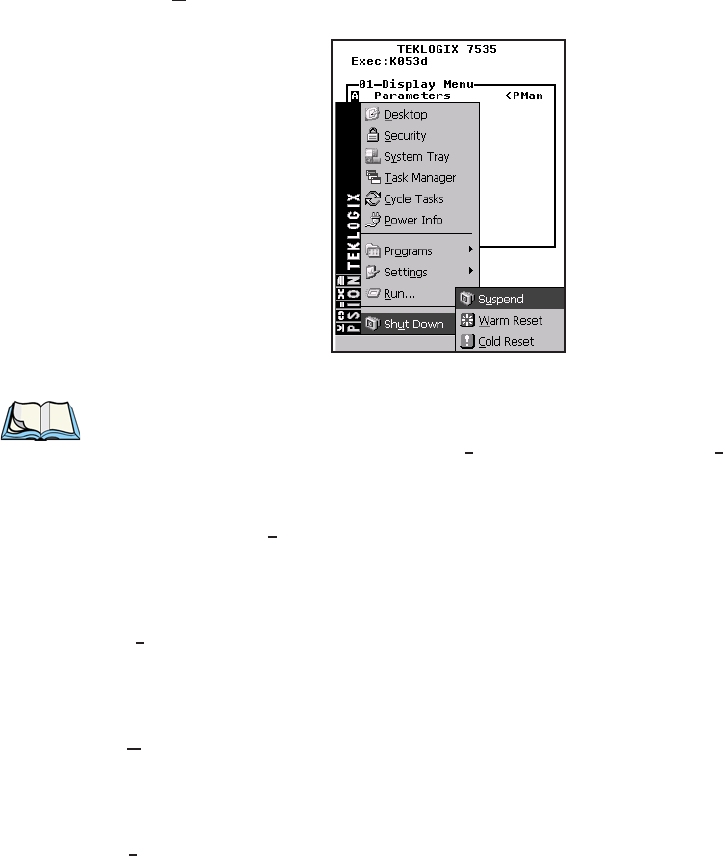
4.4.10 Shutdown
With Shutdown highlighted, pressing the <RIGHT> arrow key displays a
sub-menu of options, including Suspend, Warm Reset and Cold Reset.
Figure 4.12 Shutdown Sub-Menu
Note: This menu varies slightly depending on the security level chosen. When
the 7530 is set to User level, the Shutdown option is replaced by Suspend.
A sub-menu is not available.
At Teklogix security level, an additional option is available in the
sub-menu – Bootloader. This option behaves like cold-reset, except
that the 7530 starts Bootloader rather than Windows CE.
Suspend
The Suspend option suspends the 7530 immediately – this is equivalent to turning the
hand-held off.
Warm Reset
The Warm Reset option resets the 7530, leaving all saved files and (registry) settings
intact. Any unsaved data is lost.
Cold Reset
The Cold Reset option resets the 7530. Any files not stored in permanent memory are
lost. However, the registry settings are saved.
Chapter 4: Working With Windows CE
Using A Dialogue Box
76Psion Teklogix 7530 Hand-Held Computer User Manual
4.5 Using A Dialogue Box
A dialogue box (like the samples in Figure 4.13) appears when you need to make
selections and enter further information.
You can move between dialogue items by tapping on them, or by pressing the arrow
keys and the <TAB> key. (<SHIFT> <TAB> moves the cursor backwards.)
Figure 4.13 Dialogue Boxes
Note: If your unit is equipped with a touchscreen, you can use the stylus to tap
on an element in a dialogue box to select or deselect it, display dropdown
menu items, save your selections, and so on.
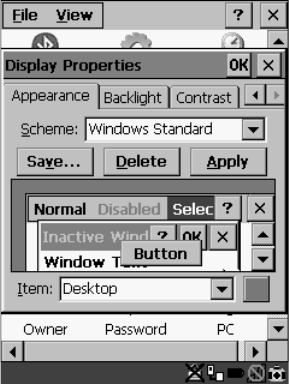
Dialogue boxes contain one or more of the following elements:
Tab: A tab separates different elements of a dialogue box. Press the <TAB> key
until a tab in the dialogue box is highlighted. To display adjoining tabs, press the
<RIGHT> or <LEFT> arrow key. To display the information in the next tab from
anywhere in the window, press <CTRL> <TAB>.
Textbox: A textbox requires that you type information. Press the <TAB> key to
highlight the textbox and then type the appropriate information.
Dropdown: This type of menu is identified by up and down arrows next to the
dropdown menu to indicate that additional options are available. Press the <TAB>
key to highlight the menu, and use the arrow keys on your keyboard to cycle through
the options.
Checkbox
Dropdown Menu
Button
Textbox
Radio
Button
Tabs

Psion Teklogix 7530 Hand-Held Computer User Manual77
Chapter 4: Working With Windows CE
Using A Dialogue Box
Checkbox: This box allows you to select or deselect an option. To select or deselect
a checkbox, press the <TAB> key to highlight the checkbox, and press the
<SPACE> key to select (√) or deselect it.
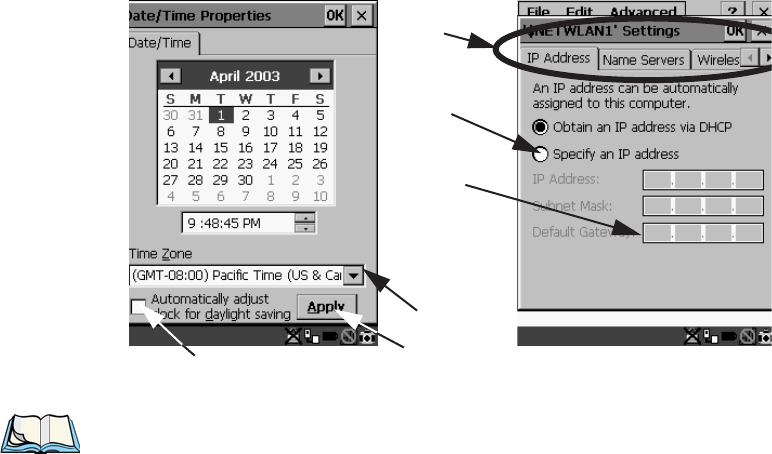
Radio buttons: These buttons allow you to choose from a number of options. For
example, in the sample screen in Figure 4.13 on page 76 you can choose to ‘Obtain an
IP address via DHCP’ or ‘Specify an IP address’. Press the <TAB> key to highlight a radio
button option, and then select a radio button by pressing the arrow keys to highlight
the appropriate option.
Buttons: This type of button allows you to ‘Save’, ‘Delete’ and so on the options
you’ve chosen in a dialogue box. Use the <TAB> key to highlight the button you
want to use. Press the <ENTER> key to activate it.
Saving Your Choices: Once you’ve made all your changes, press the <ENTER>
key to save your changes and exit the window.
Note: A dialogue box item that is displayed in grey text indicates that it is not
currently available.

Psion Teklogix 7530 Hand-Held Computer User Manual79
CONFIGURATION 5
5
5.1 Remote Desktop Connection ........................83
5.2 Pocket PC Compatibility ..........................83
5.3 The Control Panel ..............................83
5.4 Control Panel Icons .............................84
5.5 Basic Setup .................................88
5.5.1 Display Properties ..........................88
5.5.1.1 Display Contrast .......................88
5.5.1.2 Display Backlight ......................89
5.5.1.3 Display Appearance .....................91
5.5.2 Keyboard Properties .........................92
5.5.2.1 Key Repeat..........................92
5.5.2.2 Keyboard Backlight .....................93
5.5.2.3 Keyboard One Shot Modes .................94
5.5.2.4 Keyboard Macro Keys ....................95
5.5.2.5 Unicode Mapping ......................97
5.5.3 Volume And Sound Properties ....................99
5.5.3.1 Volume Adjustments .....................99
5.5.4 Power Management Properties ................... 100
5.5.4.1 Battery Capacity ...................... 100
5.5.4.2 Power Saving Schemes .................. 101
5.5.4.3 Suspend Threshold..................... 102
5.5.4.4 Charger Details ...................... 103
5.5.5 Stylus Properties .......................... 103
5.5.5.1 Setting Double-Tap Sensitivity .............. 104
5.5.5.2 Touchscreen Calibration .................. 104
5.5.6 Certificate Assignment ....................... 105
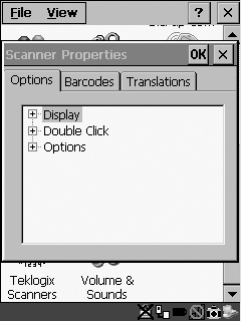
5.7 Scanner Properties Setup ......................... 118
5.7.1 Scanner Options .......................... 118
5.7.2 Bar Codes .............................. 121
5.7.2.1 Code 39 Settings ...................... 122
5.7.2.2 Code 128 Settings ..................... 124
Chapter 5: Configuration
80Psion Teklogix 7530 Hand-Held Computer User Manual
5.7.2.3 EAN 13 Settings ......................125
5.7.2.4 EAN 8 ...........................126
5.7.2.5 UPC And EAN Settings ..................127
5.7.2.6 UPC A Settings.......................127
5.7.2.7 UPC E Settings.......................127
5.7.2.8 Codabar...........................128
5.7.2.9 Code 93...........................128
5.7.2.10 Code 11 ..........................128
5.7.2.11 Interleaved 2 of 5 .....................129
5.7.2.12 MSI Plessey........................129
5.7.2.13 Discrete 2 of 5 ......................129
5.7.2.14 IATA 2 of 5 ........................130
5.7.2.15 Postal: Australian .....................130
5.7.2.16 Postal: Japanese......................130
5.7.2.17 Postal: Korean.......................130
5.7.2.18 Postal: PlaNET ......................131
5.7.2.19 Postal: PostNET......................131
5.7.2.20 Postal: Royal Mail ....................131
5.7.2.21 2D DataMatrix ......................131
5.7.2.22 2D Maxicode .......................131
5.7.2.23 2D PDF-417........................131
5.7.2.24 2D Micro PDF-417 ....................132
5.7.2.25 2D QR Code .......................132
5.7.2.26 2D RSS Code .......................132
5.7.2.27 Aztec ...........................132
5.7.3 Translations .............................132
5.8 SNMP (Simple Network Management Protocol) Setup..........134
5.8.1 Contact Tab .............................135
5.8.2 Communities Tab ..........................136
5.8.2.1 Adding A Community ...................137
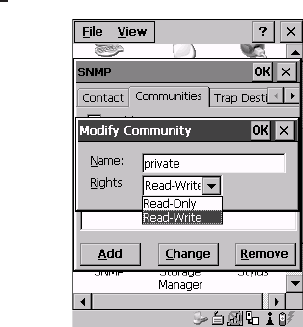
5.8.2.2 Modifying A Community Setting .............138
5.8.2.3 Removing An Existing Community ............138
5.8.3 Trap Destination Tab ........................139
5.8.3.1 Enabling Authentication TRAPS..............139
5.8.3.2 Adding A Destination ...................139
5.8.3.3 Changing A Destination ..................140
5.8.3.4 Removing A Trap Destination ...............140
Psion Teklogix 7530 Hand-Held Computer User Manual81
Chapter 5: Configuration
5.8.4 Permitted Hosts Tab ........................ 141
5.8.4.1 Adding A Host ....................... 141
5.8.4.2 Changing A Host...................... 142

Psion Teklogix 7530 Hand-Held Computer User Manual83
Chapter 5: Configuration
Remote Desktop Connection
5.1 Remote Desktop Connection
Remote Desktop Connection is a 7530 application used to connect to a Windows Terminal
Server so that you can run a “session” on the Server machine, using the 7530
(Windows CE device).
Refer to the following website for step-by-step information about setting up this
connection:
http://www.microsoft.com/WindowsXP/pro/using/howto/gomobile/remotedesktop/default.asp
5.2 Pocket PC Compatibility
The 7530 supports the AYGShell API set that allows PocketPC-compatible
applications to run on the hand-held. Microsoft® Windows® CE.NET 4.2 is
designed to include application programming interface (API) compatibility support
for the Microsoft Windows Powered Pocket PC 2002 shell in 7530s running
Windows® CE.NET 4.2.
The website listed below describes the APIs exposed through AYGShell and the
application compatibility between Windows Powered Pocket PC 2002-based
applications and Windows CE.NET 4.2-based devices:
http://msdn.microsoft.com/library/default.asp?url=/library/en-us/dncenet /html/WINCENET_CEPCC_App.asp
5.3 The Control Panel
The Windows CE Control Panel provides a group of icons through which you can set a
variety of system-wide properties, such as mouse sensitivity, network configuration
and the desktop color scheme.
Note: If you are uncertain how to move around a dialogue box and make selec-
tions, review “Using A Dialogue Box” on page 76.
When the 7530 boots up, the startup desktop (shell) is displayed, and any
applications stored in the Startup folder start up immediately.
To access the Windows CE Control Panel:
• Press BLUE> <0> to display the Start Menu.
• Highlight Settings in Start Menu, and press the <RIGHT > arrow key to
highlight the Control Panel option.
• Press the <ENTER> key to display the contents of the Control Panel window.
Chapter 5: Configuration
Control Panel Icons
84Psion Teklogix 7530 Hand-Held Computer User Manual
If you have a touchscreen:
• Use the stylus to tap on the Windows Start button in the taskbar to display the
Start Menu. Tap on Settings>Control Panel.
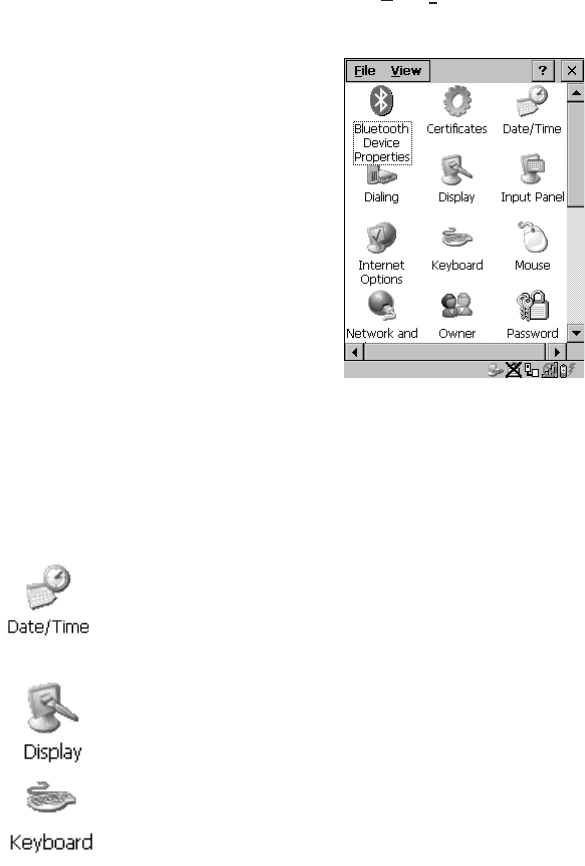
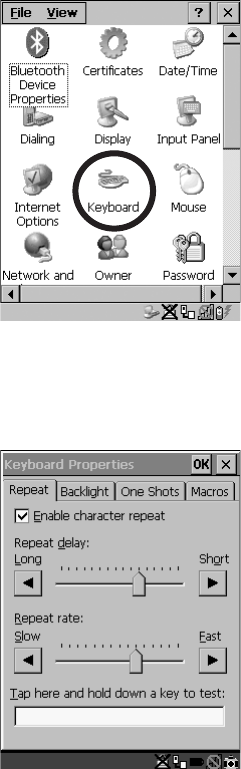
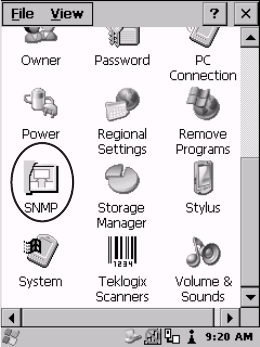
The Control Panel folder contains icons used in the setup of your 7530.
Figure 5.1 Control Panel
5.4 Control Panel Icons
The Windows CE Control Panel provides a group of icons that allow you to customize
and adjust settings on your 7530.
Date/Time
Allows you to set the current Month, Date, Time and Time Zone on your
unit.
Display
Changes the appearance (window colour scheme) on the unit desktop.
Keyboard
Toggles character repeat on and off and specifies delay and rate for repeated
characters. It also allows you to adjust the keyboard backlight threshold and
intensity.

Psion Teklogix 7530 Hand-Held Computer User Manual85
Chapter 5: Configuration
Control Panel Icons
Volume & Sound
Allows you to adjust the volume of the beep that is emitted to indicate
events like warnings, key clicks and, if your unit is equipped with a touch-
screen, screen taps.
Sounds (wave files) cannot be reproduced on 7530 units. The beeper
volume and the conditions under which it sounds are tailored from within
the application installed on your unit.
Mouse Properties
For units equipped with touchscreens, this icon allows you to customize the
sensitivity and speed of the stylus double-tap.
Owner
Provides fields in which you can specify owner information. A ‘Notes’ tab
allows additional information to be entered and displayed when the unit is
powered up. ‘Network ID’ tab information is used to access network resources.
(This information should be provided by your System Administrator.)
Password
Allows you to assign a password to restrict access to elements of the unit.
Once assigned, password access cannot be circumvented so it is important
that you write down your password and keep it in a safe place. Refer to
“Security Settings” on page 69 for details.
Power
Displays battery pack power status. (Alternately, battery status can be
accessed through the taskbar.) The ‘Power Scheme’ tab allows you to deter-
mine a suspend states, and the ‘Charger’ tab determines whether or not a
battery that requires it, can be recalibrated. (Refer to “Power Saving
Schemes” on page 101 for details.)

Chapter 5: Configuration
Control Panel Icons
86Psion Teklogix 7530 Hand-Held Computer User Manual
Regional Settings
Allows you to specify the local language the display text will use along
with the format of numbers, currency, time and date for your region.
Remove Programs
Lists the programs that can be removed from your unit. To remove a pro-
gram, select it and then click on the Remove button.
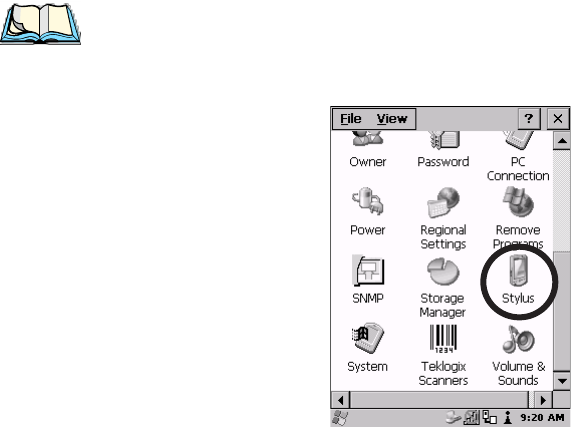
Stylus
Adjusts how Windows CE recognizes your double-tap (as slow or rapid
successive taps).
Under the ‘Calibration’ tab, you can recalibrate your touchscreen by tapping
on the ‘Recalibrate’ button and following the directions on the calibration
screen.
System
Displays system and memory properties. Under the Memory tab, you can
allocate memory between storage memory and program memory.
Dialing
Specifies dialing settings, including area code, country code, dial type and
the code to disable call waiting. You can store multiple patterns – for exam-
ple, ‘Work’, ‘Home’, and so on using this dialogue box.
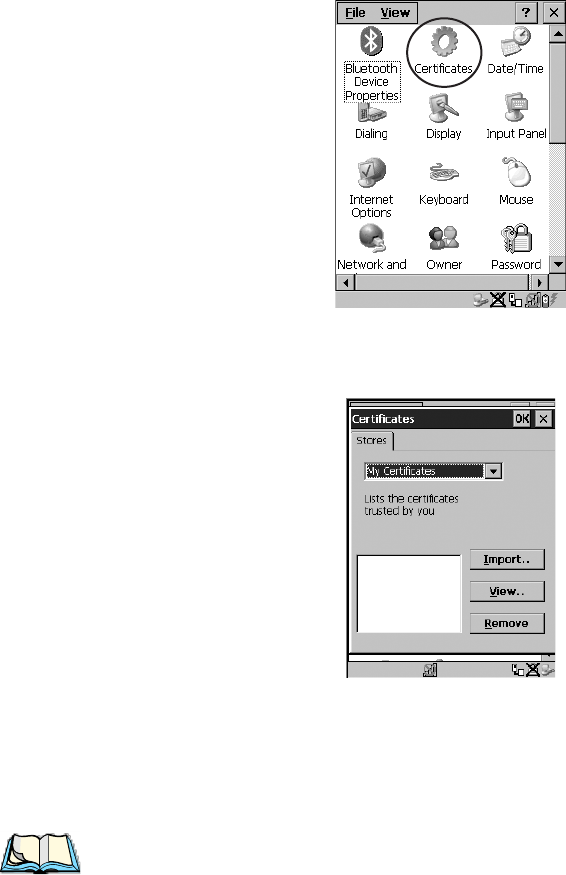
Certificates
A public key is transmitted as part of a certificate. The certificate assigned
through this icon is used to ensure that the submitted public key is, in fact,
the public key that belongs to the submitter. The client checks that the cer-
tificate has been digitally signed by a certification authority that the client
explicitly trusts. “Certificate Assignment” on page 105 directs you to the
appropriate setup information.

Psion Teklogix 7535 Hand-Held Computer User Manual 87
Chapter 5: Configuration
Control Panel Icons
PC Connection
Enables direct connections to a desktop computer. Selecting the ‘Change Con-
nection’ button allows you to change the type of direct connect to your PC.
Teklogix Scanners
Used to set up scanner parameters and choose the bar code symbologies
that the 7530 scanner will successfully read.
Network And Dial-up Connections
Displays a network window from which the 7530 radio can be configured
and an existing configuration can be executed. Refer to “Configuring An
IEEE 802.11 Radio Installed In The 7530” on page 18 for details.
Internet Options
Used to configure your Internet browser including options such as identify-
ing the default and search page that the browser applies when connecting to
the Internet, setting the cache size, specifying the Internet connection
options, and defining the security level that is applied when browsing.
SNMP
SNMP (Simple Network Management Protocol) is the protocol used to
monitor and manage devices attached to a TCP/IP network.
Input Panel
The 7535 is equipped with the framework for a Soft Input Panel (SIP)
should you need to design your own SIP.
Chapter 5: Configuration
Basic Setup
88Psion Teklogix 7530 Hand-Held Computer User Manual
5.5 Basic Setup
5.5.1 Display Properties
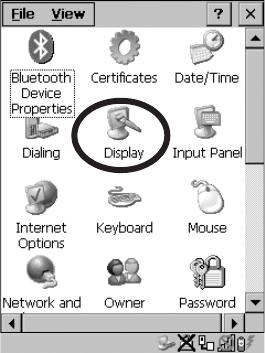
• In the Control Panel, choose the Display icon.
Figure 5.2 Choosing The Display Icon
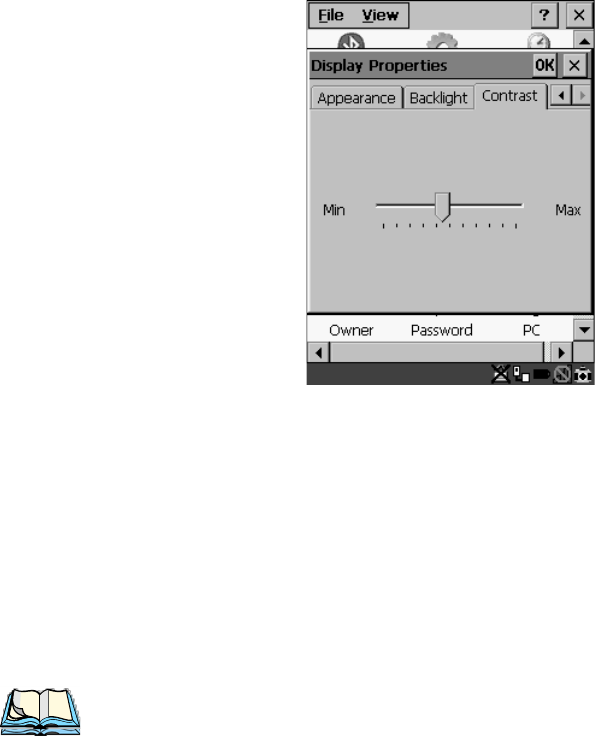
5.5.1.1 Display Contrast
The Contrast tab allows you to adjust the 7530 display contrast to suit the environment
in which you are using the hand-held.
Psion Teklogix 7530 Hand-Held Computer User Manual89
Chapter 5: Configuration
Display Backlight
• In the Display Properties dialogue box, open the Contrast tab.
Figure 5.3 Display Contrast Properties
Sliding bar in the Contrast tab to the left decreases or darkens the display contrast.
Sliding the bar to the right to increases or lightens the display contrast.
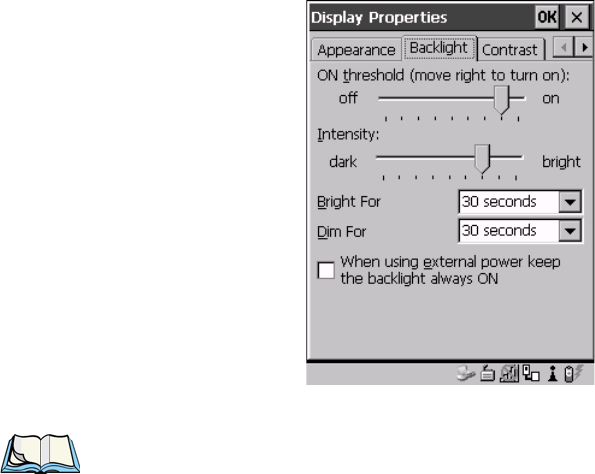
5.5.1.2 Display Backlight
The backlight is activated for a configurable amount of time if the ambient light is
below a specified threshold and if the 7530 is in use (key press, scanner trigger or
data received from the host). The Display Properties dialogue box in the Control Panel
allows you to specify the intensity of the backlight along with how the backlight
behaves in low-light conditions and when the unit is not in use.
Note: Keep in mind that this option may be restricted to supervisory use only.
Chapter 5: Configuration
Display Backlight
90Psion Teklogix 7530 Hand-Held Computer User Manual
• In the Display Properties dialogue box, open the Backlight tab.
Figure 5.4 Display Backlight Properties
Note: Backlight changes take affect immediately. You do not need to reset
the 7530.
ON Threshold
The 7530 is equipped with an ambient light sensor. This sliding bar allows you to
determine how dark the ambient light needs to be before the backlight turns on.
Intensity
This parameter is used to adjust the light intensity of the 7530 backlight. Sliding the
bar to the left lowers the light intensity, and sliding it to the right raises the intensity.
Bright For
The value chosen from this dropdown menu determines the duration of time that the
backlight stays on at the configured intensity when a unit is not in use.
Dim For
The value chosen from this dropdown menu determines the duration of time that
the backlight stays on at half the configured intensity (dimmed backlight) when a
unit is not in use.
Psion Teklogix 7530 Hand-Held Computer User Manual91
Chapter 5: Configuration
Display Appearance
External Power Checkbox
When you select (√) the checkbox next to ‘When using external power keep the backlight
always ON.’, the backlight remains ON at the configured intensity when the 7530 is
operating with external power (not battery power). If the 7530 is drawing power
from its battery, this option is ignored and the other parameters defined in Display
Properties dialogue box take affect.
5.5.1.3 Display Appearance
• In the Display Properties dialogue box, open the Appearance tab.
Figure 5.5 Display Appearance Properties
This dialogue box allows you to customize the display colour scheme.
Chapter 5: Configuration
Keyboard Properties
92Psion Teklogix 7530 Hand-Held Computer User Manual
5.5.2 Keyboard Properties
This icon displays the Keyboard Properties dialogue box in which you can adjust the
repeat rate of the keys, the intensity of the keyboard backlight and the behaviour of
the <BLUE> and <ORANGE> modifier keys. This dialogue box also allows you to
define macro keys and Unicode characters.
• In the Control Panel, choose the Keyboard icon.
Figure 5.6 Choosing The Keyboard Icon
5.5.2.1 Key Repeat
• In the Keyboard Properties dialogue box, open the Repeat tab.
Figure 5.7 Key Repeat Properties
Psion Teklogix 7530 Hand-Held Computer User Manual93
Chapter 5: Configuration
Keyboard Backlight
Repeat Delay
The value assigned for this parameter determines the delay in milliseconds between
repeat characters. Sliding the Repeat Delay bar to the left increases the delay between
key repeats while sliding the bar to the right shortens the repeat delay time.
Repeat Rate
The value assigned for the Repeat Rate parameter determines how quickly the key you
press repeats and is measured in characters per second (cps). Sliding the bar to the
left slows the repeat rate, and sliding the bar to the right increases the repeat rate.
Note: Use the field at the bottom of this dialogue box to test the repeat delay and
rate settings you’ve chosen.
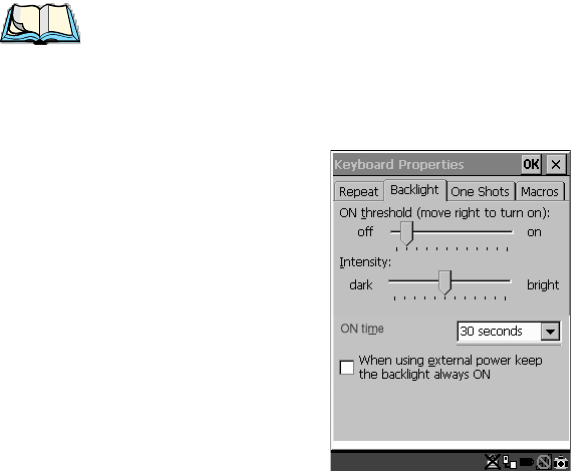
5.5.2.2 Keyboard Backlight
• In the Keyboard Properties dialogue box, open the Backlight tab.
Figure 5.8 Keyboard Backlight Properties
ON Threshold
The ON Threshold sliding bar allows you to determine how dark the ambient light needs
to be before the keyboard backlight turns on.
Intensity
This parameter is used to adjust the light intensity of the 7530 keyboard backlight.
Sliding the bar to the left darkens the keyboard backlight intensity, and sliding it to
the right lightens the intensity.
Chapter 5: Configuration
Keyboard One Shot Modes
94Psion Teklogix 7530 Hand-Held Computer User Manual
ON Time
The value chosen from this dropdown menu determines the duration of time that the
keyboard backlight stays on when a unit is not in use.
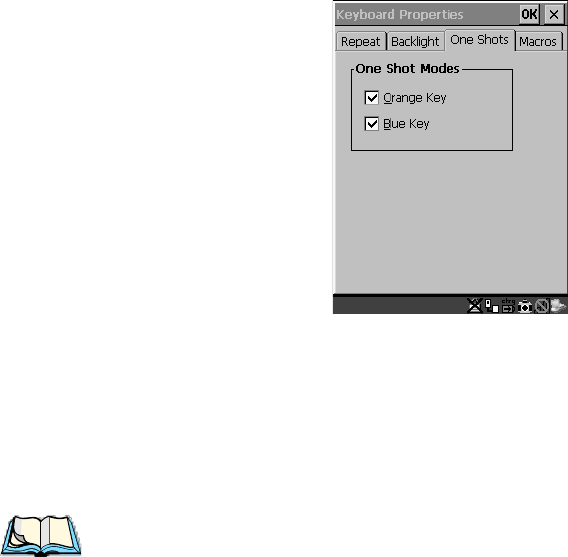
5.5.2.3 Keyboard One Shot Modes
• In the Keyboard Properties dialogue box, open the One Shots tab.
Figure 5.9 Keyboard One Shot Properties
When these options are enabled (√), the <ORANGE> and <BLUE> keys only
remain active until the next key is pressed. If the ‘One Shots’ options are disabled
(the checkbox is left blank), the <ORANGE> and <BLUE> keys are locked ‘on’
when pressed only once; they remain ‘on’ until they are pressed a second time to
unlock them.
Note: Keep in mind that checking the taskbar lets you know whether or not
these keys are locked on. When the <ORANGE> and <BLUE> keys
are locked ‘on’, the taskbar at the bottom of the screen displays them
in uppercase characters – BLUE KEY and ORANGE KEY. If these keys are dis-
played in lowercase characters in the taskbar, you’ll know that the Blue Key
and the Orange Key are not locked. They will become inactive following a
key press.
Psion Teklogix 7530 Hand-Held Computer User Manual95
Chapter 5: Configuration
Keyboard Macro Keys
5.5.2.4 Keyboard Macro Keys
• In the Keyboard Properties dialogue box, open the Macros tab.
Figure 5.10 Macro Dialogue Box
A macro has 20 programmable characters (or “positions”). The macro keys can be
programmed to replace frequently used keystrokes, along with the function of
executable keys including <ENTER>, <BKSP> and <DEL> (<BLUE>-<BKSP>),
function keys and arrow keys.
Recording And Saving A Macro
You can program up to 12 macro keys on a 58-key keyboard and 6 macro keys on a
36-key keyboard.
• In the Macro: menu, highlight a macro key number – for example, macro 1 to
assign a macro to macro key <M1>. Press the <TAB> key twice to highlight
the Record Macro button, and press <ENTER>.
Chapter 5: Configuration
Keyboard Macro Keys
96Psion Teklogix 7530 Hand-Held Computer User Manual
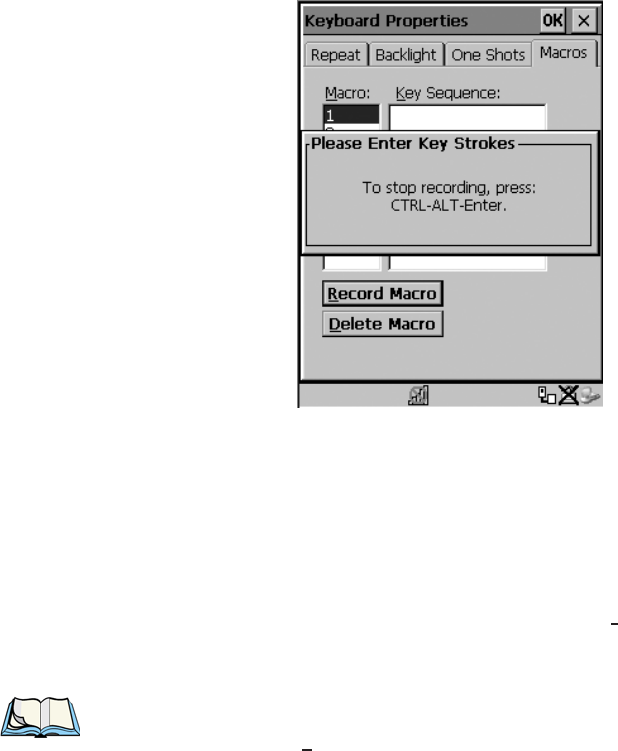
A message screen is displayed instructing you to ‘Please Enter Key Strokes’.
Figure 5.11 Recording A Macro
• Type the macro sequence you want to assign to the Macro key. You can type
text and numbers, and you can program the function of special keys into a
macro.
• When you’ve finished recording your macro sequence, press the key
sequence – <CTRL> <ALT> <ENTER>.
A new screen displays the macro sequence you created. The Save Macro button is
highlighted.
• Press <ENTER> to save your macro.
Note: If you want to discard the macro you’ve just created, press the <TAB> key
to highlight the Discard Macro button and press <ENTER>.
Executing A Macro
To execute a macro:
• Press the macro key to which you’ve assigned the macro. For example, if
you created a macro for macro key ‘1’, press <M1> to execute the macro.
Psion Teklogix 7530 Hand-Held Computer User Manual97
Chapter 5: Configuration
Unicode Mapping
Deleting A Macro
To delete a macro:
• In the Macros tab, use the arrow keys to highlight the macro number you want
to delete.
• Press <TAB> to highlight the Delete Macro button, and press <ENTER>.
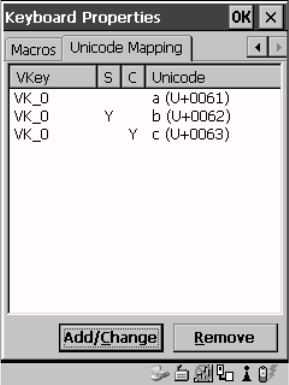
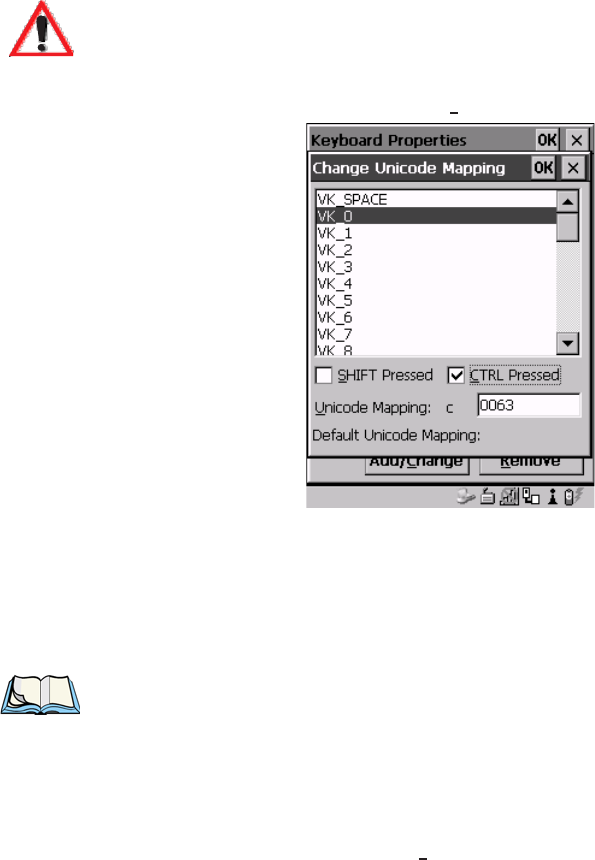
5.5.2.5 Unicode Mapping
• In the Keyboard Properties dialogue box, open the Unicode Mapping tab.
Figure 5.12 Unicode Mapping
The Unicode Mapping tab is used to map combinations of virtual key values and
<CTRL> and <SHIFT> states to Unicode™ values. This tab shows the configured
Unicode character along with the Unicode value. For example, the sample screen
above shows “a (U+0061)” indicating that the character “a” is represented by the
Unicode value “0061”, and so on. Keep in mind that Unicode configurations are
represented as hexidecimal rather than decimal values.
All user-defined Unicode mappings are listed in the Unicode Mapping tab in order of
virtual key value, and then by order of the shift state. If a Unicode mapping is not
listed, the Unicode mapping is mapped to the default Unicode value.
Chapter 5: Configuration
Unicode Mapping
98Psion Teklogix 7530 Hand-Held Computer User Manual
Adding And Changing Unicode Values
Important: Changes to Unicode mappings are not saved until you exit the
Keyboard Properties dialogue box.
• Press <TAB> to highlight the Add/Change button, and press <ENTER>.
Figure 5.13 Adding And Change Unicode Values
• Highlight the a value in the Unicode mapping list – in the sample screen
above, a value will be assigned to virtual key 0 (VK 0).
• Press <TAB> to position the cursor in the ‘Unicode Mapping’ field and
type a Unicode value for the highlighted key.
Note: To add a shifted state – <SHIFT> and/or <CTRL>, press <TAB> to posi-
tion the cursor in the checkbox next to ‘SHIFT Pressed’ and/or ‘CTRL
Pressed’. Press <SPACE> to select (
√
) the shift state you want to assign.
Removing Unicode Values
• In the ‘Unicode Mapping’ tab, highlight the item you want to delete, and
press <TAB> to highlight the Remove button.
• Press <ENTER> to delete the value.
Psion Teklogix 7530 Hand-Held Computer User Manual99
Chapter 5: Configuration
Volume And Sound Properties
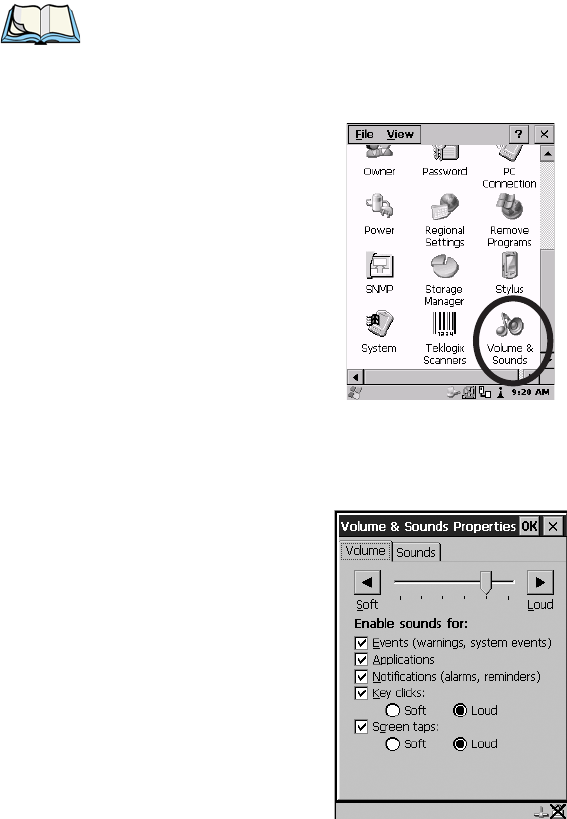
5.5.3 Volume And Sound Properties
Note: Sounds (wave files) cannot be reproduced on 7530 units. The conditions
under which 7530s emit sounds are tailored from within the application
installed on your unit.
• In the Control Panel, choose the Volume & Sounds icon.
Figure 5.14 Choosing The Volume Icon
5.5.3.1 Volume Adjustments
Figure 5.15 Volume Settings
• Slide the volume button to the left to lower the beeper volume or to the right
to increase the beeper volume.
• Under the heading ‘Enable sounds for:’, enable (√) the conditions under which
you want the 7530 to emit a beep.
Chapter 5: Configuration
Power Management Properties
100Psion Teklogix 7530 Hand-Held Computer User Manual
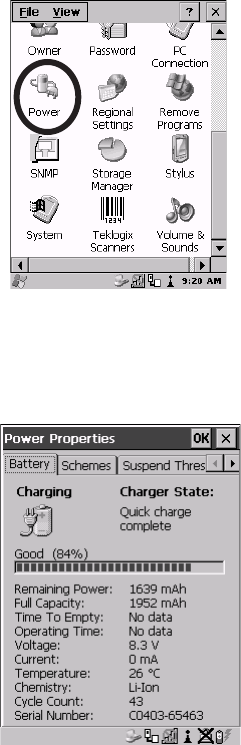
5.5.4 Power Management Properties
This icon displays a Power Properties dialogue box that indicates the unit’s battery
capacity and allows you to manage battery use.
• In the Control Panel, choose the Power icon.
Figure 5.16 Choosing The Power Icon
5.5.4.1 Battery Capacity
• In the Power Properties dialogue box, open the Battery tab.
Figure 5.17 Power Battery Properties
The Battery tab details information about the battery installed in your 7530.
Psion Teklogix 7530 Hand-Held Computer User Manual101
Chapter 5: Configuration
Power Saving Schemes
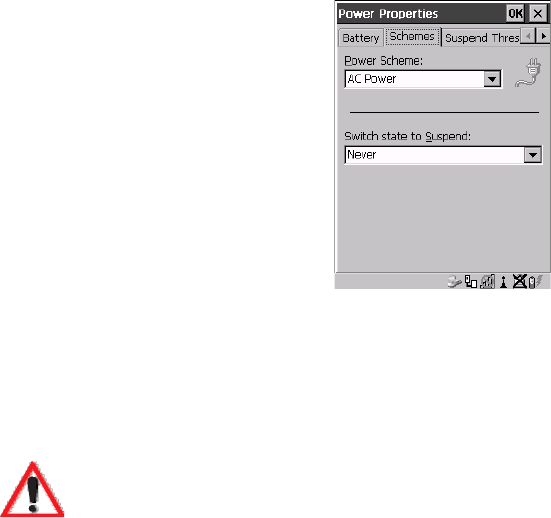
5.5.4.2 Power Saving Schemes
• In the Power Properties dialogue box, open the Schemes tab.
Figure 5.18 Power Scheme Properties
Power Scheme
This dropdown menu allows you to specify whether the unit is using AC Power or
Battery Power.
Switch State To Suspend
Important: Psion Teklogix recommends setting the Suspend value to 10 min-
utes. Setting ‘Switch State To Suspend’ to ‘Never’ will adversely
affect the battery run time.
To further reduce power consumption, carefully consider the
duration of time that the display backlight is ‘on’ (see “Display
Backlight” on page 89).
When the 7530 is idle – not receiving any user input (a key touch, a scan, and so on)
or system activity (serial data, an activity initiated by an application, and so on), the
hand-held uses the value assigned in the Switch State To Suspend field to determine when
the unit will go to sleep (appear to be off).
When the time in the Suspend field elapses without any activity, the unit enters Suspend
state. In Suspend state, the 7530 CPU enters a sleep state, and the radio is shut off. The
state of the device (RAM contents) is preserved. Pressing <ENTER> wakes the
system from suspend state. When the 7530 is in suspend state, the network
connection will not be broken immediately. If the connection is dropped, you must
re-establish the network connection.
Chapter 5: Configuration
Suspend Threshold
102Psion Teklogix 7530 Hand-Held Computer User Manual
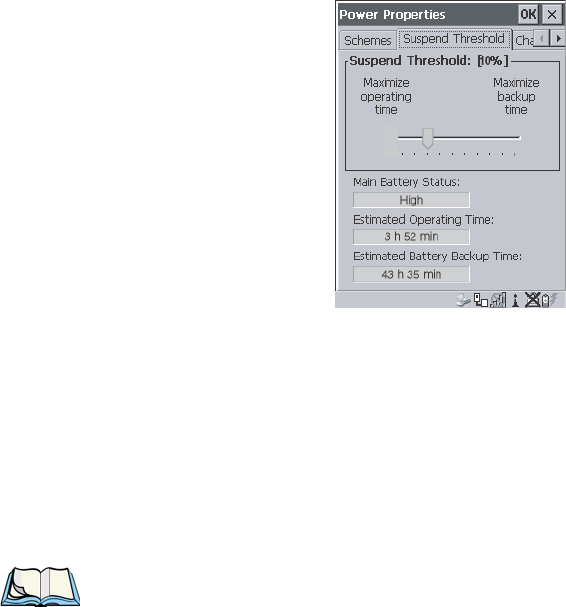
5.5.4.3 Suspend Threshold
• In the Power Properties dialogue box, open the Suspend Threshold tab.
Figure 5.19 Suspend Threshold Properties
Suspend Threshold
The sliding bar in this tab is used to set the battery capacity (as a percentage value)
at which the hand-held will be forced into a suspend state. For example, if you slide
the bar in the Suspend Threshold tab to the right to the 10% level, when the battery
capacity falls to 10%, the 7530 will enter suspend state. You will not be able to
resume until the battery is charged, or you operate the 7530 using AC power. The
allowable threshold ranges from 0 to 50%. The default value is 0%.
Note: The7530 hand-held does not enter suspend state when it is using
AC power.
Main Battery Status
This field indicates the status of the main battery.
Estimated Operating Time
This field estimates the length of time the 7530 can remain ‘on’ (operating) before
reaching the configured Suspend Threshold.
Estimated Battery Backup Time
This field displays the amount of time the state of the 7530 will be maintained in
suspend at the currently configured Suspend Threshold.
Psion Teklogix 7530 Hand-Held Computer User Manual103
Chapter 5: Configuration
Charger Details
5.5.4.4 Charger Details
• In the Power Properties dialogue box, open the Charger tab.
When the 7530 is in a Combo Dock, enabling (√) Allow Battery Calibration in this tab
allows a battery requiring recalibration to be fully discharged and recharged.
Recalibration occasionally extends the battery charge time. If you prefer that the
battery always be charged in the shortest time possible, do not check this box.
5.5.5 Stylus Properties
Note: Touchscreen calibration may not be enabled on your unit. If your screen
appears to require recalibration, contact your supervisor.
• In the Control Panel, choose the Stylus icon.
Figure 5.20 Stylus Icon
Chapter 5: Configuration
Setting Double-Tap Sensitivity
104Psion Teklogix 7530 Hand-Held Computer User Manual
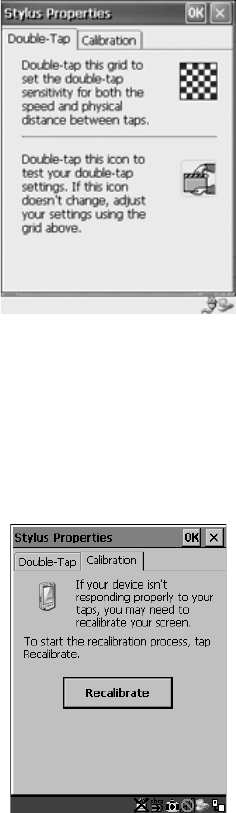
5.5.5.1 Setting Double-Tap Sensitivity
• In the Double-Tap tab, follow the directions to tailor the sensitivity of the stylus
when you tap on the touchscreen.
Figure 5.21 Setting Stylus Sensitivity
5.5.5.2 Touchscreen Calibration
Touchscreens rarely require recalibration. However, if your touchscreen has never
been calibrated or if you find that the stylus pointer is not accurate when you tap on
an item, follow the directions below.
• Choose the Calibration tab and then tap on the Recalibrate button.
Figure 5.22 Calibrating The Touchscreen
• Follow the directions in the Calibration tab to recalibrate the screen.
Psion Teklogix 7530 Hand-Held Computer User Manual105
Chapter 5: Configuration
Certificate Assignment
5.5.6 Certificate Assignment
• In the Control Panel, choose the Certificate icon.
The dialogue box is used in conjunction with 802.1x authentication to enhance 7530
security.
Figure 5.23 Certificates Dialogue Box
For a detailed description about Certificate setup for both the server and client-side
devices (7530s), refer to the following website:
www.microsoft.com/windows2000/techinfo/planning/walkthroughs/default.asp - "Security Services"
Note: When importing certificates, the 7530 only recognizes .cer files.
5.7 Scanner Properties Setup
The Teklogix Scanners icon in the Control Panel provides dialogue boxes in which you can
tailor bar code options and choose the bar codes your scanner will recognize.
5.7.1 Scanner Options
Figure 5.45 Bar Code Options
To display the sub-menus available in the Options tab:
• Highlight the option you want to work with, and press the right
<ARROW> key.
To change a parameter:
• Highlight the parameter and press the <RIGHT> arrow key, or press the
<SPACE> key.
If a field requires text entry, a text field is displayed in which you can type
the appropriate value.
Display Parameters
Scan Result
When this parameter is enabled (set to ‘ON’), the type of bar code and the result of
the scan appear on the screen. Note that this information is only displayed after a
successful decode and is visible only while the scanner trigger is pressed. When the
trigger is released, this information is cleared from the screen.

Psion Teklogix 7530 Hand-Held Computer User Manual119
Chapter 5: Configuration
Scanner Options
Scan Indicator
When this parameter is enabled (set to ‘ON’), the laser warning logo appears on the
display whenever the scanner is activated.
Scan Result Time (sec)
The value assigned to the “Scan Result Time (sec)” parameter determines how long
the scan results of a successful scan are displayed on the screen. Time is measured in
seconds, and a value of “0” (zero) disables the parameter.
Note: To remove the scan result from the screen before the “Result Time” has
expired, point the scanner away from the bar code and press the trigger.
Scan Beep
This parameter determines whether or not the 7530 emits an audible scanner ‘beep’
when a scan is performed. Set this parameter to either ‘ON’ to enable the beeper or
‘OFF’ to disable it.
Scan Log File
If this parameter is enabled, the input barcode and the modified/translated output bar
code are logged in the file \Flash Disk\ScanLog.txt. Keep in mind that if the ‘Scan
Log File’ is enabled, there is a slight performance effect when performing multiple
scans since the log file is written to persistent storage.
Double Click Parameters
Click Time (msec)
This parameter controls the maximum gap time (in milliseconds) for a double-click.
If the time between the first and second clicks of the scanner trigger is within this
time, it is considered a double-click. The allowable range is 0 to 1000. A value of
zero disables this feature.
A double-click produces different results depending on whether or not a value is
assigned in the “Click Data” parameter. When a value is not assigned for the “Click
Data”, double-clicking the scanner trigger overrides the target dot delay set in the
“Dot Time” parameter and initiates a normal scan sweep. If a value is assigned for
the “Click Data” parameter, double-clicking the scanner trigger inserts the “Click
Data” value rather than initiating a scan.
Chapter 5: Configuration
Scanner Options
120Psion Teklogix 7530 Hand-Held Computer User Manual
Click Data
For both integrated and external scanners, this parameter determines which
character is sent to the application installed in your 7530 following a double-click.
A dialogue box appears, asking that you press the key you want to insert. The
ASCII/Unicode key value of the keypress is displayed.
Pressing the <ESC> key in this dialogue box resets the data to zero.
Options
Dot Time (msec)
The value selected for “Dot Time (msec)” determines (in milliseconds) how long the
targeting dot remains on before the scanner switches to a normal scan sweep. The
allowable values are: 0, 0.1, 0.5, 1.0, 1.5, 2.0, 2.5 and 3.0
seconds. A value of 0 (zero) disables the target dot.
Short Code
When enabled (set to ‘ON’), this parameter allows scanning of short I 2 of 5 bar
codes (2 characters). When disabled, these short bar codes are rejected.
Enabling “Short Code” may reduce the robustness of the decoding since the
7530 must decode more potential bar codes; it is therefore not recommended for
general-purpose bar codes with 4 or more characters.
Verify
The value entered for this parameter determines the number of correct additional
decodes required after the initial decode before a bar code is accepted. Higher
values significantly increase the time it takes to decode a bar code but also improve
the reliability of the decoded bar code.
Security
This parameter controls the tolerance for decoding edge-to-edge bar codes
(Code 93, Code 128, UPC/EAN). Lower values have a lower tolerance for misreads,
but they also increase the time it takes to decode the bar code. The default value of
30 is generally a good compromise setting.
Psion Teklogix 7530 Hand-Held Computer User Manual121
Chapter 5: Configuration
Bar Codes
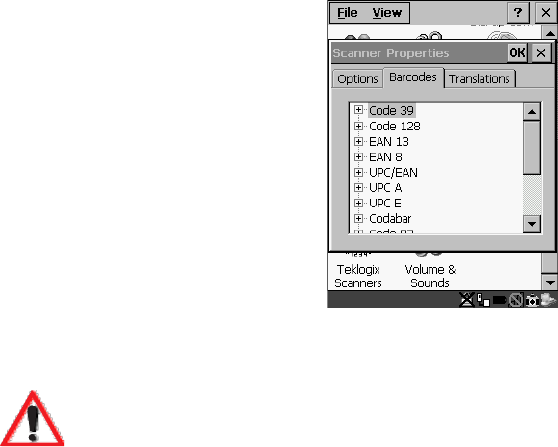
5.7.2 Bar Codes
Figure 5.46 Bar Code Selection
All the available bar code symbologies can be selected from this menu.
Important: To improve the decode speed and performance, enable (set to
‘ON’) only those codes that are required by the application.
Keep in mind that some bar code types are only available when an internal imaging
scanner is installed. The bar code settings do not affect the operation of internal or
external decoded scanners. These scanners must be configured by scanning special
configuration bar codes. These configuration bar codes affect the communication
speed or data format between the scanner and the 7530 and must not be changed.
The scanner manufacturer provides programming manuals for configuration
purposes.
• For Symbol, refer to “Programming Guide P300”.
• For PSC, refer to “Powerscan Programing guide (PSC)”.
Chapter 5: Configuration
Code 39 Settings
122Psion Teklogix 7530 Hand-Held Computer User Manual
Figure 5.47 Code 39 Bar Code Settings
A ‘plus’ sign (+) to the left of the each bar code listed in this Barcodes tab indicate that
that a sub-menu of parameters is attached. To work with a sub-menu:
• Highlight the bar code you want to work with, and press the <RIGHT>
arrow key to display the sub-menu.
• Use the <UP> and <DOWN> arrow keys to highlight a parameter.
• To change a parameter value, press <SPACE> or the <RIGHT> arrow key.
If a field requires text entry, a text box is displayed in which you can enter
the appropriate value.
5.7.2.1 Code 39 Settings
Full Ascii
If this parameter is enabled (set to ‘ON’), the characters +, %, and / are used as
escape characters. The combination of an escape character and the next character
is converted to an equivalent ASCII character.
Include Check
If this parameter is enabled (set to ‘ON’), the check digit is included with the
decoded bar code data.

Psion Teklogix 7530 Hand-Held Computer User Manual123
Chapter 5: Configuration
Code 39 Settings
AIAG Strip
If this parameter is enabled (set to ‘ON’), the AIAG data identifier is removed from
each decoded Code 39 label. The data identifier occurs in the first position next to
the Code 39 start character. It can be a single alphabetic character or a series of
numeric digits followed by an alphabetic character. This identifier defines the
general category or specific use of the data contained in the rest of the bar code.
Note: If your unit is operating with the Psion Teklogix TESS application, this
parameter should not be used in conjunction with the TESS AIAG feature.
This is because the 7530 hand-held performs the strip function before it
processes the data through the AIAG feature; if the prefix is stripped, the
data is not identified as AIAG.
Error Accept
If the “Err Accept” and “AIAG Strip” parameters are enabled (set to ‘ON’), all label
data without an AIAG identifier character is accepted. If the “Err Accept” parameter
is disabled and the “AIAG Strip” parameter is enabled (set to ‘ON’), the label data is
not accepted.
Mod Checks
Mod 43 Check
If this parameter is enabled (set to ‘ON’), the Mod 43 check digit is calculated.
Mod 10 Check
If this parameter is enabled (set to ‘ON’), the Mod 10 check digit is calculated.
None
If you choose ‘None’, a check is not executed.
Field Size/Chars
Field Size
The field size is the length of the field after the first character is stripped and
the prefix and suffix characters are added. If the field size is non-zero, only
bar codes of that length are passed through.

Chapter 5: Configuration
Code 128 Settings
124Psion Teklogix 7530 Hand-Held Computer User Manual
Prefix Char
This character, if non-zero, is added before a successfully decoded bar code. Press
the key you want to insert in the dialogue box attached to this parameter. The
ASCII/Unicode key value of the keypress is displayed.
Pressing the <ESC> key in this dialogue box resets the data to zero.
Suffix Char
Note: The appended character is treated as any other keyboard character.
For example, if <BKSP> is pressed, the usual action for that key is
performed. If your unit is operating with the Psion Teklogix ANSI
emulation application, the 7530 transmits the escape sequence
associated with the function immediately after the bar code data.
This character, if non-zero, is added after a successfully decoded bar code. Press the
key you want to insert in the dialogue box attached to this parameter. The
ASCII/Unicode key value of the keypress is displayed.
Pressing the <ESC> key in this dialogue box resets the data to zero.
Strip Leading
This parameter determines the number of characters that will be removed from the
beginning of the bar code before the prefix character is added.
Note: For Code 39 bar codes, the “AIAG Strip” is performed before the
“Strip Leading”.
Strip Trailing
The value entered in this parameter determines the number of characters that will be
removed from the end of the bar code before the suffix character is added.
5.7.2.2 Code 128 Settings
Include Sym
Setting “Include Sym” to ‘ON’ causes the group separator(s) and start code
contained in this type of bar code to be displayed on the screen.
Note: This option is available only when ‘EAN/UCC 128’ is selected.

Psion Teklogix 7530 Hand-Held Computer User Manual125
Chapter 5: Configuration
EAN 13 Settings
Variations
When using Code 128, you can choose the variation or type of bar code variation the
scanner will recognize. The options available are Standard, UCC and EAN/UCC.
These options are described below.
Standard
Enable (set to ‘ON’) “Standard” if Code 128 is desired.
UCC 128
“UCC” is a variation of Code 128.
EAN/UCC 128
To successfully scan this type of bar code, “EAN/UCC” must be enabled (set to
‘ON’). “EAN/UCC” bar codes include group separators and start codes.
Field Size/Chars
Refer to the description beginning on page 123 for details.
5.7.2.3 EAN 13 Settings
Include Country
If this parameter is enabled (set to ‘ON’), the country code is included with the
decoded bar code data.
Include Check
If this parameter is enabled (set to ‘ON’), the check digit is included with the
decoded bar code data.
Addendum
Important: Before “Addendum” can take effect, the “Short Code” parameter
in the Options menu (see page 120) must be enabled (set to ‘ON’).
An addendum is a separate bar code, supplementary to the main bar code.
This parameter provides three options: Disabled, Optional and Required.
Depending on the value chosen for this parameter, an addendum is recognized
or ignored.

Chapter 5: Configuration
EAN 8
126Psion Teklogix 7530 Hand-Held Computer User Manual
When “Addendum” is set to Disabled, the scanner does not recognize an
addendum. If this parameter is set to Optional, the scanner searches for
an addendum and if one exists, appends it to the main bar code. When the
parameter is set to Required, the scanner does not accept the main bar code
without an addendum.
Prefix/Suffix
Prefix Char
This character, if non-zero, is added before a successfully decoded bar code. Press
the key you want to insert in the dialogue box attached to this parameter. The
ASCII/Unicode key value of the keypress is displayed.
Pressing the <ESC> key in this dialogue box resets the data to zero.
Suffix Char
This character, if non-zero, is added after a successfully decoded bar code. Press the
key you want to insert in the dialogue box attached to this parameter. The
ASCII/Unicode key value of the keypress is displayed.
Pressing the <ESC> key in this dialogue box resets the data to zero.
Strip Leading
This parameter determines the number of characters that will be removed from the
beginning of the bar code before the prefix character is added.
Note: The appended character is treated as any other keyboard character. For
example, if <BKSP> is pressed, the usual action for that key is per-
formed. If your 7530 is operating with the Psion Teklogix ANSI emulation
application, the hand-held transmits the escape sequence associated with
the function immediately after the bar code data.
Strip Trailing
The value entered in this parameter determines the number of characters that will be
removed from the end of the bar code before the suffix character is added.
5.7.2.4 EAN 8
Include Check
If this parameter is enabled (set to “Y”), the check digit is included with the decoded
bar code data.

Psion Teklogix 7530 Hand-Held Computer User Manual127
Chapter 5: Configuration
UPC And EAN Settings
Addendum
Important: Before “Addendum” can take effect, the “Short Code” parameter
in the Options menu (see page 120) must be enabled (set to ‘ON’).
Refer to “Addendum” on page 125.
Prefix/Suffix
See “Size/Chars” beginning on page 126.
5.7.2.5 UPC And EAN Settings
Field Size/Char
Refer to page 123 for details.
5.7.2.6 UPC A Settings
Include Number Sys
If this parameter is enabled (set to ‘ON’), the number system digit is included with
the decoded bar code data.
Include Check
If this parameter is enabled (set to ‘ON’), the check digit will be included with the
decoded bar code data.
Addendum
Important: Before “Addendum” can take effect, the “Short Code” parameter
in the Options menu (see page 120) must be enabled (set to ‘ON’).
Refer to “Addendum” on page 125.
Prefix/Suffix
Refer to page 126 for details.
5.7.2.7 UPC E Settings
Convert to UPC-A
Setting this parameter to ‘ON’ results in a non-standard decoding that returns 12
digits from the 6 digit UPC E bar code.

Chapter 5: Configuration
Codabar
128Psion Teklogix 7530 Hand-Held Computer User Manual
Include Number Sys
If this parameter is enabled (set to ‘ON’), the number system digit is included with
the decoded bar code data.
Include Check
When enabled (set to ‘ON’), the check digit is included with the decoded bar code
data.
Addendum
Important: Before “Addendum” can take effect, the “Short Code” parameter
in the Options menu (see page 120) must be enabled (set to ‘ON’).
Refer to “Addendum” on page 125.
Prefix/Suffix
Refer to page 126 for details.
5.7.2.8 Codabar
Field Size/Char
Refer to page 123 for details.
5.7.2.9 Code 93
Field Size/Char
Refer to page 123 for details.
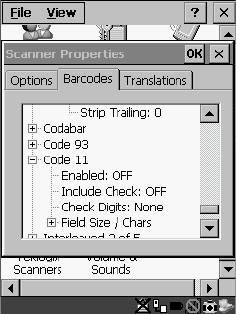
5.7.2.10 Code 11
Include Check
If “Include Chk” is enabled (set to ‘ON’), the check digit is included with the
decoded bar code data.
Check Digit
This parameter can be set to None, One Check Digits or Two Check Digits.
If this parameter set to One Check Digits, it is assumed that the last digit is a
check digit.
If this parameter is set to Two Check Digits, it is assumed that the last two digits
are check digits.
Psion Teklogix 7530 Hand-Held Computer User Manual129
Chapter 5: Configuration
Interleaved 2 of 5
Field Size/Chars
Refer to page 123 for details.
5.7.2.11 Interleaved 2 of 5
Mod 10 Chk
If this parameter is enabled (set to ‘ON’), the Mod 10 check digit is calculated. This
calculation is the same as the Code 39 Mod 10 check digit.
ITF Chk
If this parameter is enabled (set to ‘ON’), the ITF-14/16 Mod10 check digit is
calculated.
Include Check
If this parameter is enabled (set to ‘ON’), the check digit is included with the
decoded bar code data.
Field Size/Chars
Refer to page 123 for details.
5.7.2.12 MSI Plessey
One Check Digit
If this parameter is enabled (set to ‘ON’), it is assumed that the last digit is a
check digit.
Include Check
If this parameter is enabled (set to ‘ON’), the check digit is included with the
decoded bar code data.
Field Size/Chars
Refer to page 123 for details.
5.7.2.13 Discrete 2 of 5
Mod 10 Check
If this parameter is enabled (set to ‘ON’), the Mod 10 check digit is calculated. This
calculation is the same as the Code 39 Mod 10 check digit.
Chapter 5: Configuration
IATA 2 of 5
130Psion Teklogix 7530 Hand-Held Computer User Manual
ITF Check
If this parameter is enabled (set to ‘ON’), the ITF-14/16 Mod10 check digit is
calculated.
Include Check
If this parameter is enabled (set to ‘ON’), the check digit is included with the
decoded bar code data.
Field Size/Chars
Refer to page 123 for details.
5.7.2.14 IATA 2 of 5
Mod 10 Check
If this parameter is enabled (set to ‘ON’), the Mod 10 check digit is calculated.
ITF Check
If this parameter is enabled (set to ‘ON’), the ITF-14/16 Mod10 check digit is
calculated.
Include Check
If this parameter is enabled (set to ‘ON’), the check digit is included with the
decoded bar code data.
Field Size/Chars
Refer to page 123 for details.
5.7.2.15 Postal: Australian
Size/Chars
Refer to page 123 for details.
5.7.2.16 Postal: Japanese
Size/Chars
Refer to page 123 for details.
5.7.2.17 Postal: Korean
Size/Chars
Refer to page 123 for details.
Psion Teklogix 7530 Hand-Held Computer User Manual131
Chapter 5: Configuration
Postal: PlaNET
5.7.2.18 Postal: PlaNET
Size/Chars
Refer to page 123 for details.
5.7.2.19 Postal: PostNET
Size/Chars
Refer to page 123 for details.
5.7.2.20 Postal: Royal Mail
Size/Chars
Refer to page 123 for details.
5.7.2.21 2D DataMatrix
Inverse Video
If enabled (set to ‘ON’), this parameter allows symbols that contain light cells on a
dark background to be decoded.
Rectangular Symbols
When enabled (set to ‘ON’), this parameter allows rectangular DataMatrix symbols
to be decoded.
Small Symbols
If enabled (set to ‘ON’), DataMatrix symbols of small physical size can be
successfully decoded.
Field Size/Chars
Refer to page 123 for details.
5.7.2.22 2D Maxicode
Field Size/Chars
Refer to page 123 for details.
5.7.2.23 2D PDF-417
Field Size/Chars
Refer to page 123 for details.
Chapter 5: Configuration
2D Micro PDF-417
132Psion Teklogix 7530 Hand-Held Computer User Manual
5.7.2.24 2D Micro PDF-417
Field Size/Chars
Refer to page 123 for details.
5.7.2.25 2D QR Code
Inverse Video
If enabled (set to ‘ON’), this parameter allows symbols that contain light cells on a
dark background to be decoded.
Field Size/Chars
Refer to page 123 for details.
5.7.2.26 2D RSS Code
Field Size/Chars
Refer to page 123 for details.
5.7.2.27 Aztec
Field Size/Chars
Refer to page 123 for details.
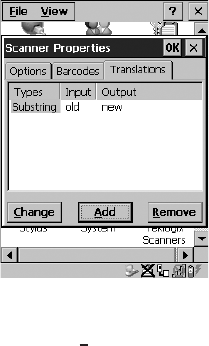
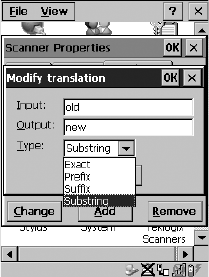
5.7.3 Translations
Figure 5.48 Translation Tab
• In the Translation tab, choose the Add button.
Psion Teklogix 7530 Hand-Held Computer User Manual133
Chapter 5: Configuration
Translations
Figure 5.49 Translation Dialogue Box
Input
This value is compared with the decoded bar code reading. If there is a match, the
“Output” string is translated into the decoded bar code.
Output
If there is a match between the decoded bar code and the corresponding “Input”
string, the decoded bar code will be translated into the “Output” string. This string
entry parameter can be null, or it may contain any combination of standard and
special characters (e.g., function keys, <ENTER>, etc.).
Type
The value chosen from this dropdown menu determines what is compared with the
decoded bar code reading – the beginning of decoded bar code, the end of decoded
bar code, the entire decoded bar code or anywhere within the decoded bar code
(default).
Chapter 5: Configuration
SNMP (Simple Network Management Protocol) Setup
134Psion Teklogix 7530 Hand-Held Computer User Manual
5.8 SNMP (Simple Network Management Protocol) Setup
Simple Network Management Protocol (SNMP) is the protocol used to monitor and
manage devices attached to a TCP/IP network (providing they support SNMP).
SNMP uses Management Information Bases (MIBs) that define the variables an
SNMP Network Management Station can access. Each product has a defined set of
MIBs that determine how SNMP operates, the type of access allowed and so on.
All Teklogix products support the TEKLOGIX-GENERIC-MIB – a MIB that
defines some common features across Teklogix products. All devices also support
MIB-II, a management information base that defines the common features of
TCP/IP networks. The SNMP Agent software embedded in the 7530 product
supports SNMPv1 (RFC 1157).
• In the Control Panel, choose the SNMP icon.
Figure 5.50 SNMP Icon
Psion Teklogix 7530 Hand-Held Computer User Manual135
Chapter 5: Configuration
Contact Tab
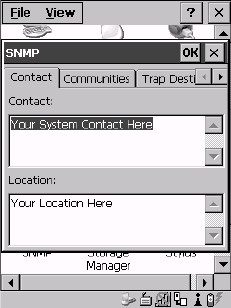
5.8.1 Contact Tab
The SNMP dialogue box is displayed.
Figure 5.51 Contact Tab
Contact
This field identifies the contact person for this managed node along with
information about how to get in touch with this person. The content of this
parameter is accessible through MIB-II’s sysContact object.
Location
This parameter is used to identify the physical location of this node (e.g., Warehouse
A: Pillar 32B). The content of this parameter is accessible through MIB-II’s
sysLocation object.
Chapter 5: Configuration
Communities Tab
136Psion Teklogix 7530 Hand-Held Computer User Manual
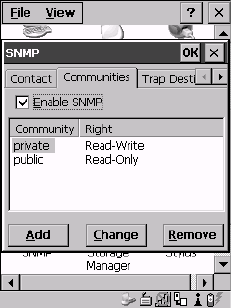
5.8.2 Communities Tab
Figure 5.52 Community Settings
The “Communities” tab provides a means of limiting access to SNMP managed
devices to those SNMP Managers with matching “community names”, as specified
by RFC 1157.
Enable SNMP
Enabling (√) ‘Enable SNMP’ allows the device to respond to SNMP queries and to send
Traps. After enabling this option and rebooting the device, the SNMP Agent will
automatically start up. To disable this feature, remove the check mark from the
check box.
Psion Teklogix 7530 Hand-Held Computer User Manual137
Chapter 5: Configuration
Adding A Community
5.8.2.1 Adding A Community
• Choose the Add button to add a new ‘community’.
Figure 5.53 Adding A Community
Name
The value assigned here is the name assigned by the network administrator to the set
of devices to which this managed node belongs.
Rights
This menu allows you to specify access – that is, ‘Read-Only’ or Read-Write’
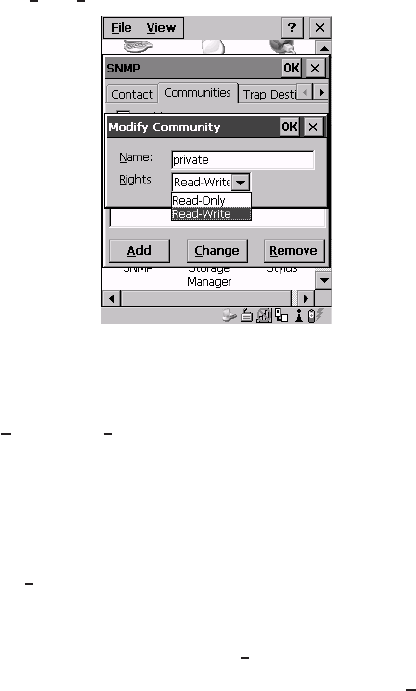
Chapter 5: Configuration
Modifying A Community Setting
138Psion Teklogix 7530 Hand-Held Computer User Manual
5.8.2.2 Modifying A Community Setting
To modify an existing community:
• Highlight the community you want to alter.
• Choose the Change button.
Figure 5.54 Changing Or Removing A Community
A Modify Community dialogue box is displayed, listing the community you highlighted.
• Edit the Name and/or Rights, and press <ENTER> to save your changes.
5.8.2.3 Removing An Existing Community
To remove an item:
• Highlight the community you want to remove in the Communities tab and then
choose the Remove button.
A Delete Confirmation screen is displayed.
• To remove a community, choose the Yes button.
• If you decide not to remove the community, choose the No button.
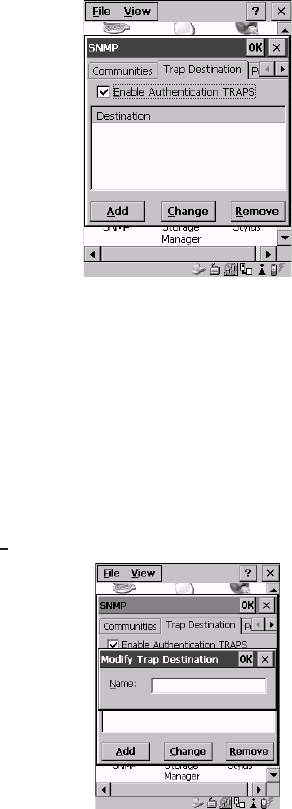
Psion Teklogix 7530 Hand-Held Computer User Manual139
Chapter 5: Configuration
Trap Destination Tab
5.8.3 Trap Destination Tab
A trap is an unsolicited report sent to SNMP Managers by the SNMP Agent running
on the managed node. This option allows you to define where the report will be sent.
Figure 5.55 Trap Destination Tab
5.8.3.1 Enabling Authentication TRAPS
Enabling (√) ‘Enable Authentication TRAPS’ allows authorization traps to be sent when a
failure is detected (e.g., an SNMP message received with a bad community name).
5.8.3.2 Adding A Destination
To add a new destination:
• Choose the Add button.
Figure 5.56 Adding A Trap Destination
• Type a destination in the text box provided, and press <ENTER>.
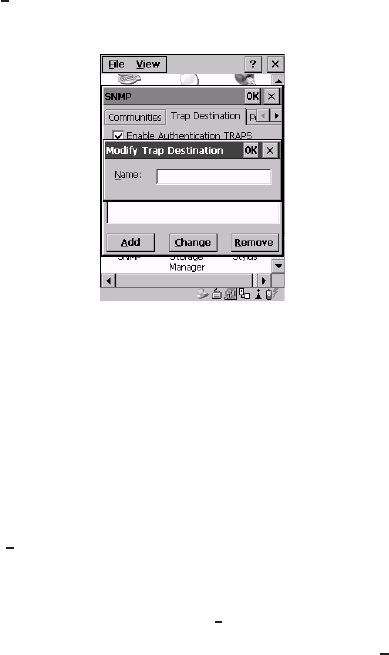
Chapter 5: Configuration
Changing A Destination
140Psion Teklogix 7530 Hand-Held Computer User Manual
5.8.3.3 Changing A Destination
To change an existing trap destination:
• Highlight the destination you want to alter in the Trap Destination tab, and then
choose the Change button.
A dialogue box like the one displayed when you add a destination is displayed.
Figure 5.57 Changing A Destination
• Make the changes to the destination, and press <ENTER> to save the
changes.
5.8.3.4 Removing A Trap Destination
To remove a trap destination:
• In the Trap Destination tab, highlight the destination you want to delete.
• Choose the Remove button.
A Delete Confirmation screen is displayed.
• To remove a destination, choose the Yes button.
• If you decide not to remove the destination, choose the No button.
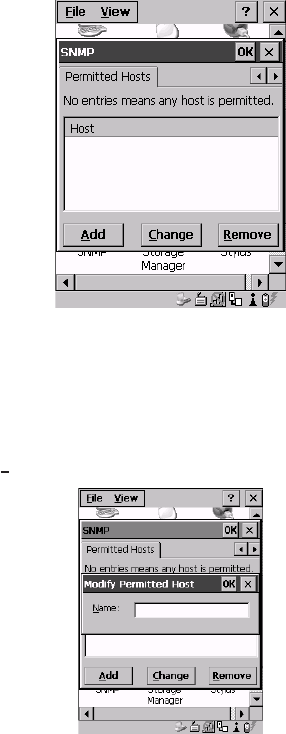
Psion Teklogix 7530 Hand-Held Computer User Manual141
Chapter 5: Configuration
Permitted Hosts Tab
5.8.4 Permitted Hosts Tab
For security reasons, the Network Administrator may want to restrict SNMP-node
access to a known sub-set of SNMP Managers. This tab lists the IP addresses of all
the SNMP Managers which are allowed to monitor and manage this device. If no
entries are listed, the device will accept SNMP queries from any host.
Figure 5.58 Permitted Hosts Tab
5.8.4.1 Adding A Host
To add a new host:
• Highlight the Add button, and press <ENTER>.
Figure 5.59 Adding A Host
• Type a new host IP address in the text box provided, and press <ENTER>.

Chapter 5: Configuration
Changing A Host
142Psion Teklogix 7530 Hand-Held Computer User Manual
5.8.4.2 Changing A Host
To change an existing host IP address:
• Highlight the IP address you want to alter in the Permitted Hosts tab, and then
choose the Change button.
A dialogue box like the one displayed when you add a host is displayed.
• Make the necessary changes, and press <ENTER>.

Psion Teklogix 7530 Hand-Held Computer User Manual143
TEKTERM APPLICATION 6
6
6.1 The Tekterm Application ...........................147
6.2 Additional Keyboard Functions .......................147
6.2.1 Function Keys And Softkeys......................147
6.2.1.1 Function Keys .........................147
6.2.1.2 Softkey Function Keys .....................148
6.2.2 Macro Keys ..............................149
6.3 Keyboard Modes ...............................150
6.3.1 View Mode ...............................150
6.3.1.1 Changing Font Sizes ......................150
6.3.1.2 Panning The Screen Contents .................150
6.3.1.3 Exiting View Mode .......................151
6.3.2 Using The Task Manager To Switch Between Applications......152
6.4 The Tekterm Status Area ...........................153
6.5 TESS Emulation ...............................154
6.5.1 Configuration..............................154
6.5.2 Working With Multiple Sessions....................154
6.5.3 The Field Types ............................154
6.5.4 IBM 5250 Emulation Keys ......................155
6.5.5 Data Entry ...............................155
6.5.5.1 TESS Edit Modes And Cursor Movement ...........156
6.5.5.2 <DEL> Key Behaviour In TESS ................157
6.5.5.3 <BKSP> Key Behaviour In TESS ...............158
6.5.6 TESS Status Message .........................159
6.5.7 Lock Messages.............................160
6.5.8 Control Commands ..........................160
6.5.9 Resetting A TESS Session .......................160
6.5.10 The Local Menu ...........................161
6.5.11 Selecting Another Host Computer ..................161
6.5.12 Queuing Mode ............................162
6.6 ANSI Emulation ...............................162
6.6.1 Configuration..............................162
6.6.2 Sending Data To The Host .......................163
6.6.3 Psion Teklogix Keyboard And VT220 Equivalent Keys........163
144Psion Teklogix 7530 Hand-Held Computer User Manual
6.6.4 Block Mode (Local Editing) ......................164
6.6.5 Working With Sessions .........................165
6.6.5.1 Establishing A New Session .................165
6.6.5.2 Listing Sessions And Moving To Other Sessions.......165
6.6.5.3 Closing A Session.......................165
6.6.5.4 Printing A Screen .......................166
6.6.5.5 Smart Echo – Disabling....................166
6.8 The Tekterm Startup Display Menu......................168
6.9 Working With Menus .............................169
6.9.1 Using The Keyboard To Navigate Through Menus ..........170
6.9.1.1 Sub-Menus ..........................170
6.9.1.2 Numeric Parameters......................170
6.9.1.3 Y/N Parameters ........................171
6.9.1.4 Alpha Parameters .......................171
6.9.1.5 String Entry Parameters....................171
6.9.2 Using The Touchscreen To Navigate Through Menus .........173
6.9.2.1 Sub-Menus ..........................173
6.9.2.2 Numeric Parameters......................174
6.9.2.3 Y/N Parameters ........................174
6.9.2.4 Alpha Parameters .......................174
6.9.2.5 String Entry Parameters....................174
6.9.3 Saving Changes To Parameters.....................175
6.9.4 Retrieving Default Parameter Values ..................175
6.10 Resetting The 7530 Hand-Held Computer .................175
6.11 The Parameters Menu ............................176
6.11.1 Security Settings............................176
6.12 Display Options ...............................177
6.13 More Parameters...............................177
6.14 Radio Parameters ..............................179
6.15 System Parameters..............................180
6.15.1 Keyboard ...............................181
6.15.1.1 Macro Control Panel.....................181
6.15.1.2 Indicators ..........................182
6.15.1.3 Softkeys ...........................182
6.15.1.4 Ctrl Panel ..........................182
6.15.2 Audio .................................183
6.15.3 Power Mgmt Ctrl Panel ........................184
6.15.4 Security ................................185
6.15.4.1 Default Mode ........................185
6.15.4.2 User Level Options .....................185
6.15.4.3 Sup. Password ........................186
6.15.4.4 Allow Teklogix........................186
Psion Teklogix 7530 Hand-Held Computer User Manual145
Chapter 6: Tekterm Application
6.16 Scanner Control Panel............................187
6.17 View Manager ................................187
6.17.1 Split Screen ..............................188
6.17.1.1 Splitting And Displaying Screens...............189
6.17.1.2 Moving Between Split Screens ................190
6.17.1.3 Toggling Between Full & Split Screens ...........190
6.17.1.4 Using The Asterisk As A Wild Card .............190
6.17.2 Custom Characters (Unicode™) ...................191
6.17.2.1 Creating A Unicode™ Character ...............191
6.17.2.2 Displaying The Unicode™ Pop-up Window .........192
6.18 Applications .................................194
6.18.1 ANSI Settings.............................195
6.18.1.1 Host Conn ...........................196
6.18.1.2 Screen .............................199
6.18.1.3 Xmit Modes ..........................202
6.18.1.4 Kbd Modes ..........................206
6.18.1.5 Edit Modes ..........................209
6.18.1.6 Serial .............................210
6.18.1.7 Host Char Set .........................210
6.18.1.8 Anchor View .........................211
6.18.2 TESS Settings.............................212
6.18.2.1 Host Conn. ..........................213
6.18.2.2 Screen .............................214
6.18.2.3 Characters ...........................216
6.18.2.4 Tests ..............................218
6.18.2.5 Features ............................219
6.18.2.6 Scanner ............................223
6.18.2.7 Fields .............................224
6.18.2.8 Anchor View .........................227
6.18.2.9 Emulation ...........................227
6.19 Ports– Tether And Console .........................235
6.19.1 Tether And Console Port Peripheral Options .............235
6.19.2 Tether And Console Port Parameter Settings .............236
6.19.3 Tether And Console Port Scan-See Parameters............239
6.19.3.1 Scan-See Sub-Menu – Mapping The Viewport........239
6.19.3.2 Scan-See Keyboard Mapping .................244
6.20 Network ...................................244
6.20.1 Network Ctrl Panel Settings .....................245
6.20.2 802.IQ v2 ...............................245
Psion Teklogix 7530 Hand-Held Computer User Manual147
Chapter 6: Tekterm Application
The Tekterm Application
6.1 The Tekterm Application
Tekterm is a powerful emulation application ideally suited for real time data
transaction applications associated with mainframes and servers. The 7530 includes
unique features that support Tekterm – a Psion Teklogix application that has the
ability to maintain multiple simultaneous sessions with a variety of host computers.
6.2 Additional Keyboard Functions
In addition to the standard keyboard functions (see “The Keyboard” on page 35),
Tekterm supports function keys, softkeys and macro keys.
6.2.1 Function Keys And Softkeys
6.2.1.1 Function Keys
The 7530 is equipped with a series of function keys each of which is defined in the
application software. Depending on the type of keyboard your 7530 has – 58-key or
36-key – the number and location of the function keys on the keyboard varies
slightly.
58-Key Keyboard Function Keys
The 58-key keyboard is equipped with thirty function keys. Function keys <F1> to
<F6> are located across the top of the keyboard and are directly accessible – a key
combination is not required. Function keys <F7> to <F30> are colour coded in blue
print above the alpha keys and are accessed using a key combination – <BLUE>
followed by the appropriate alpha key.
To access function keys <F7> to <F30>:
• Press the <BLUE> key followed by the alpha key to which the
function key you want to use is mapped. For example:
To access function key <F7>, press <BLUE> <C>.
To access function key <F8>, press <BLUE> <D>, and so on.
36-Key Keyboard Function Keys
The 36-key keyboard is equipped with thirty function keys. Function keys <F1> to
<F4> are located across the top of the keyboard and function keys <F5> to <F10>
are located at the bottom of the keyboard.

Chapter 6: Tekterm Application
Softkey Function Keys
148Psion Teklogix 7530 Hand-Held Computer User Manual
Additional function keys – <F11> to <F20> – are colour coded in orange print
above function keys <F1> to <F10>.
To access function keys <F11> to <F20>:
• Press the <ORANGE> key followed by the appropriate function key.
For example:
To access function key <F11>, press the <ORANGE> key followed
by <F1>.
To access function key <F12>, press <ORANGE> followed by <F2>,
and so on.
To access function keys <F21> to <F30>, you’ll need to press <SHIFT> <F1> to
<F10>.
To access function keys <F21> to <F30>:
• Press the <SHIFT> key followed by the appropriate function key.
For example:
To access function key <F21>, press the <SHIFT> key followed
by <F1>.
To access function key <F22>, press <SHIFT> followed by <F2>,
and so on.
6.2.1.2 Softkey Function Keys
To speed the process of moving through menus and changing parameters, function
keys <F1> to <F5> have been programmed to perform specific actions in the
Tekterm menus. Table 6.1 describes these function keys.
These softkeys can be reprogrammed to perform different functions within TESS
and ANSI applications.
Important: If your 7530 is equipped with a touchscreen, tapping the stylus on
the appropriate softkey label executes the function of the softkey
providing that the labels are visible at the bottom of the 7530
screen. See “Softkeys” on page 182 if they are not visible.
Function Key Softkey Function
<F1> NEXT – Displays the next sub-menu
<F2> PREV – Displays the previous menu.
<F3> DEFLT – Restores parameters to default settings – even after
pressing <F4> to save the changes.
Psion Teklogix 7530 Hand-Held Computer User Manual149
Chapter 6: Tekterm Application
Macro Keys
Table 6.1 Softkeys
Note: The SAVE onscreen label only appears when a parameter value has
been changed and has not yet been saved.
6.2.2 Macro Keys
Important: Refer to “Keyboard Macro Keys” on page 95 for details about
creating macros.
7530 hand-helds are equipped with a series of macro keys that can be programmed
to replace frequently used keystrokes, along with the function of executable keys
like the <ENTER> key, the <BKSP> key, any function key and arrow key, and so
on.
58-Key Keyboard Macro Keys
7530s with 58-key keyboards have twelve macro keys – <M1> to <M12>. These
keys are colour coded in orange print above alpha keys <O> to <Z>.
To access a macro key:
• Press the <ORANGE> key followed by the appropriate alpha key from
O to Z. For example:
To access macro key <M1>, press <ORANGE> <O>.
To access macro key <M2>, press <ORANGE> <P>, and so on.
36-Key Keyboard Macro Keys
36-key keyboards are equipped with six macro keys – <M1> to <M6>. Macro keys
<M1> to <M2> are directly accessible in the bottom row of the keyboard – a key
combination is not required.
Macro keys <M3> and <M4> are colour coded in orange print above macro keys
<M1> and <M2>.
• To access <M3>, press the <ORANGE> key followed by <M1>
• To access <M4>, press <ORANGE> <M2>.
<F4> SAVE – Saves a change to a parameter value.
<F5> LITRL – Literal mode allows special characters to be
entered in a string parameter such as macro key strings.
Chapter 6: Tekterm Application
Keyboard Modes
150Psion Teklogix 7530 Hand-Held Computer User Manual
Macro keys <M5> to <M6> are colour coded in blue print above macro keys <M1>
and <M2>.
• To access <M5>, press the <BLUE> key followed by <M1>.
• To access <M6>, press <BLUE> <M2>.
6.3 Keyboard Modes
6.3.1 View Mode
Placing the 7530 keyboard in View mode allows you to choose another screen font and
to pan the contents of the screen.
To place the computer keyboard in View mode:
• Press <CTRL> <ALT> <V>.
When the hand-held is in View mode, the onscreen message –
View
– is displayed in the
status area at the bottom of the screen.
Keep in mind that this is a toggle key combination – pressing <CTRL> <ALT> <V>
a second time turns View mode off.
6.3.1.1 Changing Font Sizes
To cycle through the available fonts (with the unit in View mode):
• Press the <F> key.
Each time you press the <F> key, the font on the screen changes. Once you’ve
displayed the appropriate font:
• Press <CTRL> <ALT> <V> to exit View mode.
6.3.1.2 Panning The Screen Contents
If the content of a screen is too large to fit in the margins of the 7530 display, the
content can be panned or shifted to bring the information outside the margins into
view. Normally, the Arrow keys move the cursor around the screen in the direction
of the arrow pressed. However, if the 7530 is operating in View mode, the <LEFT>,
<RIGHT>, <UP> and <DOWN> arrow keys pan the entire content of the screen
rather than the cursor.
• Press <CTRL> <ALT> <V> to place the 7530 in View mode. An onscreen
message – View – is displayed in the status area of the screen.

Psion Teklogix 7530 Hand-Held Computer User Manual151
Chapter 6: Tekterm Application
Exiting View Mode
Panning relies on the values set in the “Use Increment”, “X Increment” and
“Y Increment” parameters to determine the number of columns (spaces) and rows
(lines) the screen contents shift.
• In the “More Parameters” menu, position the cursor on “View Manager”
and press <F1>.
• First, enable the “Use Increment” parameter – set it to “Y”.
“X Increment” determines the number of columns (spaces) the screen pans when
the <LEFT> or <RIGHT> arrow key is pressed in View mode.
“Y Increment” determines the number of rows (lines) the screen pans when the
<UP> or <DOWN> arrow key is pressed in View mode.
• Assign a value to the “X Increment” and “Y Increment” parameters.
To pan the screen contents:
• Press the <RIGHT>, <LEFT>, <UP> or <DOWN> arrow key.
Note: Pressing the <LEFT> arrow pans the screen to the right, pressing the
<RIGHT> arrow pans the screen to the left, and so on.
6.3.1.3 Exiting View Mode
To exit View mode and resume normal operation:
• Press <CTRL> <ALT> <V> again.
Note: You can press the <BLUE> key followed by the appropriate arrow key
each time you want to pan the contents one increment at a time in the
direction of the arrow key without placing the 7530 in View mode.
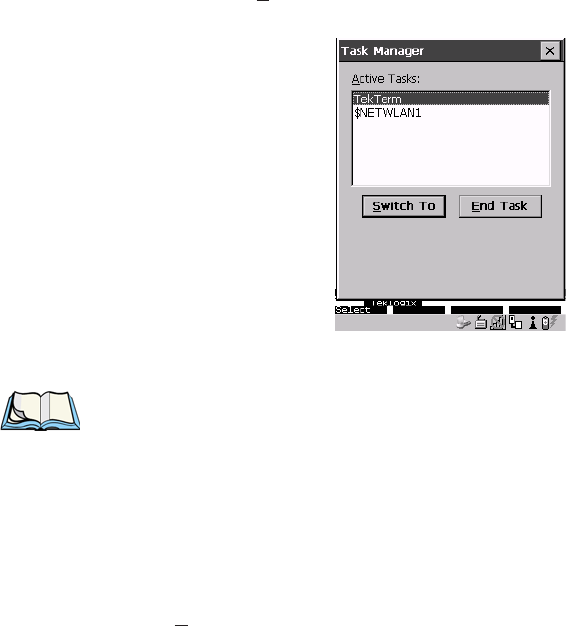
Chapter 6: Tekterm Application
Using The Task Manager To Switch Between Applications
152Psion Teklogix 7530 Hand-Held Computer User Manual
6.3.2 Using The Task Manager To Switch Between Applications
To display the Task Manager screen:
• Press <BLUE> <0> to display the Start Menu.
• Highlight Task Manager, and press <ENTER>, or
• Just type the underlined alpha character – in this case, the letter ‘t’.
Figure 6.1 Task Manager Screen
Note: A shortcut – to bypass the Start Menu and go directly to the
‘Task Manager’ screen, press <ALT> <ESC>.
To switch between applications:
• Highlight the application you want to work with, and press <ENTER>.
To end or close an application:
• Highlight the application you want to end, press <TAB> to highlight the
<End Task> button, and press <ENTER>.