Psion 8516 8516 Vehicle Mount Computer User Manual 8516 Vehicle Mount Computer
Psion Inc 8516 Vehicle Mount Computer 8516 Vehicle Mount Computer
UserManual.wiki
>
Psion
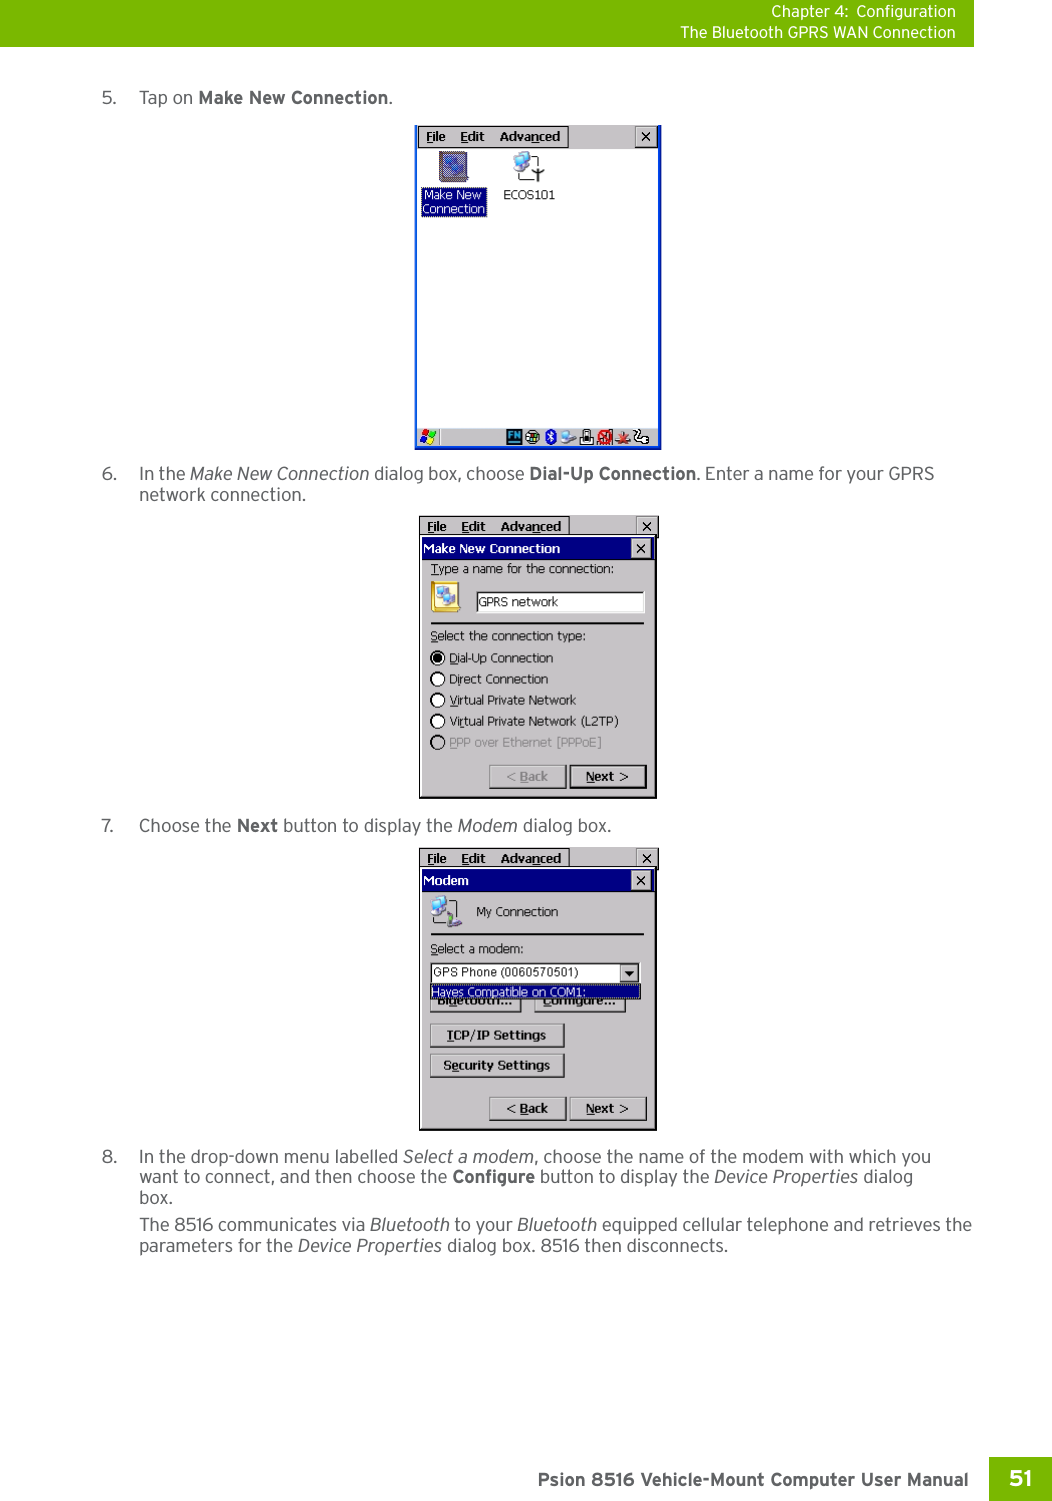
>
8516 User Manual
>
User Manual 2
Contents
1.
User Manual 1
2.
User Manual 2
3.
User Manual 3
User Manual 2
Navigation menu
Upload a User Manual
Namespaces
Wiki Guide
HTML
PDF
Info
Views
User Manual
Discussion / Help
Navigation

![Chapter 2: Basic OperationSwitching the 8516 On and Off11 Psion 8516 Vehicle-Mount Computer User Manual2.4 Switching the 8516 On and Off• To switch the 8516 on or off, press the Power button located on the top of the unit. 2.5 Resetting the 8516To perform a warm or cold reset, you can access the menu by going to the Windows menu Start>Shutdown. Alternatively you can use the keyboard shortcuts described below.2.5.1 Performing a Warm ResetDuring a warm reset, running programs are halted. The contents of the file system, RAM Disk, Flash Disk, and the registry are preserved.• Press and hold down the [FN] key and the Power button simultaneously for a minimum of six seconds.2.5.2 Performing a Cold ResetA cold reset reinitializes all hardware. All RAM including the RAM Disk is erased. Non-volatile storage such as the Flash Disk is preserved, as is the file system.To execute a cold reset:• Press and hold down the [SYM] key, the [FN] key, and the Power button, simultaneously for a minimum of six seconds.2.5.3 Performing a Clean StartA clean start returns the 8516 to factory settings, flushes the registry keys, and deletes volatile storage and the file system. The Flash Disk is preserved.• Press and hold down the [FN] key, the Power button and the [ENTER] key simultaneously for a minimum of six seconds.The 8516 displays the Boot to BooSt menu.•Type .clean.2.5.4 Boot to BooStIf you choose Boot to BooSt, the BooSt menu is loaded.Table 2.1 Backup Battery PerformanceTemperature Backup Battery Capacity-20° C (-4° F) 65% -10° C (14° F) 80% 0° C (32° F) close to 90% Note: If the 8516 is in suspend state, pressing [ENTER] ‘wakes’ the unit from this state. The screen in which you were working before the computer entered suspend state is displayed.Note: If your Desktop is switched to the PsionVU Shell (refer to “The PsionVU Desktop Shell” on page 31), resetting the unit is done solely by use of the keyboard shortcuts.Note: You need to reset your 8516 after configuring the radio by switching between Windows Zero Config and WiFi Config.Note: As part of the normal Windows Embedded CE cold boot process, the screen may go blank for a few seconds after the splash screen loading bar reaches the end. The desktop is displayed after a few moments.](https://usermanual.wiki/Psion/8516.User-Manual-2/User-Guide-1876107-Page-14.png)
![Chapter 2: Basic OperationCalibrating the TouchscreenPsion 8516 Vehicle-Mount Computer User Manual12 •Press and hold down the [FN] key, the Power button and the [ENTER] key for a minimum of four seconds.•Press [1] to launch the OS.2.6 Calibrating the TouchscreenThe 8516 touchscreen feature is factory-calibrated and ready-to-go; however, over time the touchscreen's operating parameters may change, and it may need to be recalibrated for correct operation. Refer to “Cali-brating the Touchscreen” on page 18 for details. 2.7 ConnectivityData transfer options vary slightly depending on the type of operating system installed in your PC. Various options exist depending on whether you are using Windows XP or earlier, Windows Vista® , Windows 7 or later. For information on connecting the 8516 to a PC, please refer to “Data Transfer between 8516 and a PC” on page 54. The 8516 contains an integrated 802.11a/b/g/n radio module. The Wi-Fi Config application is used to config-ure the radio for one or more wireless network profiles. To configure the radio, follow the steps outlined under the heading “Wi-Fi Config” on page 109.To configure your Bluetooth settings, please go to “Bluetooth® Setup” on page 44. To see the radio specifications, please go to “Wireless Radios” on page A-5. Note: The touchscreen function can be turned off (see “Touch” on page 95).](https://usermanual.wiki/Psion/8516.User-Manual-2/User-Guide-1876107-Page-15.png)

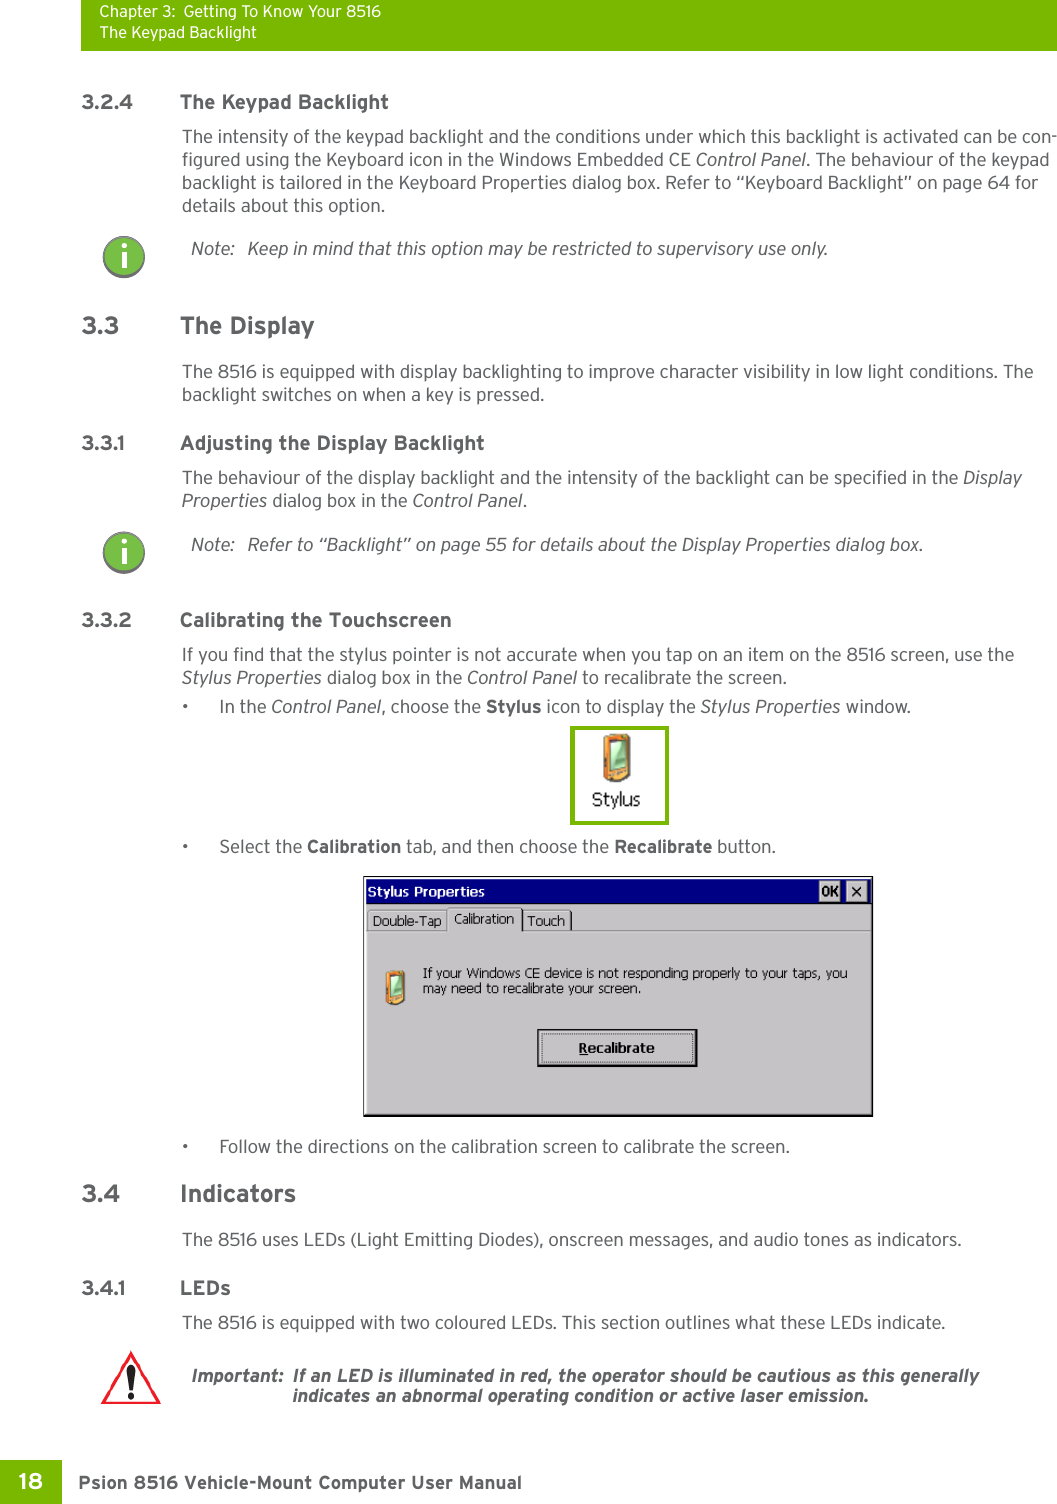
![Chapter 3: Getting To Know Your 8516Operating System15 Psion 8516 Vehicle-Mount Computer User Manual3.1 Operating System•Microsoft® Windows® Embedded CE 6.0 3.2 The KeyboardThe 8515 is available with an integrated keyboard in either QWERTY or AZERTY alphanumeric keyboard layout. It features 67 keys, 12 direct function keys, and an LED backlight.Most of the keys on the keyboard operate much like a desktop computer. Where a key or key function is not consistent with the PC keyboard, those differences are described in the following sections.There are a number of modifier keys that provide access to additional keys and system functions, as de-scribed in “Modifier Keys” on page 16.The blue [FN] modifier key provides access to additional keys and system functions. These functions are colour coded in blue print above the keyboard keys.Figure 3.1 Keyboard Layout3.2.1 Regular KeysThe Arrow KeysThe [Arrow] keys are located near the bottom of the keyboard, and are represented on the keyboard as tri-angles pointing in different directions. The [Arrow] keys move the cursor around the screen in the direction of the arrow: up, down, left and right. The left arrow key should not be confused with the backspace [DEL] key which is depicted as a left arrow. The cursor is the flashing box or underline character that indicates where the next character you type will appear.The [DEL] KeyThe [DEL] key (represented on the keyboard as an arrow pointing left) moves the cursor one character to the left, erasing the previous key stroke.The [FN] + [DEL]) erases the character at the current cursor position.Function keysENTER keyMacro keysFunction keysFN keySYM key](https://usermanual.wiki/Psion/8516.User-Manual-2/User-Guide-1876107-Page-18.png)
![Chapter 3: Getting To Know Your 8516Modifier KeysPsion 8516 Vehicle-Mount Computer User Manual16 The [SHIFT/CAPS] KeyThe [SHIFT/CAPS] key is used to display uppercase alpha characters. Pressing [FN][SHIFT] turns the [CAPS] key on so that all alpha characters are printed in uppercase until the [FN][SHIFT] sequence is pressed again.The [CTRL] and [ALT] KeyThe [CTRL] and [ALT] keys modify the function of the next key pressed and are application dependent. Pressing either key twice locks it 'on' (it appears underlined on the Taskbar). Pressing the key once again unlocks it.The [TAB] KeyTypically, the [TAB] key moves the cursor to the next field to the right or downward.The [ESC] KeyGenerally, this key is used as a keyboard shortcut to close the current menu, dialog box, or activity.The [SPACE] KeyPressing this key inserts a blank space between characters. In a Windows dialog box, pressing the [SPACE] key enables or disables a checkbox.The [INS] KeyThe [INS] key inserts a character at the cursor position.The [SCAN] KeyThe 8516 is equipped with a single [SCAN] key on the keyboard and an era [SCAN] button located on the left side of the unit. [SCAN] keys activate the scanner beam. For units that do not have internal scanners, these keys can be remapped to serve other functions.3.2.2 Modifier KeysThe [SHIFT], [CTRL], [ALT], [FN] and [SYM] keys are modifier keys that change the function of the next key pressed. The [SHIFT], [CTRL] and [ALT] keys operate much like a desktop keyboard except that they are not chorded (two keys held down simultaneously). The modifier key must be pressed first followed by the key whose function you want modified.[SHIFT] and [FN]The [SHIFT] and [FN] modifier keys provide access to additional keys and system functions. The functions related to these modifier keys are colour-coded in white and blue print respectively above the keyboard keys, dependant on your keyboard format.[SYM] The Symbol [SYM] modifier key is represented on the keyboard by the characters ‘SYM’ and provides access to commonly used symbolic characters. Pressing the key brings up the Symbol soft input panel (SIP) onscreen keyboard, with symbols mapped to each key. If you wish to adjust the settings for the pop-up screen (e.g. time of delay before screen appears, etc.), modify the file softinputpanel.xml, located in the Windows folder.The onscreen keyboard corresponds to the keyboard on your 8516. Note: When using the Mobile Devices SDK Developers' Guide (PN 8100016), note that the [SYM] key is interchangeable with the [ORANGE] key.Note: Modifier keys are remapped in the Control Panel, and the Symbol SIP will automatically show and use the new mappings after the next reboot.](https://usermanual.wiki/Psion/8516.User-Manual-2/User-Guide-1876107-Page-19.png)
![Chapter 3: Getting To Know Your 8516Function Keys and Macro Keys17 Psion 8516 Vehicle-Mount Computer User Manual3.2.2.1 Activating Modifier KeysWhen a modifier key is pressed, it is shown in the softkey bar at the bottom of the screen, making it easier to determine whether a modifier key is active. For example, if the [CTRL] key is pressed, Ctrl is displayed at the bottom of the unit screen. Once the next key is pressed, the modifier key becomes inactive and disap-pears from the taskbar.3.2.2.2 Locking Modifier KeysWhen a modifier key is pressed twice, it is ‘locked’ on. A ‘locked’ modifier key is displayed in underlined letters in the taskbar. For example, pressing the [FN] key twice locks it on—it is displayed as an underlined blue ‘FN’ in the taskbar at the bottom of the computer screen. The same is true of the [SYM] key, which is shown as an underlined orange ‘SYM’ in the taskbar.The locked modifier key will remain active until it is pressed a third time to unlock or turn it off. Once a mod-ifier key is unlocked, the underline representation at the bottom of the screen is no longer displayed.3.2.3 Function Keys and Macro KeysIn addition to the standard keyboard functions (see “The Keyboard” on page 15), the 8516 supports func-tion keys and macro keys.All function keys and macro keys can be custom defined for each application. The Open TekTerm applica-tion utilizes these keys (for detailed information, see the Open TekTerm Software User Manual, PN 8000073). 3.2.3.1 Function KeysFunction keys perform special, custom-defined functions within an application. These keys are accessed by pressing one of the dedicated function keys on the keyboard, or through the appropriate [SHIFT] or [FN] key sequence, depending on the keyboard variant being used.Alphanumeric Keyboard Function KeysThe Alphanumeric keyboards are equipped with up to thirty function keys, including those function keys that are colour-coded in blue print above the alpha keys or function keys (depending on your keyboard).To access the blue function keys, press the [FN] key followed by the appropriate alpha or function key.Function keys [F1] through [F24] can be used with the Windows Embedded CE operating system or another application. The additional function keys, [F25] through [F30] along with the macros, are not used as pa of the Windows Embedded CE operating system. 3.2.3.2 Macro KeysSeveral of the 8516 keyboards are equipped with a series of macro keys that can be programmed to replace frequently used keystrokes, along with the function of executable keys like the [ENTER] key, the [BACK-SPACE] key, any function key and arrow key, etc. 59-Key Alphanumeric Keyboard Macro KeysThese keyboards have six macro keys: [M1] to [M6], located on the S to X keys (second-last row of keys).To access a macro key, press the [FN] key followed by the macro key.Note: The locking function of the modifier keys can be changed so that pressing a key once will lock the key ‘on’. If you disable the ‘One Shot’ function of the key, pressing it once will lock the key ‘on’. Press-ing the same key a second time will unlock or turn it ‘off’. Refer to “Keyboard One Shot Modes” on page 65 for details.Important: Refer to “Keyboard Macro Keys” on page 65 for details about creating macros.](https://usermanual.wiki/Psion/8516.User-Manual-2/User-Guide-1876107-Page-20.png)
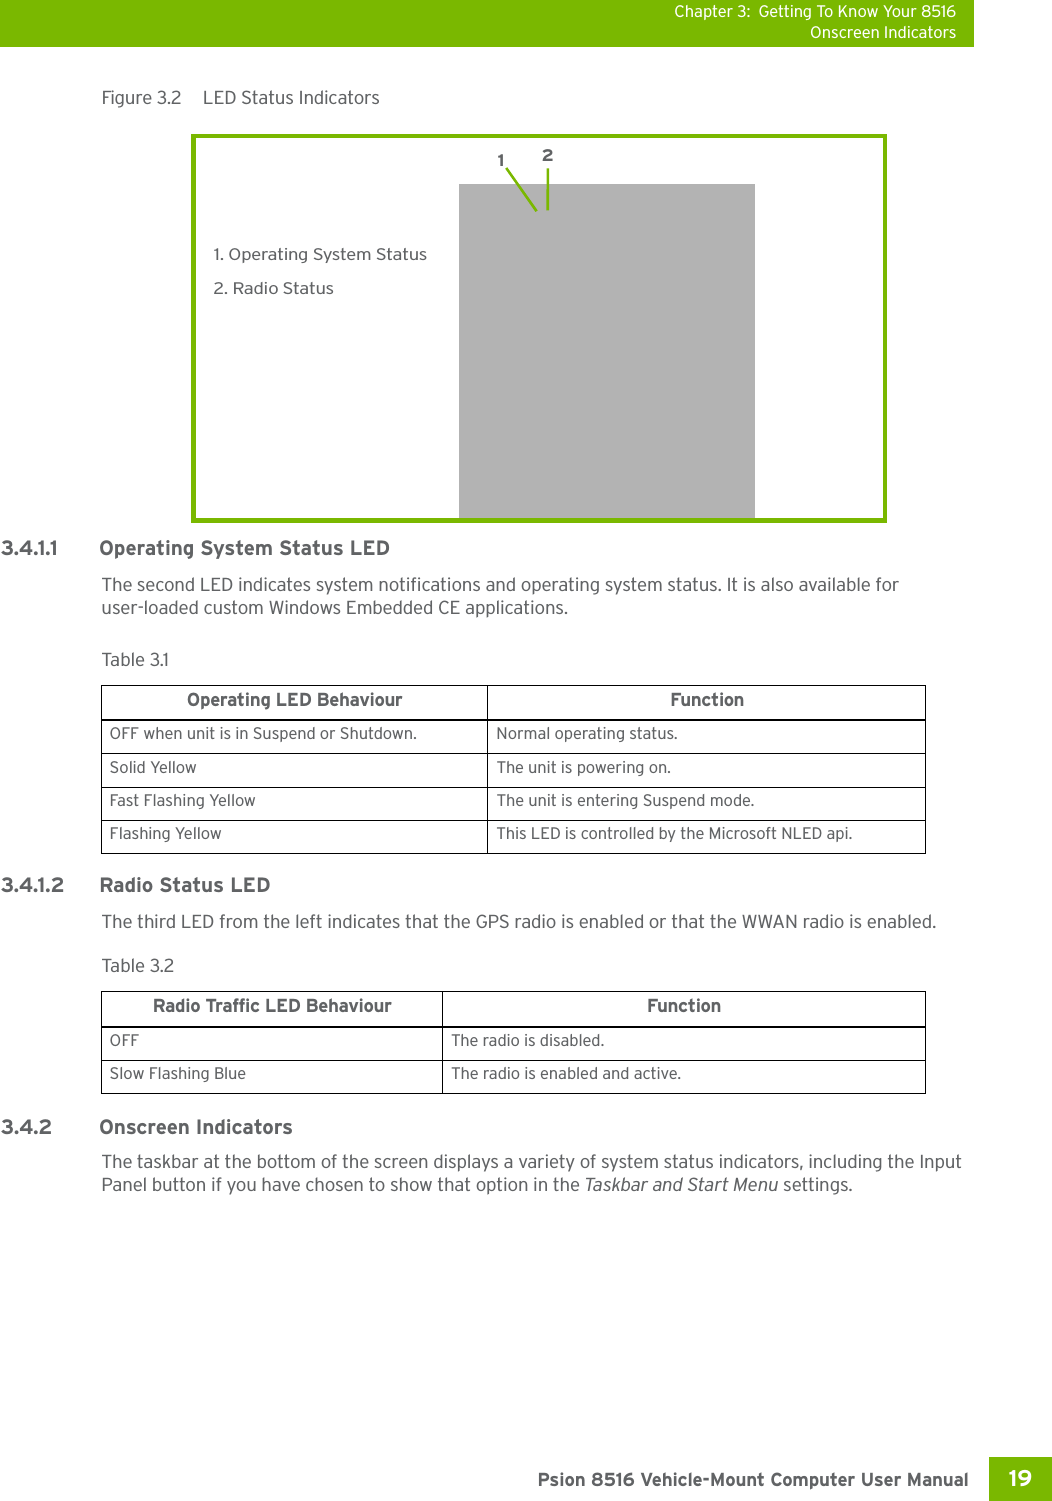
![Chapter 3: Getting To Know Your 8516Audio IndicatorsPsion 8516 Vehicle-Mount Computer User Manual20 Figure 3.3 TaskbarThe taskbar changes dynamically, and only those icons that are applicable are displayed. For example, if a radio is not installed in your 8516, the radio signal icon is not displayed in the taskbar.Windows® Start ButtonIf you are using the touchscreen, you can either tap the Windows icon at the bottom left of the screen, or press the [Windows] key to display the Start Menu, and then tap on the desired application.Modifier Key Indicators[SHIFT], [CTRL], [ALT], [FN] and [SYM] are modifier keys that have onscreen indicators to show when a key is active or locked. If a modifier key is pressed once to activate it, the key is displayed in the taskbar, for ex-ample, pressing the [FN] key once displays ‘FN’ in the taskbar. If a modifier key is pressed twice, it is ‘locked on’ and the onscreen indicator is displayed with underlined letters in the taskbar, for example, pressing [FN] twice displays ‘FN’ in the taskbar.802.11 Radio Signal QualityIncreasing radio signal quality is represented by longer, filled bars within this icon.WWAN Radio Signal QualityWireless WAN icons in the taskbar indicate the status of your wide area network connection. For details, see “Taskbar Icons” on page E-3.Bluetooth RadioThis icon displayed in the taskbar represents the installed Bluetooth radio.Input PanelYou can tap the Input Panel icon to activate the soft keyboard application.3.4.3 Audio IndicatorsThe 8516 supports several audio options, including Bluetooth. The optional rear speaker can be used for system (Windows) sounds and .wav files. When a rear speaker is absent, those sounds are routed to the front receiver. The beeper provides a variety of sounds and can be configured to emit a sound when a key is pressed, a keyboard character is rejected, scan input is accepted or rejected, an operator’s entry does not Good No RadioReceptionWeakReception Link](https://usermanual.wiki/Psion/8516.User-Manual-2/User-Guide-1876107-Page-23.png)
![Chapter 3: Getting To Know Your 8516Windows Embedded CE 6.0Psion 8516 Vehicle-Mount Computer User Manual24 3.7 Windows Embedded CE 6.03.7.1 Navigating in Windows Embedded CE and ApplicationsGraphic user interfaces like Windows Embedded CE for portable devices and desktop Windows (2000, XP, etc.) utilize ‘point and click’ navigation. An equivalent keyboard shortcut is also available for every ‘point and click’ action.Windows Embedded CE supports the same ‘point and click’ user interface and keyboard shortcuts as desktop Windows with one difference—the ‘point and click’ action is accomplished using a touchscreen rather than a mouse. Actions can be performed using any combination of keyboard shortcuts or touch-screen tapping. In those applications that support it, you can also flick and pan your finger to scroll through screens.3.7.1.1 Navigating Using a TouchscreenThe 8516 comes equipped with a stylus—a pointing tool that looks like a pen. The stylus is used to select objects on the touchscreen. You can also use gestures with your fingers. You can use two gestures: pan and flick. Use left or right flicks to quickly move between tabs of a multi-tab control panel, or to scroll long lists of options. Use panning by touching and dragging a page that has scrollbars.To choose an icon, open a file, launch an applet or open a folder:• Double-tap on the appropriate icon.3.7.1.2 Navigating Using the KeyboardIf you would like to use keyed input to choose icons and navigating dialog boxes, displaying the desktop you can refer to Table 3.3 for a description of the navigation keys.Keep in mind that unlike a desktop computer, the 8516 does not support key chording (pressing two keys at the same time). You must press one key followed by the next in sequence. Note: If the touchscreen is not registering your screen taps accurately, the touchscreen may need recalibration. Refer to “Calibrating the Touchscreen” on page 18.Note: To prevent damage to the touchscreen, use only a finger touch or the stylus (pen) supplied with your 8516.Table 3.3 Keyboard NavigationOperation Key or Key CombinationSwitch between active applications [ALT] [TAB]Open task manager [ALT] [ESC]Move the cursor Arrow keysOpen file, folder or icon [ENTER]Exit & Save [ENTER]Close/Exit & Do Not Save [ESC]Navigate Dialog Boxes [TAB]To move cursor up [SHIFT] [TAB]To display the contents of the next ‘tab’ in a dialog box [CTRL] [TAB]Select Radio Button/Press Button [SPACE]Go to Start Menu [Windows]](https://usermanual.wiki/Psion/8516.User-Manual-2/User-Guide-1876107-Page-27.png)
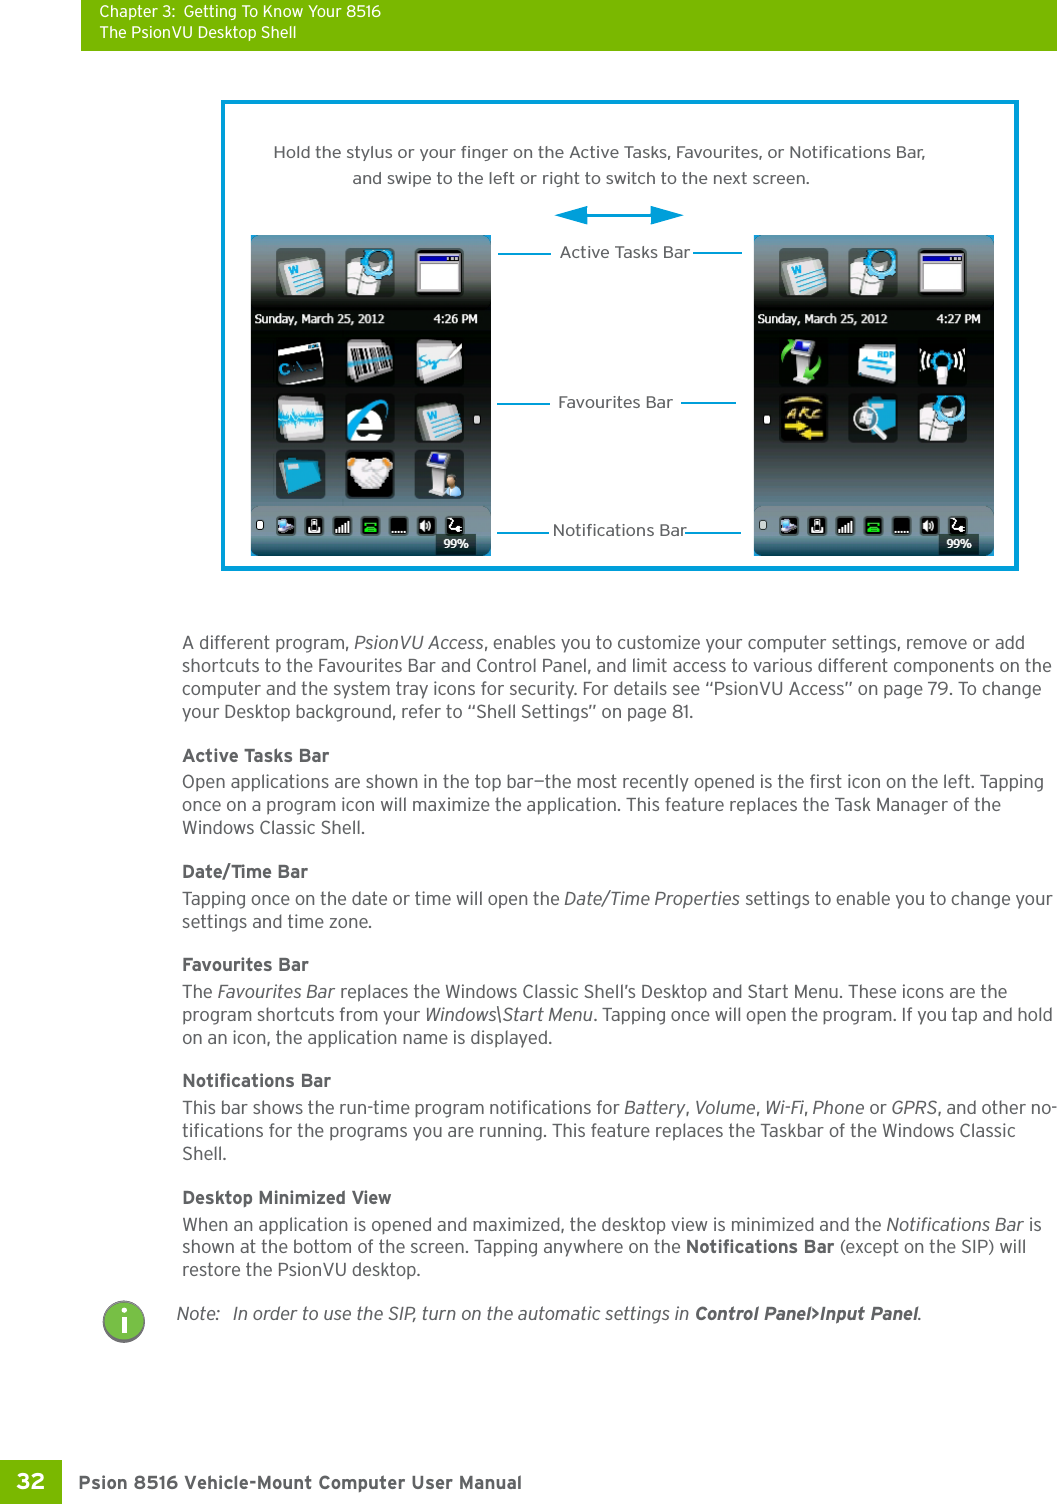
![Chapter 3: Getting To Know Your 8516The Windows Classic Shell Startup Desktop25 Psion 8516 Vehicle-Mount Computer User Manual3.7.2 The Windows Classic Shell Startup DesktopWhen the 8516 boots up, the default startup desktop (Windows Classic Shell) is displayed. Any applications stored in the Startup folder start up immediately. Figure 3.4 8516 Windows Classic Shell Startup DesktopTo access desktop icons:• Double-tap on the icon to open a window or, in the case of an application icon, launch an application.On the keyboard:• Use the arrow keys to highlight the icon, and press [ENTER] to launch the highlighted icon.3.7.2.1 The TaskbarNote: The startup folder is located in \Windows\StartUp and \Flash Disk\StartUp.Note: If the arrow keys do not highlight the desktop icons, the desktop may not be selected. Press [Windows] to display the Start Menu, and select Desktop. Now the desktop will be “in focus” and the arrow keys will highlight the icons.](https://usermanual.wiki/Psion/8516.User-Manual-2/User-Guide-1876107-Page-28.png)
![Chapter 3: Getting To Know Your 8516The Windows Classic Shell Startup DesktopPsion 8516 Vehicle-Mount Computer User Manual26 The 8516 is equipped with a taskbar at the bottom of the screen. It displays icons through which you can view the battery capacity and radio signal quality of your unit. In addition, the taskbar displays the applica-tion(s) currently running on your unit.The taskbar also displays active modifier keys: [SHIFT], [ALT], [CTRL], [FN] and [SYM]. Keys that have been locked “on” are displayed with underlined letters. For example, if you have set the [CTRL] key lock to “on” in the Keyboard menu and you press the key, it is displayed as an underlined ‘Ctrl’ in the taskbar. (For detailed information on modifier keys and keyboard options, see “The Keyboard” on page 15).3.7.2.1.1 Using the TaskbarA tooltip is displayed as each taskbar icon is highlighted. The tooltip provides the status of each icon.If you’re using the touchscreen:• Tap and hold on an icon to display the icon's tooltip. Double-tap the icon to open the Control Panel dialog box associated with the icon. For example, double-tap the battery icon to display a dialog box listing the current battery capacity information.On the keyboard:•Press [Windows] to display the Start Menu.•Choose Shortcuts from the Start Menu, and then press the [RIGHT] arrow key to display the sub-menu.•Choose System Tray in the sub-menu. • Use the arrow keys to highlight the icon in the taskbar about which you’d like more information.•Press [ENTER] to display the appropriate dialog box.3.7.2.1.2 Customizing the TaskbarTo customize the taskbar so that it displays only those icons you require:•In the Start Menu, choose Settings, and then Ta s kb a r .If you’re using the keyboard:•Press [Windows] to display the Start Menu.• Highlight the Settings option, highlight Ta sk b a r in the sub-menu, and press [ENTER]. The Task bar a nd Start M e n u dialog box is displayed.• Tap on the items you want to activate or deactivate. The check mark indicates active items.If you’re using the keyboard:• Highlight the options you want to activate, and press the [SPACE] key to select them. A check mark indicates active items.3.7.2.2 The Start MenuThe Start Menu lists the operations you can access and work with. It is available from the startup desktop or from within any application.• To display the menu, tap on the Start Menu.](https://usermanual.wiki/Psion/8516.User-Manual-2/User-Guide-1876107-Page-29.png)
![Chapter 3: Getting To Know Your 8516The Windows Classic Shell Startup Desktop27 Psion 8516 Vehicle-Mount Computer User ManualIf you’re using the keyboard:• Use the arrow keys to highlight a menu item, and press [ENTER], or If the menu item has an underlined character:• Type the underlined alpha character. For example, to display the Run dialog box, type the letter ‘r’.3.7.2.2.1 Programs•Choose Programs to display a sub-menu of options. The programs displayed will be those resident in the Windows\Programs folder of the computer.Figure 3.5 Program Sub-MenuThis sub-menu allows you to choose Command Prompt, Internet Explorer, installed applications (e.g., Micro-soft WordPad), PsionVU Access, Remote Desktop Connection, Wi-Fi Config, or Windows Explorer.DemoThis folder contains the Scanner Demo, Demo Signature and Demo Sound applications. Scanner Demo can be used to test how the Vehicle-Mount reads and writes barcodes. Demo Signature allows you to capture a signature written on the screen with your stylus and save it to a file. Demo Sound allows you to record and Note: Tap on the item in the menu with which you want to work.](https://usermanual.wiki/Psion/8516.User-Manual-2/User-Guide-1876107-Page-30.png)
![Chapter 3: Getting To Know Your 8516The Windows Classic Shell Startup Desktop29 Psion 8516 Vehicle-Mount Computer User Manual•Choose Shortcuts>System Tray.When System Tray is chosen, the taskbar icons become accessible. To display the dialog box attached to an icon:• Use the arrow keys to highlight an icon, for example, the Bluetooth icon.• Press [ENTER] to display the Bluetooth menus.Cycle TasksWhen Cycle Tasks is selected (and the Task Manager is not open), you can cycle through active applications. To cycle through your active applications:•Choose Shortcuts>Cycle Tasks, or • Press [ALT] [TAB].Task Ma n ag erThe Tas k M anag er allows you to switch to another task or to end an active task. To display the task manager window:•Tap on Shortcuts>Task Manager, or• Press [ALT] [ESC].3.7.2.2.3 SettingsThe Settings sub-menu includes the following settings: Control Panel, Network and Dial-up Connections and Taskbar and Start Menu.Figure 3.7 Settings Sub-Menu](https://usermanual.wiki/Psion/8516.User-Manual-2/User-Guide-1876107-Page-32.png)

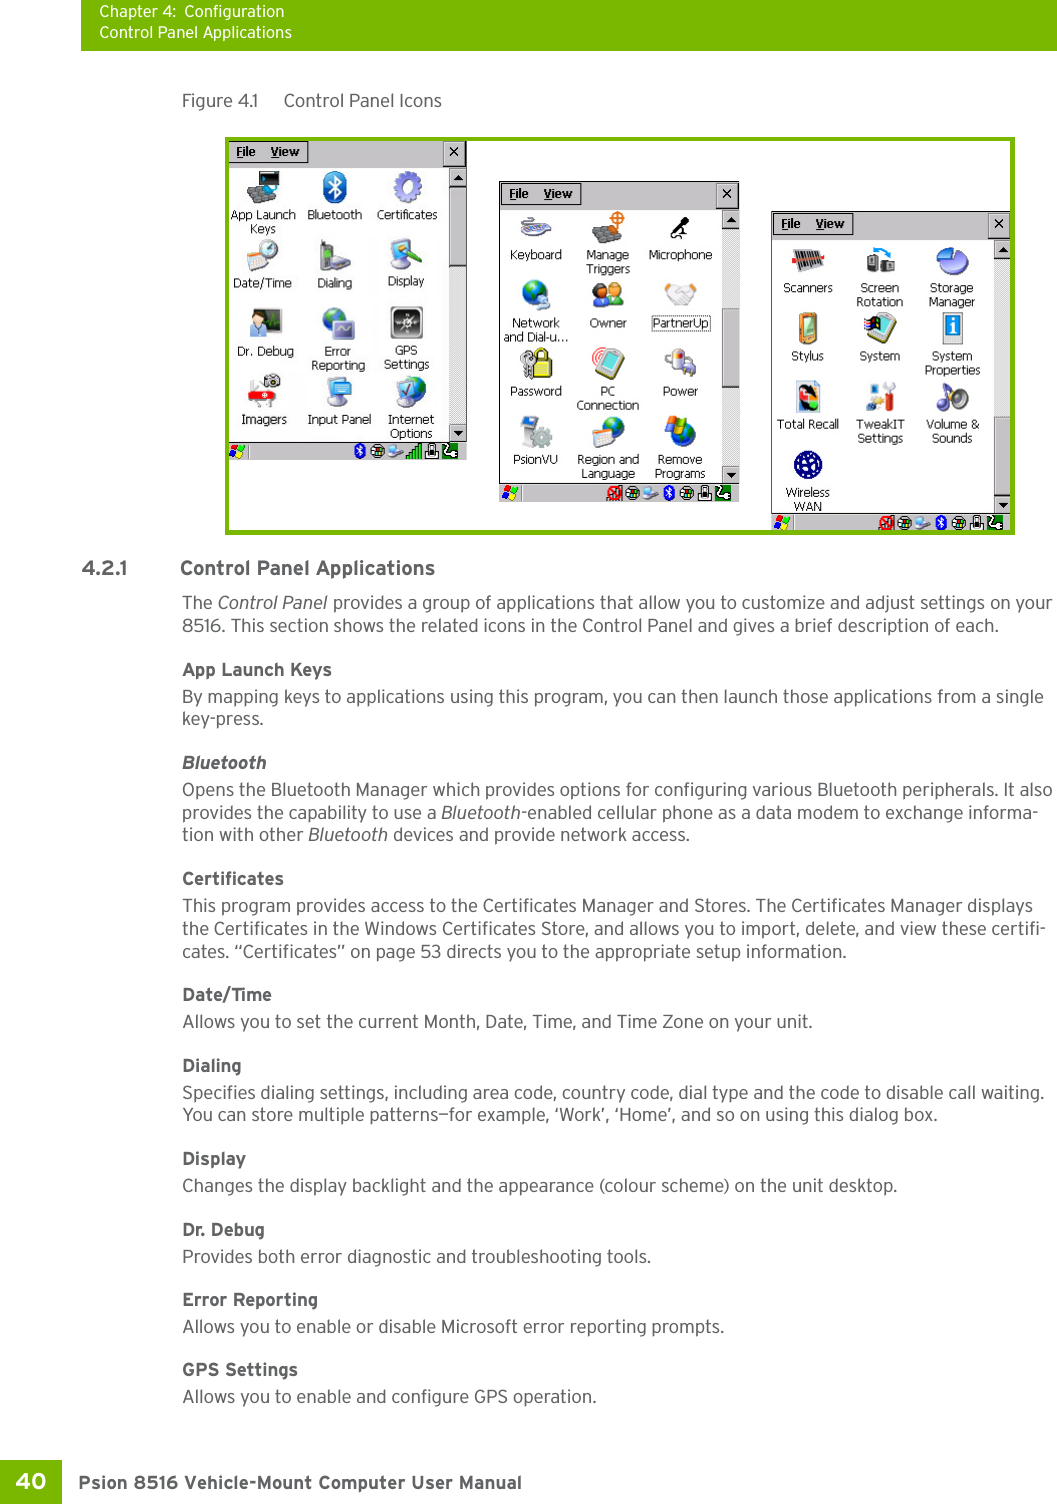
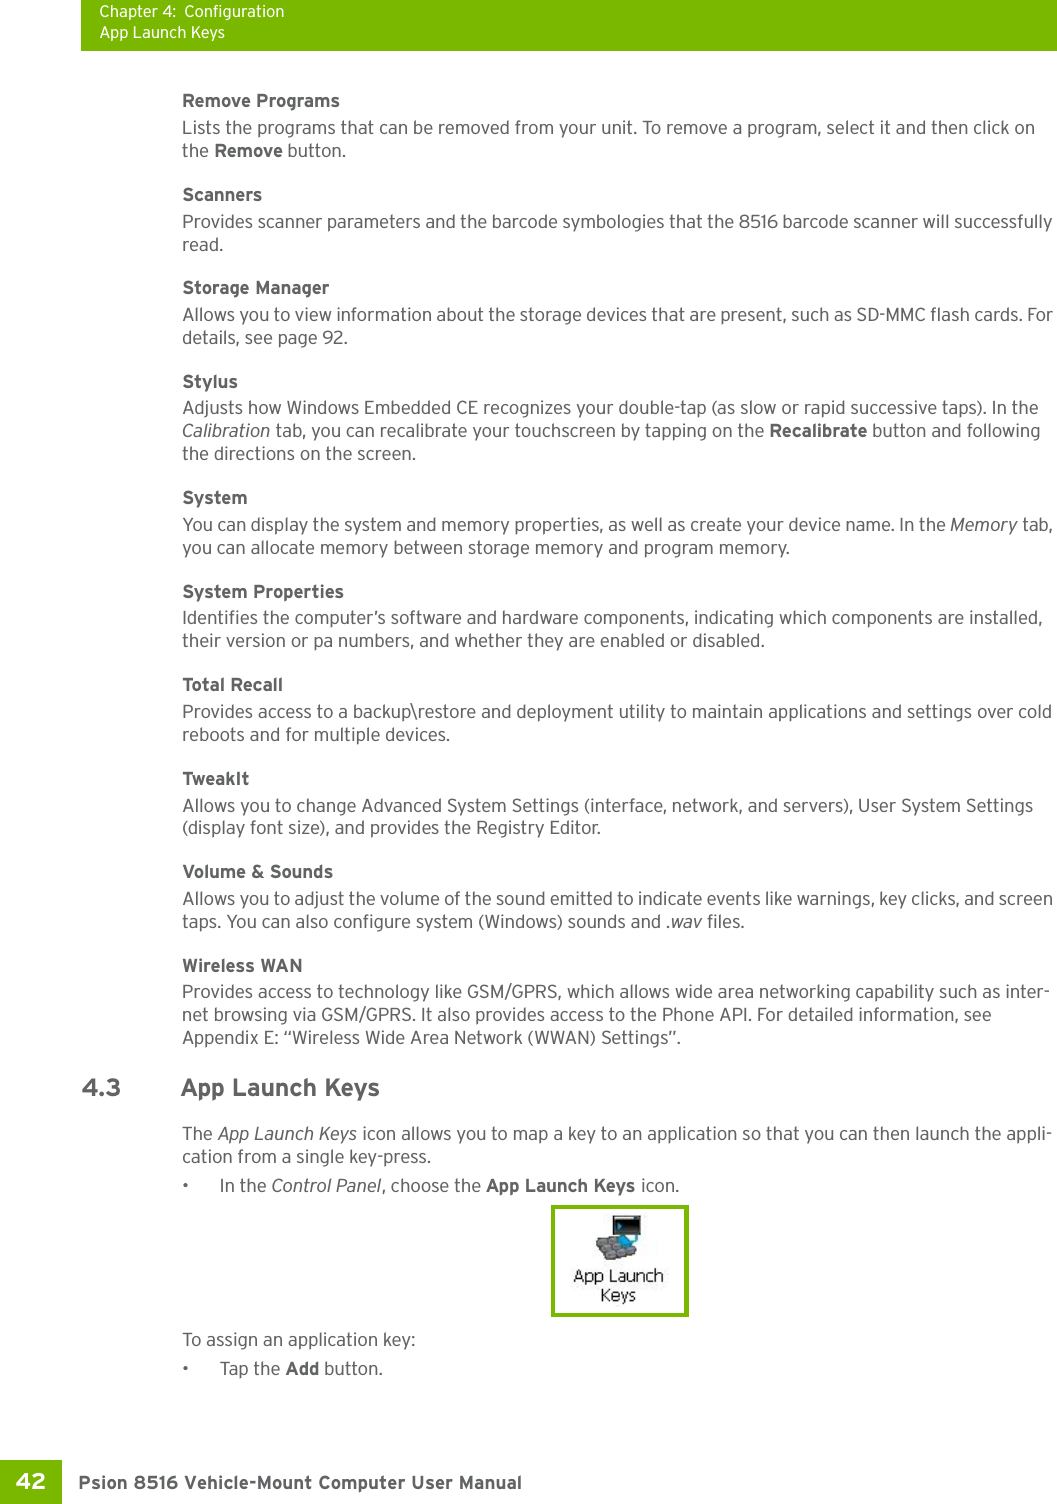
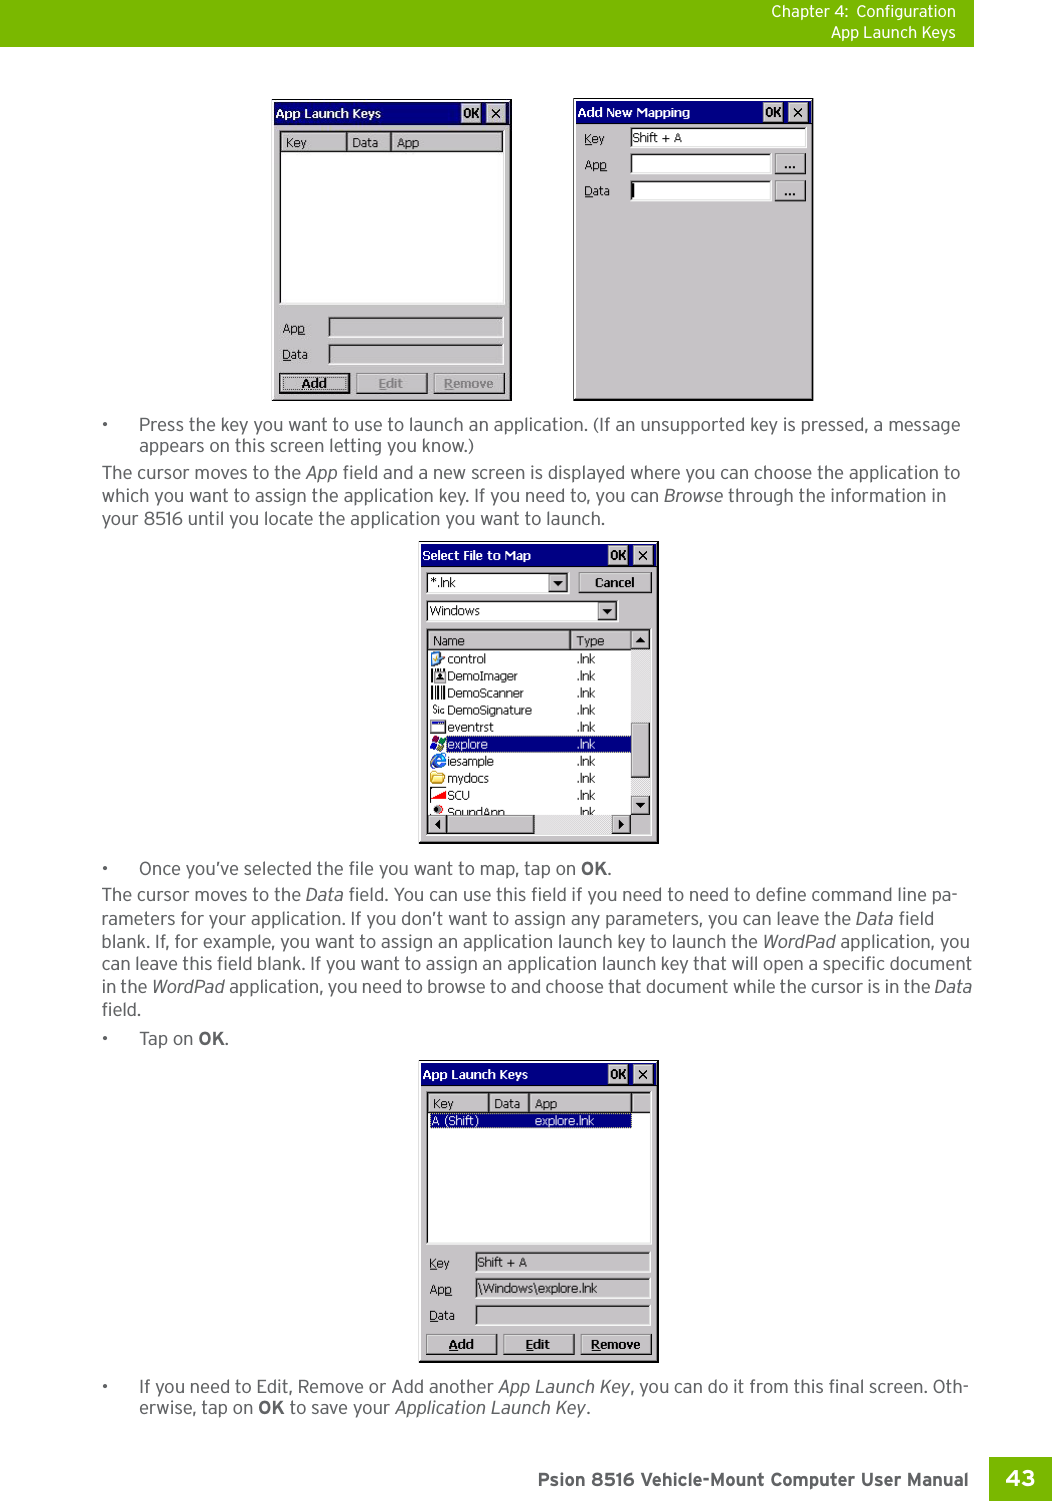
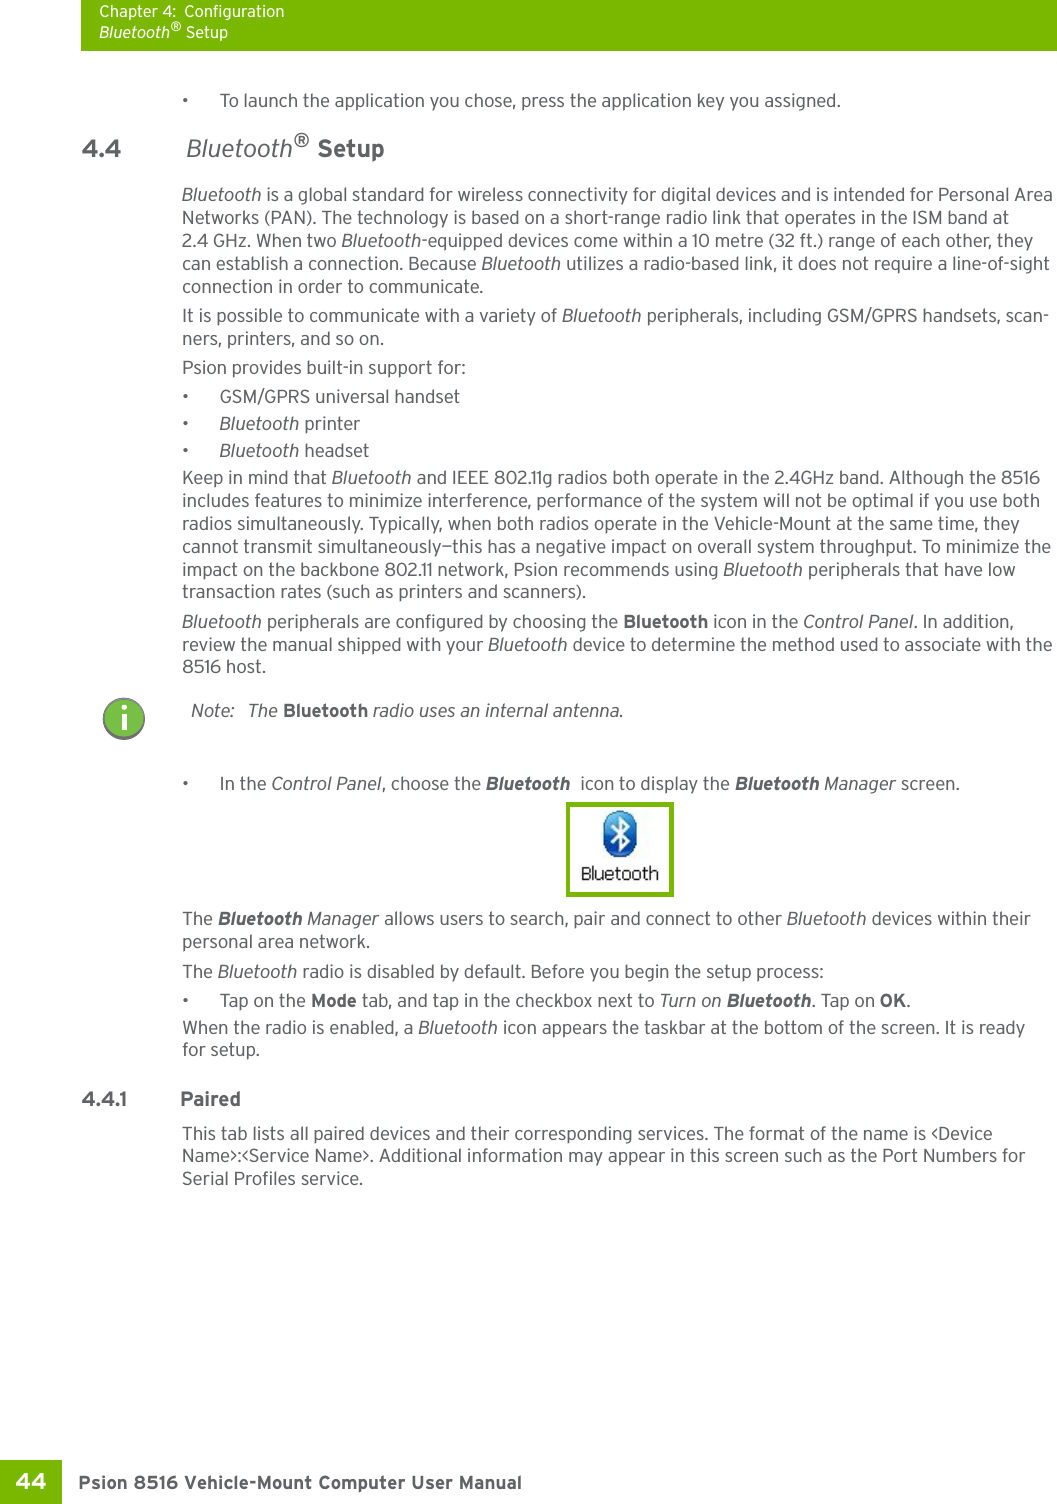
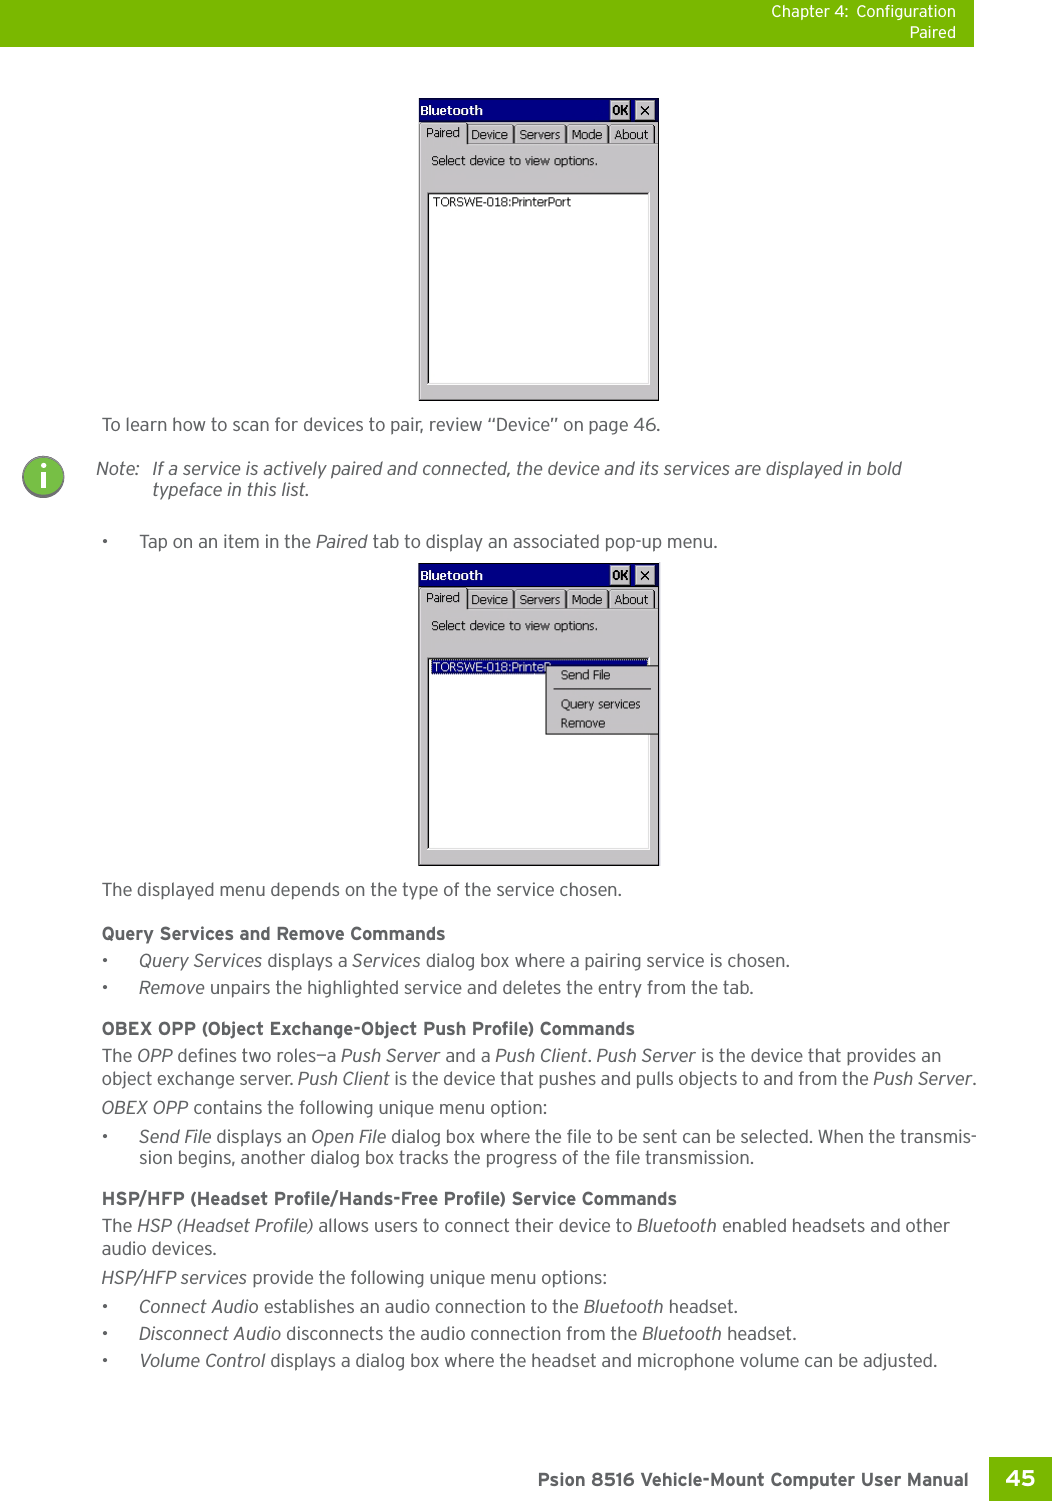
![Chapter 4: ConfigurationOverview of Software39 Psion 8516 Vehicle-Mount Computer User Manual4.1 Overview of SoftwareThe 8516 programs and applications are accessed through two main areas from the Desktop: Programs and Settings>Control Panel. This chapter details the configuration for the major software from both areas, listed alphabetically.4.1.1 Psion Software AdvantagePsion Software Advantage is a collection of applications and features designed to support system adminis-trators and end users. These tools enable enterprises to customize the product to meet their needs and to maximize productivity.AGPS PsionVuApp Launch Keys TweakItBattery Health ScannerBluetooth Manager Total RecallDr. Debug Manage TriggersPartnerUp WiFi ConfigWiFiConnect A.R.C.4.1.2 Microsoft SoftwareWindows CE 6.0 R3 is a 32-bit, real-time, multitasking Operating System. The OS features a small footprint, with compatibility to port existing Win32 applications and Touch & Gesture support. Some of the major WCE 6.0 R3 components are:Control Panel, where both Psion Advantage and Microsoft applications are groupedFlash LiteInternet Explorer EmbeddedMicrosoft WordPadRemote Desktop ConnectionWindows Explorer4.2 The Control PanelThe Windows Embedded CE Control Panel provides a group of applications through which you can set a variety of system-wide properties, such as power, keyboard sensitivity, network configuration, system backup, desktop appearance, and so on.When the 8516 boots up, the startup desktop (Windows Classic Shell) is displayed, and any applications stored in the Startup folder start up immediately. To access the Control Panel:• Press [Windows] to display the Start Menu.•Tap on Settings>Control Panel.If you’re using the keyboard:• Press [Windows] to display the Start Menu.• Highlight Settings in Start Menu, and press the [RIGHT] arrow key to highlight the Control Panel.• Press the [ENTER] key.The Control Panel folder contains icons used in the setup of your 8516.](https://usermanual.wiki/Psion/8516.User-Manual-2/User-Guide-1876107-Page-42.png)
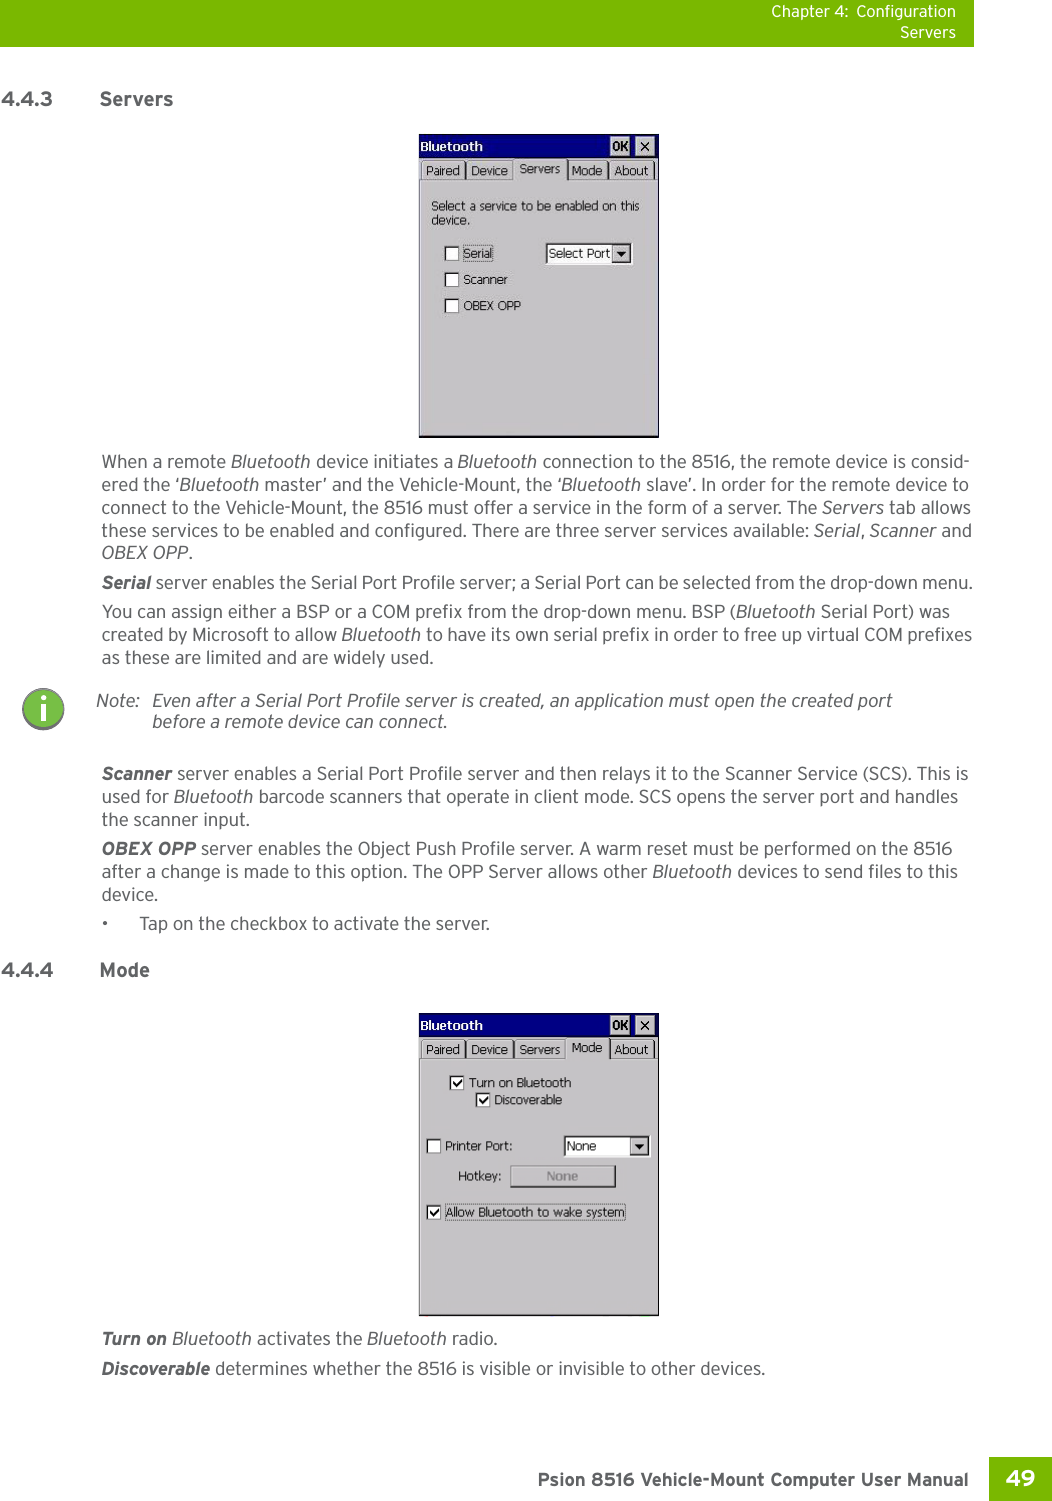
![Chapter 4: ConfigurationAboutPsion 8516 Vehicle-Mount Computer User Manual50 Printer Port allows you to assign and enable a virtual outgoing COM port selected from the drop-down menu to communicate with a paired Bluetooth printer. Keep in mind that when a port is chosen, the printer must be on and connected to the chosen port for a remote device to be able to connect.• Select a port within the Printer Port drop-down list, e.g. BSP1: • Check the Printer Port check box.•Open the Device tab and tap on Scan. • Tap-and-hold each Bluetooth Printer device entry and then select Pair, key-in the Passcode (if needed) and then tap Done. DO NOT select any services!•Close the Bluetooth Manager.• Select the Bluetooth device to print to—you will need to key-in (or programmatically raise) the following key sequence [CTRL] [ALT] [F1].• You can now select the Bluetooth device to which you wish to print. Allow Bluetooth to wake system allows remote Bluetooth devices to wake the 8516 by requesting a Blue-tooth service that requires host intervention. This feature can also be used when the 8516 is waking from suspend to significantly to reduce the initialization time of the Bluetooth system.4.4.5 About Device Name displays the broadcasted name of the Vehicle-Mount. The name can be changed in the System Properties applet: Start>Settings>Control Panel>System icon>Device Name tab.Local Address displays the MAC address (BD_Addr) of the Bluetooth chip.HCI Version & LMP Version display the version of the chip firmware.Component indicates the version of the Psion Bluetooth Subsystem (the manager, drivers, etc).Profiles lists the supported profiles on this specific 8516.4.4.6 The Bluetooth GPRS WAN ConnectionThe following steps describe how to set up an Internet data connection using a GSM cellular telephone with Bluetooth. The 8516 communicates via Bluetooth to the cell phone, which then accesses a WAN (Wide Area Network) and transfers data using GPRS.1. Enable the Dial-Up Networking service in the cell phone.2. Make the phone discoverable.3. Pair the phone service with the 8516 Dial-Up Networking service using the Bluetooth Manager. (For instructions on pairing devices, refer to “Pairing a Device” on page 47.)4. To set up the Internet parameters, choose the Network And Dial-up Connections icon from the Control Panel.](https://usermanual.wiki/Psion/8516.User-Manual-2/User-Guide-1876107-Page-53.png)
![Chapter 4: ConfigurationThe Bluetooth GPRS WAN ConnectionPsion 8516 Vehicle-Mount Computer User Manual52 9. Under the Call Options tab, turn off Cancel the call if not connected within, and press [ENTER] to save your changes.10. In the Modem dialog box, choose the Next button to display the Phone Number dialog box.The phone number you enter is network carrier dependent. Once you’ve specified all the necessary information, choose the Finish button.11. In the Control Panel, choose the Dialing icon.12. The values in the Dialing Properties dialog box need to be edited according to your network carrier specifications.](https://usermanual.wiki/Psion/8516.User-Manual-2/User-Guide-1876107-Page-55.png)
![Chapter 4: ConfigurationCertificates53 Psion 8516 Vehicle-Mount Computer User ManualOnce you’ve edited this dialog box to reflect your network carrier requirements, press [ENTER] to save your changes.13. At this point, return to the Control Panel, and choose the Network and Dial-up Connections icon.14. In the network connection window, the new network configuration—in this case, New Connection is displayed. Tap on the new icon.When you tap on your new connection, an onscreen message indicates the status of your connection: con-nected, disconnected, error messages, and so on. 4.5 CertificatesThis program provides access to the Certificates Manager and Stores. The Certificates Manager displays the certificates in the Windows Certificates Store, and allows you to import, delete, and view these certifi-cates. 8516 checks that the certificate has been digitally signed by a certification authority that the 8516 explicitly trusts. This option is used in conjunction with 802.1x authentication to enhance 8516 security.•In the Control Panel, choose the Certificates icon.Your 8516 has certificates preinstalled in the computer. My Certificates is the repository for the device’s personal certificate store, Other Authorities is the repository for the intermediate certificate store, and Trusted Authorities is the repository for the Trusted Root certificate store.](https://usermanual.wiki/Psion/8516.User-Manual-2/User-Guide-1876107-Page-56.png)
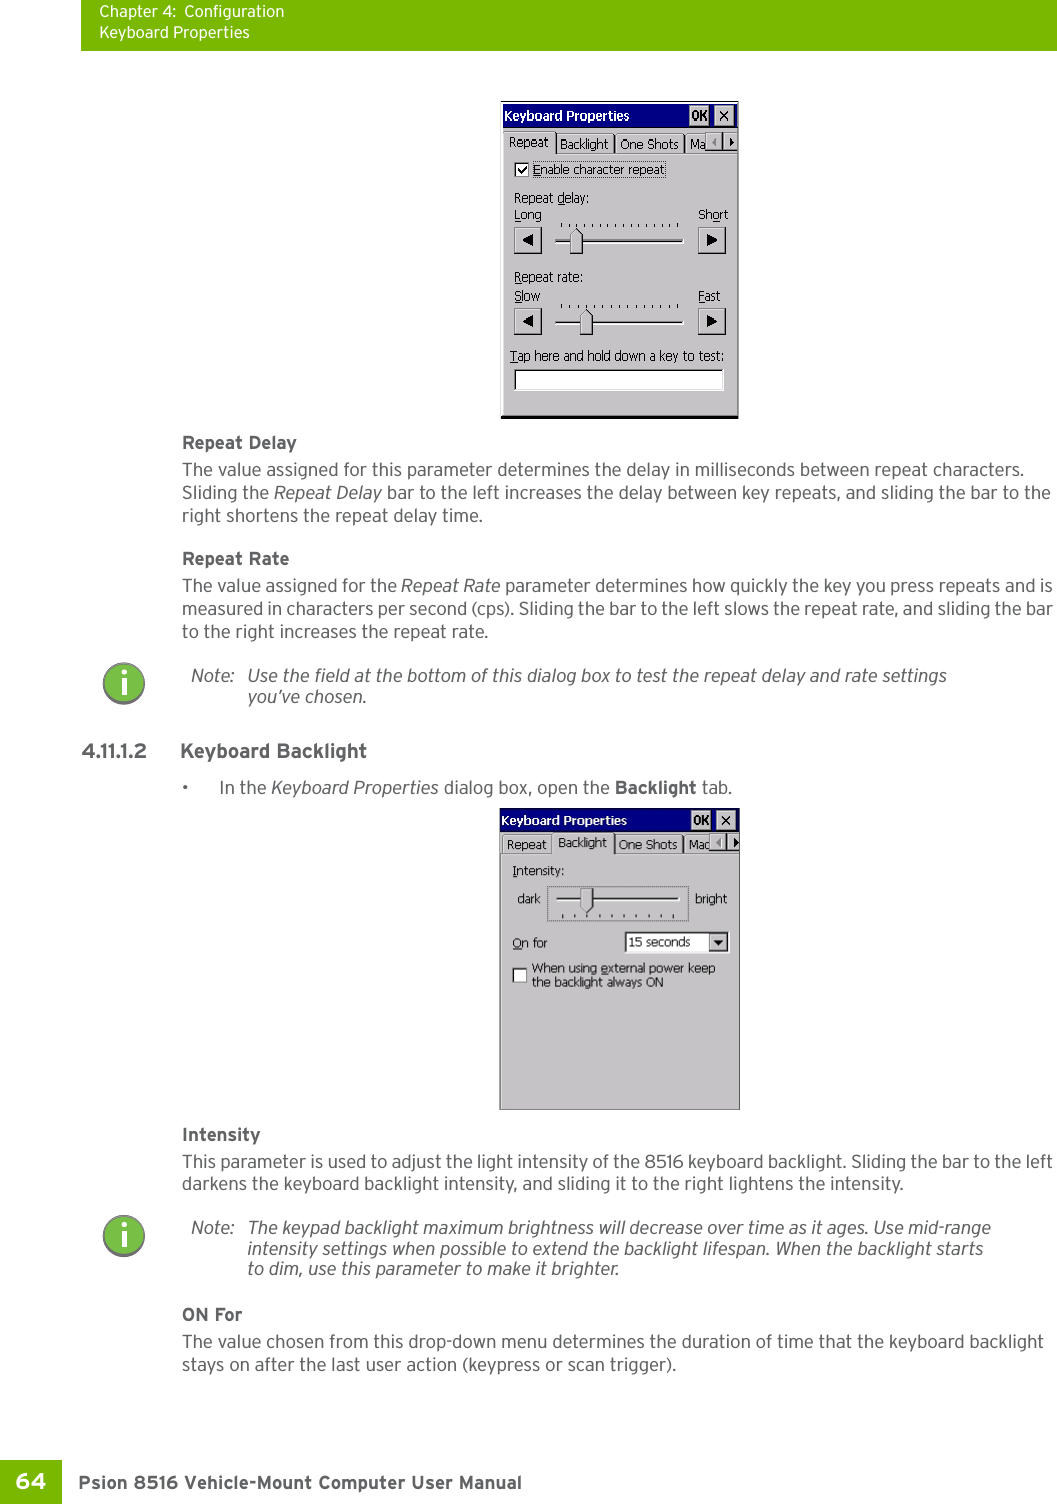
![Chapter 4: ConfigurationKeyboard Properties63 Psion 8516 Vehicle-Mount Computer User ManualTo customize the appearance and behaviour of the soft keyboard:Tap on t he Input Panel icon in the Control Panel.Figure 4.2 Input Panel Properties• Tap on the Options button to change the appearance of your soft keyboard.Figure 4.3 Soft Keyboard Options4.11.1 Keyboard PropertiesThis icon displays the Keyboard Properties dialog box in which you can adjust the repeat rate of the keys, the intensity of the keyboard backlight and the behaviour of the [FN] and [SYM] modifier keys. This dialog box also allows you to define macro keys and Unicode characters.•In the Control Panel, choose the Keyboard icon.4.11.1.1 Key Repeat•In the Keyboard Properties dialog box, open the Repeat tab.Note: You can also display this dialog box by double-tapping on the Input icon in the far-right cor-ner of the taskbar.Note: These settings apply when a key is held down continuously.](https://usermanual.wiki/Psion/8516.User-Manual-2/User-Guide-1876107-Page-62.png)
![Chapter 4: ConfigurationKeyboard Properties65 Psion 8516 Vehicle-Mount Computer User Manual4.11.1.3 Keyboard One Shot Modes•In the Keyboard Properties dialog box, open the One Shots tab.The options in this tab allow you to determine how modifier keys on your 8516 behave. For each modifier key—[ALT], [SHIFT], [CTRL], [FN], and [SYM]—you have the following options in the drop-down menu: Lock, OneShot, and OneShot/Lock. LockIf you choose Lock from the drop-down menu, pressing a modifier key once locks it ‘on’ until you press the modifier key a second time to unlock or turn it off. OneShotIf you choose OneShot, the modifier key remains active only until the next key is pressed.OneShot/LockOneShot/Lock allows you to combine these functions. When you choose this option and you press the mod-ifier key once, it remains active only until the next key is pressed. If you press the modifier key twice, it is locked ‘on’, remaining active until the modifier key is pressed a third time to turn it ‘off’.4.11.1.4 Keyboard Macro Keys•In the Keyboard Properties dialog box, open the Macros tab.Note: Tapping in the checkbox next to ‘When using external power, keep the backlight always ON’ forces the keypad backlight to remain on when the unit is operating with external power.Note: Keep in mind that checking the taskbar lets you know whether or not these keys are locked on. For example, if the [FN] key is locked ‘on’, the taskbar at the bottom of the screen dis-plays it underlined. If this key is displayed without the underline in the taskbar, you’ll know that the key is not locked. It will become inactive following a key press.Important: Once you’ve assigned a One Shot mode to a modifier key, you need to tap on the OK button at the top of the tab to activate your selection.](https://usermanual.wiki/Psion/8516.User-Manual-2/User-Guide-1876107-Page-64.png)
![Chapter 4: ConfigurationKeyboard PropertiesPsion 8516 Vehicle-Mount Computer User Manual66 A macro has 200 programmable characters (or “positions”). The macro keys can be programmed to replace frequently used keystrokes, along with the function of executable keys including [ENTER], [BACKSPACE] and [DEL] ([FN]-[BACKSPACE]), function keys and arrow keys. Recording and Saving a MacroYou can program up to 6 physical macro keys, depending on your keyboard layout. You can also increase the number of virtual macro keys up to 15 using Scancode Remapping (for details, see “Scancode Remap-ping” on page 68). •In the Macro menu highlight a macro key number, for example macro 1, to assign a macro to macro key [M1]. Choose the Record button. A message screen is displayed instructing you to Enter Key Strokes to Record.• Type the macro sequence you want to assign to the Macro key. You can type text and numbers, and you can program the function of special keys into a macro.• When you’ve finished recording your macro sequence, press the key sequence: [CTRL] [ALT] [ENTER], or choose the Stop Recording button.A new screen ‘Verify Macro’ displays the macro sequence you created. The Save button is highlighted. •Press [ENTER] to save your macro, or highlight CANCEL and press [ENTER] to discard it.Executing a MacroTo execute a macro:• Press the macro key to which you’ve assigned the macro.](https://usermanual.wiki/Psion/8516.User-Manual-2/User-Guide-1876107-Page-65.png)
![Chapter 4: ConfigurationKeyboard Properties67 Psion 8516 Vehicle-Mount Computer User ManualDeleting a MacroTo delete a macro:•In the Macros tab, highlight the macro number you want to delete.• Choose the Delete button.4.11.1.5 Unicode Mapping•In the Keyboard Properties dialog box, open the Unicode Mapping tab.The Unicode Mapping tab is used to map combinations of virtual key values and [CTRL] and [SHIFT] states to Unicode™ values. This tab shows the configured Unicode character along with the Unicode value. For ex-ample, the sample screen above shows “a (U+0061)” indicating that the character “a” is represented by the Unicode value “0061”, and so on. Keep in mind that Unicode configurations are represented as hexidecimal rather than decimal values.All user-defined Unicode mappings are listed in the Unicode Mapping tab in order of virtual key value, and then by order of the shift state. If a Unicode mapping is not listed, the Unicode mapping is mapped to the default Unicode value.Adding and Changing Unicode Values• Choose the Add/Change button.Important: Changes to Unicode mappings are not saved until you exit the Keyboard Proper-ties dialog box.](https://usermanual.wiki/Psion/8516.User-Manual-2/User-Guide-1876107-Page-66.png)
![Chapter 4: ConfigurationKeyboard PropertiesPsion 8516 Vehicle-Mount Computer User Manual68 • Highlight a value in the Unicode mapping list. In the sample screen above, a value will be assigned to virtual key 0 (VK 0).• Position the cursor in the Unicode Mapping field, and type a Unicode value for the highlighted key.Removing Unicode Values•In the Unicode Mapping tab, highlight the item you want to delete, and choose the Remove button.4.11.1.6 Scancode RemappingA scancode is a number that is associated with a physical key on a keyboard. Every key has a unique scan-code that is mapped to a virtual key, a function or a macro. Scancode Remapping allows you to change the functionality of any key on the keyboard. A key can be remapped to send a virtual key (e.g. VK_F represents the ‘F’ key; VK_RETURN represents the [ENTER/Power] key, etc.), perform a function (e.g. turn the scanner on, change volume, etc.) or run a macro.There are three different tables of scancode mappings: the Normal table, the FN table and the SYM table.The Normal table defines unmodified key presses; the FN table defines key presses that occur when the [FN] modifier is on; the SYM table defines key presses that occur when the [SYM] modifier is on. The default mappings of these scancodes can be overwritten for each of these three tables using the Scancode Remap-ping tab accessed from the Keyboard Properties dialog box.Note: To add a shifted state, [SHIFT] and/or [CTRL], press [TAB] to position the cursor in the checkbox next to ‘SHIFT Pressed’ and/or ‘CTRL Pressed’. Press [SPACE] to select the shift state you want to assign.Note: When using the Mobile Devices SDK Developers' Guide (PN 8100016), note that the [ORANGE] key is interchangeable with the [SYM] key. Similarly, in the context of the scan-code mapping tables, ‘Orange’ is interchangeable with ‘SYM’.](https://usermanual.wiki/Psion/8516.User-Manual-2/User-Guide-1876107-Page-67.png)
![Chapter 4: ConfigurationKeyboard Properties69 Psion 8516 Vehicle-Mount Computer User ManualThe first column in the Scancode Remapping tab displays the scancodes in hexidecimal. If the scancode is remapped to a virtual key, that virtual key is displayed in the next column labelled ‘V-Key’. A virtual key that is ‘Shifted’ or ‘Unshifted’ is displayed in the third column labelled ‘Function’. If the scancode is remapped to a function or a macro, the first and second columns remain blank while the third column contains the function name or macro key number (e.g., Macro 2).Adding a RemapTo add a new remapping:• Choose the Add button at the bottom of the dialog box.The Remap Scancode dialog box is displayed.• Type the scan code in hexidecimal in the field labelled Scancode.Virtual Key, Function and MacroThe radio buttons at the bottom of the dialog box allow you to define to what the scan code will be rema-pped: Virtual Key, Function or Macro. When Virtual Key is selected, you can choose to force [SHIFT] to be on or off when the virtual key is sent. If No Force is selected, the shift state is dependent on whether the shift state is on or off at the time the virtual key is sent.When Function is selected, a list of valid functions appears in the dialog box. When Macro is selected, the macro keys available on your unit are listed in the dialog box.Note: The Label field displays the default function of the scancode you are remapping.](https://usermanual.wiki/Psion/8516.User-Manual-2/User-Guide-1876107-Page-68.png)
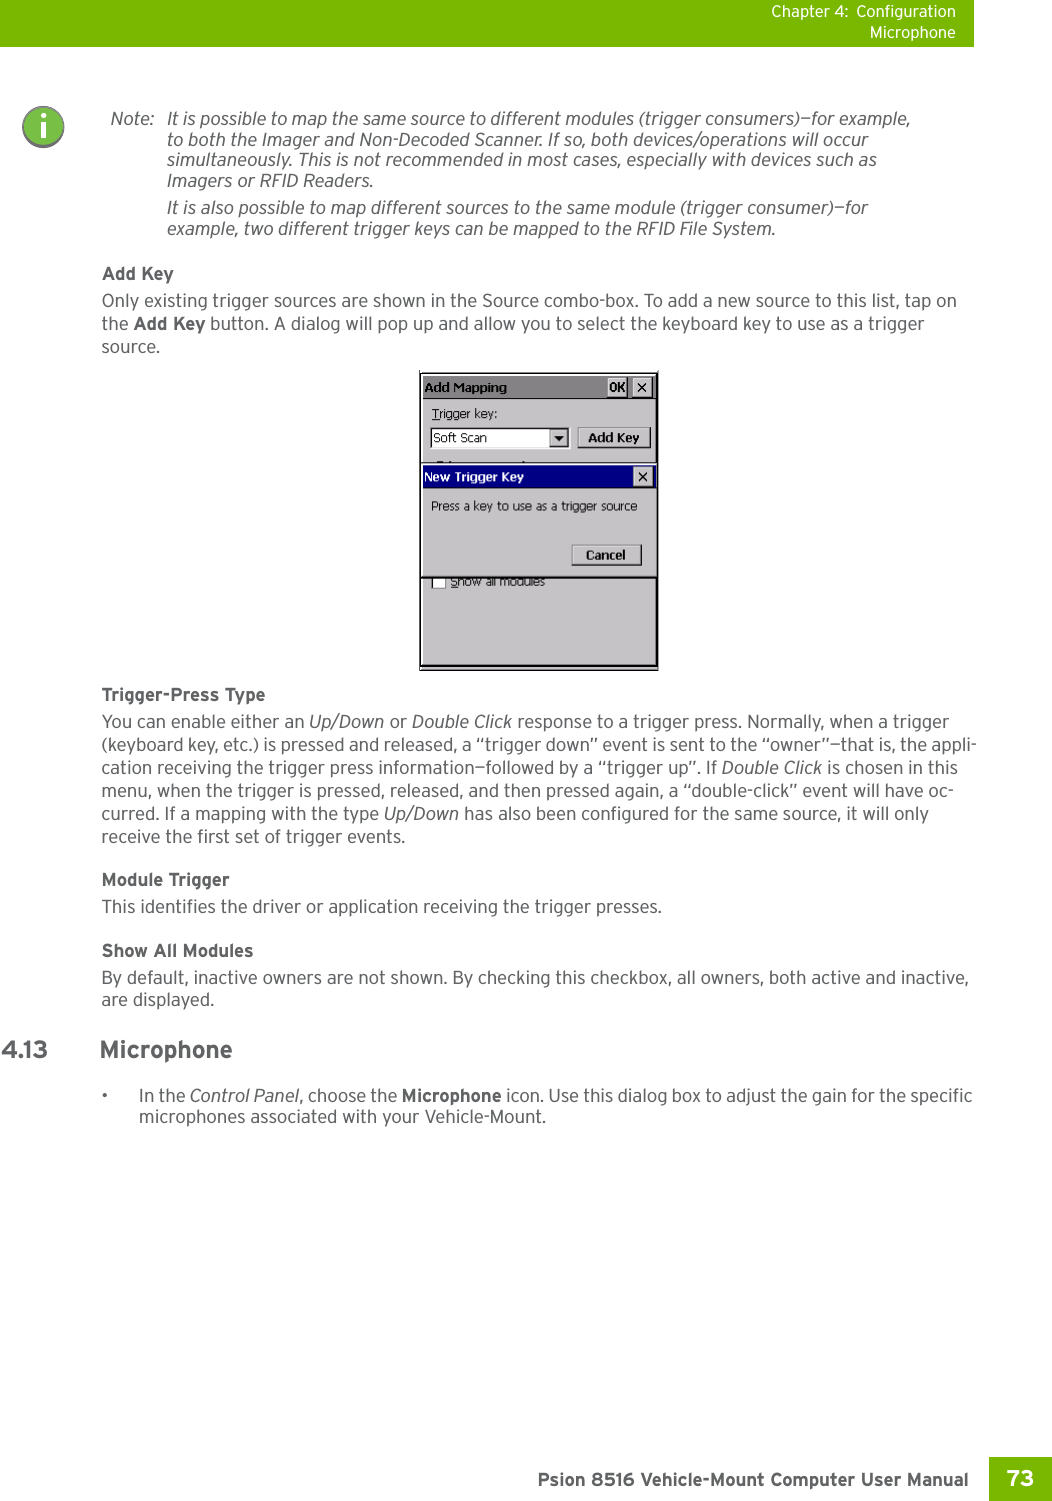
![Chapter 4: ConfigurationAdd and Edit Trigger MappingPsion 8516 Vehicle-Mount Computer User Manual72 Double-ClickWhen a key is pressed and released, then pressed again within the configured time (between 0 to 1000 msec), a double-click occurs. See also “Trigger-Press Type” on page 73.Show All ModulesBy default, the trigger mapping list only shows active mappings. Mappings for drivers or applications that are not currently active are not normally displayed. By checking this checkbox, all mappings, both active and inactive, are displayed.AddTapping this button brings up the Add Mapping dialog (see page 72), so that you can add new trigger map-pings.EditTapping this button brings up the Edit Mapping dialog (see page 72), so that you can edit existing trigger mappings.RemoveTapping this button removes an existing mapping.OKThe OK button in the top right of the Manage Triggers screen saves all changes made. If the cancel button X is tapped instead, or the [ESC] key is pressed, all changes made will be discarded.4.12.2 Add and Edit Trigger MappingThese dialogs allow you to add and edit trigger mappings. Trigger KeyThis drop-down list allows you to specify the source of the trigger events, such as the Soft Scan, Left Scan, etc., for the trigger module selected.Important: It is not possible to have two or more identical mappings—for example [F1] cannot be mapped to the Non-Decoded Scanner twice—even if the trigger type is different.A keyboard key that is used as a trigger source will no longer generate key data, or perform its normal function. For example, if the space button is used as a trigger source, it will not be able to send space characters to applications.](https://usermanual.wiki/Psion/8516.User-Manual-2/User-Guide-1876107-Page-71.png)

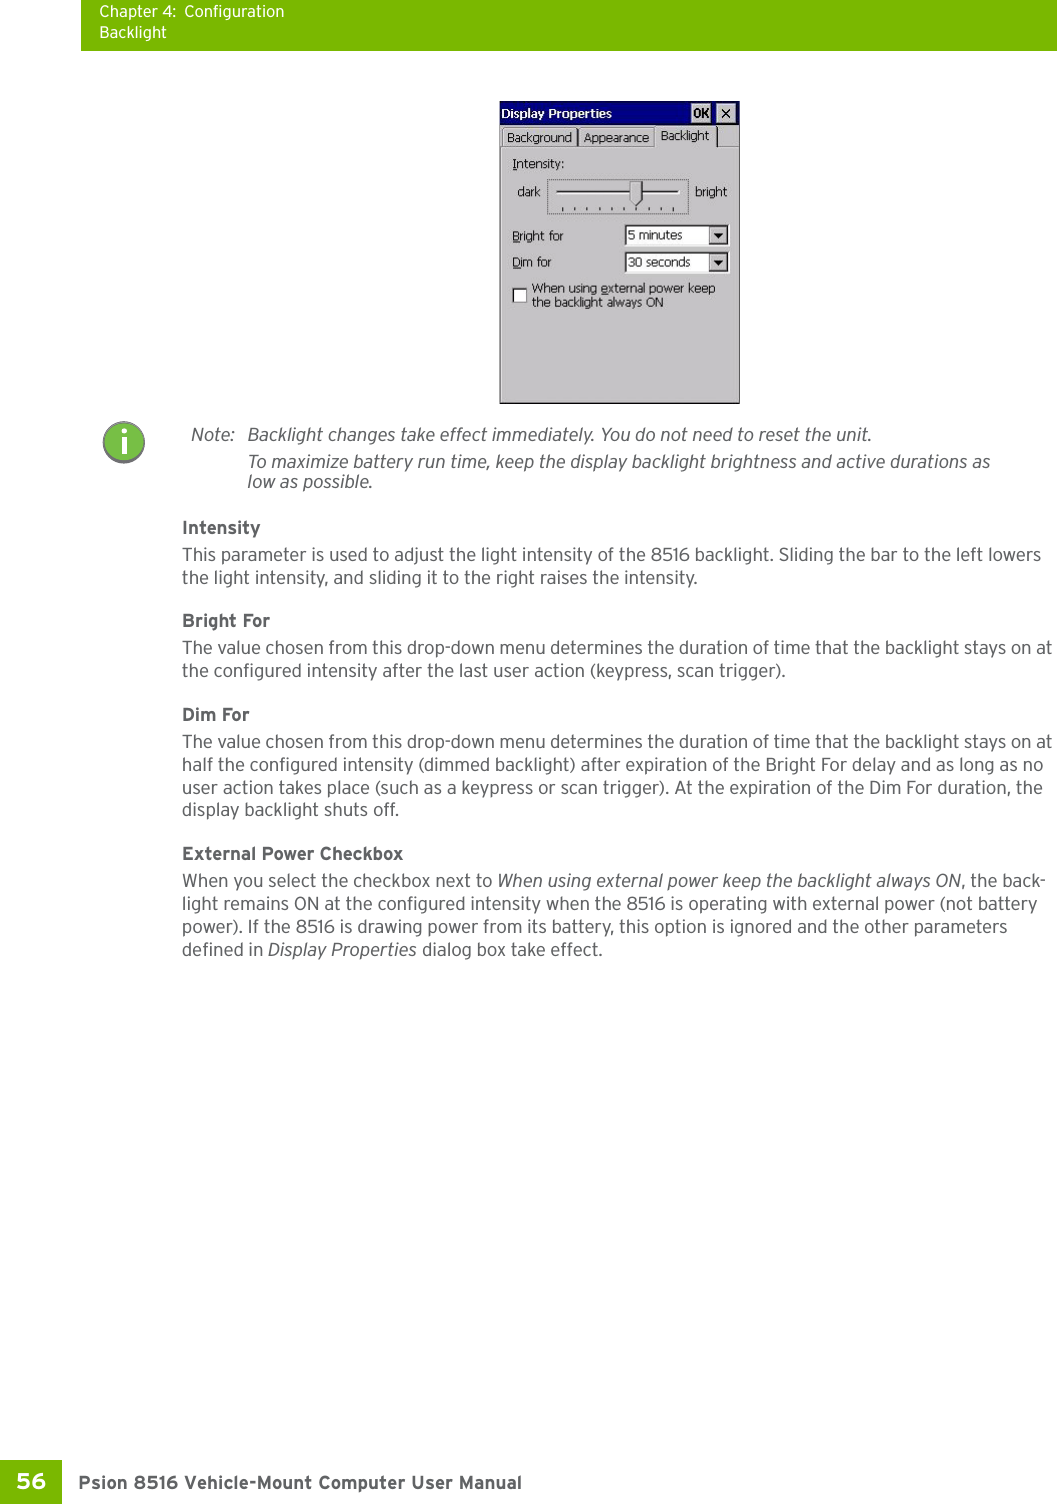
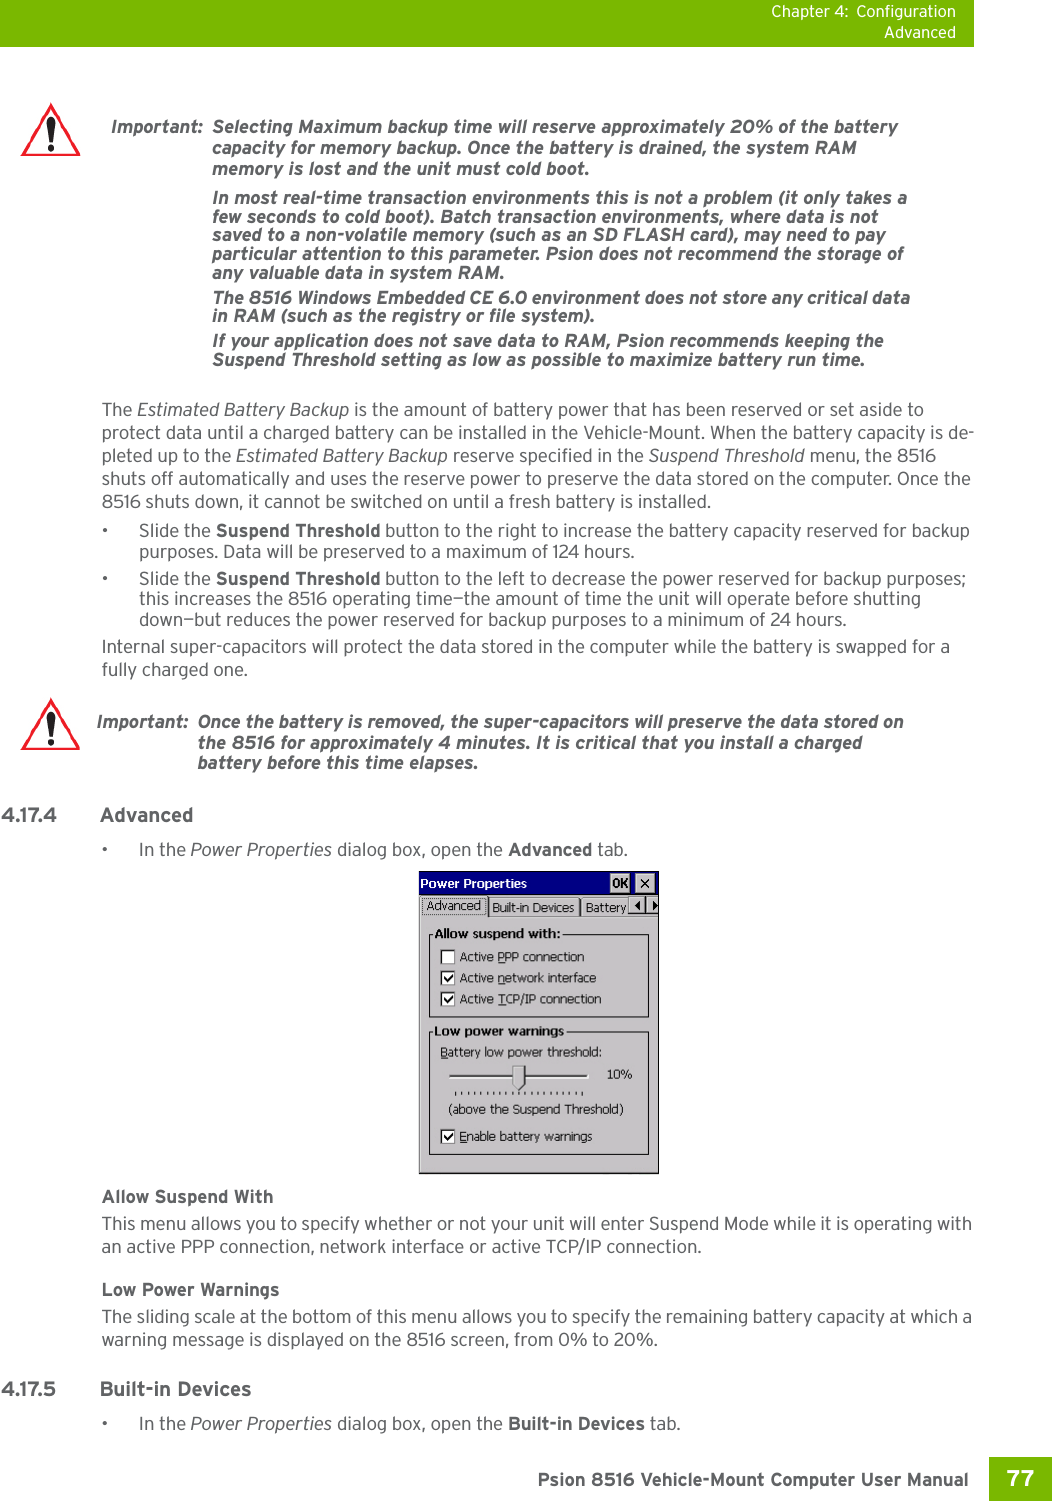
![Chapter 4: ConfigurationPower Saving SuspendPsion 8516 Vehicle-Mount Computer User Manual76 4.17.2 Power Saving Suspend•In the Power Properties dialog box, open the Suspend tab.Power SourceThis drop-down menu allows you to specify whether the unit is using AC Power or Battery Power.Suspend TimeoutWhen the 8516 is idle—not receiving any user input (a key touch, a scan, and so on) or system activity (serial data, an activity initiated by an application, and so on)—the Vehicle-Mount uses the value assigned in the Suspend Timeout field to determine when the unit will go to sleep (appear to be off). When the time in the Suspend Timeout field elapses without any activity, the unit enters suspend state. In suspend state, the 8516 CPU enters a sleep state, and wireless communication is shut off. The state of the device (RAM contents) is preserved. Pressing [ENTER] wakes the system from suspend state. 4.17.3 Suspend Threshold and Estimated Battery BackupThe Suspend Threshold adjustment tells the system when to shut down when the battery drains. If you choose Maximum Operating Time, the unit will run until the battery is completely empty; the RAM is only backed up for a short period of time. If you choose Maximum Backup Time, the Vehicle-Mount shuts off with more energy left in the battery so RAM can be backed up for a longer period of time.Important: Psion recommends setting the Suspend value to 3 minutes. To further reduce power consumption, carefully consider the duration of time that the display back-light is ‘on’ (see “Backlight” on page 55).](https://usermanual.wiki/Psion/8516.User-Manual-2/User-Guide-1876107-Page-75.png)
![Chapter 4: ConfigurationOptionsPsion 8516 Vehicle-Mount Computer User Manual88 4.20.2.1 Double Click ParametersClick Time (msec)This parameter controls the maximum gap time (in milliseconds) for a double-click. If the time between the first and second clicks of the scanner trigger is within this time, it is considered a double-click. The allowa-ble range is 0 to 1000. A value of zero disables this feature.A double-click produces different results depending on whether or not a value is assigned in the “Click Data” parameter. When a value is not assigned for the “Click Data”, double-clicking the scanner trigger overrides the target dot delay set in the “Dot Time” parameter and initiates a normal scan sweep. If a value is assigned for the “Click Data” parameter, double-clicking the scanner trigger inserts the “Click Data” value rather than initiating a scan.Click DataThis parameter determines which character is sent to the application installed in your 8516 following a dou-ble-click. A dialog box appears, asking that you press the key you want to insert. The ASCII/Unicode key value of the keypress is displayed. Pressing the [ESC] key in this dialog box resets the data to zero.4.20.2.2 Display ParametersScan ResultWhen this parameter is enabled, the type of barcode and the result of the scan appear on the screen. Note that this information is only displayed after a successful decode and is visible only while the scanner trigger is pressed. When the trigger is released, this information is cleared from the screen.Scan IndicatorWhen this parameter is enabled, the laser warning logo appears on the display whenever the scanner is ac-tivated.Scan Result Time (sec)The value assigned to the Scan Result Time parameter determines how long the scan results of a successful scan are displayed on the screen. Time is measured in seconds, and a value of 0 (zero) disables the param-eter. When you choose this option, a dialog box appears where you can enter a value.Good Scan Beep and Bad Scan Beep These parameters determine whether or not the 8516 emits an audible scanner ‘beep’ when a good (suc-cessful) scan or a bad (unsuccessful) scan is performed. Set these parameters to either on to enable the beeper or off to disable it.Multiple Beep Tones You can set the audible scanner ‘beep’ to emit a series of three beeps instead of one. Set this parameter to on to enable the multiple beep tones.Soft Scan TimeoutThis parameter is used by the SDK “Scan” function (soft-scan: starting a scan session via the SDK function, instead of a physical user trigger press). The value assigned to this parameter determines the soft-scan timeout from 1 to 10 sec (default is 3 sec). Scan Log FileIf this parameter is enabled, the input barcode and the modified/translated output barcode are logged in the file \Flash Disk\ScanLog.t. Keep in mind that if Scan Log File is enabled, there is a slight performance re-duction when performing multiple scans since the log file is written to persistent storage.Note: To remove the scan result from the screen before the “Result Time” has expired, point the scanner away from the barcode and press the trigger.](https://usermanual.wiki/Psion/8516.User-Manual-2/User-Guide-1876107-Page-87.png)