Pyxis XMTR2BTN JITrBUD Wireless Transmitter User Manual
Pyxis Corporation JITrBUD Wireless Transmitter
Pyxis >
Users Manual
JITRBUD Main
User Guide
Version 5.0
Part Number 108741-01
JITRBUD Main
User Guide
Version 5.0

ii JITRBUD Main User Guide
JITRBUD Main User Guide
Changes in equipment, software, or procedures may occur
periodically; information describing these changes will be included
in future editions of the manual and periodic change-page releases.
Because of the inherent delays involved in producing documentation,
information in this document is subject to change without notice and
does not represent a commitment on the part of Pyxis Corporation to
provide additional services or enhancements.
Unless otherwise noted, all names of companies, products, street
addresses, and persons contained herein are part of a completely
fictitious model or models, and are designed solely to document and
illustrate the use of the JITRBUD product.
Warning: This equipment generates, uses, and can radiate
radio frequency energy and if not installed and used in
accordance with the instruction manual, may cause
interference with radio communications. It has been tested and
found to comply with the limits for a Class “A” digital device
pursuant to Subpart B of Part 15 of the FCC Rules, which are
designed to provide reasonable protection against such
interference when equipment is operated in a commercial
environment. Operation of this equipment in a residential area
may cause interference, in which case the user, at their own
expense, will be required to take whatever measures may be
required to correct the interference.
This device complies with Part 15 of the FCC Rules and with
RSS-210 of Industry Canada. Operation is subject to the
following two conditions:
1.This device may not cause harmful interference, and
2.This device must accept any interference received, including
interference that may cause undesired operation.
Changes or modifications not expressly approved by the party
responsible for compliance could void the user’s authority to
operate this equipment.
July 2002
JITRBUD Main
User Guide
Part # 108741-01
JITRBUD is a registered trademark
of Pyxis Corporation. The Pyxis
logo is a registered trademark
of Pyxis Corporation.
© 2002
Pyxis Corporation
3750 Torrey View Court
San Diego, CA 92130
1-800-367-9947
Fax: 1-858-480-6329
www.pyxis.com
All rights reserved.
Printed in the
United States of America.

JITRBUD Main User Guide iii
Contents
Preface.................................................................. vii
Welcome ......................................................................................... vii
How this Guide is Organized....................................................... viii
Manual Overview ............................................................................ viii
User Guide Conventions ................................................................ ix
Text.................................................................................................... ix
Icons .................................................................................................. ix
User Guide Terminology................................................................. x
Chapter 1
System Overview.................................................1-1
Benefits and Features.................................................................... 1-2
System Components ...................................................................... 1-3
JITRBUD Stations........................................................................ 1-3
SUPPLYCENTER Console .............................................................. 1-3
The Network Information ............................................................ 1-3
Comprehensive Reporting............................................................ 1-4
Chapter 2
Station Basics......................................................2-1
Station Basics ................................................................................. 2-2
Using the Touch-Screen............................................................... 2-2
Using the Keyboard ..................................................................... 2-2

Contents
iv JITRBUD Main User Guide
Using the JITRBUD Transmitters ................................................ 2-3
Using Window and Screen Features ............................................ 2-3
Command Buttons .................................................................... 2-3
Scroll Bars................................................................................. 2-3
Lists........................................................................................... 2-4
Drop-down Lists ....................................................................... 2-4
Check Boxes ............................................................................. 2-4
Search Boxes............................................................................. 2-4
Confirmation Screens ............................................................... 2-4
Logging In ...................................................................................... 2-5
Logging In Using ID and Password............................................. 2-5
Logging Out ................................................................................... 2-6
To log out.................................................................................. 2-6
Changing Your Password ............................................................. 2-7
Main Menu..................................................................................... 2-8
Main Menu Functions .................................................................. 2-9
Using Additional Tools................................................................ 2-11
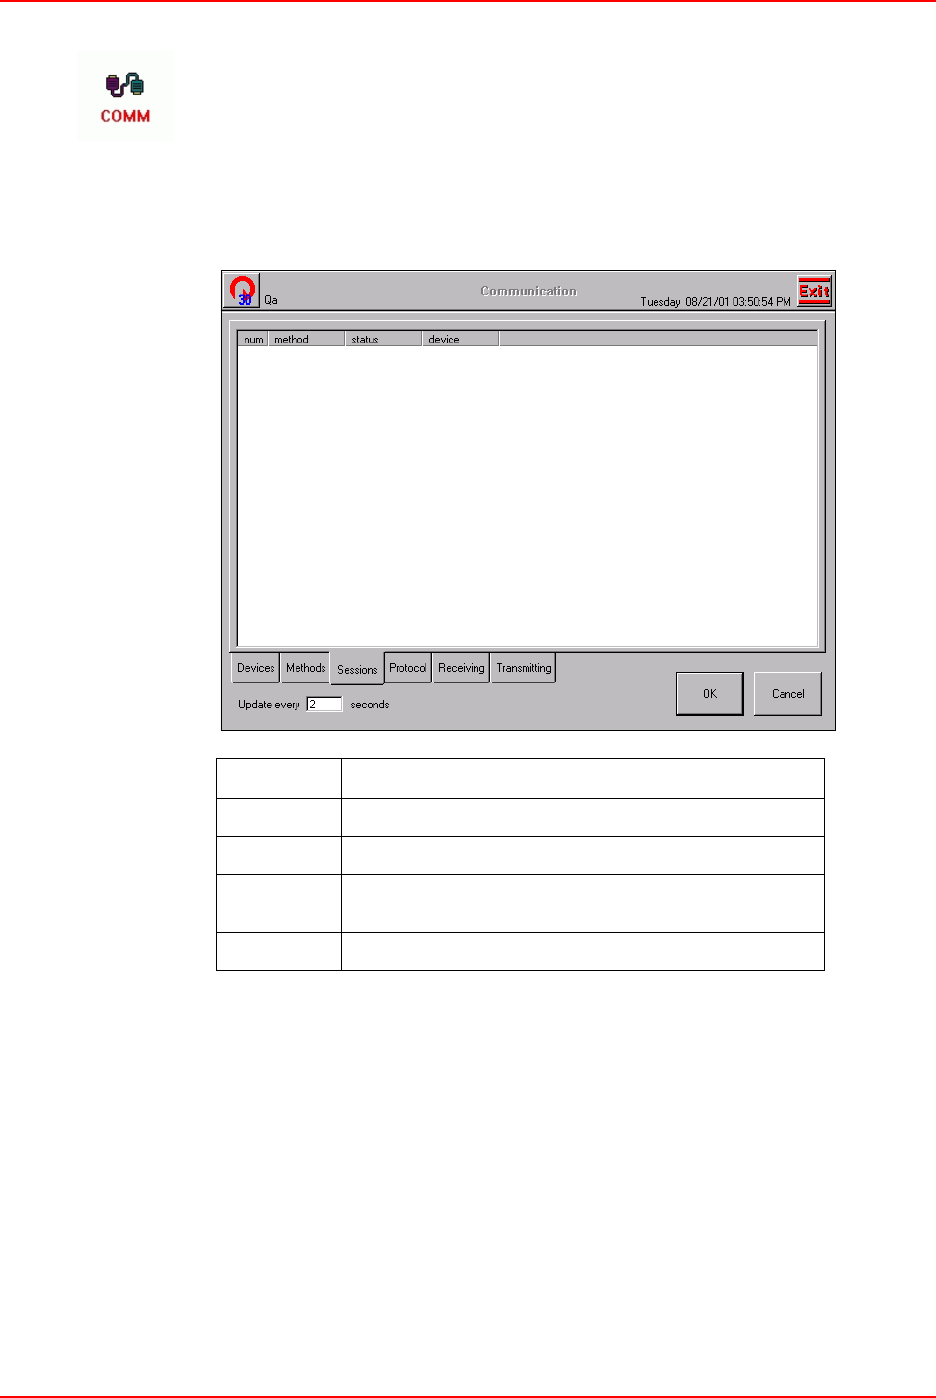
Station Communication .............................................................. 2-12
Verifying Communication ......................................................... 2-12
Device Status.............................................................................. 2-13
Methods Status........................................................................... 2-15
Sessions Status ........................................................................... 2-16
Protocol Status ........................................................................... 2-17
Receiving Status......................................................................... 2-19
Transmitting Status .................................................................... 2-20
Chapter 3
Patient Care Functions .......................................3-1
Take-Return................................................................................... 3-2
Searching for Patients .................................................................. 3-2
Sorting Lists ................................................................................. 3-3
Taking Items ................................................................................ 3-4
Taking Items with Multiple Patient Selection Feature ............. 3-4
Quick Take................................................................................ 3-5
Taking Items in No Patient Mode............................................. 3-6
Taking Items with Lot/Serial Number Tracking....................... 3-7
Using the Procedure Date Feature ............................................... 3-9
Patient Lists................................................................................ 3-10
Global Patient List (Global).................................................... 3-10
Local Patient List (Local) ....................................................... 3-10
My Patient List (My List) ....................................................... 3-10
Adding Patients to My List..................................................... 3-11
Deleting Patients from My List .............................................. 3-12
Finding Items ............................................................................. 3-13
Global Find Item..................................................................... 3-14
Returning Items.......................................................................... 3-16
Returning Items in No Patient Mode ...................................... 3-17

Contents
JITRBUD Main User Guide v
Emergency Access ..................................................................... 3-18
Patients ......................................................................................... 3-20
Searching for Patients ................................................................ 3-20
Adding Patients .......................................................................... 3-21
Editing Patients .......................................................................... 3-23
Reconcile ADT .......................................................................... 3-24
Request Item ................................................................................ 3-26
Requesting Items........................................................................ 3-26
Chapter 4
Inventory Management Functions .....................4-1
Inventory ........................................................................................ 4-2
Searching for Items ...................................................................... 4-3
Verifying Quantity ....................................................................... 4-4
Editing Items in Inventory ........................................................... 4-6
Outdating Expired Items in Inventory ......................................... 4-8
Load-Unload ................................................................................ 4-10
Searching for Items .................................................................... 4-10
Loading Items ............................................................................ 4-11
Loading Empty Bins ............................................................... 4-12
Loading Pending Bins............................................................. 4-14
Unloading Items......................................................................... 4-16
Moving Items to a New Location .............................................. 4-17
Item Alias ..................................................................................... 4-19
Searching for Items .................................................................... 4-19
Creating an Item Alias ............................................................... 4-20
Editing an Alias.......................................................................... 4-21
Deleting an Alias........................................................................ 4-22
Refill.............................................................................................. 4-23
Refilling Items............................................................................ 4-24
Spot Refill............................................................................... 4-25
Outdating Expired Items in Refill.............................................. 4-27
Refill By Request Order.............................................................. 4-30
Chapter 5
Station Management Functions .........................5-1
Users ............................................................................................... 5-2
Searching for Users...................................................................... 5-2
Creating Users.............................................................................. 5-3
Editing Users................................................................................ 5-9
Deleting Users............................................................................ 5-14
Creating User Templates............................................................ 5-15
Creating Users From Templates ................................................ 5-22
Editing User Templates.............................................................. 5-23
Deleting User Templates............................................................ 5-24
Station Options ............................................................................ 5-25

Contents
vi JITRBUD Main User Guide
Setting Station Options .............................................................. 5-25
Hardware Setup........................................................................... 5-31
Adding JITRBUD Cabinets (Locations) .................................... 5-33
Editing Cabinet Information ...................................................... 5-35
Clearing the Hardware Setup Table ........................................... 5-36
Deleting Devices ........................................................................ 5-37
Appendix A
Troubleshooting ................................................. A-1
Transmitters Not Communicating to Receiver ........................... A-2
Patients Not Showing Up At A Station....................................... A-2
Station Screen Is Black ............................................................... A-3
Keyboard Is Unresponsive .......................................................... A-3
Touch Screen Is Unresponsive.................................................... A-4
Supply Is Not Listed In Find Item .............................................. A-4
Wrong Supply Removed ............................................................ A-5
ID Is Not Working ..................................................................... A-5
Brain Transplant.......................................................................... A-6
Appendix B
Safety and Maintenance..................................... B-1
General Safety Tips ..................................................................... B-2
Safe Computing ............................................................................ B-3
Regulatory Compliance ............................................................... B-3
Electrical Guidelines................................................................... B-4
Power Requirements .................................................................... B-5
Appendix C
Specifications ..................................................... C-1
Appendix D
Glossary .............................................................. D-1
Index ..............................................................Index-1

JITRBUD Main User Guide vii
Preface
Welcome
Thank you for choosing the JITRBUD system.
The JITRBUD system consists of two primary components: the SUPPLYCENTER
Console and JITRBUD Stations. There are two types of JITRBUD Stations: the
JITRBUD Main Station and the SUPPLYSTATION 30 with the JITRBUD option.
This document covers using the JITRBUD Main Station. The user guides for the
SUPPLYCENTER Console and the SUPPLYSTATION 30 are provided as separate
documents.
The JITRBUD Main User Guide does not cover service and repair procedures.
Instead, it focuses on the daily use, minor maintenance, and troubleshooting of the
system. For information about the JITRBUD Station that is not covered in this
document, please call the Pyxis Worldwide Service Center at 1-800-727-6102.

Preface
viii JITRBUD Main User Guide
How this Guide is Organized
This manual is designed to help you quickly gain experience and confidence using
the JITRBUD Main Station. The chapters and appendixes are directed to varying
levels of need and interests. Refer to the following for more information:
Manual Overview
This manual contains the following:
•Chapter 1, System Overview - Introduces the JITrBUD system, its purpose,
and components.
•Chapter 2, Station Basics - Provides general information about the JITrBUD
Main and explains how to use menus and screens.
•Chapter 3, Patient Care Functions - Contains information and procedures
for using the patient care functions at the JITRBUD Main: Removing Items,
Returning Items, and Discarding Items.
•Chapter 4, Inventory Management Functions - Provides information and
procedures for performing inventory management functions at the JITRBUD
Main, including loading and unloading items, taking inventory, and refilling
stock.
•Chapter 5, Station Management Functions - Explains how to use the
JITRBUD Main to manage the supply system at your facility, including
defining user and Station access privileges, adding items alias’s to your
system and assigning them to the Stations; and how to run reports at the
Station.
•Appendix A, Troubleshooting - Describes troubleshooting techniques for the
JITRBUD Main, such as what to do if the Station is down or a if a patient is
not appearing at the Station.
•Appendix B, Safety and Maintenance - Provides important safety and
maintenance information.
•Appendix C, Specifications - Describes JITRBUD system equipment,
dimensions and components.
•Appendix D, Glossary - Definitions of terms used in this guide as they apply
to the JITRBUD system.
Preface
JITRBUD Main User Guide ix
User Guide Conventions
This guide uses the following conventions.
Text
• The name of a document title, field, screen, or tab is formatted in italics.
• The name of a button, command, option, or icon is formatted in bold.
• The name of a key on the keyboard is formatted in SMALL CAPS.
Icons
This document uses the following symbols:
Note text contains supplementary information or emphasizes a point
or procedure.
Caution indicates a potentially hazardous situation which, if not
avoided, could result in minor or moderate injury. Caution is also
used to alert against unsafe practices that could result in
unpredictable results or data loss.
Warning indicates a potentially hazardous situation which, if not
avoided, could result in death or serious injury.
Note
Caution
Warning

Preface
xJITRBUD Main User Guide
User Guide Terminology
Familiarity with the following terms will help you to understand and use the
information and procedures in this guide. Appendix D provides a glossary of
additional terms.
•Station — The device that stores and tracks supplies. Each Station has an
internal computer that tracks access and item usage information and
communicates with the SUPPLYCENTER Console. Station may refer to the
Main unit and any attached auxiliaries.
•SUPPLYCENTER Console — The central repository for all information is the
SUPPLYCENTER Console (also referred to as the Central Console). This
computer directs Stations in a facility. The SUPPLYCENTER Console
communicates and receives data and updates activity information to all of the
Stations. The SUPPLYCENTER Console also maintains all patient and activity
information used to generate reports.
•ProCar Computer — The ProCar computer is responsible for interface
communications, including the ADT, billing, and Material Management
Information Systems (MMIS). The interface communications software is
developed, configured, and installed by Pyxis during the Station system
installation. Pyxis considers this communication hardware and software
interface proprietary.
•Auxiliary Unit — A unit that can be added to a Station for additional
capacity. An auxiliary unit does not have an internal computer; the Station
controls access to the auxiliary unit.
•Users — Nurses or other personnel in the facility that use the Stations.
•Item — A supply that is stored, dispensed, and managed by the system. Item
is used to refer to the name of the supply assigned to a bin.
•Bin — A specific location of an item. Each item is assigned to a Station and to
a unique bin within the Station.

JITRBUD Main User Guide 1-1
Chapter 1
System Overview
The JITRBUD system automates the distribution and management of hospital
supplies. The system tracks items when they are removed from the JITRBUD
Main and used for a patient. All transaction information including the name of the
patient, and the description and quantity of supplies removed, is automatically
recorded at the Station and sent to the Console for accounting, restocking, and
billing purposes.
The JITRBUD system is used to perform the following:
•Control costs and capture lost charges by creating an electronic transaction
record for supplies managed by the JITRBUD Main.
•Increase nursing and central supply productivity by reducing or eliminating
time-consuming and labor-intensive tasks in these areas.
•Improve response time by utilizing existing storage solutions and providing
information when stock is needed.
•Optimize inventory levels using real-time usage information.

Benefits and Features
1-2 JITRBUD Main User Guide
Benefits and Features
• Open storage system - immediate access to all patient supplies
• Utilizes existing supply storage hardware
• Transmitters have wireless push-to-take buttons that use RF technology
• Expiration date tracking for flagged supplies
• No Patient Mode - eliminates patient selection for appropriate supply areas
• Patient reconciliation - ability to reconcile a temporary patient and all the
associated charges to be reconciled with a permanent patient at the
SUPPLYCENTER Console and Station
• Refill by Request - when restock report is flagged to notify Station, the
associated order appears at the Station with all the items expected to be
refilled.
• Ability to interface and send refill orders from vendors to the Station.
• Ability to create item aliases at the Station
• Ability to create user templates

System Components
JITRBUD Main User Guide 1-3
System Components
There is no one-size-fits-all implementation of the JITRBUD system; the
installation of equipment is configured specifically for your needs and the way
you do business. After working with you to evaluate various options, Pyxis
implements the required components necessary to meet your specific needs.
JITRBUD Stations
There are two types of Stations that utilize JITRBUD transmitters: the JITRBUD
Main and the SUPPLYSTATION System 30 with JITRBUD option:
•The JIT
RBUD Main is an open-shelf system that integrates JITRBUD
transmitters with existing supply storage cabinets, shelves and bins at a
hospital facility.
•The S
UPPLYSTATION 30 with JITRBUD option integrates JITRBUD
transmitters with SUPPLYSTATION System 30 cabinets to expand system
capacity. For more information about the SUPPLYSTATION 30 with JITRBUD
option, see the SUPPLYSTATION System 30 User Guide (version 6.0+).
The JITRBUD transmitters have push-to-take buttons that use radio frequency
(RF) to send transaction information from the storage location to the Station
computer. Supply inventory information is tracked at the Station and sent to the
Console to automate supply distribution and management.
SUPPLYCENTER Console
The SUPPLYCENTER Console is the computer that controls all Stations in your
facility. Each Station reports to the SUPPLYCENTER Console every time an item is
accessed and whenever a transaction is completed. The SUPPLYCENTER Console
is also used to manage users, patients, and inventory throughout the facility. It is
interfaced to the Hospital Information System (HIS) through the ProCar for
updating patient census information and to the Materials Management
Information System (MMIS) for the transfer of usage data.
The Network Information
The ProCar is also part of the SUPPLYCENTER Console communications hub.
Since Pyxis systems use information from the hospital and materials management
information systems, there must be a way to translate all the information into the
format used by Pyxis systems. This translation is the job of the Pyxis ProCar
computer which serves as a connection, or interface, between Pyxis systems and
hospital and MMIS.
Additionally, the following Station interface options are available:
1. Admission, Discharge and Transfer (ADT)
2. Automated Billing
3. Materials Management Information System (MMIS)
4. Direct Vendor Interfaces

System Components
1-4 JITRBUD Main User Guide
Comprehensive Reporting
Given the possibility of dozens of Stations spread throughout a variety of patient
care areas, the need for comprehensive and accurate reporting is critical to
Materials and System Managers.
The SUPPLYCENTER Console keeps up to forty five days of transactional data and
six months of data summary, including supply removal, refilling, inventory
verification, discarding, and returning items from all Stations. This data can be
sorted and printed into a variety of reports and kept as a permanent record of
supply usage. Reports on every aspect of the Station—including door or bin
accesses, inventory, patient ADT, and status—by Station and system-wide are
available from the SUPPLYCENTER Console. If you want to electronically store
this information for reference, safekeeping, or creating spreadsheets, you can
easily archive the SUPPLYCENTER Console’s transaction data to diskette and
import the data into several popular database and spreadsheet programs.

JITRBUD Main User Guide 2-1
Chapter 2
Station Basics
This section describes the following information:
• Using the Touch Screen
• Using the Keyboard
• Using the JITRBUD Transmitters
• Using Window and Screen Features
• Logging in and out of the Station
• Changing Your Password
• Using the Main Menu
• Using Additional Tools
• Viewing Communication status
The examples used throughout this guide show screens with full
access privileges and most Station options turned on. The screens
you see on your system may vary depending on your access
privileges and Station Option settings.
Note
Station Basics
2-2 JITRBUD Main User Guide
Station Basics
This section gives an overview of the Station user interface. There are three ways
to make selections and enter information at the Station:
• Touch-screen
• Keyboard
• Take/Return Remote Transmitters
Using the Touch-Screen
The Station has a touch-screen. Rather than typing commands, simply touch your
selection on the screen. For example, to select a patient, scroll through the list
using the up and down arrows to the right of the list until the patient’s name
appears, then touch the patient’s name. The patient is highlighted when selected.
Using the Keyboard
Some information, such as your password, is entered using the keyboard. If you
make a mistake, simply press the BACKSPACE key to erase keystrokes.
To select an item from a list, type the first few letters of the name to display all
items that match your entry. Continue entering letters until the correct item is
listed.
The following table lists keyboard keys to perform various functions.
Keys Function
UP ARROW
Scrolls up a line in a list.
DOWN ARROW
Scrolls down a line in a list.
BACKSPACE
Deleted previous character in a field.
DEL
Deletes one character forward in a field.
HOME
Takes you to the top item in a list.
END
Takes you to the bottom item in a list.
ENTER
Accepts entries and clears open dialog boxes.
Station Basics
JITRBUD Main User Guide 2-3
Using the JITRBUD Transmitters
JITRBUDs are battery powered transmitters that use radio frequency (RF) to send
transaction data to the Station. Press the Take and Return buttons on the front of
the JITRBUDs to adjust the inventory count when you remove and return items at
the Station.
JITRBUD transmitters emit an audible tone to confirm the successful receipt of
transaction information. The tone emitted for Take and Return transactions are
different so you can distinguish whether you pressed the appropriate button.
Using Window and Screen Features
The features described in the following section will help you navigate through the
Station screens.
Command Buttons
Command buttons let you accept and cancel changes and execute a selected
option.
Scroll Bars
1. Touch the up- and down-arrows. The arrows in the scroll bar are used to move
through lists.
– or –
Use the up- and down-arrows on the computer keyboard and scroll one item at
a time.
Button Description
Done
—Press this button to accept entries, save changes, and
complete an activity. On some screens this button also closes the
screen.
Cancel
—On some screens, pressing this button cancels entries
and the current operation.
Close
—Press this button to close the screen.
Continue
—Press this button to move forward in the process.
OK
—Press this button to accept entries and settings.
Next
—Press this button to go to the next item.
Done
Cancel
Close
Continue
OK
Next
Station Basics
2-4 JITRBUD Main User Guide
Lists
• Select the desired item. The item will be highlighted.
• To select multiple items in a list, press and hold down the CTRL key and
highlight each item.
Drop-down Lists
Select the top arrow to display a list of options.
Check Boxes
A check box is used to select multiple options. You can select one, a few, or all
options listed. When the option is selected, the box contains a check mark. To
clear the selection, touch the box again.
Search Boxes
Search boxes are used to find patients or items in a list. The patient search box
provides a way to search for the patient name, Room, or ID. The Item search
feature provides a way to search for the Item name or ID.
Confirmation Screens
A confirmation screen may appear after selecting an option.
• Press Yes to verify the action.
• Press No to cancel the action.
Logging In
JITRBUD Main User Guide 2-5
Logging In
Only authorized users can access the Station. The system administrator can assign
each Station one of the following modes of access:
• User ID only (not recommended by Pyxis)
• User ID and password
You must log in before you can access the system. Logging in verifies your
identity and allows the system to track your transactions. You must always log in
before performing any activity at the Station.
When you log out, or after the system has been inactive for the pre-determined
time-out interval, the screen reverts to the Login screen until the next user logs in.
Logging In Using ID and Password
Logging in with a user ID and password protects the security of a Station. Use the
touch screen and keyboard to log in to the Station.
To log in using ID and Password
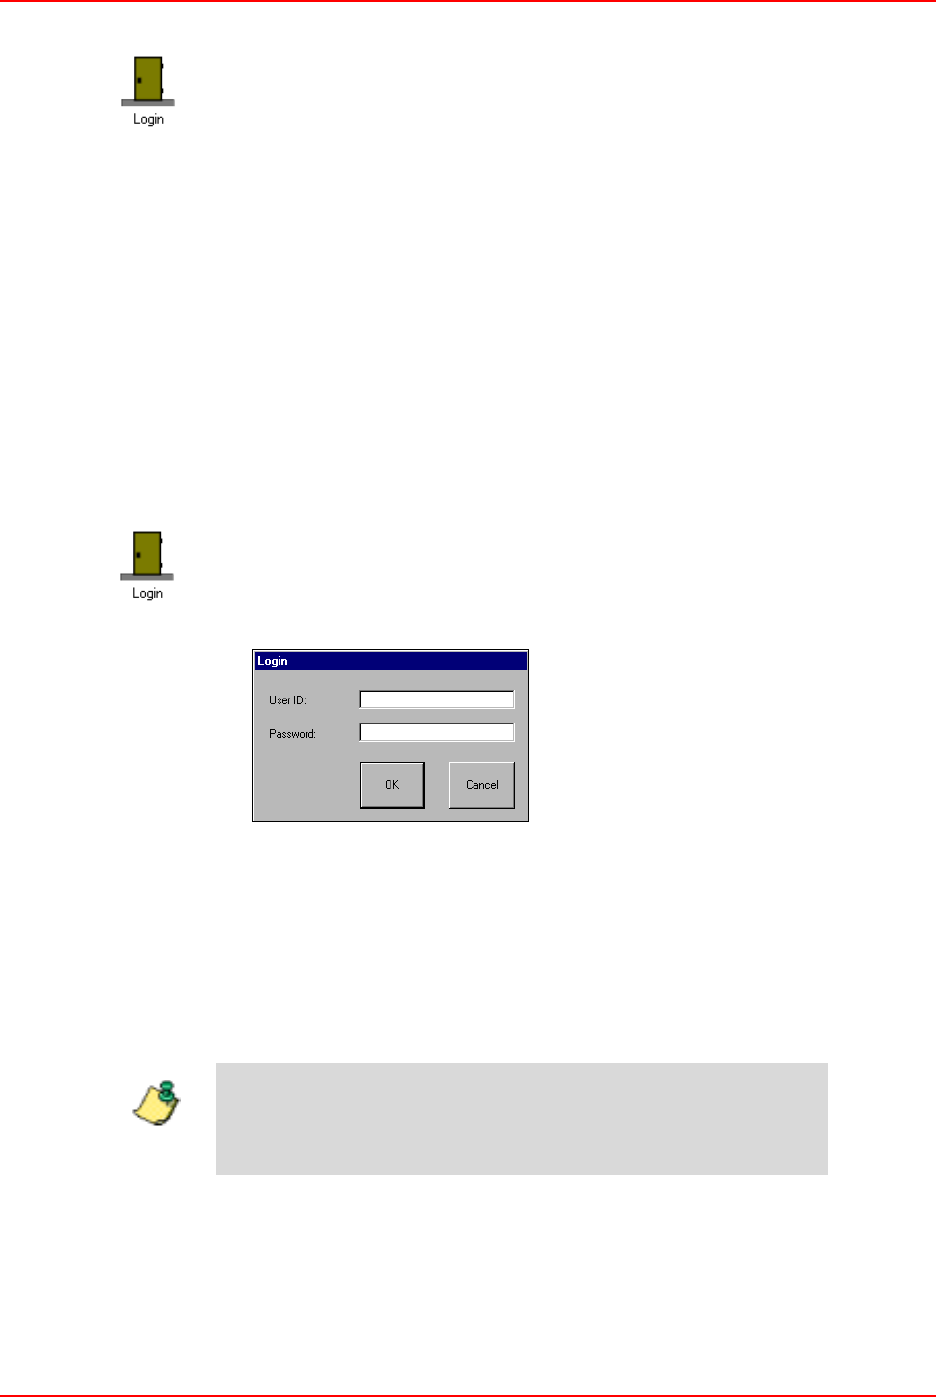
1. Press the Login icon.
The Login window appears.
2. Type your User ID and press TAB or ENTER.
The cursor moves to the Password field.
3. Type your Password and press OK or ENTER.
The screen that appears depends on your security privileges and the
preferences selected on the My Settings window at the Station. The default
screen is the Main Menu. To change the default screen, modify your user
preferences.
For more information about setting user preferences, refer to
Chapter 5, My Settings.
Note

Logging Out
2-6 JITRBUD Main User Guide
Logging Out
You must log out of the system when you leave the Station. As a safeguard
determined by the System Manager, the system will automatically revert to the
Login screen if the Station is inactive for a predetermined period of time even if
you have not logged out. However, you should never leave the Station without
logging out to ensure transactions are not performed by other users using your
login ID.
To log out
1. Press the Exit icon to log out when you are finished using the Station.
The Login screen appears and the Station is ready for the next user to login.
If you have initiated an activity that requires a response, you will
be prompted to complete the activity.
Note
Changing Your Password
JITRBUD Main User Guide 2-7
Changing Your Password
The first time you access the Station, you will use the password assigned to you
by the System Manager. If your user ID on the SUPPLYCENTER Console is set to
Expire Initial Password, you will be prompted to change your password the first
time you log in. You can also change your password at any time as a safety
measure, or when you are notified that your password is about to expire.
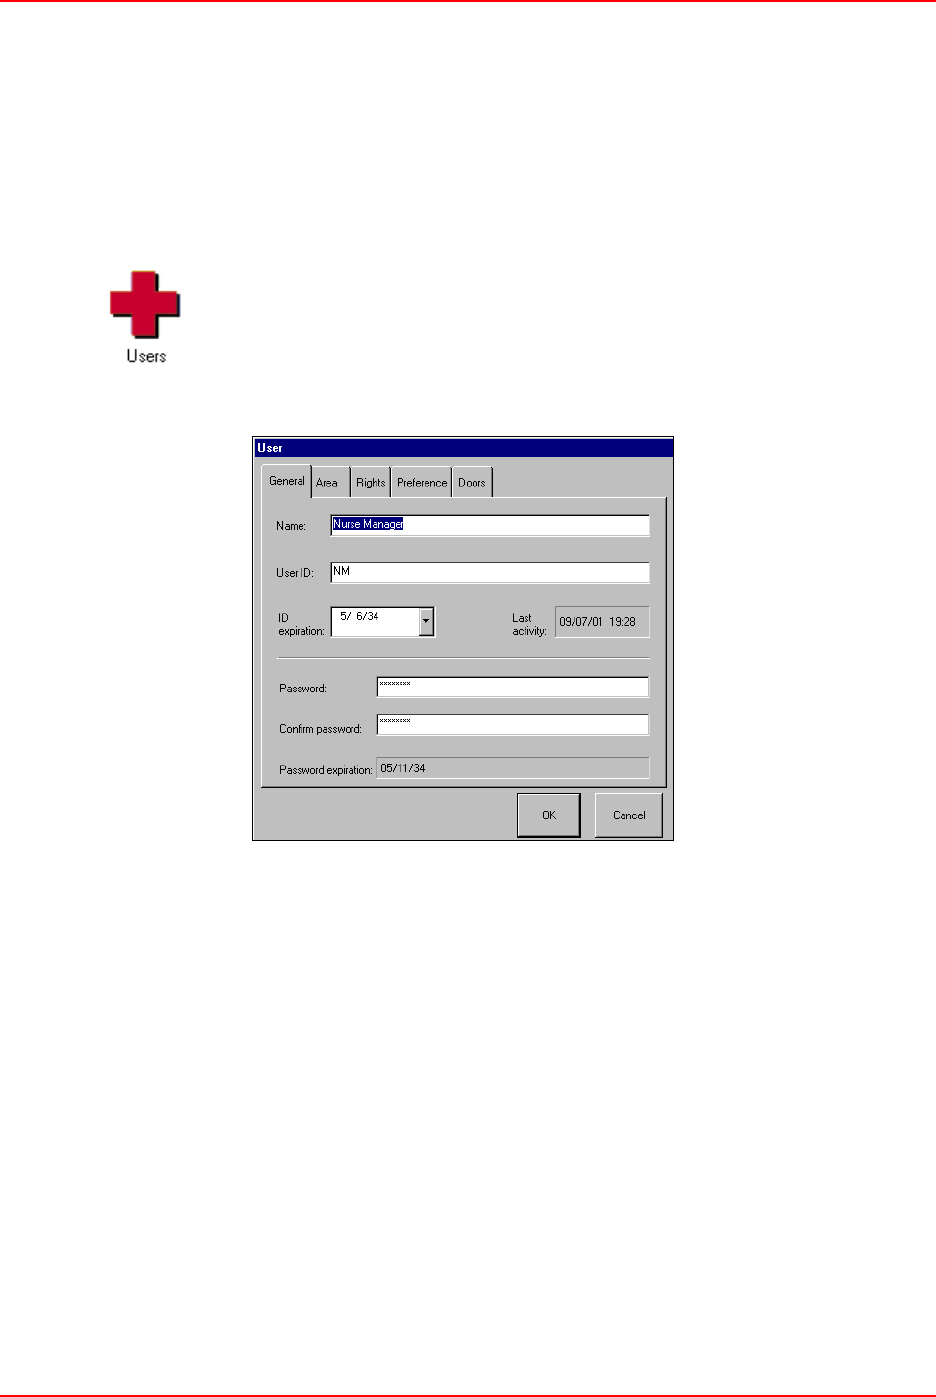
To change your password
1. From the Main Menu, press the Users icon.
The Users screen appears.
2. Select your name and press Edit.
The User window appears.
3. Enter a new password in the Password and Confirm Password fields.
4. Press OK.
5. Press Exit to log out of the Station.
Main Menu
2-8 JITRBUD Main User Guide
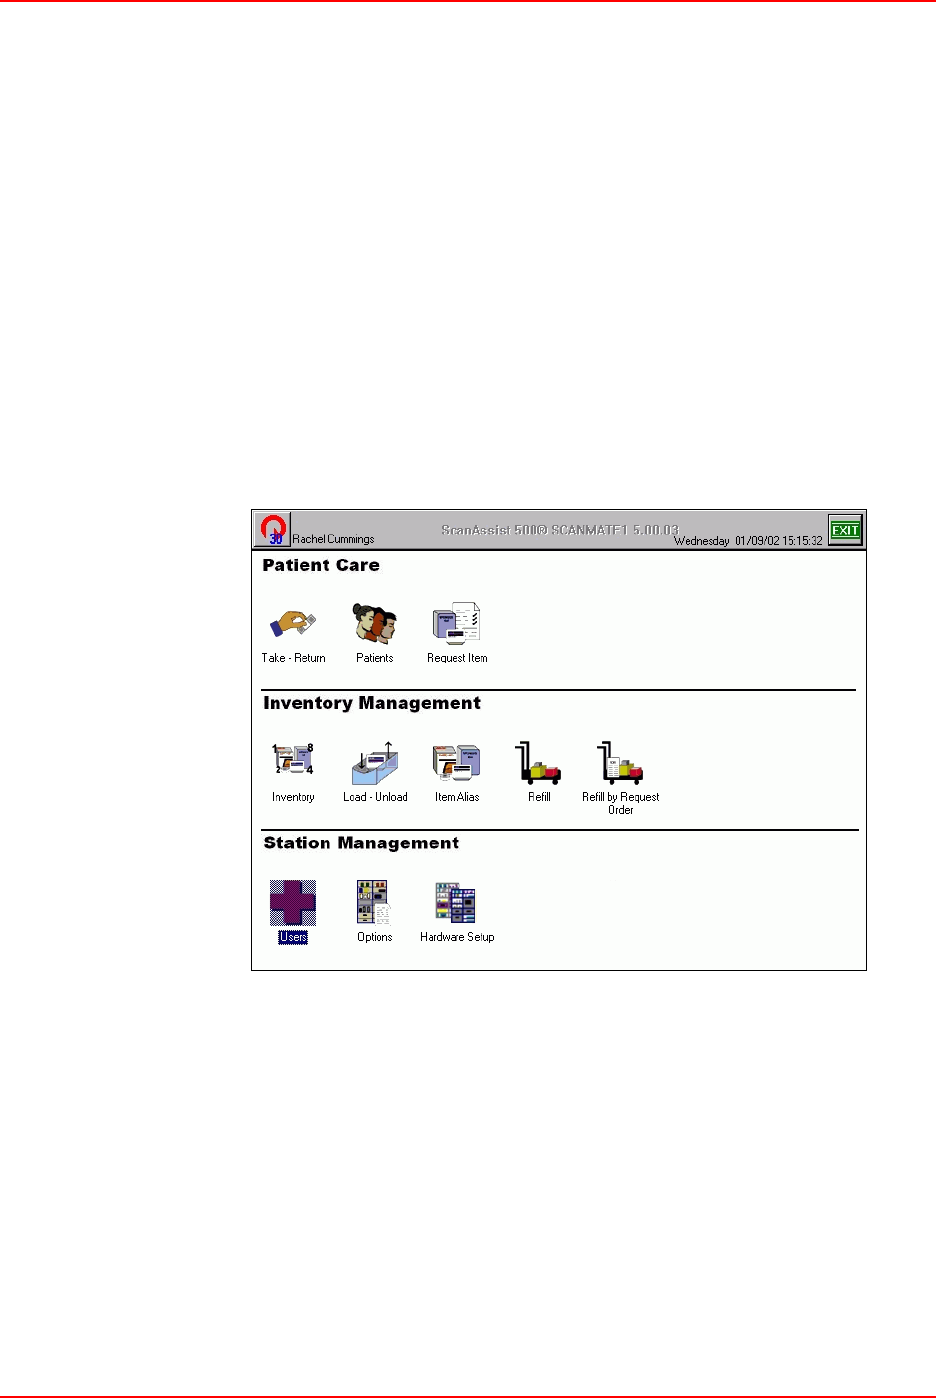
Main Menu
After you successfully login at the Station, the Main Menu appears unless you are
assigned a different Start screen on the Preference tab on the User window. The
Main Menu allows you to access all the functions available with your user access
privilege level.
•Patient Care—Provides access to the Take/Return, Patients, and Request
Item features at the Station. Instructions for these functions are included in
Chapter 3, Patient Care Functions.
•Inventory Management—Provides access to the Inventory, Load/Unload,
Item Alias, Refill, and Refill by Request Order features at the Station.
Instructions for these functions are included in Chapter 4, Inventory
Management Functions.
•Station Management—Provides access to the Users, Options, Hardware and
Setup features at the Station. Instructions for these functions are included in
Chapter 5, Station Management Functions.

Main Menu
JITRBUD Main User Guide 2-9
Main Menu Functions
Description Graphic
Use the Take-Return feature to take or
return items for patient care.
Use the Patients feature to add, edit, and
delete patients, and reconcile ADT. Only
temporary patients can be created at the
Station.
Use the Request Item feature to inform the
SUPPLYCENTER
Console that a supply is
needed at the Station. The message sent to
the
SUPPLYCENTER
Console contains the
Item name, Item ID, User name, User ID
and a text message. Upon sending the
message, the materials management is
alerted.
Use the Inventory feature to maintain
current counts of items at the Station.
Use the Load feature to assign an item to a
location in the Station.
Use the Unload feature to remove an item
from a location in the Station.
Use the Item Alias feature to create an
alternate name for an item. The alias can
be added, edited, or deleted. The item
alias appears on the item list.
Use the Refill feature to replenish items at
the Station. You can refill items at Below
Par, At Refill, At Critical Low, or do a
Spot Refill.
Main Menu
2-10 JITRBUD Main User Guide
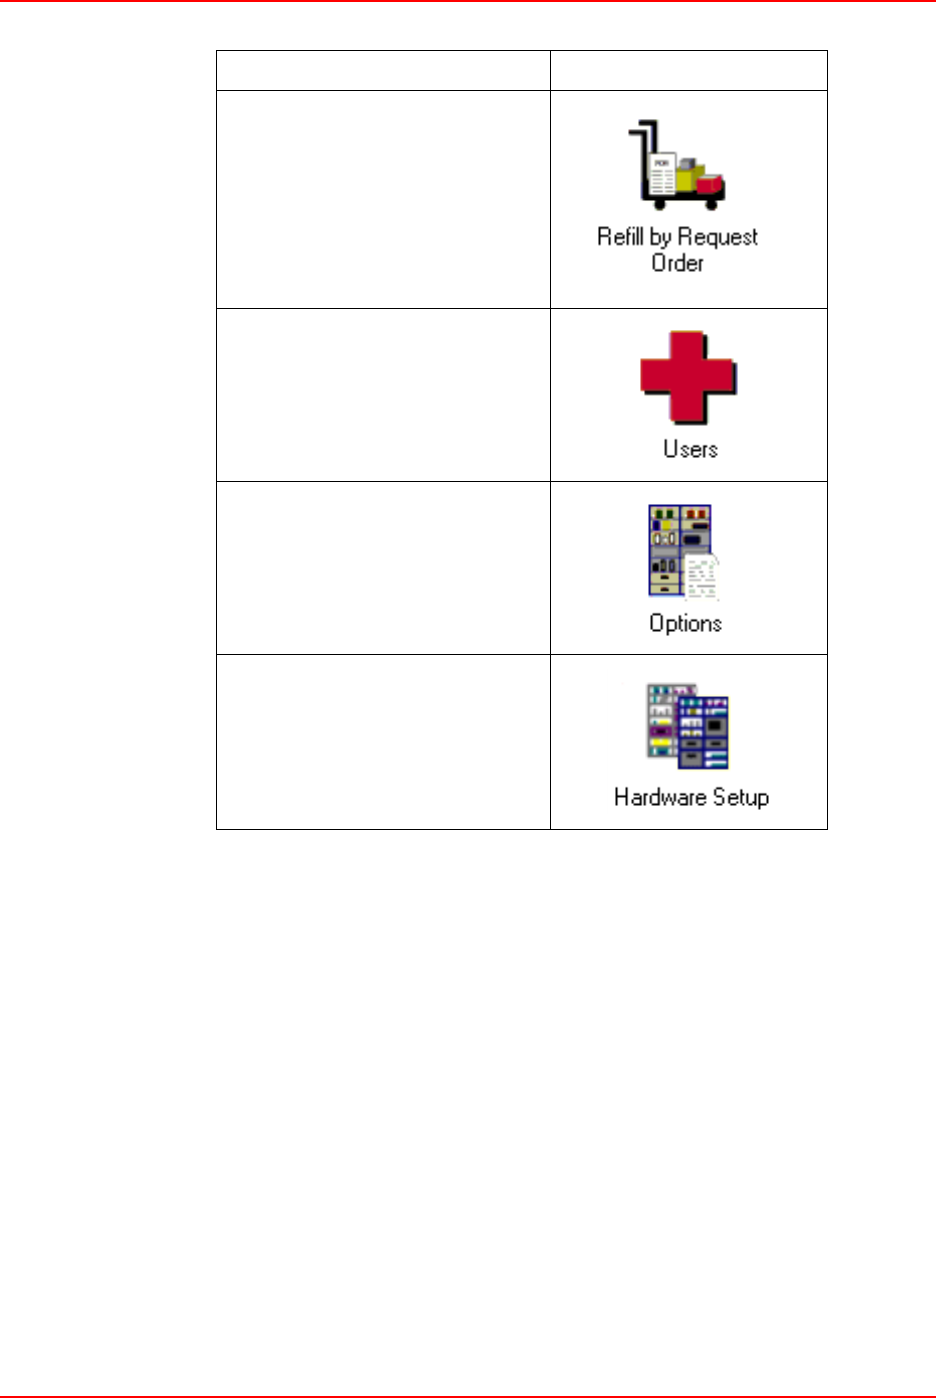
Use the Refill by Request Order feature to
replenish the Station in one simple step.
Replenishment information is received
electronically from the
SUPPLYCENTER
Console or outside vendors and transmits
data directly to the Station with an
associated PO number.
Use the Users feature to create a user or a
user template. You can also edit user
settings, delete a user, or extend an ID
Expiration.
Use the Options feature to customize the
Station for specific needs and purposes.
Included are General Station Information,
Options, Time Options, Printing Options,
and Station Communication Settings.
Use the Hardware Setup feature to add,
edit, or delete a cabinet or device. For
additional assistance or information call
the Pyxis Worldwide Service Center at:
1-800-727-6102.
Description Graphic
Using Additional Tools
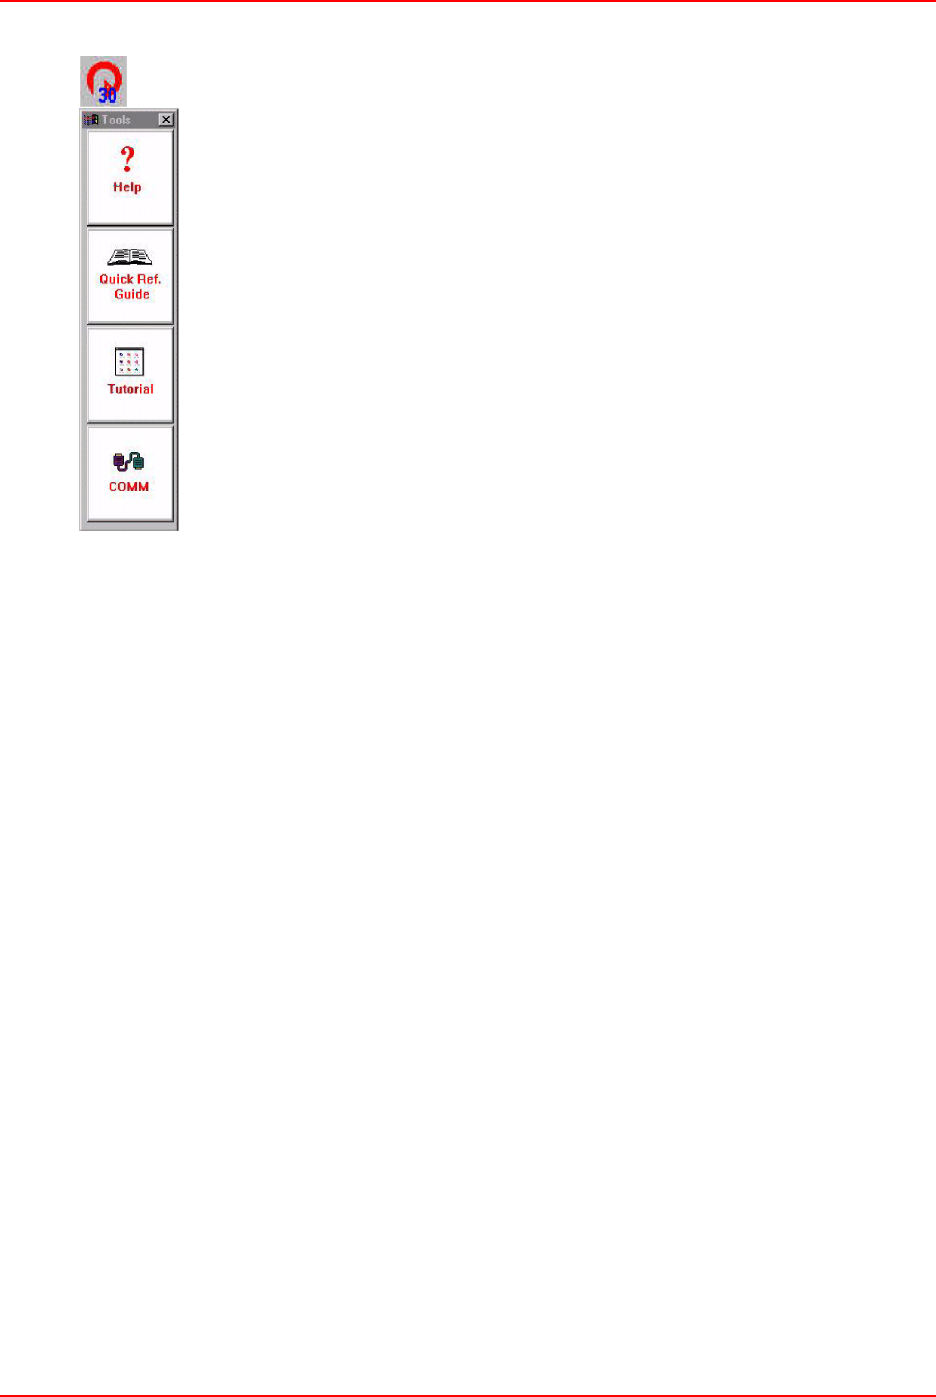
JITRBUD Main User Guide 2-11
Using Additional Tools
Select the Pyxis icon to display the toolbar.You can access the tools when you are
logged in or out of the Station.
1. Press the Pyxis icon in the upper left corner of the screen.
The Tools drop-down menu appears.
2. Press the icon to select one of the following Station tools:
•Help - provides a Help Menu to display the online Help file
•Quick Reference Guide - provides a Quick Reference Guide for the
Station functions.
•Tutorial - provides a tutorial that includes the basic steps of the major
tasks you will perform at the Station. You can not run the tutorial while
you are logged on to the Station.
•COMM - displays the status of communication between the Station and
the Console.
3. Press the close X button in the upper right corner of the Tools menu to exit.
Station Communication
2-12 JITRBUD Main User Guide
Station Communication
Communication Status at the Station shows diagnostic information about the
communication link between the Station and the SUPPLYCENTER Console. The
Comm Status window can be accessed from the toolbar menu after logging in or
from the Login screen.
There are 5 different types of communication methods:
• XT - Network
• FA - Direct Serial (9600 baud)
• RS - RS 485 (2400 baud, also NS 9600 baud)
• MO - Modem
• DA - Direct Access
Verifying Communication
To verify communication
1. Press the tools menu icon.
The tools menu appears.
2. Press the Communication icon.
The Device Status screen appears.
Station Communication
JITRBUD Main User Guide 2-13
Device Status
Device Status is the most commonly used comm status screen, showing the status
of the communication links between the Console and the various devices--i.e.,
Stations, ProCars, etc. Devices list in rows, with columns for the name, the polling
status and polling period, the time when last polled, how late the next poll is, the
time when the Console and device last communicated successfully, the poll fail
count, the number of messages in the memory message queue, the number of
messages in the overflow message queue on disk, and the finish status.
The only devices you will see on the Station’s communication status is the
Console. The Device Status screen is used to check the communications between
the Station and the Console. This is the first and most important screen to review
if a communication failure is suspected. For information about the Device Status
screen, refer to the following table.
Message Description
Device any piece of equipment that communicates directly with the
Console, such as the Station or ProCar computer
Method method type used
Poll indicates if the device is set up to be polled: Y for Yes, N for
No. (The Station should be
N
unless the Station is polling.
Usually, the Console polls the Station.)
p.fail the Console polls the Station, so value will always be 00:00
p.data the Console polls the Station, so value will always be 00:00
p. no data the Console polls the Station, so value will always be 00:00
last try data and time the device was last polled by the Console

Station Communication
2-14 JITRBUD Main User Guide
last link date and time the device was last successfully linked with the
Console
FC (Failure Count) the number of times the Console and Station
have failed to link
rq msg messages received at the Station from other units
xq msg (Disk Message) number of messages that the Station has
temporarily stored in the database for transmission to the
Console. This number is normally zero, but it may increment
if overall traffic is heavy and memory becomes depleted or if
the Stations are off-line. When memory becomes available,
the xq msg should quickly drop to zero as the messages are
again queued in memory.
status finish status code. The code shows what the last status was
between Station and Console.
Message Description
Station Communication
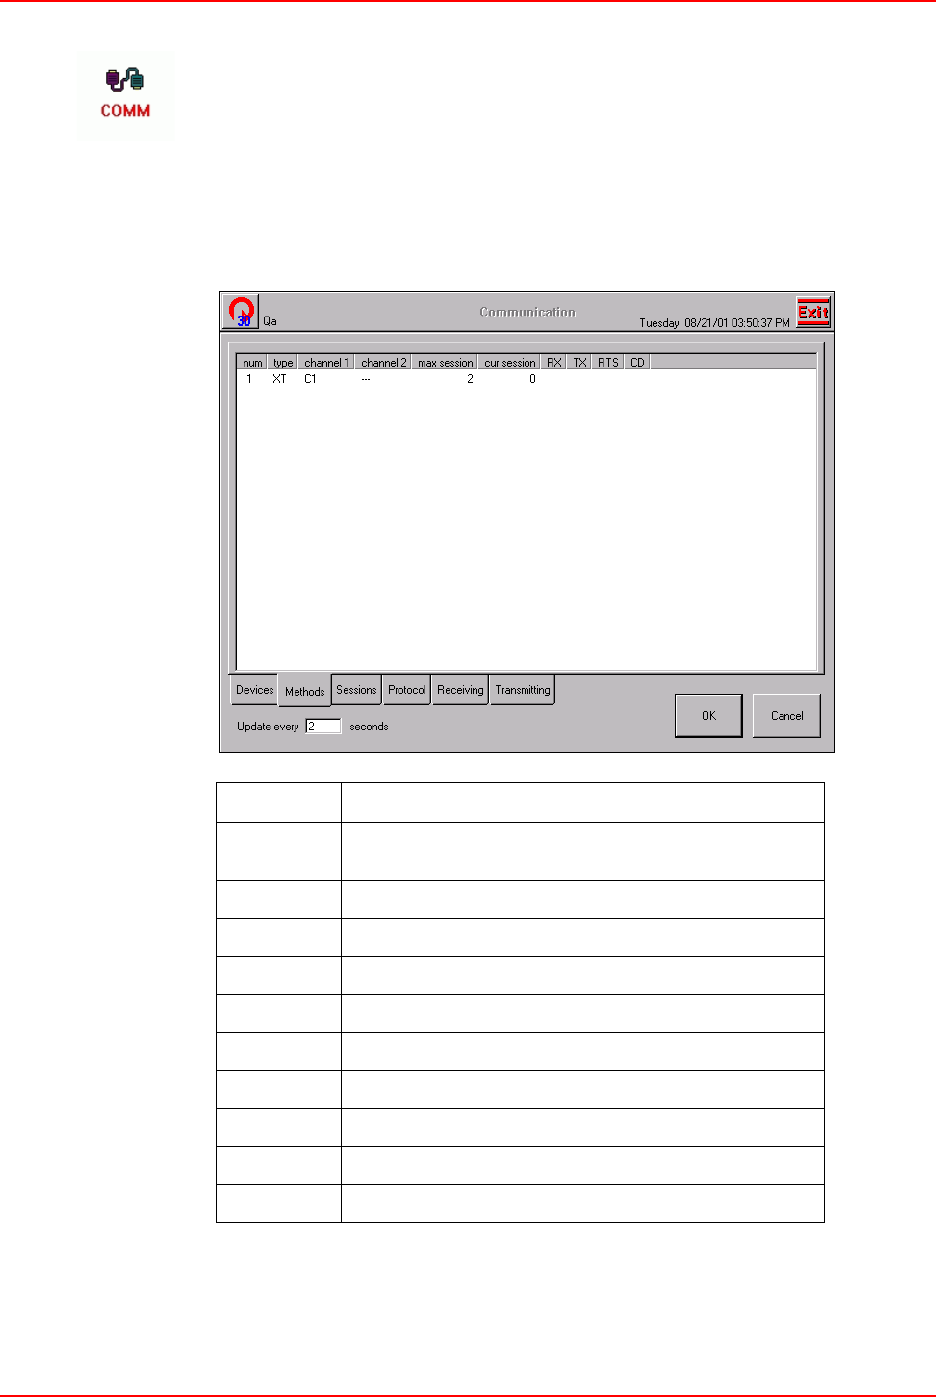
JITRBUD Main User Guide 2-15
Methods Status
Methods Status shows how each method has been set up and which session is
active in the event the method supports multiple sessions. Each method has a row.
The columns show the method number, method, primary channel (comm port),
secondary channel (for serial port expander), maximum sessions allowed, and the
number of the current active session. In all the Comm Status screens, pressing a
tab (e.g., Methods) refreshes the screen. For information about the Methods Status
screen, refer to the following table.
Message Description
num method number - number referenced from the Protocol and
Session Status screens.
type method type
channel 1 primary communication channel
channel 2 secondary communication channel
max session maximum number of sessions allowed
cur session current number of active sessions
RX Not Used - no blinking on screen
TX Not Used - no blinking on screen
RTS Not Used - no blinking on screen
CD Not Used - no blinking on screen
Station Communication
2-16 JITRBUD Main User Guide
Sessions Status
Session Status shows the stage in the session for each device currently in a comm
session with the Console. A session is the whole comm process from start to
finish. There is a row for each session for each method. The columns for each
session include the method number and method, stage in the session, and name of
the device with which the Console is communicating in that session. For
information about the Session Status screen, refer to the following table.
Message Description
num session number
method number and type of method being used
status current stage in the session for this device (idle, poll, protocol,
transmission, end)
device name of the linked device
Station Communication
JITRBUD Main User Guide 2-17
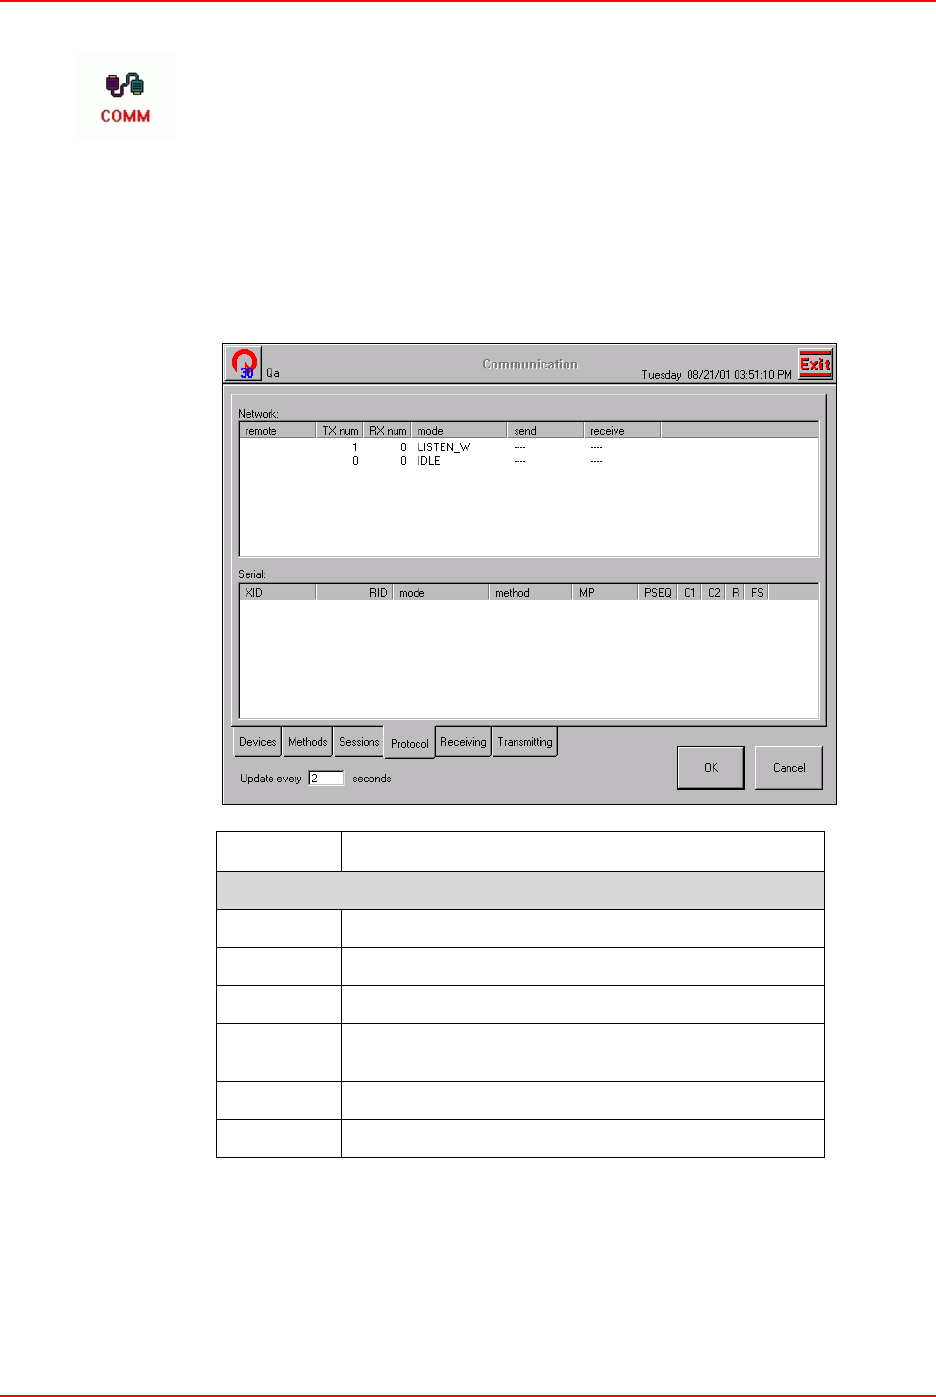
Protocol Status
Protocol Status shows the stage in the protocol for each device currently in
protocol with the Console. There is a row for each protocol session (the number of
sessions per method depends on the method). The columns for each session
include the name of the device polled, the name of the device that is polling, the
mode or stage in the protocol, method number in the methods.cfg, the 1st few
characters of the message, the packet sequence (i.e., the number of messages
sent), the retry counter value (fails at 7), a try again status flag of T or F, and finish
status. Network protocol has its own, unique status data layout. For information
about the Protocol Status screen, refer to the following tables.
Message Description
Network
remote type of device
TX num messages transmitting
RX num messages receiving
mode
(Network)
current step in the protocol
send messages sent
receive messages received
Station Communication
2-18 JITRBUD Main User Guide
Message Description
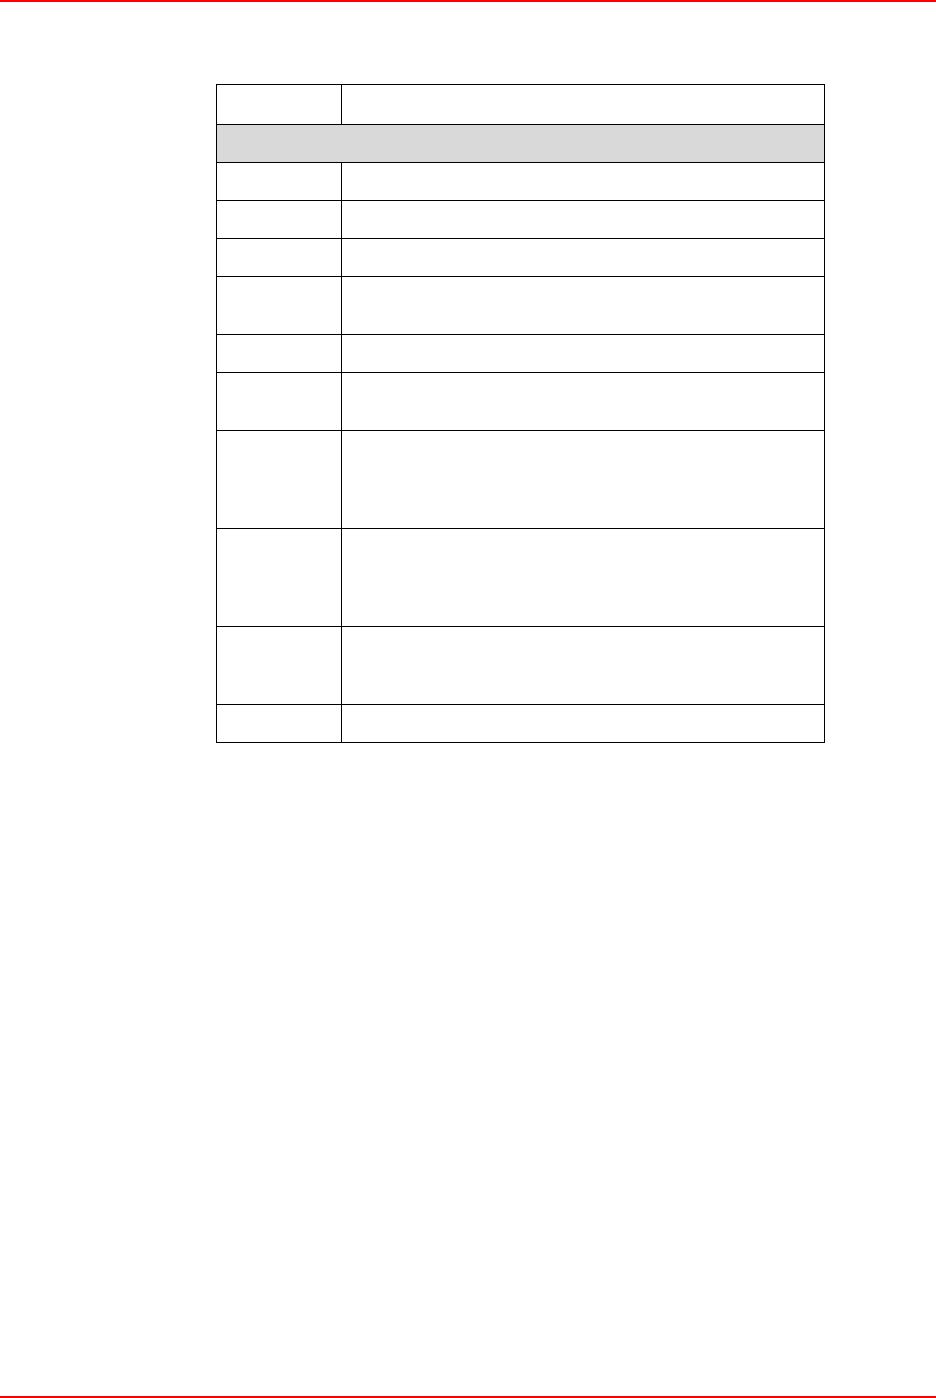
Serial
XID The name of the device polled.
RID The name of the poller, usually the Console.
mode The current step in the protocol.
method The method used which corresponds to the method number in
the method status screen.
MP The first few characters of the message being sent.
PSEQ Packet sequence, the number of messages transmitted during
the session.
C1 The first retry counter which increment when a message
packet is received with an apparent error. The packet is
retransmitted until it is error-free or fails seven times, after
which the transmission is aborted.
C2 The second retry counter which increment when a message
packet is received with an apparent error. The packet is
retransmitted until it is error-free or fails seven times, after
which the transmission is aborted.
R Indicates the direction of transmission: ‘T” indicates
communications to the polled device not yet reversed). “F”
indicates communications from the device.
FS Finish status. The result of the last poll.
Station Communication
JITRBUD Main User Guide 2-19
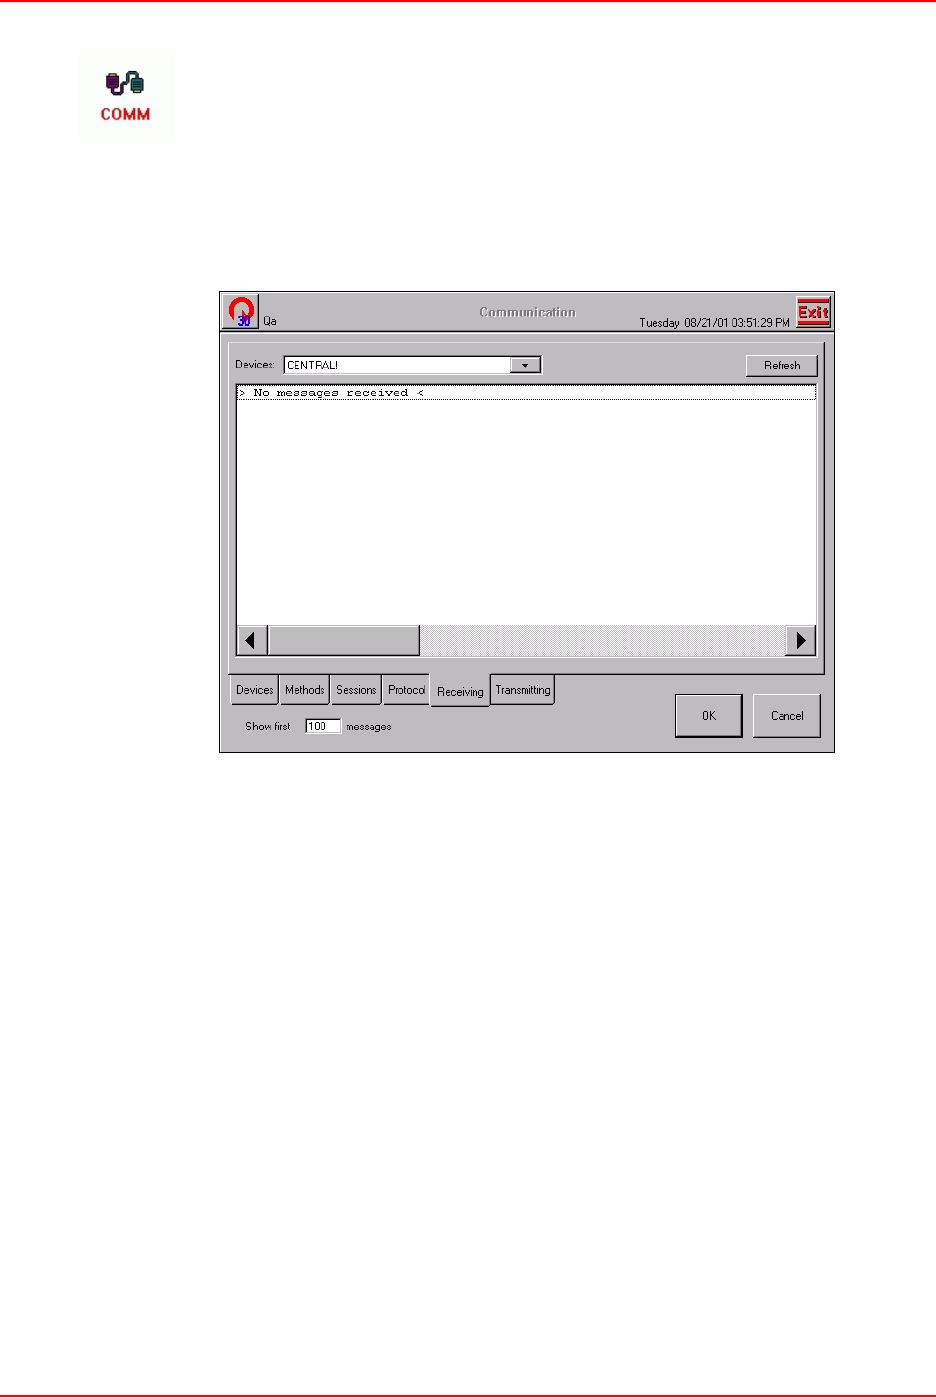
Receiving Status
The Receiving Status screen displays the messages received from a Console, other
Stations, or a Procar. The receiving status screen contains the following:
• Devices choice list - Displays the devices communicating
• Refresh button - Refreshes the display
• Show first ___ messages box - Displays the designated number of messages
received.

Station Communication
2-20 JITRBUD Main User Guide
Transmitting Status
The Transmitting Status screen displays outgoing messages to a Console, other
Stations, or a PROcar. The transmitting status screen contains the following:
•Devices choice list—displays the devices communicating
•Refresh button—refreshes the display
•Show first ___ messages box—displays the designated number of messages
transmitted.
JITRBUD Main User Guide 3-1
Chapter 3
Patient Care Functions
This chapter provides the following Patient Care features accessed from the
Patient Care section of the Main Menu:
•Take/Return—take or return items for patient care.
•Patients—add, edit, and delete patients and reconcile ADT. Only temporary
patients are created at the Station.
•Request Items—inform the SUPPLYCENTER Console that a supply is needed
at the Station.
The appropriate use of the Patient Care features is determined by your hospital’s
policies and procedures. Your user Rights determine the icons that appear on the
Main Menu.
Take-Return
3-2 JITRBUD Main User Guide
Take-Return
Use the Take-Return feature to remove supplies from the system. The Take-
Return process records transactional data and sends information to the
SUPPLYCENTER Console.
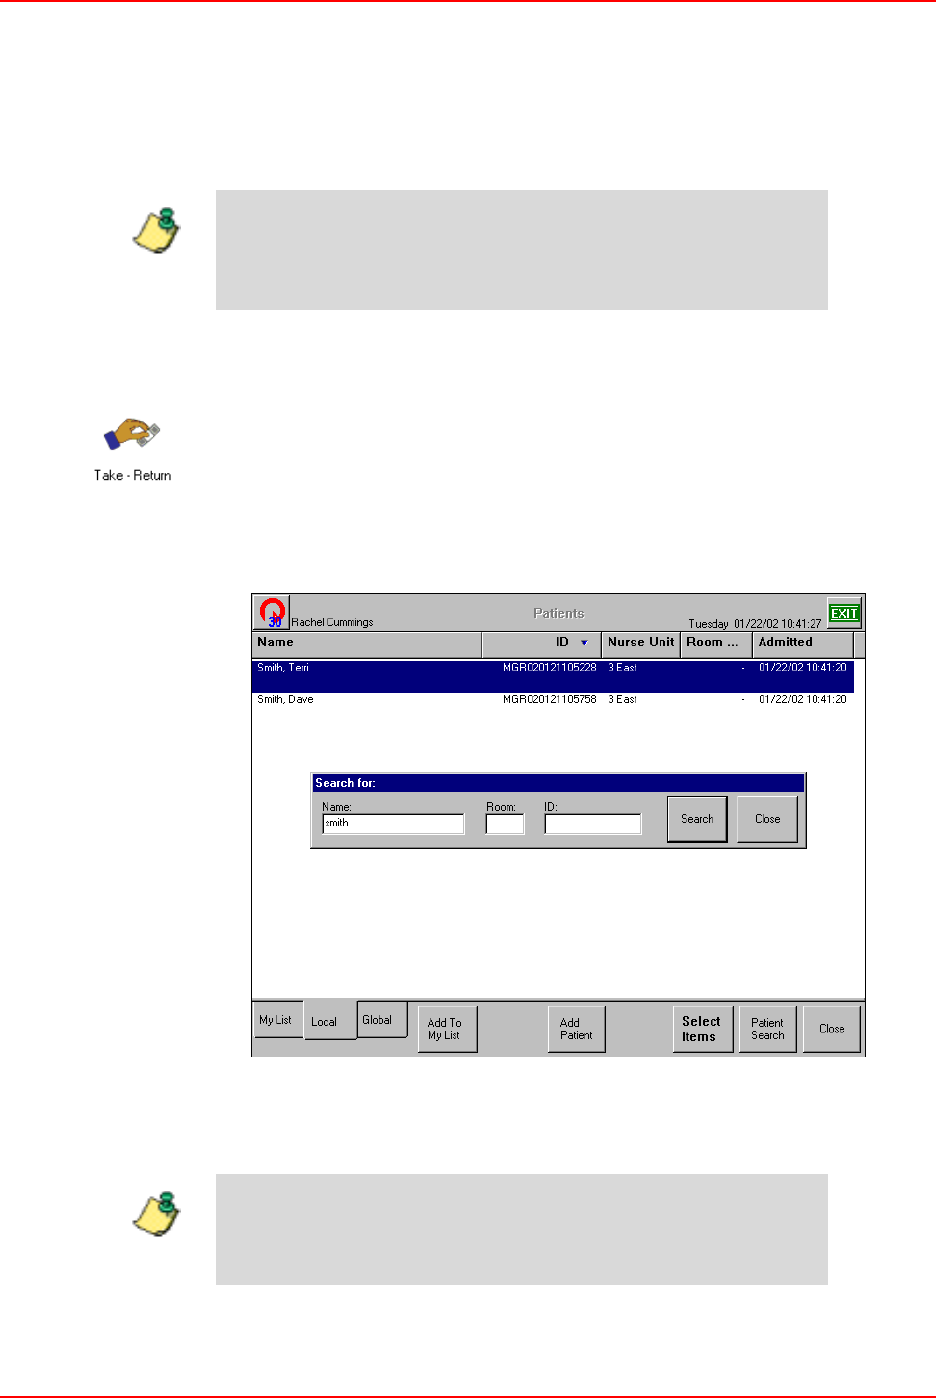
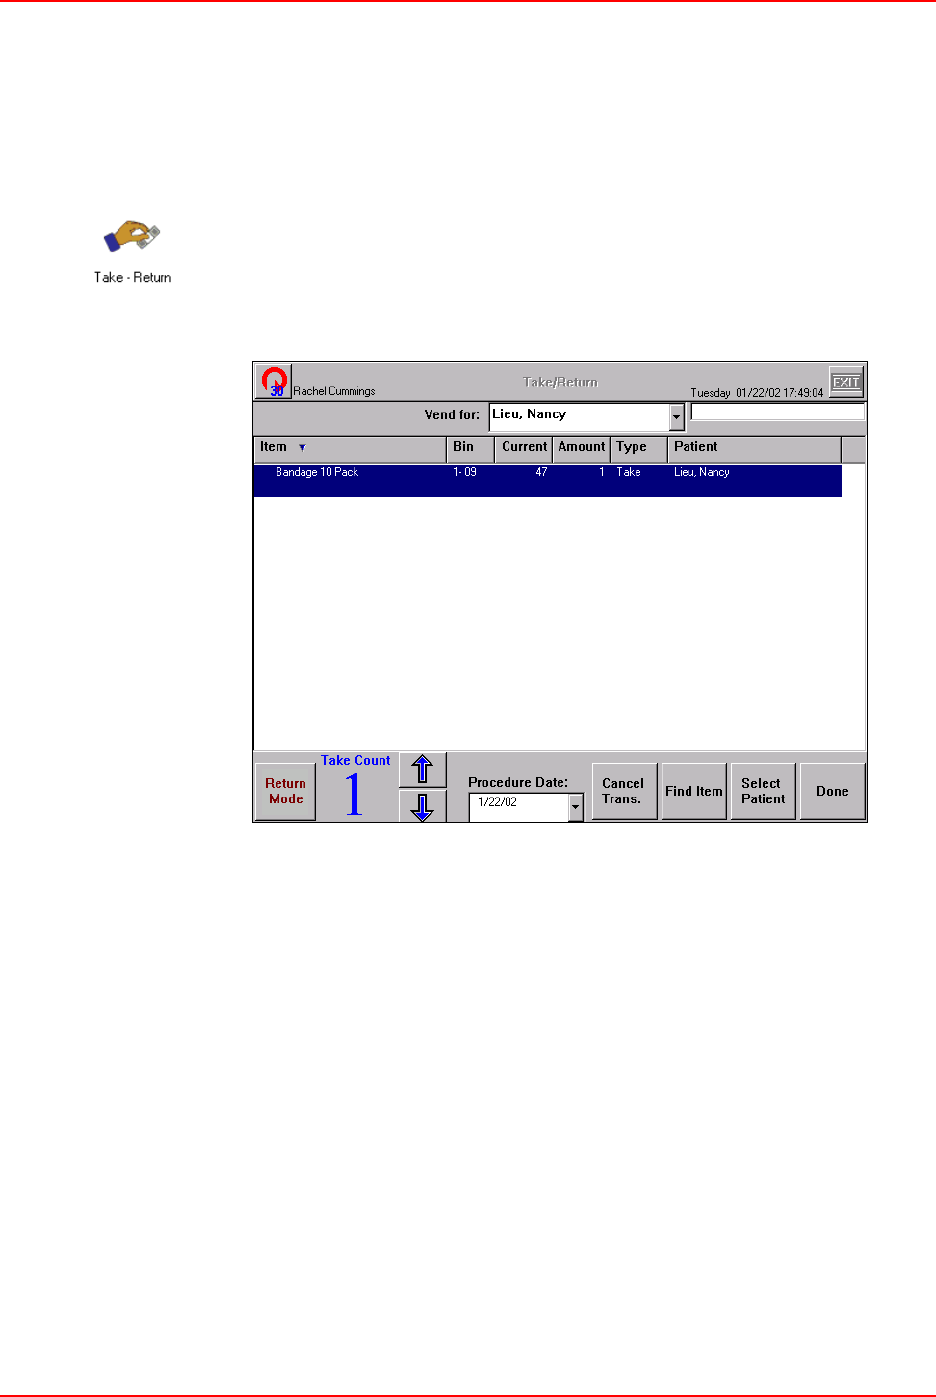
Searching for Patients
To search for a patient
1. From the Main Menu, press the Take-Return icon.
The Patient’s window appears.
2. Press the Patient Search button.
The Search For window appears.
3. Type the first letters of the name or ID you are searching for. If necessary,
press the Search button or the ENTER key.
The name appears in the Patients window.
Use the Emergency Access feature to quickly take items from the
Station without selecting a patient. The Emergency Access feature is
available only when the Emergency Access option is selected in
Station Options.
If you type the entire name, the name appears in the window. If
you type in the first few letters of the name, a list of names
appears to select the appropriate patient.
Note
Note
Take-Return
JITRBUD Main User Guide 3-3
4. To display the entire list again, delete the text in the Search For window and
press Search.
The complete list appears.
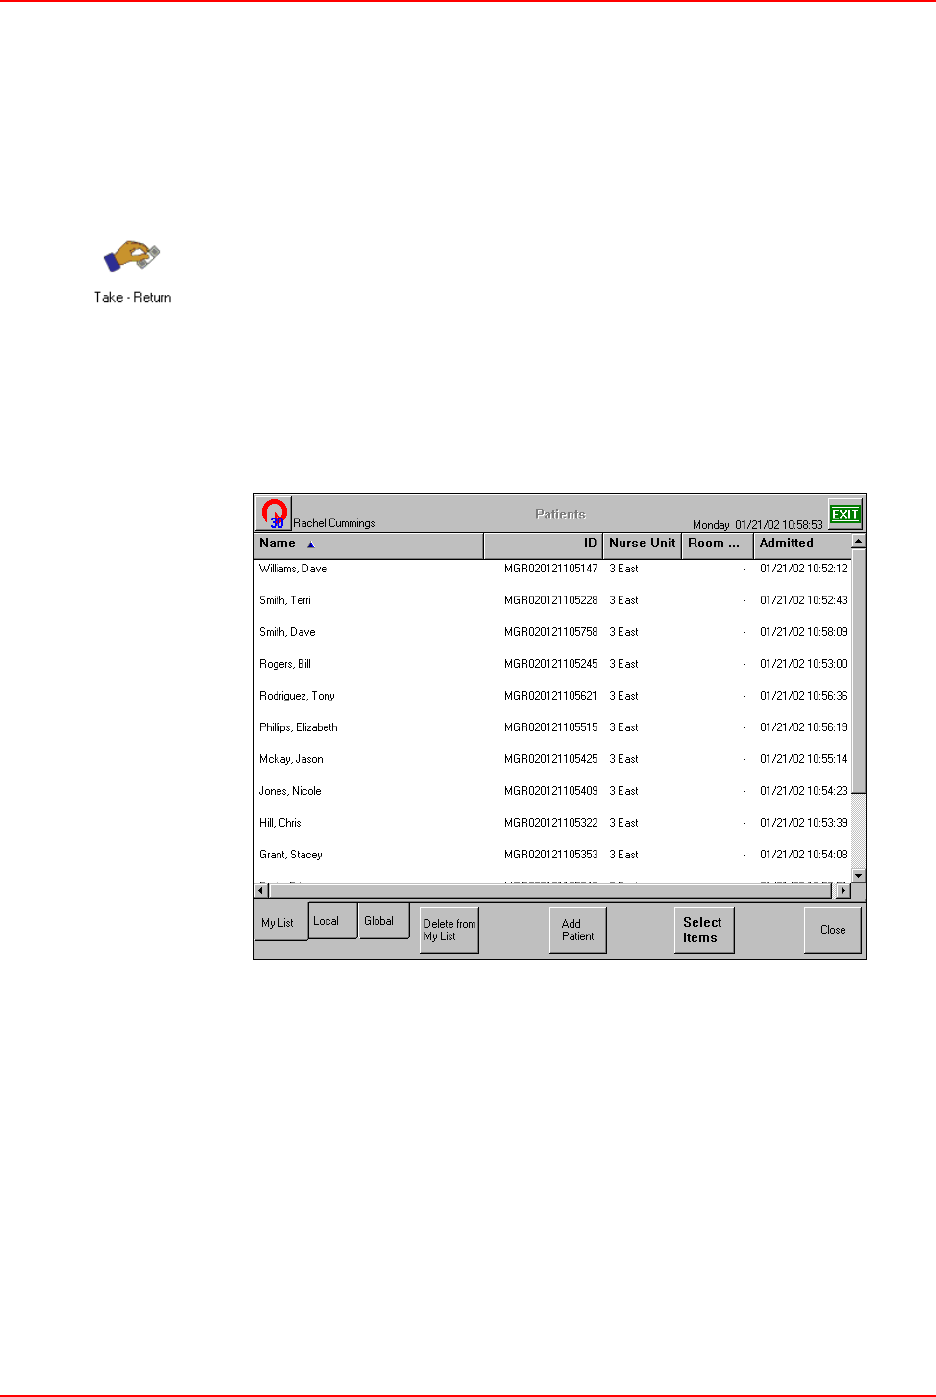
Sorting Lists
To sort a list
1. From the Main Menu, press the Take-Return icon.
The Patient’s window appears. The patients appear as you have specified on
the preference tab in the My Settings window.
2. To sort the Patient’s Name, ID, Nurse Unit, or Room and Bed, press the
information bar at the top of the column.
An arrow appears as the system sorts each column in order, as shown in the
following illustration.
Take-Return
3-4 JITRBUD Main User Guide
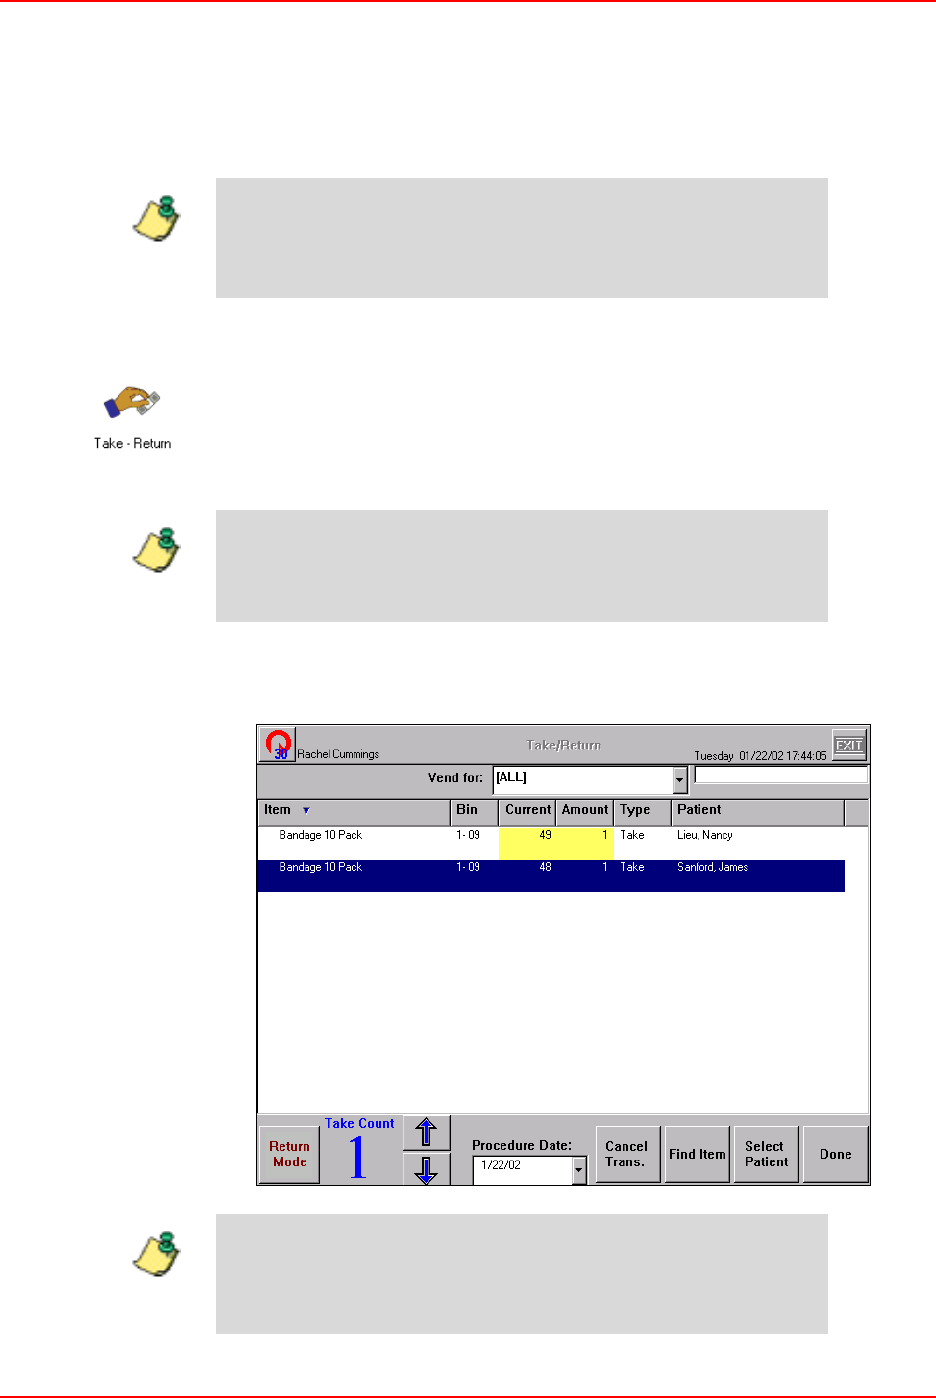
Taking Items
The Station Options menu includes the Multiple Patient Selection and No Patient
Mode options. The selected options determine the Take-Return process at the
Station.
Taking Items with Multiple Patient Selection Feature
To take items with Multiple Patient Selection feature
1. From the Main Menu, press the Take-Return icon.
2. Select the patient by touching the screen. To take the same item for multiple
patients, press and hold down the CTRL key and select multiple patients.
3. Press Select Items.
4. Press the Take button on the remote transmitter once for each item removed.
Use the Emergency Access feature to quickly take items from the
Station without selecting a patient. The Emergency Access feature is
available only when the Emergency Access option is selected in
Station Options.
Use the Patient Search feature to quickly find patients. For more
information, Searching for Patients on page 3-2.
All is displayed in the Vend For field when you are taking items
for multiple patients. At this point, you can take an item for only
one of the patients by selecting the desired patient name from the
Vend For list.
Note
Note
Note
Take-Return
JITRBUD Main User Guide 3-5
5. To adjust the Take Count, select the item and press the Up or Down arrow
buttons.
6. Press Done to return to the Main Menu, or Exit to log out of the Station.
Quick Take
To take items (Multiple Patient Selection option deselected)
1. From the Main Menu, press the Take-Return icon.
2. Select a patient.
3. Press the Take button on the remote transmitter once for each item removed.
4. To adjust the Take Count using the touch screen, select the item and press the
Up and Down arrow buttons.
5. Press Done to return to the Main Menu, or Exit to log out of the Station.
Take-Return
3-6 JITRBUD Main User Guide
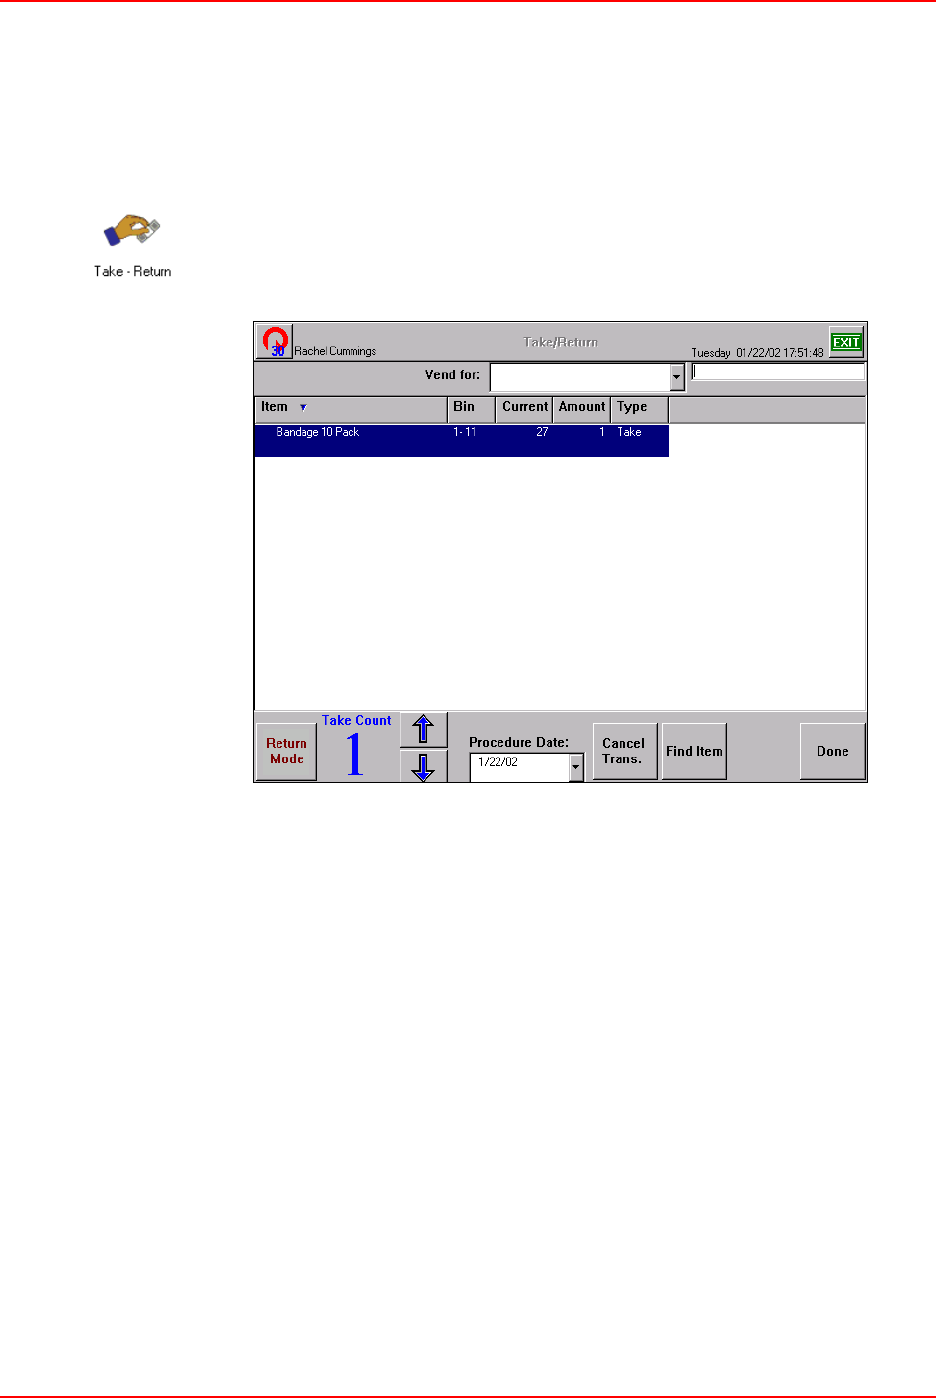
Taking Items in No Patient Mode
The No Patient Mode feature does not require you to select a patient in order to
perform Take and Return transactions. Use the No Patient Mode feature if you do
not want to associate supplies with patient records for billing purposes. The No
Patient Mode feature is available in Station Options.
To take items in No Patient Mode
1. From the Main Menu, press the Take-Return icon.
2. Press the Take button on the remote transmitter once for each item removed.
3. To adjust the Take Count using the touch screen, select the item and press the
Up and Down arrow buttons.
4. Press Done to return to the Main Menu, or Exit to log out of the Station.
Take-Return
JITRBUD Main User Guide 3-7
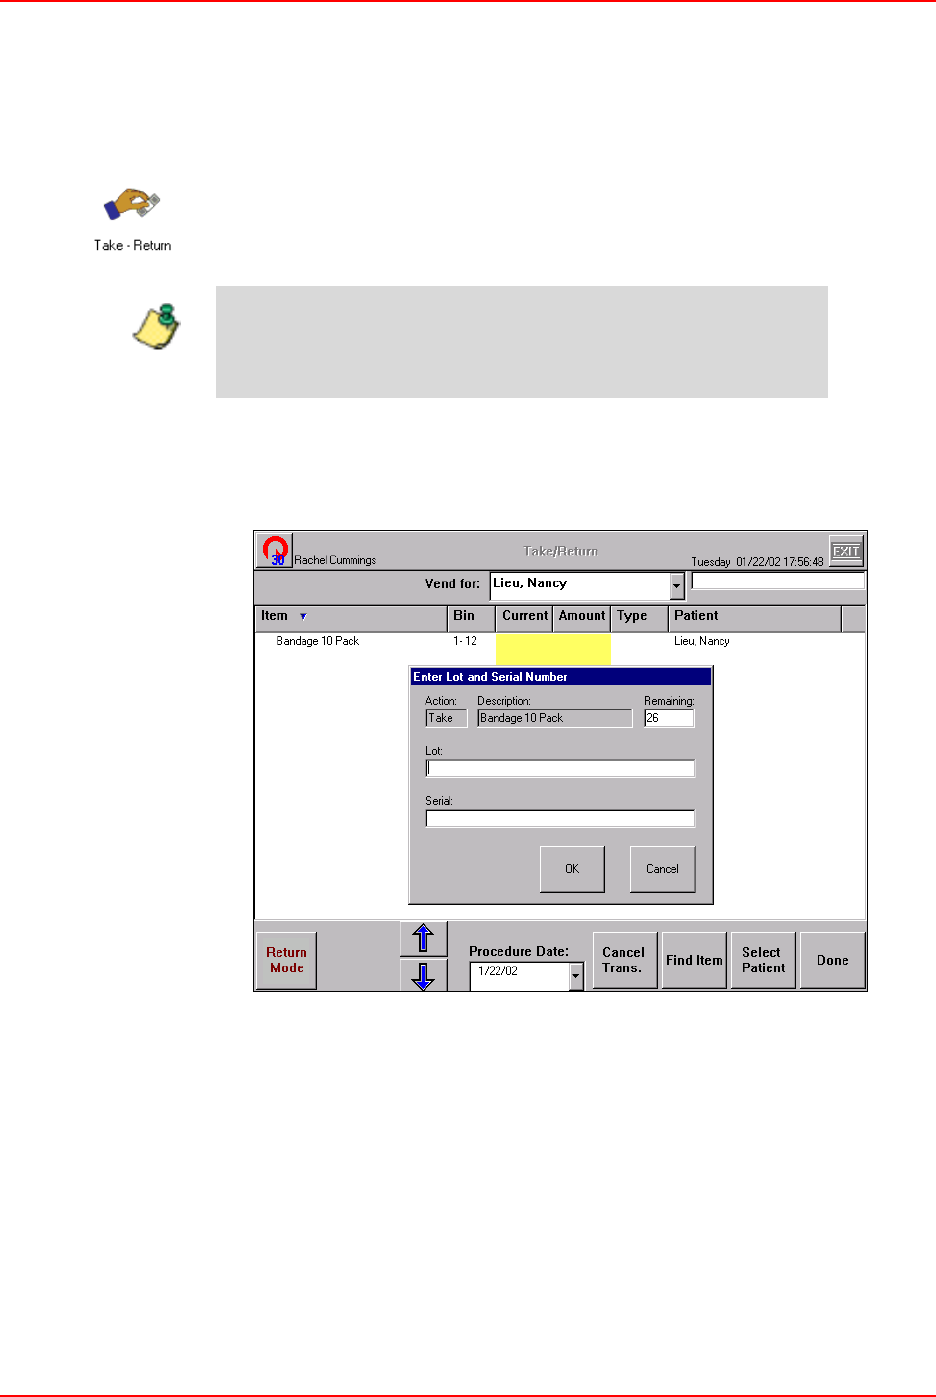
Taking Items with Lot/Serial Number Tracking
To track an item with a lot and/or serial number, the item must be flagged at the
SUPPLYCENTER Console and the Lot/Serial Number option must be selected in
Station Options.
To take items with lot/serial number tracking
1. From the Main Menu, press the Take-Return icon.
2. Select a patient.
3. Press Select Items.
4. Press the Take button on the remote transmitter.
The Enter Lot and Serial number window appears.
5. Type the Lot and/or Serial numbers.
6. Press OK.
Use the Patient Search feature to quickly find patients. For more
information, Searching for Patients on page 3-2.
Note
Take-Return
3-8 JITRBUD Main User Guide
7. To adjust the Take Count using the touch screen, select the item and press the
Up and Down arrow buttons.
8. Press Done to return to the Main Menu, or Exit to log out of the Station.
Take-Return
JITRBUD Main User Guide 3-9
Using the Procedure Date Feature
The Procedure Date feature is designed for the Supply application in an O.R.
setting. It allows users to remove items for a patient and select a procedure date
(typically for the purpose of delaying the charge until the patient’s procedure
date).
The system logs the actual time the item is removed to ensure inventory and
activity reports are accurate. The procedure date is also noted.
To Take Items using the Procedure Date feature
1. From the Main Menu, press the Take-Return icon.
2. Select a patient.
3. Press Select Items.
4. Press the Take button on the remote transmitter once for each item removed.
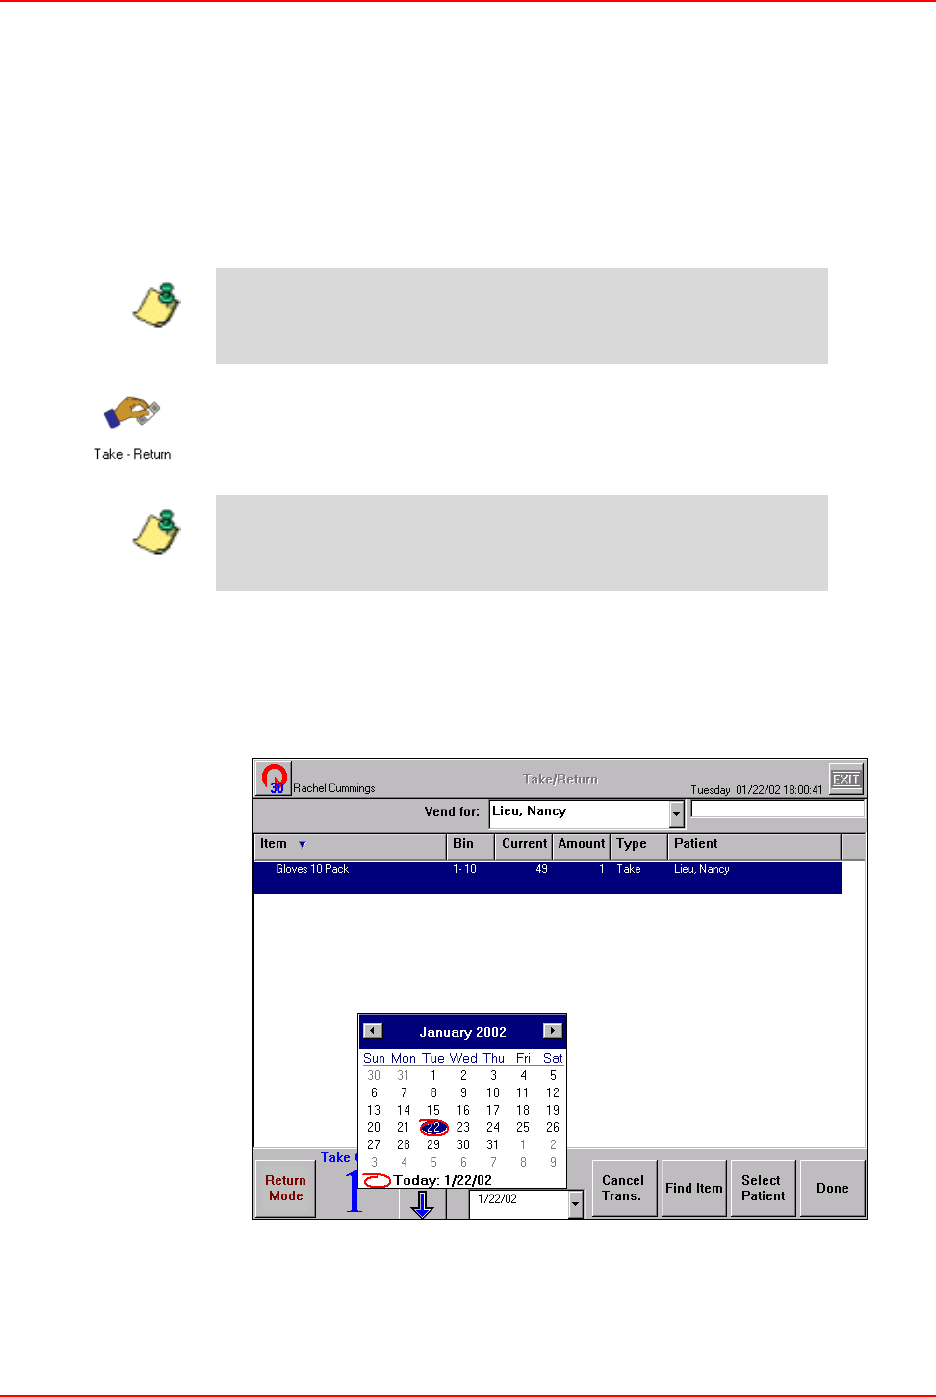
5. Press the arrow next to the Procedure Date field.
The Procedure Date calendar appears.
6. Select a procedure date for the selected items on the Procedure Date calendar.
7. Press Done to return to the Main Menu, or Exit to log out of the Station.
The Procar computer must be set up properly for the Procedure Date
feature to function correctly.
Use the Patient Search feature to quickly find patients. For more
information, Searching for Patients on page 3-2.
Note
Note

Take-Return
3-10 JITRBUD Main User Guide
Patient Lists
There are three patient list tabs at the bottom of the Patients screen: My List,
Local, and Global.
Global Patient List (Global)
The Global patient list tab allows you to select all patients from the hospital’s
ADT. When the Global patient list is active, it appears as a tab on the Patient List
screen under Take-Return and Discard.
Local Patient List (Local)
The Local patient list tab includes patients whose nursing unit is assigned to a
specific Station’s area (for example, CCU or ER only).
My Patient List (My List)
The My List tab is a customized patient list that each user can use to include or
delete patients under their care.
The Global patient list is a Station option and can be turned on and
off in the Station Options window. For more information, see Station
Options on page 5-25.
When you take an item for a patient, the patient is automatically
added to your patient list (My List).
Note
Note
Take-Return
JITRBUD Main User Guide 3-11
Adding Patients to My List
To add a patient
1. From the Main Menu, press the Take-Return icon.
The Patients window appears.
2. Select the Local or Global tab.
3. Select the patient to add to the My List tab. To select multiple patients, press
and hold down the CTRL key while you highlight the patients.
4. Press Add To My List.
The patients appear under the My List Patients tab.
5. Press Close to return to the Main Menu, or Exit to log out of the Station.
The Global tab contains a list of patients from all Stations for
purposes of transaction activity. The Global, Local, and My List
tabs are present at the Patient List screen for the Take/Return,
and Discard functions if privileges are assigned and options are
turned on in Station Options.
The Multiple Patient Selection option must be selected in Station
Options to select multiple patients.
Note
Note
Take-Return
3-12 JITRBUD Main User Guide
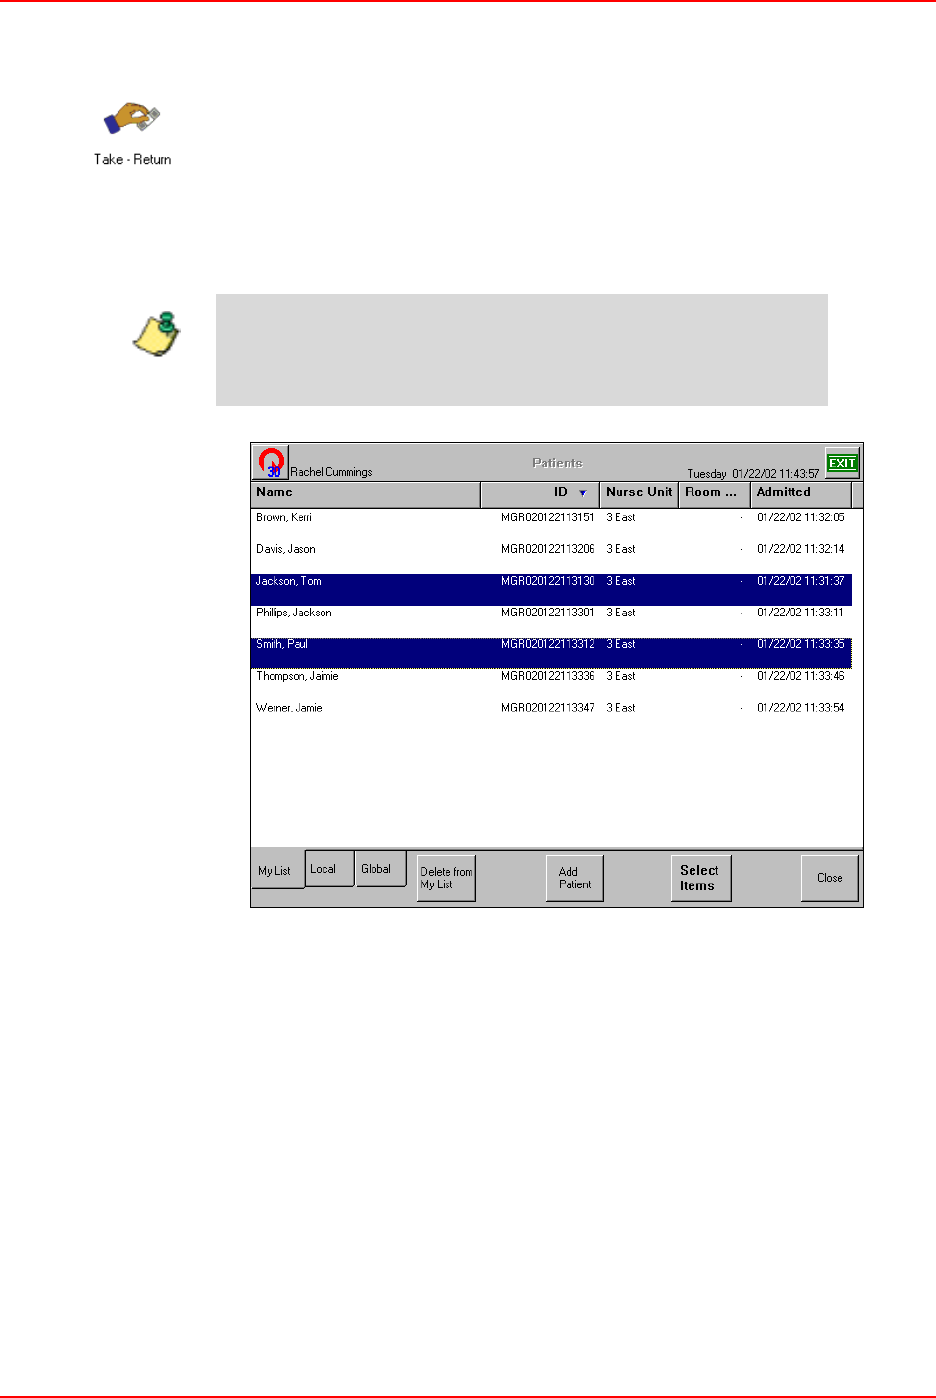
Deleting Patients from My List
To delete a patient
1. From the Main Menu, press the Take-Return icon.
The Patients window appears.
2. Select the My List tab.
3. Select the patient to delete from the My List tab. To select multiple patients,
press and hold down the CTRL key while you highlight the patients.
4. Press Delete From My List.
The patients are deleted from the My List tab.
5. Press Close to return to the Main Menu, or Exit to log out of the Station.
The Multiple Patient Selection option must be selected in Station
Options to select multiple patients.
Note
Take-Return
JITRBUD Main User Guide 3-13
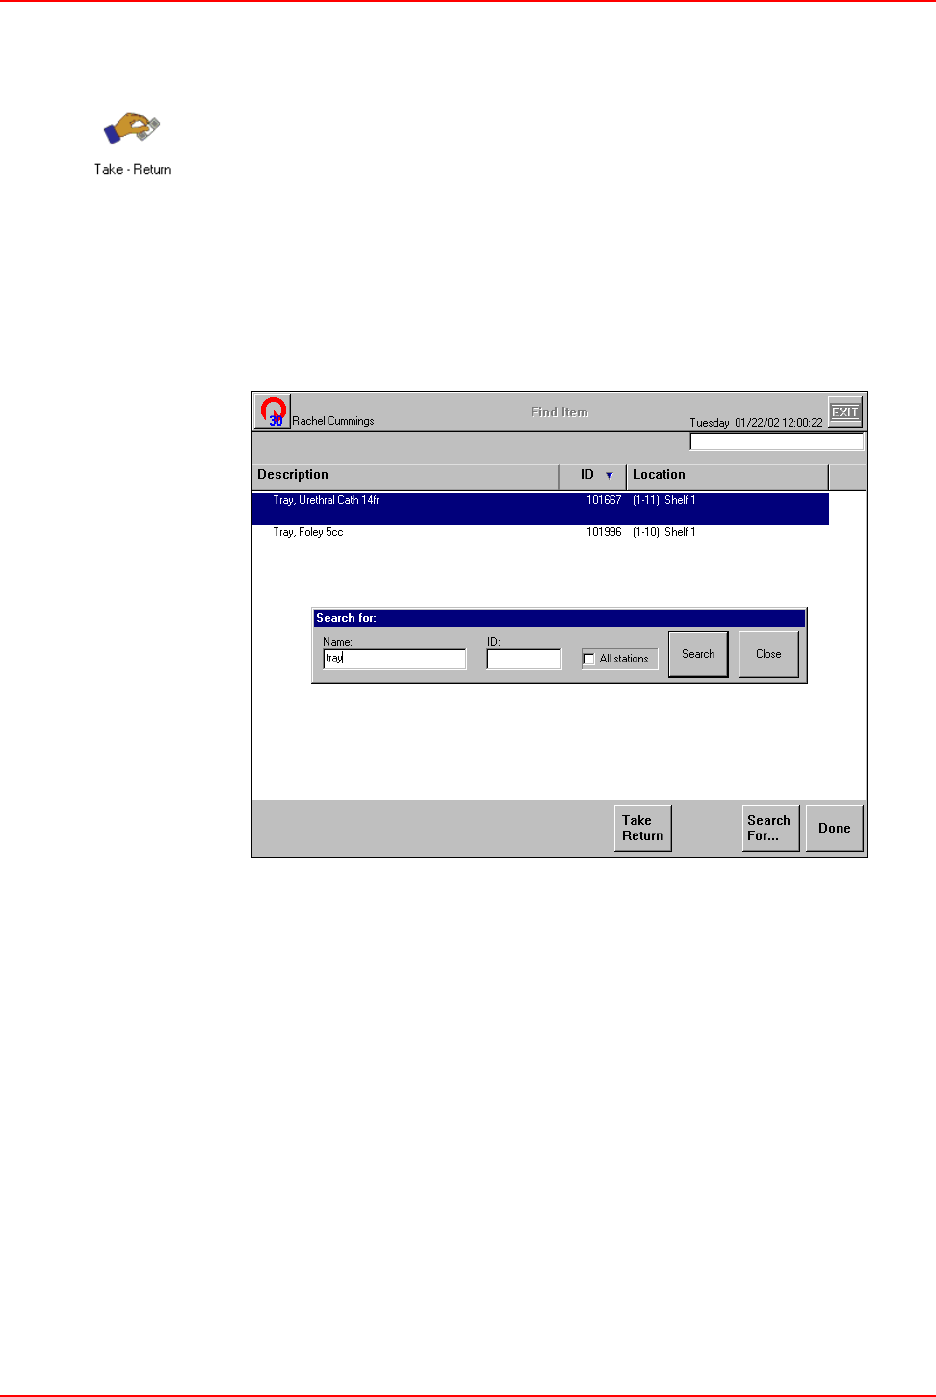
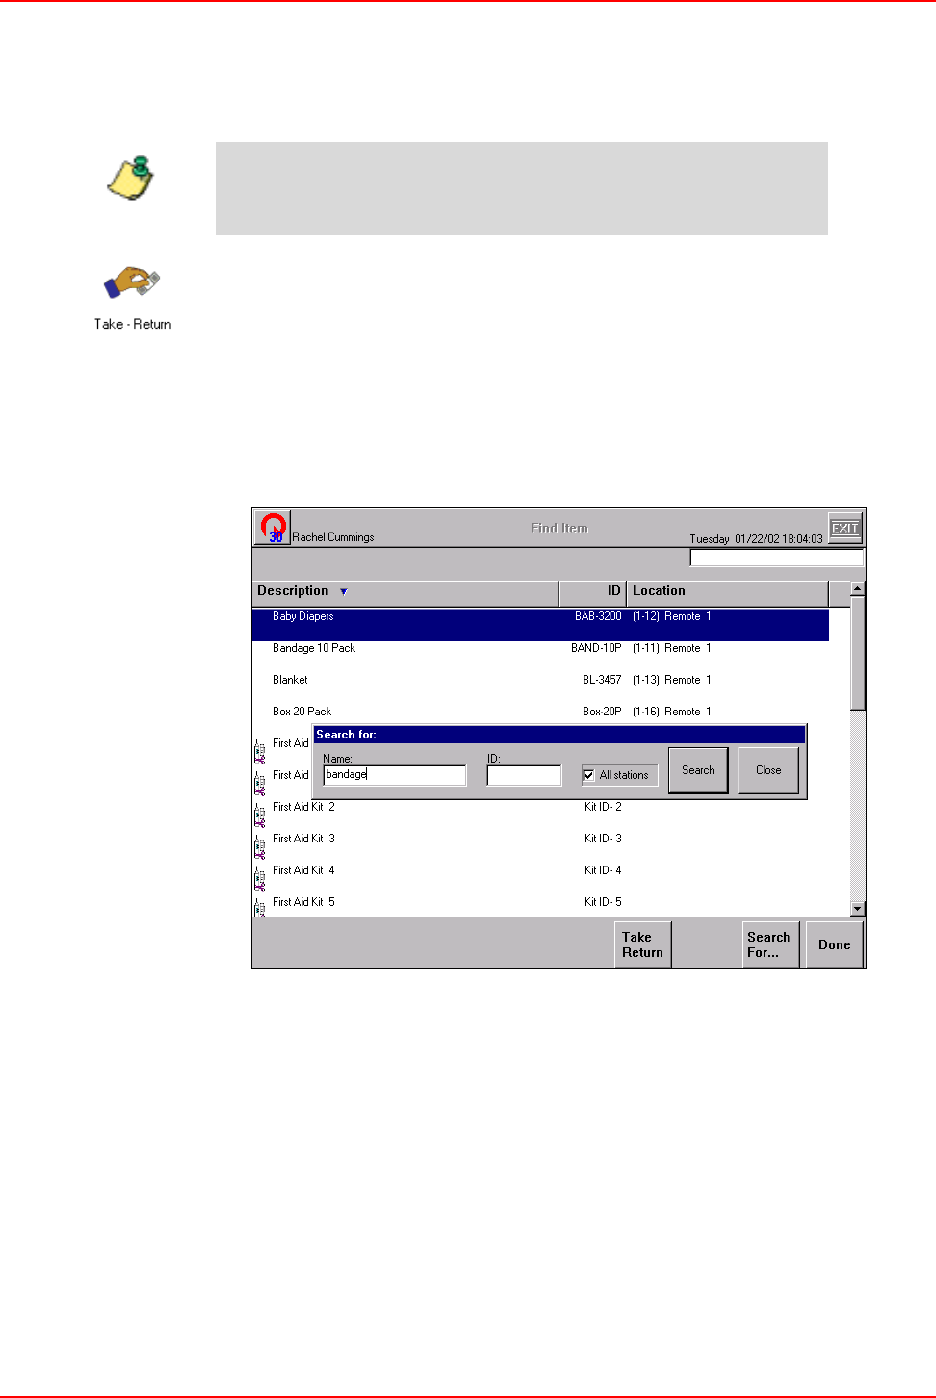
Finding Items
To find an item at the Station
1. From the Main Menu, press the Take-Return icon.
The Patients window appears.
2. Select a patient.
3. Press Select Items.
4. Press Find Item.
The Search For window appears.
5. Type the first few letters of the item name or ID.
6. If necessary, press the Search button.
The item appears on the Find Item screen.
7. To display the entire list again, delete the text in the Search For window and
press Search.
The complete list appears.
Take-Return
3-14 JITRBUD Main User Guide
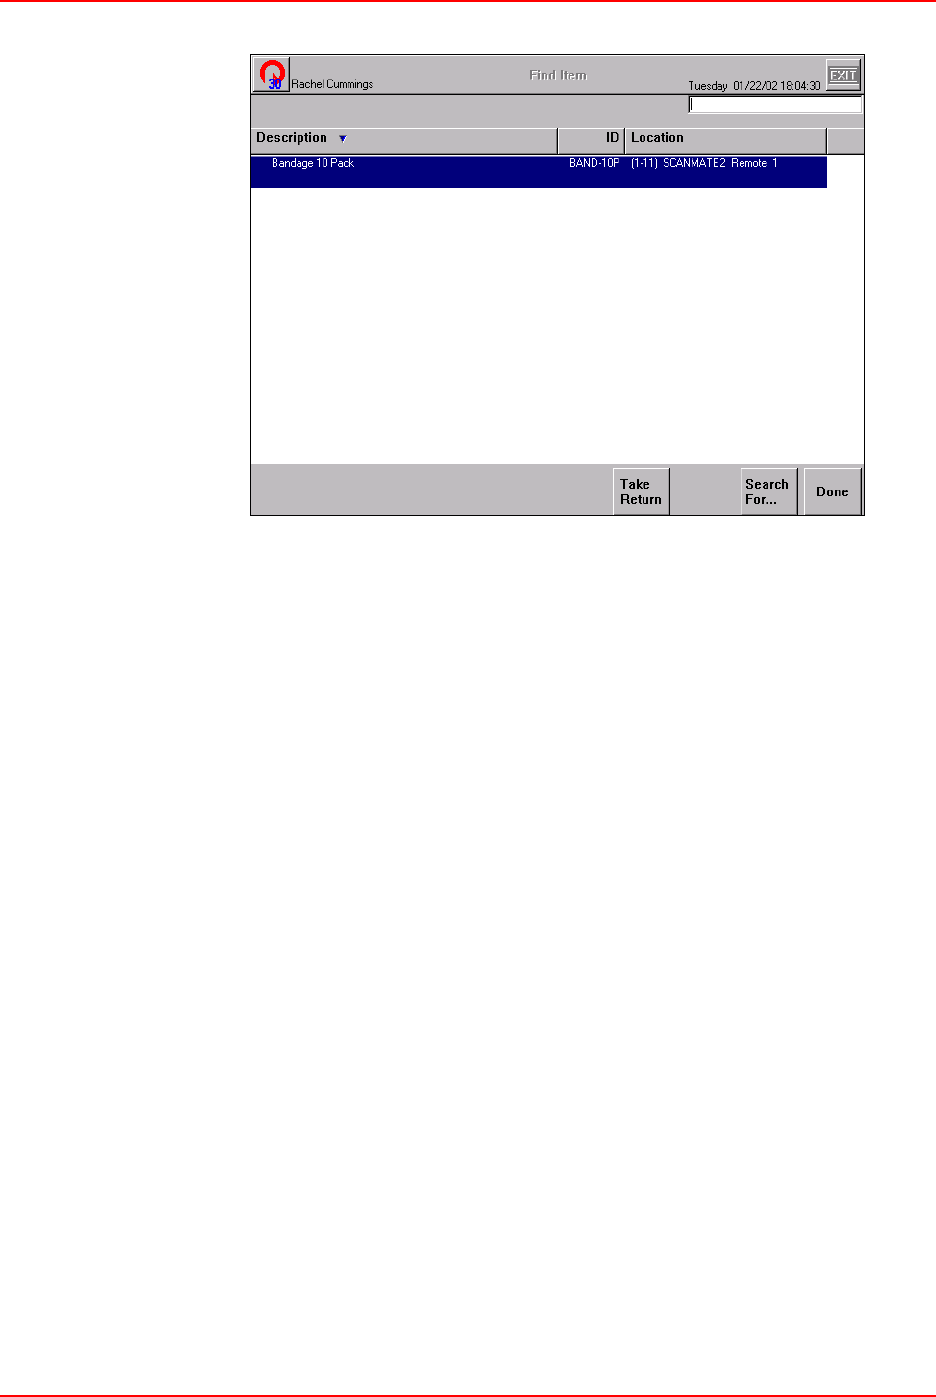
Global Find Item
The Global Find feature is used to locate an item that is in another Station if the
item is Out of Stock or not stored at your Station.
To find an item at another Station
1. From the Main Menu, press the Take-Return icon.
The Patients window appears.
2. Select a patient.
3. Press Select Items.
4. Press Find Item.
The Search For window appears.
5. Select the All Stations check box.
6. Enter the item Name or ID.
7. Press Search.
The item appears in the Find Item screen. The system identifies the location of
the item at all Stations.
The Global Item Find feature must be selected in Station Options to
locate items in other Stations.
Note
Take-Return
JITRBUD Main User Guide 3-15
8. Press Done to return to the Main Menu, or Exit to log out of the Station.
9. Go to the identified Station to take the item.
Take-Return
3-16 JITRBUD Main User Guide
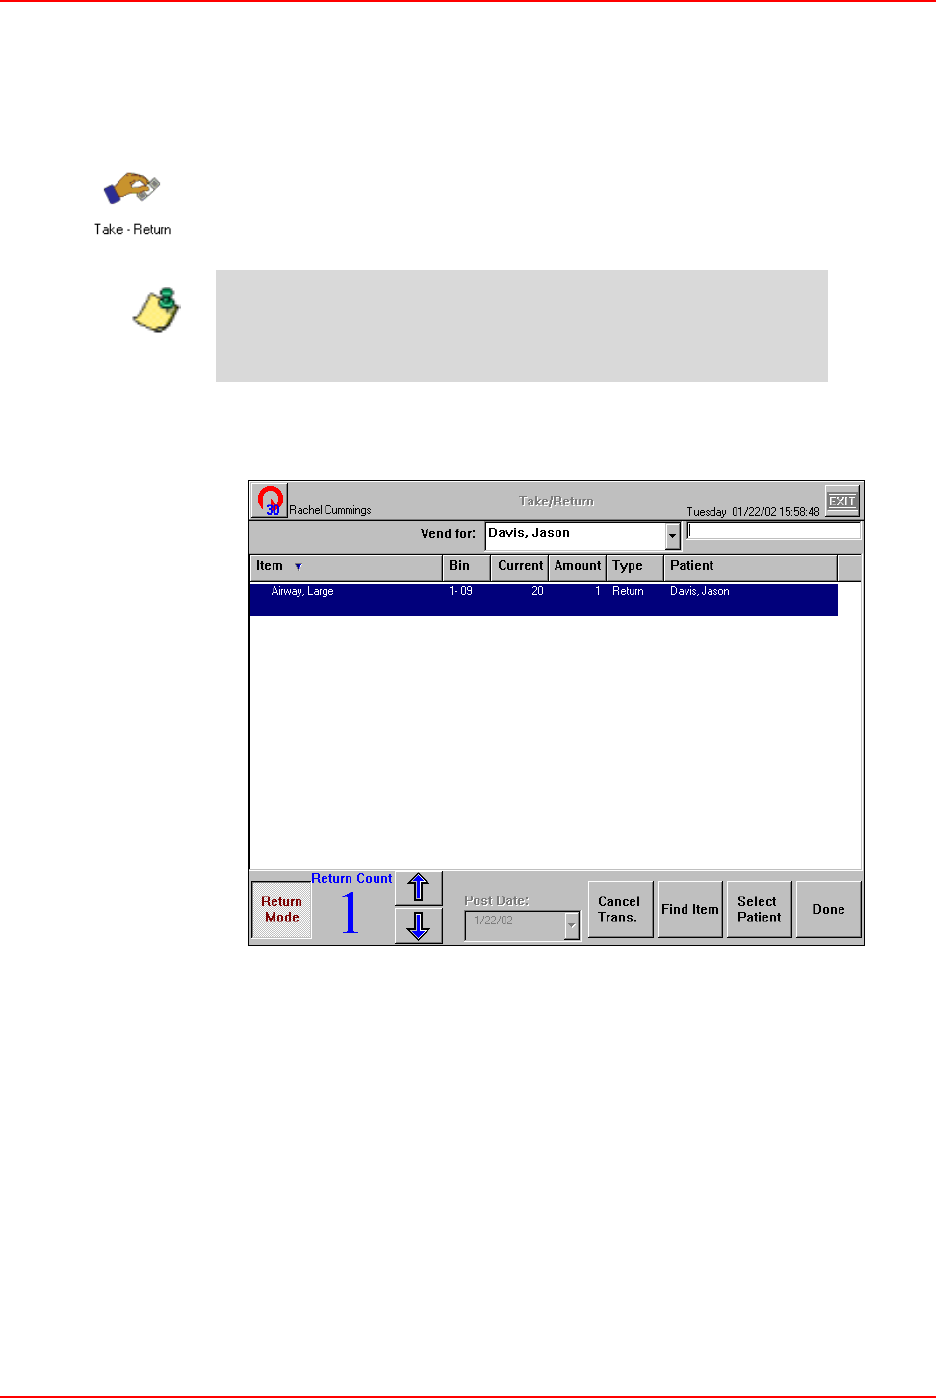
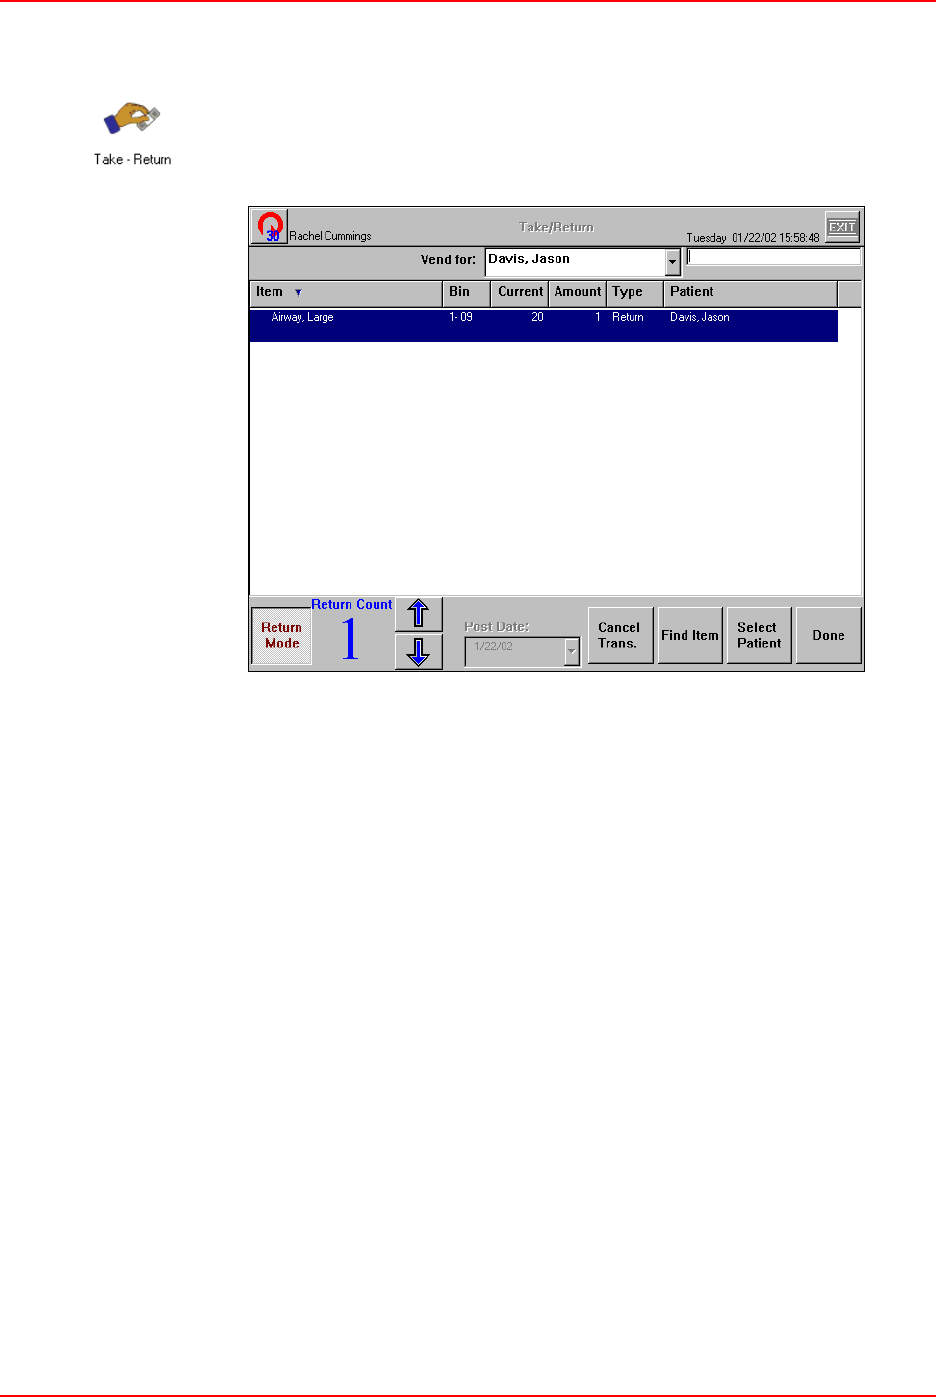
Returning Items
Use the Return feature to return an unused item to inventory and credit the
associated patient billing record.
To return items
1. From the Main Menu, press the Take-Return icon.
2. Select a patient.
3. Press Select Items.
4. Press the Return button on the remote transmitter once for each item returned.
5. To adjust the Return Count using the touch screen, select the item and press
the Up and Down arrow buttons.
6. Press Done to return to the Main Menu, or Exit to log out of the Station.
Use the Patient Search feature to quickly find patients. For more
information, Searching for Patients on page 3-2.
Note
Take-Return
JITRBUD Main User Guide 3-17
Returning Items in No Patient Mode
To return items in No Patient Mode
1. From the Main Menu, press the Take-Return icon.
2. Press the Return button on the remote transmitter once for each item returned.
3. To adjust the Return Count using the touch screen, select the item and press
the Up and Down arrow buttons.
4. Press Done to return to the Main Menu, or Exit to log out of the Station.
Take-Return
3-18 JITRBUD Main User Guide
Emergency Access
Use the Emergency Access feature to quickly take or return items without
selecting a patient. The Emergency Access option must be selected in Station
Options to enable the Emergency Access feature.
To gain emergency access from Take-Return
1. From the Main Menu, press the Take-Return icon.
The Patients screen appears.
2. Press Emergency Access.
3. Press the Take or Return button on the remote transmitter to indicate the item
quantity you are taking or returning.
The Emergency Access feature is not available if the No Patient
Mode feature is selected.
The Return Count or Take Count appears in the lower left portion
of the window to indicate the quantity returned or taken.
Note
Note
Take-Return
JITRBUD Main User Guide 3-19
4. To adjust the Take Count or Return Count using the touch screen, select the
item and press the Up and Down arrow buttons.
5. Press Done to return to the Main Menu, or Exit to log out of the Station.
An emergency access patient is created for the emergency access
transaction. The emergency access patient is listed in the Vend
For field. You must reconcile the emergency access patient with
the real patient at a later time.
Note
Patients
3-20 JITRBUD Main User Guide
Patients
Use the Patients feature to view, add, edit, or reconcile patients. You must have
patient management rights to use the Patients feature.
Searching for Patients
To search for a patient
1. From the Main Menu, press the Patients icon.
The Patients window appears.
2. Type the first letters of the patient name.
The Search For window appears.
3. If necessary, press the Search button or the ENTER key.
The patient appears in the Patients window.
Unlike patients added through ADT, all patients added at the Station
are temporary patients.
If you type the entire patient name, the patient appears in the
patients window. If you type the first few letters of the patient
name, a list of patients appears to select the appropriate patient.
You can add patients to the Patient List if they are not found in
the search.
Note
Note
Patients
JITRBUD Main User Guide 3-21
4. To display the entire patient list again, delete the text in the Search For
window and press Search.
The patient list appears.
Adding Patients
To add a patient
1. From the Main Menu, press the Patients icon.
The Patients window appears.
2. Press Add Patient.
The Add Patient window appears with the Patients Information tab selected.
3. Enter the Patient’s Name and ID (Optional - Room Number, Medical Record
Number, Discharge Date, and Bed Number).
4. Check the Private check box if you do not want the patient information listed
on the Global patient list.
5. Select the Clinical Information tab.
The Patient ID auto fills in with date and time created along with
the Discharge Date. To delete the predetermined ID, highlight
and press the DELETE key. You can then add a new patient ID if
available. Nursing unit defaults to the Nursing Unit that the
Station is assigned to.
Note
Patients
3-22 JITRBUD Main User Guide
6. (Optional) Enter the Attending Physician, Admitting Physician, and any
Comments if needed.
7. Press OK to save the new patient information.
8. Press Close to return to the Main Menu, or Exit to log out of the Station.
You can also add a patient in the Take/Return screen.
Note
Patients
JITRBUD Main User Guide 3-23
Editing Patients
To edit a patient
1. From the Main Menu, press the Patients icon.
The Patients window appears.
2. Select a patient.
3. Press Edit.
The Edit Patient window appears with the Patients Information tab selected.
4. Edit the Patient’s Name, Nursing Unit, Room Number, Medical Record
Number, Discharge Date, and Bed Number.
5. Select the Private check box if this patient’s information is not to be viewed
on the Global patient list.
6. Select the Clinical Information tab.
7. (Optional) Edit the Attending Physician, Admitting Physician, and any
Comments if necessary.
8. Press OK to save the new patients information.
9. Press Close to return to the Main Menu, or Exit to log out of the Station.
Patients
3-24 JITRBUD Main User Guide
Reconcile ADT
Use the Reconcile ADT feature to match temporary patient records with
permanent patient records. The temporary patient transaction information is
transferred to the permanent patient record.
The Reconcile ADT feature is necessary when a user takes an item for a patient
that is not in the system (for example, when the patient record has not come across
the ADT interface into Pyxis). The user can create a temporary patient record or
use the Emergency Access feature. The Emergency Access feature automatically
creates an Emergency Access Patient (EAP) record. Without the Reconcile ADT
feature, the process of reconciling temporary patient activity to the permanent
patient record must be completed outside of the Pyxis system.
You must have patient management rights to reconcile a temporary patient record
with a permanent patient record.
To reconcile ADT
1. From the Main Menu, press the Patients icon.
2. Select a temporary patient.
3. Press Reconcile ADT.
The Reconcile Patients window appears.
The Procar manages the billing of the reconciled patients.
The Reconcile ADT feature is also available at the SUPPLYCENTER
Console.
Note
Note
Patients
JITRBUD Main User Guide 3-25
4. Press the Change button next to the Permanent Patient Room-Bed field to
access the list of permanent patients.
5. Select the permanent patient to reconcile.
6. Press Continue.
7. Press Reconcile.
A confirmation window appears.
8. Press Yes to reconcile the patient records or press No to cancel the transaction.
If you select Yes, the temporary patient is deleted and all the temporary
history is transferred to the permanent patient.
9. Press Close to return to the Main Menu, or Exit to log out of the Station.
Request Item
3-26 JITRBUD Main User Guide
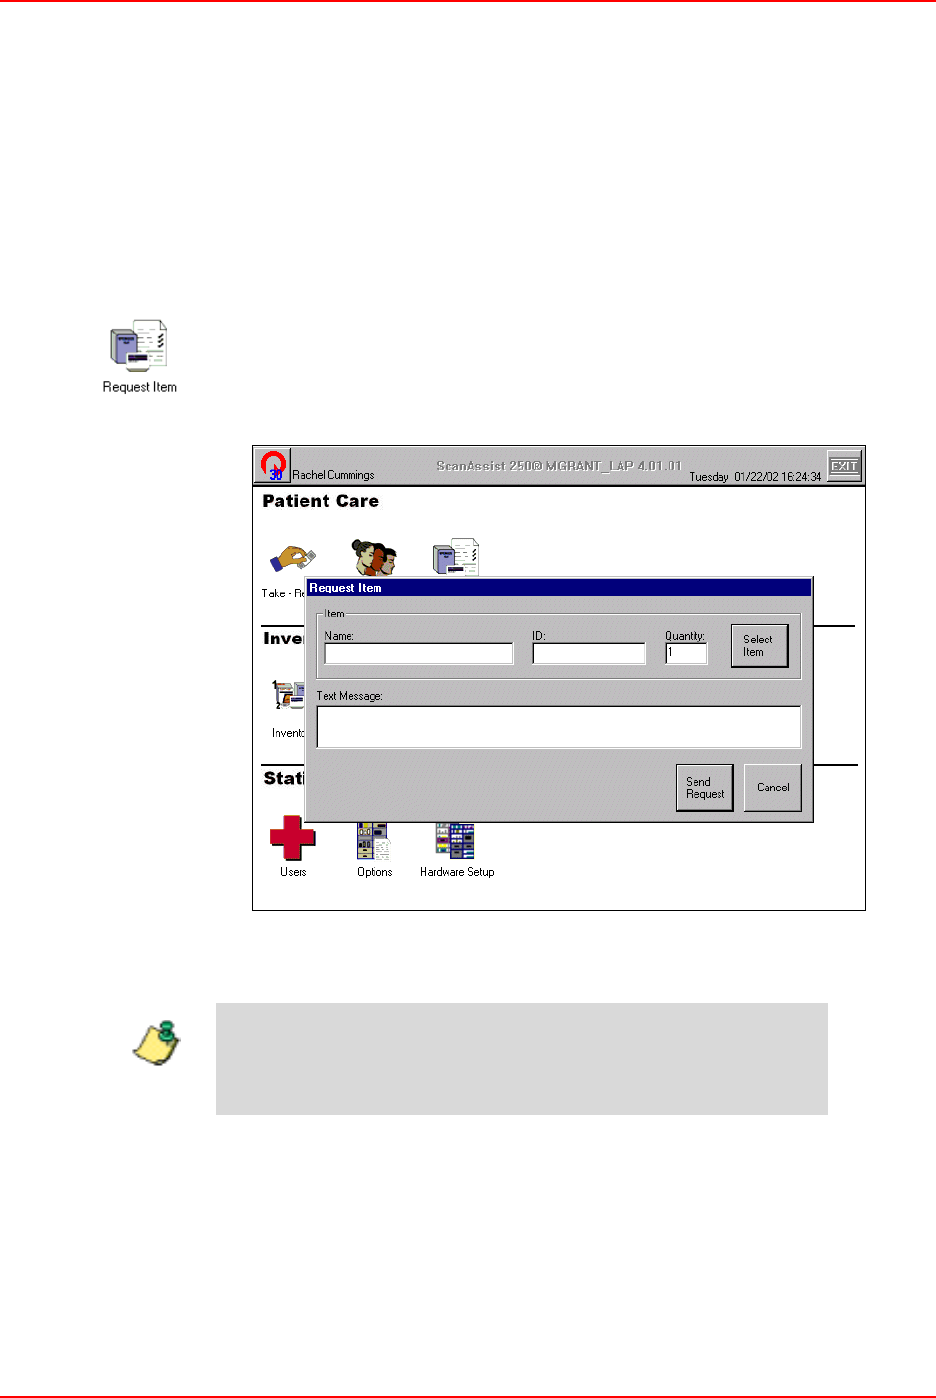
Request Item
Use the Request Item feature to send a message to the SUPPLYCENTER Console
when a supply is needed at the Station. The message sent to the SUPPLYCENTER
Console contains the Item name, Item ID, User name, User ID and a free format
message. A message is printed in the Attention window and a report is printed at
the SUPPLYCENTER Console.
Requesting Items
To request items
1. From the Main Menu, press the Request Item icon.
The Request Item window appears.
2. Press Select Item.
The Item List window appears.
3. Select the item and press Request Item.
The selected item appears in the Item Name field.
To quickly select the items, use the Search For box, the PAGE UP
and PAGE DOWN keys, or the UP and DOWN arrows to scroll through
the list until the name appears.
Note
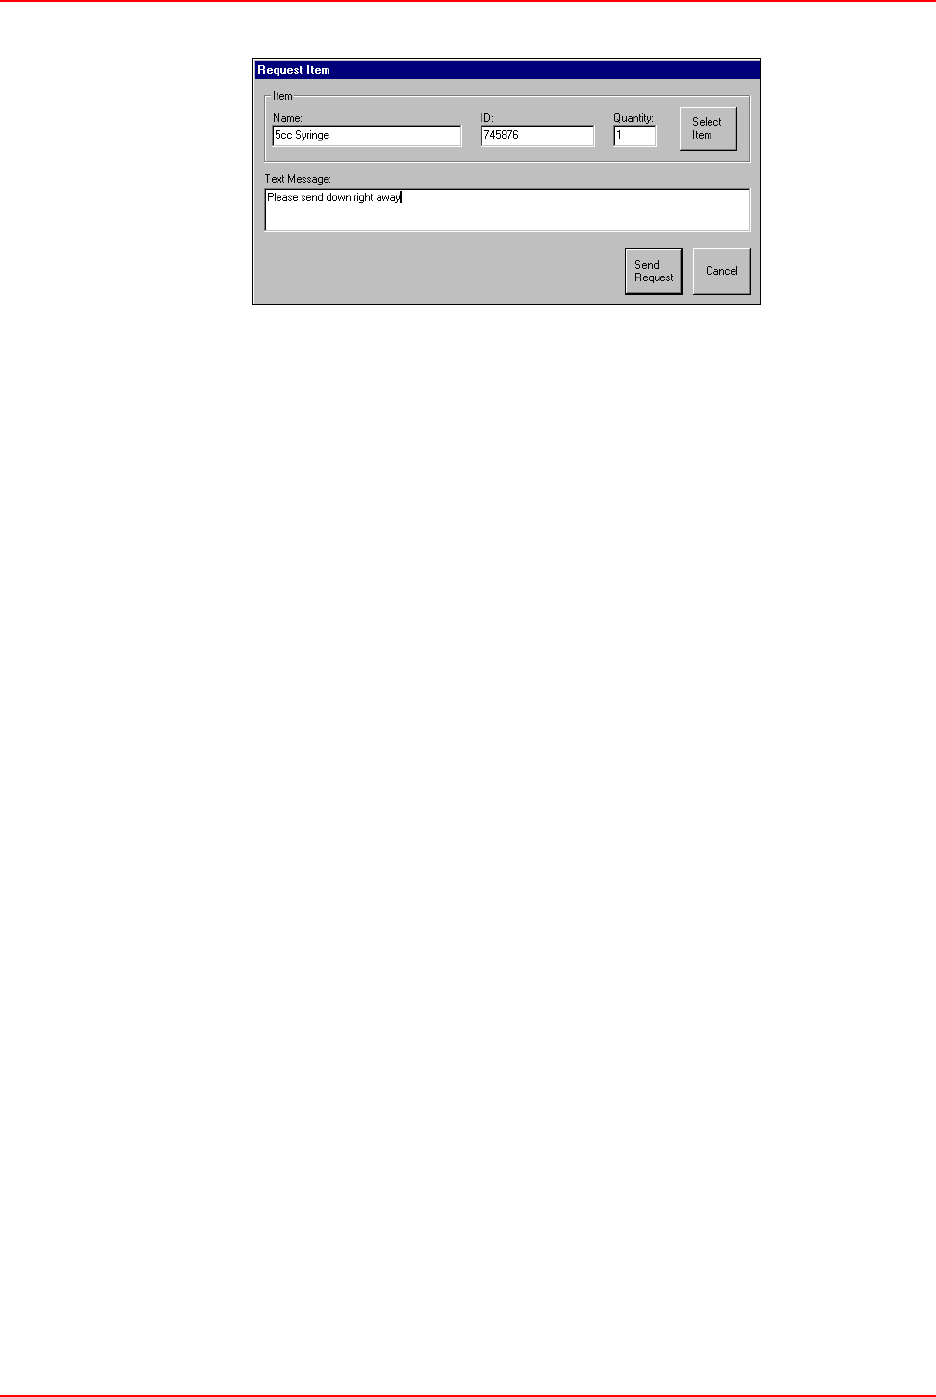
Request Item
JITRBUD Main User Guide 3-27
4. Enter the quantity needed in the Quantity field and enter any additional notes
(optional) in the Text Message field.
5. Press Send Request to complete the transaction.
The message is sent to the SUPPLYCENTER Console.

Request Item
3-28 JITRBUD Main User Guide
JITRBUD Main User Guide 4-1
Chapter 4
Inventory Management
Functions
This chapter provides the following Inventory Management functions accessed
from the Inventory Management section of the Main Menu. The functions you
have access to depend on the privileges that have been assigned to you.
•Inventory—maintain current and accurate counts of items at the Station.
•Load-Unload—assign an item to a specific location in a Station. The Unload
function removes items from the Station.
•Item Alias—create an alternate name for an item. The item alias can be
added, edited, or deleted.
•Refill—replenish items at the Station. You can refill items at Below Par, At
Refill, At Critical, or do a Spot Refill.
•Refill by Request Order—replenish items at a Station that are associated
with a PO# generated from the SUPPLYCENTER Console or Vendor.

Inventory
4-2 JITRBUD Main User Guide
All Station items are tracked by bin location. The bin is a location of a single
supply. A bin will be in one of three states:
• Loaded—supplies have been assigned to and physically placed in the bin
• Unloaded—supplies have not been assigned to or physically placed in the bin.
• Pending—supplies have been assigned to but not yet physically placed in the
bin.
Inventory
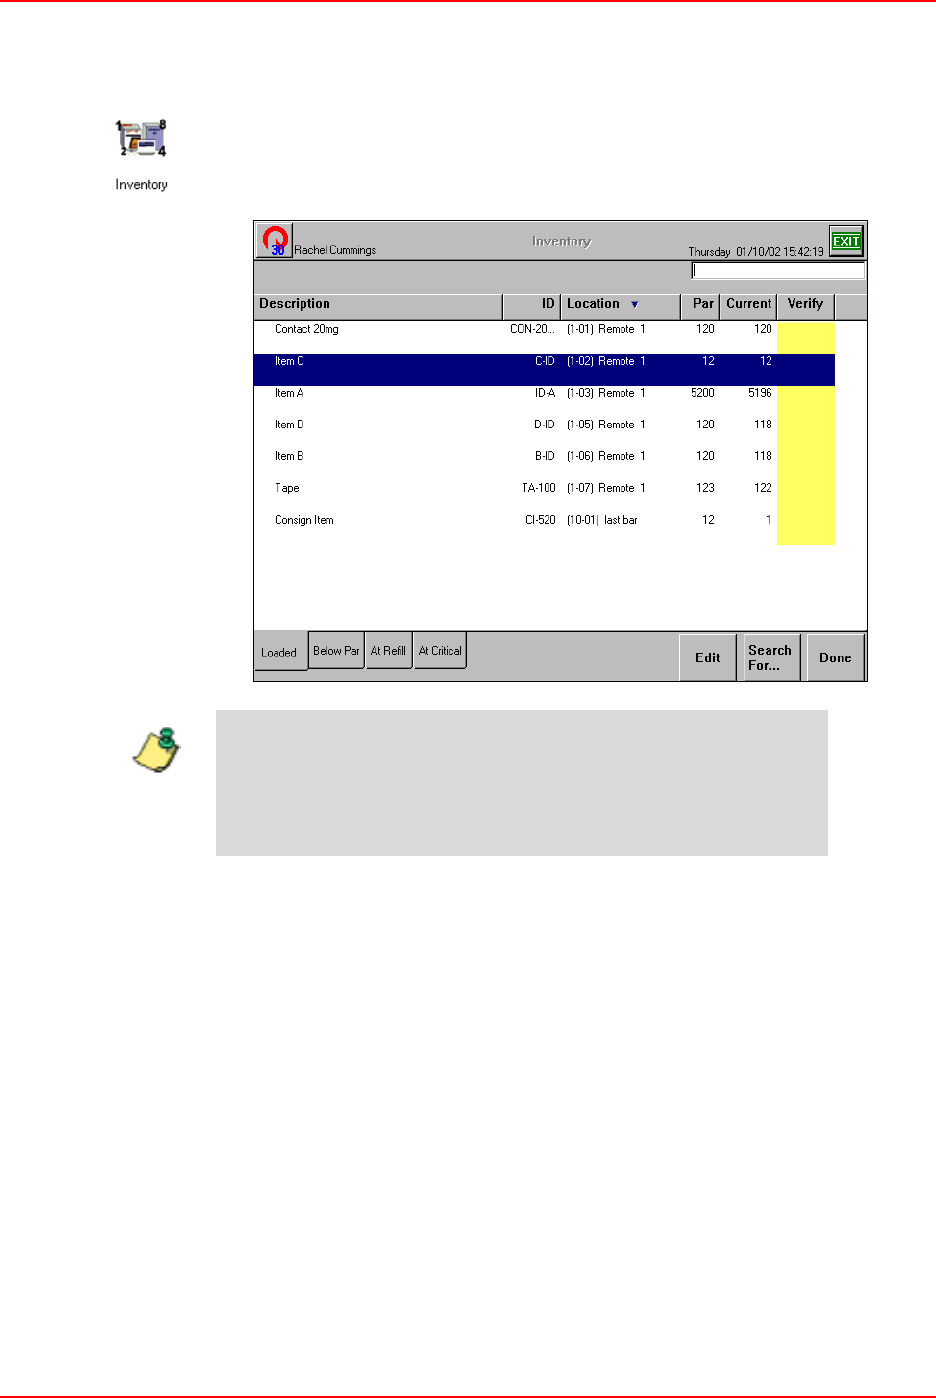
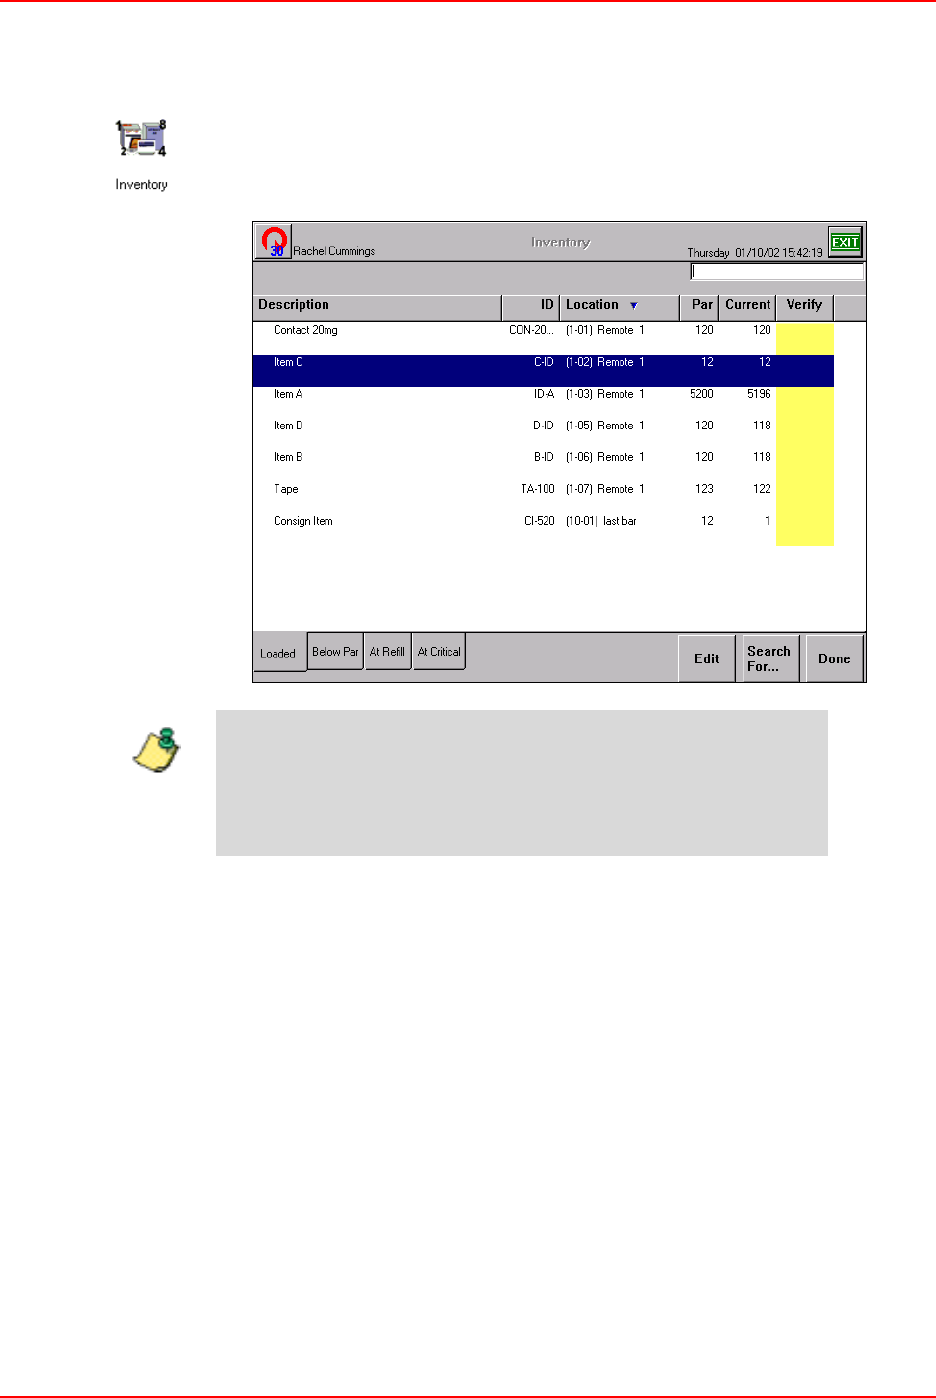
Inventory is the process of verifying the current supply of items in one or more
bins. The Inventory feature uses the standard count verification process for each
bin. The edit function provided in Inventory allows the User to update Par, Refill
Point, Critical Low, and Current fields for the bin. Flags for the Expiring Item,
Standard Stock and Chargeable Item can also be set. The Expiration date for an
expiring item can be set and any items that are expired can be outdated.
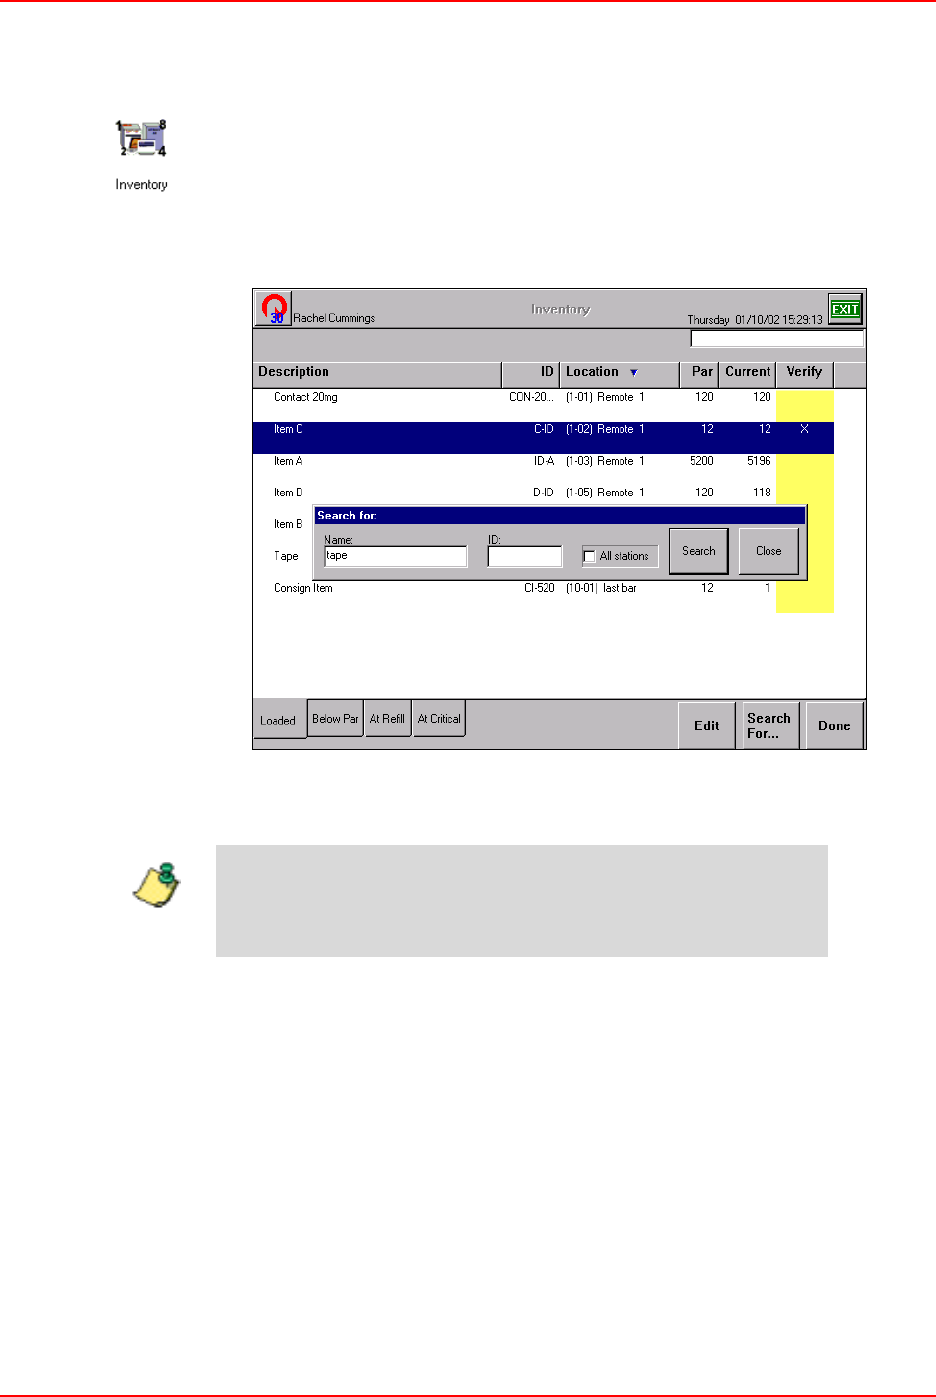
Inventory
JITRBUD Main User Guide 4-3
Searching for Items
To search for an item
1. From the Main Menu, press the Inventory icon.
The Inventory window appears.
2. Press Search For.
The Search For window appears.
3. Type the first letters of the item name and press Search.
The item appears in the Inventory window.
4. To display the entire item list again, delete the text in the Search For window
and press Search.
The item list appears.
If you type the entire item name, the item appears in the
inventory window. If you type in the first few letters of the item
name, a list of items appears to select the appropriate item.
Note
Inventory
4-4 JITRBUD Main User Guide
Verifying Quantity
To verify quantity
1. From the Main Menu, press the Inventory icon.
The Inventory screen appears.
2. Select the item to verify by pressing the Take or Return button on the
JITRBUD transmitter.
An X appears in the Verify column to indicate the item has been selected for
inventory.
3. Count the quantity of the item.
4. If you need to edit the item information, press Edit. If not, repeat Steps 2-3 for
each Inventory item.
Notice the tabs at the bottom of the screen. The Loaded tab lists
all loaded items in the Station. The Below Par tab lists only
items that are at or below Par levels. The At Refill tab lists only
items at Refill level. The At Critical tab lists all items at or below
Critical levels.
Note
Inventory
JITRBUD Main User Guide 4-5
5. Edit the quantity in the Current field. Press OK.
6. Press Done to return to the Main Menu, or Exit to log out of the Station.
Inventory
4-6 JITRBUD Main User Guide
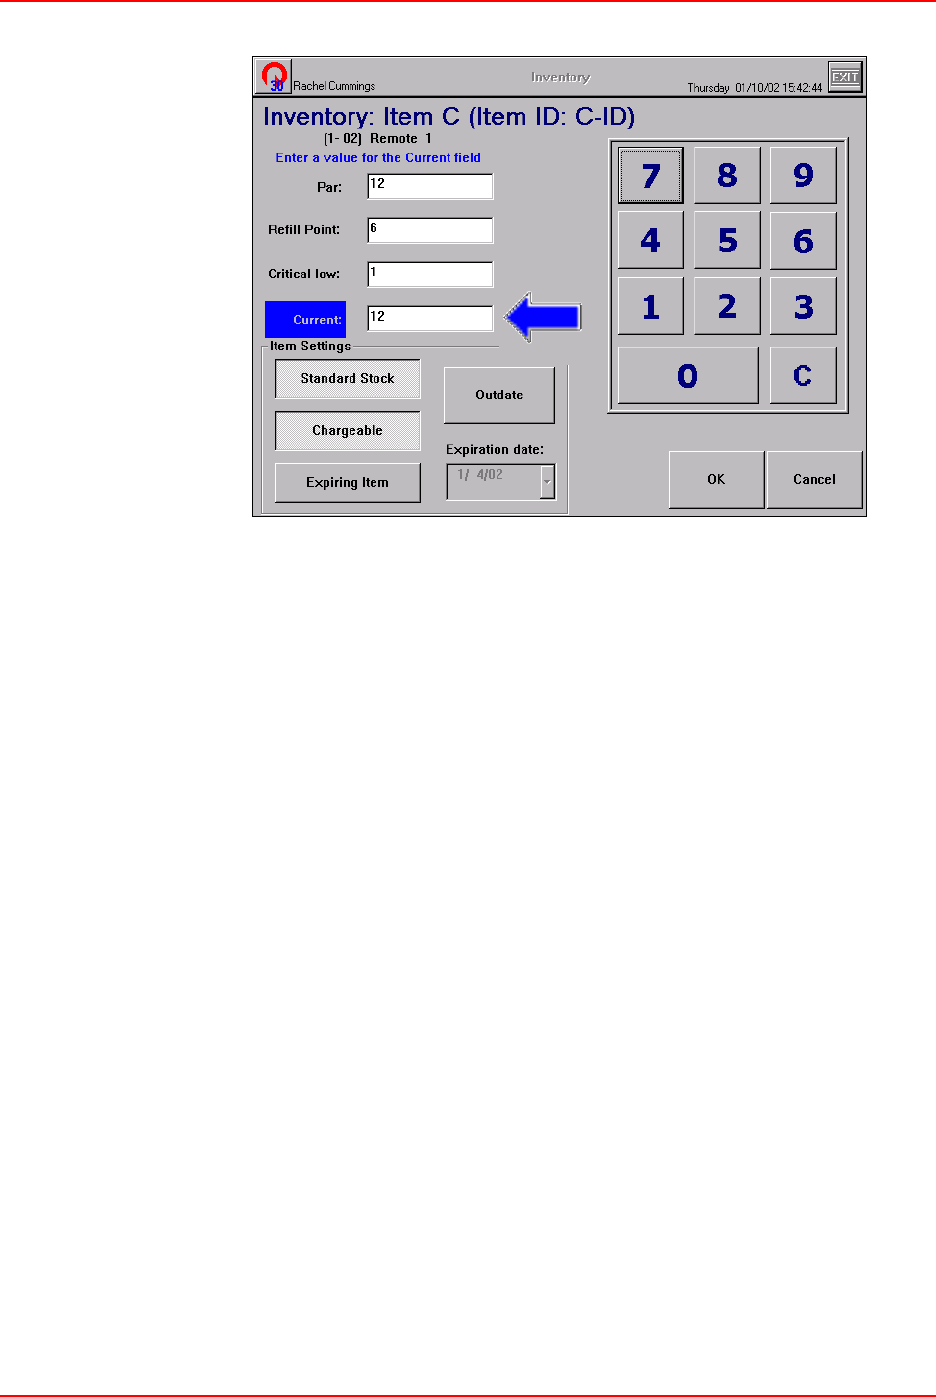
Editing Items in Inventory
To edit an item in Inventory
1. From the Main Menu, press the Inventory icon.
The Inventory screen appears.
2. Select the item on the screen, or press the Take or Return button on the
JITRBUD transmitter.
3. Press Edit.
Notice the tabs at the bottom of the screen. The Loaded tab lists
all loaded items in the Station. The Below Par tab lists only
items that are at or below Par levels. The At Refill tab lists only
items at Refill level. The At Critical tab lists all items at or below
Critical levels.
Note

Inventory
JITRBUD Main User Guide 4-7
4. Edit the item information as necessary.
• Press the Expiring Item button if item has an expiration date. Select the
Expiration date for the item.
• Press the Standard Stock button to label the item as standard stock.
• Press the Chargeable button to allow the item to be charged to patients.
5. Press OK.
6. Press Done to return to the Main Menu, or Exit to log out of the Station.
Inventory
4-8 JITRBUD Main User Guide
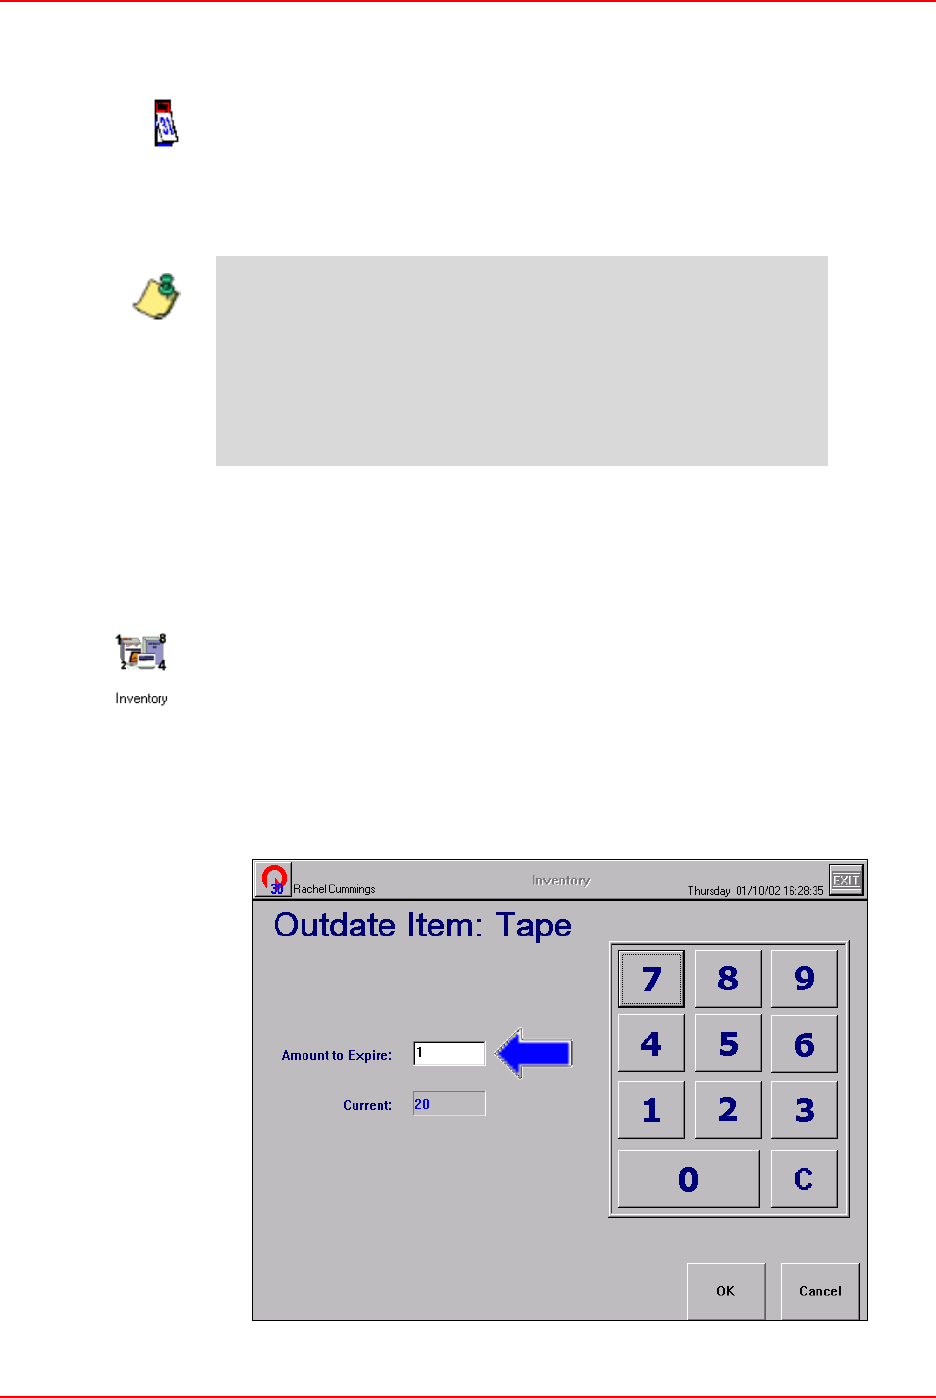
Outdating Expired Items in Inventory
The Outdate feature is used to outdate an item and remove it from inventory due
to expiration. Items that are configured with an expiration date will be tracked by
the system and a calendar icon will appear on the Inventory list when the item is
expired, or will expire within the specified Item outdated warning days. When an
item that has a calendar icon is selected for Inventory, an expiration warning
message will appear.
You can also outdate an item that is not configured with an expiration date.
However, if an item is not configured with an expiration date in the system, the
calendar icon will not appear for the item and the system will not warn users to
check the expiration date of the item.
To outdate an expired item in Inventory
1. From the Main Menu, press the Inventory icon.
2. Select the item on the screen, or press the Take or Return button on the
JITRBUD transmitter.
3. Press Edit.
4. Press Outdate.
The Outdate Item screen appears.
The Expiring Item option and Expiration Date is assigned to an item
in the Edit Bin window.
The Item outdated warning days is the number of days before an
item is set to expire that the system is configured to display the
calendar icon. The Item outdated warning days is configured in
Station Options on the Time Options tab. For more information, see
Station Options on page 5-25.
Note
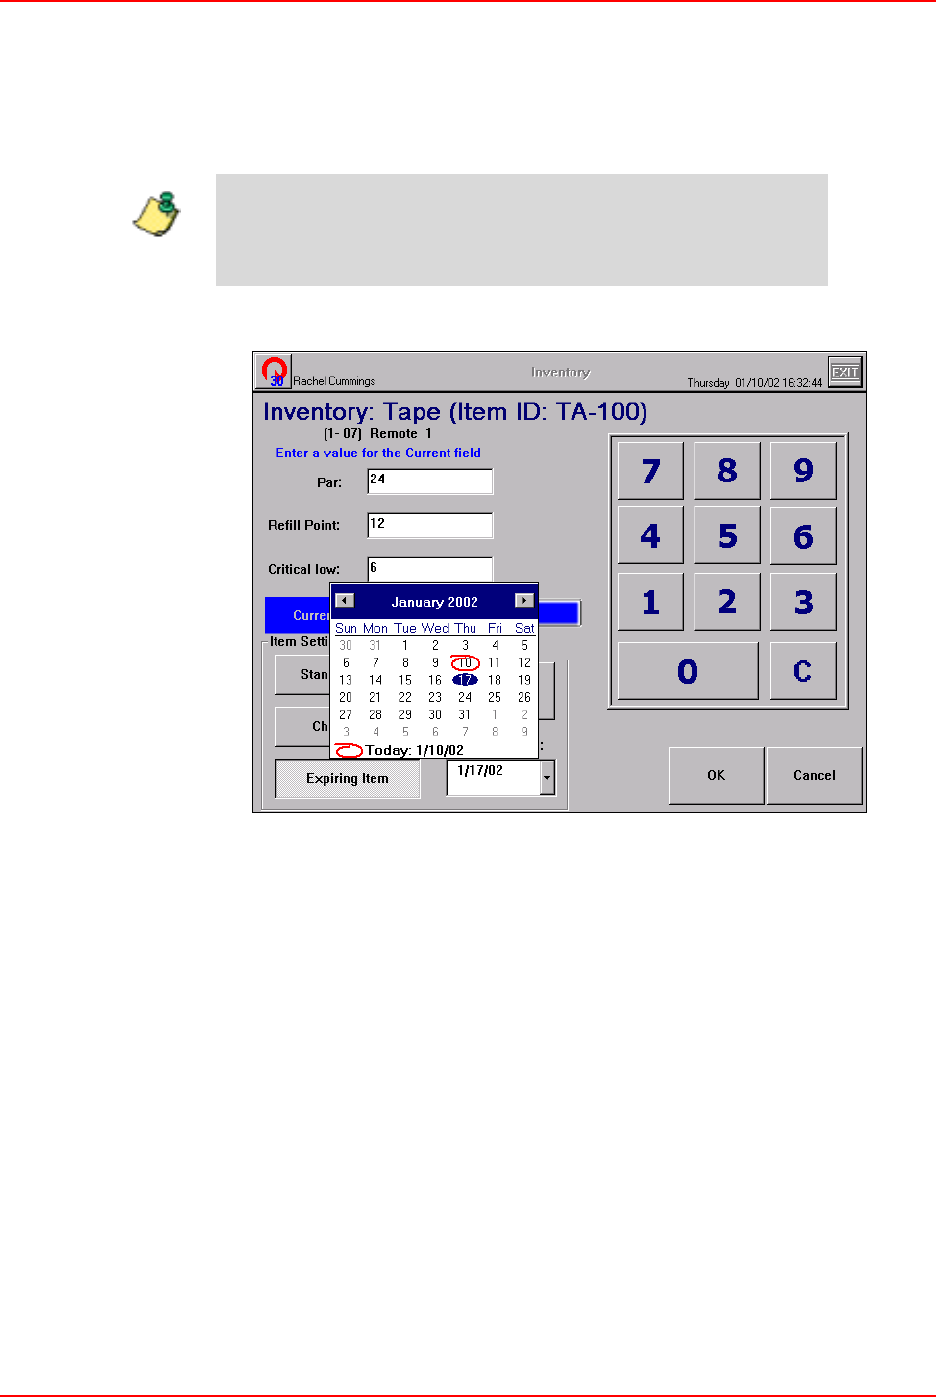
Inventory
JITRBUD Main User Guide 4-9
5. Enter the amount of the item to outdate in the Amount to Expire field.
6. Press OK.
7. Select the expiration date for the item in the bin that will expire next from the
Expiration date calendar.
The pull-down menu displays a calendar to select an appropriate date.
8. Press OK.
9. Press Done to return to the Main Menu, or Exit to log out of the Station.
10. Dispose of the outdated item(s) according to the policies and procedures at
your facility.
The expiration date calendar is not available if the item is not
flagged as an expiring item.
Note

Load-Unload
4-10 JITRBUD Main User Guide
Load-Unload
Use the Load-Unload feature to load or unload the inventory of items in bins. You
can load empty bins, load pending items, edit bin settings, outdate any expired
items and unload loaded bins. You can also move the items to a new location in
the Station or to a new location at a different Station.
Load is used to assign an item to a specific location, or bin, in the Station. Unload
is used to remove items from the Station. The unload process removes an existing
item at the Station to make the bin available for a different item.
Searching for Items
To search for an item
1. From the Main Menu, press the Load-Unload icon.
2. Press Load Items or Unload Items.
3. Press Search For.
The Search For window appears.
4. Type the first letters of the item name and press Search.
5. To display the entire item list again, delete the text in the Search For window
and press Search.
The item list appears.
If you type the entire item name, the item appears in the window.
If you type in the first few letters of the item name, a list of items
appears to select the appropriate item.
Note

Load-Unload
JITRBUD Main User Guide 4-11
Loading Items
Load is the process of initially supplying a Station with an item. In order to load
an item at a Station, the item must be entered in the system at the SUPPLYCENTER
Console. You can load items to empty bins from the item list or you can load
pending items sent by the SUPPLYCENTER Console to the Station for a designated
location.
When the pending item is loaded, it disappears from the Pending list (the
SUPPLYCENTER Console inventory screen also updates the status of the item from
pending to loaded).
Load-Unload
4-12 JITRBUD Main User Guide
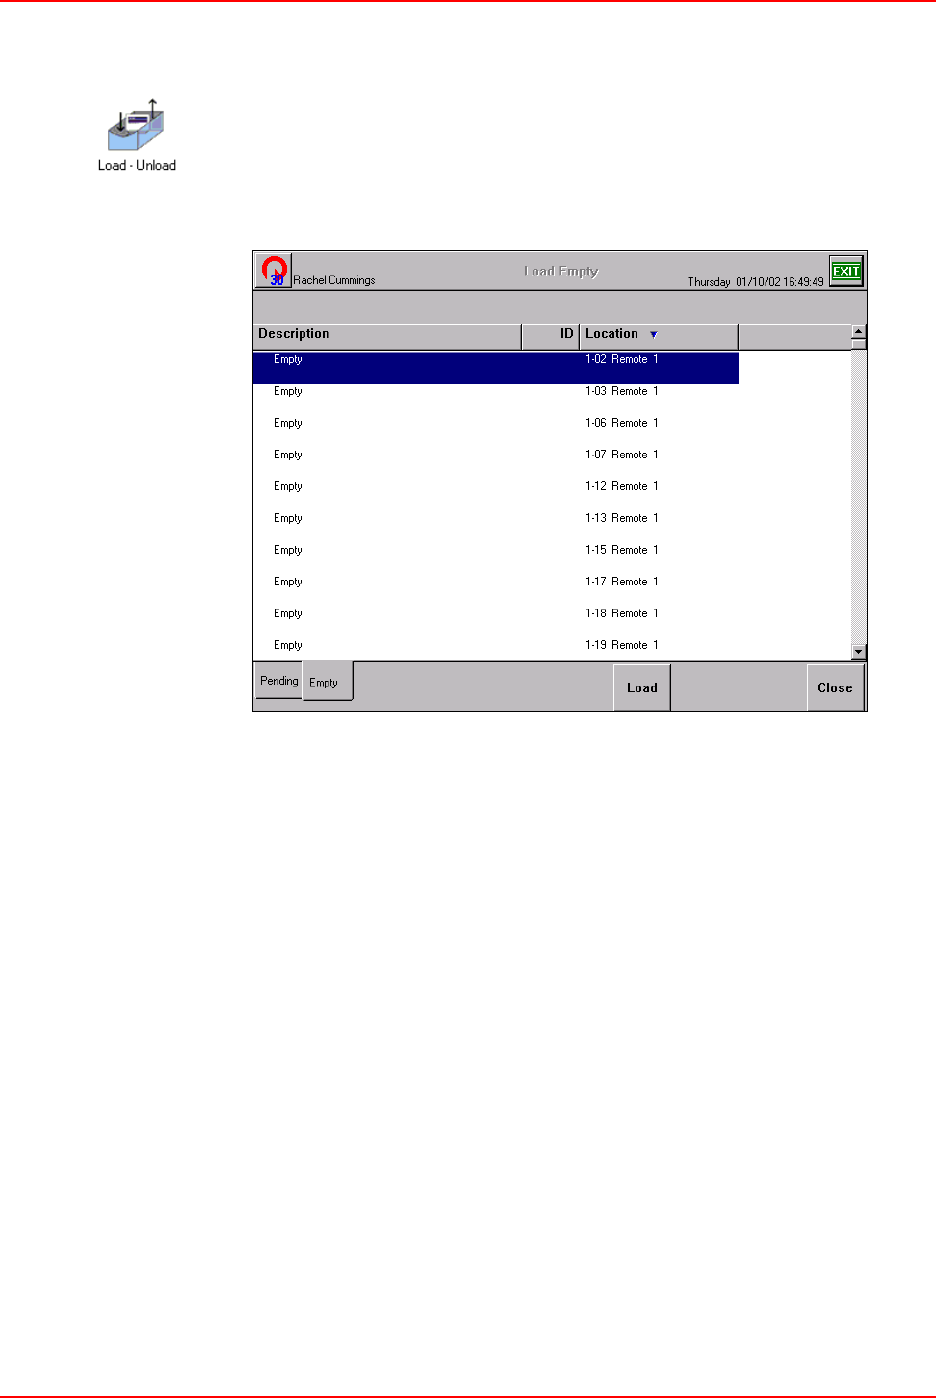
Loading Empty Bins
To load an empty bin
1. From the Main Menu, press the Load-Unload icon.
2. Press Load Items.
3. Select the Empty tab.
4. Select an empty location by pressing the Take or Return button on the
JITRBUD transmitter.
5. Press Load.
The Item List appears.
6. Select the item from the item list and press Add To Bin.
The Load Item window appears.

Load-Unload
JITRBUD Main User Guide 4-13
7. Enter the maximum quantity in the Par field and press the TAB key on the
keyboard.
8. Press the Standard Stock button to label the item as standard stock.
9. Press the Chargeable button to allow the item to be charged to patients.
10. Press the Expiring Item button if item has an expiration date. Select the
Expiration date of item from the calendar.
11. Press OK.
The item is listed on the Loaded tab.
12. Press Close and Main Menu to return to the Main Menu, or Exit to log out of the
Station.
The Refill Point (50% of Par), Critical Low (10% of Par), Current
(equal to Par) and Phys Max (equal to Par) fields will fill
automatically based on the Par level. The quantities can be
changed if needed.
Note
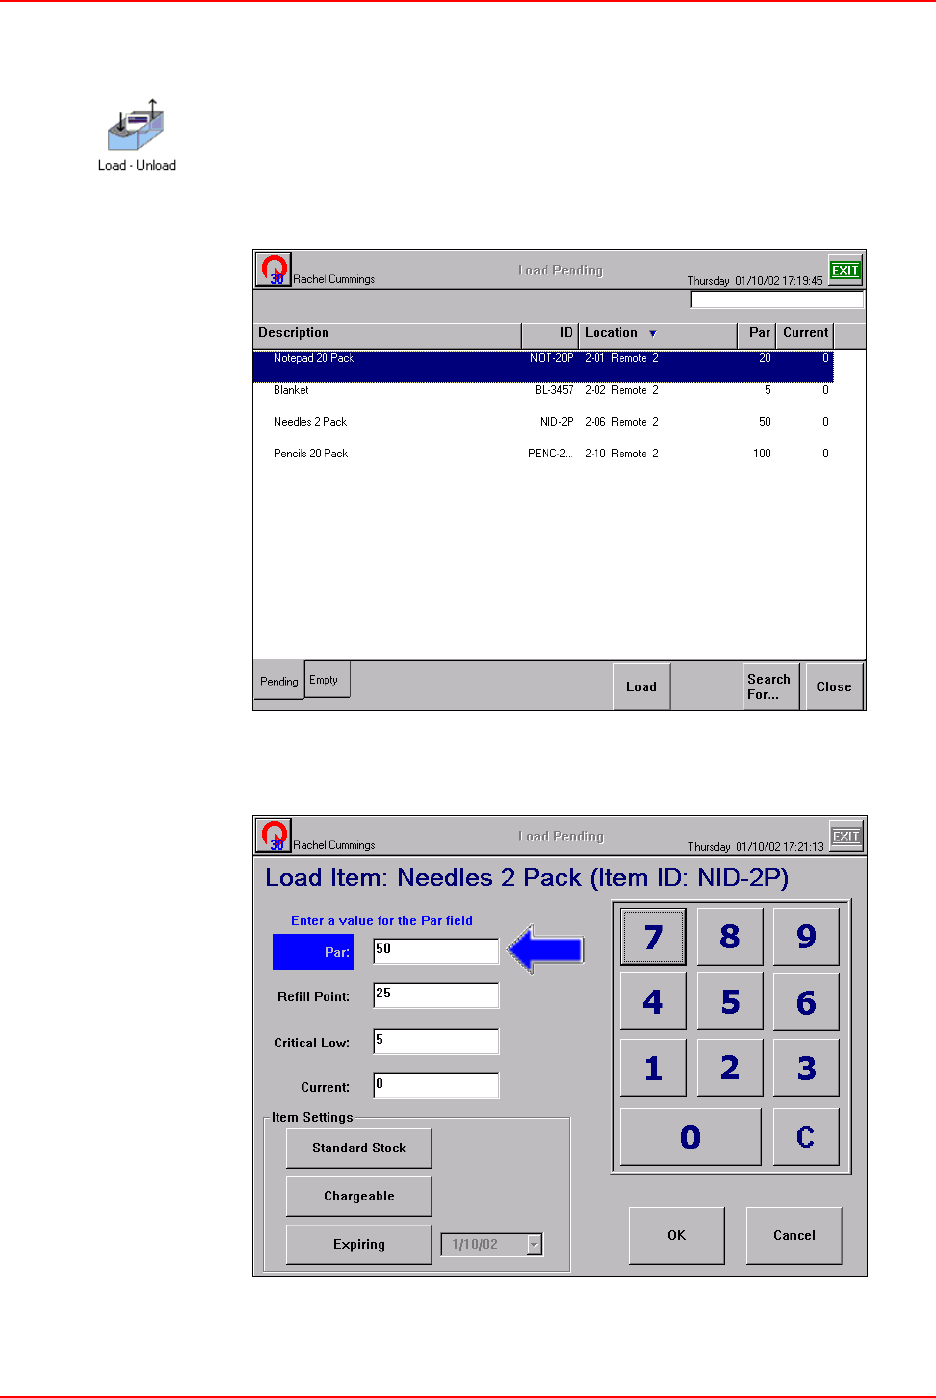
Load-Unload
4-14 JITRBUD Main User Guide
Loading Pending Bins
To load a pending bin
1. From the Main Menu, press the Load-Unload icon.
2. Press Load Items.
3. Select the Pending tab.
4. Select the item from the item list and press Load.
The Load Item window appears.
5. Edit the item information if necessary.

Load-Unload
JITRBUD Main User Guide 4-15
• Press the Standard Stock button to label the item as standard stock.
• Press the Chargeable button to allow the item to be charged to patients.
• Press the Expiring Item button if item has an expiration date. Select the
Expiration date of item from the calendar.
6. Press OK.
The item is listed on the Loaded tab.
7. Press Close and Main Menu to return to the Main Menu, or Exit to log out of the
Station.
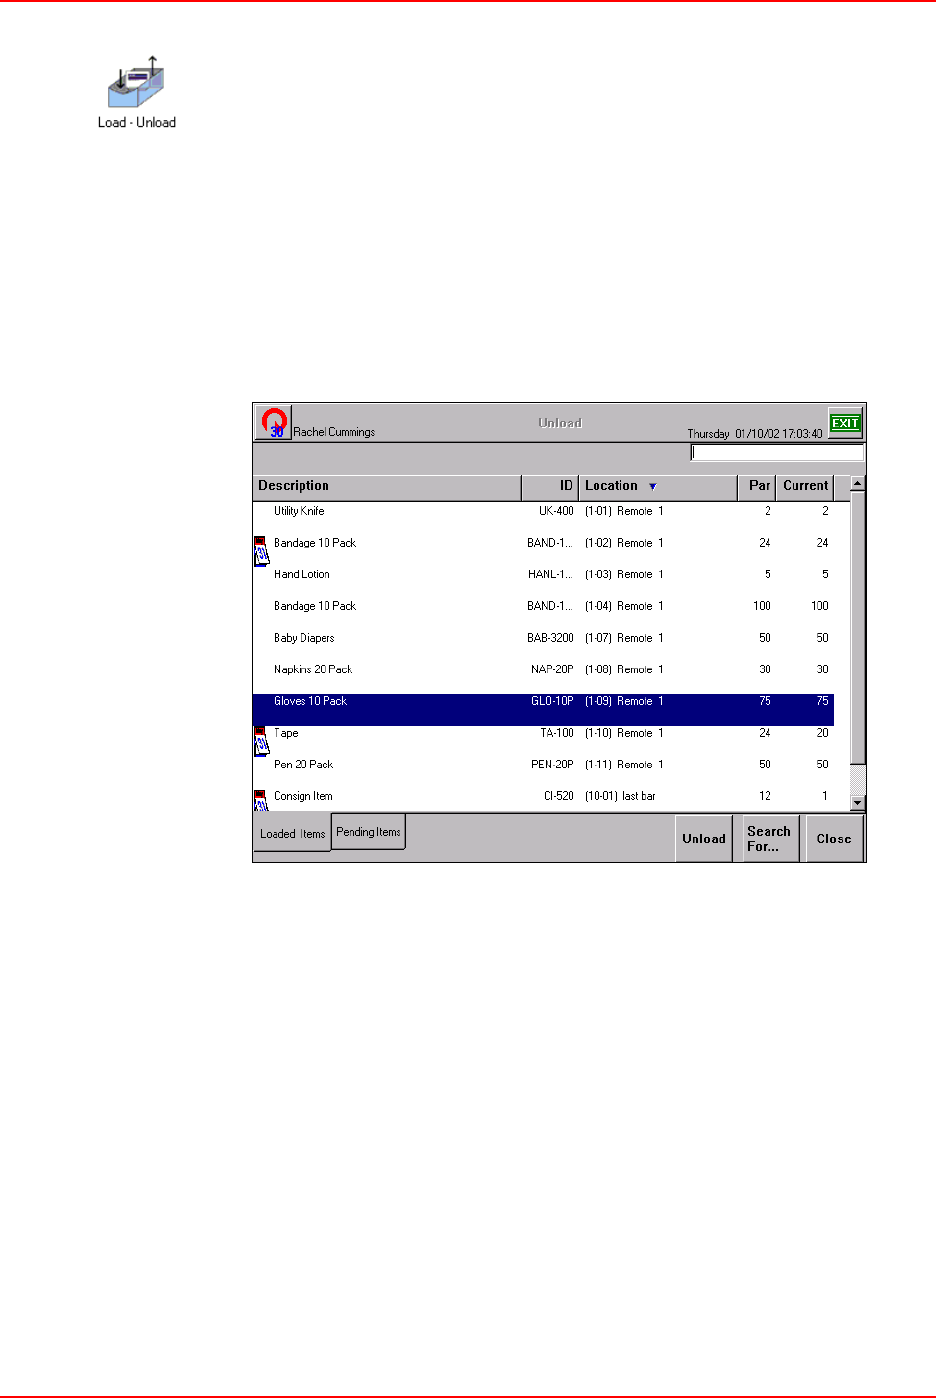
Load-Unload
4-16 JITRBUD Main User Guide
Unloading Items
Unload is the process of physically removing the entire supply of an item from a
location. After an item is unloaded, the bin is available for another item.
If an item is loaded in multiple bins, the Station will provide a prompt to select the
location you want to unload. When the item is unloaded, the item is no longer
assigned at that location on the SUPPLYCENTER Console Inventory screen.
To unload an item
1. From the Main Menu, press the Load-Unload icon.
2. Press Unload Items.
3. Select the Loaded Items tab.
4. Select the item to unload by pressing the Take or Return button on the
JITRBUD transmitter.
5. Press Unload.
A confirmation screen appears.
6. Press Yes.
The item is removed from the bin location.
7. Press Close and Main Menu to return to the Main Menu, or Exit to log out of the
Station.
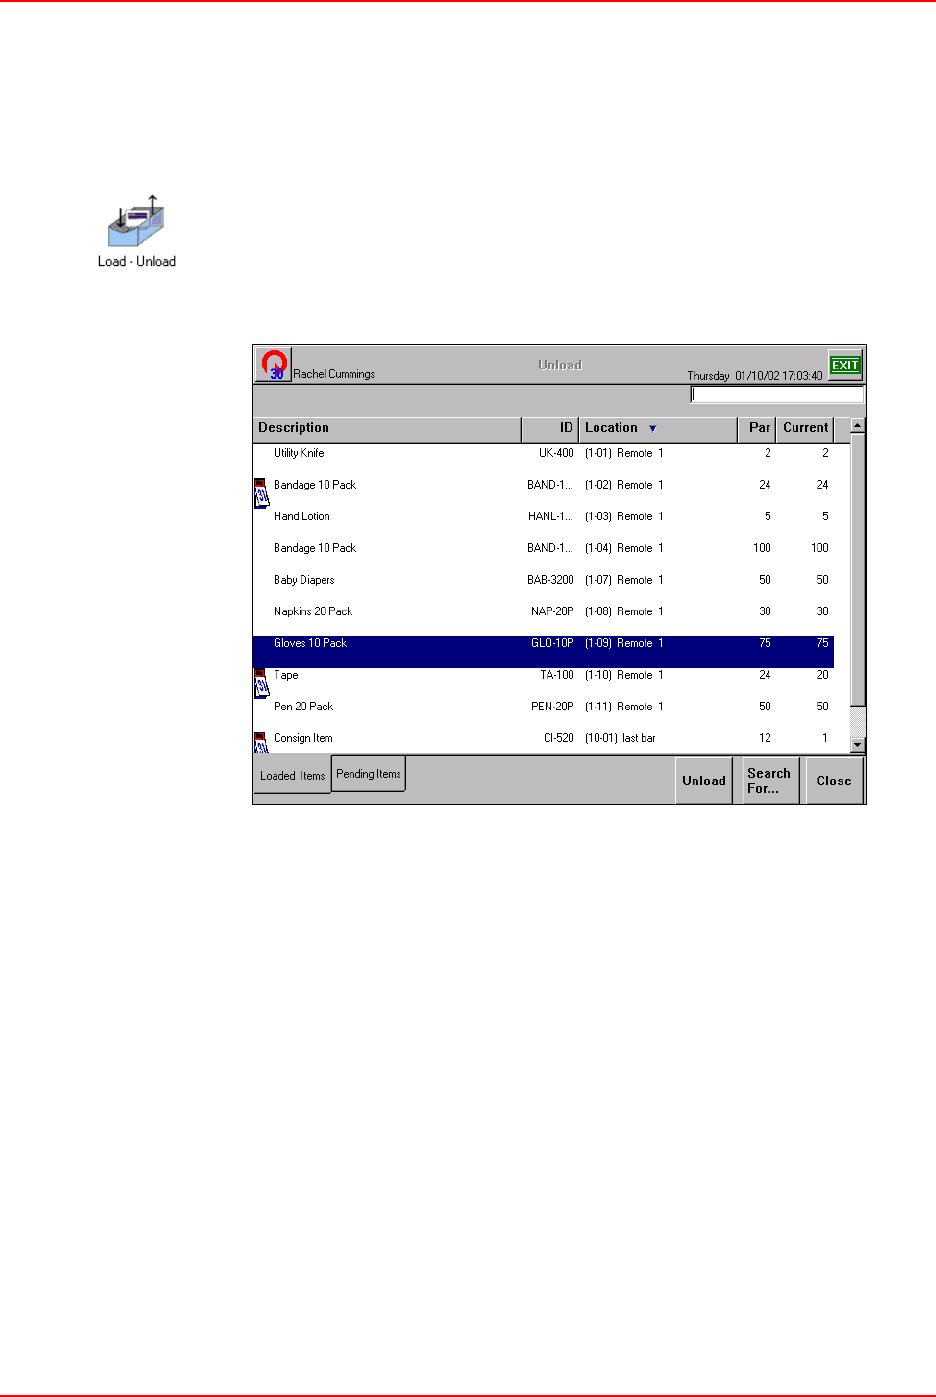
Load-Unload
JITRBUD Main User Guide 4-17
Moving Items to a New Location
To move an item from one location to another, perform an Unload transaction to
remove the item from its current location and then perform a Load transaction to
move the item to its new location.
To move items to a new location
1. From the Main Menu, press the Load-Unload icon.
2. Press Unload Items.
3. Select the Loaded Items tab.
4. Select the item to move by pressing the Take or Return button on the
JITRBUD transmitter.
5. Press Unload.
A confirmation screen appears.
6. Press Yes.
The item is removed from the bin location.
7. Press Close.
8. Press Load Items.
9. Select the Empty tab.
10. Select a new location for the item by pressing the Take or Return button on the
JITRBUD transmitter.
11. Press Load.
12. Select the item to move and press Add to Bin.
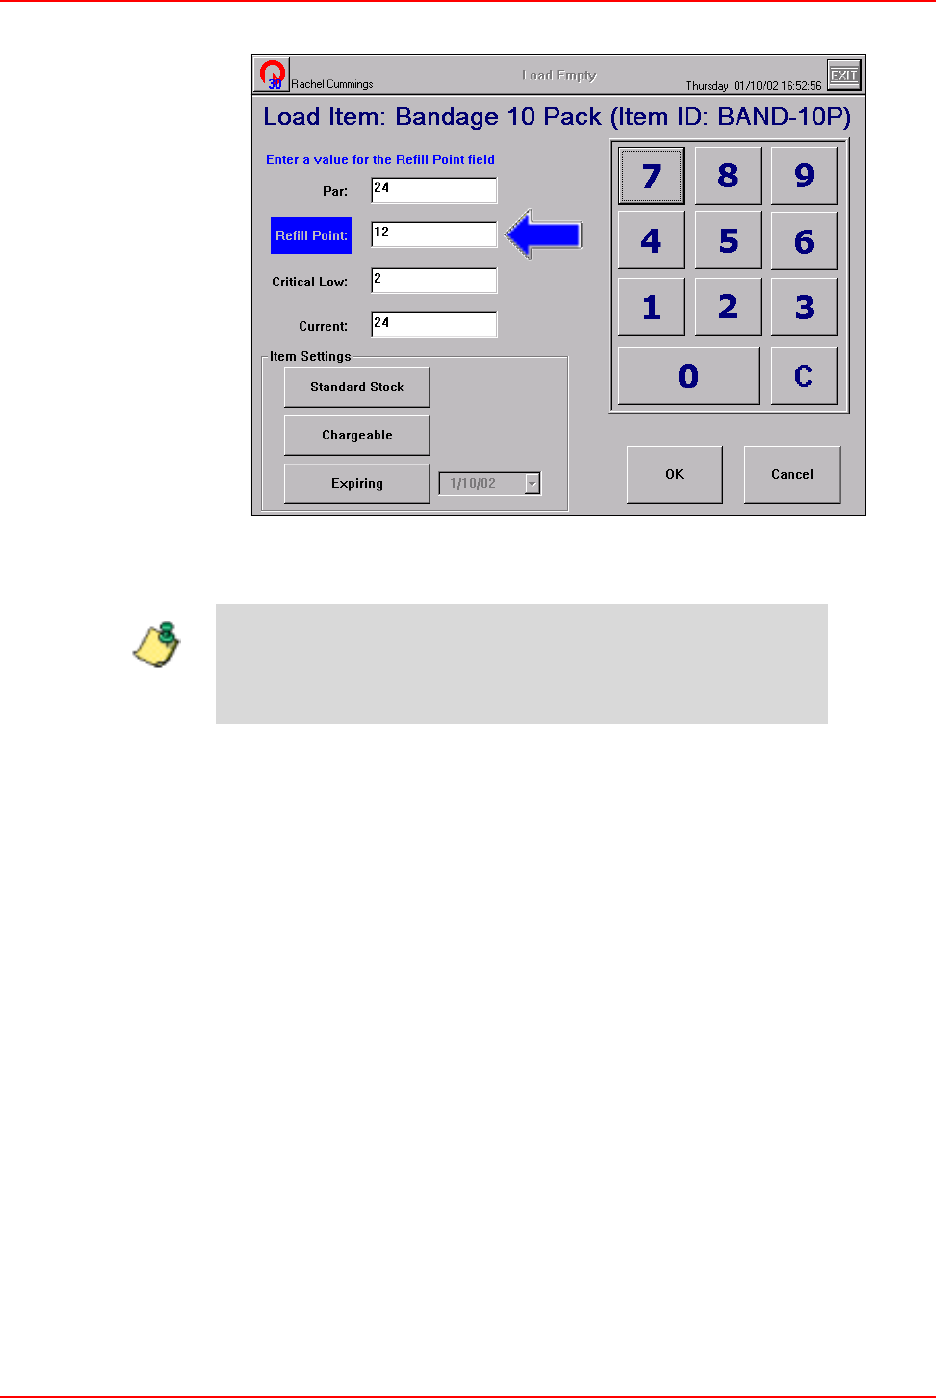
Load-Unload
4-18 JITRBUD Main User Guide
13. Enter the maximum quantity in the Par field and press the TAB key on the
keyboard.
14. Press the Standard Stock button to label the item as standard stock.
15. Press the Chargeable button to allow the item to be charged to patients.
16. Press the Expiring Item button if item has an expiration date. Select the
Expiration date of item from the calendar.
17. Press OK.
The item is listed on the Loaded tab.
18. Press Close and Main Menu to return to the Main Menu, or Exit to log out of the
Station.
The Refill Point (50% of Par), Critical Low (10% of Par), Current
(equal to Par) and Phys Max (equal to Par) fields will fill
automatically based on the Par level. The quantities can be
changed if needed.
Note
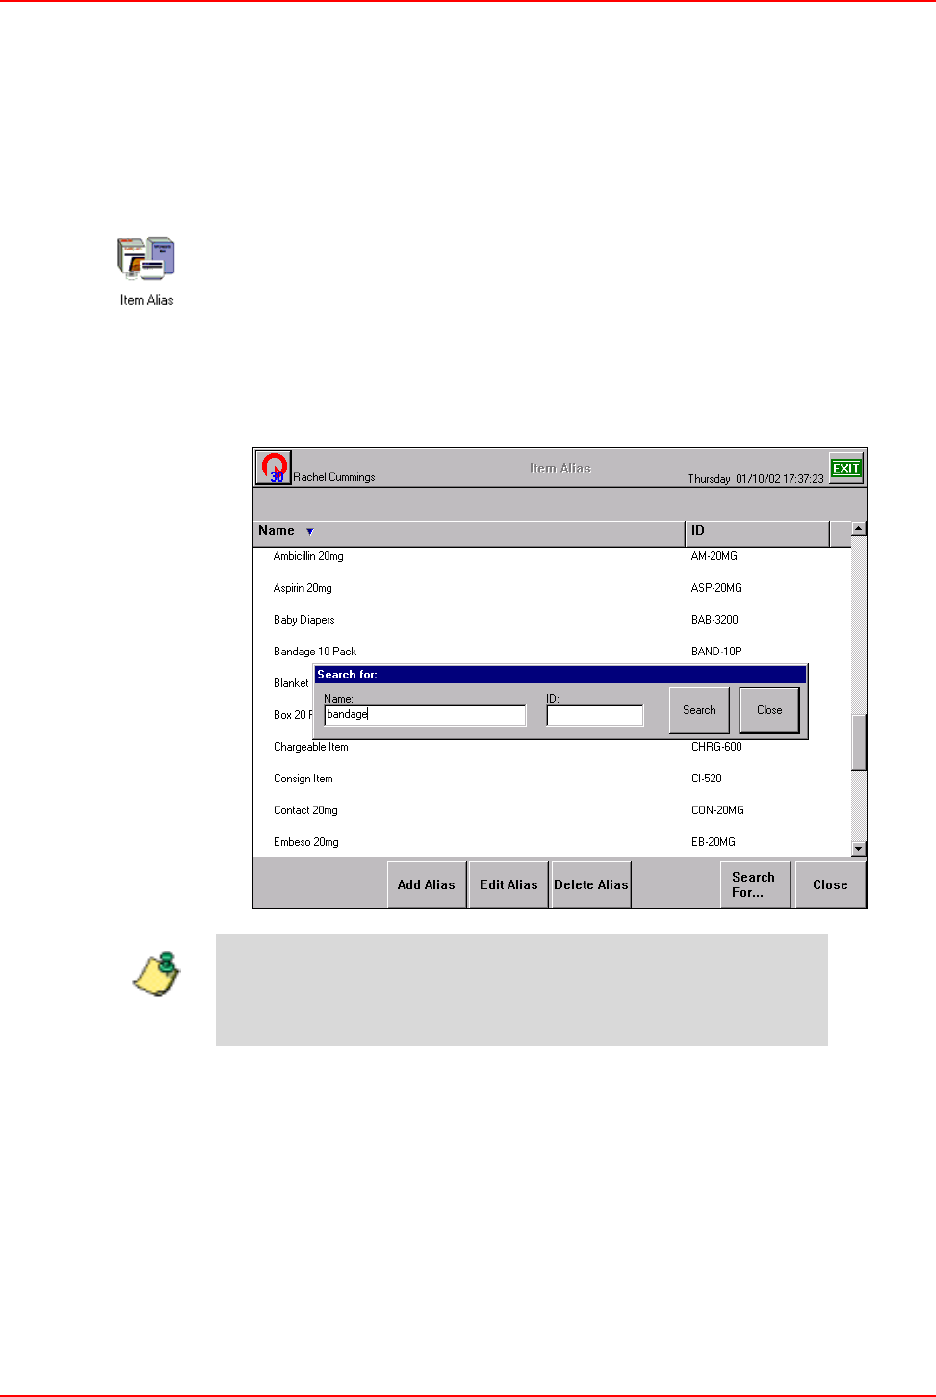
Item Alias
JITRBUD Main User Guide 4-19
Item Alias
An Alias is an alternate name for an item that is created by a user.
Searching for Items
To search for an item
1. From the Main Menu, press the Item Alias icon.
The Item Alias window appears.
2. Press Search For.
The Search For window appears.
3. Type the first letters of the item name and press Search.
.
4. To display the entire item list again, delete the text in the Search For window
and press Search.
The item list appears.
If you type the entire item name, the item appears in the Item
Alias window. If you type in the first few letters of the item
name, a list of items appears to select the appropriate item.
Note
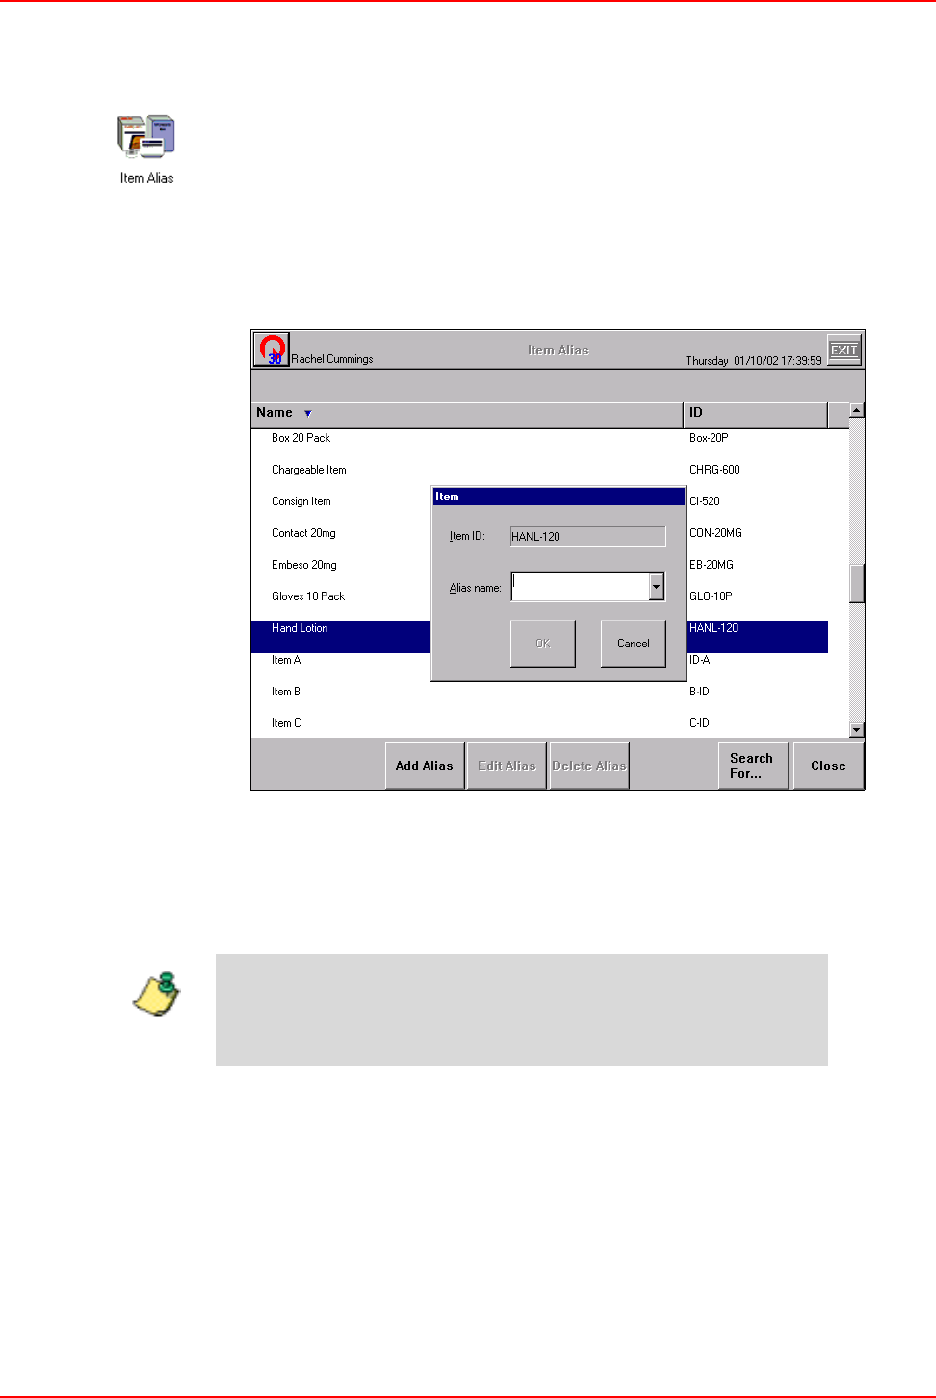
Item Alias
4-20 JITRBUD Main User Guide
Creating an Item Alias
To create an item alias
1. From the Main Menu, press the Item Alias icon.
The Item Alias screen appears.
2. Select the item for which you are creating an alias.
3. Press Add Alias.
The Item window appears.
4. Enter the Alias name for the item.
5. Press OK.
The Alias name is added to the item list.
6. Press Close to return to the Main Menu, or Exit to log out of the Station.
You can create up to 25 aliases per item.
Note
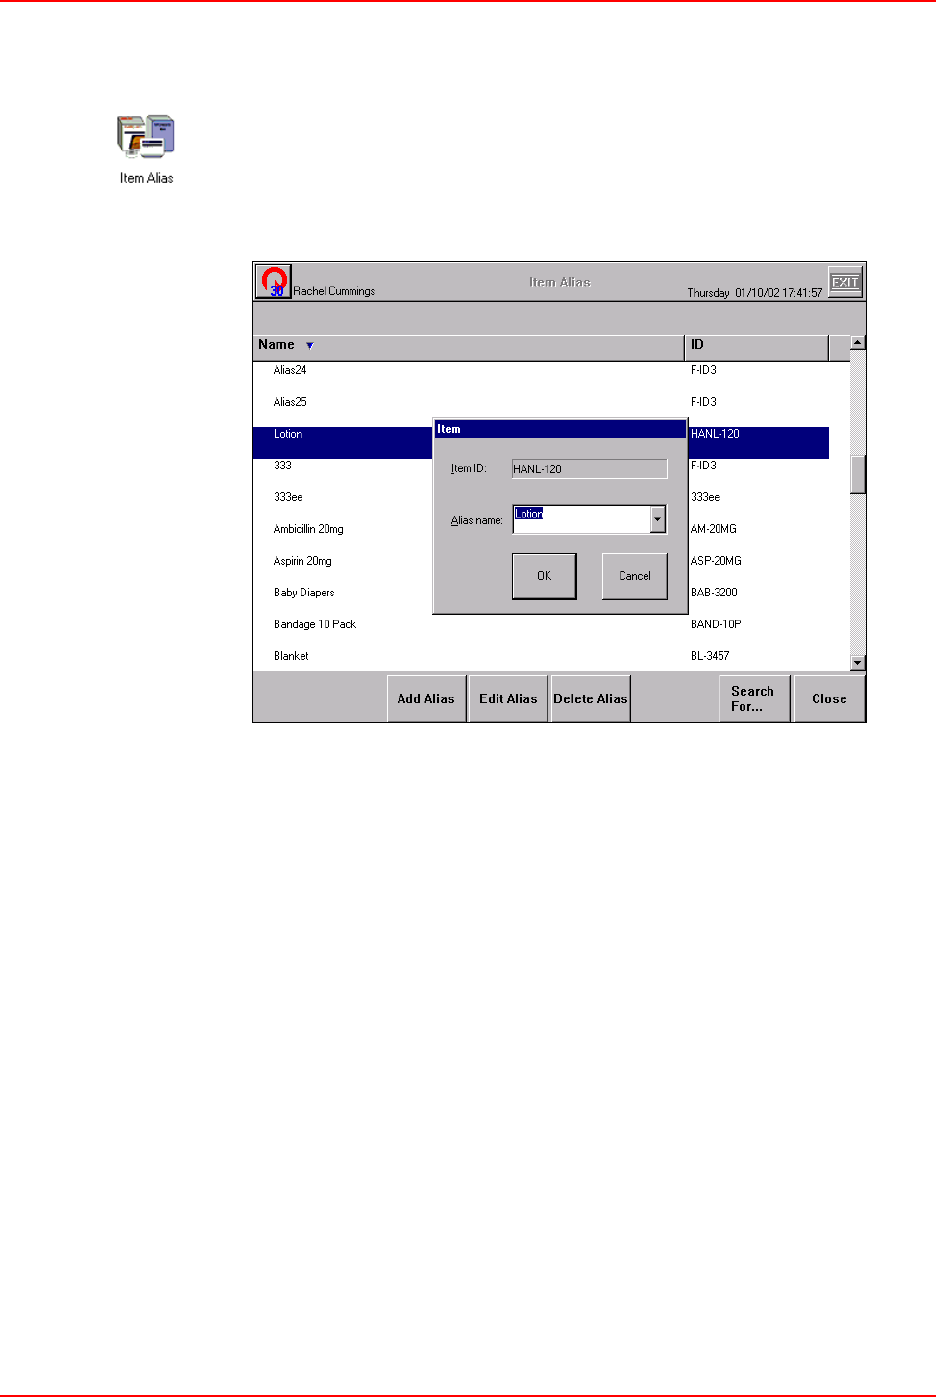
Item Alias
JITRBUD Main User Guide 4-21
Editing an Alias
To edit an alias
1. From the Main Menu, press the Item Alias icon.
2. Highlight the item alias to edit.
3. Press Edit Alias.
4. Edit the Alias name.
5. Press OK.
The change will be reflected in the item list.
6. Press Close to return to the Main Menu, or Exit to log out of the Station.
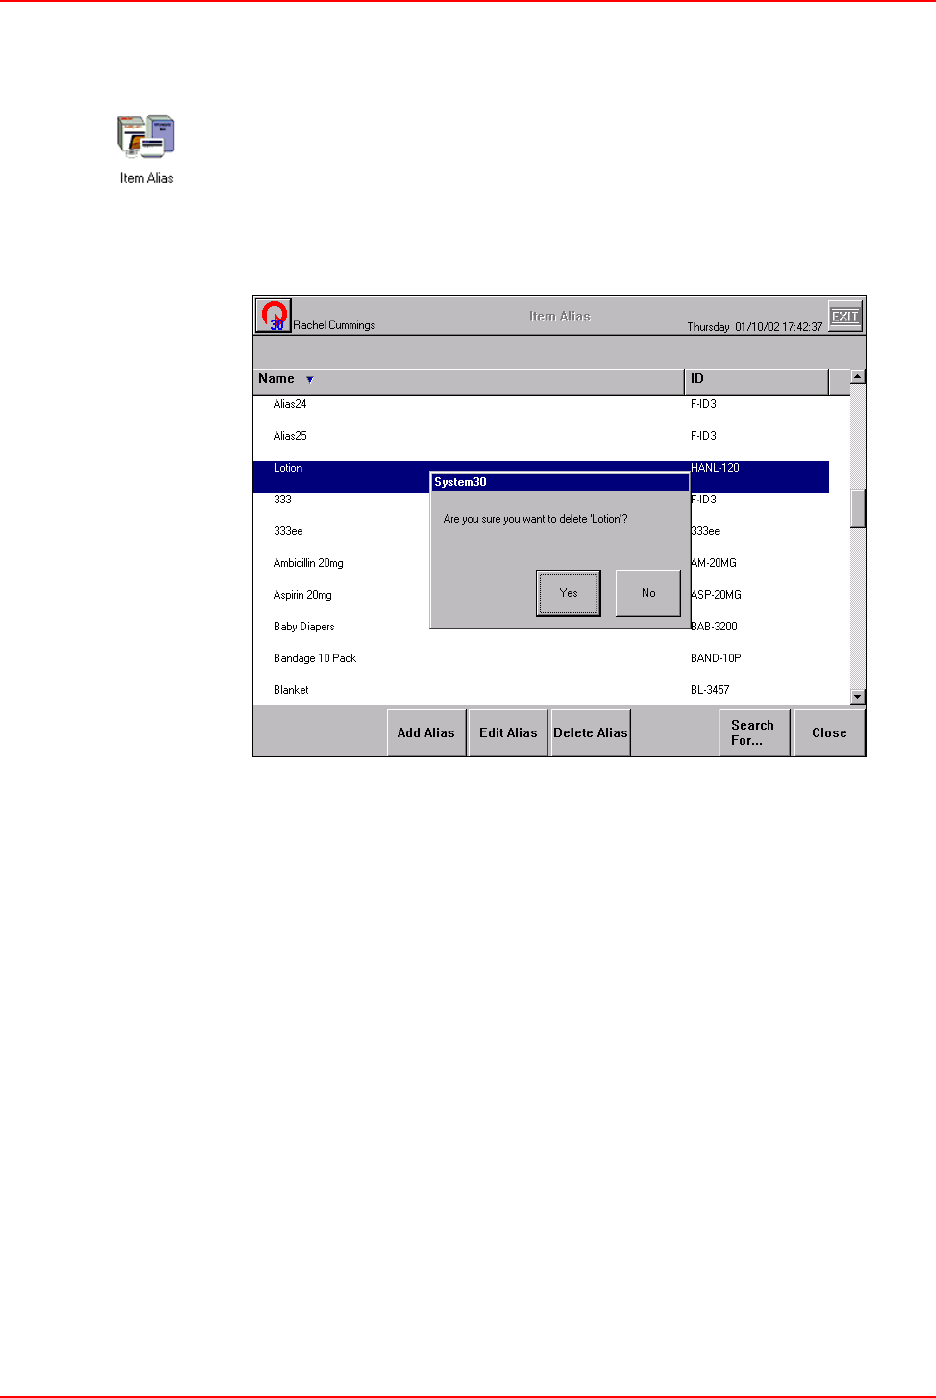
Item Alias
4-22 JITRBUD Main User Guide
Deleting an Alias
To Delete an Alias
1. From the Main Menu, press the Item Alias icon.
2. Highlight the item alias to delete.
3. Press Delete Alias.
A confirmation window appears.
4. Press Yes.
The item alias no longer appears on the item list.
5. Press Close to return to the Main Menu, or Exit to log out of the Station.
Refill
JITRBUD Main User Guide 4-23
Refill
Use the Refill feature to restock items in the JITrBUD system. The Refill screen
has four tabs that list items that are Below Par, At Refill or At Critical.
After you select the appropriate tab, you can select items to refill on the screen.
The Refill Amount and Current Amount appears for the selected item. The Refill
Amount and Current Amount can be adjusted using the keyboard. Complete the
refill process by pressing the Done button. A message is sent to the
SUPPLYCENTER Console and a refill receipt is printed at the Station (if configured
to print a receipt for refill).
The calendar icon appears in front of Expiring Items that will expire within the
time period specified in the Item outdated warning days field on the Time Options
tab in Station Options.
The default tab that is selected on the Refill screen is set in the
Station Options window on the General Configuration tab.
Note
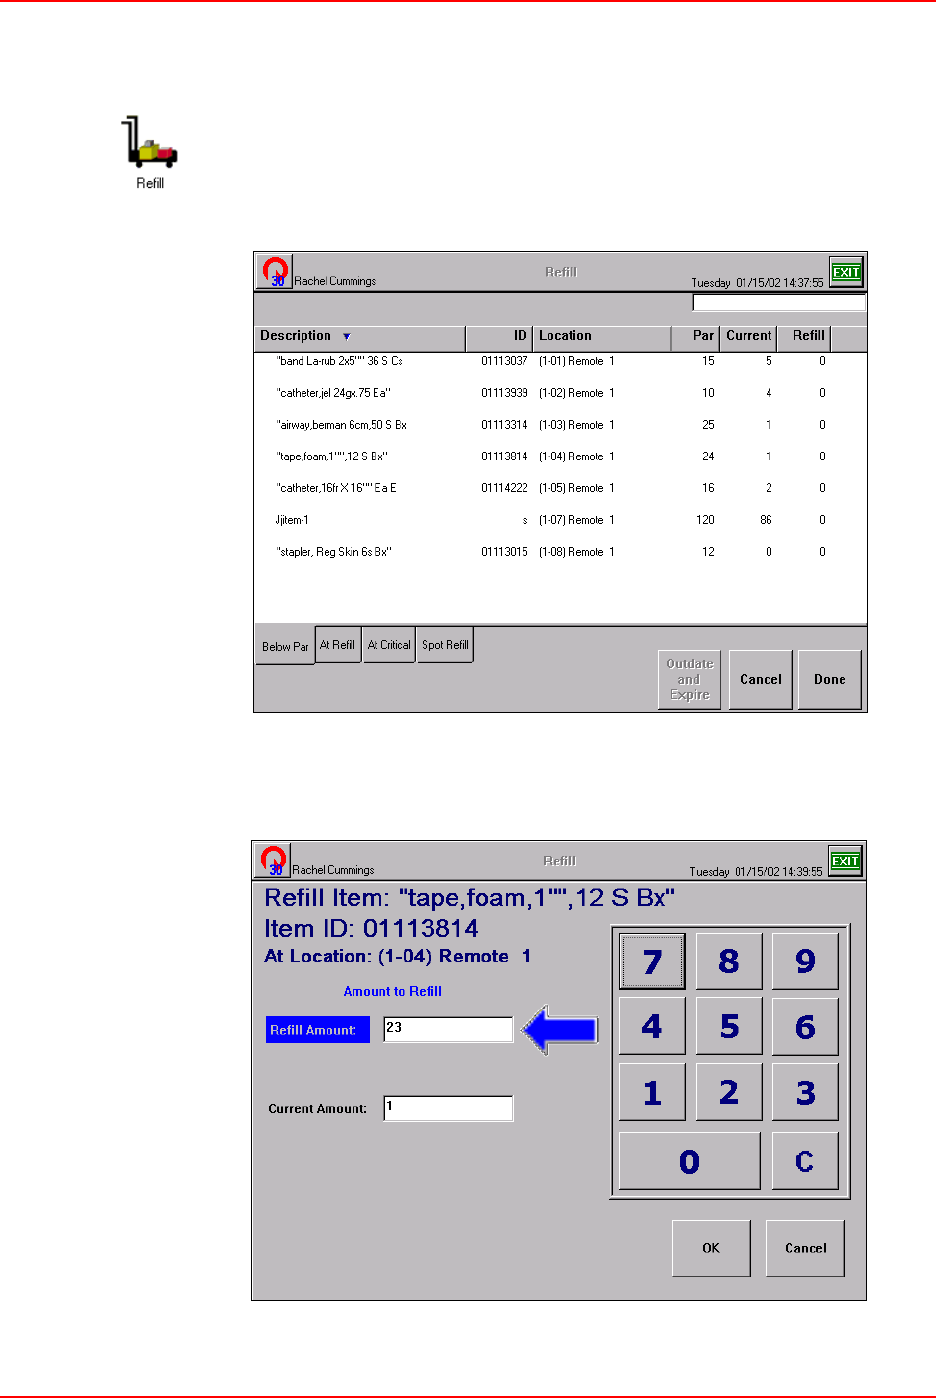
Refill
4-24 JITRBUD Main User Guide
Refilling Items
To Refill Items
1. From the Main Menu, press the Refill icon.
The Refill screen appears.
2. Select the appropriate tab at the bottom of the screen.
3. Select the item to refill using the touch screen, or by pressing the Take or
Return button on the JITRBUD transmitter.
The Refill Item screen appears.
Refill
JITRBUD Main User Guide 4-25
4. Edit the Refill Amount and Current Amount if necessary.
5. Press OK.
6. Place the items in the bin.
7. Select the next item to refill and repeat steps 3-6 until you are finished
refilling items.
8. Press Done to return to the Main Menu, or Exit to log out of the Station.
Spot Refill
To spot refill
1. From the Main Menu, press the Refill icon.
The Refill screen appears.
2. Select the Spot Refill tab at the bottom of the screen.
Items are not listed on the Spot Refill list.
3. Select the item to refill by pressing the Take or Return button on the JITRBUD
transmitter.
The Refill Item screen appears.
Refill
4-26 JITRBUD Main User Guide
4. Adjust the Refill Amount and Current Amount if necessary.
5. Press OK.
6. Place the items in the bin.
7. Press Done to return to the Main Menu, or Exit to log out of the Station.
Refill
JITRBUD Main User Guide 4-27
Outdating Expired Items in Refill
Use the Outdate and Expiration feature to outdate an item and remove it from the
Station due to expiration. Items that are flagged as Expiring Items are tracked by
the system. When an expiring item is expired, or will expire within the specified
Item outdated warning days, a calendar icon appears next to the item name on the
Refill list. If an item with a calendar icon is selected for refill, an expiration
warning message appears.
You can outdate an item that is not configured with an expiration date. However,
if an item is not configured with an expiration date in the system, the calendar
icon will not appear for the item and the system will not warn users to check the
expiration date for the item.
To outdate expired items
1. From the Main Menu, press the Refill icon.
2. Select the expired item to outdate using the touch screen, or by pressing the
Take or Return button on the JITRBUD transmitter.
The Please Check the expiration date window appears.
3. Press Outdate.
The Outdate Item window appears.
The Expiring Item option and Expiration Date is configured using
the Edit button in Inventory.
The Item outdated warning days is the number of days before an
item is set to expire that the system is configured to display the
calendar icon. The Item outdated warning days is configured in
Station Options on the Time Options tab. For more information, see
Station Options on page 5-25.
Note
Refill
4-28 JITRBUD Main User Guide
4. Enter the quantity of expired items in the Amount to Expire field.
5. Press OK.
The Please Check the expiration date window appears.
6. Select the new expiration date for the remaining items using the calendar.
7. Press OK.
8. Physically remove the expired items from the bin and press OK.
9. Press Done to return to the Main Menu, or Exit to log out of the Station.
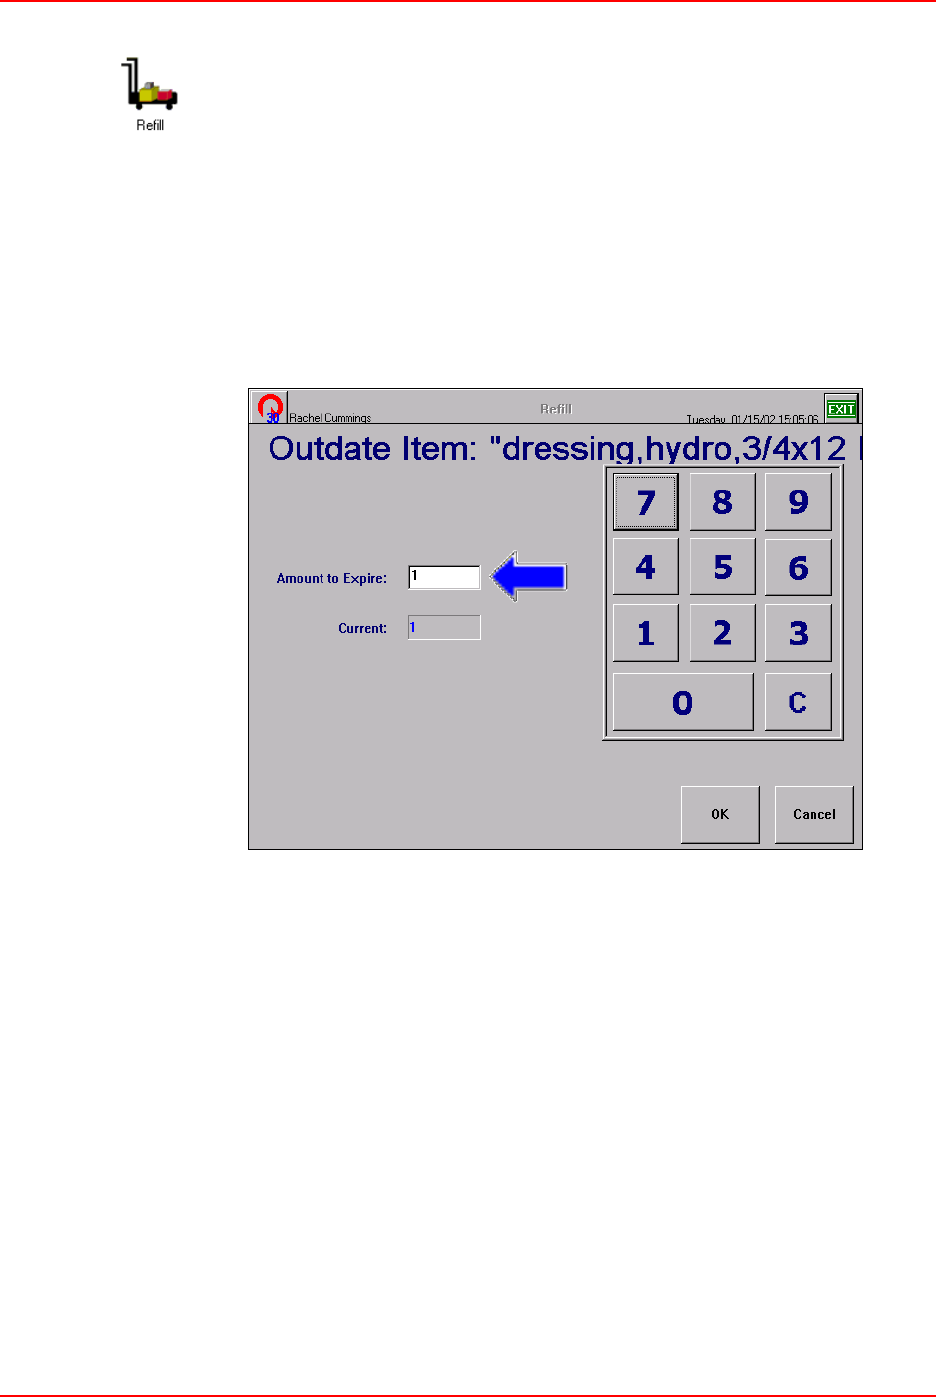
Refill
JITRBUD Main User Guide 4-29
To outdate items not configured with Expiring Item feature
1. From the Main Menu, press the Refill icon.
2. Select the item to outdate using the touch screen, or by pressing the Take or
Return button on the JITRBUD transmitter.
The Refill Item window appears.
3. Press Cancel to return to the Refill screen.
4. Press Outdate and Expiration.
The Outdate and Expire Item window appears.
5. Press Outdate.
The Outdate Item window appears.
6. Enter the quantity of expired items in the Amount to Expire field.
7. Press OK.
The Outdate and Expire Item screen appears.
8. Press OK.
9. Press Done to return to the Main Menu, or Exit to log out of the Station.

Refill By Request Order
4-30 JITRBUD Main User Guide
Refill By Request Order
Use the Refill by Request Order feature to restock the Station with items
identified by a purchase order or report number. The Refill by Request Order
feature enables refill technicians to replenish the Station in one simple step, by
receiving replenishment information electronically from the SUPPLYCENTER
Console or outside vendor and transmitting the data directly to the Station.
To view a refill request order, select the Refill by Request Order icon on the Main
Menu. A list of outstanding refills sent from the SUPPLYCENTER Console or
outside vendor is displayed with an associated PO or Report ID. Select the refill
order number and press the Continue button. A list of all items in the order appears
with the Location, Current amount, and the Refill amount.
You can select individual items on the Refill Order list screen, or you can press the
Refill All button to refill all items in the refill order. The bin lights identify the
location of the items on the Refill Order List. A receipt will print for each line
item refilled at the Station, if the print option is selected in Station Options.
To send a Refill Report ID from the SUPPLYCENTER Console to the
Station, select the Notify Station of restock check box when printing
a Restock List or Pick List report.
Note
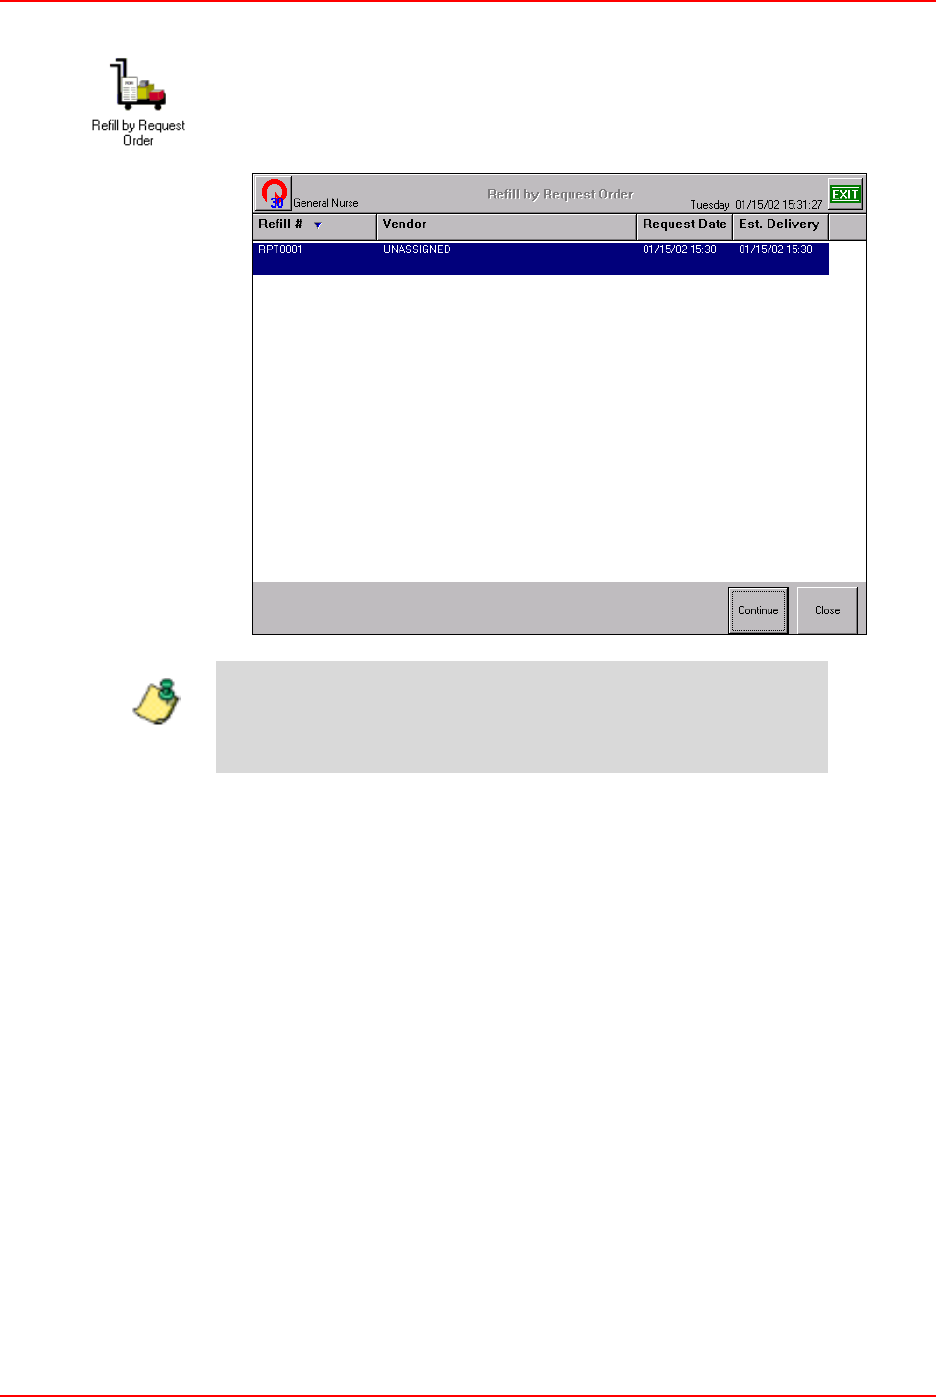
Refill By Request Order
JITRBUD Main User Guide 4-31
To Refill By Request Order
1. From the Main Menu, press the Refill by Request Order icon.
The Refill by Request Order screen lists the refill orders for the Station.
.
2. Select the refill order and press Continue.
The Refill Order List screen appears.
If Notify Station of restock check box was selected at the
SUPPLYCENTER Console, the Console Restock Report will have
same number as Refill Number at the Station.
Note
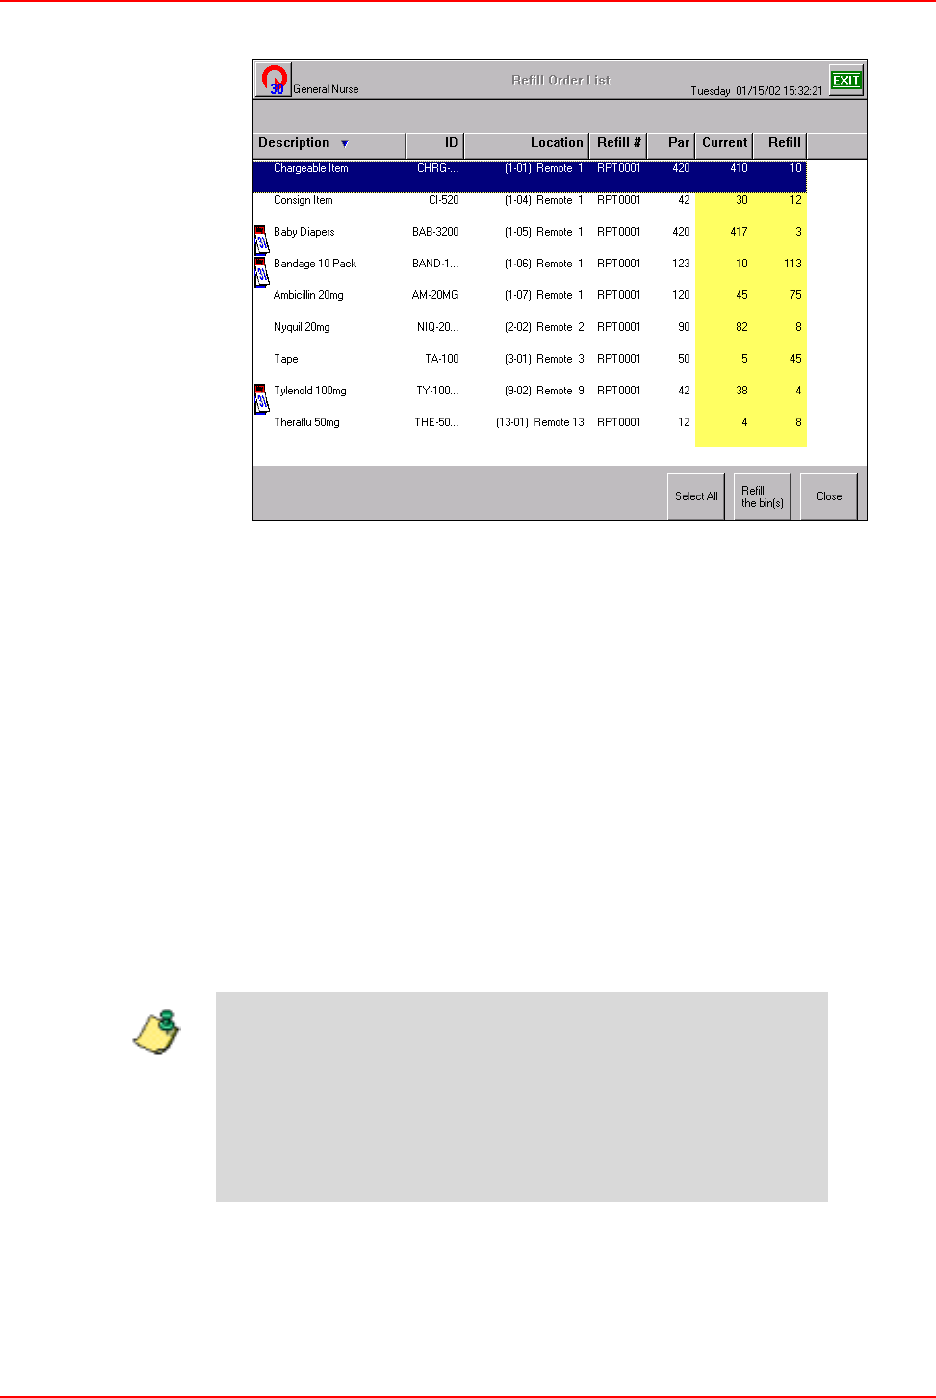
Refill By Request Order
4-32 JITRBUD Main User Guide
• To change the Refill Count, double tap the Refill field on the screen and
enter the correct quantity using the keyboard.
• To change the Current Count, double tap the Current field on the screen
and enter the correct quantity on the keyboard.
3. To refill individual items, select an item using the touch screen, or by pressing
the Take or Return button on the JITRBUD transmitter. To select multiple
items using the touch screen, press and hold down the CTRL key. Press Refill
the bin(s).
- or -
To refill all items on the Refill Order List, press Select All.
The selected items are removed from the Refill Order List.
4. Physically refill the items.
5. Press Close.
6. Press Close to return to the Main Menu, or Exit to log out of the Station.
The refill order is not complete until all items are refilled or the
refill amount for the items is changed to zero.
If you do not complete the refill order, the refill order will
remain at the Station until it is removed by the system
maintenance program. For more information about the
maintenance program, see the SUPPLYCENTER Console User
Guide.
Note

JITRBUD Main User Guide 5-1
Chapter 5
Station Management Functions
This chapter provides the following Station Management functions accessed from
the Station Management section of the Main Menu. The functions you have access
to depend upon the privileges that have been assigned to you.
•User—create a user with or without a template. Rights, privileges, and door
access are assigned at this screen.
•Options—customize each Station for specific needs and purposes. Included
are General Station Information, Options, Time Options, Printing Options,
and Station Communication Settings.
•Hardware Setup—add, edit, or delete a device at the Station.
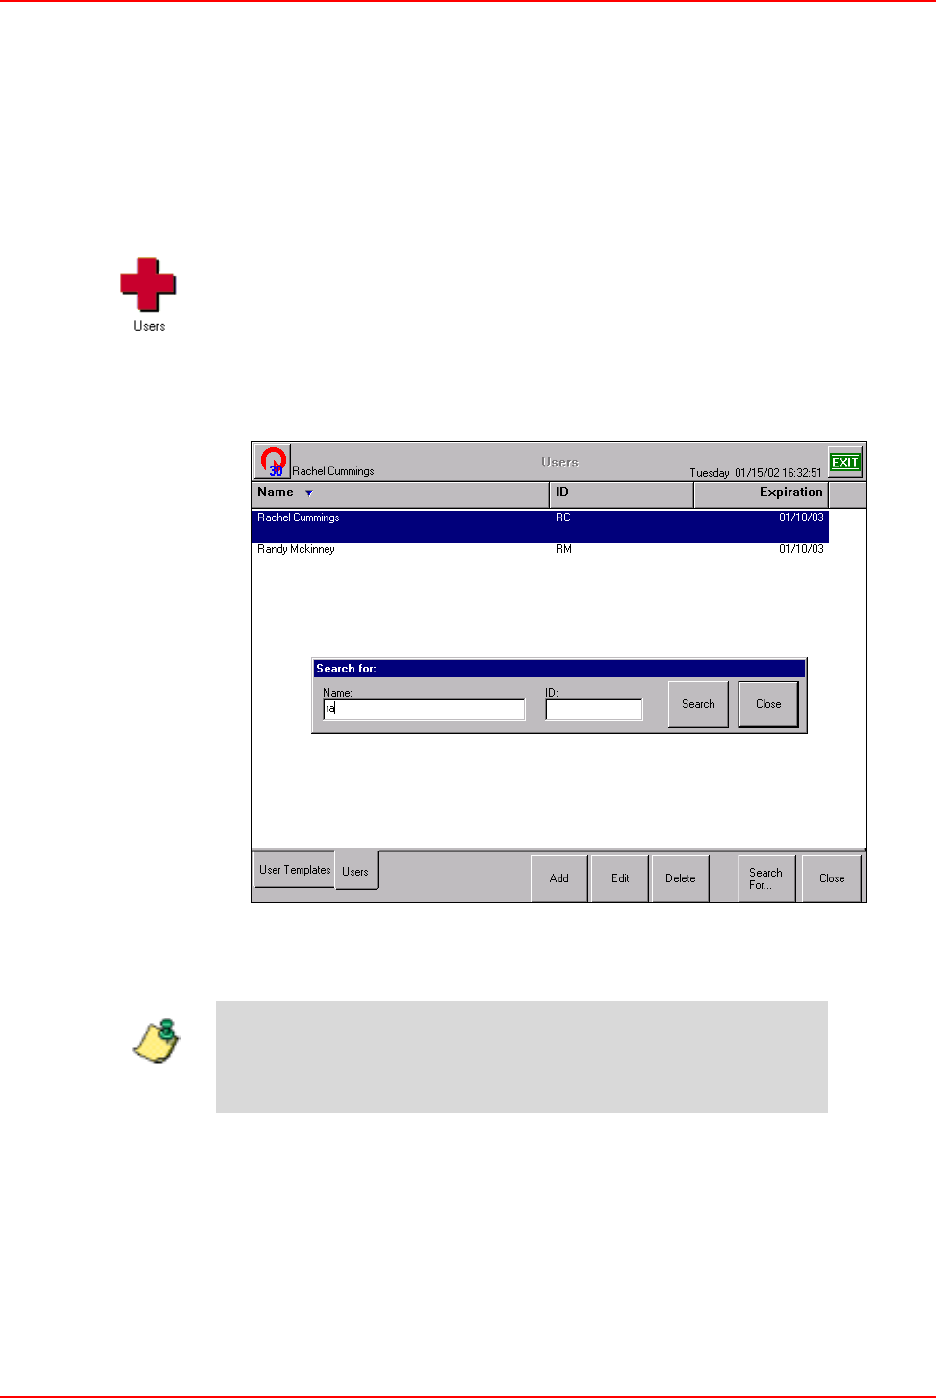
Users
5-2 JITRBUD Main User Guide
Users
Use the Users feature to add users to the system. You can also add users to the
system at the SUPPLYCENTER Console.
Searching for Users
To search for a User
1. From the Main Menu, press the Users icon.
The Users window appears.
2. Type the first letters of the user name.
The Search For window appears.
3. If necessary, press the Search button or ENTER key.
The User appears in the Users window.
4. To display the entire user list again, delete the text in the Search For window
and press Search.
The user list appears.
If you type the entire user name, the user appears in the Users
window. If you type in the first few letters of the user name, a list
of users appears to select the appropriate user.
Note
Users
JITRBUD Main User Guide 5-3
Creating Users
To create a user
1. From the Main Menu, press the Users icon.
The Users screen appears.
2. Press Add.
The Create User window appears.
3. Select the Don’t use template button.
4. Press Next.
The General window appears.

Users
5-4 JITRBUD Main User Guide
5. Enter the user’s information:
•Name—name of the user.
•User ID—ID of the user.
•ID expiration—expiration date of the User ID.
•Password—password for the user.
•Confirm password—confirmation of the password for the user.
•Password expiration—expiration date of the user password (configured
at the SUPPLYCENTER Console).
6. Press Next.
The Area window appears.

Users
JITRBUD Main User Guide 5-5
7. Select the Area access information:
• Allow access to all areas—select option to allow the user to access all
areas in the system.
•Allow access to selected areas—select option to allow the user to access
limited areas in the system. Select the check boxes next to the appropriate
areas on the Area list.
8. Press Next.
The Doors window appears.
Users
5-6 JITRBUD Main User Guide
9. Select the doors to Deny access (if applicable).
•Select All—option allows you to quickly select the Deny access check
box for all doors at the Station. You can deselect the appropriate doors if
needed.
•Clear All—option allows you to quickly deselect the Deny access check
box for all doors at the Station. You can select the appropriate doors if
needed.
10. Press Next.
The Summary window appears.
11. Press Finish.
You must select the new patient on the User List and select Edit
to assign user rights and set user preferences.
Note
Users
JITRBUD Main User Guide 5-7
12. Select the new user on the User List and press Edit.
The User window appears.
13. Select the Rights tab.
14. Select the appropriate rights for the new user.
Admin tasks:
•Patient Management—allows the user to view, add, edit, and reconcile
patients.
•Item Management—allows the user to create and edit item aliases.
•Define Local Kit—allows the user to define a kit specific to an area.
•Define Global Kit—allows the user to define a kit that can be accessed
globally in the system.
•User Management—allows the user to create users and assign rights,
areas, and door access.
•Station Login—allows the user to Login to the Station.
•Station Activity Reports—not applicable to the JITRBUD Main.
•Station System Report—not applicable to the JITRBUD Main.
•Print to Non-Station Printer—not applicable to the JITRBUD Main.
•Modify Config—allows the user to modify Station configurations.
•Station Global Patient Access—allows the user to select a patient from
any Station for purposes of transactional activity.
Stock tasks:
•Take/Return—allows the user to Take and Return Items and add
patients.
•Discard—not applicable to the JITRBUD Main.
•Refill—allows the user to Refill bins and perform Refill by Request
orders.
Users
5-8 JITRBUD Main User Guide
•Inventory—allows the user to Inventory items.
•Load/Unload—allows the user to Load and Unload items.
•Request Item—allows the user to Request items needed at the Station.
15. Select the Preference tab.
16. Select the preferences for the new user.
•Start screen—screen that appears upon initial login to the Station.
•Sort items by—sort option for item lists.
•Sort patients by—sort option for patient lists.
•Default patient list—default patient list that appears during patient care
functions.
•Use fancy find for single items—not applicable to JITrBUD Station.
•Use fancy find for kits—not applicable to JITrBUD Station.
•Show list names in mixed case—displays names in capital and lower
case letters (example, patient John McCoy).
17. Press OK.
The User screen appears.
18. Press Close to return to the Main Menu, or Exit to log out of the Station.
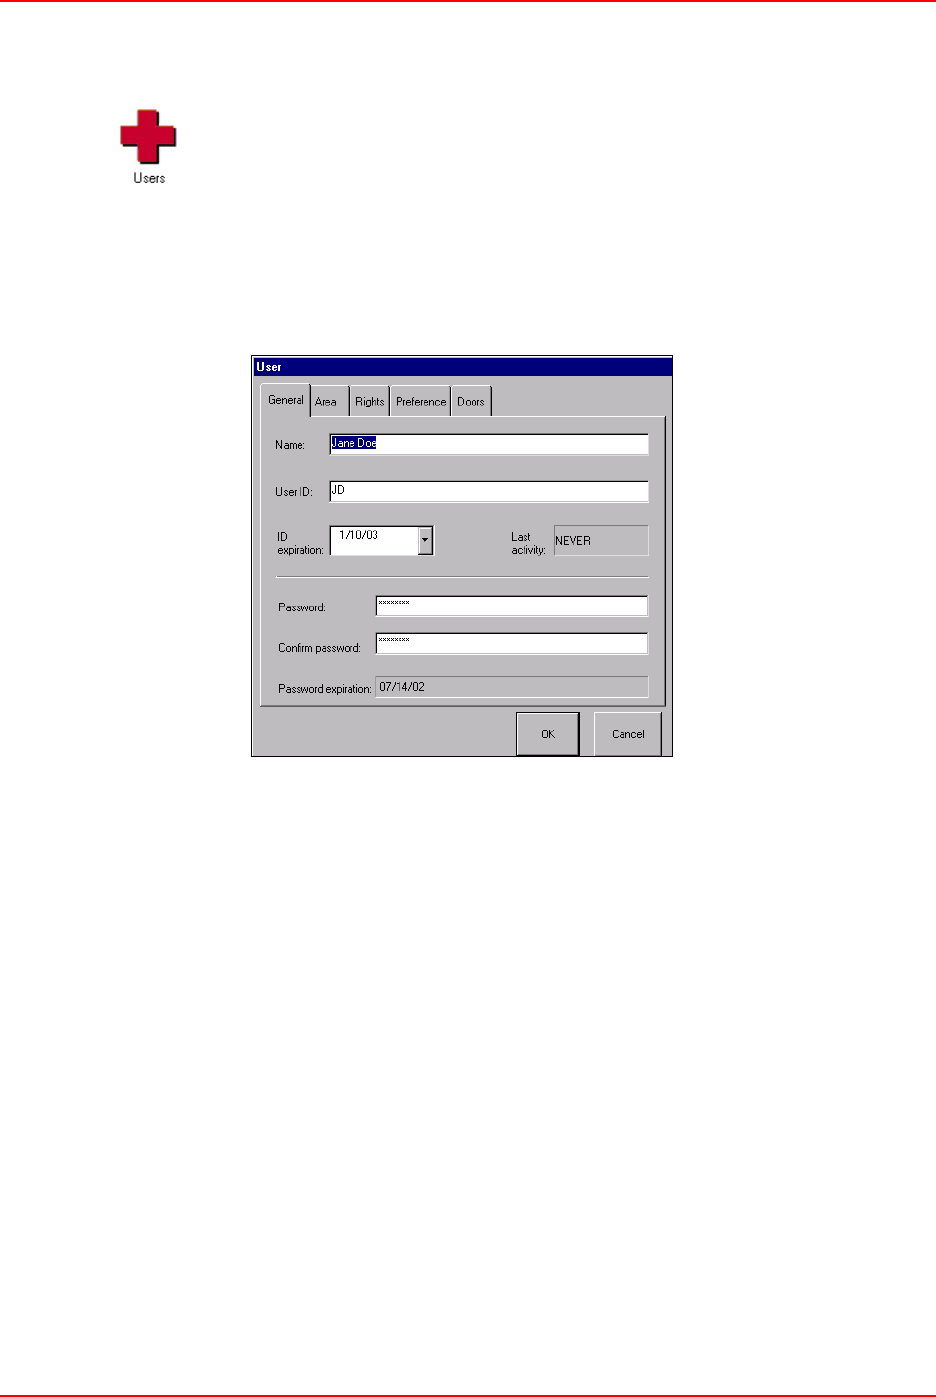
Users
JITRBUD Main User Guide 5-9
Editing Users
To edit a user
1. From the Main Menu, press the Users icon.
The Users screen appears.
2. Highlight the user to edit and press Edit.
The User window appears with five tabs including General, Area, Rights,
Preferences, and Doors.
3. Select the General tab.
4. Edit the user’s information:
•Name—name of the user.
•User ID—ID of the user.
•ID expiration—expiration date of the User ID.
•Password—password for the user.
•Confirm password—confirmation of the password for the user.
•Password expiration—expiration date of the user password (configured
at the SUPPLYCENTER Console).
5. Select the Areas tab.
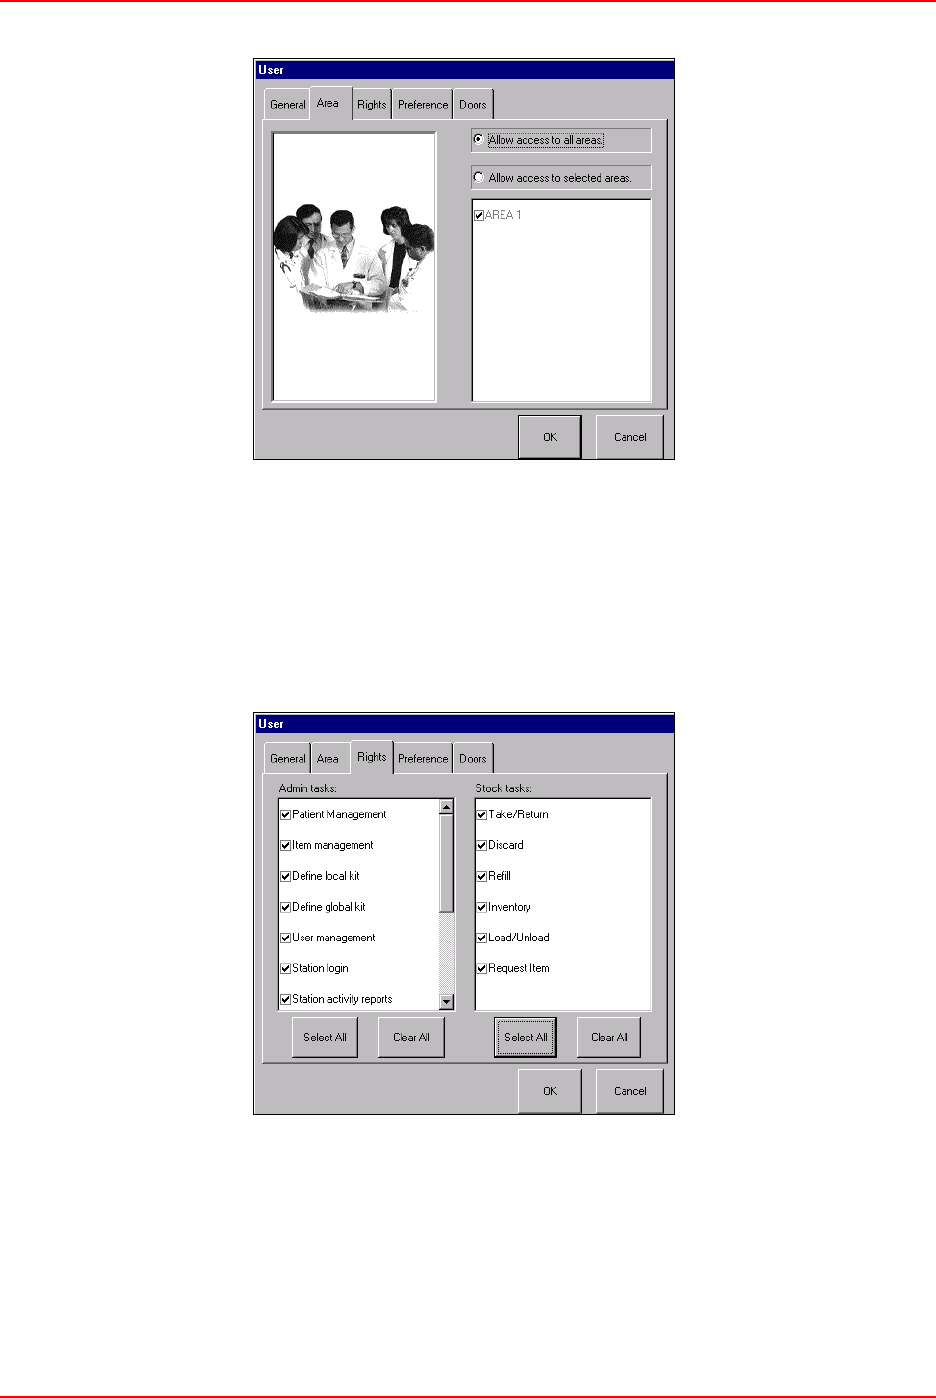
Users
5-10 JITRBUD Main User Guide
6. Edit the Area access information:
• Allow access to all areas—select option to allow the user to access all
areas in the system.
•Allow access to selected areas—select option to allow the user to access
limited areas in the system. Select the check boxes next to the appropriate
areas on the Area list.
7. Select the Rights tab.

Users
JITRBUD Main User Guide 5-11
8. Edit the rights for the user.
Admin tasks:
•Patient Management—allows the user to reconcile patients.
•Item Management—allows the user to create and edit item aliases.
•Define Local Kit—allows the user to define a kit specific to an area.
•Define Global Kit—allows the user to define a kit that can be accessed
globally in the system.
•User Management—allows the user to create users and assign rights,
areas, and door access.
•Station Login—allows the user to Login to the Station.
•Station Activity Reports—allows the user to generate Station activity
reports
•Station System Report—allows the user to create system reports.
•Print to Non-Station Printer—allows the user to print to a non-Station
printer.
•Modify Config—allows the user to modify Station configurations.
•Station Global Patient Access—allows the user to select a patient from
any Station for purposes of transactional activity.
Stock tasks:
•Take/Return—allows the user to Take and Return Items, access patients,
and add patients.
•Discard—allows the user to Discard items.
•Refill—allows the user to Refill bins and perform Refill by Request
orders.
•Inventory—allows the user to Inventory items.
•Load/Unload—allows the user to Load and Unload items.
•Request Item—allows the user to Request items needed at the Station.
9. Select the Preference tab.
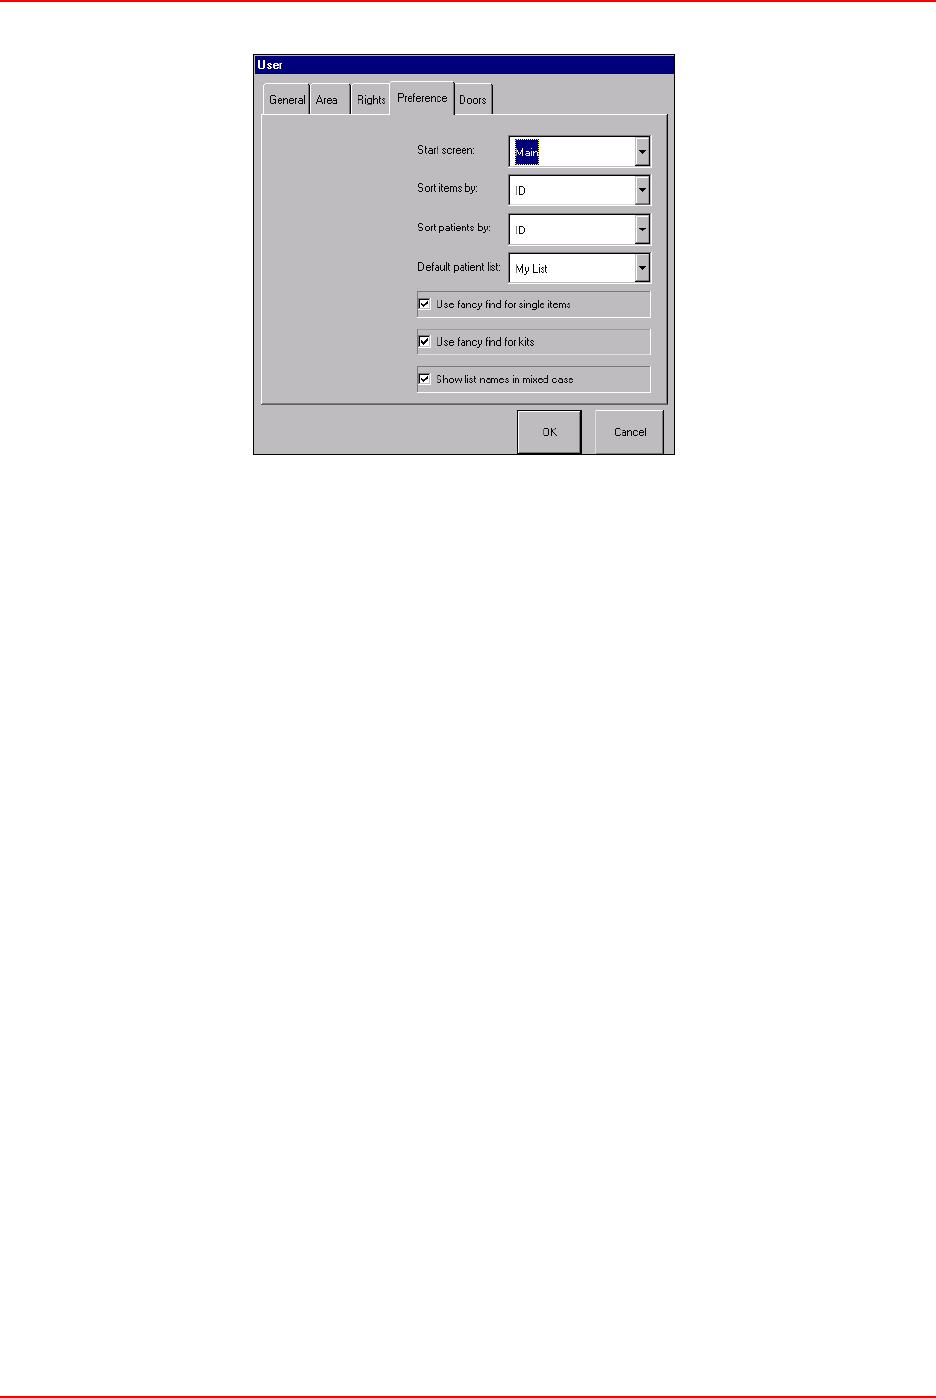
Users
5-12 JITRBUD Main User Guide
10. Edit the preferences for the user.
•Start screen—screen that appears upon initial login to the Station.
•Sort items by—sort option for item lists.
•Sort patients by—sort option for patient lists.
•Default patient list—default patient list that appears during patient care
functions.
•Use fancy find for single items—not applicable to JITrBUD Station.
•Use fancy find for kits—not applicable to JITrBUD Station.
•Show list names in mixed case—displays names in capital and lower
case letters (example, patient John McCoy).
11. Select the Doors tab.
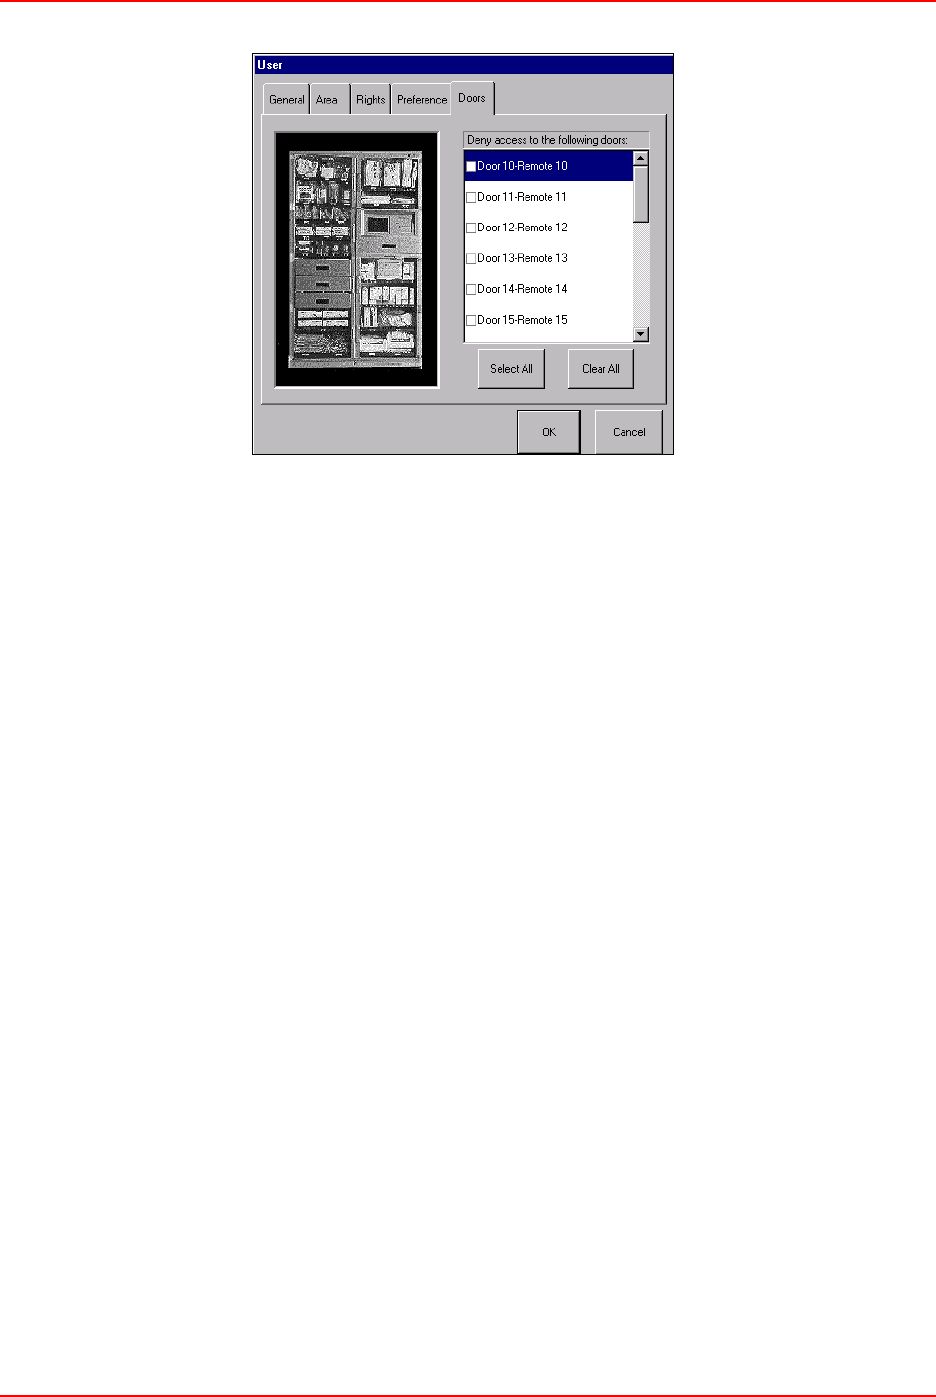
Users
JITRBUD Main User Guide 5-13
12. Select the doors to Deny access (if applicable).
13. Press OK.
14. Press Close to return to the Main Menu, or Exit to log out of the Station.
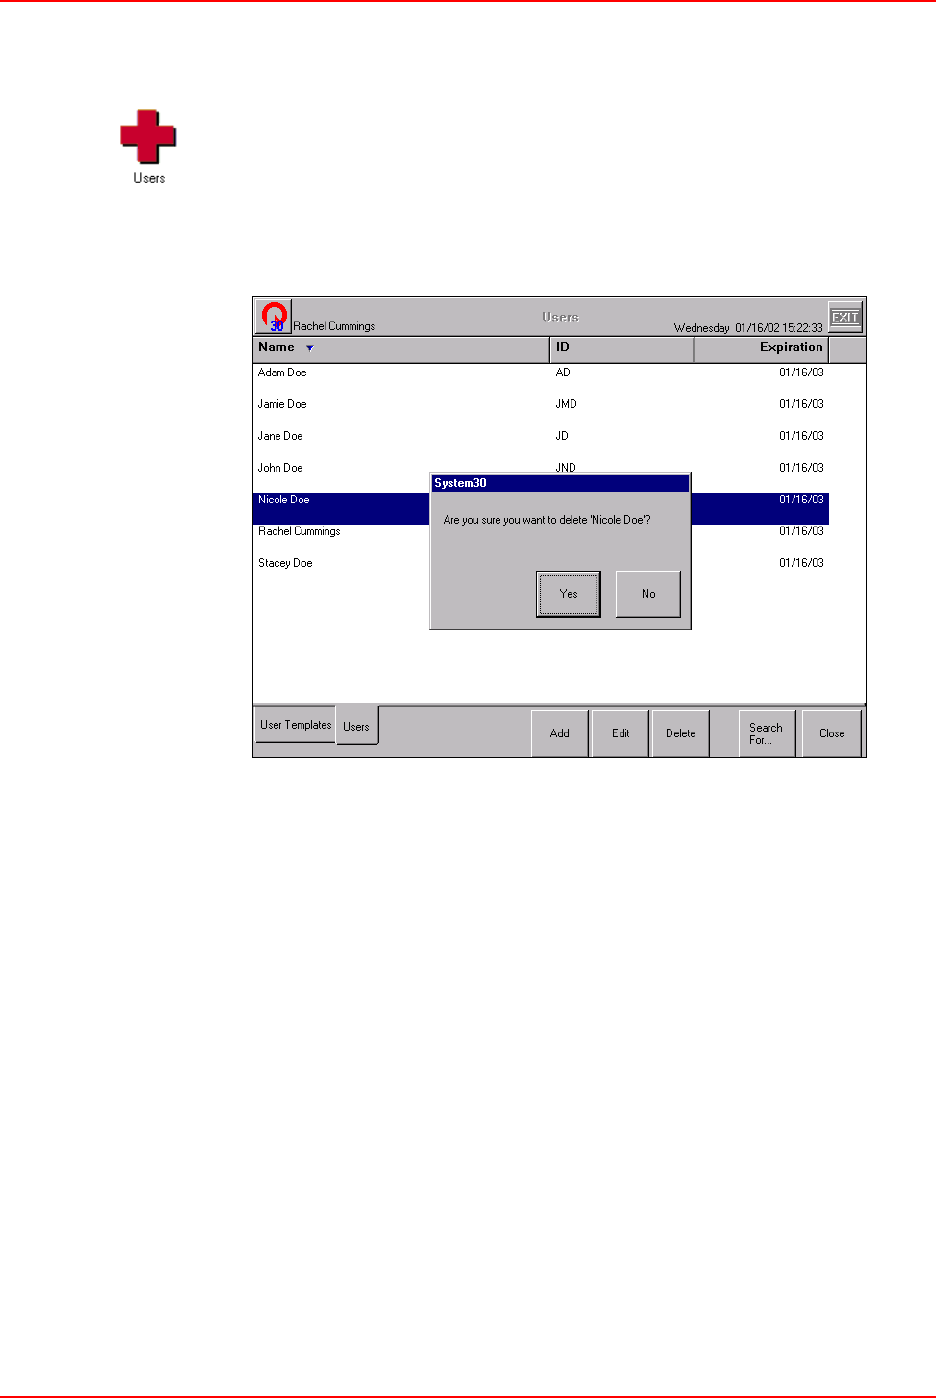
Users
5-14 JITRBUD Main User Guide
Deleting Users
To delete a user
1. From the Main Menu, press the Users icon.
The Users screen appears.
2. Highlight the user record to delete and press Delete.
A confirmation window appears.
3. Press Yes to confirm the deletion of the record.
4. Press Close to return to the Main Menu, or Exit to log out of the Station.
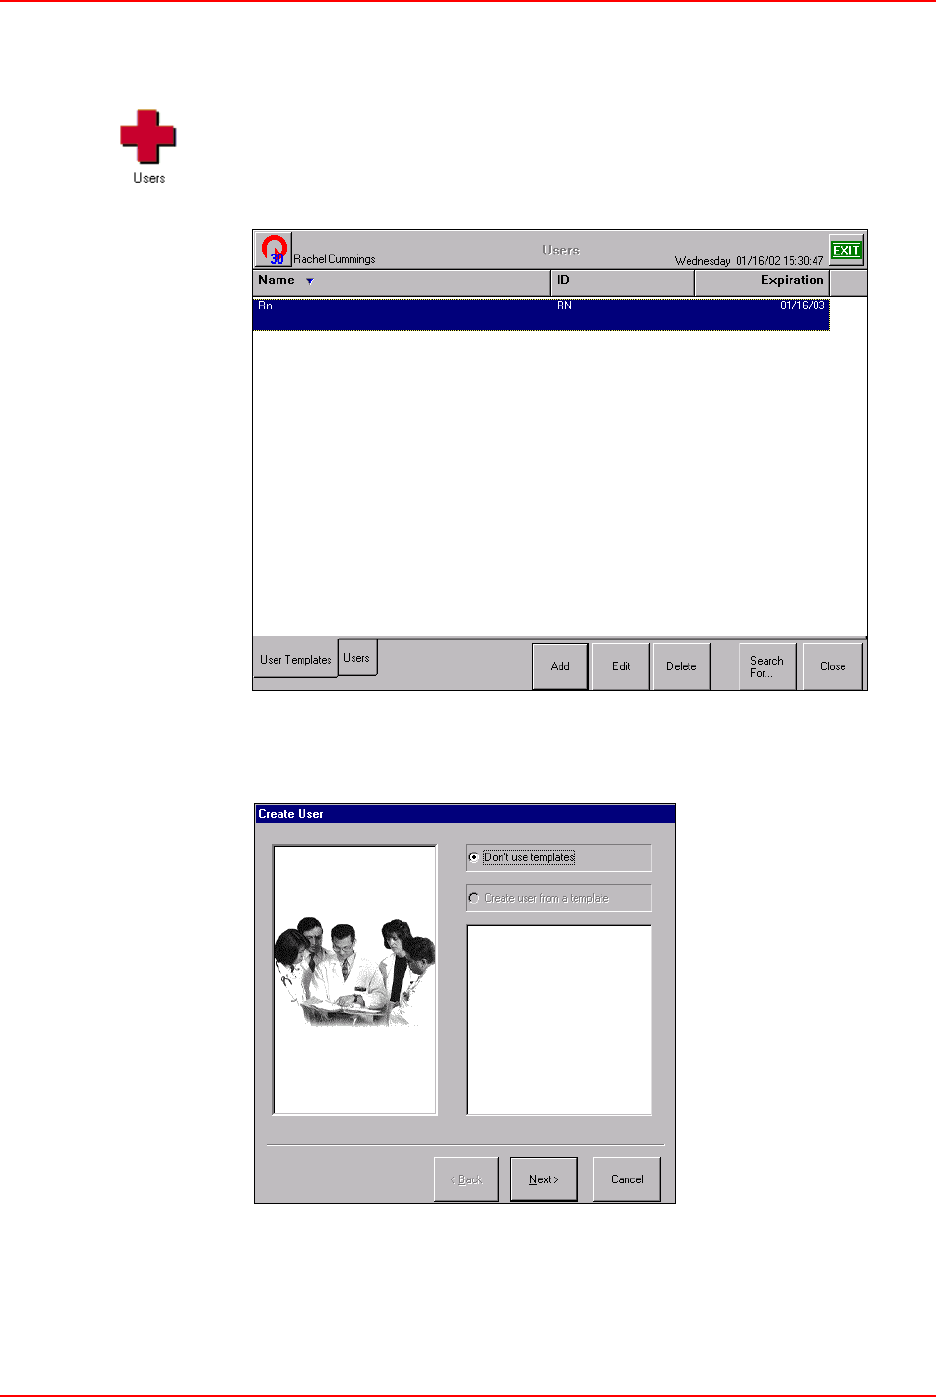
Users
JITRBUD Main User Guide 5-15
Creating User Templates
To create a user template
1. From the Main Menu, press the Users icon.
The Users screen appears.
2. Press Add.
The Create User window appears.
3. Select the Don’t use template button.
4. Press Next.
The General window appears.
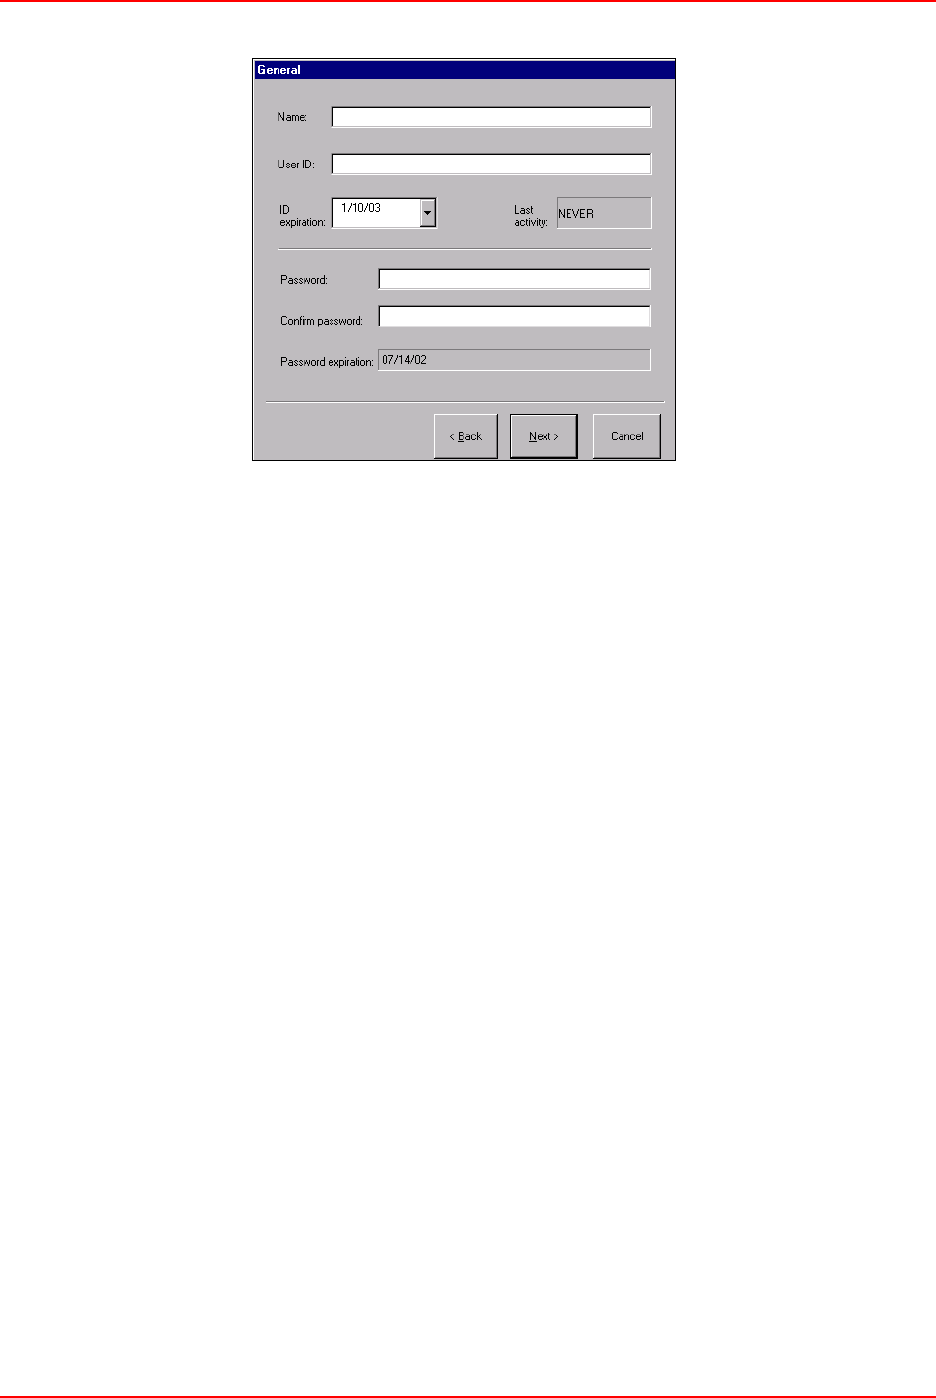
Users
5-16 JITRBUD Main User Guide
5. Enter the information for the new template
•Name—name of the template.
•User ID—ID of the user template.
•ID expiration—expiration date of the User ID.
•Password—password for the user template.
•Confirm password—confirmation of the password for the user template.
•Password expiration—expiration date of the template password
(configured at the SUPPLYCENTER Console).
6. Press Next.
The Area window appears.
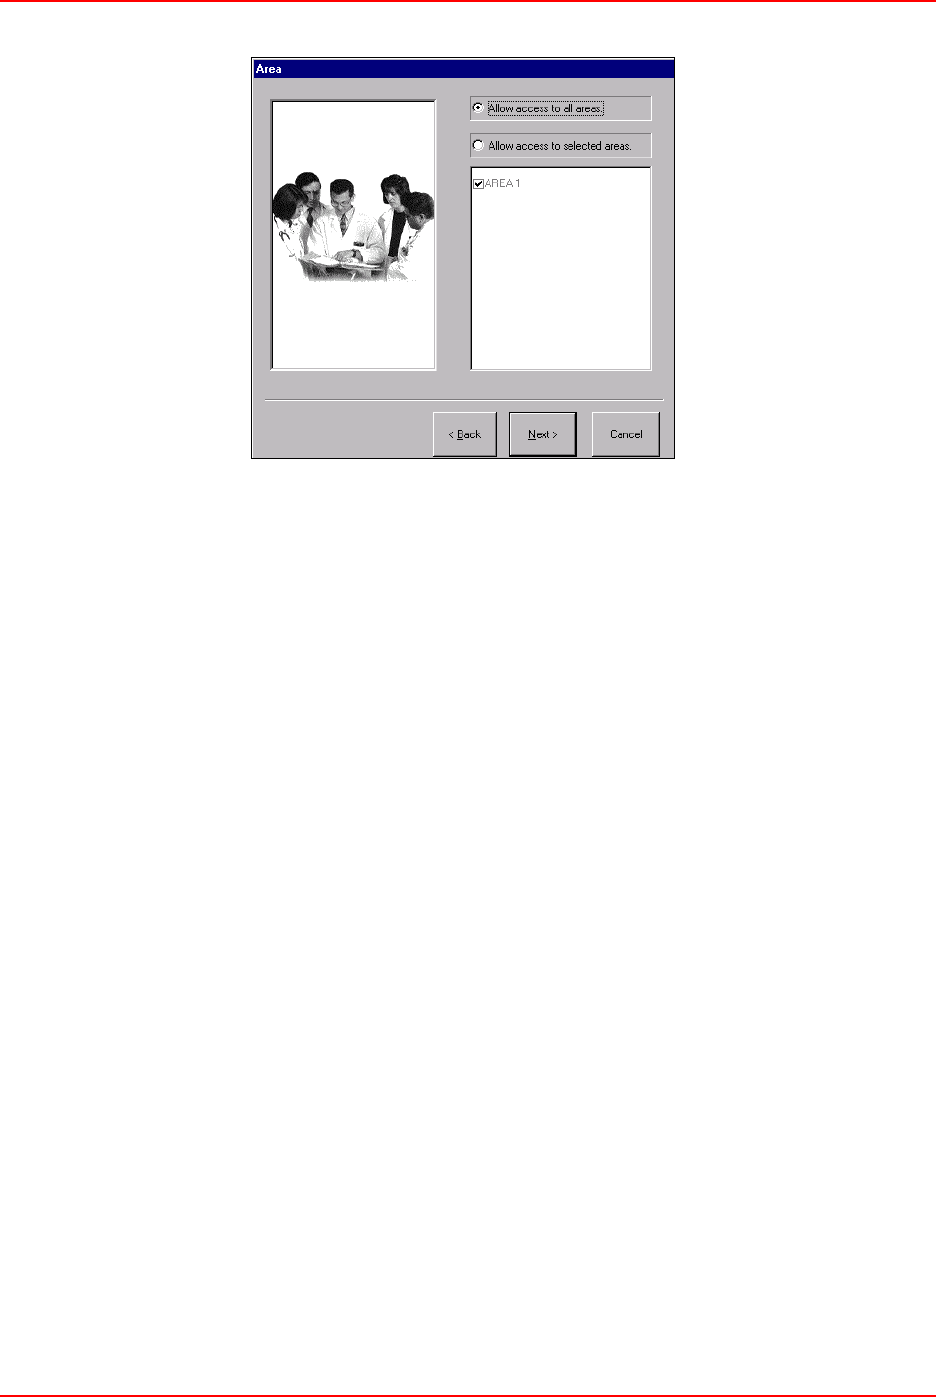
Users
JITRBUD Main User Guide 5-17
7. Select the Area access information:
•Allow access to all areas—select option to allow the user to access all
areas in the system.
•Allow access to selected areas—select option to allow the user to access
limited areas in the system. Select the check boxes next to the appropriate
areas on the Area list.
8. Press Next.
The Doors window appears.
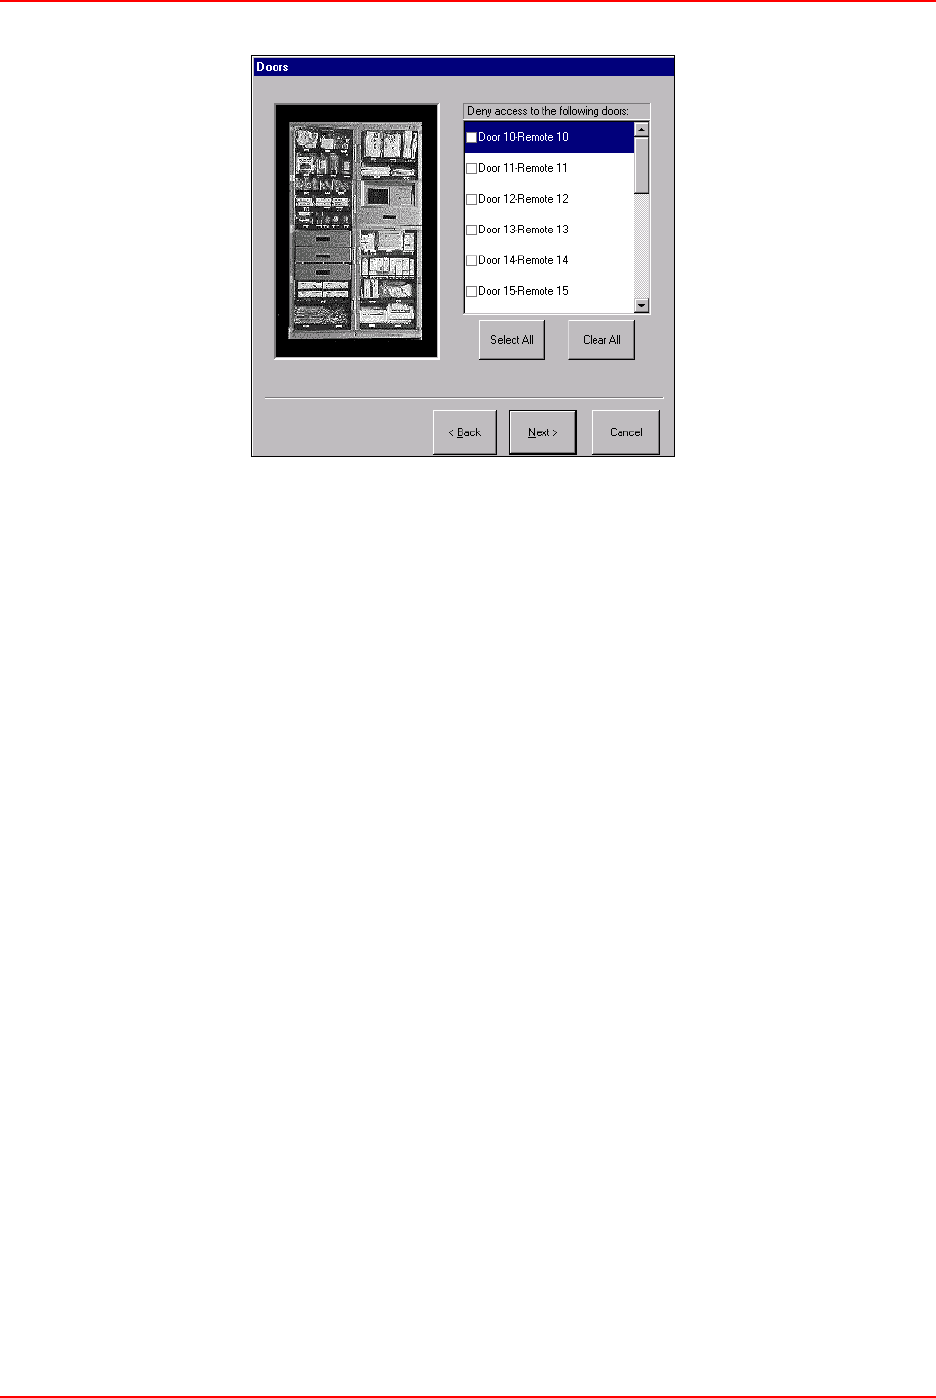
Users
5-18 JITRBUD Main User Guide
9. Select the doors to Deny access (if applicable).
•Select All—option allows you to quickly select the Deny access check
box for all doors at the Station. You can deselect the appropriate doors if
needed.
•Clear All—option allows you to quickly deselect the Deny access check
box for all doors at the Station. You can select the appropriate doors if
needed.
10. Press Next.
The Summary window appears.
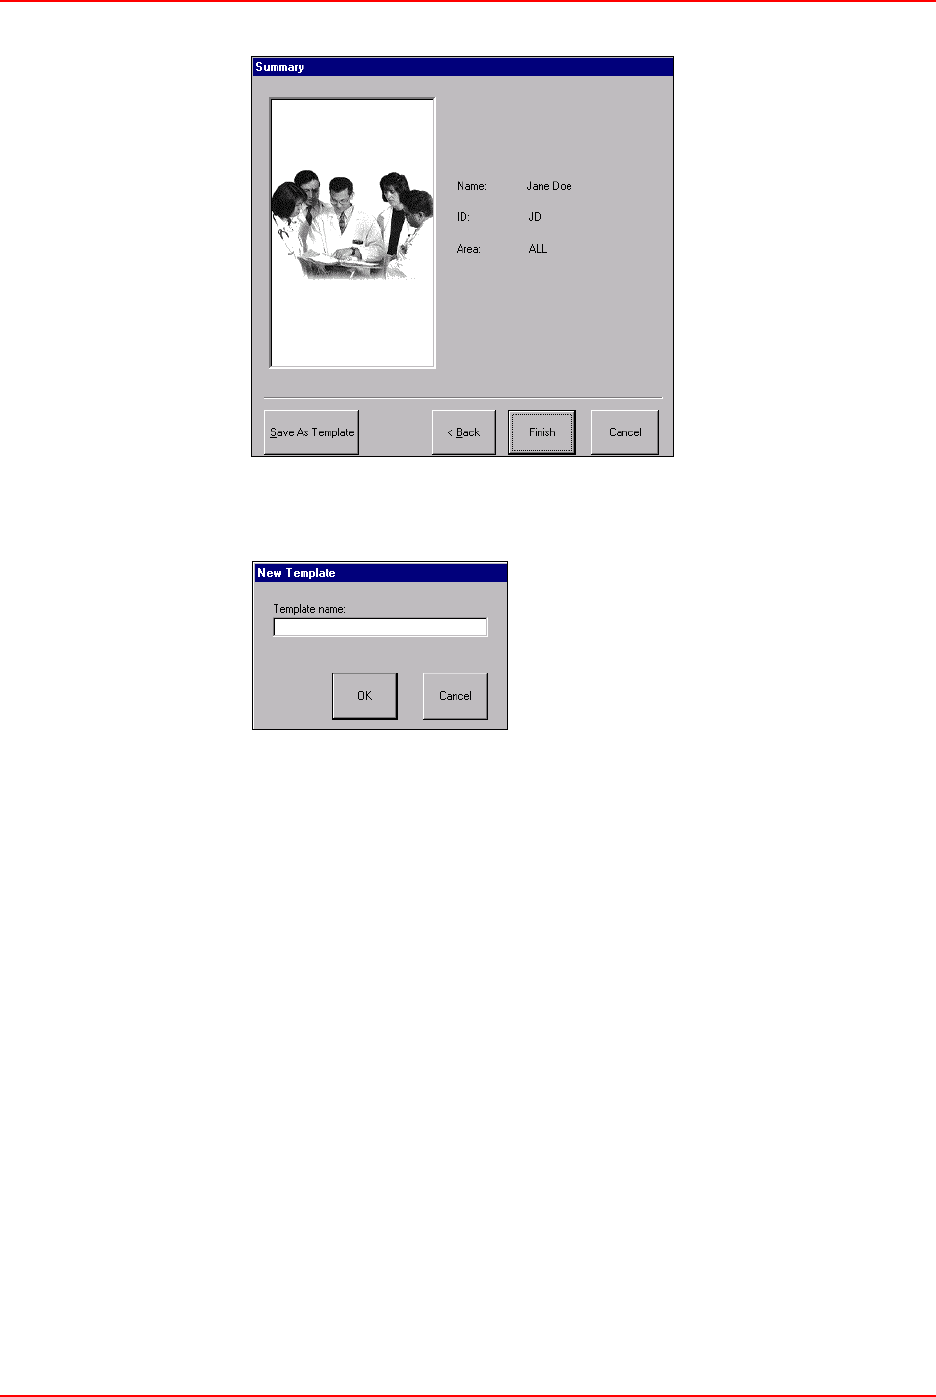
Users
JITRBUD Main User Guide 5-19
11. Press Save As Template.
The New Template window appears.
12. Enter a name for the new user template.
13. Press OK.
14. Press Cancel.
The new template appears on the User Templates list.
15. Select the User Templates tab.
16. Select the new template and press Edit.
The User window appears.
17. Select the Rights tab.
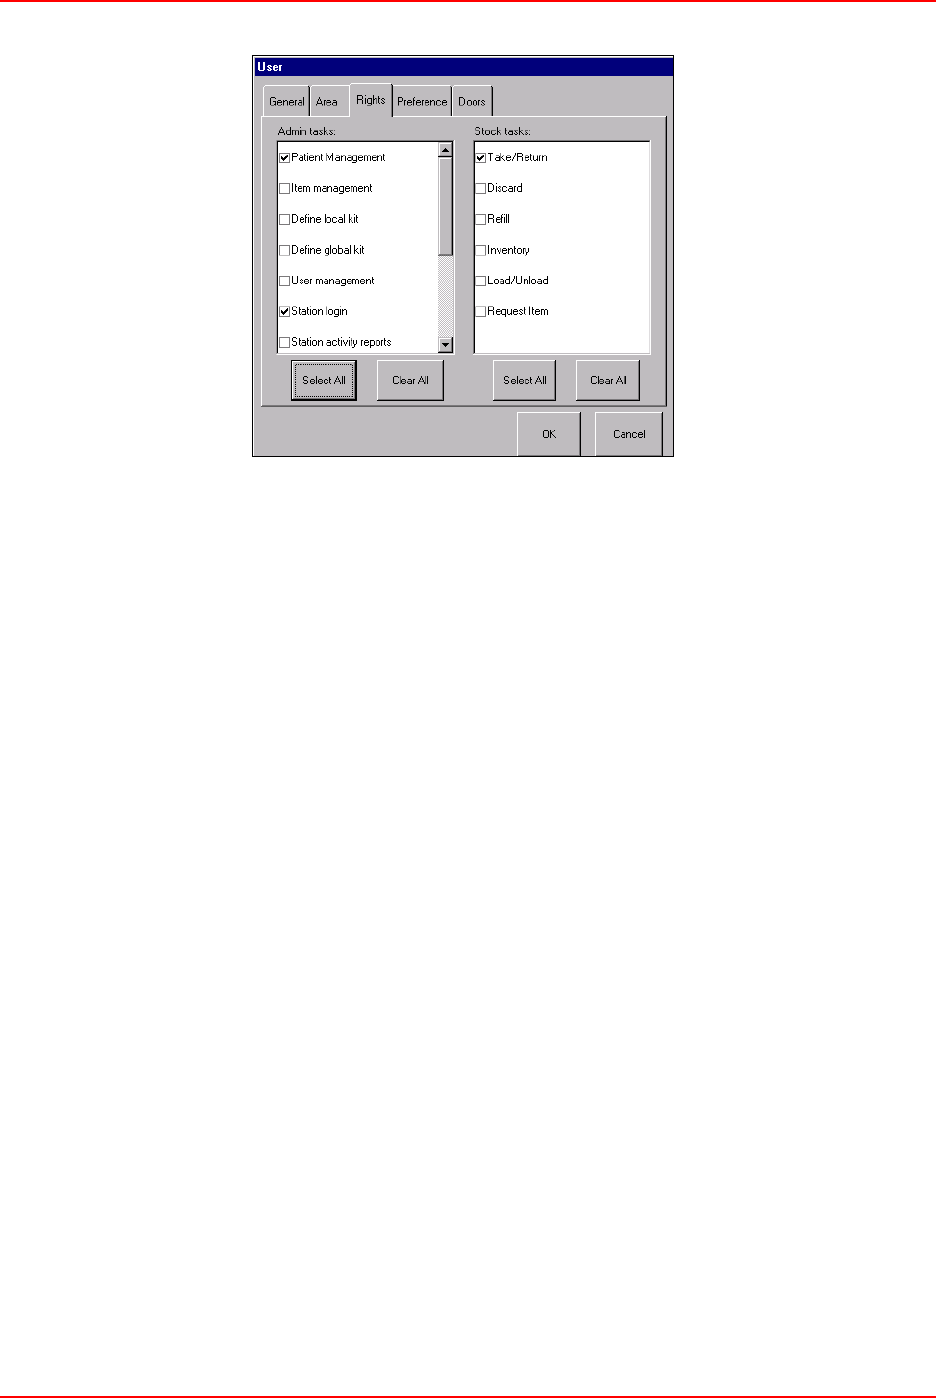
Users
5-20 JITRBUD Main User Guide
18. Select the appropriate rights for the new user template.
Admin tasks:
•Patient Management—allows the user to view, add, edit, and reconcile
patients.
•Item Management—allows the user to create and edit item aliases.
•Define Local Kit—allows the user to define a kit specific to an area.
•Define Global Kit—allows the user to define a kit that can be accessed
globally in the system.
•User Management—allows the user to create users and assign rights,
areas, and door access.
•Station Login—allows the user to Login to the Station.
•Station Activity Reports—not applicable to the JITRBUD Main.
•Station System Report—not applicable to the JITRBUD Main.
•Print to Non-Station Printer—not applicable to the JITRBUD Main.
•Modify Config—allows the user to modify Station configurations.
•Station Global Patient Access—allows the user to select a patient from
any Station for purposes of transactional activity.
Stock tasks:
•Take/Return—allows the user to Take and Return Items, access patients,
and add patients.
•Discard—not applicable to the JITRBUD Main.
•Refill—allows the user to Refill bins and perform Refill by Request
orders.
•Inventory—allows the user to Inventory items.
•Load/Unload—allows the user to Load and Unload items.
•Request Item—allows the user to Request items needed at the Station.
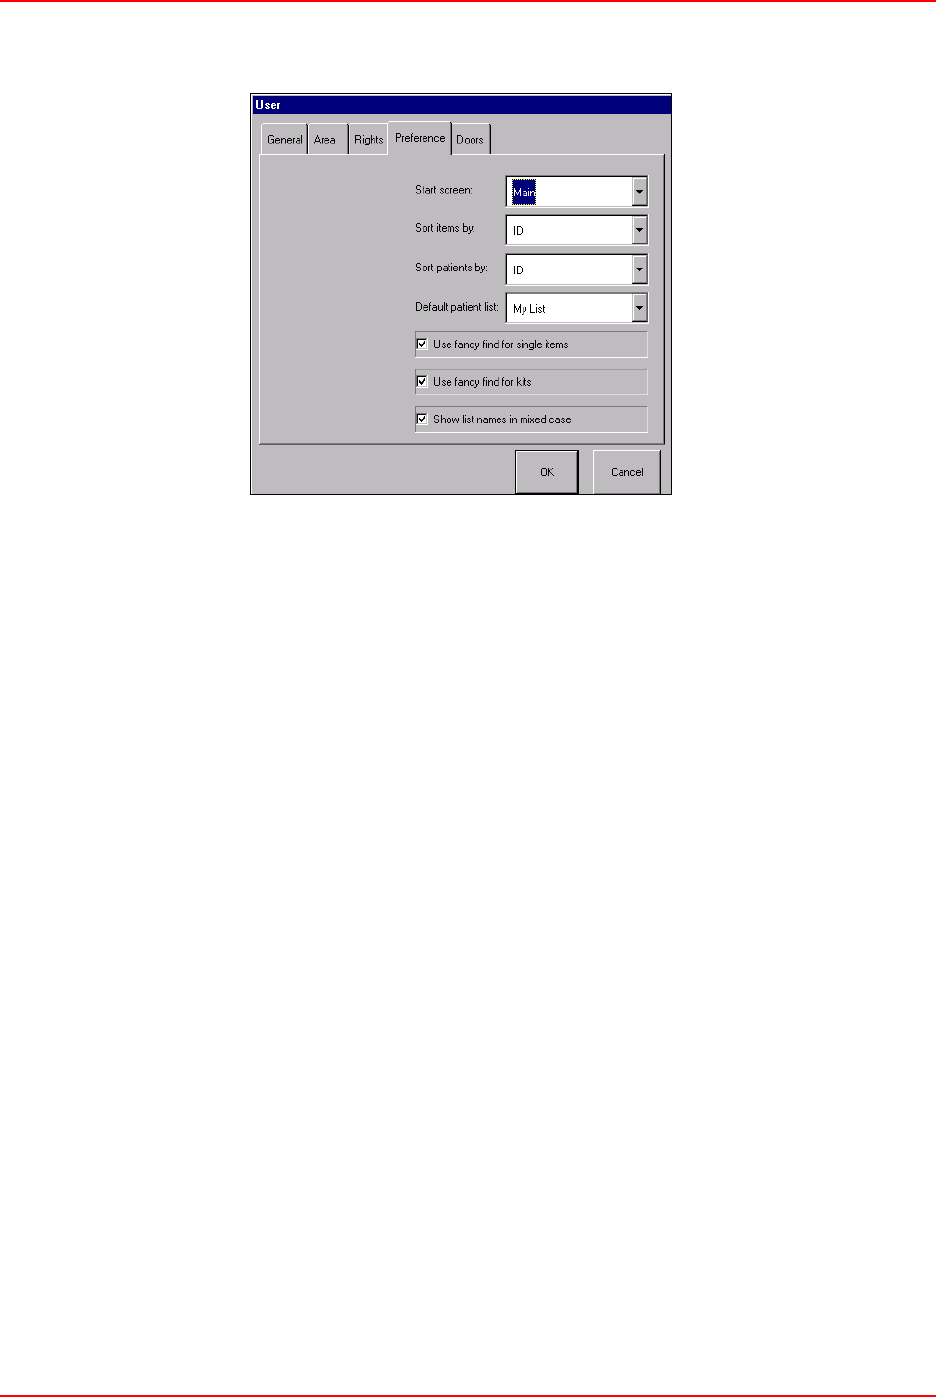
Users
JITRBUD Main User Guide 5-21
19. Select the Preference tab.
20. Select the preferences for the new user template.
•Start screen—screen that appears upon initial login to the Station.
•Default patient list—default patient list that appears during patient care
functions.
•Sort items by—sort option for item lists.
•Sort patients by—sort option for patient lists.
•Use fancy find for single items—not applicable to JITRBUD Station.
•Use fancy find for kits—not applicable to JITRBUD Station.
•Show list names in mixed case—displays names in capital and lower
case letters (example, patient John McCoy).
21. Press OK.
The User Templates screen appears.
22. Press Close to return to the Main Menu, or Exit to log out of the Station.
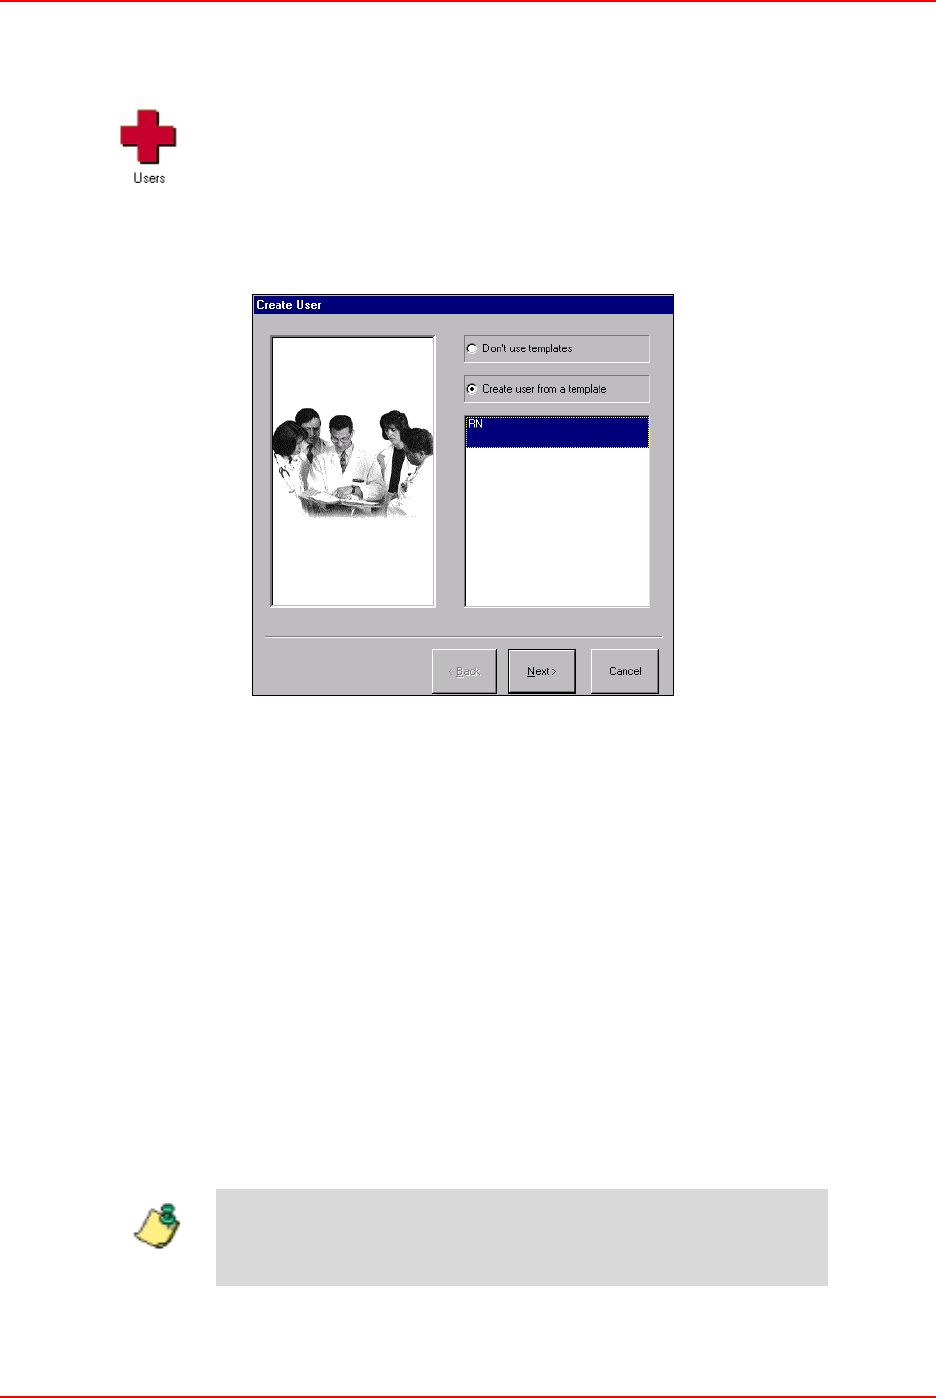
Users
5-22 JITRBUD Main User Guide
Creating Users From Templates
To create a user from template
1. From the Main Menu, press the Users icon.
The Users screen appears.
2. Press Add.
The Create User screen appears.
3. Select the Create User from a Template option.
4. Select a template from the list.
5. Press Next.
The General window appears.
6. Enter the Name, User ID, ID Expiration, Password, and Password
Confirmation.
7. Press Next.
The Areas window appears. Areas are preselected if using template.
8. Press Next.
The Doors window appears. Doors are preselected if using template.
9. Press Next.
The Summary screen appears.
10. Press Finish to save the information.
The new user appears on the User List.
To edit the user rights and preferences, select the new template
on the User List and select Edit.
Note
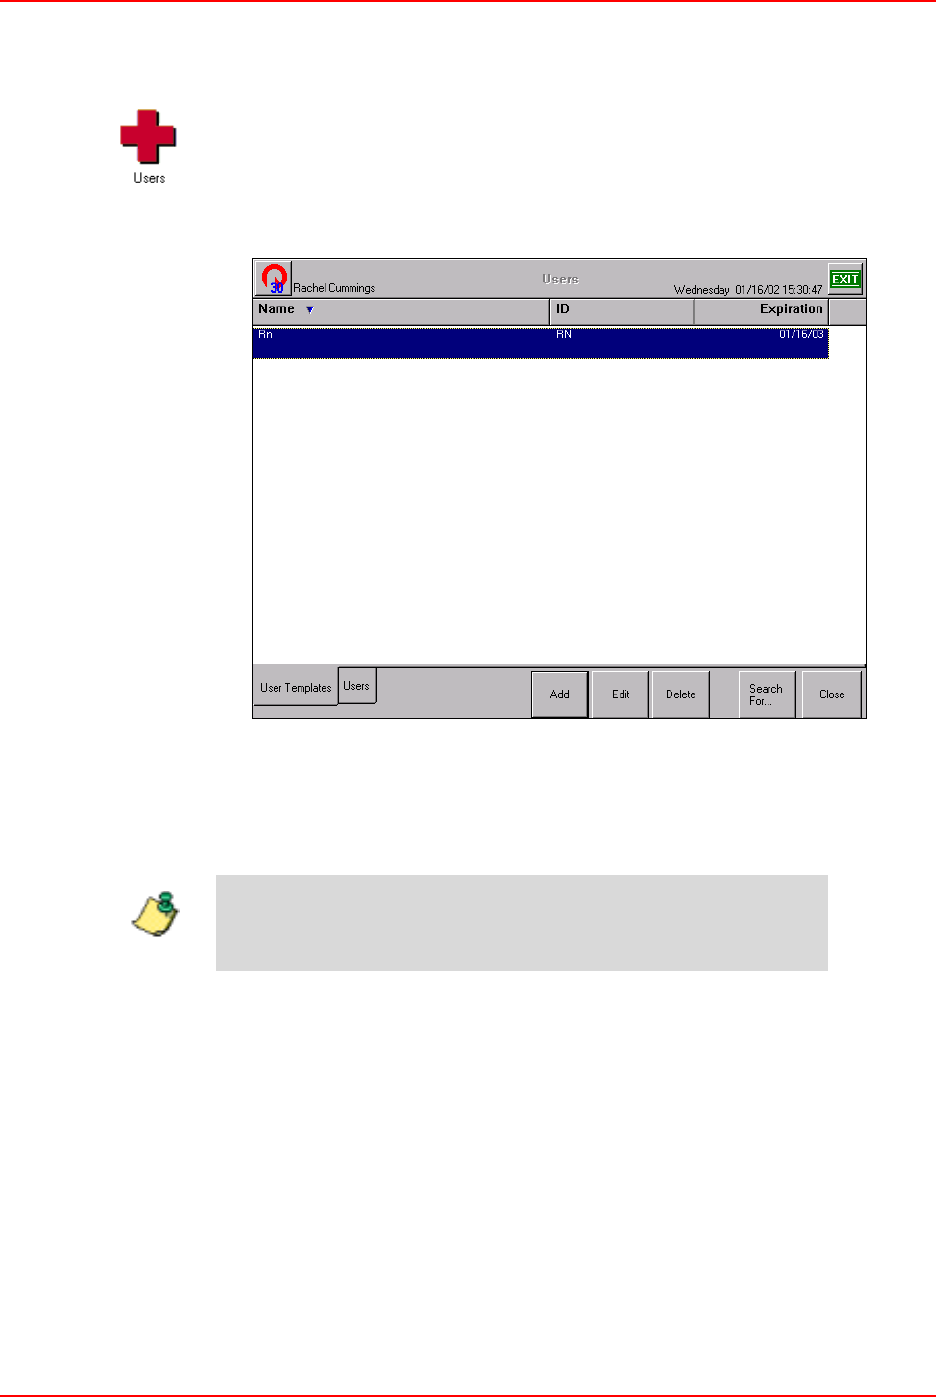
Users
JITRBUD Main User Guide 5-23
Editing User Templates
To edit a user template
1. From the Main Menu, press the Users icon.
The Users screen appears.
2. Select the User Templates tab.
3. Highlight the user template to edit and press Edit.
The User window appears with five tabs including General, Area, Rights,
Preferences, and Doors.
4. Select each tab and edit the template information, as necessary.
5. Press OK.
6. Press Close to return to the Main Menu, or Exit to log out of the Station.
See Creating Users on page 5-3 for more information about
each tab in the User window.
Note
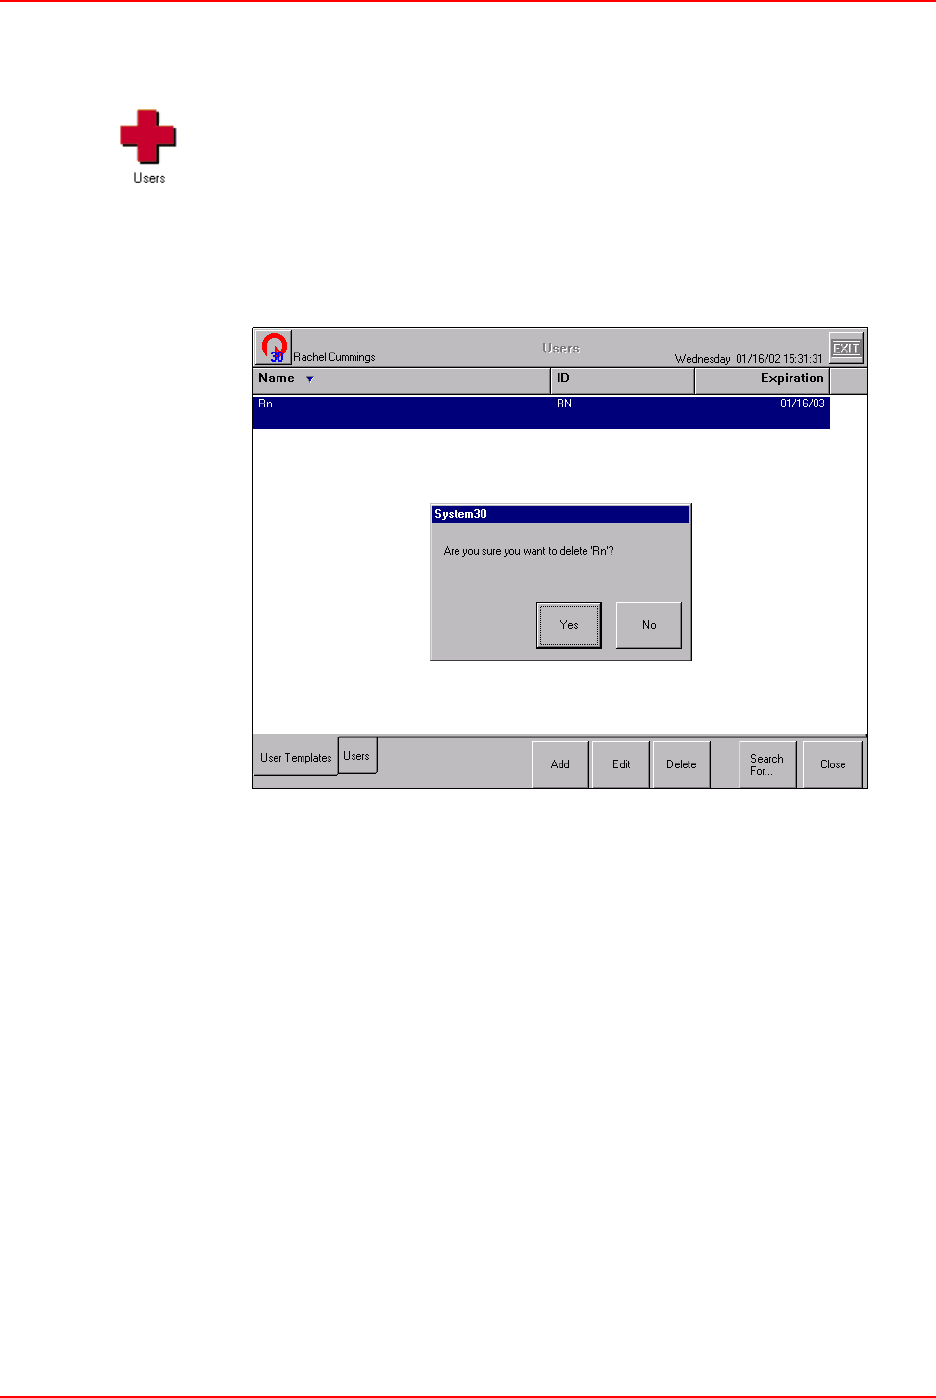
Users
5-24 JITRBUD Main User Guide
Deleting User Templates
To delete a user template
1. From the Main Menu, press the Users icon.
The Users screen appears.
2. Select the User Templates tab.
3. Highlight the user template to delete and press Delete.
A confirmation window appears.
4. Press Yes to delete the template.
5. Press Close to return to the Main Menu, or Exit to log out of the Station.
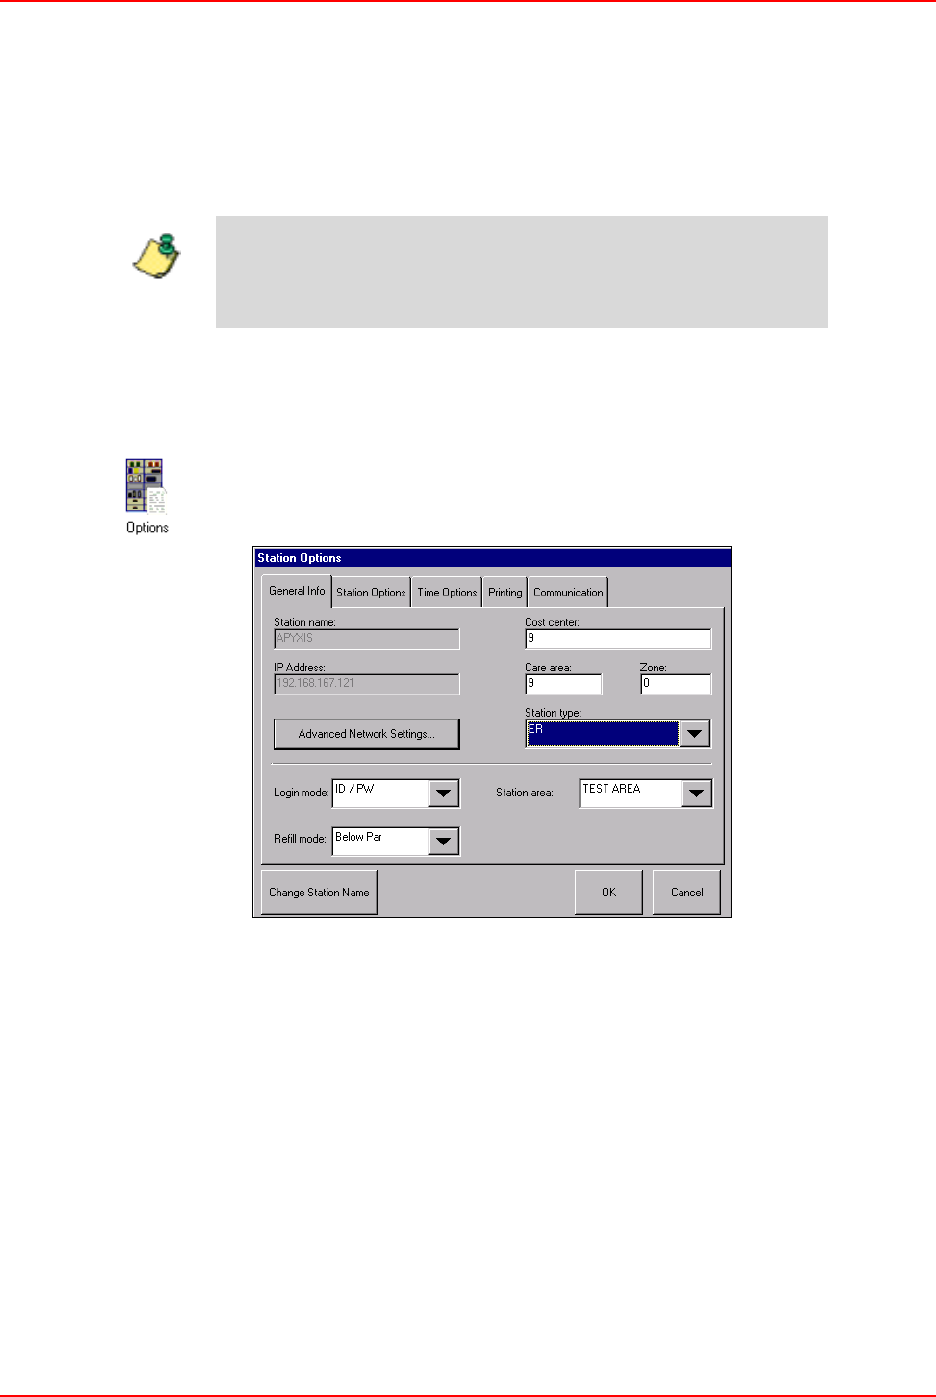
Station Options
JITRBUD Main User Guide 5-25
Station Options
The Station Options screen contains a variety of options for the selected Station
including general information, Station options, time options, printing and
communication options. These allow you to tailor the Station to meet the
particular needs of the nursing unit.
Setting Station Options
To set Station Options
1. From the Main Menu, press the Options icon.
The Station Options window appears.
2. Select the General Info tab and edit the general Station information, as
necessary.
•Cost Center—cost center associated with the Station.
•Care Area—care area associated with the Station.
•Zone—zone that the Station belongs to (defined by facility).
•Station Type—type of Station.
•Login Mode—type of login for the Station.
•Refill Mode—mode of refill for the Station.
•Station Area—area that the Station is assigned to.
The Pyxis Application Specialist initially configures the Station. Use
this feature to fine tune the Station to changing needs.
Note
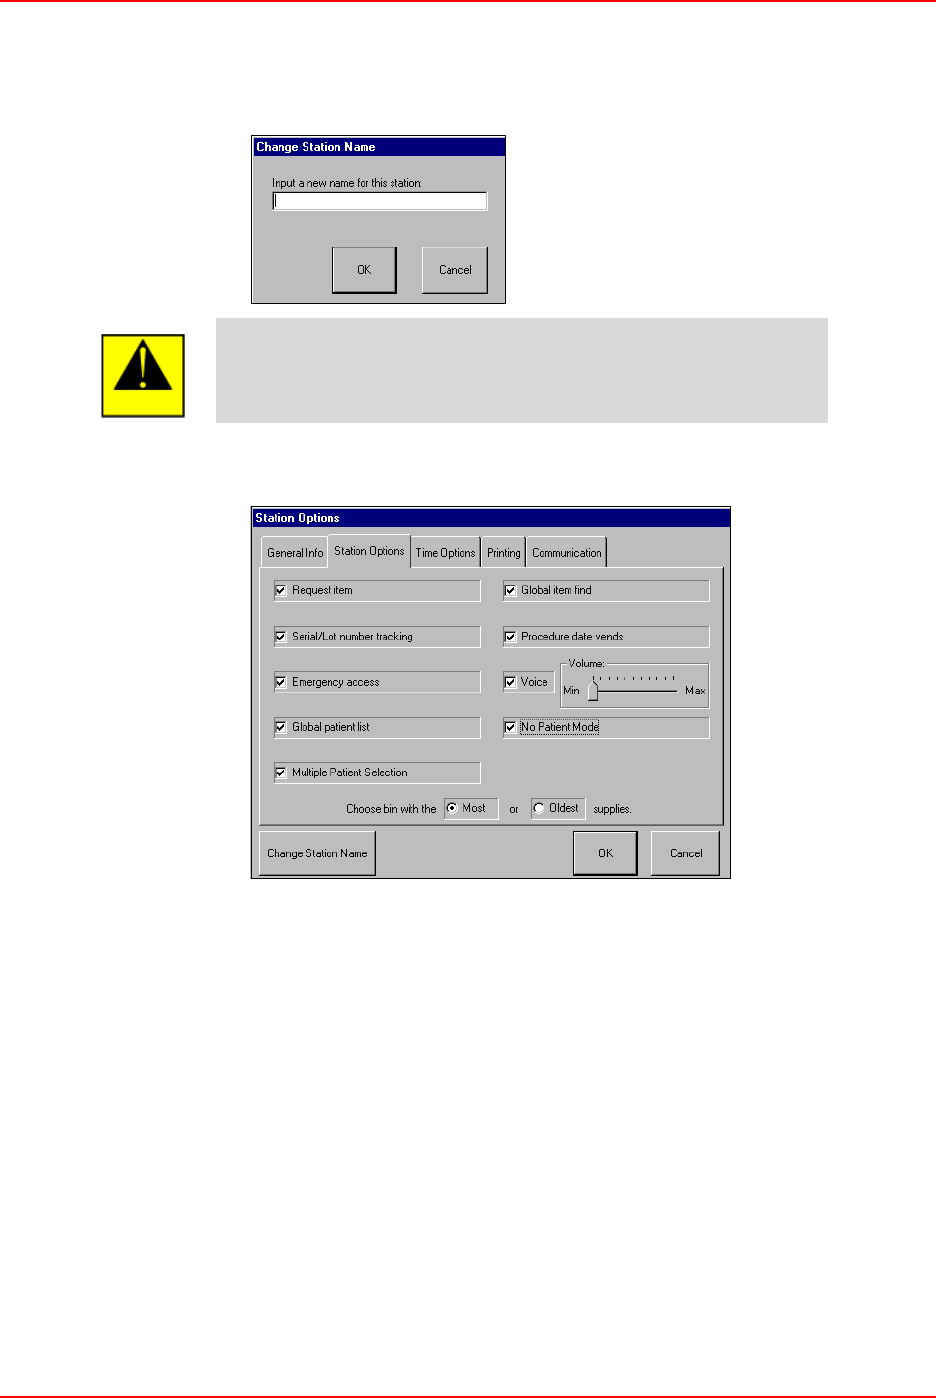
Station Options
5-26 JITRBUD Main User Guide
3. Press Station Name to change the name of the Station.
The Change Station Name window appears.
4. Enter a new name for the Station and press OK.
5. Select the Station Options tab.
6. Edit the Station Options, as necessary.
•Request Item—enables users to request items needed at the Station from
the SUPPLYCENTER Console.
•Serial/Lot Number Tracking— tracks the lot and/or serial numbers of
items associated with lot and/or serial numbers.
•Emergency Access—provides immediate access to the Station without
selecting a patient.
•Global Patient List—provides access to all patients in the system.
•Multiple Patient Selection—allows users to select multiple patients from
the Patient list. Deselect this option to use the Quick Take feature.
•Global Item Find—enables users to locate items in all Stations that
communicate to the same SUPPLYCENTER Console.
•Procedure Date Vends—allows users to remove or return items
associated with a procedure date (typically used in the OR for the purpose
You should always consult a Pyxis representative before
changing the name of the Station.
Caution
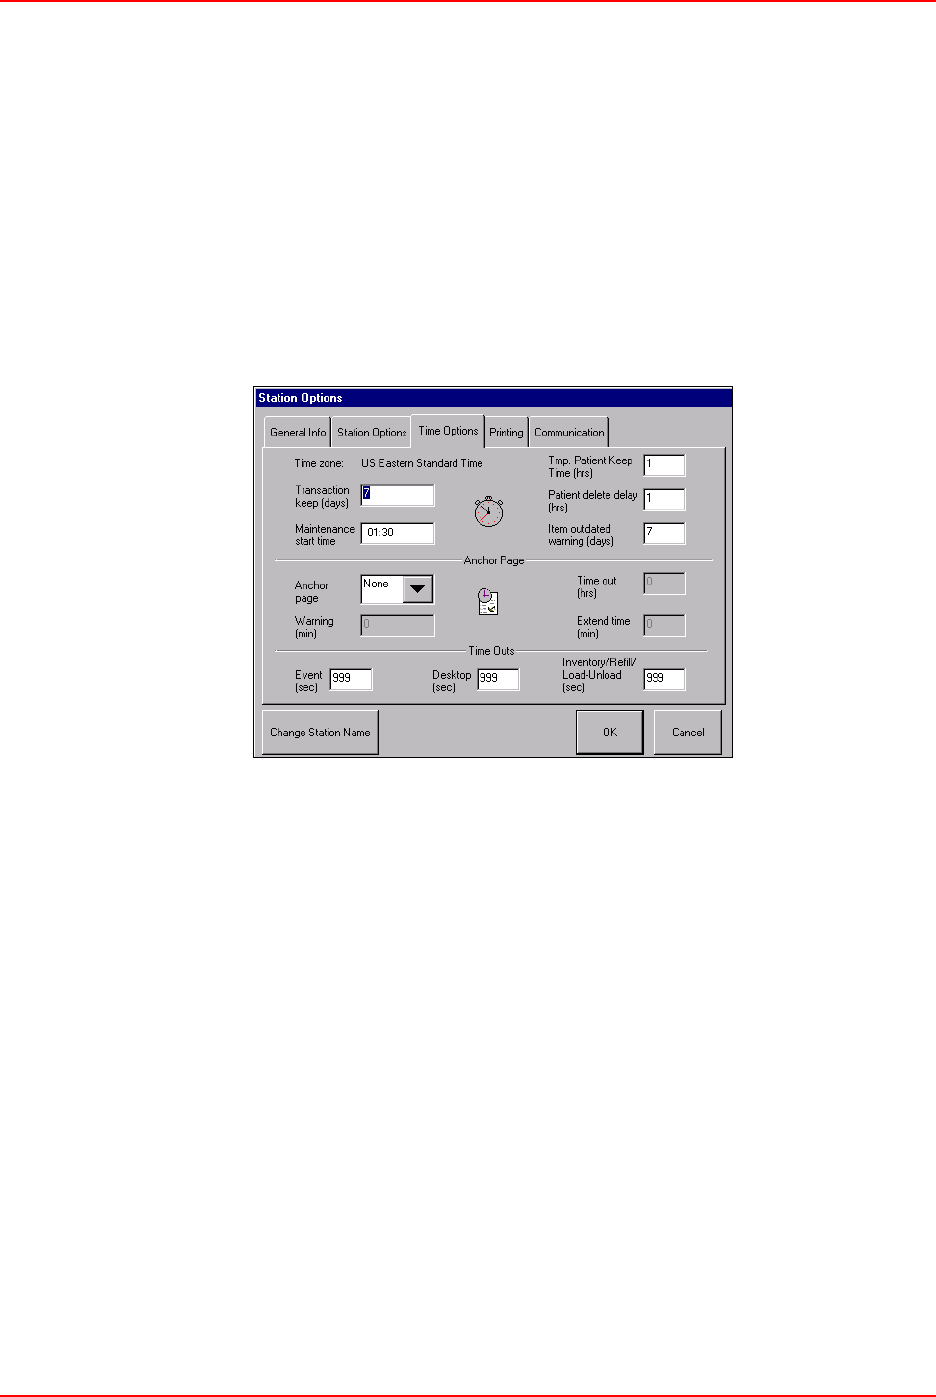
Station Options
JITRBUD Main User Guide 5-27
of removing or returning items associated with the patient’s procedure
date).
•Voice—enables the dynamic voice feature. The volume control slides
from Min to Max to control the volume of the voice feature (only if
Station is configured with the dynamic voice feature).
•No Patient Mode—disables the Patients feature and removes patient
selection from the Take-Return process.
•Choose Bin With The Most/Oldest Supplies—if the same item is
located in more than one bin at a Station, the option will control the bin
that is selected during the Take process.
7. Select the Time Options tab.
8. Edit the time parameters for transactions and system maintenance, as
necessary.
•Transaction Keep (days)—number of days a transaction record is kept at
a Station for reporting purposes. The maximum is 45 days.
(Recommended setting at 7 days)
•Maintenance Start Time—time the database maintenance program is
scheduled to begin (usually set at the SUPPLYCENTER Console). The
maintenance program is run daily. The Station is available for login when
the maintenance program is running.
•Tmp. Patient Keep Time (hrs)—number of hours (1-24) a temporary
patient record is kept at a Station until it is automatically discharged from
the system.
•Patient Delete Delay (hrs)—number of hours (1-99) that patient
information is kept at the Station for charging purposes after the patient is
discharged or transferred.
•Item Outdated Warning (days)—number of days before the expiration
date that the Station displays an expire warning for an item.
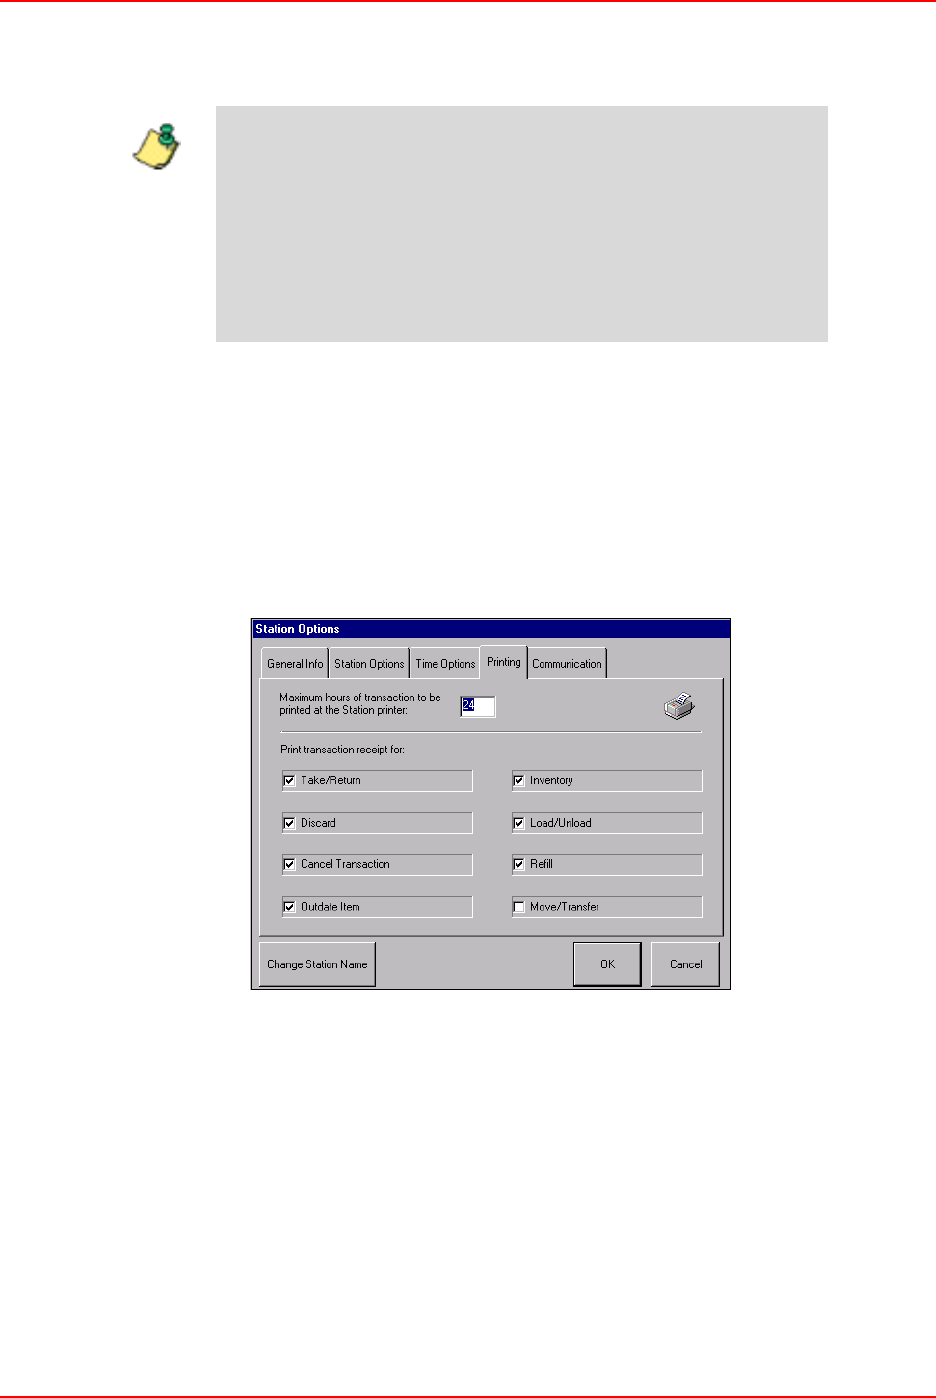
Station Options
5-28 JITRBUD Main User Guide
•Anchor Page—screen that the system can be anchored to for a
predetermined period of time without timing out.
•Event (sec)—number of seconds (10-999) before the Station will beep
and time out of an event when there is no keyboard or Station activity.
•Desktop (sec)—number of seconds (10-999) before the Station will
revert to the Standby screen when there is no keyboard or Station activity.
•Inventory/Refill (sec)—number of seconds (10-999) before the Station
will revert to the Standby screen when there is no activity during
inventory refill.
9. Select the Printing tab.
10. Identify the transactions that will generate a printed receipt.
•Maximum hours of transaction to be printed at the Station printer—
enter the maximum hours (1-72) of transactions to be printed at the
Station printer.
•Print transaction receipt for—select the transaction types that will
generate a printed receipt at the Station.
In some situations, a Station may be set up to remain
available without going through an access process. Use
Anchor page to set (or anchor) the Station screen. The
Anchor time will be preset at each Station and can be
modified at the SUPPLYCENTER Console.
It is possible to anchor onto Patients or Take/Return. Anchor
on Take/Return is commonly used in the OR setting or cath
lab where items are used throughout the procedure.
Note
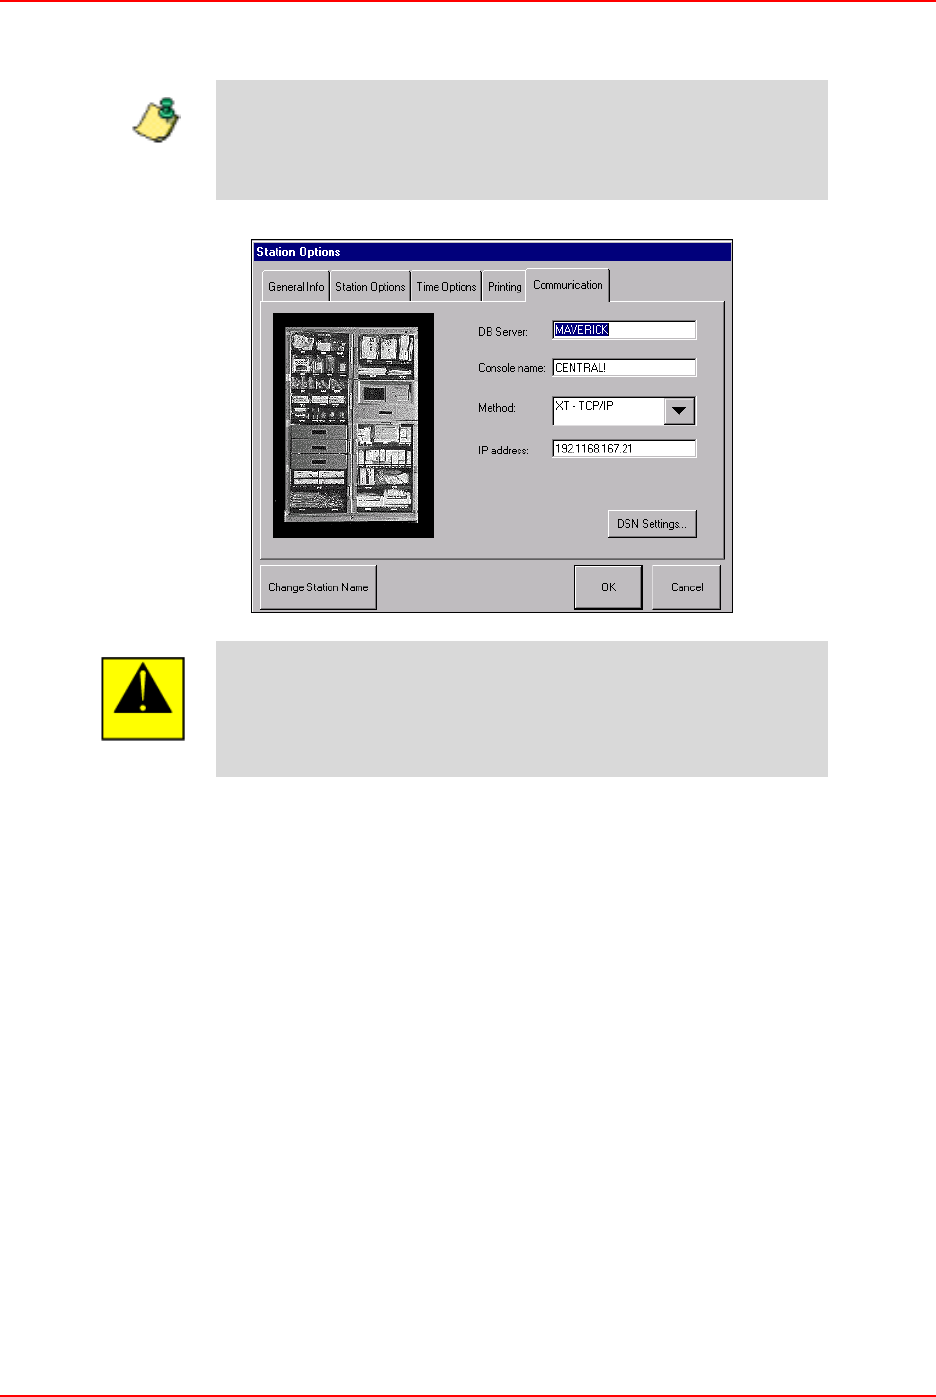
Station Options
JITRBUD Main User Guide 5-29
11. Select the Communication tab.
12. Change the Communication options, as necessary.
•DB Server—name of the database server for the Station.
•Console name—name of the SUPPLYCENTER Console for the Station.
•Method—communication method for the Station.
•IP address—IP address for the Station.
13. Press DSN Settings to change the server name and TCP/IP parameters.
You can select the Communication tab to identify the connection
between the Database server, SUPPLYCENTER Console name,
method of communication, SUPPLYCENTER Console IP Address,
and DSN Settings.
Only the System Managers should have access to the
Communication tab. Incorrect changes to the Station
Communication Options may adversely affect the Station and
can render it inoperable. It is recommended that you only make
changes to the Communication screens with Pyxis assistance.
Note
Caution
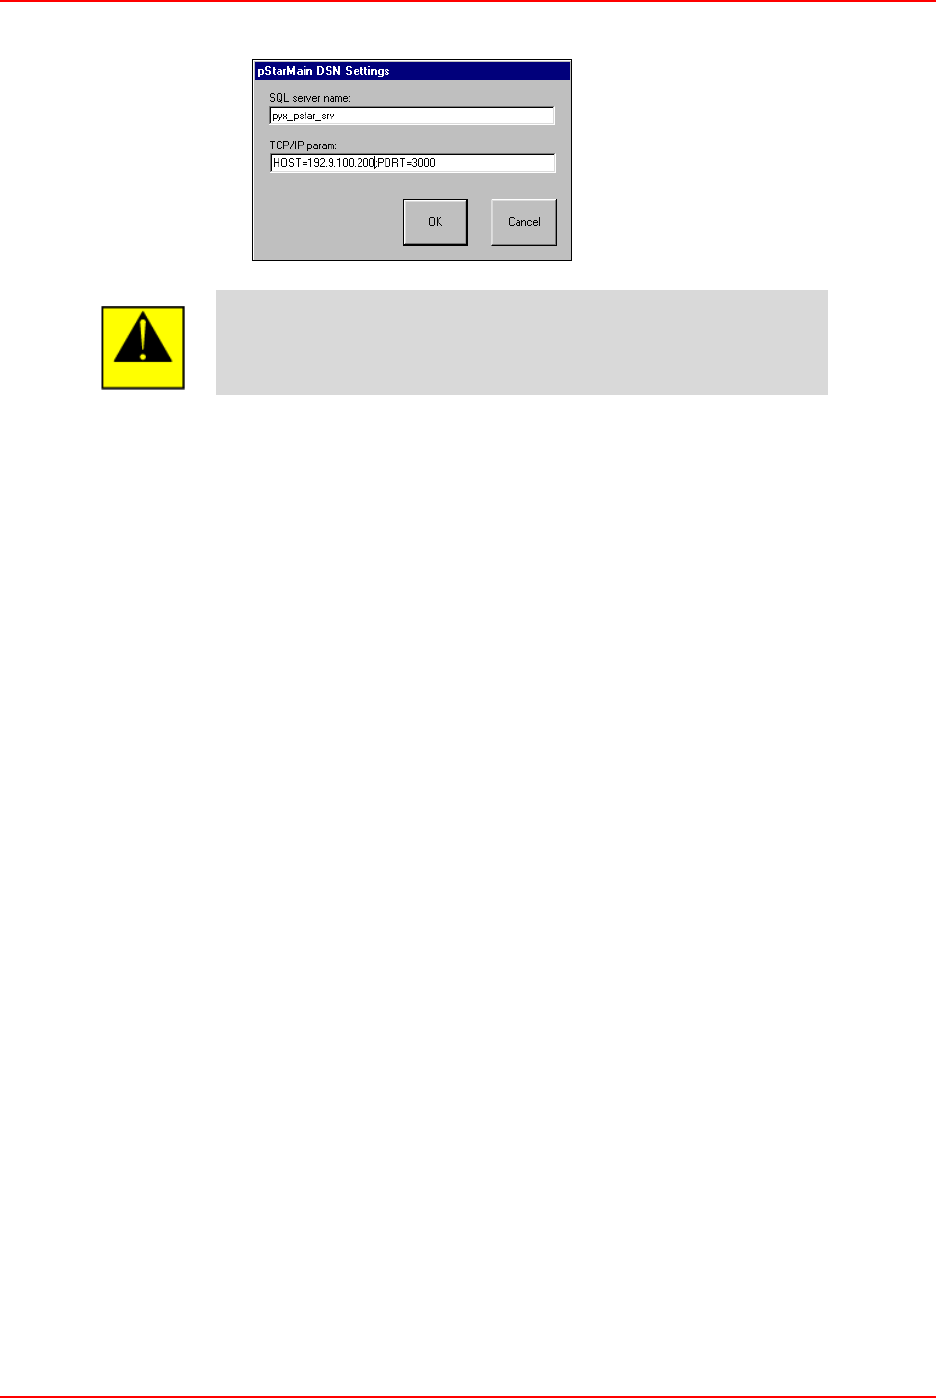
Station Options
5-30 JITRBUD Main User Guide
14. Press OK.
15. Press OK to save the options and return to the Main Menu.
16. Press Exit to log out of the Station.
The Pyxis Application Specialist initially configures the Station.
Only use this feature to fine tune the Station to the changing
needs of your facility.
Caution
Hardware Setup
JITRBUD Main User Guide 5-31
Hardware Setup
Use the Hardware Setup feature to add and configure the physical locations used
to store items that are managed by the JITrBUD Station. The hardware setup
process involves adding JITrBUD cabinets, or locations, to the system and
configuring the appropriate remote devices within the location.
Only the System Managers should have access to the Hardware
Setup screen. It is recommended that you only make changes to
hardware configurations with Pyxis assistance.
Caution
Hardware Setup
5-32 JITRBUD Main User Guide
Order Description
Left Side Tree
View
The tree view on the left side of the screen shows the logical groupings of the
cabinets & devices (i.e., doors, drawers, and shelves). Cabinets or Doors that
have more devices within them have a “+” to the left of the icon.
Name Column The Name column shows the names of the devices. Names can be edited on
this screen.
Typ Column The Typ column shows the device type (Shelf).
Dr Column The Dr column is door number that the device is in. Within coupled doors, a
device can have the same door number.
N Column The N column is the device number. This number MUST be unique for each
device.
S Column The S column is sequence number of the device within a door or attached to a
shelf. If the device is a drawer, the sequence number will be a drawer letter.
Addr Column The Address column is the micro ID of the device board. The micro ID
MUST be unique for each device.
Last 4 Column The last 4 untitled columns are for bin information: the first untitled column
will show bin 1 if there is a transmitter in that position. The maximum
configuration is 1.
The Station Configuration report, available at the SUPPLYCENTER
Console, can provide more information about the hardware setup at
the Station.
Note
Hardware Setup
JITRBUD Main User Guide 5-33
Adding JITRBUD Cabinets (Locations)
Configure the JITrBUD Station according to the item storage structure at your
facility. You can add multiple JITrBUD cabinets (locations) with their respective
remove devices, or you can add a single JITrBUD cabinet that contains all remote
devices in the system. Contact your Pyxis support representative for assistance
with your hardware configuration.
To Add a JITRBUD Cabinet
1. From the Main Menu, press the Hardware Setup icon.
1. Press Add Cabinet.
2. Select the Scan Assist icon.
3. Enter a description for the JITrBUD cabinet in the Description field.
4. Enter a serial number for the JITrBUD cabinet in the Serial # field.
5. Enter a product number for the JITrBUD cabinet in the Product # field.
6. Press Add.
The JITrBUD cabinet is listed on the left side of the screen.
7. Select the JITrBUD cabinet and press Configure.
8. Press the Take or Return button on the first JITRBUD transmitter to install.
The transmitters appear on the screen as the system detects them.
9. Repeat Step 8 for each transmitter.
10. When you are finished adding transmitters, press Finish.
11. (Optional) To edit the name of the transmitters, select a device and press Edit.
The Edit Device window appears.
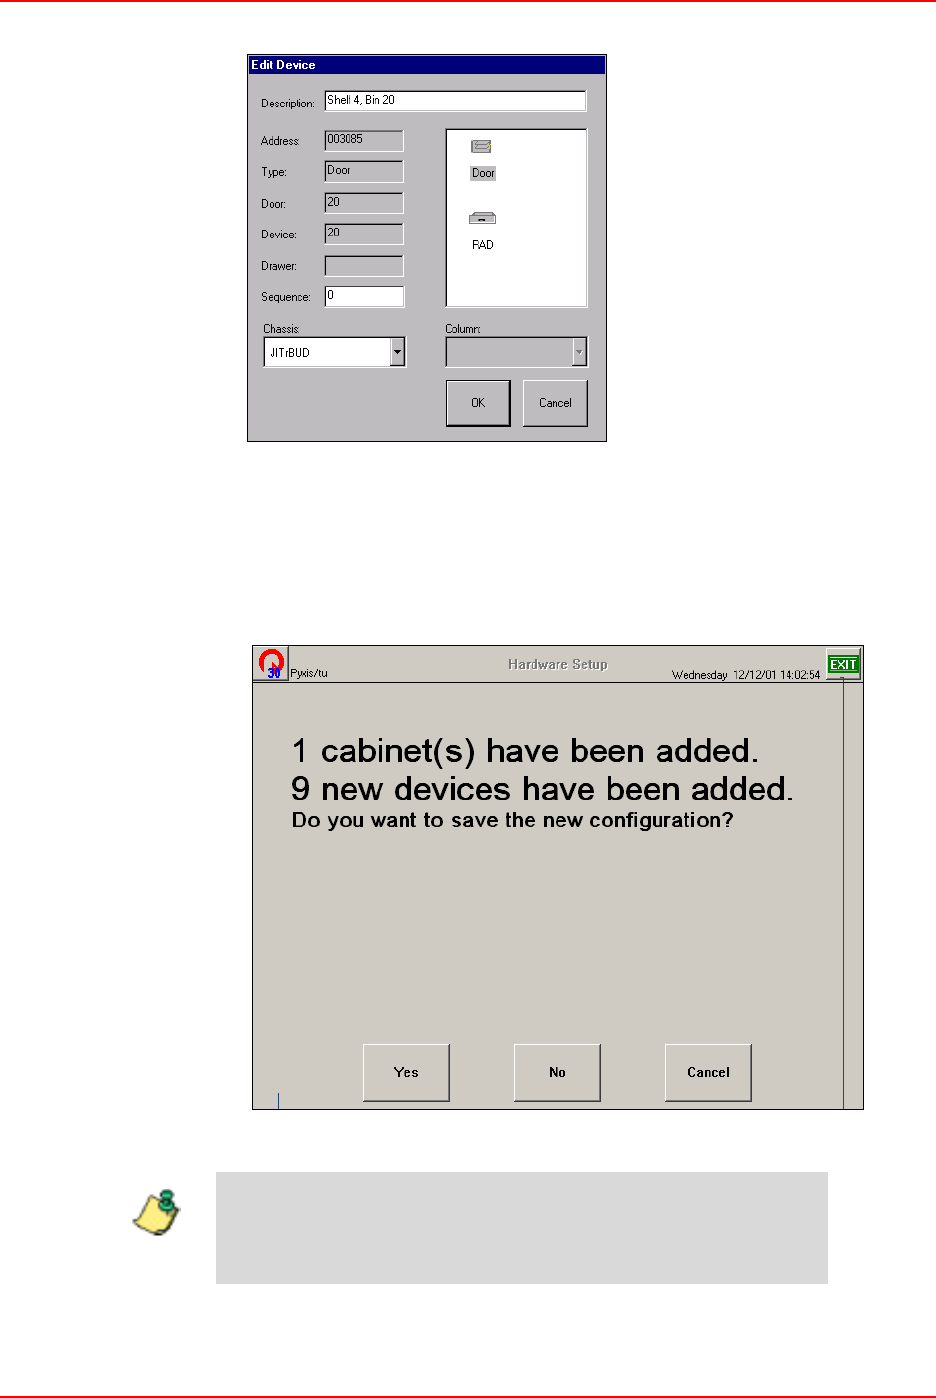
Hardware Setup
5-34 JITRBUD Main User Guide
12. Enter a name for the transmitter in the Description field.
13. Press OK.
14. Press Close.
1. Press Close.
A confirmation screen appears.
2. Press Yes to save the configuration.
You can now Load items at the new Station and the items will be
available for Take/Return, Inventory, and Refill functions at the
Station.
Note
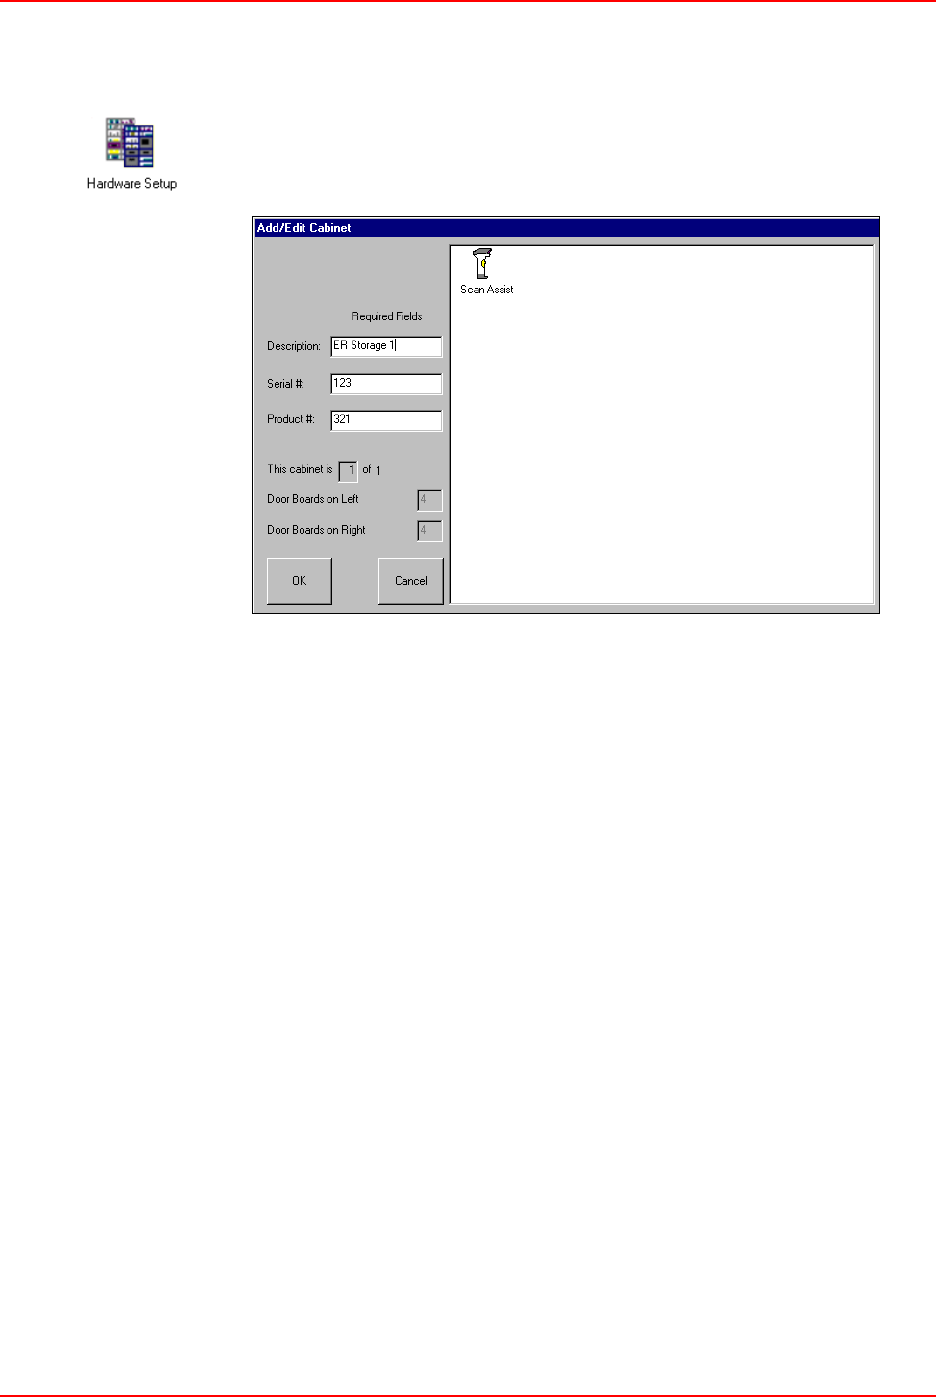
Hardware Setup
JITRBUD Main User Guide 5-35
Editing Cabinet Information
To edit a cabinet
1. From the Main Menu, press the Hardware Setup icon.
2. Select a a cabinet and press Edit.
3. Edit the device information, as necessary.
4. Press OK.
5. Press Close to return to the Main Menu, or Exit to log out of the Station.
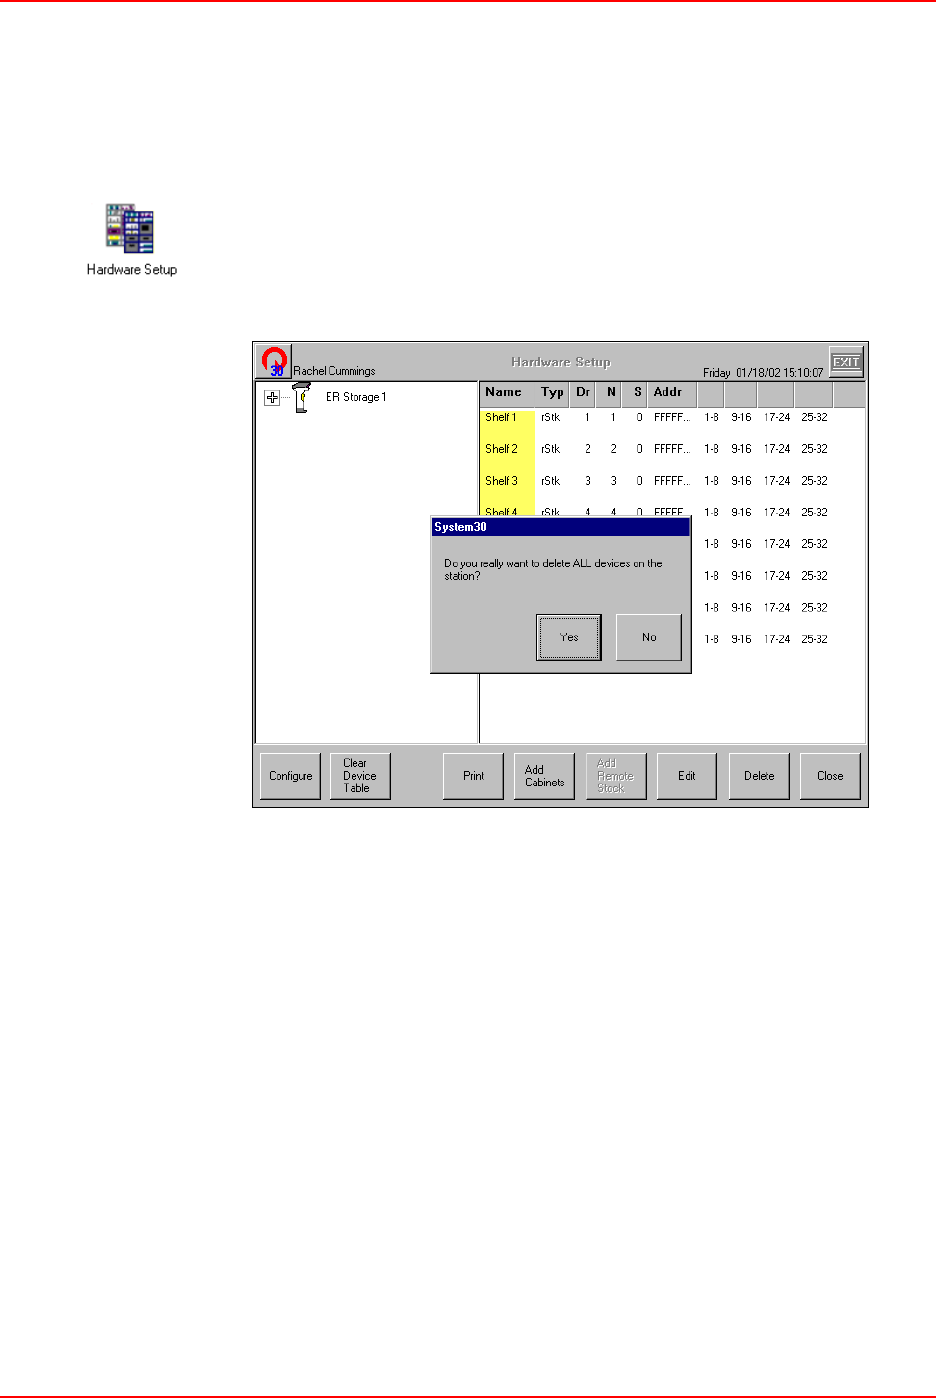
Hardware Setup
5-36 JITRBUD Main User Guide
Clearing the Hardware Setup Table
The Clear Device Tables button will erase the device (doors/drawers) table.
Pressing it again will erase the cabinet table. This was done in two steps because
most people want to keep the cabinets when they reconfigure the devices.
To clear the hardware setup table
1. From the Main Menu, press the Hardware Setup icon.
2. Press Clear Device Table to erase all devices (transmitters).
A warning message appears.
3. Press Yes to delete all devices at the Station.
4. Press Clear Device Table again to erase all cabinets.
A warning message appears.
5. Press Yes to delete all cabinets at the Station.
6. Press Close to return to the Main Menu, or Exit to log out of the Station.
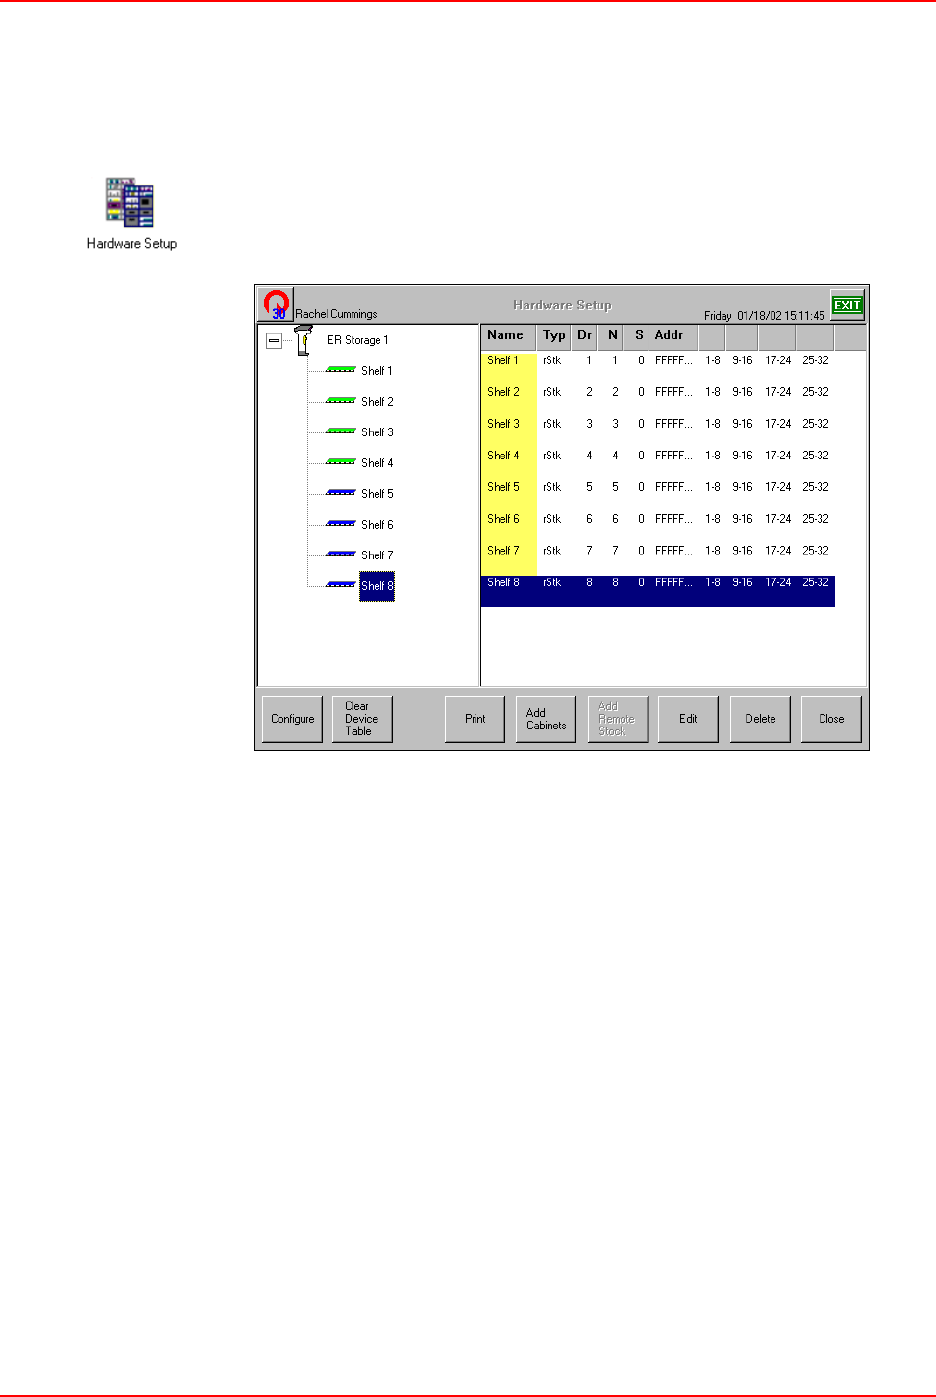
Hardware Setup
JITRBUD Main User Guide 5-37
Deleting Devices
You can only select the last cabinet or device in the table for deletion. Any other
selection will prompt an error message.
To delete a device
1. From the Main Menu, press the Hardware Setup icon.
2. Select the last device on the hardware setup table.
3. Press Delete.
A warning message appears.
4. Press OK to delete the device.
5. Press Close to return to the Main Menu, or Exit to log out of the Station.

Hardware Setup
5-38 JITRBUD Main User Guide

JITRBUD Main User Guide A-1
Appendix A
Troubleshooting
In this chapter we review possible Station error conditions and offer solutions to
get you up and running quickly. We’ve tried to address potential problems at
either Station or Console, but in some situations the distinctions about where the
problem has originated may not be clear. If you feel that a problem you are
experiencing is Station-specific, first review Troubleshooting the Station.
Likewise, if the problem seems Console-specific, first review Troubleshooting the
SUPPLYCENTER Console.
If you do not find a solution that quickly fixes your problem with the Station, refer
to your hospital’s Service Agreement with Pyxis or call our Customer Support
department, toll free at this number:
1-800-727-6102
A-2 JITRBUD Main User Guide
Transmitters Not Communicating to Receiver
Each time a transmitter button is pressed, the system should acknowledge the
transmission with a beep tone. If a receiver is having difficulty receiving
transmissions, do the following:
Patients Not Showing Up At A Station
If a patient’s data does not appear as expected at a Station, the problem could be
either a communications problem or that the patient data has not been received via
the interface from the host system. If the patient’s data still has not appeared,
consider the following possibilities:
Description Remedy
Problem - Transmitter not confirming transmission with beep tone
Has the receiver antenna been
moved? If
Yes
, reposition the antenna in its
original installation configuration and test
the transmitter buttons.
Has the problem been fixed? If
No
, Contact the Pyxis Worldwide Service
Center.
Description Remedy
Problem - Patient Not Showing Up At A Station
Is there a lot of data traffic within
the system? If
Yes
, wait a few minutes. Call the nursing
unit that identified the problem and have
them check to see if the patient has shown
up at the Station.
Is the patient in the admission
system? Check the terminal at the nurses’ Station
and then ask System Manager to check for
the patient at the Console.
Check all lists at the Station which include
global and local if privileged.
Is the private check box selected for
the patient? If
Yes
, the patient will not show up on the
Global patient list. The patient will only
show up on the Local patient list for the
Station area.
Is there a communications interface
problem between the Console and
the Station?
Check the Comm Status screen on the
Station. If the column labeled
L
shows a
value other than
0
this would indicate a
communications problem between the
Console and the Station. Contact the Pyxis
System Manager.
Has the problem been fixed? If
No
, Contact the Pyxis Worldwide Service
Center.
JITRBUD Main User Guide A-3
Station Screen Is Black
If nothing shows on the screen, check the following:
Keyboard Is Unresponsive
Sometimes the Station keyboard may seem unresponsive because the computer is
processing another transaction. Wait a few moments and try again. If the keyboard
is still unresponsive, check the following:
Description Remedy
Problem - Station Screen is Black
Is the Station still plugged into the
wall? Plug Station into the wall and turn power
on. Contact the Pyxis Worldwide Service
Center.
Description Remedy
Problem - Keyboard is Unresponsive
Does the keyboard remain
unresponsive? If
Yes
, turn the power switch (located on
the top left of the Station) to the off
position and wait at least three minutes
before turning the Station on.
Try to type on the keyboard again.
Call the Pyxis System Manager.
Are you at a screen other than the
standby screen? If
Yes
, wait a few minutes to see if the
Station will time out and return to the
standby screen. If it does not time out, call
the Pyxis Worldwide Service Center.
Note
: Always call The Pyxis Worldwide Service Center after troubleshooting so
the potential problem can be logged into the database
A-4 JITRBUD Main User Guide
Touch Screen Is Unresponsive
Sometimes the Station touch screen may seem unresponsive because the computer
is processing another transaction. Wait a few moments and try again. If the touch
screen is still unresponsive, check the following:
Supply Is Not Listed In Find Item
If a supply does not show on the Find Item list, either the supply was not loaded or
it was unloaded from the Station.
Description Remedy
Problem - Touch Screen is Unresponsive
Are you logged in? If
Yes
, touch the screen and listen for the
beep the screen makes when active. Call
the Pyxis Worldwide Service Center.
Does the touch screen remain
unresponsive? If yes, turn the power switch (located on
the top left of the Station) to the off
position and wait at least three minutes
before turning the Station on.
Touch the screen again.
Call the Pyxis Worldwide Service Center.
Are you at a screen other than the
standby screen? If
Yes
, wait a few minutes to see if the
Station will time out and return to the
standby screen. If it does not time out, call
the Pyxis Worldwide Service Center.
Note
: Always call The Pyxis Worldwide Service Center after troubleshooting so
the potential problem can be logged into the database
Description Remedy
Problem - Supply is not listed in Find Item
Is the supply loaded? Print out an Inventory report to verify.
Was the supply unloaded? Print out an activities report to see. If you
suspect the supply was unloaded more
than 24 hours prior, you must contact the
System Manager for this information. If it
is necessary to reload the supply, contact
the Pyxis System Manager.
JITRBUD Main User Guide A-5
Wrong Supply Removed
ID Is Not Working
Description Remedy
Problem - Wrong Supply Removed
Did you remove the wrong supply
for a patient? If so, select the Take/Return, select patient,
and return the item to the bin and press
Return to make sure the patient is not
charged for the supply. Go back and
remove the correct item for the correct
patient.
Description Remedy
Problem - ID/Password Is Not Working
Did a user ID and/or password fail
to gain access to the Station?Call the System Manager and verify that
the correct ID/password is being used and
the ID is not expired.
Is the user entering the correct
password? The first time a user enters a user ID, the
Station requires the user to enter a new
password. Make sure the new password is
being used. If the user has forgotten the
new password, issue a new password.
Has the user successfully logged in
before? If not, issue a new user ID and password
and determine if the new ID works. If not,
contact the System Manager to set up the
user from the Console.

A-6 JITRBUD Main User Guide
Brain Transplant
Brain Transplant is a metaphor for the process of restoring a Station’s database by
giving the Station back its memory from the data stored in the SUPPLYCENTER
Console.
A number of error conditions at the Station could signal the need for a Brain
Transplant, but you should always consult with Pyxis WorldWide Service Center
or your Application Specialist prior to initiating the process (it is best to have the
Application Specialist supervise the transplant).
If timing and circumstances preclude having a Pyxis Application Specialist on site
to complete the Brain Transplant, and you have discussed the situation with Pyxis
WorldWide Service Center, you may proceed with a Brain Transplant following
the instructions provided by the Pyxis WorldWide Service Center representative.

JITRBUD Main User Guide B-1
Appendix B
Safety and Maintenance
This appendix provides important safety information and gives suggestions for
routine maintenance procedures to keep your Station in good working order.
While Pyxis has made every effort to ensure the integrity and durability of the
Station, you do need to exercise some care in maintaining the Station and other
components of your Station.

General Safety Tips
B-2 JITRBUD Main User Guide
General Safety Tips
The following cautions apply to the JITRBUD system:
•Do not use the top of the Station computer as storage.
•Never store fluids on the Station. If anything should accidentally spill, clean
it up immediately, diverting the spill from any seams or openings.
•Do not touch any electrical or interior mechanical components while
electrical power is still coming into the device. Simply turning off the device
is not enough—always shut down the device per instructions and unplug any
electrical connection.
•Do not attempt to repair a Station. If you suspect that the system needs repair,
contact Pyxis Customer Support.
•Do not attempt to force open a stuck door or drawer. Contact Pyxis Customer
Support.
• The Stations are heavy. If a Station must be moved more than a few feet, make
sure you have adequate help to prevent the Station from falling over. Stations
can be top heavy and must be moved with extreme care once they are loaded.
• Do not place liquids on or near the keyboard.
•Never turn the Console computers or the Stations off and on. If either needs
to be restarted, call Pyxis Customer Support.
• After positioning the Station, extend the levelers to prevent the Station from
rolling on its casters.
• The maximum capacity for each drawer is 50 lbs. Distribute items evenly
throughout the drawer.
The JITRBUD Station contains electrical and mechanical
components that can cause injury if not handled appropriately.
Warning
Safe Computing
JITRBUD Main User Guide B-3
Safe Computing
We highly recommend that you only use disks available from Pyxis Corporation
for Station use, Console archiving, and Console backups. These high-quality disks
are tested rigorously to ensure their suitability and reliability.
To prevent the introduction of a computer virus into the JITRBUD system, always
use new, blank disks. If you must recycle disks, run a competent antiviral program
on the disk and reformat before using.
Regulatory Compliance
This device complies with Part 15 of the FCC Rules and with RSS-210 of Industry
Canada. Operation is subject to the following two conditions:
1. This device may not cause harmful interference, and
2. This device must accept any interference received, including interference that
may cause undesired operation.
Failure to follow the Safe Computing guidelines may result in the
loss of data.
Changes or modifications not expressly approved by the party
responsible for compliance could void the user’s authority to operate
the equipment.
Caution
Warning

Regulatory Compliance
B-4 JITRBUD Main User Guide
Electrical Guidelines
For best operation
• Do not operate heavy inductive loads such as floor polishers, drill motors, or
other heavy motor driven equipment on the same circuit as hospital electronic
equipment. These devices may cause unacceptable line voltage transients and
operational problems with associated equipment.
• Verify that the circuit on which the Station is installed is not already
overloaded with other equipment. Use the information above to size your
circuit.
• During warmer months, electric circuits can be overloaded with air
conditioning loads. This may have an adverse effect on the quality of the
electric power at your facility. Have a qualified electrician check your facility
for quality electrical power during these times.
• Do not install Stations where the flexible power cord is likely to be removed
from the wall receptacle before the Station is properly powered down.

Power Requirements
JITRBUD Main User Guide B-5
Power Requirements
The JITrBUD computer requires the following power resources:
•AC Input— 115-230 Volts, 60/50 Hz, 10/5 Amps.
In addition, the Remote Power Interface requires the following power resources:
•Input—100-240 Volts, 50/60 Hz, 2 Amps.
•Output—36 Volts DC, 2 Amps.

Power Requirements
B-6 JITRBUD Main User Guide

JITRBUD Main User Guide C-1
Appendix C
Specifications
Refer to the following for JITrBUD specifications.
C-2 JITRBUD Main User Guide
System Features
Features Description
Processor/Memory Pentium-III 800 MHz 256 MB RAM
Monitor 15” color touchscreen CRT Monitor
Keyboard full size CPU keyboard
RF Transmitters Wireless, battery powered radio frequency
(RF) transmitter cubes.
Transmitter cubes emit two frequencies
simultaneously for redundancy (315 and 433
mHz).
Batteries are non-replaceable. Battery life
estimated at approximately 3-5 years or
100,000 button presses.
Maximum range is approximately 75 feet.
Environmental variables may affect the
range.
Receivers (2) 2 receivers for redundancy: 314 mHz and
433mHz
Translator Box Translates take and return data from
receivers into Pyxis internal message format
and passes message to SCATE board within
the Station PC.
External Power Supply Provides 36 volt power to SCATE board
within Station PC.
Software Information
Operating System
Database Engine
Pyxis proprietary System 30 automated
inventory management system software
Windows NT Workstation 4.0 with service
pack 6a
Sybase SQL Anywhere 7.0.1
Communication Serial (RS), modem, and network (TCP/IP
over ethernet) - one drop/line required per
main unit
Overvoltage Category 2, Indoor use only
LCD Contrast Control Readily accessible up/down contrast control
from keyboard numeric pad
Altitude 2000m
Humidity 30-80% rH non-condensing
Temperature 25
°C
Pollution Degree 2

JITRBUD Main User Guide D-1
Appendix D
Glossary
Actual Count
The physical count of an item in a bin. Depending upon your Station
configuration, you may be asked to verify the actual count during the refill
process.
ADT
An abbreviation for the Admission, Discharge, and Transfer records for a patient
or group of patients. The ADT is sent from the facility’s host system to the
SUPPLYCENTER Console via the Pyxis Procar interface.
Auxiliary
A secure storage cabinet connected to a Main Unit. Auxiliary units contain no
screen, printer, or disk drive and are intended for storing additional supplies and,
depending on the model, bulky items. The Main and any attached Auxiliaries
make up the Station. See also Main Unit.
Bin
The specific location of a single item within a door or drawer. A bin may also
refer to the physical container in which the item is stored.

D-2 JITRBUD Main User Guide
Bin Drawer
A flexible matrix drawer which is twice the height of a single drawer and can be
configured to accommodate small items in individual spaces.
Brain Transplant
This term is a metaphor for the procedure of using the SUPPLYCENTER Console’s
up-to-date stored information to restore or correct a Station’s unique database.
Compliancy
Calculation based on number of transactions and number of discrepancies to
determine system compliance.
Device
Any component of the Station that sends or receives messages: Station,
SUPPLYCENTER Console, and PROCAR (interface).
Discrepancy
During an item count verification, if the amount you find does not match the
amount expected by the system, when you enter the correct amount, you create a
discrepancy that is recorded at the Station.
Expansion
The installation of additional Station units in a hospital with a JITrBUD Station
already in place.
Expected Count
The amount of an item in a bin that a Station expects you to find.
Global Find
A feature that allows you to search all Stations for a particular item.
Global Kit
A feature that allows you to create a kit for use throughout all Stations.
Global Patient
A feature at the Station which allows you to search all Stations for a patient.
Go-Live
The date when a facility begins using a Station to dispense supplies, replacing the
existing manual system. This implies the Station is in place, fully configured, and
at least one Station is ready for use.
Hospital Supplies List
See Item List.
Interface
Means by which information is translated from a hospital’s computer system and
the SUPPLYCENTER Console. Information obtained via the interface includes
patient admissions, discharges, transfers, billing data, and the Materials
Management Information System. (See ProCar)

JITRBUD Main User Guide D-3
Inventory
Supplies that are selected to be loaded into Stations from the master, or
SUPPLYCENTER Console list of supplies. The inventory process is counting and
verifying item counts.
Inventory Management
The function of monitoring utilization of supplies to meet the needs of the patient
care areas. Information at the SUPPLYCENTER Console provides the tools to
maintain stock at the Stations, monitor usage and refill Stations accordingly.
Item
A supply managed at the SUPPLYCENTER Console and dispensed at the Station.
Item List
A database of all supplies used by the hospital in any Station. The list of supplies
must be created and maintained by material management personnel for items to be
loaded and refilled in the Stations.
Load
The process of loading supplies into the Station. Assigning an item to a specific
location (bin) within a Station.
Main Unit
A Station that contains a touchscreen, keyboard and computer.
Maintenance
A process to purge old data from the SUPPLYCENTER Console databases which
usually occurs every 24 hours, usually late at night when system use is light.
Maximum (Max) Level
PAR level. The maximum number of a specific item you have loaded in a bin.
Minimum (Min) Level
The standard point at which an item is refilled. If a supply gets at or below min
level, it will show up in the material management reports for refill. The minimum
levels can be adjusted to reflect changing patterns of usage and demand.
Mirror Station
Using a template to add a Station to the system is known as a Mirror Station. The
template feature adds a Station to the system with the same bin items and
locations as the Station template.
Modem
A device that encodes data for transmission over a particular medium, such as
telephone lines, coaxial cables, or fiber optics.
Outdate
The process of removing expired items using the Outdate feature.

D-4 JITRBUD Main User Guide
Par Level
The maximum number of this item you want loaded in the bin.
Pending Supplies
Supplies that have been assigned at the SUPPLYCENTER Console to Station bins,
but have not yet been physically loaded.
Phys Max
Maximum number of items that can be physically loaded in a bin.
Pick Area
A storage area in your facility which you have designated for storing supplies. If
you associate a supply with an inventory pick area, that area is identified on
certain reports to help with picking supplies for delivery to the Stations.
Polling
The continuous communication between the SUPPLYCENTER Console and the
Station. The SUPPLYCENTER Console polls all Stations to update transactional
information.
ProCar Computer
A second PC connected to the SUPPLYCENTER Console. The PROCAR’s essential
task is to obtain ADT information from the hospital’s computer, which it then
translates properly and communicates to the SUPPLYCENTER Console for
distribution to the appropriate Stations. The ProCar computer can also be
configured to send billing and MMIS information to the hospital’s host system.
Quick Take
Process used to quickly take items for a single patient. The Quick Take function is
available when the Multiple Patient Selection check box is not selected in Station
Options.
Refill
The procedure designed to replenish or restock loaded inventory in the Stations.
Refill by Request Order
Used to replenish item at Station and is associated with a PO# generated from the
SUPPLYCENTER Console or Vendor.
Remote Diagnostics
A process in which the Pyxis Customer Support technician is given access dial
into the SUPPLYCENTER Console's operating system to use advanced diagnostics
and troubleshooting techniques.
Resource Nurse
A nurse who is initially trained by the Pyxis Application Specialist and is then
responsible for assisting at go-live and helping to educate other nurses to use the
JITrBUD Station.

JITRBUD Main User Guide D-5
Return
A procedure to return a supply to the Station and credit the patient.
RS
An acronym for Recommended Standard, refers to a communication method of
linking remote Stations to the SUPPLYCENTER Console.
SUPPLYCENTER Console
The central processing unit (CPU), typically located in materials management,
which manages and monitors all Stations located throughout the hospital.
Reporting capabilities to manage inventory, refills, users, and discrepancies, etc.
System Manager
A system manager is a designated hospital employee who has the responsibility of
overseeing the daily management of the Station equipment to meet the needs and
goals of the hospital.
Task Interrupt
A feature that allow a second user to perform a Take/Return transaction during the
Refill or Inventory process.
Transaction
Any activity, such as a remove, return, or discard, performed at the Station.
Transaction Queue
The accumulation of messages waiting to be communicated to the SUPPLYCENTER
Console, Station, or PROCAR computer.
UPS
The uninterrupted power supply (UPS) is a power storage device connected
between the SUPPLYCENTER Console and wall electrical outlet. It detects power
loss from the outlet and immediately provides the SUPPLYCENTER Console with
approximately 15 minutes of power. The UPS beeps continuously to warn of the
power failure.
Verify Count
An option that requires the user to confirm the correct count of supplies during the
refill process.
XQ
See Transaction Queue.
Zones
A convenient way to group areas to be able to expedite the refill process at the
Stations. You can distribute inventory and refill tasks and generate reports sorted
by and assigned by zone.

D-6 JITRBUD Main User Guide

JITRBUD Main User Guide Index-1
Index
A
Accessing Communication 2-12
Accessing Features and Functions 2-2
Actual Count
Defined D-1
Adding Patients(Patients) 3-21
Adding Patients(Take/Return) 3-11
Additional Tools 2-11
ADT
Defined D-1
Auxiliary
Defined D-1
B
Bin
Defined D-1
Bin Drawer
Defined D-2
Boxes
Check Boxes 2-4
Dialog Boxes 2-4
Search Boxes 2-4
Brain Transplant A-6
Defined D-2
Buttons
Command Buttons 2-3
C
Changing Your Password 2-7
Communication 2-12
Device Status 2-13
Methods Status 2-15
Protocol Status 2-17
Receiving Status 2-19
Sessions Status 2-16
Transmitting Status 2-20
Communication Status 2-11
Compliancy
Defined D-2
Confirmation Screens 2-4
Conventions
Icons 2-ix
Text 2-ix
User Guide 2-ix
D
Deleting a Patient 3-12
Device

Index-2 JITRBUD Main User Guide
Defined D-2
Discrepancy
Defined D-2
Drop-down lists 2-4
E
Editing Patients(Patients) 3-23
Emergency Access 3-18
Emergency Access from Take/Return Icon 3-18
Expansion
Defined D-2
Expected Count
Defined D-2
F
Finding Items 3-13
Finding an Item from Global List 3-14
G
Global Find
Defined D-2
Global Kit
Defined D-2
Global Patient
Defined D-2
Global Patient List (Global) 3-10
Glossary D-1
Go-Live
Defined D-2
H
Hardware Setup 5-31
Clearing Tables 5-36
Deleting Devices 2-12, 5-37
Editing Configuration 5-35
Editing Hardware setup 5-35
Hospital Information System 1-3
Hospital Supplies List
Defined D-2
I
Interface
Defined D-2
Inventory 4-2
Defined D-3
Editing Items 4-6
Outdating Items 4-8
Searching for Patients 4-3
Verifying Quantity 4-4
Inventory Management
Defined D-3
Inventory Management Functions 4-1
Item
Defined D-3
Item Alias 4-19
Deleting an Alias 4-22
Searching for Items 4-19
Item List
Defined D-3
Items Alias
Creating an Alias 4-20
Editing an Alias 4-21
K
Keyboard 2-2
L
Load
Defined D-3
Load/Unload 4-10
Loading Items 4-11
Searching for Patients 4-10
Unloading Items 4-16
Local Patient List (Local) 3-10
Logging In 2-5
Logging Out 2-6
Login Using ID and Password 2-5
Lot/Serial Number 3-7
M
Main Menu 2-8
Main Unit
Defined D-3
Maintenance
Defined D-3
Manual Overview 2-viii
Materials Management Information System 1-3
Maximum (Max) Level D-3
Minimum (Min) Level
Defined D-3
Mirror Station
Defined D-3
Modem
Defined D-3
Moving Items to a New Location 4-17
O
Options 5-25
Setting General Info 5-25
Outdate
Defined D-3
P
Par Level

JITRBUD Main User Guide Index-3
Defined D-4
Patient Care Functions 3-1
Patients 3-20
Searching for Patients 3-20
Pending Supplies
Defined D-4
Phys Max
Defined D-4
Pick Area
Defined D-4
Polling
Defined D-4
Power Requirements B-5
Preface 2-vii
Print Screen 2-11
ProCar Computer
Defined D-4
Q
Quick Take 3-5, 5-26
Defined D-4
R
Reconcile ADT 3-24
Refill 4-23
Defined D-4
Outdating Expired Items 4-27
Refill Items (Verify Count Off) 4-24
Refilling Items 4-24
Spot Refill 4-25
Refill By Request Order 4-30
Refill by Request Order
Refill By Request Order (Verify Count On) 4-31
Refill By Request Order(Verify Count option
selected) 4-31
Refill-by-Request
Defined D-4
Regulatory Compliance B-3
Remote Diagnostics
Defined D-4
Request Item 3-26
Resource Nurse
Defined D-4
Return
Defined D-5
Returning Items 3-16
RSDefined D-5
S
Safe Computing B-3
Safety Tips B-2
Scroll Bars 2-3
Selecting Multiple Items in a List 2-4
Specifications C-1
System Features C-2
Station
Benefits and Features 1-2
Station Basics 2-1
Station Management Functions 5-1
Supply Center
Defined D-5
System Components 1-3
Comprehensive Reporting 1-4
Network Information 1-3
Stations 1-3
Supply Center 1-3
System Manager
Defined D-5
System Overview 1-1
T
Take/Return 3-2
Finding Items 3-13
Multiple Patient Selection option deselected 3-5
Multiple Patient Selection option selected 3-4
My Patient List (My List) 3-10
Returning Items 3-16
Searching for Patients 3-20
Sorting Patients 3-3
Taking Items 3-4
Taking Items with Lot/Serial Number Tracking 3-7
Using Procedure Date Feature 3-9
Task Interrupt
Defined D-5
Terminology 2-x
Auxiliary Unit 2-x
Bin 2-x
Item 2-x
ProCar Computer 2-x
Station 2-x
Supply Center 2-x
Users 2-x
Tools
COMM 2-11
Help 2-11
Print Screen 2-11
Tutorial 2-11
User Guide 2-11
Touch-Screen 2-2
Tour 2-11
Transaction

Index-4 JITRBUD Main User Guide
Defined D-5
Transaction Queue
Defined D-5
Troubleshooting A-1
Brain Transplant A-6
ID Is Not Working A-5
Keyboard Is Unresponsive A-3
Station Screen Is Black A-3
Supply Is Not Listed In Find Item A-4
Touch Screen Is Unresponsive A-4
Wrong Supply Removed A-5
U
UPS
Defined D-5
Users 5-2
Creating a User Template 5-15
Creating User From Template 5-22
Creating Users 5-3
Deleting Users 5-14
Editing Users 5-9
Searching for Patients 5-2
V
Verify Count
Defined D-5
W
Welcome 2-vii
Window and Screen Features 2-3
X
XQ
Defined D-5
Z
Zones
Defined D-5