Q3 Innovations RH-SE Radar Detector on X, K, Ka and Ku Band User Manual FRONT
Q3 Innovations, LLC Radar Detector on X, K, Ka and Ku Band FRONT
Users Manual
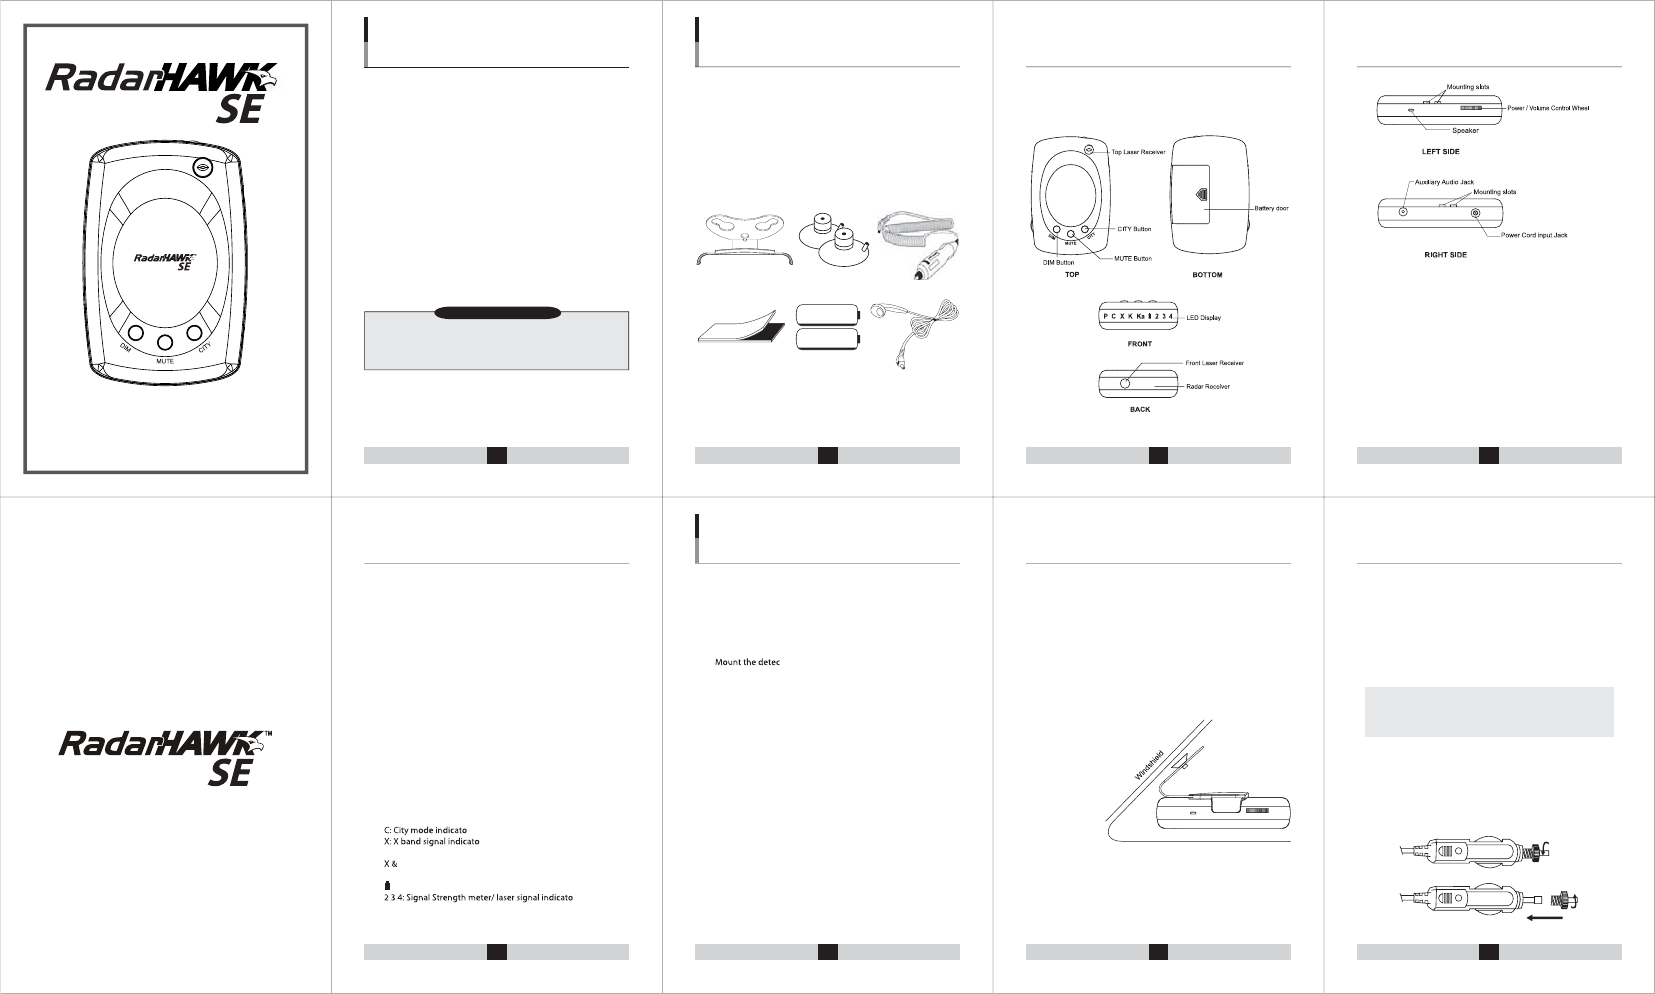
e. FRONT LASER RECEIVER/ TOP LASER RECEIVER
Laser lens to detect laser signals
f. RADAR RECEIVER
Receives the radar signals emitted by trac radars
g. SPEAKER
Alarms with tone
h. MOUNTING SLOTS
Mount the bracket
i. POWER CORD INPUT JACK
Connect the DC Power cord here
j. AUXILIARY AUDIO JACK
Connect the earphone or speakers here
k. LED DISPLAY
P: Power on indicator
r
r
K: K band signal indicator
K: Ku band signal indicator
Ka: Ka band signal indicator
: Low battery indicator/ Battery charging indicator
r
For the best performance, select the proper location for the unit
where it has a direct view of the road. The antenna and lens should
not be obstructed by metal or metallic surfaces and should be
pointed at the horizon for accurate long range detection.
tor in a level position.
Do not mount the detector behind metal surfaces, windshield
antennas, wiper blades, ornaments or mirrored glass.
Do not mount the detector where the driver or passenger
may be injured in case of an abrupt stop.
1)
FASTENER TAPE MOUNTING ON DASHBOARD
a. Use a damp cloth to thoroughly clean both the bottom of the
detector and the dashboard.
b. Peel of the tape's paper backing and apply the tape to the bottom
of the detector.
c. Remove the paper backing from the other side of the tape and
press the detector onto the dashboard.
2) WINDSHIELD MOUNTING
The supplied windshield bracket lets you quickly mount the
detector to your vehicle’s windshield.
a. Install the suction cups onto the bracket by tting them into their
holes.
b. Attach the bracket to windshield.
c. Attach the detector to the bracket.
d. Bend bracket for correct detection angle (if necessary). Do not use
the detector to bend bracket.
e. Plug the DC12V power cord into
the detector and plug the power
cord into the cigarette
lighter socket.
3) POWER CONNECTION
a.
b. The RadarHAWK™ SE is also designed to operate on most DC12V
negative ground vehicle electrical systems. The power cord
provided with the detector has a cigarette light socket plug at
one end and a small connector at the other.
Insert the small connector into the jack on the side of the detector.
Insert the other end into the cigarette lighter socket of your vehicle.
If the detector does not operate when you turn it on,
remove the adapter from the cigarette lighter socket and
carefully check the socket for debris. Also, check the fuse in
the adapter and your vehicle’s fuse box.
4) REPLACING FUSE
If the detector stops operating, the fuse in the plug might be blown.
If it has blown, unscrew the top of the plug to remove the fuse and
replace it with a new one.
2) Controls and Functions
INSTALLING THE UNIT
1 2 3 4
INTRODUCTION
5 6 7 8
Installing the Unit
Features and Standard AccessoryFeatures and Standard Accessory
Installing the UnitFeatures and Standard Accessory
FEATURES AND
STANDARD ACCESSORIES
WARRANTY
a. Power/Volume Control Wheel
Turns the detector on/o and controls the volume level.
b. DIM Button
Dim mode reduces the illumination of the display.
You can adjust the brightness of the display.
c. MUTE Button
Silences the audio alarm
d. CITY Button
Press the City button to reduce false alarms while driving in the
city. While driving on the highways or rural, press the City button
again to turn o City mode for long range detection.
AA NiMH battery
AA NiMH battery
RADAR LASER DETECTOR
Owner’s Manual
TM
1) Accessories included with your RadarHAWK™ SE
• Mounting Bracket
• Suction Cups
• 12V DC Power Cord & Fuse
• Fastener Tape
• Operation Manual
• Two AA NiMH Rechargable Batteries
• Earphone
•
•
•
•
•
•
Choose a location that does not block the driver’s vision.
•
•
•
•
•
•
•
•
We warrant your RadarHAWK™ SE against all defects in materials
and workmanship for a period of one(1) year from the date of the
original purchase.
Thank you for purchasing the wireless RadarHAWK™ SE Radar and
Laser Detector. The new RadarHAWK™ SE model incorporates
advanced antenna technology and eSEremely low power consump-
tion circuitry to ensure top-class performance. It is a completely
integrated radar and laser detector, which responds X, K, Ku and Ka
band radar guns and all known laser speed guns in use today.
The RadarHAWK™ SE is specially designed to be a simple-to-use
device in any vehicle or motorcycle keeping you fully protected at all
times. This manual contains instructions and information explain-
ing how the RadarHAWK™ SE operates.
Please read the manual in detail to get the most out of the outstand-
ing performance and features of the RadarHAWK™ SE.
The RadarHAWK™ SE is specially designed to operate on two AA
NiMH rechargeable batteries. To ensure maximum performance,
we advise that you do not use other battery typrs.
9 10 11 12 13
14 15 16 17 19
OPERATION
1) POWER AND VOLUME CONTROL
To turn on the detector, connect power/insert battery and rotate
the wheel controller(located on the side of the detector) until you
hear it click. To turn o the detector, rotate the wheel controller
in the opposite direction until it clicks again. You can also use the
controller to adjust the volume level by turning it up or down within
the range that it does not click.
2) SELF-TEST & FEATURE MEMORY
When powered up, the detector performs self-test.
AY or CITY
R
TONE
TION
3) BRIGHTNESS CONTROL
Press DIM button to toggle between 3 dierent brightness levels.
The brightness options are: Bright, Dim and Dimmer.
When a signal is detected, alerts are always displayed in Bright,
regardless of the brightness level you have selected. The display
returns to your setting following the alert. The factory default mode
is Bright.
13) CHARGING THE BATTERIES
When the power is supplied from 12-volt DC power cord, the two
AA NiMH rechargeable batteries will be charged and the battery
indicator LED will turn ON to show that the batteries are charging.
Within 2.5 hours, the batteries will be fully charged and battery
indicator LED will automatically turn o.
14) AUTO POWER-OFF AT BATTERY MODE
15) BATTERY LIFE
1) If the detector does not turn on
a. Check the power cord or battery. Be sure all power connectors
are properly installed.
b. Check the fuse that controls power to the cigarette lighter socket.
See your vehicles owner's manual.
c. The cigarette lighter socket might be dirty. Clean it with ne
emery cloth to ensure a good and clean connection.
d. Vehicle electrical problem exists.
e. Make sure that the volume control is in the ON position.
Caution: Do not place any metal object other than the cigarette
lighter or a cigarette lighter plug in the cigarette lighter socket.
2) If the detector gives a false alert when the vehicle
hits bumps
a. Check the vehicle's electrical system, including the main battery
cable and alternator connections.
b. Install a lter capacitor (470uF. 25volts) on the back of the
cigarette lighter socket, across the power connections.
3) If the receiving signals are weak
a. Check the angle of detector.
b. Point detector to the horizon.
c. Radar antenna / laser lens is obstructed.
d. Relocate the detector.
RADAR
LASER
GENERAL
*Specications are typical. Individual units might vary.
Specications are subject to change without notice.
4) MUTE
5) AUTO AUDIO CONTROL
Auto Audio Control will have the detector report with reduced
audio alarms for continuously detected alerts. When a signal is
constantly reported for more than 10 seconds, the detector will
gradually reduce the audio level in the following 10 seconds. The
reduced audio level will continue for new alerts detected within 60
seconds from the previous alert.
6) HIGHWAY AND CITY MODE
7) BAND SELECTION
strength LEDs (2, 3, 4) shows Band On or O status. Turn on the LED
to select the band.
z)
Press DIM button to turn on or o .
z)
Press MUTE button to turn on or o.
Press CITY button to turn on or o.
The factory default is all bands on.
8) SIGNAL STRENGTH METER
The numbered LEDs are called signal strength meter when they are
displayed together with a radar band LED to indicate the strength
of a detected signal. The higher number, the stronger the signal.
9) LASER DETECTION
Police laser devices transmit an invisible light beam at wavelength
of 904 nanometers. All numbered LEDs will start blinking when a
laser signal is detected.
10) VG-2 UNDETECTABLE
11) SELECTABLE TONE
There are two selectable alert tones. To change the tone sound,
press MUTE for three seconds. The unit will change the tone sound.
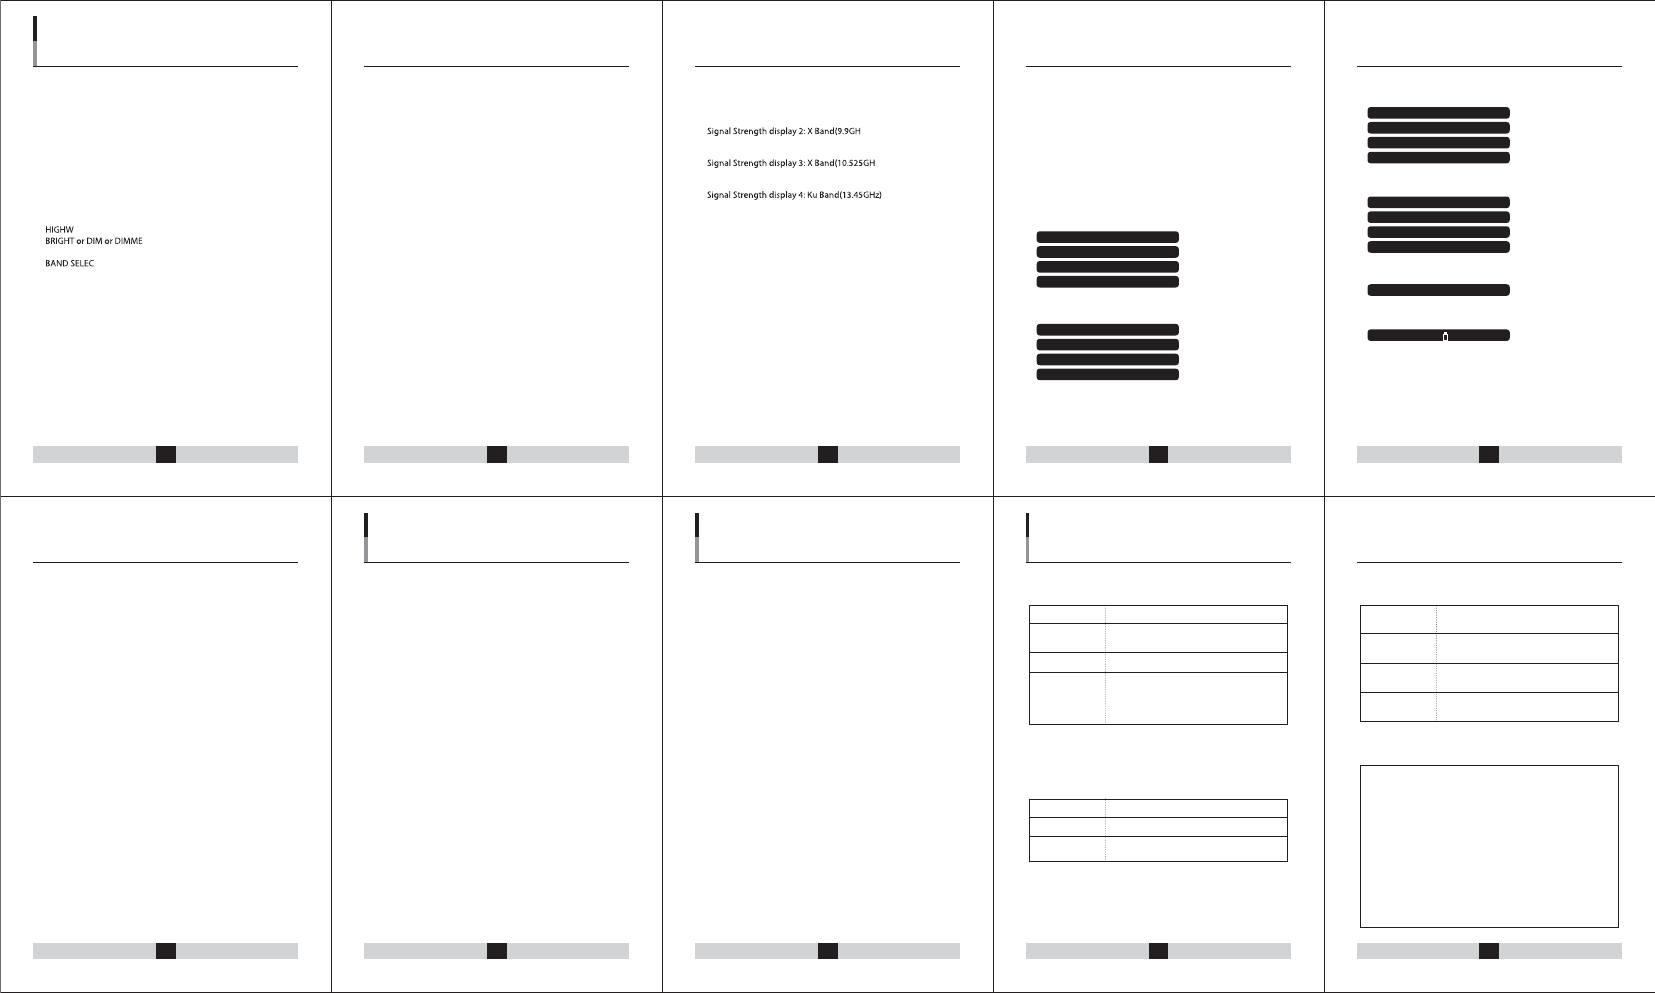
12) DEMO MODE
X band signal detected operation
K band signal detected operation
Ku band signal detected operation
Ka band signal detected operation
Laser signal detec
All LEDs on
ted operation
It automatically exits after ve seconds from the all-LED on status.
Or press any button to exit the all-LED on status, which is the
end of DEMO mode. After this has been completed the detector
automatically enters detection mode and begins detecting signals.
Operation Operation
Specications
OperationOperation
Operation SPECIFICATIONSTROUBLESHOOTINGCARE AND MAINTENANCE
PCXKKa 234
PCXKKa 234
PCXKKa 234
PCXKKa 234
PCXKKa 234
PCXKKa 234
PCXKKa 2 34
PCXKKa 234
PCXKKa 234
PCXKKa 234
PCXKKa 2 34
PCXKKa 234
PCXKKa 234
PCXKKa 2 34
PCXKKa 234
PCXKKa 234
PCXKKa 234
PCXKKa 234
Receiver Type Pulsed Laser Signal Receiver
Detector Type Digital Signal Processor
Opto Sensor Photo Diode with Convex Condenser Lens
Receiver Type Dual Conversion Superheterodyne
Antenna Type Linear Polarized. Self-Contained
Antenna
Detector Type Frequency Discriminator
Frequency of
Operation:
X Band
Ku Band
K Band
Ka Band
Temperature
Range
Power 12~15V DC, 500mA (Negative Ground)
Requirements:
Dimensions
HxWxD
Weight 160g with two AA rechargeable NiMH
1.0” X 2.85” X 4.2”
-20°C to +70°C
Press and hold both the MUTE and CITY buttons, then the detector
will demonstrate how it operates when each radar and laser signal
is detected.
•
-
•
-
•
-
•
•
•
•
Press the MUTE button for less than three seconds to toggle
between MUTE ON and MUTE OFF. Mute can be used when you
manually turn the audio alert o. Mute ON will be automatically
reset to Mute OFF when you turn the detector o?. Mute ON does not
remain in the detector's memory. The factory default mode is Mute
OFF.
The false-alerts are often caused in urban areas by automatic door
openers, air trac control systems, alarm systems and more. The City
mode reduces the detector's sensitivity and eliminates responses to
false sources. Highway mode provides maximum sensitivity for open
road driving where there are no false signals.
There is a band selection feature for two X bands and the Ku band.
The K and Ka bands are always "on" to detect. Hold down DIM and
CITY button for three seconds to enter band selection mode. Signal
The VG-2 is a "radar detector detector" device used by police to
detect signals radiated by a radar detector. The RadarHAWK™ SE
does not produce emissions detectable by VG-2 radar detector
sensing devices.
Your RadarHAWK™ SE is an example of superior design and
craftsmanship. The following suggestions will help you to handle
your detector in a proper way.
Never leave the detector on the windshield when you park your
vehicle. The temperature in the vehicle in summer can reach levels
above what is considered to be safe for this detector.
To make you less susceptible to break-in and theft, you should
remove the detector from your windshield when you leave your
vehicle.
Do not expose the detector to moisture. Rain dew, road splash, or
other liquids that can damage the internal components and reduce
sensitivity of the detector.
The RadarHAWK™ SE can provide approximately 30~40 hours of
rechargeable battery life. RadarHAWK™ SE has a separate low
battery indication LED. It intermittently blinks with warning alarms
from the moment when there is approximately two to four hours of
battery life remaining.
In the event that you forget to turn o the RadarHAWK™ SE when
you leave your vehicle, it has an automatic power-o feature to
conserve battery life. The RadarHAWK™ SE will automatically shut o
when no signals are detected for approximately 60 minutes. An
obtrusive audio and visual warning will conrm that the auto
power-o is about to happen. You can cancel auto power-o by
pressing any button while the audio and visual warning is being
displayed.
It will automatically remember the above user settings when the
unit is turned o or removed from the power. All the features
selected are retained in memory.
This device complies with part 15 of the FCC Rules. Operation
is subject to the following two conditions: (1) This device may
not cause harmful interference, and (2) this device must
accept any interference received, including interference that
may cause undesired operation.
In addition, any changes or modications to this product,
which are not expressly approved by Q3 Innovations, LLC in
writing, could void the user’s authority to operate this
product.
RadarHAWK™ SE
FCC ID : U9P-RH-SE

FCC Compliance Statements
Note: This equipment has been tested and found to comply
with the limits for a Class B digital device, pursuant to part 15
of the FCC Rules. These limits are designed to provide
reasonable protection against harmful interference in a
residential installation. This equipment generates, uses
and can radiate radio frequency energy and, if not installed
and used in accordance with the instructions, may cause
harmful interference to radio communications. However,
there is no guarantee that interference will not occur in a
particular installation. If this equipment does cause
harmful interference to radio or television reception, which
can be determined by turning the equipment off and on, the
user is encouraged to try to correct the interference by one
or more of the following measures:
• Reorient or relocate the receiving antenna
• Increase the separation between the equipment and
receiver.
• Connect the equipment into an outlet on a circuit
different from that to
which the receiver is connected.
• Consult the dealer or an experienced radio / TV
technician for help.
Warning : Your are cautioned that any change or
modifications to the equipment not expressly approved by
the party responsible for compliance could void your
authority to operate such equipment.