Qingdao Unique Develop UNIQUE-P08 Unique Printer User Manual UN P
Qingdao Unique Products Develop Co.,Ltd Unique Printer UN P
Users Manual
- 1 -
USER MANUAL
Model:UN-P
This device complies with Part 15 of the FCC Rules. Operation is subject to the following two
conditions: (1) this device may not cause harmful interference, and (2) this device must accept any interference
received, including interference that may cause undesired operation.
Changes or modifications not expressly approved by the party responsible for compliance could void the
user's authority to operate the equipment.
NOTE:This equipment has been tested and found to comply with the limits for a Class B digital device,
pursuant to Part 15 of the FCC Rules. These limits are designed to provide reasonable protection against
harmful interference in a residential installation. This equipment generates, uses and can radiate radio
frequency energy and, if not installed and used in accordance with the instructions, may cause harmful
interference to radio communications. However, there is no guarantee that interference will not occur in a
particular installation. If this equipment does cause harmful interference to radio or television reception, which
can be determined by turning the equipment off and on, the user is encouraged to try to correct the interference
by one of the following measures:
- Reorient or relocate the receiving antenna.
- Increase the separation between the equipment and receiver.
- Connect the equipment into an outlet on a circuit different from that to which the receiver is
connected.
- Consult the dealer or an experienced radio/TV technician for help.
Thanks for purchase our Talking Flower Printer. This book mainly explains the capability, operation,
setting and the connection of the printer. Please carefully read and abide this book before operate the
Talking Flower Printer.
1. Please make sure the computer has no connection with other printers, cameras or their drivers before
using the Talking Flower Printer. The Talking Flower Printer may can’t work normally if there are
other printers, cameras or drivers connected to the computer.
2. When install the Talking Flower Printer, please install the camera driver first, make sure the Talking
Flower Printer and the computer were connected by the USB line, then go next step. The system may
can’t work normally if disturb this order.
3. Please connect the Talking Flower Printer to the power before install the printer driver. Please follow
the method and the photos in this book, otherwise, you may cause exceptional situation. (Photo 4.3 is
the installation of printer driver)
4. Please take care the packing of the Talking Flower Printer, don’t miss it. When you move the Talking
Flower Printer, please well packing with the original items, otherwise, the problems caused by misuse
or bad packing not include in the warranty.
ATTENTION
1. This book has already detailed explained the capability, operation, setting, connection and other
attentions, if you have any other questions, please contact us.
2. Transship part or all the contents of this book without any permission is forbidden.
3. Because of the different developing and producing period, the actual operation maybe a little different.
4. During the using, some data may be destroyed or missing because of the data, hardware, misuse or
some other reasons. Our company can’t assure completely, please copy your important data to avoid
- 2 -
this situation.
5. The usage of this book is to satisfy most of the customers, not for some customers’ specifically
requirements.
6. We are not considering the interference of some electronic devices, such as medical treatment devices,
aviation universe equipments, and atom drive equipments during developing the Talking Flower
Printer. We never take any responsibility if some accidents or property losses caused by these
interferences during using the machine.
7. The flowing items indicates the damages may occur under safety measure, if you don’t pay attention to
these warnings and go on using the machine, we never take any responsibly of the losses caused by
these., please read carefully before using the machine.
WARNING Indicates that if ignore this mark and go on misusing, you may cause accidents which lead
to death or GBH.
ATTENTION Indicates that if ignore this mark and go on misusing, you may cause accidents which
lead to body harm of property losses.
WARNING Please don’t open or repair the machine, monitor, wires and other attachments arbitrarily.
WARNING Please pay special attention during operation, any misuse may cause fire, please don’t
destroy monitor, curve wires, or put some heavy things on the monitor and wires.
WARNING Please fix the internal attachments, wires and linker to the machine to avoid the children’s
touch. Please don’t let the children touching the machine during operation.
WARNING Please don’t fix or change the parts inside the machine when the power on. Please change
the ink cartridges when power off.
WARNING Please touch the machine by wet hands, you may get an electric shock when power on or
cause machine problem when power off.
WARNING If the machine smoking or emit peculiar smell, please cut the power of the computer and
the machine at once.
WARNING Please don’t use the machine under following situation:
Under burning sun, in bath room, under strong magnetic filed, under static effect, under
dusty, under vibration, on the uneven ground, in the hot gases, under the make water or
creepage condition, in the place where deposited antiseptic or other harmful leechdom, in
the very cold places. Please use the machine under10-40℃, relative humidity 65%-60%.
WARNING Please don’t drop liquid or put other objects into the machine, if you drop some liquid or
other objects into the machine, put cut down the power at once.
WARNING The problems caused by man-made reasons not include in the warranty. Please don’t put
anything on the machine.
WARNING To avoid fire, please cut down the power, disconnect the USB line when stop using.
ATTENTION The monitor is electronic device, it may produce static, please take care when uninstall.
Please touch the machine carefully before using to avoid static.
ATTENTION Please don’t use the power supply and voltage not suit to the nameplate on the machine.
ATTENTION Please well packing the machine when you move or send back to us for repair.
ATTENTION Please don’t clean the machine by organic impregnant such as thinner, naphtha, please
clean the linker.
ATTENTION Please obey the local law when you discard the machine.
ATTENTION OF INK CARTRIDGES
1. Please inquiry the original seller if you have any questions with the machine.
2. The valid use period is one year from purchase date.
3. During the validity, if you have any dissatisfaction with the machine, please come to the original sell
- 3 -
for discussing.
4. The after-sale service is only under normal use, please correct use it according to the user manual. The
problems caused by misuse, improper storage, over use or any change without our permission not
include in the warranty.
WARNING Indicates that if ignore this mark and go on misusing, you may cause accidents which lead
to death or GBH.
ATTENTION Indicates that if ignore this mark and go on misusing, you may cause accidents which
lead to body harm of property losses.
WARNING Please don’t eat the ink in the cartridge, if eat by mistake, please see the doctor in time.
WARNING Please don’t drop the ink into eyes.
WARNING Please keep the ink cartridge out of the children’s touch.
ATTENTION Please don’t break, librate, shake or knock the ink cartridge.
ATTENTION We don’t take any responsibility of the problems that caused by the change or the block of
the ink cartridge.
ATTENTION Please don’t repeated use or change the ink cartridge.
ATTENTION Please don’t put the ink cartridge under strong sunshine, please keep in normal
temperature.
ATTENTION Please use the ink cartridge during the validity.
ATTENTION Please don’t use other consumables except special colors and pre coats.
- 4 -
INDEX
I. Technical index ............................................................................................................................................ 5
II. Installation.................................................................................................................................................... 6
2.1 Open the CD to start the installation interface ............................................................................. 6
2.3 Install printer driver...................................................................................................................... 6
2.4 Install Talking Flowers gallery....................................................................................................11
2.5 Install Talking Flowers software ................................................................................................12
2.6 Close installation interface......................................................................................................... 15
2.7 Restart computer ........................................................................................................................ 15
2.8 Printer setting ............................................................................................................................. 16
2.9 Set Talking Flowers Program.....................................................................................................18
III. Usage.................................................................................................................................................. 20
3.1 Choose images from default gallery........................................................................................... 20
3.2 Adjusting images and printing.................................................................................................... 21
3.3 Preview or delete selected images.............................................................................................. 23
3.4 Custom images........................................................................................................................... 23
3.5 Word Edit ................................................................................................................................... 25
3.6 Picture Edit................................................................................................................................. 27
3.7 Printing....................................................................................................................................... 34
IV. Clean and change ink cartridge .......................................................................................................... 38
V. Uninstall..................................................................................................................................................... 41
5.1 Enter “Add or remove programs”............................................................................................... 41
5.2 Delete printer driver ................................................................................................................... 42
5.3. Delete Talking Flower Gallery ...................................................................................................43
5.4. Delete Talking Flower Program ................................................................................................. 44
- 5 -
I. Technical index
Product size: 460mm×295mm×250mm
Working condition:
Temperature: 10~40°C
Relative humidity: 50 %~60%
Voltage: AC 220V 50Hz or 110V/50Hz (Please check the nameplate on the machine for the
details)
Computer system (recommended) :
Operation system: WINDOWS XP
CPU: Intel Celeron600MHz and above
DDR Memory: 128M and above
VGA 24 bit resolution and support DirectX
CD-ROM
HDD 1G space (decide on the gallery)
2 USB 2.0
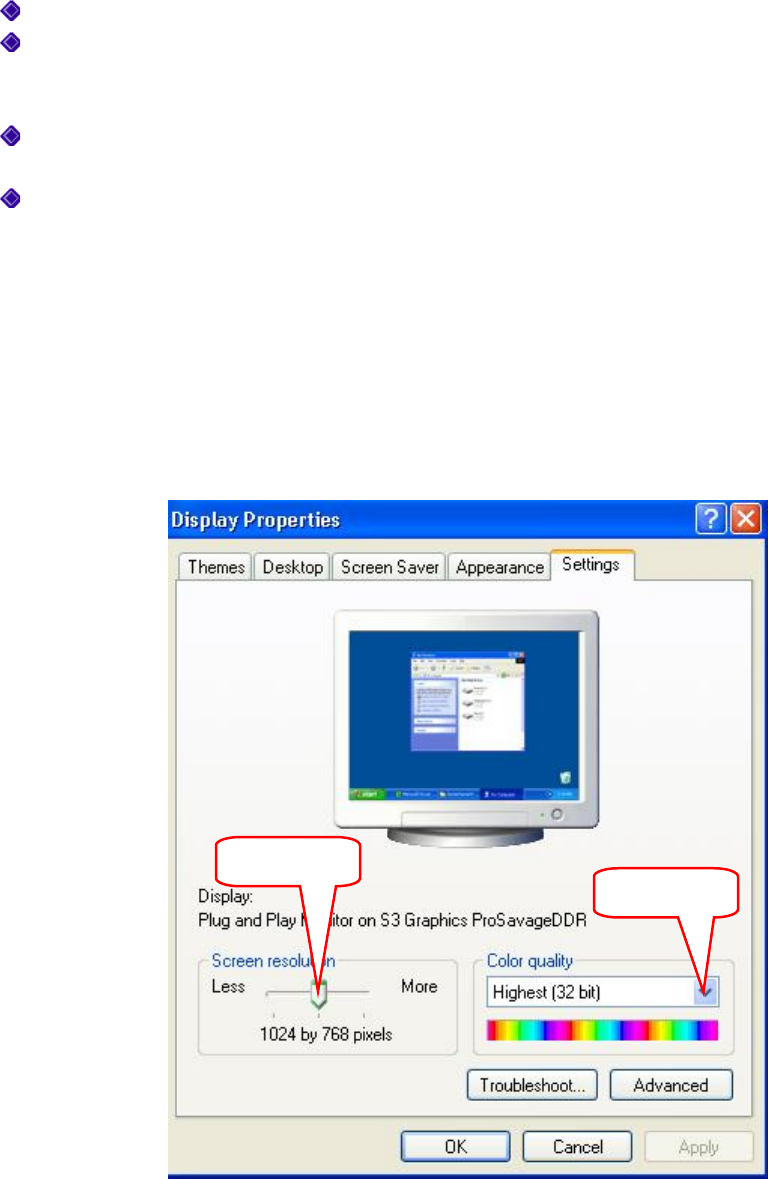
Monitor solution: 1024 x 768 pixel; Color quality: highest (32bit).
Drag to edit
Select
- 6 -
II. Installation
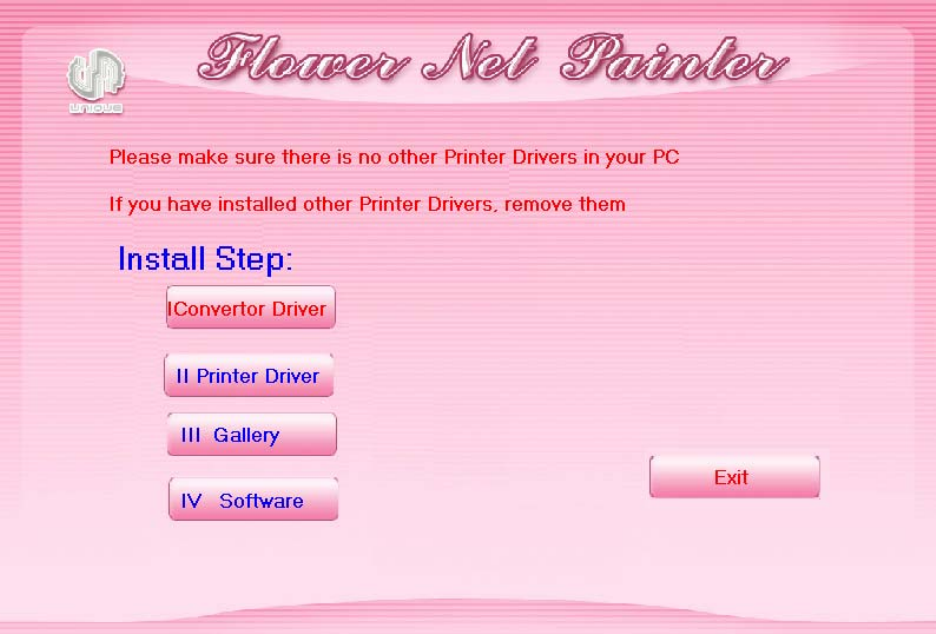
2.1 Open the CD to start the installation interface
Put the Talking Flowers software CD into CD-ROM, the system will appear the following
interface automatically. If not appear the following interface, please preview the CD, then
double click “Autorun.exe”.
2.3 Install printer driver
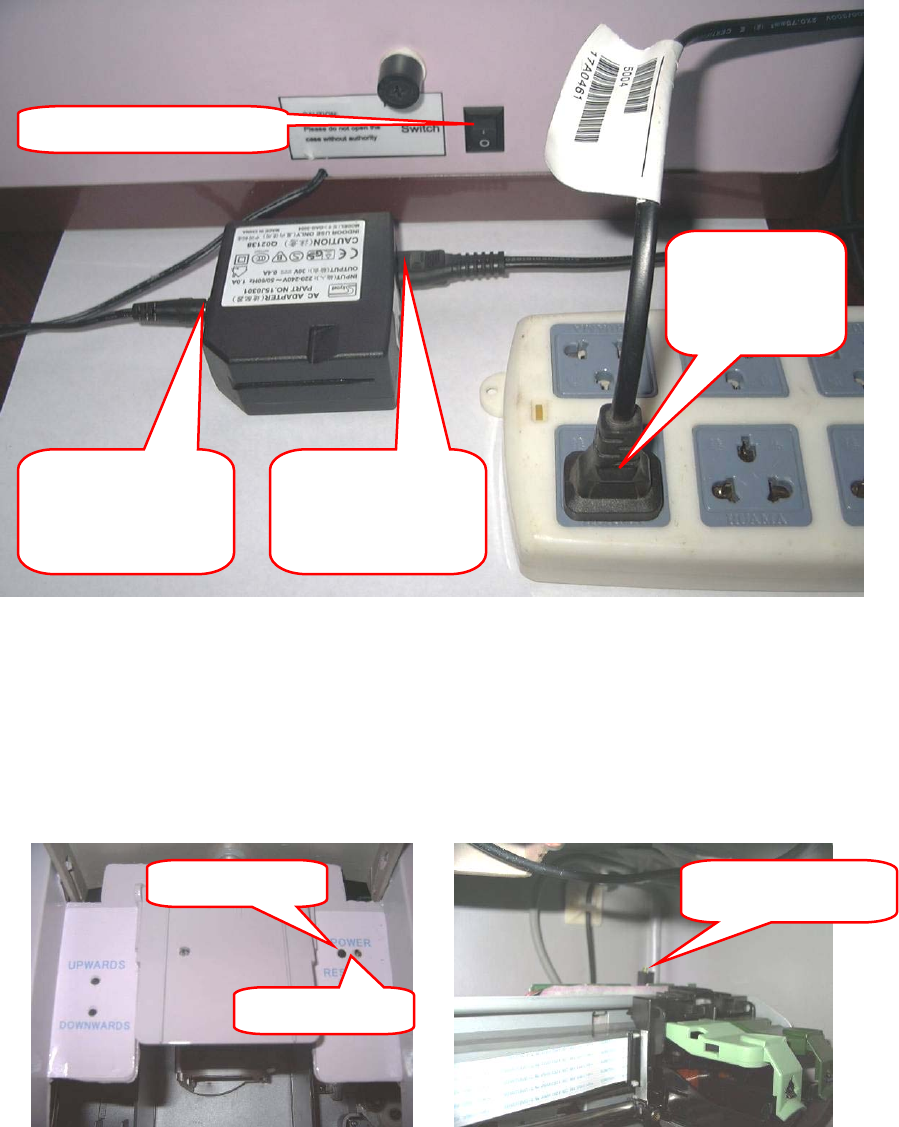
A. Connect power
1) Please connect the machine power line (black) to the power supply.
2) Please connect the attached power line to the supply.
3) Please connect the power line to the socket.
4) Turn on the switch on the back of the machine.(The machine may has some sound at this time,
this is normal)
- 7 -
5) The “power light” on the machine will be bright; the “printing status light” inside the machine
will be bright also.
ATTENTION:
1. If the “printing status light” is not on, please press “printing switch” about 2 seconds,
then release.
2. Press “printing status light” longtime is forbidden, otherwise, the printing system will be
problem.
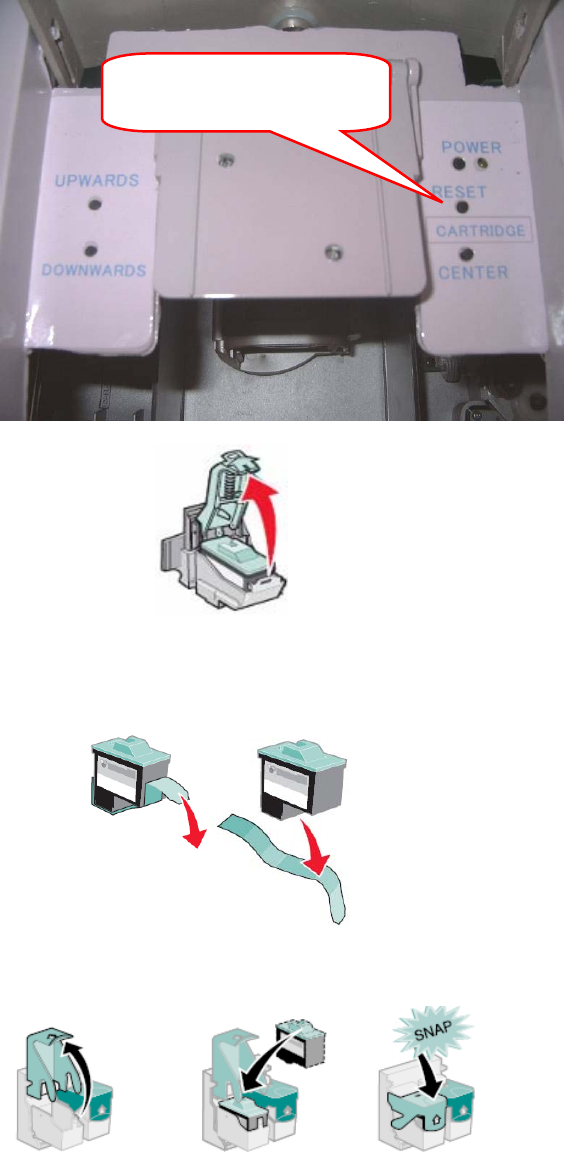
B. Install ink cartridge
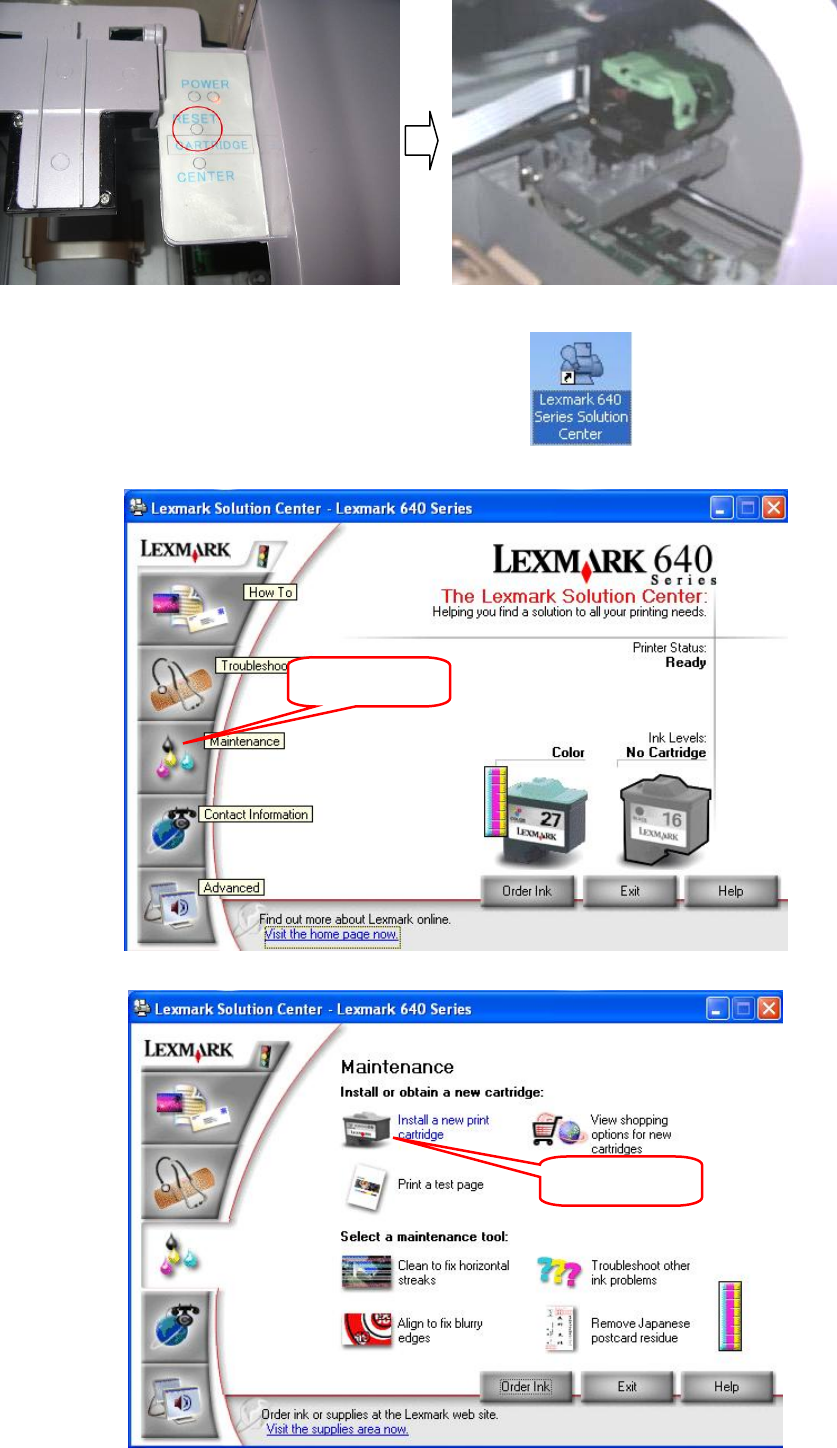
1) Press the “center” button on the machine, the cartridge plate will move to center.
1. Connect the
machine power line
to the power supply.
2. Connect the
attached power line
to the supply
3. Connect the
power line to
the socket
4. Turn on the switch
Printing status light
Power light on
Printing Switch
- 8 -
2) Open the left lid.
3) If you install the new ink cartridge, please remove the sticker first as follows:
ATTENTION: Please don’t touch the golden area on the ink cartridge.
4) Please put the ink cartridge into cartridge plate, and close the lid.
5) Press “Reset” button, the cartridge plate will go to the original place.
Press this button, cartridge
p
late will move to cente
r

- 9 -
C. Connect printer USB line
1) Connect printer USB line (white, with “printer” label) to the computer USB port.
2) Click “Cancel”, close the “Found new hardware” windows.
Press this button; the
cartridge plate will go to the
o
ri
g
inal
p
la
ce
Left Click
Insert to computer USB port
- 10 -
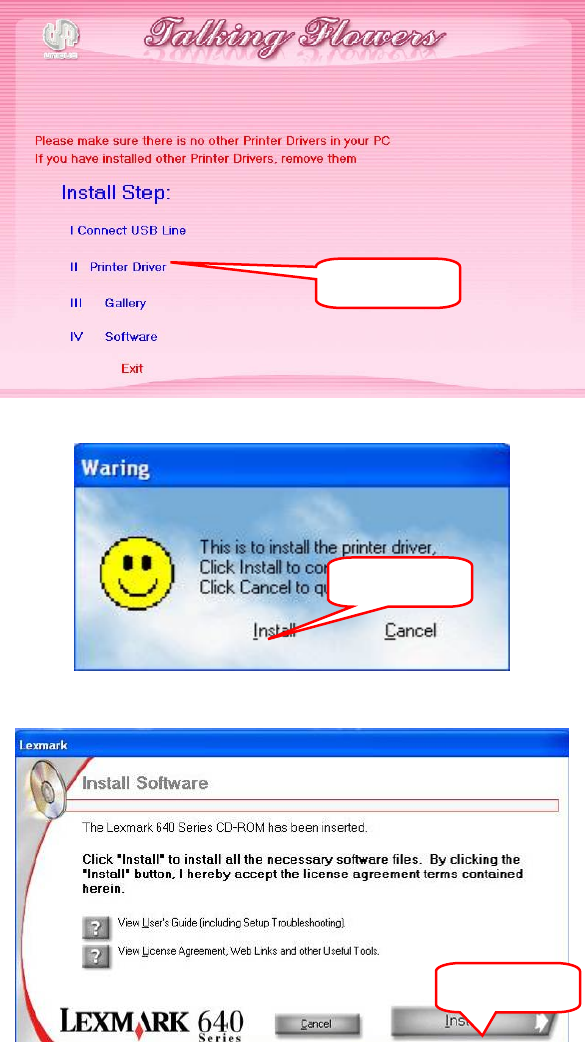
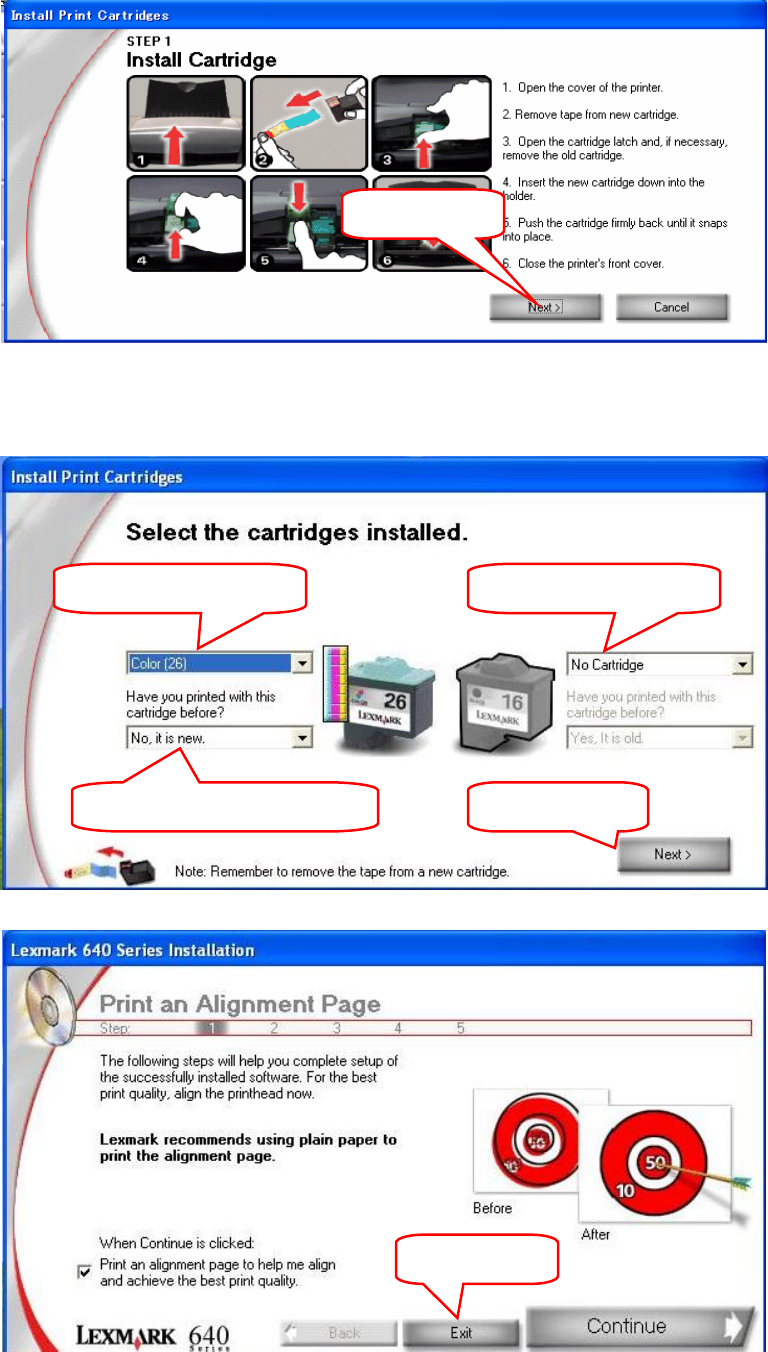
D. Install printer driver
1) Click “Printer driver” on the installation interface.
2) Click “install”
3) Click “Install”
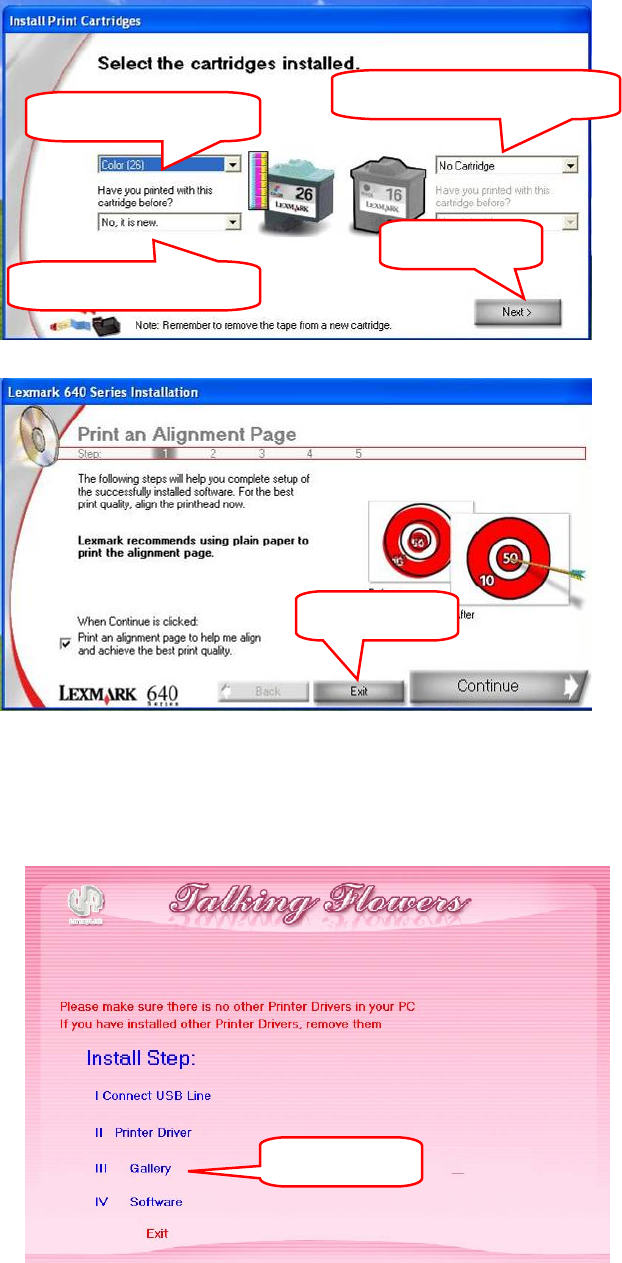
4) Set the left ink cartridge as: “Color [26]”, “No, it is new”; set the right ink cartridge as: “No ink
cartridge”. Then click “Next”.
Left Click
Left Click
Left Click
- 11 -
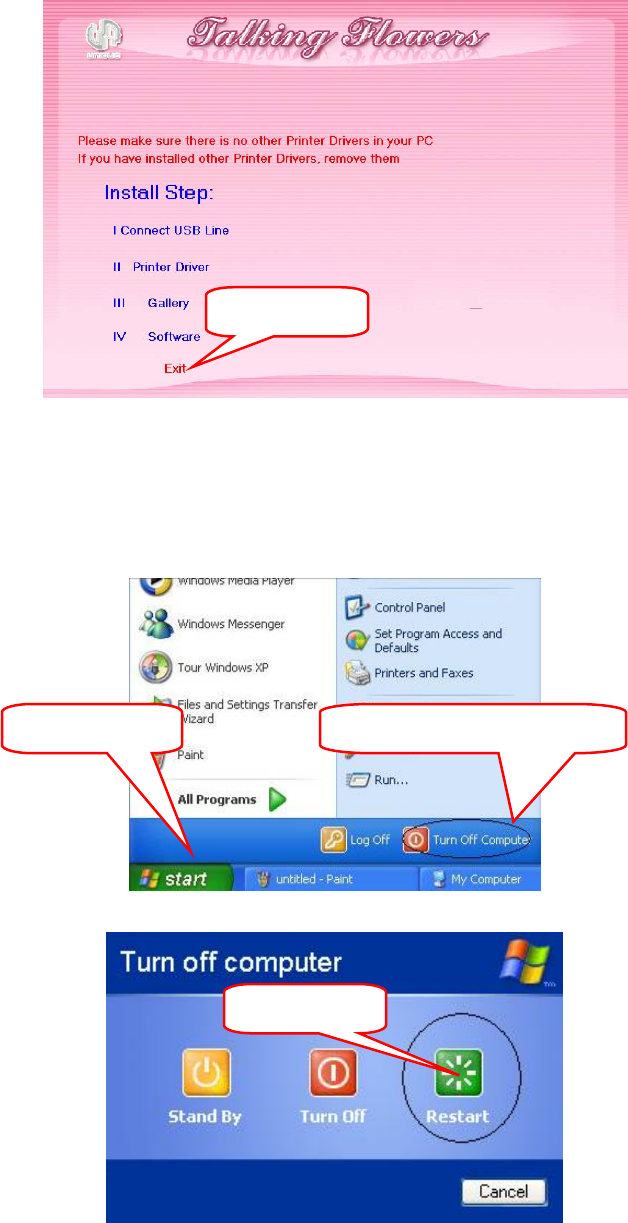
5) Click “Exit”
2.4 Install Talking Flowers gallery
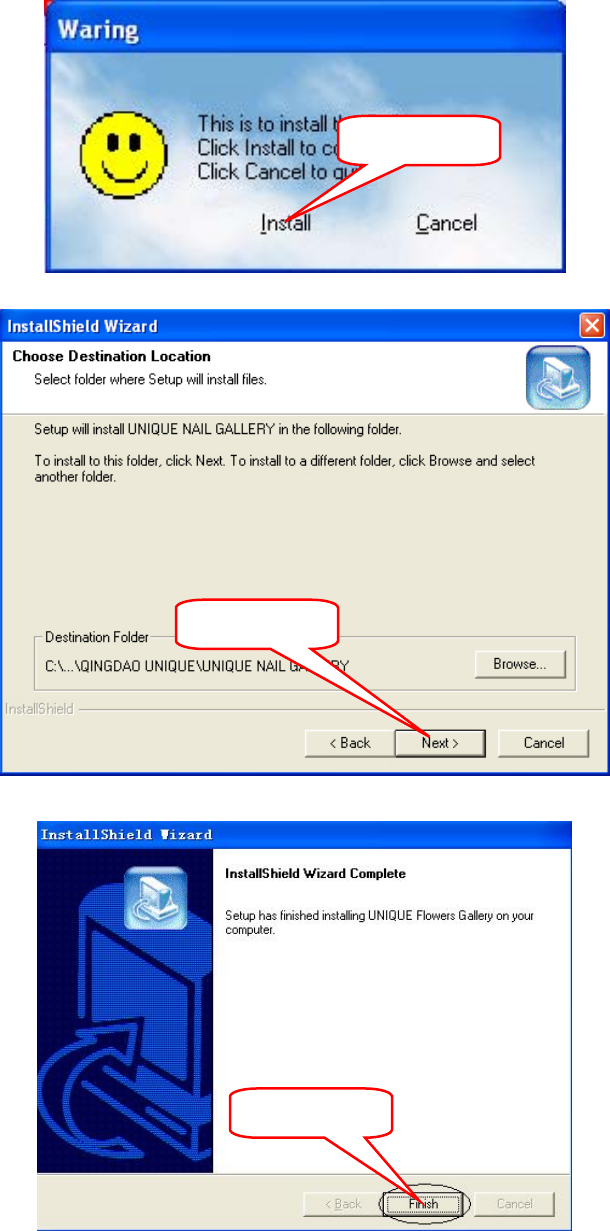
1) Click “Gallery”
2) Click “Install”
Left Click
1. Set as “Color [26]”
2. Set as “No, it is new”
3. Set as “No ink cartridge”
4. Left Click
Left Click
- 12 -
3) Click “Next”
4) Click “Finish”
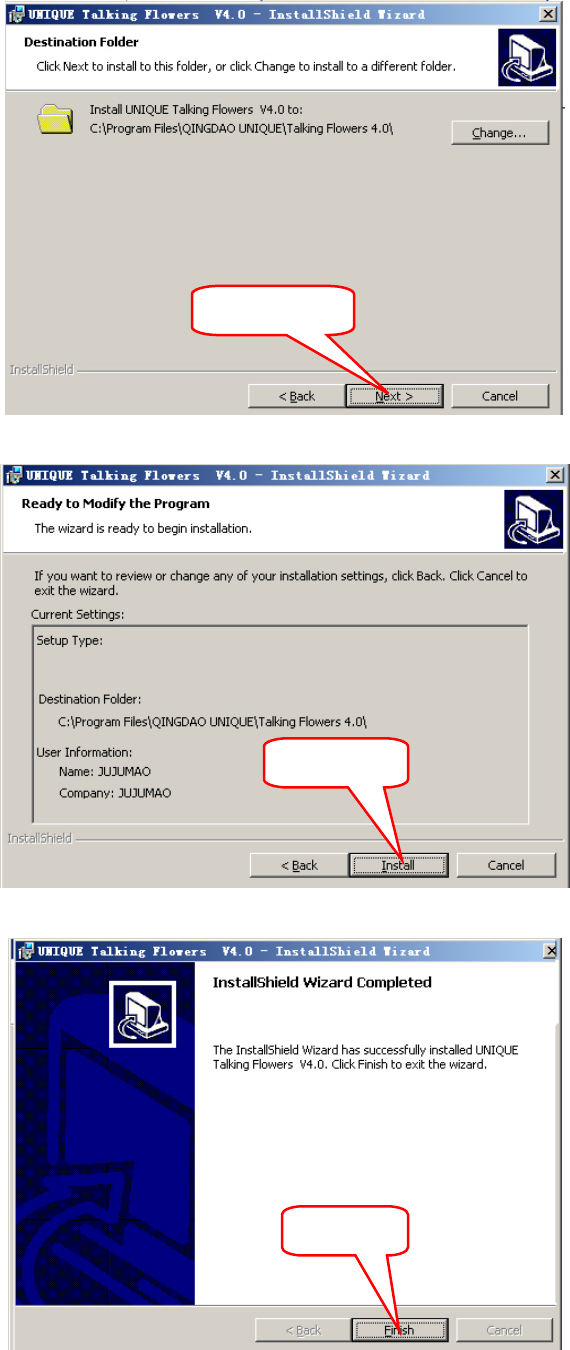
2.5 Install Talking Flowers software
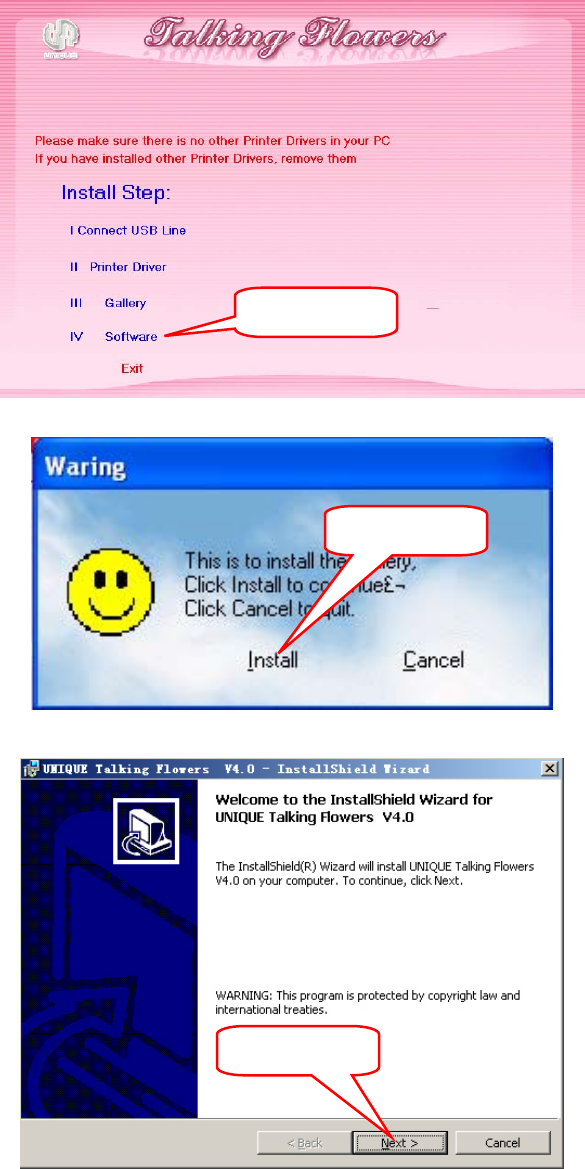
1) Click “Software”
Left Click
Left Click
Left Click
- 13 -
2) Click “Install”
3) Click “Next”
4) Click “Next”
Left Click
Left Click
Left Click
- 14 -
5) Click “Install”
6) Click “Finish”
Left Click
Left Click
Left Click
- 15 -
2.6 Close installation interface
1) Click “Exit”
2) Take out the CD.
2.7 Restart computer
1) Click “Turn off computer ” in start menu
2) Click “Restart”
3) Computer restarted
Left Click
Left Click
1. Click “Start” 2. Click “Turn off computer”
- 16 -
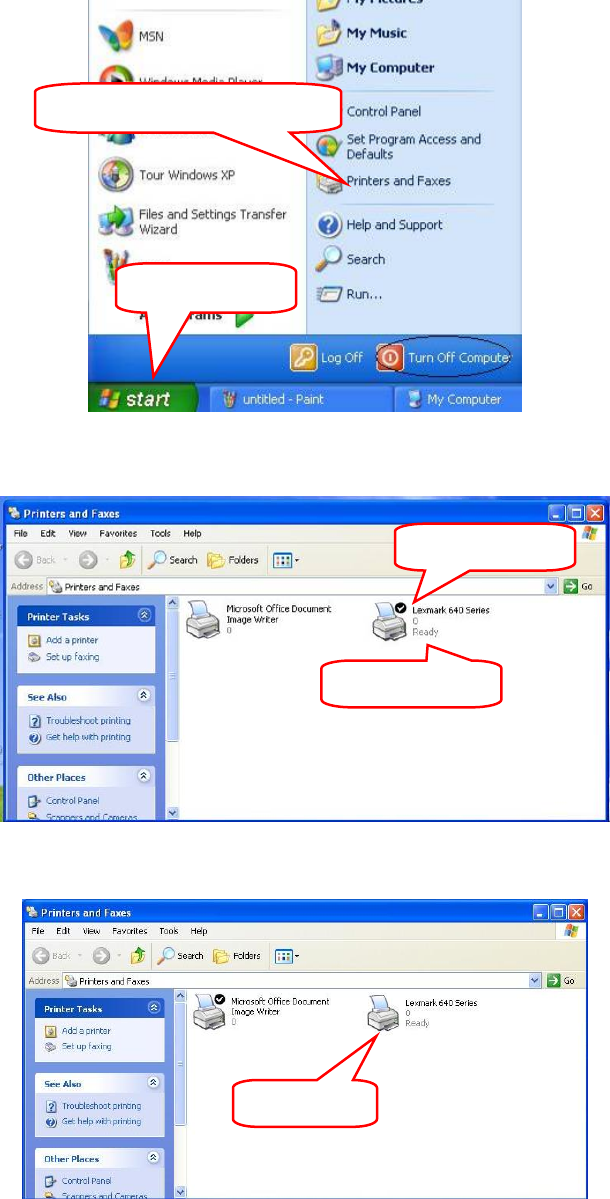
2.8 Printer setting
1) Click “Start”, open “Printers and Faxes”
2) Set default printer
a) If the “Lexmark 640 Series” is ready and already the default printer, please go next step
b) If you have many printers in your computer and the default printer is not “Lexmark 640 Series”,
please set it as default printer.
1. Click “Start”
2. Click “Printers and Faxes”
Status: Read
y
Right Click
Default printe
r
- 17 -
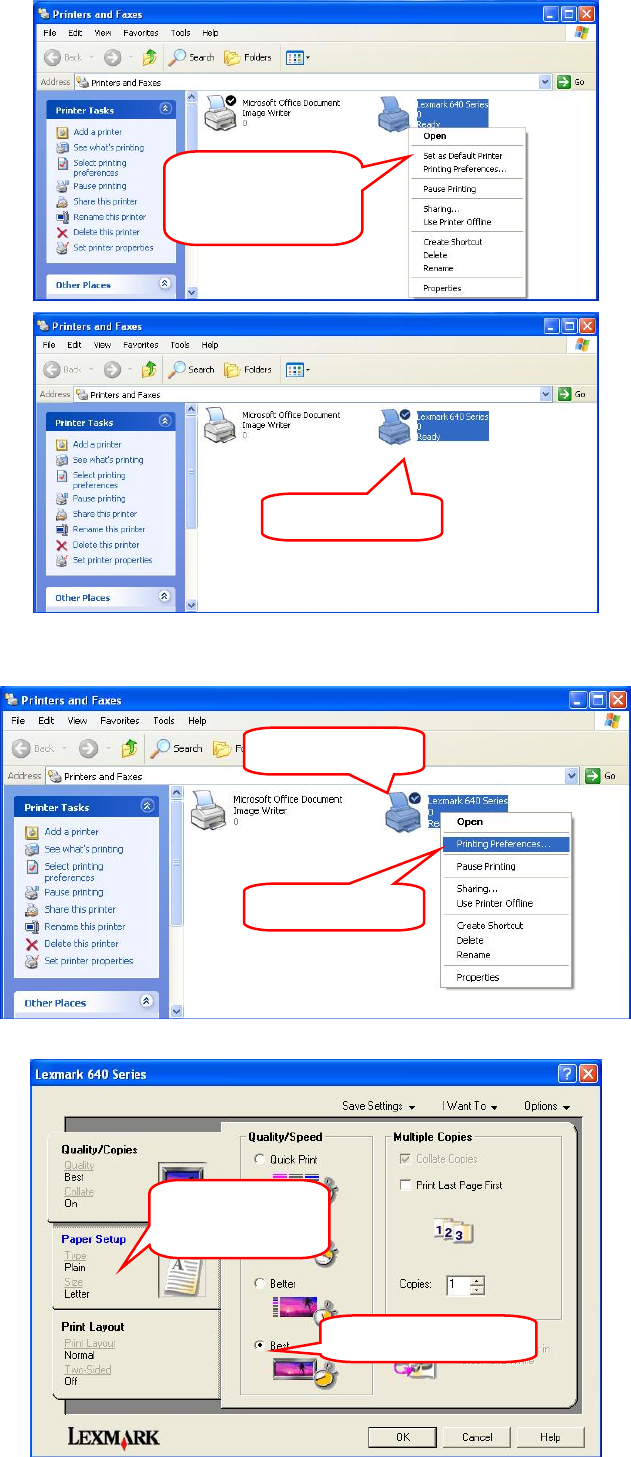
3) Set printing preference
a) Right click printer icon, choose “Printing Preference’
b) Set “Quality/Speed” as “Best”
Left Click “Set as
default printer”
Default Printe
r
1. Right Click
2. Left Click
1. Choose “Best”
2. Left Click
“Pa
p
er Setu
p
’
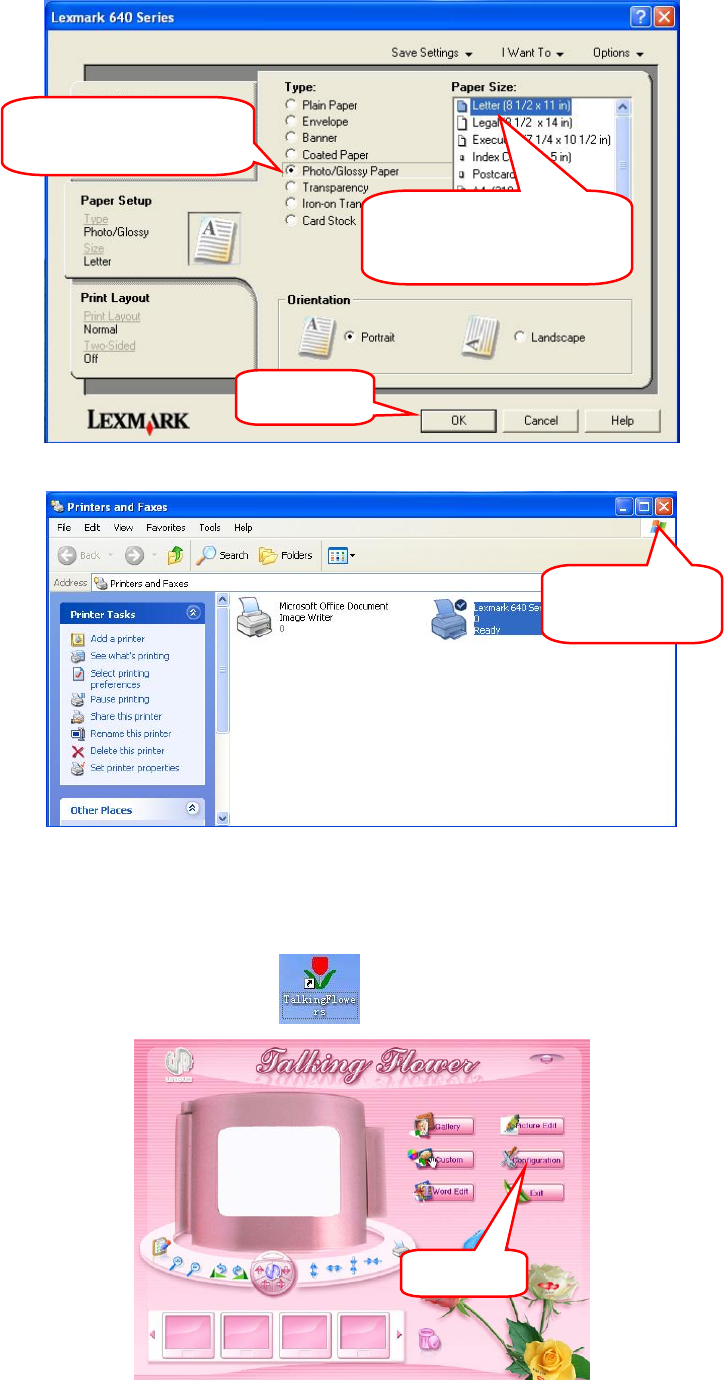
- 18 -
c) Set “Paper Setup” as “Photo Glossy Paper”, set “Paper Size” as “Letter (8 1/2×11in)”,end click
“OK” to close the window to save the change
4) Close printer window.
2.9 Set Talking Flowers Program
1) Double click Talking Flowers icon on desktop.
Left Click
1. Left Click to choose
“Photo
/
Gloss
y
Pa
p
e
r
”
2. Left click to choose
“Letter (8 1/2×11in)”
Left Click to
Close
3.Left click
- 19 -
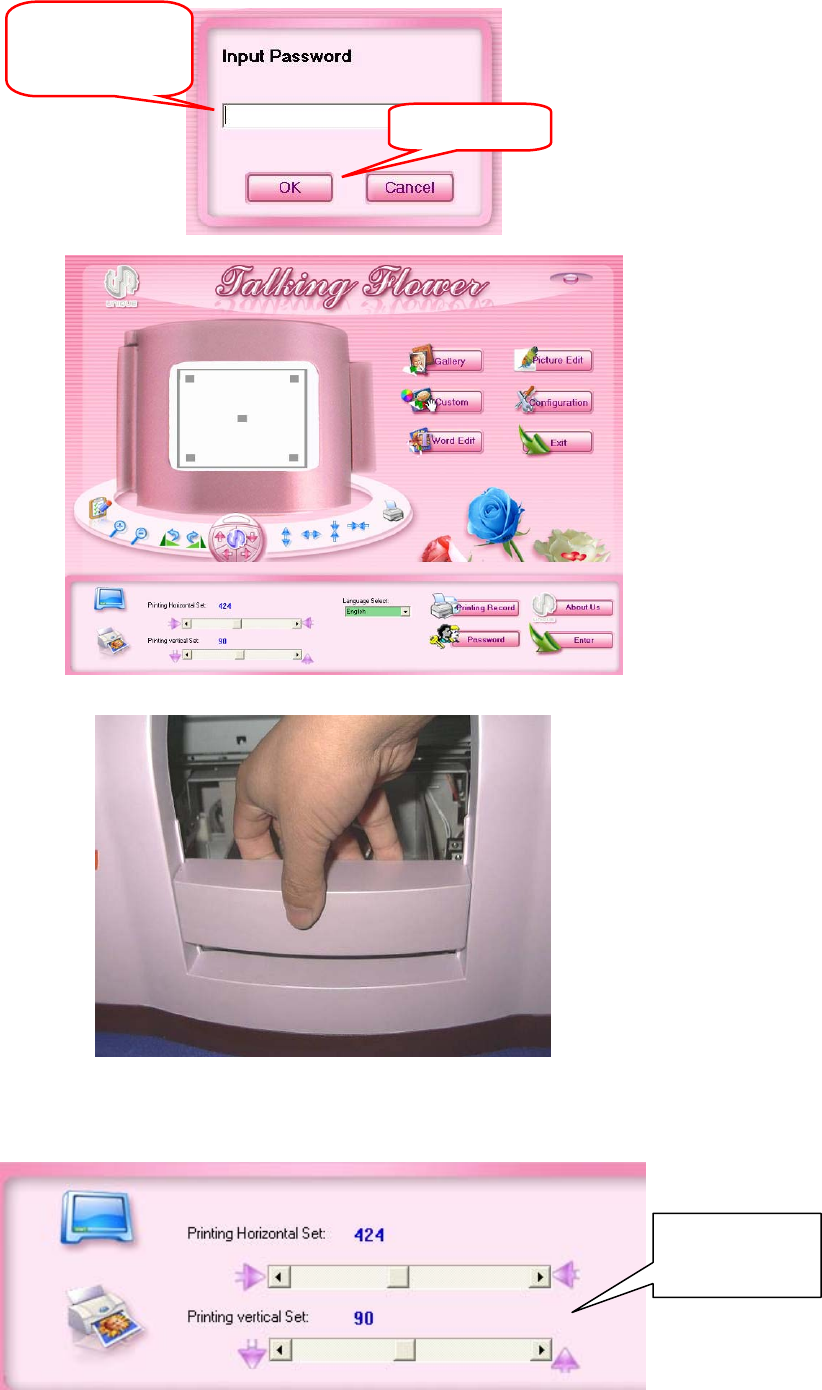
2) Click “Configuration”, input password (default password: 123), then clock “OK”. You can check
printing record ,change password ,and contract us.
3) Take off the wide board. Record the parameter on the back of wide board
4) Set “Printer Horizontal Set” and “Printer Vertical Set” according to the “Printer X” and “Printer Y”
on the wide board. (“Printer Horizontal Set” same to the “Printer X”, “Printer Vertical Set” same to
the “Printer Y”
1. Input default
password
2. Left Click
Drag to edit the
2 parameter
- 20 -
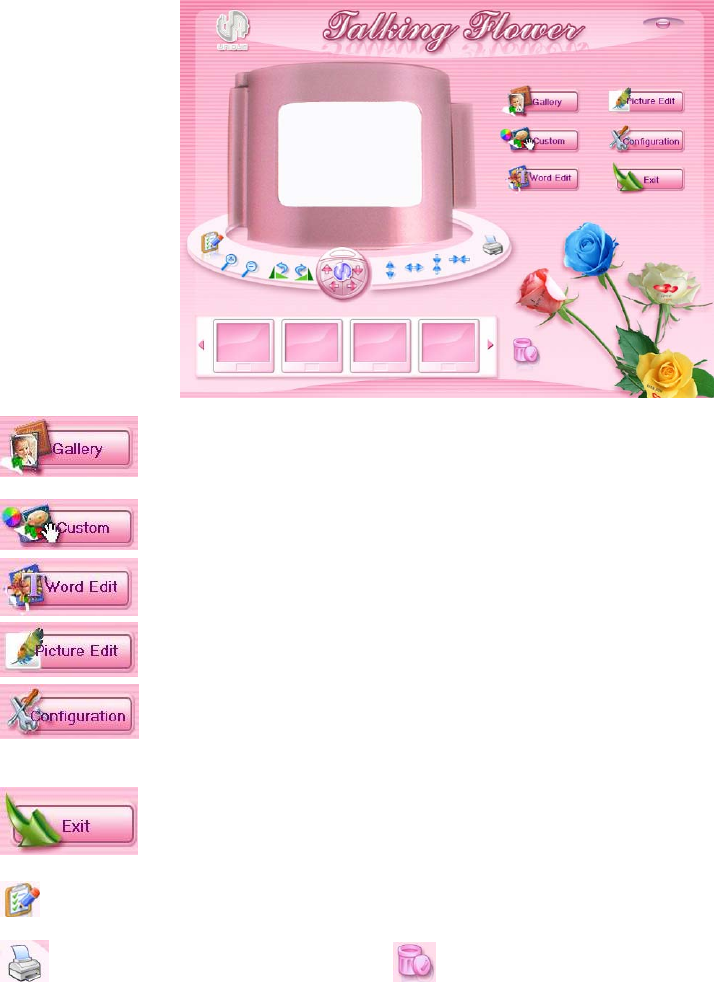
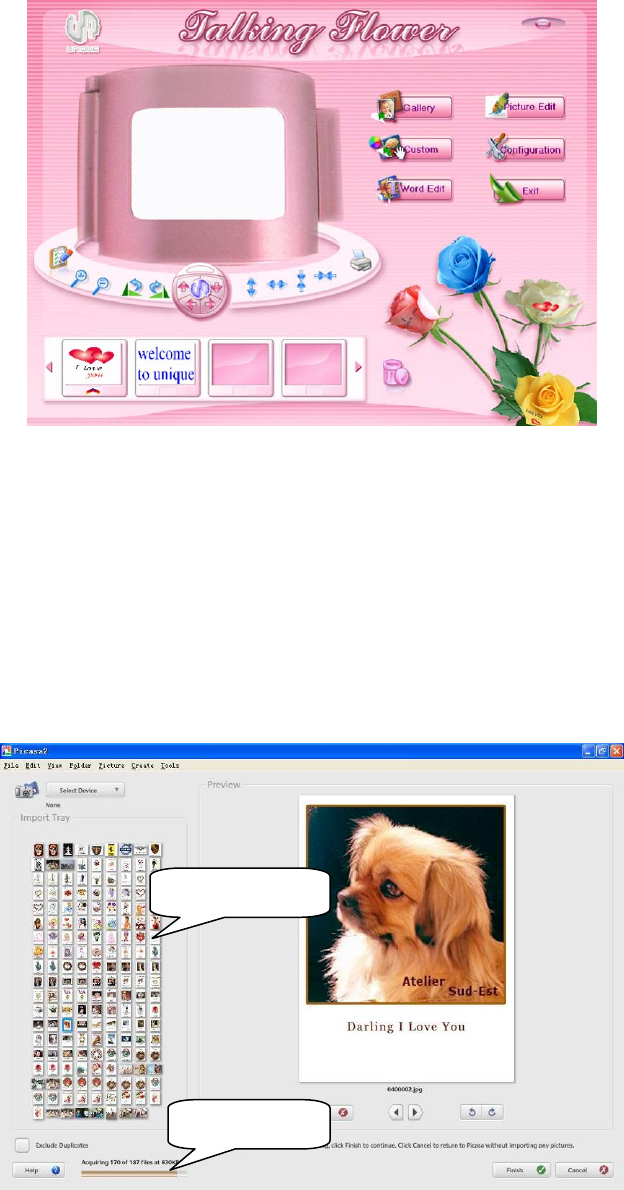
III. Usage
: Default images bank
: Custom images, personalized images (BMP, JPG format only)
: Word edit
: Picture edit
: Set the parameters of camera and printer, language change, password change, check
printing record
: Exit program
: Original
: Print : Delete
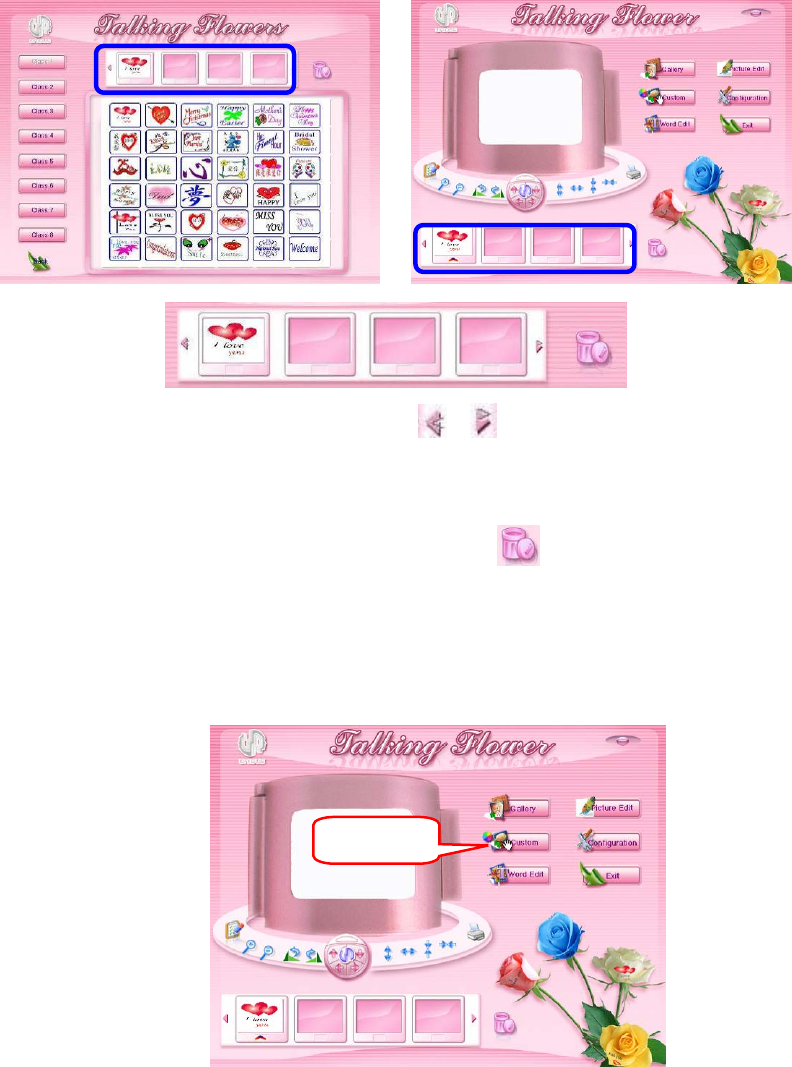
3.1 Choose images from default gallery
1) Click “Gallery”
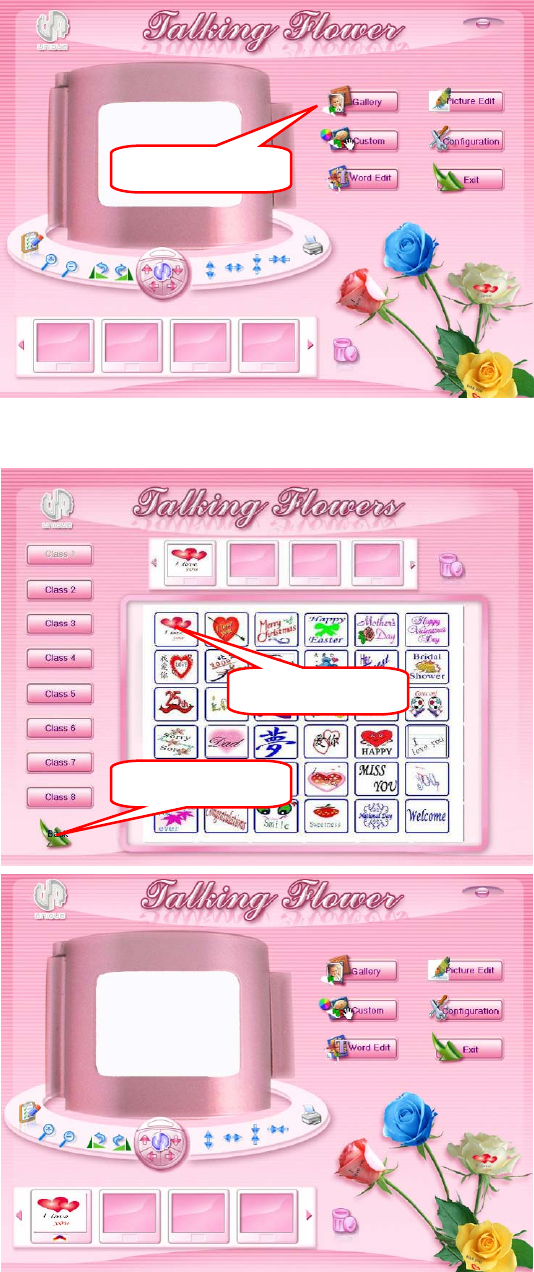
- 21 -
2) Click left buttons to choose the classes, and then choose your favorite images from right, you can
choose more than one images at one time. Click “Back” to exit the window when finish choosing.
3.2 Adjusting images and printing
1) Click chosen image, you will see from the video, see below picture.
Left Click
1. Left Click
2. Left Click
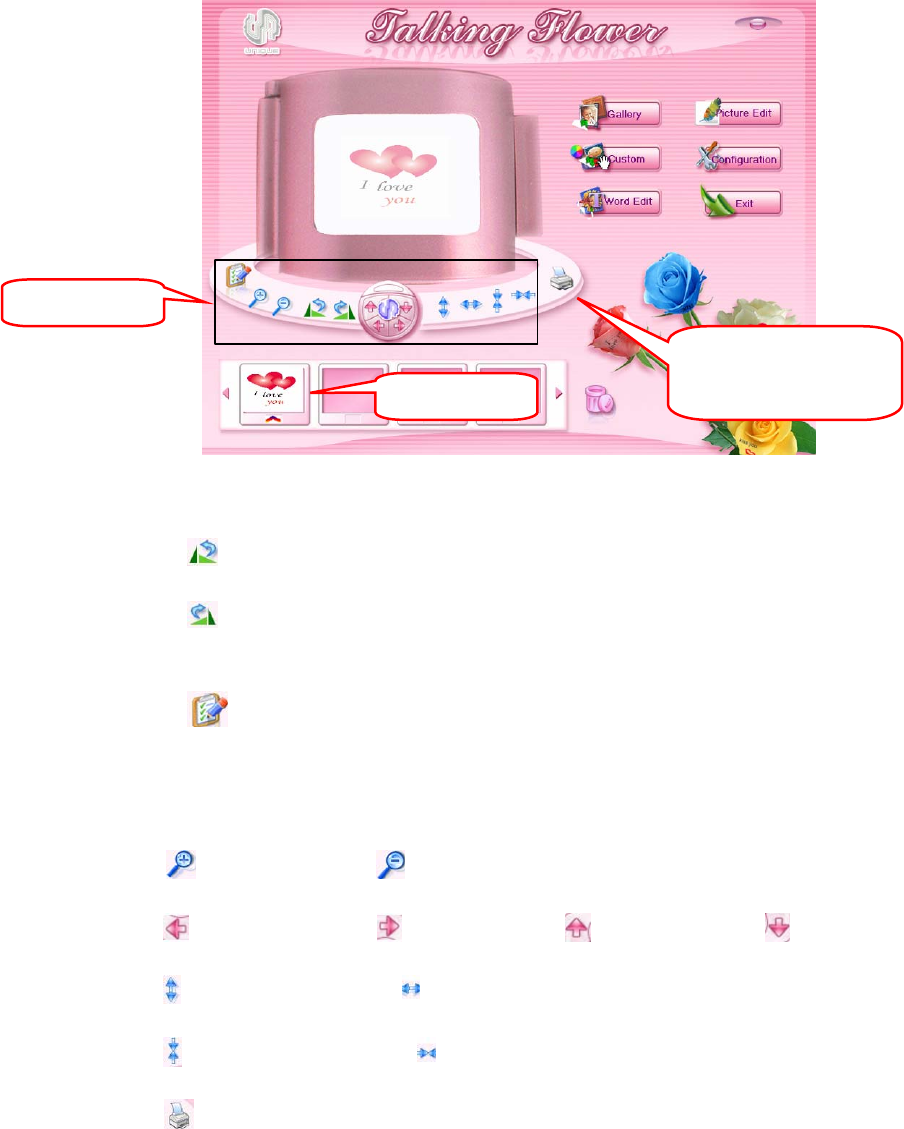
- 22 -
2) Adjust images
a) Adjust angle of images
i. : 90°anticlockwise
ii. : 90° deasil
b) Adjust the size and position of the images
i. : Set the image to original size and position
ii. Adjust size and position of images by mouse
Drag left top of the image to adjust the size, drag right bottom of image to adjust position
iii. Adjust images by buttons.
: Enlarge : Reduce
: Turn left : Turn right : turn up : Turn down
: Increase the height : Increase the width
: Reduce the height : Reduce the width
3) Click “ ” to start printing when finish adjusting
1. Left Click
2. Adjust
3. Print after finishing
adjusting
- 23 -
3.3 Preview or delete selected images
1) If the selected images more than 4, please click” ” “ ” to preview
2) Delete selected images
a) Right click the images you want to delete
b) Left click the images you want to delete, then click “ ”
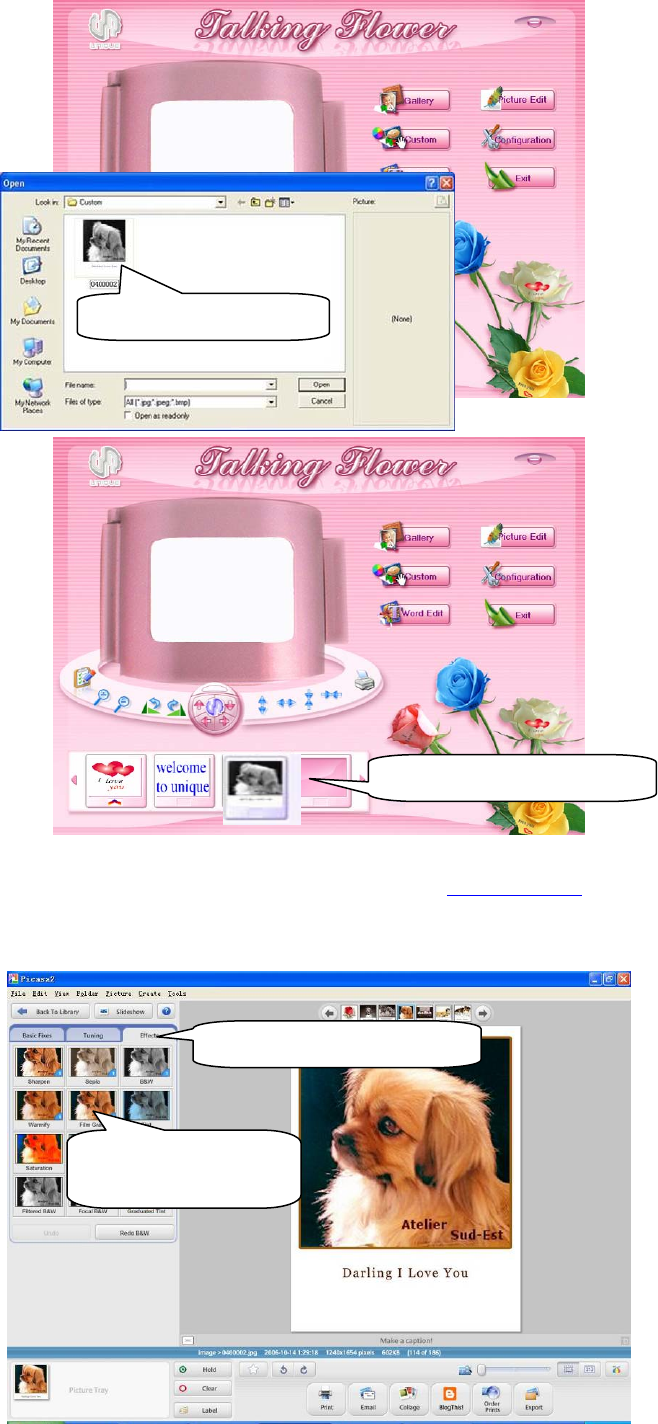
3.4 Custom images
1) Click “Custom”
Left Click
- 24 -
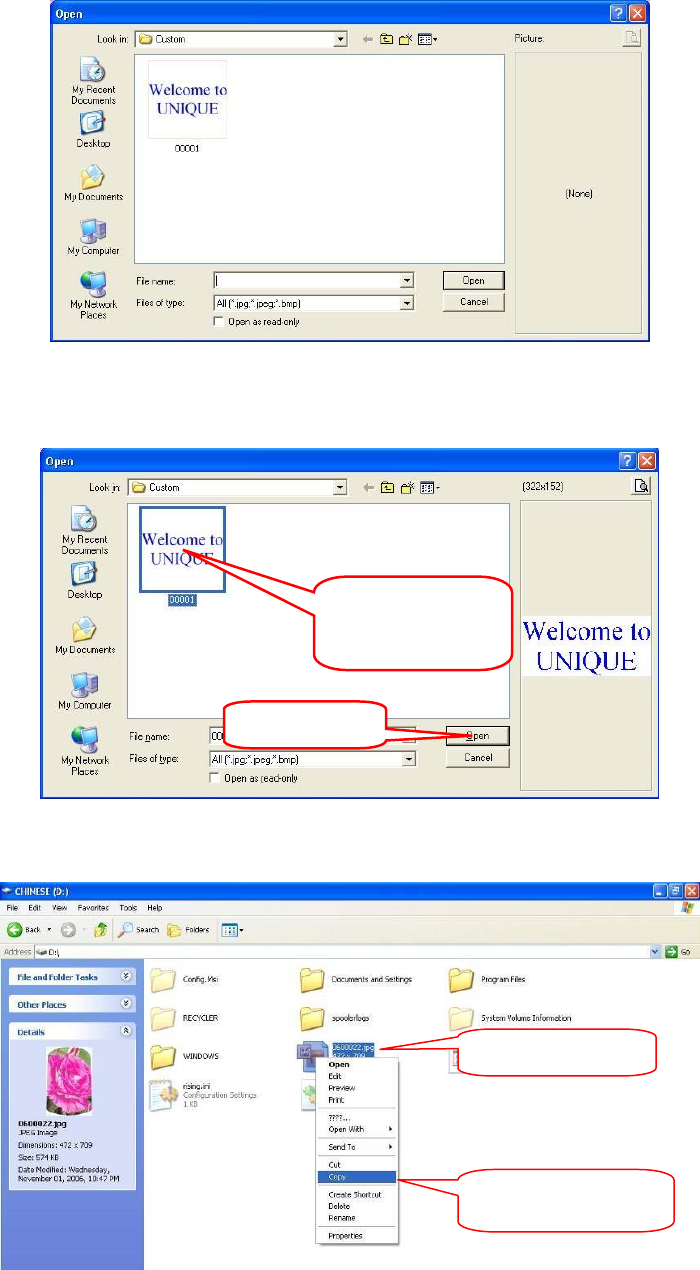
2) Custom images
a) Open images in the “Custom” folder
Select images, and then click “Open”
b) Put other images into custom gallery:
1) Select images that you like in you computer
2) Right click blank area of the dialogue, choose “Paste”, then the custom images will be saved,
click “Cancel” to exit the dialogue.
2. Left Click
1. Left click to
select the image
1. Right click
2. Left click “Copy”
- 25 -
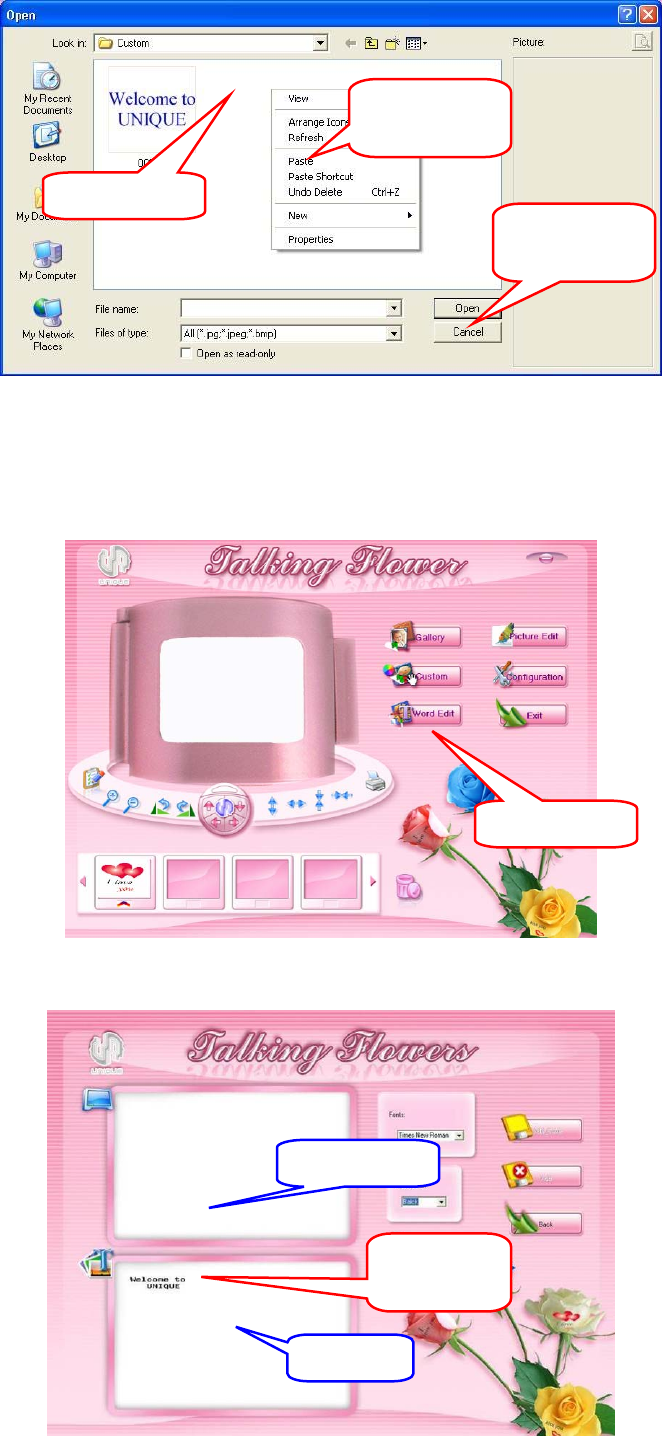
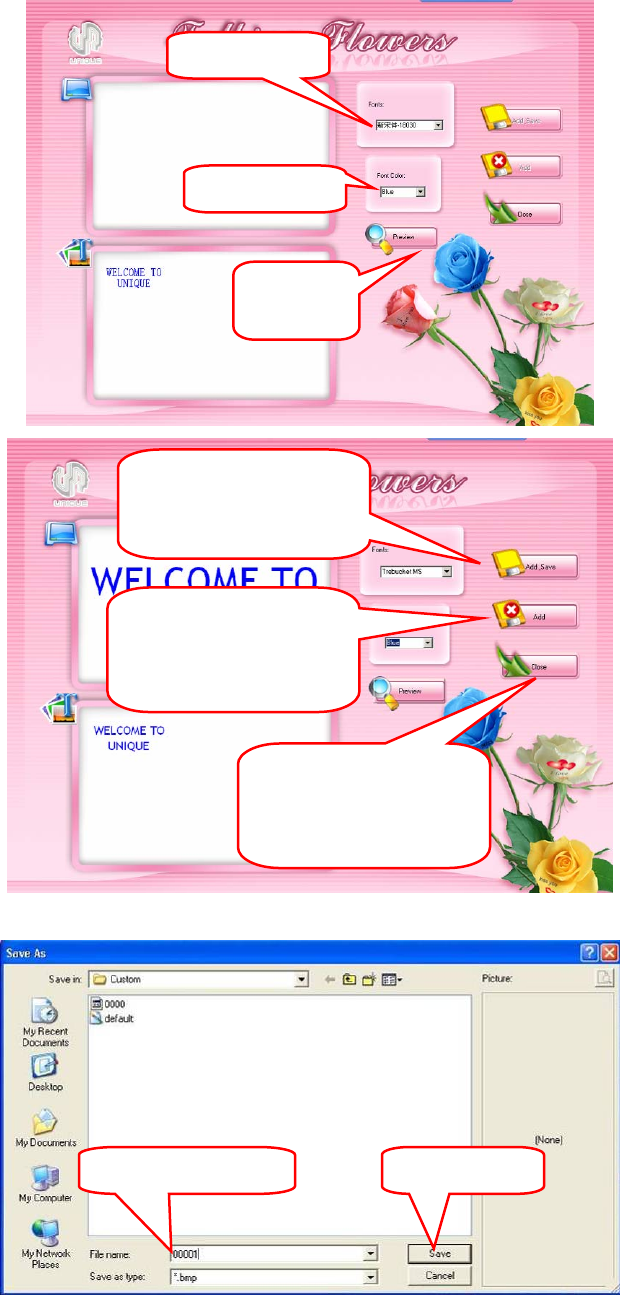
3.5 Word Edit
1) Click “Word Edit”
2) The top blank area for previewing, bottom blank area for editing, input your personalized words
from here.
Input and
edit words
Left Click
Preview are
a
Edit area
2. Left Click
“Paste”
1. Right Click
3. Left Click
to close
- 26 -
3) Edit the font and color, and then click” Preview” to preview.:
4) Click “Add and Save”, input file name, then click “Save”.
Font Select
Color Select
Click to
p
review
Add and Save pictures,
back to main operation
in
te
rf
ace
Add but not save
pictures, back to main
operation interface
No add, no save
pictures, back to main
operation interface
1. Input File Name 2. Left Click
- 27 -
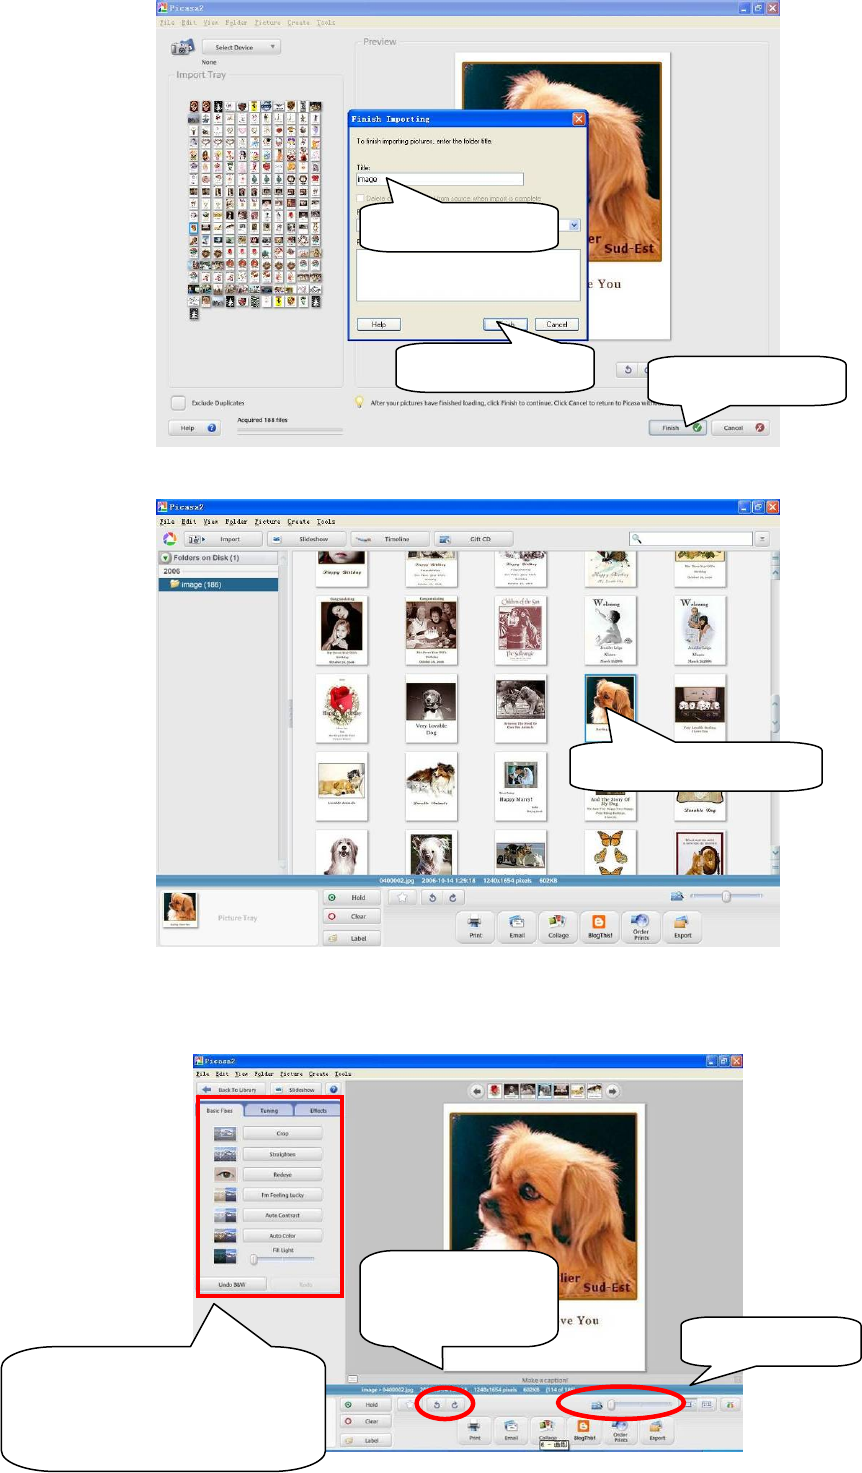
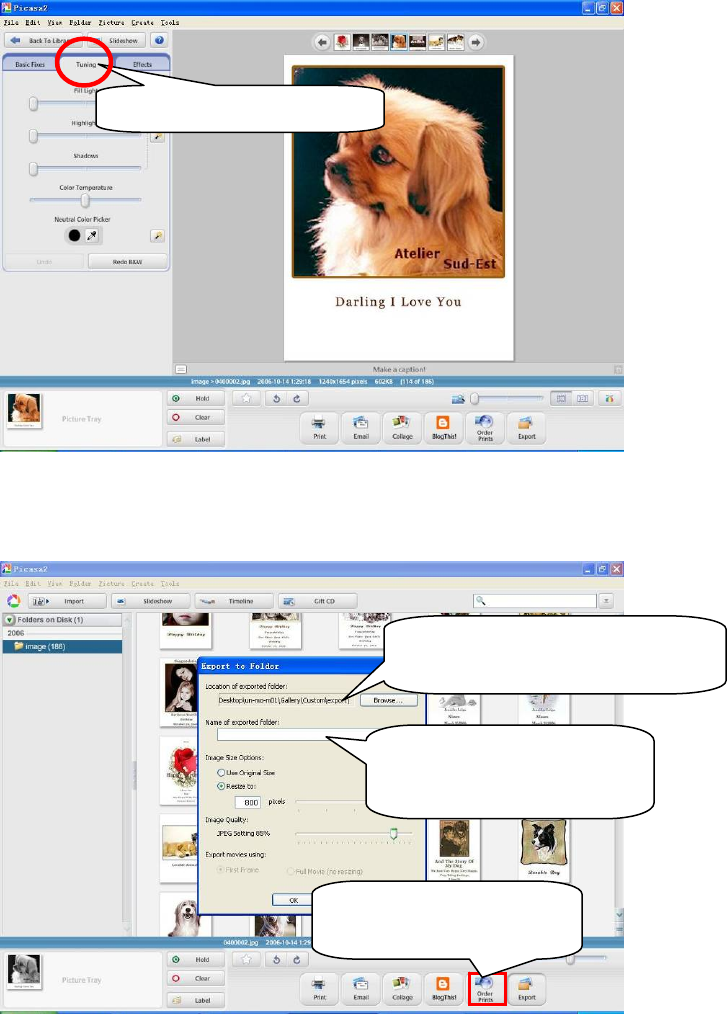
3.6 Picture Edit
Note:1. We provide a smart and small software for you to edit pictures in the gallery. In this function you can
perfect your picture such as Crop, Straighten, reduce redeye, auto contrast, auto color, and append some
especially good effect and so on.
z Description in brief
1) Click “Picture Edit” to start picasa2, a smart picture edit software. The first time picasa2 start it will scan
images in the custom.
2) After scanning, click “Finish” button and name a folder to save the images scanned.
Scan schedule
Images scanned
- 28 -
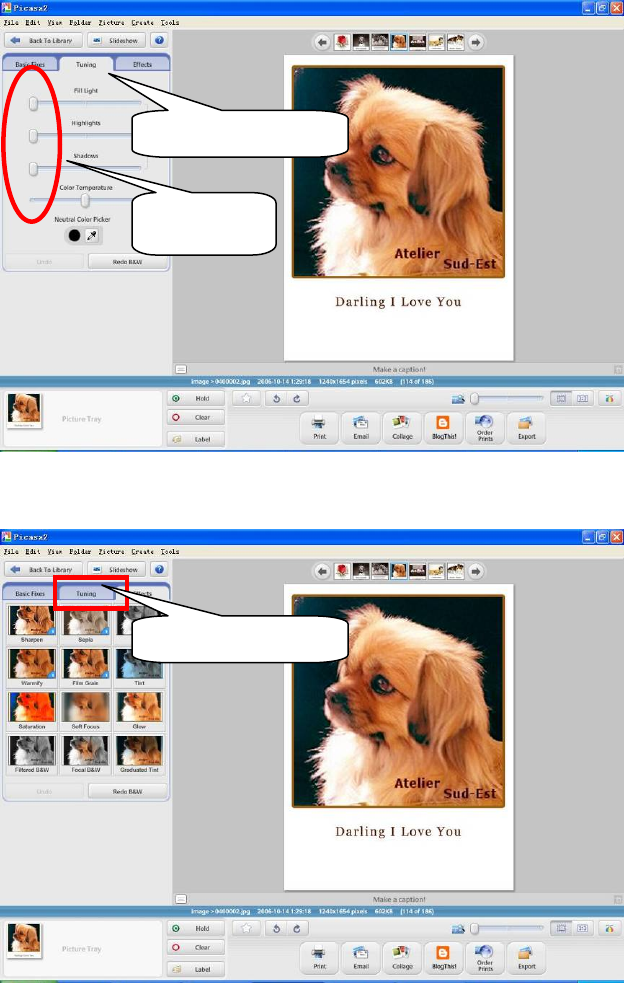
3) Double click the image you want to edit
4) Double click an image you want to edit and then the following interface will jump into your eyeshot. In
this interface you can crop, straighten, reduce redeye, auto contrast and color and fill light by the left
buttons. By the bottom button, turn clockwise or anticlockwise and zoom in or out can be actualized.
(1) Click “Finish”
(2) Name a folder
The group buttons of crop,
straighten, redeye, auto contrast
and color and fill light
Turn clockwise or
anticlockwise
Zoom in or out
(3) Click “Finish”
Double click the image
- 29 -
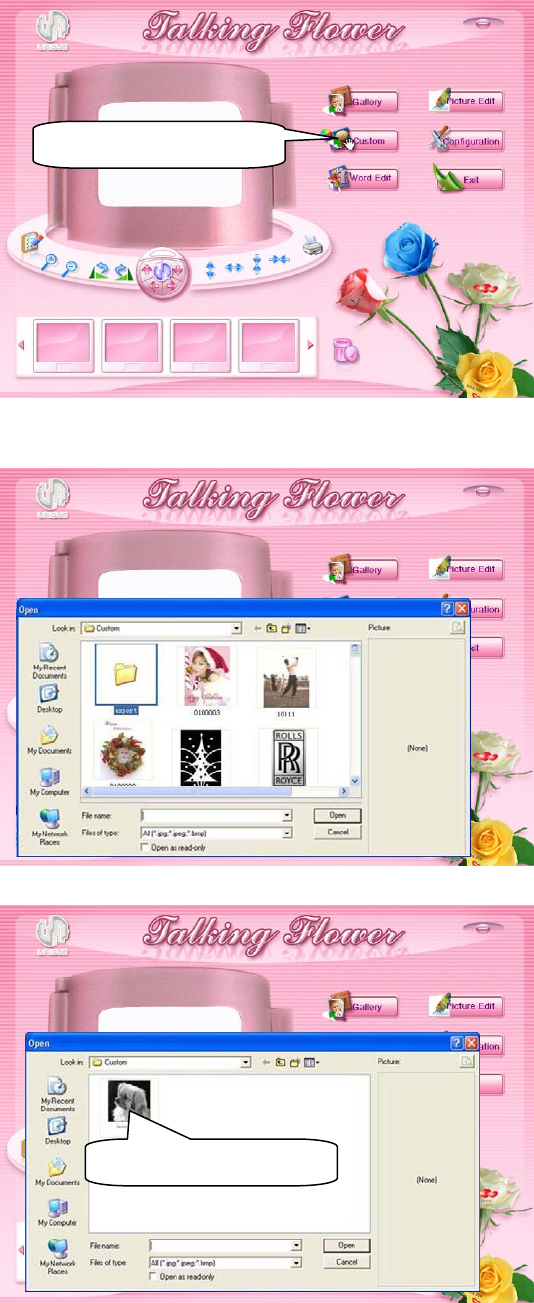
5) Click the second option card—Tuning and Fill Light, Highlights, Shadows, Color Temperature are able to
actualized by drag the scroll bars.
6) Click the third option card—Effects, Sharpen, Sepia, Warm, film grain and so on effects are able to
actualized by click corresponding images.
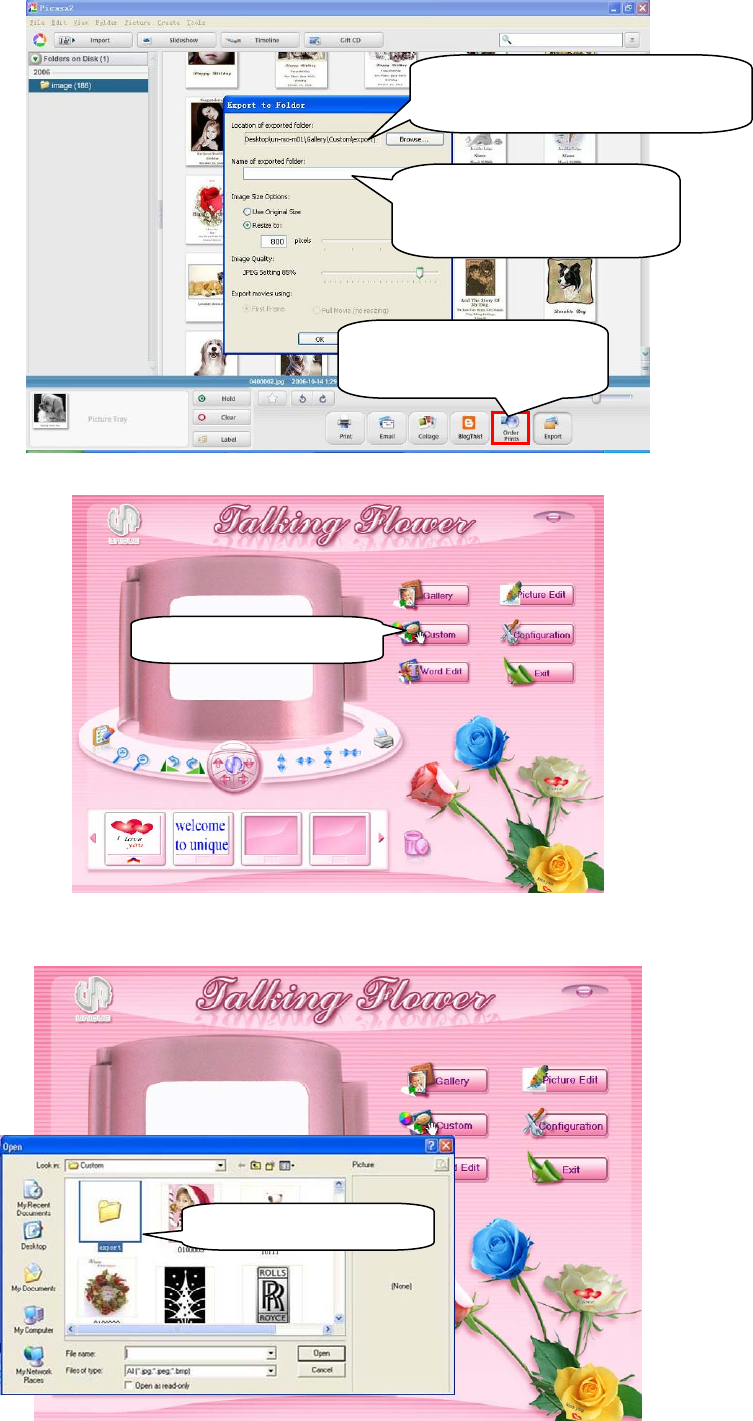
7) After perfect your images, “Export” button is able to be used as saving a copy of images that you have
just perfect. Choose the Custom directory in the software setup directory and then delete the name of
exported folder.
Tuning option card
Drag to edit
Effects option card
- 30 -
8) Then you can exit picasa2, back to software main interface. Click the custom button.
9) Find the export folder, which is be used as the output folder of the picture edit, and click it to open the
folder.
10) Click the image you just export.
Delete the name of exported
folder. Leave it vacant
“Export” button to saving
a co
py
of ima
g
es
Click the custom button
Click the custom button
Choose the Custom directory in
the software setu
p
director
y
- 31 -
11) The image would be on the preview area.
z Brighten own image
1) The first three steps of Brighten the own image is the same as the brief instruction 1 to 3.
2) Choose the effect card. Many experiments have been done, and the Film Grain is the best one, so we
commend the Film Grain effect.
Note: If the effect is not satisfying, you can also superpose multi-effect by choose more than one.
Click the custom image
The image just be adjusted
(1) Click the effect option
(2) Choose the “Film
Grain” card
- 32 -
3) You can also brighten the image by yourself. Drag right the “Fill Light” scroll bar to increase lightness of
the image.
4) After perfect your images, “Export” button is able to be used as saving a copy of images that you have
just perfect. Choose the Custom directory in the software setup directory and then delete the name of
exported folder.
5) Then you can exit picasa2, back to software main interface. Click the custom button.
(1) Click the tuning option
Delete the name of exported
folder. Leave it vacant
“Export” button to saving
a co
py
of ima
g
es
Choose the Custom directory in
the software setu
p
di
r
ector
y
- 33 -
6) Find the export folder, which is be used as the output folder of the picture edit, and click it to open the
folder.
7) Click the image you just export.
8) The image would be on the preview area.
Click the custom button
Click the custom button

- 34 -
Note: If there is Adobe Photoshop in you computer, and you are skilled in edit pictures by
Photoshop, you can also perfect your images using Photoshop in your computer.
Note: We provide smart and small software for you to edit pictures. In this function you can perfect
your picture such as Crop, Straighten, reduce redeye, auto contrast, auto color, append some
especially good effect and so on. If there is Adobe Photoshop, by which you can edit images
for more infectious, in your computer and you are skilled in edit pictures by Photoshop, you
can also perfect your images using Photoshop.
3.7 Printing
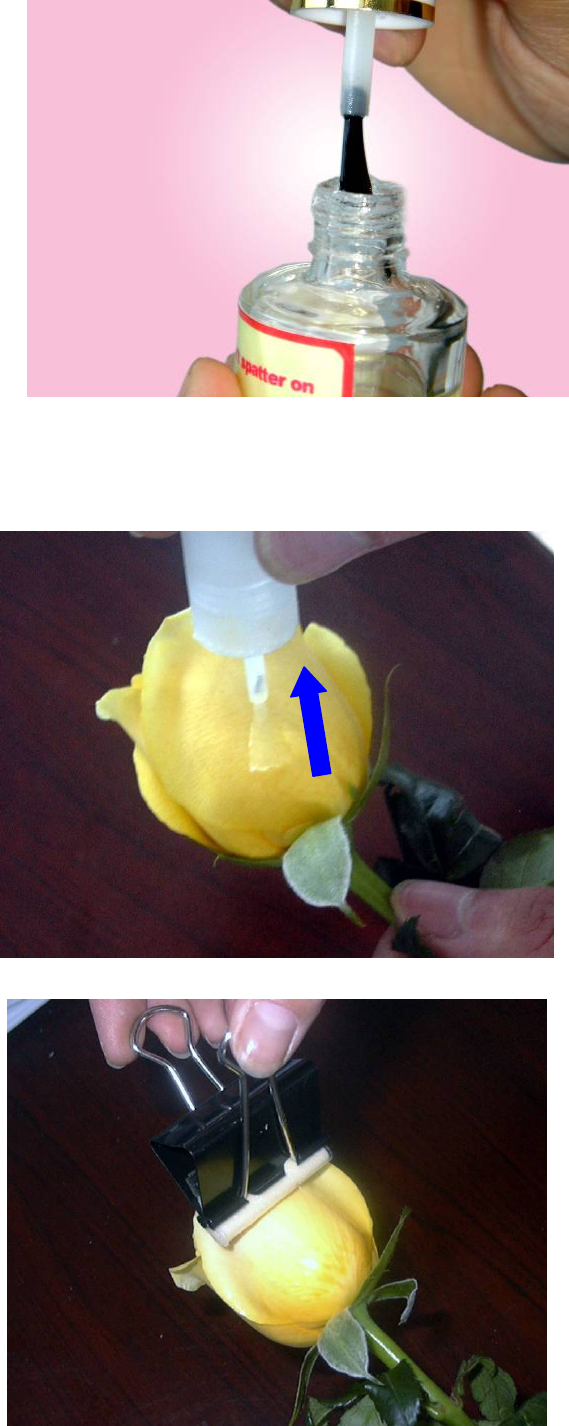
1) Dip the brush into the pre coat.
2) Please scrap the brush to avoid too much pre coat on it.
The image just be adjusted
- 35 -
3) Brush the pre coat on the petal equably
Attention:
Brush on the petal gently and along the same direction.
The quality of petal and equality of pre coat will influence the printing quality.
4) Please make the pre coat evenly, using the sponge we specially provided.
Attention: The flat of petal surface and equality of pre coat will influence the printing quality.
- 36 -
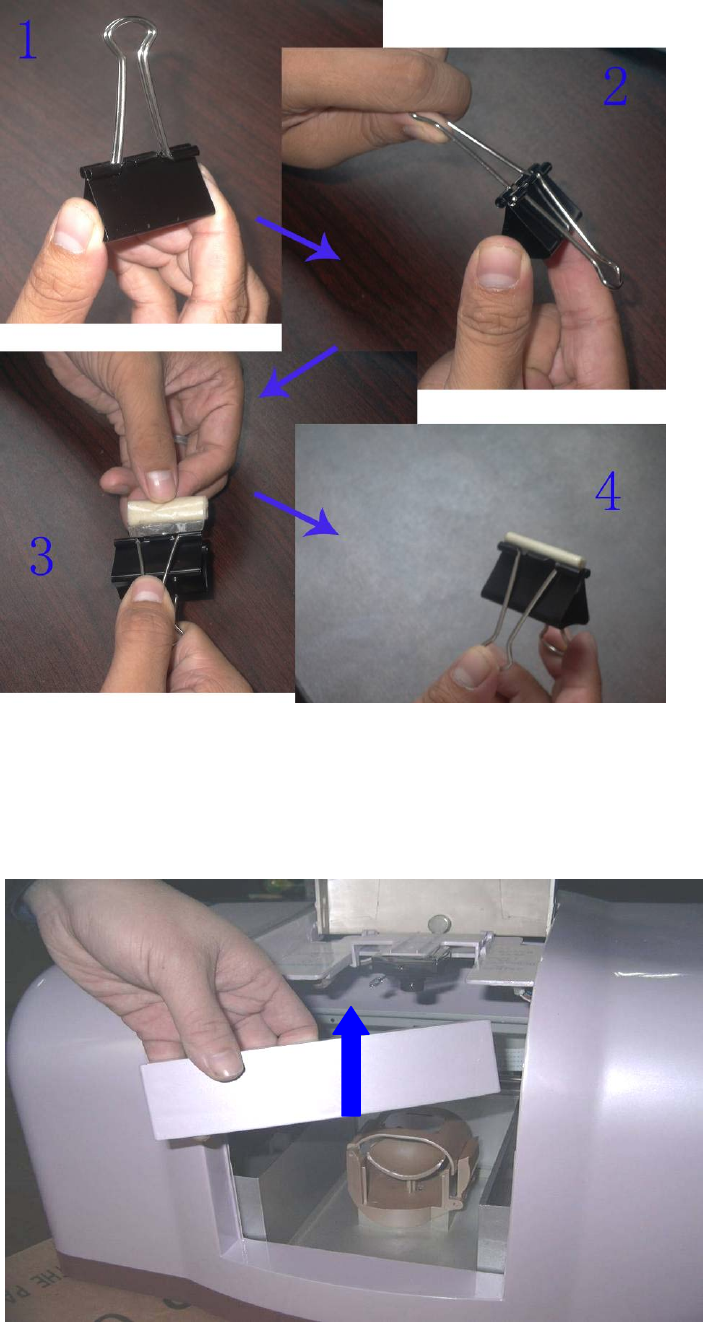
(The usage of special tool is given in the following image)
5) Dry the pre coat naturally
a) The drying time depends on local temperature and humidity
b) The pre coat should be just dry
Attention: Don’t dry too long time; the dryness degree will influence the printing quality.
6) In order to print conveniently, please take off the front wide board
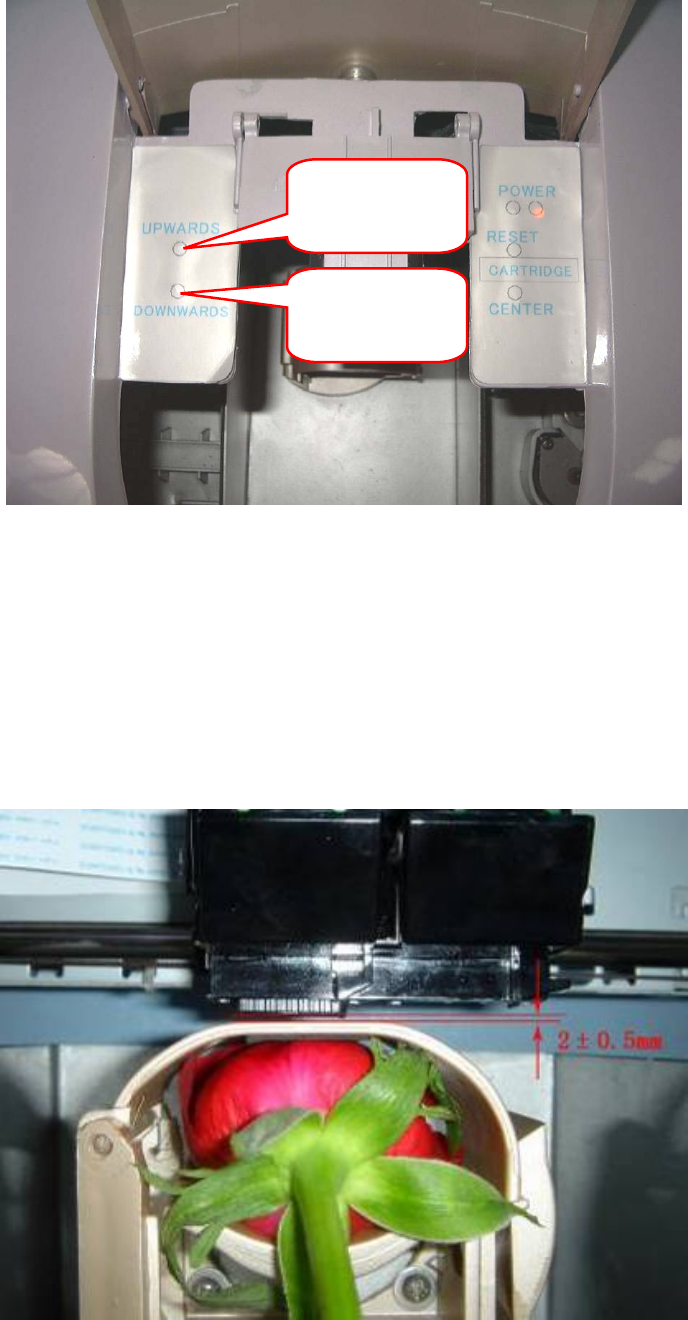
- 37 -
7) Press “Downward” to reduce the height of the flower holder.
8) Put the flower into flower holder, close the cover and make the petal flat. Press “UPWARDS’ to
increase the height flower holder, the distance between the top point of the petal and the bottom of
the cartridge head is about 2.0±0.5mm. Printing when finish adjusting.
Attention:
Don’t nip the flower too tight when adjusting the height by “UPWARDS”.
Too tight will lead to: 1. Pre coat will stick to the holder
2. Damage the flower.
You should adjust the flower to make the printed petal flat after put the flower into holder.
More flat the petal, much better the printing quality.
Reduce flower
holder height
Increase flower
holder height
- 38 -
IV. Clean and change ink cartridge
You need cleaning the cartridge if the printing color not good, and change
new cartridge if use up.
Please clean and change as follows:
4.1. Press “Center”, the cartridge plate will move to center. Open the lid and take out the cartridge.
4.2. Clean and change ink cartridge
a) Clean ink cartridge
Press cartridge head on napkin strongly until you can see very clear three colors (CMY), then
put back the cartridge.
b) Change ink cartridge:
Open the new cartridge and put in the cartridge plate. (Please check “install ink cartridge” under
“Install printer driver” for detail procedures).
4.3. Close the cartridge plate lid.
4.4. Press “RESET”, the cartridge plate will back to original place.
- 39 -
4.5. Update cartridge information in the system.
a) Double click“Lexmark 640 Series solution center” on the desktop.
b) Click “Maintenance”
c) Click “Install or obtain a new cartridge”
Left Click
Left Click
- 40 -
d) Click “Next” to go on.
e) Choose the type of the installed cartridge.
f) Set the left cartridge as “Color [26]”, “No, it is new”, set the right cartridge as “No cartridge”,
then click “Next”.
g) Click “Exit”.
1. Set as “Color [26]”
2. Set as “No, it is new”
3. Set as “No cartridge”
4. Left Click
Left Click
Left Click
- 41 -
V. Uninstall
Attention: Please take the camera and printer USB line off the computer before uninstalling.
5.1 Enter “Add or remove programs”
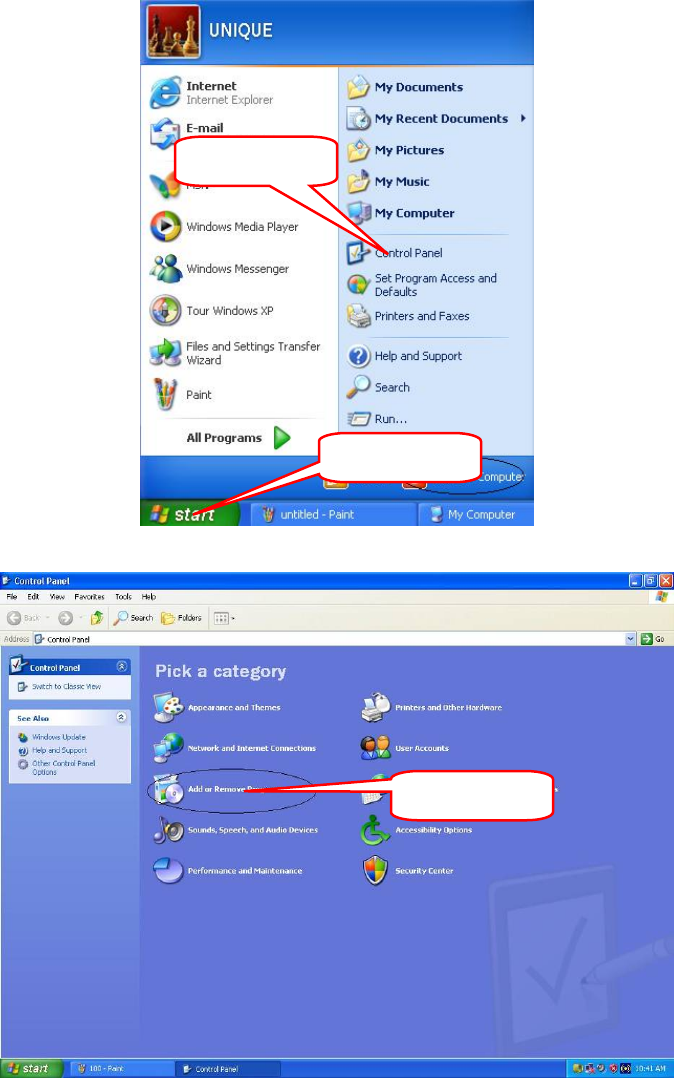
1) Click “Control panel” under “Start” menu
2) Click “Add or remove programs”
1. Left Click
2. Left Click
Left Click
- 42 -
5.2 Delete printer driver
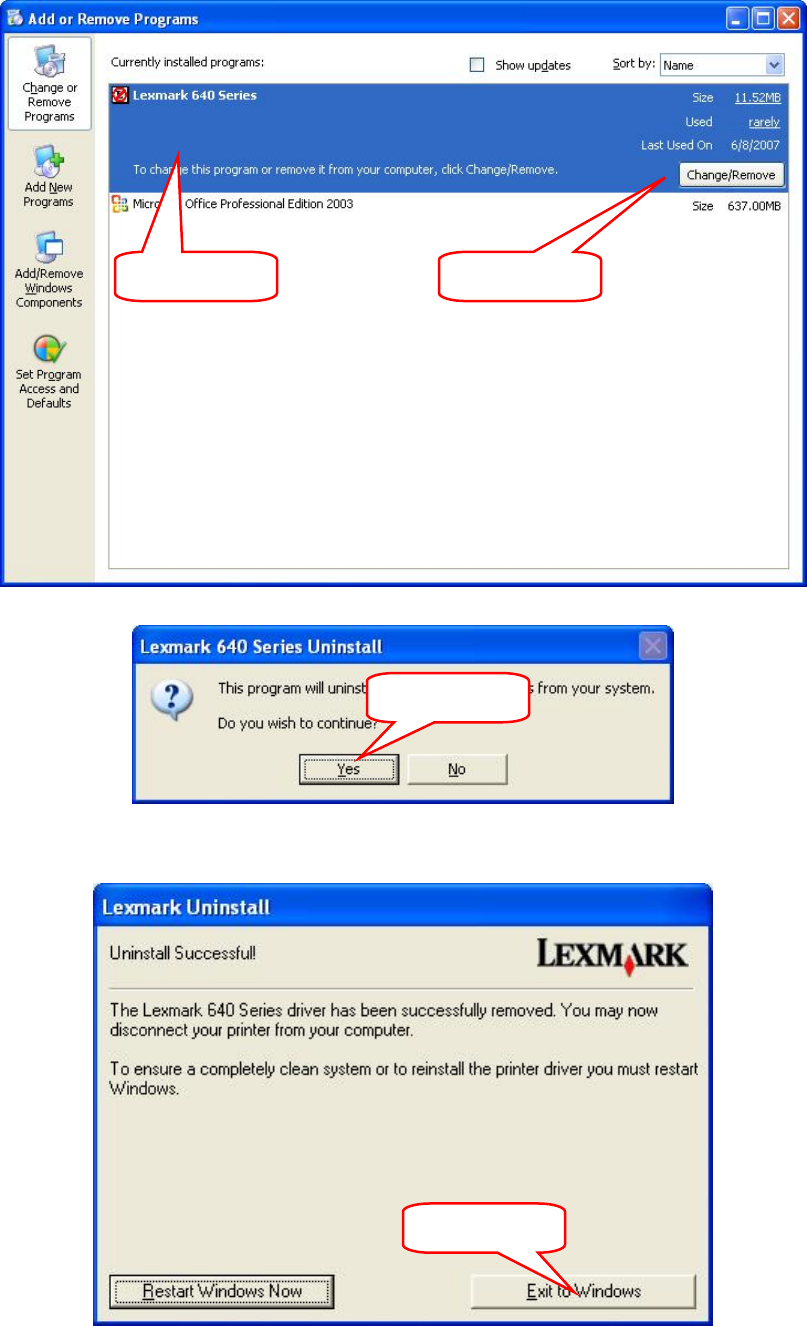
1) Click “Lexmark 640 Series”, then click “Change/remove”
2) Click “Yes”
3) If go on uninstall, please choose “Exit to Windows”, if only reinstall printer driver, please choose “Restart
Windows now”.
2. Left Click
Left Click
Left Click
1. Left Click
- 43 -
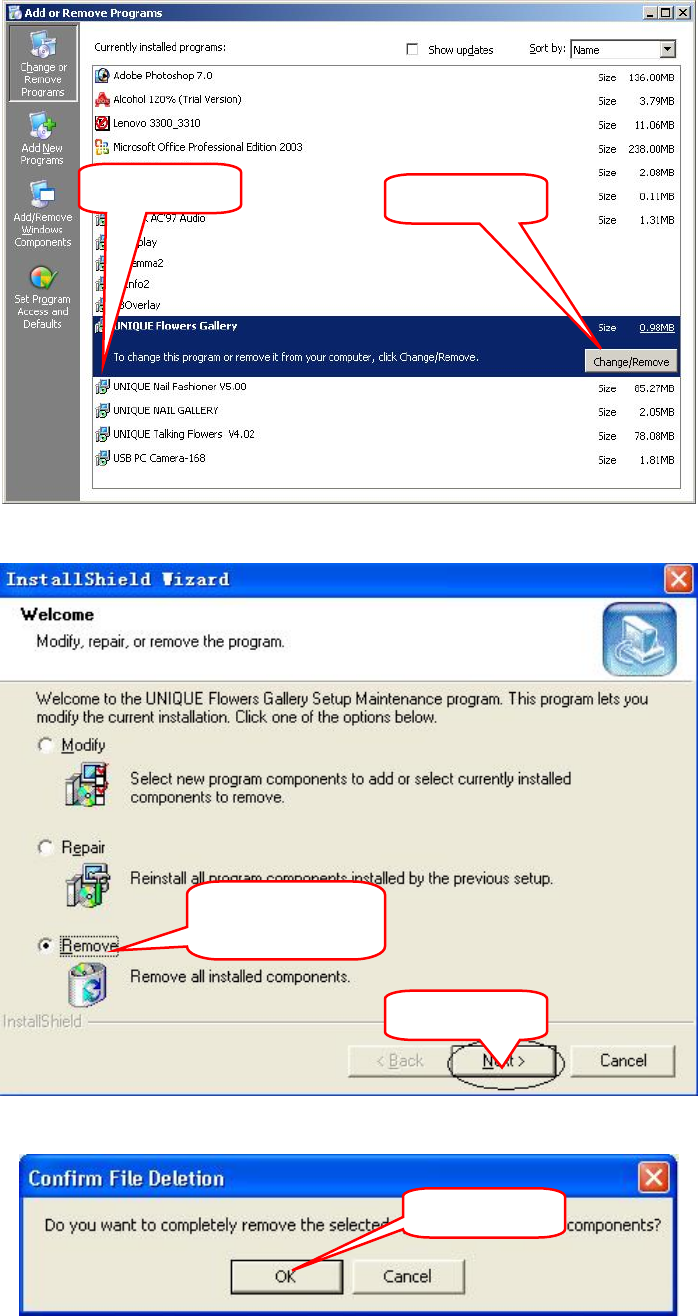
5.3. Delete Talking Flower Gallery
1) Click “UNIQUE Flowers Gallery”, then click “Change/Remove”
2) Select “Remove” and click “Next”.
3) Click “OK”
2. Left Click
Left Click
1. Left click,
select“”Remove”
2. Left Click
1. Left Click
- 44 -
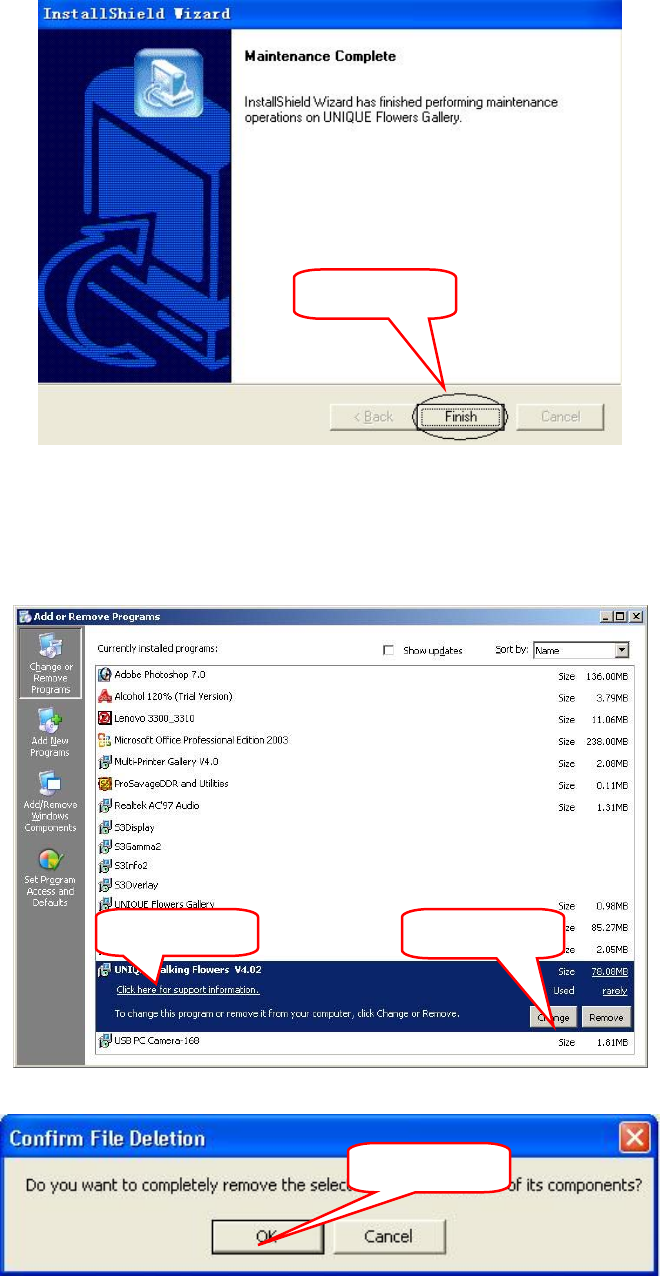
4) Click “Finish”:
5.4. Delete Talking Flower Program
1) Click “UNIQUE Talking Flowers”, then click “Remove”
2) Click “Yes”
Left Click
Left Click
2. Left Click
1. Left Click