Qisda PD060B00 E-Book User Manual Pandigital Novel User Guide
Qisda Corporation E-Book Pandigital Novel User Guide
Qisda >
User Manual

User Guide
v1.9

2
Note: Your device style and features may differ from
those documented in this User Guide.
UG-E_PRD06E-8_v1.9_09-10
3
Register your
pandigital novel
Qualify to win a FREE Register your FREE
digital photo frame!* 1-year warranty!**
(valid in USA only)
REGISTER ONLINE: www.pandigital.net
*For details, go to our website: www.pandigital.net
**The online signup is for the purpose of user and product
registration. Failure to register does not in any way diminish
any of your standard warranty rights, as described in the
documentation included with your product.
NOTE: If you must mail your registration, please send your
name, address, phone number, model, serial number, and
when and where purchased to: Pandigital, P.O. Box 2969,
Dublin, CA 94568-2969 USA
1
year

4
Table of Contents
Important Safety Precautions ............................... 12
Cleaning the device ....................................................... 14
Device Overview .................................................... 15
Power Switch Usage ............................................. 16
Touch-Screen Navigation ..................................... 17
Reset Device .......................................................... 17
Getting Started ....................................................... 18
Connecting to Public Wi-Fi Hotspot .............................. 22
Application Menus ................................................. 24
Applications ........................................................... 27
Buy & Download using Shop B&N ....................... 29
Buy & Download using BOOKSTORE ................. 30
Barnes & Noble BOOKSTORE .............................. 31
Purchase an eBook ....................................................... 32
Purchase a Magazine or Newspaper ............................ 33
Get FREE Sample ......................................................... 35
Buy Sample Books ........................................................ 36
Search the Bookstore .................................................... 36
SHOP B&N.............................................................. 37
Downloading Purchased Media .................................... 38
MY LIBRARY .......................................................... 38
Cover View .................................................................... 39

5
List View ........................................................................ 41
Get Books ..................................................................... 42
Manage Books .............................................................. 46
Lend/Return Books ....................................................... 47
Lend a Book .............................................................. 48
Check for Offers ........................................................ 49
Opening Borrowed Books ......................................... 50
Return/Buy Borrowed Books ..................................... 50
Bookshelves .................................................................. 51
Add New Bookshelf ................................................... 51
Manage Bookshelf .................................................... 52
Display Bookshelf ...................................................... 52
Quick Display a Bookshelf .................................. 53
Delete Bookshelf ....................................................... 53
Subscriptions ................................................................. 54
READER ................................................................. 55
Reader Function Menu .................................................. 57
My Library ................................................................. 58
Dictionary .................................................................. 58
Table of Contents ...................................................... 59
Bookmarks ................................................................ 60
Bookmark a page ................................................ 60
View Bookmark List ............................................. 60
Highlight text on a Page ...................................... 61
View Highlights List ............................................. 61

6
Delete Highlights ................................................. 62
Add Note to Page ................................................ 62
View Notes List ................................................... 63
Edit/Delete Notes ................................................ 63
Go To ........................................................................ 64
Font Size ................................................................... 65
Information ................................................................ 65
Lock Screen Orientation ............................................ 66
Play Music in Background while Reading ..................... 67
MUSIC ..................................................................... 68
Play Music ..................................................................... 68
Stop Music ................................................................ 69
Delete Audio Files ..................................................... 70
Playlist ........................................................................... 70
Add songs to Playlist ................................................. 71
Play songs in Playlist ................................................ 71
Remove songs from Playlist ...................................... 72
PHOTOS ................................................................. 72
Photo Gallery ................................................................ 73
Play Slideshow .............................................................. 74
Delete Photo Files ..................................................... 75
CALENDAR ............................................................ 76
View Other Months ........................................................ 77
Add Event ...................................................................... 77

7
Edit Event ...................................................................... 77
Snooze or Cancel Event Alert ....................................... 78
SUDOKU ................................................................. 78
SETTINGS............................................................... 79
Settings>General .......................................................... 79
Settings>Date and Time ................................................ 81
Settings>Barnes & Noble Account ................................ 82
Settings>Photos ............................................................ 84
Settings>Network .......................................................... 86
Turn Wi-Fi Off ............................................................ 87
Settings>Advanced Settings ......................................... 88
Firmware Update ....................................................... 88
Restore to default ...................................................... 90
Restore to default and remove user information ....... 91
Settings>Support ........................................................... 92
EMAIL ..................................................................... 92
Setup New or Add Accounts ......................................... 92
Set up Yahoo! Plus Account ..................................... 94
Set up Juno Platinum or Turbo Account ................... 95
Manual Setup ............................................................ 95
Email Inbox ................................................................... 95
Open Email Message .................................................... 96
Compose New Email Message ..................................... 96
Edit Email Account ........................................................ 97

8
Set Default Account ...................................................... 97
Delete Email Accounts .................................................. 98
CONTACTS ............................................................. 99
Add New Contacts ........................................................ 99
Edit Contacts ................................................................. 99
Delete Contacts ........................................................... 100
BROWSER ............................................................ 100
Go to a Web Site ......................................................... 100
Browser Navigation Menu ........................................... 102
Add Bookmark to Web Page ................................... 102
View Bookmarked Web Pages ................................ 103
DICTIONARY ........................................................ 103
Reader Dictionary ....................................................... 104
ALARM ................................................................. 105
Add Alarm.................................................................... 105
Shut Off Alarm Alert .................................................... 106
Edit Alarm .................................................................... 106
De-Activate Alarms ..................................................... 106
Delete Alarm ............................................................... 107
ADOBE® eBOOKS ............................................... 107
FILE MANAGER ................................................... 110
View Internal Memory Contents .................................. 110
View microSD Card Contents ..................................... 110
Import Media from microSD Card ............................... 111

9
Copy Specific Media Files into Internal Memory ......... 112
Delete Media Files from Internal Memory ................... 112
Rename Categories or Files ....................................... 113
USER GUIDE ........................................................ 114
Connect to Computer .......................................... 115
Connect to Windows PC ............................................. 115
Disconnect .............................................................. 116
Windows 7 ......................................................... 117
Windows VISTA ................................................ 117
Windows XP ...................................................... 118
Connect to Macintosh Computer ................................. 118
Disconnect .............................................................. 120
Frequently Asked Questions .............................. 121
Battery Management ........................................... 131
Charge Battery ............................................................ 131
Technical Specifications ..................................... 133
Limited Warranty ................................................. 135
Disclaimers .......................................................... 140
License Agreement and Terms of Use .............. 140
10
pandigital novel
A contemporary multimedia device designed for
straightforward functionality, featuring an ePaper
display and convenient hard-button and touch-
screen navigation.
Your pandigital novel is a light and stylish
electronic multimedia eReader which allows you to
quickly and easily download and read digital printed
material (eBooks, Magazines, and Newspapers)
anytime and anywhere.

11
Also, you can view photo slideshows and listen to
music through the built-in speakers or with
headphones (not included).
When connected to a Wi-Fi network, you can
download media files from your Barnes & Noble’s
online account, browse the web, visit your favorite
social networking sites, and much more!
READ. SURF. PLAY.
Your pandigital novel is a step up in
multimedia devices.
Congratulations on your choice!
Package Contents
pandigital novel
USB Power Adapter
Micro USB Cable
Quick Start Guide
User Guide (pre-loaded in device)
12
Important Safety Precautions
Always follow these basic safety precautions when
using your pandigital novel. This reduces
the risk of fire, electric shock, and injury.
Keep this device out of direct sunlight
and heat sources such as in a closed car
under sunlight or near a stove.
Do not use this device near water, in the
rain or allow any liquid to get inside this
product. Water and moisture may cause
short-circuit to the electronic components
and lead to malfunctions.
Do not drop or apply shock/vibration to
this device. Strong impacts may damage
the components inside. Do not lay heavy
objects on the device as this could cause
the screen to crack or break.
Do not use this device in dusty
environments. Dust grains may cover this
device and scratch the surface.
13
Do not use this device near strong
electromagnetic sources, such as a
microwave oven or television. The
electromagnetic interference may cause
this device to malfunction.
Do not attempt to disassemble or modify
this device. There are no user
serviceable parts inside this device, and
unauthorized modifications void your
warranty.
Do not insert objects other than
compatible memory cards into the
memory card slots of this device. The
metal contacts inside the slots can easily
become damaged by foreign objects.
Use only the USB power adapter with the
micro USB cable included with this
device. Using any other power adapter
voids your warranty.
Protect the micro USB cable. Route
cable so it is not likely to be walked on or
pinched by items placed on or against it.
Pay particular attention to the point
where the cord attaches to your device

14
Protect the micro USB cable. Route
cable so it is not likely to be walked on or
pinched by items placed on or against it.
Pay particular attention to the point
where the cord attaches to your device.
Cleaning the device
Treat the screen gently. To clean fingerprints or
dust from the screen, we recommend using a
soft, non-abrasive cloth such as a camera lens
cloth.
15
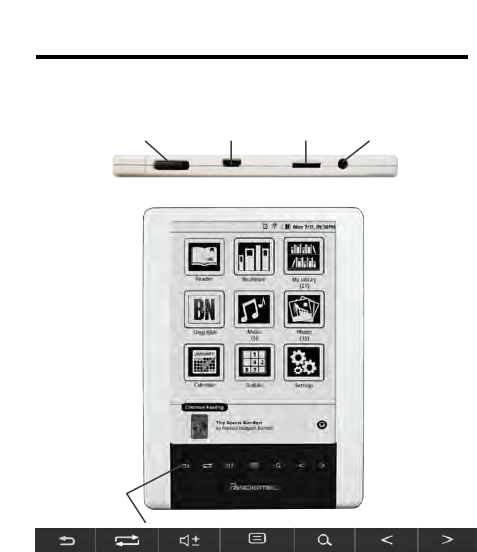
Device Overview
Power Earphone
switch microUSB microSD jack
TOP
Exit/return Refresh Volume Options Search Previous Next
to previous screen up/down menu text page page
screens
Navigation
buttons
16
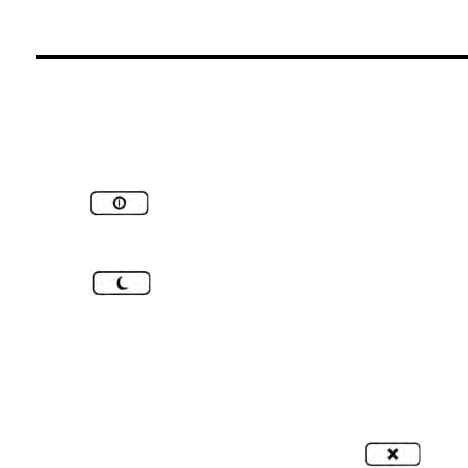
Power Switch Usage
Turn On: Slide and hold the power switch for up to 5
seconds, wait as the device boots up and the
Applica t ion M enu screen is displayed.
Turn Off: Slide and release the power switch quickly,
tap .
Turn Sleep Mode On/Off (energy saver): Slide &
release the power switch quickly,
tap .
The device automatically enters Sleep mode if left
idle in Screen Saver mode for 3 minutes.
Note: Do not leave the device in Sleep mode
for more than 2 weeks as this may cause
screen burn-in that cannot be recovered.
If you slide the power switch but don’t want to put
device into sleep mode or turn off, tap to
return to normal use.

17
Touch-Screen Navigation
The touch-screen allows for quick, easy and
convenient navigation for all applications.
Throughout the User Guide, you are instructed to use
the following touch navigation methods:
Tap = touch and quick release of your finger on
an item on the screen
Finger slide = touch & slide your finger across
the screen, and then quick release (i.e., turning
pages of your book)
Reset Device
In the event that your device “freezes” and does not
respond to your touch, reset it by poking a
straightened paperclip into the reset hole on the back
of the unit. The device automatically restarts.
18
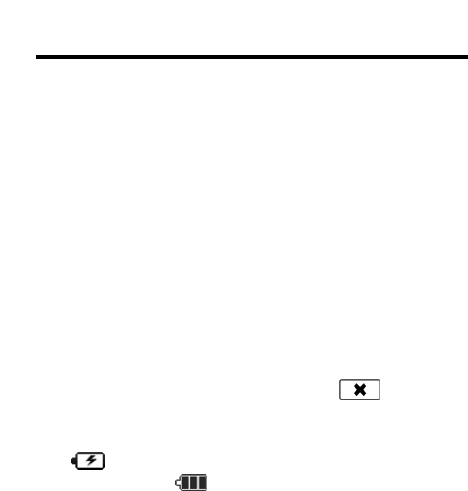
Getting Started
1. Charge device
Use one of the following methods for charging
your device.
USB Power Adapter: Insert the large end of the
micro USB cable into the USB power adapter,
plug the USB power adapter into an electrical
wall outlet, and then connect the micro end of the
micro USB cable to your device.
Direct connect with computer: Connect the
large end of the micro USB cable to your
computer, and the micro end to the micro USB
port on your device. In order to use the device
while the battery is charging, tap when
prompted to use the device as a mass storage.
While charging, the battery icon displays as:
. When fully charged the battery icon
displays as: .
You can use the device while the battery is
charging.
19
2. Turn device on
Slide and hold the power switch for up to 5
seconds. Wait as the device boots up and the
Applica t ion M enu 1 screen is displayed.
20
3. Set Date and Time
IMPORTANT: In order to connect with your Barnes
& Noble online account, the Date and Time must be
set correctly according to your location.
1. Tap Settings on the Applic ation M e nu
screen.
2. Tap Date and Time.
3. Da te screen is displayed; tap on individual
option fields and use to change
values.
4. Tap icons at top of screen to set Time Zone
and Time.
When setting time zone, press / to
display next/previous pages.
5. Tap to save Da t e/Time settings.
Time Zone Date Time

21
4. Set up Wi-Fi Network
Since many features require a Wi-Fi connection,
we recommend you set up your
Wi-Fi network now.
1. In the Settings screen, tap Network.
2. If your Wi-Fi status is off, tap Turn ON.
3. The device automatically scans and lists local
Wi-Fi Networks found.
A indicates secure networks that require
login name/password to connect.
4. Tap the desired network to which you want to
connect.
5. If applicable, enter the network Password.
The password is remembered for future
connections.
6. Tap .
When connected, the Wi-Fi status icon
appears at the top of the screen.
If your Wi-Fi network is set as hidden, it won’t
be found by the auto scan. Tap Hidden
networks and then enter the network name,
22
type of Authentication and password, and then
tap .
To view or change any of the network settings,
tap . If you make changes, tap to save.
To re-scan for local Wi-Fi networks, tap .
Connecting to Public Wi-Fi Hotspot
If you are connecting via a public Wi-Fi
hotspot, it may be necessary to immediately
launch the browser and provide the hotspot
login information prior to having an active
internet connection.
1. Follow steps 1-6 above to select the
hotspot Wi-Fi network.
2. On the Applic ation M e nu screen, tap
Browser.
3. Enter the login information as required by
the hotspot.
5. Set up Barnes & Noble Account
Your Barnes & Noble account must be set up on
the device before you can download media into
My Libra ry.

23
1. In the Settings screen, tap Barnes & Noble
Account.
2. If you have not yet registered an account with
Barnes & Noble, tap Create new account.
The browser launches and displays the
Barnes & Noble account setup page. Follow
the prompts to register your account.
3. Tap in the B&N Account field to display the
Barnes & Noble Login entry box.
4. Enter the email address that is registered with
your Barnes & Noble account, tap .
5. Enter your password, tap .
6. Tap Login.
7. The device logs into the Barnes & Noble
server to verify your account information. If
successful, the Barnes & Noble Account
screen is displayed again.
8. Press to return to previous screens.

24
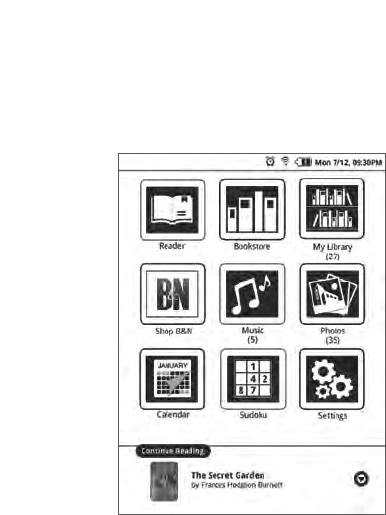
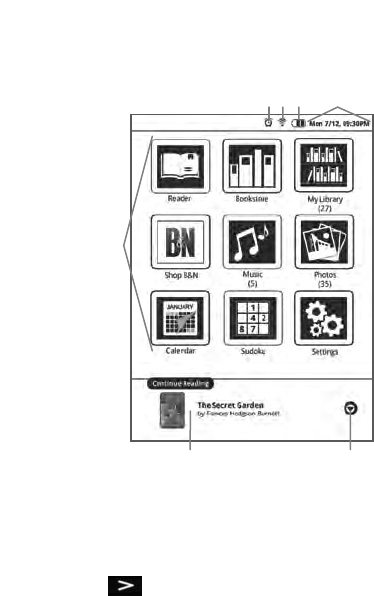
Application Menus
When you turn the device on, the Applic a tion Me nu 1
screen is displayed.
Indicates Alarm is
set/active
Wi-Fi connection status
Battery charge level
Current Date & Time
Application icons
Last read media;
tap to open
Tap to display
additional recently
read media
25
Applica t ion M enu 1
Simply tap an application icon to launch the
application.
(#) under application title indicates number of files
associated with the application.
Press to display Application Menu 2.
26
Applica t ion M enu 2
Press to return to Application Menu 1.
27
Applications
Reader Display your last read media
file.
Bookstore
Display Bestsellers, New
Releases, Magazines and
Newspapers from the Barnes
& Noble online eBookstore.
My
Library
Display eBooks, Magazines
and Newspapers that have
been downloaded to your
device.
Shop B&N Shop the Barnes & Noble
online eBookstore.
Music Play and manage audio files.
Photos View and manage photo
files.
Calendar Display monthly calendar
and schedule events.
Sudoku Play the popular number-
placement game.
28
Settings
Manage device settings,
connecting with Wi-Fi
network, and personalizing
your device.
Email Send/Receive email using
your existing email address.
Contacts Create a list of personal
contacts.
Browser Access the Internet and ‘surf
the web’.
Dictionary
Look up words and
definitions in the built-in
dictionary.
Alarm Use as alarm clock with
scheduled alarms.
Adobe®
eBooks
Read and manage eBooks
copied from Adobe Digital
Editions (ADE).
File
Manager
View, manage, and import
media files in Internal
Memory or on microSD card.

29
Buy & Download using Shop B&N
A. On Applic a tion M e nu, tap . Browser displays
Barnes & Noble online eBookstore.
B. Shop and purchase eBooks, Magazines, Newspapers,
or get Free Samples.
C. Confirm your purchase, enter your existing Barnes &
Noble account login information (email & password) or
create a new account, and then tap Login.
D. The media is added to your Barnes & Noble online
Library.
E. Press to return to the Applic a tion Me nu
screen.
F. On the Applic a tion Me nu screen, tap My Library>
Get Books. If required, provide Barnes & Noble account
login information.
G. Wait for list of downloadable media. Select desired
media to download, tap Download Selected.
H. Press to return to My Libra ry screen.
I. In My Libra ry screen, tap on a media cover to open it
in the Re ade r.
30
Buy & Download using BOOKSTORE
A. On Applic a tion M e nu, tap . Barnes & Noble
Bestsellers and New Releases are displayed.
B. Tap on book cover. Select BUY NOW or Get Free
Sample.
C. If you have not previously set up your Barnes & Noble
account on the device, you are prompted to enter your
Barnes & Noble account login information (email &
password). The login information is saved for future
logins.
D. The media is added to your Barnes & Noble online
Library.
E. Press to return to the Applic a tion Me nu
screen.
F. On the Applic a tion Me nu screen, tap M y Library>
Get Books. If required, provide Barnes & Noble account
login information.
G. Wait for list of downloadable media. Select desired
media to download, tap Download Selected.
H. Press to return to M y Libra ry screen.
I. In My Libra ry screen, tap on a media cover to open it
in the Re ade r.
31
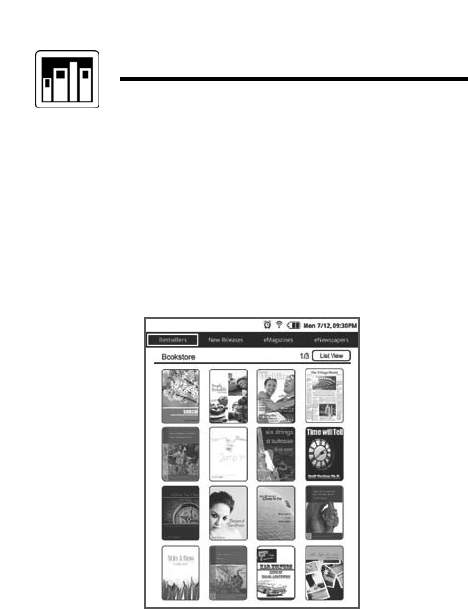
Barnes & Noble BOOKSTORE
You must be connected to a Wi-Fi network in order
to connect to Barnes & Noble.
Tap Bookstore on the Applic at ion M e nu screen.
The device connects and syncs with the Barnes &
Noble online eBookstore and displays the Bestsellers
and New Releases on the Book st ore screen.

32
If desired, tap List View to change the display
layout to a text list.
Press / to display next and previous
pages.
Purchase an eBook
1. In the Book st ore screen, tap on a book
cover to display the descriptive information,
synopsis, Buy Now and Get Sample buttons.
Press to return to the Bookstore screen
When offered,
tap Get Sample
to download a
free sample
before buying
Tap BUY NOW
to buy
immediately

33
2. Tap BUY NOW, tap OK in the confirmation
screen; the book is added to your Barnes &
Noble online account.
3. After a book is added to your Barnes & Noble
account, use Get Books to download it from
your Barnes & Noble account into your
pandigital novel (pg. 42).
4. After downloading the book, tap on a book
cover in M y Library to open it in the Reader.
Most books include a Table of Contents with
active chapter links allowing you to simply tap
the desired chapter/page that you want to view.
However, sample books’ Table of Contents
may not have active links; use Reader>Go To
to jump to a desired page in a sample book.
Purchase a Magazine or Newspaper
1. In the Book st ore – Be st se lle rs screen, tap
on eMagazines or eNewspapers to display
only same media type.
2. Tap on a publication cover to display the
descriptive information, synopsis, and buy
buttons (sample below).
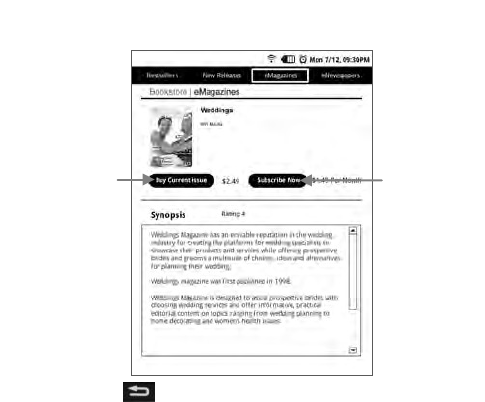
34
3. Tap Buy Current Issue to purchase only the
displayed issue.
OR
Tap Subscribe Now to order a monthly
subscription.
4. Tap OK in the confirmation screen; the
periodical is added to your Barnes & Noble
online account.
Press to return to the Bookst ore screen
Tap Subscribe
Now to order a
monthly
subscription
Tap
Buy
Current
Issue
to purchase
only the
current issue

35
5. After a periodical is added to your Barnes &
Noble account, use the Get Books feature to
download it from your Barnes & Noble
account into your pandigital novel
(pg. 42).
6. After downloading the periodical using Get
Books, tap on the cover in M y Libra ry to
open it in the Reader.
Get FREE Sample
Some, but not all, books offer a downloadable
sample for you to read before purchasing the
book.
1. When offered in the Descriptive/Synopsis
window, tap Get Sample; the sample book is
added to your Barnes & Noble online account.
2. After the sample is added to your Barnes &
Noble account, use Get Books to download it
from your Barnes & Noble account into your
pandigital novel (pg. 42).
3. After it’s downloaded, tap on the sample
cover in M y Library to open it in the Reader.

36
Some samples’ Table of Contents may not
have active links; use Reader>Go To to jump to
a desired page in a sample book/periodical.
Buy Sample Books
You can quickly and easily buy the full version of
a sample book in your Barnes & Noble online
Library.
1. In the M y Library screen, tap Lend/Return.
2. Tap Buy sample books.
3. Tap next to the sample book(s) you want
to buy, tap Buy Now.
4. Tap to confirm purchase. The sample
book is added to your Barnes & Noble online
download library.
5. Use Get Books to download your purchased
book (pg. 42).
Search the Bookstore
You can search for a specific string of text (i.e.,
title, author name, etc.) within the media files in
the Bookstore.
37
1. In the Book st ore screen, if desired, first
select one of the media categories:
Bestsellers, new Releases, eMagazines or
eNewspapers.
2. Press .
3. Enter the string of text, tap .
4. Media with matching text is listed; tap on a
media listing to display media information.
5. Follow previous instructions for purchasing
media or getting free samples.
SHOP B&N
IMPORTANT: In order to connect with your Barnes &
Noble online account, the Date and Time must be set
correctly according to your location.
Shopping directly on the Barnes & Noble website
allows you to view full details about a book, including
Editorial and Customer Reviews, along with the
synopsis.

38
Tap Shop B&N on the Applic a tion M enu to log onto
the Barnes & Noble online eBookstore.
Downloading Purchased Media
After purchasing media through the Barnes &
Noble bookstore, use Get Books to download
them from your Barnes & Noble online download
library into your pandigital novel
(pg. 42).
MY LIBRARY
Tap My Library on the Applic a tion M enu screen to
view and manage your media.
The following methods can be used to add eBooks,
Magazines and Newspapers to the device:
Download media from Barnes & Noble via
Get Books function
Import media files from a SD card
Copy media files from your computer via
microUSB
39
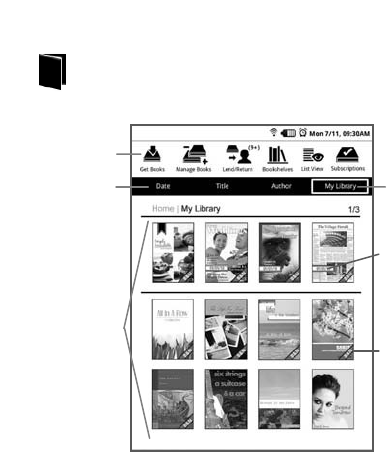
Cover View
Function Menu
Media is sorted by Date of download. If
desired, tap Title to sort by media title, or
Author to sort by author’s first name.
Media that has been loaded into your device.
Indicates media
downloaded from
Barnes & Noble
Date indicates
publication issue
date

40
Press the / buttons to display
next/previous pages.
Tap to view other Bookshelves (use
Bookshelves to create other bookshelves).
Simply tap on any media cover to open and
display it in the Re ade r.
To access Adobe books, use the Adobe®
eBooks application on the Applica t ion M e nu
screen.
41
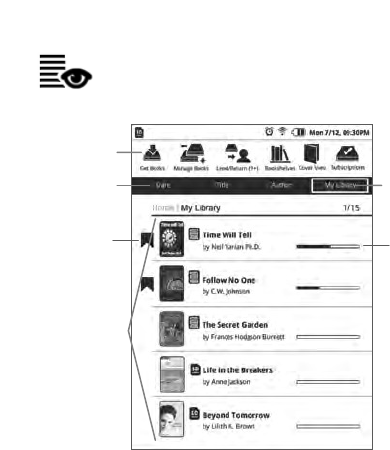
List View
Function Menu
Media is sorted by Date of download. If
desired, tap Title to sort by media title, or
Author to sort by author’s first name.
Media that has been loaded into your device.
Indicates
bookmarks
exist in file
Indicates
progress of
your reading

42
Press the / buttons to display
next/previous pages.
Tap to view other Bookshelves (use
Bookshelves to create other bookshelves).
Simply tap on any book listing to open and
display it in the Re ade r.
To access Adobe books, use the Adobe®
eBooks application on the Applica t ion M e nu
screen.
Get Books
Use Get Books to download the downloadable
eBooks, Magazines and Newspapers from your
Barnes & Noble online account into your
pandigital novel.
You must have an online account with Barnes &
Noble, and already purchased media or
requested free book samples.

43
IMPORTANT: In order to connect with your Barnes
& Noble online account, the Date and Time must be
set correctly according to your location.
eBooks downloaded from Barnes & Noble to a
Macintosh computer are saved in an
unsupported .pdb format. If you copy the .pdb
formatted eBooks into your pandigital
novel, they will not be recognized. You
should always use Get Books to download
eBooks directly from your Barnes & Noble
download library into your pandigital
novel. Books that are only available in
.pdb format are not downloadable even when
you use Get Books.
Each time you use Get Books, the device
syncs with your Barnes & Noble online
account and updates “last page read”
markers, which exist in books that you have
been reading, in both your device and online
account. This allows you to download and
open the same books in different eReaders at
the “last page read” location instead of the
beginning of the book.

44
1. Make sure your device is connected to a
Wi-Fi network.
2. In the M y Library screen, tap Get Books.
3. If you have not yet set up your Barnes &
Noble account on the device, you are
prompted for your Barnes & Noble login
information. Tap in each entry field to enter
your login information, tap Login.
If you have not yet registered an account
with Barnes & Noble, you can do so now
by tapping Settings on the Applica t ion
Me nu, tap Barnes & Noble Account,
tap Create new account. The browser
launches and displays the Barnes & Noble
account setup page. Follow the prompts to
register your account.
4. Wait for the list of your downloadable media
to be displayed, which could take up to a
minute depending on how many items are
in your account.
5. To download specific items, tap on the
items you want to download now, tap
Download Selected.
To download all purchased media, tap

45
Select All, tap Download Selected.
Press / to display next/previous
pages.
6. The media is downloaded and added to My
Libra ry.
In the Downloading media message:
S:## = number of successful downloads
F:## = number of failed downloads
T:## = total number of media files to be
downloaded
7. When the download is finished, press
to return to M y Libra ry screen.
8. The first time you tap on the downloaded
media in M y Libra ry to open it, you may be
presented with an ‘unlock’ message
requiring you to provide your credit card
name and number that is registered with
your Barnes & Noble account.

46
Manage Books
Use Manage Books to delete media from M y
Libra ry.
1. In the M y Library screen, tap Manage Books
to display the list of media you have
downloaded or imported into My Libra ry.
Press / to display next/previous
pages.
Media is sorted by Date of download; if
desired, tap Title or Author to re-sort your
media accordingly.
2. Tap on the media you want to delete, tap
Delete Selected.
3. Tap to confirm the deletion.
4. Press to return to M y Libra ry screen.

47
Lend/Return Books
There are some books that Barnes & Noble
classifies as “lendable”, which allows you to loan
them to others who also have a Barnes & Noble
account.
You must be connected to a Wi-Fi network
before you can use the Lend/Return Books
function.
A number appearing with the Lend/Return icon
indicates new/pending activity. This number
gets updated each time the device syncs with
your Barnes & Noble account (i.e., Get Books,
check Subscriptions, Lend/Return).
After launching Lend/Return, a
Le nd/Ret urn/Buy
window displays the
lend/return/buy options. The number behind
Return borrowed books indicates books that
need to be returned.
The number behind Check for offers indicates
new offers pending.

48
Please be aware of the following considerations
before loaning or borrowing any books:
To lend a book, the recipient must have a
Barnes & Noble account.
To download a borrowed book, you must have
a credit card number assigned to your Barnes
& Noble account.
To unlock and open a borrowed book, you may
be required to provide the default credit card
name and number that is registered with your
Barnes & Noble account.
The book can only be loaned for 14 days.
Only one copy of a book can be read at a time.
Therefore, the lender won’t have access to the
book until after it has been returned from the
recipient.
Lend a Book
1. In the M y Library screen, tap
Lend/Return.
2. Tap Lend books.
3. Tap next to a book that you want to
lend, tap Lend.
4. Enter the email address of your recipient.

49
5. If desired, tap in the message window to
enter a personal message to accompany
the book.
6. Tap Lend.
7. Tap when book loan is complete.
8. Press to return to previous screens.
Once you send a loan offer, the book is no
longer available in M y Libra ry until the
recipient returns the book or rejects the offer.
You can use Get Books to download the
book when the book becomes downloadable
again in the future (pg. 42).
Check for Offers
Use this function to check for book loan
offers made to you.
1. In the M y Library screen, tap
Lend/Return.
2. Tap Check for offers.
3. Tap next to the offers you want to
accept or decline, tap Accept or
Decline accordingly.

50
4. Press to return to previous screens.
Opening Borrowed Books
After accepting a book offer, use Get Books
to download the loaned book to M y Libra ry
(pg. 42).
To unlock and open the book for the first time,
you may need to provide the default credit
card name and number that is registered with
your Barnes & Noble account.
Return/Buy Borrowed Books
1. In the M y Library screen, tap
Lend/Return.
2. Tap Return/Buy borrowed books.
3. Tap on desired book, tap Return or
Buy Now as desired.
4. Press to return to previous screens.
Returned books: Status is changed to
“Returned” but remains available for
purchase later.

51
Purchased books: The borrowed book is
removed from My Library. Use Get Books to
download your purchased book (pg. 42).
Bookshelves
Use Bookshelves to create and manage
personalized bookshelves into which you want to
save your downloaded media (i.e., Short Stories,
Drama, etc.).
The number of books within a bookshelf is
displayed in the right column.
Add New Bookshelf
1. In the M y Library screen, tap
Bookshelves.
2. Tap Add Shelf.
3. Enter the desired bookshelf name (i.e.,
Short Stories, Drama, etc.).
4. Tap Save to create the new bookshelf.

52
Manage Bookshelf
Add media to bookshelf:
1. In the M y Libra ry screen, tap
Bookshelves.
2. Tap on the bookshelf that you want to
add or remove media, tap Manage
Bookshelf.
3. Media is sorted by Title; if desired, tap
Date or Author to re-sort your media
accordingly.
4. Tap on the media you want to add to the
bookshelf.
5. Tap Save, and then OK to confirm the
save.
6. Press to return to My Libra ry
screen.
Display Bookshelf
1. In the M y Library screen, tap
Bookshelves.

53
2. Tap on the bookshelf you want to display,
tap Display Shelf.
Press / to display next/previous
pages.
3. Tap on a book cover to open it in the
Re a de r.
Quick Display a Bookshelf
In My Libra ry or in any other bookshelf, tap
the bookshelf name in the upper right corner
to display the list of all bookshelves, tap
the desired bookshelf to open.
Delete Bookshelf
1. In the M y Library screen, tap
Bookshelves.
2. Tap Delete Bookshelf.
3. Tap on the bookshelf you want to delete,
tap Delete Selected.
Note: You cannot delete M y Libra ry.
4. Tap OK to confirm deletion.
54
5. Press to return to My Libra ry
screen.
Subscriptions
Use Subscriptions to check for newest issues of
active periodicals (Magazine or Newspaper)
subscriptions.
To get non-active subscriptions and purchased
single issues, use Get Book s (pg. 42).
Each time you use Subscriptions, the device
syncs with your Barnes & Noble online
account and updates “last page read”
markers, which exist in publications that you
have been reading, in both your device and
online account. This allows you to download
and open the same publications in different
eReaders at the “last page read” location
instead of the beginning of the publication.
You must be connected to a Wi-Fi network
before you can perform the Check
Subscriptions function.
1. In the M y Library screen, tap Subscriptions.

55
2. If you haven’t yet registered your Barnes &
Noble account in the device, you are
prompted for your Barnes & Noble login
information. Tap in each entry field to enter
your login information, tap Login.
3. The device syncs with your Barnes & Noble
online account.
4. If new releases or updates are found, they are
reflected in M y Library, otherwise a message
advises there are no updates, tap to
acknowledge.
READER
The Reader is used to display your digital media
(eBooks, Magazines, and Newspapers).
eBook supported formats: EPUB and PDF
56
Methods that can be used to launch the Reader:
Tap on a media cover in M y Libra ry or in a
Bookshe lf.
Tap Reader on the Applic a tion M e nu to open
the last read media file.
Tap the media title in the Cont inue Re ading
section at the bottom of the Applica t ion M e nu
screen.
Press to
display the
Re a der
Func t ion
Me nu
Press or
to re-hide it
Finger slide right-
to-left for next
page.
Or press /
to scroll next/
previous pages.
Tap to scroll page
right (appears in
.pdf files)
Zoom in/out
Fit page to screen
Return to normal view
(appears when zoomed)
Tap to scroll
page down
(appears in
.pdf files)
Indicates page
is bookmarked
57
If you are viewing a .pdf file that has not been
sized to fit the device screen you have zoomed the
page, the arrows appear for scrolling
the viewable portion of the page.
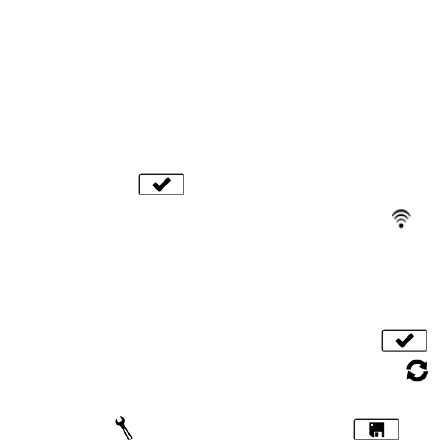
To turn Sleep Mode On/Off, slide & release the
power switch quickly.
For optimum battery charge saving while reading,
turn Wi-Fi Off (pg. 87) and Power Saving On
(pg. 80).
To switch viewing orientation from Portrait (vertical -
default) to Landscape (horizontal), tap Settings>
General> Orientation.
Reader Function Menu
Press to display the Re ade r Func t ion
Me nu at the top of the screen.
IMPORTANT: When the Rea de r Func t ion
Me nu is displayed, normal Reader functions,
such as page turn and zoom are inoperable.
58
Always press or to re-hide the
menu when you’re done with the menu
functions.
My Library
1. With page displayed in the Reader, press
to display the Re a de r Funct ion
Me nu.
2. Tap My Library.
3. My Libra ry screen is displayed. Refer to
My Libra ry section beginning on page 38
for features.
Dictionary
The built-in dictionary allows you to quickly
and conveniently look up the definition of
words either within the media you are
viewing or any other words.

59
1. With page displayed in the Re ade r, press
to display the Re ade r Func t ion
Me nu.
2. Tap Dictionary.
3. Tap on the word you want to look up.
4. If the definition is longer than the
viewable area, finger slide the scroll bar
to view the remainder of the definition.
5. Tap to close the lookup window.
Table of Contents
Quickly view the Ta ble of Cont e nt s of the
media file you are viewing.
The Table of Contents font size is fixed
and cannot be changed using the Font
Size function.
1. With page displayed in the Re ade r, press
to display the Re ade r Func t ion
Me nu.
2. Tap TOC.

60
3. Tap on the chapter/page you want to view
to jump to the selected page.
Bookmarks
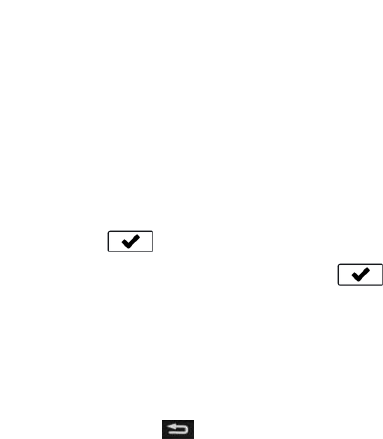
Bookmark a page
1. With page displayed in the Re ader,
press to display the Rea de r
Funct ion M e nu.
2. Tap Bookmarks.
3. Tap Add Bookmark.
4. A is added to the top left corner of
the page when bookmarked.
5. To remove bookmark, simply tap
Bookmarks, tap Remove Bookmark.
View Bookmark List
1. With page displayed in the Re ade r,
press to display the Rea de r
Funct ion M e nu.
2. Tap Bookmarks.
61
3. Tap Bookmark List. All bookmarks
within the media file are listed.
4. Tap on a bookmark to go to the page.
Highlight text on a Page
1. With page displayed in the Re ade r,
press to display the Rea de r
Funct ion M e nu.
2. Tap Bookmarks.
3. Tap Highlight.
4. Finger slide over the text you want to
highlight.
5. To cancel the highlight, while it’s still
dark and before highlighting any other
text, tap .
6. Tap to save highlights.
View Highlights List
1. With page displayed in the Re ade r,
press to display the Rea de r
Funct ion M e nu.
2. Tap Bookmarks.

62
3. Tap Highlight List. All highlights within
the media file are listed.
4. Tap on a highlight to go to the page.
Delete Highlights
1. With page that contains highlights
displayed in the Re ade r, press to
display the Re a de r Func t ion M enu.
2. Tap Bookmarks.
3. Tap Highlight.
4. Tap on the highlighted text; the
highlight darkens.
5. Tap to delete.
6. Tap to save changes.
Add Note to Page
1. With page displayed in the Re ade r,
press to display the Rea de r
Funct ion M e nu.
2. Tap Bookmarks.
3. Tap Add Note.
63
4. Enter your note, tap to save.
5. A note indicator icon appears in
the upper left corner of the page.
View Notes List
1. With page displayed in the Re ade r,
press to display the Rea de r
Funct ion M e nu.
2. Tap Bookmarks.
3. Tap Notes List.
4. Tap on a note listing to jump to that
page.
Edit/Delete Notes
1. With page containing note displayed in
the Re ade r, tap on the note indicator
icon.
2. To Edit: tap , make desired
edits, tap to re-save.
3. To Delete: tap , tap to
confirm deletion.

64
Go To
Use the Go To Page function to quickly jump
to a specific page or word within the media
file you are viewing.
1. With page displayed in the Re ade r, press
to display the Re ade r Func t ion
Me nu.
2. Tap Go To.
3. To jump to a page, enter the desired
page number, tap GO; the selected
page is displayed.
4. To jump to a specific word, tap Word,
enter the desired word, tap GO. The
first page found with the entered word is
displayed.
5. After jumping to different pages, tap Last
Read to return to the original page you
were viewing.

65
Font Size
For optimal viewing, you can adjust the size of
the onscreen text by changing the Font Size.
1. With page displayed in the Re ade r, press
to display the Re ade r Func t ion
Me nu.
2. Tap Font Size.
3. Tap the desired font size from the drop-
down list.
4. Press to close the drop-down list.
Information
You can view the document information of
the media file you are reading, such as Title,
Author, date of publication, and date of
download.
1. With page displayed in the Re ade r, press
to display the Re ade r Func t ion
Me nu.

66
2. Tap to display more menu options,
tap Information.
3. Press to return to the page you
were reading.
Lock Screen Orientation
If you have the screen orientation set as
Auto (in Settings>General), when in the
Reader (only) the screen automatically
rotates from portrait to landscape depending
on how you hold your device.
When desired, you can lock the screen in the
desired orientation to prevent the auto-
rotation.
1. With page displayed in the Re ade r, press
to display the Re ade r Func t ion
Me nu.
2. Tap to display more menu options,
tap Lock.

67
4. Press or to hide the Rea de r
Funct ion M e nu.
3. To unlock, repeat step 1-3, tapping
Unlock in step 2.
Play Music in Background while Reading
When desired, you can play music in the
background as you read in the Reader.
1. Start the music as instructed under Play
Music beginning on page 68.
2. Press to return to the Applic ation
Me nu screen.
3. Open desired media file in the Reader; the
music continues to play as you read.
4. To stop the music, press to return to the
Applica t ion M enu screen, tap Music,
tap , and then .

68
MUSIC
The following audio file formats are supported: MP3
The following methods can be used to add audio files
to your Music List:
Import audio files from a SD card
Copy audio files from your computer via
microUSB
Play Music
1. Tap Music on the Applic ation M e nu screen.
2. The M usic List screen is displayed.
3. If desired, you can change the sort display by
tapping Artist or Title.
4. Tap Shuffle if you want multiple audio files to
play in random order ( = on). Otherwise they
play in the order listed in the Music List.
5. Tap Repeat if you want the audio files to play
over and over until you stop them ( = on).
69
Otherwise the audio files play once and then
stop.
6. To play all songs listed, tap Select All, tap
Play.
To play one song, tap on the song, tap Play.
To play selected songs, tap next to the
desired songs, tap Play.
7. Tap to pause/stop, to play, /
to play previous/next audio file, and
to adjust the volume.
You can also press and then /
to adjust the volume.
8. Press to display the Applica t ion M enu
screen. The music continues to play even
when you launch other applications.
Stop Music
1. Tap Music on the Applic ation M e nu
screen to re-display the M usic Pla y
screen.
2. Tap .

70
3. Tap Menu to return to the Music List
screen.
4. Press to return to the Applic at ion
Me nu screen.
Delete Audio Files
1. Tap File Manager on the Applic a tion
Me nu screen.
2. Tap the Music category.
3. Press to display the option menu,
tap DeleteMode.
4. Tap on the files you want to delete, tap
OK.
5. Tap to confirm delete.
6. Press to return to previous screens.
Playlist
If desired, you can create a separate playlist of
selected audio files (i.e., your favorite tunes,
specific genre, specific artist, etc.) from your
Music List, allowing you to play the selected list
at any time.

71
Add songs to Playlist
1. In the M usic List screen tap next to
the song titles you want to add.
2. Tap Add to Playlist.
3. A message confirms the playlist was
updated.
Play songs in Playlist
1. In the M usic List screen, tap Playlist at
the top of the screen.
2. To play all songs listed, tap Select All,
tap Play.
To play one song, tap on the song listing,
tap Play.
To play selected songs, tap next to
the desired song files, tap Play.
3. To return to the main M usic List screen,
tap Artist or Title at the top of the screen.

72
Remove songs from Playlist
Every time you tap Add to Playlist, the entire
playlist is updated with the songs that are
selected in the main Music List.
To remove songs from the playlist, simply
de-select them in the main Music List and
tap Add to Playlist again.
PHOTOS
The following photo file formats are supported:
JPEG and PNG
The following methods can be used to add photos to
the device:
Import photo files from a SD card
Copy photo files from your computer via
microUSB

73
Photo Gallery
1. Tap Photos on the Applic at ion M enu
screen.
2. The Phot o Ga llery screen is displayed with
photos arranged alphabetically in ascending
order. You can tap View [ASC] to change the
display to descending order [DSC].
You can set the photos to display by date
added to the device through
Settings>Photos (pg. 84).
3. To view individual photos, tap on a photo.
4. When a photo is displayed in full-screen
mode, a Phot o Func t ion M enu appears at
the top of the screen with the following
options:
Back Return to Photo Gallery screen.
Zoom In
Enlarges the photo view; tap
multiple times until desired view is
achieved.
Tap to pan the
viewable section of the photo.
74
Zoom
Out
Tap to reduce the photo view back
to normal size.
Rotate
Rotates photo 90 degrees
clockwise; tap multiple times until
desired orientation is achieved.
Previous
Display previous photo listed in
Photo Gallery
Next
Display next photo listed in Photo
Gallery
Play Slideshow
To play a slideshow of all photos, in the Photo
Ga lle ry screen, tap Slideshow without selecting
any photos.
To play a slideshow of selected photos, tap
Multiple Select, tap on each photo you want
to include, tap Slideshow.
Press to return to the Photo Ga llery
screen.
75
Slideshow Options
1. While slideshow is playing, tap anywhere
on the photo to display the option menu.
2. Tap the and to set the speed at
which the slideshow photos transition
from one to another (default = 5 seconds).
3. Tap to zoom in on the photo.
4. Tap to resume the slideshow.
5. Tap to return to the Photo Ga llery.
Delete Photo Files
1. Tap File Manager on the Applic a tion
Me nu screen.
2. Tap the Photos category.
3. Press to display the option menu,
tap DeleteMode.
4. Tap on the files you want to delete, tap
OK.
5. Tap to confirm delete.
6. Press to return to previous screens.
76
CALENDAR
Tap Calendar on the Applic a tion Me nu screen
to display the Ca le ndar screen.
Triangle
i
ndicates
scheduled event
(only 1 event per
date allowed)
Outline i
ndicates
current date
Display previous
month
Display next
month

77
View Other Months
1. On the Ca le nda r screen, tap to view
previous months, or to view future
months.
2. Press to exit the Ca le ndar screen.
Add Event
Only one event per date is allowed. If you add
an event on a date with existing event, the new
event replaces the first.
1. On the Calendar screen, tap on the date to
which you want to add an event.
2. In the Add Eve nt screen, tap in each entry
field to enter the desired event information
tap Save.
3. Press to return to the Ca le nda r screen.
Edit Event
1. On the Calendar screen, tap Manage Events.
2. Tap on an event to edit, make desired
changes, tap Save.
3. Press to return to the Ca le nda r screen.

78
Snooze or Cancel Event Alert
When a scheduled event is activated, a pop-up
alert message appears.
Tap Snooze if you want to be reminded again in
10 minutes, or tap Dismiss to cancel the alert.
SUDOKU
Tap Sudoku on the Applica t ion M enu screen to play
the popular number-placement game.
Each Sudoku puzzle has a unique solution that can
be reached logically without guessing.
The Internet is a good source for more information
about playing Sudoku.
Game Rules
1. Enter digits from 1 to 9 into the blank spaces.
Every row must contain one of each digit. So
must every column, as must every 3x3 square.

79
2. Touch a number at the top of the screen, and
then touch in a square to add the number to
that square.
3. If you enter a number incorrectly, you can fix
by selecting a new number at the top of the
screen and tap on the incorrect number.
SETTINGS
Settings>General
1. Tap Settings on the Applic ation M e nu
screen.
2. Tap General.
3. The Registered to entry field shows your
Barnes & Noble account email address. This
is entered under Settings>Barnes & Noble
Account (pg 82).
4. Language: Tap to choose the desired
language.

80
5. Orientation: Tap to set the screen
display orientation, Portrait (vertical - default)
or Landscape (horizontal), or select Auto to
have the orientation automatically switch
orientation when you turn the device.
6. Screen Saver: The device automatically
enters Screen Saver mode when left idle for a
period of time; tap to set the desired
period of time. The device automatically
enters Sle ep mode when left in Screen Saver
mode for 3 minutes; slide the power switch
quickly to turn Sleep mode off.
7. Power Saving: This feature is designed to
help achieve the longest reading time per
battery charge when using the Rea de r
application.
The default power saving mode is Off. Tap
to turn On for optimum reading time
per battery charge. When On, the power
saving icon appears at the top of the
screen.
You must also turn the Wi-Fi Off when
using the Power Saving feature (pg. 87).
81
You may experience slower responses in
performance when Power Saving is turned
On.
8. Tap to save settings.
9. Press to return to previous screens.
Settings>Date and Time
IMPORTANT: In order to connect with your Barnes
& Noble online account, the Date and Time must be
set correctly according to your location.
1. Tap Settings on the Applic ation M e nu
screen.
2. Tap Date and Time.
Set Time Zone
a. Tap the Time Zone icon .
b. Tap on the appropriate Country and then
Region for your location.
Press / to display next/previous
pages.
82
Set Date
a. Tap on the Date icon .
b. Tap on the individual year/month/day
fields that you want to change, and then
tap to adjust settings.
Set Time
a. Tap on the Time icon .
b. Tap on the individual hour/minute fields
that you want to change, and then tap
to adjust settings.
c. Tap 12HR or 24HR for desired time
format.
12HR = 12:00am-12:00pm (default)
24HR = 12:00-24:00
3. Tap the to save settings.
4. Press to return to previous screens
Settings>Barnes & Noble Account
Register your Barnes & Noble account login
information on your device.
You must be connected to a Wi-Fi network in
order to set up your Barnes & Noble account.
83
1. Tap Settings on the Applic ation M e nu
screen.
2. Tap Barnes & Noble Account.
3. Tap in the B&N Account field to display the
Barnes & Noble Login entry box.
4. Enter the email address that is registered
with your Barnes & Noble account, tap
.
5. Enter your password, tap .
6. Tap Login.
7. The device logs into the Barnes & Noble
server to verify your account information. If
successful, the Barnes & Noble Account
screen is displayed again.
8. Press to return to previous screens.
Create new account
If you want to register a new account with
Barnes & Noble, tap Create new account.
The browser launches and displays the
Barnes & Noble Account setup page. Follow
the prompts to create your new account.

84
Forgot password
If you have forgotten your password, tap
Forgot password.
The browser launches and displays the
Barnes & Noble Sign I n or Crea t e Ac c ount
web page. Tap Forgot your password? and
then follow the prompts to reset your
password.
De-register
If you want to delete your Barnes & Noble
login information and delete the media
unlock information in the device, tap
De-register, tap to confirm.
CAUTION: De-registering causes the media
in the device to be locked and can only be
opened by providing the Barnes & Noble
login information and credit card that was
used to purchase the media.
Settings>Photos
Use these functions to set your Slideshow
preferences.
85
1. Tap Settings on the Applic ation M e nu
screen.
2. Tap Photos.
3. Slideshow Interval: Tap the and to
set the speed at which the slideshow photos
transition from one to another (default = 10
seconds).
4. Display Current Date and Time: Tap to
select if you want the current date and time
displayed with your photos.
5. Enable Music with Slideshow: Tap to
select if you want music to automatically play
with your photo slideshows.
If enabled, you can optionally select the music
source from these options:
Select music: Select if you want to choose
one particular audio file to play. Tap to
select the option, tap Select music to select
the desired audio file; the title is displayed
Playlist: Select if you want the music in your
custom playlist to play. Tap to select. You
must have a music added to the playlist;

86
otherwise the music defaults to the main
music library (pg. 68).
6. Photo Display Order: Select desired order in
which you want your photos displayed in the
Photo Ga llery, by Date added or by File
Name.
7. Tap to save your settings.
8. Press to return to previous screens.
Settings>Network
In order to connect to the Internet, you must have
a Wi-Fi network set up on your pandigital
novel. If you did not set up a network during
the initial setup, do so now.
1. Tap Settings on the Applic ation M e nu
screen.
2. Tap Network.
3. If your Wi-Fi status is off, tap Turn ON.
4. The device automatically scans and lists local
Wi-Fi Networks found.
A indicates secure networks that require
login name/password to connect.
87
5. Tap the desired network to which you want to
connect.
6. If applicable, enter the network Password.
The password is remembered for future
connections.
7. Tap .
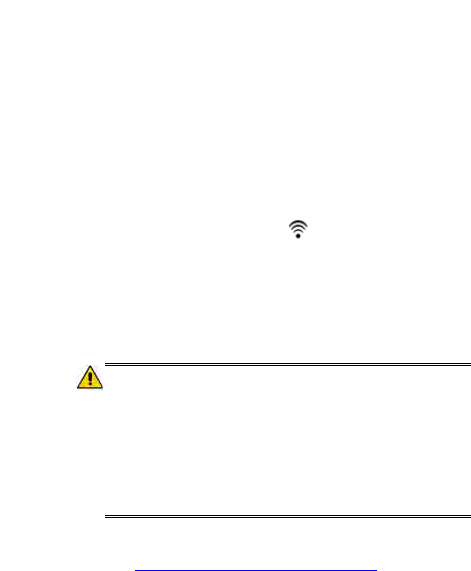
When connected, the Wi-Fi status icon
appears at the top of the screen.
If your Wi-Fi network is set as hidden, it won’t be
found by the auto scan. Tap Hidden networks
and then enter the network name, type of
Authentication, and password,
tap .
To re-scan for local Wi-Fi networks, tap .
To view or change any of the network settings,
tap . If you made changes, tap to
save.
To disconnect from a connected network,
simply tap on the network.
Turn Wi-Fi Off
There may be times when you want to
prevent your device from connecting to a
88
Wi-Fi network, even if you’ve set the network
up on your device.
1. Tap Settings on the Applic ation M e nu
screen.
2. Tap Network.
3. Tap Turn OFF.
The Wi-Fi status icon no longer appears
at the top of the screen.
Settings>Advanced Settings
Firmware Update
WARNING! If you update your firmware, all
Barnes & Noble account information and
Adobe DRM Activation records will be
deleted. Application feature default settings
will be factory reset. We recommend that
you back up all downloaded media to your
computer before updating your firmware.
1. On your computer, go to
www.pandigital.net/downloads.

89
2. Select the pandigital novel
category.
3. Select your device model and Update via
SD Card option.
4. When the File Dow nloa d window
appears, select Save and then select the
desired location to store the update file
on your computer.
5. When the download is complete, connect
your device to your computer via
microUSB cable.
6. Tap when prompted to use the
device as a mass storage. The device is
recognized by your computer as a
removable drive. “Sync in progress” is
displayed on the screen while connected.
7. In a MS Windows Explorer or Mac Finder
window, locate the Firmware folder in
PD_Novel drive.
8. Unzip the downloaded update file into the
Firmware folder (qdutil folder & contents).
9. Disconnect the microUSB from the
device and wait for the device to refresh.

90
10. Tap Settings on the Applic at ion M e nu
screen, tap Advanced Settings.
11. Tap Firmware Update, tap to
confirm update.
12. Wait as the device is updated and the
update successful message appears.
13. Turn the device off, and then slide the
power switch and hold for 5 seconds to
reboot.
14. Wait for the Applic a tion M enu screen to
be displayed.
15. Use Settings>Date and Time to reset the
Date and Time according to your location
(pg. 81). Note: In order to connect with
your Barnes & Noble online account,
these must be set correctly.
Restore to default
Restoring the defaults using this option
changes all general settings back to the
factory pre-set defaults. Your downloaded
media, contact list, photos, etc. are not
affected.

91
1. Tap Settings on the Applic ation M e nu
screen.
2. Tap Advanced Settings.
3. Tap Restore to default.
4. Tap to confirm the reset.
Restore to default and remove user information
WARNING: This option changes all
general settings back to the factory pre-set
defaults AND deletes your personal
settings, downloaded media, contact list,
photos, etc.. Use this option only if you
want the device completely returned to
“out-of-box” status.
1. Tap Settings on the Applic ation Me nu
screen.
2. Tap Advanced Settings.
3. Tap Restore to default and remove user
info.
4. Tap to confirm the reset.

92
Settings>Support
The information on the T e chnic a l Support
Inform a tion screen is for reference if you
contact Technical Support.
1. Tap Settings on the Applic ation M e nu
screen.
2. Tap Support.
EMAIL
SMTP and IMAP accounts are supported.
Note: This device does not support email
attachments. Therefore, emails sent to you with
attachments are received without the attachments.
Setup New or Add Accounts
You can enter multiple personal email addresses
that you would like to access through your
pandigital novel.

93
1. Select Email from the Applica t ion M enu
screen.
2. In the Ema il Ac c ounts screen, tap Settings.
3. Tap Add Account.
4. Tap into the Email field to enter your email
address, tap .
5. Tap into the Password field and enter your
email password, tap .
6. Tap next to Set as Default. If you add
more email addresses later, you can change
the default account.
7. Tap Next.
8. If the Incoming Server Settings were
automatically populated, you can check the
accuracy on your email provider’s website.
If necessary, enter/change the Incoming
Server Settings, tap Next.
9. Repeat for the Outgoing Server Settings,
tap Next.
10. Press to return to previous screens.

94
Set up Yahoo! Plus Account
Your pandigital novel does not
support free yahoo email accounts (POP3).
Yahoo! Plus accounts must use the following
data when setting up your email account.
Incoming Mail Server Settings
POP server: plus.pop.mail.yahoo.com
Use SSL
Port: 995
Outgoing Mail Server Settings
SMTP server: plus.smtp.mail.yahoo.com
Use SSL
Port: 465
Use Authentication
Account Name/Login Name: Your Yahoo!
Mail ID (your email address without the
“@yahoo.com”, for example “testing80”)
Email Address: Your Yahoo! Mail address
(for example, testing80@yahoo.com)
Password: Your Yahoo! Mail password

95
Set up Juno Platinum or Turbo Account
Your pandigital novel does not
support free juno email accounts (POP3).
Platinum or Turbo Juno accounts must use the
following data when setting up your email
account.
Incoming Mail Server Settings
POP server: pop.juno.comnovel
Outgoing Mail Server Settings
SMTP server: authsmtp.juno.com
Manual Setup
After setting up your email account, use
Manual Setup to edit the settings if
necessary.
Email Inbox
1. Select Email from the Applic at ion M enu
screen.
2. If you have multiple email accounts, tap on
desired account to open, tap Inbox.
3. Your mail is received and displayed in the
Inbox screen.

96
Press / to display next/previous
pages.
4. Press to return to previous screens.
Open Email Message
1. In the Inbox screen, tap on an email to
open it.
2. Tap or finger slide the scroll bar to
scroll the email.
3. To reply or forward the message, tap Reply
and then tap desired option:
Reply
Reply all
Forward
4. To display the previous or next email
message listed in the Inbox, tap Previous or
Next.
5. If you want to delete the message, tap Delete.
Compose New Email Message
1. In the Inbox screen, tap Compose.
2. Tap in the To/CC/BCC entry field and then
enter the recipient’s email address.

97
OR
Tap Add Contacts to select the recipient(s)
from your Cont a cts list.
3. Tap in the Subject entry field to enter your
desired subject title.
4. Tap in the message area to enter your
personal message.
5. Tap Send when ready to send your email.
6. If you do not want to send or save the
message, tap Discard.
Edit Email Account
1. Select Email from the Applica t ion M enu
screen.
2. Select the account that you want to edit, tap
Setting, tap Manual Setup.
3. Make desired changes to settings.
Set Default Account
One email address must be designated as the
default account, so if you have multiple email
accounts you can designate any one as the
default.

98
1. Select Email from the Applica t ion M e nu
screen.
2. Tap Setting.
3. Tap on the desired account, tap Set as
Default.
Delete Email Accounts
If you have multiple accounts, and you delete
the account designated as the default account,
the next email listed is automatically set as the
default.
1. Select Email from the Applic at ion M e nu
screen.
2. Tap Setting.
3. Tap on the desired account to be deleted,
tap Delete Account.
4. Tap to confirm deletion.

99
CONTACTS
You can create an address book of your personal
contacts, including personal notes as desired.
Add New Contacts
1. Tap Contacts on the Applica tion M enu
screen.
2. Tap Add Contact.
3. In the Add Cont a ct screen, tap in each entry
field to enter your contact information.
4. Tap Save.
Edit Contacts
1. Tap Contacts on the Applica tion M enu
screen.
2. Tap on the desired contact name that you
want to edit.
3. In the Edit Cont act screen, tap in the entry
fields to change or add information.

100
4. Tap Save.
Delete Contacts
1. In the Cont a ct s screen, tap the desired
contact name that you want to delete.
2. In the Edit Cont act screen, tap Delete.
BROWSER
Use Web to access the Internet and ‘surf the web’
and visit your favorite web sites.
Using Web requires a connection to a Wi-Fi
network. If you have not set up your Wi-Fi network,
do so now using the instructions on page 86.
Go to a Web Site
1. Tap Browser on the Applica t ion M enu
screen to launch the internet browser.
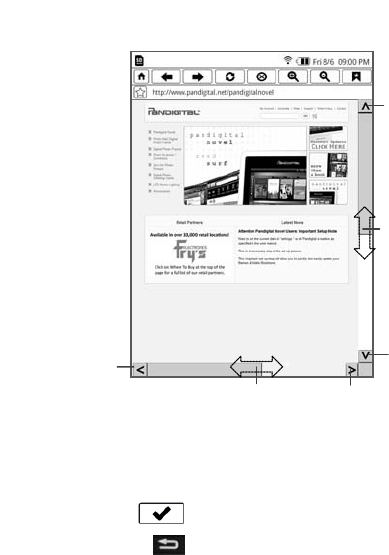
101
2. Tap in the top URL address field; the keypad
appears so you can enter the web site
address.
3. Tap to go to the web site address.
4. Press to exit the browser.
Tap to scroll
page down
Tap to scroll
page left
Finger slide
scroll bar Tap to scroll
page right
Tap to scroll
page up
Finger slide
scroll bar

102
Browser Navigation Menu
Return to Home website
Tap to bookmark web page
Display previously viewed web page
Return to web page viewed before selecting
Back
Refresh the screen by reloading the web
page
Stop web page from loading
Zoom in on the web page
Zoom web page back out
List of bookmarked web pages
Add Bookmark to Web Page
1. To bookmark a web page, tap the in the
upper left corner of the screen.
2. Tap to confirm the addition.
103
3. When the keypad appears, enter the URL
address, tap .
View Bookmarked Web Pages
1. To view a list of all bookmarked web pages,
tap .
2. To display a bookmarked web page, tap
directly on a listing.
3. To delete one bookmark, tap next to a
listing, tap Delete.
To delete all bookmarks, tap Select All, tap
Delete.
DICTIONARY
The built-in dictionary allows you to quickly and
conveniently look up the definition of words, either
within the media you are viewing or any other words.
104
1. Tap Dictionary on the Applic a tion M enu
screen.
2. Enter the word to look up, tap .
3. The word is displayed in the Sea rc h w ord
box, tap Search.
4. The definition of the word is displayed.
5. To look up a different word, tap in the Sea rc h
w ord box; repeat steps 2-3.
6. Press to exit the dictionary.
Reader Dictionary
You can also access the dictionary while reading
a media file in the Re ade r.
1. While viewing a media page, press .
2. Tap Dictionary.
3. Tap on the word you want to look up.
4. If the definition is longer than the viewable
area, finger slide the scroll bar to view the
remainder of the definition.
5. Tap to close the lookup window.

105
ALARM
An alarm icon displayed at the top of screens
indicates that one or more alarms have been set
and are active.
Add Alarm
1. Tap Alarm on the Applic a tion Me nu screen.
2. Tap Add Alarm.
3. Tap in the Label entry field to enter the
desired descriptive label for the alert (i.e.,
Lunch with friend).
4. Tap in the Time entry field to enter the time.
5. If you want the alarm to alert repeatedly on
specific days, tap next to the desired days.
6. Tap Save.
7. In the Alarm screen, tap next to the alarm
to activate it.
8. Tap Save.

106
9. The alarm icon appears at the top of the
screen
10. Press to return to the Applica tion M enu
screen.
Shut Off Alarm Alert
When a scheduled alarm is activated, an alert
appears on the screen with the alarm information.
Tap on the alert message to stop it, tap to
close the alert message.
Edit Alarm
1. In the Alarm screen, tap on the alarm you
want to edit.
2. Make desired edits tap Save.
De-Activate Alarms
You may have instances where you want to
temporarily de-activate alarms rather than delete
them.
1. In the Alarm screen, tap next to the
alarm(s) you want to de-activate.
2. Tap when you want to re-activate.

107
Delete Alarm
1. In the Alarm screen, tap on the alarm you
want to delete.
2. In the Edit Ala rm screen, tap Delete.
ADOBE® eBOOKS
Adobe® eBooks is designed for reading and
managing eBooks and other digital content
transferred from Adobe Digital Editions (ADE).
To view Adobe® eBooks, you need a free Adobe
account and Adobe Digital Editions software.
Register your account and then download the
software on the Adobe website:
http://www.adobe.com/products/digitaleditions
Authorize your pandigital novel for ADE
1. Start ADE on your computer.
2. Connect your pandigital novel to
your computer using the USB cable.

108
3. ADE detects your pandigital
novel and displays the Device Setup
Assistant.
4. Click Authorize Device, click Finished.
After you authorize your pandigital
novel, it appears as a device in ADE (titled
PD_NOVEL).
Transfer eBooks from ADE into your
pandigital novel
1. With your pandigital novel still
connected to the computer, drag and drop the
eBooks from the ADE collection into your
pandigital novel device (titled
PD_NOVEL).
2. Disconnect the USB cable from device.
Read Adobe® eBooks
1. Tap Adobe® eBooks on the Applica t ion
Me nu screen.
2. The books you transferred to PD_NOVEL are
listed.
3. Tap on a book cover to open in the Reader.

109
If you attempt to open a book but an error
message states the book cannot be opened, it
may be an expired book or the activation
record has been erased. Re-start your
pandigital novel and then re-
connect to the computer to re-activate the
authorization.
If an Adobe eBook has an expiration date, it
also expires on your pandigital
novel. If an eBook is returned in ADE
before it expires, the next time you connect
your pandigital novel to your
computer, ADE updates the status of the
returned eBook on your pandigital
novel, and you won’t be able to read it.
Delete Adobe® eBooks
1. Tap File Manager on the Applic a tion Me nu
screen.
2. Tap the Digital Editions category.
3. Press to display the option menu, tap
DeleteMode.
4. Tap on the files you want to delete, tap OK.
110
5. Tap to confirm deletion.
6. Press to return to previous screens.
FILE MANAGER
Tap File Manager on the Applic a tion Me nu screen.
View Internal Memory Contents
1. In the File M a na ge r screen, the default
media listed is the Internal Memory.
2. Tap on the desired media category, and if
applicable tap on sub-category.
3. Tap on a media file to open it in its applicable
application, or press to return to
previous screens.
View microSD Card Contents
Macintosh users must format SD cards using
the FAT32 option in order for your
pandigital novel to read the card.

111
1. In the File M a na ge r screen, tap SD Card.
2. If you created category folders on your SD
card, tap on the desired category.
3. Tap on a media file to open it in its applicable
application, or press to return to
previous screens.
Import Media from microSD Card
Macintosh users must format SD cards using
the FAT32 option in order for your
pandigital novel to read the card.
Use this option to import all files found on
microSD of selected type.
1. In the File M a na ge r screen, tap Import.
2. Select the media types you want to import,
tap Import.
3. Files are copied into your pandigital
novel.
4. Press to return to previous screens.
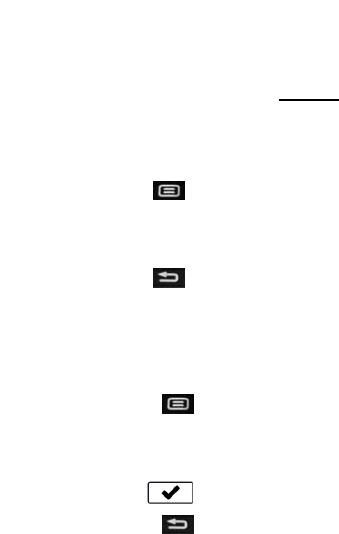
112
Copy Specific Media Files into Internal Memory
Use this option to choose specific files to copy
into the Internal Memory.
1. In the File M a na ge r screen, tap the category
in which there are files you want to copy.
2. Press to display the option menu, tap
CopyMode.
3. Tap on the files you want to copy, tap OK.
4. Press to return to previous screens.
Delete Media Files from Internal Memory
1. In the File M a na ge r screen, tap the category
in which there are files you want to delete.
2. Press to display the option menu,
tap DeleteMode.
3. Tap on the files you want to delete, tap OK.
4. Tap to confirm delete.
5. Press to return to previous screens.
113
Rename Categories or Files
1. In the File M a na ge r screen, select Internal
or SD Card based on where your media
resides that you want to rename.
2. If applicable, tap on the desired category.
3. Press to display the option menu, tap
RenameMode.
4. Tap on the file you want to rename, tap OK.
5. The keypad appears so you can enter the
desired file name, tap .
6. Press to return to previous screens.

114
USER GUIDE
The full pandigital novel User Guide is
included as a book in My Library. To view it, tap on
the User Guide book cover:
Once open, you can use the standard Reader
functions to search and navigate through the
document in the same manner as your downloaded
media files.
If you want to print the User Guide, copy it to your
computer using the Connect to Computer
instructions beginning on page 115.
The User Guide is also posted on our website:
www.pandigital.net/downloads.

115
Connect to Computer
You can connect your pandigital novel to
a Windows or Macintosh computer via a micro USB
cable to copy files between the two devices.
Compatible with operating systems: Windows XP,
Windows Vista, Windows 7, Mac OSX
If the device is in Sleep mode, it won’t be detected
by your computer. Slide the power switch and
release quickly to disable Sleep mode first.
Connect to Windows PC
1. Connect the small end of the micro USB
cable to the pandigital novel
micro USB port, and the larger end to an
available Type A USB port on your computer.
2. Tap when prompted to use the device
as a mass storage. The device is recognized
by your computer as a removable drive.
“Sync in progress” is displayed on the screen
while connected.

116
3. Open a Windows Explorer window. The
pandigital novel drive is listed as
PD_NOVEL.
4. To copy files into your pandigital
novel, select and drag the desired files
into the appropriate pre-assigned folder:
eBooks
Music
Photos
Do not break the USB connection while
copying files.
5. To copy files from your pandigital
novel into your computer, select and drag
the desired files to any desired location on
your computer.
Disconnect
It is important to always perform a safe PC
‘release’ before disconnecting the micro USB
cable from the pandigital novel
and computer.

117
Windows 7
1. On the Windows System Tray, click the
hardware removal icon.
2. Click the Eject Removable Disk message
corresponding with the pandigital
novel device drive.
3. When the message “Safe to Remove
Hardware” appears, disconnect the micro
USB cable from your pandigital
novel and computer.
Windows VISTA
1. On the Windows System Tray, click the
hardware removal icon.
2. Click the Safely remove USB mass
Storage device message corresponding
with the pandigital novel
device drive.
3. When the message “This device can now
be safely removed from the computer”
appears, disconnect the micro USB cable
from your pandigital novel
and computer.

118
Windows XP
1. On the Windows System Tray, click the
hardware removal icon.
2. Click Remove Hardware Safely.
3. Select the storage device corresponding
with the pandigital novel, and
then click Stop to disconnect. A final
dialog box opens.
4. Click Close.
5. When the message “It is now Safe to
Disconnect Hardware” appears,
disconnect the micro USB cable from
your pandigital novel and
computer.
Connect to Macintosh Computer
eBooks downloaded from Barnes & Noble to a
Macintosh computer are saved in an
unsupported .pdb format. If you copy the .pdb
formatted eBooks into your pandigital
novel, they will not be recognized. You
should always use Get Books to download
eBooks directly from your Barnes & Noble
download library into your pandigital

119
novel. Books that are only available in .pdb
format are not downloadable even when you
use Get Books.
Music and Photo files can be copied from a
Macintosh computer into your pandigital
novel as long as they are in a supported file
format.
1. Connect the small end of the micro USB
cable to the pandigital novel
micro USB port, and the larger end to an
available USB port on your computer.
2. Tap when prompted to use the device
as a mass storage. The device is recognized
by your computer as a removable drive.
“Sync in progress” is displayed on the screen
while connected.
3. Macintosh recognizes the pandigital
novel as an external storage device titled
PD_NOVEL.
4. Double-click the PD_NOVEL icon that
appears on the desktop.

120
5. To copy files into your pandigital
novel, select and drag the desired files
into the appropriate pre-assigned folder:
eBooks
Music
Photos
Disconnect
1. To safely disconnect from your
Macintosh, select the PD_NOVEL icon on
your desktop and press Command-e to
eject the disk.
2. When the icon is no longer on the
desktop, it is safe to unplug the micro
USB cable.

121
Frequently Asked Questions
ADOBE® eBooks
Q: Are digital books other than Barnes &
Noble compatible with the pandigital
novel?
A: Yes, as long as the eBook is in .epub or
.pdf format. Refer to Adobe® eBooks
section to use Adobe Digital Editions
software to transfer to your device (pg.
107).
Q: Does the pandigital novel support
Adobe® eBooks which have Digital Rights
Management (DRM) on them?
A: Yes, as long as the eBook is in .epub or
.pdf format.
Q: Does the pandigital novel support
eBooks borrowed from a public library
using a global distributor such as
Overdrive.com?
A: Yes. Download the books to your computer
and then use Adobe Digital Editions
software to transfer them to your
pandigital novel.

122
BASIC FUNCTIONALITY
Q: Do I have to charge the battery before
use?
A: Yes. Charge the battery for 4 hours using
the included USB power adapter with the
micro USB cable or connecting micro USB
cable to your computer (pg. 18). You can
use your device while the battery is
charging.
Q: Is it easy to set up my pandigital
novel?
A: Yes! Charge the battery, turn your device
on and follow the prompts for the initial
setup. It’s that simple!
Q: How do I contact Customer Support?
A: If this FAQ section doesn’t answer your
questions, you can contact Customer
Support at 1-800-715-5354.
BROWSER
Q: Do I need a Wi-Fi adapter to connect to
the Internet?
A: No. The Wi-Fi adapter is built-in to your
pandigital novel.

123
CALENDAR
Q: Can I schedule events on any date?
A: Yes, however, only one event per date is
allowed.
COMPUTER COMPATIBILITY
Q: Which media cards are compatible with
my pandigital novel?
A: Only microSD Cards.
Q: Which Operating Systems are compatible
with my pandigital novel?
A: Microsoft Windows XP, Windows VISTA,
Windows 7, and MAC OS.
Q: How do I connect my pandigital
novel with my computer?
A: Use a micro USB cable. Refer to the
Connect to Computer (pg. 115).
eBooks, Magazines, Newspapers
Q: What types of media files are compatible
with my pandigital novel?
A: EPUB and PDF

124
Q: How do I purchase books from Barnes &
Noble?
A: Make sure you are connected to a Wi-Fi
network. On the Applica tion M enu screen,
tap Bookstore and then tap on a media
cover to display the Buy Now button.
Or you can tap Shop B&N and shop online
the same as you would on your computer.
Q: How do I download books to my
pandigital novel after I
purchase them from Barnes & Noble?
A: Use My Library>Get Books (pg. 42).
Q: What types of eBook, Magazine, and
Newspaper files are compatible with my
pandigital novel?
A: EPUB and PDF
Q: Does the pandigital novel support
eBooks borrowed from a public library
using a global distributor such as
Overdrive.com?
A: Yes. Download the books to your computer
and then use Adobe Digital Editions
software to transfer them to your
pandigital novel (pg. 107).

125
Q: How does the Lend/Return Books feature
work?
A: You can lend to or borrow books from your
friends & family that Barnes & Noble has
classified as “lendable”. Use Lend/Return
Books function to lend or borrow (pg. 47).
Q: How long can I lend or keep a borrowed
book?
A: Only two (2) weeks, and then it expires, is
automatically returned to lender, and
removed from My Library.
EMAIL
Q: Can I use any of my personal email
addresses to send/receive email?
A: Your pandigital novel supports SMTP and
IMAP accounts. It does not support and
some of the free (POP3) email accounts
such as yahoo.com and juno.com.
Q: Can I add my email contacts into my
Contact list?
A: No, not at this time. However, you can use
your contact list to retrieve an email
address when composing an email
message.

126
MUSIC
Q: What type of audio files can I play on my
pandigital novel?
A: Only MP3 file format.
Q: How do I add audio files to my
pandigital novel?
A: You can download audio files from your
favorite online music store, import audio
files from a microSD card (pg. 111), or copy
audio files from your computer (pg. 115).
Q: Can I create a separate list of my favorite
songs?
A: Yes. Use Music>Playlist (pg. 70).
MY LIBRARY
Q: How do I add media to My Library?
A: You can download media from Barnes &
Noble, import media from your microSD
card, or copy media files from your
computer via microUSB cable.
Q: Can I create personal bookshelves for
organizing my media?
A: Yes. Use My Library>Bookshelves (pg. 51).

127
Q: Do I need an account with Barnes &
Noble to download from their site?
A: Yes. You also need a valid credit card
registered with your account in order to
download purchased media from your
online download library.
Use My Library>Get Books to download
your media (pg. 42).
Q: How do I display the Application Menu
from other application screens?
A: Press , multiple times if necessary, until
the Applic ation Me nu screen is displayed.
Q: What is the S:##, F:## and T:## shown
during a Get Books download process?
A: S:## = successful download
F:## = failed download
T:## = total to be downloaded
PHOTOS
Q: What type of photo files can I view on my
pandigital novel?
A: JPG, JPEG, PNG
Q: How do I add photo files to my
pandigital novel?

128
A: You can download photo files from online
photo sharing websites, import them from
your microSD card (pg. 111), or copy them
from your computer (pg. 115).
Q: Can I view individual photos as well as
slideshows?
A: Yes. On the Phot o Ga llery screen you can
select individual photos to view or tap
Slideshow to play a slideshow (pg. 72).
Q: Can I set preferences for how my
slideshow displays?
A: Yes. Slideshow options are available
through Settings> Photos (pg. 84).
READER
Q: Can I view media files in either vertical or
horizontal orientation?
A: Yes, eBooks, Magazines, Newspapers or
photos. To switch viewing orientation, tap
Settings>General>Orientation and select
desired orientation.

129
Q: Can I change the size of the displayed
text in the Reader?
A: Yes. Either tap the in the lower right
corner, or press , tap Font Size, and
then tap the desired size from the list.
Q: Can I easily jump to a specific page?
A: Yes. Use Reader>Go to (pg. 64).
Q: Can I play music and read at the same
time?
A: Yes. Refer to Play Music in Background
while Reading (pg. 67).
Q: How do I display the Reader Function
Menu while reading?
A: Press .
Q: How do I return to the Application Menu
from Reader?
A: Press .
Q: Can I bookmark a page in the Reader?
A: Yes. Use the Bookmarks function in the
Re a de r function menu (pg. 60).

130
Q: Can I highlight text on a page?
A: Yes, use the Bookmarks function in the
Re a de r function menu (pg. 60).
Q: Can I add a note to a page?
A: Yes, use the Bookmarks function in the
Re a de r function menu (pg. 60).
Q: Does the Reader have a Dictionary?
A: Yes. Access the dictionary directly from the
Applica t ion M enu screen (pg. 103) or
through the Re a de r (pg. 104).
Q: Can I read books stored on my microSD
card?
A: Yes, although we recommend that you
import the book into your pandigital
novel so it is available after you remove
the microSD card.
Q: Why doesn’t my pandigital
novel read my microSD card?
A: If you create a microSD card using a
Macintosh computer, you must use the
FAT32 option when formatting the microSD
card, otherwise the device does not read
the card.

131
Battery Management
The pandigital novel is delivered with
some charge on the battery, but before you start to
use your device, it is recommended that you charge
the battery for 4 hours.
The rechargeable battery is designed and
manufactured to be used and recharged frequently.
As with all batteries, the capacity of the battery
reduces each time it is charged/depleted. However,
you can still try to prolong the battery’s lifetime by
following the suggestions below:
Use your device at least once a week.
Charge the battery regularly and fully. Never
leave the battery fully discharged for a long
period of time.
Always keep your device and the battery away
from heat.
Charge Battery
USB Power Adapter: Plug the USB power
adapter into an electrical wall outlet, and then
connect to your device to fully charge the battery
before use (4 hours).

132
Micro USB Cable: Connect the micro USB
cable to your computer. If you want to use the
device while the battery is charging, tap
when prompted to use the device as a mass
storage.
While charging, the battery icon displays as: .
When fully charged, the battery icon displays
as:
A fully discharged battery takes approximately
4 hours to fully charge.
You can use the device while the battery is
charging.

133
Technical Specifications
Product
Specs 6” Digital ePaper Display
Compatible
Media
Sources
microSD card: Micro Secure Digital™
card (microSD)
PC: Windows XP, Windows Vista,
Windows 7
Macintosh: MAC OSX
Features
Reader for eBooks, Magazines, and
Newspapers
Wi-Fi compatible
Direct links to Barnes & Noble online
eBookstore
Plays Audio files
Displays Photo files
Clock and Calendar with events
Sudoku game
Built-in Dictionary
Contact list
Email
Web Browser
Alarm clock
File Manager

134
Compatible
File
Formats
eBooks,
Magazines,
Newspapers
EPUB, PDF
Photos JP G, JPEG, PNG
Audio MP3
USB Ports Micro USB 2.0
Internal
Memory 2GB
Wi-Fi
Compatible Yes, built-in Wi-Fi adapter (b/g)
Audio
output Built-in stereo speakers
USB Power
Adapter 5VDC 1A
Battery Rechargeable Li-Ion 1530mAh, 3.7V

135
Limited Warranty
The limited warranty set forth below is given by Pandigital with
respect to the Pandigital Novel™ line of products (the “Device”)
purchased and used in the United States of America. Pandigital
warrants this product as follows:
LABOR: For a period of one (1) year from the date of purchase, if
this Device is found to be defective, Pandigital will repair or
replace the Device, at its sole option, at no charge. After this one
(1) year period, labor charges will be charged on a case by case
basis. If your Device is repaired or replaced during the Warranty
Period, it will be covered by this Limited Warranty for the
remainder of the original Warranty Period or ninety (90) days
from the date of shipment of the replaced Device, whichever is
longer
PARTS: For a period of one (1) year from the date of purchase, if
this Device is found to be defective, Pandigital will supply at no
cost, new or rebuilt replacement parts, at its option, at no charge.
After this one (1) year period, parts will be charged for on a case
by case basis. Modifications not approved by the party
responsible for compliance will void user’s authority to operate
the equipment. If your Device is repaired or replaced during the
Warranty Period, it will be covered by this Limited Warranty for
the remainder of the original Warranty Period or ninety (90) days
from the date of shipment of the replaced Device, whichever is
longer
This Limited Warranty does not cover damage or malfunctions
caused by accident, disaster, misuse, abuse, negligence or other
external causes; third-party products; Internet or

136
telecommunications failures; commercial use; unauthorized
opening, use, service, tampering, alteration, repair or
modification; or inadequate packing or shipping procedures. This
Limited Warranty also does not cover cosmetic damage or normal
wear and tear. This Limited Warranty does not apply to Devices
sold as used, refurbished or reconditioned. This Limited Warranty
will be void if the Serial Number on your Device has been
removed, tampered with or defaced or if your Device has been
opened or serviced without authorization, tampered with, altered
or modified. This Limited Warranty applies to your Device only
(i.e., the hardware), and not to the software within your device.
Similarly, this Limited Warranty does not cover downloaded data
or materials, or accessories and peripherals, except as expressly
provided above. This warranty is valid only in the United States.
The Device must be accompanied by a copy of the original retail
purchase receipt for the warranty to be valid. If no proof of
purchase is attached, the warranty will not be honored and repair
costs incurred will be the responsibility of the end user. This
warranty is only valid with written documentation detailing the
complaint attached to the outside or inside of the carton. This
warranty is invalid if the factory applied serial number has been
altered and or removed from the product. This warranty does not
provide protection for the loss of data, regardless of format.
Pandigital reserves the right to modify and change the design of
this Device without prior notice, written or otherwise.
Limitations. TO THE EXTENT PERMITTED BY LAW, THE WARRANTY
AND REMEDIES SET FORTH ABOVE ARE EXCLUSIVE AND IN LIEU OF
ALL OTHER WARRANTIES AND REMEDIES, AND WE SPECIFICALLY
DISCLAIM ALL STATUTORY OR IMPLIED WARRANTIES, INCLUDING,
BUT NOT LIMITED TO, WARRANTIES OF MERCHANTABILITY,

137
FITNESS FOR A PARTICULAR PURPOSE AND AGAINST HIDDEN OR
LATENT DEFECTS. IF WE CANNOT LAWFULLY DISCLAIM
STATUTORY OR IMPLIED WARRANTIES, THEN TO THE EXTENT
PERMITTED BY LAW, ALL SUCH WARRANTIES SHALL BE LIMITED IN
DURATION TO THE DURATION OF THIS EXPRESS LIMITED
WARRANTY AND TO REPAIR OR REPLACEMENT SERVICE.
SOME JURISDICTIONS DO NOT ALLOW LIMITATIONS ON HOW
LONG A STATUTORY OR IMPLIED WARRANTY LASTS, SO THE
ABOVE LIMITATION MAY NOT APPLY TO YOU. WE ARE NOT
RESPONSIBLE FOR DIRECT, SPECIAL, INCIDENTAL OR
CONSEQUENTIAL DAMAGES RESULTING FROM ANY BREACH OF
WARRANTY OR UNDER ANY OTHER LEGAL THEORY. IN SOME
JURISDICTIONS THE FOREGOING LIMITATION DOES NOT APPLY TO
DEATH OR PERSONAL INJURY CLAIMS, OR ANY STATUTORY
LIABILITY FOR INTENTIONAL AND GROSS NEGLIGENT ACTS
AND/OR OMISSIONS, SO THE ABOVE EXCLUSION OR LIMITATION
MAY NOT APPLY TO YOU. SOME JURISDICTIONS DO NOT ALLOW
THE EXCLUSION OR LIMITATION OF DIRECT, INCIDENTAL OR
CONSEQUENTIAL DAMAGES, SO THE ABOVE EXCLUSION OR
LIMITATION MAY NOT APPLY TO YOU.
All content included on the Pandigital website as well as Pandigital
Devices, including pre-loaded demonstration images, digital
media, digital cookbooks, text, graphics, logos, designs,
photographs, button icons, images, audio/video clips, digital
downloads, data compilations, and software, are the property of
Pandigital or its suppliers and is protected by United States and
international copyright laws or other intellectual property laws
and treaties. Said content shall not be reproduced or used
without express written permission from Pandigital and its
suppliers respectively.

138
Use of this product constitutes acceptance of these terms and
conditions of warranty.
To obtain warranty service, refer to Customer Support section at
www.pandigital.net.
Technical support telephone number: 1-800-715-5354.
FCC Notices
FCC ID: VRS-PD060B00
This device complies with Part 15 of the FCC Rules. Operation is
subject to the following two conditions: (1) this device may not
cause harmful interference, and (2) this device must accept any
interference received, including interference that may cause
undesired operation.
Federal Communications Commission (FCC)
Statement Information to the User
WARNING! Changes or modifications to this device not
expressly approved by the party responsible for compliance
could void the user’s authority to operate the equipment.
This equipment has been tested and found to comply with the
limits for a Class B digital device, pursuant to Part 15 of the
Federal Communication Commission (FCC) Rules. These limits are
designed to provide reasonable protection against harmful
interference in a residential installation. This equipment
generates, uses, and can radiate radio frequency energy and if not
installed and used in accordance with the instructions, may cause

139
harmful interference to radio communications. However, there is
no guarantee that interference will not occur in a particular
installation. If this equipment does cause harmful interference to
radio or television reception, which can be determined by turning
the equipment off and on, the user is encouraged to try to correct
the interference by one or more of the following measures:
Reorient or relocate the receiving antenna.
Increase the separation between the equipment and
receiver.
Connect the equipment to an outlet on a circuit different
from that to which the receiver is connected.
Consult the dealer or an experienced radio/TV technician
for help.
IMPORTANT NOTE:
Federal Communication Commission (FCC) Radiation Exposure
Statement
This EUT is compliance with SAR for general population/uncontrolled
exposure limits in ANSI/IEEE C95.1-1999 and had been tested in
accordance with the measurement methods and procedures
specified in OET Bulletin 65 Supplement C.
For product available in the USA/Canada market, only channel
1~11 can be operated. Selection of other channels is not possible.
This device and its antenna(s) must not be co-located or
operating in conjunction with any other antenna or transmitter.

140
Disclaimers
Linksys is a registered trademark or trademark of Cisco Systems,
Inc. and/or its affiliates in the U.S. and certain other countries.
Copyright © 2005 Cisco Systems, Inc. All rights reserved.
Barnes & Noble and the “BN” logo are registered trademarks of
Barnesandnoble.com LLC. All rights reserved.
Facebook and the “f” logo are registered trademarks of Facebook
Inc. All rights reserved.
Yahoo!® is a registered trademark of Yahoo!
Contains Reader® Mobile technology by Adobe Systems
Incorporated.
License Agreement and Terms of Use
By activating and using the pandigital novel, you
hereby consent and agree to our License Agreement and Terms of
Use.
The Device and Related Services
The Pandigital Novel (the "Device") is a portable electronic
reading device that utilizes wireless connectivity to enable users
to shop for, download, browse, and read books, newspapers,
magazines, blogs, access websites, e-mail and other materials, all
subject to the terms and conditions of this Agreement. The
"Service" means the wireless connectivity, provision of digital
content, software and support, and other services and support
that Pandigital provides Device users.

141
Wireless Connectivity
Coverage and Service Interruptions: You acknowledge that if your
Device is located in any area without applicable wireless
connectivity, you may not be able to use some or all elements of
the wireless services. We are not responsible for the unavailability
of wireless service or any interruptions of wireless connectivity.
Digital Content
The Barnes & Noble Store: The Barnes & Noble Store enables you
to download, display and use on your Device a variety of digitized
electronic content, such as books, subscriptions to magazines,
newspapers, journals and other periodicals, blogs, RSS feeds, and
other digital content, as determined by Barnes & Noble from time
to time (individually and collectively, "Digital Content").
Use of Digital Content: Upon your payment of the applicable fees
set by Barnes & Noble, Barnes & Noble grants you the non-
exclusive right to keep a permanent copy of the applicable Digital
Content and to view, use, and display such Digital Content an
unlimited number of times, solely on the Device or as authorized
by Barnes & Noble as part of the Service and solely for your
personal, non-commercial use. Digital Content will be deemed
licensed to you by Barnes & Noble under this Agreement unless
otherwise expressly provided by Barnes & Noble.
Restrictions: Unless specifically indicated otherwise, you may not
sell, rent, lease, distribute, broadcast, sublicense or otherwise
assign any rights to the Digital Content or any portion of it to any
third party, and you may not remove any proprietary notices or
labels on the Digital Content. In addition, you may not, and you
will not encourage, assist or authorize any other person to,
bypass, modify, defeat or circumvent security features that
protect the Digital Content.

142
Software
Definitions: The following terms apply to the Device and to (a) all
software (and the media on which such software is distributed) of
Pandigital or third parties that is pre-installed on the Device at
time of purchase or that Pandigital provides as updates/upgrades
to the pre-installed software (collectively, the "Device Software"),
unless you agree to other terms as part of an update/upgrade
process; and (b) any printed, on-line or other electronic
documentation for such software (the "Documentation"). As used
in this Agreement, "Software" means, collectively, the Device
Software and Documentation.
Use of the Device Software: You may use the Device Software
only on the Device. You may not separate any individual
component of the Device Software for use on another device or
computer, may not transfer it for use on another device or use it,
or any portion of it, over a network and may not sell, rent, lease,
lend, distribute or sublicense or otherwise assign any rights to the
Software in whole or in part.
No Reverse Engineering, Decompilation, Disassembly or
Circumvention: You may not, and you will not encourage, assist or
authorize any other person to, modify, reverse engineer,
decompile or disassemble the Device or the Software, whether in
whole or in part, create any derivative works from or of the
Software, or bypass, modify, defeat or tamper with or circumvent
any of the functions or protections of the Device or Software or
any mechanisms operatively linked to the Software, including, but
not limited to, augmenting or substituting any digital rights
management functionality of the Device or Software.

143
Automatic Updates: In order to keep your Software up-to-date,
Pandigital may automatically provide your Device with
updates/upgrades to the Software.
Export Regulations: You agree to comply with all export and re-
export restrictions and regulations of the Department of
Commerce and other United States agencies and authorities, and
not to transfer, or encourage, assist or authorize the transfer of
the Software to a prohibited country or otherwise in violation of
any such restrictions or regulations.
General
No Illegal Use and Reservation of Rights: You may not use the
Device, the Service or the Digital Content for any illegal purpose.
You acknowledge that the sale of the Device to you does not
transfer to you title to or ownership of any intellectual property
rights of Pandigital or its suppliers. All of the Software is licensed,
not sold, and such license is non-exclusive.
Information Received: The Device Software will provide Pandigital
with data about your Device and its interaction with the Service
(such as available memory, up-time, log files and signal strength)
and information related to the content on your Device and your
use of it (such as automatic bookmarking of the last page read
and content deletions from the Device). Information we receive is
subject to the Pandigital Privacy Notice.
Patents: The Device and/or methods used in association with the
Device may be covered by one or more patents or pending patent
applications.
Termination: Your rights under this Agreement will automatically
terminate without notice from Pandigital if you fail to comply with
any term of this Agreement. Pandigital's failure to insist upon or

144
enforce your strict compliance with this Agreement will not
constitute a waiver of any of its rights.
Disclaimer of Warranties: YOU EXPRESSLY ACKNOWLEDGE AND
AGREE THAT USE OF THE SERVICE, DEVICE, DIGITAL CONTENT
AND SOFTWARE IS AT YOUR SOLE RISK. EXCEPT FOR THE ONE-
YEAR LIMITED WARRANTY, THE SERVICE, DEVICE, DIGITAL
CONTENT AND SOFTWARE ARE PROVIDED "AS IS" WITH ALL
FAULTS AND WITHOUT WARRANTY OF ANY KIND AND
PANDIGITAL AND ITS SUPPLIERS AND LICENSORS DISCLAIM ALL
WARRANTIES, EXPRESS OR IMPLIED, INCLUDING, BUT NOT
LIMITED TO, THE IMPLIED WARRANTIES OF MERCHANTABILITY,
FITNESS FOR A PARTICULAR PURPOSE, ACCURACY, QUIET
ENJOYMENT AND NON-INFRINGEMENT OF THIRD-PARTY RIGHTS.
NO ORAL OR WRITTEN INFORMATION OR ADVICE GIVEN BY
PANDIGITAL OR AN AUTHORIZED REPRESENTATIVE OF
PANDIGITAL SHALL CREATE A WARRANTY. THE LAWS OF CERTAIN
JURISDICTIONS DO NOT ALLOW THE DISCLAIMER OF IMPLIED
WARRANTIES. IF THESE LAWS APPLY TO YOU, SOME OR ALL OF
THE ABOVE DISCLAIMERS, EXCLUSIONS OR LIMITATIONS MAY
NOT APPLY TO YOU, AND YOU MAY HAVE ADDITIONAL RIGHTS.
Limitation of Liability: TO THE EXTENT NOT PROHIBITED BY LAW,
NEITHER PANDIGITAL NOR ITS SUPPLIERS OR LICENSORS SHALL BE
LIABLE TO YOU FOR ANY INCIDENTAL OR CONSEQUENTIAL
DAMAGES FOR BREACH OF ANY EXPRESS OR IMPLIED WARRANTY,
BREACH OF CONTRACT, NEGLIGENCE, STRICT LIABILITY OR ANY
OTHER LEGAL THEORY RELATED TO THE SERVICE, DEVICE, DIGITAL
CONTENT OR SOFTWARE, INCLUDING, BUT NOT LIMITED TO, ANY
DAMAGES ARISING OUT OF LOSS OF PROFITS, REVENUE, DATA OR
USE OF THE DEVICE OR SOFTWARE OR ANY ASSOCIATED
PRODUCT, EVEN IF PANDIGITAL HAS BEEN ADVISED OF THE
POSSIBILITY OF SUCH DAMAGES. IN ANY CASE, PANDIGITAL'S

145
AGGREGATE LIABILITY UNDER THIS AGREEMENT SHALL BE
LIMITED TO THE AMOUNT ACTUALLY PAID FOR THE DEVICE. THE
LAWS OF CERTAIN JURISDICTIONS DO NOT ALLOW THE
EXCLUSION OR LIMITATION OF INCIDENTAL OR CONSEQUENTIAL
DAMAGES. IF THESE LAWS APPLY TO YOU, SOME OR ALL OF THE
ABOVE EXCLUSIONS OR LIMITATIONS MAY NOT APPLY TO YOU,
AND YOU MAY HAVE ADDITIONAL RIGHTS.
Disputes: ANY DISPUTE ARISING OUT OF OR RELATING IN
ANYWAY TO THIS AGREEMENT SHALL BE SUBMITTED TO
CONFIDENTIAL ARBITRATION IN ALAMEDA COUNTY, EXCEPT
THAT, TO THE EXTENT YOU HAVE IN ANY MANNER VIOLATED OR
THREATENED TO VIOLATE PANDIGITAL'S INTELLECTUAL PROPERTY
RIGHTS, PANDIGITAL MAY SEEK INJUNCTIVE OR OTHER
APPROPRIATE RELIEF IN ANY STATE OR FEDERAL COURT IN THE
COUNTY OF ALAMEDA, AND YOU CONSENT TO EXCLUSIVE
JURISDICTION AND VENUE IN SUCH COURTS. The arbitrator's
award shall be binding and may be entered as a judgment in any
court of competent jurisdiction. To the fullest extent permitted by
applicable law, no arbitration under this Agreement shall be
joined to an arbitration involving any other party subject to this
Agreement, whether through class arbitration proceedings or
otherwise.
Severability: If any term or condition of this Agreement shall be
deemed invalid, void, or for any reason unenforceable, that part
shall be deemed severable and shall not affect the validity and
enforceability of any remaining term or condition.
Amendment: Pandigital reserves the right to amend any of the
terms of this Agreement at its sole discretion by posting the
revised terms on the Pandigital.net website. Your continued use
of the Device and Software after the effective date of any such

146
amendment shall be deemed your agreement to be bound by
such amendment.
Contact Information: For communications concerning this
Agreement, you may contact Pandigital by writing to Pandigital,
Attn: Legal Department, 6375 Clark Avenue, Suite 100, Dublin, CA
95468.
© 2010 Pandigital, Inc. or its affiliates. All rights reserved.
Pandigital, the Pandigital logo, Pandigital Novel, are trademarks of
Pandigital Inc. Barnes & Noble and the “BN” logo are registered
trademarks of Barnesandnoble.com LLC. All rights reserved.
Facebook and the “f” logo are registered trademarks of Facebook
Inc. All rights reserved. Java and all Java based trademarks and
logos are trademarks or registered trademarks of Sun
Microsystems, Inc. in the U.S. and other countries.
Pandigital Novel contains Adobe® Reader® Mobile software under
license from Adobe Systems Incorporated, Copyright © 1995-
2009 Adobe Systems Incorporated. All rights reserved. Adobe and
Reader are trademarks of Adobe Systems Incorporated.