Qisda S2317HJB Flat Panel Monitor User Manual
Qisda Corporation Flat Panel Monitor
UserManual.wiki
>
Qisda
>
S2317HJB User Manual
User Guide -1 Rev01-1208
Navigation menu
Upload a User Manual
Namespaces
Wiki Guide
HTML
PDF
Info
Views
User Manual
Discussion / Help
Navigation
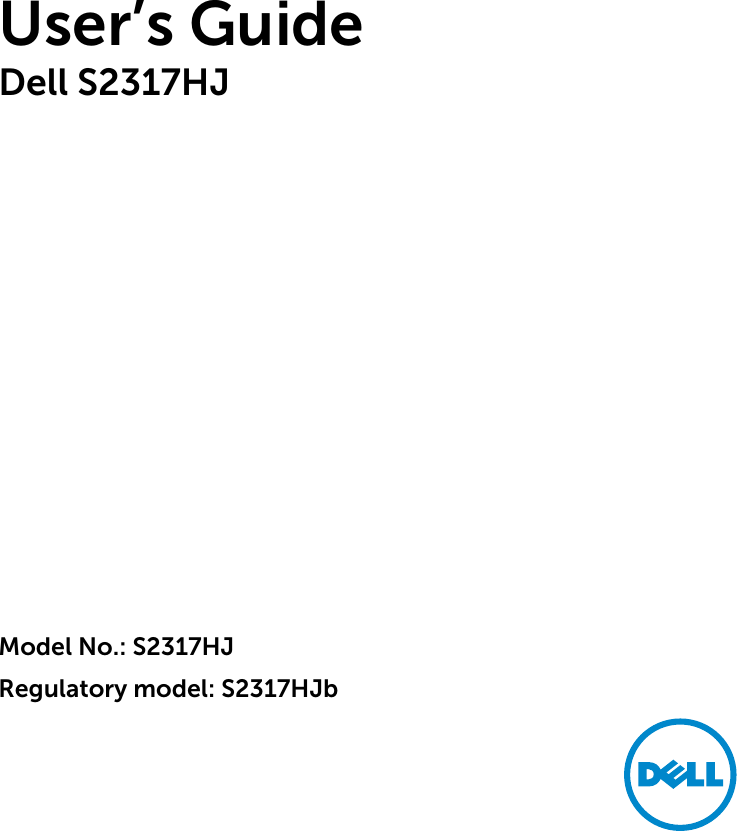
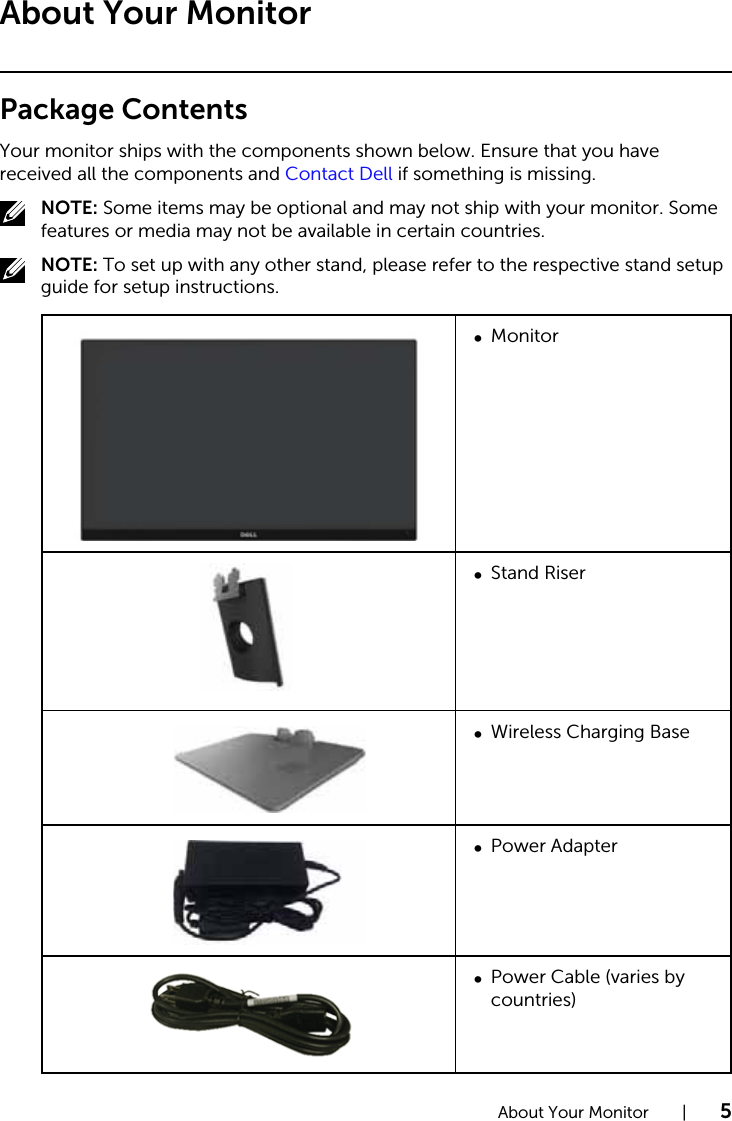


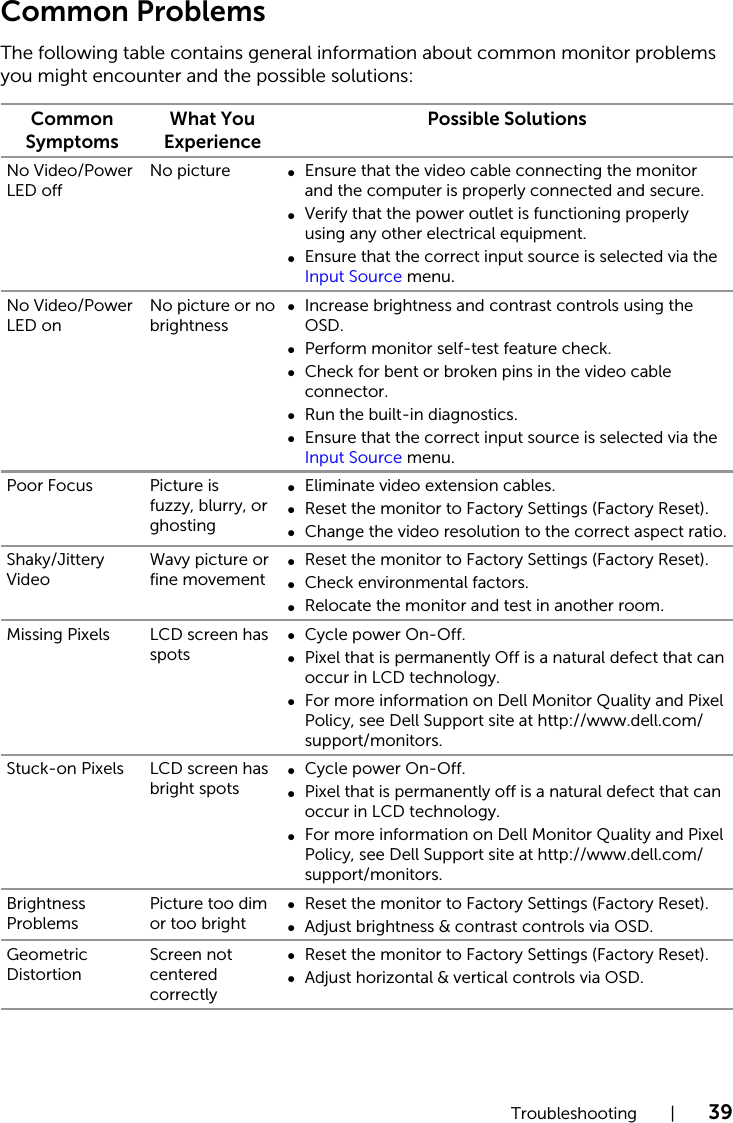
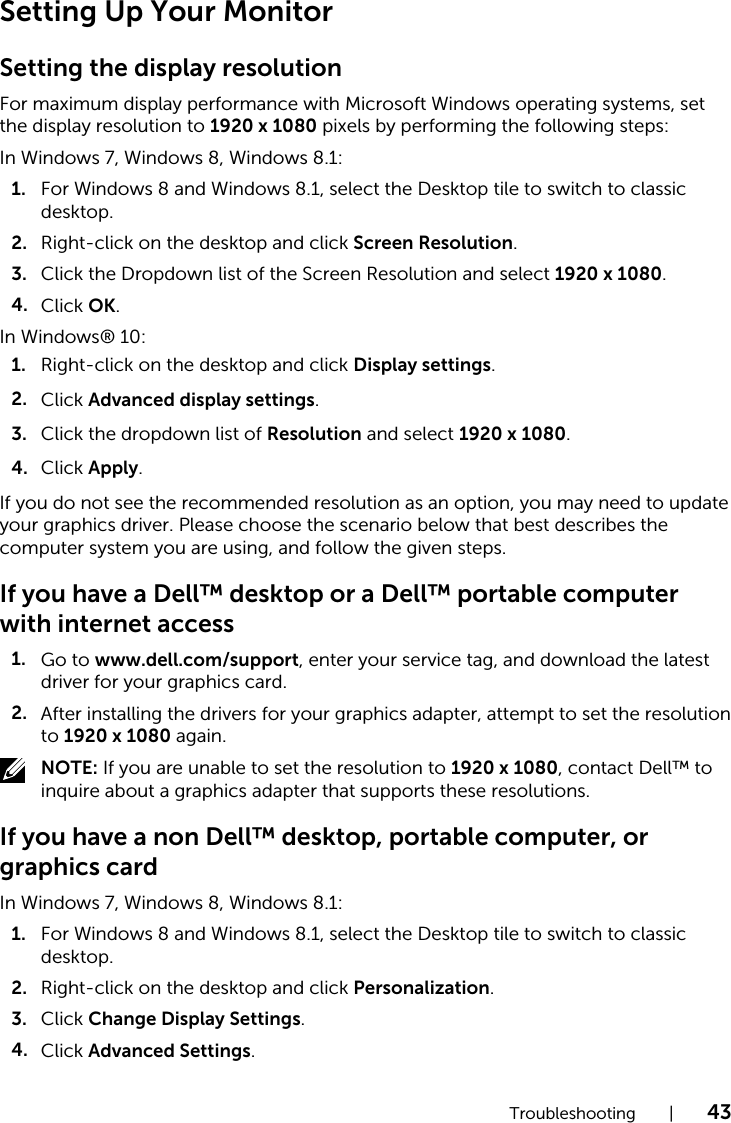
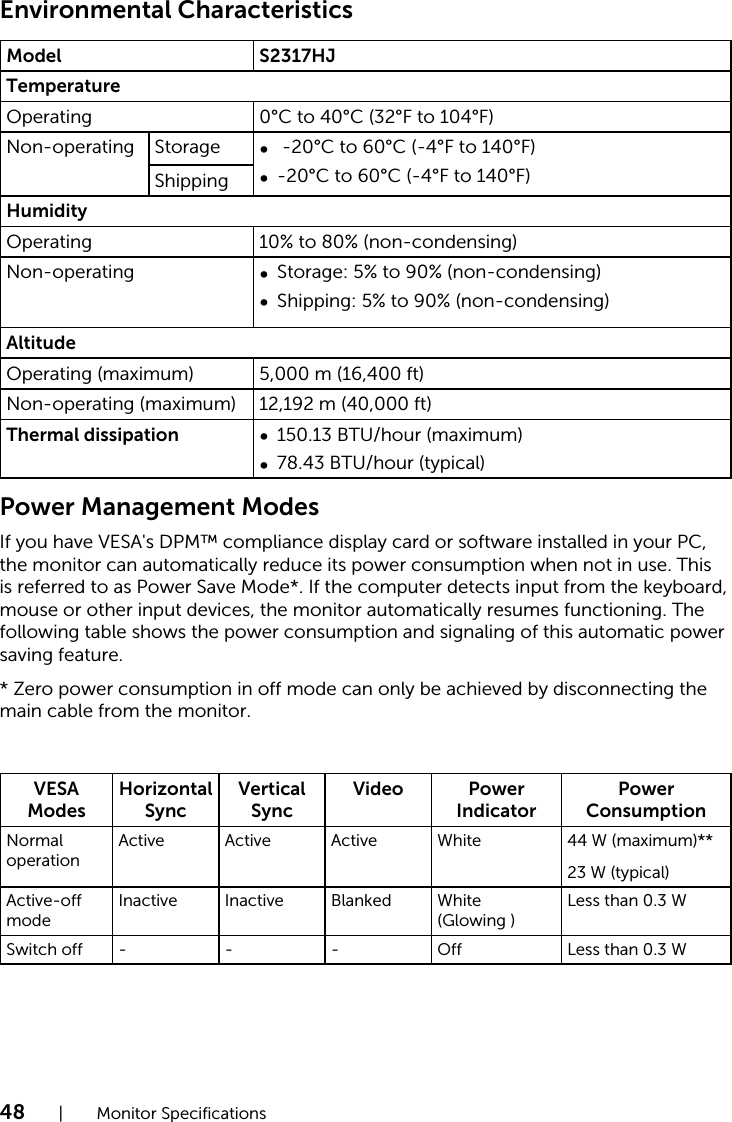
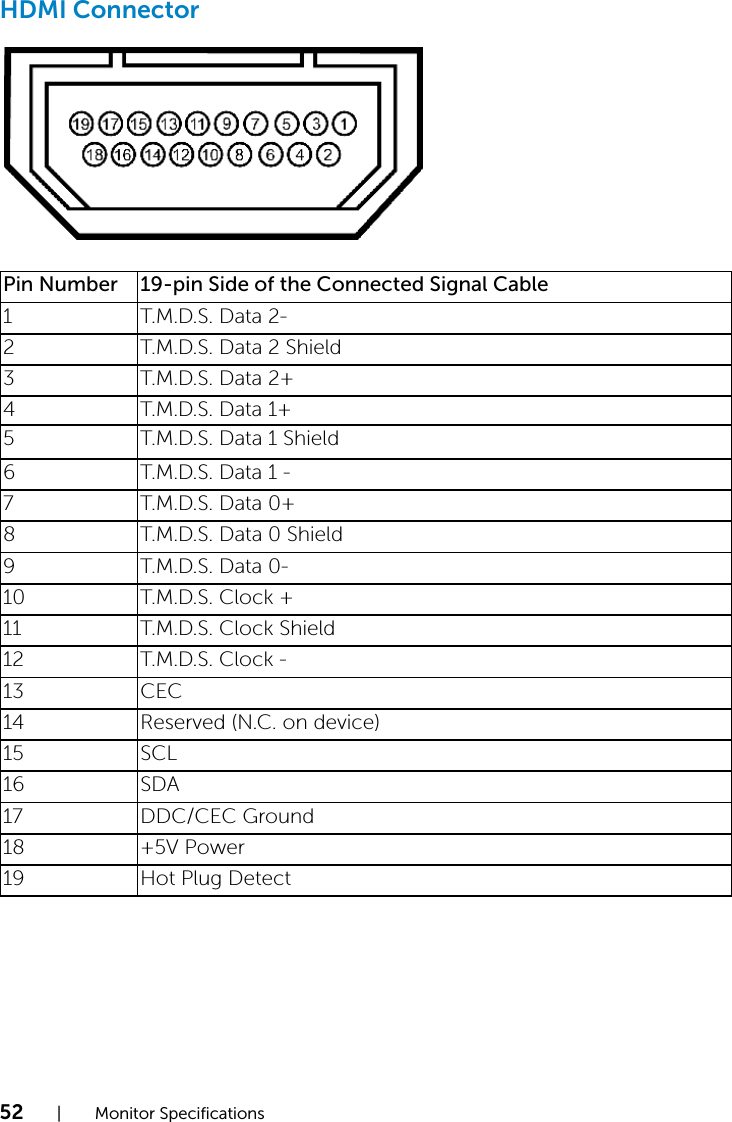
![Monitor Specifications | 45Monitor SpecificationsFlat Panel SpecificationsModel S2317HJScreen type Active matrix - TFT LCDPanel type In-plane Switching Viewable imageDiagonalHorizontal, Active AreaVertical, Active AreaArea58.42 cm (23 in)509.18 mm (20.05 in)286.41 mm (11.28 in)1458.34 cm2 (226.04 inch2)Pixel pitch 0.265 mmViewing angle (vertical / horizontal) 178° / 178° (typical)Luminance output 250 cd/m² (typical)Contrast ratio 1000 to 1 (typical)8,000,000 to 1 (Dynamic Contrast)Faceplate coating Low Haze with 3H hardnessBacklight LED edgelight systemResponse time 6ms gray to gray (typical)Color depth 16.78 million colorsColor gamut 82% (typical)**[S2317HJ] color gamut (typical) is based on CIE1976(82%) and CIE1931(72%) test standards.Resolution SpecificationsModel S2317HJHorizontal scan range 30 kHz to 83 kHz (automatic)Vertical scan range 56 Hz to 76 Hz (automatic)Maximum preset resolution1920 x 1080 at 60 Hz](https://usermanual.wiki/Qisda/S2317HJB/User-Guide-2833940-Page-45.png)
![Canada, avis G¶,QGXVWU\ Canada (IC) La circuiterie numérique de Classe B de cet appareil est conforme à la norme canadienne ICES-003. Cet appareil est conforme aux normes G¶H[HPSWLRQ de licence RSS G¶,QGXVWU\ Canada. Son fonctionnement est soumis aux deux conditions suivantes : (1) cet appareil ne doit pas causer G¶LQWHUIérence et (2) cet appareil doit accepter toute interférence, notamment les interférences qui peuvent affecter son fonctionnement. Conformément aux réglementations G¶,QGXVWU\ Canada, les émetteurs radio de cet appareil ne peuvent fonctionner TX¶j O¶DLGH G¶XQH antenne dont le type et le gain maximal (ou minimal) pour ces émetteurs - transmetteurs sont approuvés par Industry Canada. Pour réduire le risque G¶LQWHUIérence éventuelle pour les autres utilisateurs, le type et le gain de O¶DQWHQQH doivent être choisis de manière à ce que la puissance isotrope rayonnée équivalente (p.i.r.e.) minimale nécessaire à une bonne communication soit fournie. Informations sur O¶H[SRVLWLRQ à la fréquence radio (FR) La puissance rayonnée de sortie de cet appareil est inférieure aux limites G¶H[SRVLWLRQ à la fréquence radio G¶,QGXVWU\ Canada (IC). Cet appareil a été évalué et jugé conforme aux limites G¶H[SRVLWLRQ à la fréquence radio (FR) G¶,&. Cet appareil devrait être utilisé de manière à ce que le risque de contact humain au cours G¶XQ fonctionnement normal soit réduit. Cet appareil est homologué pour O¶XWLOLVDtion au Canada. Pour consulter O¶HQWUée correspondant à O¶DSSDUeil dans la liste G¶pTXLSHPHQW radio (REL - Radio Equipment List) G¶,QGXVWU\ Canada, rendez-vous sur : http://www.ic.gc.ca/app/sitt/reltel/srch/nwRdSrch.do?lang=eng Pour des informations canadiennes supplémentaires sur O¶H[SRVLWLRQ FR, rendez-vous sur : http://www.ic.gc.ca/eic/site/smt-gst.nsf/eng/sf08792.html La fonction de sélection de O¶LQGLFDtif du pays est désactivée pour les produits commercialisés aux États-Unis et au Canada. European Union, R&TTE Compliance Statement Hereby, Dell Inc. declares that this Dell Wireless Device is in compliance with the essential requirements and other relevant provisions of Directive 1999/5/EC A minimum separation distance of 20 cm must be maintained between the XVHU¶V body and the device, including the antenna during body-worn operation to comply with the RF exposure requirements in Europe. ƍƪƸƶƷƭƱƹƲưƹǂdžƯƌƭƲƳƨƸƨƾưLJƯƨƹǂƶƺƪƭƺƹƺƪưƭƹƌưƸƭƲƺưƪƨƺƨƯƨƸƨƬưƶƹǂƶƸǂƮƭƵưLJưƲƸƨƱƵưƬƨƳƭƲƶƹǂƶƩǁưƺƭƳƵưƻƹƺƸƶƱƹƺƪƨ577( ƙƵƨƹƺƶLJǁƶƺƶ'HOO,QFƬƭƲƳƨƸưƸƨƿƭƺƶƪƨƩƭƯƮưƿƵƶƻƹƺƸƶƱƹƺƪƶƵƨ'HOOƶƺƫƶƪƨƸLJƵƨƶƹƵƶƪƵưƺƭưƯưƹƲƪƨƵưLJưƬƸƻƫưƺƭƹǂƶƺƪƭƺƵưƻƹƳƶƪưLJƵƨƌưƸƭƲƺưƪƨ(& Evropská unie, SURKOiãHQt o shoGČ R&TTE 6SROHþQRVW Dell Inc. tímto prRKODãXMH åH toto bezdrátové ]DĜt]HQt Dell je v souladu se základními SRåDGDvky a GDOãtPL SĜtVOXãQêPL ustanoveními VPČUQLFH 1999/5/ES. EU-overensstemmelseserklæring, R&TTE Hermed erklæ rer Dell Inc., at denne trådløse Dell-enhed er i overensstemmelse med de væ sentligste krav og andre relevante bestemmelse i EU-direktivet 1999/5.](https://usermanual.wiki/Qisda/S2317HJB/User-Guide-2833940-Page-55.png)
![Europese unie, verklaring van naleving van de R&TTE-richtlijn Hierbij verklaart Dell Inc. dat dit draadloze apparaat van Dell voldoet aan de essentiële vereisten en andere relevante bepalingen van Richtlijn 1999/5/EC. Euroopa Liit, direktiivi R&TTE nõuetele vastavuse tunnistus Dell Inc. kinnitab käesolevaga, et Dell Wireless Device vastab direktiivi 1999/5/EÜ olulistele nõuetele ja asjakohastele sätetele. Ey:N Vaatimustenmukaisuusvakuutus Dell Inc. vakuuttaa täten, että tämä laite on direktiivin 1999/5/EY olennaisten vaatimusten ja muiden määräysten mukainen. Déclaration de conformité R&TTE, Union Européenne Par la présente, Dell Inc. déclare que ce Périphérique sans fil Dell est conforme aux exigences essentielles et aux autres provisions applicables de la Directive 1999/5/EC. Europäische Union, R&TTE-Einhaltungserklärung Hiermit bestätigt die Dell Inc., dass dieses Wireless-Gerät von Dell in Übereinstimmung mit den grundlegenden Anforderungen und anderen relevanten Bestimmungen der 1999/5/EC-Richtlinie steht. ńŰŬŴŞŵŧśĺũŴŮŤ¨śŨŴŮŤőŰŷŬűŴŮŤŭ577( ¨ŦŞůūŰŞŬŷũůūŭŤ'HOO,QFšŤŨŹũŢŦŷůŦŞŰůśŤŞŮŸŬŞůŤŮŰŮŧŢŰśůŤŭ'HOOŮŰūŬűŹũŢůŞŦŢůŦŭşŞŮŦŧŚŭŞŞŦůśŮŢŦŭŧŞŦŷŨūŰŭůūŰŭŮŲŢůŦŧūŸŭŷŬūŰŭůŤŭŎšŤŠŜŞŭńʼn Európai Unió, PHJIHOHOĘVpJL nyilatkozat a UiGLyEHUHQGH]pVHNUĘO és WiYN|]OĘ YpJEHUHQGH]pVHNUĘO szóló (R&TTE) irányelvvel A Dell Inc. ezúton kijelenti, hogy a Dell vezeték nélküli készülék megfelel az 1999/5/EK direktíva DODSYHWĘ követelményeinek és egyéb lényeges rendelkezéseinek. Unione Europea, Dichiarazione di conformità R&TTE Con la presente, Dell Inc. dichiara che questa periferica senza fili Dell è conforme ai requisiti essenziali e ad altri provvedimenti importanti della Direttiva 1999/5/CE. 3D]LƼRMXPV par aWELOVWƯEX Eiropas 6DYLHQƯEDV 5DGLRLHNƗUWX un WHOHNRPXQLNƗFLMX LHNƗUWX 'LUHNWƯYDL /ŝG] ar to Dell Inc. SD]LŪR ka ãŝ Dell bezvadu LHUŝFH atbilst DirHNWŝYŅ 1999/5/EK QRWHLNWDMŅP SDPDWSUDVŝEŅP un citiem WŅV aWELOVWRãDMLHP noteikumiem. Europos 6ąMXQJD SDUHLãNLPDV apie radijo U\ãLR ƳUHQJLQLǐ ir WHOHNRPXQLNDFLMǐ JDOLQLǐ ƳUHQJLQLǐ (R&TTE) direktyvos DWLWLNLPą âLXR kompanija Dell Inc. SDUHLãNLD kad ãLV Dell bevielis šUHQJLQ\V atitinka direktyvos 1999/5/EB esminius reikalavimus ir kitas atitinkamas nuostatas. Unjoni Ewropea, R&TTE Dikjarazzjoni tal-Konformità Hawnhekk, Dell Inc., tiddikjara li dan id-Dell Wireless Device hu konformi mal-řWLœLMLHW essenzjali u provvedimenti rilevanti RřUDMQ WD¶ Direttiva 1999/5/KE.](https://usermanual.wiki/Qisda/S2317HJB/User-Guide-2833940-Page-56.png)
![Unia Europejska, deklaracja ]JRGQRĞFL z G\UHNW\Zą 1999/5/WE Niniejszym firma Dell Inc. RĞZLDGF]D ĪH to XU]ąG]HQLH bezprzewodowe firmy Dell VSHáQLD zasadnicze wymogi oraz inne RGQRĞQH przepisy dyrektywy 1999/5/WE. União Europeia, Declaração de conformidade da R&TTE Pelo presente, a Dell Inc. declara que este Dispositivo Sem Fios Dell está em conformidade com os requisitos essenciais e outras provisões relevantes da Directiva 1999/5/EC. Uniunea (XURSHDQă 'HFODUDĠLH de Conformitate R&TTE Dell GHFODUă prin prezenta, Fă acest dispozitiv IăUă fir 'HOO rHVSHFWă FHULQĠHOH HVHQĠLDOH precum úL alte GLVSR]LĠLL relevante ale Directivei 1999/5/EC. Európska únia, vyhlásenie o zhode SRGĐD R&TTE 6SRORþQRVĢ Dell Inc. týmto vyhlasuje, åH toto bezdrôtové zariadenie Dell VSĎĖD základné SRåLDGDvky iné SUtVOXãQp ustanovenia smernice 1999/5/ES. Evropska unija, izjava o ustreznosti radijske in telekomunikacijske terminalske opreme Evropska unija, izjava o ustreznosti radijske in telekomunikacijske terminalske opreme Podjetje Dell Inc. izjavlja, da je ta EUH]åLþQD naprava Dell v skladu z glavnimi zahtevami in drugimi pomembnimi GRORþEDPL Direktive 1999/5/ES. Unión Europea, Declaración de conformidad con R&TTE Por el presente, Dell Inc. declara que este Dispositivo inalámbrico Dell cumple con los requisitos esenciales y otras provisiones relevantes de la Directiva 1999/5/EC. EU, meddelande om överensstämmelse med R&TTE-direktivet Dell Inc. deklarerar härmed att denna trådlösa Dell-enhet överensstämmer med de viktiga kraven och andra relevanta bestämmelser i direktivet 1999/5/EC. Avrupa %LUOL÷L R&TTE Uygunluk Bildirimi Burada, Dell Inc. bu Dell Kablosuz A\JÕWÕQÕQ Directive 1999/5/EC NDUDUÕQÕQ esas úDUWODUÕ ve GL÷HU ilgili hükümleri ile X\XPOÕ ROGX÷XQX beyan eder. ਠ⚓: ഻ᇦ䙊䀺ۣငᴳ վ࣏⦷䴫⌒䕫ሴᙗ䴫㇑⨶䗖⌅ ㅜॱҼọ㏃රᔿ䂽䅹ਸṬѻվ࣏⦷ሴ乫䴫ˈ䶎㏃䁡ਟˈޜਨǃ୶㲏ᡆ֯⭘㘵൷нᗇ㠚䆺ᴤ乫⦷ǃ࣐བྷ࣏⦷ᡆ䆺ᴤ䁝䀸ѻ⢩ᙗ৺࣏㜭DŽ ㅜॱഋọվ࣏⦷ሴ乫䴫ѻ֯⭘нᗇᖡ丯伋㡚ᆹޘ৺ᒢᬮਸ⌅䙊ؑ˗㏃Ⲭ⨮ᴹᒢᬮ⨮䊑ᱲˈ៹・ণڌ⭘ˈі᭩ழ㠣❑ᒢᬮᱲᯩᗇ㒬㒼֯⭘DŽ ࡽ丵ਸ⌅䙊ؑˈᤷ䴫ؑ⌅㾿ᇊᾝѻ❑㐊䴫䙊ؑDŽվ࣏⦷ሴ乫䴫丸ᗽਇਸ⌅䙊ؑᡆᐕᾝǃ、ᆨ৺䟛Ⱳ⭘䴫⌒䕫ሴᙗ䴫䁝ۉѻᒢᬮDŽ 뼩鲮 ꓩꟹ鱉 놹볁뿱겕 閵鱚ꫦ넩 넽냱ꕵꈑ 넭ꐺ껽놹隱 隵ꇝ鷑 ꟹ걙鱉 뼕 ꯍ 꽻넁 La operación de este equipo está sujeta a las siguientes dos condiciones: (1) es posible que este equipo o dispositivo no cause interferencia perjudicial y (2) este equipo o dispositivo debe aceptar cualquier interferencia, incluyendo la que pueda causar su operación no deseada. Radio Approvals It is important to ensure that you only use your radio device in countries where the device is approved for use. To determine whether you are allowed to use your wireless network device in a specific country, check to see if the radio type number that is printed on the identification label of your device or listed on the radio approval list posted on the general Dell support site at www.dell.com/support](https://usermanual.wiki/Qisda/S2317HJB/User-Guide-2833940-Page-57.png)