User Guide -1 Rev01-1208

Model No.: S2317HJ
Regulatory model: S2317HJb
User’s Guide
Dell S2317HJ

Notes, Cautions, and Warnings
NOTE: A NOTE indicates important information that helps you make better
use of your computer.
CAUTION: A CAUTION indicates potential damage to hardware or loss of
data if instructions are not followed.
WARNING: A WARNING indicates a potential for property damage, personal
injury or death.
_________________________
Information in this document is subject to change without notice.
© 2016 Dell Inc. All rights reserved.
Reproduction of these materials in any manner whatsoever without the written permission
of Dell Inc. is strictly forbidden.
Trademarks used in this text: Dell and the DELL logo are trademarks of Dell Inc.; Microsoft
and Windows are either trademarks or registered trademarks of Microsoft. Corporation in
the United States and/or other countries, Intel is a registered trademark of Intel Corporation
in the U.S. and other countries; and ATI is a trademark of Advanced Micro Devices, Inc.
ENERGY STAR is a registered trademark of the U.S. Environmental Protection Agency. As an
ENERGY STAR partner, Dell Inc. has determined that this product meets the ENERGY STAR
guidelines for energy efficiency.
Other trademarks and trade names may be used in this document to refer to either the
entities claiming the marks and names or their products. Dell Inc. disclaims any proprietary
interest in trademarks and trade names other than its own.
2016 - 02 Rev. X00

Contents | 3
Contents
About Your Monitor ................................................................ 5
Package Contents......................................................................................5
Product Features ........................................................................................6
Identifying Parts and Controls.................................................................8
Plug and Play Capability.......................................................................... 12
LCD Monitor Quality and Pixel Policy..................................................12
Maintenance Guidelines .........................................................................12
Setting Up the Monitor......................................................... 13
Connecting the Stand .............................................................................13
Connecting Your Monitor ......................................................................14
Organizing Cables.................................................................................... 15
Removing the Monitor Stand.................................................................16
Operating Your Monitor....................................................... 17
Power On the Monitor ............................................................................ 17
Using the Front Panel Controls............................................................. 17
Using the On-Screen Display (OSD) Menu.........................................19
4 | Contents
Setting the Maximum Resolution..........................................................32
Using the Tilt .............................................................................................33
Using the Wireless Charging Base........................................................34
Troubleshooting .................................................................... 37
Self-Test .....................................................................................................37
Built-in Diagnostics..................................................................................38
Common Problems .................................................................................39
Product-Specific Problems....................................................................41
Wireless Charging Specific Problems ..................................................41
Appendix ....................................................................................................42
FCC Notices (U.S. Only) and Other Regulatory Information ..........42
Contact Dell ..............................................................................................42
Setting Up Your Monitor.........................................................................43
Monitor Specifications .........................................................45
About Your Monitor | 5
About Your Monitor
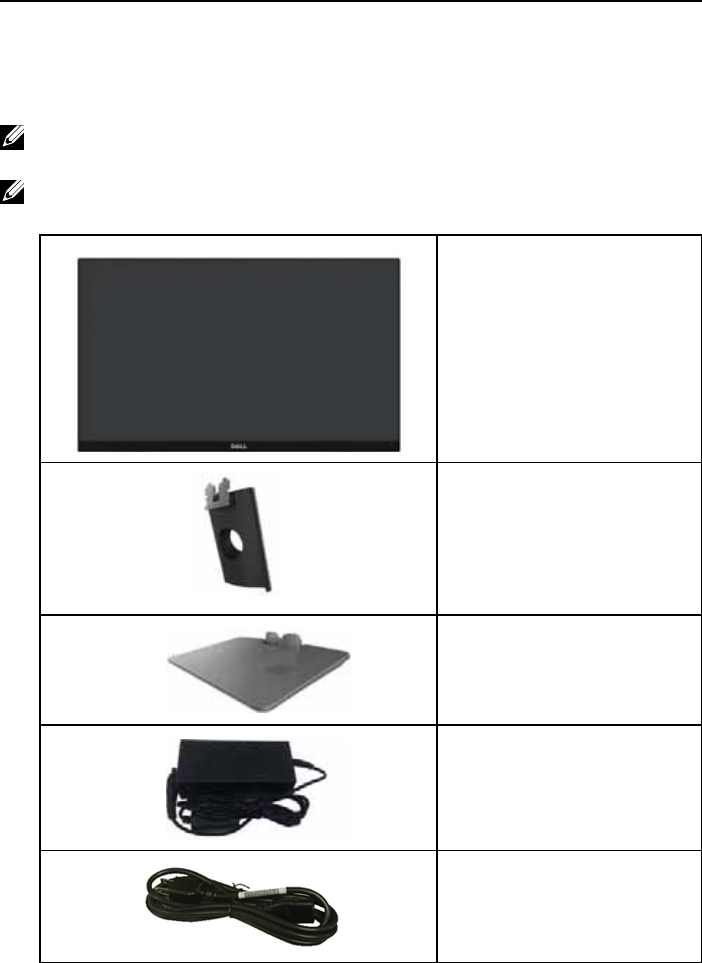
Package Contents
Your monitor ships with the components shown below. Ensure that you have
received all the components and Contact Dell if something is missing.
NOTE: Some items may be optional and may not ship with your monitor. Some
features or media may not be available in certain countries.
NOTE: To set up with any other stand, please refer to the respective stand setup
guide for setup instructions.
Monitor
∞
Stand Riser
∞
Wireless Charging Base
∞
Power Adapter
∞
Power Cable (varies by
∞countries)
6 | About Your Monitor
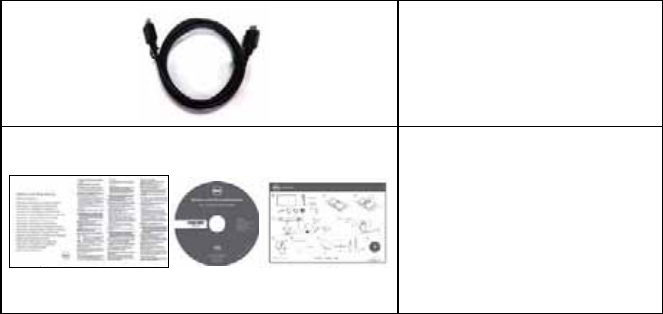
HDMI Cable
∞
DellTM UltraSharp U2715H Monitor
Drivers and
∞Documentation Media
Quick Setup Guide
∞
Safety and Regulatory
∞Information
Wireless Safety and
∞Regulatory Information
Product Features
The Dell S2317HJ flat panel display has an active matrix, Thin-Film Transistor (TFT),
Liquid Crystal Display (LCD), and LED backlight. The monitor features include:
58.42 cm (23 inch) viewable area display (measured diagonally). 1920 x 1080
∞resolution, plus full-screen support for lower resolutions.
Wide viewing angle to allow viewing from a sitting or standing position, or while
∞moving from side-to-side.
Wireless charging base makes wireless charging possible for your smartphones
∞or mobile devices.
Plug and play capability if supported by your system.
∞
VGA and HDMI connectivity makes it simple and easy to connect with legacy
∞and new systems.
Build-in Speaker (3W) x 2.
∞
On-Screen Display (OSD) adjustments for ease of set-up and screen
∞optimization.
Software and documentation media includes an Information File (INF), Image
∞Color Matching File (ICM), and product documentation.
Dell Display Manager Software included (in the CD shipped with the monitor).
∞
Energy Saver feature for Energy Star compliance.
∞
Security - lock slot.
∞
Capability to switch from wide aspect to standard aspect ratio while maintaining
∞the image quality.
EPEAT Silver Rating.
∞
TCO-Certified Displays.
∞
BFR/PVC- Reduced.
∞
High Dynamic Contrast Ratio (8,000,000:1).
∞
0.3 W standby power when in the sleep mode.
∞
About Your Monitor | 7
Energy Gauge shows the energy level being consumed by the monitor in real
∞
time (consumption from the wireless charging base is not included).
8 | About Your Monitor
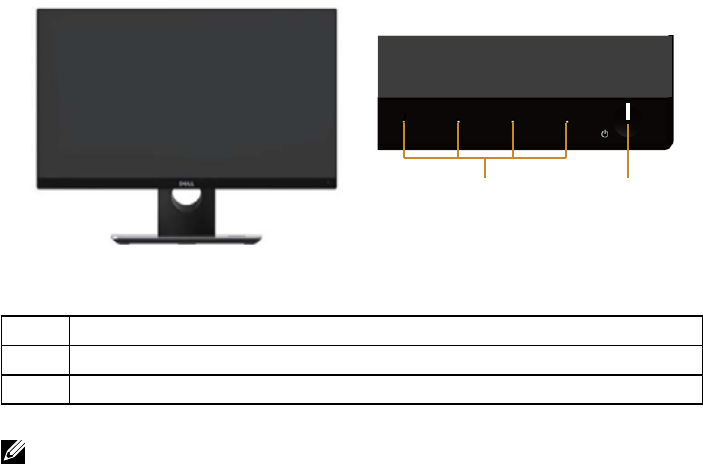
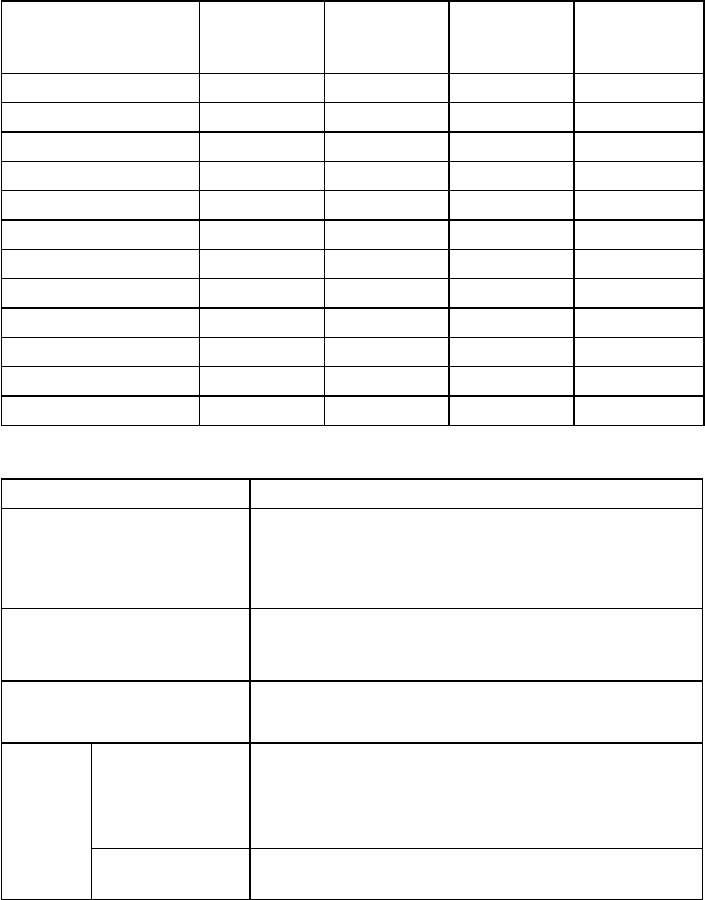
Identifying Parts and Controls
Front View
Front panel controls
2
1
Label Description
1Function buttons (For more information, see Operating Your Monitor)
2Power On/Off button (with LED indicator)
NOTE: For displays with glossy bezels the user should consider the placement of
the display as the bezel may cause disturbing reflections from surrounding light
and bright surfaces.
About Your Monitor | 9
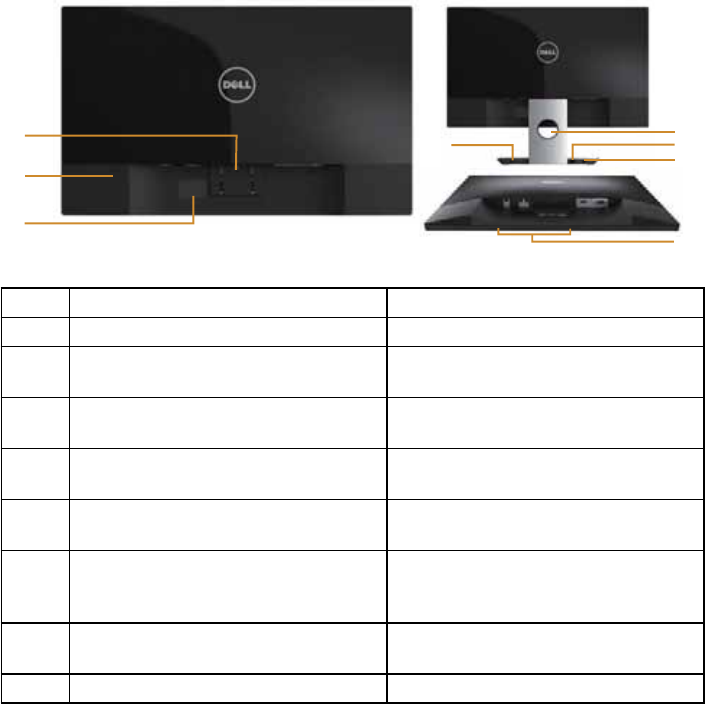
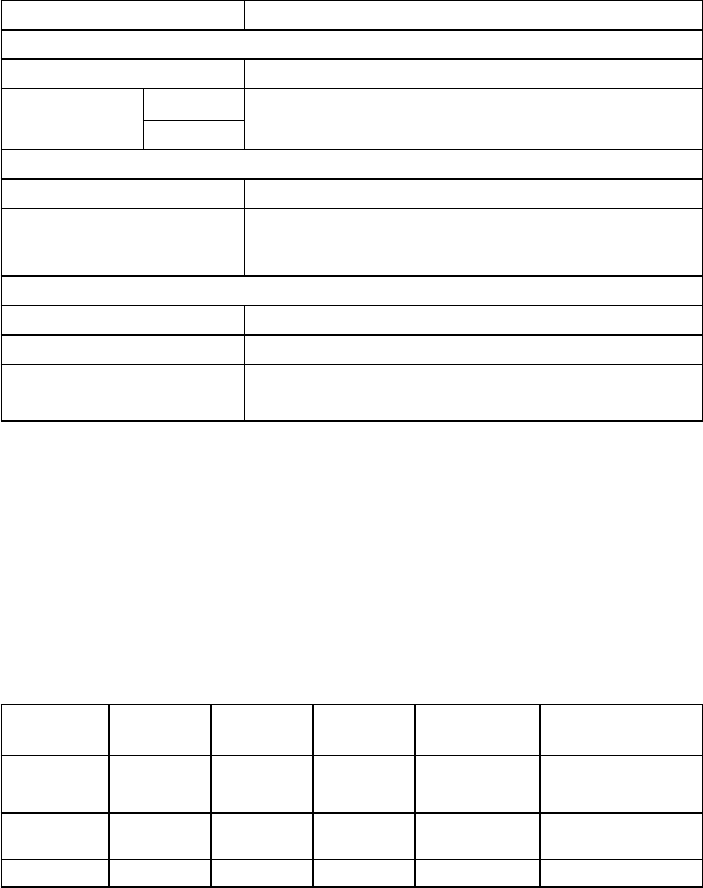
Back View
8
1
2
3
4
5
6
7
Back View with monitor stand
Back View without monitor stand
Label Description Use
1Stand release button Releases stand from monitor.
2Security - lock slot Secures monitor with security lock
(security lock not included).
3Barcode serial number label Refer to this label if you need to
contact Dell for technical support.
4Wireless charging power switch Turns on the switch for the readiness
of wireless charging.
5Cable management slot Uses to organize cables by placing
them through the slot.
6DC out cable Plugs to the power-adapter port on
the monitor, with a 12V DC power
supply.
7Power-adapter port Connects the power cable using a
19V DC adapter for transition
8Regulatory label Lists the regulatory approvals.
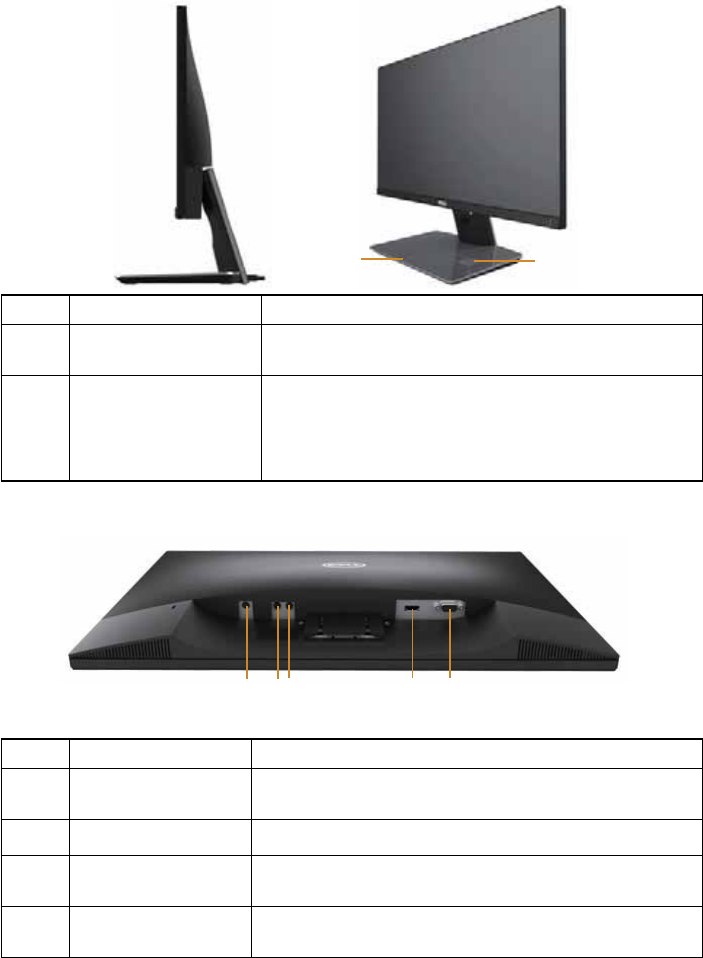
10 | About Your Monitor
Side View
21
Label Description Use
1Wireless charging
indicator
Indicates the charging status.
2Wireless charging pad Charge your Qi (WPC) or PMA compliance
Ŕ
devices.
Align your device to the pad to get max Ŕ
charging.
Bottom View
45
1 2 3
Bottom view without monitor stand
Label Description Use
1Power-adapter port Connects the DC out cable of the wireless charging
base.
2Audio Line Out port Connects external speakers (Optional Purchase) *
3Audio Line In port Connects the audio cable (Optional Purchase) from
the source device to the monitor.
4HDMI port Connects your computer to the monitor using an
HDMI cable.

About Your Monitor | 11
5VGA port Connects your computer to the monitor using a VGA
cable.
* Headphone usage is not supported for the audio line out port.

12 | About Your Monitor
Plug and Play Capability
You can install the monitor in any Plug and Play-compatible system. The monitor
automatically provides the computer system with its Extended Display Identification
Data (EDID) using Display Data Channel (DDC) protocols so the system can configure
itself and optimize the monitor settings. Most monitor installations are automatic,
you can select different settings if desired. For more information about changing the
monitor settings, see Operating Your Monitor.
LCD Monitor Quality and Pixel Policy
During the LCD Monitor manufacturing process, it is not uncommon for one or more
pixels to become fixed in an unchanging state which are hard to see and do not affect
the display quality or usability. For more information on Dell Monitor Quality and Pixel
Policy, see Dell Support site at: www.dell.com/support/monitors.
Maintenance Guidelines
Cleaning Your Monitor
WARNING: Before cleaning the monitor, unplug the monitor power cable from
the electrical outlet.
CAUTION: Read and follow the Safety Instructions before cleaning the monitor.
For best practices, follow the instructions in the list below while unpacking, cleaning
or handling your monitor:
To clean your anti-static screen, lightly dampen a soft, clean cloth with water.
∞If possible, use a special screen-cleaning tissue or solution suitable for the anti-
static coating. Do not use benzene, thinner, ammonia, abrasive cleaners or
compressed air.
Use a lightly-dampened, warm cloth to clean the monitor. Avoid using
∞detergent of any kind as some detergents leave a milky film on the monitor.
If you notice white powder when you unpack your monitor, wipe it off with a
∞cloth.
Handle your monitor with care as a darker-colored monitor may get scratched
∞and show white scuff marks more than a lighter-colored monitor.
To help maintain the best image quality on your monitor, use a dynamically
∞changing screen saver and turn Off your monitor when not in use.
Setting Up the Monitor | 13
Setting Up the Monitor
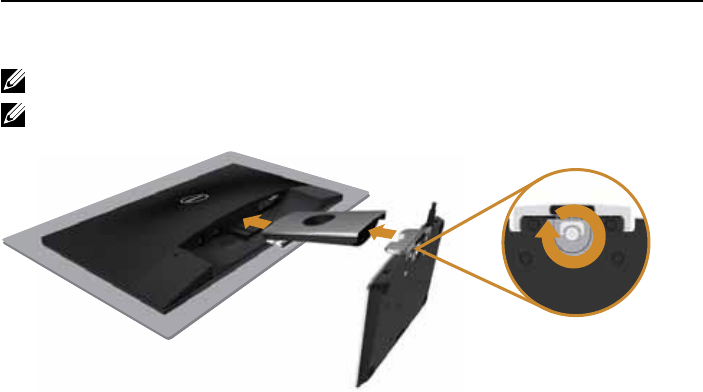
Connecting the Stand
NOTE: The stand is detached when the monitor is shipped from the factory.
NOTE: The following steps is applicable for a monitor with a stand.
2
3
4
To attach the monitor stand:
Remove the cover and place the monitor on it.
1.
Insert the stand base blocks fully into the stand slot.
2.
Turn the screw clockwise. After fully tightening the screw, fold the screw handle
3.
flat within the recess.
Fit the two tabs on the upper part of the stand to the groove on the back of the
4.
monitor.
Press the stand till it snaps into place.
5.
14 | Setting Up the Monitor
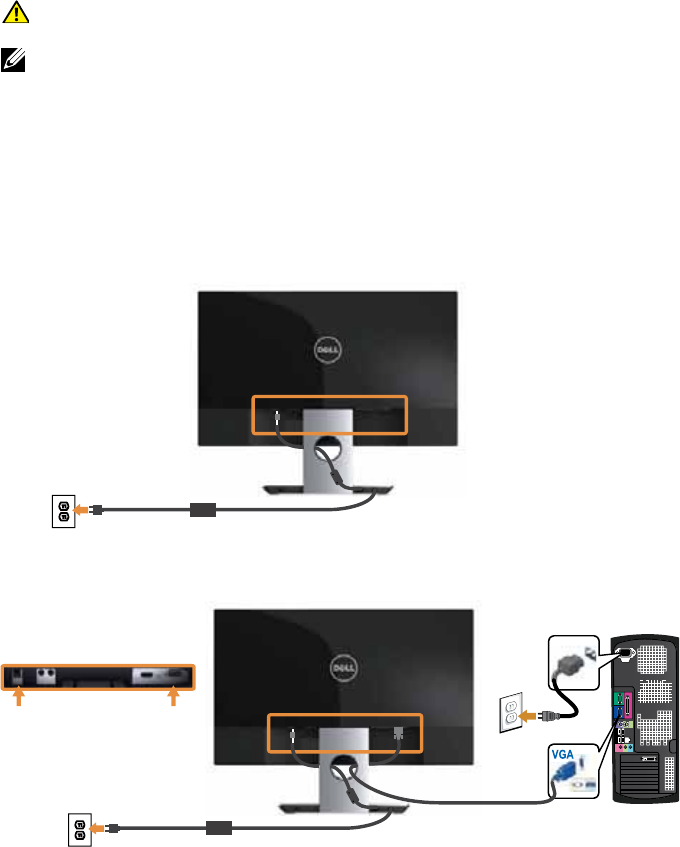
Connecting Your Monitor
WARNING: Before you begin any of the procedures in this section, follow the
Safety Instructions.
NOTE: Do not connect all cables to the computer at the same time.
To connect your monitor to the computer:
Turn Off your computer and disconnect the power cable.
1.
Connect the VGA/HDMI/audio cable from your monitor to the computer.
2.
Plug the DC out cable of the wireless charging base to the power adapter port
3.
on the monitor. And plug the supplied power cable with 19V DC adapter to the
power adapter port on the wireless charging base.
Connecting the VGA cable (Optional Purchase)
Setting Up the Monitor | 15
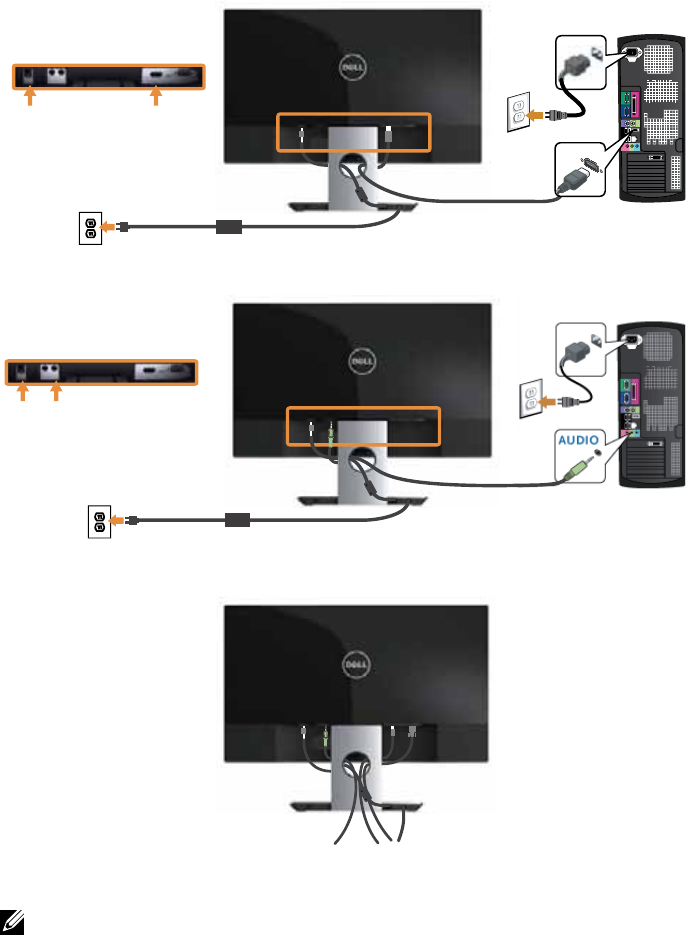
Connecting the HDMI cable
HDMI
Connecting the audio cable (Optional Purchase)
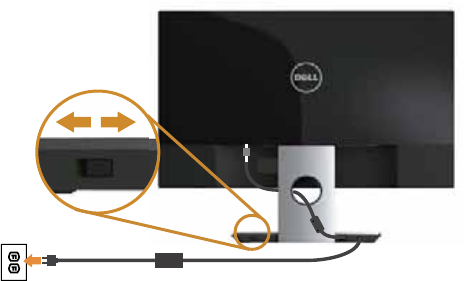
Organizing Cables
After you connect all necessary cables to your monitor and computer, organize all
cables as shown above.
NOTE: After the cables are connected, they will have to be disconnected again
to route them through the hole.
16 | Setting Up the Monitor
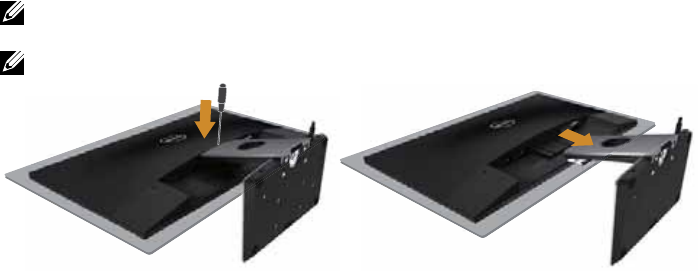
Removing the Monitor Stand
NOTE: To prevent scratches on the LCD screen while removing the stand,
ensure that the monitor is placed on a soft and clean surface.
NOTE: The following steps are applicable for a monitor with a stand.
To remove the stand:
Place the monitor on a soft cloth or cushion.
1.
Use a long and thin screwdriver to push the release latch.
2.
Once the latch is released, remove the stand away from monitor.
3.
Operating Your Monitor | 17
Operating Your Monitor
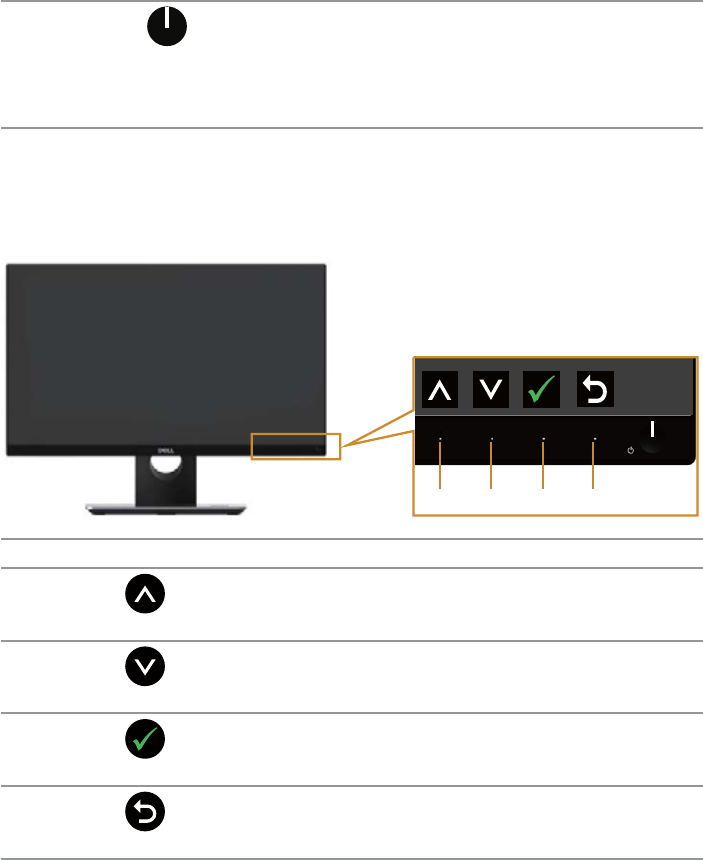
Power On the Monitor
Press the button to turn On the monitor.
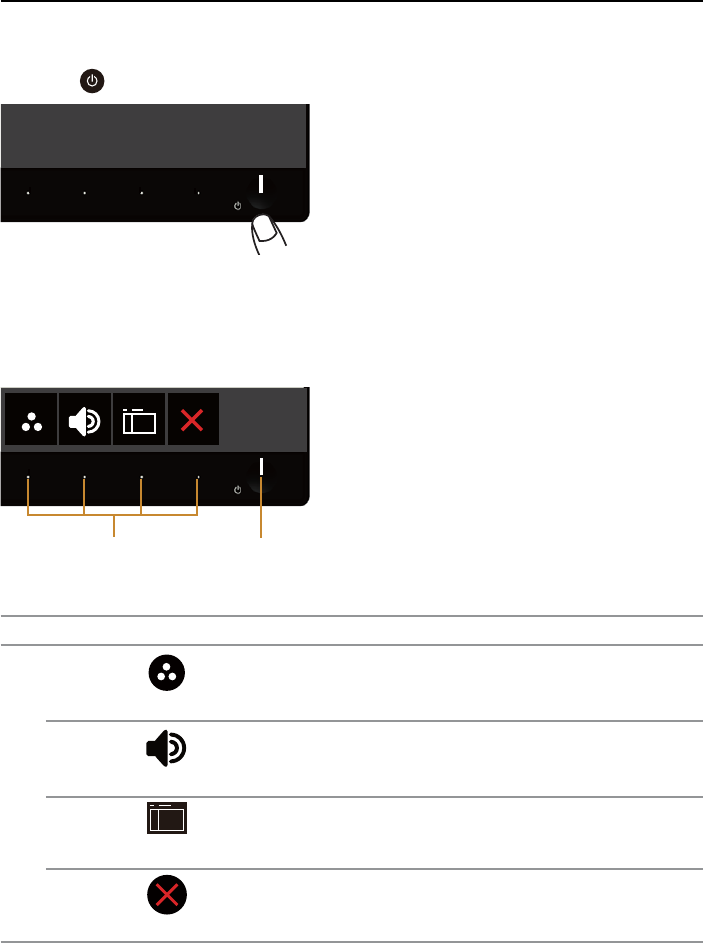
Using the Front Panel Controls
Use the control buttons on the front of the monitor to adjust the image being
displayed.
21
The following table describes the front panel buttons:
Front Panel Button Description
1
Shortcut key/Preset Modes
Use this button to choose from a list of preset
modes.
Shortcut key/Volume
Use the buttons to adjust the volume. Minimum
is 0 (-). Maximum is 100 (+).
Menu
Use the Menu button to launch the On-Screen
Display (OSD) and select the OSD Menu. See
Accessing the OSD menu.
Exit
Use this button to go back to the main menu or
exit the OSD main menu.
18 | Operating Your Monitor
2
Power On/Off button (with
LED indicator)
Use the Power button to turn the monitor On
and Off.
Solid white light indicates the monitor is On and
fully functional. Blinking white light indicates the
power save mode.
OSD controls
Use the buttons on the front of the monitor to adjust the image settings.
1234
Front Panel Button Description
1
Up
Use the Up button to increase values or move up.
2
Down
Use the Down button to adjust (decrease ranges)
items in the OSD menu.
3
OK
Use the OK button to confirm your selection.
4
Back
Use the Back button to go back to the previous menu.
Operating Your Monitor | 19
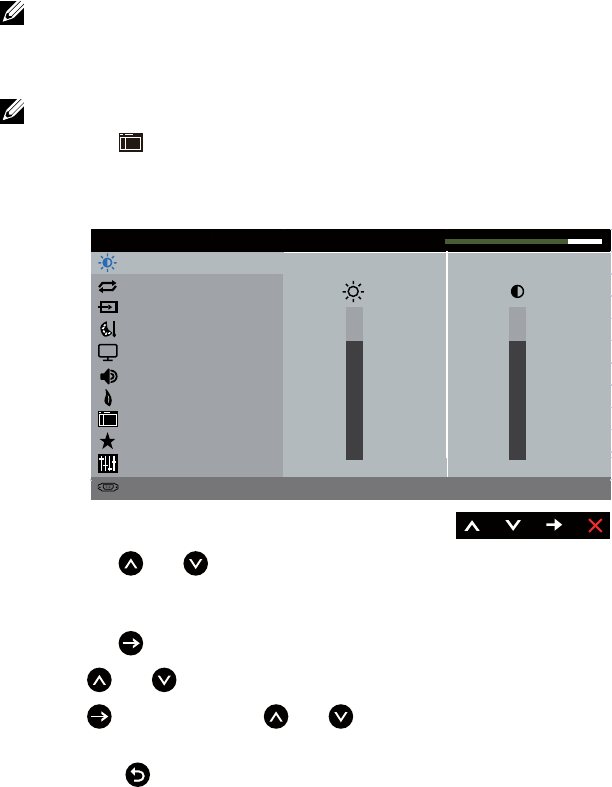
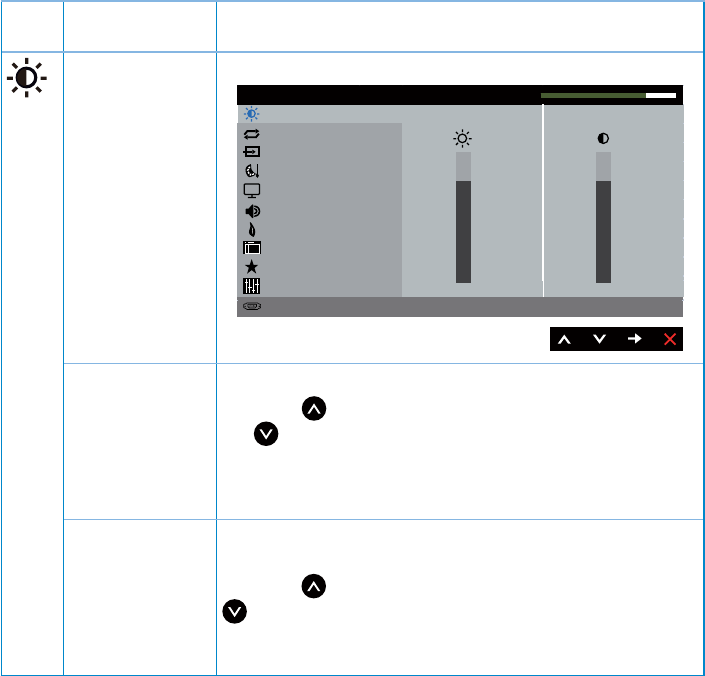
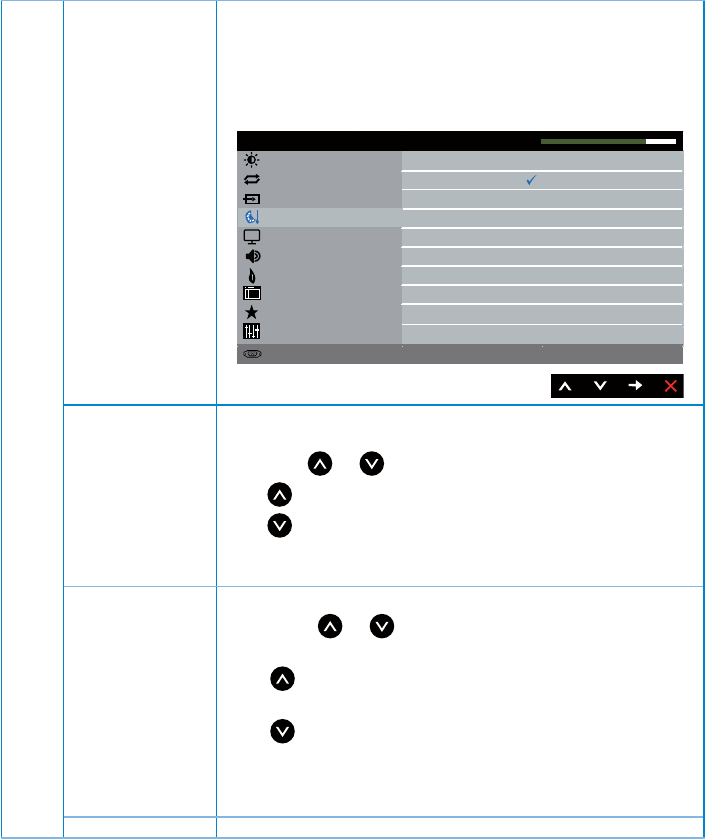
Using the On-Screen Display (OSD) Menu
Accessing the OSD menu
NOTE: If you change the settings and then either proceed to another menu or
exit the OSD menu, the monitor automatically saves those changes. The changes
are also saved if you change the settings and then wait for the OSD menu to
disappear.
NOTE: The model name S2316H is a generic name without suffix J.
Press the
1. button to display the OSD main menu.
Main Menu for analog (VGA) input
Brightness / Contrast
Auto Adjust
Input Source
Color
Display
Energy
Menu
Personalize
Others
Resolution: 1920x1080, 60Hz
Dell S2316H Energy Use
75% 75%
Audio
Press the
2. and buttons to move between the setting options. As you move
from one icon to another, the option name is highlighted. See the following
table for a complete list of all the options available for the monitor.
Press the
3. button once to activate the highlighted option.
Press
4. and button to select the desired parameter.
Press
5. and then use the and buttons, according to the indicators on
the menu, to make your changes.
Select the
6. button to return to the main menu.
20 | Operating Your Monitor
Icon Menu and
Submenus
Description
Brightness/
Contrast
Use this menu to activate Brightness/Contrast adjustment.
Brightness / Contrast
Auto Adjust
Input Source
Color
Display
Energy
Menu
Personalize
Others
Resolution: 1920x1080, 60Hz
Dell S2316H Energy Use
75% 75%
Audio
Brightness Brightness adjusts the luminance of the backlight.
Press the button to increase the brightness and press
the button to decrease the brightness (min. 0 / max.
100).
NOTE: Manual adjustment of Brightness is disabled when
Dynamic Contrast is switched On.
Contrast Adjust the Brightness first, and then adjust the Contrast
only if further adjustment is necessary.
Press the button to increase the contrast and press the
button to decrease the contrast (min. 0 / max. 100).
The Contrast function adjusts the degree of difference
between darkness and lightness on the monitor screen.
Operating Your Monitor | 21
Auto Adjust Use this key to activate automatic setup and adjust menu.
Brightness / Contrast
Input Source
Color
Display
Energy
Menu
Personalize
Others
Resolution: 1920x1080, 60Hz
Dell S2316H Energy Use
Press to adjust the screen automatically.
Auto Adjust
Audio
The following dialog appears on a black screen as the
monitor self-adjusts to the current input:
Auto Adjustment in Progress...
Auto Adjustment allows the monitor to self-adjust to the
incoming video signal. After using Auto Adjustment, you
can further tune your monitor by using the Pixel Clock
(Coarse) and Phase (Fine) controls under Display Settings.
NOTE: Auto Adjust does not occur if you press the
button while there are no active video input signals or
attached cables.
This option is only available when you are using the
analog (VGA) connector.
22 | Operating Your Monitor
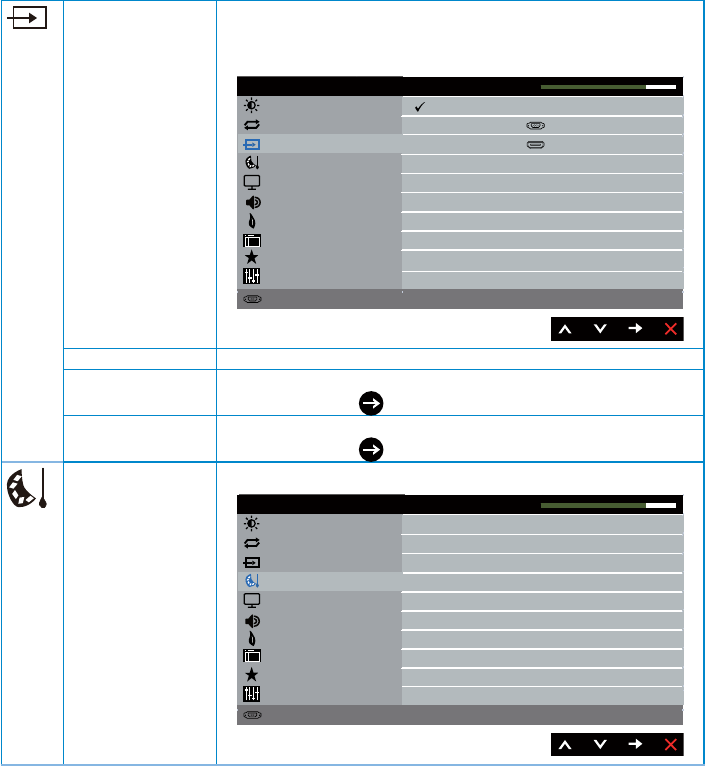
Input Source Use the Input Source menu to select between the
different video signals that may be connected to your
monitor.
Brightness / Contrast
Color
Display
Energy
Menu
Personalize
Others
Resolution: 1920x1080, 60Hz
Dell S2316H Energy Use
Auto Select
Auto Adjust
Input Source
VGA
HDMI
Audio
Auto Select Select Auto Select to scan for available input signals.
VGA Select VGA input when you are using the analog (VGA)
connector. Push to select the VGA input source.
HDMI Select HDMI input when you are using the Digital (HDMI)
connector. Push to select the HDMI input source.
Color Use Color to adjust the color setting mode.
Brightness / Contrast
Display
Energy
Menu
Personalize
Others
Resolution: 1920x1080, 60Hz
Dell S2316H Energy Use
Preset Modes
Auto Adjust
Input Source
Color
Standard
RGB
Input Color Format
Reset Color
Audio
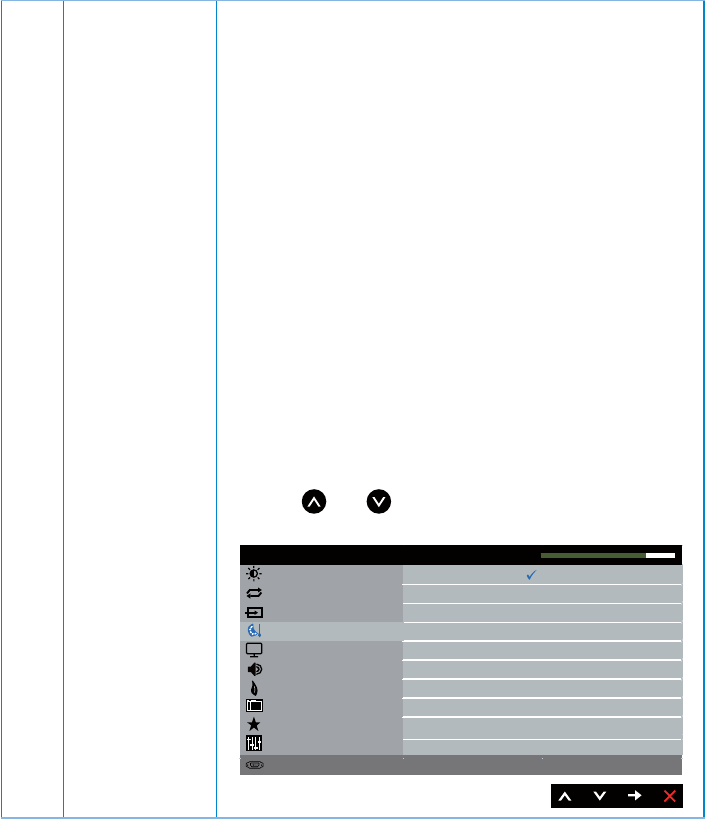
Operating Your Monitor | 23
Preset Modes When you select Preset Modes, you can choose Standard,
Multimedia, Movie, Game, Paper, Warm, Cool or Custom
Color from the list.
Standard: Loads the monitor's default color settings.
∞This is the default preset mode.
Multimedia: Loads color settings ideal for multimedia
∞applications.
Movie: Loads color settings ideal for movies.
∞
Game: Loads color settings ideal for most gaming
∞applications.
Paper: Loads brightness and sharpness settings ideal
∞for viewing text. Blend the text background to simulate
paper media without affecting color images. Applies to
RGB input format only.
Warm: Increases the color temperature. The screen
∞appears warmer with a red/yellow tint.
Cool: Decreases the color temperature. The screen
∞appears cooler with a blue tint.
Custom Color: Allows you to manually adjust the color
∞settings.
Press the and buttons to adjust the three colors (R,
G, B) values and create your own preset color mode.
Brightness / Contrast
Display
Energy
Menu
Personalize
Others
Resolution: 1920x1080, 60Hz
Dell S2316H Energy Use
Preset Modes
Auto Adjust
Input Source
Color
Standard
Multimedia
Movie
Game
Paper
Warm
Cool
Custom Color
Input Color Format
Reset Color
Audio
24 | Operating Your Monitor
Input Color
Format
Allows you to set the video input mode to:
RGB: Select this option if your monitor is connected to
∞a computer or DVD player using the HDMI cable.
YPbPr: Select this option if your DVD player supports
∞only YPbPr output.
Brightness / Contrast
Display
Energy
Menu
Personalize
Others
Resolution: 1920x1080, 60Hz
Dell S2316H Energy Use
Input Color Format
Auto Adjust
Input Source
Color
RGB
YPbPr
Preset Modes
Reset Color
Audio
Hue This feature can shift the color of the video image to green
or purple. This is used to adjust the desired flesh tone
color. Use or to adjust the hue from 0 to 100.
Press to increase the green shade of the video image.
Press to increase the purple shade of the video image.
NOTE: Hue adjustment is available only when you select
Movie or Game preset mode.
Saturation This feature can adjust the color saturation of the video
image. Use or to adjust the saturation from 0 to
100.
Press to increase the monochrome appearance of the
video image.
Press to increase the colorful appearance of the video
image.
NOTE: Saturation adjustment is available only when you
select Movie or Game preset mode.
Reset Color Allows your monitor color settings to the factory settings.
Operating Your Monitor | 25
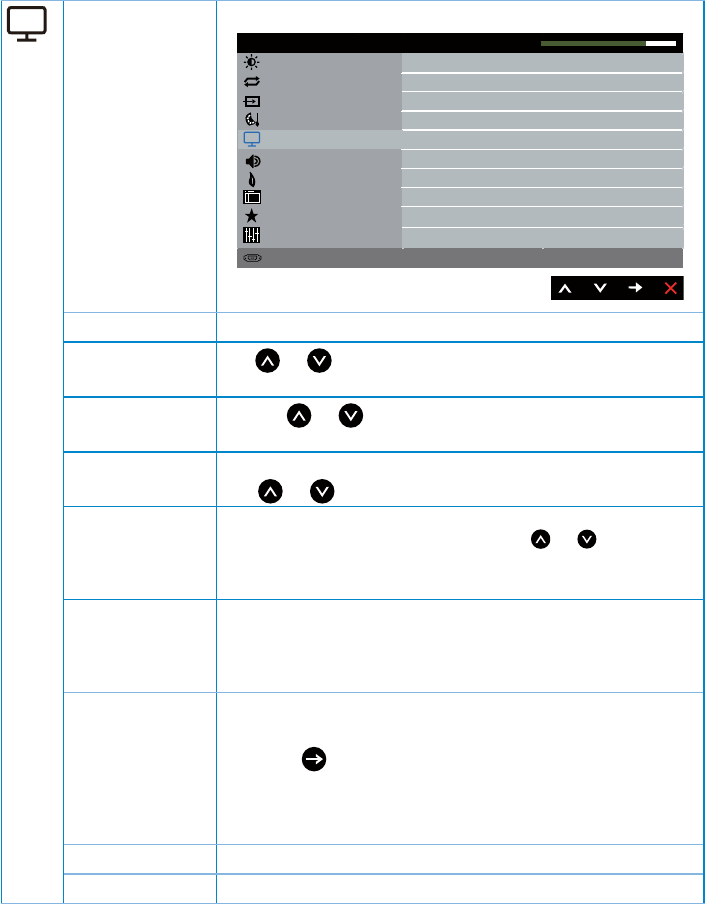
Display Use the Display to adjust image.
Brightness / Contrast
Energy
Menu
Personalize
Others
Resolution: 1920x1080, 60Hz
Dell S2316H Energy Use
Auto Adjust
Input Source
Color
Wide 16:9
50
50
50
50
23
Normal
Display
Aspect Ratio
Horizontal Position
Vertical Position
Sharpness
Pixel Clock
Phase
Dynamic Contrast
Response Time
Reset Display
Audio
Aspect Ratio Adjusts the image ratio to Wide 16:9, 4:3 or 5:4.
Horizontal
Position Use or the buttons to adjust image left and right.
Minimum is 0 (-). Maximum is 100 (+).
Vertical Position Use the or buttons to adjust image up and down.
Minimum is 0 (-). Maximum is 100 (+).
Sharpness This feature can make the image look sharper or softer.
Use or to adjust the sharpness from 0 to 100.
Pixel Clock The Phase and Pixel Clock adjustments allow you to adjust
your monitor to your preference. Use or buttons to
adjust for best image quality. Minimum is 0 (-). Maximum
is 100 (+).
Phase If satisfactory results are not obtained using the Phase
adjustment, use the Pixel Clock (coarse) adjustment and
then use Phase (fine), again. Minimum is 0 (-). Maximum is
100 (+).
Dynamic
Contrast
Allows you to increase the level of contrast to provide
sharper and more detailed image quality.
Press the button to select the Dynamic Contrast "On"
or "Off".
NOTE: Dynamic Contrast provides higher contrast if you
select Game or Movie preset mode.
Response Time User can select between Fast or Normal.
Reset Display Select this option to restore default display settings.
26 | Operating Your Monitor
Audio
Brightness / Contrast
Display
Energy
Menu
Personalize
Others
Resolution: 1920x1080, 60Hz
Dell S2316H Energy Use
Volume
Auto Adjust
Input Source
50
PC Audio
Audio Source
Speaker
Audio
Reset Audio
Enable
Color
Volume Use the buttons to adjust the volume.Minimum is 0 (-).
Maximum is 100 (+).
Audio Source Allows you to set the Audio Source mode to:
PC Audio
∞
HDMI
∞
Speaker Allows you to enable or disable speaker function.
Reset Audio Select this option to restore default display settings.
Energy
Brightness / Contrast
Display
Menu
Personalize
Others
Resolution: 1920x1080, 60Hz
Dell S2316H Energy Use
Power Button LED
Auto Adjust
Input Source
Color
On During Active
Energy
Reset Energy
Audio
Power Button
LED
Allows you to set the power LED indicator On During
Active or Off During Active to save energy.
Reset Energy Select this option to restore default Energy settings.
Operating Your Monitor | 27
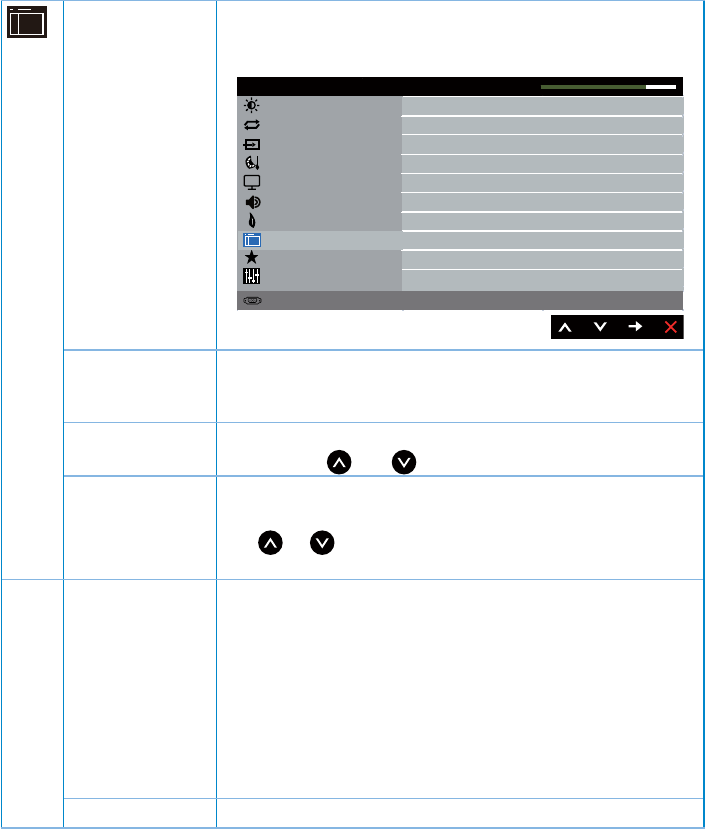
Menu Select this option to adjust the settings of the OSD, such
as, the languages of the OSD, the amount of time the
menu remains on screen and so on.
Brightness / Contrast
Energy
Personalize
Others
Resolution: 1920x1080, 60Hz
Dell S2316H Energy Use
Auto Adjust
Input Source
Color
English
20
20 s
Unlock
Display
Language
Transparency
Timer
Lock
Reset Menu
Menu
Audio
Language Language options set the OSD display to one of the eight
languages (English, Spanish, French, German, Brazilian
Portuguese, Russian, Simplified Chinese, or Japanese).
Transparency Select this option to change the menu transparency by
pressing the and buttons from 0 to 100.
Timer OSD Hold Time: sets the length of time the OSD will
remain active after the last time you pressed a button.
Use or to adjust the slider in 1 second increments,
from 5 to 60 seconds.
Lock Controls user access to adjustments. When Lock is
selected, no user adjustments are allowed. All buttons are
locked.
NOTE:
Lock – Either soft lock (through the OSD menu) or
∞hard lock (press and hold the button beside the power
button for 10 seconds)
Unlock – Only hard unlock (press and hold the button
∞beside the power button for 10 seconds)
Reset Menu Reset all OSD settings to the factory preset values.
28 | Operating Your Monitor
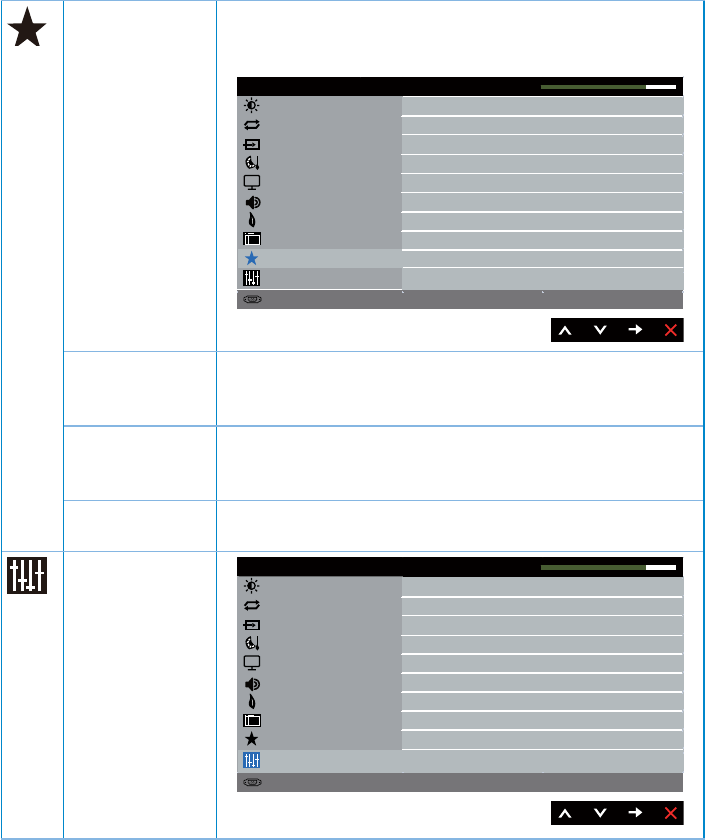
Personalize Users can choose a feature from Shortcut Key 1, Shortcut
Key 2, Reset Personalization, Preset Modes or Brightness/
Contrast and set it as a shortcut key.
Brightness / Contrast
Energy
Others
Resolution: 1920x1080, 60Hz
Dell S2316H Energy Use
Auto Adjust
Input Source
Color
Display
Menu
Personalize
Shortcut Key 1 Preset Modes
Shortcut Key 2 Volume
Reset Personalization
Audio
Shortcut Key 1 User can select one of the followings: Preset Modes,
Brightness/Contrast, Auto Adjust, Input Source, Aspect
Ratio and Volume to set the Shortcut Key 1.
Shortcut Key 2 User can select one of the followings: Preset Modes,
Brightness/Contrast, Auto Adjust, Input Source, Aspect
Ratio and Volume to set the Shortcut Key 2.
Reset
Personalization
Allows you to restore shortcut key to the default setting.
Others
Brightness / Contrast
Energy
Personalize
Resolution: 1920x1080, 60Hz
Dell S2316H Energy Use
Auto Adjust
Input Source
Color
Enable
Disable
Display
DDC/CI
LCD Conditioning
Reset Other
Factory Reset
Menu
Others
Audio
Operating Your Monitor | 29
DDC/CI DDC/CI (Display Data Channel/Command Interface)
allows your monitor parameters (brightness, color
balance and etc.) to be adjustable via the software on
your computer.
You can disable this feature by selecting Disable.
Enable this feature for best user experience and optimum
performance of your monitor.
Brightness / Contrast
Energy
Personalize
Resolution: 1920x1080, 60Hz
Dell S2316H Energy Use
Auto Adjust
Input Source
Color
Display
Menu
Others
Audio
Enable
Disable
DDC/CI
LCD Conditioning
Reset Other
Factory Reset
LCD
Conditioning
Helps reduce minor cases of image retention. Depending
on the degree of image retention, the program may
take some time to run. To start LCD conditioning, select
Enable.
Brightness / Contrast
Energy
Personalize
Resolution: 1920x1080, 60Hz
Dell S2316H Energy Use
Auto Adjust
Input Source
Color
Display
Menu
Others
Audio
Enable
Disable
DDC/CI
LCD Conditioning
Reset Other
Factory Reset
Reset Other Reset all settings under the Others setting menu to the
factory preset values.
Factory Reset Reset all settings to the factory preset values.
NOTE: Your monitor has a built-in feature to automatically calibrate the
brightness to compensate for LED aging.
30 | Operating Your Monitor
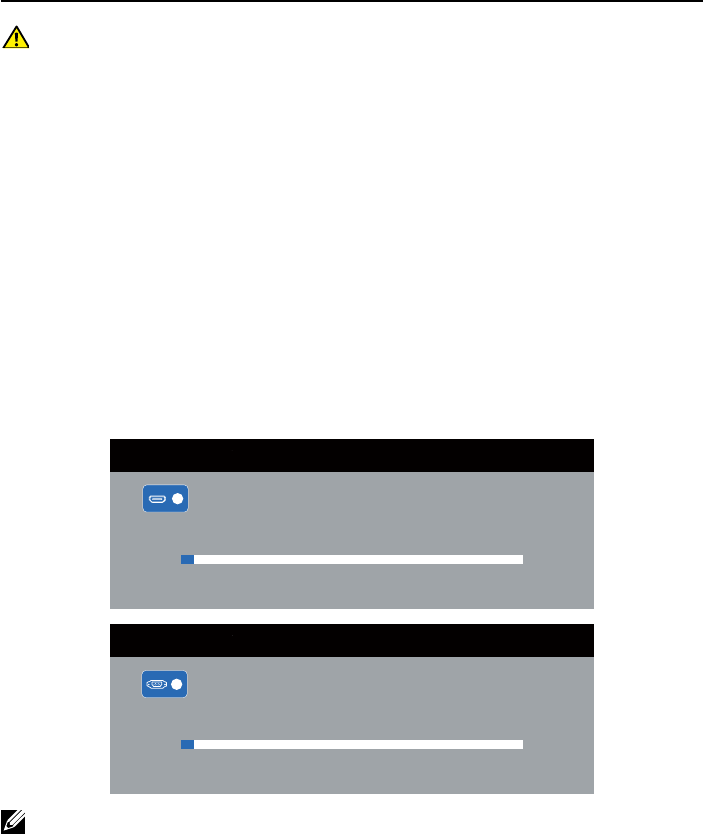
OSD Warning Messages
When the Dynamic Contrast feature is enabled (in these preset modes: Game or
Movie), the manual brightness adjustment is disabled.
Dell S2316H
To allow manual adjustment of brightness, the Dynamic Contrast will be
No
Yes
switched off.
Do you want to continue?
When the monitor does not support a particular resolution mode, the following
message is displayed:
Dell S2316H
The current input timing is not supported by the monitor display. Please
change your input timing to
1920x1080, 60Hz
or any other monitor
listed timing as per the monitor specifications.
This means that the monitor cannot synchronize with the signal that it is receiving
from the computer. See Monitor Specifications for the Horizontal and Vertical
frequency ranges addressable by this monitor. Recommended mode is 1920 x 1080.
You will see the following message before the DDC/CI function is disabled:
Dell S2316H
The function of adjusting display setting using PC application will be
No
Yes
disabled.
Do you wish to disable DDC/CI function?
Operating Your Monitor | 31
When the monitor enters the Power Save Mode, the following message appears:
Dell S2316H
Entering Power Save Mode.
If you press any button other than the power button, the following messages will
appear depending on the selected input:
Dell S2316H
There is no signal coming from your computer. Press any key on the
keyboard or move the mouse to wake it up. If there is no display, press
the monitor button now to select the correct input source on the
On-Screen-Display menu.
If VGA or HDMI cable is not connected, a floating dialog box as shown below appears.
The monitor will enter Power Save Mode after 5 minutes if left at this state.
Dell S2316H
No VGA Cable
The display will go into Power Save Mode in 5 minutes.
www.dell.com/support/monitors
?
Dell S2316H
The display will go into Power Save Mode in 5 minutes.
www.dell.com/support/monitors
No HDMI Cable
?
See Troubleshooting for more information.
32 | Operating Your Monitor
Setting the Maximum Resolution
To set the maximum resolution for the monitor:
In Windows 7, Windows 8, Windows 8.1:
For Windows 8 and Windows 8.1, select the Desktop tile to switch to classic
1.
desktop.
Right-click on the desktop and click
2. Screen Resolution.
Click the Dropdown list of the Screen Resolution and select
3. 1920 x 1080.
Click
4. OK.
In Windows® 10:
Right-click on the desktop and click
1. Display settings.
Click
2. Advanced display settings.
Click the dropdown list of
3. Resolution and select 1920 x 1080.
Click
4. Apply.
If you do not see 1920 x 1080 as an option, you may need to update your graphics
driver. Depending on your computer, complete one of the following procedures:
If you have a Dell desktop or portable computer:
Go to
∞www.dell.com/support, enter your service tag, and download the latest
driver for your graphics card.
If you are using a non-Dell computer (portable or desktop):
Go to the support site for your computer and download the latest graphic
∞drivers.
Go to your graphics card website and download the latest graphic drivers.
∞
Operating Your Monitor | 33
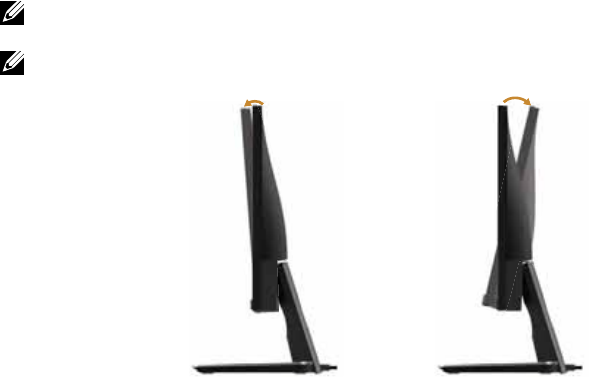
Using the Tilt
NOTE: This is applicable for a monitor with a stand. When any other stand is
bought, please refer to the respective stand setup guide for set up instructions.
NOTE: The stand is detached when the monitor is shipped from the factory.
5° 21°
34 | Operating Your Monitor
Using the Wireless Charging Base
The stand base of your monitor allows you to charge a Qi (WPC)/PMA
certified smartphone or mobile device wirelessly. For more information about
wireless charging standards and certified devices, please visit: http://www.
wirelesspowerconsortium.com/ and http://www.merger.powermatters.org/.
Setting Up the Wireless Charging Function
Ensure that the DC out cable and power cable are connected properly and
1.
secure.
Slide the wireless charging power switch to reveal the green color on the back.
2.
The white LED appears for 3 seconds and then goes off to indicate that the
wireless charging function is turned on.
OnOff
To turn off the wireless charging function, slide the wireless charging power
3.
switch to reveal the red color on the back.
Operating Your Monitor | 35
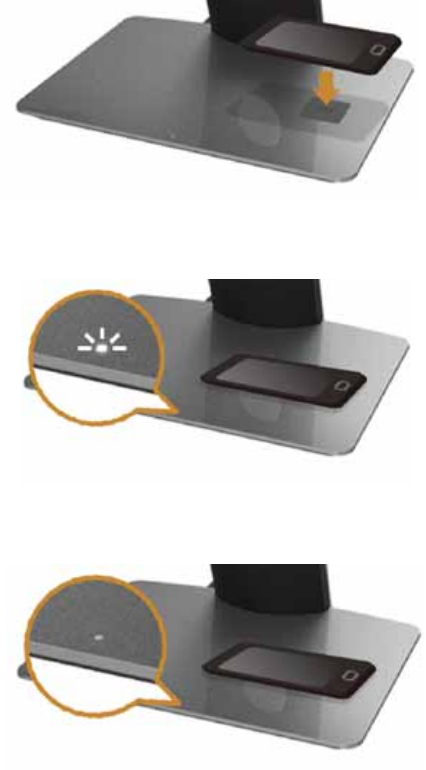
Charging Your Mobile Device Wirelessly
To charge your mobile device wirelessly:
Read the documentations that come with the mobile device for information on
1.
how to use the wireless charging function correctly.
Ensure that the charging area of the wireless charging base is clear of any object
2.
and then place your mobile device on the center of the charging area.
When the device is properly placed on the charging area, the LED indicator lights
3.
in white to indicate that your device starts to charge.
When the battery of the device is fully charged (usually > 98%), the white LED
4.
light goes off.
36 | Operating Your Monitor
WARNING: Do not charge a non Qi (WPC)/PMA certified device, or place any
other object in the wireless charging area. If you use a Qi (WPC)/PMA certified
wireless charging cover for the mobile device, do not place the cover in the
charging area without the mobile device installed.
WARNING: Do not place any magnetic storage media (like floppy disks or
credit cards) near the charging area. Otherwise the data on the media will be
accidentally erased.
NOTE: The time required for fully charging the mobile device depends on the
device’s battery life/capacity and charging efficiency.
NOTE: To avoid any interference while your device is charging, do not place
anything around the device and the charging area.
NOTE: It’s normal that the charging stand base and mobile device gets warm
while charging.
Indicator Lights
The following table describes the status that LED indicator presents:
LED Indicator Activities
White LED lights up for 3 seconds and
goes off
Power on.
No indication Not charging.
White LED Charging.
White LED goes off The battery of your device is fully
charged.
White LED appears for 2 seconds and
goes off
Notifies that the battery of your device is
actually fully charged and you may want
to remove it from the charging pad.
Troubleshooting | 37
Troubleshooting
WARNING: Before you begin any of the procedures in this section, follow the
Safety Instructions.
Self-Test
Your monitor provides a self-test feature that allows you to check if your monitor is
functioning properly. If your monitor and computer are properly connected but the
monitor screen remains dark, run the monitor self-test by performing the following
steps:
Turn off both your computer and the monitor.
1.
Disconnect the video cable from the back of the computer. To ensure proper
2.
Self-Test operation, remove all digital and analog cables from the back of
monitor.
Turn on the monitor.
3.
If the monitor is working correctly, it detects that there is no signal and one of
the following message appears. While in self-test mode, the power LED remains
white.
Dell S2316H
The display will go into Power Save Mode in 5 minutes.
www.dell.com/support/monitors
No HDMI Cable
?
Dell S2316H
No VGA Cable
The display will go into Power Save Mode in 5 minutes.
www.dell.com/support/monitors
?
NOTE: This box also appears during normal system operation, if the video cable
is disconnected or damaged.
Turn Off your monitor and reconnect the video cable; then turn on both your
4.
computer and the monitor.
If your monitor remains dark after you reconnect the cables, check your video
controller and computer, because your monitor is functioning properly.

38 | Troubleshooting
Built-in Diagnostics
Your monitor has a built-in diagnostic tool that helps you determine if any screen
abnormality you experience is an inherent problem with your monitor, or with your
computer and video card.
NOTE: You can run the built-in diagnostics only when the video cable is
unplugged and the monitor is in self-test mode.
21 34 5
To run the built-in diagnostics:
Ensure that the screen is clean (no dust particles on the surface of the screen).
1.
Unplug the video cable(s) from the back of the computer or monitor. The
2.
monitor then goes into the self-test mode.
Press and hold
3. Button 1 and Button 4 simultaneously for 2 seconds. A gray
screen appears.
Carefully inspect the screen for abnormalities.
4.
Press
5. Button 4 on the front panel again. The color of the screen changes to red.
Inspect the display for any abnormalities.
6.
Repeat steps 5 and 6 to inspect the display in green, blue, black, white and text
7.
screens.
The test is complete when the text screen appears. To exit, press Button 4 again.
If you do not detect any screen abnormalities upon using the built-in diagnostic tool,
the monitor is functioning properly. Check the video card and computer.

Troubleshooting | 39
Common Problems
The following table contains general information about common monitor problems
you might encounter and the possible solutions:
Common
Symptoms
What You
Experience
Possible Solutions
No Video/Power
LED off
No picture Ensure that the video cable connecting the monitor
∞and the computer is properly connected and secure.
Verify that the power outlet is functioning properly
∞using any other electrical equipment.
Ensure that the correct input source is selected via the
∞Input Source menu.
No Video/Power
LED on
No picture or no
brightness
Increase brightness and contrast controls using the
∞OSD.
Perform monitor self-test feature check.
∞
Check for bent or broken pins in the video cable
∞connector.
Run the built-in diagnostics.
∞
Ensure that the correct input source is selected via the
∞Input Source menu.
Poor Focus Picture is
fuzzy, blurry, or
ghosting
Eliminate video extension cables.
∞
Reset the monitor to Factory Settings (Factory Reset).
∞
Change the video resolution to the correct aspect ratio.
∞
Shaky/Jittery
Video
Wavy picture or
fine movement
Reset the monitor to Factory Settings (Factory Reset).
∞
Check environmental factors.
∞
Relocate the monitor and test in another room.
∞
Missing Pixels LCD screen has
spots
Cycle power On-Off.
∞
Pixel that is permanently Off is a natural defect that can
∞occur in LCD technology.
For more information on Dell Monitor Quality and Pixel
∞Policy, see Dell Support site at http://www.dell.com/
support/monitors.
Stuck-on Pixels LCD screen has
bright spots
Cycle power On-Off.
∞
Pixel that is permanently off is a natural defect that can
∞occur in LCD technology.
For more information on Dell Monitor Quality and Pixel
∞Policy, see Dell Support site at http://www.dell.com/
support/monitors.
Brightness
Problems
Picture too dim
or too bright
Reset the monitor to Factory Settings (Factory Reset).
∞
Adjust brightness & contrast controls via OSD.
∞
Geometric
Distortion
Screen not
centered
correctly
Reset the monitor to Factory Settings (Factory Reset).
∞
Adjust horizontal & vertical controls via OSD.
∞

40 | Troubleshooting
Horizontal/
Vertical Lines
Screen has one
or more lines
Reset the monitor to Factory Settings (Factory Reset).
∞
Perform monitor self-test feature check and determine
∞if these lines are also in self-test mode.
Check for bent or broken pins in the video cable
∞connector.
Run the built-in diagnostics.
∞
Synchronization
Problems
Screen is
scrambled or
appears torn
Reset the monitor to Factory Settings (Factory Reset).
∞
Perform monitor self-test feature check to determine if
∞the scrambled screen appears in self-test mode.
Check for bent or broken pins in the video cable
∞connector.
Restart the computer in the safe mode.
∞
Safety Related
Issues
Visible signs of
smoke or sparks
Do not perform any troubleshooting steps.
∞
Contact Dell immediately.
∞
Intermittent
Problems
Monitor
malfunctions on
& off
Ensure that the video cable connecting the monitor to
∞the computer is connected properly and is secure.
Reset the monitor to Factory Settings (Factory Reset).
∞
Perform monitor self-test feature check to determine if
∞the intermittent problem occurs in self-test mode.
Missing Color Picture missing
color
Perform monitor self-test feature check.
∞
Ensure that the video cable connecting the monitor to
∞the computer is connected properly and is secure.
Check for bent or broken pins in the video cable
∞connector.
Wrong Color Picture color
not good
Change the Color Setting Mode in the Color
∞Settings OSD to Graphics or Video depending on the
application.
Try different Preset Modes in Color settings OSD. Adjust
∞R/G/B value in Custom Color in Color settings OSD.
Change the Input Color Format to RGB or YPbPr in the
∞Color settings OSD.
Run the built-in diagnostics.
∞
Image retention
from a static
image left on
the monitor for
a long period of
time
Faint shadow
from the static
image displayed
appears on the
screen
Use the Power Management feature to turn off
∞the monitor at all times when not in use (for more
information, see Power Management Modes).
Alternatively, use a dynamically changing screensaver.
∞
Video Ghosting
or Overshooting
Moving image
appears to have
trailing shadow
or bright edge.
Change the Response Time in the Display OSD to Fast
∞or Normal depending on your application and usage.

Troubleshooting | 41
Product-Specific Problems
Specific
Symptoms
What You
Experience
Possible Solutions
Screen image is
too small
Image is centered
on screen, but
does not fill entire
viewing area
Check the Aspect Ratio setting in the Display
∞settings OSD.
Reset the monitor to Factory Settings(Factory Reset)
∞.
Cannot adjust the
monitor with the
buttons on the
side panel
OSD does not
appear on the
screen
Turn Off the monitor, unplug the power cord, plug
∞it back, and then turn On the monitor.
Check if the OSD menu is locked. If yes, press
∞and hold the button above the Power button for
10 seconds to unlock. (For more information, see
Lock).
No Input Signal
when user
controls are
pressed
No picture, the
LED light is white
Check the signal source. Ensure the computer is
∞not in standby or sleep mode by moving the mouse
or pressing any key on the keyboard.
Check if the video cable is plugged in properly.
∞Disconnect and reconnect the video cable if
necessary.
Reset the computer or video player.
∞
The picture does
not fill the entire
screen
The picture
cannot fill the
height or width of
the screen
Due to different video formats (aspect ratio) of
∞DVDs, the monitor may display in full screen.
Run the built-in diagnostics.
∞
Wireless Charging Specific Problems
Specific
Symptoms
What You
Experience
Possible Solutions
Wireless charging
is not working
No charge to the
mobile device
Ensure that the wireless charging function of the
∞mobile device works properly, and that the mobile
device is correctly placed in the center of the
charging area.
Ensure that there is no other object between the
∞mobile device and the charging area.
Wireless charging may not function near devices
∞that emit strong electromagnetic energy (like a
microwave oven or radio transmitter). Turn off these
devices and try again.

42 | Troubleshooting
Appendix
WARNING: Safety Instructions
WARNING: Use of controls, adjustments, or procedures other than those
specified in this documentation may result in exposure to shock, electrical
hazards, and/or mechanical hazards.
WARNING: For displays with glossy bezels the user should consider the
placement of the display as the bezel may cause disturbing reflections from
surrounding light and bright surfaces.
For information on safety instructions, see the Product Information Guide.
FCC Notices (U.S. Only) and Other Regulatory
Information
For FCC notices and other regulatory information, see the regulatory compliance
website located at www.dell.com/regulatory_compliance.
Contact Dell
For customers in the United States, call 800-WWW-DELL (800-999-3355).
NOTE: If you do not have an active Internet connection, you can find contact
information on your purchase invoice, packing slip, bill, or Dell product catalog.
Dell provides several online and telephone-based support and service options.
Availability varies by country and product, and some services may not be available
in your area.
To get online Monitor support content:
Visit
1. www.dell.com/support/monitors.
To contact Dell for sales, technical support, or customer service issues:
Visit
1. www.dell.com/support.
Verify your country or region in the
2. Choose A Country/Region drop-down
menu at the bottom of the page.
Click
3. Contact Us on the left side of the page.
Select the appropriate service or support link based on your need.
4.
Choose the method of contacting Dell that is convenient for you.
5.
WARNING: For displays with glossy bezels the user should consider the
placement of the display as the bezel may cause disturbing reflections from
surrounding light and bright surfaces.

Troubleshooting | 43
Setting Up Your Monitor
Setting the display resolution
For maximum display performance with Microsoft Windows operating systems, set
the display resolution to 1920 x 1080 pixels by performing the following steps:
In Windows 7, Windows 8, Windows 8.1:
For Windows 8 and Windows 8.1, select the Desktop tile to switch to classic
1.
desktop.
Right-click on the desktop and click
2. Screen Resolution.
Click the Dropdown list of the Screen Resolution and select
3. 1920 x 1080.
Click
4. OK.
In Windows® 10:
Right-click on the desktop and click
1. Display settings.
Click
2. Advanced display settings.
Click the dropdown list of
3. Resolution and select 1920 x 1080.
Click
4. Apply.
If you do not see the recommended resolution as an option, you may need to update
your graphics driver. Please choose the scenario below that best describes the
computer system you are using, and follow the given steps.
If you have a Dell™ desktop or a Dell™ portable computer
with internet access
Go to
1. www.dell.com/support, enter your service tag, and download the latest
driver for your graphics card.
After installing the drivers for your graphics adapter, attempt to set the resolution
2.
to 1920 x 1080 again.
NOTE: If you are unable to set the resolution to 1920 x 1080, contact Dell™ to
inquire about a graphics adapter that supports these resolutions.
If you have a non Dell™ desktop, portable computer, or
graphics card
In Windows 7, Windows 8, Windows 8.1:
For Windows 8 and Windows 8.1, select the Desktop tile to switch to classic
1.
desktop.
Right-click on the desktop and click
2. Personalization.
Click
3. Change Display Settings.
Click
4. Advanced Settings.

44 | Troubleshooting
Identify your graphics controller supplier from the description at the top of the
5.
window (e.g. NVIDIA, ATI, Intel etc.).
Refer to the graphic card provider website for updated driver (for example,
6. www.
ATI.com OR www.NVIDIA.com).
After installing the drivers for your graphics adapter, attempt to set the resolution
7.
to 1920 x 1080 again.
In Windows 10,
Right-click on the desktop and click
1. Display settings.
Click
2. Advanced display settings.
Click the dropdown list of
3. Resolution and select 1920 x 1080.
Identify your graphics controller supplier from the description at the top of the
4.
window (e.g. NVIDIA, ATI, Intel etc.).
Refer to the graphic card provider website for updated driver (for example,
5. www.
ATI.com OR www.NVIDIA.com).
After installing the drivers for your graphics adapter, attempt to set the resolution
6.
to 1920 x 1080 again.
NOTE: If you are unable to set the recommended resolution, contact the
manufacturer of your computer or consider purchasing a graphics adapter that
will support the video resolution.

Monitor Specifications | 45
Monitor Specifications
Flat Panel Specifications
Model S2317HJ
Screen type Active matrix - TFT LCD
Panel type In-plane Switching
Viewable image
Diagonal
Horizontal, Active Area
Vertical, Active Area
Area
58.42 cm (23 in)
509.18 mm (20.05 in)
286.41 mm (11.28 in)
1458.34 cm2 (226.04 inch2)
Pixel pitch 0.265 mm
Viewing angle (vertical
/ horizontal)
178° / 178° (typical)
Luminance output 250 cd/m² (typical)
Contrast ratio 1000 to 1 (typical)
8,000,000 to 1 (Dynamic Contrast)
Faceplate coating Low Haze with 3H hardness
Backlight LED edgelight system
Response time 6ms gray to gray (typical)
Color depth 16.78 million colors
Color gamut 82% (typical)*
*[S2317HJ] color gamut (typical) is based on CIE1976(82%) and CIE1931(72%) test
standards.
Resolution Specifications
Model S2317HJ
Horizontal scan range 30 kHz to 83 kHz (automatic)
Vertical scan range 56 Hz to 76 Hz (automatic)
Maximum preset
resolution
1920 x 1080 at 60 Hz
46 | Monitor Specifications
Preset Display Modes
Display Mode Horizontal
Frequency
(kHz)
Vertical
Frequency
(Hz)
Pixel Clock
(MHz)
Sync Polarity
(Horizontal /
Vertical)
VESA, 720 x 400 31.5 70.1 28.3 -/+
VESA, 640 x 480 31.5 60.0 25.2 -/-
VESA, 640 x 480 37.5 75.0 31.5 -/-
VESA, 800 x 600 37.9 60.3 40.0 +/+
VESA, 800 x 600 46.9 75.0 49.5 +/+
VESA, 1024 x 768 48.4 60.0 65.0 -/-
VESA, 1024 x 768 60.0 75.0 78.8 +/+
VESA, 1152 x 864 67.5 75.0 108.0 +/+
VESA, 1280 x 1024 64.0 60.0 108.0 +/+
VESA, 1280 x 1024 80.0 75.0 135.0 +/+
VESA, 1600 x 1200 75.0 60.0 162.0 +/+
VESA, 1920 x 1080 67.5 60.0 148.5 +/+
Electrical Specifications
Model S2317HJ
Video input signals Analog RGB, 0.7 Volts +/-5%, positive polarity at 75
∞ohm input impedance
HDMI1.4, 600 mV for each differential line, positive
∞polarity at 100 ohm input impedance
Synchronization input
signals
Separate horizontal and vertical synchronizations,
polarity-free TTL level, SOG (Composite SYNC on
green)
Inrush current 120 V:30 A (Max.)
240 V:60 A (Max.)
AC/DC
Adapter*
Input voltage/
frequency/
current
Delta adapter DA65NM111-00: 100 VAC to 240
VAC/50 Hz to 60 Hz ± 3 Hz/1.6 A (Max.),
Chicony adapter HA65NS5-00: 100 VAC to 240
VAC/50 Hz to 60 Hz ± 3 Hz/1.7 A (Max).
Output voltage/
current
Output: 19.5 V DC/3.33 A

Monitor Specifications | 47
Physical Characteristics
Model S2317HJ
Signal cable type Digital: detachable, HDMI, 19 pins.
∞
Analog: detachable, D-Sub, 15 pins
∞
Dimensions (with stand)
Height 408.1 mm (16.07 in)
Width 520.7 mm (20.50 in)
Depth 196.1 mm (7.72 in)
Dimensions (without stand)
Height 311.6 mm (12.27 in)
Width 520.7 mm (20.50 in)
Depth 54.2 mm (2.13 in)
Stand dimensions
Height 182.5 mm (7.19 in)
Width 262.4 mm (10.33 in)
Depth 196.1 mm (7.72 in)
Weight
Weight with packaging 5.83 kg (12.85 lb)
Weight with stand
assembly and cables
4.22 kg (9.30 lb)
Weight without stand
assembly
2.90 kg (6.39 lb)
Weight of stand
assembly
0.84 kg (1.85 lb)
Front frame gloss
(minimum)
Black frame - 85% gloss unit
48 | Monitor Specifications
Environmental Characteristics
Model S2317HJ
Temperature
Operating 0°C to 40°C (32°F to 104°F)
Non-operating Storage -20°C to 60°C (-4°F to 140°F)
∞
-20°C to 60°C (-4°F to 140°F)
∞
Shipping
Humidity
Operating 10% to 80% (non-condensing)
Non-operating Storage: 5% to 90% (non-condensing)
∞
Shipping: 5% to 90% (non-condensing)
∞
Altitude
Operating (maximum) 5,000 m (16,400 ft)
Non-operating (maximum) 12,192 m (40,000 ft)
Thermal dissipation 150.13 BTU/hour (maximum)
∞
78.43 BTU/hour (typical)
∞
Power Management Modes
If you have VESA's DPM™ compliance display card or software installed in your PC,
the monitor can automatically reduce its power consumption when not in use. This
is referred to as Power Save Mode*. If the computer detects input from the keyboard,
mouse or other input devices, the monitor automatically resumes functioning. The
following table shows the power consumption and signaling of this automatic power
saving feature.
* Zero power consumption in off mode can only be achieved by disconnecting the
main cable from the monitor.
VESA
Modes
Horizontal
Sync
Vertical
Sync
Video Power
Indicator
Power
Consumption
Normal
operation
Active Active Active White 44 W (maximum)**
23 W (typical)
Active-off
mode
Inactive Inactive Blanked White
(Glowing )
Less than 0.3 W
Switch off - - - Off Less than 0.3 W
Monitor Specifications | 49
Energy Star Power Consumption
On Mode 20.5 W ***
** Maximum power consumption with max luminance.
*** Energy consumption (On Mode) is tested at 230 Volts / 50 Hz. Measurements are
indicative for monitor head only without charging base turned on.
This document is informational only and reflects laboratory performance. Your
product may perform differently, depending on the software, components and
peripherals you ordered and shall have no obligation to update such information.
Accordingly, the customer should not rely upon this information in making
decisions about electrical tolerances or otherwise. No warranty as to accuracy or
completeness is expressed or implied.
NOTE: This monitor is ENERGY STAR-compliant.
Speaker Specifications
Model S2317HJ
Speaker rated power 2 x 3 W
Frequency Response 200 Hz - 20 kHz
Impedance 8 ohm

50 | Monitor Specifications
The OSD functions only in the normal operation mode. When any button is pressed
in the Active-off mode, the following message will be displayed:
Dell S2316H
There is no signal coming from your computer. Press any key on the
keyboard or move the mouse to wake it up. If there is no display, press
the monitor button now to select the correct input source on the
On-Screen-Display menu.
Activate the computer and the monitor to gain access to the OSD.
Monitor Specifications | 51
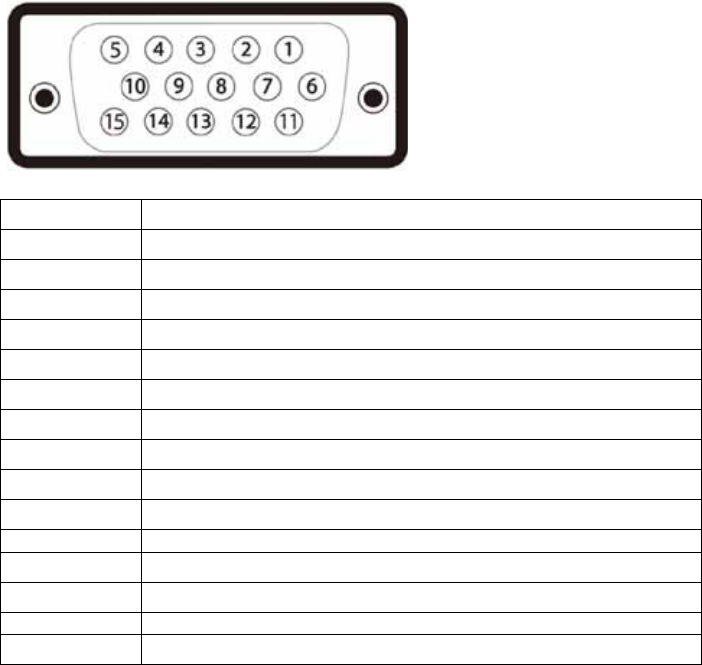
Pin Assignments
VGA Connector
Pin Number 15-pin Side of the Connected Signal Cable
1 Video-Red
2 Video-Green
3 Video-Blue
4 GND
5 Self-test
6 GND-R
7 GND-G
8 GND-B
9 Computer 5V/3.3V
10 GND-sync
11 GND
12 DDC data
13 H-sync
14 V-sync
15 DDC clock
52 | Monitor Specifications
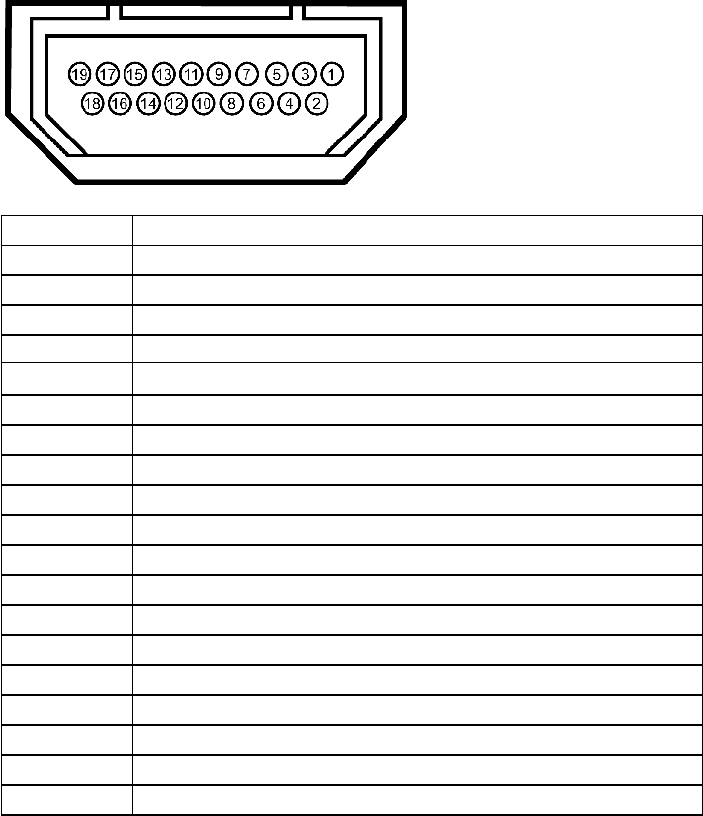
HDMI Connector
Pin Number 19-pin Side of the Connected Signal Cable
1 T.M.D.S. Data 2-
2 T.M.D.S. Data 2 Shield
3 T.M.D.S. Data 2+
4 T.M.D.S. Data 1+
5 T.M.D.S. Data 1 Shield
6 T.M.D.S. Data 1 -
7 T.M.D.S. Data 0+
8 T.M.D.S. Data 0 Shield
9 T.M.D.S. Data 0-
10 T.M.D.S. Clock +
11 T.M.D.S. Clock Shield
12 T.M.D.S. Clock -
13 CEC
14 Reserved (N.C. on device)
15 SCL
16 SDA
17 DDC/CEC Ground
18 +5V Power
19 Hot Plug Detect
Wireless Monitor and Wireless Charging Stand
Safety and Regulatory Information
www.dell.com/support
Safety
Dell Wireless devices, like other radio devices, emit radio frequency electromagnetic energy. Dell Wireless devices operate within
the guidelines found in radio frequency safety standards and recommendations. These standards and recommendations reflect the
consensus of the scientific community and result from deliberations of panels and committees of scientists who continually review
and interpret the extensive research literature. In some situations or environments, the use of Dell Wireless devices may be restricted
by the proprietor of the building or responsible representatives of the applicable organization.
Examples of such situations include the following:
Using Dell Wireless devices on board airplanes, or
Using Dell Wireless devices in any other environment where the risk of interference with other devices or services is
perceived or identified as being harmful.
If you are uncertain of the policy that applies to the use of wireless devices in a specific organization or environment (an airport, for
example), you are encouraged to ask for authorization to use a Dell Wireless device before you turn it on.
Explosive Device Proximity Warning:
Do not operate a portable transmitter (such as a wireless network device) near unshielded blasting caps or in an explosive
environment unless the device has been modified to be qualified for such use.
Use on Aircraft Caution:
Regulations of the FCC and FAA prohibit airborne operation of radio-frequency wireless devices because their signals could interfere
with critical aircraft instruments.
Regulatory Information
Dell Wireless devices must be installed and used in strict accordance with the manufacturHU¶V instructions as described in the
user documentation that comes with the product. Dell Inc. is not responsible for any radio or television interference caused by
unauthorized modification of the devices, or the substitution or attachment of connecting cables and equipment other than that
specified by Dell Inc. The correction of interference caused by such unauthorized modification, substitution or attachment is the
responsibility of the user. Dell Inc. and its authorized resellers or distributors are not liable for any damage or violation of government
regulations that may arise from the user failing to comply with these guidelines.
United States, FCC Notices
FCC Radiation Exposure Statement
WARNING: The radiated output power of this device is below the FCC radio frequency exposure limits. Nevertheless,
this device should be used in such a manner that the potential for human contact during normal operation is minimized.
This device has been evaluated for and shown compliant with the FCC RF Exposure limits under mobile exposure
conditions (antennas are greater than 20cm from a SHUVRQ¶V body). This device has also been evaluated for and shown
compliant with the FCC RF exposure limits under portable exposure conditions (antennas are within 20 cm of a SHUVRQ¶V
body) when installed in certain specific configurations. Details of the authorized configurations can be found at:
https://fjallfoss.fcc.gov/oetcf/eas/reports/GenericSearch.cfm by entering the FCC ID number on the device.
Interference Statement
This equipment generates, uses, and can radiate radio frequency energy and, if not installed and used in accordance with the
manufacturHU¶V instruction manual, may cause interference with radio and television reception. This equipment has been tested and
found to comply with the limits for a Class B digital device pursuant to Part 15 of the FCC Rules.
This device complies with Part 15 of the FCC Rules. Operation is subject to the following two conditions:
1
This device may not cause harmful interference.
2
This device must accept any interference received, including interference that may cause undesired operation.
© 2015 Dell Inc.
2015-10

Notice
: The FCC regulations provide that changes or modifications not expressly approved by Dell Inc. could void your authority
to operate this equipment. These limits are designed to provide reasonable protection against harmful interference in a residential
installation. However, there is no guarantee that interference will not occur in a particular installation. If this equipment does cause
harmful interference with radio or television reception, which can be determined by turning the equipment off and on, you are
encouraged to try to correct the interference by one or more of the following measures:
Reorient the receiving antenna.
Relocate the system with respect to the receiver.
Move the system away from the receiver.
Plug the system into a different outlet so that the system and the receiver are on different branch circuits.
If necessary, consult a representative of Dell Inc. or an experienced radio/television technician for additional suggestions.
NOTE:
This Dell Wireless devise must be installed and used in strict accordance with the manufacturHU¶V instructions as described
in the user documentation that comes with the product. Any other installation or use will violate FCC Part 15 regulations.
Modifications not expressly approved by Dell could void your authority to operate the equipment.
Canada, Industry Canada (IC) Notices
Class B digital circuitry of this device complies with Canadian ICES-003.
This device complies with Industry Canada license-exempt RSS standard(s). Operation is subject to the following two conditions:
(1)
this device may not cause interference, and (
2
) this device must accept any interference, including interference that may cause
undesired operation of the device.
Under Industry Canada regulations, the radio transmitter(s) in this device may only operate using an antenna of a type and maximum
(or lesser) gain approved for the transmitter by Industry Canada. To reduce potential radio interference to other users, the antenna
type and its gain should be so chosen that the equivalent isotropically radiated power (e.i.r.p.) is not more than that necessary for
successful communication.
Radio Frequency (RF) Exposure Information
The radiated output power of this device is below the Industry Canada (IC) radio frequency exposure limits. This device has been
evaluated for and shown compliant with the IC Radio Frequency (RF) Exposure limits. The device should be used in such a manner
such that the potential for human contact during normal operation is minimized.
This device has been certified for use in Canada. Status of the listing in the Industry &DQDGD¶V REL (Radio Equipment List) can be
found at the following web address: http://www.ic.gc.ca/app/sitt/reltel/srch/nwRdSrch.do?lang=eng
Additional Canadian information on RF exposure also can be found at the following web address:
http://www.ic.gc.ca/eic/site/smt-gst.nsf/eng/sf08792.html
The County Code Selection feature is disabled for products marketed in the U.S.A./ Canada.

Canada, avis G¶,QGXVWU\ Canada (IC)
La circuiterie numérique de Classe B de cet appareil est conforme à la norme canadienne ICES-003.
Cet appareil est conforme aux normes G¶H[HPSWLRQ de licence RSS G¶,QGXVWU\ Canada. Son fonctionnement est soumis aux
deux conditions suivantes : (
1
) cet appareil ne doit pas causer G¶LQWHUIérence et (
2
) cet appareil doit accepter toute interférence,
notamment les interférences qui peuvent affecter son fonctionnement.
Conformément aux réglementations G¶,QGXVWU\ Canada, les émetteurs radio de cet appareil ne peuvent fonctionner TX¶j O¶DLGH G¶XQH
antenne dont le type et le gain maximal (ou minimal) pour ces émetteurs - transmetteurs sont approuvés par Industry Canada. Pour
réduire le risque G¶LQWHUIérence éventuelle pour les autres utilisateurs, le type et le gain de O¶DQWHQQH doivent être choisis de manière à
ce que la puissance isotrope rayonnée équivalente (p.i.r.e.) minimale nécessaire à une bonne communication soit fournie.
Informations sur O¶H[SRVLWLRQ à la fréquence radio (FR)
La puissance rayonnée de sortie de cet appareil est inférieure aux limites G¶H[SRVLWLRQ à la fréquence radio G¶,QGXVWU\ Canada (IC).
Cet appareil a été évalué et jugé conforme aux limites G¶H[SRVLWLRQ à la fréquence radio (FR) G¶,&. Cet appareil devrait être utilisé de
manière à ce que le risque de contact humain au cours G¶XQ fonctionnement normal soit réduit.
Cet appareil est homologué pour O¶XWLOLVDtion au Canada. Pour consulter O¶HQWUée correspondant à O¶DSSDUeil dans la liste G¶pTXLSHPHQW radio
(REL - Radio Equipment List) G¶,QGXVWU\ Canada, rendez-vous sur : http://www.ic.gc.ca/app/sitt/reltel/srch/nwRdSrch.do?lang=eng
Pour des informations canadiennes supplémentaires sur O¶H[SRVLWLRQ FR, rendez-vous sur :
http://www.ic.gc.ca/eic/site/smt-gst.nsf/eng/sf08792.html
La fonction de sélection de O¶LQGLFDtif du pays est désactivée pour les produits commercialisés aux États-Unis et au Canada.
European Union, R&TTE Compliance Statement
Hereby, Dell Inc. declares that this Dell Wireless Device is in compliance with the essential requirements and other relevant
provisions of Directive 1999/5/EC
A minimum separation distance of 20 cm must be maintained between the XVHU¶V body and the device, including the antenna during
body-worn operation to comply with the RF exposure requirements in Europe.
ƍƪƸƶƷƭƱƹƲưƹǂdžƯƌƭƲƳƨƸƨƾưLJƯƨƹǂƶƺƪƭƺƹƺƪưƭƹƌưƸƭƲƺưƪƨƺƨƯƨƸƨƬưƶƹǂƶƸǂƮƭƵưLJư
ƲƸƨƱƵưƬƨƳƭƲƶƹǂƶƩǁưƺƭƳƵưƻƹƺƸƶƱƹƺƪƨ577(
ƙƵƨƹƺƶLJǁƶƺƶ'HOO,QFƬƭƲƳƨƸưƸƨƿƭƺƶƪƨƩƭƯƮưƿƵƶƻƹƺƸƶƱƹƺƪƶƵƨ'HOOƶƺƫƶƪƨƸLJƵƨƶƹƵƶƪƵưƺƭưƯưƹƲƪƨƵưLJưƬƸƻƫưƺƭƹǂƶƺƪƭƺƵư
ƻƹƳƶƪưLJƵƨƌưƸƭƲƺưƪƨ(&
Evropská unie, SURKOiãHQt o shoGČ R&TTE
6SROHþQRVW Dell Inc. tímto prRKODãXMH åH toto bezdrátové ]DĜt]HQt Dell je v souladu se základními SRåDGDvky a GDOãtPL SĜtVOXãQêPL
ustanoveními VPČUQLFH 1999/5/ES.
EU-overensstemmelseserklæring, R&TTE
Hermed erklæ rer Dell Inc., at denne trådløse Dell-enhed er i overensstemmelse med de væ sentligste krav og andre relevante
bestemmelse i EU-direktivet 1999/5.

Europese unie, verklaring van naleving van de R&TTE-richtlijn
Hierbij verklaart Dell Inc. dat dit draadloze apparaat van Dell voldoet aan de essentiële vereisten en andere relevante bepalingen van
Richtlijn 1999/5/EC.
Euroopa Liit, direktiivi R&TTE nõuetele vastavuse tunnistus
Dell Inc. kinnitab käesolevaga, et Dell Wireless Device vastab direktiivi 1999/5/EÜ olulistele nõuetele ja asjakohastele sätetele.
Ey:N Vaatimustenmukaisuusvakuutus
Dell Inc. vakuuttaa täten, että tämä laite on direktiivin 1999/5/EY olennaisten vaatimusten ja muiden määräysten mukainen.
Déclaration de conformité R&TTE, Union Européenne
Par la présente, Dell Inc. déclare que ce Périphérique sans fil Dell est conforme aux exigences essentielles et aux autres provisions
applicables de la Directive 1999/5/EC.
Europäische Union, R&TTE-Einhaltungserklärung
Hiermit bestätigt die Dell Inc., dass dieses Wireless-Gerät von Dell in Übereinstimmung mit den grundlegenden Anforderungen und
anderen relevanten Bestimmungen der 1999/5/EC-Richtlinie steht.
ńŰŬŴŞŵŧśĺũŴŮŤ¨śŨŴŮŤőŰŷŬűŴŮŤŭ577(
¨ŦŞůūŰŞŬŷũůūŭŤ'HOO,QFšŤŨŹũŢŦŷůŦŞŰůśŤŞŮŸŬŞůŤŮŰŮŧŢŰśůŤŭ'HOOŮŰūŬűŹũŢůŞŦŢůŦŭşŞŮŦŧŚŭŞŞŦůśŮŢŦŭŧŞŦŷŨūŰŭůūŰŭ
ŮŲŢůŦŧūŸŭŷŬūŰŭůŤŭŎšŤŠŜŞŭńʼn
Európai Unió, PHJIHOHOĘVpJL nyilatkozat a UiGLyEHUHQGH]pVHNUĘO és WiYN|]OĘ YpJEHUHQGH]pVHNUĘO
szóló (R&TTE) irányelvvel
A Dell Inc. ezúton kijelenti, hogy a Dell vezeték nélküli készülék megfelel az 1999/5/EK direktíva DODSYHWĘ követelményeinek és egyéb
lényeges rendelkezéseinek.
Unione Europea, Dichiarazione di conformità R&TTE
Con la presente, Dell Inc. dichiara che questa periferica senza fili Dell è conforme ai requisiti essenziali e ad altri provvedimenti
importanti della Direttiva 1999/5/CE.
3D]LƼRMXPV par aWELOVWƯEX Eiropas 6DYLHQƯEDV 5DGLRLHNƗUWX un WHOHNRPXQLNƗFLMX LHNƗUWX 'LUHNWƯYDL
/ŝG] ar to Dell Inc. SD]LŪR ka ãŝ Dell bezvadu LHUŝFH atbilst DirHNWŝYŅ 1999/5/EK QRWHLNWDMŅP SDPDWSUDVŝEŅP un citiem WŅV
aWELOVWRãDMLHP noteikumiem.
Europos 6ąMXQJD SDUHLãNLPDV apie radijo U\ãLR ƳUHQJLQLǐ ir WHOHNRPXQLNDFLMǐ JDOLQLǐ ƳUHQJLQLǐ
(R&TTE) direktyvos DWLWLNLPą
âLXR kompanija Dell Inc. SDUHLãNLD kad ãLV Dell bevielis šUHQJLQ\V atitinka direktyvos 1999/5/EB esminius reikalavimus ir kitas
atitinkamas nuostatas.
Unjoni Ewropea, R&TTE Dikjarazzjoni tal-Konformità
Hawnhekk, Dell Inc., tiddikjara li dan id-Dell Wireless Device hu konformi mal-řWLœLMLHW essenzjali u provvedimenti rilevanti RřUDMQ WD
Direttiva 1999/5/KE.

Unia Europejska, deklaracja ]JRGQRĞFL z G\UHNW\Zą 1999/5/WE
Niniejszym firma Dell Inc. RĞZLDGF]D ĪH to XU]ąG]HQLH bezprzewodowe firmy Dell VSHáQLD zasadnicze wymogi oraz inne RGQRĞQH
przepisy dyrektywy 1999/5/WE.
União Europeia, Declaração de conformidade da R&TTE
Pelo presente, a Dell Inc. declara que este Dispositivo Sem Fios Dell está em conformidade com os requisitos essenciais e outras
provisões relevantes da Directiva 1999/5/EC.
Uniunea (XURSHDQă 'HFODUDĠLH de Conformitate R&TTE
Dell GHFODUă prin prezenta, Fă acest dispozitiv IăUă fir 'HOO rHVSHFWă FHULQĠHOH HVHQĠLDOH precum úL alte GLVSR]LĠLL relevante ale
Directivei 1999/5/EC.
Európska únia, vyhlásenie o zhode SRGĐD R&TTE
6SRORþQRVĢ Dell Inc. týmto vyhlasuje, åH toto bezdrôtové zariadenie Dell VSĎĖD základné SRåLDGDvky iné SUtVOXãQp ustanovenia
smernice 1999/5/ES.
Evropska unija, izjava o ustreznosti radijske in telekomunikacijske terminalske opreme
Evropska unija, izjava o ustreznosti radijske in telekomunikacijske terminalske opreme Podjetje Dell Inc. izjavlja, da je ta EUH]åLþQD
naprava Dell v skladu z glavnimi zahtevami in drugimi pomembnimi GRORþEDPL Direktive 1999/5/ES.
Unión Europea, Declaración de conformidad con R&TTE
Por el presente, Dell Inc. declara que este Dispositivo inalámbrico Dell cumple con los requisitos esenciales y otras provisiones
relevantes de la Directiva 1999/5/EC.
EU, meddelande om överensstämmelse med R&TTE-direktivet
Dell Inc. deklarerar härmed att denna trådlösa Dell-enhet överensstämmer med de viktiga kraven och andra relevanta bestämmelser
i direktivet 1999/5/EC.
Avrupa %LUOL÷L R&TTE Uygunluk Bildirimi
Burada, Dell Inc. bu Dell Kablosuz A\JÕWÕQÕQ Directive 1999/5/EC NDUDUÕQÕQ esas úDUWODUÕ ve GL÷HU ilgili hükümleri ile X\XPOÕ ROGX÷XQX
beyan eder.
ਠ⚓: ഻ᇦ䙊䀺ۣငᴳ վ࣏⦷䴫⌒䕫ሴᙗ䴫㇑⨶䗖
⌅
ㅜॱҼọ㏃රᔿ䂽䅹ਸṬѻվ࣏⦷ሴ乫䴫ˈ䶎㏃䁡ਟˈޜਨǃ୶㲏ᡆ֯⭘㘵൷нᗇ㠚䆺ᴤ乫⦷ǃ࣐བྷ࣏⦷ᡆ䆺ᴤ䁝䀸ѻ⢩ᙗ৺࣏㜭DŽ
ㅜॱഋọվ࣏⦷ሴ乫䴫ѻ֯⭘нᗇᖡ丯伋㡚ᆹޘ৺ᒢᬮਸ⌅䙊ؑ˗㏃Ⲭ⨮ᴹᒢᬮ⨮䊑ᱲˈ៹・ণڌ⭘ˈі᭩ழ㠣❑ᒢᬮᱲᯩᗇ㒬㒼֯⭘DŽ
ࡽ丵ਸ⌅䙊ؑˈᤷ䴫ؑ⌅㾿ᇊᾝѻ❑㐊䴫䙊ؑDŽվ࣏⦷ሴ乫䴫丸ᗽਇਸ⌅䙊ؑᡆᐕᾝǃ、ᆨ৺䟛Ⱳ⭘䴫⌒䕫ሴᙗ䴫䁝ۉѻᒢᬮDŽ
뼩鲮 ꓩꟹ鱉 놹볁뿱겕 閵鱚ꫦ넩 넽냱ꕵꈑ 넭ꐺ껽놹隱 隵ꇝ鷑 ꟹ걙鱉 뼕 ꯍ 꽻넁
La operación de este equipo está sujeta a las siguientes dos condiciones: (
1
) es posible que este equipo o dispositivo no cause
interferencia perjudicial y (
2
) este equipo o dispositivo debe aceptar cualquier interferencia, incluyendo la que pueda causar su
operación no deseada.
Radio Approvals
It is important to ensure that you only use your radio device in countries where the device is approved for use. To determine whether
you are allowed to use your wireless network device in a specific country, check to see if the radio type number that is printed on the
identification label of your device or listed on the radio approval list posted on the general Dell support site at www.dell.com/support