Qixiang Electron Science and Technology 3208PLUS Two Way Radio User Manual
Qixiang Electron Science& Technology Co., Ltd Two Way Radio
UserManual.wiki
>
Qixiang Electron Science and Technology
>
3208PLUS User Manual
user manual
Navigation menu
Upload a User Manual
Namespaces
Wiki Guide
HTML
PDF
Info
Views
User Manual
Discussion / Help
Navigation


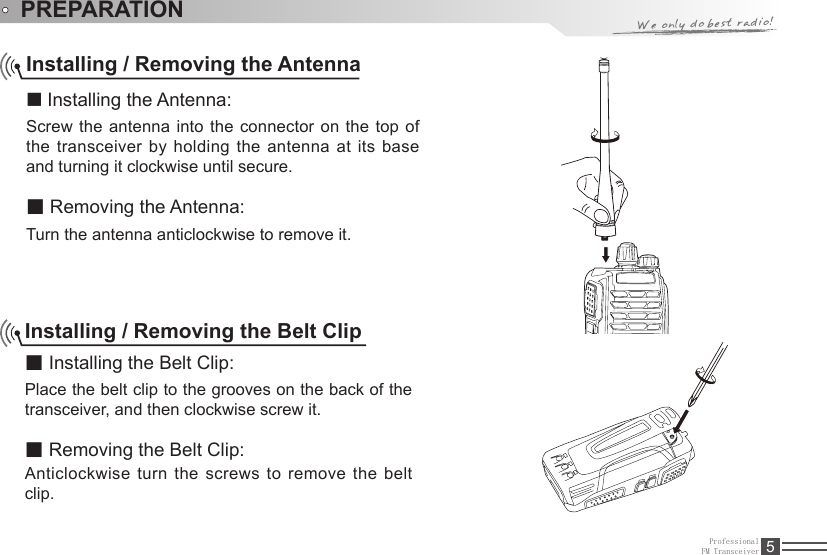
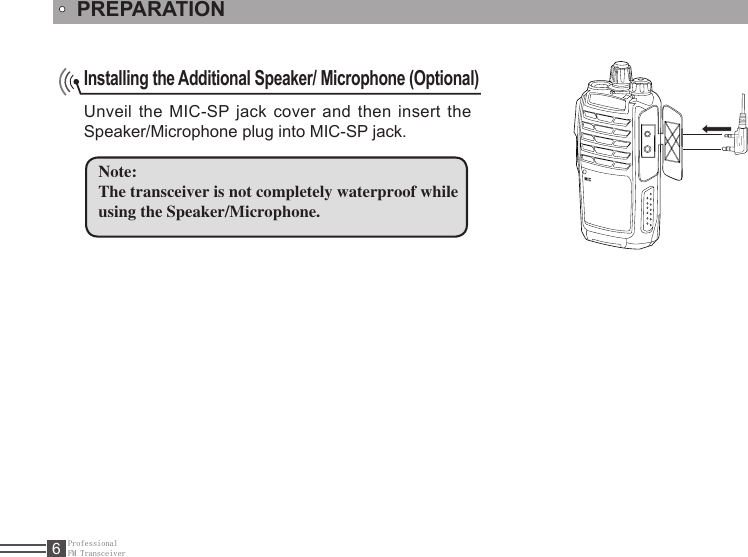
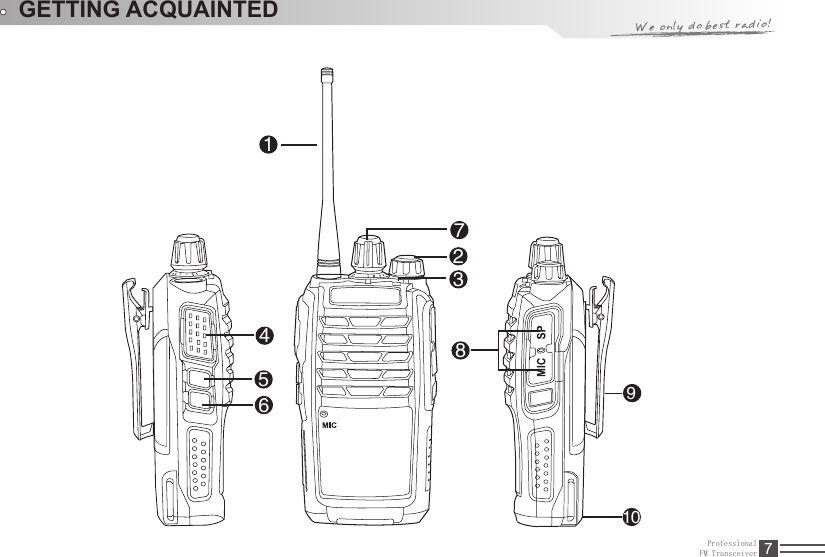
![ProfessionalFM Transceiver IUNPACKING .........................................................................................................................................1 Supplied Accessories .........................................................................................................................1STANDARD ACCESSORIES/OPTIONAL ACCESSORIES ................................................................. 2Standard Accessories ................................................................................................................................................2 BATTERY INFORMATION ....................................................................................................................3How to Charge ...........................................................................................................................................................3PREPARATION .....................................................................................................................................4Installing / Removing the Battery ...............................................................................................................................4Installing / Removing the Antenna .............................................................................................................................5Installing / Removing the Belt Clip .............................................................................................................................5Installing the Additional Speaker/ Microphone (Optional) .........................................................................................6GETTING ACQUAINTED ......................................................................................................................7Indicator Status and Beep ........................................................................................................................................9[PF1] & [PF2] Key Default .........................................................................................................................................9 ....................................................................................................................................................10BASIC OPERATIONS ...........................................................................................................................11Switch on / off Transceiver ........................................................................................................................................11Battery Capacity Enquiry ...........................................................................................................................................11Adjusting Volume .......................................................................................................................................................11Channel Selection .....................................................................................................................................................12Receiving ...................................................................................................................................................................12Monitor .......................................................................................................................................................................12CONTENTSAuxiliary Functions](https://usermanual.wiki/Qixiang-Electron-Science-and-Technology/3208PLUS/User-Guide-2311753-Page-4.png)
![ProfessionalFM Transceiver 9GETTING ACQUAINTEDIndicator Status and BeepWarning on low voltage The red light twinkles.Transmitting Lighten the red light.Receiving Lighten the green light.Reading/Writing Frequency Reading Frequency: Red light twinkles Writing Frequency: Green light twinkles Key Operation Voices "DU" into any function, "DU DU" to exit any function.[PF1] & [PF2] Key DefaultPress [PF1] Battery Capacity EnquiryPress [PF2] Squelch offPress [PF1] 1 second MonitorPress [PF2] 1 second Switch H/L PowerPress [PF1] 3 seconds On/Off VOX Function](https://usermanual.wiki/Qixiang-Electron-Science-and-Technology/3208PLUS/User-Guide-2311753-Page-14.png)
![ProfessionalFM Transceiver10Users can setup the key [PF1] and [PF2] to be one of the optional functions as bellows :Squelch off • Monitor • Current Channel Power Enquiry • Frequency Reverse • Talk Around • Battery Capacity Enquiry • TX Power Switch • Emergency Alarm • AUXILIARY FUNCTIONSGETTING ACQUAINTED](https://usermanual.wiki/Qixiang-Electron-Science-and-Technology/3208PLUS/User-Guide-2311753-Page-15.png)
![When the battery state is grade 1th (6.29V), the LED lights red. The transceiver will voice prompt ProfessionalFM Transceiver 11BASIC OPERATIONSSwitch on / off TransceiverSwitch on Transceiver: Under power-off state, turn POWER / VOLUME clockwise till hearing "Click" to switch on the transceiver. The transceiver will announce "Power on" when power-on and announce the current channel. Switch off Transceiver: Under power-off state,turn POWER / VOLUME anticlockwise till hearing "Click" to switch off the transceiver.Adjusting VolumeUnder power-on state, turn POWER / VOLUME switch to adjust the volume. Turn clockwise to increase the volume, and anticlockwise to decrease the volume. NOTE: You can press the programmed key of squelch off [PF1] / [PF2] to monitor the background noise and meanwhile turn POWER / VOLUME to adjust the volume. Under the communicating state, you can adjust volume as per your need more accurately.Battery Capacity EnquiryUnder the standby conditions, press the programmed key of "Battery Capacity Enquiry" [PF1]/[PF2],transceiver announce current battery capacity. There are 10 grades in total. Grade 10th means full battery capacity.users each 30 seconds to charge timely and also enter automatically the state of no transmission.](https://usermanual.wiki/Qixiang-Electron-Science-and-Technology/3208PLUS/User-Guide-2311753-Page-16.png)
![ProfessionalFM Transceiver12ReceivingYou can hear the transmitting party's calling when the channel you are operating is called and the LED light turns green.NOTE:You may not receive the calling if you set a high squelch off level of the transceiver.If current channel has been programmed with signaling, you can only hear the call from a same signaling, other calls can not be heard. Channels SelectionUnder the standby conditions, turn channel selector knob to choose the desired channel, and the transceiver will announce the adjusted channel. Turn clockwise to increase the channel, anticlockwise to decrease the channel. NOTE: The transceiver will emit a voice prompt when current channel is blank and the red light will flash.BASIC OPERATIONSMonitorPressing the programmed key of Monitor [PF1]/[PF2], the transceiver emits "DU" beep and then comes into the monitor state. Under these conditions, transceiver will ignore CTCSS/DCS decode and monitor signal of the other party as long as receiving the matched carrier wave. Press this key again, transceiver emits "Du Du" beep and exits the monitor state.](https://usermanual.wiki/Qixiang-Electron-Science-and-Technology/3208PLUS/User-Guide-2311753-Page-17.png)
![ProfessionalFM Transceiver 13TransmittingBefore transmitting, make sure that the channel you want to use is not in busy state through monitoring for a while by pressing the programmed Squelch off [PF1] / [PF2] key. Under these conditions, press the [PTT] key and speak into microphone. Please keep around 2.5-5cm distance between microphone and your lip. And please speak in normal tone to make the receiver obtain best tone quality.ON/OFF VOXWhen turn on this function, it's not necessary to press the [PTT], through the appropriate voice can star emission. In standby, put HS03 earphone into MIC-SPK, press and hold [PF1] more than 3 seconds, the transceiver will send a prompt voice and turn on VOX function. Repeat the above operation or restart will be closed the VOX function. NOTE: It needs to program the VOX in valid status firstly if you want to turn on this function, otherwise, the above operation is invalid. Note:Press [PTT] Red LED lighting means transmitting. Release [PTT] to receive signal.BASIC OPERATIONSPower SwitchUnder the standby conditions, press the programmed key of "Power Switch" [PF1]/[PF2], transceiver change the current channel power and announces.](https://usermanual.wiki/Qixiang-Electron-Science-and-Technology/3208PLUS/User-Guide-2311753-Page-18.png)

![ProfessionalFM Transceiver 15Resume Factory Default Once transceiver works abnormally for wrong operations or wrong programming, users can start this function to resume all functions and channels as Factory Default.Under standby conditions press [PTT] and [PF1] key synchronously to switch on transceiver. Holding the two keys until hear transceiver announces "DI" beep then release the keys,the transceiver willMaintaining and Cleaning Cover the jack with its opercula when the transceiver is not in use. After long-time use of the transceiver, keys, control buttons and housing would become dirty. Then, neutral detergent (no corrosive chemical agent) and wet cloth can be used to clean them.NOTE: Via programming software can set whether allow to use this function in transceiver, please reference to the Reset Allowed option in programming software. BASIC OPERATIONSfactory default.](https://usermanual.wiki/Qixiang-Electron-Science-and-Technology/3208PLUS/User-Guide-2311753-Page-20.png)