Qixiang Electron Science and Technology 3208PLUS Two Way Radio User Manual
Qixiang Electron Science& Technology Co., Ltd Two Way Radio
user manual

Model name:3208plus
Frequency:400-480MHz
FCC ID:T4K3208PLUS
TWO WAY RADIO

THANK YOU!
transceiver introduces innovative DSP digital signal processing technology, high level integration,
it is including kinds of professional function, best stability and great reliability as well as exterior
smooth lines, novel, fashionable, let it meet the instant communication technology and become a high
battery (7.4V 1500mAh), It is best suit for property, building, shopping mall, outdoor work place with
noisy surroundings. For your full comprehension of the varous excellent functions and maintenance,
please read the user manual before use.
NOTE:
When programming the transceiver, read the factory initial data first, then rewrite the frequency and
signaling etc., otherwise errors may occur because of different frequency band etc.
transceiver will provide you with reliable, clear and efficient communication service. The
The
performance transveiver, It boasts power (5W), long distance, loud and clear timbre, capacity
User Manual Applied to: 3208plus

SAFETY INFORMATION FOR USER
precautions to perform your obligation, prevent personal injury and ensure the safety of transceiver
usage.
Keep the transceiver and accessories away from children.1.
Please do not try to open or modify the transceiver without permission, non-professionals process 2.
may also cause damage.
Please use assorted battery and charger to avoid damage.3.
Please use assorted antenna to ensure the communication distance.4.
Please do not expose the transceiver to long period of direct sunlight, nor place it close to heat 5.
appliances.
Please do not put the transceiver in excessively dusty or humid areas.6.
Do not use harsh chemicals, cleaning solvents to clean the transceiver.7.
Do not transmit without antenna.8.
When using this transceiver, we recommend transmitting for 1 minute then receiving for 4 minutes. 9.
Continuous transmitting for long time or working in high power will heat the back of the transceiver.
Do not place the transceiver’s hot back close to any surface of plastic.
If any abnormal odor or smoke detected coming from the transceiver, turn off the power and take 10.
off the battery pack and its case. Then contact local
dealers.
ATTENTION:
All tips above apply to accessories of your transceiver. If any device can not work normally,
please contact local dealers.
If you use any accessories made by other companies, our Company does not guarantee the
operability and safety of the transceiver.
transceiver is excellently designed with advanced technology. Please observe the following the

Professional
FM Transceiver I
UNPACKING .........................................................................................................................................1
Supplied Accessories .........................................................................................................................1
STANDARD ACCESSORIES/OPTIONAL ACCESSORIES ................................................................. 2
Standard Accessories ................................................................................................................................................2
BATTERY INFORMATION
....................................................................................................................3
How to Charge
...........................................................................................................................................................3
PREPARATION
.....................................................................................................................................4
Installing / Removing the Battery
...............................................................................................................................4
Installing / Removing the Antenna
.............................................................................................................................5
Installing / Removing the Belt Clip
.............................................................................................................................5
Installing the Additional Speaker/ Microphone (Optional)
.........................................................................................6
GETTING ACQUAINTED
......................................................................................................................7
Indicator Status and Beep
........................................................................................................................................9
[PF1] & [PF2] Key Default
.........................................................................................................................................9
....................................................................................................................................................10
BASIC OPERATIONS
...........................................................................................................................11
Switch on / off Transceiver
........................................................................................................................................11
Battery Capacity Enquiry
...........................................................................................................................................11
Adjusting Volume
.......................................................................................................................................................11
Channel Selection
.....................................................................................................................................................12
Receiving
...................................................................................................................................................................12
Monitor
.......................................................................................................................................................................12
CONTENTS
Auxiliary Functions

Professional
FM Transceiver
II
Transmitting ...............................................................................................................................................................13
Power Switch .............................................................................................................................................................13
ON/OFF VOX ............................................................................................................................................................13
Battery Save Setup ....................................................................................................................................................14
CTCSS / DCS Encode and Decode ..........................................................................................................................14
Time-out Timer ...........................................................................................................................................................14
Resume Factory Default ............................................................................................................................................15
Maintaining and Cleaning ..........................................................................................................................................15
TECHNICAL SPECIFICATIONS ........................................................................................................... 16
TROUBLE SHOOTING GUIDE .............................................................................................................17
CONTENTS
Professional
FM Transceiver 1
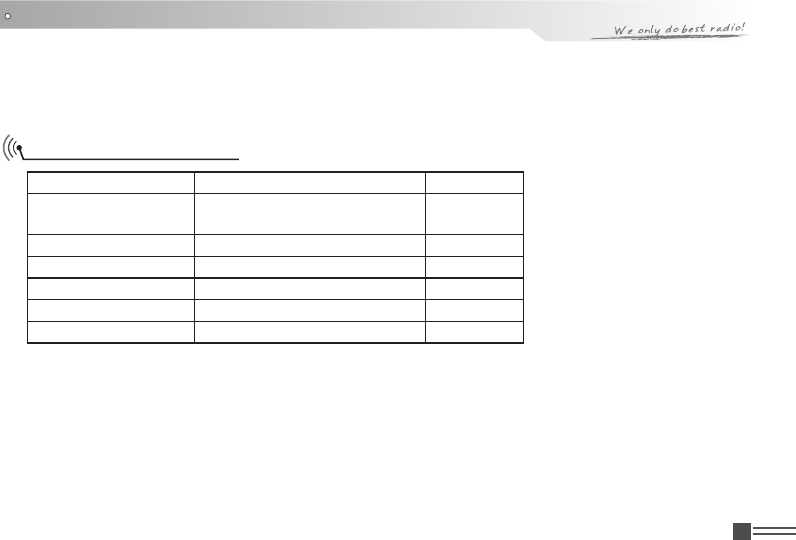
UNPACKING
Carefully unpack the transceiver. We recommend you to identify the items listed in the following
table before discarding the packing material. If any items are missing or have been damaged during
shipment, please contact dealers immediately.
Supplied Accessories
Item Number Quantity
Antenna QA01U(400-480MHz) 1
Li-ion Battery Pack QB-40L 1
Battery Charger QBC-40L 1
AC Adaptor QPS-07 1
Belt Clip BC09 1
Instruction Manual 1
Professional
FM Transceiver
2
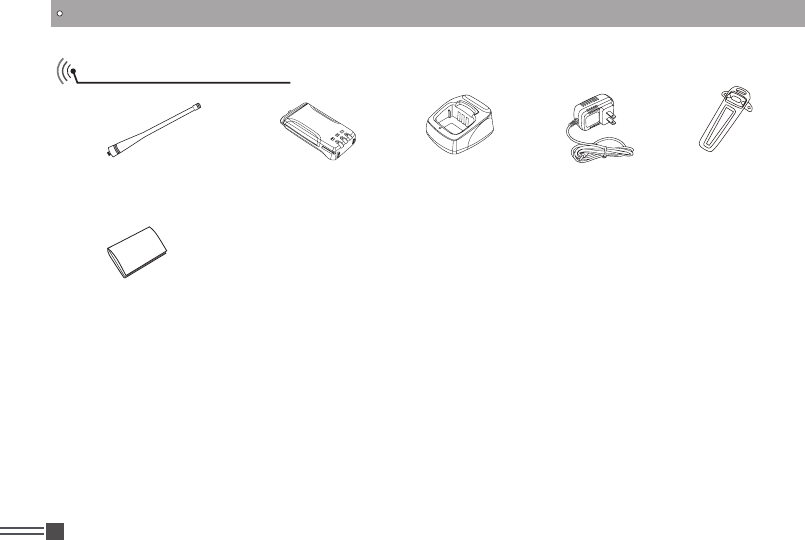
STANDARD ACCESSORIES/OPTIONAL ACCESSORIES
Standard Accessories
Antenna*1
QA01U (400-480MHz)
Li-ion Battery Pack
QB-40L
Charger
QBC-40L
Belt Clip
BC09
AC Adaptor
QPS-07
Instruction
Manual
Professional
FM Transceiver 3
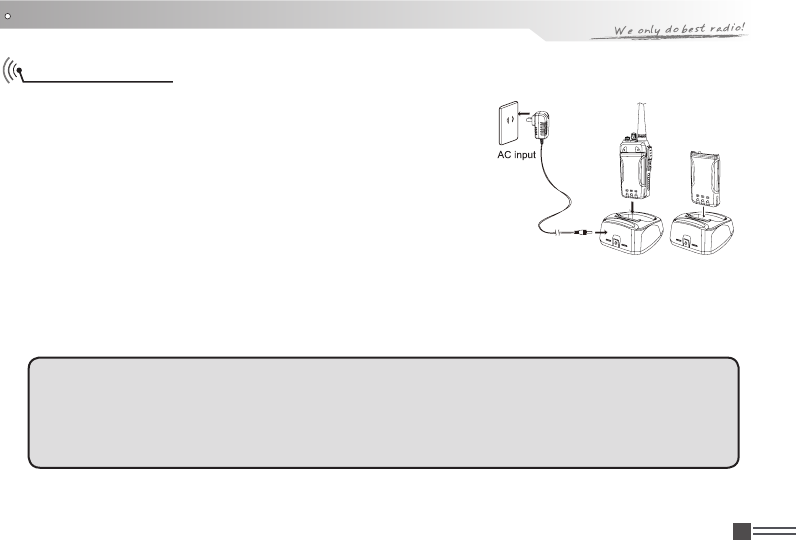
BATTERY INFORMATION
How to Charge
Plug the AC adaptor into the AC outlet, and then plug the cable 1.
of the AC adaptor into the DC jack located on the back of the
Charger. The Backlight lights orange (1s) and then goes out,
lights green----waits to charge.
Plug the battery or transceiver into the charger. Make sure that 2.
the battery terminals are in contact with charging terminals
well. The Backlight turns into twinkling red-----Pre-charging
begins.
After pre-charging for about 5 minutes, the indicator will stop 3.
twinkling----charging begins.
It takes approximately 4.5 hours to fully charge the battery. When the lamp lights green, the 4.
charging is nished. Remove the battery or the transceiver is nished. Remove the battery or the
transceiver equipped with battery from socket.
NOTE: When charging a power-on transceiver equipped with battery, the indicating lamp will not
turn into green to show the fully charged status. Only when the transceiver is switched off, can the
lamp indicate normally. The transceiver consumes energy when it is power-on, and the charger can
not detect the voltage when the battery has been fully charged. So the charger will charge battery in
constant voltage and fail to indicate correctly whether the battery has been charged fully.
Professional
FM Transceiver
4
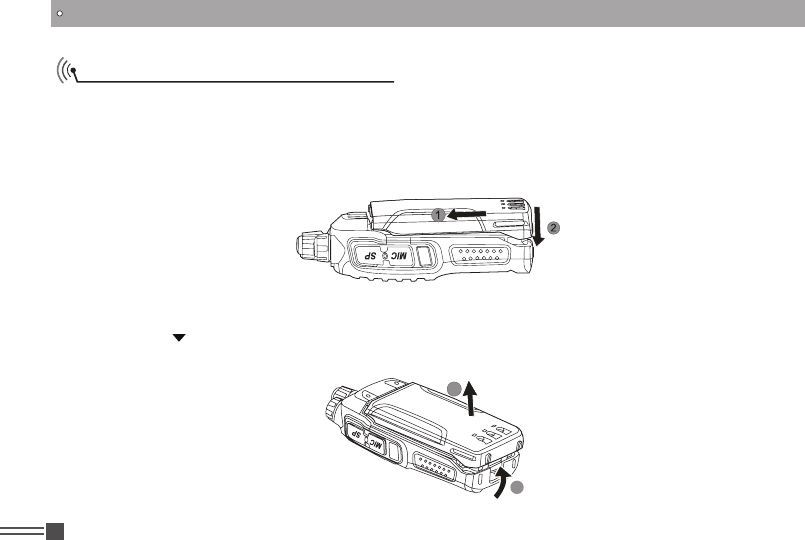
Installing / Removing the Battery
■ Installing the Battery
Lay the battery to face the back of the radio. 1.
Press the button of battery , the latch in button of transceiver locks will release . After hearing a 2.
"click" sounds ,the battery has been locked.
PREPARATION
■ Removing the Battery
According to “ ” to push the battery lock to removing the battery.
1
2
Professional
FM Transceiver 5
PREPARATION
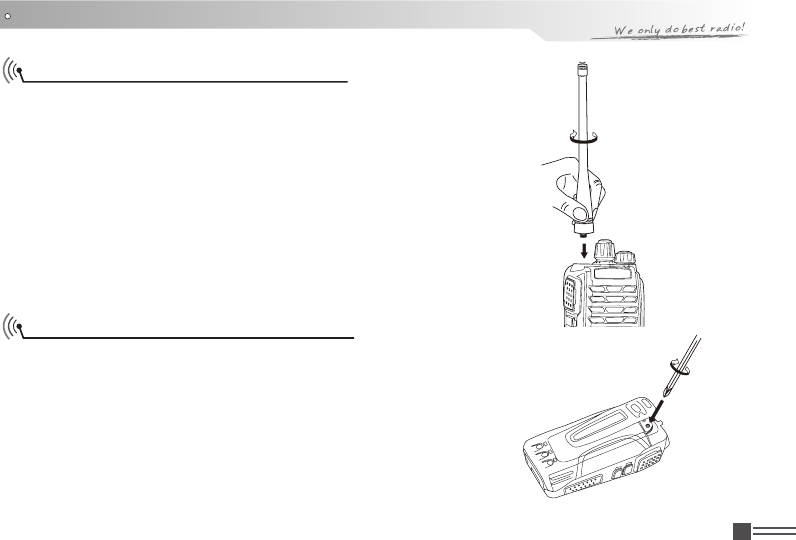
Installing / Removing the Antenna
■ Installing the Antenna:
Screw the antenna into the connector on the top of
the transceiver by holding the antenna at its base
and turning it clockwise until secure.
■ Removing the Antenna:
Turn the antenna anticlockwise to remove it.
Installing / Removing the Belt Clip
■ Installing the Belt Clip:
Place the belt clip to the grooves on the back of the
transceiver, and then clockwise screw it.
■ Removing the Belt Clip:
Anticlockwise turn the screws to remove the belt
clip.
Professional
FM Transceiver
6
PREPARATION
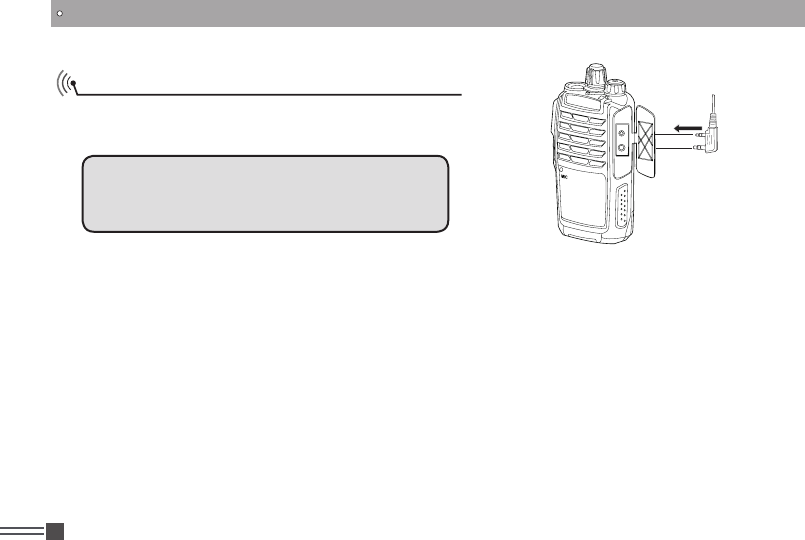
Installing the Additional Speaker/ Microphone (Optional)
Unveil the MIC-SP jack cover and then insert the
Speaker/Microphone plug into MIC-SP jack.
Note:
The transceiver is not completely waterproof while
using the Speaker/Microphone.

Professional
FM Transceiver 7
GETTING ACQUAINTED
1
2
3
7
4
5
6
8
10
9

Professional
FM Transceiver
8
GETTING ACQUAINTED
1 Antenna
2 POWER / VOLUME Switch:
Turn clockwise to switch on the transceiver, and turn anticlockwise till hearing “Click” to switch
off the transceiver. After switching on the transceiver, turn clockwise to increase the volume and
anticlockwise to decrease the volume.
3 Indicator light
4 PTT Key
When you are making a call, please press and hold this key to speak into the microphone. Release
the key to receive.
5 PF1 Key
It can realize different functions by programming.
6 PF2 Key
It can realize different functions by programming.
7 Channel Selector Knob
Turn the selector knob to select desired channel. Turn clockwise to increase channel, anticlockwise
to decrease channel.
8 Additional Microphone / Speaker Jack、Reading / Writing frequency Jack
9 Belt Clip
10 Battery Lock
Professional
FM Transceiver 9
GETTING ACQUAINTED
Indicator Status and Beep
Warning on low voltage The red light twinkles.
Transmitting Lighten the red light.
Receiving Lighten the green light.
Reading/Writing Frequency Reading Frequency: Red light twinkles
Writing Frequency: Green light twinkles
Key Operation Voices "DU" into any function, "DU DU" to exit any function.
[PF1] & [PF2] Key Default
Press [PF1] Battery Capacity Enquiry
Press [PF2] Squelch off
Press [PF1] 1 second Monitor
Press [PF2] 1 second Switch H/L Power
Press [PF1] 3 seconds On/Off VOX Function

Professional
FM Transceiver
10
Users can setup the key [PF1] and [PF2] to be one of the optional functions as bellows :
Squelch off •
Monitor •
Current Channel Power Enquiry •
Frequency Reverse •
Talk Around •
Battery Capacity Enquiry •
TX Power Switch •
Emergency Alarm •
AUXILIARY FUNCTIONS
GETTING ACQUAINTED
When the battery state is grade 1th (6.29V), the LED lights red. The transceiver will voice prompt
Professional
FM Transceiver 11
BASIC OPERATIONS
Switch on / off Transceiver
Switch on Transceiver: Under power-off state, turn POWER / VOLUME clockwise till hearing
"Click" to switch on the transceiver. The transceiver will announce "Power on" when power-on and
announce the current channel.
Switch off Transceiver: Under power-off state,turn POWER / VOLUME anticlockwise till hearing
"Click" to switch off the transceiver.
Adjusting Volume
Under power-on state, turn POWER / VOLUME switch to adjust the volume. Turn clockwise to
increase the volume, and anticlockwise to decrease the volume.
NOTE: You can press the programmed key of squelch off [PF1] / [PF2] to monitor the background
noise and meanwhile turn POWER / VOLUME to adjust the volume. Under the communicating state,
you can adjust volume as per your need more accurately.
Battery Capacity Enquiry
Under the standby conditions, press the programmed key of "Battery Capacity Enquiry" [PF1]/[PF2],
transceiver announce current battery capacity. There are 10 grades in total. Grade 10th means full
battery capacity.
users each 30 seconds to charge timely and also enter automatically the state of no transmission.
Professional
FM Transceiver
12
Receiving
You can hear the transmitting party's calling when the channel you are operating is called and the
LED light turns green.
NOTE:
You may not receive the calling if you set a high squelch off level of the transceiver.
If current channel has been programmed with signaling, you can only hear the call from a same
signaling, other calls can not be heard.
Channels Selection
Under the standby conditions, turn channel selector knob to choose the desired channel, and
the transceiver will announce the adjusted channel. Turn clockwise to increase the channel,
anticlockwise to decrease the channel.
NOTE: The transceiver will emit a voice prompt when current channel is blank and the red light will flash.
BASIC OPERATIONS
Monitor
Pressing the programmed key of Monitor [PF1]/[PF2], the transceiver emits "DU" beep and then
comes into the monitor state. Under these conditions, transceiver will ignore CTCSS/DCS decode
and monitor signal of the other party as long as receiving the matched carrier wave. Press this key
again, transceiver emits "Du Du" beep and exits the monitor state.
Professional
FM Transceiver 13
Transmitting
Before transmitting, make sure that the channel you want to use is not in busy state through monitoring
for a while by pressing the programmed Squelch off [PF1] / [PF2] key. Under these conditions, press
the [PTT] key and speak into microphone. Please keep around 2.5-5cm distance between microphone
and your lip. And please speak in normal tone to make the receiver obtain best tone quality.
ON/OFF VOX
When turn on this function, it's not necessary to press the [PTT], through the appropriate voice can
star emission.
In standby, put HS03 earphone into MIC-SPK, press and hold [PF1] more than 3 seconds, the
transceiver will send a prompt voice and turn on VOX function. Repeat the above operation or restart
will be closed the VOX function.
NOTE: It needs to program the VOX in valid status firstly if you want to turn on this function,
otherwise, the above operation is invalid.
Note:Press [PTT] Red LED lighting means transmitting. Release [PTT] to receive signal.
BASIC OPERATIONS
Power Switch
Under the standby conditions, press the programmed key of "Power Switch" [PF1]/[PF2], transceiver
change the current channel power and announces.

Professional
FM Transceiver
14
Battery Save Setup
When this function is enabled, the transceiver can efficiently reduce battery consumption. The
transceiver will automatically switch on Battery Save Function when not receiving a signal or
making any operations. But when the transceiver receives a matching signal or make operation it will
automatically exits this function.
Time-out Timer
The purpose of the Time-out Timer is to prevent any caller from using a channel for an extender
period of time. If you continuously transmit for a period of time that exceeds the programmed time
set in advance, the transceiver will stop transmitting with voice prompt.
Users can set TOT timer by programming software.
BASIC OPERATIONS
Professional
FM Transceiver 15
Resume Factory Default
Once transceiver works abnormally for wrong operations or wrong programming, users can start this
function to resume all functions and channels as Factory Default.
Under standby conditions press [PTT] and [PF1] key synchronously to switch on transceiver. Holding
the two keys until hear transceiver announces "DI" beep then release the keys,the transceiver will
Maintaining and Cleaning
Cover the jack with its opercula when the transceiver is not in use. After long-time use of the
transceiver, keys, control buttons and housing would become dirty. Then, neutral detergent (no
corrosive chemical agent) and wet cloth can be used to clean them.
NOTE: Via programming software can set whether allow to use this function in transceiver, please
reference to the Reset Allowed option in programming software.
BASIC OPERATIONS
factory default.
Professional
FM Transceiver
16
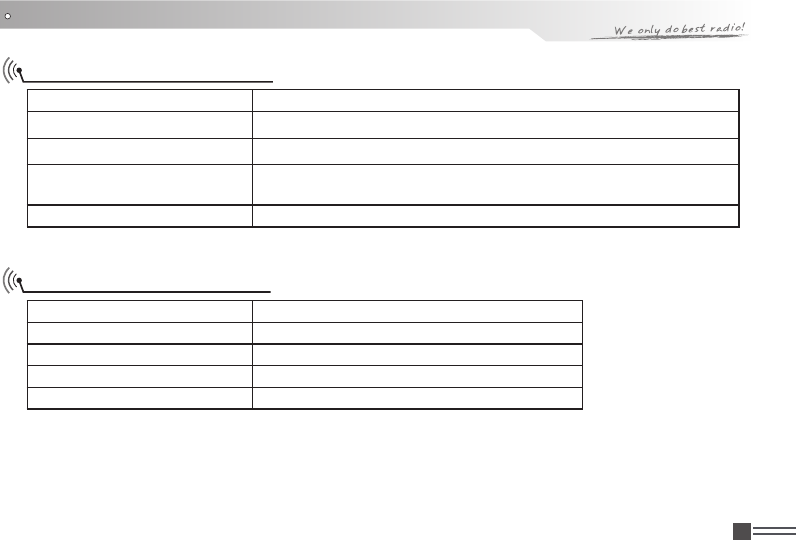
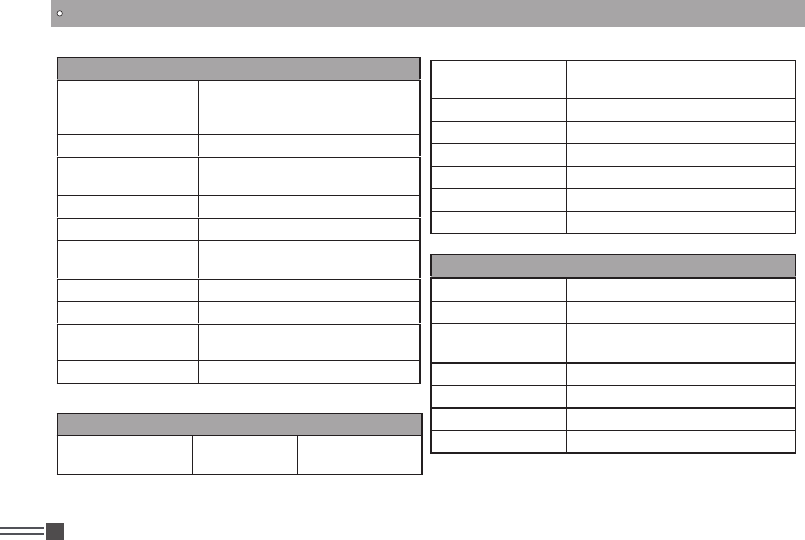
General
Frequency Range UHF: 400~480MHz
Channel Capacity 16 channels
Channel Spacing
Phase-locked Step 2.5KHz, 5KHz, 6.25KHz
Operating Voltage 7.4V DC
Battery Life More than 12 Hours (1500mAh),
by 5-5-90 work cycle
Frequency Stability ±2.5ppm
Operating Temperature -20℃~ +55℃
Size 127×60×35mm (with battery pack)
Weight 219 g (with battery pack, antenna)
Receiving Part
Sensitivity(12dB
SINAD) ≤0.25μV ≤0.35μV
Adjacent Channel
Selectivity ≥60dB
Intermodulation ≥55dB
Spurious Rejection ≥80dB
Audio Response 6dB/per interval
Hum & Noise ≥40dB
Audio Distortion ≤5%
Audio Power Output 500mW/10%
Transmitting Part
Power Output 5W
Modulation 11KΦF3E
Adjacent Channel
Power ≥65B
Hum & Noise ≥40dB
Spurious Emission ≤-36dB
Audio Response 6dB/per interval
Audio Distortion ≤5%
TECHNICAL SPECIFICATIONS
12.5KHz
Professional
FM Transceiver 17
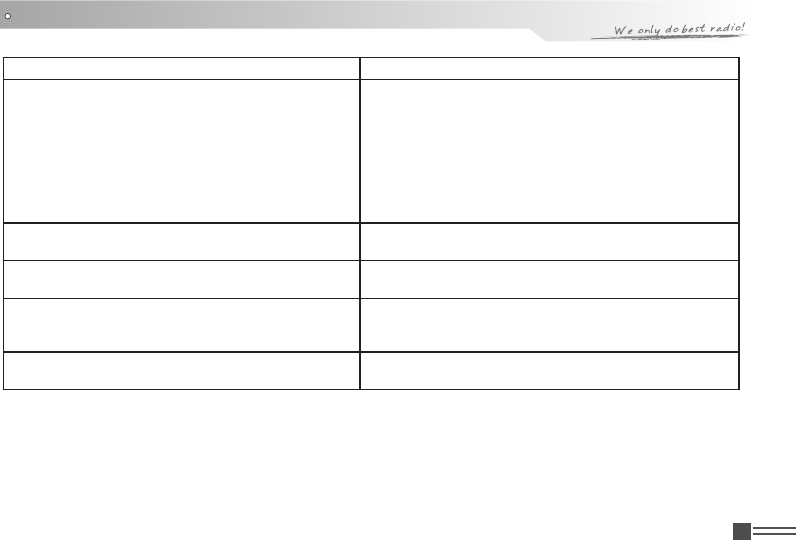
TROUBLE SHOOTING GUIDE
Problem Corrective Action
No Power
The battery pack may be exhausting. Recharge A.
or replace the battery pack.
The battery pack may not be installed correctly. B.
Remove the battery pack and install it again.
The power switch is broken; send it to local C.
dealers to repair.
Battery touch is broken; send it to local dealers D.
to repair.
Battery power dies shortly after correctly
charging.
The battery pack life is finished. Replace the
battery pack with a new one.
No sound after using microphone for a while Earphone jack is broken. (Please contact with
local dealers to repair it.)
Cannot talk to or hear other members in your
group
Different frequency or channel, please change it.A.
Different CTCSS / DCS please reset it.B.
Out of communication range.C.
Unstable communication with loud background
noise
Out of communication range or obstruct by tall
buildings or in basement and so on.

SAFETYTRAININGINFORMATION
YourQixiangElectronScience&TechnologyCo.,LtdradiogeneratesRFelectromagnetic
energyduringtransmitmode.Thisradioisdesignedforandclassifiedas“OccupationalUse
Only”,meaningitmustbeusedonlyduringthecourseofemploymentbyindividualsaware
ofthehazards,andthewaystominimizesuchhazards.ThisradioisNOTintendedforuseby
the“GeneralPopulation”inanuncontrolledenvironment.
ThisradiohasbeentestedandcomplieswiththeFCCRFexposurelimitsfor“OccupationalUseOnly”.Inaddition,
yourQixiangElectronScience&TechnologyCo.,LtdradiocomplieswiththefollowingStandardsandGuidelines
withregardtoRFenergyandelectromagneticenergylevelsandevaluationofsuchlevelsforexposuretohumans:
FCC OET Bulletin 65 Edition 97-01 Supplement C, Evaluating Compliance with FCC Guidelines for Human Exposure to
Radio Frequency Electromagnetic Fields.
American National Standards Institute (C95.1-1992), IEEE Standard for Safety Levels with Respect to Human Exposure
to Radio Frequency Electromagnetic Fields, 3 kHz to 300 GHz.
American National Standards Institute (C95.3-1992), IEEE Recommended Practice for the Measurement of Potentially
Hazardous Electromagnetic Fields– RF and Microwave.
Theinformationlistedaboveprovidestheuserwiththeinformationneededtomakehimor
herawareofRFexposure,andwhattodotoas‐surethatthisradiooperateswiththeFCCRF
exposurelimitsofthisradio.
ElectromagneticInterference/Compatibility
Duringtransmissions,yourQixiangElectronScience&TechnologyCo.,LtdradiogeneratesRFenergythatcan
possiblycauseinterferencewithotherdevicesorsystems.To avoidsuchinterference,turnofftheradioinareas
wheresignsarepostedtodoso.DONOToperatethetransmitterinareasthataresensitivetoelectromagnetic
radiationsuchashospitals,aircraft,andblastingsites.
Occupational/ControlledUse
Theradiotransmitterisusedinsituationsinwhichpersonsareexposedasconsequenceoftheiremployment
providedthosepersonsarefullyawareofthepotentialforexposureandcanexercisecontrolovertheirexposure.
Attention:
This radio complieswith IEEE and ICNIRP exposure limits for occupational/controlled RF exposure emvironment
at operating duty factors of up to 50% and is authorized by the FCC for occupational use only. An appropriate warning
lable is affixed to all units. In order to comply with RF exposure requirements, a minimum distance of 2.5cm must be
maintained when held-to-face, and body-worn operations are restricted to the approved original acessories (belt clip).
Do not use this device when antenna shows obvious damages