Qixiang Electron Science and Technology D878UV Digital DMR and analog UHF/VHF Two Way Radio User Manual
Qixiang Electron Science& Technology Co., Ltd Digital DMR and analog UHF/VHF Two Way Radio
UserManual.wiki
>
Qixiang Electron Science and Technology
>
D878UV User Manual
user manual
Navigation menu
Upload a User Manual
Namespaces
Wiki Guide
HTML
PDF
Info
Views
User Manual
Discussion / Help
Navigation
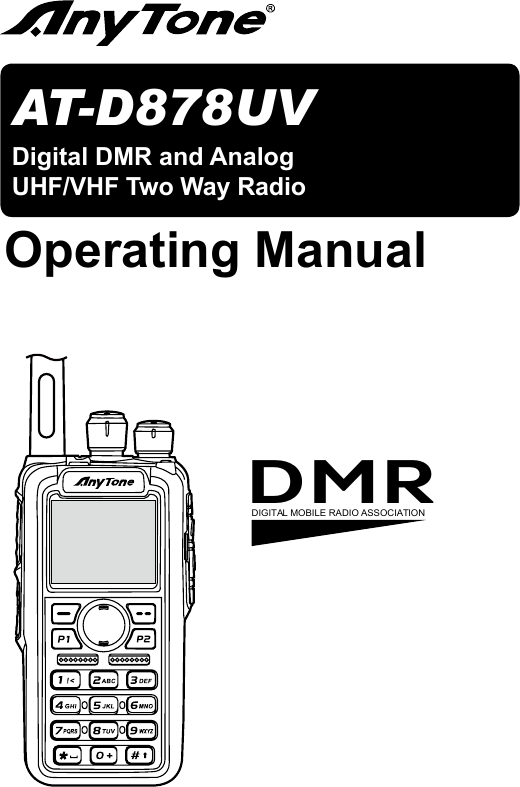

![9AT-D878UV Digital DMR and Analog UHF/VHF Two Way RadioEmergency Alarm Key (PF3)AntennaMenu keyP1 key/ P2 keyMIC InputSpeaker/Mic JacksChannel SwitchPOWER/VOLLED Status IndicatorLCDExit KeySpeakerPTT Button[PF1] top Key[PF2] bottom Key4. RADIO OVERVIEWPTT](https://usermanual.wiki/Qixiang-Electron-Science-and-Technology/D878UV/User-Guide-4057902-Page-15.png)
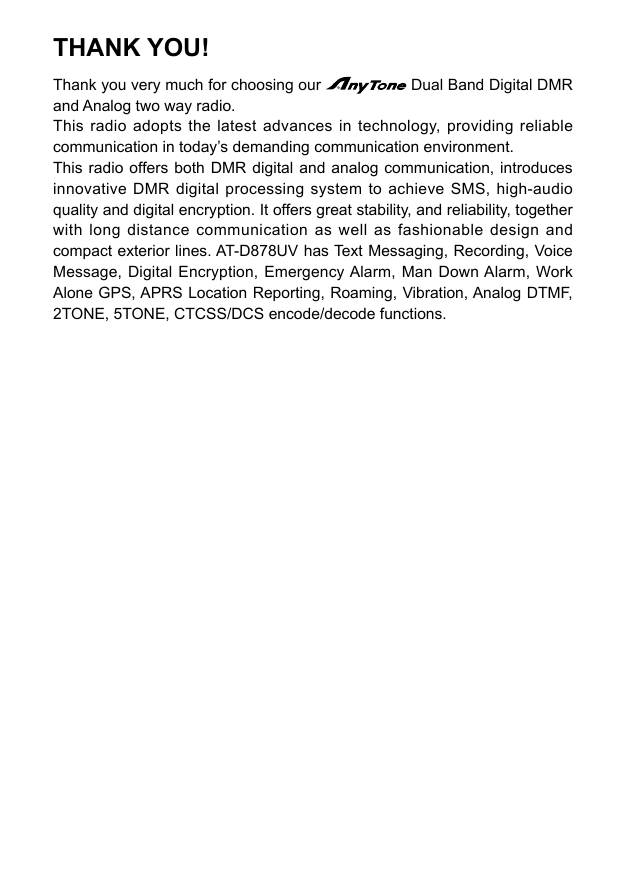
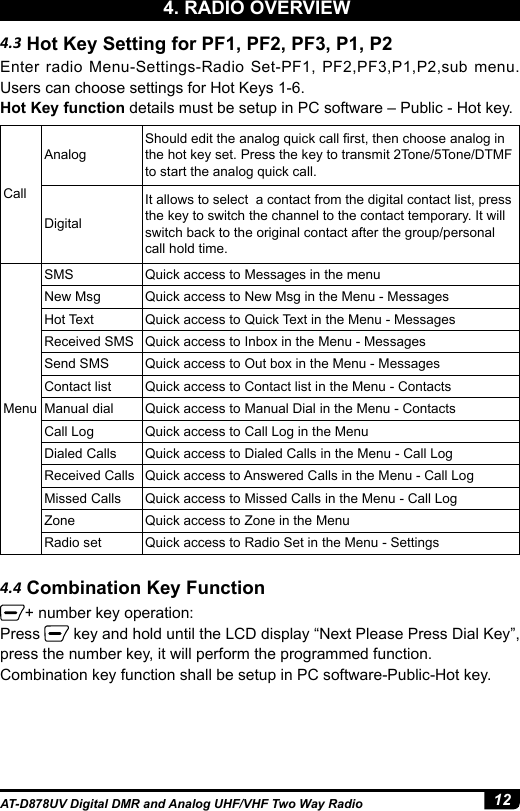
![10AT-D878UV Digital DMR and Analog UHF/VHF Two Way Radio4. RADIO OVERVIEWThe top LED will help you to identify the current radio status.4.1 Status IndicationsLED Indication StatusFlashes Red Low battery voltageConstant Red TransmittingConstant Green Analog ReceivingConstant Cyan Digital ReceivingFlashes Green Scan4.2 Programmed KeyIt is possible to set different functions for [PF1], [PF2], [PF3], , keys.Method 1: In radio Menu - Settings - Radio Set - Key - PF1, PF2, PF3, P1,P2.Method 2: In PC software - Public - Optional Setting - Key function.OFF No FunctionVolt Check the current battery capacity voltageTx Power Switch the power between super high, high, middle and low power.TalkAround Switch between Talk Around and Repeater modeReverse Turn on/off the frequency reverse function.Digi Encrypt Choose the digital encryption group for digital channelCall In Analog mode, send the DTMF/5TONE/2TONE encode. This function is only valid for analog channel.VOX Set up the VOX levelVFO / MR Switch between VFO mode and memory channel mode.Sub PTT Sub channel PTT, press to start the call on sub channel (NOTE: On PF1 - PF2 - PF3 Keys Only)Scan Scan on/offFM Radio FM radio on/offAlarm Long press the key to start alarm, short press again to exit the alarm.Record Switch Enable/disable the recording functionRecord Start/stop recording. When stop recording, the radio will remind repeat or send the record.SMS In digital mode, press to enter into SMS messagesDial Start the manually dialGPS Info Check the GPS position information](https://usermanual.wiki/Qixiang-Electron-Science-and-Technology/D878UV/User-Guide-4057902-Page-16.png)
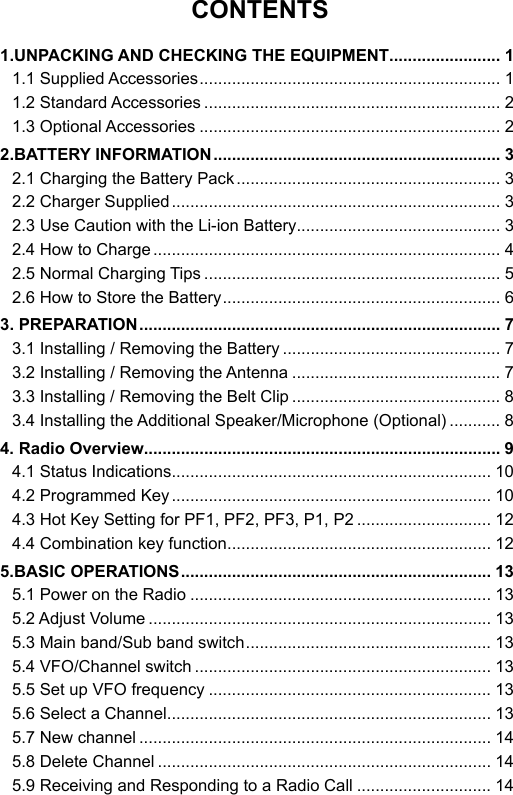
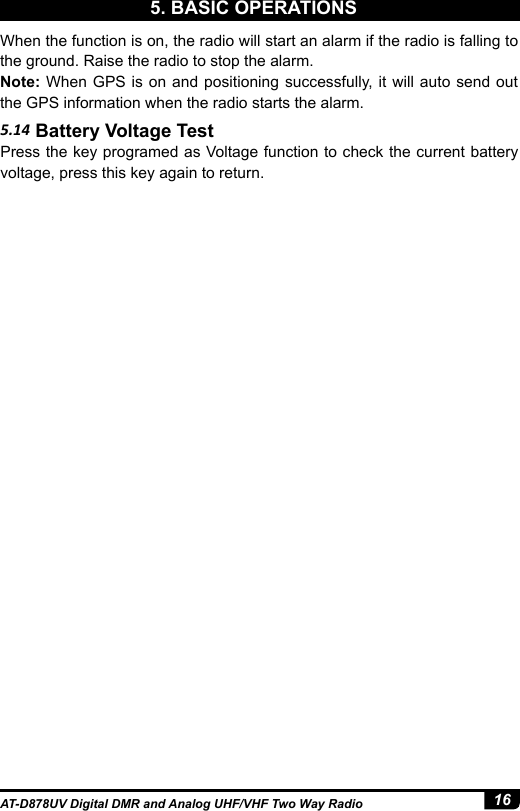
![13 AT-D878UV Digital DMR and Analog UHF/VHF Two Way Radio5.1 Power on the Radio5.2 Adjust Volume5.3 Main Band/Sub Band Switch5.4 VFO/Channel Switch5.5 Set Up VFO FrequencyTurn on the radio by turning the [Power/Volume] switch clockwise till a click is heard, and the LCD displays will show a start-up message, and you will hear a beep after 7 seconds.Rotate the [Power/Volume] knob to adjust the volume. Turn clockwise to increase the volume and counterclockwise to decrease the volume. The LCD display will show the volume status during an adjustment.Press the key to switch the main channel to the other channel if there is 2 channels shown on the display. The channel with bold characters is the main channel.Press the key to switch between VFO and channel display.Turn the radio to VFO mode , then press the key to switch to the main band, the VFO frequency can only be set up when the channel is in the main “bold text” channel.Operation 1: Input the VFO frequency directly by the keyboard.Operation 2: Turn the channel selector to adjust the VFO frequency steps.5. BASIC OPERATIONS5.6 Select a ChannelPress key to switch the radio between VFO and Channel mode, select Channel mode.Operation 1: Turn the channel switch to select a channel.Operation 2: Input the channel numbers by the keyboard. For example, if you want switch to channel 99, input 0+0+9+9 a total of 4 digits, and it will switch to channel 99.A channel can either be Analog or Digital. For the analog channels the Push-To-Talk button is always available, and on the Digital Channels the parameters can be set up by the users / system operators by individual channel to allow talk permit. There are four possible settings that can be selected in the CPS channel:(1) Always Allow: The user can transmit all the time.(2) Channel Free: The radio can transmit only if the channel is free.](https://usermanual.wiki/Qixiang-Electron-Science-and-Technology/D878UV/User-Guide-4057902-Page-19.png)
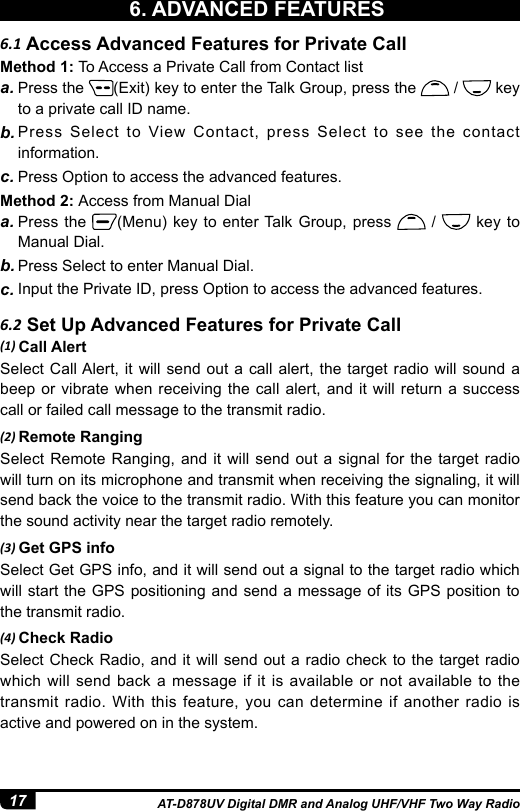
![14AT-D878UV Digital DMR and Analog UHF/VHF Two Way Radio5. BASIC OPERATIONS5.7 New channel5.8 Delete Channel(1) Press (Menu) to enter main Menu.(2) Select "Settings".(3) Select "Chan Set".(4) Select "New Chan".(5) Input the channel number by keypad, press to conrm.(6) Select a zone from zone list, then Conrm To Save. The radio will start channel saving, and saving is completed when it displays "Saved".(7) Now select the new channel in the radio and go to Channel Settings menu to set up all the new channel's parameters.Fast saving a new channel:Note: Hold (Menu) until displays "Next Please Press Dial Key", then press [P1] key to start a new channel from above step 5.(1) In channel (MR) mode, press (Menu) to enter main Menu.(2) Select "Settings".(3) Select "Chan Set".(4) Select "Delete Chan" to delete current channel.Fast delete a channel:Note: Hold (Menu) until displays "Next Please Press Dial Key", then press [P2] key to delete current channel.5.9 Receiving and Responding to a Radio CallWhen the radio is in the digital mode, it can receive and respond to a call with the same frequency/color code/ slot. When receiving a call:a. If the radio is programed with callers DMR ID number in the digital contact list, when receiving a call, the radio will ring or vibrate briey.b. The blue LED lights up.c. The left top corner of LCD shows the RSSI icon, and the LCD display will show DMR ID/name/city/state/country/call type and incoming icon based on what is in the contact list.(3) Different Color Code: The radio can transmit if the channel is free, but the color code is mismatch.(4) Same Color Code: The radio can transmit only if the channel is free and the color code matches.](https://usermanual.wiki/Qixiang-Electron-Science-and-Technology/D878UV/User-Guide-4057902-Page-20.png)
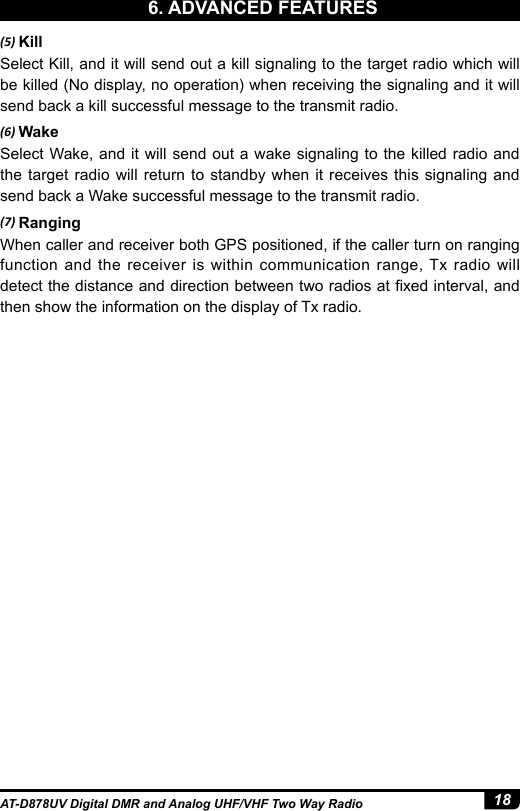
![15 AT-D878UV Digital DMR and Analog UHF/VHF Two Way Radio5. BASIC OPERATIONSd. When the call is ended, it will display “Call end”, and you can press [PTT] to respond the call.5.10 Making a CallMethod 1: from the Channel switch.Turn the channel switch to choose a programmed channel.Method 2: from the Talk Group.(1) Turn the channel switch to choose a programmed channel;(2) Press (exit) key to enter the TG List, press the / key to choose a TG. Method 3: from the keypad.(1) Turn the channel switch to choose a programmed channel.(2) Press (Menu) key to Talk Group, press select to enter TG.(3) Press / key to Manual Dial, press Select.(4) Input the ID number by keypad, press key to switch group ID or Private DMR ID.Hold the radio vertical 2.5-5cm from your mouth, press the [PTT] key to start the call, the red LED lights up, the receiver ID/name/city/state/country/call type and call out icon will be display on the LCD.Release [PTT] key to receive the reply. »When in analog mode, if no signal, it will emit noise when press the Monitor Key. ** The Rx icon is seen when monitor is activated.5.11 MonitorIn standby, press the [PF2] key to enter Monitor. When receiving matched carrier but the signaling / ID is unmatched or the signal is too weak, this function allows monitor the weak signal and signal with unmatched ID.Press the [PF2] key again to shut off speaker and return to standby.5.12 Emergency AlarmPress Emergency Alarm key [PF3] to turn alarm function, then press this key again to return.a. Press (Menu) to enter main Menu, press / key to Settings.b. Select Radio Set, press, press / key to Man Down.c. Select Man Down On to turn on the function. 5.13 Man Down Alarm](https://usermanual.wiki/Qixiang-Electron-Science-and-Technology/D878UV/User-Guide-4057902-Page-21.png)
![22AT-D878UV Digital DMR and Analog UHF/VHF Two Way Radio(4) Repeater Check - Off / OnTurn on this function will allow the radio to check the repeater status, the "Repeater is out of range" icon shows if the repeater is not in range.7.7 Settings7.7.1 Radio Set(1) BeepBeep On: The radio will beep when you press the keypadBeep Off: No beep when you press the keypad.(2) Back LightLCD backlight intensity is adjustable in 5 steps(3) Light TimeAlways: The backlight is always on. 5S-5Min adjustable.Note: This function is valid when turn off the power save. (4) Ch. NameCH name: The radio will work in channel mode and display the channel name, and then the programmed VFO/ MR key is not valid.Frequency: The radio will work in VFO mode and display the frequency, which allows the programmed VFO/MR key to switch the VFO and Memory channels.(5) Key LockManual Lock: Long press the key to lock the keypad. Press Func key, then press the key to unlock the keypad.Auto Lock: Radio will auto lock the keypad when standby for a while. Press [Func] key, then press the key to unlock the keypad(6) Auto Power OffAllow to set automatic power off when not used for a period of 10 minutes, 30minutes, 1 hour or 2 hours of inoperation.Off: Turn off the function.Start Roaming:Fixed Time: Starts timed roamingOut of Range: The roaming will be started when the radio cannot nd a repeater - "The repeater is out of range" icon will appear 3 times, then the radio will perform roaming one time, and return to roaming off automatically.7. MAIN MENU FUNCTIONS](https://usermanual.wiki/Qixiang-Electron-Science-and-Technology/D878UV/User-Guide-4057902-Page-28.png)
![24AT-D878UV Digital DMR and Analog UHF/VHF Two Way RadioChannel B: The lower displayed channel will be set to become the main channel.(17) Sub Ch OffSub Channel On: Turns on the sub channel, and the radio will display both channel. Sub Channel Off: Turns off the sub channel, and the radio will display the main channel only (18) SMS PromptDifferent prompt options when receive a new message.(19) Call RingDifferent prompt options when receive a new call.(20) Freq Step2.5K,5K,6.25K,10K,12.5K,20K,25K,30K,50K, total of 9 frequency steps.(21) Ana SQ LevelAdjusts the squelch level to receive signal with different signal strength, and a total of 5 levels offered. This function is only valid for analog channel.(22) Power SaveTurn on the function to extend the battery life.Save 1:1, work 30ms, dormant 30ms.Save 2:1, work 60ms, dormant 30msWhen turn on the power save, it may not receive the message in time.(23) TBST SelTBST frequency is used to activate some dormant repeaters, 1000Hz, 1450Hz,1750Hz, 2100Hz a total of 4 options are offered.Press PTT and PF1 key together to transmit the TBST tone.(24) VOXEnable the VOX, you can speak into the microphone to start transmitting instead of pressing the [PTT] key. A total of 3 levels are provided.(25) VOX DelayWhen the VOX is enabled, set up the VOX delay to help to extend the transmission time to avoid stopping a transmission too early. 0.5s-3s, a total of 26 times offered.(26) Scan ModSCM TO: When scanning and stopping for a signal, stays at the channel 5s before resuming the scan.7. MAIN MENU FUNCTIONS](https://usermanual.wiki/Qixiang-Electron-Science-and-Technology/D878UV/User-Guide-4057902-Page-30.png)

![27 AT-D878UV Digital DMR and Analog UHF/VHF Two Way RadioD- Digital : Set up to digital channel A+D TX A: Mixed analog, allow receive analog and digital signal, TX is analog.D+A TX D: Mixed digital, allow receive analog and digital signal, TX is digital.(4) TX PowerSet up the TX power for current channel. (5) OffsetPress / to adjust offset frequency. (6) Band WidthOnly narrow band 12.5KHz for digital channel.(7) RX FreqInput the RX frequency by keypad, click the Menu key to save, press P2 key to return.(8) TX FreqInput the TX frequency by keypad, click the Menu key to save, press [P2] key to return.(9) Talk AroundWhen the TX radio and RX radio both are set up with Talk Around on, they can communicate directly without a repeater. The analog channel will use the RX frequency as TX/RX frequency, the RX CTCSS/DCS decode as TX CTCSS/DCS encode.(10) NameAllow reset the channel name, this function is only valid in channel mode. (11) TX AllowAlways: Always allow transmitChannel Free: Allow transmit when the channel is freeDifferent CC: Allow transmit when receive matched signal but different color code.Same CC: Allow transmit when receive matched signal and same color code.(12) TX ProhibitTX ON: Will allow transmit on the current channel.TX OFF: Will not allow transmit on the current channel.7. MAIN MENU FUNCTIONS](https://usermanual.wiki/Qixiang-Electron-Science-and-Technology/D878UV/User-Guide-4057902-Page-33.png)
![31 AT-D878UV Digital DMR and Analog UHF/VHF Two Way Radio(23-24) 5Tone EncSet a 5Tone as the default call ID for the current channel.Press the [PTT] key to transmit the selected 5Tone.Edit the 5Tone in the PC programing software before it can be selected.7.7.3 Device InfoShow the Radio ID, Radio name, serial number, model name, frequency range, rmware version, radio data version, latest program date, picture version, language version etc.9. MAIN MENU7.8.1 Turn On/ Off the Recording7.8 Record7.8.2 Play the Recorda. Press (Menu) enter main Menu, press / key to Record.b. Select Talk Record, then •Select Record Switch, select on or off to turn on or off the recording.a. Press (Menu) to enter main Menu, press / key to Record.b. Select Record List to enter Record list, select a Record list to enter the Record le.c. Select a Record to see the Detailed Information.d. Press Select to choose the record option. 1) Record Play, it will play one record at a time, you can press / key to switch the recording without return to previous menu.2) Loop Playback, it will play all records in circle.The voice record is designed for security use purpose. Each call will be saved as a separated recording ile with DMR ID and time details. The standard voice 10hours record allows in DMR mode only. The optional 500 hours voice record allow in both DMR or analog mode.7.8.3 Send the Recorda. Press (Menu) to enter main Menu, press / key to Record.b. Select Record List to enter Record list, select a Record list to enter the Record le.7. MAIN MENU FUNCTIONS](https://usermanual.wiki/Qixiang-Electron-Science-and-Technology/D878UV/User-Guide-4057902-Page-37.png)
![35 AT-D878UV Digital DMR and Analog UHF/VHF Two Way Radio7.11.1 Response and Save a call in Digital Monitor ModeDuring Digital Monitor, when receive a call with unmatched ID, press key, the screen will display "Monitor Response Setup Successfully", press [PTT] key will reponse to the call.Press key, the radio will remind you choose a Zone, press / key to choose a Zone, press select key to save the new channel to the Zone.3) DigiMoni Id Any Id: Monitor any TG Same Id: Monitor the same TG4) Slot Hold Off: Turn off the slot hold On: Turn on the slot hold Recommend to turn on slot hold when monitor double slot TS1 and TS2, when the signal is disappear in one slot, instead of switching to the other slot at once, the radio will hold on some seconds and wait for the audio drop.c. Press Select to enter the sub menu and set up.7. MAIN MENU FUNCTIONS7.12 Bluetooth function (Optional with installed Bluetooth)1) BHT SwitchIt will allow select “Bluetooth ON” or “Bluetooth OFF”, select “Bluetooth ON” to turn on the bluetooth function.2) BHT MatchIt will allow select “Enter Match” or “Exit Match”, select “Enter Match” to start the bluetooth pairing.3) Device NameIt will show the bluetooth information and version.4) MIC while BHTWhen bluetooth function is on, the radio microphone is default off. This function will allow you turn on the radio microphone.5) Speaker while BHTWhen bluetooth function is on, the radio speaker is default off. This function will allow you turn on the radio speaker.6) BHT MIC GainThis function will allow you select different MIC gain level for bluetooth headset.7) BHT SPK GainThis function will allow you select different speaker gain level for bluetooth headset.](https://usermanual.wiki/Qixiang-Electron-Science-and-Technology/D878UV/User-Guide-4057902-Page-41.png)
![36AT-D878UV Digital DMR and Analog UHF/VHF Two Way Radioa. Power off the radio rstly. b. Then power it on while holding the [PTT] and the [PF1] button below the PTT at the same time. c. The radio will start up with a note on the display – “Are you sure you want to initialize radio?” Press Exit to exit the reset and power on the radio.Press Conrm to proceed the reset, it will come with a screen display note – Initialize Radio.d. After a re-start the radio will display the setting of time zone and the date and the time. Use the up-down key to set the current year. Move to the month by pushing the P1 key. Set the month, and use the P1 key to move forward each step. Once done, click the Conrm key to save the date and time. Please remember set up the time zone to avoid the date/time error. Make sure the codeplug is saved to PC before your do the update and reset.8. RESET](https://usermanual.wiki/Qixiang-Electron-Science-and-Technology/D878UV/User-Guide-4057902-Page-42.png)