Qixiang Electron Science and Technology QZQX929 Two Way Radio User Manual
Qixiang Electron Science& Technology Co., Ltd Two Way Radio Users Manual
UserManual.wiki
>
Qixiang Electron Science and Technology
>
QZQX929 User Manual
Users Manual
Navigation menu
Upload a User Manual
Namespaces
Wiki Guide
HTML
PDF
Info
Views
User Manual
Discussion / Help
Navigation
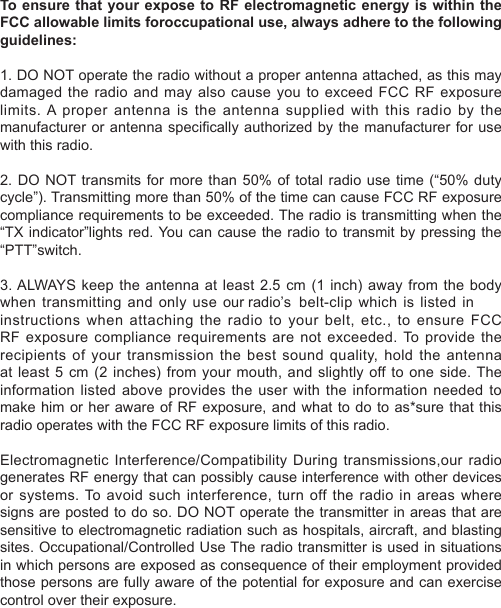

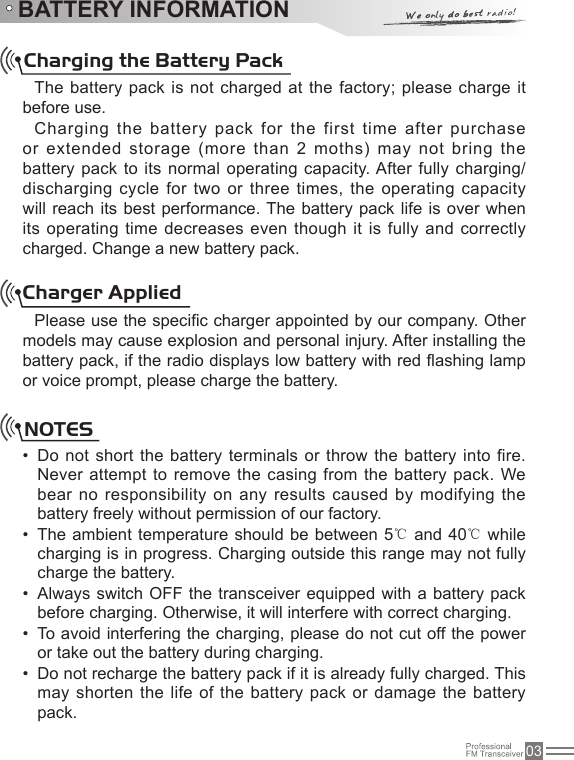
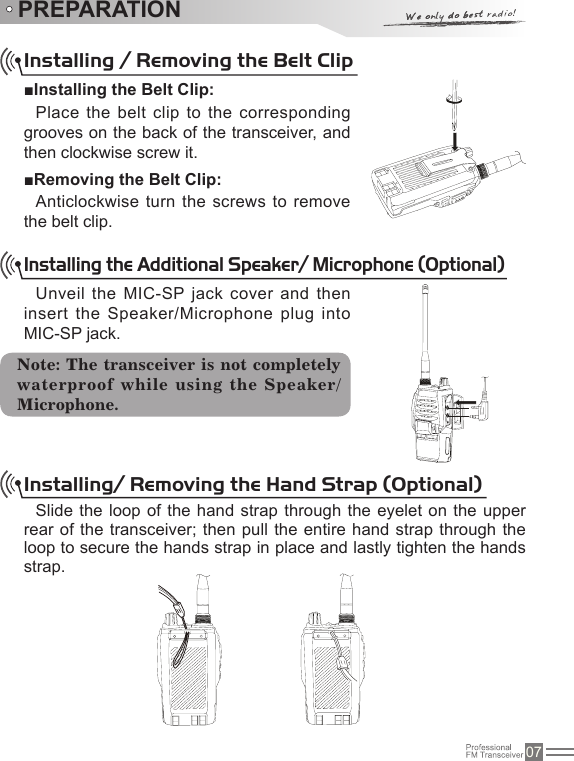
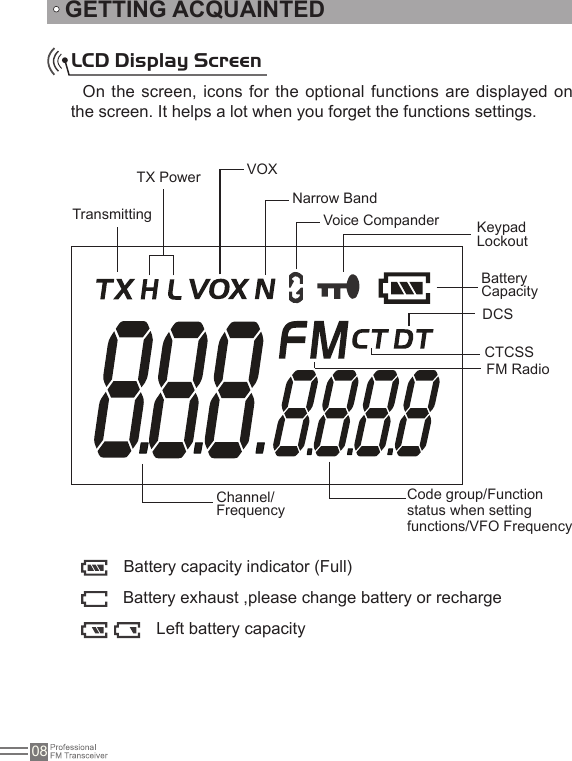
![CONTENTSUNPACKING ......................................................................................01Supplied Accessories ..................................................................................... 01STANDARD ACCESSORIES/OPTIONAL ACCESSORIES ..............02Standard Accessories ..................................................................................... 02Optional Accessories ...................................................................................... 02BATTERY INFORMATION .................................................................03Charging the Battery Pack .............................................................................. 03Charger Applied .............................................................................................. 03NOTES ........................................................................................................... 03How to Store the Battery ................................................................................ 04Emergent Charging ........................................................................................ 05PREPARATION ..................................................................................06Installing / Removing the Battery .................................................................... 06Installing / Removing the Antenna ............................................................... 06Installing / Removing the Belt Clip .................................................................. 07Installing the Additional Speaker/ Microphone (Optional) ............................... 07Installing/ Removing the Hand Strap (Optional) ............................................. 07GETTING ACQUAINTED ...................................................................08LCD Display Screen ....................................................................................... 08Backlight Status and Voice Prompt ................................................................ 11[PF1] & [PF2] Key Default .............................................................................. 11AUXILIARY FUNCTIONS ..................................................................12BASIC OPERATIONS ........................................................................ 13Switch on / off the Transceiver ....................................................................... 13Switch on/off the Jacklight .............................................................................. 13Volume Control ............................................................................................... 13Current Channel Enquiry ................................................................................ 13Adjust Frequency ............................................................................................ 13Fast Adjust Frequency .................................................................................... 14Channels Selection ......................................................................................... 14Receiving ........................................................................................................ 15Transmitting .................................................................................................... 15Emergency Alarm Function ............................................................................ 16Keypad Lockout .............................................................................................. 16FUNCTIONS SETUP ..........................................................................17Basic Functions Setup .................................................................................... 17](https://usermanual.wiki/Qixiang-Electron-Science-and-Technology/QZQX929/User-Guide-2068841-Page-6.png)

![11GETTING ACQUAINTEDBacklight Status and Voice PromptWarning on low voltageTransceiver emits a low voltage beep at intervals of 60 seconds, and red light twinkles.Receive Backlight lightens all the timeKeypad operationTransceiver emits"DU" when entering a function menu, "DU DU" to exit any function.[PF1] & [PF2] Key DefaultPress [PF1] Battery Capacity EnquiryPress [PF2] Squelch offPress [PF1] and hold for one second CallPress [PF2] for one seconds Hi/Low power switch](https://usermanual.wiki/Qixiang-Electron-Science-and-Technology/QZQX929/User-Guide-2068841-Page-18.png)
![12AUXILIARY FUNCTIONSUsers can setup the key [PF1] and PF2] to be one of the optional functions as bellows: Squelch off• Monitor• Hi/Low Power switch• Scan• Frequency Reverse• Talk around• Current battery capacity enquiry• Call• Temporarily delete interrupting channel• For better information on this part, please refer to the "Advanced Operation" instruction.](https://usermanual.wiki/Qixiang-Electron-Science-and-Technology/QZQX929/User-Guide-2068841-Page-19.png)
![13BASIC OPERATIONSSwitch on / off the TransceiverSwitch on the Transceiver: Under power-off state, turn POWER/ VOLUME knob clockwise till hearing "Click" to switch on the transceiver. The transceiver will announce "Power on" and current channel. Switch off the Transceiver: When the transceiver is in the open state, turn POWER / VOLUME anticlockwise till hearing "Click" to switch off the transceiver.Switch on/off the JacklightUnder standby state, press the Emergency Alarm Key to switch on the jacklight. Press the same key to switch off the light.Volume ControlWhen the transceiver is in open state, turn POWER / VOLUME knob to adjust the volume. Turn clockwise to increase the volume, and anticlockwise to decrease the volume. You can press the programmed key of squelch off [PF1] / [PF2] to monitor current volume.Current Channel EnquiryUnder Standby state, pressing or , the transceiver will announce channel number.NOTE: You can firstly press the programmed key of squelch off [PF1] / [PF2] to monitor the background noise and meanwhile turn POWER / VOLUME to adjust the volume. Under the communicating state, you can adjust volume as per your need more accurately.Adjust FrequencyUnder VFO( frequency mode), press repeatedly till the decimal](https://usermanual.wiki/Qixiang-Electron-Science-and-Technology/QZQX929/User-Guide-2068841-Page-20.png)
![14dot on the LCD twinkles. Under this state, press / to set desired current frequency. Press to increase the frequency value by step, to decrease the frequency value.Press [PF1] or [PF2] key to confirm the selected frequency and exit the frequency setting mode. After entering the setting mode, if users do not set the frequency or not exit the mode after adjusting the frequency, the transceiver will exit the setting mode automatically after 10seconds.BASIC OPERATIONSFast Adjust FrequencyUnder VFO( frequency mode), press repeatedly till the decimal dot on the LCD twinkles. Under this state, press / to set desired current frequency. Press to increase the frequency value by 1MHZ, to decrease the frequency value by 1MHZ.Press [PF1] or [PF2] key to conrm the selected frequency and exit the frequency setting mode. After entering the setting mode, if users do not set the frequency or not exit the mode after adjusting the frequency, the transceiver will exit the setting mode automatically after 10seconds.NOTE:Under channel mode, this function would be hidden.This function is disabled as factory default. You can enable this function via programming software.Channels SelectionUnder channel mode, to choose the desired channel, rstly, users NOTE:Under channel mode, this function would be hidden. VFO function is disabled as factory default. You can enable this function via programming software.](https://usermanual.wiki/Qixiang-Electron-Science-and-Technology/QZQX929/User-Guide-2068841-Page-21.png)
![15BASIC OPERATIONSneed to press repeatedly till the channel number displayed on the LCD twinkles, secondly, press or to up or down the channel number, and then the transceiver will announce the adjusted channel number. Press to upward the channel number and to downward the channel number. Press any key except , to conrm and exit. After entering the setting mode, if users do not set the frequency or not exit the mode after adjusting the channel number, the transceiver will exit the setting mode automatically after 10seconds.NOTE : When adjustin g channel , the tra nsc eiver will automatically skip blank channels which are not edited. Suppose you want to adjust the channel from NO.1 to NO.2, if channel NO.2 is blank, the transceiver will skip it and jump to channel NO.3.ReceivingOnce current channel is called, backlight lightens all the time, and then you can hear other party calling.NOTE:•You may not receive the calling if you set a high squelch off level of the transceiver.•If current channel has been programmed with signaling, you can only hear the call from a same signaling, other calls can’t be heard.TransmittingBe sure that the channel you want to use is not in busy state through monitoring for a while by pressing the programmed Squelch off [PF1] / [PF2] key. Under these conditions, press the [PTT] key and speak](https://usermanual.wiki/Qixiang-Electron-Science-and-Technology/QZQX929/User-Guide-2068841-Page-22.png)
![16BASIC OPERATIONSinto microphone. Please keep around 2.5-5cm distance between microphone and your lip. And please speak in normal tone to make the receiver obtain best tone quality. Emergency Alarm FunctionPress this key for over 3 second to start the Emergency Alarm Function.Once this function is started, the transceiver will voice alarm beep, start transmitting and send the alarm beep to companions or systems. Restart the power supply to exit the emergency alarm function.To prevent wrong operation, users can start Keypad Lockout function to lock key and key. To start Keypad Lockout function, press and hold Emergency Alarm key while turning on the transceiver, and then release the key when the transceiver emits "DU". Then, the LCD displays the icon . The keys , , will be invalid when this functions is started. Repeat the above operations to disable the keypad lockout function with "DU DU" prompt.Note:Pressing and holding [PTT], if the backlight lightens for 10seconds and goes out afterwards and TX icon displayed on the LCD, the transceiver is transmitting. Release the PTT to receive.NOTE:Factory default: Disabled.You can enable this function via programming software.Keypad Lockout](https://usermanual.wiki/Qixiang-Electron-Science-and-Technology/QZQX929/User-Guide-2068841-Page-23.png)
![17FUNCTIONS SETUPBasic Functions Setup1. Press repeatedly to select desired sub-menu to setup.2. Press / to set desired function value.3. Press [PF1] or [PF2] to save and exit.CTCSS/DCS Encode/Decode When the transceiver is edited with this function, only when CTCSS/DCS signaling is received can the transceiver hear the calling of the other party. Transceivers that have matched CTCSS/DCS or do not setup with any signaling can hear your call.Repeatedly press 1. till "UF" icon is displayed on the LCD.Press 2. / to select CTCSS/DCS encode/decode or disable this function.When selecting CTCSS encode/decode, "CT" on the LCD twinkles.When selecting DCS positive encode/decode, "DTN" on the LCD twinkles.When selecting DCS invert encode/decode, "DTI" on the LCD twinkles.When switching off this function, "OFF" on the LCD twinkles. Press [PF1] or [PF2] to save and exit.3. NOTE:To manually set this function, users need to activate this function via programming software firstly.CTCSS/DCS Encode/Decode SetupRepeatedly press 1. till CT/DT and CTCSS/DCS twinkles on the LCD.](https://usermanual.wiki/Qixiang-Electron-Science-and-Technology/QZQX929/User-Guide-2068841-Page-24.png)
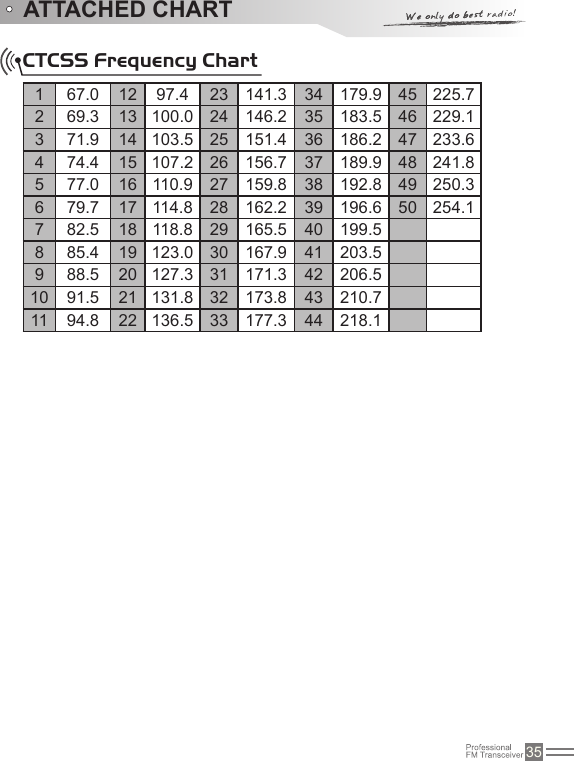
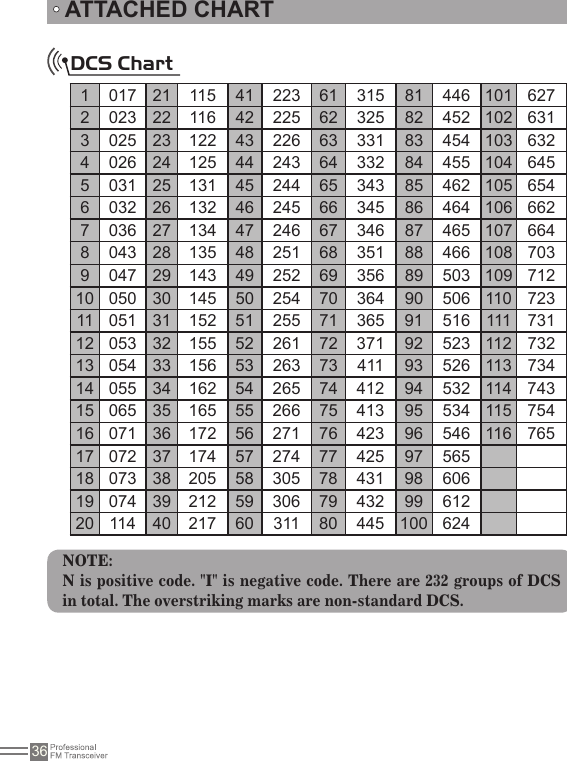
![18Press 2. / to select desired CTCSS/DCS decode.CTCSS: 67-254.1H, totally 50 groups. Default: 67HZ.DCS: 017N-765I, totally 232 groups. "N" on the LCD means positive code. "I" on the LCD means inverse code. Default: 017NPress [PF1] or [PF2] to save and back to standby 3. state.FUNCTIONS SETUPNOTE:The icon "N" or "L" will hide when CTCSS/DCS encode/decode function is closed.Mode SelectionThere are two modes for option, VFO (frequency mode) and Channel mode.Under standby state, press 1. repeatedly till "UFO" on the LCD twinkles.Press 2. / to select desired mode.OFF: Channel modeON: Frequency modePress [PF1]/[PF2] to exit.3. NOTE:To manually set the VFO ON/OFF, users need to enable this function via programming software firstly.FM Radio Press 1. repeatedly till "FM" on the LCD twinkles.Press 2. / to on/off the FM radio function.ON: turn on FM radio](https://usermanual.wiki/Qixiang-Electron-Science-and-Technology/QZQX929/User-Guide-2068841-Page-25.png)
![19FUNCTIONS SETUPOFF: turn off FM radio function (reset the transceiver when FM radio is on can also turn this function off)Press [PF1] or [PF2] to exit.3. NOTE:When FM radio function is on, press / to search FM radio station and announce current channel number. When a certain radio station is detected, the radio will rest on the station. The radio can transmit or receive when FM radio is on.Beep Voice PromptPress 1. repeatedly till "BEP" on the LCD twinkles.Press 2. / to on/off the BEEP voice prompt function.ON: turn on the BEEP voice prompt.OFF: turn off the BEEP voice prompt.Press [PF2] or [PF2] to exit.3. Squelch Level SetupThis function is used to setup the receiving signal intensity. If the receiving signal intensity reaches a certain level, you can hear the other party calling, otherwise transceiver will remain mute.Press 1. repeatedly till "SQ" on the LCD twinkles.Press 2. / to select desired squelch level.Totally 10 levels for option: OFF, 1-9 gradePress [PF1] or [PF2] to exit.3. NOTE:To manually set this function, users need to enable this function via programming software firstly.](https://usermanual.wiki/Qixiang-Electron-Science-and-Technology/QZQX929/User-Guide-2068841-Page-26.png)
![20FUNCTIONS SETUPOn/Off VOX When this function is enabled, you can begin transmitting by tted high voice, no needing to press the [PTT] key. Press 1. repeatedly till "VOX" on the LCD twinkles.Press 2. / to on/off VOX function.ON: turn on VOX functionOFF: turn off VOX functionPress [PF1] or [PF2] to exit.3. NOTE:To manually set this function, users need to enable this function via programming software firstly, otherwise this option will hide. Reset the transceiver, the VOX function will automatically be closed.VOX Level SetupThis function is used to set the volume needed to transmit. The higher the level is the louder voice it needs to transmit. Press 1. repeatedly till "VOX" and current VOX grade on the LCD twinkles.Press 2. key or to select desired VOX level.9 levels for option: 1-9 gradesPress [PF1] or [PF2] to exit.3. Note:To set desired VOX level, users need to enable the VOX function by programming software in advance; otherwise, this option will hide.Frequency Step SetupThis function is valid when the radio is in VFO mode and invalid in](https://usermanual.wiki/Qixiang-Electron-Science-and-Technology/QZQX929/User-Guide-2068841-Page-27.png)
![21Under standby state, Press 1. repeatedly till "STP" icon and current value of frequency step are displayed on the LCD.Press 2. / to select desired value. There are ve options: 5k, 6.25k, 10k, 12.5k.Press [PF1] or [PF2] to exit.3. channel mode. Under VFO mode, users can upward or downward the frequency by frequency step.FUNCTIONS SETUPNOTE:This function is invalid under channel mode.](https://usermanual.wiki/Qixiang-Electron-Science-and-Technology/QZQX929/User-Guide-2068841-Page-28.png)
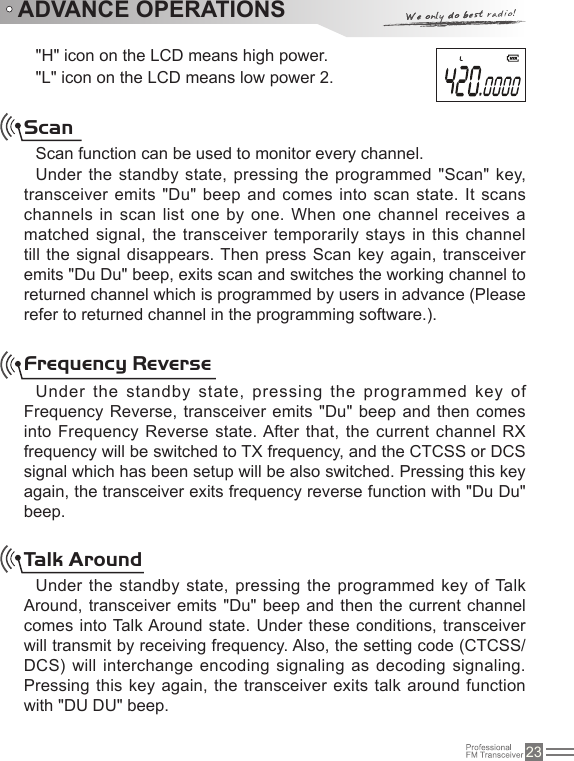
![22ADVANCE OPERATIONS[PF1] and [PF2] are programmable, which can realize certain functions as bellows via programming software.NOTE:To start the function programmed on the [PF1]-1s or [PF2]-1s, users need to press and hold [PF1] or [PF2] till the transceiver voice "DU" and then release.Repeat the above operation to turn off the programmed function.Squelch offUnder the standby state, pressing the programmed key of Squelch off [PF1] / [PF2], the squelch circuit is not mute and at present you can hear the background noise. Press this key again, the squelch circuit becomes mute. By using this function you can monitor the weaker signal which is hard to receive. Meanwhile, LCD will display current signal intensity.MonitorPressing the programmed key of Monitor [PF1] / [PF2], the transceiver emits "Du" beep and then comes into the monitor state. Under these conditions, transceiver will ignore CTCSS / DCS decode and monitor signal of the other party as long as receiving the matched carrier wave. Press this key again, transceiver emits "Du Du" beep and exits the monitor state.Hi/Low Power SwitchPressing the programmed key of Monitor [PF1] / [PF2], the transceiver emits "Du" beep and then announces current power state. If "HI" is selected, current channel transmits at high power. If "Low" is selected, current channel transmits at low power.](https://usermanual.wiki/Qixiang-Electron-Science-and-Technology/QZQX929/User-Guide-2068841-Page-29.png)
![26Time-out TimerThe purpose of the Time-out Timer is to prevent any caller from Wide / Narrow Band SetupOn the basis of national conditions, users can set channel spacing as 12.5K (narrow band) to communicate on the transceiver by programming software.This transceiver can realize 12.5K (narrow band) etc as communication way.NOTE:"N" on LCD indicates narrow band. Otherwise it is wide band.Busy Channel LockoutWhen BCL function is enabled, you can not transmit in busy channel. BCL prevents you from interfering with other parties who is using the same frequency point that you select. Under this condition, if you press the [PTT] to transmit, the transceiver will emit beep prompt and return to receiving mode.Users can set Busy Channel Lockout mode by programming software.Repeater: Repeat lockout, transmitting is inhibited when current 1. channel receives a matched carrier with different CTCSS/DCS. Carrier wave: Carrier busy lockout, transmitting is inhibited when 2. current channel receives a matched carrier waveClose: BCL disabled, you can do transmission under whatever 3. receiving state.Accession to Scan ListVia programming software, users can choose whether to add current channel into scan list. If current channel is not in the scan list, the transceiver will skip this channel when scanning.BACKGROUND OPERATIONS](https://usermanual.wiki/Qixiang-Electron-Science-and-Technology/QZQX929/User-Guide-2068841-Page-33.png)
![27using a channel for an extended period of time. If you continuously transmit for a period of time that exceeds the programmed time set in advance, the transceiver will stop transmitting with voice prompt.Users can set TOT timer by programming software.Time-Out Timer Pre-AlarmThe Time-Out Timer Pre-Alarm is to alarm users that overtime transmission is pending.Users can program desired TOT Pre-Alarm time by programming software.Battery Save SetupWhen this function is enabled, the transceiver can efficiently reduce battery consumption. The transceiver will automatically switch on Battery Save Function when not receiving any signal or making any operations. But when the transceiver receives a matched signal or make operations, it will automatically exit this function.Priority Scan SetupThere are two priority-channel settings of this transceiver, "fixed" and "selected". Users can set the desired priority scan by programming software. If transceiver sets priority scan, under scanning and receiving no signal state, it will scan every channel and also test priority channel at a time. When the non-priority channel receives signal, it will test priority channel according to yback time "A" and yback time "B" setup by users.Return to Appointed ChannelDuring scan process, press [PTT] key to transmit or stop scanning, then the transceiver will return to appointed channel. BACKGROUND OPERATIONS](https://usermanual.wiki/Qixiang-Electron-Science-and-Technology/QZQX929/User-Guide-2068841-Page-34.png)
![30Resume Factory DefaultOnce transceiver works abnormally for wrong operations or wrong programming, users can start this function to resume all functions and channels as Factory Default.Press [PTT] and [PF1] key synchronously to switch on transceiver. Holding the two keys for more than 1 second, the transceiver will resume Factory Default after announcing current channel number.Maintaining and Cleaning Cover the jack with its opercula when the transceiver is not at use. After long-time use of the transceiver, keys, control buttons and housing would become dirty. Then, neutral detergent (no corrosive chemical agent) and wet cloth can be used to clean them.](https://usermanual.wiki/Qixiang-Electron-Science-and-Technology/QZQX929/User-Guide-2068841-Page-36.png)
![34Can not power on or frequent power-offCheck whether the battery touch is out of sharp or broken.The other party gets low or intermittent receiving soundCheck weather the MIC is stoppage. (Otherwise, please contact with local dealers to repair it.)Intermittent receiving with big noise. Out of communication range or obstruct by tall buildings or in basement and so on.Loudspeaker become lower or with "ka ka" sound after using a certain timeCheck whether the loudspeaker net is broken. Iron powder or sundries is in the loudspeaker. (Please contact with local dealers to repair it.)Receive voice from the other party but can not transmitCheck [PTT] key. (Please contact with local dealers to repair it.)Receiving indicating lam (green light) lightens but no sound A.Low volume, please turn on clockwise.B. Lou d spe a ke r is b r oke n. ( P lea s e contact with local dealers to repair it.)C. Earphone jack is broken. (Please contact with local dealers to repair it.)D. Volume switch is broken. (Please contact with local dealers to repair it.)Can not adjust channelsKeypad locked. (Please refer to "keyboard locked" on page 16th to close the Keypad lockout function.)TROUBLE SHOOTING GUIDE](https://usermanual.wiki/Qixiang-Electron-Science-and-Technology/QZQX929/User-Guide-2068841-Page-40.png)