Quanta Computer 1200015318 Notebook Computer with Built-In Wireless LAN User Manual Solo1200

Quanta Computer Inc Notebook Computer with Built-In Wireless LAN Solo1200
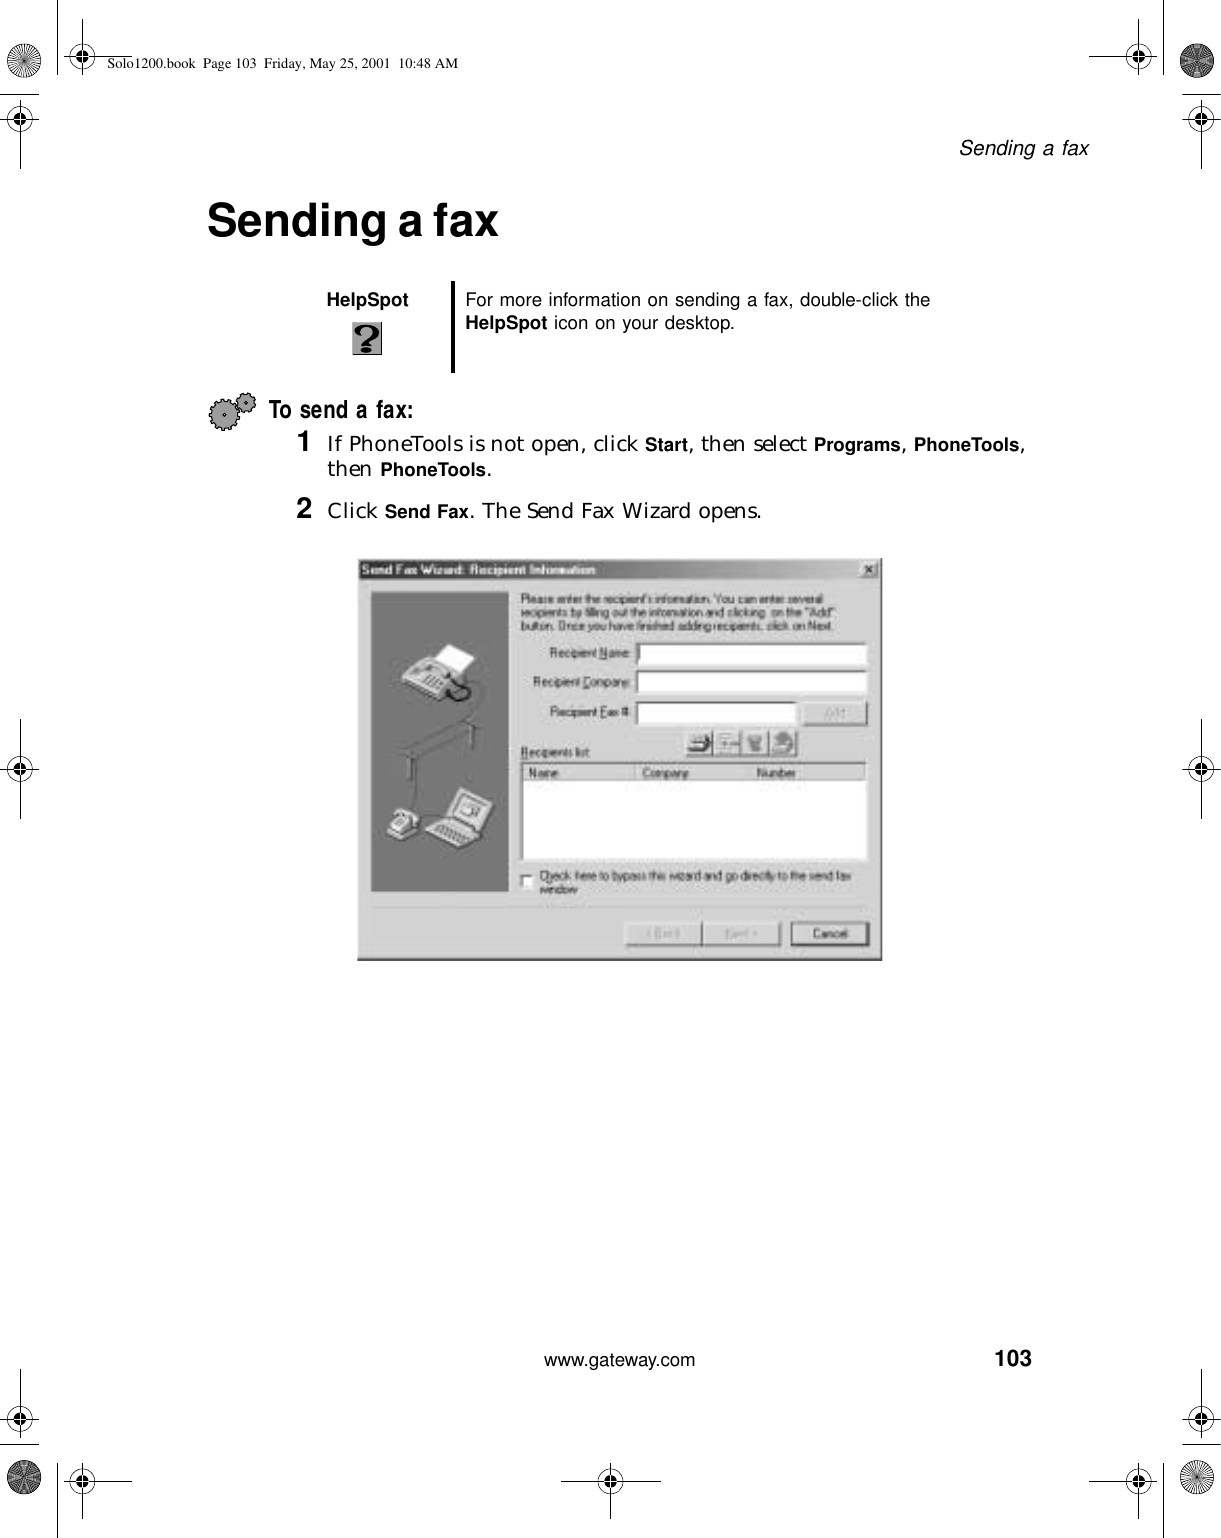
Contents

User Manual Section 1
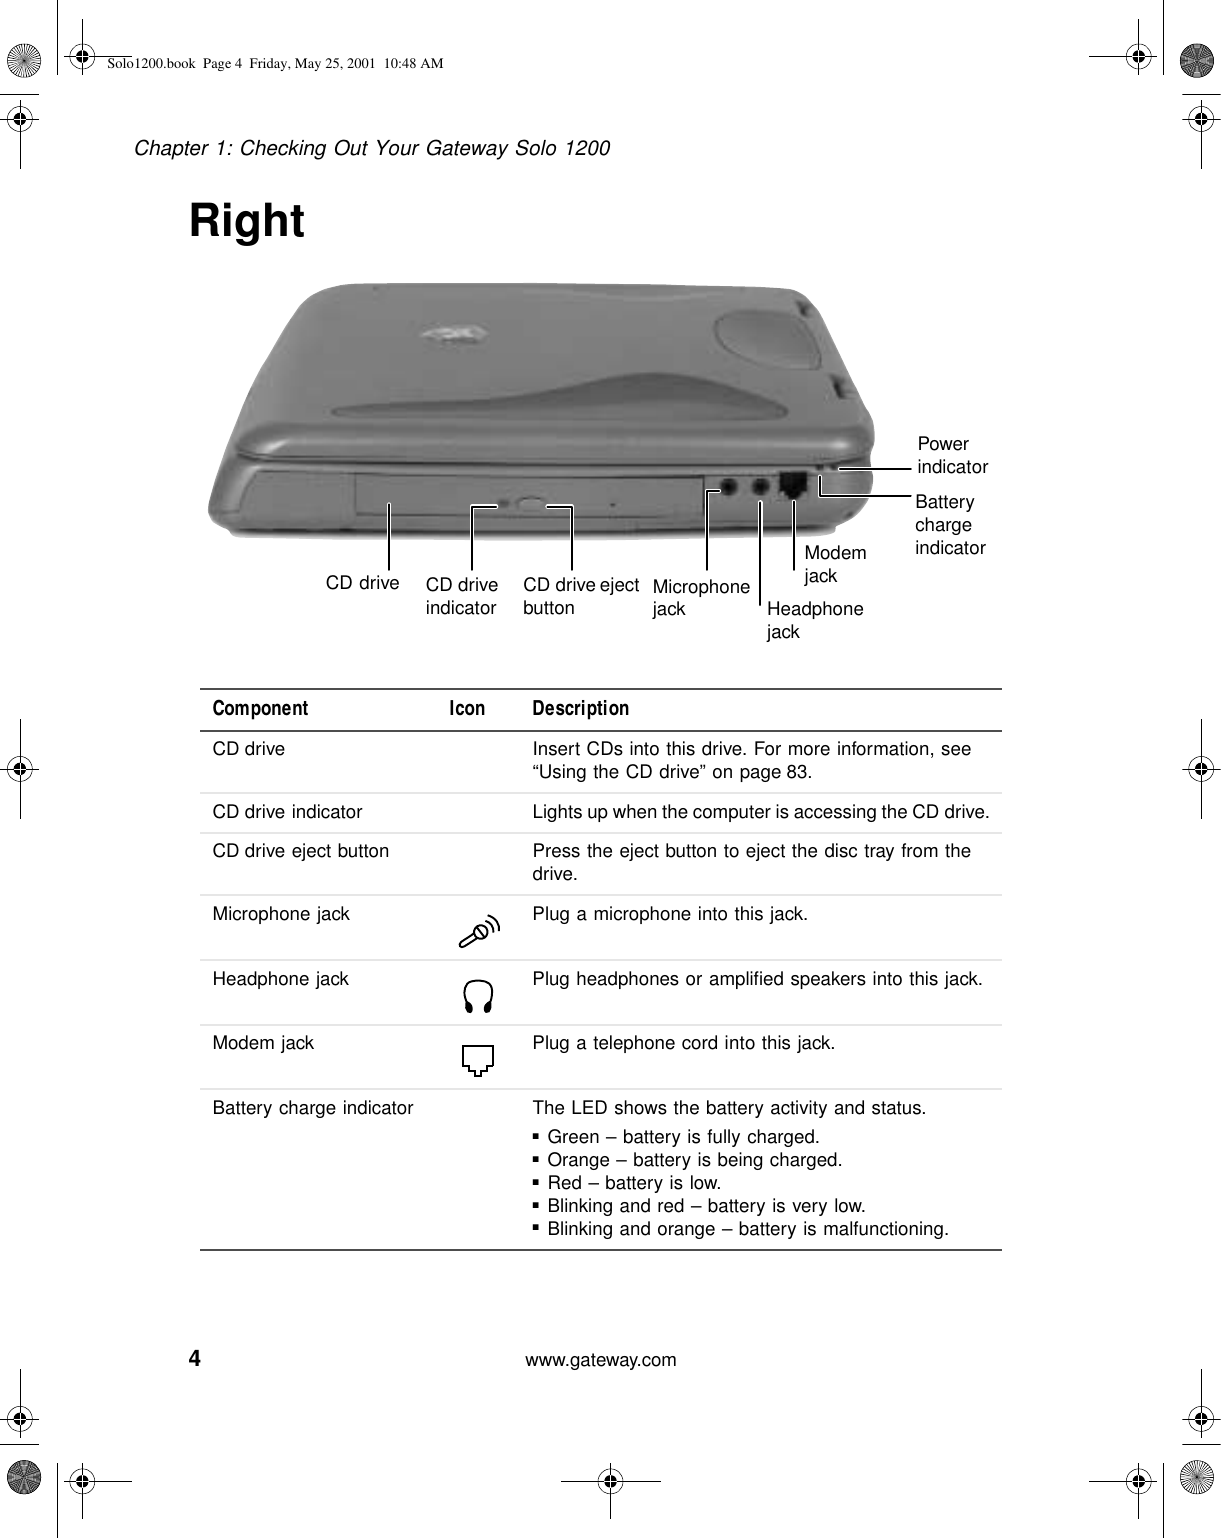
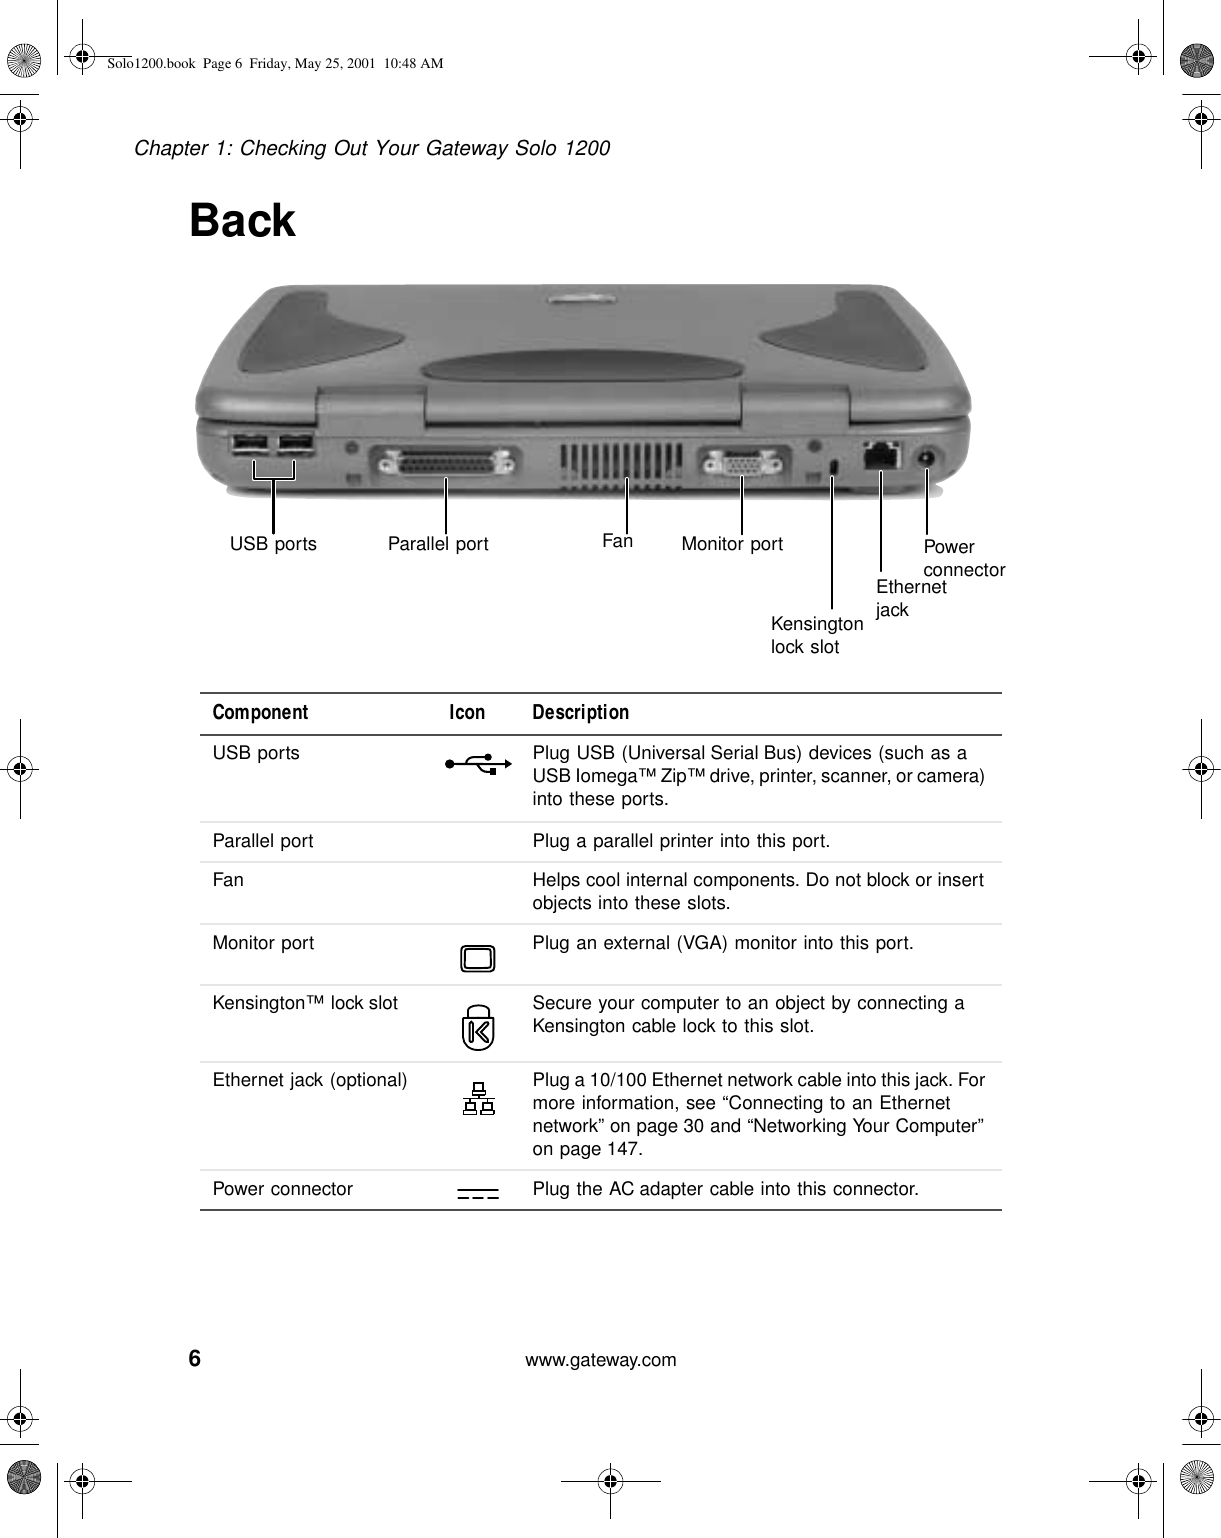
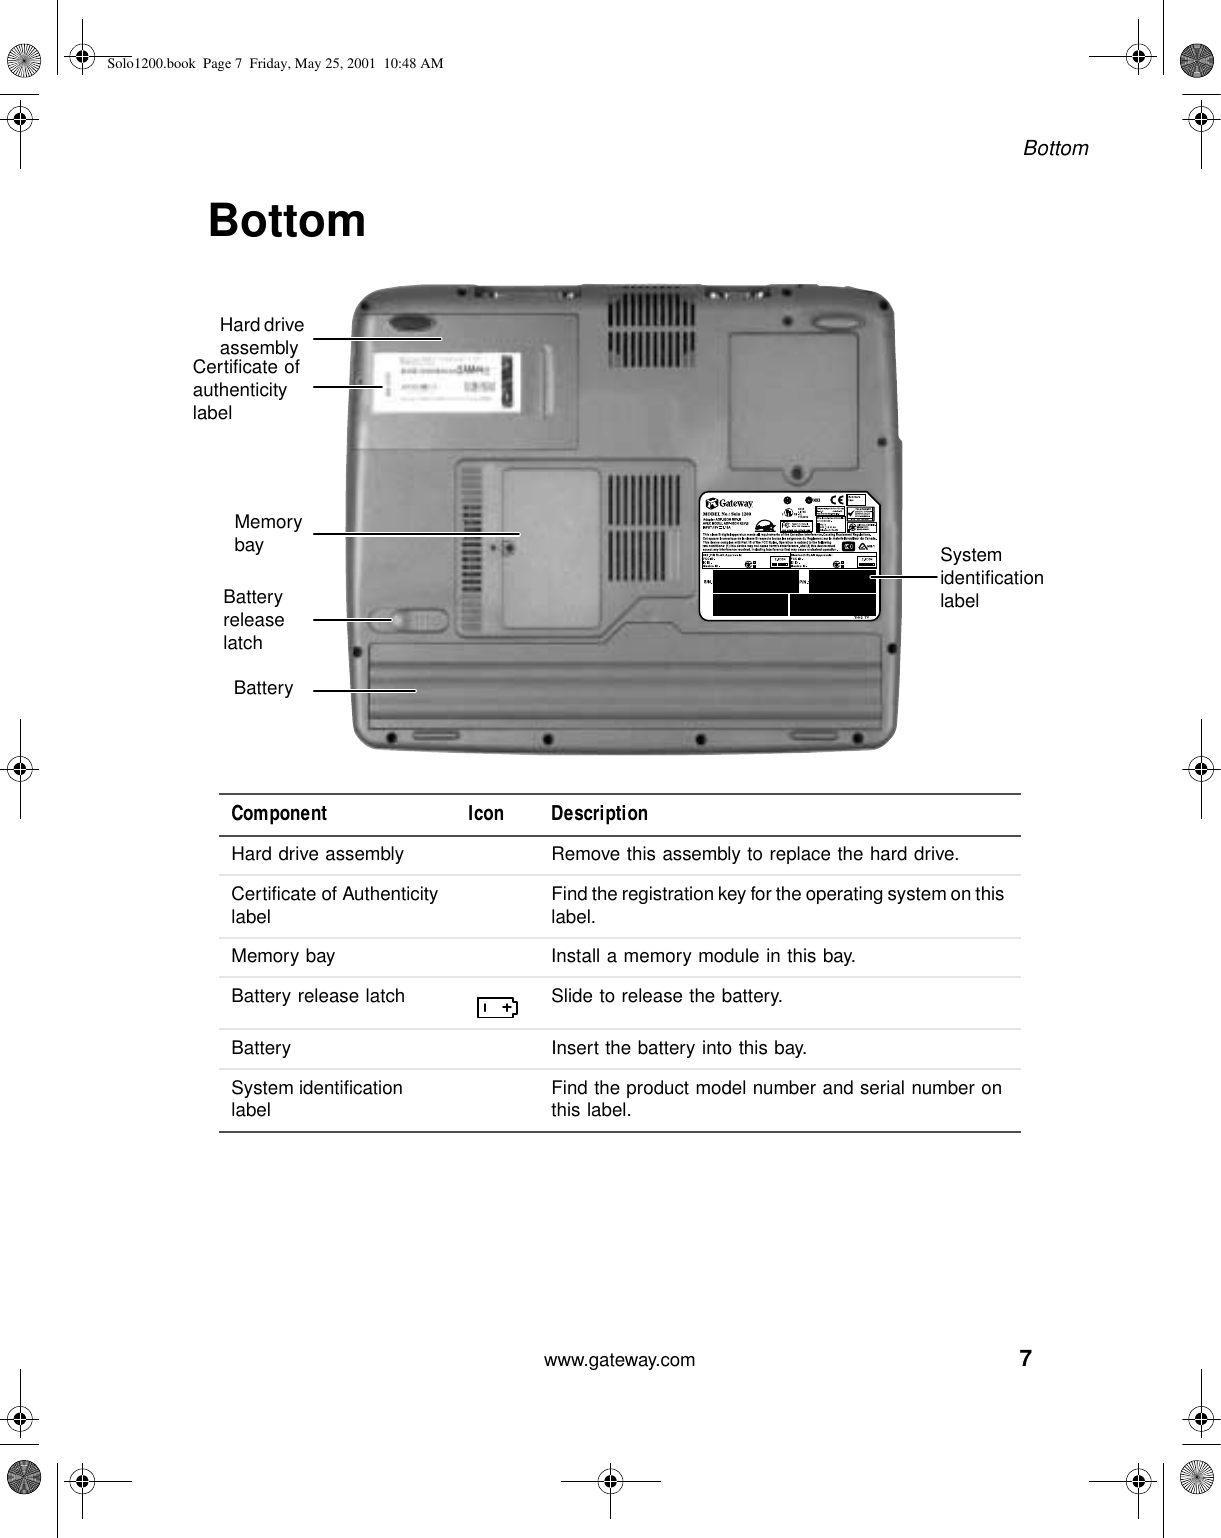
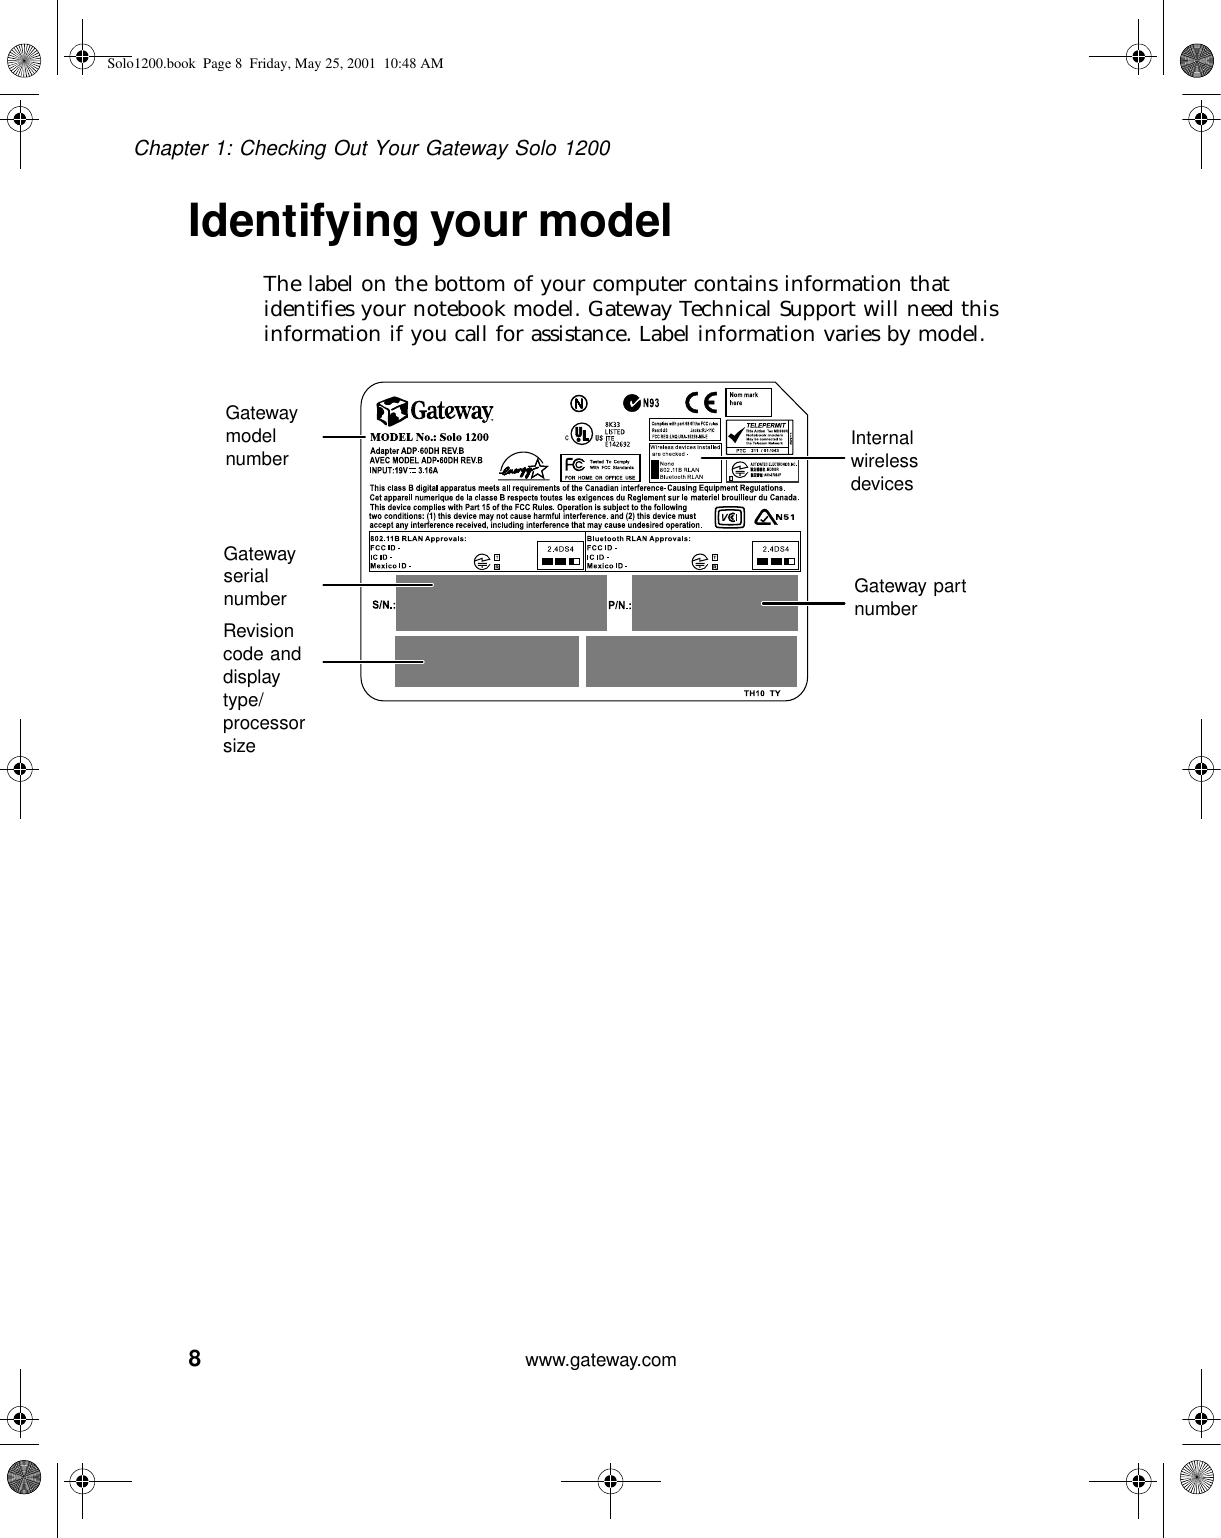
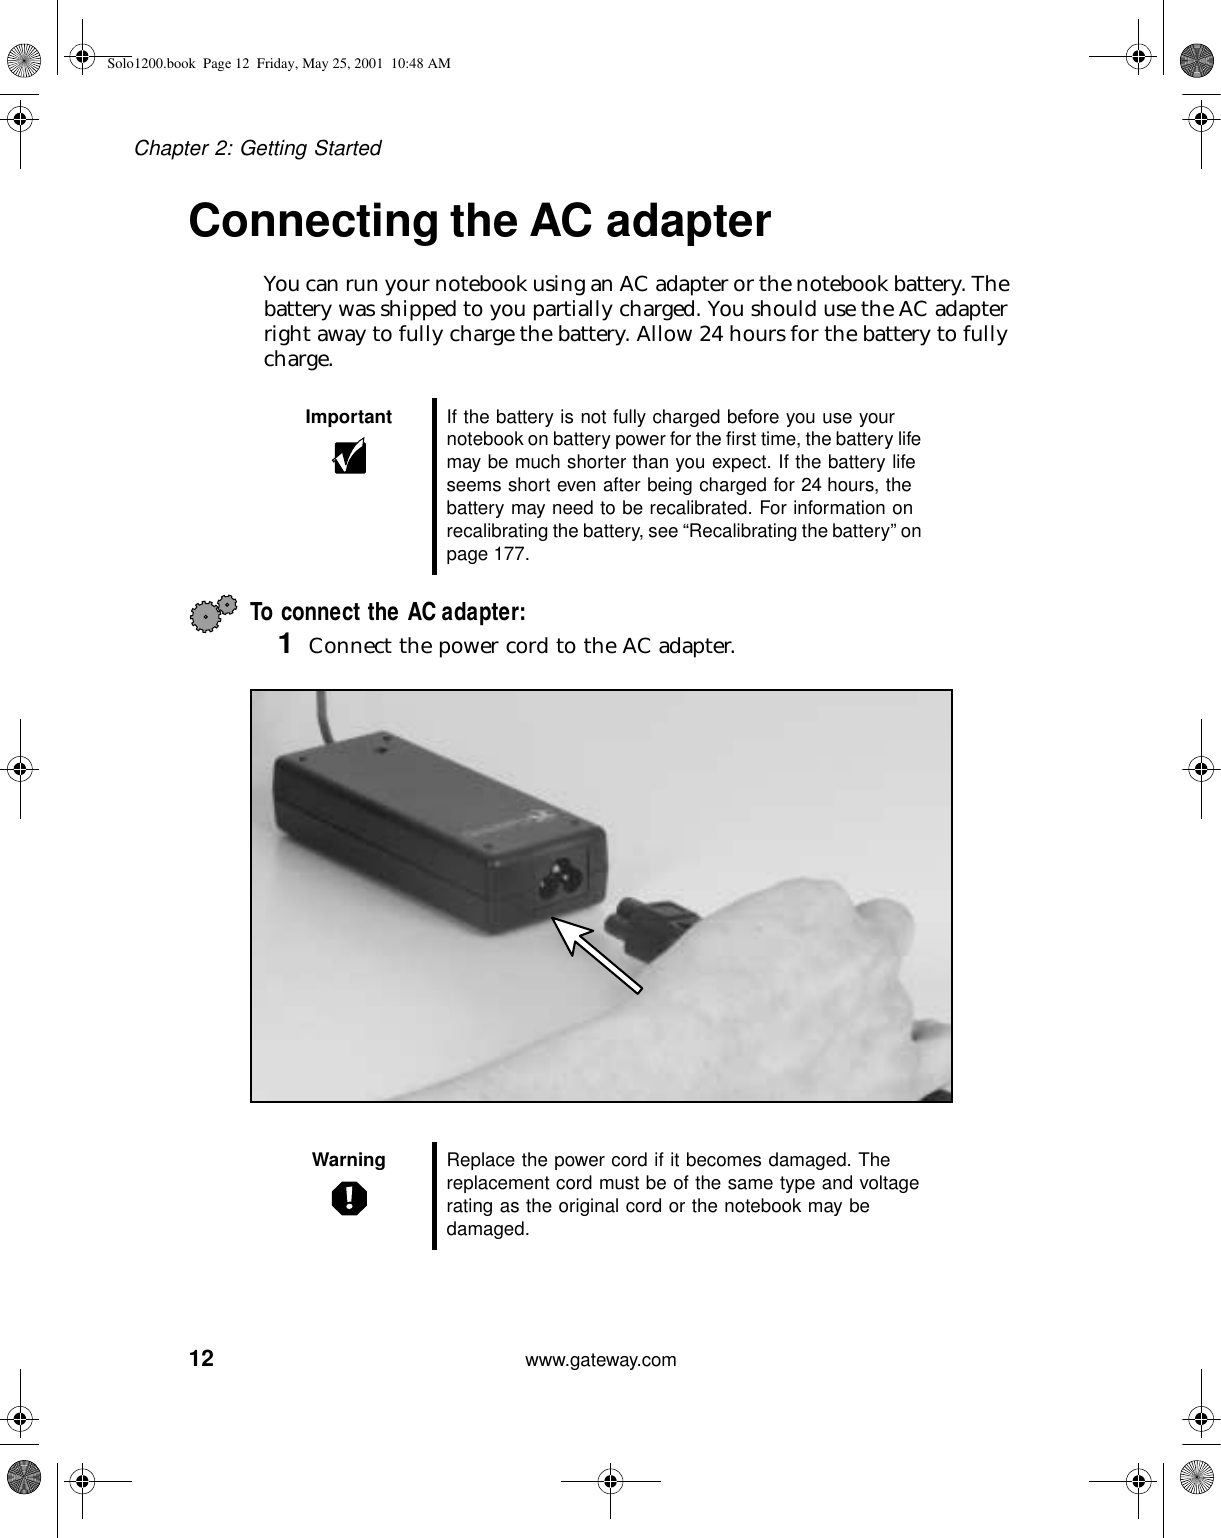
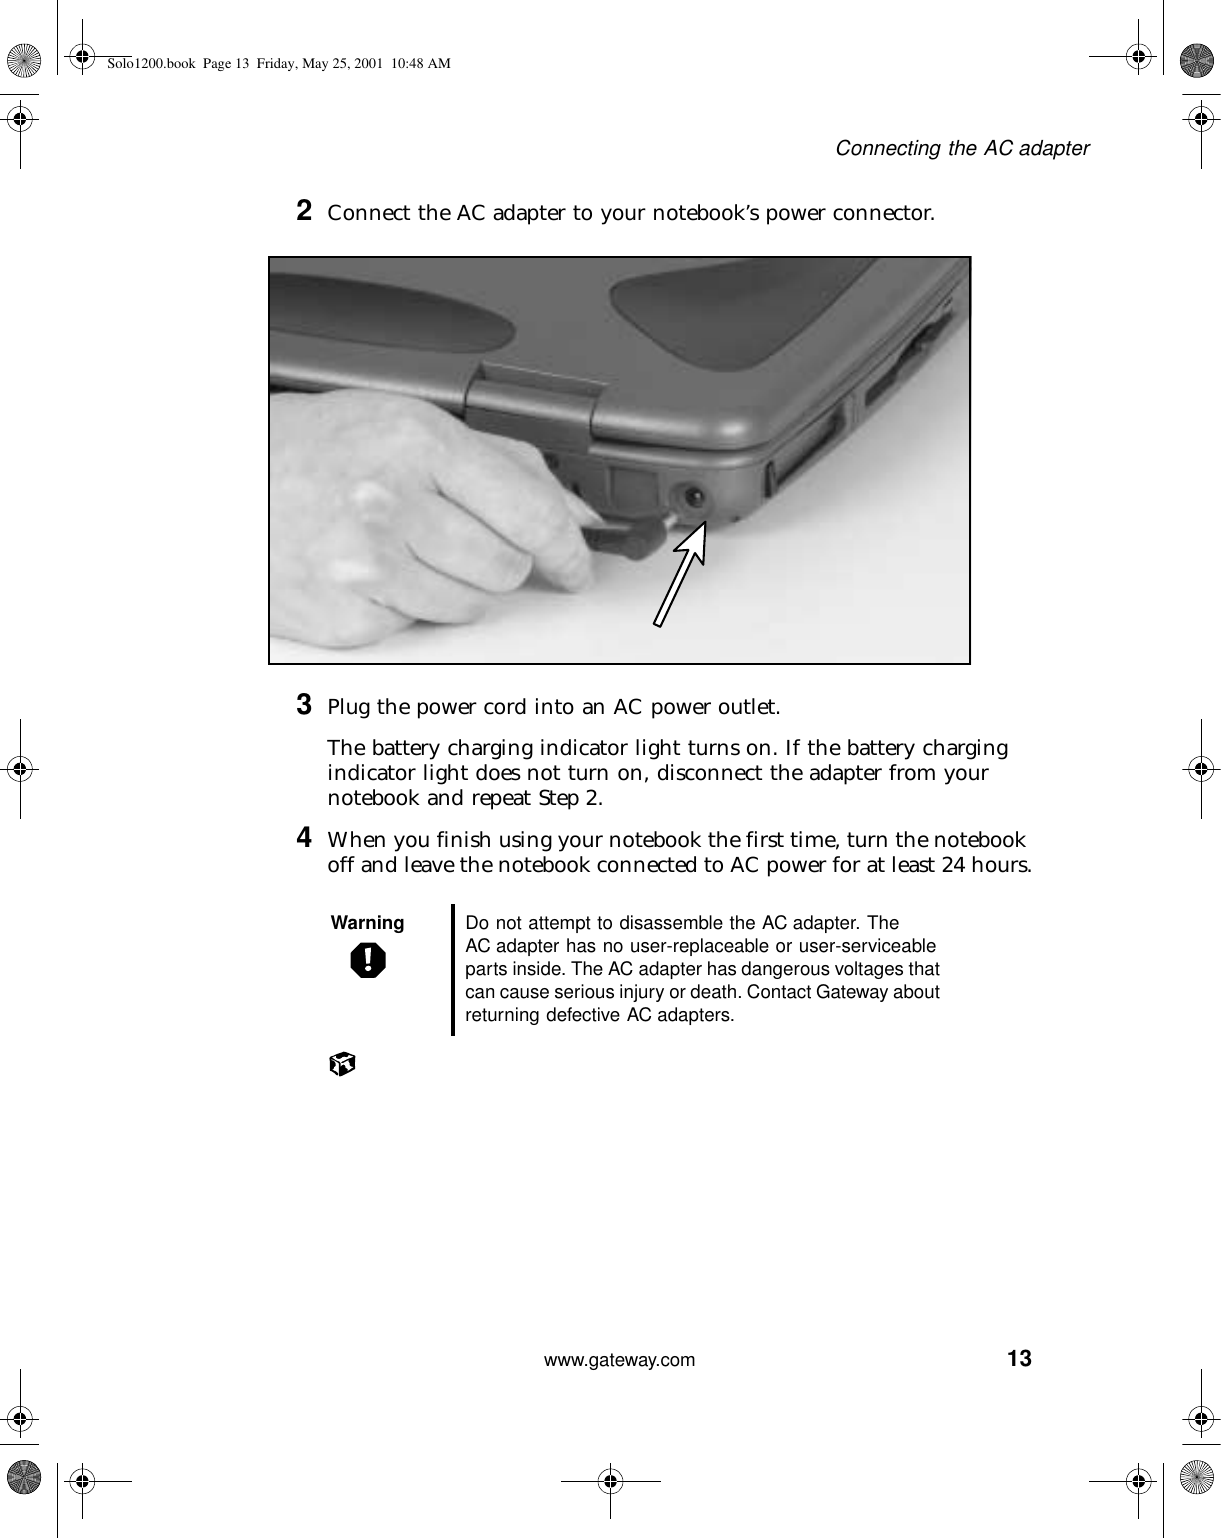
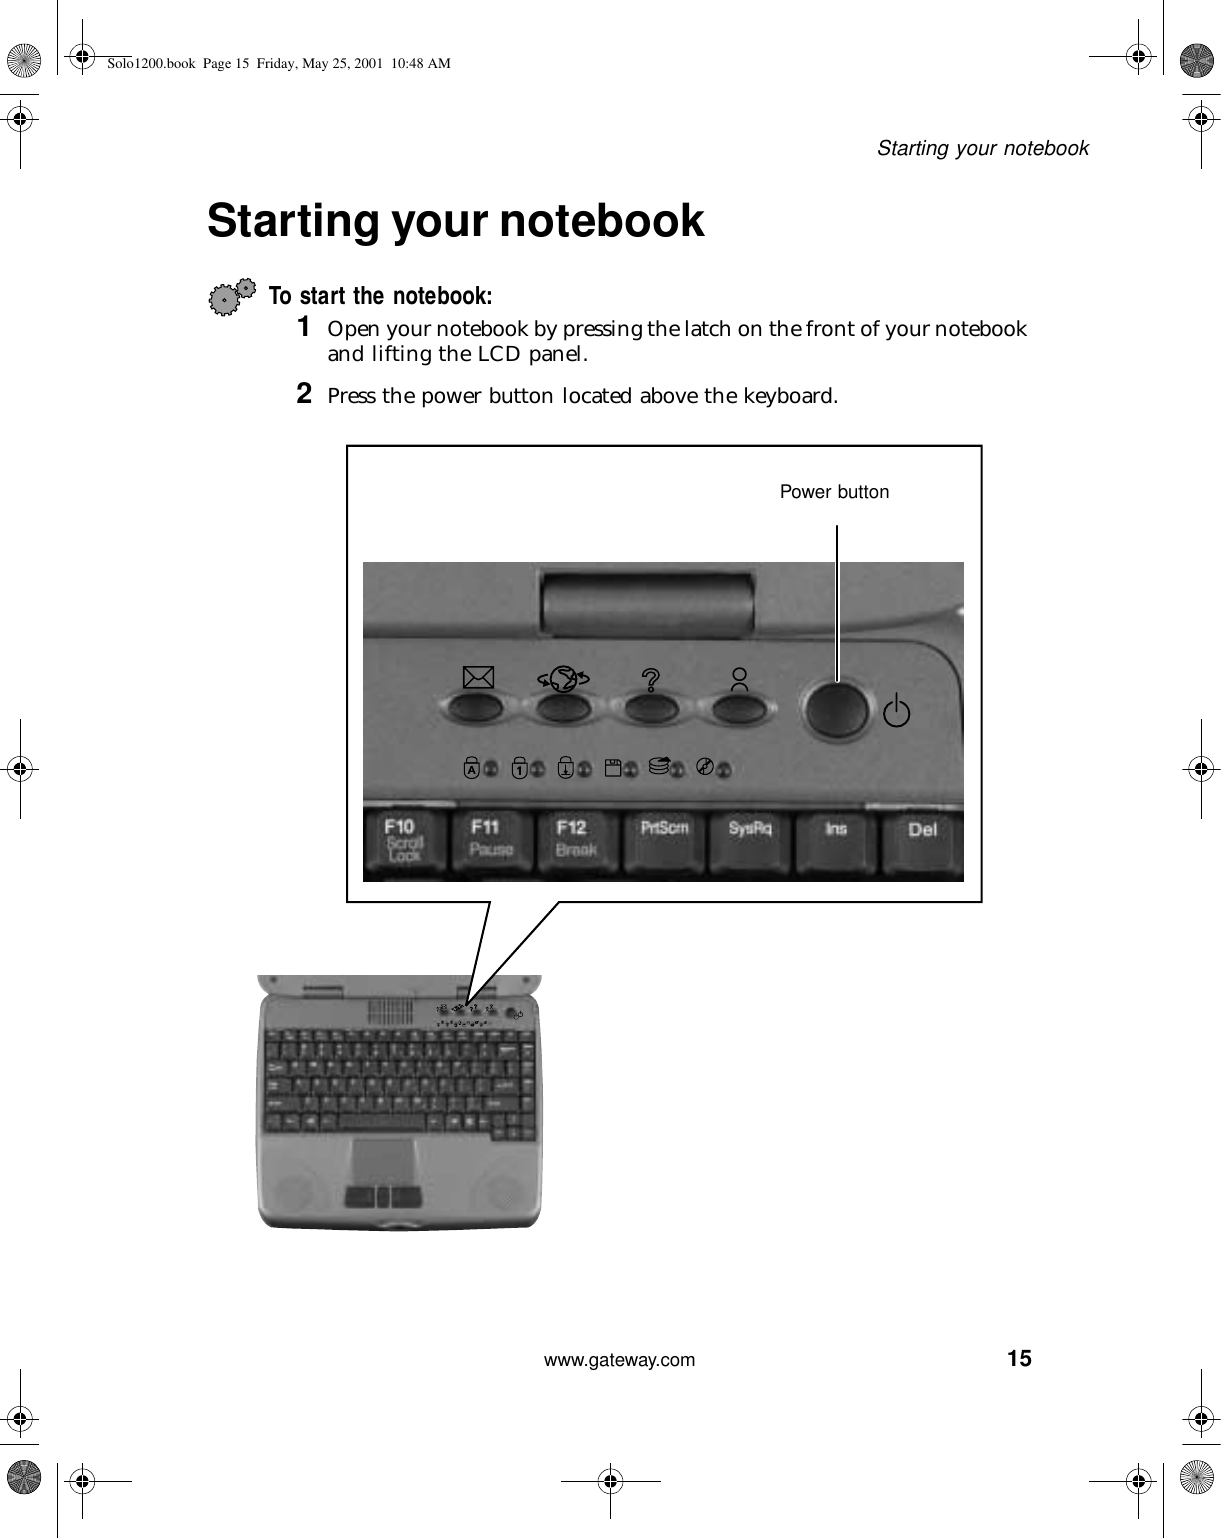
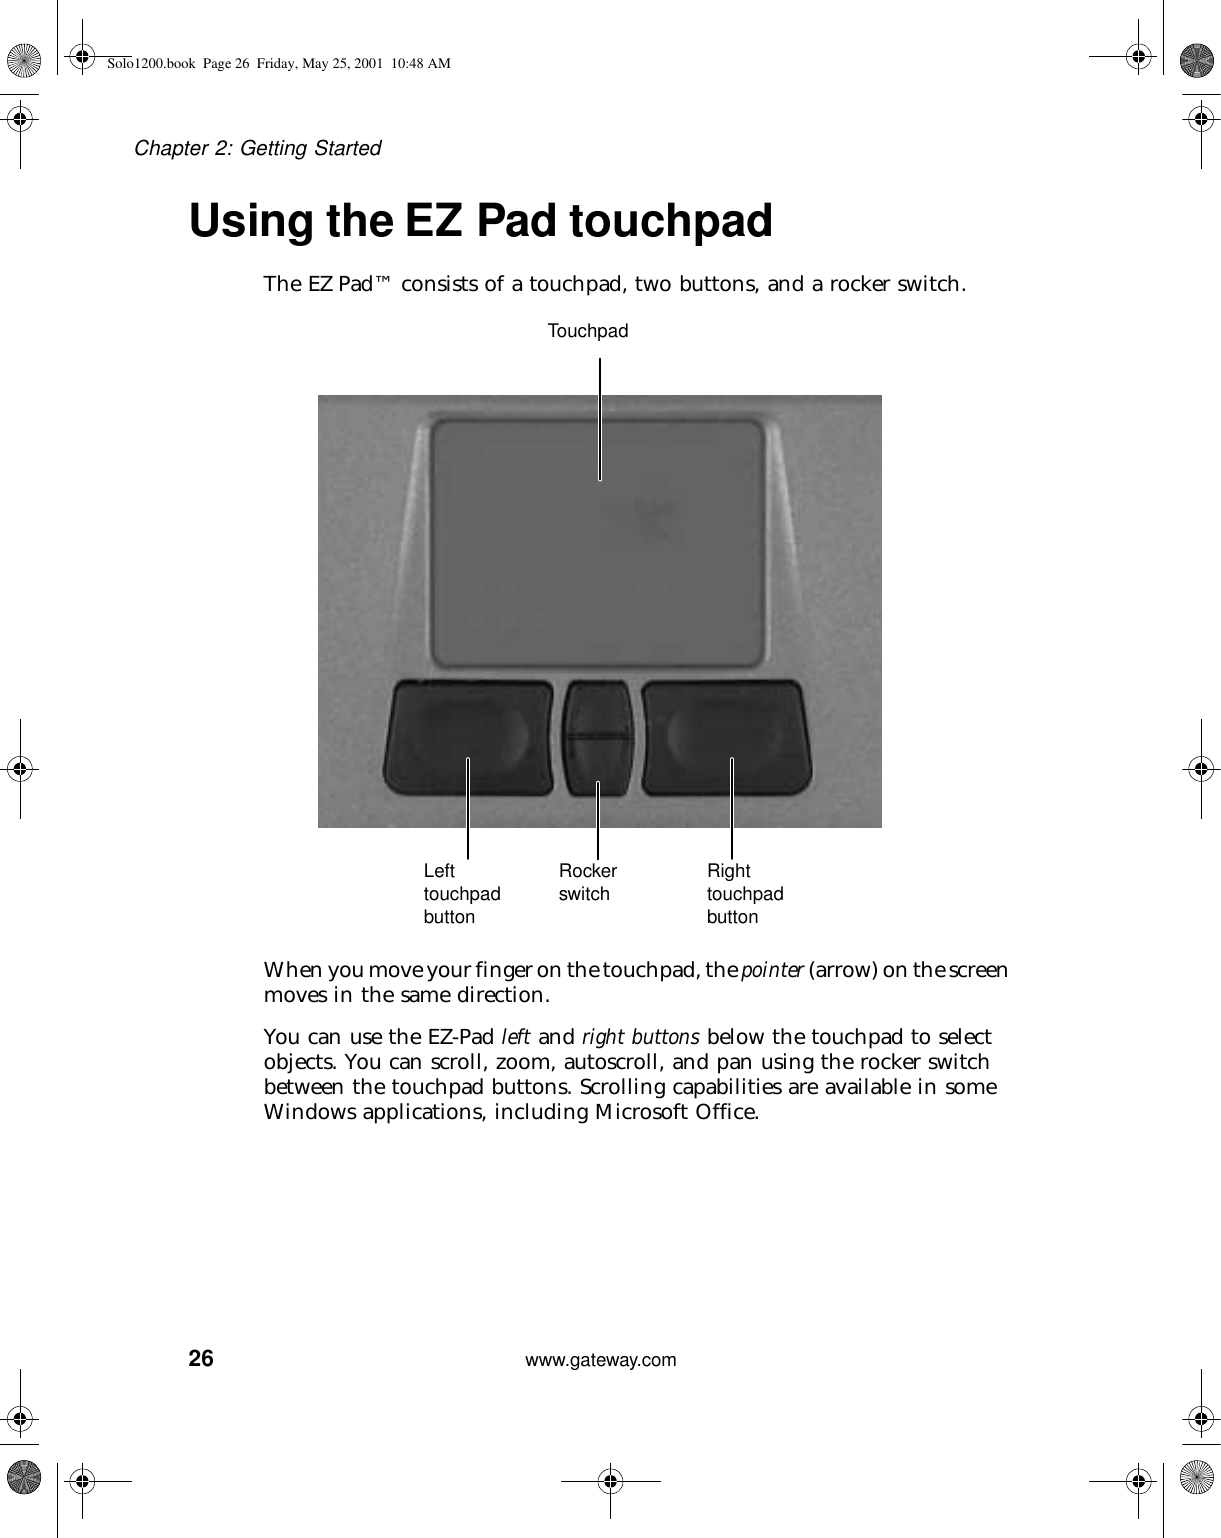
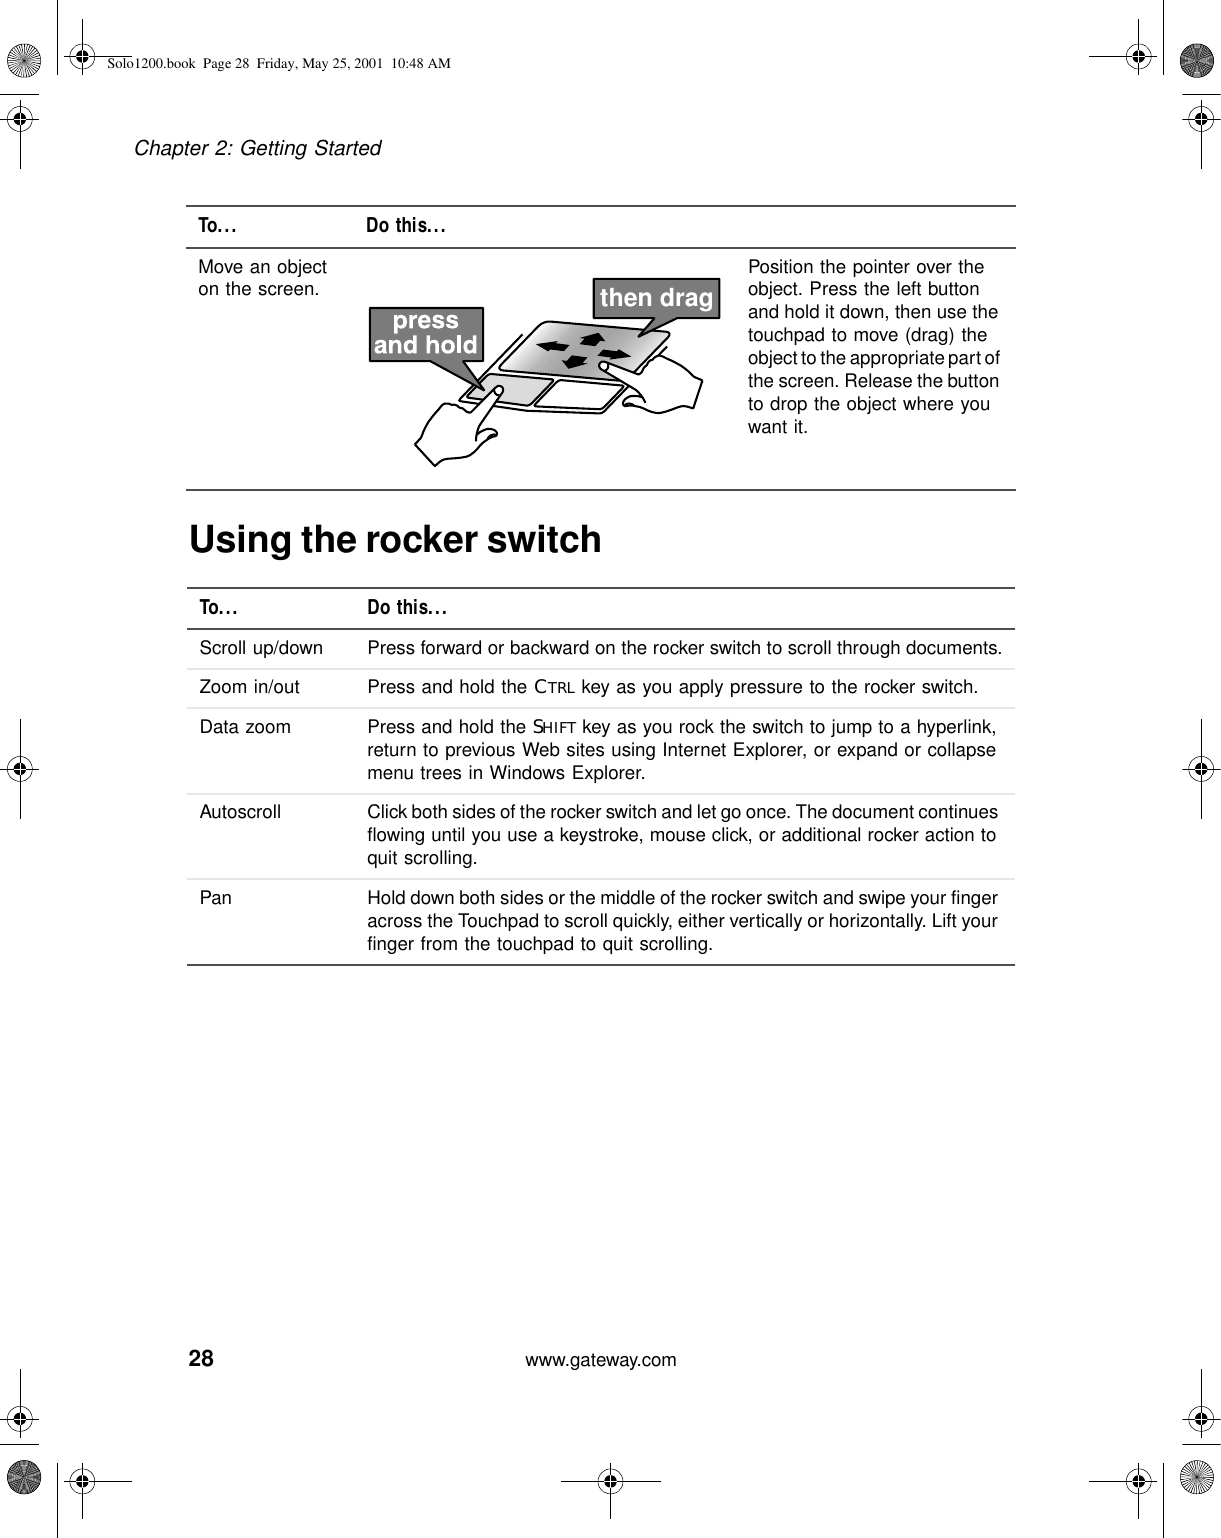
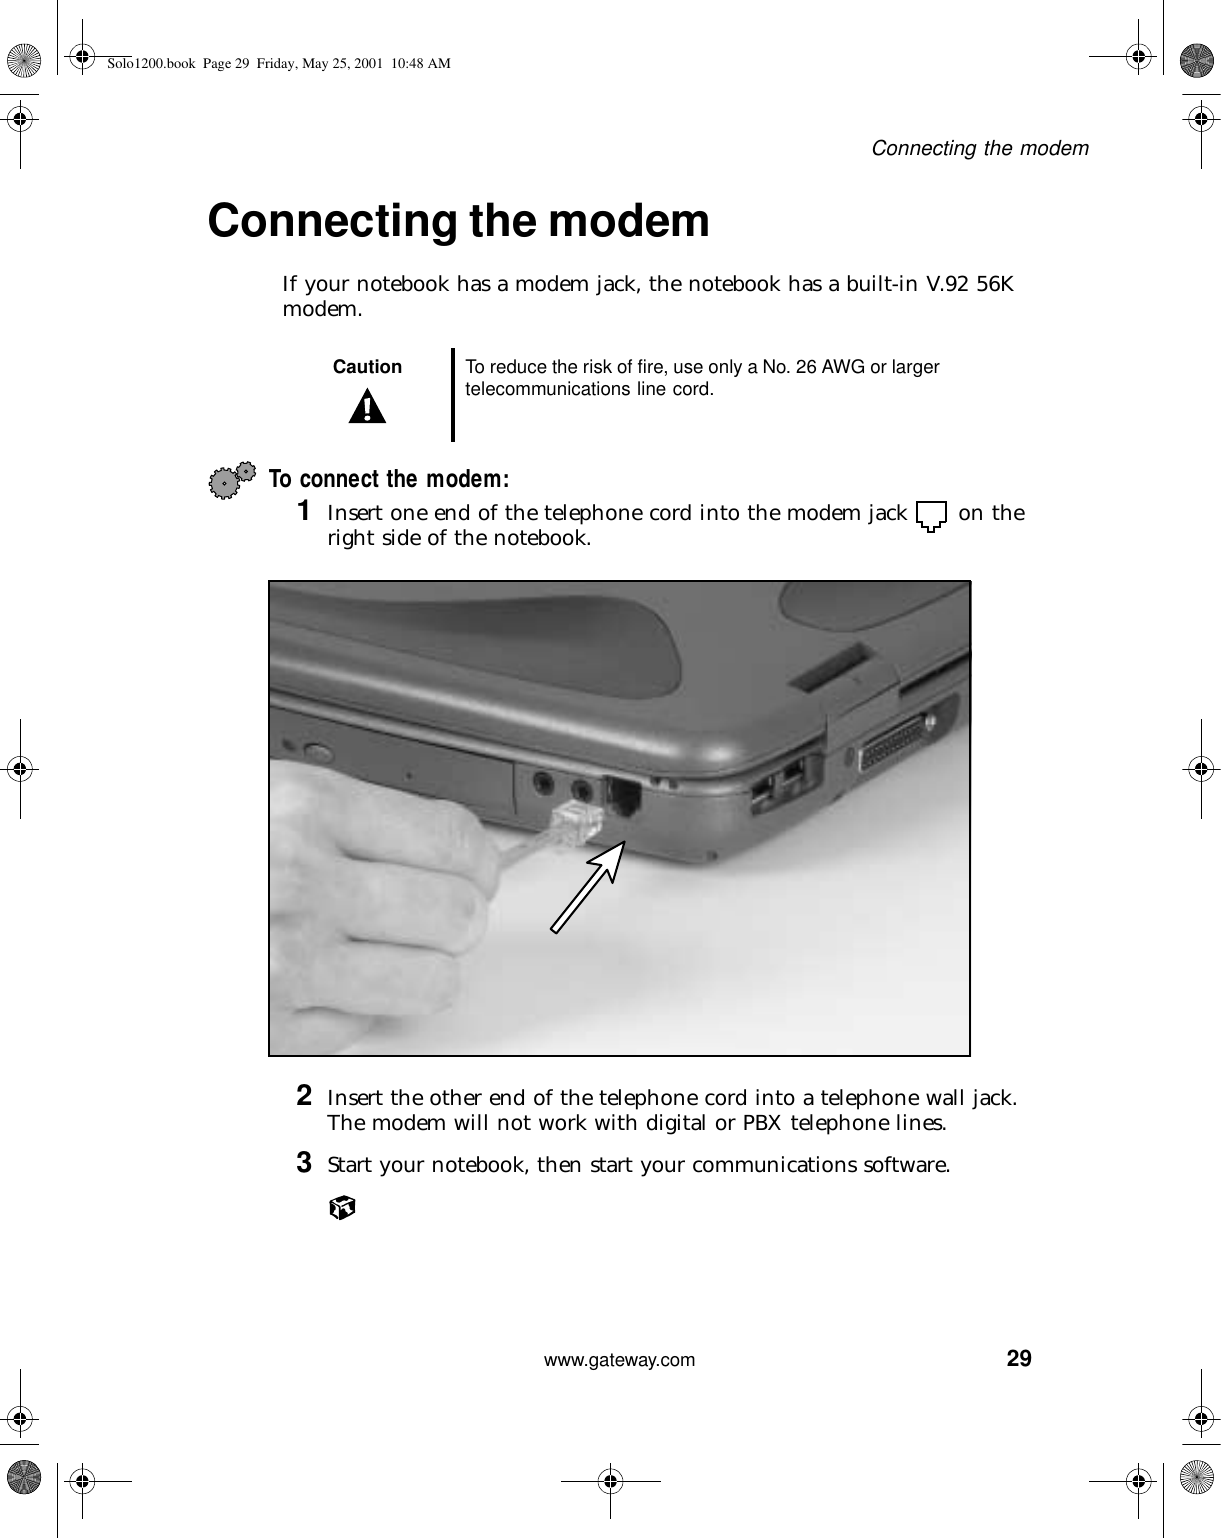
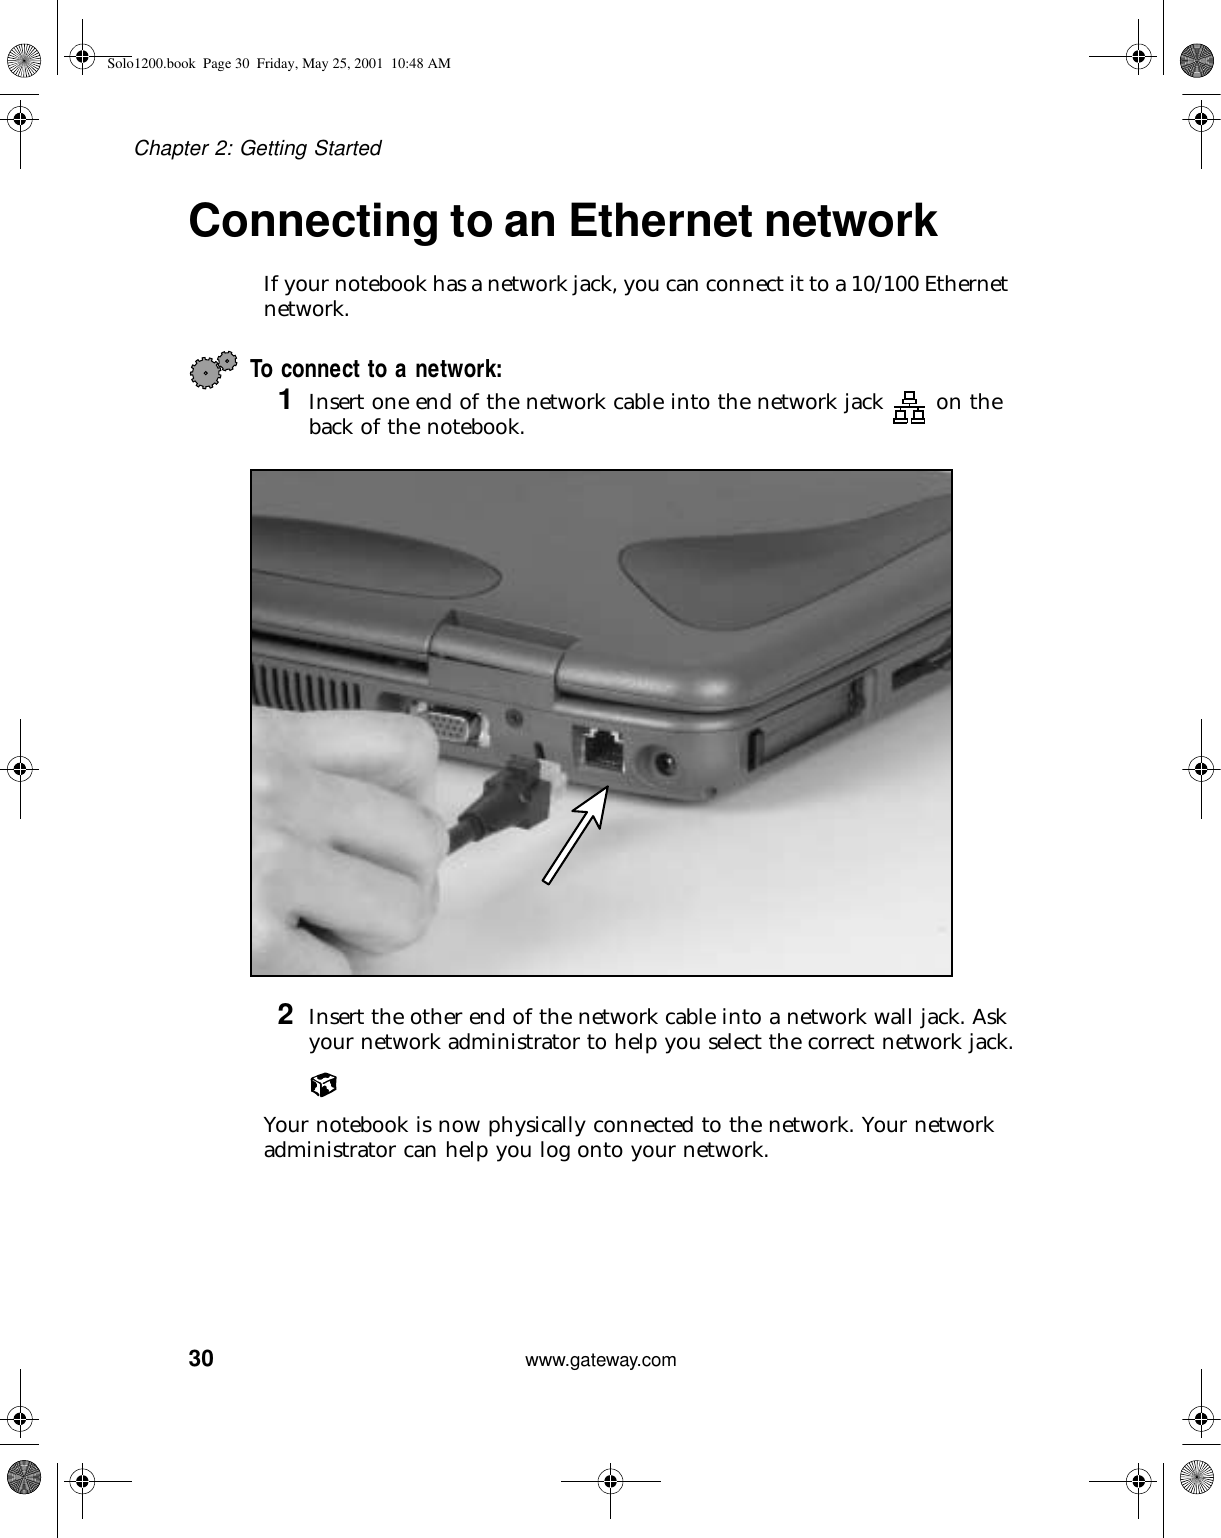
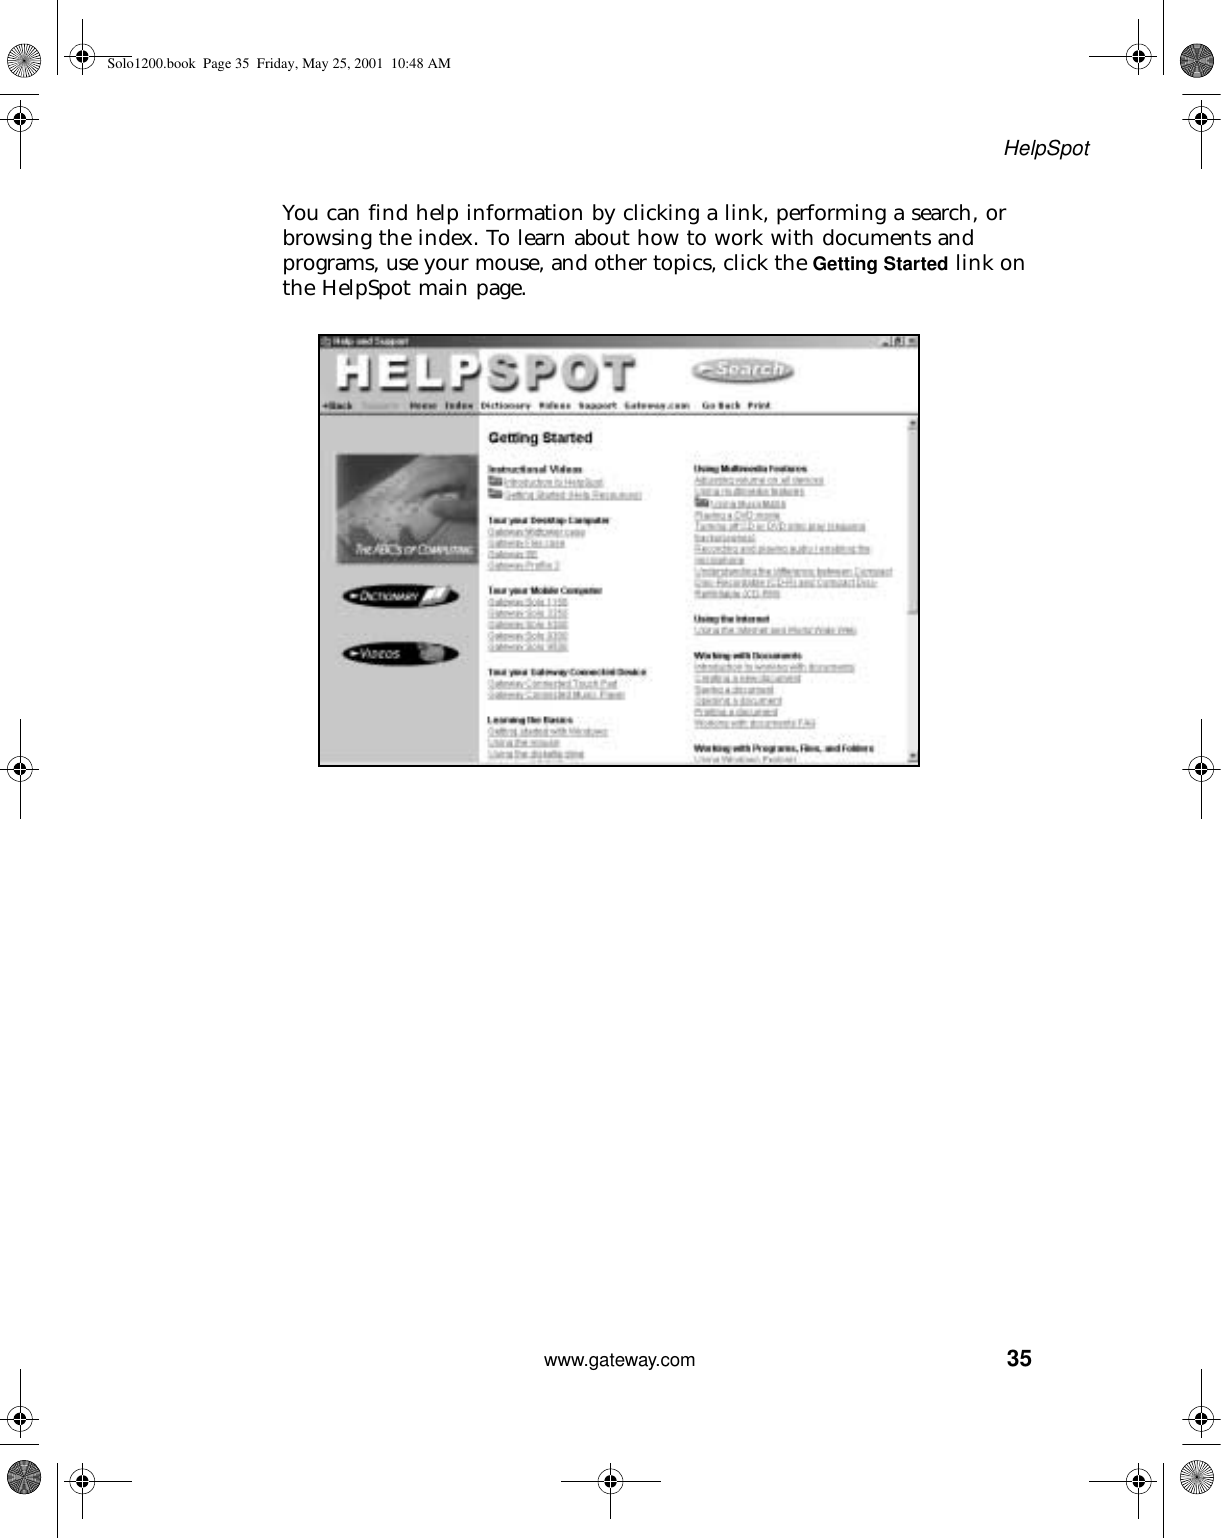
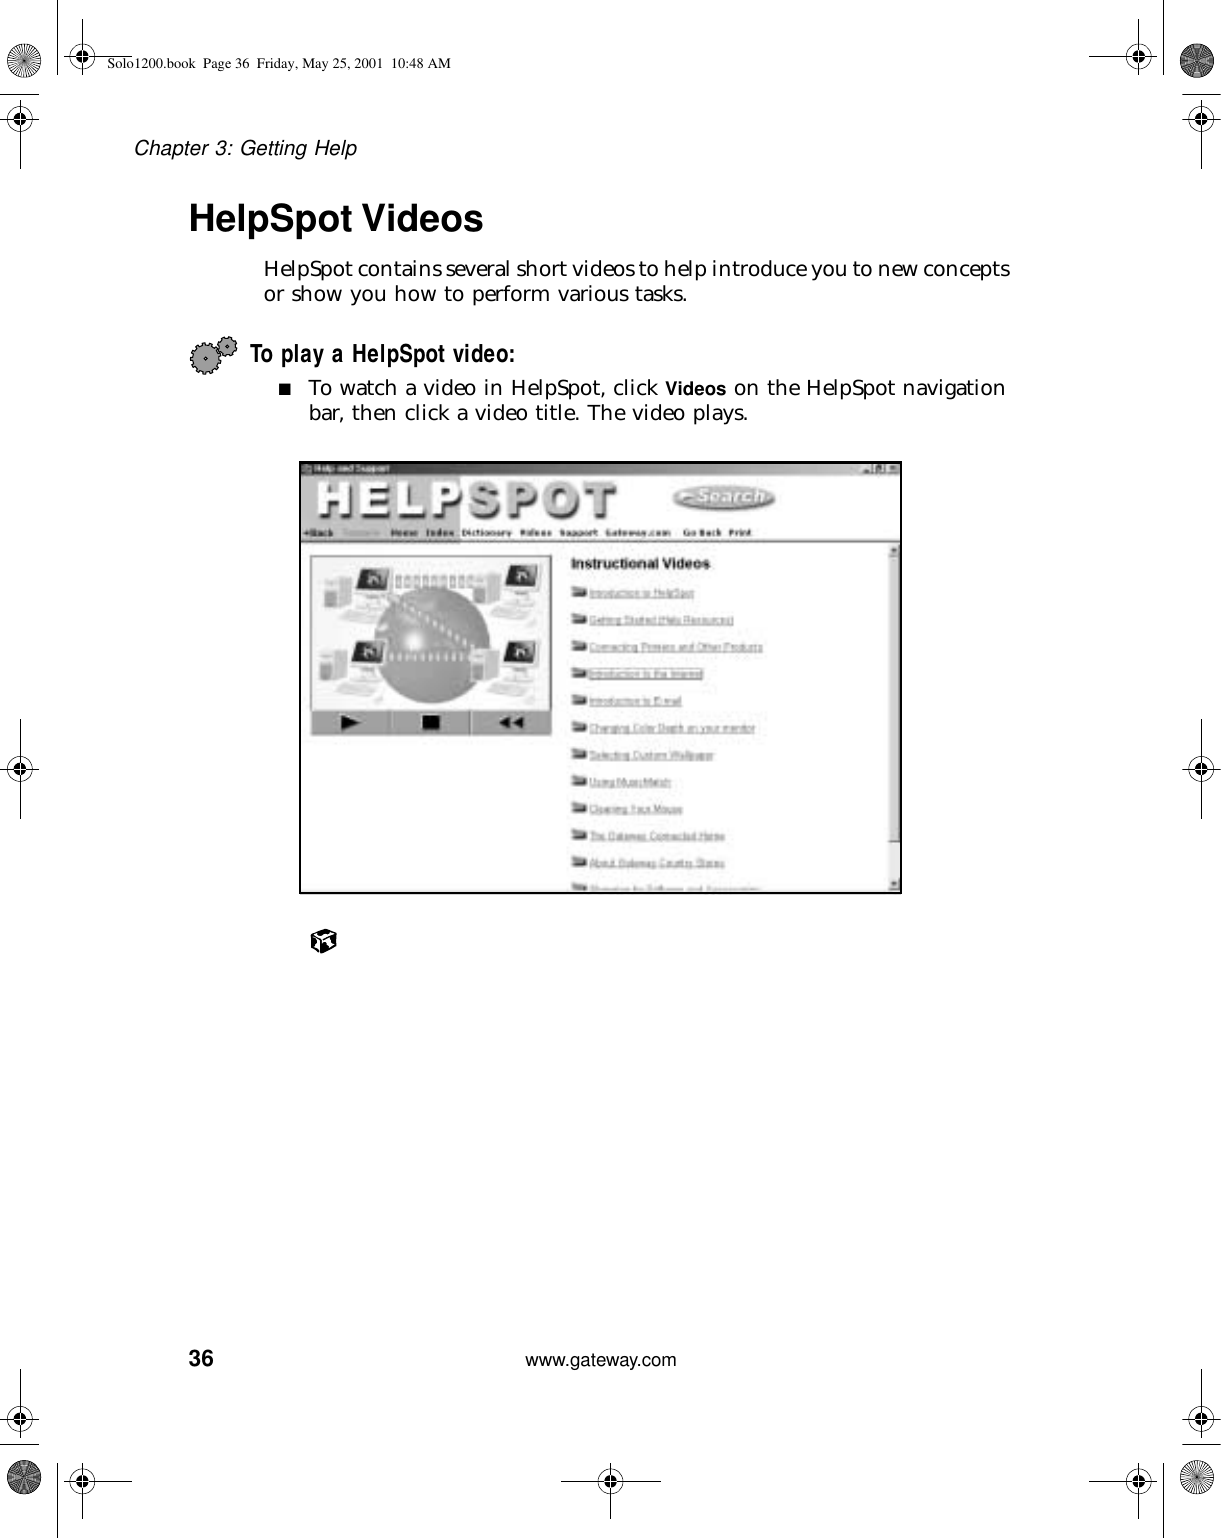
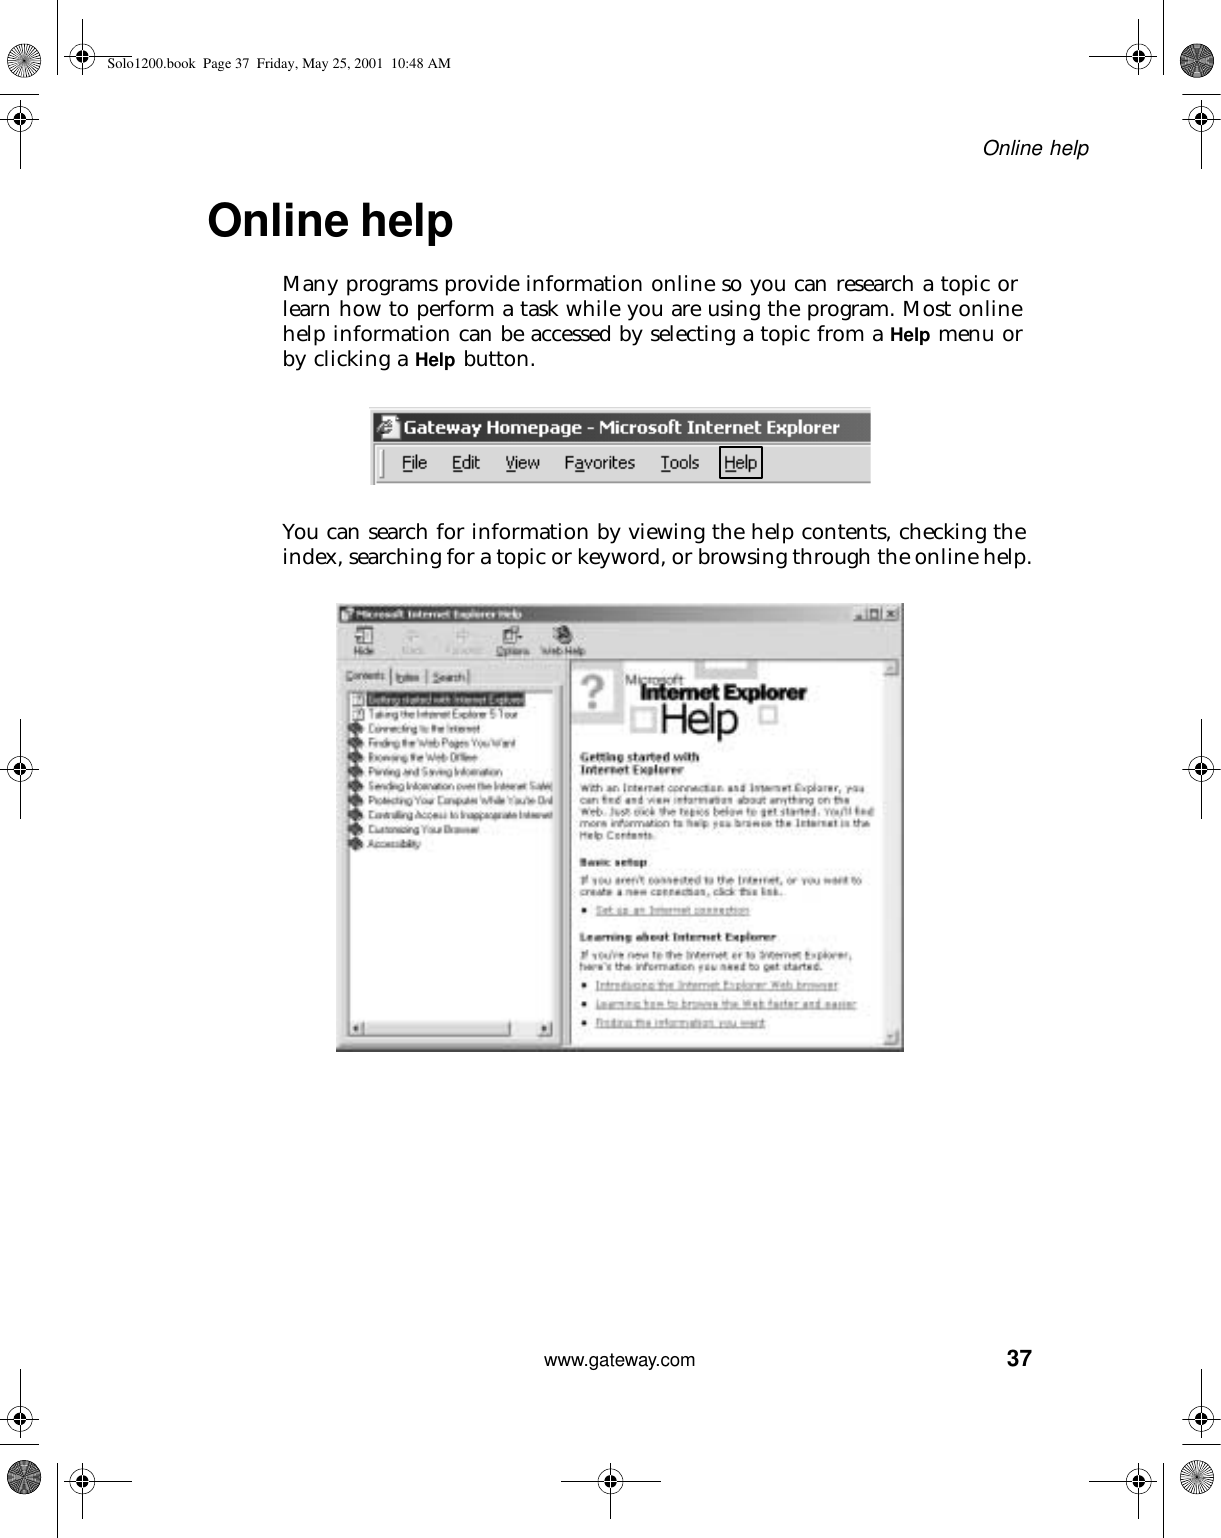
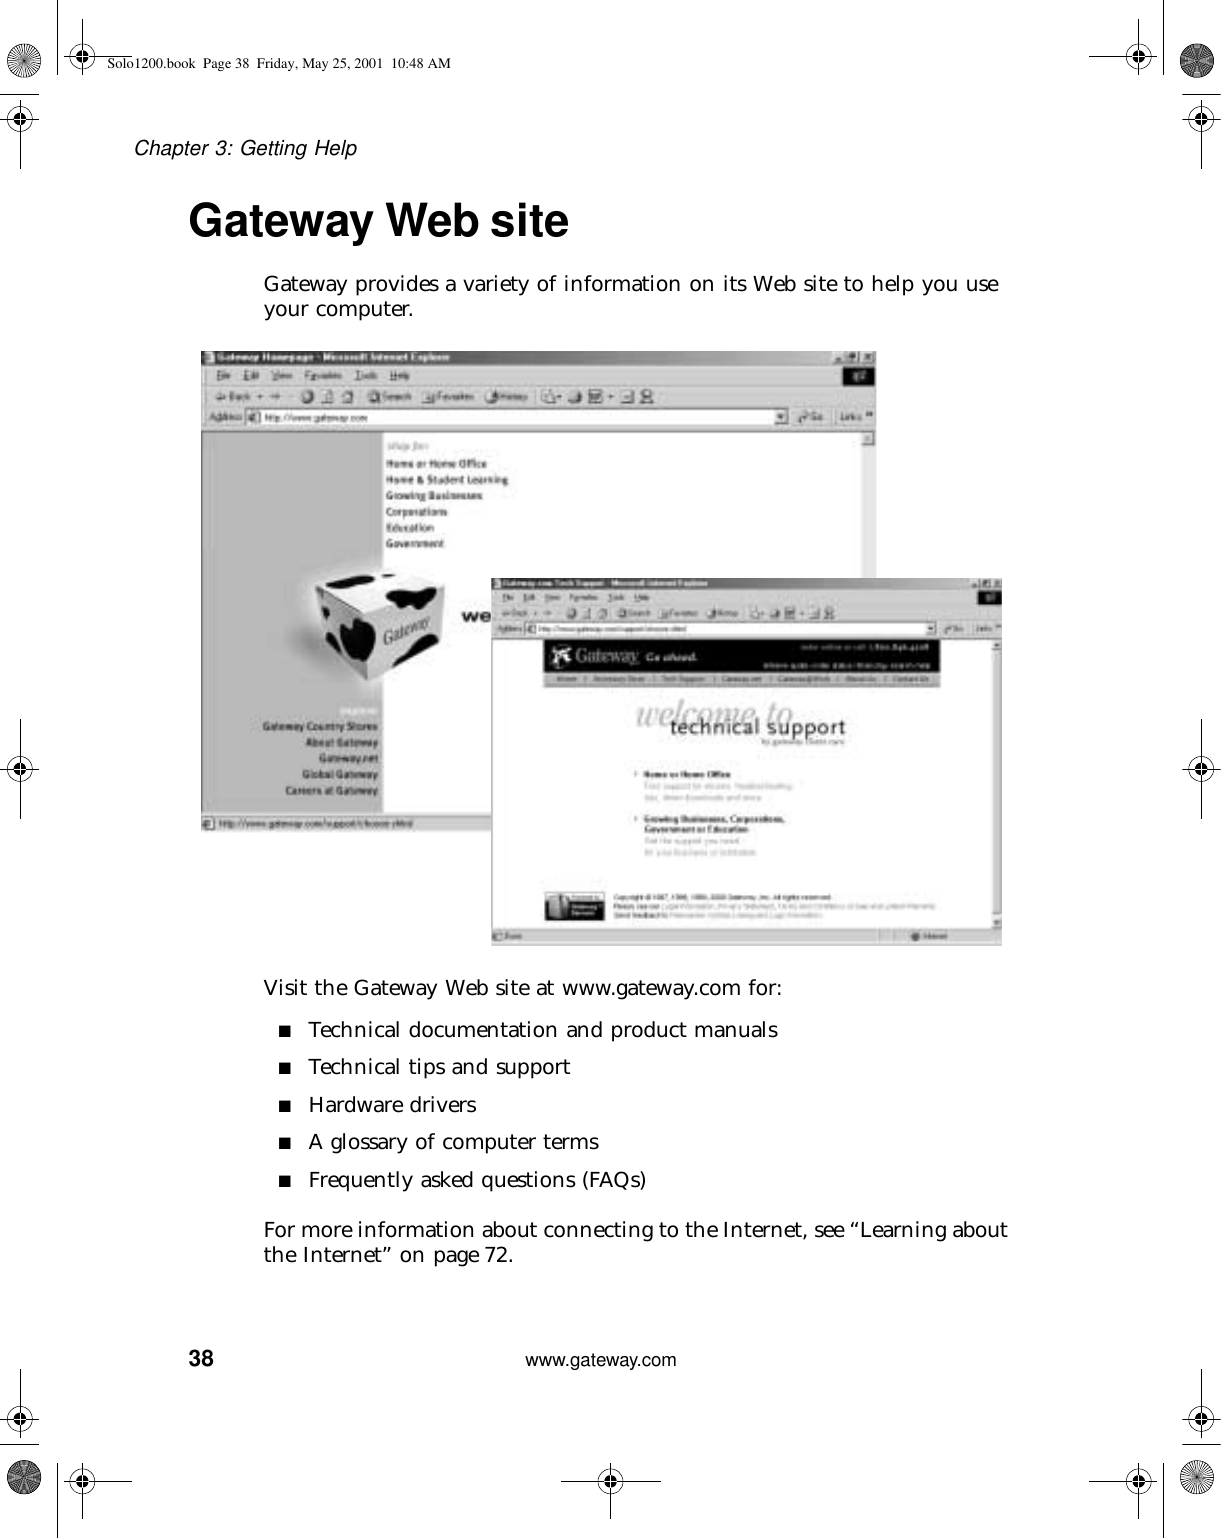
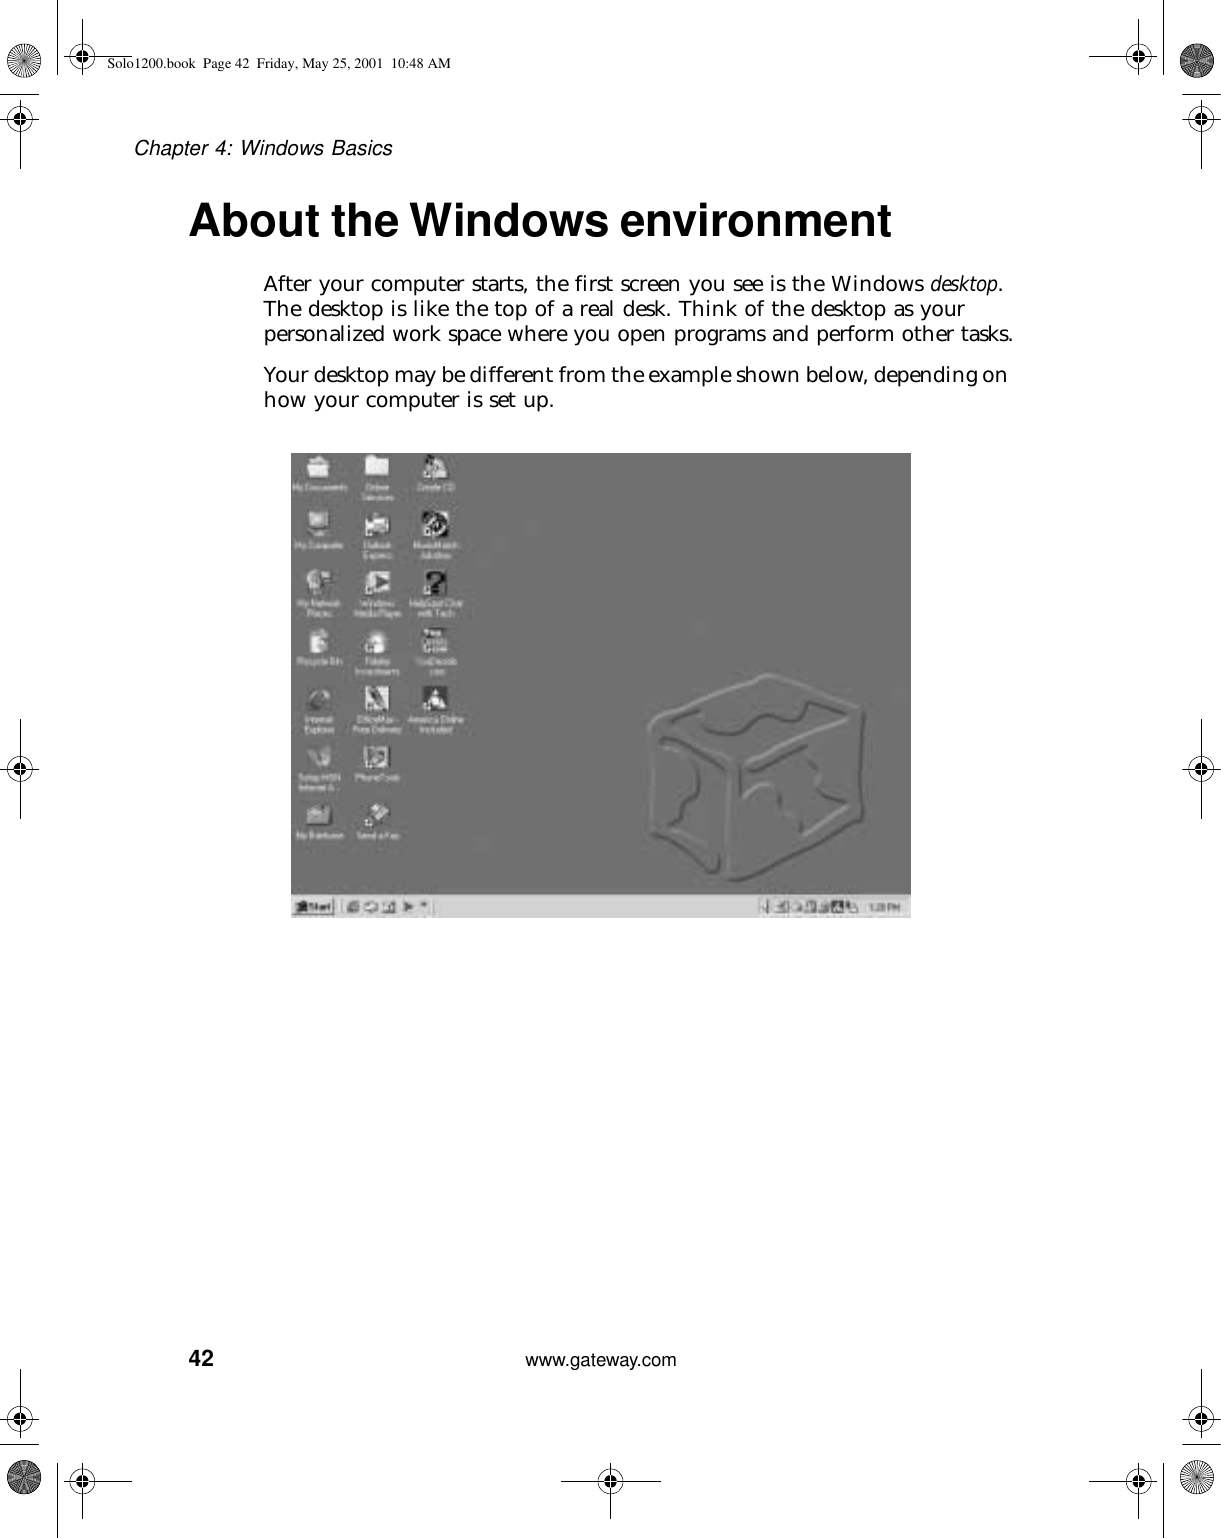
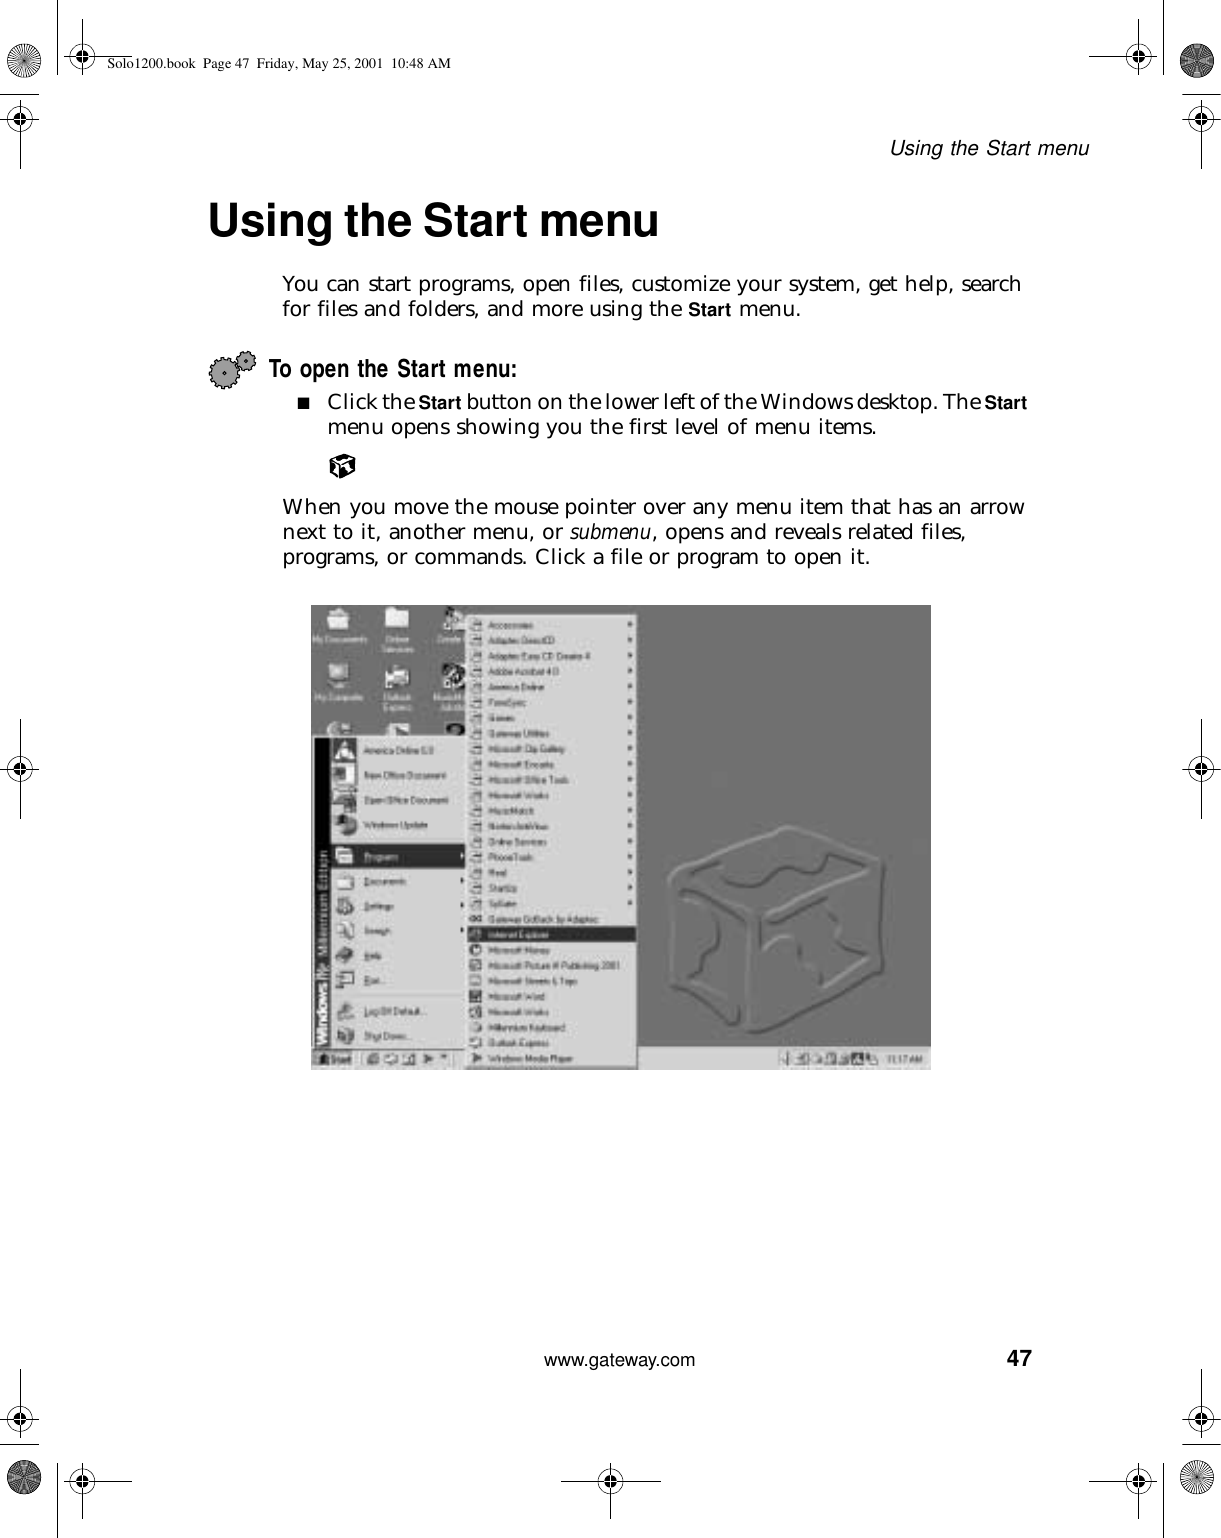
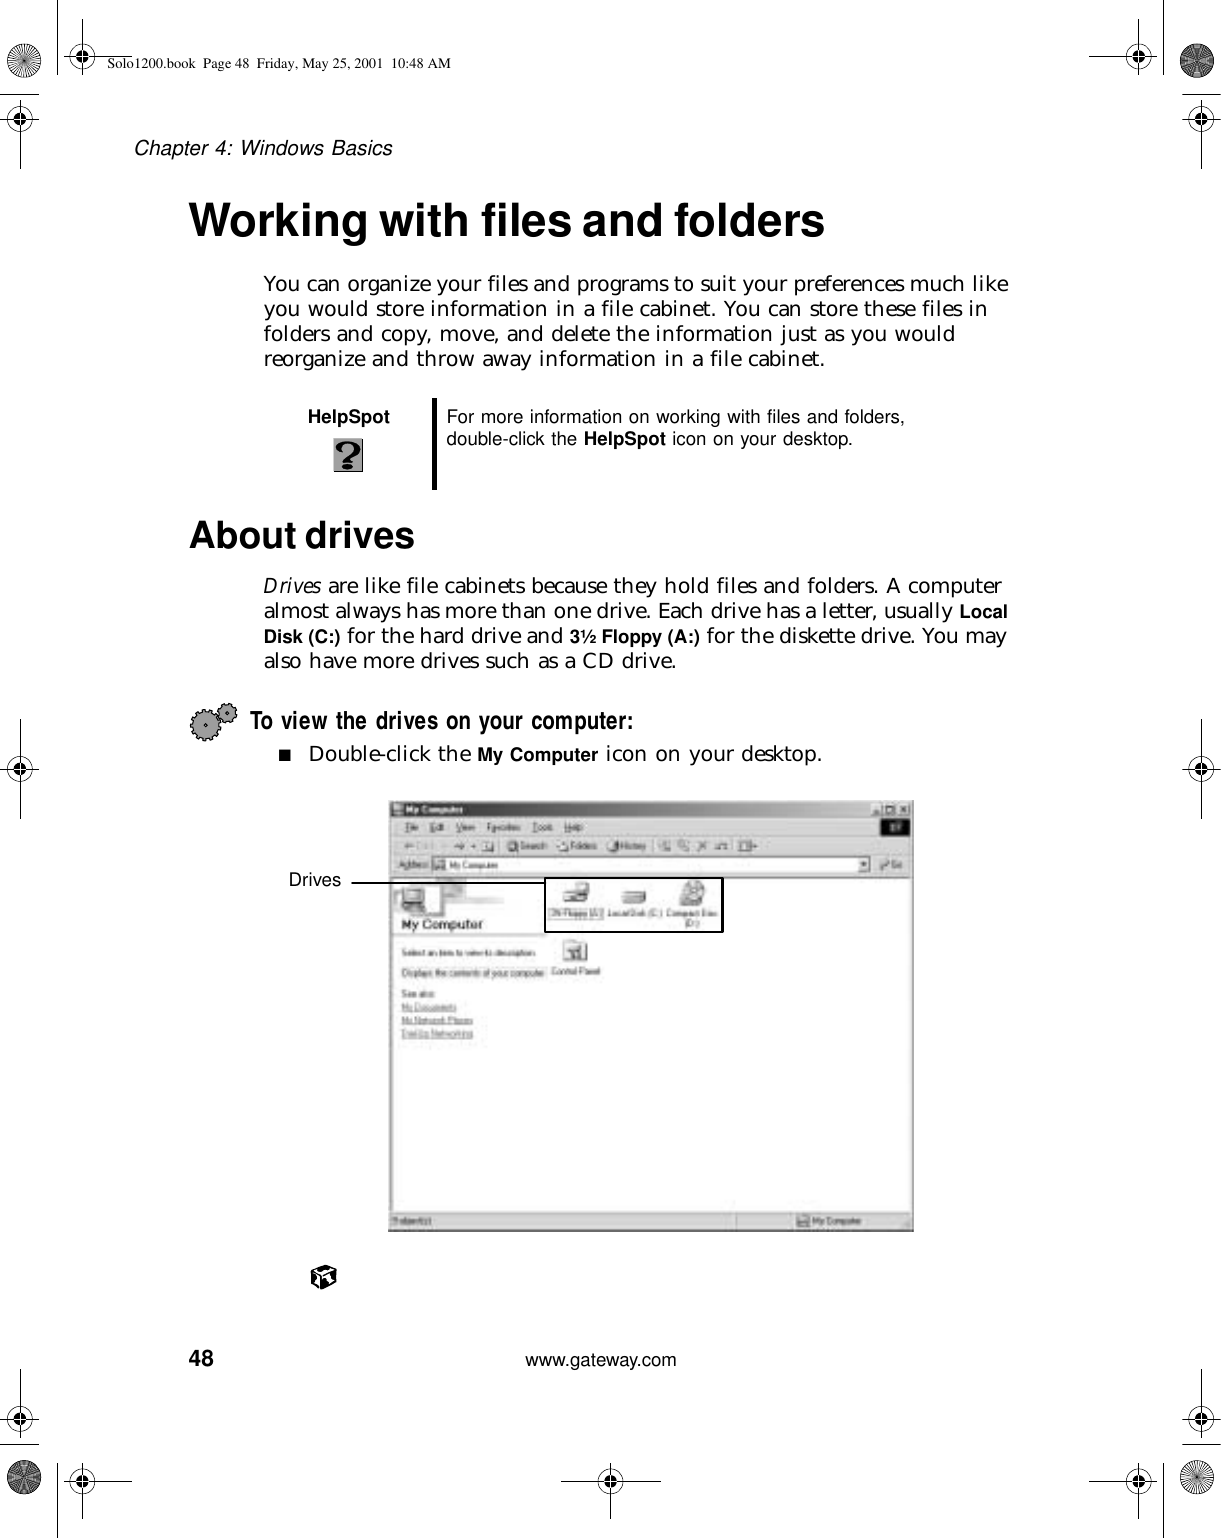
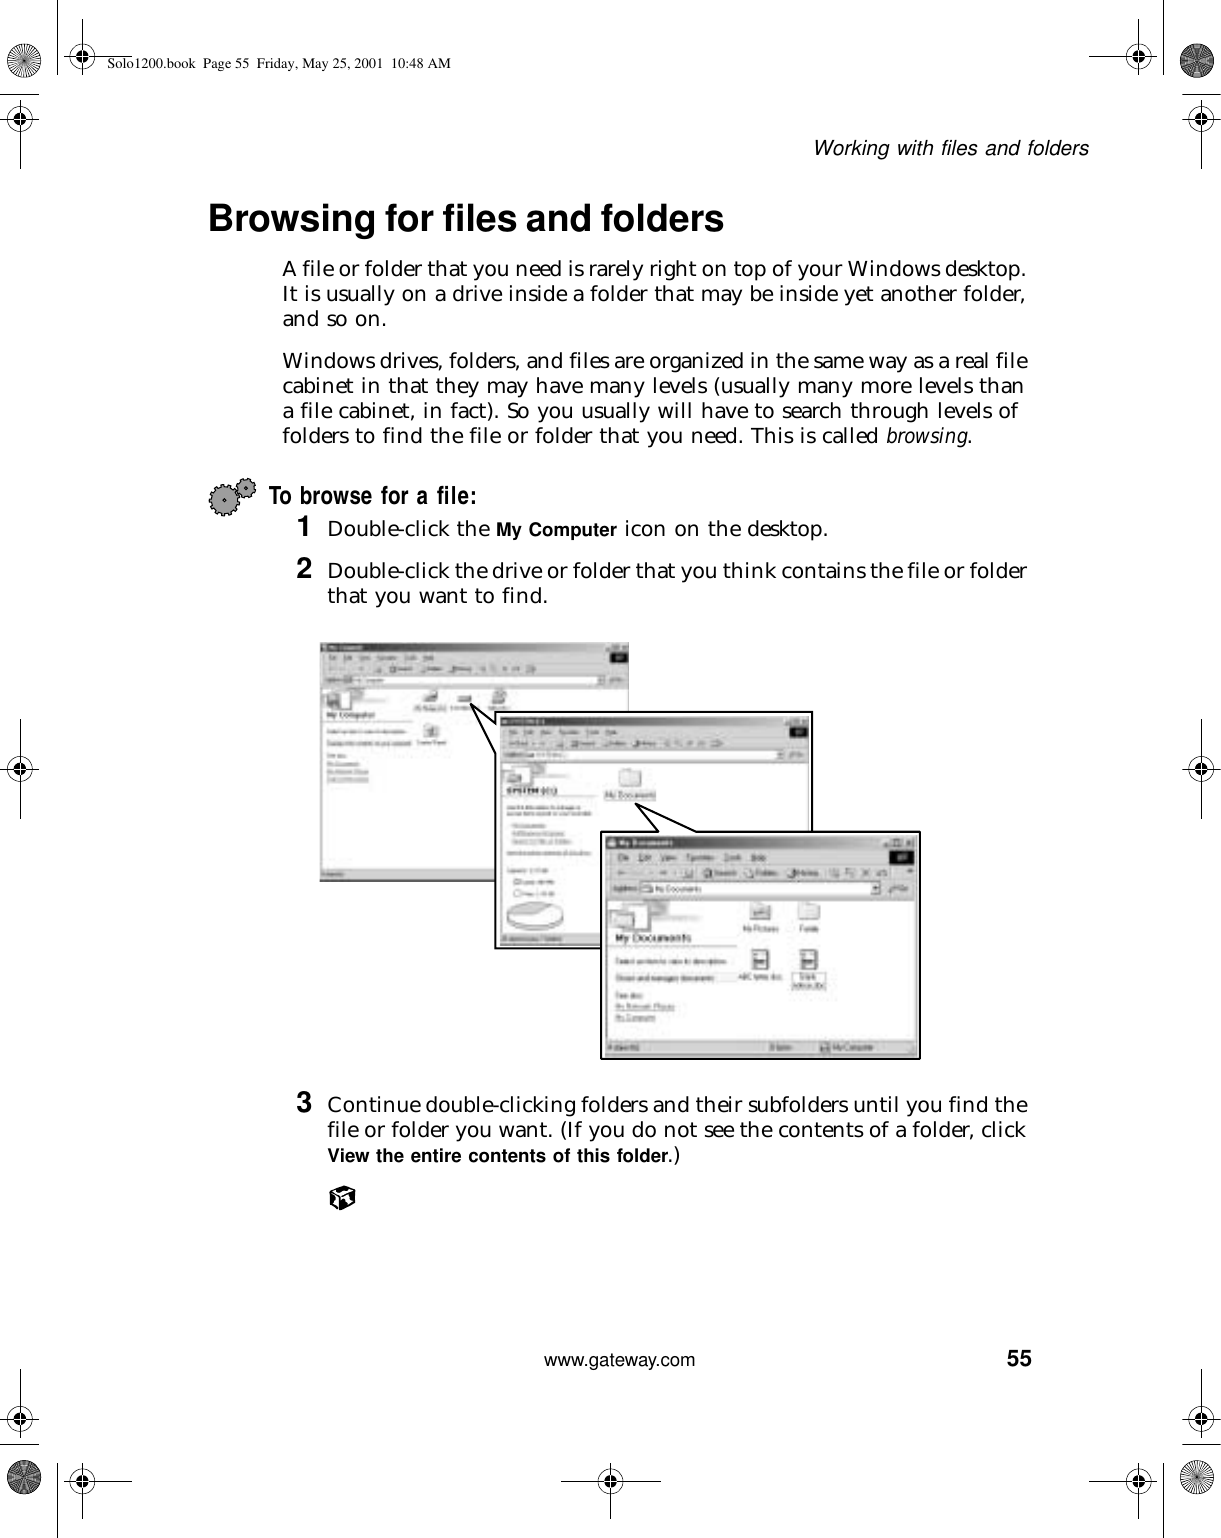
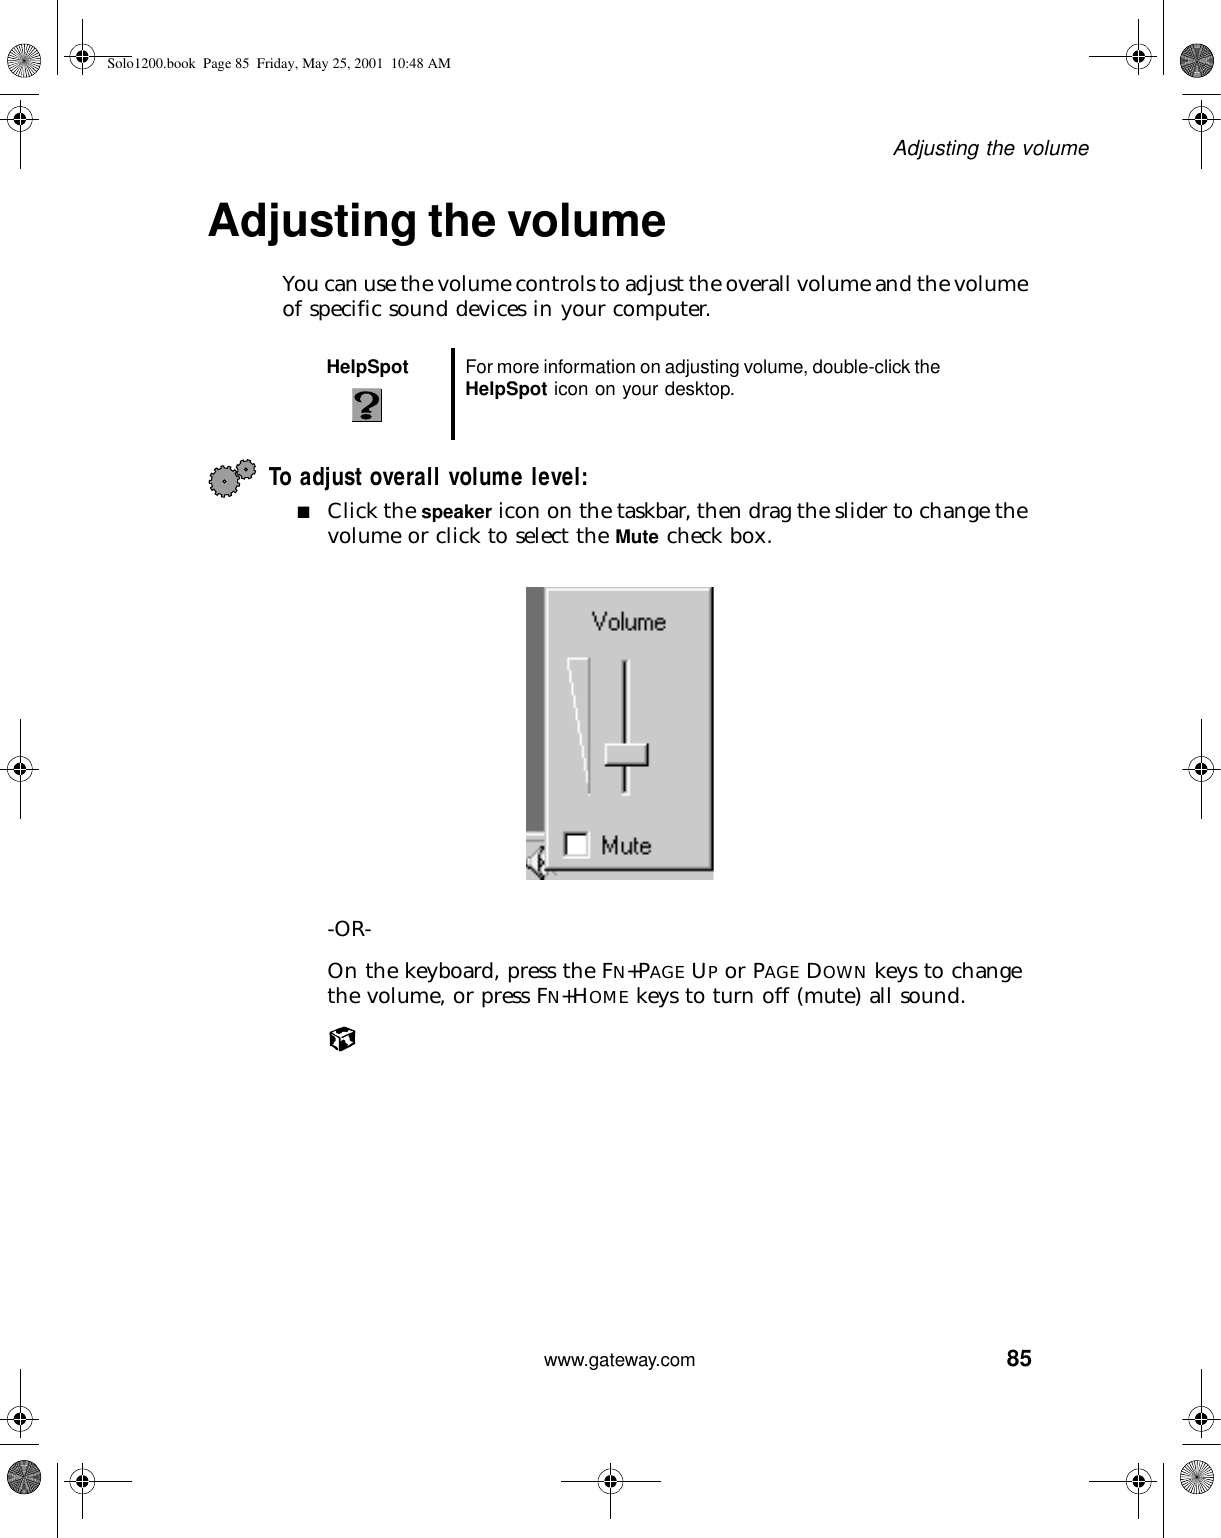
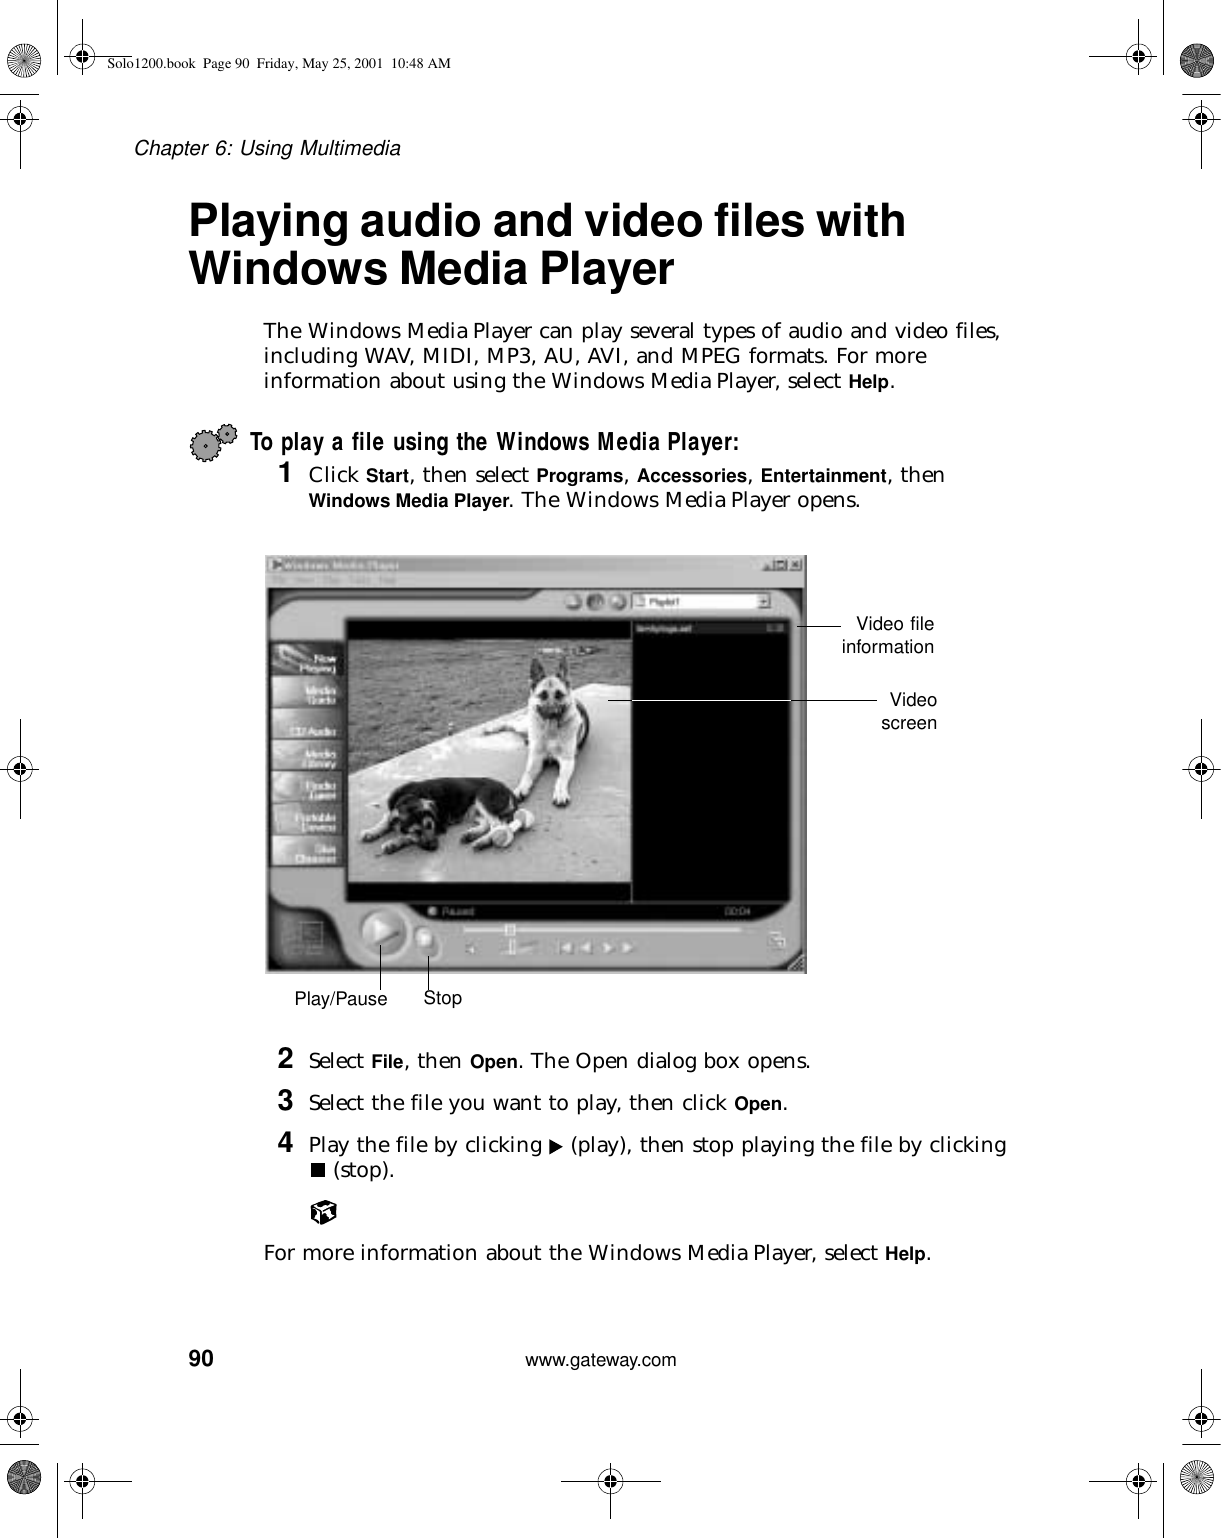
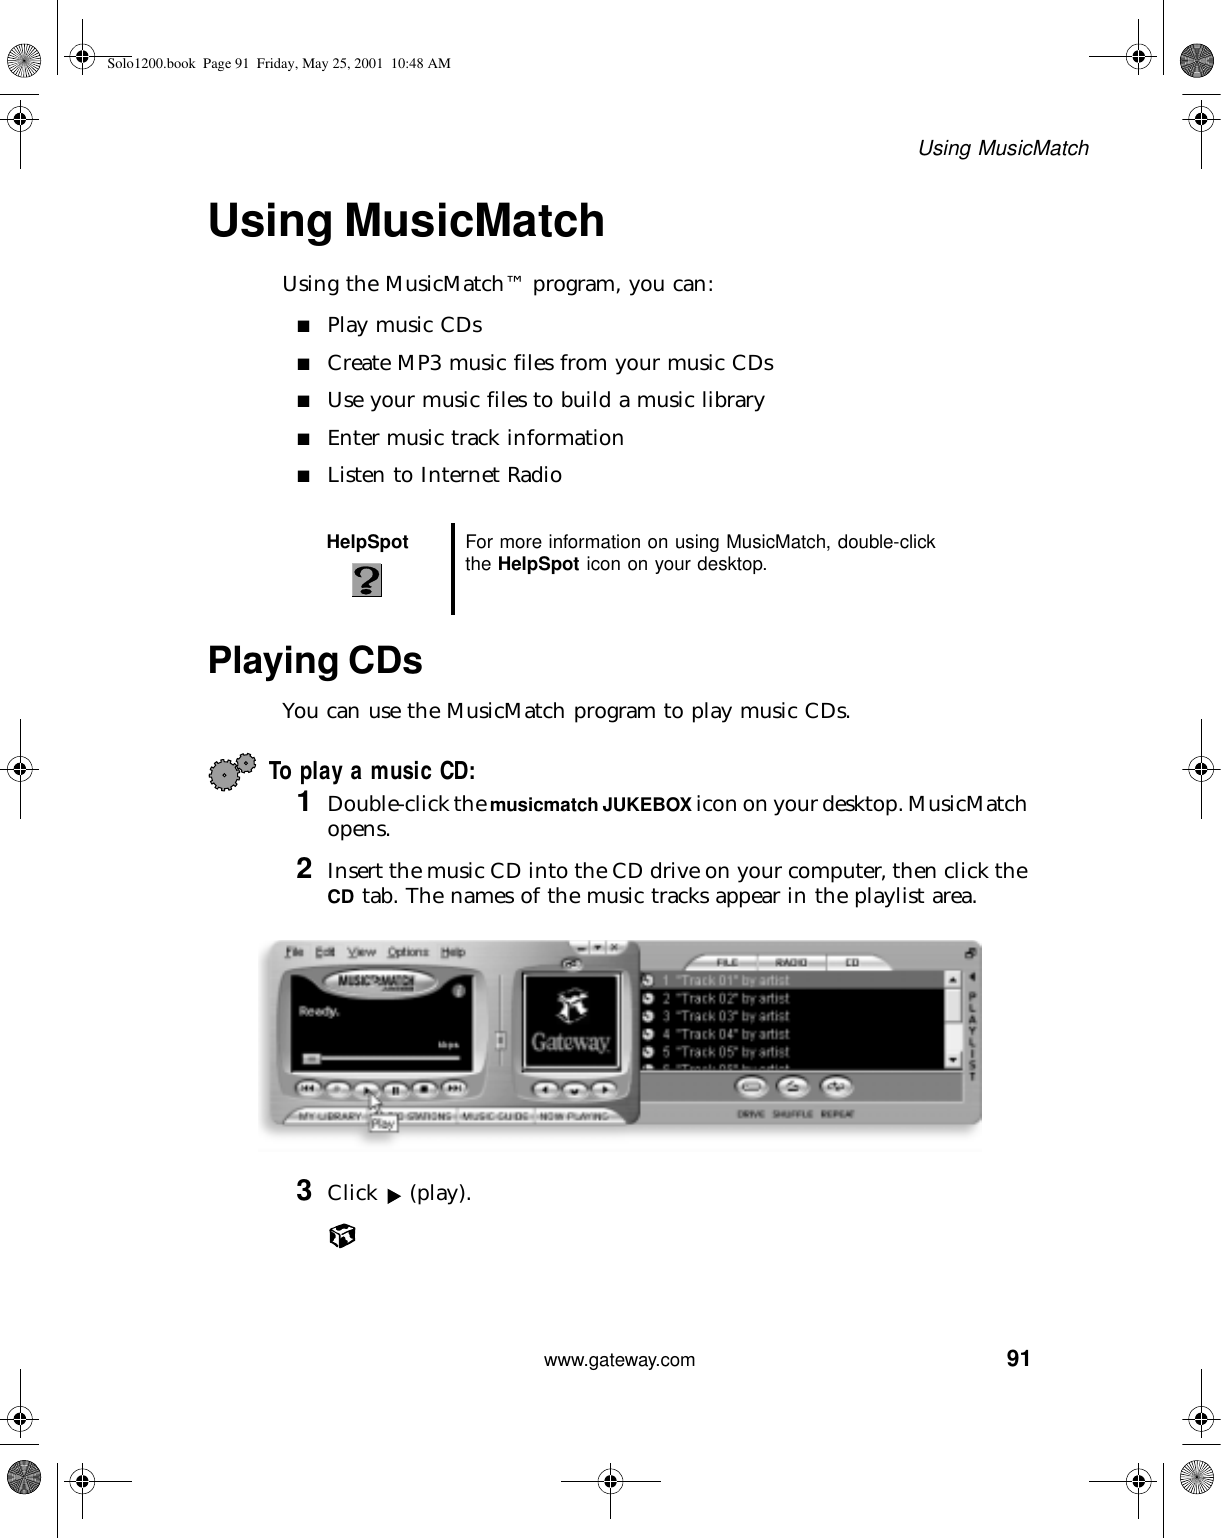
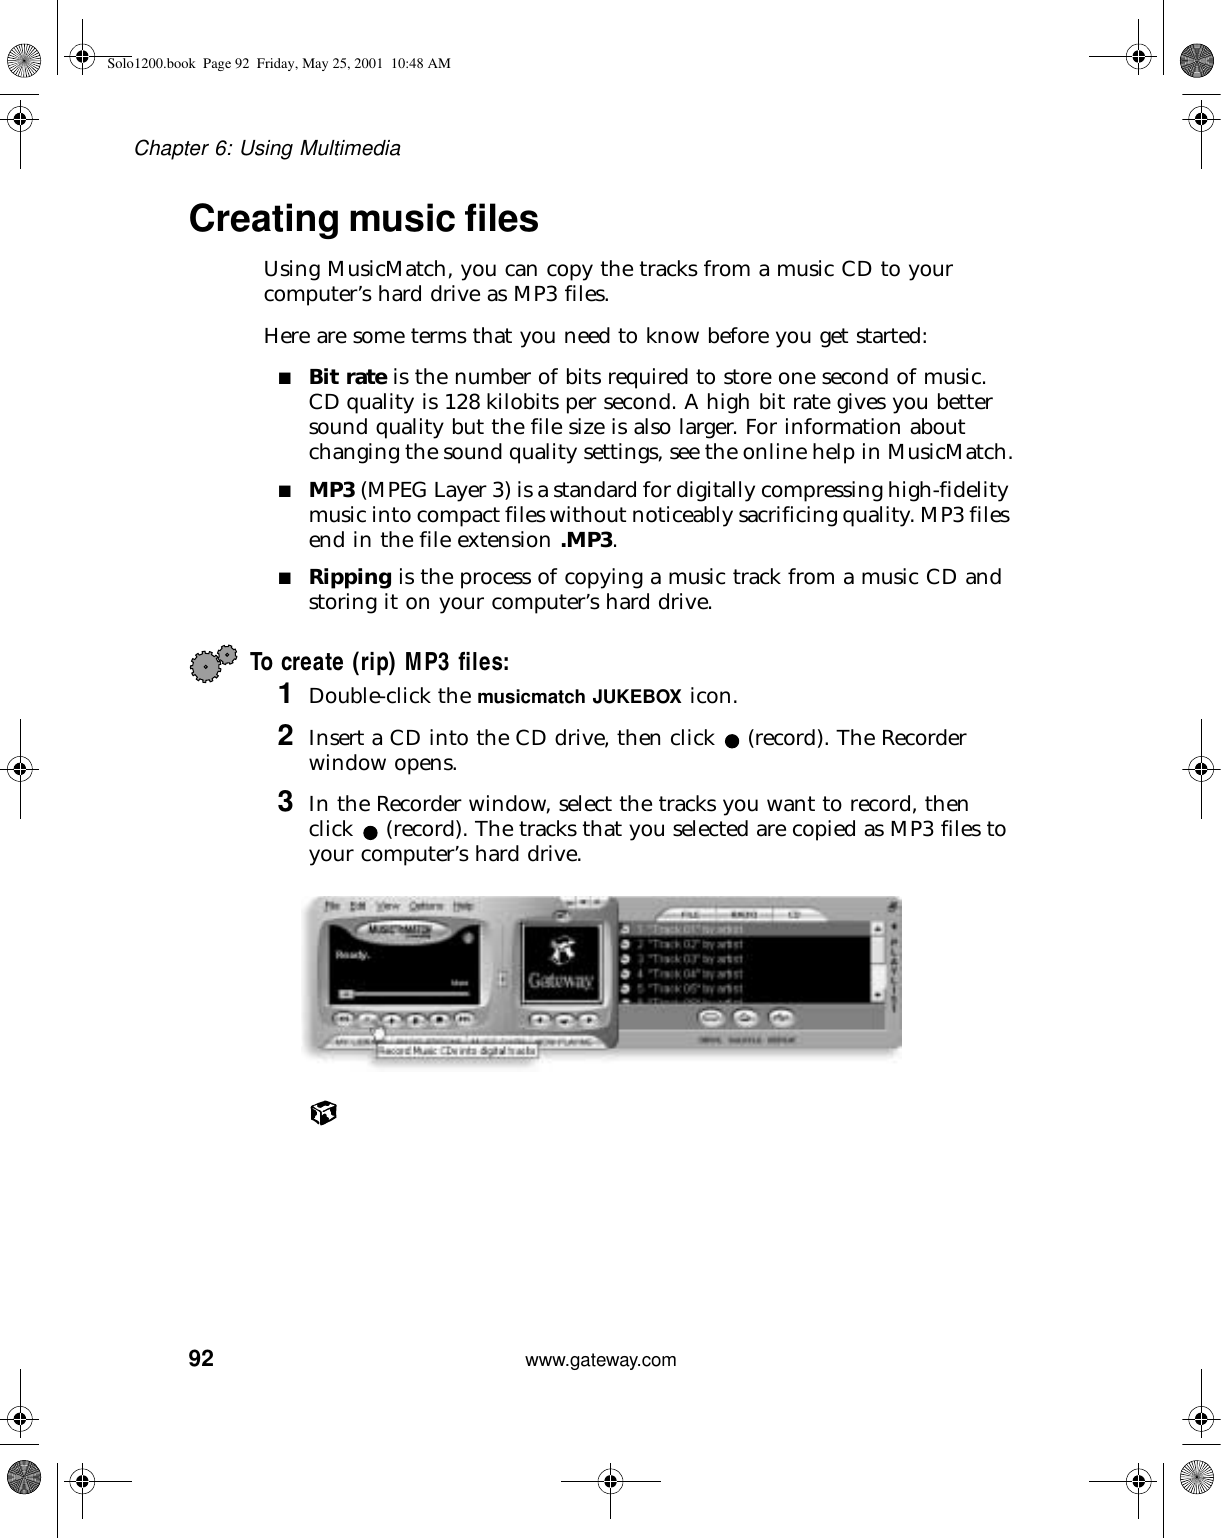
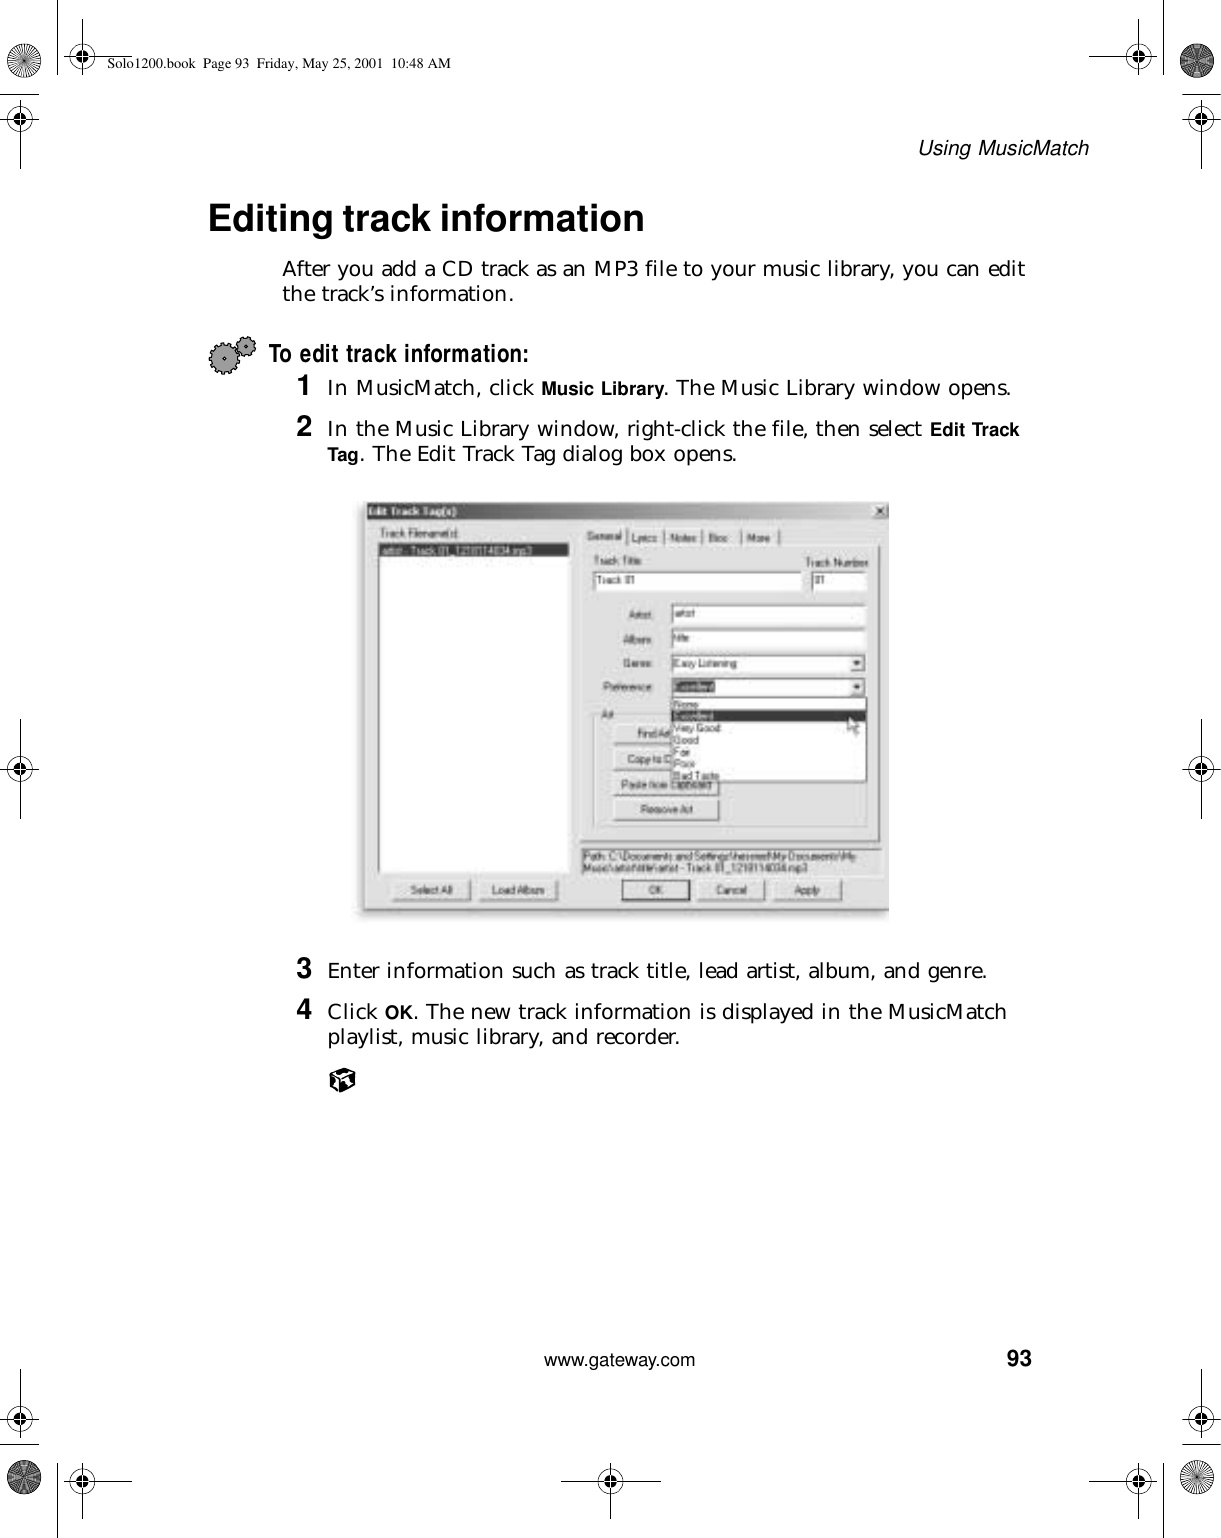
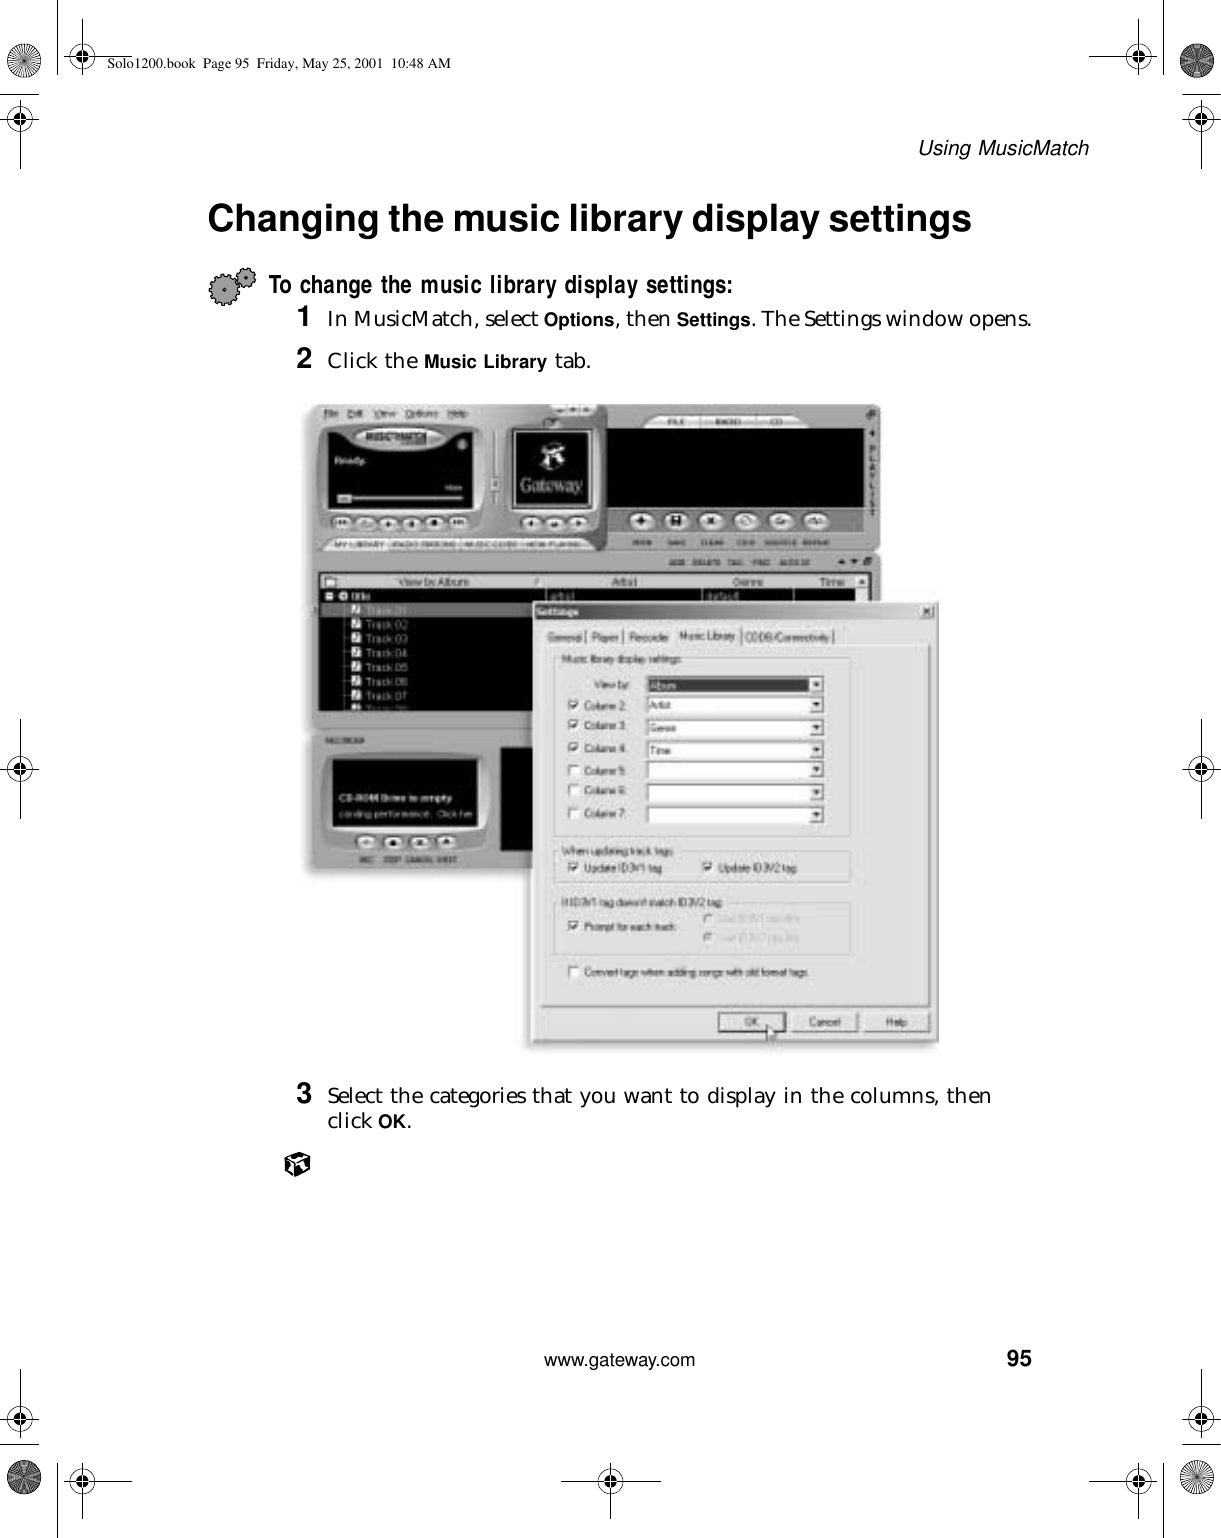
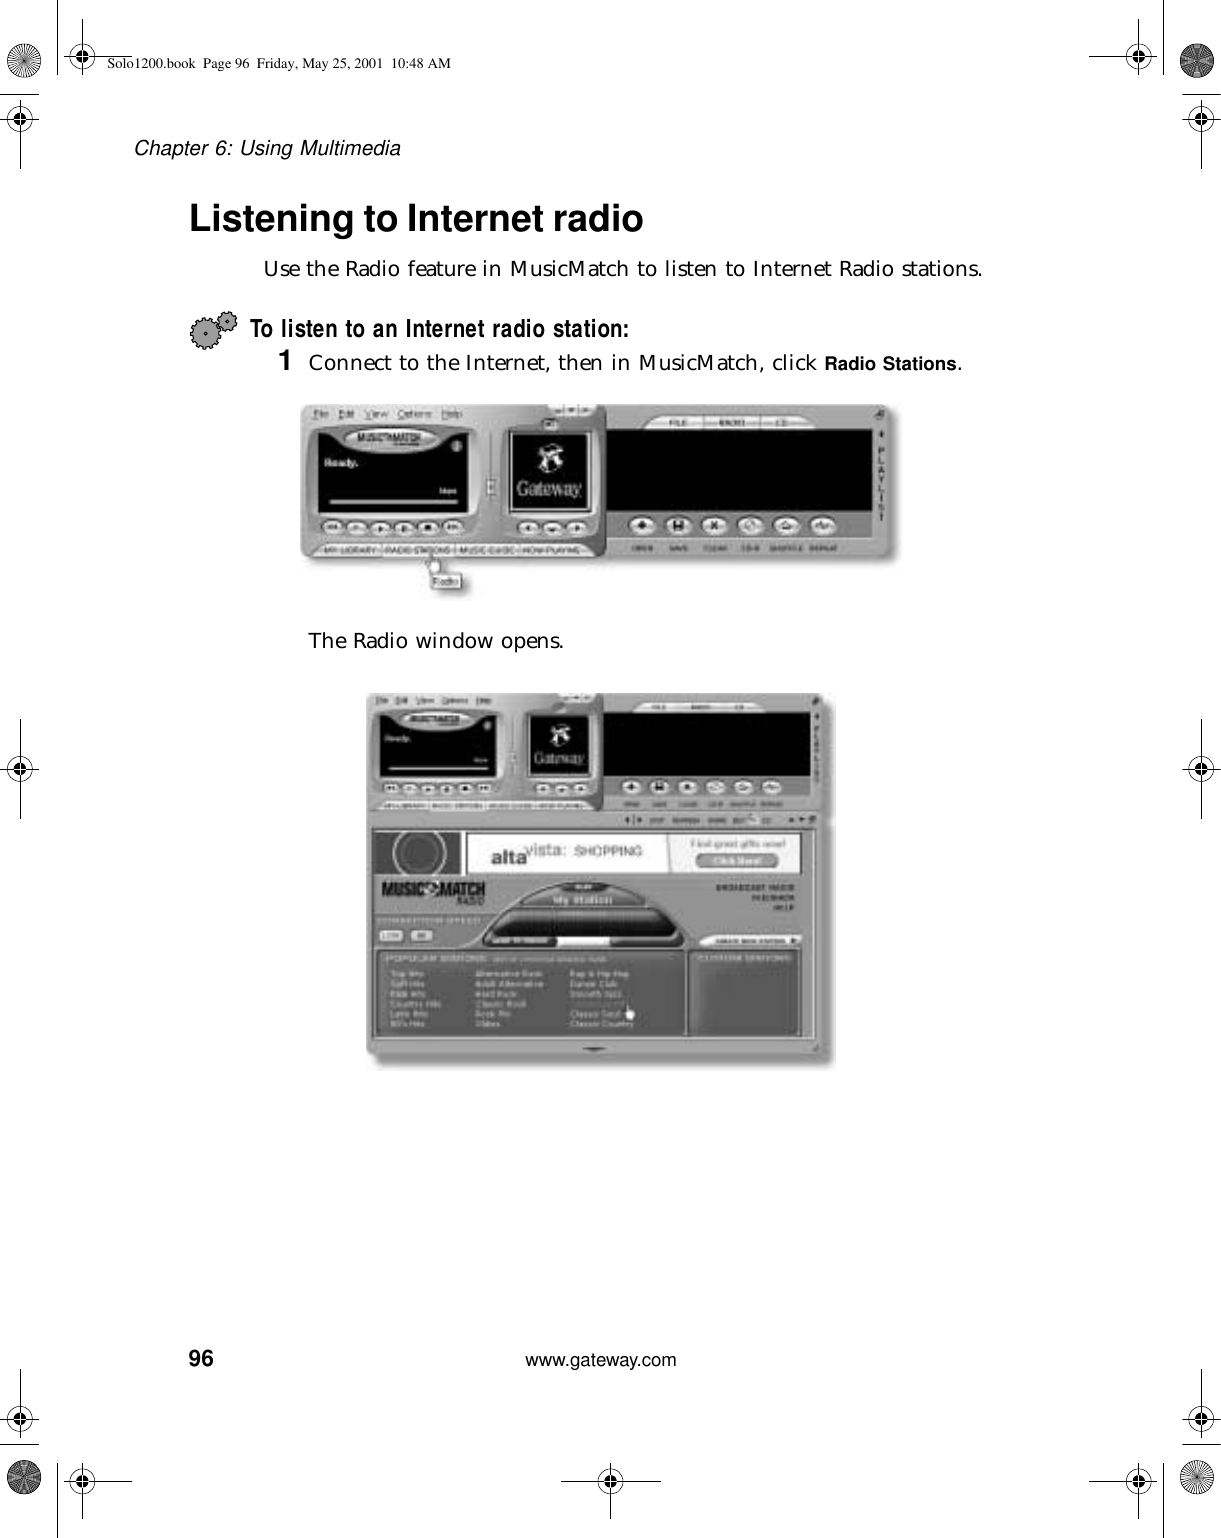
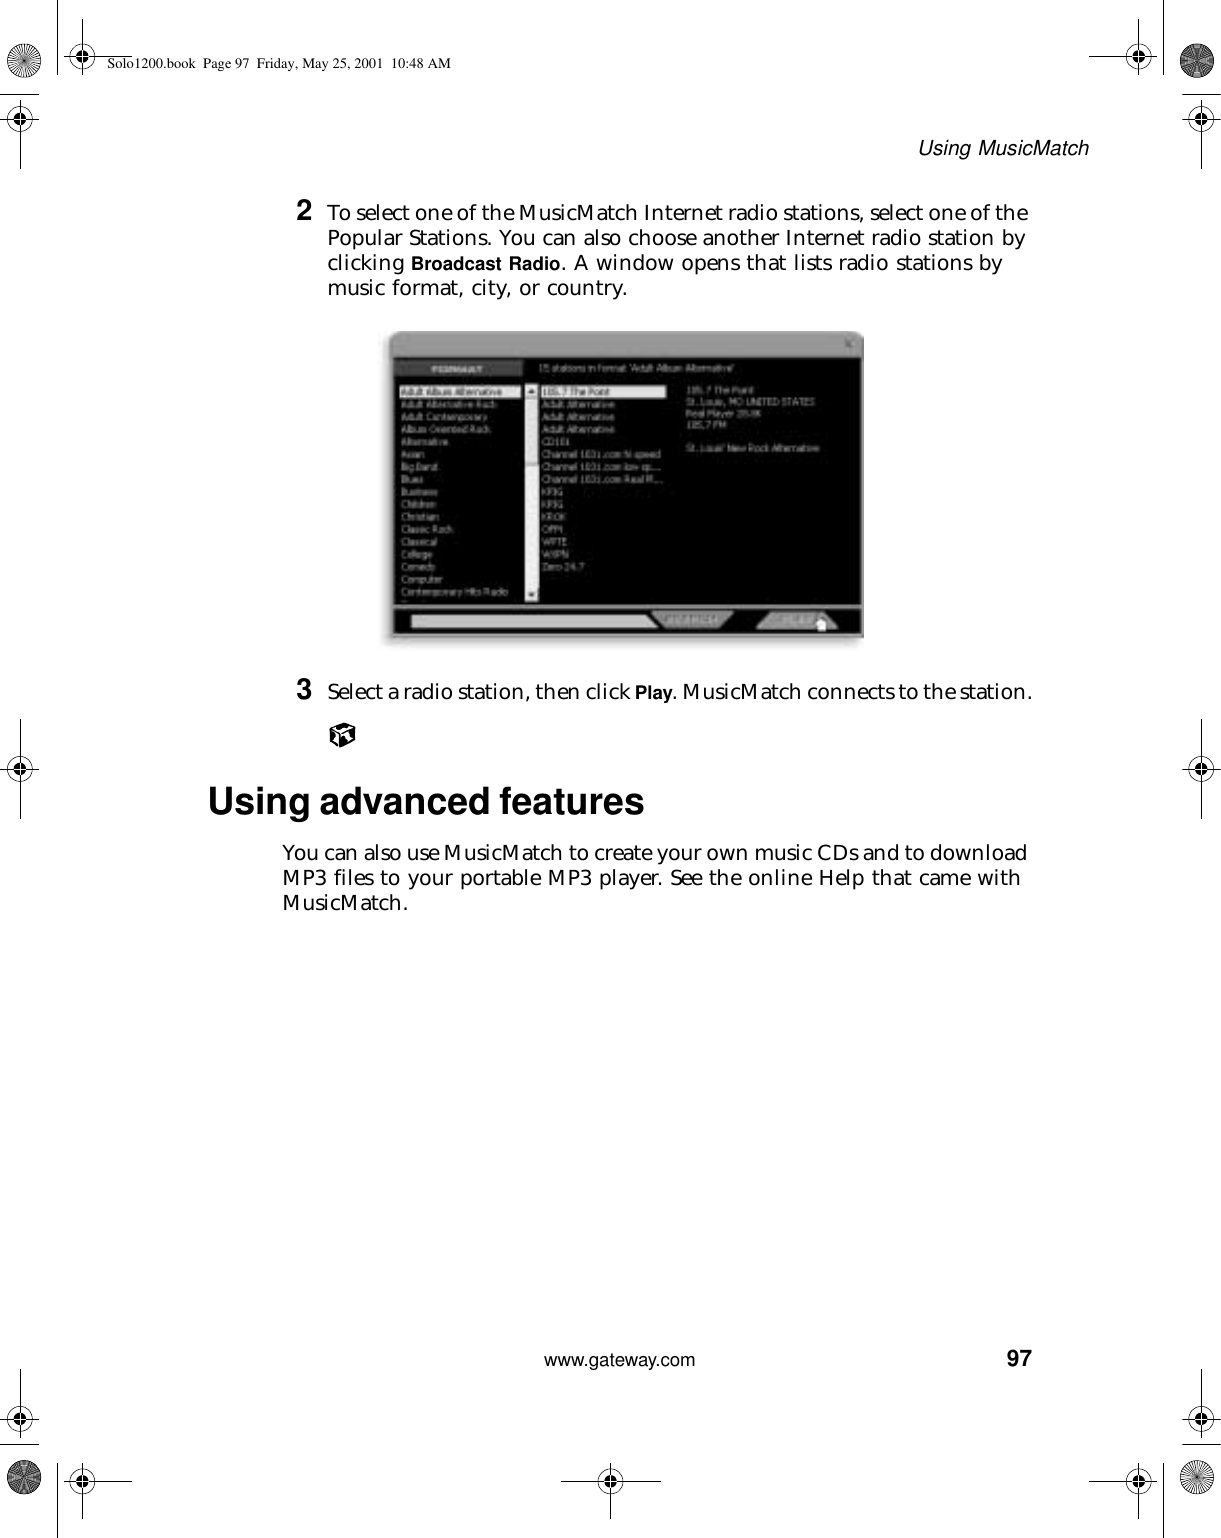
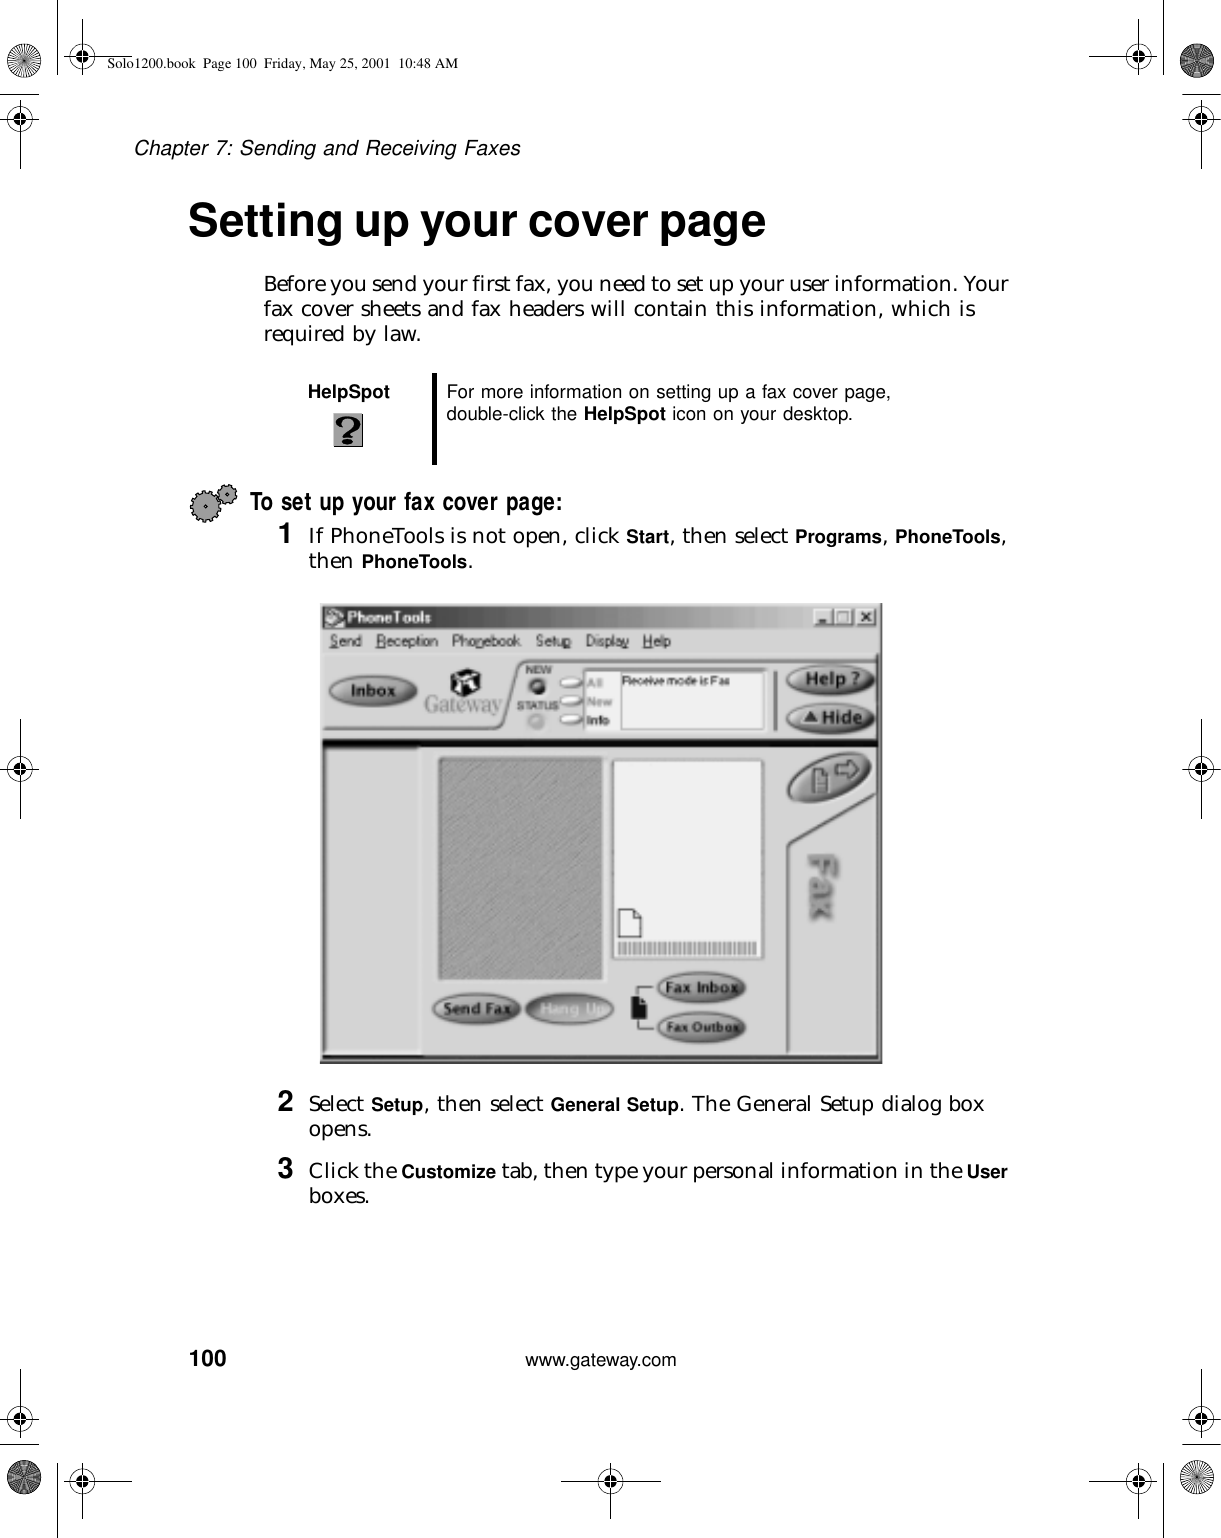
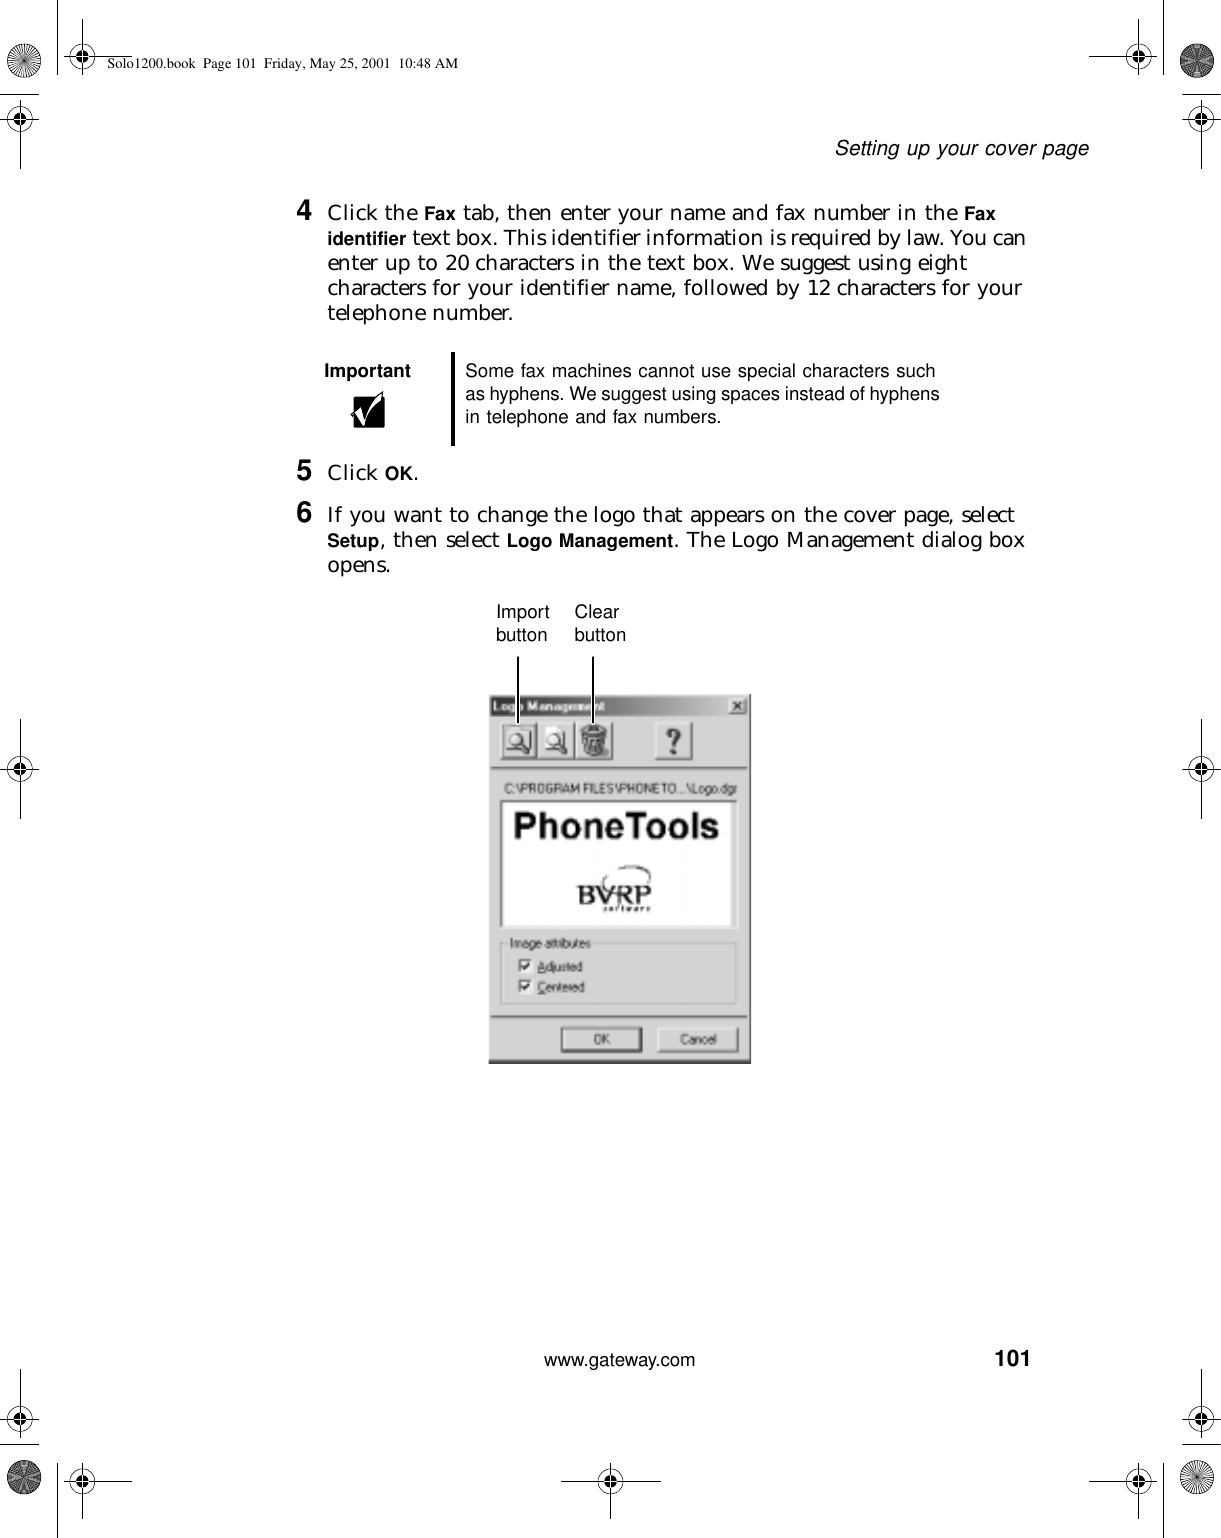
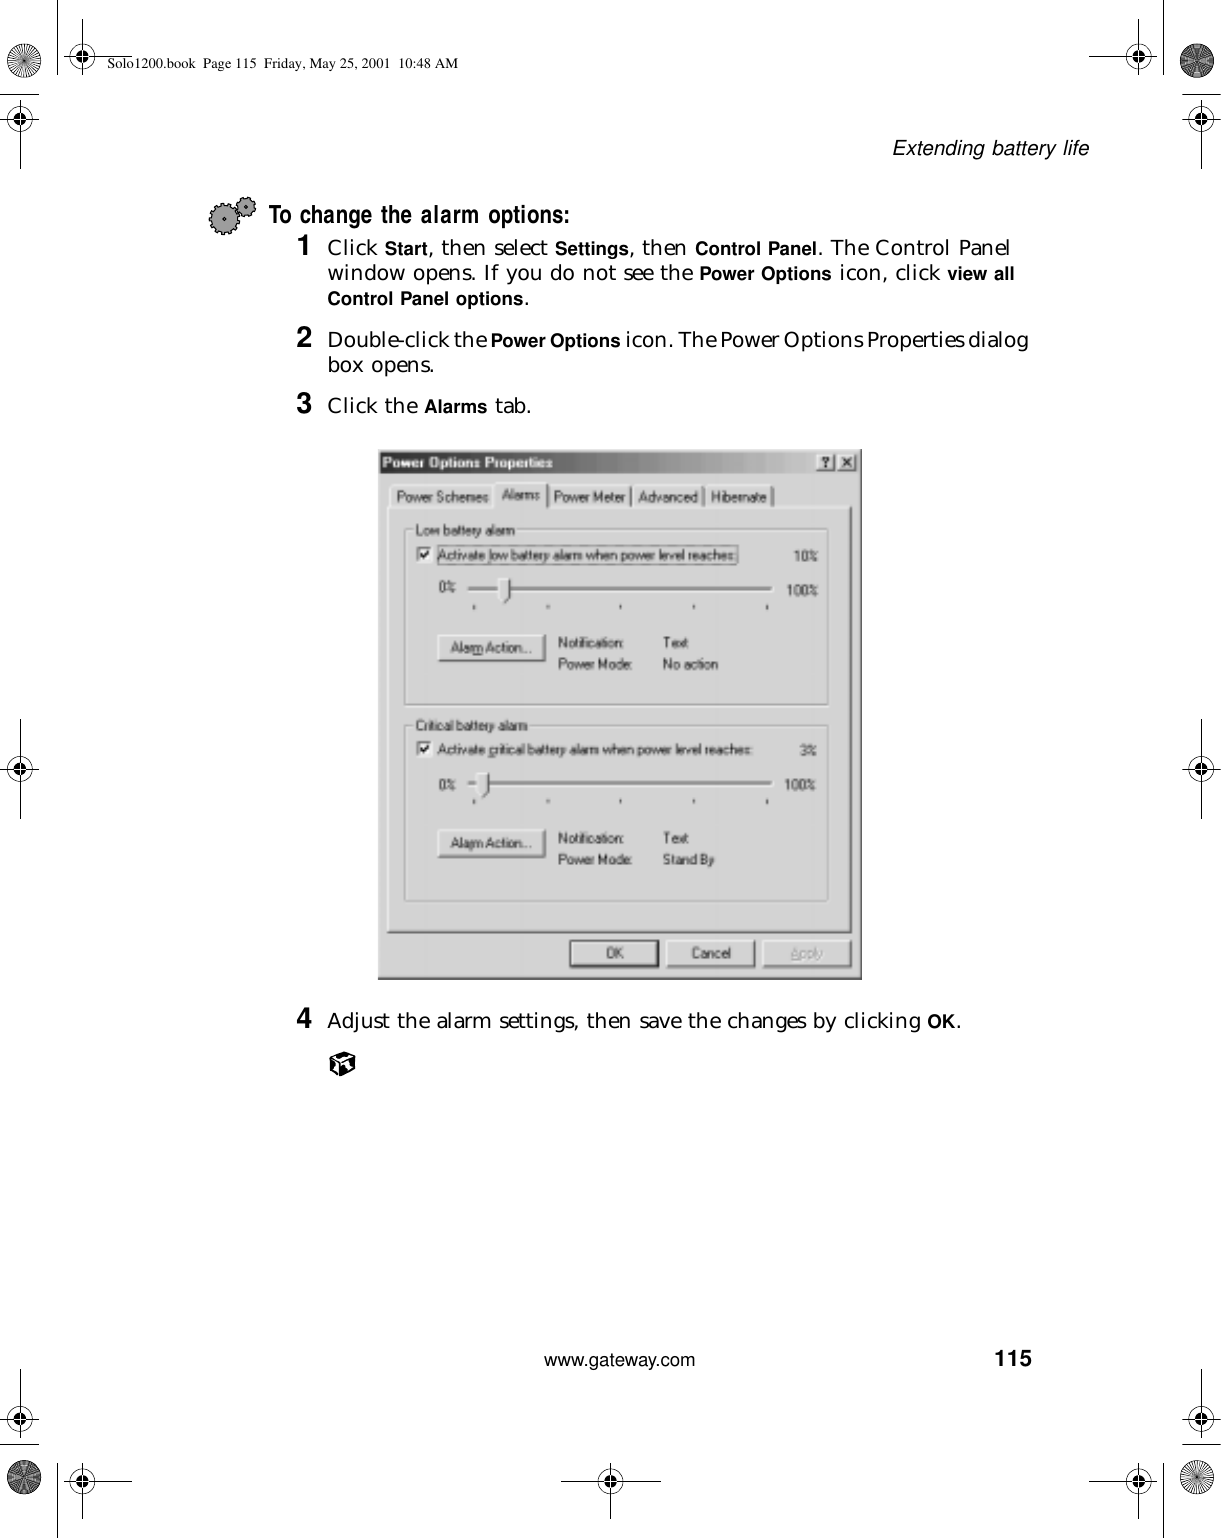
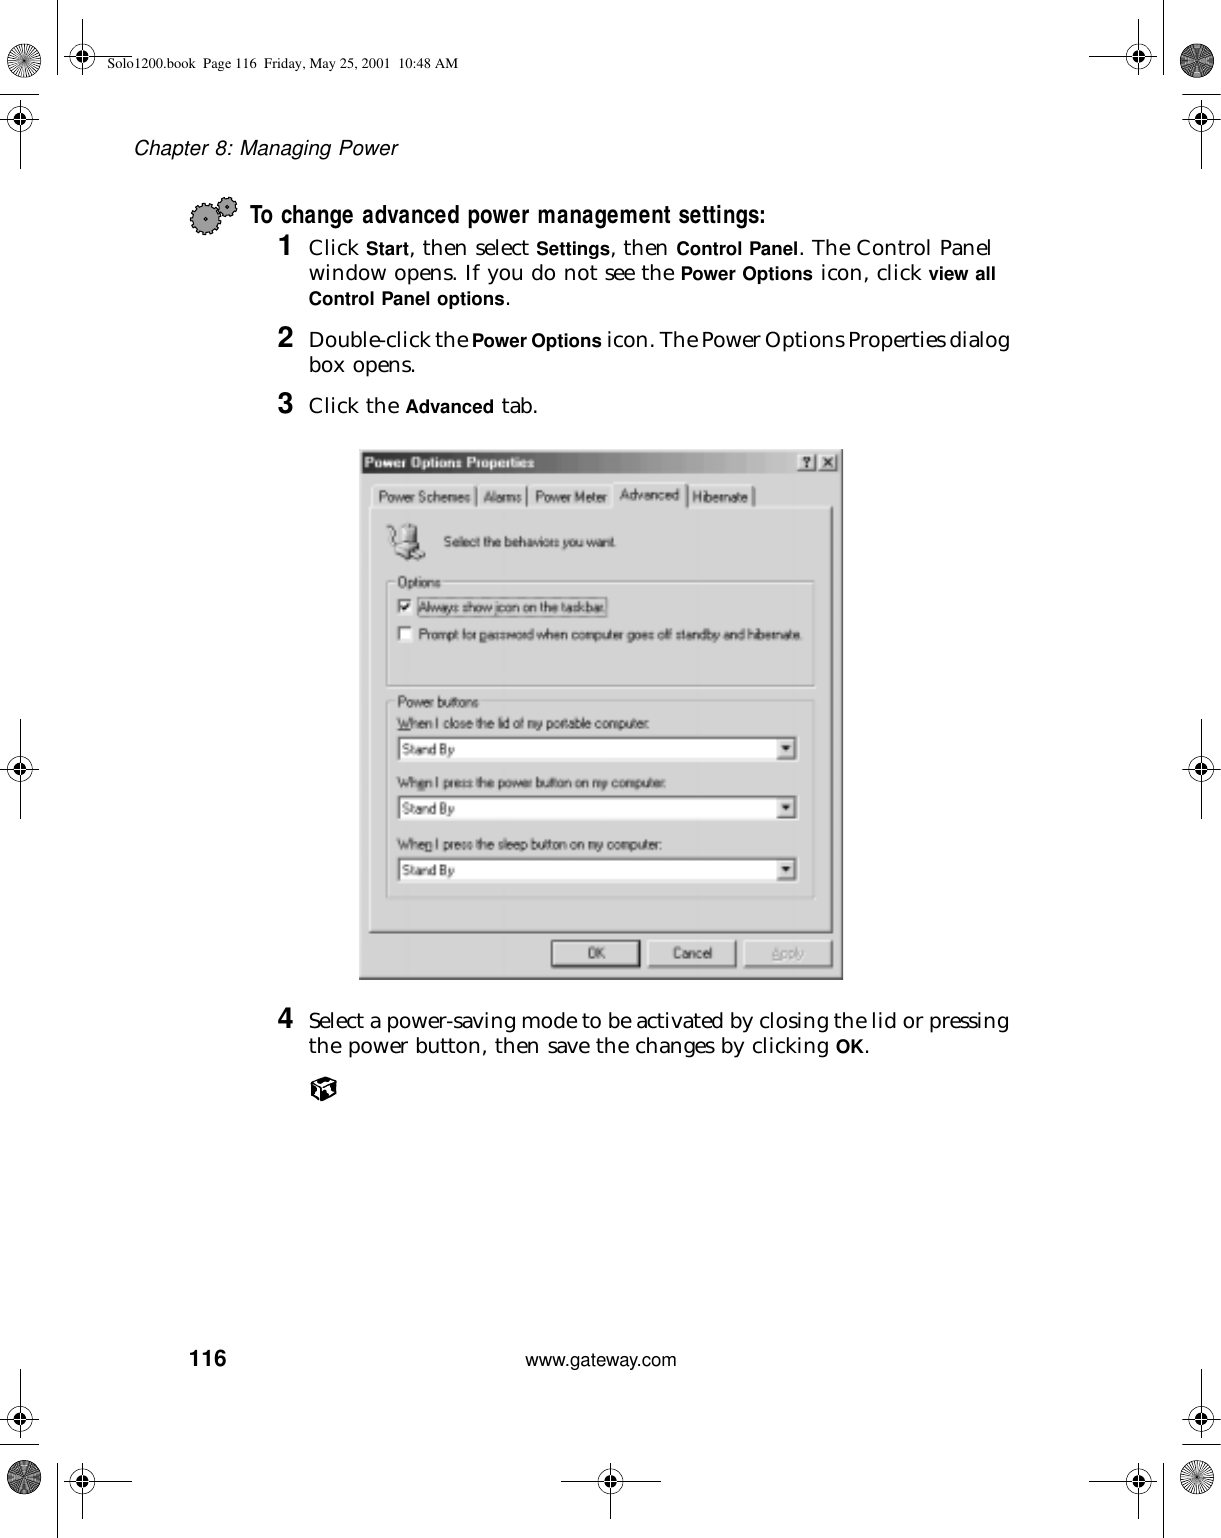
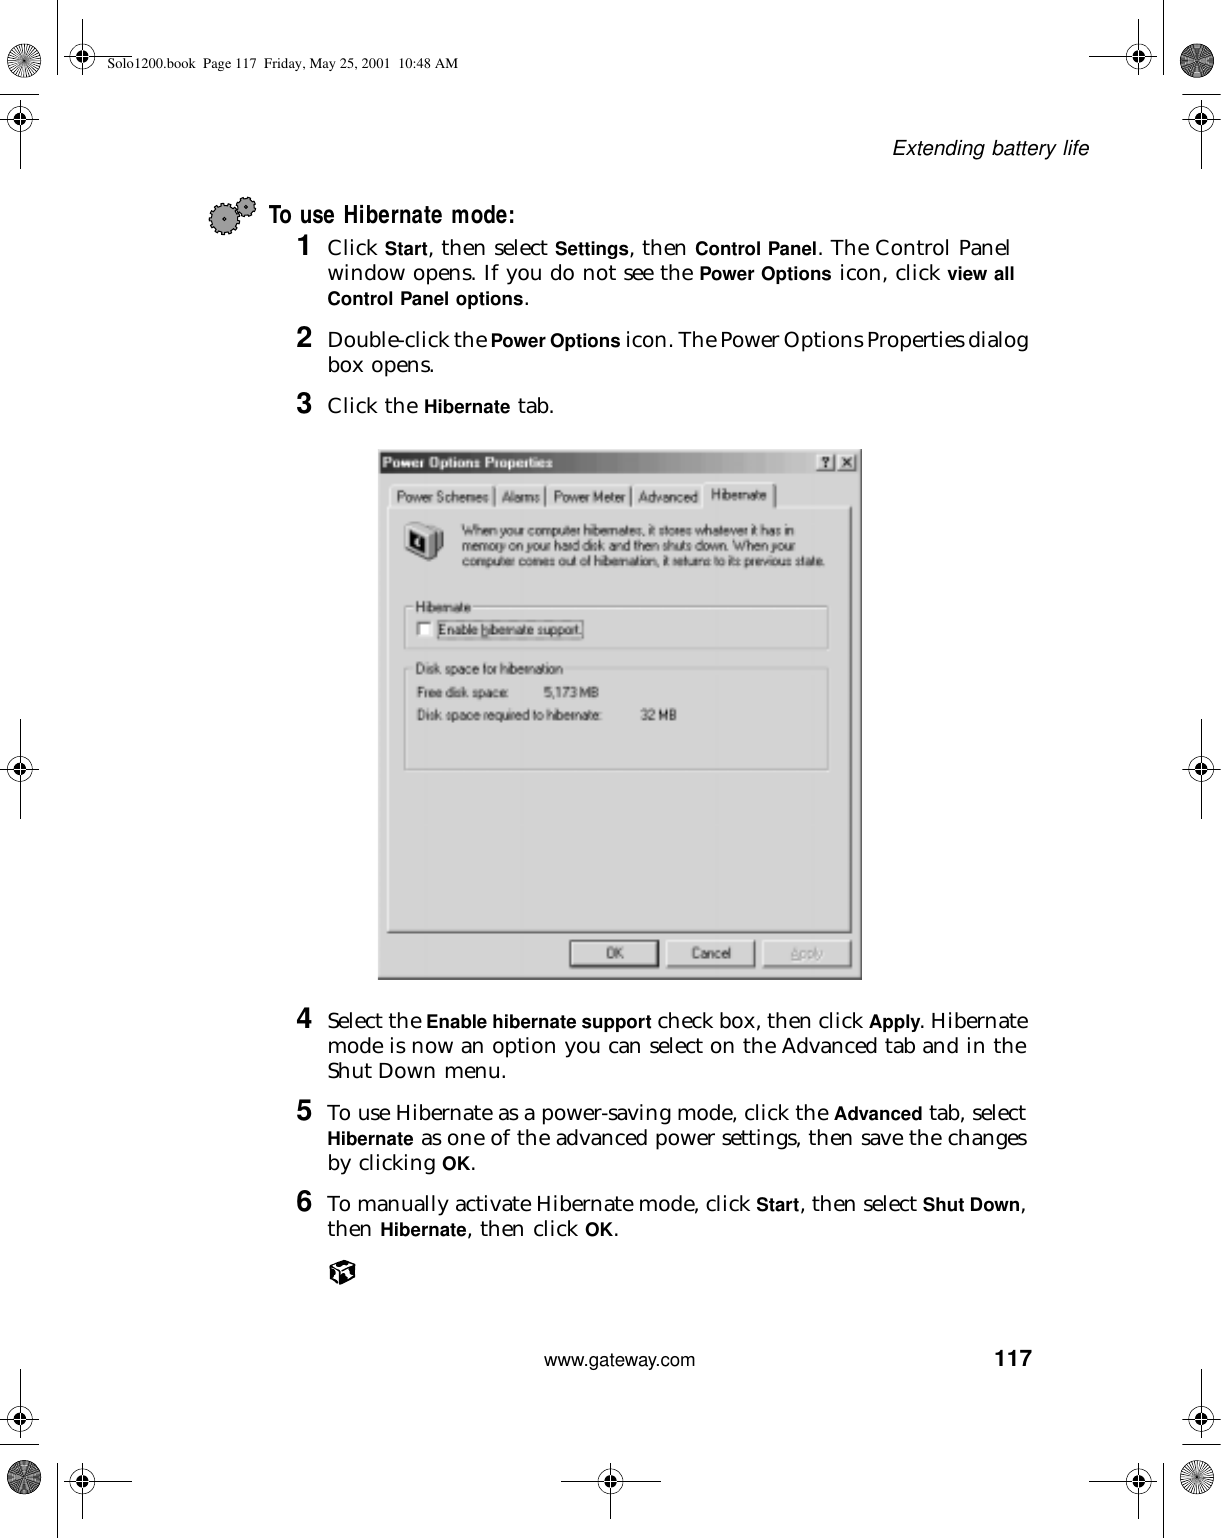
          iContents1 Checking Out Your Gateway Solo 1200. . . . . . . . . . . . . . . . . . . . . . . . . . 1Front   . . . . . . . . . . . . . . . . . . . . . . . . . . . . . . . . . . . . . . . . . . . . . . . . . . . . . . . . . . . . . 2Left  . . . . . . . . . . . . . . . . . . . . . . . . . . . . . . . . . . . . . . . . . . . . . . . . . . . . . . . . . . . . . . . 3Right   . . . . . . . . . . . . . . . . . . . . . . . . . . . . . . . . . . . . . . . . . . . . . . . . . . . . . . . . . . . . . 4Back  . . . . . . . . . . . . . . . . . . . . . . . . . . . . . . . . . . . . . . . . . . . . . . . . . . . . . . . . . . . . . . 6Bottom  . . . . . . . . . . . . . . . . . . . . . . . . . . . . . . . . . . . . . . . . . . . . . . . . . . . . . . . . . . . . 7Identifying your model  . . . . . . . . . . . . . . . . . . . . . . . . . . . . . . . . . . . . . . . . . . . . . . . . 8Accessories  . . . . . . . . . . . . . . . . . . . . . . . . . . . . . . . . . . . . . . . . . . . . . . . . . . . . . . . . 92Getting Started. . . . . . . . . . . . . . . . . . . . . . . . . . . . . . . . . . . . . . . . . . . . . . . . . . 11Connecting the AC adapter  . . . . . . . . . . . . . . . . . . . . . . . . . . . . . . . . . . . . . . . . . . . 12Protecting from power source problems . . . . . . . . . . . . . . . . . . . . . . . . . . . . . . 14Starting your notebook   . . . . . . . . . . . . . . . . . . . . . . . . . . . . . . . . . . . . . . . . . . . . . . 15Waking up your notebook  . . . . . . . . . . . . . . . . . . . . . . . . . . . . . . . . . . . . . . . . . 16Turning off your notebook  . . . . . . . . . . . . . . . . . . . . . . . . . . . . . . . . . . . . . . . . . . . . 17Status indicators   . . . . . . . . . . . . . . . . . . . . . . . . . . . . . . . . . . . . . . . . . . . . . . . . . . . 18Using the keyboard  . . . . . . . . . . . . . . . . . . . . . . . . . . . . . . . . . . . . . . . . . . . . . . . . . 20Keys   . . . . . . . . . . . . . . . . . . . . . . . . . . . . . . . . . . . . . . . . . . . . . . . . . . . . . . . . . 21System key combinations  . . . . . . . . . . . . . . . . . . . . . . . . . . . . . . . . . . . . . . . . . 22Multi-function buttons   . . . . . . . . . . . . . . . . . . . . . . . . . . . . . . . . . . . . . . . . . . . . 24Using the EZ Pad touchpad   . . . . . . . . . . . . . . . . . . . . . . . . . . . . . . . . . . . . . . . . . . 26Using the touchpad  . . . . . . . . . . . . . . . . . . . . . . . . . . . . . . . . . . . . . . . . . . . . . . 27Using the rocker switch   . . . . . . . . . . . . . . . . . . . . . . . . . . . . . . . . . . . . . . . . . . 28Connecting the modem  . . . . . . . . . . . . . . . . . . . . . . . . . . . . . . . . . . . . . . . . . . . . . . 29Connecting to an Ethernet network   . . . . . . . . . . . . . . . . . . . . . . . . . . . . . . . . . . . . 30Broadband Internet connections  . . . . . . . . . . . . . . . . . . . . . . . . . . . . . . . . . . . . 31Installing a printer, scanner, or other peripheral device  . . . . . . . . . . . . . . . . . . . . . 323Getting Help . . . . . . . . . . . . . . . . . . . . . . . . . . . . . . . . . . . . . . . . . . . . . . . . . . . . 33HelpSpot   . . . . . . . . . . . . . . . . . . . . . . . . . . . . . . . . . . . . . . . . . . . . . . . . . . . . . . . . . 34HelpSpot Videos  . . . . . . . . . . . . . . . . . . . . . . . . . . . . . . . . . . . . . . . . . . . . . . . . 36Online help   . . . . . . . . . . . . . . . . . . . . . . . . . . . . . . . . . . . . . . . . . . . . . . . . . . . . . . . 37Gateway Web site  . . . . . . . . . . . . . . . . . . . . . . . . . . . . . . . . . . . . . . . . . . . . . . . . . . 384 Windows Basics . . . . . . . . . . . . . . . . . . . . . . . . . . . . . . . . . . . . . . . . . . . . . . . . 41About the Windows environment   . . . . . . . . . . . . . . . . . . . . . . . . . . . . . . . . . . . . . . 42Desktop items  . . . . . . . . . . . . . . . . . . . . . . . . . . . . . . . . . . . . . . . . . . . . . . . . . . 43Window items   . . . . . . . . . . . . . . . . . . . . . . . . . . . . . . . . . . . . . . . . . . . . . . . . . . 45Using the Start menu   . . . . . . . . . . . . . . . . . . . . . . . . . . . . . . . . . . . . . . . . . . . . . . . 47Solo1200.book Page i Friday, May 25, 2001 10:48 AM
ii          Working with files and folders   . . . . . . . . . . . . . . . . . . . . . . . . . . . . . . . . . . . . . . . . .48About drives  . . . . . . . . . . . . . . . . . . . . . . . . . . . . . . . . . . . . . . . . . . . . . . . . . . . .48About folders and files  . . . . . . . . . . . . . . . . . . . . . . . . . . . . . . . . . . . . . . . . . . . .50Copying and moving files and folders  . . . . . . . . . . . . . . . . . . . . . . . . . . . . . . . .51Deleting files and folders  . . . . . . . . . . . . . . . . . . . . . . . . . . . . . . . . . . . . . . . . . .53Browsing for files and folders   . . . . . . . . . . . . . . . . . . . . . . . . . . . . . . . . . . . . . .55Searching for files  . . . . . . . . . . . . . . . . . . . . . . . . . . . . . . . . . . . . . . . . . . . . . . . . . . .56Using the Windows Search utility   . . . . . . . . . . . . . . . . . . . . . . . . . . . . . . . . . . .57Working with documents   . . . . . . . . . . . . . . . . . . . . . . . . . . . . . . . . . . . . . . . . . . . . .59Creating a new document   . . . . . . . . . . . . . . . . . . . . . . . . . . . . . . . . . . . . . . . . .60Saving a document   . . . . . . . . . . . . . . . . . . . . . . . . . . . . . . . . . . . . . . . . . . . . . .61Opening a document  . . . . . . . . . . . . . . . . . . . . . . . . . . . . . . . . . . . . . . . . . . . . .62Printing a document  . . . . . . . . . . . . . . . . . . . . . . . . . . . . . . . . . . . . . . . . . . . . . .63Shortcuts   . . . . . . . . . . . . . . . . . . . . . . . . . . . . . . . . . . . . . . . . . . . . . . . . . . . . . .64Transferring software and hardware from your old computer  . . . . . . . . . . . . . . . . .65Transferring files . . . . . . . . . . . . . . . . . . . . . . . . . . . . . . . . . . . . . . . . . . . . . . . . .65Transferring Internet settings  . . . . . . . . . . . . . . . . . . . . . . . . . . . . . . . . . . . . . . .67Reinstalling your old printer or scanner  . . . . . . . . . . . . . . . . . . . . . . . . . . . . . . .68Reinstalling your old programs   . . . . . . . . . . . . . . . . . . . . . . . . . . . . . . . . . . . . .695 Using the Internet . . . . . . . . . . . . . . . . . . . . . . . . . . . . . . . . . . . . . . . . . . . . . . .71Learning about the Internet   . . . . . . . . . . . . . . . . . . . . . . . . . . . . . . . . . . . . . . . . . . .72Setting up an Internet account  . . . . . . . . . . . . . . . . . . . . . . . . . . . . . . . . . . . . . . . . .73Accessing your Internet account  . . . . . . . . . . . . . . . . . . . . . . . . . . . . . . . . . . . .74Using the World Wide Web   . . . . . . . . . . . . . . . . . . . . . . . . . . . . . . . . . . . . . . . . . . .75Connecting to a Web site . . . . . . . . . . . . . . . . . . . . . . . . . . . . . . . . . . . . . . . . . .76Downloading files  . . . . . . . . . . . . . . . . . . . . . . . . . . . . . . . . . . . . . . . . . . . . . . . .77Using e-mail   . . . . . . . . . . . . . . . . . . . . . . . . . . . . . . . . . . . . . . . . . . . . . . . . . . . . . . .78Sending e-mail  . . . . . . . . . . . . . . . . . . . . . . . . . . . . . . . . . . . . . . . . . . . . . . . . . .78Checking your e-mail  . . . . . . . . . . . . . . . . . . . . . . . . . . . . . . . . . . . . . . . . . . . . .796 Using Multimedia . . . . . . . . . . . . . . . . . . . . . . . . . . . . . . . . . . . . . . . . . . . . . . . .81Using Drives  . . . . . . . . . . . . . . . . . . . . . . . . . . . . . . . . . . . . . . . . . . . . . . . . . . . . . . .82Using diskettes  . . . . . . . . . . . . . . . . . . . . . . . . . . . . . . . . . . . . . . . . . . . . . . . . . .82Using the CD drive . . . . . . . . . . . . . . . . . . . . . . . . . . . . . . . . . . . . . . . . . . . . . . .83Adjusting the volume   . . . . . . . . . . . . . . . . . . . . . . . . . . . . . . . . . . . . . . . . . . . . . . . .85Listening to music CDs . . . . . . . . . . . . . . . . . . . . . . . . . . . . . . . . . . . . . . . . . . . . . . .87Recording and playing audio  . . . . . . . . . . . . . . . . . . . . . . . . . . . . . . . . . . . . . . . . . .88Playing audio and video files with Windows Media Player  . . . . . . . . . . . . . . . . . . .90Using MusicMatch   . . . . . . . . . . . . . . . . . . . . . . . . . . . . . . . . . . . . . . . . . . . . . . . . . .91Playing CDs  . . . . . . . . . . . . . . . . . . . . . . . . . . . . . . . . . . . . . . . . . . . . . . . . . . . .91Creating music files   . . . . . . . . . . . . . . . . . . . . . . . . . . . . . . . . . . . . . . . . . . . . . .92Editing track information . . . . . . . . . . . . . . . . . . . . . . . . . . . . . . . . . . . . . . . . . . .93Solo1200.book Page ii Friday, May 25, 2001 10:48 AM
          iiiBuilding a music library . . . . . . . . . . . . . . . . . . . . . . . . . . . . . . . . . . . . . . . . . . . 94Changing the music library display settings  . . . . . . . . . . . . . . . . . . . . . . . . . . . 95Listening to Internet radio  . . . . . . . . . . . . . . . . . . . . . . . . . . . . . . . . . . . . . . . . . 96Using advanced features   . . . . . . . . . . . . . . . . . . . . . . . . . . . . . . . . . . . . . . . . . 977 Sending and Receiving Faxes  . . . . . . . . . . . . . . . . . . . . . . . . . . . . . . . . . . 99Setting up your cover page  . . . . . . . . . . . . . . . . . . . . . . . . . . . . . . . . . . . . . . . . . . 100Sending a fax   . . . . . . . . . . . . . . . . . . . . . . . . . . . . . . . . . . . . . . . . . . . . . . . . . . . . 103Faxing from programs  . . . . . . . . . . . . . . . . . . . . . . . . . . . . . . . . . . . . . . . . . . .  105Receiving and viewing a fax  . . . . . . . . . . . . . . . . . . . . . . . . . . . . . . . . . . . . . . . . . 1068 Managing Power . . . . . . . . . . . . . . . . . . . . . . . . . . . . . . . . . . . . . . . . . . . . . . . 107Monitoring the battery charge  . . . . . . . . . . . . . . . . . . . . . . . . . . . . . . . . . . . . . . . . 108Recharging the battery   . . . . . . . . . . . . . . . . . . . . . . . . . . . . . . . . . . . . . . . . . . . . . 108Changing batteries   . . . . . . . . . . . . . . . . . . . . . . . . . . . . . . . . . . . . . . . . . . . . . . . . 109Extending battery life  . . . . . . . . . . . . . . . . . . . . . . . . . . . . . . . . . . . . . . . . . . . . . . . 111Conserving battery power  . . . . . . . . . . . . . . . . . . . . . . . . . . . . . . . . . . . . . . . . 111Using alternate power sources  . . . . . . . . . . . . . . . . . . . . . . . . . . . . . . . . . . . . 111Changing power modes   . . . . . . . . . . . . . . . . . . . . . . . . . . . . . . . . . . . . . . . . . 112Changing automatic power settings  . . . . . . . . . . . . . . . . . . . . . . . . . . . . . . . . 1139 Travel Tips. . . . . . . . . . . . . . . . . . . . . . . . . . . . . . . . . . . . . . . . . . . . . . . . . . . . . 119Modem  . . . . . . . . . . . . . . . . . . . . . . . . . . . . . . . . . . . . . . . . . . . . . . . . . . . . . . . . . . 120Radio frequency wireless connections  . . . . . . . . . . . . . . . . . . . . . . . . . . . . . . . . . 120Files  . . . . . . . . . . . . . . . . . . . . . . . . . . . . . . . . . . . . . . . . . . . . . . . . . . . . . . . . . . . . 121Security   . . . . . . . . . . . . . . . . . . . . . . . . . . . . . . . . . . . . . . . . . . . . . . . . . . . . . . . . . 121Power . . . . . . . . . . . . . . . . . . . . . . . . . . . . . . . . . . . . . . . . . . . . . . . . . . . . . . . . . . . 12210 Customizing Your Notebook . . . . . . . . . . . . . . . . . . . . . . . . . . . . . . . . . . . 123Adjusting the screen and desktop settings  . . . . . . . . . . . . . . . . . . . . . . . . . . . . . . 124Adjusting the color depth   . . . . . . . . . . . . . . . . . . . . . . . . . . . . . . . . . . . . . . . . 124Adjusting the screen area  . . . . . . . . . . . . . . . . . . . . . . . . . . . . . . . . . . . . . . . . 126Applying a color scheme   . . . . . . . . . . . . . . . . . . . . . . . . . . . . . . . . . . . . . . . . 127Changing the desktop background  . . . . . . . . . . . . . . . . . . . . . . . . . . . . . . . . . 129Selecting a screen saver   . . . . . . . . . . . . . . . . . . . . . . . . . . . . . . . . . . . . . . . . 131Changing the touchpad settings  . . . . . . . . . . . . . . . . . . . . . . . . . . . . . . . . . . . . . . 133Programming the multi-function buttons  . . . . . . . . . . . . . . . . . . . . . . . . . . . . . . . . 135Allocating system memory   . . . . . . . . . . . . . . . . . . . . . . . . . . . . . . . . . . . . . . . . . . 13611 Upgrading Your Notebook . . . . . . . . . . . . . . . . . . . . . . . . . . . . . . . . . . . . . 137Adding a PC Card  . . . . . . . . . . . . . . . . . . . . . . . . . . . . . . . . . . . . . . . . . . . . . . . . . 138Preventing static electricity discharge  . . . . . . . . . . . . . . . . . . . . . . . . . . . . . . . . . . 140Solo1200.book Page iii Friday, May 25, 2001 10:48 AM
iv          Installing memory  . . . . . . . . . . . . . . . . . . . . . . . . . . . . . . . . . . . . . . . . . . . . . . . . . .141Replacing the hard drive   . . . . . . . . . . . . . . . . . . . . . . . . . . . . . . . . . . . . . . . . . . . .14512 Networking Your Computer. . . . . . . . . . . . . . . . . . . . . . . . . . . . . . . . . . . . .147Using a network   . . . . . . . . . . . . . . . . . . . . . . . . . . . . . . . . . . . . . . . . . . . . . . . . . . .148Sharing a single Internet connection  . . . . . . . . . . . . . . . . . . . . . . . . . . . . . . . .148Sharing drives   . . . . . . . . . . . . . . . . . . . . . . . . . . . . . . . . . . . . . . . . . . . . . . . . .148Sharing peripherals   . . . . . . . . . . . . . . . . . . . . . . . . . . . . . . . . . . . . . . . . . . . . .149Streaming audio and video files   . . . . . . . . . . . . . . . . . . . . . . . . . . . . . . . . . . .149Playing multi-player games   . . . . . . . . . . . . . . . . . . . . . . . . . . . . . . . . . . . . . . .149Introducing the Gateway Connected Home  . . . . . . . . . . . . . . . . . . . . . . . . . . . . . .150Components of a Gateway Connected Home  . . . . . . . . . . . . . . . . . . . . . . . . .151Selecting a network connection  . . . . . . . . . . . . . . . . . . . . . . . . . . . . . . . . . . . . . . .152Wired connections  . . . . . . . . . . . . . . . . . . . . . . . . . . . . . . . . . . . . . . . . . . . . . .152Wireless connections  . . . . . . . . . . . . . . . . . . . . . . . . . . . . . . . . . . . . . . . . . . . .153Assessing your connection needs  . . . . . . . . . . . . . . . . . . . . . . . . . . . . . . . . . .154Comparing data transfer speed  . . . . . . . . . . . . . . . . . . . . . . . . . . . . . . . . . . . .157Network shopping list  . . . . . . . . . . . . . . . . . . . . . . . . . . . . . . . . . . . . . . . . . . . . . . .159HPNA  . . . . . . . . . . . . . . . . . . . . . . . . . . . . . . . . . . . . . . . . . . . . . . . . . . . . . . . .159Ethernet   . . . . . . . . . . . . . . . . . . . . . . . . . . . . . . . . . . . . . . . . . . . . . . . . . . . . . .160Wireless Ethernet  . . . . . . . . . . . . . . . . . . . . . . . . . . . . . . . . . . . . . . . . . . . . . . .161Bluetooth   . . . . . . . . . . . . . . . . . . . . . . . . . . . . . . . . . . . . . . . . . . . . . . . . . . . . .161For more information   . . . . . . . . . . . . . . . . . . . . . . . . . . . . . . . . . . . . . . . . . . . . . . .16213 Maintaining Your Notebook. . . . . . . . . . . . . . . . . . . . . . . . . . . . . . . . . . . . .163Caring for your computer  . . . . . . . . . . . . . . . . . . . . . . . . . . . . . . . . . . . . . . . . . . . .163Creating an emergency startup diskette   . . . . . . . . . . . . . . . . . . . . . . . . . . . . . . . .165Protecting your computer from viruses   . . . . . . . . . . . . . . . . . . . . . . . . . . . . . . . . .167Managing hard drive space   . . . . . . . . . . . . . . . . . . . . . . . . . . . . . . . . . . . . . . . . . .169Checking hard drive space   . . . . . . . . . . . . . . . . . . . . . . . . . . . . . . . . . . . . . . .169Using Disk Cleanup  . . . . . . . . . . . . . . . . . . . . . . . . . . . . . . . . . . . . . . . . . . . . .170Scanning the hard drive for errors  . . . . . . . . . . . . . . . . . . . . . . . . . . . . . . . . . .171Defragmenting the hard drive   . . . . . . . . . . . . . . . . . . . . . . . . . . . . . . . . . . . . .173Backing up files   . . . . . . . . . . . . . . . . . . . . . . . . . . . . . . . . . . . . . . . . . . . . . . . .175Using Maintenance Wizard   . . . . . . . . . . . . . . . . . . . . . . . . . . . . . . . . . . . . . . .176Recalibrating the battery . . . . . . . . . . . . . . . . . . . . . . . . . . . . . . . . . . . . . . . . . . . . .177Cleaning your computer  . . . . . . . . . . . . . . . . . . . . . . . . . . . . . . . . . . . . . . . . . . . . .178Cleaning the exterior   . . . . . . . . . . . . . . . . . . . . . . . . . . . . . . . . . . . . . . . . . . . .178Cleaning the keyboard  . . . . . . . . . . . . . . . . . . . . . . . . . . . . . . . . . . . . . . . . . . .179Cleaning the screen  . . . . . . . . . . . . . . . . . . . . . . . . . . . . . . . . . . . . . . . . . . . . .179Cleaning the mouse  . . . . . . . . . . . . . . . . . . . . . . . . . . . . . . . . . . . . . . . . . . . . .179Solo1200.book Page iv Friday, May 25, 2001 10:48 AM
          v14 Reinstalling Device Drivers . . . . . . . . . . . . . . . . . . . . . . . . . . . . . . . . . . . . 181Reinstalling device drivers . . . . . . . . . . . . . . . . . . . . . . . . . . . . . . . . . . . . . . . . . . . 182Updating device drivers  . . . . . . . . . . . . . . . . . . . . . . . . . . . . . . . . . . . . . . . . . . . . . 18415 Restoring Software  . . . . . . . . . . . . . . . . . . . . . . . . . . . . . . . . . . . . . . . . . . . . 187Reinstalling Windows Me   . . . . . . . . . . . . . . . . . . . . . . . . . . . . . . . . . . . . . . . . . . . 188Reinstalling programs   . . . . . . . . . . . . . . . . . . . . . . . . . . . . . . . . . . . . . . . . . . . . . . 18916 Troubleshooting . . . . . . . . . . . . . . . . . . . . . . . . . . . . . . . . . . . . . . . . . . . . . . . 191Safety guidelines  . . . . . . . . . . . . . . . . . . . . . . . . . . . . . . . . . . . . . . . . . . . . . . . . . . 191First steps   . . . . . . . . . . . . . . . . . . . . . . . . . . . . . . . . . . . . . . . . . . . . . . . . . . . . . . . 192Software support tools . . . . . . . . . . . . . . . . . . . . . . . . . . . . . . . . . . . . . . . . . . . . . . 193Troubleshooting  . . . . . . . . . . . . . . . . . . . . . . . . . . . . . . . . . . . . . . . . . . . . . . . . . . . 194CD drive   . . . . . . . . . . . . . . . . . . . . . . . . . . . . . . . . . . . . . . . . . . . . . . . . . . . . . 194Device installation  . . . . . . . . . . . . . . . . . . . . . . . . . . . . . . . . . . . . . . . . . . . . . . 195Diskette drive   . . . . . . . . . . . . . . . . . . . . . . . . . . . . . . . . . . . . . . . . . . . . . . . . . 196File management   . . . . . . . . . . . . . . . . . . . . . . . . . . . . . . . . . . . . . . . . . . . . . . 197Hard drive  . . . . . . . . . . . . . . . . . . . . . . . . . . . . . . . . . . . . . . . . . . . . . . . . . . . .  198Internet   . . . . . . . . . . . . . . . . . . . . . . . . . . . . . . . . . . . . . . . . . . . . . . . . . . . . . . 199Keyboard  . . . . . . . . . . . . . . . . . . . . . . . . . . . . . . . . . . . . . . . . . . . . . . . . . . . . . 200LCD panel  . . . . . . . . . . . . . . . . . . . . . . . . . . . . . . . . . . . . . . . . . . . . . . . . . . . . 200Memory  . . . . . . . . . . . . . . . . . . . . . . . . . . . . . . . . . . . . . . . . . . . . . . . . . . . . . . 201Modem   . . . . . . . . . . . . . . . . . . . . . . . . . . . . . . . . . . . . . . . . . . . . . . . . . . . . . . 201Mouse  . . . . . . . . . . . . . . . . . . . . . . . . . . . . . . . . . . . . . . . . . . . . . . . . . . . . . . . 206Networks  . . . . . . . . . . . . . . . . . . . . . . . . . . . . . . . . . . . . . . . . . . . . . . . . . . . . . 206Passwords  . . . . . . . . . . . . . . . . . . . . . . . . . . . . . . . . . . . . . . . . . . . . . . . . . . . . 207PC Cards . . . . . . . . . . . . . . . . . . . . . . . . . . . . . . . . . . . . . . . . . . . . . . . . . . . . . 207Power   . . . . . . . . . . . . . . . . . . . . . . . . . . . . . . . . . . . . . . . . . . . . . . . . . . . . . . . 207Printer   . . . . . . . . . . . . . . . . . . . . . . . . . . . . . . . . . . . . . . . . . . . . . . . . . . . . . . . 208ScanDisk  . . . . . . . . . . . . . . . . . . . . . . . . . . . . . . . . . . . . . . . . . . . . . . . . . . . . . 209Sound   . . . . . . . . . . . . . . . . . . . . . . . . . . . . . . . . . . . . . . . . . . . . . . . . . . . . . . . 210Video  . . . . . . . . . . . . . . . . . . . . . . . . . . . . . . . . . . . . . . . . . . . . . . . . . . . . . . . . 210Telephone support . . . . . . . . . . . . . . . . . . . . . . . . . . . . . . . . . . . . . . . . . . . . . . . . .  211Before calling Gateway Technical Support   . . . . . . . . . . . . . . . . . . . . . . . . . . 211Telephone numbers   . . . . . . . . . . . . . . . . . . . . . . . . . . . . . . . . . . . . . . . . . . . . 212Tutoring and training  . . . . . . . . . . . . . . . . . . . . . . . . . . . . . . . . . . . . . . . . . . . . . . . 213Self-help   . . . . . . . . . . . . . . . . . . . . . . . . . . . . . . . . . . . . . . . . . . . . . . . . . . . . . 213Tutoring  . . . . . . . . . . . . . . . . . . . . . . . . . . . . . . . . . . . . . . . . . . . . . . . . . . . . . . 213Training  . . . . . . . . . . . . . . . . . . . . . . . . . . . . . . . . . . . . . . . . . . . . . . . . . . . . . . 214Solo1200.book Page v Friday, May 25, 2001 10:48 AM
vi          A Safety, Regulatory, and Legal Information. . . . . . . . . . . . . . . . . . . . . .215Index. . . . . . . . . . . . . . . . . . . . . . . . . . . . . . . . . . . . . . . . . . . . . . . . . . . . . . . . . . . . . .  231Solo1200.book Page vi Friday, May 25, 2001 10:48 AM
11www.gateway.comChecking Out Your Gateway Solo 1200Tips & Tricks To access the contents of this manual while you are traveling, download an electronic copy from www.gateway.com/support/manlib/.Solo1200.book Page 1 Friday, May 25, 2001 10:48 AM
2Chapter 1: Checking Out Your Gateway Solo 1200www.gateway.comFrontComponent DescriptionCover release latch Open notebook cover by pressing the release latch.Cover release latchSolo1200.book Page 2 Friday, May 25, 2001 10:48 AM
3Leftwww.gateway.comLeftComponent Icon DescriptionPC Card eject button Press the eject button to remove a PC Card from the PC Card slot.PC Card slot Insert one Type I, II, or III PC Card into this slot. For more information, see “Adding a PC Card” on page 138.Diskette drive Insert a standard 3.5-inch diskette into this drive. For more information, see “Using diskettes” on page 82.Diskette drive eject button Press the eject button to remove a diskette from the drive.PC Card eject button PC Card slot Diskette drive Diskette drive eject buttonSolo1200.book Page 3 Friday, May 25, 2001 10:48 AM
4Chapter 1: Checking Out Your Gateway Solo 1200www.gateway.comRightComponent Icon DescriptionCD drive Insert CDs into this drive. For more information, see “Using the CD drive” on page 83.CD drive indicator Lights up when the computer is accessing the CD drive.CD drive eject button Press the eject button to eject the disc tray from the drive.Microphone jack Plug a microphone into this jack.Headphone jack Plug headphones or amplified speakers into this jack.Modem jack Plug a telephone cord into this jack.Battery charge indicator The LED shows the battery activity and status.■Green – battery is fully charged.■Orange – battery is being charged.■Red – battery is low.■Blinking and red – battery is very low.■Blinking and orange – battery is malfunctioning.CD drive CD drive indicatorCD drive eject button Microphone jack Headphone jackModem jackPower indicatorBattery charge indicatorSolo1200.book Page 4 Friday, May 25, 2001 10:48 AM
5Rightwww.gateway.comPower indicator Lights up when the notebook is turned on and shows notebook power status:■LED on – notebook is ON.■LED off – notebook is OFF or in Hibernate.■LED flashing – notebook is in Standby.Component Icon DescriptionSolo1200.book Page 5 Friday, May 25, 2001 10:48 AM
6Chapter 1: Checking Out Your Gateway Solo 1200www.gateway.comBackComponent Icon DescriptionUSB ports Plug USB (Universal Serial Bus) devices (such as a USB Iomega™ Zip™ drive, printer, scanner, or camera) into these ports.Parallel port Plug a parallel printer into this port.Fan Helps cool internal components. Do not block or insert objects into these slots.Monitor port Plug an external (VGA) monitor into this port.Kensington™ lock slot Secure your computer to an object by connecting a Kensington cable lock to this slot.Ethernet jack (optional) Plug a 10/100 Ethernet network cable into this jack. For more information, see “Connecting to an Ethernet network” on page 30 and “Networking Your Computer” on page 147.Power connector Plug the AC adapter cable into this connector.USB ports Parallel port Monitor portFanKensington lock slotEthernet jackPower connectorSolo1200.book Page 6 Friday, May 25, 2001 10:48 AM
7Bottomwww.gateway.comBottomComponent Icon DescriptionHard drive assembly Remove this assembly to replace the hard drive.Certificate of Authenticity label Find the registration key for the operating system on this label.Memory bay Install a memory module in this bay.Battery release latch Slide to release the battery.Battery Insert the battery into this bay.System identification label Find the product model number and serial number on this label.Hard drive assemblyBattery release latchBatterySystem identification labelMemory bayCertificate of authenticity labelSolo1200.book Page 7 Friday, May 25, 2001 10:48 AM
8Chapter 1: Checking Out Your Gateway Solo 1200www.gateway.comIdentifying your modelThe label on the bottom of your computer contains information that identifies your notebook model. Gateway Technical Support will need this information if you call for assistance. Label information varies by model.Gateway part numberGateway model numberGateway serial numberRevision code and display type/ processor sizeInternal wireless devicesSolo1200.book Page 8 Friday, May 25, 2001 10:48 AM
9Accessorieswww.gateway.comAccessories Gateway offers accessories that can help you make the most of using your notebook.Batteries and automobile/airplane power adaptersIf you run your notebook on battery power for extended periods, you may want to buy an additional battery so that you can swap batteries when necessary.With an automobile/airplane power adapter, you can save battery power by plugging your notebook into an automobile cigarette lighter or an airplane in-flight power receptacle.Carrying casesGateway has large-capacity carrying cases if you need additional space for accessories or supplies.External devicesYou can attach external devices such as a keyboard, mouse, printer, or monitor to your notebook.MemoryLarge programs, such as multimedia games or graphics programs, use a lot of memory. If your programs are running more slowly than you think they should, try adding more memory.PrintersYou can attach many types of printers to your computer. The most common types are inkjet and laser printers, which print in color or black and white.Inkjet printers and cartridges are relatively inexpensive, but usually they are slower than laser printers. Using an inkjet color printer, you can print pictures, banners, greeting cards, as well as documents.Laser printers and cartridges are more expensive, but usually they print much faster than inkjet printers. Laser printers are better than inkjet printers when you are printing large documents.Solo1200.book Page 9 Friday, May 25, 2001 10:48 AM
10Chapter 1: Checking Out Your Gateway Solo 1200www.gateway.comSolo1200.book Page 10 Friday, May 25, 2001 10:48 AM
112www.gateway.comGetting StartedThis chapter provides basic information about your Gateway notebook. Read this chapter to find out:■How to connect the AC adapter■How to start and turn off your notebook■How to use the keyboard■How to use the EZ Pad™ touchpad■How to connect the modem■How to connect to a network■How to install peripheral devicesWarning Radio frequency wireless communication can interfere with equipment on commercial aircraft. Current aviation regulations require wireless devices to be turned off while traveling in an airplane. IEEE 802.11b (also known as wireless Ethernet or Wifi) and Bluetooth communication devices are examples of devices that provide wireless communication.Important If your system came equipped with an internal radio frequency wireless device, see “Safety, Regulatory, and Legal Information” on page 215 for general wireless regulatory and safety guidelines. To find out if your system has an internal wireless device, check the label (see “Identifying your model” on page 8.Solo1200.book Page 11 Friday, May 25, 2001 10:48 AM
12Chapter 2: Getting Startedwww.gateway.comConnecting the AC adapterYou can run your notebook using an AC adapter or the notebook battery. The battery was shipped to you partially charged. You should use the AC adapter right away to fully charge the battery. Allow 24 hours for the battery to fully charge.To connect the AC adapter:1Connect the power cord to the AC adapter.Important If the battery is not fully charged before you use your notebook on battery power for the first time, the battery life may be much shorter than you expect. If the battery life seems short even after being charged for 24 hours, the battery may need to be recalibrated. For information on recalibrating the battery, see “Recalibrating the battery” on page 177.Warning Replace the power cord if it becomes damaged. The replacement cord must be of the same type and voltage rating as the original cord or the notebook may be damaged.Solo1200.book Page 12 Friday, May 25, 2001 10:48 AM
13Connecting the AC adapterwww.gateway.com2Connect the AC adapter to your notebook’s power connector.3Plug the power cord into an AC power outlet.The battery charging indicator light turns on. If the battery charging indicator light does not turn on, disconnect the adapter from your notebook and repeat Step 2.4When you finish using your notebook the first time, turn the notebook off and leave the notebook connected to AC power for at least 24 hours.Warning Do not attempt to disassemble the AC adapter. The AC adapter has no user-replaceable or user-serviceable parts inside. The AC adapter has dangerous voltages that can cause serious injury or death. Contact Gateway about returning defective AC adapters.Solo1200.book Page 13 Friday, May 25, 2001 10:48 AM
14Chapter 2: Getting Startedwww.gateway.comProtecting from power source problemsDuring a power surge, the voltage level of electricity coming into your computer can increase to far above normal levels and cause data loss or system damage. Protect your computer and peripherals by connecting them to a surge protector, which will absorb voltage surges and prevent them from reaching your computer.Warning High voltages can enter your computer through both the power cord and the modem connection. Protect your computer by using a surge protector. If you have a telephone modem, use a surge protector that has a modem jack. If you have a cable modem, use a surge protector that has an antenna/cable TV jack. During an electrical storm, unplug both the surge protector and the modem.Solo1200.book Page 14 Friday, May 25, 2001 10:48 AM
15Starting your notebookwww.gateway.comStarting your notebookTo start the notebook:1Open your notebook by pressing the latch on the front of your notebook and lifting the LCD panel.2Press the power button located above the keyboard.Power buttonSolo1200.book Page 15 Friday, May 25, 2001 10:48 AM
16Chapter 2: Getting Startedwww.gateway.comThe power button is preset to On/Off mode. However, you can also set it to function in Standby/Resume mode. For instructions on changing the power button mode, see “Changing automatic power settings” on page 113.3If you are starting your computer for the first time, follow the on-screen instructions to set up your computer.Waking up your notebookWhen you have not used your notebook for several minutes, it will go into a power-saving mode called Standby. While in Standby, the power indicator light flashes.If your notebook has gone into Standby mode, “wake” it up by pressing the power button. For more information on changing power-saving settings, see “Managing Power” on page 107.Solo1200.book Page 16 Friday, May 25, 2001 10:48 AM
17Turning off your notebookwww.gateway.comTurning off your notebookTo turn off your notebook:1Click Start, then select Shut Down. The Shut Down Windows dialog box opens.2Select Shut down.3Click OK. Windows shuts down and turns off your notebook.Important If for some reason you cannot use the Shut down option in Windows to turn off your notebook, press and hold the power button for about five seconds.Solo1200.book Page 17 Friday, May 25, 2001 10:48 AM
18Chapter 2: Getting Startedwww.gateway.comStatus indicatorsCaps lockPad lockScroll lockDiskettedrive Harddrive CD driveSolo1200.book Page 18 Friday, May 25, 2001 10:48 AM
19Status indicatorswww.gateway.comThis light turns on... When...Caps Lock is turned on.Pad Lock is turned on.Scroll Lock is turned on.The notebook is accessing the diskette drive.The notebook is accessing the hard drive.The notebook is accessing the CD drive.1Solo1200.book Page 19 Friday, May 25, 2001 10:48 AM
20Chapter 2: Getting Startedwww.gateway.comUsing the keyboardYour notebook features a full-size keyboard that has the full functionality of a desktop computer keyboard. Many of the keys have been assigned alternate functions, including shortcut keys for Windows, function keys for specific system operations, and the Pad Lock keys for the numeric keypad.You can attach an external keyboard to the notebook using a USB port. You do not need to shut down the notebook to connect a USB keyboard.System keys System keysNumeric keypadNavigation keysFN key Windows key Windows key Applicationkey Arrow keysSolo1200.book Page 20 Friday, May 25, 2001 10:48 AM
21Using the keyboardwww.gateway.comKeysComponent Icon DescriptionFunction keys Press these keys labeled F1 to F12 to perform actions in programs. For example, pressing F1 may open help.Each program uses different function keys for different purposes. Refer to the program documentation to find out more about the function key actions. Numeric keypad Use these keys to type numbers when numeric keypad is turned on. Press FN+PAD LOCK to turn on the numeric keypad.System keys Press these green or blue-colored keys in combination with the FNkey to perform a specific action.Navigation keys Press these keys to move the cursor to the beginning of a line, to the end of a line, up the page, down the page, to the beginning of a document, or to the end of a document.FN key Press the FNkey in combination with a green or blue-colored system key (such as STANDBY, or PAUSE) to perform a specific action.Windows key Press to open the Windows Start menu. These keys can also be used in combination with other keys to open utilities like F(Search utility), R(Run utility), and E(Explorer utility).Application key Press for quick access to shortcut menus and help assistants in Windows.Arrow keys Press these keys to move the cursor up, down, right, or left.Solo1200.book Page 21 Friday, May 25, 2001 10:48 AM
22Chapter 2: Getting Startedwww.gateway.comSystem key combinationsWhen you press the FN key and a system key at the same time, the notebook performs an action identified by the green or blue text on the key.Press and hold FN while pressing this system key... To...Display the power status box in the upper left corner of your screen. The menu shows the battery charge level, the BIOS version, and whether the AC adapter is being used. Press the key combination again to close this box.Toggle the notebook screen between the LCD, an external monitor, or both at the same time. A monitor must be plugged into the monitor port on the notebook.Enter Standby mode. Press the power button to leave Standby mode.Turn on Pad Lock so you can use the numeric keypad. Press this key combination again to turn off Pad Lock. The Pad Lock status indicator lights up while this function is turned on.Pause the text scrolling in a DOS screen. The Scroll Lock status indicator appears when this function is turned on. Press the key combination again to continue scrolling. (This function is only available in some programs.)Pause execution of a DOS program. (This function is only available in some programs.)Stop the currently running DOS program. (This function is only available in some programs.)Increase the volume.Solo1200.book Page 22 Friday, May 25, 2001 10:48 AM
23Using the keyboardwww.gateway.comDecrease the volume.Mute the volume.Press and hold FN while pressing this system key... To...Solo1200.book Page 23 Friday, May 25, 2001 10:48 AM
24Chapter 2: Getting Startedwww.gateway.comMulti-function buttonsButton Icon Press to...E-mail Open your e-mail program.Internet Open your Web browser.E-mail Internet Help User-defined shortcutSolo1200.book Page 24 Friday, May 25, 2001 10:48 AM
25Using the keyboardwww.gateway.comHelp Open online help.User-defined shortcut Open the program you assign to this key.Button Icon Press to...Solo1200.book Page 25 Friday, May 25, 2001 10:48 AM
26Chapter 2: Getting Startedwww.gateway.comUsing the EZ Pad touchpadThe EZ Pad™ consists of a touchpad, two buttons, and a rocker switch.When you move your finger on the touchpad, the pointer (arrow) on the screen moves in the same direction.You can use the EZ-Pad left and right buttons below the touchpad to select objects. You can scroll, zoom, autoscroll, and pan using the rocker switch between the touchpad buttons. Scrolling capabilities are available in some Windows applications, including Microsoft Office.TouchpadLeft touchpad buttonRight touchpad buttonRocker switchSolo1200.book Page 26 Friday, May 25, 2001 10:48 AM
27Using the EZ Pad touchpadwww.gateway.comUsing the touchpadTo... Do this...Move the pointer on the screen. Move your finger around on the touchpad. If you run out of space on your touchpad and need to move the pointer farther, lift your finger, move it to the middle of the touchpad, then continue moving your finger.Select an object on the screen. Position the pointer over the object. Press the left button below the touchpad once. This action is called clicking.Start a program or open a file or folder.Position the pointer over the object. Press the left button below the touchpad twice in rapid succession. This action is called double-clicking.Access a shortcut menu or find more information about an object on the screen.Position the pointer over the object. Quickly press and release the right button once. This action is called right-clicking.Solo1200.book Page 27 Friday, May 25, 2001 10:48 AM
28Chapter 2: Getting Startedwww.gateway.comUsing the rocker switchMove an object on the screen. Position the pointer over the object. Press the left button and hold it down, then use the touchpad to move (drag) the object to the appropriate part of the screen. Release the button to drop the object where you want it.To... Do this...Scroll up/down Press forward or backward on the rocker switch to scroll through documents.Zoom in/out Press and hold the CTRL key as you apply pressure to the rocker switch.Data zoom Press and hold the SHIFT key as you rock the switch to jump to a hyperlink, return to previous Web sites using Internet Explorer, or expand or collapse menu trees in Windows Explorer.Autoscroll Click both sides of the rocker switch and let go once. The document continues flowing until you use a keystroke, mouse click, or additional rocker action to quit scrolling.Pan Hold down both sides or the middle of the rocker switch and swipe your finger across the Touchpad to scroll quickly, either vertically or horizontally. Lift your finger from the touchpad to quit scrolling.To... Do this...then dragSolo1200.book Page 28 Friday, May 25, 2001 10:48 AM
29Connecting the modemwww.gateway.comConnecting the modemIf your notebook has a modem jack, the notebook has a built-in V.92 56K modem.To connect the modem:1Insert one end of the telephone cord into the modem jack  on the right side of the notebook.2Insert the other end of the telephone cord into a telephone wall jack. The modem will not work with digital or PBX telephone lines.3Start your notebook, then start your communications software.Caution To reduce the risk of fire, use only a No. 26 AWG or larger telecommunications line cord.Solo1200.book Page 29 Friday, May 25, 2001 10:48 AM
30Chapter 2: Getting Startedwww.gateway.comConnecting to an Ethernet networkIf your notebook has a network jack, you can connect it to a 10/100 Ethernet network.To connect to a network:1Insert one end of the network cable into the network jack  on the back of the notebook.2Insert the other end of the network cable into a network wall jack. Ask your network administrator to help you select the correct network jack.Your notebook is now physically connected to the network. Your network administrator can help you log onto your network.Solo1200.book Page 30 Friday, May 25, 2001 10:48 AM
31Connecting to an Ethernet networkwww.gateway.comBroadband Internet connectionsYou can use your computer’s Ethernet jack for more than just networking. Many broadband Internet connections, such as cable modems and DSL modems, connect to your computer’s Ethernet jack. For more information, see “Using the Internet” on page 71 and “Networking Your Computer” on page 147.Solo1200.book Page 31 Friday, May 25, 2001 10:48 AM
32Chapter 2: Getting Startedwww.gateway.comInstalling a printer, scanner, or other peripheral deviceYour computer has two Universal Serial Bus (USB) ports and a parallel printer port. These ports are used for connecting peripheral devices such as printers, scanners, and digital cameras to your computer.USB ports support plug-and-play and hot swapping, which means that your computer will usually recognize such a device whenever you plug it into the appropriate port. When you use a USB device for the first time, your computer will prompt you to install any software the device needs. After doing this, you can disconnect and reconnect the device at any time.Parallel devices are not plug-and-play. Refer to the device documentation for detailed information and installation instructions.Solo1200.book Page 32 Friday, May 25, 2001 10:48 AM
333www.gateway.comGetting HelpThis chapter tells you about additional information resources available to help you use your computer. It includes the following topics:■HelpSpot™■Online help■Gateway Web siteTips & Tricks To access the contents of this manual while you are traveling, download an electronic copy from www.gateway.com/support/manlib/.Solo1200.book Page 33 Friday, May 25, 2001 10:48 AM
34Chapter 3: Getting Helpwww.gateway.comHelpSpotHelpSpot is an easily accessible collection of Help information, troubleshooters, instructional videos, and automated support. Use HelpSpot to answer questions about Windows and to help you quickly discover and use the many features of your Gateway computer.To start HelpSpot:■Click Start, then select Help.-OR-Double-click the Gateway Help and Support desktop icon.HelpSpot opens.If this is the first time you have started HelpSpot on your computer, you will experience a brief wait while HelpSpot builds the help database, then HelpSpot will display an introductory video.Solo1200.book Page 34 Friday, May 25, 2001 10:48 AM
35HelpSpotwww.gateway.comYou can find help information by clicking a link, performing a search, or browsing the index. To learn about how to work with documents and programs, use your mouse, and other topics, click the Getting Started link on the HelpSpot main page.Solo1200.book Page 35 Friday, May 25, 2001 10:48 AM
36Chapter 3: Getting Helpwww.gateway.comHelpSpot VideosHelpSpot contains several short videos to help introduce you to new concepts or show you how to perform various tasks.To play a HelpSpot video:■To watch a video in HelpSpot, click Videos on the HelpSpot navigation bar, then click a video title. The video plays.Solo1200.book Page 36 Friday, May 25, 2001 10:48 AM
37Online helpwww.gateway.comOnline helpMany programs provide information online so you can research a topic or learn how to perform a task while you are using the program. Most online help information can be accessed by selecting a topic from a Help menu or by clicking a Help button.You can search for information by viewing the help contents, checking the index, searching for a topic or keyword, or browsing through the online help.Solo1200.book Page 37 Friday, May 25, 2001 10:48 AM
38Chapter 3: Getting Helpwww.gateway.comGateway Web siteGateway provides a variety of information on its Web site to help you use your computer.Visit the Gateway Web site at www.gateway.com for:■Technical documentation and product manuals■Technical tips and support■Hardware drivers■A glossary of computer terms■Frequently asked questions (FAQs)For more information about connecting to the Internet, see “Learning about the Internet” on page 72.Solo1200.book Page 38 Friday, May 25, 2001 10:48 AM
39Gateway Web sitewww.gateway.comYou can access the following resources through the Gateway Web site or through HelpSpot:Resource Service description LocationGateway Update Utility This utility automatically finds, downloads, and installs the latest drivers for your Gateway-supplied hardware.www.gateway.com/ support/index.shtmlChat with Gateway CoPilotUse this remote-help utility that allows Gateway to deliver live person-to-person computer support to you. Any time you engage in a live chat session, a Gateway support representative has the ability to resolve your in-warranty technical issue in real time. This is done by simultaneously viewing your desktop, controlling the mouse and keyboard, and chatting with you.www.gateway.com/ support/index.shtml-OR-HelpSpotChat with Search AssistantEngage in a live Internet chat session to help you find data on the Gateway.com technical support Web site. If the assistants cannot direct you to the solution on the technical support site, they will refer you to the area or department that can.www.gateway.com/ support/index.shtml-OR-HelpSpotE-mail Tech Support Get the answers to your technical inquiries by e-mail from a Gateway Technical Support representative.www.gateway.com/ support/index.shtmlE-mail a Friend Send a link for the Web page you are currently viewing on the Gateway Web site to anyone in the world with an e-mail address.www.gateway.com/ support/index.shtmlFrequently Asked QuestionsGet the answers to many of our most common customer service-related questions. www.gateway.com/ support/index.shtmlChat with Customer ServiceEngage in a live Internet chat session with a Gateway Customer Service Assistant about a non-technical issue.www.gateway.com/ support/index.shtml-OR-HelpSpotE-mail Customer ServiceGet the answers to your non-technical inquiries by e-mail from a Gateway Customer Service Assistant.www.gateway.com/ support/index.shtmlSolo1200.book Page 39 Friday, May 25, 2001 10:48 AM
40Chapter 3: Getting Helpwww.gateway.comChat with eSales Advisor Get a personalized look at what system is best suited for your own individual needs. To use this service, fill out the eSales Advisor Questionnaire. The eSales Advisor will contact you by telephone and discuss the Gateway solution that best fits your needs.www.gateway.com-OR-HelpSpotOrder Status Get information on whether your order has been received, is in production, or has been shipped. You will also be given an estimated or actual shipping date, depending on the status. This information is updated daily and is available 24 to 36 hours after an order is placed.www.gateway.comResource Service description LocationSolo1200.book Page 40 Friday, May 25, 2001 10:48 AM
414www.gateway.comWindows BasicsRead this chapter to get basic information on how to:■Work on the Windows desktop■Manage files and folders■Work with documents■Use shortcuts■Transfer software from your old computerHelpSpot For more information on using Windows, double-click the HelpSpot icon on your desktop.Solo1200.book Page 41 Friday, May 25, 2001 10:48 AM
42Chapter 4: Windows Basicswww.gateway.comAbout the Windows environmentAfter your computer starts, the first screen you see is the Windows desktop. The desktop is like the top of a real desk. Think of the desktop as your personalized work space where you open programs and perform other tasks.Your desktop may be different from the example shown below, depending on how your computer is set up.Solo1200.book Page 42 Friday, May 25, 2001 10:48 AM
43About the Windows environmentwww.gateway.comDesktop itemsIcons are graphic representations of objects on the desktop that you select and open, such as a drive, folder, file, or program. Buttons are graphic representations of controls that you use to open windows or apply changes.Desktop icons, buttons, and elements DescriptionThe My Computer icon provides access to drives and other computer controls. Double-click the My Computer icon to view the drives and folders on your computer.My Documents is a folder where you store your personal files. You can create other folders to save files in, but My Documents is easy to find because it is on the desktop. Double-click the My Documents icon to view your personal files and folders.The Recycle Bin is where files, folders, and programs that you discarded are stored. You must empty the Recycle Bin to permanently delete them from your computer. For instructions on how to use the Recycle Bin, see “Deleting files and folders” on page 53.Microsoft Internet Explorer is a program called a browser that lets you view Web sites and Web pages on the Internet. Double-click the Internet Explorer icon to open the browser.The America Online Included icon lets you connect to the America Online ISP (Internet Service Provider).Double-click the America Online Included icon to dial the service.Gateway has provided an easily accessible interactive guide called HelpSpot. This guide is designed to provide help information and let you quickly discover and use the features of your computer. Double-click the HelpSpot icon to begin.Solo1200.book Page 43 Friday, May 25, 2001 10:48 AM
44Chapter 4: Windows Basicswww.gateway.comThe Start button provides access to programs, files, help for Windows and other programs, and computer tools and utilities.Click the Start button, then open a file or program by clicking (selecting) an item on the menu that opens.The taskbar is the bar at the bottom of the screen. It contains the Start button on the left and a clock on the right. Other buttons on the taskbar represent programs that are running.Click a program’s button on the taskbar to open the program’s window.Desktop icons, buttons, and elements DescriptionSolo1200.book Page 44 Friday, May 25, 2001 10:48 AM
45About the Windows environmentwww.gateway.comWindow itemsWhen you double-click the icon for a drive, folder, file, or program, a window opens on the desktop. This example shows the Local Disk (C:) window, which opens after double-clicking the Local Disk (C:) icon in the My Computer window.Minimize buttonMaximize buttonClose buttonTitle barMenu barSolo1200.book Page 45 Friday, May 25, 2001 10:48 AM
46Chapter 4: Windows Basicswww.gateway.comEvery program window looks a little different because each has its own menus, icons, and controls. Most windows include these items:Window item DescriptionThe title bar is the horizontal bar at the top of a window that shows the name of the program.Clicking the minimize button reduces the active window to a button on the taskbar. Clicking the program button in the taskbar opens the window again.Clicking the maximize button expands the active window to fit the entire screen. Clicking the maximize button again restores the window to its former size.Clicking the close button closes the active window or program.Clicking an item on the menu bar starts an action such as Print or Save.Solo1200.book Page 46 Friday, May 25, 2001 10:48 AM
47Using the Start menuwww.gateway.comUsing the Start menuYou can start programs, open files, customize your system, get help, search for files and folders, and more using the Start menu.To open the Start menu:■Click the Start button on the lower left of the Windows desktop. The Start menu opens showing you the first level of menu items.When you move the mouse pointer over any menu item that has an arrow next to it, another menu, or submenu, opens and reveals related files, programs, or commands. Click a file or program to open it.Solo1200.book Page 47 Friday, May 25, 2001 10:48 AM
48Chapter 4: Windows Basicswww.gateway.comWorking with files and foldersYou can organize your files and programs to suit your preferences much like you would store information in a file cabinet. You can store these files in folders and copy, move, and delete the information just as you would reorganize and throw away information in a file cabinet.About drivesDrives are like file cabinets because they hold files and folders. A computer almost always has more than one drive. Each drive has a letter, usually Local Disk (C:) for the hard drive and 3½ Floppy (A:) for the diskette drive. You may also have more drives such as a CD drive.To view the drives on your computer: ■Double-click the My Computer icon on your desktop.HelpSpot For more information on working with files and folders, double-click the HelpSpot icon on your desktop.DrivesSolo1200.book Page 48 Friday, May 25, 2001 10:48 AM
49Working with files and folderswww.gateway.comTo see the files and folders on a drive: ■Double-click the drive icon. If you do not see the contents of a drive after you double-click its icon, click View the entire contents of this drive.Solo1200.book Page 49 Friday, May 25, 2001 10:48 AM
50Chapter 4: Windows Basicswww.gateway.comAbout folders and filesFolders are much like the folders in a file cabinet. They contain files and other folders.Files are much like paper documents—letters, spreadsheets, and pictures—that you keep on your computer. In fact, all information on a computer is stored in files.To create a folder:1Double-click the My Computer icon on the desktop. The My Computer window opens.2Double-click the drive or folder, for example 3½ Floppy (A:) or Local Disk (C:), where you want to put the new folder.The drive or folder window opens. If you do not see the contents of the drive or folder, click View the entire contents of [this drive or this folder].3Select File, then New, then Folder. The new folder is created.4Type a name for the folder, then press ENTER. The new folder name appears under the folder.FoldersFilesSolo1200.book Page 50 Friday, May 25, 2001 10:48 AM
51Working with files and folderswww.gateway.comCopying and moving files and foldersThe skills you need to copy and move files are copying, cutting, and pasting.When you copy and paste a selection, you place a copy of the file you selected on the Windows clipboard, which stores it. Then, when you decide what folder you want the copy to go in (the destination folder), you paste it there.When you cut and paste a selection, you remove the file from its folder and place the file on the Windows clipboard. When you decide where you want the file to go, you paste it there.To copy a file or folder to another folder:1Right-click the file or folder that you want to copy. A menu opens on the desktop.2Select Copy from the menu.3Open the destination folder.4With the pointer inside the destination folder, press the right mouse button.5Select Paste. A copy of the file or folder appears in the new location.Important The clipboard stores whatever you cut or copy until you cut or copy again. Then the clipboard contains the new information only. Therefore, you can paste copies of a file into more than one place, but as soon as you copy or cut a file again, the old file is deleted from the clipboard.Solo1200.book Page 51 Friday, May 25, 2001 10:48 AM
52Chapter 4: Windows Basicswww.gateway.comTo move a file or folder to another folder:1Right-click the file or folder that you want to move. A menu opens on the desktop.2Select Cut from the menu.3Open the destination folder.4With the pointer inside the destination folder, press the right mouse button.5Select Paste. The file or folder you moved appears in its new location and is removed from its old location.Solo1200.book Page 52 Friday, May 25, 2001 10:48 AM
53Working with files and folderswww.gateway.comDeleting files and foldersWhen you throw away paper files and folders, you take them from the file cabinet and put them in a trash can. Eventually the trash can is emptied.In Windows, you throw away files and folders by first moving them to Windows trash can, the Recycle Bin, where they remain until you decide to empty the bin.You can recover any file in the Recycle Bin as long as the bin has not been emptied.To delete files or folders: 1In My Computer or Windows Explorer, select the files or folders that you want to delete. For instructions on how to select multiple files and folders, see “Shortcuts” on page 64.2Select File, then Delete. Windows moves the files and folders to the Recycle Bin.To recover files or folders from the Recycle Bin:1Double-click the Recycle Bin icon. The Recycle Bin window opens listing the files and folders you have thrown away since you last emptied it.2Select the files or folders that you want to restore. For instructions on how to select multiple files and folders, see “Shortcuts” on page 64. Select File, then Restore. Windows returns the deleted files or folders to their original locations.Solo1200.book Page 53 Friday, May 25, 2001 10:48 AM
54Chapter 4: Windows Basicswww.gateway.comTo empty the Recycle Bin:1Double-click the Recycle Bin icon on the desktop. The Recycle Bin window opens.2Click File, then Empty Recycle Bin.Windows asks you if you are sure that you want to empty the bin.3Click Yes. Windows permanently deletes all the files in the Recycle Bin.Caution Emptying the Recycle Bin permanently erases any files or folders in the bin. These files cannot be restored.Solo1200.book Page 54 Friday, May 25, 2001 10:48 AM
55Working with files and folderswww.gateway.comBrowsing for files and foldersA file or folder that you need is rarely right on top of your Windows desktop. It is usually on a drive inside a folder that may be inside yet another folder, and so on.Windows drives, folders, and files are organized in the same way as a real file cabinet in that they may have many levels (usually many more levels than a file cabinet, in fact). So you usually will have to search through levels of folders to find the file or folder that you need. This is called browsing.To browse for a file:1Double-click the My Computer icon on the desktop.2Double-click the drive or folder that you think contains the file or folder that you want to find.3Continue double-clicking folders and their subfolders until you find the file or folder you want. (If you do not see the contents of a folder, click View the entire contents of this folder.) Solo1200.book Page 55 Friday, May 25, 2001 10:48 AM
56Chapter 4: Windows Basicswww.gateway.comSearching for filesIf you are looking for a particular file or folder or a set of files or folders that have characteristics in common, but you do not remember where they are stored on your hard drive, you can use the Search utility in Windows to search by:■Name or part of a name■Creation date■Modification date■File type■Text contained in the file■Time period in which it was created or modifiedYou can also combine search criteria to refine searches.Files and folders found using these utilities can be opened, copied, cut, renamed, or deleted directly from the list in the results window.Solo1200.book Page 56 Friday, May 25, 2001 10:48 AM
57Searching for fileswww.gateway.comUsing the Windows Search utility To find files and folders using the Search utility:1Click Start, then select Search, then For Files or Folders. The search dialog box opens.2If you want to search by file or folder name, type in all or part of the file or folder name in the Search for files or folders named box in the left pane of the window.■If you type all of the name, Search will list all files and folders of that name.■If you type part of the name, Search will list all of the file and folder names containing the letters you typed.Solo1200.book Page 57 Friday, May 25, 2001 10:48 AM
58Chapter 4: Windows Basicswww.gateway.com3Click Search Now. When the search is completed, Windows lists the files and folders whose names contain the text that you searched for.4Open a file, folder, or program by double-clicking the name in the list.Using advanced search optionsSearch can find files meeting more criteria than file name. You can select options to narrow your search by clicking Search Options and selecting the options that you want:■Date searches for files that were created or modified on a specific date or during a specific period.■Size searches for files of a specific size.■Type searches for files of a specific type, such as a program or a text document.■Advanced Options give you access to further search options.Solo1200.book Page 58 Friday, May 25, 2001 10:48 AM
59Working with documentswww.gateway.comWorking with documentsDocuments are commonly word processing files, spreadsheet files, or other similar files. The basic methods of creating, saving, opening, and printing a document apply to most of these types of files.The following examples illustrate the concepts for creating, saving, opening, and printing a document in Microsoft® Word. Though these examples use Microsoft Word, similar procedures apply to other programs such as Microsoft Excel, Microsoft Works, and Microsoft Publisher.For more information about using a program, select Help on the menu bar.Solo1200.book Page 59 Friday, May 25, 2001 10:48 AM
60Chapter 4: Windows Basicswww.gateway.comCreating a new documentTo create a new document:1Click Start, then select Programs, then Microsoft Word. Microsoft Word starts and a blank document opens.2Select File, then select New. The New dialog box opens.3Click a tab for the type of document you want to create, select a document template style, then click OK. The document template opens.4Begin composing your document. Use the menus and toolbar buttons at the top of the window to format the document.HelpSpot For more information on creating a document, double-click the HelpSpot icon on your desktop.Solo1200.book Page 60 Friday, May 25, 2001 10:48 AM
61Working with documentswww.gateway.comSaving a documentAfter you create a document, you need to save it if you want to use it later.To save a document in Microsoft Word:1Select File, then Save. The Save As dialog box opens.2Select the folder in which you plan to save the file from the Save in list.3Type the new file name.4Click Save.HelpSpot For more information on saving a document, double-click the HelpSpot icon on your desktop.FilefolderFilenameSolo1200.book Page 61 Friday, May 25, 2001 10:48 AM
62Chapter 4: Windows Basicswww.gateway.comOpening a documentTo view, revise, or print an existing document, you need to open it. Open the document in the program it was created in.To open a document in Microsoft Word:1Click Start, then select Programs, then Microsoft Word. Microsoft Word starts and a blank document opens.2Select File, then Open.3Find the folder that contains the file you want to open in the Look in list.4Double-click the document file name. The document opens.HelpSpot For more information on opening a document, double-click the HelpSpot icon on your desktop.FilefolderFilenameSolo1200.book Page 62 Friday, May 25, 2001 10:48 AM
63Working with documentswww.gateway.comPrinting a documentTo print a document, you must have a printer connected to your computer or have access to a network printer. For more information about installing or using your printer, refer to the printer documentation.To print a document in Microsoft Word:1Make sure that the printer is turned on and loaded with paper.2Start Microsoft Word and open a document.3Select File, then Print. The Print dialog box opens.4Select the print options, then click OK. The document prints.HelpSpot For more information on printing a document, double-click the HelpSpot icon on your desktop.Solo1200.book Page 63 Friday, May 25, 2001 10:48 AM
64Chapter 4: Windows Basicswww.gateway.comShortcutsThe following table shows a few shortcuts that you can use in Windows and almost all programs that run in Windows. For more information on Windows shortcuts, see your Windows or program documentation.To... Do this...Copy a file, folder, text, or graphic Select the item, then press CTRL +C.Cut a file, folder, text, or graphic Select the item, then press CTRL +X.Paste a file, folder, text, or graphic Select the item, then press CTRL +V.Select multiple icons on the desktop Click the first icon, press and hold down the CTRL key, then click each of the remaining icons that you want to select.Select multiple items in a list or in an Explorer window Click the first item, press and hold down the CTRL key, then click each of the remaining items.Select multiple adjacent items in a list Click the first item in the list, press and hold down the SHIFT key, then click the last item in the list.Permanently delete a file or folder Click the file or folder, then press SHIFT +DELETE. The file is permanently deleted and is not stored in the Recycle Bin.Rename a file or folder Select the file or folder, press F2, type the new name, then press ENTER.Close the active window or program Press ALT +F4.Switch to a different file, folder, or running program Press ALT +TAB.Solo1200.book Page 64 Friday, May 25, 2001 10:48 AM
65Transferring software and hardware from your old computerwww.gateway.comTransferring software and hardware from your old computerIf your new computer is replacing an old computer, you may have personal data files, Internet settings, a printer or other peripheral devices, and other unique computer settings that you want to move from your old computer to your new one.Gateway Data Mover Plus kitIf both your old and new computers have USB ports, you can use the Gateway Data Mover Plus kit to automatically transfer customized computer settings, such as Desktop settings, sound schemes, Internet and e-mail settings, as well as personal data files, such as documents, spreadsheets, and photographs. This program, with its special USB cable, helps you do this quickly and efficiently. To order the Gateway Data Mover Plus kit, visit the Gateway Accessory Store at www.gateway.com.Transferring filesYou can manually transfer your personal data files by copying them to removable media, such as a diskette, CD, or Zip disk, or by using a home network. For more information, see “Networking Your Computer” on page 147.Finding your filesMany programs automatically save your personal data files in the My Documents folder. Look in your old computer’s My Documents folder for personal data files. Use Windows Search to locate other personal data files.Solo1200.book Page 65 Friday, May 25, 2001 10:48 AM
66Chapter 4: Windows Basicswww.gateway.comTo find files in the My Documents folder:1Double-click the My Computer icon on your desktop. The My Computer window opens.2Double-click the C:\ drive icon. The C:\ window opens.3Double-click the My Documents folder. The My Documents window opens and displays many of your saved personal data files.You can often identify different data file types by looking at the file’s extension (the part of the file name following the last period). For example, a document file might have a .DOC extension and a spreadsheet file might have an .XLS extension.To find files using Search:1Click Start, then select Search, then For Files or Folders. The Search Results window opens.2Use Windows Search to locate data files by file name or file type. For help on finding files, click Help, then select Help Topics.File type File usually ends in...Documents .DOC, .TXT, .RTF, .HTM, .HTML, .DOTSpreadsheets .XLS, .XLT, .TXTPictures .JPG, .BMP, .GIF, .PDF, .PCT, .TIF, .PNGMovies .MPEG, .MPG, .AVI, .GIF, .MOVSound and Music .WAV, .CDA, .MP3, .MID, .MIDISolo1200.book Page 66 Friday, May 25, 2001 10:48 AM
67Transferring software and hardware from your old computerwww.gateway.comTransferring Internet settingsYou can use different methods to transfer your Internet account from your old computer to your new one.Setting up your ISP■If your current Internet Service Provider (ISP) software came preinstalled on your new computer, run that setup program. If it asks to set up a new account or an existing one, choose to reconnect to an existing account.■If your current ISP software is not preinstalled on your new computer, locate the original Internet setup program provided by your local ISP, or contact your ISP to see if they have an updated version of their software, and install it on your new computer.■If you use MSN as your ISP, or if you know your ISP settings, use the Windows Internet Connection Wizard.To use the Internet Connection Wizard:1Click Start, then select Programs, Accessories, Communications, then Internet Connection Wizard. The Internet Connection Wizard window opens.2Configure your Internet settings by following the on-screen instructions.Transferring your e-mail and address bookRefer to your old e-mail program’s online help for information on exporting and importing e-mail messages and the address book. You can often export all of your old e-mail messages or address book to a diskette, then import them from the diskette into your new computer’s e-mail program. Alternatively, you may want to consider simply printing the old information or e-mailing it to yourself.Transferring your Internet shortcutsYou can export and import your old bookmarks (Netscape Navigator) or favorites (Microsoft Internet Explorer). For more information, refer to your Internet browser program’s online help.Solo1200.book Page 67 Friday, May 25, 2001 10:48 AM
68Chapter 4: Windows Basicswww.gateway.comReinstalling your old printer or scannerOlder printers, scanners, or other peripheral devices may have Windows support integrated (built in), which means you do not need any additional software. Newer devices, however, usually require your original software installation CDs or diskettes.Reinstalling a USB printer or scannerUSB devices may have special installation instructions. Refer to your USB device’s installation guide.Reinstalling a parallel port printerYou can usually install parallel port printers by following these steps.To reinstall your old printer:1Exit Windows and turn off your computer.2Connect your parallel port printer.3Turn on your printer, then your computer.4If Windows detects your printer, install your printer by following the on-screen instructions. You are finished.- OR -If Windows does not detect the printer, go to the next step.5Click Start, then select Settings, then Printers. The Printers window opens.6Double-click the Add Printer icon. The Add Printer Wizard window opens.7Install your printer by following the on-screen instructions.Refer to your peripheral device’s user guide for installation information and tips. Because most installation software is periodically updated, you should also check the publisher’s Web site for driver updates.Solo1200.book Page 68 Friday, May 25, 2001 10:48 AM
69Transferring software and hardware from your old computerwww.gateway.comReinstalling your old programsYou probably use some programs that did not come installed on your new computer, such as personal finance software, graphics programs, or games.Spend some time going through your old computer’s Start and Programs menus, making note of any programs you want to install on your new computer. Locate your original program installation CDs and installation guides. Your original CDs and guides should contain any serial numbers or product ID keys that may be required for program installation and registration. Remember to check the publisher’s Web site for important program updates.Tips & Tricks If your new computer comes with a newer version of a program, it is usually best to use the newer version than to reinstall the old one.Solo1200.book Page 69 Friday, May 25, 2001 10:48 AM
70Chapter 4: Windows Basicswww.gateway.comSolo1200.book Page 70 Friday, May 25, 2001 10:48 AM
715www.gateway.comUsing the InternetThis chapter provides information about the Internet and the World Wide Web, and tells you how to set up the America Online® Internet service so that you can send and receive e-mail and access other Internet resources.Solo1200.book Page 71 Friday, May 25, 2001 10:48 AM
72Chapter 5: Using the Internetwww.gateway.comLearning about the InternetThe Internet is a worldwide network of computers linked together to provide information to people everywhere. The two most popular services on the Internet are e-mail and the World Wide Web. You can access this network by connecting your computer to a telephone, DSL, or cable line and signing up with an Internet Service Provider (ISP).If you want to access the Internet you need:■A modem – a device that connects your computer, using a telephone, DSL, or cable line, to other computers or servers.■An Internet Service Provider – a company that provides access to the Internet through an ISP server. When you connect to an ISP, the ISP server lets you access the Internet and your e-mail messages.■A Web browser – a program that displays information from the World Wide Web.■An e-mail program – a program that lets you create, send, and receive e-mail messages over the Internet.Your computer connects to the Internet through an ISP.ISP Servers let you connect to the Internet and access your e-mail messages.Internet Servers store information so other computers can access it from the Internet.Solo1200.book Page 72 Friday, May 25, 2001 10:48 AM
73Setting up an Internet accountwww.gateway.comSetting up an Internet accountBefore you can view the information on the World Wide Web, you need to set up an Internet account with an Internet Service Provider (ISP). If you have chosen America Online as an ISP, follow these instructions to set up and connect to your account. To establish a different ISP service, or to transfer an existing account to this computer, contact the ISP directly.If you set up an account with America Online, an Internet e-mail address is created for you. After completing the setup you are ready to access the Internet.To set up an Internet account with America Online:1Double-click the America Online Included icon. If the icon is not on the Windows desktop, look for the America Online Included icon located in the Online Services folder on the Windows desktop.2Follow the on-screen instructions. After setting up your account, you can connect to the Internet and access your e-mail services.HelpSpot For more information on setting up an Internet account, double-click the HelpSpot icon on your desktop.Solo1200.book Page 73 Friday, May 25, 2001 10:48 AM
74Chapter 5: Using the Internetwww.gateway.comAccessing your Internet accountTo connect to your America Online Internet account: 1Double-click the America Online Included icon. The Connect dialog box opens.2Complete the member name and password information, then click Connect. The computer dials the Internet account telephone number.If you are using a service other than America Online, check with your ISP for the correct procedure for connecting.After connecting, the Web browser window opens. For information about the Web and the Web browser, see “Using the World Wide Web” on page 75.To disconnect from your America Online Internet account:■Click X in the top right corner of the America Online program. Your computer disconnects from the Internet.If you are using a service other than America Online, check with your ISP for the correct procedure for disconnecting.HelpSpot For more information on accessing your Internet account, double-click the HelpSpot icon on your desktop.Important Make sure that your computer disconnects correctly from your Internet account. If you do not have an “unlimited hours” ISP account, you may have to pay for the time that you are connected, even if you are not at the computer.Solo1200.book Page 74 Friday, May 25, 2001 10:48 AM
75Using the World Wide Webwww.gateway.comUsing the World Wide WebThe World Wide Web is a multimedia window to the Internet that gives you access to millions of information sources.Information on the Web comes to you on Web pages, which are electronic documents that you view using a Web page display program called a browser. You can use any of the commercially available Web browsers, like Microsoft Internet Explorer, which comes installed on your new computer.Web pages can contain not only text, but animations, music, and other multimedia features.A group of related Web pages is called a Web site. You can access Web sites to shop, track investments, read the news, download programs, and much more.You can explore a Web site or visit other Web sites by clicking areas on the Web page called links, or hyperlinks. A link may be colored or underlined text, a picture, or an animated image. You can identify a link by moving the mouse pointer over it. If the pointer changes to a hand, the item is a link.To learn more about using the Web browser features, select Help in the menu bar.WebpageLinkLinked Web pageSolo1200.book Page 75 Friday, May 25, 2001 10:48 AM
76Chapter 5: Using the Internetwww.gateway.comConnecting to a Web siteAfter you set up an account with an Internet Service Provider (ISP) such as America Online, you can access the many information sources on the World Wide Web.To connect to a Web site:1Connect to your Internet account. After the computer connects, a default opening page or welcome screen opens.2To go to a different Web site, type the address (called a URL for “Universal Resource Locator”) in the browser address bar (for example www.gateway.com) then click GO on the browser address bar.- OR - On the current Web page, click a link to a Web site.The Web browser locates the server computer on the Internet, downloads (transfers) data to your computer, and displays the page on the site that you requested.Sometimes Web pages display slowly. The speed that a Web page displays on your screen depends on the complexity of the Web page and other Internet conditions. Additionally, the speed of your connection will determine how fast Web pages display.HelpSpot For more information on connecting to a Web site, double-click the HelpSpot icon on your desktop.Solo1200.book Page 76 Friday, May 25, 2001 10:48 AM
77Using the World Wide Webwww.gateway.comDownloading filesDownloading is the process of transferring files from a computer on the Internet to your computer.To protect your computer against viruses, make sure that you scan the files you download. For more information, see “Protecting your computer from viruses” on page 167.To download files or programs from a Web site:1Connect to your Internet account.2In the address bar, type the address of the Web site that contains the file or program you want to download, then click GO on the browser address bar.- OR -Click on links on a Web page to navigate to the Web site containing the file that you want to download.3Create or locate the folder where you want to store the file on your computer.4Click the link on the Web page for the file that you want to download.5Follow the on-screen instructions for saving the file in the folder that you created.A copy of the file is downloaded to your computer. The time that it takes to transfer the file to your computer depends on file size and Internet conditions.6Open the folder that you created.7Install or view the downloaded file by double-clicking it. If applicable, follow the instructions provided on the Web site to run or install the program.HelpSpot For more information on downloading files, double-click the HelpSpot icon on your desktop.Solo1200.book Page 77 Friday, May 25, 2001 10:48 AM
78Chapter 5: Using the Internetwww.gateway.comUsing e-mailE-mail (electronic mail) lets you send messages to anyone who has an Internet connection and e-mail address. E-mail is usually a free service of your Internet account.The Internet never closes, so you can send e-mail messages at any time. Your e-mail messages arrive at most e-mail addresses in minutes.An e-mail address consists of a user name, the @ symbol, and the Internet domain name of the Internet Service Provider (ISP) or company that “hosts” that user. Your e-mail address is assigned when you sign up for an account with an ISP. For example, a person with an account with the America Online ISP might have an e-mail address that is similar to this one:Sending e-mailTo send e-mail using America Online:1Connect to your America Online account.2Click Write.3Type the e-mail address of the recipient you want to send e-mail to in the Send To box.4Type the subject of your e-mail in the Subject box.5Type the e-mail message.6When finished, click Send Now. Your e-mail is sent over the Internet to the e-mail address you specified.HelpSpot For more information on sending e-mail, double-click the HelpSpot icon on your desktop.jdoe@aol.comUser name Internet domain nameSolo1200.book Page 78 Friday, May 25, 2001 10:48 AM
79Using e-mailwww.gateway.comChecking your e-mailTo check your e-mail using America Online:1Connect to your America Online account.2Click Read.For more information about managing and organizing your e-mail messages, see the online help in your e-mail program.HelpSpot For more information on checking your e-mail, double-click the HelpSpot icon on your desktop.Solo1200.book Page 79 Friday, May 25, 2001 10:48 AM
80Chapter 5: Using the Internetwww.gateway.comSolo1200.book Page 80 Friday, May 25, 2001 10:48 AM
816www.gateway.comUsing MultimediaThis chapter provides information on using the multimedia capabilities of your notebook. Read this chapter to learn how to:■Use the diskette drive■Use the CD drive■Play CDs■Record and play audio files■Use Windows Media Player■Use MusicMatchSolo1200.book Page 81 Friday, May 25, 2001 10:48 AM
82Chapter 6: Using Multimediawww.gateway.comUsing DrivesThis section explains how to use the diskette and CD drives.Using diskettes The diskette drive uses 3.5-inch diskettes (sometimes called floppy disks). Diskettes are useful for storing files or transferring files to another computer.To use a diskette:1Insert the diskette into the diskette drive with the label facing up.2To access a file on the diskette, double-click the My Computer icon, the drive letter, then the file.3To remove the diskette, make sure the drive activity light is off, then press the diskette eject button.Caution Do not expose diskettes to water or magnetic fields. Exposure could damage the data on the diskette.Solo1200.book Page 82 Friday, May 25, 2001 10:48 AM
83Using Driveswww.gateway.comUsing the CD driveYou can use your computer to enjoy a wide variety of multimedia features, such as playing games and listening to audio CDs.To insert a CD:1Press the eject button on the CD drive, then pull the disc tray completely open.Solo1200.book Page 83 Friday, May 25, 2001 10:48 AM
84Chapter 6: Using Multimediawww.gateway.com2Place the CD in the tray with the label up, then press down carefully on the disc until it snaps into place.3Push the tray in until it is closed.Solo1200.book Page 84 Friday, May 25, 2001 10:48 AM
85Adjusting the volumewww.gateway.comAdjusting the volumeYou can use the volume controls to adjust the overall volume and the volume of specific sound devices in your computer.To adjust overall volume level:■Click the speaker icon on the taskbar, then drag the slider to change the volume or click to select the Mute check box.-OR-On the keyboard, press the FN+PAGE UP or PAGE DOWN keys to change the volume, or press FN+HOME keys to turn off (mute) all sound.HelpSpot For more information on adjusting volume, double-click the HelpSpot icon on your desktop.Solo1200.book Page 85 Friday, May 25, 2001 10:48 AM
86Chapter 6: Using Multimediawww.gateway.comTo adjust specific volume levels:1Double-click the speaker icon on the taskbar. The Volume Control dialog box opens.If the device you want to adjust does not appear in the Volume Control dialog box, select Options, then Properties. Select the audio device you want to adjust, then click OK.2Drag the volume level and balance sliders for the device you want to adjust, then close the window. For more information about the volume controls, select Help in the Volume Control dialog box.Solo1200.book Page 86 Friday, May 25, 2001 10:48 AM
87Listening to music CDswww.gateway.comListening to music CDsThe Windows Media Player turns your computer into a multimedia center. Use the player to listen to Internet radio stations, play and copy your CDs, look for Internet movies, and create lists of all media on your computer. For more information about using the Windows Media Player, select Help.To listen to a CD in the Windows Media Player:■Insert a CD into the CD drive. The Windows Media Player opens and the CD plays.If the Windows Media Player does not open automatically when you insert the CD, open it from the Start menu by clicking Start, then selecting Programs, then Windows Media Player. When the media player opens, click  (play).Play/Pause Stop Sound Controls Tra ck ControlsSolo1200.book Page 87 Friday, May 25, 2001 10:48 AM
88Chapter 6: Using Multimediawww.gateway.comRecording and playing audioUse the instructions below to make an audio recording by speaking into the microphone.To make an audio recording:1Plug a microphone into the microphone jack. For the location of the jack, see “Right” on page 42Click Start, then select Programs, Accessories, Entertainment, then Sound Recorder. The Sound Recorder opens.3Click   (record), then speak into the microphone.4When you finish recording, click   (stop).5Select File, then Save As. The Save As dialog box opens.6Name the recording, specify the path, then click Save. The recording is saved.HelpSpot For more information on recording and playing audio, double-click the HelpSpot icon on your desktop.Rewind Fast Forward Play Stop RecordSolo1200.book Page 88 Friday, May 25, 2001 10:48 AM
89Recording and playing audiowww.gateway.comTo play an audio recording in Sound Recorder:1Open the Sound Recorder.2Select File, then Open. The Open dialog box opens.3Select the file you want to play, then click Open.4Play the file by clicking   (play), then stop playing the file by clicking  (stop).Solo1200.book Page 89 Friday, May 25, 2001 10:48 AM
90Chapter 6: Using Multimediawww.gateway.comPlaying audio and video files with Windows Media PlayerThe Windows Media Player can play several types of audio and video files, including WAV, MIDI, MP3, AU, AVI, and MPEG formats. For more information about using the Windows Media Player, select Help.To play a file using the Windows Media Player:1Click Start, then select Programs, Accessories, Entertainment, then Windows Media Player. The Windows Media Player opens.2Select File, then Open. The Open dialog box opens.3Select the file you want to play, then click Open.4Play the file by clicking   (play), then stop playing the file by clicking  (stop).For more information about the Windows Media Player, select Help.Video fileinformationVideoscreenPlay/Pause StopSolo1200.book Page 90 Friday, May 25, 2001 10:48 AM
91Using MusicMatchwww.gateway.comUsing MusicMatchUsing the MusicMatch™ program, you can:■Play music CDs■Create MP3 music files from your music CDs■Use your music files to build a music library■Enter music track information■Listen to Internet RadioPlaying CDsYou can use the MusicMatch program to play music CDs.To play a music CD:1Double-click the musicmatch JUKEBOX icon on your desktop. MusicMatch opens.2Insert the music CD into the CD drive on your computer, then click the CD tab. The names of the music tracks appear in the playlist area.3Click (play).HelpSpot For more information on using MusicMatch, double-click the HelpSpot icon on your desktop.Solo1200.book Page 91 Friday, May 25, 2001 10:48 AM
92Chapter 6: Using Multimediawww.gateway.comCreating music filesUsing MusicMatch, you can copy the tracks from a music CD to your computer’s hard drive as MP3 files.Here are some terms that you need to know before you get started:■Bit rate is the number of bits required to store one second of music. CD quality is 128 kilobits per second. A high bit rate gives you better sound quality but the file size is also larger. For information about changing the sound quality settings, see the online help in MusicMatch.■MP3 (MPEG Layer 3) is a standard for digitally compressing high-fidelity music into compact files without noticeably sacrificing quality. MP3 files end in the file extension .MP3.■Ripping is the process of copying a music track from a music CD and storing it on your computer’s hard drive.To create (rip) MP3 files:1Double-click the musicmatch JUKEBOX icon.2Insert a CD into the CD drive, then click (record). The Recorder window opens.3In the Recorder window, select the tracks you want to record, then click (record). The tracks that you selected are copied as MP3 files to your computer’s hard drive.Solo1200.book Page 92 Friday, May 25, 2001 10:48 AM
93Using MusicMatchwww.gateway.comEditing track informationAfter you add a CD track as an MP3 file to your music library, you can edit the track’s information.To edit track information:1In MusicMatch, click Music Library. The Music Library window opens.2In the Music Library window, right-click the file, then select Edit Track Tag. The Edit Track Tag dialog box opens.3Enter information such as track title, lead artist, album, and genre.4Click OK. The new track information is displayed in the MusicMatch playlist, music library, and recorder.Solo1200.book Page 93 Friday, May 25, 2001 10:48 AM
94Chapter 6: Using Multimediawww.gateway.comBuilding a music libraryUse MusicMatch to build a music library. You can organize your music tracks by categories, find a track quickly by using the sort features, and add information to a music file.You can add music tracks to your music library by:■Creating MP3 files – When you create MP3 files from the tracks on your music CD, MusicMatch automatically adds these files to your music library.■Dragging and Dropping – Drag and drop files from Windows Explorer or your desktop to the music library.■Downloading files from the Internet – When you are connected to the Internet, MP3 files that you download are automatically added to your music library.Solo1200.book Page 94 Friday, May 25, 2001 10:48 AM
95Using MusicMatchwww.gateway.comChanging the music library display settingsTo change the music library display settings:1In MusicMatch, select Options, then Settings. The Settings window opens.2Click the Music Library tab.3Select the categories that you want to display in the columns, then click OK.Solo1200.book Page 95 Friday, May 25, 2001 10:48 AM
96Chapter 6: Using Multimediawww.gateway.comListening to Internet radio Use the Radio feature in MusicMatch to listen to Internet Radio stations.To listen to an Internet radio station:1Connect to the Internet, then in MusicMatch, click Radio Stations.The Radio window opens.Solo1200.book Page 96 Friday, May 25, 2001 10:48 AM
97Using MusicMatchwww.gateway.com2To select one of the MusicMatch Internet radio stations, select one of the Popular Stations. You can also choose another Internet radio station by clicking Broadcast Radio. A window opens that lists radio stations by music format, city, or country.3Select a radio station, then click Play. MusicMatch connects to the station.Using advanced featuresYou can also use MusicMatch to create your own music CDs and to download MP3 files to your portable MP3 player. See the online Help that came with MusicMatch.Solo1200.book Page 97 Friday, May 25, 2001 10:48 AM
98Chapter 6: Using Multimediawww.gateway.comSolo1200.book Page 98 Friday, May 25, 2001 10:48 AM
997www.gateway.comSending and Receiving FaxesPhoneTools lets you send and receive faxes using the modem.After you have created a document using a spreadsheet, word processor, or graphics program, you can send it as a fax. You can also receive faxes on your notebook. This chapter shows you how to:■Set up a fax cover page■Create and send a new fax■Fax a document you created in another program■Receive, view, and print a faxSolo1200.book Page 99 Friday, May 25, 2001 10:48 AM
100Chapter 7: Sending and Receiving Faxeswww.gateway.comSetting up your cover pageBefore you send your first fax, you need to set up your user information. Your fax cover sheets and fax headers will contain this information, which is required by law.To set up your fax cover page: 1If PhoneTools is not open, click Start, then select Programs, PhoneTools, then PhoneTools.2Select Setup, then select General Setup. The General Setup dialog box opens.3Click the Customize tab, then type your personal information in the User boxes.HelpSpot For more information on setting up a fax cover page, double-click the HelpSpot icon on your desktop.Solo1200.book Page 100 Friday, May 25, 2001 10:48 AM
101Setting up your cover pagewww.gateway.com4Click the Fax tab, then enter your name and fax number in the Fax identifier text box. This identifier information is required by law. You can enter up to 20 characters in the text box. We suggest using eight characters for your identifier name, followed by 12 characters for your telephone number.5Click OK.6If you want to change the logo that appears on the cover page, select Setup, then select Logo Management. The Logo Management dialog box opens.Important Some fax machines cannot use special characters such as hyphens. We suggest using spaces instead of hyphens in telephone and fax numbers.Import button Clear buttonSolo1200.book Page 101 Friday, May 25, 2001 10:48 AM
102Chapter 7: Sending and Receiving Faxeswww.gateway.com7If you do not want the PhoneTools logo on your cover page, click the picture then click the clear button.- OR -If you want to replace the PhoneTools logo with one of your own, click the import button then select a picture for the logo. The picture must be saved in a supported format (.BMP, .DGR, .GIF, .JPG, .PCX, .T31, or .TIF) and be small enough to fit in the logo box.8Click OK.Solo1200.book Page 102 Friday, May 25, 2001 10:48 AM
103Sending a faxwww.gateway.comSending a faxTo send a fax:1If PhoneTools is not open, click Start, then select Programs, PhoneTools, then PhoneTools.2Click Send Fax. The Send Fax Wizard opens.HelpSpot For more information on sending a fax, double-click the HelpSpot icon on your desktop.Solo1200.book Page 103 Friday, May 25, 2001 10:48 AM
104Chapter 7: Sending and Receiving Faxeswww.gateway.com3Enter the recipient’s name, company (if applicable), and fax number, then click Next.4Type the message text in the Message Text area.5Select a cover page template from the Template list, then click Next. If you typed a message in the Message Text area, you must select a cover page.6If you want to attach a file, make sure the file is not open, then click  (browse), select the file, then click Open.7Click Next, then click Finish. The Confirm Transmissions dialog box opens.8Click Send. PhoneTools dials the fax number and sends your fax.Solo1200.book Page 104 Friday, May 25, 2001 10:48 AM
105Sending a faxwww.gateway.comFaxing from programsTo fax a document directly from most programs: 1In the program with the document open, select File, then select Print. The Print dialog box opens.2Select the printer CAPTURE FAX BVRP, then click OK. The Send Fax Wizard opens.3Complete the wizard as instructed in “Sending a fax” on page 103.HelpSpot For more information on sending a fax directly from a program, double-click the HelpSpot icon on your desktop.Solo1200.book Page 105 Friday, May 25, 2001 10:48 AM
106Chapter 7: Sending and Receiving Faxeswww.gateway.comReceiving and viewing a faxTo receive and view a fax: 1If PhoneTools is not open, click Start, then select Programs, PhoneTools, then PhoneTools.When PhoneTools is open, it detects incoming faxes and stores them in the In Box.2To view a fax, click Fax Inbox, then double-click the fax you want to view. The fax viewer opens, where you can view and print the fax.HelpSpot For more information on receiving a fax, double-click the HelpSpot icon on your desktop.Important Your notebook cannot detect incoming faxes while in the Standby power-saving mode. For information on changing power-saving settings, see “Changing automatic power settings” on page 113.Solo1200.book Page 106 Friday, May 25, 2001 10:48 AM
1078www.gateway.comManaging PowerWhile your notebook is running on battery power, you should manage power consumption to get the most use out of the battery. This chapter shows you how to:■Check and recharge the battery■Change batteries■Extend the life of the battery by conserving battery power and using alternate power sources■Change power-saving settingsSolo1200.book Page 107 Friday, May 25, 2001 10:48 AM
108Chapter 8: Managing Powerwww.gateway.comMonitoring the battery chargeClosely monitor the battery charge. When the battery charge gets low, change the battery or connect to AC power immediately to prevent losing any unsaved work.Monitor the battery charge by:■Positioning the cursor over the power cord icon or battery icon in the taskbar. A battery status window opens. Move the cursor away from the icon to close the window.■Pressing FN+STATUS to view the Status display, which opens in the upper left corner of the screen. The Status display shows the current power source, the battery charge, and the power management mode.■Looking at the battery charge indicator:■A green light indicates the battery is fully charged■An orange light indicates the battery is being charged■A red light indicates the battery is low■An orange, blinking light indicates the battery is malfunctioning■A red, blinking light indicates the battery is critically low■Waiting for these other low battery warnings:■The battery charge indicator turning red and blinking■A Low Battery messageIf your battery charge indicators display what looks like an inaccurate charge, you may need to recalibrate the battery. For more information, see “Recalibrating the battery” on page 177.Recharging the battery The battery recharges while it is installed and your notebook is connected to AC power. While the battery is recharging, the battery indicator light is orange.Solo1200.book Page 108 Friday, May 25, 2001 10:48 AM
109Changing batterieswww.gateway.comChanging batteriesYour notebook must be plugged into AC or turned off while changing the batteries.To replace the main battery:1If your notebook is on, save all work and turn the power off.2Close the cover.3Turn your notebook over.4Slide the battery release latch to release the battery.Warning Danger of explosion if battery is incorrectly replaced.Replace only with the Gateway Solo 1200 NiMH battery. Discard used batteries according to the manufacturer’s instructions.The battery used in this device may present a fire or chemical burn hazard if mishandled. Do not disassemble, heat above 212°F (100°C), or incinerate. Dispose of used battery promptly. Keep away from children.Solo1200.book Page 109 Friday, May 25, 2001 10:48 AM
110Chapter 8: Managing Powerwww.gateway.com5Hold the latch forward and lift the battery straight out from the notebook.6Slide the recharged battery into the bay and snap it into place.7Open the notebook and press the power button.Solo1200.book Page 110 Friday, May 25, 2001 10:48 AM
111Extending battery lifewww.gateway.comExtending battery lifeConserving battery powerWhile using the battery to power your notebook, conserve power by:■Removing PC Cards when you do not need them. Many PC Cards use a small amount of power while inserted, even if they are not being used.■Modifying the Power Management settings for maximum power savings. For more information, see “Changing automatic power settings” on page 113.■Closing the display panel to turn off the display while you are not using your notebook. The display stays off until you open the panel again.■Using Hibernate mode for maximum power savings while the notebook is not in use. For more information, see “To use Hibernate mode:” on page 117.■Using the CD drive only when necessary. CD drives use a large amount of power.■Recharge the battery often, take an extra battery, and fully recharge the batteries before traveling. For more information, see “Recharging the battery” on page 108 and “Changing batteries” on page 109.Using alternate power sourcesTo extend battery life, use alternate power sources whenever possible.■If traveling internationally, take electrical adapters. Save the battery for times when you cannot use an AC adapter. If you plan on taking your AC adapter, also take a single-plug power surge protector.■If you will have access to an EmPower™ in-flight power receptacle or an automobile cigarette lighter, use an airplane/automobile power adapter. Save the battery for times when you cannot use a power adapter.■To find AC power outlets in airports, look for them next to support pillars, in large areas such as boarding gates, and under banks of telephones.Solo1200.book Page 111 Friday, May 25, 2001 10:48 AM
112Chapter 8: Managing Powerwww.gateway.comChanging power modesYou can use the following power modes to lengthen the life of your notebook’s battery:■Standby - while your notebook is on standby, it switches to a low power state where devices, such as the LCD screen and drives, turn off.■Hibernate - (also called save to disk) writes all current memory (RAM) information to the hard drive, then turns your notebook completely off. The next time you turn on the notebook, it reads the memory information from the hard drive and opens the programs and documents that were open when you activated Hibernate. For more information on using Hibernate mode, see “To use Hibernate mode:” on page 117.Using Standby modeAlways save your work before using the Standby mode. Once in Standby, your computer reduces or turns the power off to most devices except memory. However, the information in the memory is not saved to the hard drive. If power is interrupted, the information is lost.The table below shows how to use Standby mode.If your computer is... ...and youwant to... ...thenOff Start up Press the power button.On Enter Standby mode Press FN+STANDBY.In Standby mode Exit Standby mode Press the power button.On Shut down Click Start, then select Shut Down, Shut down, then click OK.Solo1200.book Page 112 Friday, May 25, 2001 10:48 AM
113Extending battery lifewww.gateway.comChanging automatic power settingsYou can change the function of the power button, Standby key, and power-saving timers by changing power settings on your notebook.You can customize power settings from the Windows Control Panel by selecting power schemes, setting power alarms, adjusting advanced power settings, and turning on Hibernate mode.Power schemes (groups of power settings) let you change power-saving options such as when the monitor or hard drive is automatically turned off. You can select one of the defined power schemes or create a custom power scheme.Alarms can alert you when the battery charge is low.Advanced power settings let you assign different power-saving modes to the power button and Standby key. You can also select which power-saving mode is activated when you close the LCD panel.Solo1200.book Page 113 Friday, May 25, 2001 10:48 AM
114Chapter 8: Managing Powerwww.gateway.comTo change the power scheme1Click Start, then select Settings, then Control Panel. The Control Panel window opens. If you do not see the Power Options icon, click view all Control Panel options.2Double-click the Power Options icon. The Power Options Properties dialog box opens.3Select a power scheme from the Power Schemes list.- OR -Set the timers for System stand by, Turn off monitor, and Turn off hard disks, then save your custom power scheme by clicking Save As and typing in a name for the scheme.4Save the changes by clicking OK.Solo1200.book Page 114 Friday, May 25, 2001 10:48 AM
115Extending battery lifewww.gateway.comTo change the alarm options:1Click Start, then select Settings, then Control Panel. The Control Panel window opens. If you do not see the Power Options icon, click view all Control Panel options.2Double-click the Power Options icon. The Power Options Properties dialog box opens.3Click the Alarms tab.4Adjust the alarm settings, then save the changes by clicking OK.Solo1200.book Page 115 Friday, May 25, 2001 10:48 AM
116Chapter 8: Managing Powerwww.gateway.comTo change advanced power management settings: 1Click Start, then select Settings, then Control Panel. The Control Panel window opens. If you do not see the Power Options icon, click view all Control Panel options.2Double-click the Power Options icon. The Power Options Properties dialog box opens.3Click the Advanced tab.4Select a power-saving mode to be activated by closing the lid or pressing the power button, then save the changes by clicking OK.Solo1200.book Page 116 Friday, May 25, 2001 10:48 AM
117Extending battery lifewww.gateway.comTo use Hibernate mode:1Click Start, then select Settings, then Control Panel. The Control Panel window opens. If you do not see the Power Options icon, click view all Control Panel options.2Double-click the Power Options icon. The Power Options Properties dialog box opens.3Click the Hibernate tab.4Select the Enable hibernate support check box, then click Apply. Hibernate mode is now an option you can select on the Advanced tab and in the Shut Down menu.5To use Hibernate as a power-saving mode, click the Advanced tab, select Hibernate as one of the advanced power settings, then save the changes by clicking OK.6To manually activate Hibernate mode, click Start, then select Shut Down, then Hibernate, then click OK.Solo1200.book Page 117 Friday, May 25, 2001 10:48 AM
118Chapter 8: Managing Powerwww.gateway.comSolo1200.book Page 118 Friday, May 25, 2001 10:48 AM
1199www.gateway.comTravel TipsThese tips can make traveling with your notebook more convenient and trouble-free. This chapter provides information on:■Using the modem■Using your radio frequency wireless connections■Transferring files■Protecting your notebook from loss and theft■Managing your notebook’s power efficientlyTips & Tricks To access the contents of this manual while you are traveling, download an electronic copy from www.gateway.com/support/manlib/.Solo1200.book Page 119 Friday, May 25, 2001 10:48 AM
120Chapter 9: Travel Tipswww.gateway.comModem■Take a telephone cord to connect the modem to telephone jacks. If you are traveling internationally, take telephone jack adapters or an acoustic handset coupler.■Take a telephone line protector.■Take a telephone line tester to check for unsafe lines, especially if you are traveling internationally.■Take remote access information with you so you can connect to your ISP while outside of your usual calling area. A list of country dialing codes may be especially useful if you are traveling internationally.■Download entire Web sites that you frequently visit for off-line viewing if you will be traveling for extended periods without access to an Internet connection.Radio frequency wireless connections■Every country has different restrictions on the use of wireless devices. If your system is equipped with a wireless device, when traveling between countries with your system, check with the local Radio Approval authorities prior to your trip for any restrictions on the use of a wireless device in the destination country.■If your system came equipped with an internal embedded wireless device, see “Safety, Regulatory, and Legal Information” on page 215 for general wireless regulatory guidelines.■Wireless communication can interfere with equipment on commercial aircraft. Current aviation regulations require wireless devices to be turned off while traveling in an airplane. IEEE 802.11b (also known as wireless Ethernet or Wifi) and Bluetooth communication devices are examples of devices which use wireless to communicate.Solo1200.book Page 120 Friday, May 25, 2001 10:48 AM
121Fileswww.gateway.comFiles■Copy your working files from your desktop computer to your notebook before you travel.■If you need to access your desktop computer files from your notebook while traveling, set up the desktop computer for remote access.■Take extra diskettes for transferring files between computers and backing up files.Security■Get a locking cable for your notebook so you can attach a cable lock and leave the notebook in your hotel room while you are away.■Always keep your notebook with you while waiting in airports, train stations, or bus terminals. Be ready to claim your notebook as soon as it passes through the x-ray machine in security checkpoints.■Write down your notebook model number and serial number (available on the system label) in case of theft or loss, and keep the information in a safe place. Also, tape your business card or an address label to your notebook and accessories.■Whoever sits next to you or behind you can see your notebook display. Avoid working with confidential files until you can be sure of privacy.■Use a startup password to restrict access to your notebook.Important Use a password that you can remember, but that is difficult for someone else to guess. The password feature is very secure, with no easy way to recover a forgotten password. If you forget your password, you must return your notebook to Gateway for service. Call Gateway Technical Support for instructions.Solo1200.book Page 121 Friday, May 25, 2001 10:48 AM
122Chapter 9: Travel Tipswww.gateway.comTo create a startup password:1Restart your notebook. As soon as you see a startup screen, press F2. The BIOS Setup utility opens.2Click Security, then select Set Admin password and follow the instructions.3Click Security, then select Set User password and follow the instructions. This is the password you need to enter at startup.4Exit the BIOS Setup utility by clicking Exit, then selecting Save and Exit.5Click OK. When you start your computer, you are prompted to enter the user password you set in Step 3.Power To get the best performance from your notebook, avoid using the battery whenever possible, monitor the battery charge, and use the most efficient power management settings.■For information on conserving battery power, see “Conserving battery power” on page 111.■For information on using alternate power sources, see “Using alternate power sources” on page 111.■For information on monitoring the battery charge, see “Monitoring the battery charge” on page 108.Solo1200.book Page 122 Friday, May 25, 2001 10:48 AM
12310www.gateway.comCustomizing Your NotebookThis chapter provides information about customizing your computer by changing settings in Windows or the system BIOS.You can:■Change screen and display settings■Change the background and screen saver■Adjust the touchpad settings■Program the multi-function buttons on the keyboard■Allocate system memorySolo1200.book Page 123 Friday, May 25, 2001 10:48 AM
124Chapter 10: Customizing Your Notebookwww.gateway.comAdjusting the screen and desktop settingsAdjusting the color depth and screen area are two of the most basic display settings you may need to change. You can also adjust settings such as the screen background and screen saver.Adjusting the color depthColor depth is the number of colors your LCD displays. Various image types require various color depths for optimum appearance on your LCD. For example, simple color drawings may appear adequately in 256 colors while color photographs need millions of colors to be displayed with optimum quality.Windows lets you choose from several color depth settings for your LCD. We recommend that the 32-bit True Color setting be used at all times.If the color in your images seems “false” or “jumpy,” especially after you have played a game or run a video-intensive program, check the color depth setting and return it to 32-bit True Color, if necessary.To change the color depth:1Click Start, then select Settings, then Control Panel. The Control Panel window opens.2Click/Double-click the Display icon. The Display Properties window opens.HelpSpot For more information on adjusting the color depth, double-click the HelpSpot icon on your desktop.Solo1200.book Page 124 Friday, May 25, 2001 10:48 AM

Navigation menu