Quanta Computer IL Notebook Computer User Manual
Quanta Computer Inc Notebook Computer Users Manual
Users Manual
1
USER’S MANUAL
ENGLISH
Notebook Computer
ILXX (X means any character or blank)

2
Contents
Before You Start ………………………………… 3
Taking Care of Your Notebook PC …………………………… 3
Checking You Have Everything ……………………………… 5
Touring the Computer ………………………………………… 6
Front …………………………………………………………… 6
Left side ………………………………………………………… 8
Right side ……………………………………………………… 9
Base ………………………………………………………………10
Getting Started ……………………………… 11
Power ……………………………………………………………11
Installing the battery …………………………………………11
Connecting the AC adapter …………………………………11
Charging the battery …………………………………………11
Switching the Power On ………………………………………12
Using the Keyboard ……………………………………………13
Function Keys …………………………………………………13
Keypad Overlay ………………………………………………14
Using the Touch Pad ……………………………………………14
Troubleshooting ……………………………… 16
Identifying the Problem ………………………………………16
Regulatory Information……………………… 17
FCC Information …………………………………………………17
CE Information …………………………………………………18
Regulatory statement (R&TTE) ………………………………18
Specications ………………………………… 19
3
Before You Start
Taking Care of Your Notebook PC
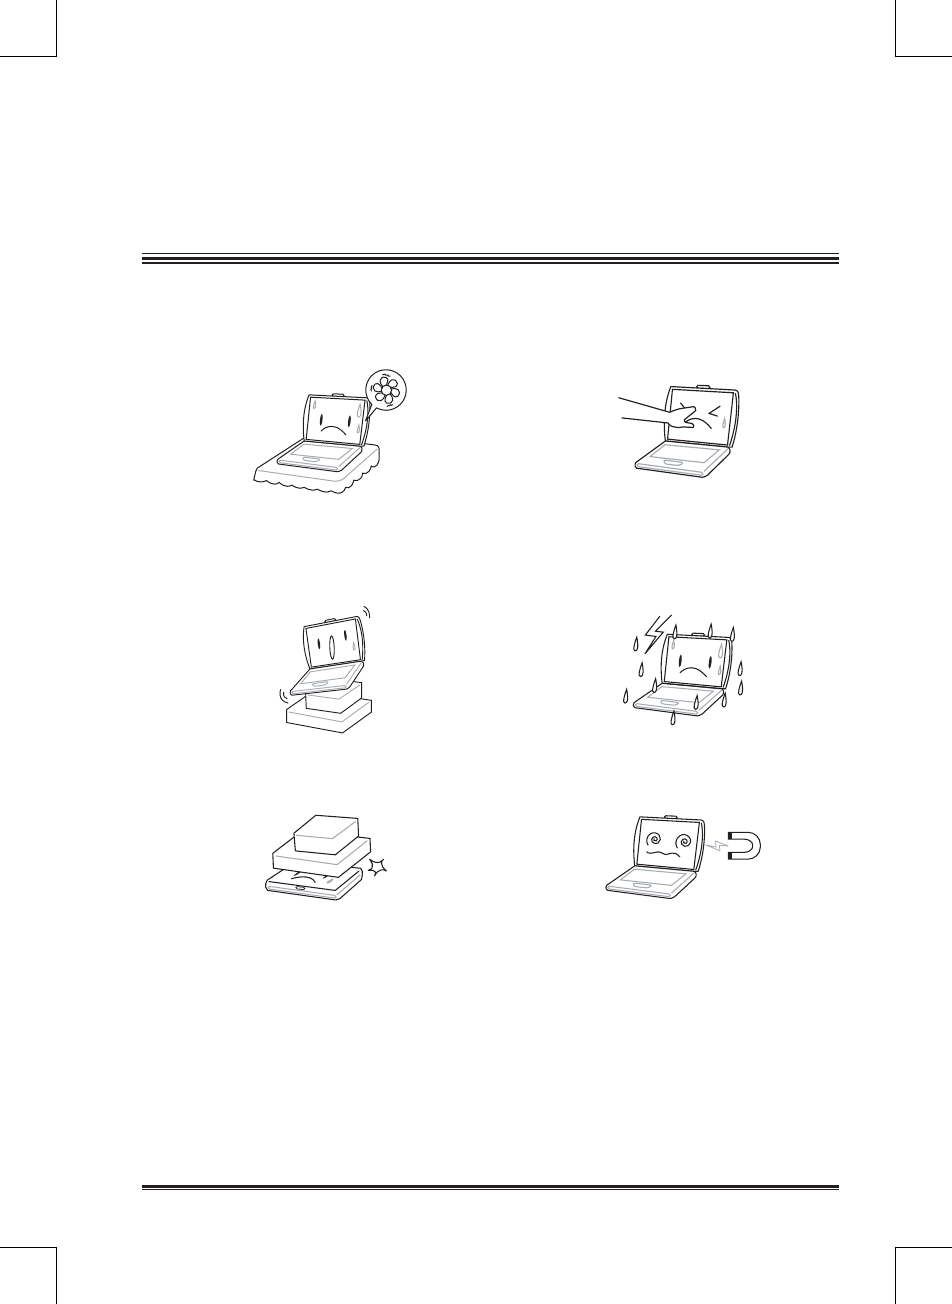
To prevent possible overheating of the
computer's processor, make sure you
don't block the openings provided for
ventilation.
DO NOT press or touch the display
panel.
DO NOT place on uneven or unstable
work surfaces.
DO NOT use your notebook computer
in extreme weather conditions.
DO NOT place or drop objects on the
computer and DO NOT apply heavy
pressure on it.
DO NOT subject the computer to mag-
netic elds.
Before You Start
4
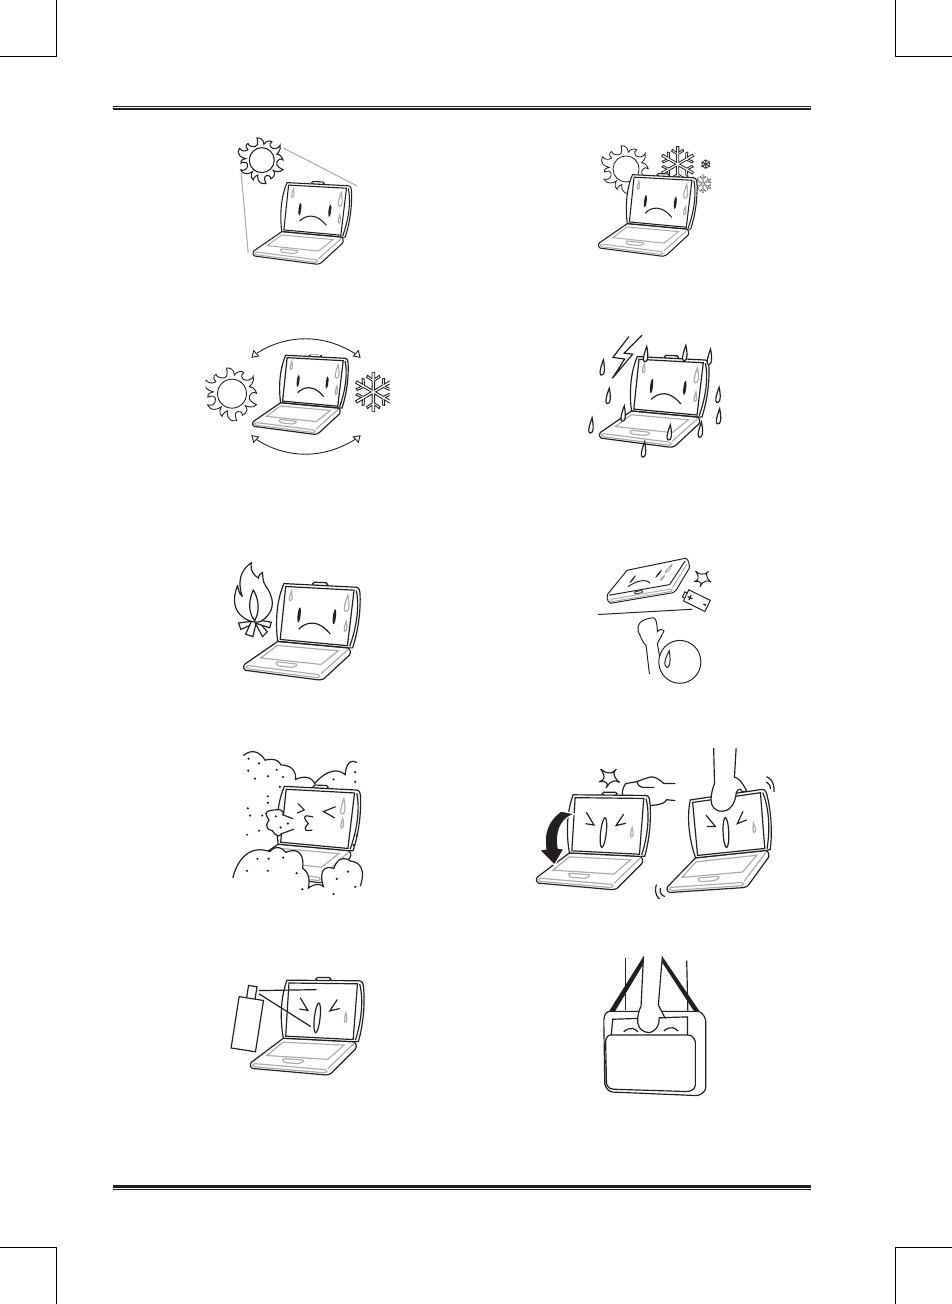
DO NOT expose to direct sunlight. DO NOT use or store in extreme tem-
peratures.
Avoid sudden changes in temperature or
humidity: keep the computer away from
heating and A/C vents.
DO NOT expose the computer to rain or
moisture.
DO NOT place near re or other sources
of heat.
DO NOT tamper with the batteries.
Keep them away from children.
DO NOT expose to dust and/or corro-
sive chemicals.
DO NOT slam your notebook shut, and
never hold it by the display.
DO NOT spray water or any other clean-
ing uids directly on the display.
If you are traveling with your computer,
remember to carry it as hand luggage.
Don’t check it in as baggage.

Before You Start
5
Checking You Have Everything
When you get your notebook PC, make sure you have the items listed below.
Notebook computer
Battery
AC adapter with power cord
Modem cable (RJ-11)
Once you have checked and conrmed that your notebook system is complete, read
through the following pages to learn about your notebook.
Before You Start
6
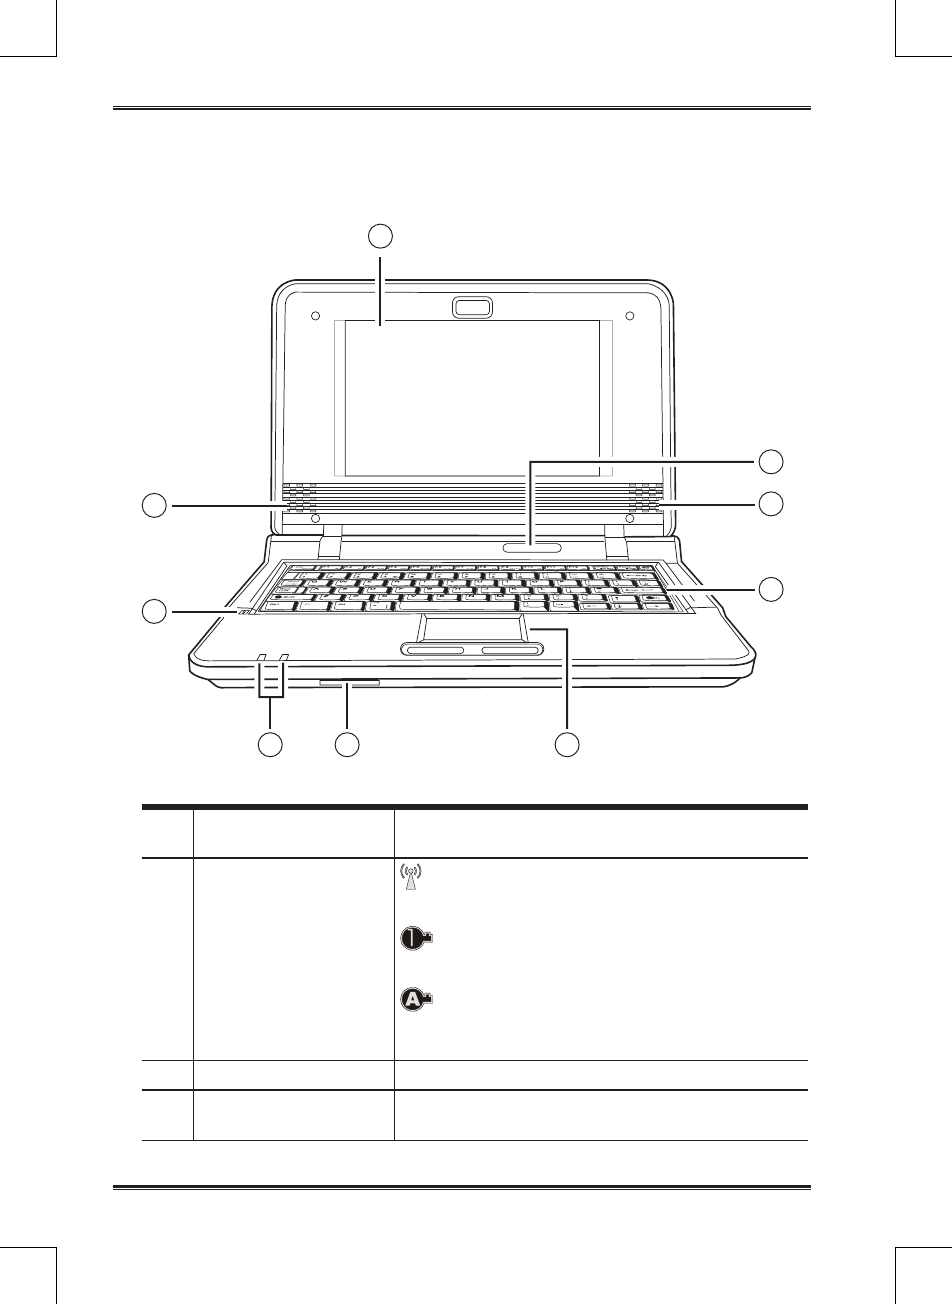
Touring the Computer
Front
6
1
4
3
2
57
8
3
1. Display Panel The display panel is a color LCD panel with back
lighting for the display of text and graphics.
2. System Status LEDs
The Wi On/Off LED is lit when wireless net-
working is turned on.
The Num Lock LED is lit when the internal
keyboard is in numeric keypad overlay mode.
The Caps Lock LED is lit when the keyboard
is in Caps Lock mode (set to type in all capital let-
ters).
3. Stereo Speakers Two built-in speakers allow for stereo sound.
4. Keyboard The 80-key keyboard features a numeric keypad
overlay.
Before You Start
7
5. Touch Pad
The Touch Pad pointing device is a mouse-like
cursor control with two buttons and a touch sensi-
tive movement pad.
6. Memory Card Reader
The memory card reader provides a fast and con-
venient method to transfer pictures, music and
data between your notebook and ash compatible
devices such as digital cameras, MP3 players, mo-
bile phones, and PDAs.
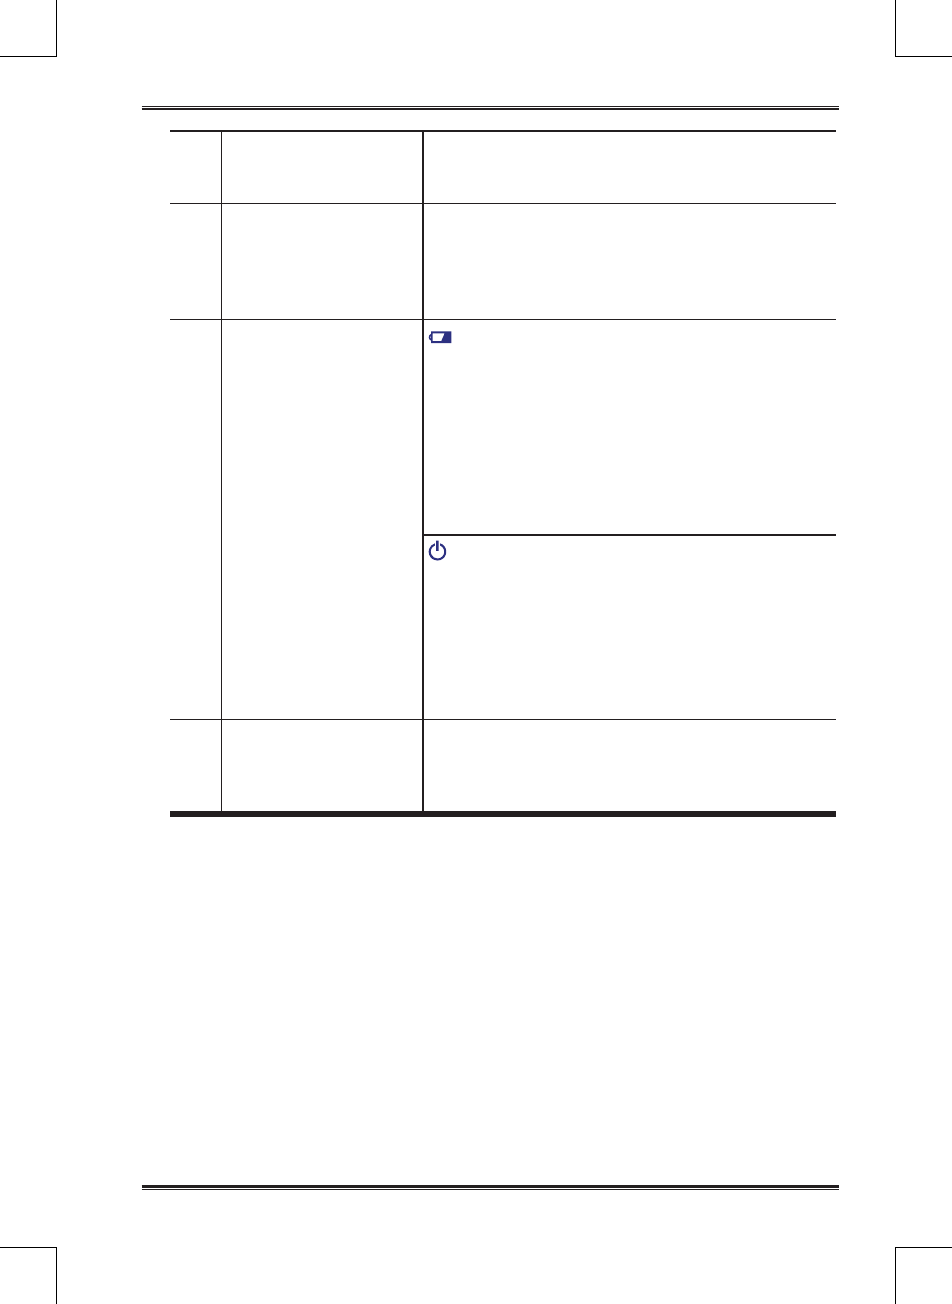
7. Power Status LEDs
The Battery LED shows the battery status as
follows:
• Green Battery full
• Orange Battery charging
• Red, ashing quickly Battery bad
• Red, ashing slowly Battery low
• Off Battery discharged
The Power LED shows the power mode as fol-
lows:
• Orange Power off, adapter connected
• Blue Power on
• Blue, ashing slowly Suspend Mode
• Off Power off, adapter not connected
8. Microphone
The built-in monophonic microphone allows the
computer to receive voice and other audio data
and transmit it to any program which accepts au-
dio input.

Before You Start
8
Left side
1 2 3 4 5
1. Headphone Jack The headphone jack allows you to connect head-
phones, external speakers or an amplier.
2. Microphone Jack The microphone jack allows you to connect an ex-
ternal mono microphone.
3. External Monitor PortThe external monitor port allows you to con-
nect an external monitor.
4. Power Adapter Port
The power adapter port allows you to plug in the
AC adapter to power your notebook and charge
the battery pack.
5. Kensington Lock Slot
The Kensington lock slot allows you to secure
your notebook to an immovable object with an
optional security cable.
Before You Start
9
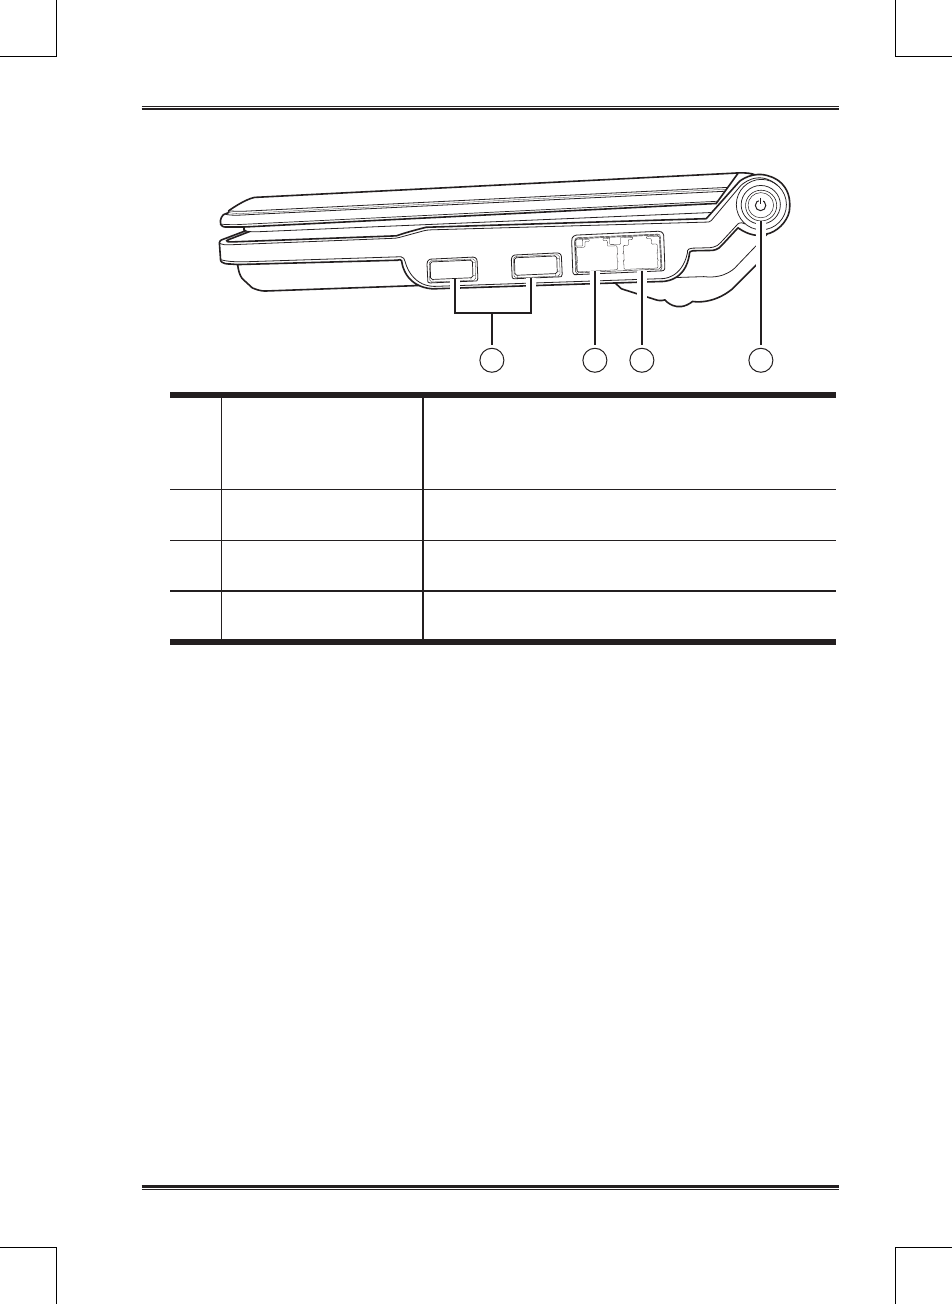
Right side
1 2 3 4
1. USB Ports
The USB ports allow you to connect Universal
Serial Bus devices. They support v2.0 of the USB
standard, which allows data exchange rates as
high as 480 Mb/s.
2. LAN (RJ-45) Port The LAN port accepts a standard RJ-45 plug to
connect to a network, router, or ADSL modem.
3. Modem (RJ-11) Port The modem (RJ-11) port is used to connect the in-
ternal 56k modem with a telephone line.
4. Power On/Off Button This button turns your notebook on and off. See
Switching the Power On, on page 12.
Before You Start
10
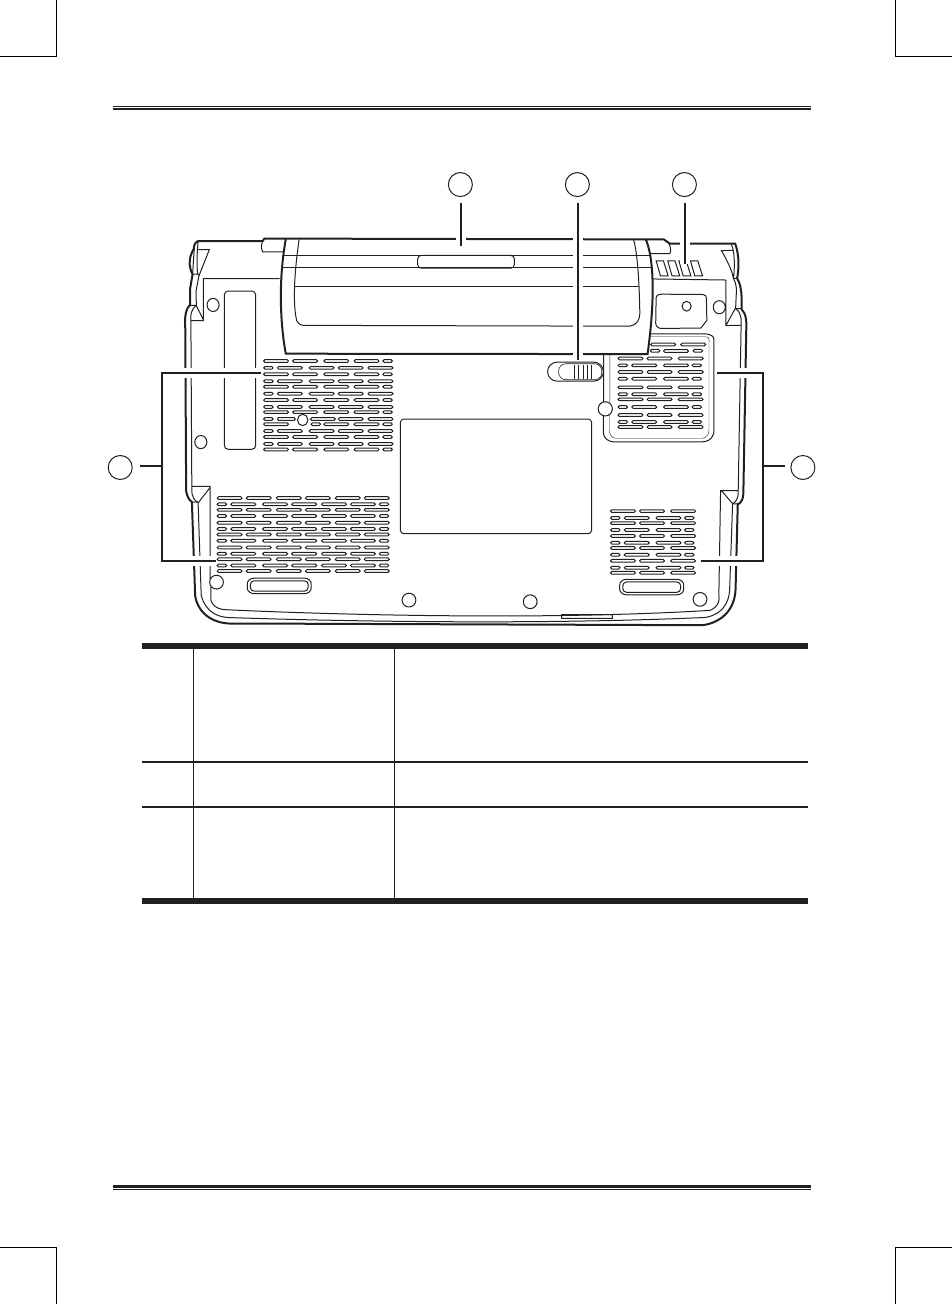
Base
1 3
33
2
1. Battery Bay
The battery bay contains the internal lithium bat-
tery pack. It can be opened for the removal of the
battery when stored over a long period of time or
for swapping a discharged battery with a charged
battery.
2. Battery Pack
Release Latch Slide this latch to remove the battery pack.
3. Fan Outlet and
Ventilation Slots
These are open ports to dissipate heat from the
computer's internal components. Do not place the
computer in such a position that you allow them
to become blocked
11
Getting Started
Power
The computer has two power sources: a Lithium battery and an AC adapter.
Installing the battery
To install the battery pack:
Make sure that the computer’s power is off and that no cables are connected.
Hold the battery pack with the label facing up, and with the connectors on the
battery facing the connectors on the computer.
Push the battery gently into the battery bay until the latch clicks into place.
Connecting the AC adapter
To protect your computer from damage, use only the power adapter that
came with it because each power adapter has its own power output rating.
To connect the AC adapter:
Plug the DC output cable into the DC power jack of your notebook PC.
Plug the AC adapter into an AC electrical outlet.
To switch from AC adapter power to DC battery power:
Make sure you have at least one charged battery installed.
Unplug the AC adapter. Your notebook will automatically to battery power.
Charging the battery
The lithium battery is recharged internally using the AC adapter. To recharge the
battery, make sure the battery is installed, and the AC adapter is connected to the
computer and the AC power supply. There is no "memory effect" in lithium batter-
ies; therefore you do not need to discharge the battery completely before recharg-
ing. The charge times will be signicantly longer if your notebook PC is in use while
the battery is charging.
If you want to charge the battery more quickly, turn your computer off while
the adapter is charging the battery.
1.
2.
3.
1.
2.
1.
2.

12
Getting Started
Switching the Power On
Once you have connected your AC adapter or charged the internal lithium battery,
power on your notebook by pressing the Power On/Off button located above the
keyboard. To power off, press the button for four seconds.
When you power on your notebook, it will perform a power on self test (POST) to
check the internal hardware and conguration. If a fault is found, your computer
makes a warning sound or displays an error message. Depending on the nature of
the problem, you may be able to continue by starting the operating system or by en-
tering the BIOS setup utility and revising the settings. After satisfactory completion
of the POST, your notebook loads the installed operating system.
Never turn off your notebook during the POST, as an unrecoverable error
may occur.

13
Getting Started
Using the Keyboard
Function Keys
The [FN] key provides extended functions for the notebook and is always used in
conjunction with another key.
[FN+F1]: Places the notebook in Suspend mode. Pressing the Power button returns
it to active mode.
[FN+F2]: Enables or disables the wireless network connection.
[FN+F3]: This is used when the computer is connected to an external monitor. It
controls where the video signal is displayed. The settings are: built-in display panel
only, both built-in display panel and external monitor, and external monitor only.
Each time you press this key combination you step to the next setting.
[FN+F4]: Increases the screen brightness.
[FN+F5]: Decreases the screen brightness.
[FN+F6]: Mutes the audio volume.
[FN+F7]: Decreases the audio volume.
[FN+F8]: Increases the audio volume.
[FN+F11]: Switches the computer into Num Lock mode, enabling the numeric key-
pad overlay.
[FN+F12]: Switches the computer into Scroll Lock mode. This is used in some appli-
cations.
[FN+INS]: This functions as the Print Screen (PRT SCN) key. It copies the current
screen to the clipboard.
[FN+DEL]: This functions as the System Request (SYS RQ) key, which may be used
by some operating systems or applications.
Fn+UP ARROW This functions as the PAGE UP key.
Fn+DOWN ARROW This functions as the PAGE DOWN key.
Fn+LEFT ARROW This functions as the HOME key.
Fn+RIGHT ARROW This functions as the END key.
14
Getting Started
Keypad Overlay
Although the keyboard does not have a separate numeric keypad, the keypad over-
lay provides the same function. To turn numeric mode on, press [FN+F11]. The
Num Lock LED lights. You can now use the keypad overlay: the keys with blue
numbers and symbols (7, 8, 9, 0, U, I, O, P, J, K, L, M, PERIOD, FORWARD SLASH).
To turn numeric mode off, press [FN+F11] again.
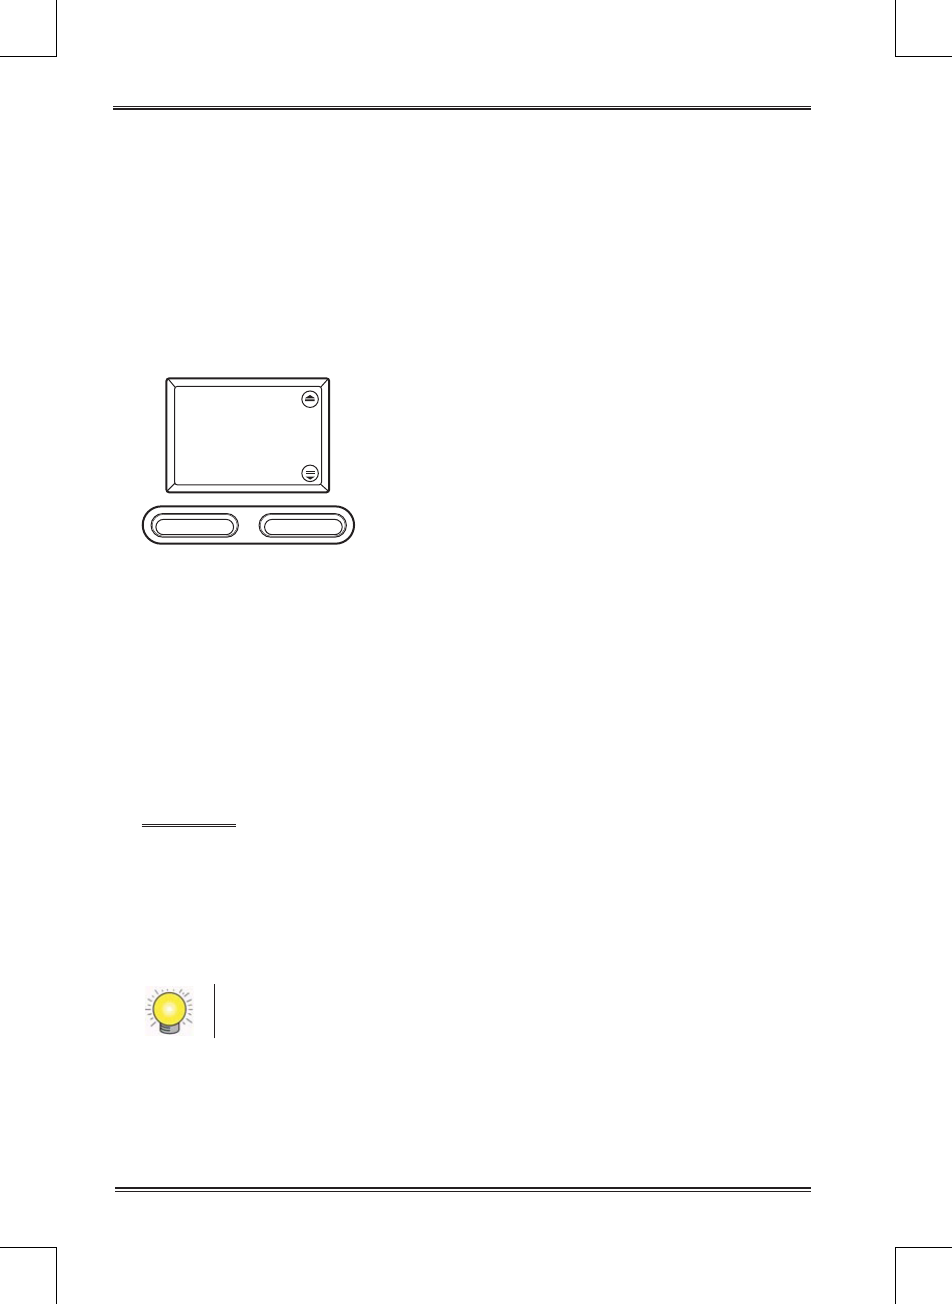
Using the Touch Pad
A Touch Pad pointing device comes built into your computer. It is used to control
the movement of the pointer to select items on your display panel. The Touch Pad
consists of a cursor control, a left and right button, and two scroll buttons.
• The cursor control works the same way a mouse does, and moves the cursor
around the display. It only requires light pressure from the tip of your nger.
• The left and right buttons function as mouse buttons. The actual functionality of
the buttons may vary depending on the application that is being used.
• The scroll buttons allow you to navigate quickly through pages, without having
to use the on-screen cursor to manipulate the up and down scroll bars.
Clicking
Clicking means pushing and releasing a button.
• To left-click, move the cursor to the item you wish to select, press the left button
once, and then immediately release it.
• To right click, move the mouse cursor to the item you wish to select, press the
right button once, and then immediately release it.
You can also click by tapping lightly on the Touch Pad once.

15
Getting Started
Double-Clicking
Double-clicking means pushing and releasing the left button twice in rapid succes-
sion. This procedure does not function with the right button.
• To double-click, move the cursor to the item you wish to select, press the left but-
ton twice, and then immediately release it.
You can also double-click by tapping lightly on the Touch Pad twice.
Dragging
Dragging is pressing and holding the left button while moving the cursor.
• To drag, move the cursor to the item you wish to move. Press and hold the left
button while moving the item to its new location and then release it.
You can also drag using the Touch Pad alone:
• First, tap the Touch Pad twice over the item you wish to move, making sure to
leave your finger on the pad after the second tap. Next, move the object to its
new location by moving your nger across the Touch Pad, and then release your
nger.
Scrolling
Using the Scroll buttons allows you to navigate through a document quickly with-
out using the window's scroll bars. This is particularly useful when you are navigat-
ing through on-line pages.

16
Troubleshooting
Your notebook PC is sturdy and subject to few problems in the eld. However, you
may encounter simple setup or operating problems that you can solve on the spot,
or problems with peripheral devices, that you can solve by replacing the device.
The information in this section helps you isolate and resolve some of these straight-
forward problems and identify failures that require service.
Identifying the Problem
If you encounter a problem, go through the following procedure before pursuing
complex troubleshooting:
Turn off your notebook.
Make sure the AC adapter is plugged into your notebook and to an active AC
power source.
Make sure that any devices connected to the external connectors are plugged in
properly. You can also disconnect such devices, thus eliminating them as pos-
sible causes of failure.
Turn on your notebook. Make sure it has been off at least 10 seconds before you
turn it on.
Go through the boot sequence.
If the problem has not been resolved, contact your support representative.
1.
2.
3.
4.
5.
6.

17
Regulatory Information
FCC Information
1. This equipment has been tested and found to comply with the limits for a Class B
digital device, pursuant to part 15 of the FCC rules. These limits are designed to
provide reasonable protection against harmful interference in a residential instal-
lation. This equipment generates, uses and can radiate radio frequency energy
and, if not installed and used in accordance with the instructions, may cause
harmful interference to radio communications. However, there is no guarantee
that interference will not occur in a particular installation. If this equipment does
cause harmful interference to radio or television reception, which can be deter-
mined by turning the equipment off and on, the user is encouraged to try to cor-
rect the interference by one or more of the following measures:
• Reorient or relocate the receiving antenna.
• Increase the separation between the equipment and receiver.
• Connect the equipment into an outlet on a circuit different from that to which
the receiver is connected.
• Consult the dealer or an experienced radio/TV technician for help.
2. You are cautioned that changes or modications not expressly approved by the
party responsible for compliance could void your authority to operate the equip-
ment.
3. This device complies with Part 15 of the FCC Rules. Operation is subject to the
following two conditions: (1) this device may not cause harmful interference and
(2) this device must accept any interference received, including interference that
may cause undesired operation.
4. FCC RF Radiation Exposure Statement:
• This Transmitter must not be co-located or operating in conjunction with any
other antenna or transmitter.
• This equipment complies with FCC RF radiation exposure limits set forth for
an uncontrolled environment. This device was tested for typical lap held oper-
ations with the device contacted directly to the human body to the back side of
the notebook computer. To maintain compliance with FCC RF exposure com-
pliance requirements, avoid direct contact to the transmitting antenna during
transmitting.

18
Regulatory Information
CE Information
It is herewith conrmed to comply with the requirements set out in the Council Di-
rective on the Approximation of the Laws of the Member States relating to Electro-
magnetic Compatibility (2004/108/EC), Low-voltage Directive (2006/95/EC) and
the Amendment Directive (93/68/EEC), the procedures given in European Council
Directive 1999/5/EC and 2004/108/EC.
The equipment was passed. The test was performed according to the following Eu-
ropean standards:
• EN 300 328 V.1.7.1:2006
• EN 301 489-1 V.1.6.1:2005 / EN 301 489-17 V.1.2.1:2006)
• EN 50385:2002
• EN 60950-1:2001
• EN 55022:2006, Class B
• EN 61000-3-2:2000+A2:2005
• EN 61000-3-3:1995+A1:2001+A2:2005
• EN 55024:1998+A1:2001+A2:2003
Regulatory statement (R&TTE)
• European standards dictate maximum radiated transmit power of 100mW EIRP
and frequency range 2.400-2.4835GHz;
• In France, the equipment must be restricted to the 2.4465-2.4835GHz frequency
range and must be restricted to indoor use.
Operation of this device is subjected to the following National regulations and may
be prohibited to use if certain restriction should be applied.
Channels are used (ch1~ch11) by firmware controlled in U.S.A. and must not have any
user controls or software to allow the device to operate on ch12 and ch13.

19
Specifications
Processor VIA C7-M
Bios 1MB Flash ROM
Chipset VIA VX800U
Main Memory DDR2 256MB/512MB/1GB
LCD Display 7” TFT LCD
Graphics Embedded
Display Mode 800x480
Hard Disk 1.8” (depends on model)
Modem 56Kbps, V.90/92 support
LAN & WLAN Built-in Ethernet
Interface I/O Ports
Line out
Mic in
DC in
RJ-11 connector for modem
RJ-45 connector for Ethernet
2 USB ports
VGA out
Audio Internal stereo speakers
Internal mono microphone
Card Reader 3-in-1: SD/MMC/ MS
System Status
LEDs
Power (dual color)
Battery status (dual color)
Wi on/off
Caps lock
Num lock
Power
Management ACPI 2.0: Mechanical Off, Soft Off, Working, Sleeping
Battery Pack &
Life
Li-Ion 4 cells, 2400mAH/cell
Li-Ion 6 cells, 2400mAh/cell
LiFePO4 2 cells, 3600mAh/cell
LiFePO4 6 cells, 1750mAh/cell
Battery life up to 4 hrs (estimation with 4-cell Li-ion battery
pack)

20
Specifications
AC adapter AC adapter Output: 12V DC, 3A, 36W
Input: 100~240V AC, 50/60Hz Universal
Keyboard 80 keys
Function Keys on
Keyboard
Fn+F1 Suspend
switch
Fn+F2 Wireless Enable/Disable
Fn+F3 Display switch LCD/CRT/LCD+CRT
Fn+F4 Brightness down
Fn+F5 Brightness up
Fn+F6 Mute
Fn+F7 Volume Down
Fn+F8 Volume Up
Fn+F11 Num Lock
Fn+F12 Scroll Lock
Fn+INS Print Screen
Fn+DEL System Request
Fn+UP ARROW Page Up
Fn+DOWN ARROW Page Down
Fn+LEFT ARROW Home
Fn+RIGHT ARROW End
Pointing Device Built-in Touch Pad with 2-way scroll function
2 click buttons
Dimensions/
Weight
243.10mm(W) × 171.9mm (D) × 28.53 mm-42.47mm(H), de-
pending on model
1020-1196g, depending on model
Operating
Temperature 0°C-35°C
Operating
Humidity 20%-80%
Security Kensington lock hole
OS Linux or Microsoft Windows