Quanta Computer LI170 LTE sip module User Manual UserMan2
Quanta Computer Inc LTE sip module UserMan2
Contents
UserMan2

Page
21
3.1.9. Device Location
1. For Quanta hostless device, please use
“Technician PC” only.
2. Please right click on top of connection manager
and select
“OptionsDevice LocationTechnician PC”.
3. Please set IP address to “10.0.0.1” and click
“OK” button.
4. Connection manager will get information from
Quanta hostless device.
Page
22
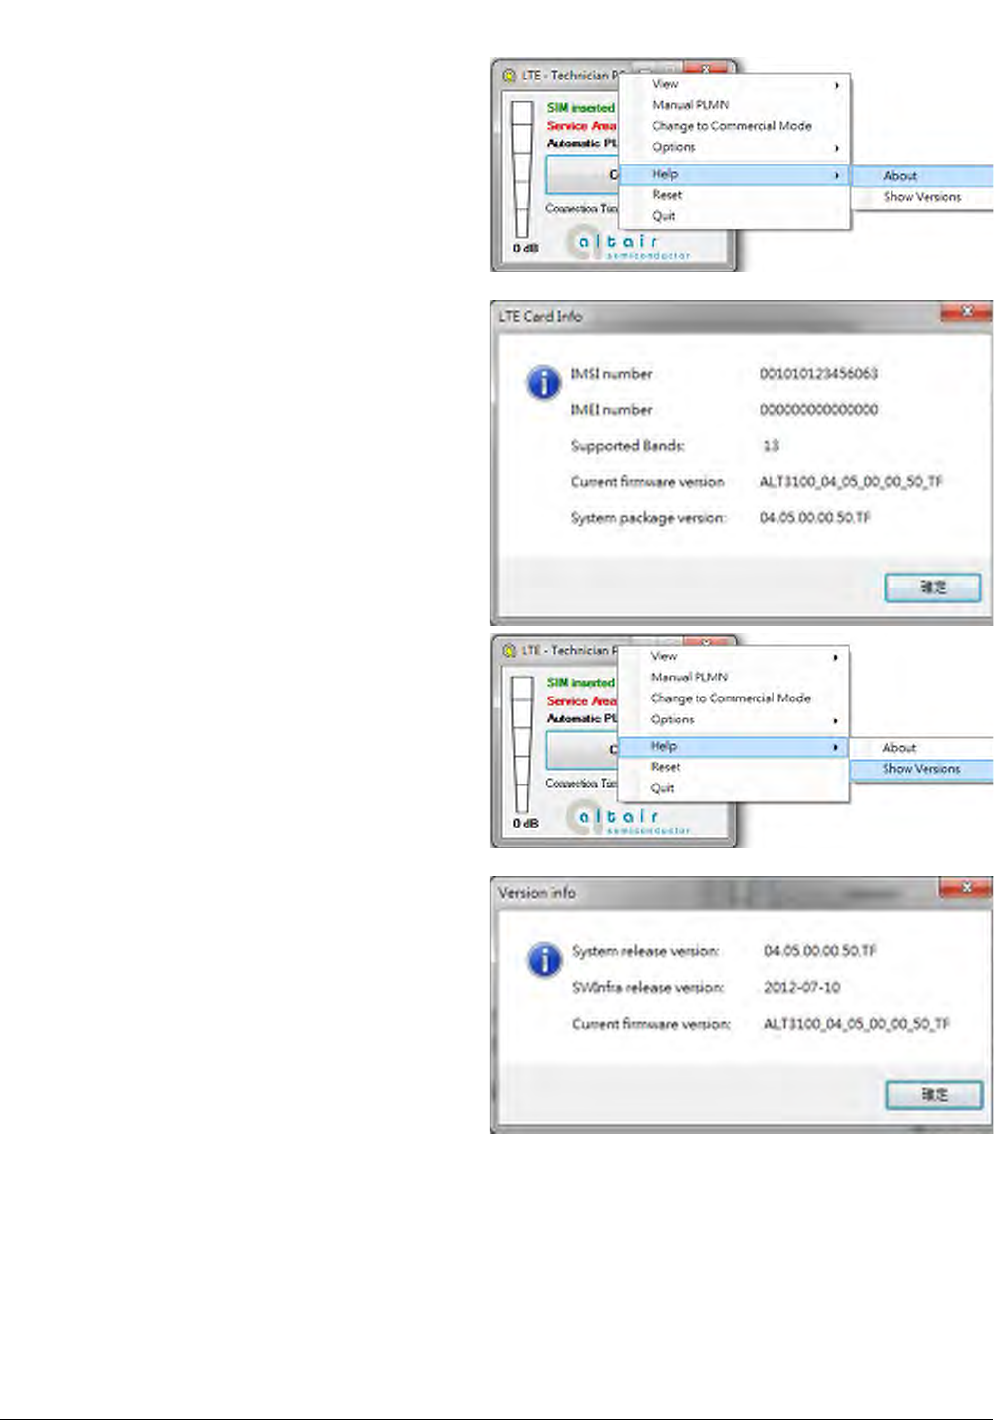
3.1.10. Help
1. Please right click on top of connection manager
and select
“HelpAbout”.
2. Connection manager will pop out a “LTE Card
Info” message box.
3. It will show information of IMSI number, IMEI
number, Supported Bands, Current firmware
version, and System package version.
4. Please click “OK” button.
5. Please right click on top of connection manager
and select
“HelpShow Versions”.
6. Connection manager will pop out a “Version
info” message box.
7. It will show information of System release
version, SWInfra release version, and Current
firmware version.
8. Please click “OK” button.
Page
23
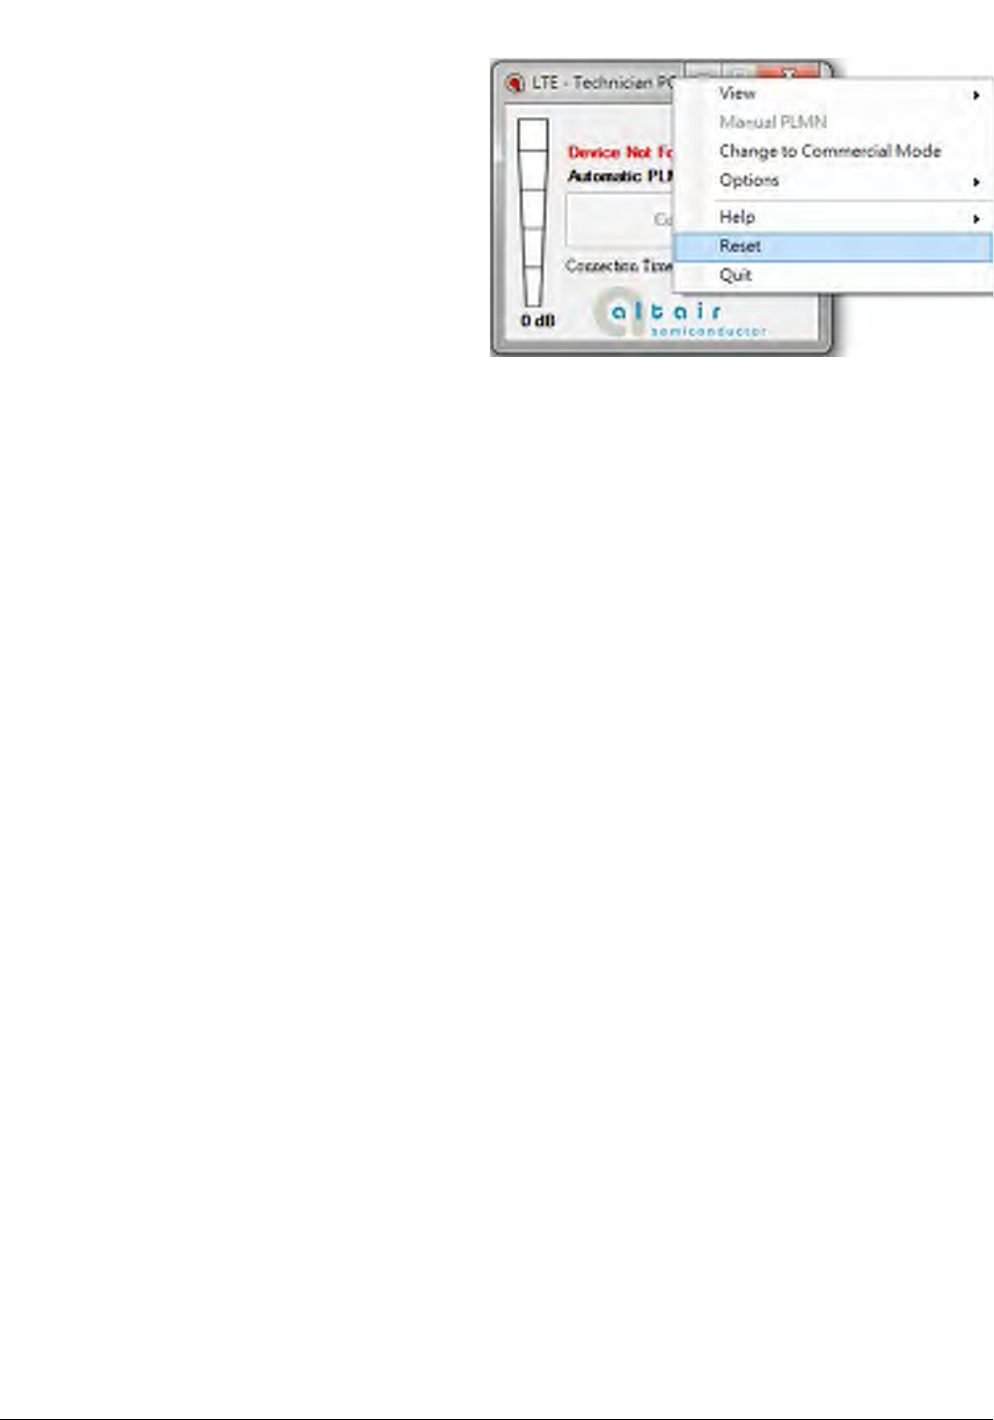
3.1.11. Reset
1. Please right click on top of connection manager
and select
“Reset”.
2. Connection manager will pop out a “” message
box.
Page
24
4. Diagnostic Tool
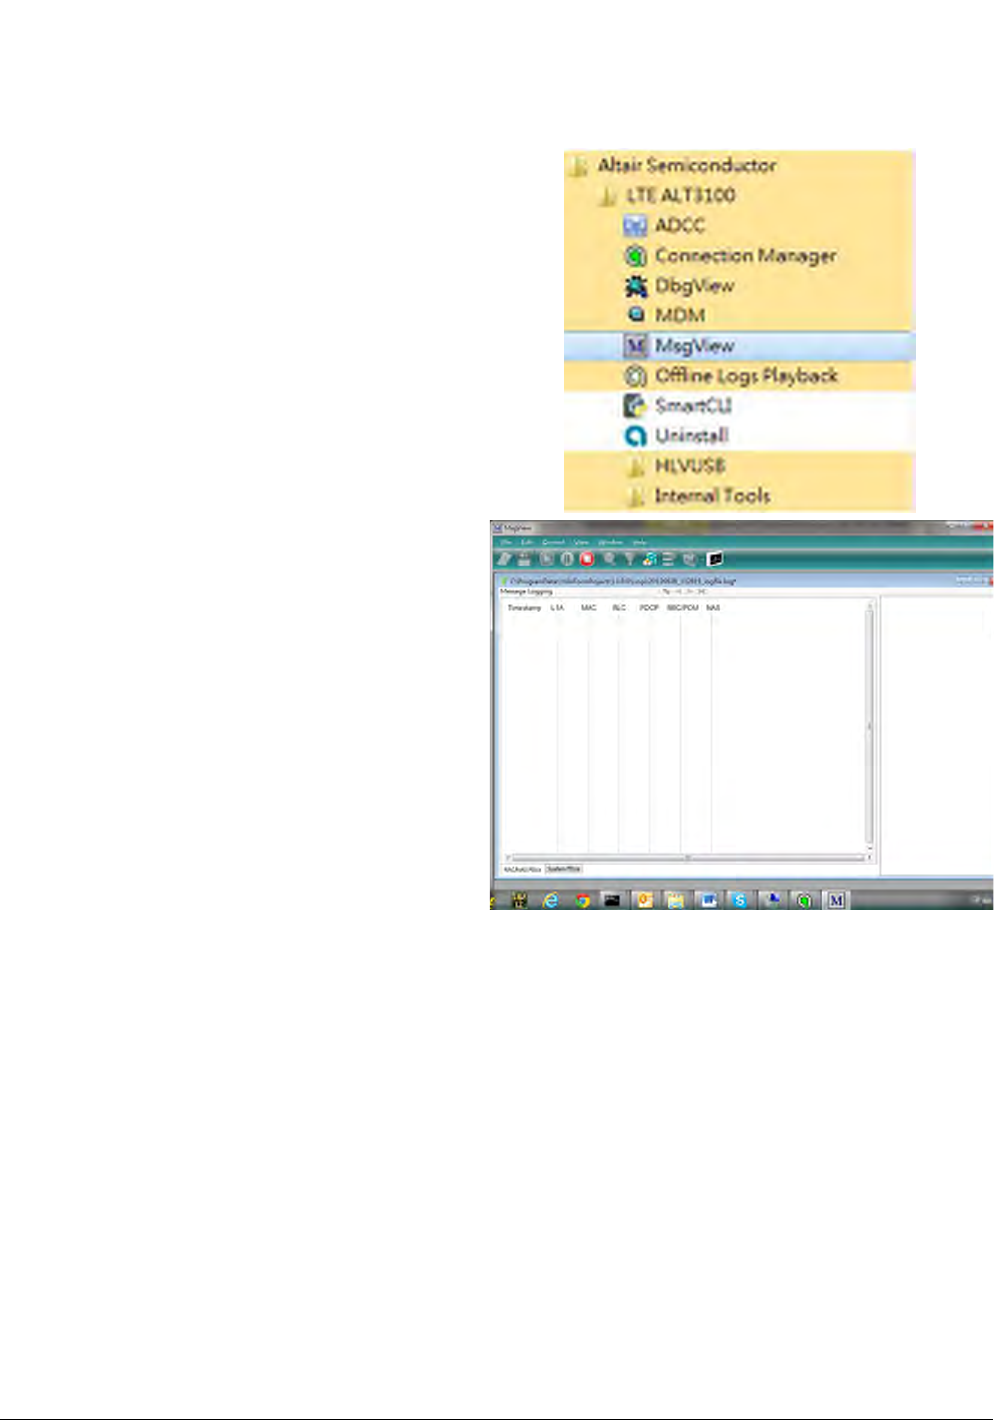
4.1. MsgView
1. Please open MsgView by clicking
StartProgramsAltair SemiconductorLTE
ALT3100MsgView.
2. Please click “Start Logging” button to start
message logging.
3. Please plug in Quanta device and wait a few
seconds for device to be ready.
4. Once you find an issue, please stop testing and
data logging, please save log file and send it to
Quanta.
Page
25
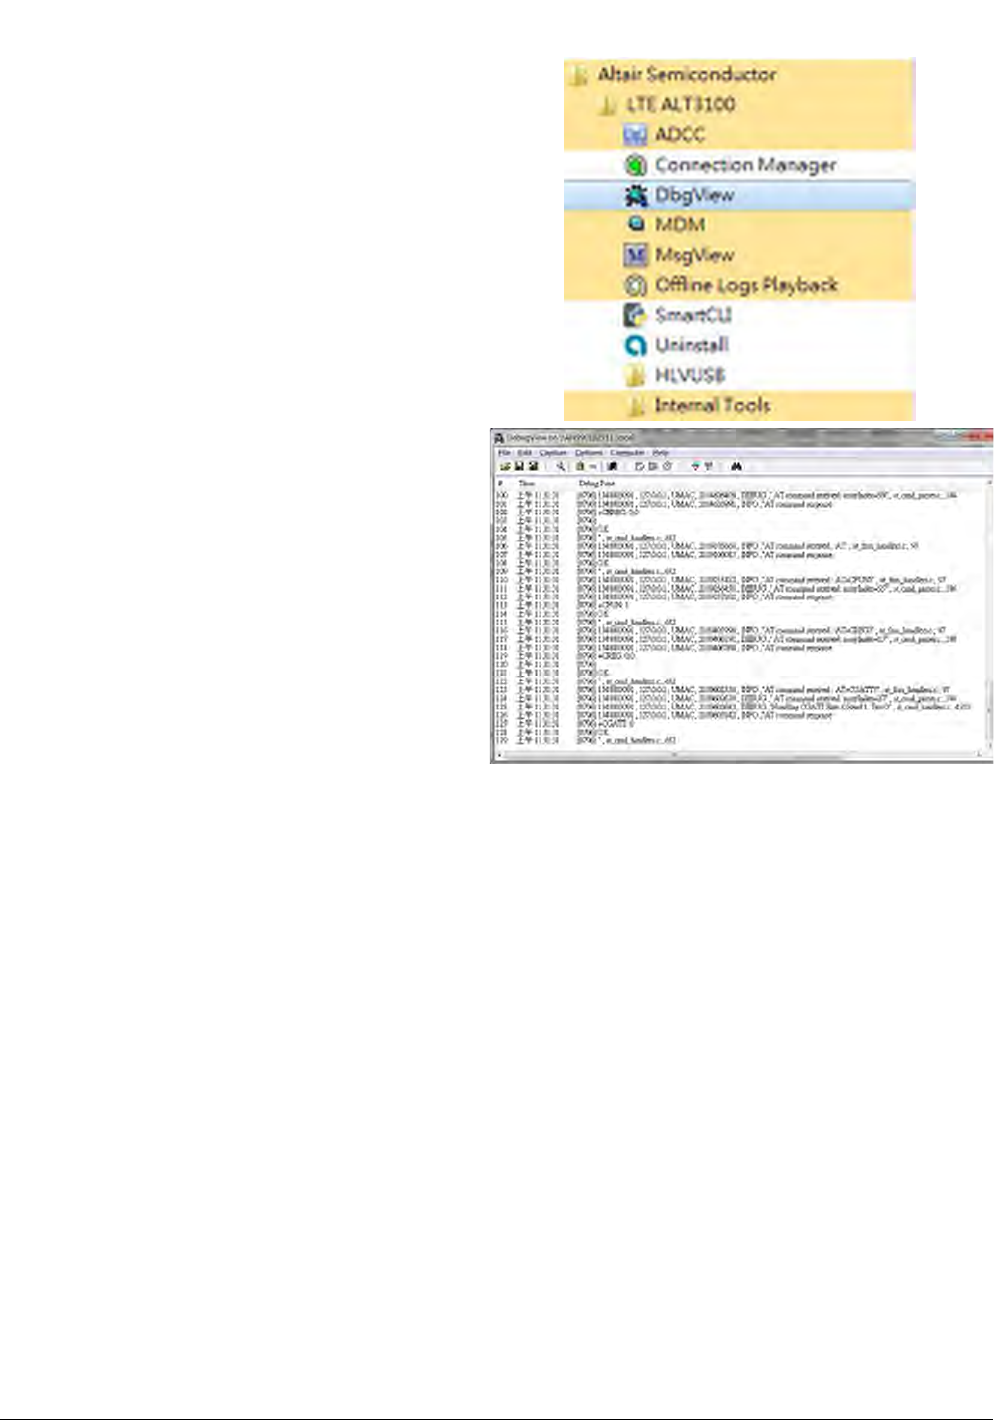
4.2. DbgView
1. Please open DbgView by clicking
StartProgramsAltair SemiconductorLTE
ALT3100DbgView.
2. Please plug in Quanta device and wait a few
seconds for device to be ready, and the
DbgView will start data logging.
3. Please click “Save” button to save log to a file.
4. Once you find any issue, please stop testing and
data logging, and please send this log file to
Quanta.
Page
26
5. Firmware Upgrade
5.1. Image Burn Tool
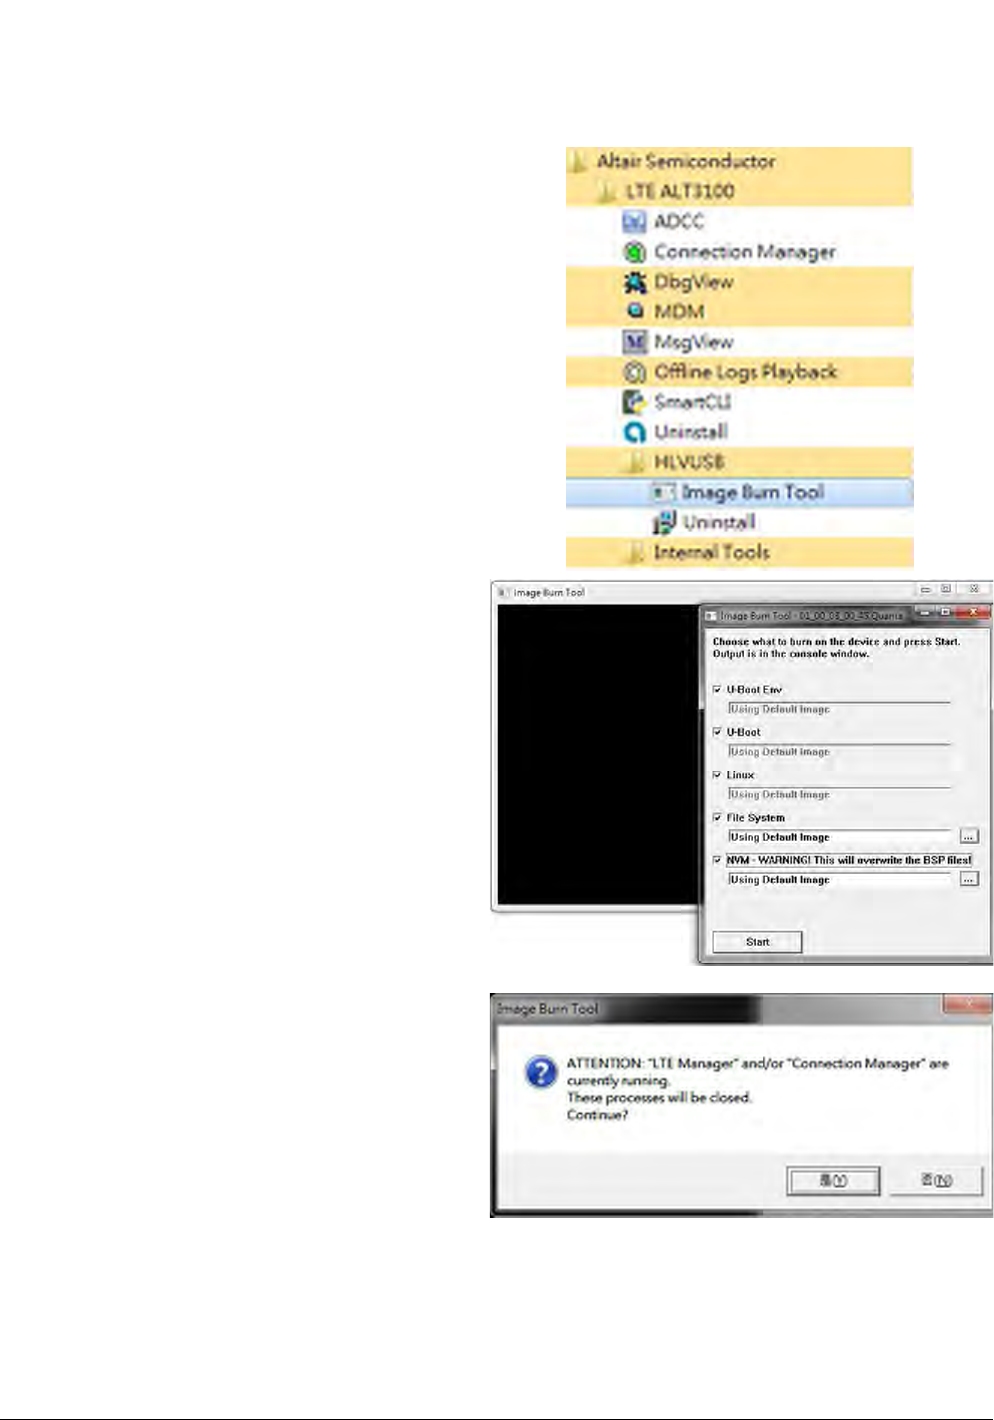
1. Please click
StartProgramsAltair SemiconductorLTE
ALT3100HLVUSBImage Burn Tool.
2. Please check “U-Boot Env”.
3. Please check “U-Boot”.
4. Please check “Linux”.
5. Please check “File System”.
6. Please check “NVM”.
7. Please click “Start” button to start firmware
upgrade process.
8. Please click “YES (Y)” button.
Page
27
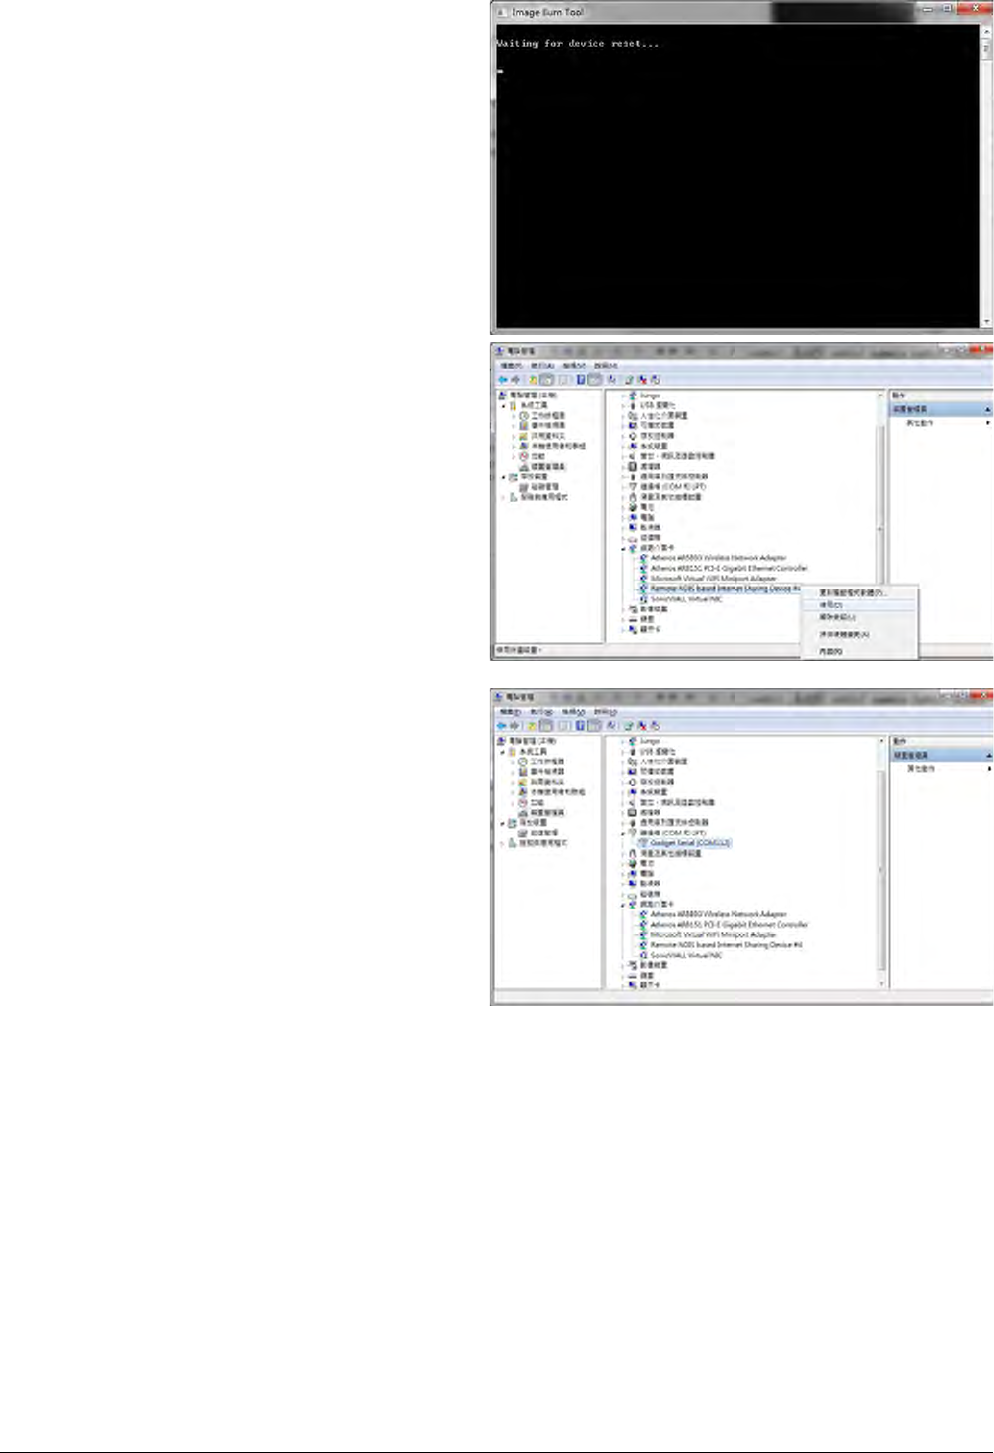
9. It will show message “Waiting for device
reset …”.
10. The easiest way to reset device is to power cycle
device (i.e. to take out and plug in device).
11. If you are doing remote firmware upgrade
process, please follow the following procedure
to reset device.
12. Please open device manager and find network
interface of Quanta device “Remote NDIS based
Internet Sharing Device #”.
13. Please disable this network interface by right
click on it.
14. Please enable this device again.
15. Please find your Gadget Serial COM port
number (for example, COM112).
Page
28
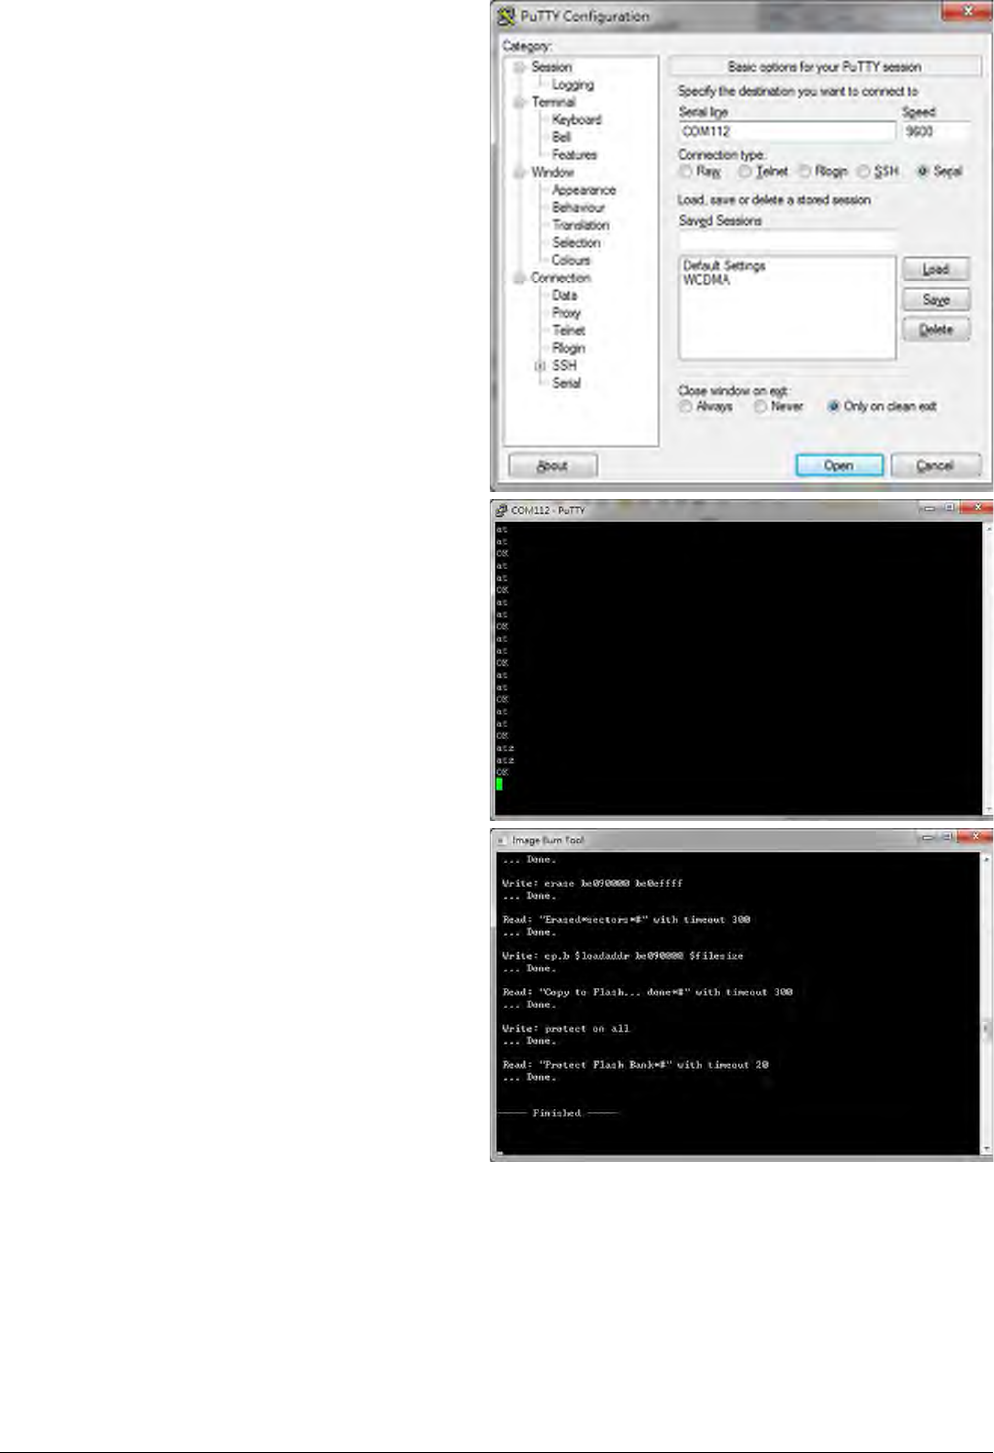
16. Please open COM112 COM port (for example,
open it by putty.exe)
17. Please select “Serial” as your “Connection type”.
18. Please fill in “COM112” as your “Serial line”.
19. Please click “Open” button to set up
connection.
20. Please enter “at”.
21. Please check if it responds with “OK”.
22. Please enter “atz” AT command to reboot
Quanta device.
23. After Quanta device reboots successfully, the
“Image Burn Tool” will start to do firmware
upgrade process.
24. Please make sure you Quanta device has
finished the firmware upgrade process with “----
Finished ----“.
25. Please close “Image Burn Tool”.
26. Please take out and plug in Quanta device.
Page
29
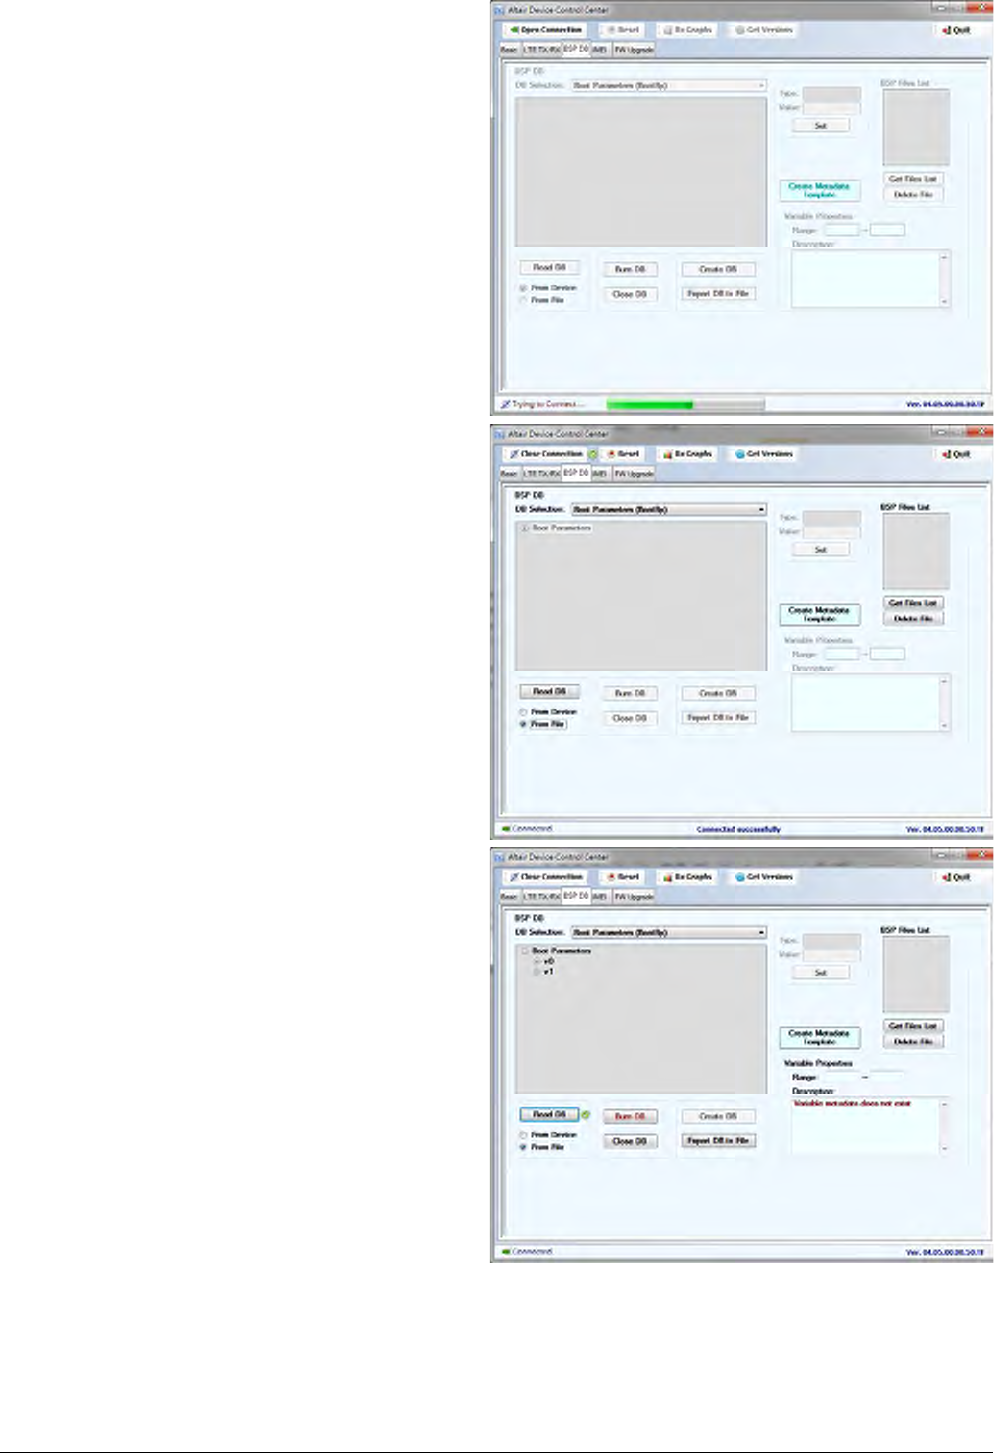
27. In order to recover the original calibration data,
please use ADCC tool.
28. After the device reboot successfully, please
open “Altair Device Control Center” by clicking,
StartProgramsAltair SemiconductorLTE
ALT3100ADCC.
29. Please click “Open Connection” and wait for a
few minutes.
30. Please click “BSP DB” tab.
31. Please select “Boot Parameters (Boot Bp).
32. Please select “From File”.
33. Please click Read DB and find the source DB and
click “Open” button to read it.
34. Please click “Burn DB” button to start burning.
35. Please repeat this procedure to burn the other
DBs.