Quanta Computer LOOX600 PDA Pocket LOOX User Manual Section 00 LOOX intro
Quanta Computer Inc PDA Pocket LOOX Section 00 LOOX intro
Revised users manual

i
Copyright
Fujitsu Limited has made every effort to ensure the accuracy and completeness of this
document. However, as ongoing development efforts are continually improving the
capabilities of our products, we cannot guarantee the accuracy of the contents of this
document. We disclaim liability for errors, omissions, or future changes.
Trademarks
BluetoothTM is the trademark of the BluetoothTM SIG and is licensed to this company.
Microsoft®, Windows®, Windows® XP, Outlook, Pocket Outlook, and ActiveSync are
registered trademarks of the Microsoft Corporation of the United States in the United
States and elsewhere.
Intel, Pentium, Celeron and PXA250 Applications Processor are registered trademarks
of the Intel Corporation of the United States.
Other product names are trademarks or registered trademarks of their respective
companies.
Other products are copyrighted items of their respective companies.
All Right Reserved, Copyright© Fujitsu Limited 2002
The permission of the Microsoft Corporation of the United States has been obtained for
the use of screens.
© Copyright 2002 Fujitsu Limited. All rights reserved. No part of this publication may be
copied, reproduced, or translated, without the prior written consent of Fujitsu Limited.
No part of this publication may be stored or transmitted in any electronic form without
the written consent of Fujitsu Limited.
Website : www.fujitsu-pc-asia.com
Pocket LOOX User’s Manual
Section 00 LOOX (intro) 6/25/02, 9:58 AM1
ii
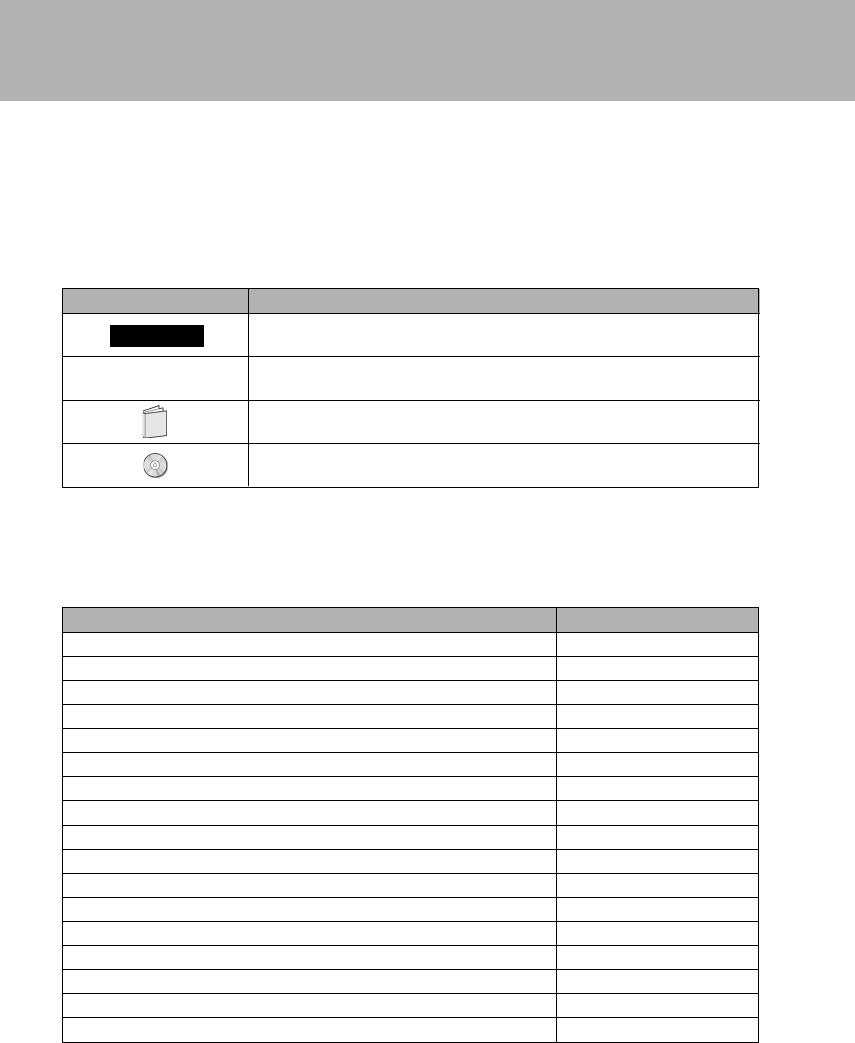
Notation Used in this Manual
Sample Screens and Illustrations
The screens and illustrations in this manual are samples. The screens and illustrations
can vary slightly by model and with circumstances.
Notation in Text
Icon Meaning
This gives items requiring attention during use or items that must be
avoided. Always read these notes.
This gives information related to operations. Read these notes as
necessary.
This gives the manual to read.
This indicates a CD-ROM.
Product Designations
This manual uses the following product name abbreviations.
Important
Product Name Notation in this Manual
Pocket LOOX This device
Microsoft® Pocket PC 2002 Pocket PC 2002
Microsoft® Windows® XP Professional Windows XP
Microsoft® Windows® XP Home Edition Windows XP
Microsoft® Windows® 2000 Professional Windows 2000
Microsoft® Windows NT® Workstation Operating System Version 4.0 Windows NT
Microsoft® Windows ® Millennium Edition Windows Me
Microsoft® Windows® 98 operating system SECOND EDITION Windows 98
Microsoft® Word Word
Microsoft® Excel Excel
Microsoft® Outlook®Outlook
Microsoft® ActiveSync®ActiveSync
Microsoft® Internet Explorer Internet Explorer
Microsoft® Pocket Word Pocket Word
Microsoft® Pocket Excel Pocket Excel
Microsoft® Pocket Outlook®Pocket Outlook
Microsoft® Pocket Internet Explorer Pocket Internet Explorer
Critical Point
Section 00 LOOX (intro) 6/25/02, 9:58 AM2
iii
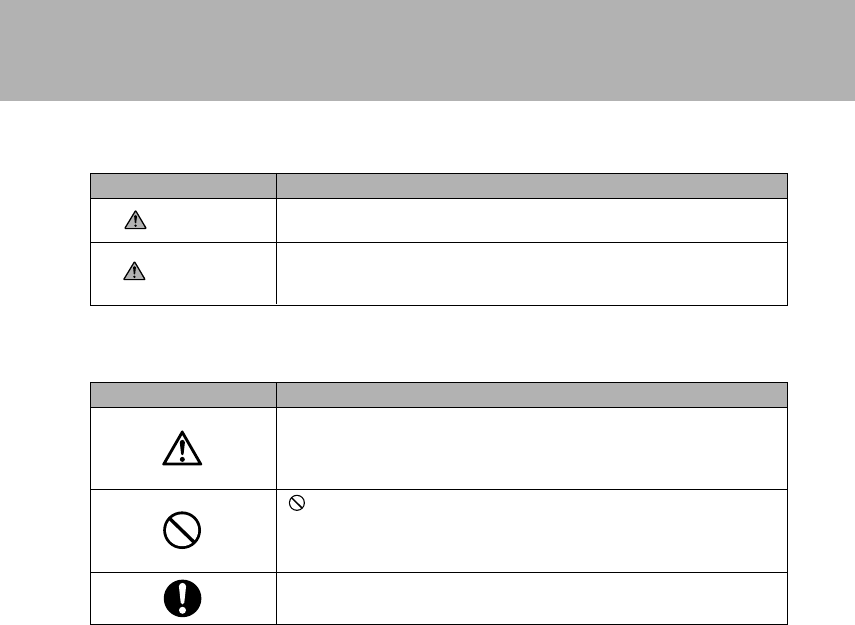
CAUTION
WARNING
Icon Meaning
This icon indicates that if the contents of the message are ignored
and the device mishandled, this can result in death or serious injury.
This icon indicates that if the contents of the message are ignored
and the device mishandled, this can result in injury or material
damage.
Safety Precautions
Icons for Safe Usage
Icon Meaning
∆ The symbol within the triangle indicates that the item is a warning
or caution. Within the symbol is indicated the concrete nature of the
warning. (The example on the left is a caution against getting fingers
trapped.)
indicates that the message is about behavior that must be
avoided (prohibited behavior). Within the symbol is indicated the
concrete nature of the prohibition. (The example on the left is a
general prohibition.)
indicates that the contents should always be followed. (The
example on the left is a general mandatory item.)
In order to distinguish the type of contents for danger and damage warnings, the
following symbols are used together with the above icons.
Data Storage Media and Customer Responsibilities
The only effective protection for the data stored in a computer, such as on a hard disk, is for you,
Purchaser to regularly back up the data. Fujitsu and its affiliates, suppliers, service providers and
resellers shall not be responsible for any software programs, data or other information stored or used
on any media or part of any Product returned to Fujitsu or its service providers for Warranty Service
or other repair, including but not limited to the costs of recovering such programs, data or other
information. It is solely your responsibility as the Purchaser to back up any software programs, data,
or information stored on any storage media or any part of a Product returned for Warranty Service or
repair to the designated service centers.
High Safety Required Use
This Product is designed, developed and manufactured as contemplated for general use, including
without limitation, general office use, personal use, household use and ordinary industrial use, but is
not designed,developed and manufactured as contemplated for use accompanying fatal risks or
dangers that, unless extremely high safety is secured, could lead directly to death, personal
injury,severe physical damage or other loss (hereinafter ‘High Safety Required Use’), including with-
out limitation, nuclear power reactioncore control in nuclear atomic facility, airplane automatic aircraft
flight control, air traffic control, operation control in mass transport control system,medical instrument
for life support system, missile launching control in weapon system. You shall not use this Product
without securing the sufficient safety required for the High Safety Required Use.
Section 00 LOOX (intro) 6/25/02, 9:58 AM3
iv
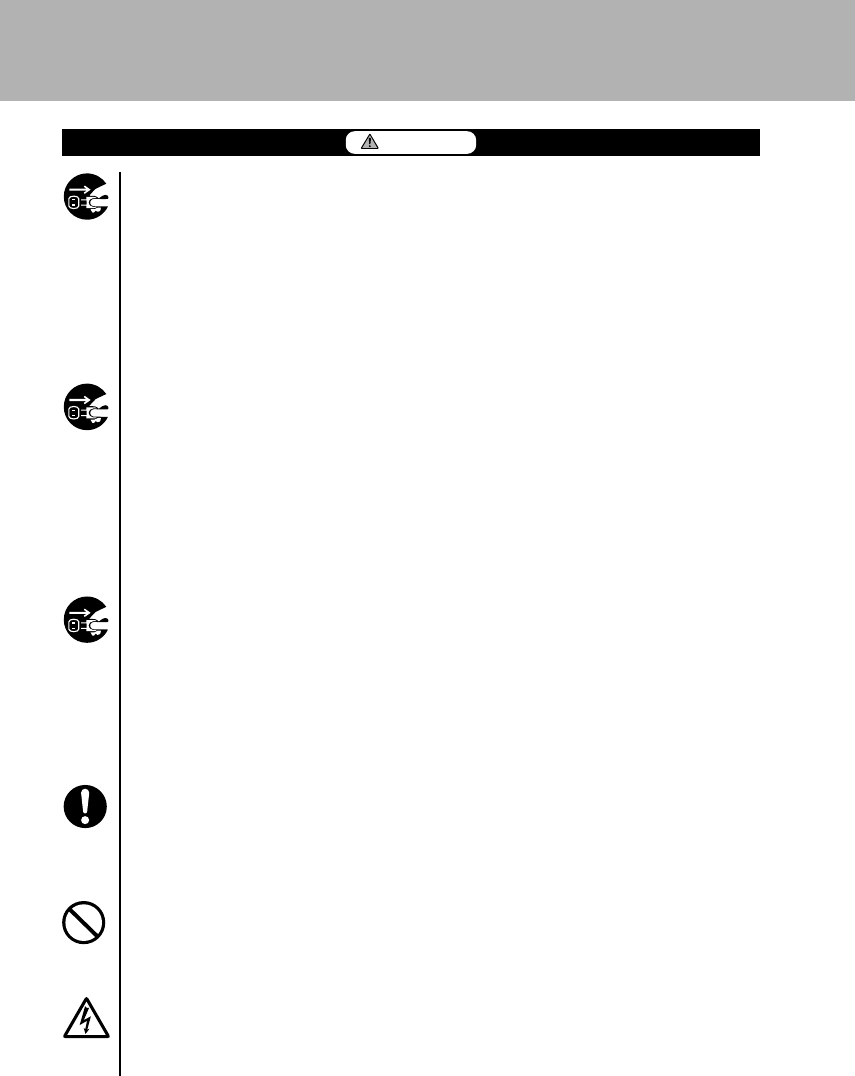
Electrical shock
In the unlikely event of an abnormality with this device involving heat or smoke,
abnormal smell, or abnormal noise, immediately switch off the power for this
device and unplug the power plug for the AC adapter from the socket.
Make sure that the smoke stops, then notify the contact point for inquiries
concerning Fujitsu products or the store you purchased this device from. Do
not attempt to make repairs yourself. That would be dangerous.
Using the device in an abnormal state can result in electrical shock and fire.
Electrical shock
If foreign matter (metal, liquid, etc.) gets inside this device, immediately switch
off the power for this device and unplug the power plug for the AC adapter from
the socket.
Then, notify the contact point for inquiries concerning Fujitsu products or the
store you purchased this device from. Using the device in this state can result
in electrical shock and fire.
Be particularly careful in households with young children.
Electrical shock
If this device is dropped or otherwise subject to strong shock and damaged,
switch off the power for this device and unplug the power plug for the AC
adapter from the socket.
Then, notify the contact point for inquiries concerning Fujitsu products or the
store you purchased this device from.
Using the device in this state can result in electrical shock and fire.
Distraction
Do not use this device while driving an automobile.
Doing so can interfere with safe driving and cause an accident. First park the
automobile safely, then use this device.
Electrical shock
Connect the AC adapter to the ordinary household electrical supply (100-240
VAC).
Electrical shock
Do not plug or unplug the AC adapter with wet hands. Doing so can cause
electrical shock.
WARNING
Section 00 LOOX (intro) 6/25/02, 9:58 AM4
v
Electrical shock
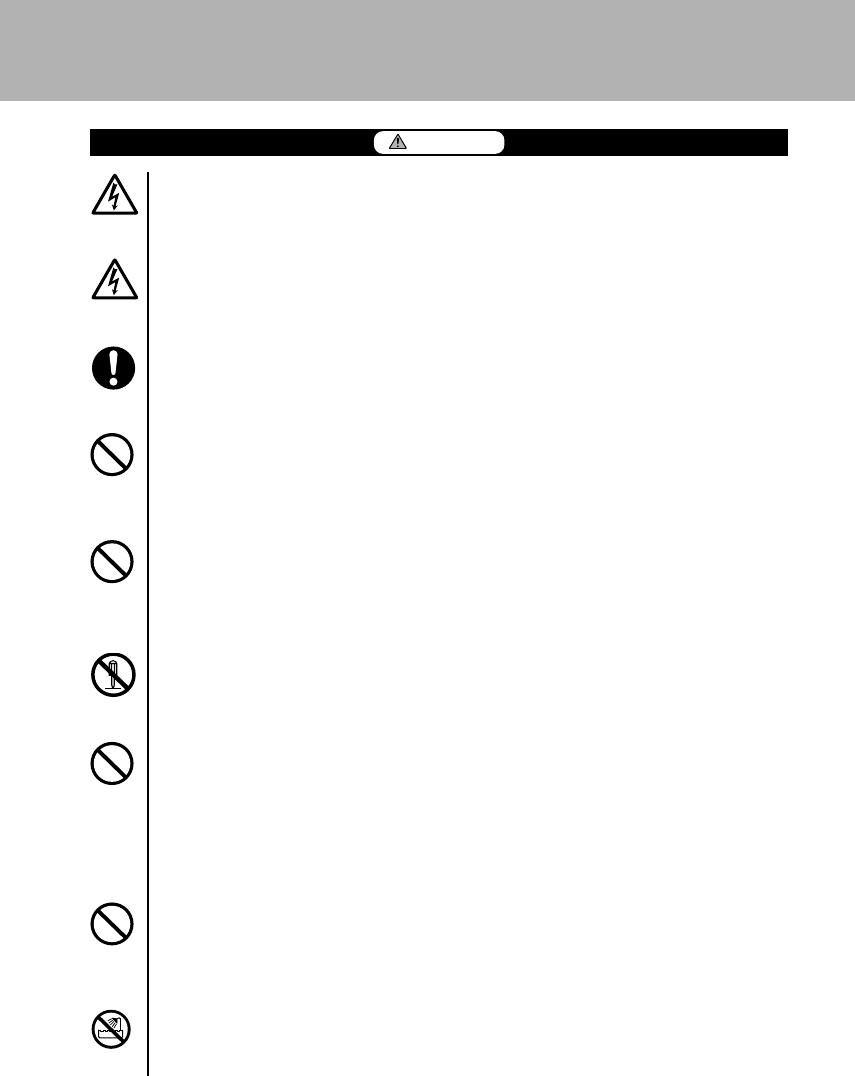
Do not touch the metal parts of connectors or the AC adapter. Doing so can
cause electrical shock.
Electrical shock
Do not touch the metal parts of connectors or the AC adapter. Doing so can
cause electrical shock.
Fire
If dust gets on the AC adapter electrodes or the socket, wipe it off with a dry
cloth. Continuing to use this device with the dust can result in fire.
Electrical shock
Do not use this device if the AC adapter power cable is damaged or the socket
is loose. Using this device under these conditions can result in electrical shock
and fire.
Electrical shock
Do not damage or work on the AC adapter power cable. If do place a heavy
object on it, yank on it, bend or twist it too forcibly, or heat it, this can damage
the power cable and result in electrical shock and fire.
Electrical shock
Do not disassemble or alter this device yourself. Doing so can result in
electrical shock and fire.
Electrical shock
Do not use this device if the LCD screen is not working and can not display
anything.
For repairs, contact the contact point for inquiries concerning Fujitsu products
or the store you purchased this device from. Using the device in this state can
result in electrical shock and fire.
Electrical shock
Do not use this device anywhere with excessive humidity, dust, or oily smoke,
for example a kitchen, or any location with poor ventilation, or anywhere with
an open flame. Doing so can result in electrical shock and fire.
Electrical shock
Do not use this device anywhere water can get on it, for example in rooms with
bath tubs or showers. Doing so can result in electrical shock and fire.
WARNING
Section 00 LOOX (intro) 6/25/02, 9:58 AM5
vi
Electrical shock
Do not get water on this device or get it wet. Doing so can result in electrical
shock and fire.
Electrical shock
Do not place any vase, flower pot, cup, or other utensil containing water or any
paper clip or other metal object on or near this device. Doing so can result in
electrical shock and fire.
Electrical shock
Do not insert or drop any metal objects or flammable foreign matter through
any openings (slots etc.) into this device. Doing so can result in electrical shock
and fire.
Choking
If a small child swallows a removed cover, cap, screw, or other small part, they
can choke. Caregivers should be careful to place such small parts somewhere
small children can not reach.
If a child should swallow such an object, seek immediate medical assistance.
Electrical shock
If lightning should occur anywhere nearby, unplug the power plug for the AC
adapter from the socket. If you continue to use this device, lightning may
destroy this device and cause electrical shock and fire. For the sake of safety, a
surge protector is also recommended. However, please understand that if
extraordinarily powerful lightning strikes and exceeds the capacity of the surge
protector, even the surge protector will not be able to protect this device.
Interference
Inside hospitals and locations with medical electrical equipment, either switch
Off the wireless communication functions or switch off the power for this device
itself. Be particularly careful not to bring this device into operating rooms,
intensive care units (ICUs), coronary care units (CCUs), or the like. The signals
from this device’s wireless functions can interfere with medical electrical
equipment and cause them to malfunction.
Interference
Keep this device at least 22 cm away from cardiac pacemakers. The signals
from this device can affect the operation of pacemakers.
WARNING
Section 00 LOOX (intro) 6/25/02, 9:58 AM6
vii
Interference
In crowded locations, such as inside full trains, there is a possibility that
someone nearby is wearing a pacemaker, so either switch Off the wireless
communication functions or switch off the power for this device itself. The
signals from this device can affect the operation of pacemakers.
Interference
Inside aircraft, either switch Off the wireless communication functions or switch
off the power for this device itself. There is a danger of the wireless
communications functions interfering with the safety of the aircraft.
Prohibited
Do not use this device near automatic doors, fire detectors, and other
automatic control equipment. The signals from the wireless communications
functions can make automatic control equipment malfunction and lead to
accidents.
Interference
At locations such as gas stations where there are flammable gases, either
switch Off the wireless communication functions or switch off the power for this
device itself.
The wireless communications functions could cause explosion or fire.
Suffocation
Do not let children put the vinyl bag for this device in their mouths or over their
heads. They could suffocate.
WARNING
Section 00 LOOX (intro) 6/25/02, 9:58 AM7
viii
Fire
Use only the specified AC adapter. Using any other adapter can cause fire and
injury.
Fire
Plug the AC adapter all the way into the socket. A half plugged-in plug can
cause fire and accidents.
Electrical shock
When unplugging the AC adapter from the socket, hold it by the plug. Never
yank on the power cable.
Yanking on the power cable can expose or break the wires in the cable and
cause electrical shock and fire.
Injury
Do not place this device on an unstable location, for example a location that
shakes drastically or is tilted. This device could fall over or drop and cause injury.
Injury
Do not place any heavy objects on this device and do not subject it to strong
mechanical shock.
Balance may be lost and something fall over or drop and cause injury.
Fire
Do not leave this device for prolonged periods in a location subject to direct
sunlight or a hot locations, such as inside a parked car on a warm, sunny day.
Excess heat can heat up the cover and other parts and deform or melt them
and if the temperature within this device becomes excessively high, this can
cause a fire.
Fire
While it is in use, do not cover or wrap this device itself or its AC adapter with a
cloth or the like. This can cause heat to build up and cause a fire.
Electrical shock
When moving this device, always unplug the AC adapter from the socket,
disconnect any connecting cables, and watch your step.
Failure to do so can damage the power cable of the AC adapter and cause
electrical shock and fire. This device might drop or fall over and cause injury.
CAUTION
Section 00 LOOX (intro) 6/25/02, 9:58 AM8
ix
Electrical shock
When leaving this product unused for a prolonged period of time, for the sake
of safety, unplug the AC adapter from the socket and from this device.
This eliminates the possibility of electrical shock and fire.
Injury
If the LCD display is broken and the liquid leaks out and gets on your skin,
wash your skin with running water for at least 15 minutes. If the liquid from the
LCD display gets in your eyes, wash out your eyes with running water for at
least 15 minutes and seek medical attention.
Protecting your health
If you look at the LCD display continuously for long time, this can cause such eye
injury as “nearsightedness” or “dry eyes”. Every hour, take at least a 10-minute
break. Also, as much as possible, position this device so that you are looking
down on the screen. Make a conscious effort to blink frequently. Use eye drops.
Hearing loss
When using headphones, be careful not to raise the volume too high.
Listening for long periods of time to volume so loud that it irritates your ears
can cause deterioration of hearing.
Hearing loss
Do not switch the power On/Off while you have headphones on. The irritating
sound that results can cause deterioration of hearing.
Battery rupture
When disposing of this product, do not throw away with other garbage. This
product contains lithium batteries which can burst thrown into a fire.
When disposing of this product, follow local regulations and ordinances.
Accidents
Do not press on this product anywhere not necessary for operation or apply
excessive force to this product. Doing so can cause malfunction.
Fire
For the sake of safety, switch this device off ( via power button ) when not
using it. Leaving it on for excessively long periods of time is not recommended.
CAUTION
Section 00 LOOX (intro) 6/25/02, 9:58 AM9
x
LCD Display Characteristics
The following are characteristics of the LCD display. Please understand that they do
not signal any breakdown of the equipment.
• TFT LCD displays use high-level technology. The screen is comprised of over 230,000
pixels (dots) (for this device). Therefore, there may be dots on the screen that do not light
up or that never turn off. Please understand that these do not signal any breakdown of the
equipment.
• Due to the nature of the manufacturing process, the colors for the LCD display used in this
device can vary from product to product. Also, temperature fluctuation and the like can
cause a certain level of color unevenness.
Caution
This device is a Class B information technology device based on the standards of
the Radio Wave Interference Self-Regulation Council for information processing
devices etc. (VCCI). This device was designed for use in the home environment, but
if this device is used too close to radio or television receivers, it may interfere with
reception. Handle this device correctly according to its manual.
Concerning the Use of This Device in Safety-Critical Programs
This device was designed for ordinary programs such as general office work,
personal use, home use, and ordinary industrial use. It was neither designed nor
manufactured for use in safety-critical programs. Do not use this product without
taking measures to secure the safety required for the particular safety-critical
program. A safety-critical program means programs such as the examples below in
which an extremely high level of safety is required and in which there is a direct and
severe danger to life and limb in the event that this required level of safety is not
secured.
• Reactor control in nuclear power facilities, automatic flight control of aircraft, air traffic
control, traffic control in high-volume transport systems, medical equipment for life support,
missile launch control and other weapons systems
Section 00 LOOX (intro) 6/25/02, 9:58 AM10
xi
Backing up Data
In order to secure the data recorded on this device (including basic software and
program software), customers should take necessary measures themselves, for
example backing up data. Also, since the preservation of the data cannot be assured
when repairs are made, when requesting repairs, it is necessary that the customer
back up their data before hand. Please understand that if data is lost during repair,
this company cannot assume any responsibility whatsoever for securing or
recovering the data or resulting damage for any reason whatsoever, other than the
items specifically listed in the warranty.
The usage environment for this device is temperatures of 0~40°C and relative
humidity of 20~80%. The storage environment temperature is from –25°C to 60°C
and relative humidity of 8~90%.
Section 00 LOOX (intro) 6/25/02, 9:58 AM11
Federal Communication Commission Interference Statement
This equipment has been tested and found to comply with the limits for a Class B digital device,
pursuant to Part 15 of the FCC Rules. These limits are designed to provide reasonable
protection against harmful interference in a residential installation. This equipment generates,
uses and can radiate radio frequency energy and, if not installed and used in accordance with
the instructions, may cause harmful interference to radio communications. However, there is no
guarantee that interference will not occur in a particular installation. If this equipment does cause
harmful interference to radio or television reception, which can be determined by turning the
equipment off and on, the user is encouraged to try to correct the interference by one of the
following measures:
- Reorient or relocate the receiving antenna.
- Increase the separation between the equipment and receiver.
- Connect the equipment into an outlet on a circuit different from that to which the receiver is
connected.
- Consult the dealer or an experienced radio/TV technician for help.
FCC Caution: To assure continued compliance, (example - use only shielded interface cables
when connecting to computer or peripheral devices) any changes or modifications not expressly
approved by the party responsible for compliance could void the user's authority to operate this
equipment.
This device complies with Part 15 of the FCC Rules. Operation is subject to the following two
conditions: (1) This device may not cause harmful interference, and (2) this device must accept
any interference received, including interference that may cause undesired operation.
IMPORTANT NOTE:
FCC Radiation Exposure Statement:
This equipment complies with FCC radiation exposure limits set forth for an uncontrolled
environment. End-users must follow the specific operating instructions for satisfying RF
exposure compliance.
This transmitter must not be co-located or operating in conjunction with any other antenna or
transmitter.
This equipment is in compliance with FCC's RF exposure rule for body-worn device. The output power
of this device is low enough to omit the SAR testing requirement.
xiii
SECTION 1
This chapter explains basic operation methods for the hardware.
SECTION 2
This chapter explains the basic operation methods for using Pocket PC 2002.
SECTION 3
This chapter explains how to use the Internet to view web pages and send and receive email
and instant messages.
SECTION 4
This chapter explains the operations for using this device with a notebook.
SECTION 5
This chapter explains various programs that can be used with this device.
SECTION 6
This chapter explains how to exchange data between this device and a computer using ActiveSync.
SECTION 7
This section explains connecting using a CF card, how to view Web pages using an CF card
and explains sending/receiving email using a CF card.
SECTION 8
This chapter explains how to customize the environment of this device and how to set the
functions you want to use.
SECTION 9
This chapter explains what to do if you device seems to be operating strangely and you do not
know how to fix the problem.
SECTION 10
The appendices provide hardware specifications and other supplementary information
concerning this device.
Configuration of this Manual
SECTION 1
SECTION 2
SECTION 3
SECTION 4
SECTION 5
SECTION 6
SECTION 7
SECTION 8
SECTION 9
SECTION 10
Section 00 LOOX (intro) 6/25/02, 9:58 AM13

xiv
Contents
SECTION 1
1 Notice Concerning Usage ...................................................2
Handling Precautions ......................................................................... 2
Locations to Avoid for Usage and Storage ......................................... 2
Cleaning ............................................................................................. 3
2 Names of the Parts and Their Functions ............................4
Right Side/Bottom .............................................................................. 4
Left Side/Top ...................................................................................... 6
Scroll Bar Operation Methods ............................................................ 8
3 Battery .................................................................................10
Charging........................................................................................... 10
Checking the Remaining Capacity of the Battery ............................. 11
Points to Watch Out.......................................................................... 12
Recharging ....................................................................................... 12
Battery Service Life .......................................................................... 12
4 Switching the Power On/Off ..............................................13
5 Resets .................................................................................16
Normal Resets ................................................................................. 16
Full Resets ....................................................................................... 16
6 Connecting with a Computer ............................................18
Computers This Device Can Connect to .......................................... 18
Connecting ....................................................................................... 19
7 Installing Expansion Units ................................................20
Expansion Units That Can Be Used with This Device ...................... 20
Installing an Expansion Pack ........................................................... 20
Setting CF Cards.............................................................................. 22
Setting SD/MMC cards ..................................................................... 23
SECTION 2
1 Initial Screen and Application Startup .............................26
Today Screen ................................................................................... 26
Screen Configuration ....................................................................... 26
Starting/Switching Applications ........................................................ 27
Starting/Switching from the Menu............................................... 28
Starting/Switching Applications from Application Buttons ................ 28
Differences between Switching Applications and
Ending Applications.......................................................................... 29
Ending Applications.......................................................................... 29
2 Operations Common to All Programs ..............................30
Navigation Bar and Command Bar .................................................. 30
Pop-Up Menus ................................................................................. 31
Section 00 LOOX (TOC) 6/25/02, 11:10 AM14
xv
3 Data Input ............................................................................32
Soft Keyboard Input.......................................................................... 34
Editing Text ....................................................................................... 39
4 Writing .................................................................................40
5 Sound Recording ...............................................................42
6 Help .....................................................................................43
7 Searches .............................................................................44
8 File Operations Using File Explorer .................................45
SECTION 3
1 Connection Settings ..........................................................48
Preparations ..................................................................................... 48
Settings for Connecting to the Internet............................................. 48
Settings for Sending/Receiving Email .............................................. 53
2 Viewing Web Pages ............................................................57
Connecting/Disconnecting ............................................................... 57
Basic Pocket Internet Explorer Operation ........................................ 58
Viewable Web Pages........................................................................ 60
3 Sending/Receiving Email ..................................................61
Email Writing and Sending/Receiving .............................................. 61
Connecting to the Email Server and Sending/Receiving ................. 64
Basic Inbox Operations .................................................................... 65
4 Exchanging Instant Messages ..........................................71
Preparations ..................................................................................... 71
Sign-in and Sign-out ......................................................................... 72
Basic MSN Messenger Operations .................................................. 74
SECTION 4
1 Summary .............................................................................78
Pocket Outlook Functions ................................................................ 78
Reminder Settings............................................................................ 78
2 Calendar ..............................................................................80
Screen Configuration ....................................................................... 80
Creating New Appointments ............................................................ 81
Using the Summary Screen ............................................................. 82
Revising/Deleting an Appointment ................................................... 82
Automatic Creation of a Meeting Reminder ..................................... 83
Section 00 LOOX (TOC) 25/06/02, 2:32 PM15
xvi
3 Contacts ..............................................................................84
Screen Configuration ....................................................................... 84
Creating a New Contact ................................................................... 85
Searching the Contacts .................................................................... 85
Using the Summary Screen ............................................................. 86
Revising/Deleting Contacts .............................................................. 86
4 Tasks ...................................................................................87
Screen Configuration ....................................................................... 87
Creating a New Task ........................................................................ 88
Using the Summary Screen ............................................................. 89
Revising/Deleting Tasks ................................................................... 89
5 Notes ...................................................................................90
Screen Configuration ....................................................................... 90
Creating a New Note ........................................................................ 91
SECTION 5
1 Program List .......................................................................94
Built-In Programs ............................................................................. 94
Bundled Applications........................................................................ 95
2 Standard Pocket PC 2002 Built-In Programs ...................96
Pocket Word ..................................................................................... 96
Pocket Excel ..................................................................................... 98
Windows Media Player for Pocket PC ............................................ 100
Pocket Internet Explorer ................................................................. 101
Pocket Outlook ............................................................................... 101
MSN Messenger ............................................................................ 101
3 Other Built-in Application ................................................102
LX Launcher ................................................................................... 102
Automatic Storage Device Startup/Inf File Editor ........................... 107
LX-Backup ...................................................................................... 109
SECTION 6
1 ActiveSync Summary ......................................................112
ActiveSync ..................................................................................... 112
Installing ......................................................................................... 113
Starting Synchronization ................................................................ 113
Detailed Synchronization Settings ................................................. 113
Synchronization Settings................................................................ 114
Synchronization Options ................................................................ 115
Copying Files ................................................................................. 117
Synchronizing Files ........................................................................ 117
2 Synchronizing Web Pages and Email .............................118
Synchronizing Web Pages ............................................................. 118
Synchronizing Email ....................................................................... 120
Section 00 LOOX (TOC) 25/06/02, 2:32 PM16

xvii
3 Viewing Web Pages through Your Computer .................121
Settings .......................................................................................... 121
4 Synchronizing Pocket Word/Pocket Excel .....................123
Linking with Word ........................................................................... 123
Linking with Excel........................................................................... 123
5 Backing Up and Restoring ..............................................124
Backing up Data ............................................................................. 124
Restoring Data ............................................................................... 125
SECTION 7
1 Various Connections........................................................128
Connecting with a Data Communications Card or Modem ............ 128
Connecting with a LAN Card .......................................................... 128
Connecting with the Cradle ............................................................ 132
Connection through Infrared .......................................................... 132
Connection through BluetoothTM .......................................................................................... 132
2 Infrared Connections .......................................................133
Infrared Communication ..................................................................133
Transferring Files ............................................................................ 134
3 BluetoothTM Connections .................................................136
BluetoothTM .................................................................................................................................................. 136
BluetoothTM Connection Using Pocket Plugfree ............................. 137
Pocket Plugfree Screen Configuration ........................................... 143
File Operations ............................................................................... 150
Exchanging Business Cards .......................................................... 153
Connecting to the Internet .............................................................. 155
Using ActiveSync ........................................................................... 158
SECTION 8
1 Settings .............................................................................160
List of Setting Items........................................................................ 160
Adjusting the Display ...................................................................... 162
Adjusting the Memory .................................................................... 164
CPU Settings .................................................................................. 165
Setting the Date/Time .................................................................... 166
Menu Settings ................................................................................ 167
Setting the Owner Information ....................................................... 168
Setting the Password ..................................................................... 169
Power Settings ............................................................................... 170
Today Screen Settings ................................................................... 171
Application Buttons Settings .......................................................... 172
Infrared Communications Settings ................................................. 174
Checking System Information ........................................................ 175
Section 00 LOOX (TOC) 6/25/02, 11:10 AM17
xviii
2 Adding/Deleting Applications .........................................177
Applications You Can Add .............................................................. 177
Adding Applications Using Your Computer ..................................... 177
Adding Applications from the Internet ............................................ 177
Registering Applications on the Menu ...................................... 178
Removing Applications ................................................................... 178
SECTION 9
1 Minimizing Problems .......................................................180
Backing up Your Data ..................................................................... 180
Checking Documents ..................................................................... 180
2 Basic Troubleshooting .....................................................181
Checking the Charge and the Connections ................................... 181
3 General Troubles ..............................................................182
Q: Is the Power on? ........................................................................ 182
Q: Slow or no response .................................................................. 182
Q: The screen is dark and hard to read .......................................... 183
Q: Strange responses to taps ......................................................... 183
Q: I forgot my password ................................................................. 183
4 Connection Related Troubles ..........................................184
Q: Infrared communications do not work ........................................ 184
BluetoothTM communications do not work ...................................... 184
Can not connect to the Internet ...................................................... 184
5 When You Can Not Solve a Problem ...............................185
SECTION 10
1 Specifications ...................................................................188
Specifications ................................................................................. 188
2 Recycling ..........................................................................190
Section 00 LOOX (TOC) 25/06/02, 2:32 PM18

1
1
SECTION
SECTION
SECTION 1
Section 01 LOOX (01-09) 6/25/02, 9:56 AM1

2
1 Notice Concerning Usage
Please watch out for the following, which can cause malfunction and accidents.
Handling Precautions
• Do not subject this device to mechanical shock or vibration.
• Do not disassemble this device.
• If this device is used a prolonged periods of time, the temperature of the surface of this device
rises and becomes hot when you touch. This is because heat radiates from the device as a
whole once the temperature within the device reaches a certain level. It does not signal
breakdown of the device.
Locations to Avoid for Usage and Storage
Avoid using this device in locations such as the following.
• Locations with extremely high or low temperatures
Operating temperatures of this device is 0 ~ 40°C and storage temperatures is –25 ~ 60°C
• Locations subject to direct sunlight
• Locations subject to mechanical shock or vibration
• Excessively dusty locations
• Locations where water or any other liquid might get on this device
• Locations with high humidity
• Locations where BluetoothTM signals could be harmful (hospitals, within aircraft, in crowded
trains, etc.)
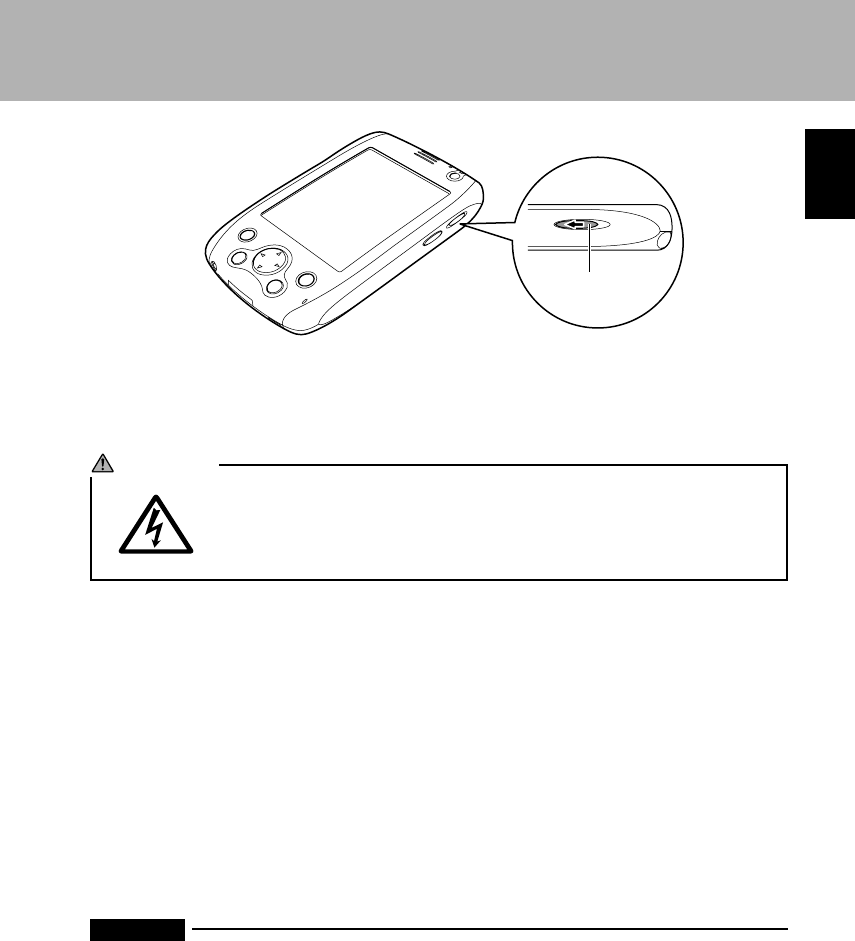
How to Stop the BluetoothTM Functions
In locations such as hospitals, aircraft, and crowded trains, where BluetoothTM signals
could be harmful, either switch Off the power for this device and stop using it or use this
device with its BluetoothTM functions stopped.
To stop the BluetoothTM functions of this device, slide the BluetoothTM switch on the right
side of the device as shown in the following figure to the Off side.
SECTION 1
Section 01 LOOX (01-09) 6/25/02, 9:56 AM2
SECTION 1
3
SECTION 1
ONOFF
Cleaning
WARNING
In order to prevent electrical shock or injury, always execute the following
before cleaning.
•Switch Off the power for this device and disconnect the AC adapter.
•If this device is connected to a computer, remove this device from its cradle.
Cleaning the Main Unit
To clean this device, wipe it gently with a soft dry cloth.
If the dirt is stubborn, use a cloth dipped in water or water with diluted neutral cleaning
solution and well-wrung out. When wiping off this device with diluted neutral cleaning
solution, wipe off the cleaning solution with a cloth dipped in water and well-wrung out.
When wiping this device, be careful not to let any water get into it. Never use paint
thinner, benzene, or any other strongly volatile solution or any washcloth with chemicals
imbedded in it.
Cleaning the Touch Screen (LCD display)
Gently wipe the touch screen clean with a soft, dry cloth or eyeglasses cloth.
Important
Never rub the touch screen surface with anything hard or press strongly against it. Doing so
could break the touch screen.
BluetoothTM switch
Section 01 LOOX (01-09) 6/25/02, 9:57 AM3
4
2 Names of the Parts and Their Functions
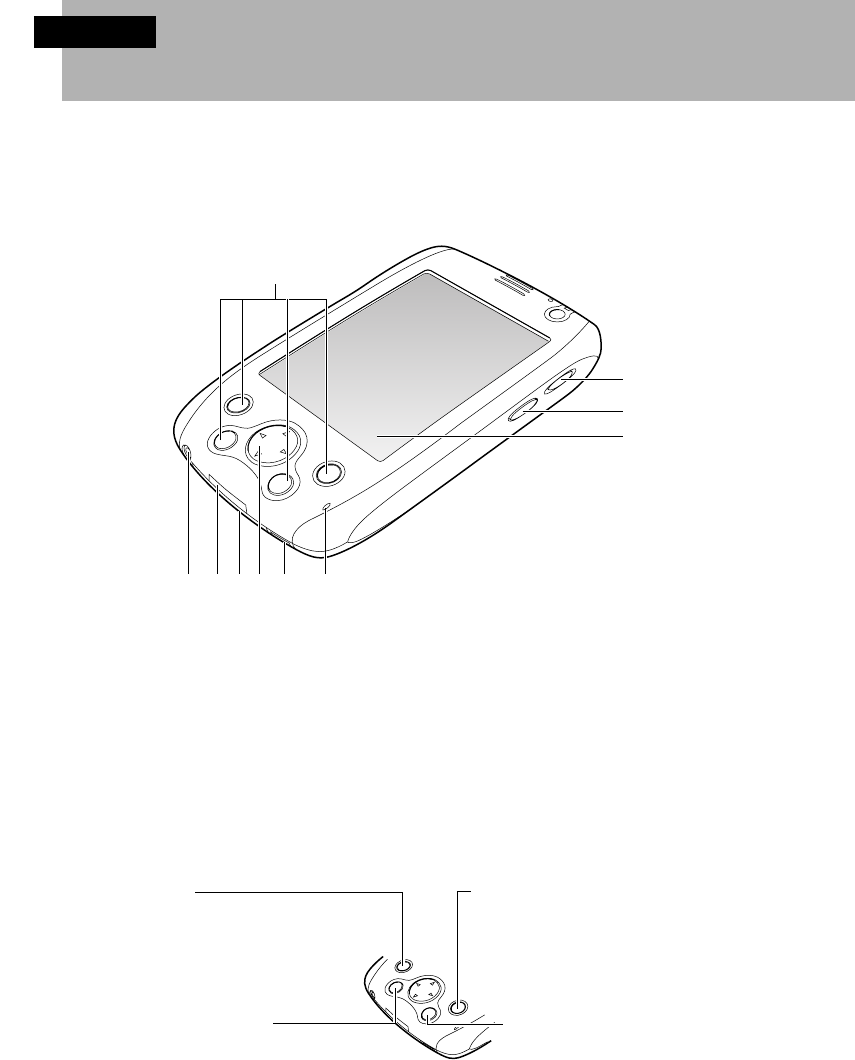
The names of the parts of this device and their functions are as follows.
Right Side/Bottom
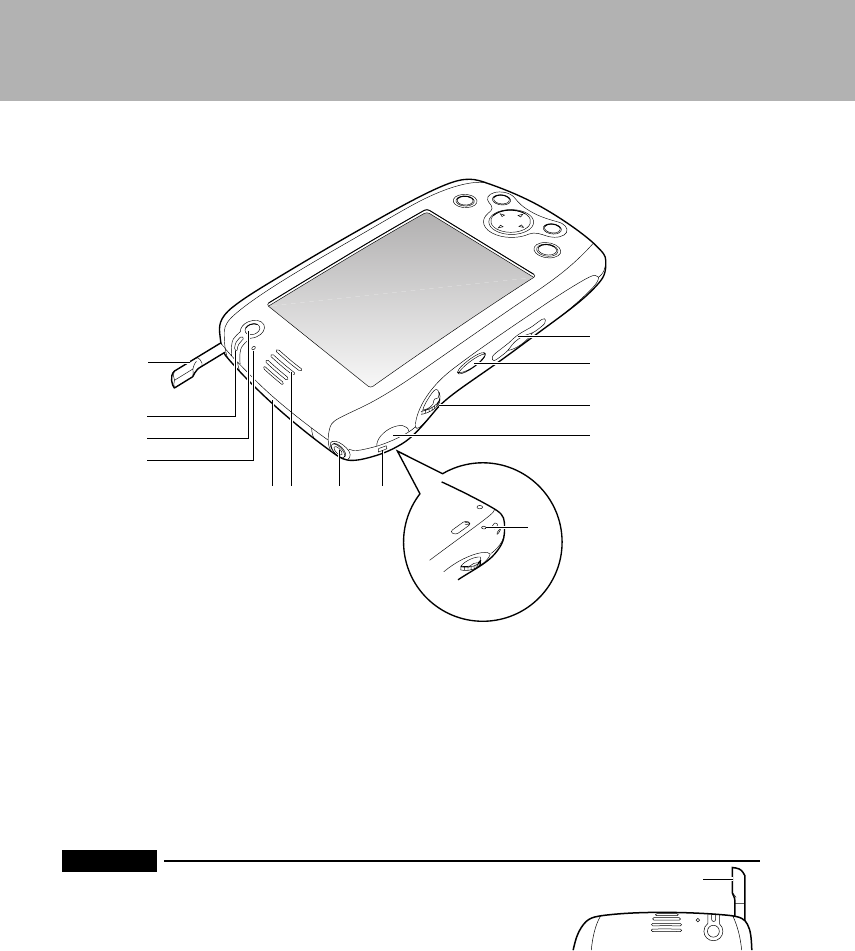
1 Applications buttons
With these buttons, you can quickly start the applications you want. Each button
can be assigned to two applications. You select which one to start by how you press
the application button.
– Press the button and release it immediately.
– Press the button and hold it about one second before releasing it (long press).
A total of eight applications can be assigned to the four application buttons. For
details on how to assign the two applications for each button, see “Application
Buttons Settings” .
The factory settings for these buttons are as follows.
Button 2
(Tasks)
“User assign” (long press)
SECTION 1
Button 1
(Calendar)
“One-Touch Mute” (long press)
Button 3
(Contacts)
“User assign” (long press)
Button 4
(LX Launcher)
“User assign” (long press)
1
2
3
4
56
78 9 10
Section 01 LOOX (01-09) 6/25/02, 9:57 AM4
SECTION 1
5
SECTION 1
Critical Point
One-Touch Mute
This application switches the muting of audio output from the built-in speakers On/Off. Be
aware of the following points.
–Even though the sound is muted, the on the title bar does not change to . MUTE is
displayed.
–When you tap , the dialog box for muting the sound and the volume setting is displayed.
Executing the one-touch mute while this dialog box is being displayed has no effect.
2 BluetoothTM switch
This is a slide switch for switching the BluetoothTM functions On/Off.
3 Record button
The factory setting for this button is to start record the sound. You can record (in
monaural) while this button is pressed. To assign this button to a different application,
please refer to “Application Buttons Settings”.
4 Touch screen (LCD display)
This screen displays information and can also be used for application operation and
data input by means of the extendable stylus pen.
5 DC-IN connector
This is where the AC adapter for the device is connected.
6 External connection port
This is the connection port for the accessory cradle and the connection cable.
7 Expansion connector (behind protective cover)
This is the connection port for an expansion battery unit or other expansion pack.
8 Navigation button
This button is equivalent to the keys on a computer keyboard and can
move the cursor up/down/left/right and through selection items. Also, pressing on the
center of this button executes the operation and is equivalent to pressing the
key on a computer keyboard (to select and execute.)
9 Battery switch (behind slide cover)
This slide switch switches battery power for this device On/Off. When starting use of
this device, slide this switch to the On side. When you slide this switch to the Off side,
any applications installed by the user of the device and the user’s data are deleted
and this device is returned to the state it was in when purchased.
10 Built-in mic
When recording sound, hold down the Record button with this built-in mic close to the
sound source. The recording is in monaural.
Section 01 LOOX (01-09) 6/25/02, 9:57 AM5
6
Left Side/Top
Back
1 Extendable stylus pen
This is a special pen for inputting text and executing programs on the touch screen.
It is taken out and stored as follows.
–To take the extendable stylus pen out of storage, press the head of the extendable
stylus pen and release your hand when you hear a click. The head of the extendable
stylus pen pops out so that you can take out the extendable stylus pen.
–To store the extendable stylus pen, insert it into its storage location and press until
you hear a click.
Important
When storing the extendable stylus pen on this device, always insert
it with the flat section facing the left side of this device, as in the
figure on the right. If you force the extendable stylus pen into its
storage place facing in any other way, you may not be able to take
it out again.
2 Indicator
This indicator flashes green during charging and lights up green when the battery
charge is complete.
Also, at the time specified for an alarm, it flashes orange. For details on how to set
alarms, see “Setting Notices” and “Setting the Date/Time”.
Flat section
2
1
3
4
56 7 8
9
10
11
12
13
Section 01 LOOX (01-09) 6/25/02, 9:57 AM6

SECTION 1
7
SECTION 1
3 Power button
This button switches the power for this device On/Off.
Also, if this button is pressed together with the scroll lever, the touch screen
calibration screen is displayed. Tap “Correct touch screen”, then following the
instructions on the screen, tap “+” to correct the touch screen. For details on how to
operate the scroll lever, see the scroll lever operation method.
4 Light sensor
This sensor is for switching the brightness of the screen according to how strong
the extra light is.
5 CF card slot (with dummy card)
This slot is where a CF card is set.
6 Built-in speakers
This speaker outputs sounds from the system (for example alarms), recorded
sound, etc.
7 Stereo headphone terminal
You can connect any off-the-shelf headphones (the type with straight 3.5 mm mini
plug) and listen to audio.
8 Strap installation port
Install any off-the-shelf hand strap.
9 SD/MMC card slot
This slot is where an SD/MMC card is set.
10 Start button
This button is equivalent to the key on a computer keyboard. When you press
and release this key, the menu is displayed. With the menu displayed, you
can use the scroll lever and the cursor button to select and execute applications.
Also, if you press and hold this button about one second (long press), the
application assigned to this button is started. For details on how to assign the
application for this button, see “Application Buttons Settings” .
11 Scroll lever
This is used for scrolling the screen and selecting/executing items.
Also, if the scroll lever is pressed together with the power button, the touch screen
calibration screen is displayed. Tap “Correct touch screen”, then following the
instructions on the screen, tap “+” to correct the touch screen. For details on how to
operate the scroll lever, see the scroll lever operation method.
12 Infrared communications port
This is the data output/input port for infrared communications.
13 Reset switch
To reset this device.
Section 01 LOOX (01-09) 6/25/02, 9:57 AM7
8
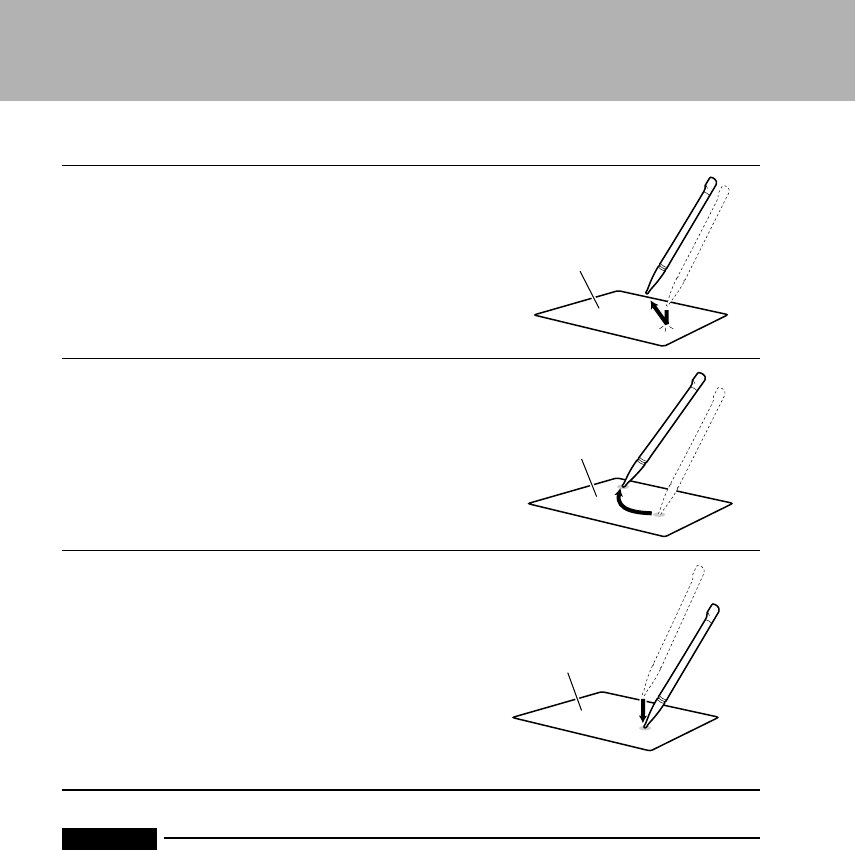
Touch Screen Operation Methods
Tap
Touch the extendable stylus pen gently to the
screen once and remove it immediately. This
operation is equivalent to “clicking” on a computer
and is used for tasks such as starting applications.
Drag
Press the extendable stylus pen gently against the
screen and drag it along the screen. This is used for
tasks such as writing.
Tap-and-hold
Press the extendable stylus pen gently against the
screen and leave it in place. This operation is
equivalent to a “right click” on a computer and is
used for displaying pop-up menus. At the position
where the extendable stylus pen is pressed, first a
red circle is displayed, then a
pop-up menu is displayed.
Important
Always use the extendable stylus pen to operate the touch screen. Using a pencil or ball point
pen will scratch the touch screen.
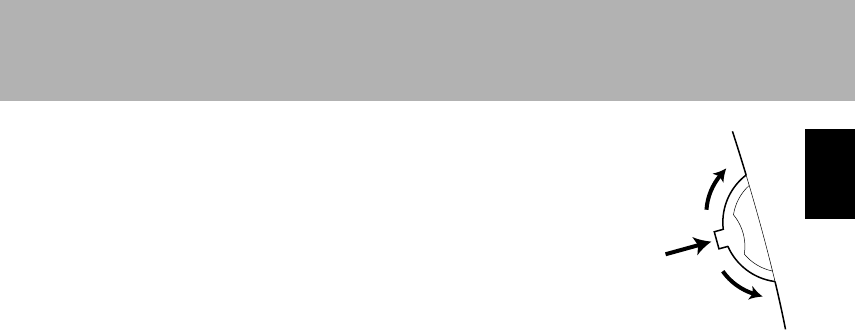
Scroll Bar Operation Methods
When a menu, scroll bar, etc. is displayed on the screen, operate as follows.
•When a menu is displayed on the screen, you can select/execute items.
Touch screen
Touch screen
Touch screen
Press
Section 01 LOOX (01-09) 6/25/02, 9:57 AM8
SECTION 1
9
SECTION 1
•To select the forward item, move in the direction of (1).
•To select the rear item, move in the direction of (2).
•To execute the selected item, press in the direction of (3).
–When the scroll bar is displayed on the screen, you can scroll up
with (1) and down with (2).
Also, when you press in the direction of (3) together with the power button, the touch
screen correction screen is displayed. Tap “Correct touch screen”, then following the
instructions on the screen, tap “+” to correct the touch screen.
(1)
(2)
(3)
Section 01 LOOX (01-09) 6/25/02, 9:57 AM9
10
3 Battery
This device can operate on external power through the AC adapter or on its
internal battery. To use this device with the battery, it is necessary to charge it
beforehand. Also, while this device is operating, if low battery indicator is
displayed at the top right of the screen, recharge the battery soon. For details on
the meaning of the icons displayed, see “Status Icons” .
Charging
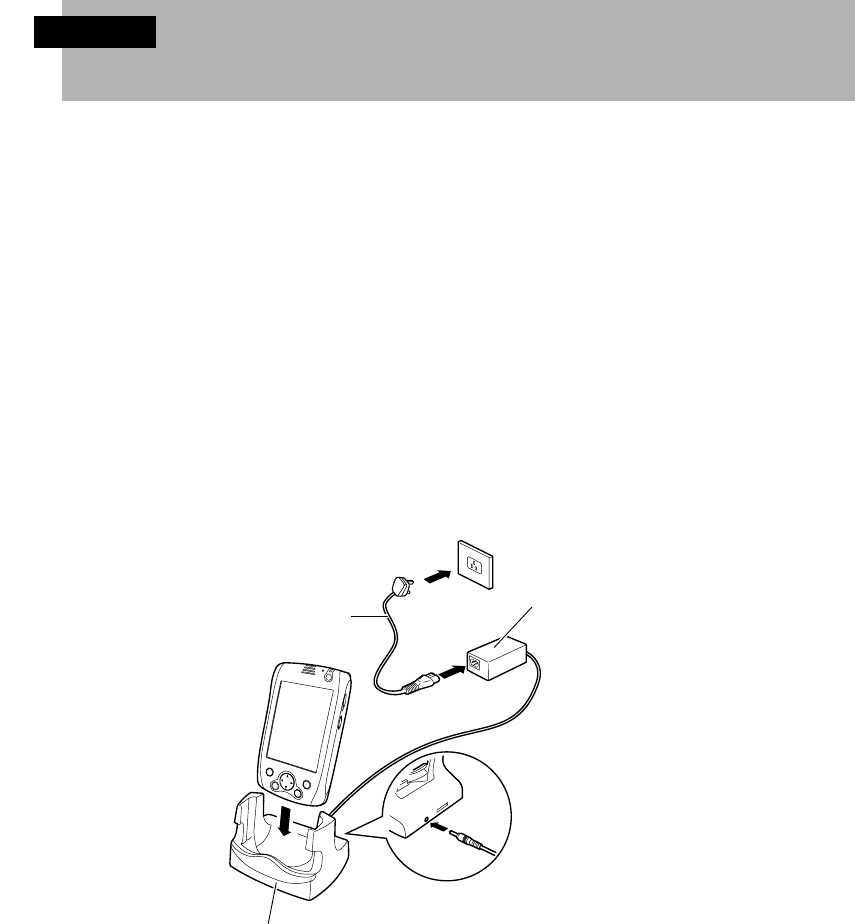
There are two ways to charge this device: with the cradle and with the AC adapter.
When using this device for the first time, read “Preparations for using this device for the
first time” and switch the battery switch On.
Charging with the Cradle
Set this device in the cradle to charge its battery.
As in the figure, (1) Connect the AC adapter to the cradle, (2) Connect the power cable
to the AC adapter, (3) Plug in the other end of the power cable to the socket, (4) Place
this device in the cradle.
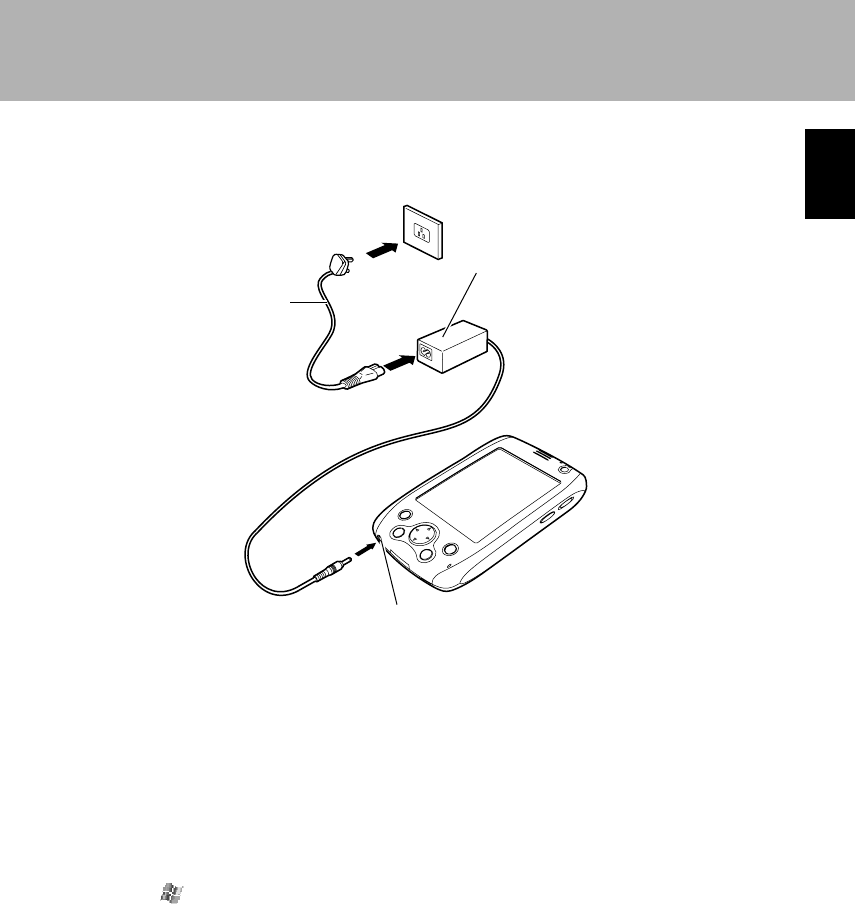
Direct Charging
You can also charge by connecting the AC adapter to this device.
As in the figure, (1) Connect the AC adapter to DC-IN connector of this device, (2)
Connect one end of the power cable to the AC adapter, (3) Plug the other end of the
power cable into the socket.
SECTION 1
Cradle
AC adapter
Power cable
(3)
(2)
(1)
(4)
Section 01 LOOX (10-17) 6/25/02, 9:56 AM10
11
SECTION 1
As in the figure, (1) Connect the AC adapter to this device or DC-IN connector, (2)
Connect the power cable to the AC adapter, (3) Plug in the power cord to the socket.
Points to Watch Out
•During charging, the indicator flashes green.
•Charging takes about three hours. When charging is complete, the indicator lights up green.
•If the expansion battery is installed, it is charged in parallel with the main internal battery.
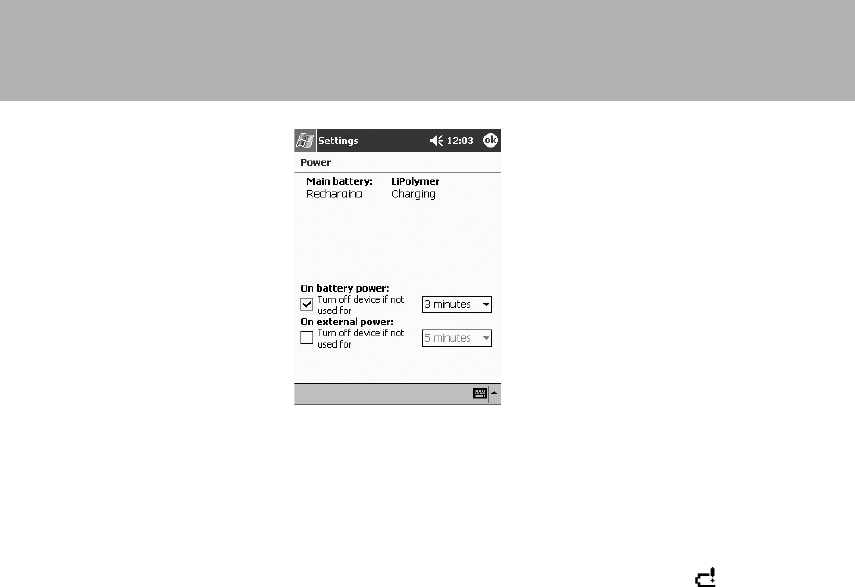
Checking the Remaining Capacity of the Battery
After you switch on the power for this device, you can check the remaining capacity of
the battery with the following procedure.
1 Tap → “System” tab → “Power Management” in that order.
You can check the remaining capacity at “Remaining Capacity”.
AC adapter
Power cable
DC-IN connector
(1)
(2)
(3)
Section 01 LOOX (10-17) 6/25/02, 9:56 AM11
12
For details on this screen, see “Power Settings”.
Points to Watch Out
•Preserving Data and Remaining Battery.
•Even when the unit is not used, the battery is used to maintain your data and
applications you add., if the battery is left too long without being recharged, the
data will be lost.
In order to prevent data loss, be ready to recharge the battery whenever is
displayed at the top right of the screen.
Please understand that Fujitsu is not responsible whatsoever for any data loss
due to failure to maintain the charge in the battery.
•Back up your data periodically just in case.
Recharging
•When using this device for the first time and if the battery has not been charged
for a long time, charge the battery before using this device.
•Charge the battery long enough to fully charge it.
•The battery charge capacity is reduced if the ambient temperature is too high or
too low.
Battery Service Life
The battery has a certain service life. As the battery is charged/discharged over
and over, its charge capacity gradually drops. When the time that the battery is
capable of running this device becomes extremely short, it is time to replace it.
(For the internal battery, send this device to the service center to have the battery
replaced.) How long the battery will last before needing to be replaced depends on
how this device is used, so observe the following points.
•If this device is left in a high-temperature or low-temperature environment, the
battery wear and deterioration proceed faster.
•Rather than completely charging/discharging the internal battery or the expansion
battery pack, charging a little at a time (or before battery state is critical low) extends
the battery service life.
Section 01 LOOX (10-17) 6/25/02, 9:56 AM12
13
SECTION 1
4 Switching the Power On/Off
You can simply switch the power On/Off, but there are a few points to watch out for.
Switching On the Power
Important
Precaution for switching On the power
When using this device for prolonged periods of time or using communications or other
operations that consume large amounts of power, we recommend connecting the AC adapter.
Precaution for use with the battery
In the following cases, the battery is not charged. Check the remaining capacity for the battery
and charge it as necessary.
•When you first purchase this device
•If the battery has not been charged for around 7 days or longer
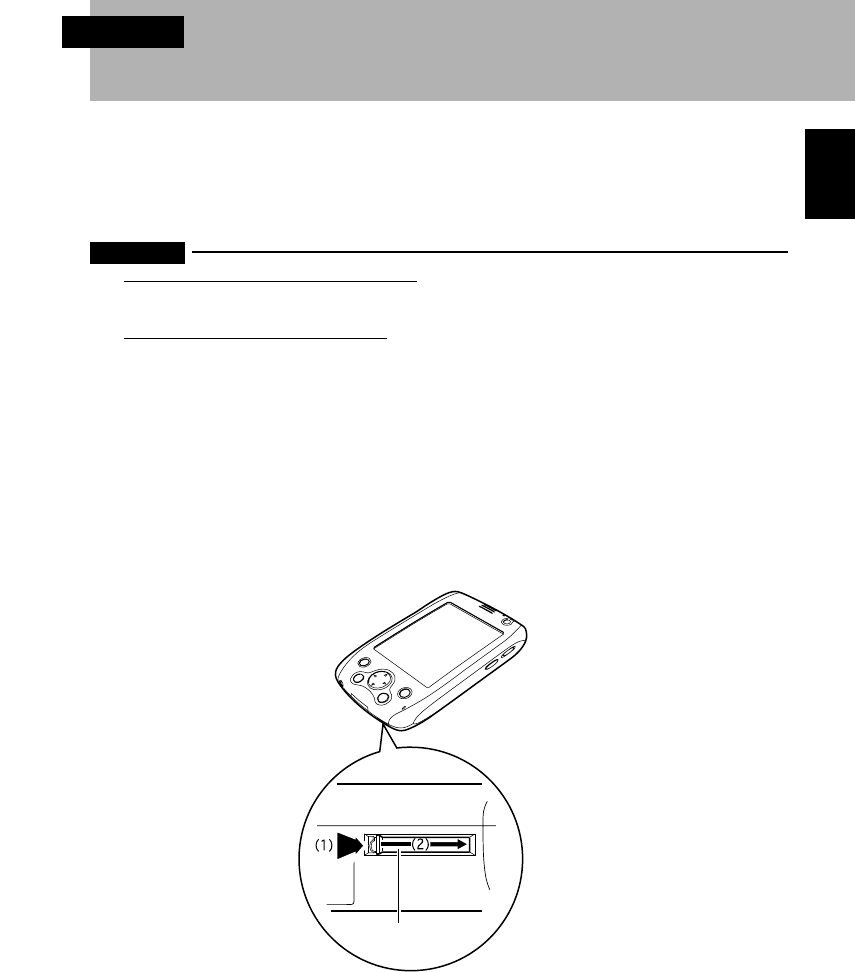
Preparing to Use this Device for the First Time
When using this device for the first time, switch the battery switch On and supply
power to the memory.
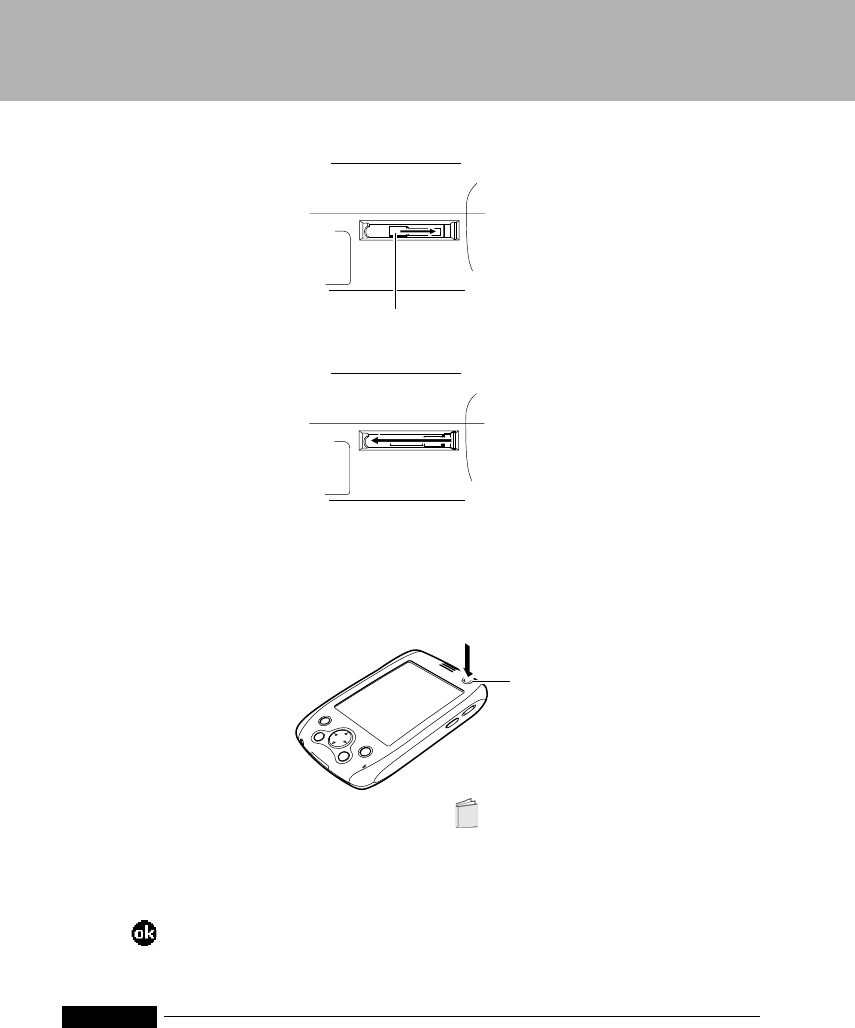
1 Use the extendable stylus pen to slide open the battery cover.
SECTION 1
Slide cover
Section 01 LOOX (10-17) 6/25/02, 9:56 AM13
14
2 Slide the slide switch to the ON side.
3 Close the slide cover.
Normal Method for Switching on the Power
1 When using this device with the AC adapter, connect the AC adapter as
explained in “Direct Charging”.
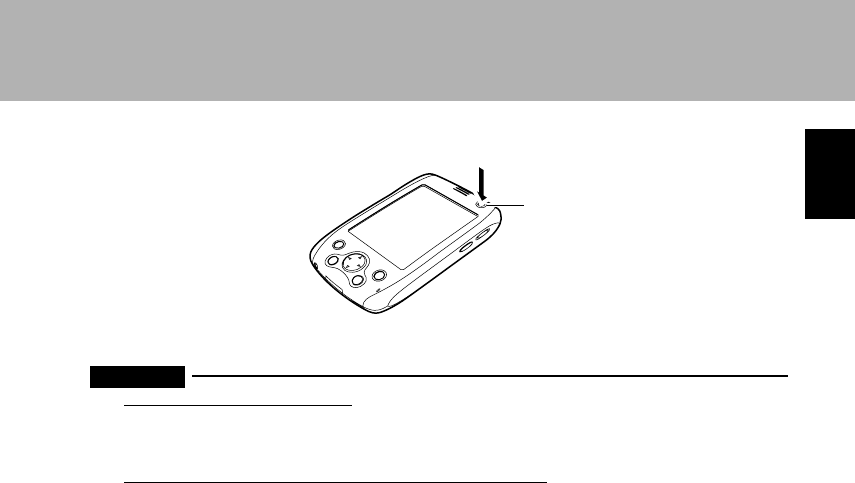
2 Press the power button.
When using this device for the first time, read the “Power on the device for the First
Time” in the “Quick Start Guide” and make the initial setup.
Switching Off
1 Tap at the top right of the screen to end the operation being carried out.
Any data being operated on is saved.
Important
Even if the power is switched Off, data being operated on is resumed (re-opened) when the
power is switched back On, but always save the data anyway. If you end operations without
saving the data, if the program encounters error, the data could be lost.
Battery switch
Power button
Section 01 LOOX (10-17) 6/25/02, 9:56 AM14
15
SECTION 1
2 Press the power button.
Important
Disconnecting the AC adapter
Check that the battery is charged before disconnecting the AC adapter and changing to battery
power while using this device. For details on how to check the battery’s remaining capacity,
see “Checking the Remaining Capacity of the Battery”.
Always disconnect the AC adapter in the following case
When leaving this device unused for a prolonged period of time.
Power button
Section 01 LOOX (10-17) 6/25/02, 9:56 AM15
16
5 Resets
Resetting is an operation that is necessary in such cases as system and
application encounter critical errors and stop respond to input. There are two
types of resets.
• Normal resets
• Full resets
Normal Resets
A normal reset is equivalent to Restart for a computer. This operation is necessary
when there is trouble such as a program that stops responding.
When you execute a normal reset, the current data will lost.
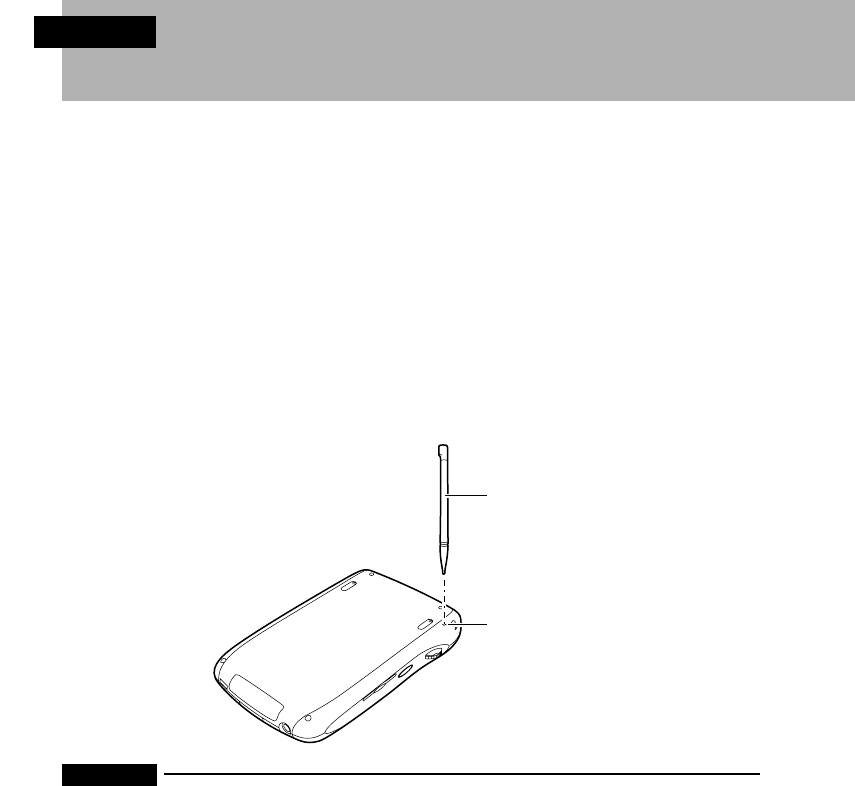
To execute a normal reset, press the reset button on the rear of the device itself with
the extendable stylus pen as shown in the figure.
Important
Always press the reset switch with this device’s extendable stylus pen. Using a ball point pen
or the like can damage this device.
Full Resets
A full reset is equivalent to recovery for a computer and returns this device to its factory
status. This operation is necessary in such unlikely cases as the system becoming
unable to start.
When you execute a full reset, the following data is lost. Make sure you back up your
data before peforming this step.
•Data being operated on
•Data created by the user
•Added programs
To execute a full reset, operate the battery switch as follows.
SECTION 1
Reset switch
Extendable stylus pen
Section 01 LOOX (10-17) 6/25/02, 9:56 AM16
17
SECTION 1
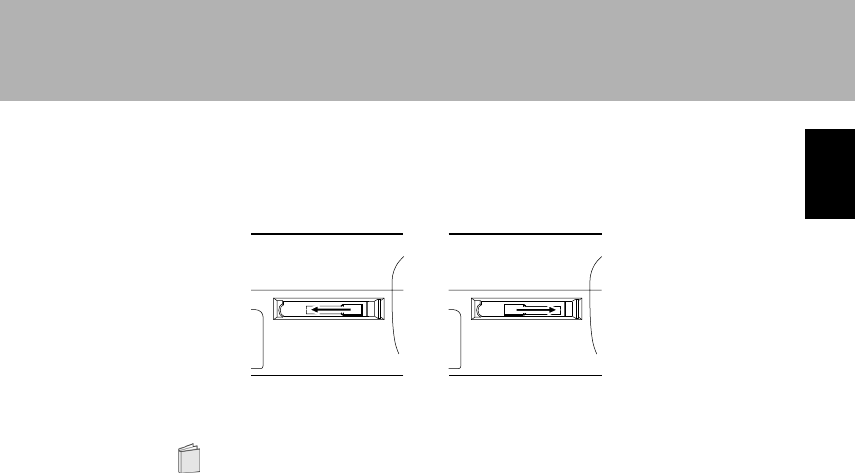
1 Open the slide cover.
2 Using the extendable stylus pen, (1) Slide the battery switch to the Off side,
then (2) Slide it back to the On side.
3 Close the slide cover.
4 Read “Switching on the Power for the First Time” in the “Quick Start
Guide” and execute the initial setup.
(1) (2)
Section 01 LOOX (10-17) 6/25/02, 9:56 AM17
18
6 Connecting with a Computer
When you connect this device with a computer, you can exchange data between
them. For further details, see “Chapter 6 Linking with a Computer”.
Computers This Device Can Connect to
In order to connect with this device, the computer must meet the following conditions.
Windows XP/Windows 2000/Windows NT (SP6 or later)/Windows ME/
Windows 98
• Outlook 98 or later
• Microsoft Office 97 or later
• Internet Explorer Version 4.0.1 Service Pack 1 or later (When using
mobile favorites, Internet Explorer 5 or later)
• Hard disk available space: 12-65 MB min.
• Port: 9-pin serial/infrared port/USB (not with Windows NT)/BluetoothTM
• Drive: Drive that can read CD-ROMs
• Graphic adaptor: 256 colors/VGA min.
• Keyboard, mouse
OS
Program
Others
SECTION 1
Notes:
• To synchronize the Inbox, Calendar, Contacts, Tasks, and Notes with the device,
Outlook 98 or Outlook 2002 is recommended (or latest ) .
• In order to synchronize Pocket Word and Pocket Excel with the device, Microsoft
Office 97 or later is required.
• Windows NT is not recommended as it does not support USB port.
Section 01 LOOX (18-24) 6/25/02, 9:55 AM18
19
SECTION 1
(2)
(1)
(3)
Connecting
This device can be connected with a computer with any of the following methods.
•Connecting using the cradle
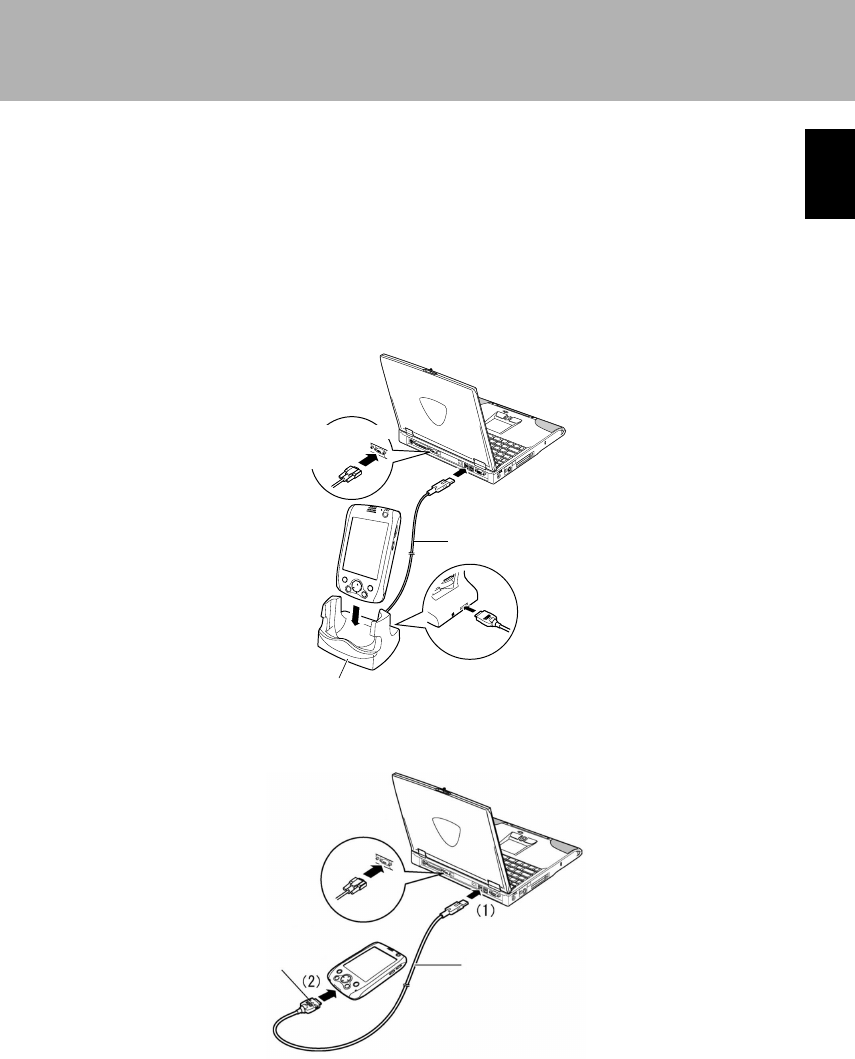
As in the following figure, (1) Connect the USB sync cable that comes with this device or a
separately-purchased serial cable to the computer connector, (2) Connect the other end to
the cradle, (3) Put this device in the cradle.
•Connecting using the infrared communications port
For details on infrared communications, see “2 Infrared Connections”.
•Connecting using BluetoothTM
For details on BluetoothTM communications, see “3 BluetoothTM Connections”.
USB sync cable
Cradle
•Connecting using USB Sync cable
USB Sync cable
While using
a serial sync
cable
Having the side
marked with
triangles facing
up
When using a
serial sync
cable
Section 01 LOOX (18-24) 6/25/02, 9:55 AM19
20
7 Installing Expansion Units
You can strengthen the functions of this device by installing expansion units,
such as memory.
Expansion Units That Can Be Used with This
Device
The following functions units can be installed in this device.
•Expansion battery
Adding the expansion battery enables you to operate this device longer between recharges.
•CF card
Installing a memory card enables you to save larger files, such as digital camera pictures, and
more applications. You can also install a communications card or other I/O CF card.
•SD/MMC card
Installing a memory card enables you to save larger files, such as digital camera pictures, and
more applications.
Installing an Expansion Pack
The methods for installing/removing expansion packs are as follows.
Installation
Before installing an expansion pack, disconnect the power of this device.
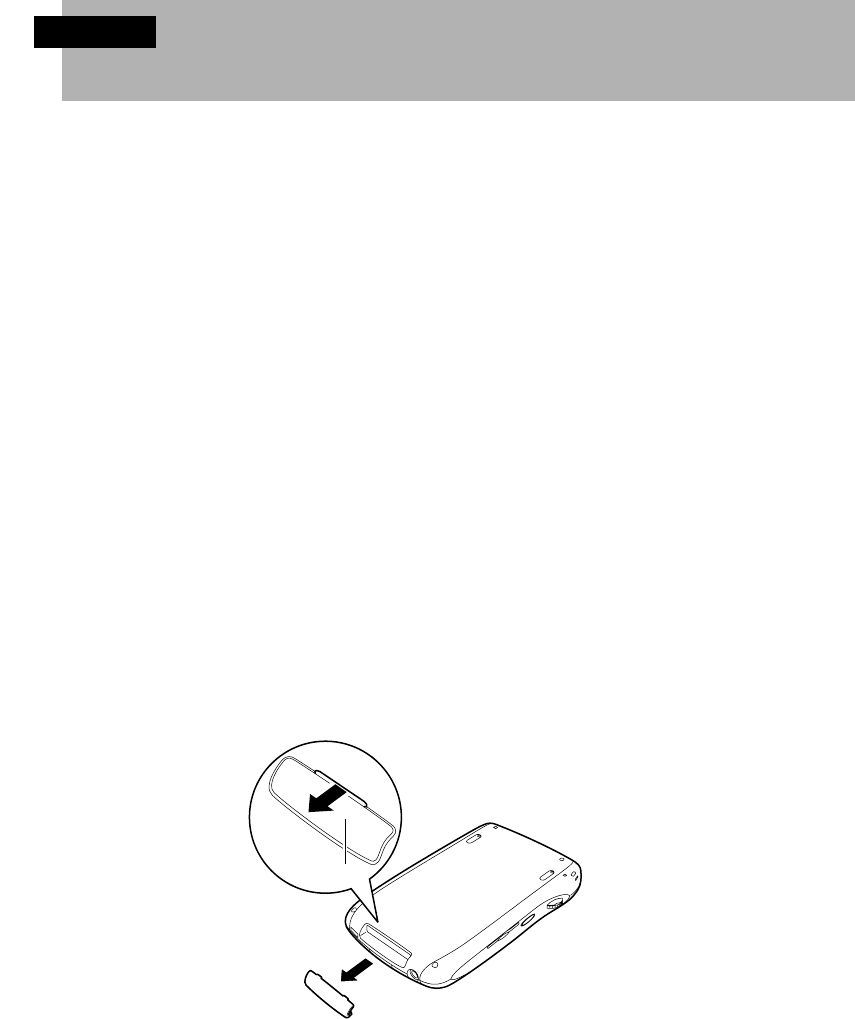
1 Remove the cover.
Press your finger against the edge of the cover and remove it.
SECTION 1
Cover
Section 01 LOOX (18-24) 6/25/02, 9:55 AM20
21
SECTION 1
(2)
(1)
Removal
Before removing an expansion pack, disconnect the power of this device.
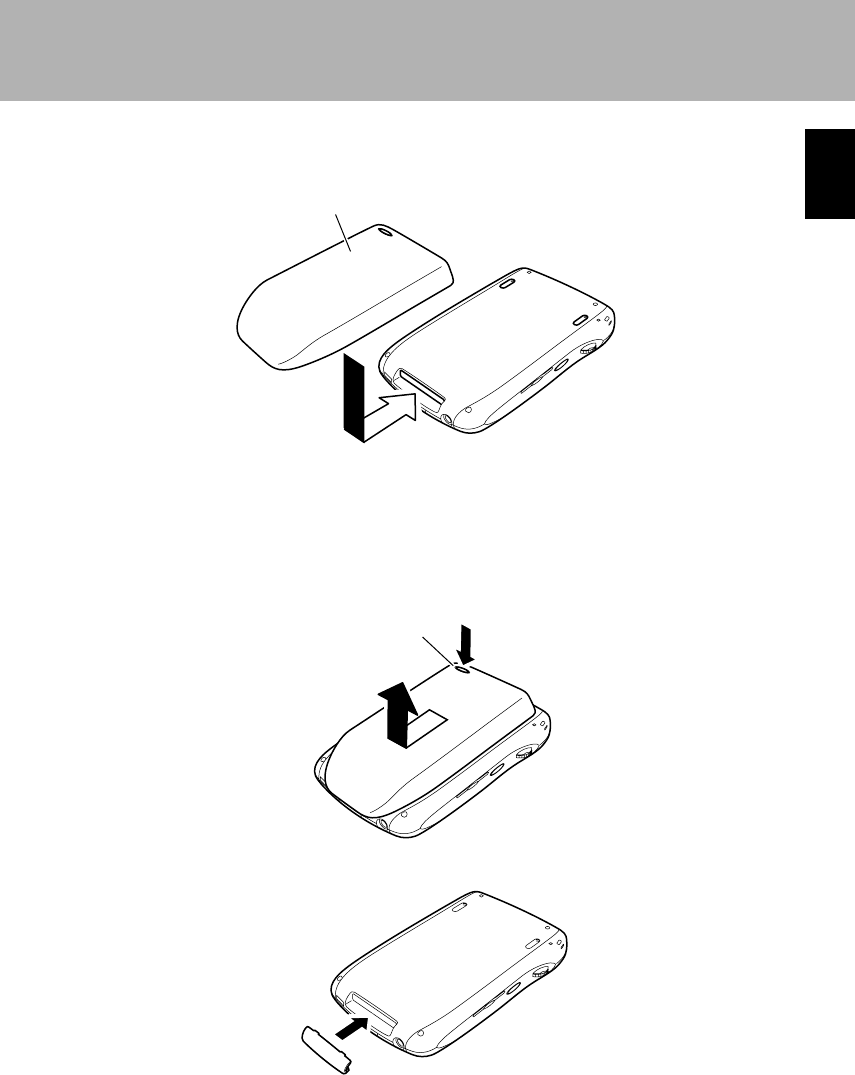
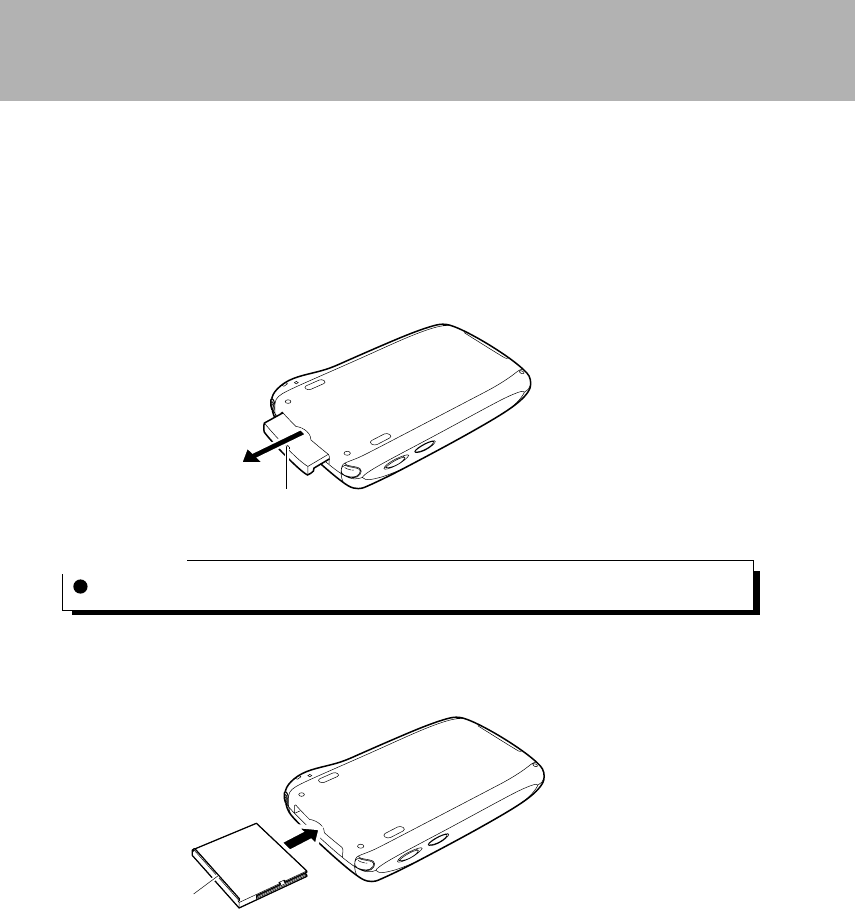
1 Remove the expansion pack.
(1) While pressing the eject button, (2) Slide in the direction of the arrow and
remove.
2 Install the cover.
2 Install the expansion pack.
Slide in the direction of the arrow until you hear a click.
Expansion pack
Eject button
Section 01 LOOX (18-24) 6/25/02, 9:55 AM21
22
Projecting section
Projecting section
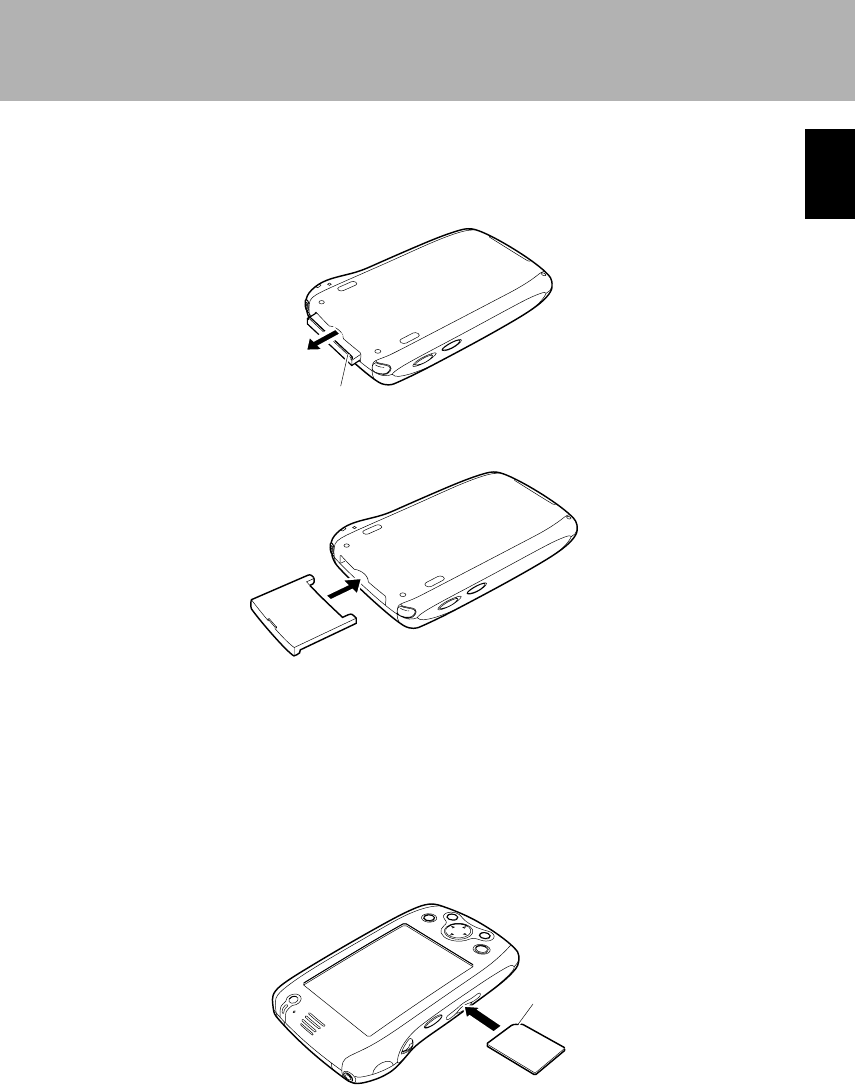
Setting CF Cards
The methods for setting/removing CF cards are as follows.
Setting
1 Remove the dummy card.
Hold the dummy card at its projecting section and pull it out.
Critical Point
Store the removed dummy card carefully to avoid losing it.
2 Setting the CF card in place.
Place the projecting section of the card facing the rear of this device.
Section 01 LOOX (18-24) 6/25/02, 9:55 AM22
23
SECTION 1
Removal
1 Remove the CF card.
Hold the card at its projecting section and pull it out.
2 Set the dummy card in place.
Setting SD/MMC cards
The methods for setting/removing SD/MMC cards are as follows.
Setting
1 Set the SD/MMC card in place.
Set the card with the rounded corner facing the bottom of this device and insert all
the way until you hear a click.
Rounded corner
Projecting section
Section 01 LOOX (18-24) 6/25/02, 9:55 AM23
24
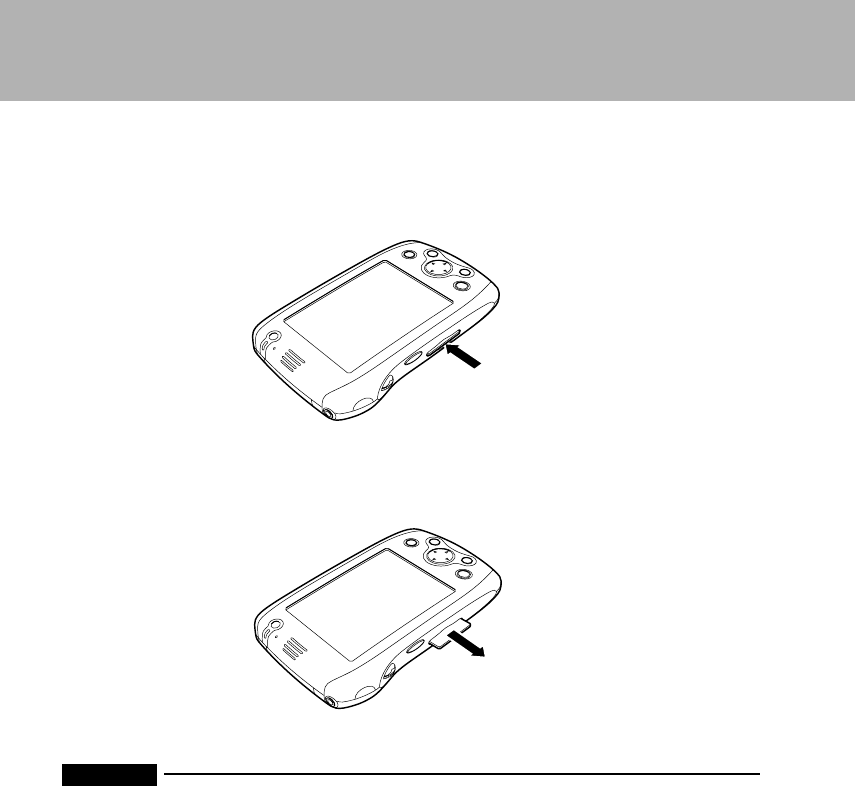
Removal
1 Push the card and let go when you hear a click.
The card jumps out slightly.
2 Remove the SD/MMC card.
Important
Be careful. The card eject mechanism contains a spring, so the card may leap out with some
force.
Section 01 LOOX (18-24) 6/25/02, 9:55 AM24
2
2
SECTION
SECTION
SECTION 2
Section 02 LOOX (25-33) 6/25/02, 9:54 AM25
26
1 Initial Screen and Application Startup
This section explains the initial screen for this device and methods for starting/
ending application.
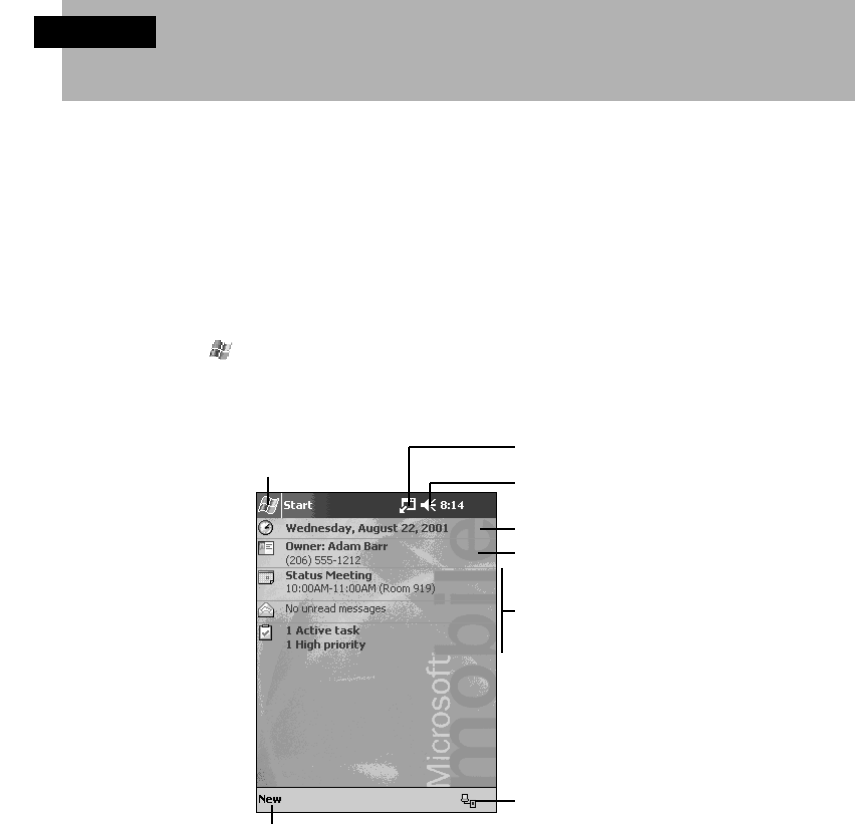
Today Screen
The Today screen is the initial screen for this device. This screen shows important
information for the day at a glance. The Today screen is displayed in cases such as the
following.
• Each day, the first time the power switched on
• When this device has not been used for more than four hours (initial setting)
• When you tap → “Today” in that order
Screen Configuration
SECTION 2
Tap to switch to
a program.
Tap to view notification
messages.
Tap to change volume
or mute all sounds.
Tap to change date and time.
Tap to open an item.
Your day at a glance.
Tap to create a new item.
Tap to view connection status.
Section 02 LOOX (25-33) 6/25/02, 9:54 AM26
27
SECTION 2
Critical Point
Customizing the Today screen
You can change the Today screen background, items displayed, etc. Tap → “Settings” →
“Personal” tab → “Today” in that order to make the settings. For details, see “Today Screen
Settings”.
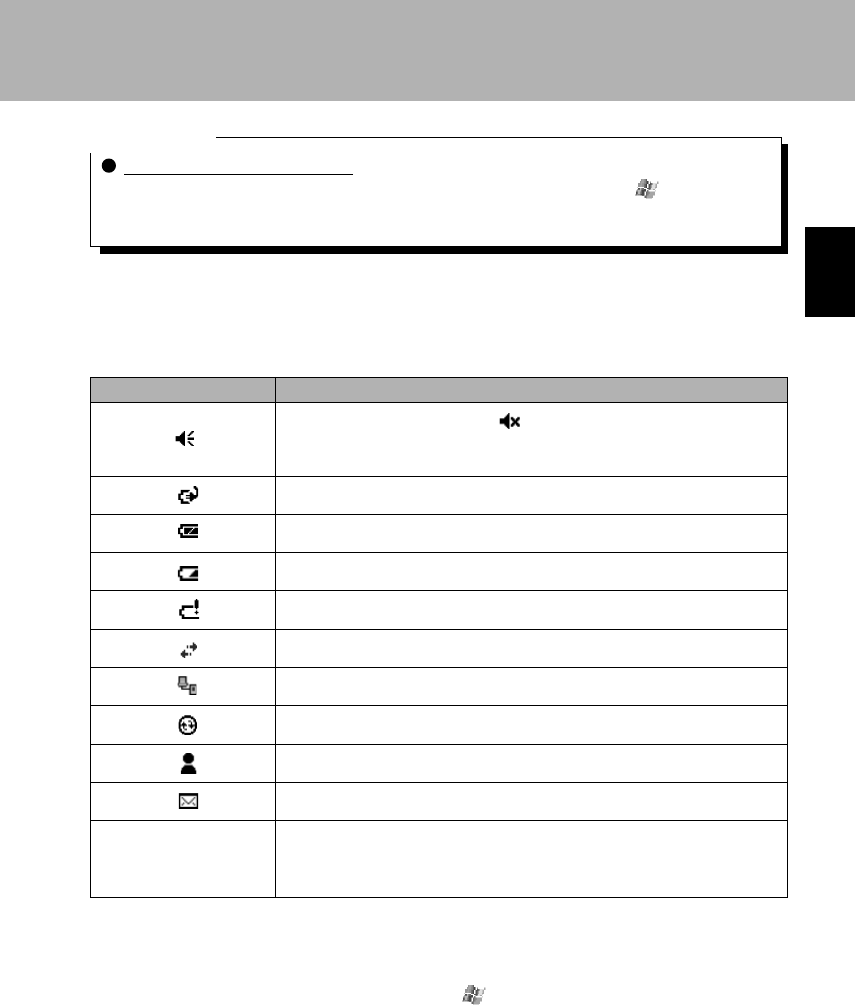
Status Icons
The status icons are displayed at the bottom right of the Today’s screen. You can check
the status of this device with the status icons. The status icons and the meanings are as
follows.
Status Icon Meaning
All audio is On. To switch Off ( ) all the audio, tap here and check
with the dialog box displayed. You can also use this same dialog box
to adjust the volume.
The battery is charging.
The battery is fully charged.
The battery is running low.
The battery is running extremely low.
The device is connected to a network.
The device is connected to a computer.
Synchronization with a computer has been started.
You have an instant message.
You have mail.
This is the state in which Application Button 1 is held down for about
one second and the internal speaker is muted. Holding down this
button again ends the muting.
Starting/Switching Applications
You can start or switch an application from the menu or with an application button.
For details on the applications built into this device, see “1 Application List”.
MUTE
Section 02 LOOX (25-33) 6/25/02, 9:54 AM27
28
Starting/Switching from the Menu
1 Tap the menu.
2 From the displayed menu, select the application you want to start or switch
to.
The selected application is started. If the application you selected has already been
started, this device switches to that application.
To start an application not registered for the menu, tap → “Programs” in that
order, then tap the application you want from the displayed application list.
Critical Point
To change an application displayed on the menu
You can change the applications displayed when you tap the menu. For details, see
“Menu Settings”.
Starting/Switching Applications from Application
Buttons
The applications registered to the application buttons on the front of this device can be
started or switched to by pressing the corresponding application buttons. For each
button, one application is started by pressing and releasing the button and another
application is started by holding down the button for about one second (long press).
To see the application button assignments your device comes with, see “Right/Bottom”.
Critical Point
To change an application assigned to an application button
You can change the applications started by pressing the application buttons. For details, see
“Application Buttons Settings”.
Section 02 LOOX (25-33) 6/25/02, 9:54 AM28
29
SECTION 2
Differences between Switching Applications and
Ending Applications
Even when you switch the application you are using or tap the at the top right,
the application is not ended. (The currently displayed application is closed and this
device returns to the previously started application.)
Details on how to completely end an application are given in “Closing Applications”.
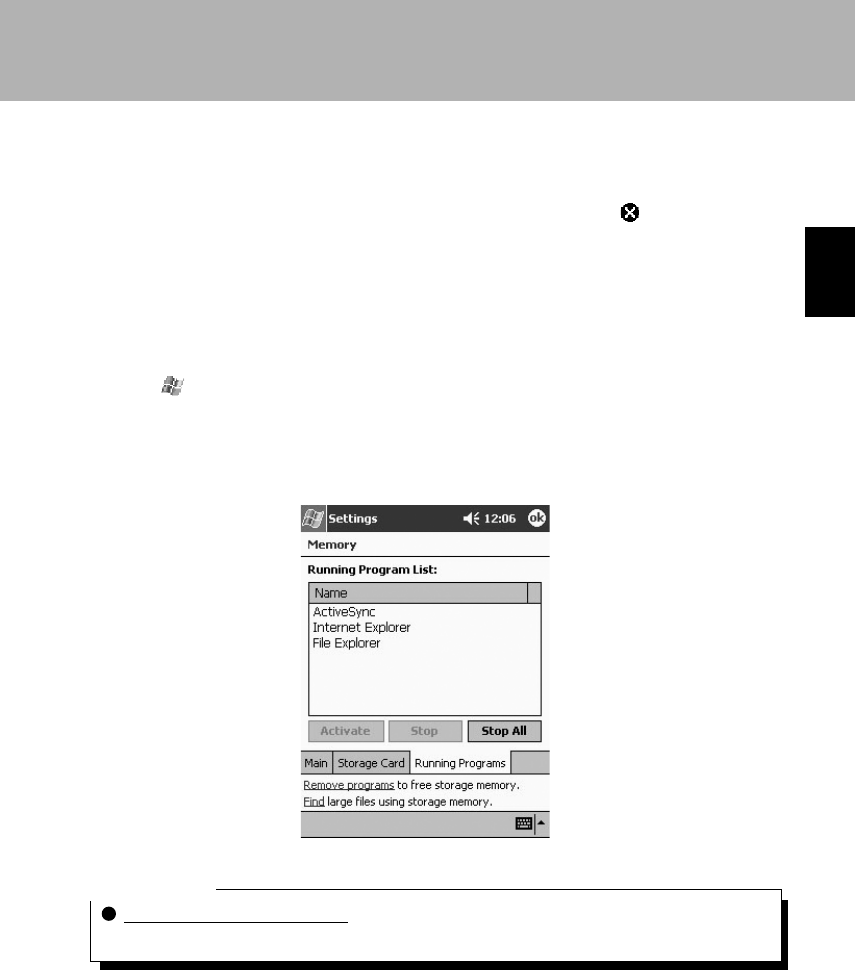
Ending Applications
1 Tap → “Settings” → “System” tab in that order.
2 From the list of setting items, tap “Memory” → “Applications Running” tab in
that order.
3 Select the application to end.
Critical Point
Ending from the LX Launcher
You can also end from the LX Launcher task. For details, see “LX Launcher”.
Section 02 LOOX (25-33) 6/25/02, 9:54 AM29
30
2 Operations Common to All Programs
This section explains the operations common to all programs.
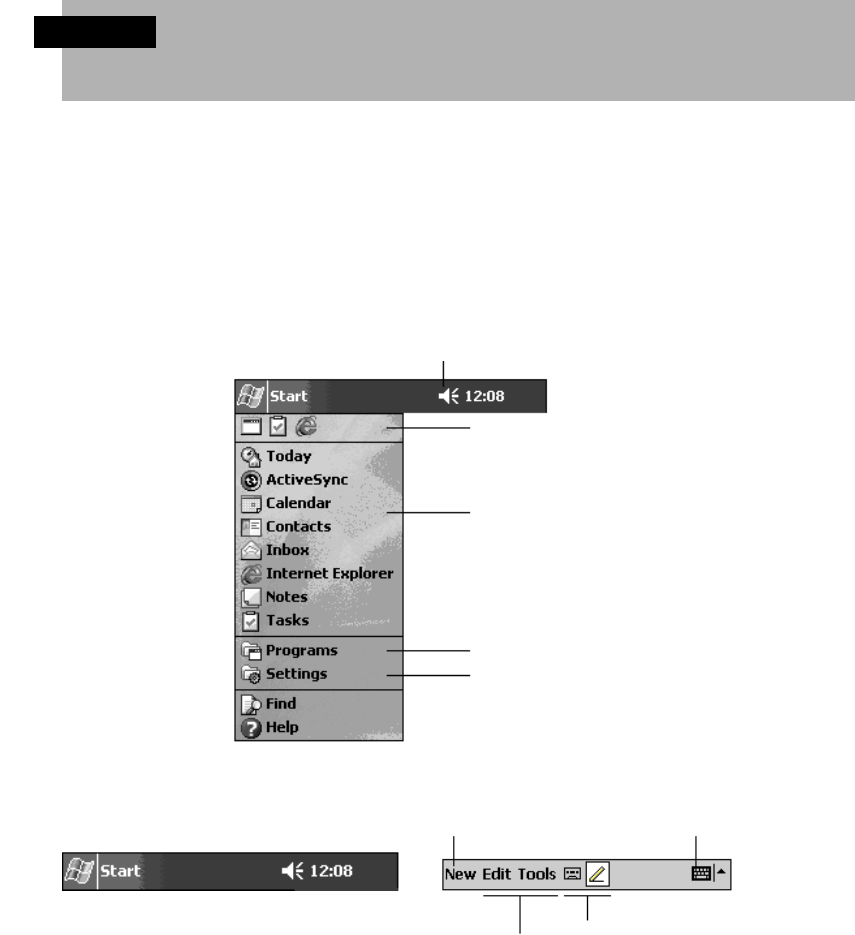
Navigation Bar and Command Bar
The blue section that is displayed at the top of the screen is the navigation bar. The
current time, the programs running, etc. are displayed.
The gray section always displayed at the bottom of the screen is the command bar. An
operation menu, buttons, etc. are displayed.
SECTION 2
Tap to change volume or mute the device.
Tap to quickly select a program
you have recently used.
Tap to select a program.
Tap to see additional programs.
Tap to customize the device.
This is the navigation bar. New button.
Menu names. Buttons
Input panel button.
Section 02 LOOX (25-33) 6/25/02, 9:54 AM30
31
SECTION 2
Pop-Up Menus
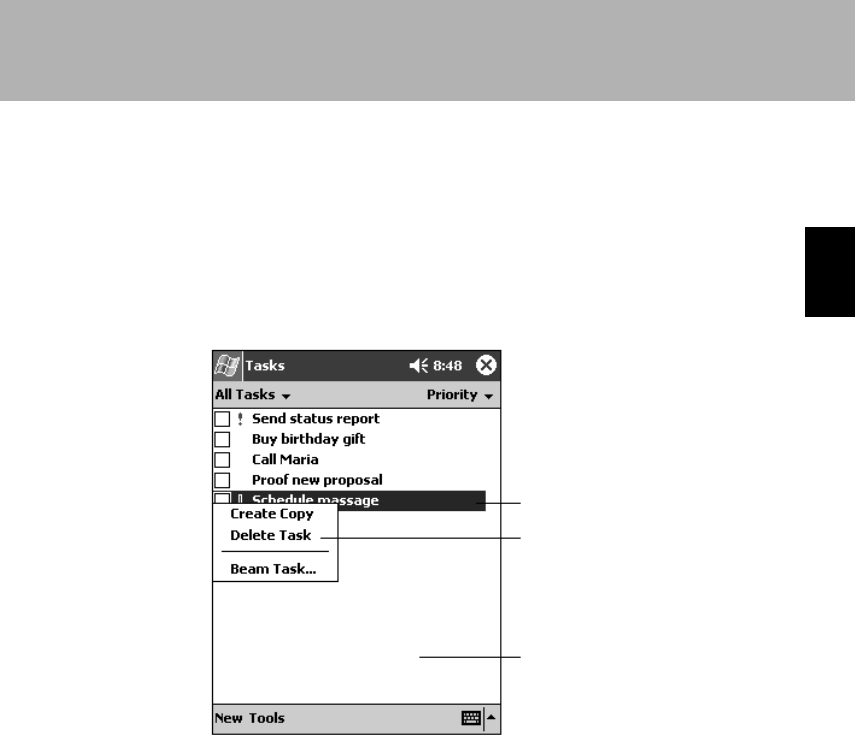
Using pop-up menus makes it possible to execute desired operations quickly and easily.
1 If you tap-and-hold the item for the operation with the extendable stylus pen,
a pop-up menu is displayed.
2 Remove the extendable stylus pen from the screen, then tap the desired
operation from the menu.
The pop-up menu displayed depends on the application.
If you tap anywhere other than the menu, the pop-up menu is closed without any
operation being executed.
Tap and hold to display
the pop-up menu.
Lift the extendable stylus
pen and tap the action you
want.
Tap outside the menu to close it
without performing an action.
Section 02 LOOX (25-33) 6/25/02, 9:54 AM31
32
SECTION 2
3 Data Input
You have several options for entering new information:
• Use the input panel to enter typed text, either by using the soft keyboard or Character
Recognizer.
• Write directly on the screen.
• Draw pictures on the screen.
• Speak into your Pocket PC microphone to record a message.
• Use ActiveSync to synchronise or copy information from your desktop computer to your
Pocket PC. For more information on ActiveSync, see the documentation accompanying
the “Companion CD” or ActiveSync Help.
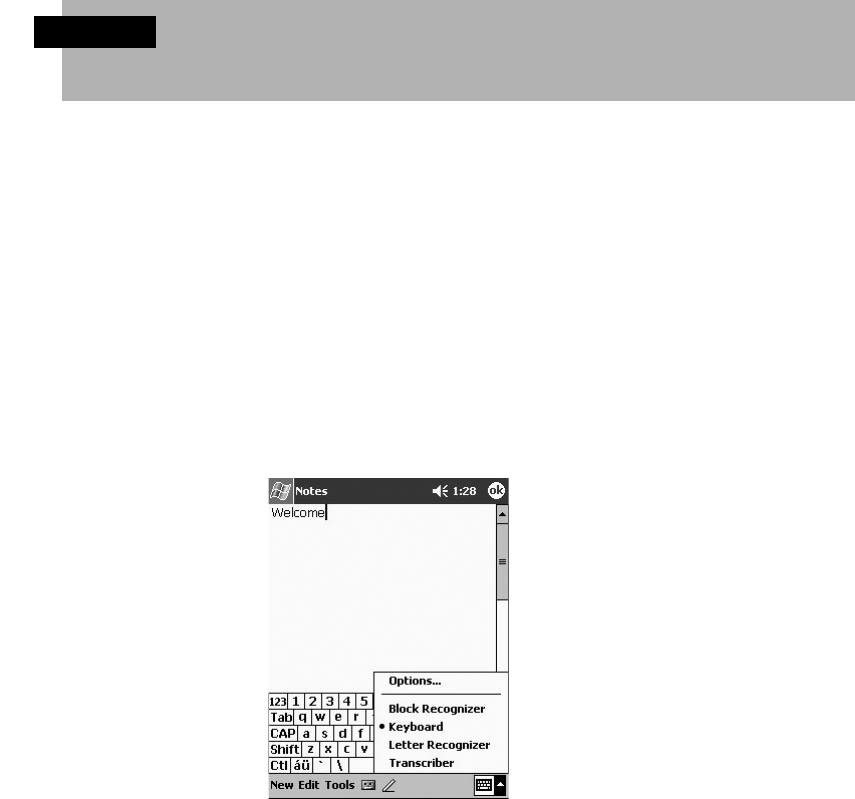
Use the input panel to enter information in any programme on your Pocket PC. You can
either type using the soft keyboard or write using Character Recognizer. In either case,
the characters appear as typed text on the screen.
To show or hide the input panel, tap the Input Panel button.
Section 02 LOOX (25-33) 6/25/02, 9:54 AM32
33
SECTION 2
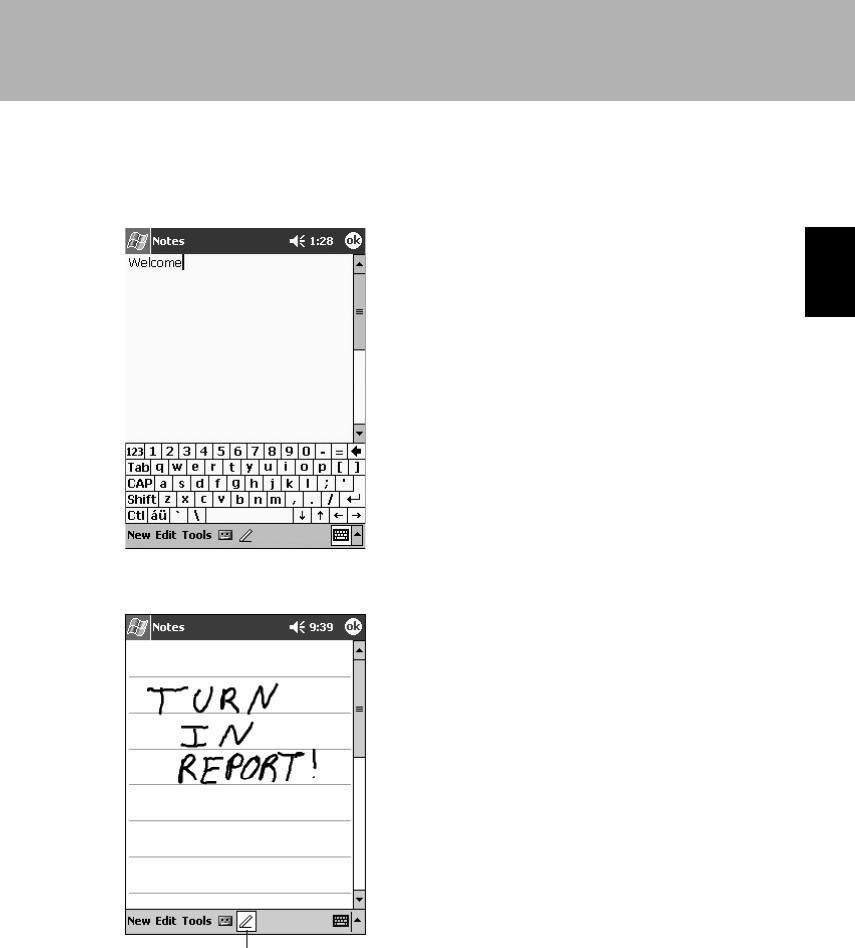
The methods for inputting data to this device are as follows.
Input using soft keyboard
Text is input using the input panel displayed
on the screen. This method is usually used
for inputting text.
Writing
You can write characters directly on the
screen with the extendable stylus pen just
like writing on paper. The characters you
write this way are stored as is.
Tap the Pen button and
use your extendable stylus
pen like a pen.
Section 02 LOOX (25-33) 6/25/02, 9:54 AM33
34
Soft Keyboard Input
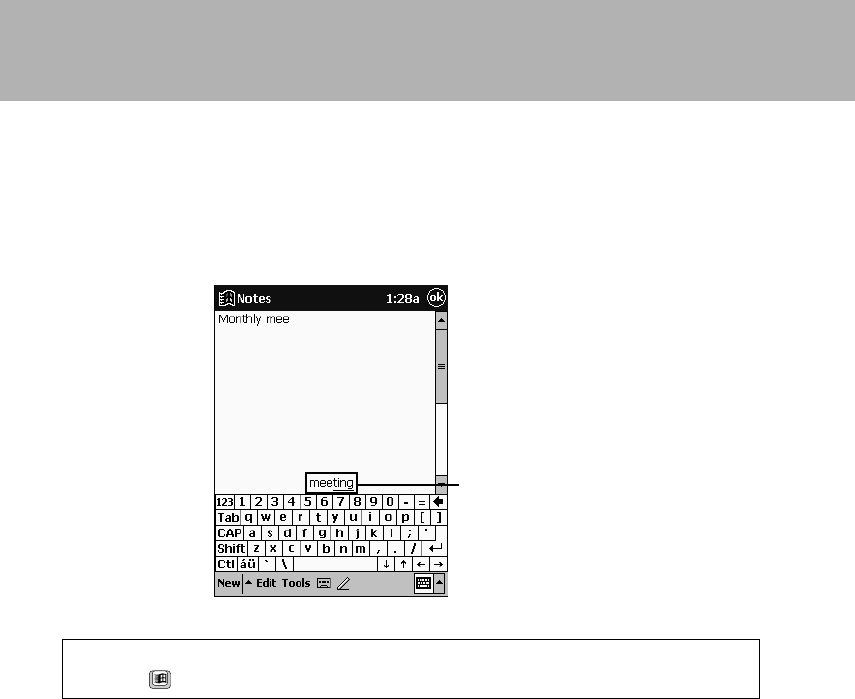
When you use the input panel, your Pocket PC anticipates the word you are typing or
writing and displays it above the input panel. When you tap the displayed word, it is
inserted into your text at the insertion point. The more you use your Pocket PC, the
more words it learns to anticipate.
To change word suggestion options, such as the number of words suggested at one
time, tap , Settings, Personal tab, Input, and then the Word Completion tab.
To type with the soft keyboard
1 Tap the arrow next to the, Input Panel button and then Keyboard.
2 On the soft keyboard that is displayed, tap the keys with your extendable stylus
pen.
To use Character Recognizer
1 Tap the arrow next to the Input Panel button and then Character Recognizer.
2 Write a letter in the box.
When you write a letter, it is converted to typed text that appears on the screen. For
specific instructions on using Character Recognizer, see “Character Recognizer”.
Tap here if this is the right word.
Section 02 LOOX (34-41) 6/25/02, 9:53 AM34
35
SECTION 2
You can cut, copy, and paste text by tapping and holding the selected words and then
tapping an editing command on the pop-up menu, or by tapping the command on the
Edit menu.
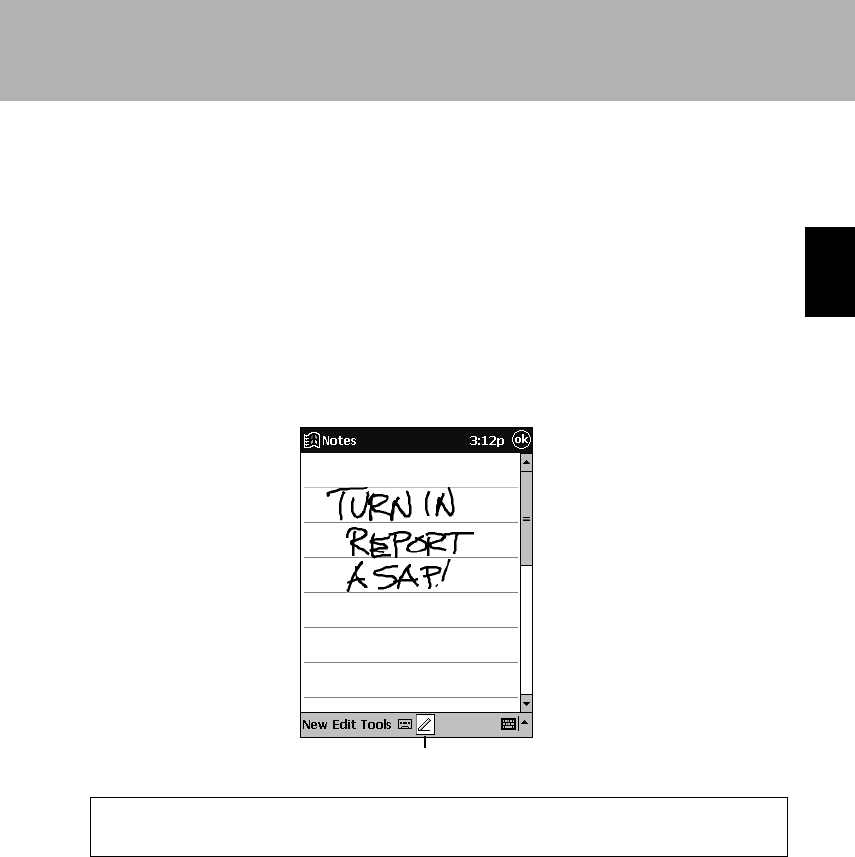
In any programme that accepts writing, such as the Notes programme and the Notes
tab in Calendar, Contacts, and Tasks, you can use your extendable stylus pen to write
directly on the screen. Write the way you do on paper. You can edit and format what
you’ve written and convert the information to text at a later time.
To write on the screen
Tap the Pen button to switch to writing mode. This action displays lines on the screen to
help you write.
Some programs that accept writing may not have the Pen buttton. See the
documentation for that programme to find out how to switch to writing mode.
Tap the Pen button and use your extendable stylus
pen like a pen.
Section 02 LOOX (34-41) 6/25/02, 9:53 AM35
36
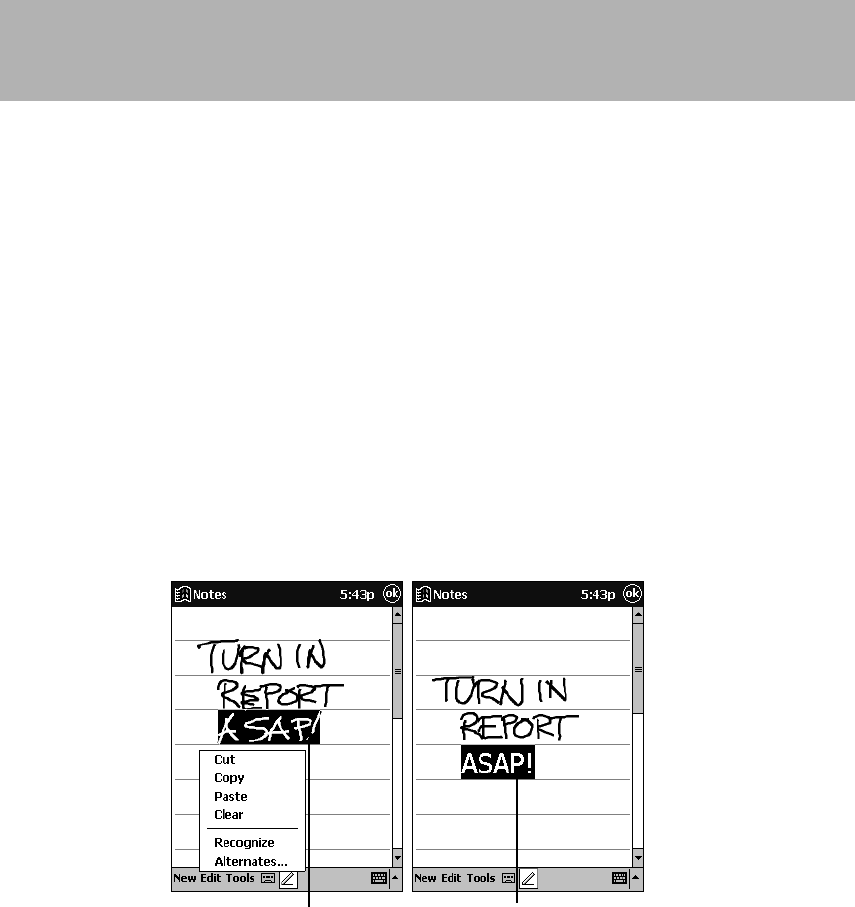
To select writing
If you want to edit or format writing, you must select it first.
1 Tap and hold the extendable stylus pen next to the text you want to select until the
insertion point appears.
2 Without lifting, drag the extendable stylus pen across the text you want to select.
If you accidentally write on the screen, tap Edit and then Undo and try again. You can
also select text by tapping the Pen button to deselect it and then dragging the
extendable stylus pen across the screen.
You can cut, copy, and paste written text in the same way you work with typed text: tap
and hold the selected words and then tap an editing command on the pop-up menu, or
tap the command on the Edit menu.
To convert writing to text
Tap Tools and then Recognize.
If you want to convert only certain words, select them before tapping Recognize on the
Tools menu (or tap and hold the selected words and then tap Recognize on the pop-
up menu). If a word is not recognised, it is left as writing.
Select the text you want to convert
and tap Recognize on the pop-up
menu.
The writing is turned into text.
Section 02 LOOX (34-41) 6/25/02, 9:53 AM36
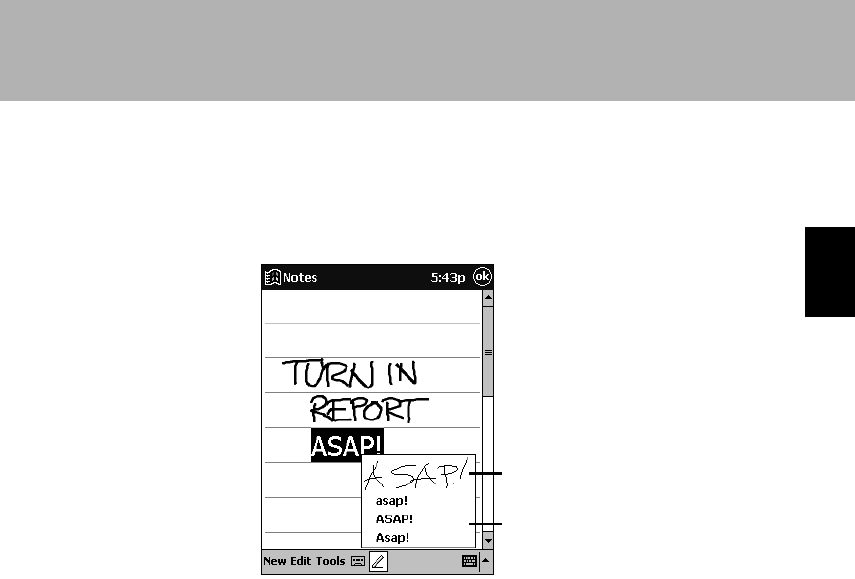
37
SECTION 2
If the conversion is incorrect, you can select different words from a list of alternatives or
return to the original writing. To do so, tap and hold the incorrect word (tap one word at
a time). On the pop-up menu, tap Alternates. A menu with a list of alternate words
appears. Tap the word you want to use, or tap the writing at the top of the menu to
return to the original writing.
Tips for getting good recognition
• Write neatly.
• Write on the lines and draw descenders below the line. Write the cross of the “t” and apostrophes
below the top line so that they are not confused with the word above. Write full stops and
commas above the line.
• For better recognition, try increasing the zoom level to 300% using the Tools menu.
• Write the letters of a word closely and leave big gaps between words so that the Pocket PC
can easily tell where words begin and end.
• Hyphenated words, foreign words that use special characters such as accents, and some
punctuation cannot be converted.
• If you add writing to a word to change it (such as changing a “3” to an “8”) after you attempt to
recognise the word, the writing you add will not be included if you attempt to recognise the
writing again.
Tap to return to your original writing.
Alternatively, tap the word you want to use.
Section 02 LOOX (34-41) 6/25/02, 9:53 AM37
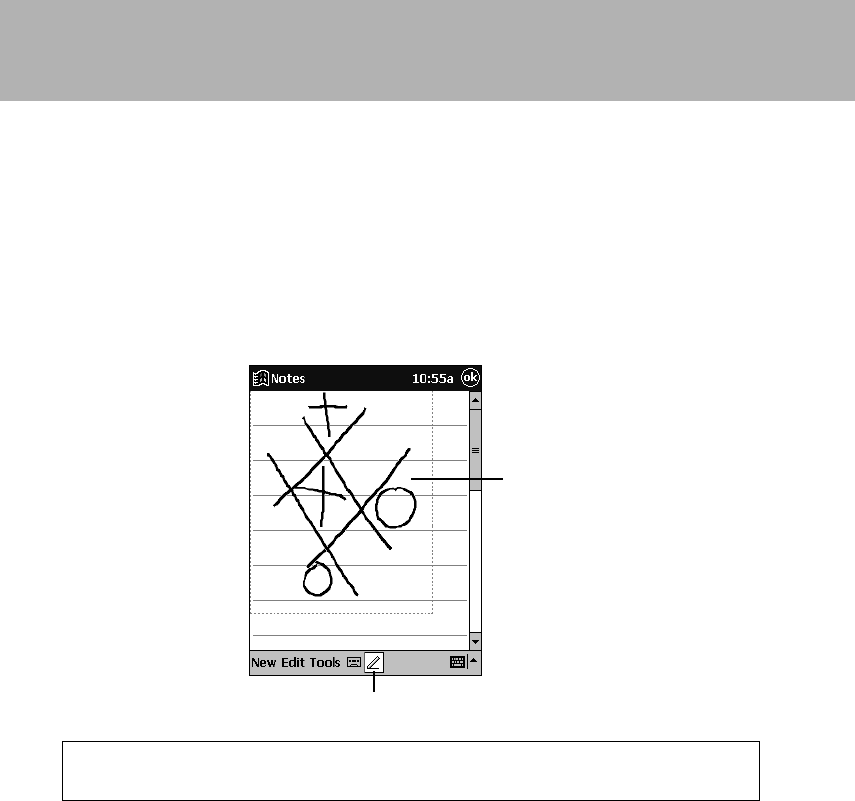
38
You can draw on the screen in the same way that you write on the screen. The
difference between writing and drawing on the screen is how you select items and how
they can be edited. For example, selected drawings can be resized, while writing
cannot.
To create a drawing
Cross three ruled lines on your first stroke. A drawing box appears. Subsequent strokes
in or touching the drawing box become part of the drawing. Drawings that do not cross
three ruled lines will be treated as writing.
You may want to change the zoom level so that you can more easily work on or view
your drawing. Tap Tools and then a zoom level.
To select a drawing
If you want to edit or format a drawing, you must select it first.
• Tap and hold the extendable stylus pen on the drawing until the selection handle
appears. To select multiple drawings, deselect the Pen button and then drag to
select the drawings you want.
You can cut, copy, and paste selected drawings by tapping and holding the selected
drawing and then tapping an editing command on the pop-up menu, or by tapping the
command on the Edit menu. To resize a drawing, make sure the Pen button is not
selected and drag a selection handle.
The drawing box indicates the
boundaries of the drawing.
Pen button
Section 02 LOOX (34-41) 6/25/02, 9:53 AM38
39
SECTION 2
Editing Text
Adding characters
1 Tap the location where you want to add characters.
The cursor is displayed flashing.
2 Input the characters.
The characters are added at the cursor position.
Deleting characters
1 To delete a single character, tap immediately after the character to delete it.
To delete multiple characters, drag the range to be deleted.
When one character is being deleted, the cursor flashes. When multiple characters
are being deleted, the character string in the dragged range is inverted.
2 Tap .
When one character is deleted, the character immediately before the cursor is
deleted. When multiple characters are deleted, the entire inverted range is deleted.
Changing Text
1 Drag the character string you want to change.
The selected range is inverted.
2 Input the new characters, then .
The text is replaced with the new characters.
Copying Text
1 Drag the character string you want to copy.
The selected range is inverted.
2 Tap the “Edit” menu → “Copy” in that order.
3 Tap the location to which you want to copy.
The cursor flashes.
4 Tap the “Edit” menu → “Paste” in that order.
The copied text is inserted at the position of the cursor.
Moving Text
1 Drag the character string you want to move.
The selected range is inverted.
2 Tap the “Edit” menu → “Cut” in that order.
3 Tap the location to which you want to move the text.
The cursor flashes.
4 Tap the “Edit” menu → “Paste” in that order.
The cut text is inserted at the position of the cursor.
Section 02 LOOX (34-41) 6/25/02, 9:53 AM39
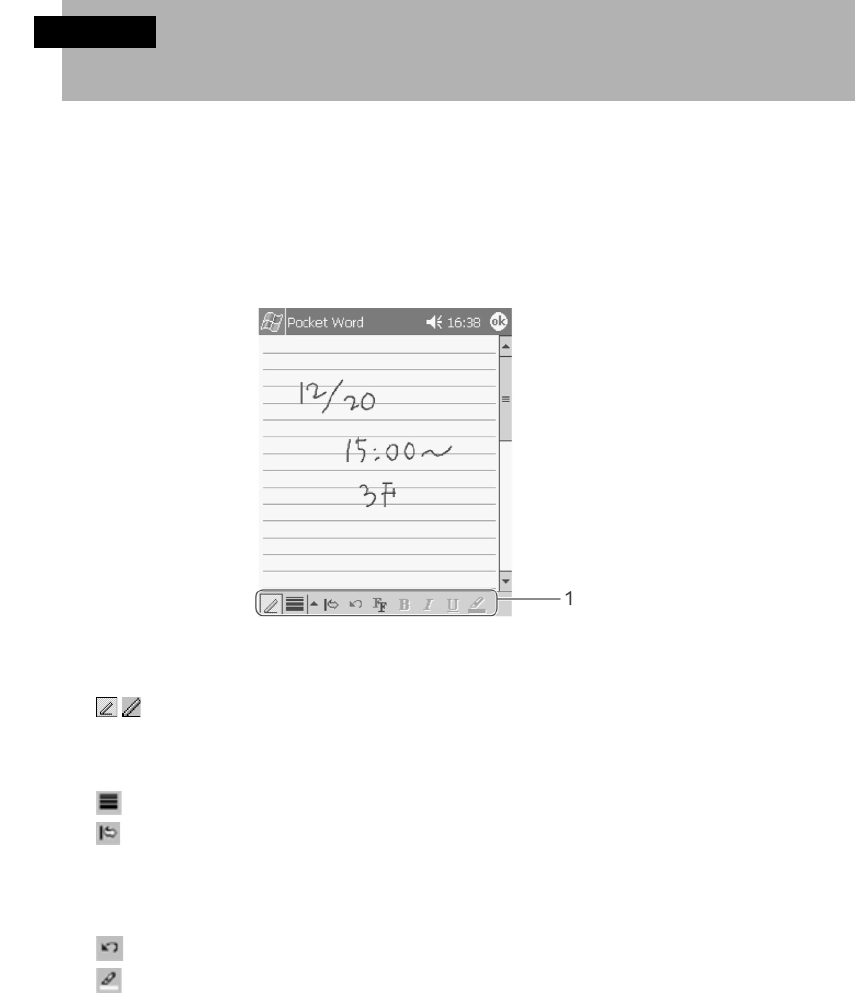
40
SECTION 2
4 Writing
You can write characters directly onto the screen with the extendable stylus pen
the same way you write on paper. Characters written by hand are stored as is and
can be used with Pocket Word or in email.
Inputting Writing with Pocket Word
When you tap the “View” menu → “Writing” in that order, the ruled line is displayed
and you can input by writing.
1 This is the toolbar
Tap "View" →"Toolbar" to switch the operation mode. When writing with
the extendable stylus pen, switch to the view with the frame. When you
want to execute a format change or other operation on written text, switch
to the display without the frame.
Tap here to change the line thickness for characters.
This is used to input a space. Tap, switch to the display with the frame, then
drag the section where you want to input the space. While you are
dragging, an arrow is displayed on the screen to show you how large the
space will be. A space the size of the dragged section is inserted. If you
drag in the opposite direction, the space is deleted.
Returns to the previous operation.
Marks with the light pen. Drag the range to be marked, then tap.
Section 02 LOOX (34-41) 6/25/02, 9:54 AM40
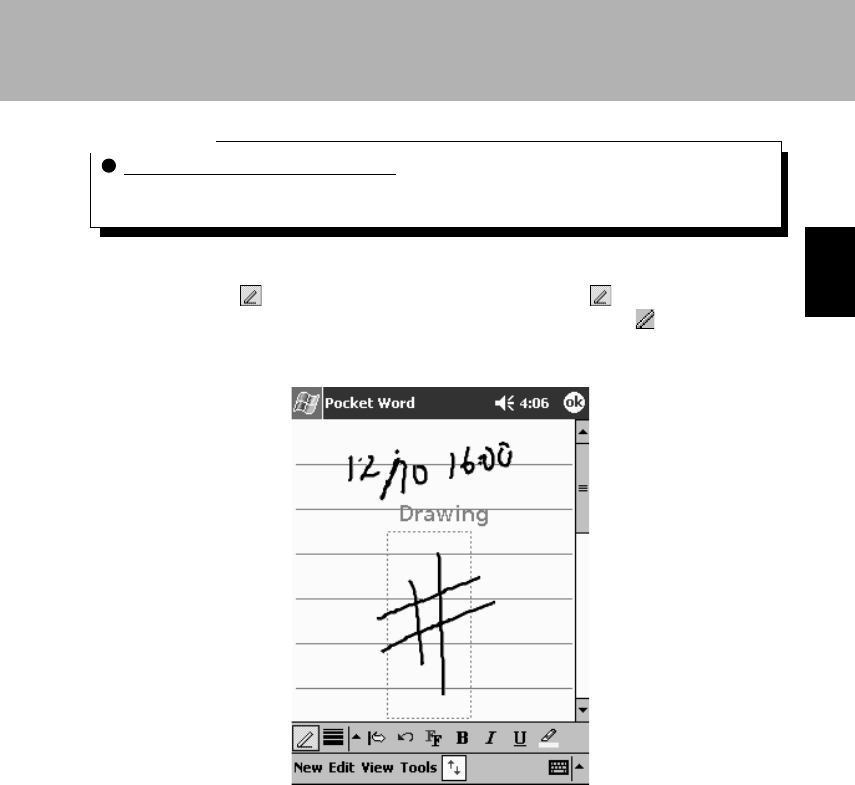
41
SECTION 2
Critical Point
When writing is handled as drawing
If your writing extends over three or more of the ruled lines, it is handled as drawing. For
more details, see “6 Drawing”.
Inputting a note by hand
When you tap and switch to the display with the frame ( ), you can input a
note by hand. When you switch to the display without the frame ( ), input is made
from an input panel.
Written characters can be selected by dragging over them and edited with copy/paste/
cut and other operations.
If your writing extends over three or more of the ruled lines, it is handled as drawing.
Section 02 LOOX (34-41) 6/25/02, 9:54 AM41
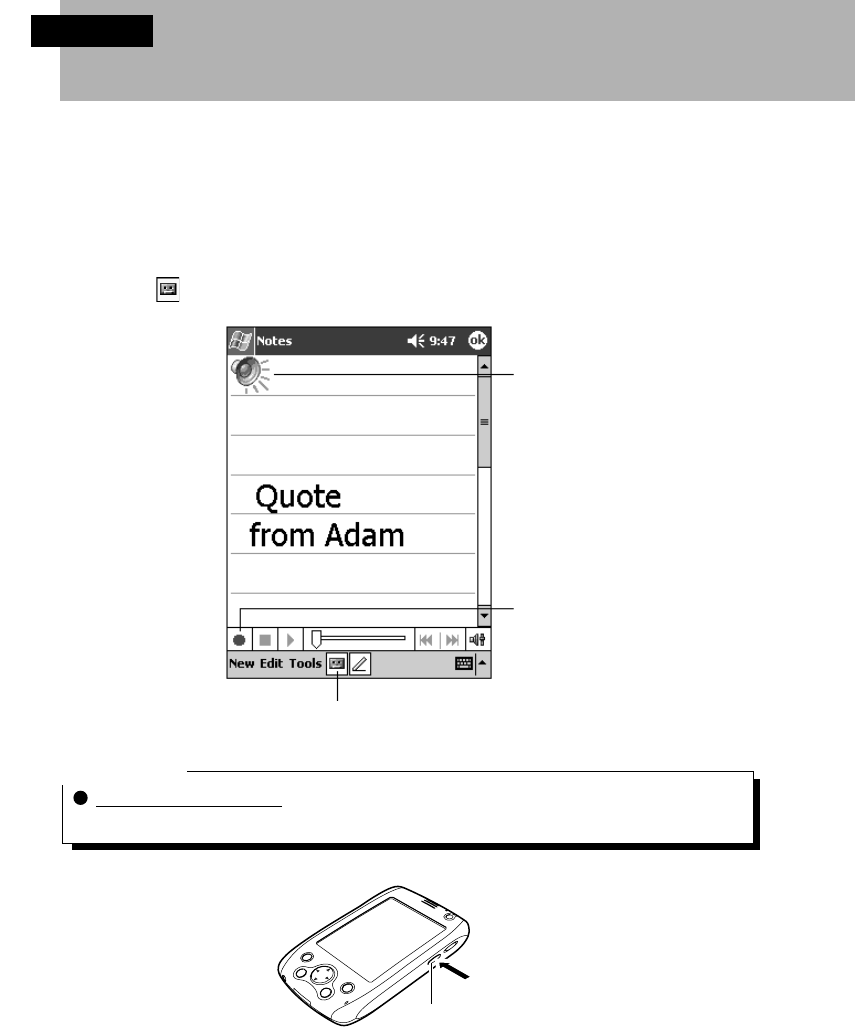
42
5 Sound Recording
SECTION 2
The recording function enables you to capture thoughts, reminders or voice
messages quickly. The recorded messages can be inserted into your document
or stored as audio file.
You can record using the recording tool bar.
• Pocket Word
Tap the “View” menu → “Recording” in that order to display the recording tool bar.
• Notes
Tapping displays the recording tool bar.
Indicates an embedded
recording.
Tap to begin recording.
Tap to show or hide the recording toolbar.
Critical Point
Using the Record button
While you hold down the “Record” button on the right side of this device, it records.
Record button
Section 02 LOOX (42-46) 6/25/02, 9:53 AM42
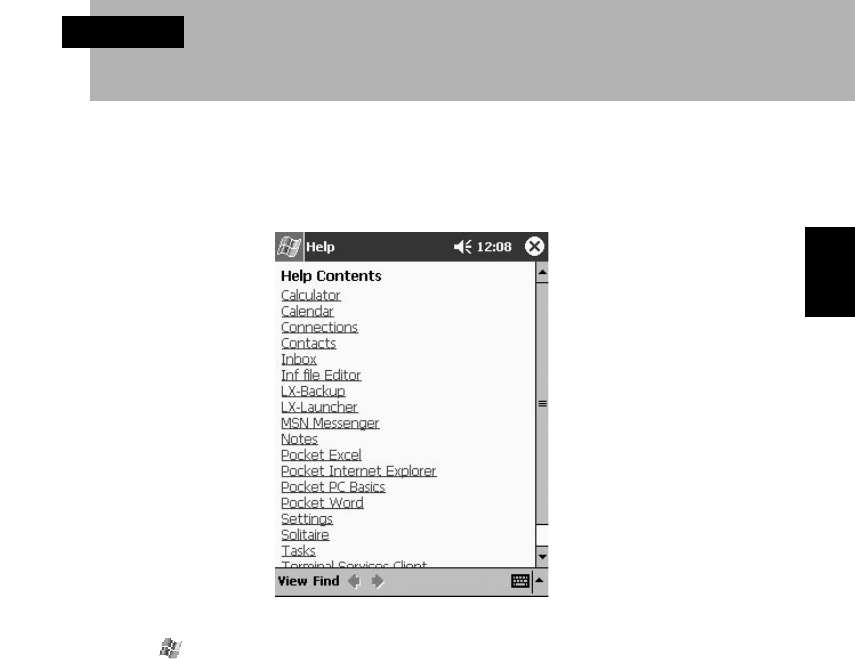
43
SECTION 2
SECTION 2
6 Help
Tapping → “Help” in that order displays the help screen for the active application.
You can check in the help to see how to operate the applications built into this
device and other applications installed on it.
The help function explains how to operate the programs built into this device.
Section 02 LOOX (42-46) 6/25/02, 9:53 AM43
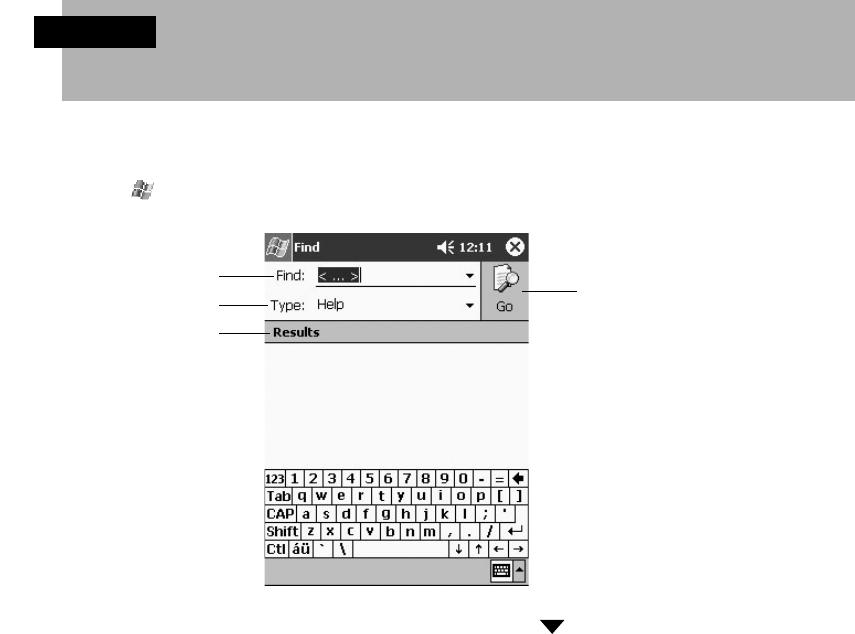
44
7 Searches
SECTION 2
You can find the information you need quickly, search for file names and for text
strings included in files.
Tapping → “Search” in that order displays the search screen.
1 Input the text string you want to search for. Tapping displays previously
searched for text strings. This is used to search for the same text string
again.
2 Selects the type of information to search for.
3 Tapping here starts the search.
4 The results of the search are displayed. Tapping the information for a file
displays that file.
You can also use File Explorer to search files. For details, see “10 File Operations Using
File Explorer”.
1
2
4
3
Section 02 LOOX (42-46) 6/25/02, 9:53 AM44
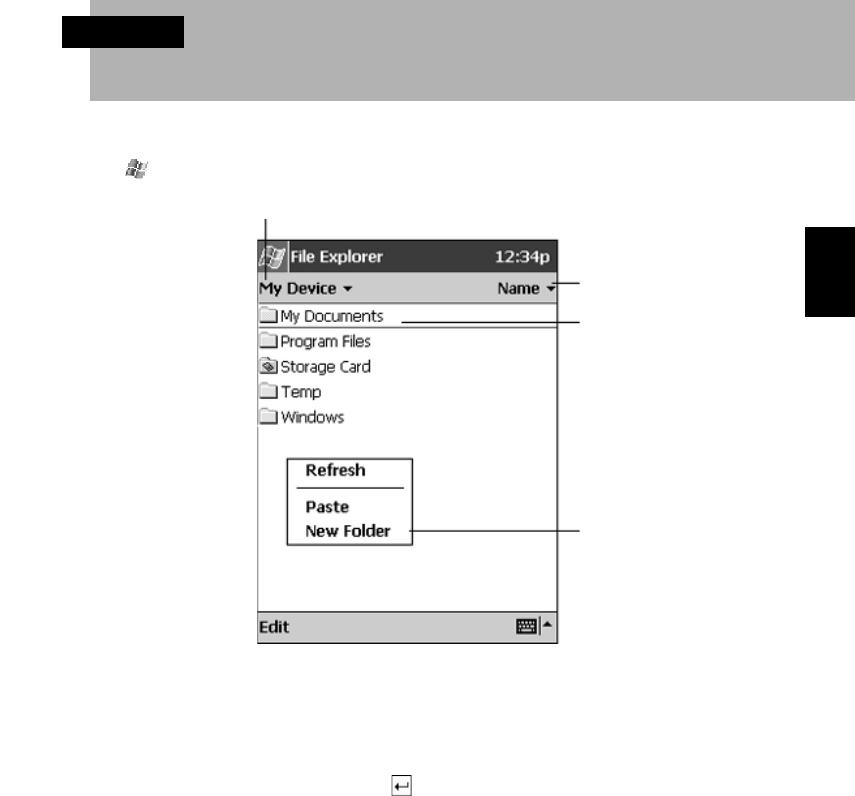
45
SECTION 2
8 File Operations Using File Explorer
SECTION 2
You can manage files using File Explorer.
Tap → “Programs” → “File Explorer” in that order to display the File Explorer screen.
Creating a new folder
1 Move to the directory level in which you want to create the new folder.
2 Tap the “Edit” menu → “New Folder” in that order.
3 Input the folder name, then tap to finalize it.
Tap to change folders.
Select the sort order
for the list.
Tap the folder name to
open it.
Tap and hold to
create a new folder.
Section 02 LOOX (42-46) 6/25/02, 9:53 AM45
46
Deleting Folders/Files
1 Tap the folder/file you want to delete and hold down on it.
2 From the displayed pop-up menu, select “Delete”.
A dialog box is displayed to confirm that you want to delete the folder or file.
3 Tap “Yes”.
Copying Folders/Files
1 Tap the folder/file you want to copy and hold down on it.
2 From the displayed pop-up menu, select “Copy”.
3 Move to the folder you want to copy to.
4 Tap the “Edit” menu → “Paste” in that order.
Moving Folders/Files
1 Tap the folder/file you want to move and hold down on it.
2 From the displayed pop-up menu, select “Cut”.
3 Move to the folder you want to move to.
4 Tap the “Edit” menu → “Paste” in that order.
Changing the Names of Folders/Files
1 Tap-and-hold the folder/file you want to change the name of.
2 From the displayed pop-up menu, select “Rename”.
3 Input the desired new name, then tap to finalize it.
Critical Point
When sending files with email
You can specify a file with File Explorer and send it with email. On the pop-up menu for the file
you want to send, tap “Send via Email” to display the Inbox. For details on sending from the
Inbox, see “Preparing and Sending/Receiving Email”.
Using infrared communications
From File Explorer, you can communicate with other devices via infrared. For details, see “2
Infrared Connections”.
Section 02 LOOX (42-46) 6/25/02, 9:53 AM46
3
3
SECTION
SECTION
SECTION 3
Section 03 LOOX (47-54) 6/25/02, 9:52 AM47
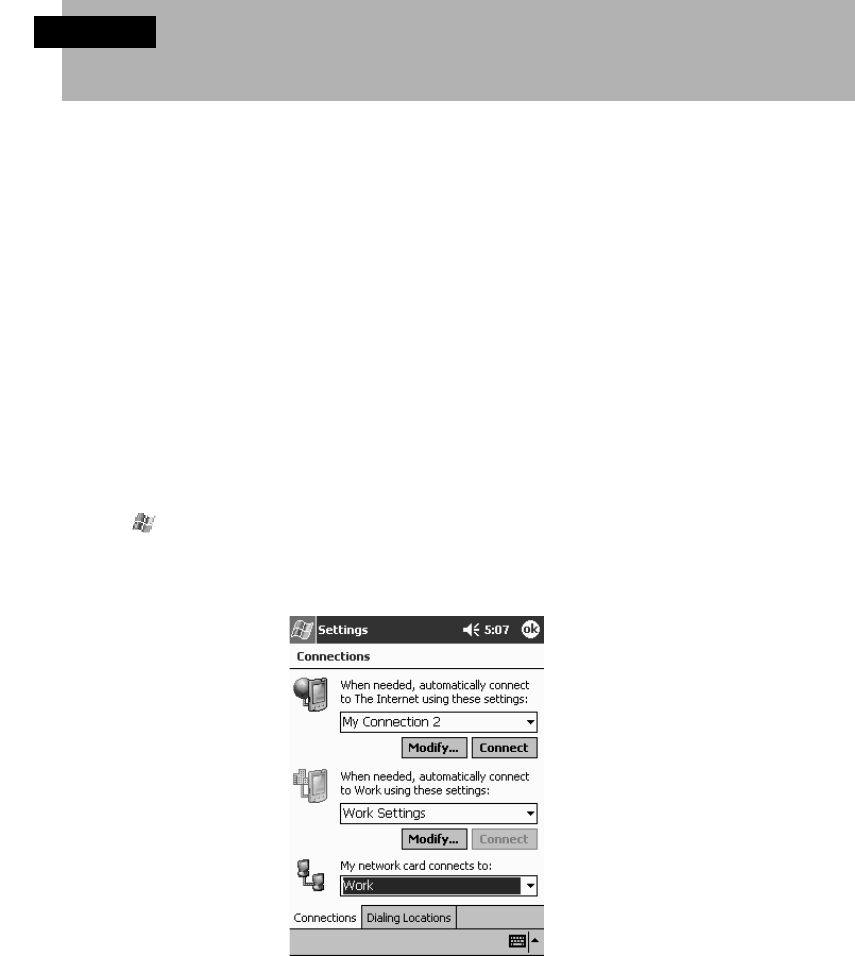
48
1 Connection Settings
SECTION 3
This sets the parameters necessary for using the Internet.
This section explains connecting using a CF card. For details on connecting in any
other way, see help or “Chapter 7 Various Connections”.
Preparations
The requirements for connecting to the Internet are as follows.
• This device
• CF card
It is also necessary to sign up for service with an Internet service provider (called a
“provider” below). Sign up for Internet service before making these settings.
Settings for Connecting to the Internet
Set your CF card in the CF card slot of this device, then make the following settings.
1 Tap → “Settings” → “Connection” tab → “Connection” in that order.
The connection screen is displayed.
2 Tap the Internet settings “Modify”.
Section 03 LOOX (47-54) 6/25/02, 9:52 AM48
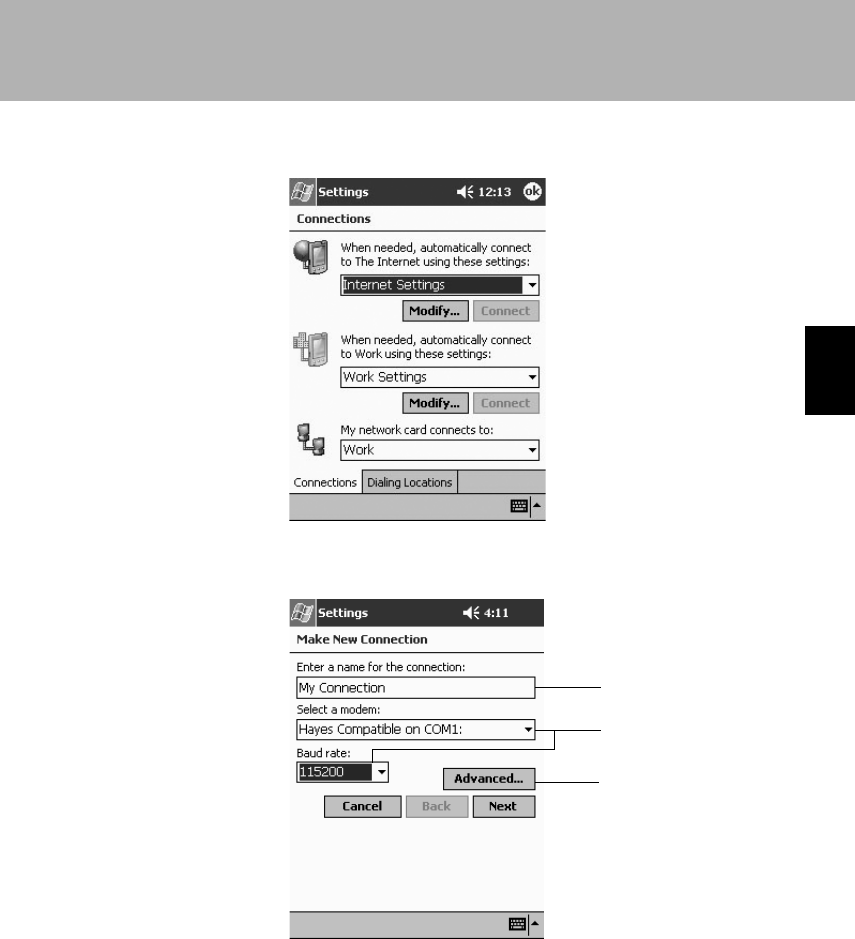
49
SECTION 3
3 Tap “Add”.
4 Execute the following operation.
2
1
3
Section 03 LOOX (47-54) 6/25/02, 9:52 AM49
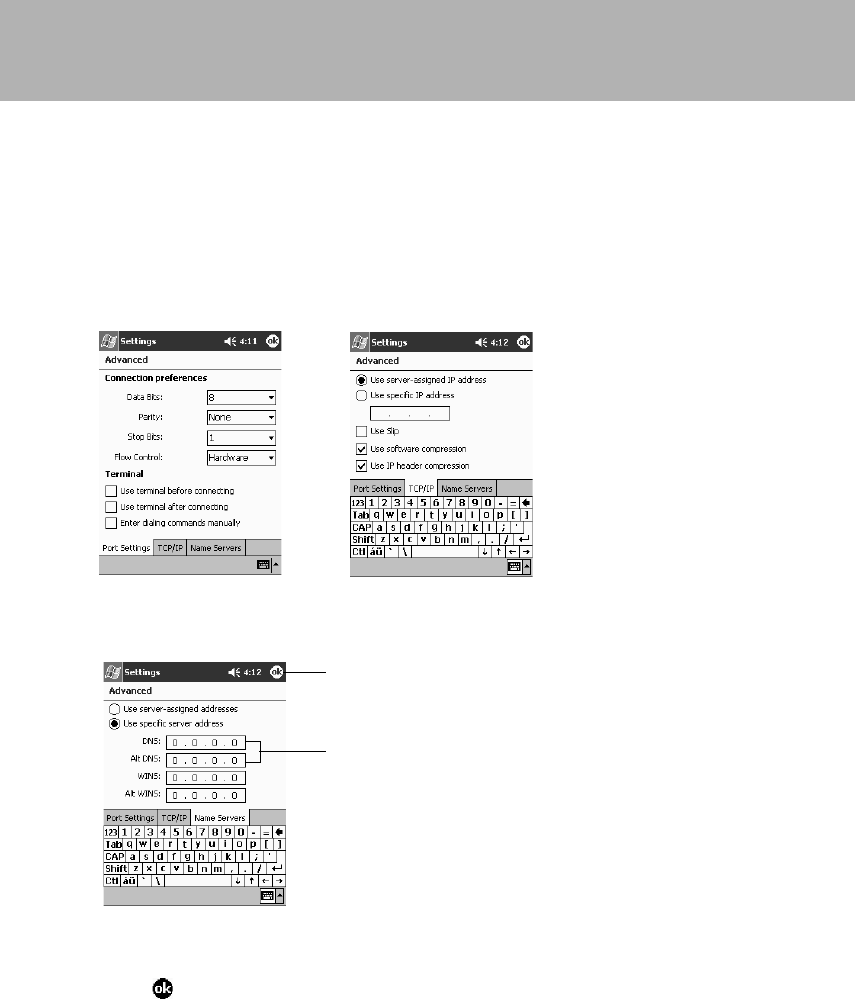
50
1 Input any name that will remind you what the contents of these connection
settings are. The name of the service provider is often a good choice.
2 Make the correct settings for your CF card.
3 Tap “Detailed settings”.
The detailed settings screen is displayed. There is usually no need to change
anything on the “Port settings” tab or the “TCP/IP” tab.
“Port settings” tab “TCP/IP” tab
5 Tap the “Name server” tab and “Use specific server address”.
1 Input the numbers specified by your provider. If your provider only gave you one
server address, set it as the primary DNS.
2 Tap .
2
1
Section 03 LOOX (47-54) 6/25/02, 9:52 AM50
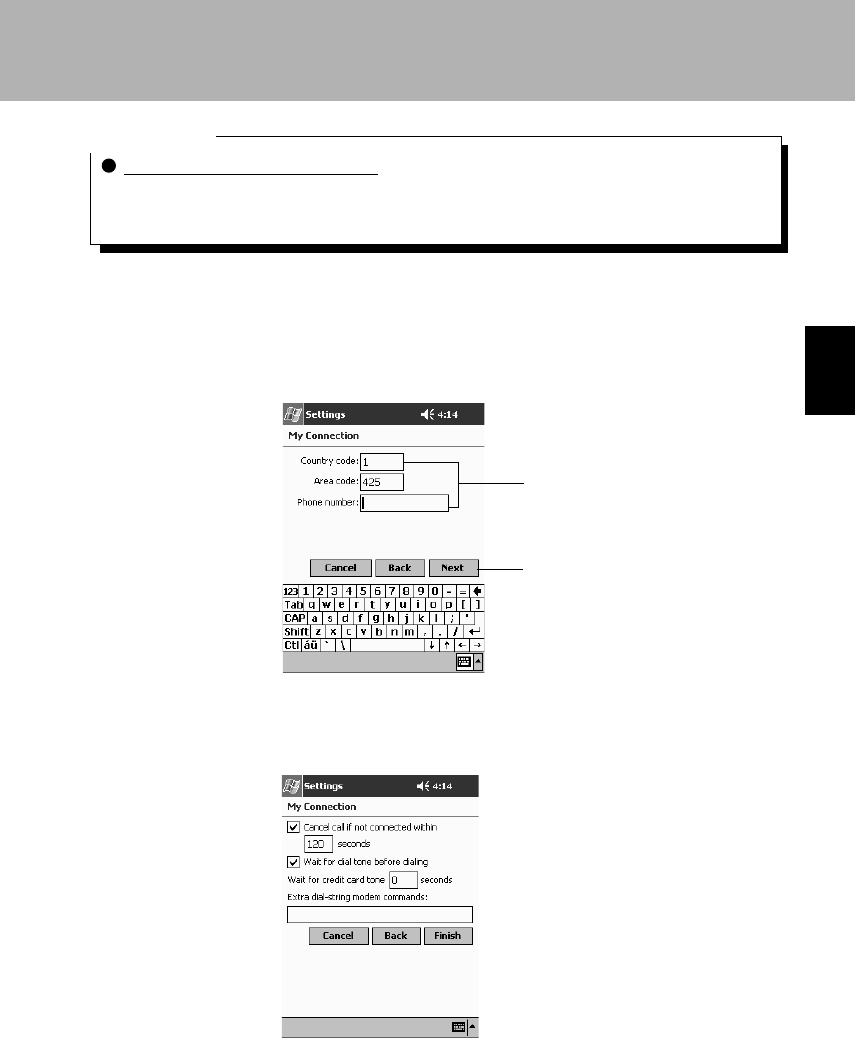
51
SECTION 3
Critical Point
Primary DNS and secondary DNS
Some providers use different designations. For example, the primary DNS may be called the
DNS server, DNS server address, or domain name server. Also, if your provider only gave you
one server address, set it as the primary DNS.
The display returns to the new connection screen.
6 On the new connection screen, tap “Next”.
7 (1) Input the telephone number for your provider’s access point.
(2) Tap “Next”.
8 Tap “Finish”.
It is usually not necessary to change anything on this screen.
1
2
Section 03 LOOX (47-54) 6/25/02, 9:52 AM51
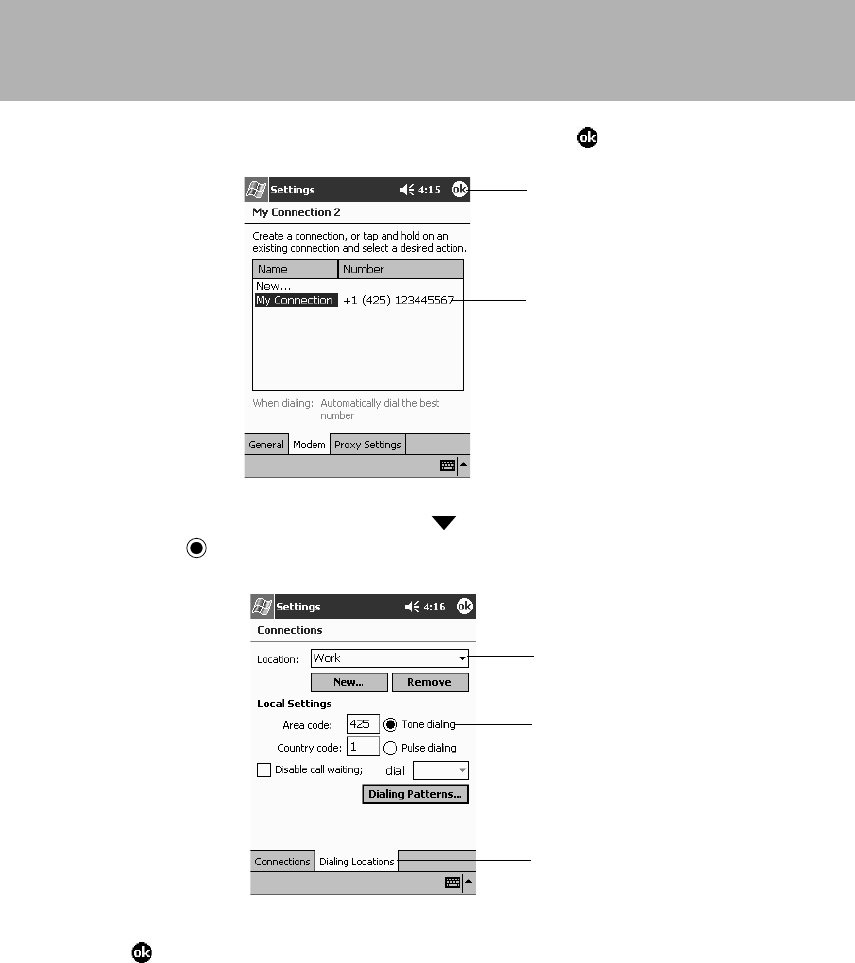
52
9 (1) Check that the connection name is displayed. (2) Tap .
10 (1) Tap the “Dial properties” tab. (2) Tap , then select “CF”. (3) Tap “Tone”
and set to .
11 Tap to finish the connection screen.
This completes the Internet connection settings.
2
1
2
3
1
Section 03 LOOX (47-54) 6/25/02, 9:52 AM52
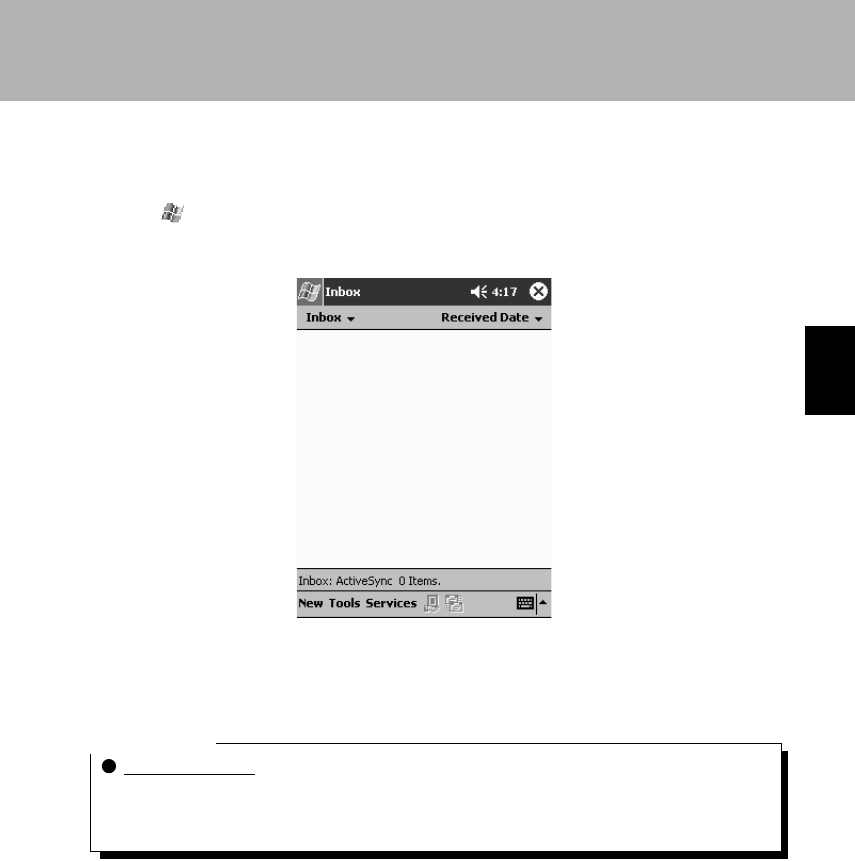
53
SECTION 3
Settings for Sending/Receiving Email
1 Tap → “Inbox” in that order.
The Inbox screen is displayed.
2 Tap the “Service” menu → “New Service” in that order.
The Email setup screen (1/5) is displayed.
Critical Point
What is a service
The setting information for one email address is considered as one service. If you have multiple
email addresses, each one is registered as a separate service. When sending/receiving email
you can switch among these services.
Section 03 LOOX (47-54) 6/25/02, 9:52 AM53
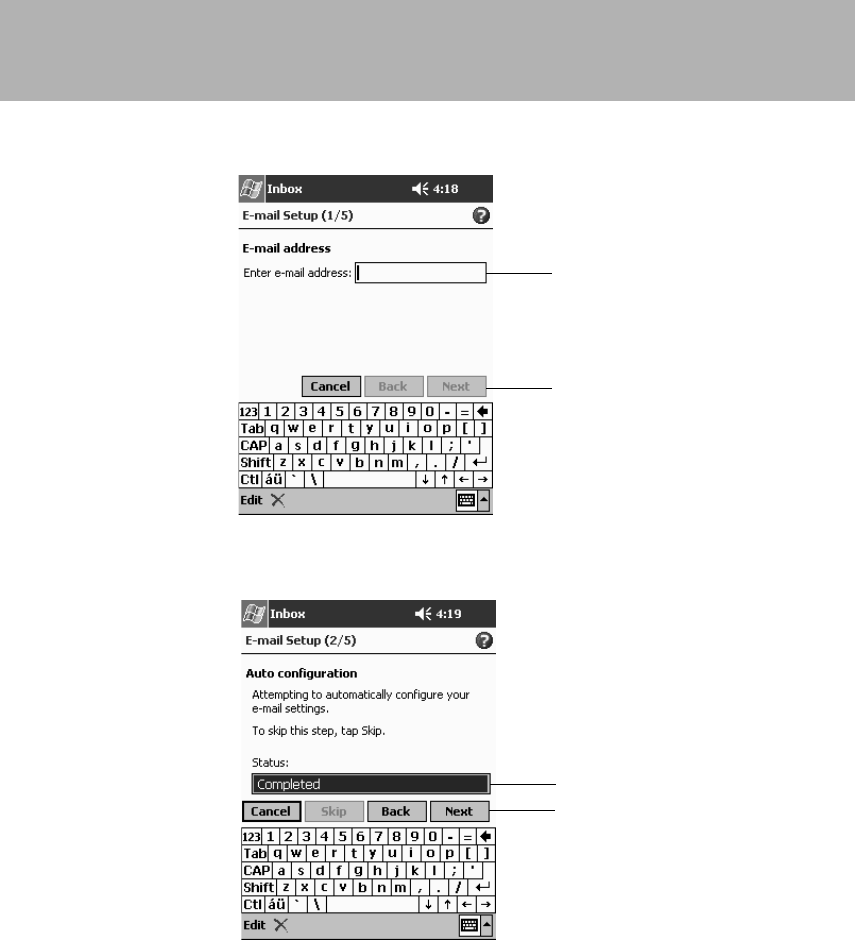
54
3 (1) Input the email address. (2) Tap “Next”.
4 (1) Check the “Status:”and if it is “Completed”, tap “Next”.
1
2
2
1
Section 03 LOOX (47-54) 6/25/02, 9:52 AM54
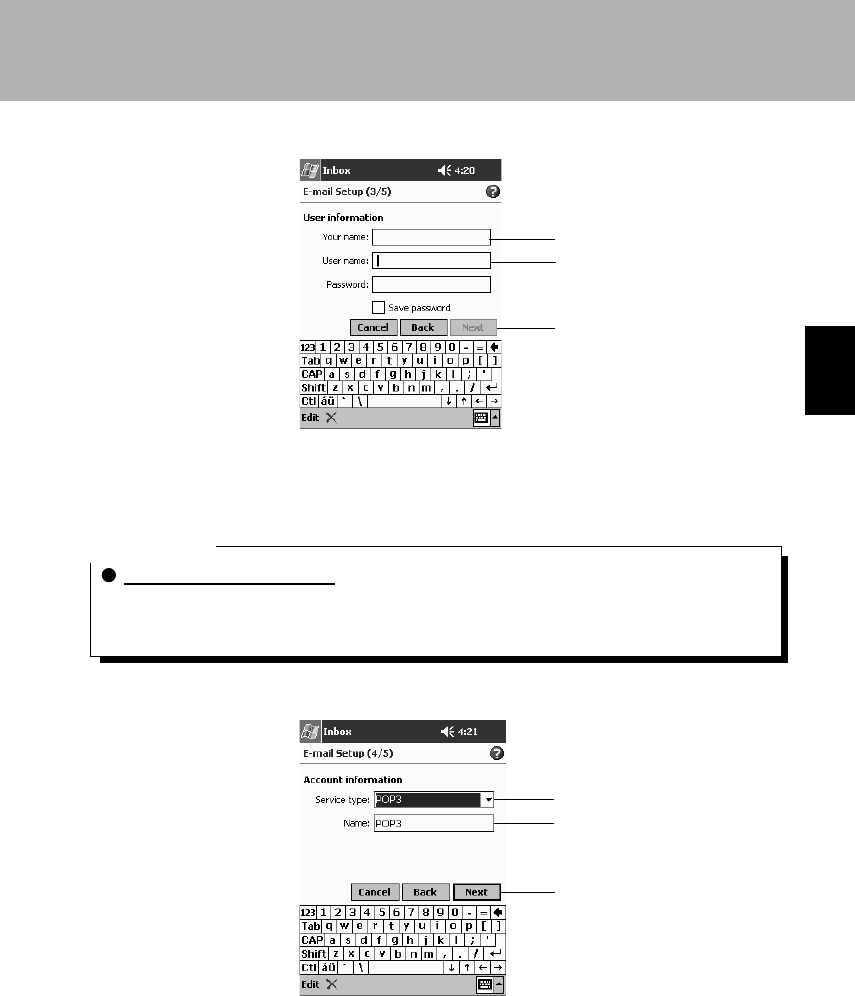
55
SECTION 3
5 Input the user information.
1 Input your own name. This is the sender name given to the receiver.
2 Input the “User name” and “Password” required for connecting to the email server.
3 Tap “Next”.
Critical Point
User names and passwords
Some providers use different designations. For example, the user name may be called the
email account, user ID, or email login name. The password may be called the email password
or login password.
6 Execute the following operation.
1 Select “POP3” or “IMAP4”. “POP3” is the most widely used.
2 Input a service name. The name of the service provider is often a good choice.
3 Tap “Next”.
1
2
3
1
2
3
Section 03 LOOX (55-63) 6/25/02, 9:51 AM55
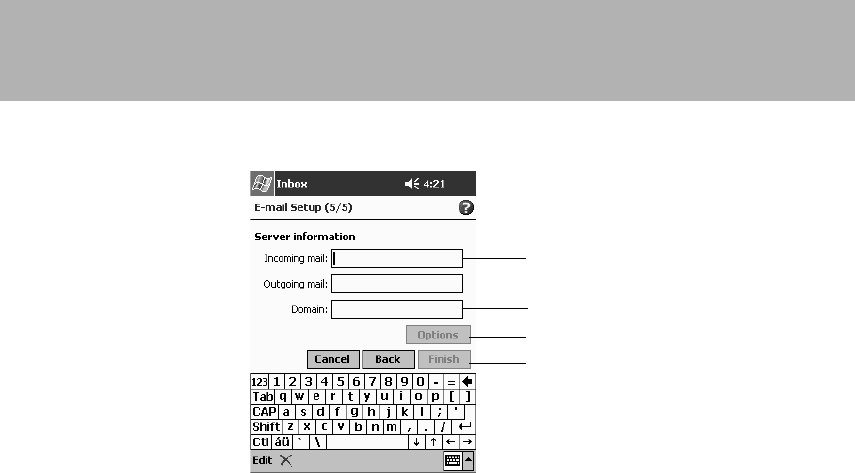
56
7 Input the server information.
1 Input the reception email server and transmission email server names specified
by the provider.
2 Set this for network connection. This does not need to be specified when
connecting with a CF card.
3 Set this as necessary. For the options, see help.
4 Tap “Finish”.
This completes the Inbox settings.
2
3
4
1
Section 03 LOOX (55-63) 6/25/02, 9:51 AM56
57
SECTION 3
2 Viewing Web Pages
SECTION 3
Once you have completed the settings for connecting to the Internet, you can
view Web pages using Pocket Internet Explorer.
This section explains how to view Web pages using a CF card. For details on
connecting in any other way, see help or “Chapter 7 Various Connections”.
Connecting/Disconnecting
Connection Method
1 Set the card in this device.
2 Tap → “Internet Explorer” in that order.
3 Input the necessary items.
– Input the user name and password for connecting to the provider.
– Tap OK.
The connection is started and Pocket Internet Explorer is started up.
Disconnecting
The method for ending the connection is as follows.
1 Tap the navigation bar → “Exit” in that order.
Section 03 LOOX (55-63) 6/25/02, 9:51 AM57
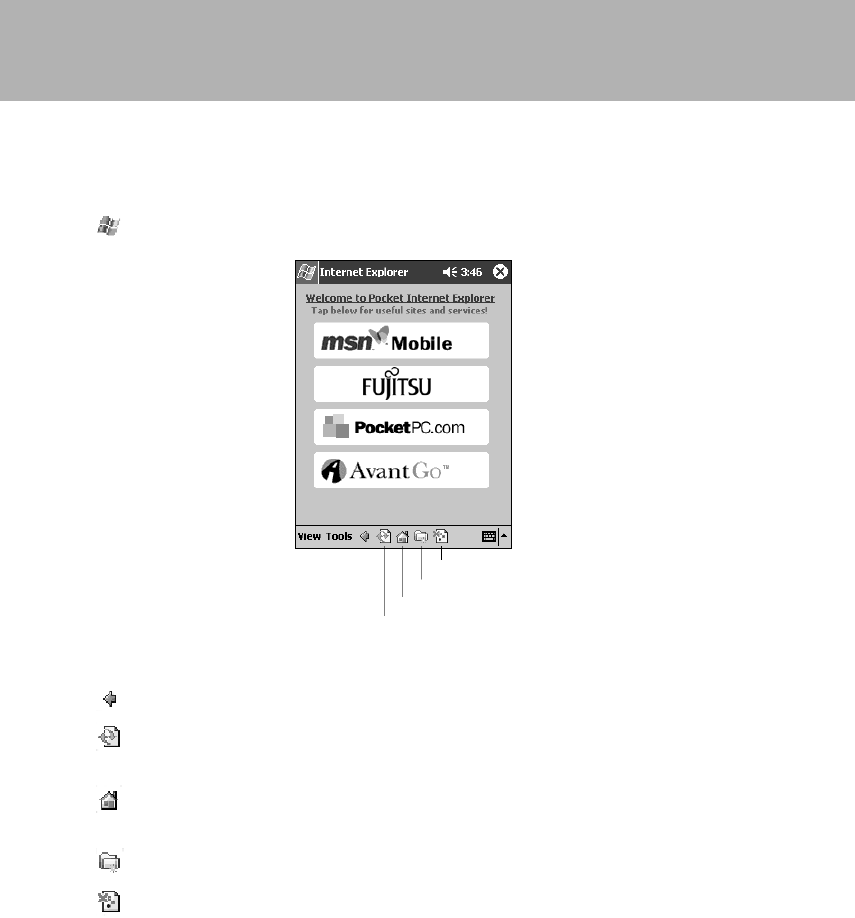
58
Basic Pocket Internet Explorer Operation
Screen Configuration
Tap → “Internet Explorer” in that order.
The operations of the buttons are as follows.
This returns the display to the previous page.
During reading-in, this stops the reading-in. At any other time, this updates
the page to the latest status.
This returns the display to the page set as the homepage. The homepage
can be set with the “Tools” menu → “Options” → “Homepage”.
This display is a list of your favorites.
Tapping here switches the image displayed on the page between displayed
and non-displayed.
Hide pictures button.
Favorites button.
Home button.
Refresh button.
Section 03 LOOX (55-63) 6/25/02, 9:51 AM58
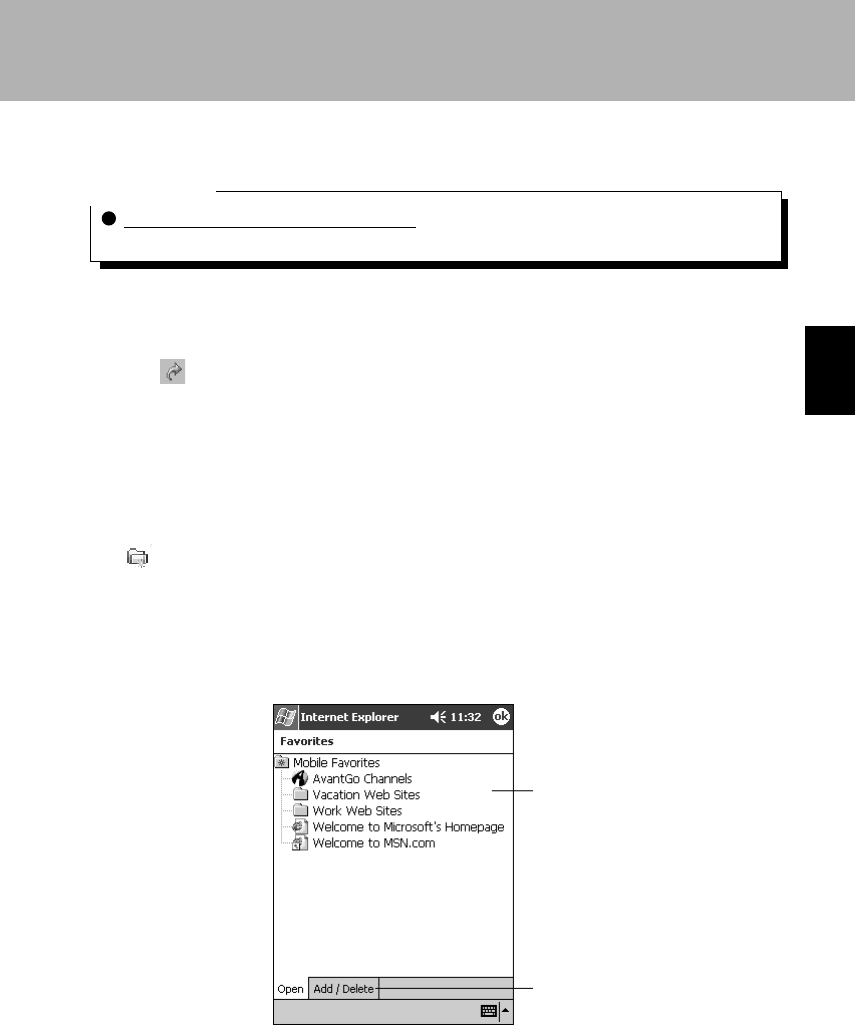
59
SECTION 3
Specifying and Opening Web Pages
Critical Point
When the address bar is not displayed
Tap the “View” menu → “Address Bar” in that order to display the address bar.
When you start Pocket Internet Explorer, the homepage is displayed first.
1 Input the URL for the Web page you want to display in the address bar.
2 Tap at the right of the address bar.
The specified Web page is displayed.
Using Favorites
Registering pages that you view frequently in “Favorites” makes it easier to view them
again.
1 While you are displaying the page you want to register in the favorites, tap
on the command bar.
The “Favorites” screen is displayed.
2 Tap the “Add/Delete” tab → “Add” in that order.
3 (1) Change the name to be displayed in the favorites list if necessary, then (2)
Tap “Add”.
The Web page is registered in the favorites list.
Tap the favorite you
want to view.
Tap to add or delete a
folder or favorite link.
Section 03 LOOX (55-63) 6/25/02, 9:51 AM59

60
Critical Point
Deleting a Web page from the favorites
1 Tap on the command bar → “Add/Delete” in that order.
2 Select the page to be deleted from the favorites list, then tap “Delete”.
To display a Web page registered in the favorites, tap on the command bar, then
tap the desired page from the favorites.
Viewable Web Pages
Pocket Internet Explorer supports the following standards.
• HTML 3.2
• WAP (WML/WBXML/WBMP/WSP/WMLSCRIPT)
• CHTML (Compact HTML)
• DHTML (InnerHTML/InnerText only)
• Windows CE Jscript 3.0 (ECMA-262 compliant)
• SSL2/SSL3/PCT 1.0/SGC
When viewing Web pages with Pocket Internet Explorer, be aware of the following
points.
• Pocket Internet Explorer has limited functions compared to a computer Web browser.
Some pages that have been produced on the assumption that they will be viewed
with a computer Web browser cannot be displayed.
• Some pages that require plug-ins cannot be viewed properly.
The version of Pocket Internet Explorer on this device has a JavaVM (Java Virtual
Machine) installed, so it can execute Java applets.
This plug-in can execute applets that conform to the PJAE (Personal Java Application
Environment).
Section 03 LOOX (55-63) 6/25/02, 9:51 AM60
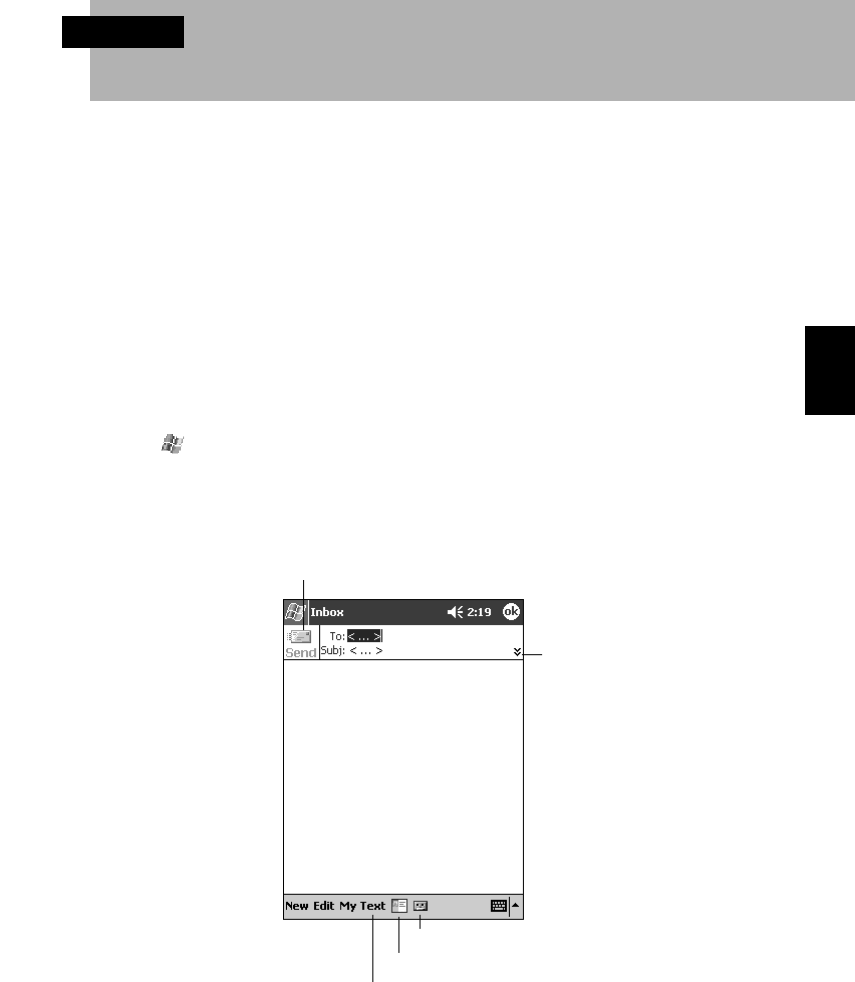
61
SECTION 3
3 Sending/Receiving Email
SECTION 3
You can use send/receive email through the Internet. Email sending and receiving
use the Pocket Outlook Inbox.
This section explains sending/receiving email using a CF card. For details on
connecting in any other way, see help or “Chapter 7 Various Connections”.
Email Writing and Sending/Receiving
In order to send and receive email, it is necessary that the settings for connecting to the
email server already be complete. For details, see “1 Connection Settings”.
Writing Email
This section explains how to write the new piece of email.
1 Tap → “Inbox” in that order.
The Inbox list is displayed.
2 Tap “Inbox” and select the service to be used for connection. This operation
is not necessary if only one service is registered.
3 Tap the “New” menu item.
4 Input the “To” and “Subj.”, then input the text.
Tap to send the message.
Tap to show or hide the
complete header.
Tap to show/hide the recording toolbar.
Tap to display the Address Book.
Tap to insert common messages.
Section 03 LOOX (55-63) 6/25/02, 9:51 AM61
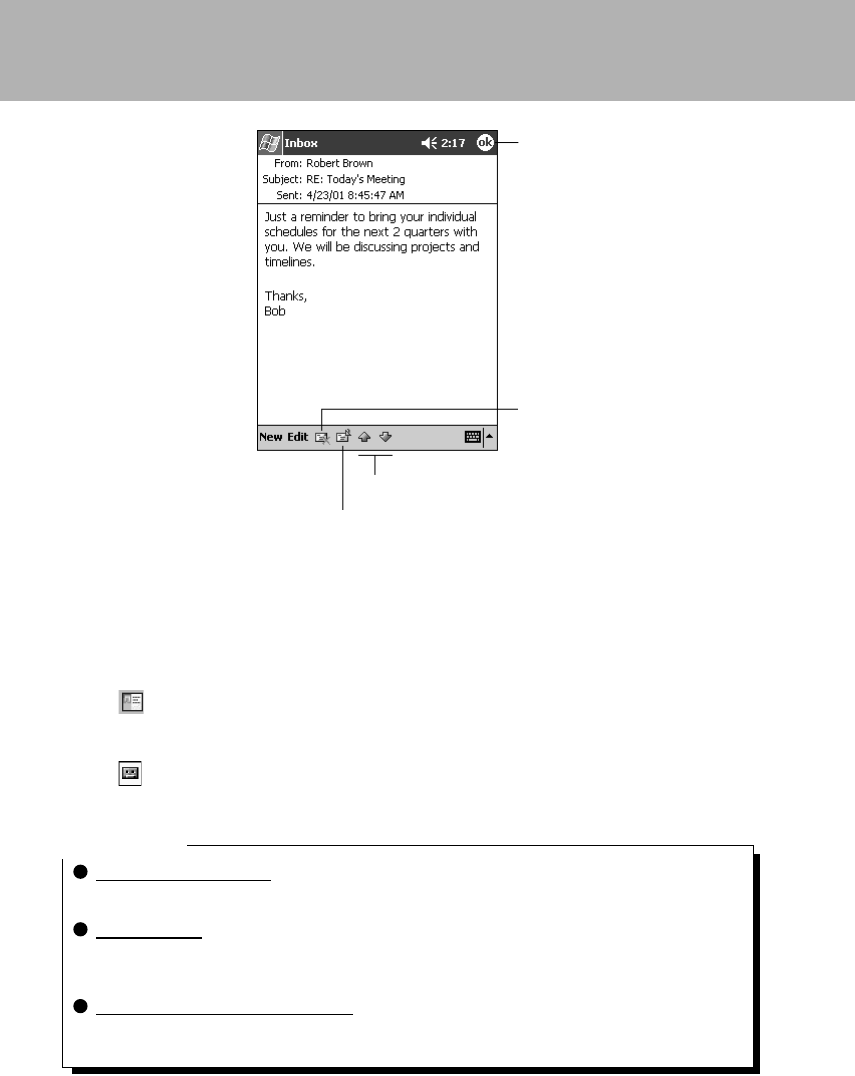
62
1 Input the email address for the contact at “To” and the subject of the email at
“Subj.”
2 Tap here to specify a “CC” or “BCC”.
3 Tap here to input the main text.
4 The operations of the buttons are as follows.
Tap here when inputting the “To” and “CC” and “BCC” in order to display
the list of email addresses registered for contacts. You can select
contacts by tapping on them in this list.
Tapping this button displays the recording toolbar and allows you to
attach a voice message to your email.
Critical Point
Attaching files to email
On the email writing screen, tap the “Edit” menu → “Attach File” in that order. A list of files is
displayed, so tap the one you want to send.
Using My Text
On the new email writing screen, you can write email easily by selecting frequently used text
from My Text. Tap “My Text”, then select the text to input into your email from the list of texts
registered in My Text.
Editing texts registered in My Text
On the Inbox screen, tap the “Tools” menu → “Edit My Text messages” in that order. The My
Text message screen is displayed, so tap the desired message and edit it.
Tap to return to the
message list.
Tap to delete this
message.
Tap to view the previous
or next message.
Tap to reply to or forward
this message.
Section 03 LOOX (55-63) 6/25/02, 9:51 AM62
63
SECTION 3
5 When input is complete, tap to the left of “To” and “Subj.”
The email you have written is stored and placed in the “Outbox”. If you are
connected to the email server, your email is sent immediately.
For details on the method for sending email in the “Outbox”, see “Connecting to the
Email Server and Sending/Receiving”.
Critical Point
When not temporarily storing email you have written
For email that is still being edited and that you do not want to put in the “Outbox” yet, tap
to end. The email you have written is put in “Pending”.
After you edit email in “Pending” again, tap (ok) to move it to the “Outbox”.
Section 03 LOOX (55-63) 6/25/02, 9:51 AM63
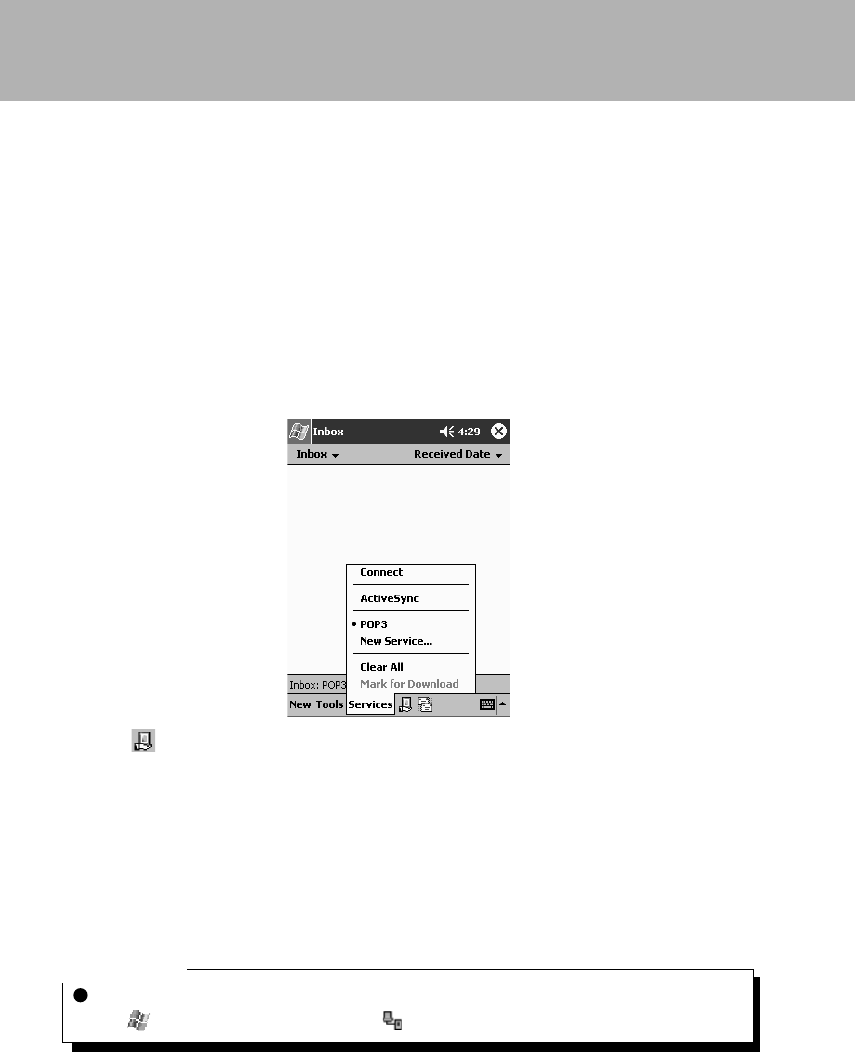
64
Connecting to the Email Server and Sending/
Receiving
When you connect the email server, your email is automatically sent/received.
• Any email in the “Outbox” is sent.
• Any unread mail on the email server is received. Received email is put in the “Inbox.
The following operations are carried out with the Inbox. For details, see help.
1 Set the card in this device.
2 Tap the “Service” menu → “Connect”.
The services registered with “Settings for Sending/Receiving Email” are displayed
in the menu.
3 Tap .
The connection screen for the service you are connecting to is displayed.
4 Input the password etc., then tap “Start Connection”.
The connection is started. Any email in the “Outbox” is sent and any unread mail on
the email server is placed in the “Inbox”.
5 When email sending/reception is complete, tap the “Service” menu →
“Disconnect” in that order.
The connection with the email server is ended.
Critical Point
If the connection is not disconnected
Tap → “today” in that order, then tap “Disconnect”.
Section 03 LOOX (64-76) 6/25/02, 9:50 AM64
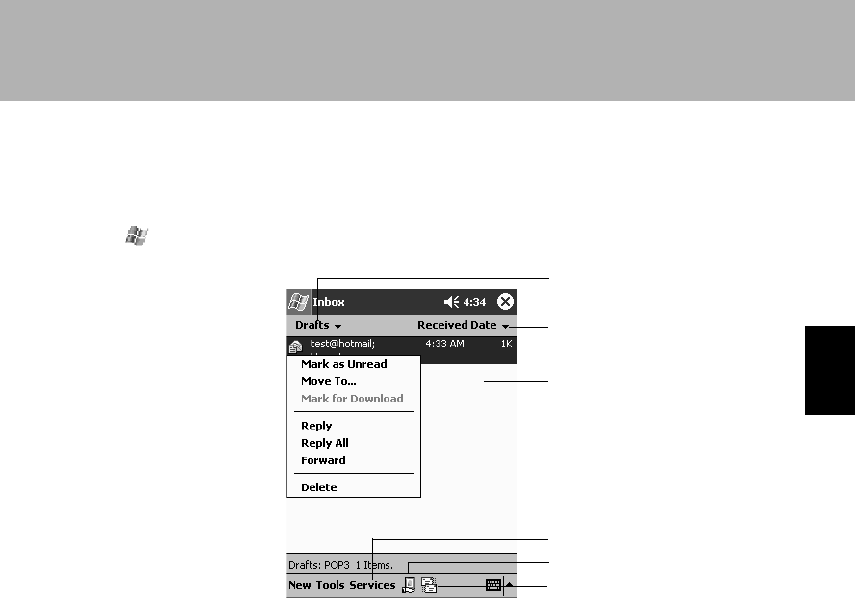
65
SECTION 3
Basic Inbox Operations
Screen configuration
Tap → “Inbox” in that order.
1 Select the folder and service displayed.
2 Select the order for email list display.
3 The sender addresses and subjects of the emails are displayed. If you tap-
and-hold, a pop-up menu is displayed and you can carry out such operations
as deleting or forwarding the email or replying to it.
4 At “Tools”, you can set options; at “Service”, you can select the service.
5 Tapping here connects you to the selected service.
6 Tapping here connects you to the selected service and sends and receives
email.
1
2
3
4
5
6
Section 03 LOOX (64-76) 6/25/02, 9:50 AM65
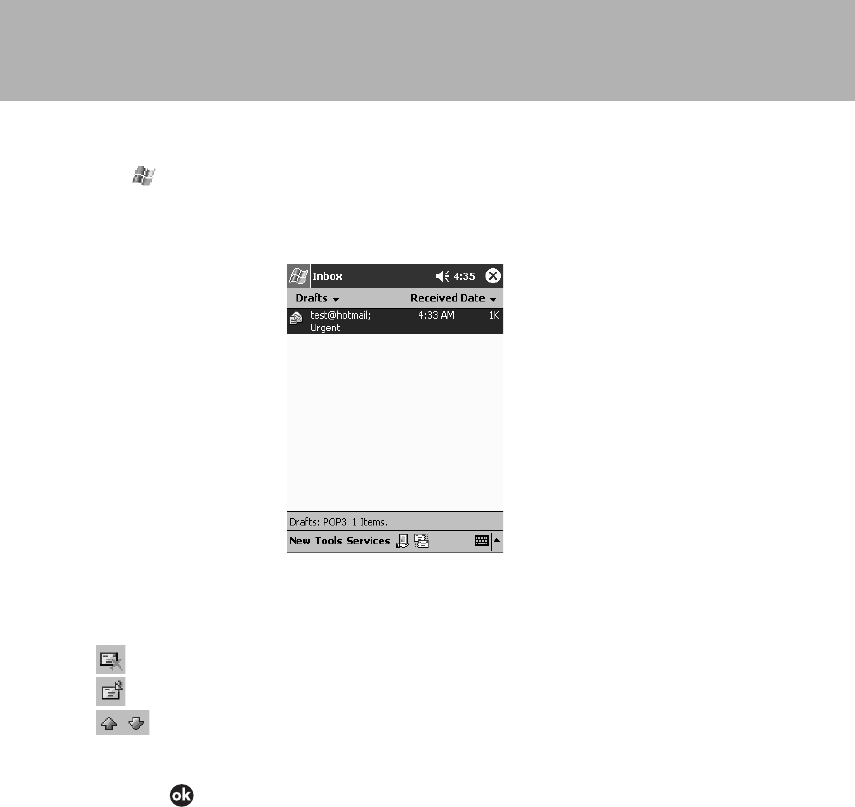
66
Viewing Received Email
1 Tap → “Inbox” in that order.
A list of the email is displayed. If you want to look at email from other services, tap
“Inbox”, then select the other service.
2 In the email list, tap the email you want to view.
The operations of the buttons are as follows.
Deletes the displayed email.
Tap here to forward the displayed email or prepare a reply to it.
Tap here to display the previous or next email in the email list directly
without going back through the email list.
3 Tapping here returns the display to the Inbox screen.
Section 03 LOOX (64-76) 6/25/02, 9:50 AM66
67
SECTION 3
Replying to/Forwarding Email
Replying
1 Display the received email according to Steps 1 and 2 of the procedure in
“Viewing Received Email”.
2 Tap on the command bar →“Reply”.
For “Reply”, the email you write is sent only to the sender of the original email. To
reply to all the addresses on the original email, including the cc’s, tap “Reply to all”.
3 Write your email reply.
4 Tap to the left of “To”, “Subj.”
The email you have written is put in the “Outbox”. If you are connected to the email
server, your email is sent immediately.
For details on the method for sending email in the “Outbox”, see “Connecting to the
Email Server and Sending/Receiving”.
Forwarding
1 Display the received email according to Steps 1 and 2 of the procedure in
“Viewing Received Email”.
2 Tap on the command bar → “Forward”.
3 Specify the email address to forward to as the “To”. When forwarding to an
email address registered in your Contacts, you can tap , then select the
contact.
4 Prepare your forward email, then tap to the left of “To”, “Subj.”
The email you have written is put in the “Outbox”. If you are connected to the email
server, your email is sent immediately.
For details on the method for sending email in the “Outbox”, see “Connecting to the
Email Server and Sending/Receiving”.
Deleting Email
1 From the list of the email in the Inbox, tap-and-hold the email you want to delete.
2 Tap “Delete” from the displayed pop-up menu.
The deleted email is moved to “Recycled items (local)”.
Section 03 LOOX (64-76) 6/25/02, 9:50 AM67
68
Critical Point
To completely delete email in “Recycled items (local)”
Tap the “Tools” menu → “Empty Recycle Bin” in that order.
Managing Email
Important
Operating on folders with this device
When executing the following operations on folders on this device, then connecting to your
email server, the operations depend on the service used (ActiveSync, SMS/POP3/IMAP4).
For details, see the Inbox help.
• Moving or deleting email
• Creating or editing folders
Email is managed with preset folders prepared by each service. The basic programs of
these preset folders are as follows.
• Drafts
Contains email being edited
• Recycled items
Contains deleted email
• Inbox
Contains received email.
• Outbox
Contains email to be sent in the next connection.
• Sent box
Contains email that has been sent.
Creating New Folders
New folders can be created for such tasks as managing email.
1 Tap the “Tools” menu → “Manage Folders” in that order.
The folder management screen is displayed.
2 (1) Select the folder to create the new folder under (normally, the Inbox).
(2) Tap the “New” menu.
Section 03 LOOX (64-76) 6/25/02, 9:50 AM68
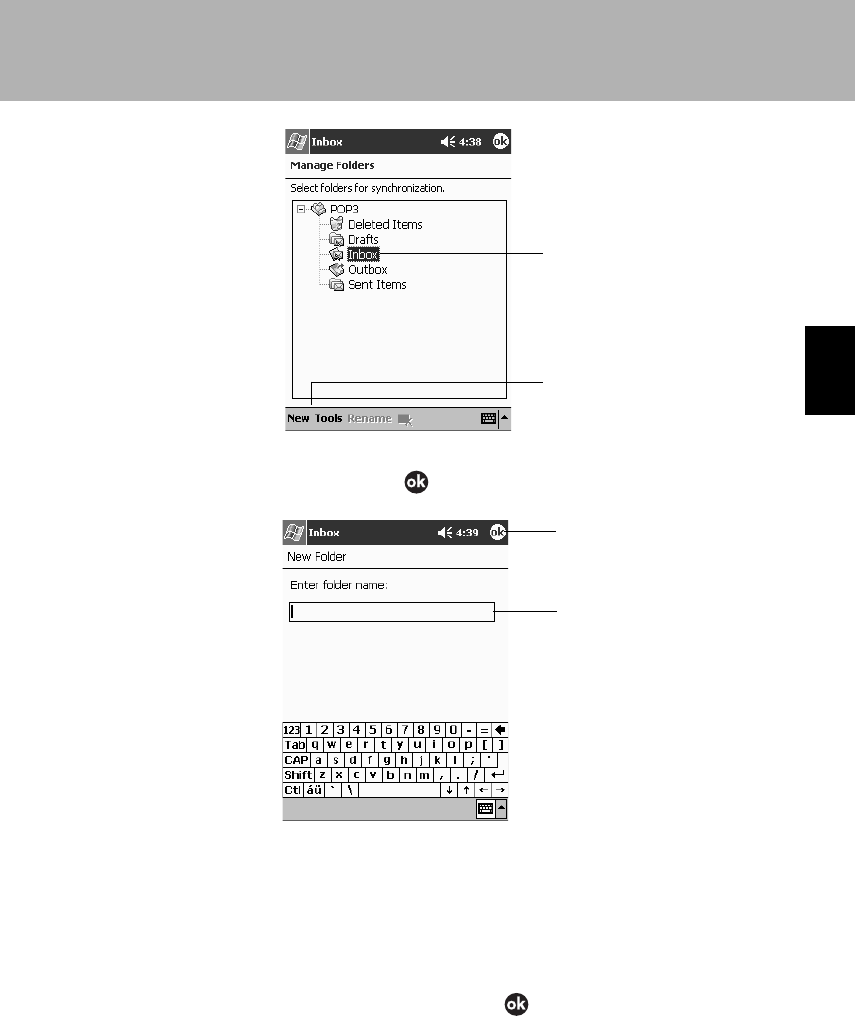
69
SECTION 3
1
2
3 (1) Input the folder name. (2) Tap .
Moving Email
1 From the email list, tap-and-hold the email you want to move.
2 From the displayed pop-up menu, tap “Move to folder”.
The screen for specifying the folder to move to is displayed. Email can not be
moved to a service folder.
3 Tap the folder to move the email to, then tap .
The email is moved to the destination folder.
2
1
Section 03 LOOX (64-76) 6/25/02, 9:50 AM69
70
Changing Folder Names
It is not possible to change the name of an existing folder. Only the names of
folders that have just been created can be changed.
1 Tap the “Tools” menu → “Manage folders” in that order.
The folder management screen is displayed.
2 Tap the folder whose name you want to change, then tap “Change name”.
The folder name change screen is displayed.
3 (1) Input the folder name. (2) Tap .
Deleting Folders
It is not possible to change the name of an existing folder. Only the names of
folders that have just been created can be changed.
1 Tap the “Tools” menu → “Manage folders” in that order.
The folder management screen is displayed.
2 Tap the folder you want to delete, then tap .
The”Delete?” is displayed.
3 Tap “Yes”.
The selected folder is deleted.
4 Tap to complete the operation.
Section 03 LOOX (64-76) 6/25/02, 9:50 AM70
71
SECTION 3
SECTION 3
4 Exchanging Instant Messages
You can use the Pocket PC edition of MSN Messenger to exchange instant
messages and hold conversations (called chats) with multiple people.
This section explains simple MSN Messenger usage methods. For further details, see
the help for this device or the MSN Messenger help.
Preparations
Obtaining Accounts
Using MSN Messenger requires either of the following accounts.
• Passport account
• Microsoft Exchange email account
Critical Point
Obtaining a Passport Account
A Passport account is a Microsoft or Hotmail account. A Passport account can be obtained
from the following Web pages.
• Microsoft Passport account (http://www.passport.com)
• Hotmail Passport account (http://www.hotmail.com)
Settings
After obtaining a Passport account or Microsoft Exchange email account, make the
settings for MSN Messenger.
1 Tap → Program → “MSN Messenger” in that order.
The MSN Messenger screen is displayed.
2 Tap the “Tools” menu → “Options” → “Account” tab.
3 Input the items required on the account setting screen.
Section 03 LOOX (64-76) 6/25/02, 9:50 AM71
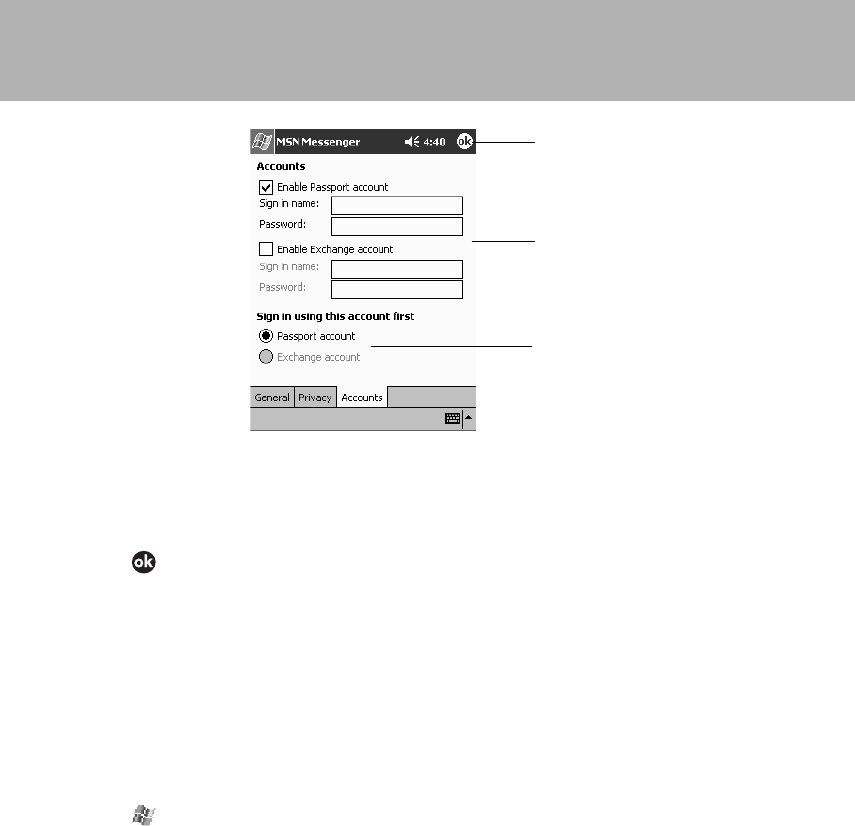
72
1 Select a Passport or Exchange account, then input the sign-in name and
password.
2 Select the account to sign in first.
3 Tap .
Sign-in and Sign-out
You must sign in to use MSN Messenger and you sign out when you exit MSN
Messenger.
Sign-in
1 Set the CF card in place.
2 Tap → “Programs” → “MSN Messenger” in that order.
3 Tap the screen and sign in.
3
1
2
Section 03 LOOX (64-76) 6/25/02, 9:50 AM72
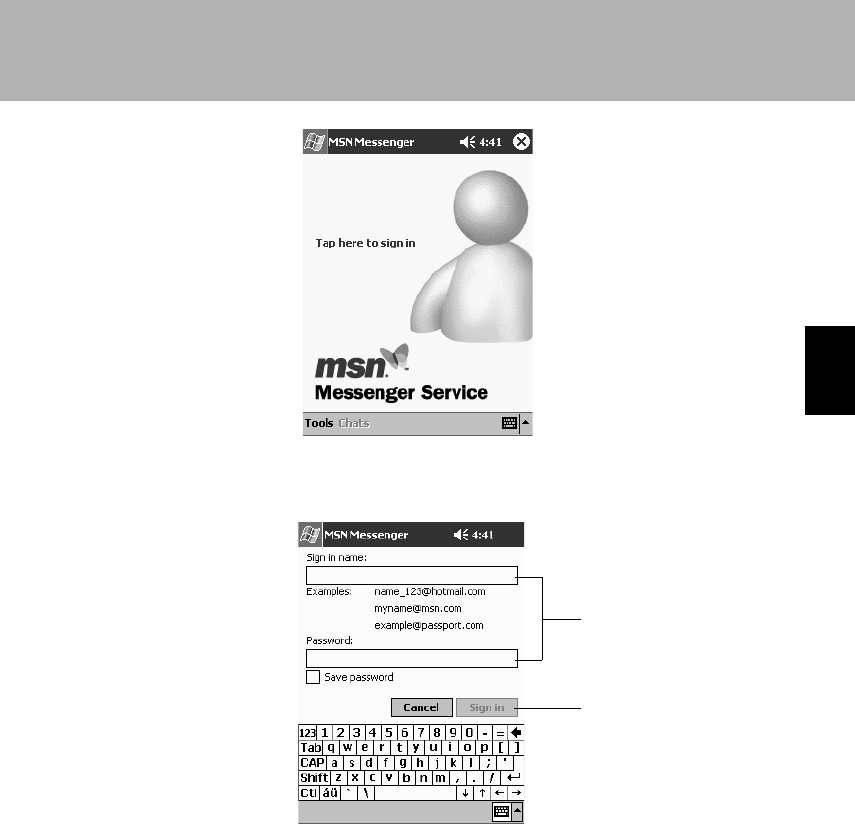
73
SECTION 3
4 (1) Input your sign-in name and password. (2) Tap “Sign-in”.
5 When connecting to the Internet for the first time, input the required items.
(This is not necessary from the second time on.)
1
2
Section 03 LOOX (64-76) 6/25/02, 9:50 AM73
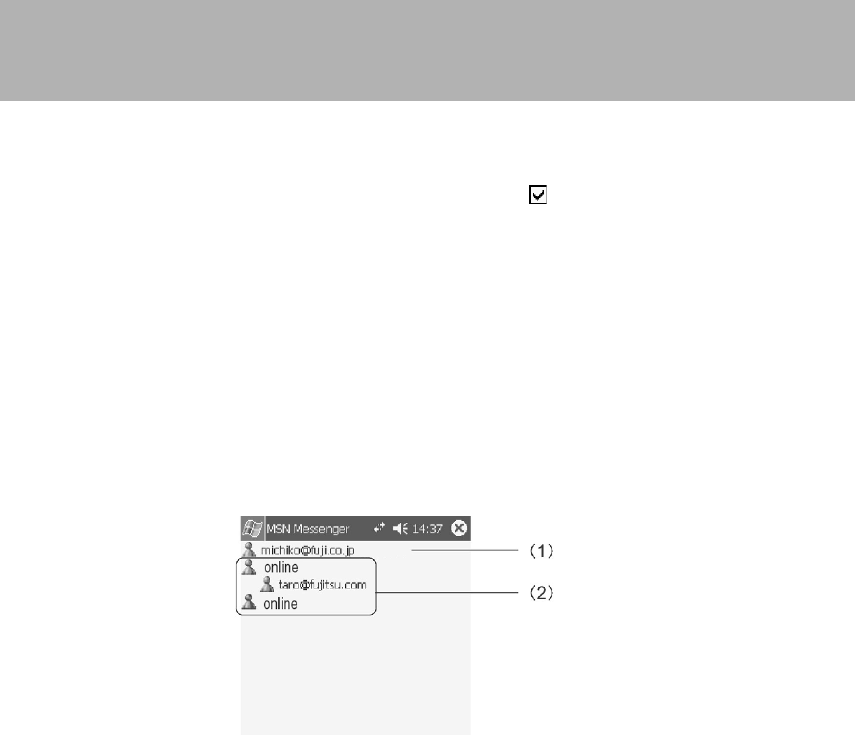
74
Basic MSN Messenger Operations
Screen Configuration
When you sign in, the following screen is displayed.
1 Displays your own status, online, offline, temporarily away from your seat,
busy with a call, etc.
2 Displays the status of other participants. You can chat with those who are
online.
3 You can set-up the additional participants, your own status and options.
1 Input the user name and password for connecting to your provider.
2 Normally, this does not need to be input.
3 To store the password, tap the checkbox to select it .
4 Tap “OK”.
The MSN Messenger screen is displayed.
Sign-out
1 Tap the “Tools” menu → “Sign-out” in that order.
Section 03 LOOX (64-76) 6/25/02, 9:50 AM74
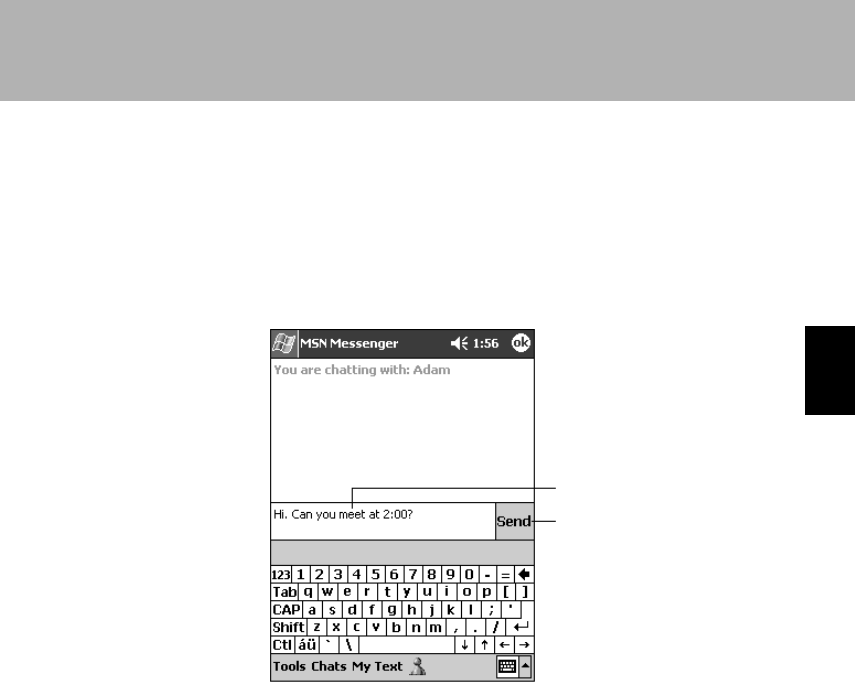
75
SECTION 3
When adding a chat contact, tap the “Tools” menu → “Add Contact” in that order, then
add the contact according to the instructions on the screen.
To delete a chat contact, tap-and-hold the name of the contact to be deleted, then tap
“Delete Contact”.
Chatting
You can exchange instant messages and chat with other participants.
1 Tap those you want to chat with from among those chat contacts who are
online.
Enter message.
Tap to send message.
Adding/Deleting Contacts
You register chat contacts beforehand.
1 Tap the “Tools” menu → “Add Contact” in that order.
2 (1) Input the sign-in name for the contact to be added. (2) Tap “Next”.
The completion screen is displayed and the new chat contact is added.
Section 03 LOOX (64-76) 6/25/02, 9:50 AM75
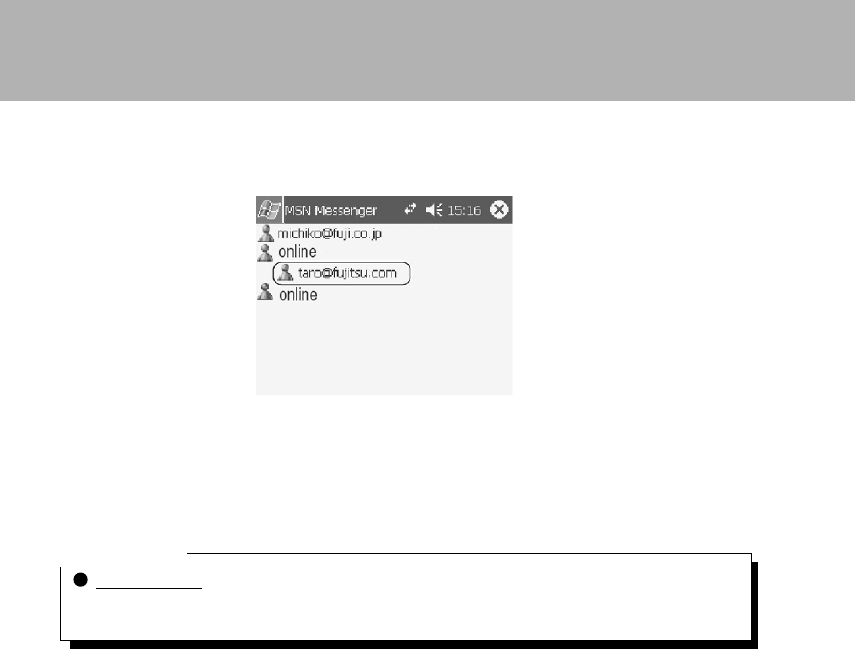
76
2 (1) Use the input panel to input your message into the text box displayed in
the center of the screen. (2) Tap “Send”.
The message you sent is delivered to the other party and your messages back and
forth are displayed as a dialog on the screen.
When an instant message arrives for you from a chat contact, you are notified with a
pop-up.
Critical Point
Using My Text
You can write messages simply by selecting frequently used phrases registered in My Text.
For details on My Text, see “Writing Email”.
If you tap “Chat”, you can switch to a separate chat with the contact who sent the
new message. If you tap “Ignore”, the chat with the current contacts is continued.
Section 03 LOOX (64-76) 6/25/02, 9:50 AM76
4
4
SECTION
SECTION
SECTION 4
Section 04 LOOX (77-83) 6/25/02, 9:49 AM77
78
1 Summary
SECTION 4
As functions for using this device as a notebook, you can use the Pocket PC
edition of Microsoft Outlook (Pocket Outlook). This chapter is a simple
explanation of Pocket Outlook information, see the help.
Pocket Outlook Functions
The functions you can use with Pocket Outlook are as follows. This section explains
how to use “Calendar”, “Contacts”, “Tasks”, and “Notes”. For details on the Inbox, see “3
Sending/Receiving Email”.
Function Summary
Calendar This program can be used as a schedule pad. You can write
appointments on the calendar and set alarms for appointments.
Contacts This program can be used as a contact list. You can record
addresses, telephone numbers, email addresses, etc.
Tasks You can manage a list of tasks to do. You can also set alarms for tasks.
Notes You can use this device as a notebook. You can write characters and
figures and also record sound.
Inbox This sends and receives email and manages email.
Critical Point
When using Microsoft Outlook on a computer, you can synchronize this device and the
computer. For details, see “Chapter 6 Linking with a Computer”.
Reminder Settings
When there is something that must be done, such as a task or appointment, an alarm,
message, or other notice can be given when the scheduled time arrives.
The reminder methods are as follows. You can also specify multiple forms of reminder
for the same event.
• A message box is displayed on the screen.
• An alarm is sounded. You can specify the type of sound.
• The indicator flashes.
The setting messages as follows.
1 Tap → “Settings” → “Personal” tab → “Sounds and Notifications” in that
order.
2 (1) Tap the “Volume” tab. (2) Select the “Programs” → “Reminder (alarm,
appointments, etc.)” checkbox .
Section 04 LOOX (77-83) 6/25/02, 9:49 AM78
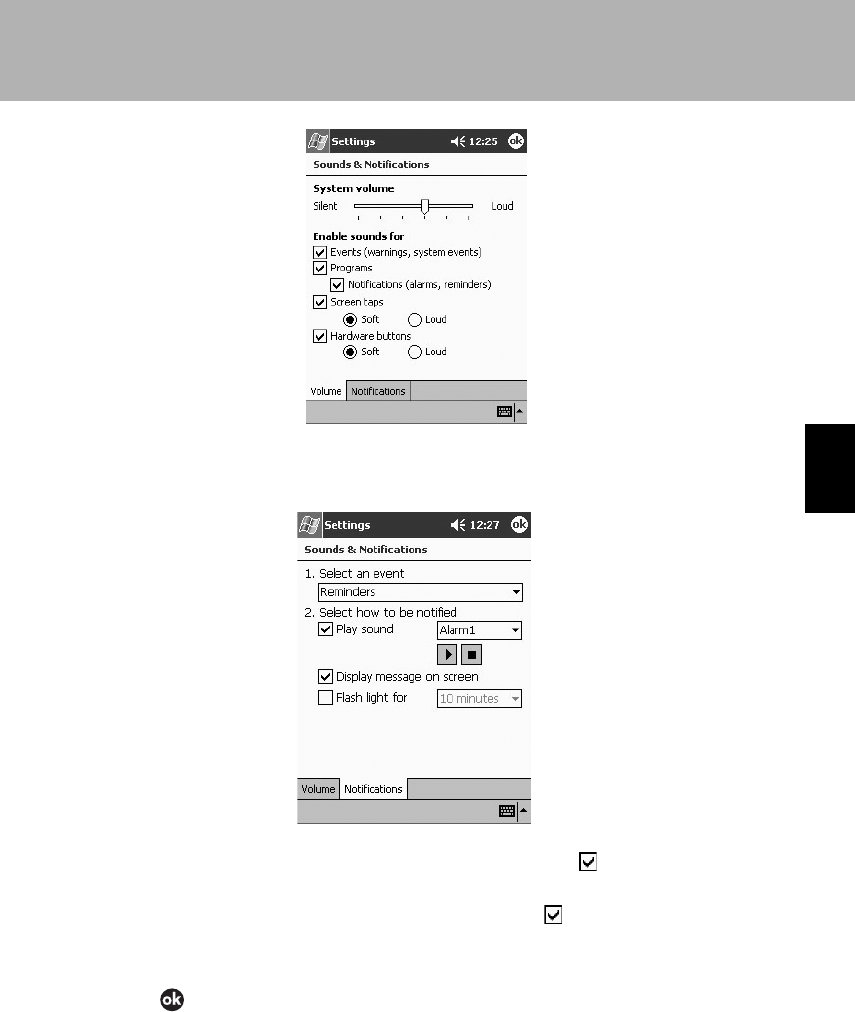
79
SECTION 4
3 Tap the “Reminder” tab and specify the reminder method.
• If you want an audible reminder, select the checkbox and specify the type of
sound from the list box on the right.
• If you want a screen reminder, select the checkbox and specify the flashing time
from the list box on the right.
4 Tap .
Section 04 LOOX (77-83) 6/25/02, 9:49 AM79
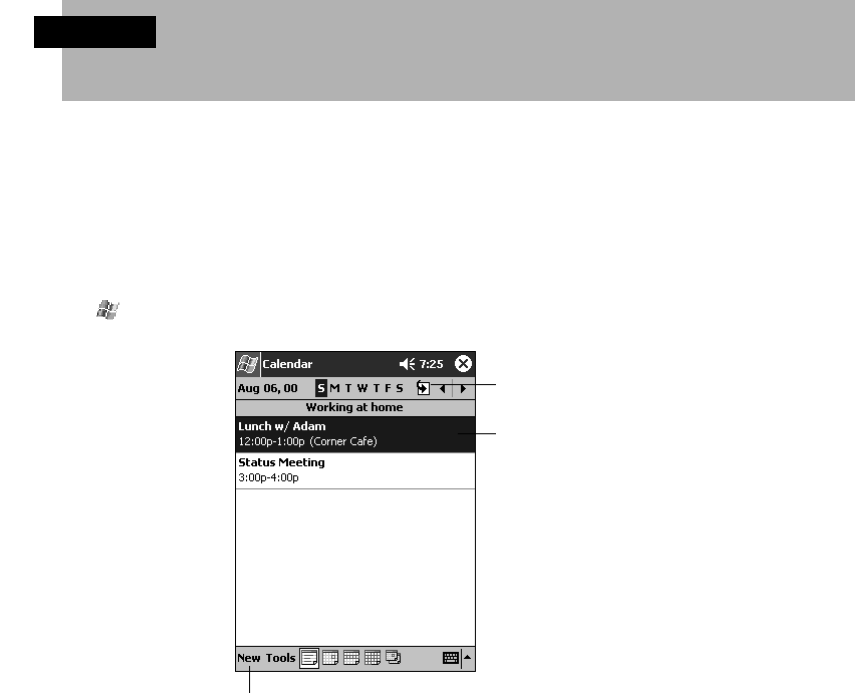
80
2 Calendar
SECTION 4
This program can be used as a schedule pad. This application can be used as a
schedule pad. Appointments can be checked on calendars of various formats.
You can also set reminder by alarm or message for the calendar date and time.
For details on alarm and message settings, see “Reminder Settings”.
Screen Configuration
Tap → “Calendar” in that order. The Calendar is displayed in the selected format.
1 Displays today’s appointments. For a monthly or annual calendar, the
calendar for today’s month or year is displayed.
2 Each time you tap here, the display proceeds to the next appointments in the
units of the displayed calendar: day, week, month, or year. Each time you tap
;, the display moves back to the previous appointments.
3 This displays the calendar. If you tap-and-hold here, a pop-up menu is
displayed showing operations you can carry out on the appointment list.
4 You can write a new appointment.
5 You can set calendar options, such as the font size and time interval.
6 You can switch the display format for the calendar. For details, see
“Switching the Display”.
Tap to go to today.
Tap to display or edit
the appointment details.
Tap to create a new appointment.
Section 04 LOOX (77-83) 6/25/02, 9:49 AM80
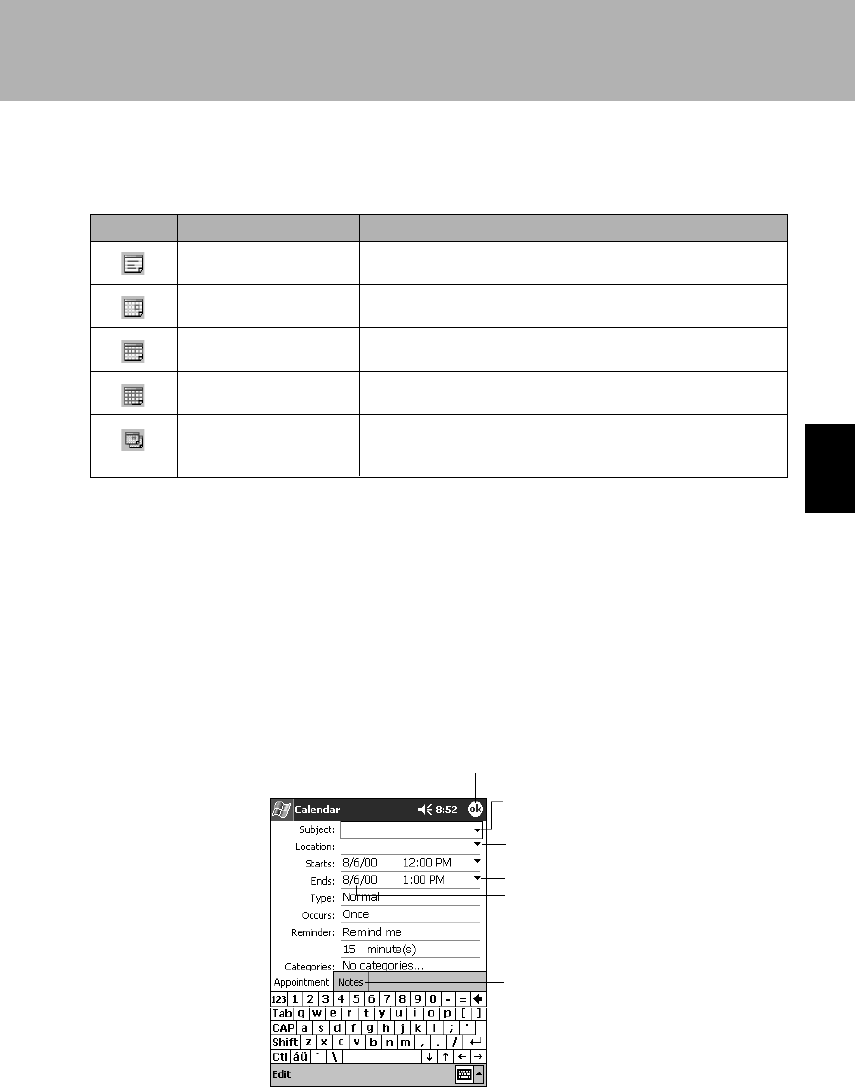
81
SECTION 4
Switching the Display
You can switch the display by tapping the icon on the command bar. The screens
displayed for each icon are as follows.
Icon Screen Name Summary
Plan display Lists the appointments for one day.
Day display Displays the appointments for one day in a timetable.
Week display Displays the appointments for one week. Tapping on a
date switches to the daily display for that day.
Month display Displays the appointments for one month. Tapping on a
date switches to the daily display for that day.
Year display Displays the calendar for the year.
Tapping the date switches to the day-by-day display
screens.
Creating New Appointments
1 Select the date and time for the new appointment.
•“Day Display” screen or “Week Display” screen
Tap the time or date into which you wish to enter the appointment.
•“Month Display” screen or “Year Display” screen
Tap the date into which you wish to enter the appointment, then tap the time on the “Day
display” screen.
2 Tap the “New” menu item.
3 Tap the item you want to input, then input the necessary items.
Tap to return to the calender
(the appointment is save automatically).
Tap to choosen from
predefined text.
Tap to choosen from
previously entered locations.
Tap to select a time.
Tap to select a date.
Notes is a good place for
maps and directions.
Section 04 LOOX (77-83) 6/25/02, 9:49 AM81
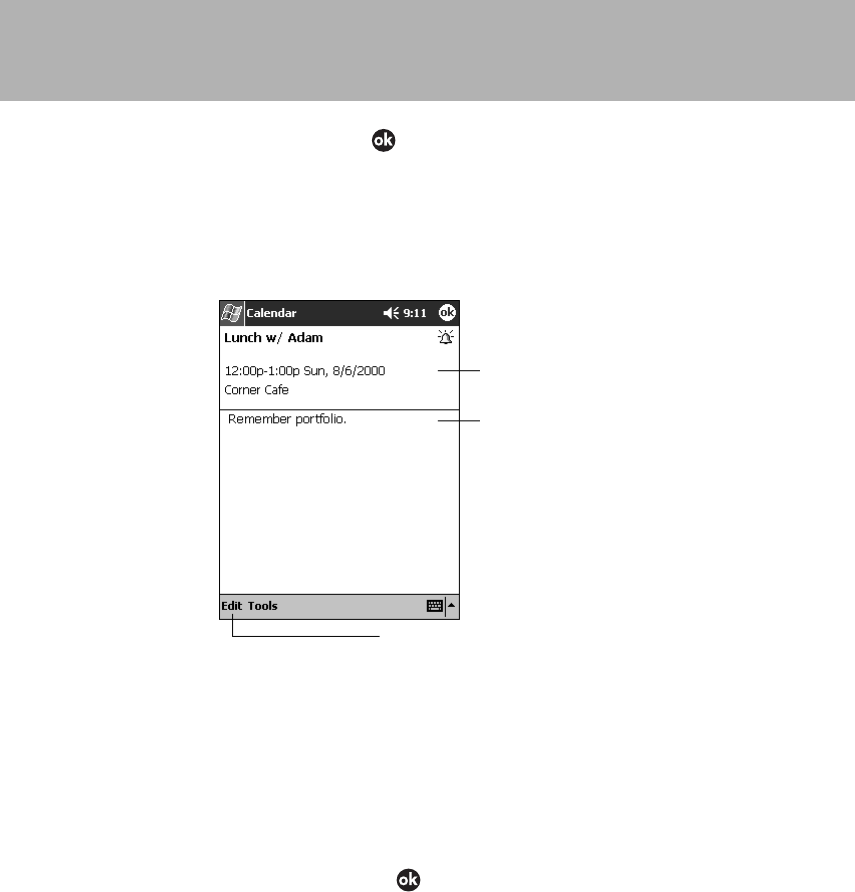
82
4 When the input is complete, tap .
The appointment is saved and the display returns to the Calendar screen.
Using the Summary Screen
The “Summary” screen is displayed when you tap an appointment on the “Plan display”
screen or the “Day display” screen.
View appointment details.
View.
Tap to change
appointment.
Revising/Deleting an Appointment
Revising an Appointment
1 The summary screen for the appointment to be revised is displayed.
2 Tap the “Edit” menu.
3 Input the revised items in the same manner as when creating a new appointment.
4 When the revision is complete, tap .
The display returns to the appointment list.
Deleting an Appointment
1 In Calendar, tap-and-hold the appointment to be deleted.
2 On the “Pop-up” menu → tap “Delete Appointment”.
The selected appointment is deleted.
3 Tap “Yes”.
Section 04 LOOX (77-83) 6/25/02, 9:49 AM82
83
SECTION 4
Automatic Creation of a Meeting Reminder
The Calendar can be used to send a meeting notice email to an Outlook or Pocket
Outlook user.
Critical Point
Before writing a meeting notice
• The email addresses for the meeting attendees must be input in Contacts beforehand.
• The settings for the Inbox handling email sending/reception must be complete.
1 Input the appointment.
2 Tap the command bar input panel button ( or the like) on the appointment
input screen, to switch off the input panel display.
3 Tap the attendees.
A list of the email addresses already input to the Contacts are displayed.
4 From the email address list, select the contacts to send the meeting notice
introduction to by tapping them to select them.
5 Tap .
The meeting notice is created automatically and placed in the Outbox.
The next time you synchronize with the computer or connect to the network, the
meeting notice is sent to the attendees.
The sending method can be specified by tapping the “Tools” menu, “Option” →
“Meeting Attendance Request Reply Method”.
Section 04 LOOX (77-83) 6/25/02, 9:50 AM83
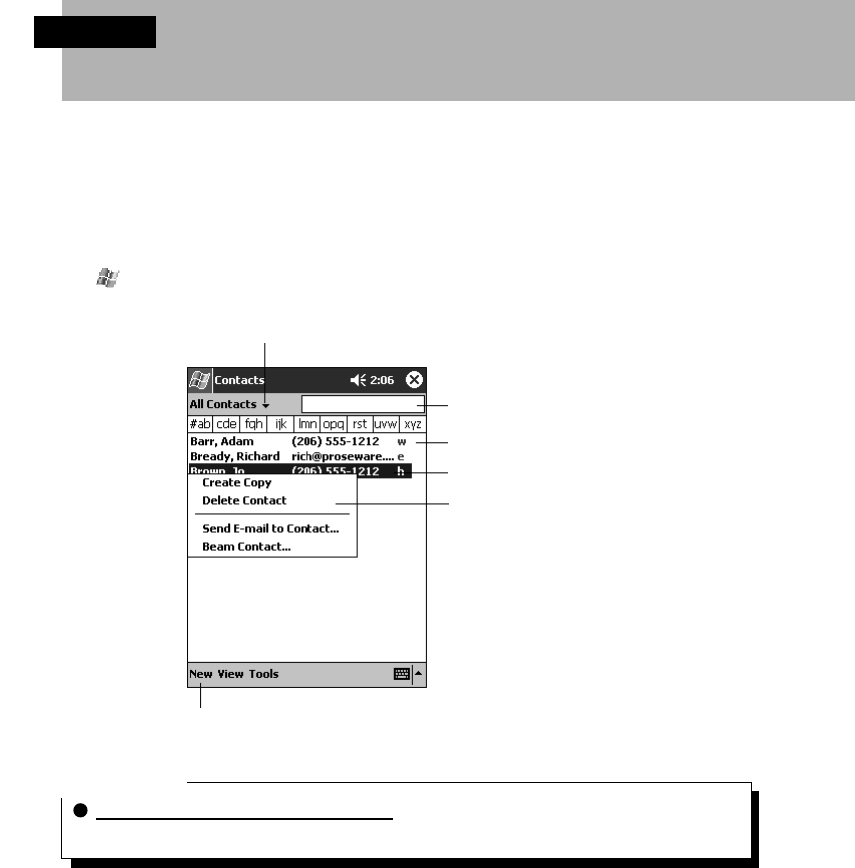
84
3 Contacts
SECTION 4
In Contacts, addresses, telephone numbers, email addresses, etc. can be
registered. Also, the registered data can be shared quickly between this device
and another Pocket PC using “2 Infrared Connections”.
Screen Configuration
Tap → “Contacts” in that order.
Critical Point
Changing the Contacts display method
Tap the “Tools” menu → “Option” in that order to change the display method.
Select the category of contacts
displayed in the list.
Tap and enter part of name
to quickly find it in the list.
Tap to see additional phone numbers
and e-mail addresses.
Tap to display or edit the contact details.
Tap and hold to display a
pop-up menu of actions.
Tap to create a new contact.
Section 04 LOOX (84-92) 6/25/02, 9:49 AM84
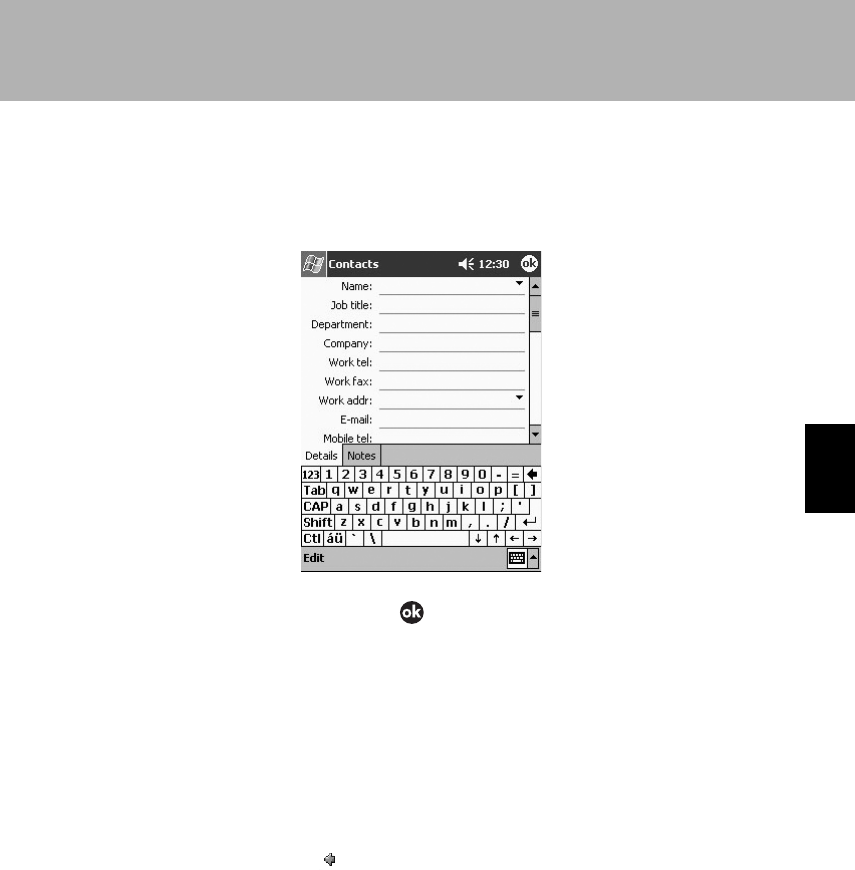
85
SECTION 4
Creating a New Contact
1 Tap the “New” menu.
2 Tap the item to be input, then input the required item.
3 When the input is complete, tap .
The information is stored and the display returns to the Contacts list screen.
Searching the Contacts
You can search using the input box under the navigation bar.
1 Input the character string you want to search for.
2 The search results are displayed.
To display the contact list again after the search, either clear the character string
from the input box or tap to the right of the input box.
Using the Pocket PC search functions
See “9 Searches”.
Section 04 LOOX (84-92) 6/25/02, 9:49 AM85
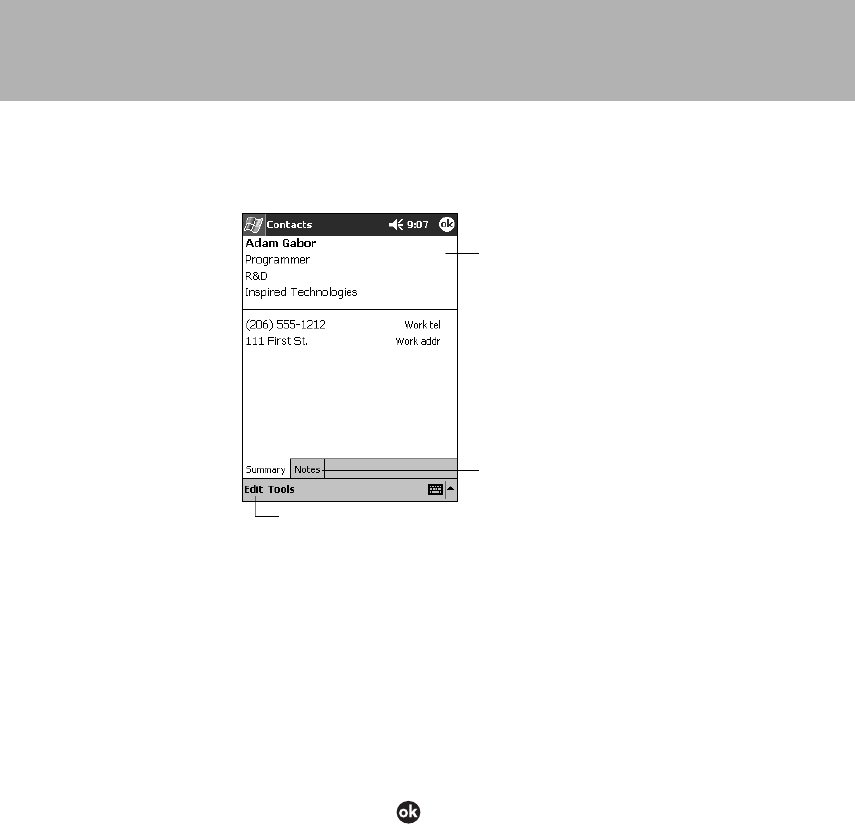
86
Using the Summary Screen
To display the “Summary” screen, tap a contact on the Contacts list.
View contact details.
Tap to view notes.
Tap to change contact information.
Revising/Deleting Contacts
Revising Contacts
1 In the Contacts list, tap the contact to be revised.
The summary screen is displayed.
2 Tap the “Edit” menu.
The contact list editing screen is displayed.
3 Input the revised items in the same manner as when creating a new contact.
4 When the revision is complete, tap .
The display returns to the Calendar list.
Deleting a Contact
1 In the Calendar, tap-and-hold the contact to be deleted.
To select multiple contacts, drag and specify the range. Next, tap-and-hold the
selected range.
2 From the displayed pop-up menu, tap “Delete Contact”.
“Continue?” is displayed.
3 Tap “Yes”.
Section 04 LOOX (84-92) 6/25/02, 9:49 AM86
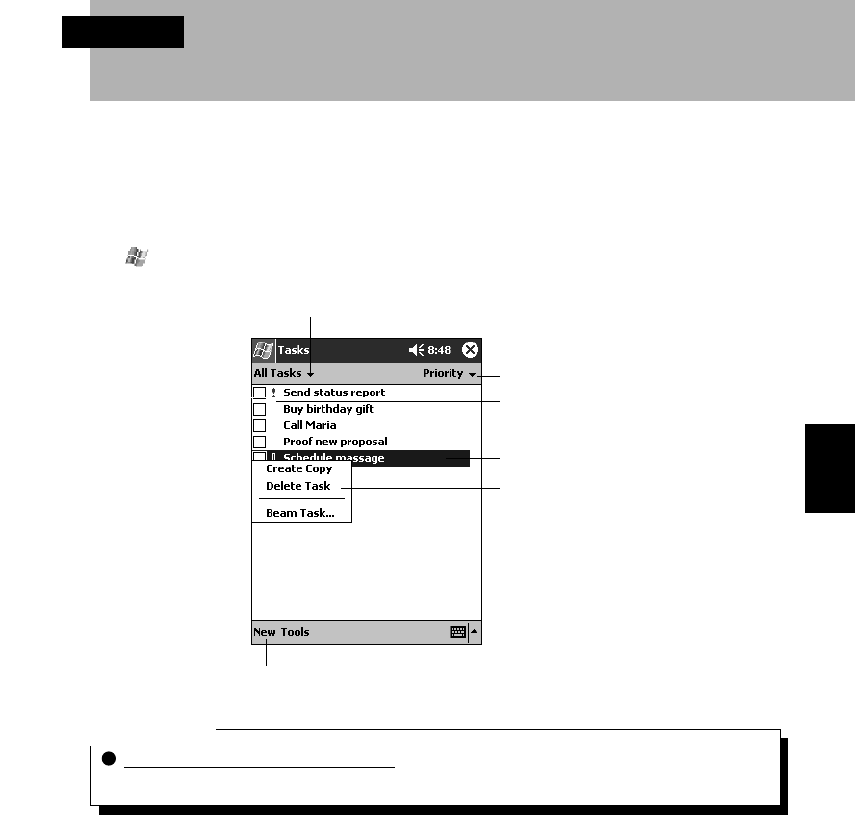
87
SECTION 4
4 Tasks
SECTION 4
Tasks that need to be executed can be managed in Tasks. You can also set alarms
for registered tasks. For details on alarm settings, see “Reminder Settings”.
Screen Configuration
Tap → “Tasks” in that order.
Critical Point
Changing the Tasks display method
Tap the “Tools” menu → “Options” in that order to change the display method.
Select the category of tasks you
want displayed in the list.
Select the short order of the list.
Indicates high priority.
Tap to display or edit the task details.
Tap and hold to display a pop-up
menu of actions.
Tap to create a new task.
Section 04 LOOX (84-92) 6/25/02, 9:49 AM87
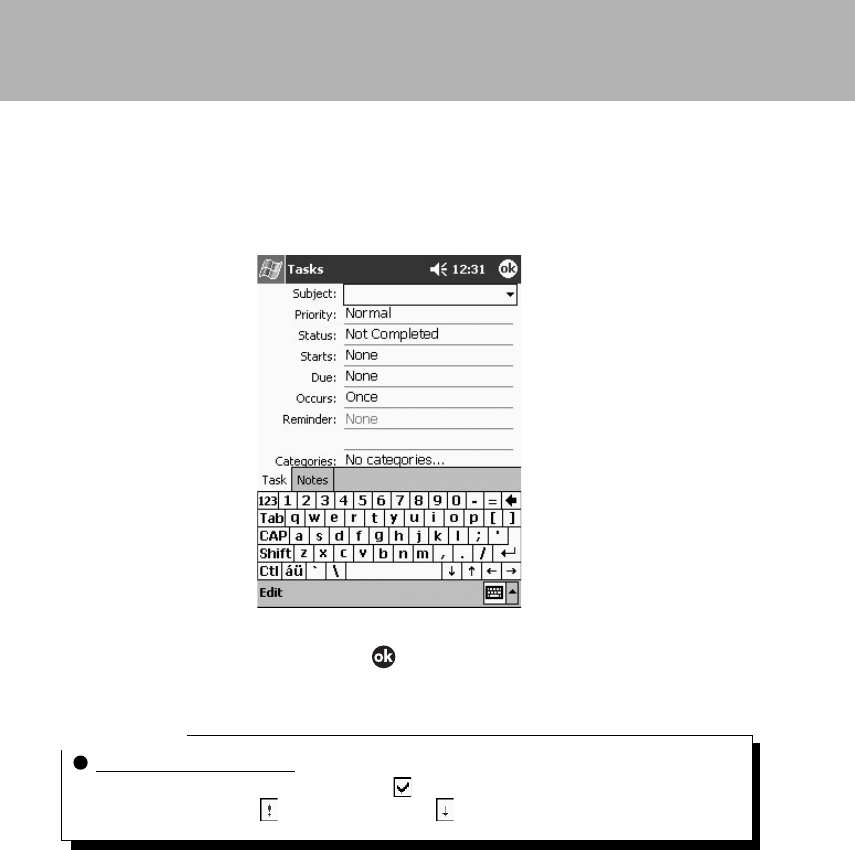
88
Creating a New Task
1 Tap the “New” menu item.
2 Tap the item to be input, then input the required item.
3 When the input is complete, tap .
The information is stored and the display returns to the Tasks screen.
Critical Point
Creating a Task list simply
Tap the “Tools” menu → select “Input Bar” to display the “Input” bar.
To set high priority, tap to set low priority, tap .
Section 04 LOOX (84-92) 6/25/02, 9:49 AM88
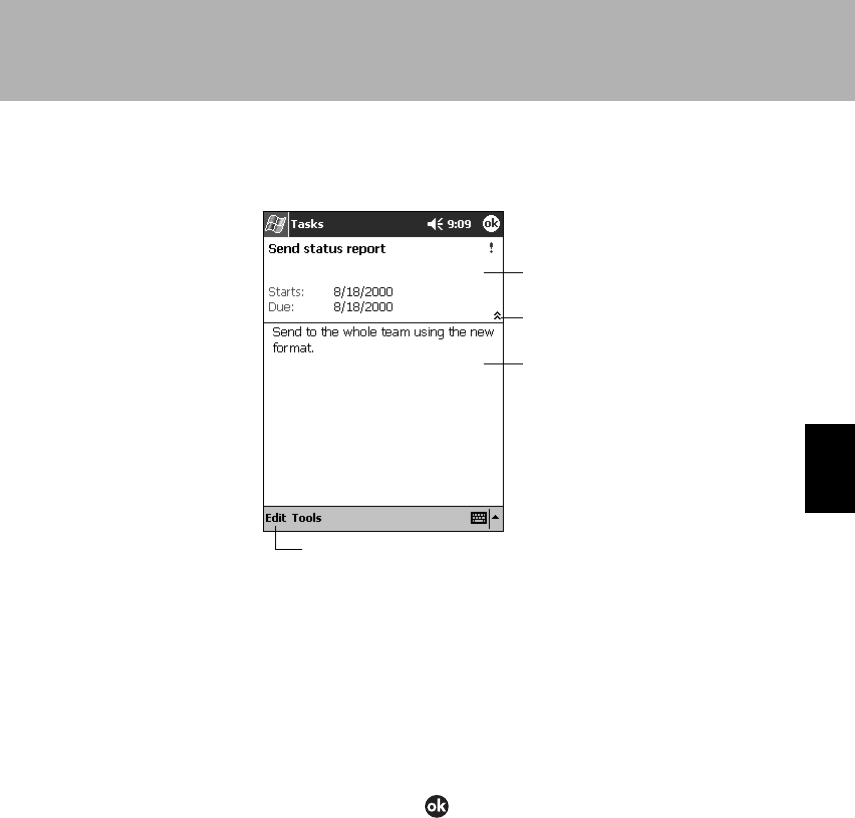
89
SECTION 4
Using the Summary Screen
To display the “Summary” screen, tap a task on the Task list.
Revising/Deleting Tasks
Revising a Task
1 From the Task list, tap the task to be revised.
The summary screen is displayed.
2 Tap the “Edit” menu.
3 Input the revised items in the same manner as when creating a new task.
4 When the revision is complete, tap .
The display returns to the Task list.
Deleting a Task
1 From the Task list, tap-and-hold the task to be deleted.
To select multiple contacts, drag and specify the range. Next, tap-and-hold the
selected range.
2 From the displayed pop-up menu, tap “Delete task”.
The selected task or tasks are displayed.
“Continue?” is displayed.
3 Tap “Yes”.
View task details.
Tap to show and hide additional
summary information.
View notes.
Tap to change task.
Section 04 LOOX (84-92) 6/25/02, 9:49 AM89
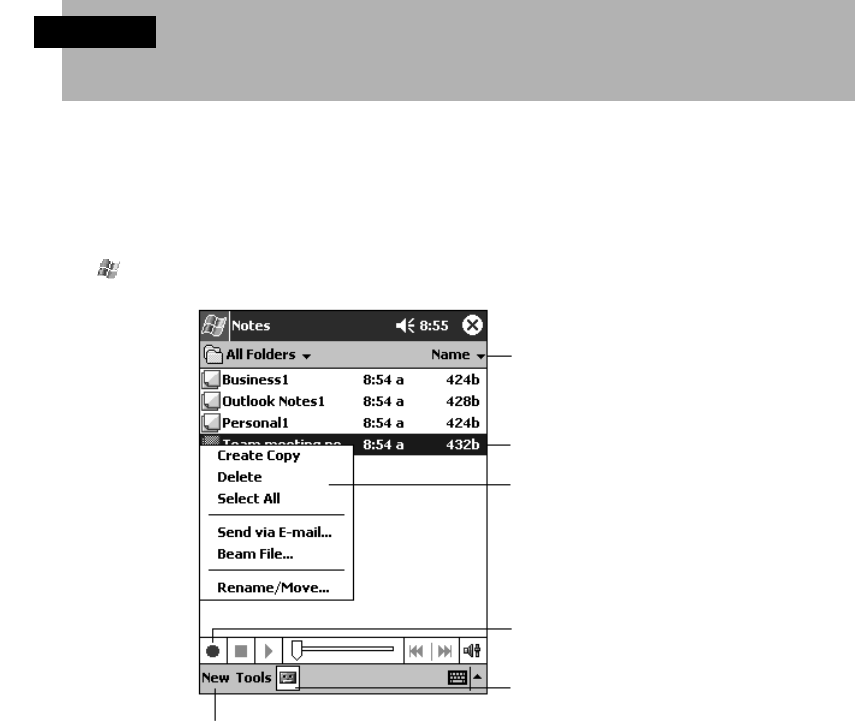
90
5 Notes
SECTION 4
This device can be used as a notepad when you want to write something down
quickly. In addition to text and figures, you can also record sound.
Screen Configuration
Tap → Notes in that order.
Tap to change the sort order of
the list.
Tap to open a note or play a
recording.
Tap-and-hold to display a pop-up
menu of actions.
Tap to record.
Tap to show or hide the
Recording toolbar.
Tap to create a new item.
Section 04 LOOX (84-92) 6/25/02, 9:49 AM90
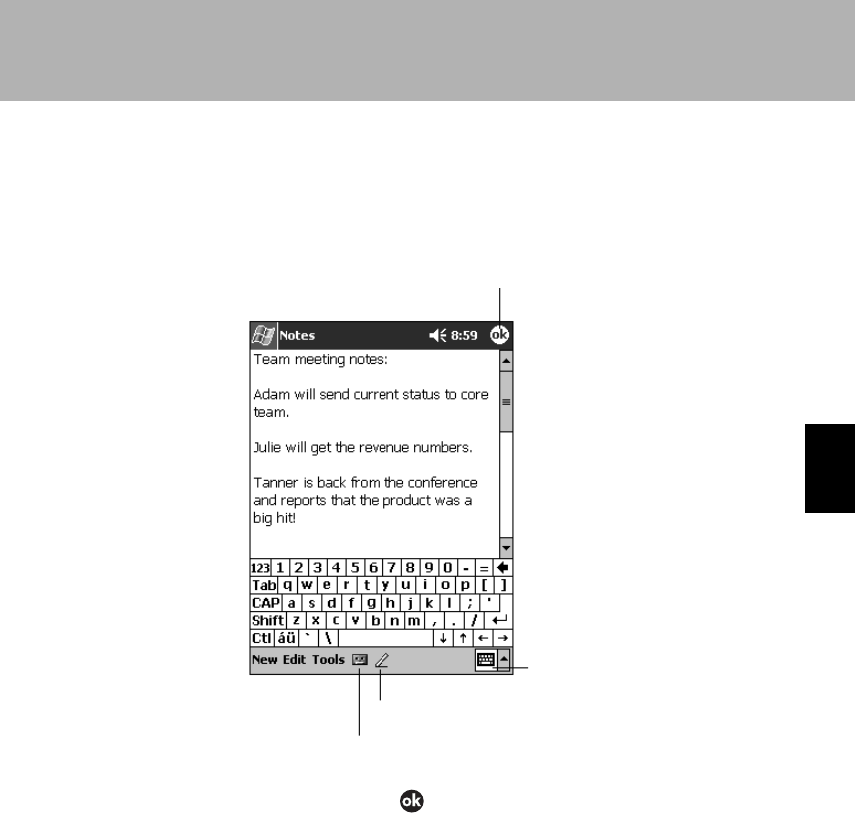
91
SECTION 4
Creating a New Note
1 Tap the “New” menu item.
2 Input the contents of the note.
3 When the input is complete, tap .
The information is saved and the display returns to the note list screen.
Tap to return to the note list
(the note is saved automatically).
Tap to show or hide the input panel.
Tap to write on the screen.
Tap to add a recording to the note.
Section 04 LOOX (84-92) 6/25/02, 9:49 AM91
5
5
SECTION
SECTION
SECTION 5
Section 05 LOOX (093-101) 6/25/02, 10:29 AM93
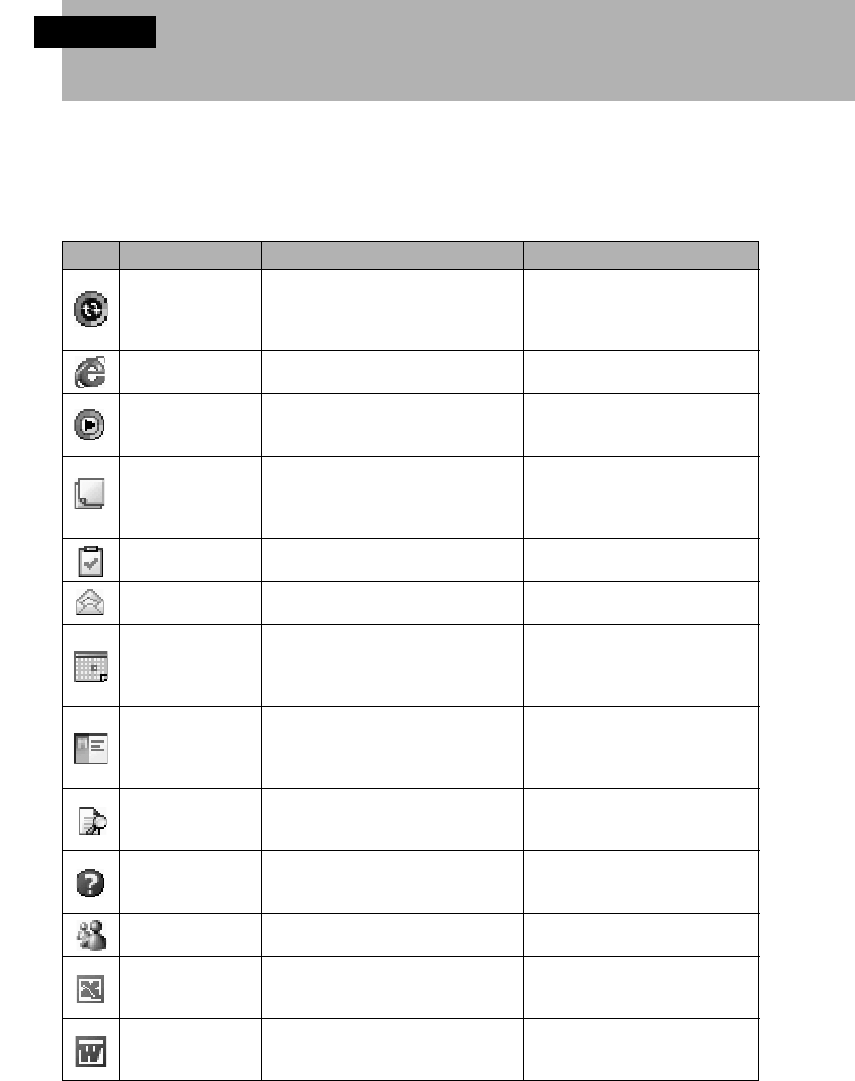
94
1 Program List
SECTION 5
This displays a list of the applications built into this device and accessory
applications. For details, read the references given in this list.
Built-In Programs
Icon Program Name Function Summary Reference
ActiveSync
Pocket Internet
Explorer
Windows Media
Player for Pocket
PC
Notes
Task“
Inbox
Calendar
Contacts
Search
Help
MSN Messenger
Pocket Excel
Pocket Word
You can connect this device and
computer and synchronize the
data on this device and on the
computer.
Views Web pages over the
Internet.
Plays back MP3 and Windows
Media audio and video.
You can use this device as a note
pad. In addition to text and
figures, you can also record
sound.
Manages tasks. Can also set
alarms for registered tasks.
You can send and receive email
and manage received email.
You can use this device as a
Calendar pad. You can write
appointments into the calendar
and set alarms for appointments.
You can use this device as an
address book. You can record
addresses, telephone numbers,
email addresses, etc.
You can search for character
strings included in file names and
data in files.
Displays help. You can check the
basic operations of this device
using this help file.
Exchanges instant messages.
This is the Pocket PC edition of
Microsoft Excel, which is used on
computers.
This is the Pocket PC edition of
the Microsoft Word used on
computers.
1 “ActiveSync Summary”
“2 Viewing Web Pages”
Windows Media Player for
Pocket PC
“5 Notes”
“4 Tasks”
“3 Sending/Receiving Email”
“2 Calendar”
“3 Contacts”
“7 Searches”
“8 Help”
“4 Exchanging Instant
Messages”
“Pocket Excel”
“Pocket Word”
Section 05 LOOX (093-101) 6/25/02, 10:29 AM94
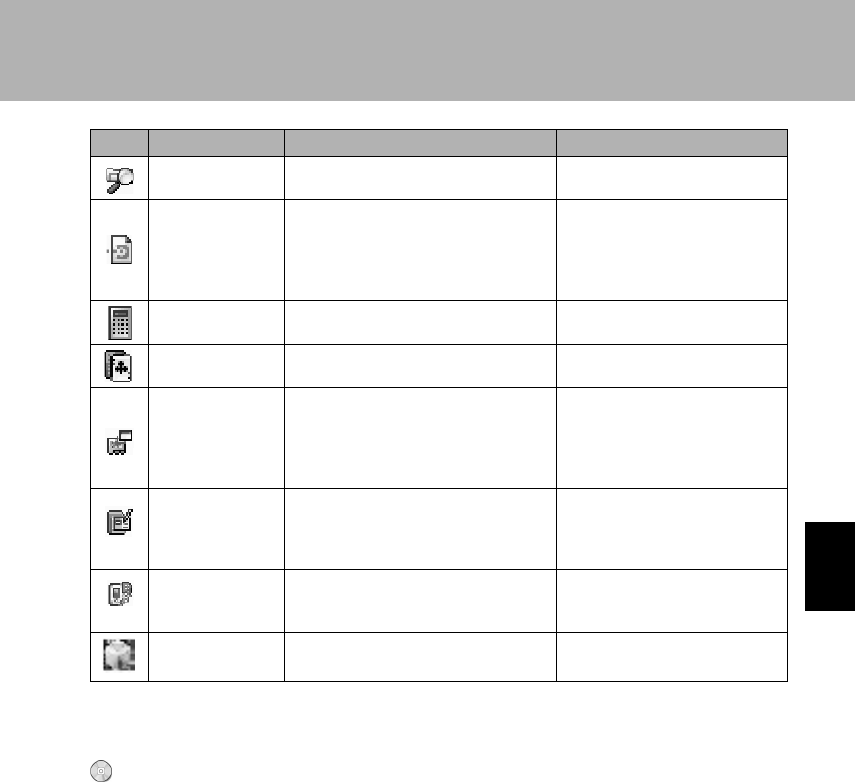
95
SECTION 5
Bundled Applications
Additional applications are stored on the “Applications CD”. These applications must
be installed on Pocket LOOX in order to be used. Please refer to your CD to setup the
applications.
Manages files and folders.
You can use the infrared
communications port to exchange
data with other Pocket PCs and
other devices with infrared
communications ports.
You can calculate using the
calculator.
You can play solitaire (card game).
Displays a list of application icons
so you can start applications
easily. This is the Pocket PC
edition of Microsoft Excel, which is
used on computers.
You can set so that when a CF
card/SD/MMC card is set in this
device, the application on it is
started automatically.
Backs up the data on this device’s
RAM to a CF card or SD/MMC
card.
Connects through BluetoothTM.
Icon Program Name Function Summary Reference
File Explorer
Infrared reception
Calculator
Game
LX Launcher
Automatic storage
device startup/Inf
File Editor
LX Backup
Pocket Plugfree
“File Explorer”
“Infrared reception”
“Calculator”
“Game”
“LX Launcher”
“Automatic storage device
startup”
“LX Backup”
“Pocket Plugfree”
Section 05 LOOX (093-101) 6/25/02, 10:29 AM95

96
SECTION 5
2 Standard Pocket PC 2002 Built-In Programs
This section explains the programs that come built-in with Pocket PC.
Pocket Word
With Pocket Word, you can create documents in the same way as when creating Word
documents on a computer. In addition to text, drawings and sound may also be stored
in these documents. You can create new documents on this device, transfer documents
created on a computer to this device and edit them on this device, and transfer
documents created on this device to a computer and edit them there. You can also
synchronize files on this device and on the computer, so you can keep the most up-to-
date data on both units. Note however that there are points to watch out for concerning
data compatibility. For these points, see “Linking with Word”. For details, see “Linking
with Word”.
Documents created can be managed in separate folders. This section provides a simple
explanation of Pocket Word operation. For more details, see help.
Screen Configuration
Tap → “Programs” → “Pocket Word” in that order.
Select the type of folder you
want displayed in the list.
Tap to change the sort
order of the list.
Tap to open a document.
Tap and hold an item to see
a pop-up menu of actions.
Tap to create a new document.
Section 05 LOOX (093-101) 6/25/02, 10:29 AM96
97
SECTION 5
Critical Point
If no file list is displayed when you start Pocket Word
The first time you start Pocket Word or if you start Pocket Word with no Pocket Word documents
stored, the screen for editing a new file is displayed.
File Operations
To copy/delete a file or move a file to another folder, operate as follows.
Copying/deleting files
1 In the file list, tap-and-hold the file you want to copy/delete.
2 From the pop-up menu displayed, tap “Copy” or “Delete”.
If you tap “Copy”, a copy is made with the name “Copy Source File Name (1)”.
(The number in the parentheses is the number of files copied.)
If you tap “Delete”, “Completely delete selected item?” is displayed, so tap “Yes”.
Moving files
1 In the file list, tap-and-hold the file you want to move.
2 From the pop-up menu displayed, tap “Change Name/Move”.
3 At “Folder” on the “Change Name/Move” screen, specify the folder to move
the file to, then tap .
The file is moved.
Critical Point
Pocket Word save formats
Pocket Word has a variety of save formats, including Pocket Word (.psw), rich text format (.rtf),
and text (.txt). The format the file is saved in can be specified by tapping the “Tools” menu →
“Save As” → “Save As Type” in that order when the file is displayed.
To check the type of a file in the Pocket Word file list, from the pop-up menu for the file, tap
“Change Name/Move” .
Input Modes
The input modes you can use with Pocket Word are as follows.
Typing
You can input using the software input panel. The input text is displayed as typed
characters on the screen. See “4 Software Input Panel”.
Section 05 LOOX (093-101) 6/25/02, 10:29 AM97
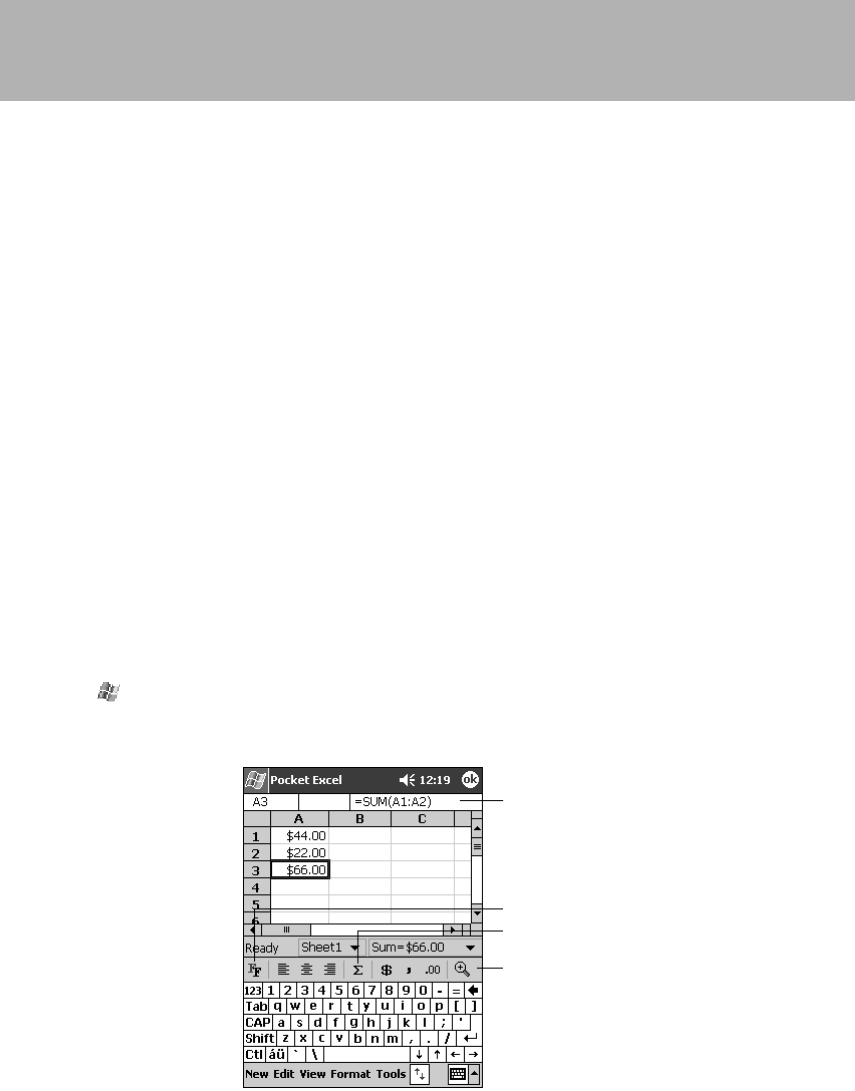
98
Handwriting
You can handwrite characters directly on the screen. Handwritten characters are
displayed as is on the screen. See “5 Writing Characters”.
Drawing
You can use the extendable stylus pen to draw freely on the screen. Such drawing
is displayed as is on the screen. See “6 Drawing”.
Recording
You can insert sound into documents. See “7 Recording”.
Pocket Excel
The same as when using Microsoft Excel on a computer, you can edit workbooks (files
created with Excel) with Pocket Excel. You can create new workbooks on this device,
transfer workbooks created on a computer to this device and edit them on this device,
and transfer documents created on this device to a computer and edit them there. You
can also synchronize files on this device and on the computer, so you can keep the
most up-to-date data on both units. Note however that there are points to watch out for
concerning data compatibility. For these points, see “Linking with Excel”. For details, see
“Linking with Excel”. Documents created can be managed in separate folders. This section
provides a simple explanation of Pocket Excel operation. For more details, see help.
Screen Configuration
Tap → “Programs” → “Pocket Excel” in that order.
The configuration of the file list screen is basically the same as for Pocket Word. See
“Screen Configuration”.
Zoom button.
Auto Sum button.
Format button.
Cell contents appear here
as you enter them.
Section 05 LOOX (093-101) 6/25/02, 10:29 AM98
99
SECTION 5
File Operations
The operations for copying/deleting a file or moving a file to another folder are basically
the same as for Pocket Word. See “File Operations”.
Critical Point
Pocket Excel save formats
Pocket Excel has a variety of save formats, including Pocket Excel (.pxl) and Excel (.xsl). The
format the file is saved in can be specified by tapping the “Tools” menu → “Save As” → “Save
As Type” in that order when the file is displayed.
To check the type of a file in the Pocket Excel file list, from the pop-up menu for the file, tap
“Change name/Move”.
Usage Hints
Widening the Screen
In order to display the worksheet as wide as possible on the screen, switch to full-
screen display. Tap “View” → “Full Screen”. When you switch to full screen display,
the tool bar, row and column numbers, and other window elements are no longer
displayed. The worksheet can be displayed over the entire screen. To return to the
original display, tap “Close Full Screen” displayed at the top right of the screen.
Critical Point
To switch display of individual window elements on/off
You can switch display of the tool bar, row and column numbers, and other window elements
on/off. Tap “View” and select only those elements that you want to display.
To Fix a Cell Frame
If there are any cells that you want displayed even when the screen is scrolled, you
can fix the window frame in units of rows and columns.
1 Select the range of cells for which the frame is to be fixed.
2 Tap the “View” menu → “Freeze Panes” in that order.
The column to the left side of the selected cell and the row above the cell are fixed. To
end this setting, tap the “View” menu → “Unfreeze Panes” in that order.
Section 05 LOOX (093-101) 6/25/02, 10:29 AM99

100
Splitting the Screen and Displaying Different Areas
Since you can scroll through each part of the split screen, you can display different
regions on the same worksheet at the same time. This is useful for viewing and
editing different areas on large worksheets.
1 Select the cell to split at.
2 Tap the “View” menu → “Split” in that order.
A double line is displayed splitting the screen above or to the left of the selected
cell.
To end the split display, tap the “ View” menu → “Remove Split” in that order.
Switching off the display for specified rows/columns
You can switch off the display in units of rows or columns.
1 Select the row(s) or column(s) you do not want to display.
2 Tap “Format” → “Row” or “Column” → “Hide” in that order.
To end this setting and display the row/column again, tap the “Format” menu →
“Row”/”Column”, “Unhide” in that order.
Setting Passwords for Files
You can protect the file by setting a password for it. While editing the file you want
to protect, select the “Edit” menu → “Password” in that order, then set the
password. From the next time, the password must be input in order to open that file.
Windows Media Player for Pocket PC
You can use Windows Media Player for Pocket PC to play back audio and video in the
following formats.
• MP3
• Windows Media Audio (wma)
• Windows Media Video (wmv)
Screen Configuration
Tap → “Windows Media Player”.
Section 05 LOOX (093-101) 6/25/02, 10:29 AM100

101
SECTION 5
Pocket Internet Explorer
For details on Pocket Internet Explorer, see “Chapter 3 Connecting to the Internet” or
help.
Pocket Outlook
For details on Pocket outlook, see “Chapter 4 Using As a Notebook”, (3 Sending/
Receiving Email” or help.
MSN Messenger
For details on MSN Messenger, see “4 Exchanging Instant Messages” or help.
Indicates the progress
of the current track.
Tap to adjust volume.
Tap to play or pause.
Tap to stop.
Tap to play a previous song.
Tap to skip to the next song.
Section 05 LOOX (093-101) 6/25/02, 10:29 AM101
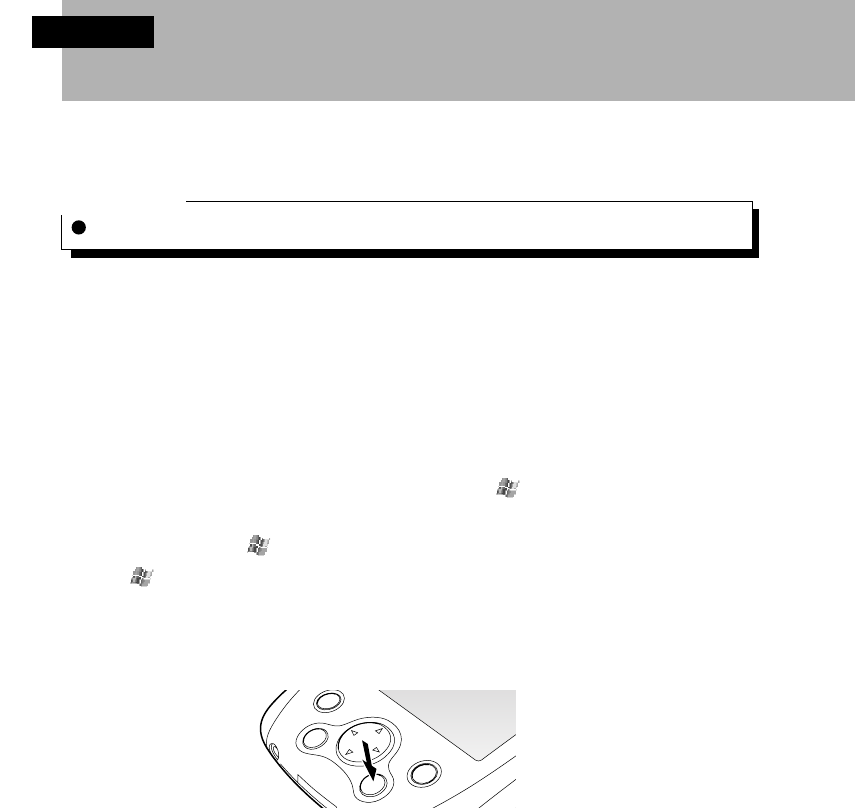
102
SECTION 5
3 Other Built-in Application
This section introduces built-in programs that are in addition to the standard
Pocket PC 2002 programs.
Critical Point
For details on each application, see help.
LX Launcher
LX Launcher makes it easier to launch pre-registered applications. You can register
applications that you use frequently with classifications that are easy for you to use.
This application can also set a picture you like to be displayed as the screen
background.
Startup
There are two ways to start the LX Launcher, from the menu or from the
Applications button.
Starting from the Menu
Tap → “Programs” → “LX Launcher” in that order.
Starting from the Applications button.
Press the Applications button at the bottom right of the Navigation button.
Section 05 LOOX (102-110) 6/25/02, 10:00 AM102
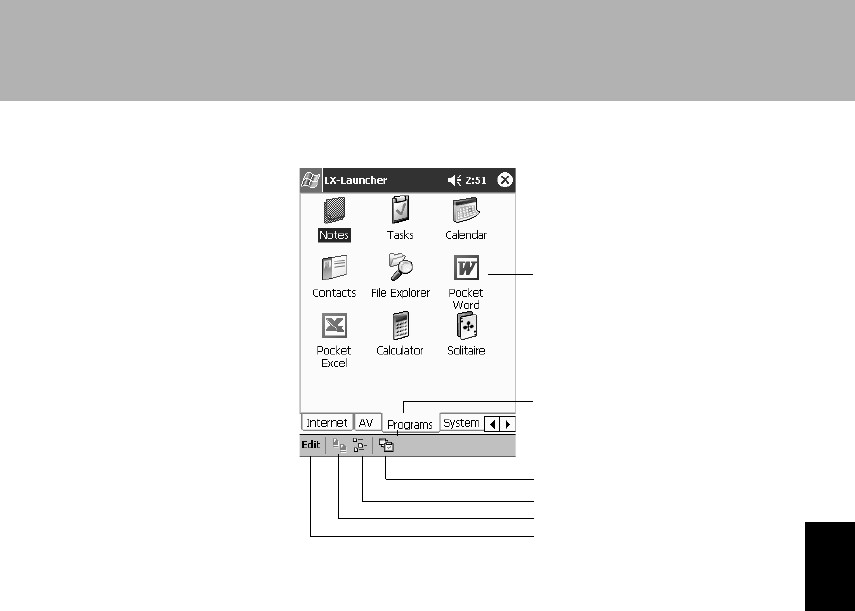
103
SECTION 5
1 Application icon
This is a registered program. Tapping one of these icons starts the application.
Tapping-and-holding an icon displays a pop-up menu that allows you to register/
delete/edit the application.
2Tab
Switches the program type.
3 Edit
Adds and deletes tabs, changes the wallpaper, etc.
4 Switching to large icon display
Switches to large program icons.
5 Switching to small icon display
Switches to small program icons
6 Task
Displays a screen for closing other applications currently running.
Tap the application to close among the running tasks, then tap “Stop”. The selected
application is closed. If you tap “Stop all”, all the displayed applications are closed.
Screen Configuration
2
1
3
4
5
6
Section 05 LOOX (102-110) 6/25/02, 10:00 AM103
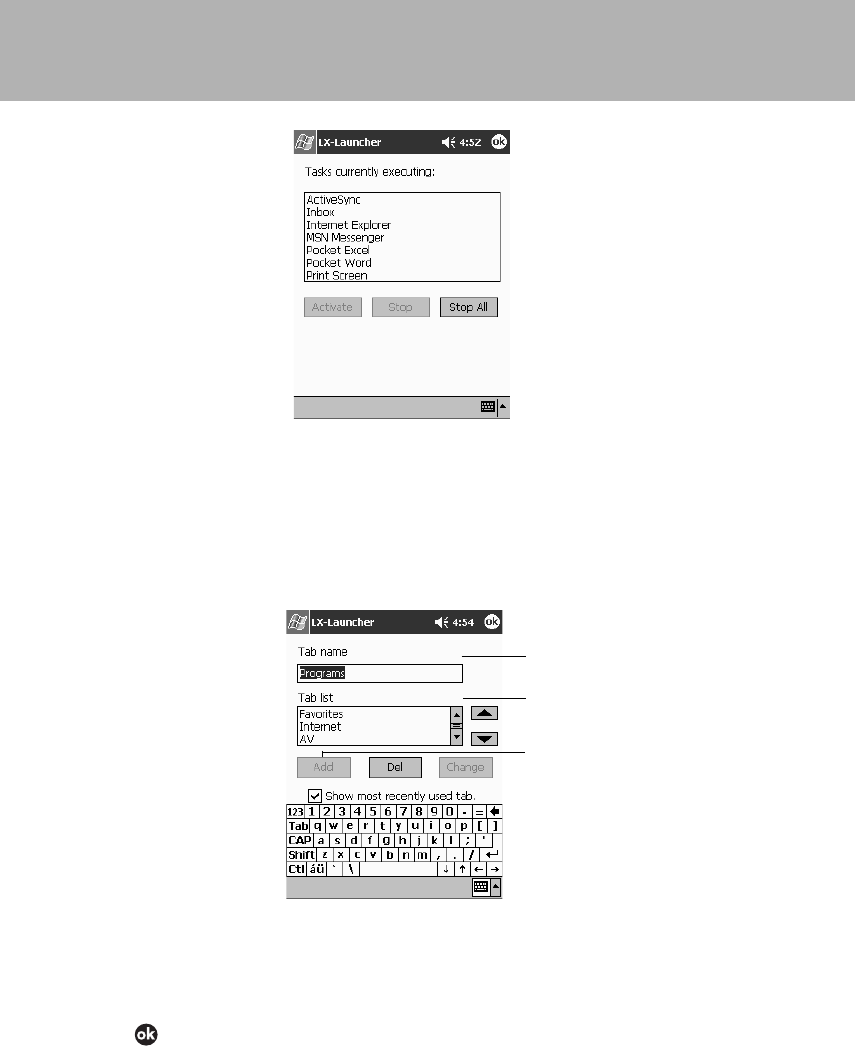
104
Registering/Deleting
Registering Programs
1 Tap the “Edit” menu → “Adding/deleting items”.
2 Operate as follows.
1 Specify the position for the tab to add.
2 Input the tab name.
3 Tap “Add”.
3 Tap .
The new tab is added behind the selected tab.
2
1
3
Section 05 LOOX (102-110) 6/25/02, 10:00 AM104
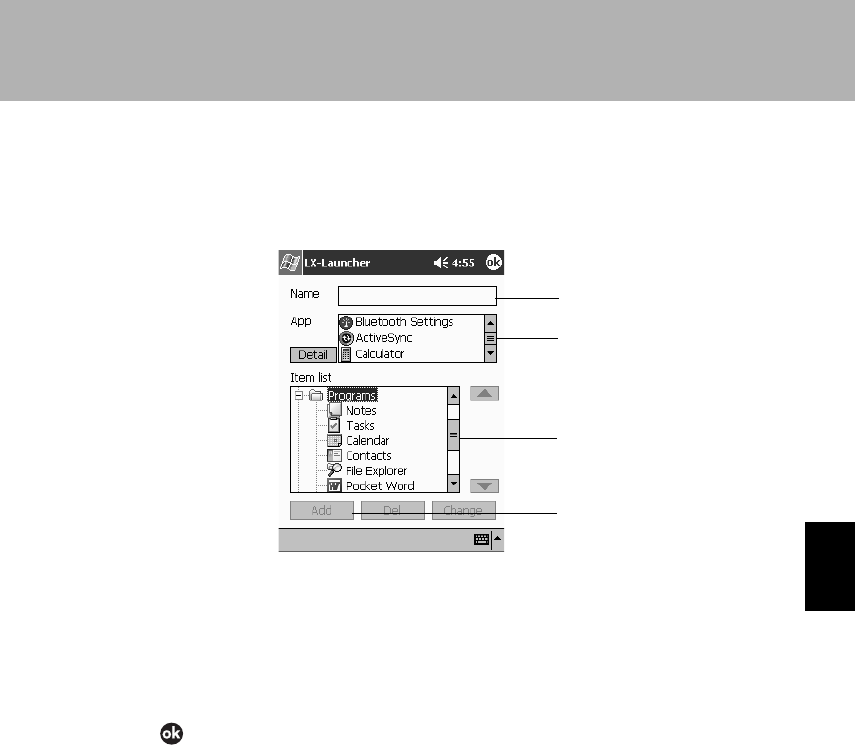
105
SECTION 5
Registering Applications
1 Tap the “Edit” menu → “Add/delete tab” in that order.
2 Operate as follows.
1 From the “Item List”, select the tab to register the application to.
2 Input the application name to be displayed.
3 Select the application to register. When directly opening a file related to the
application and when referencing an Internet page using Pocket Internet
Explorer, tap the “Details” tab and make the settings.
3 Tap .
2
3
1
4
Section 05 LOOX (102-110) 6/25/02, 10:00 AM105
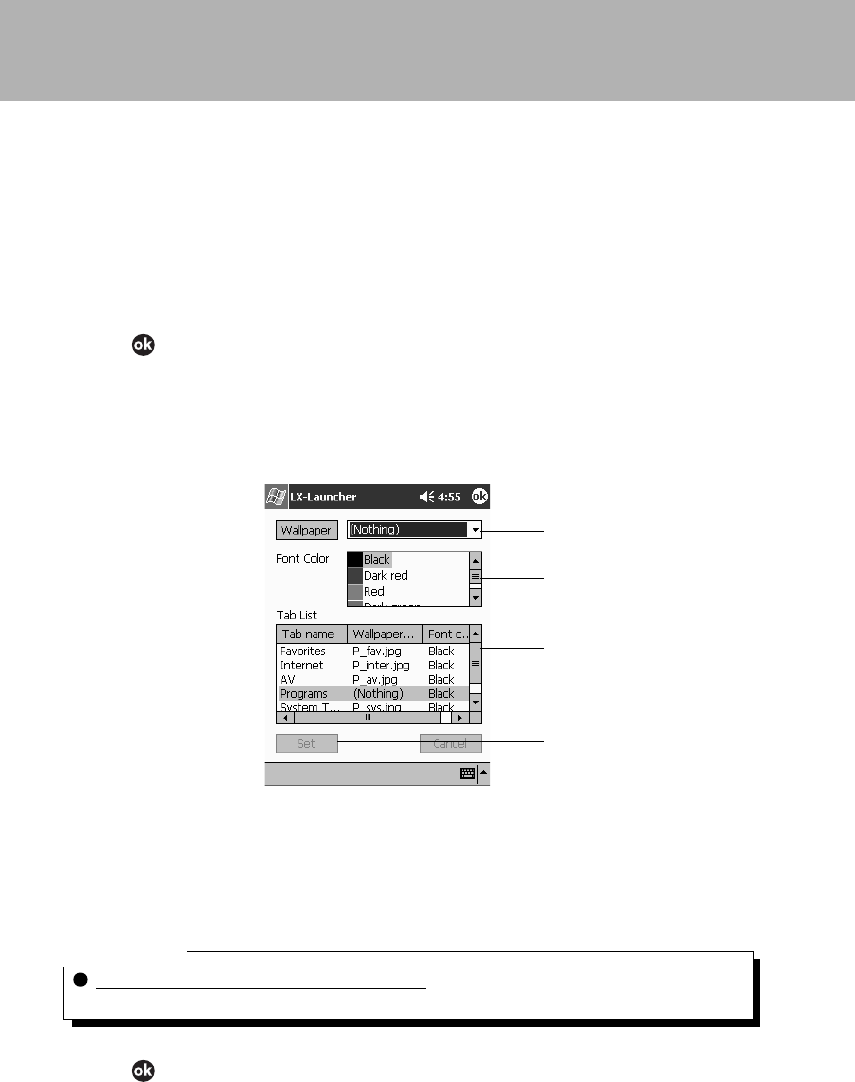
106
Deleting a registered Application
1 Tap the “Edit” menu → “Add/delete tab” in that order.
2 From the item list, tap the icon for the application to be deleted, then Tab
“Delete”.
All the starting application information registered to the tab will be lost. “OK to
delete item?” is displayed.
3 Tap “Yes”.
4 Tap .
Setting the Wallpaper
1 Tap the “Edit” menu → “Tab Wallpaper Setting” in that order.
2 Operate as follows.
1 Select the tab whose wallpaper you want to set.
2 When you tap “Wallpaper”, a file list is displayed, so select the desired image
file.
3 Select the font color.
4 Tap “Set”.
Critical Point
Returning to the original wallpaper settings
Tap “Return”. “Return to original wallpaper settings?” is displayed, so tap “Yes”.
3 Tap .
2
3
1
4
Section 05 LOOX (102-110) 6/25/02, 10:00 AM106
107
SECTION 5
Automatic Storage Device Startup/Inf File Editor
Automatic storage device startup refers to the following three applications for
automatically starting up the application in a CF card or SD/MMC card when it is set in
this device.
•Automatic startup editing tool: Creates the automatic startup file (autorun.inf).
•Automatic startup setting tool: Sets whether or not to start up programs from cards
automatically.
•Automatic startup tool: Reads in the automatic startup file from the card and runs the
application on the card or in the main memory.
Critical Point
The only applications that can be started automatically are executable files. If you set a card
containing only data files, the application related to the files is not started.
Creating the Automatic Startup File
Automatically starting up a CF/SD/MMC card application requires the automatic startup
file (autorun.inf). The automatic startup editing tool is used to set the automatic startup
file.
1 Load the CF card/SD/MMC card containing the application.
Write enable the card before setting it.
2 Tap → “Applications” → “Inf File Editor” in that order.
Section 05 LOOX (102-110) 6/25/02, 10:00 AM107
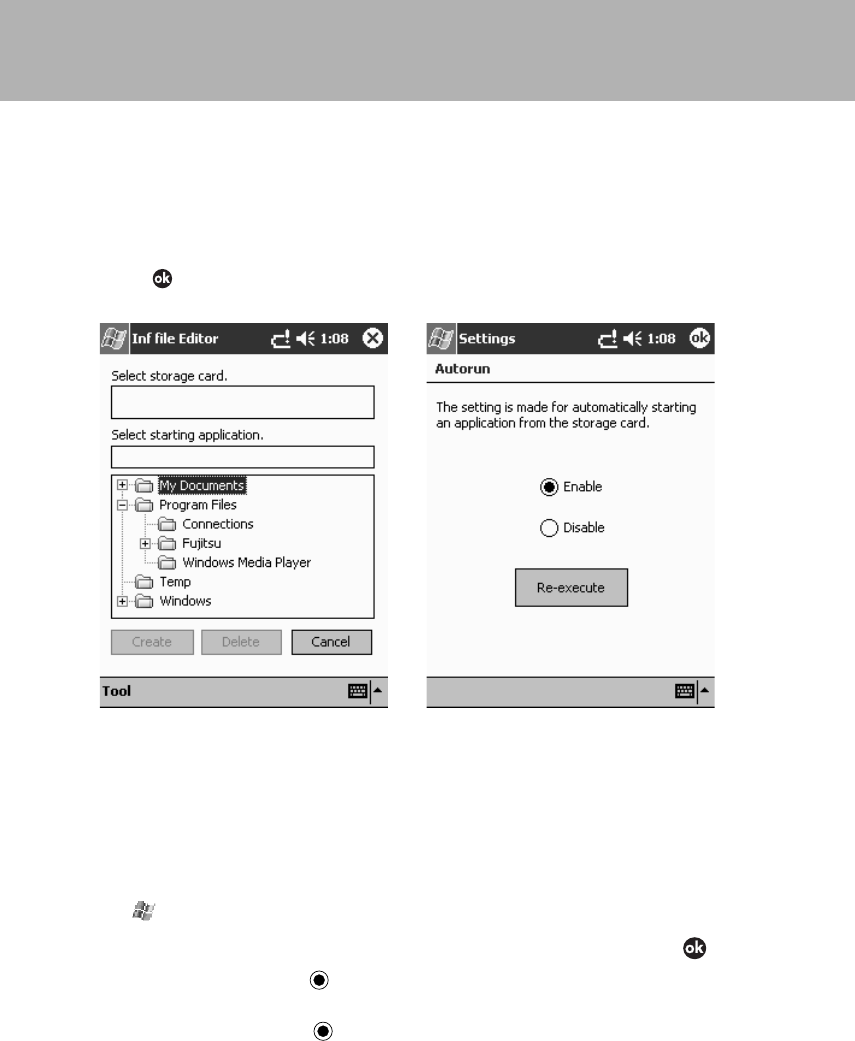
108
3 Operate as follows.
1 Tap the card in which the automatic startup file was created.
2 Tap the executable file on the card or in the main memory.
3 Tap “Create”.
The automatic startup file is created and written onto the card.
4 Tap .
Startup Settings
This sets whether or not to start the application automatically when the card is set in
place.
1 Load the CF card/SD/MMC card containing the program and the automatic
startup file.
2 Tap → “Settings” → “System” tab in that order.
3 Select whether automatic startup will be enabled or disabled. (2) Tap .
When “Enable” is selected , the applications called in automatic startup files are
started up automatically.
When “Disable” is selected , the applications called in automatic startup files are
not started up automatically.
Section 05 LOOX (102-110) 6/25/02, 10:00 AM108
109
SECTION 5
Starting Manually
1 Tap → “Settings” → “System” tab → “Autorun” in that order.
2 Tap “Re-execute”.
The “Application Selection” screen is displayed.
3 (1) Tap the automatic startup file for the program to start. (2) Tap “Execute”.
The application called in the automatic startup file is started.
LX-Backup
LX-Backup is an application that backs up the data on this device’s RAM to a CF card
or SD/MMC card. If the memory in this device is ever cleared, for example by a full
reset, you can restore your data from this backup data.
Important
Contents set for “Inbox” “Service”
Some of the contents set for “Inbox” “Service” can not be backed up to a memory card.
Therefore, the contents of “Service” can not be fully recovered even by restoring the data.
Write down the contents of “Service” on a piece of paper ahead of time. After a restoration,
create a new service with the contents you wrote down, then use that new service from then
on.
Backing up
1 If possible, connect the AC adaptor.
For details on connecting the AC adaptor, see “Charging”.
If the AC adaptor can not be used, check that the remaining battery capacity is
adequate.
2 Close any programs that are running.
For details on how to close applications that are running, see “Closing Applications” .
3 Set the CF card/SD/MMC card in place.
For details on how to set the CF card/SD/MMC card in place, see “7 Installing
Expansion Units”.
Critical Point
Checking the contents of a card
Use File Explorer to check the contents of the CF card, SD/MMC card and check that it is OK
to store backup data on the card. The contents of the backup card can not be checked from
the LX-Backup Tool screen.
Section 05 LOOX (102-110) 6/25/02, 10:00 AM109
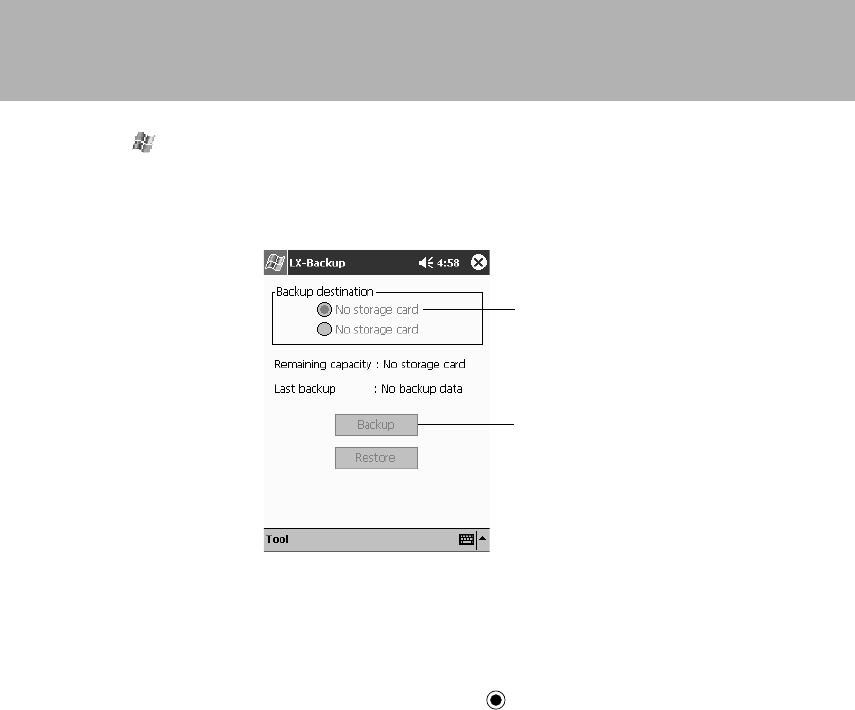
110
4 Tap → “Programs” → “LX-Backup” in that order.
5 (1) Tap either of the memory cards as the backup destination. (They are
displayed as “Memory Card” and “Memory Card 2”, depending on the order in
which they were set in place.) (2) Tap “Backup”.
The backup starts.
Restoring
1 Follow Steps 1-4 of the procedure in “Backing up”.
2 (1) Tap either of the memory cards to select it as the backup destination.
(They are displayed as “Memory Card” and “Memory Card 2”, depending on
the order in which they were set in place.) (2) Tap “Restore”.
The restore starts.
1
2
Section 05 LOOX (102-110) 6/25/02, 10:00 AM110
6
6
SECTION
SECTION
SECTION 6
Section 06 LOOX (111-126) 6/25/02, 10:05 AM111
112
SECTION 6
1 ActiveSync Summary
This section explains what you can do with ActiveSync.
ActiveSync
ActiveSync is an application for exchanging data between this device and a computer. It
can do the following.
• Synchronize
To synchronize means to compare the data on this device and on the computer and
where they are different, to make them the same. For example, the following can be
done.
– ActiveSync compares the Pocket Outlook data on this device and the Outlook data on the
computer and when one of them has older appointment and contact information,
ActiveSync updates that information to the new information.
– ActiveSync automatically converts back and forth between Pocket Word/Pocket Excel data
on this device and Word/Excel data on the computer. This makes it possible to always
have the latest information.
Critical Point
When computer Word/Excel data is converted to Pocket Word/Pocket Excel data, formats and
functions not contained in Pocket Word/Pocket Excel are dropped out.
You can set the details for synchronization, when to synchronize and which files to
synchronize. For details on how to make these settings, see “Detailed
Synchronization Settings”.
• Data backup
ActiveSync can back up the data from this device onto the computer. That way, in
the unlikely event of the data in this device being lost, you can restore it by writing
the data stored on the computer back into this device. For details on backup
methods, see “5 Backing Up and Restoring”.
• File and folder copying
You can copy files and folders between this device and the computer.
For details on copying files and folders, see “Copying Files” .
• Application installation
You can install programs using the computer’s CD-ROM drive or that were
downloaded from the Internet to the computer.
• Viewing Web pages
You can view Web pages on this device using your computer’s Internet connection
environment. For details, see “3 Viewing Web Pages through Your Computer”.
Critical Point
For details on how to set/use ActiveSync, see the ActiveSync help.
Section 06 LOOX (111-126) 6/25/02, 10:05 AM112

113
SECTION 6
Installing
When you install Microsoft ActiveSync, you are prompted to connect your Pocket LOOX
and create a partnership. The Fujitsu USB sync driver ( in Companion CD ) must be
installed to establish a connection.
The first time you connect, the New Partnership Wizard on your desktop PC helps you
to establish a partnership and sets synchronize options.
ActiveSync is on “Companion CD”. For details on how to install it, refer to the CD
contents.
Starting Synchronization
With the default settings for ActiveSync, when this device is set in its cradle, ActiveSync
starts automatically and synchronization starts. Also, while this device is in its cradle, if
information on either the computer or this device is updated, it is immediately
synchronized. When synchronizing manually, start synchronization with the following
procedure.
• Starting synchronization from the computer
Tap the “File” menu → “Synchronize” in that order, then click (synchronize).
Synchronization is started.
Critical Point
When you want to synchronize only certain information, right-click the “Information type” item
name, then click “Synchronization”.
• Starting synchronization from this device
1 Tap → in that order.
2 Tap .
Synchronization is started.
Detailed Synchronization Settings
The ActiveSync “Options” set the timing for synchronization and which files to
synchronize.
To start the “Options” dialog, tap the “Tools” menu → “Options” in that order.
Alternatively, click (Options).
Section 06 LOOX (111-126) 6/25/02, 10:05 AM113

114
Synchronization Settings
The “Synchronization Settings” tab sets which information is to be synchronized.
1 Mobile device
Select the items you want to synchronize with a computer.
2 Settings
This is for detailed settings for synchronization. When you select an item from
“Mobile Device”, its button goes into the pushed state.
Synchronization Settings
The “Synchronization Settings” tab sets which information is to be synchronized.
Section 06 LOOX (111-126) 6/25/02, 10:05 AM114

115
SECTION 6
Synchronization Mode
The “Synchronization Mode” tab sets when synchronization is executed.
Synchronize continuously while device is connected
As long as this device is in its cradle, if information is updated on either the computer or
this device, it is synchronized immediately.
Synchronize only when connecting
Synchronization is only started when this device is first placed in its cradle.
Synchronize manually
Synchronization is started when you click the “File” menu → “Synchronization” in that
order or click (synchronization) on the computer or tap → → on this
device.
Synchronization Options
The “Synchronization Options” tab sets when synchronization is executed.
Section 06 LOOX (111-126) 6/25/02, 10:05 AM115

116
1 Resolving Conflicts
Select the way how to resolve a conflict when it occurs.
– Leave conflicts unresolved
When a conflict occurs, this setting leaves undecided the decision as to which
contents to unify on. In this case, “Synchronization completed. 1 conflict item” is
displayed after synchronization ends.
If you click the “Resolve conflicts” that is displayed at the same time, the
“Resolve conflicts” dialog is displayed and you can specify how to resolve the
conflict.
– Always replace with computer item.
If a conflict occurs, the information is always unified to the computer version.
– Always replace with this device’s item.
If a conflict occurs, the information is always unified to the version on this device.
2 Set replacement
Relationships are assigned for mutual replacement of files between the computer
and this device.
3 Connecting
This selects where to connect when viewing Web pages on this device using your
computer’s Internet connection environment. When using a company LAN at work,
select “Company Network”; when using a dial-up connection at home, select
“Internet”.
4 Open ActiveSync when connecting to the mobile device.
When this device is set in its cradle, the “Microsoft ActiveSync” window is
automatically opened.
Section 06 LOOX (111-126) 6/25/02, 10:05 AM116
117
SECTION 6
Copying Files
To copy files from the computer to this device, operate as follows.
1 Set this device in the cradle connected to the computer.
2 If ActiveSync is not set to be opened automatically, double-click
(Microsoft ActiveSync) on the desktop to start ActiveSync.
3 Click the “File” menu → “Explorer” in that order or click (Windows
Explorer).
The “Mobile Device” window is opened and the folders and files on this device are
displayed.
Critical Point
You can also open the “Mobile Device” window by double-clicking (Mobile Device) in the
“My Computer” window.
4 Open the folder to copy into, then drag the file to be copied using the
computer’s “Windows Explorer” or the like.
Synchronizing Files
To synchronize any files other than Pocket Outlook files, use the synchronization folder.
When “Files” is selected during ActiveSync installation or “Files” is selected from the
“Synchronization Settings” tab in the ActiveSync Options dialog, then the
synchronization folder is created with the default name of “My Documents”. This
synchronization folder can be opened from the desktop shortcut.
If you put the files you want synchronized into the synchronization folder, they are
synchronized the next time synchronization is executed.
Section 06 LOOX (111-126) 6/25/02, 10:05 AM117
118
SECTION 6
2 Synchronizing Web Pages and Email
You can use ActiveSync to transfer Web pages viewed on the computer and email
received on it to this device so you can read them on the go.
Synchronizing Web Pages
If you find a Web page using your computer but do not have time to read it right away,
you can transfer it to this device to read on the go. Another advantage of taking in Web
pages with your computer ahead of time is that this allows you to read them on this
device regardless of communications conditions and the like.
Transferring Favorites
When you install ActiveSync, “Mobile Device Favorites” is added to the computer’s
Internet Explorer “Favorites” menu.
With the “Favorites” menu → “Add to Favorites”, if you create a favorite in the “Mobile
Device Favorites”, it is transferred to this device’s favorites during synchronization.
What is transferred in this case is just the URL for the Web page added to the favorites.
To view the contents of this page requires that you connect to the Internet.
Critical Point
Transferring a favorite requires Internet Explorer Version 4.0.1 Service Pack 1 or later.
Transferring Web Pages
When you install ActiveSync, “Create Mobile Device Favorites” is added to the
computer’s Internet Explorer “Tools” menu.
When you use this menu, the data for Web pages in “Mobile Device Favorites” in the
“Favorites” are copied and during synchronization, the contents of the Web pages are
transferred to this device.
Critical Point
Transferring a Web page requires Internet Explorer Version 5.0 or later.
Creating Mobile Favorites
The method for downloading transfer Web pages from the Internet is as follows.
1 Display the Web page to transfer.
2 On Internet Explorer on the computer, click the “Tools” menu → “Create
Mobile Favorite” in that order.
Section 06 LOOX (111-126) 6/25/02, 10:05 AM118
119
SECTION 6
3 (1) If necessary, change the name of the favorite. (2) Set the update schedule.
(3) Click “OK”.
The next time synchronization is executed, the Web page is transferred to this
device.
Critical Point
When the update schedule is specified, the newest information is downloaded to the computer
periodically.
Even if no update schedule is specified, you can update to the newest information manually
from Internet Explorer on the computer by clicking the “Tools” menu → “Synchronize” in that
order.
To add to the update Calendar or specify the depth of the links for downloading, execute the
following operations.
1 With Internet Explorer on the computer, click the “Favorites” menu → “Mobile Favorites” in
that order, then right-click the displayed favorites.
2 Click “Properties”.
3 With the “Schedule” tab, you can add to the update schedule and with the “Download” tab,
you can specify the depth of the links for downloading etc.
To Conserve Memory
When a Web page is transferred to this device, the memory area is compressed.
The following operations are executed to conserve memory.
• With “Mobile Favorites” Properties, set the link depth for downloading to “1”.
• With the following procedure, change the settings to not download pictures and
sounds.
1 If ActiveSync is set not to start automatically, double-click (Microsoft ActiveSync) on
the desktop, start ActiveSync.
2 Click the “Tools” menu → “Options” in that order. Or click (Options).
3 Click “Favorites”, then click “Settings”.
4 (1) On the “User Settings” tab, click the “Synchronize pictures” and “Synchronize sounds”
checkboxes to unselect them. (2) Click “OK”.
Section 06 LOOX (111-126) 6/25/02, 10:05 AM119
120
Mobile Channel
Mobile Channel provides text-centric Web pages to make them easier to view on Pocket
PCs. On the computer, if you execute the procedure called “Read”, the Web page is
downloaded to the computer and transferred to this device during synchronization.
Critical Point
Reading Mobile Channel requires Internet Explorer Version 4.0 or higher.
Synchronizing Email
In the ActiveSync “Options” dialog, if the “Inbox” is selected, the Pocket Outlook Inbox
and computer Outlook Inbox. Email synchronization allows the following. For details on
the “Options” dialog settings, see “Detailed Synchronization Settings”.
• Unread and newly arrived messages on the computer are transferred to the Inbox of this
device during synchronization. When there is no time to read email on the computer, you can
read them on the go.
• If you create email on this device and put it in the “Outbox” folder, it is transferred to the
“Outbox” folder on the computer during synchronization and can be sent from the computer.
This allows you to write emails on the go and send them all afterwards.
Critical Point
If you delete email on this device, the copy of that email on the computer is also deleted
during synchronization. Be careful not to delete important email by mistake.
Section 06 LOOX (111-126) 6/25/02, 10:05 AM120
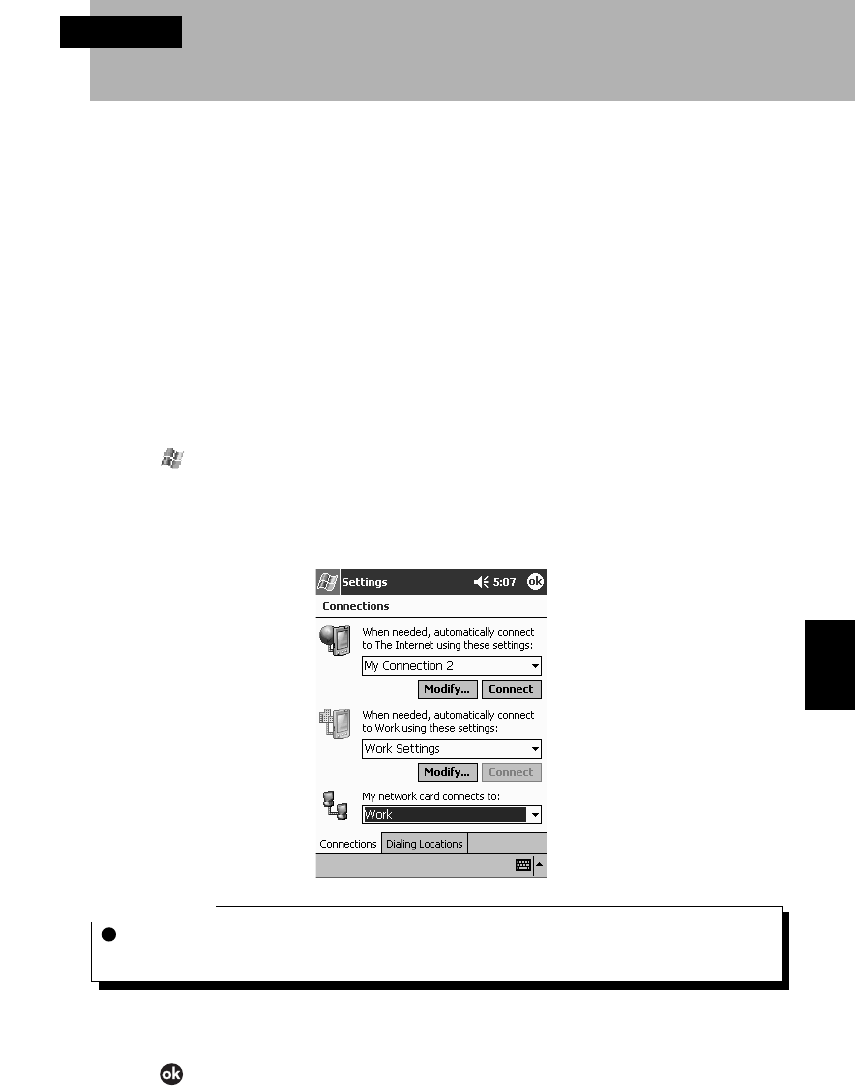
121
SECTION 6
3 Viewing Web Pages through Your Computer
You can view Web pages on this device using your computer’s Internet
connection environment by utilizing the desktop pass-through function. A log is
kept of the pages viewed on this device, so you can check them again when out
at a client’s office.
Settings
In order to use the desktop pass-through function, make the following settings on this
device and on the computer.
It is also necessary that the Internet connection environment already be set on the
computer side.
Settings on This Device
1 Tap → “Settings” → “Connection” tab → “Connection” in that order.
2 Set the “Network Card Connect To”.
When using a company LAN at work, select “Company Network”; when using a
dial-up connection at home, select “Internet”.
Critical Point
When “Company Network” is selected, the proxy server must be set. For details on setting
the proxy server, see from Step 8 onward of the procedure in “Connecting with a LAN Card”.
Check the information input in setting with the network administrator.
3 Tap .
SECTION 6
Section 06 LOOX (111-126) 6/25/02, 10:05 AM121

122
Settings on the Computer
1 Start ActiveSync.
2 Click the “Tools” menu → “Options” in that order.
3 At the “Rule” tab, set the pass-through to “Connect”.
Select either “Company Network” or “Internet” according to the setting on this
device. See “Rules”.
4 Click “OK”.
Section 06 LOOX (111-126) 6/25/02, 10:05 AM122

123
SECTION 6
SECTION 6
4 Synchronizing Pocket Word/Pocket Excel
Pocket Word/Excel files can be synchronized with computer Word/Excel files. This
section explains the points to watch out for during synchronization.
Linking with Word
When the synchronization folder is used, files can be synchronized between Pocket
Word on this device and Word on the computer. The points to watch out for during
synchronization are as follows. For details on the synchronization folder, see
Synchronizing Files.
• When synchronization is executed, Word documents (with the doc extension) on the computer
are converted to Pocket Word data format (with the psw extension). At this time, information
for functions that Pocket Word does not have (for example, double ruled lines for tables) is
dropped out. For details on file compatibility, see the ActiveSync help.
• If a Pocket Word document is deleted on this device, the same Word document is also deleted
from the synchronization folder on the computer during synchronization. For critical documents,
do not put the original in the synchronization folder; put in a copy instead.
• If you edit a Pocket Word document on this device, then synchronize, some of the functions
not found in Pocket Word are deleted without being restored in the Word document. For complex
Word documents that use many formats, do not put the original in the synchronization folder;
put in a copy instead.
Linking with Excel
When the synchronization folder is used, files can be synchronized between Pocket
Excel on this device and Excel on the computer. The points to watch out for during
synchronization are as follows. For details on the synchronization folder, see
Synchronizing Files.
• When synchronization is executed, Excel documents (with the xls extension) on the computer
are converted to Pocket Excel data format (with the pxl extension). At this time, information for
functions that Pocket Excel does not have (for example, macros) is dropped out. For details
on file compatibility, see the ActiveSync help.
• If a Pocket Excel document is deleted on this device, the same Excel document is also deleted
from the synchronization folder on the computer during synchronization. For critical documents,
do not put the original in the synchronization folder; put in a copy instead.
• If you edit a Pocket Excel document on this device, then synchronize, some of the functions
not found in Pocket Excel are deleted without being restored in the Excel document. For
complex Excel functions that use many formats, do not put the original in the synchronization
folder; put in a copy instead.
Section 06 LOOX (111-126) 6/25/02, 10:05 AM123
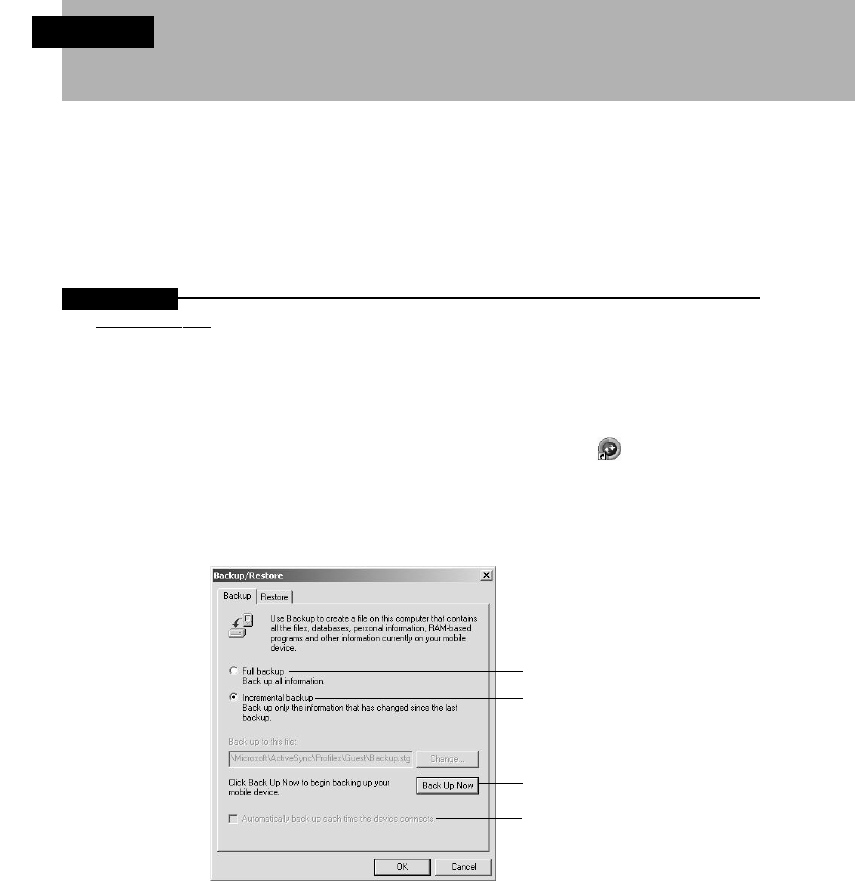
124
SECTION 6
5 Backing Up and Restoring
This section explains how to back up the data of this device to your computer
and restore it from your computer.
Backing up Data
IMPORTANT
Always backup
Always backup just in case. If you can not back up to a computer, see “LX Backup” and
backup to a CF card or SD/MMC card.
1 Set this device in its cradle connected to the computer.
2 If ActiveSync is set not to start automatically, double-click (Microsoft
ActiveSync) on the desktop to start ActiveSync.
3 Click the “Tools” menu → “Backup/Restore” in that order.
4 This sets how to backup.
1 This backs up all the data on this device. Select this when backing up for the first
time.
2 This backs up only the files that have changed since the previous backup.
3 Starts the backup.
4 If you click this checkbox to select it, the backup is executed automatically when
this device is set in its cradle.
1
2
3
4
Section 06 LOOX (111-126) 6/25/02, 10:05 AM124
125
SECTION 6
5 To save these settings, click “OK”. To start the backup immediately, click
“Backup”.
When the backup is started, “Backup processing is complete.” is displayed after the
end of the backup.
6 Click “OK”.
Critical Point
The first time you back up, execute a batch backup. After the batch backup has been completed
once, if you set to execute differential backups automatically, from then on the latest information
will be backed up reliably.
Restoring Data
If the memory in this device is cleared, for example by a full reset, restore the data with
the following procedure.
1 Set this device in its cradle connected to the computer.
2 If ActiveSync is set not to start automatically, double-click (Microsoft
ActiveSync) on the desktop to start ActiveSync.
3 If the “New Partnership” dialog is displayed, click No to set , then click
“Next”.
4 Click the “Tools” menu → “Backup/Restore” in that order.
5 Click the “Restore” tab, then click “Restore”.
If the “Select Partnership” dialog is displayed, select the name of the device on
which the files to be restored from are stored, then click “OK”.
The “Continue Restoration” dialog is displayed.
6 Click “Restore”.
The restoration starts. After the restoration completes, “Restoration complete” is
displayed.
7 Click “OK”.
8 Remove this device from its cradle.
9 Read “Normal reset”, then execute a normal reset.
Critical Point
When you synchronize for the first time after a restoration, the “Append/Replace” dialog box
may be displayed. If so, click one of the following three options.
– Append this device’s item to the item on this computer
– Replace this device’s item with the item on this computer
– Do not synchronize this type of data at this time
Section 06 LOOX (111-126) 6/25/02, 10:05 AM125
Section 06 LOOX (111-126) 6/25/02, 10:05 AM126

7
7
SECTION
SECTION
SECTION 7
Section 07 LOOX (127-140) 6/25/02, 10:04 AM127
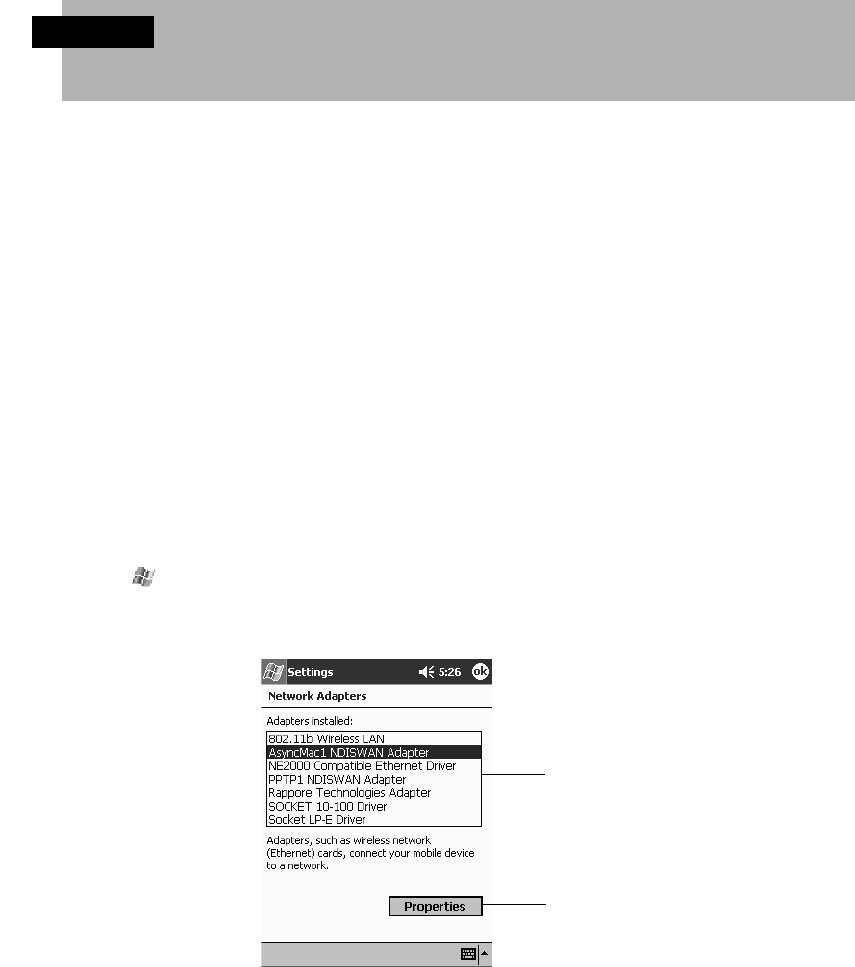
128
SECTION 7
1 Various Connections
1 Connection Configurations That Can Be Used
This section explains the connection devices that can be used with this device and
how to connect them.
Connecting with a Data Communications Card or
Modem
When a modem card or data communications CF card is set in this device, you can
make dial-up connections to the Internet.
For details on how to connect to the Internet, see “Chapter 3 Connecting to the
Internet”.
Connecting with a LAN Card
Setting an NE2000-compatible LAN card in this device, you can connect to an in-
company LAN. The general flow for connections is as follows. Check the information
input in setting with the network administrator.
1 Tap → “Settings” → “Connection” tab → “Network Adaptor” in that order.
2 (1) Tap the name of your LAN card from the “Adaptor to setup”. (2) Tap
“Properties”.
3 Operate as follows.
Using a DHCP server
1
2
Section 07 LOOX (127-140) 6/25/02, 10:04 AM128
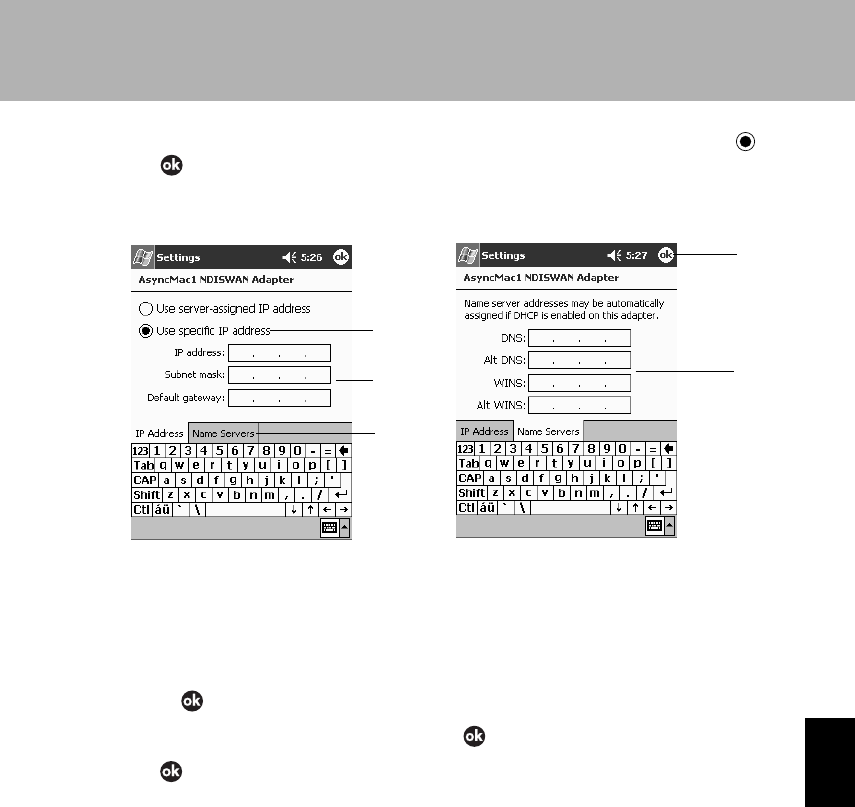
129
SECTION 7
Check that the “Use the IP address allocated by the server” checkbox is selected ,
then tap .
For a Fixed IP Address
1 Tap “Use specified IP address” to select it.
2 Set the IP address and other information.
3 Tap the “Name Server” tab.
4 Set the information concerning the DNS server.
5 Tap .
4 If the “Adaptor” dialog is displayed, tap .
5 Tap .
The display returns to the “Connection” tab on the “Settings” screen.
6 Set the LAN card in this device.
For details on how to set a LAN card in this device, see “7 Installing Expansion
Units”.
1
2
3
5
4
Section 07 LOOX (127-140) 6/25/02, 10:04 AM129
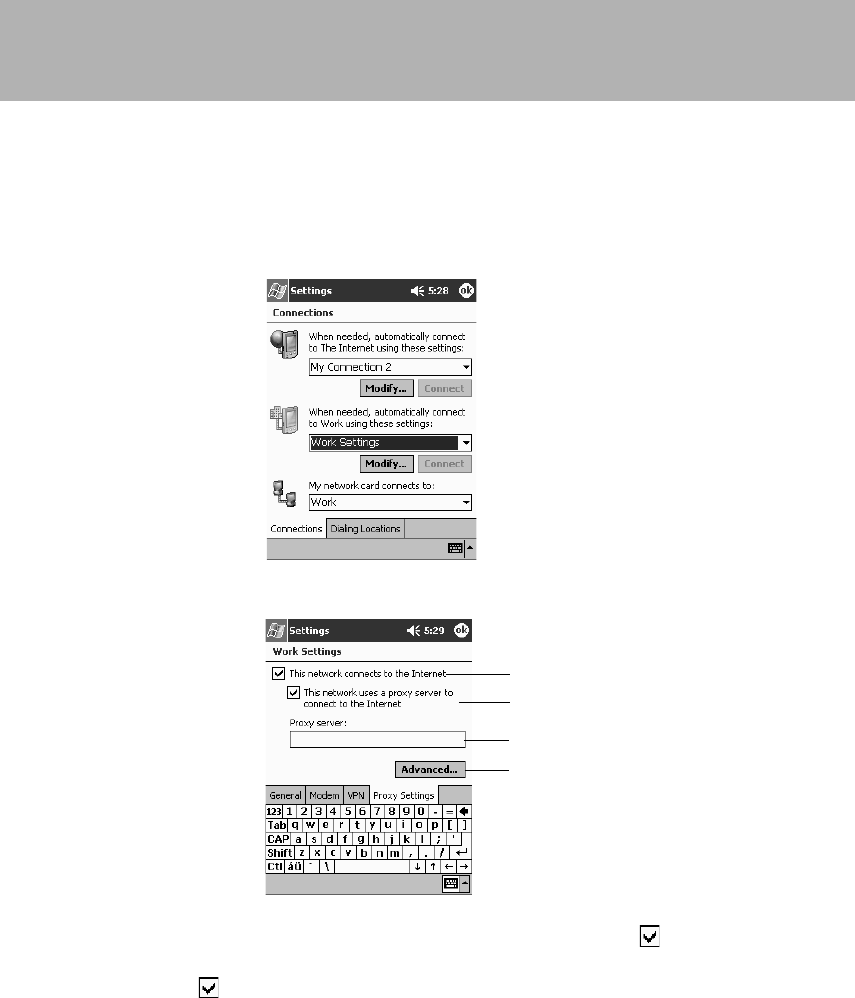
130
This enables you to connect to the company LAN.
If you will be connecting to the Internet, make the following settings too. Check the
information input in setting with the network administrator.
7 Tap “Connection” on the “Settings” screen.
8 Tap “Modify” and set your network settings.
9 Tap the “Proxy Settings” tab, then operate as follows.
1 When connecting to the Internet, tap here to select this checkbox .
2 When connecting to the Internet using a proxy server, tap here to select this
checkbox .
3 Input the proxy server name.
4 Tap “Detailed Settings”.
Set the server name, port number, etc.
1
2
3
4
Section 07 LOOX (127-140) 6/25/02, 10:04 AM130
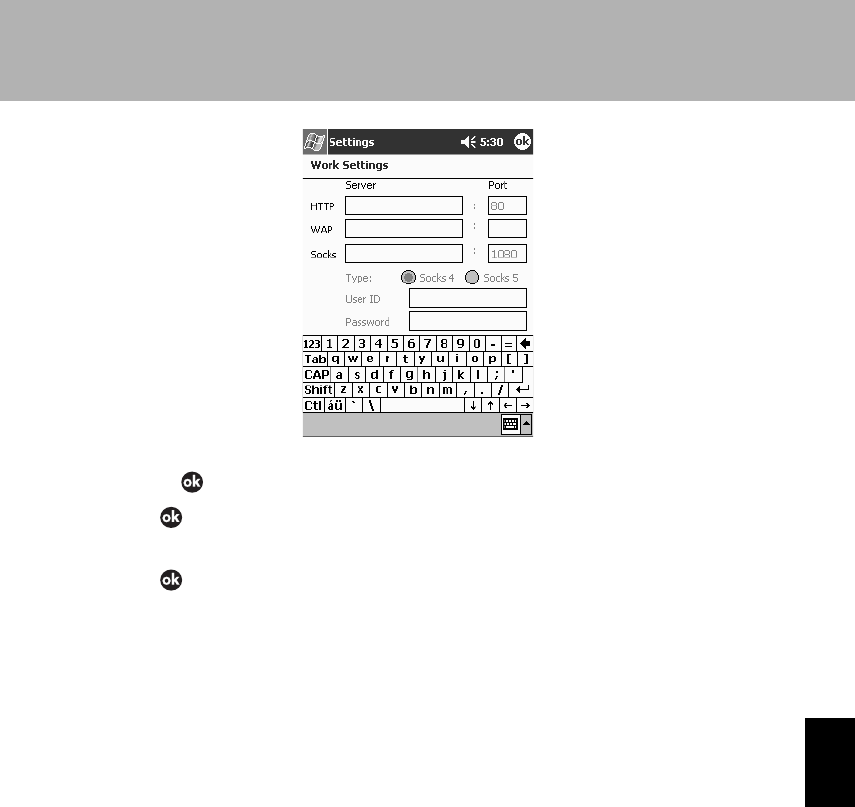
131
SECTION 7
5 Tap .
10 Tap .
The display returns to the “Proxy Settings” screen.
11 Tap .
This completes the settings. You can now connect to the Internet using Pocket
Internet Explorer. For details on Pocket Internet Explorer, see “Basic Pocket
Internet Explorer Operation”.
Section 07 LOOX (127-140) 6/25/02, 10:04 AM131

132
Connecting with the Cradle
Using the cradle enables you to connect to a computer. For details on how to connect
the cradle to the computer and on how to set in the cradle of this device, see “6
Connecting with a Computer”. For details on exchanging data with the computer, see
“Chapter 6 Linking with a Computer”.
Connection through Infrared
This device is equipped with an infrared communications port. You can exchange data
with another one of these device or with another device equipped with an infrared
communications port (cell phone, notebook computer, etc.) without needing to connect
a cable.
For details on infrared communications, see “2 Infrared Connections”.
Connection through BluetoothTM
This device is equipped with a BluetoothTM module. You can exchange data with another
one of these devices or with another device equipped with BluetoothTM (cell phone,
notebook computer, etc.) without needing to connect a cable.
For details on BluetoothTM communications, see “3 BluetoothTM Connections”.
Section 07 LOOX (127-140) 6/25/02, 10:04 AM132
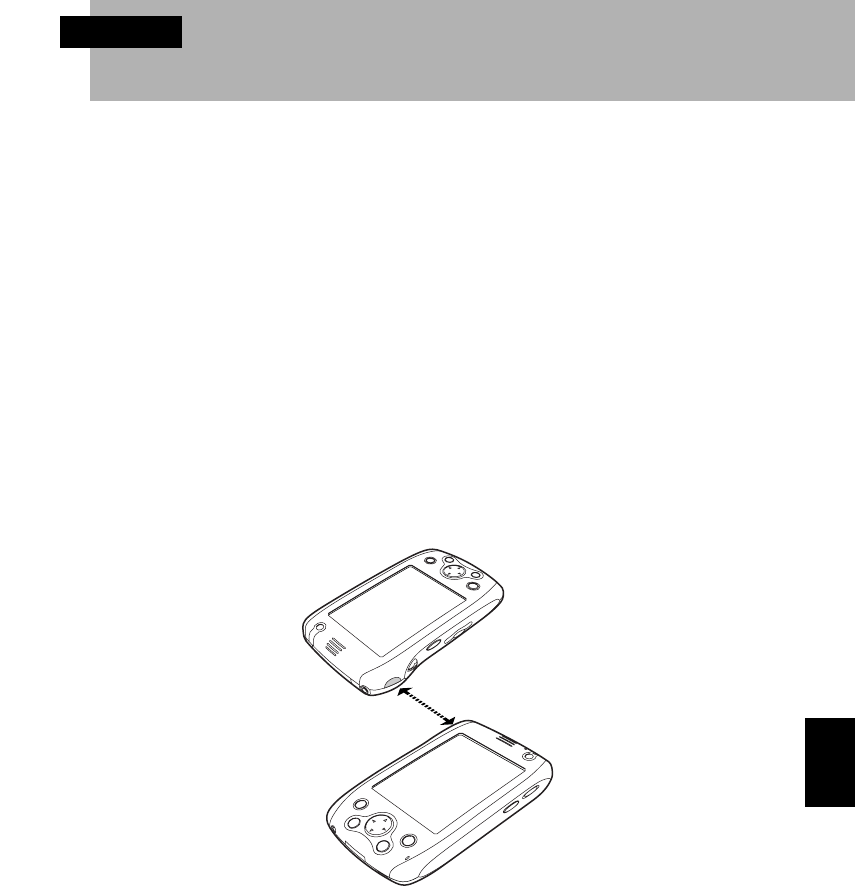
133
SECTION 7
SECTION 7
2 Infrared Connections
This section explains how to use the infrared port to exchange data between this
device and another Pocket PC.
Infrared Communication
Summary
Infrared communication is a wireless communication technology for transferring data
using light in the infrared region.
• Infrared communication is appropriate for connecting devices over short distances (20 cm).
• With this device, communication at speed up to 115Kbps is possible.
Securing Good Communications
In order to secure good communications, observe the following points.
• Face the devices so that their infrared communications ports face each other directly. The
appropriate distance is no greater than 20 cm.
• Do not place anything between the devices. This would interfere with the infrared rays.
• Do not move either of the devices while they are communicating.
• Do not use a television or other remote control, wireless headphones, or the like near the
communicating devices.
• Do not allow direct sunlight, fluorescent lights, incandescent lights, or other strong light to fall
on the infrared communications ports.
• Do not allow the infrared ports to become dirty.
20 cm max.
Section 07 LOOX (127-140) 6/25/02, 10:04 AM133
134
Critical Point
For details on how to make the infrared communications settings, see “Infrared Communications
Settings”.
Transferring Files
This section explains how to exchange files between two of these devices.
Critical Point
Folders can not be transmitted.
Transmission
1 Face the infrared communications ports to each other.
2 Select the file to send from a program or File Explorer, then tap-and-hold it.
• When sending from a program, start the program that created the file to send.
• When sending from File Explorer, tap → “Programs” → “File Explorer” in that order to start
“File Explorer”.
Critical Point
You can not send Contacts, Calendar, and Tasks data from File Explorer.
Section 07 LOOX (127-140) 6/25/02, 10:04 AM134
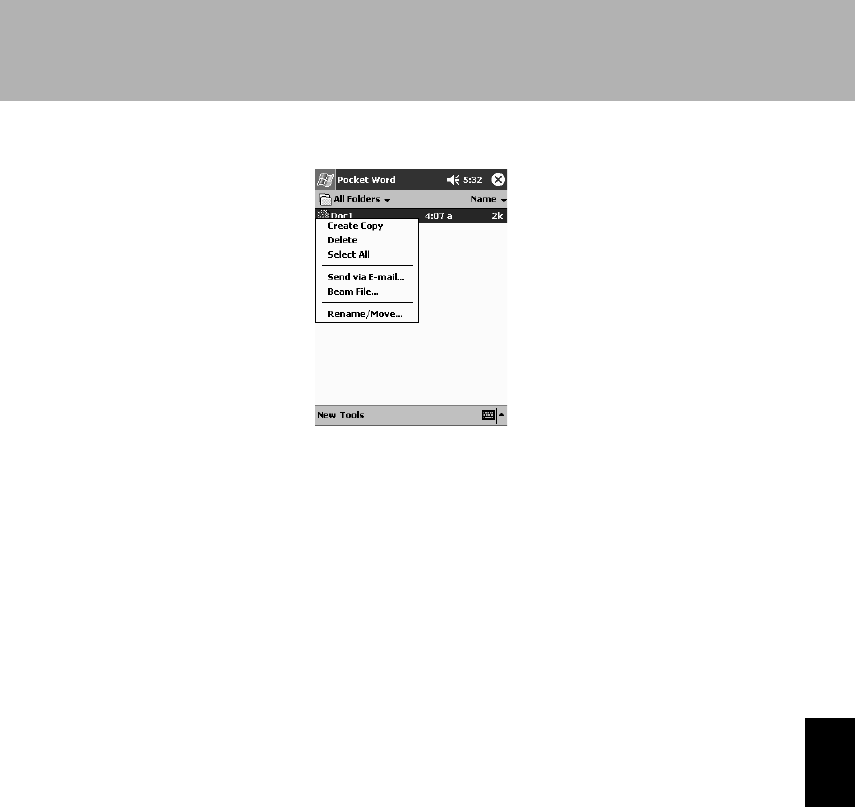
135
SECTION 7
3 From the displayed pop-up menu, tap “Beam File”.
When reception is approved on the transmission destination, the file is transmitted.
Reception
When file transmission operations are carried out on the transmission source, “Accept
(File name)?” is displayed.
When you tap “Yes”, the file is received.
Section 07 LOOX (127-140) 6/25/02, 10:04 AM135
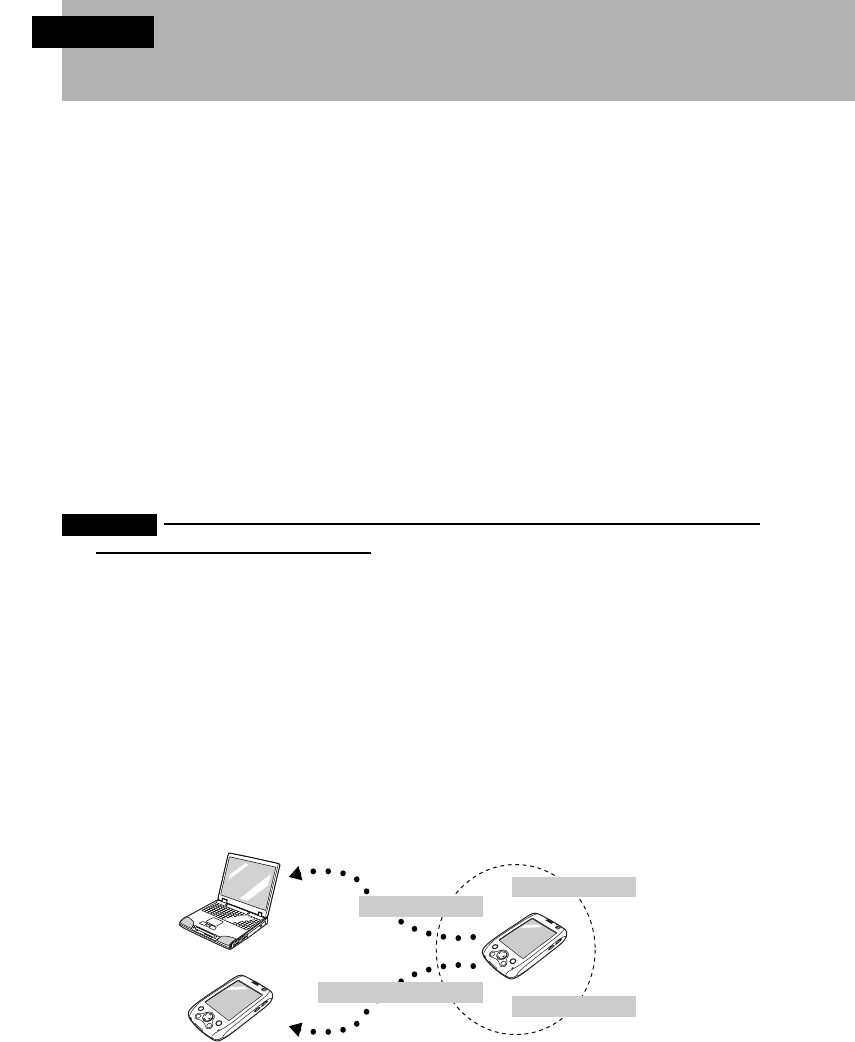
136
SECTION 7
3 BluetoothTM Connections
This section explains how to use Bluetooth to exchange data with other BluetoothTM.
BluetoothTM
Features
BluetoothTM is a wireless communication technology that transfers data using the
signals between 2400 MHz and 2483.5 MHz.
• BluetoothTM connects devices no more than 50 meters from each other.
• With this device, the maximum communications speed is 723.2 kbps download/57.6 kbps
upload for symmetrical communications and 433.9 kbps download and upload for asymmetrical
communications. (The effective speed depends on the environment.)
• You can encrypt data so that it can not be read by any third party and password authentication
called “Pass Key” can be executed.
• In addition to 1-to-1 connections, multiple devices can be connected at the same time.
• It is not necessary to face the devices to each other and connections are possible even when
a device is in a briefcase or pocket.
Important
Always observe the following points
The signals given off by BluetoothTM equipment can affect the operation of electronic medical
equipment. In some cases, BluetoothTM equipment could cause an accident, so in the following
locations, either switch off the power to this device or stop the BluetoothTM functions as explained
in “How to Stop the BluetoothTM Functions” .
In hospitals/in trains/in aircraft/at gas stations and other locations with flammable gas/near
automatic doors and fire alarms.
Service
When connecting to other BluetoothTM equipment, select the connection method
prepared for each function, called the “Service”. Which services can be used and which
can not be used depends on the equipment you are connecting to. Also, even services
for functions that the other device has can not be used if this device does not support
them.
For the services that can be used on this device, see “List of Services”.
Services supported by this device
Access to files
Sharing name cards
Other services
Other services
Section 07 LOOX (127-140) 6/25/02, 10:04 AM136
137
SECTION 7
In order to secure good communications
In order to secure good communications, observe the following points.
• Communicate with another BluetoothTM device within a straight-line distance of 50 meters
maximum. The maximum communications distance may be reduced by the ambient
environment (walls, furniture, etc.) or the building structure.
In particular, in ferro-concrete buildings, communications may be impossible between rooms
that are separated by walls or floors with steel in them.
• Communicate at least 2 meters from other equipment (electrical equipment/AV equipment/
office computer equipment/digital cordless telephones/faxes etc.). (In particular, microwave
ovens easily affect BluetoothTM communications, so be at least 3 meters away from them.) If
you come too close to other equipment while its power is on, this device may stop
communicating normally or cause noise in or interfere with radio or television reception. (On
certain UHF and satellite broadcast channels, the television picture may be disrupted.)
• When a broadcast station, transmitter, or the like is nearby and normal communications are
not possible, move to a different location. If the signal field in the area is too strong, normal
communications may be impossible.
• Interference with wireless LANs
Since BluetoothTM equipment and wireless LANs use the same frequency band (2.4 GHz), if
you use this device near equipment that has wireless LAN, signal interference will occur and
communications may drop and connections be lost. In such a case, take the following
countermeasures.
– Use this device at least 10 meters from the wireless LAN equipment.
– When using this device within 10 meters of wireless LAN equipment, switch off the power
for either this device or the wireless LAN equipment.
BluetoothTM Connection Using Pocket Plugfree
Pocket Plugfree
Pocket Plugfree is a program for connecting through BluetoothTM.
It has an easy-to-understand interface that is consistent with the Pocket PC 2002
operations system.
Critical Point
For details on Pocket Plugfree, see the help file.
List of Services
Pocket Plugfree provides the following services.
Critical Point
Meaning of “Access” and “Sharing”
The functions “access” and “sharing” appear in the services in the table below. The difference
between these two is as follows.
– Access: Function for connecting to other Bluetooth device (client)
– Sharing: Function for connecting from other Bluetooth device (server)
Section 07 LOOX (127-140) 6/25/02, 10:05 AM137
138
Service
Accessing files
Sharing files
Accessing name cards
Sharing name cards
Accessing the Internet
Waiting for ActiveSync
session
Starting ActiveSync
session
Accessing serial port
Sharing serial port
Accessing audio gateway
Sharing audio gateway
Accessing calendar
Accessing notes
Accessing email
Summary of Service
File copying/renaming/deleting/editing with another BluetoothTM
device.
Exchanges name cards (name and contact information) with
another BluetoothTM device. Names cards received from another
BluetoothTM device are added to the Pocket Outlook “Contacts”.
Connects to the Internet via a BluetoothTM-equipped cell phone/
wireless station/computer (set for Internet connection sharing).
When this device is connected to a computer via BluetoothTM ,
ActiveSync starts up automatically on this device and starts
synchronization. When there is a request from the computer side
to start synchronization with this device, use “Wait for ActiveSync
session”. When starting synchronization from this device, use
“Start ActiveSync session”.
This adds a serial port and connects to another BluetoothTM
device through a COM connection. This is used when the
program using the serial port is installed.
This service connects this device with a headset that has
BluetoothTM. Audio data and the like is transferred from this device
and audio is exchanged.
This service exchanges calendars with another BluetoothTM
device. Since this device does not have a built-in program related
to the calendar file, the contents of calendars received from other
devices can not be viewed on this device.
This service exchanges notes with another BluetoothTM device.
Since this device does not have a built-in program related to notes,
the contents of notes received from other devices can not be
viewed on this device.
This service exchanges email with another BluetoothTM device.
Since this device does not have a built-in program related to email,
the contents of email received from other devices can not be
viewed on this device.
Section 07 LOOX (127-140) 6/25/02, 10:05 AM138
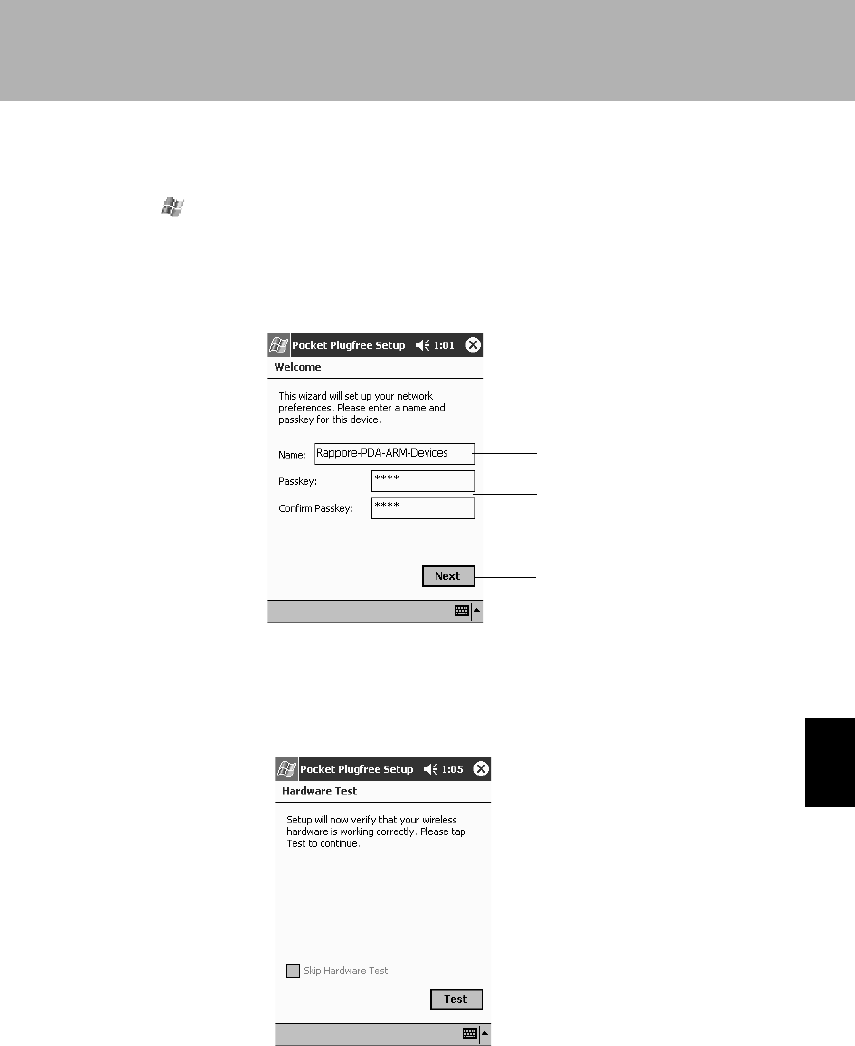
139
SECTION 7
Starting up and Initial Settings
This section explains how to start up and set Pocket Plugfree.
1 Tap → “Programs” → “Pocket Plugfree” in that order.
When you start up Pocket Plugfree for the first time, the setup wizard for making
the initial settings is started up.
2 (1) Input your name. (2) Input the pass key you want, then input it again. (3)
Tap “Next”.
The “Name” set with “Name” is displayed on other BluetoothTM devices. (The
default setting is “Plugfree Device”.) You can input up to 16 single-byte English
alphanumerics as the pass key.
3 In order to test whether or not BluetoothTM is operating correctly, tap “Test”.
When the test ends, the program automatically proceeds to the next step.
1
2
3
Section 07 LOOX (127-140) 6/25/02, 10:05 AM139
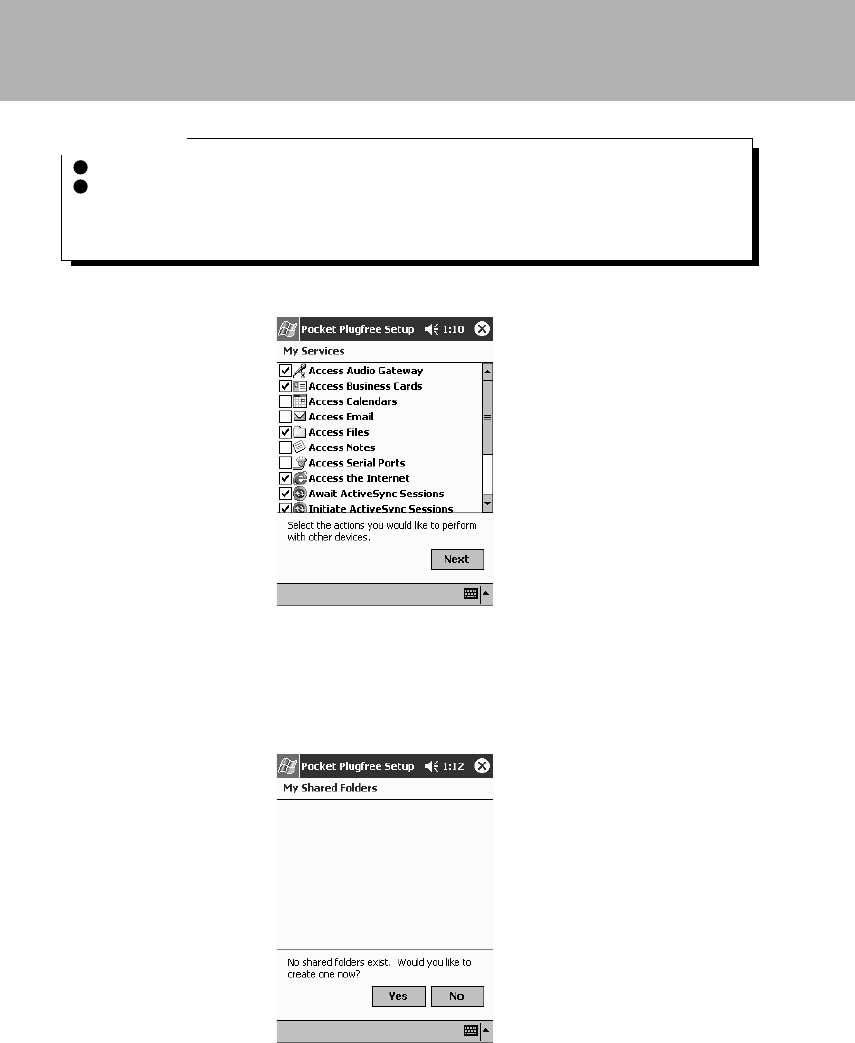
140
Critical Point
To stop the test, tap “Cancel”.
If the test does not go well, “Test ended abnormally. Wireless hardware may not be operating
correctly.” is displayed Check that the BluetoothTM switch is not switched to the Off side, then
tap “Test” again. For details on the BluetoothTM switch, see “How to Stop the BluetoothTM
Functions”.
4 Tap “Next”.
Select the services to use as necessary. (Normally, there is no need to change
from the factory settings.) For details on the services, see “List of Services” .
5 Set the shared folders to be opened to other BluetoothTM devices.
1. Tap “Yes”.
Section 07 LOOX (127-140) 6/25/02, 10:05 AM140
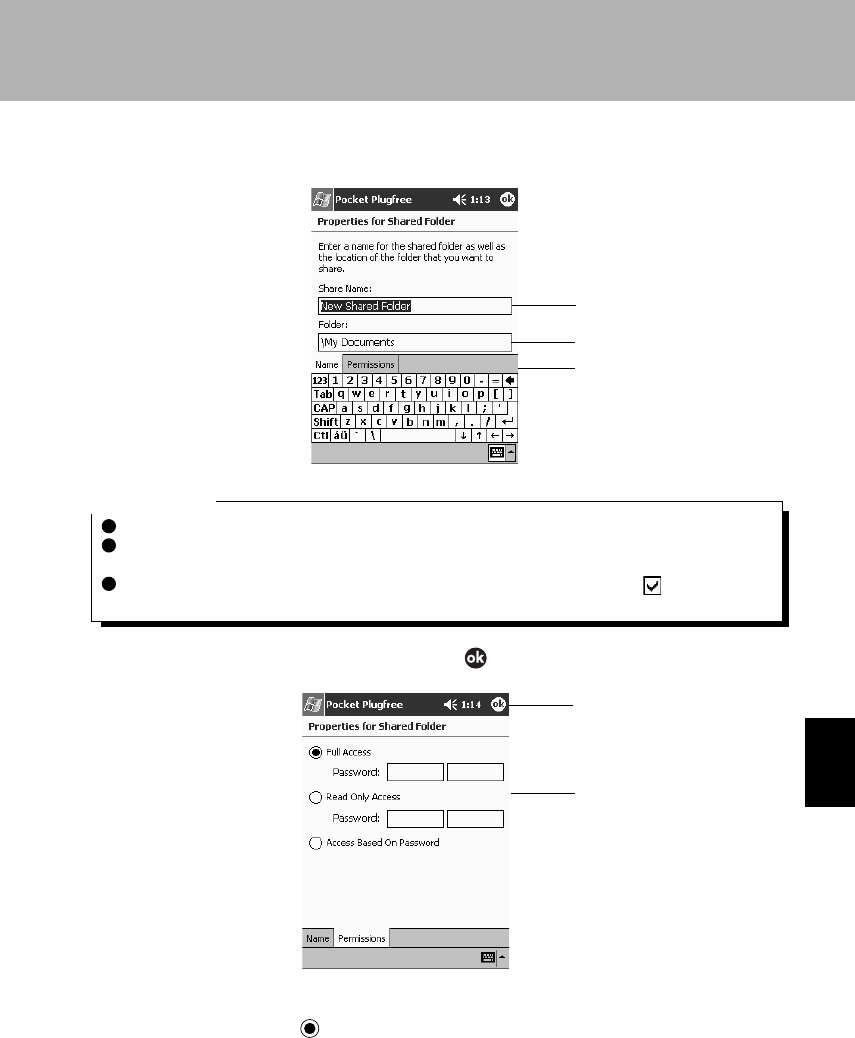
141
SECTION 7
2. (1) Input a name for the shared folder. (2) Input the shared folder path. (3) Tape
the “Access Rights” tab.
Critical Point
The shared folder name set here is displayed on other BluetoothTM devices.
The shared folder name does not need to match an actual folder name. This is a name for
display on other BluetoothTM devices.
When you tap “set this shared folder in the Inbox” and select this checkbox , calendar files,
note files, and other files sent from other BluetoothTM devices are stored in the shared folder.
3. (1) Set the folder access rights. (2) Tap .
•Full access
Tap this to select it , then input the password. After inputting the password in
the left box, input it again for verification in the right box. Other BluetoothTM
devices can read, write, and delete files on this device.
1
2
3
2
1
Section 07 LOOX (141-151) 6/25/02, 10:06 AM141
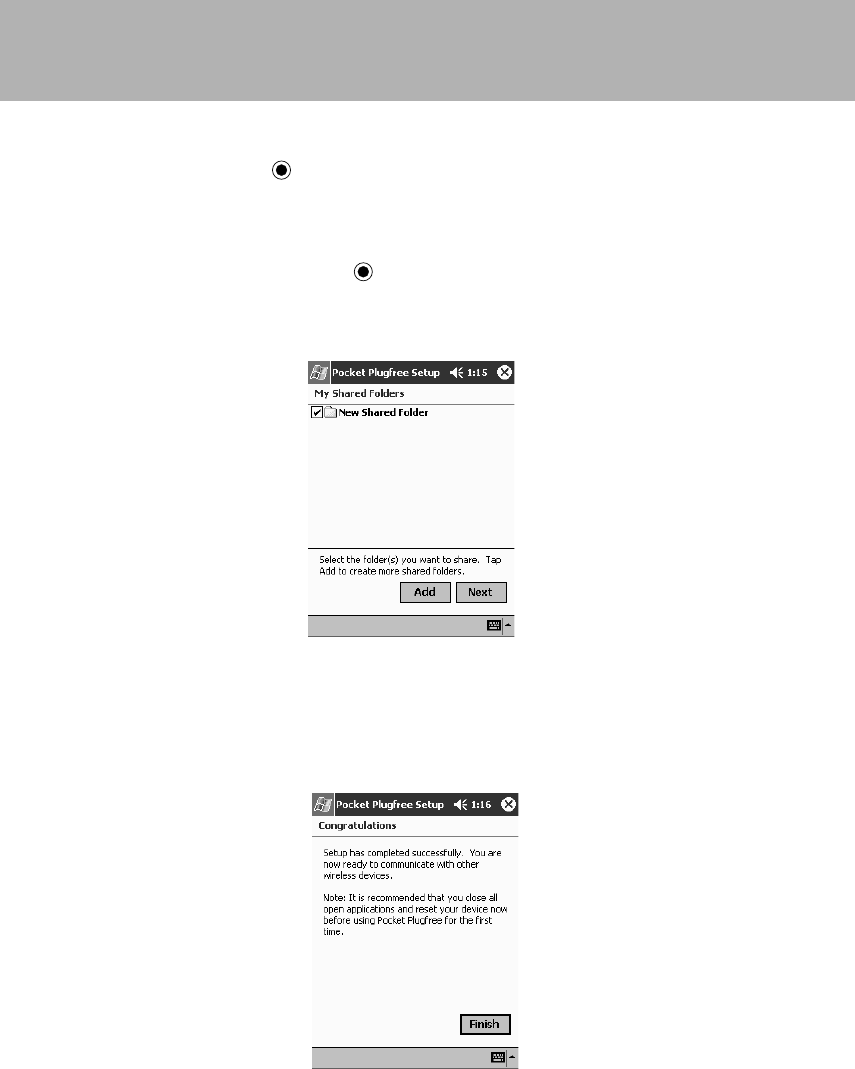
142
•Read-only access
Tap this to select it , then input the password. After inputting the password in
the left box, input it again for verification in the right box. Other BluetoothTM
devices can only read files on this device.
•Password access
When you tap this to select it , other BluetoothTM devices can access files on
this device if the password set with “Full access” or “Read-only access” is input
on that other BluetoothTM device.
4. Tap “Next”.
To add another shared folder, tap “Add”.
6 Tap “Finish”.
When you complete the settings, the device list is displayed. If there are any
BluetoothTM devices within the BluetoothTM communications range, the names of
these devices are displayed on the device list.
Section 07 LOOX (141-151) 6/25/02, 10:06 AM142
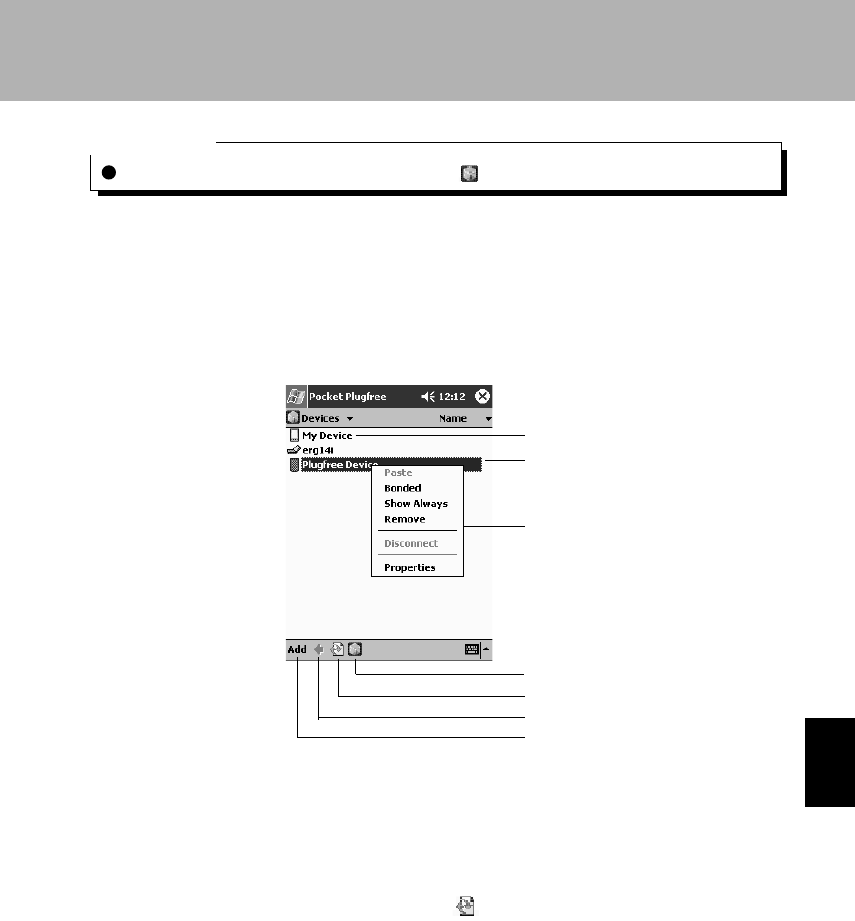
143
SECTION 7
Critical Point
To re-execute the setup wizard, tap Device List → “Setup Wizard” in that order.
Pocket Plugfree Screen Configuration
Device List
This is the first screen displayed when Pocket Plugfree is started up. At the same time,
BluetoothTM devices in the area are searched for and if any are found, their names are
displayed.
1 My Device
The setting screen is displayed. For details, see “My Device” .
2 Other BluetoothTM devices
BluetoothTM devices in the area are displayed. If a device is set to “Bonded” or
“Always display this device in the device list” in the “Properties”, the device’s icon is
always displayed in the device list. When is tapped and other devices searched
for again, if a device is not in the BluetoothTM communications range, the icon for
that device is grayed out and “×” is displayed.
Tapping one of the devices in the device list displays the shared folder set for that
device and a list of the services that device is equipped with. For details on how
these services work on that device, see the manual for that device.
1
3
2
4
5
6
7
Section 07 LOOX (141-151) 6/25/02, 10:06 AM143
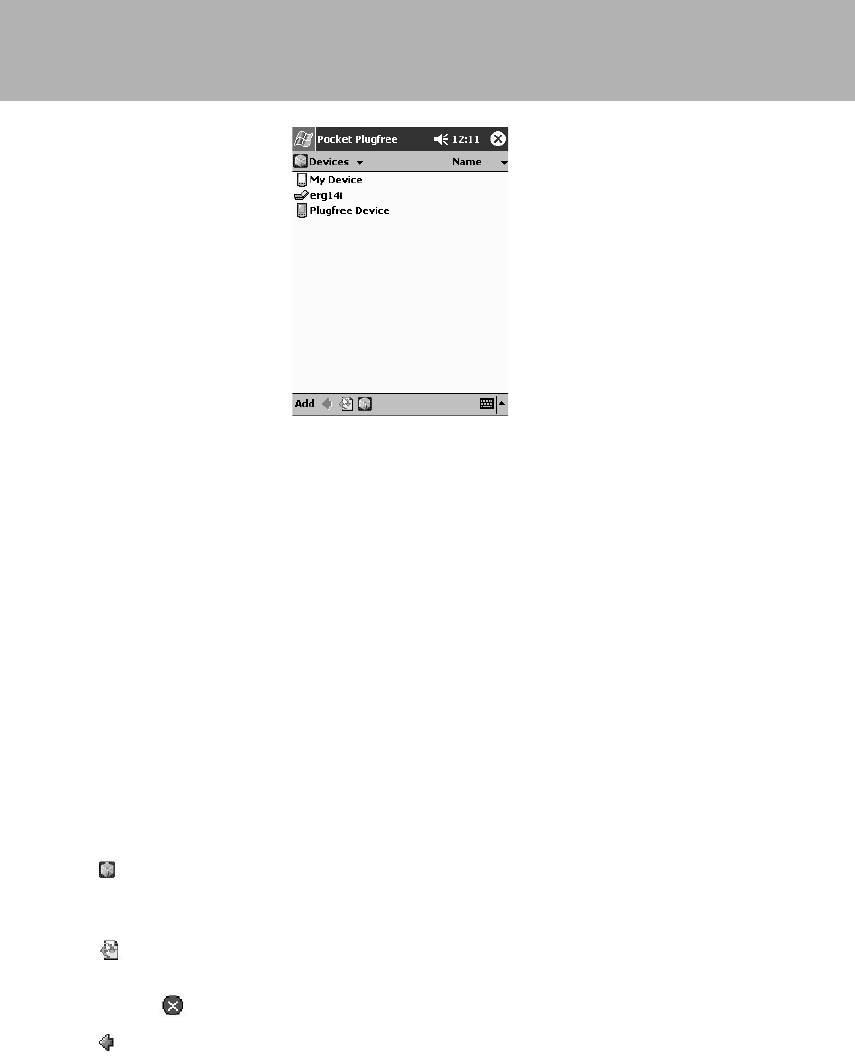
144
3 Pop-up Menu
This pop-up menu is displayed if you tap and hold another BluetoothTM device.
• Bonded: Bonding means establishing a relationship of trust between this device
and another BluetoothTM device. If pass keys are exchanged and they match, a
bonded relationship is established. When this is checked, this means that it is
possible to connect with this device without inputting the pass key. If this is not
checked and the device is tapped, the other BluetoothTM device requests you to
input the pass key. When you input the pass key, the connection becomes
bonded and the check mark is displayed.
• Always displayed: When this is checked, this means that this device is set to
always be displayed in the device list.
• Delete: Deletes this device from the device list.
• Disconnect: Disconnects the connection with this device.
• Properties: This displays the device address and type for this device. Also, it
sets whether or not connection with the device is permitted without a pass key
and whether or not to always display it on the device list. For details, see
“Properties”.
4
When you tap here, you can enable/disable BluetoothTM functions and execute the
setup wizard.
5
Tap here to search again for BluetoothTM devices in the area and update the screen.
Tapping during the search stops the search.
6
Returns the display to the previous screen.
Section 07 LOOX (141-151) 6/25/02, 10:06 AM144
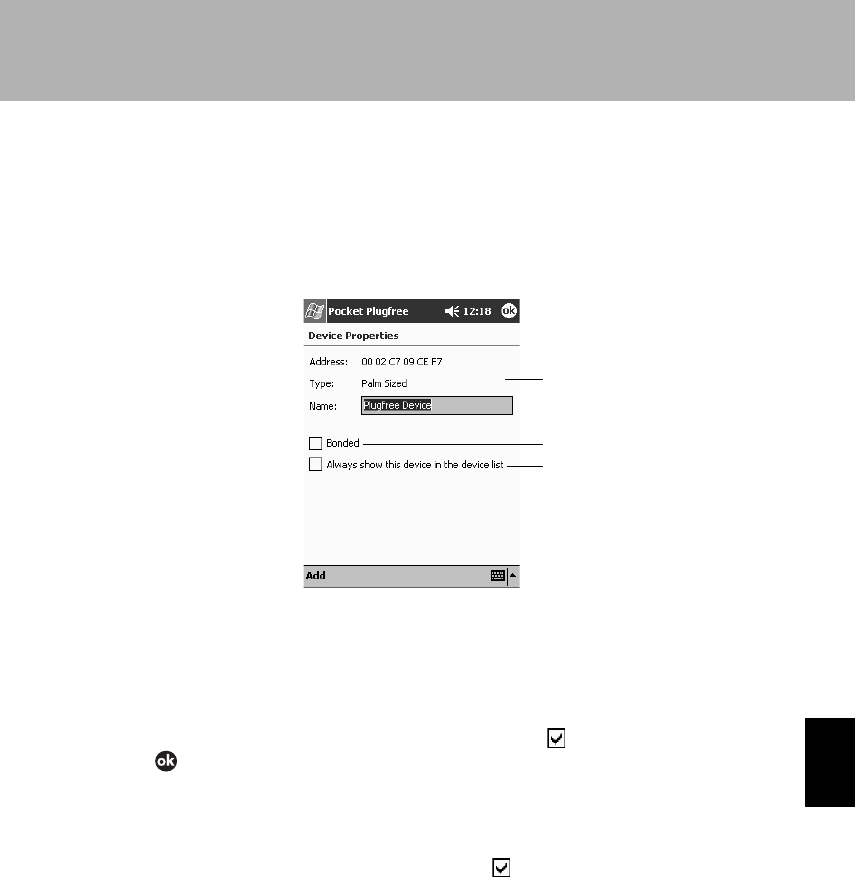
145
SECTION 7
7Add
Specifies the device address and adds other BluetoothTM devices to the device list.
Properties
This is the screen displayed when you tap and hold a device in the device list, then
tap “Properties” from the displayed pop-up menu.
1 Address/Type/Name
This displays the device address, type (desktop computer, notebook computer,
etc.), and name.
2 Bonded
To connect a relationship of trust with the device, tap and select it. When you
tap , the other BluetoothTM device requests you to input the pass key. When you
input the pass key, the connection becomes bonded and from then on, you can
connect with that device without inputting the pass key.
3 Always displayed:
To always display device in the device list, tap and select it.
1
2
3
Section 07 LOOX (141-151) 6/25/02, 10:06 AM145
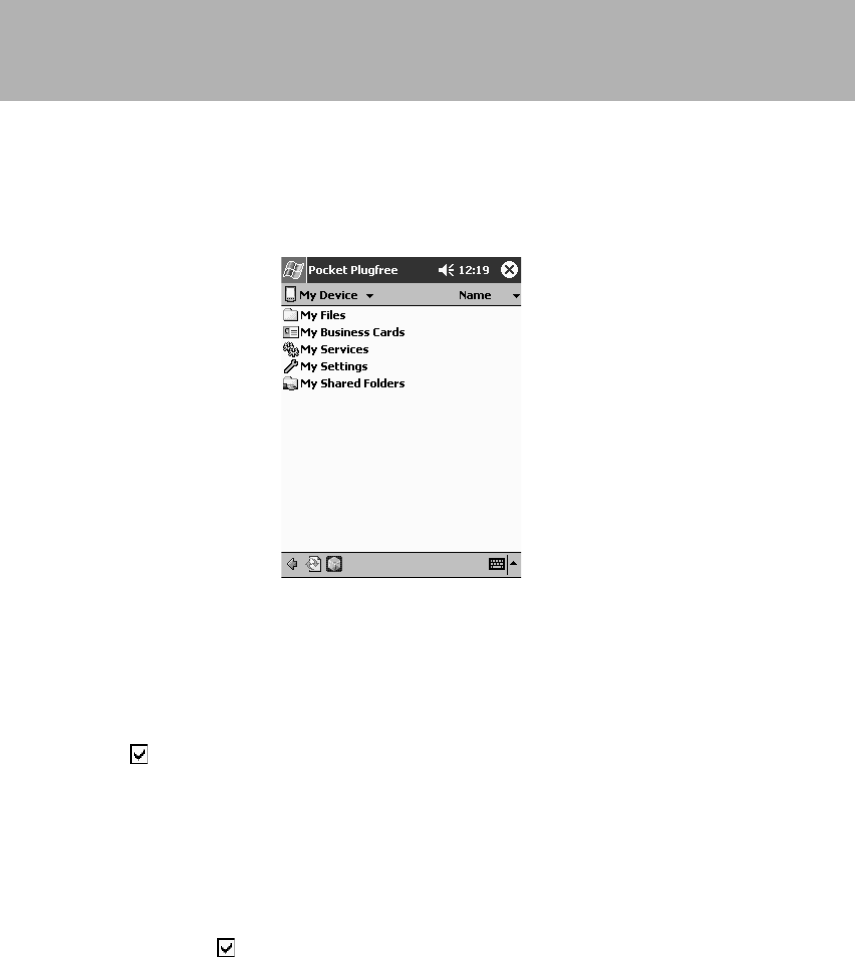
146
My Device
This is the screen displayed when you select “My Device” from the device list. This
screen is for setting basic such basic items as the device name and password and
for setting services.
1 Files
This is the folder used for exchanging files with other BluetoothTM devices. After
files from the other device are copied, they can be pasted and files to be copied to
the other device can be selected.
2 Services
Tap and select the services to use as necessary. Normally, there is no need to
change these settings.
3 Shared Folders
This sets and adds shared folders.
Normally, the shared folder set with Step 5 in “Starting up and Initial Settings” is
displayed.
4 Business Cards
Tap and select the name card to be automatically sent in response to Business
Cards requests from other BluetoothTM devices.
5 Settings
This sets such basic parameters as the device name and path key. For details, see
“Settings”.
Section 07 LOOX (141-151) 25/06/02, 11:23 AM146
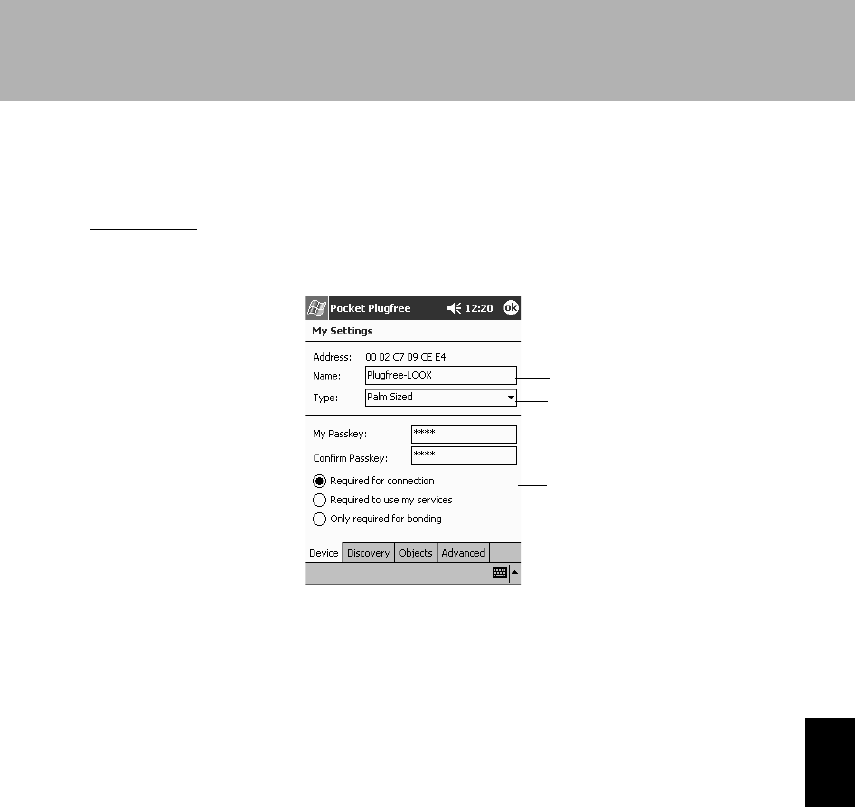
147
SECTION 7
Settings
The settings screen is divided into the “Device” tab, “Detection” tab, “Object” tab,
and “Others’ tab.
“Device” tab
This sets the name displayed on other BluetoothTM devices and the pass key input when
other devices access this device.
1 Name
Sets the name displayed on other devices.
2 Type
Select either “Palm Sized” or “Audio Device”. Normally, there will be no problems
with the “Palm Sized” setting, but if you can not connect with some BluetoothTM
headsets, select “Audio Device”.
3 Pass key
This sets the pass key input when another device accesses this device. After
inputting the password at “Pass key”, select one of the following options.
• Required for connection: Requires the pass key each time another device
accesses this device.
• Required to use service: Other devices can access this device and view the
services, but each time another device tries to use a service of this device, this
device requires the pass key.
• Required only for bonding: Handles devices that access this device as devices
that can be trusted and does not require the pass key.
1
2
3
Section 07 LOOX (141-151) 6/25/02, 10:39 AM147
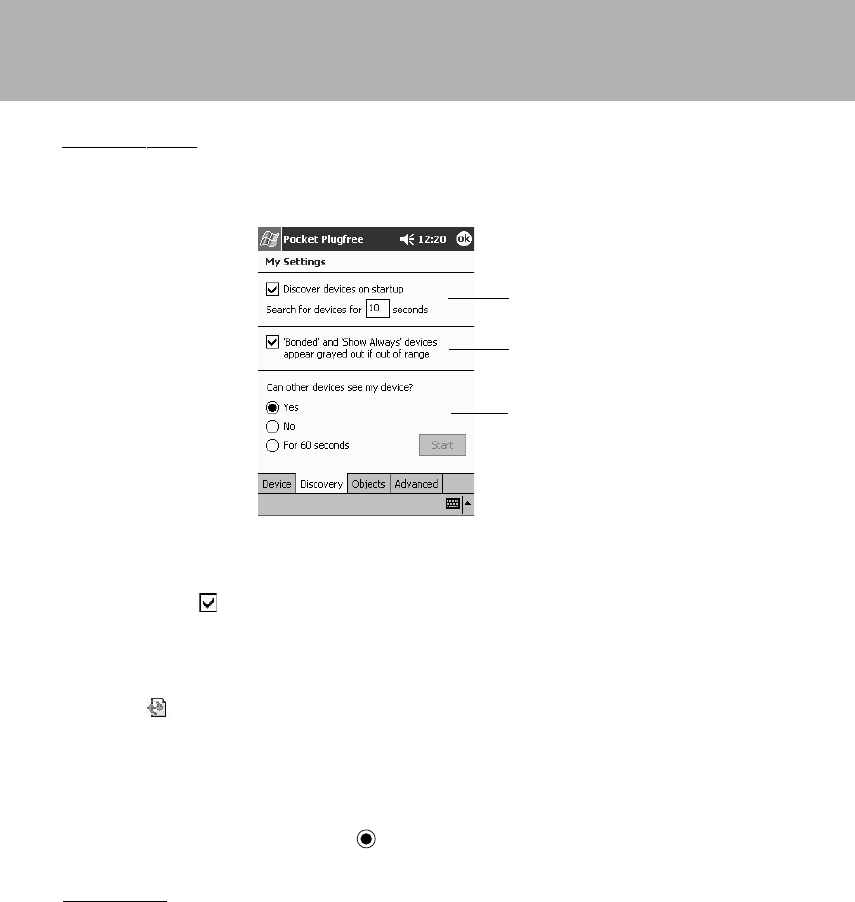
148
1 Discover devices at start up
Sets how many seconds to search for other devices when Pocket Plugfree is
started. Tap to select it , then input the number of seconds into “Devices to
search for”.
2 When they are outside the communications range, devices with the “Bonded”
or “Always display” property are displayed grayed out.
When is tapped and other devices searched for again, if a device for which
“Bonded” or “Always display” is set with the Properties is not in the BluetoothTM
communications range, the icon for that device is grayed out and “×” is displayed.
3 Can other devices reference this device?
This sets whether or not this device can be seen from other devices. Tap “Yes”,
“No”, or “60 seconds” to select it . When you tap “Start”, the selected status is
enabled.
“Object” tab
Normally, there is no need to make the settings on this screen. When making these
settings, see the help.
"Discovery" tab
This sets such parameters as the interval at which to search for other BluetoothTM
devices and whether or not this device can be seen from other devices.
1
2
3
Section 07 LOOX (141-151) 6/25/02, 10:06 AM148
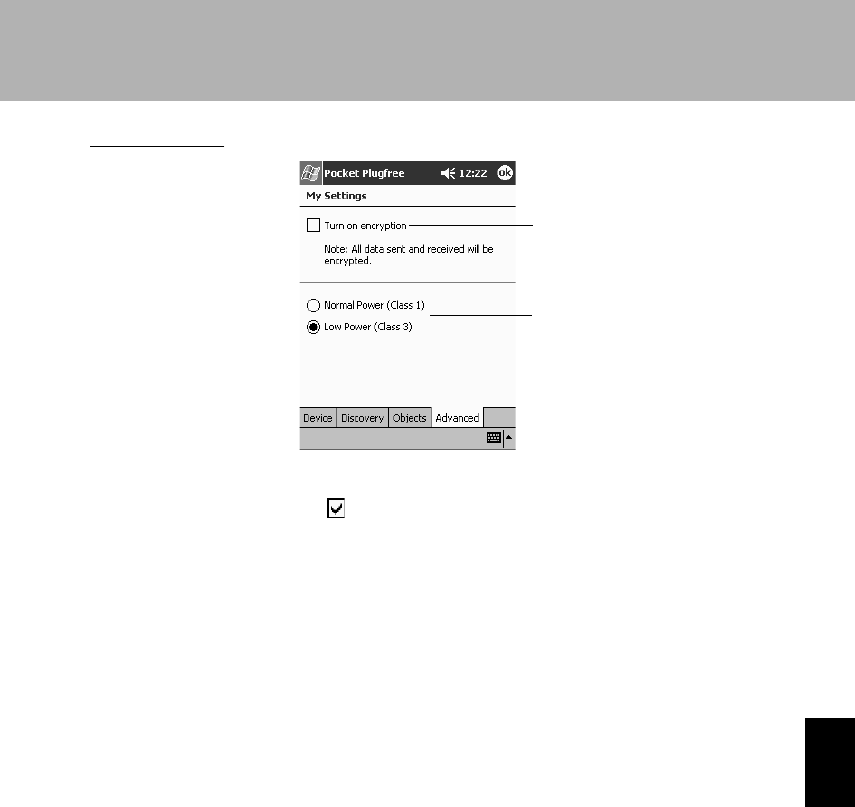
149
SECTION 7
1 Set “Encryption” On.
When you tap and select “Encryption”, data exchanged with other BluetoothTM
equipment is encrypted.
2 This sets the strength of the signals emitted by BluetoothTM . The
communications rate is about 50 meters for “Normal power (Class 3)” (the
mode which consumes more power) and about 10 meters for “Low power
(Class 3)”.
“Advanced” tab
1
2
Section 07 LOOX (141-151) 6/25/02, 10:06 AM149
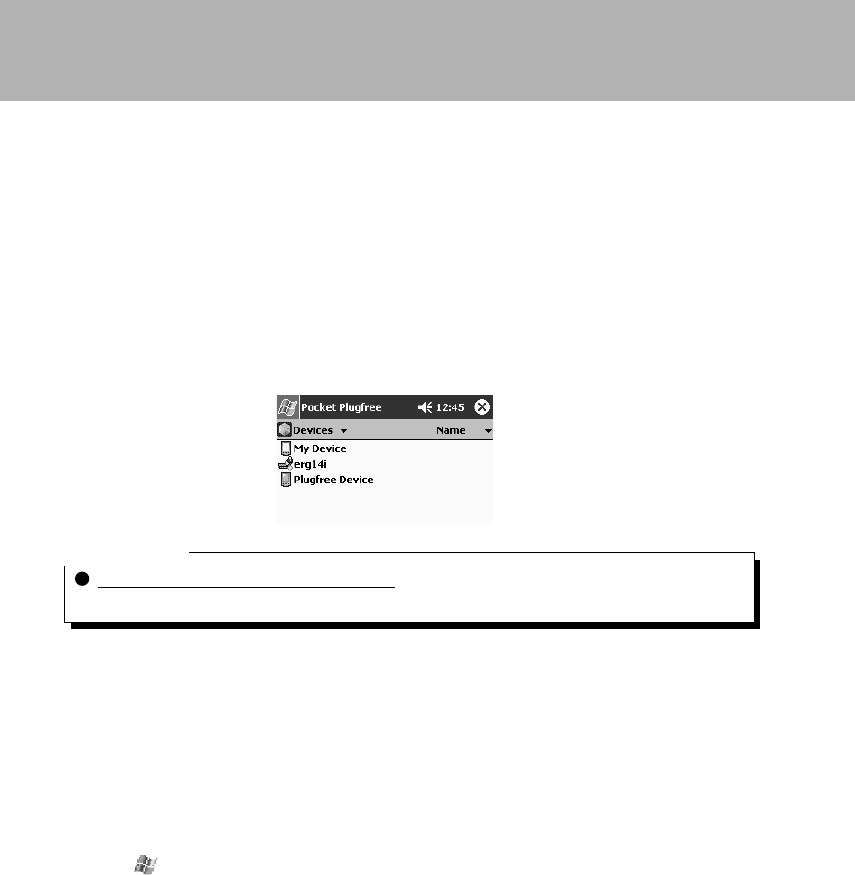
150
Critical Point
When the following screen is displayed
Input the same pass key as input on the other device, then tap “OK”.
2 From the displayed services, tap “File”.
3 Tap and hold the file or folder that you want to copy to this device.
4 From the displayed pop-up menu, tap “Copy”.
5 (1) Display the device list. (2) Tap “My Device”. (3) Tap “Files”.
6 Tap the Edit menu → “Paste” in that order.
The file or folder pasted on the above screen is copied directly under “My Device”.
7 Tap → “Programs” → “File Explorer” in that order to start File Explorer.
8 Open “My Device” and move the copied file to another folder.
File Operations
When the “Access files” or “Share files” service is used, files can be copied/renamed/
deleted/edited between this device and other BluetoothTM devices. Note also that
unlike “ActiveSync usage”, file copying is only used for exchanging data that requires
no data format conversion.
Copying from Other BluetoothTM Devices
This section explains how to copy files and folders from other BluetoothTM devices.
1 Tap the other device from the device list screen.
Section 07 LOOX (141-151) 6/25/02, 10:06 AM150
151
SECTION 7
Copying to Another BluetoothTM Device
This section explains how to copy files and folders from this device to another
BluetoothTM device.
1 Tap → “Programs” → “File Explorer” in that order to start File Explorer.
2 Move or copy the files to be copied to directly under “My Device”.
3 Start Pocket Plugfree. (1) Display the device list. (2) Tap “My Device”. (3) Tap
“Files”.
4 Tap and hold the file or folder that you want to copy to this device.
5 From the displayed pop-up menu, tap “Copy”.
6 Tap the other device from the device list screen.
Critical Point
Input the same pass key as input on the other device, then tap “OK”.
7 From the displayed services, tap “File”.
8 Tap the Edit menu → “Paste” in that order.
The file or folder is copied to the other device.
Section 07 LOOX (141-151) 6/25/02, 10:06 AM151
152
Deleting/Renaming/Editing Files on Other BluetoothTM Devices
When file access is permitted on the other BluetoothTM device, you can directly delete,
rename, or edit files. In order to edit, it is necessary that the program related to the file
being edited be installed on this device.
Deleting
1 Execute Steps 1-3 of “Copying from Other BluetoothTM Devices”.
2 Tap “Delete” from the displayed pop-up menu.
The “OK to delete Item ” message is displayed, so tap “Yes”.
Renaming
1 Execute Steps 1-3 of “Copying from Other BluetoothTM Devices”.
2 From the displayed pop-up menu, tap “Rename”.
3 Input the new name.
Critical Point
If file renaming fails because file deletion on the other BluetoothTM device is not permitted, the
copy of the file you tried to change remains on the other device. In this case, delete the
unnecessary file from the other device.
Renaming large files can take time.
Editing
1 Execute Steps 1-3 of “Copying from Other BluetoothTM Devices” .
2 Tap the file to edit.
The program related to the file is started and it can be edited and saved.
Section 07 LOOX (152-158) 6/25/02, 10:07 AM152
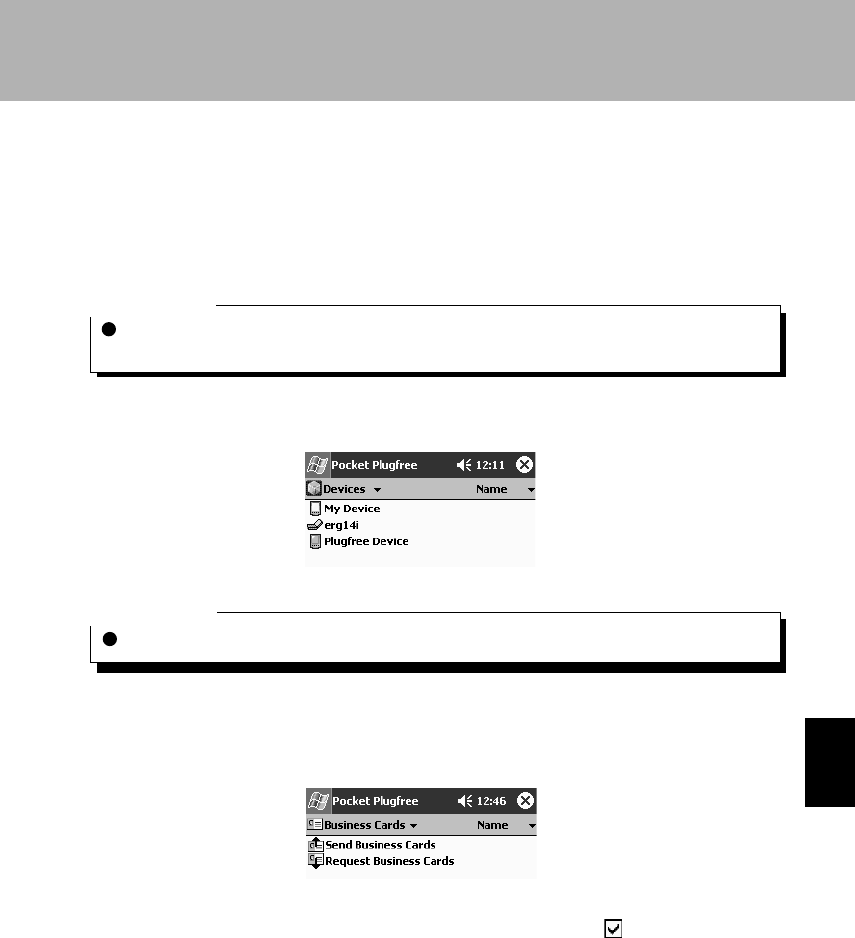
153
SECTION 7
Exchanging Business Cards
When the “Access Business Cards” or “Share Business Cards” service is used,
Business Cards (name and contact information) with another Bluetooth device.
Sending a Business Cards
Critical Point
Before starting the sending, use Pocket Outlook “Contacts” to input the information about
yourself you want to send. For details on creating a contact, see “Creating a New Contact”.
1 From the device list, tap the other device.
Critical Point
Input the same pass key as input on the other device, then tap “OK”.
2 From the displayed services, tap “Business Cards”.
3 Tap “Send Business Cards”.
4 (1) Tap the Business Cards you want to send to select it . (2) Tap “Send”.
Section 07 LOOX (152-158) 6/25/02, 10:07 AM153
154
When the other device approves reception of the Business Cards, the Business
Cards is sent from this device and “(Business Cards) sent correctly” is displayed.
When the other device refuses reception of the Business Cards, “Request denied”
is displayed on this device.
Requesting a Business Cards
Critical Point
It is necessary that the device from which you request a Business Cards be equipped with a
function for sending its Business Cards. Please understand that BluetoothTM PC cards and
BluetoothTM computers from this company do not support functions for sending Business
Cards.
It is necessary that the other device be set so that it can share Business Cards. If the other
device is a Pocket LOOX, go to “My Device” ) and set sharing with the “Business Cards”
settings.
1 From the device list screen, tap the other device.
Critical Point
Input the same pass key as input on the other device, then tap “OK”.
Section 07 LOOX (152-158) 6/25/02, 10:07 AM154

155
SECTION 7
2 From the displayed services, tap “Business Cards”.
3 Tap “Request Business Cards”.
The request is sent.
When the other device approves the request, the Business Cards is sent to this
device and displayed as Pocket Outlook “Contacts” data.
When the other device refuses the request, “Request denied” is displayed on this
device.
Connecting to the Internet
Connecting using a cell phone or CF
A dialup connection to the Internet is made through a BluetoothTM cell phone or CF.
1 Tap → “Settings” → “Connection” tab → “Connection” → “Dialing
Properties” tab in that order.
2 (1) From “Source”, select “Cell phone” or “CF”. (2) Tap .
3 Put the cell phone or CF in the state to wait for BluetoothTM signals.
For details on how to make this setting, see the manual for the cell phone or CF.
4 Start up Pocket Plugfree and tap the cell phone or CF from the device list
screen.
5 If you are requested on the cell phone or CF to input the pass key, input it.
6 Input the same pass key on this device, then tap “OK”.
7 From the displayed services, tap “Internet”.
8 (1) Input the access point for your Internet service provider. (2) Tap .
Section 07 LOOX (152-158) 6/25/02, 10:07 AM155
156
9 (1) Input the “User name” and “Password” for connecting to the Internet
service provider. (2) Tap OK.
If necessary, tap “Store password” to select it .
For the information for connecting, see the material provided by your Internet
service provider.
Critical Point
If you are requested on the cell phone or CF side to input the pass key
On some models, you may be requested to input the pass key. If this happens, input the pass
key on the cell phone or CF side, input the same pass key on this device too, then tap “OK”.
When this device is connected to the Internet, Pocket Internet Explorer is started
up automatically.
Connection Using Wireless Station
This method uses a BluetoothTM wireless station (BluetoothTM data access point) to
connect to the Internet via a LAN.
1 Tap → “Settings” → “Connection” tab → “Connection” in that order.
2 Execute “Connecting through a LAN card” from step 8 onward and make the
proxy settings.
3 Start up Pocket Plugfree and tap the wireless station from the device list
screen.
4 Input the pass key, then tap OK.
5 From the displayed services, tap “Internet”.
6 (1) Input the “user name”, “password”, and “domain” for logging onto the
LAN. (2) Tap .
For details on the information for logging in, check with the network administrator.
7 Input the pass key, then tap OK.
When this device is connected to the Internet, Pocket Internet Explorer is started
up automatically.
Section 07 LOOX (152-158) 6/25/02, 10:07 AM156
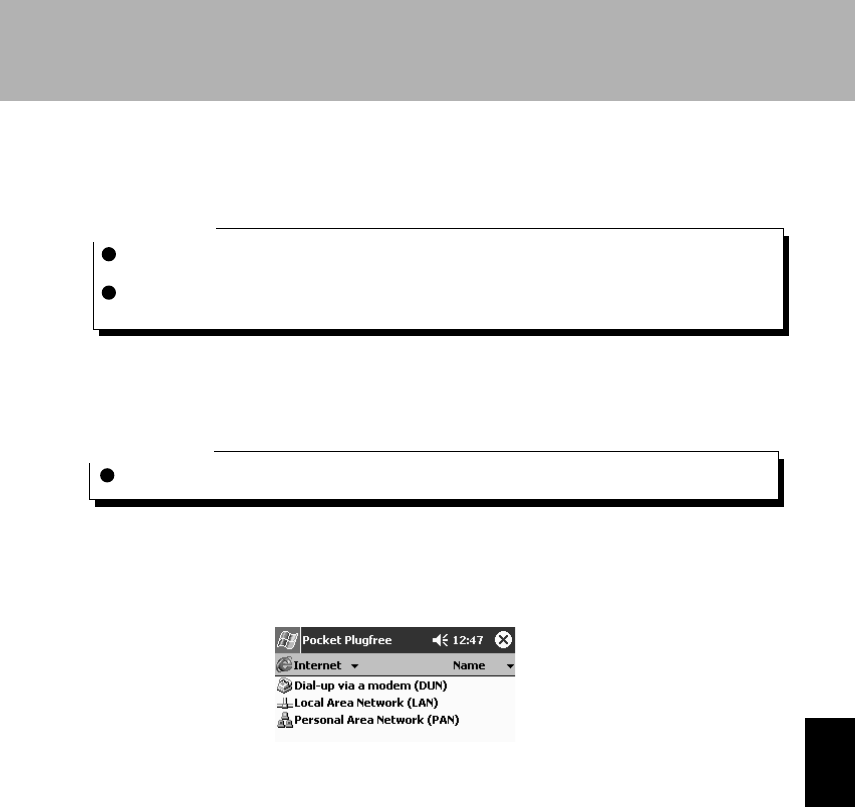
157
SECTION 7
Connecting Using Internet Connection Sharing
This method connects to the Internet via a computer set to share its Internet
connection.
Critical Point
The connecting computer must have a BluetoothTM utility equipped with the personal area
networking (PAN) profile.
For details on how to set Internet connection sharing, see the BluetoothTM manual for your
computer or optional product or the Windows help.
1 From the device list screen, tap the computer for which Internet connection
sharing is set.
Critical Point
Input the same pass key as input on the other device, then tap “OK”.
2 From the displayed services, tap “Internet”.
3 From the displayed services, tap the “Personal Area Networking (PAN)”.
When this device is connected to the Internet, Pocket Internet Explorer is started up
automatically.
Section 07 LOOX (152-158) 6/25/02, 10:07 AM157
158
Critical Point
Concerning “Dialup Network (DUN)” and “Local Area Network (LAN)”
On some computers, the “Dialup Network (DUN)” and “Local Area Network (LAN)” services
on the above screen can not be used.
Using ActiveSync
Even when this device is not set in its cradle, it can be synchronized with a computer
using BluetoothTM. When exchanging data in ways that involve converting data formats,
for example synchronizing such files as a computer’s Word/Excel files and this device’s
Pocket Word/Pocket Excel files, use ActiveSync, not “File Operations”.
Critical Point
Check the following points beforehand.
– Make the settings for partnership with a computer on which ActiveSync has been installed.
– Check that the NetBIOS settings on the computer are valid. For details on how, see the
help for your operating system.
– Remove this device from its cradle before making the BluetoothTM connection.
1 From the device list screen, tap the computer with which you want to set the
partnership.
Critical Point
Input the same pass key as input on the other device, then tap “OK”.
2 From the displayed services, tap “ActiveSync”.
When you connect with the computer, the “ActiveSync” screen is displayed
automatically and synchronization starts.
For details on ActiveSync, see “Chapter 6 Linking with a Computer”.
Critical Point
When automatic IP address assignment is enabled, connecting may take about 1-2 minutes.
Section 07 LOOX (152-158) 6/25/02, 10:07 AM158
SECTION
SECTION
SECTION 8
8
8
Section 08 LOOX (159-178) 6/25/02, 10:08 AM159
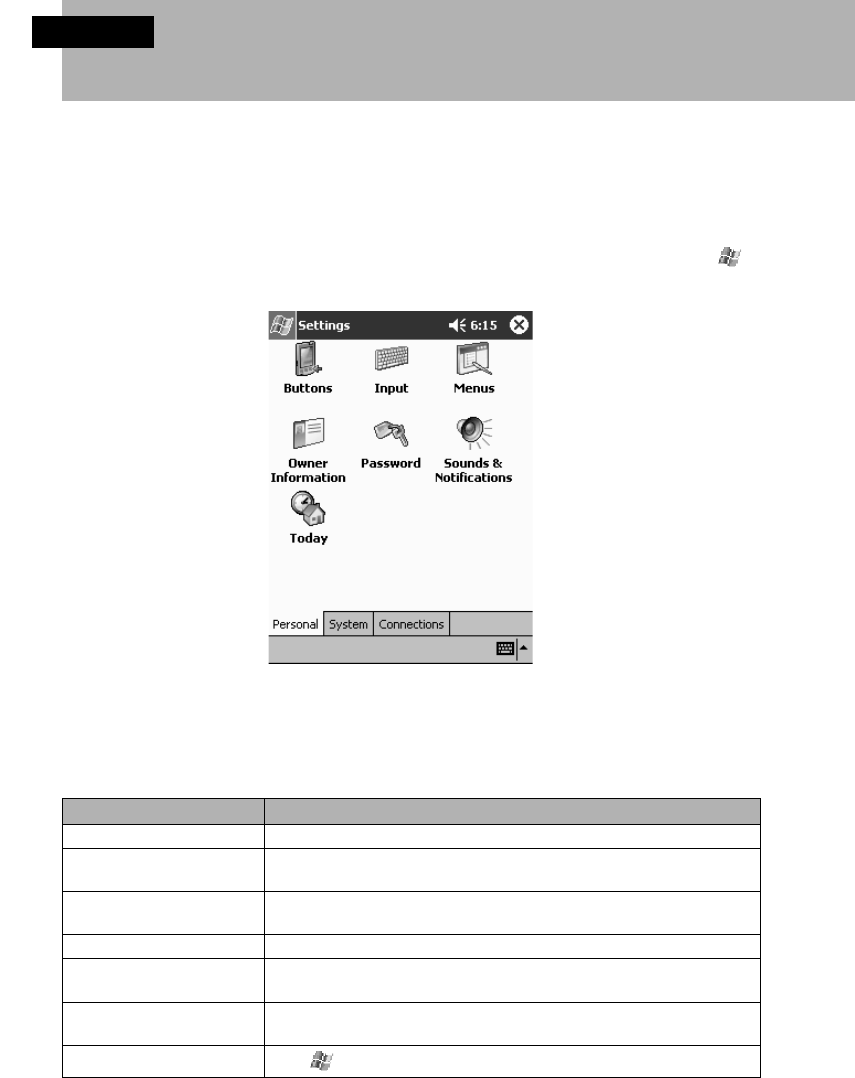
160
SECTION 8
1 Settings
You can set the basic usage environment for this device and make various
hardware adjustments.
List of Setting Items
The settings for this device are made on the following screen displayed by tapping
→ “Settings” in that order.
From this screen, tap the icon for the item to be set.
The settings made with the “Personal”, “System”, and “Connection” tabs are as follows.
“Personal” tab
Setting Item Setting Contents
Today This sets the information displayed on the “Today” screen.
Input This sets the input method (for example, handwriting) and can
also make the recording settings.
Sounds and Notifications This sets the volume for system sounds, the types of sounds for
various circumstances, and alarm reminders.
Owner Information This sets personalized information for this device.
Password This sets the password required when the power for this device is
switched on.
Button Frequently-used programs can be assigned to the Applications
buttons.
Menu The menu and “New” menu can be customized.
Section 08 LOOX (159-178) 6/25/02, 10:08 AM160
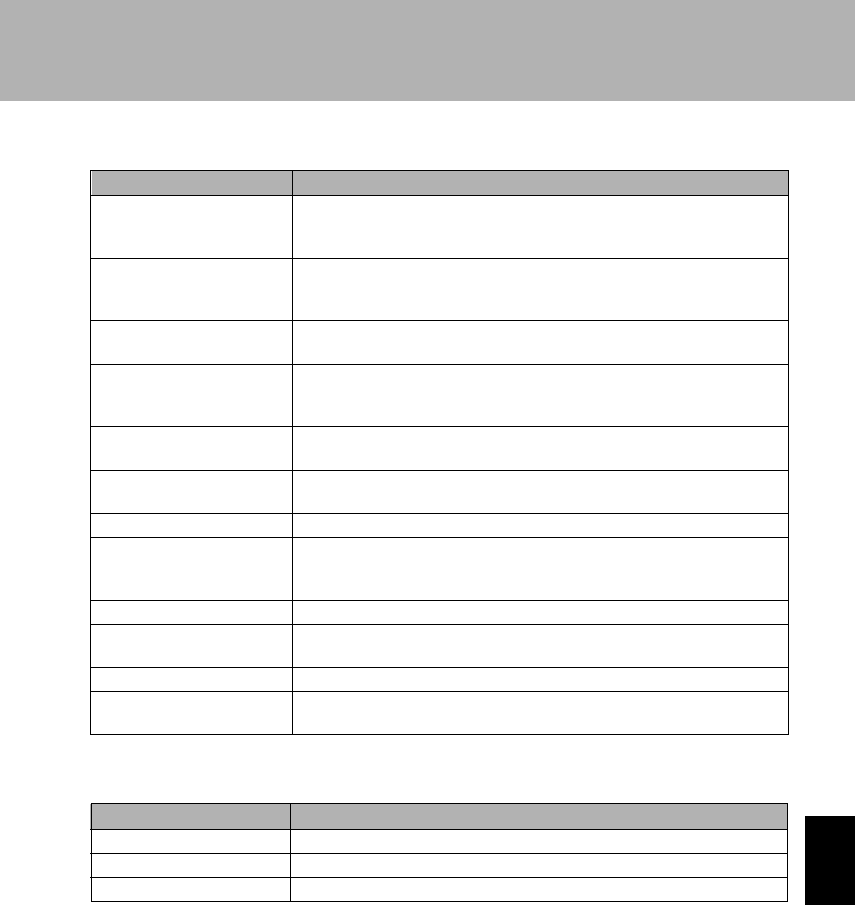
161
SECTION 8
“System” tab
Setting Item Setting Contents
Regional Settings This sets the calendar, currency, and other display formats for
each region (Japanese-language region, English-language region)
so that the display can be switched to match regions you travel to.
Clock The device for this clock can be set and the display can be
switched to the times for locations you go to frequently. Also,
wake-up alarms can be set.
Align Screen If this device does not respond correctly to taps, the touch screen
can be adjusted.
About This displays the name of the processor and other important
information about this device and also sets the name with which
this device is identified on the network.
Power Management Displays the battery remaining capacity and sets how long an idle
time to wait before switching off the power.
Front Light Sets the touch screen brightness and how long an idle time to wait
before switching off the front light.
Remove Programs Uninstalls any applications that you have installed on your device.
Memory Configures the amount of internal memory allocated for storage
and program memory and checks the usage status for memory
cards.
CPU Settings Sets whether or not to use the CPU in power-saving mode.
Expansion Pack Displays information concerning the expansion pack installed in
Status Display this device.
Asset Viewer Displays the assets of this device (memory, OS version, etc.).
Autorun Sets whether or not to automatically start the corresponding
application when a CF card, SD/MMC card is set in this device.
“Connection” tab
Setting Item Setting Contents
Connection Makes the Internet connection settings.
Network Adaptor Makes the LAN card network connection settings.
Beam Makes the infrared communications settings.
Section 08 LOOX (159-178) 6/25/02, 10:08 AM161
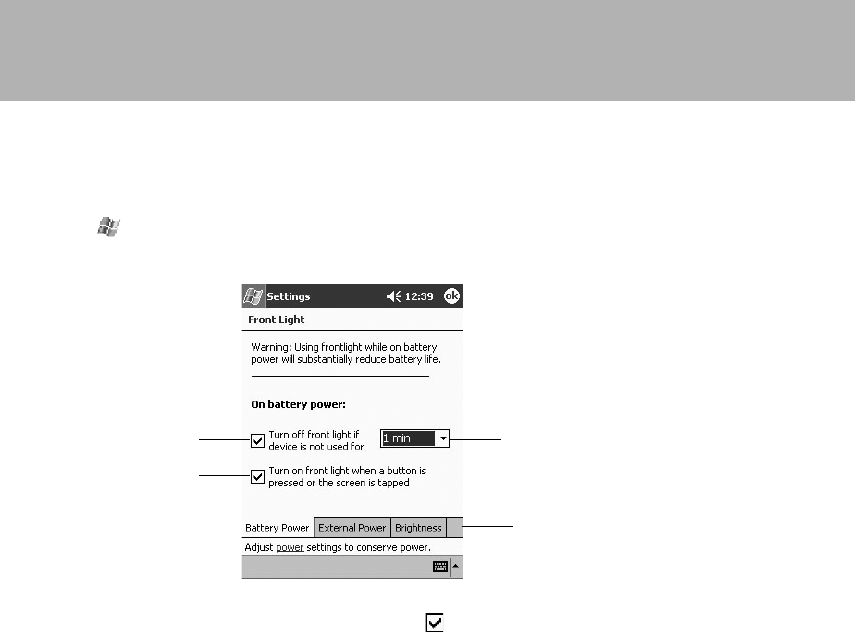
162
Adjusting the Display
Changing the Front Light
Tap → “Settings” → “System” tab → “Front Light” in that order. The following screen
is displayed.
1 If you tap here to select this checkbox , the front light goes off
automatically when the internal battery is used.
2 Sets how much time the system waits before putting off the front light
automatically.
3 With the screen displayed when you tap here, you can make the front light
settings for when the AC adaptor (external power supply) is used.
4 Tap here to move to the front light brightness level setting.
You can adjust the brightness level by tapping “Brightness”.
12
3
4
Section 08 LOOX (159-178) 6/25/02, 10:08 AM162
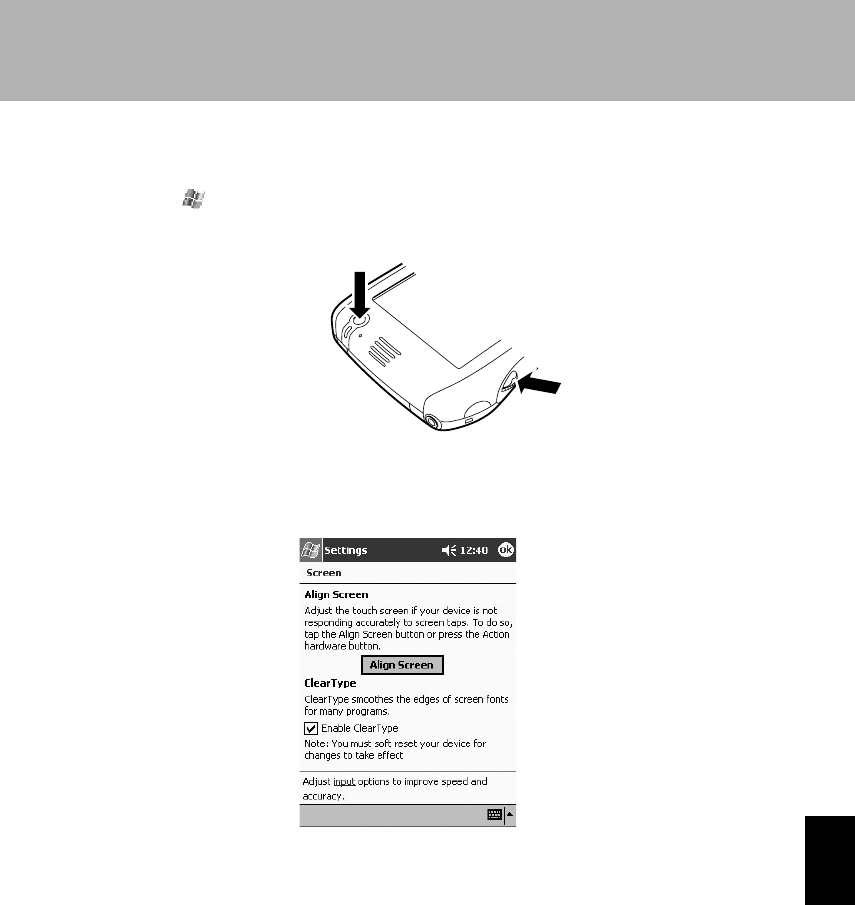
163
SECTION 8
Adjusting the Touch Screen
There are two ways to start touchscreen adjustment.
• Tap → “Settings” → “System” tab → “Align Screen” in that order.
• Press the scroll lever while holding down the power button on this device.
The following screen is displayed.
When you tap “Align Screen”, the touch screen adjustment starts. Tap “+” according to
the instructions on the screen to adjust the touch screen.
Section 08 LOOX (159-178) 6/25/02, 10:08 AM163
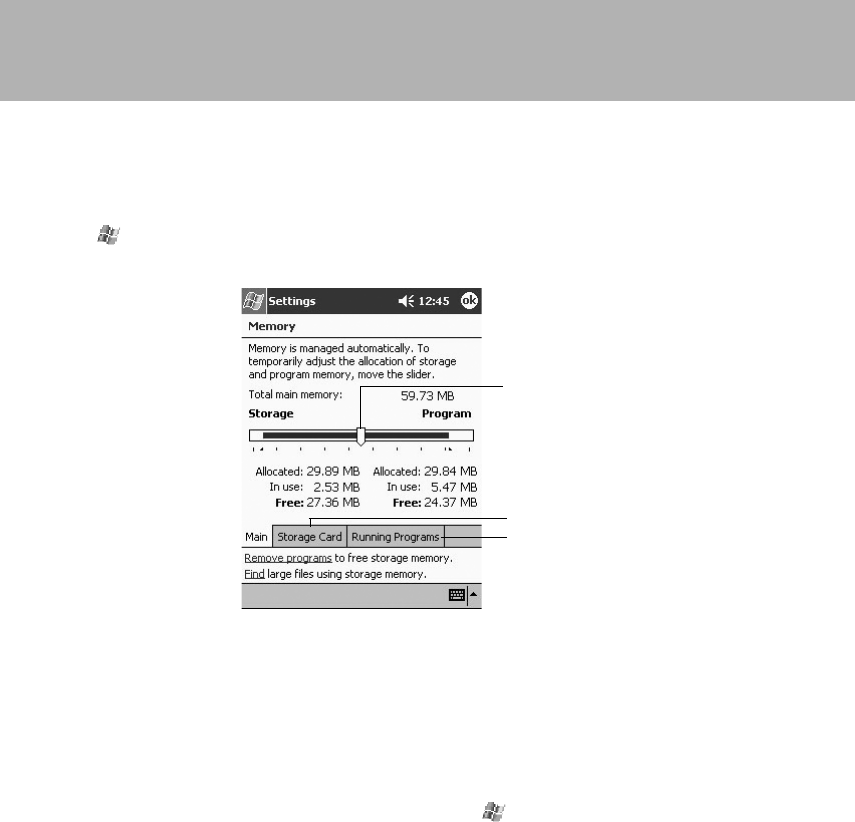
164
Adjusting the Memory
Changing the Memory Allocation
Tap → “Settings” → “System” tab → “Memory” in that order.
The following screen is displayed.
1 Dragging the knob left and right adjusts the allocation of memory to data and
application execution.
2 This displays the details on memory for application execution.
3 This displays the details on memory for data storage.
Checking the Available Memory Capacity
Set the CF card/SD/MMC card beforehand, then tap → “Settings” → “System” tab
→ “Memory” → “Memory Card” in that order.
1
2
3
Section 08 LOOX (159-178) 6/25/02, 10:08 AM164
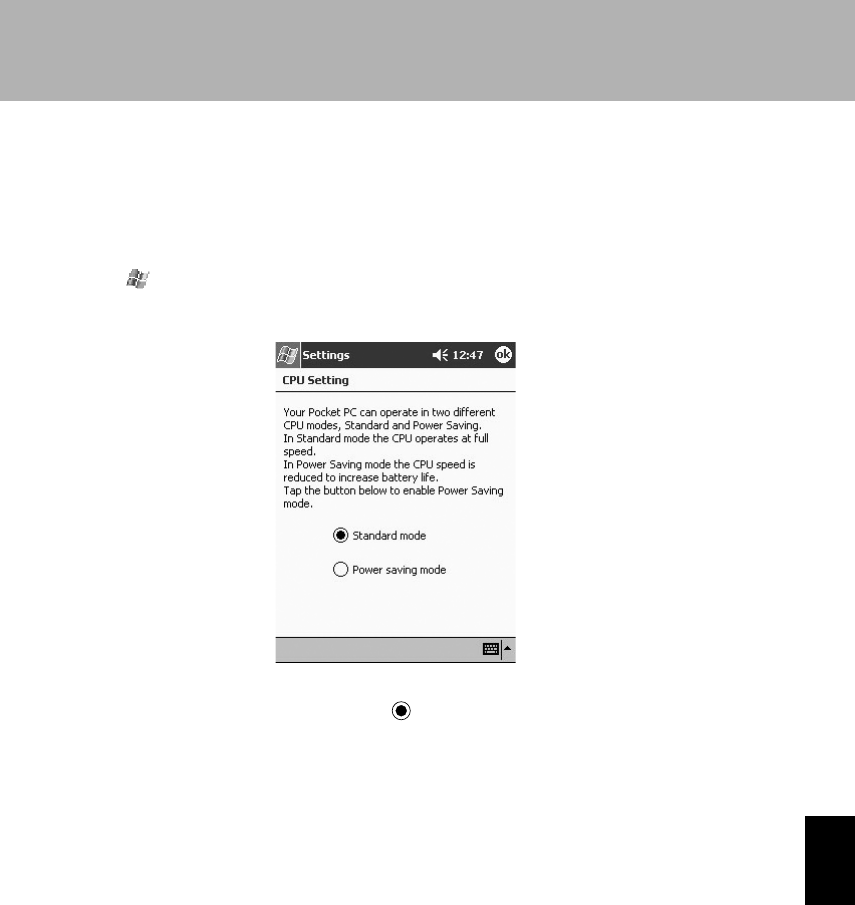
165
SECTION 8
Closing the Active Program
For details on the method for closing programs, see “Closing Programs”.
CPU Settings
Tap → “Settings” → “System” tab → “CPU Settings in that order. The following
screen is displayed.
1 When you select the checkbox , power consumption is reduced by
lowering the CPU clock speed.
Section 08 LOOX (159-178) 6/25/02, 10:08 AM165
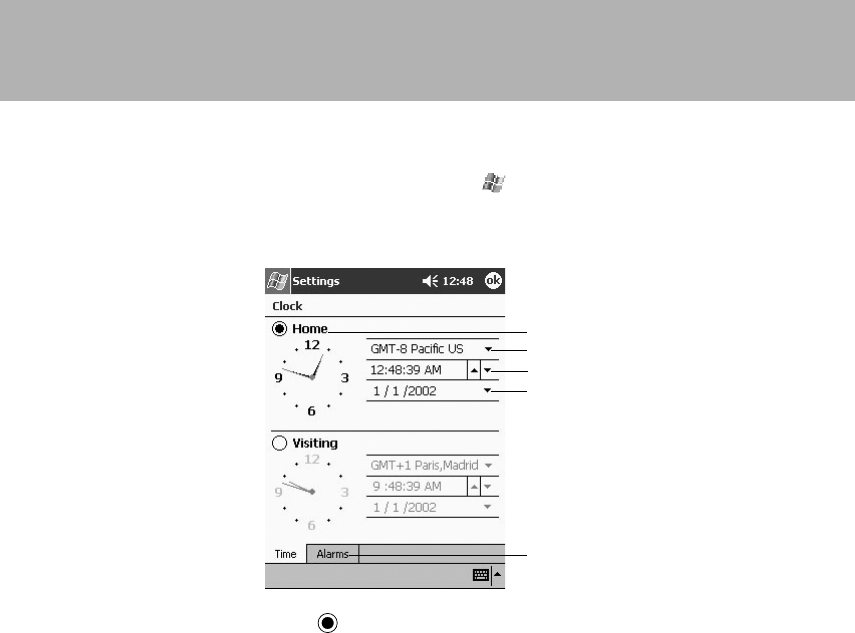
166
Setting the Date/Time
Set the CF card/SD/MMC card beforehand, then tap → “Settings” → “System” tab
→ “Clock” in that order.
The following screen is displayed.
1 Tap the t to change it to , then select the current region or visiting region
(overseas).
2 Tap and select the region from the list.
3 The hour, minute, and second are each inverted and the time is set. Tap 8 to
raise the number or 9 to decrease it.
4 Tapping here displays Calendar. Select the date you want to set.
5 Tap here to set up alarms for specific times on specific days of the week each
week.
1
2
3
4
5
Section 08 LOOX (159-178) 6/25/02, 10:08 AM166
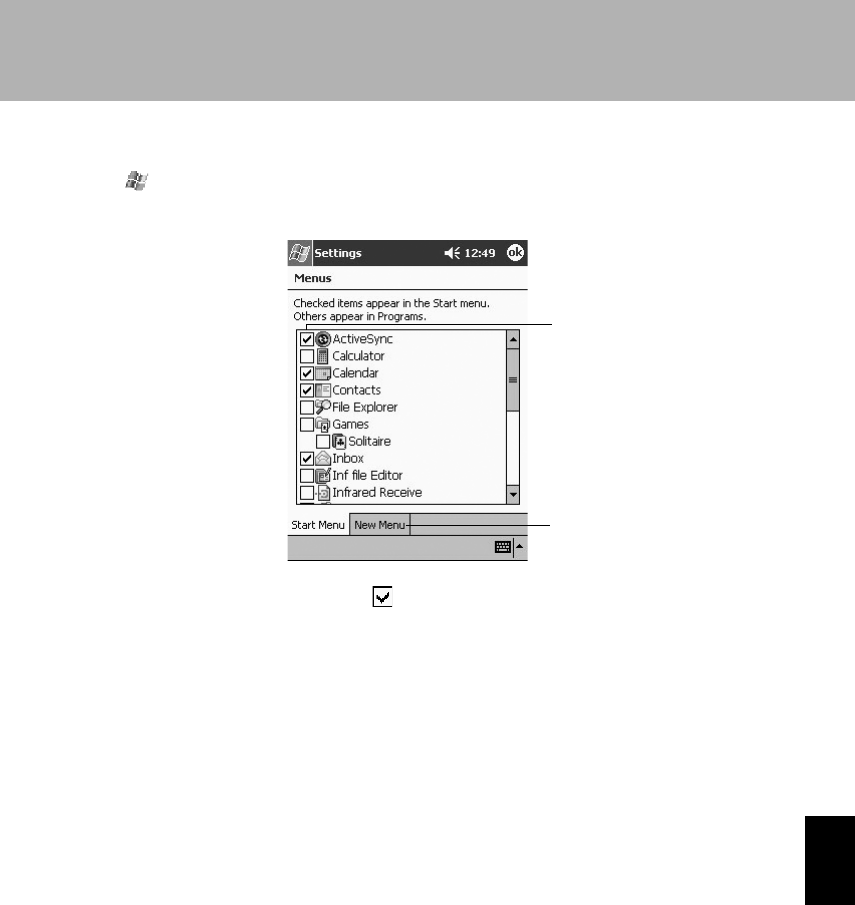
167
SECTION 8
Menu Settings
Tap → “Settings” → “Personal” tab → Menu in that order.
The following screen is displayed.
1 When you select a checkbox , the selected application is put in the menu.
The menu may have up to 9 applications.
2 Tapping here moves you to the “New Menu” settings.
With the “New Menu” tab, you can set the items displayed when you tap the “New”
menu on the “Today” screen.
2
1
Section 08 LOOX (159-178) 6/25/02, 10:08 AM167
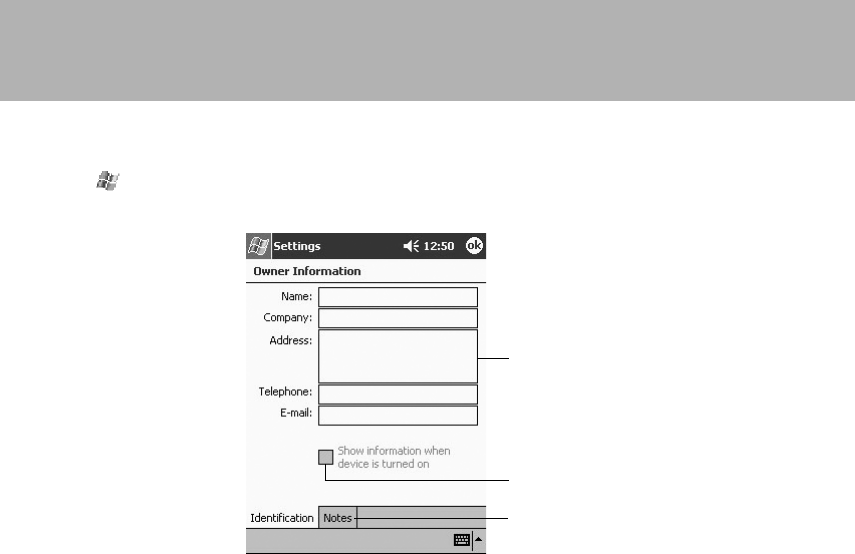
168
Setting the Owner Information
Tap → “Settings” → “Personal” tab → “Owner Information” in that order.
The following screen is displayed.
1 Tap each item and enter the appropriate information.
2 If you tap here, when you switch the power On, the “Owner Information” is
displayed on the “My Information” screen.
3 When you tap here, the note input screen is displayed.
3
1
2
Section 08 LOOX (159-178) 6/25/02, 10:08 AM168
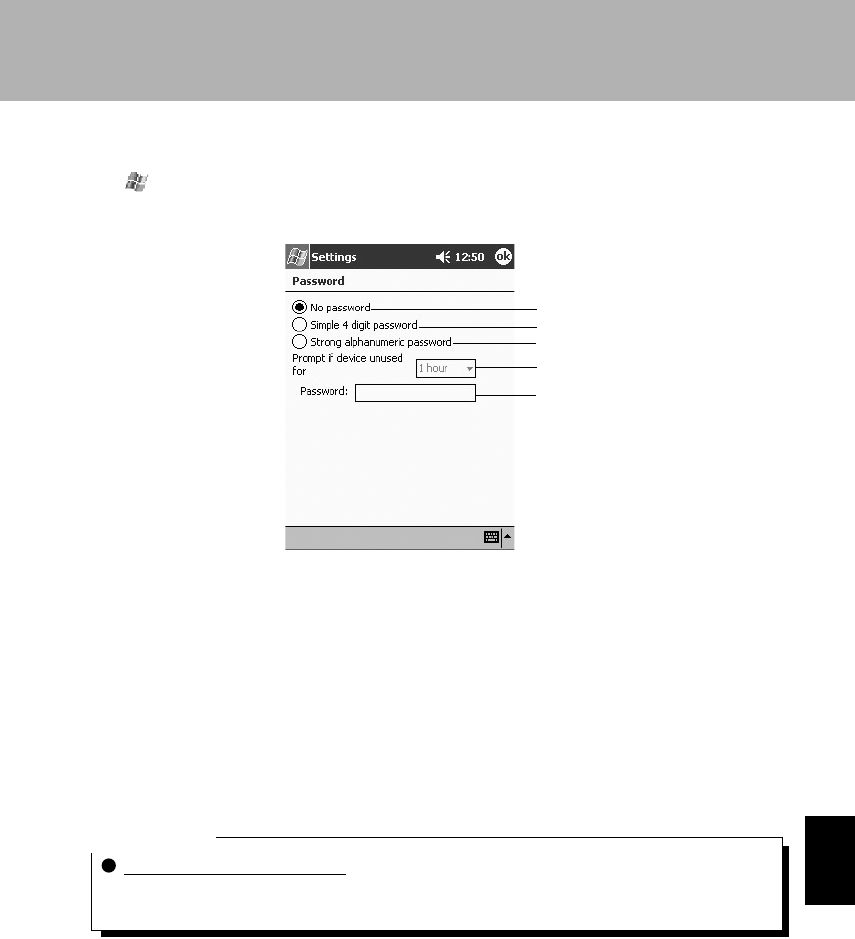
169
SECTION 8
Setting the Password
Tap → “Settings” → “Personal” tab → “Password” in that order.
The following screen is displayed.
1 No password is set.
2 You can set a four-digit number as the password by tapping the key pad
displayed on the screen.
3 You can set a password of at least 7 characters that must combine letters
(uppercase and lowercase) and delimiters (-, -, etc.)
4 If this device is left unused for a specific period, the password input screen is
displayed.
5 Tap here to re-input the password.
Critical Point
Do not forget your password.
If you forget your password, you will need to fully reset this device (which erases all your
data).
5
4
3
2
1
Section 08 LOOX (159-178) 6/25/02, 10:08 AM169
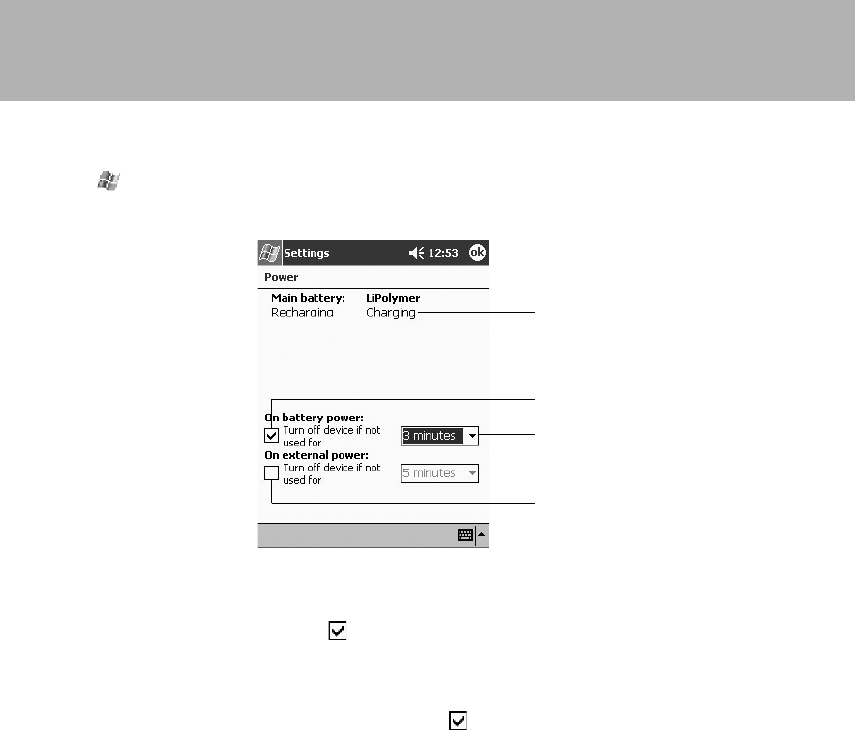
170
Power Settings
Tap → “Settings” → “System” tab → “Power Management” in that order.
The following screen is displayed.
1 Displays the battery status.
2 If you select this checkbox , if this device is left unused for the specified
time while the battery is being used, the power is switched off.
3 This sets the time after which to automatically switch off the power.
4 If you check here to select this checkbox , while the AC adapter (external
power supply) is being used, the power is switched off
4
3
2
1
Section 08 LOOX (159-178) 6/25/02, 10:08 AM170
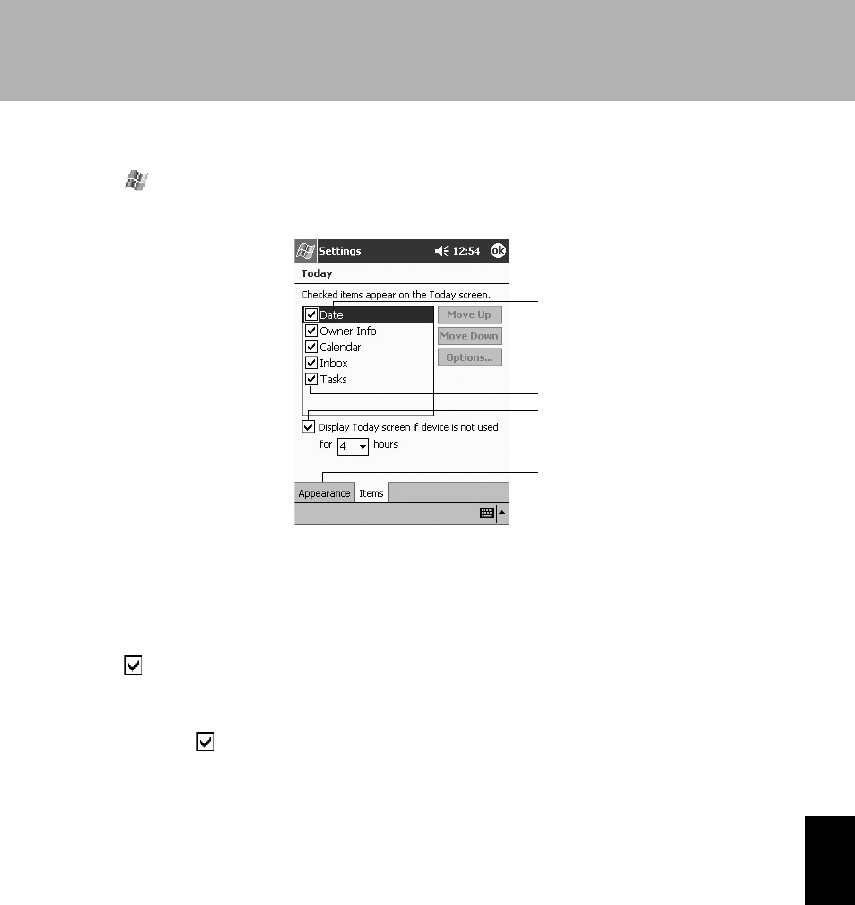
171
SECTION 8
Today Screen Settings
Tap → “Settings” → “Personal” tab → “Today” → “Item” tab in that order.
The following screen is displayed.
1 Select the item and then tap either "Move Up" or "Move Down" to change
your display order. Detailed settings for “Calendar” and “Tasks” can be set
with “Options”.
2 Tap the item you want to display on the “Today” screen to select its checkbox
.
3 If the screen is off for longer than the time set here, when it comes back on,
the display switches to the “Today” screen. To set this function, tap here to
select it , then select the time.
4 On the “Appearance” tab screen, you can set the background etc. for the
“Today” screen.
1
4
3
2
Section 08 LOOX (159-178) 6/25/02, 10:08 AM171
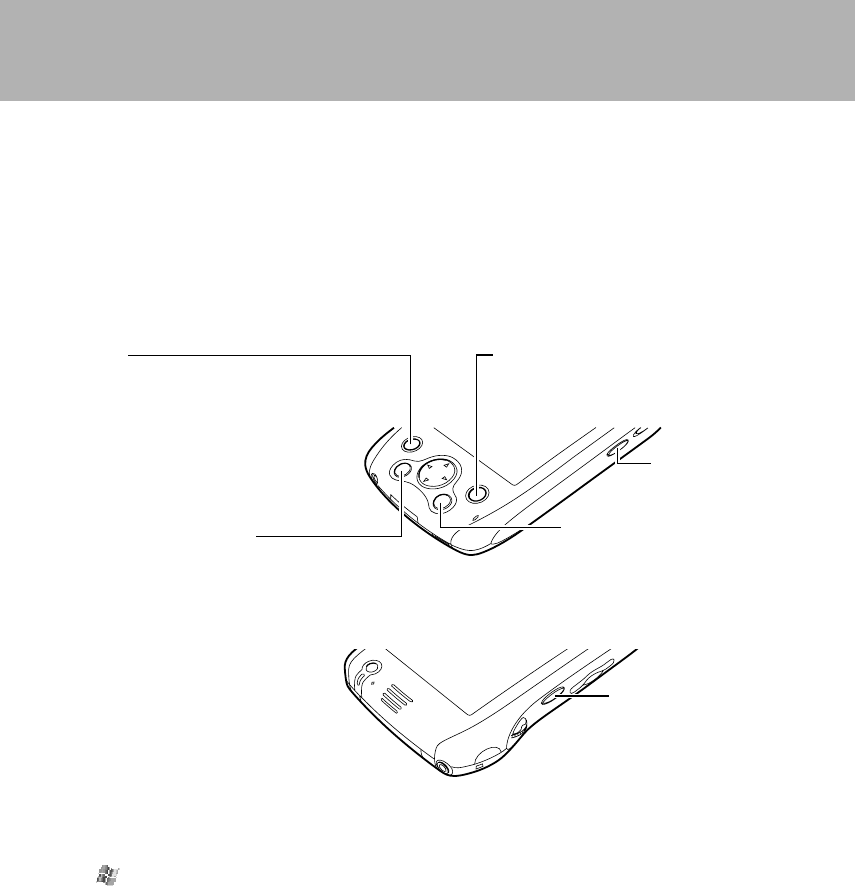
172
Application Buttons Settings
This assigns the applications started when the Record button, application buttons, and
Start button are pressed.
Each application button and the Start button can start two applications, one started by
pressing the button and releasing it immediately, the other started by pressing the
button and holding it about one second before releasing it (long press).
The factory settings are as follows.
Button 1
(Calendar)
“One-Touch Mute” (long press)
Button 2 (Tasks)
User assign (long press)
Button 3
(Contacts)
User assign (long press)
Button 4
(LX Launcher)
User assign
(long press)
Here is how to set the application assigned to each of these buttons.
Tap → “Settings” → “Personal” tab → “Buttons” in that order.
The following screen is displayed.
Start button
User assign
(long press)
Record button
“Sound Recorder”
Section 08 LOOX (159-178) 6/25/02, 10:08 AM172
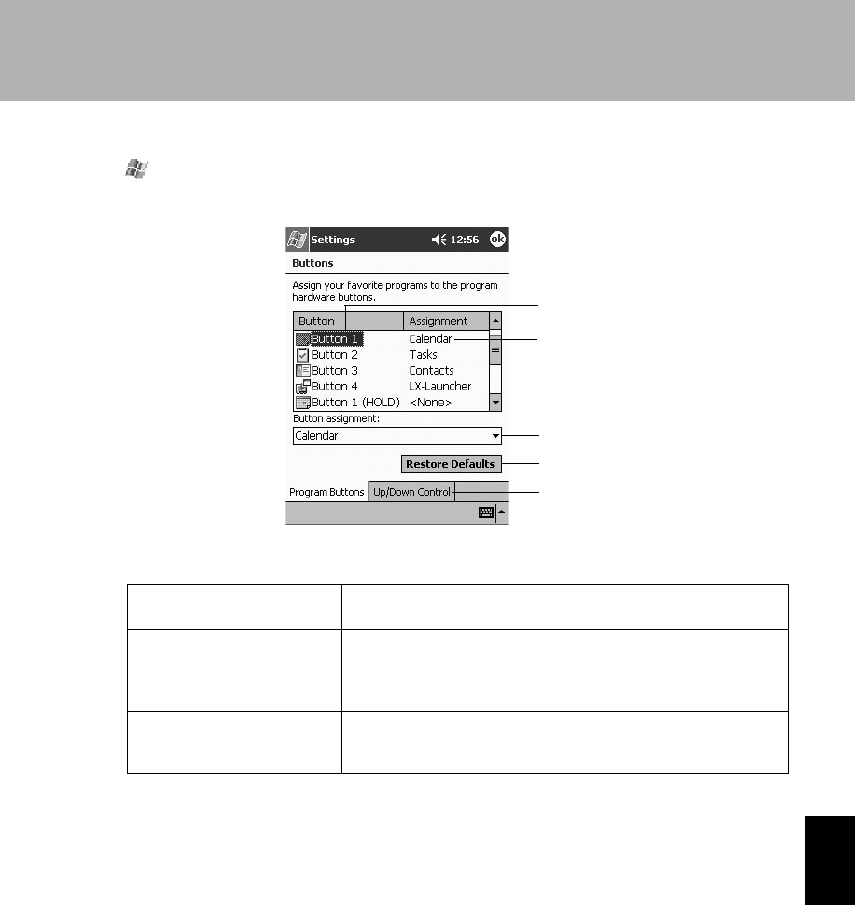
173
SECTION 8
Here is how to set the program assigned to each of these buttons.
Tap → “Settings” → “Personal” tab → “Buttons” in that order.
The following screen is displayed.
1 Tap here and select the button to be set.
2 The current assignment for this button is displayed.
3 Select the new program to be assigned to this button.
4 Return the button to its default setting.
5 Move to the “Up/Down Control” setting.
The “Up/Down Control” tab adjusts the response speed when moving the scroll
lever on this device up/down.
Voice Recorder This sets the application started when the Record button is
pressed.
Button 1 Sets the application started when each application button
Button 2 is pressed and released.
Button 3
Button 4
Button 1 long press Sets the application started when each application button
Button 2 long press is pressed and held down for about one second (long
Button 3 long press press).
1
2
3
4
5
Section 08 LOOX (159-178) 6/25/02, 10:08 AM173
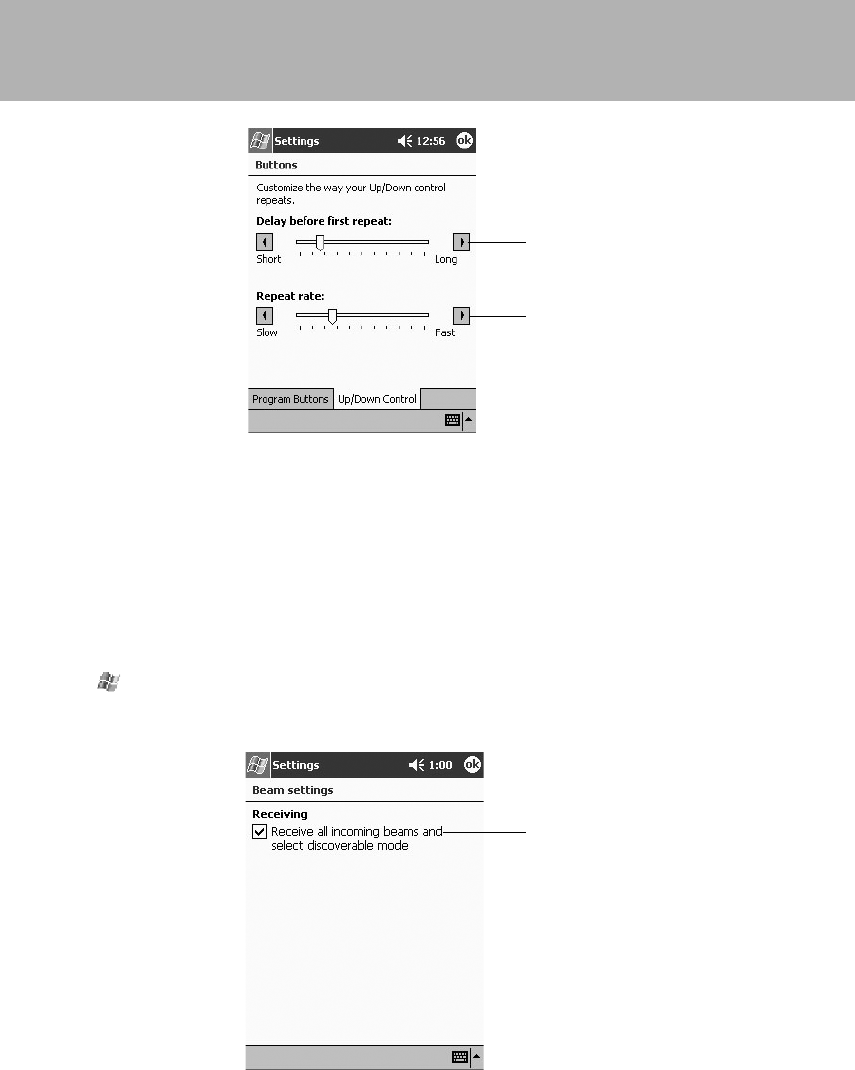
174
1 This adjusts the time from when you press the scroll lever up or down until
the item starts moving.
2 This adjusts the speed with which the item moves when the scroll lever is
held up or down.
Infrared Communications Settings
This sets the method for receiving files sent from other Pocket PCs.
Tap → “Settings” → “Connection” → “Beam” in that order. The following screen is
displayed.
1
2
1
Section 08 LOOX (159-178) 6/25/02, 10:08 AM174
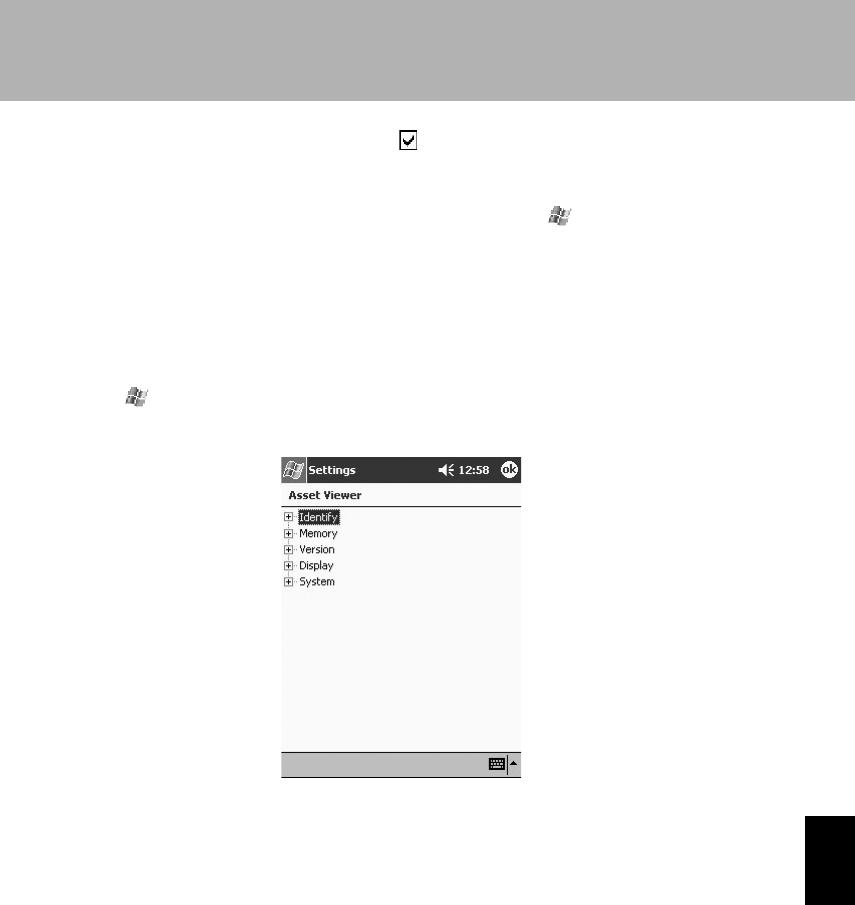
175
SECTION 8
1 When this checkbox is selected , files sent via infrared from other Pocket
PCs are always received.
When this checkbox is not selected , files sent via infrared from other
Pocket PCs are not received. To receive files, tap → “Applications” →
“Infrared Reception” in that order to ready this device to receive files.
Checking System Information
Checking Assets
Tap → “Settings” → “System” tab → “Asset Viewer” in that order. The following
screen is displayed.
When you tap “+”, detailed information is displayed for each item.
Section 08 LOOX (159-178) 6/25/02, 10:08 AM175
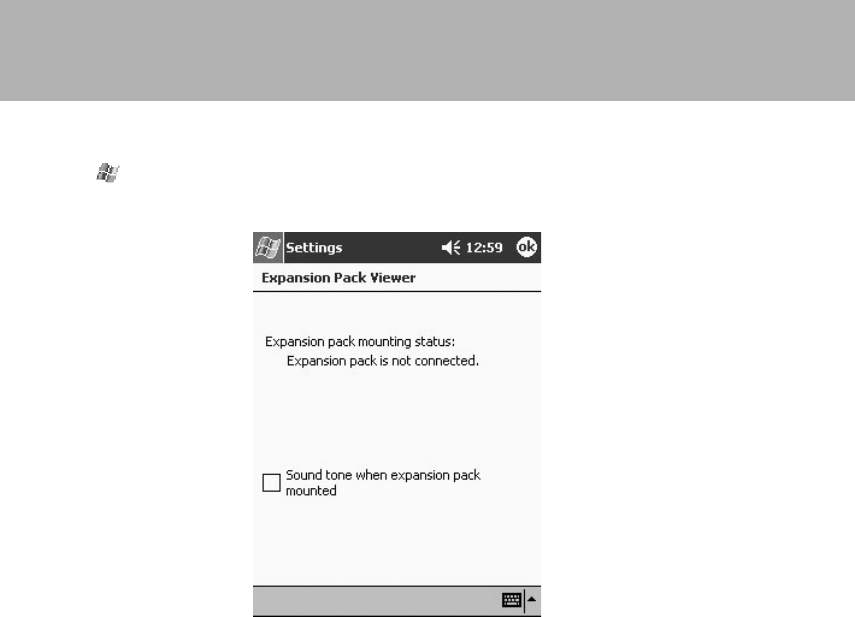
176
Checking the Expansion Pack Status
Tap → “Settings” → “System” tab → “Expansion Pack Status Display” in that order.
Section 08 LOOX (159-178) 6/25/02, 10:08 AM176

177
SECTION 8
2 Adding/Deleting Applications
SECTION 8
You can install additional applications on this device and uninstall applications from it.
Applications You Can Add
You can use the following applications on this device.
• StrongARM/XScale applications
• Pocket PC 2002 applications
Applications for other CPUs and operating systems cannot be installed.
Adding Applications Using Your Computer
You can connect this device with your computer and install applications from your
computer. It is necessary that ActiveSync already be installed on your computer. For
details on how to connect with your computer, see”6 Connecting with a Computer”. For
details on how to install ActiveSync, see the “Companion CD”.
1 Either download the program to your computer or set the CD-ROM containing
the program in the CD drive on your computer.
2 With the cradle connected to your computer, set this device in the cradle.
3 Start the program installer on your computer.
The program is automatically transferred to this device and installed on it.
Critical Point
If the program has no installer
Copy the program to Pocket LOOX according to the instructions in the program user’s guide.
Adding Applications from the Internet
Connect this device to the Internet and download the application. Then, directly start
the installer on Pocket LOOX to install it.
Critical Point
If the application has no installer
Copy the application to Pocket LOOX according to the instructions in the application user’s
guide.
Section 08 LOOX (159-178) 6/25/02, 10:08 AM177
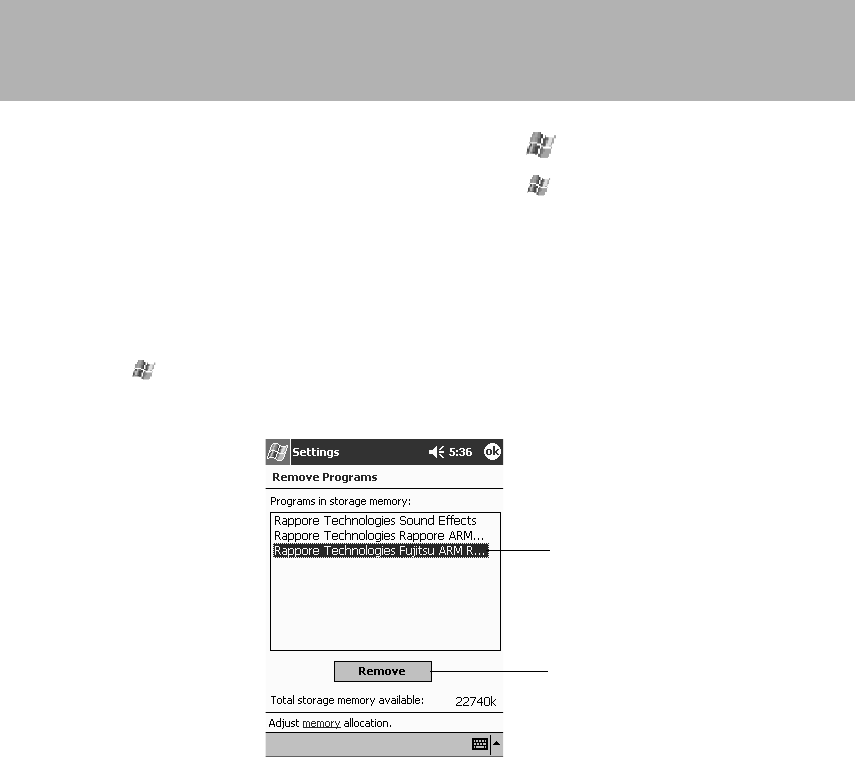
178
Registering Applications on the Menu
This makes it possible start installed applications from the menu. For details on how
to register applications on the menu, see “Menu Settings”.
Removing Applications
You can delete applications you have installed. You cannot delete applications built into
this device.
1 Tap → “Settings” → “System” tab → “Remove Programs” in that order.
2 Operate as follows.
1 From “Applications in Data Storage Memory”, select the application you intend
to remove
2 Tap “Remove”.
3 Tap “Yes”.
1
2
Section 08 LOOX (159-178) 6/25/02, 10:08 AM178

9
9
SECTION
SECTION
SECTION 9
Section 09 LOOX (179-186) 6/25/02, 10:09 AM179

180
1 Minimizing Problems
This section explains points to watch out for in order to prevent problems and
what you should watch out for in order to be ready in case a problem should
occur.
Backing up Your Data
Backup daily in case you device should ever need a full reset or should break down.
There are two ways to backup your data. You can use ActiveSync to back up to your
computer or you can use LX Backup to back up to a CF card or SD/MMC card.
For details on how to back up to your computer, see “4 Backing Up and Restoring”; for
details on how to backup to a CF card or SD/MMC card, see “LX Backup Tool”.
Also, to back up the information stored in the registry, see “Backing Up Registry
Information”.
Checking Documents
When installing an expansion unit or application, carefully read the manual that comes
with the product and check the following points.
• Hardware/software requirements
Check that the expansion unit you want use supports this device and Pocket PC 2002 or
check that the program you want to use supports the CPU in this device (PXA250) and Pocket
PC 2002.
• Points to watch out for during installation
In particular if there is a text file, such as readme.txt or install.txt, there may be critical information
that was not added to the manual. Be sure to look through this file.
SECTION 9
Section 09 LOOX (179-186) 6/25/02, 10:09 AM180

181
SECTION 9
2 Basic Troubleshooting
This section explains the first things to do if trouble occurs.
Checking the Charge and the Connections
If the power will not come on, nothing is displayed on the screen, it is not possible to
connect with the computer, or other such trouble occurs, first check the charge and the
connections.
• Is the battery switch On? See “Preparing to Use this Device for the First Time” and check that
the battery switch is switched On.
• Does the battery have enough remaining capacity? See “Checking the Remaining Capacity
of the Battery”, check the remaining capacity of the battery, and if the battery is too low,
charge it. If you are running with the AC adaptor connected, check that the cable is properly
connected to this device and the electrical socket.
• Check that the cradle is securely connected to the computer and check that this device is
securely set in the cradle.
Messages and Other Notes
If a message appears on the screen, write it down. This will help when searching for the
corresponding fault, for example in the error messages in the manual, and if you need
to ask for help.
SECTION 9
Section 09 LOOX (179-186) 6/25/02, 10:09 AM181

182
SECTION 9
3 General Troubles
If you think that your device may have broken down, check the following points
first.
Q: Is the Power on?
Solution Is the battery switch On?
See “Preparing to Use this Device for the First Time” and check that the battery switch
is switched On.
A Is the battery adequately charged?
First, connect the AC adaptor and check if you can now switch on this device. If you
can, switch off the power and leave the AC adaptor connected to charge the battery.
A Some kind of fault is occurred
If the battery is adequately charged or the AC adapter is connected, but this device still
does not work properly, see “5 Reset” and execute a normal reset. If this device still
cannot be switched on, execute a full reset.
Q: Slow or no response
A For some reason or other, the memory status is jammed
See “5 Reset” and execute a normal reset. If the response does not change, execute a
full reset.
A Insufficient memory
The memory in this device is shared as data storage memory and application execution
memory. If the amount of data increases or many applications are added, memory
capacity may become inadequate and response may slow down. If this happens, free
up memory, for example by eliminating unnecessary data and applications.
Releasing Data Storage Memory with the following methods.
Release data storage memory with the following methods.
• Delete unnecessary data or archive it to your computer or onto a CF card or SD/MMC
card.
• Delete large files. If you tap "Search”, select “Type” and then select “Files larger than 64
KB”, you can search for large files.
• Uninstall programs you do not use according to the instructions in 2 Adding/Deleting
Programs.
• Use the following procedure to transfer email attachment files to a CF card or SD/MMC
card.
1 Set a CF card or SD/MMC card.
2 Tap → “Inbox” in that order.
Section 09 LOOX (179-186) 6/25/02, 10:09 AM182

183
SECTION 9
3 Tap the “Tools” menu → “Options” in that order.
4 On the “ File Locations”, tap the “Save attached files to memory card” checkbox to
selected .
Attachment files stored in the main memory are moved to the card. Also, attachment
files received from now on are stored to the card, so either restore this setting as
necessary or be sure to install the card when receiving email.
• Delete temporary Internet files with the following procedure.
1 Start Pocket Internet Explorer.
2 Tap the “Tools” menu → “Options” in that order.
3 Tap “Clear history” and “Delete files”.
Releasing Program Execution Memory
See “Closing Programs” and close programs that are running.
Q: The screen is dark and hard to read
A Was there direct sunlight on the screen?
If the LCD panel is exposed to direct sunlight for a prolonged periods of time, the
screen becomes temporarily dim. It will return to normal after a little while.
A Adjust the screen brightness and font size
Adjust the screen brightness according to the instructions in “Changing the Front Light”.
Also, if the program allows you to adjust the font size, increase the size of the
characters.
• For Pocket Internet Explorer, adjust with the “View” menu → “Font size”.
• For Pocket Word/Pocket Excel, adjust with the “Tools” menu → “ Zoom”.
• For Pocket Outlook Calendar, Tasks, Contacts, The “Tools” menu → “options”, then tap the
“Use large fonts” checkbox to select it . For Notes, adjust the font size with the “Tools” menu.
Q: Strange responses to taps
A Adjust the touch panel position
Adjust the touch panel according to the instructions in “Adjusting the Touch Panel”.
A This device may be no functioning due to static electricity
See “Normal Reset” and execute a normal reset.
Q: I forgot my password
A Reset this device
See “Full Reset” and execute a full reset.
When you execute a full reset, the data being operated on, data created by the user,
and applications added by the user are erased and this device is returned to its factory
state.
Section 09 LOOX (179-186) 6/25/02, 10:09 AM183

184
SECTION 9
4 Connection Related Troubles
This section covers troubles related to connections.
Q: Infrared communications do not work
A Check the following points
Check the installation position and ambient environment according to the instructions in
“Securing Good Communications”.
BluetoothTM communications do not work
A Check the following points
• Check the installation position and ambient environment according to the instructions in
“Securing Good Communications”.
• Check that the BluetoothTM switch is at the On side.
• Check that the power for the other BluetoothTM device is On and that the BluetoothTM
communications software settings are correct.
Can not connect to the Internet
A Check the following points
• Check that the modem type and communications speed match your CF card.
• Check that the server addresses etc. match the information from your provider.
• Check that the telephone number matches the access point for your provider.
• Check that the Sender is set to “CF” and that the line type is set to “Tone”.
• Check that the CF card is set properly in place.
• Check that the signal is good.
Section 09 LOOX (179-186) 6/25/02, 10:09 AM184

185
SECTION 9
SECTION 9
5 When You Can Not Solve a Problem
If you can not find a solution to a problem, contact the appropriate contact point.
In the following cases, contact Fujitsu service center.
• Inquiries concerning breakdown and repair, for example if you accidentally break this device
• When you have checked the manual and help but can not find the information you need about
usage
• This device does not operate normally even after a full reset.
Important
Requesting repairs
When you send this device out for repair, it may come back with none of the contacts or other
data or in the same state it was in when you purchased it. If possible, back up all your data to
your computer or to a CF card or SD/MMC card before sending this device for repair. Also,
back up frequently.
Section 09 LOOX (179-186) 25/06/02, 2:33 PM185

10
10
SECTION
SECTION
SECTION 10
Section 10 LOOX (187-190) 6/25/02, 10:10 AM187
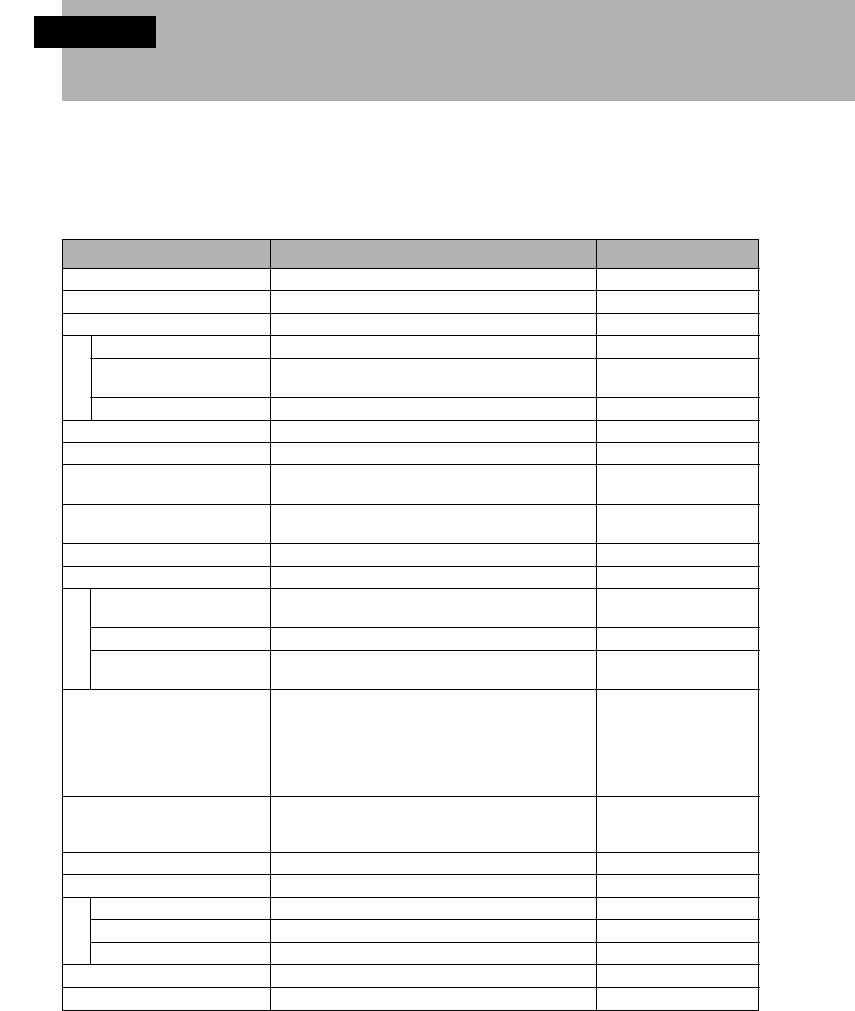
188
1 Specifications
The hardware specifications for this device are as follows.
Specifications
Main unit
Item Specifications Remark
OS
CPU
Display controller
Main memory
Backup Memory
ROM
Screen display
Pointing device
Card slots
Audio
IrDA
BluetoothTM
External connection ports
Expansion connector
Stereo headphone jack
Operation buttons
Switches
Indicator
Light sensor
Main battery
Battery life
Charge time
Dimensions (mm)
Weight (g)
SECTION 10
2-color LED
Senses ambient light
operating/suspended
M
e
m
o
r
y
E
x
t
e
r
n
a
l
i
n
t
e
r
f
a
c
e
s
65536 colors
Distance: 20cm
4-pin, 3.5-mm diameter
P
o
w
e
r
s
u
p
p
l
y
* – when "Today" screen displayed continuously, front light Off, normal temperature, battery fully
charged, Bluetooth Off
– depends on the ambient temperature, usage conditions, etc.
Microsoft Pocket PC Software 2002
Intel PXA250 Applications Processor (400 MHz)
Built into CPU
64 MB DRAM
Uses part of the above main memory and flash
memory
32 MB FLASH Memory
3.5-inch front-lit QVGA reflective color LCD
Resistance-film touch panel (glass-film)
Compact Flash card TYPE II (CF+/CompactFlash
1.4) x1; SD/MMC slot x1
Input: Monaural (built-in mic)
Output: Stereo (built-in monaural speaker)
IrDA ver.1.2 (up to 115 kbps)
Built-in BluetoothTM 1.1 Class 1 Module
For connection with Cradle, USB sync cable and
Serial sync cable
Expansion battery input etc.
For stereo headphones
Power button
Scroll lever (up/down, push)
Record button
Start button
Navigation buttons (up/down/left/right, push)
Applications buttons x4
Battery switch
BluetoothTM switch
Reset switch
LED x1: (Charge: green; Alarm: Orange)
Brightness sensor x1
Lithium polymer rechargeable battery (2 cells)
About 10 hours *
3 hours (standard)
77.3 W x 130 H x 17.5 D
175
Section 10 LOOX (187-190) 6/25/02, 10:10 AM188
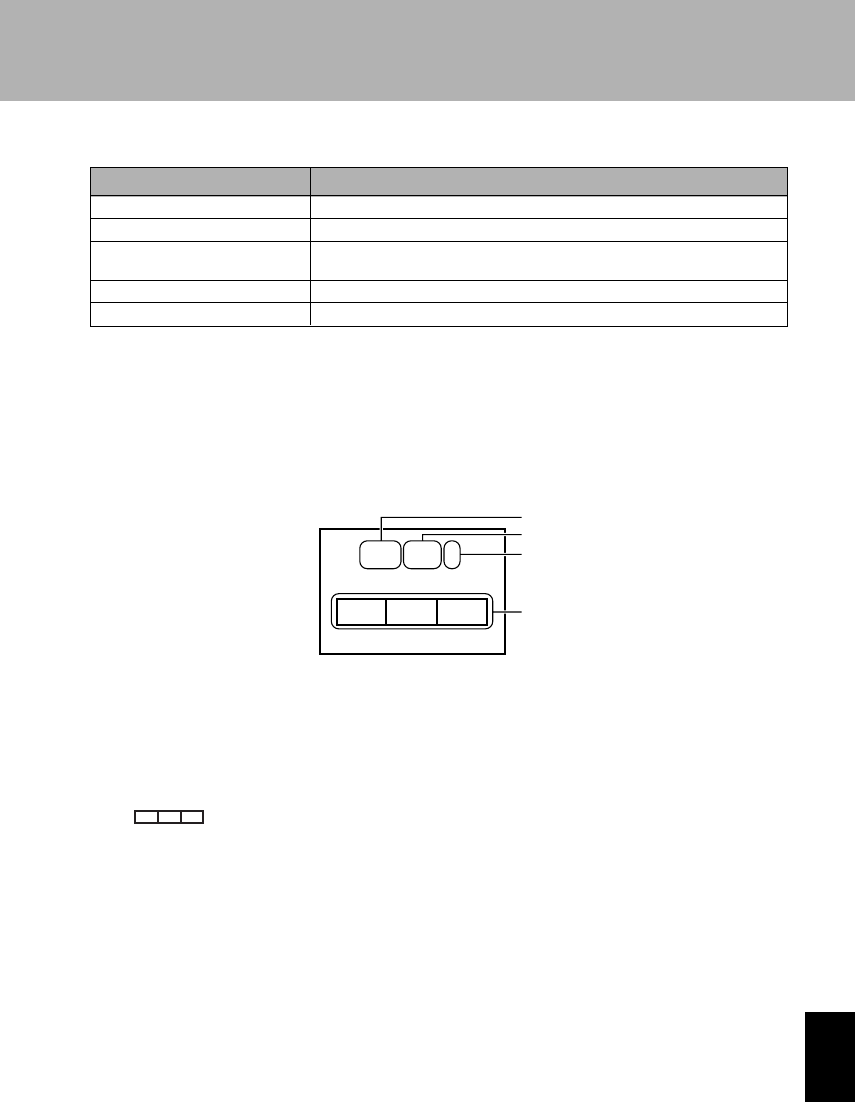
189
SECTION 10
BluetoothTM function section
Item Specifications
Interface
Communications method
Communication speed
Communications distance
Output
USB
BluetoothTM Specification Ver.1.1
about 720 kbps (for asynchronous communications)
about 430 kbps (for synchronous communications)
about 50 meters (varies with signal strength and environment)
11 dBm max. * (PowerClass 1)
* Does not include the antenna efficiency.
Frequency band
The frequency band used by this device is listed on the label on this device. This label is
read as follows.
1 “2.4”: Indicates that this is wireless equipment using the 2.4-GHz band.
2 “FH”: Indicates that the modulation method is “FH-SS”.
3 “8”: Indicates that the estimated distance over which this device might cause
interference is no more than 80 meters.
4“ ”: indicates that this device uses the entire band width from 2,400
MHz to 2,483.5 MHz and that this device cannot avoid the band region for
mobile unit identification devices.
2.4 FH 8
1
2
3
4
Section 10 LOOX (187-190) 6/25/02, 10:10 AM189

190
2 Recycling
This section explains how to dispose of/recycle this device.
Disposing of This Device
The fluorescent tube inside the LCD display in this device contains mercury. Disposal of
this device is regulated by the “Law concerning Processing and Cleaning of Waste
Materials”.
When this device is disposed of, it is handled as ordinary waste, so follow the relevant
local ordinances and regulations concerning the processing of waste.
Disposing of Expansion Batteries
Battery packs (lithium polymer batteries) are valuable resources. Please cooperate in
recycling them. If you throw such a battery pack into a fire, it may burst. Always wrap
used-up battery packs in vinyl tape or the like for insulation.
SECTION 10
Section 10 LOOX (187-190) 6/25/02, 10:10 AM190