Quanta Computer QD8 Portable Router User Manual BF 01C
Quanta Computer Inc Portable Router BF 01C
Contents
- 1. manual
- 2. user manua
- 3. user manual
manual
BF-01C
User Manual
Introduction
Installing the BF-01C
Wireless Connection to the BF-01C
Internet Connection Settings
Use Overseas
Troubleshooting
1
2
3
4
5
6
Thank you for purchasing the BF-01C.
This manual describes product installation and its
default settings. It also provides troubleshooting
information. Please always read this manual before
using the product.
Appendix 7

1
1 Introduction
1
Main Features
This section describes the main product features.
• SupportsNTTDocomo”Xi”.(Whenreceiving:Max.37.5Mbps;Whensending:Max.
12.5Mbps)
※Thecommunicationspeedsarethemaximumvaluesinsendingandreceiving
standards.However,thesedonotindicateactualcommunicationspeeds.Data
transmissionisprovidedoverabest-effortnetwork.Forthatreason,actual
communicationspeedsmayvaryaccordingtothecommunicationenviron-
mentandthetrafficloadonthenetwork.
※WhenoutsideoftheXiarea,thiscanalsobeusedinaFOMAhigh-speedarea
(whenreceiving:Max.7.2Mbps;whensending:Max.5.7Mbps).
• TheInternetconnectionautomaticallyswitchesinpublicwirelessLANareas,such
asMzone,fromtheXilineorFOMAlinetothepublicwirelessLAN.
• Theincludedcradleprovidesawiredportconnection,andrechargestheproduct.
• Connectsupto10wirelessLANdevices,suchaspersonalcomputersandgame
consoles.
• ConnectstowirelessLANdeviceswithonetouchusingAOSSorWPS.
Operating Environment
Thissectiondescribestheproductoperatingenvironment.
Supported Devices
iPad,iPodtouch,gameconsole(Nintendo3DS™,NintendoDS®,PSP®”PlayStation
Portable”),anddevicesthatsupportwirelessLAN.

2
Supported OS (Personal Computers)
Windows7(32bit/64bit),Vista(32bit/64bit),XP(32bit),
MacOSX(10.4/10.5/10.6)
※ Supports Windows 7 Starter/Home Premium/Professional/Ultimate.
※ Supports Windows Vista Home Basic/Home Premium/Business/Ultimate.
※ Windows XP must have Service Pack 3 or later installed.
Supported Browsers
InternetExplorer6/7/8/9
Firefox3.5/3.6/4
NintendoDSBrowser,NintendoDSiBrowser
PSP®InternetBrowser
InternetExplorerMobile(WindowsMobile6.x)
OperaMobile9/10
Safari3/4/5(MacOS/iPodtouch)
※ To change the product's settings, or to check the setting contents, use Internet
Explorer 6/7/8/9, or Firefox 3.5/3.6/4 (Windows 7/Vista/XP). Browsers provided in
game console or cell phones cannot implement all product settings.
3
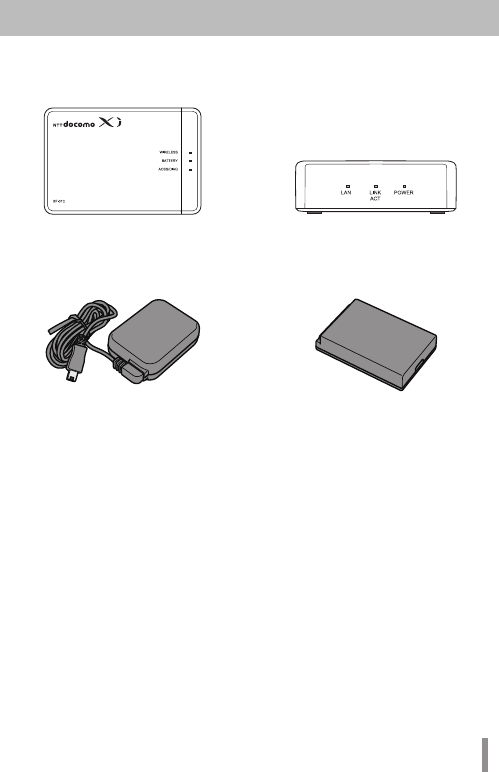
Mobile Wi-Fi Router (BF-01C) Unit
(Rear Cover BF01C, Includes Warrantee)
Desktop Cradle BF01C (Includes
Warrantee)
AC Adapter BF01 (Includes Warrantee) Battery Pack BF01
Main Unit Accessories
Beforeusingthisproduct,checkthatalloftheaccessoriesareincluded.
4
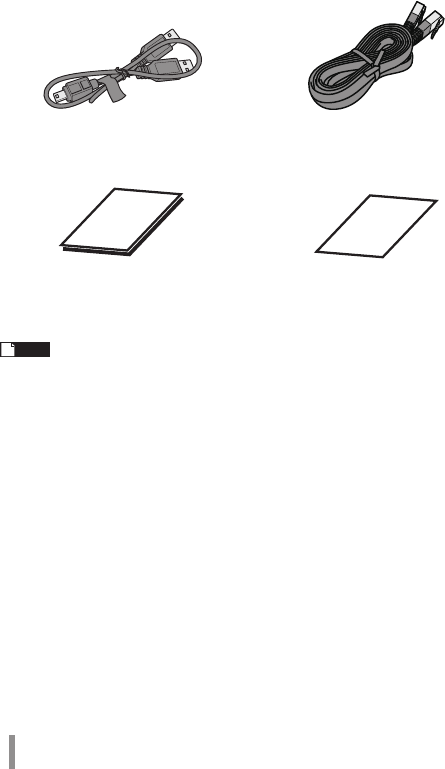
Note If separate, additional information is included, refer to that.
USB Cable BF01 LAN Cable (Free Sample)
User Manual (This Manual) Mobile Device Connection Guide
5
Part Names and Functions
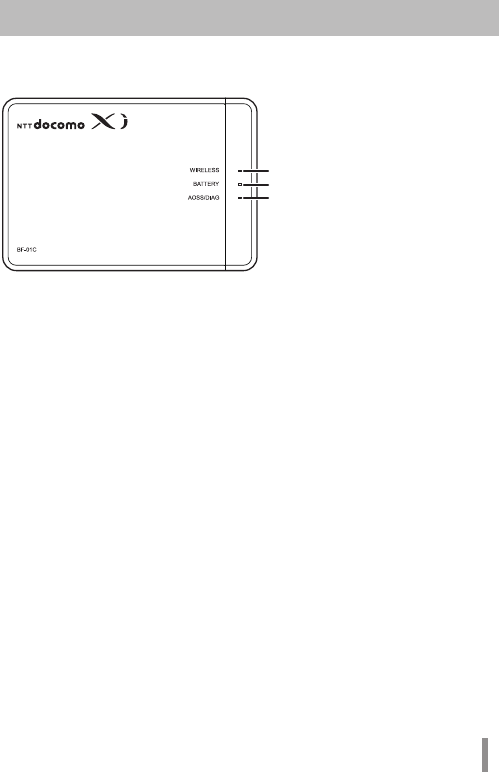
Front Panel
1. WIRELESS LED
Glowing(lightblue) : WheninXiarea
Glowing(purple) : WheninFOMAinternationalroamingarea
Glowing(blue) : WheninFOMAarea
Glowing(green) : WheninwirelessLANarea
Glowing(red) : WhenoutsideofXiarea,FOMAlineandwirelessLAN
area,andwhennotconnectedtowiredInternet
Glowing(yellow) : Wheninpowersavingmode
Flashing(lightblue) : WhencommunicatingonXiline
Flashing(purple) : WhencommunicatingonFOMAinternational
roamingline
Flashing(blue) : WhencommunicatingonFOMAline
Flashing(green) : WhencommunicatingonwirelessLAN
Off : WhenconnectedtowiredInternet
2. BATTERY LED
Glowing(blue) : Batterycapacityis50%orhigher
Rechargingiscompletedandthepoweris
turned on
Glowing(green) : Batterycapacityis50-25%
Glowing(red) : Batterycapacityis25-10%
Flashing(red) : Batterycapacityis10%orlower
Glowing(yellow) : Recharging
Off : Rechargingiscompletedandthepoweris
turned off
※ Battery capacity is a general indicator.
1
2
3
6
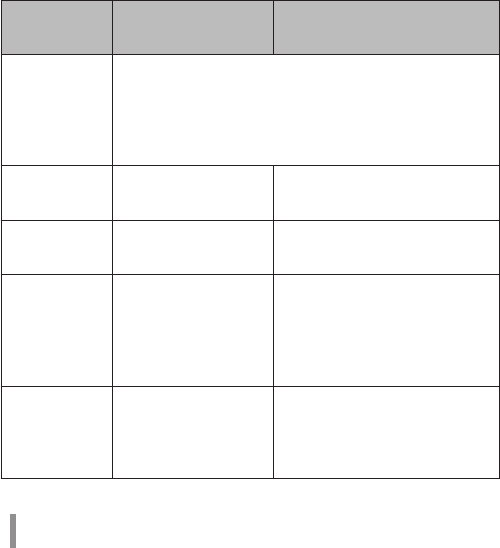
3. AOSS/DIAG LED
Glowing(yellow) : Securitykeyexchangesucceeds(AOSS/
WPSsucceeds)/WirelessLANsecuritysetting
completed
FlashingTwoTimes(blue): Thisproductcanexchangesecuritykeys.
(LANSide:AOSS/WPSIdling)
(InternetSide:AOSSIdling)*1
ContinuousFlashing(blue): Failedtoexchangesecuritykeys(AOSS/WPSfailed)
Flashing(red) : Thenumberofflashesindicatesthestatusofthe
product.
Off : WirelessLANsecurityisnotset.
Flashing (red)
status Content Status
Continuous
Flashing*2
•Bootingupsystem
•Updatingthefirmware
•Savingsettings
•Initializing
•Accessinginternalstorageregion
FlashingThree
Times *3
WiredLANError WiredLANcontrolleris
malfunctioning.
FlashingFour
Times *3
WirelessLANerror WirelessLANcontrolleris
malfunctioning.
FlashingFive
Times
IPAddressSettingError Communicationisnotpossible
becausethenetworkaddressesare
thesameontheInternetsideand
theLANside.Changetheproduct's
LAN-sideIPaddresssetting.
FlashingSix
Times
TemperatureError Theinternalproducttemperature
ishigh.Turnthepowertothe
productoffandallowittocoolfor
awhilebeforeusingit.
7
*1 Devices idling with AOSS switch to flashing two times (yellow) when
detected by the Internet side of the product.
*2 Do not turn off the power when the device is continuously flashing. Doing
so can damage it.
*3 When the AC adapter is disconnected from the device, turn off the power
to it, and remove the battery pack. Return the battery pack to its original
position after waiting for a while.
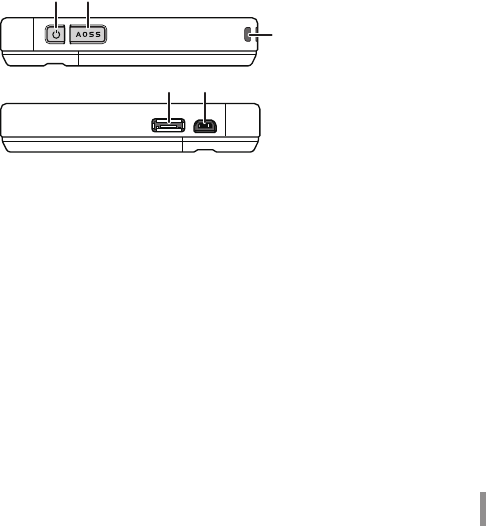
Side Panel
4. Power Button
Whenthepowerisoff,holddownthepowerbuttonforapproximatelythree
secondstoturnthepoweron.Whenoperatingthisdevice,holddownthe
powerbuttonforapproximatelythreesecondstoturnthepoweroff.
5. AOSS Button
Whenthepowerison,holddownthebutton(forapproximatelythree
seconds)untiltheAOSS/DIAGLEDflashesinbluetoenterastatus(AOSS
operatingstatus)wheresecuritykeyscanbeexchanged.
6. Strap Hole
Attachescommerciallyavailablestraps.
7. Cradle Connector
Connectstheincludedcradle.
45
6
78
8
8. Mini USB Connector
ConnectstheincludedACadapteroraUSBcable.
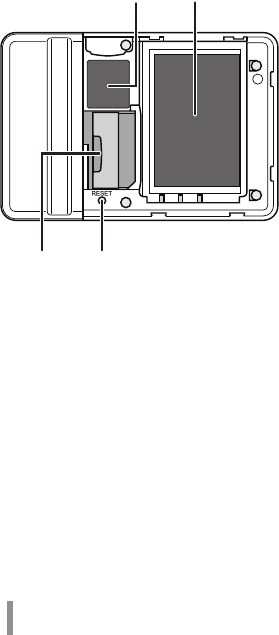
Back Side Panel
9. Default Value Label
Liststhisunit’sSSID(defaultvalue)andencryptionkey(defaultvalue)andthe
like.
10. Battery Box
Holdstheincludedbatterypack.
11. UIM Card Slot
ForinsertingaDocomoUIMcard.
※ This device does not support the use of FOMA cards. If you have a FOMA
card, please replace it from your Docomo vendor.
12. RESET Switch
Whenthepowertothisdeviceison,holddowntheRESETbutton(for
approximatelythreeseconds)untiltheAOSS/DIAGLEDflashesinredto
initializethesettings.
910
11 12
9
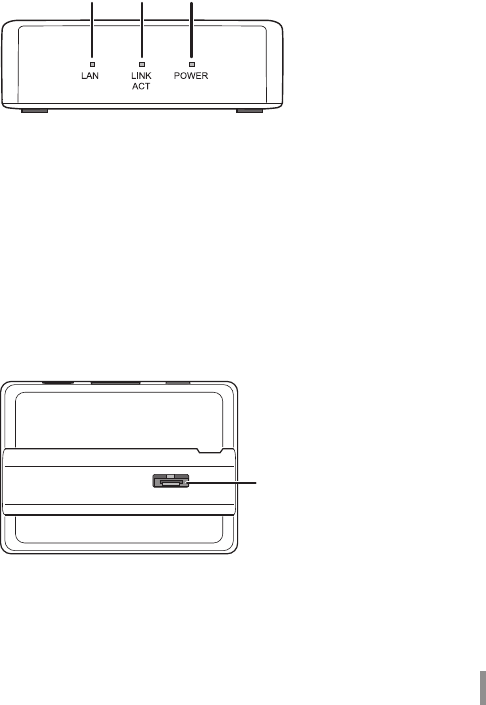
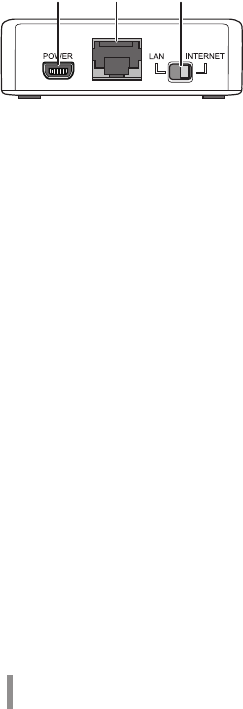
Cradle Front Side
Cradle Top
13. LAN LED
Glowing(green) : WhenthewiredportissetastheLANport
Off : WhenthewiredportissetastheINTERNETport
14. LINK/ACT LED
Glowing(green) : Whenthewiredportislinked
Flashing(green) : Whenthewiredportiscommunicating
15. POWER LED
Glowing(green) : WhentheincludedACadapterisconnected
16. Cradle Connector
Connectsthemainunit'scradleconnector.
13 15
14
16
10
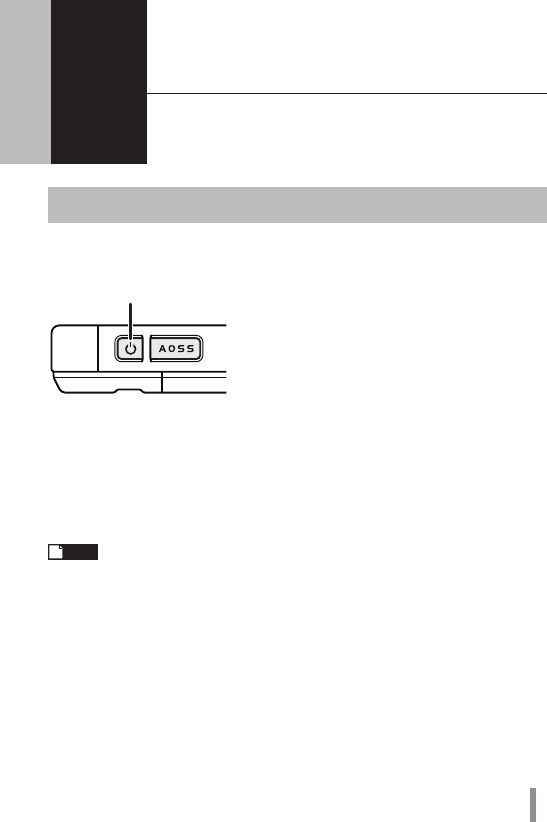
Cradle Back Side
17. POWER Connector
ConnectstheincludedACadapter.
18. Wired Port
SwitchtooperatethisastheLANportortheINTERNETportbyusingtheon-
off switch.
19. On-off Switch
SwitchtousethewiredporteitherastheLANportortheINTERNETport.
17 1918
11
2 Installing the BF-01C
2
Power ON/OFF
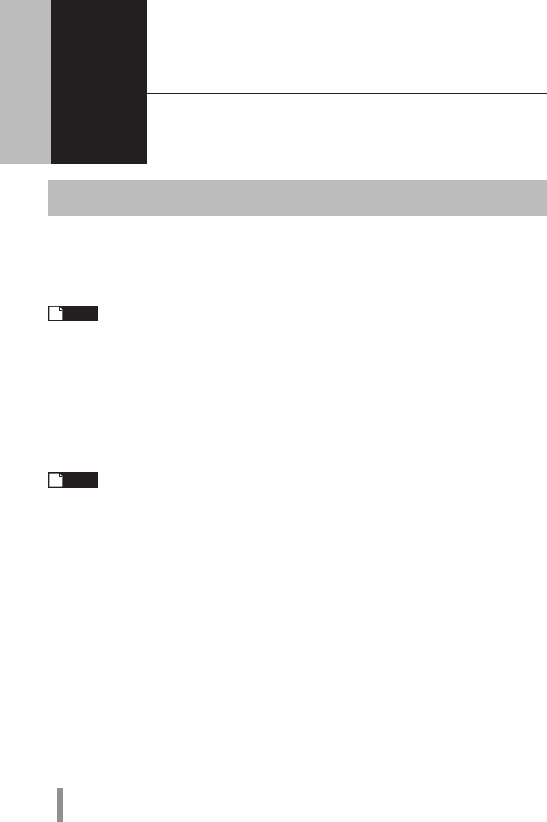
TurnthepowerON/OFFusingthepowerbutton.
Whenthepowerisoff,holddownthepowerbuttonforapproximatelythreeseconds
to turn the power on.
Whenoperatingthisdevice,holddownthepowerbuttonforapproximatelythree
seconds to turn the power off.
Note
In the default setting, if no wireless device is connected to the product
for approximately one minute, it will automatically switch to standby
mode. Operations such as connecting to the Internet do not work while
the unit is in standby mode. But the system will recover to its normal
operating status either by pressing the power button or by connecting
a wireless device to the product. However, the system will not shift to
standby mode while power is being supplied or when it is connected to a
wired port.
Power Button
12
3
Wireless Connection to the BF-01C
3
Wireless Connection to a Personal Computer
Thissectiondescribestheproceduresforconnectingthisproductwirelesslytoa
personalcomputerrunningWindows,usingAOSS/WPS(push-buttontype)asan
example.SettingmethodsvaryaccordingtotheversionofWindowsthatisrunning.
Note
Refer to the Reference Guide for details on other connecting methods.
See page 58 in this manual on reference method.
For Windows 7/Vista
FollowtheprocedurebelowtoconnecttothisdeviceusingAOSS/WPS(push-button
type)onapersonalcomputerrunningWindows7orVista.
Note
In setting AOSS/WPS (push-button type), the personal computer and this
device establish a 1-to-1 relationship. For that reason, you cannot
connect another device with AOSS/WPS (push-button type) while it is
being set. To connect multiple devices to one BF-01C unit, connect
another device after completing the AOSS/WPS (push-button type)
connection.
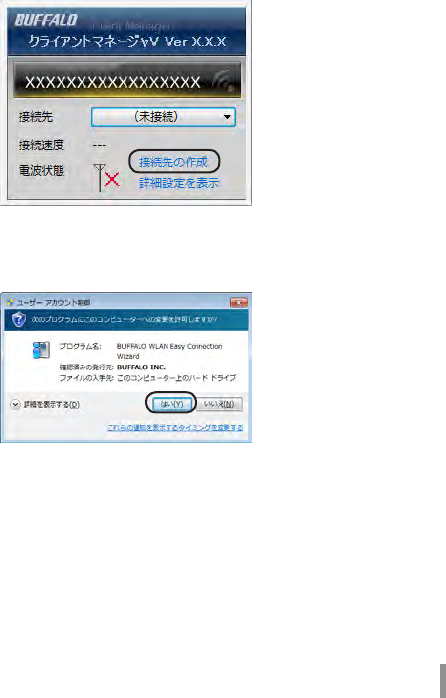
1 Select [Start] - [(All) Programs] - [BUFFALO] - [AirStation Utility] -
[Client Manager V].
13
2 When the screen below is displayed, click [Create connection
destination].
3 When the ”User Account Control” screen is displayed, click [Yes] or
[Continue].
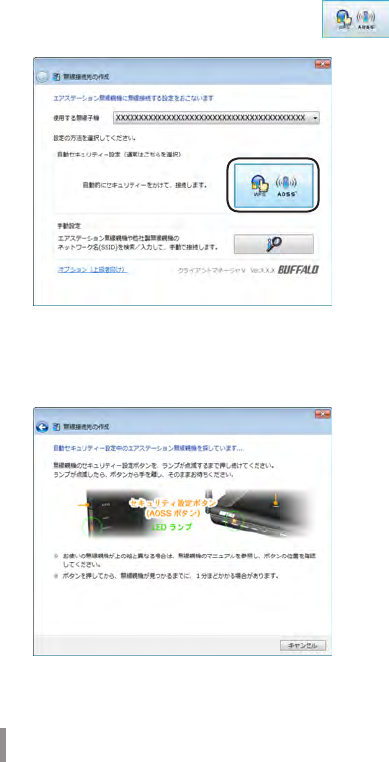
14
4 Click the automatic security setting button displayed in
the screen.
5 When the screen below is displayed, hold down the AOSS button
for approximately 2 seconds until the AOSS/DIAG LED flashes.
Release the button when the LED flashes.
※ The product image in the screen is an example. The product and AOSS
button position may differ from your system, so check the position of the
button in advance.
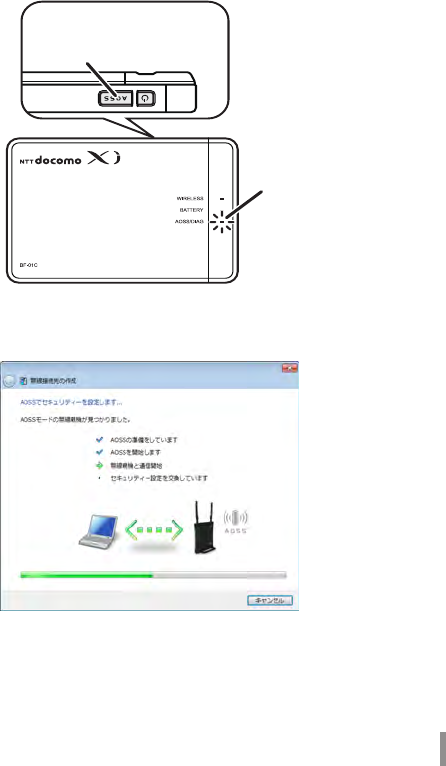
15
6 The device is automatically detected, and connected.
※ The product image in the screen is an example.
Hold down the AOSS
button until the AOSS/DIAG
LED ashes twice in blue.
AOSS/DIAG LED
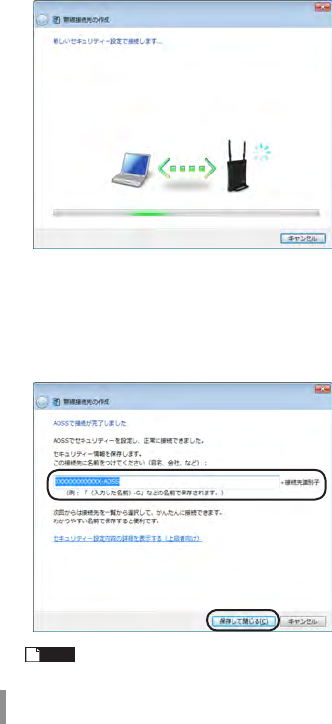
16
7 Wait for the connection to complete.
8 When ”Connection with AOSS completed” or ”Connection with WPS
push-button type completed” is displayed, check the name of the
connection destination, and click [Save and close].
※ The product image in the screen is an example.
Note The connection destination name can be freely set.
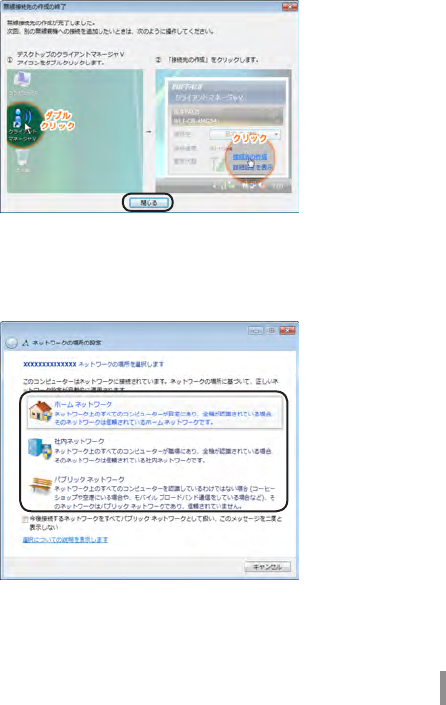
17
9 When ”Wireless connection destination creation completed” is
displayed, click [Close].
10
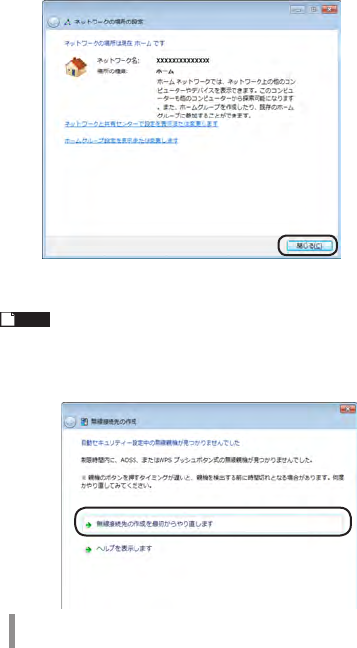
If a screen ”Set Network Location” is displayed, click the location
that matches the environment where the devices will be used.
(In the example here, click ”Home Network”.)
18
11 If the ”User Account Control” screen is displayed, click [Yes] or
[Continue].
12
If the screen below is displayed, click [Close].
Thiscompletesconnectingtothisproduct.
Note
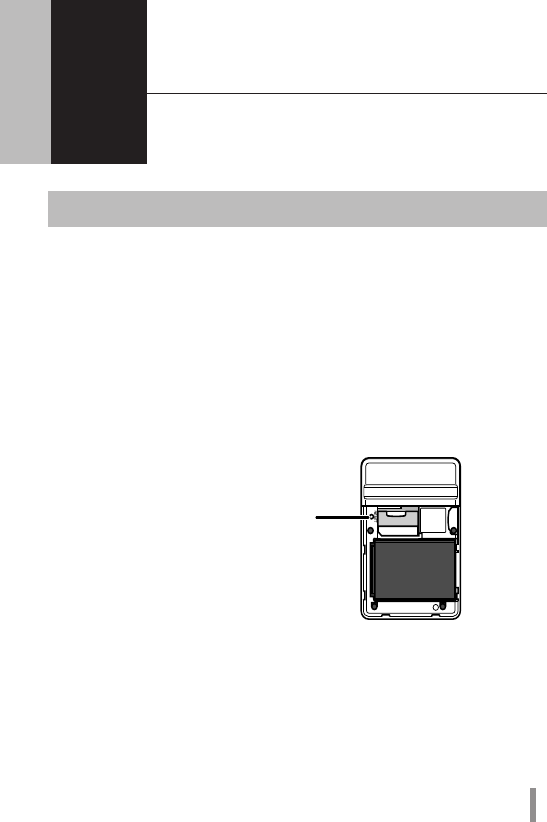
If connecting to this device fails, the AOSS/DIAG LED will continuously
flash in blue for approximately 30 minutes, and a screen like the one
below is displayed. In such case, click ”Start creating wireless connection
from the beginning” and implement the procedures again from step 4
(Page14).
※ Sample screen.
19
4 Troubleshooting
4
Initializing the Settings
Usethefollowingprocedurestoinitializethesettings(Reset).
1 Check that the power to the device is on.
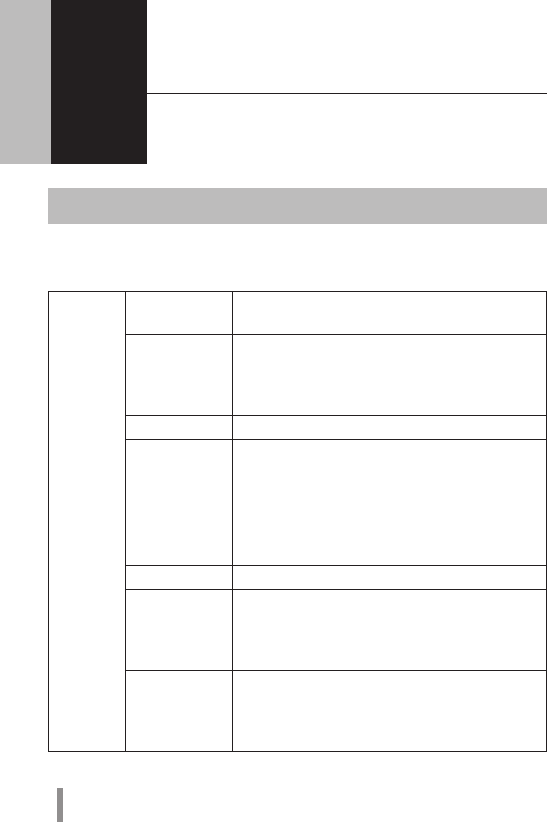
2 Remove the back side cover.
3 Hold down the RESET button (for approximately three seconds)
until the AOSS/DIAG LED flashes in red.
4 After about one minute, check that the AOSS/DIAG LED is lit in yellow.
Thiscompletesinitializationofthisproduct.
RESET Button
20
5 Appendix
5
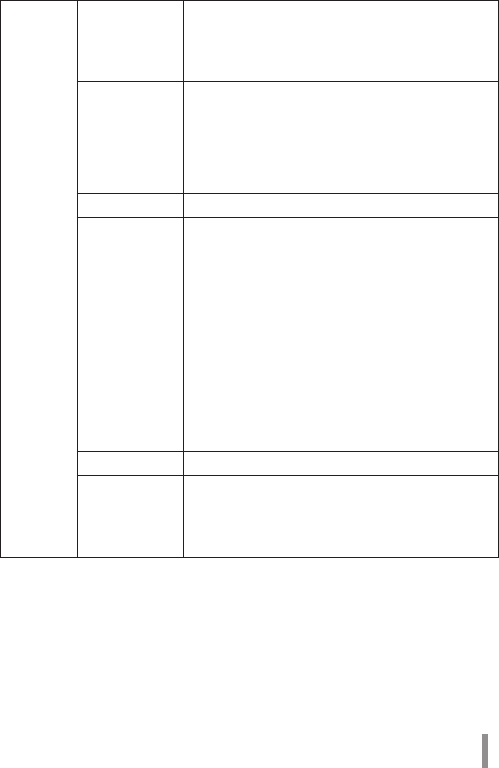
Product Specifications
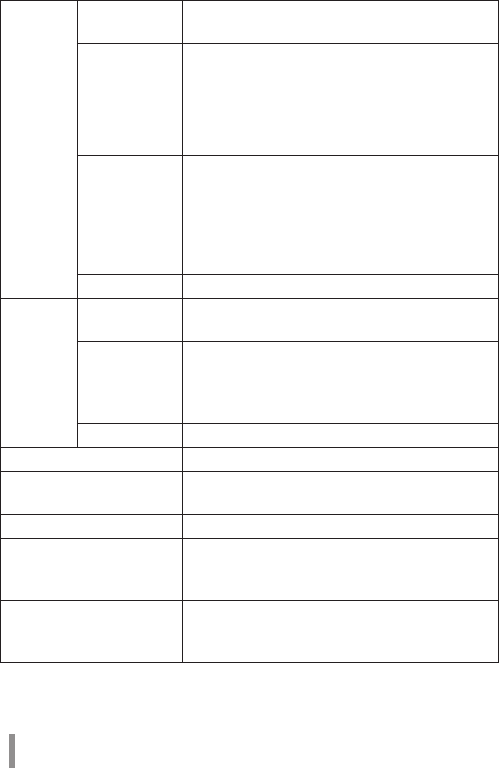
Main Unit/Cradle
Wireless
Interface
(LAN Side)
Compliance
Standards
IEEE802.11b/IEEE802.11g/IEEE802.11n
ARIBSTD-T66(IEEE802.11b/g)
Maximum Data
Transfer Speed
(Theoretical
Value)
IEEE802.11b11Mbps
IEEE802.11g54Mbps
IEEE802.11n150Mbps
Mode AccessPoint(AP)Mode
Frequency
Range
2412-2472MHz1-13channels
*Whenbeingusedoverseas(internationalroaming),the
rangeisrestrictedto2412-2462MHzand1-11channels.
*Basically,signalsdonotcross-talk(orinterfere)withthose
ofotherdevices,suchascellphones,cordlesstelephones,
televisions,radiosandthelike,butifthesedevicesare
wirelesswitha2.4GHzband,thereisthepossibilitythat
cross-talkcanoccur.
No. of Ports 1Port
No. of Devices
That Can Be
Connected
Simultaneously
10Devices
Security WPA2-PSK(TKIP/AES),WPA-PSK(TKIP/AES),WPA/
WPA2mixedPSK(TKIP/AESmixedmode),WEP
(64bit/128bit)privacyseparator,ANYconnection
rejection,MACaccessrestrictions(upto16devices)
21
Wireless
Interface
(Internet
Side)
Compliance
Standards
IEEE802.11a/IEEE802.11b/IEEE802.11g/
IEEE802.11n
ARIBSTD-T71(IEEE802.11a)
ARIBSTD-T66(IEEE802.11b/g)
Maximum Data
Transfer Speed
(Theoretical
Value)
IEEE802.11a54Mbps
IEEE802.11b11Mbps
IEEE802.11g54Mbps
IEEE802.11n150Mbps
*IEEE802.11acannotbeusedwhenthedeviceissetfor
internationalroaming.
Mode Station(STA)Mode
Frequency
Range
5GHzBandW5236/40/44/48channels
(5180-5240MHz)
W5352/56/60/64channels
(5260-5320MHz)
2.4GHzBand1-13channels
(2412-2472MHz)
*Whenthedeviceisbeingusedoverseas(international
roaming),therangeisrestrictedto2412-2462MHzand1-
11channels.Also,cannotbeusedin5GHzband.
*Basically,signalsdonotcross-talk(orinterfere)withthose
ofotherdevices,suchascellphones,cordlesstelephones,
televisions,radiosandthelike,butifthesedevicesare
wirelesswitha2.4GHzband,thereisthepossibilitythat
cross-talkcanoccur.
No. of Ports 1Port
Security WPA2-EAP(TKIP/AES),WPA-EAP(TKIP/AES),WPA2-
PSK(TKIP/AES),WPA-PSK(TKIP/AES),WPA/WPA2
mixedPSK(TKIP/AESmixedmode),802.1X/EAP
(WEP),WEP(64bit/128bit)
22
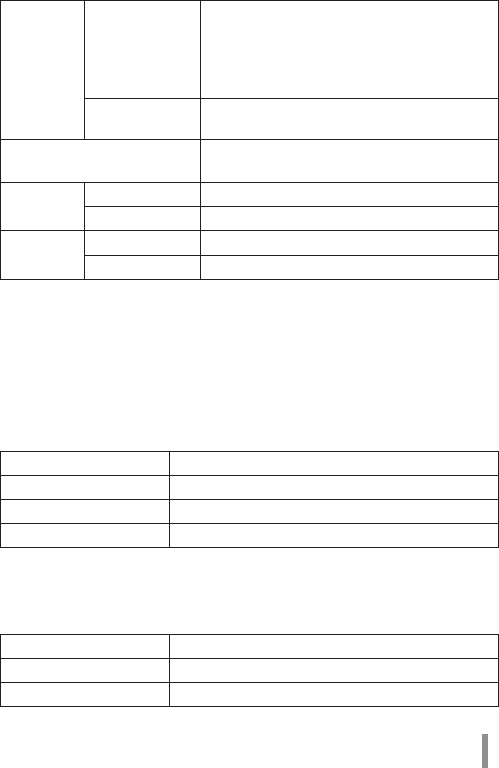
Mobile
Interface
Compliance
Standards
LTE(Cat.3)/W-CDMA(R99)/HSDPA(Cat.8)/HSUPA
(Cat.6)
Maximum Data
Transfer Speed
(Theoretical
Value)
LTE75Mbps
W-CDMA384kbps
HSDPA7.2Mbps
HSUPA5.7Mbps
*LTEcannotbeusedwhenthedeviceissetforinternational
roaming.
Frequency
Range
BandI2100MHzUP:1920-1980MHz
Down:2110-2170MHz
BandV850MHzUP:824-849MHz
Down:869-894MHz
BandVI800MHzUP:830-840MHz
Down:875-885MHz
No. of Ports 1Port
Cradle Compliance
Standards
IEEE802.3u(100BASE-TX)
IEEE802.3(10BASE-T)
Maximum Data
Transfer Speed
(Theoretical
Value)
10/100Mbps(AutomaticRecognition)
No. of Ports 1Port(SupportsAUTO-MDIX)
Supported UIM Card DocomoUIMCard
Other Unit External
Interfaces
MiniUSB(SupportsUSB1.1/2.0)x1
Built-in Flash Region Approximately15GB
Power AC100V±10%50/60Hz(WhenusingACadapter)
BF-01CDedicatedBattery(Whenusingbattery
pack)
Power Consumption Atmaximumcommunication2.5W
Atgeneralcommunication1.0W
Wheninstandby0.22W
23
Battery Pack
PartName BatteryPackBF01
BatteryType Lithium-ionBattery
NominalVoltage DC3.7V
NominalCapacity 1880mAh
AC Adapter
PartName ACAdapterBF01
Input AC100-240V50/60Hz11.2-14.8VA
Output DC5V1A
Continuous
Communi-
cation Time
When
Communicating
WheninLTECommunication
Approximately4Hours
Whenin3Gcommunication
Approximately6Hours
*Operatingtimesvaryaccordingtotheenvironmentofuse.
When in Standby Approximately30Hours
*Operatingtimesvaryaccordingtotheenvironmentofuse.
Operating Environment Temperature:0-35°C
Humidity:10-85%(nocondensation)
External
Dimensions
Main Unit Approximately95.0(W)x64.4(H)x17.4(D)mm
Cradle
Approximately64.3(W)x21.2(H)x48.3(D)mm
Weight Main Unit Approximately127g(Whenbatterypackisinstalled)
Cradle
Approximately35g
SoftwarelicensedbyGNUGeneralPublicLicense(GPL)orGNULesserGeneralPublic
License(LGPL)isincludedwiththisproduct.Fordetailsonthissoftware,seeNTT's
homepage(http://www.nttdocomo.co.jp/).

24
Export Administration Regulations
ThisproductanditsaccessoriesmaybesubjecttoJapan'sExportAdministration
Regulations(ForeignExchangeandForeignTradeControlLaw).Italsomaybe
subjecttoAmericanRe-exportingRegulations(ExportAdministrationRegulations).
Toexportorre-exportthisproductanditsaccessories,usethenecessaryprocedures
atyourownresponsibilityandcost.Fordetailsonprocedures,pleasecontactthe
MinistryofEconomy,TradeandIndustryortheU.S.DepartmentofCommerce.
Regulatory Information
Federal Communications
Commission (FCC) Statement
15.21
Youarecautionedthatchangesormodicationsnotexpressly
approvedbythepartresponsibleforcompliancecouldvoidtheuser’s
authority to operate the equipment.
15.105(b)
Thisequipmenthasbeentestedandfoundtocomplywiththelimits
foraClassBdigitaldevice,pursuanttopart15oftheFCCrules.These
limitsaredesignedtoprovidereasonableprotectionagainstharmful
interferenceinaresidentialinstallation.Thisequipmentgenerates,
usesandcanradiateradiofrequencyenergyand,ifnotinstalledand
usedinaccordancewiththeinstructions,maycauseharmful
interferencetoradiocommunications.However,thereisnoguarantee
thatinterferencewillnotoccurinaparticularinstallation.Ifthis
equipmentdoescauseharmfulinterferencetoradioortelevision
reception,whichcanbedeterminedbyturningtheequipmentoand
on,theuserisencouragedtotrytocorrecttheinterferencebyoneor
moreofthefollowingmeasures:

25
• Reorientorrelocatethereceivingantenna.
• Increasetheseparationbetweentheequipmentandreceiver.
• Connecttheequipmentintoanoutletonacircuitdierentfrom
thattowhichthereceiverisconnected.
• Consultthedealeroranexperiencedradio/TVtechnicianforhelp.
This device complies with Part 15 of the FCC Rules.
Operation is subject to the following two conditions:
1) this device may not cause harmful interference and
2)thisdevicemustacceptanyinterferencereceived,including
interferencethatmaycauseundesiredoperationofthedevice.
FCC RF Radiation Exposure Statement:
For body worn operation, this device has been tested and meets
FCC RF exposure guidelines when used with an accessory that
contains no metal and that positions the device a minimum of 1.0
cm from the body. Use of other accessories may not ensure
compliance with FCC RF exposure guidelines.
SARinformation:0.181 W/Kg (1g)

26
CE Marking
Thisdevicehasbeentestedtoandconformstotheregulatory
requirementsoftheEuropeanUnionandhasattainedCEMarking.The
CEMarkisaconformitymarkingconsistingoftheletters”CE”.TheCE
MarkappliestoproductsregulatedbycertainEuropeanhealth,safety
andenvironmentalprotectionlegislation.TheCEMarkisobligatoryfor
productsitappliesto:themanufactureraxesthemarkinginorderto
beallowedtosellhisproductintheEuropeanmarket.
ThisproductconformstotheessentialrequirementsoftheR&TTE
directive1999/5/ECinordertoattainCEMarking.Anotifiedbodyhas
determinedthatthisdevicehasproperlydemonstratedthatthe
requirementsofthedirectivehavebeenmetandhasissueda
favorablecertificateofexpertopinion.Assuchthedevicewillbearthe
notifiedbodynumber0560aftertheCEmark
TheCEMarkingisnotaqualitymark.Foremost,itreferstothesafety
ratherthantothequalityofaproduct.Secondly,CEMarkingis
mandatoryfortheproductitappliesto,whereasmostquality
markingsarevoluntary.
Marking:TheproductshallbeartheCEmark,thenotifiedbody
number(s)asdepictedtotheright.CE0560.
SARinformation:0.721 W/Kg (10g)