Quanta Computer WF1H Notebook PC User Manual User Menu P 4 warning 1
Quanta Computer Inc Notebook PC User Menu P 4 warning 1
UserManual.wiki
>
Quanta Computer
>
WF1H User Manual
>
Manual Part 1
Contents
1.
Manual Part 1
2.
Manual Part 2
Manual Part 1
Navigation menu
Upload a User Manual
Namespaces
Wiki Guide
HTML
PDF
Info
Views
User Manual
Discussion / Help
Navigation


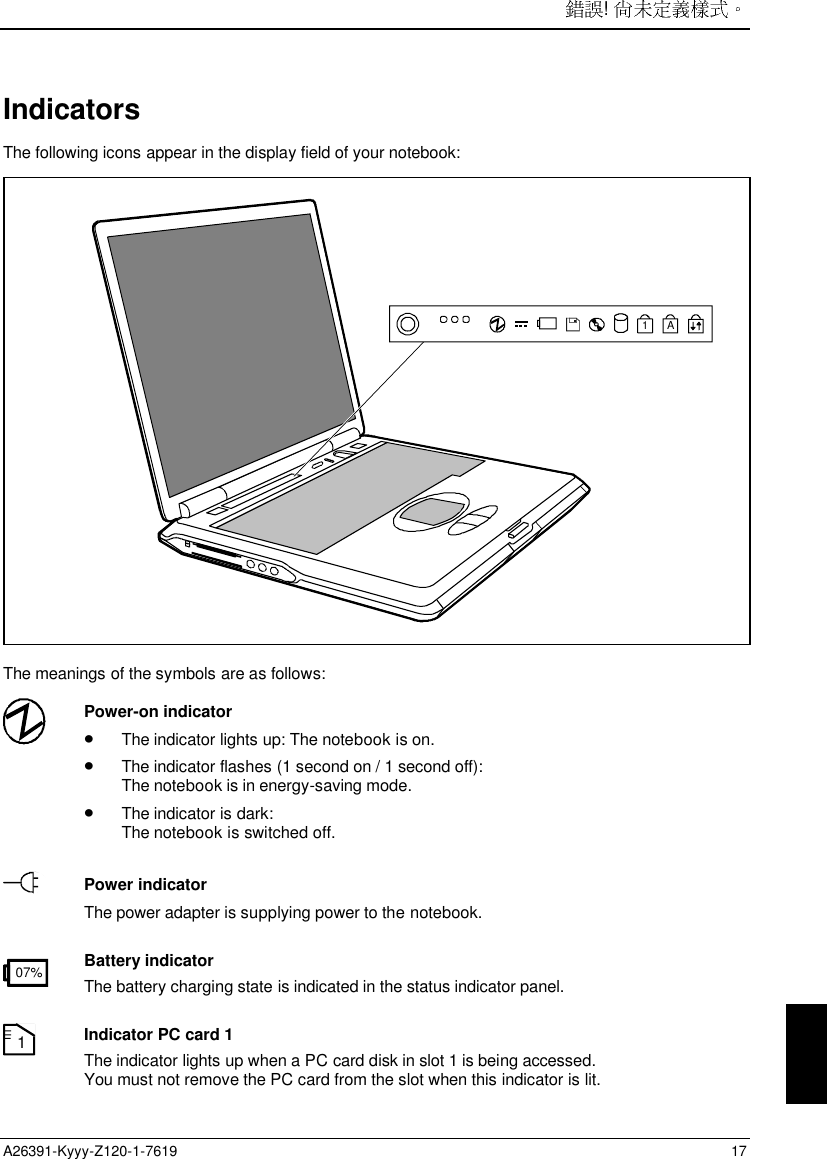
![! 182Indicator PC card 2The indicator lights up when a PC card disk in slot 2 is being accessed.You must not remove the PC card from the slot when this indicator is lit.Hard disk indicatorThe indicator lights up when the hard disk drive is being accessed.Floppy disk drive indicatorThe indicator lights up when a floppy disk in the floppy disk drive is being accessed.You must not remove the floppy disk from the floppy disk drive when this indicator is lit.Optical drive indicatorThe indicator is lit when the CD/DVD in the optical drive is being accessed.You must not remove the CD/DVD from the drive when this indicator is lit.CapsLK CapsLK indicator (Caps Lock)The Ï key has been pressed. All the characters you type appear in uppercase. In the caseof overlay keys, the character on the upper left on the keycap appears when that key ispressed.ScrLK Scroll indicator (Scroll Lock)The [Scr] key has been pressed. The effect this key has varies from programme toprogramme.NumLK NumLK indicator (Num Lock)The key combination [Fn] + [Num LK] has been pressed. The numbers on the lower left onkeys in the integrated numeric keypad are enabled.iInformation on the displays of the security panel is contained in the chapter " ! ", in the section " ! ".KeyboardThe following description of keys refers to Windows. Additional functions supported by the keys aredescribed in the relevant manuals supplied with your application programmes.The figure below shows how to access the different characters on keys with overlaid functions. Theexample applies when the CapsLK indicator is not lit.](https://usermanual.wiki/Quanta-Computer/WF1H.Manual-Part-1/User-Guide-173648-Page-26.png)
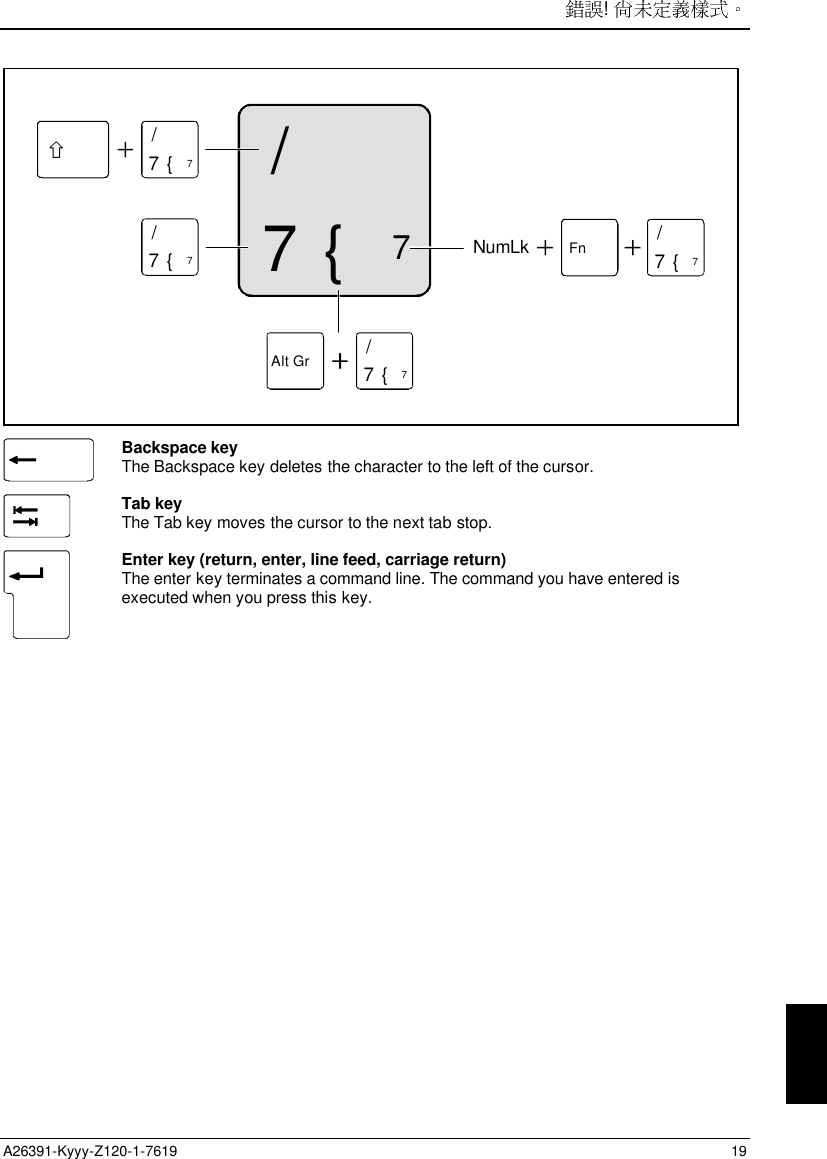
![! 20Caps Lock keyThe Caps Lock key activates uppercase mode (CapsLK indicator lit). The Caps Lockfunction causes all the characters you type to appear in uppercase. In the case ofoverlay keys, the character on the upper left on the keycap appears when that key ispressed.To cancel the Caps Lock function, simply press the Caps Lock key again.Shift keyThe Shift key causes uppercase characters to appear. In the case of overlay keys, thecharacter on the upper left of the keycap appears when that key is pressed.Alt Gr Alt Gr keyThe [Alt Gr] key causes the characters in the lower middle of the keycap to appear(e.g. { in the case of the [7] key on the German keyboard).Fn Fn keyThe [Fn] key enables the special functions indicated on overlay keys (see "Keycombinations").If the external keyboard does not feature an [Fn] key, you can simultaneously pressthe [Ctrl] + [Alt Gr] keys or the [Ctrl] + [Alt] keys.Cursor keysThe cursor keys move the cursor in the direction of the arrow, i.e. up, down, left, orright.UntbrPausePause keyThe [Pause] key temporarily suspends display output. Output will resume when youpress any other key.Start keyThe Start key invokes the Windows Start menu.Menu keyThe Menu key invokes the menu for the marked item.Numeric keypad7890UI OPJMK;L:_Ö/{([)]=}µ, . -1789 *456-123+0/.21 = Characters enabled when NumLK indicator is not lit (see "](https://usermanual.wiki/Quanta-Computer/WF1H.Manual-Part-1/User-Guide-173648-Page-28.png)

![! 22Indicators").If the numeric keypad is enabled (NumLK indicator is lit) and you hold down the [Fn] key, you canoutput the characters printed in blue on the bottom right of the keys.](https://usermanual.wiki/Quanta-Computer/WF1H.Manual-Part-1/User-Guide-173648-Page-30.png)
![! A26391-Kyyy-Z120-1-7619 23Key combinationsThe following description of key combinations refers to functions when using Microsoft Windows. Someof the following key combinations may not function in other operating systems and with some devicedrivers.Other key combinations are described in the relevant manuals supplied with your applicationprogrammes.Key combinations are performed as follows:Ê Press and hold the first key in the combination.Ê While keeping the first key pressed, press the other key or keys in the combination.iIf the external keyboard does not feature an [Fn] key, you can simultaneously pressthe [Ctrl] + [Alt Gr] keys or the [Ctrl] + [Alt] keys.Fn F2 UndockingThis key combination prepares the device for undocking off the Port Replicator.Fn F3 Enlarge MS-DOS screenThis key combination enlarges the screen in the MS-DOS mode to the full-screenmode or switches it back to the normal display mode.F4Fn +Switch internal touchpad on/offThis key combination enables and disables the touchpad function.To do this, set the setting Internal Pointing Device to Auto Disabled in the BIOSSetup in the menu Advanced - Keyboard/Mouse Features.Fn F5 Switching on the Speed Skp© modeThis key combination switches between the possible Speed Skp© modes:− Maximum power− Battery optimised power (reduced processor speed during batterymode)Fn F6 Switching the loudspeakers on/offThis key combination switches your notebook's integrated loudspeakers off andon.Fn F7 Increasing the volumeThis key combination raises the volume of the integrated loudspeakers.F8Fn +Reducing the volumeThis key combination decreases the volume of the integrated loudspeakers.Fn F9 LCD offThis key combination switches off the LCD monitor to save energy.Fn F11 Increasing the display brightnessThis key combination increases the brightness of the display.](https://usermanual.wiki/Quanta-Computer/WF1H.Manual-Part-1/User-Guide-173648-Page-31.png)
![! 24Fn F12 Reducing the display brightnessThis key combination reduces the brightness of the display.Fn +F10 Switching between internal and external screenIf an external monitor is connected, the monitor on which the output is to bedisplayed can be selected with this key combination. You can opt to use:• just the notebook's internal display• just the external display• both the internal and the external display. Strg +C Halting the current operation This key combination can be used to halt an operation instantly without clearingthe keyboard buffer. + Backtab (Shift+Tab) This key combination moves the cursor back to the previoustabular stop.Strg +Alt +Entf Carrying out a warm bootThis key combination triggers a reset and warm-boots thenotebook. First hold down the [Ctrl] and [Alt] key, and thenpress the [Del] key. With Windows 98, Windows 2000,Windows ME and Windows NT Task Manager appears first.Then you must press all three keys again to re-boot.Touchpad and touchpad buttonsThe touchpad enables you to move the mouse pointer on the screen. The two touchpad buttons allowthe selection and execution of commands. They correspond to the buttons on a conventional mouse.12](https://usermanual.wiki/Quanta-Computer/WF1H.Manual-Part-1/User-Guide-173648-Page-32.png)
![! A26391-Kyyy-Z120-1-7619 251 = Touchpad 2 = Touchpad buttons Moving the pointerÊ Move your finger on the touchpad. SelectingÊ Tap the touchpad once or press the left button once. Executing a commandÊ Tap the touchpad twice or press the left button twice. Dragging an objectÊ Move the pointer to the item you wish to select.Ê Select the desired object, and leave your finger on the touchpad.Ê Drag the object to the desired position.Ê Lift your finger from the touchpad.Display settingsSetting the desktop areaYou can change the screen resolution under Start - Settings- Control Panel - Display - Settings and thenselecting from the Resolution field.Adjusting the font sizeUnder Start - Settings - Control Panel - Display - Settings you can choose between a larger and a smallerfont in the Font size field.Setting the display brightnessYou can adjust the brightness of your LCD screen with the keys [Fn] and [F11] or [Fn] and [F12]: With[Fn] and [F12] you adjust the screen darker, and with [Fn] and [F11] brighter.Synchronising the display on the LCD screen and an external monitorYour notebook supports the simultaneous display on the LCD monitor and an external monitor. If thepicture does not appear correctly on the LCD monitor, press the key combination [Fn] + [F10] severaltimes, or switch the external monitor off and then on again. This achieves good picture synchronisation.Adjusting the speed of the mouse pointerYou can change the speed of the mouse pointer under Start - Settings - Control Panel - Mouse andclicking on the Motion tab.](https://usermanual.wiki/Quanta-Computer/WF1H.Manual-Part-1/User-Guide-173648-Page-33.png)
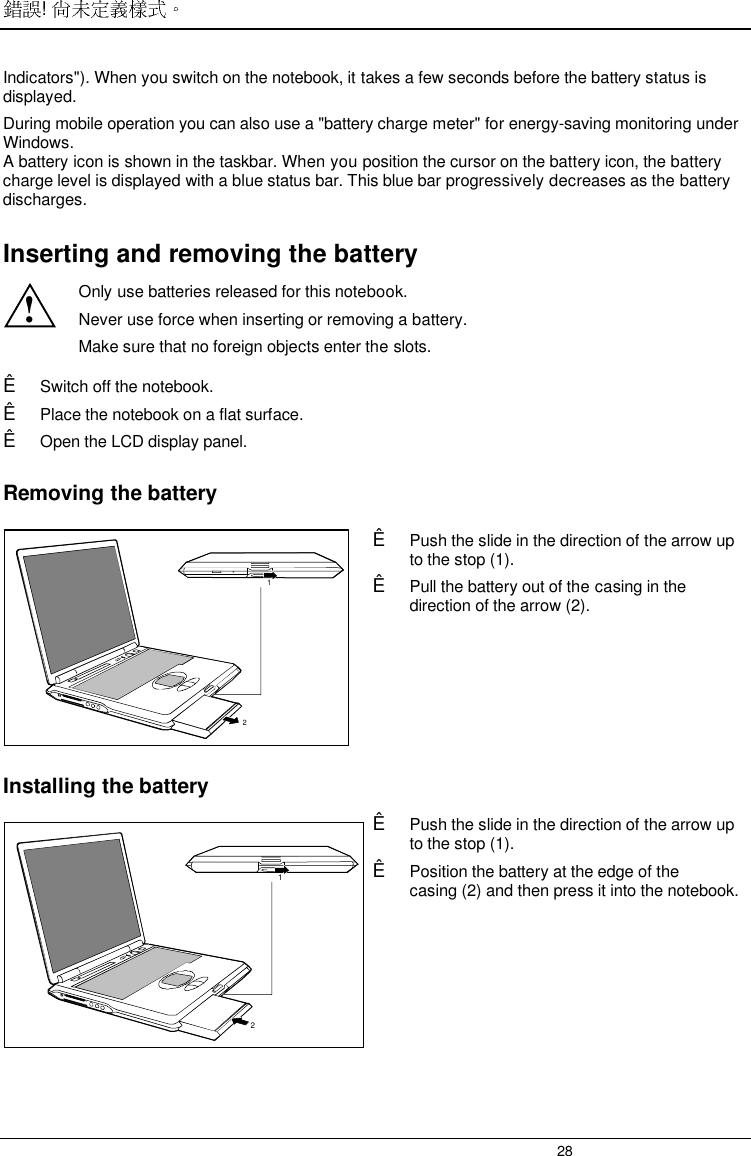
![! 26BatteryThe battery is one of the most important components of your notebook. When not plugged into a mainsoutlet, the notebook runs on its built-in battery. You can increase the life of the battery by caring for thebattery properly. The average battery life is around 500 charge/discharge cycles.You can extend the battery life by taking advantage of the available energy saving functions.!Only use batteries released for your notebook.Take care not to drop the batteries or otherwise damage their casing (fire risk).If the rechargeable batteries are defective, they must not be used.Do not touch the contacts of the batteries.Never interconnect the positive and negative terminals of a battery.Used batteries must be disposed of in accordance with local regulations (special waste).Observe the information on battery storage in the chapter "Important notes".Performing the battery learning cycleThe battery contains electronics that continuously monitor the battery charging level and display thecurrent charging level. To compensate for measuring errors in the electronics, and because thechemical properties of the battery change over time, the electronics must be recalibrated regularly. Thiscalibration is carried out using a battery learning cycle. Using the battery learning cycle ensures thatthe maximum battery capacity can always be used. During the learning cycle a defined charging cycleis carried out.iThe battery learning cycle lasts between four and six hours and must not be aborted. Duringthis period you can not work with the notebook!Ê Restart the notebook (switching ON/OFF or warm boot).The following display briefly appears on the screen during start-up:<ESC> Diagnostic screen <F12> Boot Menu <F2> BIOS SetupÊ Press function key [F6].The learning cycle is started. When the learning cycle is ended, a corresponding message is displayed.Charging the batteryThe battery indicator displays the remaining battery charge (see the section "](https://usermanual.wiki/Quanta-Computer/WF1H.Manual-Part-1/User-Guide-173648-Page-34.png)