Quanta Computer WF1H Notebook PC User Manual User s manual 2
Quanta Computer Inc Notebook PC User s manual 2
UserManual.wiki
>
Quanta Computer
>
WF1H User Manual
>
Manual Part 2
Contents
1.
Manual Part 1
2.
Manual Part 2
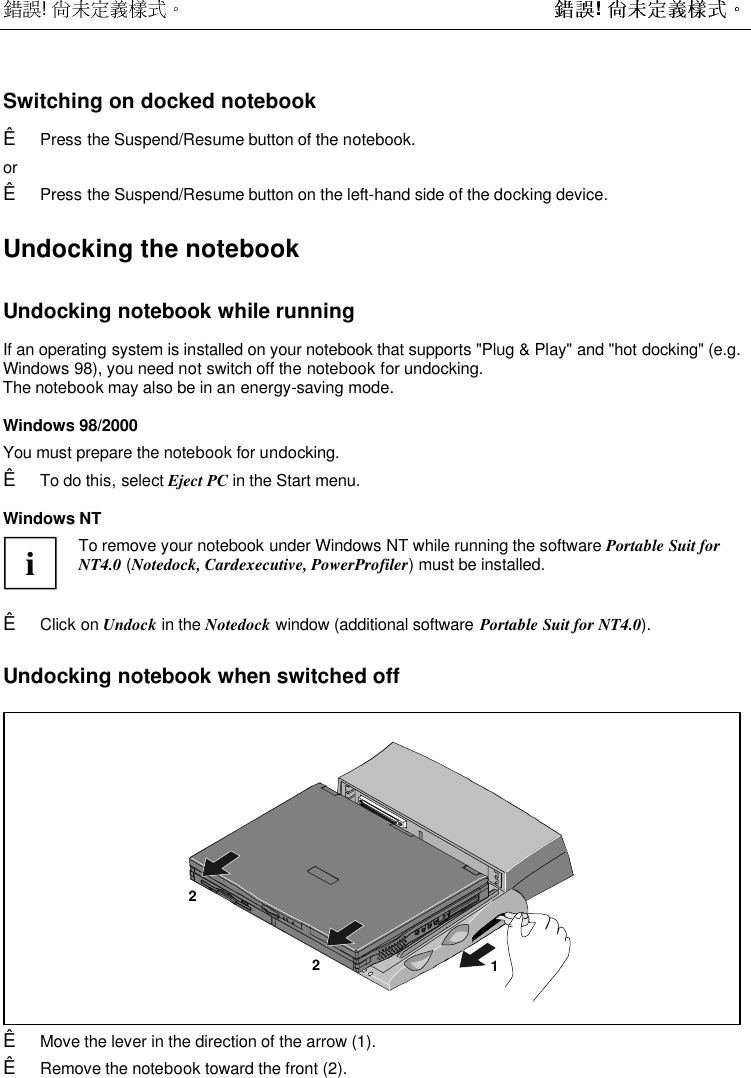
Manual Part 2
Navigation menu
Upload a User Manual
Namespaces
Wiki Guide
HTML
PDF
Info
Views
User Manual
Discussion / Help
Navigation

![! ! Fingerprint ???The notebook is equipped with a fingerprint reader. Instead of entering a user password, you can alsolog on to the system with a fingerprint. Before you can use the fingerprint reader, you must install thedriver provided on the CD.Bluetooth Keyboard Product SpecificationProduct Bluetooth KeyboardRadio Specification [1] Frequency range: 2.402 – 2.480 GHZ[2] RF output Power: Class 3[3] Receiver Sensitivity: -70dBm at 0.1% BER[4] Cover distance: 3 meter (max)Electrical Characteristics [1] Power supply: Transmitter board at keyboard site will be powered byLi-ion 1100 mAh battery; receiver board at PC site is powered by5Volt DC through USB connector[2] Power consumption: 80 mA max. (Transmitter board)[3] Visual indicator: LED indicators: Caps Lock, Num Lock, Scroll Lock,Battery status, Bluetooth connection status[4] Auto reconnecting:](https://usermanual.wiki/Quanta-Computer/WF1H.Manual-Part-2/User-Guide-173649-Page-7.png)
![! ! Automatically re-connect keyboard with notebook PC[5] Batter life: 24 hour (20,000 times key press)Intended use/purpose ofthe equipment Notebook with detachable K/B which can wireless communicate NotebookType of modulation GFSKChannel spacing 1MhzDesignation of emission ETSI 300 328ETSI 300 826Transmit RF power orpower range -6 dBm ~ 0dBmDuty cycle 625usChannel access protocol TDMADuplex direction DuplexAntenna Type Micro Strip ANTPeak Gain > 3dBi, <-5dBiVswr<= 2Return loss <= -10 dBmReference standard orother specification Bluetooth spec. V1.1](https://usermanual.wiki/Quanta-Computer/WF1H.Manual-Part-2/User-Guide-173649-Page-8.png)
![! ! To set or change a password, proceed as follows:Ê Call BIOS Setup and select the Security menu (see chapter "Settings in BIOS Setup"). You mustadditionally change into the Hard Disk Security submenu for the hard disk passwords.Ê Mark the Set Supervisor Password or Set User Password field and press the Enter key.You are asked to enter a password:Enter new Password:Ê Enter the password and press the Enter key.You are asked to confirm the password:Re-enter new Password:Ê Enter the password again and press the Enter key.The new password is saved.Notice: Changes have been saved [continue]Ê To prevent booting of the operating system, mark the Password on boot field and select the valueEnabled.If you do not want to make any other settings, you can exit BIOS Setup.Ê Select the option Exit Saving Changes in the Exit menu.The notebook is rebooted and the new password is effective.Cancelling passwordsSupervisor / User passwordiIf you cancel the supervisor password, you automatically deactivate the user password.To cancel a password (without setting a new password):Ê Call BIOS Setup and select the Security menu (see chapter "Settings in BIOS Setup").Ê Mark the Set Supervisor Password or Set User Password field and press the Enter key.You are asked to enter a password:Enter new Password:Ê Press the Enter key twice.Ê Select the option Exit Saving Changes in the Exit menu.The notebook is rebooted and the password is cancelled.Hard disk passwordTo cancel a password (without setting a new password):Ê Call BIOS Setup and select the Security menu (see chapter "Settings in BIOS Setup").Ê Change into the submenu Hard Disk Security.Ê Set the entry HDD password to Disabled in the Hard Disk Security submenu.You are asked to enter a password:Enter new Password:Ê Press the Enter key twice.](https://usermanual.wiki/Quanta-Computer/WF1H.Manual-Part-2/User-Guide-173649-Page-12.png)
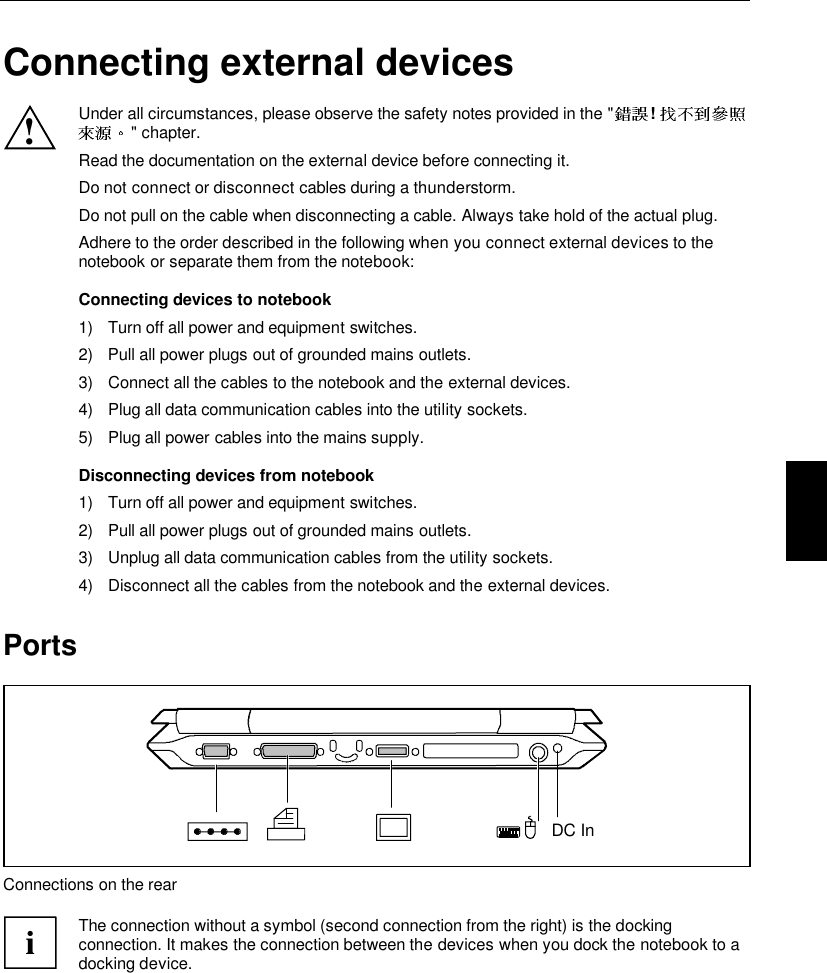
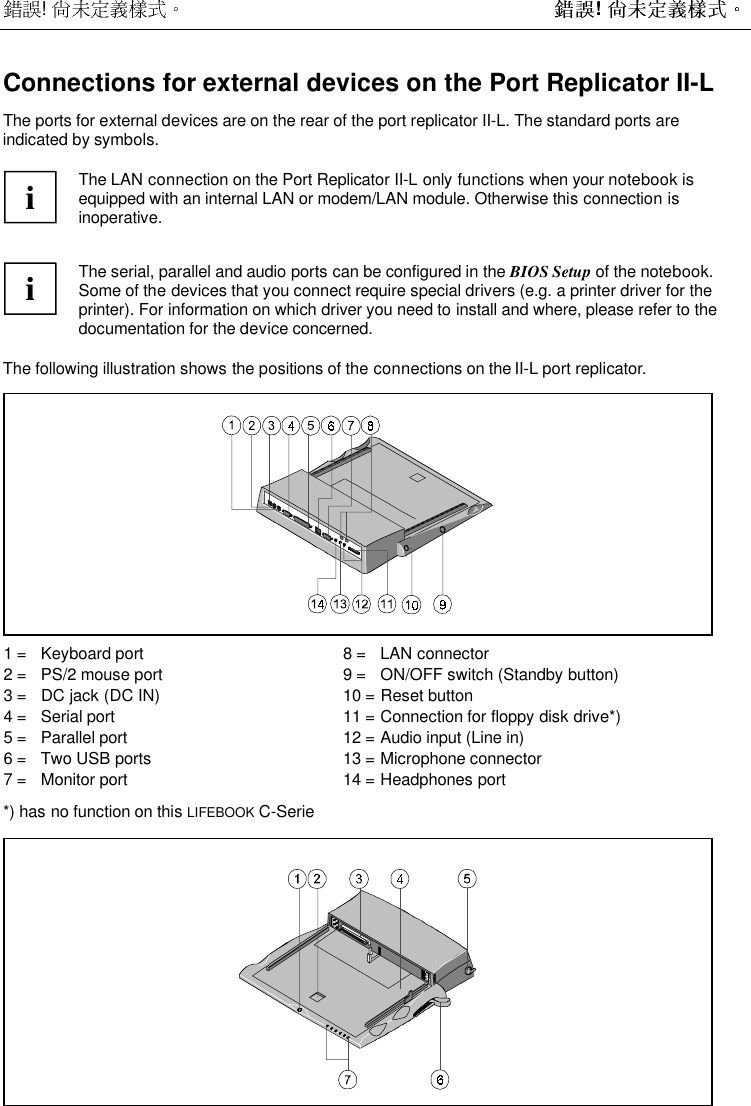
![! ! The ports are marked with the following symbols (or with similar symbols):LAN LAN-port(Local Area Network, forNetwork connection)DC In Port for power adapterPS/2 port (for keyboard ormouse)Headphones portParallel port Microphone connectorMonitor port IR Infrared portTV TV out socket(video output)USB portSerial port Modem connectoriSome of the external devices require special drivers (see the operating system and externaldevice documentation).Connecting an external monitorAn external monitor can be connected to the notebook. The screen controller in your notebooksupports extended SXGA resolutions of up to 1280x1024/60 Hz and 16 bit colour depth.• Using the [Fn] + [F10] key combination you can switch back and forth between the externalmonitor and the LCD screen.• If your notebook is equipped with a TFT monitor, you can display the same picture on the externalmonitor and the LCD screen simultaneously.Ê Switch off the notebook and the external monitor.Ê Connect the external monitor to the monitor port on your notebook.Ê First switch on the monitor and then the notebook.Setting the refresh rate for your external monitorThe refresh rate must be correctly set so that the image does not flicker.Ê To change the refresh rate or resolution select the monitor type in the menu Start - Settings -Control Panel - Display - Settings - Advanced - Monitor.Ê Now select the Adapter tab.Ê Adjust the refresh rate and then click Apply.!If the refresh rate set is too high, the monitor may be damaged. Please see thedocumentation included with your monitor for the maximum possible refresh rate.](https://usermanual.wiki/Quanta-Computer/WF1H.Manual-Part-2/User-Guide-173649-Page-19.png)
![Settings in BIOS SetupIn BIOS Setup you can set the system functions and the hardware configuration of the notebook. Thesettings can only be changed via the keyboard.When it is delivered, the notebook is set to factory default settings. You can change these settings inBIOS Setup. Any changes you make take effect as soon as you save and quit the BIOS Setup.The BIOS Setup programme contains the following menus:Main: for system settings as time, date, hard disk and monitor selectionAdvanced: for system settings such as ports and keyboardSecurity: for password settings and safety functionsPower: for setting the energy saving functionsBoot: for configuring the boot sequenceInfo: for displaying the system configuration (e.g. processor and memory configuration)Exit: to exit the BIOS Setup Start BIOS SetupÊ Restart the notebook (switching ON/OFF or warm boot).The following display briefly appears on the screen during start-up:<ESC> Diagnostic screen <F12> Boot Menu <F2> BIOS SetupÊ When this message appears, press the key [F2].iIf a password has been assigned:Ê Enter the password and press the Enter key.If you have forgotten the password, contact your system administrator or contact ourHotline/Help Desk.Operating BIOS SetupiPress the [F1] key to display help on the operation of BIOS Setup.The description of the individual settings is shown in the right-hand window of the BIOSSetup.Using the [F9] function key, you can load the default settings for the BIOS Setup menu youare currently in.Ê Use the cursor key å or ç to select the menu you wish to access to make changes.Ê Press the Enter key.The menu is displayed on the screen.Ê Use the cursor key æ or è to select the field you wish to change.Ê Press the space bar to confirm your selection.Ê Press the [ESC] key to exit the selected menu.Ê Make a note of the changes you have made (here in this manual, for example).](https://usermanual.wiki/Quanta-Computer/WF1H.Manual-Part-2/User-Guide-173649-Page-27.png)
![! The external monitor stays blank If your screen remains blank this may be due to the following: Monitor is switched offÊ Switch the external monitor on. Power saving has been activated (screen is blank)Ê Press any key to continue. Brightness is set too darkÊ Adjust the brightness of the monitor. Screen output is set to the notebook’s LCD screenÊ Press the key combination [Fn] + [F10] (selecting internal/external display). The external monitor's power cable or data cable is not connected properlyÊ Switch off the external monitor and the notebook.Ê Check whether the power cable is plugged properly into the power adapter and into the mainsoutlet.Ê Check whether the data cable is properly connected to the notebook and the external monitor (if itis plugged in with a connector).Ê Switch on the external monitor and the notebook.The external monitor is blank or the image is unstableTwo causes are possible: An incorrect type has been selected for the external monitor or the wrongscreen resolution has been set for the application program.Ê Terminate the application programme with [Alt] + [F4].If the fault continues to occur after ending the programme, switch over to the notebook's internal LCDscreen with [Fn] + [F10]. Change the following setting:Ê Select Start - Settings- Control Panel - Display - Settings and then the screen resolution you requirein the Resolution field.orÊ Select the correct monitor under Start - Settings- Control Panel - Display - Settings - AdvancedProperties - Monitor - Modify.](https://usermanual.wiki/Quanta-Computer/WF1H.Manual-Part-2/User-Guide-173649-Page-31.png)
![! Acoustic warnings A beep sounds every few seconds The battery is almost flat.Ê Charge the battery. Error messages on the screen This section describes the error messages generated by the BIOS-Setup. Error messages displayed bythe operating system or programmes are described in the relevant manuals. CMOS Battery Bad If the error message occurs repeatedly, then the buffer battery in the notebook is flat.Ê Connect the notebook via its power adapter to the mains outlet. The buffer battery will takeapproximately two days to complete its recharge. If the error message appears repeatedly, please contact the place of purchase or ourHotline/Help Desk. System CMOS checksum bad – Default configuration used The system configuration information is incorrect.Ê Restart the notebook.Ê Enter the BIOS Setup programme by pressing [F2].Ê Select the Exit menu in the BIOS Setup.Ê Select the Default Setup entry and click on OK.If the error message appears repeatedly, please contact the place of purchase or ourHotline/Help Desk.Insert system diskette and press Enter key to rebootThe operating system cannot be loaded or the hard disk contains no operating system or is notformatted.Ê Insert a system disk.Ê Press any key to continue.Invalid system disk - Replace the disk, and then press any keyThe inserted disk is not a system disk or the inserted system disk is defective.Ê Insert another system disk.Ê Press any key to continue.If you wish to boot from floppy disk:Ê Insert a system disk.Ê Press any key to continue.](https://usermanual.wiki/Quanta-Computer/WF1H.Manual-Part-2/User-Guide-173649-Page-34.png)
![! Press <F1> to resume, <F2> to SETUP. This error message appears if an error occurs during the self-test before starting the operating system.Ê Press the [F1] function key to start the operating system.Ê Enter the BIOS Setup programme by pressing [F2].Previous boot incomplete - Default configuration usedDue to an error during the previous system boot, default values were used for certain settings. Checkthe BIOS Setup and the settings.Ê Press the [F1] function key when prompted to do so. Real Time clock errorÊ Contact your sales outlet or our Hotline/Help Desk. nnnnK Shadow RAM failed at offset: xxxx Failing Bits: zzzzÊ Contact your sales outlet or our Hotline/Help Desk. System battery is dead - Replace and run SETUPÊ Contact your sales outlet or our Hotline/Help Desk. System cache error - Cache disabledÊ Contact your sales outlet or our Hotline/Help Desk. nnnnK System RAM failed at offset: xxxx Failing Bits: zzzzÊ If you have installed a DIMM, you should remove the module and reboot the notebook. If the error message is no longer displayed, the error concerned is DIMM-related. Should you receivethis error message again, please contact your dealer. System timer errorÊ Contact your sales outlet or our Hotline/Help Desk.](https://usermanual.wiki/Quanta-Computer/WF1H.Manual-Part-2/User-Guide-173649-Page-36.png)