Quanta Microsystems WU202 IEEE802.16e WiMAX USB Dongle User Manual WU202 v02
Quanta Microsystems, Inc. IEEE802.16e WiMAX USB Dongle WU202 v02
User manual rev2

Quanta
Co
m
p
ute
r
Inc.
Quanta
W
i
MAX Conn
ec
t
i
on
Manag
er
Op
er
ato
r
Gu
i
d
e
V
ersion 1.1
Aug. 25, 2010

Quanta
Co
m
p
ute
r
Inc.
F
e de
r
a
l C
o
m m
un
i
c a
ti
o n
C
o
m m issi
o n
I
n
t
e
rf
e
r
e nc e
S
t
a
t
e
m
e n
t
This e q uip me nt ha s b e e n te ste d a nd fo und to c o mp ly with the limits fo r a Cla ss B
dig ita l d e vic e , pursua nt to Pa rt 15 o f the FCC Rule s. The se limits a re de sig ne d to
p ro vide re aso na b le pro te c tio n a g a inst ha rmful inte rfe re nc e in a re side ntia l
insta lla tio n. This e q uipme nt g e ne ra te s, use s a nd c a n ra d ia te ra dio fre q ue nc y
e ne rg y a nd, if no t installe d and use d in ac c o rda nc e with the instruc tio ns, ma y
c ause harmful inte rfe re nc e to ra d io c o mmunic a tio ns. Ho we ve r, the re is no
g ua ra nte e that inte rfe re nc e will no t o c c ur in a p a rtic ula r insta lla tio n. If this
e q uipme nt do e s c ause ha rmful inte rfe re nc e to ra dio o r te le visio n re c e ptio n, whic h
c an be de te rmine d b y turning the e q uipme nt o ff a nd o n, the use r is e nc o ura g e d to
try to c o rre c t the inte rfe re nc e b y o ne o f the fo llo wing me a sure s:
-
Re o
r
ie nt o r
r
e lo c a te the
r
e c e iving a nte nna .
-
Inc
r
e a se the se p a
r
a tio n b e t
w
een
the e q uipme nt
a nd
r
e c e ive
r
.
-
Co nne c t the e q uipme nt into
a n
o utle t
o n
a c i
r
c uit
d iffe
r
e nt
f
r
o m tha t to
w
hic h
the
re c e ive r is c o nne c te d .
-
Co nsult the d e a le r o r a n e xpe
r
ie nc e d
r
a dio /
T
V
te c hnic ia n
fo r he lp .
FCC Ca utio n:
A
ny
c ha ng e s o r mo d ific a tio ns no t
e xp
r
e ssly
a pp
r
o ve d b y the p a
r
ty
re sp o nsible fo r c o mplia nc e c o uld vo id the use r's a utho rity to o pe ra te this e q uip me nt.
This de vic e c o mplie s
w
ith Pa
r
t 15 o f the FCC Rule s.
Op e
r
a tio n
is sub je c t to the
fo llo wing two c o nditio ns:
(1) This d e vic e ma y no t c a use ha
r
mful
inte
r
fe re nc e ,
a nd
(2) this de vic e must a c c e p t a ny
inte
r
fe re nc e
r
e c e ive d ,
inc luding inte
r
fe re nc e tha t
ma y c a use unde sire d o pe ra tio n.
IMPO RTANT NOTE:
FC C Ra dia tio n Expo sure S
t
a
t
e m e n
t
:
This e q uip me nt c o mp lie s
w
ith FC C
r
a d ia tio n
e xp o su
r
e
limits se t
fo
r
th fo r a n
uncontrolled environment.
This t
r
a nsmitte r must no t b e c o -lo c ate d
o r o pe
r
a ting in
c o njunc tio n
w
ith a ny
o the
r
a nte nna o r tra nsmitte r.
Page 2

Quanta
Co
m
p
ute
r
Inc.
SA
R
c
o
m
p
li
a
n
ce
h
a
s
b
ee
n
e
s
t
a
b
li
sh
e
d
i
n
t
y
p
ic
a
l la
p
t
op
c
o
m
pu
te
r(s) w
it
h
US
B
s
l
o
t
,
a
n
d
produ
ct c
ou
l
d
b
e
us
e
d
i
n
t
yp
ical la
p
t
op
c
o
m
pu
te
r
w
it
h
US
B
s
l
o
t
.
O
t
h
e
r
a
pp
licati
on
li
k
e
h
a
ndh
el
d
P
C
or
s
imila
r
d
e
v
ice
h
a
s
no
t
b
ee
n
v
e
r
i
f
ie
d
a
nd
ma
y
no
t c
o
m
p
lia
n
ce
w
it
h
r
elate
d
R
F
e
xposur
e
ru
le a
nd
su
c
h
us
e
sh
all
b
e
proh
i
b
ite
d.
Page 3

Quanta
Co
m
p
ute
r
Inc.
Contents
1.
1.1.
Int
r
oduction ...........................................................................................................................................6
Document Scope...........................................................................................................................6
2. Install a
n
d Un-install Windows Drive
r
and Con
n
ec
t
ion Manage
r
........................................................7
2.1.1.
2.1.2.
2.1.3.
2.1.4.
Un-installa
t
ion of Windo
w
s Drive
r
& Connec
t
ion Ma
n
ager........................................................7
Execute InstallShield Wizard .......................................................................................................7
Install with Second WiMAX device ...........................................................................................10
Upgrade WiMAX Connection Manager.....................................................................................10
3. Configu
r
ation by WiM
A
X Connec
t
ion Ma
n
age
r
................................................................................13
3.1.
3.1.1.
3.2.
3.2.1
3.2.2.
4.
5.
5.1.
5.2.
5.3.
5.4.
5.5.
6.
6.1.
6.2.
6.3.
6.4.
6.4.1.
6.4.2.
6.4.3.
6.4.4.
6.4.5.
Connec
t
ion Mode .......................................................................................................................14
Auto Mode..................................................................................................................................14
Profile .........................................................................................................................................15
Scanning Setting .........................................................................................................................16
User Authentication ....................................................................................................................19
How to Upgrade F/W ..........................................................................................................................20
Trouble Shooting.................................................................................................................................24
Why I can’t detect my device? ...................................................................................................24
Why I can’t find any base station? .............................................................................................24
Why I can’t connect to base station? ..........................................................................................24
How to log debug information and report it? .............................................................................25
What does LED activity mean? ..................................................................................................26
Appendix .............................................................................................................................................27
Create Device Information *.IFO file ........................................................................................27
Device Authentication ................................................................................................................28
User and Device Authentication .................................................................................................29
Functional Button .......................................................................................................................30
Profile .........................................................................................................................................31
Scan ............................................................................................................................................32
Network ......................................................................................................................................33
Statistic .......................................................................................................................................34
Tools ...........................................................................................................................................34
Page 4

Quanta
Co
m
p
ute
r
Inc.
Revision Histo
r
y
Page 5
Version Release Date Description
1.1 Aug. 25, 2010 Based on WU202 to update the document.
1.0 Apr. 30, 2009 1
st
User Guide Release

Quanta
Co
m
p
ute
r
Inc.
1.
Introduct
i
on
The WiMAX dongle supports IEEE 802.16e-2005 state of the art Scalable OFDMA based Technology. It
provides users a seamless broadband wireless access, video streaming at home, office or on
the move.
To protect information transmitting through wireless network, standard security Sublayer PKMv2
EAP based user authorization/authentication for data encryption is supported.
The following chapters will show you how to install the software package step by step.
1.1.
Document
Scope
This document has been written based on:
- WCM: 02.01.06
- OS: Windows 7 x86-based PC, English Version
Page 6
Quanta
Co
m
p
ute
r
Inc.
2.
Insta
ll
and
Un-
i
nsta
ll
W
i
ndows
Dr
i
ver
and
Connect
i
on
Manager
2.1.1.
Un-
i
nsta
ll
at
i
on
o
f
W
i
ndows Dr
i
ver &Connect
i
on
Manager
1. Please EXIT the WiMAX Connec
t
ion Ma
n
age
r
first.
2. Please click “S
t
a
r
t
All P
r
og
r
a
m
s
WCM
Uninstall WCM” to remove it.
2.1.2.
Execute
Insta
ll
Sh
i
e
l
d
W
i
zard
1. Please plug in WiMAX device in
t
o t
h
e laptop
and execute InstallShield Wizard to install
windows driver and connection manager.
2. Please click “Next”
b
u
t
ton.
Page 7
Quanta
Co
m
p
ute
r
Inc.
3. If the laptop is off auto-ins
t
all featu
r
e fo
r
security reasons, please open “CD Driver:
WU202-GN…” and run “setup.exe”.
4. Please click “Install”
b
utton to con
t
inue
installation.
5. WCM InstallShield
w
ill pop ou
t
a
m
essage if
your laptop doesn’t install .NET Framework.
6. Please c
h
eck if
y
ou
r
Windows has .NET
Framework 2.0 or plus, or WCM may not work
properly.
Page 8
Quanta
Co
m
p
ute
r
Inc.
7. P
r
epa
r
e to copy configu
r
ation file to
C:\WiMAX.
8. Windows
w
ill find
n
ew ha
r
dwa
r
e and guide
y
ou
to complete installation.
9. Please c
h
eck “Always trust software from
“Sequans Communications”.” and click
“Install” button to continue installation.
10. I
t
m
ay take a few
m
inutes
t
o co
m
plete drive
r
installation.
Page 9
Quanta
Co
m
p
ute
r
Inc.
11. Afte
r
InstallShield Wiza
r
d has successfully
installed WCM and driver, windows will prompt
a message.
12. Click “Finish”
b
u
t
ton to finish InstallS
h
ield
Wizard.
13. You can
r
un
t
he WCM f
r
om the WiMAX
Connection Manager icon on desktop or run
WCM from “Start
All Programs
WCM
WiMAX Connection Manager”.
2.1.3.
Insta
ll
w
i
th Second
W
i
MAX dev
i
ce
1. Each device is w
r
it
t
en with unique serial
number in the flash, so windows will
recognize each device as different one.
2. Once you plug in the seco
n
d device,
Windows will pop out “Found New
Hardware Wizard” and install driver
automatically.
2.1.4.
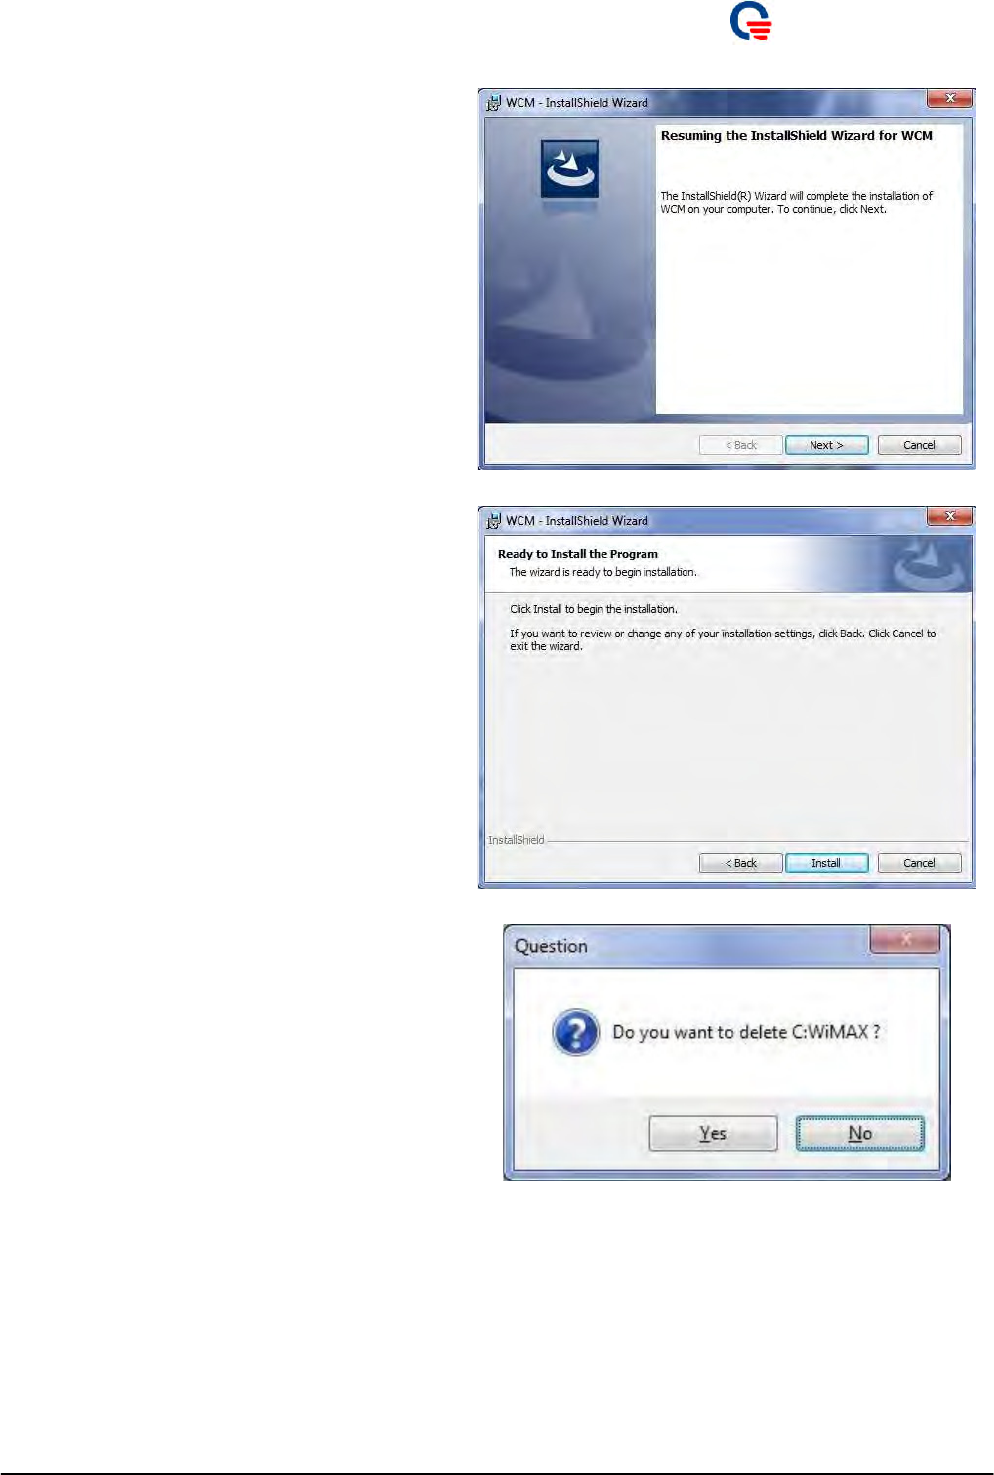
Upgrade
W
i
MAX
Connect
i
on Manager
1. T
h
is section
w
ill guide
y
ou how to upg
r
ade to
latest software package in client side.
2. Please
m
ake su
r
e to plug in
y
ou
r
WiM
A
X
device first.
3. Please execute InstallS
h
ield of new WCM,
and click “Yes ” button if you want to upgrade
the WCM.
Page 10
Quanta
Co
m
p
ute
r
Inc.
4. Click “Next”
b
utton
t
os
t
a
r
t
installing WCM.
5. Click “Install”
b
u
t
ton to s
t
a
r
t
install WCM.
6. I
t
will pop ou
t
a Question windo
w
. If you
want to keep the configuration settings,
please click “No” button.
Page 11

Quanta
Co
m
p
ute
r
Inc.
7. I
t
will show
t
he
m
essage “Found USB/ PCIe
Device”.
8. I
t
m
ay take a few
m
inutes
t
o co
m
plete drive
r
installation.
9. Please click “Finish”
b
utton to exi
t
t
h
e
Wizard.
Page 12
Quanta
Co
m
p
ute
r
Inc.
3.
Con
f
i
gurat
i
on
by
W
i
MAX Connect
i
on Manager
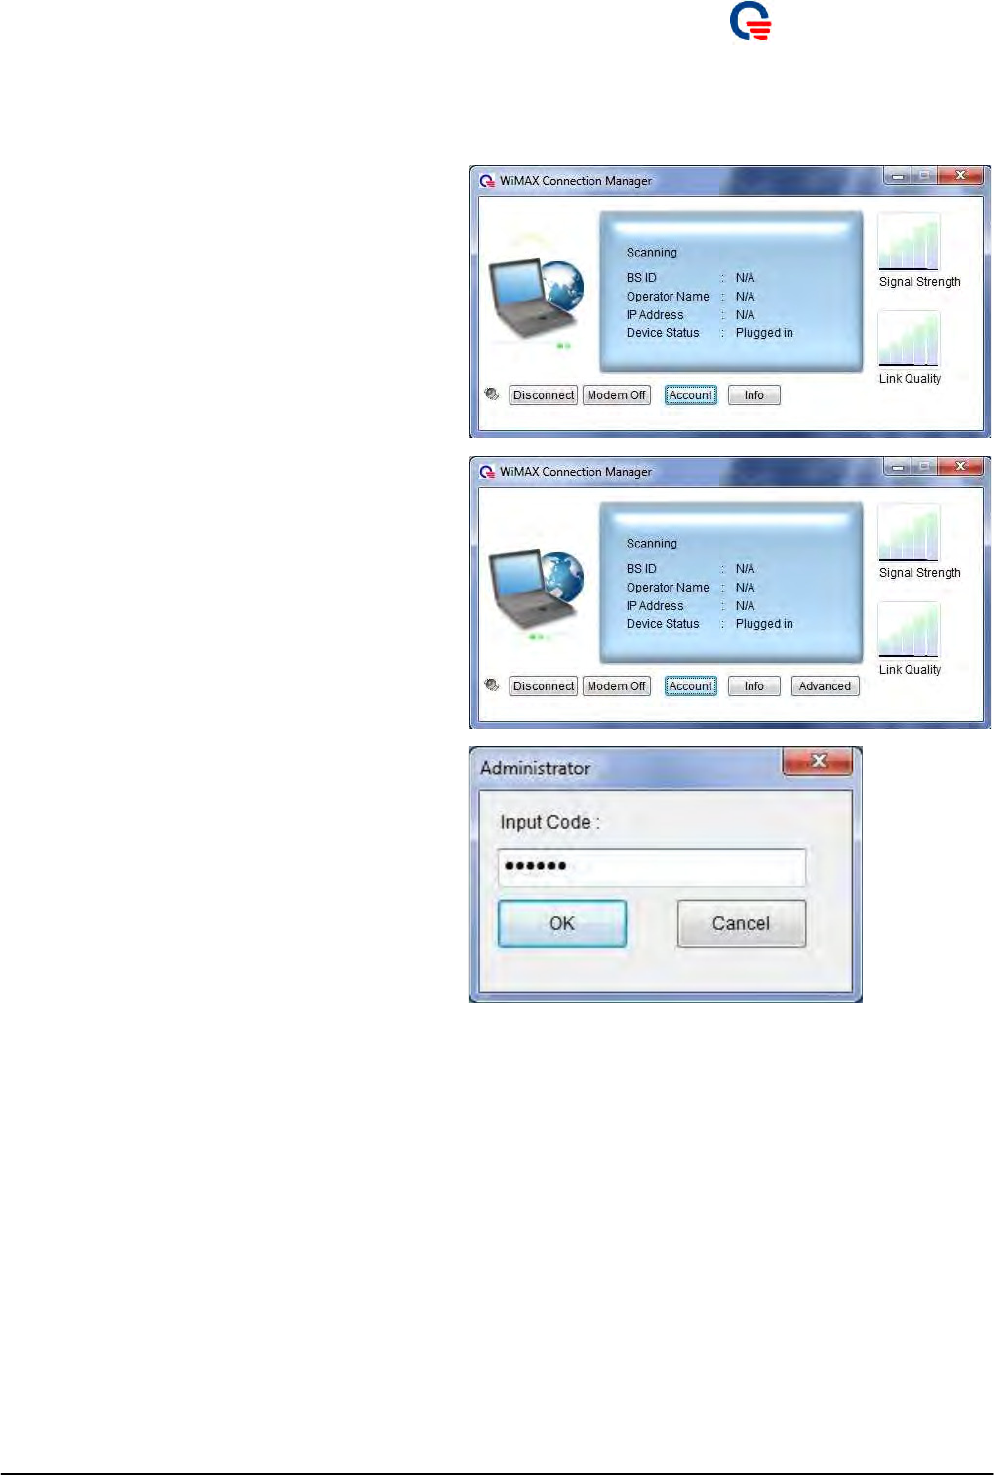
1. Please open WiMAX Con
n
ec
t
ion Manage
r
firstly.
2. Please
m
ove the
m
ouse on
t
he WCM and
press “Ctrl + Alt + F9” to show the
“Advanced” button for advance settings.
Please click “Advanced” button and input the
code “admin2”.
3. Once you swi
t
ch
t
o Advanced Vie
w
, WCM
will keep staying at Advanced View till you
exit WCM or minimize to system tray.
Page 13
Quanta
Co
m
p
ute
r
Inc.
4. Please plug in WiMAX device and wai
t
fo
r
WCM detects device.
5. Afte
r
WCM detec
t
s WiMAX device, you can
start to set up the profile settings and EAP
parameters.
3.1.
Connect
i
on
Mode
3.1.1.
Auto
Mode
1. If you have well setup f
r
e
q
uenc
y
, band
w
idth
and the other EAP settings. Please keep the
“Auto Mode” setting as “On” on “Profile”
tab, this button will let device always try to
automatically connect with BS.
2. If “Auto Mode” is to “On” and t
h
e BSs
information are listed in Pre-defined List or
in History List on “Scan” tab, MS will
automatically connect with BS.
3. Please note tha
t
if you eve
r
double clicked
t
he
NAP ID in the Base Station Scan List on
“Scan” tab, it means you didn’t want to
automatically connect with BS and the “Auto
Mode” will be “Off”.
Page 14
Quanta
Co
m
p
ute
r
Inc.
4. Please
r
e
m
e
m
b
e
r
to keep t
h
e “Auto Mode”as
“On” to let device automatically connect with
BS.
3.2.
P
r
o
f
il
e
The user profile “WiAMXd.cfg” is stored in the directory “C:\WiMAX\”.
1. Please plug in WiMAX device and wai
t
fo
r
WCM detects device as depicted in the right
screenshot.
2. When WCM detects WiMAX device, you can
start to set up the EAP parameters.
3. Please inpu
t
all
t
he info
r
m
ation on “Profile”
tab, including PKM, Authentication, EAP
Method, NWG, Inner EAP, and so on.
4. Please click “Save Setting”
b
ut
t
on
t
o save
your setting.
5. You also can
r
e-se
t
the “Operator Password”
for advance setting.
Page 15
Quanta
Co
m
p
ute
r
Inc.
3.2.1
Scann
i
ng
Sett
i
ng
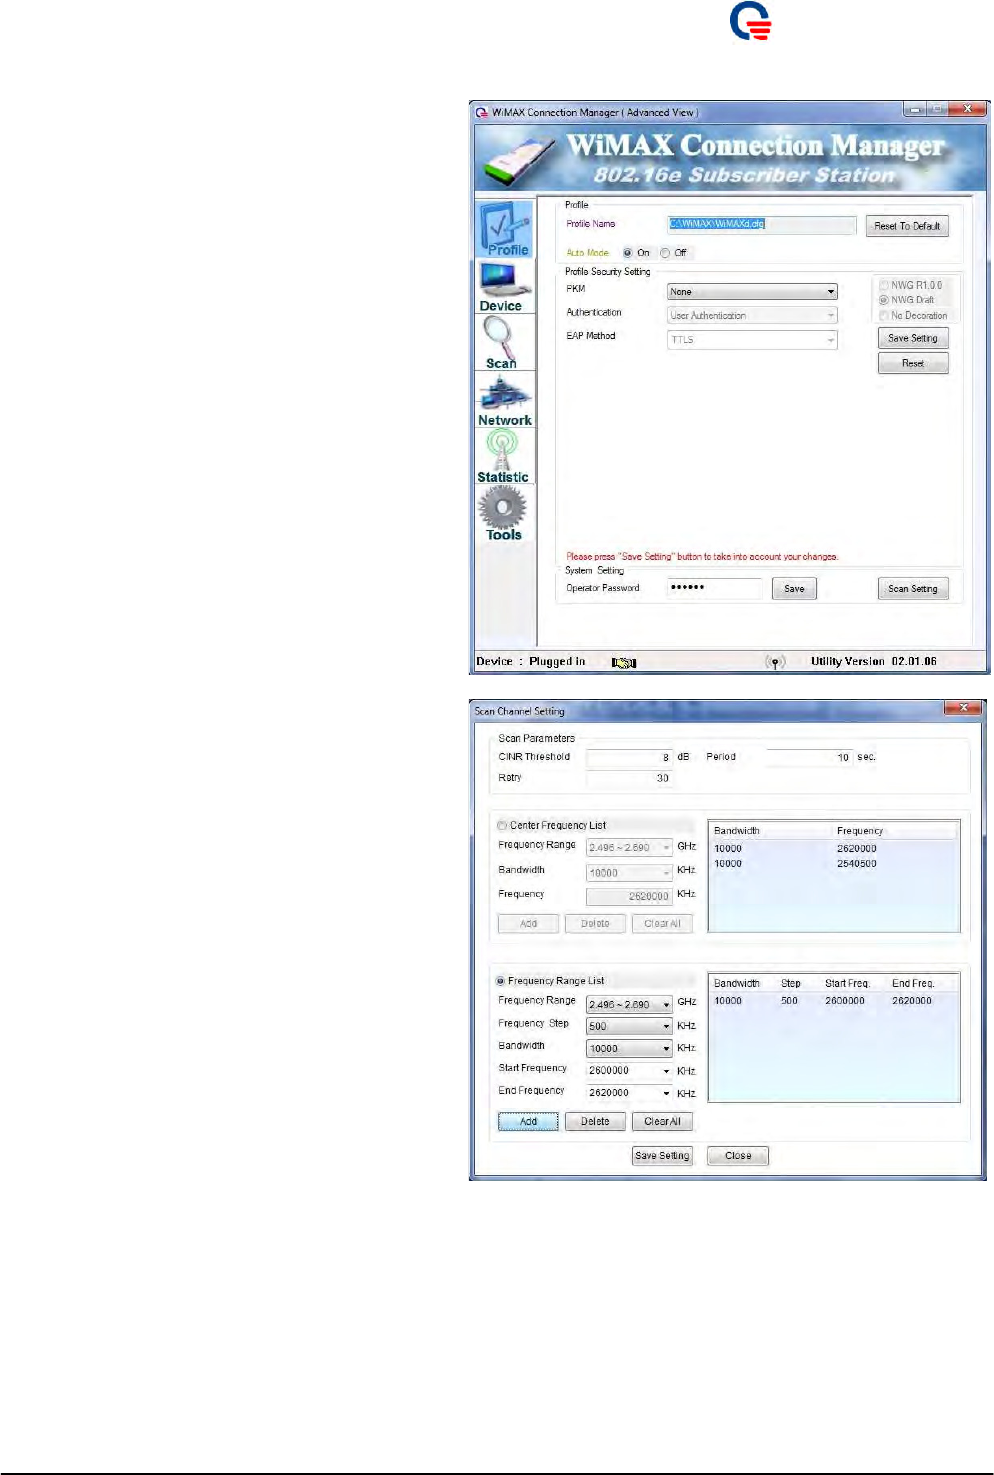
1. Please click “Scan Setting”
b
u
t
ton
t
o e
n
te
r
setting page.
2. In the Scan Channel Setting field, you can
set up some searching criteria.
3. CIN
R
Threshold filte
r
:sea
r
ching BS if a
n
d
only if CINR is higher than specified value
(dB). Minimum: -20, and maximum: 40.
4. Period set
t
ing: Pe
r
iod (0) which is initial
period in second after which the terminal
restart scanning procedure. Minimum: 0, and
maximum: 255.
5.
R
etry se
t
ting: (n) con
f
i
g
u
r
ab
l
e ma
x
imum
value of the countdown procedure. Minimum:
0, and maximum: 50.
Page 16
Quanta
Co
m
p
ute
r
Inc.
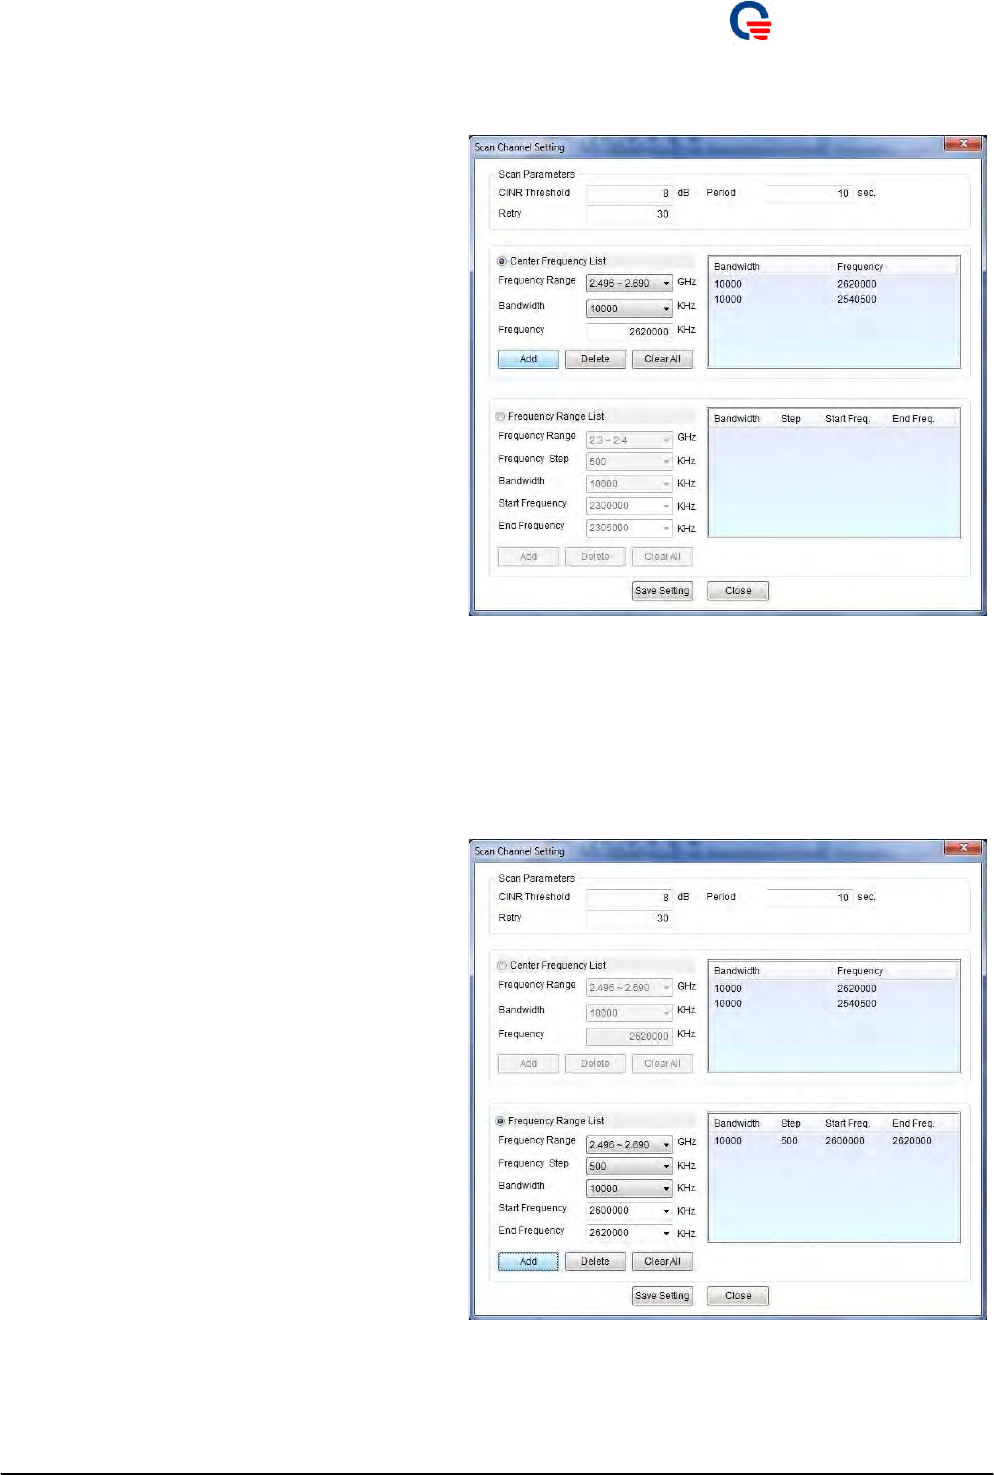
6. In the Center Frequency List field, you can
set up some specified frequency you want.
7. Frequency
R
ange: please selec
t
you
r
ta
r
ge
t
and frequency range according to what kind of
WiMAX device you used.
8. Bandwidth: please selec
t
you
r
p
r
efe
r
r
ed
bandwidth in KHz. WCM supports
mix-bandwidth scanning mechanism.
9. Frequency: please i
n
pu
t
you
r
p
r
efe
r
r
ed
frequency in KHz according to what kind of
WiMAX device you used.
10. Please click Add
b
utton
t
o add i
t
i
n
t
o
frequency list.
11. Please selec
t
f
r
eque
n
cy f
r
om f
r
equency lis
t
and click Delete button to remove it from the
list.
12. You can click Clear All
b
u
t
ton
t
o clea
r
all
setting of Center Frequency List.
13. In the Frequency
R
ange List field, you can
set up some specified frequency range you
want.
14. Frequency
R
ange: please selec
t
you
r
ta
r
ge
t
frequency range according to what kind of
WiMAX device you used.
15. Frequency Step: please selec
t
inc
r
easing s
t
ep.
16. Bandwidth: please selec
t
you
r
p
r
efe
r
r
ed
bandwidth in KHz. WCM supports
mix-bandwidth scanning mechanism.
17. Start Frequency: please selec
t
sta
r
ting
frequency in KHz according to what kind of
WiMAX device you used.
18. End Frequency: please selec
t
ending
frequency in KHz according to what kind of
Page 17

Quanta
Co
m
p
ute
r
Inc.
WiM
A
X device you used.
19. Please click Add
b
utton
t
o add i
t
i
n
t
o
frequency list. WCM supports maximum up
to three sets of frequency range list.
20. Please selec
t
f
r
eque
n
cy f
r
om f
r
equency lis
t
and click Delete button to remove it from the
list.
21. You can click Clear All
b
u
t
ton
t
o clea
r
all
setting of Center Frequency List.
22. If you have confi
r
m
ed all you
r
se
t
ting, please
click Save Setting button.
23. T
h
is device will auto-
r
eboo
t
in o
r
de
r
to
m
ake
your settings become effective.
Page 18
Quanta
Co
m
p
ute
r
Inc.
3.2.2.
User
Authent
i
cat
i
on
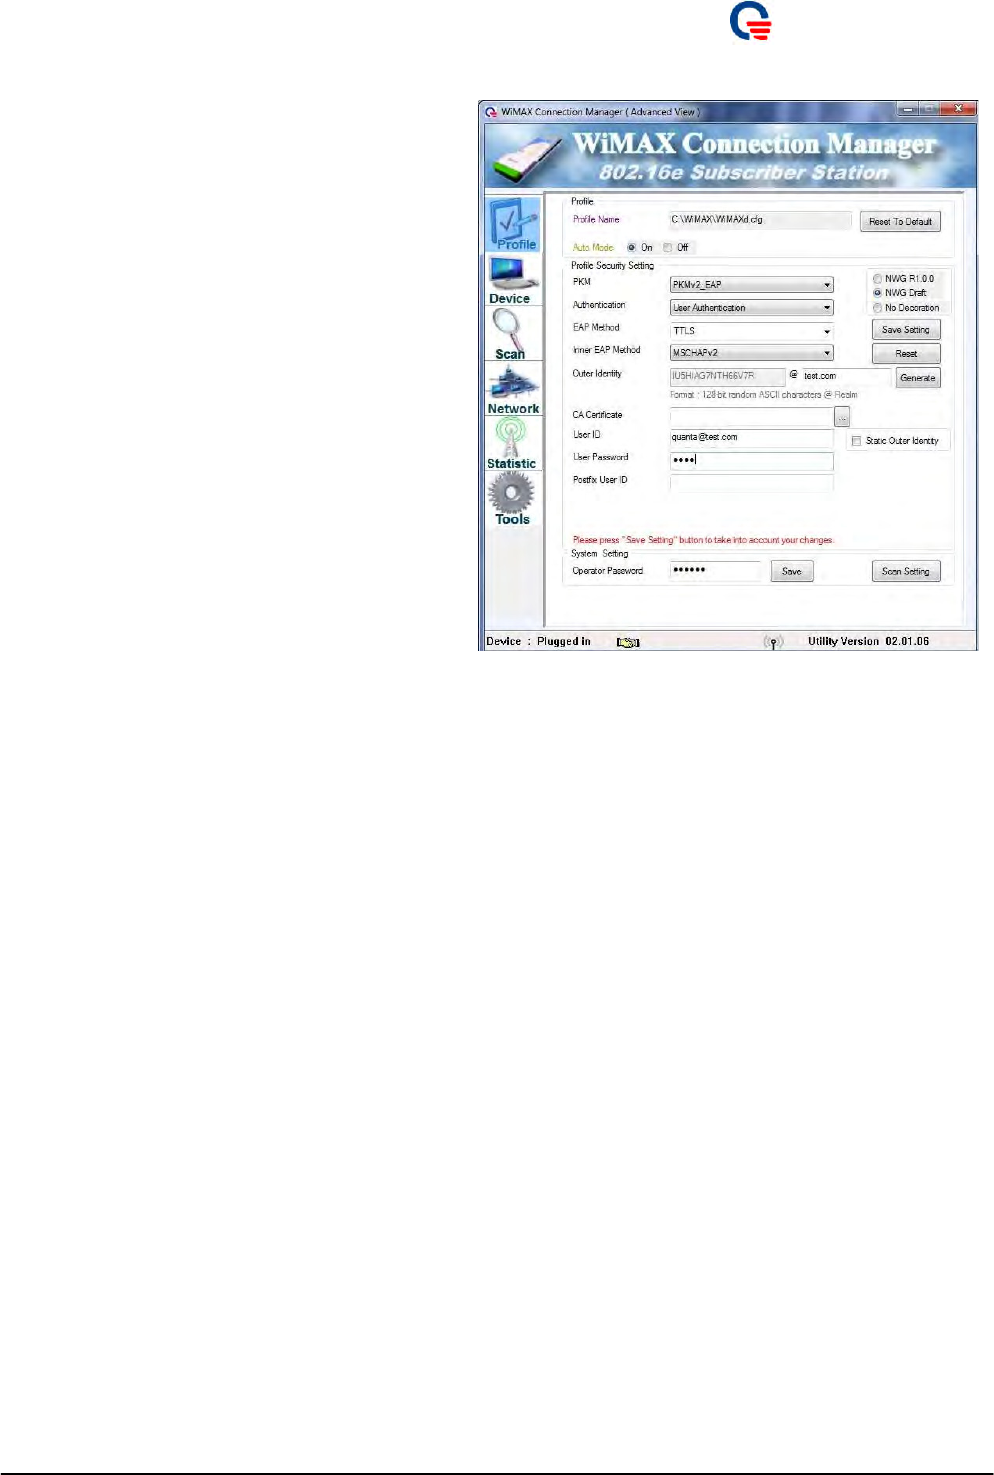
This section only guide you to connect with BS by User Authentication, for Device Authentication and
User and Device Authentication, please refer to chapter 6.
1. Please e
n
able P
K
M
b
y selecting t
h
e
“PKMv2_EAP” option.
2. Please selec
t
“User Authentication” as
y
ou
r
authentication method. WCM will select EAP
Method as “EAP-TTLS”.
3. Please selec
t
inne
r
EAP
m
ethod, such as
P
A
P
,
CHAP, MSCHAP and MSCHAPV2.
4. Please inpu
t
postfix (Real
m
) of “Oute
r
Identity”.
5. Please load
y
ou
r
CA Ce
r
t
ificate.
6. Please inpu
t
“User ID”.
7. Please inpu
t
“User Password”.
8. Please selec
t
NWG spec as R1.0, D
r
af
t
o
r
No
Decoration.
9. Please click “Save Setting”
b
ut
t
on
t
o save all
authentication settings.
10. If you wan
t
t
o
r
ese
t
to defaul
t
se
t
ting, please
click “Reset” button.
11. No
w
, you can sta
r
t
con
n
ecting to BS
successfully after setting scanning method
through scan setting button as shown in
section 3.1.
Page 19
Quanta
Co
m
p
ute
r
Inc.
4.
How
to
Upgrade F
/
W
1. T
h
is section
w
ill guide
y
ou how to upg
r
ade
the F/W of the device.
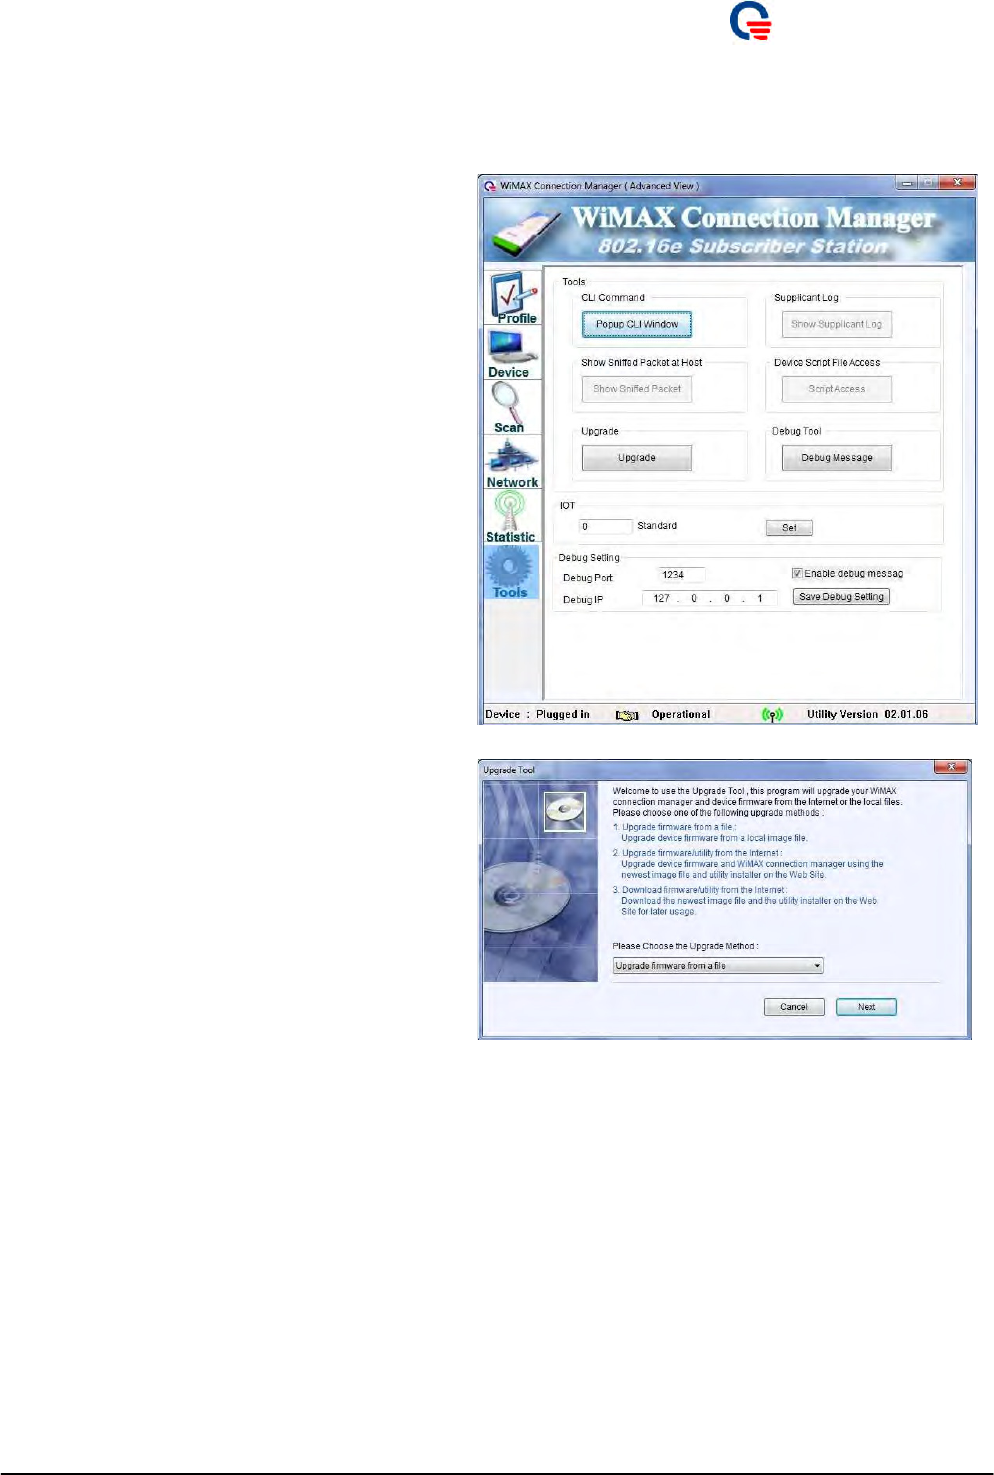
2. Please click “Upgrade”
b
u
t
ton on ‘
T
ools”ta
b
to start the F/W upgrade wizard.
3. Please choose “Upgrade firmware from a
file”, and then click “Next” button.
Page 20
Quanta
Co
m
p
ute
r
Inc.
4. Click “
R
ead Firmware”
b
utton
t
o
b
r
o
w
se
the new F/W file.
5. Please
b
r
owse the
n
ew F/W file a
n
d t
h
en
click the “Open” button.
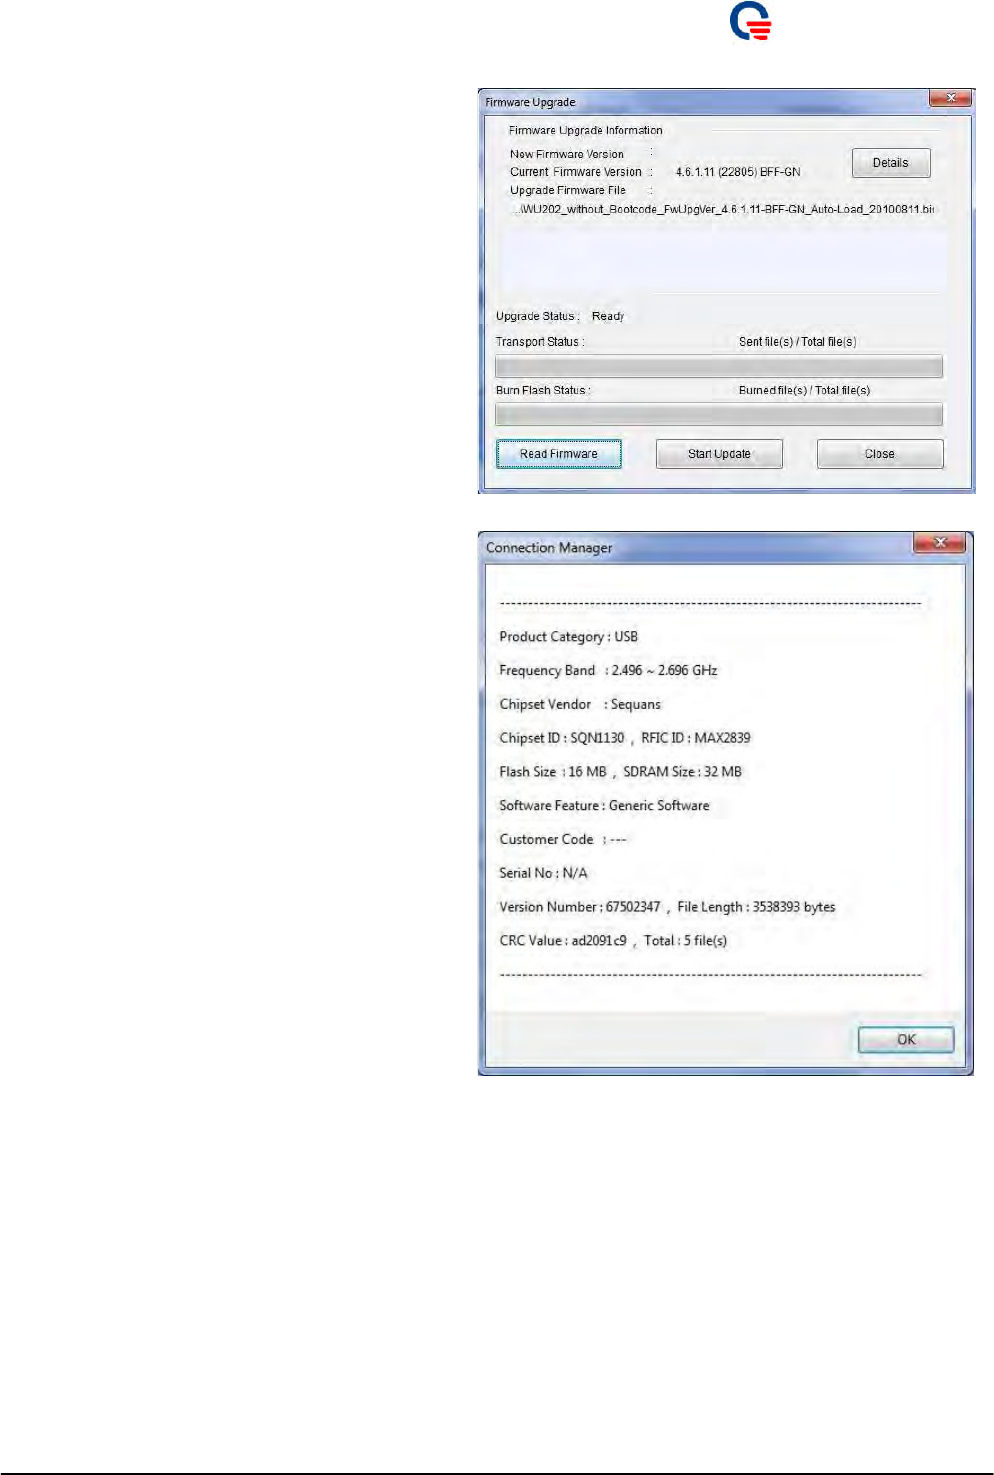
6. Please click “Details”
b
u
t
ton if you wa
n
t
to
check the new F/W information.
Page 21
Quanta
Co
m
p
ute
r
Inc.
7. I
t
will show
t
he file na
m
e of new F
/
W in the
window, then click “Start Upgrade” button
to start upgrade procedure.
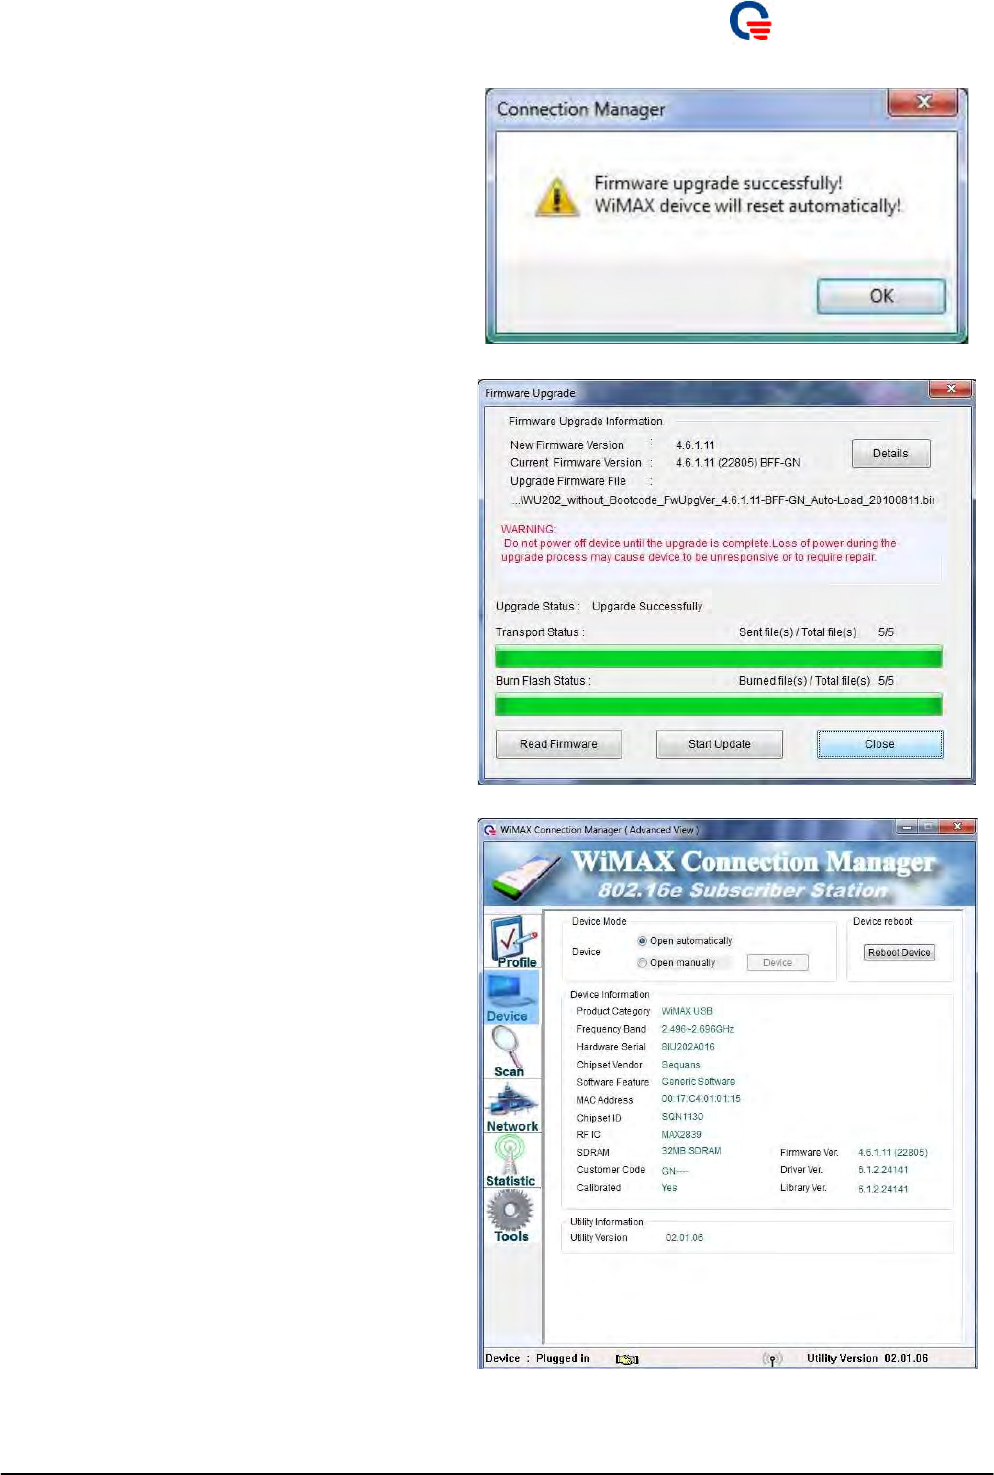
8. The
m
essage is
t
o notify
y
ou to sta
r
t
the
upgrade procedure.
9. The device
w
ill auto
r
eboo
t
and t
h
en sta
r
t
to
upgrade new F/W. Please don’t power off
device during the upgrade procedure.
10. In the upg
r
ade p
r
ocedu
r
e,
t
he LED will
display “Green Flashing” light
11. The
r
e a
r
e total 5 files to
t
r
anspo
r
t
a
n
d bu
r
n to
flash, it will take a few minutes to do this.
Page 22
Quanta
Co
m
p
ute
r
Inc.
12. Afte
r
all files a
r
e
b
u
r
n
ed success, t
h
e device
will reboot automatically and display a
successful message.
13. Please click “Close”
b
u
t
ton to exi
t
the F
/
W
upgrade wizard.
14. Please click on “Device”ta
b
to c
h
eck if
t
he
F/W version is the same with new F/W
version.
Page 23

Quanta
Co
m
p
ute
r
Inc.
5.
Troub
l
e
Shoot
i
ng
5.1.
Why
I
can’t
detect
my
dev
i
ce?
1. If
t
he
r
e is a yellow excla
m
ation poi
n
t on WiM
A
X Netwo
r
k Adap
t
e
r
, please
r
e-install t
h
e
driver from
C:\Program Files\WCM\Driver\USB.
Please check if you have installed software package successfully. If not, please uninstall WCM, reboot your
computer and reinstall it again.
Please check if LED function is OK on your device,
I. if YES,
i. Please uninstall WCM
ii. Please reinstall software package again.
II. if NO,
i. Please unplug and plug device and check it again.
Hibernation mode issue: In order to avoid an issue caused by Microsoft Vista when operating system
recovers from hibernate mode, please update the hotfix provided by Microsoft website.
http://support.microsoft.com/kb/KB946723
Blue Screen issue: In order to avoid abnormal situation caused by Microsoft XP SP2, when user uses
configure editor, please update the hotfix provided by Microsoft website.
2.
3.
4.
5.
5.2.
Why
I
can’t
f
i
nd
any
base stat
i
on?
1.
2.
3.
4.
Please c
h
eck if
y
ou
r
BS is still alive o
r
not?
Please check your bandwidth and frequency setting is correct.
If your setting is correct and you still can not find any BS, please reboot your computer and try it again.
If you still can’t find BS, please report it and contact your support team.
5.3.
Why
I
can’t
connect
to
base stat
i
on?
1.
2.
3.
4.
Please c
h
eck if
y
ou
r
BS is still alive o
r
not?
Please check if WCM detects your device and LED function of device works.
If WCM can’t detect your device, please refer to 5.1.
If WCM can detect your device and also find BS, but you can’t connect to BS, please check if your profile
setting is correct, including user ID, password, CA, and etc.
If you still can’t connect to BS, please exit WCM and unplug and plug your device and try it again.
If you still can’t connect to BS, please report it and contact your support team.
5.
6.
Page 24
Quanta
Co
m
p
ute
r
Inc.
5.4.
How
to
l
og
debug
i
n
f
ormat
i
on and report
i
t?
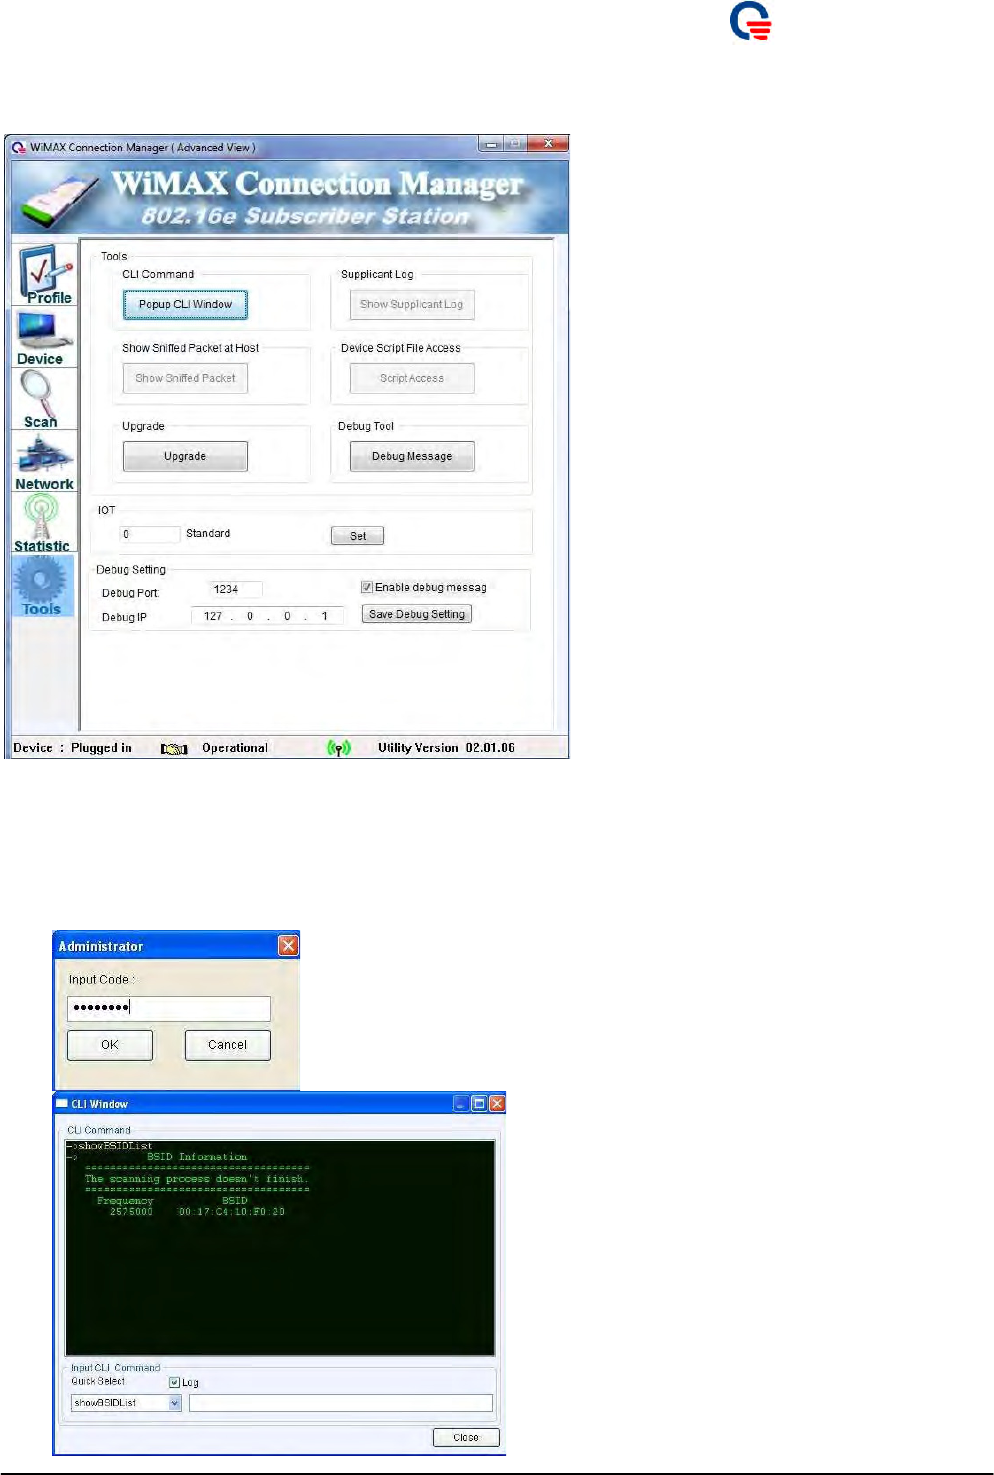
Please open WCM and click on “Tools” tab.
1. Fo
r
CLI window:
I.
II.
III.
Please click “Popup CLI
w
indow”
b
ut
t
on and inpu
t
t
h
ead
m
inis
t
r
ato
r
code “22822281”.
You can run the CLI command and get the response in this window.
The log file is stored in “C:\Program Files\WCM\WiMAXlog.txt”.
Page 25
Quanta
Co
m
p
ute
r
Inc.
2. Fo
r
Debug Message
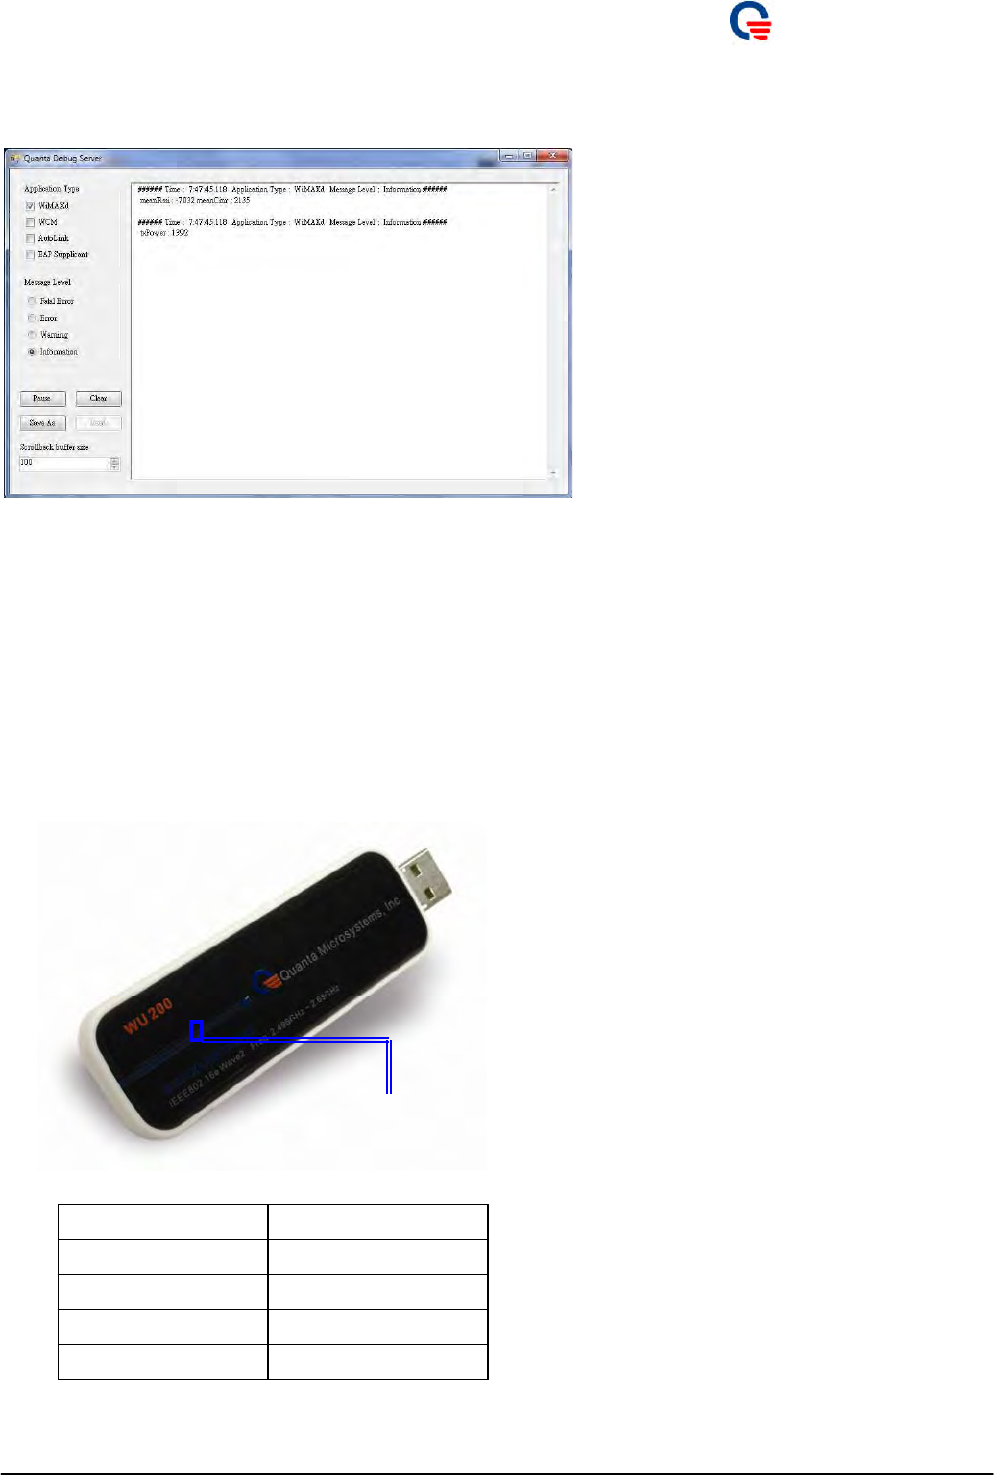
I. Please click “Debug Message” button that will pop out another window to have scanning, network
link status and EAP log.
Please check application t
y
pe a
n
d
m
essage level you wan
t
to filte
r
m
essages. You can click “Pause”, “Start”,
“Clear”, “Save As”, and “Load” button to control tracking messages.
5.5.
What
does
LED
act
i
v
i
ty
mean?
The diffe
r
e
n
t
s
t
a
t
e i
n
fo
r
m
a
t
ion fo
r
WU se
r
iesisasfollows:
1. USB dongle:
LED
Page 26
Device Activity LED Status
Initialized Green
Firmware Upgrade Green (Flashing)
No Connection Green
Normal Operation Blue

Quanta
Co
m
p
ute
r
Inc.
6.
Append
i
x
6.1.
Create
Dev
i
ce
In
f
ormat
i
on *.IFO
f
il
e
1. If you would like to se
t
up a WCM with
security, especially Device Authentication and
User + Device Authentication, please use
WCM to generate the Device Authentication
Information file firstly.
2. WCM will i
m
po
r
t
all you
r
necessa
r
y
certificates and generate a file named *.ifo
format.
3. Please e
n
able P
K
M
b
y selecting
PKMv2_EAP.
4. Please selec
t
“Device Authentication”as
your authentication method.
5. Please choose “Host PC” i
t
e
m
and click
“Create New” button from “Get Device
Authentication Information File from…”
field.
6. Please selec
t
you
r
Ce
r
t
ificate files.
CA Certificate file
Device Ce
r
tifica
t
e file
Private
K
ey Ce
r
tifica
t
efile
7. Ente
r
you
r
K
ey Passwo
r
d. If t
h
e
r
e is
n
o
password for authentication, please keep it
empty.
8. Selec
t
the di
r
ec
t
o
r
y you wan
t
to place the
*.IFO file. Please choose “Host PC” item.
“WiMAX Device” item is for feature.
9. Click “Make”
b
utton to gene
r
ate *.ifo file.
10. You have c
r
ea
t
ed Device
A
uthentication
Information File successfully.
Page 27
Quanta
Co
m
p
ute
r
Inc.
6.2.
Dev
i
ce
Authent
i
cat
i
on
1. Please follow sec
t
ion 6.1
t
o c
r
eate Device
Authentication Information File before you
set up device authentication.
2. Please e
n
able P
K
M
b
y selecting t
h
e
“PKMv2_EAP” option.
3. Please selec
t
“Device Authentication”as
your authentication method. WCM will select
EAP Method as “EAP-TLS”.
4. Please c
h
eck the “Outer Identity”, i
t
should
be “0017C4XXXXXX”.
5. 0017C4XXXXXX is the MAC add
r
ess of
your device. Please type ipconfig/all in the
DOS command window to check whether i
t
matches your MAC address or not.
6. Please inpu
t
postfix (Real
m
) of “Oute
r
Identity”.
7. Please load
y
ou
r
CA Ce
r
t
ificate.
8. Please load
y
ou
r
Device Authe
n
tica
t
ion
Information File from your local hard disk.
9. You can click “Create New”
b
u
t
ton
t
o c
r
eate
new one used for device authentication.
10. Please selec
t
NWG spec as R1.0 o
r
D
r
af
t
o
r
No Decoration.
11. Please click “Save Setting”
b
ut
t
on
t
o save all
authentication settings.
12. If you wan
t
t
o
r
ese
t
to defaul
t
se
t
ting, please
click “Reset” button.
13. If the “Oute
r
Identi
t
y” is e
m
pt
y
, please exi
t
this WCM and take out your WiMAX device.
14. You
m
us
t
plug in you
r
WiMAX device fi
r
s
t
ly
Page 28

Quanta
Co
m
p
ute
r
Inc.
b
efo
r
e you co
n
figu
r
e device au
t
hen
t
ica
t
ion,
otherwise WCM can NOT detect and get your
device MAC address and can NOT put its
MAC address as outer identity for device
authentication.
15. Once you have plugged in you
r
WiMAX
device, please open WCM and wait for 5
seconds for WCM to initialize your device
and get MAC address. Then you can start to
configure device authentication.
16. No
w
, you can connec
t
to
b
ase sta
t
ion
successfully.
6.3.
User
and
Dev
i
ce
Authent
i
cat
i
on
1. Please follow sec
t
ion 6.1 and section 6.2 to
create Device Authentication Information File
before you set up user and device
authentication.
2. Please e
n
able P
K
M
b
y selecting t
h
e
“PKMv2_EAP” option.
3. Please selec
t
“User and Device
Authentication” as your authentication
method. WCM will select EAP Method as
“EAP-TTLS”
4. Please selec
t
Inne
r
EA
P
, such as
P
A
P
, CHA
P
,
MSCHAP and MSCHAPV2.
5. Please inpu
t
postfix (Real
m
) of “Oute
r
Identity”.
6. Please load
y
ou
r
CA Ce
r
t
ificate.
7. Please inpu
t
“User ID”.
8. Please inpu
t
“User Password”.
9. Please load
y
ou
r
Device Authe
n
tica
t
ion
Page 29

Quanta
Co
m
p
ute
r
Inc.
Infor
m
ation File f
r
om you local ha
r
d disk.
10. You can click “Create New”
b
u
t
ton
t
o c
r
eate
new one used for device authentication.
11. Please selec
t
NWG spec as R1.0 o
r
D
r
af
t
o
r
No Decoration.
12. Please click “Save Setting”
b
ut
t
on
t
o save all
authentication settings.
13. If you wan
t
t
o
r
ese
t
to defaul
t
se
t
ting, please
click “Reset” button.
14. If the “Oute
r
Identi
t
y” is e
m
pt
y
, please exi
t
this WCM and take out your WiMAX device.
15. You
m
us
t
plug in you
r
WiMAX device fi
r
s
t
ly
before you configure device authentication,
otherwise WCM can NOT detect and get your
device MAC address and can NOT put its
MAC address as outer identity for device
authentication.
16. Once you have plugged in you
r
WiMAX
device, please open WCM and wait for 5
seconds for WCM to initialize your device
and get MAC address. Then you can start to
configure device authentication.
17. No
w
, you can connec
t
to
b
ase sta
t
ion
successfully.
6.4.
Funct
i
ona
l
Button
The following Configuration File parameters affect the WCM behavior.
Page 30
Quanta
Co
m
p
ute
r
Inc.
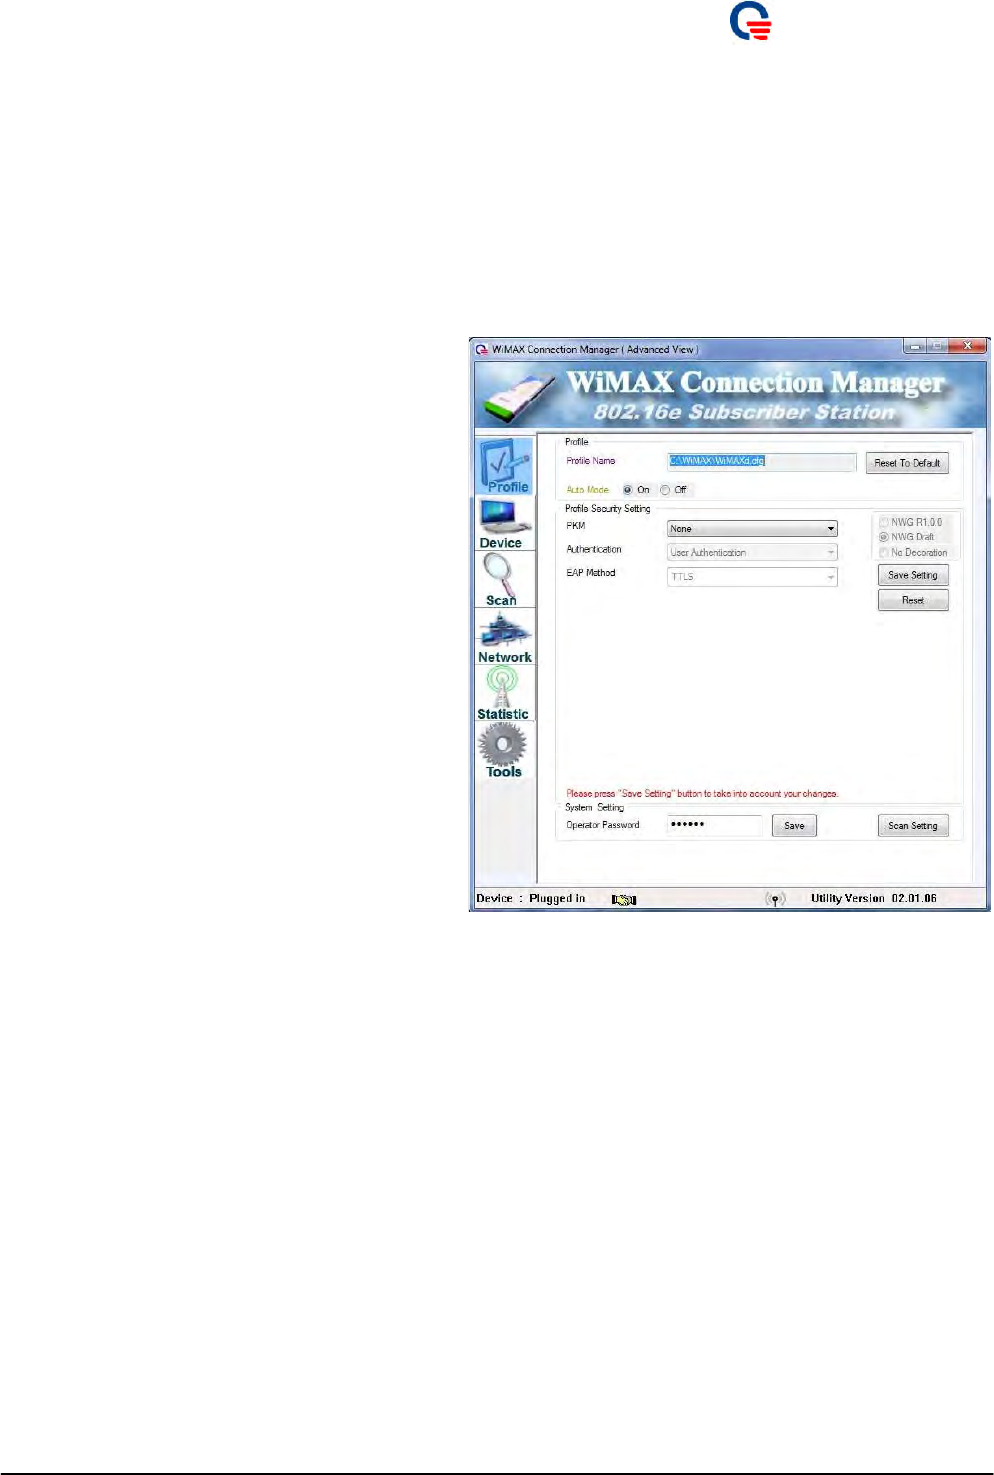
6.4.1.
Pro
f
il
e
1. “Auto Mode” O
n
/Off, selec
t
on to ena
b
le
automatic connection.
2. “NWG
R
1.0.0” op
t
ion, use deco
r
a
t
ion
w
ith
the format {am=1} preceding outer identity.
3. “NWG Draft” op
t
ion, use deco
r
a
t
ion with
the format {1} preceding outer identity.
4. “No Decoration” option, use no deco
r
a
t
ion
preceding outer identity.
5. “Save Setting”
b
u
t
ton, click to save cu
r
r
e
n
t
setting into active profile.
6. “
R
eset”
b
utton, click to
r
ese
t
cu
r
r
en
t
set
t
ing
to default.
7. “Generate”
b
u
t
ton, click to gene
r
a
t
e rando
m
outer identity.
8. “Static Outer Identity” option, check i
t
t
o
use static outer identity as user defined one.
9. “Save”
b
u
t
ton, click to save ope
r
ato
r
password once you change it.
10. “Scan Setting”
b
u
t
ton, click to open scan
setting.
Page 31
Quanta
Co
m
p
ute
r
Inc.
6.4.2.
Scan
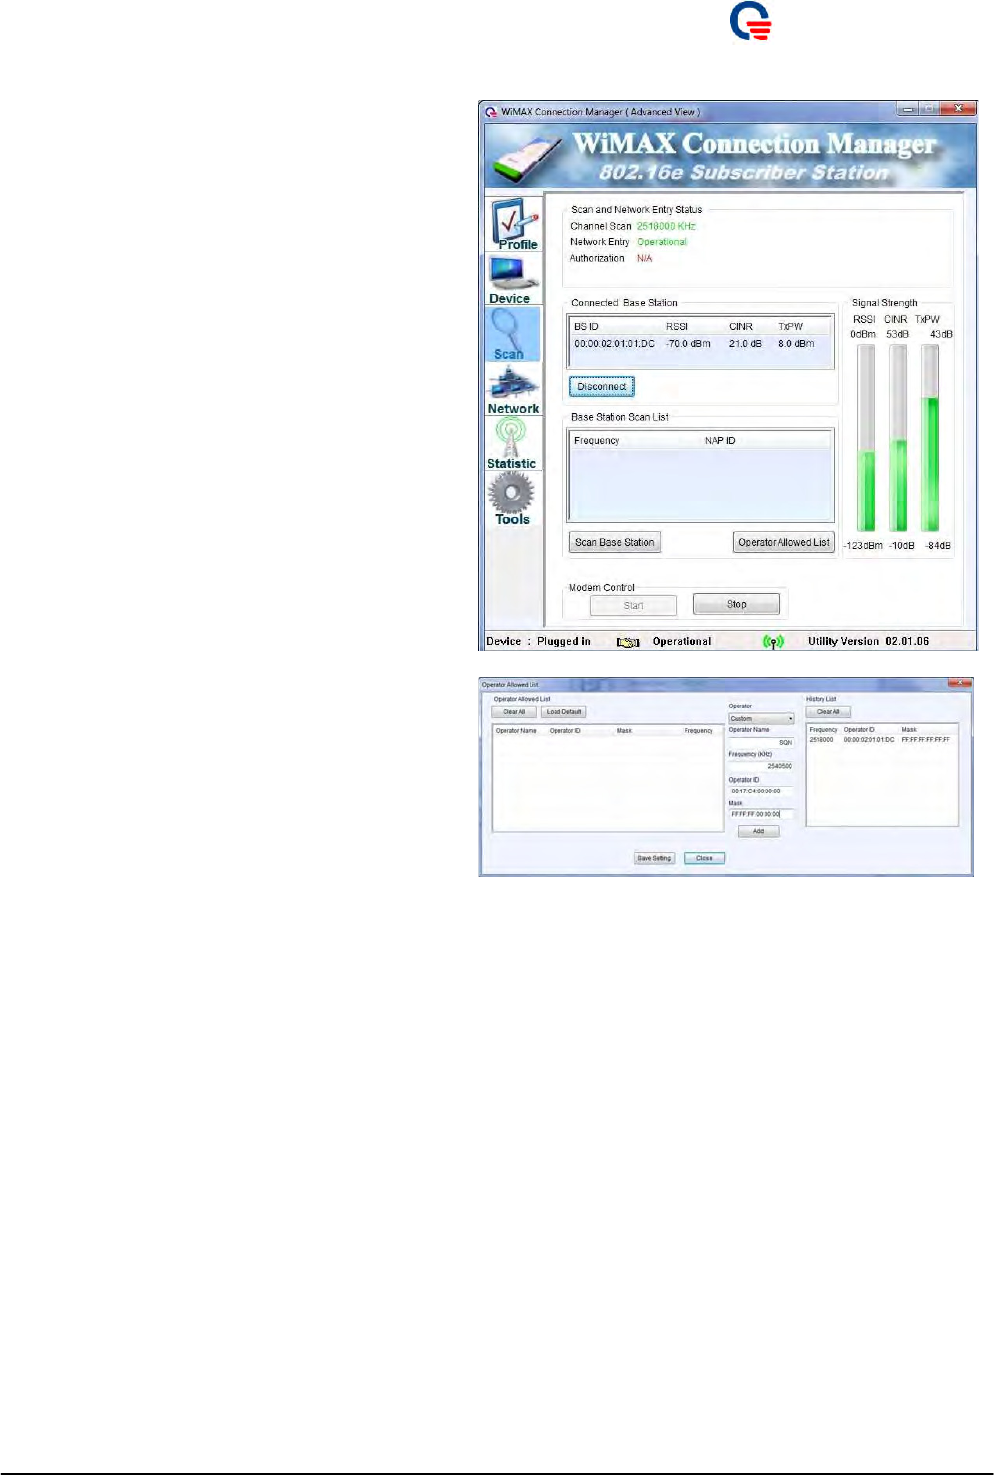
1. “Disconnect”
b
utton, click i
t
to disconnec
t
with current base station. If your WCM is in
“Auto Mode On” state, WCM will reconnect
to BS automatically. This action of
“Disconnect” button will not cause WCM to
switch off Auto Mode.
2. “Scan Base Station”
b
u
t
ton, click i
t
to do
manual scanning. This function is valid if and
only if you switch “Auto Mode” off.
3. “Start/Stop”
b
ut
t
on, click i
t
to s
t
a
r
t/stop the
WiMAX RF.
4. “Operator
A
llowed List”
b
ut
t
on, click i
t
t
o
add, delete, and clear allowed operator list.
5. “Add”
b
u
t
ton, click i
t
to add new ope
r
ato
r
ID
into allowed list.
6. “Clear All”
b
u
t
ton, click i
t
to clea
r
all
allowed list.
7. “Load Default”
b
utto
n
, click i
t
to load
default allowed list.
8. “Save Setting”
b
u
t
ton, click i
t
to save cu
r
r
e
n
t
operator allowed list.
9. “Close”
b
utto
n
, click i
t
to close cu
r
r
e
n
t
window.
Ex.,
T
a
r
ge
t
BS g
r
oup1 (HEX fo
r
m
at)
00:00:17:10:21:14
00:00:17:10:21:15
00:00:17:10:21:16
00:00:17:10:21:17
So, you can defi
n
e t
h
e Sta
r
t
Ope
r
ato
r
ID and
m
ask1
Page 32
Quanta
Co
m
p
ute
r
Inc.
as
Start Operator ID = 00:00:17:10:21:14
mask1 = FF:FF:FF:FF:FF:FC
T
a
r
ge
t
BS g
r
oup2 (HEX fo
r
m
at)
00:00:18:10:11:11
00:00:18:10:xx:
y
y
So, you can defi
n
e t
h
e Sta
r
t
Ope
r
ato
r
ID and
m
ask2
as
Start Operator ID = 00:00:18:10:11:11
mask2 = FF:FF:FF:FF:00:00
6.4.3.
Networ
k
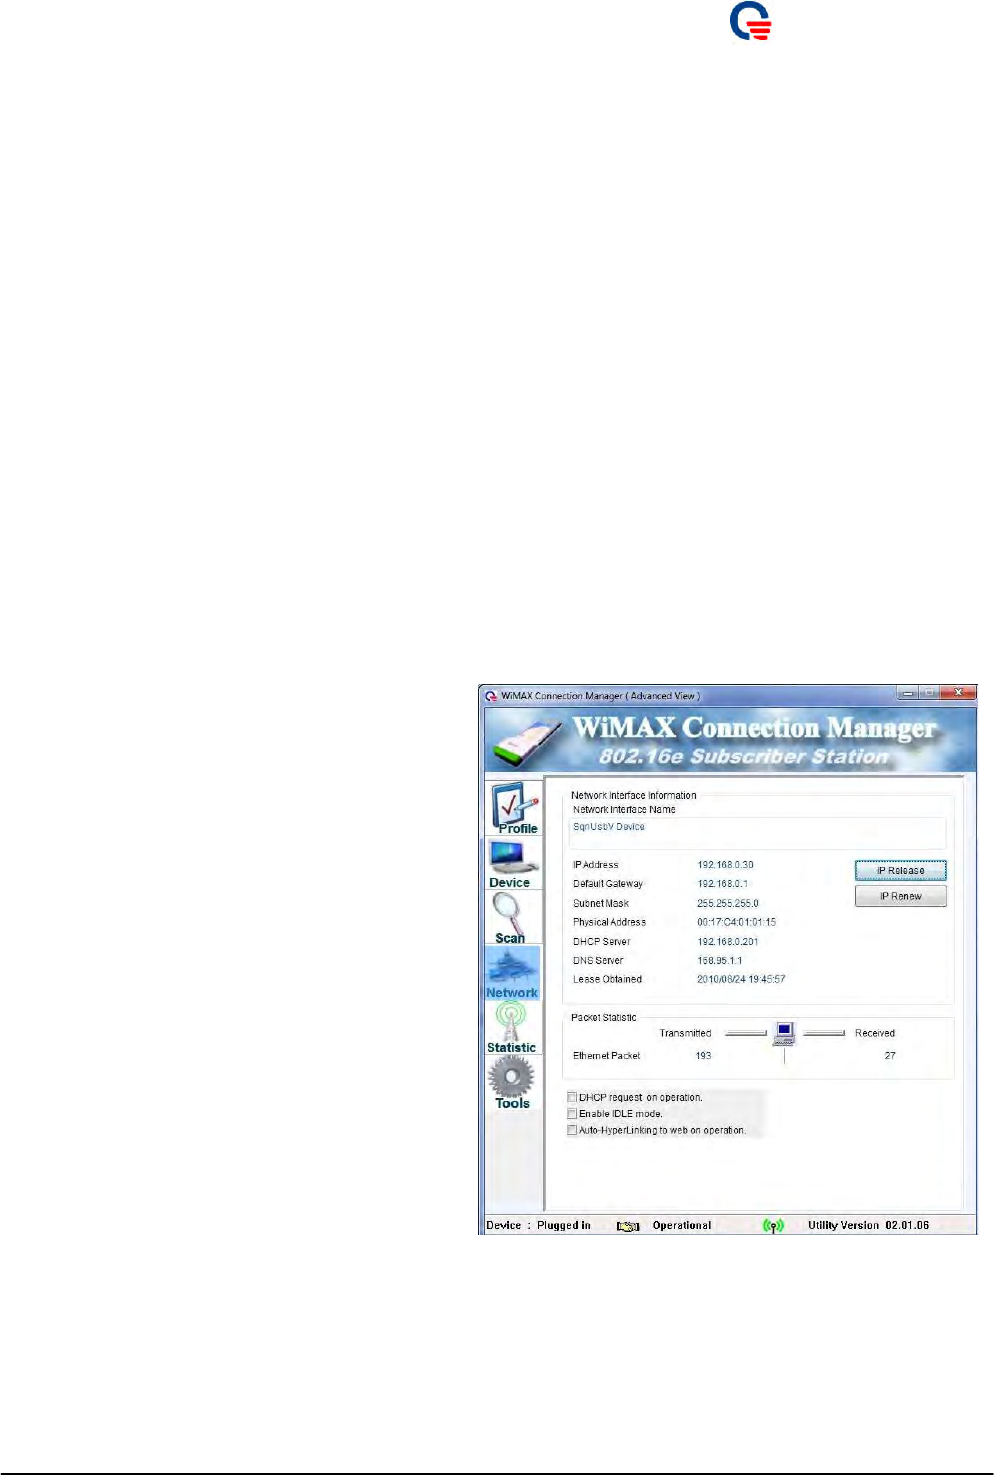
1. “IP
R
elease”
b
utton, click i
t
to
r
elease cu
r
r
en
t
IP address.
2. “IP
R
enew”
b
u
t
ton, click i
t
to
r
enew
t
he lease
time of current IP address.
NOTICE:
IP
r
elease/
r
enew
b
u
t
tons a
r
e fo
r
y
ou
t
o
m
anually
release/renew IP address. Basically, you don’t need
to do that, unless MS can not release/renew IP
address. However if MS enters network entry and
gets IP address successfully. Once if you click IP
release button, BS will deregister MS and force
MS to do network entry procedure.
Page 33
Quanta
Co
m
p
ute
r
Inc.
6.4.4.
Stat
i
st
i
c
1. “Service Flow
R
efresh” button, click i
t
to
refresh the status of service flow.
6.4.5.
T
oo
l
s
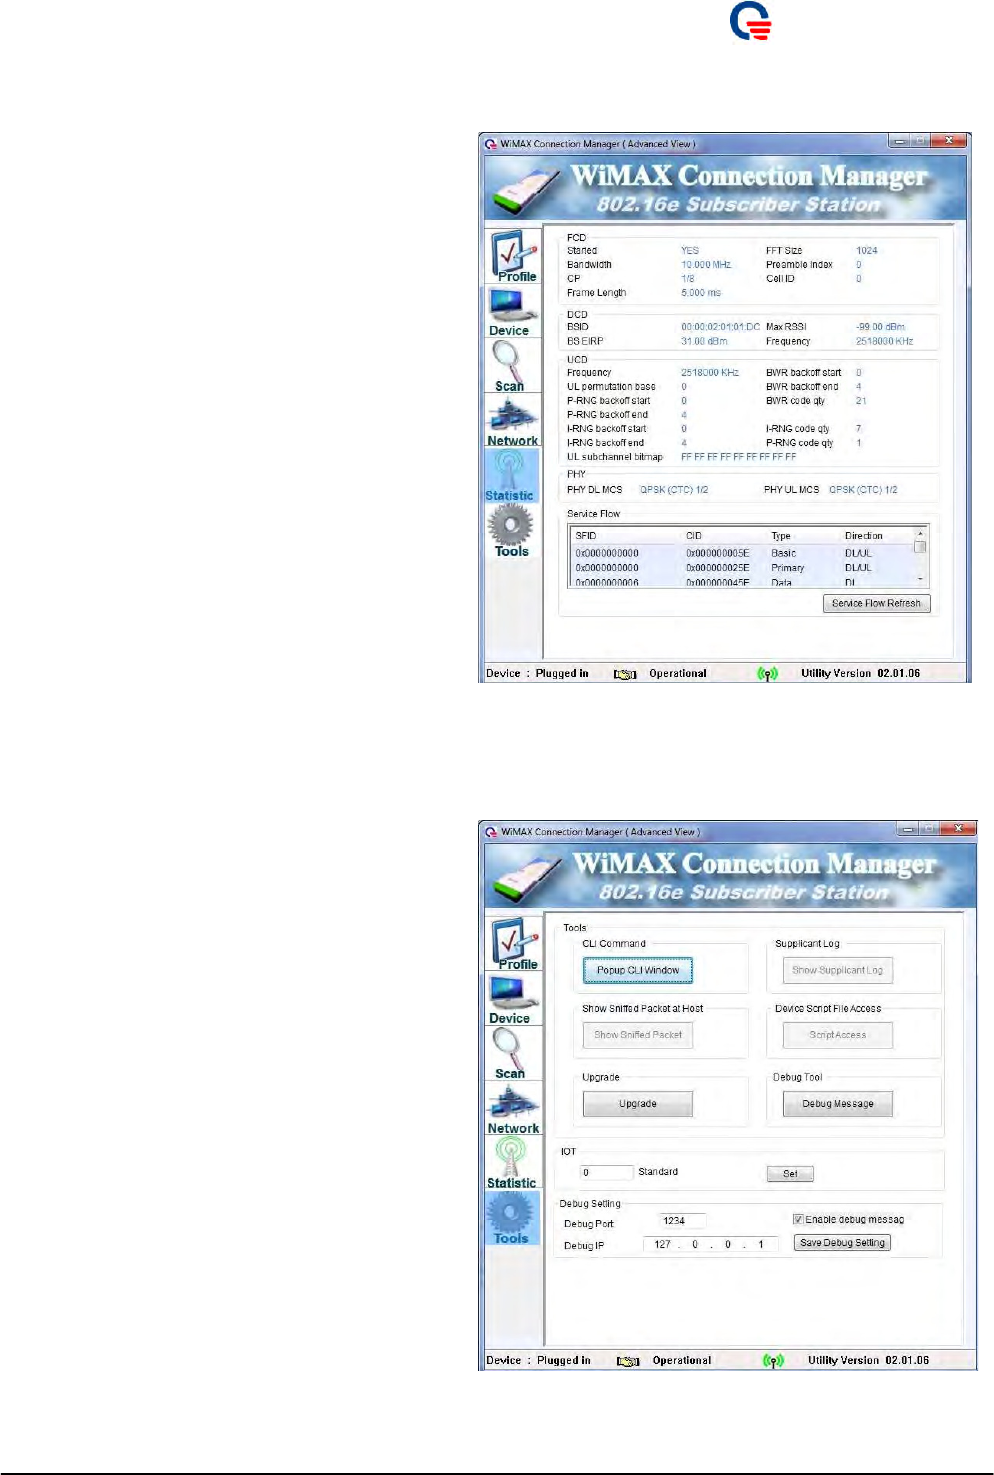
1. “Popup CLI
W
indow”
b
u
t
ton, click i
t
to
show a CLI window for CLI commands.
2. “Upgrade”
b
u
t
ton, click i
t
to open upg
r
ade
wizard.
3. “Debug Message”
b
u
t
ton, click i
t
to open
Debug Message window.
4. IOT
b
lock, se
t
IOT
m
ode fo
r
diffe
r
e
n
t
BS.
5. Debug Setting
b
lock:
Debug Port: UDP po
r
t
“1234”
Debug IP: IP add
r
ess “127.0.0.1”.
Enable debug
m
essage: Enable to show t
h
e
debug messages in Debug Message tool.
Save Debug Setting: Save
t
he debug set
t
ings.
Page 34