Quectel Wireless Solutions 16182010001 GPS Tracking Phone User Manual GS200 080807
Quectel Wireless Solutions Company Limited GPS Tracking Phone GS200 080807
User Manual
GS200
GPS Tracking Phone
User Guide
Contents
1 THE BASICS..............................................................7
1.1 INTRODUCTION.....................................................7
1.2 SAFETY NOTICE....................................................8
1.3 FOR YOUR SAFETY...............................................9
1.3.1 General matters............................................9
1.3.2 Phone Safety...............................................11
1.3.3 Battery Safety.............................................13
1.3.4 Charger Safety...........................................16
1.3.5 Cleaning and Maintenance........................18
2 BEFORE USE..........................................................19
2.1 THE NAMES AND EXPLANATION OF EACH PART.19
2.1.1 Technical information................................19
2.1.2 Appearance................................................20
2.1.3 Keypad Instructions...................................21
2.1.4 Icon............................................................23
2.2 BATTERY.............................................................23
2.2.1 Removal and Installation of the Battery.....24
2.2.2 Battery charging.........................................26
2.3 EARPHONE..........................................................27
2.4 CONNECTING TO THE NETWORK.........................28
2.4.1 SIM card.....................................................28
2.4.2 Insertion of the SIM Card...........................29
2.4.3 Turning the Phone On and Off...................31
2.4.4 Unlocking the Phone Lock.........................32
2.4.5 Unlocking the SIM card.............................33
2.4.6 Connecting to the Network.........................34
3 FLEETLY USER MANUAL...................................35
3.1 CHARACTERISTIC FUNCTION..............................35
3.2 DIALLING............................................................36
3.2.1 Making Domestic Calls..............................37
3.2.2 Calling Fixed Line Extensions...................37
3.2.3 Making International calls.........................38
3.3 EMERGENCY CALLS............................................39
3.4 RECEIVING CALLS..............................................40
3.5 ENDING A CALL..................................................40
3.6 CALL OPTION......................................................40
4 FUNCTION MENU.................................................42
4.1 HOW TO USE THE FUNCTION MENU...................42
4.1.1 Scroll to select Function.............................42
4.1.2 Speedily to select function..........................42
4.1.3 Exit a Menu................................................43
4.2 STRUCTURE OF THE FUNCTION MENU................43
4.3 CALL HISTORY....................................................49
4.3.1 Missed Calls...............................................49
4.3.2 Dialed Calls...............................................50
4.3.3 Received Calls............................................50
4.3.4 Delete Call Log..........................................51
4.3.5 Call Time....................................................51
4.3.6 Call Cost....................................................51
4.3.7 SMS Counter..............................................52
4.3.8 Auto Quick End..........................................52
4.4 CALENDER..........................................................52
4.4.1 View Tasks..................................................53
4.4.2 Jump To Date.............................................54
4.4.3 Go To Weekly View.....................................54
4.5 SERVICES............................................................54
4.6 PHONE BOOK......................................................54
4.7 MESSAGES..........................................................60
4.7.1 SMS............................................................60
4.7.2 Chat............................................................69
4.7.3 Voice Mail Server.......................................70
4.7.4 Broadcast Message....................................70
4.8 USER PROFILES...................................................71
4.9 SETTINGS............................................................74
4.9.1 Phone Setup................................................74
4.9.2 Display Characteristic...............................76
4.9.3 Call Setup...................................................78
4.9.4 Network Setup............................................82
4.9.5 Security Setup.............................................84
4.9.6 Restore Factory Settings............................88
4.10 BLUETOOTH........................................................88
4.11 ORGANIZER........................................................90
4.11.1 Alarm..........................................................90
4.11.2 To Do List...................................................91
4.11.3 Calculator..................................................91
4.11.4 World Clock................................................92
4.11.5 Stopwatch...................................................92
4.11.6 Unit Converter...........................................92
4.11.7 Currency Converter....................................93
4.11.8 Health.........................................................93
5 INPUT METHODS..................................................94
5.1 GENERAL OUTLINE.............................................94
5.2 SCREEN KEY VALUES..........................................94
6 TROUBLE SHOOTING.........................................96
1 The Basics
1.1 Introduction Thank you for choosing the GS200
GPS Tracking Phone. After reading this guide you
will be able to fully master the use of your GS200
mobile phone and appreciate all its functions and
ease of use. The GS200 GPS Tracking Phone is
designed for use on the GSM networks. Not only
does the GS200 provide you with basic calling
functions, but also with many practical functions
such as GPS Tracking Fucntion, a name card style
phonebook, personalized chord ring tones and
pictures, clock, alarm, calculator, automatic power
on/power off, to do list, calendar, world clock,
unit/currency converter and bluetooth etc, to
improve the time you spend working and playing.
Moreover, the GS200 uses a personalized
man-machine interface and the perfect functional
design will satisfy all your needs. The GS200 GPS
Tracking Phone is compatible with GSM
technology and has been approved by certification
authorities both domestically and abroad. Our
company reserves the right to revise this manual
content without prior notice.
1.2 Safety Notice
If your mobile phone is lost or stolen, please contact
the telecommunications authorities or a sales agent
immediately to have a hold put on the SIM card. This
will prevent economic loss caused by unauthorized calls
made from your mobile phone.
When you contact the telecommunications authorities
or a sales agent, they will need to know the IMEI
number of your mobile phone (remove battery to
expose number located on the label on back of phone).
Please copy this number and keep in a safe place for
future use.
In order to avoid the misuse of your mobile phone
please take the following preventative measures:
- Set the PIN number of your mobile phone’s SIM card
and change this number immediately if it becomes
known to a third party.
- Please keep the phone out of sight when leaving it in a
vehicle. It is best to keep the phone on your person, or
locked in the trunk.
- Set call restrictions.
1.3 For Your Safety Please read these safety
guidelines before using your mobile phone to assure
the safe and proper use of the phone.
1.3.1 General matters
Please turn off your mobile phone on airplanes, in
hospitals and in other locations with restricted mobile
phone use, otherwise the normal operation of electrical
equipment and medical instruments will be affected.
Please obey local regulations when using your mobile
phone.
While driving please obey local laws and regulations
with regard to mobile phone use. When talking on the
phone while driving, please obey the following rules:
Concentrate on driving and be aware of traffic
conditions; if your mobile phone has a hands-free
function, please use it in this mode. Under poor driving
conditions, please stop the car before you dial or pick
up the phone.
Please obey laws, regulations and signs when near an
area storing fuel, chemicals, or volatile materials.
Please keep mobile phones, batteries and chargers
away from children, to prevent them from injuring
themselves with them.
In order to prevent damage to your mobile phone, only
accessories, such as batteries and chargers, may be used
with your mobile phone. The use of other batteries or
chargers could result in battery leakage, overheating,
cracking, fire or other malfunctions.
Please do not use your mobile phone near low signal or
precision electronic equipment. Radio wave
interference may cause the malfunctioning of such
electronic equipment and other problems. Special
attention must be paid near the following equipment:
hearing aids, pacemakers and other electronic medical
equipment, smoke detectors, automatic doors and other
automatic control installations. To find out the effect of
mobile phones on a pacemaker or other piece of
electronic medical equipment please contact the
manufacturers or local sales agents of the equipment.
This mobile phone is equipped with an auto power on
function. Please refer to the mobile phone’s clock
setting to assure that the mobile phone will not
automatically turn on during a plane flight.
To avoid the mobile phone malfunctioning, or catching
fire, please do not violently impact, jolt or throw your
mobile phone.
Please do not place the batteries, mobile phone or
charger in a microwave oven or high-pressure
equipment. Otherwise it could lead to unexpected
accidents such as damage to the circuitry or fire.
Please do not use your mobile phone near flammable or
volatile gases, otherwise it could cause malfunctioning
or fire.
Please do not subject your mobile phone to high
temperatures, high humidity or dusty places, otherwise
this may lead to the malfunction of your mobile phone.
To avoid your mobile phone falling and malfunctioning
or being damaged, please do not place your phone on
uneven or unstable surfaces.
1.3.2 Phone Safety
Do not disassemble or modify the mobile phone, as it
will lead to damage to the phone such as battery
leakage or circuitry failure.
Please do not subject the LCD to impact or use the
screen to strike things, as this will damage the LCD
board and cause leakage of the liquid crystal. There is a
risk of blindness if the liquid crystal substance gets into
the eyes. If this occurs rinse eyes immediately with
clear water (under no circumstances rub your eyes) and
go immediately to a hospital for treatment.
Under very rare circumstances using the mobile phone
in certain model cars may negatively effect the internal
electronic equipment. In order to assure your safety
under such circumstances please do not use the mobile
phone. If your car is equipped with an airbag, please do
not place your phone on top of, or within the contact
area of the airbag in order to avoid seriously harming
the driver or passenger when the airbag inflates.
Please do not use needles, pen tips, or other sharp
objects on the keypad as this may damage the mobile
phone or cause it to malfunction.
Avoid letting the phone come into close contact with
magnetic objects such as magnetic cards as the
radiation waves of the mobile phone may erase the
information stored on floppy disks, pay cards and
credit cards.
Please keep small metal objects, such as thumbtacks,
far away from the receiver. When the receiver is in use
it becomes magnetic and may attract these small metal
objects and thus these may cause injury or damage the
mobile phone.
Avoid having the mobile phone come into contact with
water or other liquids. If liquids enter the phone, this
could cause a short circuit, battery leak or other
malfunction.
As much as possible, please use the mobile phone in a
place away from landline telephones, televisions,
radios, and automated office equipment in order to
avoid affecting both the equipment and the mobile
phone.
1.3.3 Battery Safety
Do not disassemble or modify the battery, as this will
cause the battery to leak, overheat, crack and catch fire.
Do not dispose of old batteries with everyday domestic
garbage. Please dispose of old batteries at the directed
places with specific rules for their disposal.
Please do not put/throw batteries into a fire, as this will
cause the battery to catch fire and explode.
When installing the battery, do not use force or
pressure, as this will cause the battery to leak, overheat,
crack and catch fire.
Please do not use wires, needles or other metal objects
to short-circuit the battery. Also, do not put the battery
near necklaces or other metal objects, as this will cause
the battery to leak, overheat, crack and catch fire.
Please do not solder the contact points of the battery, as
this will cause the battery to leak, overheat, crack and
catch fire.
If the liquid in the batteries goes into the eyes, there is
a risk of blindness. If this occurs do not rub the eyes,
but immediately rinse eyes with clear water and go to
the hospital for treatment.
Please do not use or place the batteries near high
temperature places such as near a fire or heating vessel,
as this will cause the battery to leak, overheat, crack
and catch fire.
If the battery overheats, changes colour, or becomes
distorted during use, charging, or storage, please stop
using and replace it with a new battery.
If the liquid from the battery comes in contact with skin
or clothing this could cause burning of the skin.
Immediately use clear water to rinse and seek medical
attention if necessary.
If the battery leaks or gives off a strange odour, please
remove the battery from the vicinity of the open fire to
avoid a fire or explosion.
Please do not let the battery become wet as this will
cause the battery to overheat, smoke and corrode.
Please do not use or place batteries in places of high
temperature such as in direct sunlight, as this will cause
the battery to leak and overheat, lower performance,
and shorten the battery’s life.
Please do not continuously charge for more than 24
hours.
Please place the battery in a cool, shady and
well-ventilated place out of direct sunlight.
The life of all mobile phone batteries is limited. The
usable time of batteries decreases with frequent
charging. When charging becomes ineffective this
means that the battery is at the end of its life and the
battery should be replaced with a new one of the
designated type.
1.3.4 Charger Safety
Please do not disassemble or modify the charger, as it
will lead to bodily harm, electrical shock, fire or
damage to the charger.
Please use AC 220 volts. The use of any other voltage
will cause battery leakage, fire and cause damage to the
mobile phone and charger. Max. allowed temp for
using the device is +40℃
It is forbidden to short circuit the charger, as this will
cause electrical shock, smoking and damage to the
charger.
Please do not use the charger if the power cord is
damaged, as this will cause fire or electrical shock.
Please immediately clean any dust gathered on the
electrical outlet.
Please do not place vessels with water near the charger
in order to avoid water splashing onto the charger and
causing an electrical shortage, leakage or other
malfunction.
If the charger comes in contact with water or other
liquid the power must immediately be switched off to
avoid an electrical short or shock, fire or malfunction
of the charger.
Please do not use the charger in the bathroom or other
excessively moist areas, as this will cause electrical
shock, fire or damage to the charger.
Please do not touch the charger with wet hands, as this
will cause electrical shock.
Do not modify or place heavy objects on the power
cord, as this will cause electrical shock or fire.
Before cleaning or carrying out maintenance please
unplug the charger from the electrical outlet.
When unplugging charger, do not pull on the cord, but
rather hold on to the body of the charger, as pulling on
the cord will damage the cord and lead to electrical
shock or fire.
Please do not charge in the following places: moist or
humid places, dusty places or places with excessive
vibration (this will cause malfunctioning); near
televisions, radios, electronic products (this will effect
the picture and sound)
1.3.5 Cleaning and Maintenance
The mobile phone, battery and charger are not water
resistant. Please do not use them in the bathroom or
other excessively moist areas and likewise avoid
allowing them to get wet in the rain.
Use a soft, dry cloth to clean the mobile phone, battery
and charger.
Please do not use alcohol, thinner, benzene or other
solvents to wipe the mobile phone.
A dirty outlet will cause poor electrical contact, lose of
power and even inability to recharge. Please clean
regularly.
2 Before Use
2.1 The Names and Explanation of Each Part
2.1.1 Technical information
Phone
Model GS200
Dimensions (w×h×t) 47×112×16.5mm
Weight 100g
Lithium Battery
Model GS200
Rating voltage 3.7V
Max charge voltage 4.2V
Capacity rating 1150mAh
Travel charger
Model SLGT/PS
Input 100V-240V~50/60Hz 0.2A
Output 5.0V, 0.55A
Earphone
spec Mono Handsfree Headset
2.1.2 Appearance
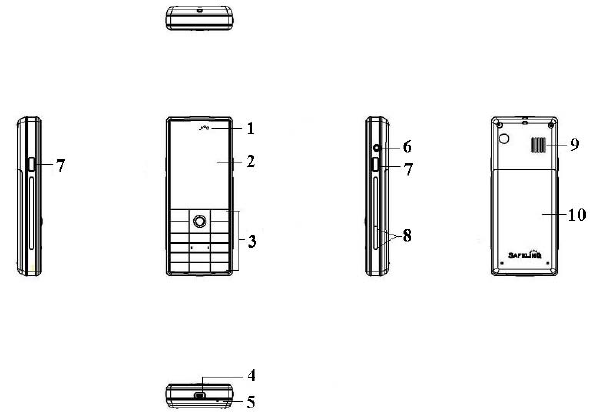
1. Receiver; 2. Screen;
3. Keypad; 4.Charge&data interface;
5. Microphone; 6. Earphone jack
7. SOS button; 8. Volume button;
9. Speaker 10. Battery lid
2.1.3 Keypad Instructions
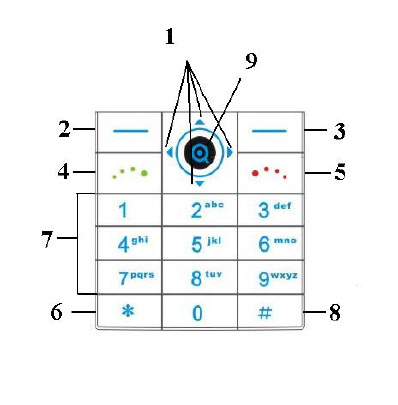
1. Navigation key: Left/right keys:for moving
the cursor when editing text; In most submenus,
press the left key to return the upper menu, press
the right key to open the file. Up/down keys:
scroll to view names, phone numbers, SMS, MMS
etc, moves the cursor up and down when editing
text.
2. Left soft key:to perform the function of the
prompt displayed in lower left corner of the screen.
3. Right soft key:to perform the function of the
prompt displayed in lower right corner of the
screen.
4. Dial key: to dial and pick up calls by master

SIM card; on standby, to see the all calls record list
in SIM card.
5. Hang-up key: to end a call or reject incoming
calls; under most circumstances pressing this key
will put the mobile phone into standby mode.
6. * key:this key has different functions in
different modes and menus.
7. Number keys: to enter numbers and letters with
the number keys from 0-9; to rapidly select menu
items, etc.
8. # key:this key has different functions in
different modes and menus.
9. OK key:OK key function is same with the left
soft key.
Attention: In this handbook, the phrase “press the
key” refers to pressing and thereafter releasing a key;
“Hold down a key” refers to pressing a key and
keeping it depressed for 2 seconds or longer.
2.1.4 Icon
Icon explain Display place
Signal intensity of internet icon area
Keyboard is locked icon area
silent activated icon area
Earphone activated icon area

Vibration Only icon area
Vibra and Ring icon area
Ring icon area
Vibra Then Ring icon area
Receive short message icon area
Startup alarm icon area
Buletooh icon area
Display batteries energy icon area
Missed calls icon area
2.2 Battery The battery is initially charged with 50% of
its total capacity, you can unpack and use it. Please
recharge the battery to full after it's exhausted for the
first 3 times, so as to make the best of your battery.
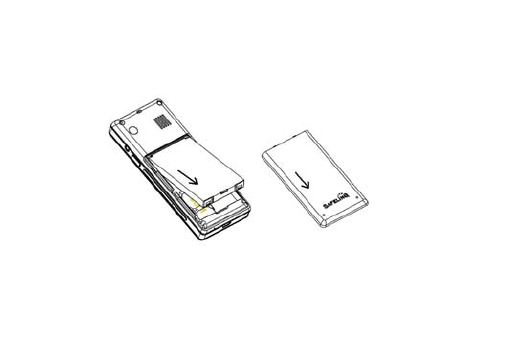
2.2.1 Removal and Installation of the Battery
When removing the battery follow the following steps: Push
the battery cover towards bottom;① Raise② the battery
bottom, break out the battery from the mobile-phone.
Warning: You must turn off your mobile phone before
removing the battery. Under no circumstances should you
remove the battery when the mobile phone is on as this may
damage the SIM card and your mobile phone.
When installing the battery follow the following steps:
According to arrowhead direction, push the battery ①to inset
mobile-phone. Cover with the battery cover.② ③Push the
battery cover towards top.
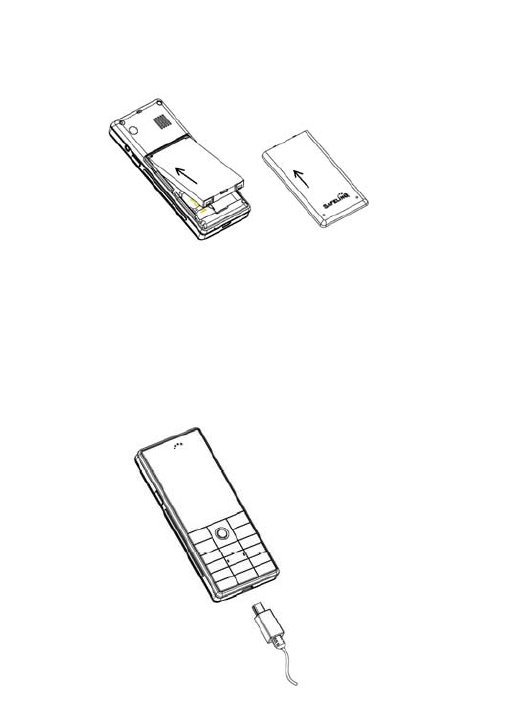
2.2.2 Battery charging
The charger connector with the bottom of the phone.
The charger connector with the electrical source.
The battery capacity indicator in Icon Area will then flash
periodically; when charging at power-off status, charging
indicator on the screen means the phone is charging now. If
you are using a phone in low battery, it may need certain time
for charging indicator to appear on the screen after starting to
charge.
When the Capacity Indicator in Icon Area is full and doesn't
flash any more, the charging process is complete. If your
phone is charged in power off status, charging complete
screen will also display. Charging process usually takes
1-2.5 hours. Battery, phone and charger normally turns hot
during charging process.
When charging process complete, disconnect connections
between AC power outlet, your phone and the charger.
Attention:
Be sure to charge in ventilated place with the temperature
ranging from -10℃ to +40℃, and always use the charger
provided by original manufacturer. Using unauthorized
charger may cause danger, and also violates warranty
coverage of the manufacturer.
Charge your battery in time when the phone automatically
powers off or displays low battery warning. The phone will
automatically decrease charging time when the battery is not
exhausted before charging.
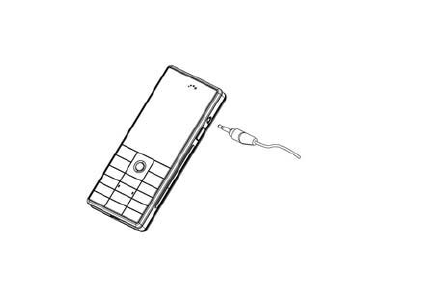
2.3 Earphone Please open the plug of the earphone jack
and then insert the earphone into earphone jack as the
following picture before you use it.
2.4 Connecting to the network
2.4.1 SIM card Before using your phone, please insert
valid SIM (Subscriber Identity Module) card into
the phone. SIM card is provided by network
service provider. All information related to network
connection is recorded in the chip of the SIM card.
Names, phone numbers and SMS are also recorded in
the card. You can take the SIM card out from your
phone and put it into any other GSM phone, which
will automatically read the SIM card. To avoid losing
or damaging the information stored in the SIM card,
don't touch metal contact surface, and always keep
your SIM card away from power and magnetic
material. Once the SIM card is damaged, you will not
be able to use the phone any more.
Warning: Be sure to turn off the phone before taking out the
SIM card. It's strictly prohibited to insert or take out the SIM
card when the phone is connected to the power source,
otherwise the SIM card or the phone could be damaged.
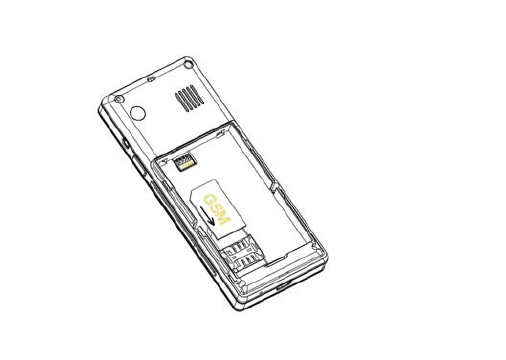
2.4.2 Insertion of the SIM Card Metal interface of SIM
card is very easy scrape.Before inserting into the
phone you must carefully remove it.
Turn off the phone; remove the battery and unplug other
external power sources.
Insert the SIM card into the SIM slot as shown in the
following picture.
When you need to remove the SIM card, please first turn off
the phone, remove the battery, then remove the SIM card.

2.4.3 Turning the Phone On and Off To turn on or off
the phone please hold down the Hang-up key. If you
turn on the phone without having inserted the SIM
card, phone will display “Insert SIM”. After inserting
the SIM card the phone will automatically check if the
SIM is useable. The following will be displayed in
this order: Enter Phone Lock Code —If you set
the Phone Lock. Enter PIN —If you set
the SIM Lock. Greeting Text —If you
turn on greeting status and edit greeting text.
Searching —The phone will conduct a
search to find the appropriate network connections.
2.4.4 Unlocking the Phone Lock In order to protect
against unlawful usage, a lock code may be set for
your phone. If you choose this option, then every time
you turn on your phone, you must enter the lock code
before you may use the mobile phone as normal. The
user may turn off the phone lock code protection.
Under such circumstances you cannot prevent the
unlawful use of your mobile phone.
Hold down the Hang-up key to turn on the mobile phone;
Enter the lock code. Use the Right soft key to delete
mistakes. Finish by pressing the left soft key or “#” key.
For example, if your lock code is set as 0000, then enter the
following: 0 0 0 0 OK If you forget your lock code,
you must contact your retailer or local authorized repair and
maintenance service centre to have the lock code opened.
2.4.5 Unlocking the SIM card
In order to protect against unlawful usage, the SIM card uses a
PIN (personal identification number) number. If you choose this
option, then every time you turn on your phone you must enter the
PIN so as to unlock the SIM card before you use the mobile phone.
The user may turn off the SIM card protection. Under such
circumstances you cannot prevent the unlawful use of the SIM
card.
Hold down the Hang-up key to turn on the mobile phone;
Enter the PIN number. Use the right soft key to delete
mistakes. Finish by pressing the left soft key or “#” key.
For example, if PIN is set as 1234, then enter the following: 1 2 3 4
OK If an incorrect number is entered three times consecutively,
your SIM card will be locked by the network and the mobile phone
will ask for the PUK number.
Attention: Your network provider will offer your SIM card
with a standard PIN number (with 4-8 numbers). You should
change this to your own number as soon as possible.
2.4.6 Connecting to the Network
When the SIM card has been successfully opened your mobile
phone will automatically search for a useable network
(“Searching” will be displayed on the screen). When the
connection is made, the name of the network provider will appear
in the middle of the screen. Your phone supports GPRS(General
Packet Radio Service) service. If your network operator has
activated your GPRS service and your phone is within the GPRS
network area, at this time you may access the WAP service
through the GPRS network.
Attention: If “Emergency” is displayed on the screen, this
means that you are already outside the normal coverage of the
network area, but you can still transmit emergency calls
depending on the strength of your signal.
3 Fleetly User manual
3.1 Characteristic Function Positioning itself as a
multimedia phone, GS200 not only provides all basic
features of mobile phone, but also supports versatile
and practical features as follows:
GPS: your mobile phone supports GPS tracking
Function.
Bluetooth: Bluetooth is a global standard for wireless
connectivity.
Phone Book: speed search matched phone number
records; each phone book record stored in the phone
corresponds to up to 4 numbers with a total 500 phone
book records capacity of the phone, and the phone book
record stored in SIM card depends on the capacity of the
card; send SMS in phone book and copy one record into
SIM card or phone; copy and paste phone book record
between SIM card and phone; delete phone book record
in SIM card and phone; support card-clipper phone book,
personalized ringtone, picture and so on.
Call History: your phone automatically stores all related
calling record for your reference; delete one single
calling record as well as speed delete all calling records,
and so on.
SMS: view capacity and used space for SIM card SMS;
extract phone number from SMS, and so on.
User Profiles: to set your mobile phone’s ring tone,
according to different event or environments.
Settings: to set the individual characteristic by demand,
include the phone setup, call setup, network setup and
security setup; can set the different function according as
the different fancy, eg: time and date, schedule power
on/off and call barring, and so on.
Preferred Input Methods: to offer 34 kinds of input
methods in the mobile-phone.
Display Characteristic: to set the individual
characteristic wallpaper by demand, and so on.
Organizer: You may use various practical functions
including calendar, alarm, world clock, calculator, unit
converter, currency converter, health.
3.2 Dialling You may dial and receive calls on your
phone when the symbol of your network provider
appears on the screen. The information bar on the
upper left corner of the screen indicates network
strength (the signal is strongest when there are four
lines visible).
Barriers greatly affect call quality, thus slightly moving your
location can increase the quality of the phone call.
3.2.1 Making Domestic Calls
Use the number keys to enter the telephone number, and then
press the dial key to dial the call. If you need to change the phone
number, press the right soft key to delete a character to the left of
the cursor. The dialing animation will appear on the screen during
dialing. When the other party picks up the phone, the screen will
display information about the call.
You can input domestic calls in this order:
Area code phone number dial key
3.2.2 Calling Fixed Line Extensions
Some fixed phone extensions cannot be called directly. You
must first go through the switchboard before you can dial the
extension, then hode down the * key to switch, as far as, the screen
will display the letter “P”, then dial the extension number.
You can input the switchboard number and the extension
number in this order:
Area code switchboard number P extension
number dial key
You must first go through the switchboard before you can dial
the extension, then hode down the * key to switch, as far as, the
screen will display the letter “W”, then dial the extension number.
You can input the switchboard number and the extension
number in this order:
Area code switchboard number W extension
number dial key
3.2.3 Making International calls For making
international calls you should hold down the * key to
switch, until the international phone prefix “+”
appears on the screen. This will allow you to make an
international call in any country regardless of what the
international call prefix is (e.g., 86 in China). After
entering the prefix, enter the country code and full
number you wish to call. The country code is
according to convention: Germany is 49, England 44,
Sweden 46 and so on.
When making international calls, you should omit the initial 0
of area codes
For example, if you were to dial the Shanghai service hotline,
you would dial +86 21 114
You can input international calls in this order:
+ Country code area code telephone number dial key
3.3 Emergency Calls
If you are located within the network area (you can find this
out by referring to the network strength indicator located on the
upper left-hand corner of your mobile phone screen), you should
be able to make emergency calls. If your network provider does
not provide roaming where you are, “Emergency” will appear on
the screen. If you are located within a network area, even if you do
not have a SIM card, you will be able to transmit emergency calls.
3.4 Receiving Calls
If you have set the “Any Key”, you can pick up the call by
pressing any key other than the hang up key and right soft key.
3.5 Ending a Call You can press the hang up key or right soft
key to refuse an incoming call. During a call you can
press the hang up key to end a call. You can also
cancel a call you have just dialed by pressing the
hang up key.
3.6 Call Option During the call, press the left soft key
“Option” to enter the call option menu, or press the
right soft key “H-Free” to activate and enlarge tone,
then you can press the right soft key “H-Held” to
close and decrease volume.
The call option menu can only be seen while a call is being
made. Functions such as call waiting, call divert, and conference
calls require network support. Please contact your network
provider. In this menu, you can handle as follows:
Hold
To put a call on pause or retrieve a call that has been put on
hold.
End
To end the call.
New Call
To begin to dial new call.
Phone Book
To enter the list of phone book entries.
Message
To enter the SMS menu.
Mute
To stop transmitting the user’s voice.
DTMF
To deactivate or activate DTMF sound.
4 Function Menu
4.1 How to Use the Function Menu
4.1.1 Scroll to select Function
On standby, press the left soft key “Menu” to enter the
main function menu. During a call press the left soft key
“Option” to enter the call option menu, then use the
up/down keys to scroll to the desired item on the call menu
and press the left soft key to select the function.
In all the menus and submenus, use the Navigation key to
scroll to the desired function and press the left soft key to
enter the function item.
4.1.2 Speedily to select function Most main menus and
submenus have speed numbers. This speed number is
the function’s corresponding index number.
On standby, press the left soft key “Menu” to enter the
main menu, left/right keys to scroll to the desired item on
the menu.
Enter the main menu’s speed number to enter the
corresponding option. Enter the submenu’s speed number
to select the corresponding option.
4.1.3 Exit a Menu Usually, when in the function menu, you
can exit a menu item by pressing the right soft key. You
can also press the hang-up key to return to the standby
mode.
4.2 Structure of the Function Menu The function
menu has the following default structure: 1 Call History
1-1 Missed Calls 1-2 Dialed Calls 1-3 Received Calls 1-4 Delete
Call Log 1-4-1 Miss Calls 1-4-2 Dial Calls 1-4-3 Received Calls
1-4-4 Delete All 1-5 Call Time 1-5-1 Last Call Time 1-5-2 Total
Sent 1-5-3 Total Received 1-5-4 Reset All Time 1-6 Call Cost
1-6-1 Last Call Cost 1-6-2 Total Cost 1-6-3 Reset Cost 1-6-4
Max Cost 1-6-5 Price Per Unit 1-7 SMS Counter 1-7-1 Sent 1-7-2
Received 1-8 Auto Quick End 2 Calendar 3 Services 3-1
STK* 4 Phone Book 4-1 Quick Search 4-2 Search Entry 4-3 Add
New Entry
4-3-1 To SIM 4-3-2 To Phone 4-4 Copy
All 4-4-1 From SIM 4-4-2 From Phone 4-5 Delete 4-5-1 From
SIM 4-5-2 From Phone 4-5-3 One By One 4-6 Caller Group
4-6-1 Friends 4-6-2 Family 4-6-3 VIP 4-6-4 Business
4-6-5 Others 4-7 My vCard 4-7-1 Edit My Card 4-8 Settings 4-8-1
Preferred Storage SIM 4-8-2 Fields 4-8-3 Ower Number 4-8-3 Service Dial
Number 4-8-4 SOS Number 4-9 Memory Status 5 Messages 5-1 SMS 5-1-1
Inbox 5-1-2 Outbox 5-1-3 Write Message 5-1-4 Template 5-1-5
Message Settings 5-2 Chat 5-2-1 Chat Room1 5-2-2 Chat Room2 5-4
Voice Mail Server 5-5 Broadcast Message 5-5-1 Receive Mode 5-5-2 Read
Message 5-5-3 Languages 5-5-4 Channel Setting 6 User Profiles 6-1
General 6-2 Meeting 6-3 Outdoor 6-4 Indoor 6-5 Headset 6-6 Bluetooth
6-6-1 Customize 7 Settings 7-1 Phone Setup 7-1-1 Time and Date 7-1-2
Display Characterisic 7-1-3 Language 7-1-4 Preferred Input Methods 7-1-5
Shortcuts 7-1-6 Dedicated key 7-1-7 Flight Mode 7-2 Display
Characteristic 7-2-1 Themes 7-2-2 Wallpaper 7-2-3 Screen Saver 7-2-4 LCD
Backlight 7-2-5 Greeting Text 7-2-6 Power On Display 7-2-7 Power Off Display
7-2-8 Show Date and Time 7-2-9 Show Owner Number 7-3 Call
Setup 7-3-1 Call Waiting 7-3-2 Call Divert 7-3-3 Call
Barring 7-3-4 Call Time ReminderDisplay 7-3-5 Call Time Display 7-3-6 Auto
Redial 7-3-7 IP Number 7-4 Network Setup 7-4-1 Network Selection
7-4-2 Preferred Networks 7-5 Security Setup 7-5-1 SIM Lock 7-5-2 Phone Lock
7-5-3 Auto Keypad Lock 7-5-4 Fixed Dial 7-5-5 Barred Dial 7-5-5 Change
Password 7-6 Restore Factory Settings 8 Bluetooth 8-1 Power 8-2 Inquiry Audio
Device 8-3 My Device 8-4 Active Device 8-5 Setting 8-5-1 Visibility
8-5-2 Chang Device Name 8-5-3 Authentication 8-5-4 Remote SIM
Mode 8-6 About 9 Organizer 9-1 Alarm 9-2 To Do List 9-3 Calculator 9-4
World Clock 9-5 Stopwatch 9-6 Unit Converter 9-7 Currency Converter 9-8
Health Attention: “STK” menu items appear different content
toward diverse network operator.
4.3 Call History In the main menu interface, press the
Navigation key to scroll and select “Call History”.
Press the left soft key “Ok” to enter the “Call History”
submenu. Here you can look up information on the call
records.
4.3.1 Missed Calls
Enter “Missed Calls” submenu, will show the telephone
number or name of missed calls (if this number is already stored in
the telephone book). Select a record of missed calls list, press the left
soft key “Ok” to look over record details, it will show date, time,
name of the call, telephone number of incoming telephone and times
of incoming telephone. Press the left soft key “Option”, include
operate as follows: Delete to delete the current record. Save
to Phone book to save the current number to phone book.
Dial to call up the current number. Edit to edit
and save number of incoming telephone. Send SMS to send
the SMS to this number.
4.3.2 Dialed Calls
Enter “Dialed Calls” submenu, show the dial calls list of the current
record. Select a record, press the left soft key “Ok” to look over call
info. Press the left soft key “Option”, operate same with
“Missed Calls”.
4.3.3 Received Calls
Enter “Received Calls” submenu, show all received calls list of the
current record. Select a record, press the left soft key “Ok” to look
over call info. Press the left soft key “Option”, operate same
with “Missed Calls”.
4.3.4 Delete Call Log
Press the left soft key “Ok” to enter “Delete Call Log” submenu.
When the record is not empty, you can delete record of Missed Calls,
Dialed Calls and Received Calls. , or select the “Delete All” option
to delete all call record.
4.3.5 Call Time
Press the left soft key “Ok” to enter “Call Time” submenu, can look
over call time record up to now.
Last Call Time to view the time of the last call.
Total Sent to view the total time of the sent calls.
Total Received to view the total time of the received calls.
Reset All Time All call time will be cleared to zero.
4.3.6 Call Cost
Press the left soft key “Ok” to enter “Call Cost” submenu, can look
over call cost record up to now.
Last Call Cost to view the cost of the last call.
Total Cost to view the accumulated cost of all calls.
Reset Cost to clear the call cost log record after entering
the PIN2.
Max Cost to view and set the limit on call cost, no limit
display “0”.
Price Per Unit to view and set the call cost unit.
Note: to be used, your network operator must support the
“Call Cost” function. You need to enter your PIN2 number
to set the “Max Cost”, “Reset Cost” and “Price Per Unit”.
Please contact your network provider to obtain this number.
4.3.7 SMS Counter
To view the current SMS counter, include the two options: “Sent”
and “Received”. Press the left soft key “Reset” to clear.
4.3.8 Auto Quick End
Enter the “Auto Quick End” submenu to set the Auto Quick End
function On or Off and the Times (1~9999s).
4.4 Calender In the main menu interface, press the
Navigation key to scroll and select “Calender”. Press
the left soft key “Ok” to enter the “Calender” submenu.
Screen will display the current month, press the
navigation key to change date. Press the left soft key
“Option”, include operate as follows:
4.4.1 View Tasks
You can enter “View Tasks” menu to set item of routing, list
display the routing today. Press the left soft key “Option”, include
operate as follows:
View Look up the current routing. Press the left soft key
“Edit” to edit the Data, Time, Note, Alarm, Repeat,
Location and Priority. Note: When the alarm is turned on,
repeat item is effectively.
Add Select a new Task Type such as Reminder, Meeting,
Course, Date, Call, and Anniversary to add.
Edit Task To edit and amend the current routing.
Delete Task To delete the current routing.
Delete All To delete all routings.
4.4.2 Jump To Date
Input the Date, press the left soft key “Ok” to jump to the
appointed date.
4.4.3 Go To Weekly View
Screen will display the current week.
4.5 Services In the main menu interface, press the
navigation key to select “Services”. Your mobile phone
supports STK functions. This service is provided by
your network operator. If your SIM card and network
operator do not provide this service, then you will not be
able to use this function. For more information please
contact your network operator.
4.6 Phone Book You can use the phonebook function “To
Phone” to save name card information such as Name,
Number, Home Number, Company Name, Email
Address, Office Number, Fax Number, Birthday,
Associate Picture, Associate Video, Associate Sound,
Caller Group. Note: This phone is able to save up
to 100 phone book records, and the record storage of
SIM card is decided by the capacity of the SIM card.
Quick Search Input the first letter of the name to search
the entry.
Search Entry to search for an entry in the phonebook
by name.
Add New Entry to add a new record to the phonebook.
You can save the number in the “To SIM”, or
the “To Phone”. A new record is added to the
Phone Book, except Name, Number, you can
add the content as follows:
Home Number: to edit home number of linkman
Company Name: to edit company name of
linkman.
Email Address: to edit email address.
Office Number: to edit office number of linkman
Fax Number: to edit fax number of linkman
Birthday: to edit linkman’s birthday
Associate Picture: to set a personalized picture for
the current phone entry. You can select the
picture of mobile telephone preediting, or select
none.
Associate Video: to set a personalized video for
the current phone entry or select none.
Associate Sound: to set a personalized ring tone
for the current phone entry. You can touch
brightness bar to select personalized income
ring tones from inner ring of mobile telephone
systemic or close personalized ring tone.
Caller Group: You can enter the telephone
numbers saved in the phonebook into different
groups according to your relation to the people.
Copy All: to copy all the telephone entries from one
location to another one by selecting “From SIM”
or “From Phone”.
Note: When you copy telephone number entries from your
mobile phone onto your SIM card, only the names, telephone
number will be copied.
Delete: to select “From SIM” or “From Phone” to
respectively delete all the entries in the SIM
card or mobile phone phonebook. You can
select “One By One” to delete the selected
telephone numbers yet.
Caller Group: mobile telephone hold out incoming caller
group function, you can select group in the list
of the caller group, view and edit the Caller
Group Detail. Caller Group Detail include
group name, ring of the incoming caller, picture
link of the incoming caller,add and delete
operating to groups member list.
My Vcard: to edit or sent my own card via Vcard format
file.
Settings you can set the item as follows:
Preferred Storage You can set a default setting
for the storage of telephone numbers to be
saved to “SIM” or “Phone”, and allow the user
to choose when adding a new phone entry.
Fields to show or un-show with Home Number,
Company Name, Email Address, Office
Number, Fax Number, Birthday, Associate
Picture, Associate Sound, Caller Group. If
choose “On” to show this item, otherwise not
show.
Owner Number to edit and erase the owner
number
Service Dial Number need the support of SIM.
Now the service can be used only in Europe.
SOS Number: to edit and set up five groups SOS
Number at most.
Memory Status You can view the total memory capacity
and occupied memory space of the phonebooks for the
mobile phone as well as SIM card.
Enter the phone book list, then press the up/down keys to scroll to
select a telephone number entry. Press the left soft key to put up
operations as follows:
IP Dial to set up IP dialing number and activating, choose
IP Dial, automatically add the IP number before
number of dial.
View to view the detailed data of the telephone entry that
you have currently selected.
Note: If the current telephone number entry is saved on the SIM
card, then you can only view the name, telephone number in the
entry.
Edit to edit and revamp the contents of the current
telephone entry
Delete to delete the currently selected telephone number
entry.
Copy to copy the currently selected telephone number entry
to another carrier, phone or SIM card.
Move to move the currently selected telephone number
entry to another carrier, if the currently selected
telephone saved in SIM card, then copy to mobile
phone, on the contrary, alike.
Duplicate to copy the currently selected phone
number entry to the same carrier.
4.7 Messages In the main menu interface you can scroll to
select “Messages” then press the left soft key to enter
the “Messages” main menu.
4.7.1 SMS
If your network supports SMS (short message service) and
you have applied for this service from your network provider, you
can send English, French, Spanish, Thai,Arabic,Russian,Indonesian
short messages through the short message service centre. The
mobile-phone supports the short information (EMS) of the enhanced
mode, can insert picture, animation, melody , sound ,etc.In short
information can use the template to produce short information.
Enter SMS submenu, you can select menu as follows: Inbox, Outbox,
Write Message, Template, Message Settings.
4.7.1.1 Inbox Enter the “Inbox” submenu to view received
messages. When you receive a short message, your mobile
phone will vibrate (if Alert Type set to the Vibration) and
ring (if Alert Type set to the Ring), display the prompt
information. If you do not wish to read it immediately,
after you exit this interface, the envelope icon appears at
the top of the screen on standby and the short message will
automatically be saved on the SIM card. The amount of
short messages that can be saved (this includes received
messages as well as saved messages) is based on the
memory size of the SIM card.
When viewing the short message list in “Inbox”, the
sender’s phone number or name (if the name has already been
saved in the phonebook) will be displayed, and show that
receives the date of short messages by floating item.
When looking at the short message list, you can use the
up/down keys to select the short message. When the “Inbox”
short message list appears, you can press the left soft key “Ok”
to read the detailed contents of a message, the date and time of
receipt and the name (if the name has already been saved in the
phonebook) or telephone number of the sender. At this time you
can also press the left soft key “Option” to perform the
following operations: Reply to send a short message to the
sender of the current message. Delete to delete the
current short message. Edit to edit the current
message.
Forward to select to Send Only it to one person, Send To
Many, or Send By Group. Copy to
Phone to copy the current message saved in
the SIM to phone. Move to Phone to move
the current message saved in the SIM to
phone. Chat you can chat with
others in the separate chat room by SMS
Delete All to delete all of the messages
in the “Inbox”. Copy All to copy all of the
messages in the “Inbox” to another carrier.
Move All to move all of the messages in
the “Inbox” to another carrier
Use Number to extract the telephone number of the
sender in the current short message and
contain the number(3—40 bit) in the current
short message, then display them by list form.
If you select one of the numbers, you can
save the number to your phonebook, or dial.
4.7.1.2 Outbox Enter the “Outbox” submenu to view the short
messages (saved in the SIM card and owner phone) in the
mobile phone. After the “Outbox” short message list
appears, you can use the up/down keys to select the short
message; press the left soft key “Ok” to read the detailed
contents of the selected short messages. At this time you
may also press the left soft key “Option” to perform the
following functions:
Send to send the current message.
Edit to edit the current message.
Delete to delete the current short message.
Copy to Phone to copy the current message saved in the
SIM to phone.
Move to Phone to move the current message saved in the
SIM to phone.
Delete All to delete all of the messages in the “Outbox”.
Copy All to copy all of the messages in the “Outbox” to
another carrier.
Move All to move all of the messages in the “Outbox”
to another carrier
Use Number to extract the telephone number of the
receiver in the current short message and contain
the number(3—40 bit) in the current short
message, then display them by list form. If you
select one of the numbers, you can save the
number to your phonebook, or dial.
4.7.1.3 Write Message Before writing a short message, please
confirm that you have set the short message service centre
number. You can edit your short message by entering the
“Write Message” submenu. Press the left soft key to enter
the “Option” menu:
Done After finishing your message you can select this
option and use the up/down keys to select
“Send Only”, “Save and Send”, “Save”, “Send
To Many” or “Send By Group”.
Use Template to insert character information of
prearranging at the currently cursor place.
Insert Object to support the short information (EMS) of
the enhanced mode, select insert object to
appear the EMS. Edit the menu as follows:
Picture: to select picture in the owner
mobile-phone to insert currently cursor place.
Predefined Animation : to insert predefined
animation picture to currently cursor place.
Melody: to select music in the owner
mobile-phone to insert currently cursor place.
Predefined Sound to select predefine sound of
system in the owner mobile-phone to insert
currently cursor place.
Format Text to under this menu, you can set format
of text: Text Style: to can apart set the text style,
Bold, Italics, Underline, Strikethrough.
Alignment: to can select the alignment mode:
Automatic, Left, Center, Right. New
Paragraph: to can add a new paragraph with
Automatic Alignment mode, Left Alignment
mode, Center Alignment mode, Right
Alignment mode.
Insert PHB Number to insert PHB number to SMS
Insert PHB Name to insert PHB name to SMS
Input Method to offer 34 kinds of input methods . After
selecting “Done”, if you select “Save” to
save the current message into “Outbox”, if
you select “Send Only” to one person, it
will prompt you to input the addressee’s
telephone number. At this time you can
input the number with the number keys, or
press the left soft key “Search” to bring up
the phonebook where you can select the
addressee’s number. If you select “Save
and Send”, you can send the message to
one person and save it into “Outbox”. If
you select “Send To Many” to enter the
Edit List to allow you to send one short
message consecutively to several people.If
you select “Send By Group” to send
information to corresponding group
member.
Attention: short message centres of some cities and districts do
not support short messages over 70 letters (160 English letters),
only the compatibility mobile-phone can incept and send the
picture, Animation and Melody.
4.7.1.4 Template Press the left soft key to enter information
template list, can Edit or Erase the template message or
Write Message.
4.7.1.5 Message Settings When using the short message
function you must first make the necessary settings. Enter
the “Message Settings” submenu to select operate as
follows:
Profile Setting Please contact your network provider to
get the SC Address. Profile list have one profile,
two profiles and four profiles because the
different network supports and SIM card.
Select one Profile, press the left soft key
“Edit”, can set the Profile Name, SC Address,
Valid Period and Message Type. During Valid
Period, the short message service centre will
continuously resend a message until it is
received. The message Valid Period is
applicable for all sent messages. You can set the
message Valid Period as any of the following:
“1 hour”, “6 hours”, “12 hours”, “1 day”, “3
days”,“1 Week” or “maximum”. The network
operators must support this function for it to be
available. Message Type can select the Text,
Fax, Page, E-mail by the left/right keys.
Note: Message Valid Perid, Fax, Page and E-mail need
support by the network operator.
Common Setting to set On/Off to the Delivery Report. If
you set it as “On”, then when the recipient
receives your short message, or if the short
message is not received for some reason, the
short message centre will send a status report so
that you can see whether the message has been
delivered.
Note: The network operator must support this function for it to
be available.
Memory Status to display the memory by % form in
the SIM card and phone. SMS numbers are
decided with SIM card capability in the SIM
card.
Preferred Storage to save the messages to “SIM” or
“Phone”.
Pref.Bearer to can select the Prefer GPRS, Prefer
GSM or GSM Only.
4.7.2 Chat Press the left soft key “OK” to enter Chat menu,
you can set two chat rooms at most. To enter Chat
Room Info menu, can set My Nickname and Remote
Number. Then select Start New, you can chat with
others in the separate chat room by SMS. During the
chat, you can select Resume or End.
4.7.3 Voice Mail Server
This will automatically direct incoming calls to the voice
mail centre when you cannot accept a call so that the caller can leave
a message on the voice mail system of service network. If a message
is left, you can access the message by visiting the voice mail system.
Enter “Voice Mail Server” submenu, can set two voice mail
servers at most.
Press the left soft key “Option” to enter mail option, can Edit
to enter your voice mailbox number, or Connect to Voice to
tune voice leave word.
The network operators must support the “Voice Mail Server”
function for it to be available. You may have to apply for it
before it will be activated. For details and the voice mailbox
number, please contact your network operator.
4.7.4 Broadcast Message
Broadcast message refer to public messages sent by your
network operator. If you use the broadcast message service you can
receive messages on all different subjects from your network operator
such as: the weather, taxis, hospitals, etc. Please contact your network
operator for available subjects.
When you enter the “Broadcast Message” submenu you will
see four menu options: “Receive Mode”,“Read Message”,
“Languages” and “Channel Setting”
You can read current broadcast message throught “Read
Message”.
Select the “Channel Setting”, can Add broadcast channel and
set Channel Title and Channel ID; can Select On/Off
operation to preparing broadcast channel, filtrate needless
broadcast channel; can select “Edit” to reinstall current channel;
can select “Delete” to delete broadcast channel of preparing.
Note: The network operators must support the “Broadcast
Message” function for it to be available.
4.8 User Profiles Your mobile phone provides many
different user profiles for you to set your mobile phone’s
ring tone, according to case and environments. In the
main menu interface, press the navigation keys to select
“User Profiles”. Press the left soft key to enter the
“User Profiles” main menu where you will be able to
see the options: “General”, “Meeting”, “Outdoor”,
“Indoor”, “Headset”and “Bluetooth”.
General for use under general circumstances.
Meeting for use in meetings. This requires presetting (for
example, Alert Type set to the Vibration
Only).
Outdoor for use in outdoor activities. This requires
presetting (for example, you can set the
volume of the receiver and ring tone
higher).
Indoor for use in indoor activities. This requires presetting.
Headset for use in headset activities, this mode will
activate when earphone insert. This requires
presetting (for example, you can set the
volume of the receiver and ring tone lower).
Bluetooth to connect the bluetooth earphone and
succeed online. Note: These seven
profiles have already been set and the
default profile is “General” when the
mobile phone leaves the factory. On
standby, hold down press # key to
quickly turn silence on or off. Press the
up/down keys to select the needful profile,
then press the left soft key “Option”:
Activate: to activate selecting profile.
Customize: for you to set your profile,
select corresponding setting to rejigger.
Select “Customize” menu, press the left
soft key “Ok”, will display the menu as
follows:
Tone Setup: to allow the user to customize different
ring tones with different option, for
example, incoming call, power on or off,
and so on.
Volume: Two type of volume can be set: Ring Tone
(including incoming call, alarm, power on,
power off, message tone) and Key Tone
(associated with key press).
Alert Type: This option allows the user to set the kind
of alert he expects whenever there is an
incoming call. user can select only one
option from Ring, Vibration Only, Vibra
and Ring and Vibra Then Ring.
Ring Type: This option allows the user to set mode of
ring, include Single, Repeat and
Ascending.
Extra Tone: The user can turn on or off the tone as
follows: Warning, Error, Camp on and
Connect.
Answer Mode: The user can select different modes of
answering: Any Key (except for the Hang-up key, right soft
key)
4.9 Settings In the main menu interface, press the
Navigation keys to select “Settings”. Press the left soft
key “Ok”to enter the “Settings” main menu. In this
menu you can make settings that configure your usage
preferences for your mobile phone.
4.9.1 Phone Setup Enter the “Phone Setup” submenu. Here
you can make the following settings:
4.9.1.1 Time and Date Use this menu to change the time and
date displayed on your phone. Enter the “Time and Date”
submenu. Here you can make the following settings:
Set Home City to can select the different city in
77 cities.
Set Time/Date to can set the current time and date of
mobile-phone according as established
format. The mobile-phone allows to set
date between 2000 and 2030 year.
Set Format to set time format , 12-hour or 24-hour,
set date format to select YYYY/MM/DD,
YYYY-MM-DD, MM DD,YYYY,
DD-MM-YYYY,
DD/MM/YYYY,MM/DD/YYYY.
4.9.1.2 Schedule Power On/Off You can edit four times to turn
on/off the mobile-phone. Each time includes setting as
follows: Status (Disable or Enable), Power On or Off and
time. Finish setting, when the time arrive, mobile-phone
will turn on/off according as the status. Note: time can
not repeat, because same time can not be actived at one
time.
4.9.1.3 Language To set the current language type, menu
interface changes according to setting.
4.9.1.4 Preferred Input Methods There are 34 kinds of input
methods in the mobile-phone, choose one kind as
acquiescence characters editor.
4.9.1.5 Shortcuts You can edit the shortcut menu, it will
display in the [shortcuts] menu.
4.9.1.6 Dedicated key In this menu, you can Edit the shortcut
function of navigation keys on standby: Up key, Down
key, Left key and Right key.
4.9.1.7 Flight Mode In this menu, you can select the Normal
Mode, Flight Mode or Query When Power On. In Flight
Mode, the Network Service is closed.
4.9.2 Display Characteristic
Themes to select menu Theme: Theme1, Theme2 or
Theme3, activate the current theme.
Wallpaper to browse and select the wallpaper from
System by the up/down keys,
Screen Saver to select “Setting” to set the
status and waiting time of screen saver. Select “Select”
submenu and enter, can choose “System”, this function
operation same with the Wallpaper.
LCD Backlight to set Brightness and Time of LCD
backlight. Brightness has 5 classes,
Time can select from 5~60 sec.
Greeting Text to turn On or Off status, and Edit the
startup greeting for the phone.
Power On Display Display’s setting is by browsing
Animations in the System.
Power Off Display the operation is the same to
Power On Display.
Show Date and Time to turn On or Off, set whether
display the date and time on
standby.
Show Owner Number to set “On”, operator name will
be displayed on the standby
interface.
4.9.3 Call Setup
Enter the “Call Setup” submenu. Here you can make the
following settings:
4.9.3.1 Call Waiting
After activating this function, the network will notify you that you
have a new incoming call when you are talking on the phone. For
details of how to use this function you can contact your network
provider.
Activate to activate this function.
Deactivate to cancel this function.
Query Status to view the status of this function.
4.9.3.2 Call Divert The call diversion network service permits
you to divert, under certain preset situations, certain
incoming calls to a telephone number designated by you.
This service requires network support. Please contact your
network provider to activate this service. You can set and
cancel the incoming call diversion function of your mobile
phone.
Divert All Voice Calls: to divert calls under all
circumstances. The number of rings at that
shall trigger depends on network.
Divert If Unreachable: to divert all incoming calls when
the phone is not reachable due to some
network error or other reasons.
Divert If No Answer: to divert the incomingcall if it is not
answered.
Divert If Busy: to divert all incoming calls when there is at
least one call in progress on the handset.
Divert All Data Calls: to divert all data calls.
Cancel All Divert: this shall deactivate this facility.
When you have selected one of the above
modes, you may carry out the following
operations:
Activate to activate this function.
Deactivate to cancel this function.
Query Status to view the status of this function.
4.9.3.3 Call Barring The Call Barring allows the user to
prevent incoming or outgoing calls based on user-defined
conditions. The network provider provides you with a 4
digit Barring PW to allow you to activate the “Call
Barring” service. When you use this function, please
contact your network provider.
Outgoing Calls to allow the user to prevent calls being
made to other numbers. It includes: All Calls,
bars user from making any outgoing call;
International Calls, prevents the user from
making international calls only;
International Calls Except To Home
PLMN, prevents the user from making any
international call other than to home.You can
Activate, Deactivate, Query Status above
options.When All Calls is activate, SOS
number can call only.
Incoming Calls: to allow the user to prevent calls being
received from other numbers. It includes: All
Calls, The user may not receive any incoming
call; When Roaming, prevents user from
receiving any incoming call when the user is
out of home. You can Activate, Deactivate,
Query Status above options.
Cancel All to input the Bar.Password, can cancel all limits.
Change Barring PW to input the old password, set the
new password.
4.9.3.4 Call Time Reminder ‘Call Time Reminder’ allow user
to remind himself about duration of a call. When this
option is enabled, there will be a short beep when duration
of a call exceeds the reminder timer. The reminder can be
single or periodic. Off: to cancel this function. Single:
a single reminder beeps only once, the times may range
from 1 to 3000 secs. Periodic: to periodic reminders beep
periodically everytime the timer expires, the times may
range from 30 to 60 secs. Captions should be appropriate
timer range according to the option (single or periodic)
selected.
4.9.3.5 Call Time Display Turn on or off to this option, can
display or not display the call time.
4.9.3.6 Auto Redial Turn on or off this option, can activate or
deactivate this function.
4.9.3.7 IP Number The mobile-phone sustains the IP number
call, can set three group IP number at best. The first edit IP
number, then activate it, when you call, IP number will
automatically add before the phone number. When you
have selected the IP Number, you may touch “Option” to
carry out the following operations:
Activate to activate this function.
Edit to edit the IP Number.
4.9.4 Network Setup
4.9.4.1 Network Selection New Search Search network
over again. Select Network Search network, can select
the network you need from the network list. Selection
Mode press the left soft key “Change” to select
Automatic or Manaul. Automatic: to automatic search
and connect to the first available network. Manual: to
search an available network list for user manually select
and select the network you want.
4.9.4.2 Preferred Networks Preferred Networks shows a list of
networks already configured and set by the user. The
preferred networks will be stored in SIM card. Pressing the
left soft key “OK” will show the user list of preferred
networks. Select an item, press the left soft key “Option”
to enter it: Add From List: to add network from
pre-defined PLMN LIST and can press the left/right keys
to set priority in the search.
Create New: to add new network to the preferred
networks list, can set name and priority.
Change Priority: to changethe priority
selected. Delete: to delete the selected
network from the Preferred Networks
list.
4.9.5 Security Setup
Enter the “Security Setup” submenu. Here you can set the
security options of your mobile phone to avoid the illegal use of your
mobile phone and SIM card.
4.9.5.1 SIM Lock The PIN number can prevent the illegal use
of your SIM card. Enter the “SIM Lock” submenu.
Floating bar register the current state, here you can make
the following operates:
If SIM Lock is Off, select “ON” and input PIN number to
activate SIM Lock protection. The next time when you turn on
your phone you will be asked for your PIN number;
If your PIN number protection is currently in use, select “Off”
to turn off the PIN number protection. Note: If you successively
input your PIN number three times incorrectly, your SIM
card will be locked. At this time you need the PUK number
to unlock the SIM card. The PIN number and PUK number
may have been provided to you together with the SIM card.
If you do not have it, please contact your network provider.
The default PIN number is usually 1234. You should change
it to your own code as soon as possible.
4.9.5.2 Phone Lock The Phone Lock can prevent the
unauthorized use of your mobile phone. Enter the
“Phone Lock” submenu. Here you can make the following
operates:
If your phone lock protection is currently inactive, select “On”
to activate the phone lock protection. The next time when you
turn on your phone you will be asked for your phone lock code;
If your handset lock protection is currently in use, select “Off”
to turn off the handset lock protection; Attention: The default
phone lock code is 0000. You should change it to your own
code as soon as possible.
4.9.5.3 Auto Keypad Lock A time select from 5 sec, 30sec, 1min
and 5min, on standby, if you do nothing in the time of
setting, keypad will automatically lock. If you select
“None”, cancel this function.
4.9.5.4 Fixed Dial If your SIM card supports it, outgoing calls
can be restricted to certain numbers. When this function is
activated, you may only dial the numbers that are in the
fixed dialing list, or numbers that have the same initial
numbers as those on the fixed dialing list. Enter the “Fixed
Dial” submenu. You can make the following settings:
Mode: to input PIN2 number to select to turn on or off
the fixed dialing functions. Fixed Dial List: to when
the fixed dialing list will appear, can carry out the desired
operations.If the list is empty, can press the left soft key
“Add” to add and edit name and number of fixed dial.
Note: You need to enter your PIN2 number to turn on
or off the Fixed Dialing function. Please contact your
network provider to obtain the PIN2 number. After
turning on the Fixed Dialing function, only numbers in
the fixed dialing number list are displayed in the phone
book.
4.9.5.5 Barred Dial If your SIM card supports it, certain
numbers can be barred call. When this function is activated,
you may only dial the numbers that is in the barred dialing
list. Mode: to input PIN2 number to select to turn on
or off the barred dialing functions. Fixed Dial List: to
when the barred dialing list will appear, can carry out the
desired operations.If the list is empty, can press the left
soft key “Add” to add and edit name and number of barred
dial. Note: You need to enter your PIN2 number to turn
on or off the Barred Dialing function. Please contact
your network provider to obtain the PIN2 number.
After turning on the Barred Dialing function, only
numbers in the Barred dialing number list are
displayed in the phone book.The barred dial number
list is stored in the BDN file in the SIM card. If current
SIM card does not have BDN file, a popup windows
shows “SIM Card Not Support!”.
4.9.5.6 Change Password You may select “Change Code” to
change the password of PIN, PIN2 and Phone Lock
Password. Please enter your old password, new password
and re-enter your new password in this order, according to
the prompts.
4.9.6 Restore Factory Settings
Enter the “Restore Factory Settings” submenu. Here you
can restore the relevant settings to the manufacturer’s settings. Note:
Restoring the manufacturer’s settings requires the correct Phone
Lock Password to be entered. Some settings cannot be restored to
the manufacturer’s settings until the phone is restarted.
4.10 Bluetooth Bluetooth is a global standard for wireless
connectivity. Bluetooth is based on a lowcost,
short-range radio.Bluetooth technology facilitates the
replacement of the cables normally used to connect one
device to another, with one universal short-range radio
link.Two Bluetooth devices can talk to each other when
they come within a range of 10 meters to each other.
Due to their dependence on a radio link, as opposed to
altemate technology such as an infrared connection,
Bluetooth devices do not require a line-of-sight
connection in order to communicate. Bluetooth can
interfere, come in for wall or other electron device and
so on. Making Bluetooth device, battery capability will
waste quickly. For insuring, phone and bluetooth can
connect, please refer with equipment manufacturer
before buy.
In some place, bluetooth can limit, before making, please refer
the local charge department or service operator.
Power to press the left soft key to turn on or off the
bluetooth function.
Inquiry Audio Device to press the left soft key to inquiry audio
device. If device is found, press the
left soft key “Bond”, then input
password, finish coupling.
My Device to press the left soft key “OK” to display
my device which device have connected.
Then press the left soft key “Option” to
handle as follows:
Connect to select one device to connect it.
Rename to amend the device show name.
Delete to delete this note.
Delete All to delete all notes.
Service List to display the service list of this device.
Inquiry New Device to find new device.
Active Device to display active device, press the left soft key
“Disc.” to cut link.
Setting to display function setting as follows:
Visibility to press the left soft key to activate or
deactivate the visibility of your mobile phone.
Change Device Name to amend the device name.
Authentication to set the device link whether need
authentication.
Audio Path to select Leave in phone or Forward to BT
Headset.
Remote SIM Mode to set On/Off to the Remote SIM
Mode
About to show service list about this phone. Note: Link
mode of device can differ, please read the device user explain
before making.
4.11 Organizer In the main menu interface, press the navigation
key to select “Organizer” and press the left soft key to
enter the “Organizer” main menu.
4.11.1 Alarm The mobile-phone can set five alarms at most, and
hold out the alarm when the phone is power off. Select
one alarm, can set to turn on/off,time , Repeat ,
Snooze(Mins) and Alert Type.
4.11.2 To Do List To display the all routing.
4.11.3 Calculator Your mobile phone provides a calculator with 4
basic functions to facilitate simple calculations. Enter
the “Calculator” submenu to display the operation
interface of the calculator: - Use the Number keys
from 0 to 9 to enter the numbers you wish to enter, use
the # key to enter the decimal point.
- Press the up/down keys and left/right keys once to enter the
symbols for the four mathematical operators +, –, x or ÷; press twice
to enter the symbols for M+,M-,MC,MR. - By pressing the right
soft key “Clear” you can delete the latest entry or result, press the
right soft key, “Back”, to exit the calculator, press the left soft key
“OK”or touch “=” to calculate the result. Note: The precision of
this calculator is limited so that rounding errors may occur,
especially in the case of indivisibility.
4.11.4 World Clock
Enter World Clock submenu, display world time zone map,
move coordinate location by the left/right keys, the interface will
show the city time located by the coordinate.
4.11.5 Stopwatch Enter Stopwatch submenu, you can select
Typical Stopwatch or nWay Stopwatch.
4.11.6 Unit Converter Unit Converter is an application
that helps the user to convert English units into metric
units and vice versa.
Weight Press the up/dowm keys to select the operational
item. Press the left/right keys to select the conversion from
Kg<->Pound and Kg<->Ounce. You input number in the
frame, press the left soft key “OK”, conversion result will
display in the other frame.
Length Press the up/dowm keys to select the operational
item. Press the left/right keys to select the conversion from
Km<->Mile, M<->Yard, M<->Foot and Cm<->Inch.
You input number in the frame, press the left soft key
“OK”, conversion result will display in the other frame.
Note: In the units converter, input eight numbers at
most, conversion result can display fourteen numbers at
most.(include radix point).
4.11.7 Currency Converter First input Rate, press the left
soft key “OK” to enter. Press the up/down keys to
select the operational item, press the left/right keys to
select the rate of local and foreign. You input number
in the frame, press the left soft key “OK”, conversion
result will display in the other frame.
4.11.8 Health Under Health menu, you may see the
BMI item: to select your sex and input your stature,
avoirdupois. BMI Result will be displayed.
5 Input Methods
5.1 General Outline This mobile phone provides many
input methods. Character entry functions permitted by
this mobile phone are: - Inputting and editing of short
messages - Inputting and editing of names in the phone
book - Looking up the phone entry by name - Editing
of text in MMS
- - ……
5.2 Screen Key values The keyboard values are as
follows: Generally the Left soft key indicates
confirmation; the Right soft key is to return or eliminate.
Navigation keys (up/down and left/right keys):
Generally used to move the cursor or candidate
characters for inputting. OK key: Generally indicates
OK. # key: to switch between different input methods.
* key: to display symbol input interface. Number keys
from 2 to 9: in the Intelligent language input modes,
indicate the letters on the corresponding key. Number
key 0: to indicate space in the foreign language input
modes.
6 Trouble shooting
If anything unusual occurs while using your mobile phone, please

refer to the following table.
Frequently
Occurring
Problems
Cause How to Fix
Using the
mobile phone
in an area
with poor
reception
such as near
tall buildings
or in a
basement
where radio
waves cannot
be
transmitted.
Try to avoid.
Poor
reception
Using the
mobile
phone when
the network
is busy,
such as
during rush
hour, when
the lines are
full making
it
impossible
to get
through.
Try to avoid.

Related to
the distance
from the
base station
built by the
network.
You can
request that
the network
service
provider
provide a
service area
plan.
Caused by
poor network
relay, a
regional
problem.
Hang up and redial,
if the relay is
changed then the line
may be better.
Echo or
noise
Some calling
regions have
poor lines.
Standby time
related to the
network
system.
Please temporarily
turn off your mobile
phone, as you are
located in an area
with poor reception.
is
Shortening
of the
standby
time
Batteries
need to be
replaced
Replace the
batteries

When you
cannot get a
signal, the
phone will
continue to
transmit in
order to find
a base
station,
thereby
expending
large
amounts of
electricity
will cause
the standby
time to
decrease.
Please move
to an area
with a strong
signal or
temporarily
turn off your
mobile
phone.
Unable to
turn on the
phone
The battery is
empty. Look at the
remaining electricity
or recharge.
SIM card is
damaged. Contact your
network service
provider.
SIM card
malfunction
SIM card is
not properly
inserted.
Confirm
SIM card is
properly
inserted.

There is a
foreign
substance
on the metal
surface of
the SIM
card.
Use a clean
cloth to wipe
off the metal
contact point
of the SIM
card.
Expired SIM
ard Contact your
network provider.
Outside the
GSM
service area
Consult your
network
provider on
the service
area.
cUnable to
connect
with the
network
Poor signal. Please move
to a place
with a better
signal and
try again.
Using the call
bar function Cancel the call bar
function.
Unable to
make a call
Using the
fixed
dialling
function.
Cancel the
fixed call
setting.
Incorrect
PIN
number
Consecutively
enter the
wrong
password
three times.
Contact your
network provider.

Battery or
charger is
damaged.
Replace the battery
or charger.
recharging
in the
environment
of less than
-10or higher
℃than 40℃
Change the
charging
environment.
Unable to
charge
Poor contact Check if the
plug is
properly
connected
Unable to
add new
phone book
entries
The storage
space of the
phone book is
full
Delete a portion of
the phone number
entries
Unable to
set certain
functions
Your network
provider does
not support
this function
or you have
not applied
for it.
Contact your
network provider.

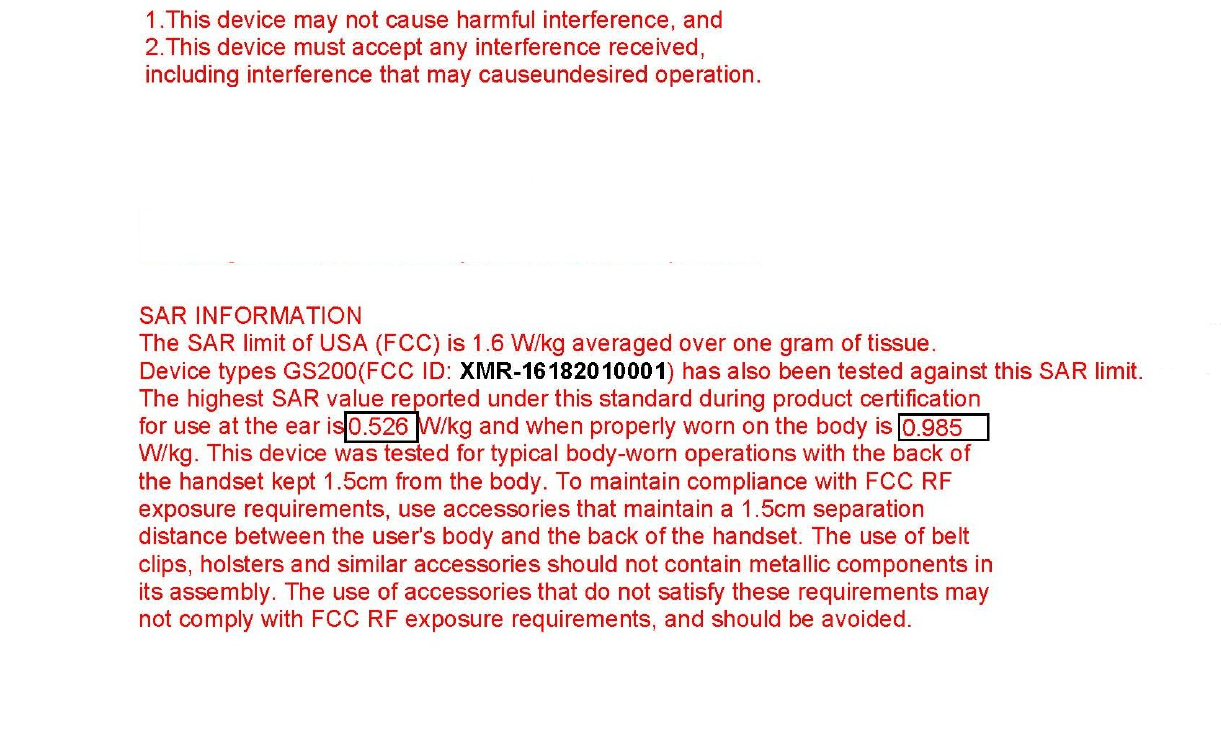
0.985
The different operating modes (data-mode, acquisition-mode) of a Bluetooth device don't
influence the output power and the channel spacing. There is only one transmitter, which is
driven by identical input parameters concerning these two parameters. Only a different
hopping sequence will be used. For this reason, the RF parameters in one op-mode are
sufficient.