R F Technologies RF1060 RF1060 User Manual manual
R.F. Technologies, Inc. RF1060 manual
manual
24-Hour Customer Service & Technical Support
www.rftechno.com
1.800.598.2370
SINCE 1989
Brought To You By The Drive-Thru Experts
R.F. TECHNOLOGIES, INC.
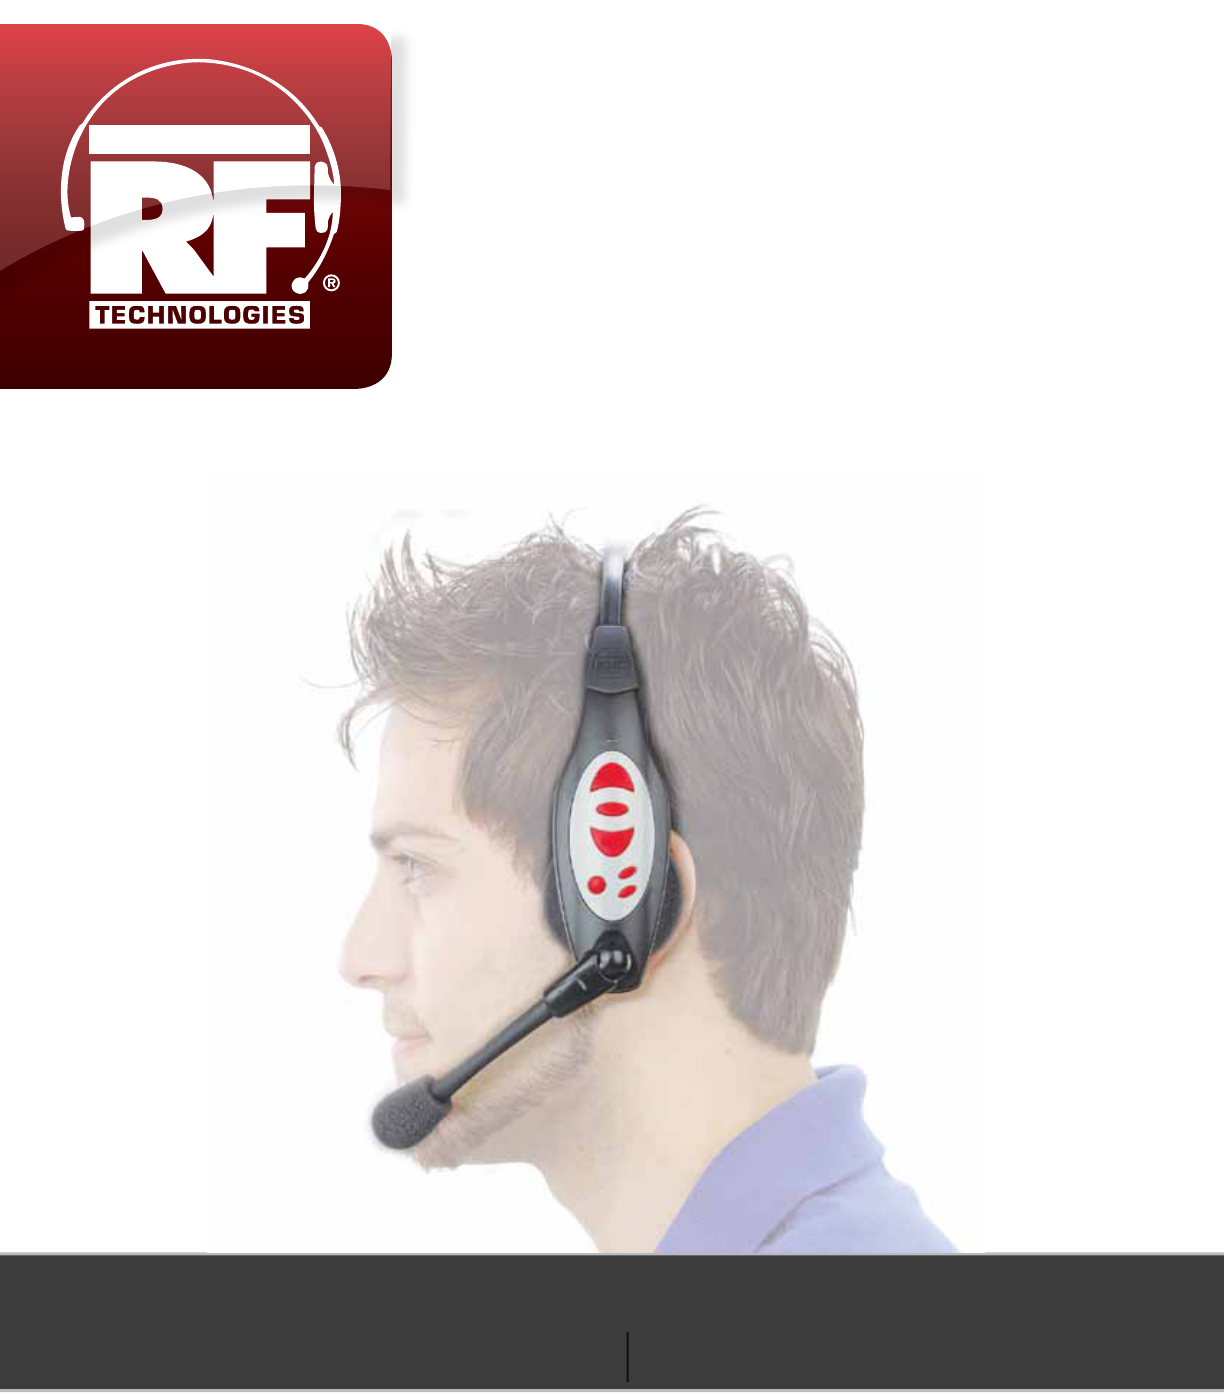
RF1060 Headset
OPERATING INSTRUCTIONS
For Use With 3M C1060 Drive-Thru Systems

OPERATIONAl CONTENTS
Safety Information
Headset Controls and Indicators
Conguration Settings
Headset Preparation
Headset Operation
Maintenance
Troubleshooting
Warranty Information
Repair and Purchase Information
SAFETY INFORMATION
• Use inside a dry location only
• Always disconnect power to outlet before installing
or remove base power supply
• Do not open, crush, expose to heat above 200º or
incinerate battery
ENVIRONMENTAl CONTAMINATION
Please refer to your local, state and federal laws for
battery, charger, and headset disposal. Please return
them to R.F. Technologies, Inc., for proper disposal.
IMPORTANT INFORMATION
• Clean headset contacts with a water moistened
cotton swab
• Turn headset o and then on, to set the volume to
mid level, then adjust volume to desired level
FCC INFORMATION
This device complies with part 15 of the FCC Rules
listed ID TOM-RF1060. IC # 9830A-RF1060.
Operation is subject to the following two conditions:
(1) This device may not cause harmful interference,
and (2) this device must accept any interference
received, including interference that may cause
undesired operation. These limites are designed to
provide a reasonable protection against harmful
interference when the equipment is operated ina
commercial environment. This eqiupment generates,
and can radiate radio frequency energy and, if not
installed and used in accordance with the instruction
manuals, may cause harmful interference to radio
communications. Changes or modications not
expressly aproved by the party responsible for
compliance could void the user’s authority to operate
the equipment.
SINCE 1989
WARRANTY INFORMATION
The RF1060 All-In-One headset contains
a 1 year warranty. Excessive abuse and
electronic component malfunction due
to power surges that are not protected
with a power conditioner or surge
protector voids warranty.
REPAIR, SERVICE & PARTS
Please contact R.F. Technologies, Inc
at 1-800-598-2370 or online at www.
rftechno.com.
HEADQUARTERS
330 Lexington Drive
Bualo Grove IL 60089
(847) 495-7335 | Fax (847) 495-7418
PARTS & PRODUCTION FACILITY
542 South Prairie Street
Bethalto IL 62010
(618) 377-2654 | Fax (618) 377-1320
R.F. TECHNOLOGIES, INC.
“The Drive-Thru Experts”
24 HOUR TECHNICAL SUPPORT 18005982370
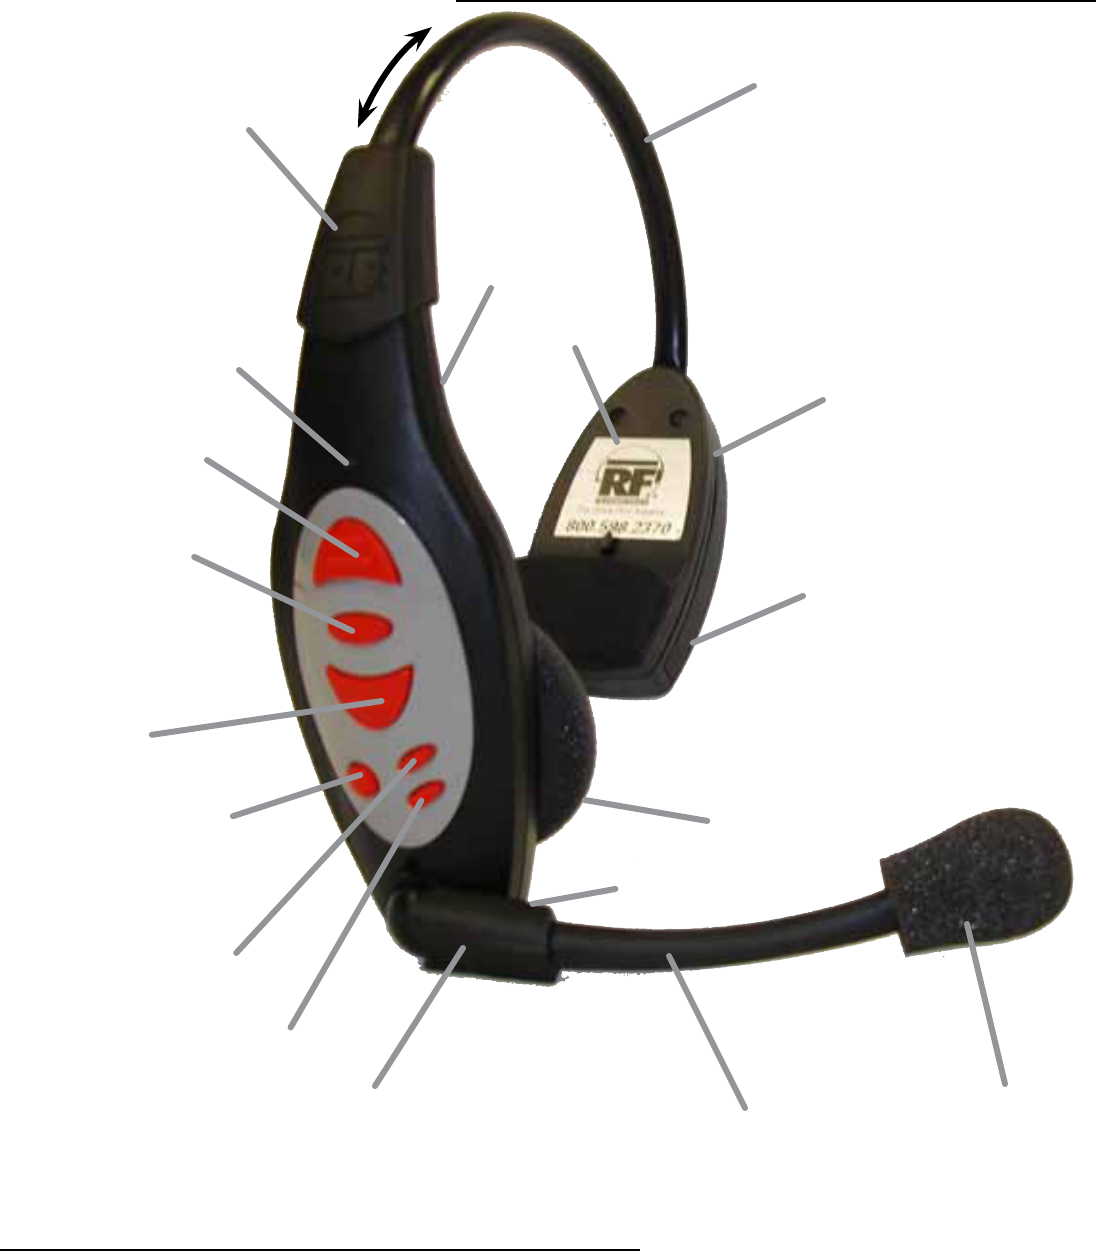
On/O Switch
Volume UP
Control
Volume
DOWN
Control
T1
(Talk Lane 1)
Switch
T2
(Talk Lane 2)
Switch
Page Switch
Talk Lock Switch
(Hands Free)
Mic Boom Support Sleeve
To Prevent Mic Boom
Separation From Case
Earphone / Earpad
Battery
Headset Programming
Window
Battery Release
Headband Adjustment
Slide
Headband Support
Jacket Prevents
Headband From
Separating From
Case
Windscreen
Microphone
Battery Side
Indicator LED
CONTROlS & INDICATORS : RF1060
PREPARATION
Adjust Headband Slide headband out of headset to make larger
Push headband in headset to make smaller
Mic Positioning Align the mic boom with the corner of your mouth by rotating the mic
up or down. Do not bend or pull.

OPERATION
Turning On The
Headset
Operating Modes
Standby Mode
Talk/Listen Mode
Press the ON switch located on the inside of the headset. A single tone will
sound and the LED indicator will glow green to indicate the headset has been
turned on
Single-lane, dual-lane, standard communication, duplex communication
Standby enables the headset to wait for menu sign or other headset
communcation
Used to talk / listen to customer at menu sign. Mode is available with all sys-
tem congurations
SINGLE-LANE STANDARD or DUPLEX COMMUNICATION
A. Single beep alert tone at 2-second intervals when vechicle deteted
B. Press and hold T1 or T2 to talk to the customer at the menu sign.
Release T1 or T2 to listen
DUAL-LANE STANDARD or DUPLEX COMMUNICATION
In dual-lane sytems, some headsets are programmed to communicate with
Lane 1 and others are programmed to communicate with Lane 2. The head-
sets are labeled accordingly:
1. tone sounds in headset when customer detected at menu sign:
A. Lane 1 single beep, repeated at 2-second intervals
B. Lane 2 double beep, repeated at 2-second intervals
2. When single beep is heard, press and hold T1 and talk to customer at
menu sign 1. Release T1 to listen.
When double beep is heard, press and hold T2 and talk to customer at
menu sign 2. Releast T2 to listen.
CROSS-LANE COMMUNICATION SYSTEMS (Communication During Heavy Use)
During busy times, the cross-lane module is turned OFF and the system func-
tions like a dual lane duplex systm. Some headsets are programmed for lane 1
and others lane 2.
(Communication During O-Peak Hours)
During o-peak use, the cross-lane module is turned ON to enable a single
operator to communicate with customers in either lane (1 or 2)
1. Tone sounds when customer detected at menu sign:
A. Lane 1, single beep
B. Lane 2, double beep
2. When single beep is heard, press and hold T1 and talk to customer
at menu sign 1. Release T1 to listen.
When double beep is heard, press and hold T2 and talk to customer
at menu sign 2. Releast T2 to listen.

OPERATION (CONT.)
Talk Lock Mode
“Hands Free”
Page Mode
Page Monitor Mode
Crucial Informaiton
Use this to operate “hands free”. This feature only available with duplex system
congurations.
The headset automatically switches from standby to talk/listen when a cus-
tomer is detected at menu sign. Headset automatically switches back to
standby when customer leaves menu sign.
“Hands Free” operation (talk lock mode) prevents all other headset operators
from communicating.
Will not work in cross lane mode
Press the talk lock switch to enable “hands free” mode
Press T1 or P to return to normal operation
Led indicator changes from glowing green to red when talk lock is enabled
Used to talk to other headset operators without being heard by customer.
Can be used with all system congurations
Do not use the page mode while the menu sign operator is communicating if
you are not a menu sign operator. This may interupt or prevent sign operator
communication to the customer.
Used to listen for other operator pages (without hearing menu sign commu-
nication) Convenient for managers and supervisors only intered in hearing
page communication. Available with all system congurations.
Enabling Page Monitor Mode:
Turn headset o.
While pressing and holding the page switch, turn headset ON. Monitor mode
is now locked. LED indicator turns green.
To respond to a page, press P
Return to normal operation by turning the headset o, then on
• Communication between menu sign operator and customer may be heard
by several people
• Only one headset operator can talk or page at a time
• Communication to and from the headset is heard by menu sign customers
and all operators who are wearing headsets in the talk/listen mode
• Communication from any headset is heard only ball all operators who are
wearing headset (not customers at menu sign) in page mode

MAINTENANCE
Replacing The
Battery
Replacing The Ear
and Headset Pads
A short, low-volume tone is heard at seven-second interals when the battery
voltage is low. Tone continues for 2 minutes, then headset turns o. Insert
fully charged battery when warning tones are heard.
Make sure batteries are fully charged prior to use
TO REPLACE BATTERY:
1. Slide and hold battery release
2. Remove battery from battery housing
3. Insert FULLY CHARGED battery in battery housing with notch facing battery
release. Ensure battery is fully inserted.
Remove the damaged ear pad from ear cup and replace with new pad.
Remove headband pad by peeling from case. Remove protective backing
from new pad and press into place.
PROGRAMMING
Cross-Lane
Operation
Reprogramming
Enabling / Disabling
Talk Lock Feature
Headset are factory programmed for single-lane operation to enable operator
to press either T1 or T1 to commnicate with lane 1.
For cross-lane systems, the headset must also be programmed to enable com-
munication with either lane 1 or lane 2. With cross-lane module turned ON,
the land 1 or lane 2 operators can press T1 to talke to lane 1 customers or T2 to
tlake to lane 2 customers.
To program the headset for cross-lane operation:
While pressing and holding both the T1 and T2 switches on headset,
turn the headset ON. Hold all three switches for a t least 5 seconds.
Audible tones are heard indicating the headset is programmed for
cross-lane operation.
To remove this function and lock T1 and T2 back together, turn the headset
OFF, then hold either T1 or T2 while pressing ON for 5 seconds. An acknowl-
edging beep is heard. (Holding down T1 congures the headset to be a lane 1
headset; holding down T2 congures it for lane 2)
The talk lock feature provides hands fre eoperation in duplex communica-
tion systems. With talk lock enabled, the headset automatically switches from
standby to talk/listen when a customer is detected at menu sign. Headset
automatically switches back to standby when customer leaves menu sign.
System Manager Use

TO ENABLE OR DISABLE TALK LOCK FEATURE:
1. Turn headset o
2. Press and hold talk lock button while pressing and holding the ON but-
ton until audible tones are heard. This indicates features has been enabled /
disabled.
3. Check headset to determine if the talk lock feature has been diabled or
enabled. With the talk lock feature enabled:
• Headset automatically switches from standby to talk/listen when
customer is detected at menu sign
• The headset automatically switches back to standby when the
customer leaves the menu sign
HEADSETS ARE SHIPPED WITH TALK LOCK FEATURE ENABLED
SYMPTOMS OF RADIO FREQUENCY INTERFERENCE
• Operating range between the base station and the headsets gets very short,
sometimes 25 ft or less
• Normally, you will hear nothing to indicate interference. Occasionally, may
hear a whistle or chirp in the background. Seldom, if ever, will you hear talk-
ing.
• The Talk or Page LED on the base station ickers briey causing one of the
following:
A. The system may leave STANDBY mode, and go to LISTEN mode
with no vehicle alert heard.
B. System may drp out of TALK LOCK by itself.
SOLUTIONS:
• Change base to alternate channel three channels away. For dingle lane,
change jumper J3 to Lane 2
• Locate and shut o other 900 MHz devices such as cordless phones, video
systems, and speaker systems.
• Certain combinations of cell frequencies may cause random interference.
Changing channels may have no eect. Please call R.F. Technologies, Inc. in
these cases.
Enabling / Disabling
The Talk Lock Feature
Changing Channels
If Interference Is
Encountered
Programming Instructions
Turn off headset and simply insert the unit into the
programmer as usual. It will not go all the way in
horizontally: slant the headset downward to 30º.
(See above photo)
Allow the optical window on the headet to get past
the outside by moving the mic boom up, enabling
the circuit to program. (See above photo)
Turn on headset. You will hear a series of tones.
Your headset is now
programmed.
1
2
3