RAE Systems QRAE3 QRAE3 User Manual QRAE 3 User s Guide
RAE Systems, Inc QRAE3 QRAE 3 User s Guide
User manual
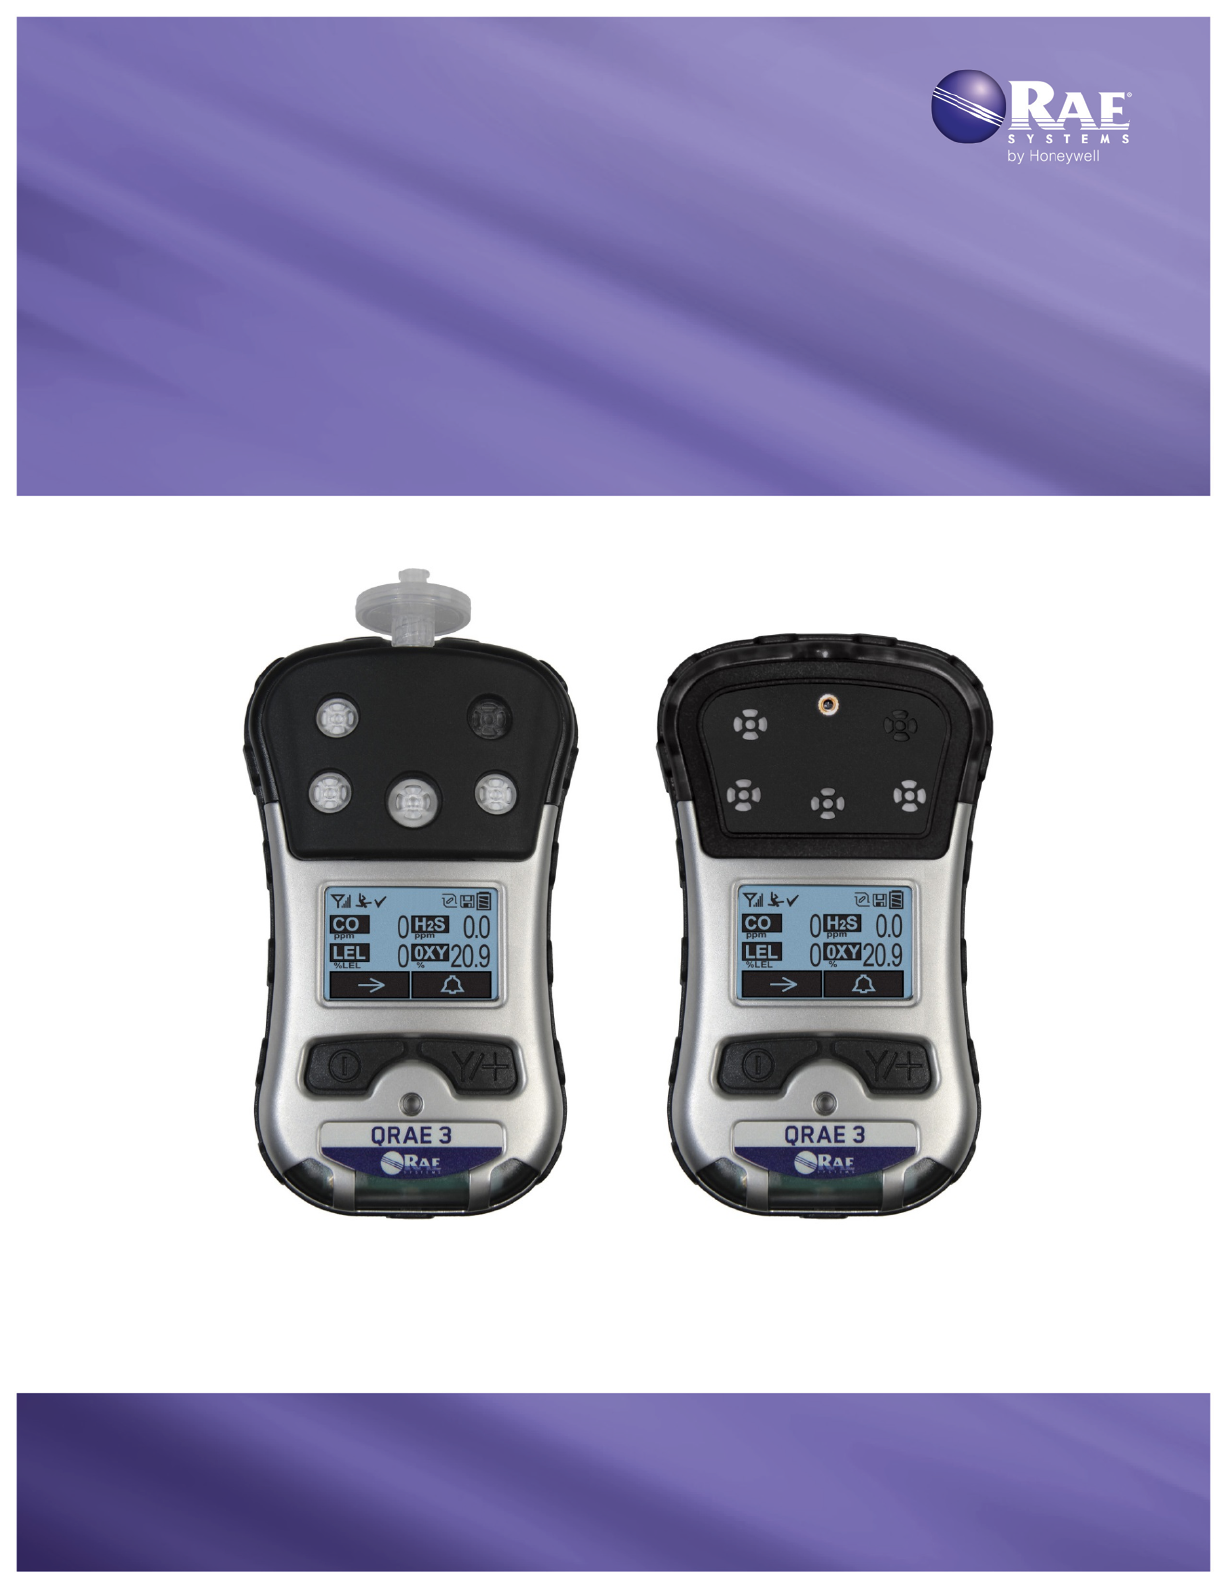
QRAE 3
TM
Wireless Personal Four-Gas Monitors
Rev. G
September 2016
P/N M02-4001-000
© 2016 RAE Systems by Honeywell
Product Registration
Register your product online by visiting:
http://www.raesystems
.com/support/product-registration
By registering your product, you can:
• Receive notification of product upgrades or enhancements
• Be alerted to Training classes in your area
• Take advantage of RAE Systems special offers and promotions
QRAE 3 User’s Guide
Contents
1. Standard Contents ........................................................................................................... 6
2. General Information ........................................................................................................ 7
3. User Interface .................................................................................................................. 8
3.1. Display Overview................................................................................................. 8
3.1.1. Status Indicator Icons.................................................................................... 8
3.1.2. LCD Flip ....................................................................................................... 9
3.1.3. Keys & Interface ........................................................................................... 9
3.2. Screen Display For Various Numbers Of Active Sensors ................................. 10
3.3. Menus ................................................................................................................. 10
4. Wireless Control And Submenus .................................................................................. 10
5. Battery ........................................................................................................................... 11
6. Turning The QRAE 3 On And Off ............................................................................... 13
7. Modes Of Operation...................................................................................................... 15
8. Programming................................................................................................................. 16
8.1. Enter Programming In Basic Mode.................................................................... 16
8.2. Enter Programming In Advanced Mode ............................................................ 18
8.3. Menus And Submenus ....................................................................................... 19
8.3.1. Editing And Selecting Parameters And Sensors ............................................. 19
8.3.2. Calibration....................................................................................................... 20
8.3.3. Measurement ................................................................................................... 22
8.3.4. Datalog ............................................................................................................ 25
8.3.5. Monitor............................................................................................................ 26
8.3.6. Wireless........................................................................................................... 28
9. Policy Enforcement....................................................................................................... 31
10. Calibration And Testing.............................................................................................. 34
10.1. Manual Alarms Test ....................................................................................... 34
10.2. Bump Testing And Calibration....................................................................... 34
10.2.1. Bump (Functional) Testing ........................................................................... 35
10.3. Zero Calibration .............................................................................................. 36
10.3.1. Zero Calibration ............................................................................................ 36
10.3.2. Single-Sensor Zero Calibration ............................................................... 36
10.4. Span Calibration ............................................................................................. 36
10.4.1. QRAE 3 Pumped Model ............................................................................... 36
10.4.2. QRAE 3 Diffusion Model ............................................................................. 37
10.4.3 Multi-Sensor Span Calibration ...................................................................... 38
10.4.4. Single-Sensor Span Calibration .................................................................... 38
11. Datalog Transfer, Monitor Configuration, and Firmware Upgrades Via Computer .. 39
12. Maintenance ................................................................................................................ 40
13. Alarms Overview ........................................................................................................ 47
14. Troubleshooting .......................................................................................................... 51
15. Diagnostic Mode ......................................................................................................... 51
16. Spec ific at io ns .............................................................................................................. 53
17. Controlled Part of the Manual for PGM-25XX/D ...................................................... 57
18. Technical Support ....................................................................................................... 68
19. RAE Systems Contacts ............................................................................................... 68

QRAE 3 User’s Guide
1
WARNINGS
This Manual must be carefully read by all individuals who have or will have the respon-
sibility of using, maintaining, or servicing this product. The product will perform as
designed only if it is used, maintained, and serviced in accordance with the manufac-
turer’s instructions. The user should understand how to set the correct parameters and
interpret the obtained results.
CAUTION!
• Only use RAE Systems battery pack P/N G02-3004-000 (Li-ion, rechargeable)
• Charge the instrument Li-ion battery using the appropriate RAE Systems charger
and only outside hazardous areas
• Use of non-RAE Systems components will void the warranty and can
compromise the safe performance of this product
• Warning: Substitutio n of components may impair intrinsic safety
SPECIAL CONDITIONS FOR SAFE USE
• The PGM-25XX/D multi-gas monitor must be calibrated if it does not pass a
bump test, when a new sensor has been installed, or at least once every 180 days,
depending on use and sensor exposure to poisons and contaminants
• No precautions against electrostatic discharge are necessary for portable
equipment that has an enclosure made of plastic, metal or a combination of the
two, except where a significant static-generating mechanism has been identified.
Activities such as placing the item on a belt, operating a keypad or cleaning with a
damp cloth, do not present a significant electrostatic risk. However, where a
static-generating mechanism is identified, such as repeated brushing against
clothing, then suitable precautions shall be taken, e.g., the use of anti-static
footwear.
Note: Users are recommended to refer to ISA -RP12.13, Part II-1987 for general
informatio n on installation, operation, and maintenance of combustible gas detection
instruments.
WARNINGS
ONLY THE COMBUSTIBLE GAS DETECTION PORTION OF THIS
INSTRUMENT HAS BEEN ASSESSED FOR PERFORMANCE.
UNIQUMENT, LA PORTION POUR DÉTECTOR LES GAZ COMBUSTIBLES
DE CET INSTRUMENT A ÉTÉ ÉVALUÉE.

QRAE 3 User’s Guide
2
CAUTION: BEFORE EACH DAY’S USAGE, SENSITIVITY OF THE
COMBUSTIBLE GAS SENSOR MUST BE TESTED ON A KNOWN
CONCENTRATION OF METHANE GAS EQUIVALENT TO 20 TO 50% OF FULL-
SCALE CONCENTRATION. ACCURACY MUST BE WITHIN 0 AND +20% OF
ACTUAL. ACCURACY MAY BE CORRECTED BY CALIBRATION PROCEDURE.
ATTENTION: AVANT CHAQUE UTILISATION JOURNALIERE VERIFIER LA
SENSIBILITE AVEC UNE CONCENTRATION CONNUE DE METHANE
EQUIVALENTE A 20-50% DE LA PLEINE ECHELLE. LA PRECISION DOIT ETRE
COMPRISE ENTRE 0-20% DE LA VALEUR VRAIE ET PEUT ETRE CORRIGEE
PARUNE PROCEDURE D’ETALONNAGE.
CAUTION: HIGH OFF-SCALE READINGS MAY INDICATE AN EXPLOSIVE
CONCENTRATION.
ATTENTION: DES LECTURES SUPÉRIEURES A L’ÉCHELLE PEUVENT
INDIQUER DES CONCENTRATIONS EXPLOSIVES.
QRAE 3 User’s Guide
3
CAUTION
This device complies with Part 15 of the FCC Rules / Industry Canada license-exe mpt
RSS standard(s). Operation is subject to the following two conditions: (1) this device may
not cause harmful interference, and (2) this device must accept any interference received,
including interference that may cause undesired operation.
Le présent appareil est conforme aux CNR d'Industrie Canada applicables aux
appareils radio exempts de licence. L'exploitation est autorisée aux deux conditions
suivantes : (1) l'appareil ne doit pas produire de brouillage, et (2) l'utilisateur de
l'appareil doit accepter tout brouillage radioélectrique subi, même si le brouillage est
susceptible d'en compromettre le fonctionnement.
Changes or modifications not expressly approved by the party responsible for compliance
could void the user's authority to operate the equipment.
This equipment has been tested and found to comply with the limits for a Class B digital
device, pursuant to part 15 of the FCC Rules. These limits are designed to provide
reasonable protection against harmful interference in a residential installation. This
equipment generates uses and can radiate radio frequency energy and, if not installed and
used in accordance with the instructions, may cause harmful interference to radio
communications. However, there is no guarantee that interference will not occur in a
particular installation. If this equipment does cause harmful interference to radio or
television reception, which can be determined by turning the equipment off and on, the
user is encouraged to try to correct the interference by one or more of the following
measures:
• Reorient or relocate the receiving antenna.
• Increase the separation between the equipment and receiver.
• Connect the equipment into an outlet on a circuit different from that to which the
receiver is connected.
• Consult the dealer or an experienced radio/TV technician for help.
Under Industry Canada regulations, this radio transmitter may only operate using an
antenna of a type and maximum (or lesser) gain approved for the transmitter by Industry
Canada. To reduce potential radio interference to other users, the antenna type and its
gain should be so chosen that the equivalent isotropically radiated power
(e.i.r.p.) is not more than that necessary for successful communication.
Conformément à la réglementation d'Industrie Canada, le présent émetteur radio peut
fonctionner avec une antenne d'un type et d'un gain maximal (ou inférieur) approuvé
pour l'émetteur par Industrie Canada. Dans le but de réduire les risques de
brouillage radioélectrique à l'intention des autres utilisateurs, il faut choisir le type
d'antenne et son gain de sorte que la puissance isotrope rayonnée équivalente
(p.i.r.e.) ne dépasse pas l'intensité nécessaire à l'établissement d'une communication
satisfaisante.

QRAE 3 User’s Guide
4
Product Marking
The QRAE 3 (PGM-25XX/D) is certified by IECEx, ATEX and CSA for US and Canada
as intrinsically safe.
The PGM-25XX/D contains the following marking:
RAE SYSTEMS
3775 N. 1st. St., San Jose
CA 95134, USA
PGM-25XX/D
Type PGM-25XX/ PGM-25XXD
Serial No/barcode: XXXX-XXXX-XX
IECEx CSA 13.0029X
Ex ia IIC T4 Ga
0575 II 1G
SIRA 13 ATEX 2390X
Ex ia IIC T4 Ga
12.2583152
Cl.I, Div 1, Grps A, B, C, D T4
Class I, Zone 0 AEX/Ex ia IIC T4
C22.2 No.152-M1984
ANSI/ISA-12.13.01-2000
Intrinsically safe/ Securite
Intrinseque/Exia
Ambient temperature : -20ºC ≤ Tamb ≤ +50ºC
Um: 20V
Battery Packs: G02-3004-000 (Li-ion rechargeable)
Warning:
• Read User’s Manual for intrinsic safety precautions
• Read and understand Manual before operating

QRAE 3 User’s Guide
5
Proper Product Disposal At End Of Life
The Waste Electrical and Electronic Equipment (WEEE) directive
(2002/96/EC) is intended to promote recycling of electrical and electronic
equipment and their components at end of life. This symbol (crossed-out
wheeled bin) indicates separate collection of waste electrical and electronic
equipment in the EU countries. This product may contain one or more
Nickel-meta l hydride (NiMH), Lithium-ion, or Alkaline batteries. Specific
battery information is given in this user guide. Batteries must be recycled or
disposed of properly.
At the end of its life, this product must undergo separate collection and recycling from
general or household waste. Please use the return and collection system available in your
country for the disposal of this product.
Sensor Specifications, Cross-Sensitivities, And Calibration Information
For information on sensor specifications, cross-sensitivities, and calibration information, refer to
RAE Systems Technical Note TN-114: Sensor Specifications And Cross-Sensitivities (available
for free download from www.raesystems.com). All specifications presented in this Technical
Note reflect the performance of standalone sensors. Actual sensor characteristics may differ when
the sensor is installed in different instruments. As sensor performance may change over time,
specifications provided are for brand-new sensors.
Make Sure Firmware Is Up To Date
For best operation, make sure your monitor is running the latest firmware. Check
www.raesystems.com for updates.

QRAE 3 User’s Guide
6
1. Standard Contents
The QRAE 3 is availab le in various user-specified configurations, each with the
accessories shown below.
In addition to the instrument, the following are included:
Item
Part Number
Travel charger
M02-3005-000
Travel charger for barrier charger (for ATEX/IECEx version)
M02-3026-000
Barrier charger (for ATEX/IECEx version)
M02-3011-000
AC adapter
500-0036-102
External filter, 3 in package (pumped models)
008-3022-003
PC cable
410-0203-000
QRAE 3 CD
M02-4008-000
Software CD (ProRAE Studio II)
000-5007-001
QuickStart guide
M02-4002-000
T calibration tube for pumped models
M02-3008-000
Calibration cap for diffusion models
M02-3009-000
Calibration tube for diffusion models
M02-3010-000
Warranty card
000-4008-001
Calibration and test certificate card
700-0167-000
QRAE 3 User’s Guide
7
2. General Information
The QRAE 3 is a family of multi-threat gas detectors that combines continuous monitoring
capabilities for toxic and combustible gases with Man Down Alarm functionality in one highly
portable instrument. QRAE 3 monitors are available in pumped and diffusion versions and offer a
selection of field-replaceable electrochemical and combustible sensors to fit a wide variety of
applications. The QRAE 3’s wireless capability elevates worker protection to the next level by
providing safety officers real-time access to instrument readings and alarm status from any
location for better visibility and faster response.
2.1. Key Features
• All-in-one continuous monitoring capabilities for oxygen, toxic and combustible
gases, for a total of up to four threats at a time
• Wireless access to real-time instrument readings and alarm status from any location
• Unmistakable five-way local and remote wireless notification of alarm conditions,
including Man Down Alarm
• Large graphical display with easy-to-use, icon-driven user interface
• Simple maintenance with easily accessible sensors and pump
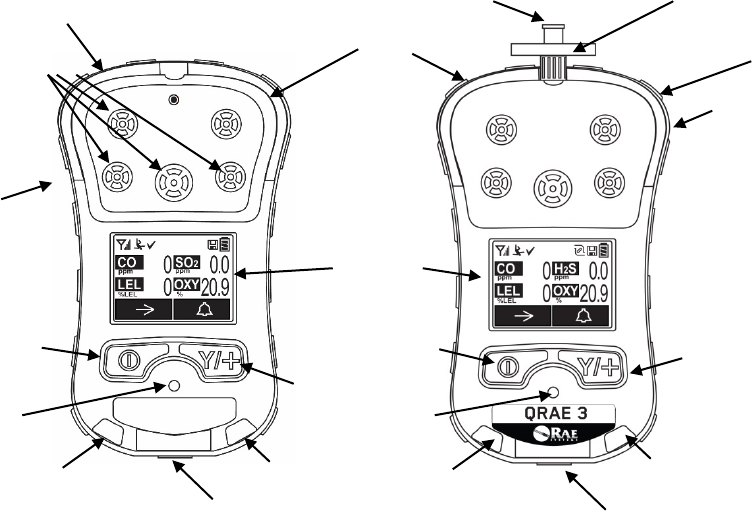
External filter
QRAE 3 Diffusion
QRAE 3 Pumped
Gas inlets
Gas inlet
Display
MODE
Key
MODE
Key
Y/+
Key
Y/+
Key
Alligator clip
(on back)
Alarm
Buzzer
Alarm
Buzzer
LEDs
LEDs
LEDs
LED
LED
LED
LED
Alligator
Clip
(on back)
Charging and
Communicaion
Contacts
Charging and
Communicaion
Contacts
QRAE 3 User’s Guide
8
3. User Interface
The QRAE 3’s user interface consists of the display, LEDs, an alarm buzzer, and two keys.
3.1. Display Overview
The LCD display provides visual feedback that includes the sensor types, readings, battery
condition, and other functions.
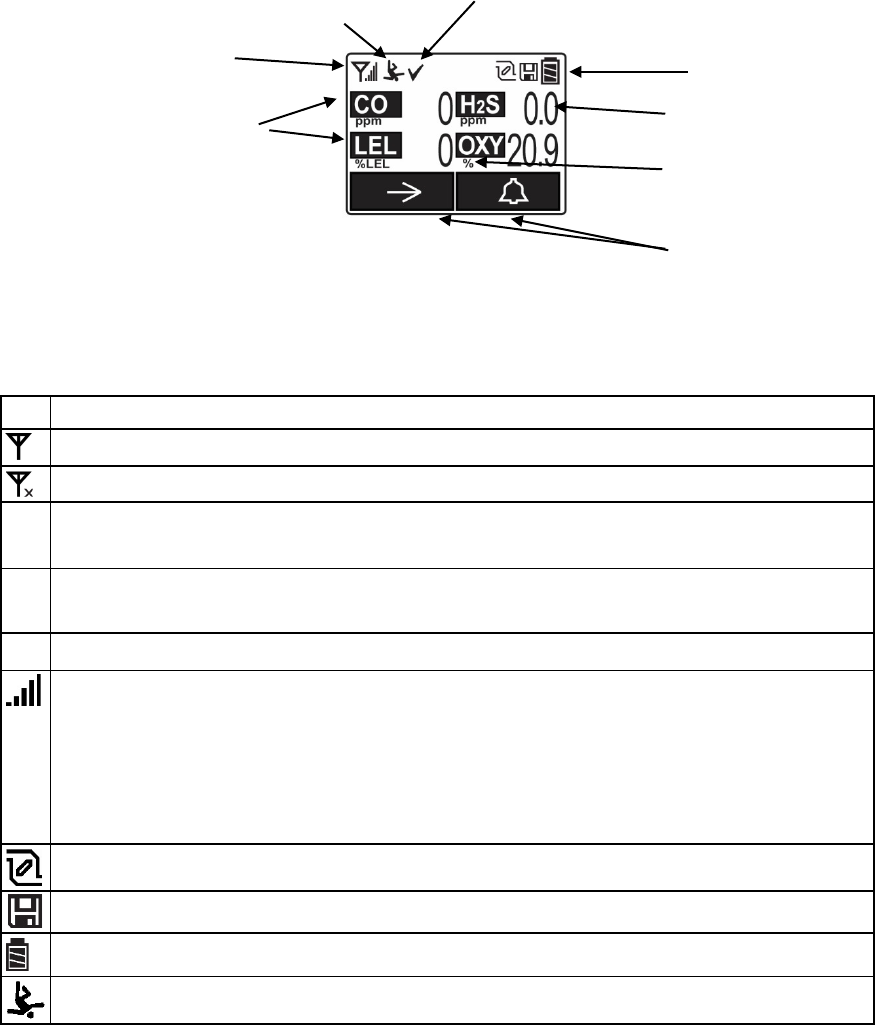
3.1.1. Status Indicator Icons
Along the top of most screens are status indicators that tell you whether a function is operating
and/or its strength or level.
Icon
Function
Wireless status: the radio is on (replaced by “R” when Roaming is on)
Wireless status: the radio is off (replaced by “R” when Roaming is on)
R
Roaming status: “R” blinks when trying to find a network (replaced by antenna
when Roaming is off)
R
Roaming status: “R” solid when network communication established (replaced by
antenna when Roaming is off)
The instrument is not equipped with a radio (no icon)
Wireless strength (0 to 5 bars)
1 bar = Network joined, signal very low RSSI (less than 20%)
2 bars = Network joined, signal low RSSI (21% to 40%)
3 bars = Network joined, signal medium RSSI (41% to 60%)
4 bars = Network joined, signal good RSSI (61% to 80%)
5 bars = Network joined, signal very good RSSI (81% to 100%)
Pump status (only on pump-equipped models)
Datalogging status (shown when datalogging is on, blank when off)
Battery status (three segments show battery charge level)
Man Down alarm enabled
Unit of measure
Reading value
Sensor type
Soft keys (functions
change by activity)
Pump, Datalog, and Battery
Status indicators
Wireless radio status
and signal strength
Man Down alarm on
Calibration and bump test
up to date
QRAE 3 User’s Guide
9
Icon
Function
All sensors tested and calibrated tick mark (all sensors have been bump tested and
calibrated; no sensor is overdue for a bump test or calibration according to the
intervals configured on the instrument
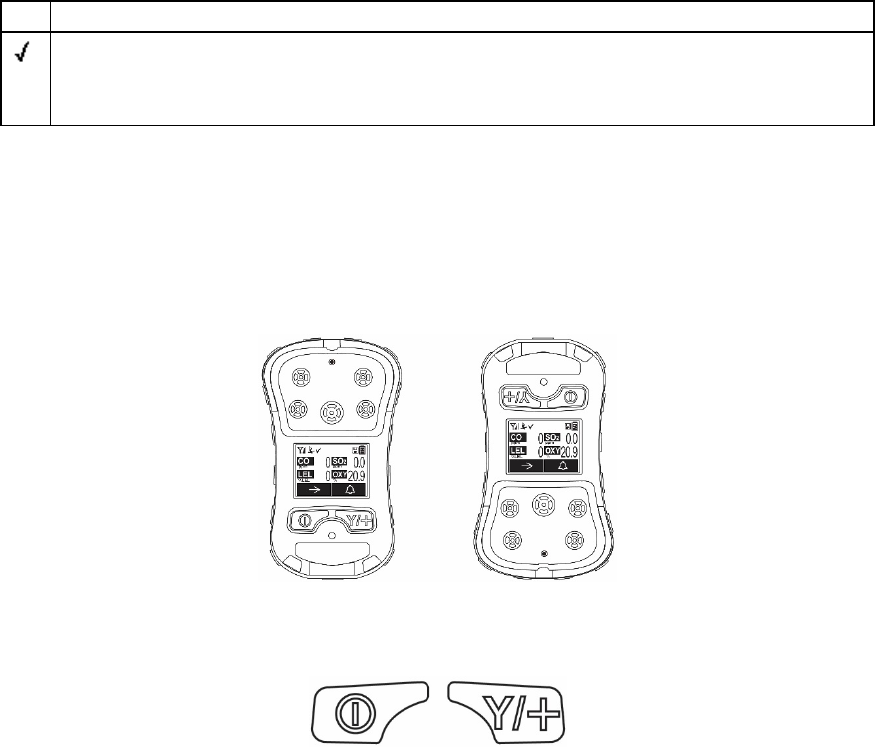
3.1.2. LCD Flip
The QRAE 3 senses its vertical/horizontal orientation, and can automatically flip the display180
degrees, making it easy to read if the QRAE 3 is upside down. (You can turn this feature on or off
in Programming Mode, under “Monitor.”) As the QRAE 3 is tilted, the sensor detects its
orientation and inverts the screen when it passes its horizontal position.
3.1.3. Keys & Interface
The QRAE 3 has two keys:
MODE
Y/+
In addition to their labeled functions, the keys labeled [MODE] and [Y/+] act as “soft keys” that
control different parameters and make different selections within the instrument’s menus. From
menu to menu, each key controls a different parameter or makes a different selection.
Two panes along the bottom of the display are “mapped” to the keys. These change as menus
change, but at all times the left pane corresponds to the [MODE] key, and the right pane
corresponds to the [Y/+] key. Here are examples that show the relationships of the keys and
functions:
In addition to the functions described above, either key can be used to manually activate display
backlighting. Press a key when the backlighting is off to turn it on.
QRAE 3 User’s Guide
10
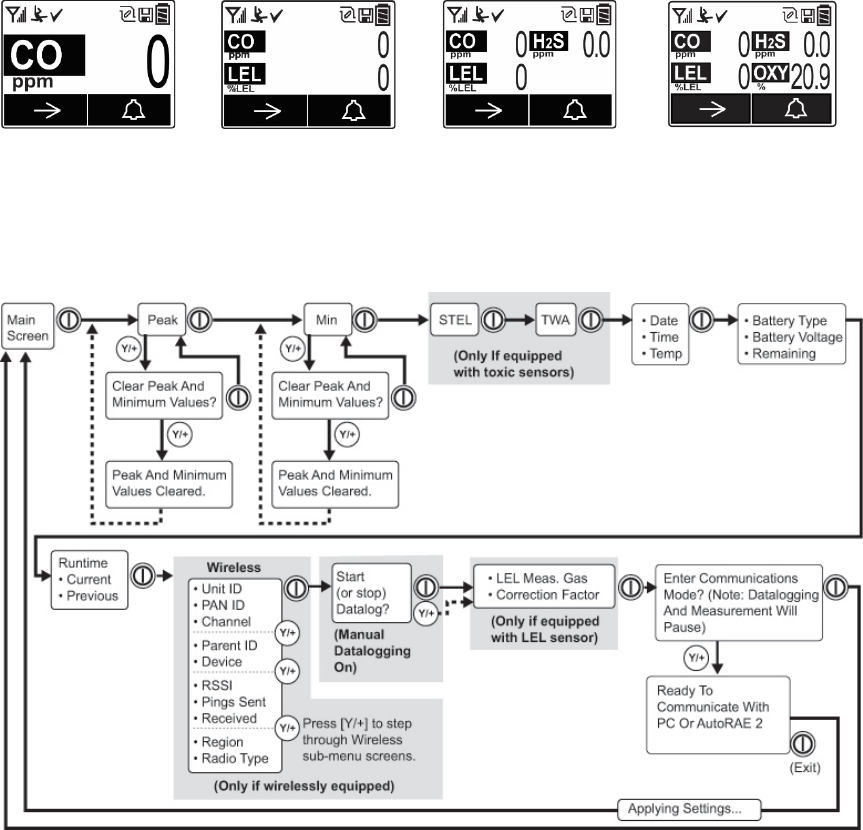
3.2. Screen Display For Various Numbers Of Active Sensors
The QRAE 3 family of instruments can accommodate from one to four sensors. In order to
maximize readability and the amount of information shown, the display is automatically
reconfigured, according to the number and types of sensors in the QRAE 3.
One se nsor.
Two sensors.
Three sensors.
Four sensors.
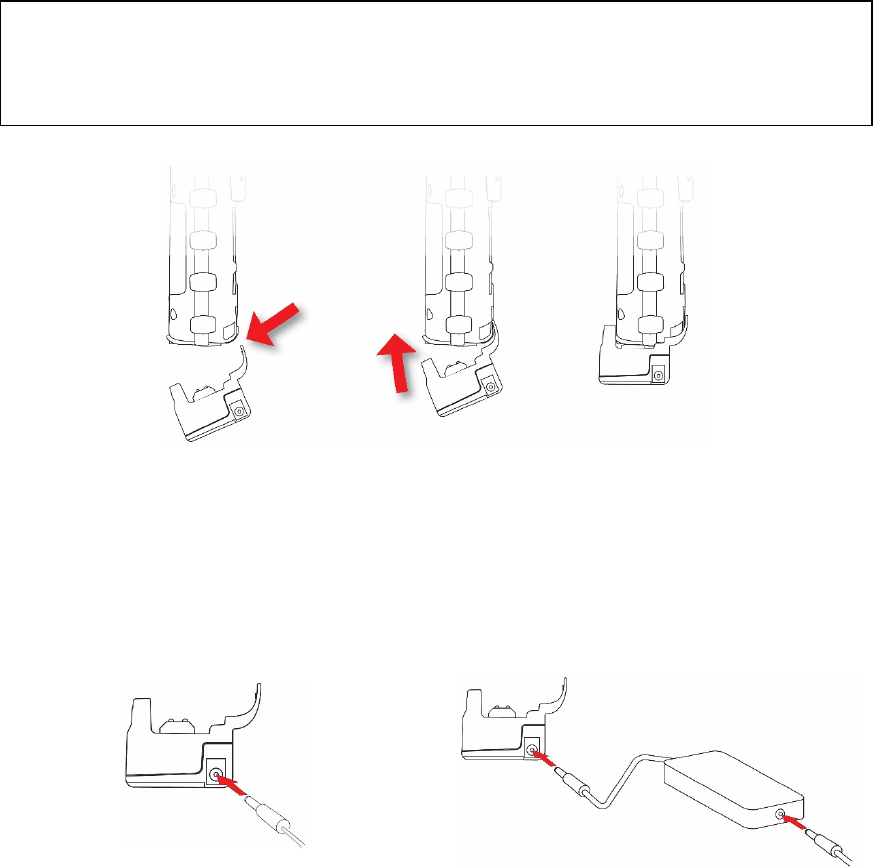
3.3. Menus
The reading menus are easy to step through by pressing the [MODE] and [Y/+] key.
4. Wireless Control And Submenus
When you step through the main menu, as shown in the previous diagram, there are four
screens for wireless communication, containing information on wireless settings and
status.
Note: These are only present if the QRAE 3 is equipped with a wireless module.
QRAE 3 User’s Guide
11
5. Battery
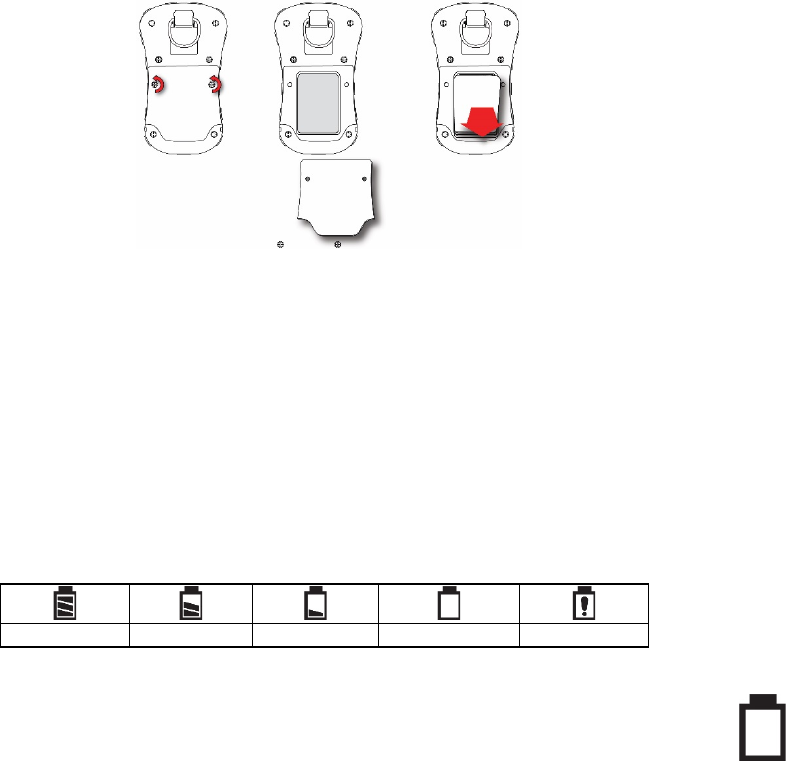
Always fully charge the battery before using the QRAE 3. Its Li-ion battery is charged by placing
the QRAE 3 in its Travel Charger. Contacts on the bottom of the instrument meet the Travel
Charger’s contact pins, transferring power.
Battery pack (P/N G02-3004-000) is used for QRAE 3.
Note: Before attaching the QRAE 3 to its Travel Charger, visually inspect the contacts to make
sure they are clean. If they are not, wipe them with a soft, dry cloth. Do not use solvents or
cleaners.
WARNING
To reduce the risk of ignition of hazardous atmospheres, recharge, remove or replace the
battery only in an area known to be non-hazardous! Do not mix old and new batteries or
batteries from different manufacturers.
Next, put the plug from the power supply into the jack on the side of the Travel Charger.
Note: For ATEX/IECEx applications, plug the cord from the Barrier Box (P/N M02-3011-000)
into the Travel Charger, and then plug the power adapter into the Barrier Box.
Non-ATEX/IECEx: Power supply plugged
directly into Travel Charger.
ATEX/IECEx: Barrier Box Between power
supply and Travel Charger.
Plug the other end of the charger into a power source (AC outlet or 12VDC mobile power port,
depending on the model). When power is applied and the QRAE 3’s battery is charging, the LED
glows red. The LED glows green when the battery is fully charged.
Catch the lip of the Travel
Charger on the front of the
QRAE 3
Tilt the Travel
Charger up
Click the latch
into place
From Power
Supply
Barrier
Box
QRAE 3 User’s Guide
12
5.1. Replacing The Battery
To replace the QRAE 3 battery:
1. Remove the two screws that hold the battery compartment cover in place.
Note: It is not necessary to remove the belt clip.
2. Remove the cover plate by tilting up the end closest to the belt clip and lifting off.
3. Slide the QRAE 3’s battery out of its compartment and into your hand.
4. Press a fully charged battery into the battery compartment and place it in the instrument. Pay
careful attention to the direction of the battery so that the electrical contacts are on the bottom.
5. Replace the cover and tighten the two screws to secure the battery.
5.2. Battery States
The battery icon on the display shows how much charge is in the battery and alerts you to any
charging problems.
Full charge
2/3 charge
1/3 charge
Low charge
Battery alert
When the battery’s charge falls below a preset voltage, the instrument warns you by beeping
once and flashing once every minute, and the “empty battery” icon blinks on and off once per
second. The instrument automatically powers down within 10 minutes, after which you will
need to either recharge the battery, or replace it with a fully charged one.
QRAE 3 User’s Guide
13
6. Turning The QRAE 3 On And Off
6.1. Turning The QRAE 3 On
With the instrument turned off, press and hold the [MODE] key until the audible alarm stops, and then
release.
When starting up, the QRAE 3 turns the backlight on and off, beeps once, blinks once, and
vibrates once. A RAE Systems logo should appear first. During a normal startup, this is followed
by a progression of screens that tell you the QRAE 3’s current settings:
• Product name and model number, air flow type, and serial number
• Application firmware version, build date, and build time
• Installed sensors (including production/expiration/calibration date and alarm limit settings)
• Current date, time, and temperature
• User mode and operation mode
• Battery type, voltage, shutoff voltage
• Alarm mode and alarm settings
• Datalog period (if it is activated) and interval
• Policy Enforcement settings
Then the QRAE 3’s main reading screen appears. It takes 1 to 2 minutes for sensors to show a reading, so if
any have not warmed up by the time the main screen is shown, you will see “- -” instead of a numerical
value until the sensor provides data (typically less than 2 minutes). Then it displays instantaneous readings
similar to the following screen (depending on the sensors installed) and is ready for use.
Note: If the battery is completely empty, then the display briefly shows the message “Battery Fully
Discharged,” and the QRAE 3 shuts off. You should charge the battery or replace it with a fully charged
battery before turning it on again.
IMPORTANT!
If a major error that prevents the QRAE 3 from functioning is found during startup, the message “Please
Contact Service Department” is shown on the display. The instrument should be shut off and serviced.
6.2. Turning The QRAE 3 Off
Press and hold [MODE]. A 5-second countdown to shutoff begins. You must hold your finger on
the key for the entire shutoff process until the QRAE 3 is powered off.
Caution: The alarm is very loud. During startup, you can mute most of the sound by holding a
finger over the alarm port. Do not put tape over the alarm port to permanently mute it.
QRAE 3 User’s Guide
14
6.3. Testing Alarm Indicators
Under normal-operation mode and non-alarm conditions, the buzzer, vibration alarm, LED, and
backlight can be tested at any time by pressing [Y/+] once.
IMPORTANT!
If any of the alarms do not respond to this test, check the Alarm Settings in Programming Mode.
It is possible that any or all of the alarms have been turned off. If all of the alarms are turned on,
but one or more of them (buzzer, LED lights, or vibration alarm) does not respond to this test, do
not use the instrument. Contact your RAE Systems distributor for technical support.
6.4. Pump Status IMPORTANT!
During operation, make sure the probe inlet and the gas outlet are free of obstructions.
Obstructions can cause premature wear on the pump, false readings, or pump stalling. During
normal operation, the pump icon alternately shows inflow and outflow as shown here:
If there is a pump failure or obstruction that disrupts the pump, the alarm sounds and you see this
icon blinking on and off:
Once the obstruction is removed, you can restart the pump by pressing the [Y/+] key. If the pump
does not restart, and the pump stall alarm continues, consult the Troubleshooting section of this
guide or contact your RAE Systems distributor for technical support.
Note: Pump Status is not indicated on the diffusion QRAE 3.
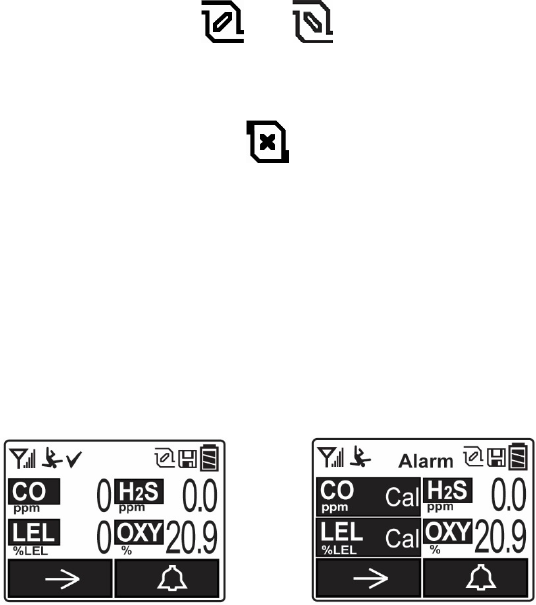
6.5. Calibration Status
If one or more sensors requires calibration, then the screen displays the word “Alarm” at the top
and alternates between the sensor reading and the word “Cal” with a highlighted background:
Calibration is required if:
• The sensor module has been replaced with one whose calibration is overdue.
• The defined period of time between calibrations has been exceeded. (See Section 9 for
information on policy enforcement.)
• If you have changed the calibration gas type without recalibrating the instrument.
• The sensor has failed a previous calibration.

QRAE 3 User’s Guide
15
6.6. Bump Status
If one or more sensors requires a bump test, then the screen displays the word “Alarm” at the top
and alternates between the sensor reading and the word “Bump” with a highlighted background:
A bump test is required if the defined period of time between bump tests has been exceeded. This
interval is set by an administrator using ProRAE Studio II.
7. Modes Of Operation
The QRAE 3 has two user modes.
7.1. Basic User Mode
In Basic User Mode, some restrictions are applied, including password protection that guards
against entering Programming Mode by unauthorized personnel.
7.2. Advanced User Mode
In Advanced User Mode, there are no access restrictions (you do not need a password), and the
QRAE 3 provides the indications and data you need most for typical monitoring applications.
QRAE 3 User’s Guide
16
8. Programming
The menu in Programming Mode is to adjust settings, calibrate sensors, and initiate
communication with a computer. It has the following submenus:
• Calibration
• Measurement
• Alarms
• Datalog
• Monitor
• Wireless
8.1. Enter Programming In Basic Mode
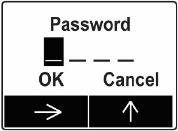
1. To enter Programming Mode, press and hold [MODE] and [Y/+] until you see the Password
screen.
2. Input the 4-digit password:
• Increase the number from 0 through 9 by pressing [Y/+].
• Step from digit to digit using [MODE].
• After inputting the password’s four digits, advance to “OK.”
• Press [Y/+] to register the password and enter Programming Mode. Otherwise, advance to
“Cancel” then press “[Y/+].
If you make a mistake, you can cycle through the digits by pressing [MODE] and then using
[Y/+] to change the number in each position.
Note: The default password is 0000.
Note: The password screen only appears when you enter the Programming Mode the first time
after turning the instrument on in Basic Mode. If you have input the correct password, you do not
have to input it again to enter Programming Mode until you turn the instrument off and on again.
QRAE 3 User’s Guide
17
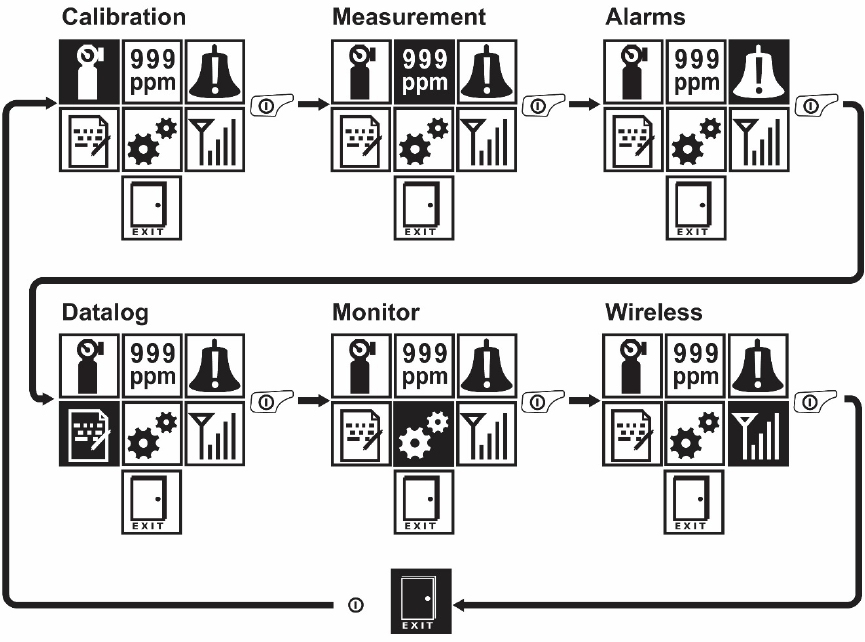
Once you enter Programming Mode, the Calibration screen is shown. Press [MODE] to step
through the programming screens.
To enter a menu and view or edit parameters in its submenus, press [Y/+].
QRAE 3 User’s Guide
18
8.2. Enter Programming In Advanced Mode
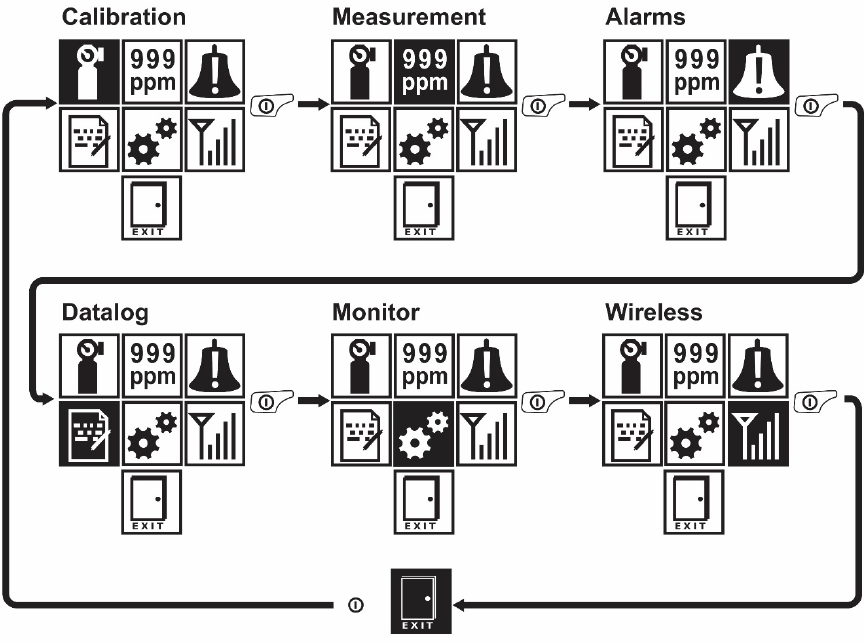
1. To enter Programming Mode, press and hold [MODE] and [Y/+] until you see the Calibration
screen. No password is necessary in Advanced Mode.
2. Press [MODE] to step through the programming screens.
To enter a menu and view or edit parameters in its submenus, press [Y/+].
QRAE 3 User’s Guide
19
8.3. Menus And Submenus
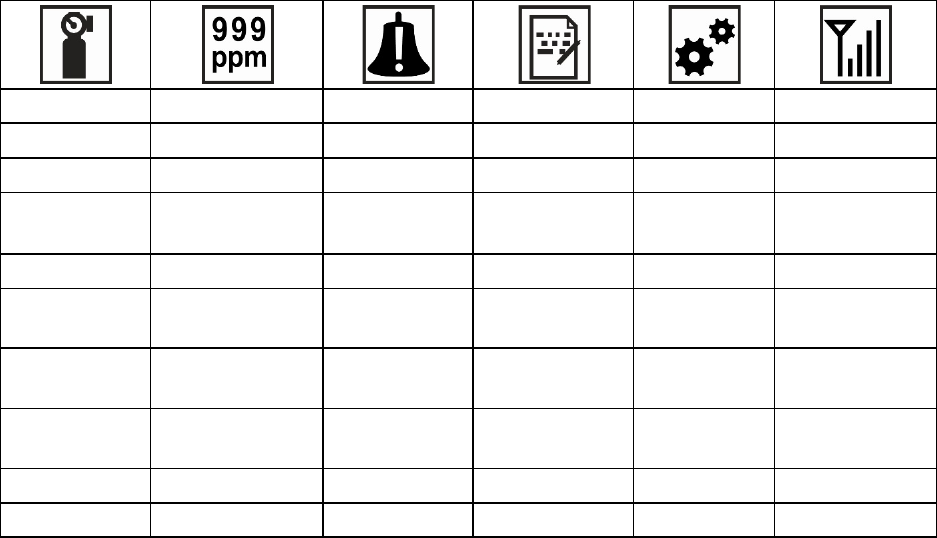
In Programming Mode, menus and submenus are organized as shown here:
Calibration
Measurement
Alarms
Datalog
Monitor
Wireless*
Multi Bump
Sensor On/Off
Alarm Limits
Clear Datalog
Date And Time
Radio On/Off
Multi Zero
Meas. Unit
Alarm Mode
Interval
Display
Roaming
Multi Span
LEL Meas. Gas
Alarm Settings
Sensor Selection
Pump
Speed**
PAN ID
Single Bump
Exit
Comfort Beep
Data Selection
Site ID
Channel
Single Zero
Man Down
Alarm
Datalog Type
User ID
Join Network
Single Span
Exit
Action When
Full
User Mode
Interval
Set LEL Cal.
Gas
Exit
Zero At Start
Off Network
Alarm
Set Span Value
Exit
Factory Reset
Exit
Exit
* Wirelessly equipped versions only.
** Pump-equipped version only.
8.3.1. Editing And Selecting Parameters And Sensors
There are a few basic ways to edit parameters, select sensors, and perform other activities
in the QRAE 3. The actions performed by pressing keys always match 1-to-1 with the
boxes along the bottom of the display and the two keys. Some parameters are edited by
scrolling and selecting individual items (black bars behind white text act as highlighters).
Some include a choice via “radio keys,” where only one item in a list can be selected,
while other menus use boxes for you to “check” with an “X,” and these allow for
multiple items in a list to be selected. In all cases of editing, you can save or undo your
choice.
QRAE 3 User’s Guide
20
8.3.2. Calibration
Use this menu to perform zero or span calibration for one or more sensors, and change the gas
concentration value assumed to be used in span calibration, as well as zero calibration and calibration
reference gas.
8.3.2.1. Multi Bump
Depending on the configuration of your QRAE 3 and the span gas you have, you can perform a
bump test simultaneously on multiple sensors.
The selected sensors and their values are shown on the screen. With calibration gas connected to
the instrument, start a multiple bump test by pressing [Y/+]. If you do not want to perform a
multiple bump test, press [MODE].
Note: You can abort a multiple bump test by pressing [MODE] once testing has started.
When the Multi Bump test is done, a screen is shown, with the sensor names and either “Pass” or
“Fail” shown next to them.
8.3.2.2. Multi Zero
You can perform a zero calibration simultaneously on multiple sensors. This procedure
determines the zero point of the sensor calibration curve for all the sensors that require a zero
calibration. The instrument should be zero calibrated in clean ambient air with 20.9% oxygen. A
zero calibration should precede a span calibration.
The selected sensors are shown on the screen. Start a multiple zero test by pressing [Y/+]. If you
do not want to perform a test, press [MODE].
Note: You can abort a multiple zero test by pressing [MODE] once testing has started.
When the Multi Zero test is done, a screen labeled Calibration Results is shown, with the sensor
names and either “Pass” or “Fail” shown next to them.
8.3.2.3. Multi Span
Depending on the configuration of your QRAE 3 and the span gas you have, you can perform a
span calibration simultaneously on multiple sensors.
The selected sensors and their values are shown on the screen. With calibration gas connected to
the instrument and turned on, start a multiple span calibration by pressing [Y/+]. If you do not
want to perform a multiple span calibration, press [MODE].
Note: You can abort a multiple span calibration by pressing [MODE] once testing has started.
When the Multi Span calibration is done, a screen labeled Calibration Results is shown, with the
sensor names and either “Pass” or “Fail” shown next to them.
8.3.2.4. Single Bump
You can perform a separate bump test on each individual sensor.
The active sensors’ names are shown in a list. Press [MODE] to highlight the sensor you want to
bump test, and then press [Y/+] to select it.
QRAE 3 User’s Guide
21
When the Apply Gas screen is shown, connect the calibration gas to the instrument, and start the
bump test by pressing [Y/+]. If you do not want to perform a single bump test, press [MODE] to
quit.
Note: You can abort a bump test by pressing [MODE] once testing has started.
When the Multi Bump test is done, a screen is shown, with the sensor names and either “Pass” or
“Fail” shown next to them.
8.3.2.5. Single Zero
This allows you to perform zero (fresh air) calibration on individual sensors. The instrument
should be zero calibrated in clean ambient air with 20.9% oxygen. A zero calibration should
precede a span calibration.
The active sensors’ names are shown in a list. Press [MODE] to highlight the sensor you want to
zero calibrate, and then press [Y/+] to select it.
When the Zero Calibration screen is shown with the sensor name and its measurement unit, start
the zero calibration by pressing [Y/+]. If you do not want to perform a calibration, press [MODE]
to quit.
Note: You can abort a zero calibration by pressing [MODE] once testing has started.
When the zero calibration is done, the Calibration Results screen is shown with either “Pass” or
“Fail” shown.
8.3.2.6. Single Span
Instead of performing a span calibration on more than one sensor simultaneously, you can select a single
sensor and perform a span calibration.
The active sensors’ names are shown in a list. Press [MODE] to highlight the sensor you want to
span calibrate, and then press [Y/+] to select it.
When the Apply Gas screen is shown with the sensor name and its measurement unit, connect a
cylinder of span gas, start its flow, and then start the zero calibration by pressing [Y/+]. If you do
not want to perform a span calibration, press [MODE] to quit.
Note: You can abort a span calibration by pressing [MODE] once testing has started.
When the span calibration is done, the Calibration Results screen is shown with either “Pass” or
“Fail” shown.
8.3.2.7. Set LEL Cal. Gas
For best response, it is desirable to calibrate an LEL sensor with the specific gas that you are
surveying (target gas). Changing the gas requires selecting the right calibration reference gas in
the QRAE 3. Choose the sensor, and then select from the list of reference gases. Select from a
Custom Gases list that you create or the built-in Gas Library for your sensor (taken from RAE Systems’
Technical Note TN-156 or the table at the end of this user’s guide).
Choose Custom Gases or Gas Library by pressing [MODE], and then press [Y/+] to make your selection.
QRAE 3 User’s Guide
22
Up to eight custom gases are in the library. Scroll through the choices by pressing [Y/+], and then
select the custom gas configuration by pressing [MODE] to highlight it. With “Save” highlighted,
press [Y/+] to save your choice.
If you choose from the Gas Library, press [Y/+] to scroll through the list, and then press [MODE]
to make your selection. With “Save” highlighted, press [Y/+] to save your choice. The gas is
saved, and then the screen briefly shows the Correction Factor applied to that gas by the QRAE 3.
Note: The Gas Library contains many gases. To rapidly scroll through the list, press and hold
[Y/+].
8.3.2.8. Set Span Value
You can individually set the span gas value for each sensor. The units of measure (ppm, %LEL,
etc.) are shown on the display.
Press [MODE] to scroll through the list of active sensor names. Then press [Y/+] to select one.
Set the span value by pressing [Y/+] to increase a value, and pressing [MODE] to advance
through the digits.
Once your span value is input, press [MODE] to advance and highlight “OK.” Press [Y/+] to
register the change and to advance to the next sensor in the list.
When you reach the end of the list, press [MODE] to highlight “Exit,” and then press [Y/+] to
select it.
8.3.3. Measurement
The submenus for Measurement include Sensor On/Off, Change Measurement Gas, and LEL
Measurement Units.
8.3.3.1. Sensor On/Off
You can turn sensors on or off via this set of submenus. An “X” in a box to the left of a sensor’s
name indicates it is turned on.
1. Press [MODE] to advance down the list of sensors.
2. Press [Y/+] to select/deselect a sensor.
3. Press [MODE] until “Exit” is selected.
4. Press [Y/+] to save your selection and exit to the Measurement menu.
8.3.3.2. Meas. Unit
The measurement unit for displaying data from sensors can be changed. Your options are ppm
(parts per million) mg/m3 (milligrams per cubic meter), and μmol/mol (micromoles per mole).
1. Press [MODE] to move between measurement units.
2. Press [Y/+] to select a measurement unit.
3. Press [MODE] until “Exit” is selected.
4. Press [Y/+] to save your selection and exit to the Measurement menu.
QRAE 3 User’s Guide
23
8.3.3.3. LEL Meas. Gas
Note: The LEL Measurement Gas option is only available if an LEL sensor is installed.
The QRAE 3 has extensive onboard gas libraries for combustible gases that you can use to
configure your instrument to automatically apply the appropriate correction factors and produce
readings in the units of the desired combustible gas.
LEL measurement gases are organized in two lists:
• Custom Gases are gases with user-modified parameters. Using ProRAE Studio II, all
parameters defining a gas can be modified, including the name, span value(s), correction
factor, and default alarm limits.
• Gas Library is a library that consists of many of the gases found in RAE Systems’ Technical
Note TN-156 (available online at www.raesystems.com). Methane is the default gas.
Choose Custom Gases or Gas Library by pressing [MODE], and then press [Y/+] to make your selection.
Up to eight custom gases are in the library. Scroll through the choices by pressing [Y/+], and then select the
custom gas configuration by pressing [MODE] to highlight it. With “Save” highlighted, press [Y/+] to save
your choice.
If you choose from the Gas Library, press [Y/+] to scroll through the list, and then press [MODE] to make
your selection. With “Save” highlighted, press [Y/+] to save your choice.
Note: The Gas Library contains many gases. To rapidly scroll through the list, press and hold [Y/+].
8.3.3.4. Alarms
Use this menu to change high, low, STEL, and TWA alarm limits - the points at which alarms are
triggered. It can also change alarm mode (latched or automatic reset) and alarm output methods
(combinations of light, buzzer, and vibration alarm indications).
8.3.3.5. Alarm Limits
There are four groups of alarm settings that you can adjust for each individual sensor for which a
particular alarm type is available.
Settings:
• High Alarm
• Low Alarm
• STEL Alarm
• TWA Alarm
Note: Some alarm settings are not applicable to all sensors. If a setting is irrelevant to a sensor (in
some cases STEL or TWA are not relevant to a sensor), then that sensor does not appear in the
list for alarm limits.
QRAE 3 User’s Guide
24
8.3.3.6. Alarm Mode
You can program the QRAE 3 so that there are two ways to shut off an alarm:
Auto Reset
When the alarm condition is no longer present, the alarm stops and resets itself.
Latch
The latched setting only controls alarms for High Alarm, Low Alarm, STEL
Alarm, and TWA alarm. When an alarm is in “latched” mode, the alarm signal
remains on even when the alarm condition is no longer present Press [Y/+] to
acknowledge and reset alarm signals.
8.3.3.7. Alarm Settings
You can enable/disable any combination of light (LEDs), buzzer, and vibration alarms.
Settings:
• All Enabled
• Light
• Vibration
• Buzzer
• Buzzer & Light
• Buzzer & Vibration
• Vibration & Light
• All Disabled
8.3.3.8. Comfort Beep
A Comfort Beep is a single beep of the audible alarm at 60-second intervals that reminds the
person using the QRAE 3 that it is functioning. It can be turned on or off.
8.3.3.9. Man Down Alarm
The Man Down Alarm is a critical and potentially lifesaving safety feature of every QRAE 3. The
Man Down Alarm is based on the premise that if the instrument is motionless when it is not
supposed to be, something wrong may be happening to its user. If that is the case, the QRAE 3
not only goes into alarm locally on the instrument, but also remotely, over the RAE Systems
Dedicated Wireless Network, to notify people in the vicinity, as well as remote safety officers at a
command center, that a person is down, so that help can be dispatched quickly.
Note: Remote notification requires wireless connection to a network.
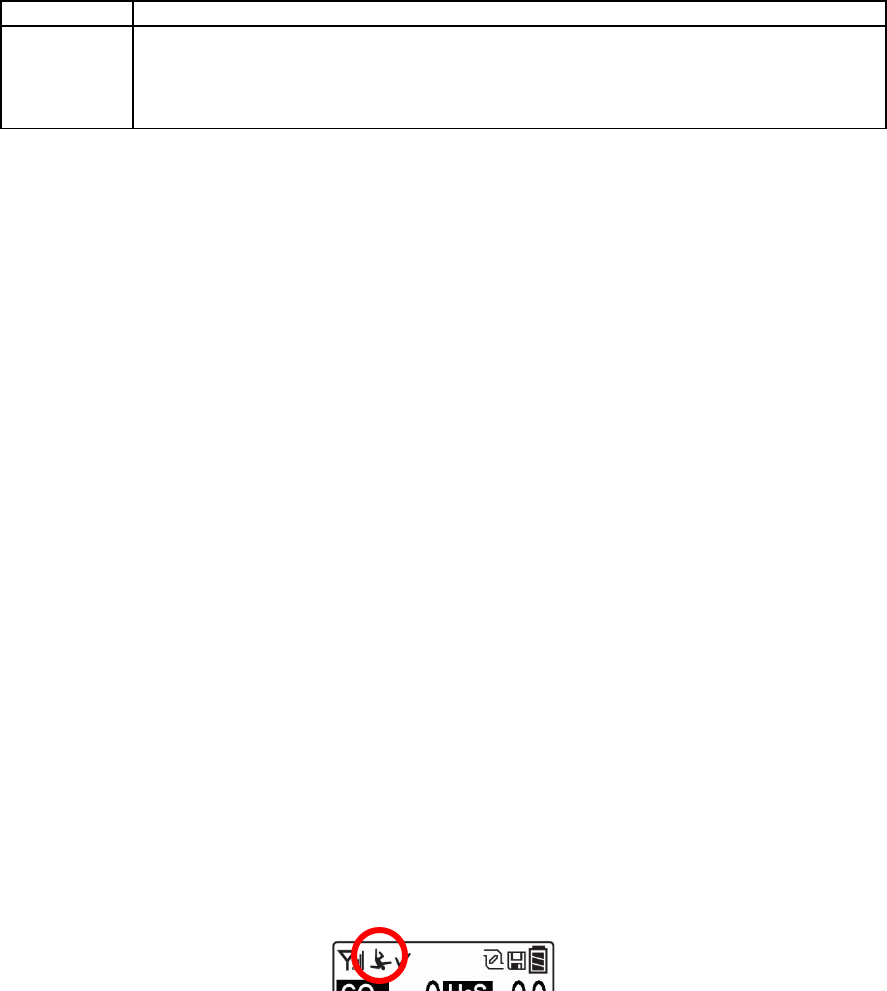
Whenever the Man Down feature is on, the main screen displays a Man Down icon along the top to
indicate it is active:
QRAE 3 User’s Guide
25
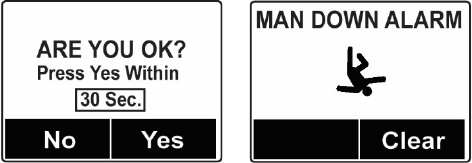
When the Man Down feature is on and there is no gas alarm, the QRAE 3 senses that it is motionless for the
amount of time set in the “Motionless Time” parameter. If the instrument is not moved during that time, then
a pre-alarm is activated to alert the user, and shows the “Are You OK?” screen. Pressing [Y/+] clears the
alarm and returns the QRAE 3 to its normal operation. Pressing [MODE] sets it into Man Down Alarm (and
if wireless connectivity is enabled, a Man Down message is sent in real time to remote observers). If neither
key is pressed, then after the countdown, it goes into Man Down Alarm (again sending a message to remote
observers if wirelessly enabled).
Settings are available for:
• Off/On
• Motionless Time (time the instrument is motionless before initiating a pre-alarm)
• Sensitivity (set to low, medium, or high to compensate for ambient vibration or motion)
• Warning Time (countdown, in seconds, from pre-alarm to Man Down alarm)
When the Man Down alarm is activated, the buzzer sounds and LEDs flash continuously, and a countdown
begins.
• If the QRAE 3’s user presses [Y/+] for “Yes” in response to the “Are You OK?” question on
the screen before the countdown reaches zero, the Man Down alarm stops and the main reading
screen is displayed.
• If the person does not press [Y/+] for “Yes” in response to the “Are You OK?” question on the
screen before the countdown reaches zero, the Man Down alarm is sounded and LEDs flash
continuously.
• If the person presses [MODE] during the countdown, answering the “Are You OK?” question
with “No,” the Man Down alarm starts.
If wireless connectivity is enabled, and the QRAE 3 is connected to a network, a Man Down message is
also sent to remote observers.
8.3.4. Datalog
The instrument displays a floppy disk icon to indicate that a datalog is being recorded. The
instrument stores the measured gas concentration for each sensor, date and time for each
measurement, Site ID, User ID, and other parameters. The QRAE 3 memory is sufficient to
record three months’ worth of data for four sensors at one-minute intervals. All data are retained
(even after the unit is turned off) in non-volatile memory so that they can be downloaded at a later
time to a PC.
8.3.4.1. Clear Datalog
This operation erases all data stored in the datalog.
Note: Once the datalog is cleared, the data cannot be recovered.
QRAE 3 User’s Guide
26
8.3.4.2. Interval
Intervals are shown in seconds. The default value is 60 seconds. The maximum interval is 3600
seconds, and the minimum is 1 second.
8.3.4.3. Sensor Selection
You can choose which sensors’ data are included in the datalog. The entire list of installed
sensors is shown, and you can individually select whether their data is included.
Note: Turning a sensor off in the list does not change or erase its settings.
8.3.4.4. Data Selection
Data Selection allows you to select which types of data are stored and made available when you
download your datalog to a computer via ProRAE Studio II (version 1.7.0 or higher) software.
You can choose any or all of four types of data (you must choose at least one):
• Minimum
• Average
• Maximum
• Real Time
8.3.4.5. Datalog Type
The instrument offers two options for starting the datalogging process:
Auto Automatically collects datalog information every time the instrument is sampling
until the datalog memory is full.
Manual Datalogging occurs only when you manually initiate it (see below for details).
Note: You can only choose one datalog type to be active at a time.
About Manual Datalog
When the instrument is set to Manual Datalog, you can turn datalogging on and off by repeatedly
pressing [MODE] and stepping through the screens from the main display until you reach the
screen that says “Start Datalog?”
• When you reach the screen that says “Start Datalog?” press [Y/+] to start it. You see
“Datalog Started,” confirming that datalogging is now on.
• If datalogging is running, it says, “Stop Datalog?” Press [Y/+] to stop datalogging.
Otherwise, press [MODE] to advance to the next screen.
8.3.4.6. Action When Full
When the internal datalog memory is full, the QRAE 3 can either stop collecting data (Stop when
full) or go back to the beginning and overwrite the data from the first entry, second entry, etc.
(Wraparound).
8.3.5. Monitor
The submenus under “Monitor” control the LCD’s contrast, operation mode, pump speed, and
other parameters.
QRAE 3 User’s Guide
27
8.3.5.1. Date And Time
Date
Month (MM) and Day (DD) have two digits each, while the year (YYYY) uses four
digits.
Time
The QRAE 3’s time must be set using the 24-hour format, following hours, minutes, and seconds
(HH:MM:SS).
8.3.5.2. Display
LCD Contrast
The display’s contrast can be increased or decreased from its default setting. You may not need to
ever change the default setting, but sometimes you can optimize the display to suit extreme
temperature and ambient brightness/darkness conditions.
Use the [Y/+] key to change the LCD contrast. When you are done, press [MODE] to highlight
“OK” and press [Y/+] to save your change. Otherwise, highlight “Cancel” and press [Y/+] to
abort changes and revert to the original setting.
LCD Flip
The display can be configured to flip 180° automatically when the QRAE 3 is turned upside-
down. The LCD Flip feature can be set to On or Off.
Backlight
The display’s backlight can be set to illuminate either automatically, based on ambient light
conditions, or manually, or it can be shut off.
8.3.5.3. Pump Speed
If the QRAE 3 is equipped with a pump, the pump can operate at two speeds, high and low.
Running at low speed is quieter, extends pump lifespan, and conserves a small amount of power.
There is almost no difference in sampling accuracy. Note: High speed should be used for exotic
sensors and for taking samples via a hose from a long distance.
8.3.5.4. Site ID
Choose and enter an 8-digit Site ID to uniquely identify the particular site where the instrument is
to be used. The first four digits can be an alphabet letter or number, while the last four digits can
only be numbers. This Site ID is included in the datalog report.
Note: Advance through the alphabet and numbers (0 through 9) by one with each press of the
[Y/+] key. To scroll quickly, hold down the [Y/+] key for as long as you want it to scroll rapidly.
Save your changes by highlighting “OK” and pressing [Y/+].
8.3.5.5. User ID
Enter an 8-digit alphanumeric User ID to uniquely identify a user. This User ID is included in the
datalog report.
QRAE 3 User’s Guide
28
Note: Advance through the alphabet and numbers (0 through 9) by one with each press of the
[Y/+] key. To scroll quickly, hold down the [Y/+] key for as long as you want it to scroll rapidly.
Save your changes by highlighting “OK” and pressing [Y/+].
8.3.5.6. User Mode
Two User Modes are available: Advanced and Basic. The Advanced User Mode allows a greater
number of parameters to be changed than Basic User Mode. No password is required to enter the
Programming Menu when in Advanced User Mode.
8.3.5.7. Zero At Start
If your QRAE 3 has been configured to perform a zero (fresh air) calibration upon startup, called
Zero At Start, then the startup routine is interrupted so that you can perform a fresh air
calibration.
Press [Y/+] to start zero calibration when prompted. If you do not want to perform a zero
calibration, press [MODE] to bypass it. If you start a zero calibration and want to abort it, press
[MODE], and the calibration stops and the main display is shown.
8.3.6. Wireless
When a QRAE 3 is equipped with a wireless modem, its settings are controlled via the menu
items under “Wireless.”
8.3.6.1. Radio On/Off
Turn the radio on or off via this menu.
1. Choose between “On” and “Off” by pressing [MODE].
2. Select the highlighted state by pressing [Y/+].
3. Press [MODE] until Exit is selected.to register the change.
• Press [Y/+] to save the change. You see the message “Turning On Radio. Please
Wait.” or (if you are turning off the radio) it simply advances to the Wireless menu
screen.
8.3.6.2. Roaming
The Roaming function provides continuous wireless connectivity between zones enabling users
of wireless monitors to travel from one zone/work area to another without losing communication
between their monitor and ProRAE Guardian. You can turn Roaming on and off in your monitor,
or you can set it via ProRAE Studio II.
1. In the Wireless menu, press [MODE] to scroll down to “Roaming.”
2. Press [Y/+] to select “Roaming.”
3. Press [MODE] to scroll to “On” or “Off.”
4. Press [MODE] to scroll to “Exit.”
5. Press [Y/+] to exit.
Note: When Roaming is on, you cannot change the instrument’s PAN ID. In addition, when
Roaming is on, the “PAN ID” is not shown in the Wireless menu. To turn “PAN ID”
back on:
1. In the Wireless menu, press [N/-] to scroll down to “Roaming.”
2. Press [Y/+] to select “Roaming.”
QRAE 3 User’s Guide
29
3. Press [MODE] to scroll from “On” to “Off.”
4. Press [Y/+] to select “Off.”
5. Press [MODE] to select “Exit.”
6. Press [Y/+].
The screen says “Apply Settings” and then goes to the Wireless Menu. Roaming is now off,
and the “PAN ID” menu item is now visible and selected.
8.3.6.3. PAN ID
The QRAE 3 and any other devices that you want to connect wirelessly must have the same PAN
ID. Note: When Roaming is on, “PAN ID” is not shown in the Wireless menu. You must turn off
Roaming to make the “PAN ID” menu item visible and accessible.
1. With “PAN ID” selected in the Wireless menu, press [Y/+] to select it.
2. Press [Y/+] to increase the number and [MODE] to advance to the next digit.
3. After moving to the last digit and making changes, press [MODE].
• Press [Y/+] to save the change.
• Press [MODE] to undo the change.
8.3.6.4. Channel
The QRAE 3 and any other devices that you want to connect wirelessly must be operating on the
same channel.
1. Press [Y/+] to increase the number and [MODE] to advance to the next digit.
2. After moving to the last digit and making changes, advance to “OK” and press [MODE]
to save the change, or advance to “Cancel” and exit to “Join Network” without saving the
change.
8.3.6.5. Join Network
You can tell the QRAE 3 to automatically join a network. The PAN ID and Channel are shown
for reference (if either is incorrect, you can change it, as described above). Press [Y/+] to join or
[MODE] to advance to “Interval” without making a change. Note: If Roaming is turned on,
instead of a PAN ID number, you see “- - -”.
While it is searching for a network to join, the display shows this message:
Joining Network…
If it is unsuccessful, you will see this message:
Failed To
Join Network
Check your other settings, as well as those of the network you are trying to join.
You can press [Y/+] to retry or [MODE] to exit without joining a network.
QRAE 3 User’s Guide
30
8.3.6.6. Interval
This menu allows you to change the interval between wireless transmissions. The interval can be
set to 10, 30, 60, 120, or 240 seconds.
Note: The default interval is 30 seconds.
8.3.6.7. Off Network Alarm
If you would like the QRAE 3 to notify you when it loses connection with a network, turn this on.
1. Choose between “On” and “Off” by pressing [MODE].
2. Select the highlighted state by pressing [Y/+].
3. Press [MODE] until Exit is selected, to register the change.
Note: When wireless network connection is lost, the QRAE 3 alarms once per second.
8.3.6.8. Factory Reset
Restore all the wireless settings to their original factory defaults.
Caution! Once you reset the wireless settings, you cannot retrieve any of the settings deleted by
performing this reset.
Reset Wireless
Settings?
• Press [Y/+] to reset the wireless settings.
• Press [MODE] to exit without resetting the wireless settings.

QRAE 3 User’s Guide
31
9. Policy Enforcement
The QRAE 3 can be configured to enforce a facility/company’s requirements that
calibration and/or bump testing be performed at specified intervals, and to warn the user
that calibration/bump testing is required. In addition, it can require calibration or bump
testing and not allow normal operation of the instrument unless calibration or bump
testing is performed.
If Policy Enforcement is enabled and if the instrument has been bump tested and
calibrated in compliance with the policy settings, a check-mark icon is included along the
top of the QRAE screen:
If Policy Enforcement is enabled, then after startup the QRAE 3 displays a screen that
informs the user that the instrument requires either a bump test or a calibration. If both
are required, then they are shown in sequence.
9.1. Setting Policy Enforcement
You must use ProRAE Studio II to make changes to Policy Enforcement settings.
Make sure the AC adapter is connected and that a USB cable is connected to the Travel
Charger and a computer running ProRAE Studio II.
1. Turn on the QRAE 3. Allow the system to start up and go through its startup routine.
2. Press [MODE] until “Enter Communications Mode?” is displayed.
3. Press [Y/+]. The screen now displays: “Ready To Communicate With Computer.”
4. Start ProRAE Studio II.
5. Select “Administrator.”
6. Input the password (the default is “rae”).
7. Click “OK.”
8. Click “A” (detects instruments automatically).
9. Click on the instrument’s icon when it appears to highlight it.
10. Click “Select.”
11. Click “Setup.”
12. Click “Policy Enforceme nt. ”
QRAE 3 User’s Guide
32
The Policy Enforcement pane is shown:
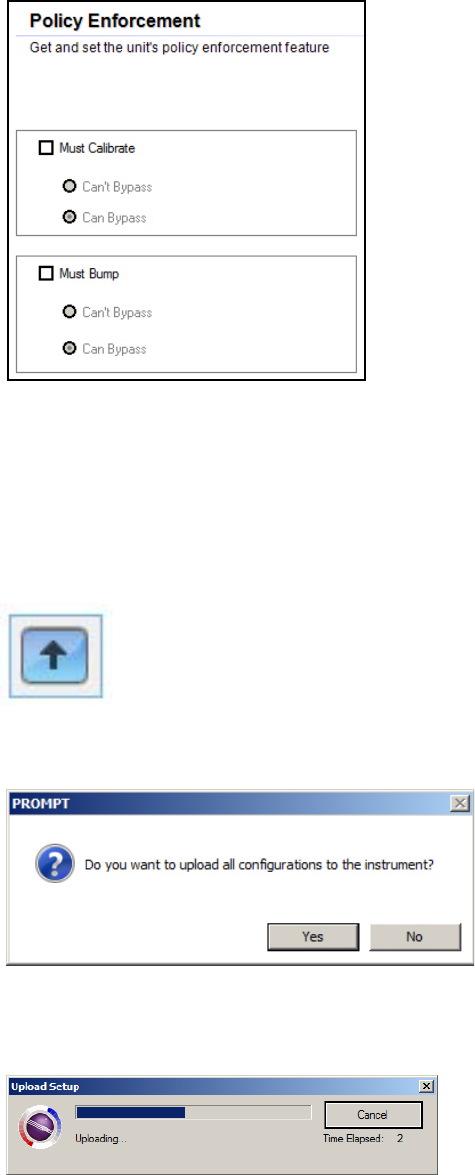
You can select “Must Calibrate” and/or “Must Bump” and then set whether the user
must perform the selected operation in order to use the instrument.
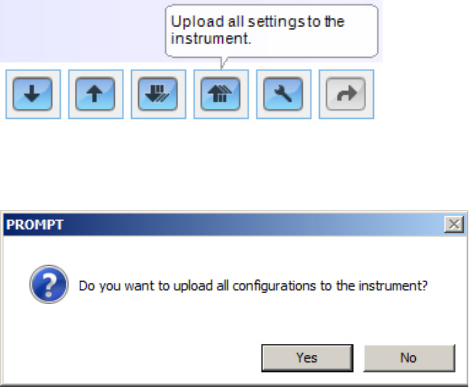
13. Once you have made your selections in ProRAE Studio II, you must upload the
changes to the instrument. Click the icon labeled “Upload current settings to the
instrume nt. ”
14. A confirmation screen is shown. Click “Yes” to perform the upload, or “No” to abort.
Uploading takes a few seconds, and this progress bar is shown. You can abort the
upload by clicking “Cancel.”
QRAE 3 User’s Guide
33
15. Exit ProRAE Studio II.
16. Press [MODE] on the QRAE 3 to exit Communica tio n Mode.
9.2. Deactivating Policy Enforcement
If the QRAE 3 screen displays the message that it must be bump tested or calibrated, and
if the option to bypass bump testing or calibration is not available, you should shut off the
instrument and follow the procedure outlined here if you want to change the Policy
Enforcement settings:
1. Use a USB cable to connect the QRAE 3 in its Travel Charger to a computer running
ProRAE Studio II.
2. Enter Diagnostic Mode on the QRAE 3 (with the instrument turned off, press and
hold [Y/+] and [MODE] until it starts up.
3. After startup, enter the password when prompted (default is “0000”) and press
[MODE].
4. Press [MODE] repeatedly until you see the “Enter Communications Mode?” screen.
5. Press [Y/+] to enter Communica tio ns Mode.
6. Start ProRAE Studio II.
7. Select “Administrator.”
8. Input the password (the default is “rae”).
9. Click “OK.”
10. Click “A” (detect instruments automatically).
11. Click on the instrument’s icon when it appears.
12. Click “Select.”
13. Click “Setup.”
14. Click “Policy Enforcement.” The Policy Enforcement pane is shown.
15. Deselect Policy Enforcement features you do not wish to use.
16. Click “Upload all settings to the instrume nt. ”
17. When you see this confirmation. Click “Yes.”
Uploading will take a few seconds, and this progress bar is shown:

QRAE 3 User’s Guide
34
18. When the upload is done, exit ProRAE Studio II.
19. Press [MODE] on the QRAE 3 to exit Communicatio n Mode.
10. Calibration And Testing
10.1. Manual Alarms Test
Under Normal Operation Mode and non-alarm conditions, the buzzer (audible alarm),
vibration, visible alarms, and backlight can all be tested anytime by pressing [Y/+]. If any
alarm does not respond, check the alarm settings in the Programming Menu to make sure
all alarms are enabled (selected setting under Programming/Alarms/Alarm Settings
should be “All Enabled”). If any alarms are enabled but not functional, the instrument
should not be used.
10.2. Bump Testing And Calibration
RAE Systems recommends that a bump test be conducted periodically on the QRAE 3. The
purpose of a bump test is to ensure that the instrument’s sensors respond to gas and all the alarms
are enabled and functional.
• The QRAE 3 multi-gas detector must be calibrated if it does not pass a bump test, or at
least once every 180 days, depending on use and sensor exposure to poisons and
contaminants.
• Calibration intervals and bump test procedures may vary due to national legislation.
A bump test can be performed either manually or using the AutoRAE 2 Automatic Test and
Calibration System. When a bump test is done manually, the instrument makes a pass/fail
decision based on sensor performance, but the user still has the responsibility to make sure all the
alarms are enabled and functional.
Note: Bump testing and calibration can be performed using an AutoRAE 2 Automatic Test &
Calibration System. An AutoRAE 2 bump test takes care of both the sensor and alarm tests.
Consult the AutoRAE 2 User’s guide for details.
QRAE 3 User’s Guide
35
10.2.1. Bump (Functional) Testing
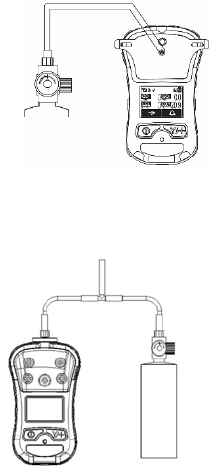
The same gas is used for a bump test as for calibration. A constant-flow regulator producing 0.5
to 1 liters per minute should be used, and the calibration adapter must be installed on diffusion
models. The instrument must be connected to a cylinder of calibration gas with supplied tubing.
Note: Pumped models require a T calibration tube, as illustrated below.
1. Turn on your QRAE 3 by pressing and holding the [MODE] key, and allow the
instrument to boot up fully until the main measurement screen with sensor names and
readings is shown.
Important! Make sure all of the instrument’s sensors have warmed up before performing the
bump test. The instrument will take the time to warm up the sensors prior to enabling access
to bump test menus. You can tell a sensor has warmed up if you see a reading next to it name
on the display. If it has not warmed up, you see three dashes (“--”) next to it.
2. Install the calibration adapter on the QRAE 3 if it is a diffusion model.
3. Turn on the gas to initiate flow.
4. Connect the instrument to the T calibration tube and connect it to the calibration gas.
5. Press Start ([Y/+] key) to start the bump test, or press [MODE] to quit. While the bump
test is being performed, the readings for each sensor are shown. Once the bump test
completes, pass/fail test results and readings are shown for each sensor.
Important! If one or more sensors fails a bump test, be sure to calibrate those sensors.
6. The bump test is now complete. Press [Y/+] to exit and return to the Calibration menu.
If all the alarms and all sensors have passed and no sensor is due for a calibration, the
instrument is now ready for use.
Note: Make sure pressure in
the calibration gas cylinder
is higher than 100 psi when
using a T calibration tube
(pumped models only).
Diffusion models
require calibration
cap, but no T
calibration tube.
QRAE 3 User’s Guide
36
10.3. Zero Calibration
This operation sets the zero point of the sensor calibration curve for clean air. It should be
performed before other calibrations.
Note: If you use a zero air cylinder, you must use the QRAE 3 Calibration Adapter (and a T
calibration tube if the instrument has a pump). Using a calibration adapter is not necessary for
calibration in fresh air.
10.3.1. Zero Calibration
This procedure determines zero points of most sensors. The QRAE 3 should be zero-calibrated in
clean air with 20.9% oxygen or with a cylinder of clean zero air.
At the Calibration menu, select “Fresh Air” by pressing [Y/+] once to enter fresh air calibration.
After a timer countdown, the zero calibration is done. The LCD displays the sensor names and
tells you whether each calibration passed or failed, followed by the sensor readings.
Note: You can abort the calibration at any time during the countdown by pressing [MODE].
10.3.2. Single-Sensor Zero Calibration
Select the sensor and then start the calibration by pressing [Y/+]. You can abort the procedure
anytime by pressing [MODE].
10.4. Span Calibration
This procedure determines the second point of the sensor calibration curve for the sensor.
Note: When a manual calibration is performed, the readings shown are in the equivalent
units of the calibration gas, and not the measurement gas.
10.4.1. QRAE 3 Pumped Model
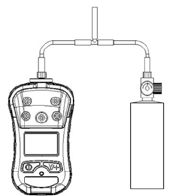
The QRAE 3 pump draws at a flow rate of between 200cc/min and 450cc/min. The
instrument must be connected to a cylinder of calibration gas with supplied tubing
featuring a T calibratio n tube (P/N M02-3008-000), as illustrated below.
Note: A constant-flow regulator with flow rates from 500cc/min to 1000cc/min should be used.
Note: Make sure pressure in
the calibration gas cylinder
is higher than 100 psi when
using a T calibration tube.
QRAE 3 User’s Guide
37
10.4.2. QRAE 3 Diffusion Model
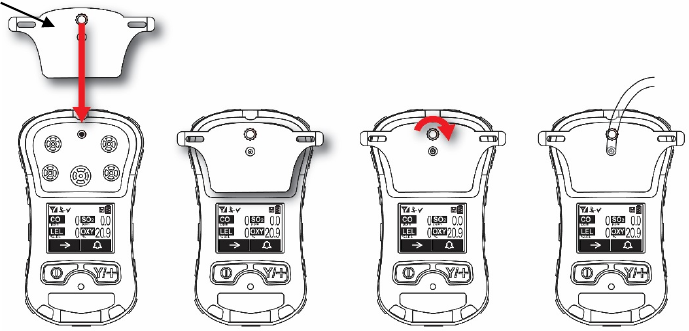
Because there is no single inlet on the diffusion (non-pumped) version of the QRAE 3, a
Calibration Adapter (calibration cap for diffusion models: P/N M02-3009-000; calibration tube
for diffusion models: P/N M03-3010-000) is used for supplying calibration gas to all sensors at
one time. Follow these steps for attaching the Calibration Adapter:
1. Align the Calibration Adapter’s main body with the indented area around the QRAE 3’s
gas inlets.
2. Turn the knob clockwise to secure the Calibration Adapter to the instrument.
3. Connect the hose to the Calibration Adapter and to its gas source.
4. Make sure the Calibration Adapter is securely attached before starting the flow of
calibration gas. (The Calibration Adapter has small grooves on its underside to allow gas to
escape after passing over the sensors.)
Calibration
Adapter
Hose to
Calibration
Gas Source

QRAE 3 User’s Guide
38
10.4.3 Multi-Sensor Span Calibration
This lets you perform a span calibration on multiple sensors simultaneously. It requires using the
appropriate span gas and that the concentration labeled on the gas cylinder matches the
concentration programmed in the QRAE 3.
1. Start the flow of calibration gas.
2. Attach the calibration adapter and gas to the QRAE 3.
3. Press [Y/+] to begin calibration. A countdown screen is shown. You can abort the
calibration at any time during the countdown by pressing [MODE].
If the calibration reaches its conclusion, it shows the sensor names and tells you whether the
calibration passed or failed, followed by the sensor readings.
10.4.4. Single-Sensor Span Calibration
To perform span calibration of an individual sensor, follow these steps:
1. At the Calibration Menu, select “Single Sensor Span.”
2. Select a sensor from the list.
3. Start the flow of calibration gas.
4. Connect the calibration adapter and connect it to a source of calibration gas.
5. Verify that the displayed calibration value meets the concentration label on the gas
cylinder.
6. Press [Y/+] to start calibrating. You can abort the calibration at any time during the
countdown by pressing [MODE].
After a timer countdown, the span calibration is done. The LCD will display whether the
calibration was successful and the reading for that calibration gas.
Note: If the sensor calibration fails, try again. If calibration fails again, turn off the power and
then replace the sensor.
WARNING: Do not replace sensors in hazardous locations
QRAE 3 User’s Guide
39
11. Datalog Transfer, Monitor Configuration, and
Firmware Upgrades Via Computer
Datalogs can be downloaded from the QRAE 3 to a computer, and firmware updates can be
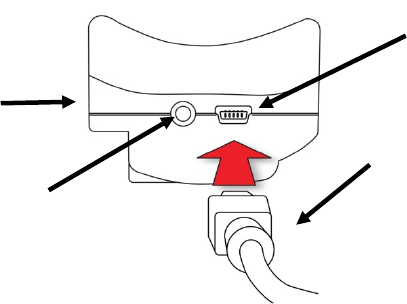
uploaded to the QRAE 3 via the USB port on the Travel Charger. Use the included Mini B USB
(5-pin)-to-USB cable to connect the Travel Charger to a computer running ProRAE Studio II
(version 1.7.0 or higher).
11.1. Downloading Datalogs And Performing PC-Based
Instrument Configuration and Firmware Upgrades
The QRAE 3 communicates with a PC running ProRAE Studio II Instrument Configuration and
Data Management software to download datalogs, configure the instrument, or upload new
firmware.
The QRAE 3 must be connected to a PC through the supplied Travel Charger and must be in the
PC communications mode.
1. Use the supplied PC Communications Cable (USB to mini-USB cable) to connect the
Travel Charger to a PC.
2. Turn on the QRAE 3. Make sure it is running (with the main measurement screen
showing).
3. Activate the PC communications mode on the QRAE 3 by pressing [MODE] repeatedly,
starting from the main measurement screen until you reach the “Enter Communications
Mode?” screen.
4. Press [Y/+]. Measurement and datalogging stop, and the instrument is now ready to
communicate with the PC. The display now says “Ready To Communicate With PC Or
AutoRAE2.”
5. Start up the ProRAE Studio II software, enter a password, and detect the instrument
following the directions provided in the ProRAE Studio II User’s Manual.
6. Follow the instructions in the ProRAE Studio II User’s Manual to download the datalog,
configure the instrument settings, or update the QRAE 3’s firmware.
7. When you are done, press [MODE] to exit the PC communications mode on the QRAE 3.
After upgrading the QRAE 3's firmware, the instruments will turn off automatically.
Mini B USB
(5
-Pin) to
USB cable
Travel
Charger
Mini B USB
(5
-Pin) port
LED
Power
Indicator
QRAE 3 User’s Guide
40
12. Maintenance
The QRAE 3 requires little maintenance, aside from replacing sensors, the filter, and the battery.
If the instrument is equipped with a pump, it may need replacement, as well.
12.1. Replacing The Filters
Pumped Version
If the external filter is dirty or clogged, remove it by unscrewing it from the inlet. Discard it and
replace it with a new filter.
IMPORTANT! A pumped QRAE 3 must not be calibrated or operated without a filter.
Operation without a filter may damage the instrument.
12.2. Removing/Cleaning/Replacing Sensor Modules
WARNING! Do not replace sensors in hazardous locations.
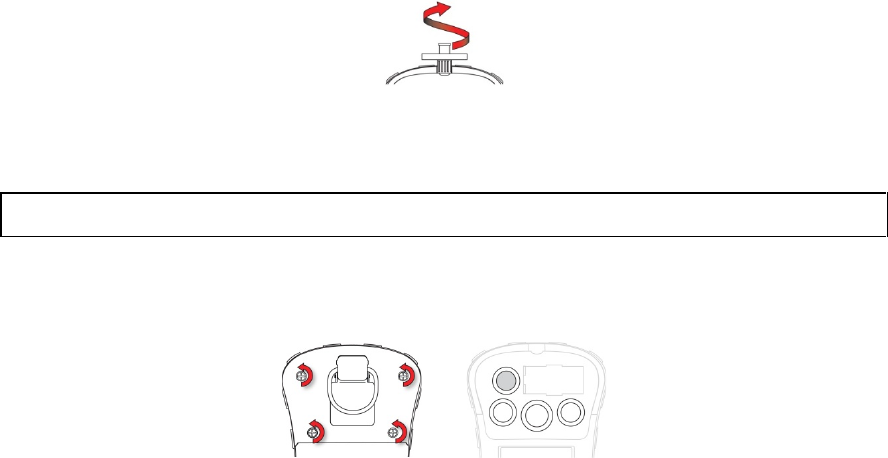
All sensors are located inside the sensor compartment in the upper half of the QRAE 3. They are
accessed by removing the four screws in the top portion and then turning the instrument over and
lifting off the sensor cover.
1. Turn off the instrument.
2. Remove the four screws holding the sensor compartment.
3. Turn over the instrument and remove the cover. The sensors are plugged into the slots.
4. Gently lift out the desired sensor module with your fingers.
5. Install the replacement sensor. Make sure the electrical contact pins are aligned with the
holes in the PC board and that the sensor is seated firmly.
6. Replace the cover and tighten the four screws.
IMPORTANT! Always perform a full calibration after replacing sensors.
QRAE 3 User’s Guide
41
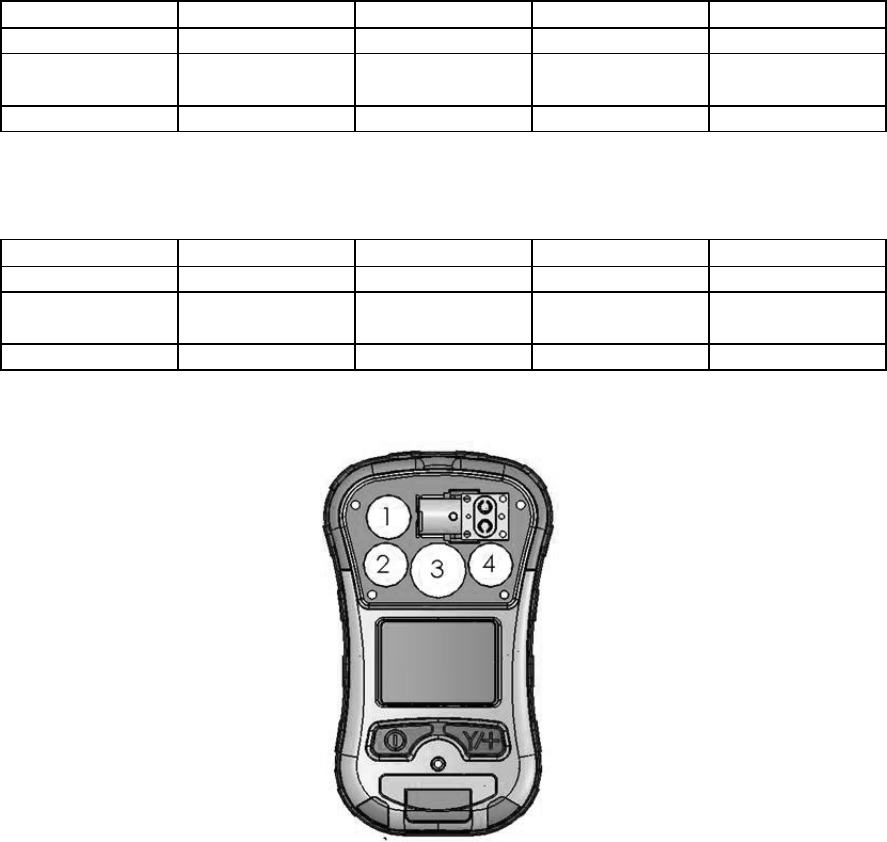
12.3. Sensor Locations
IMPORTANT!
The current QRAE 3 model number is PGM-25XX (“D” indicates Diffusion). Sensors must be
placed in the indicated sockets. A diffusion (“D”) instrument cannot be changed to a pumped
version, nor can a pumped version be converted to a diffusion version.
PGM-2500/D
Slot 1
Slot 2
Slot 3
Slot 4
LEL
X
EC
X
(Group P)
X
(Group P)
OXY
X
Group P: CO, H2S, SO2, HCN, NH3. and PH3
PGM-2560/D
Slot 1
Slot 2
Slot 3
Slot 4
LEL
X
EC
X
(Group N)
X
(Group P)
OXY
X
Group N: Cl2, NO2
IMPORTANT! Always calibrate the instrument after replacing or removing sensors.
QRAE 3 User’s Guide
42
12.4. Changing The QRAE 3 Sensor Configuration
IMPORTANT!
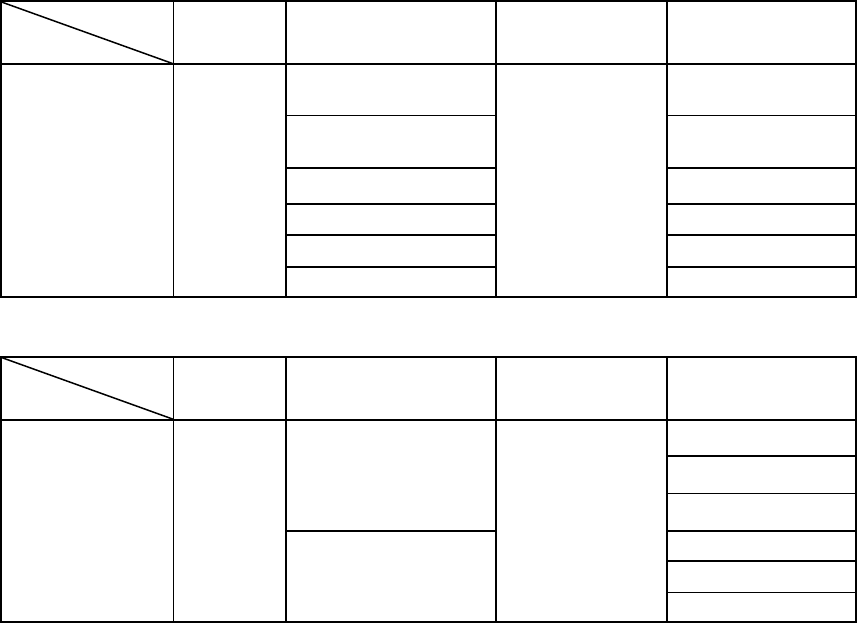
The following table lists sensor slot allocations on the printed circuit board inside the QRAE 3.
When changing sensors, be careful to make sure each sensor is in the correct slot and that the pins
are not bent or incorrectly placed.
Sensor configuration:
Slot
Model Slot 1
Slot 2
(Group P) Slot 3
Slot 4
(Group P)
Updated
PGM-2500/D 3R LEL
3R H
2
S (3 pins)
4R Liquid O2
3R CO
(3 pins)
3R CO (3 pins)
3R H
2
S
(3 pins)
3R SO
2
3R SO
2
3R HCN
3R HCN
3R NH3
3R NH3
3R PH3
3R PH3
Sensor configuration:
Slot
Model Slot 1
Slot 2
(Group N) Slot 3
Slot 4
(Group P)
Updated
PGM-2560/D 3R LEL
3R NO2
4R Liquid O2
3R CO
3R H
2
S
3R SO2
3R Cl2
3R HCN
3R NH
3
3R PH
3
Note: In order to support this procedure, your QRAE 3’s current firmware must be V2.02 or
above. ProRAE Studio II must be V1.9 or above.
QRAE 3 User’s Guide
43
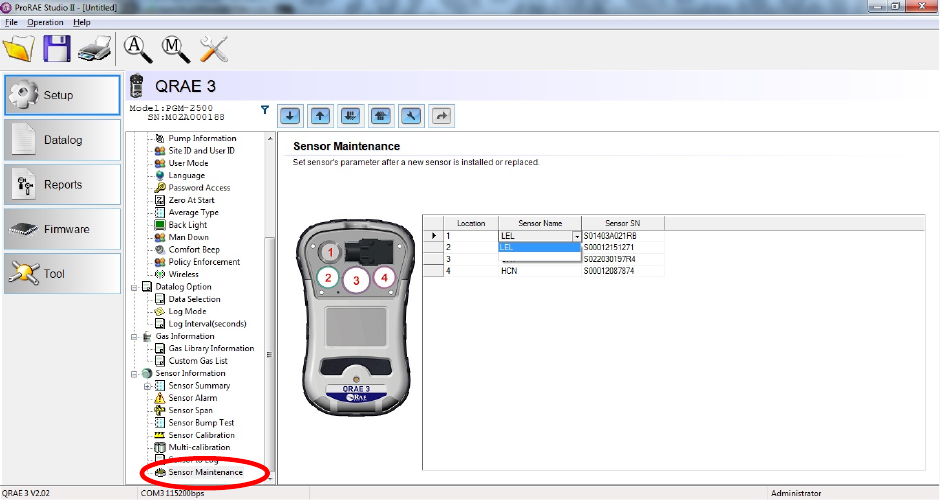
1. Connection:
a. Connect QRAE 3 unit to PC through the QRAE 3 Travel Charger.
b. Set the QRAE 3 into PC Communication mode.
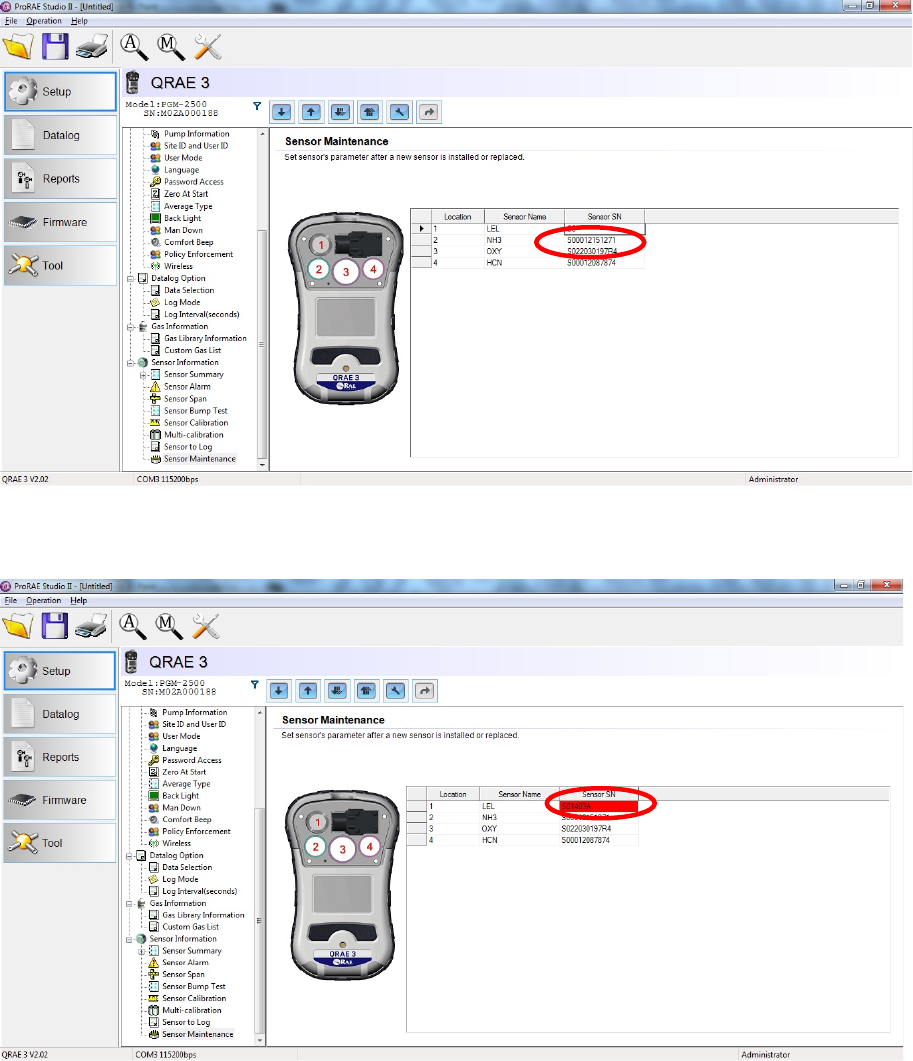
c. Start ProRAE Studio II on the PC and go into Setup >> Sensor Maintenance to do the
sensor configuration setting after placing new sensors in the QRAE 3.
QRAE 3 User’s Guide
44
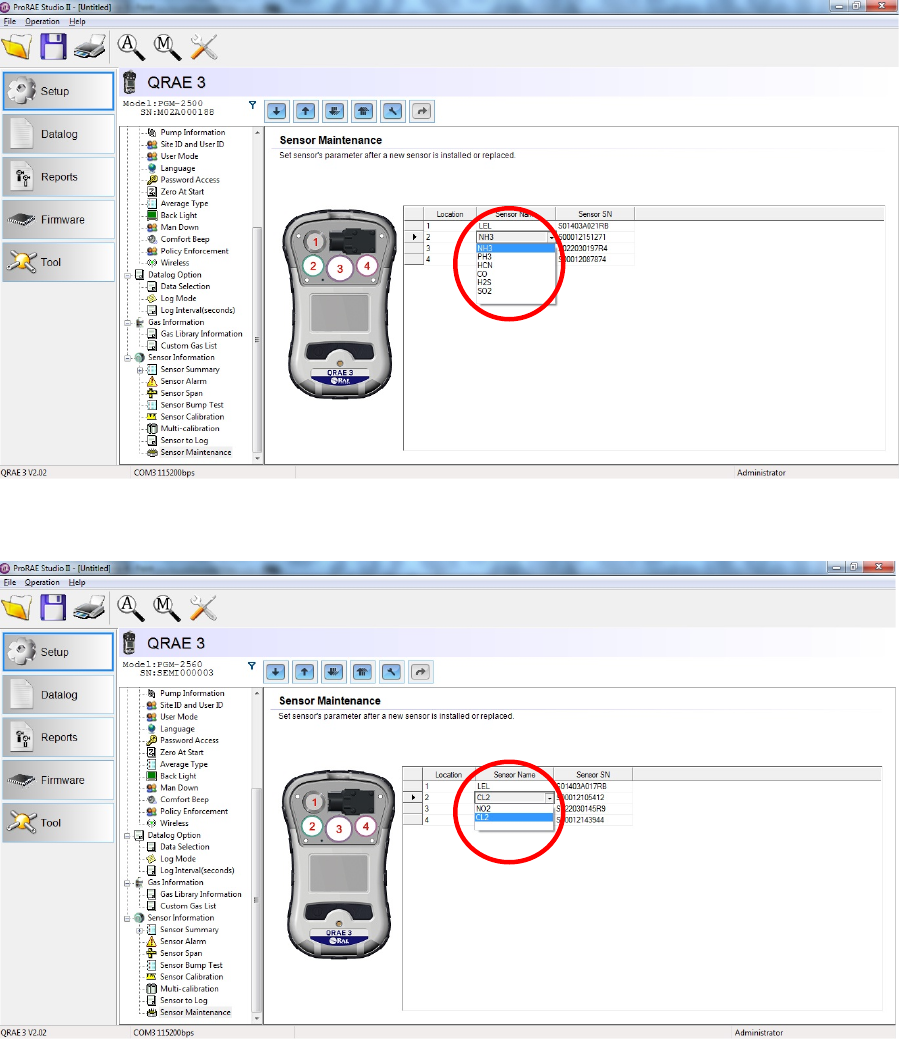
2. The locations of 3R LEL sensor & 4R Liquid O2 sensor are fixed to Slot 1 & Slot 3. So after
changing to a new sensor, you must change the sensor S/N (serial number) through ProRAE
Studio II.
Important: You only need to input last 10 digits of the sensor S/N. It is not necessary to
input “S0”.
If you do not input all 10 digits of the sensor S/N, you will be alerted by red highlighting on
the serial number text.
QRAE 3 User’s Guide
45
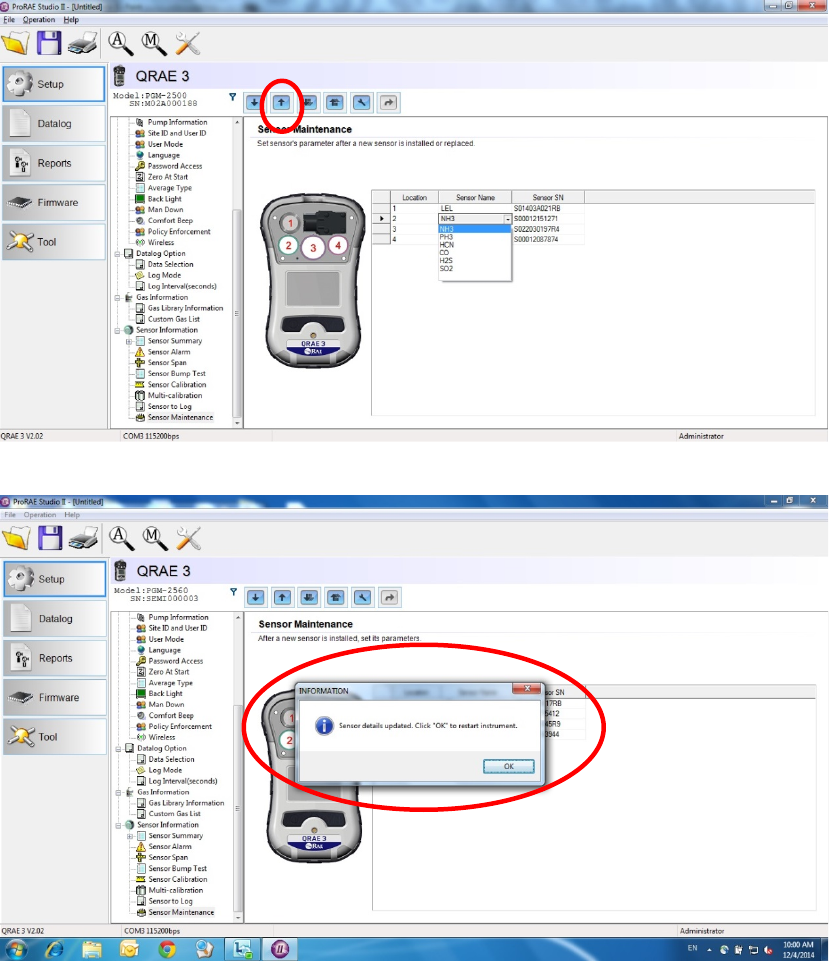
3. Slot 2 & Slot 4 accommodate 3R EC (electrochemical) sensors. These slots support Group P
EC sensors in an updated PGM-2500/D. The drop-down list is used to set the sensor ID after
installing a new sensor. You must also input last all 10 digits of the S/N for the new sensor.
Note: For an updated PGM-2560/D, Slot 2 only supports Group N sensors, and not Group P
sensors. Also, Slot 4 only supports Group P sensors.
QRAE 3 User’s Guide
46
4. After you have changed the parameter settings for all new sensors, you must upload the
changes to the QRAE 3.
a. Press the “Set” to send current settings changes to the QRAE 3.
b. You must click “OK” to confirm the changes:
5. ProRAE Studio II sends an order to restart the QRAE 3, to confirm all firmware changes.
6. Turn on the QRAE 3 to make sure that unit is showing the correct sensor configuration.
IMPORTANT!
Before using the QRAE 3, you must calibrate all sensors in the QRAE 3 to ensure
proper performance.

QRAE 3 User’s Guide
47
12.5. Replacing The Pump
If your QRAE 3 has a pump and it requires replacement, follow these steps. Make sure the
battery is removed before proceeding.
1. Remove the rear cover.
2. The pump is held in place by a metal bracket and two Philips screws. Remove the two
screws.
3. Lift off the metal bracket.
4. The pump has an inlet and outlet that fit tightly over two small pipes inside the pump cavity.
Pressing down on the instrument’s body with one hand, pull the pump straight out.
5. Press a new pump into place (a small amount of wiggling helps), making sure that both the
inlet and outlet from the pump fit snugly over the two pipes.
6. Place the metal bracket over the pump.
7. Insert and tighten the two screws that attach the bracket to the housing.
8. Replace the cover.
9. Turn on the instrument and check for proper pump operation.
13. Alarms Overview
The QRAE 3 provides an unmistakable five-way alarm notification system that combines local
alarms on the device with real-time remote wireless alarm notification to take worker safety to the
next level. Local alarms include audible buzzer alarm, visible alarm via bright LED lights,
vibration alarm, and an alarm notification on the display. These can be programmed or selectively
turned on or off.
13.1. Alarm Signals
During each measurement period, the gas concentration is compared with the programmed alarm
limits for Low, High, TWA and STEL alarm. If the concentration exceeds any of the preset
limits, the alarms are activated immediately to warn both the QRAE 3 user and a remote safety
officer (if wireless is enabled) of the alarm condition.
In addition, the QRAE 3 alarms if one of the following conditions occurs: battery voltage low,
pump blocked, etc.
When the low battery alarm occurs, there may be approximately 10 minutes of operating time
remaining. In this case, it is recommended that you promptly change or charge the battery in a non-
hazardous location.
QRAE 3 User’s Guide
48
13.2. Changing The Alarm Mode
Your choices are Auto Reset and Latched. A latched alarm stays on until you acknowledge the
alarm by pressing a key. An auto-reset alarm turns off when the condition that set off the alarm is
no longer present (for instance, a high H2S reading that exceeds the preset threshold and triggers
an alarm, but then lowers below that threshold, turning the alarm off).
1. Enter the Alarm Mode sub-menu of the Alarms section under the Programming Menu.
2. Select Auto Reset or Latched by pressing [MODE] to select, and [Y/+] to confirm the
choice.
3. Press [Y/+] to save your selection.

QRAE 3 User’s Guide
49
13.3. Alarm Signal Summary
Alarm Summary
Alarm Type
Buzzer & LED
Display
Vibration
Reading
Backlight
Priority
Super Alarm 4 beeps/sec
“Man Down Alarm”
screen 400ms - On Highest
Man Down
Alarm 3 beeps/sec
“Man Down Alarm”
screen 400ms - On
Man Down
Warning 2 beeps/sec
“Are You OK?”
screen 400ms - On
Pump 3 beeps/sec
Blinking pump
symbol 400ms Reading On
Max 3 beeps/sec
“Max” at sensor
location
400ms
Blinking
reading
On
Over Range 3 beeps/sec “Over” at sensor
location 400ms
Blinking
maximum
reading
On
High 3 beeps/sec
“High” at sensor
location 400ms
Blinking
reading
Low 3 beeps/sec
“Low” at sensor
location
400ms
Blinking
reading
Negative 1 beep/sec
“Neg” at sensor
location
400ms
Blinking
“0”
On
STEL 1 beep/sec
“STEL” at sensor
location 400ms
Blinking
reading On
TWA 1 beep/sec
“TWA” at sensor
location
400ms
Blinking
reading
On
Calibration
Failure
1 beep/sec
“Cal” at sensor
location
400ms
Blinking
reading
On
Bump Failure 1 beep/sec
“Bump” at sensor
location
400ms
Blinking
Reading
On
Datalog Full 1 beep/sec
Blinking datalog
symbol
400ms Reading On
Calibration Due -
“CAL” at sensor
location -
Blinking
Reading -
Bump Test Due -
“Bump” at sensor
location
-
Blinking
Reading
-
Battery 1 beep/min
Blinking battery
symbol
400ms Reading Stays as is
Network Lost 1 beep/sec
Blinking radio
symbol
400ms Reading On
Network Joined 1 beep Radio symbol 400ms Reading On
Comfort Beep
1 beep/min
No LED flash
- - Reading - Lowest
Notes
“Negative” means that the reading is below zero.
“Network Lost” means that the QRAE 3 has lost wireless connectivity with its network.
“Network Joined” means that the QRAE 3 has joined a wireless network.

QRAE 3 User’s Guide
50
General Alarms
Testing Alarms
Under normal operation mode and non-alarm conditions, the audible, visible, and vibration
alarms can be tested at any time by pressing the [Y/+] key.
Message
Condition
Alarm Indications
HIGH
Gas exceeds “High Alarm” limit
3 beeps/flashes per second
OVR
Gas exceeds sensor’s measurement range
3 beeps/flashes per second
MAX
Gas exceeds electronic circuit’s maximum
range
3 beeps/flashes per second
LOW
Gas exceeds “Low Alarm” limit*
2 beeps/flashes per second
TWA
Gas exceeds “TWA” limit
1 Beep/flash per second
STEL
Gas exceeds “STEL” limit
1 Beep/flash per second
Crossed pump
icon flashes
Inlet blocked or pump failure
3 beeps/flashes per second
Empty battery
icon flashes
Low battery
1 flash, 1 beep per minute
CAL
Calibration failed, or needs calibration
1 beep/flash per second
NEG
Zero gas reading measures less than
number stored in calibration
1 beep/flash per second
* For oxygen, “low alarm limit” means a concentration is lower than the low alarm limit.

QRAE 3 User’s Guide
51
14. Troubleshooting
Problem
Possible Reasons & Solutions
Cannot turn on power after
charging the battery
Reasons: Defective charging circuit. Defective battery.
Solutions: Replace battery or charger. Try charging the battery
again.
Lost password
Solutions: Call Technical Support at +1 408-952-8461
or toll-free at +1 888-723-4800
Buzzer, LED lights, and
vibration motor
inoperative
Reasons: Buzzer and/or other alarms disabled.
Bad buzzer.
Solutions: Check under “Alarm Settings” in
Programming Mode that buzzer and/or other
alarms are not turned off.
Call authorized service center.
Pump failed message.
Pump alarm.
Reasons: Inlet probe blocked. Direct connection to a
gas outlet while the gas value is turned off.
External filter sucks in water. External filter
too dirty. Water condensed along the inlet
probe. Bad pump or pump circuit.
Solutions: Remove the blocking objects and then press
[Y/+] key to reset the pump alarm. Replace
contaminated external filter. Be careful not to
allow water condensation inside the unit.
Replace the pump.
If you need replacement parts, please contact an authorized RAE Systems distributor.
15. Diagnostic Mode
In Diagnostic Mode, the QRAE 3 provides raw counts for sensor, battery, and other readings, as
well as a list of installed sensors and information about them (expiration date, serial number,
etc.). Most of these screens are useful only to service technicians. A few allow access for
changing settings.
The QRAE 3’s Diagnostic Mode can only be accessed at startup time. In Diagnostic Mode, QRAE
3 displays readings in raw counts instead of units such as parts per million (ppm).
15.1. Entering Diagnostic Mode
1. With the QRAE 3 turned off, press and hold both [MODE] and [Y/+].
2. When the display turns on and the password screen appears, release the keys.
3. Enter the 4-digit password (the password is the same as the one for the Programming
Mode; the default password is 0000).
• Step from one position in the four-character string to the other by pressing [MODE].
• Press [Y/+] repeatedly to select a desired number. Numbers increase from 0 to 9.
• Once 9 is reached, pressing [Y/+] again “wraps” around back to 0.
QRAE 3 User’s Guide
52
4. When you are done, press [MODE] followed by [Y/+]. If you input the correct password,
you see the “Product Model” screen.
15.2. Exiting Diagnostic Mode
1. Turn off the QRAE 3 by pressing and holding [MODE]. There will be a standard shutoff
countdown.
2. When the instrument shuts off, you will be alerted. Release your finger.
Note: The next time you start QRAE 3, hold only [MODE], and it will automatically start in
Normal Mode.
15.3. Navigating Diagnostic Mode
Step through Diagnostic Mode by pressing [MODE]. The first screen you see is information
about the product, including the serial number, firmware version, etc.
Press [MODE] to advance through the screens:
• Instrument model name, serial number, and ID
• Instrument Firmware
• Sensors Installed
• Socket 1
• Socket 2
• Socket 3
• Socket 4
• Socket Raw Count
• Zero/Span Count
• Location 1 ID and Name
• Location 2 ID and Name
• Location 3 ID and Name
• Location 4 ID and Name
• Buzzer Mode
• Buzzer Frequency
• Pump (High)
• Pump (Low)
• Battery
• RTC (real-time clock)
• Lights/Vibrator
• Temperature
• LCD Contrast
• LCD Test
• Position Sensor
• Run Time
• Communication – Enter communication mode with computer (Datalogging And
Measurement Will Pause)

QRAE 3 User’s Guide
53
16. Specifications
Instrument Specifications
Size
Diffusion: 5.5" x 3.2" x 1.5" (140 mm x 82 mm x 42 mm)
Pumped: 5.7" x 3.2" x 1.7" (145 mm x 82 mm x 42 mm)
Weight
Diffusion: 12.9 oz (365 g with Li-ion battery and clip)
Pumped: 14.5 oz (410 g with Li-ion battery, clip, and external filter)
Sensors
Four field-replaceable sensors, including electrochemicals for toxics and oxygen,
combustible LEL
Battery Options
• Rechargeable Li-ion: 14 hours continuous without wireless and no alarms, in
diffusion mode;
11 hours continuous without wireless and no alarm in pumped mode;
10 hours with wireless and no alarm in diffusion mode;
8 hours continuous with wireless and no alarm in pumped model
Note: All battery specifications at 20° C; lower temperatures will affect runtime.
Display
• Monochrome graphic display (128 x 80)
• Display size: 40 mm x 27 mm with backlighting (activated automatically in dim
ambient lighting conditions, when monitor is in alarm, or with a key press)
• Automatic screen flipping.
Display
Readout
• Real-time reading of gas concentrations; battery status; pump status (if equipped
with pump); datalogging on/off; wireless on/off and wireless reception quality.
• STEL, TWA, peak, and minimum values
• Man Down and policy enforcement indicators
Keypad
2 operation and programming keys (MODE and Y/+)
Sampling
Built-in pump (200cc/min to 450cc/min) or diffusion. Can sample through tubing up
to 30 meters long; using tubing increases response time
Calibration
Manual
Alarms
• Wireless remote alarm notification; multi-tone audible (95 dB @ 30 cm), vibration,
visible (flashing bright red LEDs), and on-screen indication of alarm conditions
• Man Down Alarm with pre-alarm and real-time remote wireless notification
Datalogging
• Continuous datalogging (three months for four sensors at 1-minute intervals, 24/7)
• User-configurable datalogging interval (from 1 to 3,600 seconds)
Communication
and
Data Download
• Data download and instrument set-up and upgrades on PC via charging and Travel
Charger
• Wireless data and status transmission via built-in RF modem (optional)
Wire le ss
Network
RAE Systems Dedicated Wireless Network and closed-loop systems (with EchoView
Host)
Wire le ss
Frequency
ISM license free band, 868Mhz or 900Mhz
FCC Part15, CE R&TTE, ANATEL
Wireless Range
(Typical)
EchoView Host & QRAE 3: Line of sight >200m (650 ft), receiving data >80%
ProRAE Guardian & Mesh Reader & QRAE 3: Line of sight >200m (650 ft), receiving data
>80%
ProRAE Guardian & RAELink3 & QRAE 3: Line of sight >100m (330 ft), receiving
data >80%

QRAE 3 User’s Guide
54
Instrument Specifications
continued
EM Immunity
EMI and EDS test: 100MHz to 1GHz
30V/m, no alarm
Contact: ±4kV, Air: ±8kV, no alarm
Operating
Temperature
-4° to 122° F (-20° to 50° C)
Humidity
0% to 95% relative humidity (non-condensing)
IP Rating
Pumped: IP-65
Diffusion: IP-67
Hazardous
Location
Approvals
USA and Canada: classified for use in Class I, Division 1,
Groups A, B, C and D
Global: IECEx
Europe: ATEX (II 1G Ex ia IIC T4)
CE Compliance
(European
Conformity)
2004/108/EC (EMC)
1999/5/EC (Radio)
94/9/EC (ATEX)
FCC
Compliance
FCC Part 15
Languages
Arabic, Chinese, Czech, Dutch, English, French, German, Indonesian, Italian,
Japanese, Korean, Norwegian, Polish, Portuguese, Russian, Spanish, Swedish, and
Turkish (language must be changed through ProRAE Studio II)
Warranty
• Three years on LEL, CO, H
2
S, and O
2
sensors
• One year on other sensors
Specifications are subject to change.
Wireless Approval For UAE In Middle East
TRA REGISTERED No: ER36635/15
DEALER No: HONEYWELL INTERNATIONAL MIDDLE EAST - LTD - DUBAI
BR
Wireless Approval For QATAR In Middle East
ictQATAR
Type Approval Reg. No.: R-4635
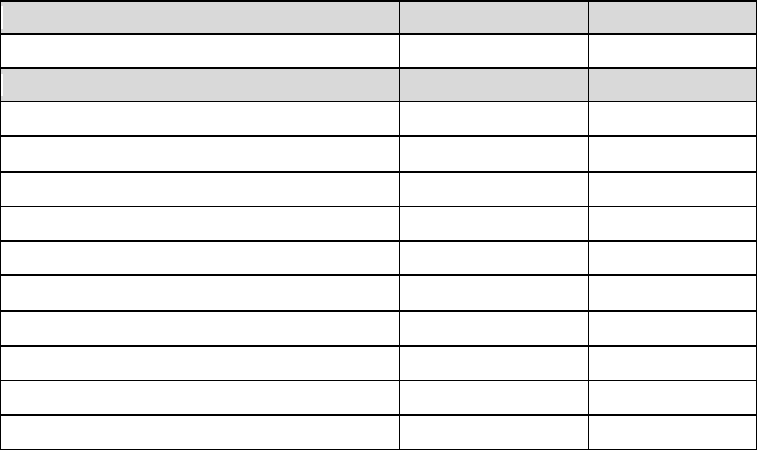
QRAE 3 User’s Guide
55
Sensor Specifications
Combustible Sensor
Range
Resolution
Catalytic bead LEL
0 to 100% LEL
1% LEL
Electrochemical Sensors
Range
Resolution
Carbon Monoxide (CO)
0 to 500 ppm
1 ppm
Hydrogen Cyanide (HCN – 4R Sensor)
0 to 50 ppm
0.5 ppm
Hydrogen Cyanide (HCN – 3R Sensor)
0 to 50 ppm
0.2 ppm
Hydrogen Sulfide (H2S)
0 to 100 ppm
0.1 ppm
Sulfur Dioxide (SO2)
0 to 20 ppm
0.1 ppm
Oxygen (O2)*
0 to 30% Vol.
0.1% Vol.
Ammonia (NH3)
0 to 100 ppm
1 ppm
Phosphine (PH
3
)
0 to 20 ppm
0.01 ppm
Chlorine (Cl
2
)
0 to 50 ppm
0.05 ppm
Nitrogen Dioxide (NO2)
0 to 50 ppm
0.1 ppm
* Only use the liquid electrolyte O2 sensor in the QRAE 3. Use of other types can degrade
performance.
All specifications are subject to change without notice.
LEL Range, Resolution & Response Time
LEL 0-100% 1 % 15 sec
Caution:
Refer to RAE Systems Technical Note TN-144 for LEL sensor poisoning.

QRAE 3 User’s Guide
56
Year Of Manufacture
To identify the year of manufacture, refer to the serial number of the instrument.
The second to last digit in the serial number indicates the year of manufacture. For example, “M”
indicates the manufacturing year is 2010.
First digit
Year
J
2008
K
2009
M
2010
N
2011
P
2012
Q
2013
R
2014
S
2015
T
2016
U
2017
V
2018
W
2019
Standard Span Values For Sensors
Sensor
Standard Span Values
CO
50 ppm
H
2
S
10 ppm
OXY
18.0 %
LEL
50 %LEL Methane
SO
2
5 ppm
HCN (3R sensor and 4R sensor)
10 ppm
NH3
50 ppm
PH
3
5 ppm
Cl2
10 ppm
NO2
5 ppm

QRAE 3 User’s Guide
57
17. Controlled Part of the Manual for PGM-25XX/D
SAFETY INSTRUCTIONS
Read Before Operating
This Manual must be carefully read by all individuals who have or will have the
responsibility of using, maintaining, or servicing this product. The product will perform
as designed only if it is used, maintained, and serviced in accordance with the
manufacturer’s instructions. The user should understand how to set the correct parameters
and interpret the obtained results.
CAUTION!
• Only use RAE Systems battery pack P/N G02-3004-000 (Li-ion, rechargeable)
• Charge the instrument Li-ion battery using the appropriate RAE Systems charger
and only outside hazardous areas
• Use of non-RAE Systems components will void the warranty and can
compromise the safe performance of this product
• Warning: Substitutio n of components may impair intrinsic safety
SPECIAL CONDITIONS FOR SAFE USE
• The PGM-25XX/D multi-gas detector must be calibrated if it does not pass a
bump test, when a new sensor has been installed, or at least once every 180 days,
depending on use and sensor exposure to poisons and contaminants
• No precautions against electrostatic discharge are necessary for portable
equipment that has an enclosure made of plastic, metal or a combination of the
two, except where a significant static-generating mechanism has been identified.
Activities such as placing the item on a belt, operating a keypad or cleaning with a
damp cloth, do not present a significant electrostatic risk. However, where a
static-generating mechanism is identified, such as repeated brushing against
clothing, then suitable precautions shall be taken, e.g., the use of anti-static
footwear.
Note: Users are recommended to refer to ISA-RP12.13, Part II-1987 for general
information on installation, operation, and maintenance of combustible gas detection
instruments.

QRAE 3 User’s Guide
58
WARNINGS:
ONLY THE COMBUSTIBLE GAS DETECTION PORTION OF THIS
INSTRUMENT HAS BEEN ASSESSED FOR PERFORMANCE.
UNIQUMENT, LA PORTION POUR DÉTECTOR LES GAZ COMBUSTIBLES
DE CET INSTRUMENT A ÉTÉ ÉVALUÉE.
CAUTION: BEFORE EACH DAY’S USAGE, SENSITIVITY OF THE
COMBUSTIBLE GAS SENSOR MUST BE TESTED ON A KNOWN
CONCENTRATION OF METHANE GAS EQUIVALENT TO 20 TO 50% OF FULL-
SCALE CONCENTRATION. ACCURACY MUST BE WITHIN 0 AND +20% OF
ACTUAL. ACCURACY MAY BE CORRECTED BY CALIBRATION PROCEDURE.
ATTENTION: AVANT CHAQUE UTILISATION JOURNALIERE VERIFIER LA
SENSIBILITE AVEC UNE CONCENTRATION CONNUE DE METHANE
EQUIVALENTE A 20-50% DE LA PLEINE ECHELLE. LA PRECISION DOIT ETRE
COMPRISE ENTRE 0-20% DE LA VALEUR VRAIE ET PEUT ETRE CORRIGEE
PARUNE PROCEDURE D’ETALONNAGE.
CAUTION: HIGH OFF-SCALE READINGS MAY INDICATE AN EXPLOSIVE
CONCENTRATION.
ATTENTION: DES LECTURES SUPÉRIEURES A L’ÉCHELLE PEUVENT
INDIQUER DES CONCENTRATIONS EXPLOSIVES.

QRAE 3 User’s Guide
59
PGM-25XX/D Marking
The QRAE 3 (PGM-25XX/D) is certified by IECEx, ATEX and CSA for US and Canada
as intrinsically safe.
The PGM-25XX/D is certified by IECEx, ATEX and CSA for US and Canada as
intrinsically safe.
The PGM-25XX/D contains the following marking:
RAE SYSTEMS
3775 N. 1st. St., San Jose
CA 95134, USA
PGM-25XX/D
Type PGM-25XX/ PGM-25XXD
Serial No/barcode: XXXX-XXXX-XX
IECEx CSA 13.0029X
Ex ia IIC T4 Ga
0575 II 1G
SIRA 13 ATEX 2390X
Ex ia IIC T4 Ga
12.2583152
Cl.I, Div 1, Grps A,B,C,D T4.
Class I, Zone 0 AEX/Ex ia IIC T4
C22.2 No.152-M1984
ANSI/ISA-12.13.01-2000
Intrinsically safe/ Securite
Intrinseque/Exia
Ambient temperature : -20ºC ≤ Tamb ≤ +50ºC
Um: 20V
Battery Packs: G02-3004-000 (Li-ion rechargeable)
Warning:
• Read User’s Manual for intrinsic safety precautions
• Read and understand Manual before operating

QRAE 3 User’s Guide
60
Operation Area and Conditions
Hazardous Areas Classified by Zones
PGM-25XX/D is intended to be used in hazardous areas classified Zone 0, Zone 1 or
Zone 2, within the T4 temperature code range, where gases of explosion groups IIA, IIB
or IIC may be present.
For North America and Canada, the equipment can further be used in Class I, Zone 0 in
the same T4 temperature range .
Hazardous Areas Classified by Divisions
PGM-25XX/D is intended to be used in hazardous areas classified for Class I, Div. 1 or
2, within the temperature range of -20º C to +50º C, where gases of explosion groups A,
B, C or D may be present and within the T4 temperature code range.
Using the PGM-25XX/D in Class I, Division 1, Group A, B, C, D Hazardous
Locations
Equipment which is intended for use in explosive atmospheres and which has been
assessed and certified according to international regulations may be used only under
specified conditions.
The components may not be modified in any way. The appropriate regulations for service
and repair must be properly observed during such activities.
The PGM-25XX/D is intrinsically safe and may be used in hazardous locations.
SUBSTITUTION OF COMPONENTS MAY IMPAIR INTRINSIC SAFETY.
WARNING
TO REDUCE THE RISK OF IGNITION OF HAZARDOUS ATMOSPHERES,
RECHARGE, REMOVE OR REPLACE THE BATTERY ONLY IN AN AREA
KNOWN TO BE NON-HAZARDOUS! DO NOT MIX OLD AND NEW
BATTERIES OR BATTERIES FROM DIFFERENT MANUFACTURERS.

QRAE 3 User’s Guide
61
Year of Manufacture
To identify the year of manufacture, refer to the serial number of the instrument. The
letter in the serial number indicates the year of manufacture. For example, “P” indicates
the manufacturing year is 2012. Other alphabetical letters may be used after 2019.
Letter
Year
N
2011
P
2012
Q
2013
R
2014
S
2015
T
2016
U
2017
V
2018
W
2019
Combustible (LEL) Sensor Performance Specifications
Range
0 to 100% LEL
Resolution
1%
Response Time:
T90 < 30 sec.
Caution:
• Refer to RAE Systems Technical Note TN-114 for LEL sensor cross-sensitivities.
• Refer to RAE Systems Technical Note TN-144 for LEL sensor poisoning.
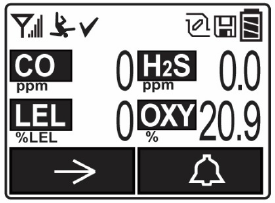
QRAE 3 User’s Guide
62
Turning the PGM-25XX/D On
With the instrument turned off, press and hold the [MODE] key for 3 seconds, and then
release. The startup process begins. The instrument performs a set of self-tests, while
displaying information about instrument’s settings, configuration, due dates for
calibration and bump tests, etc.
When the startup completes, the PGM-25XX/D displays its normal measurement screen
with instantaneous readings and other information in a fashion similar to what is shown
in the illustration below (depending on the sensors installed ).
Turning the PGM-25XX/D Off
Press and hold [MODE]. A 5-second countdown to shutoff begins. You must hold your
finger on the key for the entire shutoff process.
Alarm Signals
The instrume nt is equipped with audible, visib le, and vibratio n alarms. During its normal
operation, the PGM-25XX/D compares gas concentrations to the programmed alarm
limits for Low, High, TWA and STEL alarms. If the concentration exceeds any of the
preset limits, the loud buzzer, red flashing LED, and vibration alarm are activated
immed iate ly to warn of the alarm condition. In addition, the PGM-25XX/D alarms if the
battery voltage is low, pump is blocked, etc.
When a low-battery alarm occurs, there may be approximately 20 to 30 minutes of
operating time remaining. However, it is recommended that you promptly change or
charge the battery in a non-hazardous location.

QRAE 3 User’s Guide
63
Alarms Summary
* For oxygen, “low alarm limit” means a concentration is lower than the low alarm limit.
Testing Alarms
Under normal operation mode and non-alarm conditio ns, the audible, visual, and
vibration alarms can be tested at any time by pressing the [Y/+] key.
Message
Condition
Alarm
Indications
HIGH
Gas exceeds “High Alarm” limit
3 beeps/flashes
per second
OVR
Gas exceeds sensor’s measurement
range
3 beeps/flashes
per second
MAX
Gas exceeds electronic circuit’s
maximum range
3 beeps/flashes
per second
LOW
Gas exceeds “Low Alarm” limit*
2 beeps/flashes
per second
TWA
Gas exceeds “TWA” limit
1 Beep/flash per
second
STEL
Gas exceeds “STEL” limit
1 Beep/flash per
second
Crossed pump icon flashes
Inlet blocked or pump failure
3 beeps/flashes
per second
Empty battery icon flashes
Low battery
1 flash, 1 beep
per minute
CAL
Calibration failed, or needs calibration
1 beep/flash per
second
NEG
Zero gas reading measures less than
number stored in calibratio n
1 beep/flash per
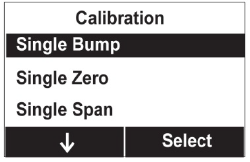
QRAE 3 User’s Guide
64
Programming Menu
Programming Menu is used to change instrument configuration settings can be entered
from Normal Mode by pressing and holding [MODE] and [Y/+] together for more than 3
seconds and supplying a password when prompted.
Alarm Menus
Use these menus to change high, low, STEL, and TWA alarm limits -- the points at
which alarms are triggered. It can also change alarm mode (latched or automatic reset)
and alarm output methods (combinations of light, buzzer, and vibration alarm
indicat io ns ).
Changing Alarm Mode
Auto Reset and Latched alarm modes are supported. A latched alarm stays in alarm until
the user acknowledges the alarm by pressing a key. An auto-reset alarm turns off when
the condition that set off the alarm is no longer present. A user can configure the desired
alarm mode by supplying a password and entering the Programming Menu / Alarms /
Alarm Mode
Bump Testing and Calibration
RAE Systems recommends that a bump test be performed on the PGM-25XX/D prior to
each use. A bump test is defined as a brief exposure of the monitor to the calibration gas
to confirm that the sensors respond to gas and the alarms are functional and enabled.
The PGM-25XX/D multi-gas detector must be calibrated if it does not pass a bump test,
when a new sensor has been installed, or at least once every 180 days, depending on use
and sensor exposure to poisons and contaminants.
Calibration and bump test intervals are user-configurable to match national, regional, and
local regulatio ns.
All calibratio n and bump test options are available under Programming
Menu/Calibration.
Each bump test or calibration option shows a countdown followed by sensor reading and
pass/fail results.
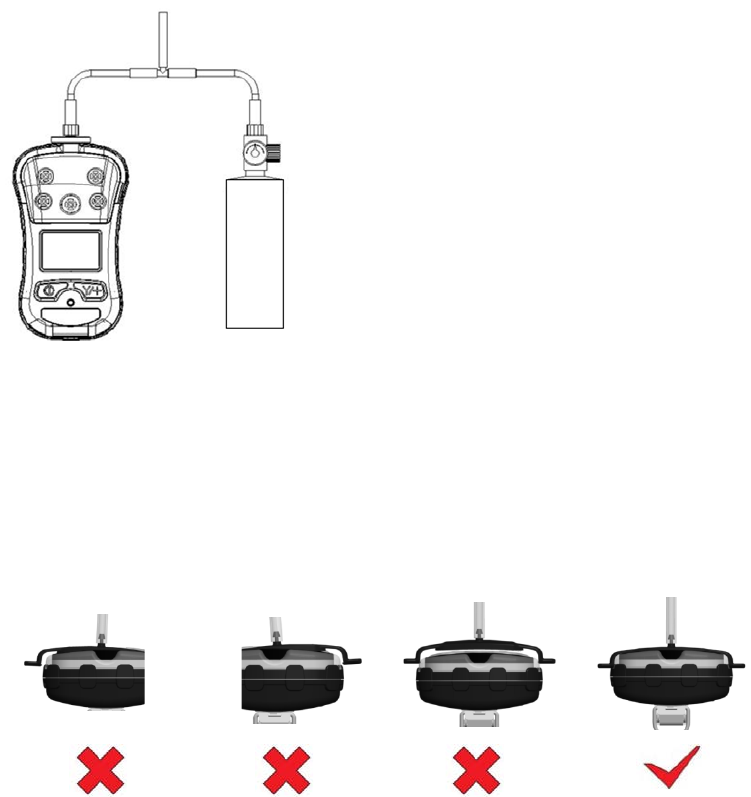
QRAE 3 User’s Guide
65
Pumped Models (PGM-25XX)
The PGM-25XX’s internal pump has two speed settings: low or high. The pump draws at
a flow rate of between 200cc/min and 450cc/min. The instrument must be connected to a
cylinder of calibration gas with supplied tubing featuring a T calibratio n tube, as
illustrated below.
Note: A constant-flo w regulator with flow rates from 500cc/min to 1000cc/min should be
used.
Diffusion Models (PGM-25XXD)
RAE Systems’ provided calibration cap should be installed on the diffusion versions of
the instrument when it is being bump tested or calibrated. A constant-flow regulator with
flow rates from 500cc/min to 1000cc/min should be used.
WARNING: Make sure the calibration cap clips on and stays in t correct position during
calibratio n, as illustrated below.
Wrong Wrong Wrong Correct

QRAE 3 User’s Guide
66
Zero Calibration
The instrument should be zero calibrated in clean ambient air with 20.9% oxygen. A zero
calibration should precede a span calibration.
Changing Span Value
Use this function to change the gas concentration to be used for bump testing or span
calibratio n.
Note: If the sensor calibration fails, try again. If calibration fails repeatedly, the sensor(s)
should be replaced. Replace the sensor.
WARNING: Do not replace sensors in hazardous locations.
Battery Replacement
A Li-ion battery pack (PN: G02-3004-000) is supplied with each PGM-25XX/D.
To replace a PGM-25XX/D battery pack, unscrew the two screws on the battery cover,
and then remove the battery cover. After installing a new battery pack, reinstall the
battery cover and the two screws.
QRAE 3 User’s Guide
67
Troubleshooting
Problem
Possible Reasons & Solutions
Cannot turn on
instrument after
charging the
battery
Reason: Defective charging circuit. Defective battery.
Solution: Replace battery pack or charger. Try another charger or
battery.
Lost password
Solution: Call Technical Support at +1 408-952-8461 or toll-
free at +1 888-723-4800
Buzzer
Inoperative
Reason:
Buzzer disabled.
Bad buzzer.
Solution: Check that buzzer is not turned off in Programming
Menu.
Call authorized service center.
Pump failed
message. Pump
alarm.
Reasons:
Inlet probe blocked. Instrument directly connected to
a gas outlet with the gas valve turned off. External
filter sucked in water. External filter too dirty. Water
condensed along the inlet probe. Bad pump or pump
circuit.
Solutions: Remove the blocking objects and then press [Y/+]
key to reset the pump alarm. Replace contaminated
external filter. Be careful not to allow water
condensation inside the unit. Replace the pump.
The list of replacement parts is available online at www. rae systems.com.
QRAE 3 User’s Guide
68
18. Technical Support
To contact RAE Systems Technical Support:
Monday through Friday, 7:00AM to 5:00PM Pacific (US) Time
Phone (toll-free): +1 877-723-2878
Phone: +1 408-952-8200
Fax: +1 408-952-8480
Email: RAE-tech@honeywell.co m
Outside the Americas:
E-Mail: HAexpert@honeywell.com
Honeywell Analytics Ltd.
4 Stinsford Road
Nuffield Industrial Estate
Poole, Dorset, BH17 0RZ
United Kingdom
Tel: +44 (0) 1202 645 544
Fax: +44 (0) 1202 645 555
Honeywell Analytics
ZAC Athélia 4 – 375 avenue du Mistral
Bât B, Expace Mistral
13600 La Ciotat
France
Tel: +33 (0) 4 42 98 17 75
Fax: +33 (0) 4 42 71 97 05
Honeywell Analytics
Elsenheimerstrasse 43
80687 München
Germany
Tel: +49 89 791 92 20
Fax: +49 89 791 92 43
Honeywell Analytics
P.O. Box-45595
6th Street
Musaffah Industrial Area
Abu Dhabi
UAE
Tel: +971 2 554 6672
Fax: +971 2 554 6672
19. RAE Systems Contacts
RAE Systems by Honeywell World Headquarters
3775 N. First St.
San Jose, CA 95134-1708 USA
Phone: +1 888-723-4800
E-mail: RAE-tech@honeywell.com
Web Site: www.raesystems.com
Training
Phone: +1 408-952-8260
Email: training@raesystems.com

QRAE 3
User’s Guide
Rev. G
September 2016
P/N M02-4001-000
CORPORATE HEADQUARTERS
RAE Systems by Honeywell
3775 North First Street
San Jose, CA 95134 USA
Phone: 408.952.8200
Fax: 408.952.8480
RAE-tech@honeywell.com
WORLDWIDE SALES OFFICES
USA/Canada 1.877.723.2878
Europe +800.333.222.44/+41.44.943.4380
Middle East +971.4.450.5852
China +86.10.5885.8788-3000
Asia Pacific +852.2669.0828