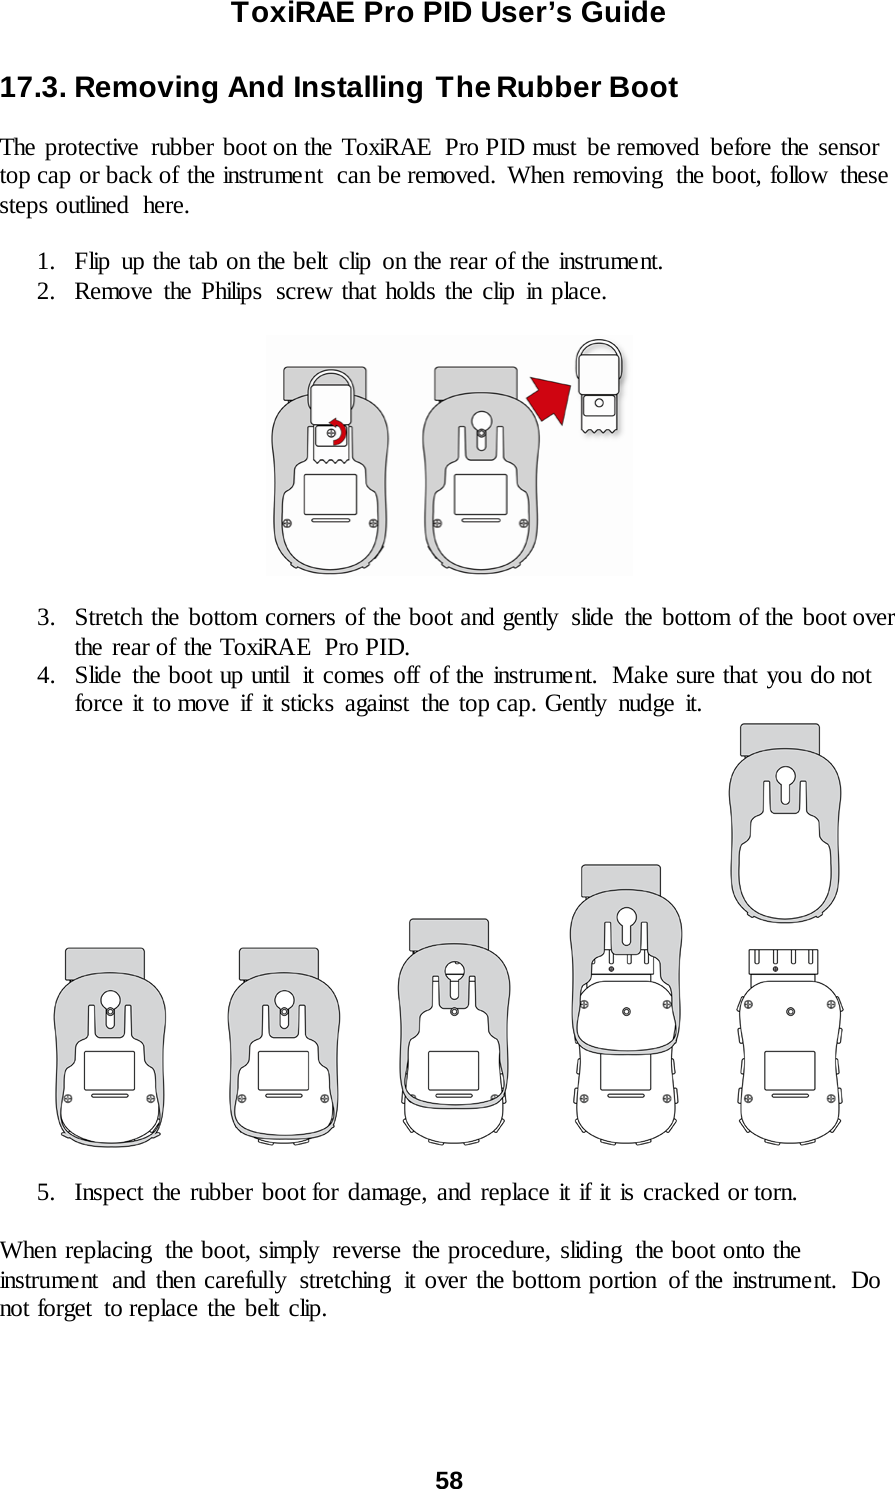
RAE Systems TOXIRAEPRO QRAE3 User Manual ToxiRAE Pro PID User s Guide
RAE Systems, Inc QRAE3 ToxiRAE Pro PID User s Guide
UserManual.wiki
>
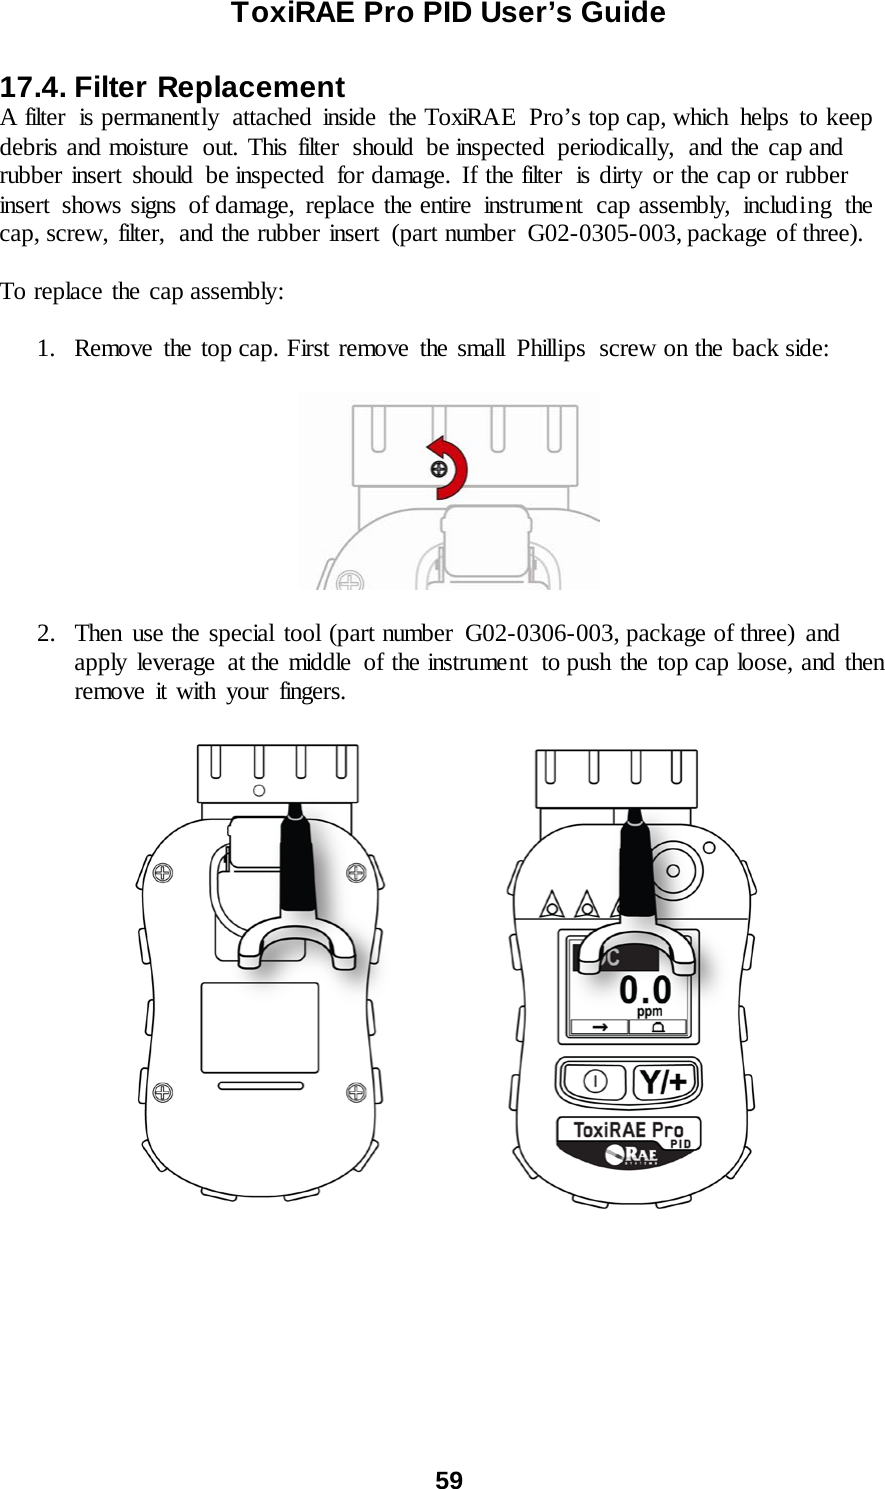
RAE Systems
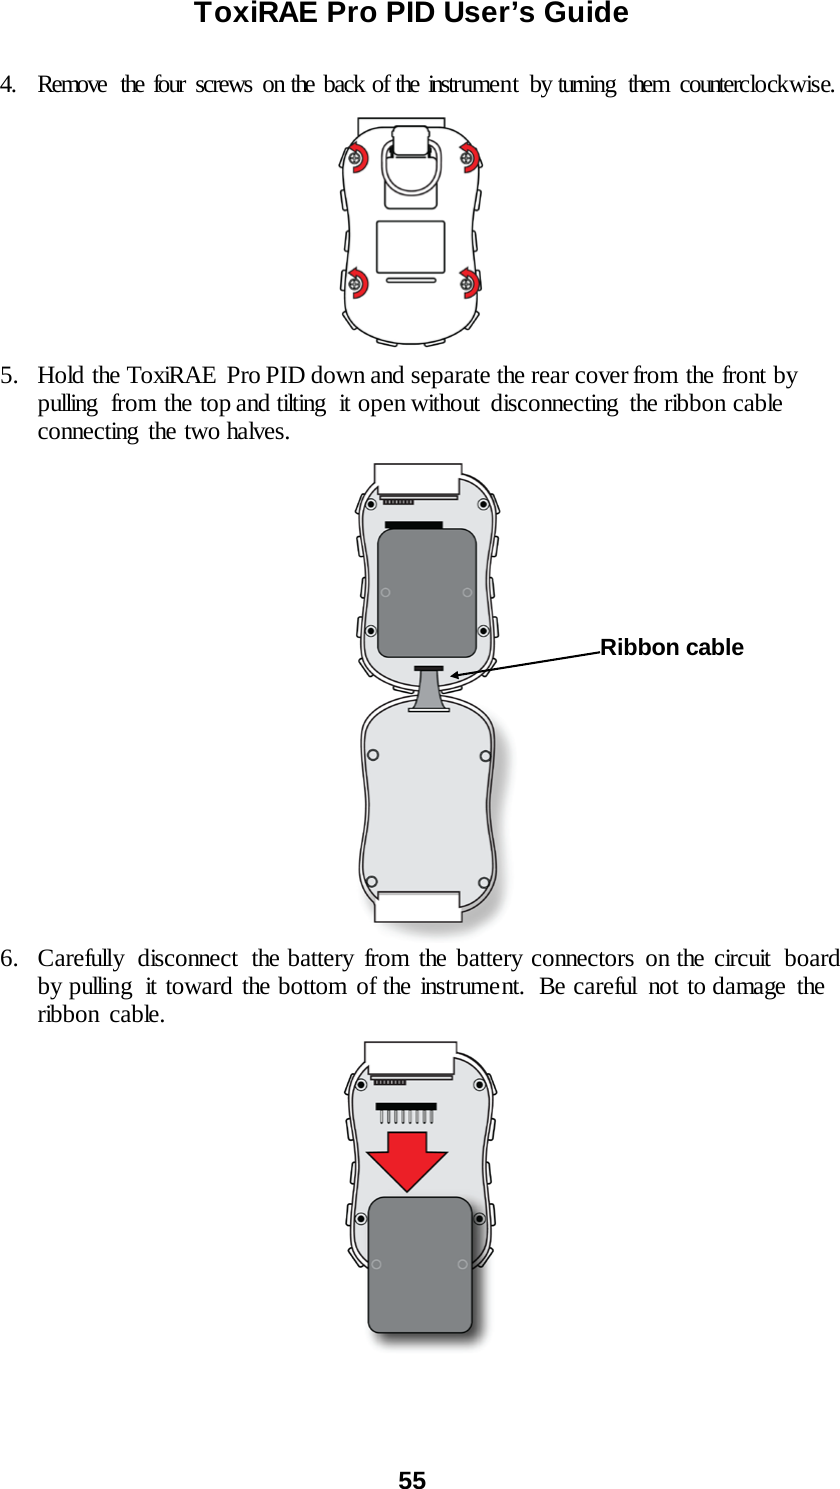
>
TOXIRAEPRO User Manual
manual
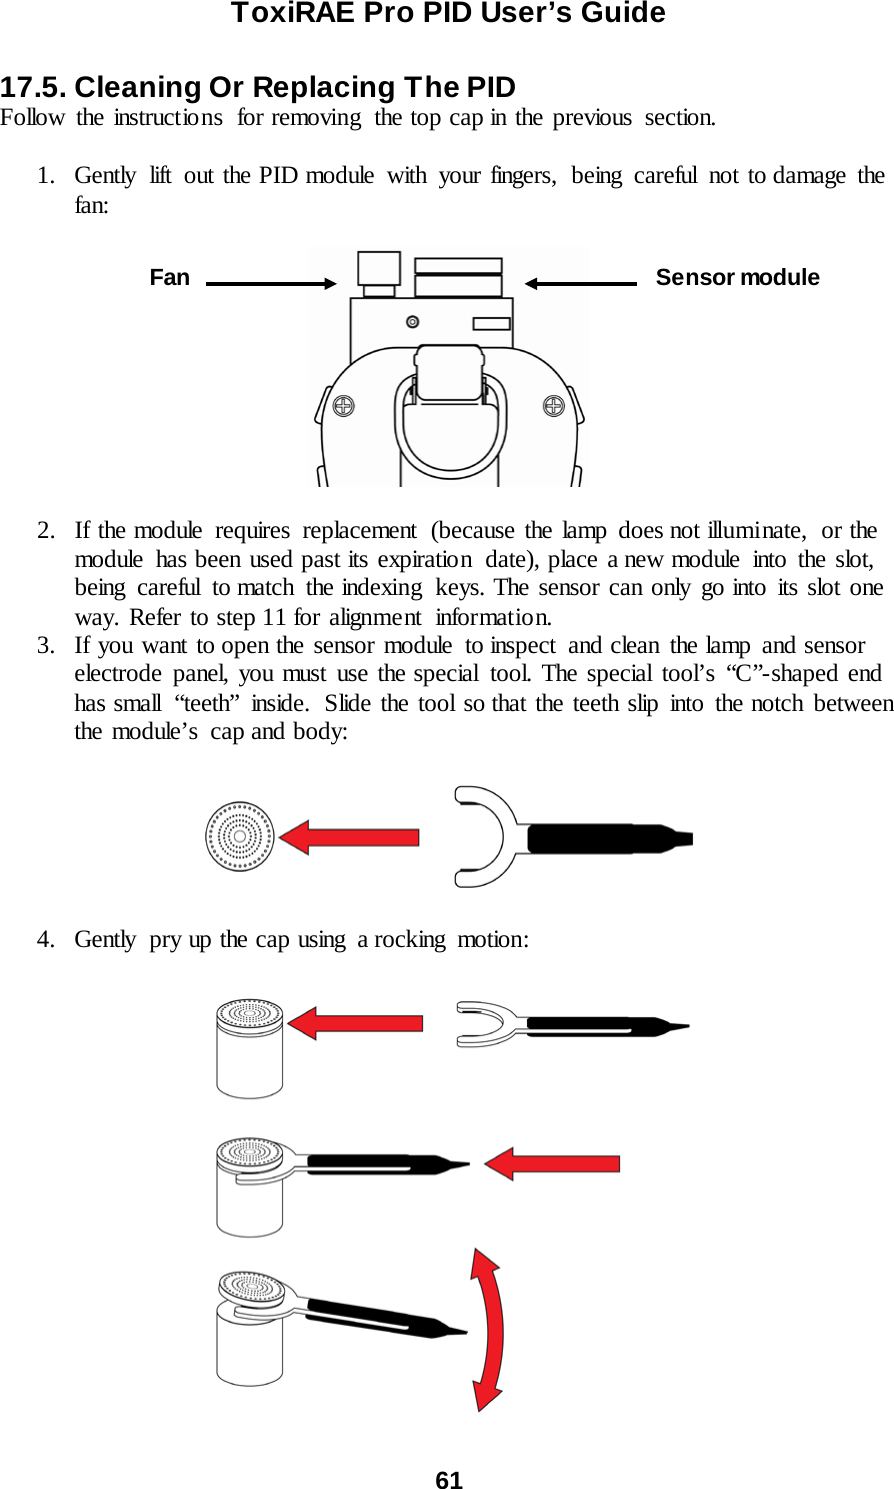
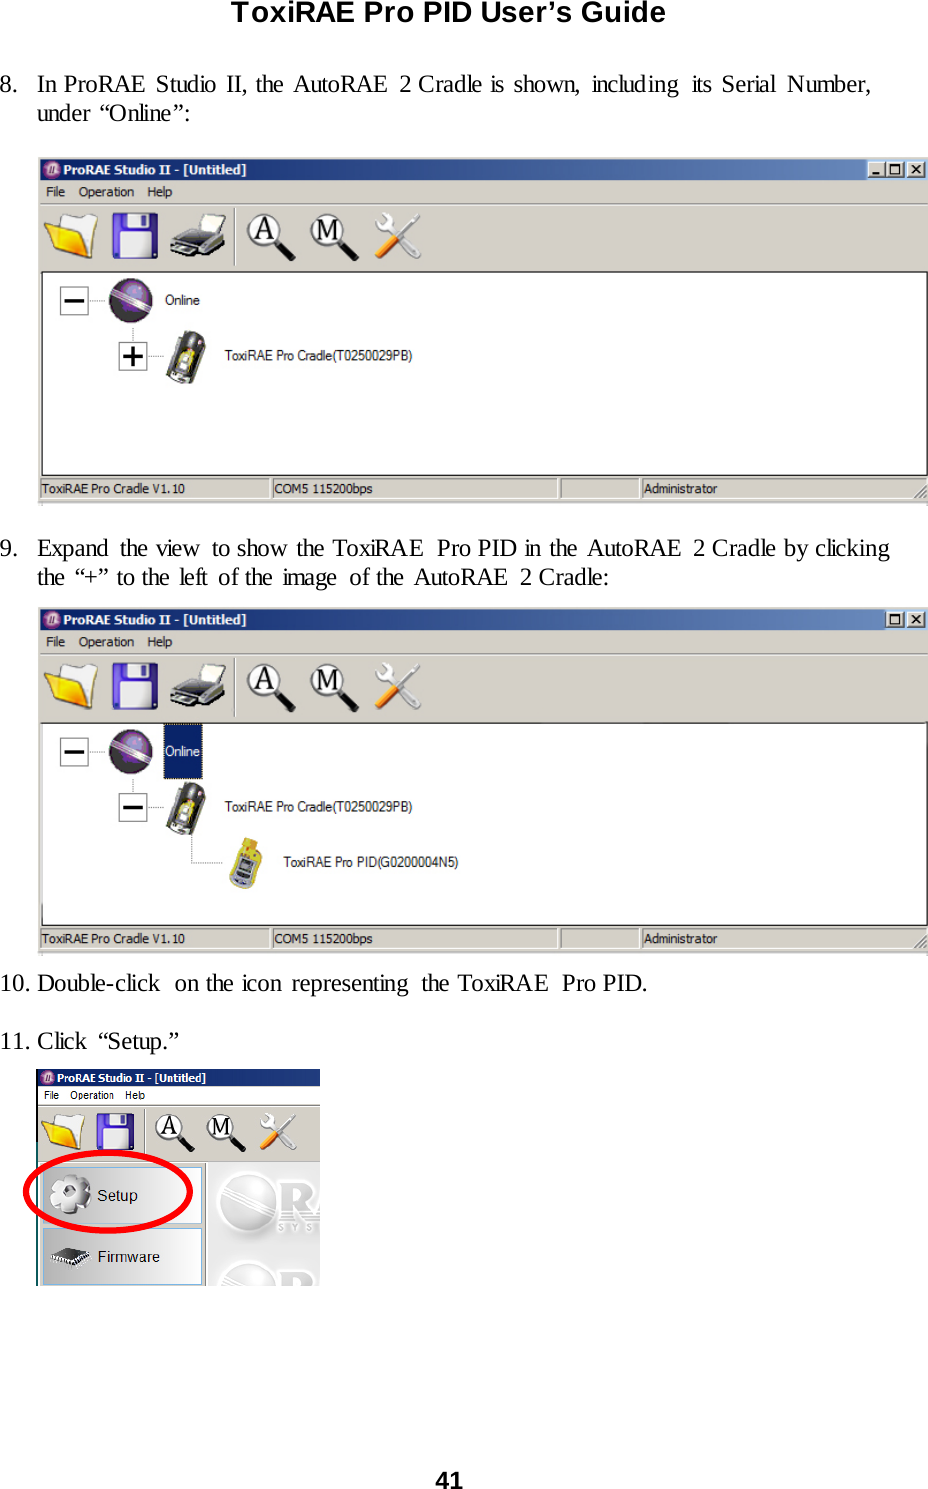
Navigation menu
Upload a User Manual
Namespaces
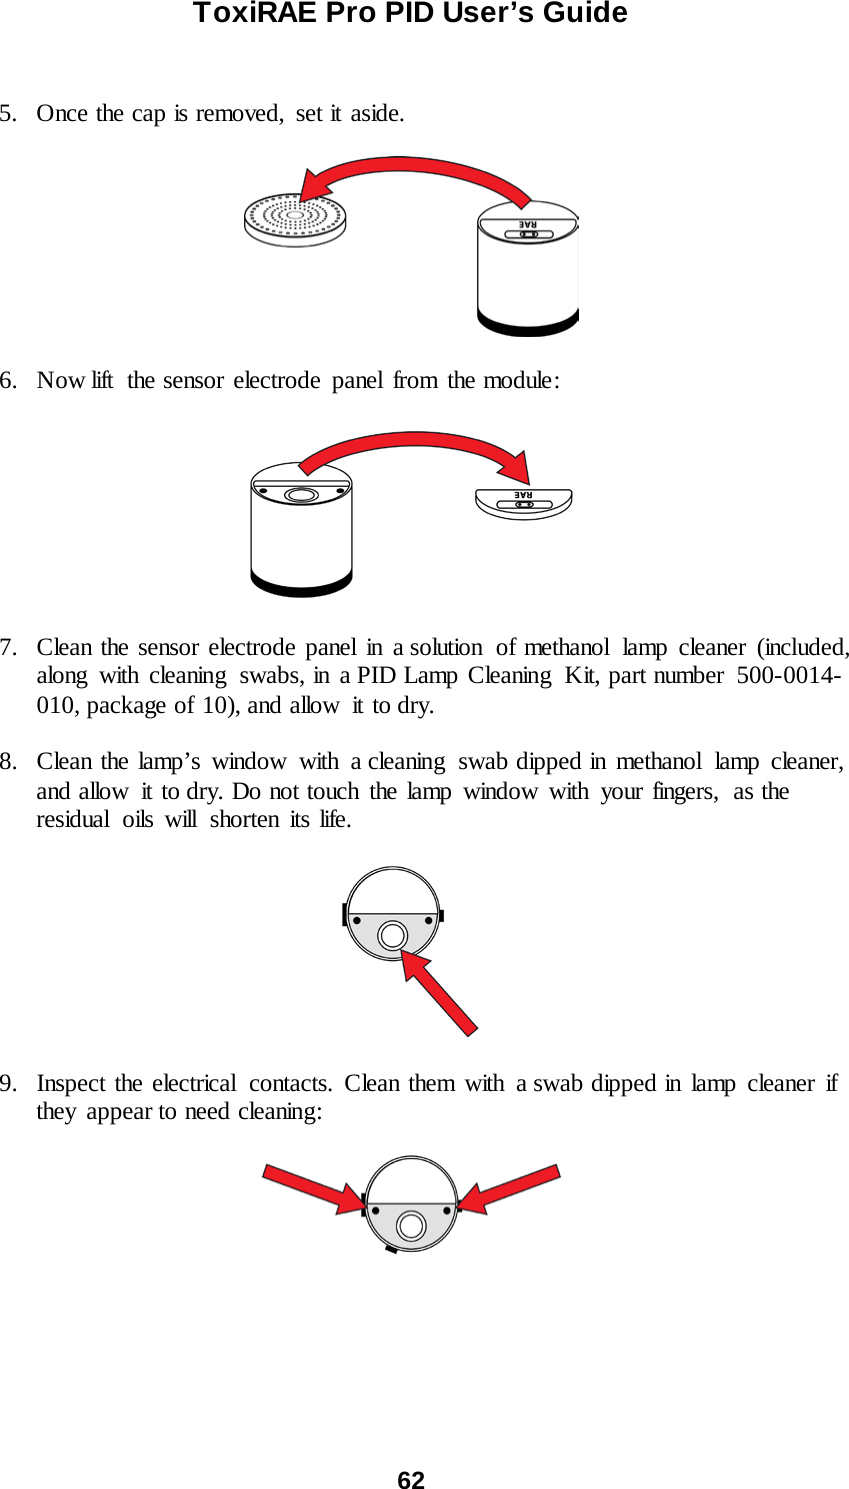
Wiki Guide
HTML
PDF
Info
Views
User Manual
Discussion / Help
Navigation


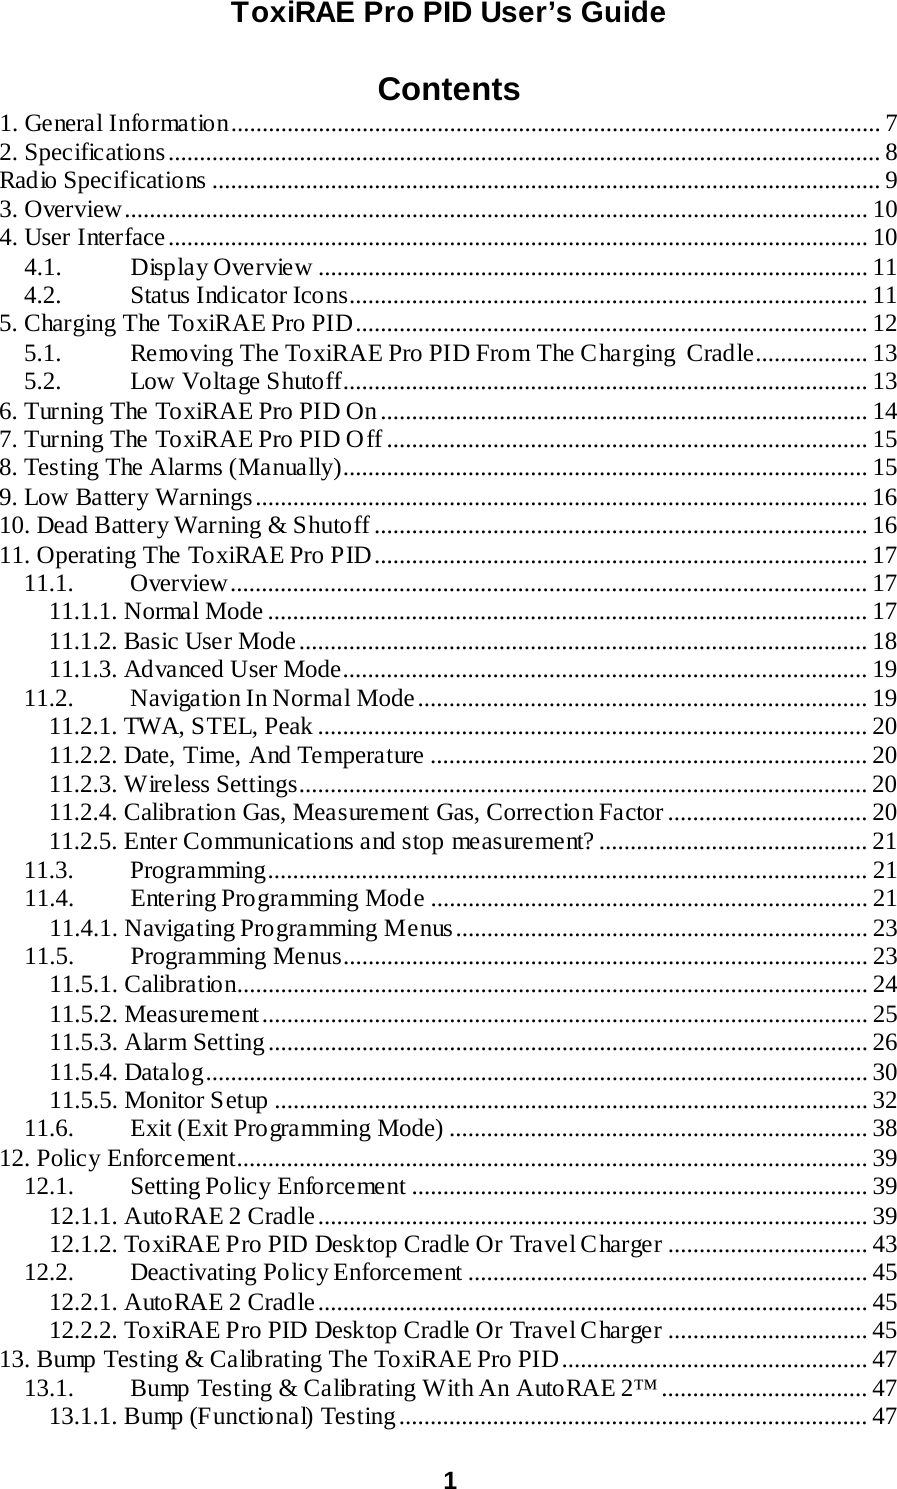


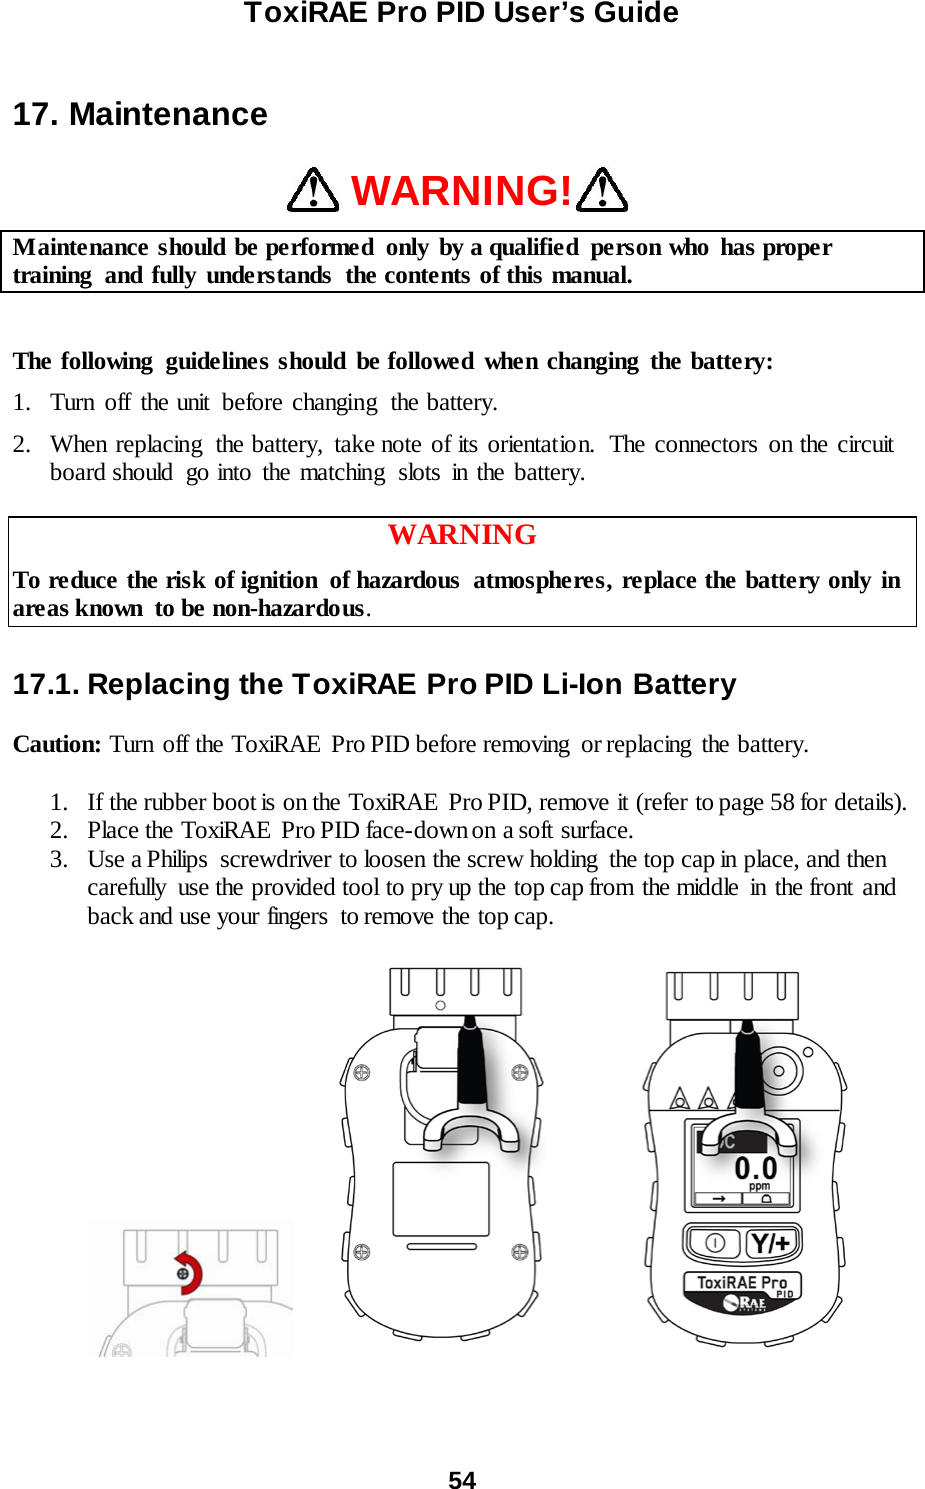
![ToxiRAE Pro PID User’s Guide 10 3. Overview The ToxiRAE Pro PID is a wireless, personal volatile organic compounds (VOC) monitor, the world’s smallest. The ToxiRAE Pro PID takes worker protection to the next level by providing safety professionals wireless access to real-time instrume nt readings and alarm status from any location for better visibility and faster response. The ToxiRAE Pro PID features RAE Systems’ next-generation PID sensor that delivers fast, reliable detection and accurate monitoring of a wide variety of VOCs in a broad range of temperature and humidity conditions. 4. User Interface The ToxiRAE Pro PID’s user interface consists of the display, four LEDs, an alarm buzzer, and two keys, [MODE] and [Y/+]. The LCD displays real-time reading in specified measurement units, sensor type, alarm type (when in alarm, including cal. overdue), battery status, datalog (if on), and radio and connection quality (if available). [Y/+] key [MODE] key Gas inlet Display LEDs Alarm Buzzer Belt clip (on back) LED Top cap](https://usermanual.wiki/RAE-Systems/TOXIRAEPRO/User-Guide-3228900-Page-12.png)


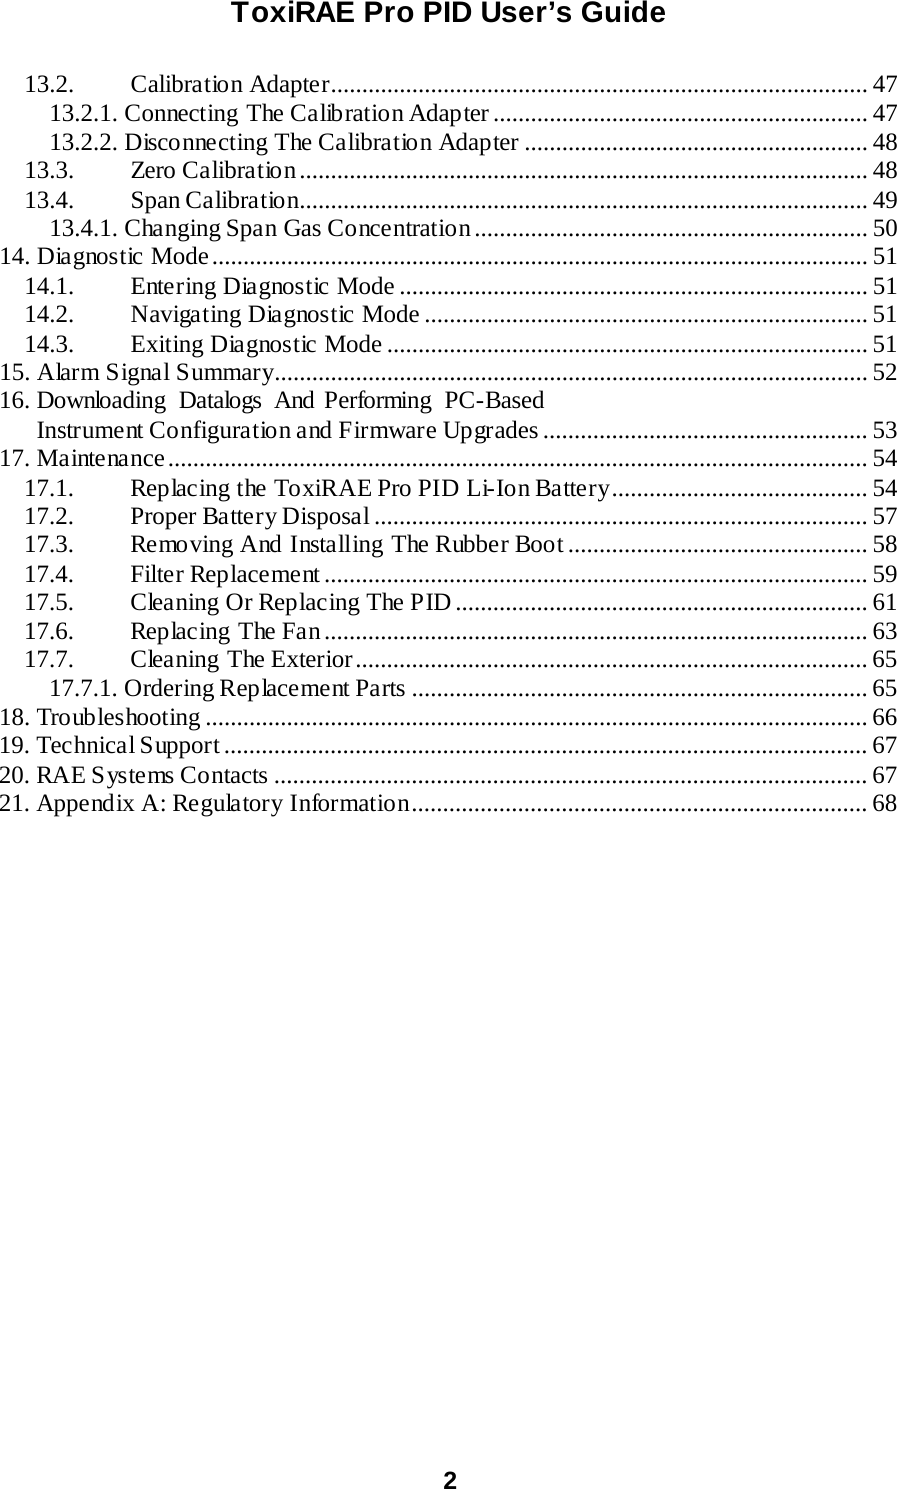
![ToxiRAE Pro PID User’s Guide 14 6. Turning The ToxiRAE Pro PID On To turn the ToxiRAE Pro PID on, press and hold [MODE] for 3 seconds. Caution: The alarm buzzer is very loud. During startup, you can mute most of the sound by holding a finger over the alarm buzzer port. Note: Never put tape over the alarm buzzer port to permanently mute it or otherwise limit the loudness of the buzzer. 1. When the ToxiRAE Pro PID turns on, the buzzer, vibratio n alarm, and LEDs are tested. The firmware version is shown in the display (for example, “V1.00” indicates firmwa re version 1.00). 2. A battery test is performed. If the battery has sufficient charge, then the next step is a self test of the system. Note: If the battery is almost fully discharged, the message “Battery too low! Needs charging. Powering off!” shows in the display and the ToxiRAE Pro PID shuts off. You must charge the battery before you can use the instrument. 3. Self-testing is performed by the ToxiRAE Pro PID. Note: If one of the following error messages is displayed, shut off the ToxiRAE Pro PID by pressing [MODE]: • Sensor error! • Wrong sensor! If any of the following error messages occurs, you can either shut off the instrument by pressing [MODE], or continue to the next startup test by pressing [Y/+]: • No fan or fan error! • Real time clock error! • Memory error! • Sensor changed! • Failed to turn on lamp! For any of these error types, try restarting the instrument. If the error message appears again after five more attempts to restart the instrument, consult the distributor from whom the instrument was purchased for technical support.](https://usermanual.wiki/RAE-Systems/TOXIRAEPRO/User-Guide-3228900-Page-16.png)
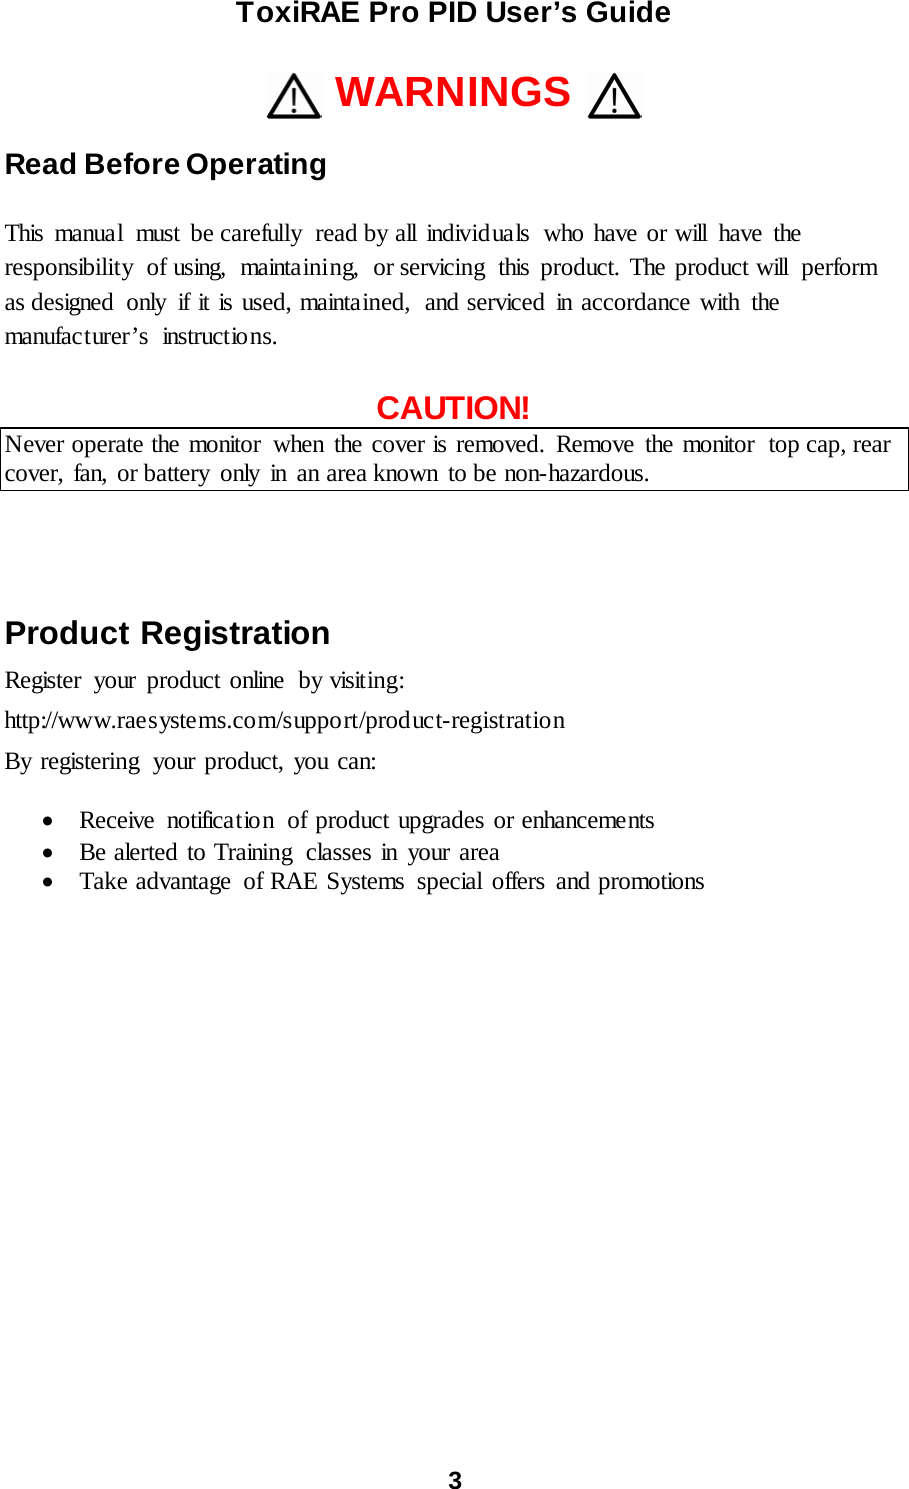
![ToxiRAE Pro PID User’s Guide 15 4. After self-testing, two start-up options are available for the ToxiRAE Pro PID: Normal and Fast Start-up. The following information is displayed in sequence under Normal Start-up and skipped under Fast Start-up: • Sensor type • Sensor serial number • Date, time, and temperature • Calibratio n gas • Last calibration date • Measurement gas • Correction factor • User mode • Battery type, voltage, and shutoff voltage • Alarm mode • Buzzer enabled/disabled status • Light enabled/disabled status • Vibration alarm enabled/disabled status • Alarm settings for High, Low, STEL, and TWA • Datalog type and interval 5. Once the startup process is complete, a sensor warm-up screen is shown (with countdown, if necessary). Then the main measurement screen is shown. The type of monitored hazard is displayed, with current reading. The ToxiRAE Pro PID is now ready for use. 7. Turning The ToxiRAE Pro PID Off Press and hold [MODE]. In 2 seconds, a 5-second countdown to shutoff begins, accompanied by one buzzer beep per second. You must hold your finger on the key for the entire shutoff process. If you remove your finger from the key during the countdown, the shutoff operation is canceled and the ToxiRAE Pro PID continues normal operation. When you see “Unit Off,” release your finger from the [MODE] key. The ToxiRAE Pro PID is now off. 8. Testing The Alarms (Manually) Under normal non-alarm conditions, the buzzer, vibration alarm, and LEDs can be tested at any time by pressing and holding [Y/+]. Important! If any of the alarms does not respond to this test, check the Alarm Settings. It is possible that any or all of the alarms have been turned off. If all the alarms are turned on, but one or more of them (buzzer, LED lights, or vibration alarm) does not respond to this test, do not use the instrument; contact your RAE Systems distributor for technical support.](https://usermanual.wiki/RAE-Systems/TOXIRAEPRO/User-Guide-3228900-Page-17.png)
![ToxiRAE Pro PID User’s Guide 18 11.1.2. Basic User Mode When the ToxiRAE Pro PID is in Basic User Mode, pressing [MODE] allows you to step through the screens in the following fashion: Note: The gray boxes indicate the datalog functions when datalogging is in Manual mode. When datalogging is in Automatic mode, these screens do not appear. Refer to page 30 for information on selecting Automatic or Manual datalogging.](https://usermanual.wiki/RAE-Systems/TOXIRAEPRO/User-Guide-3228900-Page-20.png)
![ToxiRAE Pro PID User’s Guide 19 11.1.3. Advanced User Mode Note: To enter Advanced User mode from Basic User mode, you must enter Programming mode on an instrument that is running in Basic User mode by simultaneously pressing and holding both the buttons for 3 seconds and supply a password. To exit Programming Menu and return to the measurement screen (in Advanced User mode), press the [MODE] button repeatedly to highlight the Exit icon in Programming Menu and press Y to exit to the measurement screen. When the ToxiRAE Pro PID is in Advanced User mode, pressing [MODE] steps through the same screens, but with the addition of a screen that allows for selection of different measurement gases from the interna l library. Also, once in Advanced User mode, you may enter Programming without using a password. Note: In Advanced User Mode, you may select different measurement gases from the internal library. Note: The gray box indicates the datalog functions when datalogging is in Manual mode. When datalogging is in Automatic mode, these screens do not appear. Refer to page 30 for information on selecting Automatic or Manual datalogging. 11.2. Navigation In Normal Mode Step through the screens in Normal Mode by pressing [MODE]. Some screens allow actions on your part, such as clearing the data. In these instances, pressing [Y/+] performs the action.](https://usermanual.wiki/RAE-Systems/TOXIRAEPRO/User-Guide-3228900-Page-21.png)
![ToxiRAE Pro PID User’s Guide 20 11.2.1. TWA, STEL, Peak The first screen includes a readout for TWA, STEL, and Peak readings. TWA The TWA (time-weighted average) reading is the average reading of the gas concentration times that the monitor has been on, prorated to an 8-hour period. STEL Short Term Exposure Limit (STEL) data based on 15-minute STEL values, expressed in ppm or mg/m3. A STEL value is only displayed after the ToxiRAE Pro PID has been on for 15 minutes or longer. After exiting PC Communica tio ns mode, the STEL is reset. Peak The Peak value tells you the highest reading for the sensor since the ToxiRAE Pro PID was turned on. Press [Y/+] twice to clear the Peak value. Note: If you do not press a key within 1 minute, the display reverts to the normal reading. Press [MODE] to advance from screen to screen. 11.2.2. Date, Time, And Temperature The current Date is expressed as Month/Day/Year, with two digits for month and day, and four digits for the year. Below the date is the time, which is expressed as Hours/Minutes/Seconds, with two digits for each. The time is in 24-hour (military) format. Below the time is the internal temperature, which can be in degrees Fahrenheit or Celsius (settable in Programming Mode). 11.2.3. Wireless Settings The current wireless settings are shown here. These include the Roaming, PAN ID, Channel, and Unit ID, which are helpful when creating or troubleshooting networks. Parent ID data does not apply. 11.2.4. Calibration Gas, Measurement Gas, Correction Factor This screen shows calibration gas (Cal. Gas), measurement gas (Meas. Gas), and correction factor (CF).](https://usermanual.wiki/RAE-Systems/TOXIRAEPRO/User-Guide-3228900-Page-22.png)
![ToxiRAE Pro PID User’s Guide 21 11.2.5. Enter Communications and stop measurement? Before communicating with a PC running ProRAE Studio II Instrument Configuration and Data Management software (for downloading datalogs, configuring the instrument, or uploading new firmware), the ToxiRAE Pro PID must be set to communicate with the computer. Press [MODE] repeatedly until you reach the “Enter Communica tio ns and stop measurement?” screen. Then press [Y/+]. Measurement and datalogging are stopped, and the instrument is now ready to communicate with the PC. 11.3. Programming You must provide a 4-digit password to enter Programming Mode, unless the ToxiRAE Pro PID is already running in Advanced User mode. The default password is 0000. 11.4. Entering Programming Mode 1. Press and hold [MODE] and [Y/+] simultaneo usly until the Password screen appears. 2. Input the 4-digit password: • Press [Y/+] repeatedly to select a desired number. Numbers increase from 0 to 9. Once 9 is reached, pressing [Y/+] again "wraps" around back to 0. • Step from digit to digit using [MODE]. • When you are done, continue pressing [MODE] until OK or Cancel is highlighted. • Press [Y/+] to register the password (if OK is highlighted) or to exit without entering the password (if Cancel is selected). If you make a mistake, you can cycle through the digits by pressing [MODE] repeatedly and then using [Y/+] to change the number in each position. Note: The default password is 0000.](https://usermanual.wiki/RAE-Systems/TOXIRAEPRO/User-Guide-3228900-Page-23.png)
![ToxiRAE Pro PID User’s Guide 22 When you have successfully entered Programming Mode, the following screen appears: Note: The password can only be changed by connecting the instrument to a PC running ProRAE Studio II software. Follow the instructio ns in ProRAE Studio II to change it. The Calibratio n icon is highlighted first by default, but you can press [MODE] to step from one programming menu item to the next, with the name of the menu shown at the top of the display and the corresponding icon highlighted. As you repeatedly press [MODE], the selection moves from left to right, and the following screens appear in sequence: Note: When you reach Exit and press [MODE], the menu cycles back to Calibration. To exit the Programming Menu, highlight Exit by pressing the [MODE] button, and press the [Y/+] key.](https://usermanual.wiki/RAE-Systems/TOXIRAEPRO/User-Guide-3228900-Page-24.png)
![ToxiRAE Pro PID User’s Guide 23 11.4.1. Navigating Programming Menus Navigating through the Programming menus is easy and consistent, using a single interface format of a “forward arrow” and “Select,” controlled by the [MODE] key and [Y/+] key, respectively. In the submenus, the functions of a “down arrow” and “Select” are controlled by the [MODE] key and [Y/+] key, respectively. Also in submenus, the functions of the keys may correspond to the instruction directly above each key. Therefore, if it says “OK” above the [MODE] key, pressing [MODE] selects “OK.” When setting numerical data, the [MODE] key typically selects which digit is highlighted, while each press of [Y/+] increases the digit by 1. 11.5. Programming Menus Programming allows anyone with the password to change the instrument’s settings, calibrate the instrument, enter user information, etc. Programming has five menus. Each menu includes several submenus to perform additional programming functions. This table shows the menus (and their icons) and submenus: Calibration Measurement Alarm Setting Datalog Monitor Setup Zero Calibr a tio n Meas. Gas High Alarm Clear Datalog Wireless Span Calib ra tio n Meas. Unit Low Alarm Interval Site ID STEL Alarm Data Selection User ID TWA Alarm Datalog Type User Mode Alarm Mode Date Buzzer & Light Time Man Down Alarm Temp. Unit Language Zero At Start LCD Contrast Note: There is also an “Exit” icon. It has only one function. When you select it, the instrument exits Programming Mode, updates the settings, and returns to monitoring.](https://usermanual.wiki/RAE-Systems/TOXIRAEPRO/User-Guide-3228900-Page-25.png)
![ToxiRAE Pro PID User’s Guide 24 Once you enter Programming, the LCD displays the first menu, Calibratio n. Each subsequent menu is accessed by pressing [MODE] repeatedly until the desired menu is displayed. To enter a submenu of a menu, press [Y/+]. 11.5.1. Calibration Two types of calibration are available: Zero (fresh air) and Span. In the Calibratio n submenu, select Zero or Span Calibration by pressing [MODE]. Once your choice is highlighted, press [Y/+]. Zero Calib The procedure for performing a zero calibration is covered on page 39.](https://usermanual.wiki/RAE-Systems/TOXIRAEPRO/User-Guide-3228900-Page-26.png)
![ToxiRAE Pro PID User’s Guide 25 Span Calib The procedure for performing a basic span calibration is covered on page 49. Exit Press [Y/+] to exit. Calibration is exited, and Measurement is highlighted in the Programming Menu screen. 11.5.2. Measurement The submenus for Measurement are Measurement Gas and Measurement Unit. Meas Gas Measurement gases are organized in a list called Gas Library: The Gas Library consists of 190 compounds found in RAE Systems’ Technical Note TN-106 (available online at www.raesystems.com). 1. Scroll through the Gas Library by pressing [Y/+] until you find the gas you want as your measurement gas. 2. When you are on the gas of your choice, press [MODE] to highlight “Save.” 3. To save your choice, press [Y/+]. Otherwise, press [MODE] to highlight “Quit,” followed by [Y/+]; the newly selected gas will not be saved. Meas Unit Standard available measurement units include: Abbreviation Unit ppm parts per millio n mg/m3 milligra ms per cubic meter 1. Choose between the two measurement units by pressing [MODE]. 2. If you switch to a different measurement unit, press [Y/+] to select the new choice. Press [MODE] until “Exit” is highlighted. 3. Press [Y/+] to save your choice and exit. Exit Press [Y/+] to exit. Measurement is exited, and Alarm Setting is highlighted in the Programming Menu screen.](https://usermanual.wiki/RAE-Systems/TOXIRAEPRO/User-Guide-3228900-Page-27.png)
![ToxiRAE Pro PID User’s Guide 26 11.5.3. Alarm Setting High Alarm Set the High Alarm as follows : 1. In the High Alarm submenu, press [Y/+] repeatedly to select a desired number. Numbers increase from 0 to 9. Once 9 is reached, pressing [Y/+] again “wraps” around back to 0. 2. Press [MODE] to move to the next digit. 3. When you are satisfied with the number, press [MODE] until “OK” is highlighted. 4. To save the new value, press [Y/+]. The value is saved, and the menu advances to Low Alarm. To exit without saving the new value: 1. Press [MODE] to advance to Cancel. 2. Press [Y/+] to exit the High Alarm submenu and advance to the Low Alarm submenu. Low Alarm Set the Low Alarm as follows: 1. In the Low Alarm submenu, press [Y/+] repeatedly to select a desired number. Numbers increase from 0 to 9. Once 9 is reached, pressing [Y/+] again “wraps” around back to 0. 2. Press [MODE] to move to the next digit. 3. When you are satisfied with the number, press [MODE] until “OK” is highlighted. 4. To save the new value, press [Y/+]. The value is saved, and the menu advances to STEL Alarm. To exit without saving the new value: 1. Press [MODE] to advance to Cancel. 2. Press [Y/+] to exit the Low Alarm submenu and advance to STEL Alarm submenu. STEL Alarm Set the STEL Alarm as follows: 1. In the STEL Alarm submenu, press [Y/+] repeatedly to select a desired number. Numbers increase from 0 to 9. Once 9 is reached, pressing [Y/+] again “wraps” around back to 0. 2. Press [MODE] to move to the next digit. 3. When you are satisfied with the number, press [MODE] several times until “OK” is highlighted.](https://usermanual.wiki/RAE-Systems/TOXIRAEPRO/User-Guide-3228900-Page-28.png)
![ToxiRAE Pro PID User’s Guide 27 4. To save the new value, press [Y/+]. The value is saved, and the menu advances to TWA Alarm. To exit without saving the new value: 1. Press [MODE] to advance to Cancel. 2. Press [Y/+] to exit the STEL Alarm submenu and advance to the TWA Alarm submenu. TWA Set the TWA Alarm as follows: 1. In the TWA Alarm submenu, press [Y/+] repeatedly to select a desired number. Numbers increase from 0 to 9. Once 9 is reached, pressing [Y/+] again “wraps” around back to 0. 2. Press [MODE] to move to the next digit. 3. When you are satisfied with the number, press [MODE] until “OK” is highlighted. 4. To save the new value, press [Y/+]. The value is saved, and the menu advances to Alarm Mode. To exit without saving the new value: 1. Press [MODE] to advance to Cancel. 2. Press [Y/+] to exit the TWA Alarm submenu and advance to the Alarm Mode submenu. Alarm Mode There are two selectable alarm types: Auto Reset When an alarm is triggered and after the alarm condition is no longer present, the alarm stops and resets by itself. Latch When the alarm is triggered, it will not cease until you manually turn it off. The latched setting only controls alarms for High Alarm and Low Alarm, not the STEL or TWA alarms. Note: To clear an alarm when the instrument is set to “Latched,” press [Y/+] when the main (measurement) display is shown. 1. Press [MODE] to step from one alarm type to the other. 2. Press [Y/+] to select an alarm type. 3. When you have completed your selection, press [MODE] until “Exit” is highlighted. Then press [Y/+] to save the change and exit to “Buzzer and Light.”](https://usermanual.wiki/RAE-Systems/TOXIRAEPRO/User-Guide-3228900-Page-29.png)
![ToxiRAE Pro PID User’s Guide 28 Buzzer & Light The buzzer, light, and vibration alarms can be programmed so that any combination, all, or none of them are activated when the ToxiRAE Pro PID goes into alarm. Important! If you program the ToxiRAE Pro PID so that no alarms are activated in an alarm conditio n, you may put yourself or your workers at risk of being exposed to a hazardous atmosphere and being unaware of it, as the indicatio n of a dangerous condition will be limited to the concentration shown in the display and the name of the type of alarm flashing on the display. 1. Choose an alarm combination setting by pressing [MODE] until your choice is highlighted. 2. Press [Y/+] to select it. 3. Press [MODE] repeatedly until “Exit” is highlighted. 4. Press [Y/+] to register your selection and exit. To exit without saving the new value: 1. Make sure your previous setting is selected. 2. Press [MODE] repeatedly to advance to Exit. 3. Press [Y/+] to exit. Man Down Alarm The Man Down Alarm is a critical and potentially lifesaving safety feature of every ToxiRAE Pro PID. The Man Down Alarm is based on the premise that if the instrument is motionless when it is not supposed to be, something wrong may be happening to its user. If that is the case, the ToxiRAE Pro PID not only goes into alarm locally on the instrument, but also remotely, over the RAE Systems Dedicated Wireless Network, to notify people in the vicinity, as well as remote safety officers at a command center, that a person is down, so that help can be dispatched quickly. Whenever the Man Down feature is on, the main screen displays a Man Down icon along the top to indicate it is active:](https://usermanual.wiki/RAE-Systems/TOXIRAEPRO/User-Guide-3228900-Page-30.png)
![ToxiRAE Pro PID User’s Guide 29 When the Man Down feature is on and there is no gas alarm, the ToxiRAE Pro PID senses that it is motionless for the amount of time set in the “Motionless Time” parameter. If the instrument is not moved during that time, then a pre-alarm is activated to alert the user, and shows the “Are You OK?” screen. Pressing [Y/+] clears the alarm and returns the ToxiRAE Pro PID to its normal operation. Pressing [MODE] sets it into Man Down Alarm (and if wireless connectivity is enabled, a Man Down message is sent in real time to remote observers). If neither key is pressed, then after the countdown, it goes into Man Down Alarm (again sending a message to remote observers if wirelessly enabled). Settings are available for: • Off/O n • Motionless Time (time the instrument is motionless before initiating a pre-alarm) • Sensitivity (set to low, medium, or high to compensate for ambient vibration or motion) • Warning Time (countdown, in seconds, from pre-alarm to Man Down alarm) When the Man Down alarm is activated, the buzzer sounds and LEDs flash continuously, and a countdown begins. • If the ToxiRAE Pro PID’s user presses [Y/+] for “Yes” in response to the “Are You OK?” question on the screen before the countdown reaches zero, the Man Down alarm stops and the main reading screen is displayed. • If the person does not press [Y/+] for “Yes” in response to the “Are You OK?” question on the screen before the countdown reaches zero, the Man Down alarm is sounded and LEDs flash continuously. • If the person presses [MODE] during the countdown, answering the “Are You OK?” question with “No,” the Man Down alarm starts. If the ToxiRAE Pro PID’s wireless connectivity is enabled, a Man Down message is also sent to remote observers. Exit (the Alarm Settings Submenu) Press [Y/+] to exit the Alarm Settings submenu. Alarm Settings is exited, and Datalog is highlighted. If you want to cycle through the Alarm Setting submenus, press [MODE] instead of [Y/+].](https://usermanual.wiki/RAE-Systems/TOXIRAEPRO/User-Guide-3228900-Page-31.png)
![ToxiRAE Pro PID User’s Guide 30 Exit (the Alarm Settings Submenu) Press [Y/+] to exit the Alarm Settings submenu. Alarm Settings is exited, and Datalog is highlighted. If you want to cycle through the Alarm Setting submenus, press [MODE] instead of [Y/+]. 11.5.4. Datalog Clear Datalog This operation erases all data stored in the datalog. Note: Once the datalog is cleared, the data cannot be recovered. Press [Y/+] to clear the datalog. The display asks, “Are you sure?” • Press [Y/+] if you want to clear the datalog. When it has been cleared, the display shows “Datalog Cleared!” • Press [MODE] if you do not want to clear the datalog. You are taken to the next submenu, Interval. Interval Intervals are shown in seconds. The default value is 60 seconds. The maximum interval is 3600 seconds, and the minimum is 1 second. 1. Press [Y/+] repeatedly to select a desired number. Numbers increase from 0 to 9. Once 9 is reached, pressing [Y/+] again “wraps” around back to 0. 2. Press [MODE] to advance to the next digit. 3. Repeat this process until the desired value is entered. When you have completed your selections, press [MODE] repeatedly until “OK” is highlighted. • To save the new value, press [Y/+]. • To cancel the changes and keep the settings as they were, press [MODE] to highlight “Cancel.” Then press [Y/+]. You are taken to the next submenu, Data Selection.](https://usermanual.wiki/RAE-Systems/TOXIRAEPRO/User-Guide-3228900-Page-32.png)
![ToxiRAE Pro PID User’s Guide 31 Data Selection Data Selection allows you to select which types of data are recorded and made available when you download your datalog to a computer via ProRAE Studio II software. You can choose any or all of four types of data (you must choose at least one): • Minimum • Average • Maximum • Real Time 1. Press [MODE] to step from one option to the next. The highlighter indicates your choice. 2. Press [Y/+] to toggle your selection on or off (the check box indicates “on” with an “X”). 3. When you have completed your selections, press [MODE] repeatedly until “Exit” is highlighted. 4. Press [Y/+] to save the changes and exit. Datalog Type The instrument has two datalog types: Auto Collects datalog informatio n when the instrume nt is sampling until the datalog memory is full. Manual Datalogging occurs only when you manually initiate datalogging (see below for details). 1. Press [MODE] to step from one option to the next. 2. Press [Y/+] to make your selection (the dark circle in the “radio button” indicates that an option has been selected). 3. When you have completed your selection, press [MODE] until “Exit” is highlighted. 4. Press [Y/+] to save your selection and exit. About Manual Datalog When the instrument is set to Manual Datalog, you can turn datalogging on and off from the main measurement display in the Normal Mode by pressing the [MODE] key three times. • When you reach the screen that says “Start Datalog?” press [Y/+] to start it. You see “Datalog Started,” confirming that datalogging is now on. • When you reach the screen that says “Stop Datalog?” press [Y/+] to stop it. You see “Datalog Stopped,” confirming that datalogging is now off. Exit (the Datalog Submenu) Press [Y/+] to exit. Datalog is exited, and Monitor Setup is highlighted.](https://usermanual.wiki/RAE-Systems/TOXIRAEPRO/User-Guide-3228900-Page-33.png)
![ToxiRAE Pro PID User’s Guide 32 11.5.5. Monitor Setup Wireless There are seven Wireless parameters: • Radio On/Off • Roaming • PAN ID • Channel • Join Network • Interval • Off Network Alarm • Factory Reset Radio On/Off This turns the wireless modem on or off. Note: Turning the radio off does not change any of the settings. They are stored and ready for use the next time the wireless modem is turned on. 1. Choose an “On” or “Off” by pressing [MODE] until your choice is highlighted. (the dark circle in the “radio button” indicates that an option has been selected). 2. Press [Y/+] to select it. 3. Press [MODE] repeatedly until “Exit” is highlighted. 4. Press [Y/+] to register your selection and exit. To exit without saving the new value: 1. Make sure your previous setting is selected. 2. Press [MODE] repeatedly to advance to Exit. 3. Press [Y/+] to exit. Roaming The Roaming function provides continuous wireless connectivity between zones enabling users of wireless monitors to travel from one zone/work area to another without losing communication between their monitor and ProRAE Guardian. You can turn Roaming on and off in your monitor, or you can set it via ProRAE Studio II. Note: When Roaming is on, you cannot change the instrument’s PAN ID. When Roaming is on, the “PAN ID” is not shown in the Wireless menu. To turn “PAN ID” back on: 1. While in the Wireless menu, press [MODE] to scroll to “Roaming.” 2. Press [Y/+] to select “Roaming.” 3. Press [MODE] to scroll to “Off.” 4. Press [Y/+] to select. 5. Press [MODE] to scroll to “Exit.” 6. Press [Y/+] to exit.](https://usermanual.wiki/RAE-Systems/TOXIRAEPRO/User-Guide-3228900-Page-34.png)
![ToxiRAE Pro PID User’s Guide 33 The message “Applying Settings” is shown and then the menu advances automatically to “PAN ID.” PAN ID All units on a network must be programmed with the same Pan ID (Personal Network Identifier) to ensure communication compatibility. Important! The allowed range for Pan ID numbers is 001 through 999. Note: When Roaming is on, you cannot change the instrument’s PAN ID. When Roaming is on, the “PAN ID” is not shown in the Wireless menu. Choose and enter a 3-digit PAN ID: 1. Press [Y/+] and the display shows the current PAN ID. Example: “866.” The left-most digit is highlighted. 2. Press [Y/+] repeatedly to select a desired number. Once 9 is reached, pressing [Y/+] again “wraps” around back to 0. 3. Press [MODE] to advance to the next digit. Repeat this process until all eight characters of the new PAN ID are entered. To save your new PAN ID and exit, press [MODE] repeatedly until “OK” is highlighted. Then press [Y/+]. It says, “Applying settings…” and then “Settings applied successfully!” to indicate they have been registered. The menu now advances automatically to “Channel.” Channel Every network operates on its own channel, between 01 and 10 (do not use 00). If you need to know the network’s channel, check the EchoView Host’s setting. Note: In Europe, only Channel 00 can be used, and it is preset (it cannot be changed). Choose and enter a 2-digit Channel: 1. Press [Y/+] and the display shows the current Channel. Example: “10.” The left-most digit is highlighted. 2. Press [Y/+] repeatedly to select a desired number. Once 9 is reached, pressing [Y/+] again “wraps” around back to 0. 3. Press [MODE] to advance to the next digit. Repeat this process until all eight characters of the new Channel are entered. To save your new Channel number and exit, press [MODE] repeatedly until “OK” is highlighted. Then press [Y/+]. It says, “Applying settings…” and then “Settings applied successfully!” to indicate they have been registered. The menu now advances automatically to “Join Network.”](https://usermanual.wiki/RAE-Systems/TOXIRAEPRO/User-Guide-3228900-Page-35.png)
![ToxiRAE Pro PID User’s Guide 34 Join Network This screen is for joining an existing network. When you see this screen, press [Y/+] to join, or [MODE] to exit without joining. While searching for the network, the message “Joining network…” is displayed. If the network is found and successfully joined, then “Join network successful!” is displayed. Press [MODE] to acknowledge the connection and return to the Wireless menu. If the network is not joined, the display shows: “Join network failed!” You have two options: Exit and Retry. If you want to retry, check that your network setting is correct (matches the EchoView Host) and that the EchoView Host is turned on and operating. Then press [Y/+] to retry. Interval This sets the amount of time between data transmissions to the EchoView Host. To change the Interval: 1. Press [MODE] to step from one option to the other. The highlighted option changes each time you press [MODE]. 2. Press [Y/+] to make your selection (the dark circle in the “radio button” indicates the option has been selected). 3. When you have completed your selection, press [MODE] repeatedly until “Exit” is highlighted. 4. Press [Y/+] to save your selection, exit the Interval menu, and advance to “Off Netwk Alarm.” Off Netwk Alarm When this is enabled, the unit goes into alarm whenever an active network connection is lost. This informs you that connectivity has been broken between the ToxiRAE Pro and the EchoView Host. 1. Choose “On” or “Off” by pressing [MODE] until your choice is highlighted. (the dark circle in the “radio button” indicates that an option has been selected). 2. Press [Y/+] to select it. 3. Press [MODE] repeatedly until “Exit” is highlighted. 4. Press [Y/+] to register your selection and exit. To exit without saving the new value: 1. Make sure your previous setting is selected. 2. Press [MODE] repeatedly to advance to Exit. 3. Press [Y/+] to exit.](https://usermanual.wiki/RAE-Systems/TOXIRAEPRO/User-Guide-3228900-Page-36.png)
![ToxiRAE Pro PID User’s Guide 35 Factory Reset Selecting this resets the wireless settings to their original factory configura t io ns. CAUTION! A factory reset of the wireless settings deletes any customized settings and cannot be undone. 1. Press [Y/+] to select “Factory Reset.” You will see the message “Reset wireless settings?” 2. Press [Y/+] for “Yes” or [MODE] for “Exit.” If you select “Exit,” the ToxiRAE Pro exits without performing a factory reset. Exit (the Wireless Submenu) Press [Y/+] to exit. Wireless is exited, and Monitor Setup is highlighted. Site ID Choose and enter an 8-digit alphanumeric Site ID to uniquely identify the particular site where the instrument is to be used. This Site ID is included in the datalog report. 1. Press [Y/+] and the display shows the current Site ID. Example: “SITE0001.” The left-most digit is highlighted. 2. Press [Y/+] repeatedly to select a desired character. Letters increase from current value to Z followed by digits from 0 to 9. Once 9 is reached, pressing [Y/+] again “wraps” around to the letter A. For the last four characters that must be numerical, numbers increase from 0 to 9. Once 9 is reached, pressing [Y/+] again “wraps” around back to 0. Note: The last four characters must be numerals. 3. Press [MODE] to advance to the next character. Repeat this process until all eight characters of the new Site ID are entered. To save your new Site ID and exit, press [MODE] repeatedly until “OK” is highlighted. Then press [Y/+]. User ID Enter an 8-digit alphanumeric User ID to uniquely identify a user. This User ID is included in the datalog report. 1. Press [Y/+] and the display shows the current User ID. Example: “USER0000.” The left-most character is highlighted. 2. Press [Y/+] repeatedly to select a desired character. Letters increase from current value to Z followed by digits from 0 to 9. Once 9 is reached, pressing [Y/+] again “wraps” around to the letter A. 3. Press [MODE] to advance to the next character. Repeat this process until all eight characters of the new User ID are entered. To save your new User ID and exit, press [MODE] repeatedly until “OK” is highlighted. Then press [Y/+].](https://usermanual.wiki/RAE-Systems/TOXIRAEPRO/User-Guide-3228900-Page-37.png)
![ToxiRAE Pro PID User’s Guide 36 User Mode The ToxiRAE Pro PID has two user modes: Basic Basic users can only see and use a basic set of functions. Advanced Advanced users can see all screens and take advantage of all available functions. Note: The default value for User Mode is Basic. To change the User Mode: 1. Press [MODE] to step from one option to the other. The highlighting changes each time you press [MODE]. 2. Press [Y/+] to make your selection (the dark circle in the “radio button” indicates the option has been selected). 3. When you have completed your selection, press [MODE] repeatedly until “Exit” is highlighted. 4. Press [Y/+] to register your selection, exit the User Mode submenu and advance to Date. Date The Date is expressed as Month/Day/Year, with two digits for each (MM/DD/YY). The left-most digit is highlighted to indicate it is selected when you enter the Date submenu. 1. Press [Y/+] repeatedly to select a desired number. Numbers increase from 0 to 9. Once 9 is reached, pressing [Y/+] again “wraps” around back to 0. 2. Press [MODE] to advance to the next digit. Repeat this process until all six digits of the new date are entered. 3. Press [MODE] repeatedly until “OK” is highlighted. 4. Press [Y/+] to save your selection and advance to Time. Note: If you do not want to save the change, press [MODE] repeatedly until “Cancel” is highlighted. Press [Y/+] to exit to Time without saving the changes. Time The Time is expressed as Hours/Minutes/Seconds, with two digits for each. The time is in 24-hour (milita ry) format of HH:MM:SS. The left-most digit is highlighted to indicate it is selected. 1. Press [Y/+] repeatedly to select a desired number. Numbers increase from 0 to 9. Once 9 is reached, pressing [Y/+] again “wraps” around back to 0.](https://usermanual.wiki/RAE-Systems/TOXIRAEPRO/User-Guide-3228900-Page-38.png)
![ToxiRAE Pro PID User’s Guide 37 2. Press [MODE] to advance to the next digit. Repeat this process until all six digits of the new time are entered. 3. Press [MODE] repeatedly until “OK” is highlighted. 4. Press [Y/+] to save your selection, exit the Time submenu and advance to Temp. Unit. Note: If you do not want to save the change, press [MODE] until “Cancel” is highlighted. Press [Y/+] to exit to Temp. Unit without saving the changes. Temp. Unit The display unit of the internal temperature sensor can be switched between Fahrenheit and Celsius. To change the Temp. Unit: 1. Press [MODE] to step from one option to the other. The highlighted option changes each time you press [MODE]. 2. Press [Y/+] to make your selection (the dark circle in the “radio button” indicates the option has been selected). 3. When you have completed your selection, press [MODE] repeatedly until “Exit” is highlighted. 4. Press [Y/+] to save your selection, exit the Temp. Unit menu, and advance to Language. Language English is the default language, but other languages can also be selected for the instrument. 1. Press [MODE] to step from one option to the next. The highlighted option changes each time you press [MODE]. 2. Press [Y/+] to make your selection (the dark circle in the “radio button” indicates this option has been selected). 3. When you have completed your selection, press [MODE] repeatedly until “Exit” is highlighted. 4. Press [Y/+] to save your selection, exit the Language submenu, and advance to Zero At Start. Zero At Start When Zero At Start is turned on, the instrument starts with a zero calibration every time it is turned on. 1. Press [MODE] to choose between “Off” and “On.” 2. Press [Y/+] to make your selection (the dark circle in the “radio button” indicates your selection). 3. When you have completed your selection, press [MODE] repeatedly until “Exit” is highlighted.](https://usermanual.wiki/RAE-Systems/TOXIRAEPRO/User-Guide-3228900-Page-39.png)
![ToxiRAE Pro PID User’s Guide 38 4. Press [Y/+] to save your selection, exit the Zero At Start submenu, and advance to LCD Contrast. LCD Contrast The display’s contrast can be increased or decreased from its default setting. You may not need to ever change the default setting, but sometimes you can optimize the display to suit extreme temperature and ambient brightness/darkness conditions. 1. Press and hold [Y/+] to select a desired level of contrast. The range is 1 to 100. Once 100 is reached, pressing [Y/+] again "wraps" around back to 1. 2. When you have completed your selection, press [MODE] repeatedly until “OK” is highlighted. 3. Press [Y/+] to save your selection, and exit the LCD Contrast. Note: If you do not want to save the change, press [MODE] repeatedly until “Cancel” is highlighted. Press [Y/+] to exit without saving the changes. Exit (Monitor Setup Submenu) Press [Y/+] to exit. Monitor Setup is exited. Exit (to exit Programming Mode) is highlighted. 11.6. Exit (Exit Programming Mode) To exit Programming Mode and return to normal operation, press [MODE] until the Exit icon is highlighted. Press [Y/+] to exit. You will see “Updating Settings…” as changes are registered and the mode changes to normal operation.](https://usermanual.wiki/RAE-Systems/TOXIRAEPRO/User-Guide-3228900-Page-40.png)
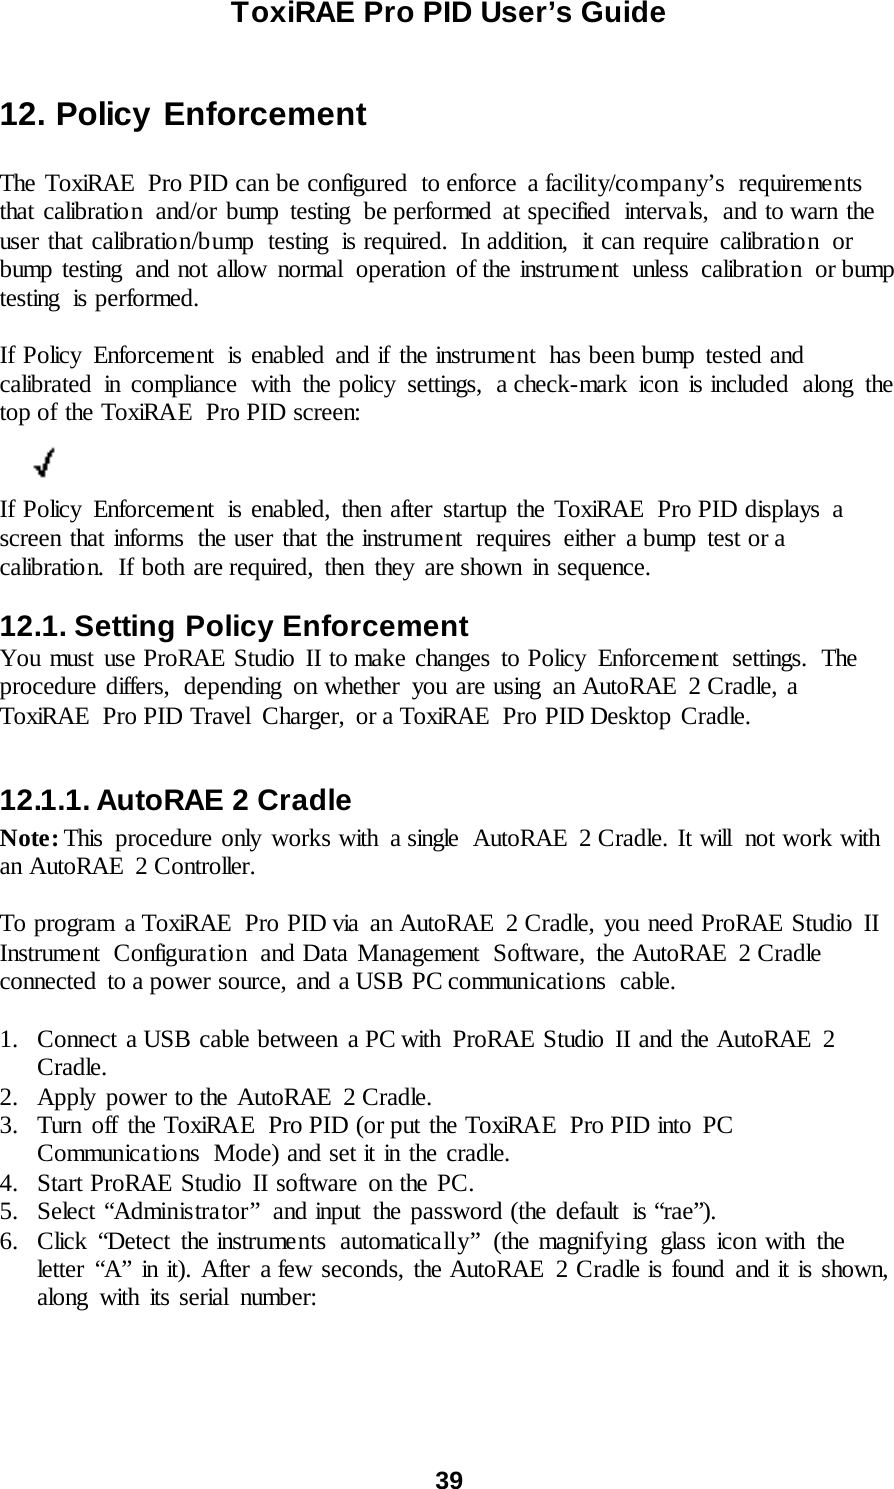
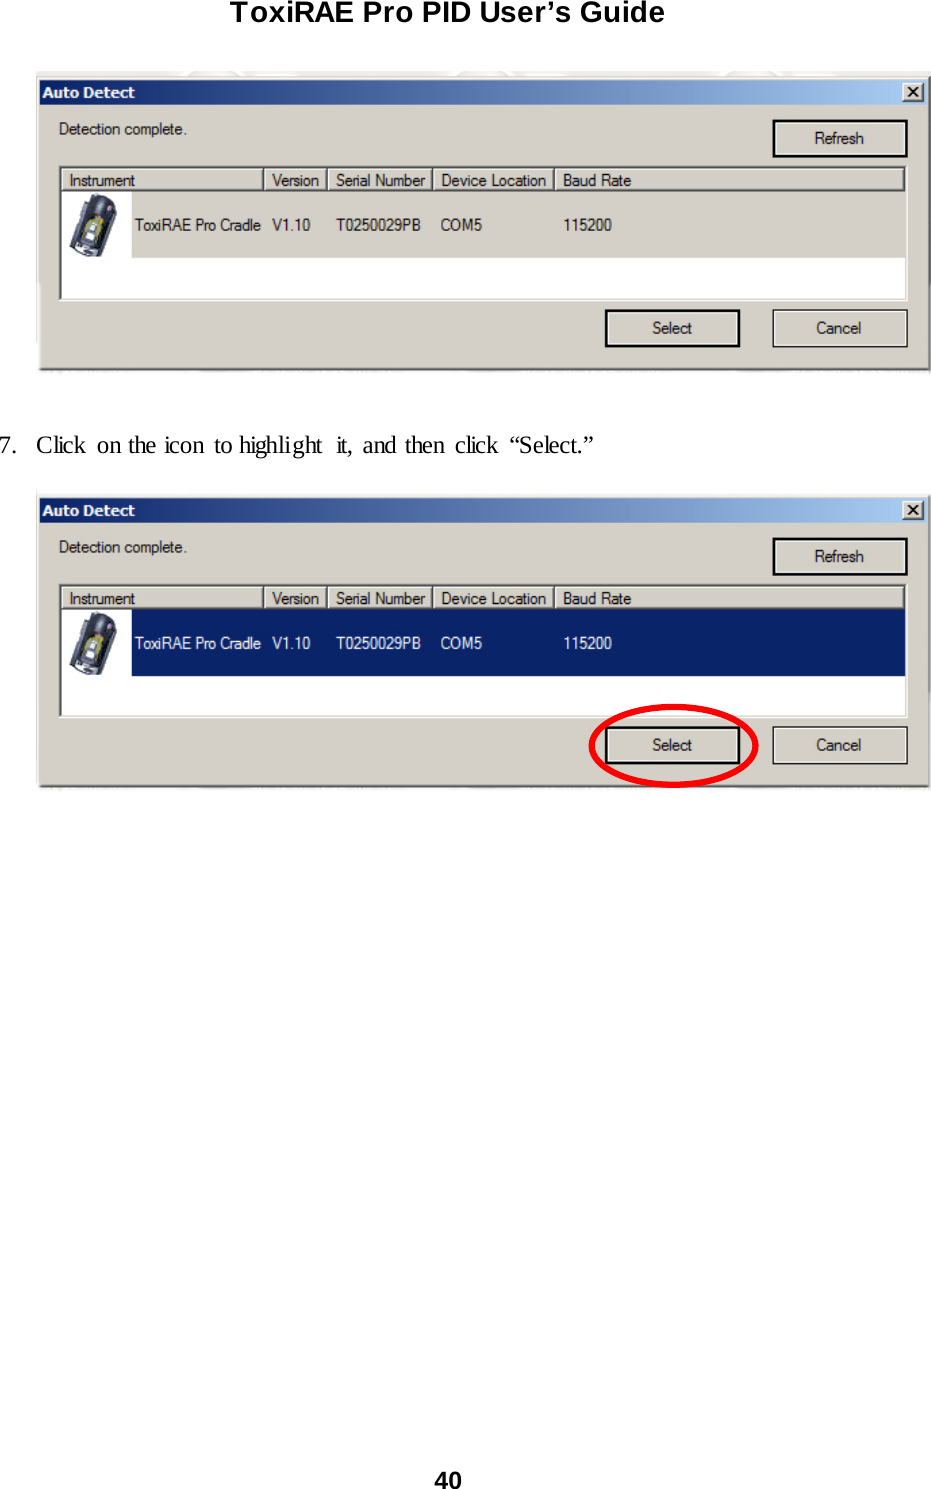
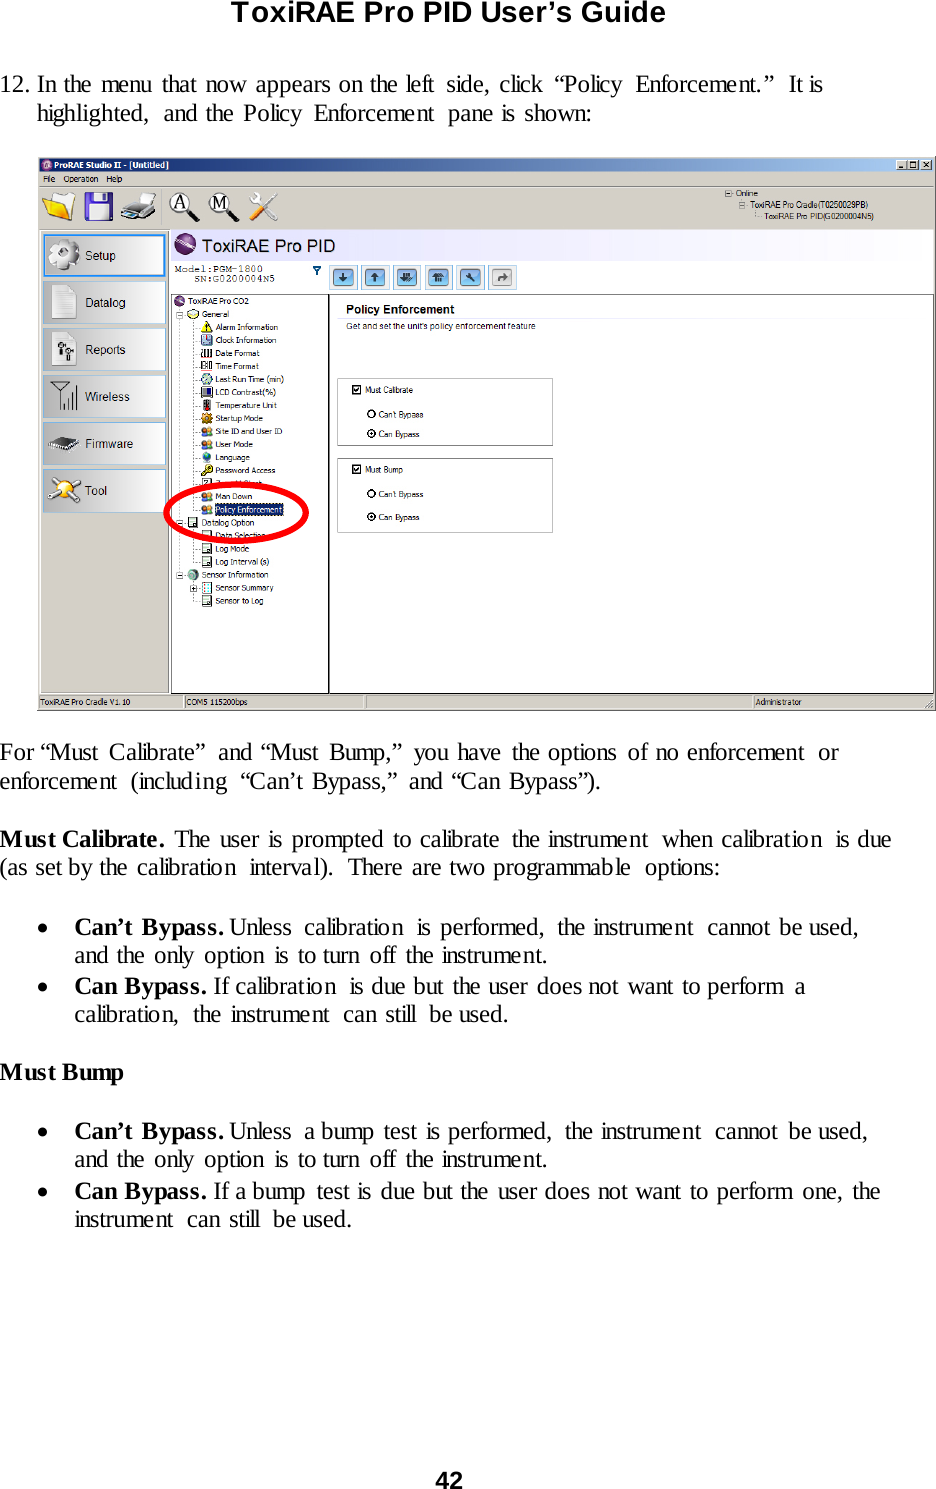
![ToxiRAE Pro PID User’s Guide 43 These are the screens that are shown on a ToxiRAE Pro PID after startup if “Can Bypass” is selected: If “Can’t Bypass” is selected, the display looks like this, and only allows the options of performing the test or shutting down: 12.1.2. ToxiRAE Pro PID Desktop Cradle Or Travel Charger Make sure the AC adapter is connected and that a USB cable is connected to a computer running ProRAE Studio II. 1. Turn on the ToxiRAE Pro PID. 2. Hold down [MODE] and [Y/+] to enter Programming Mode. 3. Provide the password. 4. Press [MODE] until “Enter Communicatio ns Mode?” is displayed. 5. Press [Y/+]. The screen shows that it is ready by saying “Communications Mode ready…” It is now ready to communicate with the computer running ProRAE Studio II. If you want to exit, press [MODE]. 6. Start ProRAE Studio II. 7. Select “Administrator.” 8. Input the password (the default is “rae”). 9. Click “OK.” 10. Click “A” (detects instruments automatically). 11. Click on the instrument’s icon when it appears to highlight it. 12. Click “Select.” 13. Click “Setup.” 14. Click “Policy Enforcement.”](https://usermanual.wiki/RAE-Systems/TOXIRAEPRO/User-Guide-3228900-Page-45.png)

![ToxiRAE Pro PID User’s Guide 45 17. Exit ProRAE Studio II. 18. Press [Y/+] on the ToxiRAE Pro PID to exit Communication Mode. 12.2. Deactivating Policy Enforcement 12.2.1. AutoRAE 2 Cradle To deactivate Policy Enforcement when using an AutoRAE 2 Cradle, follow the procedure for changing settings. See page 39 for details. 12.2.2. ToxiRAE Pro PID Desktop Cradle Or Travel Charger If the ToxiRAE Pro PID screen displays the message that it must be bump tested or calibrated, and if the option to bypass bump testing or calibration is not available, you should shut off the instrument and follow the procedure outlined here if you want to change the Policy Enforcement settings: 1. Use a USB cable to connect the ToxiRAE Pro PID in its Travel Charger or Desktop Cradle to a computer running ProRAE Studio II. 2. Enter Diagnostic Mode on the ToxiRAE Pro PID (with the instrument turned off, press and hold [Y/+] and [MODE] until it starts up. 3. After startup, enter the password when prompted (default is “0000”) and press [MODE]. 4. Press [MODE] repeatedly until you see the “Enter Communications Mode?” screen. 5. Press [Y/+] to enter Communications Mode. 6. Start ProRAE Studio II. 7. Select “Administrator.” 8. Input the password (the default is “rae”). 9. Click “OK.” 10. Click “A” (detect instruments automatically). 11. Click on the instrument’s icon when it appears. 12. Click “Select.” 13. Click “Setup.” 14. Click “Policy Enforcement.” The Policy Enforcement pane is shown. 15. Deselect Policy Enforcement features you do not wish to use. 16. Click “Upload all settings to the instrume nt. ”](https://usermanual.wiki/RAE-Systems/TOXIRAEPRO/User-Guide-3228900-Page-47.png)
![ToxiRAE Pro PID User’s Guide 46 17. When you see this confirmation. Click “Yes.” Uploading will take a few seconds, and this progress bar is shown: 18. When the upload is done, exit ProRAE Studio II. 19. Press [Y/+] on the ToxiRAE Pro PID to exit Communication Mode.](https://usermanual.wiki/RAE-Systems/TOXIRAEPRO/User-Guide-3228900-Page-48.png)
![ToxiRAE Pro PID User’s Guide 48 Caution! After calibration is complete, remove the Calibration Adapter. When monitoring, never operate the ToxiRAE Pro PID with the Calibration Adapter attached. If the Calibration Adapter is attached during normal operation, inconsistent and lower-than-normal readings will occur because of decreased concentration of the gas being monitored. 13.2.2. Disconnecting The Calibration Adapter After calibrating the ToxiRAE Pro PID, you must remove the Calibration Adapter by lifting it off the ToxiRAE Pro PID. 13.3. Zero Calibration This operation sets the zero point of the sensor calibration curve for clean air. Expose the ToxiRAE Pro PID to a clean air source with 20.9% oxygen and without any organic, toxic, or combustib le gas impurities. This “Zero Air” can come from a cylinde r or clean ambient air. Note: If you use a zero air cylinder, you must use the ToxiRAE Pro PID Calibratio n Adapter. Using a calibration adapter is not necessary for calibration in fresh air. Turn on the ToxiRAE Pro PID. Once it has been through its startup, enter Programming Mode: 1. Press and hold [MODE] and [Y/+] until you see the Password screen. 2. Input the 4-digit password: • Press [Y/+] repeatedly to select a desired number. Numbers increase from 0 to 9. Once 9 is reached, pressing [Y/+] again “wraps” around back to 0. • Step from digit to digit using [MODE]. • When you are done, press [MODE] until OK or Cancel is highlighted. • Press [Y/+] to register the password (if OK is highlighted) or to exit without entering the password (if Cancel is selected).](https://usermanual.wiki/RAE-Systems/TOXIRAEPRO/User-Guide-3228900-Page-50.png)
![ToxiRAE Pro PID User’s Guide 49 If you make a mistake, you can cycle through the digits by pressing [MODE] and then using [Y/+] to change the number in each position. Note: The default password is 0000. If you do not know the password, do not enter anything. Just press [MODE] repeatedly to highlight OK, and then press [Y/+]. Note: If the ToxiRAE Pro PID is in Programming Mode and you do not press a key within 60 seconds, it exits Programming Mode and re-enters Normal Mode. 1. At the Calibration screen, press [Y/+]. 2. “Zero Calib” is highlighted. Make sure the ToxiRAE Pro PID is in clean air. Otherwise attach a cylinder of zero gas to the Calibration Adapter installed on the instrument. 3. Press [Y/+]. The message “Apply zero gas…” is displayed. 4. Start the flow of the zero gas (if used) and press [Y/+] to start the zero calibration. 5. There is a 60-second countdown, during which time the screen shows the word “Zeroing…” and the countdown. 6. Upon completion, it says “Zeroing is done! Reading = 0.0ppm” along with the reading (it should be 0.0 ppm or very close to it). 7. “Span Calib” is highlighted. Note: You can abort the zero calibration during its countdown by pressing the [MODE] key. Important! If you used the Calibration Adapter and a zero air cylinder, you must remove the Calibration Adapter from the ToxiRAE Pro PID. If the Calibration Adapter is attached during normal operation, inconsistent and lower-than-norma l readings will occur because of decreased concentration of the gas being monitored. 13.4. Span Calibration This procedure determines the second point of the sensor calibration curve for the sensor. To begin calibration, connect the calibration gas cylinder, flow regulator, and calibration adapter to the ToxiRAE Pro PID. With the ToxiRAE Pro PID in Programming Mode, and with Span Calib highlighted, follow this procedure: 1. Press [Y/+]. The screen displays the current (or default) calibration gas and its concentration. For example: Cal. Gas: Isobutylene Span=100ppm Change? • Press [MODE] if you do not want to change it.](https://usermanual.wiki/RAE-Systems/TOXIRAEPRO/User-Guide-3228900-Page-51.png)
![ToxiRAE Pro PID User’s Guide 50 • Press [Y/+] if you want to change it. If you entered the Calibration Menu without supplying the correct password, or supplied the correct password but chose not to change the Cal.Gas, you will see a message like this: Cal.Gas: Isobutylene Span=100ppm Apply gas… 2. Press [Y/+] to start calibration. 3. Press [MODE] if you want to quit without calibrating. During calibration, the calibration gas name, its concentration, and the countdown are displayed. Depending upon the device alarm settings, the monitor may go into low and then high alarm once span calibration is complete, which is expected in response to the test gas. Note: You can abort span calibratio n during its countdown by pressing [MODE]. Upon completion, the screen “Span is done!” appears along with the reading (it should be within 10% of the span gas concentration). Important! After calibration is complete, you must remove the Calibration Adapter from the ToxiRAE Pro PID. If the Calibration Adapter is attached during normal operation, inconsistent and lower-than-normal readings will occur because of decreased concentration of the gas being monitored. 13.4.1. Changing Span Gas Concentration If you selected “Change” for span gas concentration, the following screen appears: 1. Press [Y/+] repeatedly to select a desired number. Numbers increase from 0 to 9. Once 9 is reached, pressing [Y/+] again “wraps” around back to 0. 2. Step from one digit to the next by pressing [MODE]. 3. When you are done, press [MODE] until either “OK” or “Cancel” is selected. Press [Y/+] to register your selection (if “OK” is highlighted) or to exit without registering it (if “Cancel” is selected).](https://usermanual.wiki/RAE-Systems/TOXIRAEPRO/User-Guide-3228900-Page-52.png)
![ToxiRAE Pro PID User’s Guide 51 14. Diagnostic Mode In Diagnostic Mode, the ToxiRAE Pro PID provides raw counts for sensor, battery, and other readings. Most of these screens are useful only to service technicians. Therefore, if you require information on Diagnostic Mode, refer to the ToxiRAE Pro PID Service Guide. The ToxiRAE Pro PID’s Diagnostic Mode can only be accessed at startup time. In Diagnostic Mode, ToxiRAE Pro PID displays readings in raw counts instead of units such as parts per million (ppm). 14.1. Entering Diagnostic Mode 1. With the ToxiRAE Pro PID turned off, press and hold both [MODE] and [Y/+]. 2. When the display turns on and the password screen appears, release the keys. 3. Enter the 4-digit password (the password is the same as the one for the Programming Mode): • Step from one position in the four-character string to the other by pressing [MODE]. • Press [Y/+] repeatedly to select a desired number. Numbers increase from 0 to 9. • Once 9 is reached, pressing [Y/+] again “wraps” around back to 0. 4. When you are done, press [MODE] until either OK or Cancel is selected. Press [Y/+] to register the password (if “OK” is highlighted) or to exit without entering the password (if “Cancel” is selected). 14.2. Navigating Diagnostic Mode Step through Diagnostic Mode by pressing [MODE]. 14.3. Exiting Diagnostic Mode 1. Turn off the ToxiRAE Pro PID by pressing and holding [MODE]. There will be a standard shutoff countdown. 2. When the instrument shuts off, you will be alerted. Release your finger. Note: The next time you start ToxiRAE Pro PID, hold only [MODE], and it will automatically start in Normal Mode.](https://usermanual.wiki/RAE-Systems/TOXIRAEPRO/User-Guide-3228900-Page-53.png)
![ToxiRAE Pro PID User’s Guide 53 16. Downloading Datalogs And Performing PC-Based Instrument Configuration and Firmware Upgrades The ToxiRAE Pro PID communicates with a PC running ProRAE Studio II Instrument Configuration and Data Management software (version 1.03 or higher) to download datalogs, configure the instrument, or upload new firmware. The ToxiRAE Pro PID must be connected to a PC through the supplied Charging / PC Communica tio ns Cradle and must be in the PC communicatio ns mode. 1. Make sure the Charging/PC Communications Cradle has power from its AC adapter (the LED on the front of the cradle should be illuminated). 2. Use the supplied PC Communic atio ns Cable (USB to mini-USB cable) to connect the Cradle to a PC. 3. Turn on the ToxiRAE Pro PID. Make sure it is running in Normal mode (with the main measurement screen with VOC reading showing). 4. Insert the ToxiRAE Pro PID in the cradle. 5. Activate the PC communications mode on the ToxiRAE Pro PID by pressing [MODE] repeatedly, starting from the main measurement screen until you reach the “Enter Communications Mode and stop measurement?” screen. 6. Press [Y/+]. Measurement and datalogging stop, and the instrument is now ready to communicate with the PC. The display now says “PC comm ready…” 7. Start up the ProRAE Studio II software, enter a password, and detect the instrument following the directions provided in the ProRAE Studio II User’s Manual. 8. Follow the instructions in the ProRAE Studio II User’s Manual to download the datalog, configure the instrument settings, or update the ToxiRAE Pro PID’s firmwa re. 9. When you are done, press [MODE] to exit the PC communications mode on the ToxiRAE Pro PID. The screen displays “Sensor initializing,” after which the instrument returns to operating in Normal mode.](https://usermanual.wiki/RAE-Systems/TOXIRAEPRO/User-Guide-3228900-Page-55.png)