RAL DIAGNOSTICS 405000 Tag Reader User Manual 12060 V05 User Guide RAL Stainer EN Emitech
RAL DIAGNOSTICS Tag Reader 12060 V05 User Guide RAL Stainer EN Emitech
USERS MANUAL
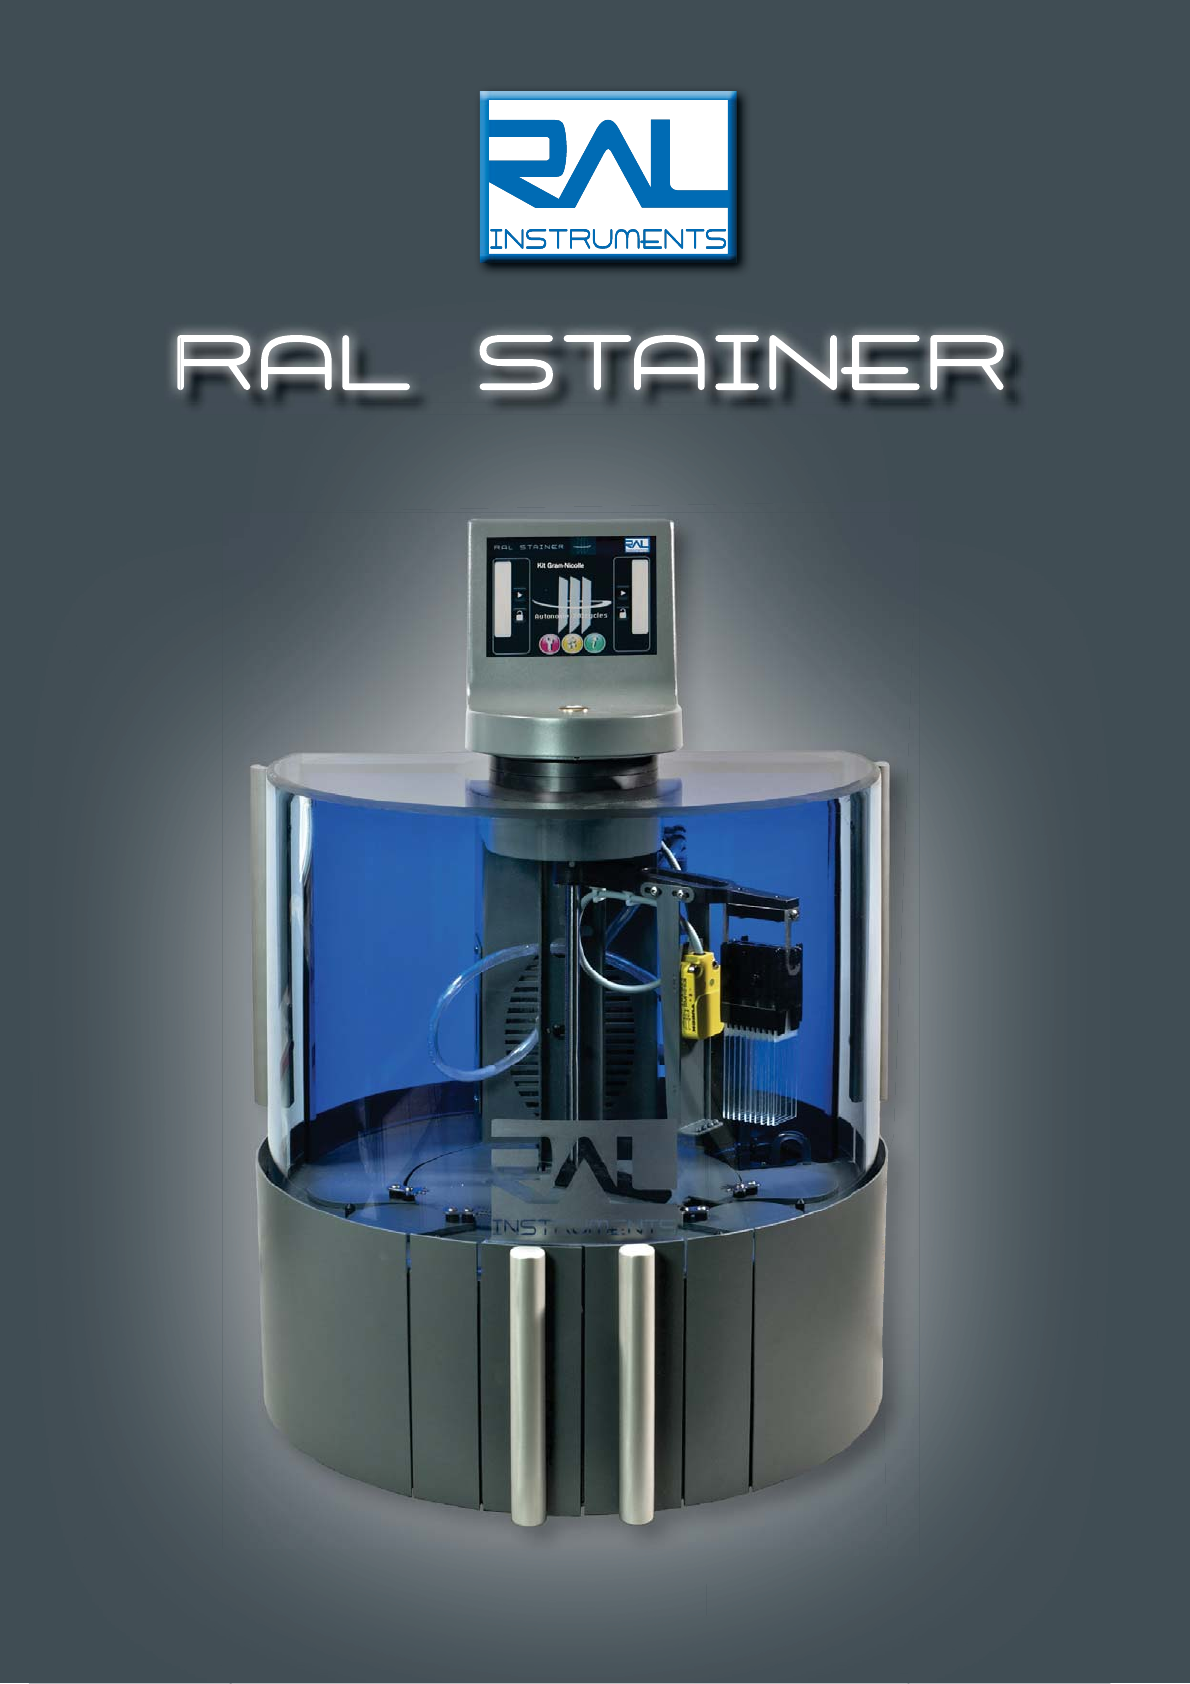
The RAL Automated staining system
User Guide
RAL STAINER
The RAL Automated staining s
y
ste
m
Use
r
Guide
Ref:12060-V05 / EN
RAL STAINER
2 RAL STAINER User guide
Before use, please read the user guide carefully in order to be able to use the equipment correctly.
The user guide must be kept in the immediate vicinity in order to be available for reference at all
times.
All rights reserved. The reproduction, modification or use of any part of this document in any form is prohibited
without the written permission of RAL Instruments.
RAL DIAGNOSTICS - Site Montesquieu - 33650 Martillac - FRANCE
E-mail: commercial@ral-diagnostics.fr
Tel: +33 (0) 557 960 404 - Fax: +33 (0) 557 960 405
www.ral-instruments.com
History of changes to the user guide
Revision Date Section Software Version
1 03/2012 2.43
2 07/2012 6 2.55
3 08/2012 12 2.55
4 02/2013 - 2.60
5 07/2013 - 2.63
Updates available on www.ral-instruments.com.

RAL STAINER
3 RAL STAINER User guide
1 INTRODUCTION .....................................5
1.1 RESPONSIBILITY ...................................5
2 SYMBOLS .........................................6
2.1 SYMBOLS USED IN THIS GUIDE ........................6
2.2 DESCRIPTION OF THE SYMBOLS ON THE APPLIANCE .........6
3 WARRANTY AND WARRANTY LIMITS .....................7
4 SAFETY INSTRUCTIONS ............................... 8
4.1 COMPLIANT USE ...................................8
4.2 WARNINGS .......................................8
4.3 WASTE ..........................................9
4.3.1 ELECTRONIC WASTE ..............................9
4.3.2 BACTERIOLOGICAL AND CHEMICAL WASTE ...............9
5 DESCRIPTION OF THE APPLIANCE ......................10
5.1 OPERATING PRINCIPLES ............................13
5.2 PERFORMANCE ...................................13
5.3 SAFETY ........................................13
5.4 SIZE ..........................................13
5.5 ELECTRIC SPECIFICATIONS .......................... 13
5.6 ENVIRONMENTAL LIMITS FOR USE .....................14
5.7 ENVIRONMENTAL LIMITS FOR TRANSPORTATION AND STORAGE 14
6 STAINING REAGENTS ............................... 15
7 INSTALLATION ....................................16
7.1 PACKAGING LIST .................................. 16
7.2 INSTALLATION ENVIRONMENT ........................17
7.3 SETTING UP ..................................... 17
7.4 CONNECTION OF THE INSTRUMENT TO THE MAINS POWER SUPPLY
7.5 HYDRAULIC CONNECTIONS ..........................18
8 SCREEN DESCRIPTIONS .............................19
8.1 MEANINGS OF THE SYMBOLS ........................19
8.2 PAGE DESCRIPTIONS ..............................20
8.2.1 STAINING PAGE ................................. 20
8.2.2 SETTINGS PAGE .................................21
8.2.3 CHANGE SESSION PAGE ...........................23
8.2.4 INFORMATION PAGE .............................. 24
8.2.5 ALPHANUMERIC AND NUMBER KEYBOARD ..............25
9 INITIALISATION ....................................26
9.1 USER CREATION AND RIGHTS MANAGEMENT ............. 26
10 USE ...........................................29
10.1 STARTING UP ................................... 29
10.2 INSTALLING REAGENTS ............................ 29
10.2.1 STAINING KIT ..................................29
10.2.2 RINSING SOLUTION .............................30
CONTENTS

RAL STAINER
4 RAL STAINER User guide
10.3 STAINING PROTOCOL .............................30
10.3.1 PROTOCOL MODIFICATION ........................31
10.3.2 CHANGING THE PROTOCOL ........................33
10.4 INSTALLING THE SLIDES ...........................33
10.4.1 LOADING THE SLIDE HOLDER ...................... 33
10.4.2 PLACE THE SLIDE HOLDER IN THE APPLIANCE .......... 33
10.5 STAINING ...................................... 34
10.6 CHANGING THE STAINING KIT OR DRAINING ............. 34
10.6.1 CHANGING THE STAINING KIT ......................34
10.6.2 DRAINING ....................................35
10.7 STAND-BY .....................................35
10.8 POWERING OFF ..................................35
11 TRACEABILITY ................................... 36
11.2 LOADING THE TRACEABILITY FILE .....................36
12 CLEANING ......................................37
12.1 CLEANING .....................................37
12.2 HYDRAULIC SYSTEM CLEANING ......................37
12.3 ACTIVATED CARBON FILTER .........................38
12.4 DECONTAMINATION ............................... 39
13 CONSUMABLES AND OPTION EQUIPMENT ...............40
13.1 CONSUMABLES .................................40
13.2 OPTIONAL EQUIPMENT ............................40
14 MAINTENANCE ................................... 41
15 AFTER-SALES SERVICES ............................ 41
16 TROUBLESHOOTING ...............................42
16.1 ERROR MESSAGES ...............................42
16.2 WHAT TO DO WHEN ...? ............................43
17 SUMMARY OF TIPS ................................45
18 INDUSTRIAL PROPERTY ............................ 46
19 EC DECLARATION .................................47
20 INDEX .........................................48
RAL STAINER
5 RAL STAINER User guide
Thank you for having chosen RAL Stainer.
RAL Stainer is intended for the staining of haematological or bacteriological smears.
It can be used to autonomously stain 20 slides and returns the slides ready for observation.
It recognises the staining kits installed and recommends the protocol to use as well as the renewal of the
reagents.
It can trace staining carried out using an RFID system.
It ensures the complete safety of the user: the user loads and unloads the biological samples without
opening the appliance, the residual stain emanations are retained by an activated carbon filter.
1.1 RESPONSIBILITY
Even if the greatest care has been given to the drafting of this guide, RAL Instruments cannot be held liable
by any party in the event of damages caused, or supposed to have been caused, either directly or indirectly, by
the failure to carry out the instructions contained in this guide or by the non compliant use of the equipment
described below.
1 INTRODUCTION
RAL STAINER
6 RAL STAINER User guide
2 SYMBOLS
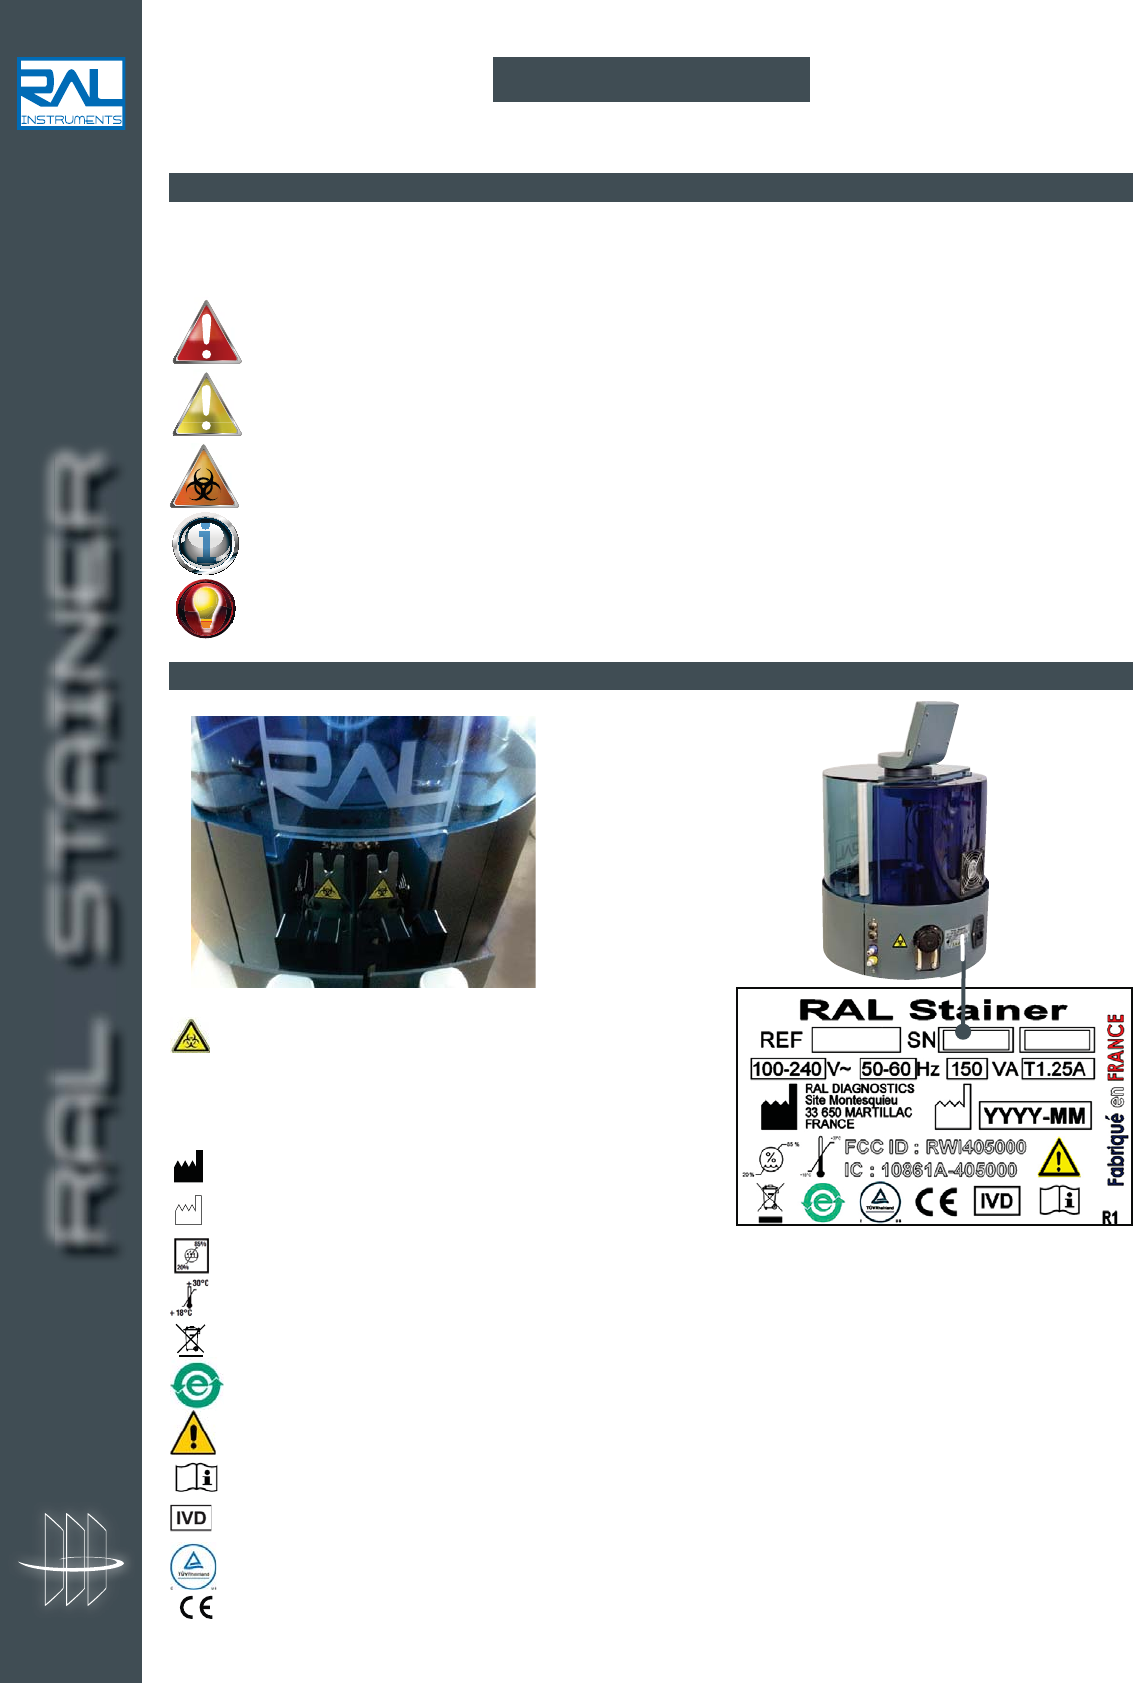
2.1 SYMBOLS USED IN THIS GUIDE
RAL Stainer is designed in order to ensure the maximum safety of the user. However, it is necessary to follow
the instructions described in this guide and indicated by the following symbols:
Attention : Failure to respect the information preceded by this symbol can be dangerous for the
user or for the environment ; or cause major damage to the appliance.
Warning: This symbol precedes all information covering the correct use of the appliance and a
quality diagnosis.
Biological risks
Information: This symbol precedes information that may be useful to a user operating the appliance.
Tips: This symbol precedes useful advice.
2.2 DESCRIPTION OF THE SYMBOLS ON THE APPLIANCE
Biological Risks
REF Appliance Reference
SN Appliance Serial Number
Manufacturer's Address
Fabrication Date
Operating relative humidity limits
Operating temperature limits
Recycling of the instrument or return to the distributor
Pollution Control
Attention, see User Guide
Consult the User Guide
Medical In Vitro Diagnosis System
Security Certification
European Compliance
Back sideFront side
RAL STAINER
7 RAL STAINER User guide
3 WARRANTY AND WARRANTY LIMITS
The duration of the warranty for equipment and manufacturing faults is indicated on your warranty contract.
The warranty period starts on the day your RAL Instruments representative commissions the equipment.
Failure to respect the safety instructions below or a use which is not compliant with this user guide may use
cause the cancelling of the warranty.
The warranty does not cover wear parts.
RAL STAINER
8 RAL STAINER User guide
4.1 COMPLIANT USE
r3"-4UBJOFSJTintended for the staining of haematological or bacteriological smears. It operates using RAL
Stainer kits from RAL Diagnostics. It is not designed for any other use and cannot be operated using other
reagents than those from RAL Diagnostics.
r5IFTNFBSTXJMMCFNBEFPOTUBOEBSETMJEFT
r3"-4UBJOFSJTTUSJDUMZSFTFSWFEGPSJOUFSJPSVTF
r5IFVTFPGUIFBQQMJBODFNVTUDPNQMZXJUIUIFJOTUSVDUJPOTHJWFOJOUIJTHVJEF
r5IFDPOEJUJPOTPGDPNQMJBOUVTFBMTPJODMVEFUIFSFHVMBSDMFBOJOHPGUIFBQQMJBODFBOEUIFDBSSZJOHPVUPG
maintenance operations.
r5IFVOQBDLJOHJOTUBMMBUJPOBOESFQBJSPQFSBUJPOTNVTUCFDBSSJFEPVUCZBOBVUIPSJTFEUFDIOJDJBO
rThe reservoir tank must be always in place. See section 7.3.
r5IJTEFWJDFDPNQMJFTXJUI1BSUPGUIF'$$3VMFT0QFSBUJPOJTTVCKFDUUPUIFGPMMPXJOHUXPDPOEJUJPOT
this device may not cause harmful interference, and (2) this device must accept any interference received,
including interference that may cause undesired operation.
4.2 WARNINGS
r
Failure to respect the safety instructions and the use instructions may compromise the user safety
.
r/FWFS DPOOFDU UIF BQQMJBODF UP B NBJOT QPXFS PVUMFU TVQQMZJOH B WPMUBHF EJGGFSFOU UIBO UIBU
indicated on the rear of the appliance. The main supply must not exceed ± 10% of the specified
voltage (100-240V). Failure to follow this instruction can cause a fire or an electric shock.
r"WPJEDBVTJOHEBNBHFUPUIFQPXFSTVQQMZDBCMF%POPUQMBDFBOZBQQMJBODFTPOJU%POPUUVH
on the cable (to disconnect the appliance for example). Failure to follow these instructions can
cause a short circuit or a disconnection that could, in turn, cause a fire or an electric shock.
r
Before connecting the product to the mains, check that the electrical installation of the building
complies with national installation regulations.
r
Do not use a power cable of a length greater than 3m
.
r/FWFSUPVDIUIFFMFDUSJDDJSDVJUTPSPUIFSQBSUTMPDBUFEJOTJEFUIFBQQMJBODF5IFSFJTBSJTLPG
electric shock, especially with damp hands.
r5IFMJUIJVNCBUUFSZDPOUBJOFEJOUIFFMFDUSPOJDDBSEMPDBUFEJOUIFMFGUSFBHFOUESBXFSPGUIFEFWJDF
can be replaced by a battery with the same characteristics (CR1220 3v). If not, it may cause an
explosion. Throwing away used batteries according to your laboratory practises.
r*OUIFFWFOUPGVOVTVBMTNPLFCFJOHFNJUUFECZUIFBQQMJBODFJNNFEJBUFMZTXJUDIJUPGGVTJOHUIF
main switch and unplug the mains power supply cable. Contact the RAL Instruments post-sales
service.
r*UJTQSPIJCJUFEUPGPSDFUIFDPWFSPQFOJOHTUIFTMJEFESBXFSTPSUIFSFBHFOUESBXFSTCPUIXIFO
operating and when not operational.
r*UJTQSPIJCJUFEUPGPSDFUIFSPUBUJOHBSNCPUIXIFOPQFSBUJOHBOEXIFOOPUPQFSBUJPOBM
r8FBSMBCPSBUPSZHMPWFTBOE B MBCPSBUPSZ DPBU XIFO VTJOH UIF BQQMJBODFBOE JUTSFBHFOUT 5IF
dangers relative to each reagent are indicated on their respective packaging or see section 6. In
the event of an accident, refer to the relevant safety data sheets.
rAll biological samples, all effluents and all used consumables should be considered to be
potentially dangerous. Once the appliance is no longer used, the user should disinfect and
wash his/her hands.
rThe contact between contaminated hands and the appliance can cause the contamination of
the appliance. In this case, decontaminate the appliance according to current laboratory best
practises. See also section 12.2.
r(FOFSBMMZNBLFTVSFUIBUDVSSFOUMBCPSBUPSZCFTUQSBDUJTFTBSF used.
The guarantee is not responsible for any changes or modifications not expressly approved by the
party responsible for compliance. Such modifications could avoid the user's authority to operate
the equipment.
4 SAFETY INSTRUCTIONS
RAL STAINER
9 RAL STAINER User guide
4.3 WASTE
4.3.1 ELECTRONIC WASTE
This symbol is applicable in European countries.
It indicates, in compliance with the 2003/108/EC directive relating to electric and electronic waste,
that electric and electronic objects are subject to selective waste collection by the company that
brought them onto the territory. Contact your RAL Instruments representative.
Outside the European Union, refer to current local or national regulations.
4.3.2 BACTERIOLOGICAL AND CHEMICAL WASTE
Before disposing of biological samples and/or chemical reagents, consult the reagent safety instructions.
Generally, make sure that current laboratory best practises are used.
RAL STAINER
10 RAL STAINER User guide
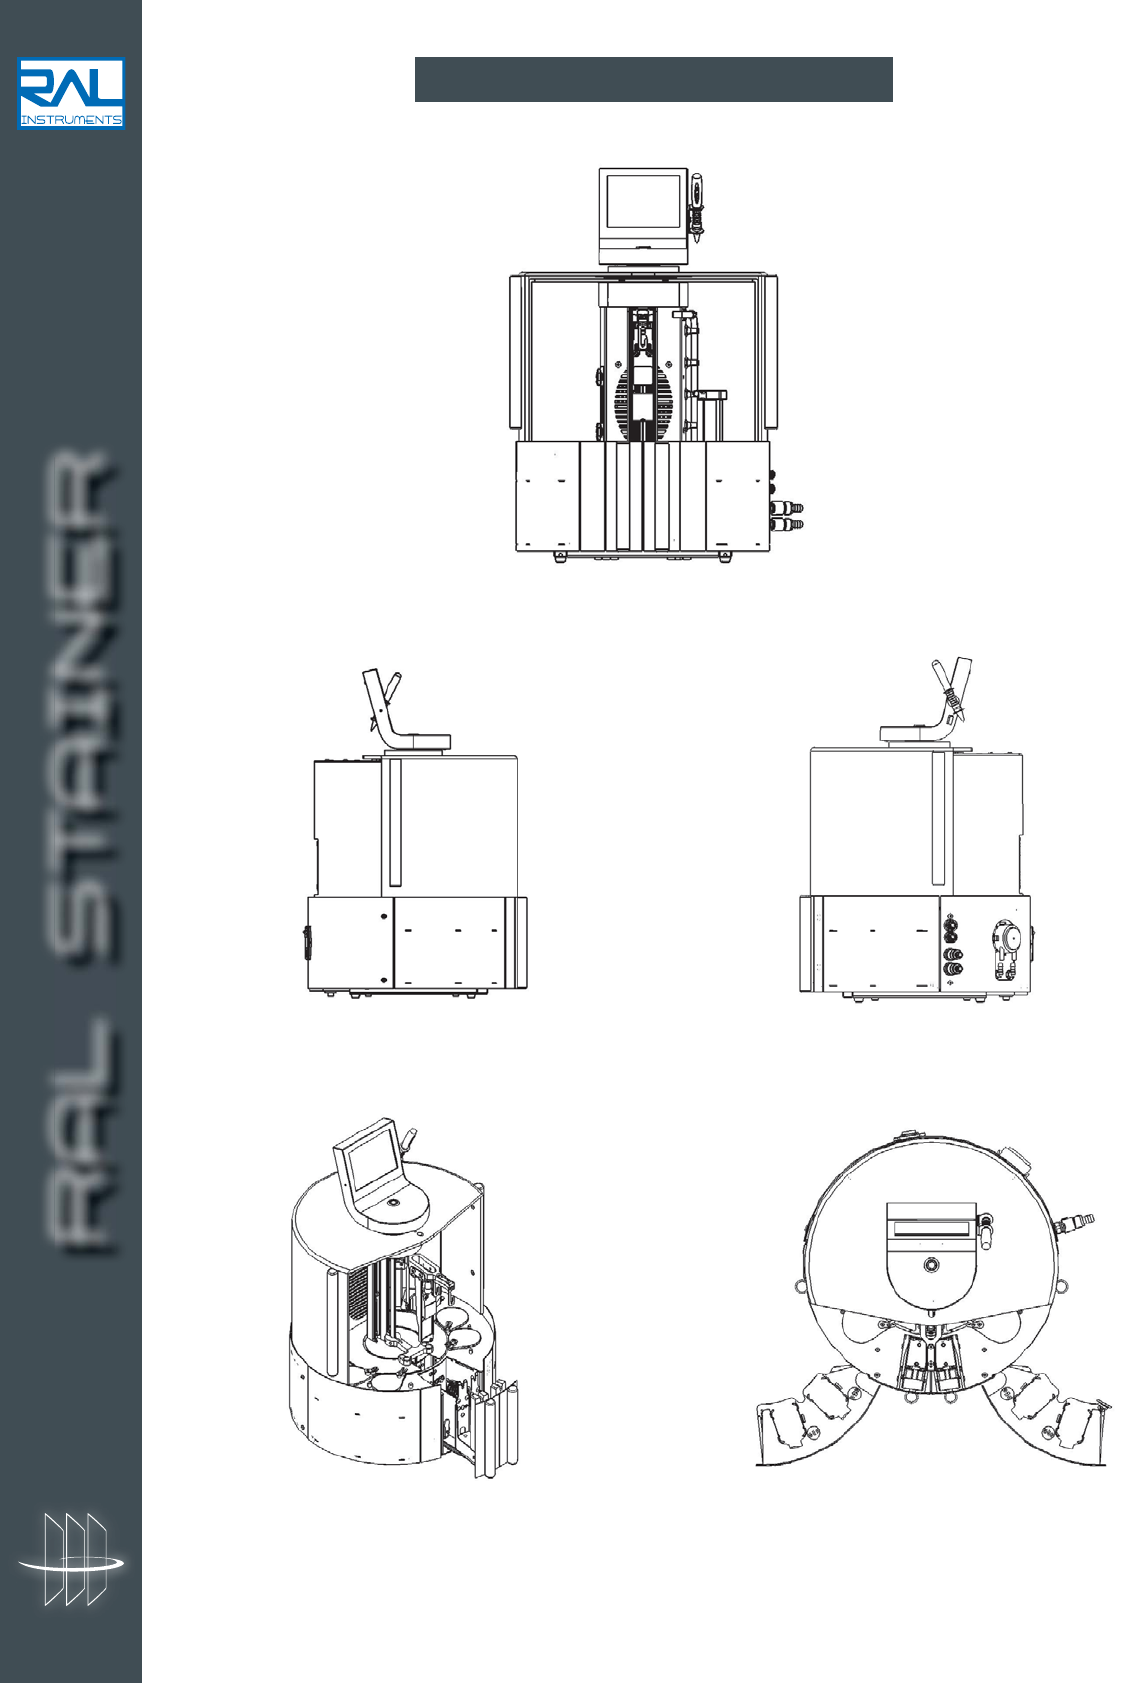
5 DESCRIPTION OF THE APPLIANCE
Open front face view
Left view Right view
Side view with
drawers open
Top view with
drawers open
RAL STAINER
11 RAL STAINER User guide
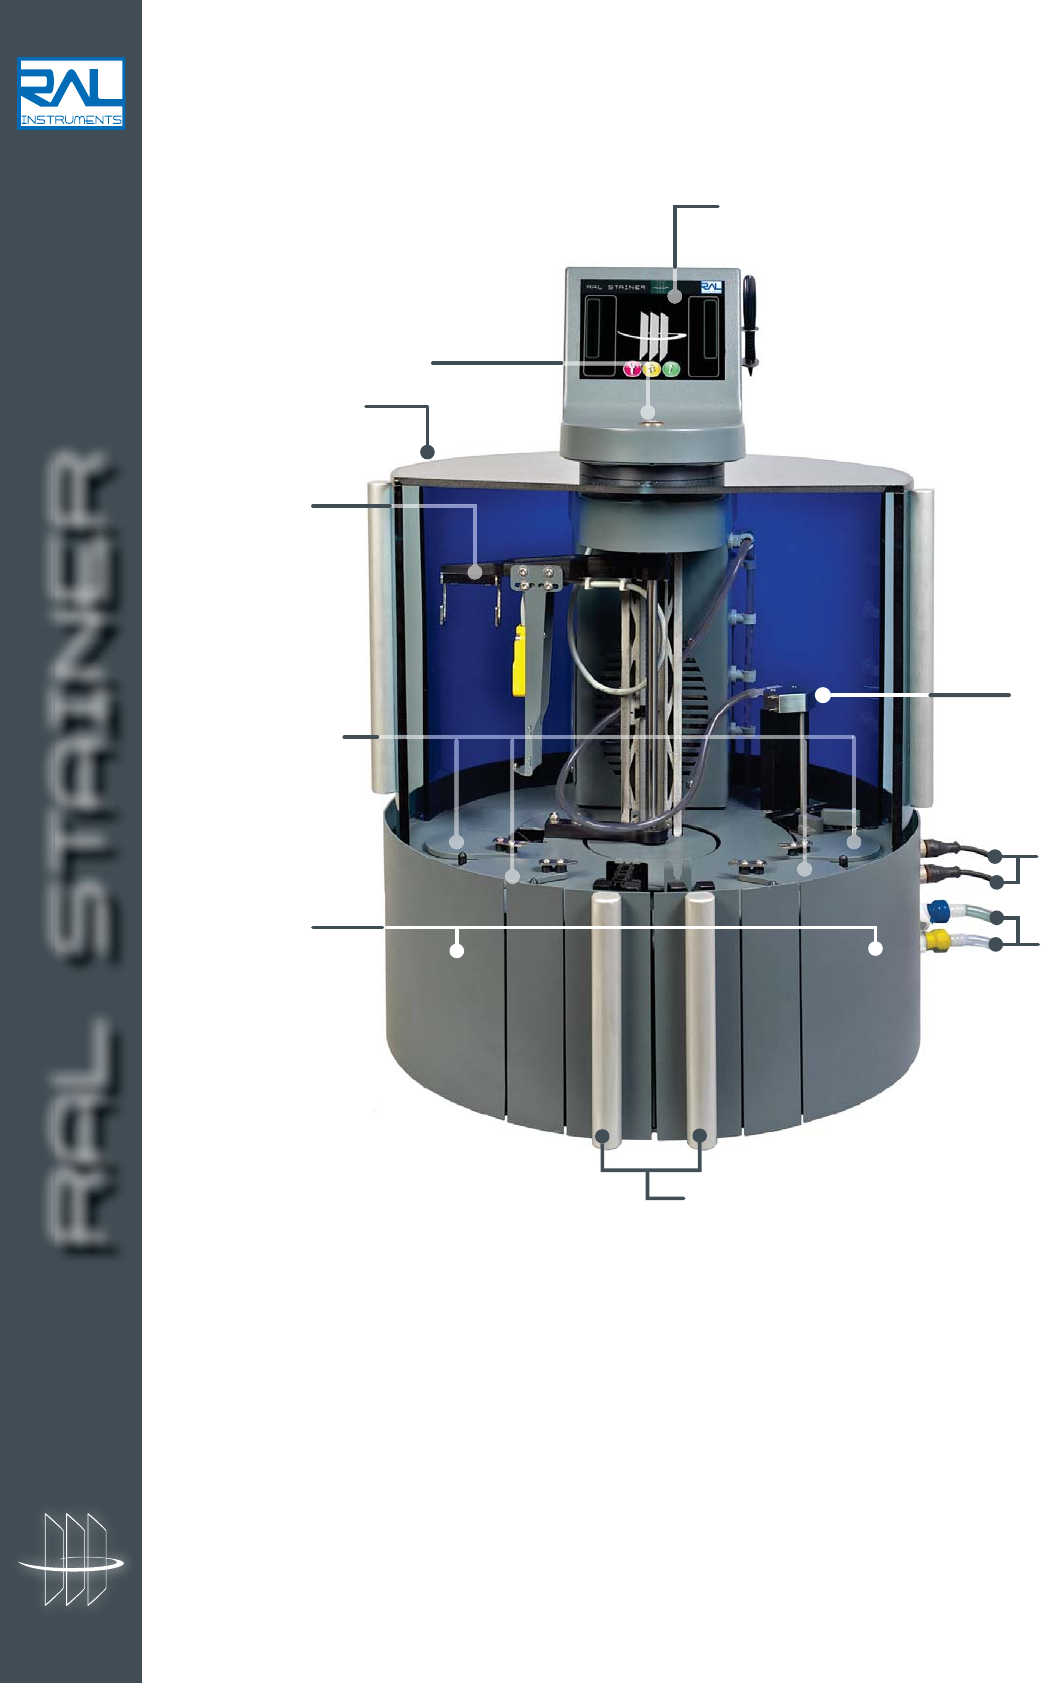
Touch screen interface
Standby button
Staining arm
Connectors
liquid with level
detection
Waste outlet
and rinsing
liquid
Slide loading/unloading drawers
And drying zone (x2)
Autonomy of 1 to 20 slides
(2 ten-slide slide holders)
Staining stations
with sealed lid (x4)
Reagent loading
drawers
Protective cover
Draining nozzle
RAL STAINER
12 RAL STAINER User guide
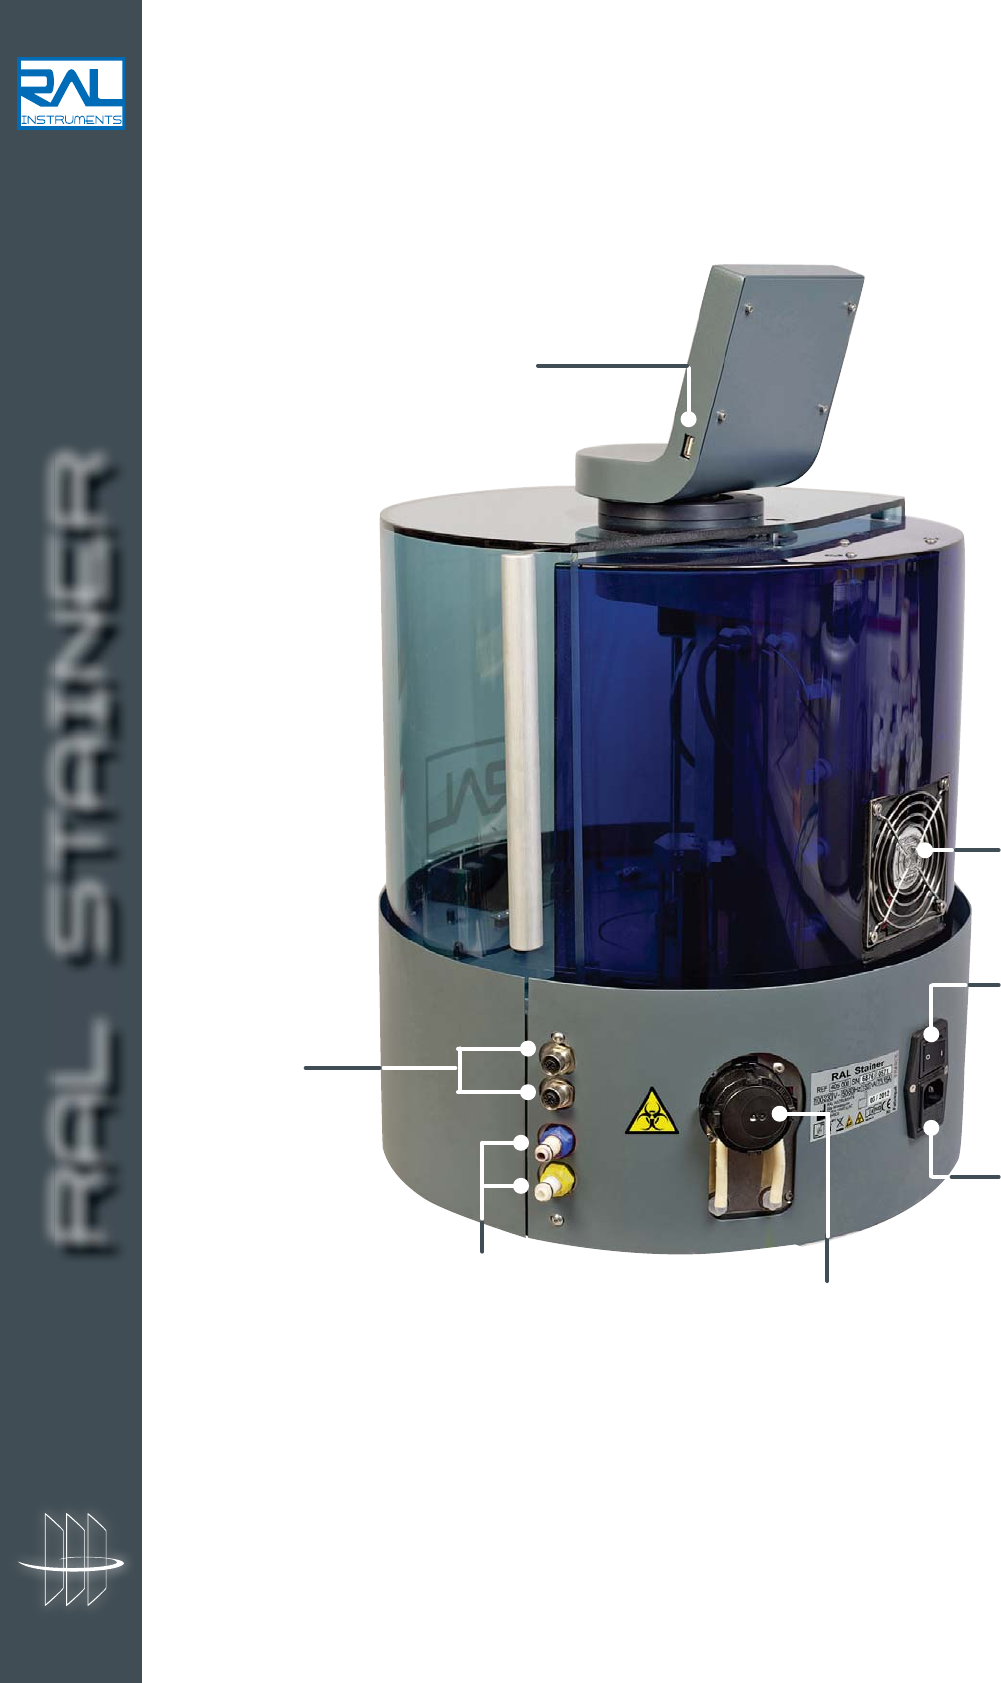
On/Off or
0/1 switch
Activated
carbon filter
Peristaltic pump
for effluent suction
Power supply input
Connections for the rinsing
liquid and the waste outlet
Connections for
the rinsing level
and the waste
outlet level
USB port for
downloading
traceability
information
RAL STAINER
13 RAL STAINER User guide
5.1 OPERATING PRINCIPLES
RAL Stainer is an automatic bath staining appliance.
A arm which follows a circular and vertical path successively:
- Hooks the slide holder installed by the user;
- Brings the slide holder into each staining tank and then into the rinsing tank depending on the recorded
protocol;
- Returns the slide holder to its initial position.
- The slides are then dried.
Staining is complete.
5.2 PERFORMANCE
r-$%UPVDITDSFFO
r$BQBDJUZYTMJEFT
rTUBJOJOHTUBUJPOT
rSJOTJOHTUBUJPO
rMPBEJOHVOMPBEJOHESBXFSTGPSUPTMJEFTFBDIXJUIBWFOUJMBUPSUPESZUIFTMJEFTBUUIFFOEPGUIFDZDMF
r6QUPTUBJOJOHQSPHSBNNFTJONFNPSZ
rVTFSTUIBUDBOCFQBSBNFUFSFEGPVSMFWFMTPGBVUIPSJTBUJPO"ENJOJTUSBUPS&YQFSU6TFSBOE.BJOUFOBODF
r3'*%4ZTUFN
Automatic recognition of kits and corresponding staining protocol optimised by RAL Diagnostics.
Control of the batch, the expiry date, the staining kit autonomy and the activated carbon filter replacement.
r1PMZWBMFOUVTF
It is possible to switch from one kit to the other, from one application to another: RAL Stainer keeps the data
about all the kits being used in memory.
r4UBJOJOHUSBDFBCJMJUZø
It is possible to print a report giving the correlation of work dates, users, staining and the product batch used.
5.3 SAFETY
Vapour emanation is limited because the loading/unloading of the reagents and slides is carried out using
drawers.
Each tank is closed using a sealed lid inside the appliance.
The cover need not be opened other than for cleaning operations.
RAL Stainer has a ventilation system which uses an activated carbon filter to evacuate all possible residual
vapour (Warning when the filter needs to be changed).
The arm is fitted with a level sensor which adjusts the slide immersion height depending on the liquid
remaining in the containers.
The draining of the solutions is carried out by the appliance itself thanks to a peristaltic pump which directs
towards the waste bin (10 L), thus avoiding dangerous handling.
The waste bin level will be automatically detected in order to avoid any overflow.
The level of rinsing liquid will be automatically detected to avoid launching staining without rinsing liquid.
Drainage holes and a reservoir tank can collect liquids in case of leak.
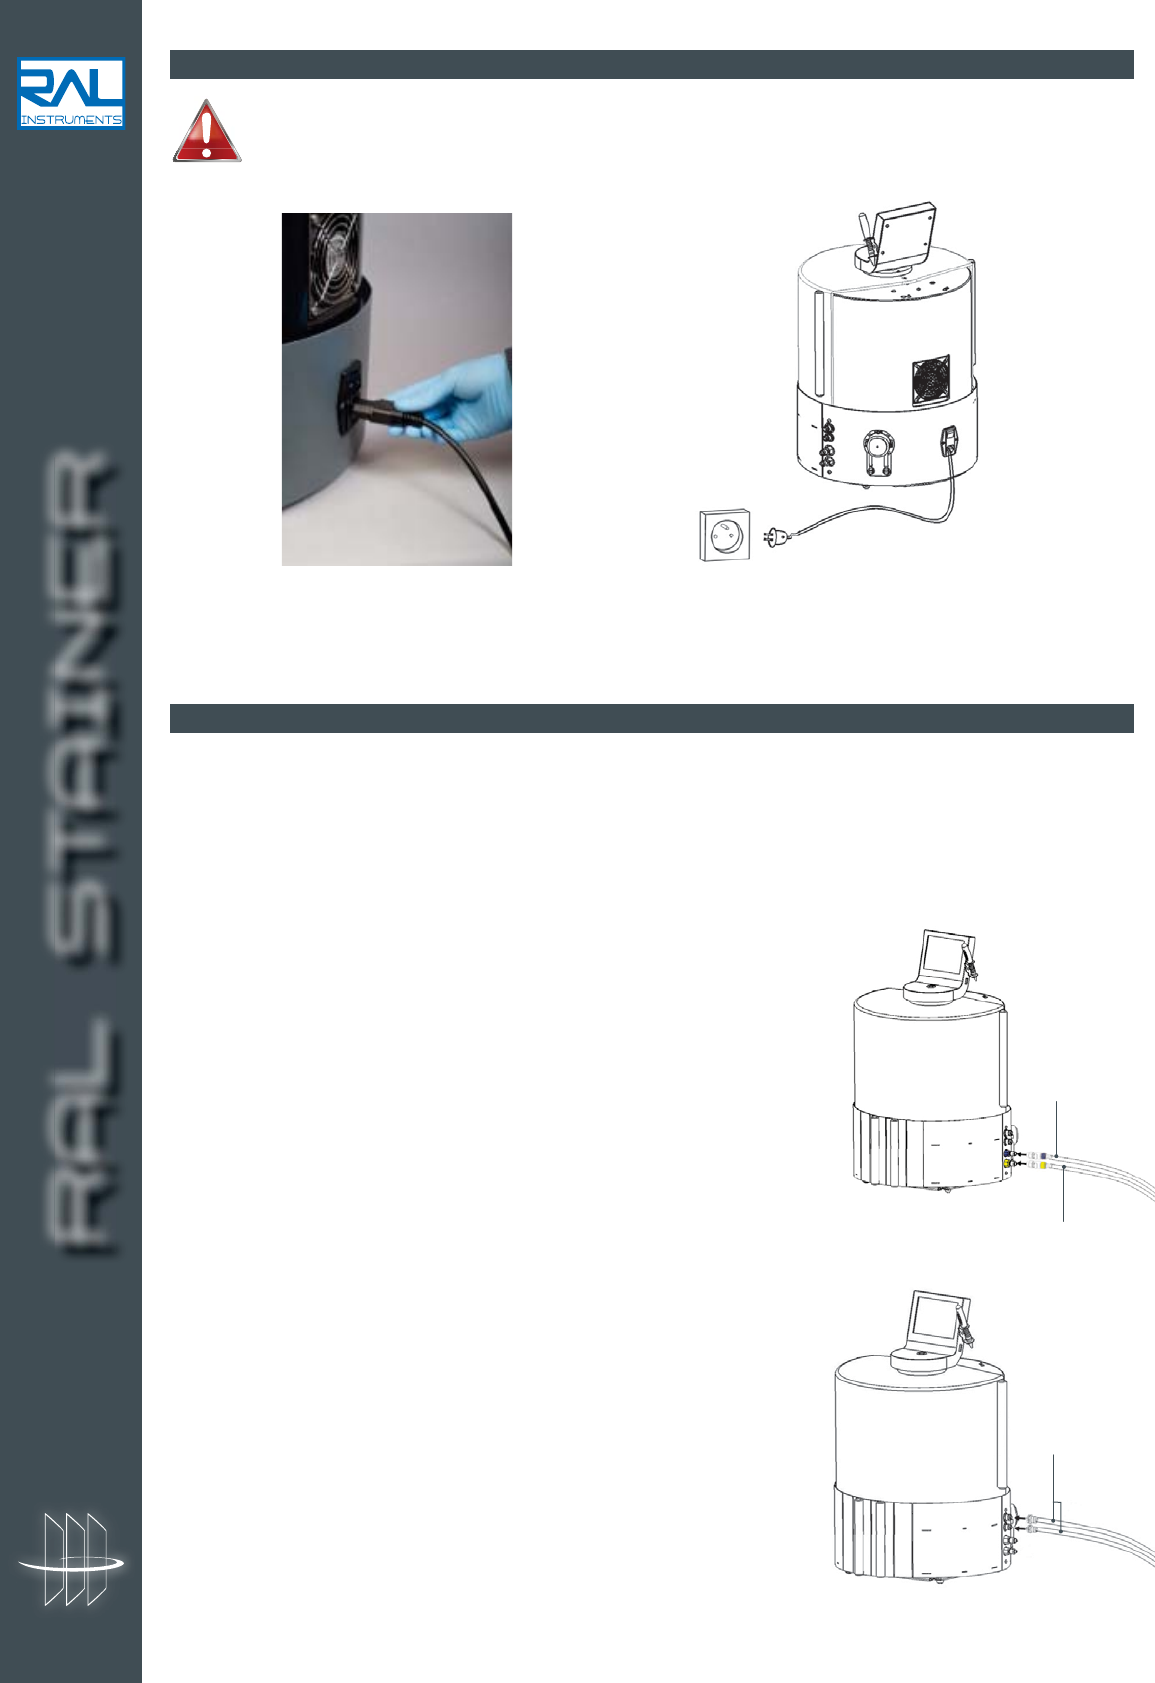
5.4 SIZE
Weight: 28 kg
Diameter: 42.5 cm
Height: 62.4 cm
5.5 ELECTRIC SPECIFICATIONS
Voltage: 100-240V/ ~ 50-60Hz. Overvoltage category 2
Operating power: 150 VA
RAL STAINER
14 RAL STAINER User guide
5.6 ENVIRONMENTAL LIMITS FOR USE
Temperature: from 18 to 30°C
Humidity: from 20 to 85%
RAL Stainer is strictly reserved for interior use. It is not recommended to use this device in a location with
an altitude more than 3 000 meters and in an environment having a pollution degree superior than 2.
5.7 ENVIRONMENTAL LIMITS FOR TRANSPORTATION AND STORAGE
Temperature: from -10 to 55°C
Humidity: from 5 to 85%
RAL STAINER
15 RAL STAINER User guide
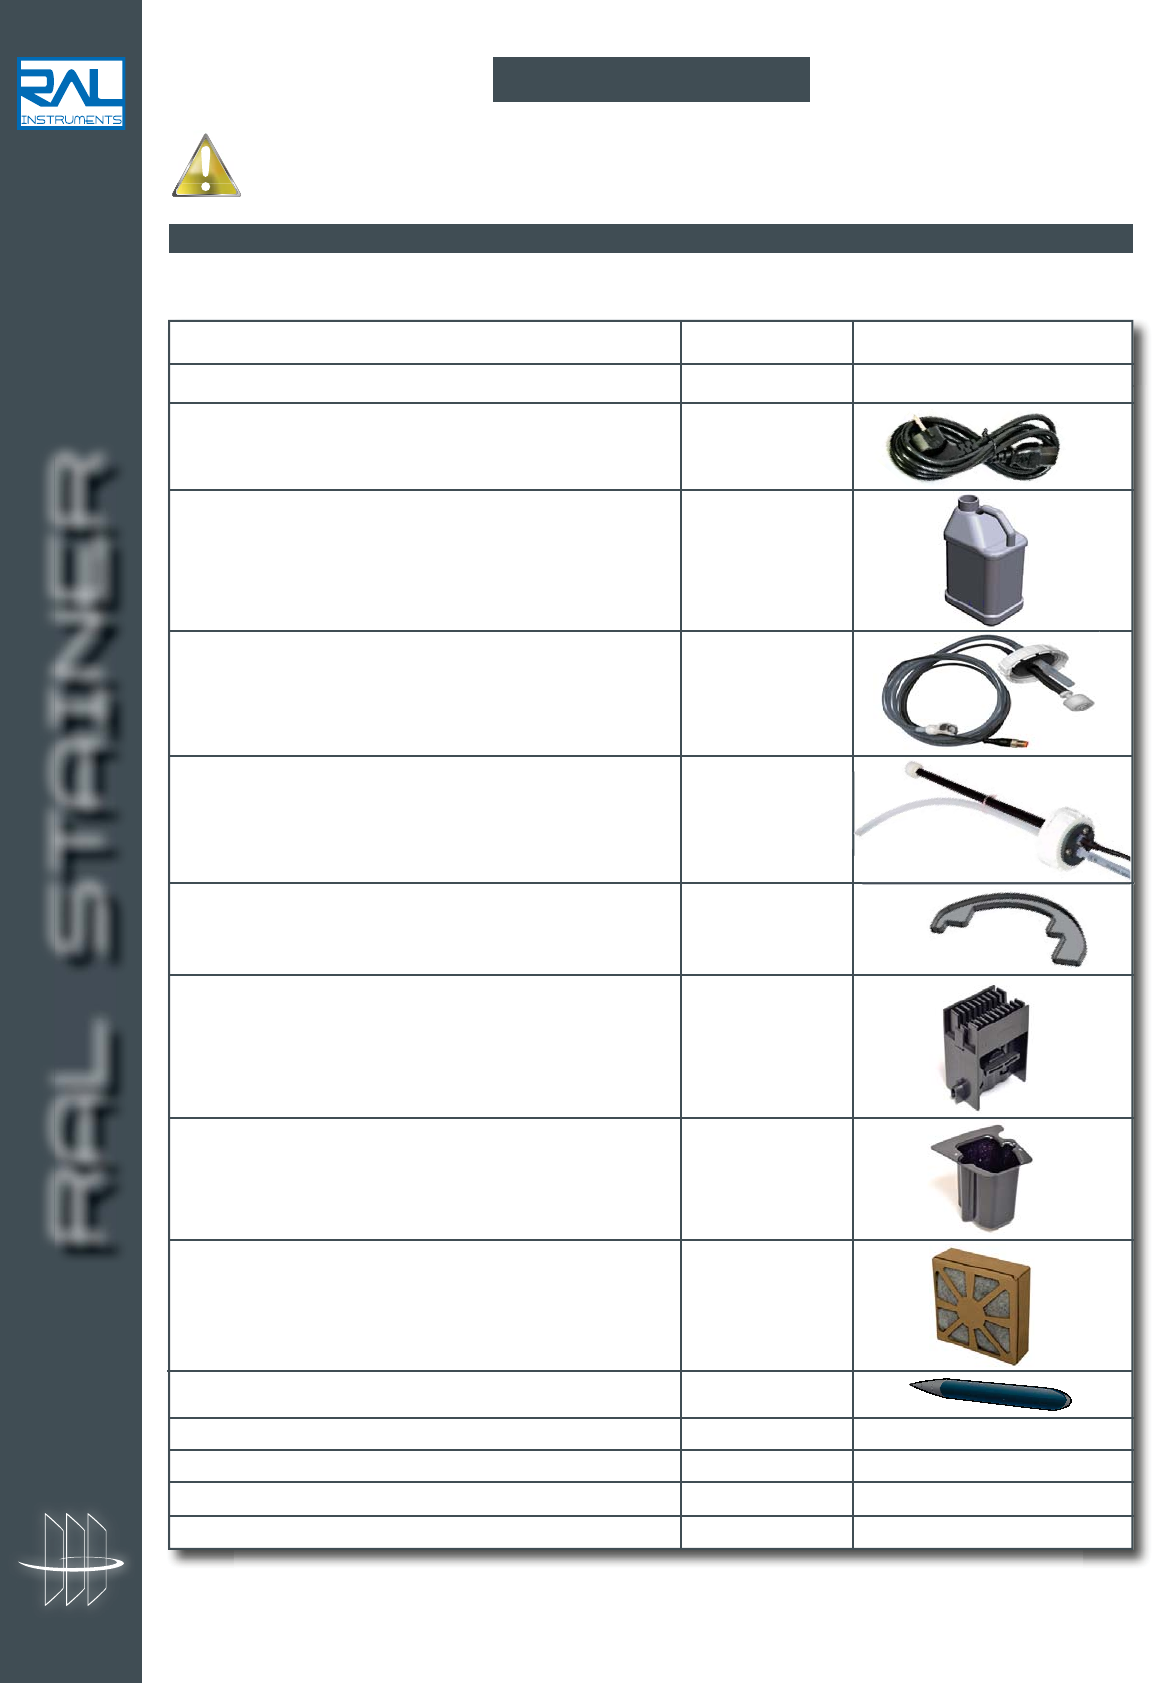
Only RAL Diagnostics staining reagents can be used in the RAL Stainer.
Staining kits available:
Some reagents may occur a danger. Refer to the staining kit packaging and reagents MSDS.
Refer to the staining protocol for the use of each staining kit, for the attempt performances, for the quality
control and the standard staining protocol.
6 STAINING REAGENTS
Field of
activity Kit description Use Reference
Number of
reusable
slides
Number of days
after opening =
BBD
Expiry
Haematology
Bacteriology
Bacteriology
Bacteriology
Kit RAL Stainer MCDh
Kit RAL Stainer Gram-Hucker
Kit RAL Stainer Gram-Nicolle
Kit RAL Stainer 555
Staining kit for
blood and bone marrow smears
Staining kit for
Gram + and Gram - bacteria
Staining kit for
Gram + and Gram - bacteria
Fast staining kit
for cytobacteriology
360200-0000
360210-0000
360220-0000
360250-0000
500 slides
500 slides
500 slides
300 slides
21 days
14 days
14 days
14 days
18
months
24
months
24
months
24
months
Xi
Ethylic Alcohol, Isopropanol
F, Xn
Ethylic Alcohol, Crystal Violet
F
Ethylic Alcohol
F, T
Methanol
Danger
Bacteriology
Bacteriology
Kit RAL Stainer Fluo-RAL
Kit RAL Stainer Cold ZN
Auramine staining kit
for mycobacterium tests
Cold fuchsine staining kit
for mycobacterium tests
360230-0000
360240-0000
300 slides
500 slides
7 days
14 days
12
months
12
months
F, C
Ethanol, Phénol
F, C
Ethanol, Phénol
RAL STAINER
16 RAL STAINER User guide
The RAL Stainer must be installed by a technician approved by RAL Instruments.
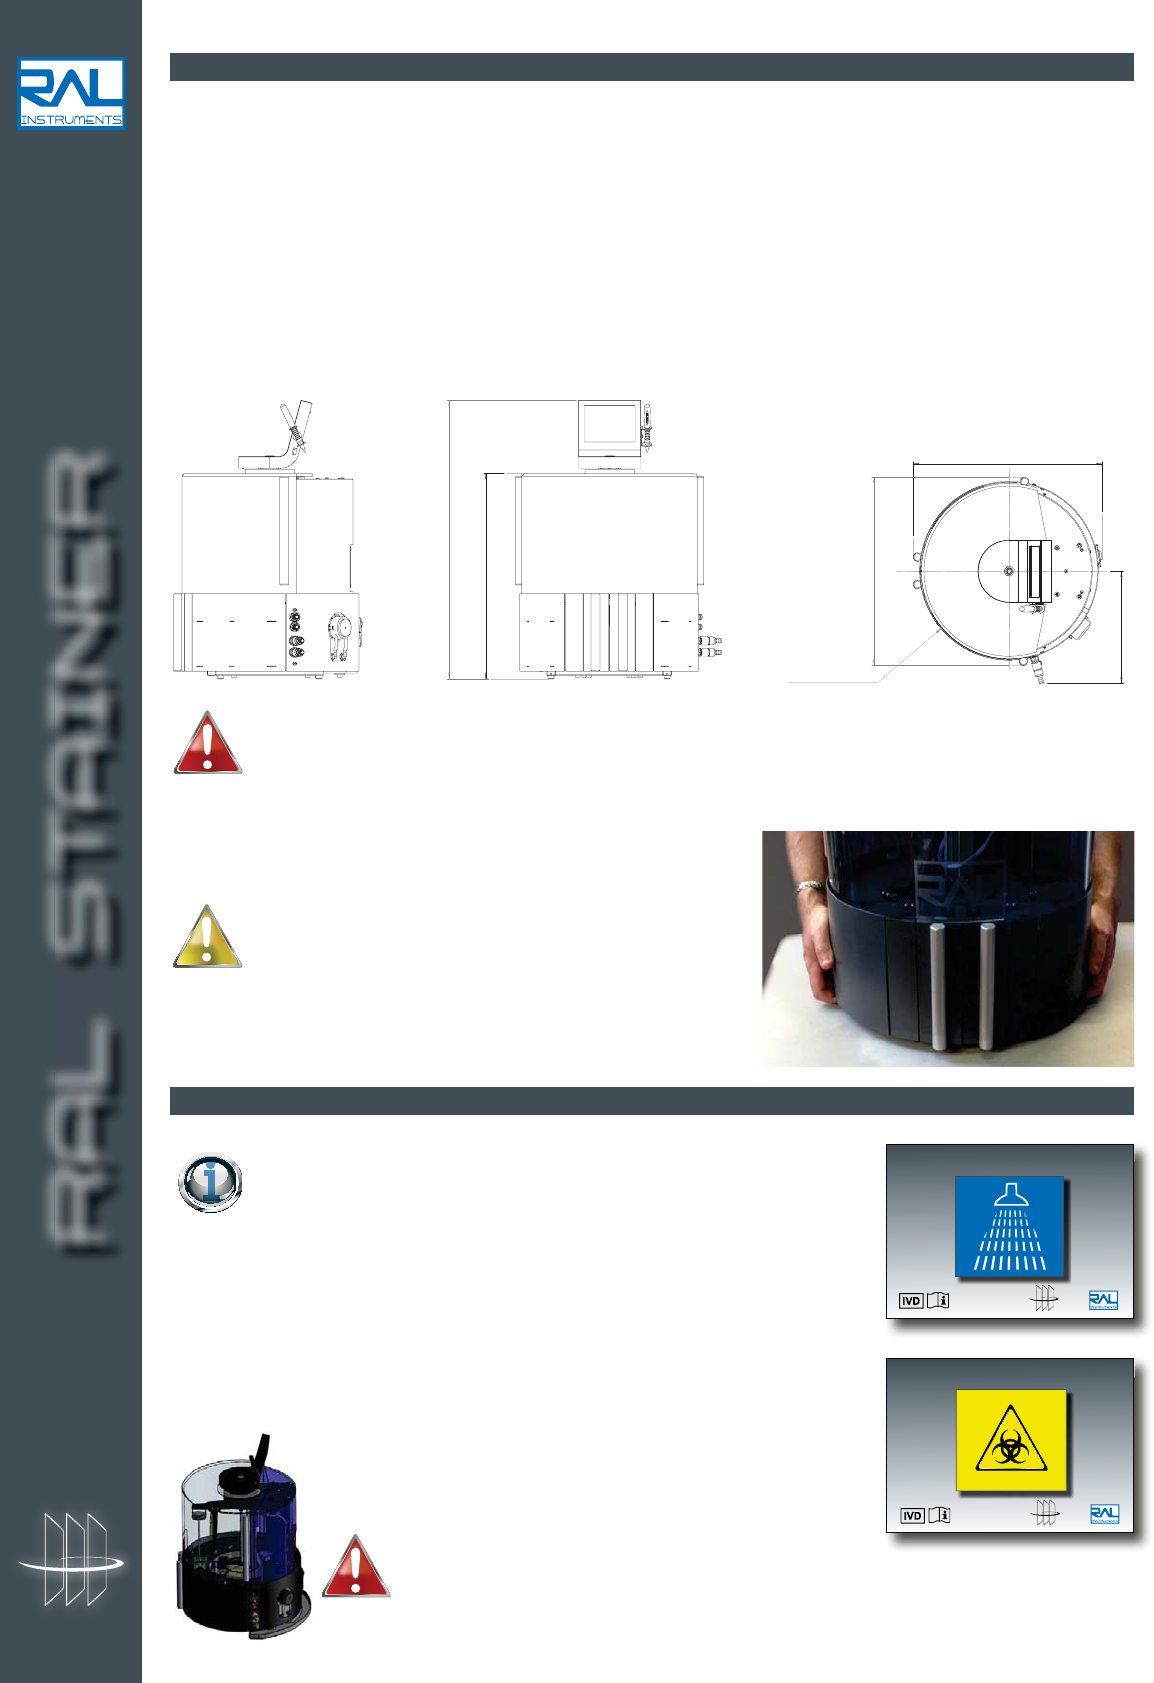
7.1 PACKAGING LIST
Check that all the items below are contained in the RAL Stainer package:
Description Quantity
RAL Stainer 1
Power supply (L=2m) 1
RAL Stainer 10 L Jerrycan 2
Hydraulic cane for effluents 1
Hydraulic cane for rinsing liquid 1
Reservoir tank 1
Pack of Slide-holder RAL Stainer (x3) 1
Rinsing Station RAL Stainer 1
Filter Cartridge RAL Stainer 2
Stylus 1
RAL Stainer CD 1
RAL Stainer Quick Start 1
Label sheets 20
RAL Stainer USB Stick 1
If one of the items is damaged or missing, contact your RAL Instruments representative.
7 INSTALLATION
RAL STAINER
17 RAL STAINER User guide
7.2 INSTALLATION ENVIRONMENT
r4UPSFUIFJOTUSVNFOUJOBMPDBUJPOXJUIJOUIFFOWJSPONFOUBMPQFSBUJOHMJNJUT
r5IFBQQMJBODFNVTUCFQMBDFEPOBTUBCMFGMBUBOEDMFBOUBCMF"WPJETIPDLTBOEWJCSBUJPOT
r$POTJEFSJOHUIFXFJHIUPGUIF3"-4UBJOFSLHVTFBTVGGJDJFOUMZTPMJEUBCMF
r1MBDFUIFBQQMJBODFDMPTFUPBNBJOTQPXFSPVUMFUBOEBSVOOJOHXBUFSUBQJGZPVIBWFTFMFDUFEUIFSVOOJOH
water connection option.
r$POTJEFSJOHUIFTJ[FPGUIF3"-4UBJOFSDN)DNQMBOUPVTFBTQBDFPGYDNGPS
the appliance installation, use and maintenance.
Avoid placing the appliance behind a window in order to limit the heating of the reagents under the
sun's rays.
If the appliance has been stored at temperatures outside the environmental usage limits, it must
remain at room temperature for 1 hour before powering up.
Avoid using the appliance in close proximity to a chemical reagent storage area or in an atmosphere
containing emanations of dangerous gases.
Make sure the on/off switch and the mains power
outlet remain accessible.
If you have to move the instrument, handle it carefully
by lifting it up by the bottom, like showing the opposite
picture
7.3 SETTING UP
Place the RAL Stainer on a flat and stable surface, in a sufficiently wide space, as described in
section 7.2.
Place the two supplied containers beneath the table.
To eliminate any risk of error in the use of the appliance, mark each supplied container with the
supplied labels in order to assign a function to each one: Effluent Container and Rinsing liquid
container.
The standard containers supplied with the RAL Stainer can be replaced by autoclave
compatible containers. Contact your RAL Instruments representative.
The supplied containers can also be replaced using your usual containers. However take care over the sealing of
the container as it is not certain that the supplied cover fits your container.
Rayon vrai
200 mm
424 mm
250 mm
421 mm
624 mm
460 mm
w
wi
d
d
d
d
ib
ib
d
d
i
i
pplied container with the
C
C
ntainer and Rinsing liquid
e
e
Réf.: 12094-V04 Rév.: 09/2013
RAL STAINER
r
f
f
f
f
f
f
f
f
f
f
ff
f
f
f
Réf.: 12094-V04 Rév.: 09/2013
RAL STAINER
Rinse label
Waste label
Slide the reservoir tank below the machine on the back until
it is blocked.
The reservoir tank must always be empty. If it is full,
because of the flammability hazard of some
products, remove it by sliding it gently, then empty it
and call your service engineer.
RAL STAINER
18 RAL STAINER User guide
7.4 CONNECTION OF THE INSTRUMENT TO THE MAINS POWER SUPPLY
Only use the power supply supplied with the appliance.
Using the supplied power cable, connect the RAL Stainer to an alternating current power outlet nearby.
The appliance operates in the voltage range 100V to 240V, 50-60Hz
7.5 HYDRAULIC CONNECTIONS
Connect the Effluent container and the rinsing liquid container to the right hand part of the appliance.
1. Introduce the tube and the level sensor connected to the red cover into the waste container and screw the
cover to hermetically seal the container.
2. Introduce the tube and the level sensor connected to the blue cover
into the rinsing container and screw the cover to hermetically seal
the container.
3. Connect the tubes to the corresponding couplers on the appliance
taking care to respect the colour codes:
Blue: Connection of the rinsing liquid container
Yellow: Connection of the effluent container
4. Connect the electric cables using the male jack connectors to the
appliance's female male connectors in any order. The level sensors
do not have any specific connectors.
power outlet
120/240V, 50-60Hz
Rinsing container
tube
Rinsing level
and waste level
connections
Waste container
tube
RAL STAINER
19 RAL STAINER User guide
8 SCREEN DESCRIPTIONS
RAL Stainer has a simple and user friendly interface, and a touch screen.
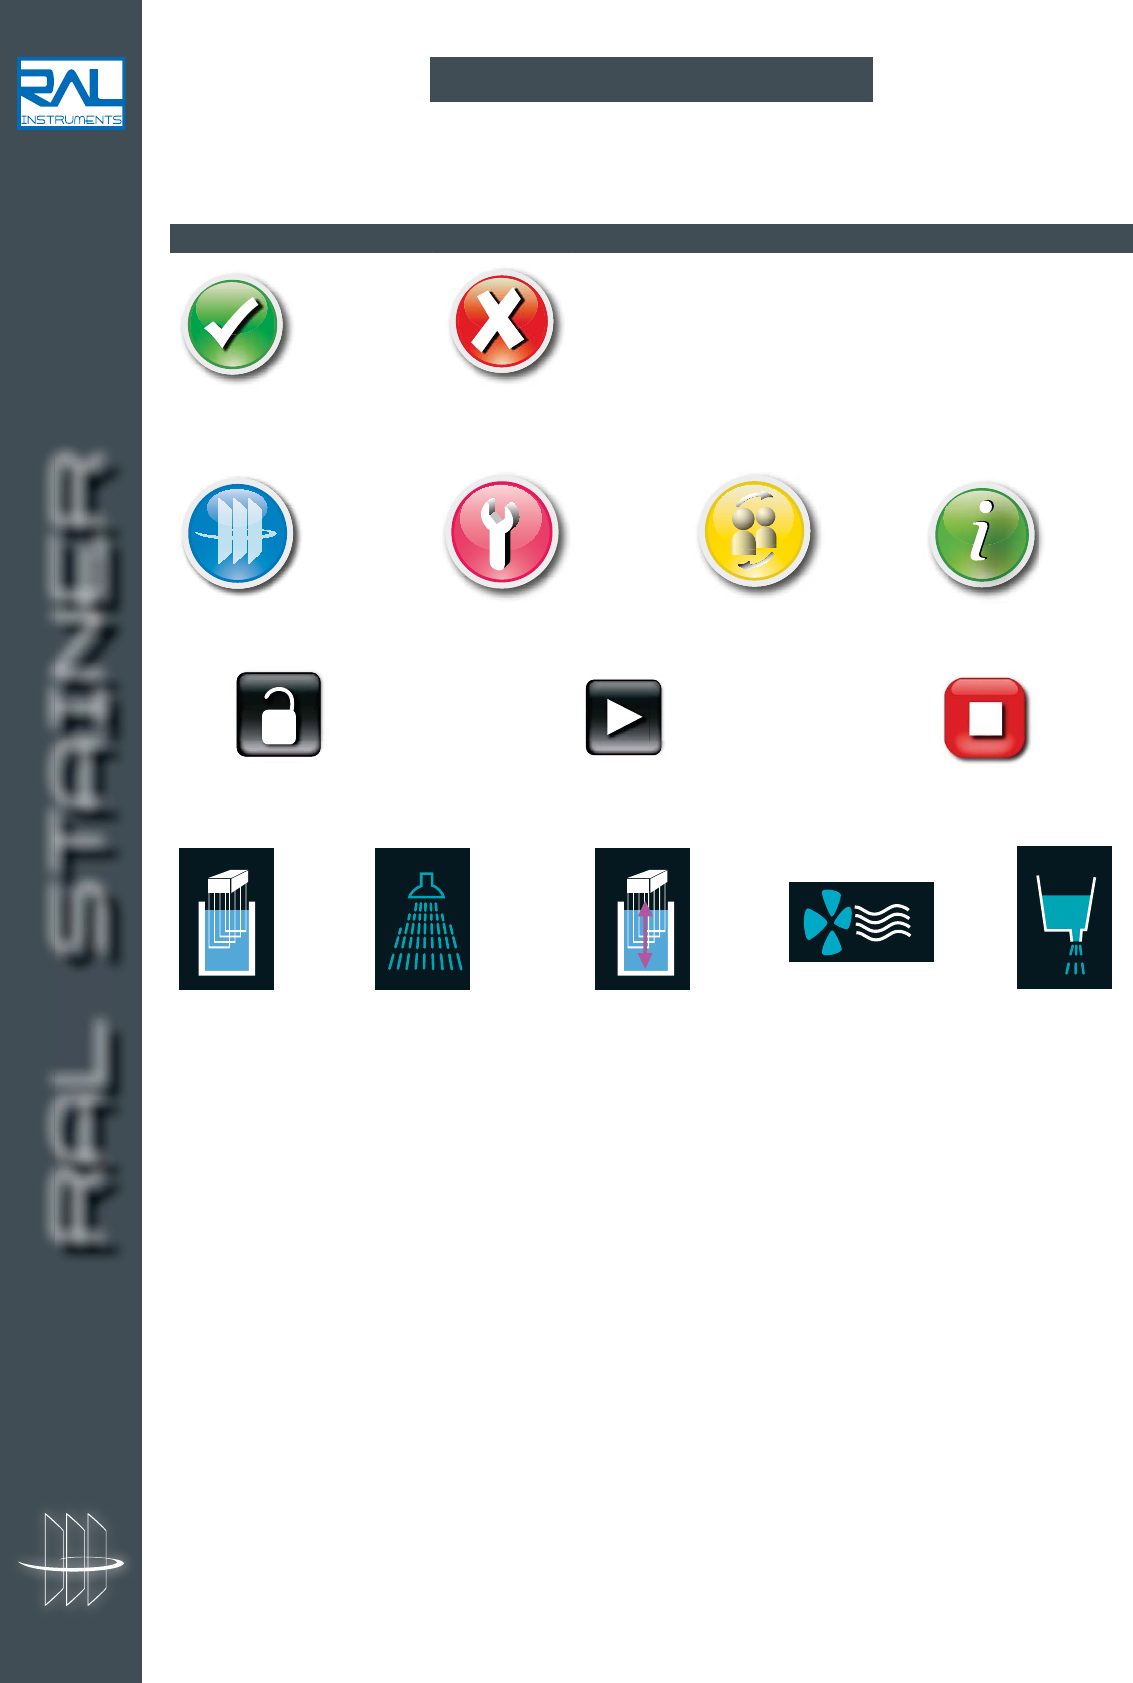
8.1 MEANINGS OF THE SYMBOLS
Validate Cancel
Go to page
w
Staining Settings Change session Information
Unlock the slide drawer Launch staining Halt staining
Soak Rinse Mix Dry Drain
w
w
w
w
RAL STAINER
20 RAL STAINER User guide
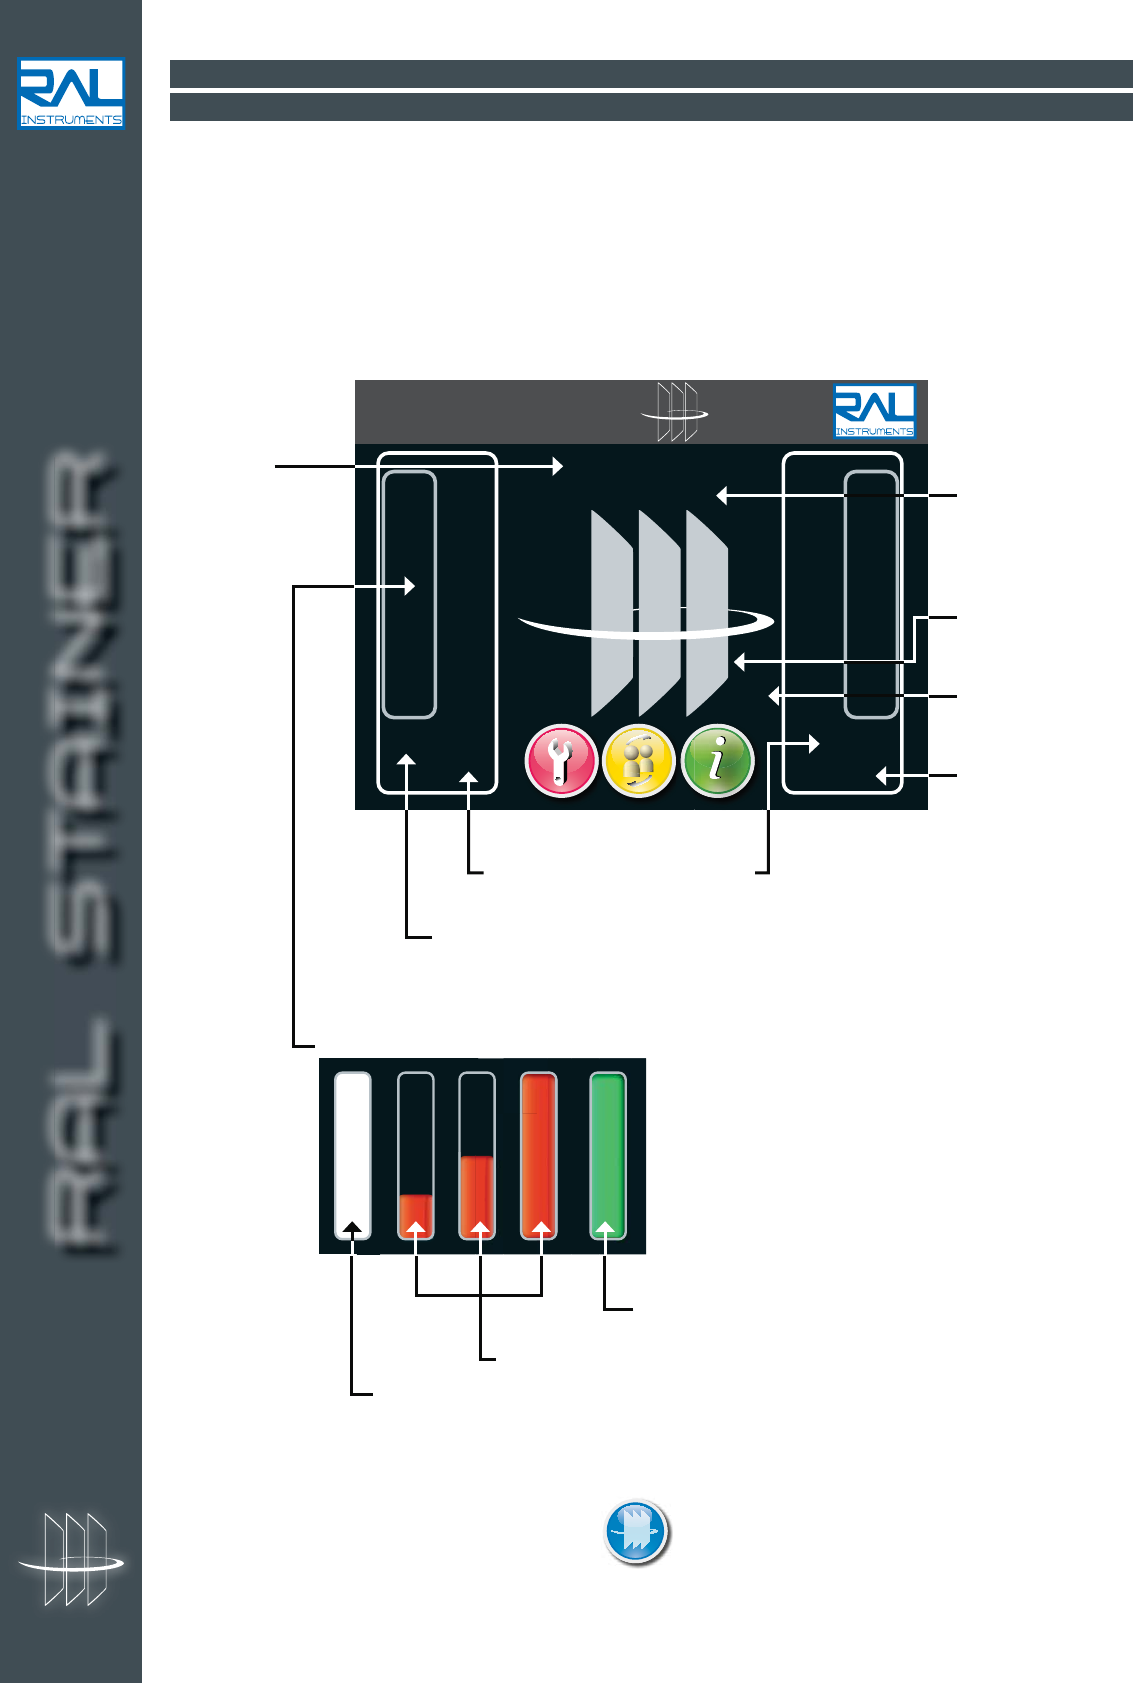
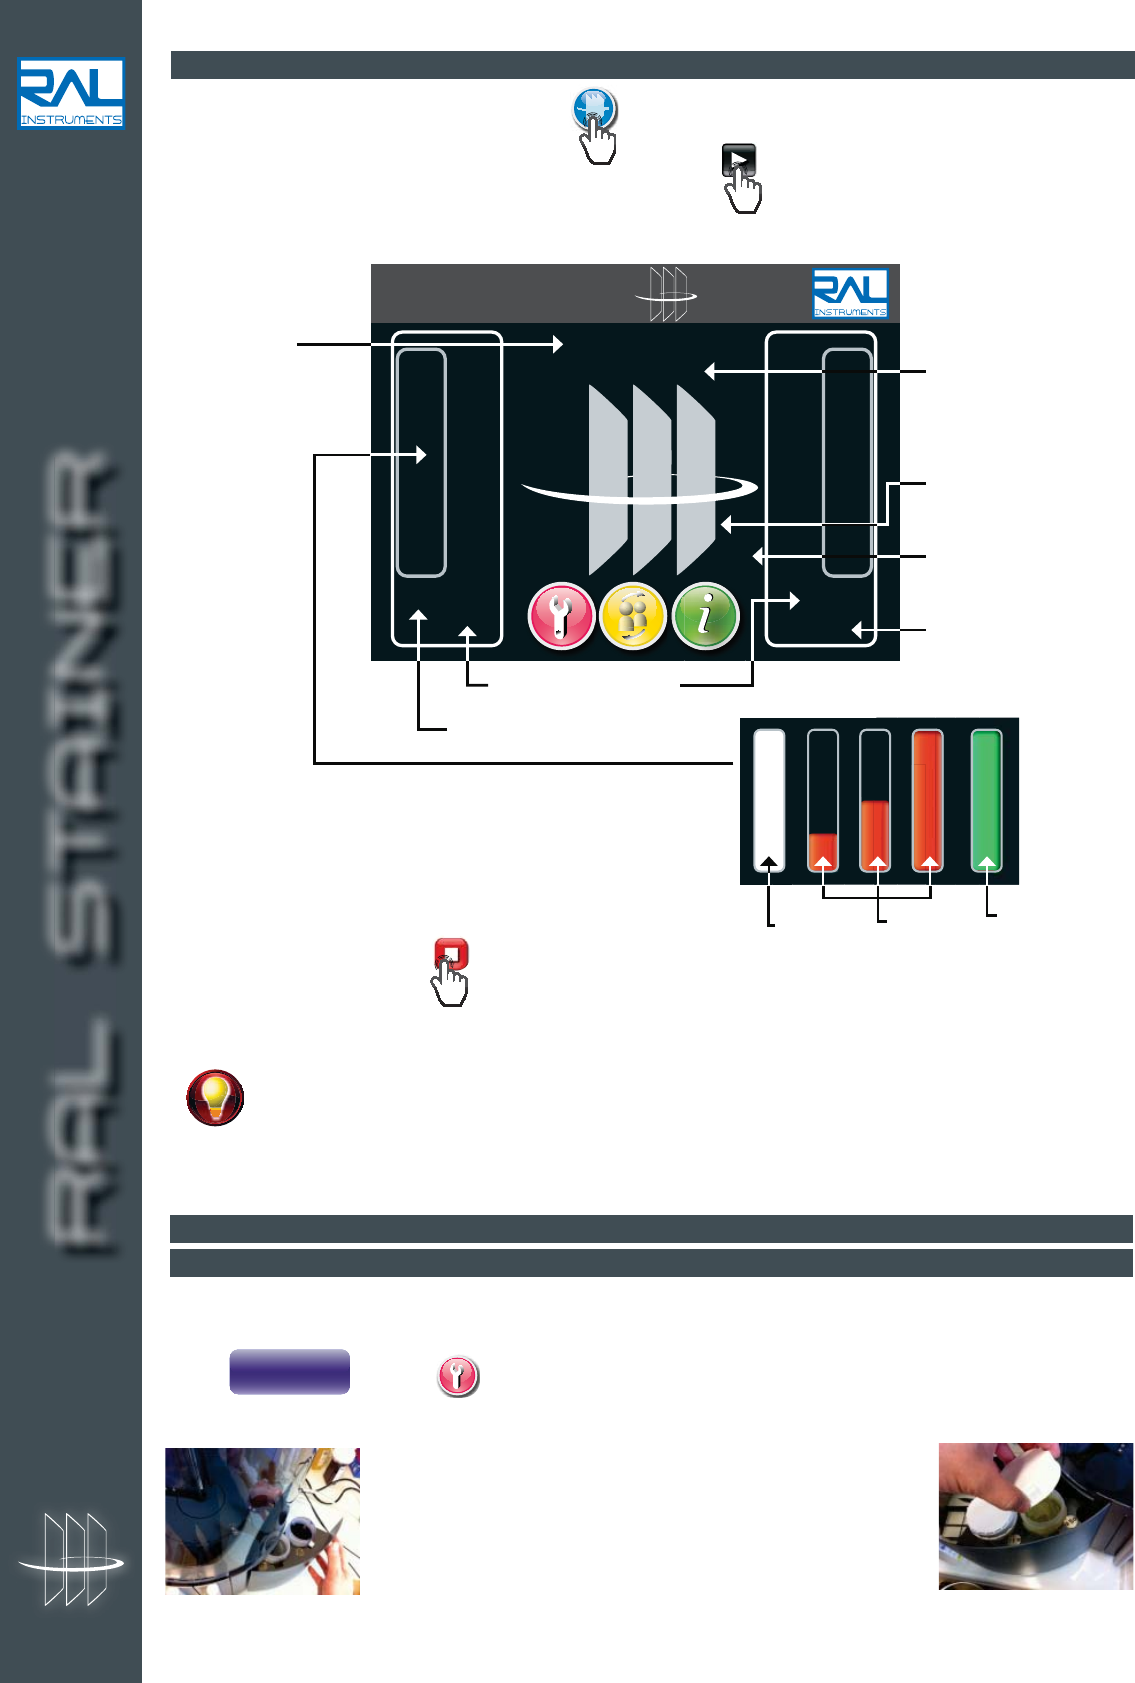
RAL STAINER
Progress of staining
Staining in progress
Drying in progress
Available zone
Name of the staining
protocol used
Name of the
staining kit
Control panel of the two work
zone
Error or information
message area
Remaining staining time
Number of staining
cycles remaining
Drawer status
To return to this page, press the button
8.2 PAGE DESCRIPTIONS
8.2.1 STAINING PAGE
The Staining page is the page that is always displayed by default. Staining is launched from this page.
RAL STAINER
21 RAL STAINER User guide
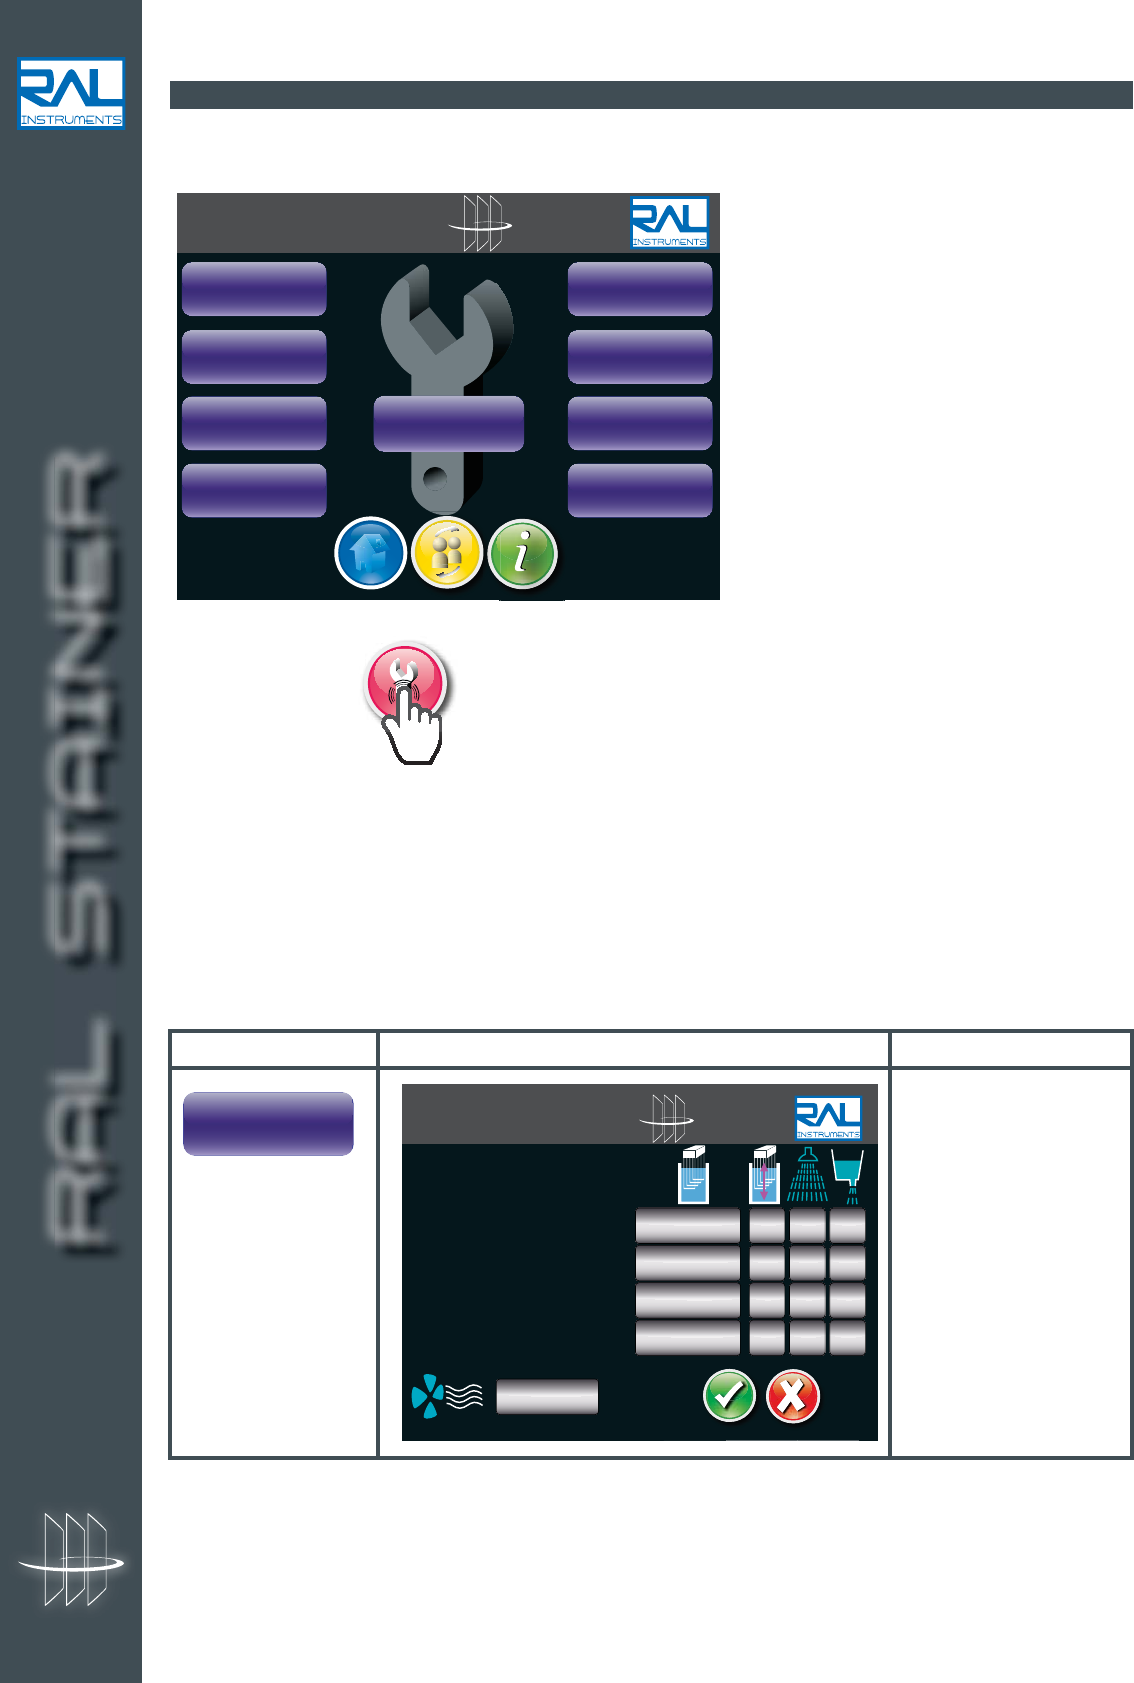
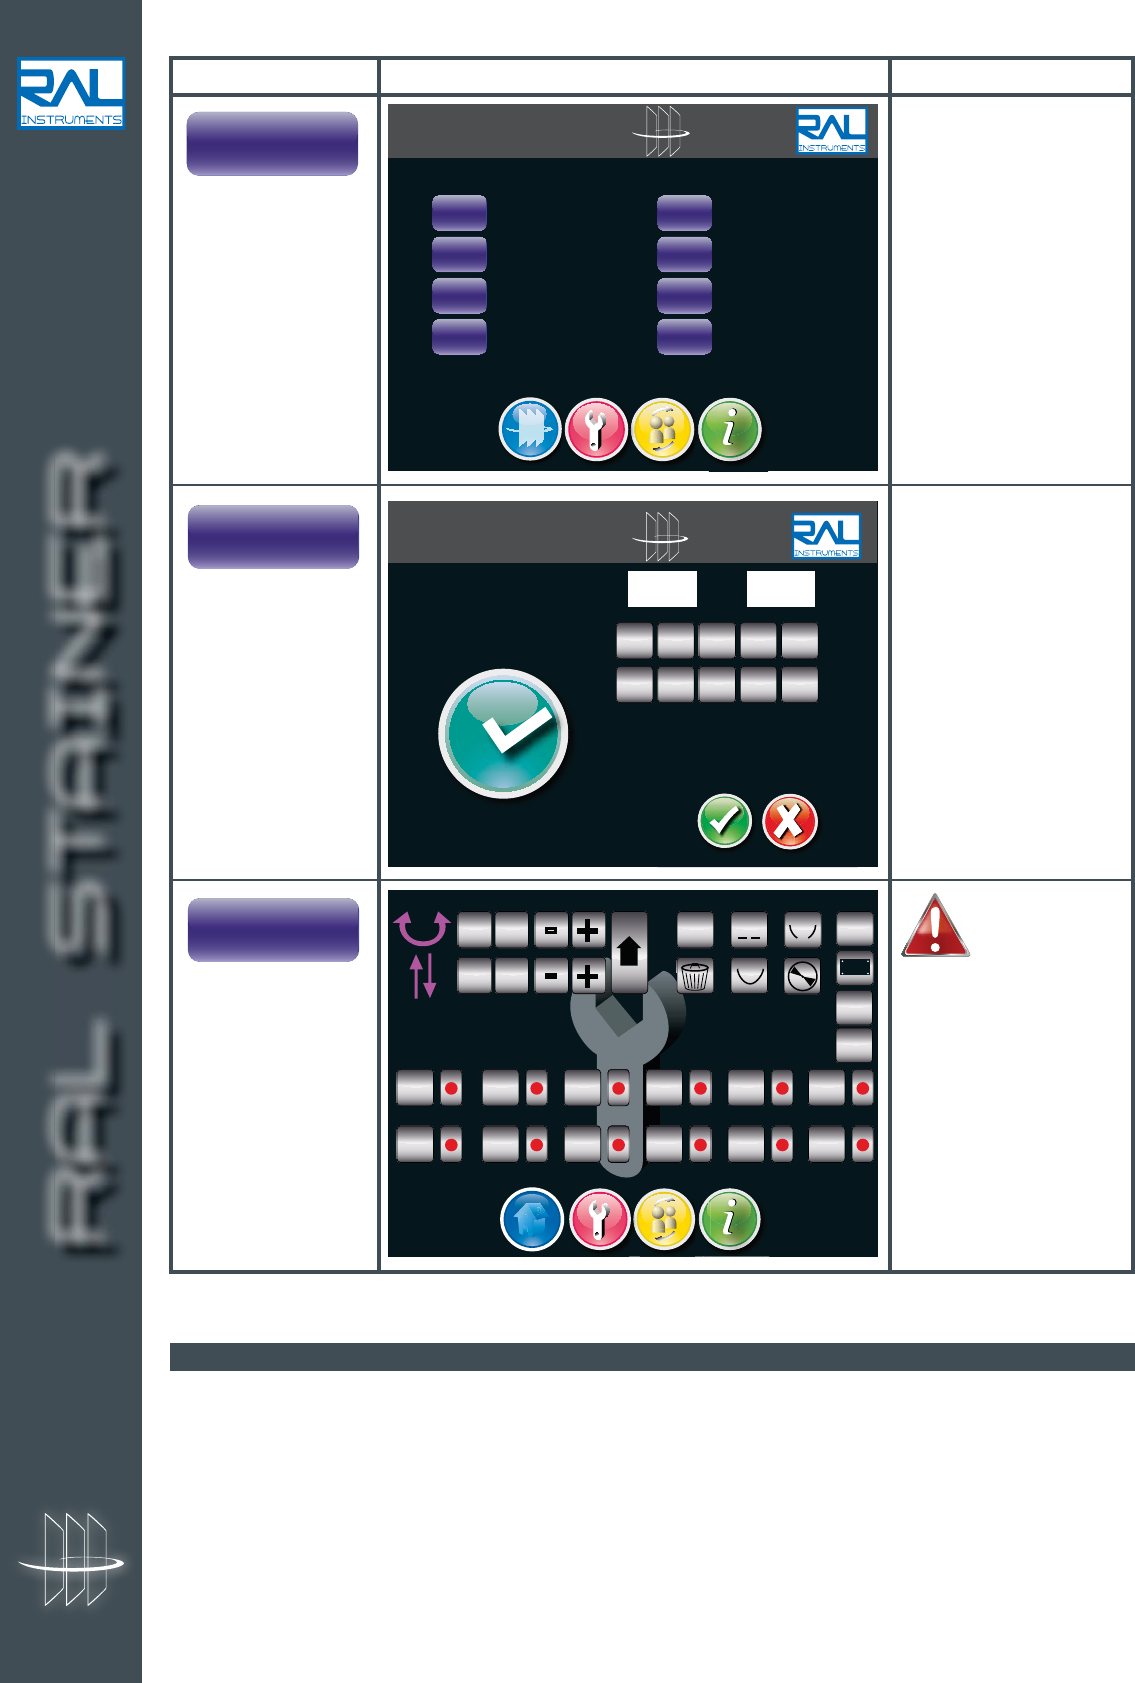
8.2.2 SETTINGS PAGE
9 functions
To access this page,
Presentation of the functions:
RAL STAINER
SET
PROTOCOL
LOAD/CHANGE
REAGENTS
EMPTY
REAGENTS
USER RIGHTS
MANAGEMENT
LANGUAGE
DATE / HOUR
MAINTENANCE
OPEN
COVER LID
ADJUST
PROTOCOL
Name
ADJUST
PROTOCOL
Screen Function
Used to access the
protocol modification
page and record up to
9 modified protocols
modified from standard
protocols
RAL STAINER
yes
min:sec
1
no
1 Reagent name
2 Reagent name
3 Reagent name
4 Reagent name
min:sec
RAL STAINER
22 RAL STAINER User guide
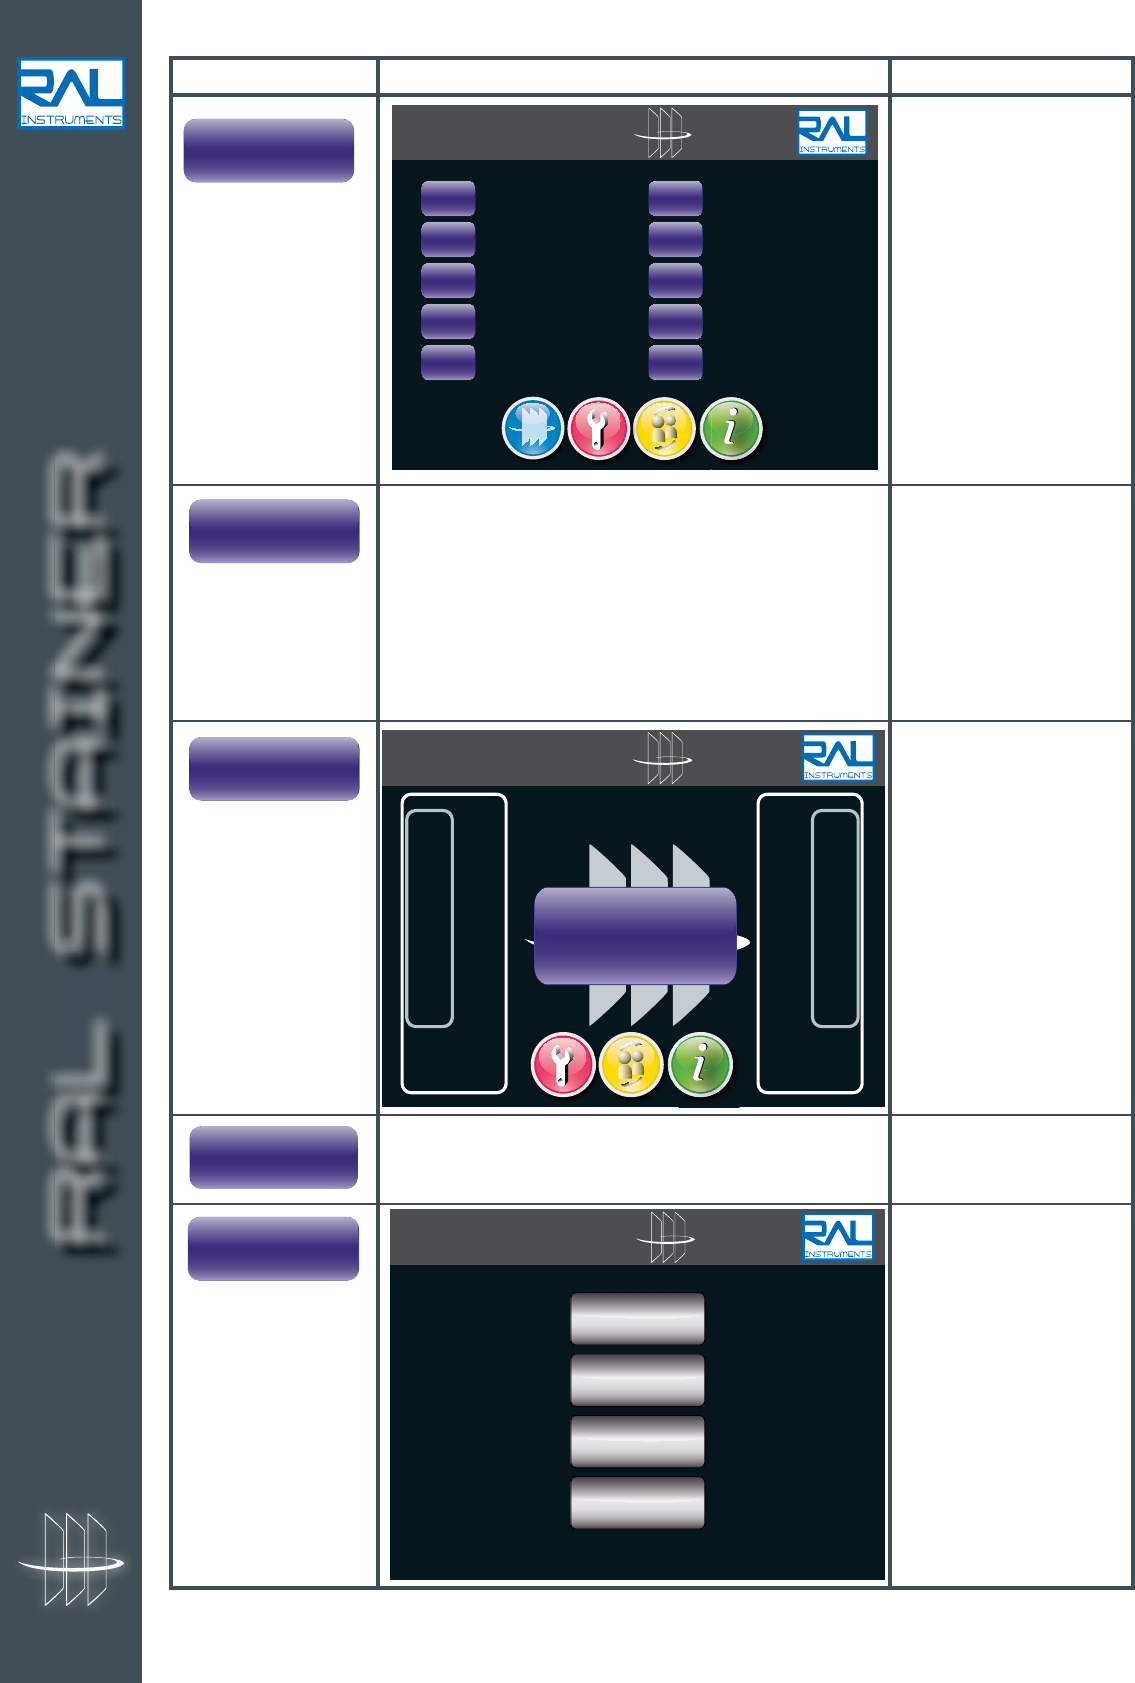
Name
SET
PROTOCOL
No specific screen, PLC action
No specific screen, PLC action
Screen Function
Used to access the list of
recorded protocols and
switch from one to the
next.
Used to open the sealed
lids of the staining
stations and the reagent
loading side doors in
order to load a new
staining kit or replace a
staining kit.
Used to drain the
reagents in order to
remove the containers in
complete safety when the
staining kit has expired
or is out of service, or
when the user requires.
Used to open the cover
for a weekly interior
clean.
Used to record the users
with a level of rights to be
selected.
RAL STAINER
RAL STAINER
EMPTY
REAGENTS
RAL STAINER
UTILISATEUR
USER
EXPERT
ADMINISTRATOR
INSTALLER
LOAD/CHANGE
REAGENTS
EMPTY
REAGENTS
OPEN
COVER LID
USER RIGHTS
MANAGEMENT
RAL STAINER
23 RAL STAINER User guide
Name Screen Function
Used to select the
operating language;
French, English or
German.
Used to update the
date and time on the
machine for use with the
traceability monitoring.
Only accessible
to authorised
persons. Used
to check the appliance's
operating steps and to
operate the hydraulic
system.
RAL STAINER
Français
English
Deutsch
ࡄ੶
Português
᪥ᮏே
Español
Italiano
RAL STAINER
01234
56789
H2O
NS
-+
-+
-+
-+
6
T1
T2
T3
T4
C1
C2
C3
C4
L1
L2
V
R
erase
trace
erase
mem
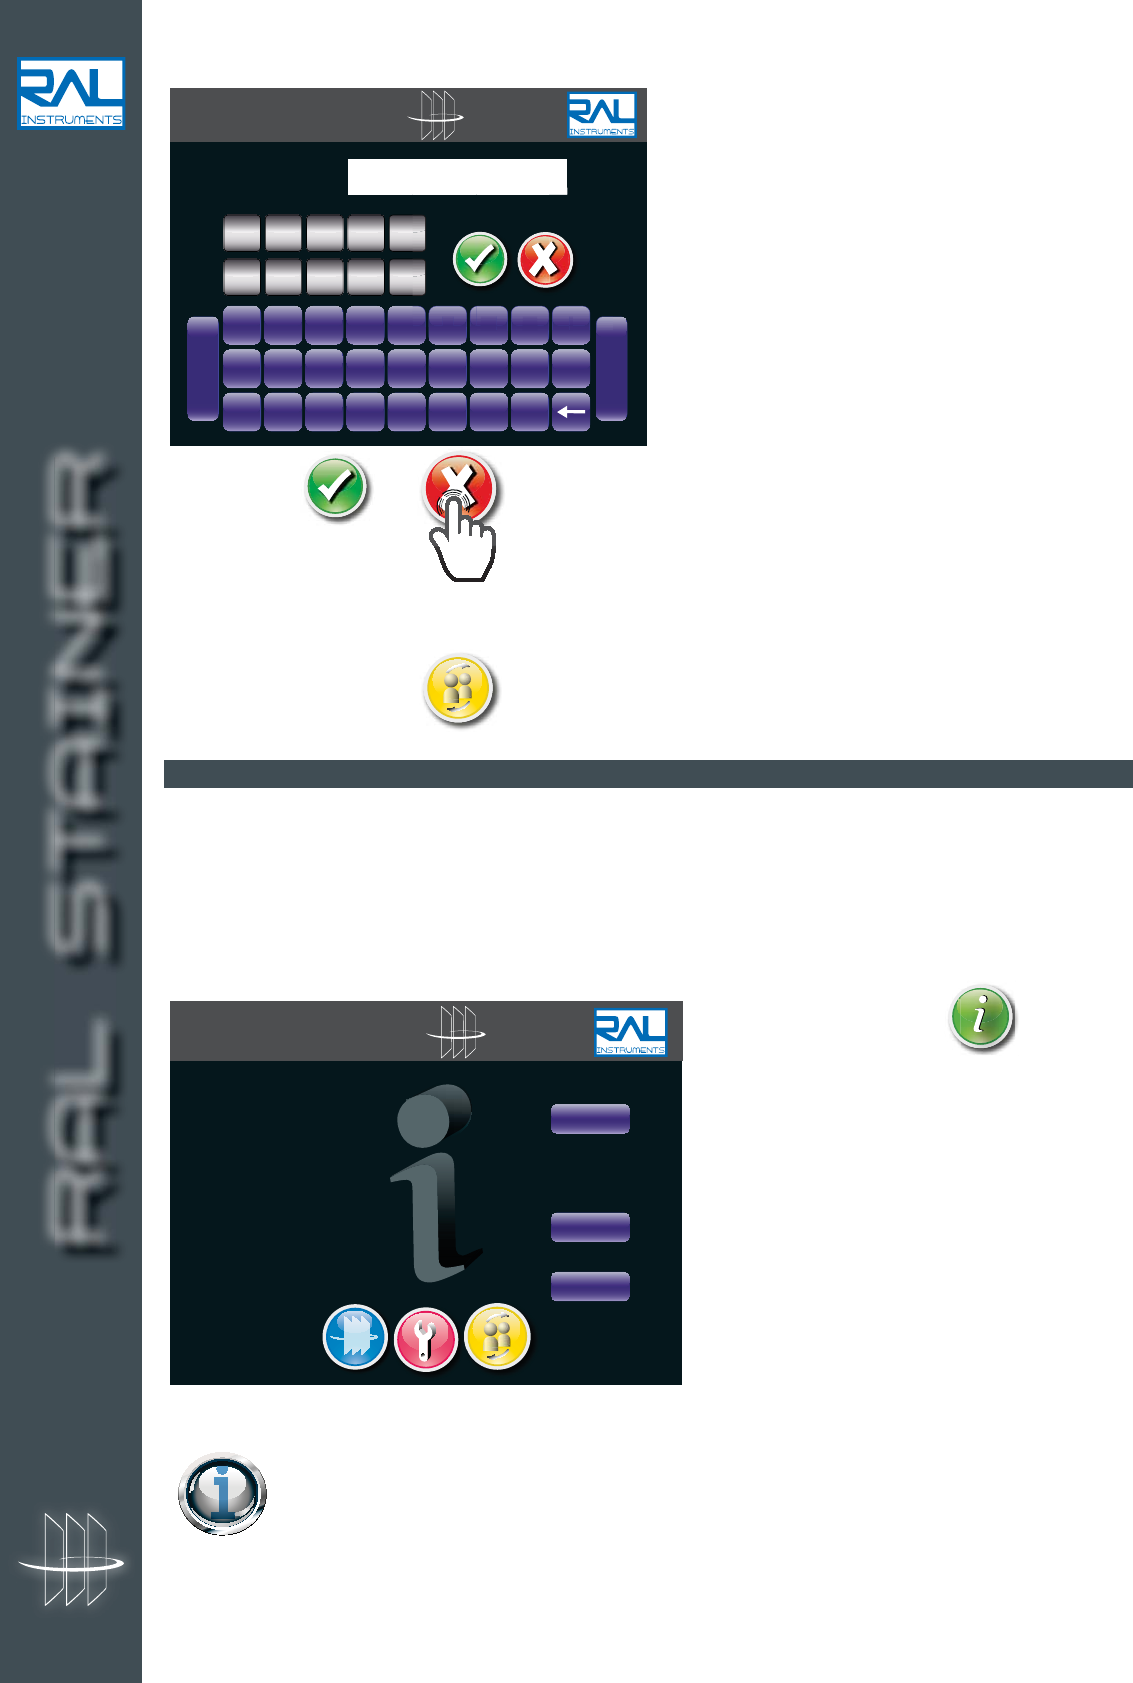
8.2.3 CHANGE SESSION PAGE
The Change session page is used to change users while operating.
LANGUAGE
DATE / TIME
MAINTENANCE
RAL STAINER
24
Fill in the code
and press on or .
Four authorisation levels are defined: Installer, Administrator, Expert and User.
To access this page, press
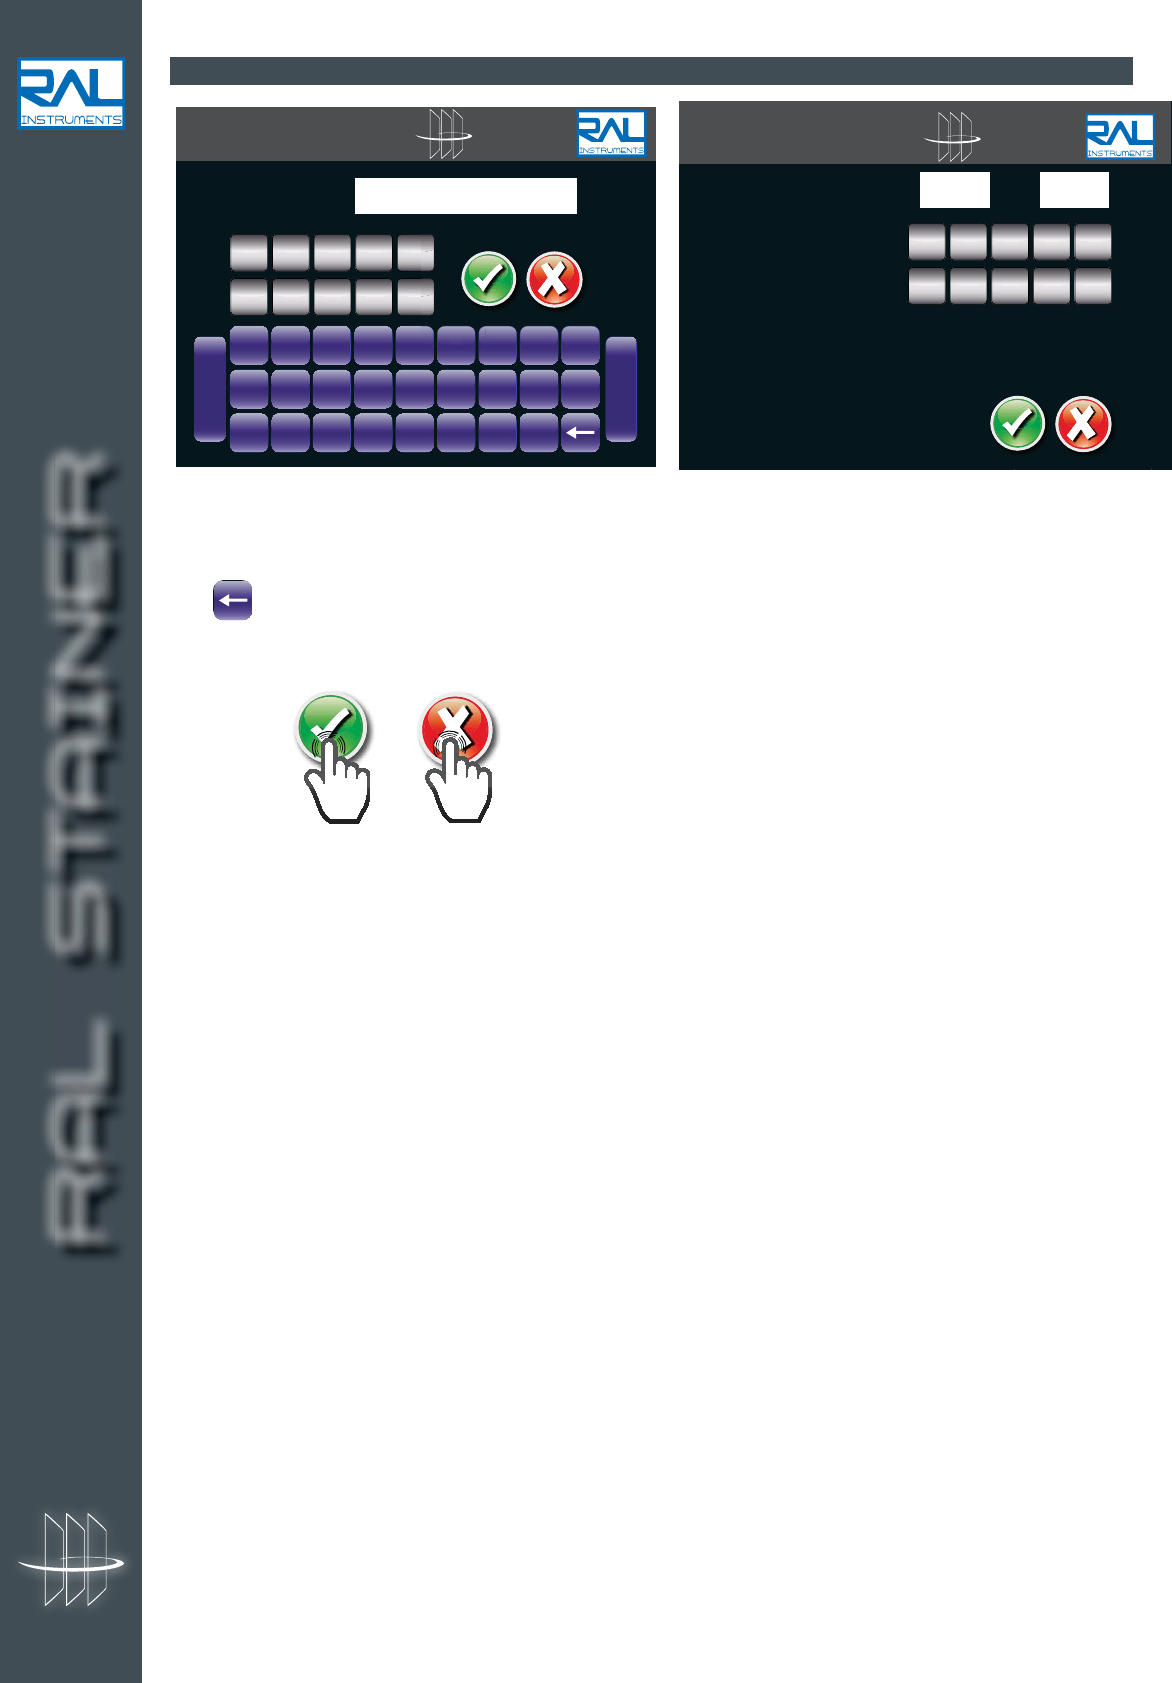
8.2.4 INFORMATION PAGE
The information page gives access to:
- The information on the staining kit being used: Kit batch number and remaining number of cycles;
- The information about your staining appliance: serial number and software version (GUI software version/
Motor software version/ RFID software version)
- Access to information on the activated carbon filter: the remaining time of use
- Information on the user currently working and the list of all users.
To access this page, press
This information can be useful when you contact your RAL Instruments representative for
questions about the use of your RAL Stainer appliance or your RAL Stainer staining kit.
RAL STAINER
A B C D E F G H I
J K L M N O P Q R
S T U V W X Y Z
-
Space
CODE :
G
H
I
I
F
F
G
G
H
H
01234
56789
RAL STAINER
PROFILES
INIT
INFO
REAGENT KIT INFORMATION
Loaded kit : ---
Remaining cycles : 0
MACHINE INFORMATIONS
Serial number: 0000 20/02/2012 15:09:31
Software version : 02:41 / 02:14 / V305
Filter autonomy : 61h
PROFILES
Current session : XXX
RAL STAINER User guide
RAL STAINER
25 RAL STAINER User guide
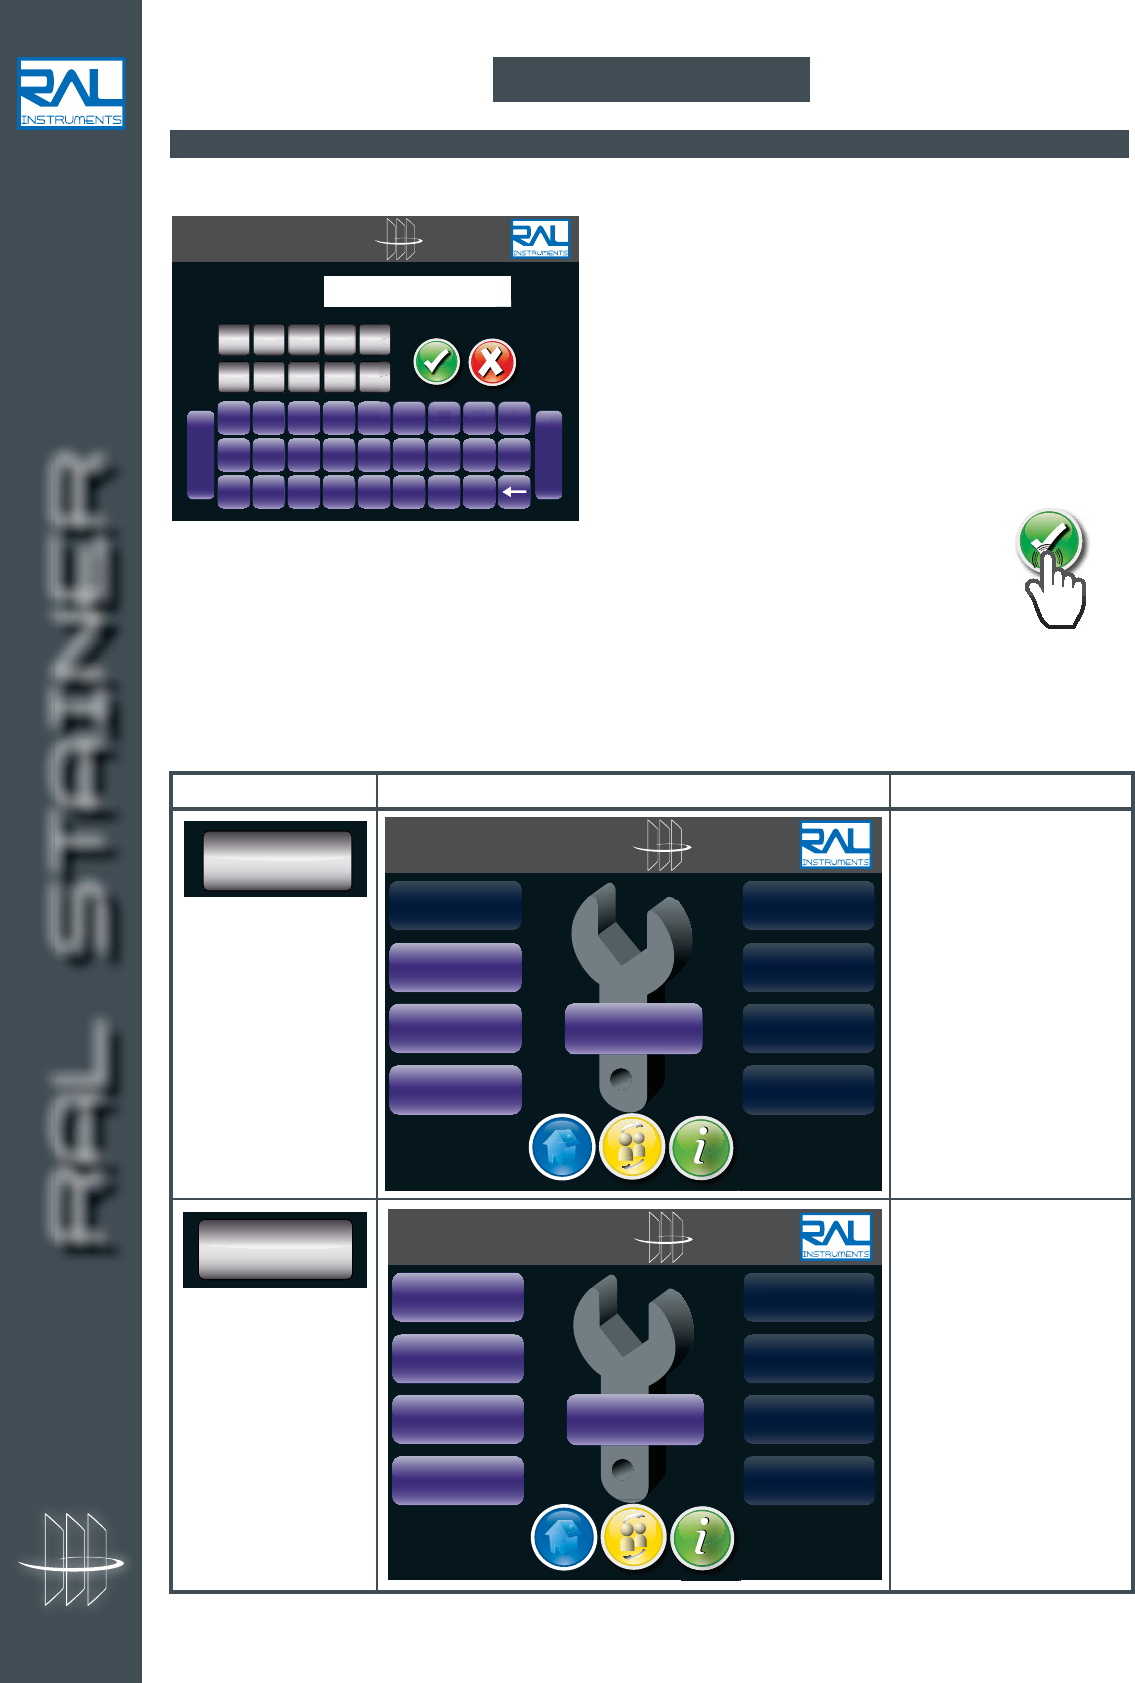
8.2.5 ALPHANUMERIC AND NUMBER KEYBOARD
These dialogue pages are used in several parts of the interface.
They are used to enter numbers from 1 to 9, letters, add a space [Space] or a hyphen [-].
The key is used to cancel entered characters.
On the number page, the cursor passes automatically from minutes to seconds.
Then press : or .
RAL STAINER
A B C D E F G H I
J K L M N O P Q R
S T U V W X Y Z
-
Space
G
H
I
I
F
F
G
G
H
H
01234
56789
RAL STAINER
01234
56789
RAL STAINER
26 RAL STAINER User guide
9.1 USER CREATION AND RIGHTS MANAGEMENT
Turn on the appliance using the 0/1 switch located behind the instrument.
Enter the user code created with your RAL Instruments representative during the installation,
On first use, you must record the users and assign them access rights. The user code will then suffice to
start up the machine.
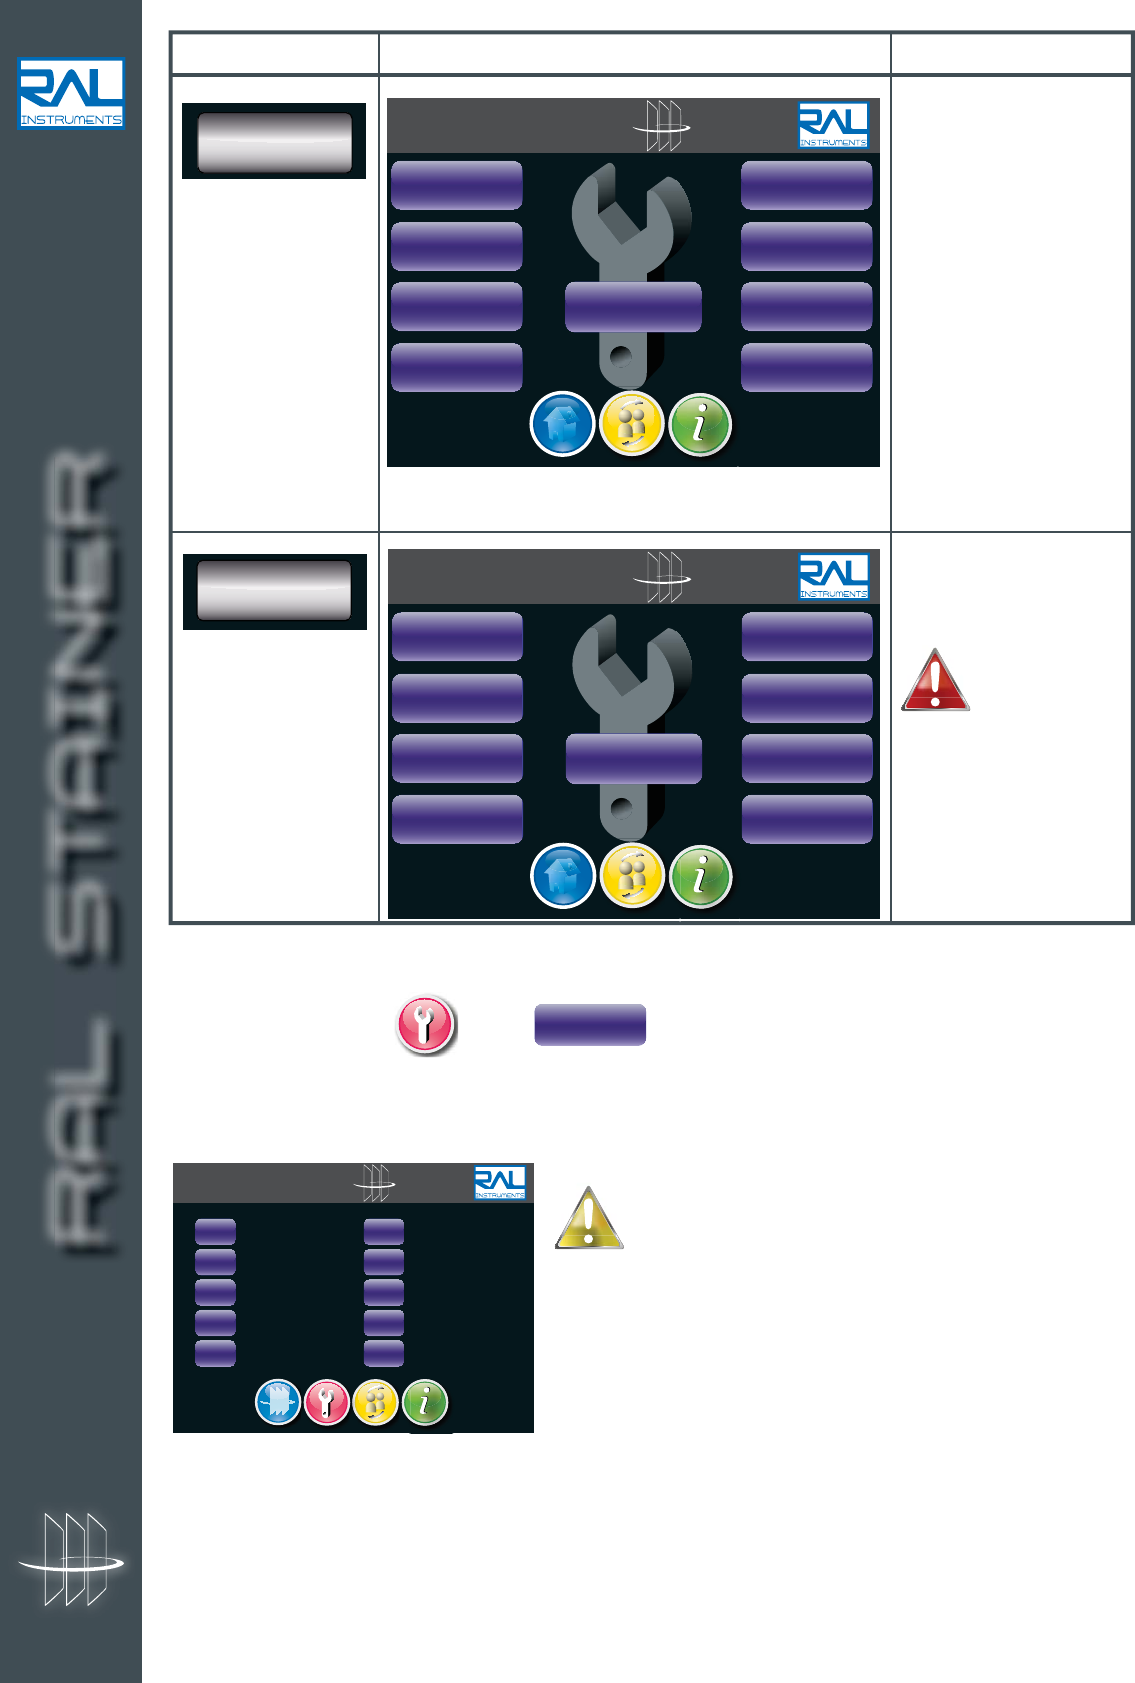
Four authorisation levels can be used:
9 INITIALISATION
Type Screen Rights
User level
This level makes it
possible to use the
machine and to load
protocols that have been
defined by an Expert or
Administrator user.
USER RAL STAINER
SET
PROTOCOL
LOAD/CHANGE
REAGENTS
EMPTY
REAGENTS
USE
USE
USE
USE
RR
RR
RR
R R
IGH
IGH
IGH
IGH
TS
TS
TS
TS
MAN
MAN
AGE
AGE
MEN
MEN
T
T
LANGUAGE
LAN
LAN
LAN
GUA
GUA
GUA
GE
GE
GE
DATE
/
HOUR
DAT
DAT
E/
E/
HO
HO
UR
UR
MAINTENANCE
MAI
MAI
MAI
NTE
NTE
NTE
NAN
NAN
NAN
CE
CE
CE
OPEN
COVER LID
ADJ
ADJ
ADJ
ADJ
UST
UST
UST
UST
PRO
PRO
TOC
TOC
OL
OL
User level + creation and
modification of staining
protocols.
This level makes it
possible to use the
machine and to modify
the settings for a
protocol or to create a
new protocol.
EXPERT RAL STAINER
SET
PROTOCOL
LOAD/CHANGE
REAGENTS
EMPTY
REAGENTS
USE
USE
USE
USE
RR
RR
RR
R R
IGH
IGH
IGH
IGH
TS
TS
TS
TS
MAN
MAN
AGE
AGE
MEN
MEN
T
T
LANGUAGE
LAN
LAN
LAN
GUA
GUA
GUA
GE
GE
GE
DATE
/
HOUR
DAT
DAT
E/
E/
HO
HO
UR
UR
MAINTENANCE
MAI
MAI
MAI
NTE
NTE
NTE
NAN
NAN
NAN
CE
CE
CE
OPEN
COVER LID
ADJUST
PROTOCOL
RAL STAINER
A B C D E F G H I
J K L M N O P Q R
S T U V W X Y Z
-
Space
CODE :
G
H
I
I
F
F
G
G
H
H
01234
56789
RAL STAINER
27 RAL STAINER User guide
Type Screen Rights
Administrator level
+ access to the
maintenance page
This level gives
access to all
the functions of
the machine. It
is reserved for persons
authorised by RAL
Instruments.
INSTALLER RAL STAINER
SET
PROTOCOL
LOAD/CHANGE
REAGENTS
EMPTY
REAGENTS
USER RIGHTS
MANAGEMENT
LANGUAGE
DATE / HOUR
MAINTENANCE
OPEN
COVER LID
ADJUST
PROTOCOL
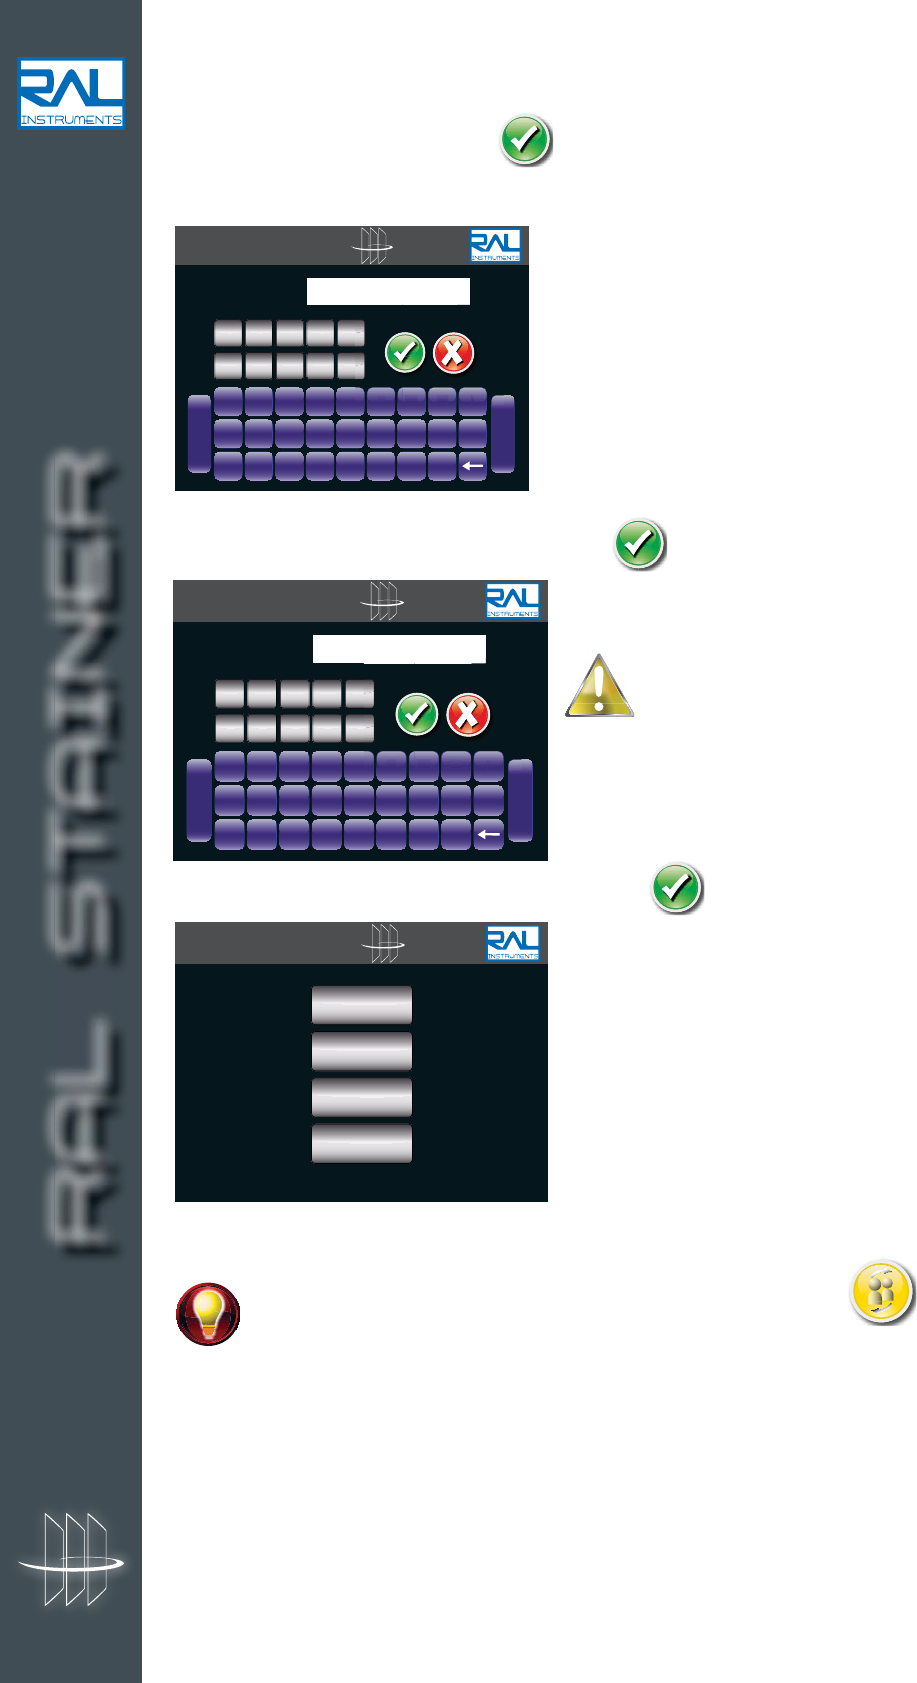
a. On the settings menu , press
The user list page appears.
b. Select a location. 10 users can be defined.
If you use a location that is already in use, the new
record will overwrite the previous record.
USER RIGHTS
MANAGEMENT
RAL STAINER
Expert level + Rights
management + some
functions of maintenance
screen
This level gives access to
all settings except for the
Maintenance page.
Only an Administrator
can create a new user
and define his/her rights.
Authorized functions on
the maintenance screen:
operating arm movements,
activation of water pump
and peristaltic pump
for effluents, trace file
erasing.
ADMINISTRATOR
RAL STAINER
SET
PROTOCOL
LOAD/CHANGE
REAGENTS
EMPTY
REAGENTS
USER RIGHTS
MANAGEMENT
LANGUAGE
DATE / HOUR
MAINTENANCE
OPEN
COVER LID
ADJUST
PROTOCOL
RAL STAINER
28 RAL STAINER User guide
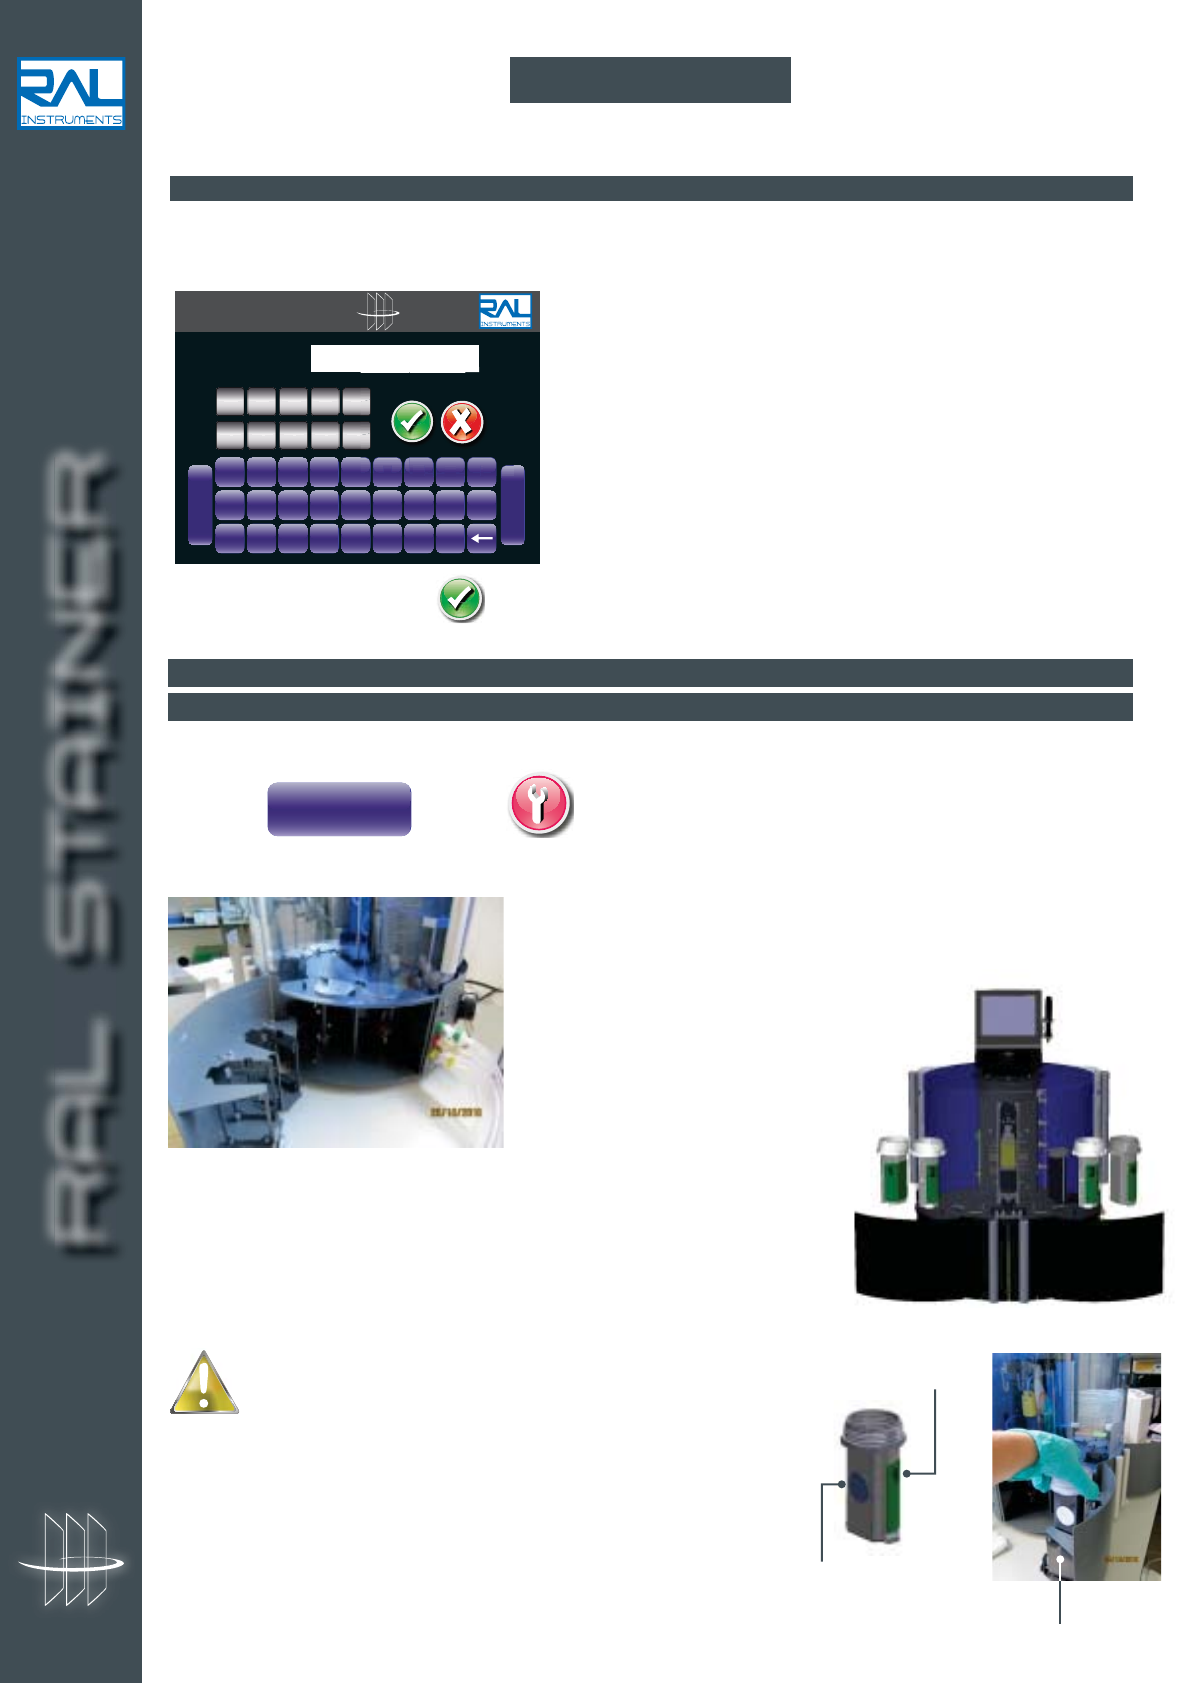
d. Enter the user identification code and validate
It is recommended to choose a mnemonic type code,
the appliance cannot remind the user of the code.
e. Choose the level of rights to associate to the user
At all times it is possible to change users by clicking on the icon
See section 8.2.3.
A strict use of this tool makes it possible to enrich traceability related to the use of the machine.
RAL STAINER
A B C D E F G H I
J K L M N O P Q R
S T U V W X Y Z
-
Space
CODE :
G
H
I
I
F
F
G
G
H
H
01234
56789
RAL STAINER
UTILISATEUR
USER
EXPERT
ADMINISTRATOR
INSTALLER
RAL STAINER
A B C D E F G H I
J K L M N O P Q R
S T U V W X Y Z
-
Space
NAME :
G
H
I
I
F
F
G
G
H
H
01234
56789
c. Enter the user name and validate
RAL STAINER
29 RAL STAINER User guide
10.1 STARTING UP
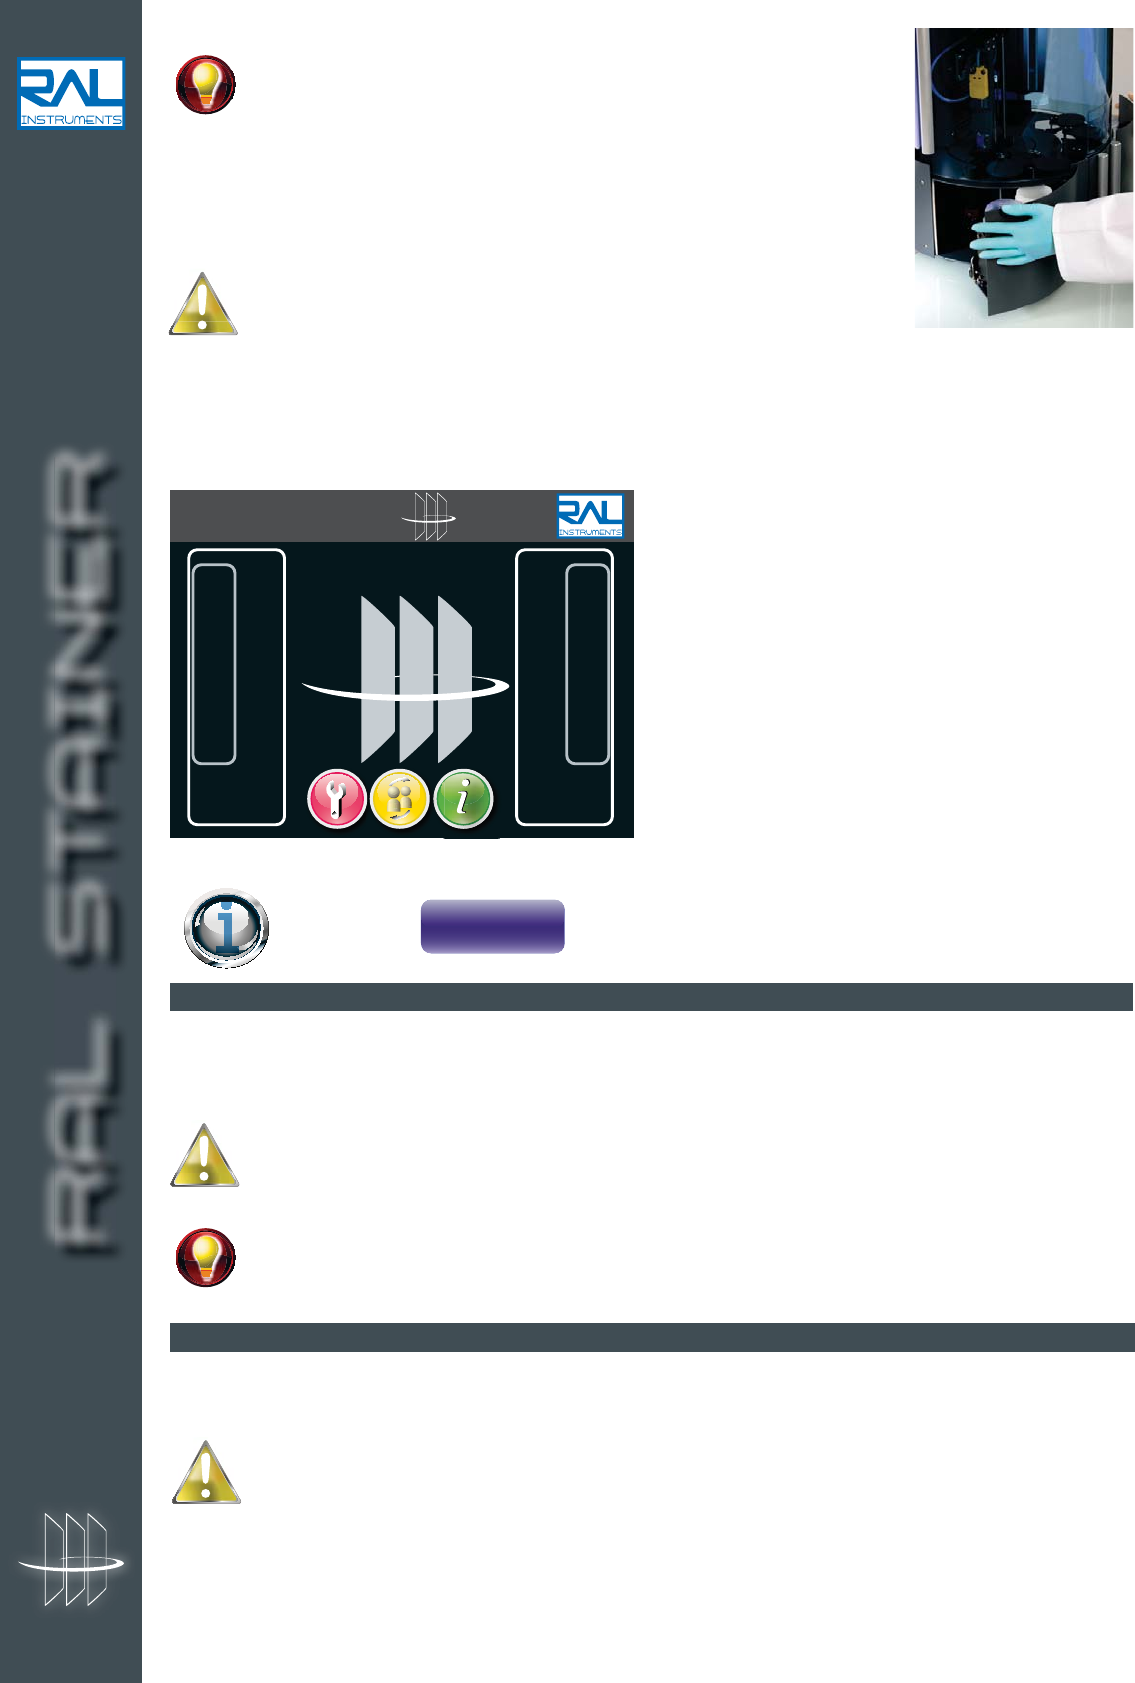
Turn on the appliance using the 0/1 switch located behind the instrument.
The following page is displayed:
Enter the user code. Validate
10.2 INSTALLING REAGENTS
10.2.1 STAINING KIT
If, on start-up, the appliance does not detect a staining kit, it will request one to be inserted.
1. Press on page
2. The appliance opens the lids on the reagent housings and the reagent loading doors.
3. Break the protection seal and place the closed containers from
your staining kit using the numbers on the labels to place them at the
corresponding location within the instrument. Carefully remove the
container caps and keep them. Take off the tamper-proof seal.
10 USE
RAL STAINER
A B C D E F G H I
J K L M N O P Q R
S T U V W X Y Z
-
Space
CODE :
G
H
I
I
F
F
G
G
H
H
01234
56789
RFID Reader
Special precautions for bottle 1:
Bottle 1 contains the RFID chip. This chip must be opposite
the RFID reader (located to the left of the left reagent drawer)
in order to be read. If we consider that the front face of the bottle
is the labelled, curved face, this face must be placed opposite you,
thus the chip will be correctly read by the appliance. In the event
of an error, the "Tag error" message will be displayed. This can be
corrected by turning bottle 1.
LOAD/CHANGE
REAGENTS
RFID chip
Front face
bottle
RAL STAINER
RAL STAINER User guide
30
Removing the caps from the bottles once they have been placed in the
appliance avoids any dangerous handling such as the spilling of the
reagent.
If the kit is new, turn the caps a quarter turn to break the seals.
4. Then gently close the reagent loading drawers until you hear a "click"as they
lock.
It is important that the necks of the bottles be free from reagent so
that the level sensor can adjust the soaking height of the slides in the
reagents.
Remove the tamper-proof seal, the can disturb the arm movement.
5. The appliance closes the covers of the reagent housings.
RAL Stainer identifies the staining kit that was placed
in the appliance and proposes a "Standard" protocol.
It is possible to vary the protocol settings (time, mixing, rinsing). See section 10.3.
This function LOAD/CHANGE
REAGENTS can also be used to change staining kits during their use.
10.2.2 RINSING SOLUTION
Fill the container reserved for this use with the adequate rinsing liquid for the stain being used. Refer to the
staining kit instructions.
Adapt the cap with the suction cane to the rinsing container.
In the case of a low consumption of rinsing water, RAL Instruments recommends the regular
replacement of rinsing water in order to prevent the proliferation of bacteria and to clean the rinsing
liquid container weekly. See section 12.
RAL Stainer permanently checks the level of the rinsing liquid and notifies you when the level
becomes critical.
10.3 STAINING PROTOCOL
10 protocols can be memorised by the appliance.
The protocols proposed by default are protocols optimised by RAL Diagnostic in collaboration with
expert laboratories.
Due to the complex actions of the stainers, it is necessary to establish standard staining conditions
to ensure good staining quality and reproduction.
We therefore advise to test and assess the protocols tested by RAL Diagnostics before making any
changes to the protocol settings.
RAL STAINER
RFID Reading
RAL STAINER
31 RAL STAINER User guide
10.3.1 PROTOCOL MODIFICATION
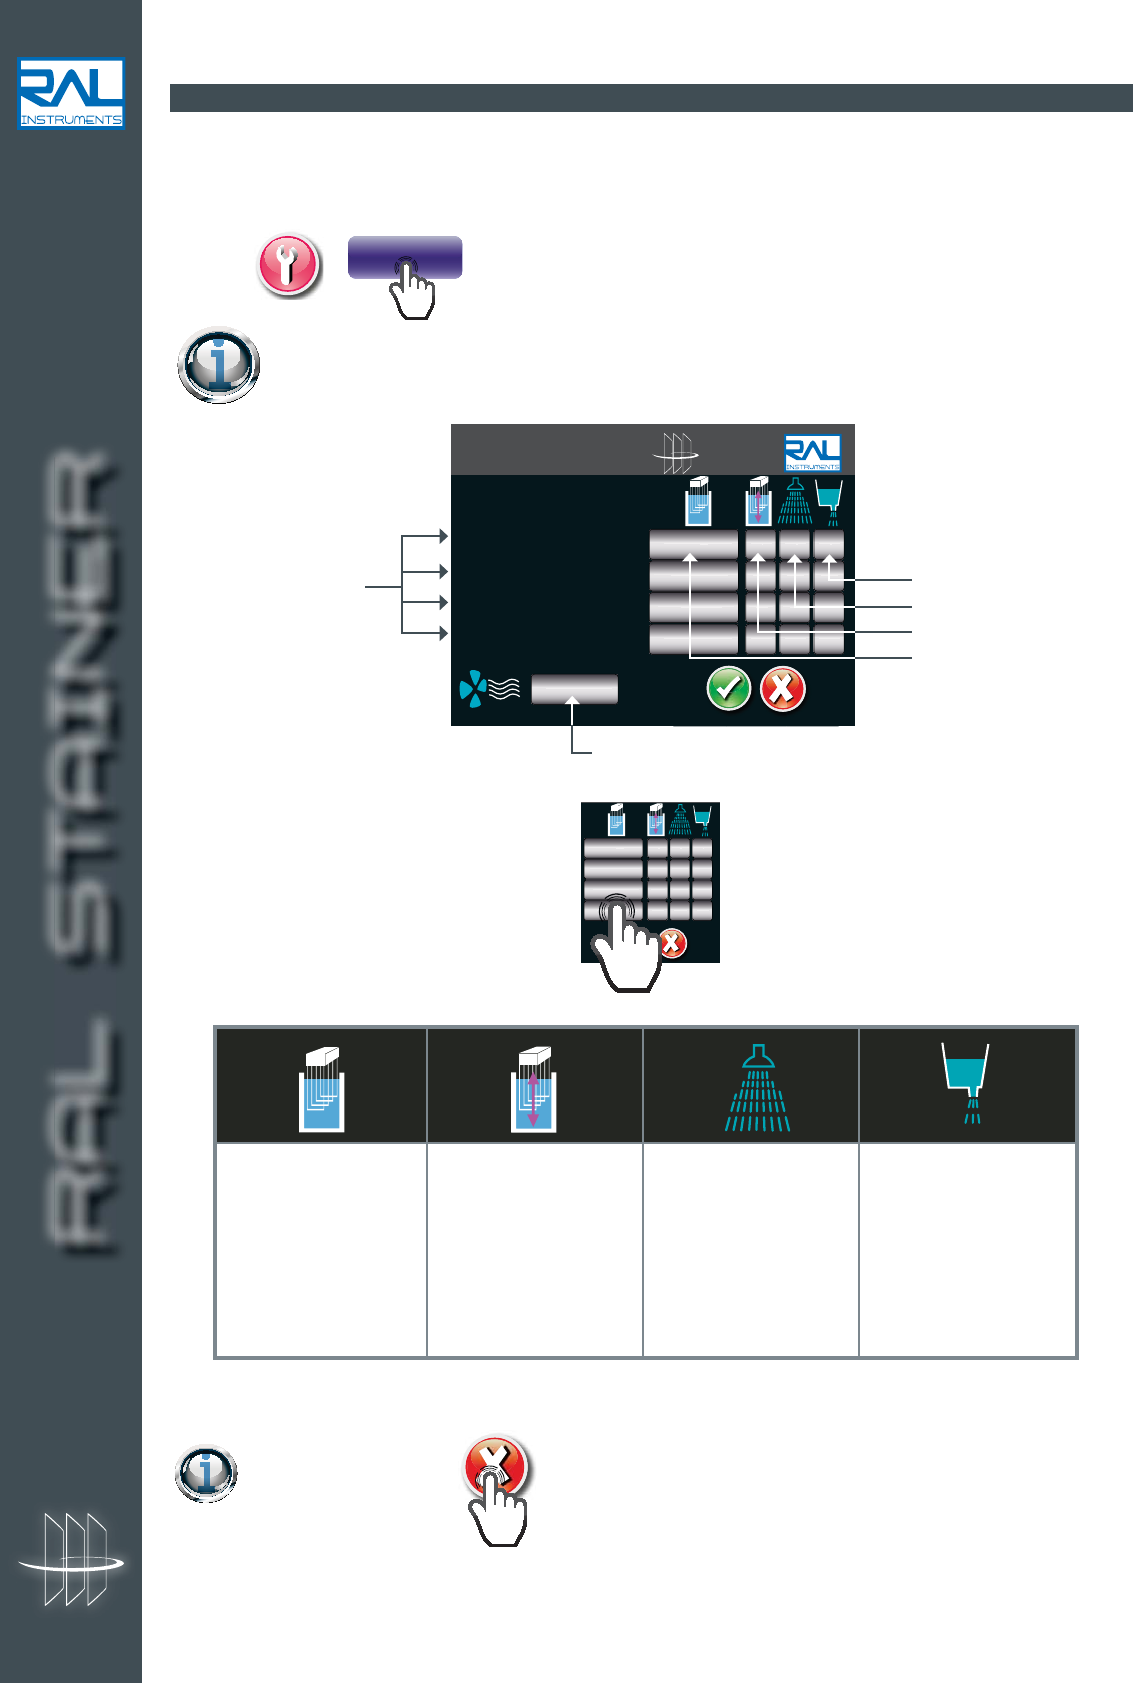
RAL Stainer identifies the staining kit that was placed in the appliance and proposes a “Standard” protocol.
It is, however, possible to vary the protocol settings (time, mixing, rinsing).
On page , ADJUST
PROTOCOL
This function is only accessible to Administrator and Expert users.
See section 9.1.
Main settings
In the event of an error, returns to the previous screen.
Indicate whether you
wish to drain the rinsing
liquid after each rinse.
A single push on the
key is used to switch
from yes to no.
Indicate the number of
rinses after each tank.
Pressing this key
displays another screen
used to define the
rinsing parameters. See
next section.
A single push on the
key is used to switch
from yes to no.
Select "Yes" if you wish
to agitate the slides in
reagent. If you select
"No" the slide holder
will not move during
soaking.
Press the time bar to
change the soaking
time in tank.
RAL STAINER
yes
min:sec
1
no
1 Reagent name
2 Reagent name
3 Reagent name
4 Reagent name
min:sec
Loaded reagents
Dipping time
Drying time
Slides shaking
Number of rinsing
Rinsing station
draining
To modify a setting,
yes
min:sec
1
no
.
RAL STAINER
32 RAL STAINER User guide
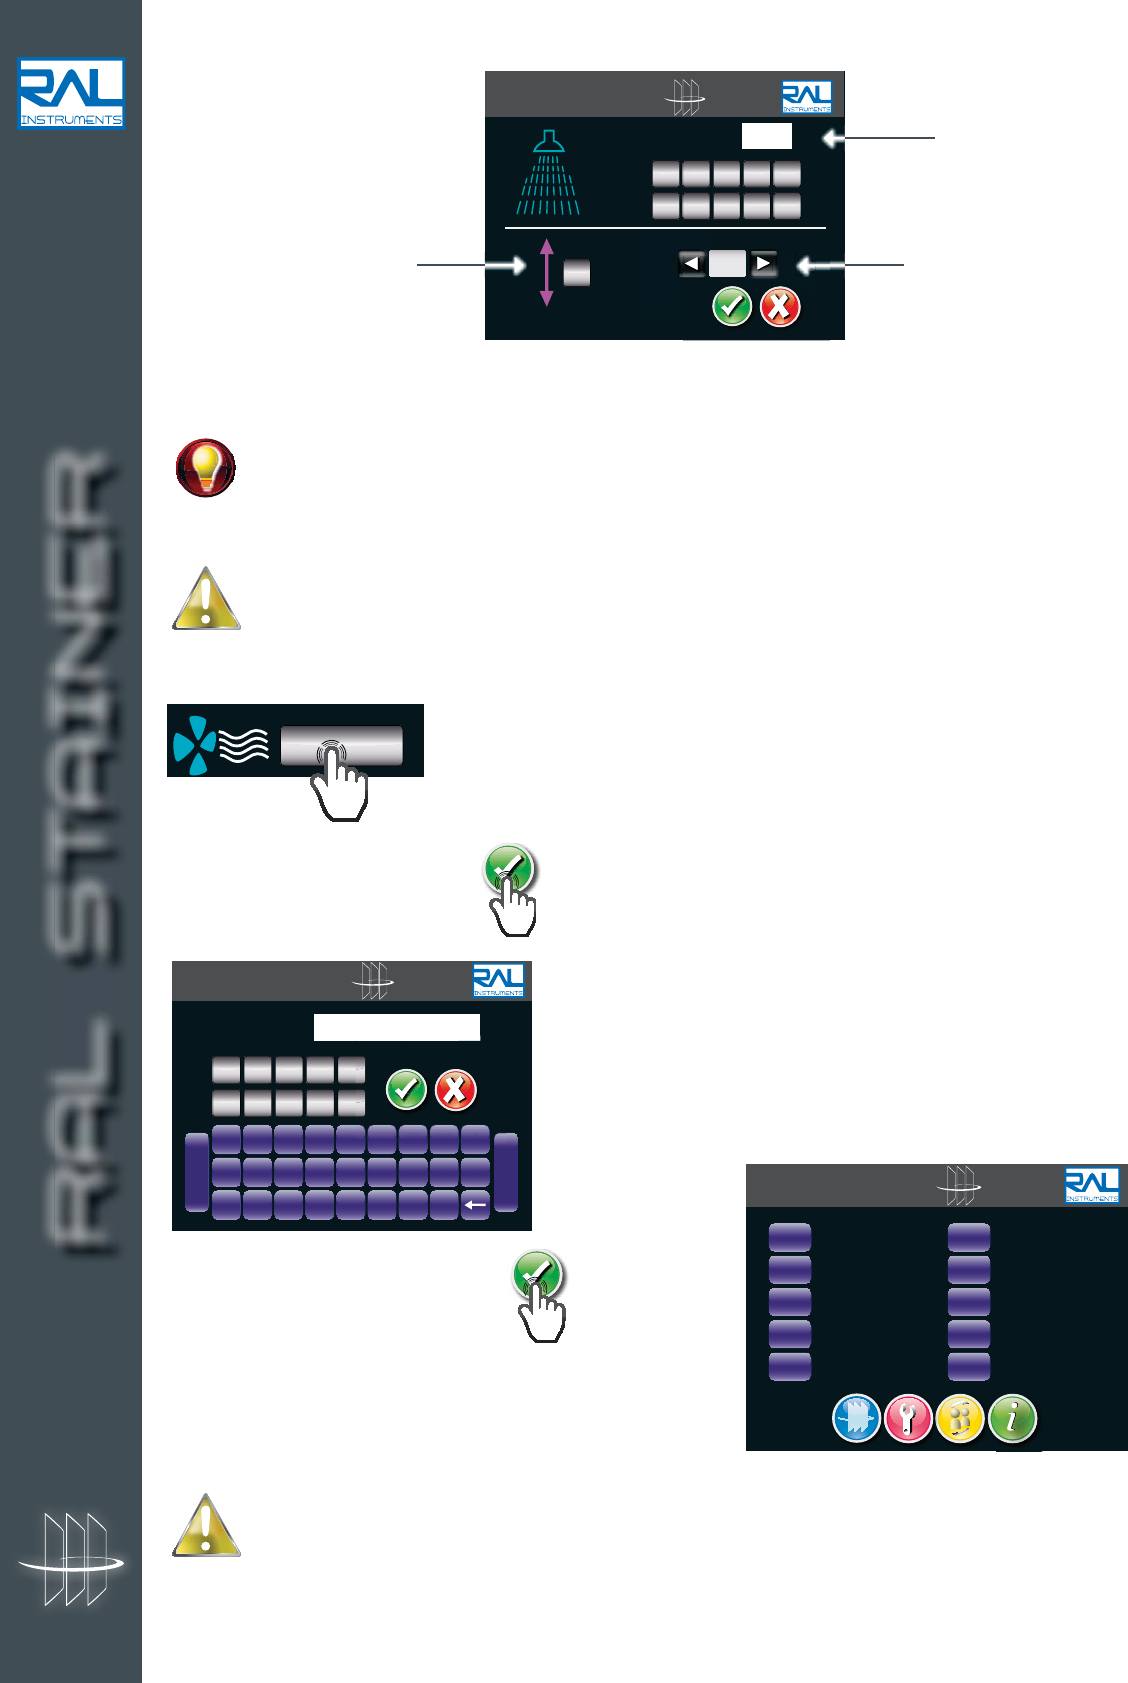
Rinsing
3 parameters :
Draining
RAL Stainer makes it possible to limit the volume of your effluents. You choose whether to drain the
rinsing liquid after each dip. If you choose never to drain the rinsing liquid during a cycle, RAL
Stainer will request the draining frequency by the question :
"How many cycles before draining rising water?" Enter the value.
RAL Instruments recommends draining the rinsing tank after each soaking in order to optimise the
quality of the staining.
Drying
Select the drying time with the numeric keypad.
When all the settings are correct, .
Give a name to the defined protocol, .
Select a location to which to save your new protocol on the
protocol list page.
The selection of a location that has already been used will overwrite the protocol that was previously
at this location.
It is impossible to record a new protocol in location 1 which is reserved for the protocol proposed
by RAL Diagnostics. It is possible to return to this protocol at any time.
RAL STAINER
A B C D E F G H I
J K L M N O P Q R
S T U V W X Y Z
-
Space
PROTOCOL NAME :
G
H
I
I
F
F
G
G
H
H
01234
56789
RAL STAINER
RAL STAINER
Min
Number of rinses
Sec
01234
56789
Define whether you require
movement during rinsing.
Define rinsing time
with the numeric
keypad.
Define the number of
rinses by pressing on the
left and right arrows.
i
00min 00s
RAL STAINER
33 RAL STAINER User guide
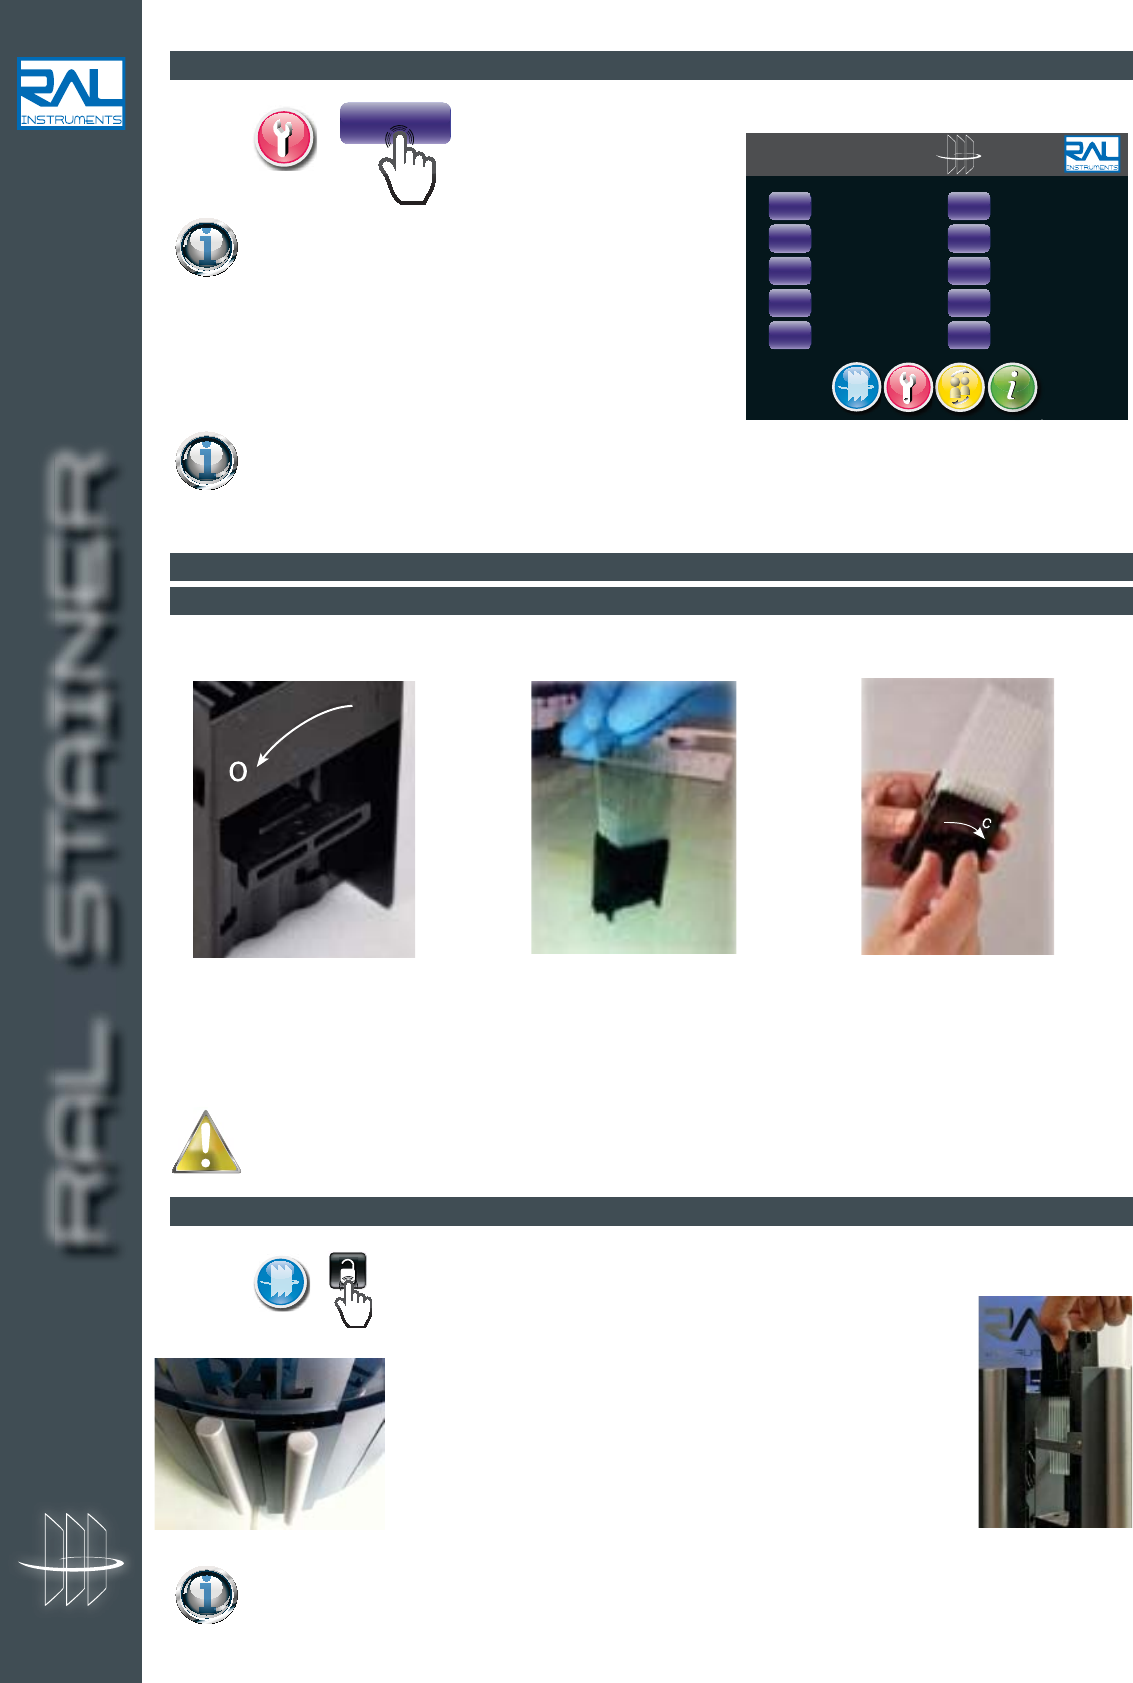
1. Turn the slide holder
and free the jaw by
placing the knob on the
O "Open" position.
2. Place up to ten
slides (identification
maintained).
3. Block the jaw by
moving the knob to the
C "Close" position.
10.3.2 CHANGING THE PROTOCOL
On page ,
SET
PROTOCOL
This function is available to all users. See section
9.1.
The parametered protocol list is displayed, press on the
protocol to be changed to load it.
The last used protocol remains the active protocol after all appliance off/on operations.
10.4 INSTALLING THE SLIDES
10.4.1 LOADING THE SLIDE HOLDER
Place from 1 to 10 slides in the slide holder.
Always make sure that the slides are correctly placed and aligned.
10.4.2 PLACE THE SLIDE HOLDER IN THE APPLIANCE
On page , for unlocking the slide loading drawer.
Place the slide holder correctly on its support in the drawer(s).
Close the drawer(s) until the "click" indicates they are locked.
During staining, it is possible to load a second slide holder or to remove an awaiting slide holder
to add or change a slide.
RAL STAINER
RAL STAINER
34 RAL STAINER User guide
10.5 STAINING
Staining is launched from the staining page, gives access to this page from any other page.
Once the protocol has been selected and the slides placed, to launch the staining.
The appliance moves into action, the arm picks up the slide holder. Staining begins.
To halt an ongoing staining, .
At the end of a cycle, unlock the drawer. Your slides are ready to be examined.
If two stainings are launched, the arm will begin the second staining after having dropped the first
slide holder back to its initial position. Before the second cycle begins, you can retrieve an
awaiting slide holder to add or change a slide by pressing on the lock button.
You can retrieve the first batch of slides after drying while the second batch is being stained.
The slide holder can be retrieved while drying is in progress.
10.6 CHANGING THE STAINING KIT OR DRAINING
10.6.1 CHANGING THE STAINING KIT
This is a useful function if you wish to use the appliance for several staining operations.
Press
LOAD/CHANGE
REAGENTS
on page .
The arm opens the lids, the reagent drawers open.
Put the caps back onto the bottles before removing them.
Remember to store the bottles away from light.
Then insert the bottles for the new staining kit and close the
reagent drawers.
The appliance is ready to operate using the new staining kit,
no cleaning cycle is required.
Name of the staining
protocol used
Name of the
staining kit
Control panel of the two
work zone
Error or information
message area
Remaining staining time
Number of staining
cycles remaining
Drawer status
Progress of staining
Staining in
progress
Drying in
progress
Available
zone
RAL STAINER
RAL STAINER
35 RAL STAINER User guide
The appliance can manage several staining kits in parallel, it keeps the data for each kit in
memory: the autonomy and the customised protocols for this kit reference.
10.6.2 DRAINING
The RAL Stainer will systematically drain the reagents being used if:
EMPTY
REAGENTS
- the kit has expired,
- the autonomy (cycles or slides) has been exceeded,
- the level of one reagent is lower.
The effluents are rejected into the appliance's waste container, the reagent drawers are opened to allow to
remove the empty bottles.
The bottles must be disposed of using the decontaminated waste channel.
If the expiry date after opening is passed, the RAL Stainer will advise you to drain the staining kit with the
message: "Warning BBD expired".
On page ,
EMPTY
REAGENTS
.
These safety mechanisms have been included for quality assurance reasons. We advise you to
follow the RAL Stainer recommendations.
10.7 STAND-BY
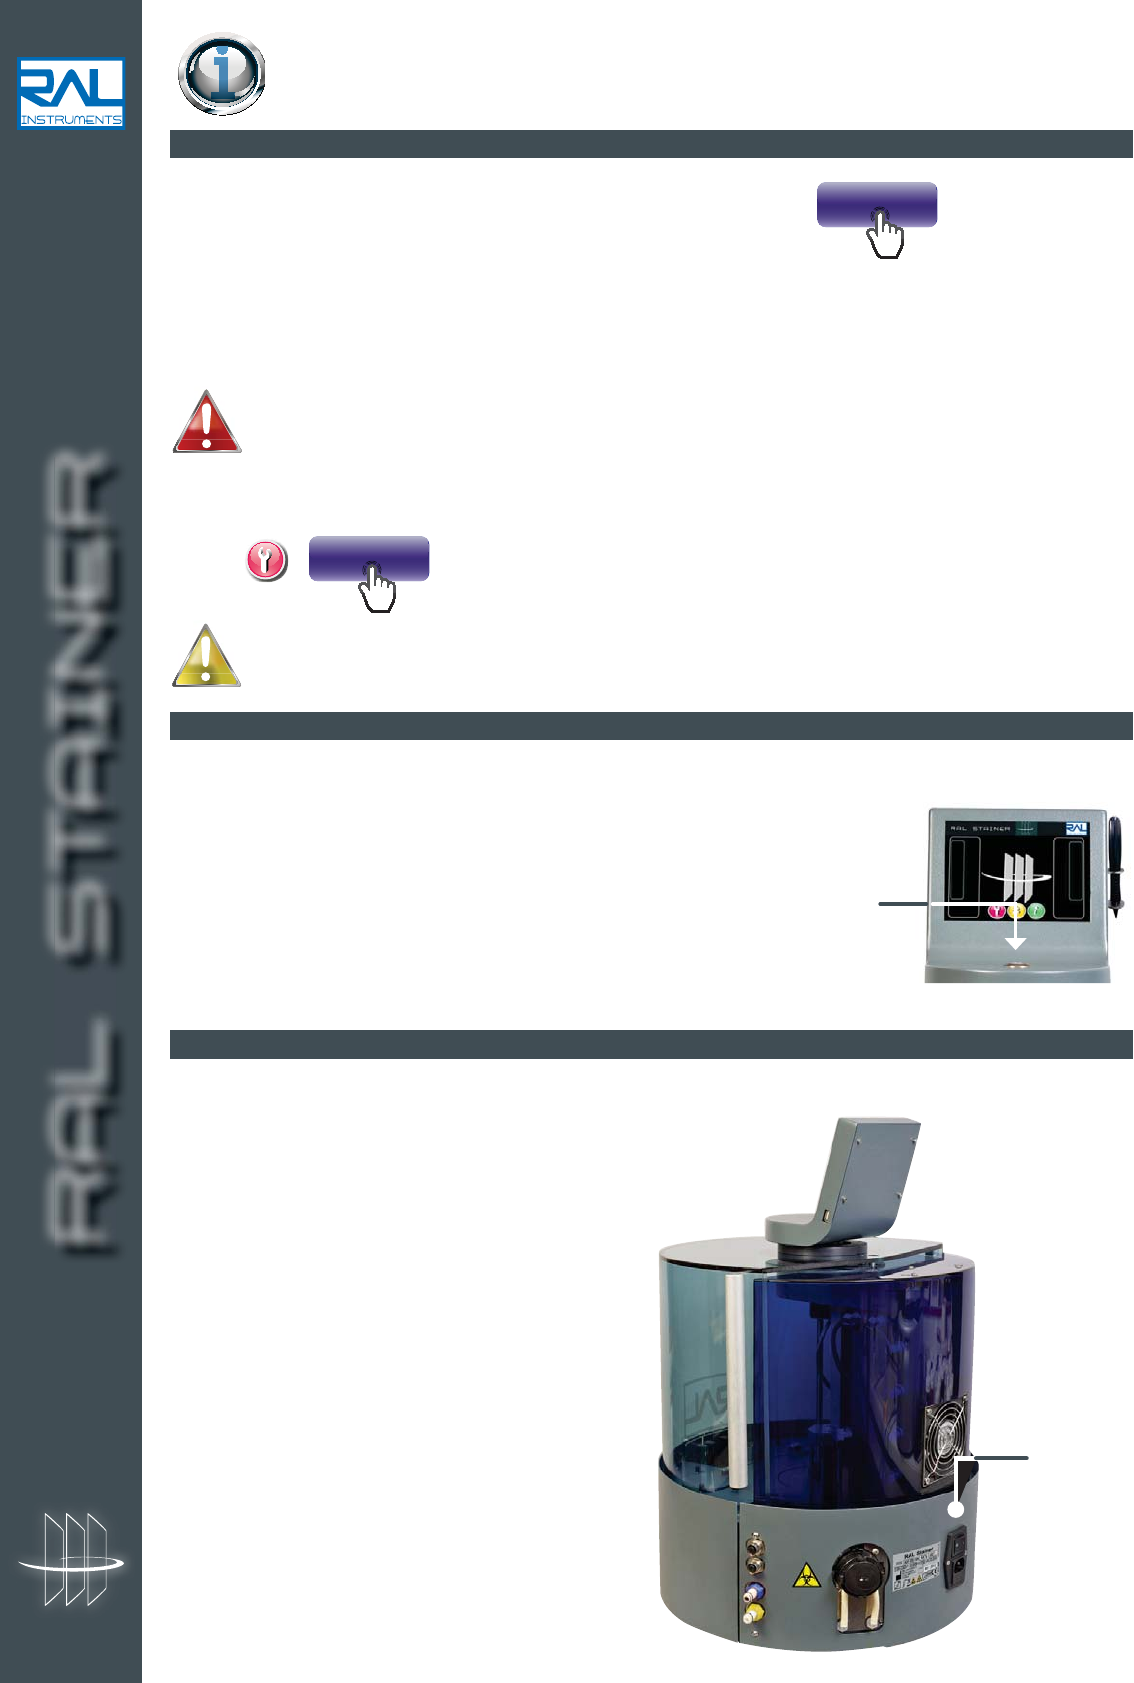
At the end of your working session, simply place the appliance on standby by using the standby button on
the top of the machine.
The RAL Stainer can be restarted by simply pressing the same button again.
10.8 POWERING OFF
When a long period of inactivity is foreseen, prefer powering off the machine to placing it on standby.
In this case press the O/1 switch at the back of the appliance.
On/Off or
0/1 switch
gy
Standby button
RAL STAINER
36 RAL STAINER User guide
The traceability file will indicate:
- Dates of each cycle
- User
- Staining kit name and batch
- Dyeing compliant Yes/No with error message. See section 16.1.
- Staining protocol
11.1 USING THE TRACEABILITY SOFTWARE
Insert the supplied CD into your computer.
Execute the file "Trace.exe" Follow the instructions.
The CD will install software which will enable you to decrypt the traceability file that can be retrieved from the
RAL Stainer.
11.2 LOADING THE TRACEABILITY FILE
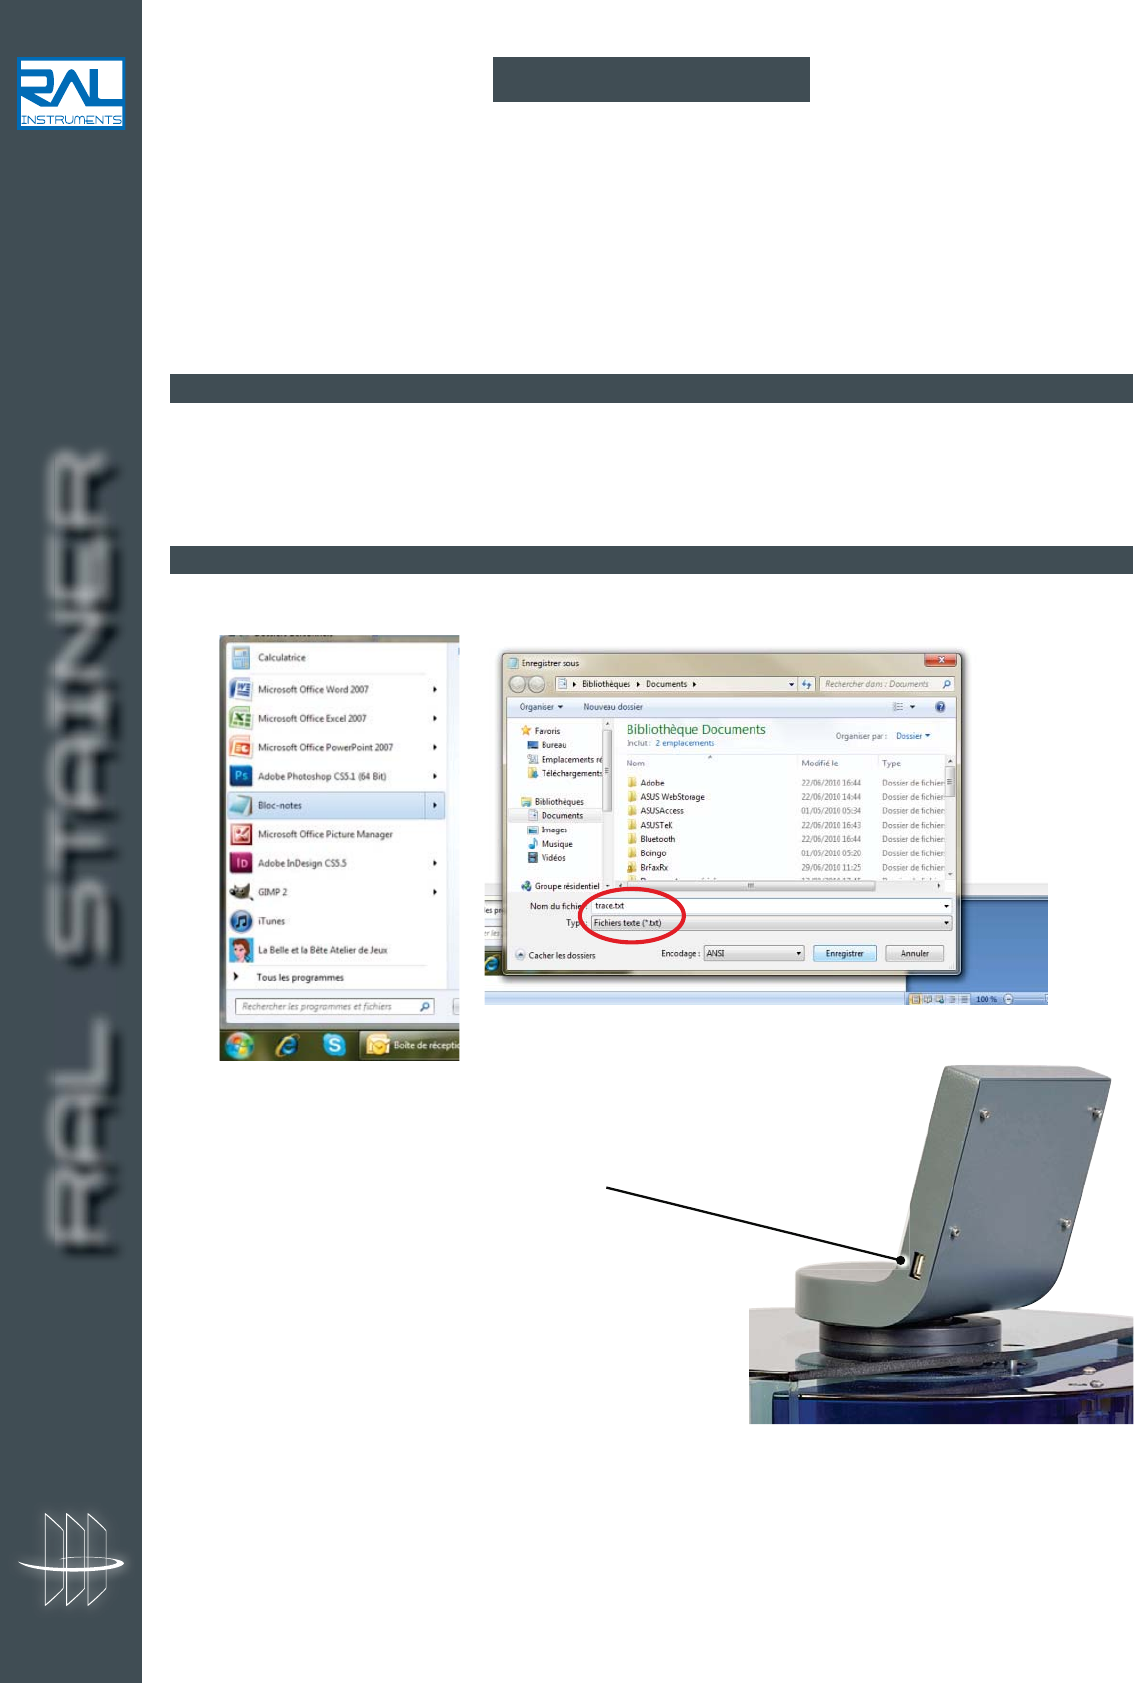
1. Create a new file on the supplied USB stick called "TRACE.txt" (capital letters) using the windows Notepad.
2. Turn off the appliance and insert the USB stick
supplied with the appliance in its location.
3. Turn the machine back on:
- the diode flashes.
- 3 Beeps indicate the end of the download.
4. Open the file on the USB stick named "TRACE.txt" using your traceability software "Trace.exe" on your
computer.
11 TRACEABILITY
RAL STAINER
37 RAL STAINER User guide
12 CLEANING
12.1 CLEANING
On page , OPEN
COVER LID gives access to the inside of the machine.
Basic weekly surface cleaning is sufficient with a wet cloth.
You can use for exemple Ethanol 70°.
Clean:
- The slide drawers
- The slide holders
- The inside and outside surfaces
- The rinsing tank
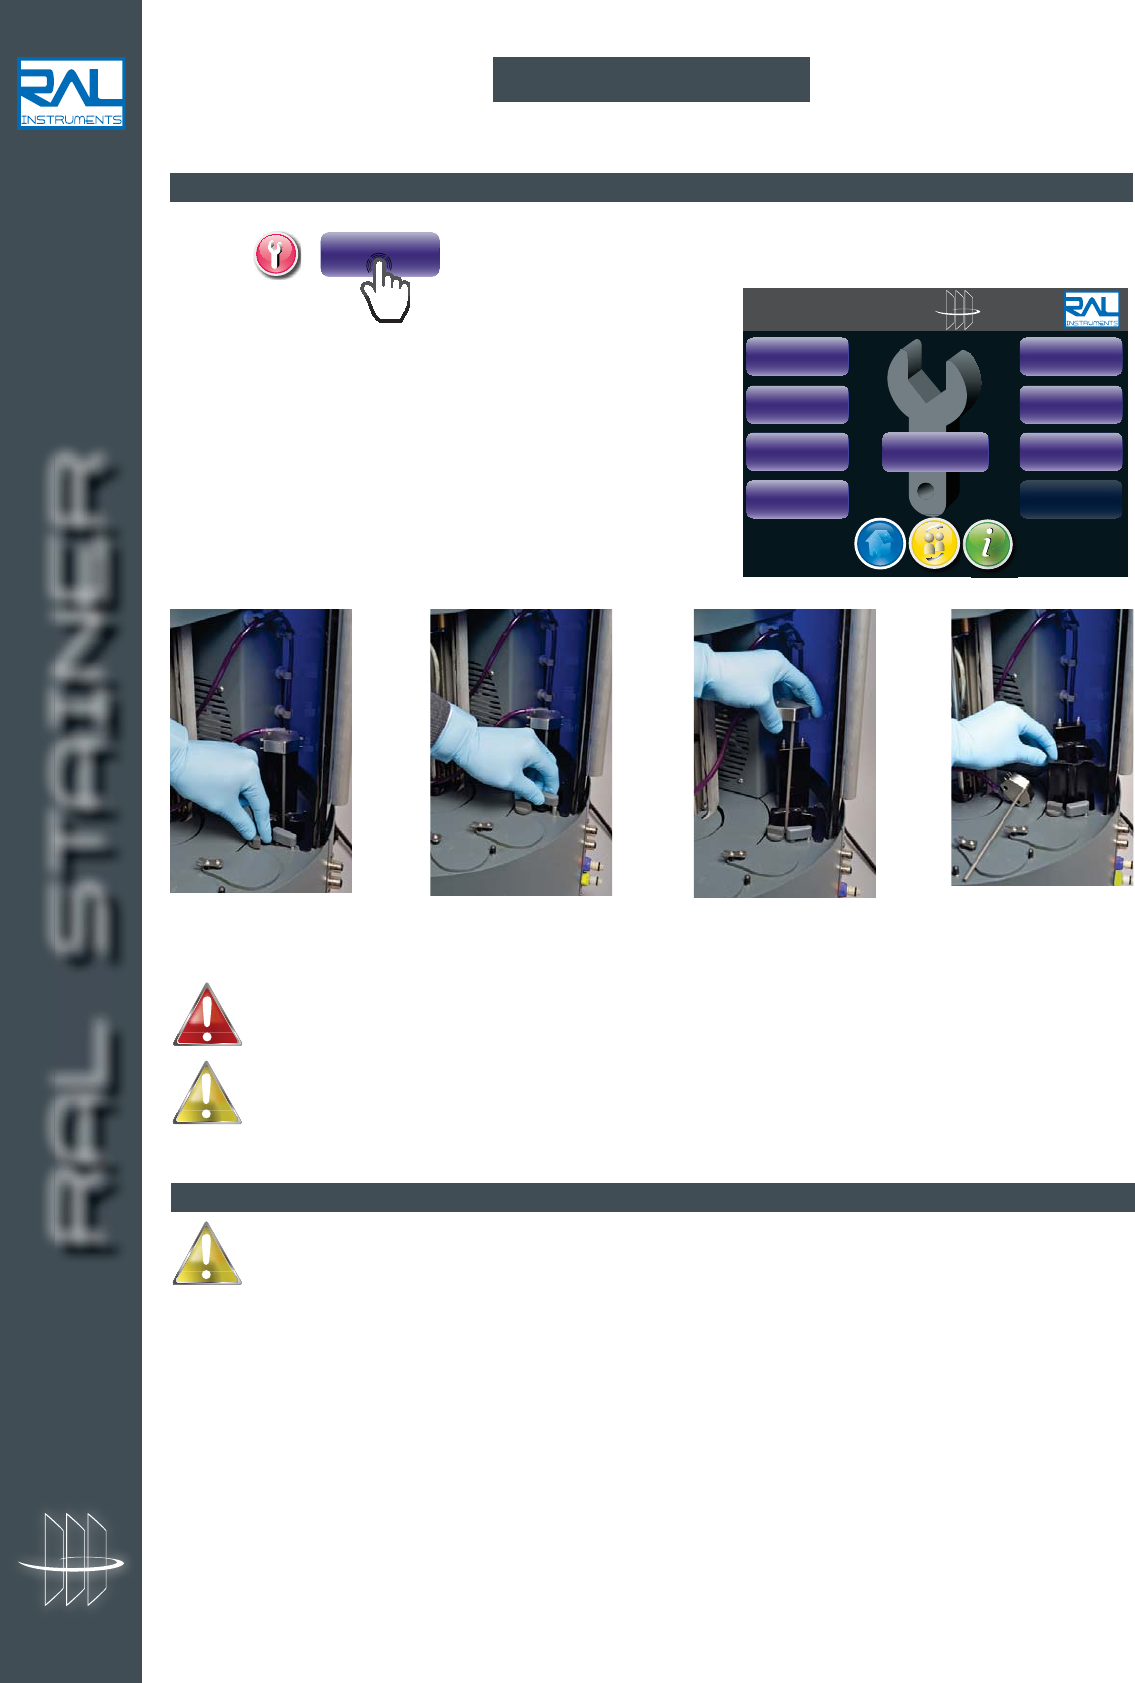
Procedure of rinsing station release
Never pour liquid onto the appliance, it could damage the electronic components.
Do not use solvents on the screen and the cover lid.
In the event of accidental spillage of reagents, turn off the appliance as quickly as possible and
clean using a cloth and the appropriate solvent.
In all cases limit the dose of solvent.
12.2 HYDRAULIC SYSTEM CLEANING
This procedure should be done weekly in order to prevent the bacteria proliferation.
Equipment must be switched on.
Rinsing and draining circuits must be connected to the equipment.
Decontamination solution advised :
- Bleaching water with 2,6 % of active chlorine (available in commerce)
- Solutions like Stereanios of the Laboratoires Anios or Elusept of Pierre Fabre Santé
a. Clean the rinsing liquid container with a decontamination solution in order to prevent the proliferation of
bacteria on the container bottom.
b. Fill the rinsing liquid container with approximatively 500 ml of decontamination solution.
c. Deep the rinsing cane in the container filled with the disinfectant solution.
RAL STAINER
SET
PROTOCOL
LOAD/CHANGE
REAGENTS
EMPTY
REAGENTS
USER RIGHTS
MANAGEMENT
LANGUAGE
DATE / HOUR
MAINTENANCE
MAIN
MAIN
MAIN
TENA
TENA
TENA
NCE
NCE
NCE
OPEN
COVER LID
ADJUST
PROTOCOL
1. Free the rinsing tray
by giving a quarter
turn to the screw
2. Lift the rinsing nozzle
and pivot it lightly
3. Remove the rinsing
nozzle
4. Remove the rinsing
tank
RAL STAINER
38 RAL STAINER User guide
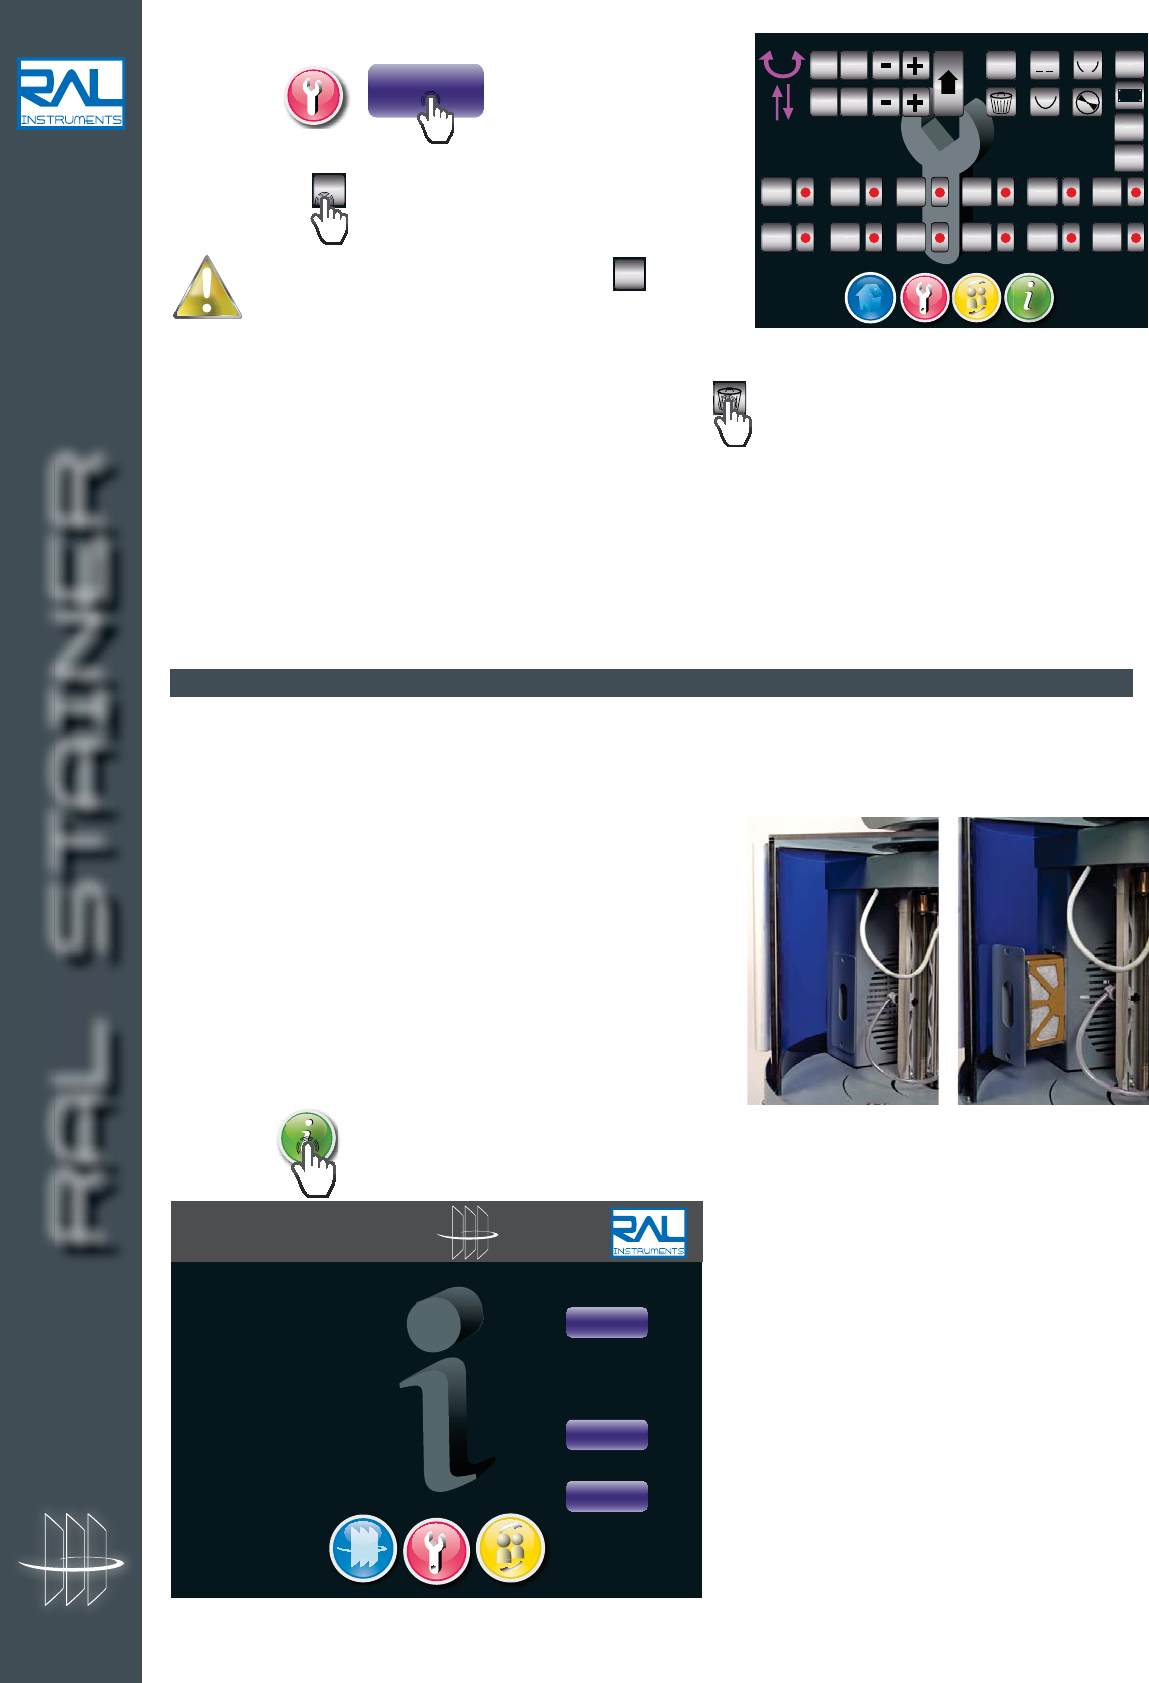
12.3 ACTIVATED CARBON FILTER
The RAL Stainer recommends the changes of the activated carbon filter cartridges.
The life span is calculated using the RAL Stainer operating times.
RAL Stainer will give you an advertising message before the necessity of the filter-cartridge change: "The
activated carbon filter has expired: have you replaced it?"
The filter-cartridges are housed on the left of the machine.
1. Open the cover lid
2. Unscrew the two screws by a quarter turn
3. Remove the used filter cartridge
4. Fit a new filter-cartridge
5. Re-screw the two screws by a quarter turn
d. On page ,
MAINTENANCE
.
e. Switch on the rinsing pump in order to decontaminate the
rinsing circuit :
H2O
.
Switch off the rinsing pump by pressing
H2O
again.
Be careful, pump doesn’t stop automatically.
Fill the rinsing tank until to have the level at 1 cm from the rim.
f. Clean the waste circuit by switching on the draining pump, , and press again this touch when the tank
is empty in order to switch off the pump.
Repeat at least 3 times steps “e” and “f” in order to decontaminate perfectly the waste circuit.
g. Rinse the rinsing liquid container with your rinsing solution.
h. Deep now the rinsing cane in the rinsing solution.
Repeat again by 3 times (at least) steps “e” and “f” with the rinsing solution of staining in order to eliminate
the disinfectant solution previously used.
H2O
NS
-
+
-
+
-
+
-
+
6
T1
T2
T3
T4
C1
C2
C3
C4
L1
L2
V
R
erase
trace
erase
mem
6. On page , set the cartridge life span counter to zero by pressing RAZ
RAL Stainer filter cartridges are available from your RAL Diagnostics reseller.
RAL STAINER
PROFILES
INIT
INFO
REAGENT KIT INFORMATION
Loaded kit : ---
Remaining cycles : 0
MACHINE INFORMATIONS
Serial number: 0000 20/02/2012 15:09:31
Software version : 02:41 / 02:14 / V305
Filter autonomy : 61h
PROFILES
Current session : XXX
RAL STAINER
39 RAL STAINER User guide
12.4 DECONTAMINATION
All biological samples should be considered to be potentially dangerous. The contact between
contaminated hands and the appliance can cause the contamination of the appliance.
Before operation of decontamination, unplug the mains power supply cable.
Use the adapted personal protective equipment : laboratory gloves, laboratory glasses and a
laboratory coat.
Decontamination solution advised:
- Bleaching water with 2,6% of active Chlorine (available in the commerce)
- Solutions like Stereanios of the Laboratoires Anios or Elusept of Pierre Fabre Santé
If your laboratory procedures require it:
- the reagent bottles can be decontaminated before being disposed of;
- the appliance itself and its accessories (slide-holder, rinsing station) can be decontaminated using air or
manual cleaning. Use a decontamination solution and scrub using a clean cloth soaked in the disinfecting
BHFOUBMMUIFBQQBSBUVTQBSUTøTVSGBDFTESBJOJOHOP[[MFIZESBVMJDTZTUFN1MFBTFTFFTFDUJPOBOE
12.2.
- The effluents and their containers are to be eliminated and/or decontaminated in compliance with current
laboratory best practises. The procedure will depend on the type of effluent container you are using.
RAL Stainer 10L jerrycan: decontamination using air or manual cleaning
Autoclave compatible container: resists up to 135°C
In all cases respect the laboratory best practises applied by your laboratory.
The use of organic solvents is under the responsibility of the user and may cause the discolouring
of certain parts of the appliance as well as the alteration of some plastic parts.
RAL STAINER
40 RAL STAINER User guide
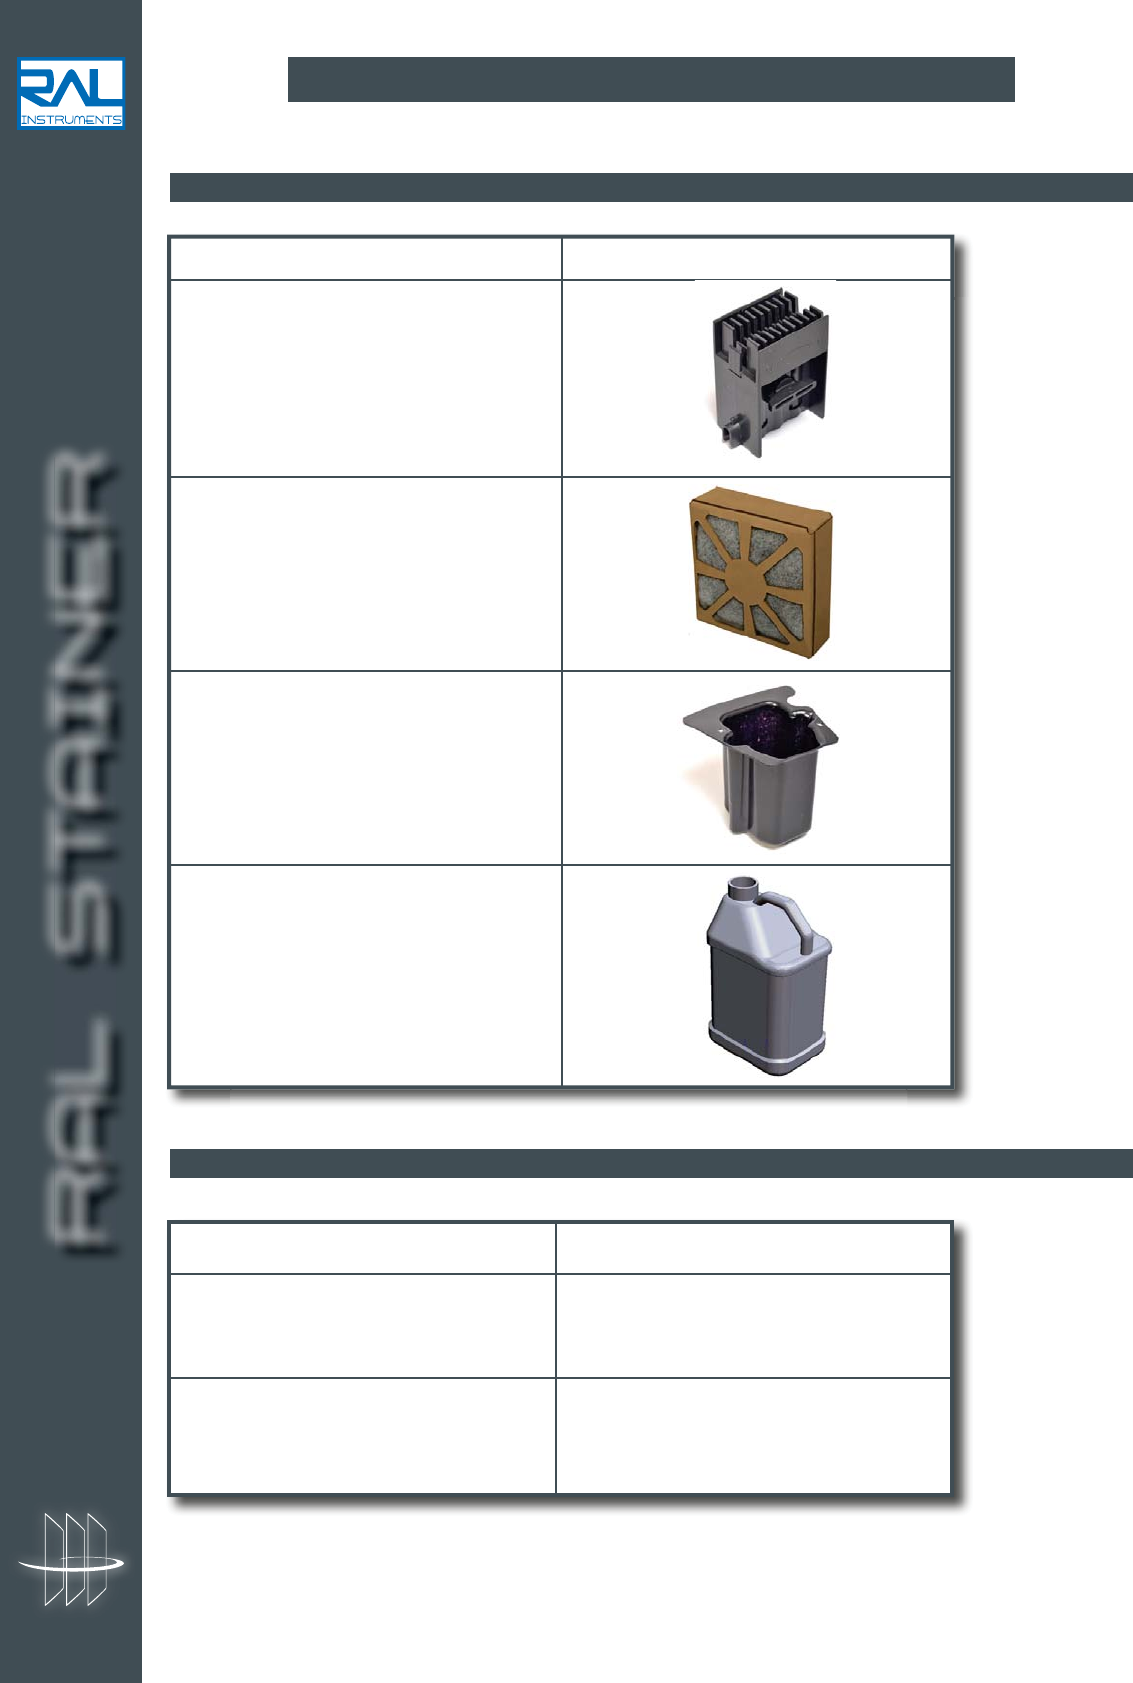
13.1 CONSUMABLES
13.2 OPTIONAL EQUIPMENT
13 CONSUMABLES AND OPTION EQUIPMENT
Consumable name
Pack of slide-holder RAL Stainer (x3
Filter cartridge RAL Stainer
Rinse station RAL Stainer
RAL Stainer 10L jerrycan
Consumable name
Autoclavable 10L jerrycan
Connection system
to the mains water networ

RAL STAINER
41 RAL STAINER User guide
Maintenance must be carried out by a technician approved by RAL Instruments.
For the first year following the purchase of your appliance, the maintenance is ensured by your RAL Instruments
representative.
Beyond this period you can subscribe to a maintenance contract. Contact your RAL Instruments representative.
If your RAL Stainer should be return to your RAL Instrument representative workshop, it must be decontaminated.
The decontamination declaration joined with your apparatus should be well filled in and added to the
equipment for the acceptation in the workshop.
14 MAINTENANCE
15 AFTER-SALES SERVICES
RAL STAINER
42 RAL STAINER User guide
Message Diagnosis Solution
Warning BBD expired Best Before Date expired Change the Staining Kit
The activated carbon filter Carbon filter expired Change the activated carbon
has expired filter
Tag error Bad tag position Check that bottle 1 is correctly
placed as per the operating
instructions in section 10.2.1
SID tag incorrect The tag on your Change the staining kit
Staining Kit is defective. or Contact your RAL Diagnostics
representative.
Motor unit card error Contact your RAL Instruments
representative.
Rinsing Station filling fault Check that the hydraulic circuit
is not disconnected at some
point.
Turn off the appliance and then
turn it back on. If the system is
not restored, contact your RAL
Instruments representative.
Step loss on Theta Turn off the appliance and then Check that the arm is operating
Code 200 turn it back on correctly by simulating a
Slide-holder incorrectly placed in staining kit change.
the drawer If the system is not restored,
Slide incorrectly placed on its support
contact your RAL Instruments
Drainage nozzle incorrectly placed representative.
on its support
16.1 ERROR MESSAGES
16 TROUBLESHOOTING
Step loss on Z
Code 1+tank number+1 =
Loss of Z step when
lowering to tank X
Examples :
Code 131 :
Loss of Z step
when lowering to tank 3
Code 1A1 :
Loss of Z step
when lowering to rinsing tank
Code 1B1 :
Loss of Z step
when picking up or dropping
off basket
Code 1+
tank number
+2 =
Liquid missing in tank
X
Example :
Code 142 :
Liquid missing in
tank
4
Call a maintenance
technician
This can occur when
the level
detection could not be carried out.
Check that the necks of the
bottles are not dirtied.
If so, clean them.
Turn off the appliance and then
turn it back on.
Check that the arm is operating
correctly by simulating a staining
kit change.
If the system is not restored,
contact your RAL Instruments
representative.
Contact your RAL
Instruments representative.
RAL STAINER
43 RAL STAINER User guide
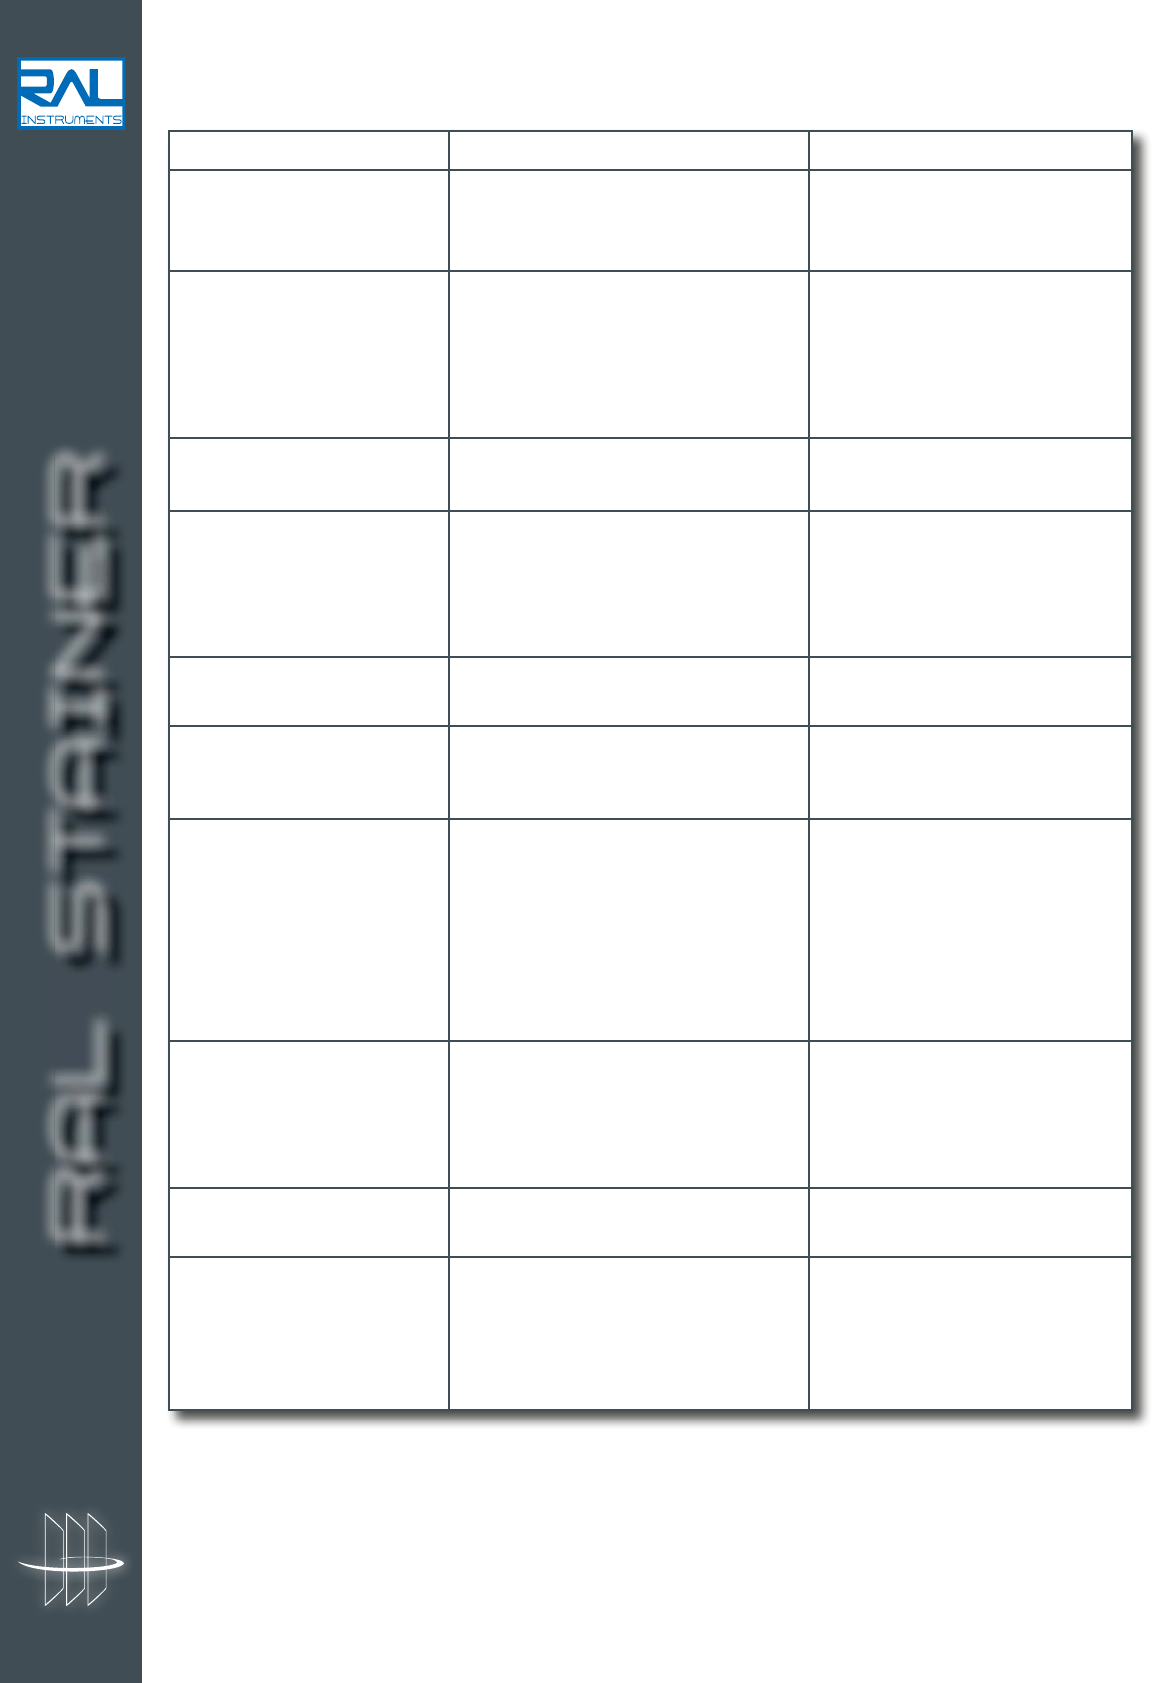
Problem encountered Diagnosis Solution
Screen off The green and blue diodes visible
when powering on on the USB be port are on?
If yes Is the machine on standby? Press the standby button.
ON/OFF too fast? Turn off the appliance and then
turn it back on. If the system is
not restored, contact your RAL
Instruments representative.
If not Contact your RAL Instruments
representative.
The machine does not turn on?
Is the green diode that is visible
inside the machine when the arm is
in the soaking position in tank 3
on?
If yes Contact your RAL Instruments
representative.
If not You must changed the power Contact your RAL Instruments
supply or the fuse. representative.
No reaction No beep when pressing Turn off the appliance
of the touch screen impossible to enter the code. and turn it back on. If the system
is not restored, contact your RAL
Instruments representative.
Incorrect reaction Contact your RAL Instruments
on the touch screen representative
The codes do not allow Data loss Fill in the code
to go to the codes page to initialise the machine. If
the system is not restored,
contact your RAL Instruments
representative.
The machine does not Memory problem There is an SD card in the RFID
keep the codes in memory card located in the left reagent
loading door. Check that the
SD card is in the machine. If
necessary, remove it and replace
it after having cleaned the
connections.
Tag reading impossible Check whether the blue diode is on If the diode is on, try another
"Tag reading" very long the RFID card and check on the tag. If it persists impossible,
(greater than 10 seconds) info page whether the RFID software contact your RAL
is present. Instruments representative.
If the diode is off, contact your
RAL Instruments representative.
16.2 WHAT TO DO WHEN ...?
RAL STAINER
44 RAL STAINER User guide
Problem encountered Diagnosis Solution
Staining begins, but
one of the positioning settings Contact your
slides are found is to be adjusted. RAL Instruments representative.
on the machine plate.
The slides are incorrectly Rinsing is carried out using Drain the rinsing container more
rinsed soiled water. often or change the rinsing water
in your container. If the fault
persists there may be a fault on
the draining pump. Contact your
RAL Instruments representative.
The rinsing tray overflows
Contact your RAL Instruments
representative.
Variation of the soaking Check that there is no liquid Wipe the bottle necks.
of the slides on the neck thread. If the fault persists, Contact your
RAL Instruments representative
to adjust the settings on the
level sensor.
The arm opens the lids
The arm positions have become offset.
Contact your RAL Instruments
either too far or too little. representative.
Major oscillation of the Too much space between the hooks Slightly tighten the
slide holders during and the slide holders hooks
Z movements
Systematic message Reagent levels low? Check the level of the liquid
"Z step loss" in the containers.
If necessary, if the arm is more
than one year old, re-grease the
Z axis.
If the problem persists,
contact your RAL Instruments
representative.
On installation the arm The machine has been taken out Wait 1 Hour
moves a few mm, groans of its packing. The cold tightens the i.e. at room temperature
and stops moving the gaps and fixes the grease Use the "Load/Change the
on the Z axis. staining kit" function several
times to make the arm operate.
The loading drawer Bad adjustment of the switch or Contact your RAL Instruments
refuses to shut electro-magnetic bearing. representative.
Impossible to load Wrong USB stick Use the USB stick supplied with
the traceability programme your instrument or try to format
your USB stick for FAT16.
Other USB sticks are available
on demand.
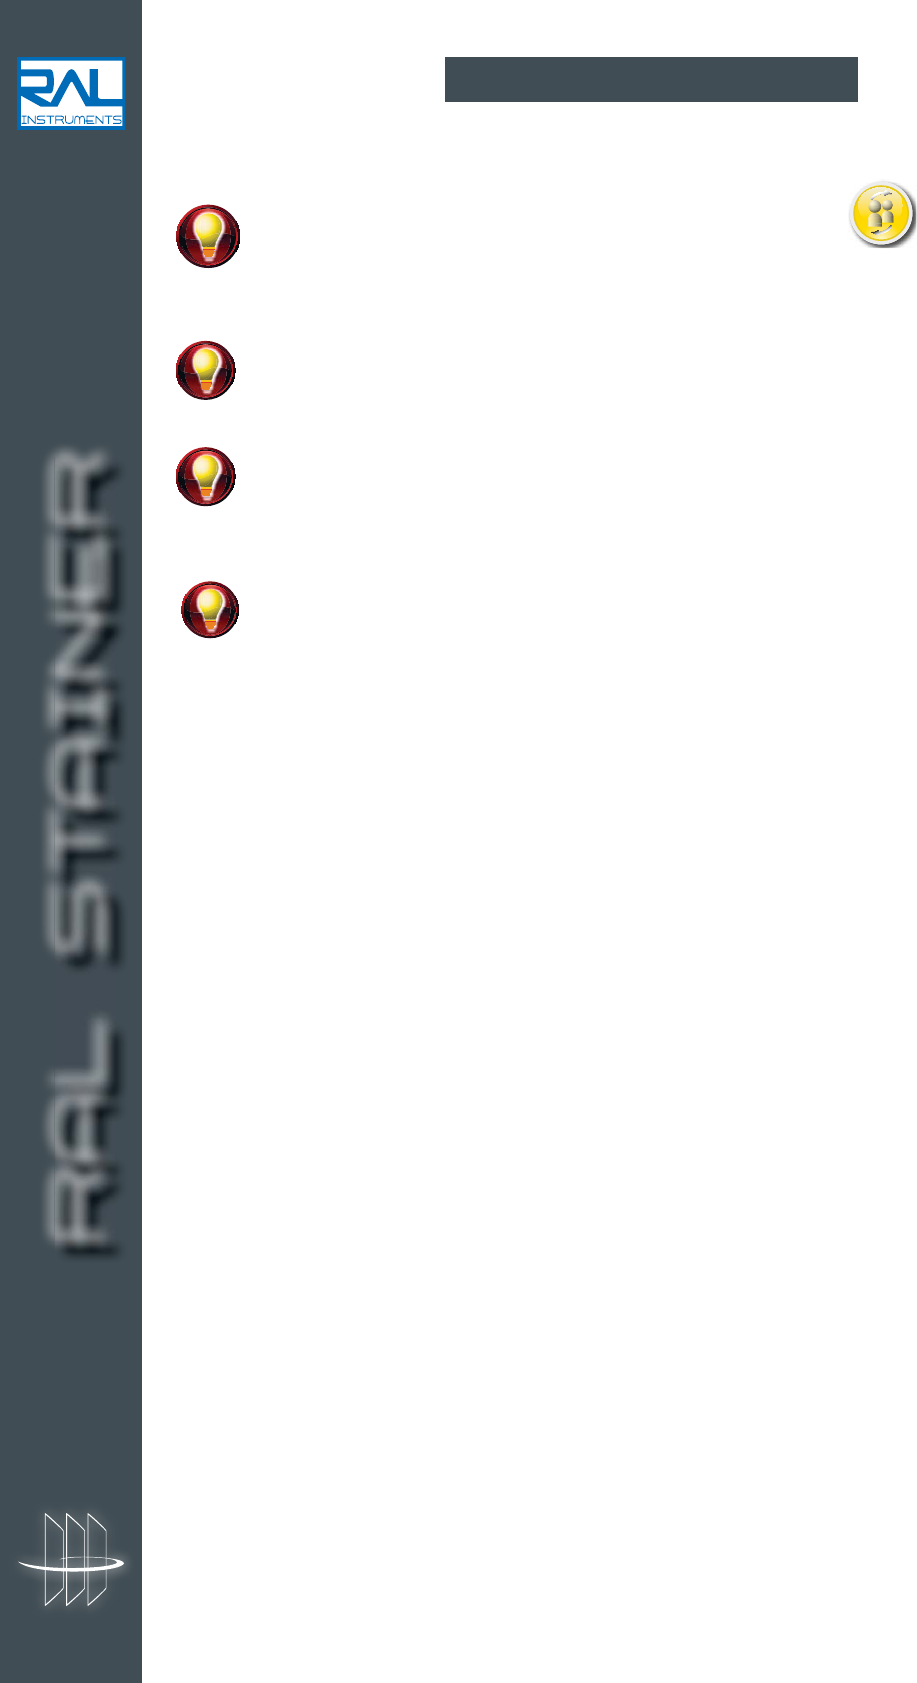
RAL STAINER
45 RAL STAINER User guide
At all times it is possible to change users by clicking on the icon
See section 8.2.3.
A strict use of this tool makes it possible to enrich traceability related to the use of the machine.
RAL Stainer permanently checks the level of the rinsing liquid and notifies you when the level
becomes critical.
RAL Stainer makes it possible to limit the volume of your effluents. You choose whether to drain the
rinsing liquid after each dip. If you choose never to drain the rinsing liquid during a cycle, RAL
Stainer will request the draining frequency by the question :
"How many cycles before draining rising water?" Enter the value.
If two stainings are launched, the arm will begin the second staining after having dropped the first
slide holder back to its initial position. Before the second cycle begins, you can retrieve an awaiting
slide holder to add or change a slide by pressing on the lock button.
You can retrieve the first batch of slides after drying while the second batch is being stained.
The slide holder can be retrieved while drying is in progress.
17 SUMMARY OF TIPS
RAL STAINER
46 RAL STAINER User guide
18 INDUSTRIAL PROPERTY
The RAL Stainer model is a community model registered under the n° 001733361-001.
It is prohibited, unless explicitly authorised by RAL Instruments in writing, to manufacture, propose, put on the
market, import, export, use or possess a product including the model for the same purposes.
RAL STAINER
47 RAL STAINER User guide
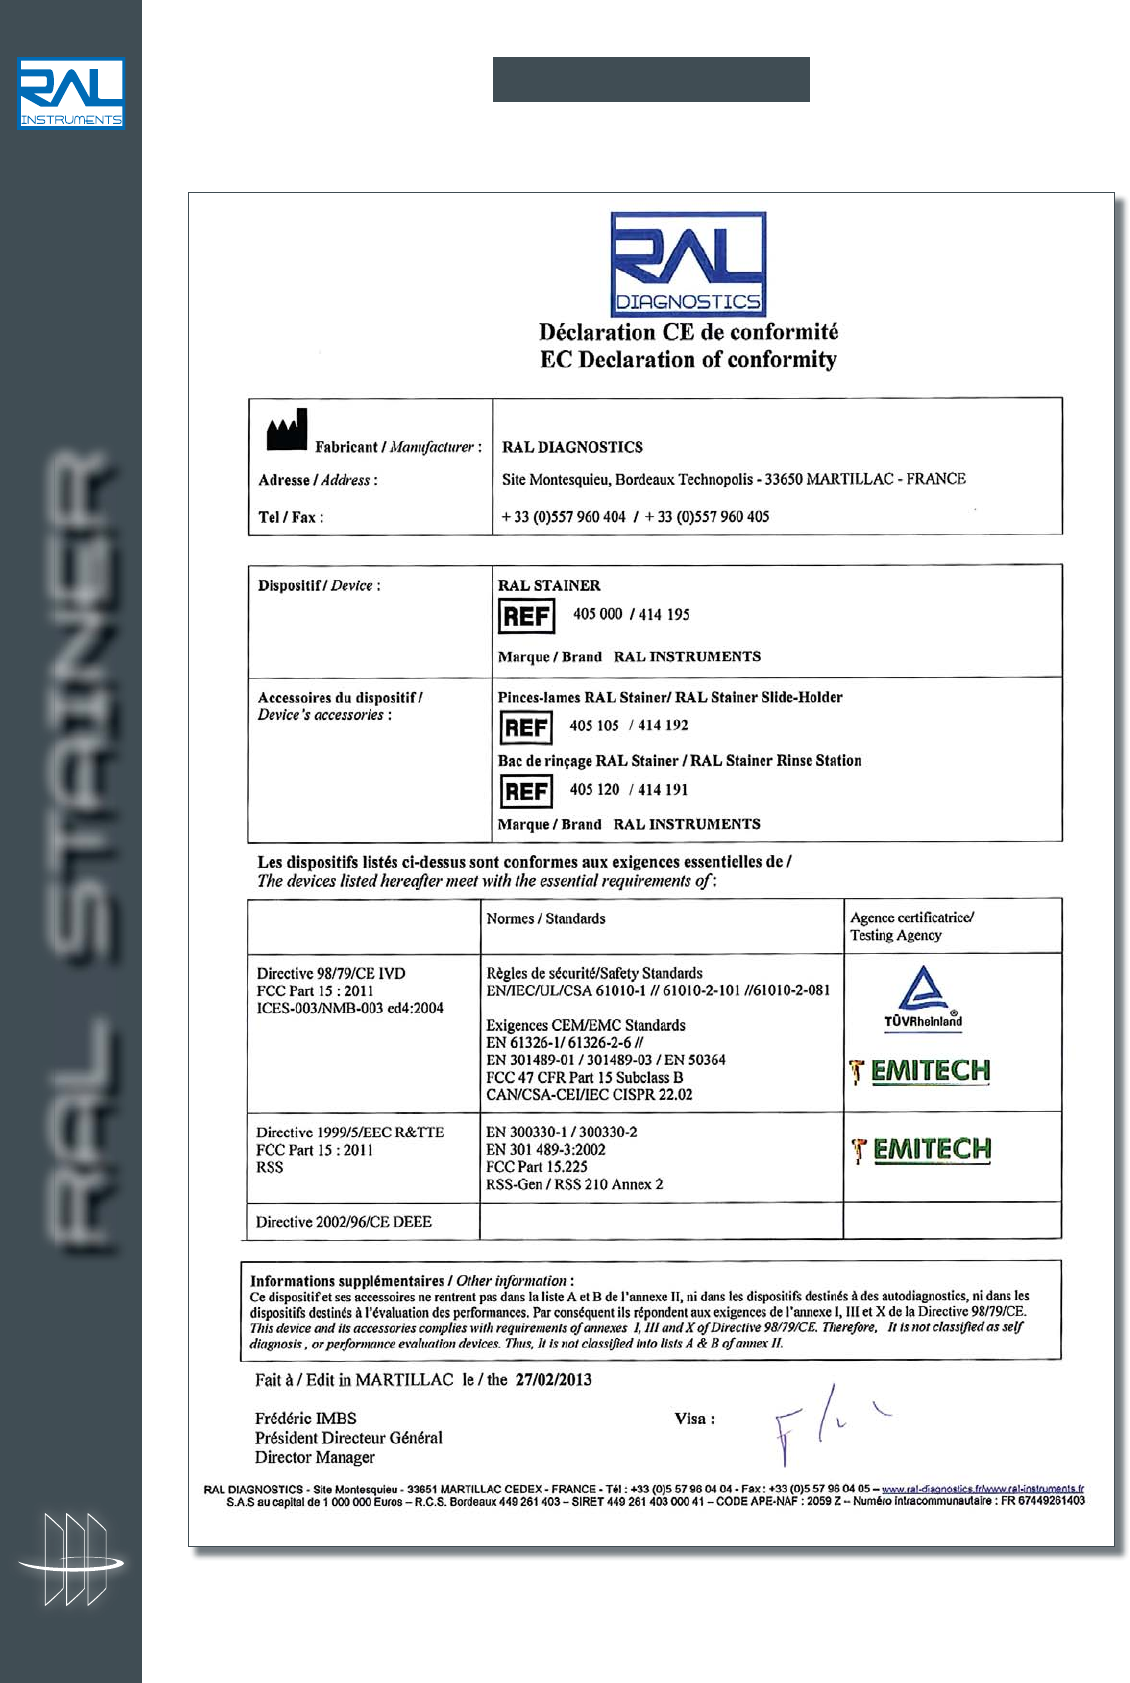
19 EC DECLARATION
RAL STAINER
48 RAL STAINER User guide
20 INDEX
A
Activated carbon filter .......................39
C
Cleaning ...................................39
D
Decontamination ...........................40
Description ................................11
Draining ...................................34
Drying ....................................34
H
Hydraulic ..................................21
I
Installation .................................19
Interface ..................................22
M
Main settings ...............................33
Maintenance ...............................42
P
Power cable ................................21
Power supply ...............................21
R
Rights management .........................28
Rinsing ....................................34
Rinsing solution ............................32
S
Settings page ...............................23
Setting up ..................................20
Slides .....................................35
Smears .....................................9
Staining ...................................36
Staining reagents ............................16
Standards ...................................9
Symbols ....................................7
T
Traceability ................................38
Troubleshooting ............................43
U
User safety .................................10
W
Warnings ...................................9
Warranty ...................................8
Waste .....................................10
RAL INSTRUMENTS is a brand of RAL DIAGNOSTICS
RAL DIAGNOSTICS - Site Montesquieu - 33650 Martillac - FRANCE
E-mail: commercial@ral-diagnostics.fr
Tel: +33 (0) 557 960 404 - Fax: +33 (0) 557 960 405
www.ral-instruments.com
HAEMATOLOGY
BACTERIOLOGY
MYCO-PARASITOLOGY
CYTOLOGY
HISTOLOGY
Leader in stains for microscopy
since 1916