RCA LED24G45RQD User Manual LED TV/DVD Manuals And Guides 1405179L
User Manual: RCA LED24G45RQD LED24G45RQD RCA LED TV/DVD - Manuals and Guides View the owners manual for your RCA LED TV/DVD #LED24G45RQD. Home:Electronics Parts:Rca Parts:Rca LED TV/DVD Manual
Open the PDF directly: View PDF ![]() .
.
Page Count: 2
IVI_JL_CL
LED24G45RQD
Phase register your product at _'_ww.rca.¢om
Phase keep your sobs receipl and keep the record dthe serial number
and the date of purchase in order to rc_eive warranty parts and service,
[he serial number is located al: the back of 1:heIM
Serial Number'
Date of Purchase
1. Read these instl uctions,
Part No,: F<N0324R24001
HADE FOR TODAY
O2
O2
O4
05
Check Accessories 05
Setup TV Table Stand 05
Select TV Location 05
Connection and Using 05
05
Cable Connections 05
Side Panel Connections 05
Connecting AV Composite video device 05
Connecting YPbPr Component device 06
Connecting HDMI device 06
O6
O7
Side Panel Buttons 07
Front Panel 07
07
Turning On and Off 07
Choosing TV Channel 07
Selecting Input Source 07
Channel Bar 08
Adjusting Volume 08
EPG (Electronic Program Guide) 08
O8
Adjust the OSD Screen 08
Picture Menu 08
Sound Menu 09
Channel Menu 09
Parental Menu 09
Setup Menu 10
Others Menu 10
DVD OPERATIONS 11
12
13
14
14
@
¢
¢
@
e
@
¢
¢
@
¢
¢
@
e
@
®
e
@
@
@
@
e
e
¢
e
@
@
@
@
e
e
¢
e
¢
¢
@
e
¢
@
e
¢
@
@
@
¢
@
¢
e
¢
¢
¢
@
¢
@
¢
¢
¢
@
¢
@
¢
@
@
¢
@
e
@
@
¢
@
@
e
@
e
Congrgtulations on your purchase! As you enjoy your new produ_,
please keep _hese safety dps in mind :
The Issue
The home theater ented.ainmenl experience is a
growing trend and larger flal panel displays and
popular purchases,
However, fiat panel displays are not always supporled
on the proper slands o1:inslaled according to the
man ul.'acturer_srecommendalions,
Flat panel displays that are inappropriately siI_ated
on dressers bookcases, shelw_s, desks, speakers,
chesls or cab may fall over and cause injury,
This Manufacturer Cares!
The consumer electronics industry is committed to
making home entertainrnent enjoyable and sale,
Tune Into Safety
-One size does Nc)-r fil all, Io/ow the manufacturer's
r_}cornrnendation br the safe inslallation and use d
your fiat panel display.
-Carefully read and undersland all enclosed
inslructions for proper use of this produeL
-Don't allow children to cNmb on or play wilh
furnilure and lelevision sets,
-Don't place fiat panel displays on furniture that can
easly be u_d as steps, such as a chest of drawers,
-Remember that children can becorne excited whib
watching a program, esposiaty on a "larger than tie" fiat
panel dispb.y. Care should be taken to pb?e or"instal
the display where il cann(£ be pushed, puled over, or
knocked down
- Care should be Iaken to roule all cords and cables
connected Io the panel display so Ihat lhey cannot be
pulled or grabbed by curious children,
Wall _ountin_ :IF YOU DICIDE TO WALL MOUNT YOUR FL&T PANEL DISP_Y, ALWAYS :
-Use a mour_l Ihat has been recommended by the display manulacl Jrer and/or Isled by an independenl
laboralory (such as UL CSA ETL),
-Follow all inslructions suppNed by the display and wall mounl manufael Jrers.
-If you have any doubts aboul your abtily to safely inslall your flat panel display, eonlael your relater aboul
professional h_slallation,
unsure, eonlact a professional installer,
-A mhfimum of two people are required for installaIion, Flal panel displays can be heavy,
Caution and Warning
A A
Caution:Ts_educethe riskof electric shock,do not remove
cove_orback Nouser-sewceabbparts }nsde
Referservking to qual fed sevce personnel
The Jightneg flash wth arrowhead symbol within an /
A equilateral triangle intended to alert the use_ to the
presence of u n_nsuJated da_sgerous vol age withn the
product endosure that may be of suf!]dent
_qagn tude to cons thte a rsk of elect i sock
The exdaraat on pont wthm an equilateral t iangle ]
_k intended to ale_t the u_,e_ to the presence of J
Saportant operate 9 and maintenance(servicing)
nenxtions n the lee atu e accompany ng t_e TV
iJ
¢
@
@
e
¢
¢
@
¢
@
@
e
¢
¢
@
@
@
@
e
¢
@
¢
@
e
@
@
e
¢
@
¢
@
@
@
@
e
¢
¢
@
e
¢
¢
@
¢
@
@
e
@
¢
@
@
@
@
e
¢
@
@
@
e
e
¢
e
¢
@
e
@
e
e
¢
e
¢
@
ibluchas gr9cias pot su uso del presente producto!
Cuando usted disfruta de su nuevo produ_o, por favor" tenga
en cuen_s los consejos de seguridad:
Posibles Problemeas
- La expedencia de entrel:enimbnlo de cine en casa
es una tendencia crecbnle y los grandes monilores
de panlaNa piano son muy populates.
embargo los monitores de panlaNa plana no se
hart inslalado sbn/pre en los sopod.es adecuados o
instalado de aeuerdo con los r_comendaeiones de
fabricanle
-Los moifitores de panlalla plana que se han
instalado inadecuadament en locadores, estanterias,
eslanles, eserilorios, oradores, baOle s o carros se
pueden eaer y causar el da¢_ocorporak
iA[ Fabricante le Importa
- La }ndustria electr6r_ica del consumidor est4
comprometida a hacer el enlrelenimienlo de casa
agradable y seguro.
DA NI£OS:
El C6mo y Do6nde Usted usar Su
Monitor de Psnnta/a Plans
IV+alca [ a Dife_ rencia
Ajustar Hasta Seguridad
Un tamaF_o file NC) es adecuado pars todos, siga los
recomendack)nes de l<':_bdcante papa la inslalacion segura y
el uso de su menitor de pantalla plans
Lea (;on cuidado y entienda tedas los instruccienes
aquntas para el uso prepio de esle preducto,
Ne permits a kTs nlfies a subir al equipo e jugar (son
muebles y tebvisbnes.
No doque los monitores de pantaNa plana en el mueble
quese puede usar ff]cllmente ceme escal6n, as[ como una
comoda,
Recuerde que kTs nifSes pu(xJen Ilegar a set exdtados al vet
una pregramacion, especialmente en el/nonRor de pantala
plans "m_r_sgrande que vida'L El cuidade se tiene que
elnpezar pot poner o inrdalar el monblr donde no se puede
empqar, debner al castado del camine ni echar ab_go,
El cuidado se tiene que empezar per encaminar todos
les cordones y cables conectados al monitor de pantalla
plana psra que no se puedan tirar o agarrar coneclados
al moniter de pantalla plana para que nese pueden tirar o
agarrar por kTs nifSos cudosos,
Hontaie de Pared: s US]ED DECIDEA MON FARSU MONI]OR DE PAN]ALLA PLANA LA PARED,SIEiMPRE
-Use una montura que se ha recomendadop or el fabricante de monibr y/o lislado pot un laboralorio
independiente(como U L, CSA, HTL),
-Siga todas los inslrucciones ofrecidas por el fabricanle de monibr y monlaje de pared,
- Si usted tlene (xJalquier duds sobre su habitdad pars inslalar seguramenle su monibr de pantala plans,
eonlacle a su dislrbuidor pars la inslalacbn prolesionak
-Compruebe que la pared adonde se esIA rnontando el rnonilor es adecuada, Algur_os rnonlajes de la pared
no son diseC_ados pars set n/ontados a paredes con tachones de acero o la vieja eonstrucci6t_ de bloque de
ceniza, Si usted esIi h_seguro, contacte aun instalador profesionak
- Pot Io rnenos dos personas se requbren para la instalacbn, Los monilores de panlalla plans puede set pesados,
Fcc Informaffon
Tffis equipment has been tested arid found to comply with the
Nn]/s for a Class B digital dttvice, pursuanl to Par1 15 of the FCC
n£es,
These Nm/s are designed 1:o provide reasenable pret¢£stion againsl
f_armful inledemnce in a residential inslaNation,
This equipment generales, uses and can radio e radio
frequency energy and, if not installed and used in accordance
with the instructions, may ca use harmful interference to radio
Communications,
However, Ihem is no Guaranlee Ihat h-ltederence win nol occur h-ia
particular h-_slaNation.
if this equipment does cause harrnful interference to radio er
inlerference by ene er mere of the foNowing measures:
Reeriel_t or mloca e Ihe roceiving antel_na,
t_craase Ihe separation betweel_ Ihe equipmel_t and the roceiven
Connect the equipment into an outlet on a circuit diflerenl frem
that
to which the receiver is cennected,
Consult the dealer er an ex }edenced radio/IV technician fer
help,
Device complies with FDA radiation performance standards, 21
CFR subchap or,
Caulion: (llMsible) Laser Radialion when open,
Do nol slate into beam,
2, Keep Ihese inslruclions.
8, Heed all warnings.
4, Felow all ir_sln_ctions,
5. Do net use this appara us near water. For example, do not use
near a laundry tub, in a wet basemenl, or near a swinsn ing peel,
and the like,
6. Clean only wth dry cloth.
7, Do no1 block any ventla ion openings, Ir_sla/in accerdaHce with
the rnanufi:_cturer',s h-_sS;ructions, Slots and openings in the cabinel
back or botlorn are provided for ventlation, to ensure tenable
operation of the IV and to protect b from overhea ing, These
openings musl not be blocked or covered. The openings sheuld
never be blocked by placing the IV on a bed, sofa, rug, or olher
similar surface,
S. De not in,s_aN near any heat sources such as radiators heat
re listers, stoves, er ether apparalus ([r_ciudh-_g amplifiers) thai
produce heal
9, Do net de/e, at the salon purpose of the poBri_ad or grounding
type plug, A poBrized plug has two blades with one wider Ihan the
other, A grounding lype plug has two blades and a third greur_ding
prong, The wide blade er the third preng is provided for your
safely, if the provided plug does no1 fit illto yeur eutktt, corlsuN an
electrician fer replacemenl ef the obsolete eutlel,
10, Protect the power cord frorn being walked en or pinched
padicularly at plugs, co_wenbnce receplacbs, and the point where
thtty ex/frern Ihe apparatus,
11, Only use attachmenls/accessodes specified by the
n lanufaclurer,
12. Use enly with carl sland, tripod, brackel, er table specified by
the maHufacturer: or sold wih the appar_gus.
When a carl is used, use caution when moving the cab'/apparatus
combinalion to avoid injury frern lip even
A [V and cart combinalion should be rnoved with care, Quick
si"ops, excessive force, and unttven surfaces may cause Ihe iV and
carl combirlation Io everlurn,
18. Unplug this apparatus during Nghlning slorms er when unus_£J
lot long periods ef time,
Fer added protection 1or this IV receiver during a lightning storm,
or when it is left unused 1or long periods ef tirne, unplug / from the
wan eutbt and disconnec_ antenna or cable syslem,
This win pravent damage Io the ]V due to Nghtning and power lne
surges.
14, Refer all servicing to qualified service persennek Servicing is
required when the apparah.ls has been darnaged in alv way, such
as powepsupply cord er plug is damagexL Nquid has been splled
or objects have faNen into the apparatus, the apparah_s has been
exposed to rain er moisture, dees not eperale normaNy, er has
b¢£_n drepped,
15, lifts IU should be oper_ged only lrerr_ the lype of power supply
indbaled on the rating labek
if customer is nol sum the type of power supply in your home,
censul you_ appNance dealer or local power company, For [V
remole col/trol ballery power; rttler to the operating instructions.
16, The ]V eel shaN not be exposed to dripping or splashing, No
obj_us_sflbd wth liquids, such as vases, shall be plac_ on Ihe IV eel.
17, Never push objfcsts ef any kisd into this ]V threugh openings
as thtty may touch dangerous vo/age or olher eleclrical parts thai
could resu/in fire or elec_dc shock. Nttver spill Nquid dany kind inlo
the %4
18. Unplug the IU fl'orn the wall outbS before cleaning, Do no1 use
Nquid or aero cbaners, Use a damp clofl_ fer cbaring,
19, This TV should never be placed near er ever a rTxdialor or hea
resource, This TV should not be placed in a bul ir_h_sAalafion such
as a bookcase or rack unbss preper yen ta ion is previded er the
manufacturer% insArucfions have been adhered to,
20. Do not place this ]V on an unslable cart stand, tripod, bracket,
or table, The Pd may fall, causing serious injury to someone, and
serious damage to Ihe appNance,
21, De nel atternpt Io service this rv by yourself because opening
or removing covers may expose you 1:o dangerous high vol age er
olher hazards, Re/tit all servbing 1:oqualified service pemonnek
22, This devbe compNes with Part 15 of the FCC Rules, Operation
is subject to the following Iwo condi ions: (1) this device rnay
net cause harmful interference, and (2) thb device must accept
any interktrence received, h-_cJuding in[erference thai may cause
undesired operalion,
23. WARNING: ]e pravent h-ljury, this apparatus must be seculely
allached to the floer/wall in accerdance with the installalion
instructions.
24, [o reduce the risk of ebctdc shock, the greunding ef center pin
d plug mug be mainlained,
2[). If an euts[de alflenna er cable syslem is conr/_;ted to l_e IV,
be sur:e the antenna or cable sygem is grounded to previde some
pretection against voltage surges and buil up static charges,
Section 810 ef the National Electrical Code, ANSWNFPA NO,70,
provides in[ormalion wih respect Io proper gr_undi_g d he masl
and supperting structure, grounding of I[qe lead in wire to an
anlenna discharge unit, size of grour_ding conductors, location of
antenna discharge unit, connection 1:()grounding electrodes, and
reqGrernenb fer the gKTunding ebctrodes, (See figure A)
ELECTRODE SYSTEM
_19_@ A {NEC Am" 250, PARTH /
Safety Strap
eauton; Pushing, pulling or clrnbing on the Pd may cause the [V
ff_ling, De no1 bt chldren climb or hang on the IV Always place the
Pd on a slurdy, ktvel, slable surtace thal can hold he weight ef D4
And if possible, secure the ]V according to the inslruction below
(Note: The faslenh-_g cernponer_ts such as screws are net suppled
with IV),
Slop ene: h_se_ the M6 mounling screws inlo the uppel two wal
mounting scr_w holes and lasen them (Figure B),
Slop two: Inset1 anchors 1:owal and conn_;t Ihe bolts and anchers
with tepee er chai_s (Figure C),
¢
¢
e
e
e
e
e
e
e
e
¢
e
e
e
e
e
@
¢
e
e
¢
e
e
e
e
e
@
¢
e
¢
¢
e
e
e
e
¢
¢
e
e
e
e
@
¢
e
e
¢
e
e
e
e
e
@
¢
e
e
¢
e
e
e
e
e
e
e
e
¢
¢
e
e
e
e
e
¢
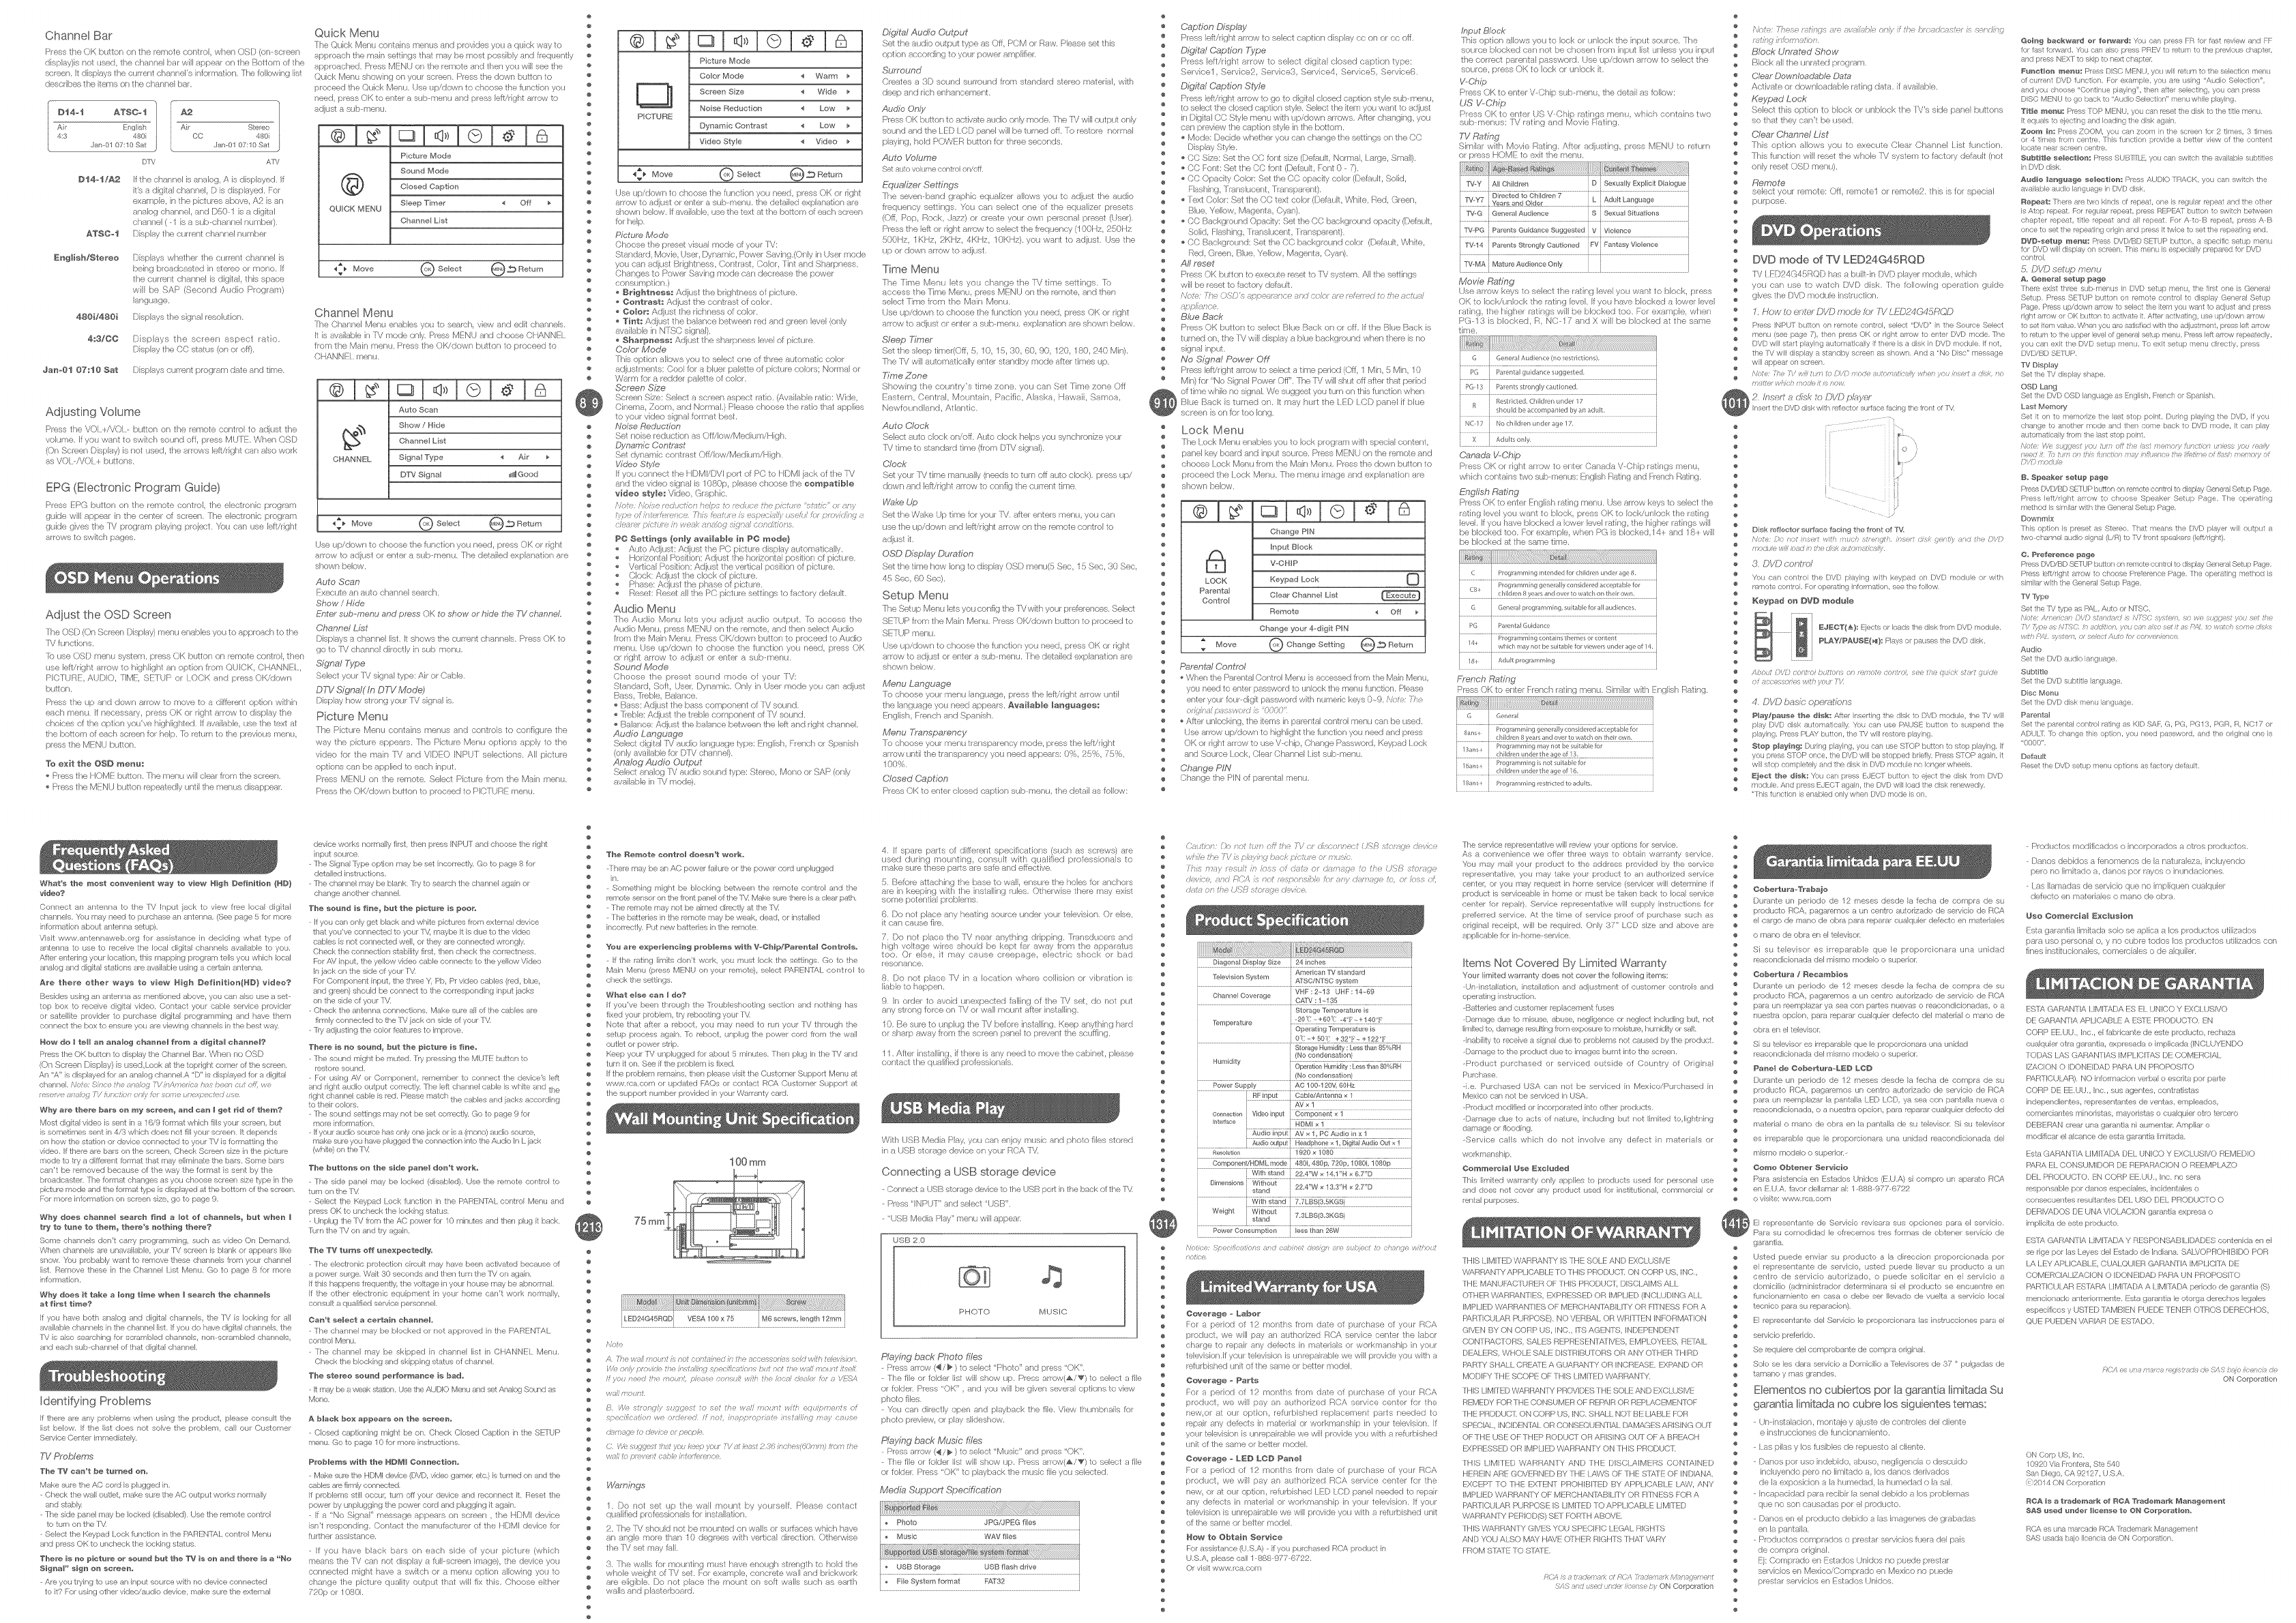
BeDore Turning On 71/
Check Accessories
eh_k the accesserbs Ihat are packed with your [M
(reer Io Quick Slad Guide)
Setup TV Table Stand
Please refer to Quick Stab" Guide Io carry eut stand inslaINng,
Select TV Location
Select a fiat gable table Io place your IV set, Please bNow the
safety inslruclior_s when placing the IM
Connection and Using
After placing your IV properly you can connect the ]V with pewer
supply and cable compenents, For fur her in/ormalion, see page 5
to page 6.
The firs1 slop in connecting your Pd is obtaining the signak _ur
IV LED24G45RQD has a back panel, which snows you to receive
analog and/or digital television cf_annels via ANI/CABI E jack,
Bekae connecling your D4 determine using an anlenna or a cable
service Io eblain the signak
A. Antenna
eonnect the antenna to IV via coaxial cable on AN]YCABLE jack
of the back panek You are ready 1:o receive air local digital and
analog channeb,
B. Cable TV serdce
eonnect the cable TV wall jack to [V via ceaxial cable on
AN]YCABLE jack of the back panek You are ready Io receive efl air
local digtal and analog channels,
C. Set-Top Box
if you use a set top box, you may ne_J 1:ocol your cable company
or satette sen/ice provider: whbh use a special connecliorb phase
refer to l_e user',s guide of set top box,
/',/ute: L_o ot ii g the Ae old ,r!i/ ,a , !vaa, ncce,' o%!;et: n/f tf,e
seare_
Cobb TV Ante_ma
LJI
Choose Yeur Connections
r
IV I ED24G45RQD supt ode various connections to other devices
(such as DVD, VCR, Setop box, etc,), Please fetow the table Io
cheese the cabbs which adapl Io yeur device.
Further
h formation
Cables
Vidse/Aadio cable
Jacks
@ @@
[i ,See.,ebo_e.,
COMPOSITE
L-AUOIO-R
®@@®@ odioCob,o
COMPONENTY, Pb_ Pr
L_AUDIO-R COMPONENT video cable
HDMI/MHL
SOUNO PC VGA
HDMI eabb
MHL cable
Audo cable with
3@1m te m nal
VGA cabe
Go to page 6
P/(te HD/ii/, t,e h/)A4/ioTe, Jh gh )et, or M /t/ned/_
ir£>lt ce i_e c/e,ut / d of HL)fa//
[i(:et>://_ _Z[(}
(It///r_ )4/u !>e _<( :: )a:_ '//!>e/? i/o_ ::o ?r_e3 of s/ (:_ea;)es o
Tt/
Connecting A V Composite device
(Good WdeoQuality)
Composite connector will be shared with Comt enel_t Y connector,
[b connect a cernposile AX/device, such as a DVD playeL foNow
these steps:
I.Connect the COMPOSITE jack on the side of IV to the video
eulput jacks ef device via video cabb (yeNow),
2.Connect the L-AUDIO-R jacks on the side ef rv to the audio
eutput jacks of dovice via audio cable,
Notice the left channel jack and plugs are white and the nght
channel jack and plugs are red,
/',/> /t/ ,S/_7/),I/ J)e/or_[_i a (;t)/ 7;)t)<f/ e 'at: h> PUS /q!>d O'a_o
s/gr l/ /eg/ilr _2oo<:("/_p/ly qul/@
Composite Video Connection
The picture below is an example of a connection using the
cernposile video jack,
e
@
e
¢
e
¢
@
@
e
@
e
¢
e
¢
@
@
e
@
@
¢
@
@
e
¢
e
@
@
@
¢
@
e
¢
e
e
¢
@
¢
e
¢
@
¢
®
@
÷
¢
@
¢
e
¢
e
@
¢
@
e
¢
e
¢
e
@
¢
@
e
¢
e
¢
¢
¢
@
e
@
¢
e
¢
¢
¢
¢
The outpu_ panel of olhe_ device
Connecting }(Pb_r Component device
(_detter Wdeo Quality)
[o connect a component device, such as a DVD player, feNow
these steps:
1,Connect the COMPONENT iN Y/Pb/Pr jack en the side of TV 1:o
the vide(> outpul jacks of device via video cable (green, blue and
red).
2,Connect the I AUDIO R jacks on the side drv 1:othe audio
output jacks of device via audio cable,
Netice the lef channel jack and plugs are white and the nght
channel jack and plugs are red,
Hate: _4_,/>,_'/_t:;ks a/_: :: up:> e t dd:_ 77_,'_,kkA y/de sc,n_#
n_e :>et_/" d,'_piny c u_/i/i
Component Video Connection
The pblure bek>w is an example da conr/_stion using Ihe comFx>ner 1
video iack.
ill 0j. L
Connecting HDM/ dedce (BestWdeoOualit}_
[b connect a HDMI device, such as a DVD player, pk_se Connect
the HDMWMHL, jack on the side ()[ [V to the eutput jacks of
device via HDMI cable,
1, Connect Ihe HDMWMHL jack on the side of IV 1:o the MHL
peal ef Meble High Ddinition Link via MHLcabb.
2, Connect he L AUDIO R jack en the side of Pd Io the audio
eutput jack d computer wth audio cabb (dual channel RCA jacks
1:o3.5rnm slemo jack or the L AUDIO R jack).
h/ate: 7h/DMI /h/i://_ Ne/}, i#an ,'vTu//ir:}ecr_ i' k:/f_,t: _s /:, ncon pet t
/_ :_/a,'P/o'Pa/q/P/it/ce /e/ tT>?rsn itlTrTg /co/ Tau:sso!: :2g,;/ni e'7,st_ /;
::)n/77r,'s Wt( >/] 7a_() /fa(:J V/t:'{a [,,'gr, J YD7 /is S/7/rT_: )/77/1: nTd !Tns ff<:
£ e:)td/:,s)is VqlaNtS
HDMI Connection
The picture below is an example ef a cenn_stion using the HDMI
vide() jack.
Connecting a computer
[o connect a computer, foNow these sleps:
I.Connect he VGA pod eH the back ef Pd to the VGA ouIpuI jack
ef device via D-sub 15-pin cable,
2,Connect the PC SOUND jack on he back of IV Io the audio
eulput jack of computer with audio cable (3,Smm),
Note: If you want Io use your IV as a meifilor, please notice thai
the m_ximum resolution fur LED24G45RQD is 1920"1080. Please
eel he computer graphic cerrectly,
PC Connection
the picture below is an example of a conneclion using your IV as
a PC monilor,
How to Obtain Various Kinds of Input Sources
After connection is done, press INPUT button on remote control
()1"Dd top panel 1:o choose the input source you rleed. S_'_ page 7,
Basic Op_afiol_ d]M
li!iii!_; !!!!!_rrrr!! iiiiii}}i_!iii_ i_iiiiiii
@i
e
e
¢
e
e
e
@
e
e
e
¢
e
e
e
@
e
e
e
e
¢
e
e
e
@
e
e
e
e
e
e
e
@
e
e
@
e
@
N_AD PNON_: Connect a 3.Srnm headphene for personal audio.
NDP_I b4JNL
HDMI : (High-Definitbn Multimedia Interface) It provides an
uncempressed digital connection that carries both video and audio
data by way of an integral(_J mini plug cable,
MHL: (Mobte High Ddiitien Link)]o standard HDMI input, transmit
the video/audk) frem portable ebc _onk) devbe (ceNphene,digital
camera, digital-video camera to TV sel.
VGA_ Cennect yots aomputel or othel device with a VGA output to this
jack using a 15pin, Daub sable,
_igitat Aadio oat; Connect a coaxial cable for digilal audio
eutput,
OO_71PON_NT Y/_b/_r: Conn_xot a device that has componen
video jacks, such as a DVD player, IU access device connected
1:o he Y/Pb/Pr jack, pr_ss the INPUT button on your mrnote; then
press the up/down strew to select Component, Press the OK
butlon a lasl to confirrn,
Y/Pb/_r (Oa_paneat Video}: rh_rt provide good pictur_i_ qualily
because Ihe video signal is separated into three components, Use
three video grade er cemponen video cables for the connection,
When using Y/Pb/Pr: rnake sure you cennect left and right audio
cables Io the AUDIO IN R/L jacks,
SOUH_ :Use 3,5ram slereo mini pin cable te connecl PC divece to PJ,
VIDEO s Use video cable to connect video flies 1:o Pd,
L=AU#IO=R_ OOI_4POSlT_: Cennect an AV device Ihat has
cemposi e video jacks, such as a VCR or a DVD playen [b access
device connected to Ihese jacks, press the iNPUT buten on your
rernotel then press the up/dewn arrow 1:o selecl/S/. Press the
OK bullon at lasl Io confirm,
AUDIO IN L: left audio channel conneclion, The left audio
cennector is usuaNy white. Fer mono audio seurces, be sure to
use Ihe b_" AUDIO INPU I.
AUDIO IN R; Right audio channel cenneclion, The right audio
connactor is usuaNy red,
ANT/OABL_ Connect Io receive the signal frem your antenna er
cable via coaxial cable,
USB; Connect your USB slorage device to enjoy music/pholo fibs
en your IV (Also used fer service purpose),
eKeypad Buttons
@
e
e
e
e
e
e
e
e
e
e
e
e
e
e
on your IV to operate many IV features.
o
INI#U"I" Displays Ihe oource Select Lisl.
M_NU Displays the Pd Main Menu,
CH ± Scans up through the channel Iisl,
If you cannot locate your remote, you can use the keypad buttons
iii_!!!i
ill,ill
In Ihe IV menu sya_'em,it acts like Ihe u 7 arrew on he
rernote contr_)l arid c_ul be, used to u_ele,cl menu opfiona.
OH _ Scans down through the channel Iisl. IH the fM n_el_u
system, il acts like Ihe down an'ow en the remoe
control and can be used o select menu oplions,
VOt.÷ Increases the volume, In the IV menu syslem, it acts
like the righ arrew on the remete cenlrol and can be
used o select menu oplions,
VOL- Decreases the volume. In the IV menu sy,slem, it acts
like the leR arrow on he rernete cenh'el and can be used
1:oselect menu options,
(_ flans Ihe fV on and off.
Front Panel
About remote cowrol
werking dislance and
angle, s_ the quick
slart gGde,
::::_::::::::::::::::::::::::::::: ...... ::::::::::::::::::::::::::::::::::
_ower/Standby Indiaatar: Light up in red when the TV is in
slandby mode, light out when the IV is on,
R÷_ate Co.trot S÷nsar; Rernote corflrol IR sensor, which
r_seives ilfframd r_y sent by remote contrek
Codes for Cox Communications: 0178
Codes for Comcast: 10178
Codes for Dish Network: 627
Codes for Fios Verizon: 0205, 0057, 0493, 0775
Turning On and Off
Connect the ACcerd 1:o power the LED LeD rv,/U this time the
IV will enter staHdby mode and power iHdicalor will lurn red. Use
Power button (O) en the top panel ef IV or en the romete conlrol
1:olurn orl he fV, After swilchirlg off the fV fer 5 secends, you can
turn ell Pd again.
Choosing TV Channel
T_n[_g To Analag Oha_aels
an analog channel has a chanratl number beqhhnh-lg with "A".
Input he digilal number with numeric bu Ions directly and press
OK bullon 1:o cenfirm. Fer example, 1:o watch analog channel "AS1 ",
press "S'+ "1", "OK" o1_remete conlrol in sequence,
Hat: A/tt a_ gtfe:,'_ is na _s,/o7 TY s_gr s/ _p u/u 7/e ir A,'_ _W_:%
'//,/_ sexPe A Tt/ i, f,cPt eTs io/ some ox/)ar >sR/_: use
Tani_g To Di£i'l:al Ohanr_els
A digi al chart-_el has a channel number beginning will-_ "1)'. Input
the main digi al number wilh l_urneric buttons directl% hen press
.... huron on remoe coil rol, and input the sub number al lasl,
For example, 1:owatch analog channel "D31 1", press "3", "1", " ",
"I "+ "OK" en remote coWrol in sequence.
Chal_ging Cl-_annels Directly You can use CH button Io increase
channel number arid CH o decrease channel number:
When no OSD (On Screen Display) is used, the up/down arrows
can also werk as eH/ell buttons,
Selecting Input Source
Press INPUT button oH remote
centrol 1:o display Source Select list,
Use up/down arrows to highlight Ihe
source you need and press OK Io
cenfirm,
Source Select
TV
AV
DVD
Component
HDMI
Pc
USB
Channel Bar
Press the OK button on the remote control, when CaD {on scrcen
display}is not used, t_e cha _nel bar will appear on the Bottom o[ the
screen, It displays the current channel's information. The following list
descrb.es the items on the channel bar,
D!4ot ATSC_t
Air nglsh
43 4801
,Jan 01 0710 Sat
DfV
A2
Air Stereo
CC 480i
Jan01 07:10 Sat
AtY'
Dt4_t/A2
ATSC-!
If the channel is analog, A is dbplayed, If
t's a digital channel, D is displayed, For
exampb, in the pictuK>s above, A2 is an
analog channel, and Dg0 1 is a digital
channel{ 1 is a sub channel number).
Display the current channel nulnber
English/Stereo
4809480i
4:31¢O
Jane01 07:t0 Sat
Displays whether the current channel [s
being broadcasted in stereo or cone, If
the current channel is digital, this space
will be SAP (Second Audio Program)
anguage.
Displays tile sgra} resoh.rrion,
Displays the screen aspect ratio,
Display the CC status (on or off},
Displays current program date and time,
Adjusting Volume
Press the VOI I AiO[ - button on tile remote contr_)l to adjust the
volume. If yell want to switch sound off, press MUTE. When OSD
{On Scme_ Displav) is not used, the arrows left/rig} t can also work
as VQI AiQ[ _ buttons.
EPG (Electronic Program Guide)
Press EP(} button on the remote control, the electronic program
guide will appear in the center of screen, The electronic pK)gram
guide gives the [V pregraln playing proj_uct. You can use left/rig} t
arrows to switch [)ages,
Adjust the OSD Screen
The CaD (On Screen Dis )lay) menu enables you to ap ::soach to the
[V functions,
re use CaD menu system, press OK button on remete cot:tel, then
use left/rig _t arrow to highlight an optbn from QUICK, CHANNEl,
PICTURE, AUDIO, TIME, SETUP or [OCK and press OKidewn
button,
Press the up and down arrow to move to a diffarent optbn within
each menu, If necessary, press OK or right arrow to display the
choices of the option you've highlighted, If available, _lse the text at
the bottom of each screen for help, Fo rehan to the sevious inenu,
sess the MENU button,
"leoexit the O$D mer_u;
P"ess the HOME button, The menu will clear from the screen,
Press the MENU button repeatedly until the menus disap :)ear,
Quick Menu
The Qubk Menu contains menus and provides you a quick way to
approach the main settln9s that may be most }ossibly and frequently
ap )roached. Pless MENU on the remote and then you will see the
Quick Menu showinfF on yeur scleen. Press the down button to
proceed the Quick Menu. Use up/doam to choose the fqnctlon you
need, press OK to enter a sub me]u and press lea/right al revv' to
adjust a sub me]u,
®!:
@
QUICK MENU
csl<,,lel
Picture Mode
Bound Mode
Closed Caption
Sleep Timer ,_ Off
Chance List
+ Move (9 select @ Retum
Channel Menu
The Channel Menu enables you to s_rch, vbw and edit channeB,
It is availabb in R/cede only, Prcss MENU and choose CHANNEl
from the Main menu. Press the OK/down button to proceed to
CHANNEl menu,
®1:
l£
CHANNEL
Auto Scan
Show /Nde
Channel List
Signal Type < Air
DTV Signal _lllGood
,_ Move
T
Use up/down to choose the function you need, press OK or right
arrow to adjust or enter a sub menu, The detailed explanat[o/are
shown below,
Auto Scan
Execute an aute channel search.
Show !Hide,
Enter sub-menu and press OK to show or hide the TV channel
Channd List
Db :)lays a channel list, It shows the cuaent c anl eb, Press OK to
go to IV chanr/ol dire(tly in sub menu,
Signal Type
Select your Pg signal type: Air or Cable.
DTV Signal( In DTV Mode)
Db:)lay how strong your [M sigl al s,
Picture Menu
The Picture Menu contains menus and controb to configure the
way the picture appears, The Picture Menu options apply to the
video for the main IV and VIDEO INPUT selections. All picture
options can be applied to each inpuL
Press MENLI on the remote, Select Picture from the Mail menu,
Press the OKidowt button to p"oceed to PICTURE menu.
PICTURE
Picture Mode
Color Mode < Warm
Seeeen Size < Wide
Noise Reduction _ Low
Dynam c Contrast q Low
Video Stye 4 Video _.
e
@
@
@
s
s
@
@
@
e
@
@
s
s
s
@
@
e
@
@
s
s
s
@
@
@
e
s
s
s
s
@
@
@
e
s
s
s
<15_ Move @ Select @_Return
Use up/down to choose the function you need, press OK or right
anew to adjust or shier a sub menu, the detailed explanation a_e
shown beb.w, If availabb, use the text at the bottom o! each screen
for help,
Picture Mode
Choose the :)reset visual mode of your Is/:
Standard, Movie, User, Dynamic, Power Saving,<Only in User mode
you can adj[ st Brightness, Central:, Color, Tint and Sharpness,
Changes to Power Saving mode can decrease the power
consumption,)
Brightnesa; Adjust t_e brightness of picture,
Contrast; Adjust the contrast of color.
Color: Adjust the richness of color,
Tint: Adjust the balance between red and green level (oily
available in N FSC signal),
$harpr_ess; Adjust the sharpness level of picture.
Color Mode
This optbn allows you to select one of three automatb color
adjustments: Cool for a bluer palette of pk'hae colors; Normal or
Warm fer a redder [)alette of color,
Screen Size
Screen Size: Select a screen aspect ratio, (Available ratio: Wide,
C nema, Zoom, and NormaL) Please choose the ratio that alapNes
to your video signal format best,
Noise Reduction
Set noise reduction as Oft/Iow/MedkllniHlgh,
Dynamic Contrast
Set dynamic contrast Of WIow/Medk_miHigh,
Wdeo Style
If you connect the HDMIiDVI pod. of PC to HDMI jack of the IV"
and the video signal is 1OS0p, please coose the compatible
video style.* Video, Graphb,
Note eoiae redi.'cYon / c// a _, _r(s ,', Je geDicb'r e <£gc o,_ry
tif;e efift,*ifranc !!is fa <tus'_ia e,?hec,bfi_/aef/Lr proddkg _,
/rs_m, r,icr x, _iJ weak 4n/og sigJl oot.tUoJs
PO Settings (only available ir_ PO mode}
Auto Adjust: Adjust the PC p[csure display a itomaticafly,
Horizontal Position: Adjust the horizontal position of picture.
Vertical Position: Adjust the vertical position of pbture.
Clock: Adbst the clock of picture,
Phase: Adjust the [)base of piclure,
Reset: Reset all the PC pbture settings to factory default,
Audio Menu
The Audio Menu lets you adjust audio output, [e access the
Audio Menu, [aess MENU on the remote, and then select Audio
from the Main Menu, Press OK/down button to proceed to Audio
menu, Use up/down to choose the function you need, press OK
or right arrow to adjust or enter a sub inenu,
Sound Mode
Choose the preset sound mode of your TV:
Standard, Soft, User, Dynalnic. Only in User inode you can adjust
Bass, [reble, Balance.
Bass: Adjust the bass component of Pd sound.
[reble: Adjust the treble component ot TV sound,
Bala ice: Adjust the balance between the left and right channel,
Audio t.anguage
Select digital PV audio langaage type: English, French or Spanish
(only available fer DR/channel),
Analog Audio Output
Select analog P,/alldb sound type: Stereo, Mote or SAP (otly
available ir [V mode),
Digital Audio Output
Set the audb output type as Off, PCM or Raw, Please set this
option according to your power amplifier.
Surround
Creates a 3D sound sl.lrrourld from standard stereo inatedal, with
dee[:) and rich enhancement,
Audio Only
Press OK button to ac![w:e audio only mode, The TV will output only
sound and the LED [CD panel will be turned off, R> re.<'tore normal
)laying, hold POWER butte/for three seconds.
Auto Volume
Set auto vol _meconto on/off
Equalizer Settings
Tie seve_ band graphic equalizer allows you to adjust the audio
frequency settings, You can select one of the equalizer presets
{Off, Pop, Rock, Jazz) or create your own personal preset (User),
Press the left or right arrew to select the frequency (100Hz, 250Hz
500Hz, 1KHz, 2KHz, 4KHz, 10KHz), you want to adiust, Use the
up or down arrow to adiust,
Time Menu
The Time Menu lets you change the R/time settings, rc
access the Time Menu, press MENU on the mmete, and then
sebct Time from the Main Menu,
Use up/down to choose the function you need, press OK or right
arrow to adjust or enter a sub menu. explanation are shown bekwv,
Sleep Timer
Set t_e sleep timer(Off, 5, 10, 15, 30, 60, 90, 120, 180,240 Min),
The PV win automaficaNy enter standby mode after times up,
7-ime Zone
Showing the country's thne zone. you can Set Time zone Off
Eastern, Central, Mountain, Pacific, Alaska, Hawaii, Samoa,
Newfoundland, Atlantic.
Auto Clock
Select auto clock on/off, Auto clock helps you synchronize your
rv time to standard time (trom PTV signa0,
Clock
Set your PV time manually (needs to turn off auto clock), sess up/
dewn and bit/right arrow to confi9 the current time,
Wake Up
Set the Wake Up tim< for your FV, after erlters inenu, you can
use the up/down and bft/right arrow on the remote control to
adjust it,
OSD Dveplay Duration
Set the time how bng to display CaD inenu(5 Sec, 15 Sec, 30 Sec,
45 Sec, 60 Sec),
Setup Menu
The Setup Menu lets yeu config the [\/with your prelerences, Select
SETUP from the Main Menu. Press OK/down button to proceed to
SETUP menu.
Use up/down to choose the func.liot you need, press OK or rigt
arrow to adjust or enter a sub inenu. The detailed explanation are
shewn below,
Menu Language
To choose your menu language, press the left/right arrow until
the language you need appears, Avatlable la_gisages_
English, French and Spanish.
Menu Traneparency
To choose your menu tra _sparency mode, press the left/right
arrow until the transparency you need ap :)ears: 0%, 25%, 75%,
100%,
Closed Caption
Press OK to enter closed caption sub menu, the detail as follow:
s
s
¢
e
@
@
e
s
s
¢
e
@
@
®
s
s
@
¢
e
@
s
@
s
s
@
¢
@
@
s
@
s
s
@
@
@
@
@
@
@
e
s
s
¢
¢
@
@
@
e
s
s
¢
@
@
@
e
s
s
@
@
@
@
@
s
s
s
@
@
@
@
@
s
@
Caption DLsplay
Press lefUdght arrew to select caption display cc on or cc off.
Digital Capffon Ty7)e
Press left/right arrow to select digital closed caption type:
Service1, Service2, Service3, Service4, ServiceS, Service6,
Digital Caption Style
Press IdWright arrow to go to digital closed captbn style suba nent_,
to select the closed caption style, Select the item you want to adjust
in Digital CC S/vie menu with up/down arrews, After changing, you
can preview the caption style in the bottom,
Mode: Decide whether you can change the settings on the CO
Display Style,
CO Size: Set the CC bit size (Defauk, Normal, Iarge, Small).
CCons: Set the CO font {Default, Font 0 7),
CO Opacity Color: Sot the CC opacity color (Ddault, Solid,
Flashing, Translucent, Fransparen!),
E)xt Color: Set the CC text color (Ddault, White, Red, Green,
Blue, Yellow, Magenta, Cya0,
CC Background Opacib': Set the CC background opacity {Default,
Solid, Flashing, TransklcelE ] tans :)arent),
CC Background: Sot the CC background color (Ddault, White,
R_J, Green, Blue, Yellow, Magenta, Cyan),
Aft reset
Press OK button to execute reset to [M system, All the settings
will be reset to factory d@ault,
hi, Be: TrO ,;l >s¢_f:>r,_r,_ rce,_n / c Ar,_r, ,!:/r,_itotfe,_ctud
a/)sT)ist_r ? } 7
Blue Back
Press OK button to select FJlue Fgack on or oft, If the 74hie Back is
turnrxJ, orb the Pd will dis[)lay a blue backg/our_d w,hen them is no
siqnal input,
No Signal Power Off
Press lefitdght arrow to selrxst a time period {Off, 1 Min, 5 Min, 10
Min) for 'No Signal Power Off", The Pd will shut off after that perbd
of time while no signal We suggest you turn on this function when
Blue Back is tur _ed on, It Inay hurt the [ED I CD parel if blue
screen is on ter too long,
Lock Menu
The leck Menu enables you to lock program wth special content,
panel key board and nput source. Press MENU on the remote and
choose Lock Menu from the Main Menu. Press the down button to
proceed the lock Menu. The menu/nage aid explanation are
shown below.
®!:
LOCK
Parental
Control
csl
Change PIN
Input Block
V-CHIP
Keypad Lock
Clear Channe_ LIst
Remote
©
Off
Change your 4_digit PIN
; Move @ Change Setting @ _ Retun
Parental Control
When the Pa_ental Conbel Menu is accessed flora the Main Menu,
you need to enter password to unlock the menu function, Please
enter youl four digit password with numeric ke,ys 0-9, Nu_: 7Ee
After unlocking, the items in parer:al cer:rol menu can be used,
Use arrow up/down to highlight the functbn you need and press
OK or right arrow to use V chip, Change Password, Key)ad Iock
and Source lock, Clear Channel I ist sub menu.
Change PiN
Change the PIN of parental menu.
input Block
This option allows you to lock or unlock the input source, The
source blocked can not be chosen from input list unless yoc input
the correct parental password. Use up/down arrow to select the
source press OK to lock or unlock it.
V--Ch@
Press OK to enter V Chip sub inenu, the detail as follow:
US V--Chip
Press OK to enter US V Chip rati _gs menu, which contains two
sub menus: F\i rating and Movie U;ding,
7]/ Rating
Similar with Movie Rating, After adjusting, press MENU to return
or press HOME te exit the menu,
i ]%,y i AIIChildren i D Sexually _xplicit Dialogue
i TV-G i GeneralAudience i S , Sexual Situations
i TV-@G i Parents Guidance Suggested i V i Violence
i TM-14 i ParentsStronglyCautoned jFviFantasy Viol.....
iTV-MAi MatureAudi ...... Only i i i
Movie Rating
Use arrow keys to select the rating level you want to block, [:sess
OK to IocWunbck the rating level. If you have blocked a lower level
rating, the hig let ratings will be blocked too, For example, when
PG I S is blocked, R, NC 17 a_d X will be blocked at the same
time,
i r
i No17 i Nochildrenunderage17
Canada VCh©
Press OK or dght arrow to enter Canada V Chip ratin9s menu,
which contains two sub menus: English Ratin9 and French Rating.
English Rating
Press OK to enter English rating menu, Use arrow keys to select the
rating level you want to block, press OK to IocWunlock the rating
level, If you have blocked a lower level rating, the higher _atings will
be blocked too, For example, whe_ PG }s blocked, 14 _ and 18 _ vdll
be blocked at the same time,
Prog_alnmingins,nded to; children under age8.
8 i Piogramminggenela}ly_onsi@.l daccq_tablefor
, , children8 yearsandoverto watchon ther own ,
G Genelalprogramming,svitabfe for all audiences
PG ParentalGuidance
P_ogramlningconta ns themeso_content
/4_ which _ay lot besuitabb for viewersunderageof/4.
8* Adult programming
French Rating
Press OK to e_ter French rating menu, Similar with English Rating,
6ans Programmingisnot suitablefor
18aK!S4 Pfo/jPftlnmiflg Kessiclod tO adults+
e
a
@
@
@
@
@
e
e
a
@
@
@
@
@
e
e
a
@
@
@
@
@
e
e
a
@
@
@
@
@
e
e
e
@
@
@
@
@
@
@
@
e
e
¢
¢
@
@
@
@
s
s
a
¢
@
a
@
@
s
s
a
@
@
@
@
@
e
e
a
@
@
@
@
@
e
s
MNe: /hese ;_ffr;gsaeavk_b/,o yif/i,eLx_:_uaae r, se k_g
Block Unrated Show
Bloc}< all the unmted program.
Clear Down/oas_'_b/e Data
Activate or downloadable rating data. if available,
Kej.7>ad Lock
Select this option to block or unblock the TV's side oanel butte/s
so t_at they can't be used,
Clear Channel Lief
This option allows you to execute Clear Channel list function,
This funelion will reset the whole TV system to factory default (not
only reset CaD menu),
Remote
select your remote: Off, remote1 or remote2, this [s for special
purpose,
DVD mode of _ LED24G45RQD
[V [ ED24G45RQD has a builtdn DVD player module, which
you can use to watch DVD disk, The renewing operation guide
gives the DVD module instruction,
7. How to enk>r DW) modD Pr II/LED24045RQD
Press INPUT b£en on remote control, select "DVD" n the Soume Seed
menu (see page 7), then p/ess OK or rght arow to enter DVD mode, The
DVD wl start paying ac tomaticaly f there is a disk in DVD mo&le, If not,
the TV wl dispay a standby s<een as shown And a "No Ds<" message
wll appear on so/sen,
?,,lute: 7_e 7Y :? turn 0 r)//) mead aue/?as/_/_,_ //,'v q }A_ it) cat a d_'k, /7o
maHn: r * sh coop//ie nor4
2,/nserl a d&k to DVD p/aYDr
}nseM the DVD dsk with reflector SLtrace _acing the front of]M
Disk raffecto_ sudace facing the front of Tt.t
/Vote: De net isv_ <,U _ch s/:aegt/, /_ ec _t amk genU! ao he DYf)
ft oou_e _4 _}'//(?act i/ the (:hff( a/eras@?/
3, DYD control
You cal control the DVD Jlaying wit/ keypad on DVD module or with
remete cent ol. For operat ng qfo malion, see the folow
Keypad on DVD _od_le
_ _d_OT(_}: Ejects or loads the disk from DVD module,
PL&Y/PAU$_(_}_ Plays el pat sea the DVD disk,
ahou DiD co tT)i/r/tone )) 'mot conic/, _ 6 _/?P _[//o£ ! t ga/7:
er <"".....¸¸ _ssenes a_h t our /' _
4. DVD basic operatkms
_la_/pallse the diel¢_ Al?er nsert ng the dsk to DVD modue, the TV wl
play DVD disk automat caly, Yet can use PAUSE button to suspend the
p a#ing, Press P_AY button, the ]V wl rest<re p %/ing,
Step playisg; D_rng paying, yol can _se BTOP but!on to stop payng, If
you press StOP once, the DVD will be stopped b iefy, Press S!OP again, it
wl stop completely and the dsk n DVD module no onger whee s,
_ect the dis_ Yo_ can press EJECi" b£ton to eject the disk from I}'gD
module, And press EJECI again, the DVD wil cad the dsk renewedy,
*]hs f _nction is enab ed only when 17gD mode s on,
Gsi_g backward sr tsrv,_ar_: Ycu can )tess FR for fast review and FF
for fast iowa d, You can as() press PRIV to retcm to the previous chapter,
and pess NEXT to skp tc lext c la/ter,
_r_etio_ ree_." Press L)ISC MENU, you wil ret _r/ to the se ectio / men_
of cc rrent DVD fun(t on, For exampe, you are us-/g "Audio Select o f',
and you choose "Cent n _e -)lay ng", then after se ecting, you can pess
DISC MENU to go back to "ALdie Selection" menL whe paying,
$itle _esu: Press TOP MENU, you can reset the disk to the ttle cent
It equas to eject ng and loading the dsk agan,
Zco_ i_: Press ZOOM, you can zoom in the screen for 2 trees, 3 trees
or 4 trees from centre, This h notion provde a better view of the content
locate near screen centre,
S!.lbtitl@ selaetio_: Press StJBNNf, you can swit_ h tqe avai ab e st )ti es
n DVD dsk.
A_dio language selectis_; Press AUDIO ]RACK, yet can switch the
avala) e atdio language in DVD disk.
Repeat: ]wre are two kinds of repeat, one s regu ar repeat and the other
s Atop/epeal. For reguar/epeat, peas REP[Yt[ b£ton to swtch between
chapler repeat, ttle repeat and al repeat. For AtoB repeat, press AB
once to set the repeating orgn and sress t twce to set the repeat ng end.
DTD_setl,19 mel_ll: P/ess DVD/BD SEIUP bLtton, a ssecfc setup menL
for DVD wil disp ay on screen, This cent s especaly prepared for DVD
control,
5, DV/) setup menu
A, Qel_eral setup paga
There exst three sub men is n DVD setup menu, the frst one s Genera
Set@ Press SEIUP button on emote centre to dspay Genera Setup
Page, Press up/down arrow to seect the tern you want to adjust and )ress
rg-/t arrow el OK button te activate t, After activating, tse up/down arrow
to set te/T vaue. When you are satis led wth the adjusbr ent, pess el', a/ow
to return to the tipper evel of general setL) menu. Press left arrow repeatedly,
you can ext the DVD setls _renu. To ext settp men< d/ecly, press
DVD/BD SE'I UP,
TV Bisplay
Set the 1U disp ay s/ape,
OSD Lang
Set the DVD CaD lang age as English, Fench or Spanish,
Last Memory'
Set it oe to memorize tie ast ate) point, Du'ing playing the DVD, i you
change to another cede and then come back to DVD mode, t can pay
actomatcaly from the ast stop :)oint,
kjo 7k _c// s .,i) ti _ CL_th il !Y) !r f',/ ilia/cu [!li/V
d£ Ur/ ),_ Ms f i),) r ,/ i ls/(' i liP:r7 )_nl# 7 SOtV )
DiD e od / :!
B. Speaker setup page
Pre_s DVb/BD SETUP bul+en on remote control to disphy General Set'Jp Page,
P/ess left/r ght aow to choose Speaker Set@ Page, The operat ng
method s ei/iar wth the General Setup Page,
Downmix
This option s preset as Stereo, 1hat Teans the DVD pays/wil outp£ a
two channel aLdio sgnal (WR) to ]V font speakers (left/ ight),
O. Pretera_ea paps
Press IDVD/BD SEIUP button on remote centrol to dsplay Genera Setup Page,
P/ess lef<Vright arow to choose P/eference Page, The operatng method is
simi ar wth the General Settp Page,
TV Type
Set the TV type as PAl, A_to or N]SC,
_,ate:/_r!(sUSO /_/_ eraoeaf:l K; f,/DC s!;r( ?, so 4e sag<D_ yo se_ rap
7P/_:/2 as f'/ _(_ //aa'_!_o , yoi C;;r a/!o (3 i a i@i/ ro ,?P:M? craft _Y_<ts
s_bi:n e>et( ,77.O:ec :ciq: :(::co!/rt:eqc
Audio
Set the DVD acdio language,
Subt tie
Set the DVD st brits an%age,
Disc Menu
Set the DVD dsk cent language,
Parental
Set the parenta centre ratng as KID N/\E G, PG, PG13, PGR, R, NO17 or
ADUlt To change this opt on, you need passwo d, and the o/ig hal one s
"0000",
Default
Reset the DVD setu) menL options as factory default,
What's the _ost co.veriest way te view High Defi_itia_ (HD)
video?
Connect an antenna to the rv Input jack to view free local dig tal
chan-_els, ?b_ nlay heed to puruhase an antenna. (See page 5 for nlors
nlonllafior_ about antenna setup),
Visit www,antenn_.wveb,org for aseistance in deciding what type of
antenna to uee to receive the local digital channele available to you,
After enledng your location, thb mapphlg program tells you which local
_nalog _nd digital statione _re, wail _bleueing _ cert h_ _ntenna.
Are there other s_ays to view High Defi_itior_(HD) video?
Besides using an antenna as nlen ioned above, you can also use a sel
top box to receive digital video, Contact yohr cable service previder
or satellite provider to p_rnhase digital pmgrammihg and have them
connect the box to ensure yo_ are viewing cha-_hels ill the best wa h
Hew de I tall a_ a_aleg cha_el frem a digital char/r/el?
Press the OK button to disphN the Channel Bar, When ne OSD
(Oil Screen Dbplay) is usedj.ook at the topright comer of the screen.
An 'W' }s dispbNed for an analog ohanneI,A "D" is disphNed for a d}gi al
channel, !%.re: Sue tt e //,s/o s' 7Yb/v!sra:a b:_s : eo c:f e :r 4/<'
cs(_m ::l::_ef)U .::7e8(:/oH/}.,t(,,, SOrW i:scs?<>e£ai:SO
Why are there bars o_ _y scree_ arid ca_ I get rid of the_?
Most digi al vdeo is sent ill a 18/9 format which tiffs your screen, but
s sometimes sent n 4/3 which does _ot fill your screen. It depends
on how the station or device connected to your 1V is k)mlatt}ng tile
video, If them are bars on the screen, Check Screen size in the picthm
mode to try a diffemrlt format thai nla_/elinlh/ate the bars, Sonle bars;
can't be removed because of the way the fomwt is sent by the
bread<as er, The forma4 c[_angee as you choose screen size type in the
pichse mode ahd tie format lype is displayed at the bottom of the screen,
Fer nlore hiformalion on screen size, go to page 9,
Why does <haggai search fi_d a lat of cha_els_ b_t whe_ I
try to tu_a te ther_ b there's _ethi_g there?
Some channeb don't carry prcgranlming, such as video Oh Demand,
Wheh channeb are unavailable, your T\/screen is blank or appears_ like
s-_ow, You probably war to remove these cha inels fmnl your channel
Ist, Remove these in the Cha u/el list Menu, Go to page 8 fer more
nfermafiorn
Why does it _ke a le_g t[_e whe_ I search the chal!_els
at first ti_e?
If you have both analog a_d digital channels, the T\/ie looking for all
available channeb ill t-_e channel list, If you do ha_/edigital cha inels, the
Pd is also searching for scrambled channels, norl scranlbled channels,
_nd each sub channel of that digi al channel,
Identifying Problems
If there are any problems wlqen using the product, please consult the
lie below, If the lie1 does not solve the problem, call our Cu.stomer
Bervice Center inlmediately,
7_/" Prob/eme
The TV ca_t be t_med e_.
M_ke sum the AC cold is plugged in,
Check the wan o_tlet, nlake s_ae tile AC output works nornlally
and stably
The side panel may be locked {disabled). Use tile retools control
to tun/orl the 1M
Select the Keypad lock funcSorl in the PARENTAl con rcl Menh
_nd press OK to uncheck the locking sta!us,
The_ is _c pict_ or sea_d bat the _ is a_ a_d there is a "He
Signal" sig_ e_ screen.
Are you trying to use an input source with no device connected
to it? Fer using other video/u_dio device, make sum the ex er _al
device works normally fir_E then press INPUT and choose the dght
h/put souI:ce,
The Signal [ype open may be set incorrectly, Go to page 8 fer
de!ailed instruclions,
The channel may be blank, by to search the channel again or
change anolher chan -eL
The sea_d is fi_e_ bat the pictare is peer,
If you call only get black and white pictures from external device
that you've connected 1:oyour [\4 maybe il ia due to the video
cablee is not connected well, or they am co ]nected wrongly,
Check the connection stability firet, then check tlne corrsctness,
Fer AV i iput, the yellow video cable connects to the yellow Video
In jack on the side of your 1\4
For Component input, the throe Y, Pb, Pr video cables (red, blue,
_hd green) should be connect to the corresponding input jacks
on the side of your YV,
Check the antenna conheclions, Make sure all of the c _bles _m
firmly connected to the 1V jack orl side of your r\L
hy adjhsting tie color feahses to imprcve,
There is r_e sa_d_ bat the pict_ is fi_e,
- Ihe sound migh bs cued, [ry pmsdllg the MtJI[ button to
tel}tore soon(t,
@
@
s
s
s
s
@
@
@
s
s
s
s
@
@
@
s
s
@
@
@
@
s
s
s
The Re_ote ce_trol doesn't work.
Them may be an AC power tMlum or the power cord unplugged
hm
Somethhqg might be blocking beiween the remole control aid the
mmole sensor orl the front panel of the Ix,/, Make surs thers b a clear path,
The mnlote nlay not be aimed direclly ak the [M
The ba£eries in t_e renloh> m%/be weak, dead, or installed
incorrectly. Put new batteries in the remote,
Yee are experiencing preblerr_s with V-Ch@iParen_l Co_trole.
If the raking limits don't work, you must lock the settings, Go to the
Main Menu (Mess MENU on your remote,), select P/\REN]?tL oo _trol to
check the se tings,
What else call I de?
If you've been through the lroubleshoot}ng section and nothing has
fixed your problen h try rebooting your [M
Note that afer a mboot, you nlay iced to run your TV thre_gh the
set_@ process aga}rn If) reboot, unplug the power cord ffem the wall
outlet or power strip.
Keep your Pd u iplugged for about 5 mind,tea, Then plug ill the T\/and
turn it on, See if the problem is fixed,
- For ushlg /W or Component, remember to <sonneot tile device's left
r-_d right audio outpu correctly, the left channel cable is whie and the
riglt channel cable is red. Please match the cables and jacks according
to their colors,
The sound selti/gs may not be set correctly, Go to page 9 for
more information,
Ifyour ::die source has only one jack or is a troche) ::db source,
make sure you/ave plugged the corlnection inlo the Audio In L jack
{white) on he T\L
The battans e_ the side panel don't work.
The side panel may be locked (disabled), Use tile mnlole control to
turn on the [M
Select the Keypad Lock function ill the PAREN]?\I control Men_ and
press OK to uncheck tile locking stalus,
Unplug the FV trom the AC power for 10 minut:e; and tll_l plug it back,
[urn the TV on and try again,
The TV t_ms eft a_axpectedly.
- The electrenic protection circuit ir!a_/ha_/e been actiw:ed because of
a power surge, Wait 30 seconds and then thm tile TM orl agairn
If this happens frequently, the voltage your house may be abner hal
If the other electronic equipme _t in your home cant work non'aally,
corlsuIt a qhalified sewice personnel
Car/_t select a cer_h! cha_rleL
Tse channel may be blocked or nol approved in the PARENTAl
conhol Menu,
The chanhel may be skipped ih channel list in CHANNEL Menu,
Check the bier:king and skipping staus of channel
The stereo sau_d peder_a_ce is bad.
It may be a weak etation, Use the; AUDIO M:_lu a_ld _>atAnalog SouKJ [!}
Mono,
A black bex appears a_ the screen.
- Closed captioning might be on, Check Clos_J Caption in the SFIUP
menu. Go to page 10 for more instructions,
P_bler_s with the H#I'_I Ca_ectie_o
Make sure t-e HDMI devbe (IWD, video>garner, etc,} is turls_J orl and the
cables ars firmly cohn_v;tsd,
If problenls still occur, turn off yo_r device and reconnect it, Reset the
power by u-_plugging the power cord and pk_ggihg }t again.
If a "No Signal" message appears on screen , the HDMI device
sn't responding, Contact the manutacbaer of the HDMI device Ka
fuRher assistance,
If you have black bars on each side of your picture (which
T_eans the rv can not display a fun son-sen image), the device you
cennected might have a switch o/a T/enu option allowing you to
change the picture quality output that will fix this, Choose either
720p or 1080i,
@
@
@
s
s
s
s
@
@
@
s
s
s
@
s
s
@
@
@
s
s
s
@
@
@
s
s
s
s
@
@
@
s
@
s
@
@
@
s
s
s
s
@
@
@
s
s
s
s
@
@
If the problem remains, then please visit tile Customer Support Mehu at
www,rca,com or updated [7\Qe or co itacl RCA Customer Support al
the supporl number provided in your Warranty card,
1O0 mm
75 m
i LED24G45RQDi VESA 100 x 75 M8 screws, length 12ram
, i
/"ff: e
A77e 4,_d :cuff h :_o cu/ fabled httle aeeessr;m;_ eeM 4a? h)_<ask)
Y,t:::,:>.i?s::_::(> bu sn:.':i:r,gr,pecMeas::r, /_: ,'_o rv, ,,::is)(>i: u'r,</"
/f ;..o::_c>'>:7iv' ::,:::e :d ,:_sc,cone:it <srh h:, k.: si :Te:_k::t:.r:,Yi\",/t
:/::is::% :ni
g_:> :.;rs:a,/g. :f/£c>etc: :-e b:' :,':_//n) >:m" ,4fi_eq ::c:!le: e cf
:.poMfi<wtc!_ me er:i<'red ifo:: , im_p; r:>pr_:," inef:,B: g mm, ca::.,
(:_ s:{:'r>(, _t?s:(' (,r©(a;a/<!
C 4,is pg>: :> k ,p.s: r/ t/<_s :,8 :t., O: 4,i>r ,
:lass >:W:"_l):_f C:,bV!s: fls:(¢e:;(r'
W_smings
1, Do not set up the wall mount by yourself, Please contact
qualified professionals for installation,
2, The Pd should _ot be mounted on walls or sudaces which have
an angle more t_an 10 degrees with vertbal dkection, Otherwise
the I_/set may fall.
3. The walls for mounting must have enough strength to held the
whole weight of IV sek For example, concrete wall and brickwork
are eligible, Do not place the inount on soft walls such as earth
walls and plasterboard.
4. If spare parts of different specifications (such as screws) are
used duri _g mounting, consult with qualified professionals to
make sum. these parts are safe and effective,
5, Befere attaching the base to wall, ensure the holes for anchors
are in keeping with the installing rules. Otherwise there may exist
some potential problems,
6, Do not place any heating source under your tebvision, Or else,
it can cause fire,
7, Do not :)lace the lY near :_ything dripping, Dansducers and
hig_ voltage wires should be ke°)t far away f"om the apparatus
too, Or else, it may cause cree:)age, electric shock or bad
resonsnoe.
8, Do not place [V in a location where collision or vibration is
liable to happen.
9. Ii order to avoid u _expected fallin9 of the ]V set, do not put
any strong force on [\/or wall inount after installing.
10. Be sure to unplug the Pd before installing. Keep any/hing hard
or sharp away from the screen panel to prevent the scuffing.
1 1, After inst _Ning if there is any need to move the cabinet, [)lease
contact the qualified professbnals,
With I.JSB Media Play you can enjoy mush and photo files stored
in a USB storage device on your RCA Pr,
Connecting a USB storage device
Connect a USB sto/age device to tile LtSB pod: in tile back of the IV,
Press "INPLtT" and select "USB',
"USB Media Pby" menu will appear,
USB 20
PHOTO MUSIC
P:aying baDk Photo fries
Press arrcw (</_) to select "Photo" and press "OK",
The file or tolder }st win show up, Press arrow(_/_) to select a file
or folder, Pix_ss "OK" , and you wNI be given several options to vbw
-)hob files,
You can directly open and playback the file, View thu'nbnails Ks
photo preview, or play slideshcw,
P:aying back DZus/c files
Press arrew (4/_ ) to select "Music" and press "OK",
The file or tolder fist win show up, Press arrcw(A/_') to select a file
or folder P_ss "OK" to playback the music file you selected,
Media Support Specification
• Photo JPG/JPEG files
i • Music WAV files
I
• USB Storage USB flash drive
_ File System format FAT32
s
s
@
@
@
@
s
s
s
s
@
@
@
@
@
s
s
@
@
@
@
s
s
s
s
@
@
@
@
s
s
s
@
@
@
@
@
@
@
@
@
Cath,_ L)O T)t flirtOff tie T/or (_,'a(o::r>_M:_,Rs,}mge d< vk:e
:4:/:/;tf T/r pi y.x.pbe:k:u:,t':r- or'm:a:o
hi,, m l/ re:>uiti: i,_auv: u, :a 6r u,lr!acd :6 / > Jc:/tr,6:uiE>
r/r>v:<s h'(;/,:: r;4 re:d>::r,':bi':/<::,s : u),:tupc c, c: i,xs__:/,
ri:_t,_6r t;rLk:iFi:_6:,Ip :/ey_<
_i_;_iiiiiiii!!:!7111iiiii¸iii!!iiiiiililiiiiiiiiiiii!i!i!i!i_iiiiii!ii!ii!i!l !!t!!!!:t!!!!:t!!!!:t!!!!:t!!!!:t!!!!:t!!!!!r
IDiagonal Display Size I24 inches
Alnerican TV standard
Television System ATSC/NTSC sysbrn
VHF ;2--13 UHF ; 14-89
Channel Coverage
,,CATV :1--135 ,
Storage Tempelature is
Temperature _-20'( - + 60't -4? --+ 140_J< I
Operating Temper,rat ure is
, , 0'( -+80_( +32_},.. +122_ i
StorageHumidity :Lessthan88%RH
(No condensation)
Humidity r _peration_umidiN i i essthan%S, RH i
fire condensation)
i RFinput Cable/Antenna × 1
, TAv;_ j
Oonrlection i Videoinput , Component × 1
Interface i HDMI x 1
rA_,dbnFi]_ AV_ _i _ A[_ o n x _ i
, i AudfoOL@Ut Headphone× 1, DigitalA_dioOut x 1
Resolution , 1920 × 1080
Component/HDMLmode 480i, 489p, 729p, 1080i, 1080p
IWith starld I22.4W × 14.1"H × 6.7D
Dimensions Without
stand 22.4W × 13.3"H × 2.7D
, + +
With stand I7.7LBS 3.5KGS
Weight Without
stand 7.3LBS(3.3KGS)
Power Consumption less than 26W
s_,fots:e Spcictt/on; ane cabi:e f :!9ign 7/6> uh/ect te ci?:/n{/a x:/iho/
sotice
Coverage -Labor
For a pedod of 12 months from date of purchase of your RCA
e product, we will pay an authorized RCA sew}ce center the label
s charge to repah" any defects in materials or workmanship in your
s telsvision,lf your tebvision is unlx@ah\qbb we will pr(Mde you with a
s rdurbished unit of the same or better model,
s
e Coverage -Parts
e for a period of 12 months from date of purchase of your RCA
e product, we will pay an authorized RCA service center for the
e new,er at our ()ption, refurbished replacement parts needed to
s repair any detects in material or wo/kmansh}p in your television. If
s your telev sion is unrepaimble we will previde you with a refurbished
e unit of the same or better model,
s
eCoverage -LED LCD Panel
e For a period of 12 T/onths from date of purchase of your RCA
e product, we will pay an authorized RCA service center for the
enow, or at our option, Is_Xurbished I ED ICD panel needed to repair
sany defects in n'/aterial or workT/ansh[p in your television, If your
s tekMsion is unrepairable we will previde you with a refurbished unit
® of the same or better model,
sHow to Obtah_ Se_wise
e
e Fer assistance (U,S,A) if yoh purnhased RC/t pmduol n
e U,S,A, please call 18889776/'22,
@ Or ViSitwww.roa.oom
s
s
s
The service mprosehh:¢Ne will review your optic _sfor service,
As a corlvenier_ce we offer three ways to obtain warranty service,
M)u may mail your product to the address provided by the service
representative, you may take your product to ah authorized service
center, or yo_ may req_est in home serv ce (servicer will detennine if
product is serviceable in home or must be taken back to local service
oehter for repair}, Service /epresentative will supply h_structions for
preferred service, At the time of service proof of pumhase such as
origihal receipl, win be roqu/ed, Only 37" ICD size and above se
_pplicable for in home service,
Items Not Covered By Limited Warranty
Your limited warranty does riot cover the fellowing iterrls:
Un-installatiorl, installation and adjustnlent of customer controls and
operating ihstnJctio i,
Balferies and custorner replacement fuses
Danlage due to i/lisuse, abuse, hegligence or ieglect inch_dihg but, not
Ibked to, damage resuItirlg from exposhre to mobturs, hun lidily or salt,
Inabilily to receive a sig lal due to problems not ca_sed by tile producL
Damage to the product dhe to images burnt into the screen,
Product pumhased or serviced outside of Co_altry of Origin d
Purchase,
i,e, Purchased USA can not be serviced ill Mexioo/Purch _sed in
Mexico can not be serviced ill USA,
Product modified or ncorperated into chef products,
Damage dhe to acts of nature, nclud _g but _ot Ii%ted tojightning
d _mage or flooding,
Service calls which do not nvolve any deject ill ma erials or
workmanship,
Ce_ercial Use Excladed
This Iinlited warranty only applies to products used for persorlal use
_nd does not cover arN product used for nstitutional, commercial or
rental purposes;,
THIS LIMITED WARRANTY IS THE SOLE AND EXCLUSME
W/\RRAN [Y APPI ICABI E 10 1HIB PRODUC[ ON CORP US, INC.
THE MANUI-AO FURER OF THIS PRODUCI] DISCI AIMS All..
OTHER WABIV\NTIEB, FXPPEBBED OB IMPLIED (INCLUDING ALL
IMPI NZD WARRANTIES OF MERONANTABIIJIM OR Frl NESB FOR A
PAR rlcuI AR PURPOS[), NO VERBAL OR WRlYTEN INFORMATION
GIVEN BY ON CORP UB, INC. rls AGENTB, INDEPENDEN1
CONTRACrORg, BALEB REPREBEN1?\rlVES, I}MPI OYEEB, RFTAII
D[!\L[ Rg, WHOLE BALI[ DIBTRIBUTORS OR ANY OIHER THIRD
PAR [Y BHALL CRE!VI I. A GUARANTY OR INORF/\gE, EXPAND OP
MODI[Y THE SCOPE OF THIS lIMITED WARRAN rY,
THIg I IMrl ED W/\RRAN [M PROVIDES THL} BOlE AND bXOI USIVE
REMEDY [Y)R THK CONSUMER OF REPAIR OR REPI ACIZMEN1()F
THE PRODUC[ ON CORP US, INC, .<}HALl NO1 BE IJABI E VOR
BPFCIAL INCIDEN [AL OR OONSI GUENTIAL IM\MAGES ARISING OUT
OF THE UBE OF THEP RODUC[ OR ARIBING OU1 OF A BREACH
FKPREBBED OR IMPLIED WARRANrY ON THkg PRODUC I,
THIB lIMITED WARRAN IY AND THE DISOLAIMERB CON I/\INED
NIt _EIN ARE GOVEPNED BY THE LAWS OF THI} B]AIE OF INDIANA,
EXOEP r TO THE EXIENT PRONIBITED BY APPI ICABI E lAW, ANY
IMPLIED W/\RRAN rY OF MERONAN [ABIIJIM OR FITNEBS FOB A
PAR rlOULAR PURPOBE IS lIMITED TO APPL ICABI E LIMITED
WARRAN rY PERIOD(B) BF[ rOR rH ABOVE,
THIS W/\RRANIM GIVES YOU SPECIFIC lEGAl RIGHTS
AND YOU AIBO MAY HAVE OTHER RIGHTS %b\ VAPY
FROM S IXrE TO S I?XrE.
F[(.i_iS ', ef FT{W ft:I:i:r /:k
_!_S and ursd unc_s iicesee hy ON C0rporation
@
@
s
s
@
@
@
s
s
@
@
@
@
s
s
s
s
@
@
@
@
s
s
s
s
@
@
s
@
s
CebertaraoTrabaje
Dumnte uh periodo de 12 tosses desde la re<ha de compra de su
pmducto RCA, pagammos a un cenhe autorizado de servicio de RC/\
el cargo de mane de obm pare mpamr cualqu}er defecto en materi des
o mane de obra en el telsvisor.
S su telev sor es irreparable que le proporoio _ • _ u_ u_d_d
mace idiciorlada del mismo modelo o superior,
Cebert_ra /Recambies
Dumnte uh periodo de 12 nleses desde la fecha de cornpra de su
producto RCA, pagaremos a un cenlre autorizado de serv}cio de RC/\
para un reen}plazar ya sea con parles nNevae o reacondicionadas, o a
nhestm opcion, pars repamr cu dquier defeclo del malerial o m_no de
obra en el televisor,
Si su televisor es irreparable que le proporciorlam una unidad
rsacondicionada del miemo modelo o superior.
Parcel de CobeA_raoLED LCD
Dumnte un pedodo de 12 meses desde la re<ha de compm ds su
pmduclo RC/\, pagaremos un cenlm auto izado de serv}c}o de RCA
para un reemplazar la pan alia LED I CD, ya sea con pa italia nueva o
reacondiciorlada, o a nuestm opcion, pare reparar cualqhier defecto del
maler d o mane de obr_ en I_ pantalla de su televisor, Si su televisor
es rrepamble que le pmpom onam una u lidad macondicionada del
nlismo modelo o shperior
Collr_e Obtel_er Sersicie
Pare asistenc[a en Estades UnkJos (E,U,A) si oompm un _psr rto RC/t
en E,U,A, favor dellanwr al: 18889776722
o visits: www.rua.com
El representarre de Servicio revisara sus opciones para el servicio,
Para s_ corned}dad le ohecemos tres formas de obtener servicio de
garantia.
e
s Usted puede enviar sh producto a la dire<<ion proporcionada per
÷ el representante de servicio, usted puede Ilevar su produc o a un
s oehtro de servicio autorizado, o puede solicitar en el eerv}c}o a
s domioiNo (adnlh/istrador detemlh_ara si el producto se encuehtre en
e funcionan@nto en casa o debe set Ilev _do de vuelta a servicio Iocd
e tecnico para su reparacion),
e
El representante del .,ervic}o le proporcionar _las instrucciones par_ el
s
s servicio preferido,
s Be requiere del comproba ire de compra original,
so
e ..olo ee lea data servicio a Domicilio a %lew;oree de 3/ ' pulgadas de
e t _mano y mas grandee,
Elementos no cubiertos per la garantia Iimitada Su
s garantia Iimitada no cubre los siguientestemas:
s
s Un instalacion, montaje y ajuste de controles del clients
s e instrucciones de funcionaraiento,
e I a<4pilas y los fusbbs de repuesto al clb, r!te,
e D:Ylos [>or us() indebick), abuse, negligoncia o c%scuick)
e ir)oluyendo pete no Ih nitado :_,los danes deriwvJos
s d<_,la cxposbiorl a la hun'ledrM, la humedad o la sal,
s Incapacidad peru recibir la serial debklo a los problemas
S (]ue r)o f_or) causadEie [)or el prc)ducto,
s
D:mos en e,I producto debido a lae imaqsr)ee de rfrabadas
eerl la parltalla,
e Productos comprados o prestar servbios fuera del paLq
e de compra original,
s Ej: Comprado erl Estados Unides no puede prestar
s servbies en Mexico/Coraprado en Mexico no puede
s prestar servicios en Estados LJnidos,
s
Productos modificados o incorporados a otros productos.
Danes debidos a tenomenos de la naturaleza, incluyendo
pete no Ihaitado a, danes per myos o inundaciones.
as Ilamadas de servbio que no hT/pliquen cualquier
defecto en matedales o mane de obra,
Uso Co_eroiat Exclaaio_
Esta qarantia Iimit:vJa solo se aplba a los productos utilizados
para use personsl o, y no cubl_ todos los pFeductos utili ados oct!
fine,s irr)titucionak_/7, cornerciahe7 ocb alquiler,
ESIA GARANTIA LIMrI?\DA ES EL UNICO Y / XCI_USIVO
DE GABAN11A APLICABI E A EBIE PRODUO1 O, LN
CORP EE,UU. In<,, el fi_brica ]te de este preducto, mchaza
oualquier otra gamn ia, expmeada o implicada (INCI UYENDO
TODAB IAS GARAN11AS IMPLICrlAB DE OOMERCIAL
IZAOION O IDONEIDAD PM_,A UN PROPOBITO
P/\R1 ICUI AR), NO informacion verbal o eecrita per parte
CORP DE EE,UU. Inc. s;ue agen es;, contrafi!;tas
independientes, mpresentantes de ventas, enlpleados,
oomemia ires mh/oristas, mayoristas o cualquier otto temem
DEBEPAN cre,ar una garantia ni aunlerltar, Ampliar o
rnodificar el alcance de esta garantia lirdtada,
Esl_ GAW\N11A I IMrI?\B/\ DEI UNICO Y EXCI USIVO REMEDIO
P/\RA El CONSUMIDOR DE REI-Wb\CION O REEMPI AZO
DEI PRODUCrO, I}N CORP IiE,UU. Ihc, no sere
msponsable per dales especiales, ihciden ales o
oonsecuentes msuIlantes DEI USO DEI PRODUCTO O
DERIVADOS DE UNA VIOIACION gamntia expmsa o
implicita de este prcduclo,
ESTA GARANTIA IJMrlt\DA Y RESPONBABIIJI)/\DES contenida en el
se rigs per las keyes del Estado de Indiana, SAI VOPROHIFYDO POR
IA IEY APHCABI E, CUAI GUIER GARAN rlA IMPI ICrB\ DE
COMERCIAI IZACION O IDONI-IDAD FY\RA UN PROPOBITO
P/\RTICUIJ\R IW FARA LIMg?\DA A I..IMI[?\DA periodo de gamntia (S)
mencionado antedormente, Esta gaes itia le otorga derrv;hos }egales
especificos y UBIED TAMBIEN PUEDE TENER OTROS DERECHOS,
QUE PUEDEN VARIAR DE ES I?tDO.
FlOe Hn7 rv/m, [fJ/e_'d;: de )/_/o//ae ?i;;_i
ON Corporation
ON Corp tJS, In<,
1D920 Via Frontera, Ste 540
San Diego, CA 92127, U,S,A,
d2014 ON Corporation
ROA is a trade_ark ot ROA Trade_ark lYtar_agemerlt
SAS ilsed iir_der Iieel/se ts ON ¢orporatior_.
RGA es una mat<ads RCA ]?ademark Management
SAS tsada )ajo Icenca de ON Corporation.
