RDI Technology 004RX DIGITAL WIRELESS CAMERA AND RECEIVER SYSTEM User Manual 7644A 004M rev
RDI Technology (Shenzhen) Co., Ltd. DIGITAL WIRELESS CAMERA AND RECEIVER SYSTEM 7644A 004M rev
Users Manual

QRZ
\RX
FDQ
VHH
1. Power: Pressing this button turns the monitor on and o
2. TV/AV: If your monitor is connected to another video source, pressing this button will
transfer the image from the 7" LCD monitor to the attached monitor.
3. Quad: Opens up a quad screen view. For more information on camera viewing, please
see “Camera Viewing” on Pg. 16
4. Volume: This adjusts the volume of the audio that plays through your monitor
5. IR Sensor: The IR sensor is how the remote and monitor communicate
6. Manual Record: Prompts the monitor to begin constant recording. To stop recording, press this
button again
7. Motion Record: Prompts the monitor to record only when motion is detected. To stop motion
recording, press this button again
8. Manual Channel: Manually changes which camera is being viewed on screen
9. Auto Channel: Turns auto channel on and o. When this function is on, the camera channels will
sequence through automatically
10. Delete/Scan: This button will turn on the screen saver. The screen saver will display until
motion is detected, once detected, the screen saver will close and the monitor
will display the camera that detected motion. During playback this button allows
you to delete single clips of recorded footage. For more information on deleting
recorded footage, please see “DELETE” on Pg. 27
11. Menu/Exit: Enters and exits the main menu
12. Joystick: This tab has many functions when accessing the menu as well as playing back
footage. For information about how to use this joystick, please see “Joystick” on
Pg. 14 of the manual
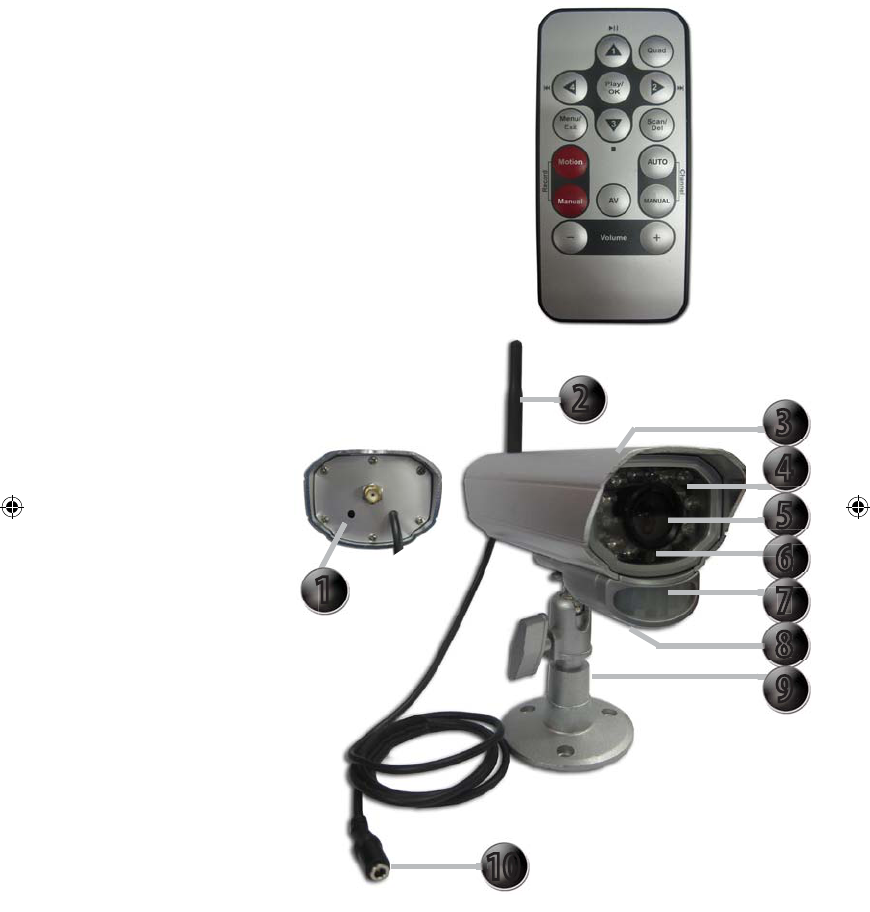
13. Antenna: This antenna allows for a stronger signal between the camera and monitor
14. Power Input: Plug the small end of the included power adapter marked “monitor” into this area
15. A/V Out: Plug the single end of the included A/V cable into this area
16. SD Card Insert: Your SD card can be inserted into this area to record and save footage
17. Talk: This button allows for two-way communication. The monitor and camera are
both equipped with a microphone and a speaker, pressing this button allows you
to speak through the camera from the monitor
MONITOR
QZ
\
Q
HH
REMOTE
The included remote control has the same functions
as the monitor with the exception of two commands
that are NOT included on the remote control,
they are:
• Talk: Cannot access talk function with remote
• Power: Cannot power on or o the monitor from
the remote control
CAMERA
1. Pair Button:
Located at the back of the
camera, you press this
button when pairing the
camera and monitor. For
more information, please
see “Pairing” on Pg 14
2. Antenna:
This removable antenna
allows for a better signal
between the camera and
monitor
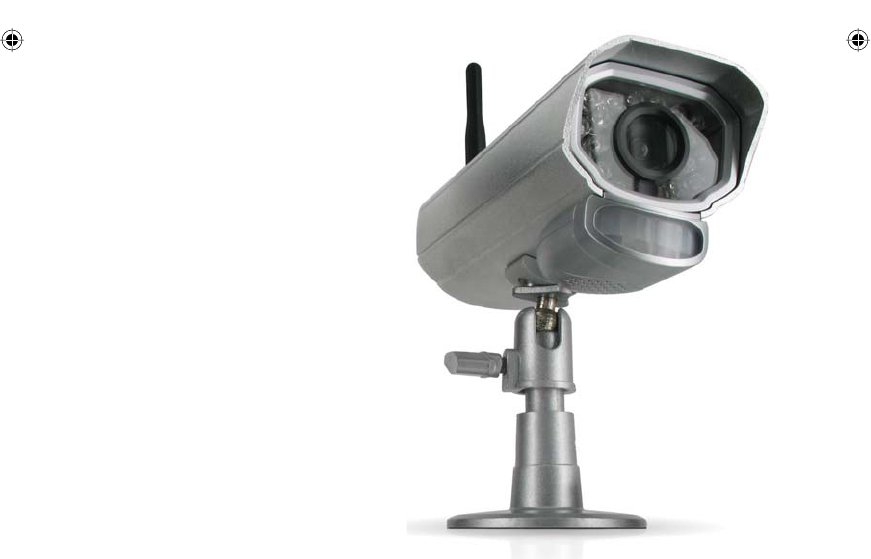
3. Camera Housing:
Made of anodized aluminum
to prevent rust
4. Infrared (IR):
The 18 LEDs allow the
camera to see in the dark up
to 40ft away
5. Camera Lens:
The camera lens is located in
the center of the LEDs
6. CDS Sensor: Automatically turns on the infrared LEDs when it gets dark
7. Motion Detection: Detects any motion in front of the camera
8. Microphone: Allows you to hear and record sounds as well as footage
9. Camera Mount: Allows the camera to be desk or wall mounted
10. Power connection: This 3 ft. cord connects to the power adapter (marked “Camera”)
1
23
4
5
6
7
8
9
10
Back of Camera
THINGS TO CONSIDER BEFORE INSTALLATION
• The camera should be installed between 8 to 13ft above the area to be monitored
• Ensure that the camera is installed NO MORE than 100 ft away from the monitor’s position to maintain a
strong signal between the camera and monitor
• Before mounting the camera, ensure there are no obstructions in the camera’s view
• Place camera in the most strategic place where it can provide detailed video of your home or business. Having
the camera in the open for people to see can help deter criminals
• To cover large, dark areas such as backyards, garages, and driveways, place camera in a strategic location, such
as on the roof or deck. This way, more area is covered by the camera
• Ensure that the camera is positioned to avoid glare. Be sure to position camera away from direct sunlight or
indoor lighting
• For best results, light in front of the camera should be around the same brightness as the light around the area
or object being monitored
• Decide whether the camera will be wall-mounted, ceiling mounted or mounted on a desk/table top. We
recommend that the mount is secured using the included screws and hardware for all installations
The GX301 utilizes Clear Signal Technology,
meaning that it is designed to avoid the
frequencies of common wireless devices.
By doing so, the system does not receive
interference from any standardized
2.4GHz or 5.8 GHz wireless devices
within your home or business.
The signal also passes easily through
interior walls. However, buildings with
metal frames or placing the camera
near large metal objects may cause signal
interference. If reception is poor, moving the
camera and/or monitor closer to one another
may x this problem. Interference is also
possible if another device within the building
(such as a cordless phone) is operating on the
same frequency.
AVOIDING INTERFERENCE
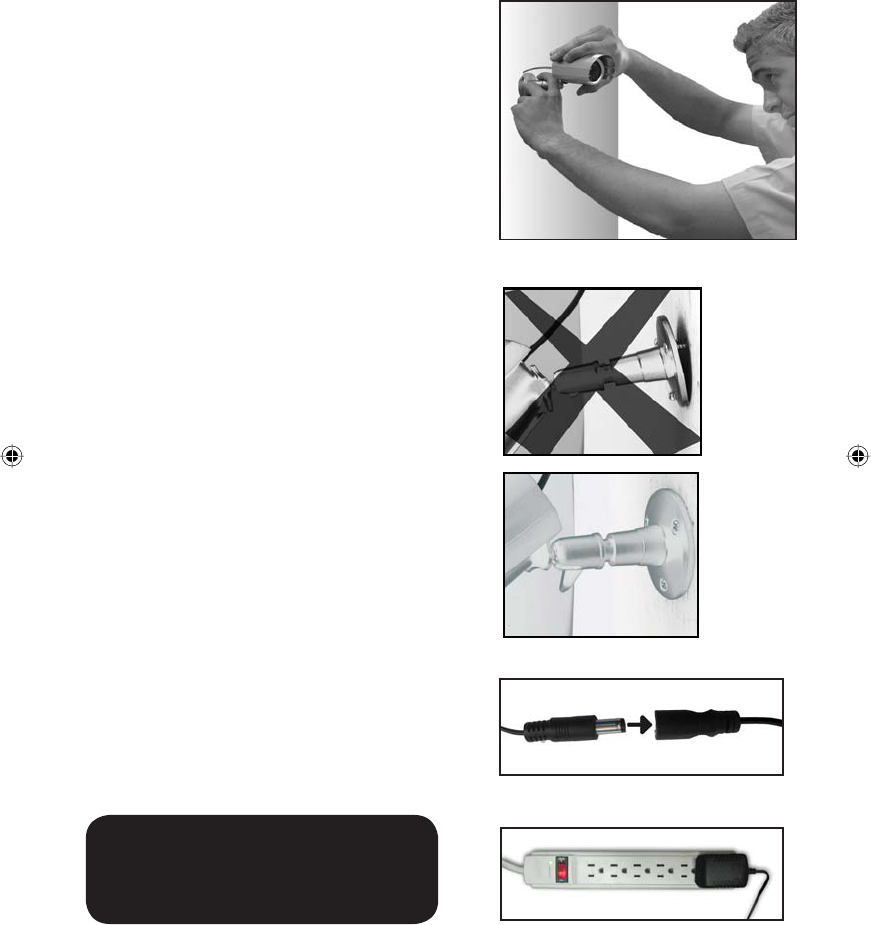
MOUNTING THE CAMERA
1. Decide if the camera will be wall-mounted or sitting
on a desk/tabletop. The camera can be adjusted
for many mounting scenarios by rotating it to the
required position.
• Keep in mind that the camera is microphone
equipped. If you would like audio recorded,
make sure the camera is within a close enough
range of the area being monitored to record
any sounds (within 6 ft)
• Be sure to mount the camera no further than
100ft away from your monitor
• Be sure to mount the camera no further than 8ft
away from a power source
2. Screw the mounting bracket into the camera’s
mounting hole, turning it clockwise.
3. Ensure that the camera is strongly secured into
the wall.
4. Adjust camera to the desired viewing angle.
5. For additional help with mounting the camera,
please see the drilling template located at the back
of the manual.
6. Once you have mounted the camera and placed
it at the desired viewing angle, plug the camera’s
power adapter (marked for camera) into the cord on
the camera and then plug the adapter into a power
source. (A surge protected power source is
recommended)
7. If you purchased a kit with additional cameras,
repeat the above steps for all additional cameras.
Note: The above photos are examples of
mounting a camera, your camera will
look dierent from the above images.
Plug power adapter into Camera’s cord
Plug into Surge Protected power source
Adjust camera to desired viewing angle
Ensure the camera is secure

\
To plug monitor in:
1. Make sure that the monitor is set up no more then
100ft from the camera. This is to ensure a strong
signal between the camera and monitor.
2. Plug the monitor’s power adapter (marked for
monitor) into the monitor’s power input area
(marked “9V DC”).
3. Plug the other end of the power adapter into a power
source (surge protected power source recommended).
4. Press the power button to turn the monitor on to view
and hear the camera.
PLUGGING IN MONITOR
Once the monitor is connected to a power source , turn it on using the power button and it will automatically pair
with the camera. If the camera and monitor do not automatically pair please see “PAIRING” Pg 14.
Plug into Surge Protected power source
To plug the 7" LCD Monitor into another Monitor:
1. Plug single end of the A/V cable into A/V out area on back of monitor.
2. Plug the video jack (yellow) into the video input on your monitor and the audio jack (white) into the audio
input on your monitor, then press the A/V button on the 7" LCD monitor.
3. You may have to adjust the channels or video source input on your monitor to view the footage.
4. Once the proper channel is set, the footage from the camera will display on the monitor.
CONNECTING TO ANOTHER MONITOR
The GX301 comes equipped with an audio/video cable that can be plugged into any monitor with an audio/video
input. Once plugged in, you will be able to watch and hear live video, access and view the menu as well as watch
playback footage from the monitor you have plugged into.
Plug adapter into 9VDC
Plug A/V cable into A/V out on monitor Plug A/V cord into monitor
CAMERA
Image sensor.............................................................................................................1/4" CMOS Color
Outdoor use ..............................................................................................................Yes
IP Rating ...................................................................................................................IP56
Maximum Wireless Range (Line of Sight) ..................................................................300ft
Optimum Wireless Range (Line of Sight) ...................................................................100ft
Wireless Frequency ...................................................................................................200~2483.5Mhz
Wireless Channel Frequencies ...................................................................................Hopping frequency
Resolution .................................................................................................................360 TV Lines
Night Vision ...............................................................................................................Yes
Number of IR LEDs and Range ...................................................................................18,up to 40ft
IR LED control ............................................................................................................Automatic (CDS Sensor)
IR Cut Filter................................................................................................................Yes
Min. Illumination ......................................................................................................0 lux
Viewing Angle ...........................................................................................................62 degree
TV System .................................................................................................................NTSC
Focal Length..............................................................................................................4.5mm
Focus Type ................................................................................................................. Fixed Focus
Optimal Focal Distance ..............................................................................................20ft
Microphone ...............................................................................................................Yes
Motion Detection ......................................................................................................Yes, triggers audio alarm
Sun Shield .................................................................................................................Yes, not adjustable
Housing Material .......................................................................................................Aluminum & ABS
Housing Color ............................................................................................................Silver
Electronic shutter speed ............................................................................................1/60 ~ 1/15,000 sec
Signal/Noise Ratio .....................................................................................................>48dB
Camera Bracket .........................................................................................................Yes
Operating Temperature .............................................................................................14°F ~ 104°F
Operating Humidity ..................................................................................................85%
Mounting Hardware ..................................................................................................Included
Camera Power Input ..................................................................................................9VDC 600mA
Power Adapter Input .................................................................................................AC 100~240 50/60 Hz
Dimensions ...............................................................................................................5.25" x 4.75" x 2'' (With Stand)
Weight ......................................................................................................................0.75 lbs
SPECIFICATIONS
My Unit has Scrolling
horizontal lines
• Ensure that the device is set to NTSC. For more information
please see “AV OUT on Pg. 22
Schedule record is not working • Ensure that both manual and motion record modes are turned
OFF for schedule record to take place

\
MONITOR
Wireless Frequency ...................................................................................................2400~2483.5Mhz
Channel Frequencies .................................................................................................Hopping Frequency
Number of Cameras Supported .................................................................................4
Output Terminal ........................................................................................................1/8th inch to RCA A/V output
Resolution .................................................................................................................640x480 or 320x240
Speaker ..................................................................................................................... Internal Buzzer
Maximum SD Card Size ..............................................................................................32 GB
Compression .............................................................................................................MPEG-4
File Type ....................................................................................................................AVI
Operation Mode ........................................................................................................Simplex
Scheduled Recording ................................................................................................24 Hour clock
Automatic Overwrite when Full ................................................................................Optional
Motion Activated Alert ..............................................................................................Compatible
Post Motion Recording ..............................................................................................5, 15, 30 seconds
Digital Zoom .............................................................................................................1x , 2x
Auto-Scanning .......................................................................................................... Yes
Button Lock ...............................................................................................................Yes
Remote Control .........................................................................................................IR
IR Remote Extension .................................................................................................6 ft
New Video Footage Notier .......................................................................................Yes, LED
Viewing Modes Single, Quad, Manual,
Automatic
Recording Mode ........................................................................................................Manual, Schedule
Adjustable Brightness ...............................................................................................Yes
Video Output .............................................................................................................PAL/NTSC
Operating Temperature .............................................................................................14°F ~ 120°F
Operating Humidity ..................................................................................................85%
Housing Material .......................................................................................................Aluminum and ABS Plastic
Housing Color ............................................................................................................Silver
Monitor Power Input .................................................................................................9VDC 500 mAh
Power Adapter Input .................................................................................................AC 100~240 V 50/60Hz
Dimensions ...............................................................................................................4.25" x 3" x 0.75''
Weight .......................................................................................................................4 lbs
\
If you accidentally damage or lose any parts they can be replaced with ease. The following are parts that
came with your system and their reference model numbers so you can continue to eectively monitor
your premises.
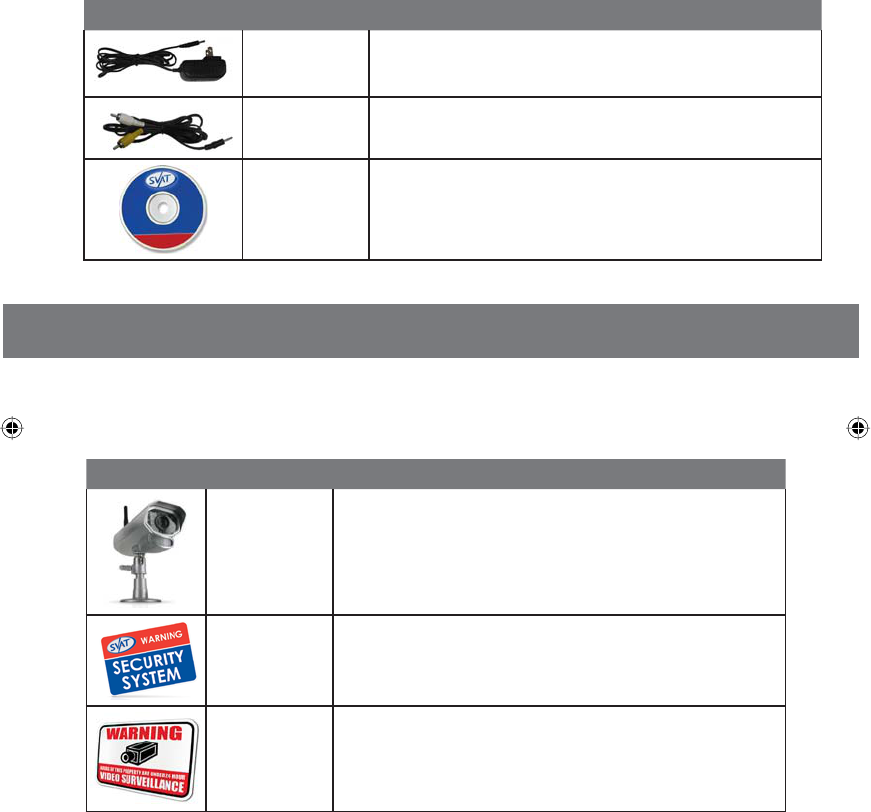
ADDITIONAL ACCESSORIES
PRODUCT MODEL# DESCRIPTION
GX301-C
Expand your system to a maximum of four cameras to monitor
more locations
VU100-ST
Alert all potential criminals of your security system and help
deter crime with a window sticker
SGN100
Alert all potential criminals of your security system and help
deter crime with this durable aluminum sign
You may wish to add to your system and upgrade some components of it. Here are some
items that can boost the eectiveness of your video security system.
PRODUCT MODEL# DESCRIPTION
Power Adapters
Audio/Video Cable
SOFTWARE/
MANUALS
Your product software and manual are available for download at:
http://www.SVAT.com/downloads.php
FCC NOTE:
This device complies with Part 15 of the FCC Rules. Operation is subject to the following two
conditions:(1)this device may not cause harmful interference, and (2) this device must accept
any interference received, including interference that may cause undesired operation.
The manufacturer is not responsible for any radio or TV interference caused by unauthorized
modifications to this equipment. Such modifications could void the user's authority to operate
the equipment.
IC NOTE:
Operation is subject to the following two conditions: (1) this device may not cause interference,
and (2) this device must accept any interference, including interference that may cause undesired
operation of the device.
This Class A/B digital apparatus meets all requirements of the Canadian Interference-Causing
Equipment Regulations.
NOTE: This equipment has been tested and found to comply with the limits for a Class B digital
device, pursuant to part 15 of the FCC Rules. These limits are designed to provide reasonable
protection against harmful interference in a residential installation. This equipment generates,
uses and can radiate radio frequency energy and, if not installed and used in accordance with the
instructions, may cause harmful interference to radio communications. However, there is no
guarantee that interference will not occur in a particular installation. If this equipment does
cause harmful interference to radio or television reception, which can be determined by turning
the equipment off and on, the user is encouraged to try to correct the interference by one or more
of the following measures:
- Reorient or relocate the receiving antenna.
- Increase the separation between the equipment and receiver.
-Connect the equipment into an outlet on a circuit different from that to which the receiver is
connected.
-Consult the dealer or an experienced radio/TV technician for help.