RDI Technology XASC04 Artemis Ceiling Mounted LED Stairwell Fixture User Manual
RDI Technology (Shenzhen) Co., Ltd. Artemis Ceiling Mounted LED Stairwell Fixture
User Manual
ArtemisSeriesofLowOccupancyLED
CeilingMountedFixtures(IncludingStairwells)
Installation&OperationGuide
XeleumLighting,LLC.333NorthBedfordRd.MountKisco,NY10549*Phone954‐617‐8170*Fax954‐571‐9777*www.xeleum.com
1
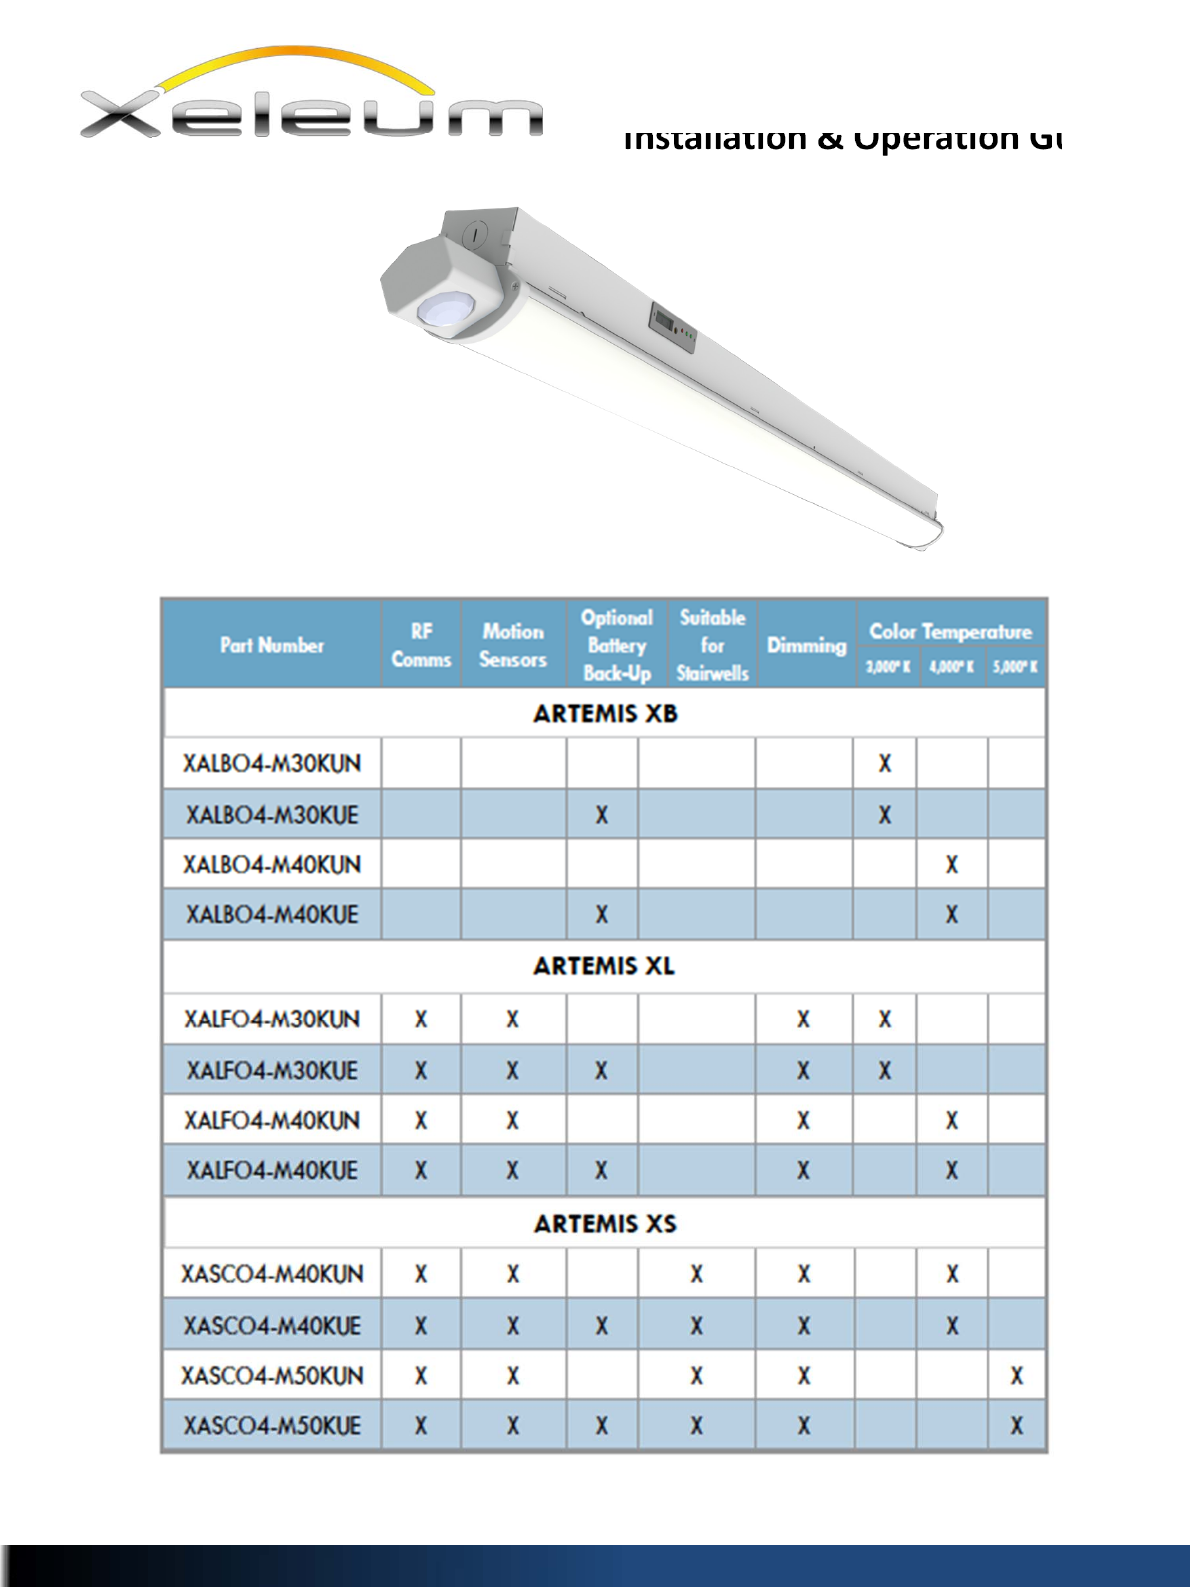
LowOccupancyFixture XL
StairwellFixtureXS
BasicFixtureXB

Pleasereadtheseinstructionscarefully,andkeepthemforfuturereference.
2
XeleumLighting,LLC.333NorthBedfordRd.MountKisco,NY10549*Phone954‐617‐8170*Fax954‐571‐9777*www.xeleum.com
IMPORTANT SAFEGUARDS
When using electrical equipment, basic safety precautions should
always be followed including the following:
a) READ AND FOLLOW ALL SAFETY INSTRUCTIONS.
b) Do not use outdoors.
c) Do not let power supply cords touch hot surfaces.
d) Do not mount near gas or electric heaters.
e) Use caution when servicing batteries. Battery acid can cause burns
to skin and eyes. If acid is spilled on skin or in eyes, flush acid with
fresh water and contact a physician immediately.
f) Equipment should be mounted in locations and at heights where it
will not readily be subjected to tampering by unauthorized personnel.
g) The use of accessory equipment not recommended by the
manufacturer may cause an unsafe condition.
h) Do not use this equipment for other than intended use.
SAVE THESE INSTRUCTIONS
ArtemisSeriesofLowOccupancyLED
CeilingMountedFixtures(IncludingStairwells)
Installation&OperationGuide

PARTS&TOOLSREQUIRED:
ArtemisStairwellFixture WireNuts
FlatBladeScrewdriver(NotProvided)
WARNING:Turnpoweroffatcircuitbreakerorfusebox.Donot
relyonawallswitchalonetoturnoffpower.Failuretodosomay
causeashockhazardanddamagethiselectronicfixture!
3
DrillandMasonryDrillBits(Notprovided)
PhillipsScrewdriver(NotProvided)
XeleumLighting,LLC.333NorthBedfordRd.MountKisco,NY10549*Phone954‐617‐8170*Fax954‐571‐9777*www.xeleum.com
Anchors&MountingHardware(NotProvided)
Note:Ensurecompliancewithlocalcodesand
ordinances.
ArtemisSeriesofLowOccupancyLED
CeilingMountedFixtures(IncludingStairwells)
Installation&OperationGuide
4
StepDescription Image
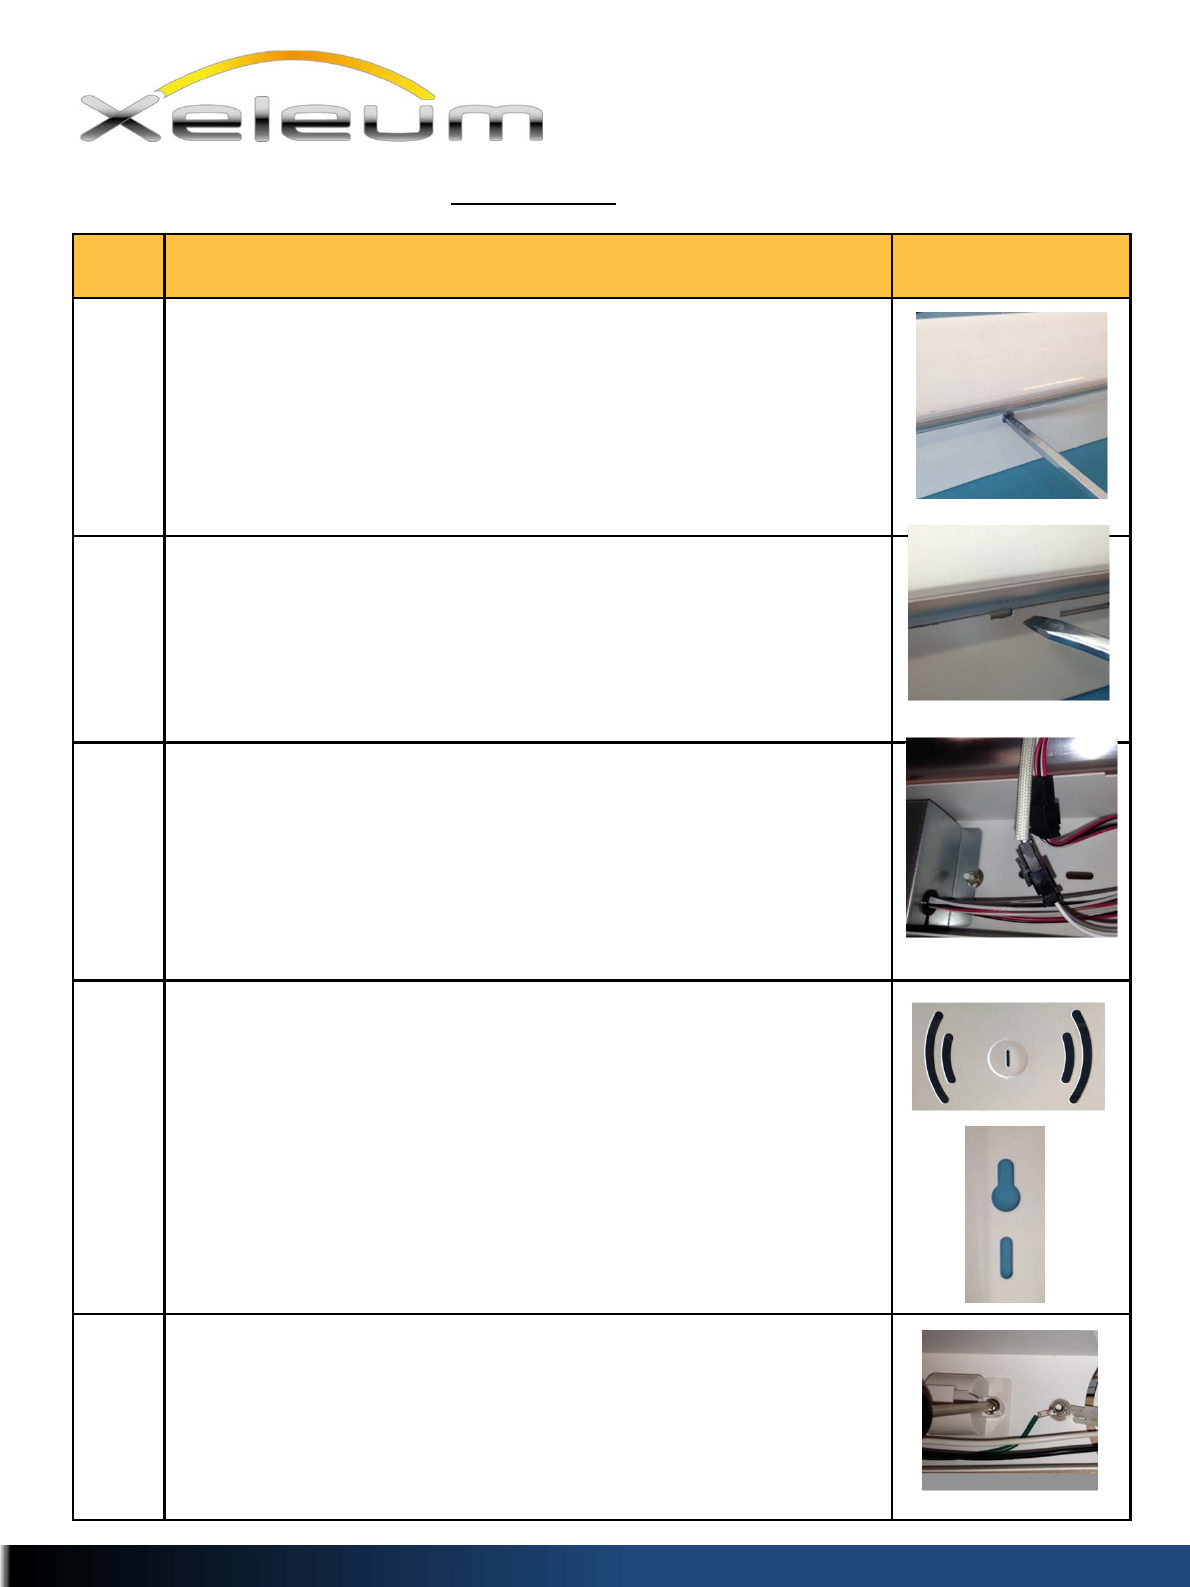
1
Removethefixturefromthepackagingandmakesureithas
arrivedingoodcondition.Placethefixtureonaflatsurfaceand
removetwoscrewswhichsecuretheback‐boxtothelight
engine(locatedoneithersideofthefixtureinthemiddleand
justbehindthelens).
2
Useastraightslotscrewdriverandgentlyprythesheetmetal
awayfromthelightengine.Thereisanotchdesignedintothe
backboxforthispurpose.Thiswillreleasetheprimarylight
enginefromthebackbox(white).
3
Carefullyremovetheprimarylightengineandsetitnexttothe
backbox.Therearetwoconnectorsthatmustbedisconnected.
Thelargerofthetwoconnectorsisforthemotionsensorarray.
Thesmallerconnectorpowersthelightengine.
4
Afterremovingtheexistingfixturefromtheceiling,positionthe
newbackboxwhereyouwantit.Usingtheprovidedopenings,
securethebackboxtotheimbeddedjunctionbox(ifpoweris
cominginfromthebackofthefixture).Checkthealignmentof
thebackboxandthensecuretheendsofthefixtureusingthe
providedholes.AnanchororTapconisrecommended,ensuring
thatthisiscompliantwithlocalcodesandordinances.Note:
Usewashersasspacersiftheceilingisnotflat.Notdoingsocan
resultinawarpingofthebackbox,makingitdifficulttosnapin
theprimarylightengine.
5
Ifinstallinganemergencyback‐upbattery,usaPhilips
screwdrivertoremovethebatteryholdingfixtureclosesttothe
driver.
Installation
XeleumLighting,LLC.333NorthBedfordRd.MountKisco,NY10549*Phone954‐617‐8170*Fax954‐571‐9777*www.xeleum.com
ArtemisSeriesofLowOccupancyLED
CeilingMountedFixtures(IncludingStairwells)
Installation&OperationGuide
4
StepDescription Image
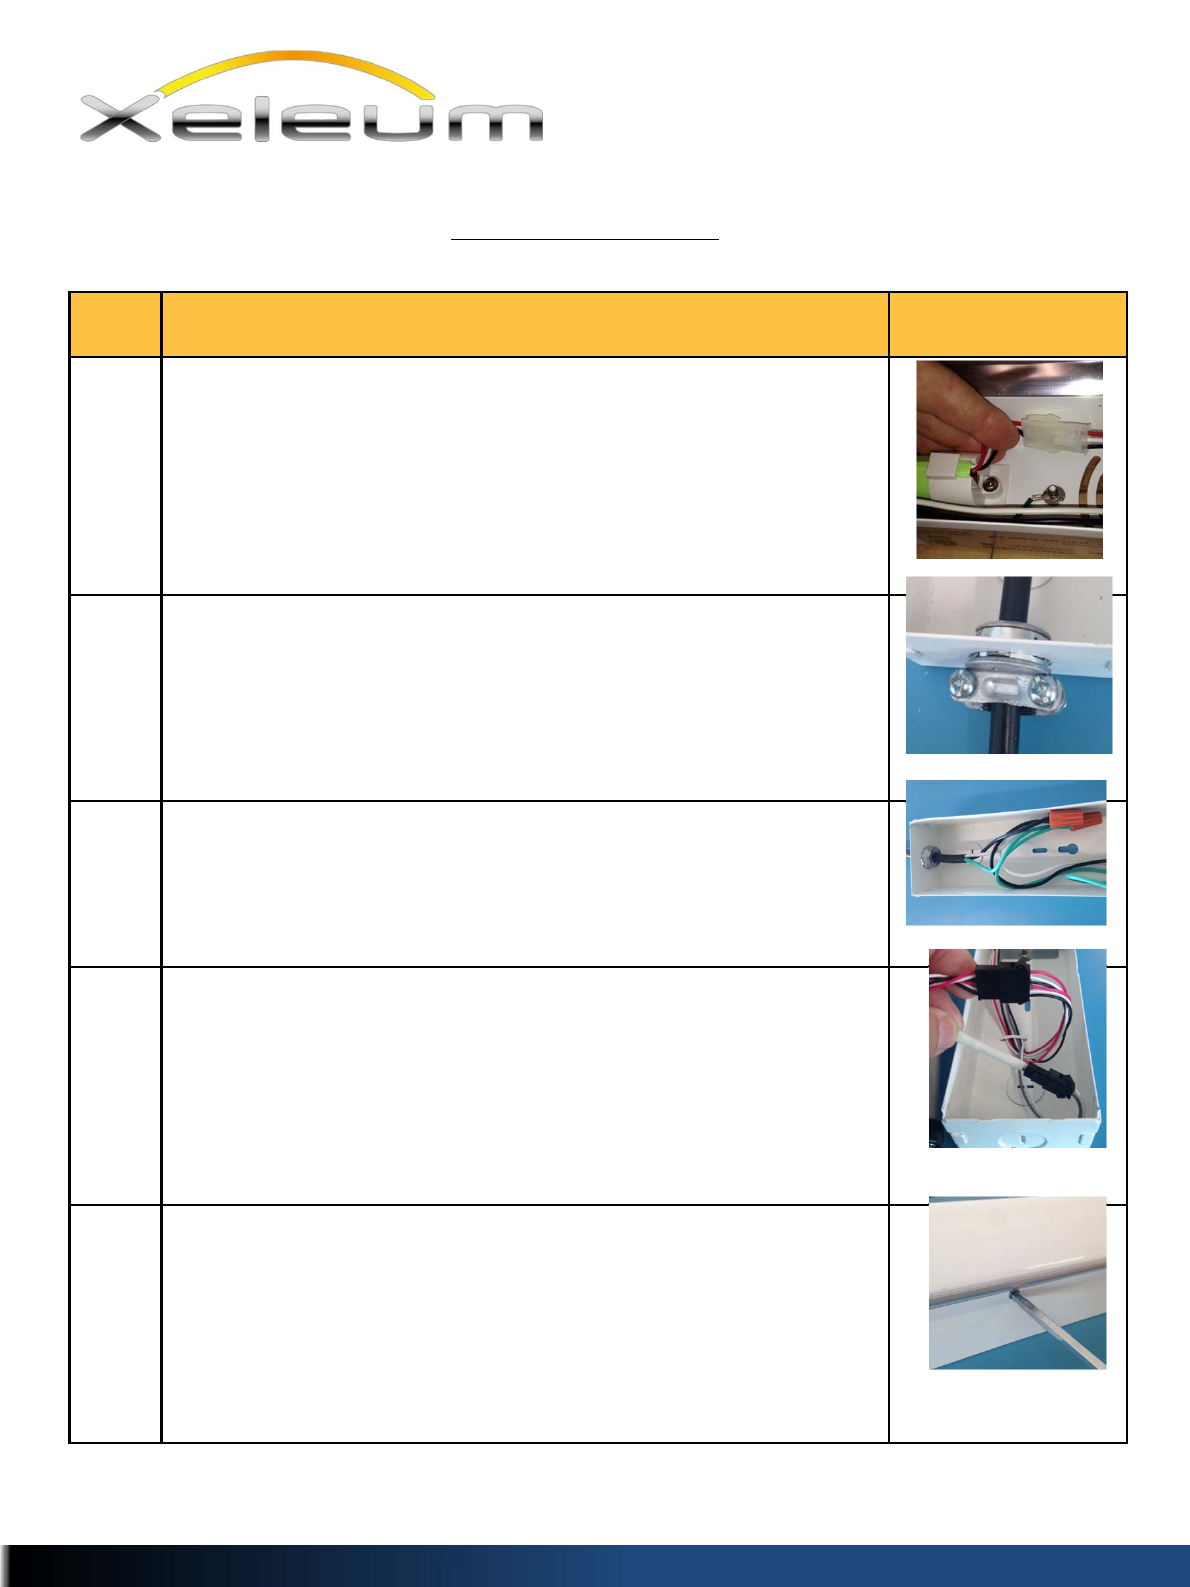
6
Feedthebatteryconnectorthroughtheopeninginthebattery
holderyoujustremoved.Placetheotherendofthebatteryin
thecorrespondingholder.UseaPhilipsheadscrewdriverand
re‐installthebatteryholder.Plugthewhiteconnectorcoming
outofthebatteryintothemattingconnectorinsidetheback
box.
7
Ifpoweriscomingintothefixtureviaanelectricalconduit(flex
orrigid),useoneoftheknockoutsateitherendofthefixture.
Makesuretheproperstrainreliefsareusedtofullycomplywith
localcodesorordinances.
8
Hookupthethreeincomingpowerwirestothethreewires
withinthebackbox.Usetheprovidedwirenutsorsimilar
productstoensurethesafetyoftheinstallation.
9
Holdthelightengineclosetothebackboxmountedtothe
ceilingandpluginthetwoconnectors(sensorarrayandpower
forthelightengine).
10
Snapthelightengineintothebackbox,beingverycarefulnotto
pinchanywires.Youmayneedtoprybackthemetalofthe
backboxslightlytofacilitatethisstep.Oncethelightengineis
snappedintothebackboxre‐installtothetwoscrewsinto
eithersideofthefixture.
5
Note:Ifareplacementbatteryisneeded,thepartnumberisasfollows:XAP‐0039
XeleumLighting,LLC.333NorthBedfordRd.MountKisco,NY10549*Phone954‐617‐8170*Fax954‐571‐9777*www.xeleum.com
ArtemisSeriesofLowOccupancyLED
CeilingMountedFixtures(IncludingStairwells)
Installation&OperationGuide
Installation(cont.)
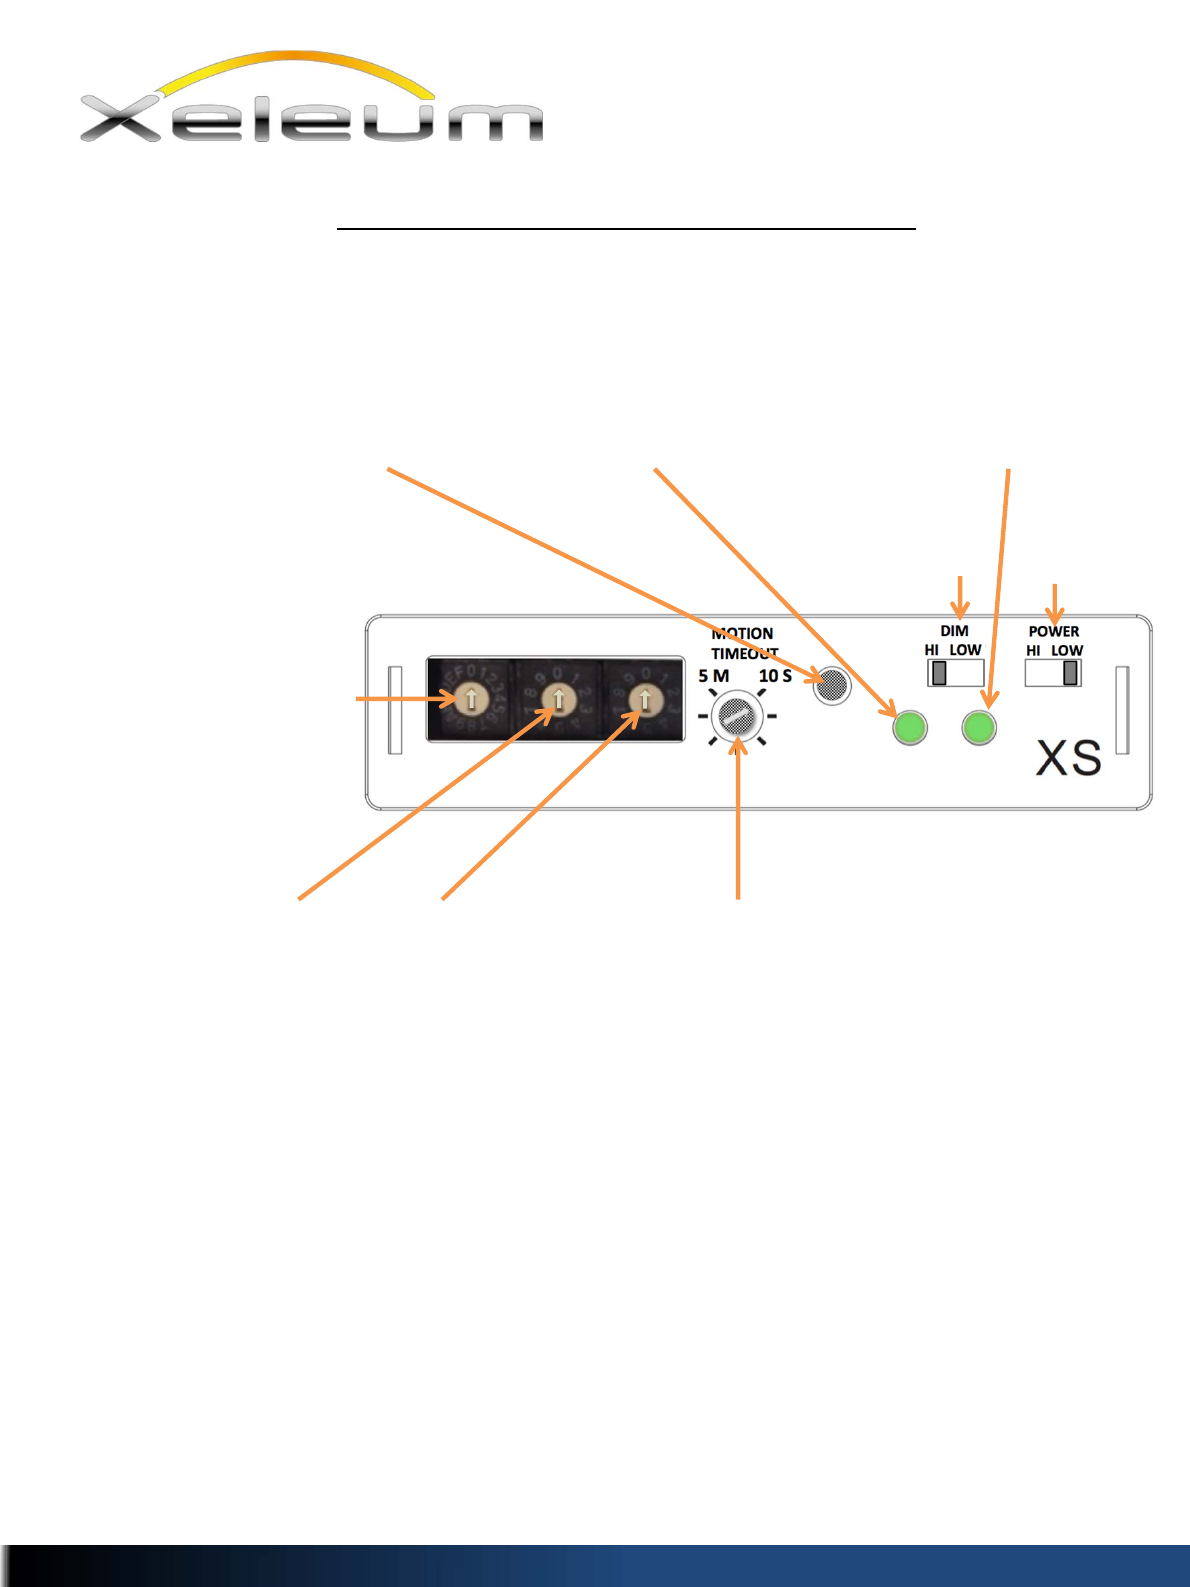
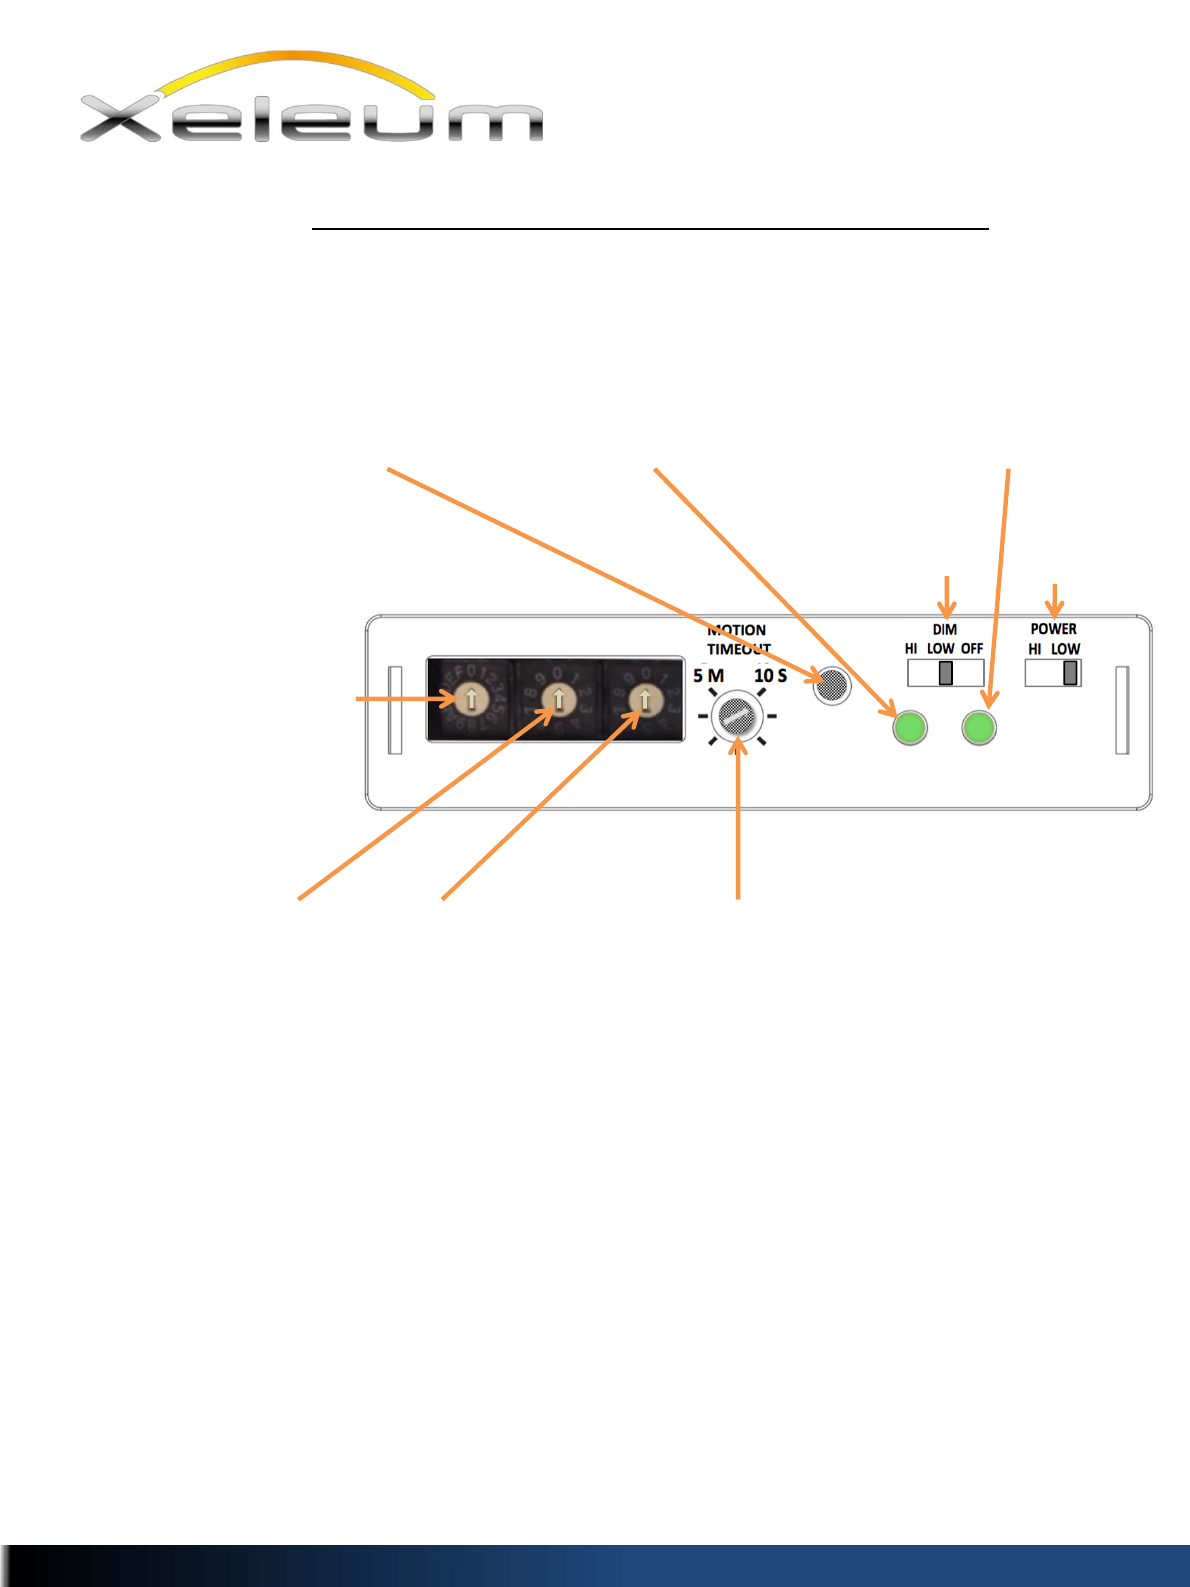
ControlPanelForStairwell(XS)Fixtures
FloorX1DialSwitch:
Thisdialissetto
indicatethefloora
particularfixtureis
beinginstalledon.If
thefixtureisbeing
installedonthe4th
floor,thisdialwould
besetto“4”.Ifthe
fixtureisbeing
installedonthe23rd
floorthisdialwouldbe
setto“3”,etc.
StairwellDialSwitch:Some
buildingshavemorethanone
stairwell.Thisswitchhelpsto
keepfixturesinonestairwell
fromtalkingtofixturesin
anotherstairwell.Ifyouhave
onestairwell,useasmall
straightslotscrewdriverand
setthedialto“1”.Formultiple
stairwellswithinabuilding,set
thedialaccordingly.
Timer:Oncethefixtureseesmotionwithinthe
stairwellitwillimmediatelyilluminatetofullintensity.
Asmallscrewdriverisusedtoadjustthe“Timer”.
ThisTimeradjuststhelengthoftimethatthefixture
remainsonatfullpowerpriortoreturningtothe
“DIM”setting.TurningtheTimerallthewaytothe
left(counterclockwise)willkeepthefixtureonat
highpowerforonly10‐seconds.TurningtheTimerall
thewaytotheright(clockwise)willkeepthelightson
atfullpowerfor5‐minutesafterthesensorseesits
lastmotion.Thetimecanalsobesetanywhere
between10‐secondsand5‐minutesbypositioning
theTimeraccordingly.
StatusIndicatorLED:Thisisa
bi‐coloredLED(RedorGreen).
ThisLEDprovidestheoperator
withthecurrentsystemstatus.
Seethetableonthenextpage
foradetaileddescriptionof
thevariousindications.
Self‐Diagnostic:Periodicallyit’sagood
ideafortheoperatorstopushtheSelf‐
Diagnosticbuttontorunthebuilt‐in
testingprogram.ResultsoftheSelf‐
Diagnostictestarereportedonthe
“DIAG”LEDIndicator.Seethetableon
thenextpageforadetaileddescription
oftheindications.
Self‐DiagnosticStatusLED:Thisis
abi‐coloredLEDs(RedorGreen).
ThisLEDprovidetheoperator
withtheself‐diagnosticteststatus
andresults.Seethetableonthe
nextpageforadetailed
descriptionoftheindications.
6
FloorX10DialSwitch:This
dialissettoindicatethe
flooraparticularfixtureis
beinginstalledon.Ifthe
fixtureisbeinginstalledon
floors1‐ 9,thisdialwould
besetto“0”.Ifthefixture
isbeinginstalledonfloors
10– 19,thisdialwouldbe
setto“1”.Ifitisbeing
installedonfloors20– 29,
thisdialwouldbesetto“2”,
etc.
EXAMPLE#1:Ifafixtureisbeinginstalledinthesecondstairwellofabuildingonthe17th floor,thedialindicators
wouldbesetlikethis:217.
EXAMPLE#2:Ifafixtureisbeinginstalledinabuildingwithonlyonestairwellonthelandingbetweenfloors5and
6,thedialindicatorswouldbesetlikethis:105.
NOTE:Landingsbetweenfloorsshouldhavethesamedialsettingsasthefloorjustbelowit…i.e.Afixtureinstalled
onalandingbetweenfloors2and3shouldhavethesamedialsettingsasthefixtureonfloor2.
XeleumLighting,LLC.333NorthBedfordRd.MountKisco,NY10549*Phone954‐617‐8170*Fax954‐571‐9777*www.xeleum.com
ArtemisSeriesofLowOccupancyLED
CeilingMountedFixtures(IncludingStairwells)
Installation&OperationGuide
STAIRWELLX10FLOORX1 DIM
HILOW
POWER
HILOW
“DIM”Settingcontrols
thelightlevelwhenthe
stairwellisun‐occupied.
“POWER”Setting
controlsthelight
levelwhenthe
stairwellisoccupied.
STAIRWELLX10FLOORX1
TEST
DIAG.STATUS
ControlPanelForLowOccupancy(XL)Fixtures
AreaX1DialSwitch:
Thisdialissetto
indicatetheflooror
areaaparticular
fixtureisbeing
installedon.Ifthe
fixtureisbeing
installedonthe4th
floor,thisdialwould
besetto“4”.Ifthe
fixtureisbeing
installedonthe23rd
floorthisdialwouldbe
setto“3”,etc.
ZoneDialSwitch:Some
facilitieshavemorethanone
buildingorareastoilluminate.
Thisswitchhelpstokeep
fixturesinonebuildingorarea
fromtalkingtofixturesin
adjoiningbuildingsorareas.If
you’reonlyilluminatingone
area,useasmallstraightslot
screwdriverandsetthedialto
“1”.Formultiplebuildingsor
areassetthedialaccordingly.
Timer:Oncethefixtureseesmotionwithinanareait
willimmediatelyilluminatetofullintensity.Asmall
screwdriverisusedtoadjustthe“Timer”.ThisTimer
adjuststhelengthoftimethatthefixtureremainson
atfullpowerpriortoreturningtothe“DIM”setting.
TurningtheTimerallthewaytotheleft(counter
clockwise)willkeepthefixtureonathighpowerfor
only10‐seconds.TurningtheTimerallthewaytothe
right(clockwise)willkeepthelightsonatfullpower
for5‐minutesafterthesensorseesitslastmotion.
Thetimecanalsobesetanywherebetween5‐
secondsand10‐minutesbypositioningtheTimer
accordingly.
StatusIndicatorLED:Thisisa
bi‐coloredLED(RedorGreen).
ThisLEDprovidestheoperator
withthecurrentsystemstatus.
Seethetableonthenextpage
foradetaileddescriptionof
thevariousindications.
Self‐Diagnostic:Periodicallyit’sagood
ideafortheoperatorstopushtheSelf‐
Diagnosticbuttontorunthebuilt‐in
testingprogram.ResultsoftheSelf‐
Diagnostictestarereportedonthe
“DIAG”LEDIndicator.Seethetableon
thenextpageforadetaileddescription
oftheindications.
Self‐DiagnosticStatusLED:Thisis
abi‐coloredLEDs(RedorGreen).
ThisLEDprovidetheoperator
withtheself‐diagnosticteststatus
andresults.Seethetableonthe
nextpageforadetailed
descriptionoftheindications.
7
AreaX10DialSwitch:This
dialissettoindicatethe
floororareaaparticular
fixtureisbeinginstalledon.
Ifthefixturesarebeing
installedonfloors1‐ 9,this
dialwouldbesetto“0”.If
thefixtureisbeinginstalled
onfloors10– 19,thisdial
wouldbesetto“1”.Ifitis
beinginstalledonfloors20
– 29,thisdialwouldbeset
to“2”,etc.
EXAMPLE#1:Ifafixtureisbeinginstalledinthesecondstairwellofabuildingonthe17th floor,thedialindicators
wouldbesetlikethis:217.
EXAMPLE#2:Ifafixtureisbeinginstalledinabuildingwithonlyonestairwellonthelandingbetweenfloors5and
6,thedialindicatorswouldbesetlikethis:105.
NOTE:Landingsbetweenfloorsshouldhavethesamedialsettingsasthefloorjustbelowit…i.e.Afixtureinstalled
onalandingbetweenfloors2and3shouldhavethesamedialsettingsasthefixtureonfloor2.
XeleumLighting,LLC.333NorthBedfordRd.MountKisco,NY10549*Phone954‐617‐8170*Fax954‐571‐9777*www.xeleum.com
ArtemisSeriesofLowOccupancyLED
CeilingMountedFixtures(IncludingStairwells)
Installation&OperationGuide
ZONEX10AREAX1 DIM
HILOWOFF
POWER
HILOW
“DIM”Settingcontrols
thelightlevelwhenthe
stairwellisun‐occupied.
“POWER”Setting
controlsthelight
levelwhenthe
stairwellisoccupied.
XL
ZONEX10AREAX1
TEST
DIAG.STATUS
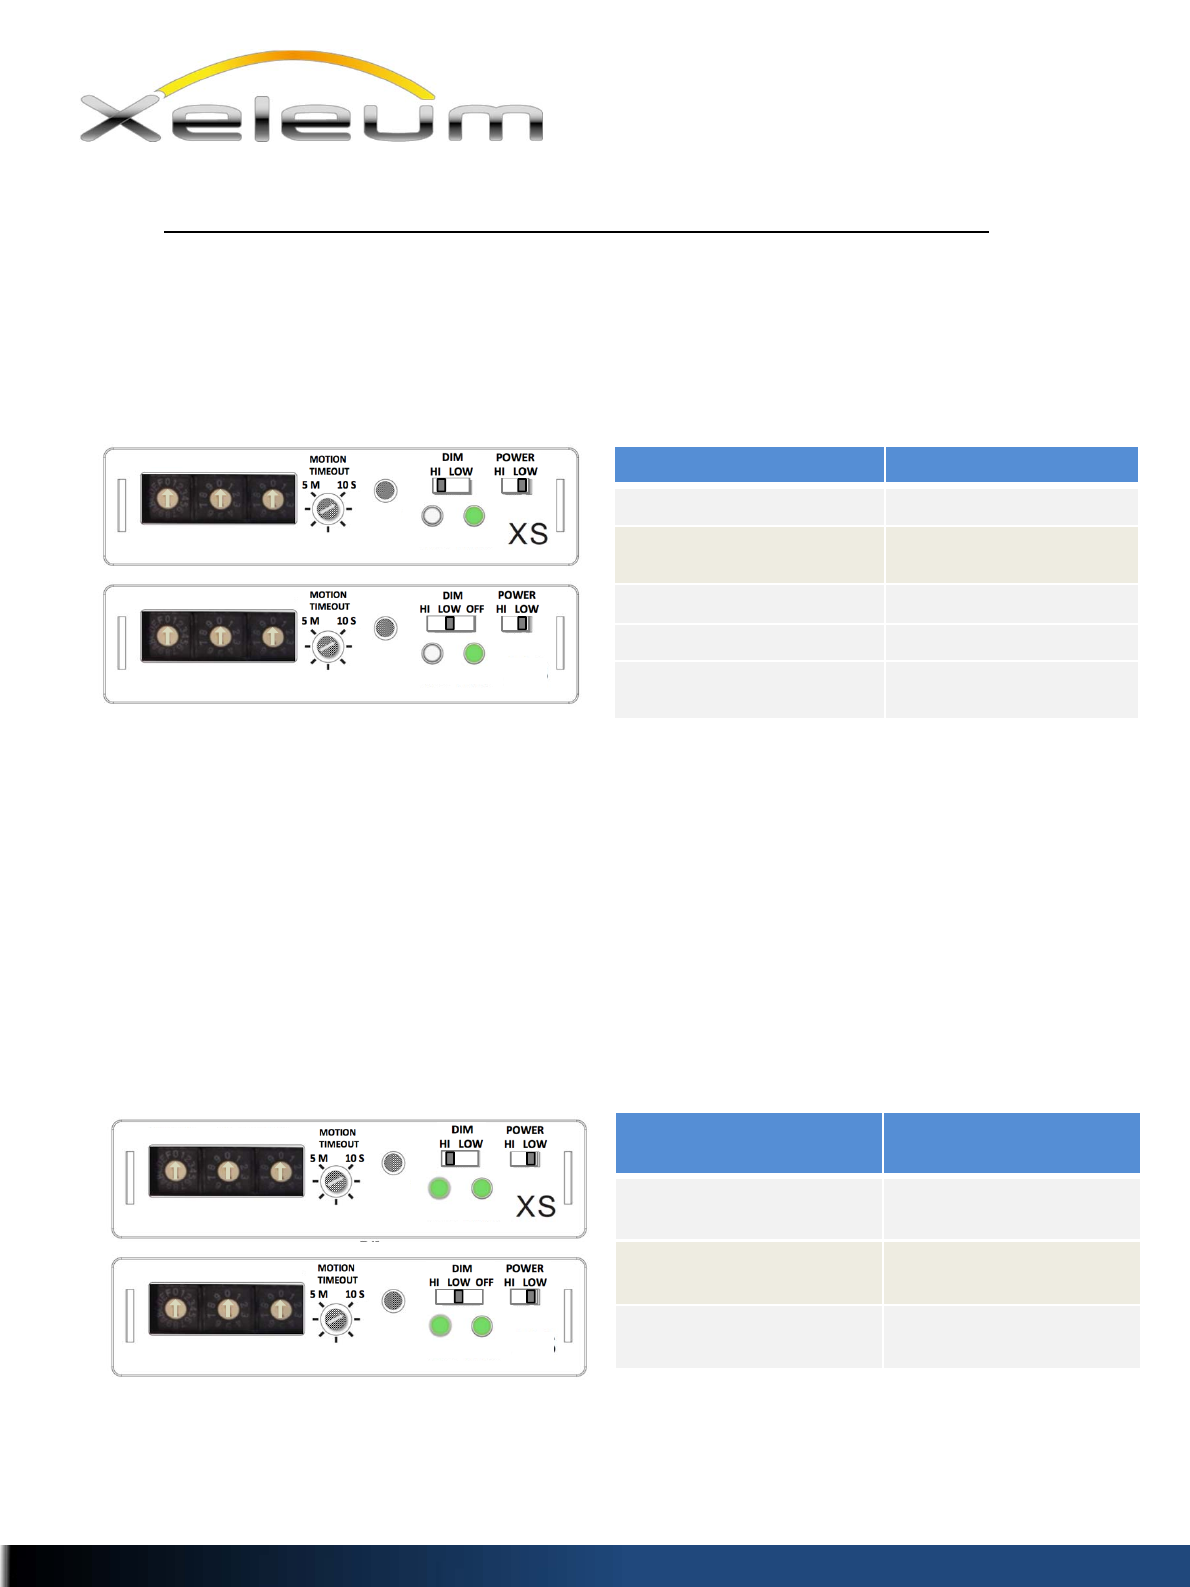
ControlPanelLEDIndicatorMessageInterpretation
“OnlyForFixtures(XS&XL)withBatteryBack‐Up”
DiagnosticLEDFunction DiagnosticLED
DiagnosticFAILED RED:On
DiagnosticPASSED GREEN:On
Diagnosticin PROGRESS Alternate Flashing
betweenREDandGREEN
TobeincompliancewithNFPALifeSafetyCode101,endusersmustperforma30‐secondmonthlyfunctional
testanda90‐minuteannualtest.The30‐secondmonthlytestisdonebypressingtheDiagnosticTestButton
onthecontrolpanel.A30‐secondself‐diagnostictestisbuiltintotheprogrammingofthisunit.After30‐
secondstheresultswillbedisplayedasindicatedinthetablebelow.Toconducttheannualtest,power
shouldbesecuredtothestairwellfixturesexternally(i.e.thecircuitbreaker).Attheendof90minutesthe
fixturesshouldstillbeprovidingadequateilluminationthroughtheintegratedbatteryback‐upsystemwithin
thisfixture(ifsoequipped).Thetestitselfandtheresultsshouldberecordedandthisrecordmaintainedby
theenduser.ThetablebelowexplainswhattheDiagnosticLEDIndicator(DIAG)means:
StatusLEDFunction StatusLED
ACPowerGood,BatteryCharged GREEN:On
ACPowerGood,Battery
Charging GREEN:Flashing
ACPowerOff,BatteryGood RED:On
AC PowerOff,BatteryLow RED:Flashing
BatteryFAULT Alternate Flashingbetween
REDandGREEN
Oncethefixturehasbeenproperlysecuredtotheceilingandpowered,twoIndicatorLEDscanbeseenonthe
controlpanelonthesideofthefixture.Theonetotheleft(whenlookingatthecontrolpanel)isthe
DiagnosticLEDIndicator.TheonetotherightistheStatusLEDIndicator.TheseLEDsarebi‐colored,meaning
theycanbe2differentcolors,inthiscaseRED orGREEN.ThetablebelowexplainswhattheStatusLED
Indicatormeans:
8
Note:Forfulldetailsrelatedtoperiodictestingofstairwellfixtures,seeNFPA101(00),Sec7.9.3.
XeleumLighting,LLC.333NorthBedfordRd.MountKisco,NY10549*Phone954‐617‐8170*Fax954‐571‐9777*www.xeleum.com
ArtemisSeriesofLowOccupancyLED
CeilingMountedFixtures(IncludingStairwells)
Installation&OperationGuide
or
XL
ZONEX10AREAX1
or
XL
ZONEX10AREAX1
STAIRWELLX10FLOORX1
TEST
DIAG.STATUS
TEST
DIAG.STATUS
XL
ZONEX10AREAX1
STAIRWELLX10FLOORX1
TEST
DIAG.STATUS
TEST
DIAG.STATUS
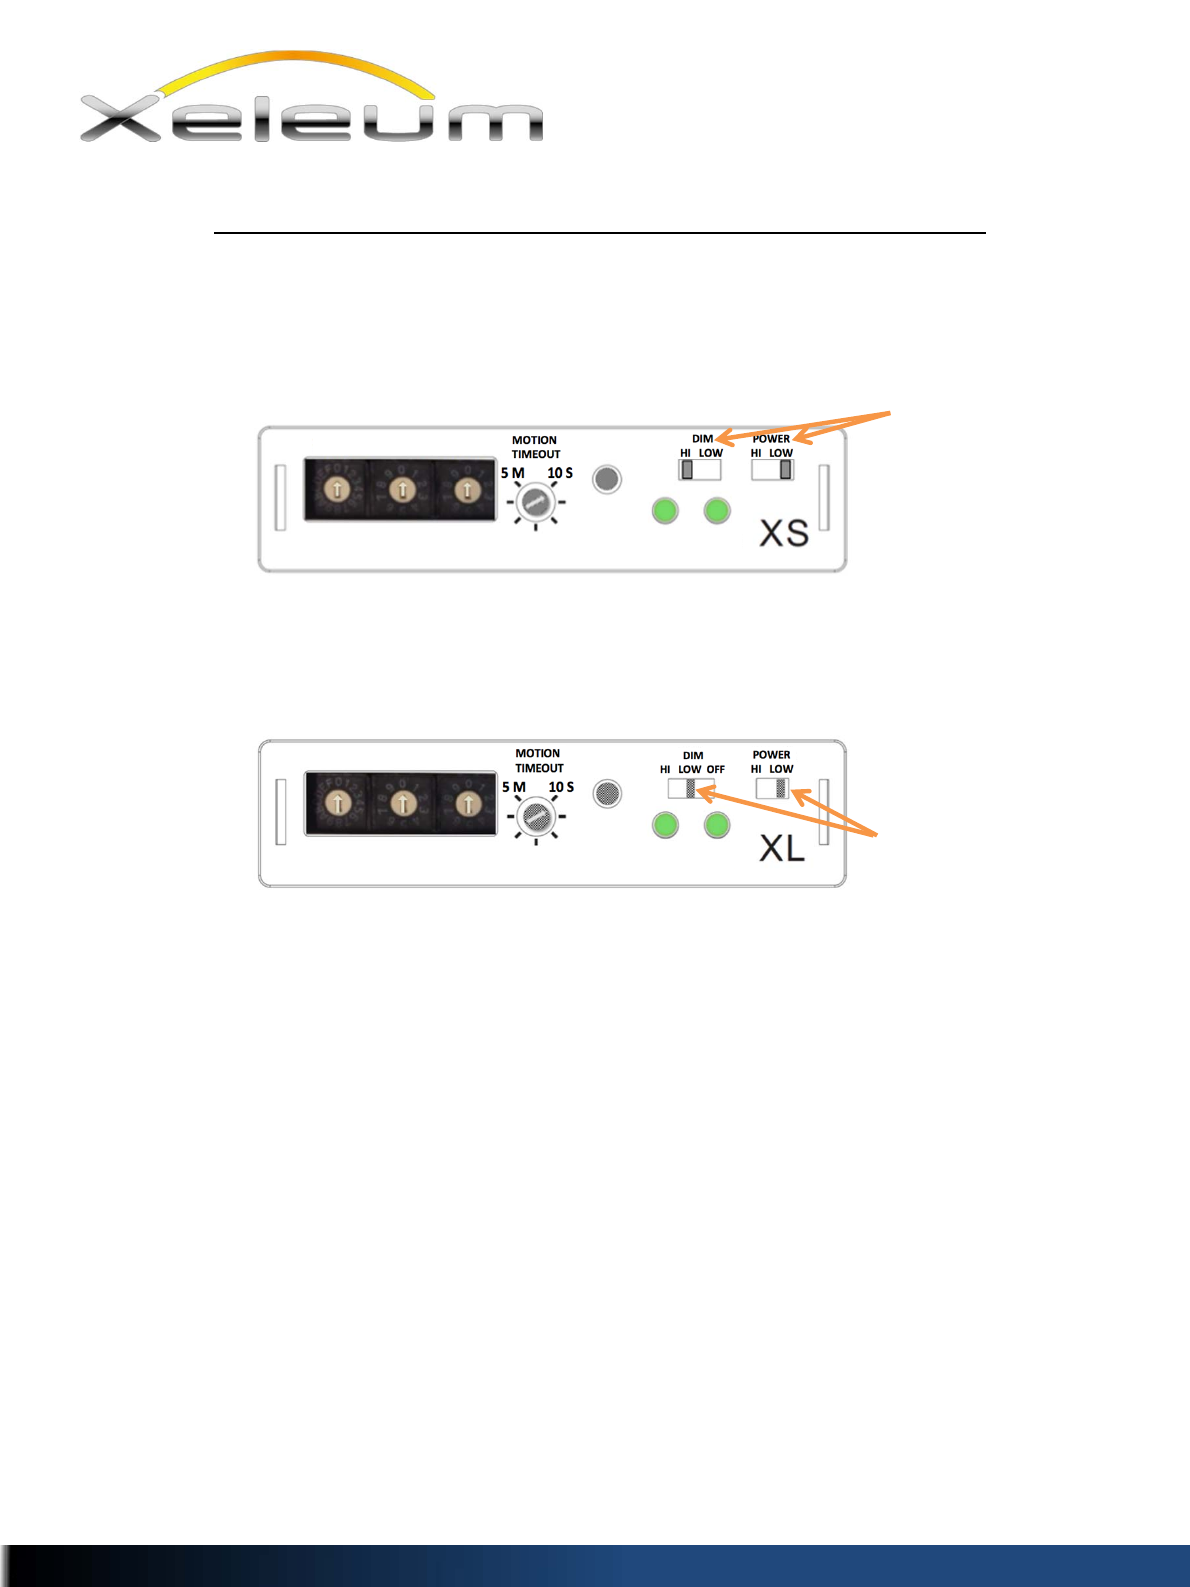
“DIMandPOWER”SettingsForArtemisFixtures
9
XeleumLighting,LLC.333NorthBedfordRd.MountKisco,NY10549*Phone954‐617‐8170*Fax954‐571‐9777*www.xeleum.com
ArtemisSeriesofLowOccupancyLED
CeilingMountedFixtures(IncludingStairwells)
Installation&OperationGuide
Thereareverystringentilluminationregulationsgoverningfixturesintendedforuseinstairwells.Xeleum’sXS
Artemisfixturesarespecificallydesigntosurpasstheserequirements,andhavebeenvalidatedwith3rd party
testingandcertification.Assuch,neitherthePOWER(occupied)andDIM(un‐occupied)settingscanbe
turnedoff.Thisensurestheproperilluminationrequiredtobecompliantwithregulatoryrequirements.
Fornon‐stairwellapplications,Xeleum’sArtemisXLseriesoffersseveraldifferentPOWERandDIMsettings
allowingfullcustomizationforcustomerspecificapplication.Asmall“slideswitch”isprovidedinthewindow
undertheDIMandPOWERlabelsonthecontrolpanel.Thesecanbesetwithafingerorasmallscrewdriver.
POWERandDIMSettings:
DIMSettingsfortheXL(non‐stairwellversion):The“DIM”settingcontrolsthelightlevelwhentheareabeing
illuminatedis“unoccupied”.Therearethreedifferentoptionsforthissetting…
HI – Thissettingprovidesabout50%ofthefixturesfullilluminationcapabilitywhentheareabeing
illuminatedisunoccupied.
LOW – Thissettingprovidesabout10%ofthefixturesfullilluminationcapabilitywhentheareabeing
illuminatedisunoccupied.
OFF – Thissettingturnsthefixturecompletelyoffwhentheareabeingilluminatedisunoccupied.
Note:Theremaystillbeaslightglowcomingfromthefixtureinthissetting.Thisisrelatedtothe
chargingandmemoryfeaturesofthisfixture.
POWERSettings:The“POWER”settingcontrolsthelightlevelwhentheareaisbeingilluminatedafterthe
fixture’sPIRsensorhasidentifiedmovementwithinthespace(occupied)…
HI–Thissettingprovides100%powerorabout4200lumensformaximumilluminationwithinthe
spacebeingilluminated.
LOW‐ Thissettingprovidesabout75%powerorabout3200lumenswithinthespacebeing
illuminated.Thissettingprovidesanadditional25%energysavingsascomparedtotheHIsetting.
SlideSwitch
STAIRWELLX10FLOORX1
TEST
DIAG.STATUS
DIAG.STATUS
TEST
ZONEX10AREAX1

Caution:
10
XeleumLighting,LLC.333NorthBedfordRd.MountKisco,NY10549*Phone954‐617‐8170*Fax954‐571‐9777*www.xeleum.com
ArtemisSeriesofLowOccupancyLED
CeilingMountedFixtures(IncludingStairwells)
Installation&OperationGuide
Cet appareil est conforme àlaPartie 15desrèglements delaFCCetauxnormes RSSdel’Industrie duCanada.
Sonfonctionnement est soumis auxdeux conditionssuivantes :(1)cet appareil nedoit pascauserdes
interférences nuisibles,et(2)cet appareil doit acceptertoute interférence reçue,ycompris lesinterférences
quipeuvent provoquer unfonctionnement indésirable.
Lefabricantn'est pasresponsable destoutes interférences radioou télévision causées pardesmodifications
nonautorisées apportées àcet appareil.Detelles modificationspeuvent empêcher l’utilisateur d’utiliser
l'appareil.
ThisdevicecomplieswithPart15oftheFCCrulesandIndustryCanadalicense‐exemptRSSstandard(s).
Operationissubjecttothefollowingtwoconditions:(1)thisdevicemaynotcauseharmfulinterference,and(2)
thisdevicemustacceptanyinterferencereceived,includinginterferencethatmaycauseundesiredoperation.
ThemanufacturerisnotresponsibleforanyradioorTVinterferencecausedbyunauthorizedmodificationsor
changetothisequipment.Suchmodificationsorchangecouldvoidtheuser’sauthoritytooperatethe
equipment.
Leprésent émetteur radio(identifierledispositif parsonnuméro decertificationou sonnuméro demodèle s'il
faitpartie dumatériel decatégorie II)aété approuvé parIndustrie Canadapourfonctionner aveclestypes
d'antenne énumérés ci‐dessous etayant ungainadmissiblemaximal.Lestypesd'antenne noninclus dans
cette liste,etdont legainest supérieur augainmaximalindiqué,sont strictement interdits pourl'exploitation
del'émetteur.
Thisradiotransmitter(identifythedevicebycertificationnumberormodelnumberifCategoryII)hasbeen
approvedbyIndustryCanadatooperatewiththeantennatypeslistedbelowwiththemaximumpermissible
gainindicated.Antennatypesnotincludedinthislist,havingagaingreaterthanthemaximumgainindicated
forthattype,arestrictlyprohibitedforusewiththisdevice.
Max.AntennaGain(dBi)
3dBi
AntennaType
Monopoleantenna
WithRP SMAconnector