REALBELL ELECTRONIC REALBELL Wireless Digital Doorbell User Manual
SHENZHEN REALBELL ELECTRONIC Co.,LTD Wireless Digital Doorbell User Manual
User-Manual
REALBELL ELECTRONICS
Wireless Doorbell Instructions
Product Features
1. All touch panels adopt touch-sensitive technology, without any
physical buttons. It has a long service life, simple but classical.
Humanized music settings guarantee non-retriggerable anti-noise
function;
2. The circuit scheme is provided by LCH Dr team from the United States,
ensuring stable penetration and a remote control distance of 350 meters;
3. The transmitter adopts waterproof and dustproof design without screw
engagement on its surface, possessing automatic power-off function
during misuse;
4. The product adopts original sleep standby technology; low power
consumption is possible for the chip when standby (μA level);
5. The transmitter battery compartment uses an innovative patented
drawer design, compatible with large-capacity batteries 2032, 2025 and
2016, environmental and energy-saving;
6. Innovative superheterodyne learning code encoding makes it possible
for users to simply set pairing mode;
7. Microprocessor-controlled receiver with double-sided stable PCB
design;
8. Safe separate high & low voltage circuit design;
9. Multiple appearances, utility models, internal structures and PCB
designs have been patented;
Model List
Transmitter
Pictures
Transmitter
Models
Receiver
Pictures
Receiver
Models
Complete
product
model and
configuration
A
01 A01 AC one
for one
-
-----
-----
----
-----
Installation Instructions
Open the package, take out the battery insulation film and close the
battery compartment. Energize the receiver, touch the sensing area of the
transmitter, test whether it works normally; if yes, install it; if no, consult
the manufacturer for solution. (Take Model A transmitter as an example;
the same mounting way applies to Models B and C.)
Take out the supplied double-sided adhesive, remove the sticker on one
side of the adhesive and paste it to the bottom surface of the transmitter
properly.
Clean the appropriate area, remove the sticker on another side of the
adhesive and paste it to the area. Press the transmitter a bit hard so that it
is securely mounted (Note: smooth and dust-free marble and glass walls
are preferred).
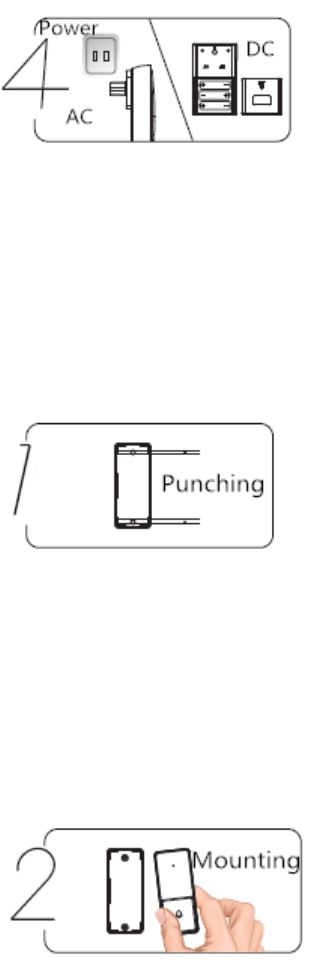
For AC receiver, connect it to the power directly; for DC receiver, put the
batteries into the compartment.
Wall Screws Mounting
Open the transmitter from the middle part on the front left side, use a
small screwdriver to pierce the mounting holes, mark the center of the
holes, use a 3.5mm chopping bit to punch and put the rubber plugs into
the holes.
Fix the bottom surface of the transmitter with self-tapping screws, press
the front of transmitter moderately. (Note: do not touch the PCB parts
during mounting process).

Receiver Parameters
Category
Parameters &
Descriptions
Remarks
Power consumption
<0.5W
Standby
Sensitivity
<-105dBm
Imported high
sensitivity chip
Power supply
AC110-240/50-60Hz
Wide input voltage
design ( DC receiver
uses AAA batteries)
Decoding
Microprocessor
Effectively prevent
malfunction
Encoding
Automatic learning
code
Easy to operate
Music configuration
36 hi-fi music chords
Pleasant tone
Receiving distance
350 meters
Open, barrier-free
Button
Induction touch
Without physical
buttons
Circuit design
Separate high & low
voltage circuit
Compliance with
safety requirements
(apply to AC receiver)

Transmitter Parameters
Category
Parameters &
Descriptions
Remarks
Public frequency
434MHz OEM
Battery models
2025/2032 DC3V
Compatible battery
and humanized drawer
design
Transmitter power
<10mW
Micro-power design
Encoding number
Millions
Learning code
Button
Induction touch
Without any physical
buttons, no wearing
Assembly method
Embedded design
Waterproof and
moisture-proof
Learning Code Setting
(As factory pairing setting is a default, this is only suitable for repairing
when the learning codes are lost. If you need to clear the codes, please
press the Volume Adjustment for three seconds.)
One for one setting: After being electrified, press the music switch
sensing area of the receiver for 3 seconds and enter the learning status. In
the meantime, the bicolor LED light of the receiver flashes. Touch the
transmitter until the LED light of the receiver stops flashing. Then the
learning succeeds and one for one control is achieved.
One for two setting: After being electrified, press the music switch
sensing area of the receiver for 3 seconds and enter the learning status. In
the meantime, the bicolor LED light of the receiver flashes. Touch the
transmitter until the LED light of the receiver stops flashing. Then the
learning succeeds; use another receiver to repeat the above steps and one
for two control is achieved.
Two for one setting: After being electrified, press the music switch
sensing area of the receiver for 3 seconds and enter the learning status. In
the meantime, the bicolor LED light of the receiver flashes. Touch the
transmitter until the LED light of the receiver stops flashing. Then the
learning succeeds; use another transmitter to repeat the above steps and
two for one setting is achieved.

Troubleshooting
Failure
Cause
Elimination
Method
Remarks
The transmitter
light is not on
The batteries are
not properly
mounted
Check the positive
and negative of the
large-capacity
batteries: the
batteries are placed
in the compartment
with their negative
towards the front of
the transmitter.
Batteries 2032 and
2025 also apply,
which can be
bought in
supermarkets,
watch repair shop
and toy store or
through online
stores.
The receiver does
not work
The light is not on
The power is not
correctly energized
or the batteries are
not properly
placed.
Please contact the
manufacturer if you
fail to solve the
problem.
The light is on but
does not ring
The learning mode
is abnormal; please
reset it in
accordance with
the instructions.
Transmission
distance is
shortened
If wireless
electronic product
gets close to metal
objects, the
transmission
distance will be
affected.
Field test proves
that effective
transmission
distance will be
reduced if the
transmitter is
mounted near metal
door or at sites with
serious
electromagnetic
interference. Too
many walls also
interfere the signal.
The product shall
be mounted away
from metal objects;
if appropriate
mounting sites are
not available,
increase the
distance between
transmitter and
metal objects.
No signal is
received
The batteries run
out
Replace the
batteries of the
transmitter
DC sound is
distorted
The batteries run
out
Replace the
batteries
This equipment has been tested and found to comply with the limits for a Class B
digital device, pursuant to part 15 of the FCC Rules. These limits are designed to
provide reasonable protection against harmful interference in a residential installation.
This equipment generates, uses and can radiate radio frequency energy and, if not
installed and used in accordance with the instructions, may cause harmful interference
to radio communications. However, there is no guarantee that interference will not
occur in a particular installation. If this equipment does cause harmful interference to
radio or television reception, which can be determined by turning the equipment off
and on, the user is encouraged to try to correct the interference by one or more of the
following measures:
• Reorient or relocate the receiving antenna.
• Increase the separation between the equipment and receiver.
• Connect the equipment into an outlet on a circuit different from that to which the
receiver is connected.
• Consult the dealer or an experienced radio/TV technician for help.
Caution: Any changes or modifications to this device not explicitly approved by
manufacturer could void your authority to operate this equipment.
This device complies with part 15 of the FCC Rules. Operation is subject to the
following two conditions: (1) This device may not cause harmful interference, and (2)
this device must accept any interference received, including interference that may
cause undesired operation.

After-sales Matters
This after-sales service is provided in accordance with relevant national
standards. Except for human damage, one-year free warranty is offered.
Manufacturer Guarantee
Our product adopts high-precision components, including stable
double-sided PCB; the circuit scheme is designed by American Dr team.
All plastic molds are produced in accordance with German standards. We
innovate to provide consumers with more cost-effective products.
Follow us on WeChat to learn more
SHENZHEN REALBELL ELECTRONICSCO., LTD
REALBELL INDUSTRIAL HOLDINGS (HK) CO., LTD
Address: 6/F,C/B, Anle Industry Park, Hezhou Xixiang, Bao'an District,
Shenzhen, China.
Tel: 0755-29473820 Fax: 0755-29473830
Email: realbell@126.com Business QQ:2549767778
Official website: www.realbell.com