User Manual

Page 1 of 16
RGIS
®
RM2 Handheld
RM2 BT Imager
G
etting
S
tarted
REV 1.0
55-341-0001
tarted
G
uide
RM2 Getting Started Guide
Page 2 of 16
Warnings and Precautions
WARNING: The RM2 & RM2-BTI is designed with adequate safeguards to protect users from
shock and other hazards when used as specified within this documentation. If users use the
device in a manner not specified by this document, the protection provided by the RM2 &
RM2-BTI may be impaired. Please read the documentation before using the device.
WARNING: The RM2 &RM2-BTI device is designed to function with the RGIS battery packs
only.
Handheld pack:
1-66-0002-0002 ; Imager pack: 1-66-0002-0003
WARNING: The battery used in this device may present a risk of fire or chemical burn if
mistreated. DO NOT disassemble, heat above 60c, crush or puncture, short circuit external
contacts, or dispose in fire or water.
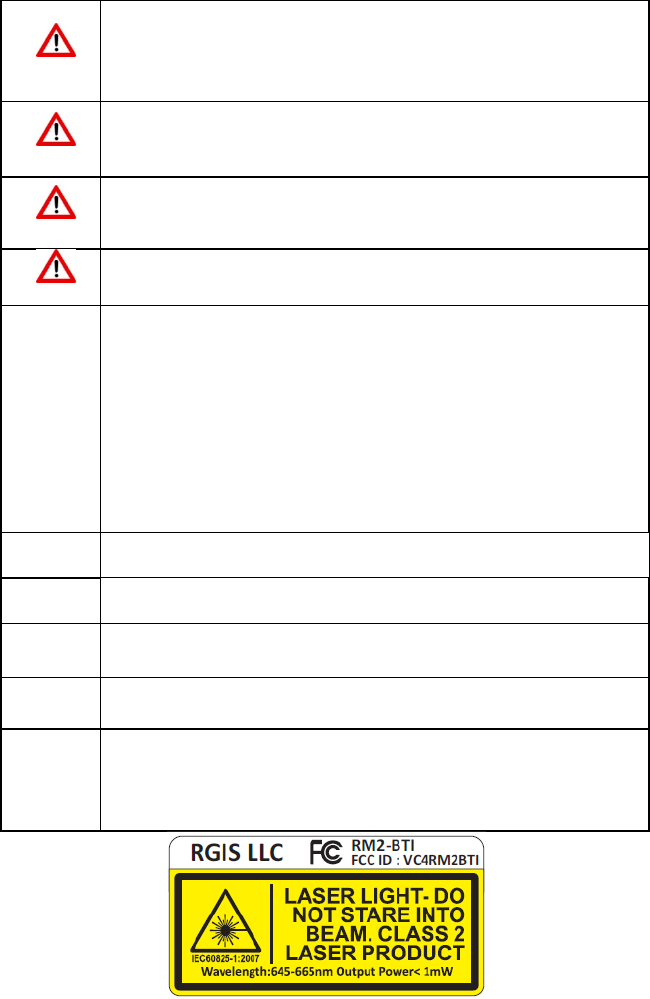
WARNING: LUMIERE LASER-NE PAS REGARDER DANS LE FAISCEAU APPAREIL A LASER DE
CLASSE 2
Class 2
Laser
Products
• Complies with 21CFR1040.10 and 1040.11 except for deviations pursuant to Laser
notice No. 50 dated June 24, 2007.
• IEC60825-1:2007
• Caution: Use of controls, adjustments or performance of procedures other than
those specified herein may result in hazardous laser light exposure.
• Class 2 laser scanners use a low power, visible light diode.
As with any very bright light source, such as the sun, the user should avoid staring
directly into the light beam. Momentary exposure to a Class 2 laser is not known to
be harmful.
• Complies with FDA standards for laser products except for deviations under Laser
Notice 50, dated 6/24/2007.
Battery
Operation
The battery voltage should be in the range 3.3 V to 4.2V when inserted into the device.
User
Serviceability
Do not disassemble the RM2 & RM2-BTI device. It contains no user serviceable parts. Please
return to the FSC for repair.
Liquids Avoid spilling liquids on the RM2 & RM2-BTI. Liquids spilled onto the RM2 could short circuit
it If liquids are accidentally spilled, let the device dry before use.
Battery
Disposal
Battery packs should be disposed in accordance with local regulations. Packs can also be
returned to the RGIS FSC for disposal.
Battery
Charging
Battery packs should be charged only using the GTS provided battery charger bay, Model no:
1-28-0080-0001:
Battery Charger 2 Bay, 4.2V DC, 100-240 AC Input.
1-28-0080-0002: Battery Charger 8 Bay, 4.2V DC, 100-240 AC Input.
RM2 Getting Started Guide
Page 3 of 16
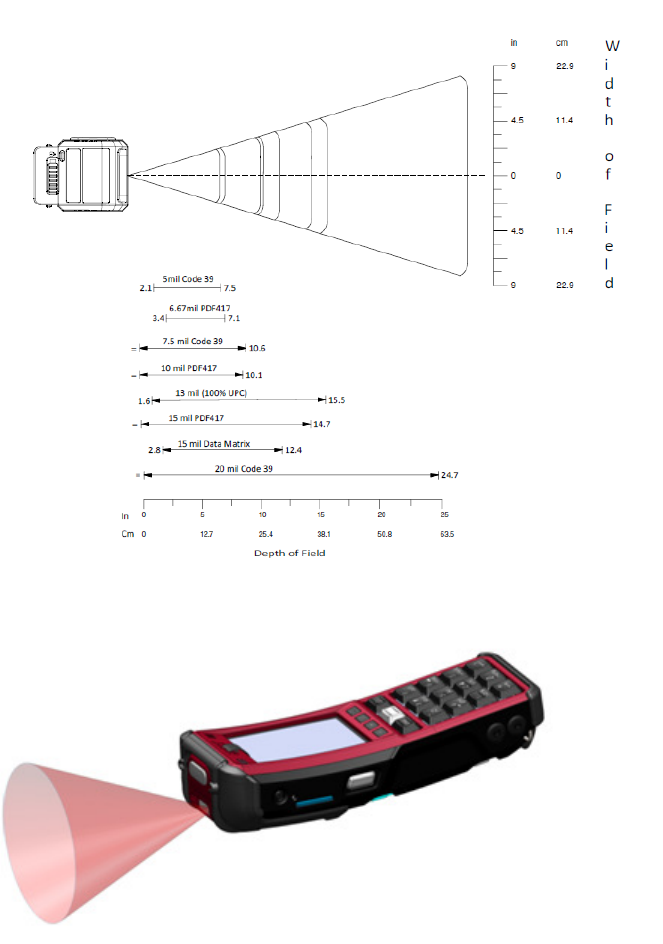
Field Of View Specification
Laser Aperture
RM2 Getting Started Guide
Page 4 of 16
Overview
This manual shall serve as a familiarization guide for the RM2 and RM2-BTI (Handheld and the BT
Imager). The pictures and figures shown are for illustrative purposes only, and the actual device
may vary.
What’s in the Box?
Each unit carton will have:
Two RM2 Handheld
Model: RM2
Two RM2 BT Imager
Model: RM2-BTI
Two Rechargeable Li-Ion battery packs
Model no: Handheld pack: 1-66-0002-0002
Imager pack:
1-66-0002-0003
Two Hand straps: 91-341-0002
Getting Started Guide
Device Operation:
Insert battery into the device, ensuring the battery pack is latched properly.
Press the Suspend/Sleep/Resume button on the side of the device. The device will
power on and display the RM2 Inventory menu.
To put the device into Sleep mode, the user should “tap” the Suspend/Sleep/Resume
button. The user can return the device into operational mode by tapping the button
again.
A momentary press on the Reset button on the side of the device will cold boot the
device.
Pressing the Suspend/Sleep/Resume button for approximately 5 seconds will shut down
the device.
It is recommended that users put the device in sleep mode by tapping the
Suspend/Sleep/Resume button prior to removing the battery pack.
RM2
Getting Started Guide
Page 5 of 16
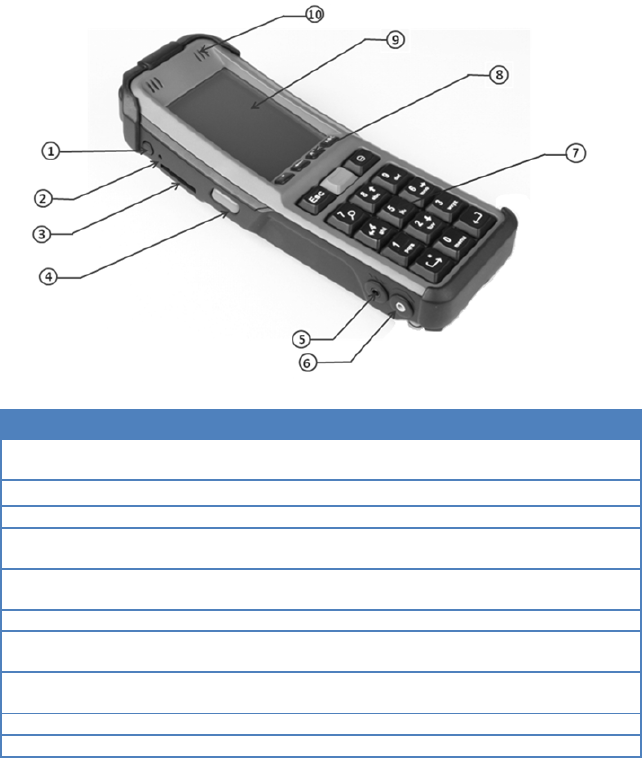
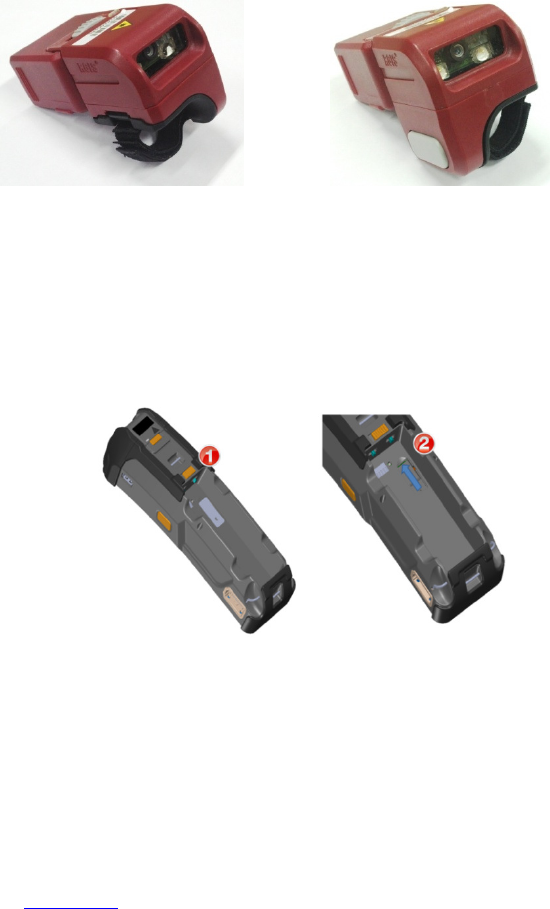
Getting to know the RM2 & RM2-BTI
RM2
Ref Part Function
1
Suspend/Sleep/
Resume button
Press once to put the RM2
into suspend/sleep mode; press
again to resume previous operation.
2
Reset
Button
Press to do a
cold boot or
hard reset on the
3
SD Card Slot
F
ull
-
size Secure Digital Input/ Output card (SDIO).
4
Left Trigger Switch
Activates
scanning
when used in the appropriate text box
field.
5
Vibra
Jack
For
use with a Vibra cable
necessary for the hearing
impaired.
6
Audio Jack
M
icrophone/speaker headset.
7
Numerica
l
Keys
Alpha
-
numeric keypad with embedded functionality for
data entry.
8
Function
Keys
Four programmable function buttons: Decimal, Backspace,
ALT, ABC.
9
LCD Display
LCD with resistive to
uch panel
.
10
Speaker
Sound/audio
output
Getting Started Guide
into suspend/sleep mode; press
hard reset on the
RM2
.
size Secure Digital Input/ Output card (SDIO).
when used in the appropriate text box
necessary for the hearing
numeric keypad with embedded functionality for
Four programmable function buttons: Decimal, Backspace,
RM2
Getting Started Guide
Page 6 of 16
Ref Part Function
11
Status Light
Indicates di
fferent statuses of the RM2
.
12
Center (Enter)
Key
RGIS application uses this key to control the triggering of the
Imager Scan Engine.
13
USB Port
To use with external USB devices.
14
Right Trigger Switch
Activates scanning when used in the appropriate text box field.
15
Custom
Serial
Port
Use to attach the tethered ring scanners and any other
device(s) that needs to communicate with the handheld via a
serial interface.
16
Belt Hook
To h
ook the RM2 when
used
with a belt.
Getting Started Guide
RGIS application uses this key to control the triggering of the
Activates scanning when used in the appropriate text box field.
Use to attach the tethered ring scanners and any other
device(s) that needs to communicate with the handheld via a
RM2
Getting Started Guide
Page 7 of 16
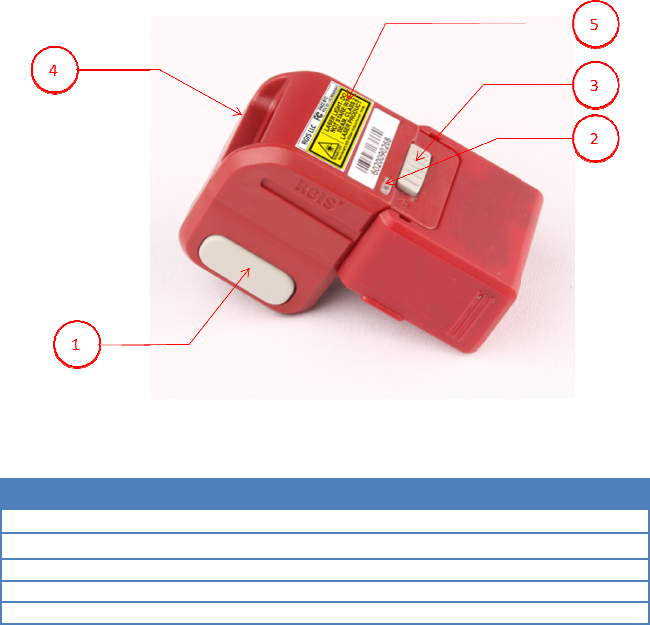
RM2-BTI
Ref Part Function
1
Trigger button Activates
scanning when used in the appropriate text box field.
2
Status LED Indicates different status of Imager
3
Imager Latch
To properly lock the Imager into RM2 or Imager battery
4
LASER Aperture
LASER source
5
LASER label
LASER
explanatory/
warning label
Getting Started Guide
scanning when used in the appropriate text box field.
To properly lock the Imager into RM2 or Imager battery

RM2 Getting Started Guide
Page 8 of 16
RM2 & RM2-BTI Product Specifications
Model : RM2
Battery Model: 1-66-0002-0002
Battery rating: 3.7 V,6400 mAH
Operating Ambient
temperature: -20°F to 122°F (-29°C to 50°C)
Storage temperature : -40° F to 158° F (-40° C to 70° C)
Display: 3.5” LCD (320 x 480 pixels) with resistive touch panel
Keyboard: 15 keys plus 4 ‘Function’ keys
Dimensions: 219 mm x 80 mm x 42 mm
Weight: 540 g with battery
Model : RM2-BTI
Battery Model: 1-66-0002-0003
Battery rating: 3.7 V,1170 mAH
Operating Ambient
temperature: -20°F to 122°F (-29°C to 50°C)
Storage temperature : -40° F to 158° F (-40° C to 70° C)
Dimensions: 44.4 mm X 70.7 mm X 42.5 mm
Weight: 75 g with battery
RM2 Getting Started Guide
Page 9 of 16
Operating Modes
The RM2 has been designed with a Bluetooth (BT) Imager to have convenient operating modes for
the user. The BT Imager (RM2-BTI) can be used docked as well as undocked to the RM2.
The battery pack is also designed as a combination of two battery packs: the RM2 battery pack and
the BT Imager battery pack. When the BT Imager is docked, both the battery packs are stored in the
RM2.The Imager battery pack is to be removed from the master pack and inserted into Imager
body to power up the Bluetooth Imager while in undocked mode.
The operating modes and configurations are detailed below.
RM2 with BT Imager Docked
In this mode, BT Imager is docked in the RM2.
1. Insert the imager battery into the master pack and master battery pack into the RM2;
ensure the battery pack is latched properly.
2. Insert the RM2-BTI into the docking bay of the RM2.
• The RM2 will power ON once the master pack is installed and displays the RM2 home
menu.
• Scanning can be done either by pressing any scan button on the handheld or by
pressing the trigger button on the Imager when used in the appropriate text box
field.
RM2 with BT Imager Detached
1. Remove the Imager battery from the master pack.
2. Attach the Imager battery into the RM2-BTI; ensure the Imager battery is latched properly;
LED will be illuminated green to indicate the imager is powered ON.
3. The BT in the RM2 will automatically turn ON as soon as the RM2-BTI is undocked.
4. The RM2 will power ON once the master pack is installed and displays the RM2 home
menu.
5. Pair the Imager.
•
Scanning can be done by pressing the trigger button on the Imager when used in the
appropriate text box field.
RM2 Getting Started Guide
Page 10 of 16
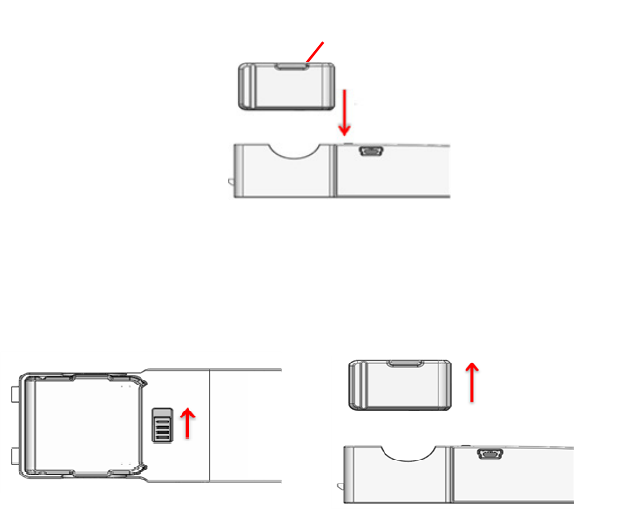
Installing the Batteries
Imager Battery Installation & Removal
Installation
1. Slide the imager battery into the master pack until the latch engages.
Removal
1.
The latch is disengaged by sliding
upward.
2.
Remove the imager battery from the
master pack.
Grip for removing battery
RM2 Handheld
RM2 Getting Started Guide
Page 11 of 16
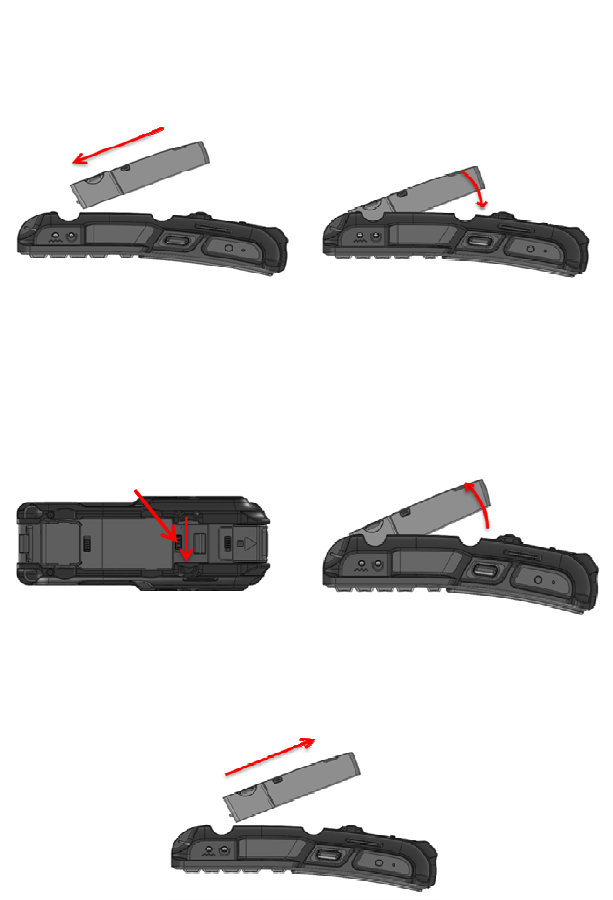
Master Battery Pack Installation &Removal
Installation
Removal
3. Remove the master pack from the battery bay by
lifting at an angle.
1. Slide the latch in the direction shown
below to release the battery.
2. Remove the master pack from the
battery bay in an upward motion.
1
.
Slide one end of the battery
into the battery bay as
shown.
2.
Ensure that the battery is properly
located in the battery bay and then
push it downward until secure.
RM2 Getting Started Guide
Page 12 of 16
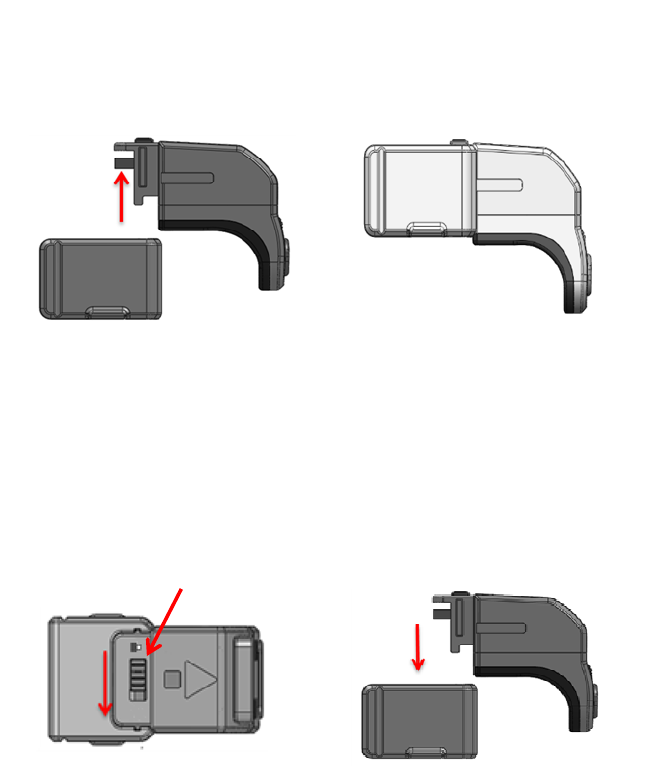
Imager Battery Pack Installation &Removal into BT Imager
Installation
Removal
1. Slide the latch in the direction shown
below to release the Imager battery.
2. Slide the Imager battery down from the
Imager in a straight and downward motion
as shown, to remove the Imager battery.
Imager battery properly attached
.
1. Slide the Imager battery onto the
RM2
-
BTI
in a straight and
upward motion as shown. Slide the latch to the lock position.
RM2 Getting Started Guide
Page 13 of 16
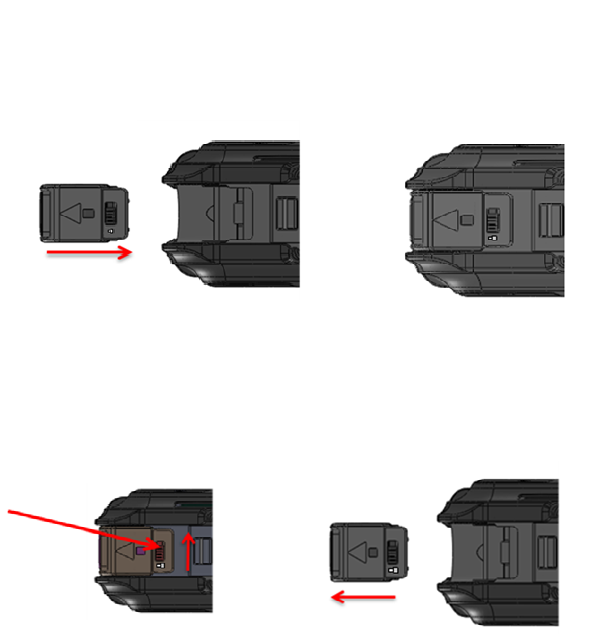
Bluetooth Imager Docking & Undocking
Docking
Undocking
1.
Slide the latch in the
direction shown below to
release the RM2-BTI.
2.
Remove the
RM2
-
BTI
in the
direction shown below to
undock.
Bluetooth Imager is properly docked.
1.
Slide the
RM2
-
BTI
into the RM2 doc
king bay in
the
direction shown. Slide the latch to the lock
position.
RM2 Getting Started Guide
Page 14 of 16
Imager Trigger Rotation
Imager is designed in such a way that, the trigger button can be rotated either to the left hand side
or to the right hand side of the Imager, for convenient user operation.
Note: The Imager battery pack is to be removed before rotating the trigger button assembly.
For Right handed operator For Left handed operator
Installing the Micro SD Card
1.
Remove the master battery pack and then unscrew the cover using the Torx (T5)
screw driver.
2.
Insert the MicroSD card into the slot as in figure below, close the cover by
tightening the screw.
Repair Instructions
If RM2 & RM2-BTI is malfunctioning or technical issues arise, contact the RGIS FSC. Do not
disassemble the RM2 without contacting the RGIS FSC.
RGIS, LLC
Attn: Repair Dept.
2000 E. Taylor Rd.
Auburn Hills, MI 48326
1-800-521-3102
www.rgis.com

RM2 Getting Started Guide
Page 15 of 16
Safety
: For safety information related to the battery charger terminal, see the information
included with it.
Product Support:
For Technical Support or for help not available in this manual, contact the
RGIS Service Depot @ 1-800-874-4841.
FCC Notice (United States):
Contains Transmitter Module FCC ID: N6C-SDMAN
This device complies with part 15 of the FCC Rules. Operation is subject to the following two
conditions: (1) This device may not cause harmful interference, and (2) this device must accept
any interference received, including interference that may cause undesired operation.
This equipment has been tested and found to comply with the limits for a Class B digital device,
pursuant to part 15 of the FCC Rules. These limits are designed to provide reasonable
protection against harmful interference in a residential installation. This equipment generates
uses and can radiate radio frequency energy and, if not installed and used in accordance with
the instructions, may cause harmful interference to radio communications. However, there is
no guarantee that interference will not occur in a particular installation. If this equipment does
cause harmful interference to radio or television reception, which can be determined by
turning the equipment off and on, the user is encouraged to try to correct the interference by
one or more of the following measures:
Reorient or relocate the receiving antenna.
Increase the separation between the equipment and receiver.
Connect the equipment into an outlet on a circuit different from that to which the
receiver is connected.
Consult the dealer or an experienced radio/TV technician for help.
FCC Notice (Canada):
This device complies with part 15 of FCC Rules and Industry Canada’s licence-exempt RSSs.
Operation is subject to the following two conditions: (1) this device may not cause harmful
interference, and (2) this device must accept any interference received, including interference
that may cause undesired operation.
Le présent appareil est conforme à la partie 15 des règles de la FCC et aux normes des CNR
d'Industrie Canada applicables aux appareils radio exempts de licence. L'exploitation est
autorisée aux deux conditions suivantes : (1) l'appareil ne doit pas produire de brouillage et (2)
l'appareil doit accepter tout brouillage subi, même si le brouillage est susceptible d'en
compromettre le fonctionnement
.
The available scientific evidence does not show that any health problems are associated with
using low power wireless devices. There is no proof, however, that these low power wireless
devices are absolutely safe. Low power Wireless devices emit low levels of radio frequency
energy (RF) in the microwave range while being used. Whereas high levels of RF can produce
health effects (by heating tissue), exposure of low-level RF that does not produce heating
effects causes no known adverse health effects. Many studies of low-level RF exposures have
FCC CAUTION
Changes or modifications not expressly approved by the party responsible for compliance could
void the user’s authority to operate the equipment.

RM2 Getting Started Guide
Page 16 of 16
not found any biological effects. Some studies have suggested that some biological effects
might occur, but such findings have not been confirmed by additional research.
RM2 and RM2-BTI has been tested and found to comply with FCC/IC radiation exposure limits
set forth for an uncontrolled environment and meets the FCC radio frequency (RF) Exposure
Guidelines and RSS-102 of the IC radio frequency (RF) Exposure rules.
Les connaissances scientifiques dont nous disposons n
’ont mis en évidence aucun problème de
santé associéà l usage des appareils sans fil à faible puissance. Nous ne sommes cependant pas
en mesure de prouver que ces appareils sans fil à faible puissance sont entièrement sans
danger. Les appareils sans fil à faible puissance
émettent une énergie fréquence radioélectrique (RF) très faible dans le spectre des micro-
ondes lorsqu’ils sont utilisés. Alors qu’une dose élevée de RF peut avoir des effets sur la santé
(en chauffant les tissus),l’exposition à de faibles RF qui ne produisent pas de chaleur n’a pas de
mauvais effets connus sur la santé.De nombreuses études ont été menées sur les expositions
aux RF faibles et n’ont découvert aucun effet biologique. Certaines études ont suggéré qu’il
pouvait y avoir certains effets biologiques, mais ces resultants n’ont pas été confirmés par des
recherches supplémentaires. [ ( )] a été testé et jugé conforme aux limites
d’exposition aux rayonnements énoncées pour un environnement non contrôlé et respecte les
règles les radioélectriques (RF) de la FCC lignes directrices d'exposition et d’exposition aux
fréquences radioélectriques (RF) CNR-102 de l’IC.
CE Notice (European Notice):
The Conformite Europene symbol found on this product
indicates compliance to the EMC Directive and the Low Voltage Directive of the European
Union. This means that the product meets the following technical standards: EN
55022(CISPR22), EN 55024(CISPR24)(IEC 61000 4-2,4-3,4-5,4-6,4-8,4-11), EN 61000 3-2(IEC
61000 3-2),EN 61000 3-3(IEC 61000 3-3),EN60950(IEC 60950 3
rd
Ed;1999;2000).
Battery Notice:
The sealed batteries that work with this product comply with all applicable
shipping regulations as prescribed by industry and legal standards.
Commercial Use Notice:
The RM2 & RM2-BTI is for commercial, work-related use by RGIS
employees for inventory, merchandising, mapping or other data collection purposes only. The
device is not intended for sale.
Radio Frequency (RF) Notice:
This transmitter must not be co-located or operated in conjunction with any other antenna or
transmitter.
This equipment complies with FCC radiation exposure limits set forth for an uncontrolled
environment and meets the FCC radio frequency (RF) Exposure Guidelines. This equipment
should be installed and operated keeping the radiator at least 20cm or more away from
person’s body.
Units intended for use in the United States are set for use on channels 1-11.The user has no
access to modify these settings and should in no way try to alter the radio settings. Changes or
modifications not expressly approved by RGIS could void the user’s authorization to operate
the equipment.