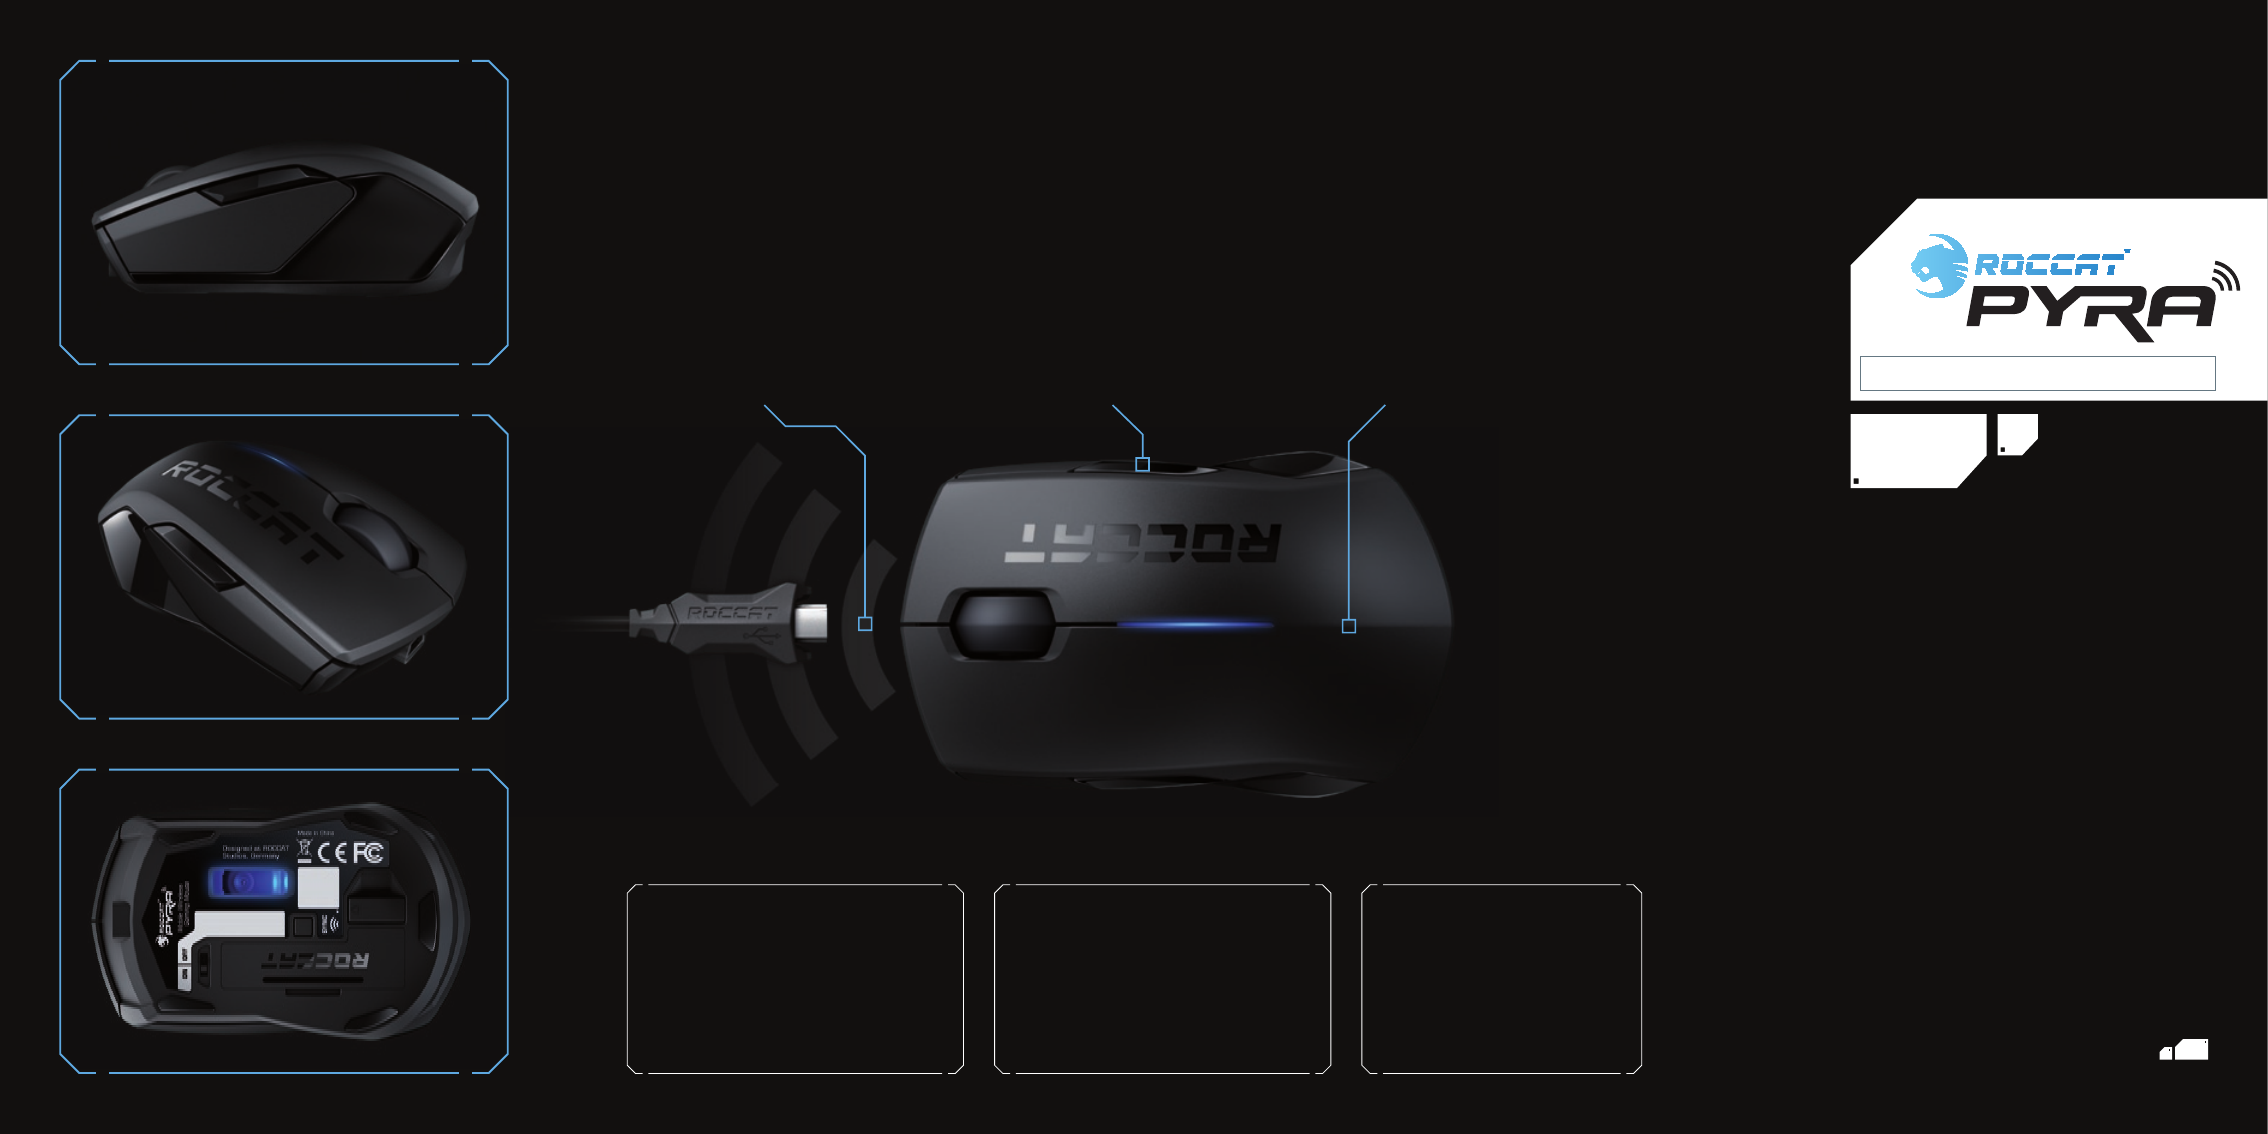
ROCCAT PYRAWIRELESS Mobile Wireless Gaming Mouse User Manual
ROCCAT GmbH Mobile Wireless Gaming Mouse Users Manual
ROCCAT >
Users Manual

QUICK INSTALLATION GUIDE
IMPORTANT
DOCUM E N T
TECH SPECS
5 mouse buttons (+2 incl. mouse wheel)
EasyShift [+]: up to 12 functions at once
1600dpi optical sensor
1000Hz polling rate
130ips maximum speed
30 G acceleration
PACKAGE CONTAINS
ROCCAT™ Pyra – Mobile Wireless Gaming Mouse
Wireless USB nano receiver
1.5m USB charging cable
2 x rechargeable batteries (AAA, 1.5V, LR03)
Quick Install Guide
Driver CD
ROCCAT ID Card
Soft Transport Bag
8*3&-&44
SYSTEM REQUIREMENTS
Windows® XP 32-bit
Windows Vista®
Windows® 7
USB 1.1 Port
CD-ROM Drive
Warranty
We guarantee this product to be free of defects in workmanship
and materials for a period of two years from the original date of
purchase.
Should you need assistance …
Our support team will help you with any technical problems –
just send us an email (support@roccat.org) or visit our website:
WWW.ROCCAT.ORG/SUPPORT
ROCCAT GmbH,
Otto von Bahrenpark, Gasstrasse 6B, Kontor N,
22761 Hamburg, Germany
© 2009 ROCCAT GmbH. All rights reserved. Any product names mentioned in this manual
may be trademarks or registered trademarks and are the property of their respective owners.
Information contained herein is subject to change without notice. ROCCAT GmbH shall not be
made liable for any errors that may appear in this manual. This publication or parts of it may
not be reproduced without the express consent of the publisher.
Wireless Freedom
The Pyra gets rid of all problems gamers
often face when using wireless mice.
The 1000Hz polling rate guarantees fast
and lag-free transmission without data loss.
The batteries (included) can be charged via
USB cable, but the mouse can also be opera-
ted using conventional disposable batteries.
ROCCAT™ EasyShift[+]
Besides the normal functions of a 5-button
mouse, the sophisticated Pyra features an
innovative EasyShift[+] button, which allows
2nd level functions to be assigned to the
mouse buttons and the scroll wheel. In this
way, you can virtually double the number of
functions that can be used at any one time.
Unisize design
The handy size and symmetric shape of
the Pyra are not only perfect for trans-
port and mobile gaming on notebooks,
these features also transform the mouse
into an exceptionally versatile device: It is
suitable for right and lef t-handed use and
fits into any hand size.
SPECIFICATIONS
CONGRATULATIONS
With the ROCCAT™ Pyra you have purchased ROCCAT’s first Mobile Wireless Gaming Mouse, designed especially for easy transport and
mobile gaming on notebooks. The times when wireless mice lagged or could not compete with the polling rate of wired mice are finally over.
Besides completely lag-free polling with 1000Hz, Pyra features a brand-new invention, the so-called EasyShift[+] button, which adds a
second level to all your mouse functions enabling you to virtually duplicate your mouse buttons.
根據低功率電波輻射性電機管理辦法:
率電波輻射性電機管理辦法:
第十二條 經型式認證合格之低功率射頻電機,非經許可、公司、商號或使用者均不
得擅自變更頻率,加大功率或變更原設計之特性及功能。
第十四條 低功率射頻電機之使用不得影響飛航安全及干擾合法通信:經發現有干擾現
象時,應立即停用,並改善至無干擾時方得繼續使用。
前項合法通信,指依電信規定作業之無線電信。低功率射頻電機須忍受合法通信或工
業、科學及醫療用電波輻射性電機設備之干擾
This equipment has been tested and found to comply with the limits for a class B
digital device, pursuant to part 15 of the FCC rules. These limits are designed to
provide to provide reasonable protection against harmful interference in a
residential installation. This equipment generates, uses and can radiate radio
frequency energy and, if not installed and used in accordance with the
installation. , May cause harmful interference to radio communication. However,
there is no guarantee that interference
Will not occur in a particular installation. if this equipment does cause harmful
interference to radio or television reception, which can be determined by turning
the equipment off and on, the user is encouraged to try to correct the interference
by one or more of the following measures:
-Reorient or relocate the receiving antenna
-Increase the separation between the equipment and receiver
-Connect the equipment into an outlet on a circuit different from that to which
the receiver is connected
-Consult the dealer or an experienced radio / TV technician for help
You are cautioned that changes or modifications not expressly approved by the
party responsible for compliance could void your authority to operate the
equipment.
This device complies with part 15 of the FCC rules. Operation is subject to the
following two conditions
(1)•This device may not cause harmful interference and
(2) This device must accept any interference received, including interference that
may cause undesired operation

1 3
RU SC TC TH
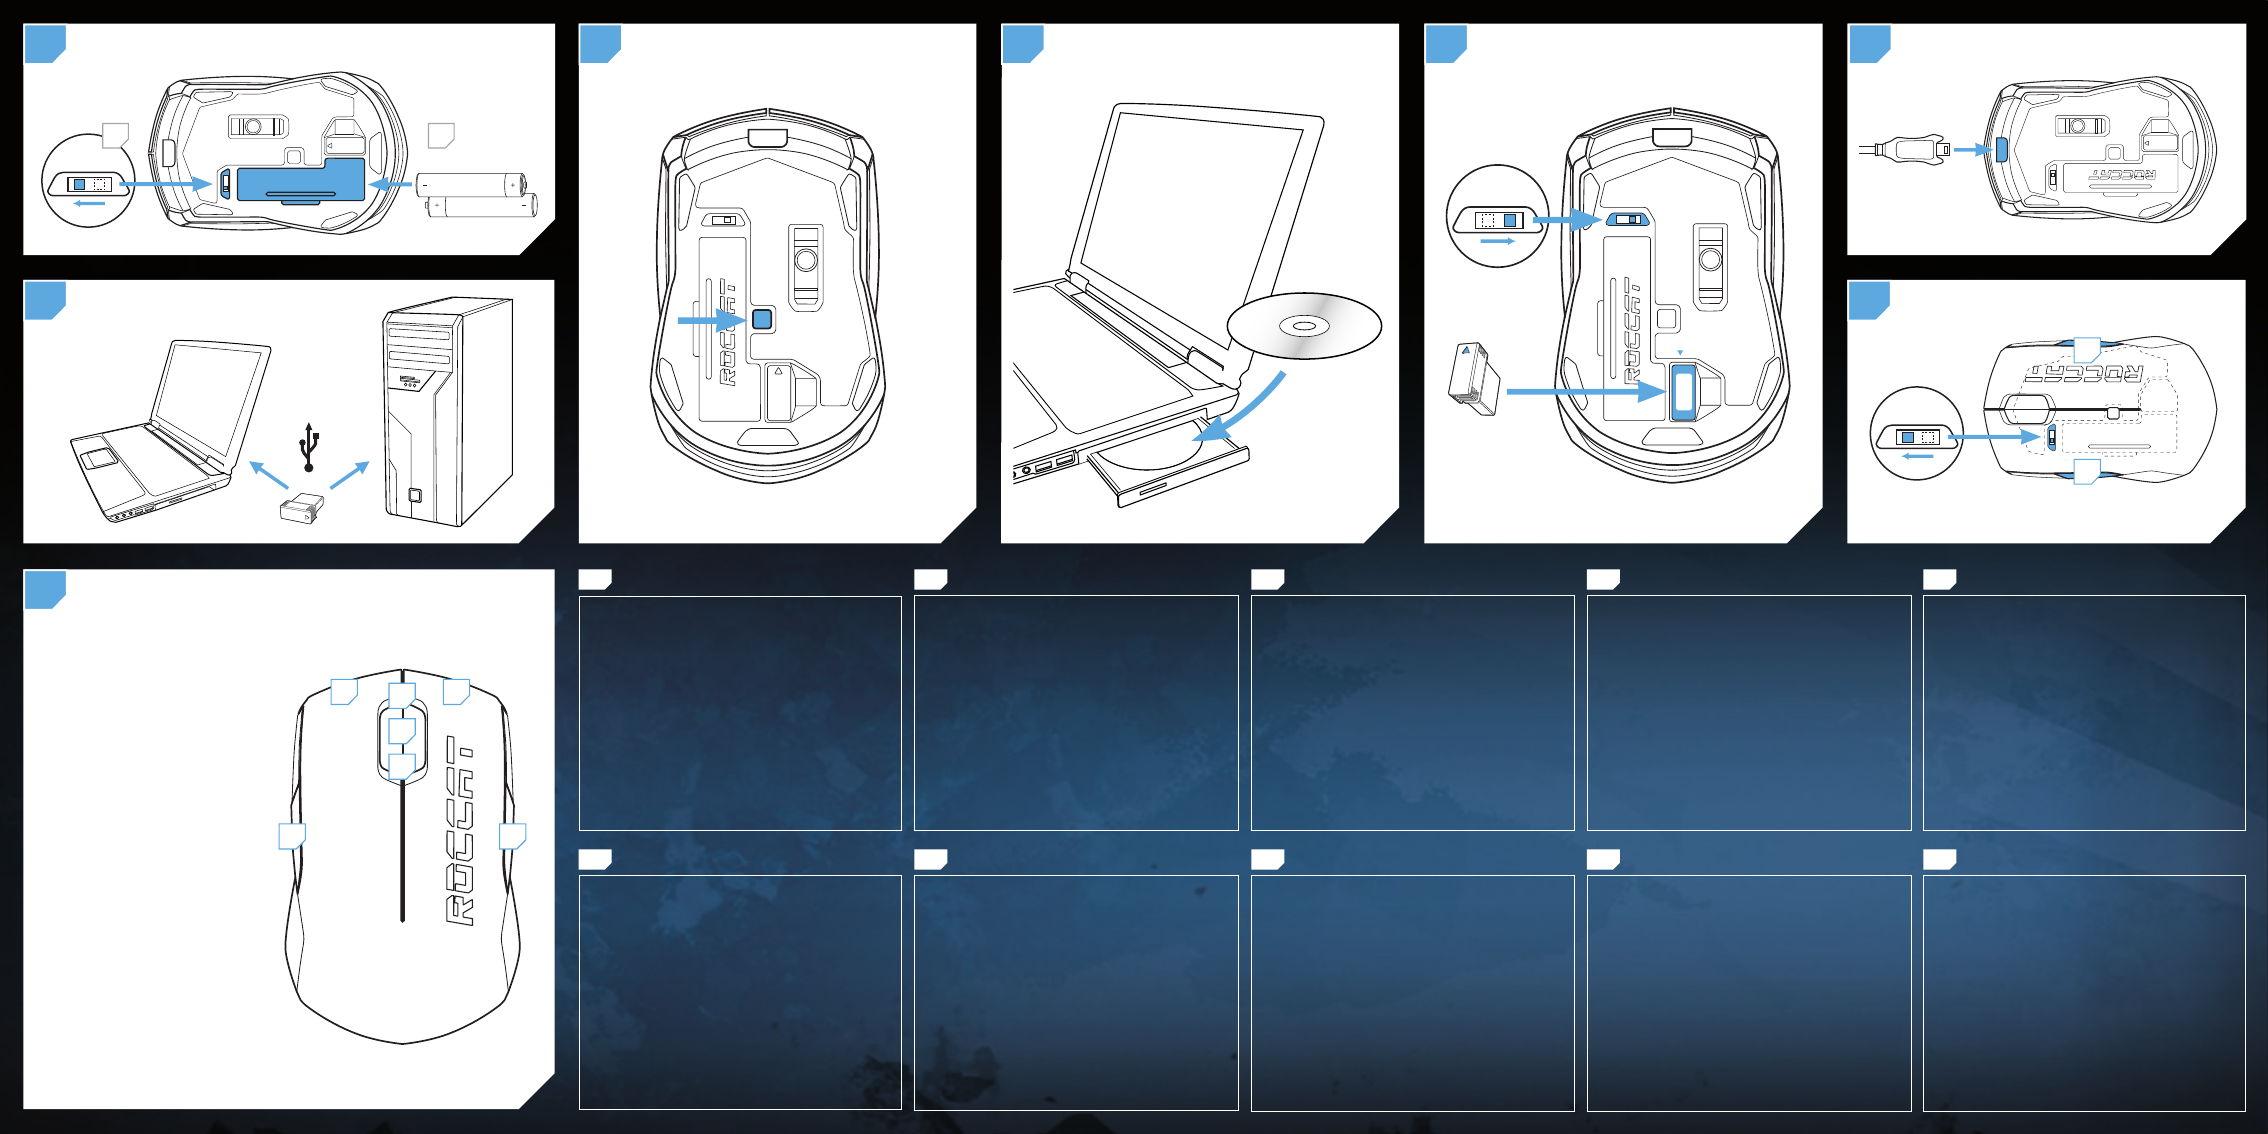
Open the battery compartment on the underside of the
mouse and insert the batteries supplied. Take note of the
correct polarity.
Connect the USB nano receiver to a free USB port on your
notebook or PC.
Hold down the SYNC button on the underside of the mouse.
Successful connection is indicated by a blue LED that lights
up for 10 seconds.
Insert the Pyra driver CD in your CD-ROM drive and follow
the instructions on the screen.
For purposes of transport, simply store the nano receiver in
the underside of the mouse and switch it off.
When the batteries are almost empty, a blue light in the
mouse flashes. Exchange the batteries or charge the
rechargeable batteries via the USB cable at a USB port on
your PC.
To switch from right-handed mode to left-handed mode, simul-
taneously press buttons 4 and 5 and switch on the mouse.
1.
2.
3.
4.
5.
6.
7.
Öffne das Batteriefach an der Unterseite der Maus und
lege die mitgelieferten Akkus ein. Achte dabei auf die
richtige Polarität.
Verbinde den USB-Nano-Receiver mit einer freien USB-
Schnittstelle deines Notebooks oder PCs.
Halte den SYNC-Knopf an der Mausunterseite gedrückt. Bei
erfolgreichem Connect leuchtet die LED 10 Sek. lang blau auf.
Lege die Pyra-Treiber-CD in dein CD-ROM-Laufwerk und
folge den Anweisungen auf dem Bildschirm.
Für den Transport verstaue den Nano-Receiver einfach in
der Unterseite der Maus und schalte sie aus.
Sind die Batterien nahezu entladen, blinkt die Maus blau
auf. Wechsle dann die Batterien oder lade die Akkus über
das USB-Kabel an einer USB-Schnittstelle deines PCs auf.
Um vom Rechts- in den Linkshänder-Modus zu wechseln,
drücke gleichzeitig die Tasten 4 und 5 und schalte die
Maus ein.
1.
2.
3.
4.
5.
6.
7.
Abre el compartimiento de pilas en la parte inferior
del ratón y coloca las pilas adjuntas. Ten en cuenta la
polaridad al ponerlas.
Conecta el receptor nano del ratón a un puerto USB que
esté libre en tu ordenador de mesa o portátil.
Pulsa el botón SYNC que está en la parte inferior del
ratón. Si la conexión funciona bien, se enciende durante
10 seg. el LED azul.
Coloca el CD del controlador Pyra en la unidad de CD-ROM
y sigue las instrucciones que aparecen en pantalla.
Para el transporte introduce el receptor nano en la parte
inferior del ratón y desconéctalo.
Cuando las pilas están a punto de agotarse, parpadea el
ratón en azul. Cambia las pilas y recárgalas con el cable
USB enchufándolo a cualquier puerto USB de tu ordenador.
Para cambiar del modo diestros a zurdos pulsa al mismo
tiempo los botones 4 y 5 y conecta el ratón.
1.
2.
3.
4.
5.
6.
7.
マウス裏面のバッテリー収納部を開け、付属のバッテリーを挿入します。極性
の方向にご注意ください。
ノートパソコンまたはPCの空いているUSBポートにUSBナノ・レシーバーを接
続します。
マウス裏面のSYNCボタンを長押しします。青いLEDが10秒間点灯したら、正
常に接続されています。
PyraドライバCDをCD-ROMドライブに挿入し、画面の指示に従います。
移動の際は、ナノ・レシーバーをマウス裏面に収納し、スイッチをオフにします。
バッテリー残量が残り僅かになると、マウスの青い光が点滅します。バッテリー
を交換、あるいは充電池をご使用のPCのUSBポートにUSBケーブルを接続
して充電してください。
右利きモードから左利きモードに切り替えるには、4と5のボタンを同時に押し
ながらマウスをオンにしてください。
1.
2.
3.
4.
5.
6.
7.
마우스아래쪽의배터리격실을열고제공된배터리를삽입합니다.
음극과양극을올바르게맞췄는지확인합니다.
USB나노리시버를노트북또는PC의비어있는USB포트에연
결합니다.
마우스아래쪽의SYNC버튼을누릅니다.성공적으로연결되면청
색LED가10초동안점등됩니다.
Pyra드라이버CD를CD-ROM드라이브에넣고화면에표시되는
지침을따릅니다.
마우스를옮기려면나노리시버를마우스아래쪽에넣고마우스
를끕니다.
배터리가거의소모되면,마우스의청색등이깜박거립니다.배터
리를교환하거나PC의USB포트에USB케이블을연결해충전식
배터리를충전합니다.
오른손잡이모드에서왼손잡이모드로전환하려면버튼4와5를
동시에누르고마우스를켭니다.
1.
2.
3.
4.
5.
6.
7.
EN DE ES JP KO
VI
1.
Открой отсек для батареек на нижней стороне мышки и вложи
аккумуляторы. Соблюдай при этом правильную полярность.
2. Соедини наноприемник со свободным USB-портом
ноутбука или компьютера.
3. Удерживай кнопку SYNC на нижней стороне мышки
нажатой. При успешном соединении светодиод загорается
синим примерно на 10 с.
4. Вставь CD с драйверами Pyra в дисковод и следуй
указаниям на экране.
5. Для переноски вставь наноприемник в отсек с нижней
стороны мышки и выключи ее.
6. Если батарейки почти разрядились, мышка начинает
мигать синим цветом. В этом случае замени батарейки или
заряди аккумуляторы с помощью USB-кабеля от USB-порта
компьютера.
7. Для переключения режимов для правшей и левшей
одновременно нажать кнопки 4 и 5 и включить мышку.
打开鼠标底部的电池仓,装入附带的电池。注意极性方向正确。
将USB微型接收器连接到笔记本电脑或PC电脑的空闲USB端口。
按住鼠标底部的SYNC按键。蓝色LED灯亮起10秒钟,
说明连接成功。
将Pyra驱动光盘放入CD光驱,按照屏幕上的指示进行安装。
如需移动,只要将微型接收器插入鼠标底部并关闭。
电池电量即将耗尽时,鼠标上的蓝色指示灯闪烁。更换电池,或通
过USB线连接到PC电脑的USB端口,对充电电池进行充电。
要从右手模式切换到左手模式,同时按鼠标上方的4和5键。
1.
2.
3.
4.
5.
6.
7.
打開滑鼠底部的電池蓋,並放入隨附的電池。請注意電池極性方向
是否正確。
將USB微型接收器連接至筆記型或桌上型電腦的USB連接埠。
按住滑鼠底部的SYNC按鈕。成功連接時,藍色LED燈會亮起
10秒。
將Pyra驅動程式光碟放入光碟機,並依照螢幕上的指示操作。
只要將微型接收器放入滑鼠底部並將其關閉,即可隨身攜帶。
電池電量即將用盡時,滑鼠會閃爍藍色燈。此時必須更換電池,或
利用連接電腦USB連接埠的USB線充滿充電式電池的電力。
若要從右手模式切換為左手模式,請在滑鼠連接狀態下同時按下
按鈕4和5。
1.
2.
3.
4.
5.
6.
7.
เปิดช่องใส่แบตเตอรี่ที่ด้านล่างของเม้าส์แล้วใส่แบตเตอรี่ที่ให้มา
โดยดูให้ถูกขั้ว
เชื่อมต่อตัวรับสัญญาณนาโนUSBกับพอร์ตUSBที่ว่างอยู่บนเครื่อง
โน้ตบุ๊คหรือพีซีของคุณ
กดปุ่มซิงค์ที่ด้านล่างของเม้าส์ค้างไว้เมื่อเชื่อมต่อได้สำเร็จไฟLED
สีน้ำเงินจะติดสว่างนานประมาณ10วินาที
ใส่ซีดีไดรเวอร์Pyraในไดร์ฟCD-ROMแล้วทำตามคำแนะนำบนหน้าจอ
เก็บตัวรับสัญญาณนาโนใต้เม้าส์แล้วปิดสวิตช์การทำงานเพื่อพกพาไป
ตามที่ต่างๆ
เมื่อแบตเตอรี่ใกล้หมดไฟสัญญาณสีน้ำเงินจะกระพริบให้เปลี่ยน
แบตเตอรี่หรือชาร์จแบตเตอรี่แบบชาร์จไฟได้ผ่านสายUSBที่พอร์ตUSB
บนเครื่องพีซีของคุณ
เปลี่ยนจากโหมดถนัดขวาเป็นโหมดถนัดซ้ายโดยกดปุ่ม4และ5
พร้อมกันขณะเปิดสวิตช์ใช้งานเม้าส์
1.
2.
3.
4.
5.
6.
7.
Mởkhoangchứapinởmặtdướichuộtvàlắppinkèmtheomáy.
Lưuýlắpđúngcực.
CắmbộthunanoUSBvàocổngUSBcósẵntrênmáytínhxáchtay
hayPCcủabạn.
NhấnnútSYNCởmặtdướichuột.Kếtnốithànhcôngsẽđượcthể
hiệnbởiđènLEDxanhsánglêntrong10giây.
LắpđĩaCDdriverPyravàoổđĩaCD-ROMvàthựchiệntheocác
hướngdẫntrênmànhình.
Đểtiệnvậnchuyển,chỉcầncấtgiữbộthunanovàomặtdướichuột
vàtắtnguồn.
Khipinsắphếthẳn,đènmàuxanhtrênchuộtsẽnhấpnháy.
ThaypinhoặcsạclạipinquacápUSBởcổngUSBtrênPC.
Đểchuyểntừchếđộtayphảisangtaytrái,nhấncùnglúcnút4và5
rồibậtchuột.
1.
2.
3.
4.
5.
6.
7.
2
4
5
ON OFF
ON OFF
ON OFF
SYNCHRONIZE FREQUENCY
INSERT RECHARGEABLE BATTERY
CONNECT TO COMPUTER (USB)
4DRIVER INSTALLATION
8
5STORE FOR TRANSPORT 6
BUTTON ASSIGNMENT (right-handed mode)
STANDARD BUTTON
ASSIGNMENT
1 = Left Mouse-Button
2 = Right Mouse-Button
3 = Middle Mouse-Button
4 = EasyShift[+] Button #1
5 = EasyShift[+] Button #2
(Disabled on delivery, please use
driver interface to assign a function.)
6 = Mouse Wheel Up
7 = Mouse Wheel Down
1 2
3
4 5
EASYSHIFT[+] BUTTON
ASSIGNMENT
4 + 1 = Browser Back
4 + 2 = Browser Forward
4 + 3 = Mute Volume
4 + 5 = Disabled on delivery
(Please use driver interface to
assign a function.)
4 + 6 = Volume Up
4 + 7 = Volume Down
6
7
7
PRESS 4+5 SIMULTANEOUSELY WHILE SWITCHING THE MOUSE ON
= Change hand mode from right- to left-handed and vice versa
RECHARGE BATTERIES
OPTIONAL: SWITCH HAND MODE
AB